

Page 1
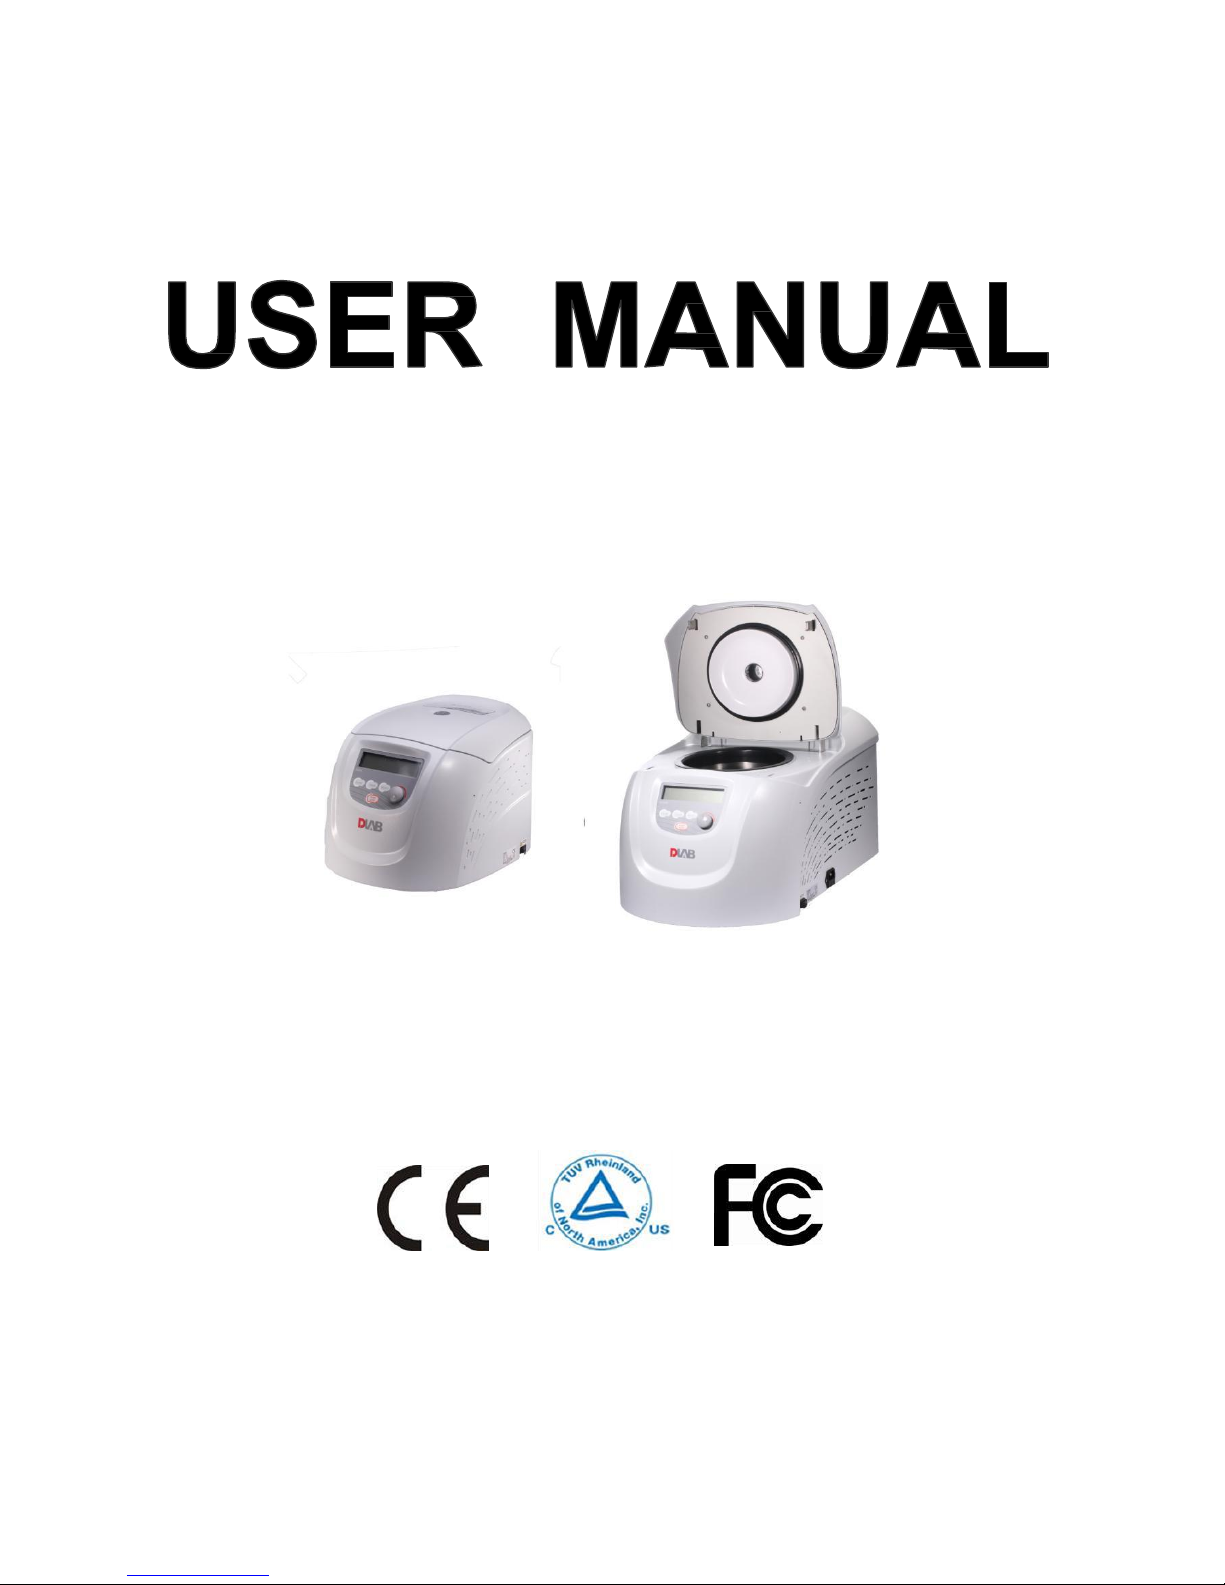
D3024 & D3024R
High Speed (Refrigerated)
Micro-Centrifuge
Before using centrifuge, please carefully read this user manual for its efficient operation and safety.
Page 2

USER MANUAL
Contents
Safety Reminder ............................................................................................................................................... 2
1. Specifications ............................................................................................................................................... 4
2. Declaration of Conformity ........................................................................................................................... 4
3. Required Operational Condition .................................................................................................................. 5
3.1 Basic operational Conditions.............................................................................................................. 5
3.2 Transport and storage condition ......................................................................................................... 5
4. Installation .................................................................................................................................................... 5
4.1 Location.............................................................................................................................................. 6
4.2 Connection of the power cord and grounding .................................................................................... 6
5. Structure ....................................................................................................................................................... 6
6. Operation panel ............................................................................................................................................ 8
7. Rotor Preparation ....................................................................................................................................... 10
7.1 Prepare the samples .......................................................................................................................... 10
7.2 Inject the samples into tubes. ........................................................................................................... 10
7.3 Keep the tubes balance ..................................................................................................................... 10
7.4 Inspect the rotor................................................................................................................................ 10
7.5 Symmetrically load centrifuge tubes in rotor ................................................................................... 10
8. Operation.................................................................................................................................................... 11
8.1 Normal Operation............................................................................................................................. 11
8.2 RCF Operation ................................................................................................................................. 14
8.3 Pulse Operation ................................................................................................................................ 15
9. Maintenance ............................................................................................................................................... 15
9.1 Cleaning ........................................................................................................................................... 15
9.2 Consumables .................................................................................................................................... 16
9.3 The replacement of seal rings........................................................................................................... 16
9.4 Routine inspection............................................................................................................................ 17
10. Troubleshooting........................................................................................................................................ 17
10.1 Possible problems and solutions..................................................................................................... 17
10.2 How to open the door ..................................................................................................................... 18
10.3 Replacement of fuses...................................................................................................................... 19
11. Instructions of rotor and tube ................................................................................................................... 19
11.1 The rotor instructions...................................................................................................................... 19
11.2 Tubes .............................................................................................................................................. 21
12. Calculate Relative Centrifuge Force(RCF) .............................................................................................. 22
13. Ordering information................................................................................................................................ 22
14. Warranty ................................................................................................................................................... 23
14.1 Warranty of the centrifuge .............................................................................................................. 23
14.2 Warranty of the rotor ...................................................................................................................... 23
15. After-sales Service.................................................................................................................................... 23
Page 3

USERMANUAL
2
Page 4
USER MANUAL
2
Safety Reminder
Common safety precautions
Carefully read the following safety precautions for a thorough understanding.
⚫ Follow the instructions and procedures described in this manual to operate this centrifuge safely.
⚫ Carefully read all safety messages in this manual and the safety instructions on the instrument.
⚫ Safety messages are labeled as indicated below. They are in combination with signal words of
“WARNING” and “CAUTION” with the safety alert symbol to call your attention to items or
operations that could be dangerous to you or other persons using this instrument. The definitions of
signal words are as follows:
WARNING:Personal Danger
Warning notes indicate any condition or practice, which if not strictly observed, could result in personal
injury or possible death.
CAUTION:Possible damage to instrument
Caution notes indicate any condition or practice, which if not strictly observed or remedied, could result
in damage or destruction of the instrument.
NOTE:Notes indicate an area or subject of special merit, emphasizing either the product‟s capability or
common errors in operation or maintenance.
⚫ Do not operate this centrifuge in any manner not described in this User manual. When in doubt or have
any troubles with this centrifuge, ASK FOR HELP.
⚫ The precautions described in this User manual are carefully developed in an attempt to cover all the
possible risks. However, it is also important that you are alert for unexpected incidents. Be carefully
operating this centrifuge.
WARNING:
⚫ This centrifuge is not explosion-proof. Never use explosive or flammable samples.
⚫ Do not install the centrifuge in or near places where inflammable gases are generated or chemicals are
stored.
⚫ Do not place dangerous material within 30cm around the centrifuge.
Page 5

USER MANUAL
2
⚫ Make sure to prepare necessary safety measures before using samples that are toxic, radioactive or
contaminated with pathogenic micro-organisms at your own responsibility.
⚫ If the instrument, rotor and/or accessories that has been contaminated by solutions with toxic,
radioactive or pathogenic materials, clean it according to the decontamination procedure that you are
specified.
⚫ If you require services at site, please sterilize and decontaminate it in advance, and then notice the
service center involved in the details of the particular materials.
⚫ Do not handle the power cord or turn on or off the POWER switch with wet hands to void electrical
shocks.
⚫ For safety purposes, do not enter within 30cm around this centrifuge while it is in operation.
⚫ While the rotor is rotating, never forcedly release the door lock.
⚫ Unauthorized repairs, disassembly, and other services to the centrifuge except by our service center are
strictly prohibited.
CAUTION
⚫ This centrifuge must be located on one firm and level table.
⚫ Make sure the centrifuge is horizontal before running.
⚫ Make sure the angle between the door and cover is greater than 70 degrees when open the door.
⚫ Be careful not put your fingers or hands between the door and cover when the door off.
⚫ Do not move or relocate this centrifuge while it is running.
⚫ If fluid spills in the rotor chamber, please promptly clean and dry with a dry cloth to avoid sample
contamination.
⚫ Ensure to remove any objects and fragments of the tubes dropped inside the rotor chamber before
running this centrifuge.
⚫ Cautions on rotors
(1) Always check for corrosion and damages on the rotor surface before using it. Do not use the rotor if an
abnormality is found.
(2) Do not set the centrifuge speed beyond the allowable minimum speed of the rotor kits (rotor or
adapters). Make sure to run it below the allowable minimum speed.
(3) Do not exceed the allowable imbalance.
(4) Use the rotor and tubes within their actual capacities.
(5) If the rotor is attached with a lid, ensure it is tightened before operation.
⚫ If any abnormal condition occurs during operation, please stop it immediately and contact our service
center. Notify the service center is a warning code if displayed.
⚫ Vibrations are likely to damage the centrifuge, contact our service center if abnormality observed.
Page 6
USER MANUAL
4
1. Specifications
Maximum speed
15000rpm(200-15000rpm), increment: 10rpm
Maximum RCF
21380×g, increment: 10×g
Maximum capacity
2ml×24, 0.5ml×36, 4-PCR8 serial tubes
Temperature range
-20℃-40℃(D3024R)
Timer
30seconds -99minutes-HOLD, continuous operation
Driving Motor
Brushless DC motor
Safety devices
Dual door interlock、Over-speed detector、Over-temperature detector、
Automatic internal diagnosis
Power requirements
D3024:
Single-phase, 220V-240V, 50Hz/60Hz, 5A.
110V-120V, 50Hz/60Hz, 5A
D3024R:
Single-phase, 220V-240V, 50Hz/60Hz, 10A.
110V-120V, 50Hz/60Hz, 10A
Dimensions(mm)
D3024:(L)280×(W)364×(H)266
D3024R:(L)338×(W)580×(H)324
Weight
D3024: 12kg
D3024R: 30kg
Additional features
Speed/RCF switch、Pulse operation、Processing display、Voice reminder
2. Declaration of Conformity
Construction in accordance with the following safety standards:
EN 61010-1
EN 61010-2-10
Construction in accordance with the following EMC standards:
EN 61326-1/ FCC Part 15 Subpart B/ IECS 001
Associated EU guidelines:
EMC-guidelines: 2004/108/EC
Instrument guidelines: 2006/95/EC
This ISM device complies with Canadian ICES-001.
Changes or modifications not expressly approved by the party responsible for compliance could void the
user's authority to operate the equipment.
Page 7

USER MANUAL
5
NOTE: This centrifuge has been tested and found to comply with the limits for a Class A digital device,
pursuant to Part 15 of the FCC Rules. These limits are designed to provide reasonable protection against harmful
interference when the centrifuge is operated in a commercial environment. The centrifuge generates, uses, and
can radiate radio frequency energy and, if not installed and used in accordance with the user manual, may
cause harmful interference to radio communications. Operation of centrifuge in a residential area is likely
to cause harmful interference in which case the user will be required to correct the
interference.
3. Required Operational Condition
3.1 Basic operational Conditions
(1)Power: 110V-240V, 50 Hz/60Hz, 3A.
D3024: Single-phase, 220V-240V, 50Hz/60Hz, 5A; 110V-120V, 50Hz/60Hz, 5A
D3024R: Single-phase, 220V-240V, 50Hz/60Hz, 10A; 110V-120V, 50Hz/60Hz, 10A
(2)Ambient temperature: 2℃-40℃.
(3)Relative humidity: ≤80%.
(4)No vibration and airflow around.
(5)No electric dust, explosive and corrosive gases around.
3.2 Transport and storage condition
(1)Storage temperature: -40℃-55℃.
(2)Relative humidity: ≤93%.
4. Installation
This section describes the instructions that you should abide when install the centrifuge to ensure your
safety and the optimum performance. Before moving the centrifuge, the rotor must be removed.
WARNING:
⚫ Improper power supply may damage centrifuge.
⚫ Make sure the power source conforms to the required power supply before connecting.
Page 8
USER MANUAL
6
4.1 Location
(1)Place the centrifuge on a firm, flat and level table, ensure the four feet of this centrifuge stand on the
table firmly. Avoid installing on the slippery surface or surface prone to vibration.
(2)Ideal ambient temperature is 20℃±5℃, avoid placing the centrifuge in direct sunlight if temperature
exceeds 30℃.
(3)Keep clear of the centrifuge at least 10cm on both sides and at least 30cm behind it to guarantee the
cooling efficiency.
(4)Keep away from heat or water to avoid sample temperature issues or centrifuge failures.
4.2 Connection of the power cord and grounding
WARNING:
⚫ To avoid electrical shocks, ensure your hands are dry when touching the power cord.
⚫ This centrifuge must be grounded properly.
A minimum 10A outlet providing a sufficient ground is required, and this must meet with local safety
requirements.
5. Structure
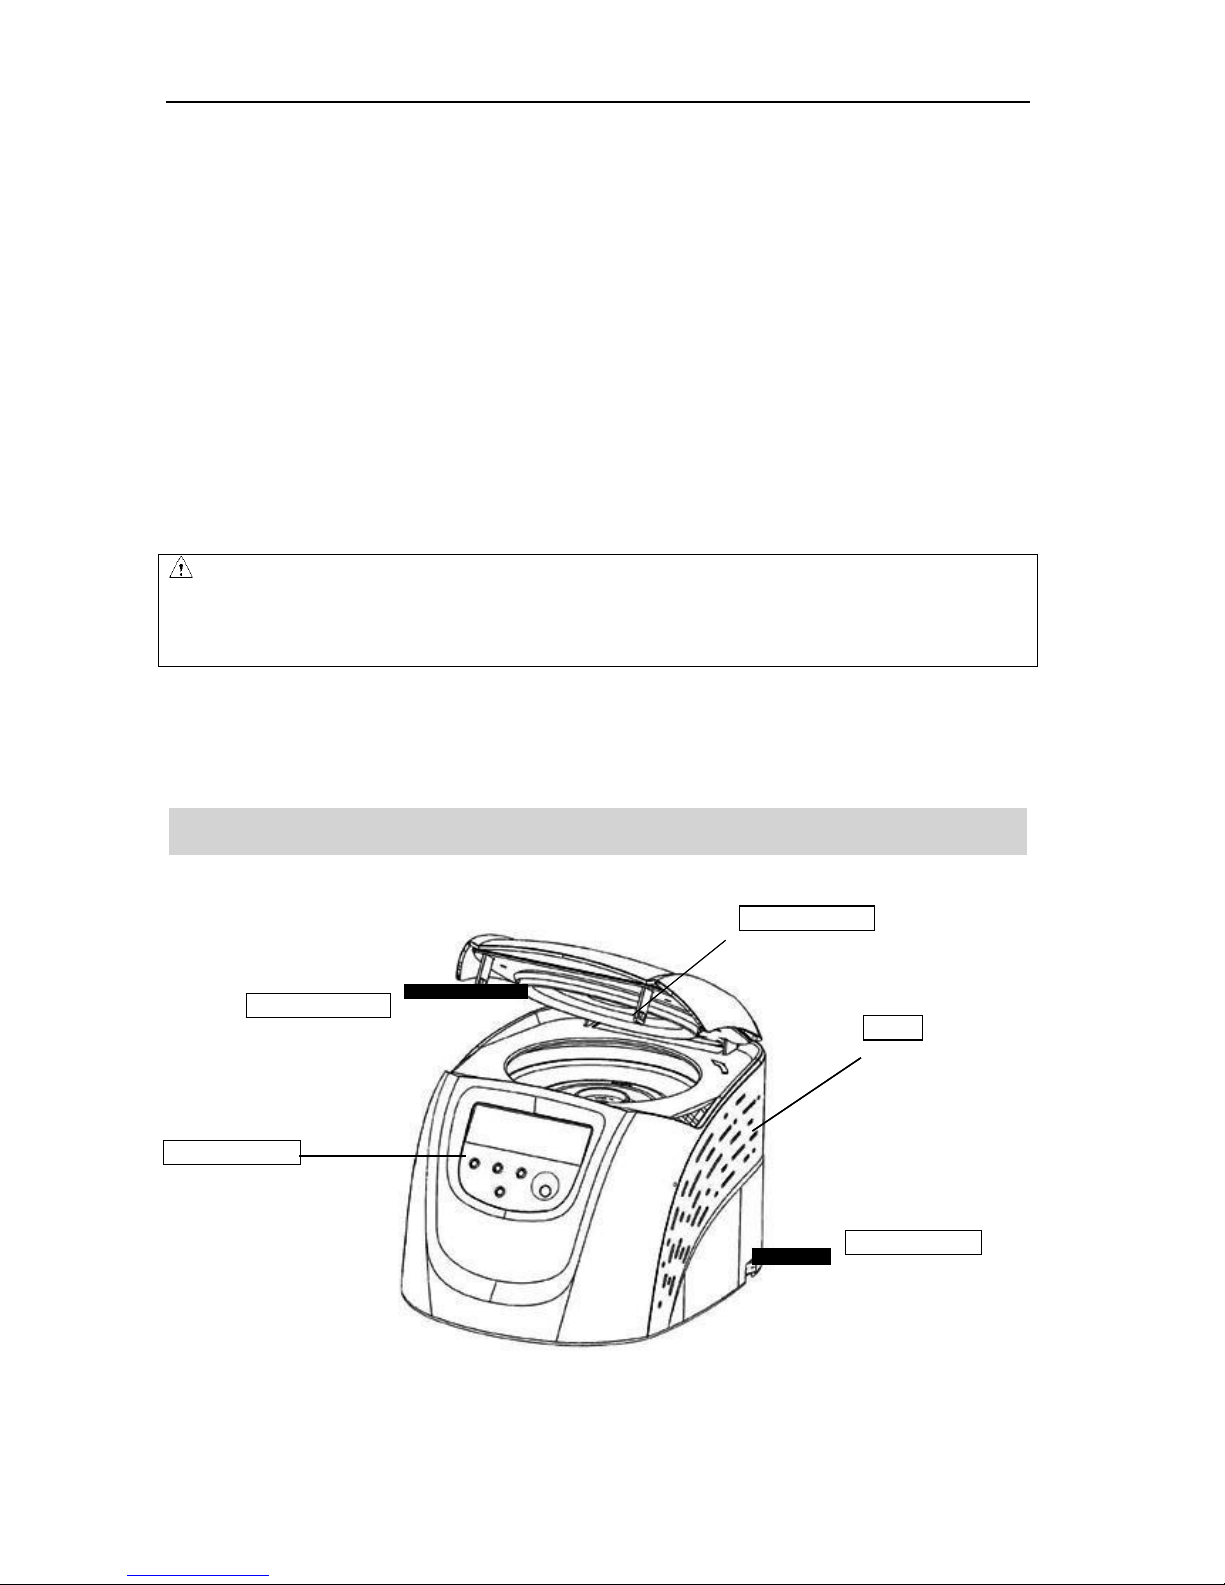
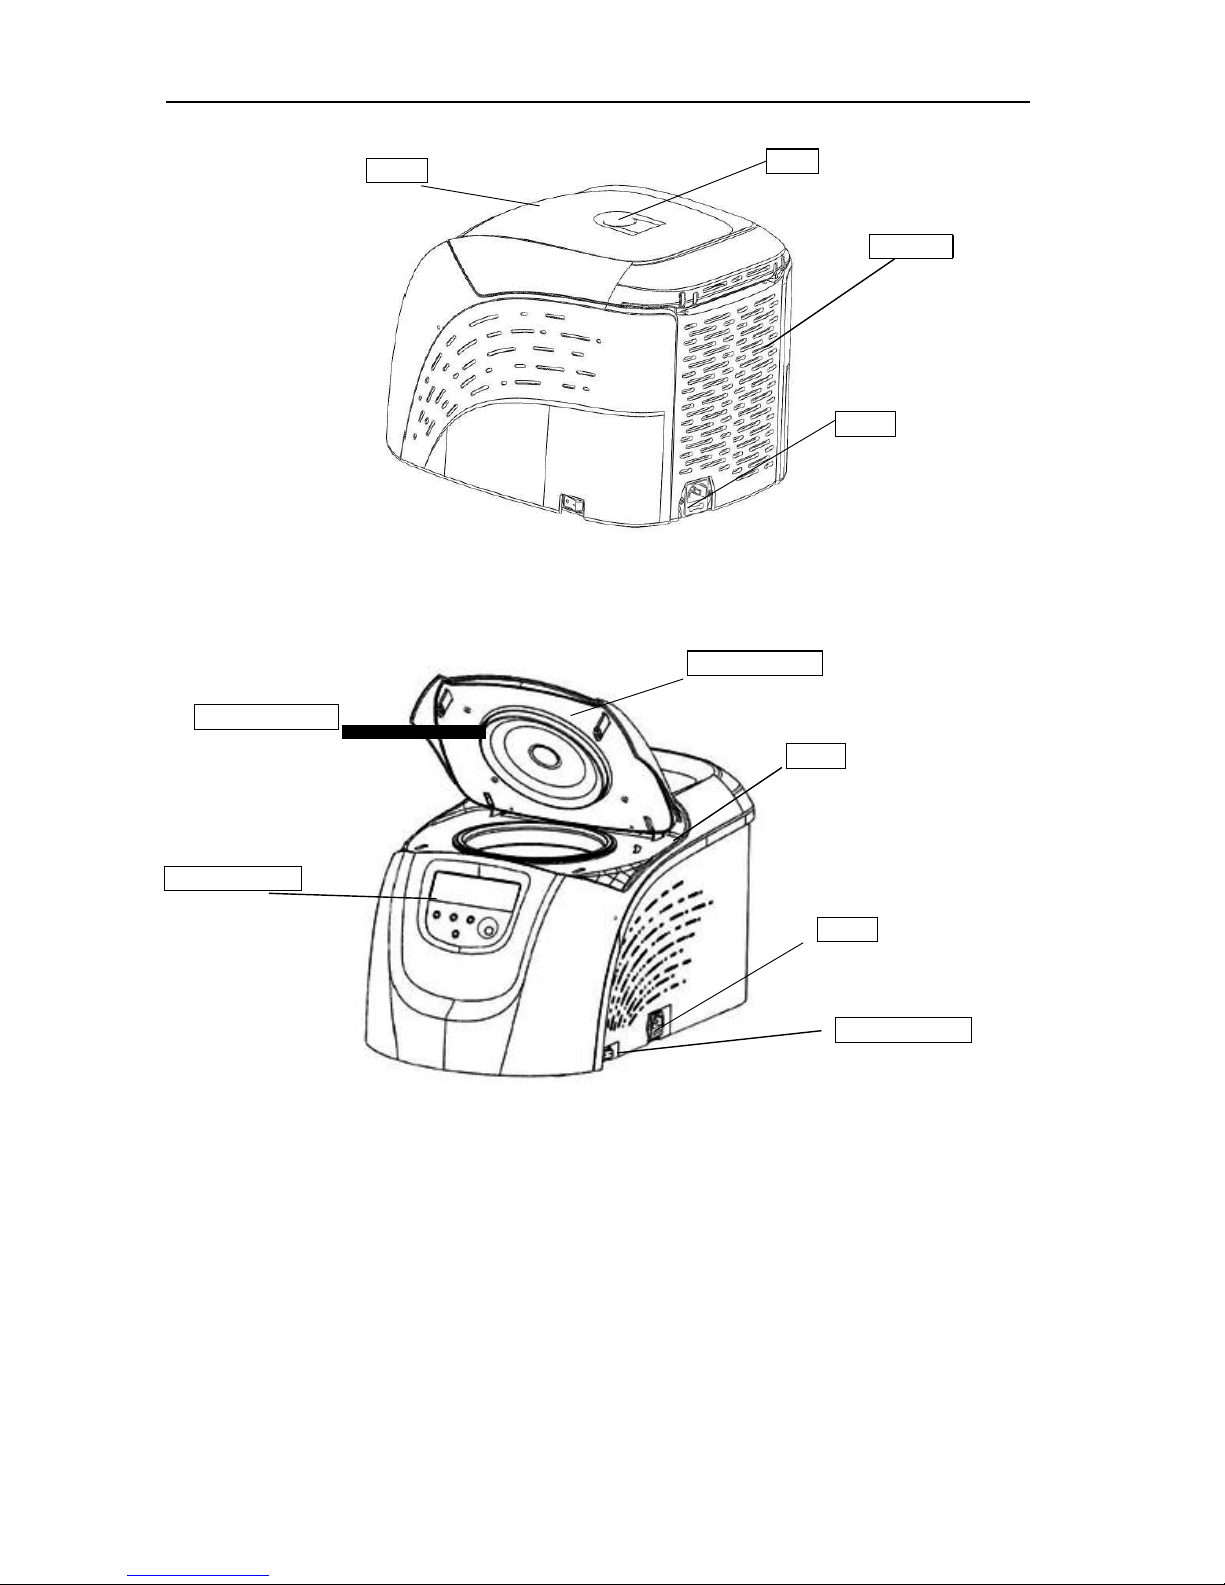
D3024
Door lock hook
Seal ring of door
Operation panel
Cover
POWER switch
Figure 5.1 D3204 Front view of centrifuge
Page 9
USER MANUAL
7
Door
View
Air vents
Outlet
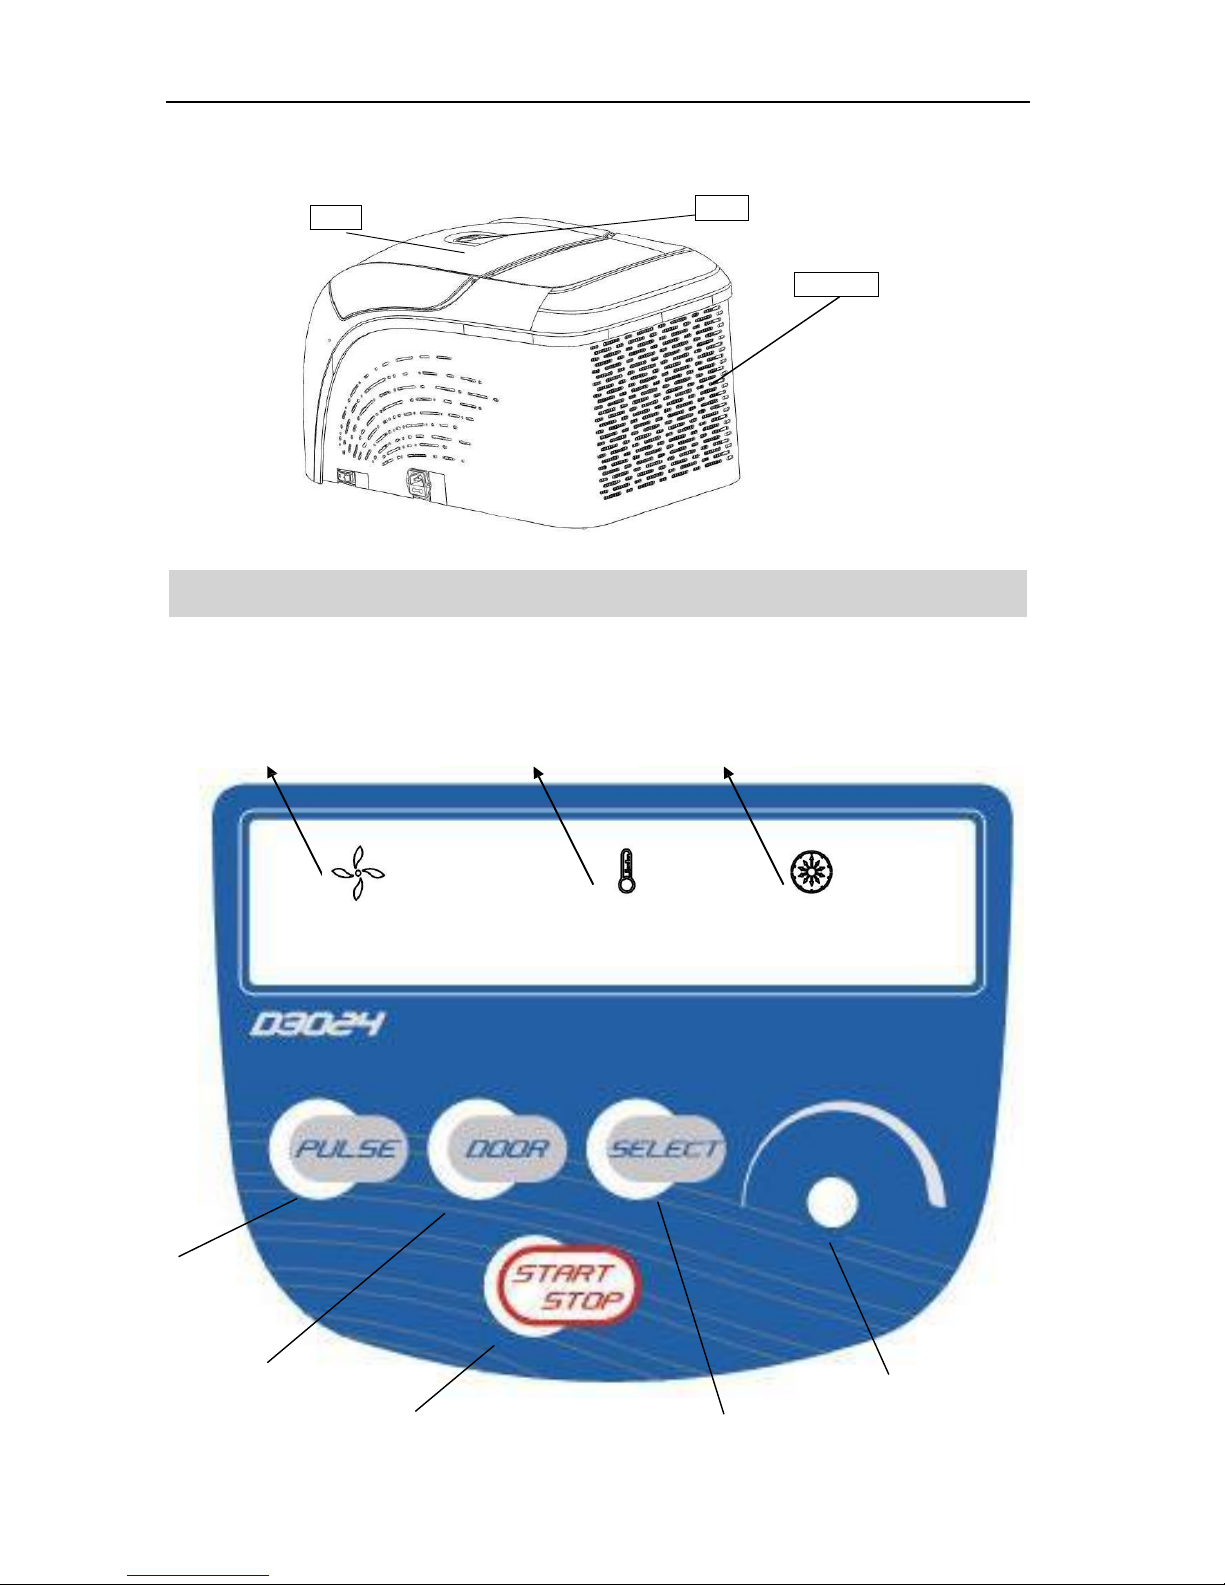
D3024R
Figure 5.2 D3024 Rear view of centrifuge
Door lock hook
Seal ring of door
Cover
Operation panel
Outlet
POWER switch
Figure 5.3 D3024R Front view of centrifuge
Page 10
USER MANUAL
8
Door
View
Air vents
Figure 5.4 D3024R Rear view of centrifuge
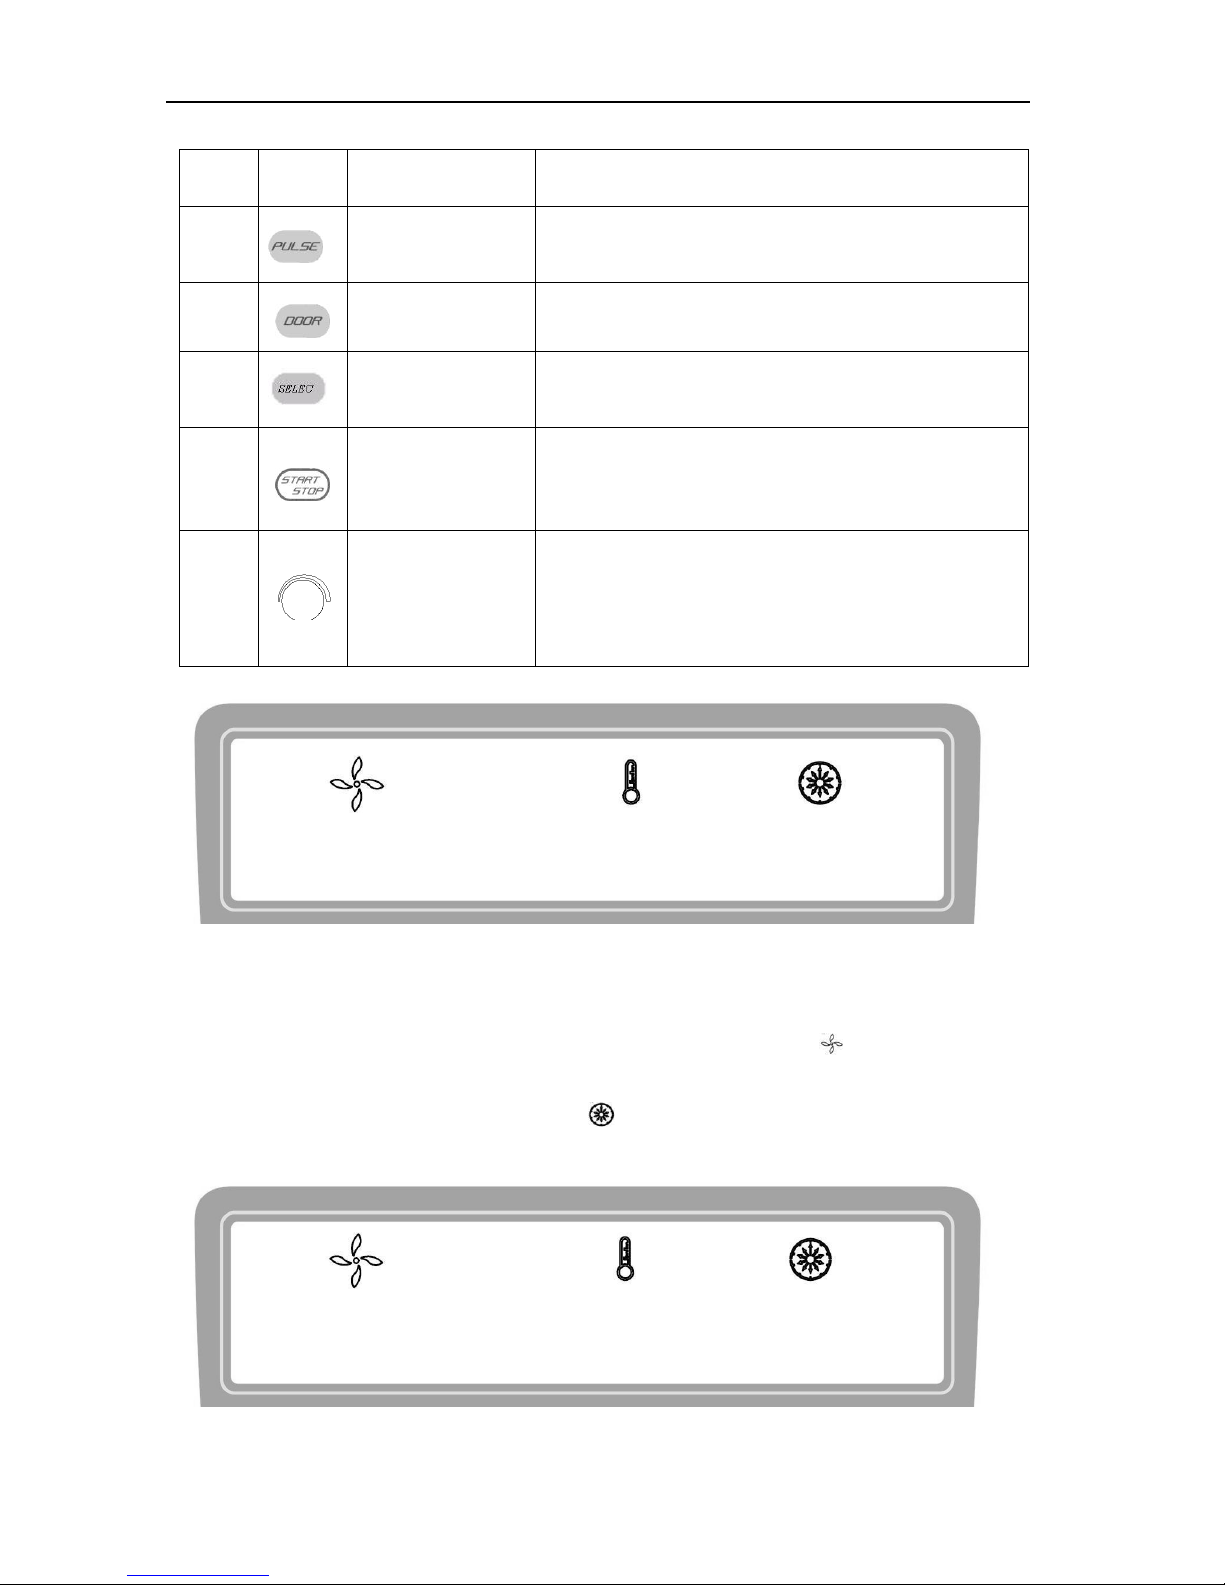
6. Operation panel
Speed display area Temperature display area Time display area
15000
rpm
25 ℃ 12 min
(1)
(2)
(4)
(3)
(5)
Page 11

USER MANUAL
9
Figure 6-1 Operation Panel
Page 12
USER MANUAL
10
Item
Symbol Name
Function
1
Pulse button
When the door closed, press and hold the button to
accelerate running, release the button to stop it.
2
Open/ lock button
Press the button to open the door The button is not
available when the centrifuge is running.
3
Select button
Press the button to choose the parameter which you want to
modify.
4
Start/ Stop button
Press down the button to start running. The centrifuge will
brake to stop running if press the button during
centrifugation.
5
Parameter button
Clockwise rotate to increase parameter values.
counter-clockwise rotate to decrease parameter values.
Press down the button, shift between speed and RCF
display.
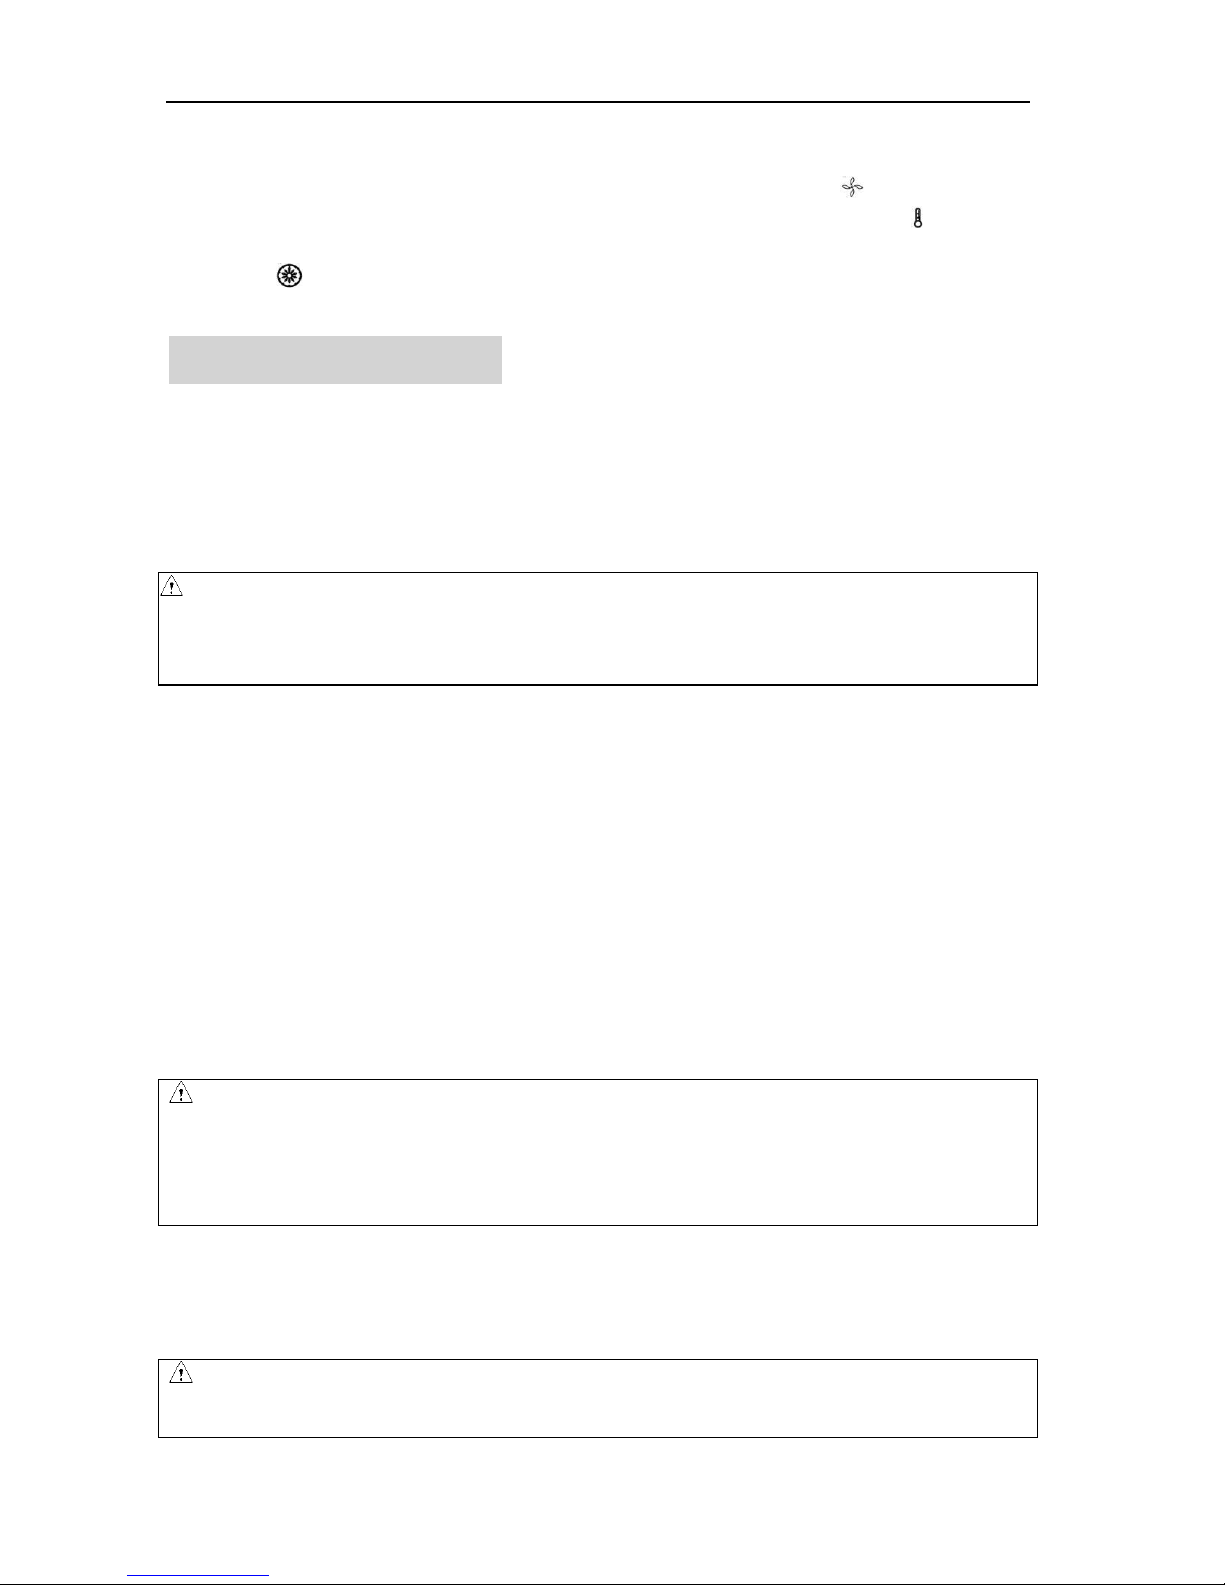
15000 25 ℃ 12 min
Figure 6-2 the main interface (D3024)
Main interface of D3024 model is as figure 6-2. The speed is set to be 15000rpm, temperature of centrifugal
chamber is 25℃, and the running time is12 minutes. When speed symbol is rotating, indicating the
centrifuge is running, the rotation is faster, the speed is higher. Temperature only displays the temperature of
chamber and can not be controlled. Time symbol displays the ratio of working to time setting. The total
time setting is divided into 10 scales.
15000 4 ℃ 12 min
Figure 6-3 The main interface (D3024R)
Page 13
USER MANUAL
11
Main interface of D3024R model is as figure 6-3. The speed is set to be 15000rpm, temperature of
centrifugal chamber is 4℃, and the running time is 12 minutes. When speed symbol is rotating, indicating
the centrifuge is running, the rotation is faster, the speed is higher. When temperature symbol is blinking,
indicating refrigeration is running, no blinking means refrigeration stop working.
Time symbol displays the ratio of working to time setting. The total time setting is divided into 10
scales.
7. Rotor Preparation
7.1 Prepare the samples
7.2 Inject the samples into tubes.
CAUTION:
⚫ Do not overload samples into the centrifuge which will cause leaking.
⚫ Do not exceed the actual capacity allowed in the user manual.
7.3 Keep the tubes balance
⚫ Although the centrifuge can accept sample balancing by eye, we recommend that you keep this
centrifuge in a well-balanced condition to extend its life expectancy.
⚫ Never intentionally run the centrifuge under unbalanced condition even though the allowable
imbalance is not exceeded.
7.4 Inspect the rotor
Check the rotor for corrosion or scratches before using.
CAUTION:
⚫ If any abnormality such as corrosions or scratches are found, stop using the rotor and contact our
service center.
⚫ Only manufacturer‟s rotors must be used with the unit.
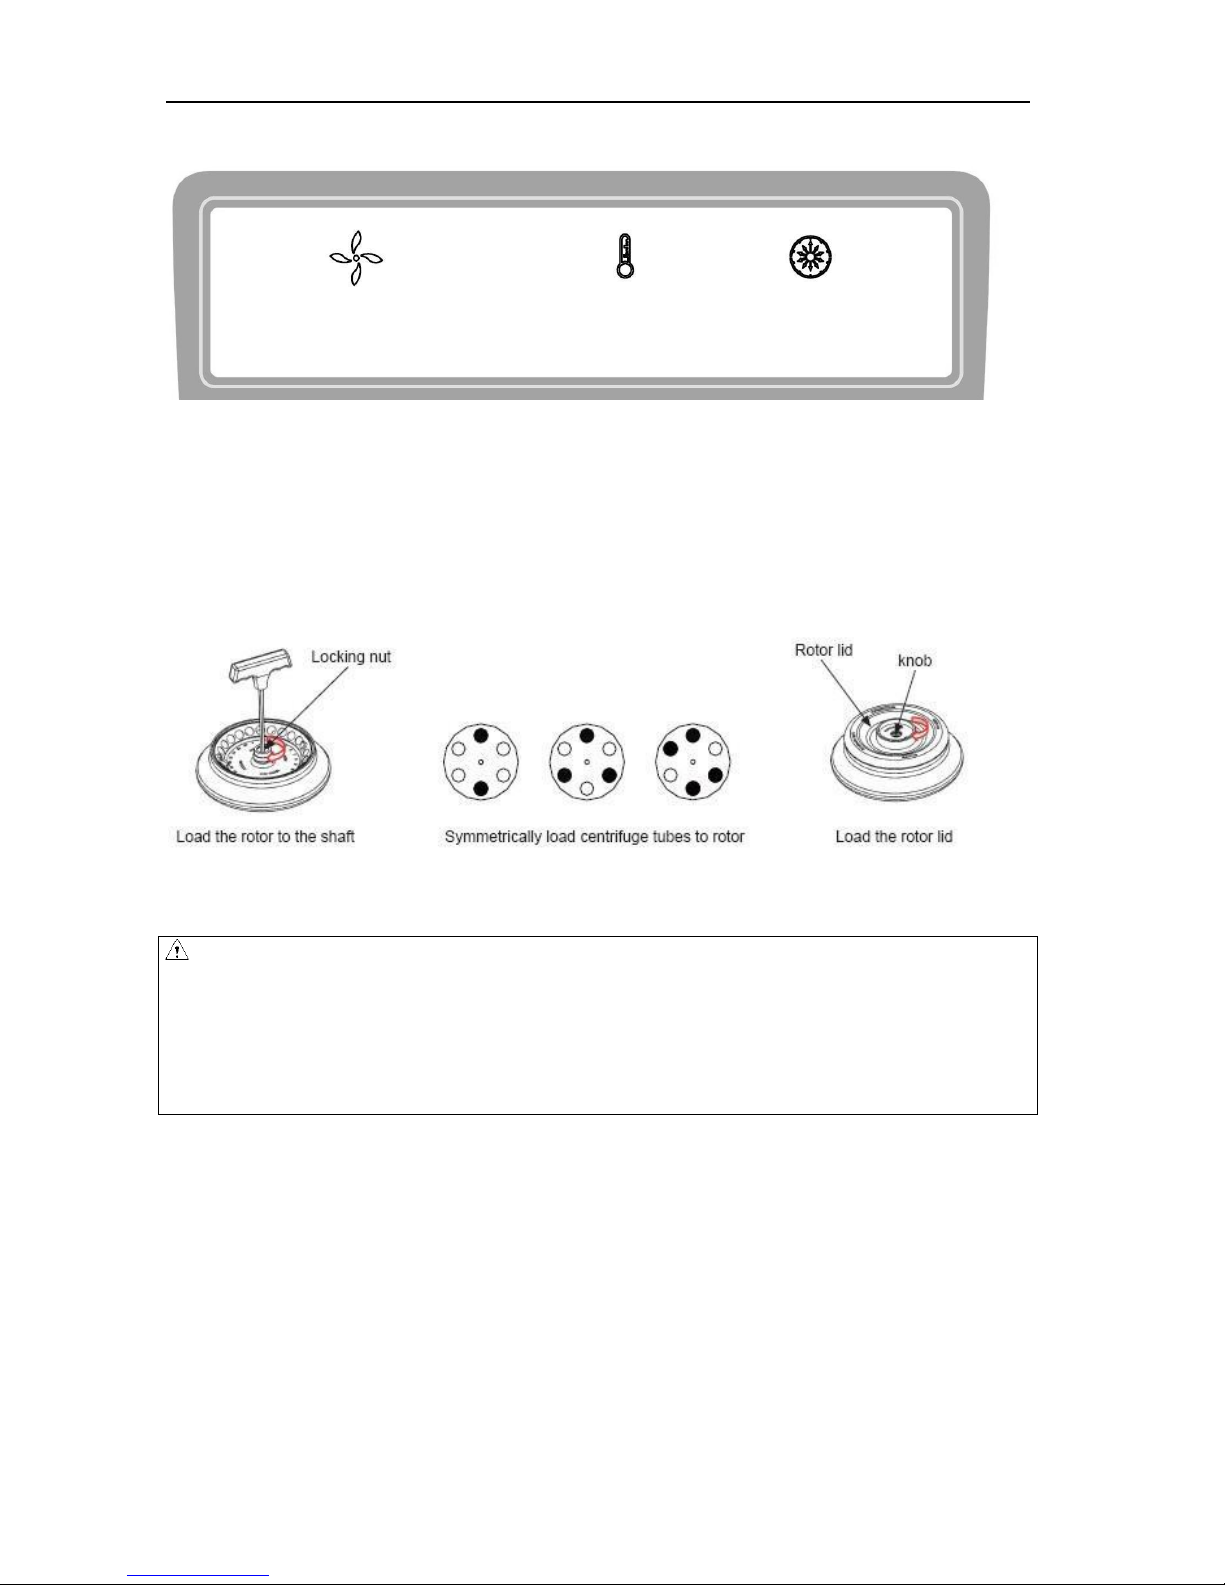
7.5 Symmetrically load centrifuge tubes in rotor
CAUTION:
⚫ Make sure the rotor lid is securely fixed on the rotor, as well as the rotor and shaft are tightened.
Page 14
USER MANUAL
12
Otherwise, the rotor may be moved off while rotating and cause damage of the centrifuge and rotor.
⚫ Firmly tighten the rotor door with rotor.
8. Operation
CAUTION:
⚫ Do not push or lean against the centrifuge while it is running.
⚫ Do not run the centrifuge when fragments or sample solutions are left in the centrifuge chamber.
Always keep the centrifugal chamber clean.
⚫ If the centrifuge makes strange noise during operation, stop it immediately and contact our service
center. Notify them of the warning code if displayed.
8.1 Normal Operation
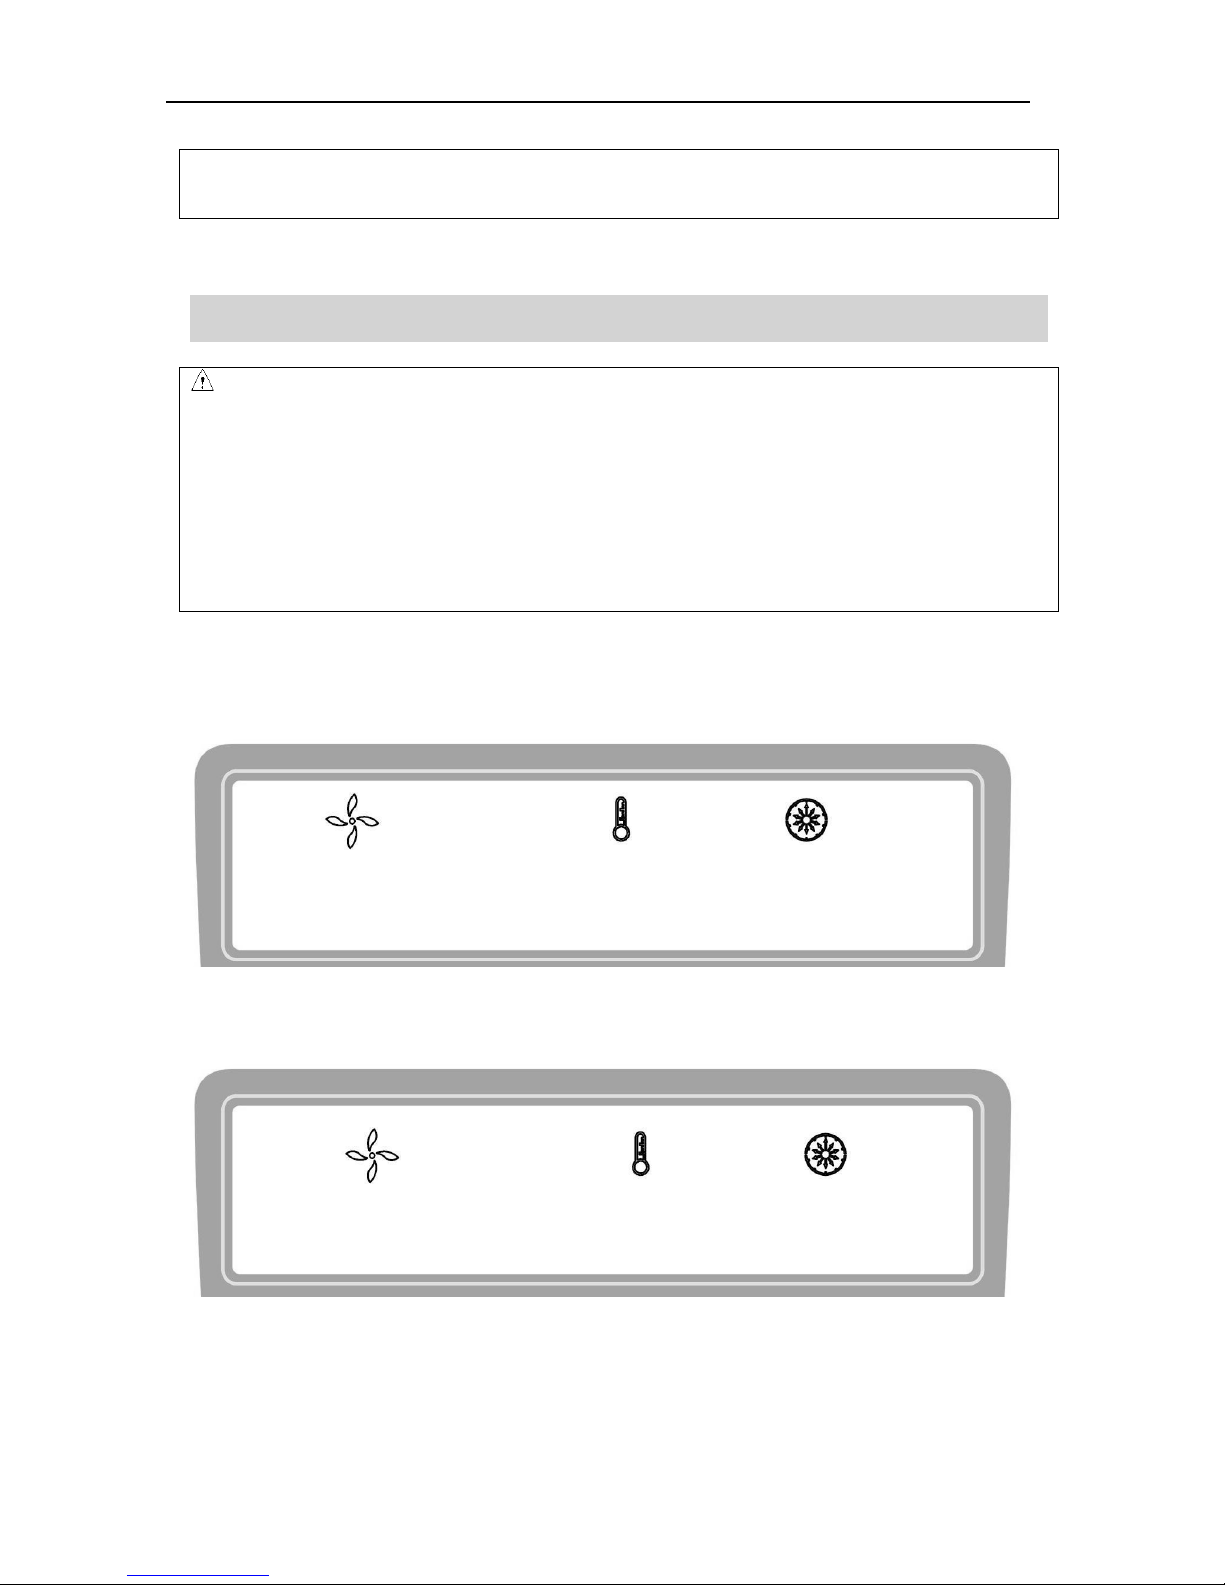
Turn on the power switch, centrifuge will start self-diagnostic checks, see figure 8-1 below:
HELLO 88 ℃ 88 min
Figure 8-1 Self-checking interface
After self-checking, instrument will display accumulative running time, see figure below:
00312 56 45
Figure 8-2 Accumulative running time interface
Figure 8-2 indicates the centrifuge has accumulated running time 312 hours 56 minutes and 45 seconds, and
then the centrifuge displays the last running values, see figure 8-3 below:
Page 15
USER MANUAL
13
rpm
15000 25 ℃ 12 min
Figure 8-3 Last running interface
⚫ Speed: 15000rpm. Running time: 12 minutes.
⚫ The door lock is released.
8.1.1 Load and replace the rotor
Figure 8-2 Load the rotor
CAUTION
⚫ Attach the rotor to the rotor shaft. Ensure the rotor is in position and connected with the shaft,
tightening the locking nut to secure the rotor with shaft, to prevent the rotor damaging the centrifuge.
⚫ Ensure the rotor lid is firmly tightened to the rotor.
⚫ Load the rotor to shaft to ensure rotor is in position until it connected with the shaft.
⚫ You should feel a „cli
ck‟
when the rotor is properly loaded to the shaft. If not, there may be something
stuck between the rotor and the shaft . Double check and clean it if necessary.
⚫ Rotate the rotor slightly with your fingers to check if the rotor vibrates. If so attach the rotor again.
⚫ Rotate the nut clockwise using the wrench to tighten the rotor to the shaft firmly.
⚫ Close the rotor lid, firmly tighten clockwise the lid to the rotor and ensure is in position. Close the door
and then start running.
⚫ The method of removing the rotor is as same as the above mentioned by turning the locking nut
counterclockwise.
Page 16

USER MANUAL
14
8.1.2 Standby Cooling ( D3024R )
When the centrifuge is powered on, the refrigeration system will cool down the chamber to the setting
temperature.
⚫ The standby cooling will run automatically and control the chamber temperature once the lid is close.
⚫ The standby cooling will stop running once the lid is open.
Note:
⚫ When standby cooling is running, please don‟t open the lid frequently to avoid gathering excessive
water steam.
⚫ To extend the life time of centrifuge, recommended don‟t set the temperature under - 4℃ by standby
cooling.
8.1.3 Set the operation parameters
Press the button to select required parameters. The parameter can be modified when the parameter is
flashing. Clockwise rotate the parameter button to increase parameter value; counter-clockwise rotate the
parameter button to decrease parameter value. Parameter button rotate faster, parameter value
increase faster. The minimum speed increment is 100 rpm, the minimum time increment is 1 second.
(1)Set the speed
⚫ Press the select butt on until the speed rpm is displayed.
⚫ When the speed button is selected, the speed symbol will flash the speed value.
⚫ The minimum speed value you can set 500rpm, the minimum increment is 100rpm.
⚫ Rotate program button clockwise to increase speed value, rotate the program button anti-clockwise
to decrease speed value.
⚫ You can speed-up set the speed value by rotating program button quickly.
⚫ There is a circulating function to increase/decrease the speed values. Rotate the program button
clockwise to change settings from small → large → maximum → minimum. Rotate the program
button anti-clockwise to change settings from large → small → minimum → maximum.
(2)Set the time
⚫ Press button , time value flashes in the time setting mode.
⚫ Rotate the program button to set running time from 30 seconds to 99 minutes.
⚫ When time displays HD, this is a continuous running mode.
(3) Set the temperature (D3024R):
⚫ Press select button , temperature value flash into temperature setting mode.
⚫ Rotate the program button , and input temperature value range from -20℃ to 40℃.
⚫ When temperature symbol flash, indicating refrigeration system is running, not flashing indicates the
Page 17

USER MANUAL
15
refrigeration is not running.
8.1.4 Start the operation
(1)Press button to start running
⚫ The door should be locked before rotor starts rotating.
⚫ Timer will operate once the speed setting value is reached, the screen displays the remaining run time.
(2) View and modify the operation programs
⚫ Pressing button , returns the display to the program interface and displays settings programs. Press
the select button to the desired program. When flashing, rotate parameter button to modify
values. Release the button after 5 seconds, and the centrifuge will return to normal operation mode and
run according to the new value.
⚫ If the set time value has been modified, the operation time is not affected and will continue.
(3)Warning display
⚫ If an error occurs during the operation, the centrifuge will brake to stop automatically, and display the
error code on the time/display area. The error code can be checked in the table 10-1, and corrective
actions can be applied accordingly.
8.1.5 End the operation
(1)The centrifuge will brake when it reaches the setting time or button is pressed.
⚫ When the rotor stops rotating, centrifuge will start beeping to alert the operation has finished.
(2)Open the door
⚫ The door can be released automatically when the operation has stopped (D3024).
⚫ The centrifuge keeps the door close when operation has stopped ( D3024R ).
⚫ With the door closed, you are able to press the button to open it.
⚫ After ending the operation, the program will store the setting parameters of this operation, and will
recall these parameters when restart the program.
(3)Open the door and take out the rotor and samples.
8.2 RCF Operation
(1)Turn on the power switch.
(2)Set a RCF (Relative Centrifugal Force) value.
Page 18
USER MANUAL
16
CAUTION:
● Do not exceed the allowable maximum RCF value of the rotor and adapters.
⚫ Press the select button and choose speed unit ×g, the speed symbol will flash into RCF value
input status.
⚫ If no button is pressed after the speed value has flashed for 5 seconds, the input mode will be shut
down.
⚫ Rotate program button to input a RCF value, RCF increment is100×g.
(3)Set operating conditions
The other operation, please refer to the section 8.1.
8.3 Pulse Operation
This function is used to remove the residual samples adhered on the interior of the tubes.
Note:The button works only when the rotor stopped and the door is locked.
(1)Turn on the power switch and load the rotor to the shaft, tighten the rotor lid and make sure it is in
secured position, and then close the door.
(2)The centrifuge gets into preparation mode and displays last running values. The values can be reset.
(3)Press knob and hold, the centrifuge will speed up to the setting speed. While releasing
knob during acceleration, the centrifuge will start to decelerate and stop.
9. Maintenance
9.1 Cleaning
CAUTION
⚫ If do not follow the recommended instructions for cleaning or disinfecting may damage the centrifuge.
(1)Centrifuge
⚫ If the centrifuge is exposed to ultraviolet rays for a long time, the color of the doors may be changed or
the label may be came off. After using, cover the centrifuge with a piece of cloth to protect it from
direct exposure.
⚫ If the centrifuge needs cleaning, clean it with a cloth or sponge moistened with a neutral detergent
solution.
Page 19

USER MANUAL
17
⚫ Sterilize the centrifuge by wiping with a cloth moistened with 70% ethanol solution.
(2) Rotor chamber
CAUTION
⚫ Do not directly pour water, neutral detergent or disinfectant solution into the rotor chamber. Otherwise
fluids may leak into the drive units and cause corrosion or deterioration to the bearings.
⚫ If the rotor chamber needs cleaning, clean with cloth or sponge moistened with a neutral detergent
solution. Sterilize the centrifuge by wiping with a cloth moistened with 70% ethanol solution.
(3)Drive shaft
⚫ We recommend regular maintenance for drive shaft. You can wipe the drive shaft with soft cloth, and
then apply a thin coat of silicon grease.
(4)Door
⚫ Clean and sterilize the door using the same method as the step (1) above.
(5)Rotor
⚫ To prevent corrosion, remove the rotor from rotor chamber. If not in use for a lone term, then detach
the rotor lid and turn upside down to dry the tube holes and keep clean.
⚫ For sample leaks in the rotor, rinse the rotor with water. Apply a thin coat of silicon grease to the rotor
when it is completely dry.
⚫ The rotor should be regular maintenance, recommend to cleaning it each 3 months to ensure tube and
rotor holes keep clean, and then apply a thin coat of silicon grease.
(6) Drain (D3024R)
⚫ The centrifuge is equipped with drain pipe for excess water. Drain off water when water is in drain
pipe.
9.2 Consumables
Replaceable wearing parts listed below. It is recommended to replace these according this table.
Item.
Replacement parts
Replacement conditions
1
Seal ring of door
Cracked
2
Rubber block of temperature sensor
3
Seal ring of centrifuge chamber (3024R)
9.3 The replacement of seal rings
9.3.1 Instructions
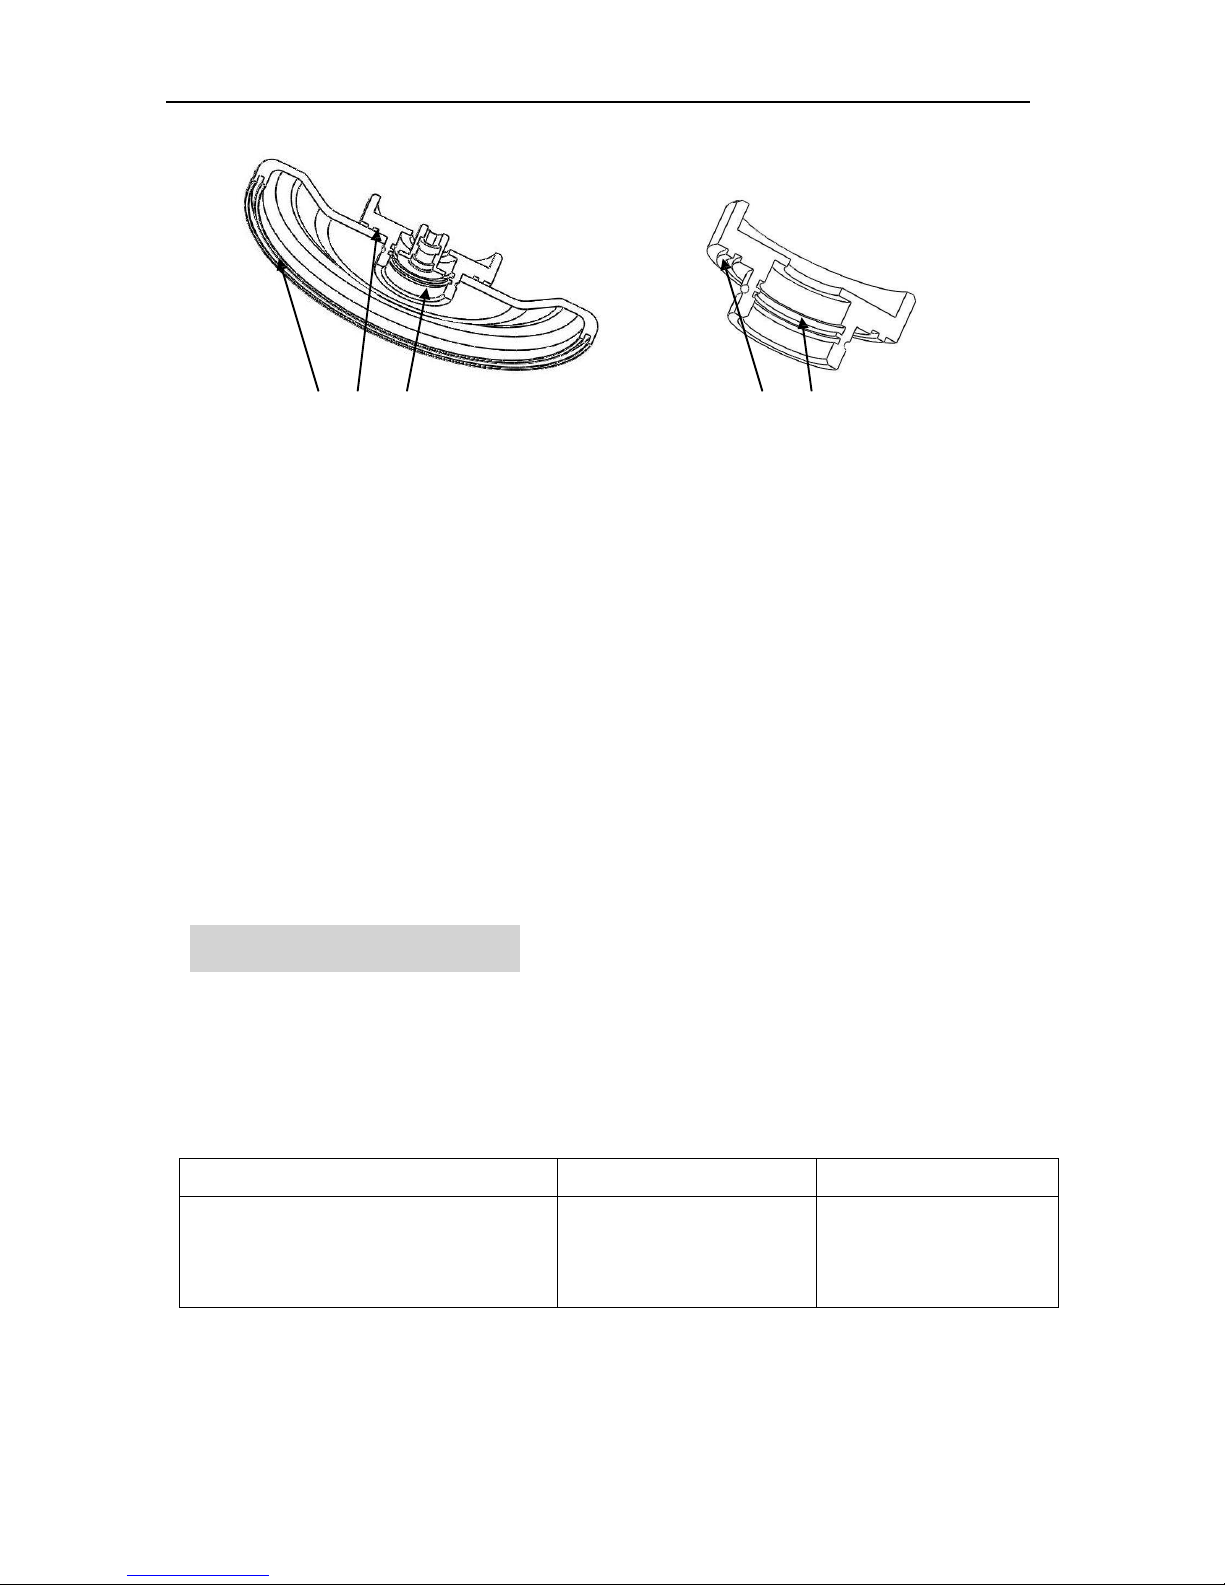
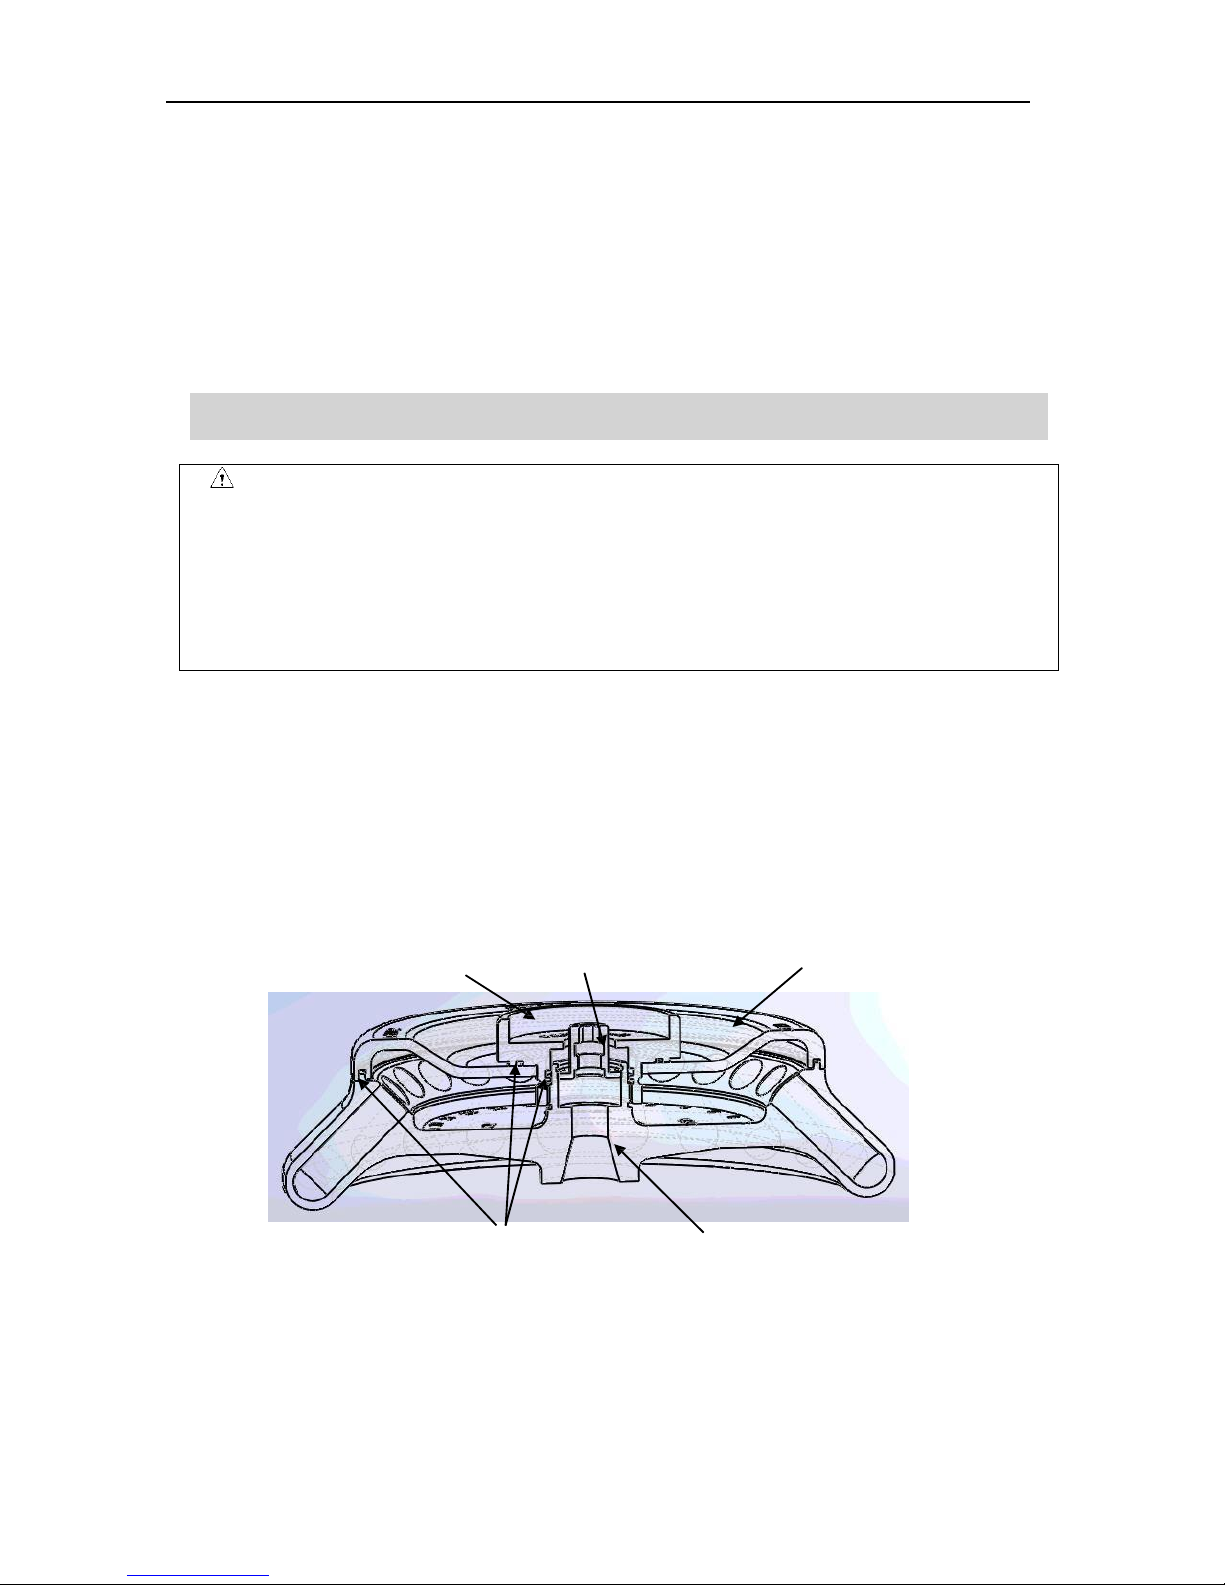
There are three high-temperature rubber seal rings that equipped into rotor to achieve bio-safe. The seal
rings may fall off or aging after several autoclaving, need to be replaced or re-installed.
Page 20
USER MANUAL
18
Seal ring 1 2 3
Seal ring 2 3
Figure 9-1 Seal rings of rotor
9.3.2 Replacement methods
(1)Clean the seal ring slot with neutral detergent solution and make it dry.
(2)Evenly coated with glue (501) in the seal ring slot and keep the seal ring into slot, press evenly to make
it contact enough with the slot bottom and bond firmly.
(3)Place for 20 minutes and waiting for the glue to completely solidified.
9.4 Routine inspection
(1) Check that if the centrifuge is on a firm、flat and level table, ensure the four feet stand on the table
firmly.
(2) Check if the centrifuge grounded properly: Use multi-meter to check if is short circuit between the
power cord grounding pin and the motor shaft. If yes, indicating grounded properly; if is open circuit, need
to check failure reason first and make troubleshooting before use.
10. Troubleshooting
10.1 Possible problems and solutions
This centrifuge has a self-diagnostic function. If a problem occurs, an error/warning code will be displayed
on the time display screen and the operator can determine the malfunction with the warning code below.
Symptom
Causes
Solutions
Nothing appears on the screen when the
POWER is turned on.
·
Building power circuit
breaker trips.
·
the fuse was blown out.
·
Remove the trouble and
turn on the POWER.
·
Replace the fuse.
Page 21
USER MANUAL
19
Error code appeared on
the time display screen
E-02
Door fault
·
The door opened in running.
·
Press the button
while the door opening.
·
Close the door
immediately.
·
Close the door,and then
start to operate.
E-04
Temperature
fault
·
The air inlets are blocked.
·
Radiator fan is damaged.
·
Clean air inlets.
·
Replace radiator fan.
E-06
Set wrong
parameter
·
The setting parameter
exceed the allowable range.
·
Modify the parameter
value.
E-10~86
·
Read the maintenance
manual.
·
Contact with service
center.
Table 10-1 Possible problems and solutions
10.2 How to open the door
10.2.1 In the case of po wer on
CAUTION
⚫ The door just can be opened while the power on and rotor stops rotating.
(1)Turn on the POWER switch, the door lock will release automatically.
(2)The door lock will release automatically once the operation finished.
(3)It is available to release the door by pressing button once the rotor stops.
10.2.2 In the case of power outage
The door cannot be opened automatically if there is a power outage. It is available to be opened manually.
(1)Ensure if the rotor has stopped rotating.
⚫ Listen carefully to ensure no rotating sound can be heard.
(2)Insert a screw driver into the hole to open the door.
⚫ Hole is located on the top right side of the unit.
⚫ Insert a screw driver into the hole and push forward to release the door.
Page 22
USER MANUAL
20
10.3 Replacement of fuses
⚫ (1)There are two fuses of D3024, 250V, 5A time-delay type, size: Ф5×20. There are two fuses of
D3024R, 250V, 10A time-delay type, size: Ф5×20.
⚫ (2)The fuse holder is located in the power inlet. Pull out the fuse holder from power inlet and replace
the fuses if necessary.
11. Instructions of rotor and tube
CAUTION:
⚫ Read the instructions thoroughly, correct use rotor.
⚫ Do not exceed the allowable maximum speed of rotor、tube and adapters etc., be care that the allowable
maximum speed of some adapters are lower than the rotor‟s maximum speed.
11.1 The rotor instructions
11.1.1 Rotor structure
Knob Locking nut Cover
Seal ring Shaft hole
Figure 11-1 The rotor structure
11.1.2 Available rotors and adapters
All rotors are used for bio-safe when the rotor lid was tightened with the rotor, centrifuge tubes will be
Page 23

USER MANUAL
21
enclosed into rotor to ensure the sample does not leak in centrifugal process. If rotor lid is not available, the
rotor would be no bio-sealing function. The rotors can be used as follows:
Rotor
type
ID
code
Tube/bottle
Adapter
Maximun
speed
(rpm)
Maximum
centrifugal
radius
r
max
(cm)
Maximum RCF
Rcf (×g)
1
AS24-2
2/1.5ml tube
15000
8.5
21380
0.2ml PCR tube
A02P2
15000
6.9
17350
0.5ml micro
tube
A05P2
15000
7.6
19100
2
AS36-05
0.5ml micro
tube
15000
8.5
21380
PCR8 serial
tube
A02P05
15000
7.6
19100
3
AS4-PCR8
PCR8 serial
tube
6.5/7.2
16350/18100
Table 11.1 Rotors and adapters
11.1.3 Notice
(1) The centrifuge rotor can separate sample which density lower than 2.0g/ml, if the samples density is
over 2.0g/ml, please calculate allowable speed depending on the following formula.
Allow Speed (rpm)= Maximum speed×(2.0(g/ml)/Sample density (g/ml))
1/2
(2)To prevent corrosion, remove the rotor from rotor chamber if do not use for a lone term, then detach
the rotor lid and upside the rotor down to dry the tube holes.
(3)If some samples leaked in the rotor hole, wash the hole with water, apply a thin coat of silicon grease
on the rotor surface after drying.
(4)It is necessary for a regular maintenance for rotor, recommend to clean it each 3 months to keep
cleaning of tube hole and shaft hole, and then apply a thin coat of silicon grease on it.
11.1.4 Autoclaving
The rotor is manufactured in high-strength aluminum alloy material and can be autoclaved:
121℃ (1.0kg/cm2),
20 minutes.
11.1.5 Bio-safe seal ring
The rotor is sealed by bio-safe structures, achieved using three high-temperature rubber seal rings. The seal
rings may fall off or aging after several autoclaving, need to be replaced or re-installed. The replacement
methods please refer to the section 9.3.
Page 24

USER MANUAL
22
11.2 Tubes
11.2.1 Cleaning and sterilizing tubes
Condition Material
PA
PC
PP
Cleaning
Cleaning fluids
Acidic(pH5 or lower)
X X X
Acidic(higher than pH5 )
O O O
Alkaline(higher than pH9 )
O X O
Alkaline(pH9 or lower)
O O O
Neutral(pH7)
O O O
Warm water(up to 70℃)
O O O
Ultrasonic cleaning
Neutral detergent(pH7)
O O O
Sterilization
Autoclaving
115℃(0.7kg/cm2)30minutes
O O O
121℃(1.0kg/cm2)20 minutes
X O O
126℃(1.4kg/cm2)15 minutes
X X X
Boiling
15 to 30 minutes
O O O
Ultraviolet sterilization
200-300nm
X X X
Gas sterilization
Ethylene oxide
O X O
Formaldehyde
O O O
PA: Polyallomer;PC:Polycarbonate;PP:Polypropylene
11.2.2 Cleaning PC tubes
PC materials are low in chemical resistance against alkaline solutions. Avoid using neutral detergents with
pH higher than 9. Note that pH of some neutral detergents are still higher than 9 even if diluted according to
the instruction in the maker‟s catalog. Use detergent with its pH between 7 and 9.
11.2.3 Autoclaving PA、PC and PP tubes
PA begins softening at about 120℃, PC and PP at about 130℃. Autoclave PA tubes at 115℃(0.7kg/cm2)for
30 minutes and PC and PP tubes at 121℃(0.1kg/cm2)for 20 minutes. If a certain temperature is exceeded,
the tubes may be deformed.
When using a sterilizing chamber, please operate as follows:
(1)Place tubes in vertical position, mouths upward. If tubes are placed sideways, they may deform
into an oval shape due to gravity.
(2)Remove screw nuts and inner covers to prevent from deformation or rupture.
(3)Wait until the sterilizing chamber cools down to the room temperature before the tubes are
removed.
Page 25

USER MANUAL
23
11.2.4 Condition and life expectancy of tubes
The life expectancy of plastic tubes depends on the characteristics of samples, speed of the rotor used, and
temperature applied, and so on. When the plastic tubes are used for centrifuge of ordinary aqueous samples
(pH between 5 and 9), their life expectancies are defined as follows.
Be operated at the maximum speed:
High quality tubes (PA、PC、PP): 30-50 operations
Ordinary tubes(PA、PC、PP): around 10 operations(Using in low speed can extend the tube life).
Life expectancy of tubes also depends on the pretreatment conditions such as cleaning and sterilization,
lifetime can be cut down.
Notice: Do not use damaged or cracked tubes.
12. Calculate Relative Centrifuge Force(RCF)
Relative Centrifuge Force (RCF) can be determined with the following calculation formula.
RCF=1.118×r×n2×10
-5
R—rotating radius, unit: cm; n—rotating speed, unit: rpm
13. Ordering information
Cat. No.
Model
Descriptions
912015137777
D3024
High Speed Micro-Centrifuge,with AS24-2 rotor kits, US
plug, 110V/50Hz/60Hz
912115127777
D3024
High Speed Micro-Centrifuge,with AS24-2 rotor kits, Cn plug,
220V/50Hz/60Hz
912215127777
D3024
High Speed Micro-Centrifuge,with AS24-2 rotor kits, Euro
plug , 220V/50Hz/60Hz
912315127777
D3024
High Speed Micro-Centrifuge,with AS24-2 rotor kit s, UK
plug, 220V/50Hz/60Hz
922015137777
D3024R
High Speed Refrigerated Micro-Centrifuge,with AS24-2 rotor
kits, US plug, 110V/50Hz/60Hz
922115127777
D3024R
High Speed Refrigerated Micro-Centrifuge,with AS24-2 rotor
kits, Cn plug, 220V/50Hz/60Hz
922215127777
D3024R
High Speed Refrigerated Micro-Centrifuge,with AS24-2 rotor
kits, Euro plug, 220V/50Hz/60Hz
922315127777
D3024R
High Speed Refrigerated Micro-Centrifuge,with AS24-2 rotor
kits, UK plug, 220V/50Hz/60Hz
Accessories
19400002
AS24-2
Rotor kits with cover, fixing clips and O'ring, 15000rpm,
2ml*24, used with D3024 & D3024R
Page 26

USER MANUAL
24
19400003
AS36-05
Rotor kits with cover, fixing clips and O'ring, 15000rpm,
0.5ml*36, used with D3024 & D3024R
19400004
AS4-PCR8
Rotor kits with cover, fixing clips and O'ring, 15000rpm,
4-PCR8, used with D3024 & D3024R
19500001
A02P2
0.2ml rotor adapter, used with A12-2 & AS24-2 rotors,
24pcs/pk
19500002
A05P2
0.5ml rotor adapter, used with A12-2 & AS24-2 rotors,
24pcs/pk
19500003
A02P05
0.2ml rotor adapter, used with AS36-05 rotor,36pcs/pk
14. Warranty
14.1 Warranty of the centrifuge
This centrifuge is guaranteed for two years from the date of delivery provided that it has been operated and
maintained properly.
14.2 Warranty of the rotor
The rotor is guaranteed for 5 years from the date of delivery upon manufacture. Please pay attention, do not
use the rotor once it has been corrosion or fatigue damage. We do not guarantee this centrifuge and the rotor
under the following conditions even if within the guarantee period expires:
(1) Failures caused by incorrect installation.
(2)Failures caused by rough or improper handling.
(3)Failures caused by conveyance or relocation after installation.
(4)Failures caused by unauthorized disassembly or modification.
(5)Failures caused by using parts of the other companies, such as rotors and adapters.
(6)Failures caused by natural disasters including fire, earthquakes and so on.
(7)Consumables and parts have a limited guarantee period
15. After-sales Service In
order to ensure to operate centrifuge safely and efficiently, it is necessary for regular maintenance. If
centrifuge has problems, do not attempt to repair it by yourself. Contact our sales or service center.
Page 27

DLAB Scientific Inc.
Add: 775 Rivera St, Riverside, CA 92501, USA
Tel: +1- 747- 230-5179
Fax: +1-909-230-5275
E-mail: [email protected]
web: www.dlabsci.com
 Loading...