

Page 1
Page 2

Many thanks . . .
…that you have decided in favour of one of our products.
For your own safety and for helping you to understand
the complete functional range, please read these
instructions carefully and keep them for a later
consultation. Should you sell the appliance please give
the buyer the manual to take it with him.
www.dk-digital.com
© 2005 Copyright DK digital AG
-11-
ENGLISH
Page 3

General things
•
Your TS-2000 disposes of four different display
functions:
- Time with alarm function
- Temperature
- Date with weekday
- Timer.
•
By a careful tapping of the display, you transfer the
display of the respective function. After each switch
over, the display is shortly illuminated in another
colour. You can switch off this display illumination by
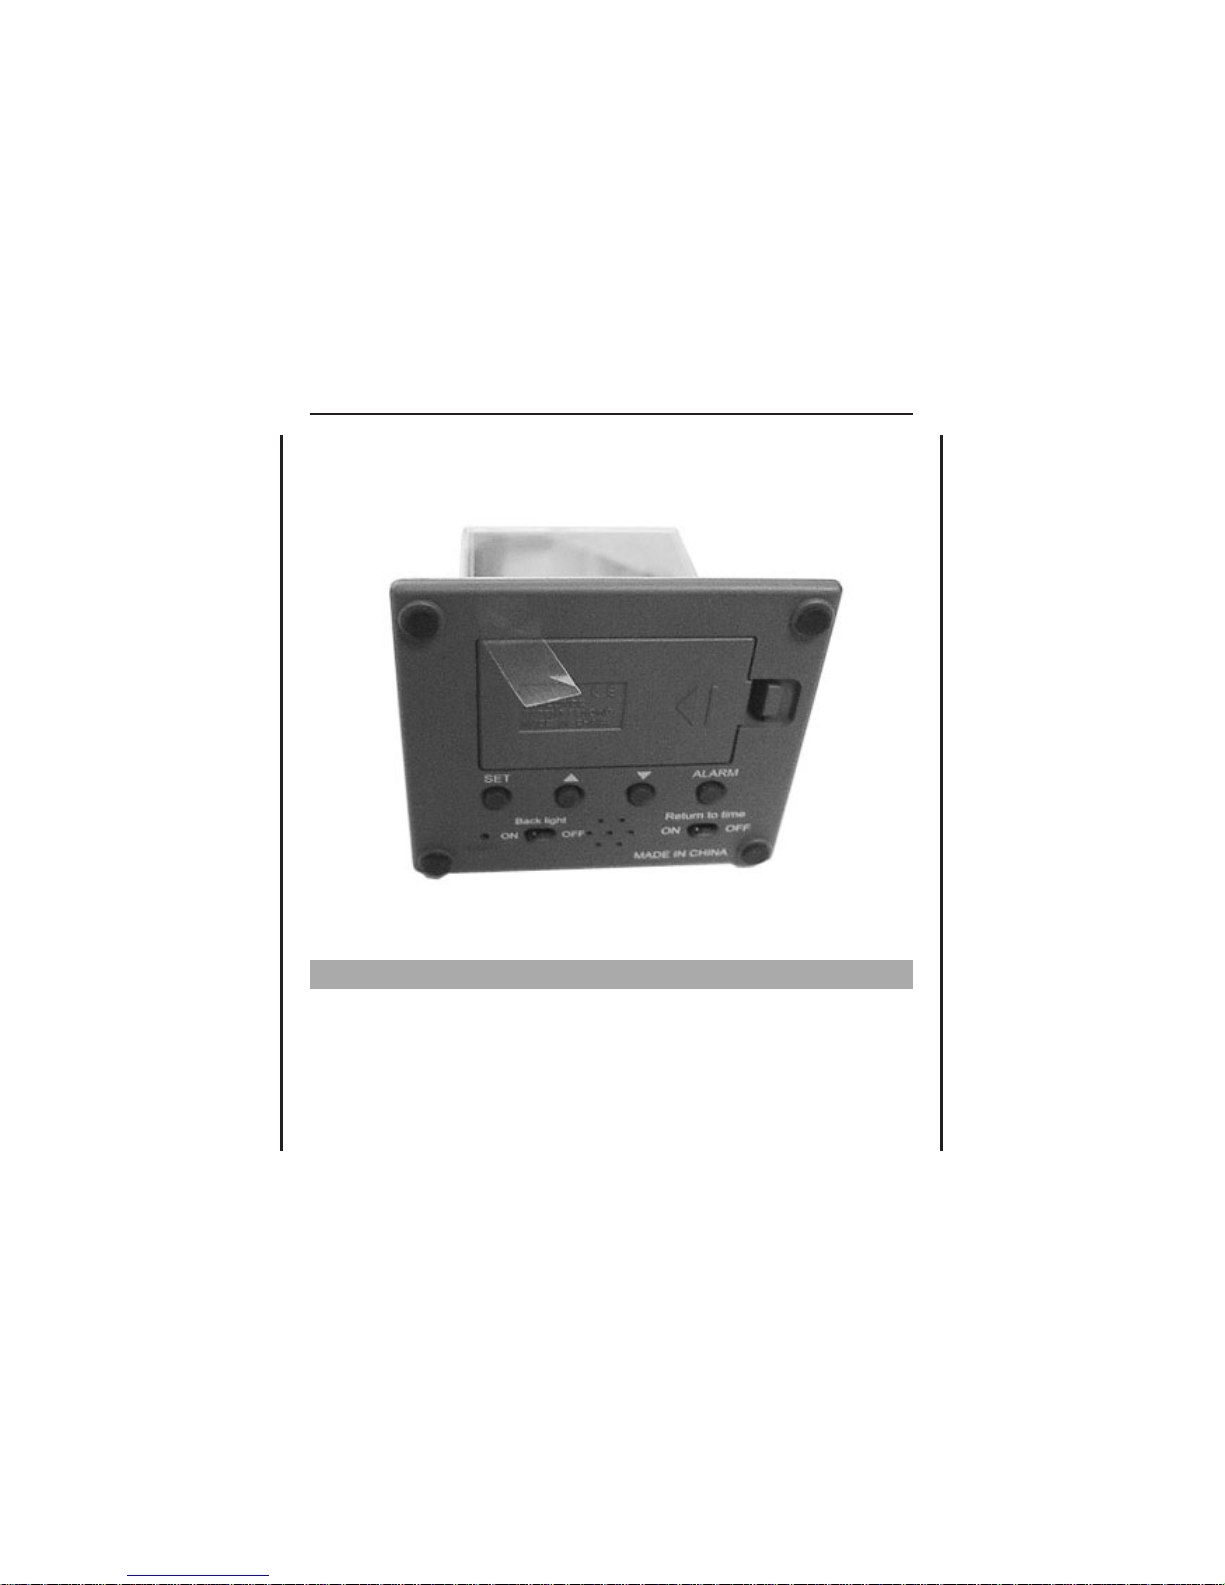
pushing the switch “Back light” on the bottom side of
the appliance into the position “OFF”.
•
With the switch “Return to time” you can determine
whether after having shown the temperature, timer or
date display in each case for ten seconds, the appliance
is to display the time again (On) or to permanently
maintain the respective function display (Off).
•
We have inserted a transparent protection foil between
the battery poles so that the batteries are still fresh at
their first use (see next page). In order to start-up
the appliance, please open first of all the battery
compartment and remove the protection foil.In
doing so, the display should be activated immediately.
-12-
ENGLISH
Page 4
Setting the time
•
Tap the display so many times until the time is shown.
•
Hold the SET key at the bottom side of the appliance
for two seconds. Now, the hour value is flashing and
you can enter the current time by using the 5 or 6
key.
-13-
ENGLISH
Page 5

•
Then, you push the SET key once again. Now, the minute
value is flashing and you can enter the minute of the
current time by using the 5 or 6 key.
•
Push the SET key once again in order to save settings.
If no key is pushed for one minute, the appliance saves
the current setting.
•
After completion of the time setting, you can change
the time display to 12 hours or 24 hours mode by
pushing the 5 or 6 key once.
Setting the alarm time
•
If necessary, tap the display so many times until the
time is shown.
•
Push the ALARM key at the bottom side of the
appliance. The AL sign appears in the display. You have
now ten seconds for setting the alarm time. If this time
expires, the appliance returns to the time display.
•
Now, push the SET key and the hour value is flashing.
By means of the 5 or 6 key, you can set the hour of
the desired alarm time.
•
Push the SET key once again and the minute value is
flashing. You can now set the minute of the desired
alarm time by using the 5 or 6 key.
-14-
ENGLISH
Page 6

•
Finally, push the SET key. The alarm time is now saved
and the alarm clock symbol appears in the display.
After ten seconds, the appliance returns to the time
display. You can have the alarm time displayed at any
time by pushing the ALARM key.
•
At the set time, the alarm tone is activated and will be
peeping for a maximum of two minutes or until you tap
the display. The alarm time is, however, saved. In order
to switch the alarm function off, push the ALARM key and
then hold this key for two seconds. The alarm clock
symbol disappears.
Temperature display
•
If you tap the display during the time display once, the
display changes to the current room temperature.
•
Push the 5 or 6 key during the temperature display for
changing from Celsius to Fahrenheit as measuring unit.
Date display
•
If you tap the display during the temperature display
once, the display changes to the date.
•
For setting the correct date, hold the SET key for two
seconds. Now, the year is flashing for one minute and
you can change it by means of the 5 or 6 key. Then,
you push the SET key and the number for the month is
-15-
ENGLISH
Page 7

flashing which you can again set with the 5 or 6 key.
Push the SET key once again for setting the day in the
same way. Push the SET key for the last time for
completing your setting.
Timer function
•
If you tap the display during the date display once, the
appliance changes to the timer operation. With it, you
can program a split-second “countdown” of up to 180
minutes at the end of which an alarm signal resounds.
•
For setting the desired timer time, push the SET key
during the timer display. Now, the minutes of the timer
time are flashing and you can set them by means of the
5 or 6 key. Then, you push the SET key once again
and the seconds of the timer time are flashing which
you can again set by means of the 5 or 6 key. Finally
push the SET key.
•
In order to start the “countdown”, push the 6 key. If
you want to stop it, push the 6 key again, also for
continuing.
•
After the timer time has expired, the alarm signal
resounds which can be stopped by tapping the display.
The timer time is, however, saved.
-16-
ENGLISH
Page 8

Changing the batteries
If the display looks blurred or the display remains totally
dark, you must replace the batteries. For doing so, open
the battery compartment on the bottom side of the
appliance. Remove the discharged batteries and insert
three batteries (1.5 V, size AAA) according to the layout
that is shown in the battery compartment. When doing so
look out exactly for the compliance of the correct
polarity, otherwise, the appliance will not function and
can be damaged. For a longer useful economic life, you
should use alkaline batteries. Close the battery
compartment again.
Batteries do not belong into the domestic waste.
Please turn your discharged batteries in at the
responsible collecting point or at the place where
you have bought the new ones. Never throw
batteries into fire.
If you do not use the appliance for a longer period of
time, remove the batteries from the battery
compartment in order to avoid damage due to leakage of
the batteries.
-17-
ENGLISH
Page 9

Resetting
If you want to reset all settings into the state of delivery,
push the switch behind the RESET opening on the bottom
side of the appliance with a pointed object (e.g. a
needle). You must then newly set the time and the date.
-18-
ENGLISH
 Loading...