

Page 1
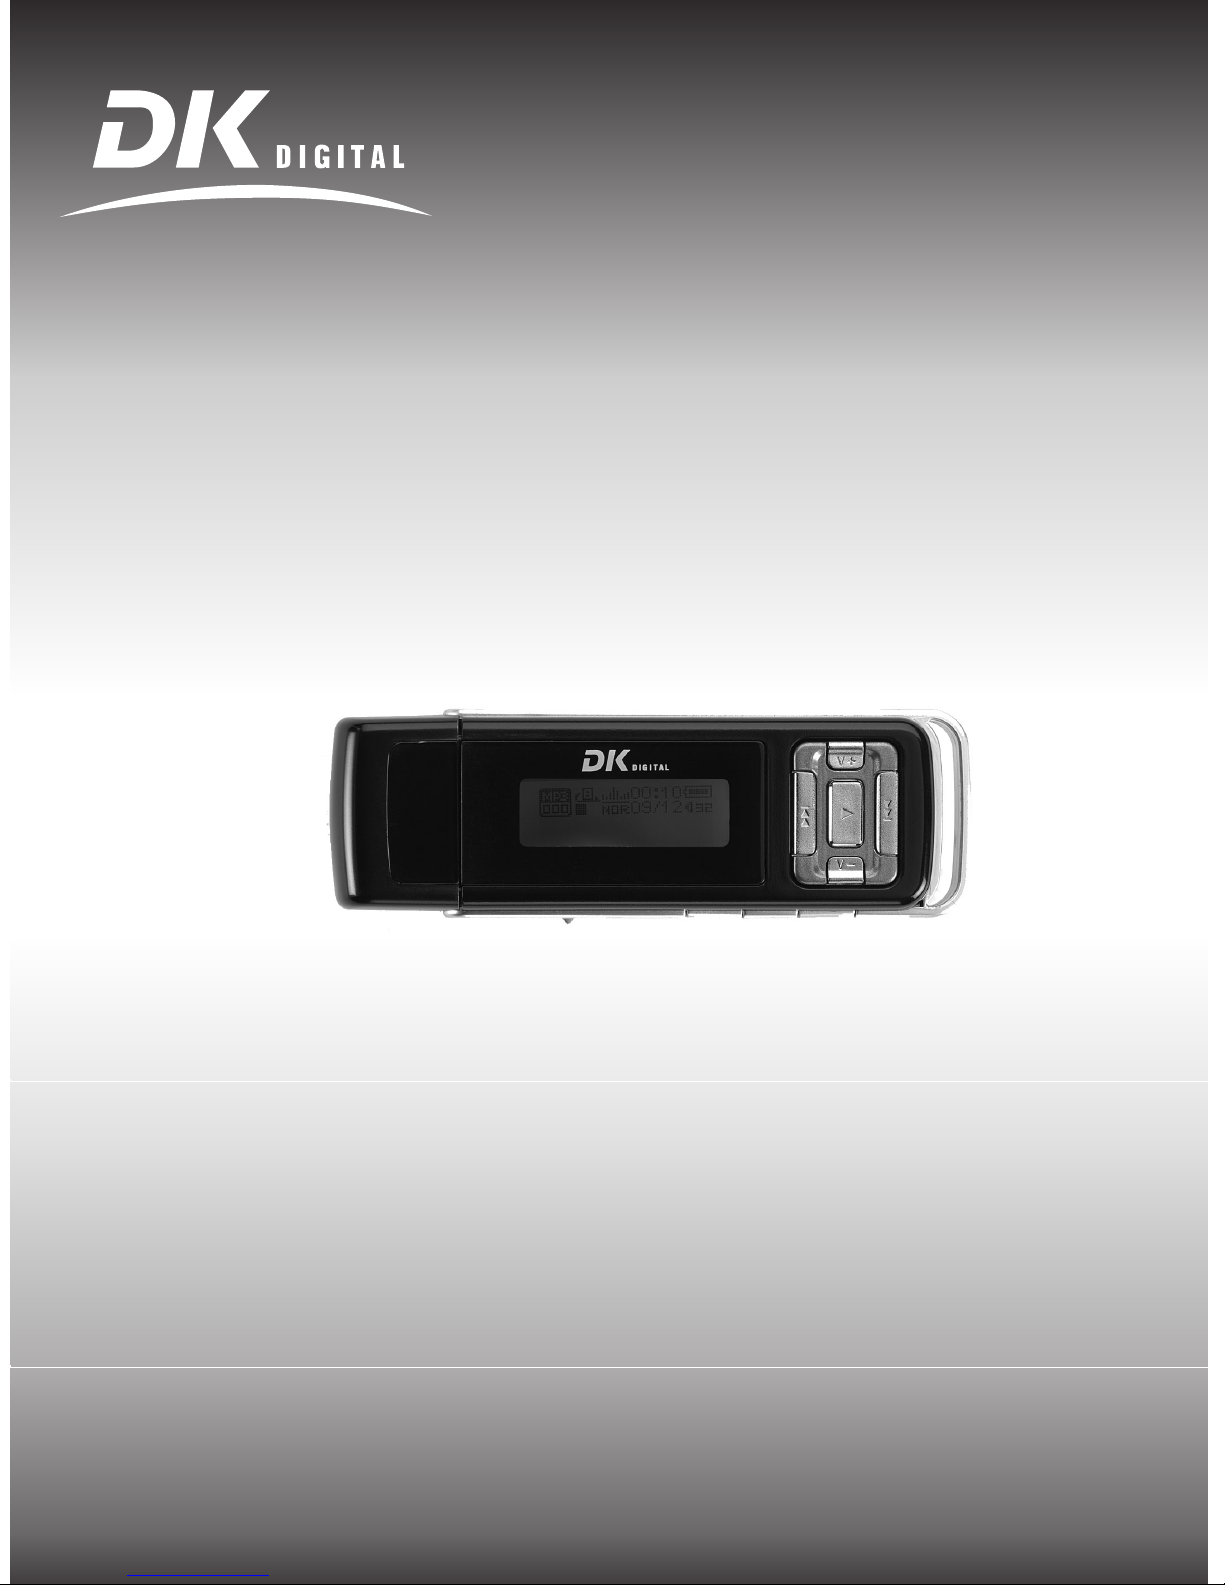
Owner's Manual
MP3-Player
with radio and
recording function
MP-050
MP-051
MP-052
Page 2

Thank you very much …
. . . for choosing one of our MP3 players. For your own safety and in order to learn more about the
functions available, please read this manual and keep it for future reference. And if you once sell
the unit, please include the manual.
www.dk-digital.com
© 2006 Copyright, Manufacturer: DK digital GmbH, Germany
2
Page 3
Important Safety Guidelines
•
This unit is meant to record and play back MP3,
WMA or WAV files as well as a memory for
digital data.
• Always keep the player in a clean condition. Do
not expose it to heat sources, direct sunlight, dirt,
moisture or rain.
• Caution – Danger for your health! Your hearing
may be unnoticeably damaged by exposure to
extremely loud sounds.
• Never attempt to open your MP3 player. There
are no operating elements inside. All servicing or
repair must be referred to qualified service
personnel authorised by us.
• Do not use the player whilst driving a car or
other vehicles. Accidents may result from
inattentiveness. When crossing the street as a
pedestrian do not listen to your player at
extreme volumes. Switch off your player for
safety reasons wherever danger may arise.
• Connect the headphone,
the player to avoid damage to the headphone and
the player.
before
switching on
• You can use a soft damp cloth to clean the
housing. Do not use alcohol or other cleansing
products.
• Never use the player in a very dry environment
to avoid static charge.
• Never disconnect the player from the PC during
a data transfer (download/upload) or during
formatting to avoid application errors.
• If you use the player as an external data memory,
please observe the correct procedure for data
transfer. We do not assume any responsibility for
lost data.
• Do not place any objects onto the device and do
not exert any pressure onto the housing or the
display. Otherwise the display might be damaged.
3
Page 4

Table of Contents
Important Safety Guidelines
About this device . . . . . . . . . . . . . . . . . . . . . . . . . 5
Scope of delivery
Features . . . . . . . . . . . . . . . . . . . . . . . . . . 5
Notes on the Copyright . . . . . . . . . . . . . . . . 5
What are MP3, WMA, WAV and DRM? . . . . 5
System requirements . . . . . . . . . . . . . . . . . . 6
Before you switch on
Insert battery
Control elements of the player
Display . . . . . . . . . . . . . . . . . . . . . . . . . . . . . . . . 8
Connection with the PC . . . . . . . . . . . . . . . . . . . . 9
Connect with the PC
Driver for Windows 98 . . . . . . . . . . . . . . . . 9
Windows 98 SE / ME/2000 . . . . . . . . . . . 9
Windows XP with Media Player 10 . . . . . . . . 9
USB mode and MTP . . . . . . . . . . . . . . . . . 10
Data transfer (download/upload) . . . . . . . . . 10
Copying of the files from the Media Player 10 10
Removing the MP3 player from the PC . . . . . 10
Data transfer of WMA files protected by DRM
DRM mode
Update Media Player 10 . . . . . . . . . . . . . . 11
Copy from Media Player 10 . . . . . . . . . . . . 11
Operation
Switching the MP3 player on
Switching the MP3 player off . . . . . . . . . . . 13
Main menu . . . . . . . . . . . . . . . . . . . . . . . 13
Set volume . . . . . . . . . . . . . . . . . . . . . . . . 13
MP3 player
Play music
Search titles . . . . . . . . . . . . . . . . . . . . . . . 14
Folder navigation . . . . . . . . . . . . . . . . . . . 14
FM tuner
Radio functions
Automatic scan radio station . . . . . . . . . . . . 15
Manual station scanning . . . . . . . . . . . . . . . 15
Delete radio station . . . . . . . . . . . . . . . . . . 15
Recording device
Recording
Play recording . . . . . . . . . . . . . . . . . . . . . 16
Quality setting . . . . . . . . . . . . . . . . . . . . . 16
. . . . . . . . . . . . . . . . . . . . . . . . . . . . . 13
. . . . . . . . . . . . . . . . . . . . . . . . . . . . 14
. . . . . . . . . . . . . . . . . . . . . . . . . . . . . . 15
. . . . . . . . . . . . . . . . . . . . . . . . 16
. . . . . . . . . . . . . . . . . . . . 5
. . . . . . . . . . . . . . . . . . . . . . 6
. . . . . . . . . . . . . . . . . . . . . . . . 6
. . . . . . . . . . . . . . . . . . . . . . . 11
. . . . . . . . . . . . . . . . . . . . . . . . 14
. . . . . . . . . . . . . . . . . . . . . 15
. . . . . . . . . . . . . . . . . . . . . . . . 16
. . . . . . . . . . . . . . . . . 3
. . . . . . . . . . . . . . . 7
. . . . . . . . . . . . . . . . . . 9
. . . 11
. . . . . . . . . . . 13
Function setting
Menu settings
Equalizer . . . . . . . . . . . . . . . . . . . . . . . . . 17
Play mode . . . . . . . . . . . . . . . . . . . . . . . . 17
Contrast . . . . . . . . . . . . . . . . . . . . . . . . . . 17
Backlight . . . . . . . . . . . . . . . . . . . . . . . . . 18
Power set . . . . . . . . . . . . . . . . . . . . . . . . . 18
Recording quality . . . . . . . . . . . . . . . . . . . . 18
Language . . . . . . . . . . . . . . . . . . . . . . . . . 18
System settings . . . . . . . . . . . . . . . . . . . . . 18
Additional functions
Preview
About . . . . . . . . . . . . . . . . . . . . . . . . . . . 19
Folder navigation . . . . . . . . . . . . . . . . . . . . 19
Repeat function . . . . . . . . . . . . . . . . . . . . . 19
Hold . . . . . . . . . . . . . . . . . . . . . . . . . . . . 20
Karaoke function (lyric) . . . . . . . . . . . . . . . . 20
USB mode . . . . . . . . . . . . . . . . . . . . . . . . 20
Troubleshooting
Technical data . . . . . . . . . . . . . . . . . . . . . . . . . . 22
Disposal . . . . . . . . . . . . . . . . . . . . . . . . . . . . . . . 22
. . . . . . . . . . . . . . . . . . . . . . . . . 17
. . . . . . . . . . . . . . . . . . . . . . 17
. . . . . . . . . . . . . . . . . . . . . . 19
. . . . . . . . . . . . . . . . . . . . . . . . . . 19
. . . . . . . . . . . . . . . . . . . . . . . . . 21
4
Page 5
About this device
Scope of delivery
1.
Player 1 piece
2. Headphone 1 piece
3. AAA battery 1.5 V 1 piece
4. Owner’s manual 1 piece (as a PDF file stored on the player)
Features
• plays MP3, WAV, WMA
• supports DRM (Digital Rights Management) 10
• Digital Voice Recording
• ID3 Tag
• Folder Funktion
• USB 2.0 High Speed
• 96x32 Dot Matrix LCD Display with blue backlight
• Hold function
• Battery status display
• Sanyo FM tuner (integrated)
• Equalizer: standard, Rock, Jazz, classical music, Pop
• Bit rate: 32-320 KBps
• Battery – life: approx.10 hours
• Weight: < 26g
• MP-050 (Article No. 17050) with 512 MB memory
• MP-051 (Article No. 17051) with 1 GB memory
• MP-052 (Article No. 17052) with 2 GB memory
Notes on the Copyright
Save only MP3 or WMA files from a legal source on your MP3 player. Please observe the international copy
right.
What are MP3, WMA, WAV and DRM?
One minute of music requires approx. 11 MB memory space on a CD. The compressed MP3 format
manages with approx 1 MB per minute of music depending on the compressing rate. This results in a minor
loss in quality, which is hardly audible even on HIFI equipment. The file extension is ”.mp3".
WAV is an uncompressed digital audio format, e.g. for CDs (then, however, it has a different name) and
requires extensive memory space. WAV files have the extension ".wav"
Windows Media Audio (WMA) is a Microsoft standard for digital music. Files are recognized by their file
extension ".wma". In contrast to MP3, this format includes simultaneously copy protection which is
guaranteed by the Windows –Media –Digital –Rights Management (DRM).
Important!
WMA files can only be played on your MP3 player, when the copy protection code has been legalised. WMA
files have to be copied from your Microsoft Media Player 10 from your computer. Your MP3 player supports
DRM 10.
5
Page 6

System requirements
•
Microsoft Windows 98 SE/2000/Me/XP
• Pentium 200 MHz or quicker
• USB port
• 120 MB RAM
• Mouse installed
• Internet access for downloading the driver for Windows 98.
Before you switch on
Insert battery
Remove the USB compartment lid. Press on the arrow of the battery cover and slide the battery cover in
the direction of the USB plug. Carefully remove the battery. Insert an AAA Micro1.5 V battery as shown in
the housing. Carefully return the battery cover and slide it in the direction of the housing.
The activated device shows the battery charging status in the display top right.
6
Page 7
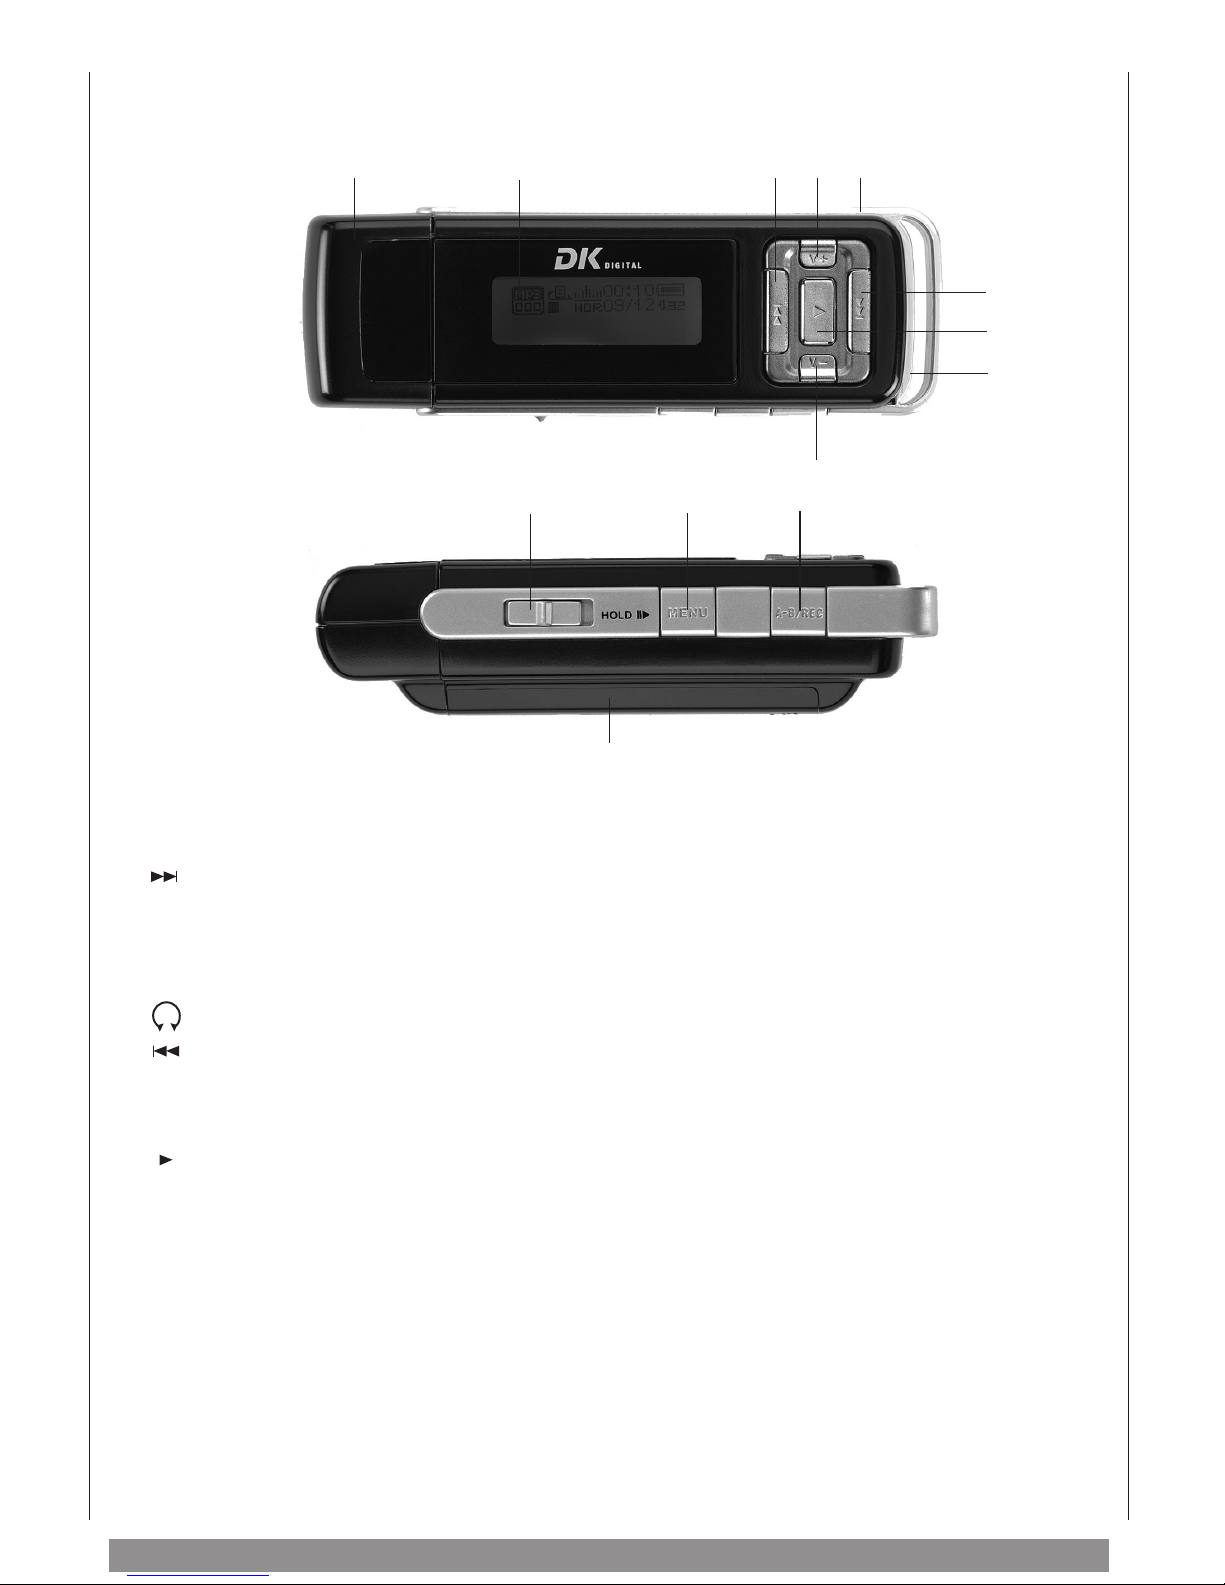
Control elements of the player
1 2 3 4 5
10
6
7
8
9
11 12
1
USB lid
2
Display
3
4
V+
: – increase volume
5
6
7
8
9
10
11
12
13
Microphone
V–
– decrease volume
HOLD
MENU
A-B/REC
Battery compartment
– select menu/menu control
13
– remove the lid to expose USB port
– shows all important information
– select next title
– fast forward during playback
– navigate within the menu
– scan station
– headphone connection
– select previous title
– fast forward during playback
– navigate within the menu
– scan station
– switch player on and off (press for two seconds)
– playback music or recording
– pause
– hold playback (press for two seconds)
– for voice recording/dictating
– keylock
– start and stop recording
– start and stop repetition
– for 1 battery AAA 1.5 V
7
Page 8
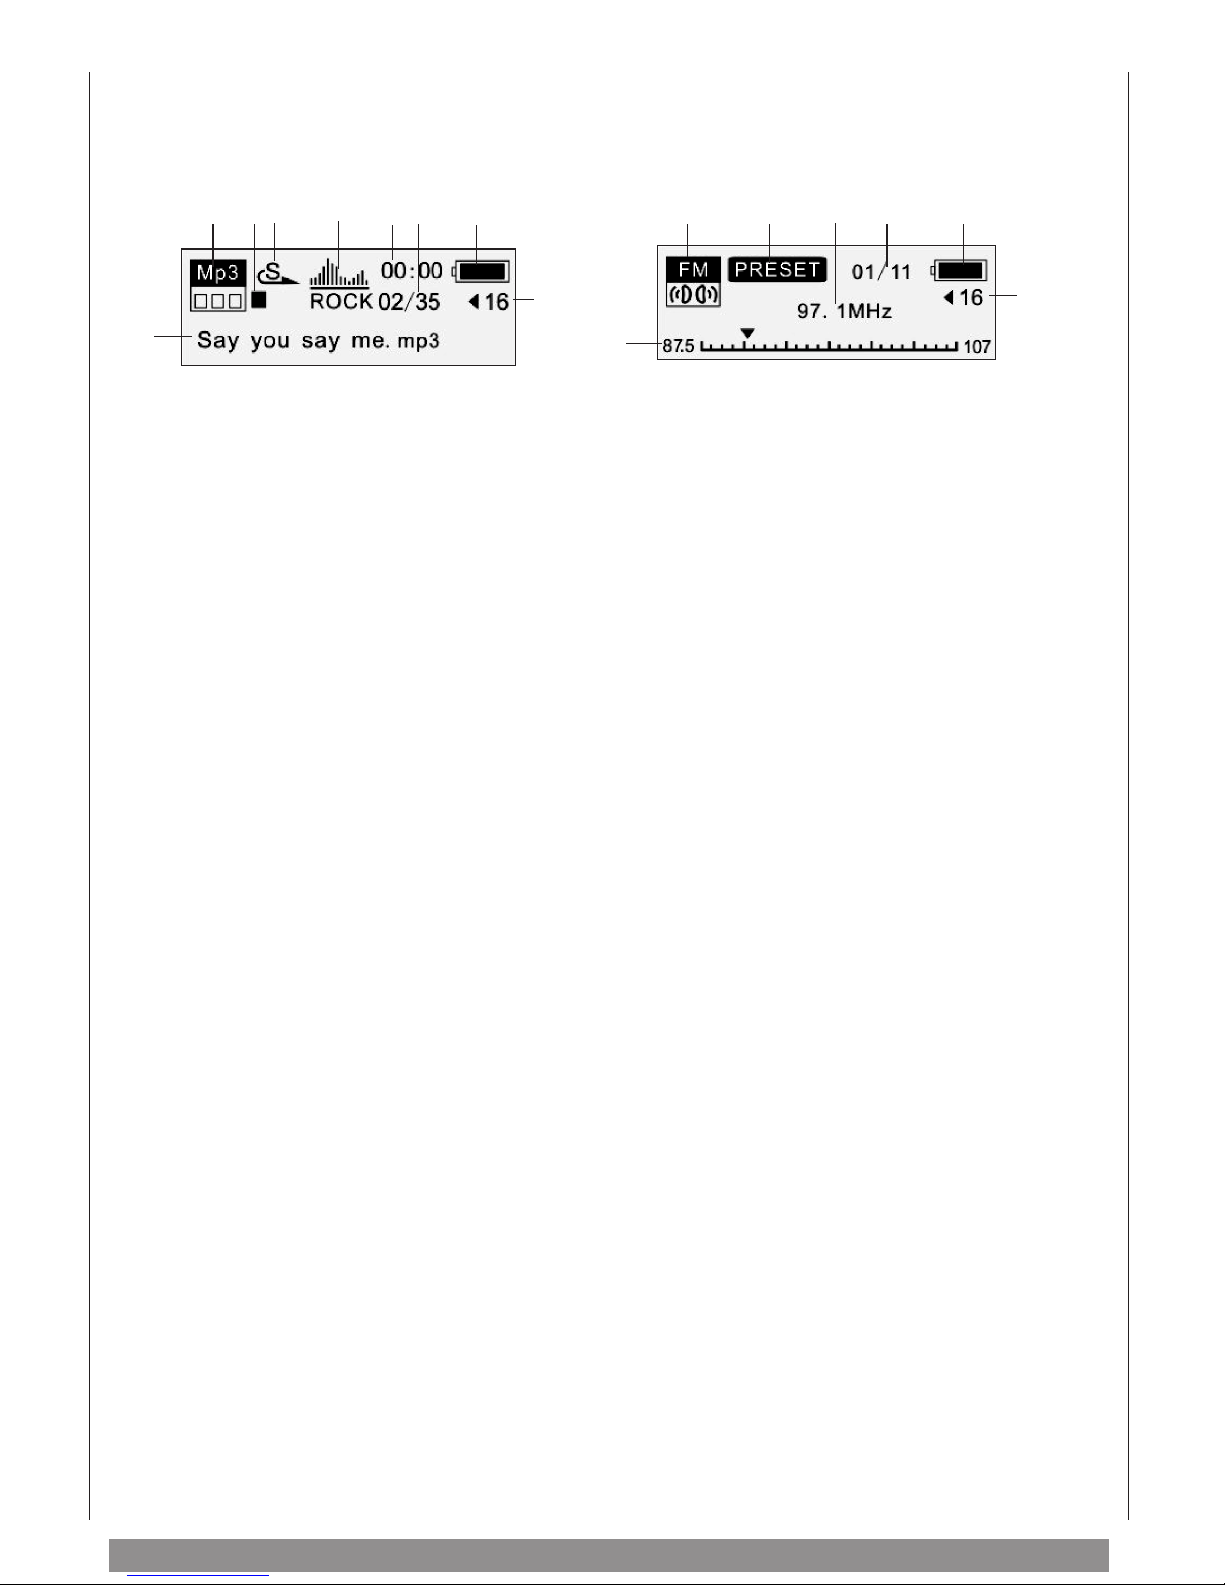
Display
16 17 18 19 20 21 22 24
15
15
Text display
16
Mode
17
Function display
18
Function display
19
Equalizer
20
Time display
21
Title number
22
Battery status
23
Volume display
24
Function display
25
Function display
26
Station display
16 25 26 22
23
15
– shows the name of the selected title (MP3 player)
– tuner scale (FM tuner)
– shows the names of the file (recording function)
– shows the current function
(MP3 player, FM tuner, recording function)
– shows playback/pause/stop
– shows repeat function
– shows the selected sound setting
– shows the time elapsed of a selected title
– shows the number of the selected music title/file
as well as total number
– shows the charging status of the battery
– shows the current volume
– shows information on the station memory
– shows the frequency of the selected station
– shows the current station/total number of stored stations
23
8
Page 9
Connection with the PC
Connect with the PC
Note!
After switching on the computer, ensure that Windows has been completely loaded before connecting the
MP3 player to the USB port!
1. Switch off the MP3 player before you connect the device to the USB port of your PC which must be
switched on.
2. Press the button for two seconds.
The MP3 player switches itself on and turns into the standby mode.
Driver for Windows 98
Download the driver from our Website www.dk-digital.com.
To install the driver for Windows 98 SE (not required for Windows ME and higher as the player is
automatically recognised):
1. Switch off MP3 player and connect it to the USB port of your PC which must be switched on.
2. Press the button for two seconds.
The MP3 player switches itself on and turns into the standby mode.
The message "new hardware found" is shown on the screen.
3. Install the driver as in Windows 98 in the usual way.
Windows 98 SE / ME/2000
1. Your PC recognises the MP3 player as a "removable medium”, i.e. USB mass memory. Move the files in
the usual way in the Windows Explorer between the MP3 player and your PC, e.g. with "copy and paste”
or "send to”.
Windows XP with Media Player 10
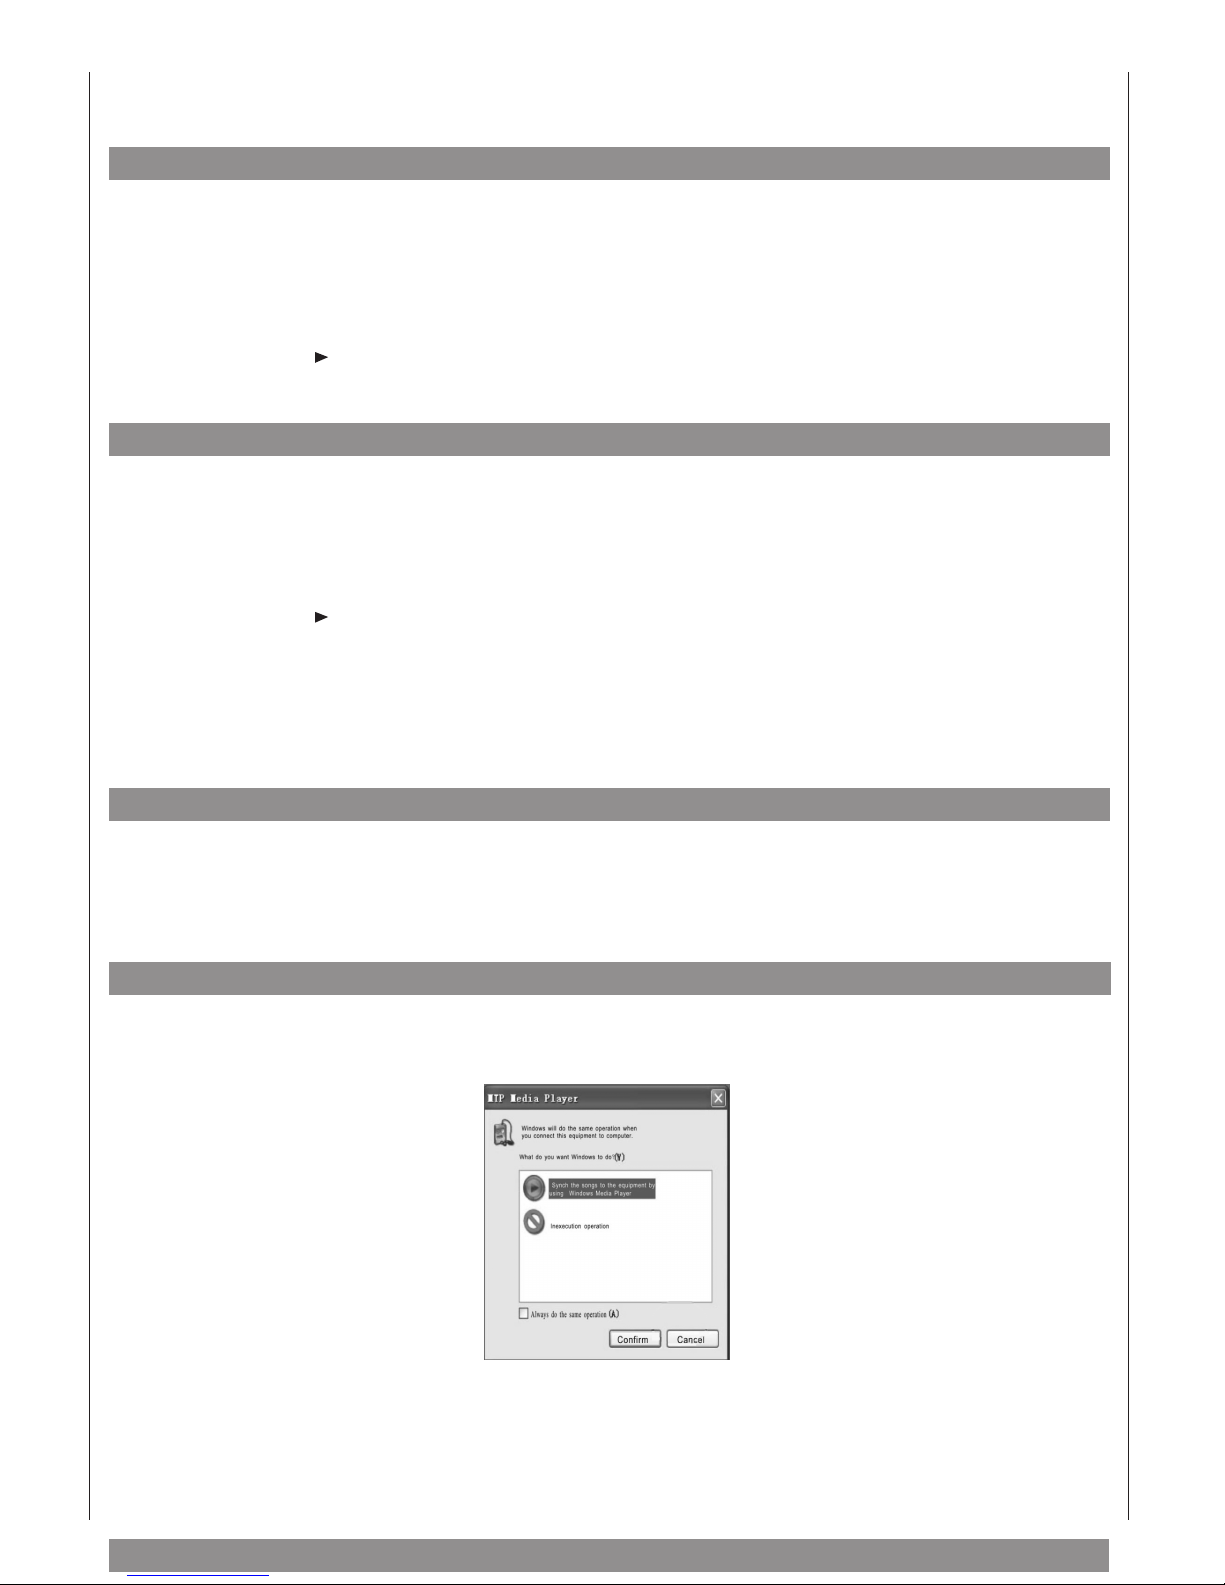
It is only in this configuration that the MTP mode (Media Transfer Protocol) is available. The media player
is used, for example, to synchronize your player with your selection of titles. Your MP3 player is recognised
as an MTP device and the following is displayed:
To switch from the MTP mode to the USB mode, click on "Escape". The MP3 player exists now as a
removable medium in Explorer.
9
Page 10
USB mode and MTP
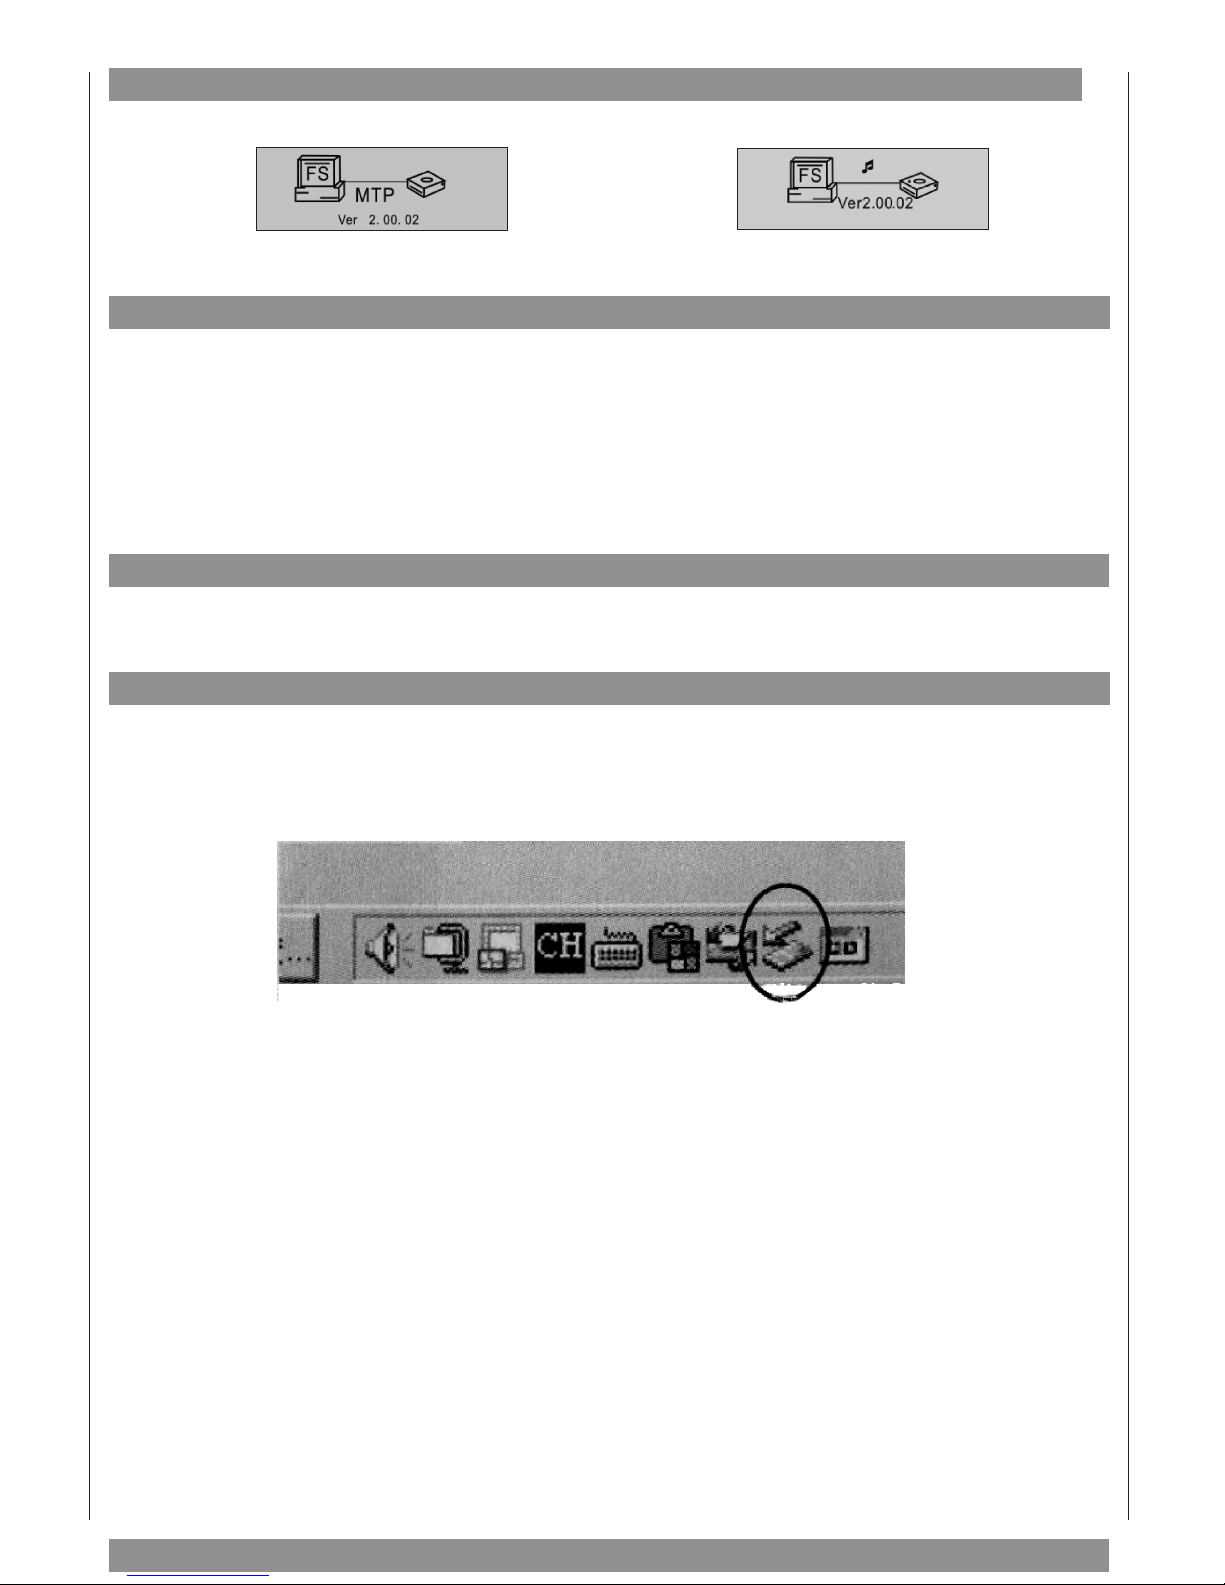
There are two possibilities how the MP3 player is automatically recognised:
MTP mode: USB mode:
Data transfer (download/upload)
Move the files in the usual way between the MP3 player and your PC in the Windows Explorer, e.g. with
"copy and paste” or "send to”.
Important!
WMA files can only be played on your MP3 player, when the copy protection code has been legalised. WMA
files have to be copied from your Microsoft Media Player 10 from your computer. Your MP3 player supports
DRM 10.
Copying of the files from the Media Player 10
See "Data transfer from WMA – data with DRM” on page 11.
Removing the MP3 player from the PC
Important!
Never disconnect the player abruptly from the PC during a data transfer (download/upload). The player
could be damaged. After the data transfer, the player must be logged off as follows:
1. Doubleclick on the Icon "Securely remove data carrier" on the task bar.
2. Highlight the entry USB mass memory.
3. Now continue as under Windows in the usual way.
10
Page 11
Data transfer of WMA files protected by DRM
DRM mode
Important!
WMA data protected by DRM can only be played on
your MP3 player, when the copy protection code
has been legalised. WMA files have to be copied
from your Microsoft Media Player 10 (only
Windows XP) from your computer. If you copy files
with DRM protection in any other way, your player
can probably not read them.
Your MP3 player supports DRM 10.
Update Media Player 10
To decode data with DRM, you need the Media
Player 10.0 for Windows XP.
Copy from Media Player 10
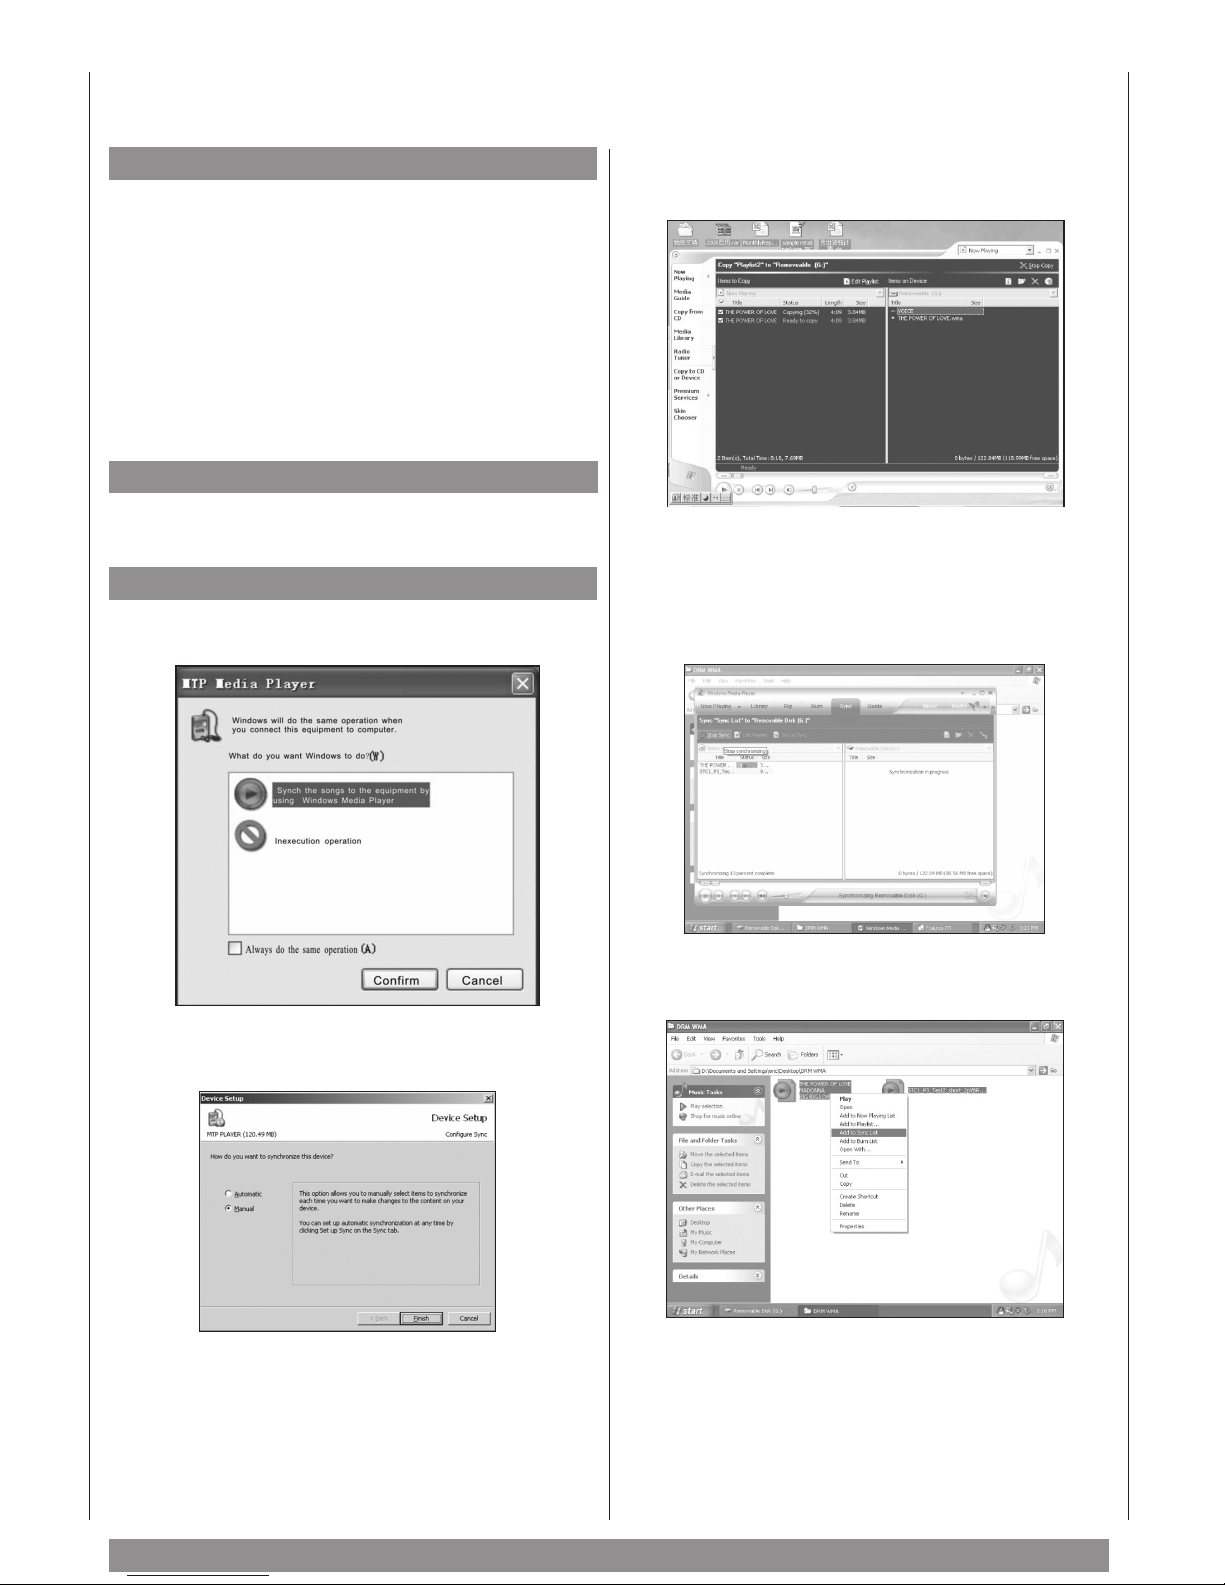
1. Connect the player to the PC. The following
dialogue is shown:
4. Select the desired WMA music with DRM
protection. .
5. Click with the right mouse button onto the
desired title.
6. Select "Add to Sync list".
7. Select the "Sync" option in the open window.
2. Select "continue". The following display is
shown. .
3. Select "manual". Click on "Finish".
8. Select the desired WMA music with DRM protection as step 2 in the Sync window.
11
Page 12
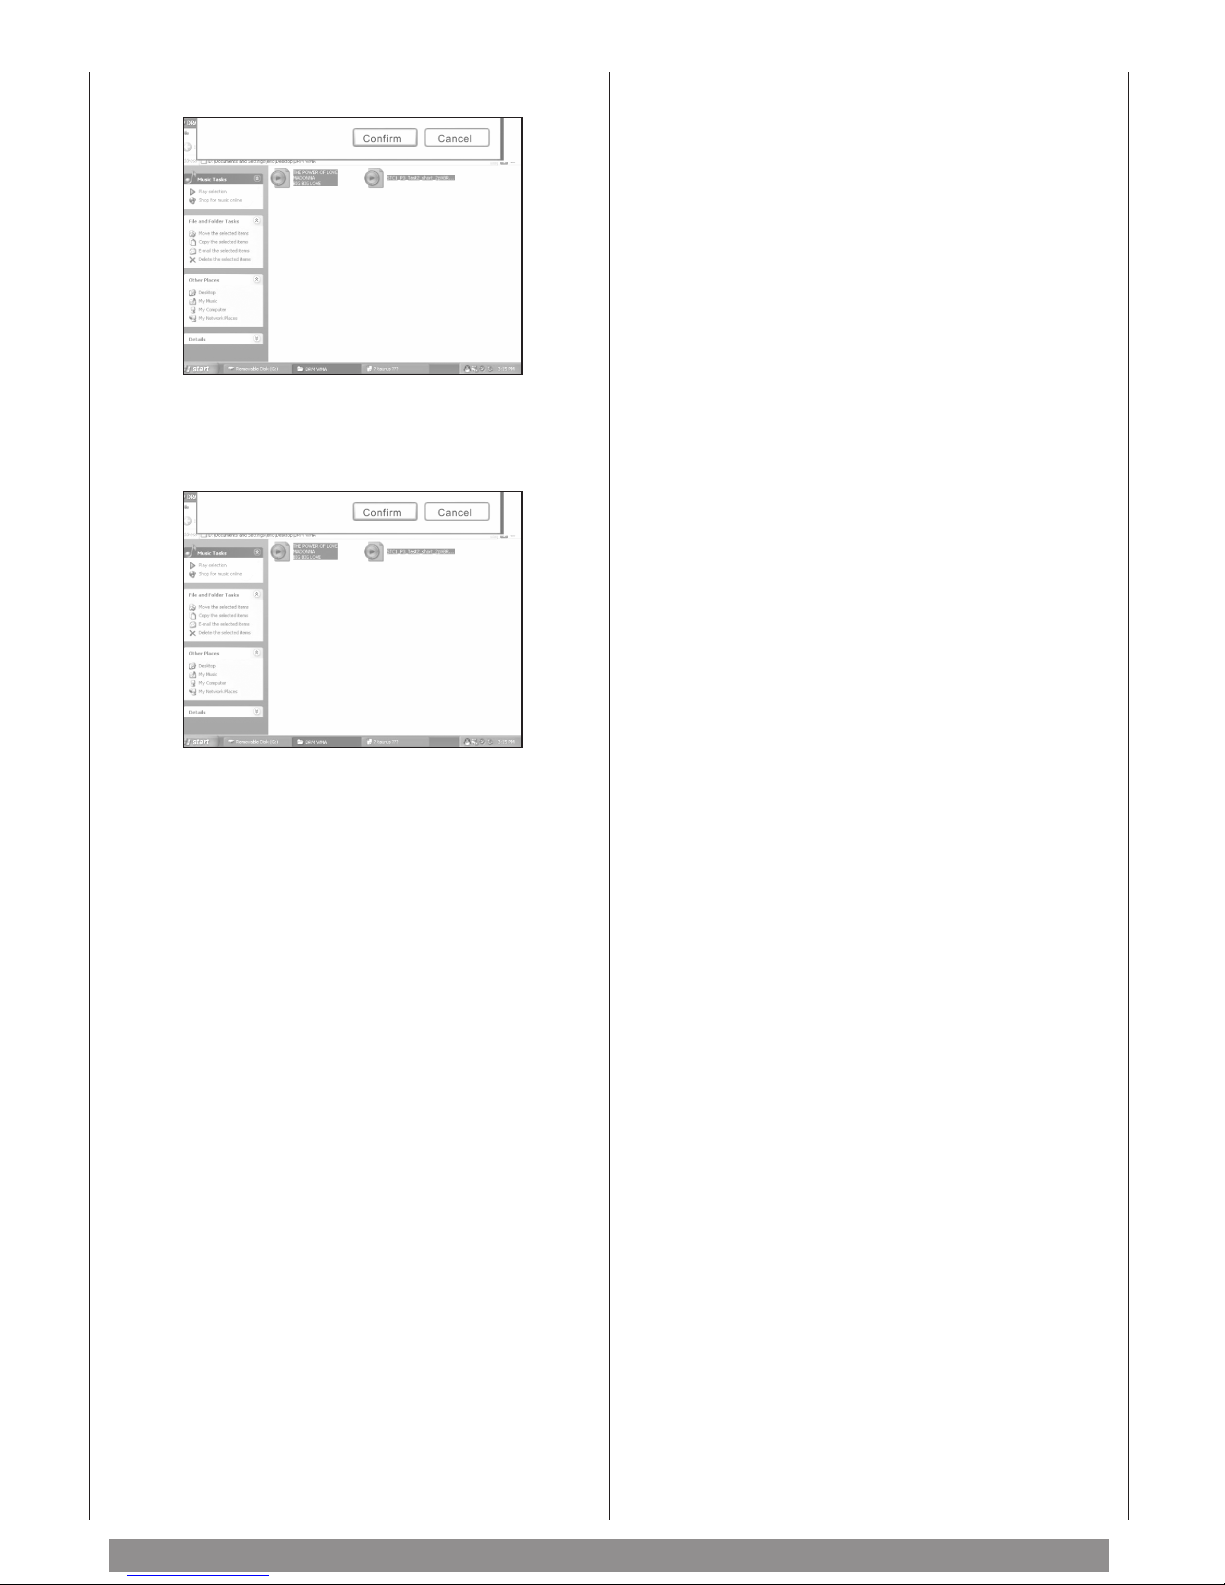
9. Select "Removable medium".
10. Start the synchronization process by clicking on
"Confirm". Now the WMA files are copied onto
your player.
11. After successful transfer, log off the MP3 player
from Windows and disconnect the MP3 player
from the PC.
12
Page 13
Operation
Switching the MP3 player on
1. Press the button for two seconds.
The MP3 player is activated and turns into the
standby mode.
Switching the MP3 player off
1. Press the button for at least three seconds.
The MP3 player saves the desired settings and
switches itself off.
Important!
If you switch off the player in the standby mode or
during playback, all settings are lost.
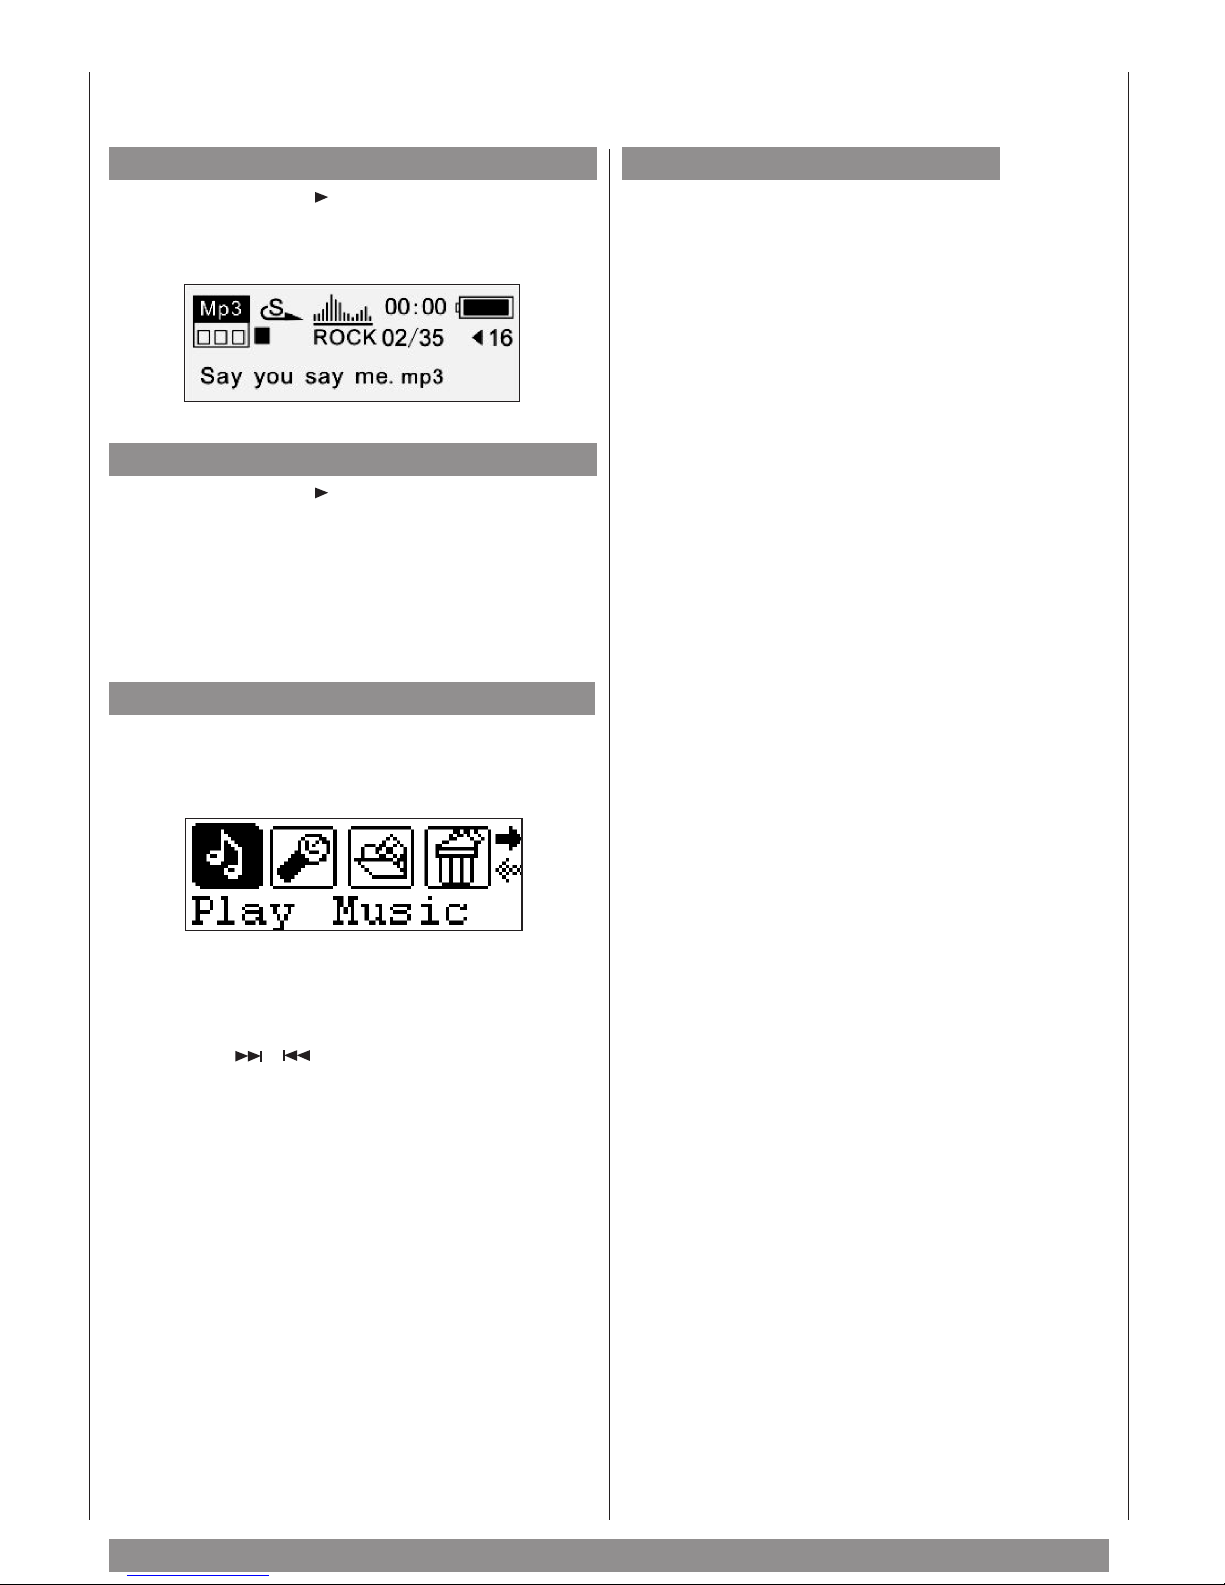
Main menu
1. Press the MENU button in the standby or play
mode.
Set volume
Change volume using the button:
V+ : increases the volume
V– : decreases the volume
The main menu is shown in the display.
The selected submenu is highlighted in black and
shown as text.
2. You access the following submenus with the
buttons :
– Play Music
– Play Voice
– FM Tuner
– Setting
– Preview
– About
– Folder
– Exit
3. Press the MENU button to access the desired
submenu.
4. Press the MENU button again to return to the
main menu.
13
Page 14
MP3 pl
ayer
Play music
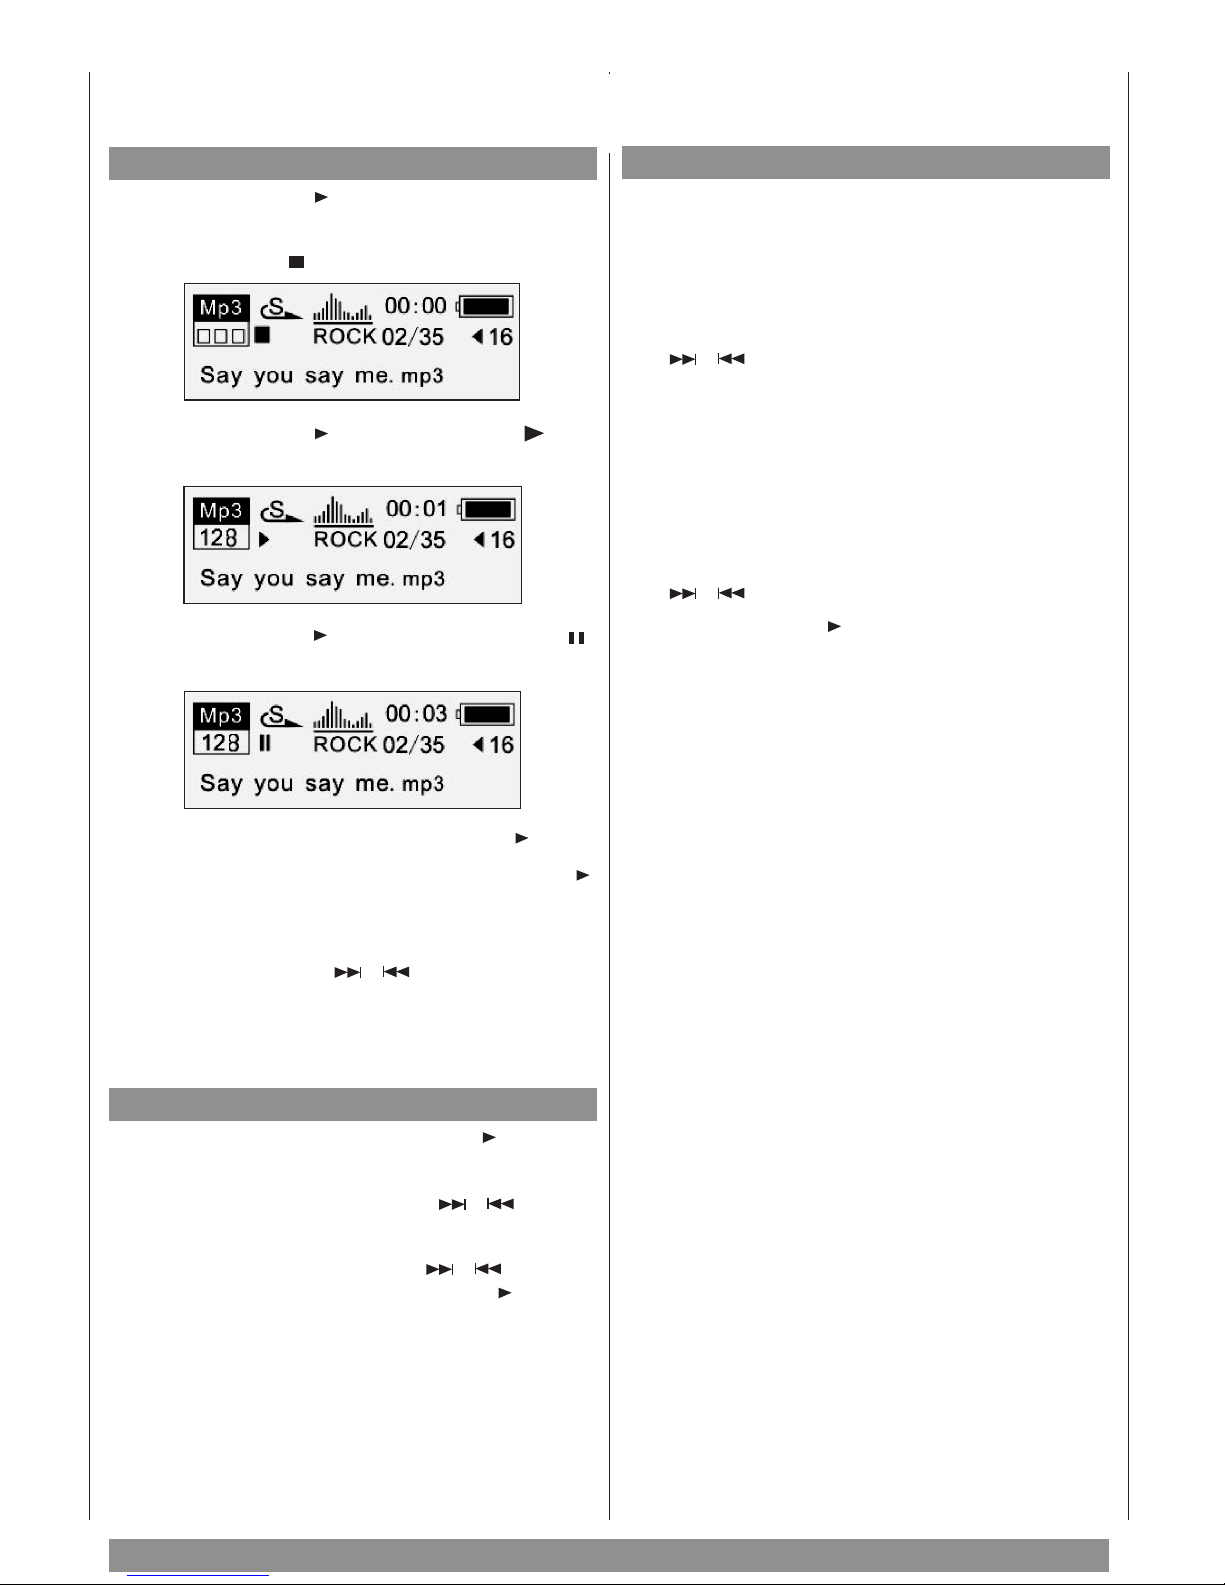
1. Press the button for two seconds.
The MP3 player is activated and turns into the
standby mode .
2. Press the button . The play triangular
appears in the display and the music is played.
3. Press the button again. The pause symbol
appears in the display.
Folder navigation
Have a quick overview over the total content of the
MP3 player by the folder function. You can quickly
access, play and also delete the desired title.
1. Press the MENU button.
2. Select the Folder function with the buttons
.
3. Press the MENU button again.
The player changes into the folder mode.
4. Press the MENU button in the folder mode to
access the play or delete mode (playback and/or
delete).
5. Select the desired function with the buttons
.
6. Press the button to confirm your selection.
4. To resume playback, press the button again.
5. To stop playback completely, hold the button
pressed for two seconds.
6. To fast forward or reverse during playback, keep
one of the buttons pressed until you
reach the desired position. The time showed in
the display indicates where you are inside the
title.
Search titles
1. To stop playback, hold the button pressed
for two seconds.
2. Press one of the two buttons to
listen to the next or previous title.
3. Keep one of the two buttons pressed
to browse the data. Press the button again to
play the selected title.
14
Page 15
FM tuner
Your MP3 player has an integrated Sanyo FM tuner
with automatic scan radio station and memory for
30 stations.
The headphone cable serves as an antenna. Should
the reception not be optimum, try to improve the
reception by adjusting the player and the headphones.
Radio functions
1. Press the MENU button to access the main
menu.
2. Select the FM mode with the buttons .
3. Press the MENU button again.
You are in the tuner operation. If no station has
been saved, scan radio station starts automatically.
4. Select another station with the buttons
.
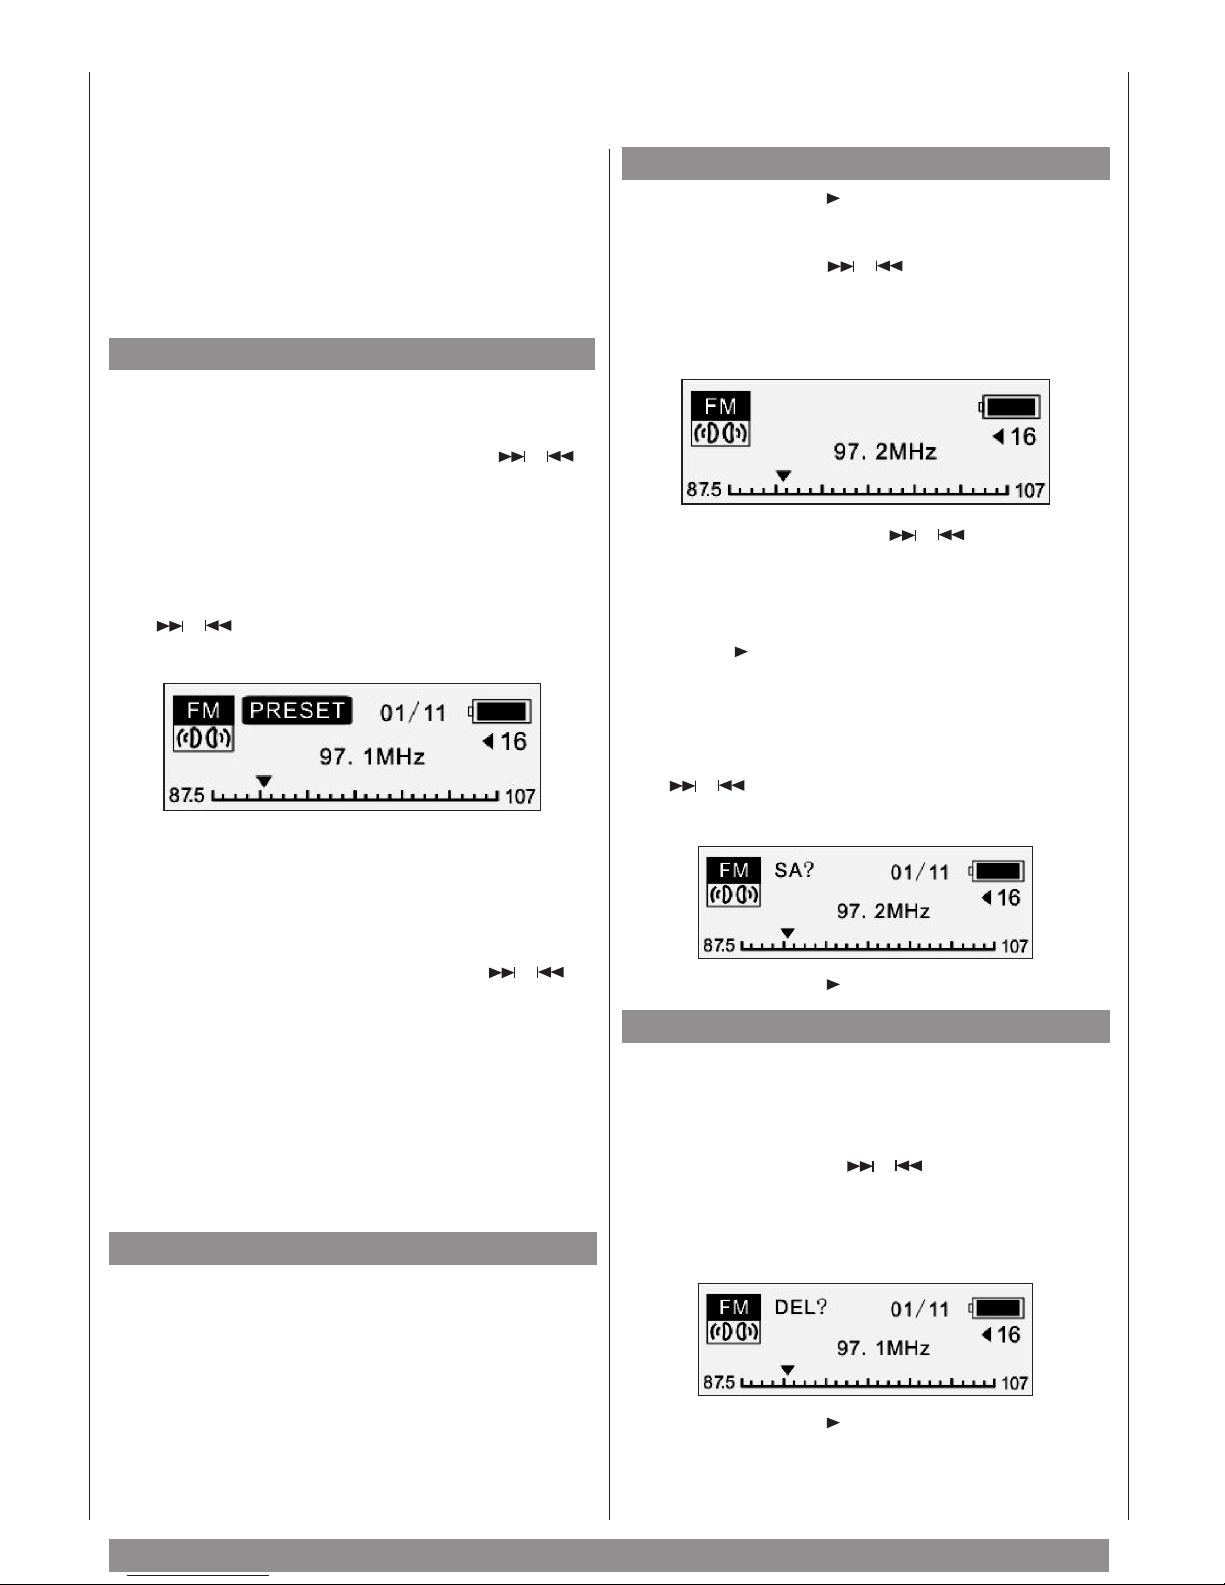
The display shows "PRESET".
Manual station scanning
1. Press the button to search a new station
during tuner operation.
2. Use the buttons to change the
frequency in increments of 0.1 MHZ upwards or
downwards.
The display shows the station in MHz.
3. If you keep the buttons pressed for a
short time, the frequency is increased until a
new station is found.
4. If you have found the desired station, press the
button .
5. To store the station setting press the MENU
button to access the menu for radio operation.
5. Using the V+ and V– buttons, change the
volume.
6. To access the submenus for the radio during
tuner operation, press the MENU button again.
Select a submenu with the buttons :
– Return to music playing
– Return to voice playing
– Save radio station
– Delete radio station
– Scan radio station
– Return to FM Tuner
Press the MENU button to access the selected
submenu.
Automatic scan radio station
1. Select the submenu "Scan radio station”.
2. Press the MENU button.
6. Select "Save station" using the buttons
.
7. Press the MENU button.
8. Press the button to store the station.
Delete radio station
1. Select the station which you intend to delete.
2. Press the MENU button to access the submenu
for radio operation.
3. Select the buttons "Delete Radio
Station".
4. To call up the submenu press the MENU
button:
The scan radio station starts at the lowest
frequency.
Up to 30 stations can be stored.
Then it is automatically switched to tuner
operation.
5. Press the button to delete the station.
15
Page 16
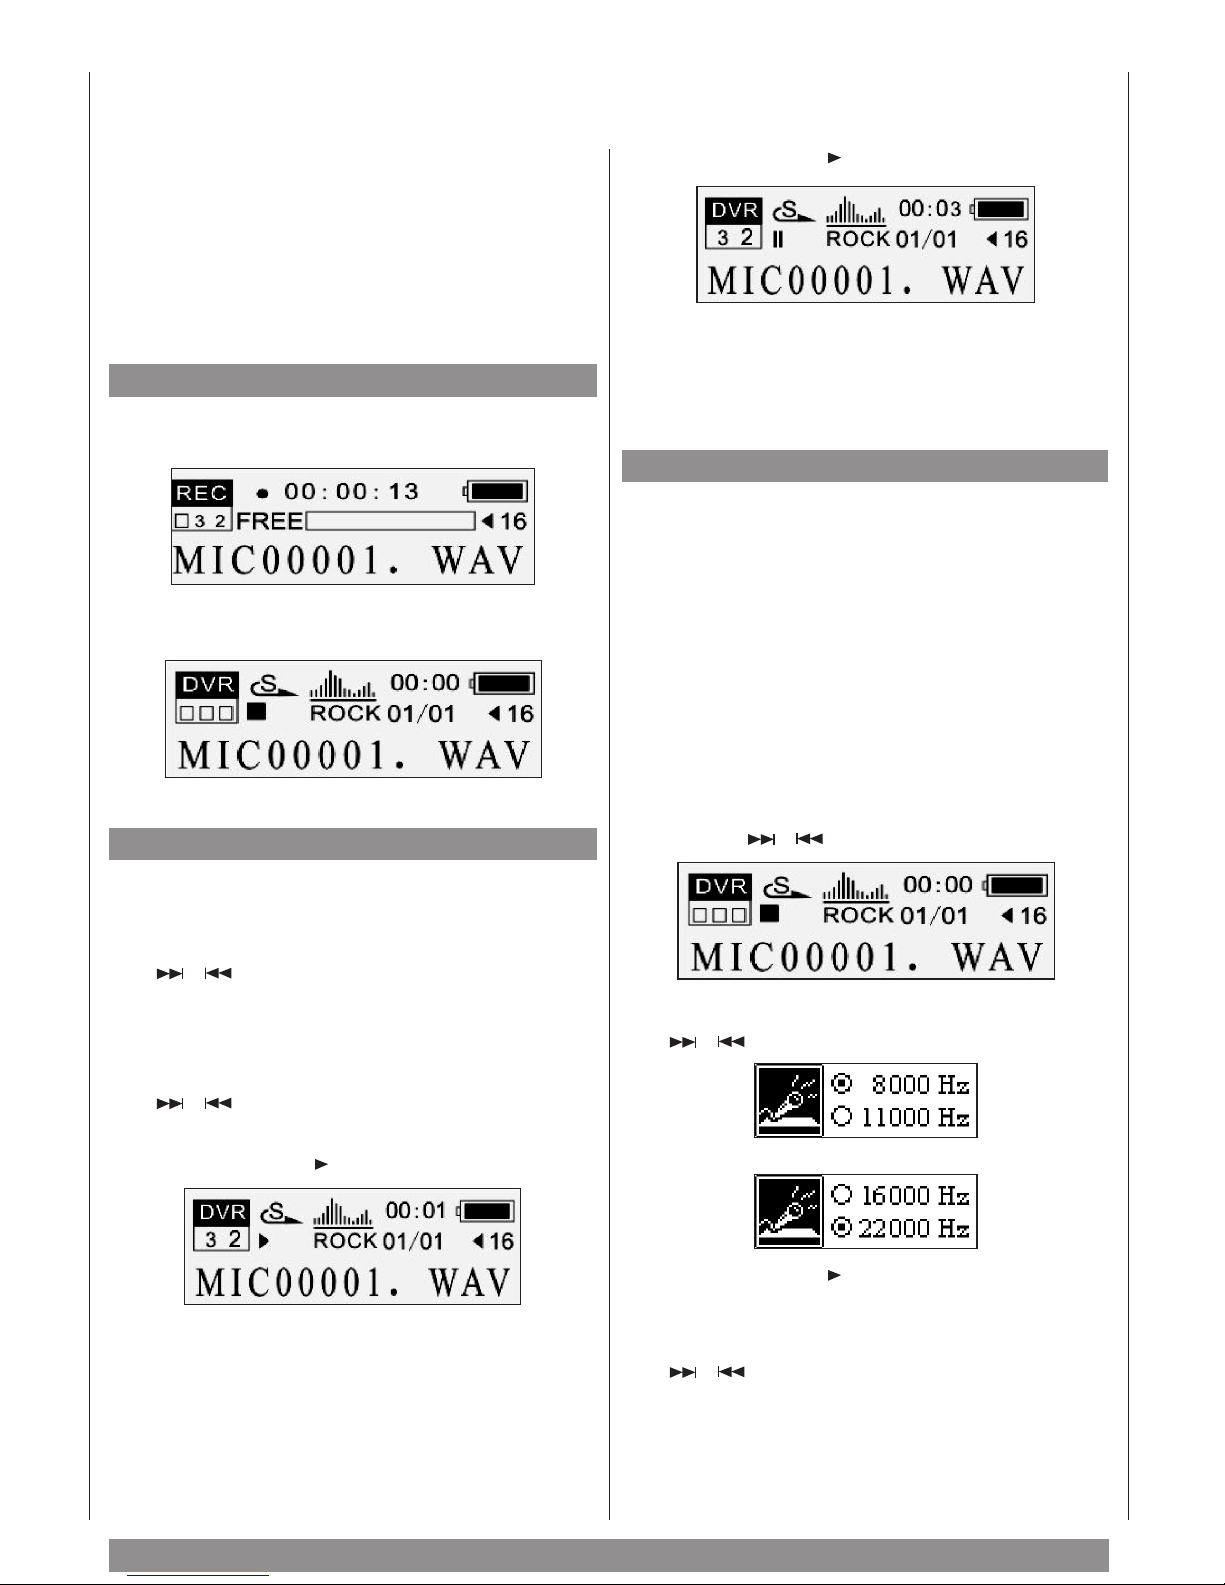
Recording device
Use the integrated microphone to record language
and music. For this purpose you must be in the
submenu Music or Language. The recorded file
starts with MIC.
If you are in the tuner submenu, the current tuner
station is recorded. The recorded file starts with
FM.
Recording
1. Press the A-B/REC button for two seconds to
start recording.
2. Press the A-B/REC button again to finish
recording
6. Press the button , again to switch to pause.
7. Press the MENU button to return to the main
menu.
Note: When playing files, which have been
recorded, the equalizer is without effect.
Quality setting
Recording is in the Wave format. To save memory
space, quality can be adjusted in increments of
8000 Hz, 11000 Hz, 16000 Hz and 22000 Hz. The
lower the resolution, the less memory space is
required. However, this will lead to loss in quality.
For music recording, in particular, you should
choose a higher quality.
1. Select the submenu "Setting" in the main menu.
Play recording
1. Press the MENU button to return to the main
menu.
2. Select the voice mode using the buttons
.
3. Press the MENU button to access the
selection.
4. Select the desired recording using the buttons
. If you keep the button pressed, a fast
search is made.
5. Press the button , to play the selected file.
2. Press the MENU button to call up the
submenu.
3. Select the submenu "Recordset" by using the
buttons .
4. Select the desired resolution with the buttons
.
5. Press the button to confirm your selection.
6. In the play mode, you can fast forward or reverse in the current title keeping the buttons
pressed. The time indicator in the
display shows you where you are in the title.
16
Page 17
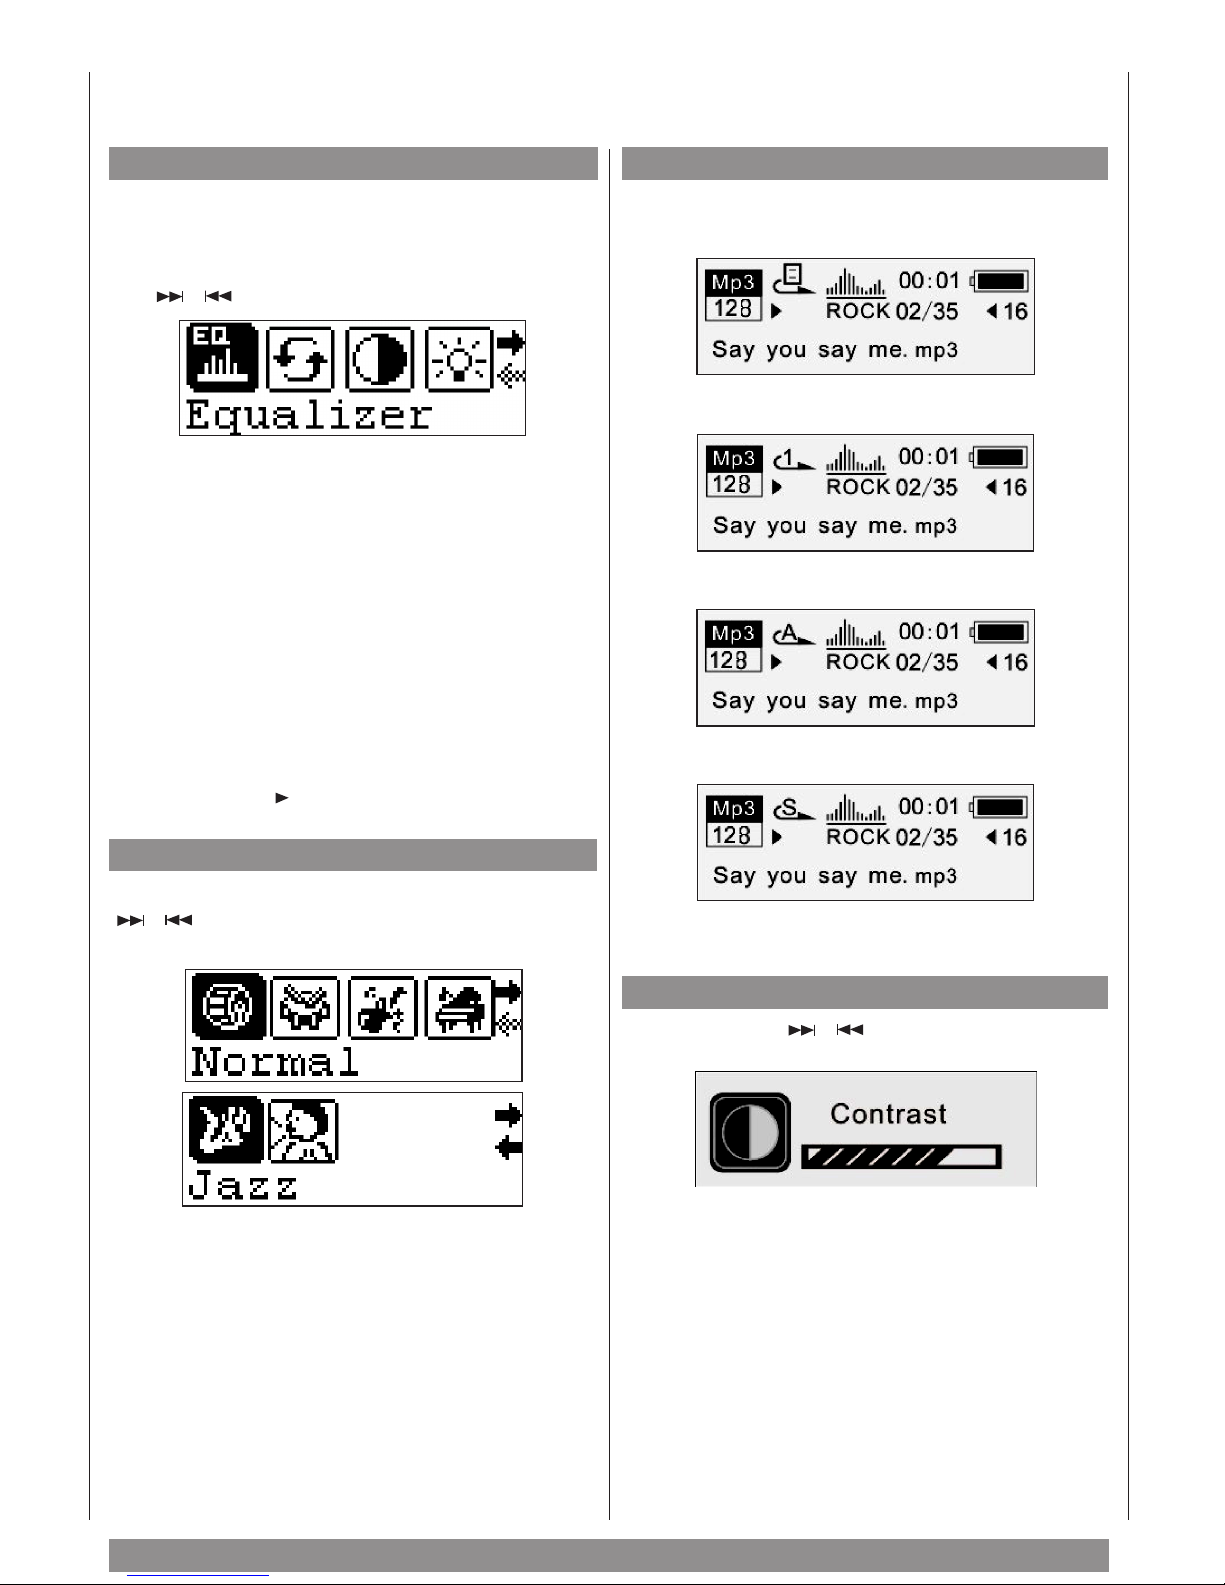
Function setting
Menu settings
To access the Setting menu:
1. Press the MENU button in the stand-by mode.
Select the "Setting" submenu using the buttons
.
There are the following submenus:
• Equalizer
• Play mode
• Contrast
• Backlight
• Power set
• Recording set
• Language
Play mode
You have the following choice:
• normal
• repeat selected title
• repeat all titles
• System settings
Press the button to confirm your selection.
Equalizer
Please set the desired sound with the buttons
. You have a choice between normal,
Rock, Jazz, classic music, Pop and bass.
Press the MENU button to confirm your selection.
Important:
The equalizer is not available in the voice mode.
• random sequence
Press the MENU button to confirm your selection.
Contrast
Use the buttons to set the display
contrast.
Press the MENU button to confirm your selection.
17
Page 18
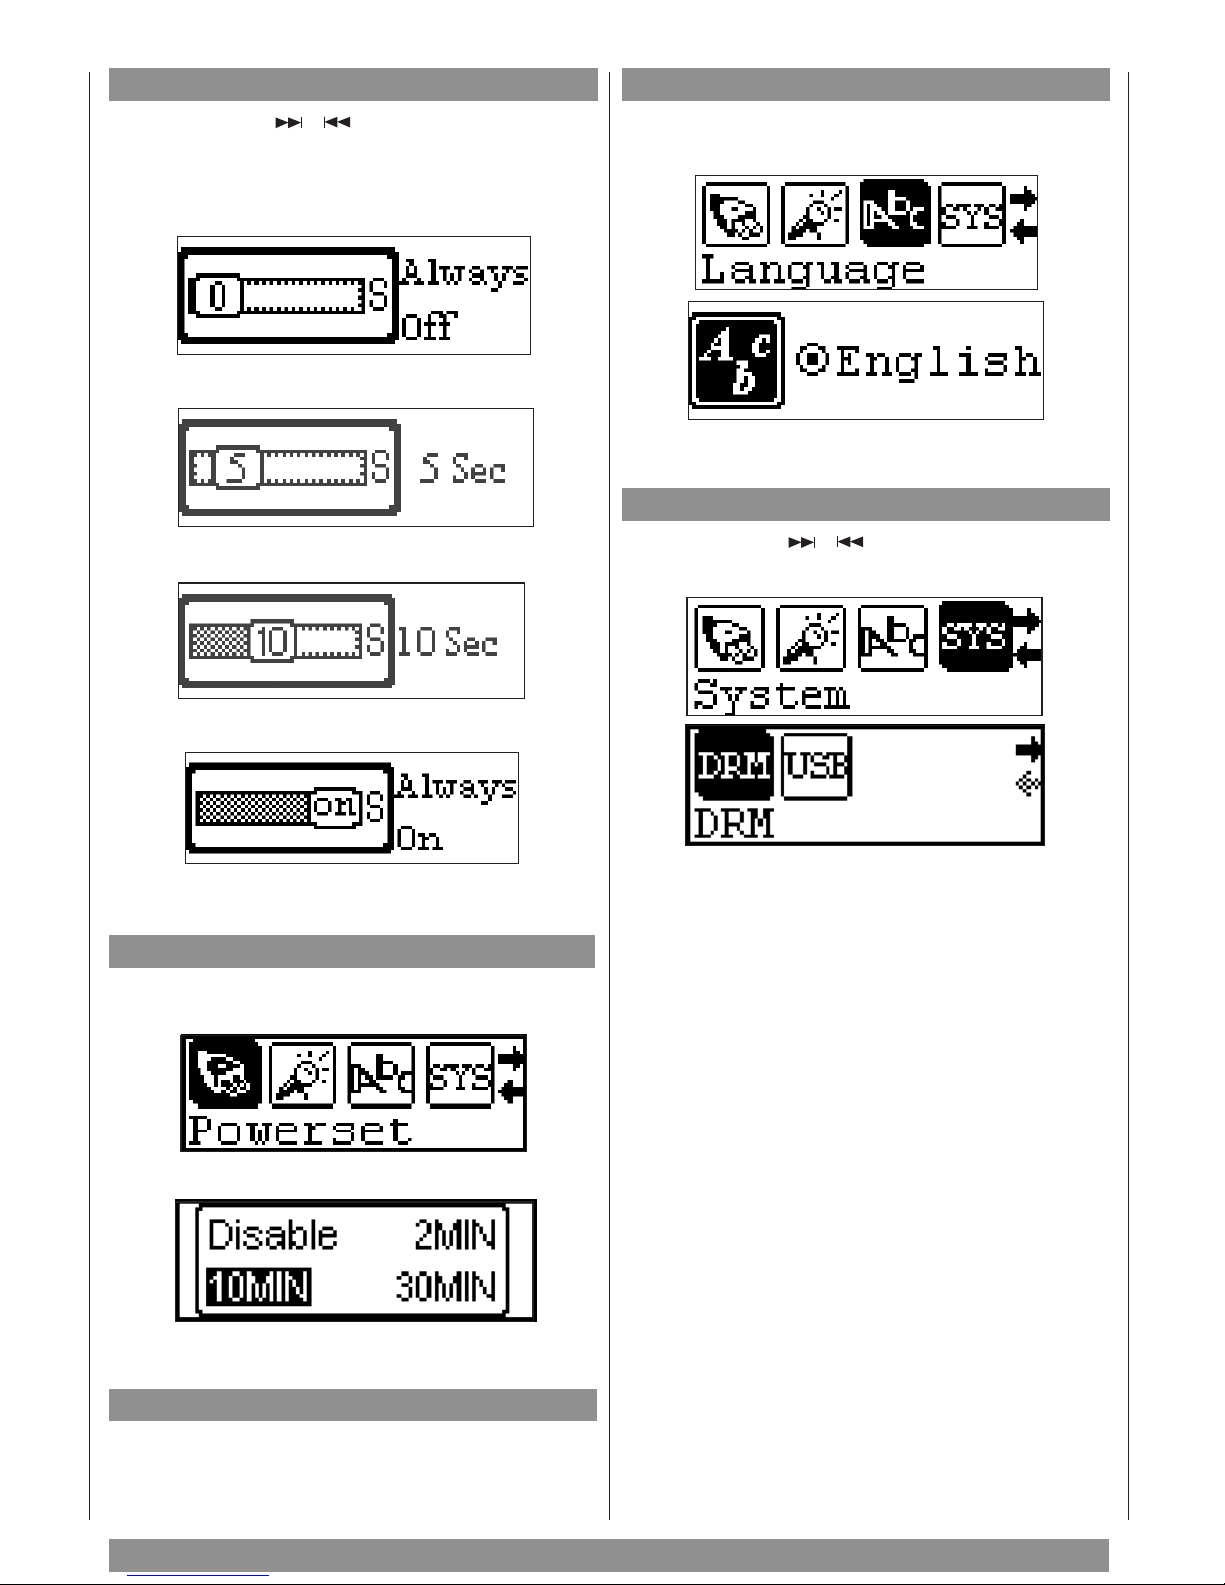
Backlight
Language
Use the buttons to select the time to
elapse after which the backlight automatically
switches off:
always off
5 seconds
10 seconds
Select between German, English, Spanish, Italian,
Dutch as a display language.
Press the MENU button to confirm your selection.
System settings
Use the buttons to toggle between USB
or DRM mode.
always on
Press the MENU button to confirm your selection.
Power set
Preset the time to elapse after which the MP3 player
automatically switches off:
off, 2 minutes, 10 minutes, 30 minutes.
Press the MENU button to confirm your selection.
In the USB mode, the player operates as an ordinary
external memory.
In the DRM mode, you can use files which are
especially suitable for the Microsoft Media Player.
See "What are MP3, WMA, WAV and DRM?” on
page 5 as well as "Data transfer of WMA files with
DRM” on page 11 for more information. WMA files
are transferred in MTP (Media Transfer Protocol).
Press the MENU button to confirm your selection.
Recording quality
See “Recording device” on page 16.
18
Page 19
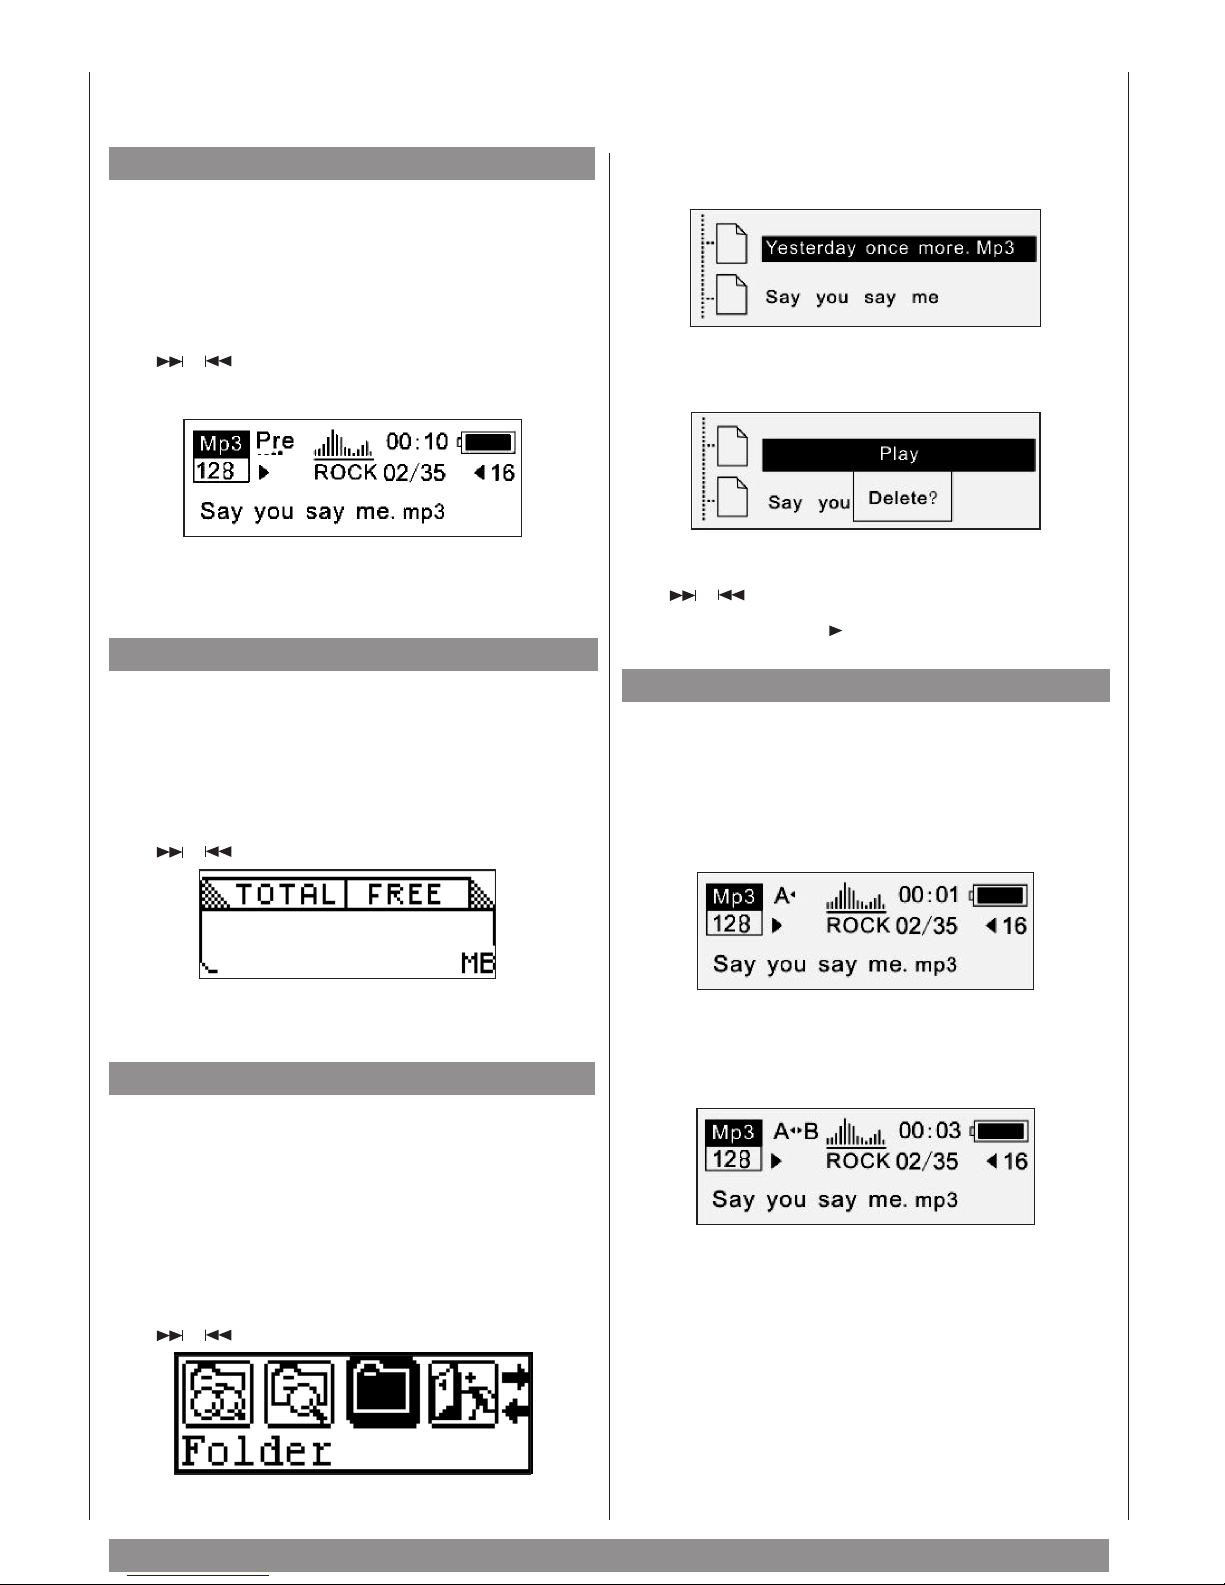
Additional functions
Preview
This function previews each title for 10 seconds and
then jumps to the following title.
1. Press the MENU button in the MP3 or Voice
mode to return to the main menu.
2. Select the "Preview" function using the buttons
.
3. Press again the MENU button.
4. To end "Preview”, press again the MENU
button.
About
This function shows the entire memory space still
available.
1. Press the MENU button in the MP3 or Voice
mode to return to the main menu.
2. Select the "About" function using the buttons
.
3. Press the MENU button again. The player
shows the folder structure.
4. Press the MENU button to access the play or
delete mode (playback and/or delete).
5. Select the desired mode using the buttons
.
6. Press the button to confirm your selection.
Repeat function
You can repeat a part of your title or your voice
recording as many times as you like:
1. Press briefly the A-B/REC button at the desired start point at the side of the player.
The display shows "A".
Total memory as well as free memory space is
shown.
Folder navigation
The folder navigation function offers a quick
overview over the total content of your MP3 player.
You can very quickly access, play or delete the
desired title.
1. Press the MENU button in the MP3 or Voice
mode to return to the main menu.
2. Select the "Folder" function using the buttons
.
2. Press briefly again the A-B/REC button at the
desired end of the sequence.
The display changes to "A-B".
3. Press the A-B/REC button again to leave this
mode.
19
Page 20
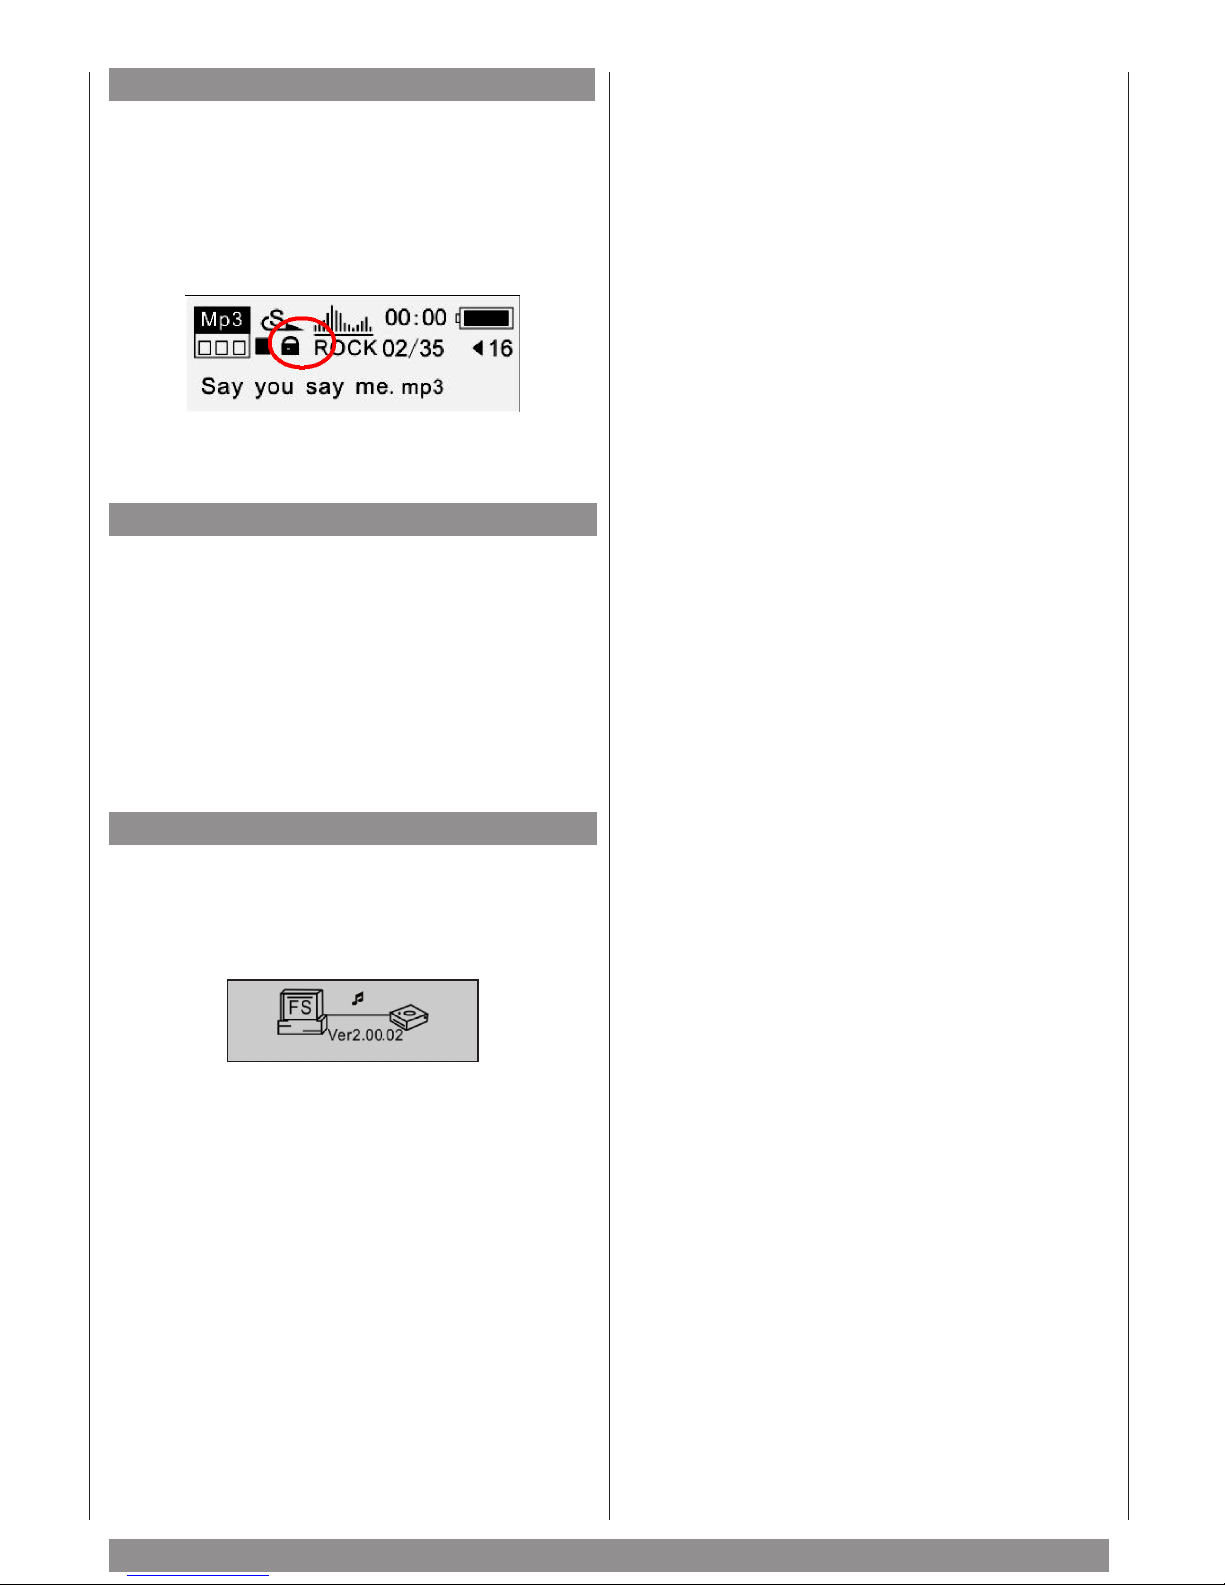
Hold
Use the keylock "Hold” to prevent an unintended
activation of the buttons, e.g. during transport in a
bag.
1. Move the HOLD slide in the direction of the
arrow to activate the keylock.
A closed padlock appears in the display.
2. Move the HOLD slide against the direction of
the arrow to switch off again the keylock.
Karaoke function (lyric)
You can have the text of the current music shown
on the display.
For this purpose, a text file with time markers is
required. This file must have the same name as the
respective music file. It must have the extension
.LRC and be in the same folder.
You can download LRC files from the Internet or
simply create them using a simple text editor.
USB mode
After connecting the player to the USB port of the
PC a corresponding icon appears on the display. The
PC has recognised the MP3 player as a removable
medium and is now ready for data transfer.
20
Page 21
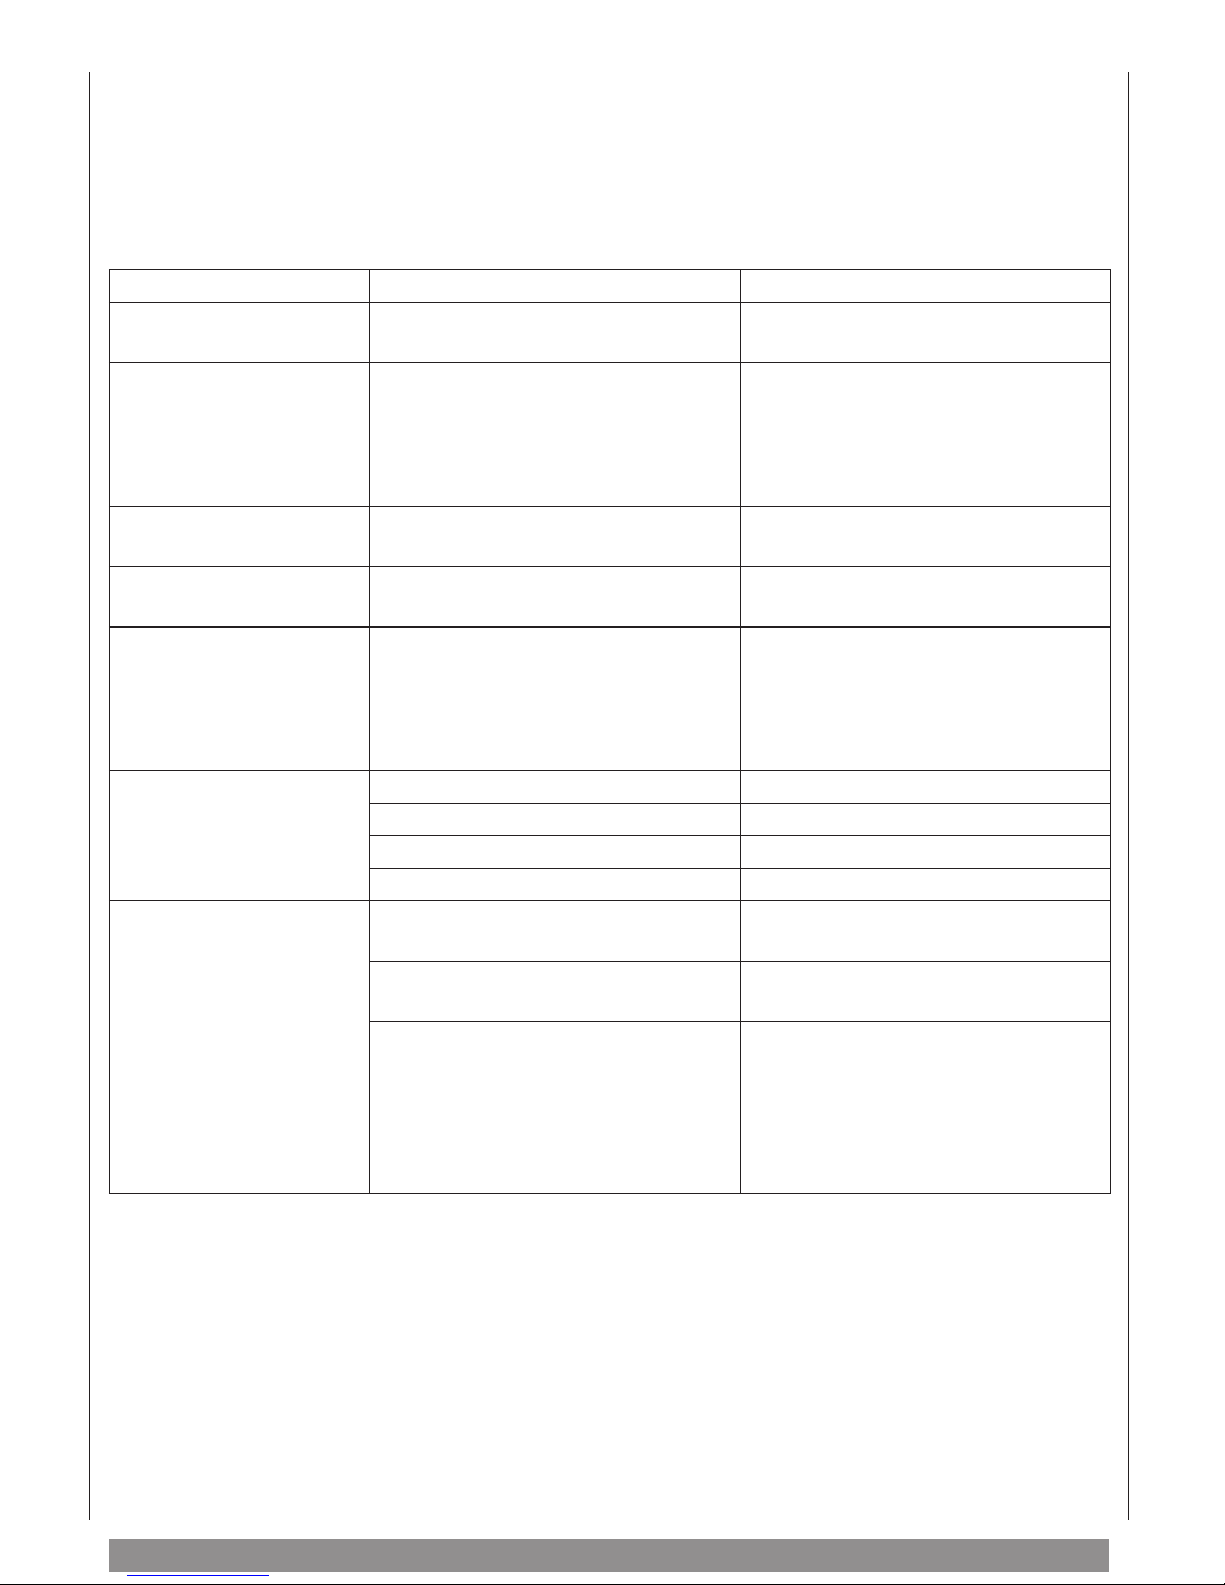
Troubleshooting
Before requesting service for this player, check the chart below for a possible cause of the problem or
trouble during the operation of your device. If the problem is not eliminated or proper operation restored,
please contact our Service Hotline under 0900 1 393 684 (Euro 1.89/min.) or send an email to
Problem Cause Solution
No display after switching
on.
Self-created MP3 files are
not played.
MP3 player is not
recognised by the PC.
No reaction to keystroke. The Hold (keylock) function is
Player cannot be opened
as a data carrier. Or shows
I/O error after PC
connection.
No sound when playing. Volume is too low. Increase volume.
No data transfer possible
after PC connection.
No battery or exhausted battery. Check whether battery has been
inserted. If applicable, replace battery.
The MP3 files were created with
variable compression rates. The player
supports only standard formats. Do
not use compression with layer one or
two.
Wrong operation. Format the removable medium.
switched on.
Caused by wrong operation. Hold the V+ button pressed when
Exhausted battery. Replace battery.
MP3 or WMA file is defect. Reload files.
No music in the player. Load files.
Keylock activated, therefore write
connection.
USB not correctly connected. Connect again. Ensure that the PC
Memory directory not correct. Maximum 256 folders or files can be
Load again with standard MP3 data.
Slide the HOLD button in the
opposite direction.
connecting the USB cable. If a circle
appears in the firs box, press "Format
firmware". The uprgrade is ok, if the
circle changes into a hook.
Slide the HOLD button against the
direction of the arrow.
recognises the player.
set up under the root directory. File
names of more than 8 characters
reduce the possible number. In this
case, create a new subdirectory. Then
copy your data.
21
Page 22
Technical data
Bit rate: 8-320 Kbps
Adjustable LCD contrast: 0-5
Signal-to-noise ratio: > 85 dB
Dynamic range: > 80 (1kHz)
Operating environment: humidity under 85%, –10 up to + 40 °C
Distortion: under 0.05% (reference level 0dB MP3; 1 mW/4 mW - 52 dB/-62dB,
voice reference frequency 1 kHz)
USB interface: 2.0 high speed
Memory: 512 MB / 1 GB / 2 GB
Net weight: < 26 gram
Dimensions: 84 x 29 x 24 mm
Power consumption: 5 mW
Battery life: > 10 hours. Batteries must be disposed as hazardous waste.
Languages: German, English, French, Spanish, Italian, Dutch
Recording time: 0.8 hours with 320 KBps (128 MB),
30 hours with 8 KBps, (128 MB)
Power consumption
during operation: 60 mA
Subject to technical and optical changes of the player due to improvements of the product.
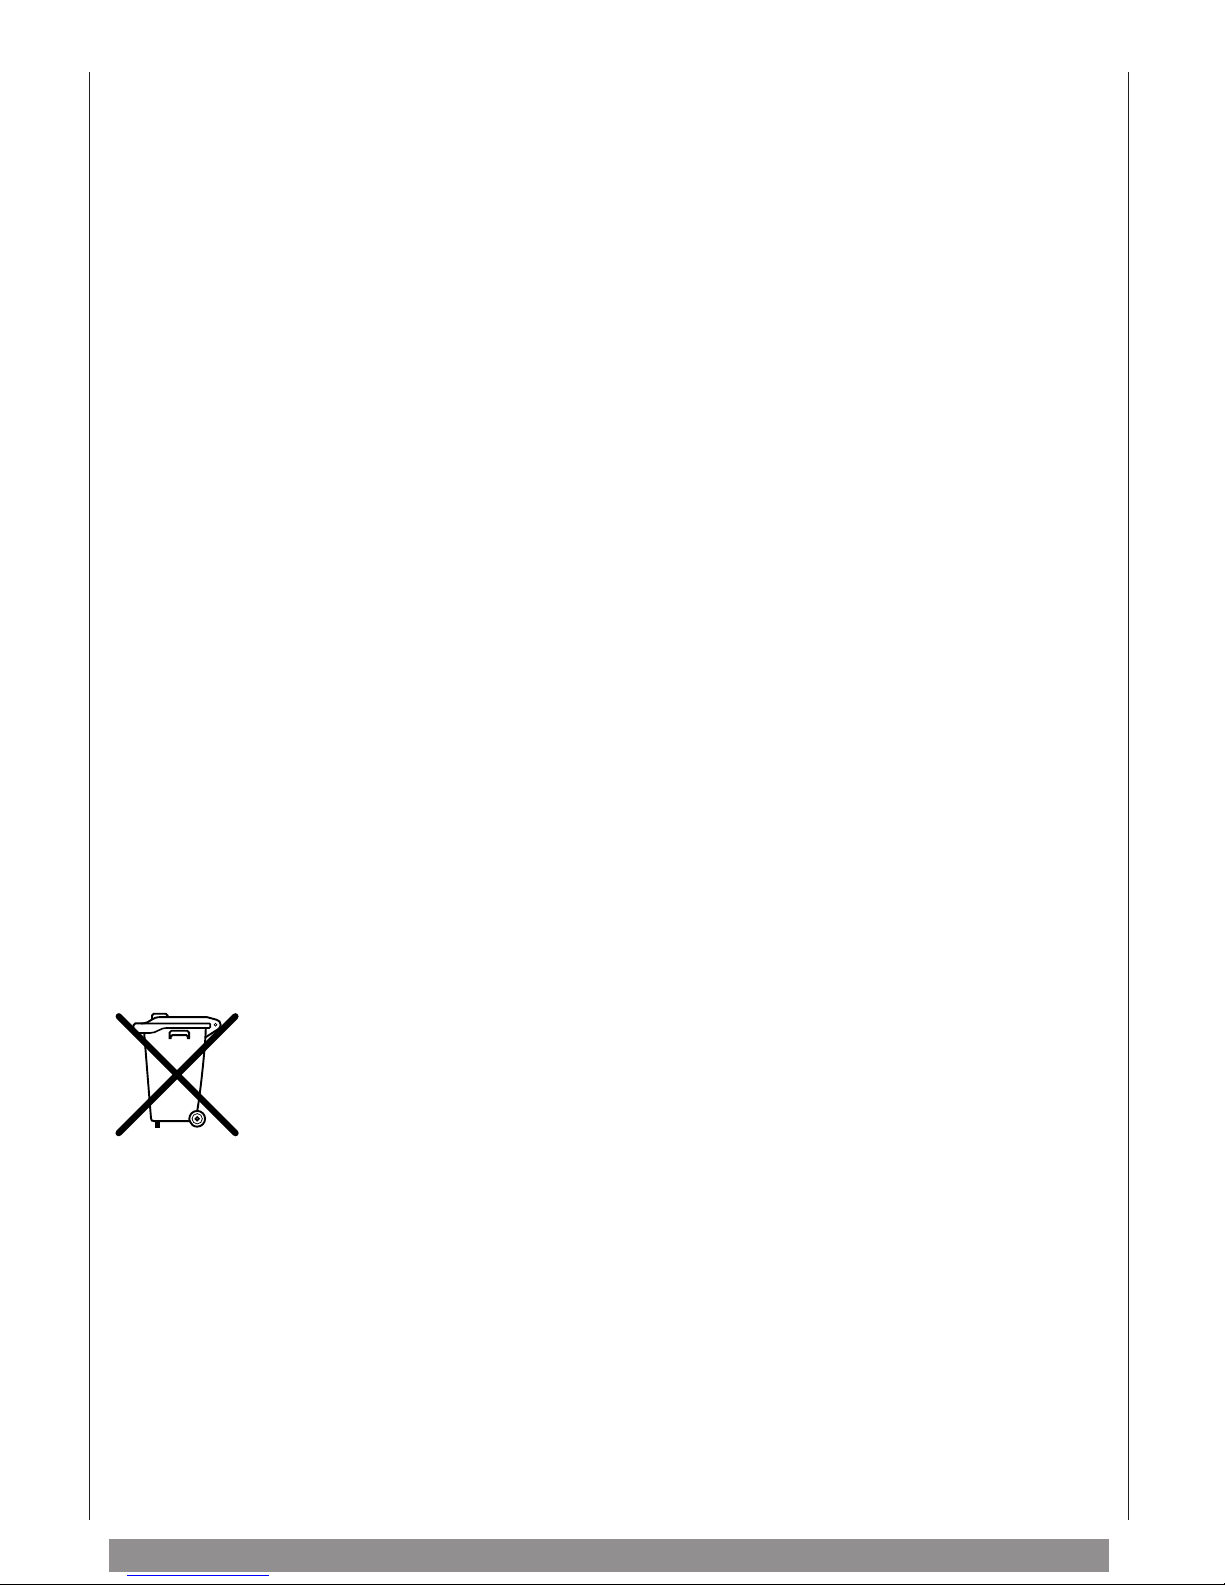
Disposal
Used electric and electronic equipment must not be disposed with the unsorted domestic
waste according to the European regulations [GUIDELINE 2002/96/EC OF THE EUROPEAN
PARLAMENT AND THE COUNCIL dated 27th January 2003 on electric and electronic used
equipment]. They must be sorted. The symbol on the waste bin on wheels points out the
necessity of the separate collection.
Support the environment by ensuring that the equipment is disposed into the systems with separate collection
when you do not intend to use it any longer.
In Germany, you are legally obligated [Law on the circulation, the return and the environmentally-friendly
disposal of electric and electronic equipment (Electric and Electronic Device Act - ElektroG) of 16 March
2005], to dispose used equipment separately from domestic waste. The public disposal authorities
(Municipalities) have set up collecting points for this purpose, at which used equipment from private
households in your area are accepted free of costs. Possibly municipally disposal authorities may also collect
used equipment from the private households.
Please inform yourself about your local waste calendar or ask your municipal or local authority about the
possibilities for a disposal available in your area.
22
Page 23

23
Page 24

Subject to technical changes and errors. This manual is protected by copyright.
© 2006 Copyright
All rights retained. Neither the entire manual nor extracts thereof
must be reproduced without our prior written approval.
DK digital GmbH
40878 Ratingen
Germany
www.dk-digital.com
 Loading...