

Page 1
Page 2

Thank you very much . . .
. . . for choosing one of our CD micro systems. For your own safety and in order to learn all
about the functions available, please read this manual and keep it for future reference. And
if you once sell the unit please include the manual.
www.dk-digital.com
© 2006 Copyright, manufacturer: DK digital GmbH
2
Page 3
Important Safety Instructions, please read carefully!
•
This unit is meant to playback CDs, to
receive radio program and to playback
and record compact cassettes. Using it in
any another way you risk electric shock.
This device may not be used differently
from the instructions in this manual.
•
Never attempt to open the housing of
your CD micro system or to service the
product beyond that described in this
manual. All servicing or repair must be
referred to qualified service personnel
authorised by us.
•
To avoid the risk of electric shock never
use the product in humid areas or near
water - e.g. near a bathtub, washbowl,
kitchen sink, in a wet basement or near a
swimming pool, or the like.
•
This unit is intended for use with the
mains voltage of AC230V~ / 50 Hz.
Never try to use it with different voltage
supply.
•
Proper air circulation around the
housing must be provided to avoid
overheating.
•
If objects have fallen inside or liquid
has been spilt onto the product disconnect
the plug from the mains immediately and
consult qualified service personnel.
•
Never let children play with the unit or
stick anything into it. Otherwise they face
the risk of electric shock.
•
Do not place the unit near strong
magnetic fields, water or heat.It
should not be exposed to direct sunlight
for a longer period. Avoid positions with
heavy dust or poor ventilation. The unit
should not be exposed to mechanical
vibrations or shock.
•
This product uses invisible “Class-1Laser”. Never expose your eyes to this
dangerous laser beam.
•
If you move the FUNCTION switch to the
TAPE (OFF) position, the device is not
disconnected from the mains.Soifyou
don’t use the product for a longer period
disconnect it from the mains.
•
If you transport the unit from cold to warm
conditions, condensation inside may
cause moisture leading to malfunctions.
If so please open the disc tray and wait
about 30 minutes, until the moisture has
evaporated.
•
Never touch a power cord with wet hands!
Never use a damaged power cord to avoid
risk of life by electric shock.
•
After disconnection from the mains you
can use a soft damp cloth to clean the
housing. Don’t use strong cleansing
products.
3
Page 4
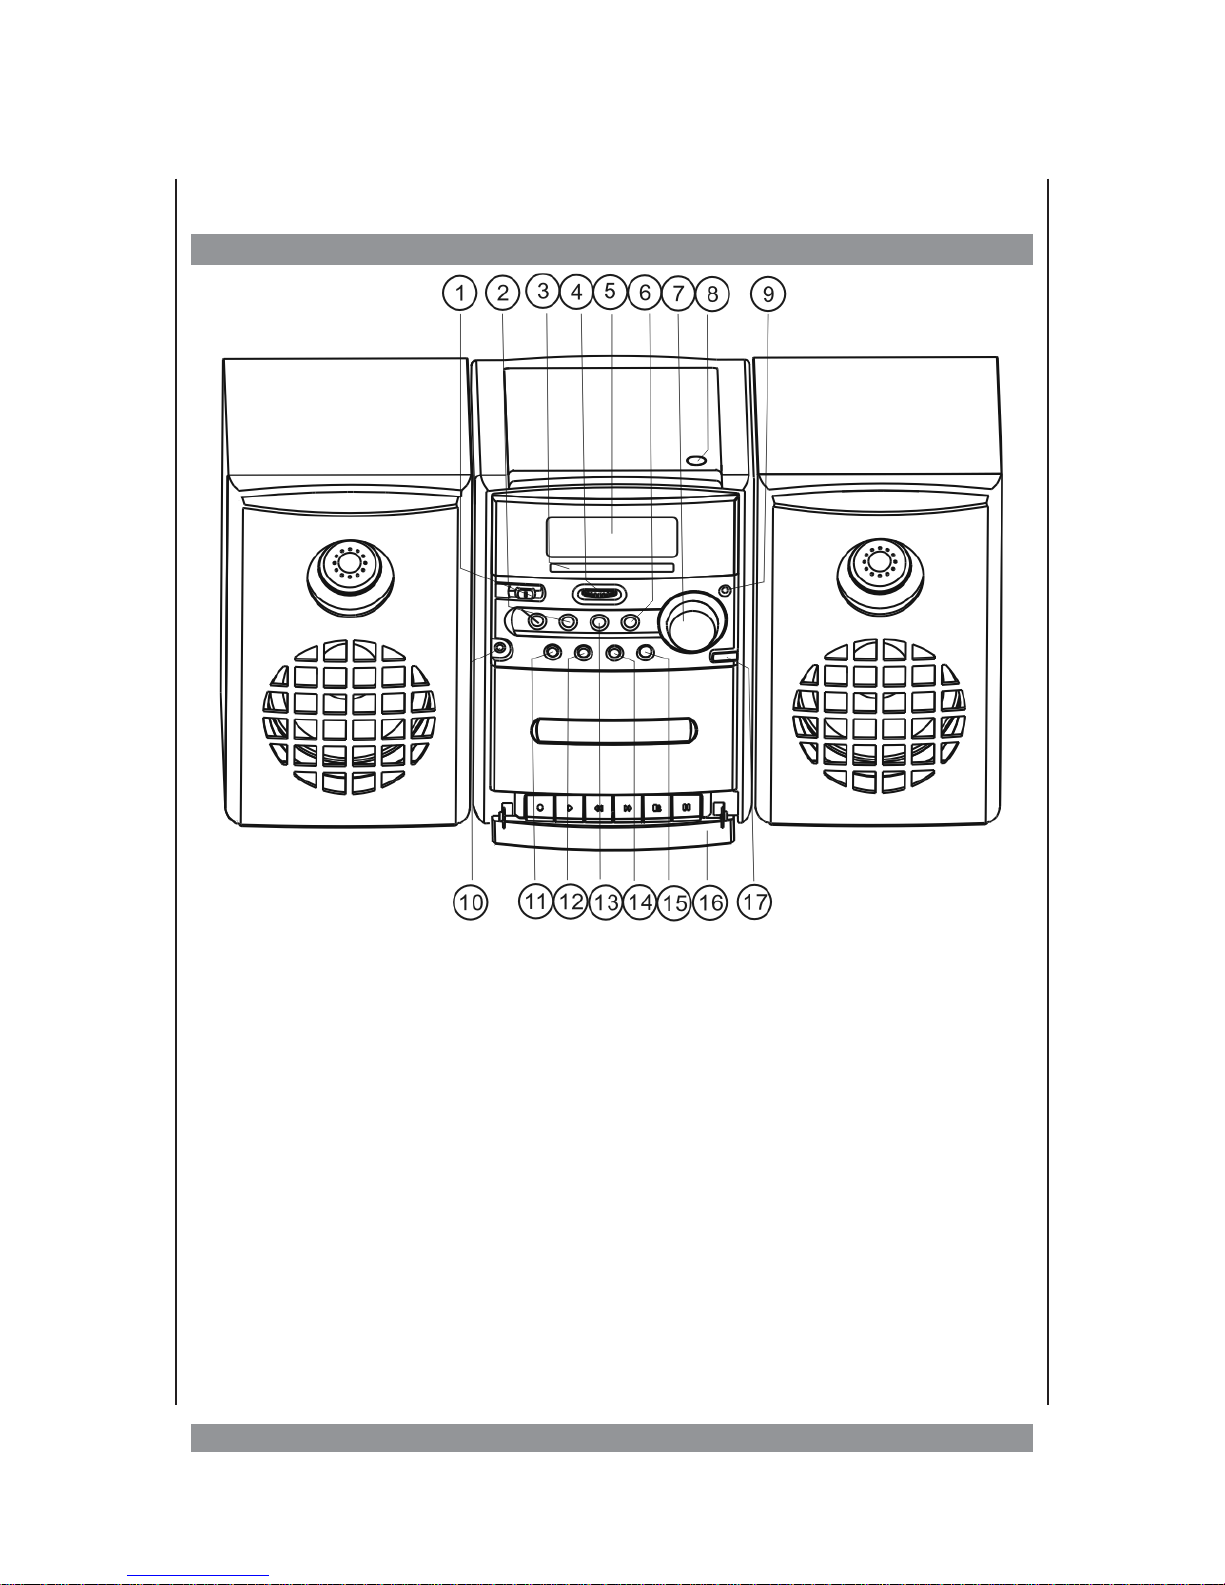
The control elements
...onthefront panel:
1. FUNCTION - to choose the requested operating mode
2.
9: - Skip / search forward & back
3. Dial scale
4. TUNING - to tune in the stations
5. CD display
6. 4/; - to start / pause CD playback
7. VOLUME - to set the volume
8. CLOSE / OPEN - locking button for CD compartment lid
9. FM ST. - FM stereo indicator
10. Head phones socket
11. PROG. - to program a sequence of CD tracks
12. REPEAT - to repeat one or all CD tracks
13. < - to stop CD playback
14. INTRO - plays all CD tracks for 10 seconds
15. Infrared sensor - receives the signals from the remote control
16. Cover of buttons for cassette operation
17. DBBS - to increase the level of the low frequencies
4
Page 5
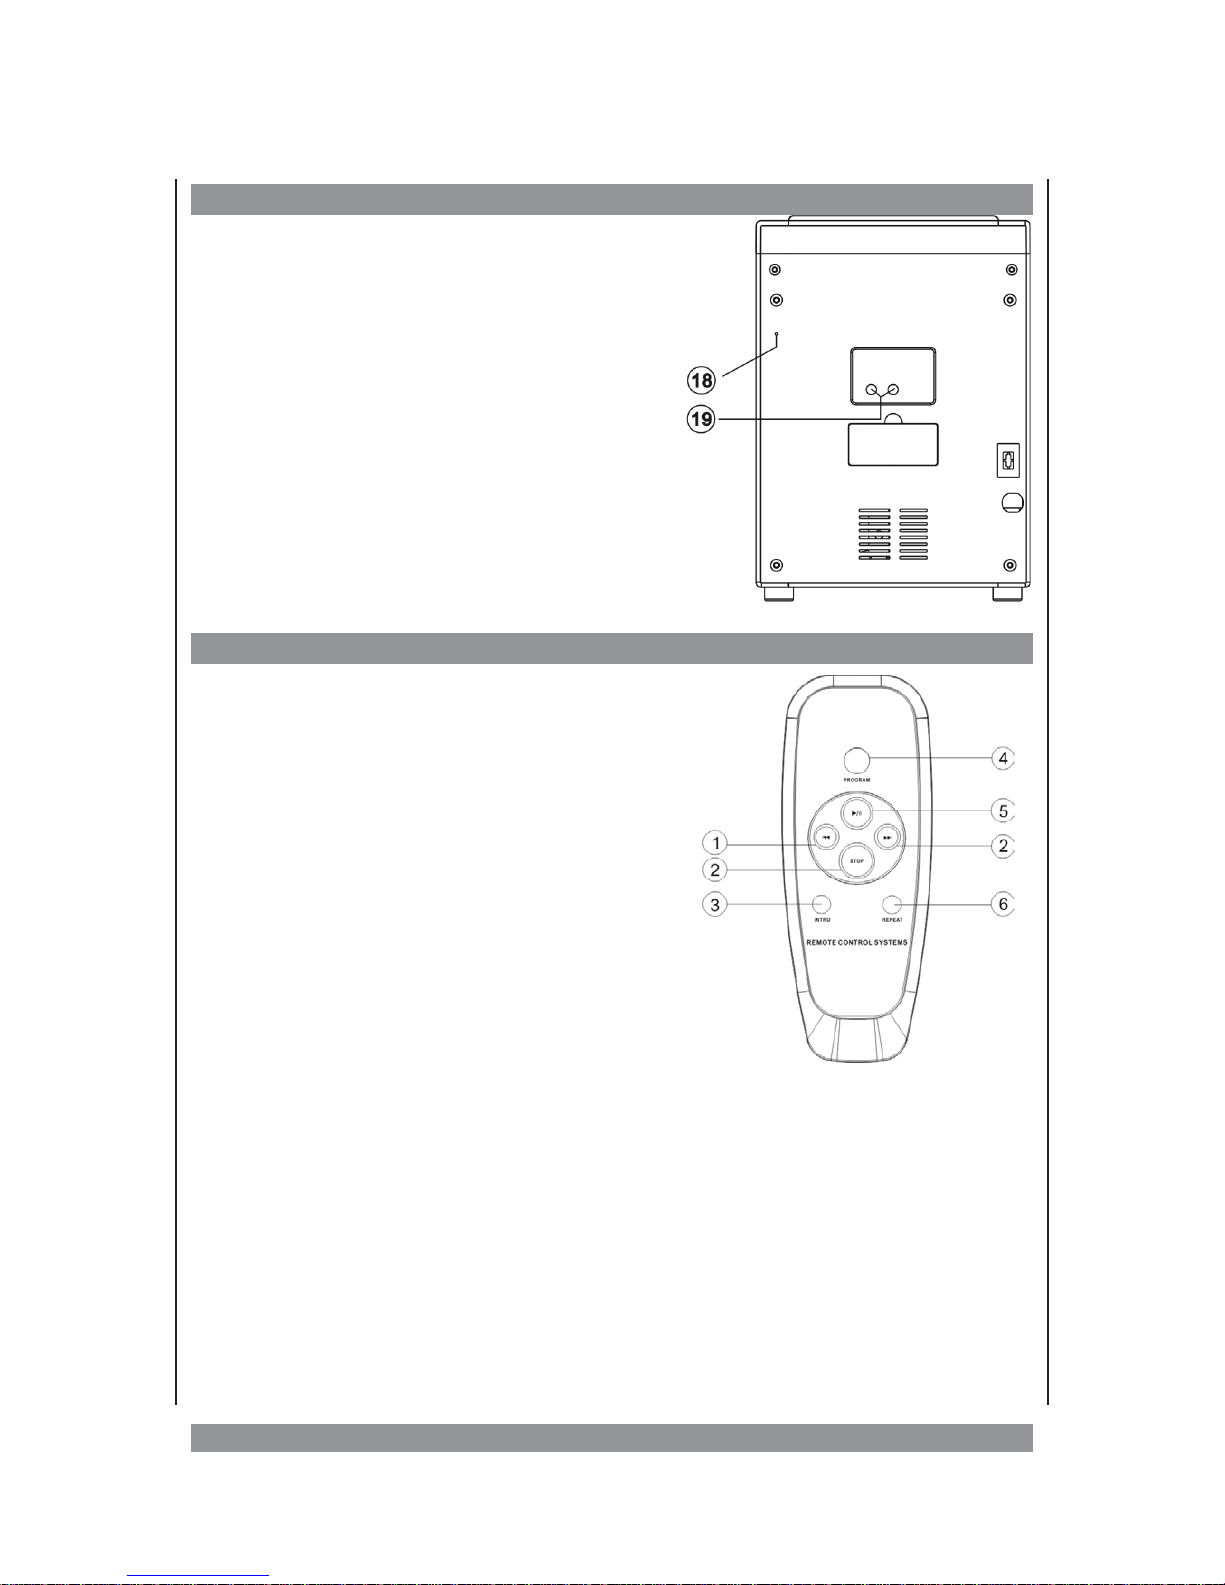
...ontherear panel:
18. FM pigtail antenna
19. Speaker outputs
...ontheremotecontrol:
1. 9 : - CD skip / search forward & back
2. < - to stop CD playback
3. INTRO - plays all CD tracks for
10 seconds
4. PROGRAM- to program a sequence of
CD tracks
5. 4/; - to start / pause CD playback
6. REPEAT - to repeat one or all CD tracks
5
Page 6
Setting up the system
You can mount your new CD micro system on a plane and stable surface.
The stand of the unit should be located close to a properly connected power
socket. In order to ensure a sufficient ventilation, the device must not be
operated on soft surfaces (carpets or the like). Possible ventilation openings
of the devices must not be covered by newspapers, curtains etc.
The Remote Control
Take out the remote control handset from the package. Open the battery compartment.
Insert two batteries (1,5 V, size “AAA”). Please make sure the polarity matches the marks
inside the compartment. Otherwise the r/c will not work and may be damaged. Replace the
cover.
Should the r/c start to work unreliably replace both batteries. We recommend using alkaline
batteries. Please point the r/c towards the main unit when calling up functions. No obstacles
may stand in the way between r/c and infrared sensor.
If you won’t use the r/c for a week or longer, please remove the batteries from the
compartment, to prevent damage by leakage.
Batteries must not be disposed by ordinary refuse disposal. Please lead empty
batteries towards appropriate collecting points. Never throw batteries into fire.
Establish connections
1. Connect the cable of the speaker box to be set up to the right to the
SPEAKER output “R”. Connect the cable of the speaker box to be set up to
the left to the SPEAKER output “L”.
2. Connect the mains chord to a properly wired mains wall outlet (230V~/50Hz).
6
Page 7

Operation of the CD micro system
General operation
To switch the unit on move the FUNCTION switch from the TAPE (OFF) position to the
position of the desired signal source.
Ø
“CD/MP3” for CD and MP3 disc playback, or
Ø
“FM” for FM radio reception, or
Ø
“AM” for AM radio reception, or
Ø
"TAPE (OFF)” for cassette operation.
The blue bar on the front panel will be lit and the unit is in operation.
Setting the volume
With the VOLUME controller on the front panel of the unit you can set the volume as
requested. Turn the controller clockwise to increase the volume. Turn it counter clockwise
to lower the volume.
Headphone operation
You can connect a headphone to the phones jack on the front panel of the device using a
3.5mm jack plug. This deactivates the connected speakers.
Be careful with regard to your hearing. A too high volume may lastingly impair the
hearing ability of your ears.
DBBS
If you would like to boost the low frequencies, press the DBBS button. Press the button
again to deactivate this function.
Switching off
To switch the unit off, move the FUNCTION switch to the „TAPE (OFF)” position. As this
doesn’t disconnect the device from the mains you should unplug the power chord if you’re
not going to use the micro system for a longer period of time.
CD / MP3 operation
This device plays generally audio CDs as well as CD-R(W) media burnt with a PC. For MPEG
format bit rates from 8 to 320 kbps are supported. Due to the various types of blank CDs, PC
types, operating systems, burning software and methods, we cannot guarantee that every
burnt CD will be played immaculately. The device does not play CD-ROMs or DVD media.
You can also control the disc functions using the remote control.
If the device plays a MP3 disc, ESP lights up in the display and indicates, that playback will
be continued error-free even when the unit is exposed to light shock of vibration.
7
Page 8
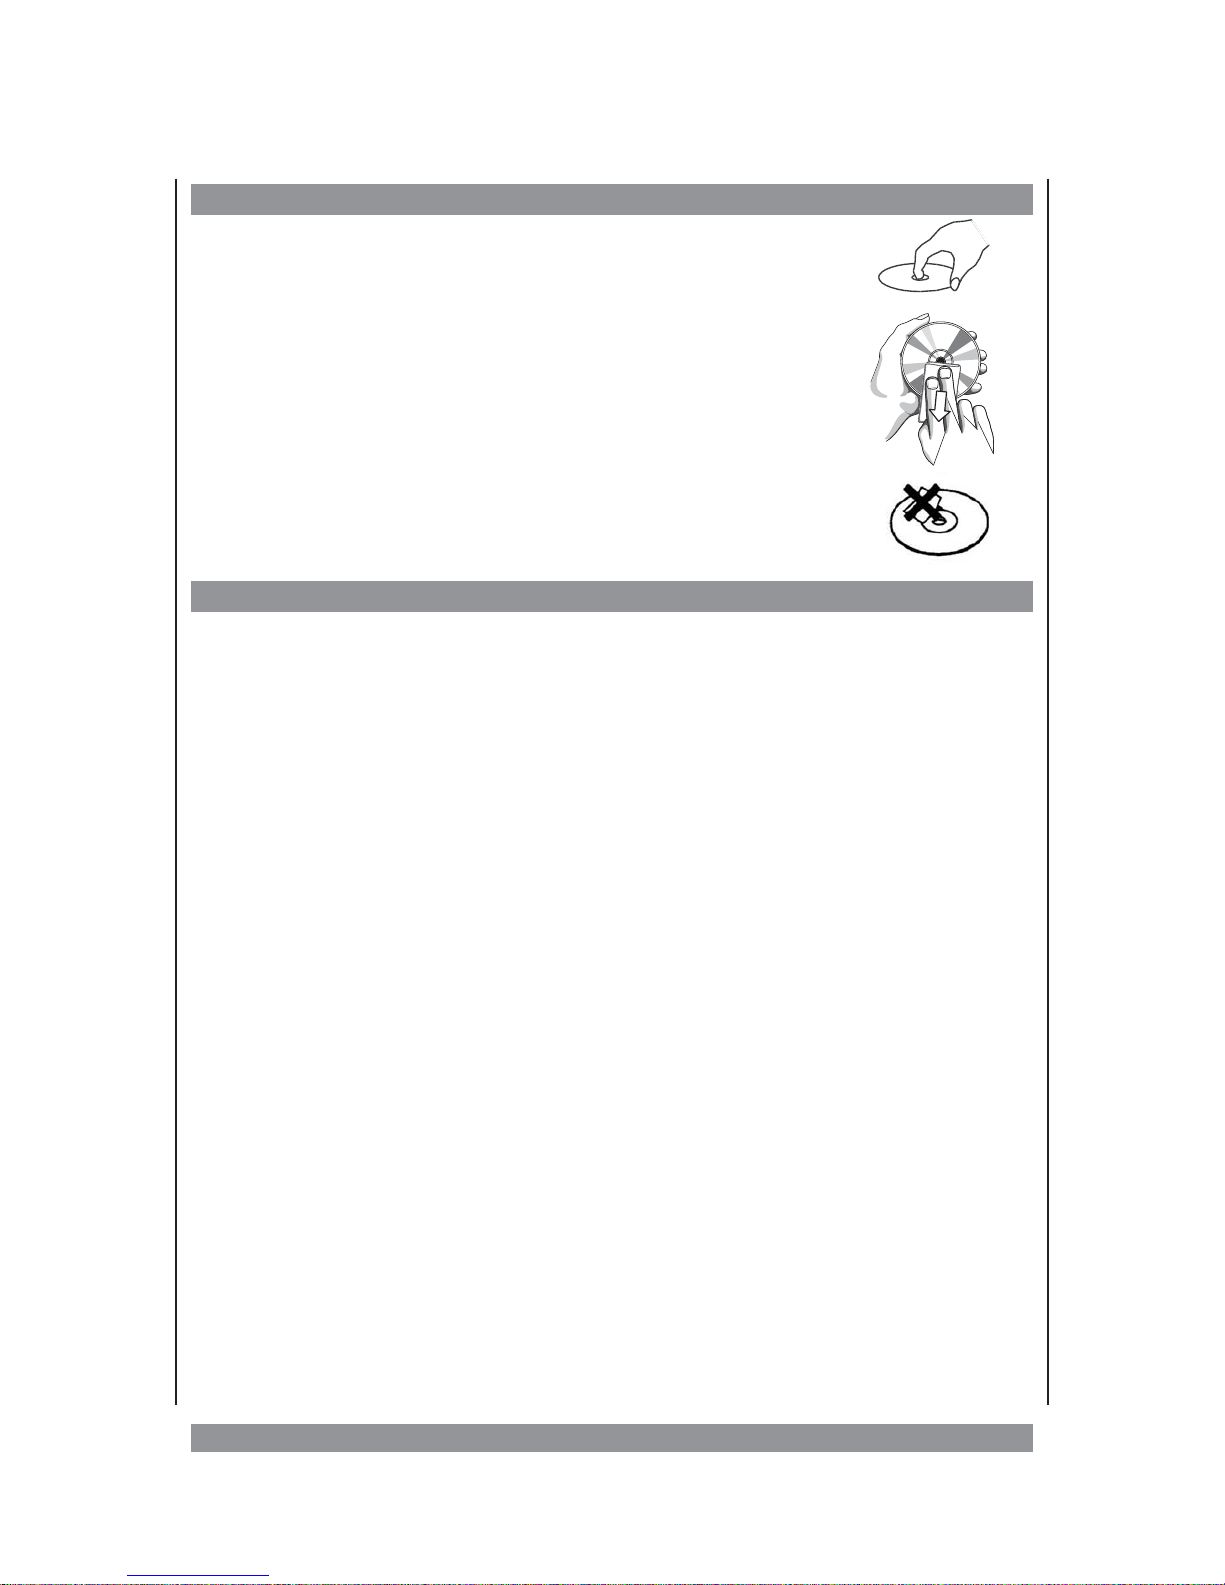
How to handle CDs
Ø
Only touch CDs at the edges to avoid finger prints and dirt.
Ø
Clean dirty CDs carefully with a soft non-fluff cloth by wiping from
the middle to the outside. Avoid circulating movements! Do not
use any solvents as this may damage the CD.
Ø
Do not use any inscriptions and labels on your CDs. This could
damage the CD or lead to unbalance which might impair playback and
the device.
CD playback
Ø
Move the FUNCTION switch to the CD/MP3 position.
Ø
Open the CD compartment by carefully pressing on the “CLOSE OPEN” field. Insert a CD
with the label side up onto the spindle of the CD plate.
Ø
Close the CD compartment by carefully pushing down the cover of the CD compartment
and slightly press the “CLOSE OPEN” area until it clicks into place. The device is then
reading the CD. Now the display shows the total number of tracks on the CD.
Ø
To start playback, press the 4; button. The CD display shows the respectively played
track number and the playback symbol
4. Press this button again to pause playback.
The playback symbol
4starts flashing. Pressing the button again continues the playback
process.
Ø
Press the STOP < button to stop playback. Now the display shows the total number of
tracks on the CD. Please always press the STOP < button first before opening the CD
compartment.
Select tracks
During playback you can briefly press the
9 or : button to select the previous or
subsequent track. Keep one of these buttons pushed to activate the search mode
(highspeed playback). When the requested portion has been reached, release the button.
Playback with normal speed will be resumed. With MP3 discs, the sound is muted in the
search mode.
Repeat function
If you press the REPEAT button once during playback, the display shows “REPEAT”, and the
track currently being played will be repeated. If you press this button twice, the whole CD
will be repeated and “REPEAT ALL” is displayed. The track(s) will be repeated over and over,
until you leave the repeat mode by pressing the REPEAT button again or if your cancel
playback by pressing the STOP button.
8
Page 9
Playback in programmed order
You can programme the playback of tracks in a special sequence of up to 32 tracks selected
by yourself.
Ø
To select the tracks for your individual sequence, stop playback first. Then press the
PROGRAM button. Now “PROG” is flashing in the display and invites you to select track
no. 01.
Ø
Now use the 9 or : buttons to select the first track.
Ø
Press the PROGRAM button, to store that track. “P02” in the display shows you that you
now can store track no. 2. Repeat above steps, until all desired tracks have been stored.
Ø
Press the 4; button, to start the playback of the programmed sequence.
Ø
To delete the programme press the STOP button twice, or open the CD compartment, or
select another signal source. Then the PROG indication in the display goes out.
Intro function
Use the INTRO function to let the unit play the initial 10 seconds of every CD track.
Therefore press the INTRO button. Press the button again to cancel this function.
Radio operation
Ø
Depending on which frequency band you want to select, move the function switch to the
“FM” or “AM” position.
Ø
For FM reception you need to unwind the pigtail antenna on the rear side of the unit. Lay
the antenna to find the best antenna orientation.
For AM reception the device has a built-in antenna. If AM reception is noisy or distorted,
please turn the unit to find the best orientation.
Ø
Use the TUNING control to select the broadcasting stations. Use the dial scale to
orientate yourself.
Ø
When receiving FM Stereo transmission, the “FM ST.” indication is activated.
Cassette operation
Do not use C-120 tapes or very cheap tapes. This may lead to malfunctioning and tape
spillage. Before inserting a tape please ensure that the tape reels run smoothly and that
there are no tape loops. Otherwise this might result in tape spillage.
The tapes are equipped with plastic clips which can be removed to secure recordings against
re-recording or erasing (see Fig.). The resulting deepening may be covered with adhesive
tape to re-record the tape.
ATTENTION!
When you have removed the erase protection, the record button
will be locked and cannot be pressed! These plastic clips are also
removed in commercial music tapes.
9
Page 10
Play Tapes
Ø
Move the FUNCTION switch into the position TAPE - (OFF) and open the cover of the
buttons for cassette operation.
Ø
Press the button . The cassette compartment opens, and you can insert a recorded
tape with tape opening downwards into the cover bracket. The full tape reel should be
on the left side.
Ø
Carefully close the cover by slighting pressing the cover of the cassette compartment.
Press the play 4 button. The tape will be played.
Ø
If you want to interrupt the playback for a short time only, press the button . If you
press this button again, the playback will continue.
Ø
You may discontinue the playback by pressing the button.
Fast Forward and Rewind
You can run forward and rewind the stopped tape. Use the button for fast forward and
the button for fast rewind. When you have reached the desired tape position, press the
button to stop the process. Never use the fast forward or rewind functions during
playback. This may cause damage to the tape.
Record Tapes
Put a cassette into the compartment: The side to be recorded must be visible from the
outside. The full tape reel has to be on the left side. Any previous recordings will be
overwritten. Please keep in mind that the first centimetres of the tape material are not
recordable.
You need not pay attention on the level control – the recording automatics will regulate the
best possible level control. The volume control has therefore no impact on the recording.
Ø
Select the sound source you would like to record (CD or RADIO). Prepare the CD
component or the radio for playing in accordance with these instruction.
Ø
Press the pause button, then the record button. The 4 button will also click into
place. In order to start recording, press the button again to release it.
Ø
The button discontinues the recording.
Automatic Tape Stop
When in the process of recording or playback the end of the tape is reached, the tape stops
automatically and the relevant button is released.
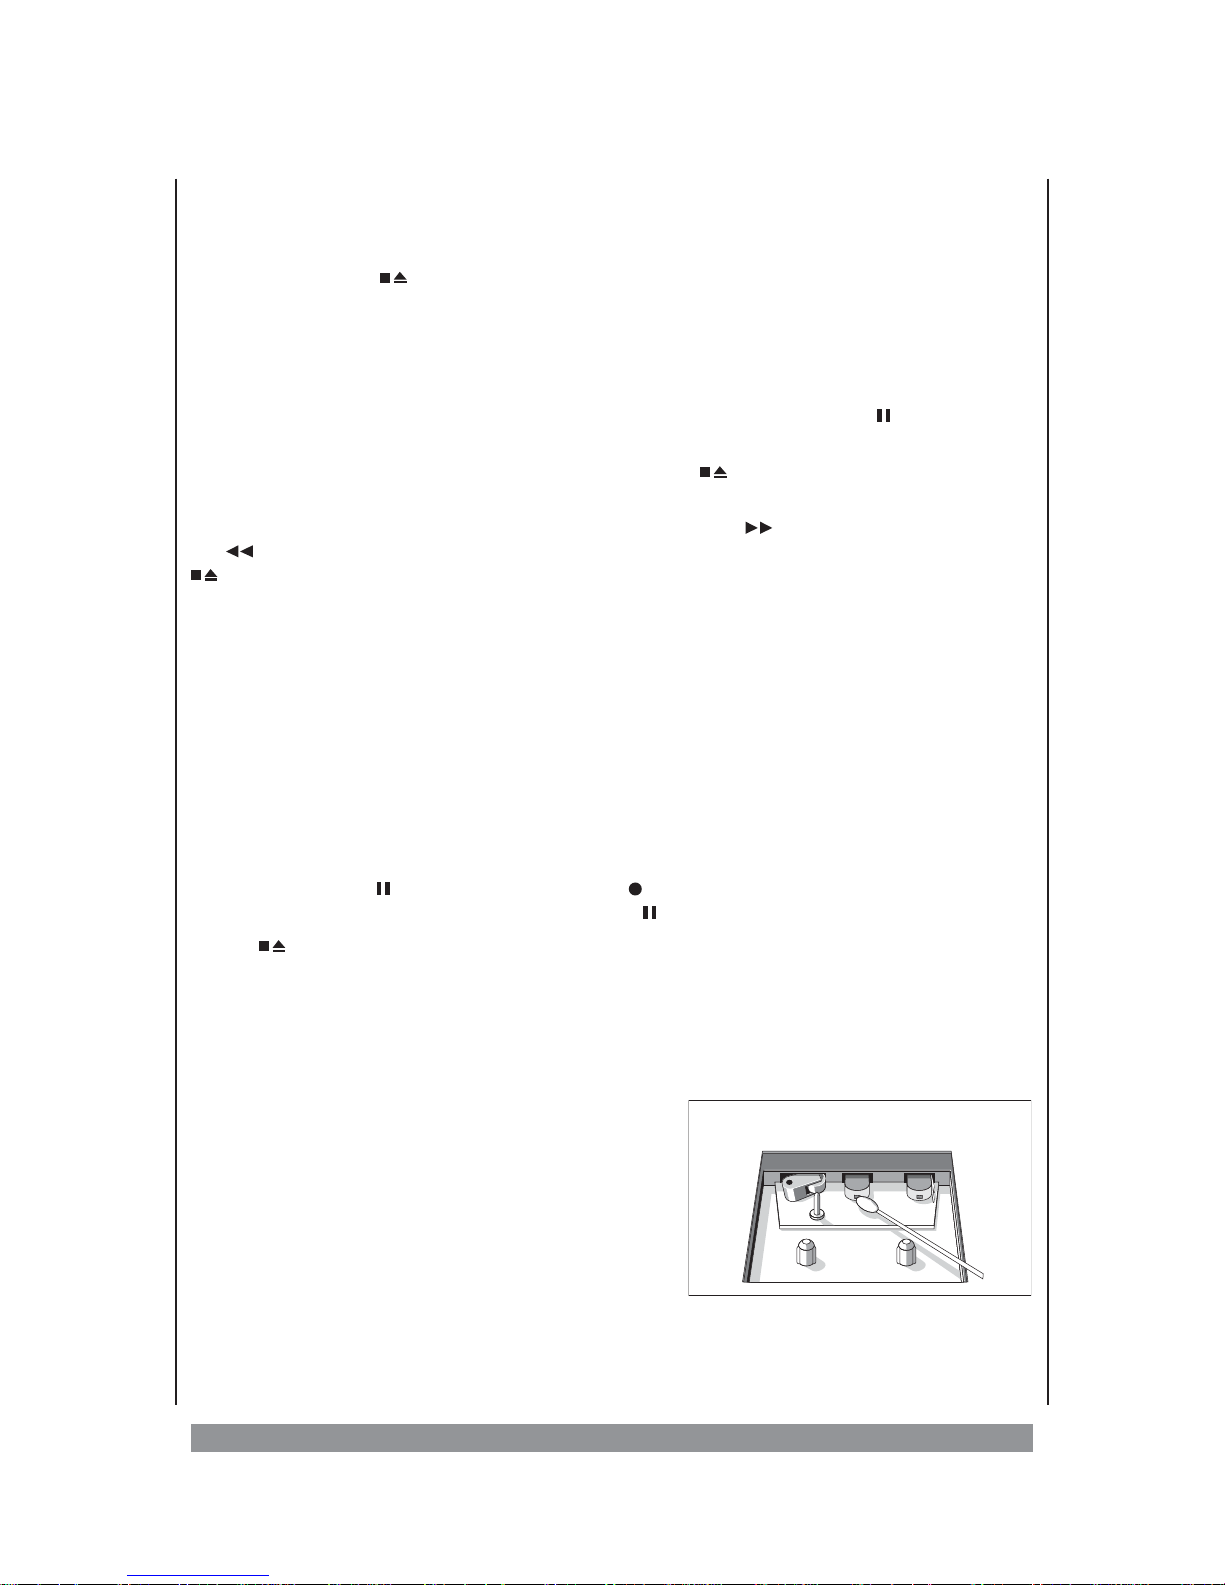
Cleaning
In order to avoid tape transport errors you should
regularly clean the parts of the cassette recorder
which have contact with the tape. Either use a
cleaning cassette available from specialized dealers
or clean the parts shown below manually. For this,
you will need a cotton bud soaked in spirit or a
lint-free cotton cloth. Never use hard or metallic
items for cleaning: this would damage the device.
Unplug the device, open the cassette department
and press the 4 Play buttons without a cassette
being inserted. Begin the cleaning.
10
Page 11

Disposal advice
When the operating life of this device has ended it must not be disposed as
domestic waste, but in accordance with national environmental guidelines.
Technical Specifications
Power output : - R.M.S. / P.M.P.O.
- 2 x 2 watts /2x10 watts
Reception range: - MW 540 - 1600 KHz
FM 88 - 108 MHz
Power supply: - AC230V~ / 50 Hz
11
Page 12

© 2006 Copyright
We reserve the right to correct errors and make technical alterations. This manu
-
al is copyrighted. All rights reserved. Neither the manual as a whole nor excerpts
may be reproduced without our prior written permission.
DK digital GmbH
40878 Ratingen
Germany
www.dk-digital.com
 Loading...