

Page 1
Professional USB Turntable
USER MANUAL(ENGLISH)---------------------------------------------------------P1-P8
CONTENTS:
MANUEL D’UTILISATION (FRANÇAIS)----------------------------------------P9-P15
CONTENU
BEDIENUNGSANLEITUNG (DEUTSCH)---------------------------------------P16-P22
INHALT
Snel Begin Het Handboek van de eigneaar (DUTCH)
In Process
Manual de incio rápido del usuarío (ESPAÑOL)
In Process
Manual Rapido di Utilizzazione (ITALIANO)
In Process
● SAFETY INSTRUCTIONS
● SPECIFICATIONS
● CONTROL AND FUNCTIONS
● OPERATIONS
● INSTRUCTIONS DE SÉCURITÉ
● CARACTERISTIQUES
● COMMANDE ET FONCTIONS
● OPERATIONS
● WICHTIGE SICHERHEITSHINWEISE
● EIGENSCHAFTEN
● BEDIENELEMENTE UND FUNKTIONEN
● BEDIENUNG
Page 2

2
USER MANUAL
Vinyl USB 50
SAFETY INSTRUCTIONS
• Read these Instructions - All the safety and operating instructio ns should be read before this product is operated.
• Keep these Instructions - The safety and operating instructions should be ret ained for future reference.
• Heed all Warnings - All warnings on the appliance and in the operating instructions should be adhered to.
• Follow all Instructions - All operating and use instructions should be followed.
• To reduce the risk of fire or electric shock, do not expose this apparatus to rain or moisture. The apparatus shall
not be exposed to dripping or splashing and that no objects filled with liquids, such as vases, shall be placed on
the apparatus.
• Carts and Stands - The appliance should be used only with a cart or stand that is recommended by the
manufacturer.
An appliance and cart combination should be moved with care.
Quick stops, excessive force, and uneven surfaces may cause
the appliance and cart combination to overturn.
•
Wall or Ceiling Mounting - The product should be mounted to a wall or ceiling only as recommended by the
manufacturer.
•
Heat - The appliance should be situated away from heat sources such as radiators, heat registers, stoves, or
other appliances (including amplifiers) that produce heat.
•
Power Sources - This product should be operated only from the type of power source indicated on the rating
label. If you are not sure of the type of power supply to your home, consult your product dealer or local power
company. For products intended to operate from battery power, or other sources, refer the operating
instructions.
•
Grounding or Polarization - This product may be equipped with a polarized alternation-current line plug (a plug
having one blade wider than the other). This plug will fit into the power outlet only one way. This is a safety
feature. If you are unable to insert the plug fully into the outlet, try reversing the plug. If the plug should still fail to
fit, contact your electrician to replace your obsolete outlet. Do not defeat the safety purpose of the polarized
plug.
•
Power-Cord Protection - Power-supply cords should be routed so that they are not likely to be walked on or
pinched by items placed upon or against them, paying particular attention to the cord in corresponde nce of plugs,
convenience receptacles, and the point where they exit from the appliance.
•
Cleaning - The appliance should be cleaned only as recommended by the manufacturer.
Clean by wiping with a cloth slightly damp with water. Avoid getting water inside the appliance.
•
For AC line powered units - Before returning repaired unit to user, use an ohm-meter to measure from both AC
plug blades to all exposed metallic part s. The resistance should be more than 100,000 ohms.
•
Non-use Periods - The power cord of the appliance should be unplugged from the outlet when left unused for a
long period of time.
•
Object and Liquid Entry - Care should be taken so that objects do not fall and liquids are not spilled into the
enclosure through openings.
•
Damage Requiring Service - The appliance should be serviced by qualified service personn el when:
- The power-supply cord or the plug has been damaged; or
- Objects have fallen, or liquid has been spilled into the appliance; or
- The appliance has been exposed to rain; or
- The appliance does not appear to operate normally or exhibits a marked change in performance; or
- The appliance has been dropped, or the enclosure damaged
•
Servicing - The user should not attempt any service to the appliance beyond that described in the operating
instructions. All other servicing sho uld be referred to qualified service personnel.
Page 3
3
•
Ventilation - Slot s and openings in the cabinet are provided for ventilation and to ensure reliable operation of the
product and to protect it from overheating, and these openings must not be blocked or covered. The openings
should never be blocked by placing the product on a bed, sofa, rug, or other similar surfa ce. T his product should
not be placed in a built-in installation such as a bookcase or rack unless proper ventilation is the manufacturer’s
instructions have been adhered to.
•
Attachments - Do not use attachments not recommended by the product manufacturer as they may cause
hazards.
•
Accessories - Do not place this product on an unst able ca rt, st and, tripod, bracket, or t abl e. The product m ay fall,
causing serious injury to a child or adult, and serious damage to the product. Use only with a cart, stand, tripod,
bracket, or table recommended by the manufacturer, or sold with the product. Any mounting of the product
should follow the manufacturer’s instructions, and should use a mounting accessory recommended by the
manufacturer.
•
Lightning - For added protection for this product during a lightning storm, or when it is lef t unattended and unu sed
for long periods of time, unplug it from the wall outlet and disconnect the antenna or cable system. This will
prevent damage to the product due to lightning and power-line surges.
•
Replacement Parts - When replacement pa rts are re quired, be su re the service techni cian has u sed replac ement
parts specified by the manufacturer or have the same characteristics as the original part. Unauthorized
substitutions may result in fire, electric shock, or other hazards.
•
Safety Check - Upon completion of any service or repairs to this product, ask the service technician to perform
safety checks to determine that the product is in proper operating condition.
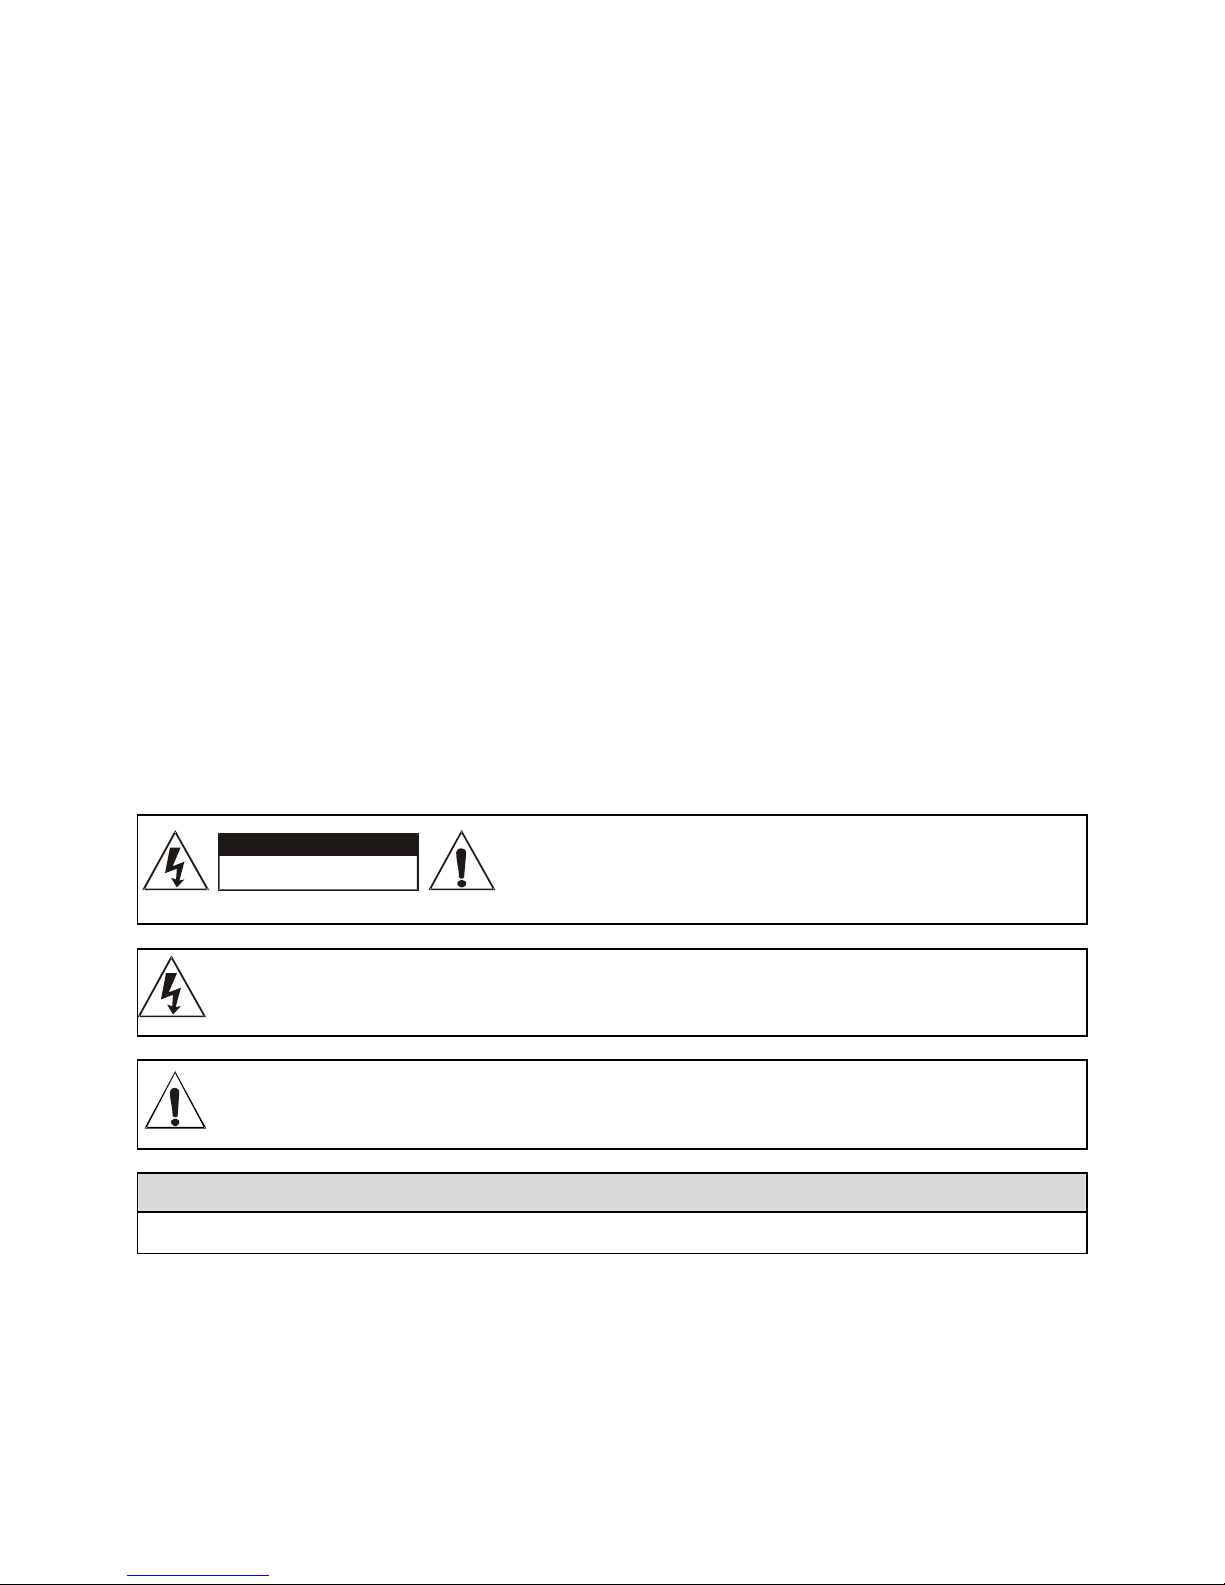
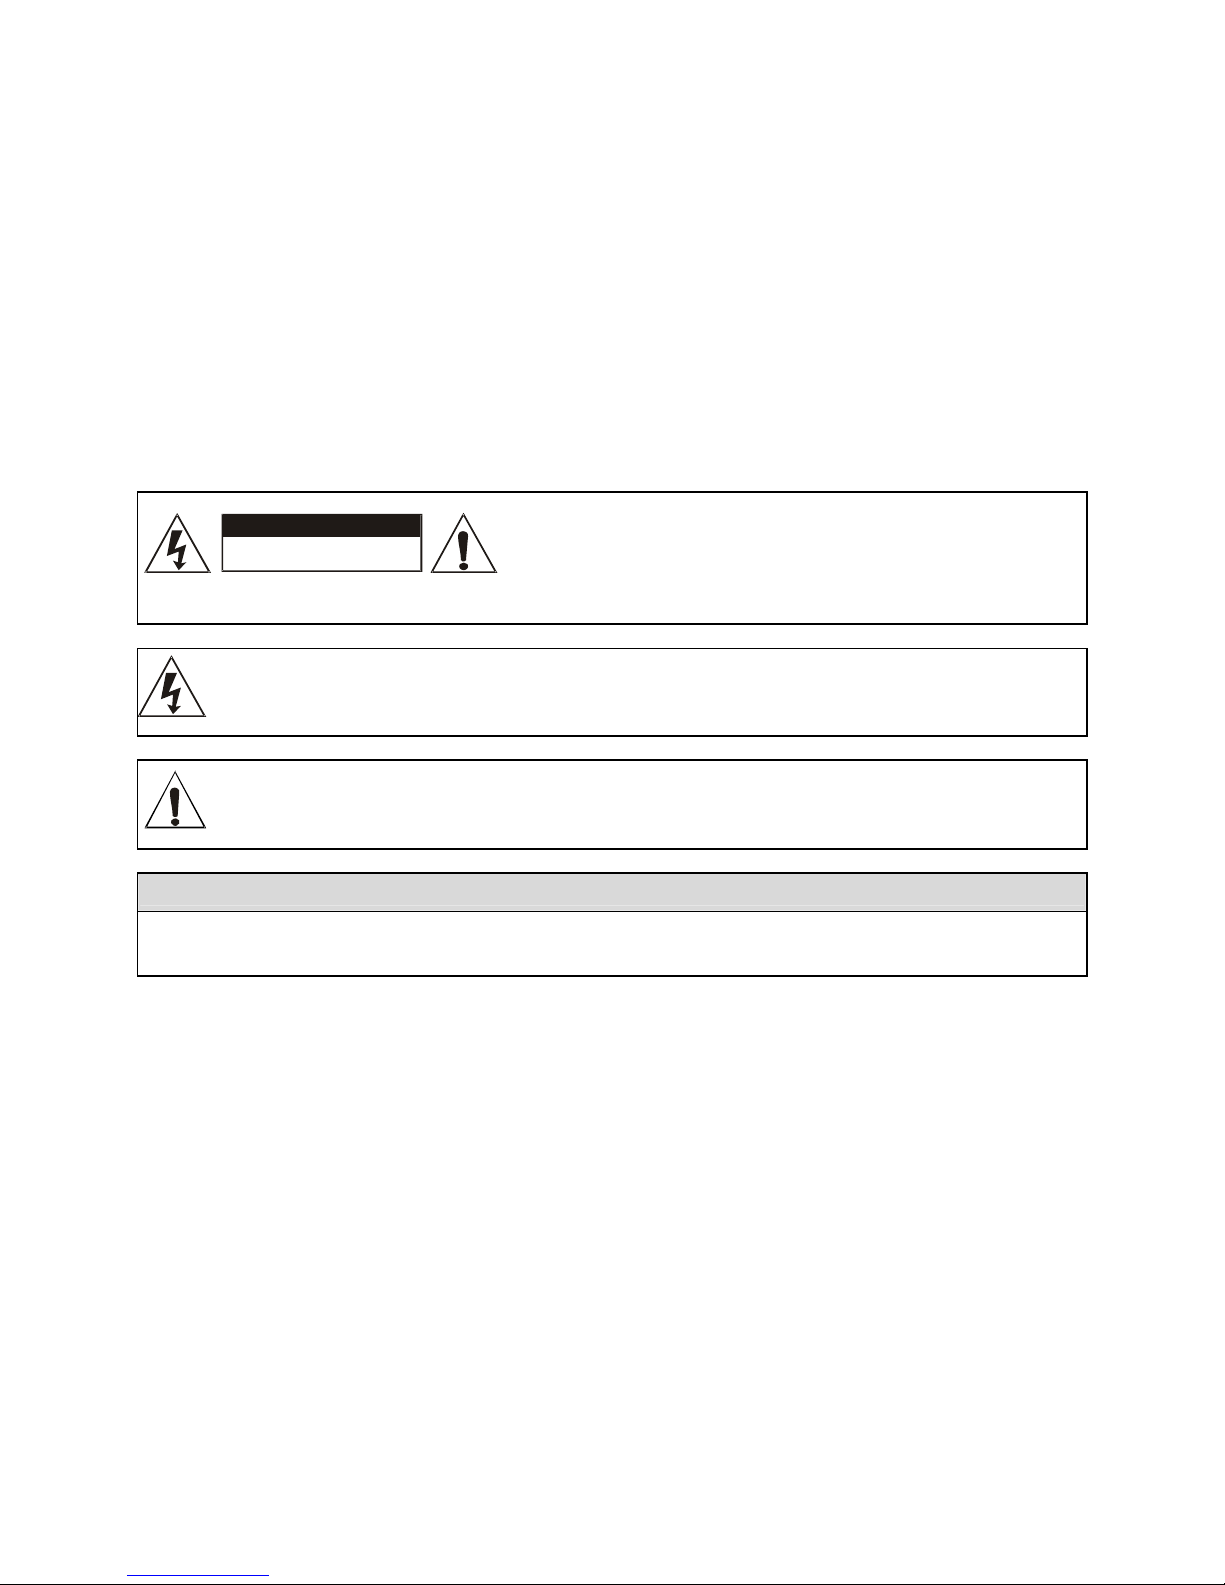
CAUTION: To reduce the risk of electric shock, do not remove
any cover. No user-serviceable parts inside. Refer servicing to
qualified service personnel only.
The lightning flash with arrowhead symbol within the equilateral triangle is intended to alert the use to
the presence of un-insulated “dangerous voltage” within the product’s enclosure that may be of
sufficient magnitude to constitute a risk of electric shock.
The exclamation point within the equilateral triangle is intended to alert the user to the presence of
important operation and maintenance (servicing) instructions in the literature accompanying this
appliance.
CAUTION
To prevent electric shock, do not use this polarized plug with an extension cord, recept acle or other outlet unless
the blades can be fully inserted to prevent blade exposure.
DO NOT OPEN
RISK OF ELECTRIC SHOCK
CAUTION
Page 4
4
SPECIFICATIONS
TURNTABLE
Type 3-speed full manual
Motor 16pole, 3phase,brushless DC motor
Driving Method Direct drive
Speeds 33
1
/3 and 45 rpm and 78rpm
USB Function USB rec. Function
Wow and Flutter Less than 0.1% WRMS (JIS WTD) with 33
1
/3rpm
S/N Ratio More than 55dB (DIN-B)
Pitch Controls +/- 10%,+/- 20%,+/-50%
GENERAL
Power Supply AC1 15/230V, 50/60Hz
Power Consumption 13.5 Watts
Dimensions 449 (W) x 370 (D) x 145 (H) mm
Weight 9.8 Kgs
NOTE:
Specifications and design subject to possible modification without notice, due to improvements.
BEFORE USB
Check for the following parts included in the pa ckage with the main unit:
• Instruction manual
• 45 rpm adaptor
• Target light
• Platter
• RCA cable
•
Headshell
• Counter weight
• Slipmat
• AC cord
•
USB cable
CONTROLS AND FUNCTIONS
Page 5

5
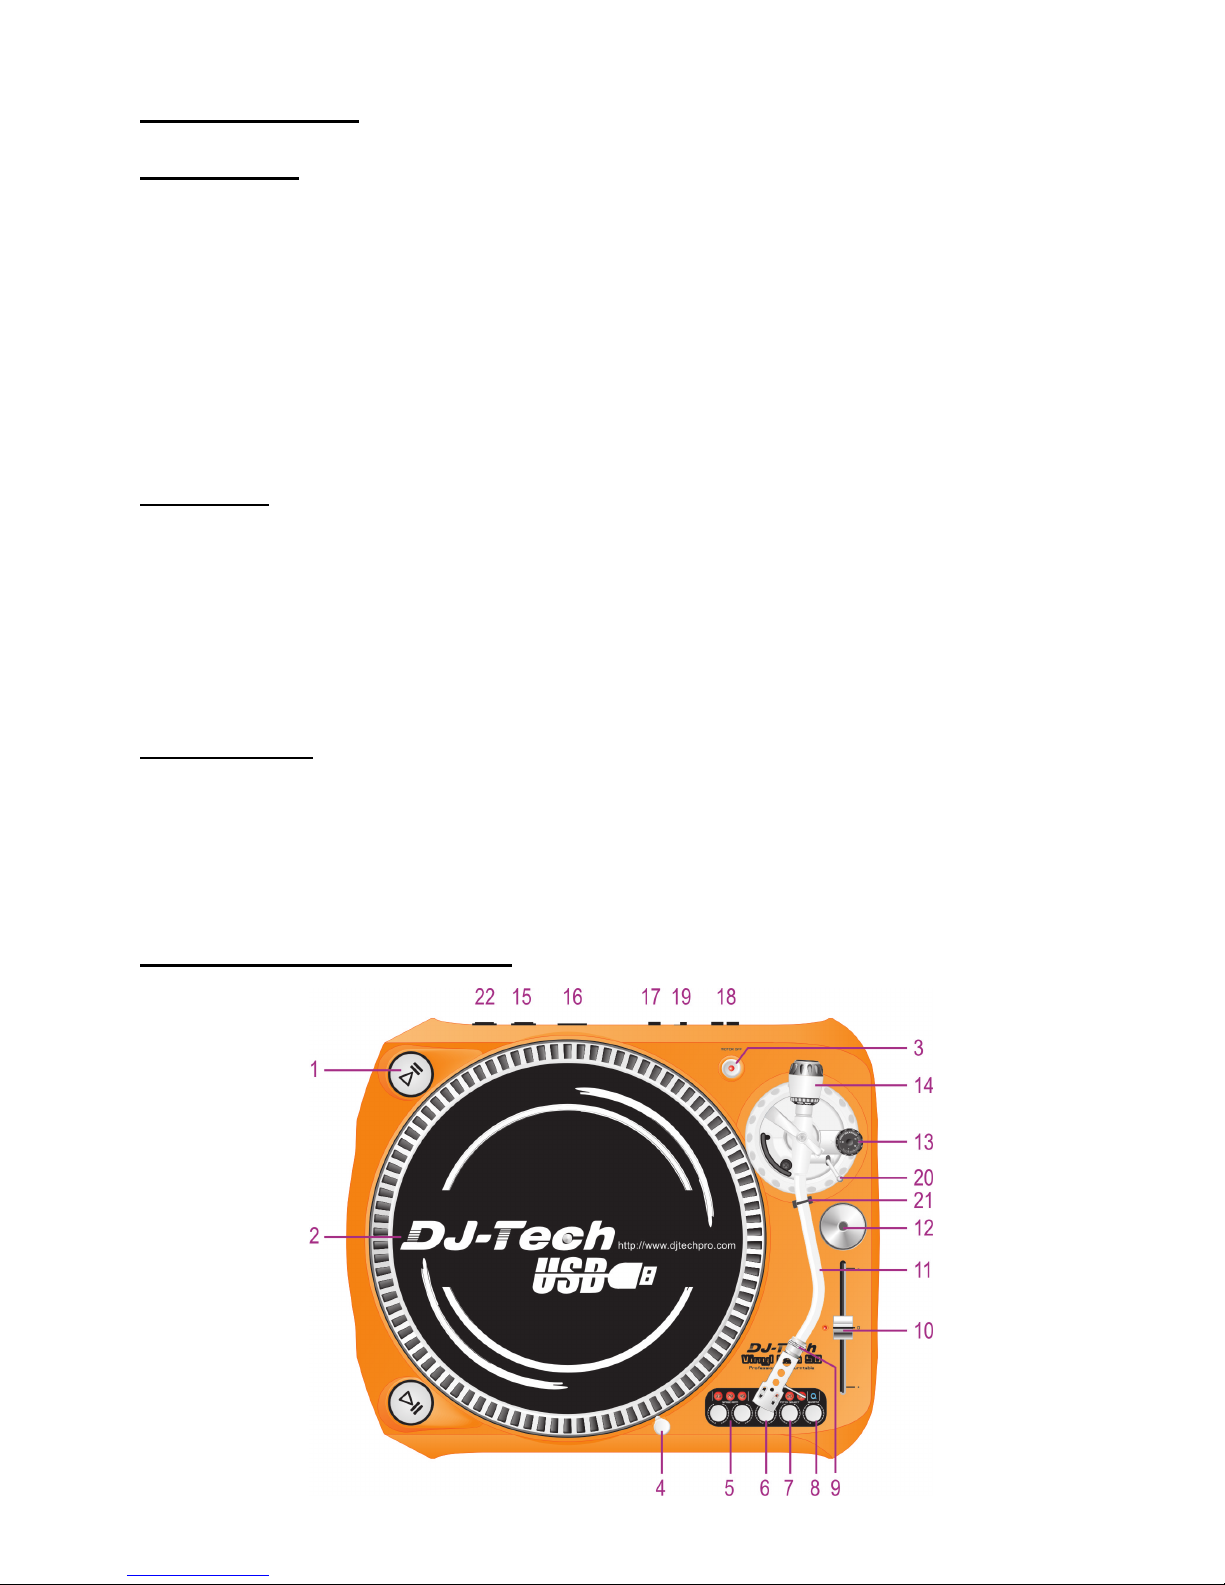
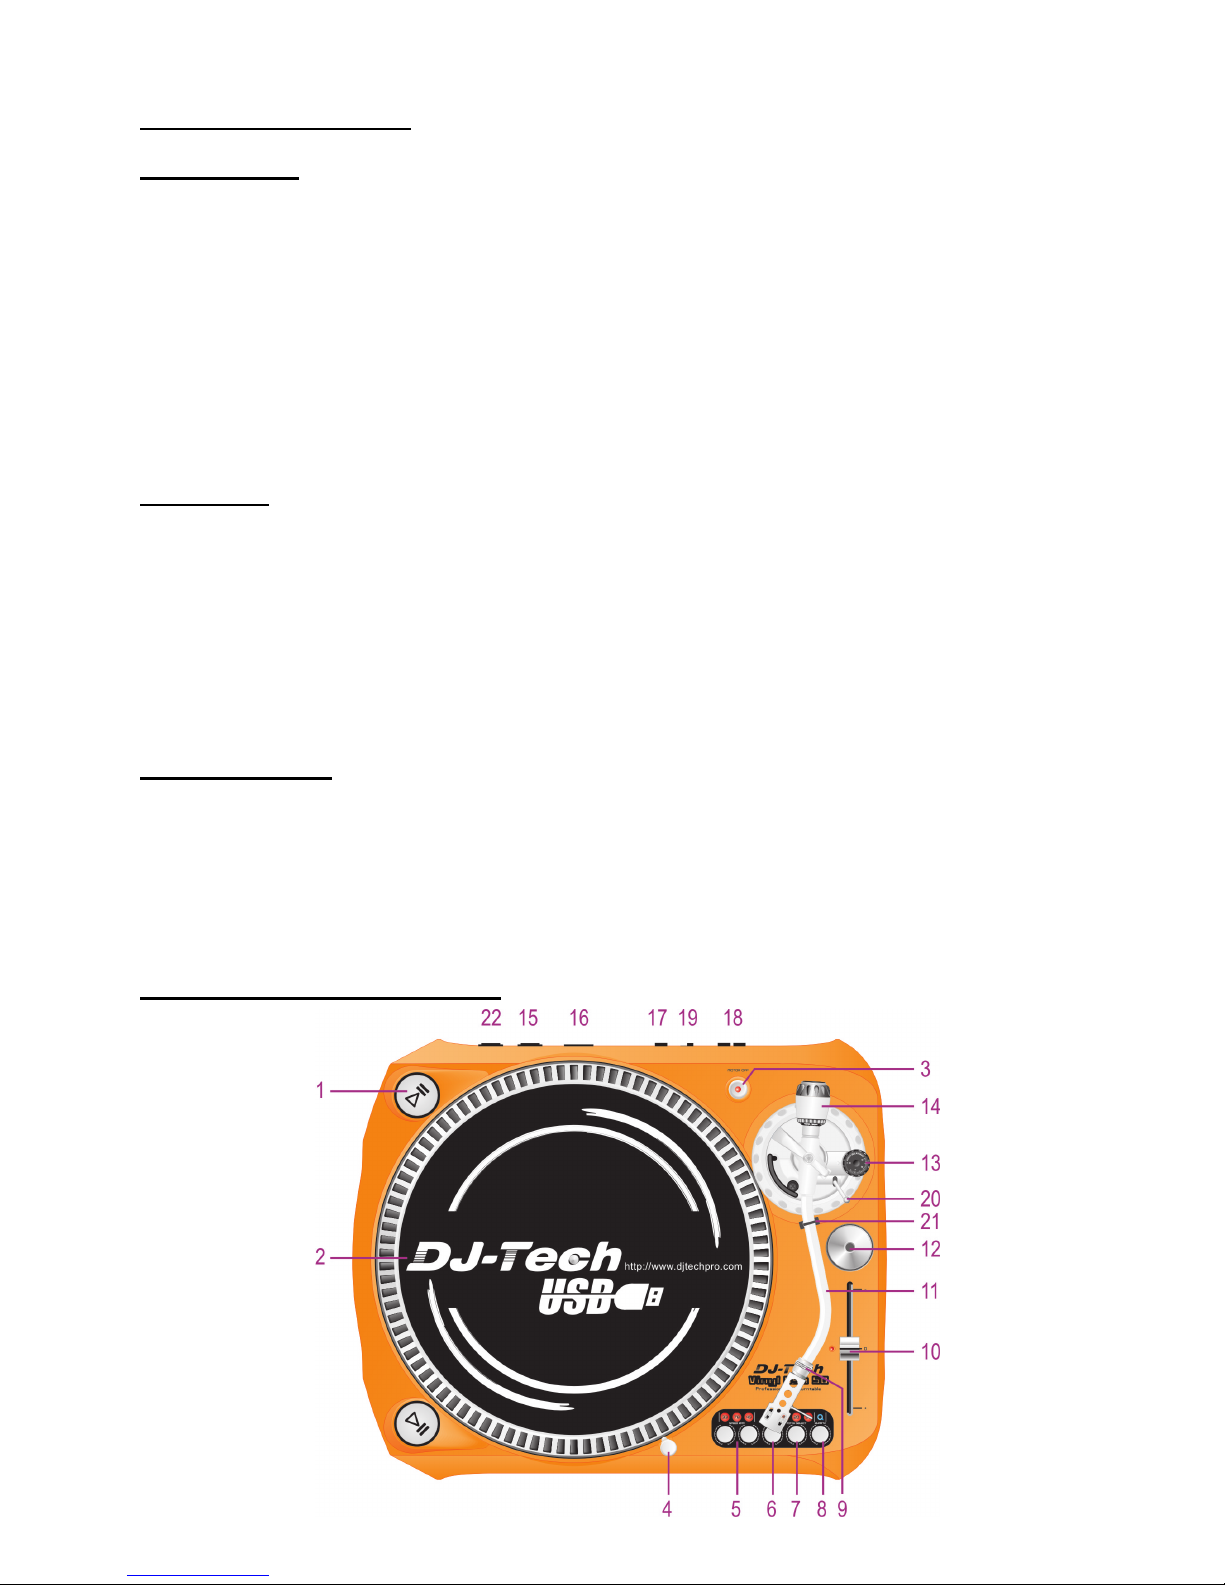
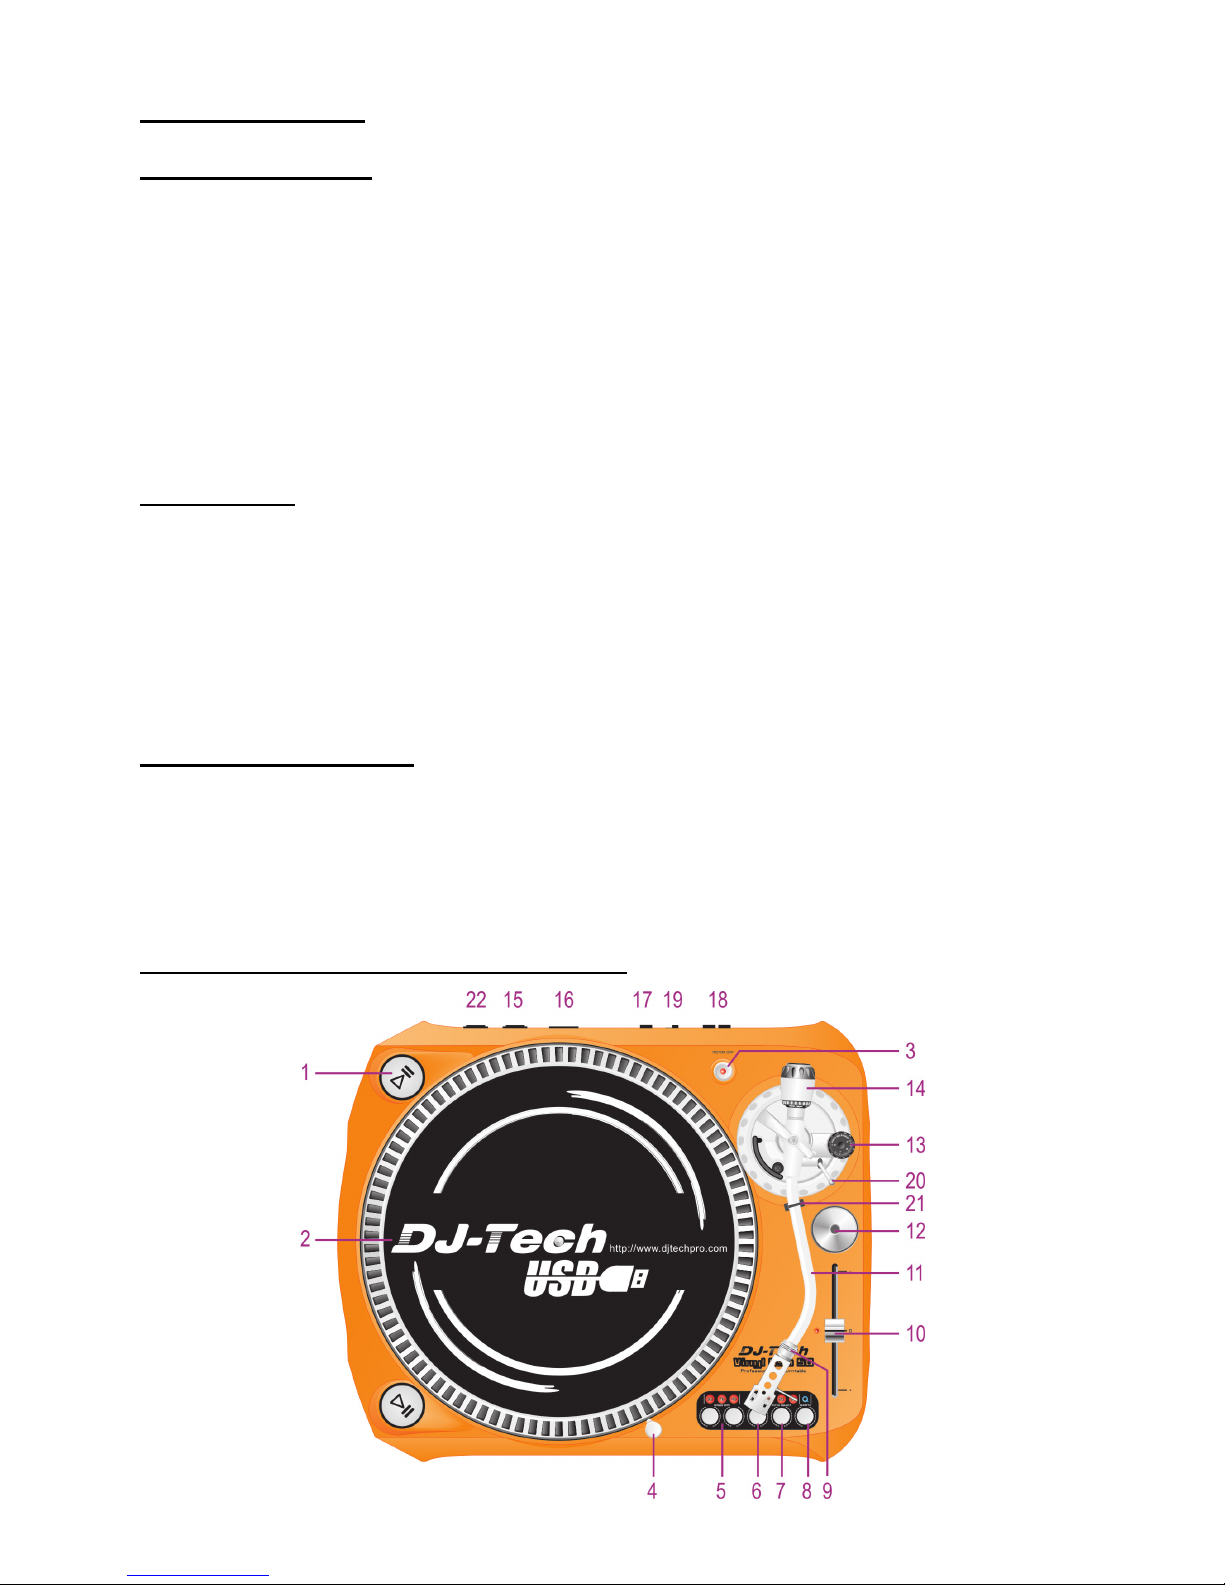
CONTROLS AND FUNCTIONS
1. ST AR T/STOP BUTTON
Press this button to start or stop the platter.
2. PLATTER
3. MOTOR OFF
Press the button to enable motor off, and the led will
be flash.
Press the button again to disable function.
4. T A RGET LIGHT
Insert target light to the deck and it will light up.
5. PLATTER SPEEDS
For 33 rpm - press 33
For 45 rpm - press 45
For 78 rpm - press 33 and 45 at the same time
To return to 33 or 45rpm play mode, just press the
desired button.
6. REVERSE
This button is used to reverse the direction of the
platter rotation.
7. PITCH SELECT
Sets the adjustment range of the pitch slider . Press the
button to switch to +/-10% pitch, press again to switch
to +/-20% pitch and again for +/-50%.
8. QUARTZ
on - will hold the speed at 0%
off - will allow use of the pitch adjust.
9. HEADSHELL LOCKING NUT
Attach the headshell by inserting it into the front end of
the tonearm and then turn the locking nut clockwise.
10. PITCH SLIDER
Use this to change the speed of the platter when the
PITCH indicator is lit.
11. S-SHAPED TO NEARM
12. 45 RPM ADAPTOR
Place on center spindle for playing 7” records with
large center holes.
13. ANTI SKATE KNOB
When a record is playing, a force is generated drawing
the stylus towards the center of the record. This
control compensates for that force and needs to be set
to the same value as the counterweight pressure ring.
14. COUNTERWEIGHT
Adjustment creates the proper downward pressure of
the stylus to the record. Attach now by sliding the
counterweight onto the rear of the tone arm. Twist it
lightly and it will screw onto the rear shaft of the tone
arm.
15. POWER SWITCH
This switch turns the power on or off.
16. POWER CORD CONNECTOR
Used to connect the included power cord.
17. USB SOCKET
USB connect (USB cable limit within 3M).
18. PHONO/LINE OUTPUT
Connect the turntable to any phono or line level input,
using the supplied cinch/cinch cable. Be sure to put
the phono/line switch in the right position.
19. PHONO/LINE SWITCH
Depending on the position of the phono/line switch,
you can connect the turntable to any phono or line
level input.
20. TONEARM LIFT
This elevates the tone arm above the record surface.
21. TONEARM CLAMP AND REST
Use this rest for the tone arm and clamp it in position
during transportation.
22. AC VOLTAGE SELECTOR
Make sure the selector is set properly.
Page 6
6
OPERATIONS
1. Push Power button to on.
2. Insert target light for illumination the stylus.
3. Place a record on the turntable mat. When playing
a 45rpm record with a large center hole; place the
45-rpm adapter on the center spindle.
4. Set the rotation speed (33/45/78) to match the
record.
5. Release the arm clamp.
6. Set the cueing lever to the up position.
7. Press the Start/Stop button and the turntable
platter will start to rotate.
8. Move the tone arm over the desired groove.
9. Set the cueing lever to the down position, the tone
arm will descend slowly onto.
The record and play begins.
10. Set the desired pitch adjusts range by depressing
the buttons until the desired pitch is reached.
Options are +/-10%, +/-20% or +/-50%.
11. Adjust the pitch to a desirable speed, move the
pitch control slider up or down to adjust the speed.
12. To suspend play, lift tone arm with cueing lever.
13. When play is finished, raise the cueing lever,
move the tone arm to the arm-rest and secure the
tone arm with the arm clamp.
14. Press the Start/Stop button to stop the platter
rotating.
15. Push the Power button to off.
SET-UP
Headshell and Cartridge Assembly
When installing a cartridge, refer to the operating instructions of that cartridge. During installation, attach the
stylus protector to guard the stylus tip from damage.
Connect the Headshell lead wires to the cartridge terminals. The terminals of cartridges and the Headshell lead
wires are color coded. Connect each lead wire to the cartridge terminals of the same color.
White (L+) .............……………....Left channel +
Blue (L-) ....……………................Left channel -
Red (R+) ..…………....................Right channel +
Green (R-) .......…………….........Right channel -
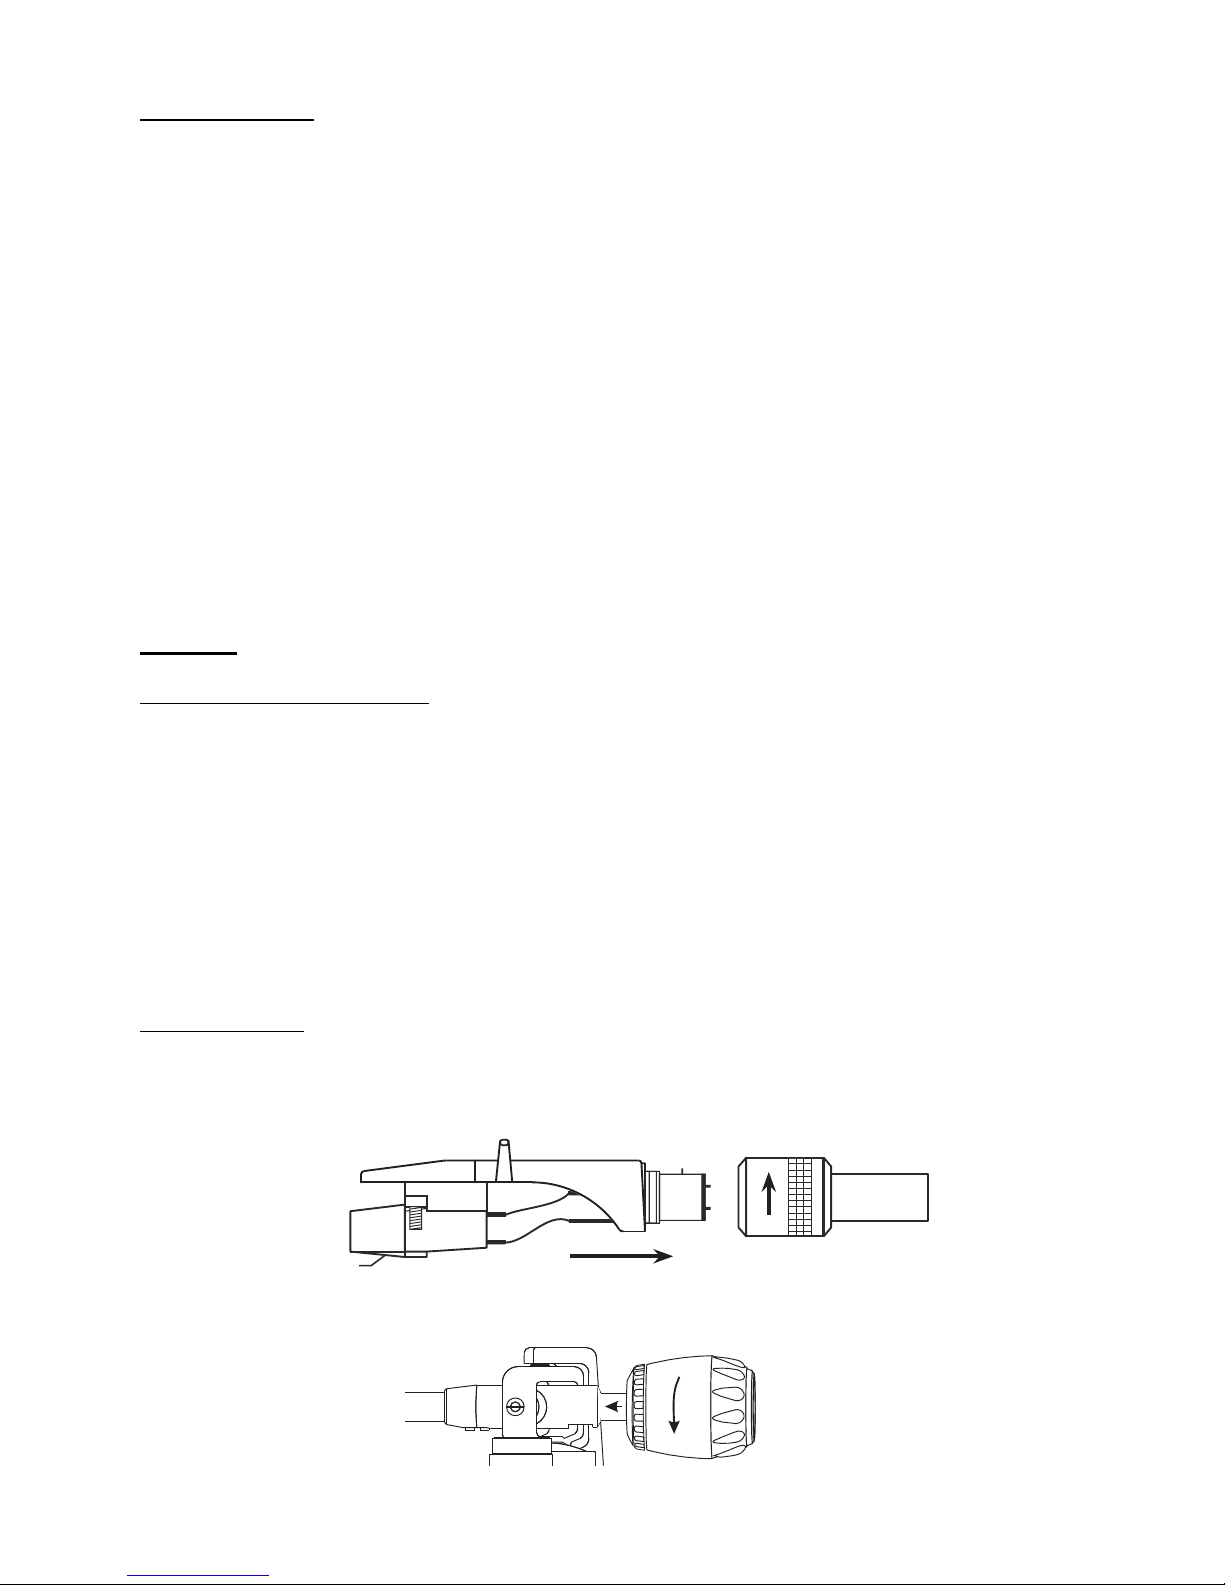
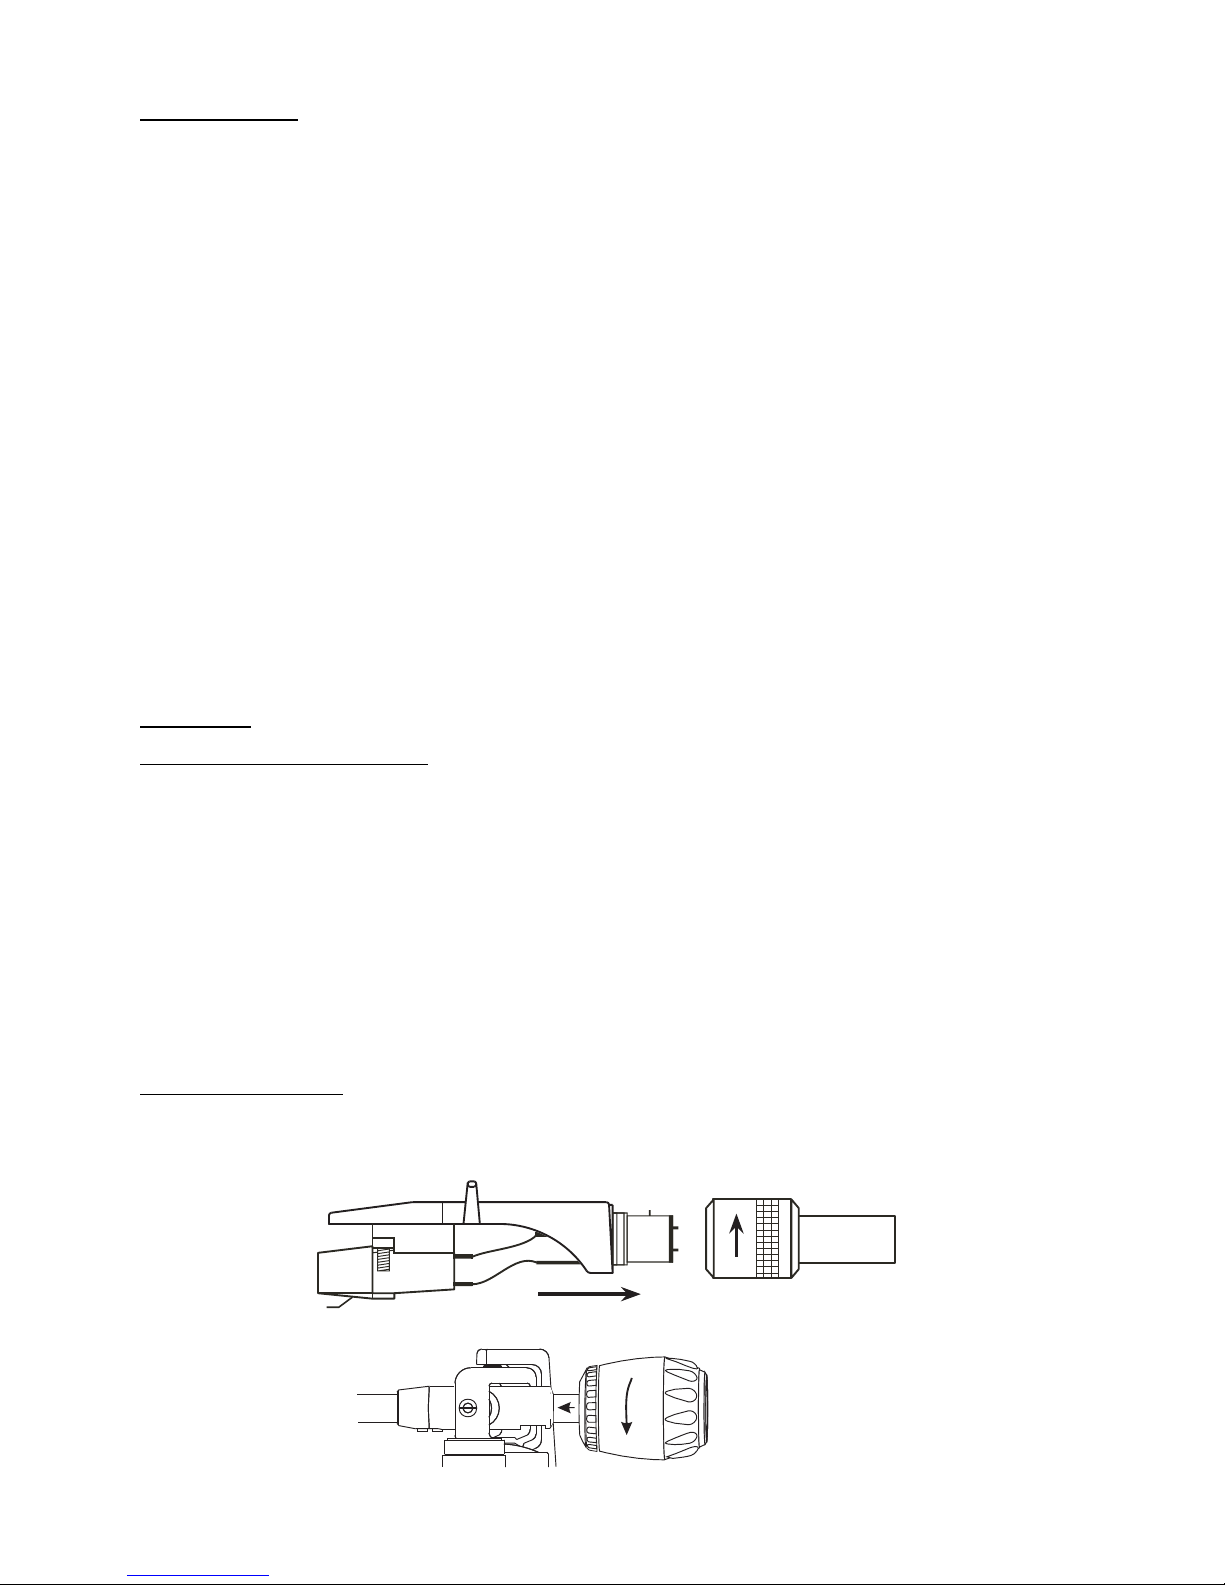
Turntable Assembly
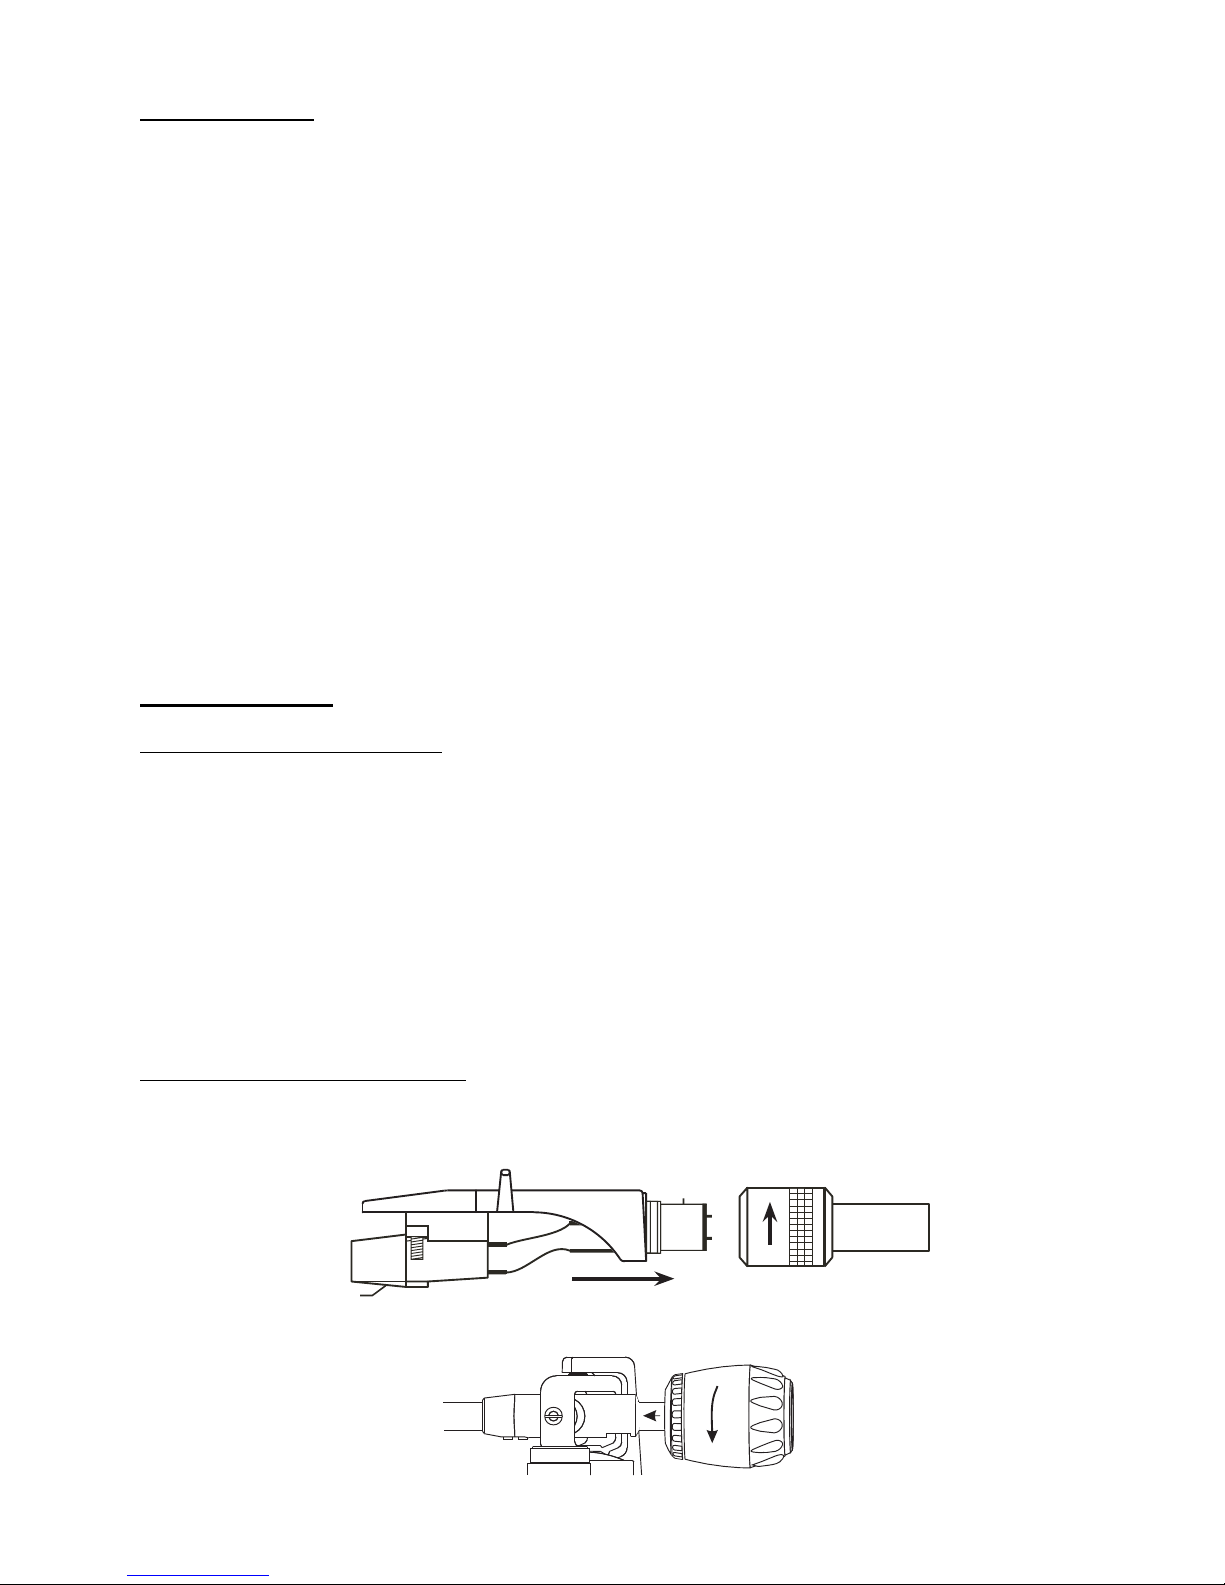
A. Headshell :Insert the Headshell into the front end of the Tonearm Assembly. While holding Headshell firmly into
he front end of the tonearm assembly, turn the Headshell Locking Nut counter-clockwise to firmly securethe
Headshell to Tonearm Assembly .
B. Counterweight : Locate and remove the tonearm Counterweight from the packaging. Slide Counterweight onto
therear of the Tonearm. Turn it lightly and it will screw onto the rear shaft of the tonearm.
Page 7
7
AUDACITY SOFTWARE OVERVIEW
Audacity is free software, licensed under the GNU General Public License(GPL). More information as well as
open source code can be found on the web at http://audacity.sourceforge.net
/
Note : Please ensure you have installed the software before starting.
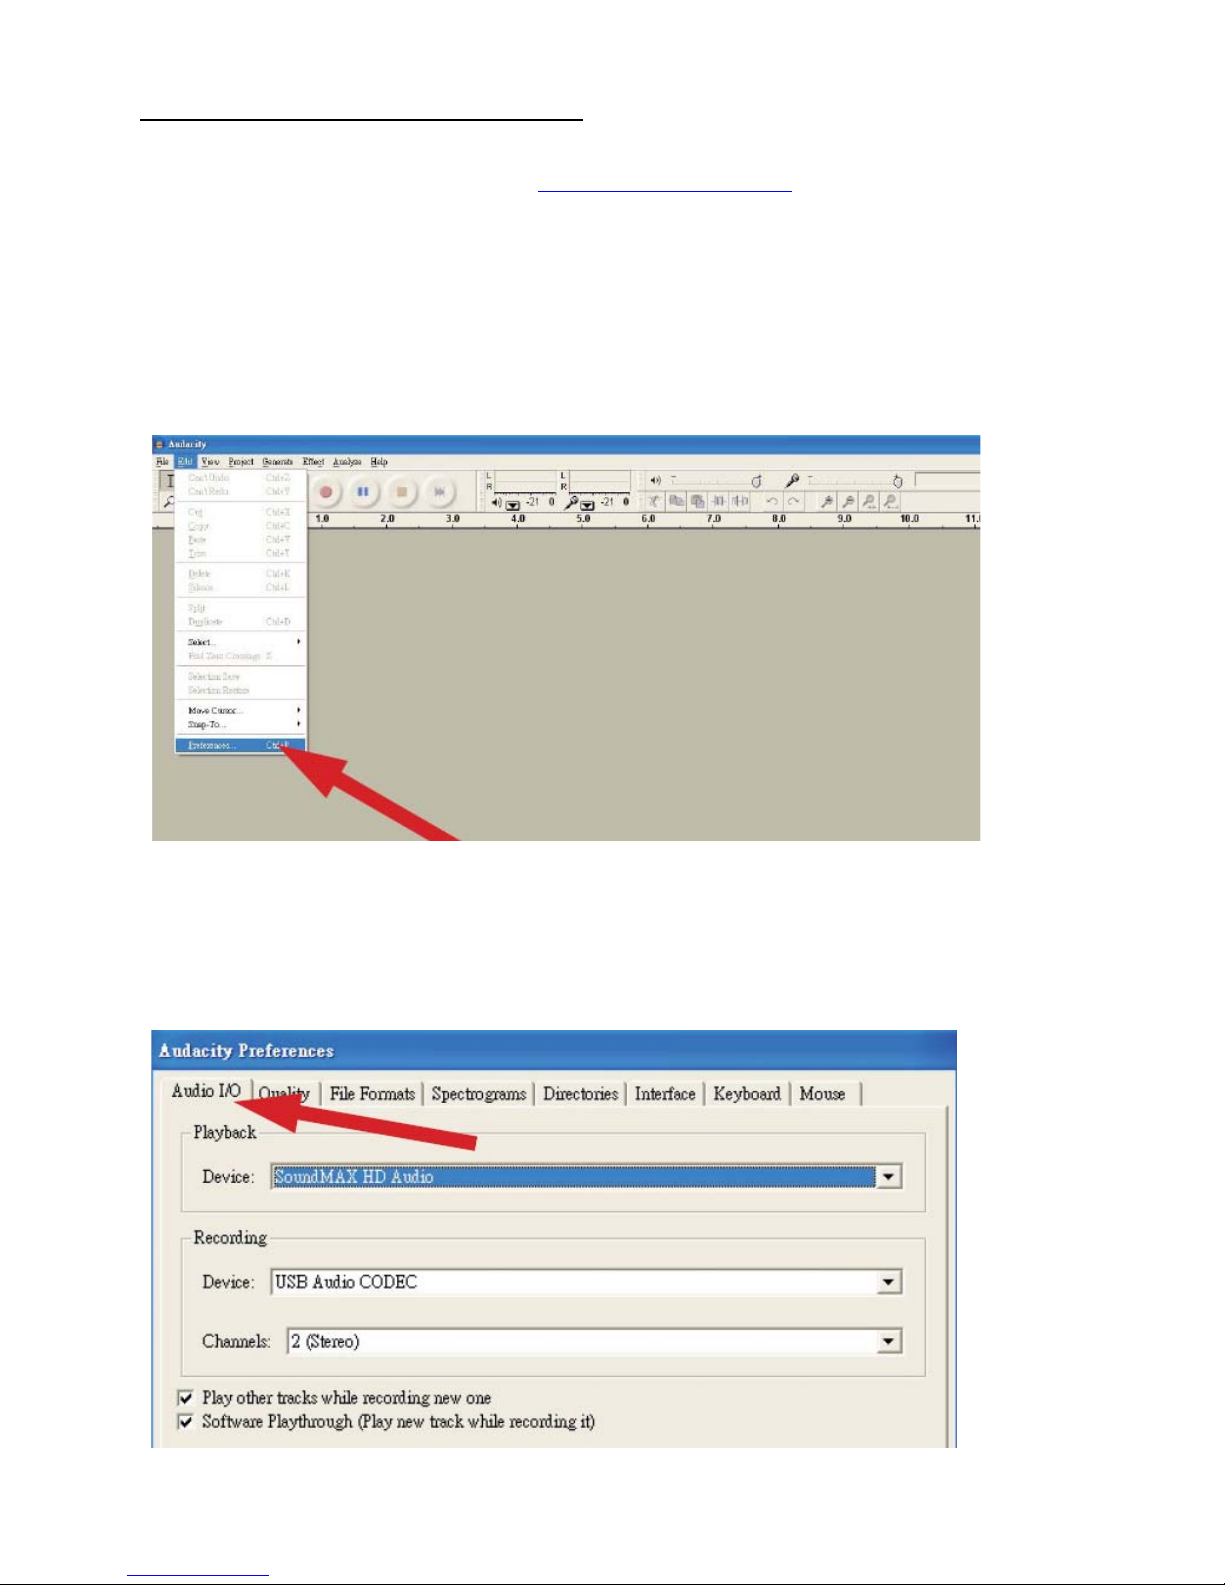
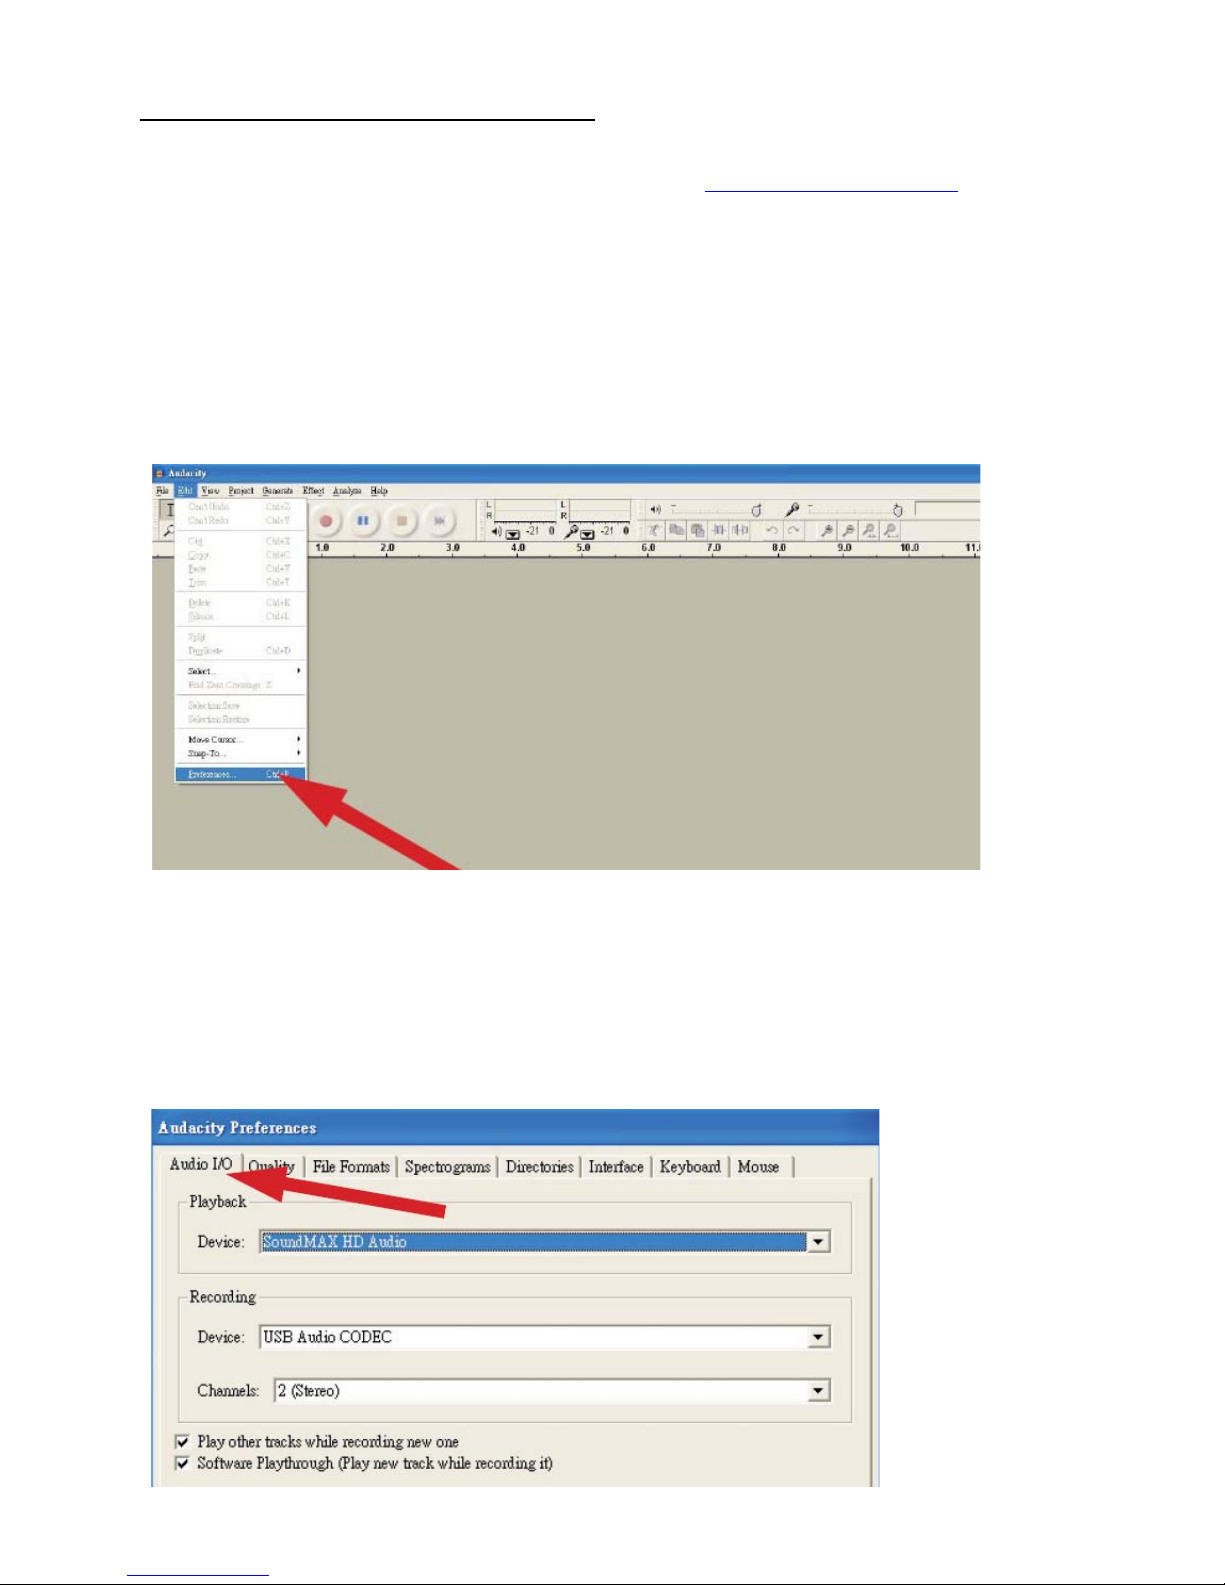
Setting up your PC to work with Audacity
1. Connect an input source to the unit
2 Connect the USB lead to your computer
3. Install the Audacity recording software
4. Open the Audacity program
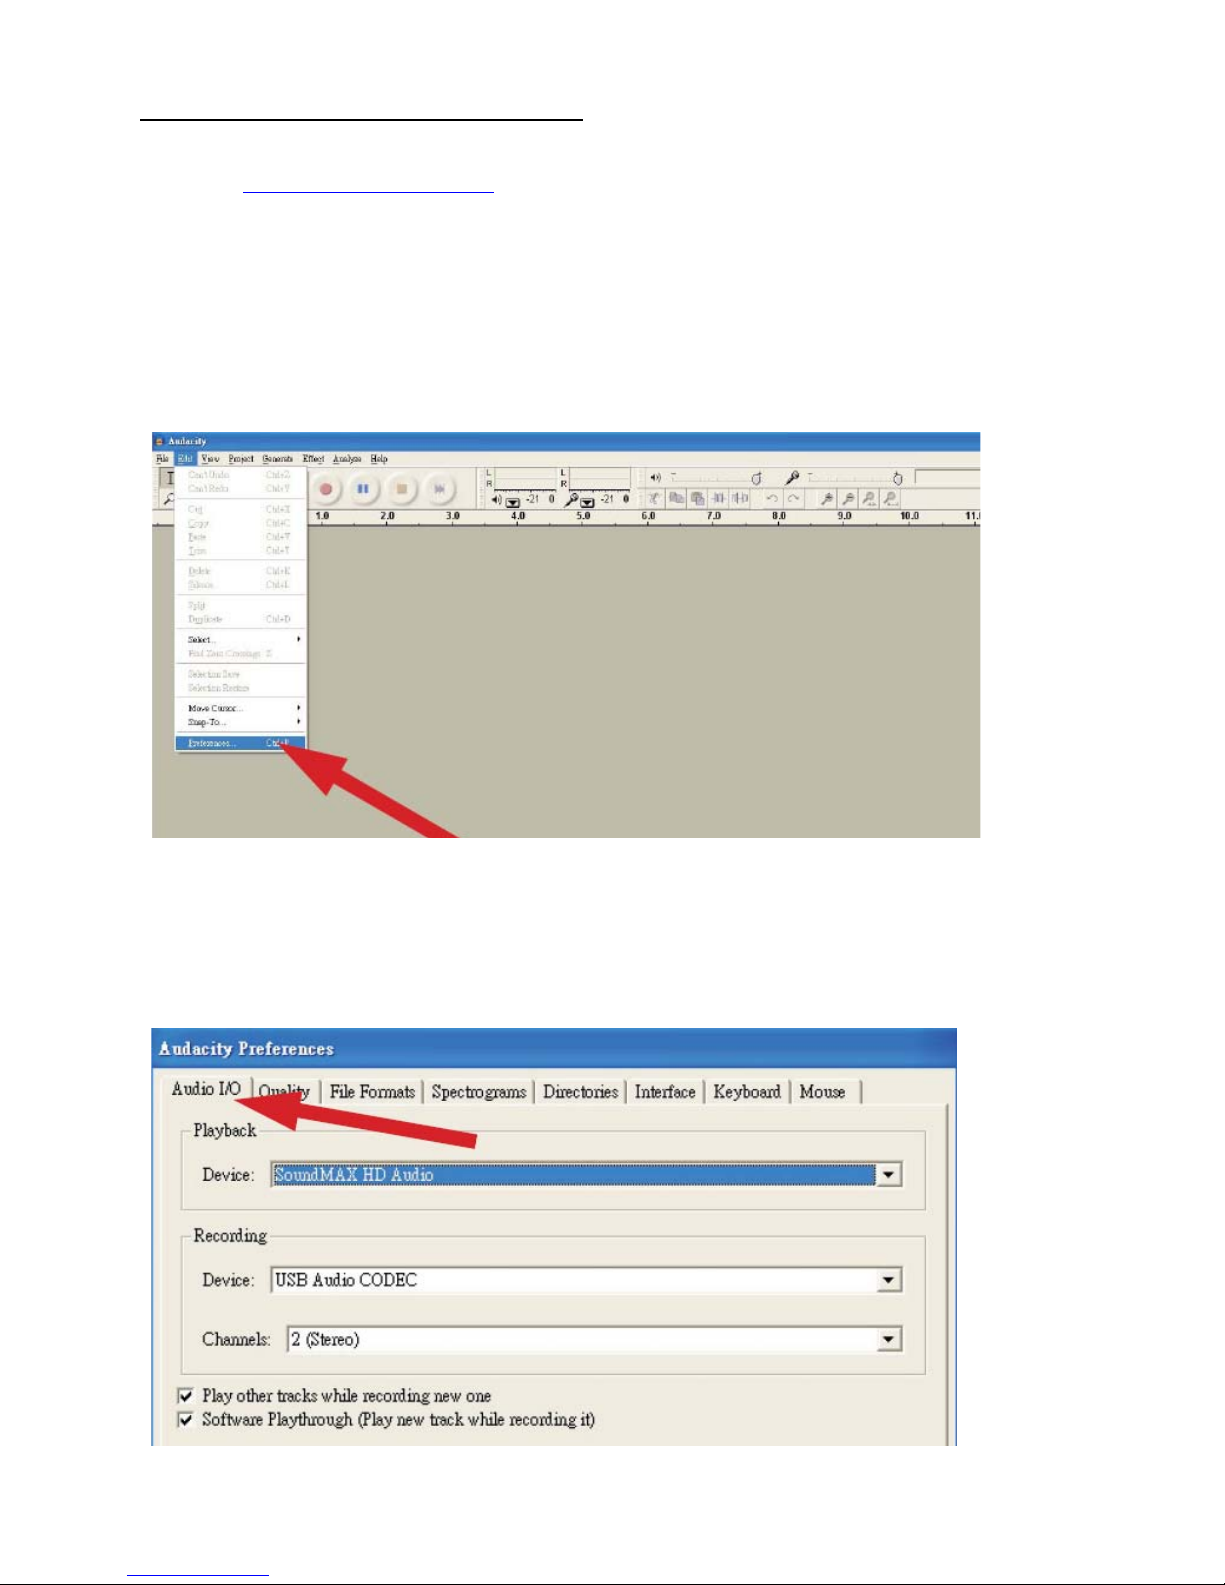
5. Select
Preference
from the Edit tab in the Audacity menu
6. Select
Audio I/O
tab at the top left
• Under Playback, Device, select
your internal sound card
• Under Recording, Device, select
USB Audio CODEC
• Under Recording, Channels, select
2 (Stereo)
• Check the box marked
Play other tracks while recording new one
• Check the box marked
Software Playthrough
Page 8
8
AUDACITY SOFTWARE OVERVIEW
Recording Albums with Audacity
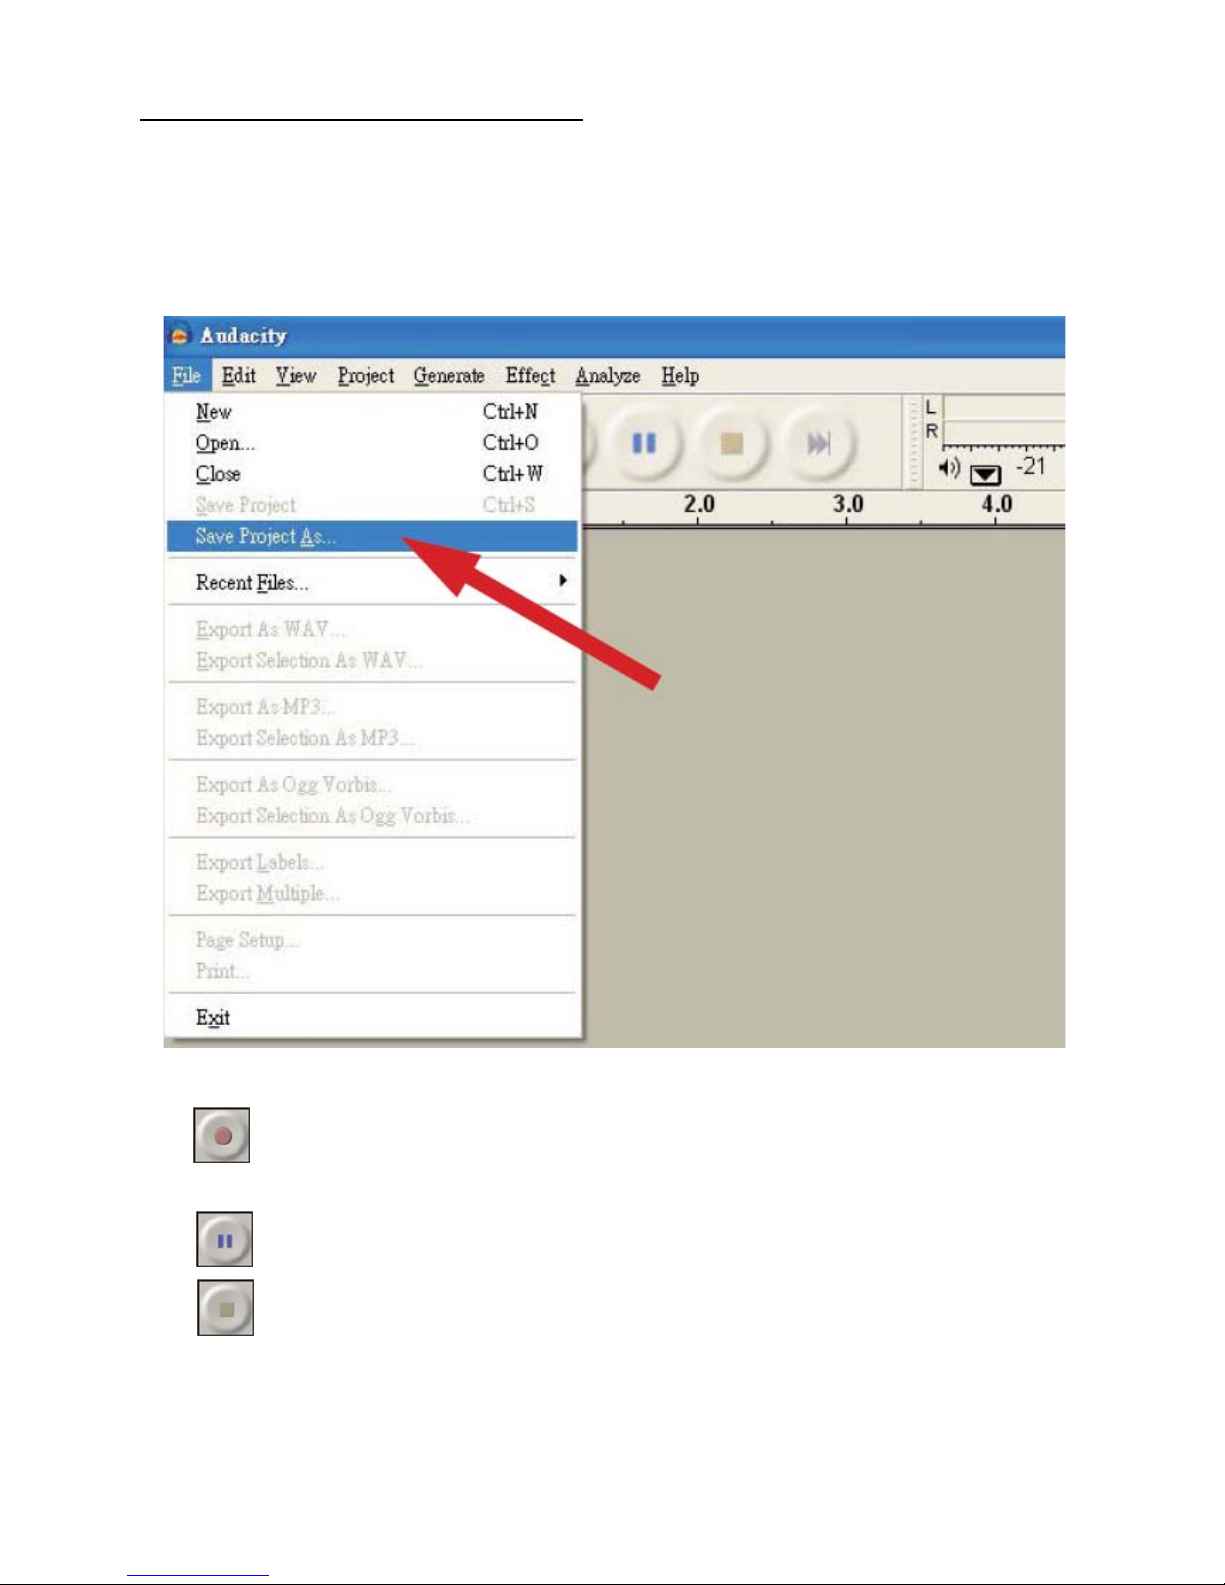
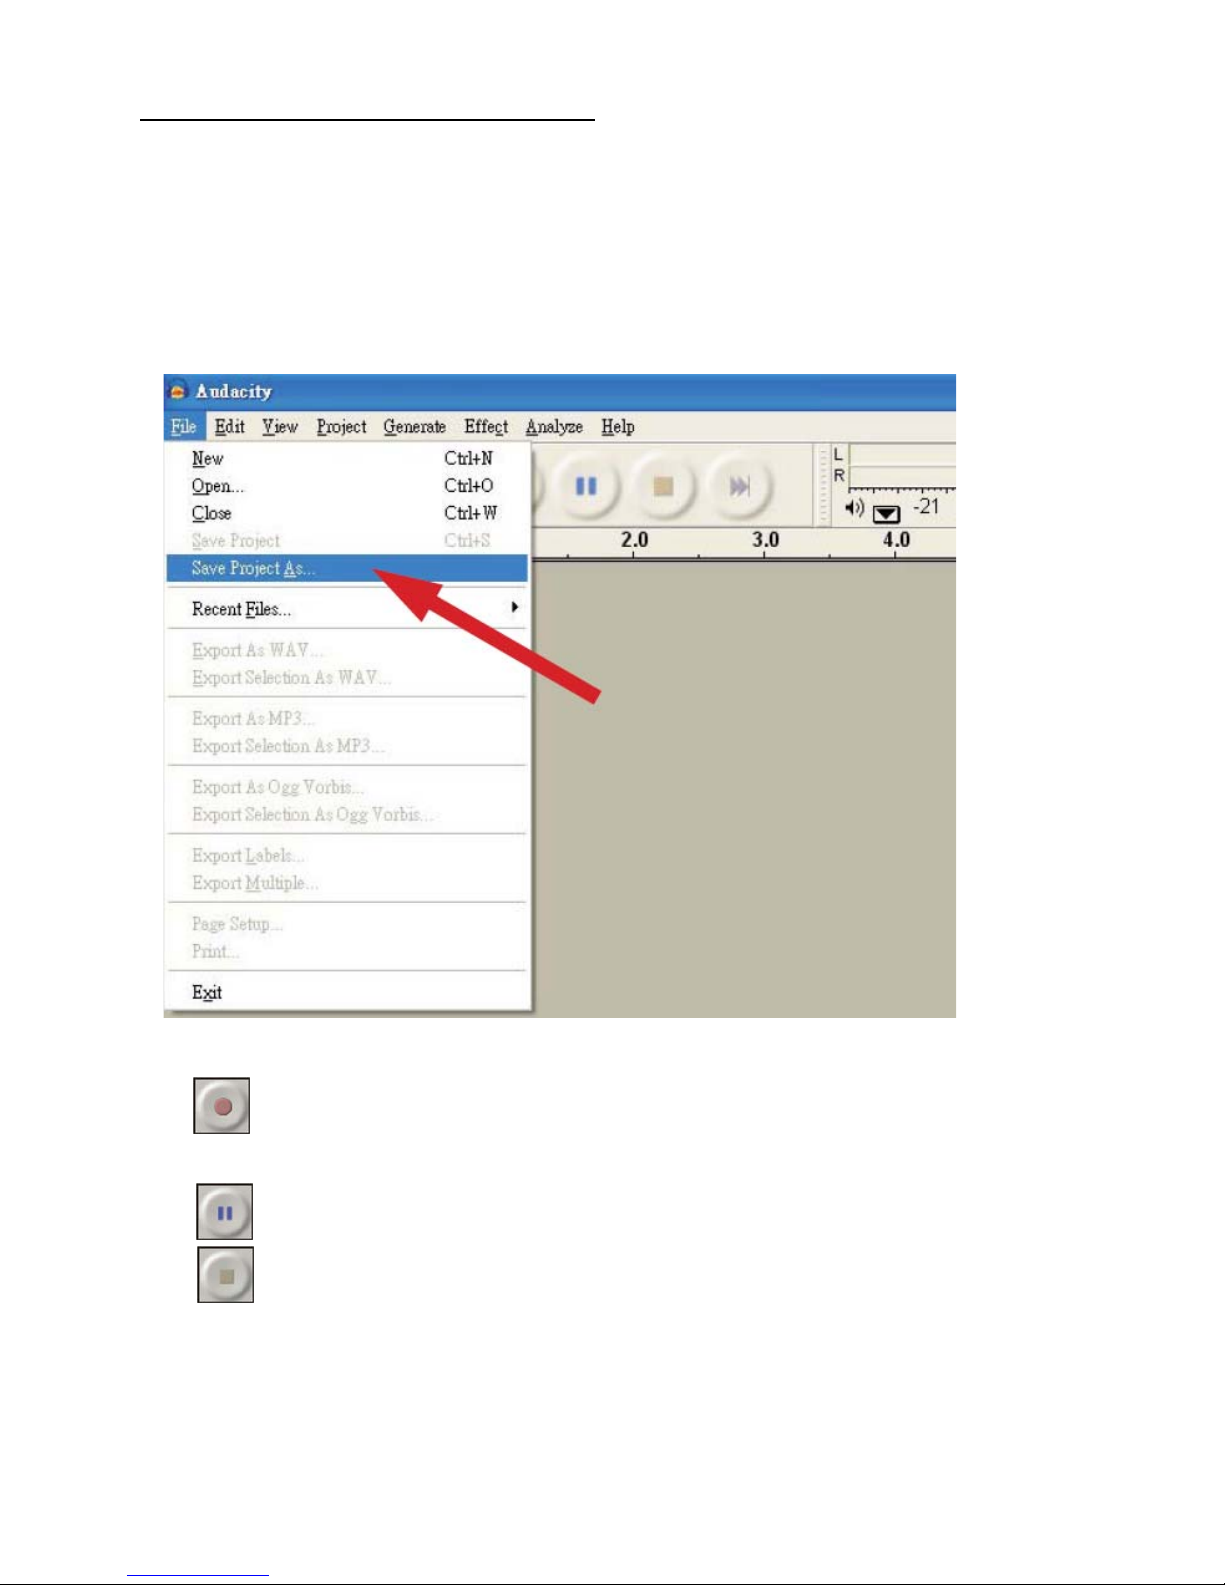
1. Saving a project
• Audacity writes all the changed and recorded audio to a directory called Projectname_data, which is loc a te d
right where you saved the project file itself
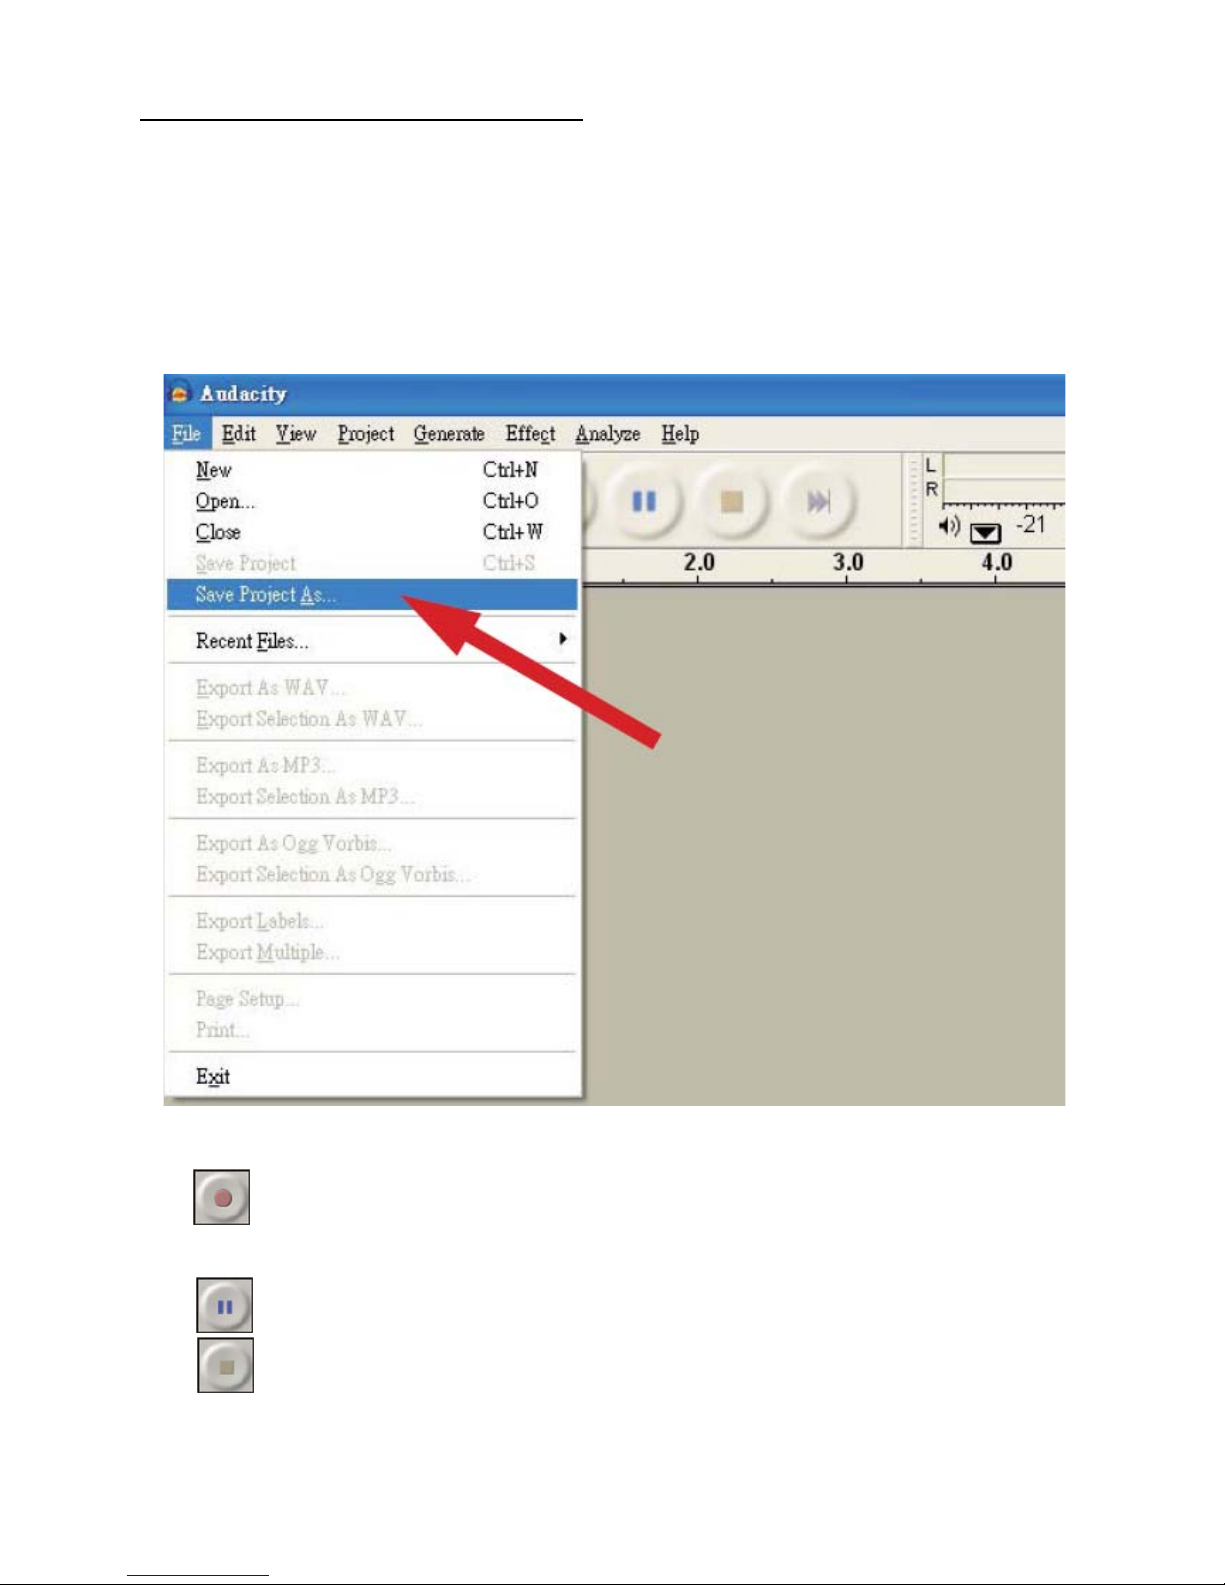
• Thus, select Save project as from your Audacity File tab and choose a location and filename for your project
• Please note that when you startup Audacity fresh, only the “Save As...” menu option is available.
2. How to record
• Set your USB turntable up to play the song or album you want to record
•
Click on the red Record button to b to begin recording.
• Lower tone arm on USB turntable onto album and track you want to record.
•
Click on the blue Pause button to pause the recording. Press it again to continue.
y
Click on the yellow Stop button
That's it. You can now play around with your recording and explore the editing capabilities of Audacity .
Remember that you can use the Undo function almost without limits while the project is open.
NOTE: CD's cannot be burned directly from the Audacity application. Other CD burning applications should be
used.
Page 9

9
MANUEL D’UTILISATION
Vinyl USB 50
INSTRUCTIONS DE SÉCURITÉ
• Lire ces instructions - toutes consignes d sécurité et d'utilisation devraient être lues avant que ce produit soit
utilisé.
• Garder ces instructions - les consignes d'utilisation devraient être garder pour une future consultation.
• Observer tous les avertissements - tous les avertissements sur l'appareil et les consignes d'utilisation devraient
être respectés.
• Suivre toutes les instructions - toutes les instructions de fonctionnement et d'utilisation devraient être suivies.
• Pour réduire le risque du feu ou de décharge électrique, ne pas exposer cet appareil à la pluie ou à l'humidité.
Ne pas exposé l'appareil à l’éclaboussure d’eau, ne pas placés aucuns objets remplis de liquides, tels que des
vases, sur l'appareil.
• Transporte en charrette et des stands - l'appareil dev rait être employé seuleme nt avec un chariot ou un stand qui
est recommandé par le fabricant.
Une combinaison d'appareils et de chariot devrait être déplacée avec soin. Les arrêts rapides,
la force excessive, et les surfaces inégales peuvent faire retourner la combinaison d'appareils
et de chariot.
•
Support de mur ou de plafond - le produit devrait être monté à un mur ou à un plafond seulement comme
recommandé par le fabricant.
•
La chaleur - l'appareil devrait être situé loin des sources de chaleur telles que des radiateurs, des fourneaux, ou
d'autres appareils (amplificateurs y compris) tous ce qui produit de la chaleur.
•
Sources d'énergie - ce produit devrait être alimenté seulement à partir du type de source d'énergie indiqué sur
l'étiquette. Si vous n'êtes pas sûr du type d'alimentation d'énergie à votre maison, consulter votre marchand de
produit ou compagnie locale de d’électricité. Pour des produits prévus pour fonctionner à partir de la puissance
de batterie, ou d'autres sources, se référer les consignes d'utilisation.
•
Masse ou polarisation - Cette prise s'adaptera dans la prise de courant seulement. C'est un dispositif de sûreté.
Si vous ne pouvez pas insérer la prise entièrement dans la sortie, essayé de renverser la prise. Si la prise ne
s'adapte pas, contacter votre électricien pour remplacer la prise.
•
Cordon Protection de Puissance – la câble d’alimentation devrait être manipulé de sorte qu'elles ne soient pas
susceptibles d'être marché dessus ou pincées par des articles placés sur ou contre eux.
•
Nettoyage - l'appareil devrait être nettoyé seulement comme recommandé par le fabricant.
Nettoyer en essuyant avec un tissu humide. Éviter de mettre de l'eau à l'intérieur de l'appareil.
•
La tension AC. unités de puissance - avant de renvoyer l'unité réparée à l'utilisateur, utiliser un ohmmètre pour
mesurer à partir des deux lames de prise à AC. à tout es les parties métalliques exposées. La résistance devrait
être plus de 100.000 ohms.
•
Périodes de non-usage - le cordon de secteur de l'appareil devrait être débranché de la prise secteur une fois
laissé inutilisé pendant une longue période.
•
Entrée d'objet et de liquide - le soin devrait être pris de sorte que les objets ne tombent p as et que les li quides ne
soient pas renversés dans l’appareil par les ouvertures.
•
Dommages exigeant le service - l'appareil devrait être entretenu par le personnel de service qualifié quand:
- le cordon d’alimentation ou la prise a été endommagée ; ou
- Les objets sont tombés, ou le liquide a été renversé dans l'appareil ; ou
- L'appareil a été exposé à la pluie ; ou
- L'appareil ne semble pas fonctionner normalement ou L'appareil a été lâché, ou la clôture a été endommagée
•
Entretien - l'utilisateur ne devrait essayer d’intervenir sur l’appareil au delà de cela décrit dans les consignes
d'utilisation. Tout l'autre qui entretient devrait être mentionné a qualifié le personnel de service.
Page 10
10
•
Ventilation - des fentes et les ouvertures dans le coffret sont prvu pour la ventilation et pour assurer le bon
fonctionnement du produit et pour la protéger contre la surchauffe, et ces ouvertures ne doivent pas être
bloquées ou couvertes. Les ouvertures devraient ne jamais être bloqué es en plaça nt le produit sur un lit, l e sofa,
la couverture, ou toute autre surface semblable. Ce produit ne devrait pas être placé dans une installation
intégrée telle qu'une bibliothèque ou le support à moins que la ventilation appropriée soit les instructions du
fabricant ont été respectées.
•
Attachments - Do not use attachments not recommended by the product manufacturer as they may cause
hazards.
•
Accessoires - ne pas placer ce produit sur un chariot, un stand, un trépied, ou une table instable. Le produit peut
tomber, causant des dommages sérieux à un enfant ou à un adulte, et sérieux dégât le produit. Utiliser
seulement avec un chariot, un stand, un trépied, , ou une table recommandée par le fabricant, ou vendue avec
le produit. N'importe quel support du produit devrait suivre les instructions du fabricant, et devrait utiliser un
accessoire de support recommandé par le fabricant.
•
Foudre - pour la protection supplémentaire pour ce produit pendant la foudre, ou quand elle est laissée sans
surveillance et inutilisée pendant de longues périodes, débrancher de la prise murale et débrancher le système
d'antenne ou de câble. Ceci empêchera des dommages au produit dû aux monté es subites de foudre et de li gne
à haute tension.
•
Pièces de rechange - quand des pièces de rechange sont exigées, être sûr que le technicien de service a
employé des pièces de rechange indiquées par le fabricant ou a les mêmes caractéristiques que la partie
originale. Les substitutions non autorisées peuvent avoir comm e consé quence le feu, la décha rge électriqu e, ou
d'autres risques.
•
Le contrôle de sûreté - sur l'accomplissement de tout le service ou réparations à ce produit, demandent au
technicien de service d'exécuter des contrôles de sûreté pour déterminer que le produit est en condition de
fonctionnement appropriée.
ATTENTION: Pour réduire le risque de décharge électrique,
n'enlever aucun couvercle. Aucunes pièces utilisateur-utiles à
l'intérieur. Se référer l'entretien au personnel de service qualifié
seulement
Le flash de foudre avec le symbole de pointe de flèche dans la triangle équilatérale est prévu pour
alerter l'utilisation à la présence « de la tension dangereuse » non isolée dans la clôture du produit qui
peut être de la grandeur suffisante pour constituer un risque de décharge électri que.
Le point d'exclamation dans la triangle équilatérale est prévu pour alerter l'utilisateur à la présence
des instructions importantes d'opération et d'entretien (entretien) dans la littérature accompagnant cet
appareil.
ATTENTION
Pour empêcher la décharge électrique, ne pas utiliser cette prise polarisée avec une ralonge non adapté.
DO NOT OPEN
RISK OF ELECTRIC SHOCK
CAUTION
Page 11
11
CARACTERISTIQUES
TURNTABLE
Type manuel de 3 vitesses
Moteur 16 pole, 3 phase, moteur sans brosse DC
Mode d’entrainement Entrainement directe
Vitesses 33
1
/3 et 45 t/mn et 78rpm
Fonction d'USB USB rec. Function
Défaut de reproduction sonore et flottement Moins de 0.1% WRMS (JIS WTD) avec 33
1
/3rpm
Rapport de S/N Plus que 55dB (DIN-B)
Commandes de lancement +/- 10%,+/- 20%,+/-50%
GENERAL
Alimentation AC115/230V, 50/60Hz
Consomation 13.5 Watts
Dimensions 449 (W) x 370 (D) x 145 (H) mm
Poids 9.8 Kgs
NOTE:
Caractéristiques et conception sujet à la modification possible sans la communication préalable, due aux
améliorations.
AVANT EMPLO
Vérifier que les pièces suivantes sont incluses dans le paquet avec l'appareil:
• Manuel d’utilisation
• Adaptateur 45 rpm
• Lumière
• Plateau
• Câble RCA
•
Tête
• Contre poids
• Slipmat
• Cordon d’alimentation
• Câble USB
COMMANDE ET FONCTIONS
Page 12

12
COMMANDE ET FONCTIONS
1. BOUTON START/STOP
Appuyer sur ce bouton pour mettre en marche ou
arrêter le plateau.
2. PLATEAU
3. Moteur off
Appuyer sur le bouton pour activer l’arrêt du moteur,
la led clignotera.
Appuyer encore sur le bouton pour déactiver la
fonction.
4. LUMIÈRE CIBLE
La lumière de cible s'allumera.
5. VITESSES Du PLATEAU
pour 33 rpm – appuyer 33
pour 45 rpm – appuyer 45
pour 78 rpm – appuyer 33 et 45 en meme temps
Pour retourner au mode 33 ou à mode de lecture
45rpm, appuyer juste sur le bouton désiré.
6. INVERSE
Ce bouton est utilisé pour inverser le sens de rotation
du plateau.
7. Sélection du pitch
Régler le pitch . Appuyer sur le bouton pour commuter
à +-10% la lecture, encore une pression au
commutateur à +-20% et encore pour +-50%.
8. QUARTZ
on - tiendra la vitesse à 0%
off - permettra l'utilisation du pitch.
9. VERROUDUPORTECELLULE
Insérer le porte cellule dans le bras et tourner le verrou
comme indiqué ci-dessous.
10. Curseur pitch
Utiliser le pitch pour changer la vitesse du plateau
quand l'indicateur de s’éclaire.
11. TONEARM EN FORM E DE S
12. ADAPTEUR DE 45 T/MN
Placer sur l'axe central pour lire les disques 7’’ avec
les grands trous centraux.
13. BOUTON anti-patinage
Quand un disque joue, une force est produite
dessinant l'aiguille vers le centre du disque. Cette
commande compense cette force et doit être placée à
la même valeur que l'anneau de pression de
contrepoids.
14. CONTREPOIDS
L'ajustement crée la pression de haut en bas
appropriée de l'aiguille au disque. Attacher maintenant
en glissant le contrepoids sur l'arrière du bras de
tonalité. Le tordre légèrement et il vissera sur l'arbre
arrière du bras de tonalité.
15. Bouton d’alimentation
Ce bouton alimente ou pas l’appareil.
16. CORDON DE SECTEUR
Utiliser le cordon de secteur inclus.
17. USB SOCKET
Connexion USB (Câble USB limité à 3M).
18. Sortie PHONO
Connecter la platine sur une entrée phono avec le
câble cinch/cinch. Assurez-vous de placer
l'interrupteur phono/line sur la bonne position.
19. INTERRUPTEUR PHONO/LINE
Suivant la position de l'interrupteur phono/line, vous
pouvez connecter la platine sur un niveau d'entrée
phono ou line.
20. Guide bras
Permet d’élevé le bras au-dessus de la surface du
disque.
21. Support bras
Permet de maintenir en position pendant le transport.
22. SÉLECTEUR DE TENSION AC
S'assurer que le sélecteur de tension est réglé
correctement.
Page 13
13
OPERATIONS
1. Appuyer le bouton d’alimentation.
2. Insérer la lumière de cible pour l'éclairer l'aiguille.
3. Placer un disque sur la feutrine du plateau
tourne-disques. En lisant un disque 45rpm avec
un grand trou central ; placer l'adapteur de 45 t/mn
sur l'axe central.
4. Placer la vitesse de rotation (33/45/78) sur le
disque.
5. Libérer la bride de bras.
6. Placer le levier positionnant dans la position
haute.
7. Appuyer sur le bouton start / stop et le plateau du
tourne-disques commencera pour tourner.
8. Déplacer l'excédent de bras de tonalité la
cannelure désirée.
9. Placer le levier positionnant à la position basse, le
bras de tonalité descendra lentement sur.
Le disque et la lecture commence.
10. Régler le pitch sur la vitesse désiré.
Les options sont +-10%, +-20% ou +-50%.
1 1. Ajuster la vitesse, relever o u baisser le pitch pour
ajuster la vitesse.
12. Pour suspendre la lecture, soulever le bras de
tonalité.
13. Quand la lecture est fini, soulever le levier,
déplacer le bras de tonalité au support et fixer le
bras de tonalité avec le support.
14. Appuyer sur le bouton start / stop pour arrêter la
rotation de plateau.
15. Appuyer le bouton d’alimentation pour éteindre
l’appareil.
INSTALLATION
Tête et Assemblage de la cartouche
En installant une cartouche, se référer aux consignes d'utilisation de cette cartouche. Pendant l'installation,
attacher le protecteur d'aiguille pour garder le bout d'aiguille des dommages.
Relier les fils de la tête aux bornes de la cartouche. Les bornes des cartouches et des fils la tête sont de code à
couleurs. Relier chaque fil aux bornes de cartouche de la même couleur.
Blanc (L+)………..canal gauche +
Blue (L-)…………canal gauche Rouge (R+)………canal droit +
Vert (R-) …………canal droit -
Assemblage du plateau tourne-disques
A. Tête: Insérer la tête dans l'embout avant d’assemblée le bras. Tout en tenant la tête fermement dans l’e mbout à
l’avant du bras, tourner l'écrou de fermeture de la tête dans le sens contraire des aiguilles d'une montre.
B. Contrepoids: Localiser et enlever le contrepoids du bras de l'emballage. Glisser le contrepoids sur le bras. Le
tourner légèrement et il vissera sur l'arbre arrière du bras.
Page 14
14
AUDACITY SOFTWARE OVERVIEW
Logiciel gratuit: Audacity sous licence GNU General Public License (GPL). Pour plus d’information consulter le
site internet:http://audacity.sourceforge.net
/
Note : Please ensure you have installed the software before starting.
PROCEDURE ET REGLAGE
1. Connectez l’appareil à une source d’entrée
2. Connectez le câble USB vers l’ordinateur
3. Installez le logiciel d’enregistrement Audacity
4. Ouvrir le programme Audacity
5. Sélectionner
Préférence
dans le menu edit du logiciel Audacity
6. Sélectionner
Audio I/O
en haut à gauche
• En lecture, sélectioner votre carte son interne
• En enregistrement, sélectionner le
CODEC Audio USB
• En enregistrement, sélectionner
2 (stereo)
• Vérifier la boite, lire d’autre piste tout en enregistrant une nouvelle piste
• Vérifier la boite, logiciel
Page 15
15
AUDACITY SOFTWARE OVERVIEW
Enregistrer des albums avec Audacity
1. Sauver un projet
• Audacity écrit tout changement et enregistrement dans un repertoire appelé Projectname_data, qui est situé
ou vous avez enregistré le projet
• Choisir suver le projet comme à partir de votre étiquette de dossier et choisir un endroit et un nom de fichier
pour votre projet
•Veuillez noter quand vous démarré Audacity, seulement « sauv er sous… » dans l'option de menu est
disponible.
2. Comment enregistrer
• Placer votre tourne-disques USB jusqu'à la lecture de la chanson ou l'album que vous voulez enregistrer
y
Clic sur le bouton record rouge pour commencer à enregistrer.
• Abaisser le bras sur le plateau tourne-disques USB sur l'album et la piste que vous souhaité
enregistrer.
y
Clic sur la touche attente bleue pour faire une pause à l'enregistrement.
Le presser encore pour continuer.
y
Clic sur la touche "ARRÊT" jaune.
Voilà. Vous pouvez maintenant jouer avec votre enregistrement et explorer les possibilités de édition de Audacity. Se
rappeler que vous pouvez employer la fonction de annulation presque sans limites tandis que le projet est ouvert.
NOTE: Des CD ne peuvent pas être gravé directement de l'application Audacity. D'au tres applica tions de gravure d e
CD devraient être employées.
Page 16

16
BEDIENUNGSANLEITUNG
Vinyl USB 50
WICHTIGE SICHERHEITSHINWEISE
• Lesen Sie bitte alle Warn- und Bedienungs-hinwei se sorgfältig durch, bevor Sie dieses Gerät in Betrieb nehmen.
• Bewahren Sie diese Bedienungsanleitung für evtl. später auftauchende Fragen sorgfältig auf.
• Entfernen Sie bitte nicht die Warnhinw eise am Gerät.
• Befolgen Sie bitte alle Hinweise in dieser Bedie-nungsanleitung genau.
• Nutzen Sie dieses Gerät niemals in der Nähe von feuchten Stellen wie z.B. Waschbecken, Badewannen oder
Teichen und Seen.
• Dieses Gerät sollte nur in solchen Einbauhalterun gen eingebaut werd en, die der Herst eller zum T ransp ort empfi ehlt.
Achten Sie beim Transport darauf, dass das Gerät ausreichend gesichert ist! Unebene
Oberflächen oder plötzliche Bremsbewegungen können zum Umkippen der Einbauhalterung,
worin das Gerät eingebaut wurde, führen und es beschädigen.
•
Der Einbau in eine Einbauhalterung darf nur so vorgenommen werden, wie es vom Hersteller vorgesehen ist.
•
Das Gerät muss von anderen, Wärme verursachenden Geräten wie Endstufen, Heizkörpern usw. ferngehalten
werden.
•
Dieses Gerät darf nur mit der Betriebsspannung versorgt werden, die der Hersteller vorsi eht. Wenn Sie sich nicht sicher
sind, ob Ihr Stromnetz für dieses Produkt geeignet ist, kontaktieren Sie bitte Ihren Fachhändler. Bei Geräten, die
batteriebetrieben werden, nehmen Sie sich die entspreche nde Bedie-nungsanleitun g zur Hilfe.
•
Dieses Produkt verfügt möglicherweise über einen Schutzkontakt Stecker, der nur in einer Position in die
Steckdose pa sst. Dies ist ein Sicherheit smerkmal zur Erdung des P rodukt s. Ent f ernen Sie niemals Bauteile vom
Stecker, damit er besser in die Steckdose passt!
•
Achten Sie im Betrieb darauf, dass das Stromanschlusskabel nicht eingeklemmt oder eingeschnitten werden
kann. Verlegen Sie das Kabel immer so, dass es von keinen anderen Geräten beschädigt werden kann.
•
Reinigung des Gerätes: Reinigen Sie das Gerät nur wie vom Hersteller vorgesehen.
Nutzen Sie hierfür einen weichen, leicht feuchten Lappen und wischen Sie das Gerät damit vorsichtig ab.
Achten Sie darauf, dass niemals Feuchtigkeit oder gar Flüssigkeit ins Gerätein nere gelangen kann!
•
Bevor Sie Wechselstromgeräte nach einer Reparatur wieder in Betrieb nehmen, messen Sie an allen
metallischen Gehäuseteilen den Widerstand. Er sollte mehr als 100.000 Ohm betragen.
•
Wenn Sie das Gerät für längere Zeit nicht benutzen wollen, ziehe n Sie den Netzstecker vom Stromnetz ab.
•
Achten Sie darauf, dass das Gerät nicht in Flüssigkeiten fällt, so dass diese ins Gehäuseinnere eindringen
könnte.
•
Das Gerät sollte von einem autori sierte m Servicet echniker gewart et werden we nn:
- Das Stromanschlu sskabel oder der Stecker beschädigt wurde oder
- Das Gerät heruntergefallen ist oder Flüssigkeit eingedrungen i st oder
- Das Gerät Regen ausgesetzt war oder
- Das Gerät nicht fehlerfrei arbeitet bzw. Fehler im Betrieb verursacht oder
- Das Gerät geworfen wurde oder das Gehäuse sichtbar beschädi gt ist
•
Nehmen Sie keine Reparatur- oder Wartungsarbeiten vor, die nicht ausdrücklich in dieser Anleitung aufgeführt
sind. Kontaktieren Sie für solche Arbeiten immer Ihren Fachhändler.
•
Lüftungsschlitze und Öffnungen am Gerät dienen zur Kühlung während des Betriebes. Die Kühlluftzufuhr darf
niemals durch zu dicht am Gerät stehende Gegenstände blockiert werden. Achten Sie bei der (Fest-) Installation
darauf, dass eine ausreichende Kühlluftzufuhr stets gewährleistet ist. Nutzen Sie das Gerät nicht auf
Gegenständen wie z.B. Sofa oder Bett, da dies die Lüftungsschlitze blockiert und verdreckt. Sollten die
Lüftungsschlitze verstaubt oder verdreckt sein, reinigen Sie diese bitte.
•
Benutzen Sie kein Zubehör, welches nicht vom Hersteller empfohlen wurde. Es könnte Schäden verursachen.
Page 17
17
•
Benutzen Sie dieses Gerät nicht auf Gegenständen wie wackeligen Tischen oder Ähnlichem. Durch ungewolltes
Herunterfallen kann nicht nur das Gerät stark beschädigt oder Zerstört werden, sondern es können auch
Personen oder Kinder verletzt werden. Bauen Sie das Gerät nur so auf und ein, wie es vom Hersteller
empfohlen wird oder in Einbauhalterungen die mit diesem Gerät angeboten oder verkauft werden. Fragen Sie
ggf. Ihren Fachhändler nach geeigneten Einbauhalterungen.
•
Zu Ihrer eigenen Sicherheit trennen Sie das Gerät bei Gewitter oder langen Nutzungspausen vom Stromnetz.
Somit gewährleisten Sie, dass auch andere Geräte nicht in Mitleidenschaft gezogen werden und das Gerät
lange und zuverlässig funktioniert.
•
Falls Ersatzteile erforderlich sind, achten Sie darauf, dass nur vom Hersteller empfohlene oder baugleiche Teile
verwendet werden. Lassen Sie den Einbau nur durch Ihren Servicetechniker durchführen.
•
Kontaktieren Sie zur optimalen Sicherheit von Zeit zu Zeit Ihren Fachhändler und lassen Sie ihn einen
Sicherheitscheck durchführen. Solche kurzen Checks sind in der Regel immer kostenlos und tragen erheblich
zur Sicherheit im Betrieb bei.
ACHTUNG: Um das Risiko eines elektrischen Stromschlags zu
minimieren, entfernen Sie bitte keine Gehäusedeckel!
Gefährliche Betriebsspannung im Gehäuseinnern kann
lebensgefährlich für den Menschen sein. Überlassen Sie evtl.
Reparaturen ausschließlich qualifiziertem Fachpersonal!.
ACHTUNG: Um einen elektrischen Schlag zu vermeiden, öffnen Sie niemals das Gerät! Hohe
Betriebsspannung im Innern des Gerätes kann für den Menschen lebensg efährlich sein! Schü tzen Sie
das Gerät unbedingt vor Feuchtigkeit!
Dieses Symbol weist Sie darauf hin, dass der Betrieb dieses Gerätes unbedingt das Lesen der
Bedienungsanleitung erfordert. Unsachgemäße Anwendung birgt Gefahren für Mensch und Umwelt
und kann zu schweren gesundheitlichen Schäden führen.
ACHTUNG
Um einen lebensgefährlichen Stromschlag zu verhindern, nutzen Sie bitte nur Verlängerungskabel zum
Anschluss an das St romnetz, wenn diese exakt passgenau sind.
DO NOT OPEN
RISK OF ELECTRIC SHOCK
CAUTION
Page 18
18
EIGENSCHAFTEN
PLATTENSPIELER
Bauart Manuell, 3 Geschwindigkeiten
Motor Bürstenloser Gleichstrommotor , 16-polig, 3 Phasen
Antriebsart Direktantrieb
Geschwindigkeiten 33
1
/3, 45 und 78 RPM
USB Funktion USB Aufnahme Funktion
Gleichlaufschwankungen Weniger als 0,1 % WRMS (JIS WTD) bei 33 1/3 RPM
Geräuschspannungsabstand Mehr als 55dB (DIN-B)
Pitch Geschwindigkeiten +/- 10%,+/- 20%,+/-50%
ALLGEMEIN
Stromversorgung AC115/230V, 50/60Hz
Stromverbrauch 13.5 Watts
Abmessungen (BxHxT) 449 (W) x 370 (D) x 145 (H) mm
Gewich 9.8 Kgs
Hinweis
: Technische Änderungen ohne vorherige Ankündigung und Irrtümer vorbehalten.
VOR DEM BENUTZEN
Bitte überprüfen Sie, ob folgende Teile im Lieferumfang enthalten sind:
• Bedienungsanleitung
• 45 RPM Adapter
• LED-Nadelbeleuchtung
• Plattenteller
• RCA (Cinch) Kabel
•
Headshell
• Kontergewicht
• Slipmat
• Stromkabel
•
USB Kabel
BEDIENELEMENTE UND FUNKTIONEN
Page 19

19
BEDIENELEMENTE UND FUNKTIONEN
1. Start/Stop Schalter
Drücken Sie diesen Knopf um den Plattenteller zu
starten oder zu stoppen.
2. Plattenteller
3. Motor Aus
Drücken Sie diesen Taster, um den Motor
Abzuschalten. Die entsprechende LED blinkt.
Drücken Sie die Taste erneut, um die Funktion Wieder
zu deaktivieren.
4. Nadelbeleuchtung (Target Light)
Bringen Sie die Nadelbeleuchtung an, damit sie Bei
Dunkelheit das Arb eiten erleichtert.
5. Plattenteller Geschwindigkeiten
Für 33 RPM drücken Sie: 33
Für 45 RPM drücken Sie: 45
Für 78 RPM drücken Sie: 33 und 45 gleichzeitig
Um zu 33 oder 45 RPM zurückzukehren drücken Sie
einfach den gewünschten Taster.
6. REVERSE
Dieser Taster dient dazu, den Plattenteller Rückwärts
laufen zu lassen.
7. Pitch Auswahl
Dieser Taster dient dazu, die Pitch Geschwindig-keit
auszuwählen. Drücken Sie ihn, um den Be- reich +/10% zu aktivieren. Drücken Sie ihn erneut, um den
Bereich +/- 20% zu aktivieren und drücken Sie ihn
noch einmal, um den Bereich +/- 50% zu aktivieren.
8. QUARTZ
Funktion ein: Hält die Geschwindigkeit bei 0%
Funktion aus: Ermöglicht die Funktion Pitch.
9. Headshell Verschluss
Montieren Sie das System, indem Sie es auf das
vordere Ende des Tonarmes stecken und den
Bajonettverschluss im Uhrzeigersinn verriegeln.
10. Pitch Regler
Benutzen Sie den Pitch Regler, um die
Geschwindigkeit des Plattentellers zu ändern.
11. S-förmiger Tonarm
12. 45 RPM Adapter
Nutzen Sie diesen Adapter um 7“ Platten mit
Gr0ßen Mittellöchern zu spielen.
13. Anti Skate Regler
Stellen Sie die Anti-Skating Regelung immer auf das
Gewicht des Nadeldrucks ein.
Lesen Sie bitte auch das Kapitel Aufbau.
14. Kontergewicht
Das Kontergewicht dient zum Einstellen des
Nadeldrucks. Wie das Kontergewicht ange-bracht wird,
lesen Sie bitte im Kapitel Aufbau
15. Hauptschalter
Dieser Schalter dient zum Ein- und Ausschal-ten des
Plattenspielers
16. Stromanschluss
Bitte verbinden Sie hier das Hauptstromkabel
17. USB port
USB Anschluss für USB Kabel mit einer max.
Länge von 3 Metern
18. Phono Ausgang
Schließen Sie den Plattenspieler an einen Phono oder
Line Anschluss eines Mischpultes an. Verwenden Sie
hierbei ein Cinch-Cinch Kabel (RCA). Versichern Sie
sich das der Phono/Line Schalter an Ihrem Mischpult
in der richtigen Position steht.
19. Headshell
Abhängig von der Position des Phono/Line Schalters,
können Sie den Plattenspieler an jeden Phono oder
Line Eingang anschließen.
20. T onarm Lift
Der Tonarm Lift hebt den Tonarm von der Platte, um
ihn zurück zu setzen oder um ihn an einer anderen
Stelle abzusenken
21. T onarm Halter und -Klammer
Legen Sie den Tonarm hier ab und befestigen Sie ihn
mit der Klammer, wenn Sie das Gerät Transportieren
wollen oder die Platte wechseln möchten.
22. Spannungs wahlschalter
Gehen Sie sicher, dass die richtige Spannung für Ihr
Stromnetz ausgewählt wurde. In Deutschland muss
dieser Schalter auf 230V stehen.
Page 20
20
BEDIENUNG
1. Schalten Sie das Gerät mit dem Hauptschalter
ein.
2. Montieren Sie die Nadelbeleuchtung, um die
Nadel bei Dunkelheit besser erkennen zu können.
3. Legen Sie eine Platte auf den Plattenteller. Wenn
Sie eine 7“ Platte mit großer Öffnung in der Mitte
spielen möchten, nutzen Sie den 45 RPM Adapter
und legen Sie ihn in die Mitte des Plattentellers.
4. Stellen Sie die Plattenteller Geschwindigkeit auf
die entsprechende Platte ein
5. Lösen Sie die Halteklammer des Tonarmes
6. Heben Sie den Tonarm mit dem Tonarm Lift an
7. Drücken Sie den Start/Stop Taster, damit der
Plattenteller anfängt zu drehen
8. Bewegen Sie den Tonarm an die Stelle, wo die
Nadel aufsetzen soll.
9. Senken Sie den Tonarm Lift. Der Arm senkt sich
langsam ab und der T itel beginnt zu spielen
10. Stellen Sie den gewünschten Pitch Bereich ein.
Die Geschwindigkeit lässt sich um.
+/- 10%, +/- 20% oder +/- 50% verstellen.
11. Nachdem Sie den Bereich ausgewählt Haben,
können Sie mit Hilfe des Pitch Reglers die
gewünschte Geschwindigkeit einstellen.
12. Um die Wiedergabe zu unterbrechen, heben Sie
den Tonarm mit dem Tonarm Lift an
13. Wenn die Wiedergabe beendet ist, heben Sie den
Tonarm mit dem Tonarm Lift an und legen Sie den
Arm auf die Halterung. Befesti-gen Sie die
Halteklammer am Tonarm
14. Drücken Sie den Start/Stop Taster, um den
Plattenteller anzuhalten
15. Schalten Sie das Gerät mit dem Haupt- schalter
aus
AUFBAU
Headshell und System vorbereiten
Für die Installation eines Systems lesen Sie bitte immer auch die Hinweise des Herstellers eines Tonabnehmer
Systems durch. Entfernen Sie den Nadelschutz erst nach der Inst allation des Systems.
Verbindungen der Kabel bei Austausch eines Systems: Die Anschlüsse der meisten Systeme sind farblich gleich
gekennzeichnet. Verbinden Sie jedes Kabel mit dem farblich entsprechenden Anschluss.
Weiß (L+) .............……………....Linker Kanal +
Blau (L-) ....……………...............Linker Kanal -
Rot (R+) ..………….................... Rechter Kanal +
Grün (R-) .......…………….......... Rechter Kanal –
Plattenspieler vorereiten
A. Befestigen Sie das System mit den zugehörigen Schrauben an der Headshell.
Schrauben Sie die Headshell mit Hilfe der am Tonarm angebrachten Befestigungsschraube in das vordere Ende
des Tonarmes und halten Sie es dabei horizontal.
B. Schrauben Sie das Kontergewicht auf das hintere Ende des Tonarmes.
Page 21
21
AUDACITY SOFTWARE ÜBERSICHT
Audacity ist eine Gratis-Software, die durch die GNU General Public Lizenz (GPL) lizenziert ist. Weitere
Informationen sowie den Quellcode erhalten Sie auf der Webseite http://audacity.sourceforge.net
/
Hinweis: Bitte installieren Sie die Software, bevor Sie das Gerät aufbauen und mit dem Computer
verbinden.
PC für die Nutzung von Audacity vorbereiten
1. Verbinden Sie eine Audio Quelle mit der Einheit
2 Verbinden Sie das USB Kabel mit Ihrem Computer
3. Installieren Sie die Audacity Recording Software
4. Öffnen Sie das Audacity Programm
5. Wählen Sie den Punkt Einstellungen aus der Registerkarte Bearbeiten im Audacity Menü aus
6. Wählen Sie im sich nun öffnenden Menüfenster die Registerkarte
Audio E/A
oben links aus
• Unter dem Punkt “Wiedergabe” wählen bei “Gerät”
Ihre Soundkarte
• Unter dem Punkt “Aufnahme” wählen Sie bei „Gerät“
USB Audio CODEC
• Unter “Aufnahme” “Kanäle” wählen Sie bitte
2 (Stereo)
• Markieren Sie das Kästchen “Multiplay“ (bestehende Spuren während Aufnahme einer neuen anhören) mit
einem Haken
• Markieren Sie das Kästchen “Software Playthrough“ (neue Spuren während Aufnahme mithören) mit
einem Haken
Page 22
22
AUDACITY SOFTWARE ÜBERSICHT
Alben mit Audacity aufnehmen
1. Ein Projekt speichern
• Audacity schreibt alle Änderungen und Audio-Aufnahmen in einen Ordner namens „IhrProjektname_data“,
welcher exakt dort gespeichert wird, wo Sie auch das Projekt als solches abgelegt haben
• Wählen Sie dazu „Projekt speichern unter“ aus dem Menü „Datei“ aus und speichern Sie die Datei an dem
Ort ab, wo Sie das Projekt ablegen wollen
• Bitte beachten Sie: Wenn Sie das Programm öffnen, steht zunächst nur „Projekt speichern unter“ zur
Verfügung.
2. So startet man eine Aufnahme
• Bereiten Sie die Platte, die Sie mit Ihrem USB-Plattenspieler aufnehmen wollen, vor.
•
Drücken Sie diesen roten Knopf, um die Aufnahme zu starten.
• Senken Sie den Tonarm an der Stelle, wo Sie die Aufnahme beginnen wollen, ab.
•
Klicken Sie auf das Pause Symbol, wenn Sie die Aufnahme unterbrechen möchten.
y
Klicken Sie auf den gelben Stop-Knopf, wenn Sie die Aufnahme beenden möchten
Das ist schon alles. Sie können sich jetzt in aller Ruhe mit der Audacity Software vetraut machen und Ihre
Schallplatten aufnehmen.
Bemerkung: Mit der “Rückgängig” Funktion können Sie nahezu unbegrenzt Schritte zurücksetzen und
sind so sehr flexibel bei der Bearbeitung.
Hinweis: CD’s können mit Audacity nicht gebrannt werden. Nutzen Sie hierfür eine entsprechende
Brennsoftware.
 Loading...