

Page 1
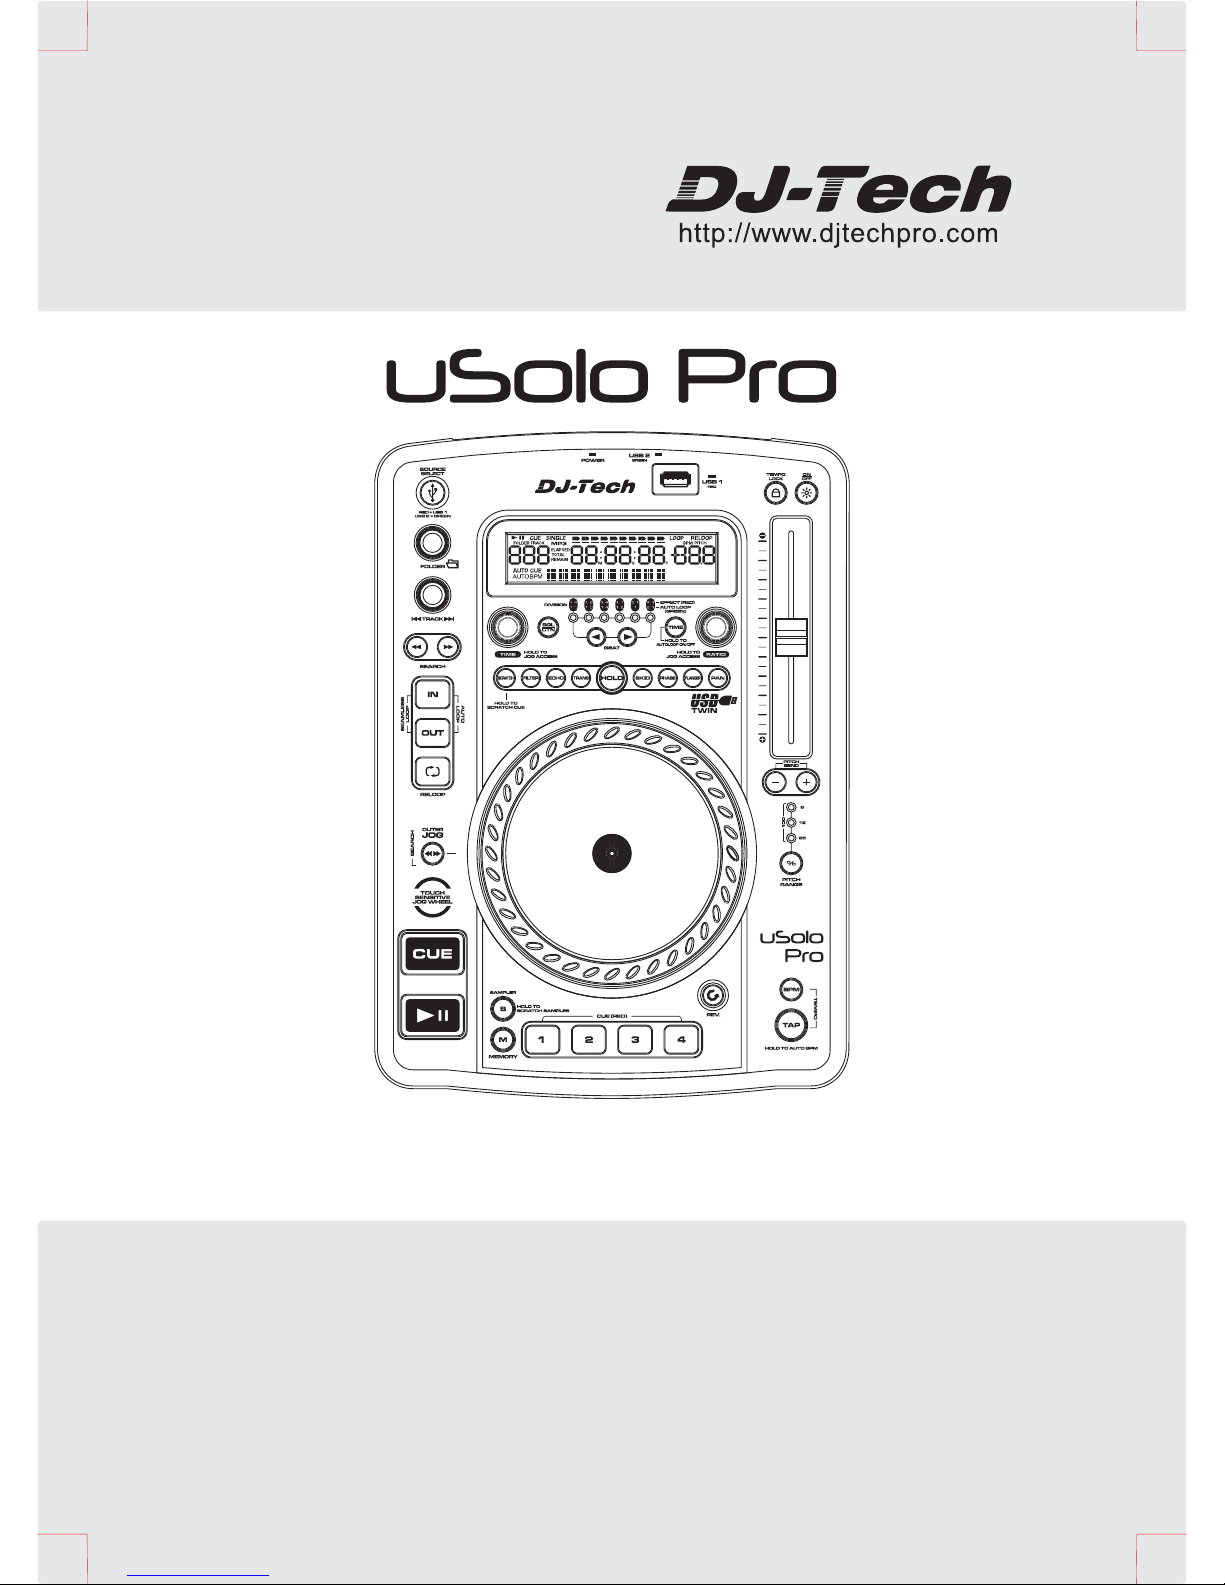
PROFESSIONAL USB MP3 PLAYER
USER MANUAL
Page 2
1. Read these instructions.
2. Keep these instructions.
3. Heed all warnings.
4. Follow all instructions.
5. Do not use the apparatus near water.
6. Clean only with dry cloth.
7. Do not block any ventilation openings. Install in accordance with the manufacturer’s instructions.
8. Do not install near any heat sources such as radiators, heat registers, stoves, or other apparatus (including
amplifiers) that produce heat.
9. Do not defeat the safety purpose of the polarized or grounding-type plug. A polarized plug has two blades
with one wider than the other. A grounding- type plug has two blades and a third grounding prong. The wide
blade or the third prong is provided for your safety. If the provided plug does not fit into your outlet, consult
an electrician for replacement of the obsolete outlet.
10. Protect the power cord from being walked on or pinched particularly at plugs, convenience receptacles, and
the point where they exit from the apparatus.
11. Only use attachments/ accessories specified by the manufacturer.
12. Use only with a cart, stand, tripod, bracket or table specified by the manufacturer, or sold with
the apparatus. When a cart is used, use caution when moving the cart/apparatus combination to
avoid injury from tip-over.
13. Unplug this apparatus during lighting storms or when unused for long periods of time.
14. Refer all servicing to qualified service personnel. Servicing is required when the apparatus has been
damaged in any way, such as power-supply cord or plug is damaged, liquid has been spilled or objects have
fallen into the apparatus, the apparatus has been exposed to rain or moisture, does not operate normally, or
has been dropped.
15. The main plug is used as the disconnect device, the disconnect device shall be readily operable.
16. The apparatus shall be connected to a MAINS socket outlet with a protective earthing connection.
17. Where an appliance coupler is used as the disconnect device, the disconnect device shall remain readily
operable.
WARNING
To reduce the risk of fire or electric shock, do not expose this apparatus to rain or moisture. The apparatus
shall not be exposed to dripping or splashing and that no objects filled with liquids, such as vases, shall be
placed on the apparatus.
CAUTION: To reduce the risk of electric shock, do not remove any
cover. No user-serviceable parts inside. Refer servicing to qualified
service personnel only.
The lightning flash with arrowhead symbol within the equilateral triangle is intended to alert the use
to the presence of un-insulated “dangerous voltage” within the product’s enclosure that may be of
sufficient magnitude to constitute a risk of electric shock.
The exclamation point within the equilateral triangle is intended to alert the user to the presence of
important operation and maintenance (servicing) instructions in the literature accompanying this
appliance.
CAUTION
To prevent electric shock, do not use this polarized plug with an extension cord, receptacle or other outlet
unless the blades can be fully inserted to prevent blade exposure.
DO NOT OPEN
RISK OF ELECTRIC SHOCK
IMPORTANT SAFETY INSTRUCTIONS
1
Page 3
y 9 Effects (can be combined): Scratch, Flanger, Echo, Filter, Pan, Trans, Phase, Skid and Brake
y 4 banks Sampler with mixer
y 4 Hot Cues
y Cue points can be Stored into the USB device and Recall. (4 Cues per folder)
y Dual SCRATCH mode
y Touch sensitive and multi mode jog wheel
y Reverse play
y Pitch 100%/ 100mm Pitch Fader
y Seamless LOOP & Master Tempo
y Twin USB Access
y Fader start and BPM counter
y Editable Effects in real time
MAIN FEATURES
CONTROLS AND FUNCTIONS TOP PANEL
14
12
11
10
9
8
7
6
3
2
24
25
19
1
5
4
15
13
16
28
27
26
23
21
34
18
30
31 32 33 35 36 37 38
29
20
22
17
2
Page 4

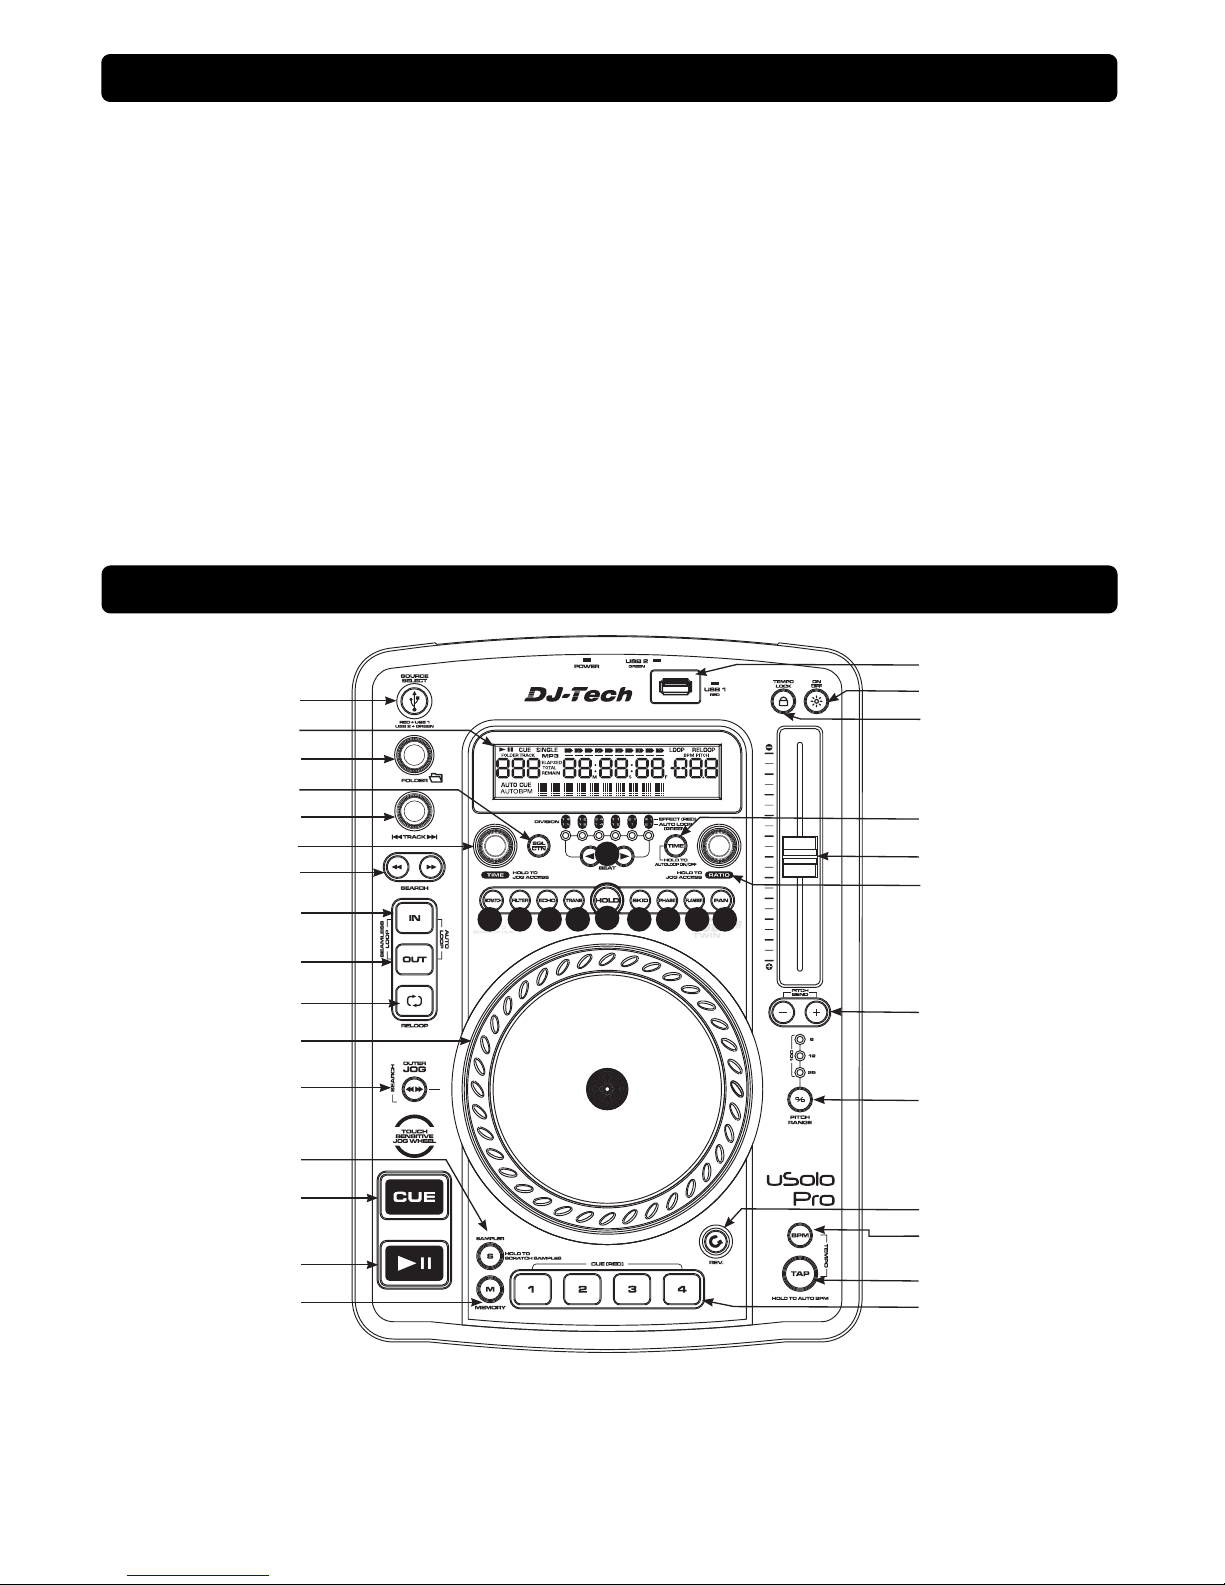
1. SOURCE SELECT BUTTON - This button lets you toggle between USB Port 1 and 2 for the MP3 File
source. The color of LED shows which source is activated. Glowing red LED refers to USB 1 port; glowing
green LED refers to USB 2 port. USB Port 1 and 2 can only be selected under pause mode.
2. LCD DISPLAY ─ This high quality LCD display indicates all the information and functions, as they are occurring.
3. FOLDER KNOB
y Press FOLDER knob to switch folder and track info to be displayed on the LCD.
y Turn FOLDER knob to search the desired folder.
4. SGL/CTN BUTTON - This function allows you to choose between single track play or continuous track
play (all tracks in order).Press and hold the button for 1 second to switch auto cue on/off.
5. TRACK KNOB
y The knob is used to select a track. Turning track knob will forward / backward skip to next track.
y Holding down and turning track knob will rapidly forward/backward skip through the tracks by 10 tracks
per click.
y Press TRACK knob to switch File name/Title (ID3)/Artist (ID3)/Album (ID3)/Genre (ID3) on the LCD.
y Press and hold TRACK knob and turn RATIO knob to move LINE NAME on the LCD.
6. TIME KNOB (Parameter) - Turn the TIME knob, press and turn the TIME knob, or press the TIME knob
and turn the jog wheel to adjust the parameter time value.
7. SEARCH buttons
This search button allows you to quickly scan backwards through a track.
This search button allows you to quickly scan forwards through a track.
8. IN BUTTON - This function allows you to set a cue point without music interrupt. This button also sets the
starting point of a seamless loop.
9. OUT BUTTON - This button is used to set the ending point of a loop. A loop is started by pressing the IN
button; pressing the OUT button set the loop ending point. The loop will continue to play until the OUT button
is pressed once again.
10. RELOOP BUTTON - If a seamless loop has been made, but the music is not actively in seamless loop mode
(a loop is not playing), pressing the RELOOP button will instantly reactivate the seamless loop mode. To exit
loop, press the OUT button. “LOOP” will appear in the LCD display when the reloop function is available. When
a seamless loop is playing, “RELOOP” will be flashing on the LCD. During play mode (no loop is stored in the
device), pressing the RELOOP button will instantly return play the last set point without interrupt of music.
11. JOG WHEEL -This wheel has 2 pats: The Outer part and the Touch Sensitive part
A. The outer part has 4 functions:
(1). The jog wheel will act as a frame search control when the music in the pause or cue mode, allowing
you to set a point.
(2). The wheel also works as a pitch bend during playback. Turning the wheel clockwise will increase the
pitch percentage up to 100%, and turning the wheel counterclockwise will decrease the pitch
percentage down to –100%. The pitch bend will be determined on how fast and how long you turn the
jog wheel continuously.
(3). The jog wheel can be used with the help of the TIME and RATIO knob to set effects and samples
parameter adjustment.
(4). When Jog Search mode is on, it can be used to search forward/ backward of the song.
B. The Touch Sensitive part:
The Touch Sensitive part is used for scratching. There are 3 scratch modes including: normal scratch,
scratch CUE and scratch samples.
12. JOG SEARCH BUTTON - Press this knob to toggle the Jog Wheel search function. The button will be
lightened when the function is on. The search function has 4 forward and 4 reverse speeds allowing you to
quickly scan through tracks. The more you turn the wheel in either direction the faster you search.
13. SAMPLER BUTTON
y Press this button, then press the desired BANK button to set the sampler mode. When sampler mode is
set, then sampler will mix the music together. The sampler can play even no USB mass storage
connected. The sampler will play only once or continuous depends on SINGLE is indicated or not on the
LCD. And press the SAMPLER button again to cancel sampler function.
y When in the playback of sampler loop mode, the TIME PARAMETER is used to adjust pitch and the
RATIO PARAMETER is used to adjust volume.
y Press and hold the SAMPLER button until LED blinks to enable the Sample scratch mode; press the
button again to cancel this function.
CONTROLS AND FUNCTIONS TO P PANEL
3
Page 5

4
14. CUE BUTTON - Pressing the CUE button during playback immediately pauses playback and returns the
track to the last set cue point. In pause mode and the music is at the cue point, press the CUE button to
provide cue monitor. The CUE LED will glow when the music is at the cue point.
15. PLAY/PAUSE BUTTON - Press this button to change from play to pause or from pause to play. When
Skid effect is on, press this button to break or slow start.
16. MEMORY BUTTON - Press this button to set the memory mode (MEMORY LED will be on), then press
the desired BANK button to set the current playing position as the cue point. You can also store the BANKs
by pressing the memory for 1 sec. It will store the cue points onto the USB drive. To recall the pre-stored
BANKs, just make the memory mode set before inserting the USB device.
17. USB 1 PORT – This is the USB port where you insert your USB mass storage device for playing MP3 files.
When using external USB harddisk, please be sure the file system is FAT 12/16/32. Other file system is not
supported in this unit.
18. PITCH ON/OFF BUTTON – This button is used to turn the PITCH SLIDER function on and off.
19. TEMPO LOCK BUTTON -Enables the TEMPO lock function, which allows the tempo of the music to be
altered without affecting the key. This button is illuminated when enabled.
20. TIME BUTTON - The TIME button will switch the time value described in the LCD time meter between
elapsed play time and track remaining time.
21. PITCH SLIDER -This slider is used to adjust the playback pitch percentage. The slider is a set adjustment
and will remain set until the pitch slider is move or the pitch function has been turned off. For example, if you
set the pitch to be +10% in current track, it will be kept at +10% when you go to next track.
22. RATIO BUTTON (Parameter) - Turn the RATIO knob or hold the RATIO knob and turn the jog wheel to
adjust the parameter ratio value.
23. PITCH BEN D BUTTONS - The desired pitch of music decrease or increase when button is pressing and
returns to the original pitch when the button is released.
24. PITCH RANGE BUTTON - Press the button in order to change pitch percentage of 6%, 12%, 25%, 100%.
25. REVERSE BUTTON - This button activates reverse play mode. This function will play your track or
sampler in reverse.
26. BPM BUTTON -To change the BPM/ PITCH display by pressing the BPM button.
27. TAP BUTTON
y The TAP button is used for manual BPM. Press the TAP button according to the beat of the music to set
your desired BPM value.
y Press and hold the TAP button then turn the TIME or RATIO knob will allow you to adjust BPM value.
y Hold down the TAP button for 1 second to switch to Auto BPM.
28. 4 HOT CUE (BANK) BUTTONS
y Press the desired BANK button to play the music from the stored cue point.
y When the MEMORY LED is lit, press the desired BANK button to set the cue point.
y When SAMPLER LED is lit, press the desired BANK button to play the sample. Press the desired BANK
button will return to the start point instantly. The LED of the activated BANK button will be flashing.
29. BEAT-SYNC SELECT BUTTONS
y BPM SYNC effect: These 2 buttons can be used to set the time parameter of the effect in order to
synchronize the BPM of the playing music. There are six effect-sync parameters: 1/4, 1/2, 3/4, 1/1, 2/1,
4/1 BPM. Press button at the same time to off beat sync.
y Auto loop length: In Autoloop Mode, hold TIME button and press these 2 buttons to select the auto loop
length among 1/16, 1/8, 1/4, 1/2, 1, 2/1.
30. SCRATCH BUTTON — This button is used to activate and deactivate the SCRATCH effect. When
SCRATCH effect is activated and LED lights red, the TIME PARAMETER is to adjust the start time and the
RATIO PARAMETER is to adjust the stop time. Hold the button to active scratch cue function and
SCRATCH LED is lighted green.
CONTROLS AND FUNCTIONS TO P PANEL
Page 6
K SCRATCH CUE
y IN PLAYBACK MODE:
While in play mode and when the touch sensitivity function is active, the JOG WHEEL can be used to
return the unit to last cue point. Simply touch the JOG WHEEL and unit will immediately return to the last
set cue point and allow you to scratch at this cue point.
y IN CUE MODE:
While in cue mode and when the touch sensitivity function is active, tapping on the JOG WHEEL can be
used to start playback. The unit will continue to playback until the JOG WHEEL is released. Once the JOG
WHEEL is released the unit will return to the last point.
31. FILTER — This button is used to activate and deactivate the FILTER effect.
32. ECHO BUTTON — This button is used to activate and deactivate the ECHO effect.
33. TRANS BUTTON — This button is used to activate and deactivate the TRANS effect.
34. HOLD BUTTON - This button allows you to set and lock any new parameters you set to the FX. This
button will glow when the hold function is activated. If the hold function is not selected any changes to the
effect parameters will be momentary and will return to the previous parameter.
35. SKID BUTTON — This button is used to activate and deactivate the SKID effect. When SKID effect is
activated, the TIME PARAMETER is to adjust the start time and the RATIO PARAMETER is to adjust the
stop time.
36. PHASE BUTTON — This button is used to activate and deactivate the PHASE effect.
37. FLANGER BUTTON —This button is used to activate and deactivate the FLANGER effect.
38. PAN BUTTON — This button is used to activate and deactivate the PAN effect.
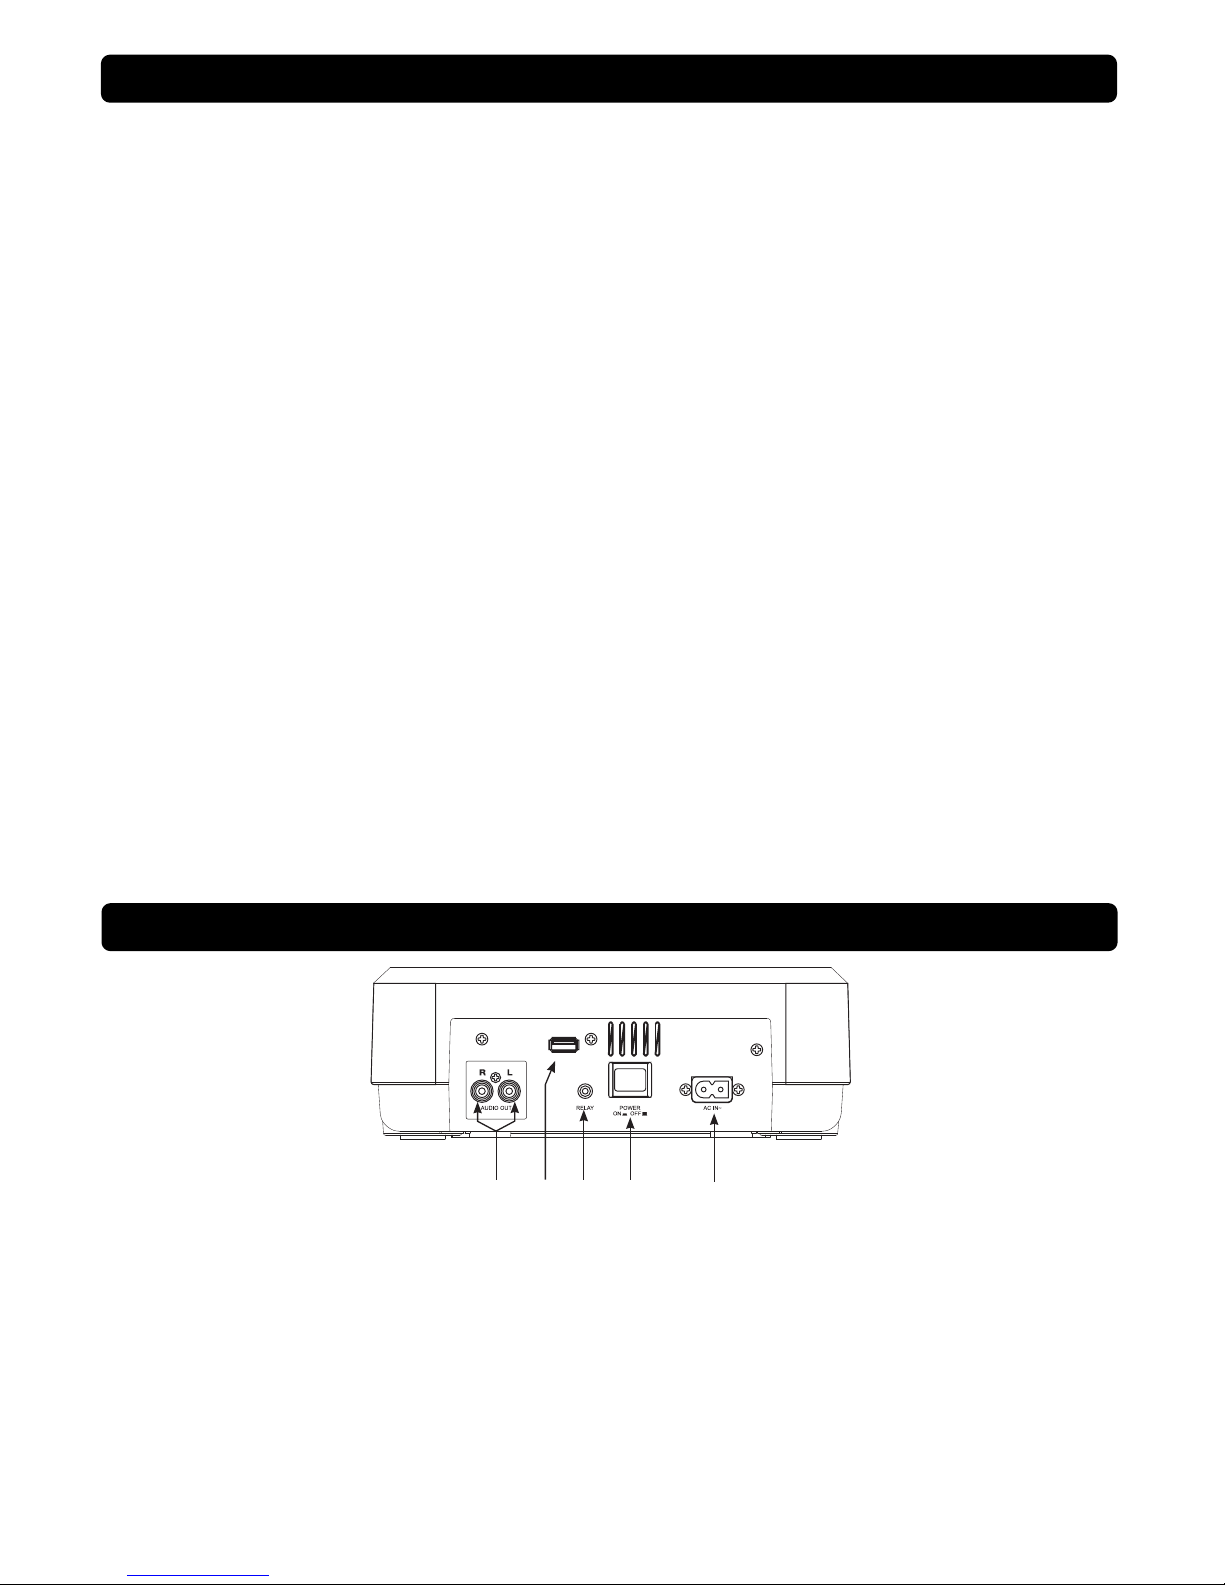
1. AUDIO OUT SOCKETS - These analogue output sockets are used to connect to the input of you mixer.
2. USB 2 PORT – This is the USB port where you insert your USB mass storage device for playing MP3 files.
3. RELAY SOCKET - Via the RELAY SOCKET, two player can relay play. If you connect with a mixer which
supporting fader start, you can also relay play via mixer’s cross-fader.
4. POWER SWITCH - Press this button to turn on/off the unit.
5. AC CONNECTION - Plug the power supply cable in here.
CONTROLS AND FUNCTIONS TO P PANEL
CONTROLS AND FUNCTIONS REAR PANEL
USB 2
1
2
45
3
5
Page 7
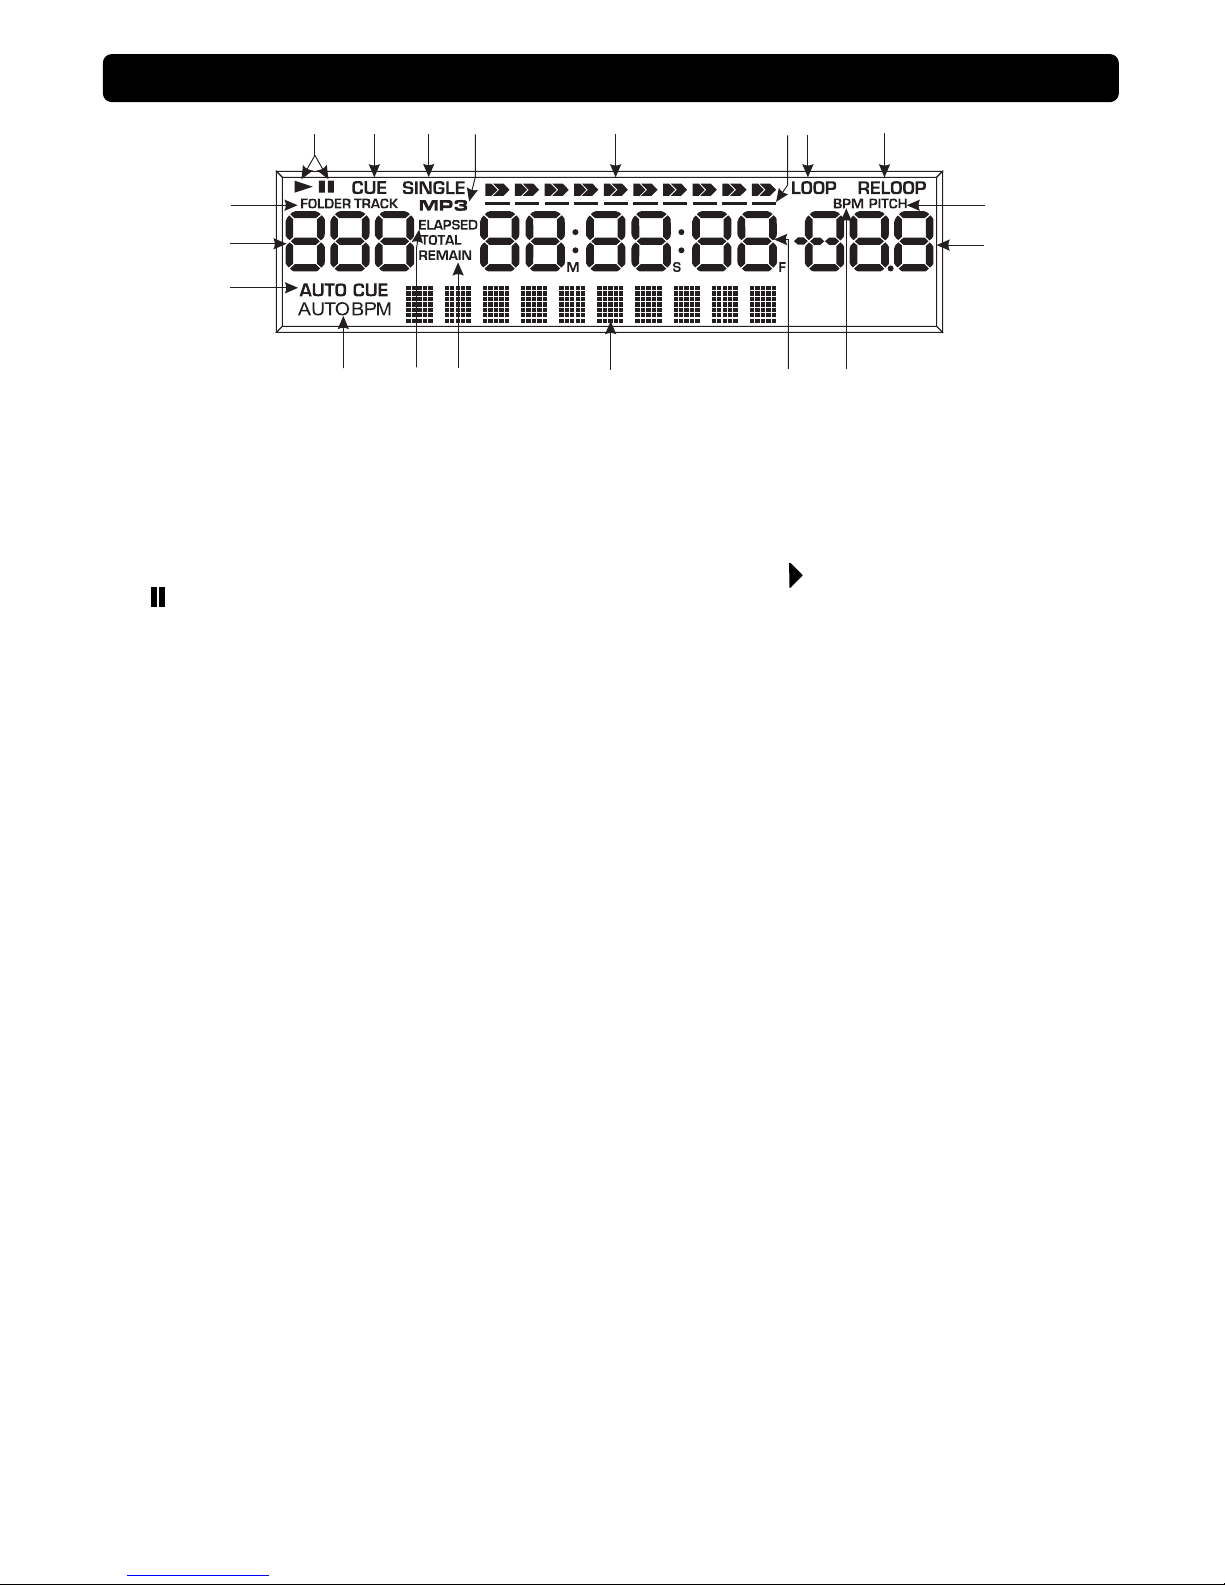
1. AUTO CUE - This will indicate if the Auto Cue is on or off. Press and hold the SGL/CTN for 1 sec. to turn
the Auto Cue function on and off.
2. TRACK METER - Indicates the number of the currently playing track or folder.
3. FOLDER/TRACK INDICATOR -This indicator shows you if you are looking at the track number or the
folder number in the TRACK INDICATOR.
4. PLAY / PAUSE INDICATOR -Indicates the device is in play mode (“ “), or the player is in pause mode
(“ “).
5. CUE INDICATOR - This indicator will glow when the unit is in CUE mode and will flash every time a new
CUE POINT is set.
6. SINGLE INDICATOR - This indicates that the track is in single play mode, the track will play once and go
to CUE mode in the next song. If the single indicator is not on the unit is in continuous mode the drive will
play all the remaining tracks on the USB until you stop it or power is interrupted.
7. MP3 INDICATOR - This will indicate that a MP3 is loaded.
8. TIME BAR INDICATOR - This bar gives a visual approximation of a track's remaining time. This bar will
begin to flash when a track is ending.
9. CUE & PLAY MEMORY BUFFER INDICATOR -The memory status is represented on the display by the
line bar being filled or emptied. The first bar itself represents 5 seconds of cue memory buffer. And following
bar each represents 1 second of play memory buffer. There are more than 9 seconds of play memory buffer
available when the bar line is being filled.
10. LOOP INDICATOR -Indicates if LOOP function is activated.
11. RELOOP INDICATOR - Indicates if a loop has been set which can be activated with the Reloop function.
12. PITCH INDICATOR - Indicator will light up when the BPM/ PITCH METER is showing the Pitch info.
13. BPM / PITCH METER - Shows either the percentage change in pitch or the BPM of the song.
14. BPM INDICATOR - Indicator will light up when the BPM/ PITCH METER is showing the BPM information.
15. TIME DISPLAY - These indicators detail the Minutes, Seconds, and Frames. The meter will display either
the elapsed time, or remaining time of a track.
16. CHARACTER DISPLA Y - This will display the name of the file, artist, title…etc of the loaded MP3.
17. REMAIN INDICATOR - It indicates that the remaining time is shown on the TIME DISPLAY
18. ELAPSED INDICA TOR -It indicates that the elapsed time is shown on the TIME DISPLAY.
19. AUTO BPM - This will indicate that the AUTO BPM counter is active.
LCD DISPLAY PANEL
3
2
1
4
5
6
7
8
10
11
12
13
14
15
16
19
17
18
9
6
Page 8

1. SELECTING TRACKS
Select desired track by turning the TRACK SEARCH knob once to move to one higher or lower track or
press and hold the TRACK knob to change tracks continuously at a +10 tracks higher speed. When a new
track is selected during playback, playback begins as soon as the search operation is completed.
2. STARTING PLAYBACK
Press the PLAY/PAUSE button during the pause or cue to start playback. The PLAY indicator lights when
playback starts.
3 PAUSING PLAYBACK
There are two ways to pause playback.
(1) Press the PLAY/PAUSE button during playback to pause at that point and the PLAY/PAUSE button will
flash.
(2) Press the CUE button during playback to return to the previous set cue point.
4. CUEING
"Cuei ng " is th e ac ti on o f p r ep a ri ng fo r pl ay ba ck . There are 1 Floating cue (the CUE button) and 4 Hot Cue (the
4 BANK buttons) in this unit.
When the CUE button is pressed, playback returns to the cue point and enters pause mode. When the
PLA Y/PAUSE button is pressed during the cue mode, playback starts.
When the BANK buttons are press during playback, it will start playing from the Cue point instantly.
CUE POINT SETTING:
(1) Playback starts from pause (using the jog wheel to set the start point) or skips to a new track during play
or pause. The beginning play point will be set to the cue point. Or
(2) Press the IN button during playback to set the new cue point (“CUE on the fly”).
(3) Press MEMORY to activate memory mode and press one of the 4 BANK buttons to set cues.
5. SAMPLER
There are 4 banks of sampler sharing the 4 BANK buttons of the HOT CUE function.
SETTING SAMPLES
Set a CUE point to one of the 4 banks, the sampler will also take sample from that playing time. The sampler
can take maximum of 5 seconds sample and store in the internal memory. (The samples will be erased after
powering off and on).
SETTING SAMPLES LENGTH
The sample length can be set by user (maximum of 5 seconds). When the unit is not in sampler mode, select
an available bank (the button will be flashing). Press IN to set the starting point and press OUT to set the ending
point. This section will be stored in the sampler.
PLAYING SAMPLES
Press the SAMPLER button to activate the sampler function. Press any of the available BANK to play the
sample. TIME knob can be used to a djust the pitch of t he sample and RATIO knob can be used to adjust the
volume of the sample. Press and hold the SAMPLER button until LED blinks to enable the Sample scratch
mode; press the button again to cancel this function.
6. STORE AND RECALL THE HOT CUE AND SAMPLES
The HOT CUE and SAMPLES memory can be stored into the USB Device. One database file will be cr eated on
the USB device per folder. For example, if there are 100 folders in your USB device, you can store up to 100
databases for the Cues and Samples.
STORING THE HOT CUES AND SAMPLES
(1). Created the Cues or Samples you want to store.
(2). Press and hold the MEMORY button for more than 1 second.
(3). “Saving” will be displayed on the LCD and the list of HOT CUE and SAMPLES will be stored into the USB
Device
(4). The database file will be created in the current playing folder. If there is already database file in the folder, it
will be overwritten.
(5). Only the Cues or Samples in the current playing folder can be stored. The database file will be stored in the
current playing folder when you press the MEMORY button.
OPERATION INSTRUCTION
7
Page 9
RECALLING THE HOT CUE AND SAMPLES
(1). Activate the Memory mode by pressing the MEMORY Button (MEMORY Button lit in red)
(2). Insert the USB Device containing Hot Cue and Samples database.
(3). “Recall” will be shown on LCD indicating that the unit is reading the Hot Cues and Samples from the first
folder. The BANK Buttons will be lightened one by one.
(4). As the HOT CUE database is stored per folder, if you want to recall the CUE Memory for a desired folder,
please activate the Memory mode (MEMORY Button lit in red) and select that folder.
Note: Recall of cue points an d sa mples may n ot wo rk properl y if th e cont ent of the USB dri ve is modifie d aft er
storing.
7. FRAME SEARCH
This is done by first pausing then using the jog wheel to set the starting point. (When you use the jog wheel
the monitor function allows you to hear what is playing.) Once you reach your desired starting point, you can
set a cue (starting) point by pressing PLAY/PAUSE button.
8. SCANNING (fast forward/fast reverse)
There are 2 ways to fast scan the track:
(1) Turn on the Outer Jog Wheel Search Mode by pressing the JOG SERACH BUTTON. Turn the outer jog
wheel forward or reverse to search through a track.
(2) Press and hold the SEARCH Button.
You will scan forward or reverse at 4 different speeds depending on how much you turn the wheel or how
long you press the Search Buttons.
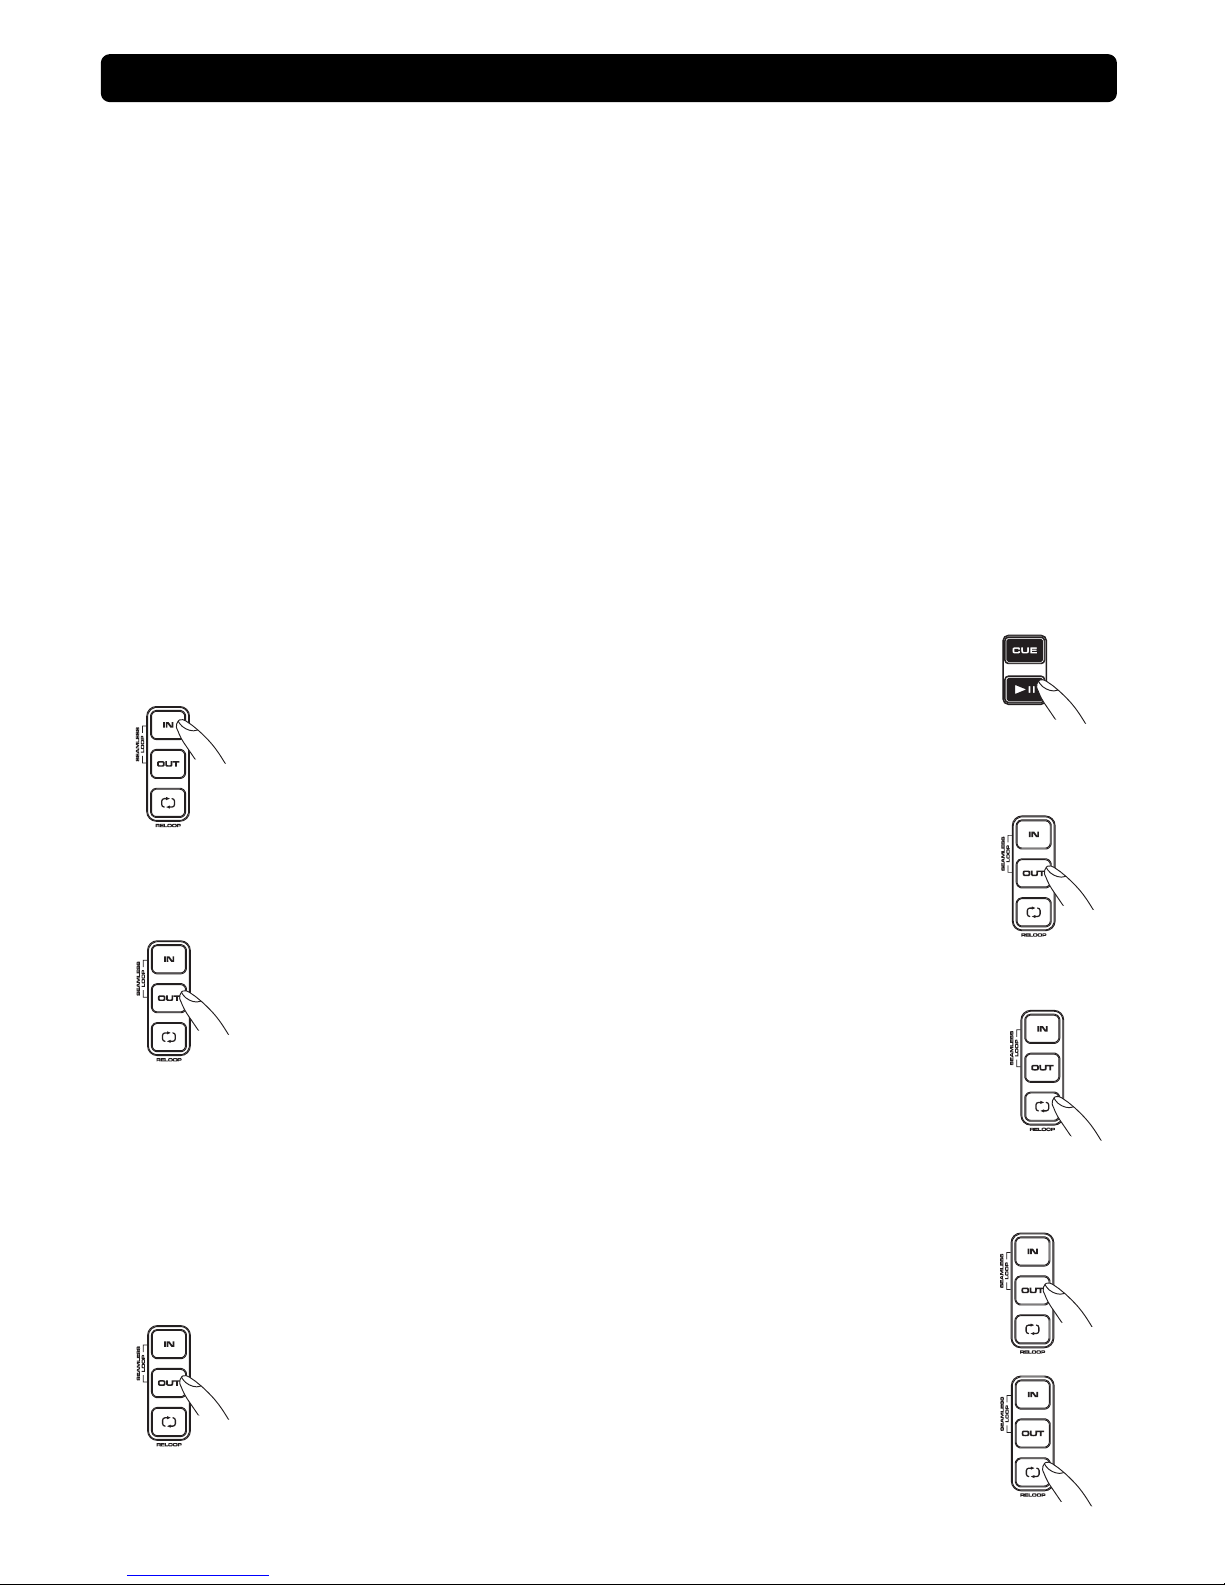
9. LOOP PLAY
You can create a seamless loop between two points continuously.
(1) Press PLAY/PAUSE button to start a music playing. The PLAY/PAUSE button’s LED lights.
(2) Press IN button. This sets the starting point of the SEAMLESS LOOP. The IN button LED
will light.
(3) Press OUT button to set desired ending point of the SEAMLESS LOOP. You will know you
are in SEAMLESS LOOP mode because IN and OUT LED will light and flash. RELOOP
INDICATOR in LCD DISPLAY will also flash. Sound will continue with no interruption
(SEAMLESS LOOP).
(4) To exit SEAMLESS LOOP, press OUT button LED will stay on but not flash.
Music will resume normal play.
(5) To replay loop, press the RELOOP button. IN and OUT LED and RELOOP INDICATOR in
LCD DISPLAY will all begin flashing again.
MODIFYING LOOP LENGTH
(1) (Must be in SEAMLESS LOOP mode). If a SEAMLESS LOOP has not been created, follow instructions
on this page for creating a SEAMLESS LOOP. If a SEAMLESS LOOP has already been created, press
RELOOP BUTTON to reenter the SEMALESS LOOP mode.
(2) Next, press OUT BUTTON to return to normal play. This disengages the SEAMLESS
LOOP mode.
(3) Press OUT button again for new desired ending point of the loop.
(4) To press and hold the RELOOP button until the end time of the loop is displayed to edit a
loop and the OUT button LED will light and flash, turn the JOG WHEEL to edit loop
shooter or longer, and then press RELOOP to confirm the change.
OPERATION INSTRUCTION
8
Page 10
10. TIME DISPLAY
During normal play, each time you press TIME button, the display information changes between time
elapsed and time remain.
11. PITCH BENDING
There are 2 ways to pitch bend the playing song:
(1) The speed increases or decreases respectively while the PITCH BEND “+” or PITCH BEND “-” button is
pressed. The pitch changes within the range of +/- pitch selected.
(2) Turning the jog wheel will temporarily bend the pitch of the music, turning the wheel clockwise to speed
up or counterclockwise to slowdown.
12. AUTO LOOP
Hold the TIME button for 1 second to turn on/off AUTO LOOP mode. A green LED will glow in the BEAT
LEDs part. Hold TIME button and press the BEAT-SYNC Button to change the AUTO LOOP BEAT division
among 1/16, 1/8, 1/4, 1/2, 1, 2/1.
In Auto Loop mode, press IN to activate the auto loop and press OUT to quit the auto loop.
Note: As the AUTO LOOP function depends on the BPM detection. Normally, the AUTO BPM detection
takes a few seconds to detect the BPM for the song. So, when a new song is selected, the AUTO LOOP
cannot be activated until a BPM value is detected or manually set.
13. BPM SYNC EFFECT
There are 8 BPM SYNC effects (FXs) in this unit. Multiple FXs can be activated at the same time. Among the
FXs, there are some mutually exclusive pairs, which means that you can only turn on one FX in these pair at
the same time. They are SCRATCH and SKID, FILTER and PHASE, ECHO and FLANGER, and TRANS
and PAN. For example, when SCTARCH FX is on, pressing the SKID button will activate SKID FX and
deactivate SCTARCH FX.
These 8 FXs are BPM SYNC. Press the BEAT-SYNC SELECT BUTTONS to adjust the Time parameter of
the FX to be synchronized with the BPM.
14. RELAY PLAY USING TWO PLAYERS
How to set the Relay function:
When the both players’ RELAY jacks are connected to each other, the relay-play FX can be produced. The
relay play is explained as below.
y Set both players to single play mode (the SINGLE indicators will light in the displays).
y Begin playback on the first player.
y When the currently playing track ends, playback will begin automatically on the standby player.
y The first player will enter pause mode at the beginning of the next track.
y By repeating this operation, the two players can be used to perform continuous relay play.
Note: Relay play may not work properly if the audios out jacks on the two players are not connected to the
same audio amplifier.
15. STUTTER EFFECT
It can create a sound similar to a CD skipping. The STUTTER Effect can be created in 2 ways.
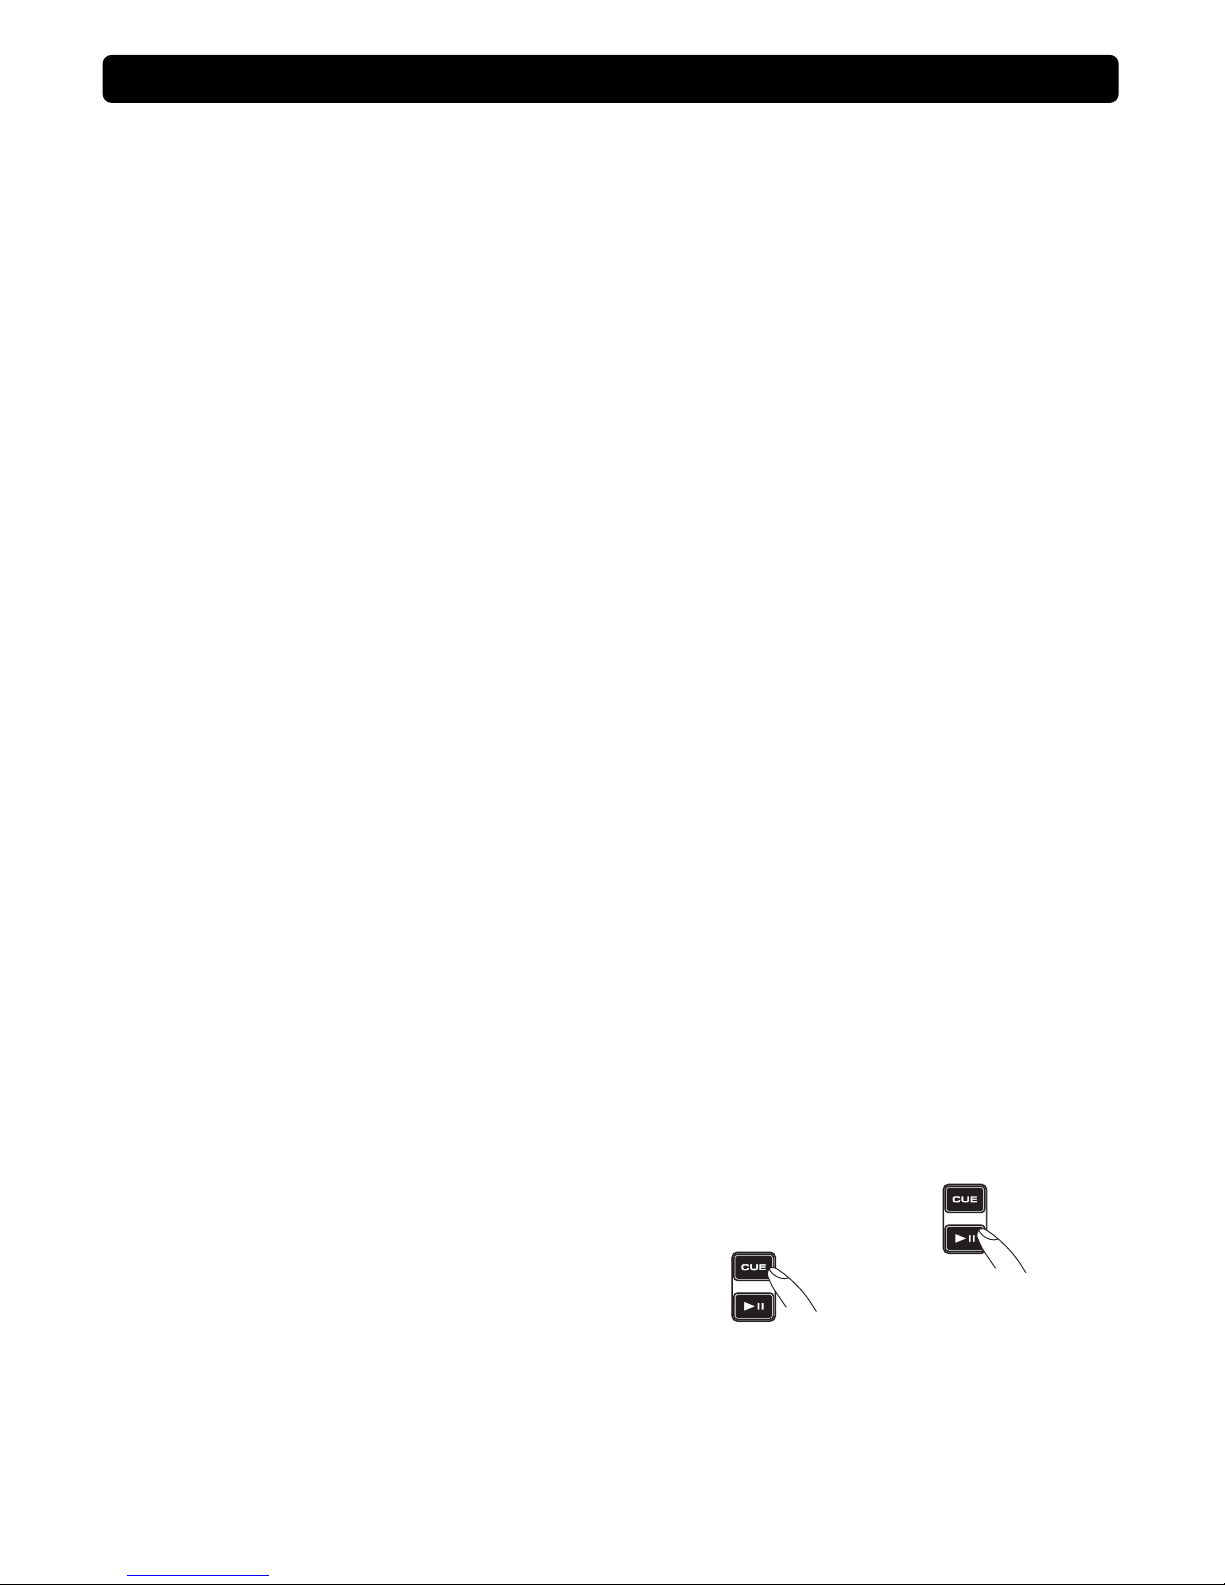
(1) By rapidly pressing the CUE button
a. Press PLAY/PAUSE button so that music is playing. PLAY/PAUSE LED will light.
b. Next, rapidly press the CUE button in sync with the music.
(2) By rapidly pressing the BANK1 or BANK 2 or BANK 3 or BANK 4 buttons.
OPERATION INSTRUCTION
9
Page 11

10
16. SYSTEM SETTING
Press and hold TIME button then press TIME or RATIO knob enter system setting.
Turn and press TIME or RATIO knob to enter item and confirm, press TIME button to leave mode.
1. Version.............. CON: VerXX( control version)
DSP: VerXX( DSP version)
2. Sensitivity.......... ADJ.= -20~+20(Touch Wheel: sensitive adjustment)
3. Stop Time.......... 0.5~12.0 sec( LINE NAME: start run time adjustment for the Character display)
4. Run Time........... 50~2000 msec( LINE NME: move time adjustment for the Character display)
5. Pitch Bend......... PitchRange, +/-1%~100%
6. Line Setup......... MODE=1,2
MODE1.............. displaying folder name & IDTag3 information circularly repeated mode.
MODE2.............. display i n g f o l d e r n a m e once, th e n I D Tag3 in f ormation c ircularl y r e p eated mod e .
7. Repeat Mode..... ON/OFF(Support only for tracks inside the same folder)
8. Bit rate............... Disp ON
Disp OFF
9. LOAD Defaults .. Enter Load(return to default value)
Return(exit without returning to default value)
A. EXIT&SAVE...... Exit & Save se t t i n g t o n ex t p ower on. (Pr e s s SAVE TO button to e x p r e s s sa v e t he s e t t in g )
NOTE:
y After setting, press MEMORY button to fast EXIT & SAVE; press TIME button to fast EXIT.
y SAVE →PITCH ON/OFF, PITCH RANGE, SGL/CTN, AUTO CUE, TIME MODE, HOLD, KEY LOCK,
EFFECTS ON/OFF, Sensitivity, SLEEP/STOP/RUN TIME, Pitch Bend, Bit rate.
y Defaults →PITCH (ON), PITCH RANGE (12%), (CTN), AUTO CUE (ON), TIME MODE (REMAIN), HOLD
(OFF), KEY LOCK (OFF), EFFECTS (OFF), Sensitivity (0), STOP (1.5sec) / RUN (400msec) TIME, Pitch
Bend(Pitch range), Bit rate(Disp ON), Repeat (OFF),Line Setup (MODE 1)
When touch sensor is abnormal;
y Press and hold PITCH ON/OFF button and POWER ON.
y It will show A/D value and don’t touch WHEEL at this time.
y Release the PITCH ON/OFF button and the value will be saved to memory
OPERATION INSTRUCTION
Page 12
1. GENERAL SECTION
PRODUCT: USB MP3 PLAYER
POWER SOURCE: AC100 - 240V, 50/60Hz
POWER CONSUMPTION:
11W
DIMENSIONS: 246 (W) x 346(D) x 105(H) mm
WEIGHT: 2kg
2. AUDIO CHARACTERISTICS (TEST SIGNAL FORMAT: MP3,128KBPS, LOAD=100KOHM)
ITEM TYPICAL LIMIT CONDITION
OUTPUT LEVEL 1.4V +/-0.5dB 1.4V +/-1dB 1KHz, 0dB, TCD-782 TRK2
CHANNEL BALANCE WITHIN 0.2dB WITHIN 1dB 1KHz, 0dB, TCD-782 TRK2
FREQUENCY RESPONSE 17-16KHz +/-0.3dB 17-16KHz +/-1dB 0dB OUTPUT, TCD-781 TRK1,4,16
CHANNEL SEPARATION(*2) 91dB 85dB 1KHz, 0dB, TCD-782 TRK9,11
THD+N (*1) 0.006% 0.01% 1KHz, 0dB, TCD-782 TRK2
S/N (*2) 115dB 90dB 1KHZ, OdB, TCD-782 TRK2,8
NOTE: *1: WITH 20KHz LOW PASS FILTER.
*2: WITH 20KHz LOW PASS FILTER, "IHF-A" WEIGHTED.
4. MP3 FORMAT
File System FAT 12/16/32
Applicable file extensions mp3. MP3. mP3. Mp3
Max. number of Folders 999
USB Format
Max. number of files max. 999 files
MPEG 1 Layer 3 standard (ISO/IEC
11172-3), which provides for single channel
(‘mono’) and two-channel (‘stereo’) coding at
sampling rates of 32, 44.1 and 48kHz.
32/40/48/56/80/96/112/128/160/192/
224/256/320 kbps
Xing/VBRI VBR
MPEG 2 Layer 3 standard (ISO/IEC
13818-3), which provides for similar coding
at sampling rates of 16, 22.05 and 24 kHz.
32/40/48/56/64/80/96/112/144/160
Kbps
MP3 Format
MPEG 2.5 Layer 3 standard, which provides
for similar coding at sampling rates of 8,
11.025 and 12 kHz.
32/40/48/56/64/80/96/112/144/160
Kbps
OPERATION INSTRUCTION
11
 Loading...