

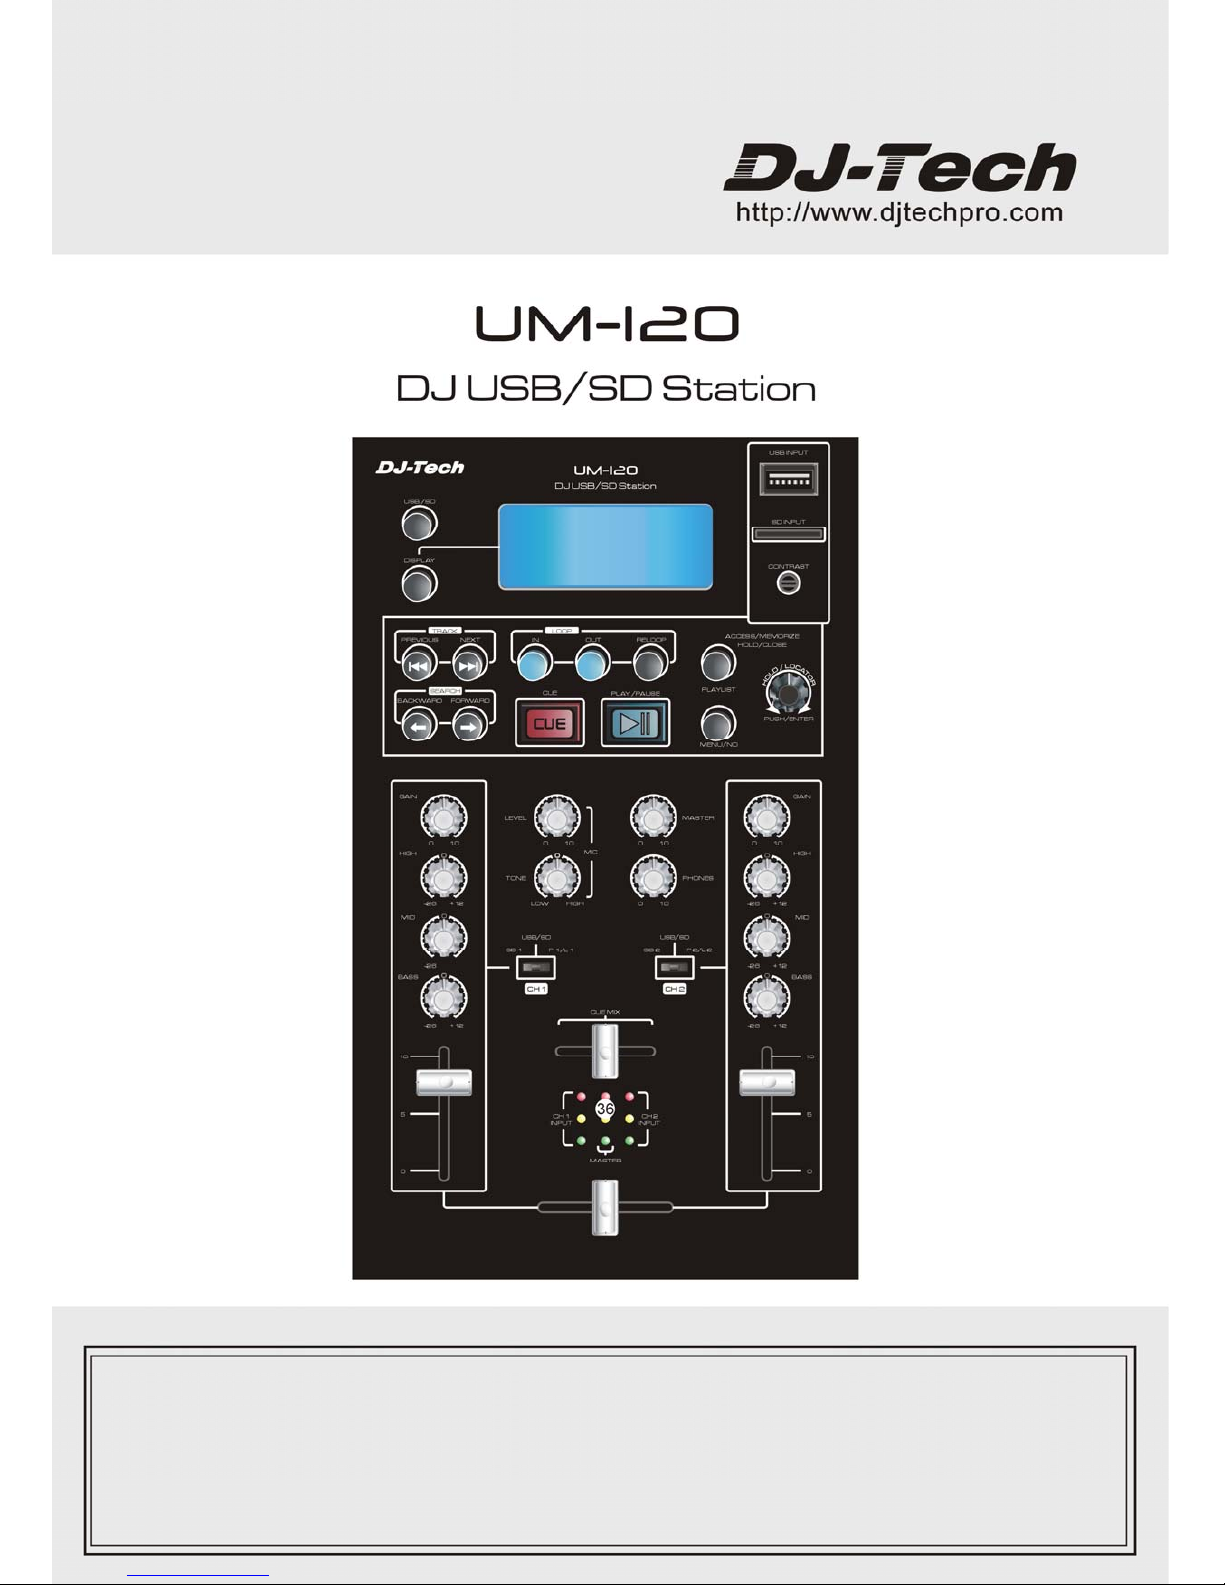
DJ-Tech UM-120 User Manual
USER MANUAL---------------------------------------------------------------------------------1-26

1
Table of Contents
1 Product description ……………………………………………………………………………… ………… …..1
2 Safety instructions ……………………………………………………………………………………………….2
3 Connections and control elements ………………………………………………………………………….3
3.1 Rear panel description ………………………………………………………………………………………3
3.2 Front panel description ………………………………………………………………………………………3
3.3 Top panel description ………………………………………………………………………………………...4
3.3.1 MP3 player control area ……………………………………………………………………………………4
3.3.2 MP3 player function description ………………………………………………………………………….5
3.3.3 Mixer function area …...…………………………………………………………………………………….9
3.3.4 Mixer control area…………………………………………………………………………………………..10
4 Configuration …………………………………………………………………………………………………….12
4.1 Connection …………………………………………………………………………………………………….12
4.2 Operation precaution ………………………………………………………………………………………..12
5 Technical specifications ……………………………………………………………………………………….13
1 PRODUCT DESCRIPTION
1 2 channel stereo DJ mixer with built-in MP3 decoder.
2 Multiple input and output: input included 1 Mic input, 1 USB input, 1 SD card input, 2 CD input, 2
line input, 2 PHONO input with RIAA trait; output included 1 master output, 2 REC output and 1
headphone output.
3 Blue backlight LCD DOT matrix display with contrast control.
4 Compatible with 4GB SD card and USB stick, full navigation of MP3 with EZ search encoder.
5 Mic input channel with Level and Tone adjust; 2 stereo input with individual Gain, 3 band EQ
(HIGH, MID, BASS) and Vol adjust.
6 200 000 cycles Crossfader & Headphone Crossfader.
7 Stereo headphone monitoring output with MIX, CUE MIX and CUE LEVEL.
8 Input and output channel with individual LED level indication.
9 External low power adapter, which make the unit more safety and better Signal-to-Noise.
10 High glossy finish which make the unit more beautiful.
11 High quality components and our good workmanship, which make our products more reliable.
2 SAFETY INSTRUCTIONS
The lightning flash with arrowhead symbol inside an equilateral triangle is intended to alert User
that the presence of uninsulated "hazardous voltage"within the product’s enclosure, which
may be of sufficient magnitude to induce a risk of electric shock to persons.
2
The apparatus shall not be exposed to dripping or splashing and that no objects filled with liquids,
such as vases, shall be placed on the apparatus.
The exclamation mark inside an equilateral triangle is intended to alert user that the presence
of important operating and maintenance (servicing) instructions in the literature accompanying
the product.
WARNING: TO REDUCE THE RISK OF FIRE OR ELECTRIC SHOCK, DO NOT EXPOSE THIS APPLIANCE TO
RAIN OR MOISTURE.
1. Caution: To reduce the risk of electric shock, do not remove
cover(or back). No user-serviceable parts inside. Refer servicing to
qualified personnel.
2. Do not install the equipment in a place exposed to direct sunlight.
3. Do not install the equipment in a dusty, damp or poorly ventilated
place.
4. To prevent damage to the equipment, please unplug from the
power outlet if not in use.
5. To unplug the equipment, always handle the power cord using the
plug. Do not pull out the plug by tugging the cord.
6. Place the equipment on a stable surface and avoid placing other
objects on top.
7. Cleaning care: Use a soft, dry cloth for cleaning. For stubborn dirt,
soak the cloth in a weak detergent solution; wring well and wipe to
remove the dirt. Do not use volatile agents such as benzene or paint
thinner, as they may damage the surface finish of the equipment.
8. Please do not block the cooling vents to avoid overheating.
9. No naked flame sources, such as lighted candles, should be placed
on the apparatus.
3 CONNECTIONS AND CONTROL ELEMENTS
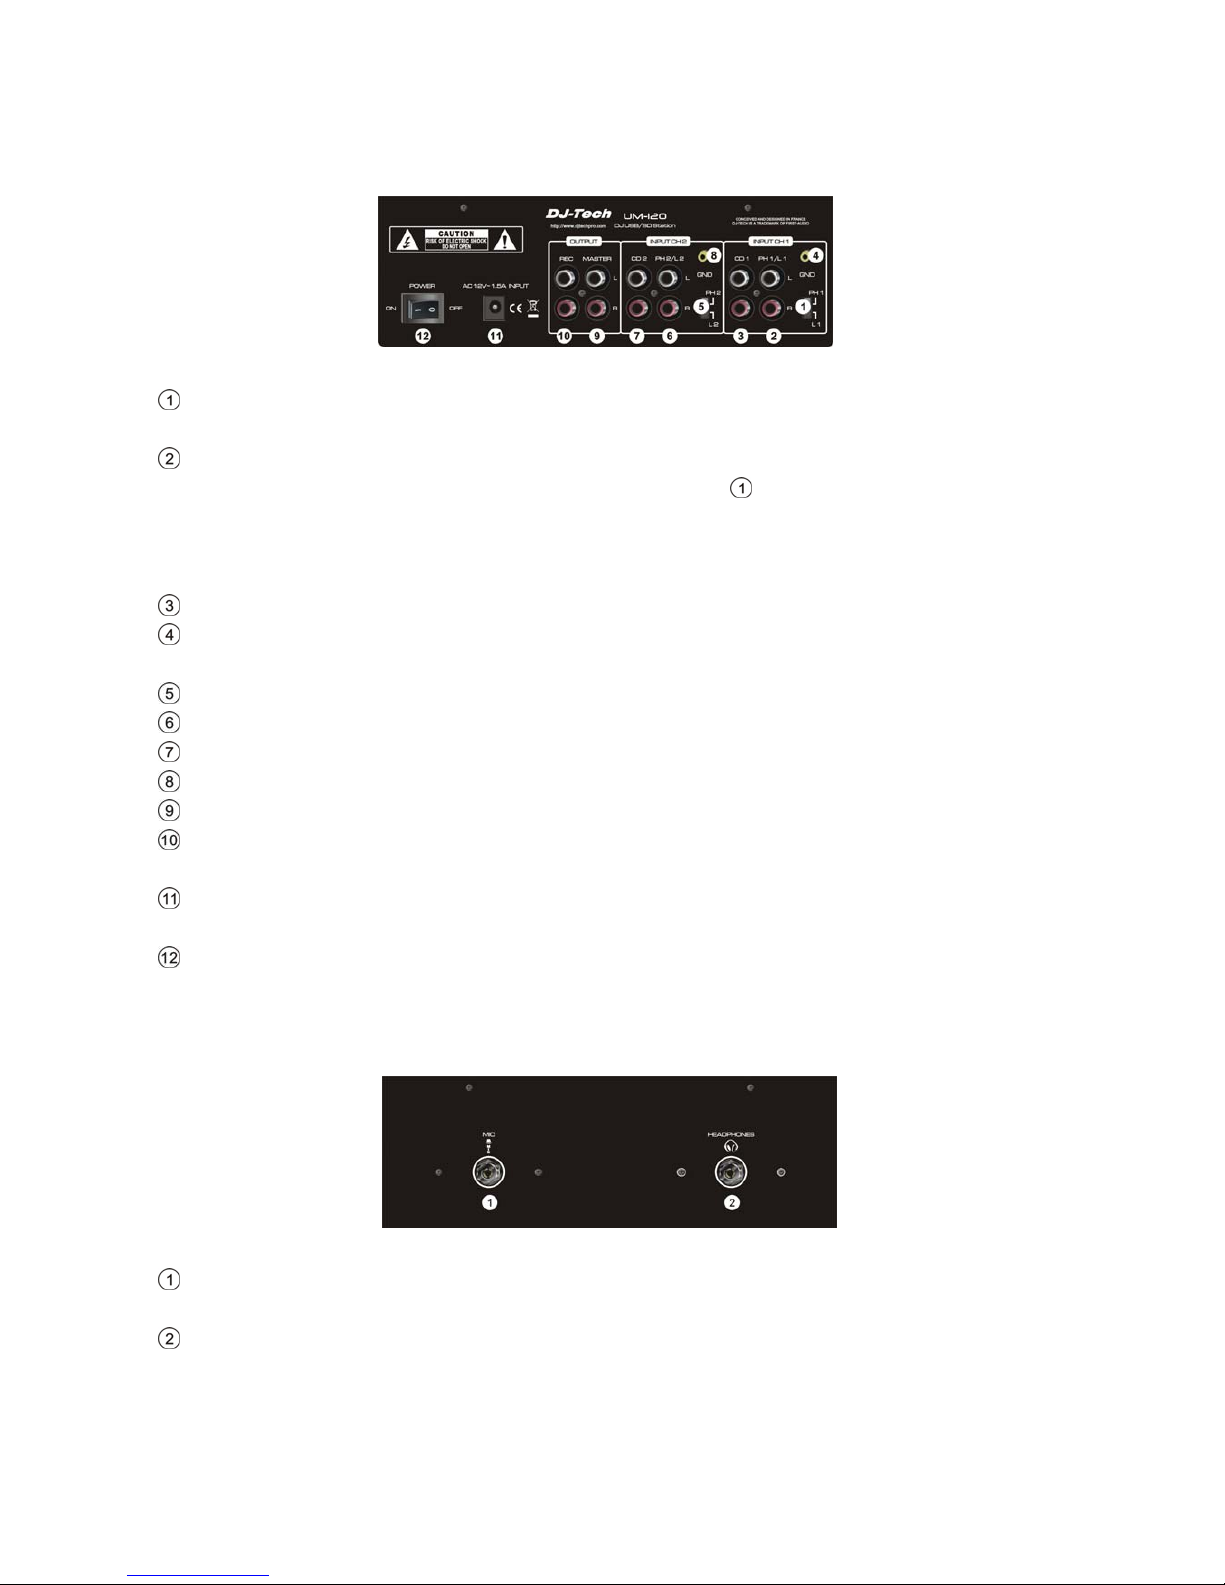
3.1 Rear panel description
Power input, signal input and output components are placed in the rear panel, please refer to Fig
3.1.0:
Fig 3.1.0 rear panel layout
INPUT CH1: When use the same RCA input jacks for PHONO input and Line input, slide to upper
for PHONO input, and slide adown for Line input.
INPUT CH1PH1/L1: PHONO and LINE are the same input jacks; you can choose each of them as
per your requirement, this selection is controlled by Switch
.
Attention: Due to the big difference of input sensitivity between PHONO and LINE, please slide
the switch to the position you need firstly, and preset the volume of the related components on
the top panel, and then connect the signal.
INPUT CH1 CD1: for connecting the output signal of CD player.
INPUT CH1 GND: for connecting the external signal source, so as to avoid interference and
improve the Signal-to-Noise.
INPUT CH2: the same working principle as INPUT CH1.
INPUT CH2 PH2/L2: the same working principle as INPUT CH1PH1/L1.
INPUT CH2 CD2: the same working principle as INPUT CH1 CD1
INPUT CH2 GND: the same working principle as INPUT CH1 GND.
OUTPUT MASTER OUTPUT: for connecting the external power amplifier or other audio processors.
OUTPUT REC OUTPUT: Here the output signal is not controlled by the Master volume; it is for
external REC devices.
Power input jack: for connecting the AC power adapter to the mixer, you may use AC 12V,
50Hz or 60Hz output adapter as the power of this unit.
Power ON/OFF: to connect or disconnect the power supply.
3.2 Top panel layout
Mic input jack and headphones output jack are placed on the top panel; please refer to the Fig
3.2.0.
Fig 3.2.0 front panel layout
MIC INPUT: 6.35mm BALANCED and UNBALANCED input,which is suitable for MIC which
impedance is around 600 ohm。
HEADPHONES:6.35mm stereo output, which is suitable for headphone which is 32~64 ohm。
3

3.3 Top panel description
The front panel is mainly divided into two parts: MP3 player area and mixer control area please refer to th e Fig 3.3.0
and Fig 3.3.1.
3.3.1 MP3 player control area
Fig 3.3.0 front panel layout (MP3player area)
USB INPUT: USB device is inserted here, if the USB stored any MP3 format music or songs, the
built-in decoder will decode out audio signal and play the music and songs accordingly.
SD INPUT: the SD card is inserted here, if USB stored any MP3 format music or songs, the built-in
decoder will decode out audio signal and play the music and songs accordingly.
LCD display: it is a blue backlight dot matrix LCD, all the functions of MP3 player can be
displayed via this LCD.
CONTRAST: for compensating the display effect for the temperature variety in different areas, or
you can adjust as per your favor, when slide to left, the contrast decreased, when slide to right,
the contrast increased.
USB/SD: To select USB or SD card.
DISPLAY: can see the current status of the LCD, like the PLAY status or the PLAYLIST information.
PREVIOUS: when press this key, it will skip to the last song and play accordingly. It can also turn
over the pages of playlist.
NEXT: when press this key, it will skip to the next song and play accordingly. It can also turn over
the pages of the playlist.
BACKWARD: when in PLAY or PAUSE, press this key can fast backward and monitor. If we press
continuously till it comes to the first program, it will stop search automatically and skip to the last
program and
play accordingly. This BACKWARD key can work with PLAY/PAUSE key and accomplish the CUE
for the current song.
FORWARD: When in PLAY or PAUSE, press this key can fast forward and monitor. If we press
continuously till it comes to the next program, it will stop search automatically and skip to the
next program and play accordingly. This FORWARD key also can work with PLAY/PAUSE key and
accomplish the CUE for the current song.
PLAY/PAUSE: When press this key, it will start or stop the current song, it also can be the
confirmation key for other functions.
CUE: to play a song which is set the CUE point, if there is no CUE point of a song, the default CUE
point will be the start point of a song.
LOOP-IN: to set the start point of the loop playback.
4
LOOP-OUT: to set the end point of the loop playback.
RELOOP: press this key to start or to stop the looping section which is playing.
MENU/NO: press this key to show the main MENU of this unit, and also can check the current
play status or playlist information as well as the enquiry function of other keys.
PLAYLIST: with PUSH/ENTER, PREVIOUS, NEXT, PLAY/PAUSE and MENU/NO can set up the list,
playback and delete of the Mp3 songs.
PUSH/ENTER: this is a push switch with a rotary encoder, with this rotary function, we can select
the menu up and down, when press this button, we can confirm the selection we made, when
works with other keys, we may accomplish all kinds of desired functions.
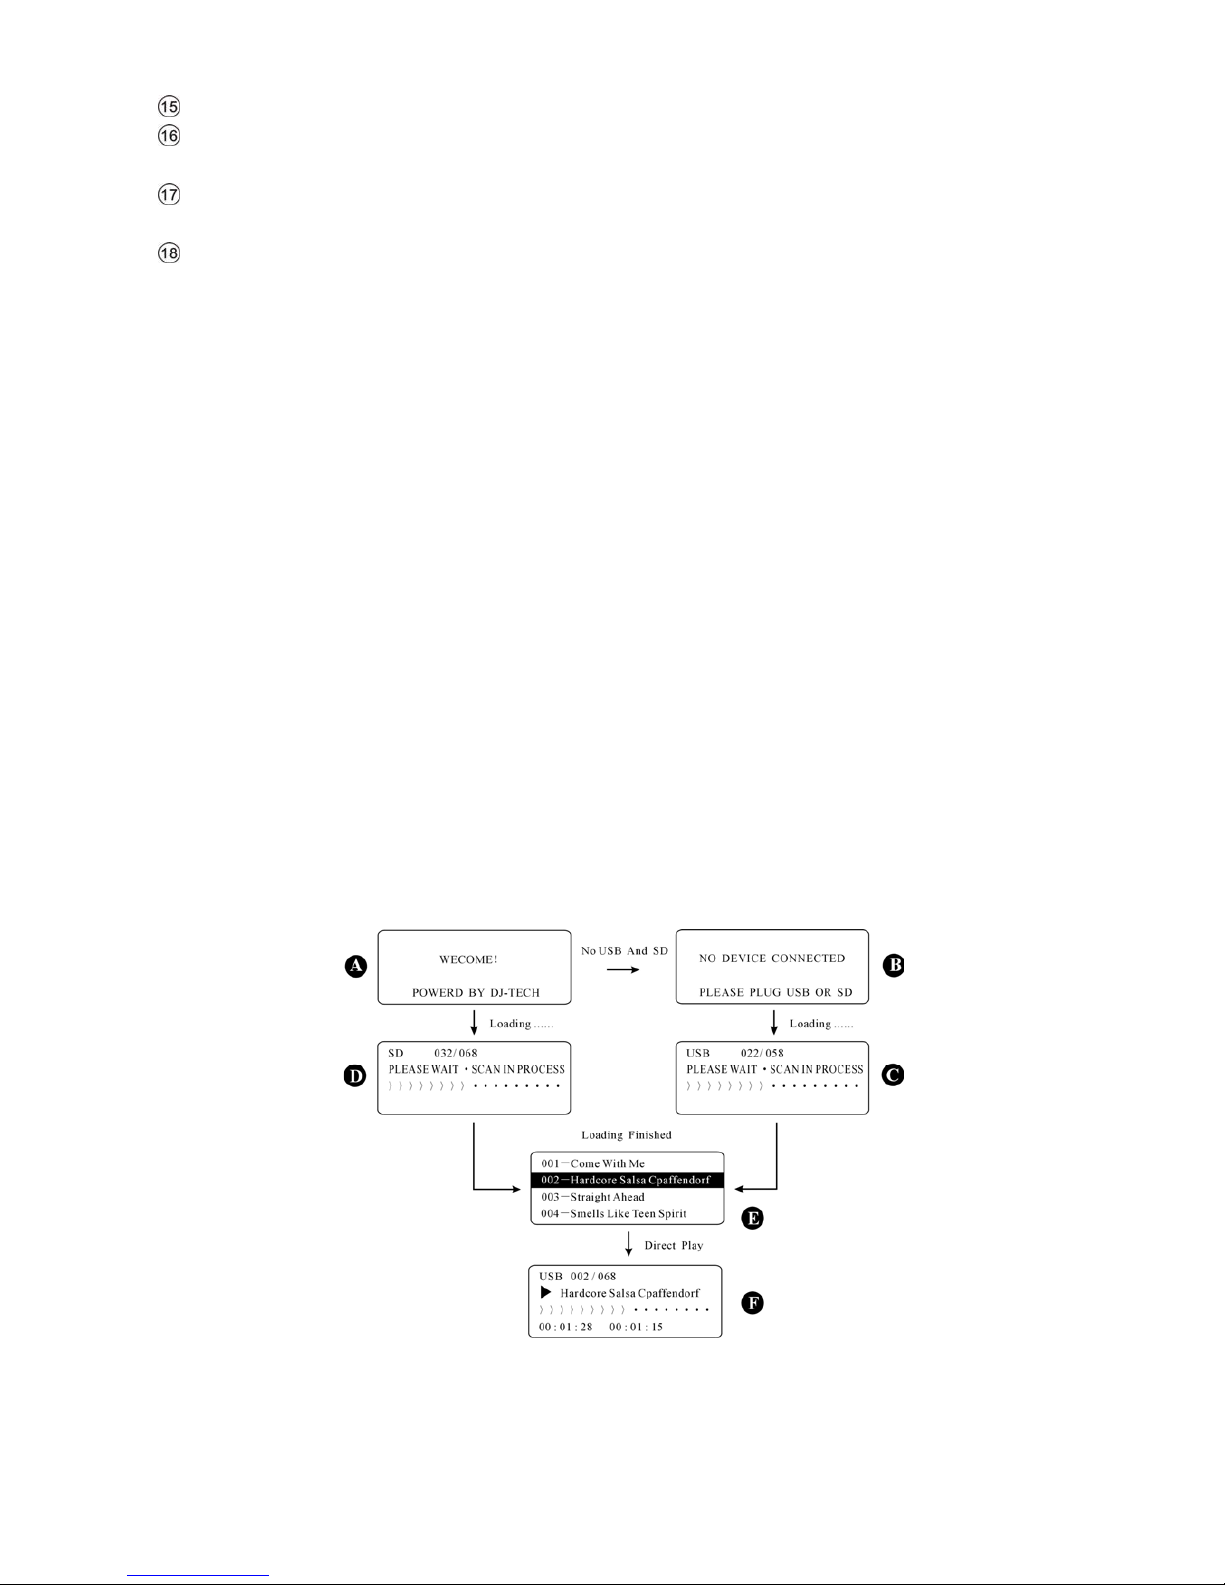
3.3.2 MP3 player function area
1 The loading and playback of MP3
After connecting power supply, Fig 3.3.2-1 A will appear in the LCD, if there is no USB and SD card
inserted, the Fig A will be changed to Fig B. If there is no contents or no any MP3 format inside the
USB and SD card, Fig B will be NO MP3 MUSIC!
So if we insert USB or SD card with MP3 format, the Fig B will be change to Fig C, it means the songs of
the USB are being loading, the LCD also displays the amount of the songs.
If we insert the USB or SD card firstly and connect to power after, the LCD will displays the Fig A and
then change to Fig D, the loading sequence of the system will be SD card first and then USB stick.
After loading, all the songs as well as the titles and numbers will be displayed according to the
playlist like the Fig E as show below. There are only 4 songs displayed in each page of the LCD, for
more information, please use PUSH/ENTER, PREVIOUS or NEXT to change the pages, the system can
load 500 MP3 songs maximum, due to the there is no more storage inside the system, the loading
capacity is depending on the volume of the USB stick or SD card.
You can use PUSH/ENTER, PREVIOUS or NEXT to select the songs in the playlist, like the second song in
Fig E, an then press PLAY/PAUSE to play directly.
When playing, the first row shows the current device, total songs and the current song; the second
row shows the current title of a song; the third row shows the playback process via graphics mode.
The fourth row shows the current playback time, and after it will be remain time of palyback.
Fig 3.3.2-1 Loading and direct playback
2 CREATE PLAYLIST
5
If you want to reorganize the playback list and sequence of the songs, please enter the edit status
and set up the playlist. You can set up 10 playlist, in each playlist, you can put 120 songs, please

refer to fig 3.3.2-2 below:
After finish loading, press PLAY/PAUSE or PUSH/ENTER to go into the playback, like Fig A, and also you
can go into pause as you wish. When press PLAYLIST, the Fig B will appear, from the top to the
bottom, there are 3 playlist: CREATE PLAYLIST, PLAY PLAYLIST and ERASE PLAYLIST.
Select the CREATE PLAYLIST, and press the PAUSE/TNTER or PLAY/PAUSE key, the display shows 10
playlist like fig C and all of them are empty.
Select each of them and set up your playlist, like the first list PLAYLIST 01 [EMPTY], press PUSH/ENTER or
PLAY/PAUSE, Fig D will appear, and then Fig E, on the left top of Fig E, there is a clue on playlist 1, you
can put your songs inside the list.
Use NEXT or PREVIOUS to select the songs, then press PLAYLIST, the Fig F will appear, it means the first
song has been added to the playlist, so use the same method to put other songs to the playlist 1, like
the Fig G which means 52 songs have been added to the playlist1.
When songs are added to the playlist, you can store them. just press PLAYLIST for 3 seconds till the Fig
H appear, and select SAVE & CLOSE PLAYLIST 01, press PUSH/ENTER or PLAY/PAUSE, Fig I will appear,
then press YES, and PUSH/ENTER or PLAY/PAUSE, fig J will appear, then Fig K. then playlist 1 is done.
Use the same methods to set up the playlist 2 to 10, during the set up, if you want to cancel, please
press MENU/NO to cancel.
Fig 3.3.2-2 set up the playlist
If you want to exchange the SD/USB, please press USB/SD, and then press PLAY/PAUSE or
PUSH/ENTER to confirm. After loading, it is ok to play.
3 PLAY PLAYLIST
After setting up the playlist, you can play each of them, please refer to the Fig 3.3.2-3 for operation.
During playback of a song, press PLAYLIST, Fig B appears, select the PLAY LIST and press PLAY/PAUSE,
Fig C appears, and you may found the PLAYLIST is not empty anymore.
Select PLAYLIST01, and press PLAY/PAUSE, Fig D appears, on the top right of fig D, it shows the current
6
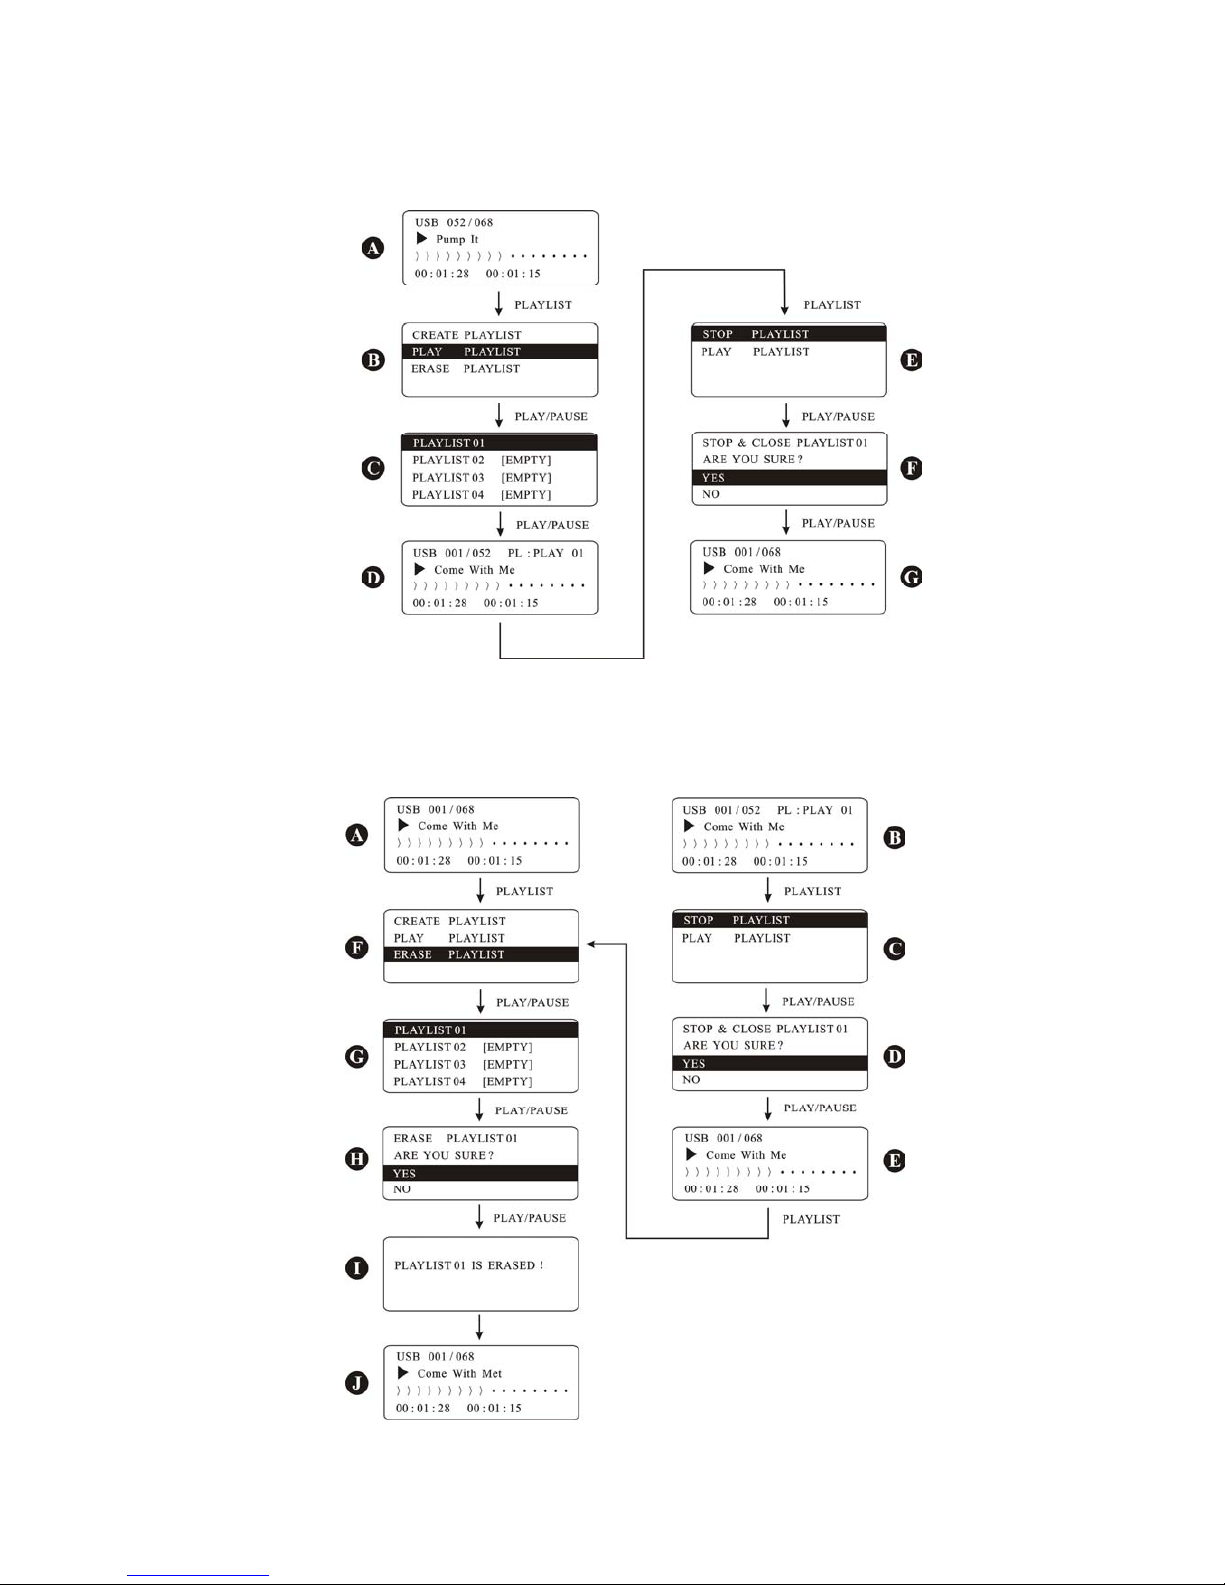
songs are from playlist 1, meanwhile, it shows the amount of the songs as well as the current songs.
If you want to exit the playlist, press PLAYLIST key, and the STOP PLAYLIST in Fig E, then PUSH/ENTER or
PLAY/PAUSE key, press YES to come back to the original Stochastic playback mode in Fig F, please
refer to the Fig G.
Fig 3.3.2-3 playback of playlist
4 ERASE PLAYLIST
If you want to cancel the playlist you set up before, you may erase it as per the fig 3.3.2-4 show
below:
7
Fig3.3.2-4 EARSE the PLAYLIST
If the playlist existed, but the status is stochastic, please press PLAYLIST-ERASE PLAYLIST-PUSH/ENTER or
PLAY/PAUSE, and select PLAYLIST01 in Fig G, then PUSH/ENTER or PLAY/PAUSE, select YES in Fig H,
then PUSH/ENTER or PLAY/PAUSE, after fig I, there is Fig J, it means one PLAYLIST 01 is erased.
If you are in PLAY PLAYLIST, like Fig B, please exit the PLAYBACK mode and then do your erase
operation.
Press the PLAYLIST, select the STOP PLAYLIST in Fig C, press PUSH/ENTR or PLAY/PAUSE, then press YES
in Fig D, and PUSH/ENTER or PLAY/PAUSE again, then Fig E, it means the playback of the playlist is
exited, and now is in stochastic playback. Press PLAYLIST again, Fig F appears, follow the same as
below can carry out the erase of the playback.
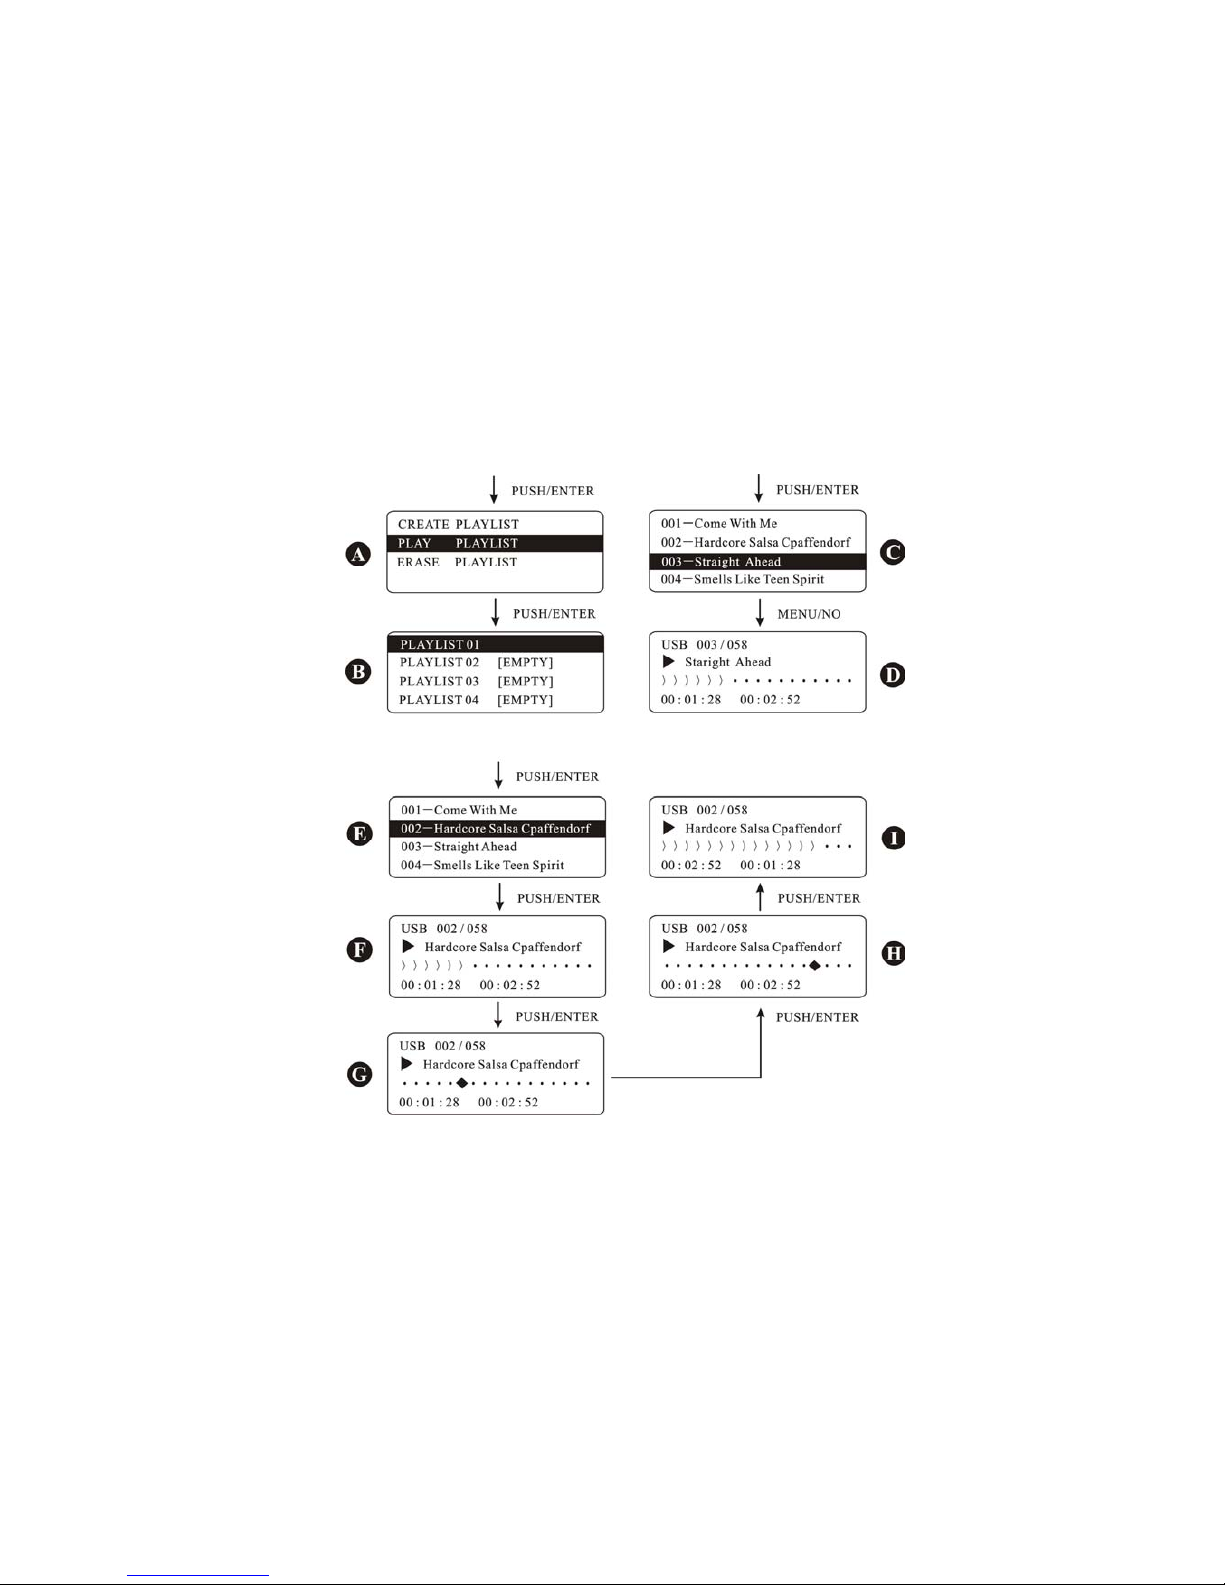
5 PUSH/ENTER quick application
PUSH/ENTER is a high efficiency operation components, with this PUSH/ENTER; we may read and
locate the Menu or playlist quickly and also may check the details for the current songs, for more
details, please refer to 3.3.2-5.
Fig 3.3.2-5 PUSH/ENTER operation
With the PUSH/ENTER rotary knob, we may fast read and locate the menu or playlist, please refer to
Fig A and Fig B, if you would like to continue the next step, please use PUSH/ENTER for confirmation,
otherwise please press MENU/NO.
When uses PUSH/ENTER in a playback of a song, it will select the playlist first and then select the
current song automatically, like Fig C. and if you don’t want to continue the next step, please press
MENU/NO to exit and back to Fig D.
8
For details of current song, except press BACKWARD or FORWARD for search, press PUSH/ENTER is
much convenient. Take the Fig F for example; if you want to search one point to play, you may press
PUSH/ENTER, please refer to the Fig G. when rotary PUSH/ENTER to right, the icon will go to right,
please refer to Fig H, when press PUSH/ENTER, it will be confirmed to the new position and start the
playback here, please refer to Fig I.
 Loading...