

- USER MANUAL
- MANUEL DE L'UTILISATEUR
- BENUTZERHANDBUCH
Club Edition
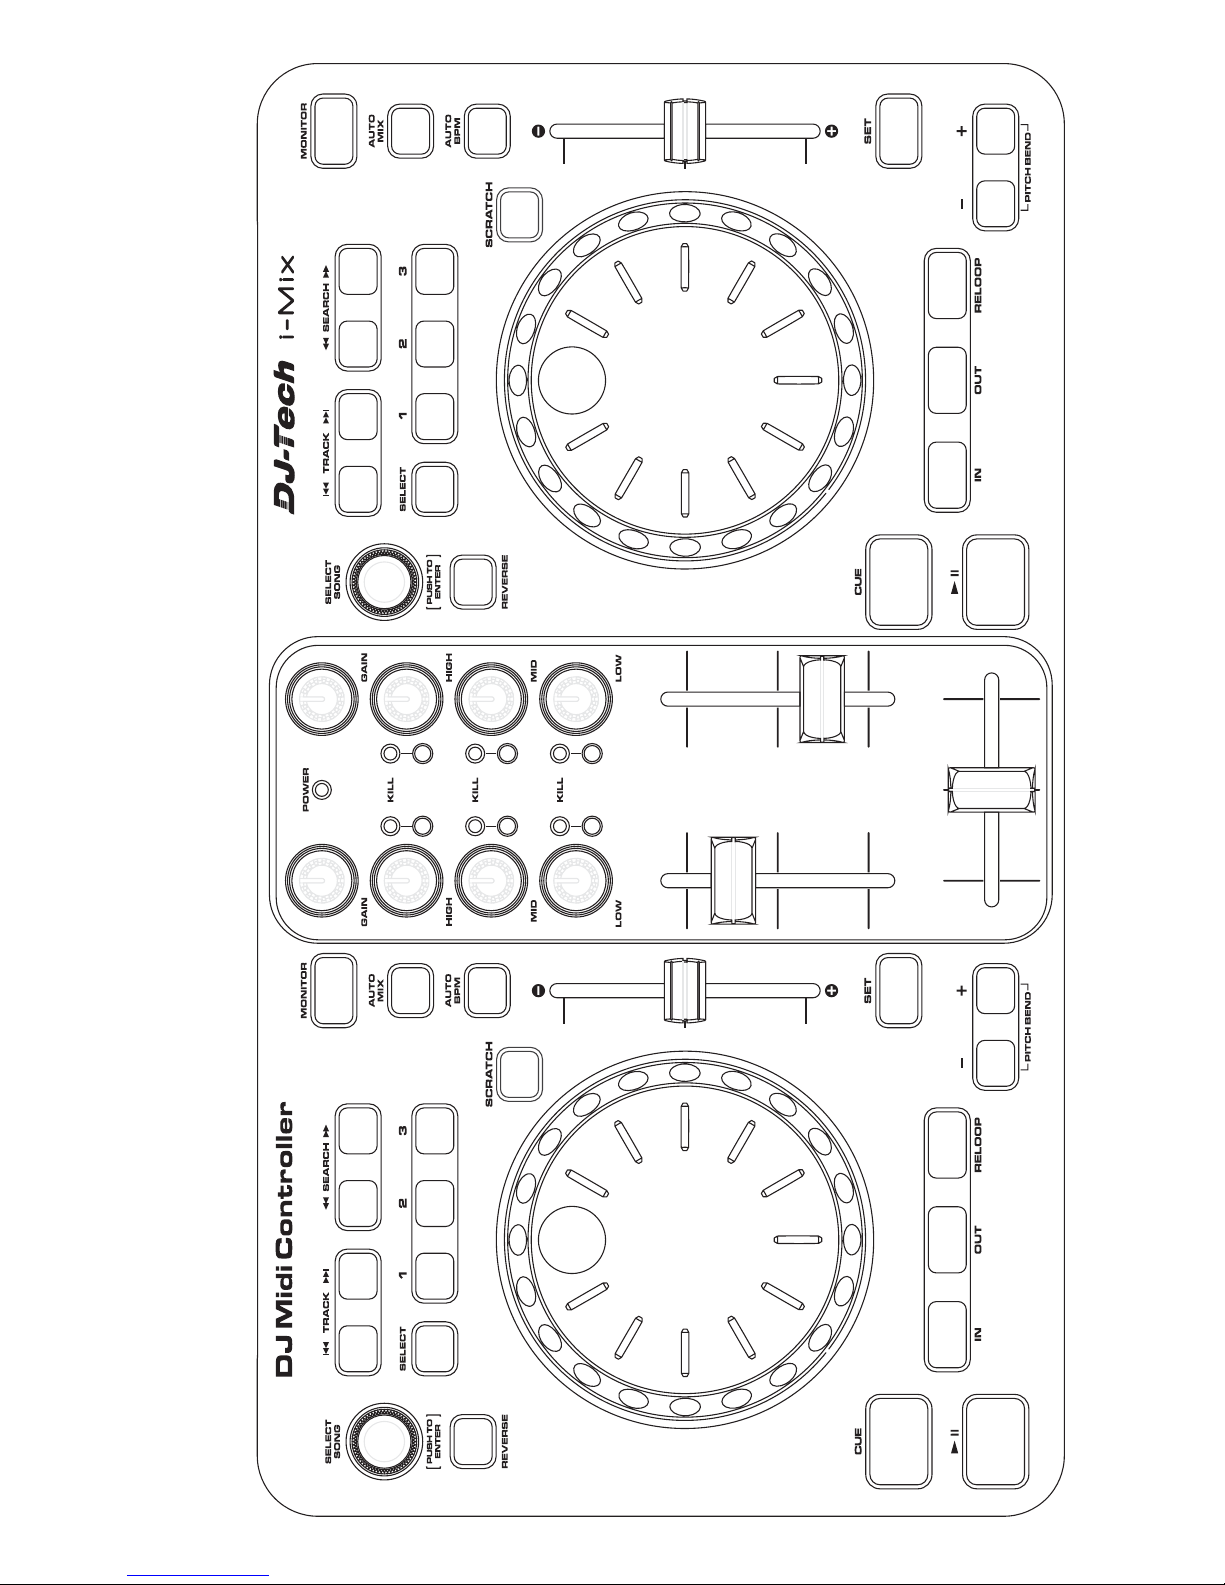
ENC1
KEY30
KEY25
KEY26
KEY27
KEY28
KEY3
KEY2KEY1
KEY29
KEY4
LED1 LED2 LED3
LED4
KEY5
LED5
KEY6
LED6
KEY7
LED7
KEY8
LED8
KEY9
LED9
KEY34
KEY35
KEY36
ENC2
VR9
KEY31
KEY32
KEY33
VR10
VR11
VR13
VR12
VR1
VR5
VR2
VR6
VR3
VR7
VR4
Vr8
KEY21
LED21
KEY20
LED20
KEY22
LED22
KEY23
LED23
KEY24
LED24
KEY19
LED19
KEY18
LED18
KEY17
LED17
KEY16
LED16
ENC3
ENC4
KEY37 KEY38
KEY39
KEY40
KEY41
KEY42
KEY47
KEY48
KEY46
KEY45
KEY44
KEY43
LED25
LED10 LED11
KEY11
LED12 LED13
KEY12 KEY13
LED15LED14
KEY15
KEY14
KEY10
MIDI MAP

MIDI MAP
CONTROL KEY1/LED1 KEY2/LED2 KEY3/LED3 KEY4/LED4 KEY5/LED5 KEY6/LED6 KEY7/LED7 KEY8/LED8
MIDI Note (09 hex) Note (10 hex) Note (17 hex) Note (06 hex) Note (0D hex) Note (14 hex) Note (01 hex) Note (08 hex)
CONTROL KEY9/LED9 KEY10/LED10 KEY11/LED11 KEY12/LED12 KEY13/LED13 KEY14/LED14 KEY15/LED15 KEY16/LED16
MIDI Note (0F hex) Note (20 hex) Note (1C hex) Note (15 hex) Note (27 hex) Note (23 hex) Note (2A hex) Note (25 hex)
CONTROL KEY17/LED17 KEY18/LED18 KEY19/LED19 KEY20/LED20 KEY21/LED21 KEY22/LED22 KEY23/LED23 KEY24/LED24
MIDI Note (2C hex) Note (33 hex) Note (29 hex) Note (30 hex) Note (37 hex) Note (24 hex) Note (2B hex) Note (32 hex)
CONTROL KEY25 KEY26 KEY27 KEY28 KEY29 KEY30 KEY31 KEY32
MIDI Note (04 hex) Note (0B hex) Note (12 hex) Note (19 hex) Note (02 hex) Note (03 hex) Note (11 hex) Note (07 hex)
CONTROL KEY33 KEY34 KEY35 KEY36 KEY37 KEY38 KEY39 KEY40
MIDI Note (05 hex) Note (1B hex) Note (0E hex) Note (16 hex) Note (2E hex) Note (35 hex) Note (1F hex) Note (26 hex)
CONTROL KEY41 KEY42 KEY43 KEY44 KEY45 KEY46 KEY47 KEY48
MIDI Note (1E hex) Note (34 hex) Note (18 hex) Note (38 hex) Note (0C hex) Note (22 hex) Note (31 hex) Note (1D hex)
CONTROL VR1 VR2 VR3 VR4 VR5 VR6 VR7 VR8
MIDI CTRL (48hex) CTRL (45hex) CTRL (46hex) CTRL (47hex) CTRL (4Bhex) CTRL (4Chex) CTRL (4Ahex) CTRL (49hex )
CONTROL VR9 VR10 VR11 VR12 VR13
MIDI CTRL (44hex) CTRL (43hex) CTRL (42hex) CTRL (41hex) CTRL (40hex)
CONTROL ENC1 ENC2 ENC3 ENC4 ENC1_KEY ENC3_KEY
MIDI Note (51 hex) Note (52 hex) Note (50 hex) Note (53 hex) Note (0A hex) Note (2D hex)
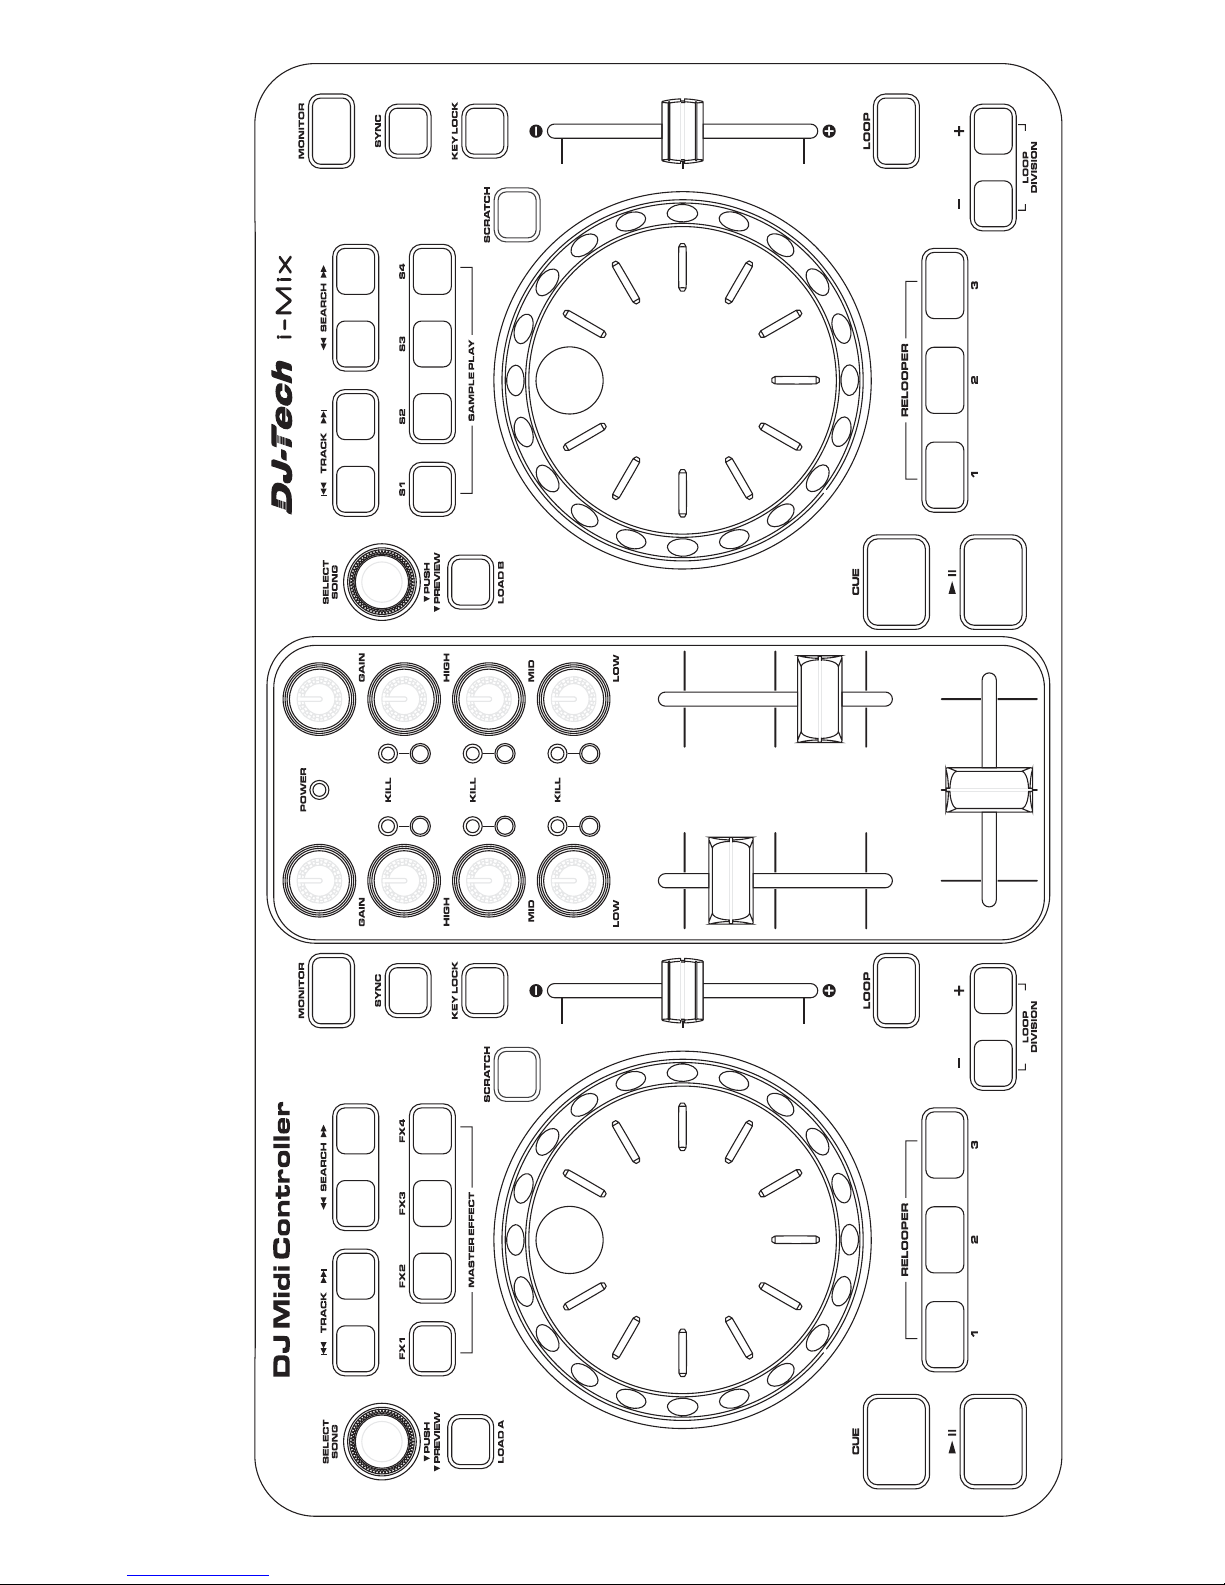
ENC1
KEY30
KEY25
KEY26
KEY27
KEY28
KEY3
KEY2KEY1
KEY29
KEY4
LED1 LED2 LED3
LED4
KEY5
LED5
KEY6
LED6
KEY7
LED7
KEY8
LED8
KEY9
LED9
KEY34
KEY35
KEY36
ENC2
VR9
KEY31
KEY32
KEY33
VR10
VR11
VR13
VR12
VR1
VR5
VR2
VR6
VR3
VR7
VR4
Vr8
KEY21
LED21
KEY20
LED20
KEY22
LED22
KEY23
LED23
KEY24
LED24
KEY19
LED19
KEY18
LED18
KEY17
LED17
KEY16
LED16
ENC3
ENC4
KEY37 KEY38
KEY39
KEY40
KEY41
KEY42
KEY47
KEY48
KEY46
KEY45
KEY44
KEY43
LED25
LED10 LED11
KEY11
LED12 LED13
KEY12 KEY13
LED15LED14
KEY15
KEY14
KEY10
MIDI MAP (CLUB EDITION)

MIDI MAP
CONTROL KEY1/LED1 KEY2/LED2 KEY3/LED3 KEY4/LED4 KEY5/LED5 KEY6/LED6 KEY7/LED7 KEY8/LED8
MIDI Note (09 hex) Note (10 hex) Note (17 hex) Note (06 hex) Note (0D hex) Note (14 hex) Note (01 hex) Note (08 hex)
CONTROL KEY9/LED9 KEY10/LED10 KEY11/LED11 KEY12/LED12 KEY13/LED13 KEY14/LED14 KEY15/LED15 KEY16/LED16
MIDI Note (0F hex) Note (20 hex) Note (1C hex) Note (15 hex) Note (27 hex) Note (23 hex) Note (2A hex) Note (25 hex)
CONTROL KEY17/LED17 KEY18/LED18 KEY19/LED19 KEY20/LED20 KEY21/LED21 KEY22/LED22 KEY23/LED23 KEY24/LED24
MIDI Note (2C hex) Note (33 hex) Note (29 hex) Note (30 hex) Note (37 hex) Note (24 hex) Note (2B hex) Note (32 hex)
CONTROL KEY25 KEY26 KEY27 KEY28 KEY29 KEY30 KEY31 KEY32
MIDI Note (04 hex) Note (0B hex) Note (12 hex) Note (19 hex) Note (02 hex) Note (03 hex) Note (11 hex) Note (07 hex)
CONTROL KEY33 KEY34 KEY35 KEY36 KEY37 KEY38 KEY39 KEY40
MIDI Note (05 hex) Note (1B hex) Note (0E hex) Note (16 hex) Note (2E hex) Note (35 hex) Note (1F hex) Note (26 hex)
CONTROL KEY41 KEY42 KEY43 KEY44 KEY45 KEY46 KEY47 KEY48
MIDI Note (1E hex) Note (34 hex) Note (18 hex) Note (38 hex) Note (0C hex) Note (22 hex) Note (31 hex) Note (1D hex)
CONTROL VR1 VR2 VR3 VR4 VR5 VR6 VR7 VR8
MIDI CTRL (48hex) CTRL (45hex) CTRL (46hex) CTRL (47hex) CTRL (4Bhex) CTRL (4Chex) CTRL (4Ahex) CTRL (49hex )
CONTROL VR9 VR10 VR11 VR12 VR13
MIDI CTRL (44hex) CTRL (43hex) CTRL (42hex) CTRL (41hex) CTRL (40hex)
CONTROL ENC1 ENC2 ENC3 ENC4 ENC1_KEY ENC3_KEY
MIDI Note (51 hex) Note (52 hex) Note (50 hex) Note (53 hex) Note (0A hex) Note (2D hex)

1. Read these instructions.
2. Keep these instructions.
3. Heed all warnings.
4. Follow all instructions.
5. Do not use the apparatus near water.
6. Clean only with dry cloth.
7. Do not block any ventilation openings. Install in accordance with the manufacturer’s instructions.
8. Do not install near any heat sources such as radiators, heat registers, stoves, or other apparatus
(including amplifiers) that produce heat.
9. Do not defeat the safety purpose of the polarized or grounding-type plug. A polarized plug has two
blades with one wider than the other. A grounding- type plug has two blades and a third grounding
prong. The wide blade or the third prong is provided for your safety. If the provided plug does not fit into
your outlet, consult an electrician for replacement of the obsolete outlet.
10. Protect the power cord from being walked on or pinched particularly at plugs, convenience receptacles,
and the point where they exit from the apparatus.
11. Only use attachments/ accessories specified by the manufacturer.
12. Use only with a cart, stand, tripod, bracket or table specified by the manufacturer, or sold with
the apparatus. When a cart is used, use caution when moving the cart/apparatus combination to
avoid injury from tip-over.
13. Unplug this apparatus during lighting storms or when unused for long periods of time.
14. Refer all servicing to qualified service personnel. Servicing is required when the apparatus has
been damaged in any way, such as power-supply cord or plug is damaged, liquid has been spilled
or objects have fallen into the apparatus, the apparatus has been exposed to rain or moisture, does
not operate normally, or has been dropped.
WARNING
To reduce the risk of fire or electric shock, do not expose this apparatus to rain or moisture. The
apparatus shall not be exposed to dripping or splashing and that no objects filled with liquids, such
as vases, shall be placed on the apparatus.
CAUTION: To reduce the risk of electric shock, do not
remove any cover. No user-serviceable parts inside. Refer
servicing to qualified service personnel only.
The lightning flash with arrowhead symbol within the equilateral triangle is intended to alert
the use to the presence of un-insulated “dangerous voltage” within the product’s enclosure
that may be of sufficient magnitude to constitute a risk of electric shock.
The exclamation point within the equilateral triangle is intended to alert the user to the
presence of important operation and maintenance (servicing) instructions in the literature
accompanying this appliance.
CAUTION
To prevent electric shock, do not use this polarized plug with an extension cord, receptacle or other
outlet unless the blades can be fully inserted to prevent blade exposure.
IMPORTANT SAFETY INSTRUCTIONS
DO NOT OPEN
RISK OF ELECTRIC SHOCK
ENGLISH
FRANÇAIS
DEUTSCH
1

y The i-Mix is USB MIDI and provides simple plug & play features working with Windows.
y Jog wheel and control technology from the turntables.
y Adjustable Crossfader curve.
y i-Mix's cont
rol section via USB MIDI IN/OUT.
y
A high resolution pulse sensor jog wheel
y Pitch bending, scratching and select song.
y The resistance value of the fader movement is AD converted
y The DATA SEND(POWER LED)indicated the DATA is sent/received.
y The power source is selectable from USB bus-power and the exclusive power adaptor.
1. POWER CONNECTOR – Plug in power adapter here.
2. POWER SWITCH (Adaptor / OFF/ USB power) – Set the switch
to AC ADAPTOR when using the exclusive AC adaptor, set to
USB BUSS POWER when using power provided from the
computer via USB.
3. USB PORT INPUT – Used to connect a computer.
4. C.F CURVE CONTROL –Adjusts the shape of the crossfader
curve from a quick cut for scratching or to a longer fade for mixing.
1. Install the DJ software normally.
2. Connect the i-Mix to computer normally.
3. Open the software.
4. Start up the software to perform settings with the i-Mix.
Note: The software may not recognize the i-Mix if it is co
nnected to the computer after the software
has starte
d.
5. Operations after the system recovering from power saving mode is not guaranteed.
Note: Power save setting is required to be set OFF.
6. Many DJ software products have a MIDI LEARN function. The i-Mix can control all software that
has this function.
This function is used to i-Mix as controls for parameters of the software.
Note: The MIDI LEARN setting for each software is different; please refer to each software's
manual for further instructions.
7. The MIDI data created with functions can be manually set with the software, if the software does
not support the MIDI LEARN function. Please refer to the software's manual for further instructions.
POWER SUPPLY: DC 9V 0.5A
DIMENSION: 360(W) × 200(D) × 64.5(H) mm
WEIGHT: 1.4kg
MAIN FEATURES
OPERATIONS
CONNECTION
SPECIFICATION
ENGLISH
FRANÇAIS
DEUTSCH
2
432
1

1. Lire les instructions suivantes.
2. Conserver ce manuel.
3. Faire attention aux avertissements.
4. Suivre toutes les instructions.
5. N’utiliser pas l’appareil près de l’eau.
6. Nettoyer uniquement avec un chiffon doux.
7. Ne pas obstruer les ouvertures de ventilation. Installer conformément aux instructions du
constructeur.
8. Ne pas installer près des sources de chaleur tels que radiateur, cuisinière ou tout autre appareil qui
produit de la chaleur.
9. Ne pas abîmer le cordon d’alimentation. Consulter un électricien si le cordon est abîmé
10. Ne pas marcher sur les cordons d’alimentation.
11. Utiliser uniquement des accessoires recommandés par le fabricant.
12. Ne pas placer ce produit sur un chariot, un stand, un trépied ou une table instable, cela
pourrait causer des dommages sérieux à un enfant ou à un adulte.
13. Le cordon d’alimentation est utilisé comme un dispositif de déconnexion, il doit être en parfait état
de fonctionnement.
14. Sur l’accomplissement de tout le service ou réparations à ce produit, demander à technicien
qualifié d’exécuter des contrôles de sécurité pour déterminer que le produit est en condition de
fonctionnement approprié.
AVERTISSEMENT
Pour réduire le risque d'incendie ou d'électrocution, ne pas exposer cet appareil à la pluie ou à
l'humidité. L'appareil ne doit pas être exposé à des projections de liquides et aucun objet rempli de
liquides, tels que des vases, ne doit être placé sur l'appareil.
Avertissement: Pour réduire les risques de chocs
électriques, ne pas un personnel qualifié.
Ce logo vous indique la présence de « tension dangereuse », il y a risque de choc
électrique.
Ce logo vous indique des opérations de maintenance importante.
ATTENTION
Afin d'éviter des chocs éléectrics , ne pas utiliser de prise de rallonges , de prises multiples que les
bornes ne peuvent s'insérer correctement.
INFORMATION DE SECURITE IMPORTANTE
DO NOT OPEN
RISK OF ELECTRIC SHOCK
ENGLISH
FRANÇAIS
DEUTSCH
3

1
y Le i-Mix USB MIDI est simple et fournit des fonctionnalités Plug & Play pour travailler sous Windows.
y Roue jog et technologie de contrôle des platines.
y Crossfader réglable.
y Section de contrôle i-Mix via USB MIDI IN/OUT.
y Roue jog à capteur d’impulsion haute resolution.
y Pitch bending, scratching et sélection de la chanson.
y La valeur de la résistance fader est convertie en AD.
y L’envoie des données (LED) est indiqué lorsque le DATA est envoyé/reçu.
y Source d’alimentation est sélectionnable par USB et par adaptateur.
1. CONNECTEUR D’ALIMENTATION – Brancher l’adaptateur secteur
ici.
2. BOUTON D’ALIMENTATION (ADAPTATEUR, OFF, USB
POWER) – Régler le bouton en position AC ADAPTATOR lorsque
vous utiliser l’adaptateur secteur, régler le bouton en position USB
BUSS POWER lorsque l’alimentation provient de l’ordinateur via
USB.
3. ENTREE USB – utiliser l’entrée USB pour connecter à l’ordinateur.
4. CONTROLE C.F. CURVE – Permet de régler la forme de la courbe
du crossfader rapidement couper pour scratcher ou pour mixer.
1. Installer le DJ software normalement.
2. Connecter le i-Mix à l’ordinateur normalement.
3. Exécuter le software.
4. Démarrer le logiciel pour effectuer les réglages avec la i-Mix.
REMARQUE: Le software ne peut reconnaître le i-Mix s’il est co
nnecté à l’ordinateur après que le
softwa
re ait été exécuté.
5. Les opérations après le système de récupération en mode d’économie d’énergie ne sont pas
garanties.
REMARQUE: le réglage de sauvegarde de puissance doit être sur OFF.
6. Beaucoup de logiciels DJ ont une fonction MIDI LEARN. Le i-Mix peut contrôler tous les softwares
qui possèdent cette fonction.
Cette Fonction est utilisée pour l'i-Mix comme contrôle des paratètres du logiciel
REMARQUE: le MIDI LEARN est différent pour chaque logiciel , veuillez vous référer au manuel
de votre logiciel.
7. Les données MIDI créées avec des fonctions peuvent être réglées manuellement avec le logiciel, si
le logiciel ne supporte pas la fonction MIDI LEARN. Veuillez vous référer au manuel du logiciel.
ALIMENTATION: DC 9V 0.5A
DIMENSION: 360(W) × 200(D) × 64.5(H) mm
POIDS: 1.4kg
FONCTIONS
OPERATIONS
CONNECTION
SPECIFICATION
ENGLISH
FRANÇAIS
DEUTSCH
4
432
1

1. Lesen Sie bitte alle Warn- und Bedienungshinweise sorgfältig durch, bevor Sie dieses Gerät in Betrieb nehmen.
2. Bewahren Sie diese Bedienungsanleitung für evtl. später auftauchende Fragen sorgfältig auf.
3. Entfernen Sie bitte nicht die Warnhinweise am Gerät.
4. Befolgen Sie bitte alle Hinweise in dieser Bedienungsanleitung genau.
5. Nutzen Sie dieses Gerät niemals in der Nähe von feuchten Stellen wie z.B. Waschbecken, Badewannen oder Teichen und Seen.
6.
Reinigung des Gerätes: Reinigen Sie das Gerät nur wie vom Hersteller vorgesehen. Nutzen Sie hierfür einen weichen, leicht
feuchten Lappen und wischen Sie das Gerät damit vorsichtig ab. Achten Sie darauf, dass niemals Feuchtigkeit oder gar Flüssigkeit
ins Geräteinnere gelangen kann!
7. Lüftungsschlitze und Öffnungen am Gerät dienen zur Kühlung während des Betriebes. Die Kühlluftzufuhr darf niemals durch zu dicht
am Gerät stehende Gegenstände blockiert werden. Achten Sie bei der (Fest-) Installation darauf, dass eine ausreichende
Kühlluftzufuhr stets gewährleistet ist. Nutzen Sie das Gerät nicht auf Gegenständen wie z.B. Sofa oder Bett, da dies die
Lüftungsschlitze blockiert und verdreckt. Sollten die Lüftungsschlitze verstaubt oder verdreckt sein, reinigen Sie diese bitte.
8. Das Gerät muss von anderen, Wärme verursachenden Geräten wie Endstufen, Heizkörpern usw. ferngehalten werden.
9. Dieses Produkt verfügt möglicherweise über einen Schutzkontakt Stecker, der nur in einer Position in die Steckdose passt. Dies ist
ein Sicherheitsmerkmal zur Erdung des Produkts. Entfernen Sie niemals Bauteile vom Stecker, damit er besser in die Steckdose
passt!
10. Achten Sie im Betrieb darauf, dass das Stromanschlusskabel nicht eingeklemmt oder eingeschnitten werden kann. Verlegen Sie
das Kabel immer so, dass es von keinen anderen Geräten beschädigt werden kann.
11. Benutzen Sie kein Zubehör, welches nicht vom Hersteller empfohlen wurde. Es könnte Schäden verursachen.
12. Benutzen Sie dieses Gerät nicht auf Gegenständen wie wackeligen Tischen oder Ähnlichem. Durch ungewolltes Herunterfallen kann
nicht nur das Gerät stark beschädigt oder Zerstört werden, sondern es können auch Personen oder Kinder verletzt werden. Bauen
Sie das Gerät nur so auf und ein, wie es vom Hersteller empfohlen wird oder in Einbauhalterungen die mit diesem Gerät angeboten
oder verkauft werden. Fragen Sie ggf. Ihren Fachhändler nach geeigneten Einbauhalterungen.
13. Trennen Sie das Gerät von der Stromversorgung, wenn Sie es eine längere Zeit nicht einsetzen wollen oder ein Gewitter
vorhergesagt wurde.
14. Nehmen Sie keine Reparatur- oder Wartungsarbeiten vor, die nicht ausdrücklich in dieser Anleitung aufgeführt sind. Kontaktieren Sie
für solche Arbeiten immer Ihren Fachhändler.
ACHTUNG
Zur Verringerung der Gefahr von Feuer oder elektrischem Schlag setzen Sie dieses Gerät niemals
Regen oder Feuchtigkeit aus. Das Gerät darf auf keinem Fall Tropf- oder Spritzwasser ausgesetzt
werden! Stellen Sie niemals Behälter mit Flüssigkeiten wie z.B. Vasen auf das Gerät.
ACHTUNG: Um das Risiko eines elektrischen
Stromschlags zu minimieren, entfernen Sie bitte keine
Gehäusedeckel! Gefährliche Betriebsspannung im
Gehäuseinnern kann lebensgefährlich für den Menschen
sein. Überlassen Sie evtl. Reparaturen ausschließlich
qualifiziertem Fachpersonal!
ACHTUNG: Um einen elektrischen Schlag zu vermeiden, öffnen Sie niemals das Gerät!
Hohe Betriebsspannung im Innern des Gerätes kann für den Menschen lebensgefährlich
sein! Schützen Sie das Gerät unbedingt vor Feuchtigkeit!
Dieses Symbol weist Sie darauf hin, dass der Betrieb dieses Gerätes unbedingt das Lesen
der Bedienungsanleitung erfordert. Unsachgemäße Anwendung birgt Gefahren für Mensch
und Umwelt und kann zu schweren gesundheitlichen Schäden führen.
ACHTUNG
Um einen lebensgefährlichen Stromschlag zu verhindern, nutzen Sie bitte nur Verlängerungskabel
zum Anschluss an das Stromnetz, wenn diese exakt passgenau sind.
WICHTIGE SICHERHEITSHINWEISE
DO NOT OPEN
RISK OF ELECTRIC SHOCK
ENGLISH
FRANÇAIS DEUTSCH
5

y Der i-Mix ist USB MIDI kompatibel und bietet einfache Plug & Play Features für Windows.
y Jog Whell und Bedienfnktionen wie bei einem Turntable.
y Einstellbare Crossfader Kurve.
y i-Mix's Steuersektion via USB MIDI IN/OUT.
y Hochauflösendes Puls-Sensor Jog Wheel
y Pitch bending, scratching und Titel Auswahl.
y Die “DATA SEND” (POWER LED) erkennt ob Daten gesendet oder empfangen werden.
y Die Stromversorgung kann wahlweise über Netzteil oder USB erfolgen.
1. STROMANSCHLUSS – Stecken Sie hier das Netzteil ein.
2. STROMQUELLE WAHLSCHALTER (Netzteil / Aus/ USB
Strom) – Stellen Sie den Schalter auf USB, wenn das Gerät über
den PC mit USB-Strom versorgt wird. Stellen Sie den Schalter
auf “Adaptor”, um das Netzteil als Stromquelle zu nutzen.
3. USB PORT INPUT – Schließen Sie hier über USB Ihren PC an.
4. C.F CURVE CONTROL –Stellen Sie hier die Crossfader Kurve
ein.
1. Installieren Sie die DJ Software.
2. Verbinden Sie den i-Mix mit Ihrem Computer.
3. Öffnen Sie das Programm.
4. Starten Sie die i-Mix Software um die Grundeinstellungen festzulegen.
Hinweis: Das Programm erkennt möglicherweise den i-Mix nicht, wenn er erst nachdem die
Software geöffnet wurde angeschlossen wurde.
5. Nachdem der PC im Stromsparmodus Ihres PC’s aktiv war, kann es sein, dass der i-Mix nicht
erkannt wird.
Hinweis: Wir empfehlen, den Stromsparmodus zu deaktivieren.
6. Viele DJ Software Produkte haben eine MIDI LERN Funktion. Der i-Mix kann jede Software steuern,
die diese Funktion bietet.
Diese Funktion
des i-Mix dient zum Einstellen der Parameter der Software.
Hinweis: Die MIDI LERN Einstellungen für jede Software ist verschieden; lesen Sie bitte die
entsprechende Anleitung, um evtl. Unklarheiten zu beseitigen.
7. Die MIDI Daten, die manuell erstellt wurden, können mit dieser Software eingestellt werden, wenn
die Software das MIDI LERN Programm nicht unterstützt. Lesen Sie bitte die entsprechende
Anleitung für weitere Informationen.
Betriebsspannung: DC 9V 0.5A
Abmessungen: 360(B) × 200(H) × 64.5(T) mm
Gewicht: 1.4kg
EIGENSCHAFTEN
INSTRUKTIONEN
ANSCHLUSS
SPECIFICATION
6
ENGLISH
FRANÇAIS
DEUTSCH
432
1

 Loading...