

DJ-Tech DJM-303 User Manual
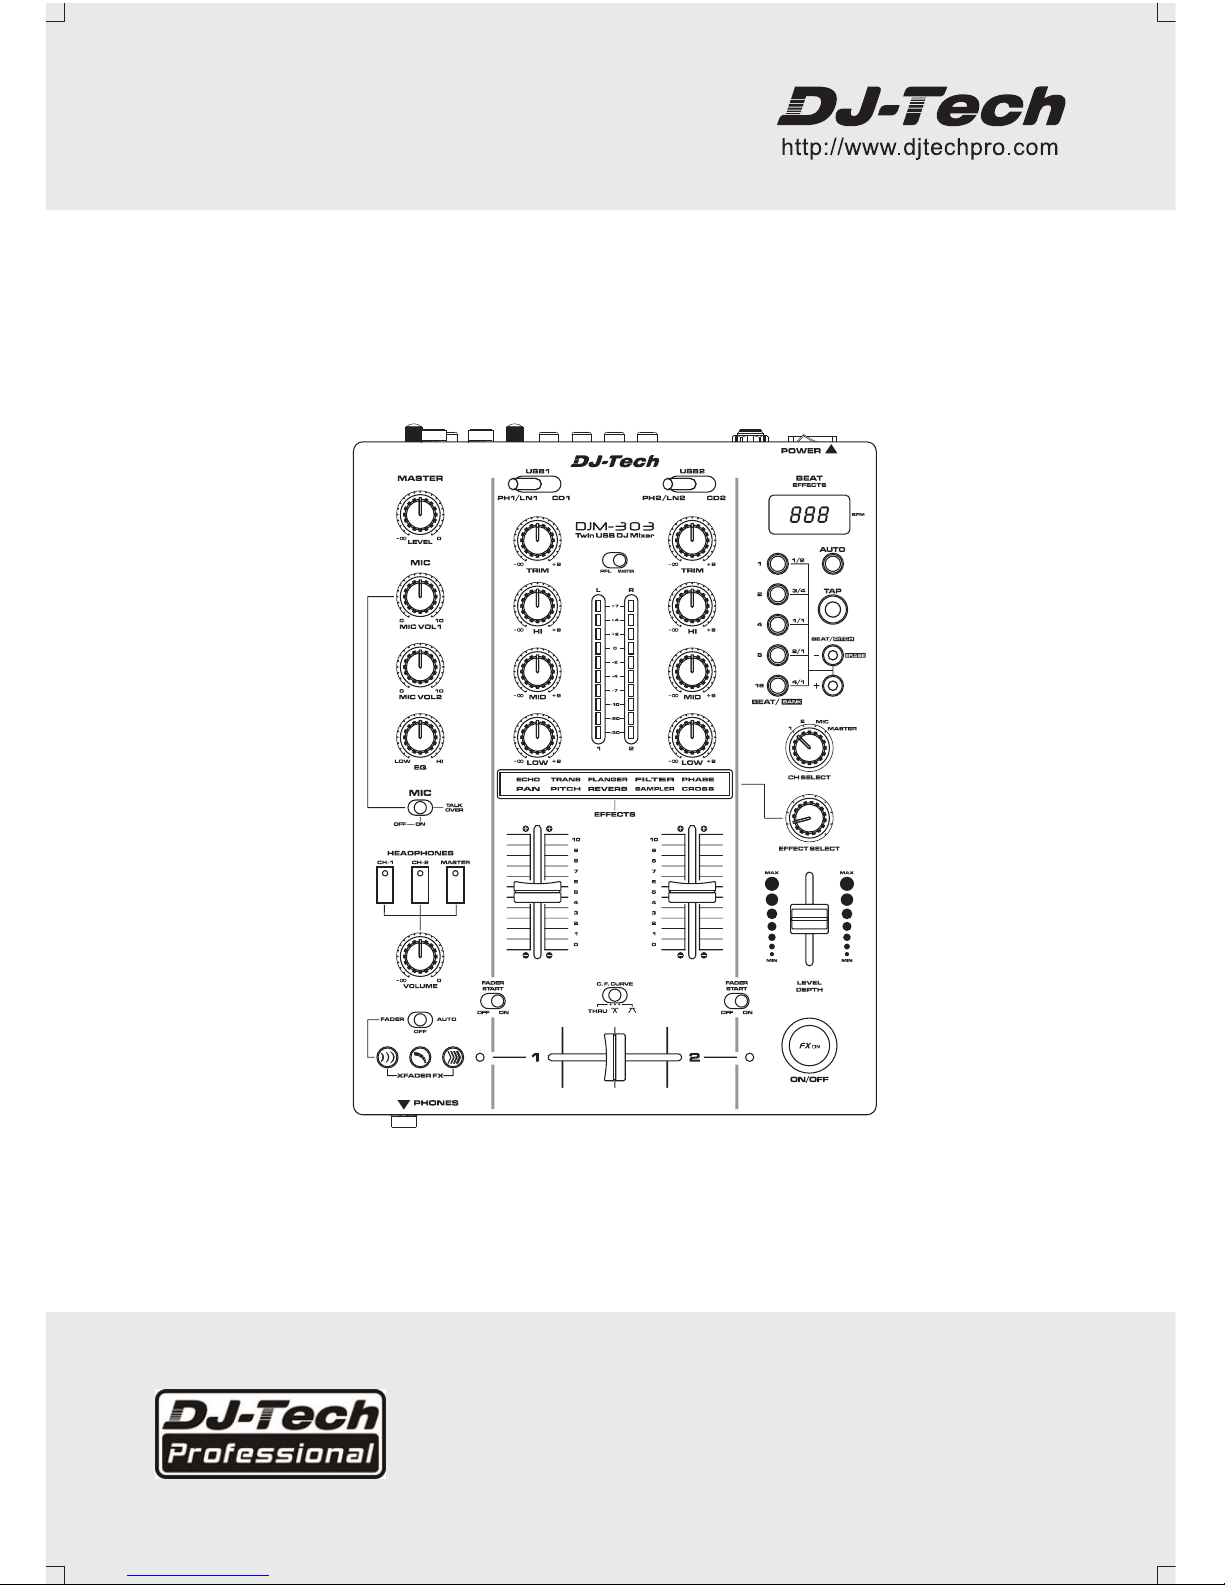
Twin USB DJ Mixer
D J M - 3 0 3
USER MANUAL (ENGLISH) P01-09
MANUEL D’UTILISATION(FRANÇAIS) P10-18
BEDIENUNGSANLEITUNG (DEUTSCH) P19-26
GEBRUIKERSHANDLEIDING (NEDERLANDS) P27-36
MANUAL DE INSTRUCCIONES (ESPAÑOL) P37-44
MANUALE DI ISTRUZIONI (ITALIANO) P45-52
ENGLISH
DEUTSCH FRANÇAIS
ESPAÑOL
DUTCH
ITALIANO
2
1. Read these Instructions.
2. Keep these Instructions.
3. Heed all Warnings.
4. Follow all Instructions.
5. Do not use this apparatus near water.
6. Clean only with dry cloth.
7. Do not block any ventilation openings. Install in accordance with the manufacturer’s instructions.
8. Do not install near any heat sources such as radiators, heat registers, stoves, or other apparatus
(including amplifiers) that produce heat.
9. Do not defeat the safety purpose of the polarized plug. A polarized plug has two blades with one
winder than the other. The wide blade is provided for your safety. If the provided plug does not fit
into your outlet, consult an electrician for replacement of the obsolete outlet.
10.Protect the power cord from being walked on or pinched particularly at plugs, convenience
receptacles, and the point where they exit from the apparatus.
11. Only use attachments/accessories specified by the manufacturer.
12.
Use only with the cart, stand, tripod, bracket, or table specified by the manufacturer,
or
sold
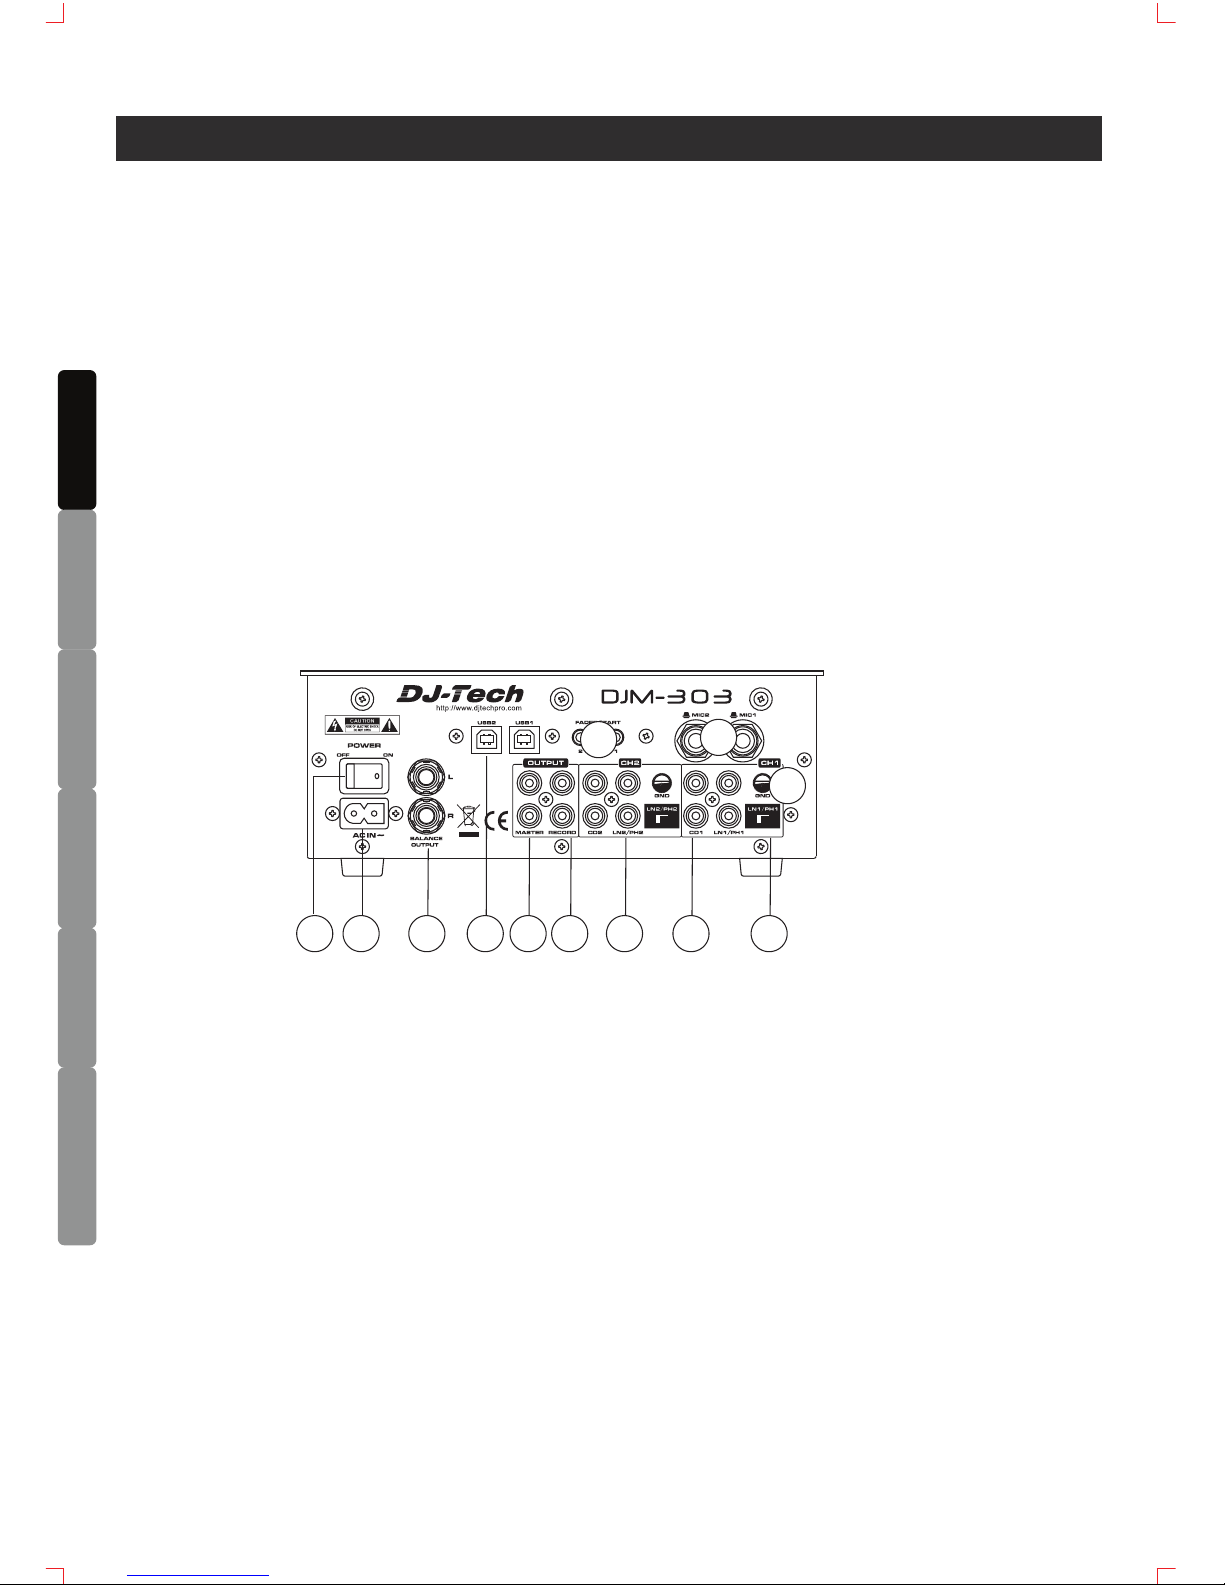
with the apparatus. When a cart is used, use caution when moving th
e
cart/apparatus combination to avoid injury from tip-over.
13. Unplug this apparatus during lightning storms or when unused for long periods of time.
14. Refer all servicing to qualified service personnel. Servicing is required when the apparatus has
been damaged in any way, such as power-supply cord or plug is damaged, liquid has been
spilled or objects have fallen into the apparatus, the apparatus has been exposed to rain or
moisture, does not operate normally, or has been dropped.
15. WARNING: To reduce the risk of fire or electric shock, do not expose this apparatus to rain or
moisture.
16. Where an appliance coupler is used as the disconnect device, the disconnect device shall remain
readily operable.
17. The ventilation should not be impeded by covering the ventilation openings with items, such as
newspapers, table-cloths, curtains, etc.
18. No naked flame sources, such as lighted candles, should be placed on the apparatus.
19. The apparatus should be used in moderate climate.
20. The apparatus shall not be exposed to dripping or splashing and that no objects filled with liquids,
such as vases, shall be placed on the apparatus.
WARNING
To reduce the risk of fire or electric shock, do not expose this apparatus to rain or moisture. The
apparatus shall not be exposed to dripping or splashing and that no objects filled with liquids, such as
vases, shall be placed on the apparatus.
CAUTION: To reduce the risk of electric shock, do not remove
any cover. No user-serviceable parts inside. Refer servicing to
qualified service personnel only.
The lightning flash with arrowhead symbol within the equilateral triangle is intended to alert
the use to the presence of un-insulated “dangerous voltage” within the product’s enclosure
that may be of sufficient magnitude to constitute a risk of electric shock.
The exclamation point within the equilateral triangle is intended to alert the user to the
presence of important operation and maintenance (servicing) instructions in the literature
accompanying this appliance.
CAUTION
RISK OF ELECTRIC SHOCK
DO NOT OPEN
CAUTION
To prevent electric shock, do not use this polarized plug with an extension cord, receptacle or other
outlet unless the blades can be fully inserted to prevent blade exposure.
SAFETY INSTRUCTIONS
3
ENGLISH
DEUTSCH
FRANÇAIS
ESPAÑOL
DUTCH
ITALIANO
FEATURES
9 Digital Effects
Sampler Function
Balanced Output
2 USB Connector for PC Playback and Recording
10 LED Multi-Function Level Meter
CD Fader Start function
3 Band Kill EQ for Each Channel
VCA Controlled Channel and Crossfader
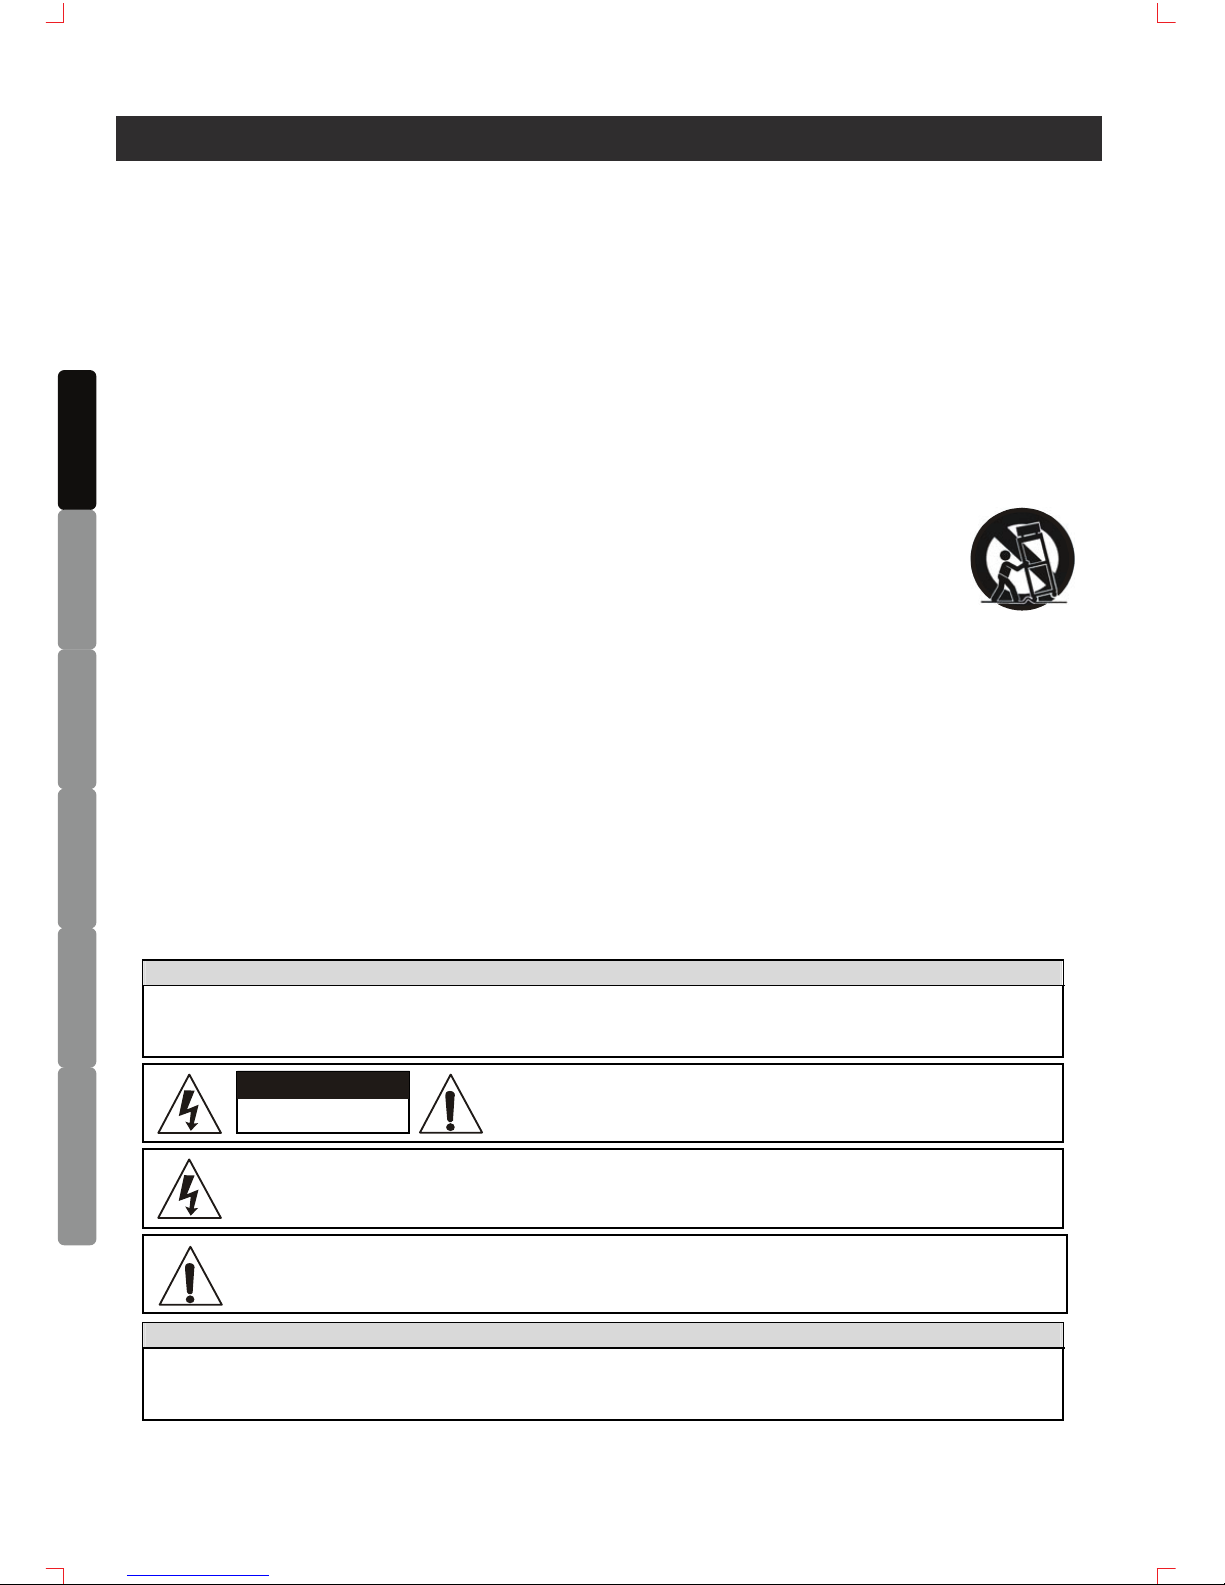
25
1
2
3
4
5
7
24 23 22 21
20
19
18
17
16
15
14
13
12
10
27
6
11
9
26
8
ENGLISH
DEUTSCH FRANÇAIS
ESPAÑOL
DUTCH
ITALIANO
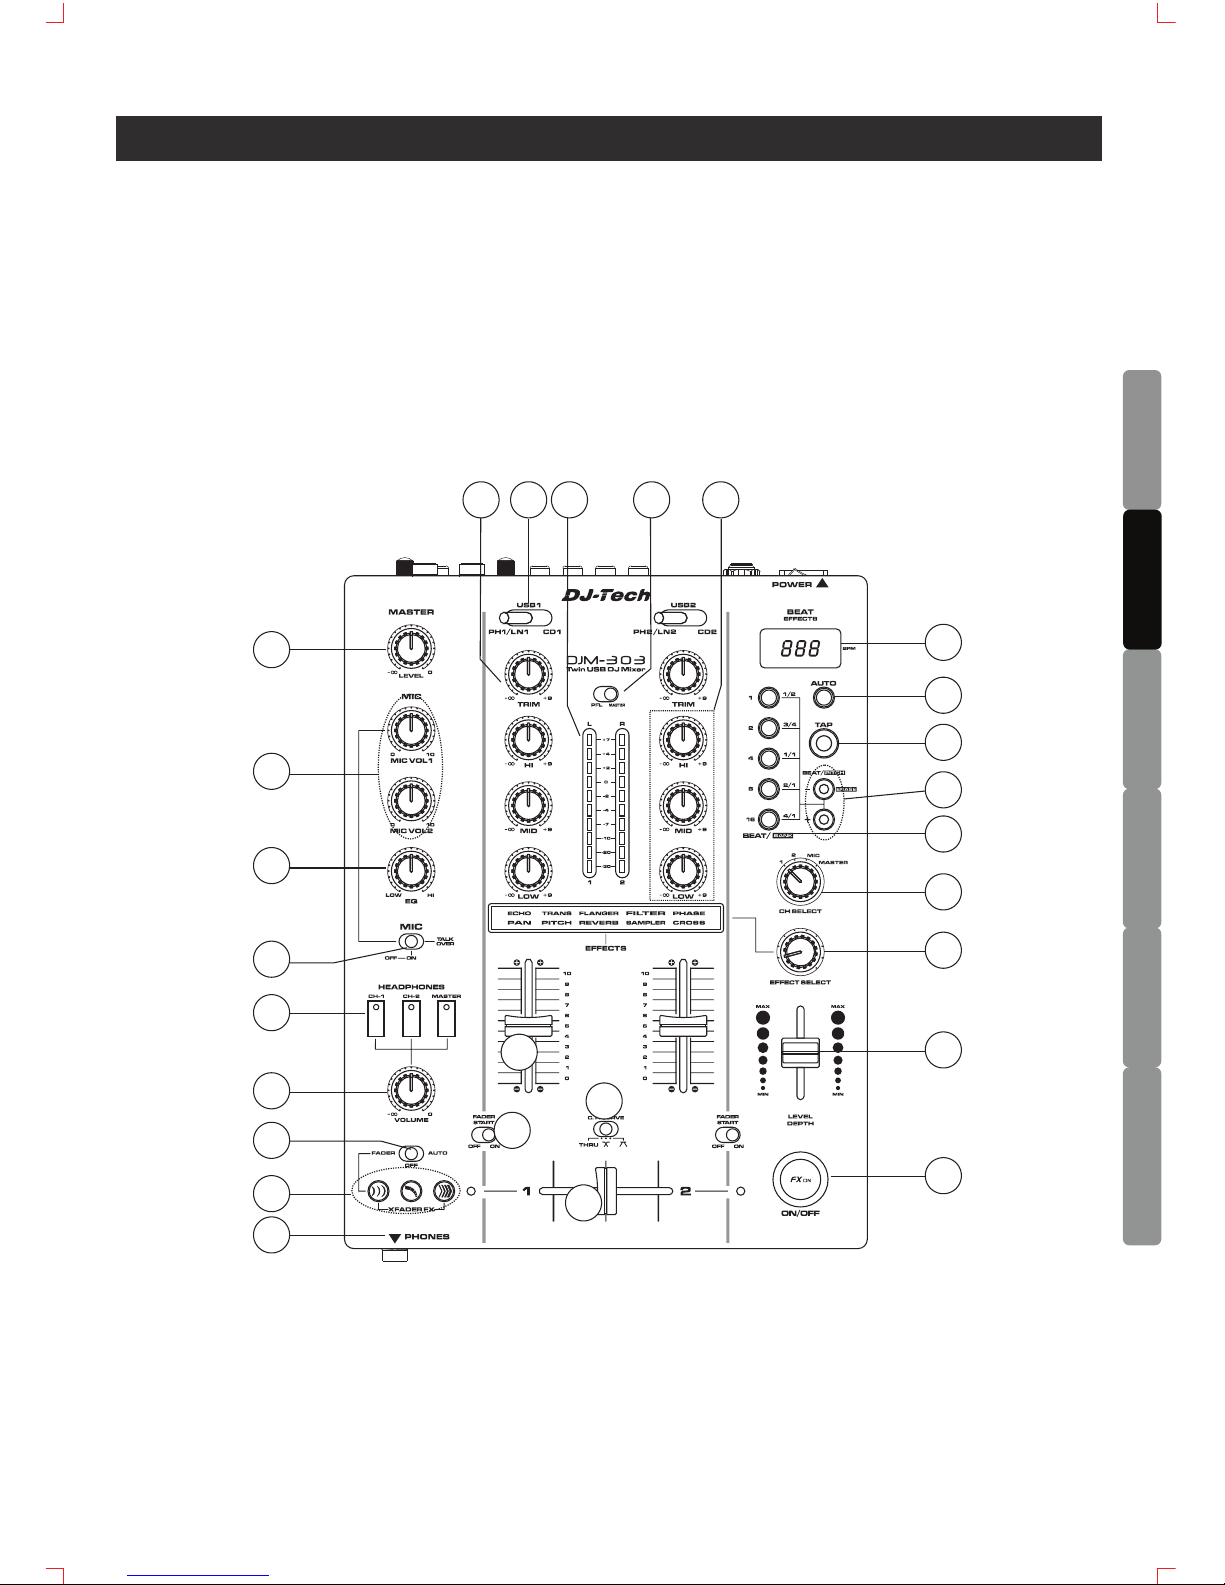
PART NAME AND FUNCTIONS
1. Master Level - Adjusts the level of the master output.
2. Mic Volume - Adjusts microphone level.
3. Mic EQ - These controls are used to adjust the microphone tone level HI and Low.
4. Mic OFF/ON/Talkover - To set mic on and off, when switch at the talkover position, the
mic1 and 2 on, the sound level for everything other than that from the mic will decrease
to around 20dB.
5. Headphones Cue Button/Indicator - Press the button for the source you wish to
monitor with headphones. When a button is OFF, its indicator lights dimly; when ON,
the button indicator lights brightly. When the ECHO effect is selected, the MASTER is
applied to headphone output only.
Relationship of headphones cue button and headphones output.
Headphone cue
button Headphones output
CH1 CH2 MASTER L CH R CH
ON
OFF OFF CH-1 (L) CH-1 (R)
OFF
ON
OFF CH-2 (L) CH-2 (R)
OFF OFF
ON
MASTER (L) MASTER (R)
ON ON
OFF CH-1 (L)+ CH-2 (L) CH-1 (R)+ CH-2 (R)
ON
OFF
ON
CH-1 (mono) MASTER (mono)
OFF
ON ON
CH-2 (mono) MASTER (mono)
ON ON ON
CH-1 (mono)
+
CH-2 (mono)
MASTER (mono)
6. Headphone Volume - This rotary knob adjusts the headphone volume output level.
Turning the knob in clockwise direction will increase headphone volume output.
7. XFADER FX - The three effect select buttons are used to select the type of effect mix
desired, 3 functions of ECHO, BRAKE and TRANSFORM can be chosen.
8. Effects mode switch - Used to select the desired crossover effect mode.
• Fader
In this mode you can select one of the effect buttons and use the
Crossfader to control the crossfader effects
• Off
Crossfader effects are disabled
• Auto
In this mode you don’t have to use the crossfader; simply push one of the
effect buttons and the mix will be done automatically in full beat sync!
Either Fader or Auto mode is active, CROSS effect is on.
9. Headphone Input - Insert in the ¼” plug for your headphones here.
4

5
ENGLISH
DEUTSCH
FRANÇAIS
ESPAÑOL
DUTCH
ITALIANO
10. Fader Start ON/OFF - When the unit has been connected with a control cable to a
CD player, this is the ON/OFF switch for the function to automatically start playing and
stop (back cue) of the CD player using the crossfader.
11. C.F.Curve Switch - Used to select the rising curve patterns for the crossfader
function.
a THRU
When switch to left (THRU) position, the crossfader is disabled. On/off
switch for fader start function using the channel fader.
b
When switch to center ( ) position, a slowly rising curve response is
selected.
c
When switch to right ( ) position, a rapidly rising curve response is
selected.
12. FX ON Button - This button functions as an effect Master on/off button and is used to
activate and deactivate the effects.
13. Level Depth - Used to adjust the value of the parameter Y (mix ratio or resonance or
feedback) of the effector.
14. Effect Select Knob - Used to select desired effects.
15. CH Select Knob - Used to select the source to be effected.
16. Effect Beat Selector Knob - To select different beat (also change the time parameter)
according to the measured BPM of the effector.
17. Beat/Pitch +,- Buttons
• beat up (+) - Doubles the calculated BPM.
• beat down (-) - Halves the calculated BPM.
• In sampler mode, hold the ERASE button and press BEAT/BANK button, the
music sample recorded in the bank will be erased.
• In sampler mode, press + button, pitch increases ; press - button, pitch
decreases.
18. Tap Button - This button is used to manually calculate BPM. In the Auto mode, press
the Tap button to switch to manual BPM. Hold the Tap button and press Beat/Pitch
button (-,+) to manually increase or decrease BPM.
19. Auto Indcator - Switch Auto/manual BPM by pressing Auto button.
20. BPM Display - Display the current track tempo as beats per minute. In the Auto
mode, the display flashes when BPM can’t be calculated.
21. Channel EQ - Contour the frequency response for each channel 9 +/-2dB.
PART NAME AND FUNCTIONS
6
ENGLISH
DEUTSCH FRANÇAIS
ESPAÑOL
DUTCH
ITALIANO
22. PFL/Master Switch - The position of this switch will determine the level meter mode.
In the “Master” position, the meter will detail the out level of the left and right channels.
In the “PFL” position, the left side of the meter will indicate monaural level of the PGM.
23. Level Meter - The dual LED's indicators are used to detail either the master output
level, a combination of the master output level or the PGM monaural level.
24. Source Input Selector Switch - These switches are used to select the input source
assigned to each channel. Each channel may only be assigned one input source at a
time.
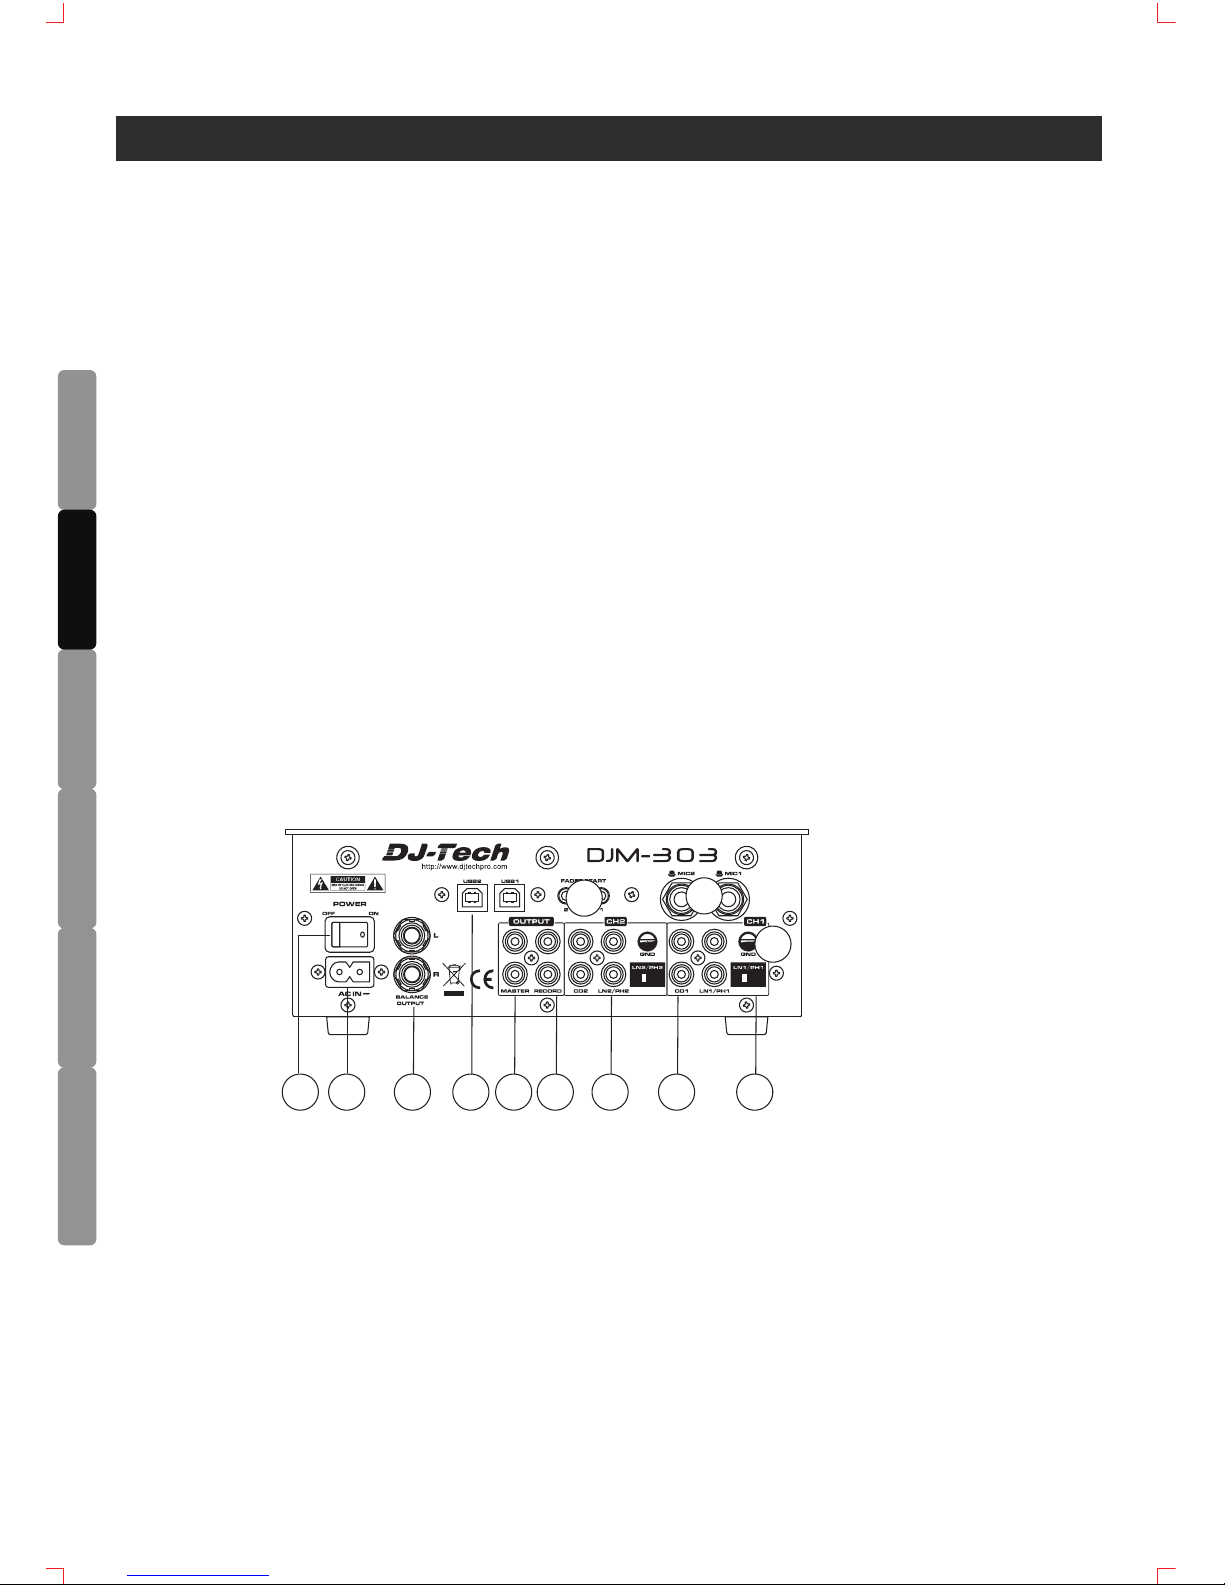
25. Channel Gain - Used to adjust the input level for each channel.
26. Cross Fader - Used to mix the sound from the 2 channels.
27. Channel Fader - Adjust the volume for CH1 and CH2.
28. Power Switch - Turn this unit power ON/OFF.
29. Power Connector - This connection is used to connect your main power. Be sure
that your local power matches the unit’s required power.
30. Master Balanced Output - These 1/4” TRS jacks provide a balanced line level
output.
31. USB PORT - Use the accessory USB cord to connect to a PC.
32. Master Unbalanced Output - Left & Right line level unbalanced RCA.
33. Record Output - The record out level is dictated by the channel and cross fader level,
it is not influenced by the master volume control.
PART NAME AND FUNCTIONS
29
31 32 33 3534
37
38
39
30
28
36
7
ENGLISH
DEUTSCH
FRANÇAIS
ESPAÑOL
DUTCH
ITALIANO
4
34. PH/LN Input Jacks - These jacks are inputs for a phono (RIAA) stage for magnetic
(MM) cartridge or a line level device.
35. CD Input Connectors - Use to connect a DJ CD player or other component with line
level output.
36. LN/PH Selector Switches - These switches are used to change the mode of phono
input jacks. When connecting turntable to these jacks be sure the switch is in the
phono position, and when using line level input devices select LN. Always be sure
main power is shut off before change the position of the Ln/Phone selector switch.
37. GND
38. Mic Input Connector - Use for microphone input.
39. Fader start control jacks - Connect these jacks to the fader input jacks of the CD
player using the 3.5mm stereo mini cord.
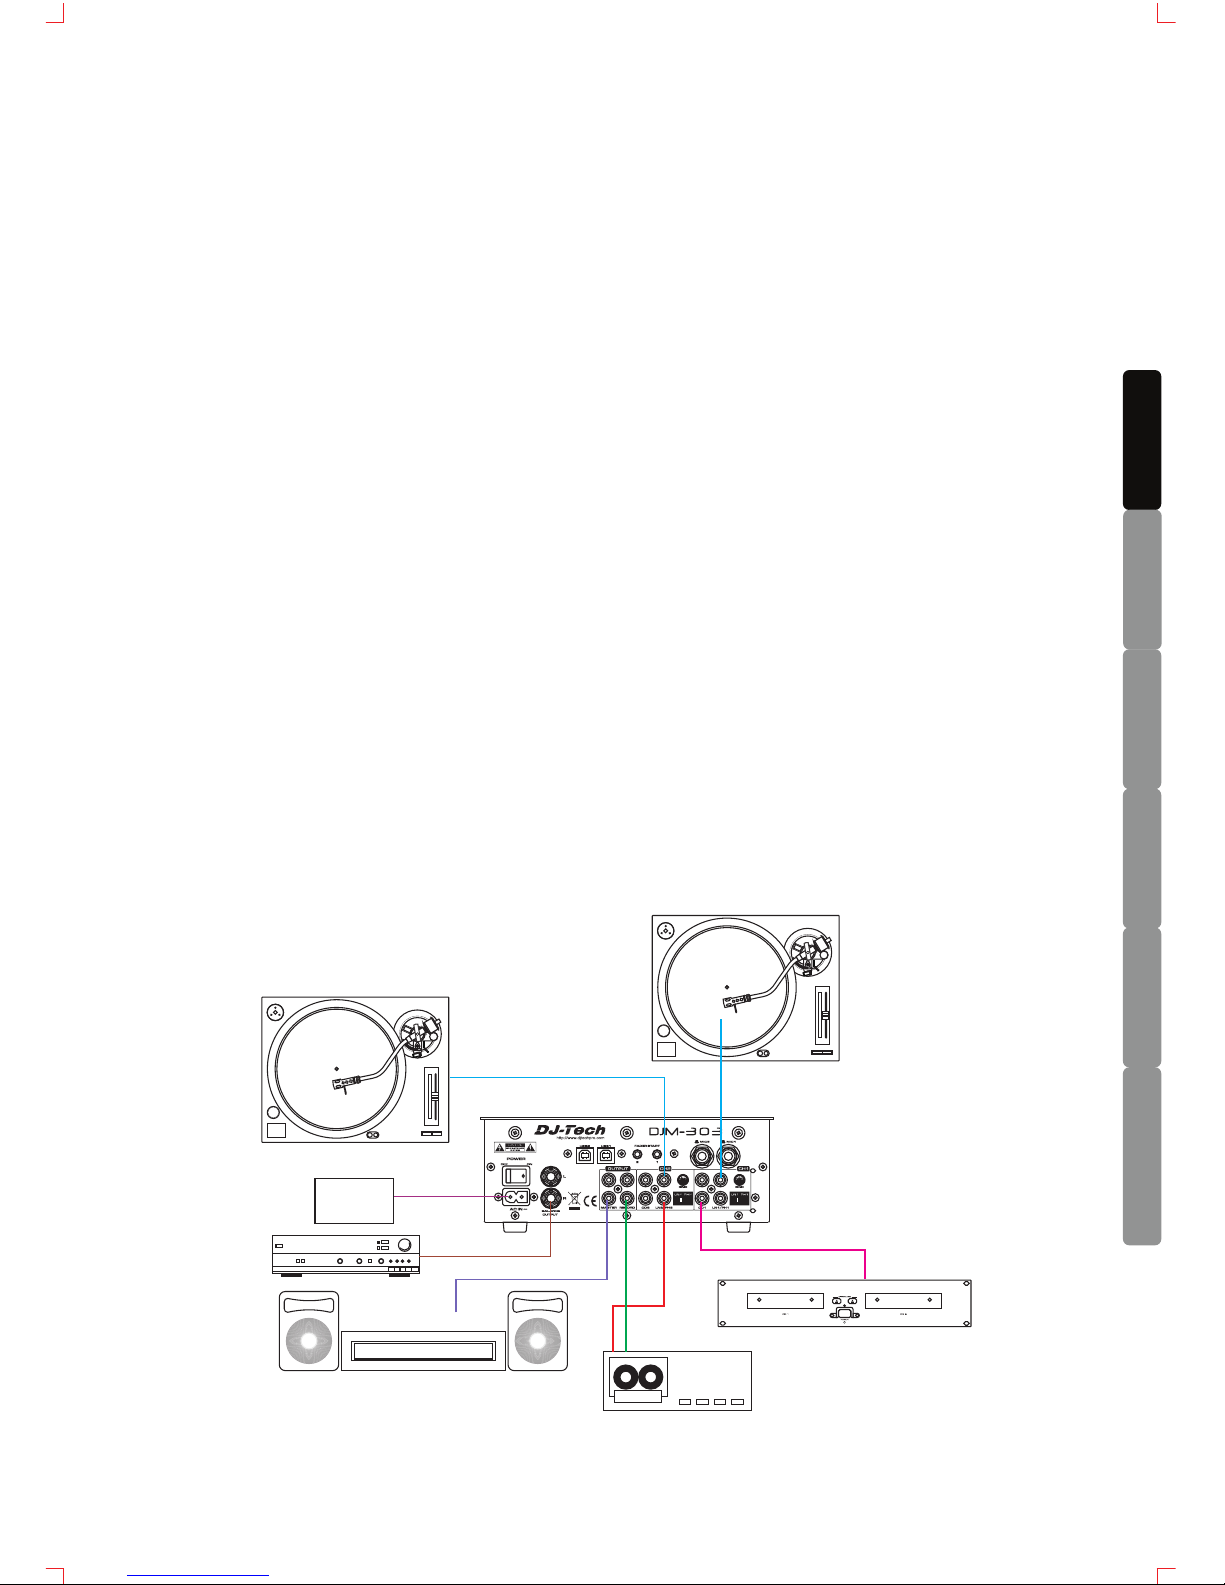
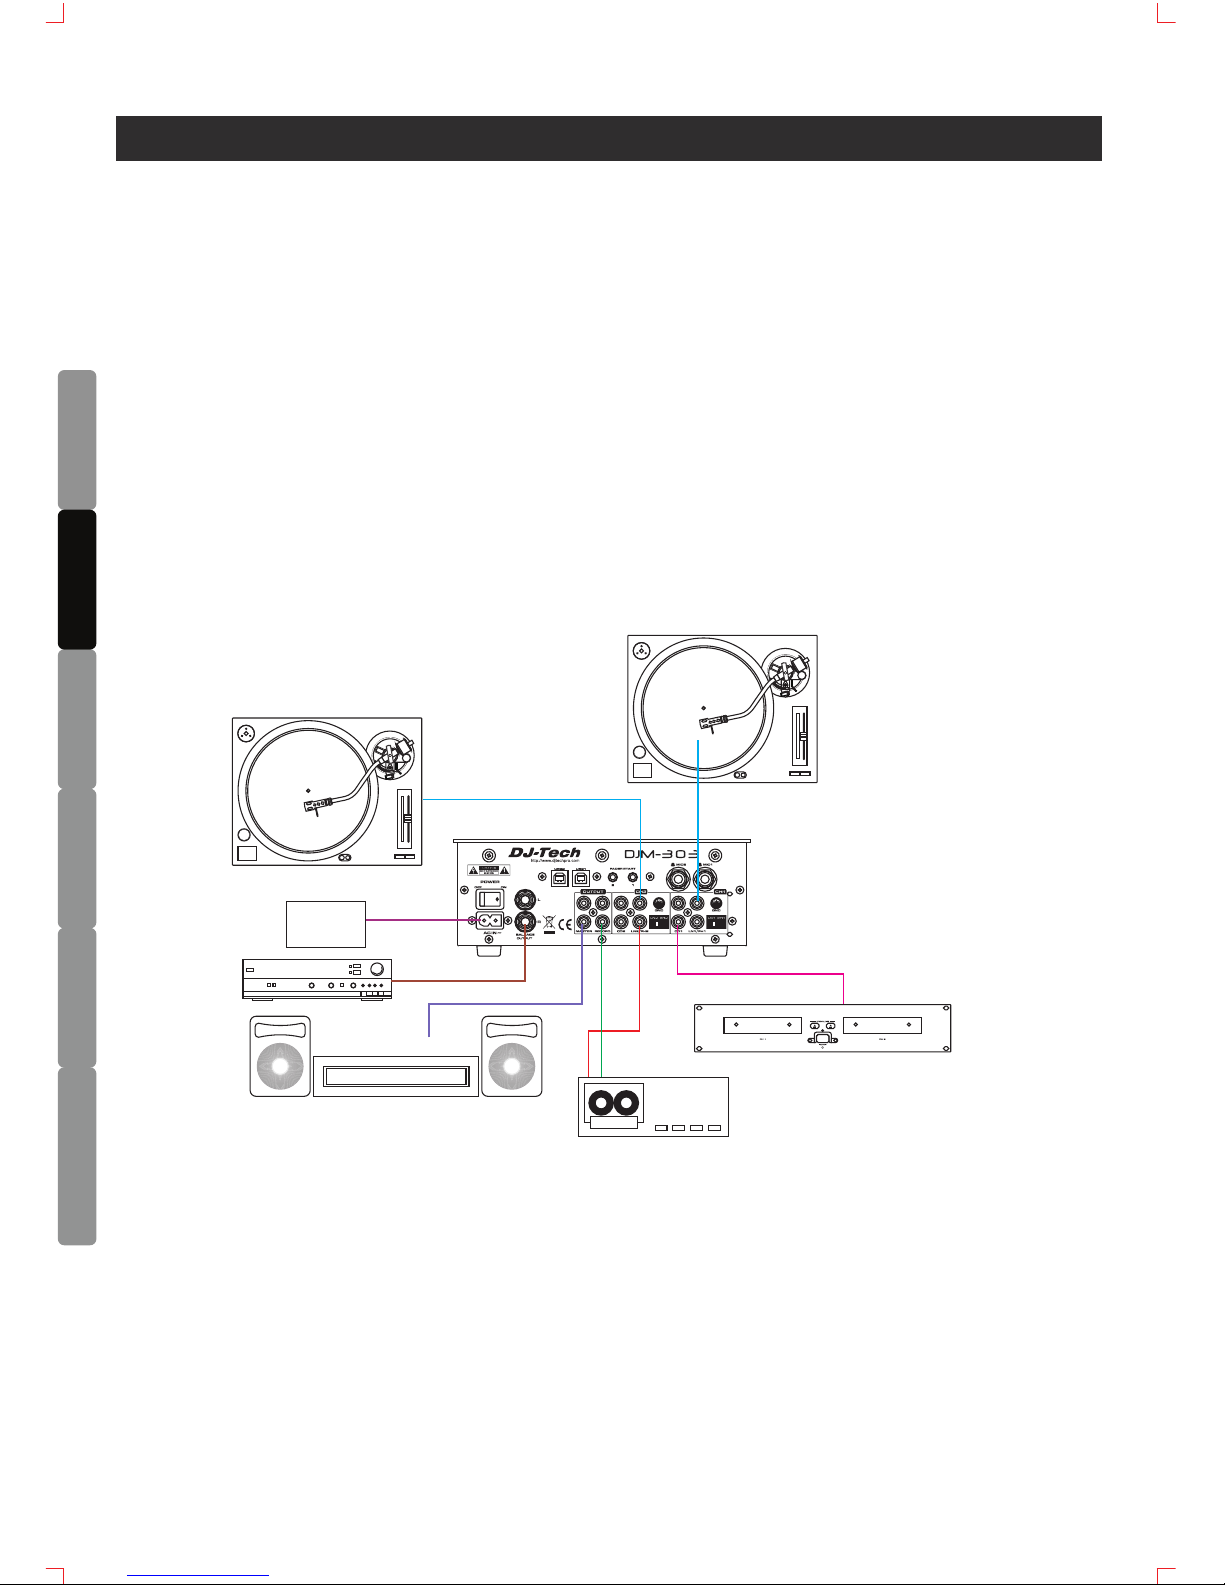
Study this setup diagram. Make sure all faders are at "zero" and all devices are off. First,
connect all input sources and processors. Next, connect your microphone and monitor
headphones. Finally, connect the stereo outputs to the power amplifier(s) and/or audio
receivers such as tape decks. Plug your mixer into AC power. Now you are ready to
switch everything on.
IMPORTANT: Always switch on your audio input sources such as turntables or CD
players first, then your mixer, and finally any amplifiers. When turning off, always
reverse this operation by turning off amplifiers, then your mixer, and then input devices.
Tur ntable
Sound sy ste m
Tape Deck
CD Playe r
Power
Supply
Power Amp .
Tur ntable
QUICK SETUP DIAGRAM
ENGLISH
DEUTSCH FRANÇAIS
ESPAÑOL
DUTCH
ITALIANO
8
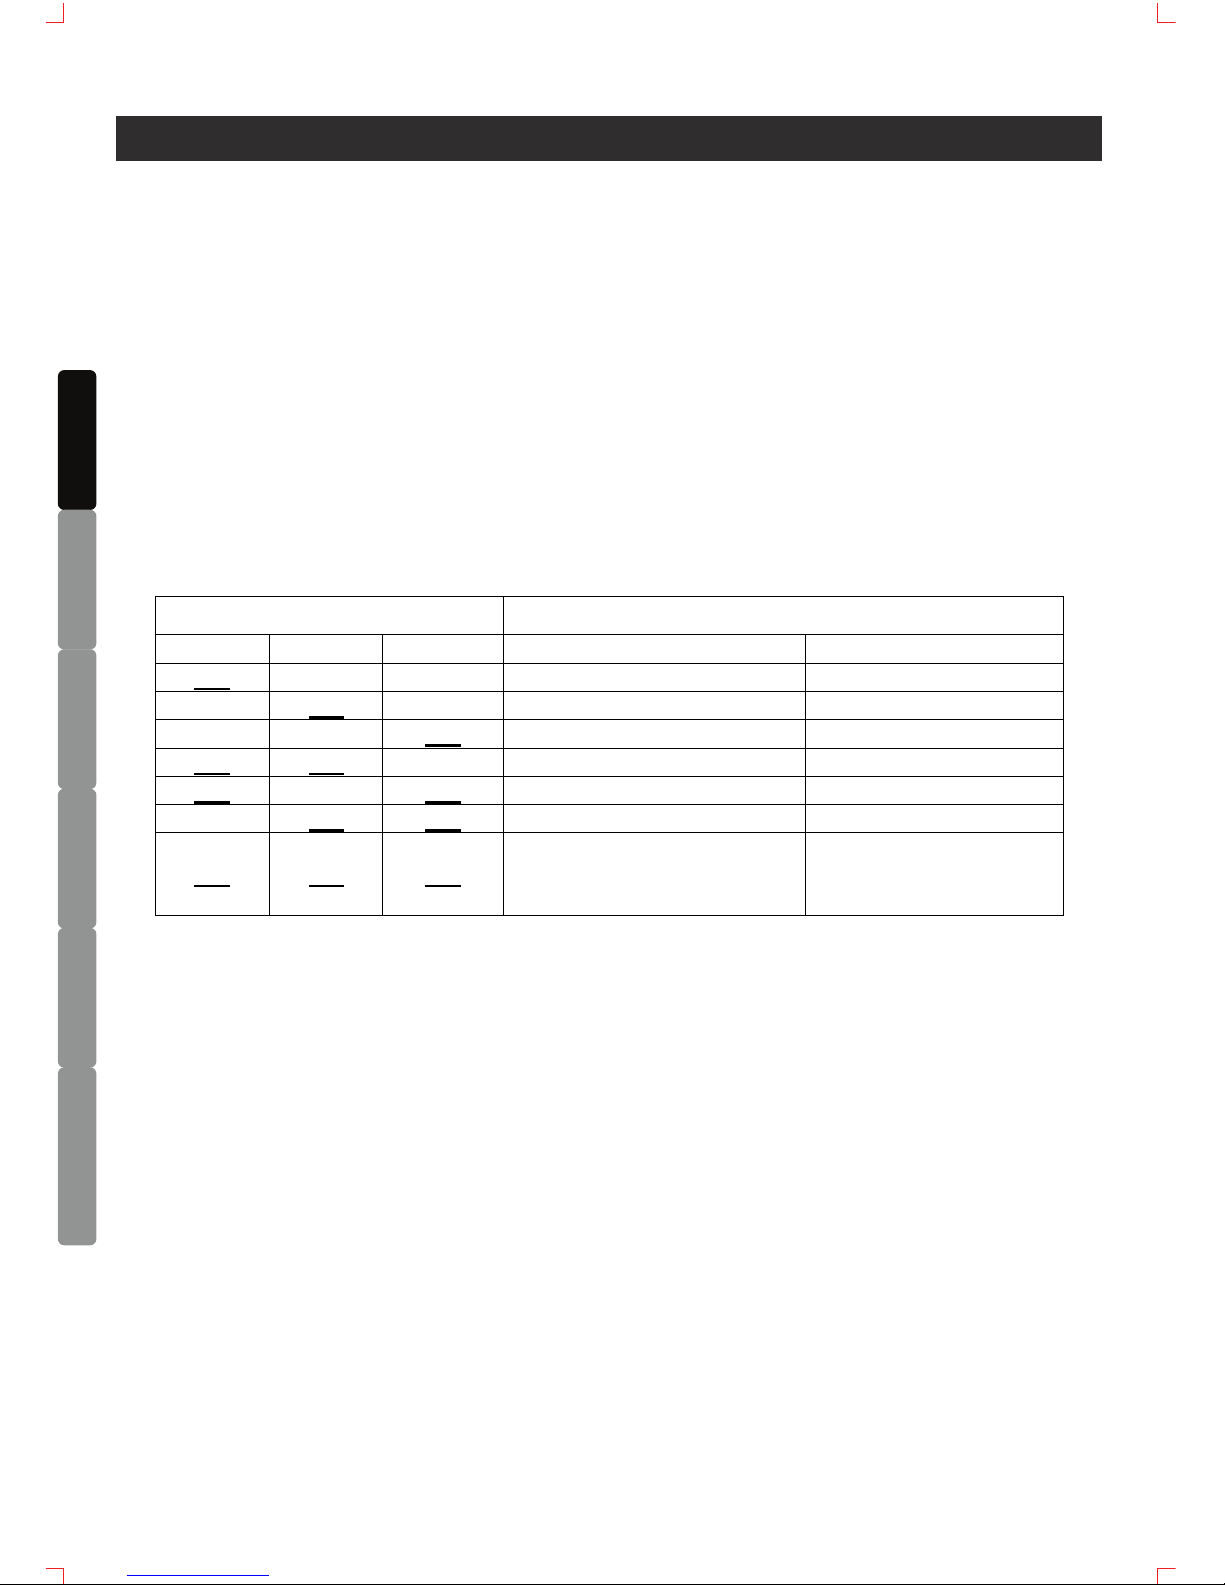
EFFECT PARAMETERS
Name BEAT/BANK button parameters
Parameter X
(Beat button)
Setting range (unit)
Parameter Y
(Level/Depth fader)
ECHO
Sets delay time of 1/2 to 4/1 per 1
beat of BPM time
2~2000 (ms)
Sets balance
between original and
delay sound
TRANS
Sets change time of 1/2 to 4/1 per
1 beat of BPM time
25~32000 (ms)
The duty cycle for a
square volume wave
FLANGER
Cycle of flanger shift is set in units
of 1/1 to 16/1 relative to 1 beat of
BPM
100~32000 (ms)
Amount of effect
increases when fader
is pushed upward.
When fader is at
minimum, only
original sound is
output
FILTER
Cycle of cutoff frequency shift is
set in units of 1/1 to 16/1 relative to
1 beat of BPM
100~32000 (ms)
Amount of effect
increases when fader
is pushed upward
PHASE
Cycle of phase effect shift is set in
units of 1/1 to 16/1 relative to 1
beat of BPM
100~32000 (ms)
Amount of effect
increases when fader
is pushed upward.
When fader is at
minimum, only
original sound is
output
PAN
Sets change time of 1/2 to 4/1 per
1 beat of BPM time
30~32000 (ms)
The sharpness for
pan between left and
right channel
min→most smooth
max→most sharp
PITCH Select -50%~+100% of pitch -50~+100 (%)
Amount of effect
increases when fader
is pushed upward
REVERB Select 0%~100% of reverb 0~100 (%)
Amount of effect
increases when fader
is pushed upward
SAMPLER
Select bank of recording/
playback of 4 beat source
7 sec. of max
recording for per
bank
Sets balance of
original sound and
recorded sample.
min→Original sound
max→Sample sound

ENGLISH
DEUTSCH
FRANÇAIS
ESPAÑOL
DUTCH
ITALIANO
SPECIFICATIONS
Power source AC 100-240V, 60/50Hz, 13 Watts
Dimensions 223(W) x 300.2 (D) x 106 (H)mm
Weight 3.5 kg
Input impedance and reference level:
CD: 7.5-20K ohm /-14dBV +/-0.1dB (200mV)
LINE: 47K ohm /-14dBV +/-0.1dB (200mV)
PHONO: 47K ohm /-54dBV +/-0.1dB (1mV)
MIC: 10K ohm /-54dBV +/-0.1dB (1mV)
Output impedance and level:
REC: 2.3K ohm /-10dBV (316mV) +/-2dB
MASTER UNBAL.: 1K ohm /0dB (1V) +/-2dB
MASTER BAL.(load=600 ohm): 600 ohm /+4dBm (1.23V) +/-2dB
PHONES (load=32 ohm) 33 ohm /0dBV(1V, CH1,2),4dBV(1.58V, master) +/-2dB
Frequency response: (EQ Flat, Maximum gain, FX OFF, Master Output, Load=100K ohm)
LINE, CD: 25 - 20K Hz +/-2dB
PHONO: 25 - 20K Hz +2/-3dB (RIAA)
MIC: 25 - 20K Hz +/-2dB
THD + N: (EQ Flat, Maximum gain, FX OFF, W/ 20KHz LPF, Master output, Load=100K ohm)
LINE, CD: Less than 0.03% 25 - 20KHz
PHONO: Less than 0.2% @ 1KHz (A-weighted)
MIC: Less than 0.15% @ 1KHz (A-weighted)
Maximum input:
(1KHz, THD=1%, EQ Flat, FX OFF, Master at center, Master output, Load=100K ohm)
LINE, CD: More than +5dBV
PHONO: More than -35dBV
MIC: More than -35dBV
Maximum output: (EQ Flat, Maximum gain, FX OFF, THD=1%, Load=100K ohm)
MASTER: More than +18dBV (8.0V)
REC More than +8dBV (2.5V)
PHONES: More than +4dBV (1.58V) Load=32 ohm
. S/N RATIO: (Maximum gain, EQ Flat, W/20KHz LPF, A-Weighted, FX OFF, Master output)
LINE, CD: More than 82dB
PHONO: More than 66dB
MIC More than 65dB
ACCESSORIES
User manual
AC power Cord
USB cable
9
Deckadacne LE DJ Software Installation CD
Traktor 3 LE DJ Software Installation CD
ENGLISH
DEUTSCH FRANÇAIS
ESPAÑOL
DUTCH
ITALIANO
1. Lire les instructions suivantes.
2. Conserver ce manuel.
3. Faire attention aux avertissements.
4. Suivre toutes les instructions.
5. N’utiliser pas l’appareil près de l’eau.
6. Nettoyer uniquement avec un chiffon doux.
7. Ne pas obstruer les ouvertures de ventilation.
8. Installer conformément aux instructions du constructeur.
9. Ne pas installer près des sources de chaleur tels que radiateur, cuisinière ou tout autre appareil qui
produit de la chaleur.
10. Ne pas abîmer le cordon d’alimentation. Consulter un électricien si le cordon est abîmé.
11. Ne pas marcher sur les cordons d’alimentation.
12. Utiliser uniquement des accessoires recommandés par le fabricant.
13. Ne pas placer ce produit sur un chariot, un stand, un trépied ou une table instable,
cela pourrait causer des dommages sérieux à un enfant ou à un adulte.
14. Sur l’accomplissement de tout le service ou réparations à ce produit, demander à technician
qualifié d’exécuter des contrôles de sécurité pour déterminer que le produit est en condition
de fonctionnement approprié.
15. Le cordon d’alimentation est utilisé comme un dispositif de déconnexion, il doit être en parfait état
de fonctionnement.
16. Les ouvertures de ventilation ne doivent pas être obstruées par des objets, tels que journal,
vêtements, rideaux, etc.
17. Aucune flamme ne doit être posée sur l'appareil
18. L'appareil doit être utilisé dans des conditions normales de température.
19. L'appareil ne doit pas être exposé aux projections et aux éclaboussures et aucun récipient rempli
d'eau ne doit être placé sur l'appareil.
A
VERTISSEMENT
Pour réduire le risqué d’incendie ou d’électrocution, ne pas exposer cet appareil à la pluie ou à
l’humidité.
L’appareil ne doit pas être exposé à des projections de liquids et aucun object rempli de liquids, tells
que des vases, ne doit être place surl.l’qppare.
AVERTISSEMENT: Pour réduire les risques de chocs
électriques, ne pas ouvrir I’appareil. Référez-vous à un
personnel qualifié.
Ce logo vous indique la presence de《tension dangereuse》, il y a risqué de choc
électrique.
Ce logo vous indique des operations de maintenance importante.
ATTENTION
Pour éviter les chocs électriques, n'utilisez pas une rallonge électrique.
CAUTION
RISK OF ELECTRIC SHOCK
DO NOT OPEN
INFORMATIONS DE SECURITE
10
ENGLISH
DEUTSCH
FRANÇAIS
ESPAÑOL
DUTCH
ITALIANO
Table de mixage DJ 2 canau
2 cartes son intégrées pour lecture et enregistrement PC
8 effets digital
3 effets Crossfader
Sampler 5-bank avec Beatmatch
Control du VCA par canal et crossfader
Sorties Jack ajustable
Vue mètre multi fonction de 10 LED
Fonction démarrage fader du CD
2 logiciels DJ inclus
FONCTION
11
25
1
2
3
4
5
7
24 23 22 21
20
19
18
17
16
15
14
13
12
10
27
6
11
9
26
8
ENGLISH
DEUTSCH FRANÇAIS
ESPAÑOL
DUTCH
ITALIANO
1. Volume Master - Pour adjuster le volume de sortie Master
2. Mic Vol - Règle le volume du microphone
3. Mic EQ - Ces boutons règlent les aigus et les graves pour le microphone
4. Mic ON/OFF/bouton Talkover - Pour allumer et éteindre le microphone. Lorsque le
bouton est sur la position Talkover, si les mic1 et 2 fonctionnent, le son des autres
entrées baissent jusqu’à environ 20dB
5. Bouton pré écoute casque/témoin - Appuyer sur le bouton correspondant à la
source que vous voulez entendre dans le casque. Lorsque le bouton est sur OFF,
l’indicateur s’allume faiblement; lorsque le bouton est sur ON, l’indicateur s’allume
fortement. Lorsque le l’effet ECHO est sélectionné, Le MASTER est sélectionné
uniquement dans la sortie casque.
Relation entre le bouton pré écoute et la sortie casque
Bouton pré éco
ute casque Sortie casque
CH1 CH2 MASTER
L CH R CH
ON
OFF OFF CH-1 (L) CH-1 (R)
OFF
ON
OFF CH-2 (L) CH-2 (R)
OFF OFF
ON
MASTER (L) MASTER (R)
ON ON
OFF CH-1 (L)+ CH-2 (L) CH-1 (R)+ CH-2 (R)
ON
OFF
ON
CH-1 (mono) MASTER (mono)
OFF
ON
ON
CH-2 (mono) MASTER (mono)
ON ON ON
CH-1 (mono)
+
CH-2 (mono)
MASTER (mono)
6. Volume casque - Ce bouton rotatif règle le volume du casque, tourner dans le sens
d’une aiguille d’une montre augmente le volume de sortie du casque
7. XFADER FX - Ces trois boutons sont utilisés pour sélectionner les effets mix, 3
fonctions peuvent être choisies : ECHO, BREAK et TRANSFORM.
8. Effects mode switch - Utilisé pour sélectionner le mode crossover désiré.
• Fader
Dans ce mode vous pouvez sélectionner un des bouton d'effet et utiliser
le crossfader pour contrôler les effets crossover
• Off
Les effets crossovers sont désactivés
• Auto
Dans ce mode vous n'avez pas à utiliser le crossfader, Appuyer
simplement sur l'un des bouton d'effet et le mixage se fera
automatiquement
lorsque Fader ou mode Auto est activé, l'effet CROSS est activé
CARACTERISTIQUES DU PANNEAU AVANT
12

ENGLISH
DEUTSCH
FRANÇAIS
ESPAÑOL
DUTCH
ITALIANO
CARACTERISTIQUES DU PANNEAU AVANT
13
9. Prise casque - Enfoncer la prise 6.35mm de votre casque ici
10. Interrupteur de démarrage au fader - Quand l’appareil est connecté par un contrôle
au lecteur CD, c’est le bouton ON/OFF pour la fonction lecture et arrêt automatique
du lecteur CD utilisant le fader ou le crossfader
11. Interrupteur pour la courbe du fader - Utiliser pour sélectionner la courbe
d’attaque du crossfader
a THRU
Quand l’interrupteur est à gauche (THRU), le crossfader est désactivé.
Le bouton On/off pour la fonction demarrage du fader utilisant le fader
du canal
b
Quand l’interrupteur est au centre ( ), La courbe d’attaque est
progressive
c
Quand l’interrupteur est à droite ( ), La courbe d’attaque est rapide
12. Bouton FX ON - Ce bouton fonctionne comme un bouton d’effect Master on/off et est
utilisé pour activer et désactiver les effets
13. Level Depth - Utiliser pour adjuster la valeur du paramètre Y (ratio mix ou resonance
ou feedback) de l’effet
14. Sélections des effects - Pour sélectionner les effets desirés
15. Bouton CH - Utiliser pour sélectionner la source sur laquelle les effets seront
appliqués
16. Bouton de selection de l’effet Beat - Pour sélectionner different Beat (également
pour changer le paramètre temps) pour mesurer l’effet BPM
17. Bouton Beat/Pitch +,-
• beat up (+) - Double la valeur du BPM
• beat down (-) - Divise par deux la valeur du BPM
• En mode Sampler, maintenir le bouton ERASE et appuyer sur le bouton
BEAT/BANK, Le sample de la musique enregistrée dans la banque sera effacé
• En mode Sampler, appuyer sur le bouton + pour augmenter le pitch et sur le
bouton - pour diminuer le pitch
18. Bouton Tap - Ce bouton est utilisé pour calculer manuellement le BPM. En mode
Auto, Appuyer sur le bouton Tap pour sélectionner le BPM manuel. Maintenir le
bouton Tap et presser le bouton Beat/Pitch pour augmenter ou diminuer
manuellement le BPM
19. Indicateur Auto - Sélectionner BPM Auto/manuel en pressant sur le bouton Auto
ENGLISH
DEUTSCH FRANÇAIS
ESPAÑOL
DUTCH
ITALIANO
CARACTERISTIQUES DU PANNEAU AVANT
14
20. Affichage du BPM - Affiche le tempo en battements par minute du morceau en cours
En mode Auto, l’affichage clignote lorsque le BPM ne peut être calculé
21. Equalizer - Pour régler les aigus, medium et basse des canaux d’entrées pour un
meilleur son
22. Bouton PFL/Master - La position de cet interrupteur déterminera le mode du
vue mètre. En position “Master”, le vue mètre indiquera le niveau de sortie des
canaux gauche et droite. Dans la position “PFL”, le côté gauche du vue mètre
indiquera le niveau mono de la pré écoute
23. Vue mètre - Les deux indicateurs à LED sont utilisés soit pour le niveau de sortie
MASTER, soit pour une combinaison du niveau de sortie master avec la pré écoute
24. Sélecteur d’entrée source - Ces boutons sélectionnent les sources d’entrée pour
chaque canal. Chaque canal peut être assigné seulement à une source d’entrée à la
fois
25. Gain du canal - Utiliser pour adjuster le niveau d’entrée sur chaque canal
26. Crossfader - Utiliser pour mélanger le son des deux canaux
27. Fader du canal - Pour régler le volume du CH1 et CH2
28. Interrupteur de courant électrique - Pour allumer/éteindre l’appareil
29. Entrée d'alimentation - Est utilisé pour connecter l'alimentation principale.
30. Sorties symétriques Master - Niveau ligne jack 6.35.
31. Prise USB - Utiliser le câble USB pour connecter au PC
32. Sorties Master - Niveau ligne RCA assymétrique Gauche et Droit.
29
31 32 33 3534
37
38
39
30
28
36

ENGLISH
DEUTSCH
FRANÇAIS
ESPAÑOL
DUTCH
ITALIANO
CARACTERISTIQUES DU PANNEAU AVANT
15
33. Entrée ligne (input) - Lecteur de disque compact, lecteur de cassette, Samplers ou
autres dispositifs de niveau à ligne devraient être branchés à ces entrées
34. Ligne/Phono de l’interrupteur source (switch) - Cet interrupteur active et
désactive les préamplificateurs RIAA pour phono. Seules les platines vinyls peuvent
être assignees quand l’interrupteur est en position phono. Il y a des platines qui
offrent une sortie à niveau en ligne. Pour utiliser ces platines et autres dispositifs
comme lecteurs de disques compacts, changer l’entrée à Ligne
35. Entrée Phono - Cette entrée sert à vos connexions de platines vinyl. Elle possède un
RIAA pour phono
36. Ligne/Phono de l’interrupteur source (switch) - Cet interrupteur active et
désactive les préamplificateurs RIAA pour phono. Seules les platines vinyls peuvent
être assignees quand l’interrupteur est en position phono. Il y a des platines qui
offrent une sortie à niveau en ligne. Pour utiliser ces platines et autres dispositifs
comme lecteurs de disques compacts, changer l’entrée à Ligne
37. GND
38. Connecteur d’entrée Mic - Pour l’entrée Microphone
39. Prise pour contrôle du démarrage du fader - Connecter aux prises d’entrée fader
du lecteur CD en utilisant le câble 3.5mm stereo
ENGLISH
DEUTSCH FRANÇAIS
ESPAÑOL
DUTCH
ITALIANO
DIAGRAMME D’INSTALLATION RAPIDE
16
Etudier le diagramme de montage. Vous assurer que tous les appareils sont éteints et
que tous les faders sont à “zero”. D’abord connecter toutes les sources d’entrée (input)
de la stereo tel qu’indiqué sur le diagramme. Ensuite connecter votre microphone et le
casque.
Finalement, brancher toutes les sources de sortie (output) à l’amplificateur de
puissance et/ou consoles d’enregistrement.
Brancher votre table de mixage à l’alimentation. Maintenant, vous êtes prêt à
l’utilisation.
IMPORTANT: Toujours allumer les sources d’entrée (input) audio comme les platines
ou lecteurs de disques compacts, ensuite la table de mixage et en dernier,
l’amplificateur. Pour éteindre, toujours inverser l’opération, éteindre d’abord
l’amplificateur, la table de mixage et en dernier tous les dispositifs d’entrée (input).
Tur ntable
Sound syste m
Tape Deck
CD Player
Power
Supply
Power Amp.
Tur ntable
 Loading...