


M i d i C o n t r o l l e r D J M - 1 0 1
USER MANUAL (ENGLISH) P01-03
MANUEL D’UTILISATION(FRANÇAIS) P04-06
BEDIENUNGSANLEITUNG (DEUTSCH) P07-10
GEBRUIKERSHANDLEIDING (NEDERLANDS) P11-13
MANUAL DE INSTRUCCIONES (ESPAÑOL) P14-16
MANUALE DI ISTRUZIONI (ITALIANO) P17-20

1. Read these instructions.
2. Keep these instructions.
3. Heed all warnings.
4. Follow all instructions.
5. Do not use this apparatus near water.
6. Clean only with dry cloth.
7. Do not block any of the ventilation openings. Install in accordance with the manufacture’s
instructions.
8. Do not install near any heat sources such as radiators, heat registers, stoves, or other apparatus
(including amplifiers) that produce heat.
9. Do not defeat the safety purpose of the polarized plug. The wide blade is provided for your safety.
If the provided plug does not fit into your outlet, consult an electrician for replacement of the
obsolete outlet.
10. Protect the power cord from being walked on or pinched particularly at plug, convenience
receptacles, and point where they exit from the apparatus.
11. Only use attachments/accessories specified by the manufacturer.
12.
Use only with a cart, stand, tripod, bracket, or table specified by the manufacturer,
or sold with the apparatus. When a cart is used, use caution when moving the
cart/apparatus combination to avoid injury from tip-over.
13. Unplug this apparatus during lighting storms or when unused for long periods of time.
14. Refer all servicing to qualified service personnel. Serving is required when the apparatus has
been damaged in any way, such as power-supply cord or plug is damaged, liquid has been spilled
or objects have fallen into the apparatus, the apparatus has been exposed to rain or moisture,
does not operate normally, or has been dropped.
15. The main plug is used as the disconnect device, the disconnect device shall be readily operable.
16. Please keep the unit in a good ventilation environment.
WARNING
To reduce the risk of the fire or electric shock, do not expose this apparatus to rain or moisture. The
apparatus shall not be exposed to dripping or splashing and that no objects filled with liquids, such
as vases, shall be placed on the apparatus.
CAUTION: To reduce the risk of electric shock, do not
remove any cover. No user-serviceable parts inside.
Refer servicing to qualified service personnel only.
The lightning flash with arrowhead symbol within the equilateral triangle is intended to
alert the use to the presence of un-insulated “dangerous voltage” within the product’s
enclosure that may be of sufficient magnitude to constitute a risk of electric shock.
The exclamation point within the equilateral triangle is intended to alert the user to the
presence of important operation and maintenance (servicing) instructions in the literature
accompanying this appliance.
CAUTION
To prevent electric shock, do not use this polarized plug with an extension cord, receptacle or other
outlet unless the blades can be fully inserted to prevent blade exposure.
CAUTION
RISK OF ELECTRIC SHOCK
DO NOT OPEN
1
ENGLISH
DEUTSCH
FRANÇAIS
ESPAÑOL
DUTCH
ITALIANO
SAFETY INSTRUCTIONS
MAIN FEATURES
CONNECTIONS
2
ENGLISH
DEUTSCH
FRANÇAIS
ESPAÑOL
DUTCH
ITALIANO
- USB Powered
- 17 MIDI Messages
- 8 Selectable MIDI Channels
- 3 x 45mm Channel Faders and Crossfader
- Adjustable Crossfader Curve
- 2 x Illuminated Push PFL buttons with LED indication.
- 11 x Rotary Knobs
- 2 x columns 10-LED level Meter
- 1 x switch for Master/ PFL Meter selection
- DJ Software for MAC/PC included: DECKADANCE LE
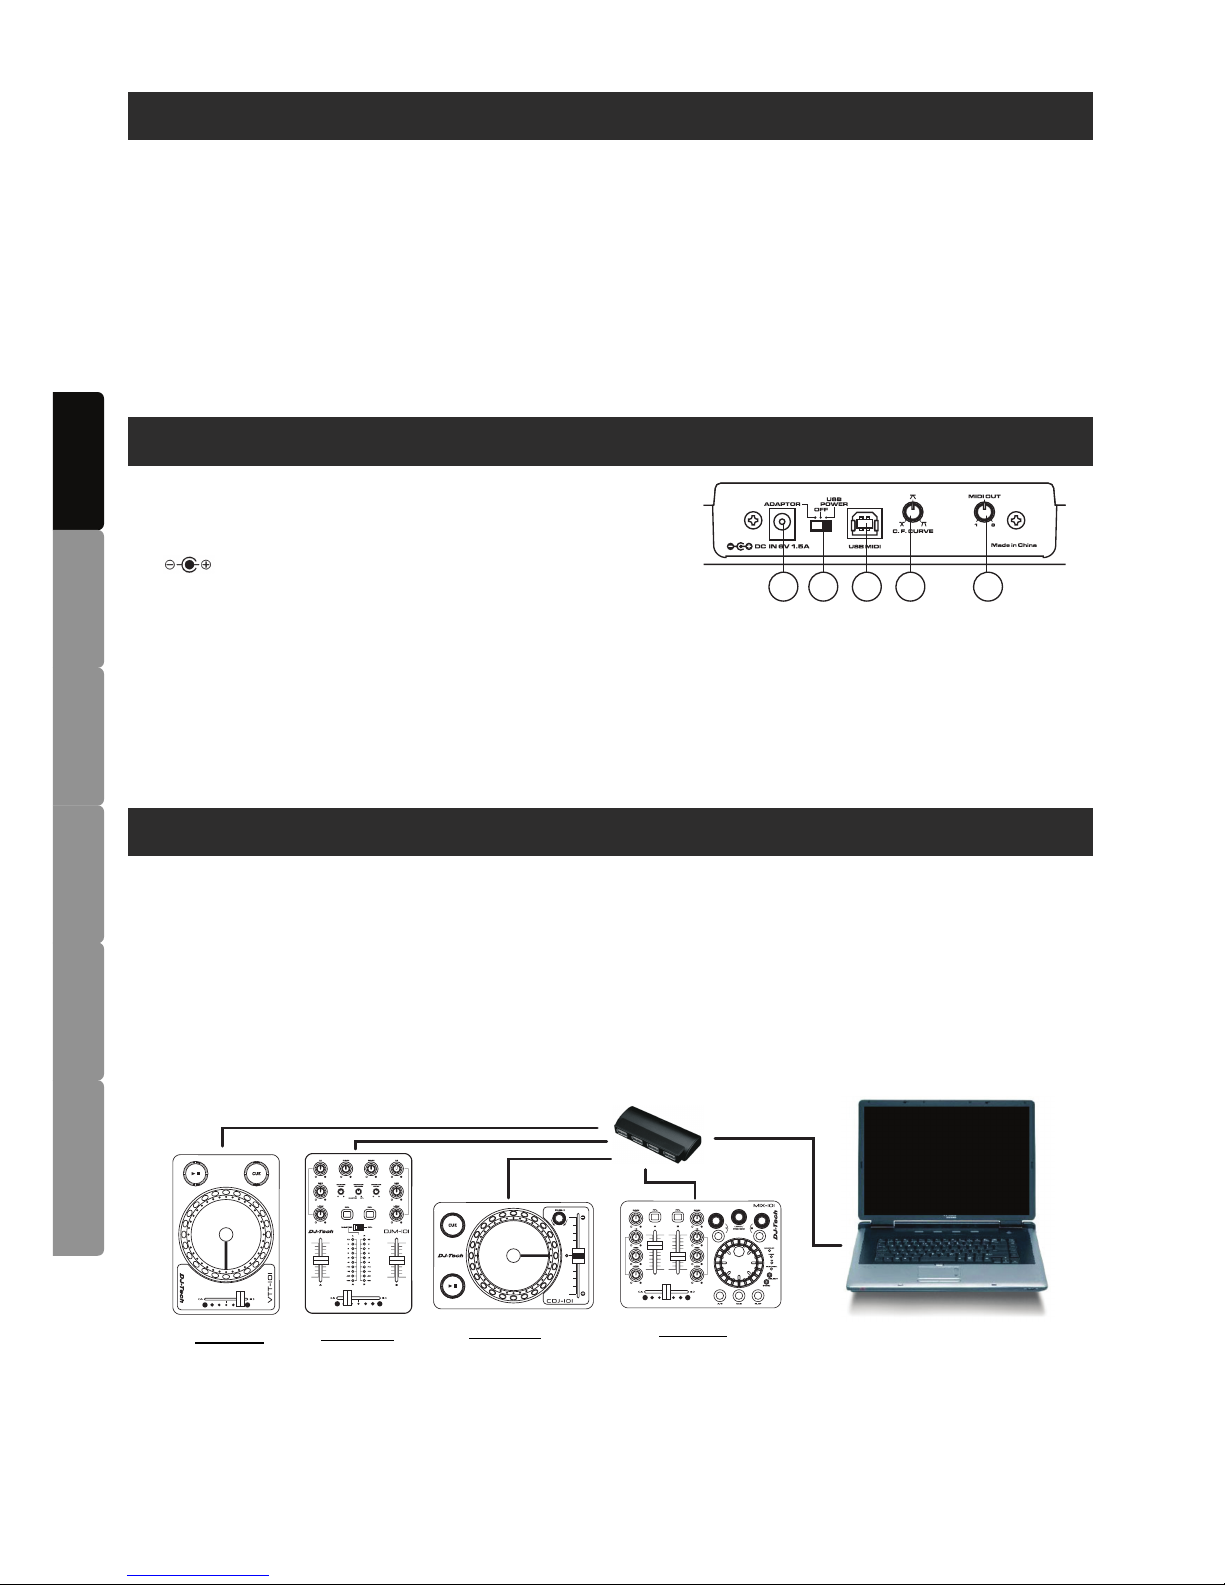
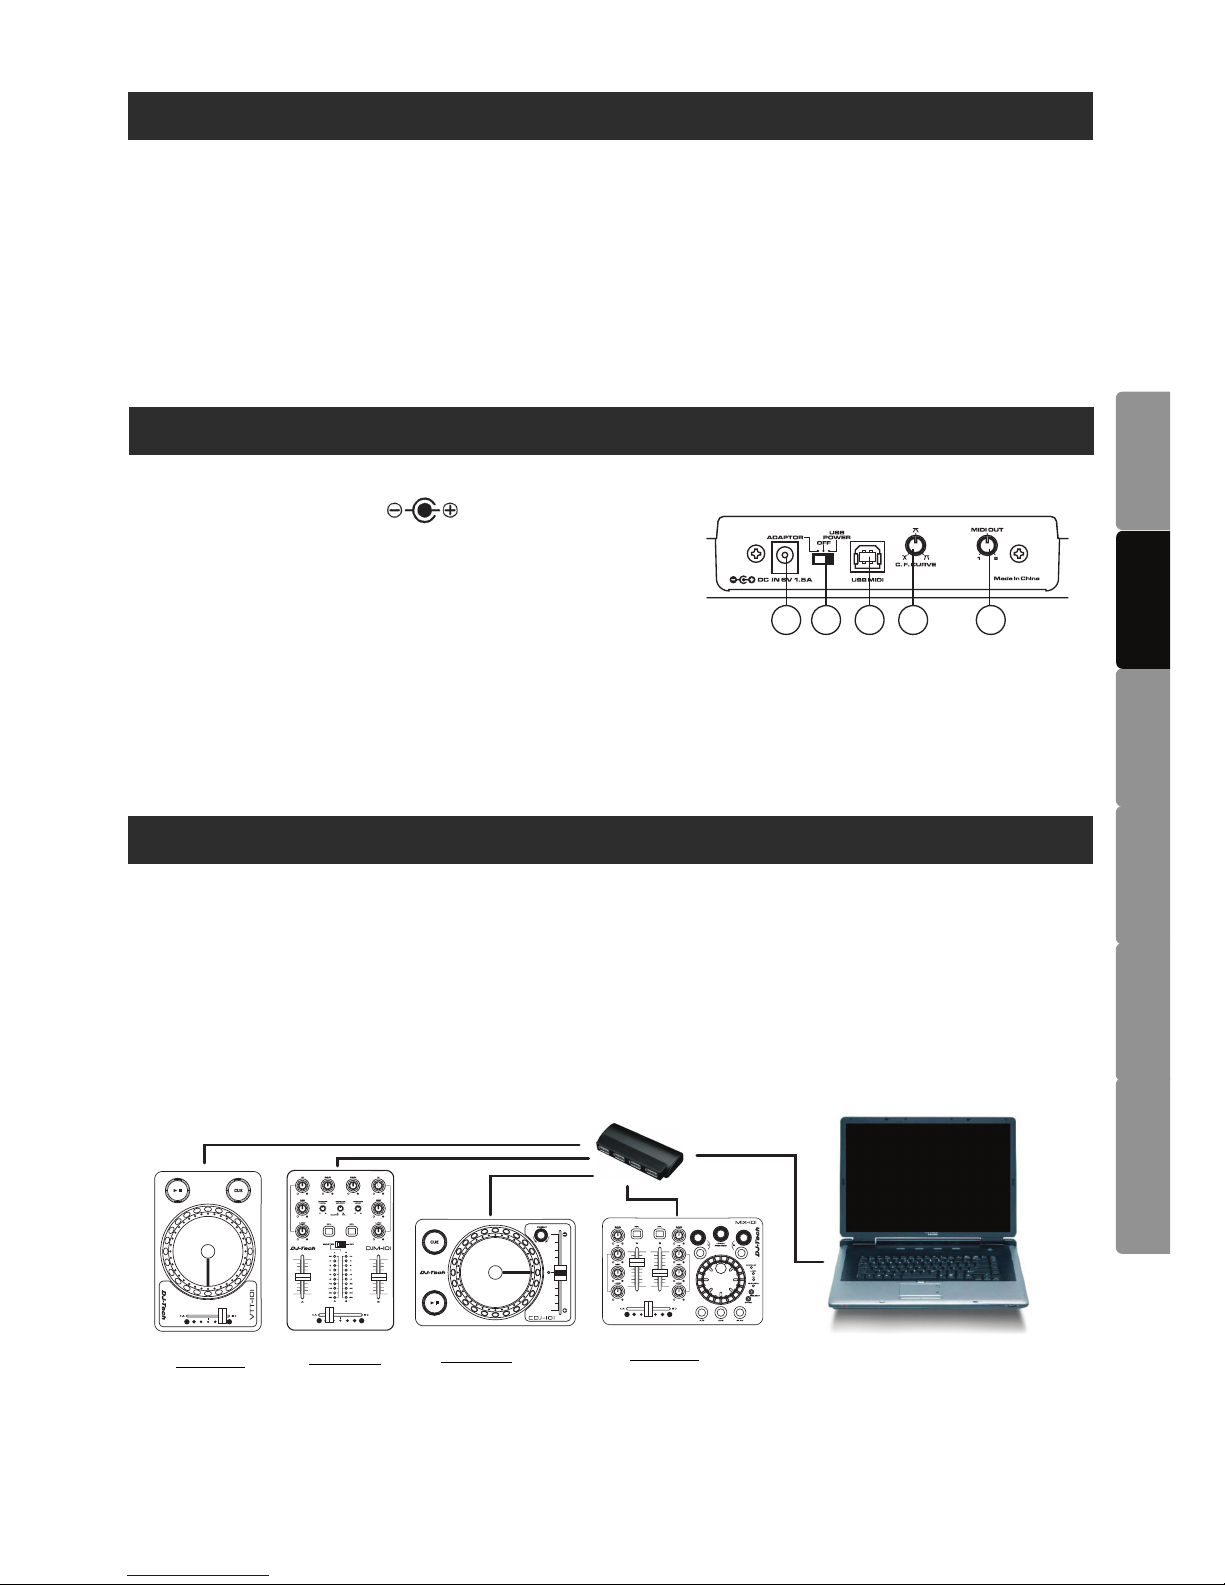
1. Power Connector - Plug in power adaptor here. DC
adaptor can be used when the USB port cannot provide
enough power to the unit. Please use only a 6V DC
adaptor.
2. Power Switch (Adaptor / OFF/ USB power) - Set the
switch to adaptor when using the exclusive adaptor, set to USB bus power when using power
provided from the computer via USB.
3. USB Socket - Used to connect a computer.
4. C.F Curve Control - Adjusts the shape of the crossfader curve from a quick cut for scratching or to a
longer fade for mixing.
5. MIDI Out - Rotate the MIDIOUT knob to select MIDI channel from 1 to 8. Every time MIDI channel is
changed, the LED level meter will show the MIDI channel number.
1. Install the DJ software from the software CD included. Follow the instruction to finish the installation.
You may need to enter the serial number for the software during installation. The serial number can
be found on the paper pocket of the software CD.
2. Connect the DJM-101 to Computer USB port. Driver will be installed automatically. No Driver is
needed.
You can use the DJM-101 alone or use with other 101 series controllers (including CDJ-101,
VTT-101 and MIX-101) at the same time. Sample connection as below:
VTT-101:
Deck A
MIDI CH1
DJM-101:
Deck A&B
MIDI CH1
CDJ-101:
Deck B
MIDI CH2
MIX-101:
Deck A&B
MIDI CH1
Computer
Powered USB Hub
1 2 3 4 5
OPERATIONS
Note: If you
are using a USB Hub for connection, it is recommended to use a Powered USB hub to
ensure the stability of the setup.
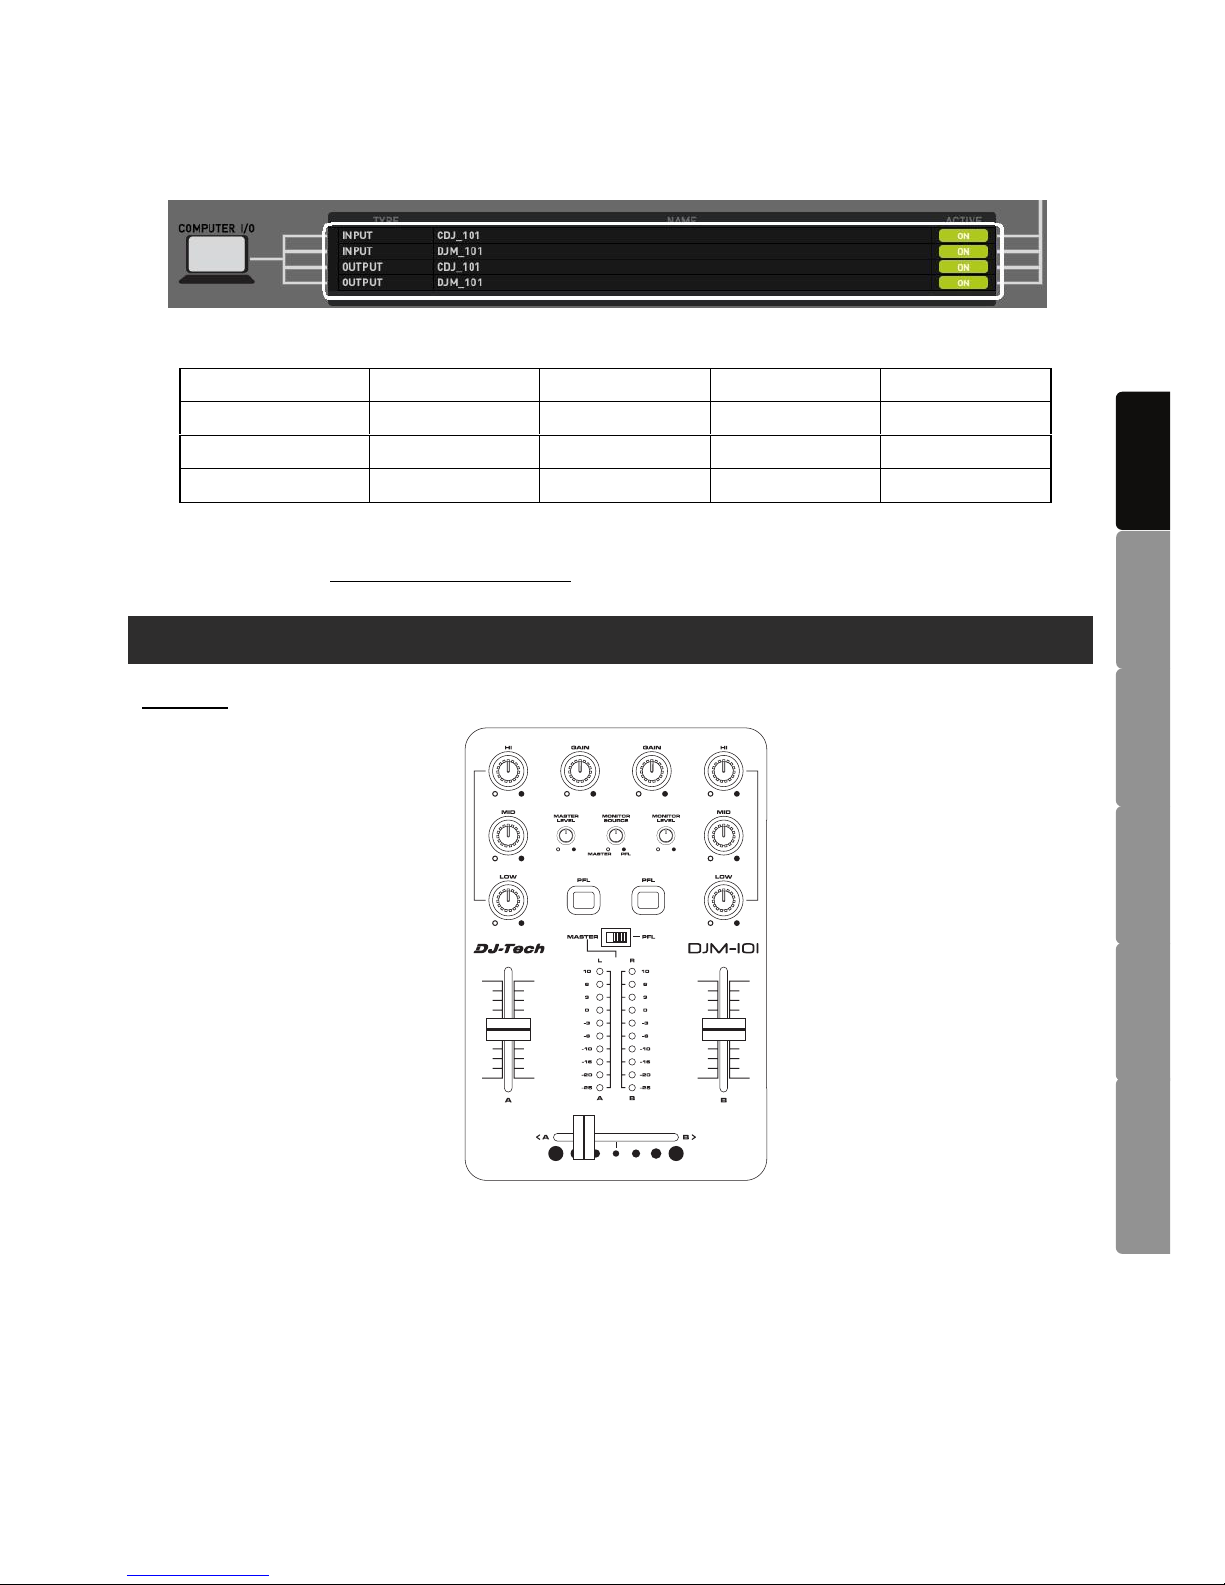
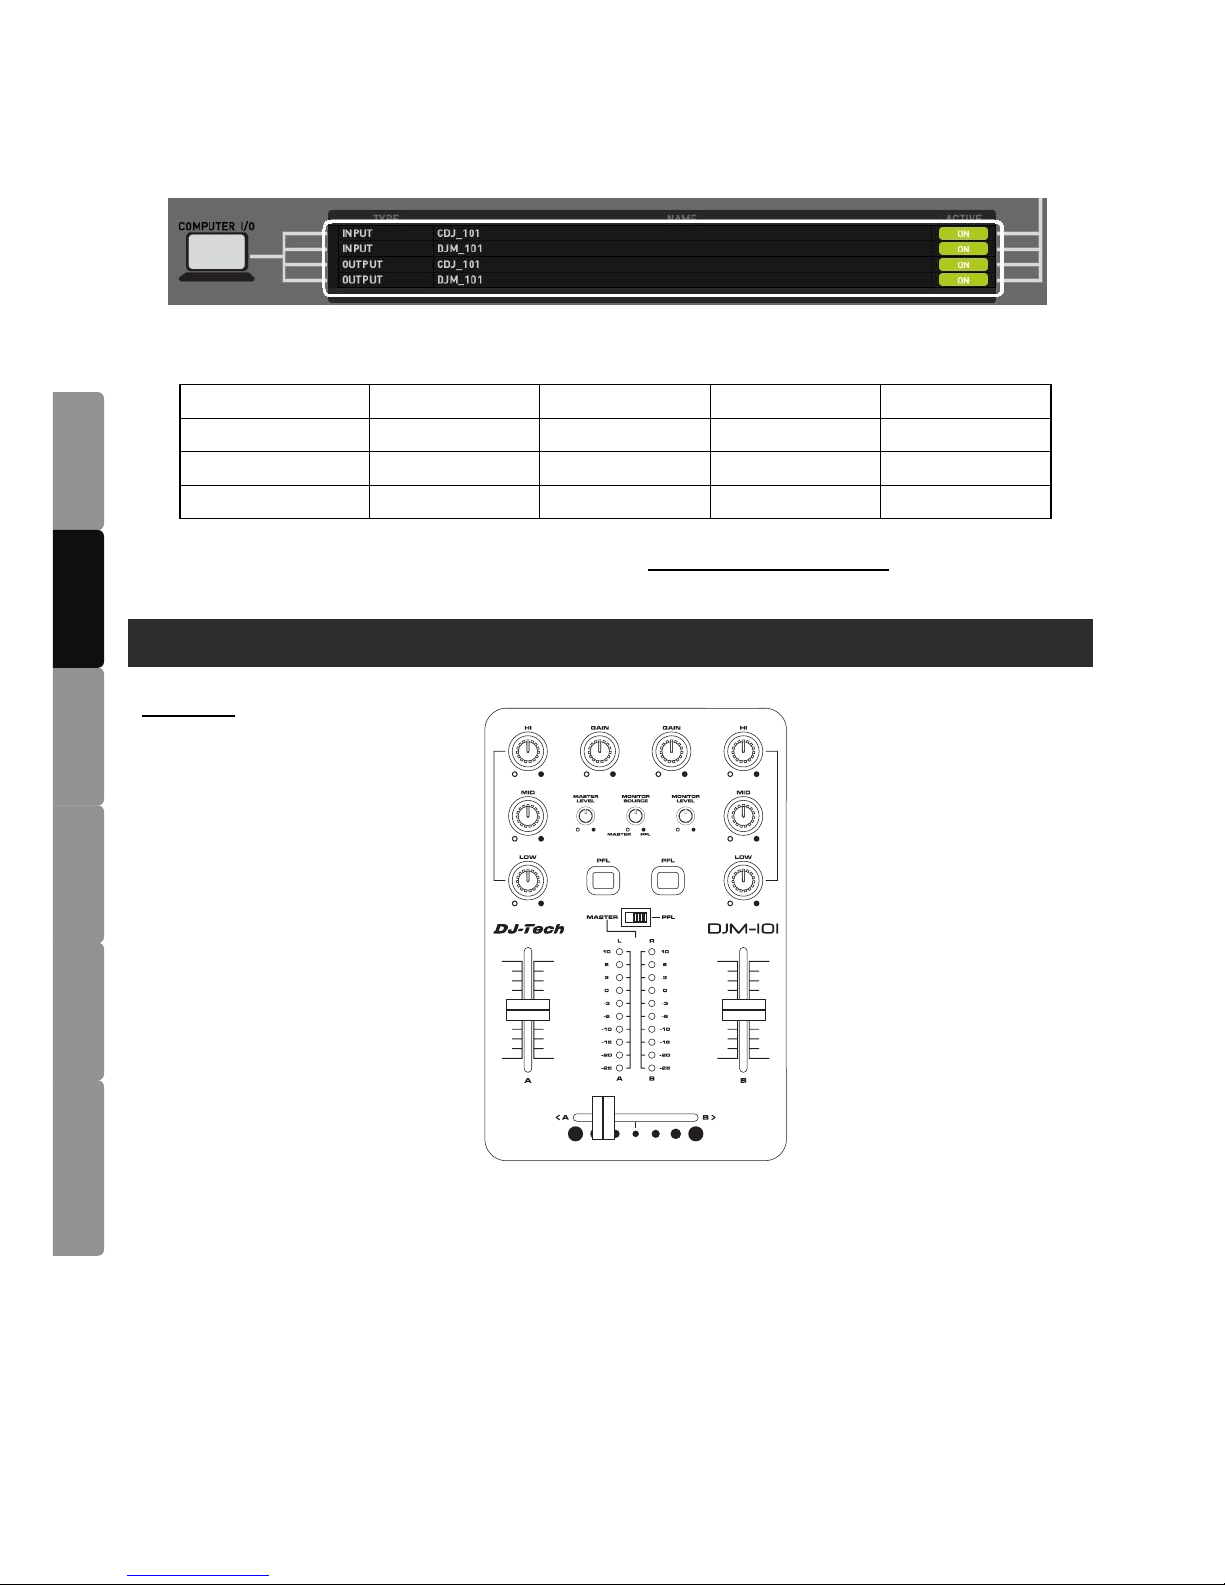
3. Open the DJ software. Go to SETUP page and activate the INPUT and OUTPUT for connected
controller(s). As below:
4. The MIDI Channel setting of the controller allows you to control different decks in DJ software.
Please refer to below table for MIDI Channel in Deckadance Software:
CDJ-101 VTT-101 DJM-101 MIX-101
MIDI CH1 Deck A Deck A Deck A & B Deck A & B
MIDI CH2 Deck B Deck B N/A N/A
MIDI CH3 to CH8 N/A N/A N/A N/A
* N/A = Not Available
5. The 101 series USB MIDI controllers also support other DJ software like Traktor Pro. Please visit
DJ Tech website (http://www.djtechpro.com/ ) for software mapping and further info.
DJM-101
1. GAIN KNOB
2. 3-BAND EQ KNOB
3. MASTER VOLUME KNOB
4. MONITOR SOURCE KNOB – Adjust the amount of master source and monitor source for the
monitor channel.
5. MONITOR LEVEL KNOB
6. PFL BUTTON
7. LED LEVEL METER – Use the switch to select between Master Channel or PFL Channel on the
LED level meter
8. CHANNEL VOLUME FADER
9. CROSSFADER
ENGLISH
DEUTSCH
FRANÇAIS
ESPAÑOL
DUTCH
ITALIANO
3
1
2
8
7
9
3 4 5
6
FUNCTIONS
AVERTISSEMENT
Pour réduire le risque d'incendie ou de choc électrique, n’exposez pas cet appareil à la pluie ou à
l'humidité. Ne placez aucun récipient rempli de liquide, tel qu’un vase, à proximité de celui-ci.
ATTENTION : Ne démontez pas l’appareil afin de prévenir tout
risque de choc électrique. Aucune pièce interne ne peut être
réparée par l’utilisateur. Confiez toutes les opérations
d'entretien à un technicien qualifié.
Le symbole de l'éclair terminé par une flèche situé à l'intérieur d'un triangle équilatéral
avertit l'utilisateur de la présence de tension dangereuse non isolée dans l'appareil, dont
l’amplitude peut constituer un risque de choc électrique.
Le symbole du point d’exclamation dans un triangle équilatéral vise à avertir l’utilisateur de
la présence, dans la documentation accompagnant cet appareil, d’importantes
instructions de fonctionnement et d’entretien.
ATTENTION
Pour prévenir tout risque de choc électrique, veillez à ce que les bornes de la fiche d’alimentation
soient insérées complètement, de manière à ne pas être exposées.
ENGLISH
DEUTSCH
FRANÇAIS
ESPAÑOL
DUTCH
ITALIANO
INFORMATIONS DE SECURITE
CAUTION
RISK OF ELECTRIC SHOCK
DO NOT OPEN
4
1. Lisez les instructions suivantes.
2. Conservez ces instructions.
3. Respectez tous les avertissements.
4. Suivez toutes les instructions.
5. N’utilisez pas l’appareil près d’une source d’eau.
6. Nettoyez-le uniquement avec un chiffon doux et sec.
7. N’obstruez pas les ouvertures de ventilation. Installez l’appareil conformément aux instructions du
fabricant.
8. N’installez pas l'appareil près de sources de chaleur telles qu’un radiateur, une bouche à air
chaud, un amplificateur ou tout autre appareil qui produit de la chaleur.
9. Ne contournez pas le dispositif de sécurité de la fiche polarisée ou avec mise à la terre. Toute
fiche polarisée dispose de deux lames dont une est plus grande que l’autre. Toute fiche avec mise
à la terre dispose de trois lames dont une pour la mise à la terre. La lame la plus large et la lame
de mise à la terre assurent votre sécurité. Si la fiche ne correspond pas à votre prise secteur,
consultez un électricien pour remplacer votre prise secteur obsolète.
10. Placez le cordon d’alimentation de manière à ne pas le piétiner ou l'écraser. Faites
particulièrement attention à la fiche et à l’endroit où le cordon sort de l’appareil.
11. Utilisez exclusivement des attaches/accessoires recommandé(e)s par le fabricant.
12. Ne placez pas ce produit sur une surface instable, cela pourrait causer des blessures
corporelles ou des dommages sérieux à l’appareil. Si vous utilisez un chariot, déplacez
l’appareil avec prudence afin d’éviter de le renverser et de blesser quelqu’un.
13. Débranchez l’appareil en cas d’orage ou de non-utilisation prolongée.
14. Confiez toutes les opérations d'entretien à un technicien qualifié. Une réparation est nécessaire
lorsque l’appareil a été endommagé de quelque manière que ce soit : fiche ou câble
d’alimentation abîmé(e), introduction de liquides ou d’objets dans l’appareil, exposition à la pluie
ou à l’humidité, dysfonctionnement, chute.
15. La fiche permet de débrancher l’appareil et doit rester facilement accessible.
16. S'il vous plaît garder l'unité dans un environnement à une bonne ventilation.
Deck A
Canal MIDI 1
DJM-101:
Deck A&B
Canal MIDI 1
CDJ-101:
Deck B
Canal MIDI 2
MIX-101:
CARACTERISTIQUES
CONNECTIONS
ENGLISH
DEUTSCH
FRANÇAIS
ESPAÑOL
DUTCH
ITALIANO
5
- Alimenté par USB
- 17 MIDI Messages
- 8 canaux MIDI sélectionnable
- 3 x Canal Fader et Crossfader 45mm
- Courbe Crossfader ajustable
- 2 x Bouton PFL éclairé avec indicateur à LED
- 11 x Bouton Rotatif
- 2 x vue mètre, colonne de 10-LED
- 1 x bouton selection Master/ PFL
- DJ Software pour MAC/PC inclu: DECKADANCE LE
1. CONNECTEUR D’ALIMENTATION - Brancher
l’adaptateur secteur ici.
2. BOUTON D’ALIMENTATION (Adaptateur / OFF/ USB
power) - Régler le bouton en position AC ADAPTOR
lorsque vous utilisez l’adaptateur secteur, régler le bouton
en position USB POWER lorsque l’alimentation provient de
l’ordinateur via USB.
3. ENTRÉE USB - Utilisez l’entrée USB pour connecter à l’ordinateur.
4. CONTROLE C.F CURVE - Permet de régler la forme de la courbe du crossfader rapidement, pour
scratcher ou pour mixer.
5. Sortie MIDI - Tournez le bouton MIDI OUT pour sélectionner l’un des 8 canaux MIDI. A chaque fois
qu’un nouveau canal MIDI est sélectionné, le numéro de celui-ci est indiqué via les voyants LED de
l’échelle des niveaux.
1. Installez le logiciel DJ grâce au CD fourni. Suivez les instructions d’installation du logiciel. Lors de
l’installation, il se peut que vous deviez saisir le numéro de série du logiciel. Celui-ci est inscrit sur la
pochette en papier du CD correspondent.
2. Reliez le DJM-101 au port USB de l’ordinateur. Aucun pilote de périphérique n’est requis. Celui-ci
s’exécute automatiquement.
Vous pouvez utiliser le DJM-101 seul ou en association avec d’autres contrôleurs de la série 101: le
VTT-101, le CDJ-101 et le MIX-101. Veuillez trouver ci-dessous un exemple de connexions
possible:
VTT-101:
Ordinateur
Deck A&B
Canal MIDI
1
Concentrateur USB
avec alimentation
1 2 3 4 5
OPERATIONS
Remarque:
Si vous utilisez un concentrateur USB, il est recommandé d’utiliser un concentrateur
USB disposant d’une alimentation autonome afin de garantir la stabilité de la configuration.
3. Ouvrez le logiciel DJ. Rendez-vous à la page de configuration et activez l’entrée et la sortie pour le(s)
contrôleur(s) connecté(s) (voir illustration):
4. La configuration MIDI du contrôleur vous permet de contrôler les différents decks via le logiciel DJ.
Veuillez vous référer au tableau ci-dessous pour en savoir davantage sur les canaux MIDI dans le
ogiciel Deckadance:
CDJ-101 VTT-101 DJM-101 MIX-101
Canal MIDI 1 Deck A Deck A Decks A et B Decks A et B
Canal MIDI 2 Deck B Deck B Pas disponible Pas disponible
Canaux MIDI 3 à 8 Pas disponible Pas disponible Pas disponible Pas disponible
5. Les contrôleurs MIDI USB de la série 101 supportent également d’autres logiciels DJ tels que
Traktor Pro. Veuillez visiter le site Web de DJ Tech (http://www.djtechpro.com/) pour télécharger le
logiciel de mapping ou pour obtenir de plus amples informations.
DJM-101:
1. Boutons de réglage du gain
2. Boutons de réglage de l’équaliseur 3 bandes
3. Bouton MASTER LEVEL pour le réglage du volume master
4. Bouton MONITOR SOURCE – Réglage de la proportion entre le volume master et celui des
haut-parleurs du moniteur.
5. Bouton MONITOR LEVEL pour le réglage du volume des haut-parleurs du moniteur
6. Boutons PFL
7. Echelle des niveaux avec voyants LED - Utilisez le commutateur situé au-dessus de l’échelle pour
sélectionner le canal master ou le canal PFL
8. Potentiomètre de réglage du volume du canal
9. Crossfader
FONCTION
1
2
8
7
9
3 4 5
6
ENGLISH
DEUTSCH
FRANÇAIS
ESPAÑOL
DUTCH
ITALIANO
6
ENGLISH
DEUTSCH
FRANÇAIS
ESPAÑOL
DUTCH
ITALIANO
ENGLISH
DEUTSCH
FRANÇAIS
ESPAÑOL
DUTCH
ITALIANO
WICHTIGE SICHERHEITSHINWEISE
ENGLISH
DEUTSCH
FRANÇAIS
ESPAÑOL
DUTCH
ITALIANO
ENGLISH
DEUTSCH
FRANÇAIS
ESPAÑOL
DUTCH
ITALIANO ENGLISH
DEUTSCH
FRANÇAIS
ESPAÑOL
DUTCH
ITALIANO
WICHTIGE SICHERHEITSHINWEISE
7
1. Lesen Sie diese Betriebsanleitung.
2. Verwahren Sie diese Anleitung auf.
3. Beachten Sie alle hier aufgeführten Warnhinweise.
4. Folgen Sie den Anleitungen.
5. Setzen Sie das Gerät weder Regen noch sonstiger Feuchtigkeit aus.
6. Reinigen Sie die Oberfläche des Gerätes nur mit einem weichen, trockenen Tuch.
7. Achten Sie auf ausreichende Belüftung des Gerätes und stellen Sie es entsprechend den
Anweisungen auf.
8. Stellen Sie das Gerät nicht an direkte Wärmequellen (z.B. Heizungen / Verstärkern) auf.
9. Verändern Sie nicht die Masseleitung. Auch das Betreiben des Gerätes an einer ungeerdeten
Steckdose kann lebensgefährlich sein. Stellen Sie daher sicher, dass Sie das Gerät an einer
fachgerecht installierten Netz-Steckdose von 100-240 V, 50 -60 Hz betreiben.
10. Legen Sie das Netzkabel so, dass es frei liegt und nirgends eingeklemmt ist oder leicht
herausgerissen werden kann. Dort wo es aus dem Gerät herauskommt, soll es nicht unter
Zugspannung stehen.
11. Verwenden Sie ausschließlich original Gerate Hersteller Zusatzprodukte und Erweiterungen.
12. Das Gerät sollte zu Ihrer Sicherheit nur auf Wagen, Ständern, oder Tischen
aufbewahrt und betrieben werden die für professionelle Audio- und
Musikinstrumente geeignet sind. Achten Sie immer darauf, dass die jeweiligen
Geräte sicher installiert sind, um Schäden und Verletzungen zu vermeiden.
Wenn Sie einen Rollwagen benutzen, achten Sie darauf, dass dieser nicht
umkippen kann, um Verletzungen auszuschließen.
13. Im Falle eines Gewitters oder auch bei längerer Nichtinbetriebnahme ist es ratsam den
Netzstecker aus der Wandsteckdose zu entfernen.
14. Die Wartung sollte nur durch qualifiziertes Fachpersonal erfolgen. Eine Wartung wird notwendig,
wenn das Gerät beschädigt wurde, das Stromkabel oder der Stecker, Gegenstände oder
Flüssigkeiten in das Gerät gelangt sind. Das Gerät heruntergefallen, dem Regen oder
Feuchtigkeit ausgesetzt war und deshalb nicht mehr normal arbeitet.
15. Der Hauptstecker wird zum Ausschalten verwendet und muss deshalb leicht zugänglich sein
16. Bitte halten Sie das Gerät in einer guten Lüftung Umwelt.
WARNUNG
Um das Risiko eines elektrischen Schlages zu minimieren, setzen Sie das Gerät niemals Regen
oder Feuchtigkeit aus. Meiden Sie auch den Kontakt mit tropfenden, spritzenden Flüssigkeiten und
stellen Sie keine mit Flüssigkeit befüllten Gegenstände auf das Gerät. (Gläser, Flaschen, Vasen etc.)
ACHTUNG: Um das Risiko eine elektrischen Schlages zu
minimieren, entfernen Sie niemals das Gehäuse des
Gerätes. Es befinden sich keine vom Anwender
auszutauschenden Teile im Gerät. Eine Reparatur oder die
Überprüfung des Gerätes erfolgt ausschließlich durch
qualifiziertes Fachpersonal.
Dieses Symbol warnt den Benutzer vor nicht isolierter Spannung innerhalb des Gerätes,
die gefährliche elektrische Schläge verursachen können.
CAUTION
RISK OF ELECTRIC SHOCK
DO NOT OPEN

ENGLISH
DEUTSCH
FRANÇAIS
ESPAÑOL
DUTCH
ITALIANO
ENGLISH
DEUTSCH
FRANÇAIS
ESPAÑOL
DUTCH
ITALIANO
WICHTIGE SICHERHEITSHINWEISE
ENGLISH
DEUTSCH
FRANÇAIS
ESPAÑOL
DUTCH
ITALIANO
ENGLISH
DEUTSCH
FRANÇAIS
ESPAÑOL
DUTCH
ITALIANO
ENGLISH
DEUTSCH
FRANÇAIS
ESPAÑOL
DUTCH
ITALIANO
WICHTIGE SICHERHEITSHINWEISE
Dieses Symbol weist den Benutzer darauf hin, dass es wichtige Funktions- und
Wartungshinweise in der Produkt-Begleitenden Anleitung gibt.
ACHTUNG
Um das Risiko eines elektrischen Schlages zu minimieren, sollten Sie bei der Verwendung von
Mehrfach- und Verteilersteckdosen darauf achten, dass diese korrekt geerdet sind und der
Geräte-Netzstecker vollständig eingesteckt wurde.
8
ANSCHLÜSSE
GERÄTE EIGENSCHAFTEN UND MERKMALE
- Stromversorgung über USB
- 17 MIDI Signale
- 8 Wählbare MIDI Kanäle
- 3 x 45mm Kanal Fader und Crossfader
- Justierbare Crossfader Curve
- 2 x beleuchtete PFL Knöpfe mit LED anzeige
- 11 x Roary Knöpfe
- 2 x Spalten 10-LED level Meter
- 1 x Schalter für Master/PFL Meter Auswahl
- DJ Software DECKADANCE LE für Mac/PC
1. NETZSTECKER ANSCHLUSS - Schließen Sie hier ein
passendes Netzteil an. Das Netzteil kann verwendet werden
wenn die vom PC - Notebook gelieferte USB Stromstärke nicht
ausreichen sollten. Verwenden Sie ausschließlich einen 6V
Wechselstrom Adapter. (Nicht mitgeliefert.
2. NETZ SCHALTER (Adaptor / OFF/ USB power) - Stellen Sie
den Schalter auf „AC ADAPTOR“ wenn Sie ein externes Netzteil verwenden (Nicht mitgeliefert),
Stellung auf USB POWER wenn Sie das Gerät mit dem Anschluss Strom betreiben wollen, welcher
von Ihrem Laptop- / Desktop Computer geliefert wird.
3. USB ANSCHLUSS - Verwenden Sie diese Buchse zum Anschluss des USB Kabels. Wir empfehlen
das mitgelieferte USB Kabel zu verwenden. Besonders lange oder qualitativ minderwertige Kabel
können zu einer Beeinträchtigung des Betriebes führen.
4. C.F Curve Control - Justieren Sie mithilfe diese Reglers das „Blenden-Verhalten“ des Crossfaders.
Sie haben die Möglichkeit von einer scharfkantigen- bis zu einem weichen
Überblendungs-Verhalten zu variieren. Steilere Regelkurven eignen sich besonders zum
„Scratchen“, hingegen werden weichere Kurven-Verläufe bei längeren Kreuz-Blenden, (crossfades)
verwendet.
5. Ausgang MIDI - Den Knopf MIDIOUT drehen, um den MIDI-Kanal von 1 bis 8 auszuwählen. Bei
jedem Ändern des MIDI-Kanals, zeigt die LED-Niveauanzeige die MIDI-Kanalnummer an.
1 2 3 4 5

ENGLISH
DEUTSCH
FRANÇAIS
ESPAÑOL
DUTCH
ITALIANO
ENGLISH
DEUTSCH
FRANÇAIS
ESPAÑOL
DUTCH
ITALIANO
WICHTIGE SICHERHEITSHINWEISE
ENGLISH
DEUTSCH
FRANÇAIS
ESPAÑOL
DUTCH
ITALIANO
ENGLISH
DEUTSCH
FRANÇAIS
ESPAÑOL
DUTCH
ITALIANO
1. Die DJ-Software anhand der mitgelieferten CD-ROM installieren. Die Anweisungen bis zum Ende
der Installation befolgen. Sie müssen eventuell während der Installation die Seriennummer der
Software eingeben. Die Seriennummer befindet sich auf dem Papieretui der Software-CD.
2. Den CDJ-101 an den USB-Port des Computers anschließen. Der Treiber wird automatisch installiert.
Es ist kein Treiber erforderlich.
Sie können CDJ-101 allein oder mit anderen Controllern der Serie 101 (darunter VTT-101, DJM-101
und MIX-101) gleichzeitig verwenden. Hier ein Anschlussbeispiel:
Hinwe
is: Wenn Sie einen USB-Hub zum Anschließen verwenden, empfehlen wir, einen USB-Hub
mit eigener Stromversorgung zu verwenden, um die Stabilität der Konfiguration sicherzustellen.
3. Öffnen Sie die DJ-Software. Begeben Sie sich zur SETUP-Seite und aktivieren Sie INPUT und
OUTPUT für den/die angeschlossenen Controller. Wie unten:
4. Die MIDI-Kanal-Einstellung erlaubt es, die verschiedenen Geräte über die DJ-Software zu steuern.
Die folgende Tabelle zeigt die MIDI-Kanäle der Deckadance-Software:
CDJ-101 VTT-101 DJM-101 MIX-101
MIDI CH1 Gerät A Gerät A Gerät A & B Gerät A & B
MIDI CH2 Gerät B Gerät B NA NA
MIDI CH3 to CH8 NA NA NA NA
* NV = NICHT VERFÜGBAR
5. Die USB MIDI-Controller-Serie 101 unterstützt auch andere DJ-Software, wie zum Beispiel Traktor
Pro. Auf der DJ Tech-Website (http://www.djtechpro.com/ ) finden Sie ausführlichere
Softwareangaben und Informationen.
VTT-101:
Gerät A
MIDI CH1
DJM-101:
Gerät A&B
MIDI CH1
CDJ-101:
Gerät B
MIDI CH2
MIX-101:
Gerät A&B
MIDI CH1
Computer
USB-Hub mit Stromversorgung
VORGEHENSWEISE
9
ENGLISH
DEUTSCH
FRANÇAIS
ESPAÑOL
DUTCH
ITALIANO

1. VERSTÄRKUNGSKNOPF
2. 3-BAND EQ-KNOPF
3. HAUPT-LAUTSTÄRKEREGELUNG
4. MONITOR QUELLE-KNOPF - Einstellen des Verhältnisses zwischen Master-Lautstärke und
Monitor-Lautsprechern für den Monitorkanal
5. MONITOR-PEGELKNOPF
6. PFL-KNOPF
7. NIVEAUANZEIGE MIT LEDs - Den Schalter zum Auswählen zwischen Master-Kanal und
PFL-Kanal auf der Pegelanzeige mit LEDs verwenden
8. KANAL-LAUTSTÄRKE-FADER
9. CROSSFADER
1
2
8
7
9
3 4 5
6
ENGLISH
DEUTSCH
FRANÇAIS
ESPAÑOL
DUTCH
ITALIANO
FUNKTIONSWEISE
10
DJM-101:

1
ENGLISH
DEUTSCH
FRANÇAIS
ESPAÑOL
DUTCH
ITALIANO
ENGLISH
DEUTSCH
FRANÇAIS
ESPAÑOL
DUTCH
ITALIANO
SAFETY INSTRUCTIONS
4
ENGLISH
DEUTSCH
FRANÇAIS
ESPAÑOL
DUTCH
ITALIANO
ENGLISH
DEUTSCH
FRANÇAIS
ESPAÑOL
DUTCH
ITALIANO
INFORMATIONS DE SECURITE
BELANGRIJKE VEILIGHEIDSVOORSCHRIFTEN
1. Lees deze voorschriften.
2. Bewaar deze voorschriften.
3. Houd rekening met alle waarschuwingen.
4. Volg alle voorschriften.
5. Gebruik het toestel niet in de nabijheid van water.
6. Reinig enkel met een droge doek.
7. Blokkeer de ventilatie-openingen niet. Installeer volgens de instructies van de fabricant.
8. Niet installeren in de nabijheid van warmtebronnen zoals radiatoren, warmteroosters, ovens of
andere toestellen (inclusief versterkers) die warmte produceren.
9.Houd rekening met de veiligheidsdoelstelling van de gepolariseerde stekker of de aardingsstekker.
Een gepolariseerde stekker heeft twee pinnen waarvan de ene breder is dan de andere. Een
aardingsstekker heeft twee pinnen en een derde aardingspin. De brede pin of de derde pin zijn
voorzien voor uw veiligheid. Als de meegeleverde stekker niet in uw stopcontact past, raadpleeg
dan een elektricien voor vervanging van het verouderde stopcontact.
10. Bescherm de stroomkabels tegen vertrappelen of belemmeren, vooral aan de stekkers,
stopcontacten en het punt waar ze uit het toestel komen.
11. Gebruik enkel hulpstukken/toebehoren die door de fabrikant gespecificeerd worden.
12. Enkel gebruiken met een door de fabrikant gespecificeerde of met het toestel
meegeleverde kar, steun, drievoet, plank of tafel. Als er een kar wordt gebruikt,
wees dan voorzichtig als u het toestel verplaatst in een kar/toestel-combinatie om
letsels door omkantelen te vermijden.
13. Trek het toestel uit tijdens onweersbuien of als het toestel gedurende lange tijd niet wordt
gebruikt.
14. Laat alle onderhoud over aan bevoegd onderhoudspersoneel. Onderhoud is nodig wanneer het
toestel op een of andere manier beschadigd is, bijvoorbeeld door een beschadigde
voedingskabel of stekker, als er vloeistof op het toestel gemorst is of er voorwerpen ingevallen
zijn, als het toestel werd blootgesteld aan regen of vocht, niet normaal werkt of gevallen is.
15. De hoofdstekker wordt gebruikt als ontkoppeling en moet dus steeds toegankelijk blijven.
16. Houd het apparaat in een goede ventilatie milieu.
WAARSCHUWING
Stel het toestel niet bloot aan regen of vocht om het risico op brand of elektrische schok te
vermijden. Het toestel mag niet blootgesteld worden aan druppels of spatten en er mogen geen
voorwerpen met vloeistof, zoals vazen, op het toestel geplaatst worden.
WAARSCHUWING: Geen beschermingen verwijderen om
het risico op elektrische schok te verminderen. Geen door de
gebruiker te repareren onderdelen. Laat onderhoud enkel
over aan bevoegd personeel
Het symbool van een driehoek met een bliksemschicht die eindigt op een pijl is bedoeld
om de gebruiker te waarschuwen voor de aanwezigheid van ongeïsoleerde “gevaarlijke
spanning” in het product die van zulke omvang kan zijn dat het een risico op elektrische
schok vormt.
De gelijkzijdige driehoek met het uitroepteken is bedoeld om de gebruiker te
waarschuwen voor de aanwezigheid van belangrijke bedienings- en
onderhoudsvoorschriften in de documentatie die bij dit toestel hoort.
WAARSCHUWING
Om elektrische schok te vermijden, de gepolariseerde stekker niet gebruiken met een verlengkabel,
stopcontact of andere ontvanger, tenzij de pinnen er helemaal kunnen ingestoken worden zodat er
geen blootstelling van de pinnen is.
CAUTION
RISK OF ELECTRIC SHOCK
DO NOT OPEN
ENGLISH
DEUTSCH
FRANÇAIS
ESPAÑOL
DUTCH
ITALIANO
11

CARACTERISTIQUES
CONNECTIONS
CONNECTIONS
- Voorzien van USB
- 17 MIDI-boodschappen
- 8 selecteerbare MIDI-kanalen
- 3 x 45 mm channel faders en crossfader
- Aanpasbare crossfader-curve
- 2 x verlichte PFL druktoetsen met LED-verlichting
- 11 x potmeterknoppen
- 2 x kolom met 10 LED-level meter
- 1 x schakelaar voor Master/ PFL Meter selectie
- DJ software voor Mac of pc inbegrepen: DECKADANCE LE
1. STROOMAANSLUITING - Sluit hier uw stroomadapter
aan. De DC-adapter kan gebruikt worden wanneer de
USB-poort onvoldoende stroom aan de eenheid levert.
Gebruik uitsluitend een DC-adapter van 6V.
2. STROOMSCHAKELAAR (adapter / UIT / USB-stroom) -
Plaats de schakelaar op ADAPTOR wanneer u een externe
DC-adapter gebruikt (niet meegeleverd) of op USB POWER wanneer u de stroom van de computer
via USB gebruikt.
3. USB-AANSLUITING - Gebruikt om een computer aan te sluiten. Het is raadzaam om de
meegeleverde USB-kabel te gebruiken. Een lange USB-kabel of een kabel van slechte kwaliteit zou
de eenheid onstabiel kunnen maken.
4. CROSSFADER-KROMMEREGELING - Verstelt de vorm van de crossfader-kromme van een snelle
overgang om te scratchen naar een lange overgang om te mixen.
5. MIDI Out - Draai aan de MIDIOUT-knop om het MIDI-kanaal van 1 tot 8 te selecteren. Telkens een
MIDI-kanaal wordt gewijzigd wordt het kanaalnummer weergegeven op de LED niveaumeter.
1. Installeer de DJ software op de meegeleverde software CD. Volg de instructies om de installatie te
voltooien. Mogelijk moet u tijdens het installeren het serienummer van de software invoeren. U vindt
dit serienummer terug op het papieren hoesje van de software CD.
2. Sluit de CDJ-101 aan op een USB-aansluiting op uw computer. Het stuurprogramma wordt
automatisch geïnstalleerd. Er is geen stuurprogramma vereist.
U kunt de CDJ-101 alleen gebruiken of tegelijk met andere controllers uit de 101-serie (VTT-101,
DJM-101 en MIX-101). Hieronder ziet u een voorbeeldaansluiting:
Deck A
MIDI CH1
DJM-101:
Deck A&B
MIDI CH1
CDJ-101:
Deck B
MIDI CH2
MIX-101:
Deck A&B
MIDI CH1
Computer
USB-hub (met voiding)
ENGLISH
DEUTSCH
FRANÇAIS
ESPAÑOL
DUTCH
ITALIANO
1 2 3 4 5
VTT-101:
12

Opmerking: Voor een
aansluiting via een USB-hub verdient het aanbeveling een hub te gebruiken
met voeding om een stabiele set-up te garanderen.
3. Open de DJ software. Ga naar de SETUP pagina en activeer de INPUT en OUTPUT van de
aangesloten controller(s). Zie hieronder:
4. Met de MIDI-kanaalinstelling van de controller kunt u verschillende decks in de DJ software
besturen. In de tabel hieronder vindt u de MIDI-kanalen terug in de Deckadance Software:
CDJ-101 VTT-101 DJM-101 MIX-101
MIDI CH1 Deck A Deck A Deck A & B Deck A & B
MIDI CH2 Deck B Deck B n.b. n.b.
MIDI CH3 to CH8 n.b. n.b. n.b. n.b.
* n.b. = niet beschikbaar
5. USB MIDI-controllers van de 101-serie ondersteunen ook andere DJ software zoals Traktor Pro.
Raadpleeg de DJ Tech website (http://www.djtechpro.com/ ) voor een software overzicht en meer
info.
DJM-101:
ENGLISH
DEUTSCH
FRANÇAIS
ESPAÑOL
DUTCH
WERKING
1
2
8
7
9
3 4 5
6
1. GAIN KNOP
2. 3-BAND EQ KNOP
3. MASTER VOLUME KNOP
4. VOORBELUISTEREN BRON KNOP - aanpassen van de verhouding master bron en bron
voorbeluisteren voor het voorbeluisterkanaal
5. VOORBELUISTERNIVEAU KNOP
6. PFL KNOP
7. LED NIVEAUMETER - gebruik de schakelaar om te schakelen tussen masterkanaal of
PFL-kanaal op de LED niveaumeter
8. KANAAL VOLUME FADER
9. CROSSFADER.
ITALIANO
1

CAUTION
RISK OF ELECTRIC SHOCK
DO NOT OPEN
ATENCIÓN
Para reducir el riesgo de incendio o de descarga eléctrica, no exponga este aparato a la lluvia o la
humedad. No coloque objetos llenos de líquido, como jarrones, cerca del aparato.
ATENCIÓN: Para reducir el riesgo de descarga eléctrica, no
desmonte el aparato. En su interior no hay ninguna pieza
que pueda ser reparada por el usuario. Para las operaciones
de mantenimiento, póngase en contacto con personal
técnico cualificado.
El símbolo del rayo terminado en forma de flecha dentro de un triángulo equilátero
advierte al usuario de la presencia de voltaje peligroso no aislado en el interior del aparato
de magnitud suficiente para constituir un riesgo de descarga eléctrica para las personas.
El signo de exclamación dentro de un triángulo equilátero es una señal de aviso que
alerta al usuario de la existencia de instrucciones importantes de funcionamiento y
mantenimiento en la documentación que acompaña al producto.
ATENCIÓN
Para evitar el riesgo de descarga eléctrica, introduzca completamente las clavijas del enchufe en la
toma de corriente.
INSTRUCCIONES DE SEGURIDAD
1
ENGLISH
DEUTSCH
FRANÇAIS
ESPAÑOL
DUTCH
ITALIANO
1. Lea estas instrucciones.
2. Conserve estas instrucciones.
3. Respete todas las advertencias.
4. Siga todas las instrucciones.
5. No use este aparato cerca de fuentes de agua.
6. Límpielo únicamente con un paño seco.
7. No bloquee los orificios de ventilación. Instale el aparato siguiendo las instrucciones del
fabricante.
8. No lo instale cerca de fuentes de calor, como radiadores, calefactores, estufas u otros aparatos
(incluidos los amplificadores) que emitan calor.
9. No retire el dispositivo de seguridad del enchufe polarizado o con puesta a tierra. Los enchufes
polarizados disponen de dos clavijas de diferente tamaño. Un enchufe con puesta a tierra
dispone de tres clavijas, de las cuales una es de puesta a tierra. La clavija más ancha (en el caso
de los enchufes polarizados) o la clavija de puesta a tierra (en el caso de los enchufes de puesta
a tierra) garantizan su seguridad. Si el enchufe suministrado no es compatible con su toma de
corriente, acuda a un electricista para que remplace dicha toma.
10. Coloque el cable de alimentación de forma que no pueda ser pisado ni dañado de otro modo.
Preste especial atención al enchufe y al punto de conexión del cable al aparato.
11. Utilice únicamente los accesorios especificados por el fabricante.
12. No coloque este aparato sobre una superficie inestable; podría provocar heridas
corporales o estropear el aparato. Si usa un carro para transportar el aparato,
tenga cuidado al desplazarlo para evitar que se caiga y se produzcan daños
13. Desenchufe el aparato durante las tormentas o si no va a utilizarlo durante un periodo de tiempo
prolongado.
14. Para las operaciones de mantenimiento, póngase en contacto con personal técnico cualificado.
El aparato ha de repararse siempre que haya sufrido daños: deterioro del cable de alimentación o
del enchufe, caída de líquido u objetos sobre el aparato, exposici
ó
n a la lluvia o la humedad,
funcionamiento defectuoso o caída del propio aparato.
15. El acceso al enchufe debe permanecer despejado durante el uso del aparato.
16. Por favor, mantenga la unidad en un ambiente de buena ventilación.

Deck A
Canal MIDI 1
DJM-101:
Deck A&B
Canal MIDI 1
CDJ-101:
Deck B
Canal MIDI 2
MIX-101:
CARACTERISTICAS
FUNCIONAMIENTO
ENGLISH
DEUTSCH
FRANÇAIS
ESPAÑOL
DUTCH
ITALIANO
Deck A&B
Canal MIDI 1
Ordenador
Concentrador USB con
alimentación propia
- Alimentado por la puerta USB
- 17 mensajes Midi
- 8 Canales Midi seleccionables
- 3 x 45mm Channel Faders y Crossfader
- Ajuste de la curva del Crossfade
- 2 x Botones iluminados PFL con indicacion LED
- 11 x Controles giratorios
- 2 x Columnas con 10 Led para Vu Meter
- 1 x switch para selecionar entre Master/PFL
- DJ Software para Mac/Pc incluido: DECKADANCE LE
1. TOMA DE ALIMENTACIÓN - Para conectar el adaptador
de alimentación. Si el puerto USB no puede suministrar a
la unidad la energía suficiente, utilice el adaptador de red.
Utilice únicamente un adaptador CC de 6V.
2. CONMUTADOR DE ALIMENTACIÓN (Adaptor / OFF/ USB
power) - Coloque el conmutador en la posición
«ADAPTOR» cuando utilice el adaptador de corriente (no incluido) y en la posición «USB POWER»
cuando utilice el ordenador como fuente de alimentación a través del puerto USB.
3. PUERTO USB - Para conectar un ordenador. Es conveniente utilizar el cable USB suministrado. El
uso de otros cables USB puede provocar un fallo en el funcionamiento del aparato.
4. Rueda C.F. CURVE - Permite ajustar la forma de la curva del crossfader: corte rápido para el efecto
scratch y atenuación prolongada para la fase de mezcla.
5. Salida MIDI - Gire la rueda MIDIOUT para seleccionar uno de los 8 canales MIDI. Cada vez que
cambie de canal MIDI, el piloto LED del medidor de nivel mostrará el número del canal.
1. Instale el software para DJ que se encuentra en el CD del software suministrado. Siga las
instrucciones de instalación del fabricante. Durante la instalación es posible que tenga que
introducir el número de serie del software. El número de serie se encuentra en la funda de papel del
CD.
2. Conecte el DJM-101 al puerto USB del ordenador. Los drivers se instalarán automáticamente. No
necesita ningún driver.
Puede utilizar el DJM-101 solo o junto con otros controladores de la serie 101 (incluyendo VTT-101,
CDJ-101 y MIX-101). Puede encontrar un ejemplo de las conexiones a continuación:
1
1 2 3 4 5
CONEXIÓN
VTT-101:

Nota: Si está utilizando un concentrador USB, le recomendamos que utilice un concentrador USB
con alimentación propia para asegurar la correcta configuración.
3. Abra el software. Vaya a la página de configuración y active la entrada y la salida de (los)
controlador(es) conectado(s). Como en la imagen:
4. La configuración del canal MIDI del controlador le permite controlar los diferentes decks mediante
el software DJ. Consulte la siguiente tabla para conocer mejor los canales MIDI del software
Deckadance:
CDJ-101 VTT-101 DJM-101 MIX-101
MIDI CH1 Deck A Deck A Deck A & B Deck A & B
MIDI CH2 Deck B Deck B N/D N/D
MIDI CH3 to CH8 N/D N/D N/D N/D
* N/A = No Disponible
5. Los controladores MIDI USB de la serie 101 son compatibles con otros software DJ como el
Traktor Pro. Por favor visite la página web de DJ Tech (http://www.djtechpro.com/
ENGLISH
DEUTSCH
FRANÇAIS
ESPAÑOL
DUTCH
ITALIANO
1. Botón giratorio paraDjustar el gain
2. Botón giratorio de ajuste del ecualizador de 3 bandas
3. Botón giratorio MASTER LEVEL para ajustar el volumen master
4. Botón giratorio MONITOR SOURCE - Ajuste la proporción entre el volumen master y el de los
altavoces del monitor
5. Botón giratorio MONITOR LEVEL - para ajustar el volumen de los altavoces del monitor
6. Botón PFL
7. Medidor de nivel con pilotos LED - Utilice el conmutador situado bajo el medidor para seleccionar
el canal master o el canal PFL
8. Fader para ajustar el volumen del canal
9. CROSSFADER
) para
descargarse software mapping y para obtener más información.
DJM-101:
1
2
8
7
9
3 4 5
6
FUNCTIONS
16

1. Leggete le istruzioni.
2. Conservate le istruzioni.
3. Rispettate tutte le avvertenze.
4. Seguite tutte le istruzioni.
5. Non servitevi dell’apparecchio vicino all’acqua.
6. Per pulire l'apparecchio, utilizzate solo panni asciutti.
7. Non ostruite le aperture di ventilazione. Installate l’apparecchio seguendo le istruzioni del
fabbricante.
8. Non collocate il prodotto vicino a fonti di calore quali radiatori, stufe, bocchette per l’uscita di aria
calda o vicino ad ogni altro apparecchio che emette calore (compresi gli amplificatori.
9. Non neutralizzate la funzione di sicurezza della spina polarizzata o con spinotto di protezione.
Una spina polarizzata ha due lame di cui una più ampia dell’altra. Una spina con un contatto di
protezione è dotata di due lame e di un terzo polo di messa a terra. La lama più larga o il terzo
polo sono forniti per la vostra sicurezza. Se la spina fornita in dotazione non entra nella presa di
corrente, rivolgetevi ad un elettricista per sostituire la vecchia presa.
10. Proteggete il cavo di alimentazione in modo tale che non sia calpestato o schiacciato, in
particolare in corrispondenza delle spine, delle prese e del punto in cui escono dall'apparecchio.
11. Utilizzate esclusivamente componenti/accessori specificati dal produttore.
12. Utilizzate l’apparecchio solo con carrelli, sostegni, treppiedi, staffe o tavoli specificati
dal costru
ttore o venduti insieme all'apparecchio. Se usate un carrello, fate
attenzione durante gli spostamenti per evitare infortuni causati da un eventuale
ribaltamento del carrello stesso.
13. Scollegate l’apparecchio durante i temporali o quando rimane inutilizzato per lunghi periodi di
tempo.
14. Per qualunque intervento di assistenza rivolgersi a personale qualificato. È necessario intervenire
sull’apparecchio ogniqualvolta risulti danneggiato in qualsiasi modo, ad esempio in caso di
danneggiamento di spina o cavo di alimentazione, versamento di liquido sull’apparecchio o
caduta di oggetti all'interno, esposizione dell'apparecchio a pioggia o umidità, funzionamento
irregolare o caduta.
15. La presa principale è usata come sistema di disconnessione dalla corrente. È dunque necessario
che resti facilmente accessibile.
16. Si prega di tenere l'unità in un buon ambiente di ventilazione.
AVVERTENZA
Per ridurre il rischio d'incendio o di scossa elettrica, non esponete l'apparecchio alla pioggia o
all'umidità. Non esponete l’apparecchio all'acqua (schizzi, gocciolamento) e non collocate oggetti
contenenti liquidi (ad esempio un vaso) in prossimità dell'apparecchio.
ATTENZIONE: Per evitare il rischio di scossa elettrica, non
aprite l’alloggiamento. All'interno non vi sono parti utilizzabili
dall'utente. Per ogni intervento rivolgersi esclusivamente a
personale qualificato.
Il simbolo del fulmine con punta di freccia all'interno di un triangolo equilatero segnala la
presenza di un “pericoloso voltaggio” non isolato entro il perimetro del prodotto di
grandezza sufficiente a comportare il rischio di folgorazione.
Il punto e
sclamativo all’interno del triangolo equilatero segnala all'utilizzatore la presenza
di importanti istruzioni operative e di manutenzione nella guida che accompagna
l’apparecchio.
ATTENZIONE
Per evitare scosse elettriche, non utilizzate la presa polarizzata con una prolunga, un connettore o altra
presa se non quando gli spinotti possono essere inseriti interamente (per evitare che rimangano scoperti).
ENGLISH
DEUTSCH
FRANÇAIS
ESPAÑOL
DUTCH
IMPORTANTI AVVERTENZE DI SICUREZZA
CAUTION
RISK OF ELECTRIC SHOCK
DO NOT OPEN
ITALIANO
17

CARATTERISTICHE
CONNESSIONI
- Alimentato dalla porta USB
- 17 messaggi Midi
- 8 Canali MIDI selezionabili
- 3 x 45mm Channel Faders e Crossfader
- Curva del Crossfader regolabile
- 2 x Pulsanti illuminati PFL con indicazione a LED
- 11 x Controlli rotativi
- 2 x Colonne con 10-LED per Vu-meter
- 1 x switch per selezionare tra Master/ PFL
- DJ Software per MAC/PC incluso: DECKADANCE LE
1. Ingresso alimentazione - Collegate a
questa presa l’adattatore di corrente. È
possibile utilizzare l’adattatore DC quando
la porta USB non è in grado di fornire
potenza sufficiente all’apparecchio.
Utilizzate esclusivamente un adattatore 6V
DC.
2. Selettore di alimentazione (alimentazione di
rete / spento / alimentazione via USB) - Spostate il selettore in funzione della sorgente di
alimentazione utilizzata: elettrica (ADAPTOR), quando utilizzate un cavo esterno DC (non fornito in
dotazione); oppure USB POWER, tramite il computer.
3. Porta USB - Collegate l’apparecchio ad un computer tramite la porta USB. Si raccomanda di
utilizzare il cavo USB fornito in dotazione. Cavi USB più lunghi o di qualità inferiore possono
causare malfunzionamenti.
4. Manopola C.F. CURVE - La manopola di controllo del crossfader consente di regolare la portata
della curva del crossfader: cut rapido per l'effetto scratch oppure lunga attenuazione per il mixaggio.
5. Uscita MIDI - Ruotate la manopola MIDI OUT per selezionare uno degli 8 canali MIDI. Il numero
corrispondente ad ogni nuovo canale MIDI selezionato è segnalato tramite le spie LED che indicano
il livello dell’audio.
ENGLISH
DEUTSCH
FRANÇAIS
ESPAÑOL
DUTCH
ITALIANO
1 2 3 4 5
18

1. Installate il software per DJ contenuto nel CD fornito in dotazione. Seguite le istruzioni per portare a
termine l'installazione del software. Durante l'installazione è possibile che sia necessario inserire il
numero di serie del software. Il numero di serie è riportato sulla custodia cartacea del CD.
Potrebbe essere necessario digitare il numero di serie del software durante l’installazione. Il numero
di serie è riportato sulla custodia cartacea del CD con il software.
2. Collegate DJM-101 al computer tramite la porta USB. Il driver si installa automaticamente. Non è
necessario installare nessun driver ulteriore.
È possibile utilizzare DJM-101 da solo oppure in combinazione con altri controller della serie 101:
VTT-101, CDJ-101 e MIX-101. Riportiamo qui di seguito un esempio di connessione possibile:
Note: Se
utilizzate un concentratore USB, si raccomanda di utilizzare un concentratore USB che
dispone di un'alimentazione autonoma per poter garantire la stabilità della configurazione.
3. Avviate il software. Accedete alla pagina di configurazione e attivate l’ingresso e l’uscita per il (i)
controller collegato(i) (cfr. illustrazione).
4. La configurazione MIDI del controller consente di gestire i diversi deck attraverso il software DJ.
Fate riferimento alla tabella sotto riportata per ulteriori informazioni sui canali MIDI all'interno del
software Deckadance:
CDJ-101 VTT-101 DJM-101 MIX-101
Canale MIDI 1 Deck A Deck A Deck A & B Deck A & B
Canale MIDI 2 Deck B Deck B Non disponibile Non disponibile
Canali MIDI 3 a 8 Non disponibile Non disponibile Non disponibile Non disponibile
5. I controller MIDI USB della serie 101 supportano anche altri software per DJ, come Traktor Pro.
Visitate il sito di DJ Tech (http://www.djtechpro.com/) per scaricare il software di mapping o per
ulteriori informazioni.
VTT-101:
FUNZIONAMENTO
ENGLISH
DEUTSCH
FRANÇAIS
ESPAÑOL
DUTCH
Deck A
Canale MIDI 1
DJM-101:
Deck A&B
Canale MIDI 1
CDJ-101:
Deck B
Canale MIDI 2
MIX-101:
Deck A&B
Canale MIDI 1
Computer
Concentratore USB
con alimentazion
ITALIANO
19

DJM101:
1. Manopola di regolazione del guadagno
2. Manopole per l’impostazione dell’equalizzatore 3 bande
3. Manopola MASTER LEVEL per la regolazione del volume
4. Manopola MONITOR SOURCE - Regola la proporzione tra il volume master e quello degli
altoparlanti del monitor
5. Manopola MONITOR LEVEL - per la regolazione del volume degli altoparlanti del monitor
6. Tasti PFL
7. Banda luminosa a LED - Utilizzate il commutatore posto sotto la banda luminosa per selezionare il
canale master o il canale PFL
8. Cursore di regolazione del volume
9. CROSSFADER
1
2
8
7
9
3 4 5
6
ENGLISH
DEUTSCH
FRANÇAIS
ESPAÑOL
DUTCH
ITALIANO
FUNCTIONS
20

SPECIFICATIONS
CARACTERISTIQUES TECHNIQUES
TECHNISCHE EIGENSCHAFTEN
SPECIFICATIES
CARACTERÍSTICAS TÉCNICAS
SPECIFICHE TECNICHE
:
POWER SUPPLY: DC 6V, 1.5A
DIMENSION: 210 x 140 x 73.5mm
WEIGHT: 631g
ALIMENTATION: DC 6V, 1.5A
DIMENSIONS 210 x 140 x 73.5mm
POIDS: 631g
NETZTEIL-EINGANGSPANNUNG: DC 6V, 1.5A
ABMESSUNGEN: 210 x 140 x 73.5mm
GEWICHT: 631g
STROOMBRON: DC 6V, 1.5A
AFMETINGEN: 210 x 140 x 73.5mm
GEWICHT: 631g
ALIMENTACIÓN: DC 6V, 1.5A
DIMENSIONES: 210 x 140 x 73.5mm
PESO: 631g
ALIMENTAZIONE: DC 6V, 1.5A
DIMENSIONES: 210 x 140 x 73.5mm
PESO: 631g

SW NAME ID ON OFF
KEY1 A-PLF 01 09 90-97
21 7F 09 90-97
21 00
KEY2 B-PLF 02 09 90-97
22 7F 09 90-97
22 00
SEL1 A to B 03 09 90-97
23 7F
B to A 04 09 90-97
24 7F
ADC1 CROSSFADE
VR131 30 0B B0-B7
40 00-7F
ADC2 A-FADER VR132 31 0B B0-B7
41 00-7F
ADC3 B-FADER VR133 32 0B B0-B7
42 00-7F
ADC4
MASTER
LEVEL
VR134 33 0B B0-B7
43 00-7F
ADC5
MON
SOURCE
VR135 34 0B B0-B7
44 00-7F
ADC6 MON LEVEL VR136 35 0B B0-B7
45 00-7F
ADC7 MIDIOUT VR102 37 09 90-97
25
00-07
(CH)
ADC8 A-GAIN VR137 38 0B B0-B7
48 00-7F
B-LOW VR144 39 0B B0-B7
49 00-7F
ADC9
B-LOW
MID POINT
VR144 39 09 90-97
75 7F 09 90-97
75 00
A-HIGH VR138 3A 0B B0-B7
4A 00-7F
ADC10
A-HIGH
MID POINT
VR138 3A 09 90-97
70 7F 09 90-97
70 00
B-MID VR143 3B 0B B0-B7
4B 00-7F
ADC11
B-MID
MID POINT
VR143 3B 09 90-97
74 7F 09 90-97
74 00

SW NAME ID ON OFF
A-LOW VR140 3C 0B B0-B7
4C 00-7F
ADC12
A-LOW
MID POINT
VR140 3C 09 90-97
72 7F 09 90-97
72 00
B-HIGH VR142 3D 0B B0-B7
4D 00-7F
ADC13
B-HIGH
MID POINT
VR142 3D 09 90-97
73 7F 09 90-97
73 00
A-MID VR139 3E 0B B0-B7
4E 00-7F
ADC14
A-MID
MID POINT
VR139 3E 09 90-97
71 7F 09 90-97
71 00
ADC15 B-GAIN VR141 3F 0B B0-B7
4F 00-7F

MIDI OUT
SW NAME ID ON OFF
SWITCH IN MASTER POSITION
LED1 D132 10 0B B0-B7
50 7F 0B B0-B7
50 <7F
LED2 D133 11 0B B0-B7
50 >=70 0B B0-B7
50 <70
LED3 D134 12 0B B0-B7
50 >=60 0B B0-B7
50 <60
LED4 D135 13 0B B0-B7
50 >=50 0B B0-B7
50 <50
LED5 D136 14 0B B0-B7
50 >=4A 0B B0-B7
50 <4A
LED6 D137 15 0B B0-B7
50 >=40 0B B0-B7
50 <40
LED7 D138 16 0B B0-B7
50 >=30 0B B0-B7
50 <30
LED8 D139 17 0B B0-B7
50 >=20 0B B0-B7
50 <20
LED9 D140 18 0B B0-B7
50 >=10 0B B0-B7
50 <10
LED10 D141 19 0B B0-B7
50 >00 0B B0-B7
50 00
LED11 D142 20 0B B0-B7
51 >=7F 0B B0-B7
51 <7F
LED12 D143 21 0B B0-B7
51 >=70 0B B0-B7
51 <70
LED13 D144 22 0B B0-B7
51 >=60 0B B0-B7
51 <60
LED14 D145 23 0B B0-B7
51 >=50 0B B0-B7
51 <50
LED15 D146 24 0B B0-B7
51 >=4A 0B B0-B7
51 <4A
LED16 D147 25 0B B0-B7
51 >=40 0B B0-B7
51 <40
LED17 D148 26 0B B0-B7
51 >=30 0B B0-B7
51 <30
LED18 D149 27 0B B0-B7
51 >=20 0B B0-B7
51 <20
LED19 D150 28 0B B0-B7
51 >=10 0B B0-B7
51 <10
LED20 D151 29 0B B0-B7
51 >00 0B B0-B7
51 00

MIDI OUT
SW NAME ID ON OFF
SWITCH IN PFL POSITION
LED1 D132 10 0B B0-B7
52 7F 0B B0-B7
52 <7F
LED2 D133 11 0B B0-B7
52 >=70 0B B0-B7
52 <70
LED3 D134 12 0B B0-B7
52 >=60 0B B0-B7
52 <60
LED4 D135 13 0B B0-B7
52 >=50 0B B0-B7
52 <50
LED5 D136 14 0B B0-B7
52 >=4A 0B B0-B7
52 <4A
LED6 D137 15 0B B0-B7
52 >=40 0B B0-B7
52 <40
LED7 D138 16 0B B0-B7
52 >=30 0B B0-B7
52 <30
LED8 D139 17 0B B0-B7
52 >=20 0B B0-B7
52 <20
LED9 D140 18 0B B0-B7
52 >=10 0B B0-B7
52 <10
LED10 D141 19 0B B0-B7
52 >00 0B B0-B7
52 00
LED11 D142 20 0B B0-B7
53 >=7F 0B B0-B7
53 <7F
LED12 D143 21 0B B0-B7
53 >=70 0B B0-B7
53 <70
LED13 D144 22 0B B0-B7
53 >=60 0B B0-B7
53 <60
LED14 D145 23 0B B0-B7
53 >=50 0B B0-B7
53 <50
LED15 D146 24 0B B0-B7
53 >=4A 0B B0-B7
53 <4A
LED16 D147 25 0B B0-B7
53 >=40 0B B0-B7
53 <40
LED17 D148 26 0B B0-B7
53 >=30 0B B0-B7
53 <30
LED18 D149 27 0B B0-B7
53 >=20 0B B0-B7
53 <20
LED19 D150 28 0B B0-B7
53 >=10 0B B0-B7
53 <10
LED20 D151 29 0B B0-B7
53 >00 0B B0-B7
53 00

 Loading...