

Page 1
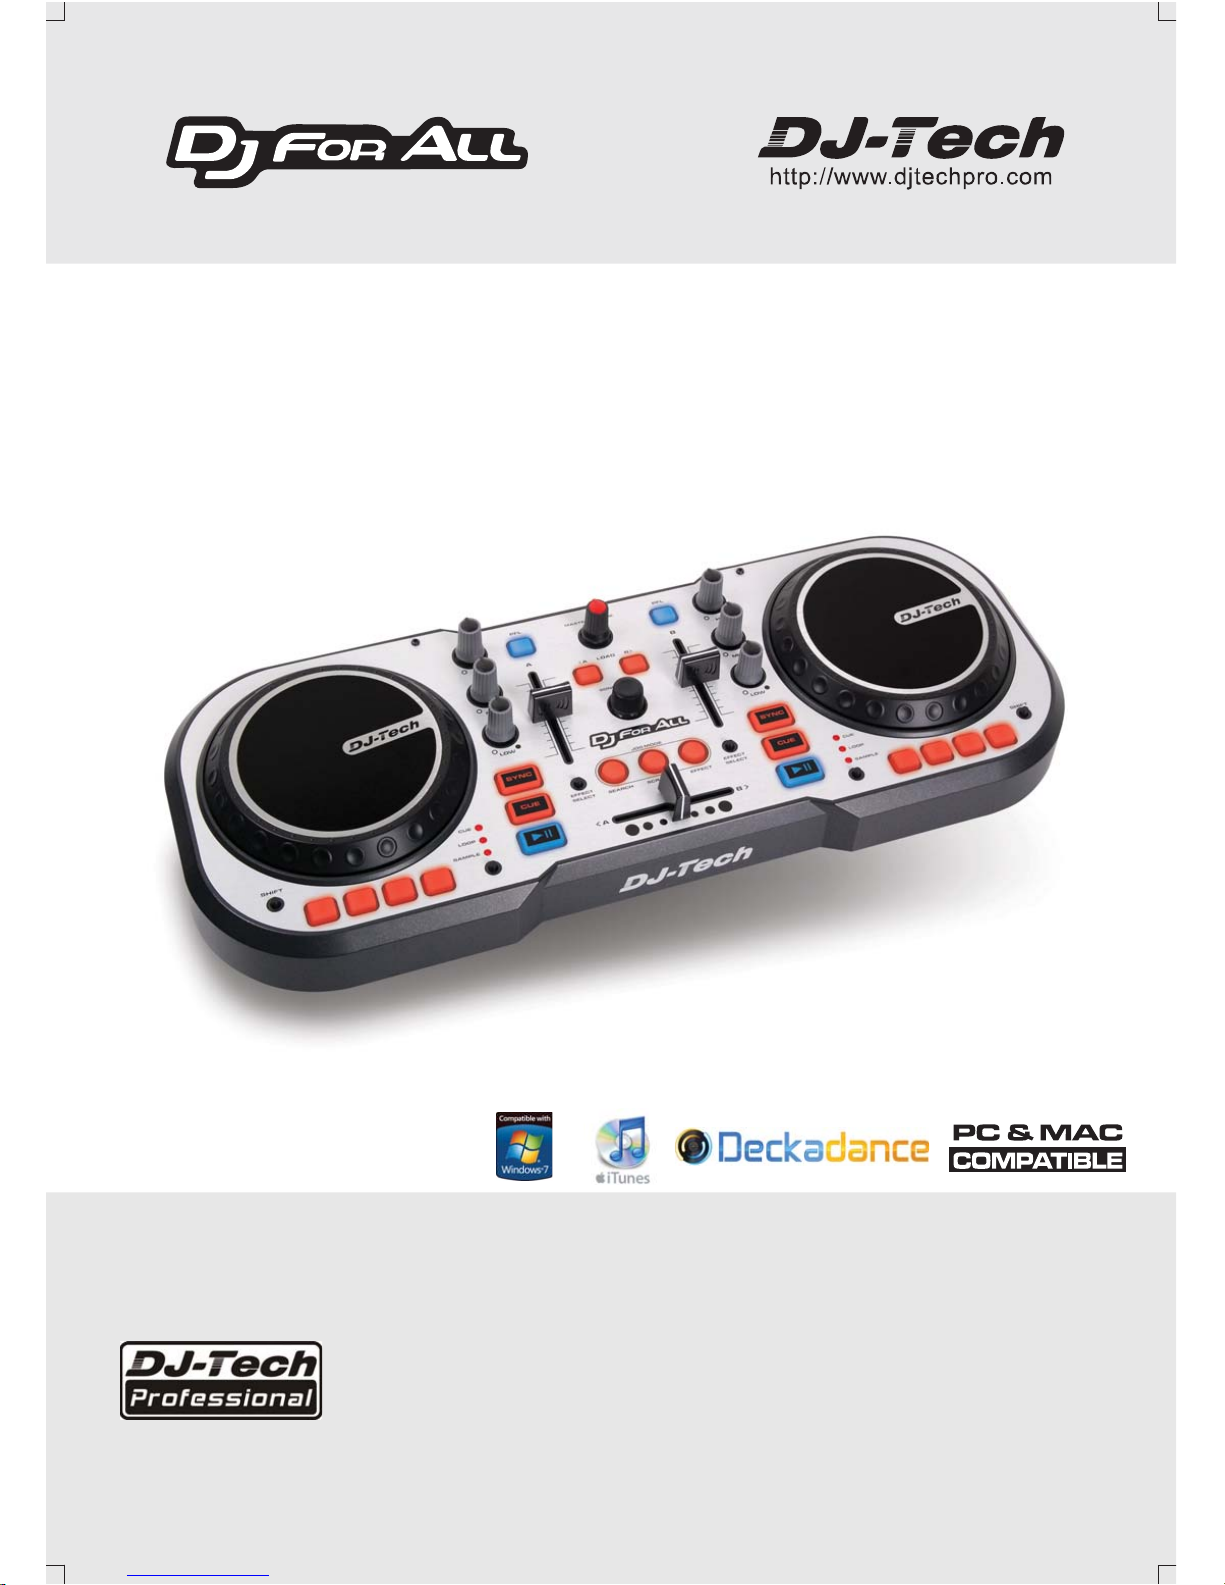
DJ Controller for the Mass
Windows is a registered trademark of Microsoft Corporation in the United States and other countries.
Mac and iTunes are trademarks of Apple Inc., registered in the U.S. and other countries.
USER MANUAL
MANUEL D’UTILISATION
BENUTZERHANDBUCH
GEBRUIKSAANWIJZING
MANUAL DE INSTRUCCIONES
MANUALE DI ISTRUZIONI
(English)
(Français)
(Deutsch)
(Nederlands)
(Español)
(Italiano)
01~05
06~10
11~15
16~20
21~25
26~30
Page 2
1
ENGLISH
DEUTSCH FRANÇAIS
ESPAÑOL
DUTCH
ITALIANO
1. Read these instructions.
2. Keep these instructions.
3. Heed all warnings.
4. Follow all instructions.
5. Do not use this apparatus near water.
6. Clean only with dry cloth.
7. Do not block any of the ventilation openings. Install in accordance with the manufacture’s instructions.
8. Do not install near any heat sources such as radiators, heat registers, stoves, or other apparatus
(including amplifiers) that produce heat.
9. Do not defeat the safety purpose of the polarized plug. The wide blade is provided for your safety. If the
provided plug does not fit into your outlet, consult an electrician for replacement of the obsolete outlet.
10. Protect the power cord from being walked on or pinched particularly at plug, convenience receptacles,
and point where they exit from the apparatus.
11. Only use attachments/accessories specified by the manufacturer.
12. Use only with a cart, stand, tripod, bracket, or table specified by the manufacturer, or sold with the
apparatus. When a cart is used, use caution when moving the cart/apparatus combination to avoid injury
from tip-over.
13. Unplug this apparatus during lighting storms or when unused for long periods of time.
14. Refer all servicing to qualified service personnel. Serving is required when the apparatus has been
damaged in any way, such as power-supply cord or plug is damaged, liquid has been spilled or objects
have fallen into the apparatus, the apparatus has been exposed to rain or moisture, does not operate
normally, or has been dropped.
15. The main plug is used as the disconnect device, the disconnect device shall be readily operable.
16. Please keep the unit in a good ventilation environment.
WARNING
To reduce the risk of the fire or electric shock, do not expose this apparatus to rain or moisture. The
apparatus shall not be exposed to dripping or splashing and that no objects filled with liquids, such as vases,
shall be placed on the apparatus.
The lightning flash with arrowhead symbol within the equilateral triangle is intended to alert the
use to the presence of un-insulated “dangerous voltage” within the product’s enclosure that may
be of sufficient magnitude to constitute a risk of electric shock.
The exclamation point within the equilateral triangle is intended to alert the user to the presence
of important operation and maintenance (servicing) instructions in the literature accompanying
this appliance.
CAUTION
To prevent electric shock, do not use this polarized plug with an extension cord, receptacle or other outlet
unless the blades can be fully inserted to prevent blade exposure.
SAFTY INSTRUCTIONS
CAUTION
RISK OF ELECTRIC SHOCK
DO NOT OPEN
CAUTION: To reduce the risk of electric shock, do not remove
any cover. No user-serviceable parts inside. Refer servicing to
qualified service personnel only.
Page 3
ENGLISH
DEUTSCH
FRANÇAIS
ESPAÑOL
DUTCH
ITALIANO
- Thank you very much for purchasing DJ For ALL! -
Welcome to DJ For All - A fun and easy way to DJ on your computer for MAC OR PC.
Simply install Deckadance DJ Software on the included CD, plug in DJ For All to your computer and you can get
started mixing, scratching like a real DJ.
DJ For All works with all of your MP3s and other music in your computer (including WAV, OGG, iTunes Playlist),
it is easy to use and it is the perfect way to learn how to DJ.
DJ For All has 2 Giant Jog Wheels that you can pitch, scratch, search and control the incredible effects in real
time!
With, the 4 multi-purpose buttons, it provide hands-on controls to toggle the autoloops, trigger the samples
and play the hot cues. With the carefully chosen rubber silicon material, you can enjoy the durable and
responsive feeling.
The DJ For All package includes an Amplink USB Audio Cable and a pair of DJH-100 DJ Headphones. You
can enjoy a full monitoring function without extra equipment.
This document is organized in below
sections:
A – Minimum System Requirements
B – Connecting DJ For All
C – START using DJ For All
D – Rear and Top Panels Features
E – Specification
PC:
MAC:
‧
Windows XP (SP2)/ Windows Vista/ Windows 7
‧
Intel Pentium III 1GHz or Athlon XP 1.4GHz
‧
CD-ROM Drive
‧
512MB RAM, 200MB Free Space
‧
DirectSound or ASIO compatible Soucdcard
‧
USB ports x 2
‧
OSX V10.4 (Universal Binary)/ 10.5/ 10.6
‧
G4 1.5GHz or Intel Core Duo Family
‧
CD-ROM Drive
‧
512MB RAM, 200MB Free Space
‧
Soundcard with CoreAudio drivers
‧
USB ports x 2
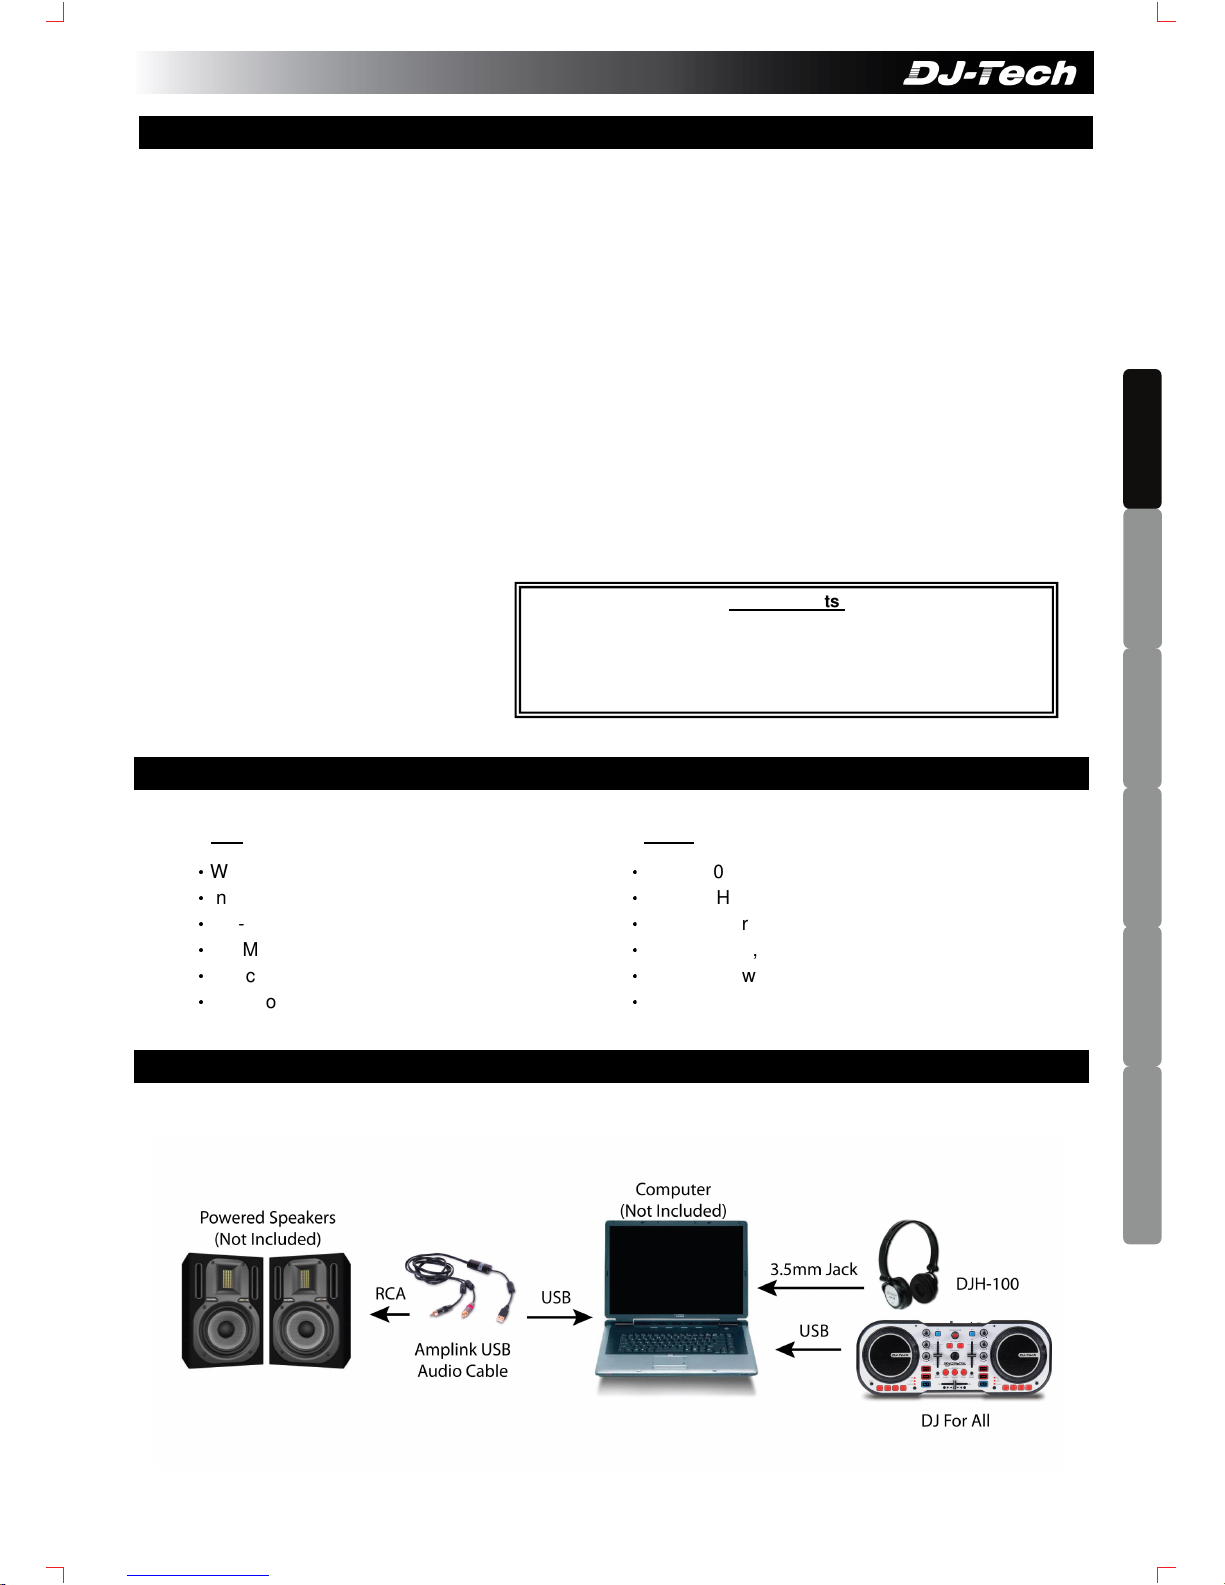
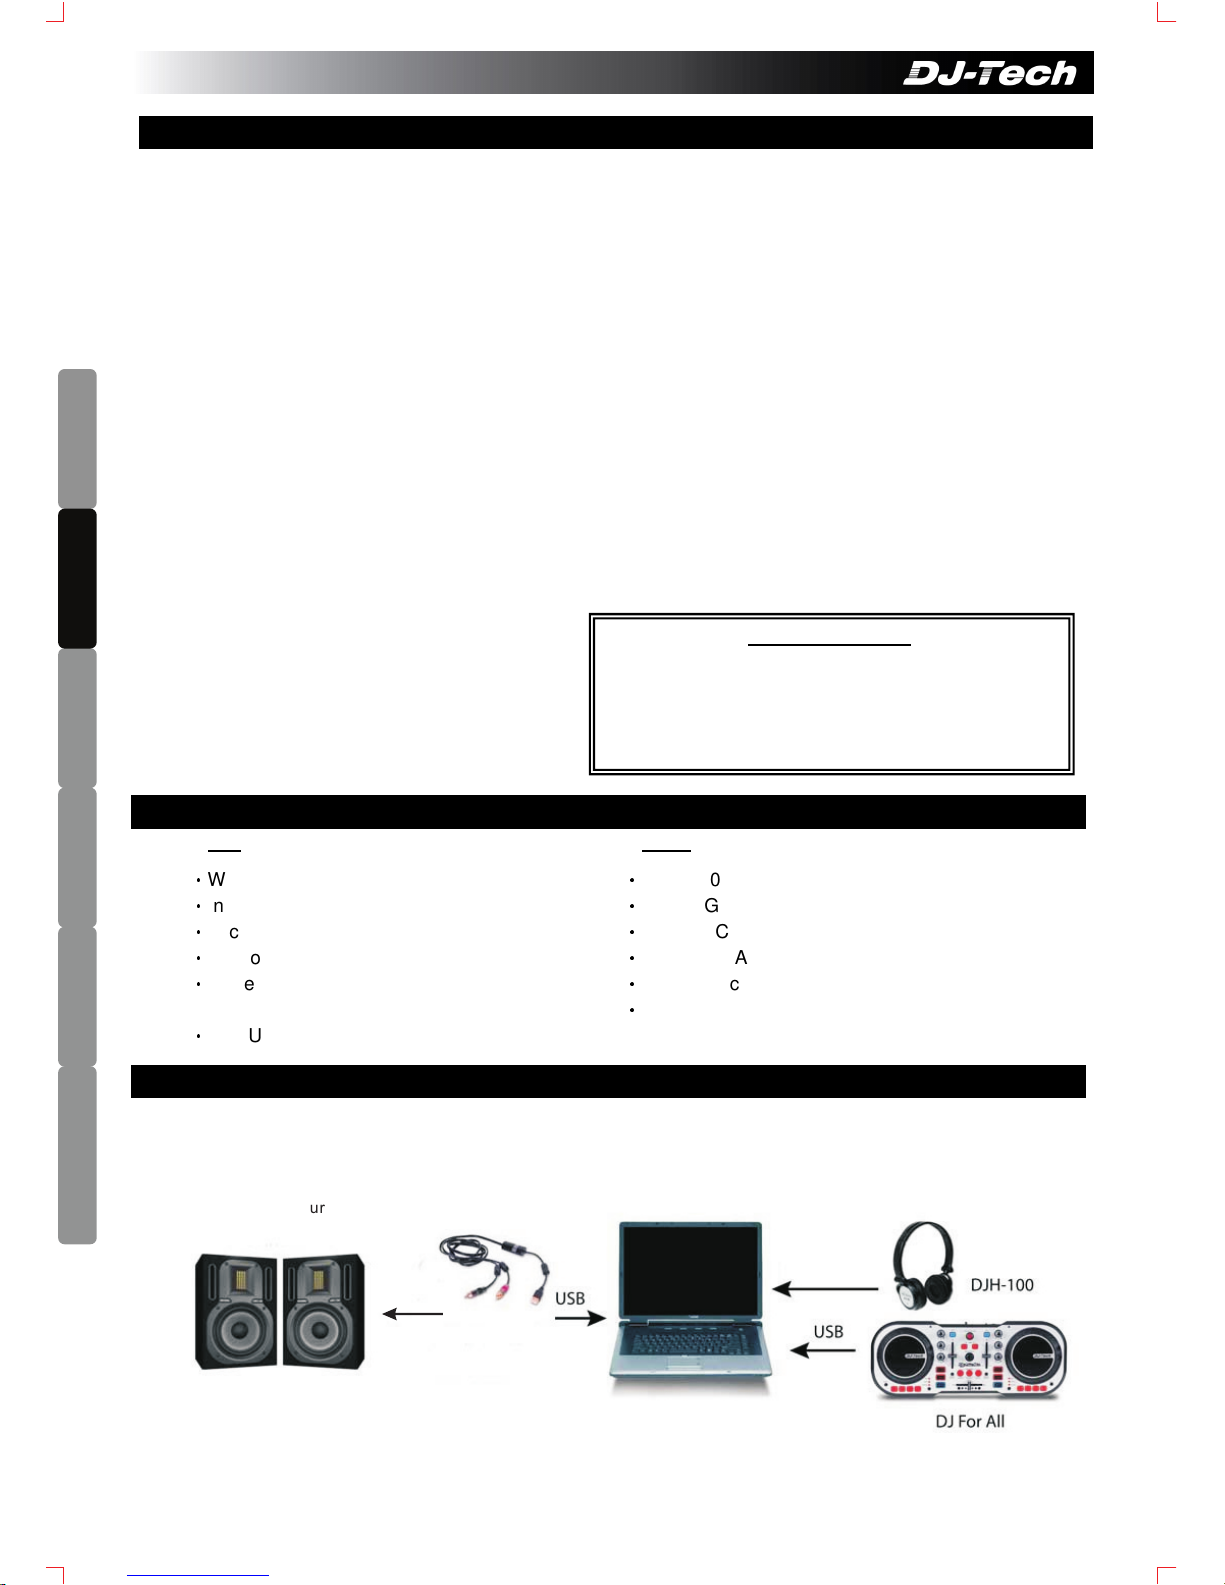
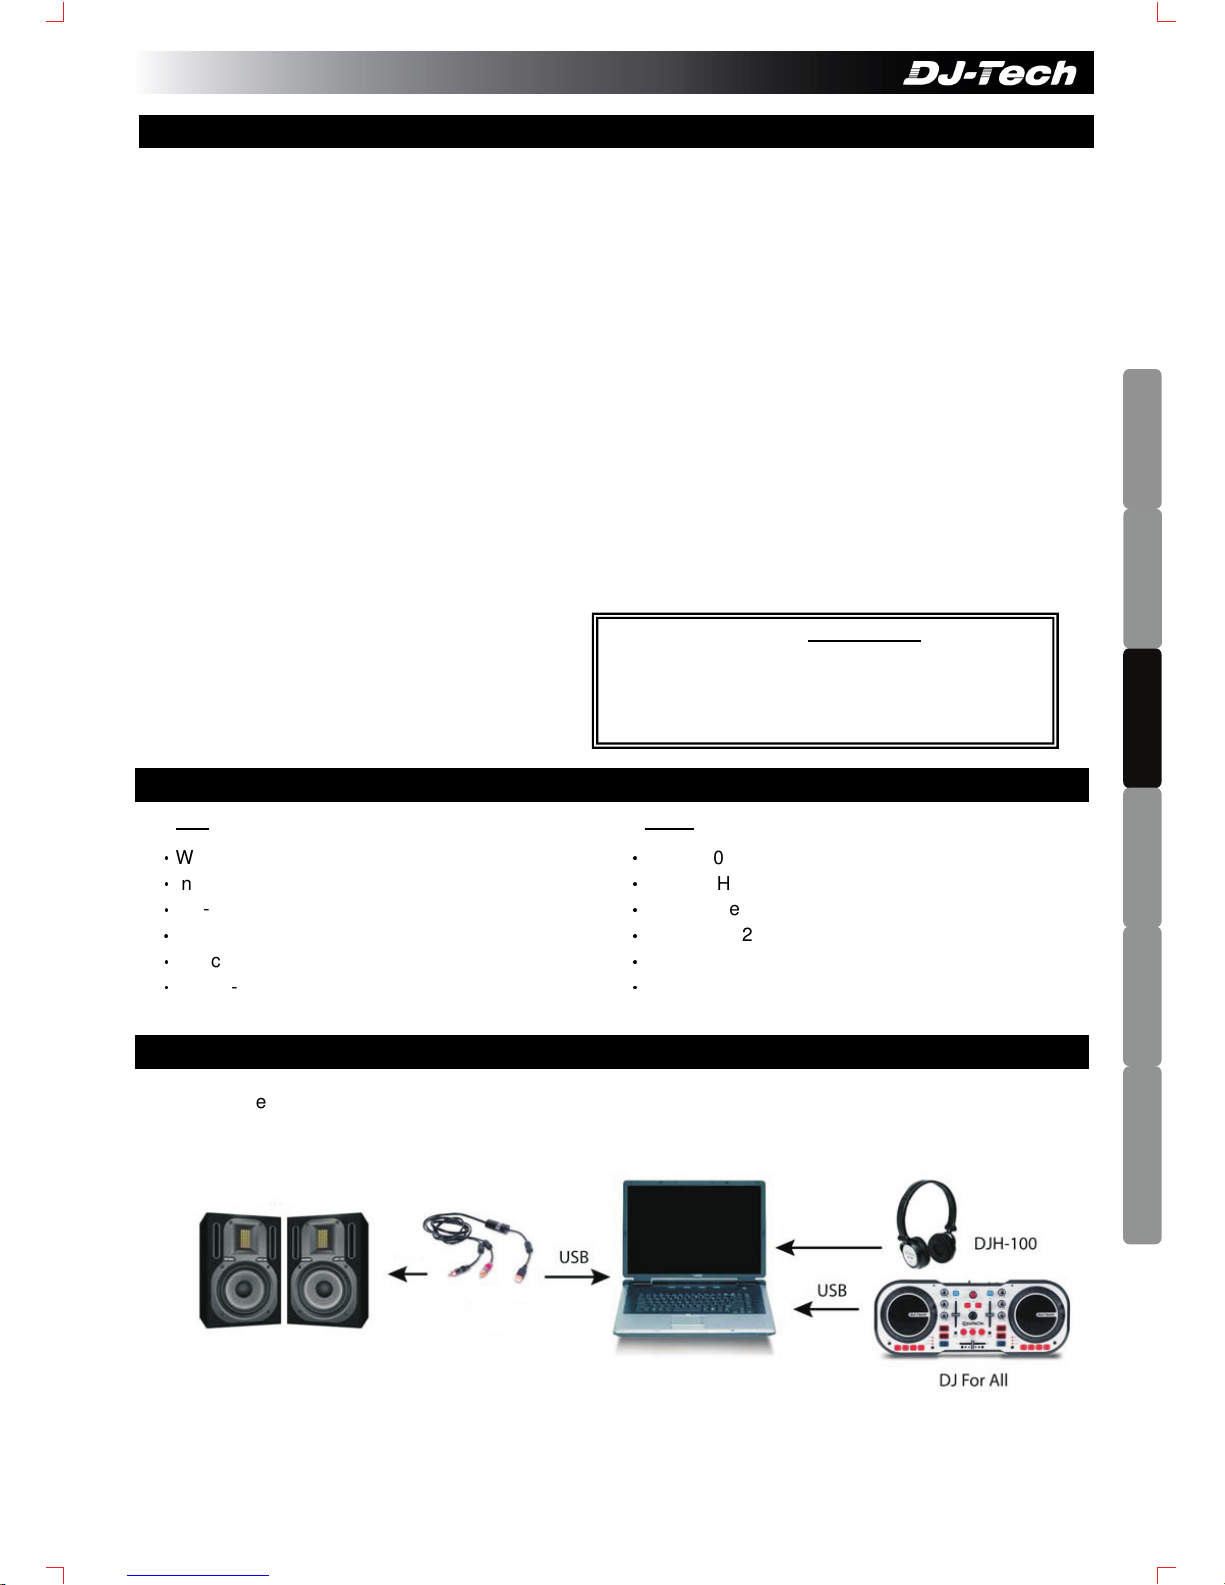
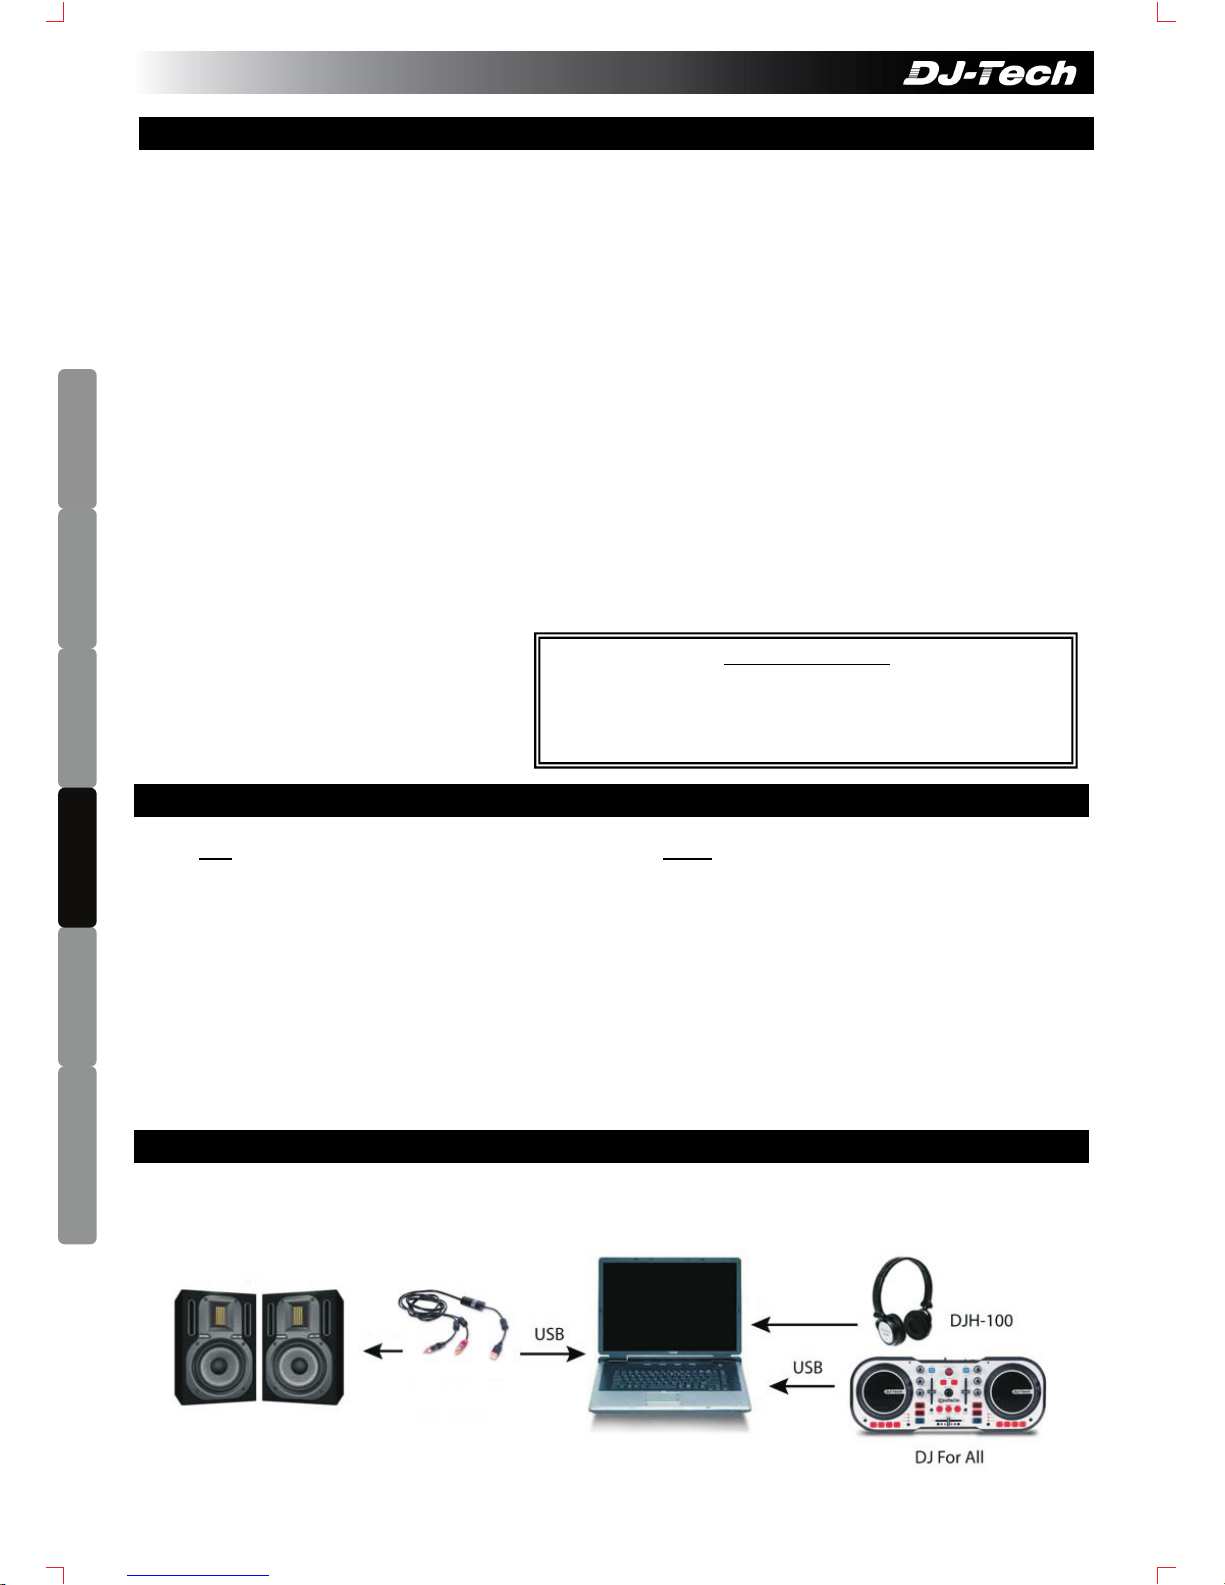
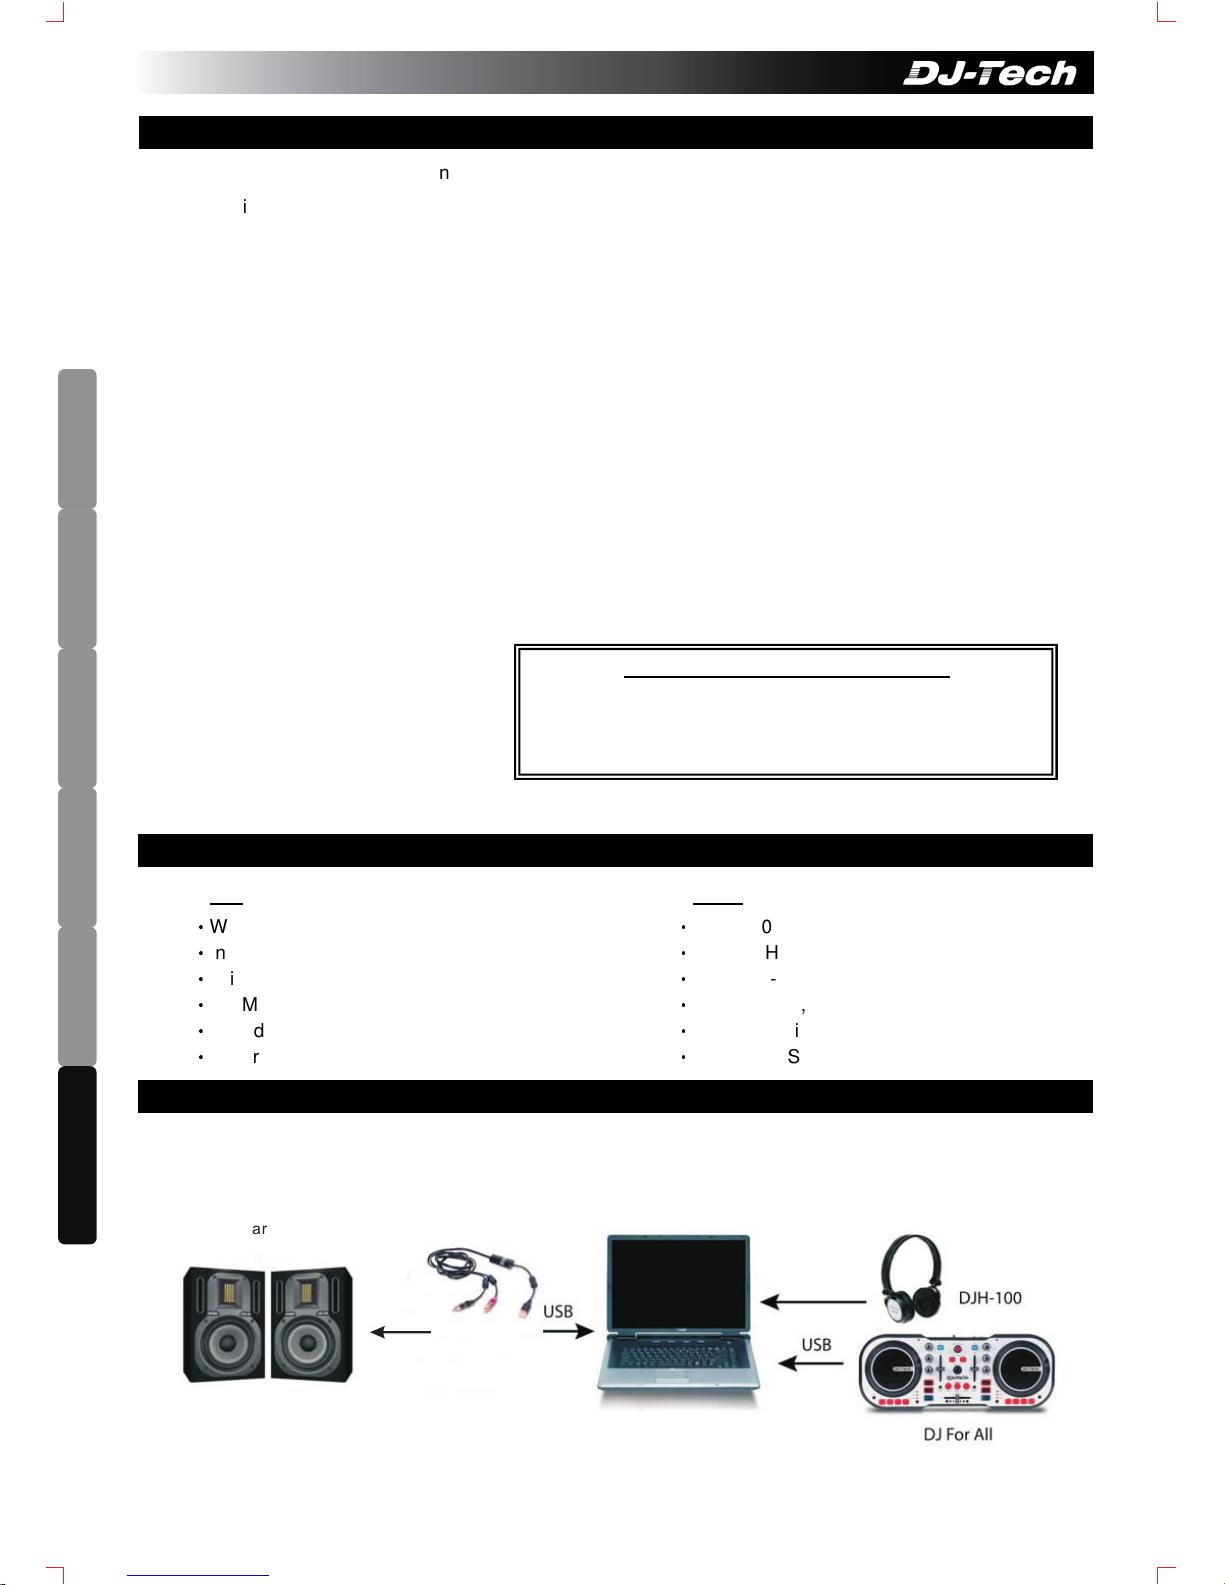
1. Connect the DJ For All, Amplink USB Audio Cable and DJH-100 Headphones as below:
Box Contents:
► DJ For All x 1pc
► USB Cable x 1pc
► DJH-100 DJ Headphones x 1
► Amplink USB Audio Cable x 1
► Deckadance LE Setup CD x 1pc
► User Manual x 1pc
INTRODUCTION
A. Minimum System Requirements
B. Connecting DJ For All
2
Page 4
ENGLISH
DEUTSCH FRANÇAIS
ESPAÑOL
DUTCH
ITALIANO
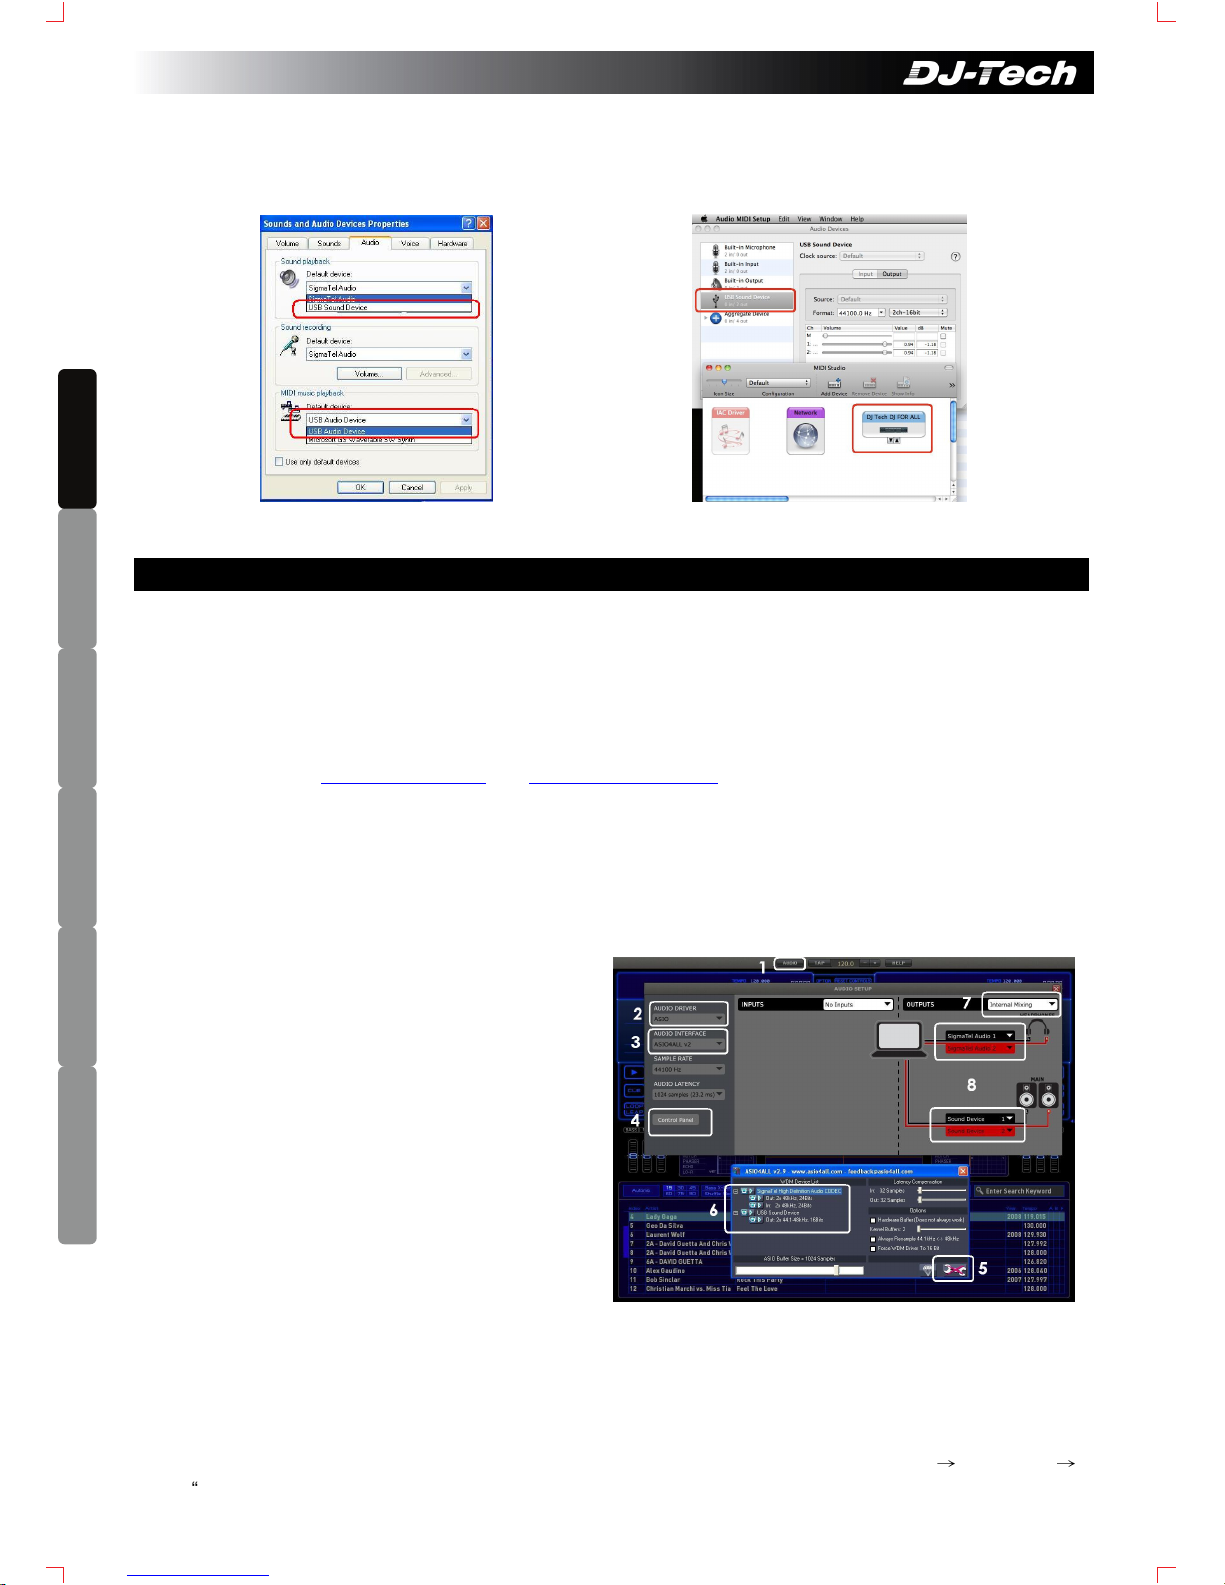
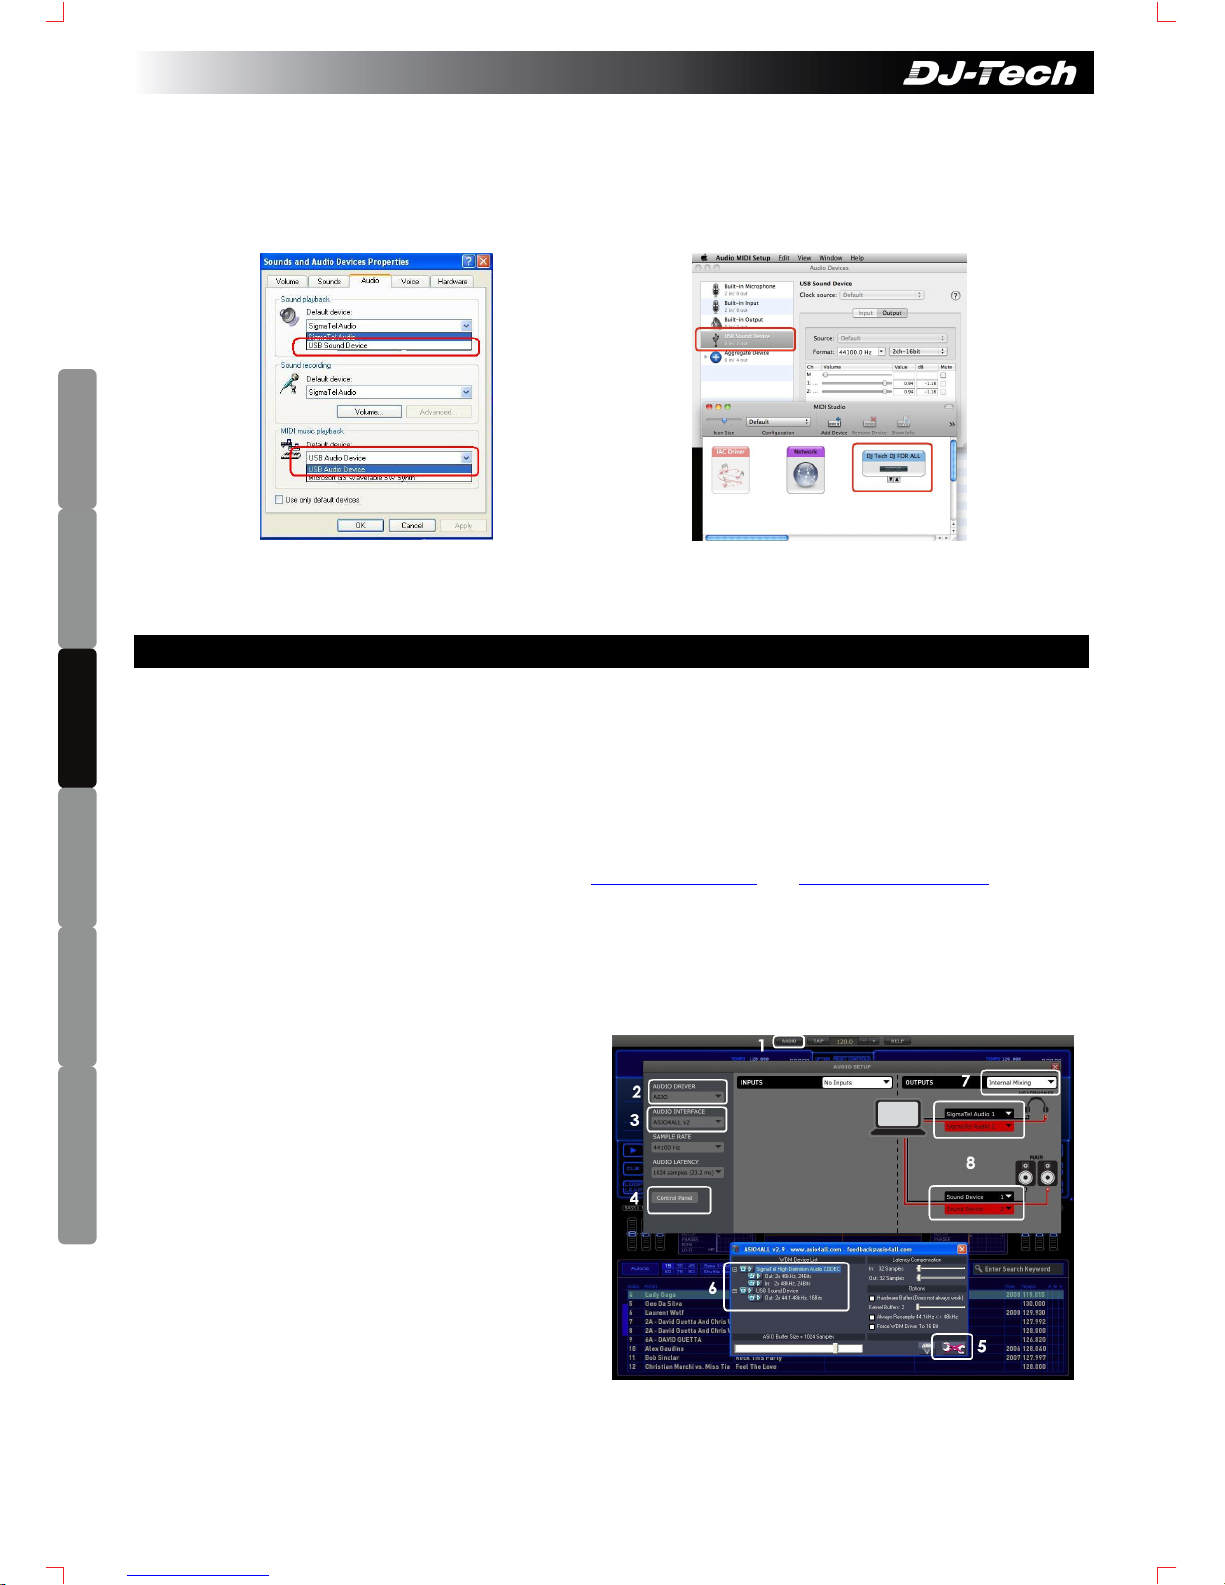
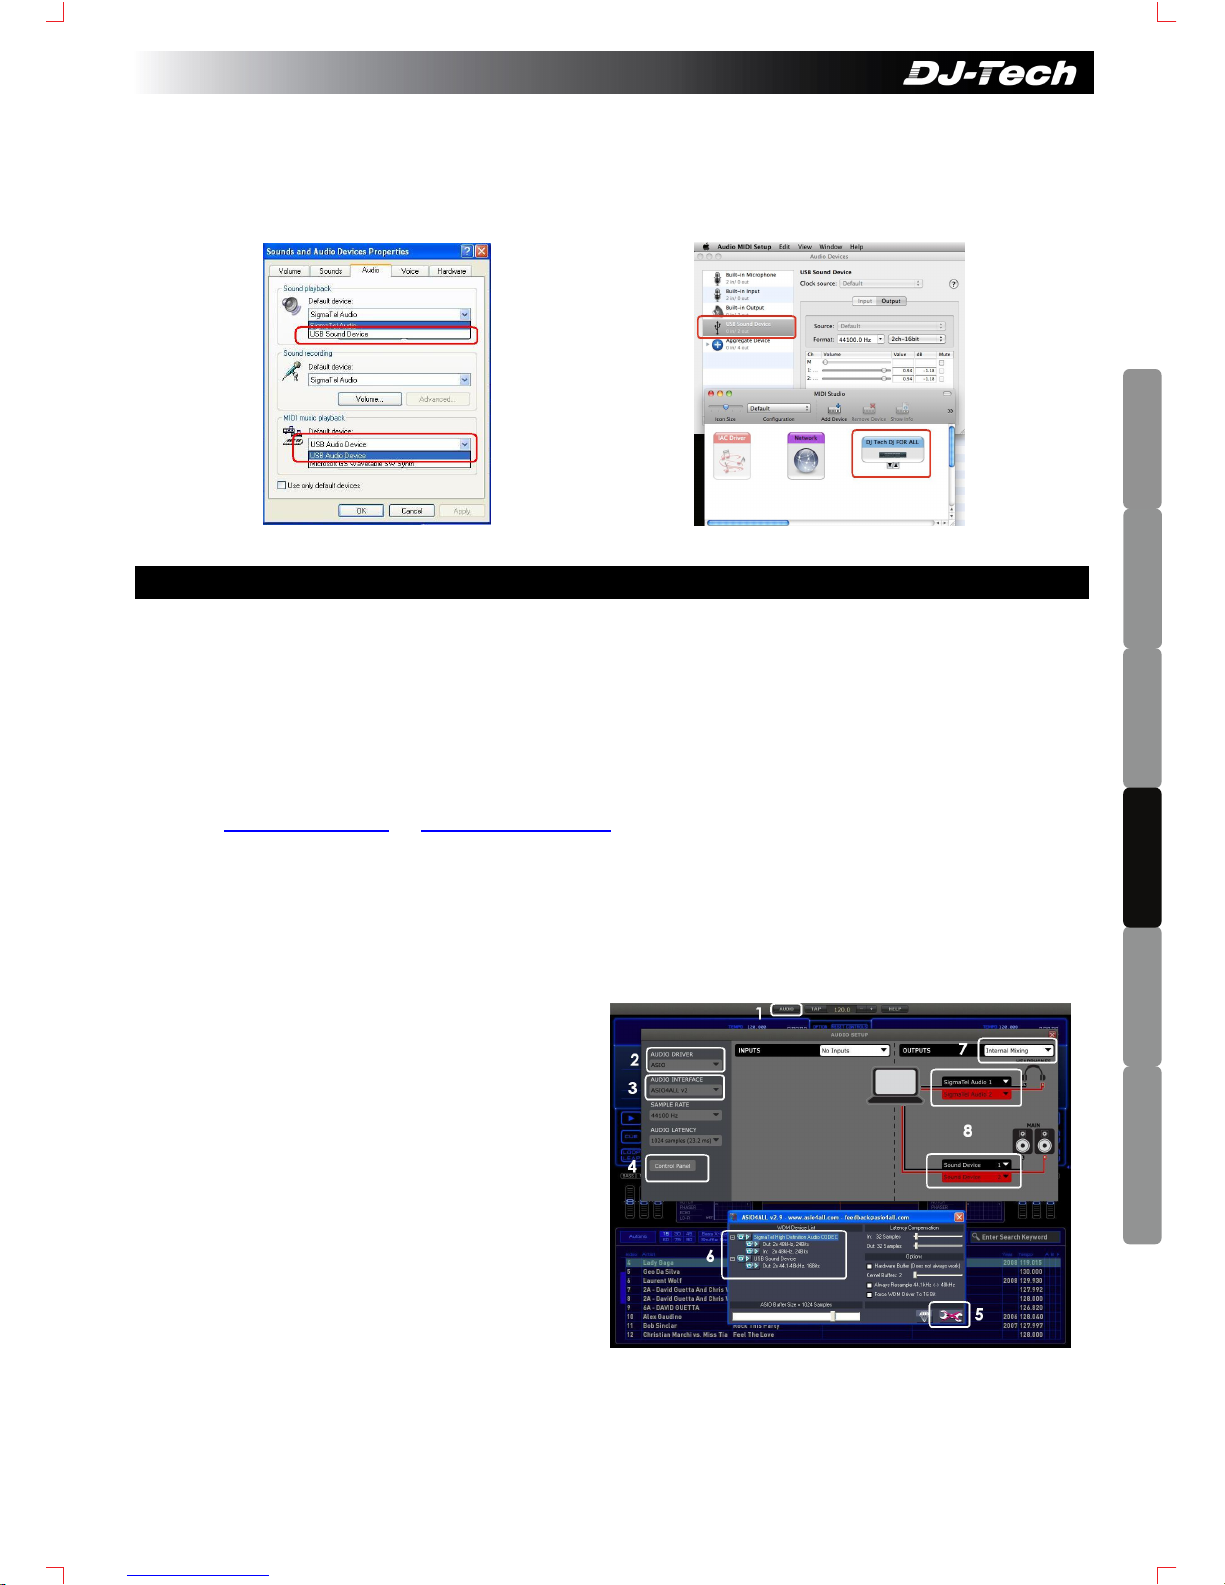
Windows XP: Control Panel -> Sound and Audio Mac OSX 10.6: Application -> Utilities -> Audio MIDI Setup
1. Insert the Deckadance LE Setup CD into computer CD-ROM.
i) For PC, click “INSTALL DECKADANCE” in the Autorun menu screen or double click the “Menu.exe” in
the CD content to launch the menu.
ii) For Mac, double click the “Install Deckadance.mpkg” to install.
Please follow the on screen instructions to finish the installation. You will be asked to enter the serial number
of the software. The serial number can be found on the paper pocket of the Setup CD. For Windows, please
install also ASIO4ALL audio driver, it is available in the Deckadance LE installation option.
Please refer to www.djtechpro.com and www.deckadance.com for latest software update.
2. Connect the DJ FOR ALL, Amplink USB Audio Cable, speaker system and DJH-100 as in Section B. Turn on
DJ For All and your speakers.
Note: If you are using a USB Hub for connection, it is recommended to use a Powered USB hub to ensure
the stability of the setup.
3. Audio Configuration (For PC) (Shown below in Windows XP)
1. Open Deckadance LE and Click “AUDIO”
2. Select “ASIO” for Audio Driver
3. Select “ASIO4ALL” for Audio Interface
4. Click “Control Panel” to bring the
AISO4ALL panel.
5. Click the button to switch to “Advance
Options”
6. Turn on the Amplink (“USB Audio Device”)
and you computer soundcard (SigmaTel
Audio in this example). Close the
ASIO4ALL panel and restart Deckadance
LE software.
7. Open again Deckadance LE AUDIO
SETUP. Select “Internal Mixing” in the
OUTPUTS.
8. Select the Amplink (Sound Device 1 & 2) for MAIN, and Computer Soundcard (SigmaTel Audio 1 & 2
in this example) for Headphones output. Audio configuration done! Please refer to ASIO4ALL Manual
and Deckadance Manual for more information.
4. Audio Configuration (For MAC) (Shown below in Mac OSX 10.6): Go to “Applications”
→
“Utilities” →
“Audio Midi Setup”: (For other versions of Mac OS please refer to the Help of Audio MIDI setup to perform
C. Start using DJ For All
3
2. When the DJ For All is connected to computer, the red SAMPLE LEDs on the unit will turn on. And,
when Amplink USB Audio Cable is connected to computer USB ports, the LED in the middle box of the
cable will turn on. Driver will be installed automatically. No extra driver is needed.
You should find 2 USB Audio Devices connected to your computer as below:
Page 5
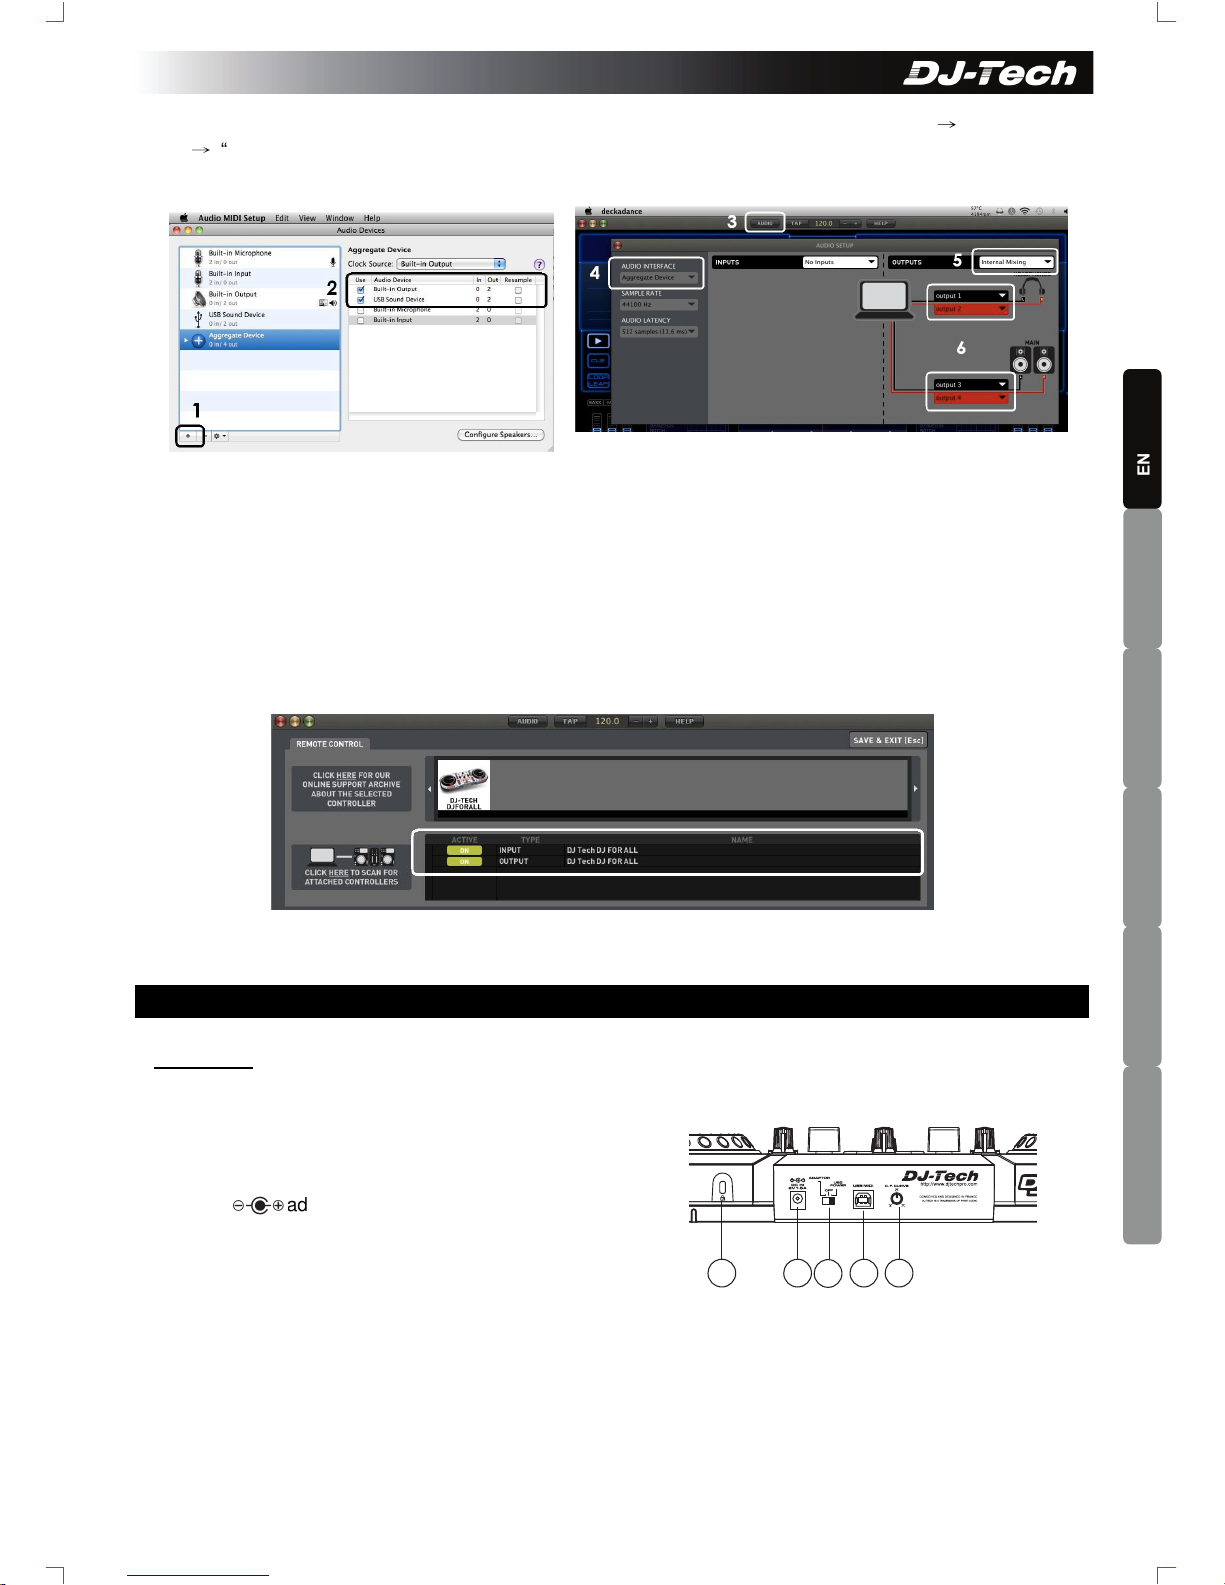
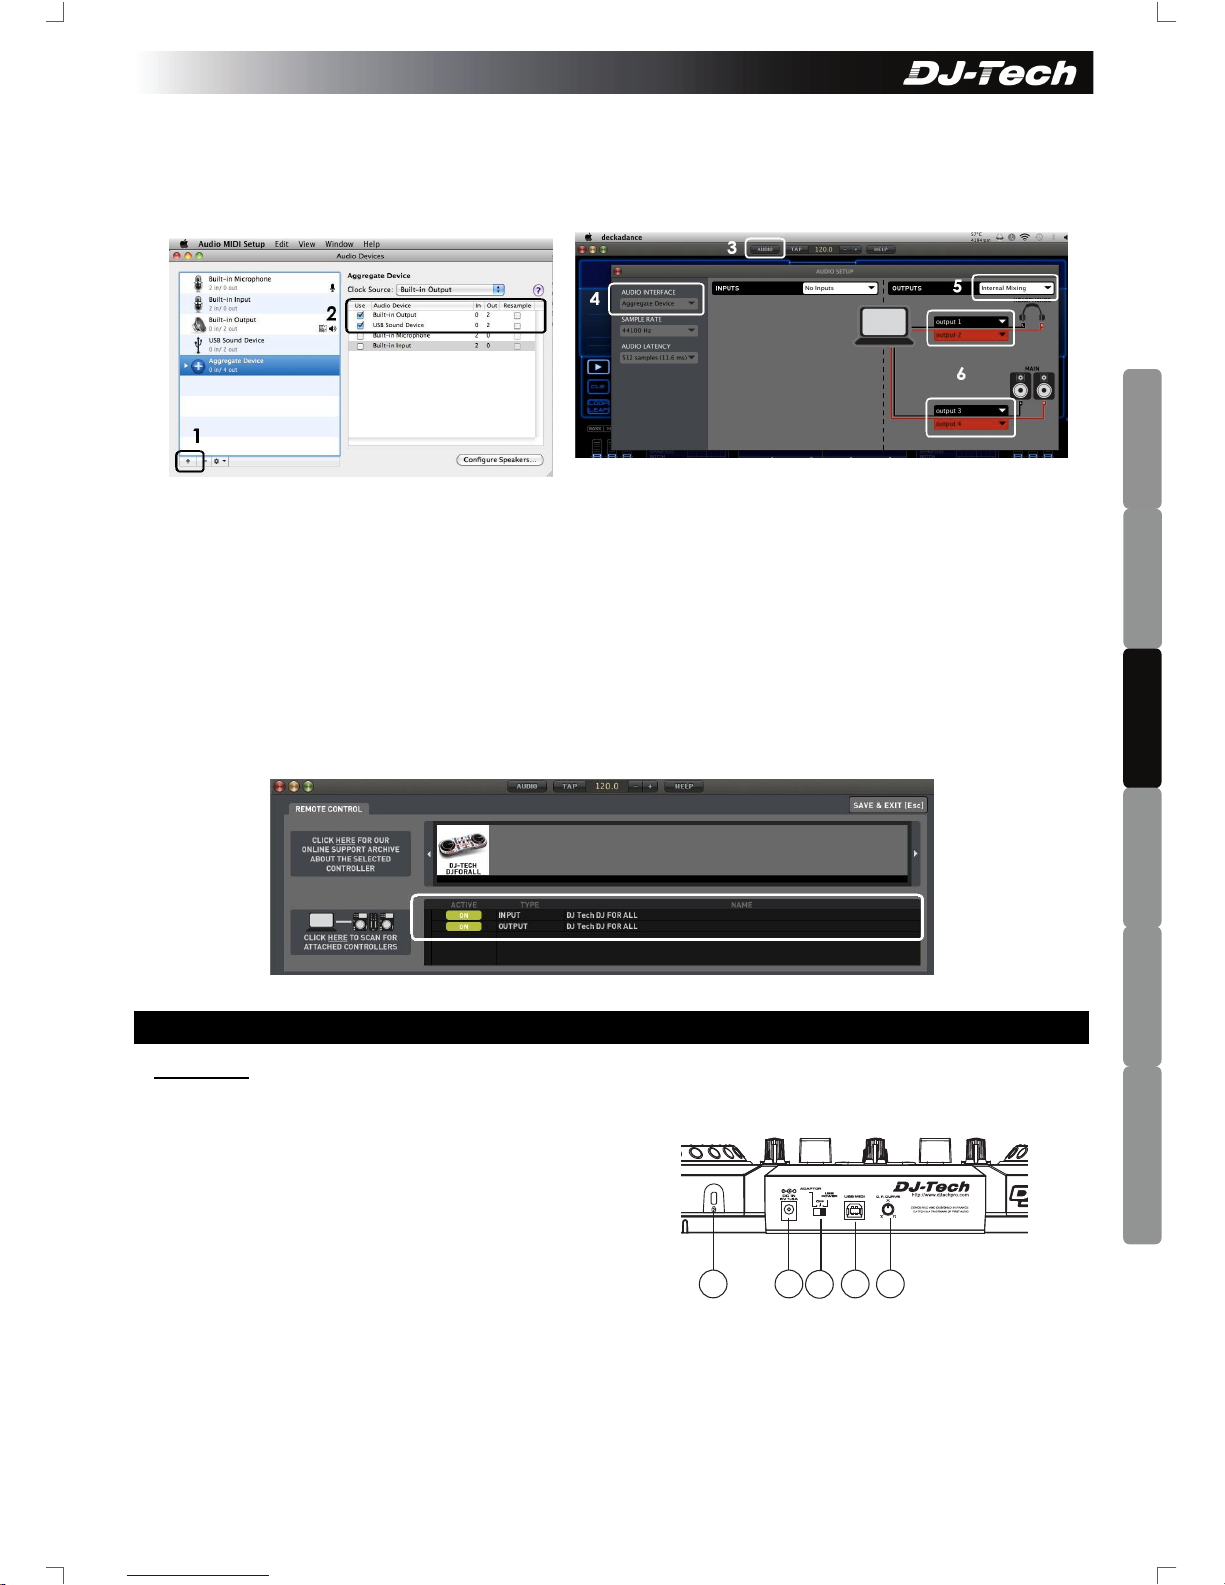
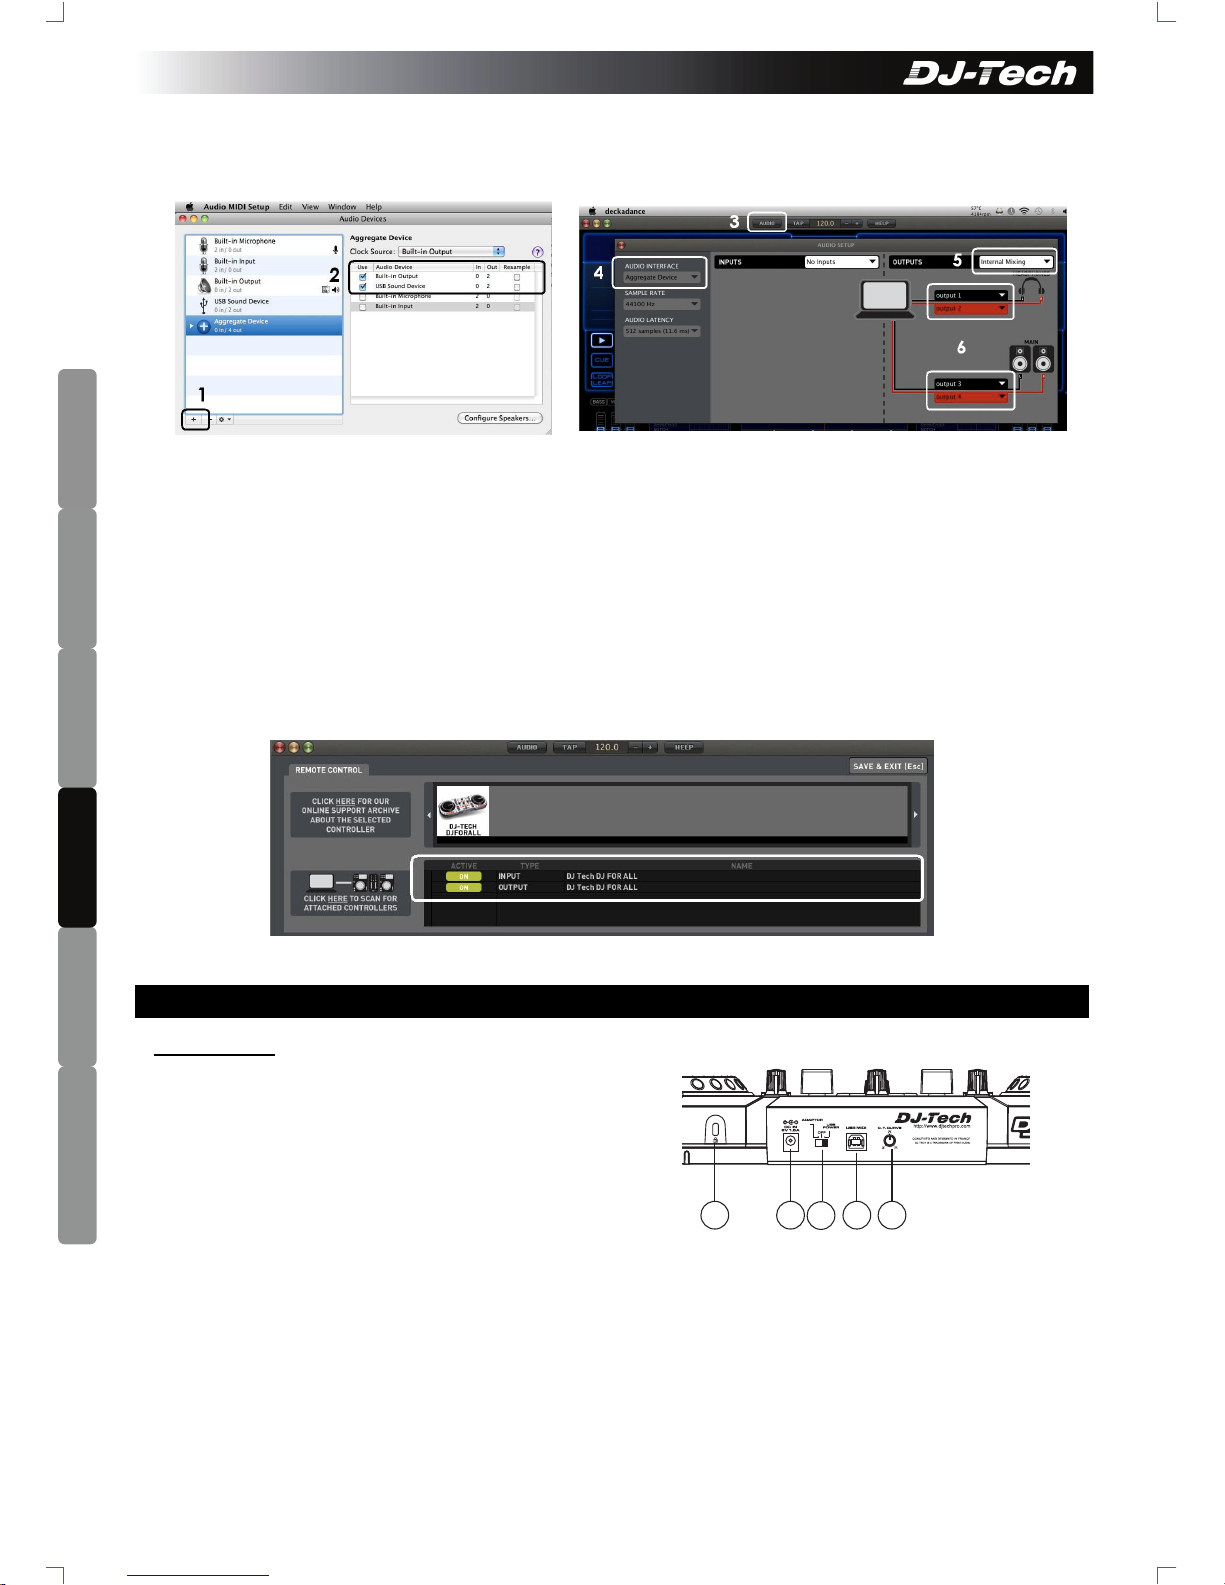
4. Audio Configuration (For MAC) (Shown below in Mac OSX 10.6): Go to “Applications” → “Utilities”
→
“Audio Midi Setup”: (For other versions of Mac OS please refer to the Help of Audio MIDI setup to
perform the setup)
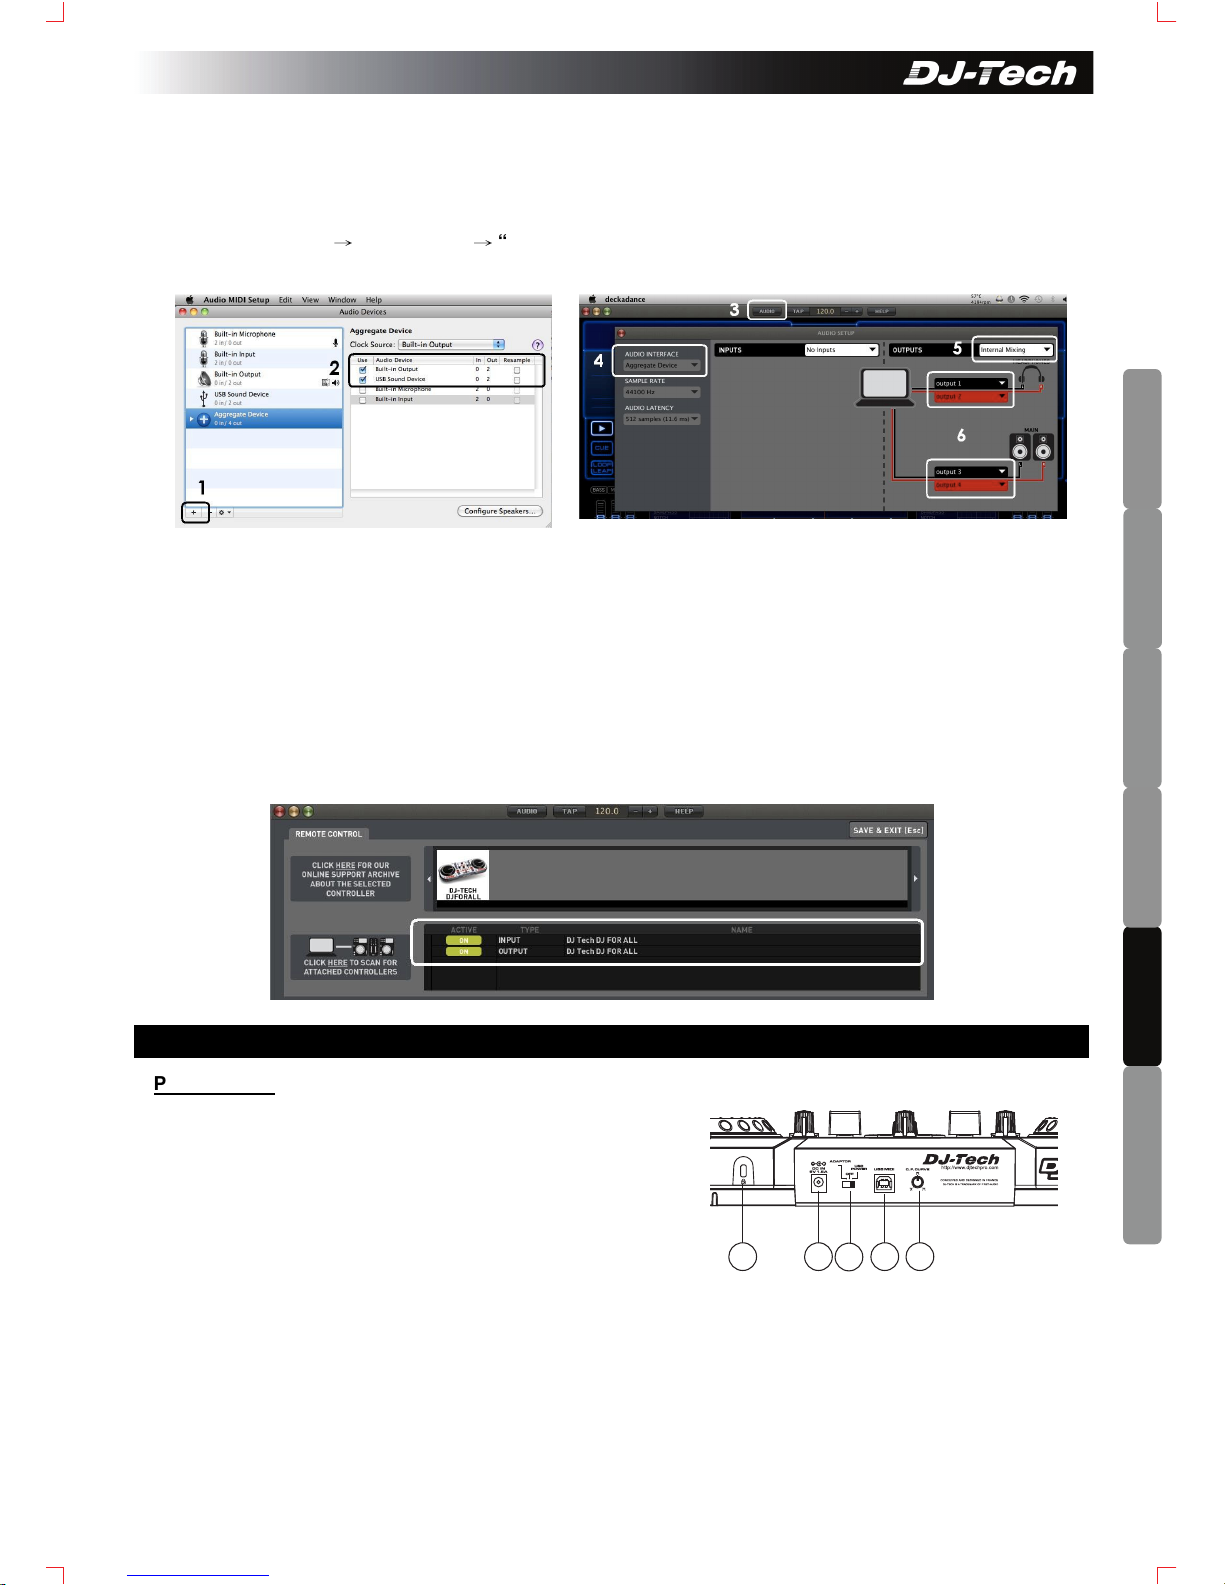
1. Click the “+” button to add an Aggregate
Device
2. Check the boxes to use the Amplink (USB
Sound Device) and Built-in Output
3. Open Deckadance and click “AUDIO” for
Audio setup
4. Select “Aggregate Device” for Audio Interface
5. Select “Internal Mixer” for Outputs
6. Select the Built-in Sound (output 1 & 2 ) for
Headphones output and Amplink (output 3 & 4)for
Main output . You may have to swap the selection for
Headphones and Main if they are reversed. Please
refer to Deckadance Manual for more information.
5. Go to SETUP page of Deckadance LE and enable the INPUT and OUTPUT of DJ For ALL (or “USB
Audio Device”
Rear Panel
1. Kensington Lock - Standardized connection for theft
protection.
2. Power Connector - Plug in power adaptor here. DC
adaptor can be used when the USB port cannot
provide enough power to the unit. Please use only a
6V DC adaptor.
3. Power Switch (Adaptor / OFF/ USB power) - Set the
switch to adaptor when using external DC adaptor. Set
to USB bus power when using power from the
computer via USB.
4. USB Socket - Used to connect a computer.
5. C.F Curve Control - Adjusts the shape of the crossfader curve from a quick cut for scratching or to a
longer fade for mixing.
D. Top Panel Features
2
3
51 4
4
ENGLISH
DEUTSCH
FRANÇAIS
ESPAÑOL
DUTCH
ITALIANO
Page 6
ENGLISH
DEUTSCH FRANÇAIS
ESPAÑOL
DUTCH
ITALIANO
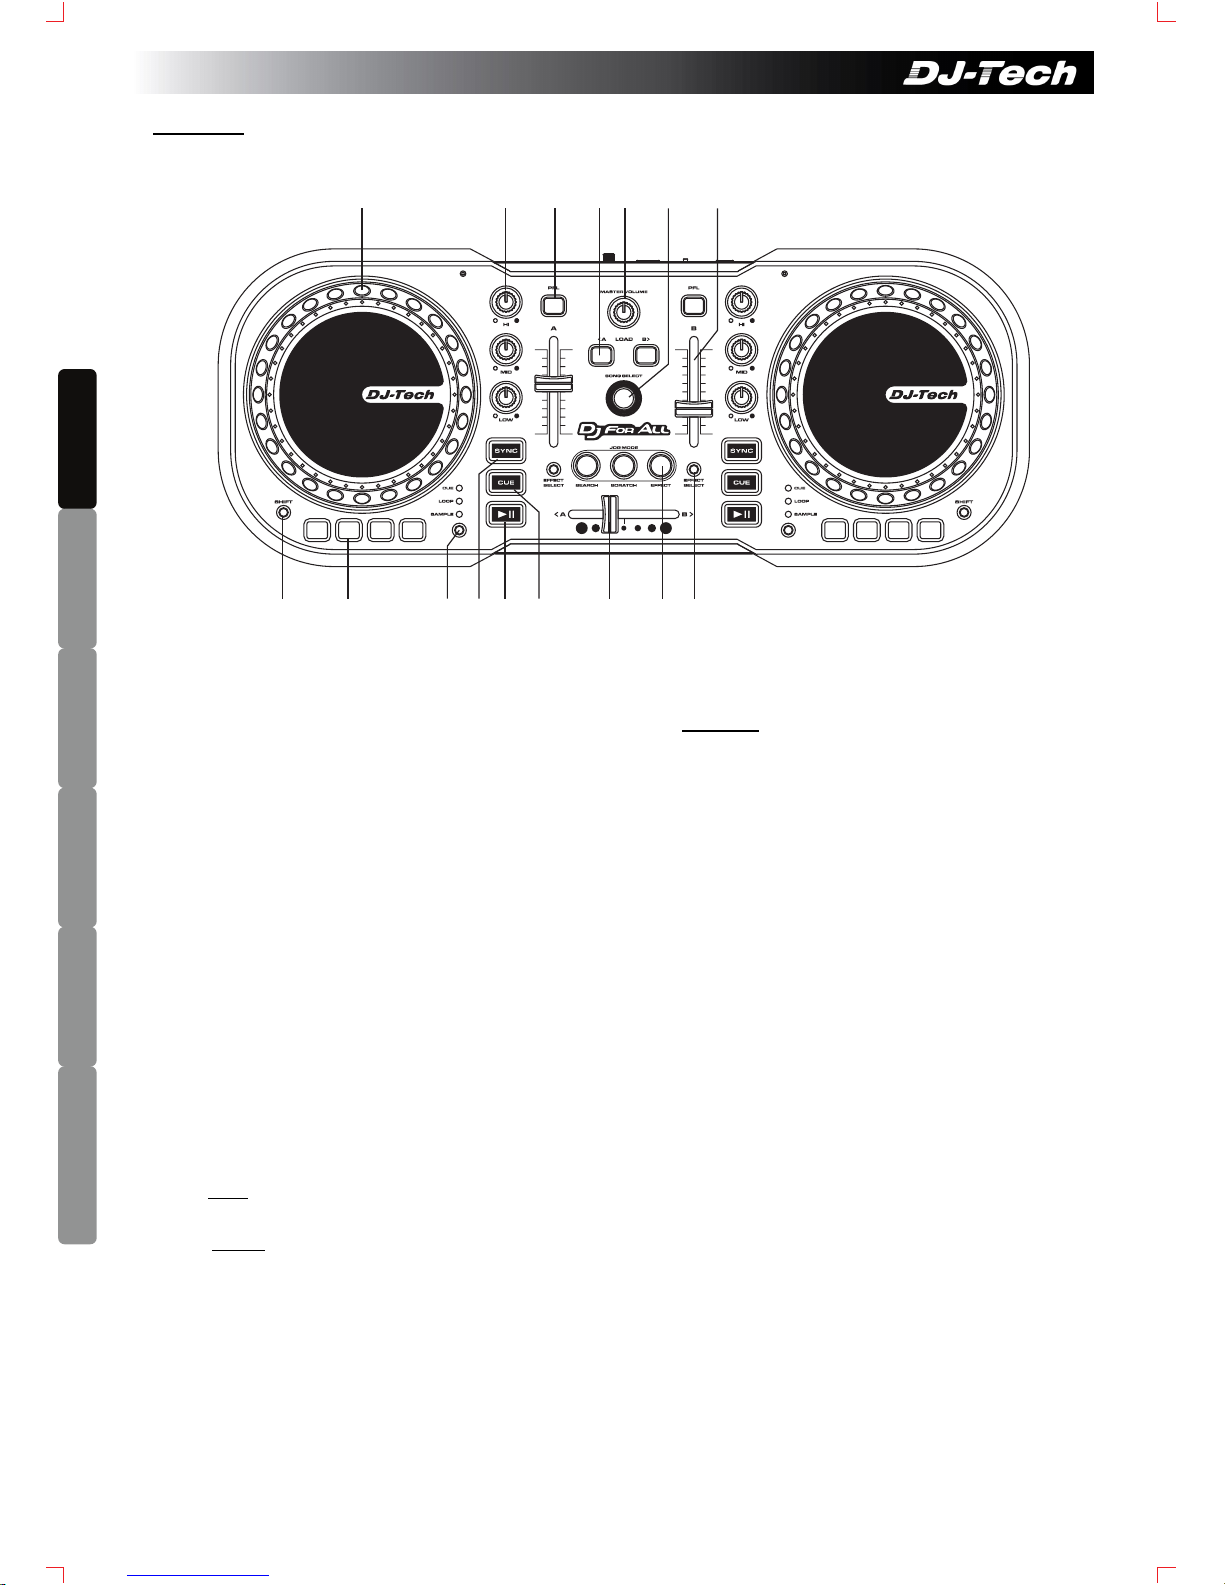
Top Panel
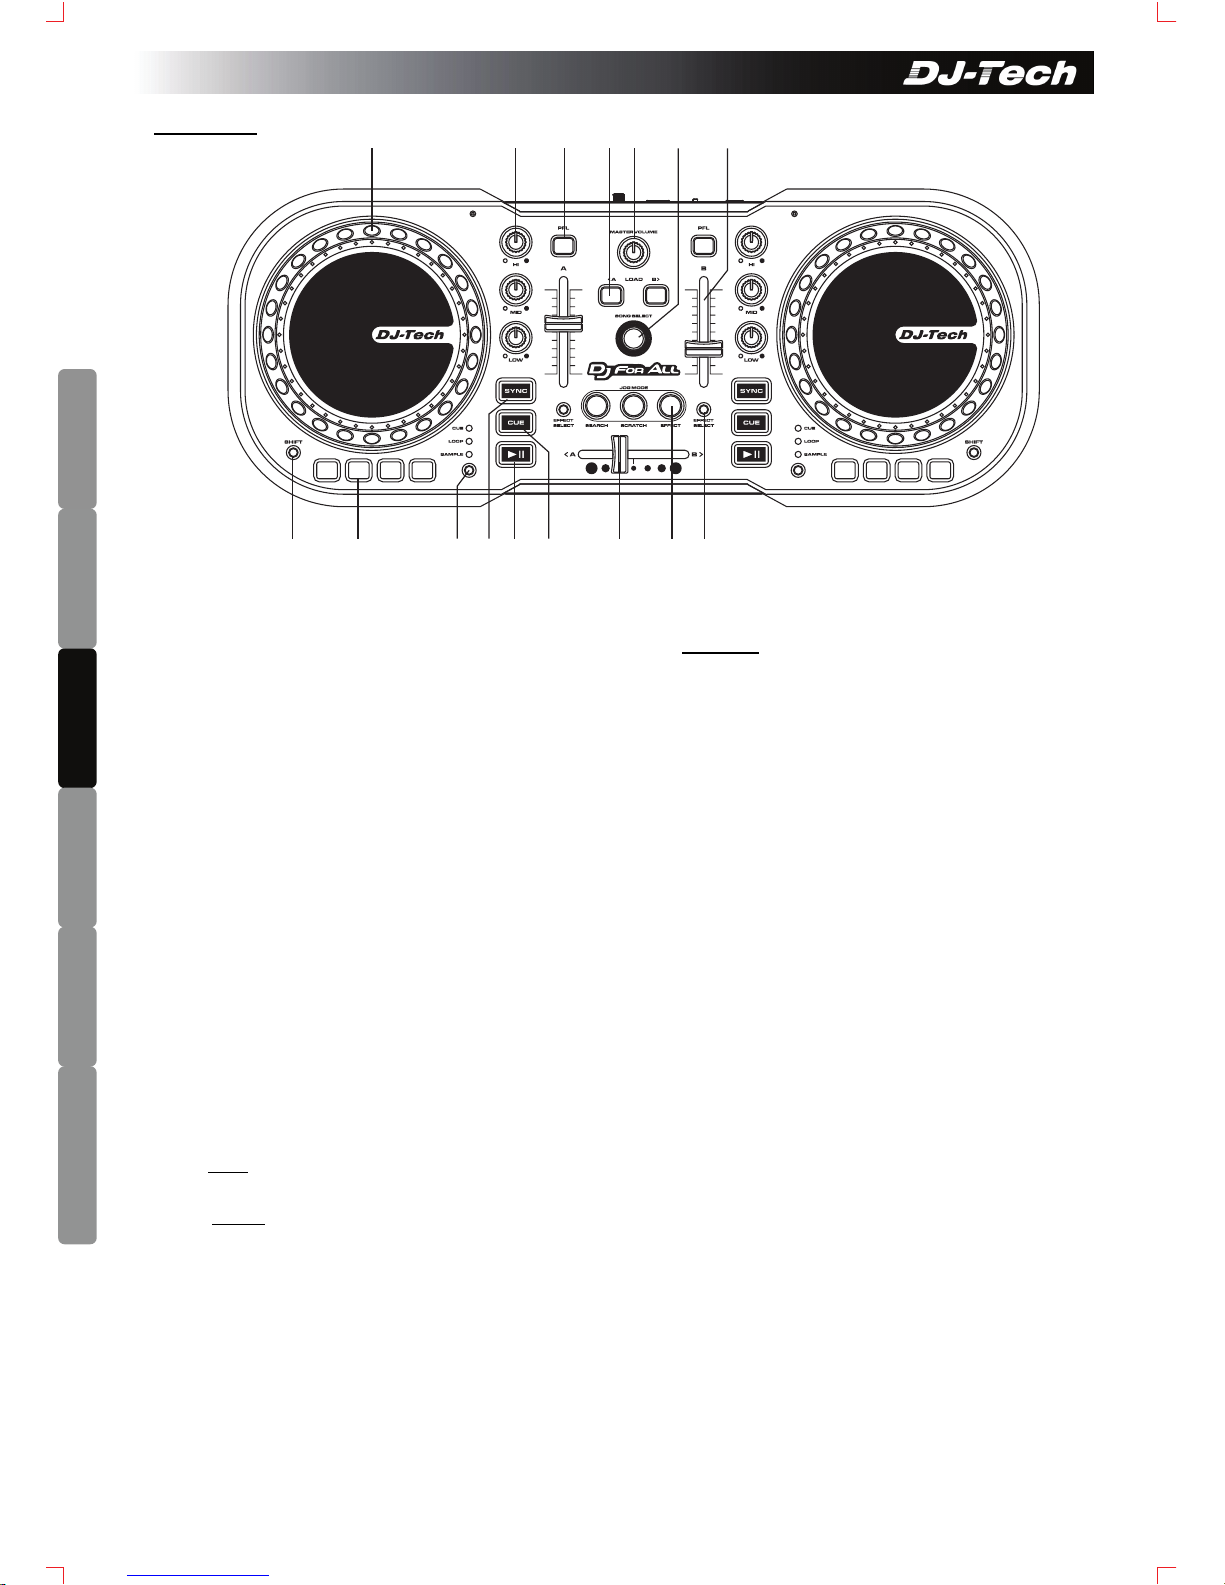
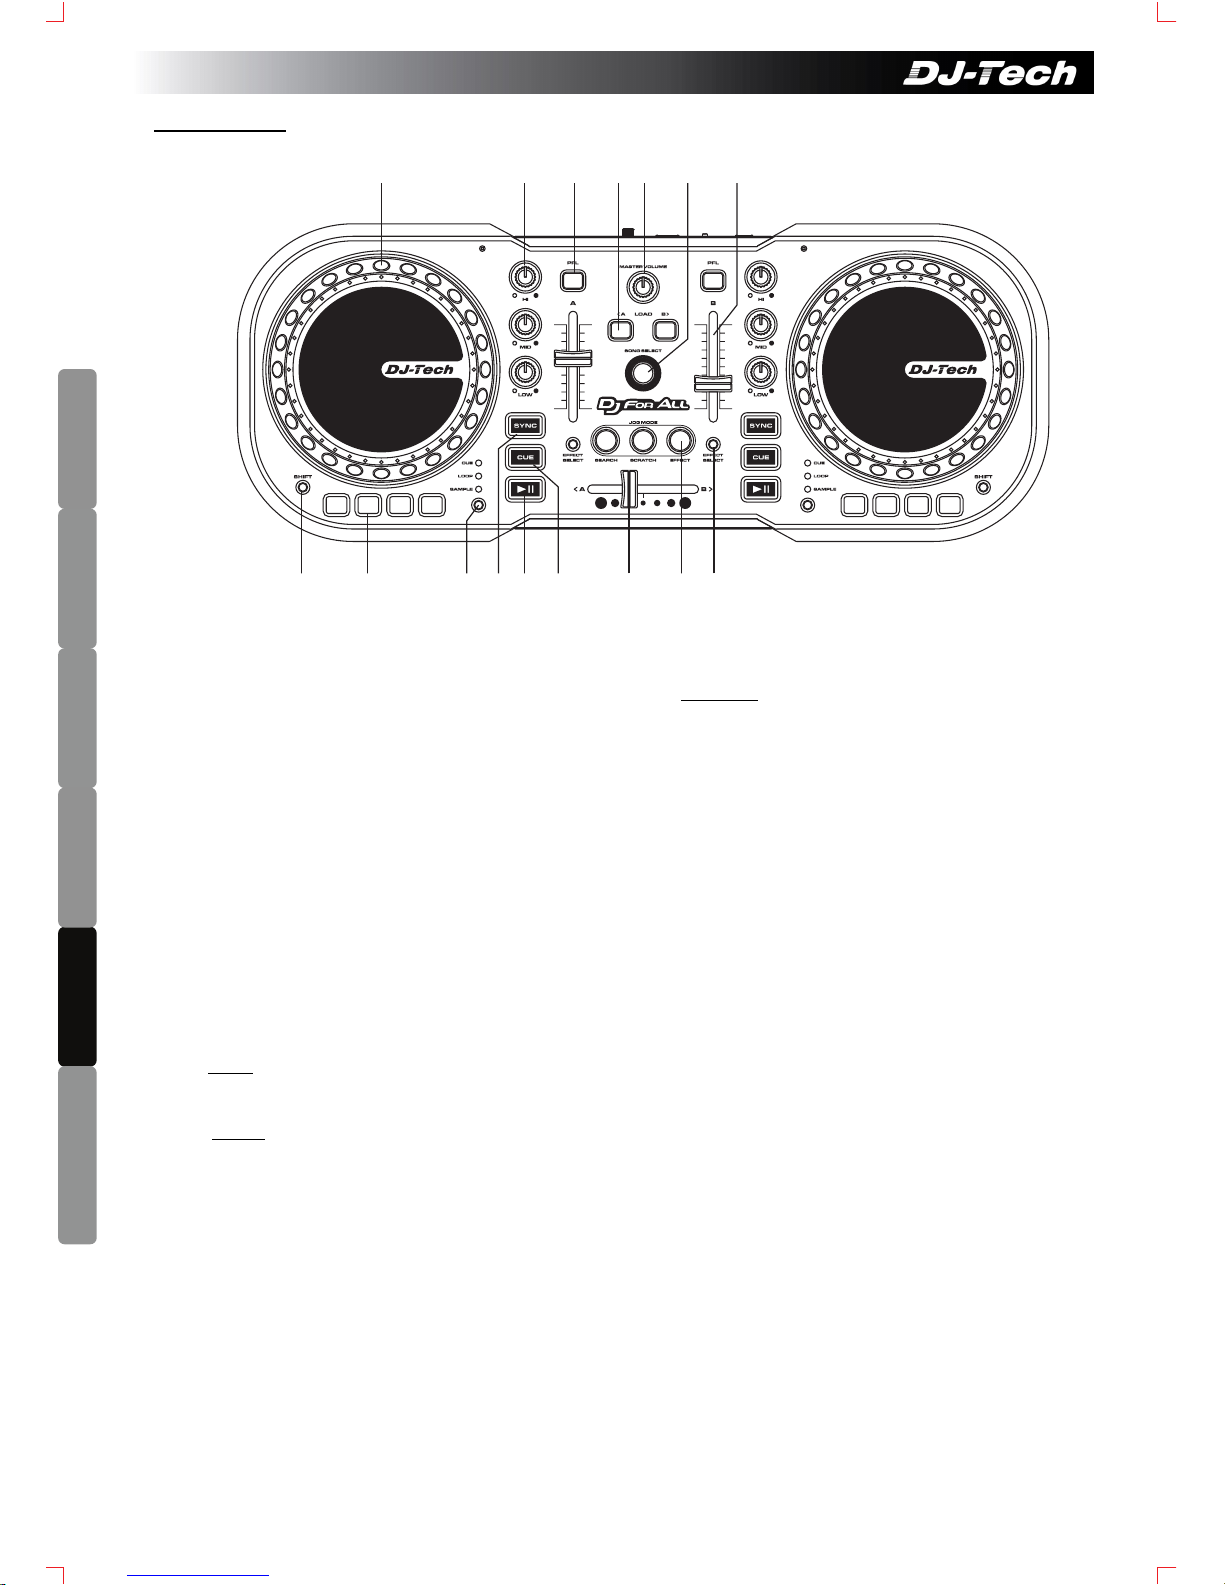
Please refer to below for using DJ For All and Deckadance LE
1. Multi-Function Jog Wheel – Depends on the
Jog Wheel mode (No. 15) for Pitch, Scratch,
Search or Effect.
2. DECK EQ (High/ Mid/ Low)
3. PFL Button – PFL (Monitoring) Button for Deck
A/B
4. LOAD Button – Load the selected song to Deck
A/B
5. Master Volume
6. TRACK SELECT Encoder – Turn to select tracks
in the song list. Press to preview the selected
so
ng.
7. VOLUME Fader
8. SHIFT Button – Press and hold with other
controls for extended functions. Please refer to
No.9 and No.15.
9. Multi-Function Buttons – Depends on the Mode
selected (No. 10):
i) CUE
– Press to select the Cue 1 to 4. Press
SHIFT and these buttons to set the Cue.
ii) LOOP
– Press and hold to enable the Autoloop
at length 1:16, 1:8, 1:4 or 1:2. Press SHIFT and
these buttons to toggle the Autoloop on/off.
Press SHIFT and turn the Jog Wheel to adjust
the loop length.
iii) SAMPLE
– Press and hold to play the sample
(slot 1 to 4 for deck A and slot 5 to 8 for deck
B). Press SHIFT and these buttons to toggle
the SAMPLE play/pause.
10. MODE SELECT Button – Press to select
different modes (CUE, LOOP and SAMPLE) for
the Multi-Function Buttons (No. 9)
11. SYNC Button
12. PLAY Button
13. CUE Button
14. CROSSFADER
15. Jog Wheel Mode Buttons – Press to select
between SEARCH, SCRATCH and EFFECT
modes for the Jog Wheel (No. 1):
i) When all the 3 buttons are off, the Jog Wheel
will be in PITCH mode.
ii) When EFFECT mode is on, the effect for Deck
A/B will be turned on automatically. When
EFFECT mode is off, the effect for Deck A/B
will be turned off automatically.
Use the Deck A and B Jog Wheels to control
the X and Y parameters of both decks.
iii) When in SEARCH mode, turn the Jog Wheel
to search quickly in the song
iv) When in SCRATCH mode, turn the Jog Wheel
to scratch the song.
16. EFFECT SELECT Buttons – Press to select
different effects for Deck A/B.
5
1 2 3 54 6 7
8 9 10 11 12 13 14 15 16
Page 7
6
ENGLISH
DEUTSCH
FRANÇAIS
ESPAÑOL
DUTCH
ITALIANO
CONSIGNES DE SÉCURITÉ
1. Lisez les instructions suivantes.
2. Conservez ces instructions.
3. Respectez tous les avertissements.
4. Suivez toutes les instructions.
5. N’utilisez pas cet appareil à proximité d’une source d’eau.
6. Nettoyez-le uniquement avec un chiffon doux et sec.
7. N’obstruez aucun orifice de ventilation. Procédez à l’installation conformément aux instructions du
fabricant.
8. N’installez pas l'appareil près de sources de chaleur telles qu’un radiateur, une bouche à air chaud, un
amplificateur ou tout autre appareil qui produit de la chaleur.
9. Ne cherchez pas à contourner la fonction de sécurité de la fiche polarisée. La borne plus large est conçue
pour assurer votre sécurité. Si la fiche ne correspond pas à votre prise secteur, consultez un électricien
pour remplacer votre prise secteur obsolète.
10. Veillez à ce que le câble d’alimentation ne soit ni piétiné ni écrasé. Faites particulièrement attention à la
fiche, à la prise secteur et à l’endroit d’où le câble d’alimentation sort de l’appareil.
11. Utilisez exclusivement des attaches/accessoires recommandé(e)s par le fabricant.
12. Veillez à la stabilité du support sur lequel vous placez l’appareil. Si vous utilisez un chariot, déplacez
l’appareil avec prudence afin d’éviter de le renverser et de blesser quelqu’un.
13. Débranchez l’appareil en cas d’orage ou de non-utilisation prolongée.
14. Confiez toutes les opérations d'entretien à un technicien qualifié. Une réparation est nécessaire lorsque
l’appareil a été endommagé de quelque façon que ce soit : fiche ou câble d’alimentation endommagé(e),
introduction d’un objet ou d’un liquide dans l’appareil, exposition à la pluie ou à l’humidité,
dysfonctionnement ou chute.
15. La fiche permet de débrancher l’appareil et doit rester facilement accessible.
16. Veillez à garantir une bonne ventilation à l'appareil.
AVERTISSEMENT
Afin de réduire le risque d’incendie ou de choc électrique, n’exposez pas cet appareil à la pluie ou à l’humidité.
Ne placez aucun récipient rempli de liquide, tel qu’un vase, à proximité de celui-ci.
ATTENTION : Ne démontez pas l’appareil afin de prévenir tout
risque de choc électrique. Aucune pièce interne ne peut être réparée
par l’utilisateur. Confiez toutes les opérations d'entretien à un
technicien qualifié.
Le symbole de l'éclair terminé par une flèche situé à l'intérieur d'un triangle équilatéral avertit
l'utilisateur de la présence de tension dangereuse non isolée dans l'appareil, dont l’amplitude peut
constituer un risque de choc électrique.
Le symbole du point d’exclamation dans un triangle équilatéral vise à avertir l’utilisateur de la
présence, dans la documentation accompagnant cet appareil, d’importantes instructions de
fonctionnement et d’entretien.
ATTENTION
Pour prévenir tout risque de choc électrique, veillez à ce que les bornes de la fiche d’alimentation soient insérées
complètement, de manière à ne pas être exposées.
CAUTION
RISK OF ELECTRIC SHOCK
DO NOT OPEN
Page 8
- Nous vous remercions d’avoir choisi DJ For ALL! -
Vous allez découvrir DJ For All - Devenir DJ facilement et en s’amusant sur votre ordinateur MAC ou PC.
Installez simplement le logiciel Deckadance DJ disponible sur le CD fourni, branchez DJ For All à votre
ordinateur et vous pouvez commencer à mixer et à scratcher comme un vrai DJ.
DJ For All fonctionne avec tous les fichiers MP3 et autres fichiers musique de votre ordinateur (y compris
WAV, OGG, iTunes Playlist). Simple à utiliser, c’est le meilleur outil pour apprendre à devenir un DJ.
DJ For All possède deux grandes molettes jog avec lesquelles vous pouvez réaliser des pitch, scratcher,
faire une recherche et contrôler les effets incroyables en temps réel!
Avec ses 4 boutons multifonctions, il permet un contrôle manuel pour sélectionner les autoloops,
déclencher les samples et lire les hot cues. Le matériau en caoutchouc de silicone, choisi avec soin, vous
garantit un matériel solide et de bonnes sensations.
Le package DJ For All comprend un câble audio USB Amplink et un casque audio DJH-100. Vous
profitez d’un contrôle complet sans avoir besoin d’appareils supplémentaires.
Ce document est divisé en différentes sections :
A – Systèmes requis
B – Connexion de DJ For All
C – Avant d’utiliser DJ For All
D – Caractéristiques des panneaux avant et
arrière
E – Caractéristiques
PC:
MAC:
‧
Windows XP (SP2)/ Windows Vista/ Windows 7
‧
Intel Pentium III 1 GHz ou Athlon XP 1,4GHz
‧
Lecteur CD-ROM
‧
Mémoire RAM 512 Mo et 200 Mo d’espace libre
‧
Carte son compatible avec DirectSound ou
ASIO
‧
Port USB x 2
‧
OSX V10.4 (Universal Binary)/ 10.5/ 10.6
‧
G4 1,5 GHz ou Intel Core Duo Family
‧
Lecteur CD-ROM
‧
Mémoire RAM 512 Mo et 200 Mo d’espace libre
‧
Carte son compatible avec CoreAudio
‧
USB ports x 2
1. Branchez l’appareil DJ For All, le câble audio USB Amplink et le casque DJH-100 comme montré
ci-dessous :
Contenu de la boîte:
► DJ For All x 1pc
► Câble USB x 1pc
► Casque audio DJH-100 x 1
► Câble audio USB Amplink x 1
► CD d’installation du logiciel
Deckadance LE x 1pc
► Manuel d’utilisation x 1pc
INTRODUCTION
A. Systèmes requis
B. Connexion de DJ For All
7
ENGLISH
DEUTSCH FRANÇAIS
ESPAÑOL
DUTCH
ITALIANO
Haut-parl eu rs
(non fourni s)
Connecteu r
RCA
Ordinateu r
(non fourni )
Prise jack
3,5 mm
Câble audio
USB Amplink
Page 9
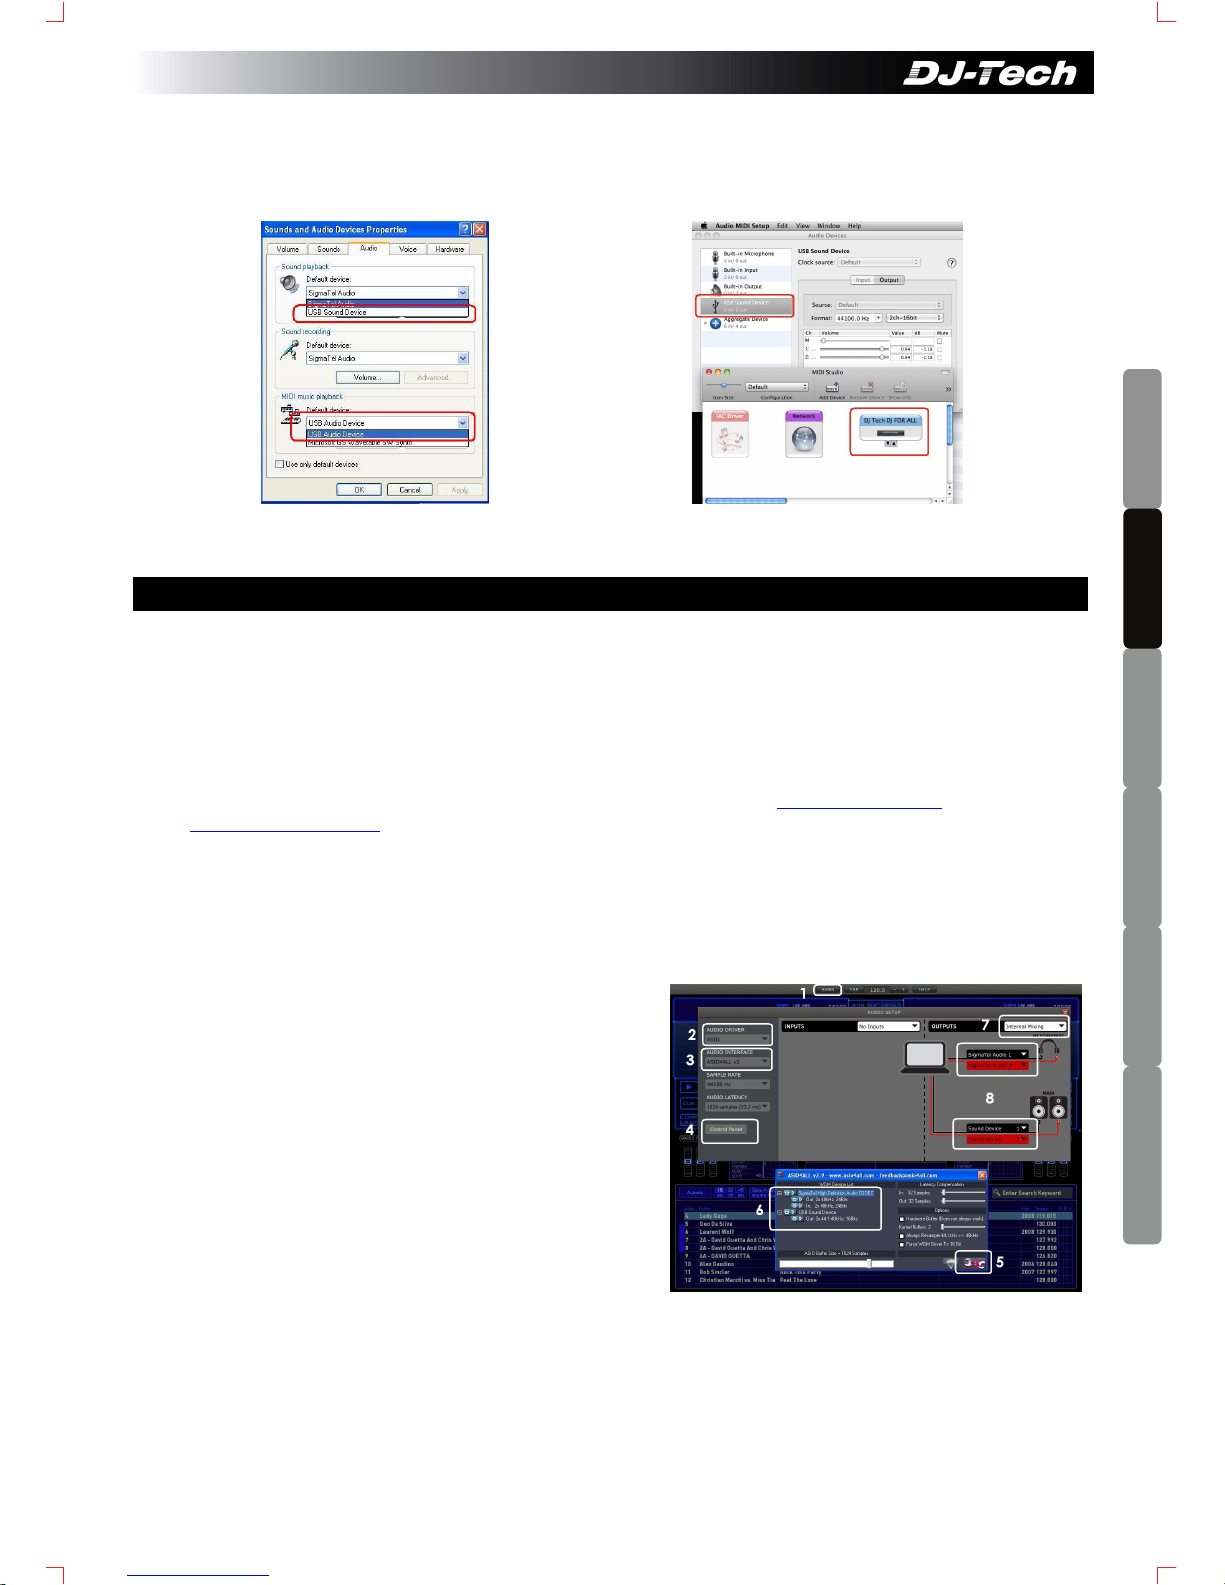
2. Lorsque l’appareil DJ For All est connecté à l’ordinateur, les voyants LED rouges s’allument. Et lorsque
le câble audio USB Amplink est connecté au port USB de l’ordinateur, le voyant LED du câble s’allume.
Les pilotes sont installés automatiquement. Aucun pilote supplémentaire n’est nécessaire.
Deux périphériques audio USB sont connectés à votre ordinateur, comme illustré ci-dessous :
Windows XP : Panneau de configuration -> Sons et
périphériques audio
Mac OSX 10.6 : Applications -> Utilitaires -> Configuration
audio et midi
1. Insérez le CD d’installation du logiciel Deckadance LE dans le lecteur CD-ROM de votre ordinateur.
i) Sur un PC, cliquez sur “INSTALLER DECKADANCE” dans le menu autorun ou double cliquez sur
“Menu.exe” dans le contenu du CD pour lancer le menu.
ii) Sur un Mac, double cliquez sur “Installer Deckadance.mpkg” pour installer le logiciel.
Suivez les instructions d’installation du logiciel. Vous devez saisir le numéro de série du logiciel.
Celui-ci est inscrit sur la pochette en papier du CD d’installation. Pour Windows, installez également le
pilote audio ASIO4ALL qui se trouve dans les options d’installation de Deckadance LE.
Pour la mise à jour du logiciel, veuillez vous référer aux sites Internet www.djtechpro.com et
www.deckadance.com.
2. Branchez l’appareil DJ FOR ALL, le câble audio USB Amplink, le système de haut-parleurs et le casque
audio DJH-100 comme expliqué dans la section B. Allumez DJ For All et vos haut-parleurs.
Remarque : Si vous utilisez un concentrateur USB (hub), il est recommandé d’utiliser un concentrateur
USB disposant d’une alimentation autonome afin de garantir la stabilité de la configuration.
3. Configuration audio (pour PC) (exemple donné avec
Windows XP)
1. Ouvrez Deckadance LE et cliquez sur « AUDIO »
2. Sélectionnez « ASIO » comme pilote audio.
3. Sélectionnez « ASIO4ALL » comme interface
audio
4. Cliquez sur « Panneau de configuration » pour
afficher le menu AISO4ALL.
5. Cliquez sur ce bouton pour activer les
« Paramètres avancés ».
6. Allumez Amplink (« Périphérique audio USB »)
et la carte son de votre ordinateur (dans cet
exemple Sigma Tel Audio). Fermez le menu
ASIO4ALL et redémarrez le programme Deckadance LE.
7. Ouvrez une nouvelle fois la configuration audio de Deckadance LE. Dans « Sorties », sélectionnez
« Mixage interne ».
8. Sélectionnez Amplink (périphérique son 1 & 2) comme sortie PRINCIPALE, et Carte son de
l’ordinateur (SigmaTel Audio 1 & 2, dans cet exemple) comme sortie Ecouteurs. La configuration
audio est terminée! Pour plus d’informations, veuillez vous référer aux manuels de ASIO4ALL et
de Deckadance.
C. Avant d’utiliser DJ For All
8
ENGLISH
DEUTSCH
FRANÇAIS
ESPAÑOL
DUTCH
ITALIANO
Page 10
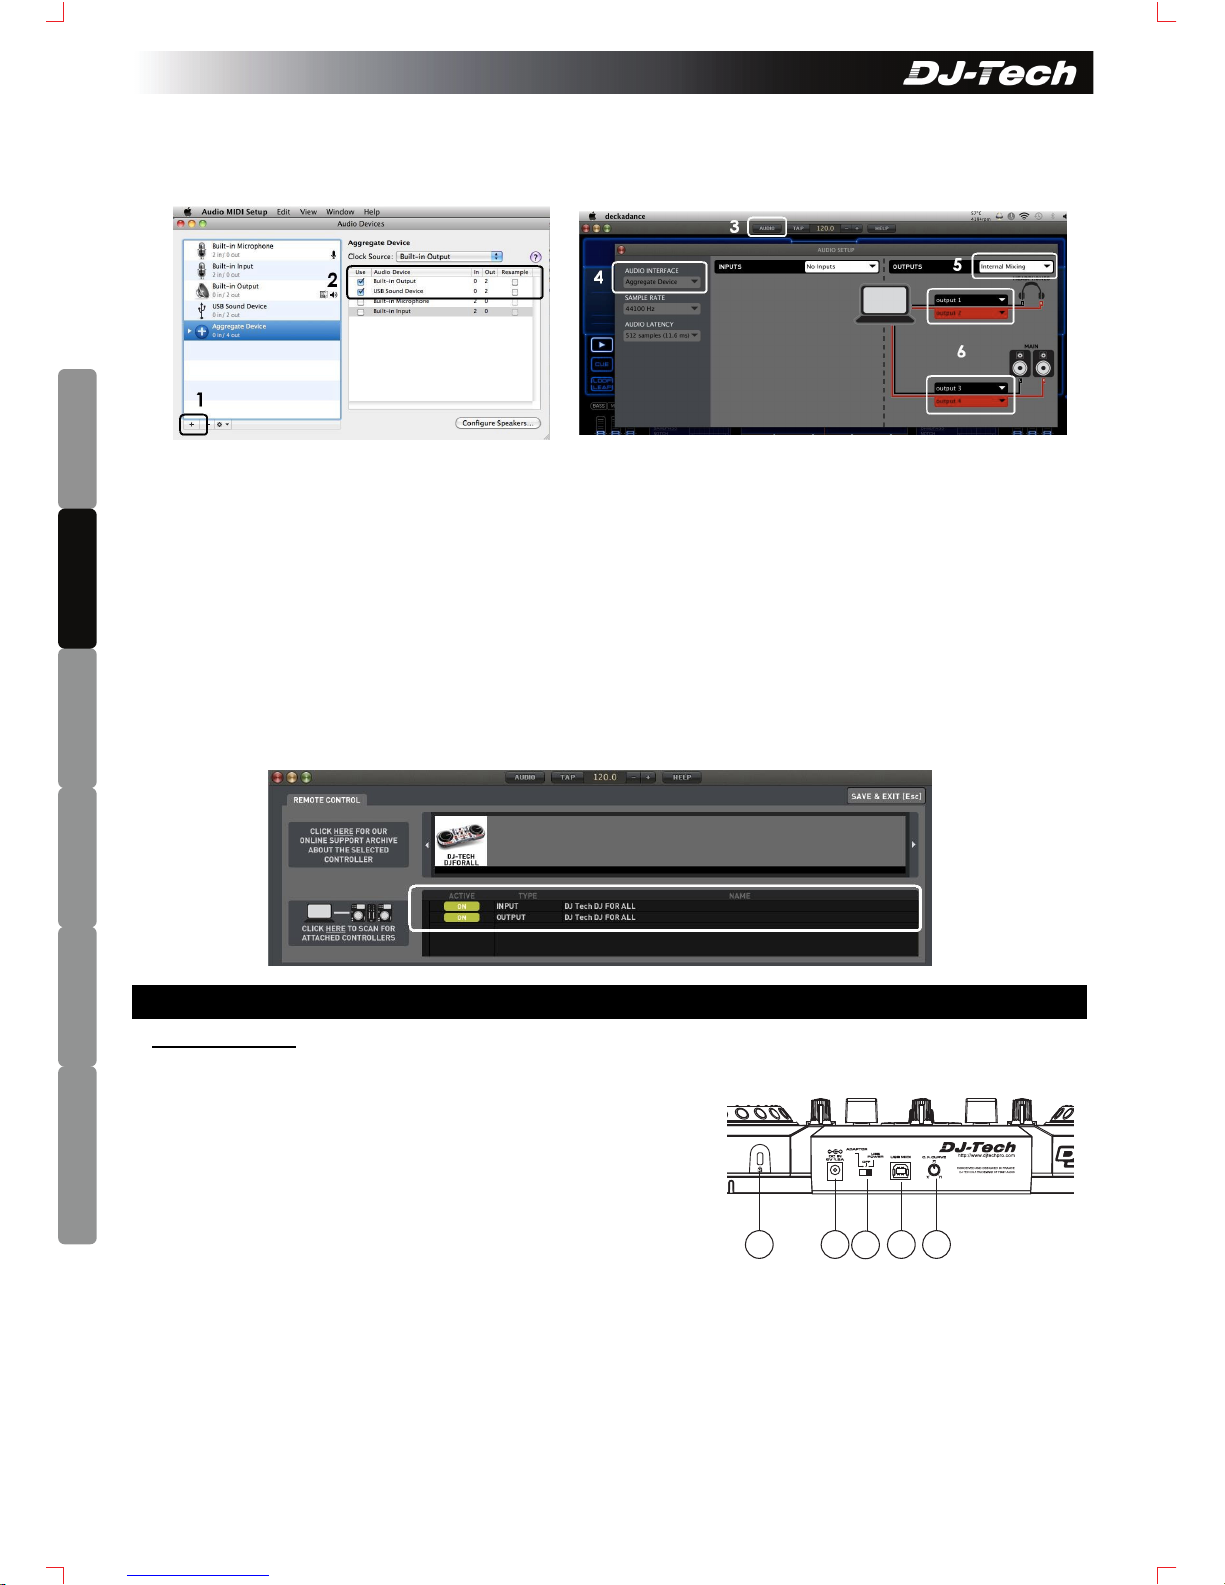
9
ENGLISH
DEUTSCH FRANÇAIS
ESPAÑOL
DUTCH
ITALIANO
4. Configuration audio (pour MAC) (exemple donné avec Mac OSX 10.6) : Cliquez sur « Applications »
→ « Utilitaires » → « Configuration audio et midi » : (Pour les autres versions de Mac OS,
consultez l’Aide de « Configuration audio et midi » pour effectuer la configuration)
1. Cliquez sur le bouton « + » pour ajouter un
« Périphérique agrégé »
2. Cochez les cases Amplink (Périphérique
son USB) et Sortie intégrée
3. Ouvrez Deckadance et cliquez sur
« AUDIO » pour effectuer la configuration
audio
4. Sélectionnez « Périphérique agrégé » comme
interface audio
5. Sélectionnez « Mixage interne » comme sortie
6. Sélectionnez Son intégré
(sortie 1 & 2 ) comme sortie
Ecouteurs et Amplink (sortie 3 & 4) comme sortie
Principale. Il se peut que les sorties Ecouteurs et
Principale soient inversées, inversez également la
sélection. Pour plus d’informations, veuillez vous
référer au manuel d’utilisation de Deckadance.
5. Allez sur la page CONFIGURATION de Deckadance LE et activez l’entrée et la sortie de DJ For ALL
(ou du « Périphérique audio USB »)
Panneau arrière
1. Verrou Kensington - Connexion standard de protection
contre le vol.
2. ENTREE ALIMENTATION – Branchez l’adaptateur secteur
ici. Vous pouvez utiliser un adaptateur secteur lorsque le port
USB ne fournit pas assez d’énergie à l’appareil. Utilisez
uniquement un adaptateur secteur 6 V.
3. Commutateur d’alimentation (Adaptor (adaptateur) / OFF
(arrêt) / USB power (alimentation USB)) - Positionnez le
commutateur sur « Adaptor » lorsque vous utilisez un adaptateur secteur externe. Positionnez-le sur
« USB power » lorsque vous utilisez le port USB de l’ordinateur comme alimentation.
4. PORT USB – Pour une connexion à votre ordinateur.
5. BOUTON C.F. CURVE (courbe crossfader) – Permet de régler la forme de la courbe du crossfader :
coupure rapide pour le scratch ou coupure progressive pour le mixage.
D. Caractéristiques des panneaux avant et arrière
2
3
51 4
Page 11
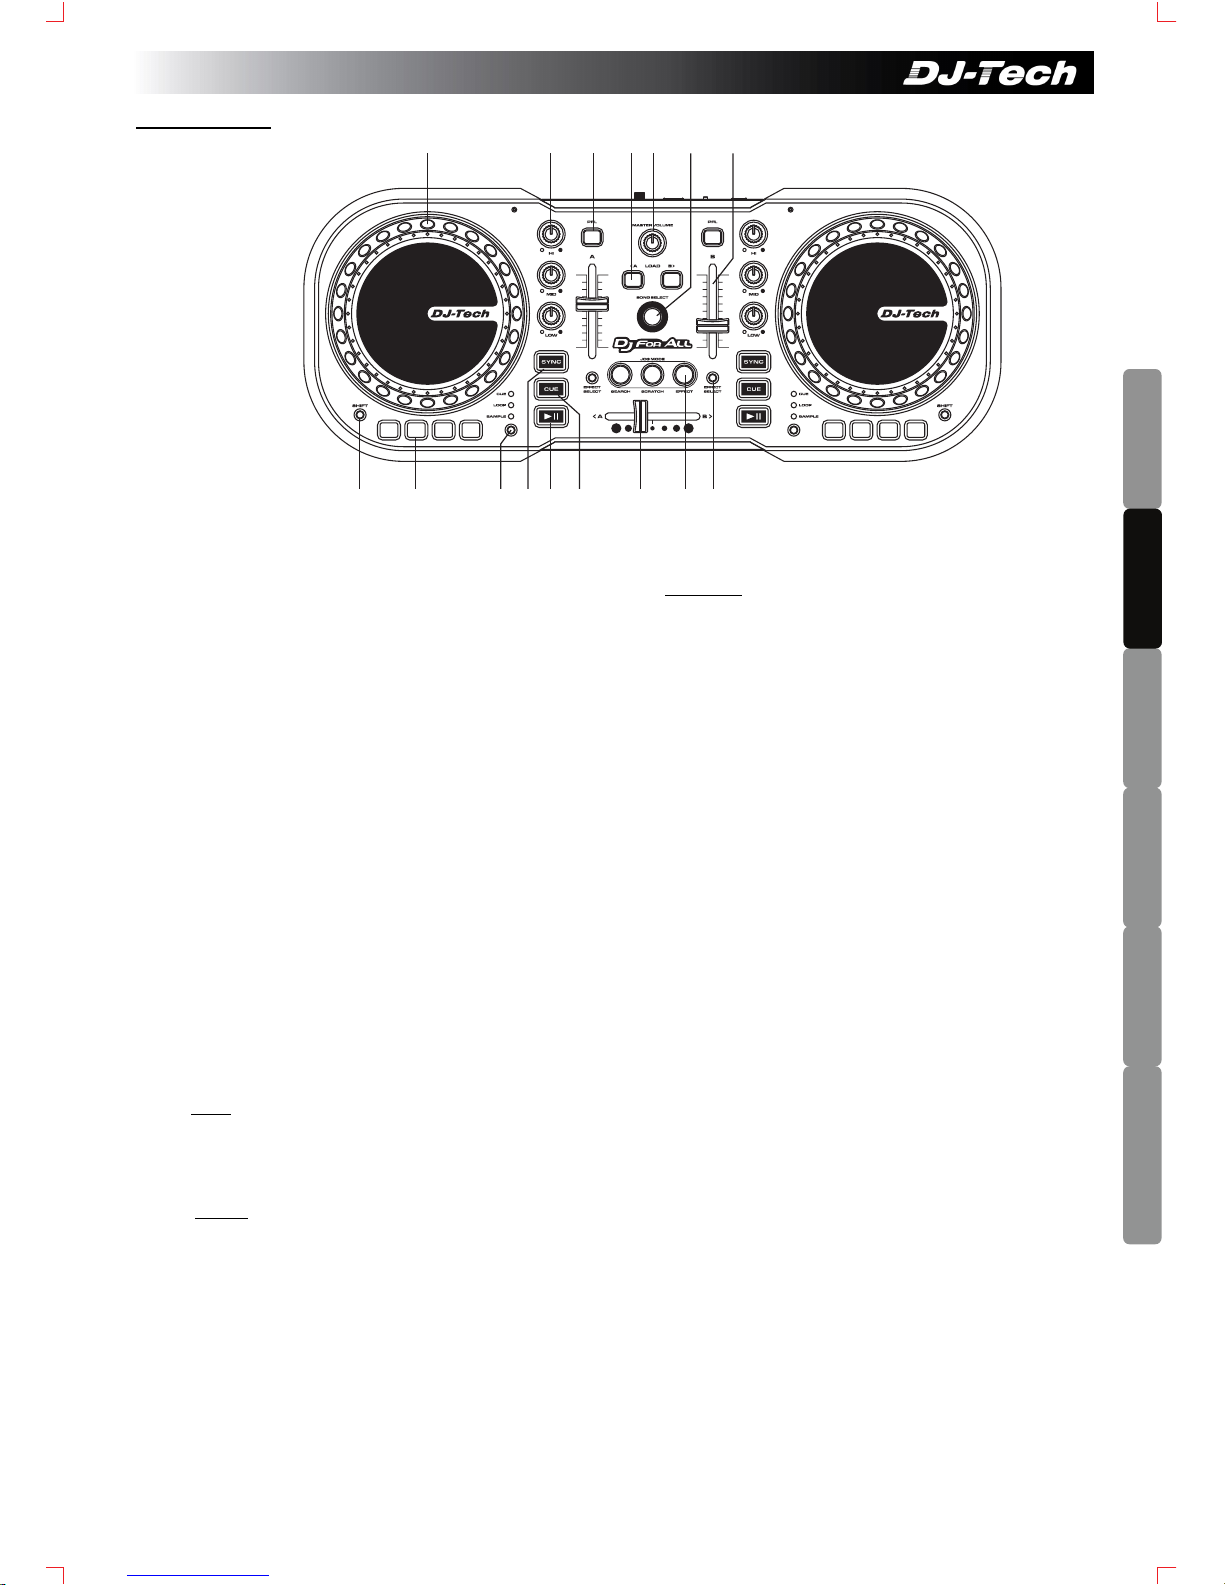
Panneau avant
Référez-vous au tableau ci-dessous pour utiliser DJ For All et Deckadance LE
1. Molette jog multifonctions – Son utilisation
dépend du mode de molette jog sélectionné
(n°15) : pitch, scratch, recherche ou effet.
2. Equaliseur deck (haut / moyen / faible)
3. Touche PFL – PFL (Contrôle) Touche pour les
decks A et B
4. Touche LOAD (chargement) –
Chargement de la
chanson sélectionnée dans le deck A/B
5. Réglage du volume master
6. Bouton de sélection d’une plage – Tournez ce
bouton pour sélectionner une plage dans la listes
des chansons Appuyez sur ce bouton pour lire la
chanson sélectionnée.
7. Volume du Fader
8. Touche SHIFT – Appuyez longuement sur ce
bouton et en même temps sur d’autres
commandes pour plus de fonctions. Référez-
vous
aux numéros 9 et 15.
9. Touches multifonctions – Leur utilisation
dépend du mode sélectionné (n°10) :
i) CUE – Appuyez sur cette touche pour
sélectionner le Cue 1 à 4. Appuyez sur la
touche SHIFT et puis sur ces touches pour
régler le Cue.
ii) LOOP – Appuyez longuement pour activer la
fonction Autoloop avec une longueur de 1:16,
1:8, 1:4 ou 1:2. Appuyez simultanément sur
cette touche et sur la touche SHIFT pour activer
ou désactiver la fonction Autoloop.
Appuyez sur
la touche SHIFT et tourner la molette jog pour
ajuster la longueur du loop.
iii) SAMPLE
– Appuyez longuement sur cette
touche pour lire le sample (slot 1 à 4 pour le
deck A et slot 5 à 8 pour le deck B). Appuyez
sur la touche SHIT pour lancer la lecture du
sample ou la mettre en pause.
10. Touche de sélection du mode – Appuyez sur
cette touche pour choisir un m
ode (cue, loop et
sample) pour les touches multifonctions (n° 9)
11. Touche SYNC
12. Touche PLAY
13. Touche CUE
14. Crossfader
15. Touches de sélection du mode pour les
molettes jog – Appuyez sur ces touches pour
choisir un mode (recherche, scratch et effet)
pour les molettes jog (n° 1) :
i) Lorsque les trois boutons sont désactivés, la
molette jog est en mode PITCH.
ii) Lorsque le mode EFFET est sélectionné, les
effets pour les deck A et B seront
automatiquement activés. Lorsque le mode
EFFET est désactivé, les effets pour les decks
A et B seront désactivés automatiquement.
Utilisez les molettes jog des decks A et B pour
contrôler les paramètres X et Y des deux
decks.
iii) En mode RECHERCHE, tournez la molette jog
pour effectuer une rapide recherche dans la
chanson
iv) En mode SCRATCH, tournez la molette jog
pour scratcher la chanson.
16. Touches EFFECT SELECT –
Appuyez sur ces
touches pour choisir les différents effets pour
les decks A et B.
10
ENGLISH
DEUTSCH
FRANÇAIS
ESPAÑOL
DUTCH
ITALIANO
1 2 3 54 6 7
8 9 10 11 12 1 3 14 15 16
Page 12
1. Bitte lesen Sie diese Anweisungen.
2. Bitte bewahren Sie diese Anweisungen auf.
3. Beachten Sie alle Warnungen.
4. Befolgen Sie alle Anweisungen.
5. Verwenden Sie das Gerät nicht in Nähe von Wasser.
6. Reinigen Sie es nur mit einem trockenen Tuch.
7. Halten Sie sämtliche Belüftungsöffnungen offen. Installieren Sie das Gerät entsprechend den
Anweisungen des Herstellers.
8. Stellen Sie das Gerät nicht in der Nähe von Wärmequellen wie Heizkörpern, Luftschächten,
Wärmegeräten, Öfen oder anderen Wärme erzeugenden Geräten (dazu zählen auch Verstärker) auf.
9. Der Schutzkontaktstecker dient durch den Erdungskontakt an der Seite Ihrer Sicherheit. Falls der
mitgelieferte Stecker nicht in Ihre Steckdose passt, wenden Sie sich bitte an einen Elektriker und lassen
die entsprechende Steckdose austauschen.
10. Schützen Sie das Stromkabel, damit niemand darauf tritt oder es gequetscht wird; achten Sie besonders
auf den Stecker und die Stelle, an der das Kabel aus dem Gerät austritt.
11. Verwenden Sie ausschließlich vom Hersteller empfohlenes Zubehör.
12. Nur mit vom Hersteller vorgegebenen oder mit dem Gerät verkauften Ständern, Wagen, Stativen,
Halterungen oder Unterlagen benutzen. Wenn ein Wagen verwendet wird, bewegen Sie die Kombination
aus Wagen und Gerät besonders vorsichtig: Beim Umkippen besteht Verletzungsgefahr.
13. Ziehen Sie bei Gewitter oder wenn das Gerät längere Zeit nicht benutzt wird, den Stecker aus der
Steckdose.
14. Lassen Sie Wartungsarbeiten nur vom Fachmann ausführen. Reparaturen sind notwendig, wenn das
Gerät auf irgendeine Weise beschädigt wurde, zum Beispiel wenn das Stromkabel oder der Netzstecker
beschädigt sind, Flüssigkeit in das Gerät geraten ist oder Gegenstände auf das Gerät gefallen sind, das
Gerät Regen oder Feuchtigkeit ausgesetzt wurde, nicht normal funktioniert oder herunter gefallen ist.
15. Der Netzstecker wird zum Ausschalten verwendet und muss deshalb leicht zugänglich sein.
16. Bitte nutzen Sie das Gerät nur an gut belüfteten Orten.
WARNUNG
Damit es nicht zu Bränden oder Stromschlägen kommt, darf dieses Gerät weder Regen noch sonstiger
Feuchtigkeit ausgesetzt werden. Das Gerät darf weder Tropf- noch Spritzwasser ausgesetzt werden; mit
Wasser gefüllte Gegenstände, wie zum Beispiel Vasen, dürfen nicht auf das Gerät gestellt werden.
VORSICHT: Entfernen Sie keine Abdeckungen – andernfalls
besteht Stromschlaggefahr. Das Gerät enthält keine Teile, die der
Benutzer selbst reparieren kann. Eingriffe sind Fachpersonal
anzuvertrauen
Der Blitz im gleichseitigen Dreieck weist den Benutzer darauf hin, dass innerhalb des Gerätes eine
„gefährliche Spannung“ anliegt, die ausreichend stark sein kann, um für Menschen gefährliche
Stromschläge zu verursachen.
Das Ausrufungszeichen im gleichseitigen Dreiecks soll den Benutzer darauf aufmerksam
machen, dass die das Produkt begleitenden Dokumente wichtige Betriebs- und Wartungshinweise
enthalten.
VORSICHT
Damit es nicht zu Stromschlägen kommt, verzichten Sie auf den Einsatz von Verlängerungskabeln,
Mehrfachsteckdosen und ähnlichen Dingen, sofern es sich dabei nicht um Schutzkontaktsteckdosen handelt.
SICHERHEITSHINWEISE
CAUTION
RISK OF ELECTRIC SHOCK
DO NOT OPEN
11
ENGLISH
DEUTSCH FRANÇAIS
ESPAÑOL
DUTCH
ITALIANO
Page 13
- Vielen Dank für den Kauf unseres DJ For ALL! -
Willkommen bei DJ For All – im Handumdrehen setzen Sie Ihren PC oder Mac nun auch für amtlichen
DJ-Sound ein.
Installieren Sie einfach die Deckadance DJ-Software von der mitgelieferten CD, schließen Sie DJ For All an
Ihren Computer an –und legen Sie gleich mit Mixen und Scratchen los; genau wie beim „großen“ Vorbild.
DJ For All arbeitet mit sämtlichen MP3- und anderen Audiodateien Ihres Computers (einschließlich WAV,
OGG, iTunes-Wiedergabelisten) zusammen, ist ganz einfach zu bedienen und ein perfekter Einstieg in die
moderne DJ-Welt.
DJ For All bietet dir 2 riesige Jog Wheels, mit denen du Pitch- und Scratch-Effekte in Echtzeit steuerst und in
Windeseile durch die Titel rast!
Über die vier Mehrzwecktasten steuerst du Autoloops, startest Samples und spielst heiße Cues einfach
aus dem Handgelenk ab. Und durch die sorgfältig ausgewählte Silikonausführung genießt du ein wertiges
Das DJ For All-Paket enthält ein Amplink-USB-Audiokabel und einen DJH-100 DJ-Kopfhörer. So kannst
du die Monitoring-Funktion ganz ohne lästige Zusatzgeräte nutzen.
Diese Anleitung haben wir in die nachstehenden Abschnitte unterteilt:
A – Minimale Systemvoraussetzungen
B – DJ For All anschließen
C – DJ For All benutzen
D – Anschlüsse und Bedienelemente an
Rückwand und Vorderseite
E – Technische Daten
PC: MAC:
‧
Windows XP (SP2)/ Windows Vista/ Windows 7
‧
Intel Pentium III 1GHz or Athlon XP 1.4GHz
‧
CD-Laufwerk
‧
512 MB RAM, 200 MB freier Festplattenspeicherplatz
‧
DirectSound- oder ASIO-kompatible Soundkarte
‧
2 USB-Ports
‧
OSX V10.4 (Universal Binary)/10.5/10.6
‧
G4 1.5GHz or Intel Core Duo-Reihe
‧
CD-Laufwerk
‧
5MB RAM, 200 MB freier Festplattenspeicherplatz
‧
Soundkarte mit CoreAudio-Treibern
‧
2 USB-Ports
1. Schließe DJ For All, Amplink-USB-Audiokabel und den DJH-100-Kopfhörer wie folgt an:
Lieferumfang:
► 1 DJ For All
► 1 USB-Kabel
► 1 DJH-100 DJ-Kopfhörer
► 1 Amplink-USB-Audiokabel
► 1 Deckadance LE-CD
► 1 Bedienungsanleitung
Einleitung
A. Minimale Systemvoraussetzungen
B. DJ For All anschließen
Aktivlaut sp recher
(nicht mitg el iefert)
Cinch
Computer
(nicht mitg el iefert)
3,5 mm
Anschluss
Amplink-U SB -Audiok ab el
12
ENGLISH
DEUTSCH
FRANÇAIS
ESPAÑOL
DUTCH
ITALIANO
Page 14
2. Wenn DJ For All mit dem Computer verbunden ist, leuchten die roten SAMPLE-LEDs am Gerät auf.
Zusätzlich leuchtet die LED am Kästchen in der Mitte des Kabels auf, wenn das
Amplink-USB-Audiokabel mit den USB-Port des Computers verbunden ist. Treiber werden automatisch
installiert. Zusätzliche Treiber sind nicht erforderlich.
Dein Computer sollte nun zwei USB-Audiogeräte finden – siehe nachstehende Abbildungen:
Windows XP: Systemsteuerung -> Sound und Audiogerät Mac OSX 10.6: Anwendungen -> Werkzeuge ->
Audio-MIDI-Einstellungen
1. Lege die Deckadance LE-CD in das CD-Laufwerk deines Computers ein.
i) Am PC: Klicke im automatisch angezeigten Menü auf „Deckadence installieren“; alternativ kannst du
auf die Datei „Menu.exe“ auf der CD doppelklicken, um das Menü einzublenden.
ii) Am Mac: Doppelklicke zum Installieren auf „Deckadance.mpkg installieren“.
Bitte schließe die Installation mit den Anweisungen auf dem Bildschirm ab. Du wirst aufgefordert, die
Seriennummer der Software einzugeben. Die Seriennummer findest du auf der Hülle der CD. Wenn du
mit Windows arbeitest, installiere bitte auch die ASIO4ALL-Audiotreiber; diese findest du als
Installationsoption in Deckadance LE.
Neuste Softwareaktualisierungen findest du be www.djtechpro.com
und www.deckadance.com.
2. Schließe DJ FOR ALL, Amplink-USB-Audiokabel, Lautsprecher und DJH-100 wie in Abschnitt B
beschrieben an. Schalte DJ For All und die Lautsprecher ein.
Hinweis: Wenn du einen USB-Hub benutzt, achte darauf, dass es sich um einen aktiven Hub (mit eigener
Stromversorgung) handelt – dies kann so manches Problem schon lösen, bevor es überhaupt auftritt.
3. Audiokonfiguration am PC (im folgenden Beispiel nutzen wir Windows XP)
1. Öffne Deckadance LE und klicke auf „Audio“.
2. Wähle „ASIO“ als Audiotreiber.
3. Wähle „ASIOALL“ als Audioschnittstelle.
4. Klicke auf „Bedienfeld“ – das
AISO4ALL-Bedienfeld erscheint.
5. Schalte durch Anklicken zu den „Erweiterten
Optionen“ um.
6. Aktiviere Amplink („USB-Audiogerät“) und die
Soundkarte deines Computers (in unserem
Beispiel: SigmaTel Audio) Schließe das
ASIO4ALL-Bedienfeld und starte die
Deckadance LE-Software neu.
7. Öffne die Deckadence
LE-Audioeinstellungen noch einmal. Wähle bei den Ausgängen die Option „Intern mischen“.
8. Wähle Amplink (Audiogerät 1 & 2) als Haupt-, die Computer-Soundkarte (in unserem Beispiel
SigmaTel Audio 1 & 2) als Kopfhörerausgang. Die Audiokonfiguration ist damit erledigt! Weitere
Informationen findest du in der ASIO4ALL- und in der Deckadance-Anleitung.
C. DJ For All benutzen
13
ENGLISH
DEUTSCH FRANÇAIS
ESPAÑOL
DUTCH
ITALIANO
Page 15
4. Audiokonfiguration am Max (im folgenden Beispiel nutzen wir Mac OSX 10.6) Wechsele zu
„Anwendungen“ -> „Werkzeuge“ -> „Audio-MIDI-Einstellungen“. (Die entsprechenden Menüs können
je nach Mac OS-Version anders lauten; in den Audio-MIDI-Einstellungen findest du auch weitere
Hinweise zur Einrichtung.)
1. Füge mit der „+“-Schaltfläche ein
Aggregatgerät hinzu
2. Markiere die Kästchen zur Nutzung von
Amplink (USB-Audiogerät) und den
Integrierten Ausgang
3. Starte Deckadance, rufe die
Audioeinstellungen mit einem Klick auf
„Audio“ auf.
4. Wähle das „Aggregatgerät“ als Audioschnittstelle
5. Wählen den „Internen Mixer“ als Ausgang.
6. Wählen den Integrierten Sound (Ausgänge 1 & 2) als
Kopfhörerausgang, Amplink (Ausgänge 3 & 4) als
Haupt
ausgang. Eventuell musst du die Auswahlen für
Kopfhörer- und Hauptausgang vertauschen. In der
Deckadance-Anleitung findest du weitere Angaben.
5. Wechsele zur Einstellungen-Seite in Deckadance LE und aktiviere EINGANG und AUSGANG von DJ
For ALL (oder: „USB-Audiogerät“).
Rückwand
1. Vorbereitung für Kensington-Schloss -
Standardanschluss zum Diebstahlschutz.
2. Netzteilanschluss - Netzteil hier anschließen. Du
kannst ein Netzteil verwenden, wenn der USB-Port nicht
genug Strom liefern sollte. Bitte nutze nur Netzteile mit
6V-Gleichspannungsausgan.
3. Spannungsumschalter (Adaptor/OFF/USB power) -
Bitte stelle den Schalter auf „Adaptor“ ein, wenn du ein
externes Netzteil anschließt. Wenn du die
USB-Stromversorgung nutzt, stellst du den Schalter auf
„USB power“ ein.
4. USB-Anschluss - Zum Anschluss an den Computer.
5. C.F Curve Control - Zum Anpassen der Crossfader-Kurve: Schnell zum Scratchen, langsamer zum
Mixen.
D. Anschlüsse und Bedienelemente
2
3
51 4
14
ENGLISH
DEUTSCH
FRANÇAIS
ESPAÑOL
DUTCH
ITALIANO
Page 16
Vorderseite
Nachstehend findest du die Funktionen, die du mit DJ For All und Deckadance LE nutzen kannst.
1. Multi-Function Jog Wheel – Depends on the
Jog Wheel mode (No. 15) for Pitch, Scratch,
Search or Effect.
2. DECK EQ (High/ Mid/ Low)
3. PFL Button – PFL (Monitoring) Button for Deck
A/B
4. LOAD Button – Load the selected song to Deck
A/B
5. Master Volume
6. SONG SELECT-Drehregler – Zur Auswahl von
Titeln aus der Songliste durch simples Drehen.
Beim Drücken des Reglers wird der ausgewählte
Titel kurz angespielt.
7. Lautstärke-Fader
8. SHIFT-Taste – Zum Auslösen erweiterte
Funktionen gedrückt halten und andere
Bedienelemente betätigen. Bitte schau dir dazu
die Elemente 9 und 15 an.
9. Multifunktionstasten – Unterschiedliche
Funktionen; je nach Modus (Nr. 10):
i) CUE
– Zur Auswahl von Cue 1 bis 4. Mit SHIFT
und diesen Tasten legst Du das Cue fest.
ii) LOOP – Drücken und halten: Autoloop der
Längen 1:16, 1:8, 1:4 oder 1:2 aktivieren. Mit
SHIFT und diesen Tasten schaltest du Autoloop
ein und aus. Die Loop-Länge stellst du ein,
wenn du das Jog Wheel bei gedrückter
SHIFT-Taste drehst.
iii) SAMPLE
– Zum Abspielen eines Samples
(Slots 1 bis 4 bei Deck a, Slots 5 bis 8 bei Deck
B) gedrückt halten. Mit SHIFT und diesen
Tasten schaltest Du zwischen Abspielen und
Pause um.
10. Modustaste –Mit diesen Tasten wählst du
unterschiedliche Modi (Cue, Loop und
Sample)
der Multifunktionstasten (Nr. 9) aus.
11. SYNC-Taste
12. Wiedergabetaste
13. Wiedergabetaste
14. Crossfader
15. Jog-Modus-Tasten – Zur Auswahl von Search-,
Scratch- und Effect-Modi, die mit dem Jog
Wheel (Nr. 1) gesteuert werden können:
i) Wenn keine der drei Tasten gedrückt ist,
befindet sich das Jog Wheel im Pitch-Modus.
ii) Bei aktivem EFFECT-Modus wird der Effekt für
Deck A/B automatisch eingeschaltet. Bei
inaktivem EFFECT-Modus wird der Effekt für
Deck A/B abgeschaltet.
Mit den Deck A- und Deck B-Jog Wheels
steuerst du die X- und Y-Parameter beider
Decks.
iii) Im SEARCH-modus kannst du mit dem Jog
Wheel schnell durch den Titel spulen.
iv) Im SCRATCH-Modus kannst du mit dem Jog
Wheel Scratch-Effekte im Titel auslösen.
16. EFFECT SELECT-Tasten – Zur Auswahl
unterschiedlicher Effekte für Deck A/B.
1 2 3 54 6 7
8 9 10 11 12 13 14 15 16
15
ENGLISH
DEUTSCH FRANÇAIS
ESPAÑOL
DUTCH
ITALIANO
Page 17
1. Lees deze voorschriften.
2. Bewaar deze voorschriften.
3. Houd rekening met alle waarschuwingen.
4. Volg alle voorschriften.
5. Gebruik het toestel niet in de nabijheid van water.
6. Reinig enkel met een droge doek.
7. Blokkeer de ventilatie-openingen niet. Installeer volgens de instructies van de fabrikant.
8. Niet installeren in de nabijheid van warmtebronnen zoals radiatoren, warmteroosters, ovens of andere
toestellen (inclusief versterkers) die warmte produceren.
9. Houd rekening met de veiligheidsdoelstelling van de gepolariseerde stekker. De brede pin is voorzien
voor uw veiligheid Als de meegeleverde stekker niet in uw stopcontact past, raadpleeg dan een
elektricien voor vervanging van het verouderde stopcontact.
10. Bescherm de stroomkabels tegen vertrappelen of belemmeren, vooral aan de stekkers, stopcontacten
en het punt waar ze uit het toestel komen.
11. Gebruik enkel hulpstukken/toebehoren die door de fabrikant gespecificeerd worden.
12. Enkel gebruiken met een door de fabrikant gespecificeerde of met het toestel meegeleverde kar, steun,
drievoet, plank of tafel. Als er een kar wordt gebruikt, wees dan voorzichtig als u het toestel verplaatst in
een kar/toestel-combinatie om letsels door omkantelen te vermijden.
13. Trek het toestel uit tijdens onweersbuien of als het toestel gedurende lange tijd niet wordt gebruikt.
14. Laat alle onderhoud over aan bevoegd onderhoudspersoneel. Onderhoud is nodig wanneer het toestel
op een of andere manier beschadigd is, bijvoorbeeld door een beschadigde voedingskabel of stekker,
als er vloeistof op het toestel gemorst is of er voorwerpen ingevallen zijn, als het toestel werd
blootgesteld aan regen of vocht, niet normaal werkt of gevallen is.
15. De hoofdstekker wordt gebruikt als ontkoppeling en moet dus steeds toegankelijk blijven.
16. Plaats het toestel in een goed geventileerde ruimte.
WAARSCHUWING
Stel het toestel niet bloot aan regen of vocht om het risico op brand of elektrische schok te vermijden. Dit
apparaat mag niet worden blootgesteld aan vochtdruppels of spatwater en er mogen geen voorwerpen gevuld
met vloeistoffen, zoals vazen, op het product worden geplaatst.
WAARSCHUWING: Geen beschermingen verwijderen om het risico
op elektrische schok te verminderen. Geen door de gebruiker te
repareren onderdelen. Laat onderhoud enkel over aan bevoegd
personeel. WAARSCHUWING Niet openen, risico op elektrische
schokken
Het symbool van een driehoek met een bliksemschicht die eindigt op een pijl is bedoeld om de
gebruiker te waarschuwen voor de aanwezigheid van ongeïsoleerde “gevaarlijke spanning” in het
product die van zulke omvang kan zijn dat het een risico op elektrische schok vormt.
De gelijkzijdige driehoek met het uitroepteken is bedoeld om de gebruiker te waarschuwen voor de
aanwezigheid van belangrijke bedienings- en onderhoudsvoorschriften in de documentatie die bij dit
toestel hoort.
OPGEPAST
Om elektrische schok te vermijden, de gepolariseerde stekker niet gebruiken met een verlengkabel, stopcontact
of andere ontvanger, tenzij de pinnen er helemaal kunnen ingestoken worden zodat er geen blootstelling van de
pinnen is.
VEILIGHEIDSINSTRUCTIES
16
ENGLISH
DEUTSCH
FRANÇAIS
ESPAÑOL
DUTCH
ITALIANO
CAUTION
RISK OF ELECTRIC SHOCK
DO NOT OPEN
Page 18
- Hartelijk dank voor uw aankoop van de DJ For ALL! -
Welkom bij de DJ For All – een plezierige en eenvoudige manier om DJ te spelen op uw computer voor MAC
of PC.
Installeer eenvouig de Deckadance DJ Software op de bijgevoegde CD, verbind de DJ For All met uw
computer en je kan aan de slag met mixing en scratching net als een echte DJ.
DJ For All werkt met al uw MP3’s en andere muziek op uw computer (inclusief WAV, OGG, iTunes Playlist),
het is eenvoudig in gebruik en de perfecte manier om het vak van DJ te leren.
DJ For All heeft 2 Giant Jog Wheels waarmee u de functies pitch, scratch en zoeken bedient en de
ongelooflijke effects in real time controleert!
Met de 4 veelzijdige functietoetsen heeft u directe controle over autoloops, samples starten en cues
lanceren. Dankzij het zorgvuldig gekozen rubber en silicoon, ervaart u het duurzame en reactieve gevoel.
Het pakket DJ For All beat een Amplink USB Audiokabel en een DJH-100 DJ koptelefoon. U heeft een
volledige monitoringfunctie zonder bijkomend materiaal.
Dit document bevat de volgende hoofdstukken:
A – Minimale systeemvereisten
B – DJ For All aansluiten
C – DJ For All gebruiken
D – Functies achter- en bovenpaneel
E – Specificaties
PC:
MAC:
• Windows XP (SP2)/ Windows Vista/ Windows 7
• Intel Pentium III 1GHz of Athlon XP 1,4GHz
• CD-ROM Drive
• 512MB RAM, 200MB vrije ruimte
• DirectSound of ASIO compatibele geluidskaart
• USB-poorten x 2
• OSX V10.4 (Universal Binary)/ 10,5/ 10,6
• G4 1,5GHz of Intel Core Duo Family
• CD-ROM Drive
• 512MB RAM, 200MB vrije ruimte
• Geluidskaart met CoreAudio drivers
• USB-poorten x 2
1. Sluit de DJ For All, Amplink USB Audiokabel en DJH-100 koptelefoon aan zoals hieronder getoond:
INLEIDING
Inhoud van de doos:
► DJ For All x 1
► USB-kabel x 1
► DJH-100 DJ koptelefoon x 1
► Amplink USB Audiokabel x 1
► Deckadance LE Setup CD x 1
► Handleiding x 1
A. Minimale systeemvereisten
B. DJ For All aansluiten
Luidsprek er s
(niet meege le verd)
RCA
Computer
(niet meege le verd)
3,5 mm Jack
Amplink USB a ud iokabel
17
ENGLISH
DEUTSCH FRANÇAIS
ESPAÑOL
DUTCH
ITALIANO
Page 19
2. Wanneer de DJ For All werd aangesloten aan de computer, gaan de rode SAMPLE LED’s op het toestel
aan. En wanneer de Amplink USB Audiokabel aangesloten wordt op de USB-poorten van de computer,
gaat de LED in het midden van de kabel aan. De driver wordt automatisch geïnstalleerd. Extra drivers
zijn niet nodig.
U vindt 2 USB Audiotoestellen aangesloten op uw computer als volgt:
Windows XP: Controlepaneel -> Klank en geluid Mac OSX 10,6: Toepassing -> Functies -> Audio MIDI Setup
1. Plaats de Deckadance LE Setup CD in de computer CD-ROM.
i) Voor PC, klik op “INSTALL DECKADANCE” in het Autorun menuscherm of dubbelklik op “Menu.exe”
in het CD-menu om de installatie te starten.
ii) Voor Mac, dubbelklik op “Install Deckadance.mpkg” om de installatie te starten.
Volg de instructies op het scherm tot de installatie afgerond is. U krijgt de vraag het serienummer van de
software in te geven. Dit serienummer vindt u op de papieren houder van de Setup CD. Voor Windows
moet ook de ASIO4ALL audiodriver geïnstalleerd worden, die vindt u in de Deckadance LE installatie
opties.
Zie www.djtechpro.com
en www.deckadance.com voor de meest recente software update.
2. Sluit de DJ FOR ALL, Amplink USB Audiokabel, speakersysteem en DJH-100 aan zoals in hoofdstuk B.
Schakel de DJ For All en de luidsprekers aan.
Opmerking: als u een USB-Hub gebruikt voor de aansluiting, raden we aan een USB-hub onder stroom te
gebruiken om de stabiliteit van de setup te garanderen.
3. Audioconfiguratie (voor PC) (Hieronder getoond in Windows XP)
1. Open Deckadance LE en klik op “AUDIO”
2. Kies “ASIO” voor de Audio Driver
3. Kies “ASIO4ALL” voor Audio Interface
4. Klik op “Control Panel” om het AISO4ALL
paneel te tonen
5. Klik op de toets om de “Advance Options”
te tonen
6. Schakel de Amplink in (“USB Audio
Device”) en de geluidskaart van uw
computer (SigmaTel Audio in dit voorbeeld).
Sluit het ASIO4ALL paneel en herstart de
Deckadance LE software.
7. Open de Deckadance LE AUDIO SETUP.
Kies “Internal Mixing” in de OUTPUTS.
8. Kies de Amplink (Sound Device 1 & 2) voor
MAIN, en Computer geluidskaart (SigmaTel Audio 1 & 2 in dit voorbeeld) voor Koptelefoon output.
Audioconfiguratie is klaar! Zie de ASIO4ALL en Deckadance handleidingen voor meer informatie.
C. DJ For All gebruiken
18
ENGLISH
DEUTSCH
FRANÇAIS
ESPAÑOL
DUTCH
ITALIANO
Page 20
4. Audioconfiguratie (voor MAC) (Hieronder getoond in Mac OSX 10,6): Ga naar “Toepassingen” →
“Functies” → “Audio Midi Setup”: (voor andere versies van Mac OS zie de Help van Audio MIDI
setup om deze instellingen uit te voeren)
1. Klik op de “+” toets om een Aggregate
Device toe te voegen
2. Vink aan: Amplink (USB Sound Device) en
Built-in Output
3. Open Deckadance en kli op “AUDIO
” voor de
Audio setup
4. Kies “Aggregate Device” voor Audio Interface
5. Kies “Internal Mixer” voor Outputs
6. Kies de ingebouwde Sound (output 1 & 2) voor
Koptelefoon output en Amplink (output 3 & 4) voor
Main output. Eventueel moet u de selectie voor
Koptelefoon en Main omwisselen als deze
omgekeerd zijn. Zie de
Deckadance handleiding voor
meer informatie.
5. Ga naar de SETUP pagina van Deckadance LE en schakel de INPUT en OUTPUT van DJ For ALL in
(of “USB Audio Device”).
Achterpaneel
1. Kensington Lock - Standaard verbinding als
diefstalbeveiliging.
2. Stroomaansluiting - Plaats de netwerkadapter hier. DC
adaptor kan worden gebruikt als de USB-poort
onvoldoende stroom levert aan het toestel. Gebruik
uitsluitend een 6V DC-adapter.
3. AAN/UIT knop (Adapter / UIT / stroom USB) - zet deze
schakelaar op adapter wanneer een externe DC-adapter gebruikt wordt. Zet op USB wanneer de stroom
geleverd wordt via de USB van de computer.
4. USB-ingang - Gebuikt om de computer aan te sluiten.
5. C.F Curvecontrole - Wijzigt de vorm van de crossfadercurve van een snelle cut voor scratching of naar
een langere fade voor mixen.
D. Functies bovenpaneel
2
3
51 4
19
ENGLISH
DEUTSCH FRANÇAIS
ESPAÑOL
DUTCH
ITALIANO
Page 21
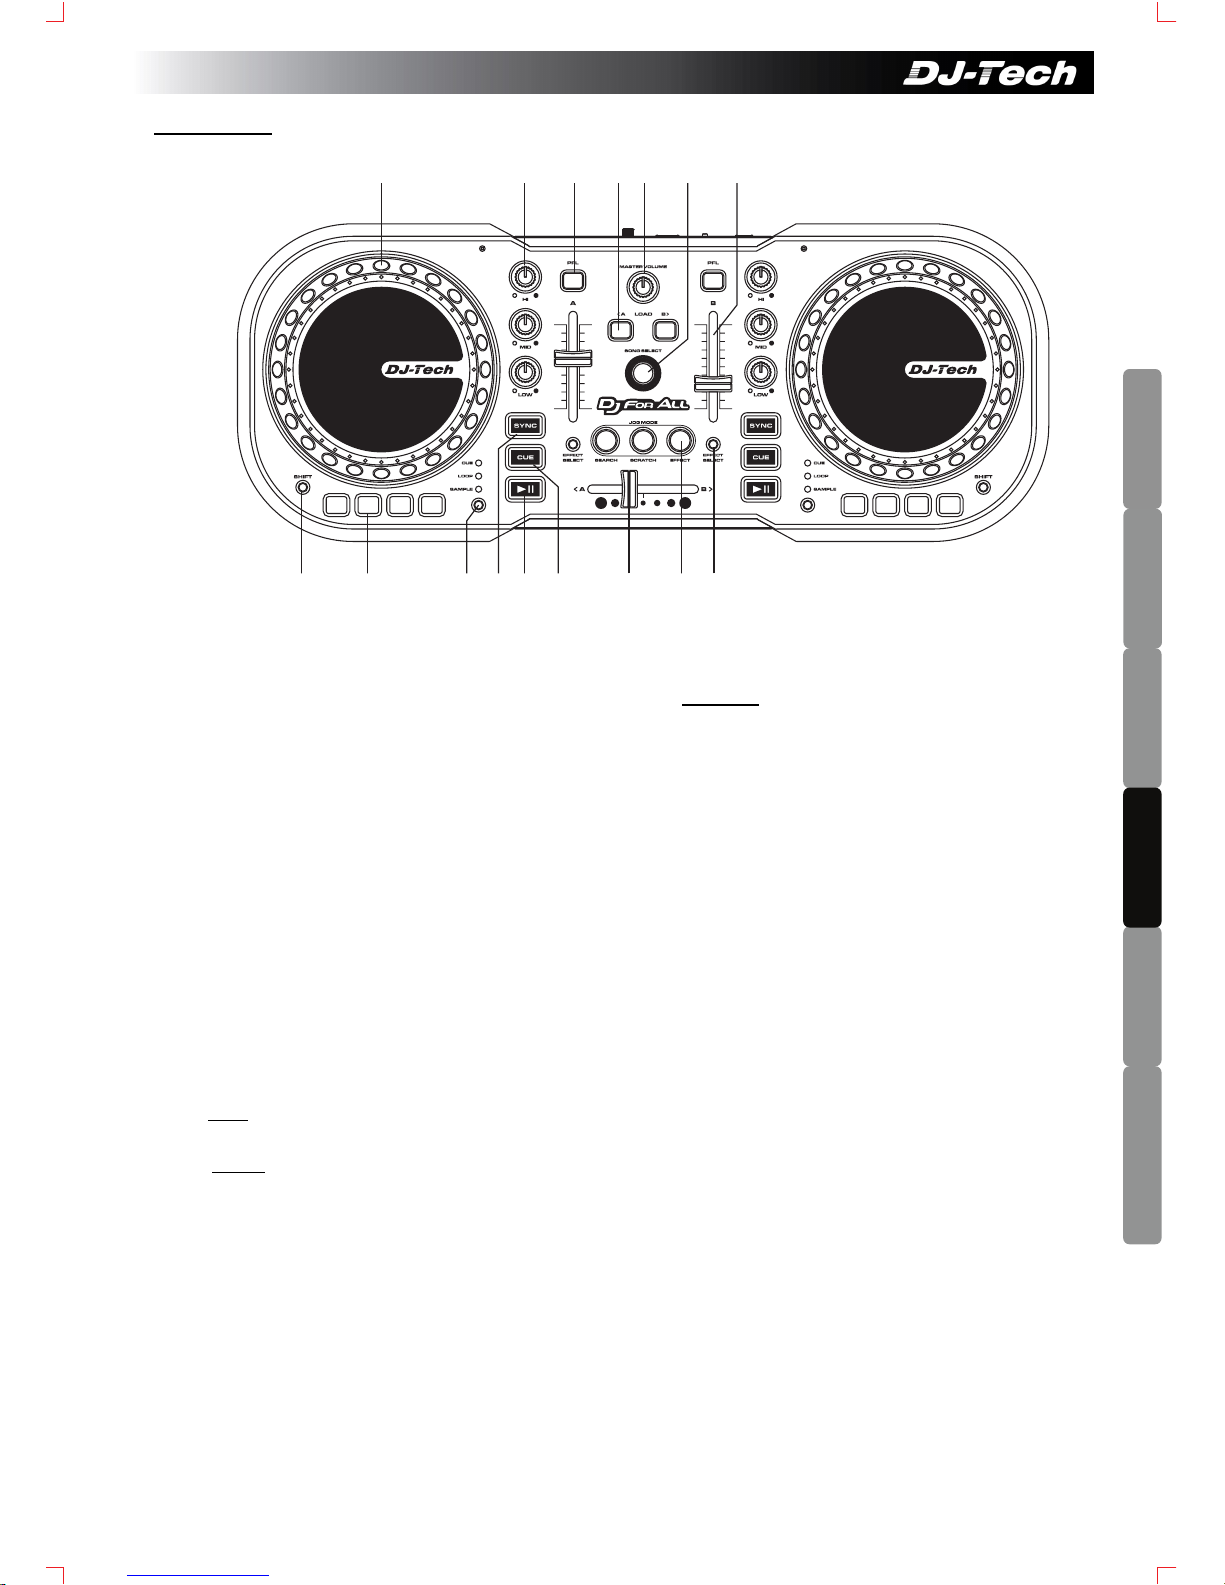
Bovenpaneel
Zie onderstaand voor het gebruik van de DJ For All en Deckadance LE
1. Multifunctioneel Jog Wiel – Afhankelijk van de
Jog Wiel modus (No. 15) voor Pitch, Scratch,
Search of Effect.
2. DECK EQ (High/ Mid/ Low)
3. PFL Toets – PFL (Monitoring) toets voor Deck A/B
4. LOAD toets – Laadt het gekozen nummer naar
Deck A/B
5. Mastervolume
6. TRACK SELECT Encoder –
draai om tracks in de
lijst te selecteren. Druk voor een preview van de
gekozen track.
7. VOLUME Fader
8. SHIFT toets –
Houd ingedrukt met andere toetsen
voor uitgebreide functies. Zie nrs. 9 en 15.
9. Multifunctionele toetsen – Hangt af van de
gekozen modus (Nr. 10):
i) CUE – Druk om Cue 1 tot 4 te kiezen. Druk op
SHIFT en deze toetsen om de Cue in te stellen.
ii) LOOP – Houd ingedrukt om de Autoloop in te
stellen op 1:16, 1:8, 1:4 of 1:2. Druk op SHIFT
en deze toetsen om de Autoloop aan of uit te
schakelen. Druk op
SHIFT en draai aan het Jog
Wiel om de lengte van de loop te wijzigen.
iii) SAMPLE
– Houd ingedrukt om de sample te
spelen (slot 1 tot 4 voor deck A en slot 5 tot 8
voor deck B). Druk op SHIFT en deze toetsen
om SAMPLE te pauzeren/starten.
10. MODE SELECT Toets – Druk in om
verschillende modi te kiezen (CUE, LOOP en
SAMPLE) voor de multifunctionele toetsen (Nr.
9)
11. SYNC toets
12. PLAY toets
13. CUE toets
14. CROSSFADER
15. Jog Wheel Mode Buttons – Druk in om te
kiezen tussen SEARCH, SCRATCH en
EFFECT modi voor het Jog Wie (Nr. 1):
i) Wanneer alle 3 de toetsen uit zijn, is het Jog
Wiel in PITCH modus.
ii) Is EFFECT aan, dan wordt het effect voor Deck
A/B automatisch ingeschakeld. Staat EFFECT
uit, dan wordt het effect voor Deck A/B
automatisch uitgeschakeld.
Gebruik de Deck A en B Jog Wielen om de X en
Y parameters van beide decks te bedienen.
iii) In de SEARCH-modus kunt u het Jog Wiel
draaien om snel binnen de track te zoeken
iv) In SCRATCH-modus kunt u het Jog Wiel
draaien om te scratchen binnen de track.
16. EFFECT SELECT Toetsen – druk in om
verschillende effecten te kiezen voor Deck A/B.
1 2 3 54 6 7
8 9 10 11 12 13 14 15 16
20
ENGLISH
DEUTSCH
FRANÇAIS
ESPAÑOL
DUTCH
ITALIANO
Page 22
1. Lea estas instrucciones.
2. Conserve estas instrucciones.
3. Respete todas las advertencias.
4. Siga todas las instrucciones
.
5. No use este aparato cerca de fuentes de agua.
6. Límpielo únicamente con un paño seco.
7. No bloquee las rejillas de ventilación. Instale el aparato siguiendo las instrucciones del fabricante.
8. No lo instale cerca de fuentes de calor, como radiadores, calefactores, estufas u otros aparatos (incluidos
los amplificadores) que emitan calor.
9. No retire el dispositivo de seguridad del enchufe polarizado. La clavija más ancha garantiza su seguridad.
Si el enchufe suministrado no es compatible con su toma de corriente, acuda a un electricista para que
remplace dicha toma.
10. Proteja el cable de alimentación de forma que no se pise o pellizque. Preste especial atención a los
enchufes, tomas de corriente y al punto de conexión del aparato.
11. Utilice únicamente los accesorios especificados por el fabricante.
12. Use el aparato únicamente con un carro, soporte, trípode o mesa especificados por el fabricante o
vendidos con el aparato. Si usa un carro para transportar el aparato, tenga cuidado al desplazarlo para
evitar que se caiga y se produzcan daños.
13. Desenchufe el aparato durante las tormentas o si no va a utilizarlo durante un periodo de tiempo
prolongado.
14. Para las operaciones de mantenimiento, póngase en contacto con personal técnico cualificado. Se
requiere reparación cuando el aparato haya sufrido daños de alguna manera, como daños en el cable de
alimentación, en el enchufe u objetos que hayan caído dentro del aparato, se haya caído líquido dentro, el
aparato haya estado expuesto a lluvia o humedad, no funcione normalmente o se haya caído.
15. El acceso al enchufe debe permanecer despejado durante el uso del aparato.
16. Mantenga el aparato en un entorno con buena ventilación.
ADVERTENCIA
Para reducir el riesgo de incendio o de descarga eléctrica, no exponga este aparato a la lluvia o la humedad. No
exponga el aparato a goteos o salpicaduras ni coloque objetos llenos de líquido, como jarrones, encima del
aparato.
ATENCIÓN: Para reducir el riesgo de descarga eléctrica, no
desmonte el aparato. En su interior no hay ninguna pieza que pueda
ser reparada por el usuario. Para las operaciones de mantenimiento,
póngase en contacto con el personal técnico cualificado.
El símbolo de un rayo dentro de un triángulo equilátero advierte al usuario de la presencia de “voltaje
peligroso” no aislado en el interior del aparato, de una magnitud suficiente como para constituir
riesgo de descarga eléctrica.
El signo de exclamación dentro de un triángulo equilátero alerta al usuario de la existencia de
instrucciones importantes de funcionamiento y mantenimiento en la documentación que acompaña
al aparato.
ATENCIÓN
Para evitar el riesgo de descarga eléctrica, no utilice el enchufe polarizado con un cable extensor, una toma de
corriente o cualquier otra toma, a menos que las clavijas del enchufe puedan introducirse completamente.
INSTRUCCIONES DE SEGURIDAD
CAUTION
RISK OF ELECTRIC SHOCK
DO NOT OPEN
21
ENGLISH
DEUTSCH FRANÇAIS
ESPAÑOL
DUTCH
ITALIANO
Page 23
¡Muchas gracias por adquirir DJ For ALL! -
Bienvenido a DJ For All – Una manera fácil y divertida de mezclar en su ordenador MAC o PC.
Simplemente instale el software de Deckadance DJ del CD que va incluido, conecte DJ For All a su
ordenador, y puede empezar a mezclar y a scratchear como un DJ de verdad.
DJ For All funciona con todos sus archivos MP3 y otros formatos de música en su ordenador (incluyendo
WAV, OGG, iTunes Playlist), es fácil de utilizar y la manera perfecta para aprender a mezclar.
¡DJ For All tiene 2 ruedas jog con las que puede controlar el pitch, scratchear, buscar y controlar los efectos
increíbles en tiempo real!
Los cuatro botones multifunción le permitirán activar los autobucles, reproducir muestras y reproducir hot
cues. Gracias al material de silicona que se ha escogido atentamente, puede disfrutar de una sensibilidad
receptiva y duradera.
El pack DJ For All incluye un cable de audio USB y unos cascos DJH-100 DJ. Puede disfrutar de una
completa función de control sin ningún equipo extra.
El documento está organizado en las siguientes secciones:
A – Requisitos mínimos del sistema
B – Conexión de DJ For All
C – EMPEZAR a utilizar DJ For All
D – Características del panel superior y
trasero
E – Especificaciones técnicas
PC:
MAC
‧
Windows XP (SP2)/ Windows Vista/ Windows 7
‧
Intel Pentium III 1GHz o Athlon XP 1.4GHz
‧
Unidad de CD-ROM
‧
512MB RAM, espacio libre: 200MB
‧
Tarjeta de sonido compatible con DirectSound o
ASIO
‧
Puertos USB x 2
‧
OSX V10.4 (Universal Binary)/ 10.5/ 10.6
‧
G4 1.5GHz o Intel Core Duo Family
‧
Unidad de CD-ROM
‧
512MB RAM, espacio libre: 200MB
‧
Tarjeta de sonido con unidades Core Audio
‧
Puertos USB x 2
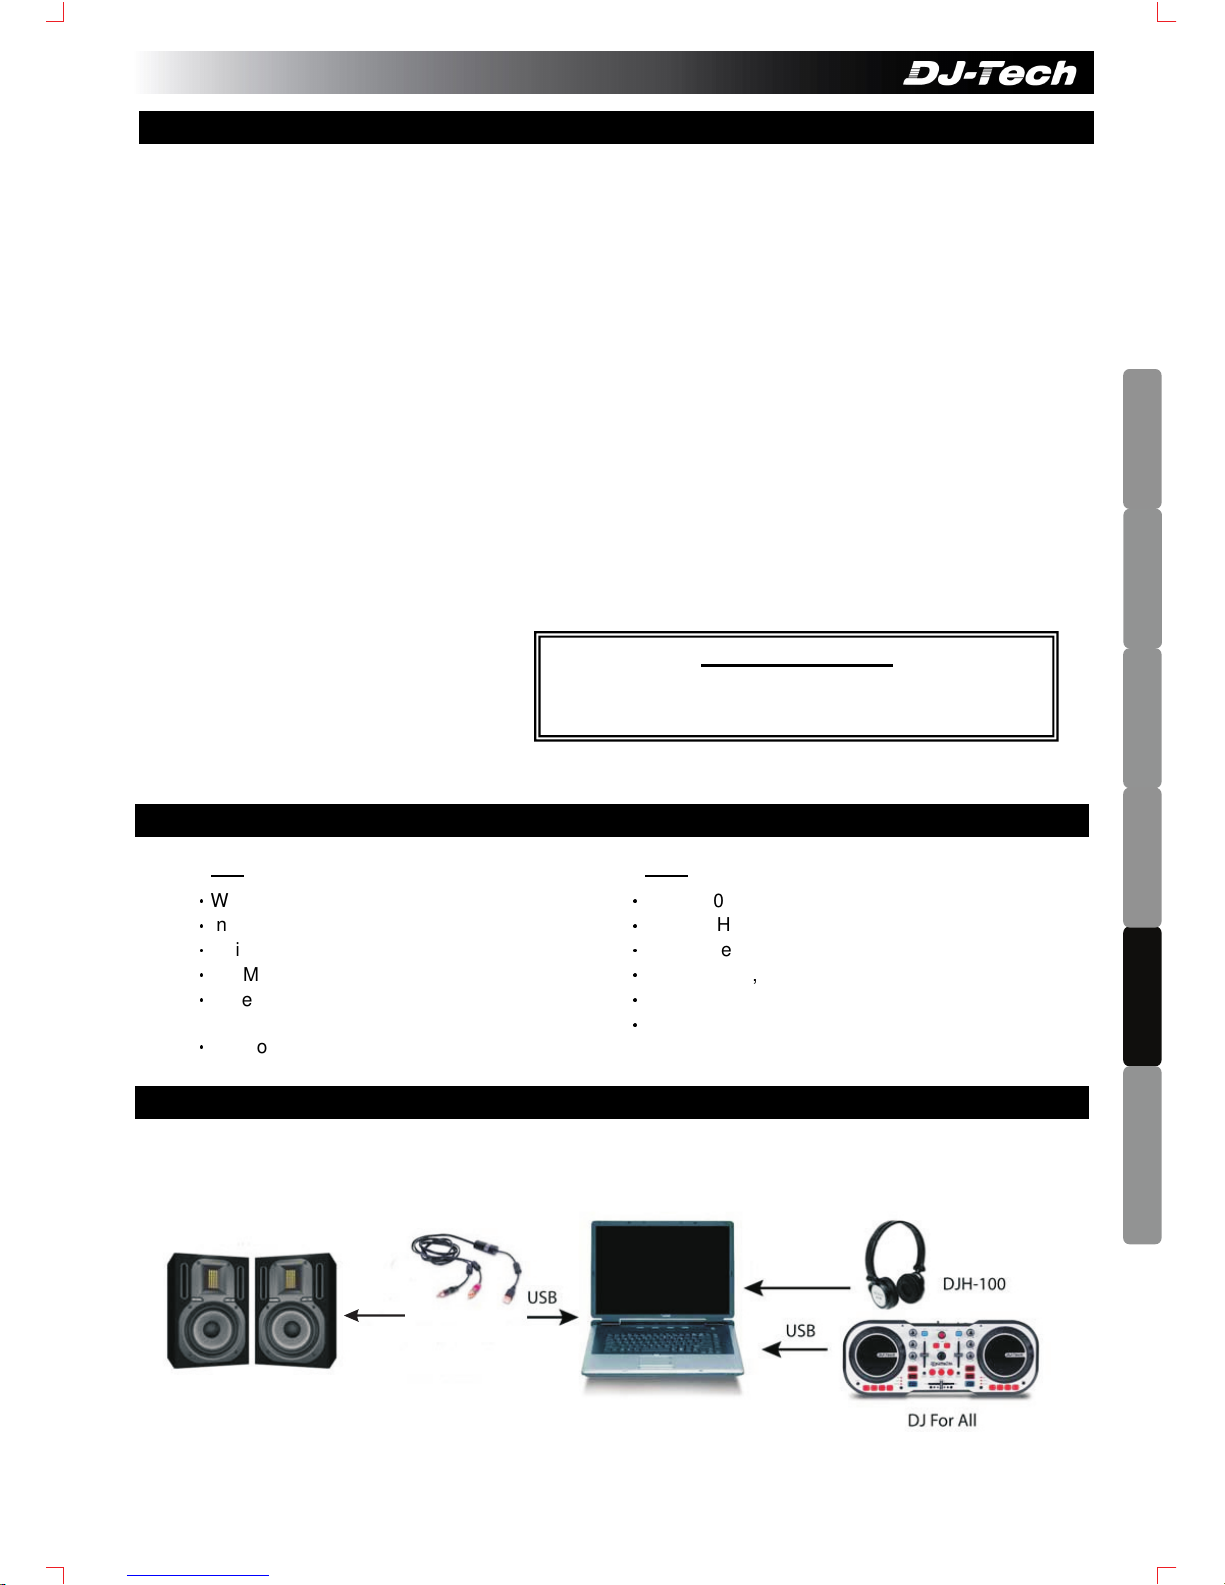
1. Conecte DJ For All, el cable de audio Amplink y los cascos DJH- 100 como se muestra a continuación:
Introducción
Contenido de la caja:
► DJ For All x 1p
► Cable USB x 1
► Cascos DJH-100 DJ x 1
► Cable Amplink USB Audio x 1
► CD de instalación Deckadance LE x 1
► Manual de instrucciones x 1
A. Requisitos mínimos del sistema
B. Conexión de DJ For All
22
ENGLISH
DEUTSCH
FRANÇAIS
ESPAÑOL
DUTCH
ITALIANO
Altavoces
(No incluid os )
RCA
Ordenador
(No incluid o)
Toma de 3.5 mm
Cable USB de au di o Amplink
Page 24
2. Cuando conecte DJ For All al ordenador, los indicadores LED se iluminarán en rojo. Y; cuando conecte
el cable de audio Amplink a los puertos USB del ordenador, se iluminará el indicador LED que se
encuentra en medio del cable. Los drivers se instalarán automáticamente. No necesita ningún driver
extra.
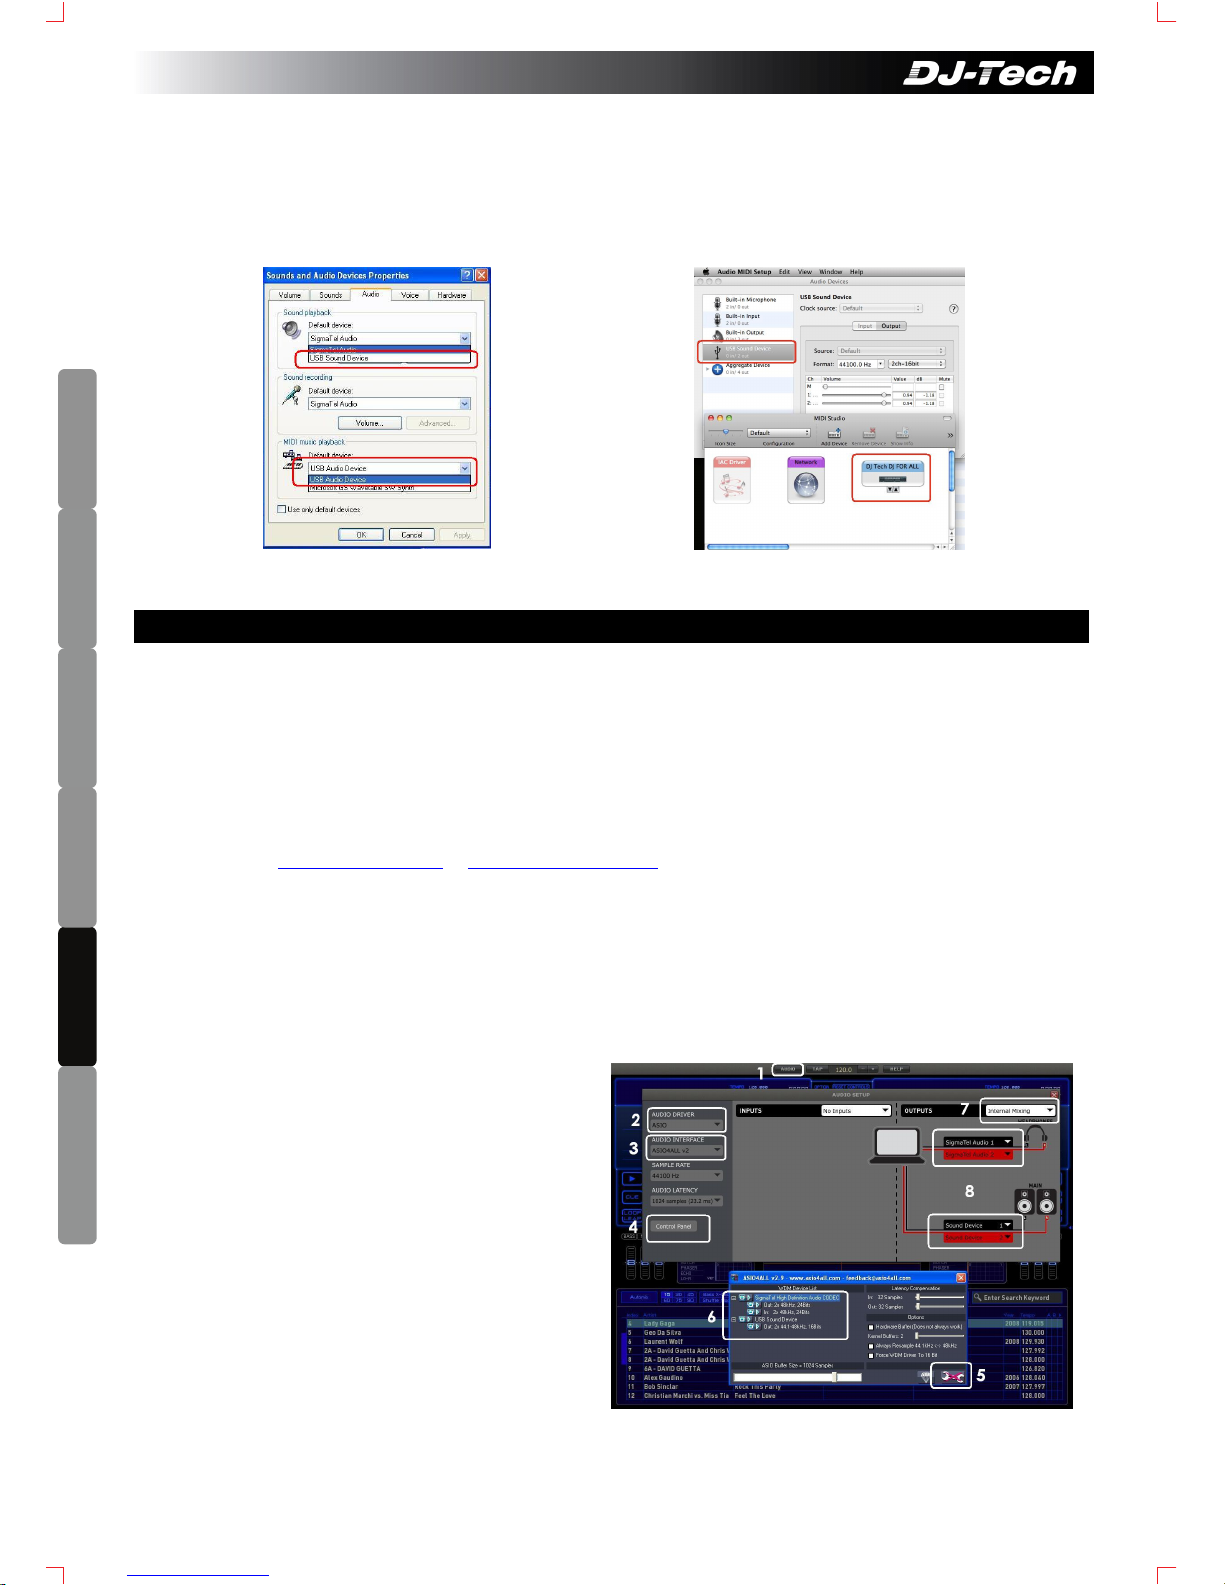
Debería encontrar 2 dispositivos USB de audio conectados a su ordenador como se indica a
continuación:
Windows XP: Panel de Control -> Dispositivos de sonido y
audio
Aplicación Mac OSX 10.6 -> Utilidades -> Configuración de
Audio MIDI
1. Introduzca el CD de instalación Deckadance LE en CD-ROM del ordenador.i) Para PC, haga clic en
“INSTA
LL DECKADANCE” en la pantalla del menú de ejecución automática o haga doble clic en
"Menu.exe" dentro del contenido del CD para iniciar el menú.ii) Para Mac, haga doble clic en “Install
Deckadance.mpkg” para instalarlo.
Siga las instrucciones de la pantalla para finalizar la instalación. Se le pedirá que introduzca el número de
serie del software. El número de serie se encuentra en la funda de papel del CD de instalación. Para
Windows, instale también la unidad de audio ASIO4ALL. Está disponible en la opción de instalación
Deckadance LE.
Consulte www.djtechpro.com y www.deckadance.com para las últimas actualizaciones de software.
2. Conecte DJ FOR ALL, el cable de audio USB Amplink, los altavaces y loscascos DJH- 100 como se
indica en la Sección B. Encienda DJ For All y los altavoces.
Nota: Si está utilizando una conexión USB, le recomendamos que utilice un dispositivo USB con
alimentación propia para asegurar la correcta configuración.
3. Configuración de Audio (Para PC) (Indicado a continuación en Windows XP)
1. Abra Deckadance LE y haga clic en “AUDIO”
2. Seleccione “ASIO” como unidad de audio
3. Seleccione “ASIO4ALL” como interfaz de
audio.
4. Haga clic en “Panel de control” para
visualizar el panel ASIO4ALL.
5. Haga clic en el botón para cambiar a
“Opciones avanzadas”
6. Active el Amplink (“Dispositivo USB de
Audio”) y la tarjeta de sonido de su
ordenador (Sigma Tel Audio en este
ejemplo). Cierre el panel ASIO4ALL y
reinicie el software Deckadance LE.
7. Abra de nuevo la CONFIGURACIÓN DE
AUDIO LE Deckadance. Seleccione
“Internal Mixing” en OUTPUTS.
C. Empezar a utilizar DJ For All
23
ENGLISH
DEUTSCH FRANÇAIS
ESPAÑOL
DUTCH
ITALIANO
Page 25
8. Seleccione Amplink (Dispositivo de sonido 1 & 2) para MAIN; y la tarjeta de sonido (Sigma Tel
Audio 1 & 2 en este ejemplo) para la salida Headphones. ¡Configuración de audio finalizada!
Consulte el manual ASIO4ALL y el manual Deckadance para más información.
4. Configuración de Audio (para MAC) (Indicada a continuación en Mac OSX 10.6): Vaya a
“Aplicaciones”
→
“Utilidades” → “Configuración de Audio Midi”:(Para otras versiones de Mac
OS consulte la sección Help de configuración de Audio MIDI para efectuar la configuración)
1. Haga clic en el botón “+” para añadir un
Dispositivo agregado
2. Marque las casillas para utilizar Amplink
(dispositivo de sonido USB) y Built-in
Output
3. Abra Deckadance y haga clic en “AUDIO”
para la configuración de audio.
4. Seleccione “Aggregate Device”como interfaz de
audio.
5. Seleccione “Internal Mixer” para salidas
6. Seleccione Built-
in Sound (salida 1 & 2) para la salida
Headphones Amplink (salida 3 & 4) para la salida
Main. Es posible que tenga que intercambiar la
selección para Headphones y Main si éstas se
invierten. Consulte el manual Deckadance para más
información.
5. Vaya a la página de CONFIGURACIÓN de Deckadance LE y active la ENTRADA y la SALIDA de DJ
For ALL (o “Dispositivo USB de audio”)
Panel trasero
1. Conector de seguridad Kensington – Conexión
estándar antirobo.
2. Conexión a la corriente eléctrica – Conecte el
adaptador de corriente aquí. Si el puerto USB no puede
suministrar a la unidad la energía suficiente, utilice el
adaptador de red. Utilice únicamente un adaptador CC
de 6V.
3. Conmutador de encendido (Adaptor / OFF/ USB power) – Desplace el conmutador a la posición
adaptor cuando utilice un adaptador CC externo. Desplácelo a la posición USB power cuando utilice el
ordenador como fuente de alimentación a través del puerto USB.
4. PUERTO USB – Para conectar un ordenador.
5. Rueda C.F. CURVE – Permite ajustar la forma de la curva del crossfader: corte rápido para el efecto
scratch y atenuación prolongada para la fase de mezcla
D. Características del panel superior
2
3
51 4
24
ENGLISH
DEUTSCH
FRANÇAIS
ESPAÑOL
DUTCH
ITALIANO
Page 26
Panel superior
Consulte lo que viene a continuación para utilizar DJ For All y Deckadance LE
1. Rueda jog multifunción -
Depende del modo Jog
Wheel (N°15) para Pitch, Scratch, Search o Effect.
2. Ecualizador del plato (alto/medio/bajo)
3. Botón PFL - PFL (Regulador) Botón para plato
A/B
4. Botón LOAD - Cargue la canción seleccionada
en el plato A o en el plato B
5. Volumen master
6. Rueda de selección de pistas - Gire la rueda
para seleccionar pistas en la lista de canciones.
Pulse para escuchar la canción seleccionada.
7. Regulador VOLUME Fader
8. Botón SHIFT -
Púlselo y manténgalo pulsado con
otros controles para activar otras funciones.
Consulte los puntos N°9 y N°15.
9. Botones multifunción - Depende del modo
seleccionado (N°10):
i) CUE – pulse para seleccionar del Cue 1 al Cue
4. Pulse SHIFT y estos botones para fijar el
Cue.
ii) LOOP – Púlselo y mántengalo pulsado para
activar el Autoloop con extensión 1:16, 1:8; 1:4
o 1:2. Pulse SHIFT y estos botones para act
ivar
o desactivar el Autoloop. Pulse SHIFT y gire la
rueda jog para ajustar la extensión del loop.
iii) SAMPLE
–
Púlselo y manténgalo pulsado para
reproducir el sample (slot del 1 al 4 para el
plato A y slot del 5 al 8 para el plato B). Pulse
SHIFT y estos botones para seleccionar
SAMPLE play/pause.
10. Botón MODE SELECT - Pulse para
seleccionar diferentes modos (CUE, LOOP y
SAMPLE) para los botones multifunción (N°9)
11. Botón SYNC
12. Botón PLAY
13. Botón CUE
14. CROSSFADER
15. Botones modo rueda jog - Pulse para
seleccionar los modos SEARCH, SCRATCH y
EFFECT para la rueda jog (N°1):
i) Cuando los 3 botones estén desactivados, la
rueda jog estará en modo PITCH.
ii) Cuando el modo EFFECT esté activado, los
efectos para los platos A/B se activarán
automáticamente. Cuando el modo EFFECT
esté desactivado, los efectos para los platos
A/B se desactivarán automáticamente.
Usa las ruedas jog del plato A y del plato B para
controlar los parámetros X e Y de ambos
platos.
iii) En modo SEARCH, gire la rueda jog para una
búsqueda rápida dentro de la canción.
iV) En modo SCRATCH, gire la rueda jog para
añadir un efecto de rayado a la canción.
16. Botones EFFECT SELECT - Pulse para
seleccionar diferentes efectos para el plato A/B.
1 2 3 54 6 7
8 9 10 11 12 13 14 15 16
25
ENGLISH
DEUTSCH FRANÇAIS
ESPAÑOL
DUTCH
ITALIANO
Page 27
1. Leggete le istruzioni.
2. Conservate le istruzioni.
3. Rispettate tutte le avvertenze.
4. Seguite tutte le istruzioni.
5. Non servitevi dell’apparecchio vicino all’acqua.
6. Per pulire l'apparecchio, utilizzate solo panni asciutti.
7. Non ostruite le aperture di ventilazione. Installate l’apparecchio seguendo le istruzioni del fabbricante.
8. Non collocate il prodotto vicino a fonti di calore quali radiatori, stufe, bocchette per l’uscita di aria calda o
vicino ad ogni altro apparecchio che emette calore (compresi gli amplificatori).
9. Non disattivate la spina polarizzata. Il contatto più lungo è installato per la vostra sicurezza. Se la spina
fornita in dotazione non entra nella presa di corrente, rivolgetevi ad un elettricista per sostituire la vecchia
presa.
10. Proteggete il cavo di alimentazione in modo tale che non sia calpestato o schiacciato, in particolare in
corrispondenza della spina, delle prese e del punto in cui queste escono dall'apparecchio.
11. Utilizzate esclusivamente componenti/accessori specificati dal produttore.
12. Utilizzate l’apparecchio solo con carrelli, sostegni, treppiedi, staffe o tavoli specificati dal costruttore o
venduti insieme all'apparecchio. Se usate un carrello, fate attenzione durante gli spostamenti per evitare
infortuni causati da un eventuale ribaltamento del carrello stesso.
13. Scollegate l’apparecchio durante i temporali o dopo lunghi periodi di non utilizzo.
14. Per qualunque intervento di assistenza rivolgersi a personale qualificato. È necessario intervenire
sull’apparecchio ogniqualvolta risulti danneggiato, ad esempio in caso di danneggiamento di spina o cavo
di alimentazione, versamento di liquido sull’apparecchio o caduta di oggetti all'interno, esposizione
dell'apparecchio a pioggia o umidità, funzionamento irregolare o caduta.
15. La presa principale è usata come sistema di disconnessione dalla corrente. È dunque necessario che resti
facilmente accessibile.
16. Conservate l’apparecchio in un ambiente ben ventilato.
AVVERTENZA
Per ridurre il rischio d'incendio o di scossa elettrica, non esponete l'apparecchio alla pioggia o all'umidità. Non
esponete l’apparecchio all'acqua (schizzi, gocciolamento) e non collocate oggetti contenenti liquidi (ad esempio
un vaso) in prossimità dell'apparecchio.
ATTENZIONE: Per ridurre il rischio di scossa elettrica, non aprite
l’alloggiamento. All'interno non vi sono parti utilizzabili dall'utente. Per
ogni intervento rivolgersi esclusivamente a personale qualificato.
Il fulmine stilizzato con punta di freccia inscritto nel triangolo equilatero indica all'utente la presenza
all'interno dell'apparecchio di tensione pericolosa non isolata, di potenza sufficiente a costituire un
rischio di scossa elettrica per le persone.
Il punto esclamativo inscritto nel triangolo equilatero segnala all'utente la presenza, nella
documentazione che accompagna l'apparecchio, di istruzioni importanti per il funzionamento e la
manutenzione (nonché riparazione) dell'apparecchio.
ATTENZIONE
Per prevenire il rischio di scosse elettriche, non utilizzate la presa polarizzata con una prolunga, un connettore o
altra presa se non nel caso in cui gli spinotti possano essere inseriti interamente (per evitare che rimangano
scoperti).
AVVERTENZE DI SICUREZZA
CAUTION
RISK OF ELECTRIC SHOCK
DO NOT OPEN
26
ENGLISH
DEUTSCH
FRANÇAIS
ESPAÑOL
DUTCH
ITALIANO
Page 28
MAC:
‧
Windows XP (SP2)/ Windows Vista/ Windows 7
‧
Intel Pentium III 1GHz o Athlon XP 1.4GHz
‧
Drive CD-ROM
‧
512MB RAM, spazio libero: 200MB
‧
Scheda audio DirectSound oppure compatibile ASIO
‧
2 entrate USB
‧
OSX V10.4 (Universal Binary)/ 10,5/ 10,6
‧
G4 1.5GHz oppure Intel Core Duo Family
‧
Drive CD-ROM
‧
512MB RAM, spazio libero: 200MB
‧
Scheda audio con driver CoreAudio
‧
2 entrate USB
1. Collegate Dj For All, il cavo audio USB Amplink e le cuffie DJH-100 come
illustrato:
CONTENUTO DELLA CONFEZIONE:
► DJ For All x 1
► Cavo USB x 1
► DJH-100 cuffie x 1
► Cavo audio USB Amplink x 1
► CD di installazione Deckadance LE x 1
► Manuale di istruzioni x 1
Benv
enuti in DJ For ALL, uno strumento semplice ed originale, compatibile con Mac e Pc, per diventare un
vero DJ.
Basta installare il software Deckadance Dj, che troverete sul CD fornito in dotazione e collegare DJ For All al
vostro computer per iniziare da subito a mixare e scratchare come un vero DJ.
DJ For All è compatibile con i file MP3 e con tutti gli altri tipi di formati audio del vostro computer (inclusii file
WAV, OGG e iTunes Playlist). Facile da usare, DJ For All è il modo migliore per imparare il mestiere del DJ.
DJ For All è dotato di due Jog Wheel giganti per ottenere e controllare increbili effetti di pitch e scratch, e per
la funzione di ricerca.
I 4 tasti multifunzione vi permetteranno di avere un controllo immediato della riproduzione degli autoloop,
dei sample e dei punti cue. Grazie ai materiali (gomma silicone) accuratamente selezionati, DJ For All è
uno strumento ad altissima sensibilità.
Nella confezione di DJ For All troverete inoltre un cavo audio USB Amplink e un paio di cuffie professionali
DJH-100. DJ For All vi garantisce il massimo controllo senza attrezzature extra.
Il manuale è suddiviso in diverse sezioni:
A – Requisiti minimi di sistema
B – Collegamento di DJ For All
C – Utilizzo di DJ For All
D – Caratteristiche dei pannelli
posteriore e superiore
E – Specifiche tecniche
PC:
- Vi ringraziamo per aver acquistato DJ For ALL -
INTRODUZIONE
A. Requisiti minimi di sistema
B. Collegamento di DJ For All
27
ENGLISH
DEUTSCH FRANÇAIS
ESPAÑOL
DUTCH
ITALIANO
Altoparla nt i
(non fornit i in d otazion e)
Cavo RCA
Computer
(non fornit o in d otazion e)
Jack 3,5 mm
Cavo audio US B Amp link
Page 29
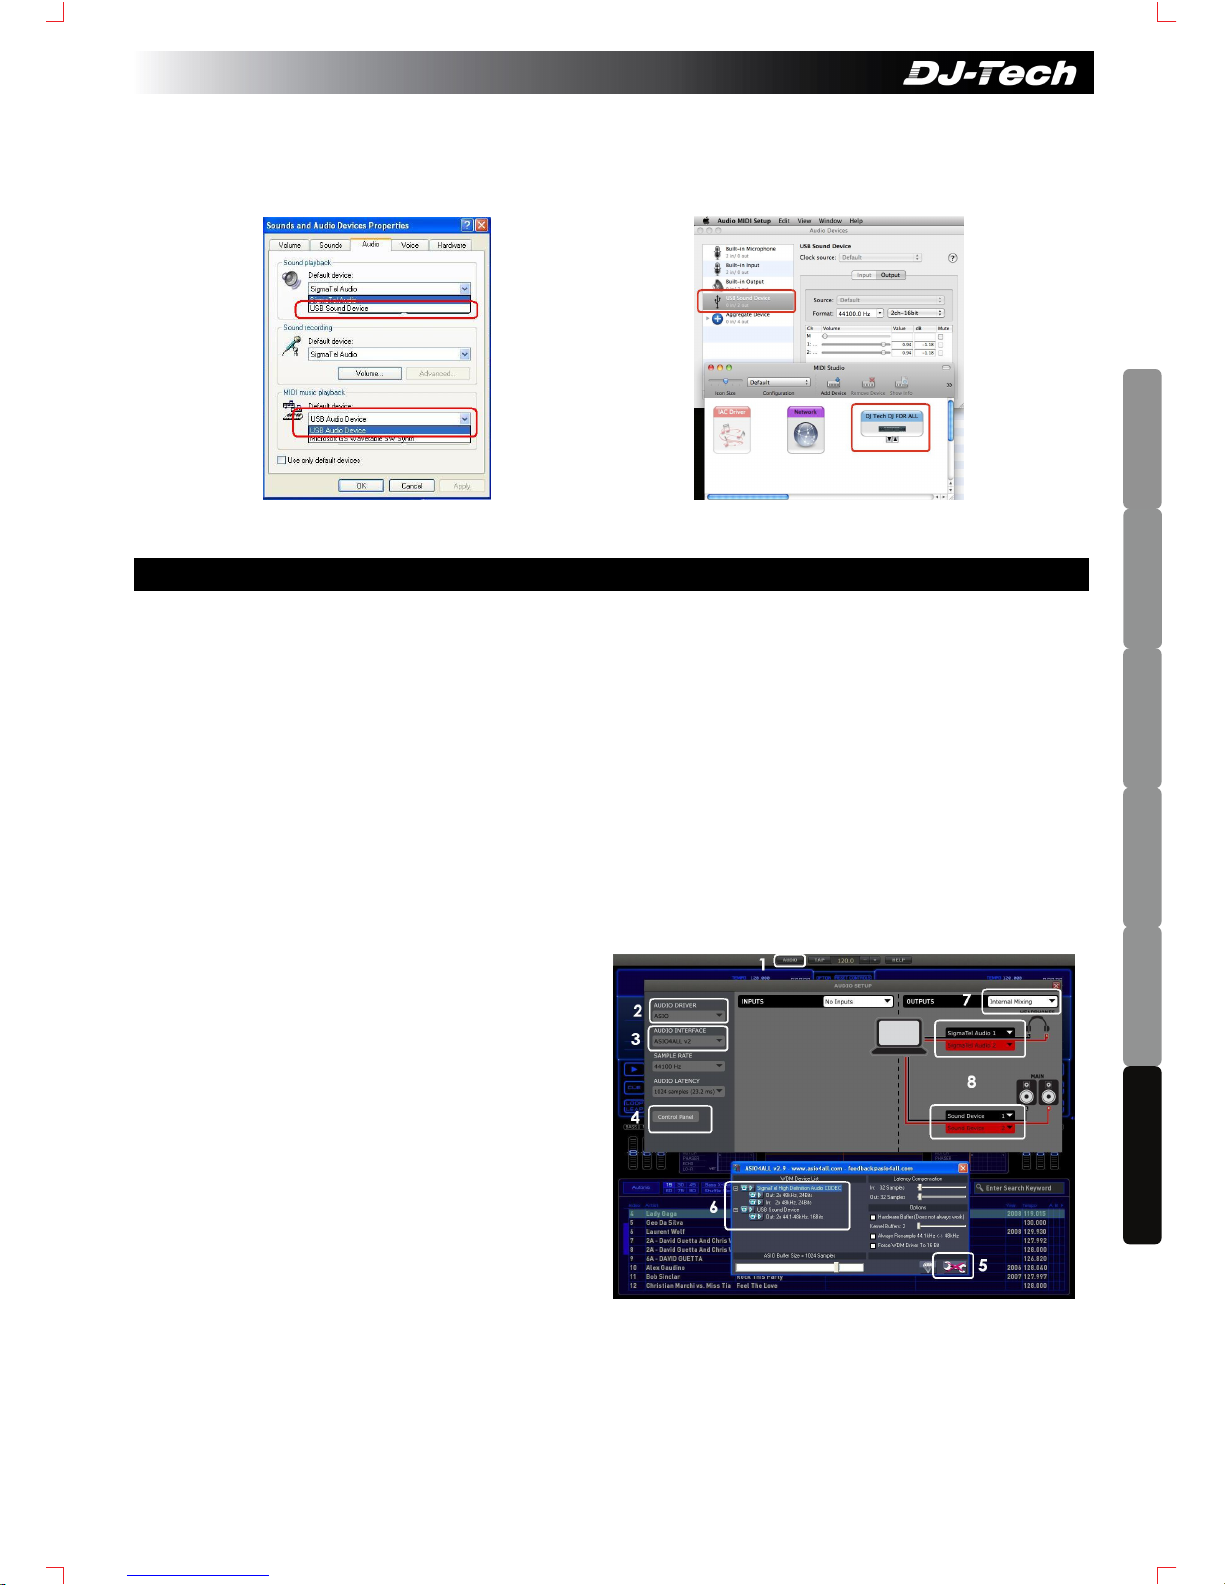
2. Una volta collegato Dj For All al computer, il LED rosso sull'apparecchio si illumina. Inserito il cavo
audio USB Amplink nell'entrata USB del computer , il led posizionato al centro del cavo si accende. Il
driver si installa automaticamente. Non è necessario installare ulteriori driver.
Come illustrato nella figura, troverete 2 dispositivi audio USB connessi al vostro computer.
Windows XP: Pannello di controllo -> Suoni e Periferiche
Audio
Mac OSX 10.6: Applications -> Utilities -
> Audio MIDI
Setup
1. Inserite nel lettore CD-ROM il CD di installazione Deckadance LE.
i) Per PC: fate clic su “INSTALLA DECKADANCE” nella schermata del menu principale o, per aprire il
menu, doppio clic sulla scritta “Menu.exe” nel contenuto della periferica CD. ii) Per Mac: fate doppio clic
su “Installa Deckadance.mpkg” per installare il programma. Seguite le istruzioni della procedura guidata
per portare a termine l'installazione. Vi sarà richiesto di inserire il numero di serie del software. Il numero
di serie è riportato sulla custodia cartacea del CD di installazione. Per Windows è necessario installare
anche il driver audio ASIO4ALL, disponibile tra le opzioni di installazione di Deckadance. Per tutti gli
aggiornamenti del software fate riferimento ai siti www.djtechpro.com e www.deckadance.com.
2. Collegate DJ For All, il cavo Audio USB Amplink , gli altoparlanti e le cuffie DJH-100 come illustrato nella
Sezione B. Accendete DJ For All e gli altoparlanti.
Nota: Se utilizzate un concentratore USB, per poter garantire la stabilità della configurazione si
raccomanda di utilizzare un concentratore USB che dispone di alimentazione autonoma.
3. Configurazione Audio (per PC) (esempio in Windows XP)
1. Aprite Deckadance LE e fate clic su “AUDIO”
2. Selezionate ASIO come driver audio
3. Selezionate “ASIO4ALL” come interfaccia
audio
4. Fate clic su “Control Panel” per visualizzare
il pannello di controllo ASIO4ALL.
5. Fate clic per passare a “Advanced
Options”.
6. Attivate Amplink (periferica audio USB) e la
scheda audio del vostro pc (nell’esempio
SigmaTel Audio). Chiudete il pannello di
controllo ASIO4ALL e procedete al riavvio del
software Deckadance LE.
7. Aprite nuovamente Il menu di impostazione
audio Deckadance LE (Deckadance LE AUDIO SETUP). Nella sezione “OUTPUTS” selezionate
“Internal Mixing”.
8. Per l'uscita “MAIN”, selezionate Amplink (dispositivi audio 1 e 2). Per l'uscita “Headphones” (cuffie),
selezionate la scheda audio del computer (in questo esempio “SigmaTel Audio 1 e 2). Fine della
procedura di configurazione audio. Per ulteriori informazioni consultare il manuale di istruzioni di
ASIO4ALL o di Deckadance.
C. Utilizzo di DJ For All
28
ENGLISH
DEUTSCH
FRANÇAIS
ESPAÑOL
DUTCH
ITALIANO
Page 30
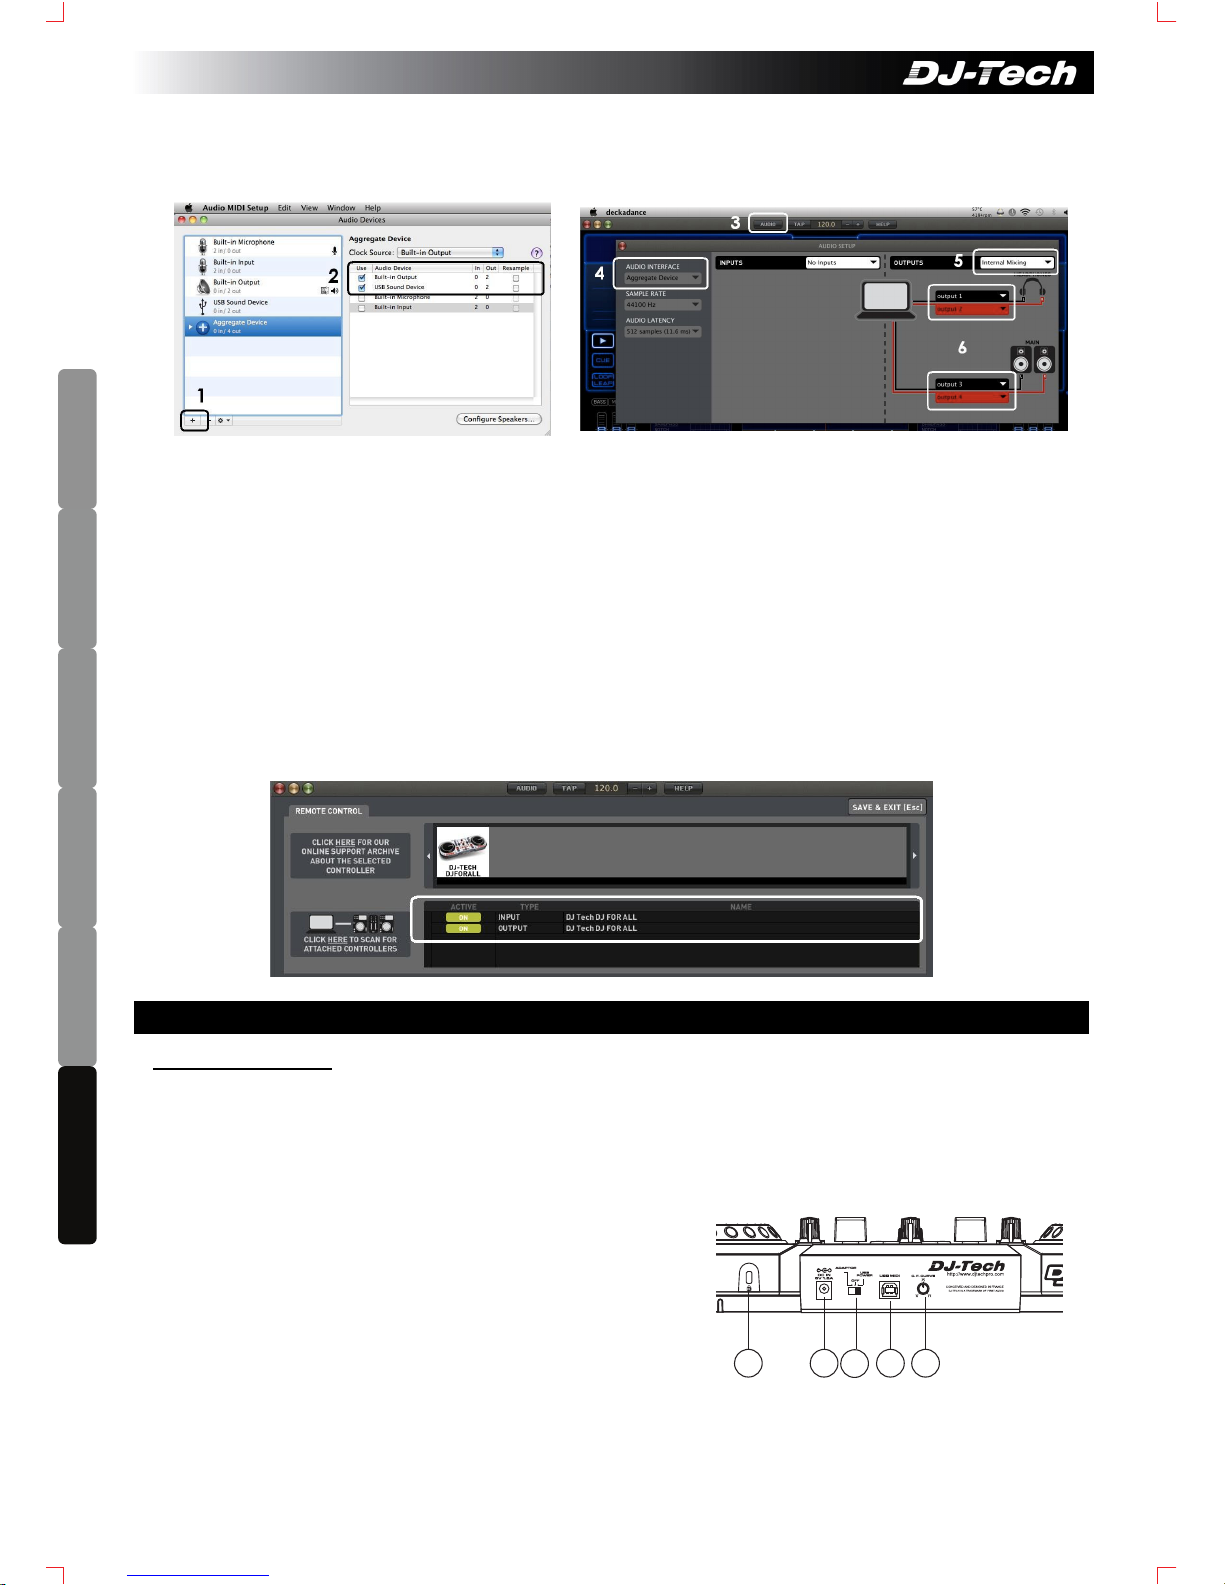
29
ENGLISH
DEUTSCH FRANÇAIS
ESPAÑOL
DUTCH
ITALIANO
4. Configurazione Audio (per MAC) (esempio in Mac OSX 10.6): Seguite il percorso “Applications→
“Utilities” → “Audio Midi Setup”: Per l'impostazione dei parametri di altre versioni del SO Mac
consultate la sezione Help del menu MIDI Audio.
1. Fate clic sul tasto “+” per aggiungere un
dispositivo (Aggregate Device)
2. Spuntate le caselle per utilizzare Amplink
(dispositivo audio USB) e l’uscita audio
integrata.
3. Aprite Deckadance e fate clic su “AUDIO
” per
accedere al menu di impostazione audio.
4. Selezionate “Aggregate Device” come interfaccia
audio;
5. Selezionate “Internal Mixing” per impostare le
uscite audio.
6. Selezionate le uscite audio integrate (uscite 1 e 2) per
l’output Headphones e Amplink (uscite 3 e 4) per
l'output Main. Se le opzioni Headphones e Main
dovessero risultare invertite, sarà necessario invertire
anche la selezione. Per ulteriori informazioni
consultare il manuale di istruzioni Deckadance.
5. Entrate nella pagina delle impostazioni di Deckadence LE per attivare le entrate e le uscite audio di DJ
For All (oppure la periferica audio USB).
Pannello posteriore
1. Kensington Security Slot – compatibile con il sistema di antifurto Kensington.
2. Ingresso alimentazione – Collegate a questa presa
l’adattatore di corrente. È possibile utilizzare l’adattatore DC
quando la porta USB non è in grado di fornire sufficiente
potenza all’apparecchio. Utilizzate esclusivamente un
adattatore 6V DC.
3. Selettore di alimentazione (alimentazione di rete / spento /
alimentazione via USB) – Spostate il selettore in funzione
della sorgente di alimentazione utilizzata: elettrica
(ADAPTOR), quando utilizzate un cavo esterno DC, oppure
USB POWER, se utilizzate il computer.
4. Presa USB MIDI – Consente il collegamento al computer..
5. Manopola C.F. CURVE (crossfader curve) – La manopola di controllo del crossfader consente di
regolare la portata della curva del crossfader: cut rapido per l'effetto scratch oppure lunga attenuazione
per il mixaggio.
2
3
51 4
D. Caratteristiche del pannello superiore e posteriore
Page 31
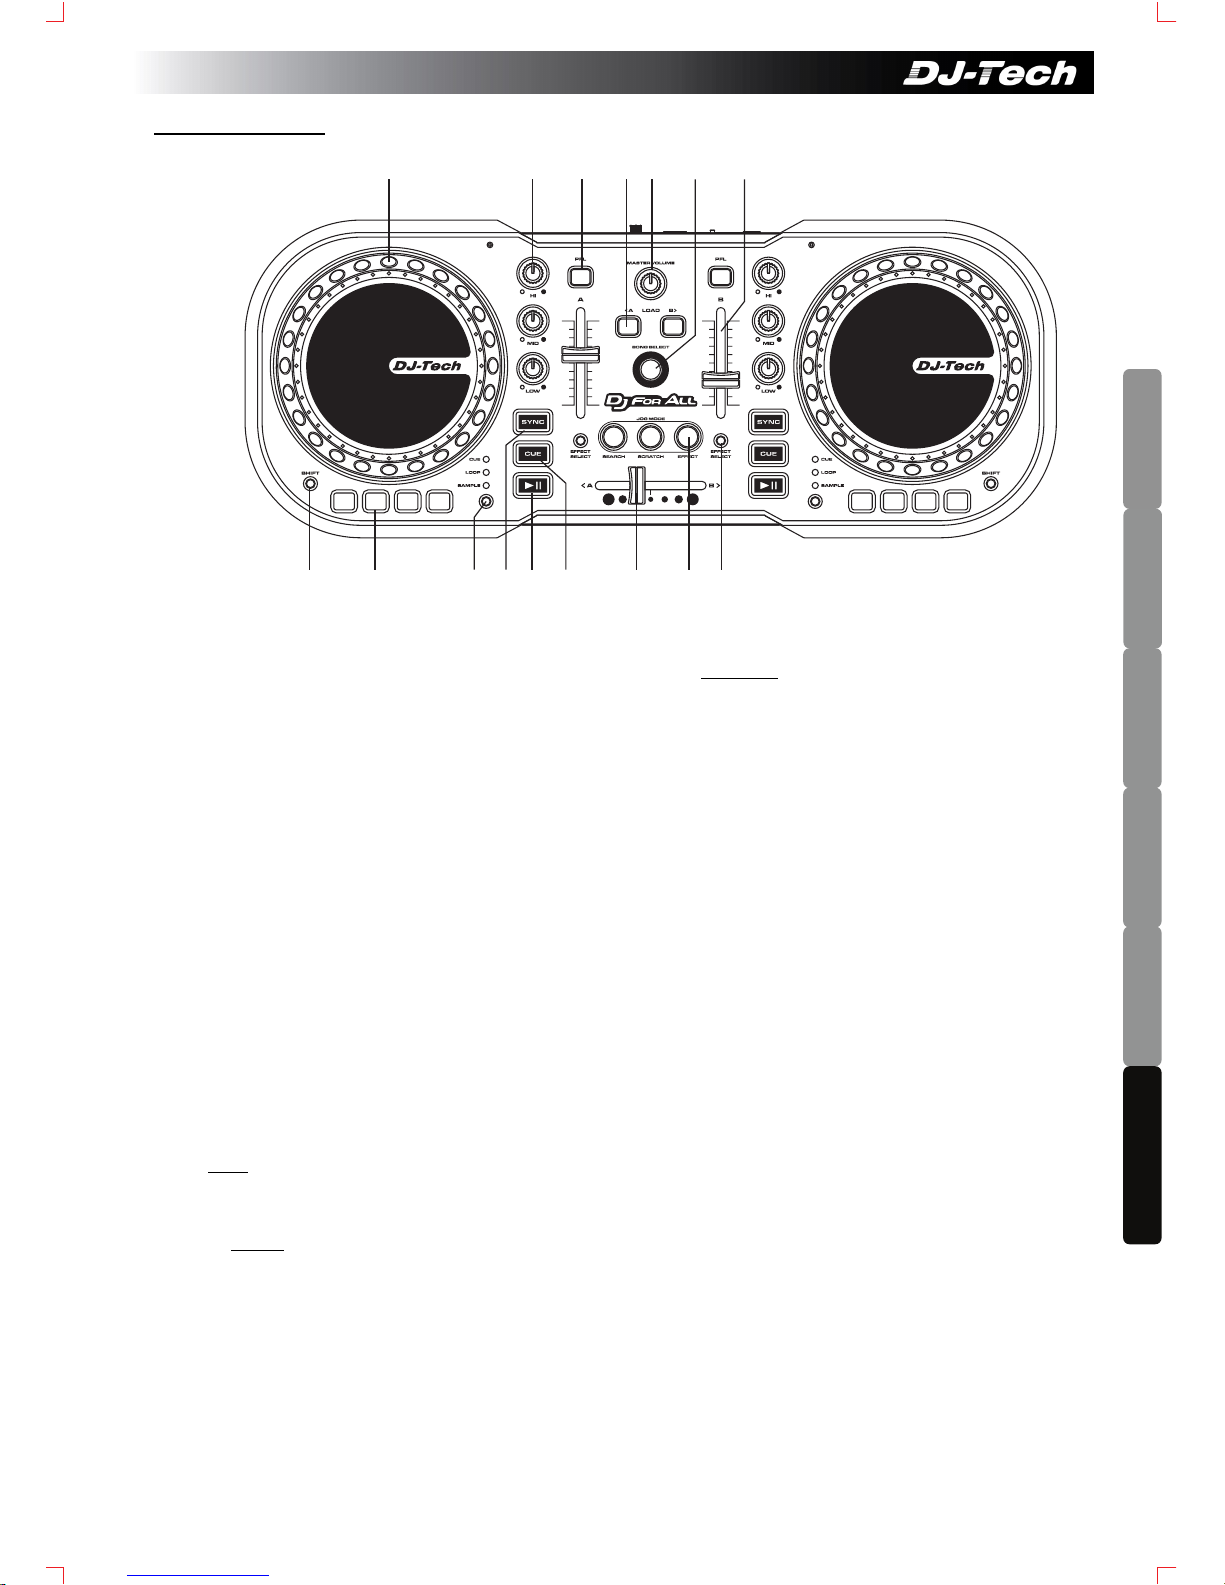
Pannello superiore
Per l’utilizzo di DJ For All e Deckadence LE seguite le istruzioni qui di seguito riportate.
1. Jog Wheel multi funzione – a seconda della
modalità selezionata è possibile attivare diverse
funzioni: Pitch, Scratch, ricerca o attivazione degli
effetti.
2. DECK EQ (Alta/ media/ bassa) – equalizzatore
3. Tasto PFL – per il controllo dei Deck A/B
4. Tasto LOAD – carica il brano selezionato sul
Deck A o B.
5. Master Volume
6. Manopola TRACK SELECT – ruotate la
manopola per selezionare i brani all’interno
dell'elenco. Premere per preascoltare il brano
selezionato.
7. VOLUME Fader
8. Tasto SHIFT – Per funzioni estese, premete
contemporaneamente ad altri tasti. Fate
riferimento ai punti 9 e15.
9. Tasti multifunzione – a seconda della modalità
selezionata (punto n. 10):
i) CUE – Premete per selezionare i Cue da 1 a 4.
Premete SHIFT e questi tasti per impostare il
Cue desiderato.
ii) LOOP – Tenete premuto per attivare
l’autoloop con estensione 1:16, 1:8, 1:4 o 1:2.
Premete SHIFT contemporaneamente a questi
tasti per attivare/ disattivare l’autoloop. Premete
SHIFT e ruotate la Jog Wheel per regolare la
lunghezza del loop.
iii) SAMPLE
– Tenete premuto per riprodurre il
sample (slot da 1 a 4 per deck A e slot da 5 a 8
per deck B) Premete SHIFT
contemporaneamente a questi tasti per avviare
/ mettere in pausa la riproduzione del sample.
10. Tasto MODE SELECT – Premete per
selezionare modalità differenti (CUE, LOOP e
SAMPLE) per i tasti multifunzione (punto n. 9)
11. Tasto SYNC (sincronizzazione)
12. Tasto PLAY (riproduzione)
13. Tasto CUE
14. CROSSFADER
15. Tasti Jog Mode – Premete questi tasti per
selezionare una delle modalità della Jog Wheel
tra SEARCH (ricerca), SCRATCH o EFFECT
(effetto) (vedi punto n. 1):
i) La Jog Wheel è in modalità PITCH quando i tre
tasti sono disattivati.
ii) Quando la modalità EFFECT è in funzione,
l'effetto per il Deck A/B si attiva
automaticamente. Quando la modalità
EFFECT non è in funzione, l'effetto per il Deck
A/B si disattiva automaticamente.
Per controllare i parametri X e Y di entrambi i
Deck utilizzate le Jog Wheel dei Deck A e B.
iii) In modalità SEARCH, ruotate la Jog Wheel
per
una rapida ricerca all’interno del brano.
iv) In modalità SCRATCH, ruotate la Jog Wheel
per scratchare il brano.
16. Tasti EFFECT SELECT – Premete per
selezionare diversi effetti per i Deck A/B.
1 2 3 54 6 7
8 9 10 11 12 13 14 15 16
30
ENGLISH
DEUTSCH
FRANÇAIS
ESPAÑOL
DUTCH
ITALIANO
Page 32

Power Supply: DC 6V, 1.5A
Dimension: 434 (W) x 62.3 (H) x 170 (D) mm
Weight: 1.21 kg
Alimentation: DC 6V, 1.5A
Dimensions 434 (W) x 62.3 (H) x 170 (D) m m
Poids: 1.21 kg
Netzteil-Eingangspannung: DC 6V, 1.5A
Abmessungen: 434 (W) x 62.3 (H) x 170 (D) mm
Gewicht: 1.21 kg
Stroombron: DC 6V, 1.5A
Afmetingen: 434 (W) x 62.3 (H) x 170 (D) mm
Gewicht: 1.21 kg
Alimentación: DC 6V, 1.5A
Dimensiones: 434 (W) x 62.3 (H) x 170 (D) mm
Peso: 1.21 kg
Alimentazione: DC 6V, 1.5A
Dimensiones: 434 (W) x 62.3 (H) x 170 (D) mm
Peso: 1.21 kg
CARACTERISTIQUES TECHNIQUES
TECHNISCHE EIGENSCHAFTEN
SPECIFICATIES
CARACTERÍSTICAS TÉCNICAS
SPECIFICHE TECNICHE
SPECIFICATIONS
Page 33
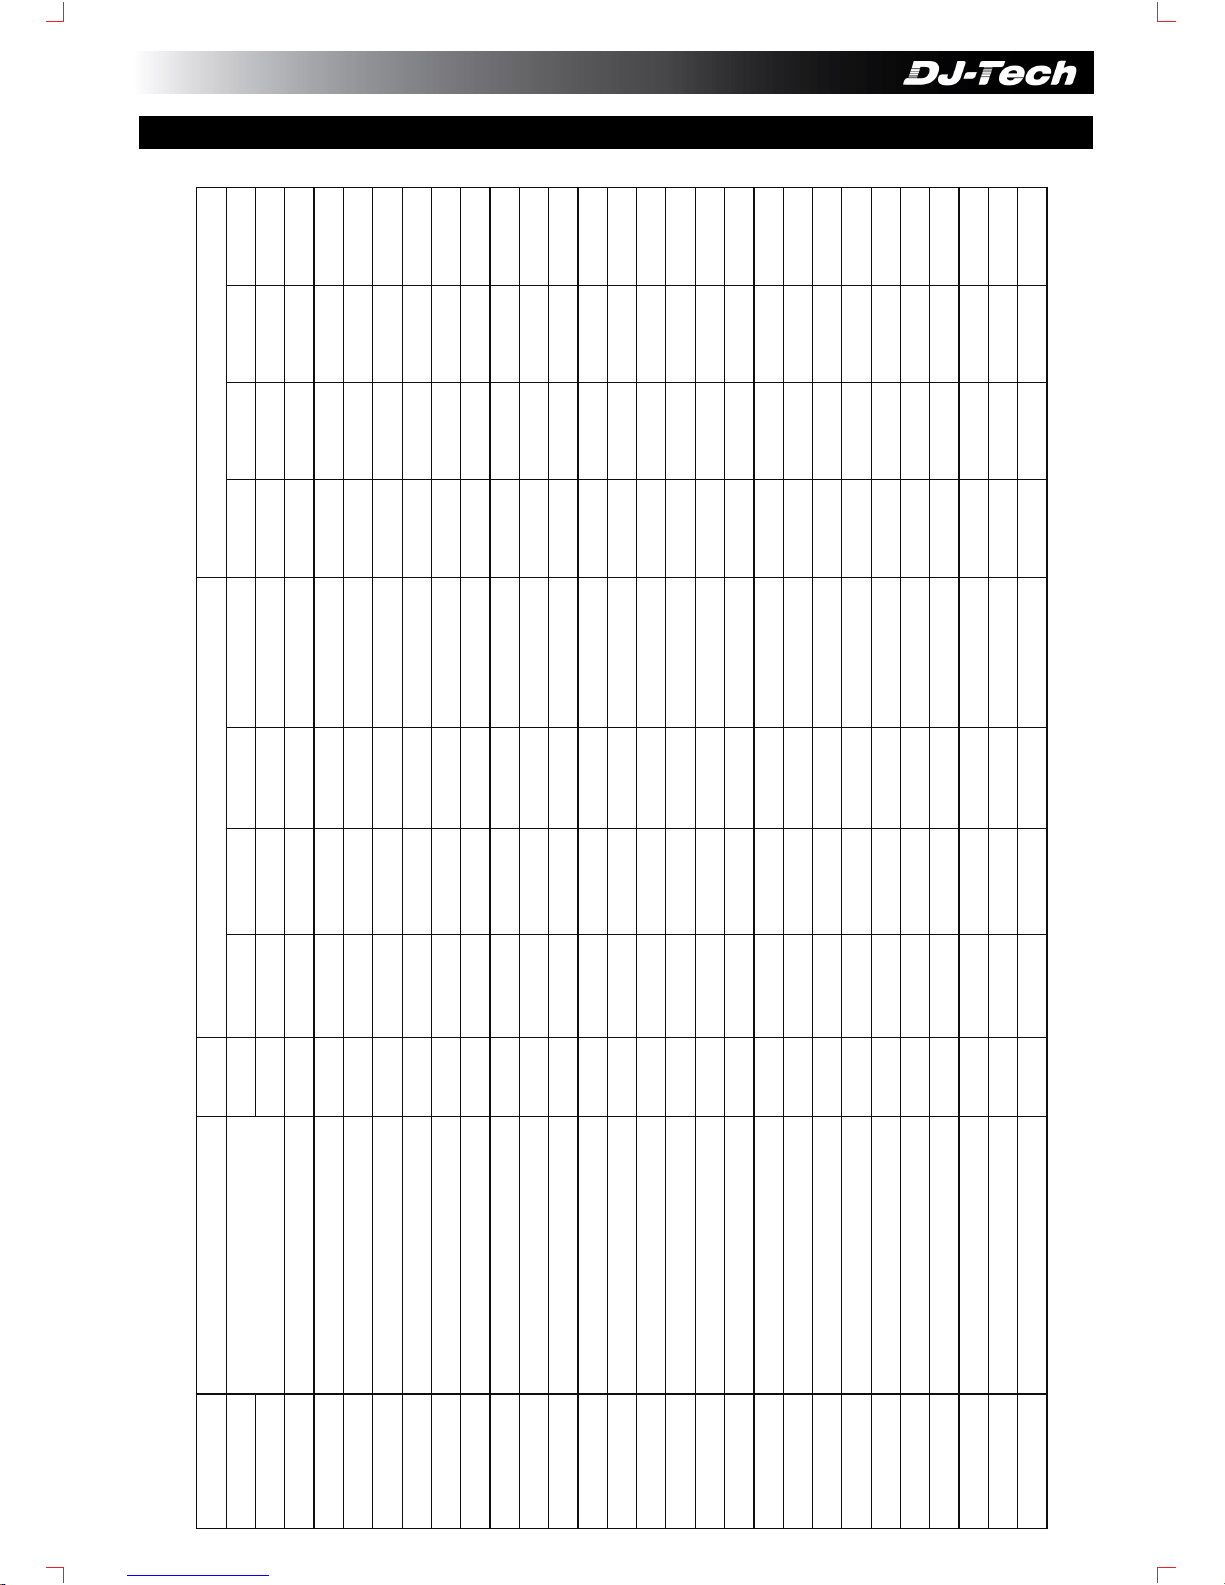
SW NAME ID ON OFF
SW12 L SHIFT 1C 09 90 1C 7F 09 90 1C 0
SW27 L1 19 09 90 19 7F 09 90 19 0
SW26 L2 15 09 90 15 7F 09 90 15 0
SW23 L3 11 09 90 11 7F 09 90 11 0
SW25 L4 0D 09 90 0D 7F 09 90 0D 0
SW24 L CLS 09 09 90 09 7F 09 90 09 0
SW8 L PLAY 05 09 90 05 7F 09 90 05 0
SW22 L CUE 1A 09 90 1A 7F 09 90 1A 0
SW17 L SYNC 1B 09 90 1B 7F 09 90 1B 0
SW11 L PFL 18 09 90 18 7F 09 90 18 0
SW16 L ES 17 09 90 17 7F 09 90 17 0
SW14 SEARCH 13 09 90 13 7F 09 90 13 0
SW13 SCRATCH 0F 09 90 0F 7F 09 90 0F 0
SW15 EFFECT 0B 09 90 0B 7F 09 90 0B 0
SW10 A 14 09 90 14 7F 09 90 14 0
SW9 B 0C 09 90 0C 7F 09 90 0C 0
SW28 SONG SELECT 10 09 90 10 7F 09 90 10 0
SW2 R PFL 08 09 90 08 7F 09 90 08 0
SW4 R ES 07 09 90 07 7F 09 90 07 0
SW3 R SYNC 03 09 90 03 7F 09 90 03 0
SW21 R CUE 16 09 90 16 7F 09 90 16 0
SW7 R PLAY 01 09 90 01 7F 09 90 01 0
SW20 R CLS 12 09 90 12 7F 09 90 12 0
SW19 R1 0E 09 90 0E 7F 09 90 0E 0
SW18 R2 0A 09 90 0A 7F 09 90 0A 0
SW6 R3 06 09 90 06 7F 09 90 06 0
SW5 R4 02 09 90 02 7F 09 90 02 0
SW1 R SHIFT 04 09 90 04 7F 09 90 04 0
MIDI MAP
Page 34
SAMPLE 41 09 90 41 7F
LOOP 42 09 90 42 7F
L CLS
CUE 43 09 90 43 7F
SAMPLE 45 09 90 45 7F
LOOP 46 09 90 46 7F
L CLS
CUE 47 09 90 47 7F
CLOCKWISE
30 09 90 30 7F
ENCODE
ANTI-
CLOCKWISE
31 09 90 31 7F
CLOCKWISE
34 09 90 34 7F
JOG
WHEEL1
ANTI-
CLOCKWISE
35 09 90 35 7F
CLOCKWISE
37 09 90 37 7F
JOG
WHEEL2
ANTI-
CLOCKWISE
38 09 90 38 7F
MIDI MAP
Page 35
ROUND START ROUND END
JOG
WHEEL
JOG WHEEL ROUND 36 09 90 36 7F 09 90 36 0
JOG
WHEEL
JOG WHEEL ROUND 39 09 90 39 7F 09 90 39 0
ADC1
FADER A 21 0B B0 21 0x00-7F
ADC2 FADER B 22 0B B0 22 0x00-7F
ADC3 CROSS FADER 23 0B B0 23 0x00-7F
ADC4 L HIGH 24 0B B0 24 0x00-7F
ADC5 L MID 26 0B B0 26 0x00-7F
ADC6 L LOW 28 0B B0 28 0x00-7F
ADC7 R HIGH 25 0B B0 25 0x00-7F
ADC8 R MID 27 0B B0 27 0x00-7F
ADC9 R LOW 29 0B B0 29 0x00-7F
ADC10 MASTER 2A 0B B0 2A 0x00-7F
ADC11 CF CURVE 23 0B B0 23 0x00-7F
MIDI MAP
Page 36
MIDI OUT
SW NAME ID ON OFF
LED1 L1 19 09 90 19 7F 09 90 19 0
LED2 L2 15 09 90 15 7F 09 90 15 0
LED3 L3 11 09 90 11 7F 09 90 11 0
LED4 L4 0D 09 90 0D 7F 09 90 0D 0
LED5 L SYNC 1B 09 90 1B 7F 09 90 1B 0
LED6 L CUE 1A 09 90 1A 7F 09 90 1A 0
LED7 L PLAY 05 09 90 05 7F 09 90 05 0
LED8 L SAMPLE 41 09 90 41 7F 09 90 41 0
LED9 L LOOP 42 09 90 42 7F 09 90 42 0
LED10 L SCUE 43 09 90 43 7F 09 90 43 0
LED11 L PFL 18 09 90 18 7F 09 90 18 0
LED12 SEARCH 13 09 90 13 7F 09 90 13 0
LED13 SCRATCH 0F 09 90 0F 7F 09 90 0F 0
LED14 EFFECT 0B 09 90 0B 7F 09 90 0B 0
LED15 A 14 09 90 14 7F 09 90 14 0
LED16 B 0C 09 90 0C 7F 09 90 0C 0
LED17 R PFL 08 09 90 08 7F 09 90 08 0
LED18 R SYNC 03 09 90 03 7F 09 90 03 0
LED19 R CUE 16 09 90 16 7F 09 90 16 0
LED20 R PLAY 01 09 90 01 7F 09 90 01 0
LED21 R SAMPLE 45 09 90 45 7F 09 90 45 0
LED22 R LOOP 46 09 90 46 7F 09 90 46 0
LED23 R SCUE 47 09 90 47 7F 09 90 47 0
LED24 R1 0E 09 90 0E 7F 09 90 0E 0
LED25 R2 0A 09 90 0A 7F 09 90 0A 0
LED26 R3 06 09 90 06 7F 09 90 06 0
LED27 R4 02 09 90 02 7F 09 90 02 0
MIDI MAP
 Loading...