

Page 1
Page 2
E-1
Warning: to prevent fire or shock hazard, do not expose this appliance to rain or moisture.
These markings are located on the bottom, side or back of the unit.
Caution: to prevent the risk of electric shock, don’t remove cover (or back). No user-
serviceable parts inside. Refer servicing to qualified service personnel.
The lightning flash with arrowhead symbol, within an equilateral triangle, is intended to alert
the user to the presence of uninsulated “dangerous voltage” within the product’s enclosure
that may be of sufficient magnitude to constitute a risk of electric shock to persons.
The exclamation point within an equilateral triangle is intended to alert the user to the
presence of important operating and maintenance (servicing) instructions in the literature
accompanying the appliance.
Dripping warning: ”The product shall not be exposed to dripping or splashing and that no
objects filled with liquids, such as vases, shall be placed on the product.”
Warning: the normal ventilation of the product shall not be impeded for intended use.
LASER SAFETY
This unit employs laser. Only a qualified service person should remove the cover or
attempt to service this device, due to possible eye injury.
“Caution: use of controls or adjustments or performance of procedure other than specified
herein may result in hazardous radiation exposure.”
Danger: invisible laser radiation when open and interlock failed or defeated avoid direct
exposure to beam.
Caution: hazardous laser radiation when open and interlock feated.
Page 3

E-2
TABLE OF CONTENT
1. Features ……………………………………………………………………………………......... E-2
2. Safety Instructions ………………………………………………………………………........... E-3
3. Control and Indicators ……………………………………………………………………......... E-5
3.1 CD Encoder 10 Main Unit ………………………………………………………………..... E-6
3.2 Remote Control …………………………………………………………………………...... E-6
4. Getting Start ……………………………………………………………………………….......... E-7
4.1 Installation …………………………………………………………………………………… E-7
4.2 Connections …………………………………………………………………………………. E-7
4.3 Power ON/OFF ……………………………………………………………………………… E-7
5. Operation: Compact Disc/MP3/WMA ……………………………………………………........ E-7
5.1 Inserting the MP3/ WMA-CD/CD Disc ……………………………………………………. E-7
5.2 Playing the Entire Disc ……………………………………………………………………… E-7
5.3 Selecting A Different Track During Play …………………………………………………. E-8
5.4 Programming Tracks ………………………………………………………………………. E-8
5.5 Playing A Program …………………………………………………………………………. E-8
5.6 Clear Program Tracks ……………………………………………………………………… E-8
5.7 Repeat Play (For CD) ………………………………………………………………………. E-8
5.8 Repeat Play (For MP3/WMA-CD/CD) ……………………………………………………. E-9
6. Operation: USB/SD/MMC …………………………………………………………………....... E-9
6.1 Inserting the USB Memory/SD/MMC/Card ……………………………………………… E-9
6.2 Selecting USB Or SD/MMC ………………………………………………………………... E-9
6.3 Playing The USB Or SD/MMC …………………………………………………………….. E-9
6.4 Selecting A Different Track During Play ………………………………………………….. E-9
6.5 Programming Tracks ……………………………………………………………………….. E-10
6.6 Playing A Program ………………………………………………………………………….. E-10
6.7 Repeat Play ………………………………………………………………………………….. E-10
7. Operation: Recorder ………………………………………………………………………......... E-10
7.1 Record From CD/MP3 ……………………………………………………………………… E-10
7.2 Record From Line In ………………………………………………………………………… E-11
7.3 Record From Built-in Mic …………………………………………………………………… E-11
7.4 Copy From USB To SD/MMC ……………………………………………………………… E-11
7.5 Copy From SD/MMC to USB ……………………………………………………………… E-11
7.6 Delete File Of USB Or SD/MMC ………………………………………………………….. E-12
7.7 Format USB Or SD/MMC …………………………………………………………………... E-12
8. Specifications ……………………………………………………………………………………. E-13
1. FEATURES
- CD/CD-R/CD-RW/MP3-CD/WMA-CD playback
- Play/Encode Directly from/to USB pen drive or SD Card
- CD Ripping (1x or 2x speed selectable)
- 3 Ways to Encode: CD, AUX IN or MIC
- No need Any Software
- Encode in MP3 with adjustable bit rate (64Kbps to 256Kbps)
- Built-in stereo condenser Mic with Mic record level control
- Headphone output
- Large Blue LCD Display with ID3 Text
- CD Playlist up to 32 songs
- USB & SD support up to 999 songs & 99 folders
- Speaker and Amplifier built-in (2W RMS)
- 21-Key Flat Remote control (battery included)
Page 4
E-3
2. SAFETY INSTRUCTIONS
1. READ INSTRUCTIONS - All the safety and operating instructions should be read before the
appliance is operated
2. RETAIN INSTRUCTIONS - The safety and operating instruction should be retained for future
reference.
3. HEED WARNINGS - All warnings on the appliance and in the operating instructions should be
adhered to.
4. FOLLOW INSTRUCTIONS - All operating and use instructions should be followed.
5. WATER AND MOISTURE - The appliance should not be used near water, for example near a
bathtub, washbowl, kitchen sink, laundry tub,swimming pool or in a wet basement.
6. VENTILATION - The appliance should be situated so that its location or position does not
interfere with its proper ventilation. For example, the appliance should not be situated on a bed,
sofa, rug or similar surface that may block the ventilation openings; or, placed in a built-in
installation, such as a bookcase or cabinet that may impede the flow of air through the ventilation
openings.
7. HEAT - The appliance should be situated away from heat sources such as radiators, heat
registers, stoves, or other appliances (including amplifiers) that produce heat.
8. POWER SOURCES - The appliance should be connected to a power supply only of the type
described in the operating instructions or as marked on the appliance.
9. GROUNDING AND POLARIZATION - Precautions should be taken to insure that the grounding
or polarization means of an appliance is not defeated.
10. POWER CORD PROTECTION - Power- supply cords should be routed so that they are not likely
to be walked on or pinched by items placed upon or against them, paying particular attention to
cords at plugs, convenience receptacles, and the point at which they exit from the appliance.
11. CLEANING - The appliance should be cleaned only as recommended by the manufacturer.
12. POWER LINES - An outdoor antenna should be located away from power lines.
13. NONUSE PERIODS - The power cord of the appliance should be unplugged from the outlet
when the appliance is to be left unused for a long period of time.
14. OBJECT and LIQUID ENTRY - Care should be taken so that objects do not fall and liquids are
not spilled into the enclosure through openings.
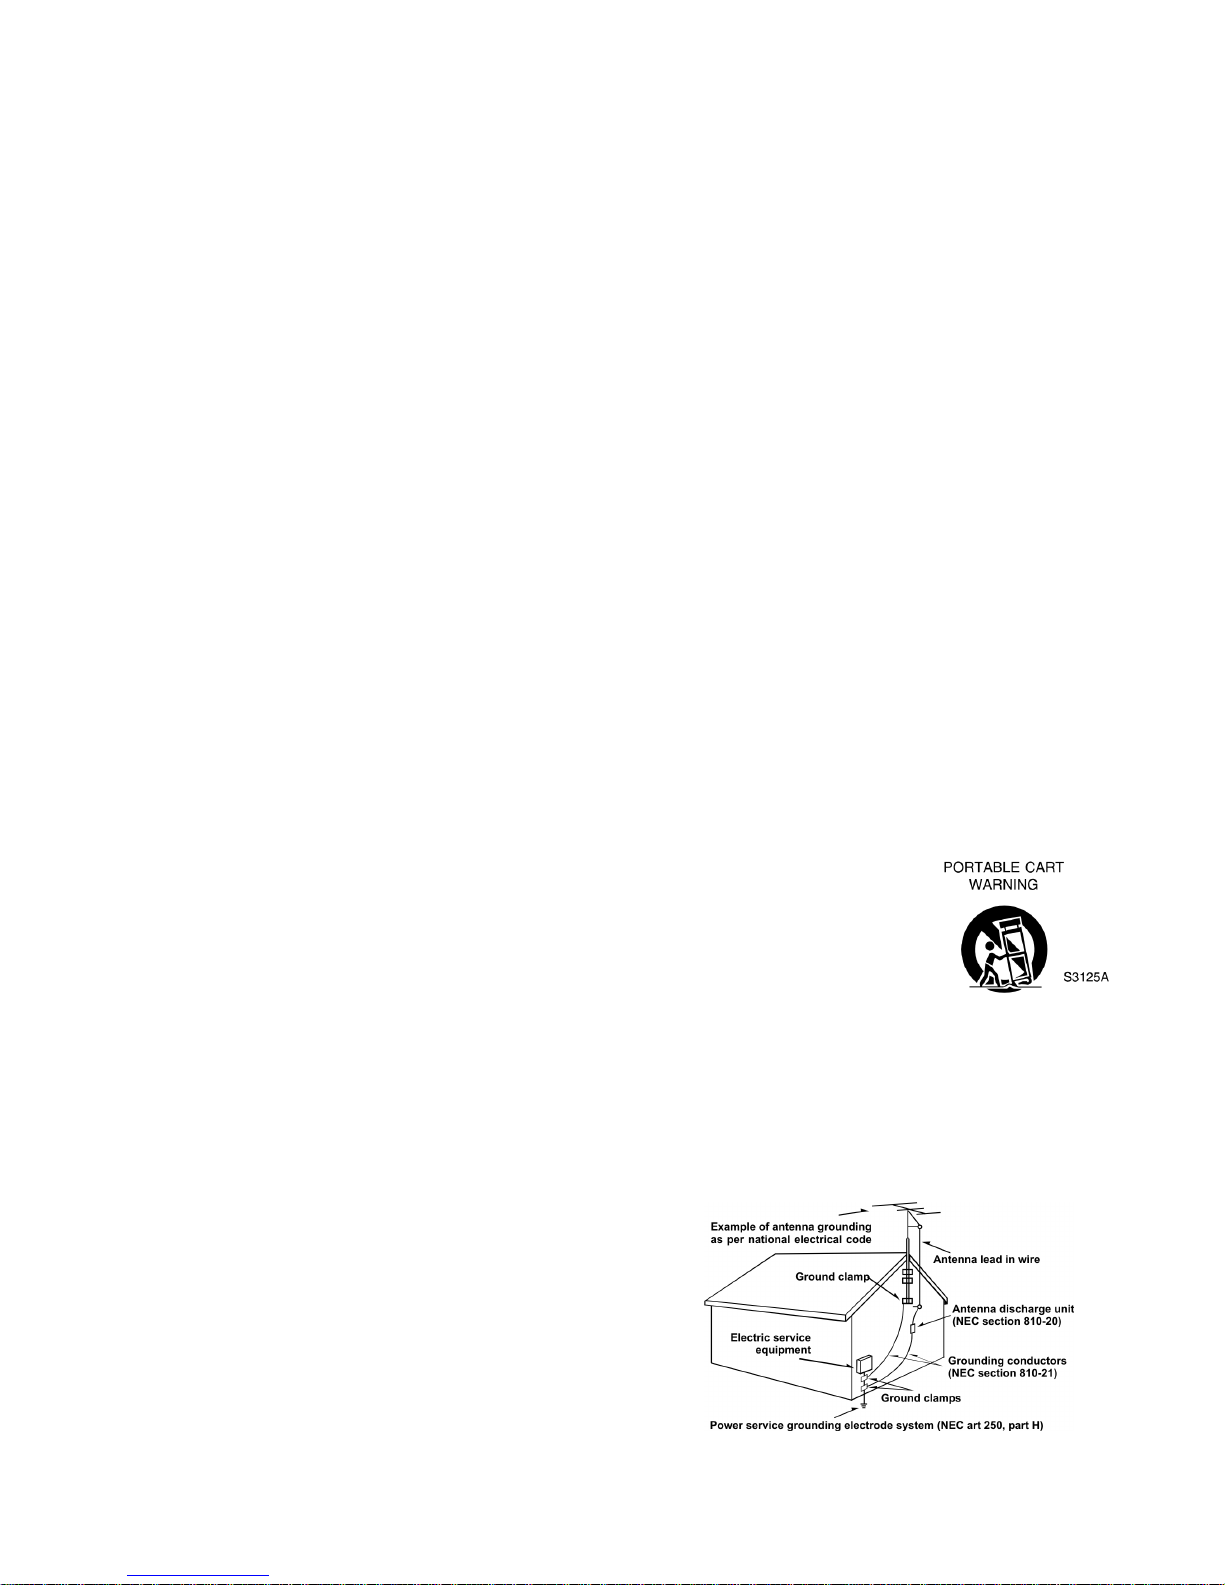
15. CARTS AND STANDS - The appliance should be used only with a cart or
stand that is recommended by the manufacturer. An appliance and cart
combination should be moved with care. Quick stops, excessive force, and
uneven surfaces may cause the appliance and cart combination to overturn.
16. WALL OR CEILING MOUNTING - If the appliance is mounted to a wall or
ceiling it should be mounted only as recommended by the manufacturer.
17. DAMAGE REQUIRING SERVICE – The appliance should be serviced by qualified service
personnel when:
A. The power-supply cord or plug has been damaged.
B. Objects have fallen into, or liquid has been spilled into the appliance enclosure.
C. The appliance has been exposed to rain.
D. The appliance has been dropped, or the enclosure damaged.
E. The appliance does not appear to operate normally or exhibits a marked change in
performance.
18. SERVICING - The user should not attempt to service
the appliance beyond that described in the user’s
operating instructions. All other servicing should be
referred to qualified service personnel.
19. OUTDOOR ANTENNA GROUNDING - If an outside
antenna is connected to the receiver, be sure that
the antenna system is grounded so as to provide
some protection against voltage surges and built up
static charges. Section 810 of the National Electrical
Code, ANS/-NFPA No. 70-1984 provides information
Page 5
E-4
with respect to proper grounding of the mast and supporting structure, grounding of the lead-in
wire to an antenna discharge unit, size of grounding conductors, location of antenna discharge
unit, connection to grounding electrodes, and requirements for the grounding electrode.
20.
PROTECTIVE ATTACHMENT PLUG –The appliance is equipped with an attachment plug having
overload protection. This is a safety feature. See instruction Manual for replacement or resetting
of protective device. If replacement of the plug is required, be sure the service technician has
used a replacement plug specified by the manufacturer that has the same overload protection as
the original plug.
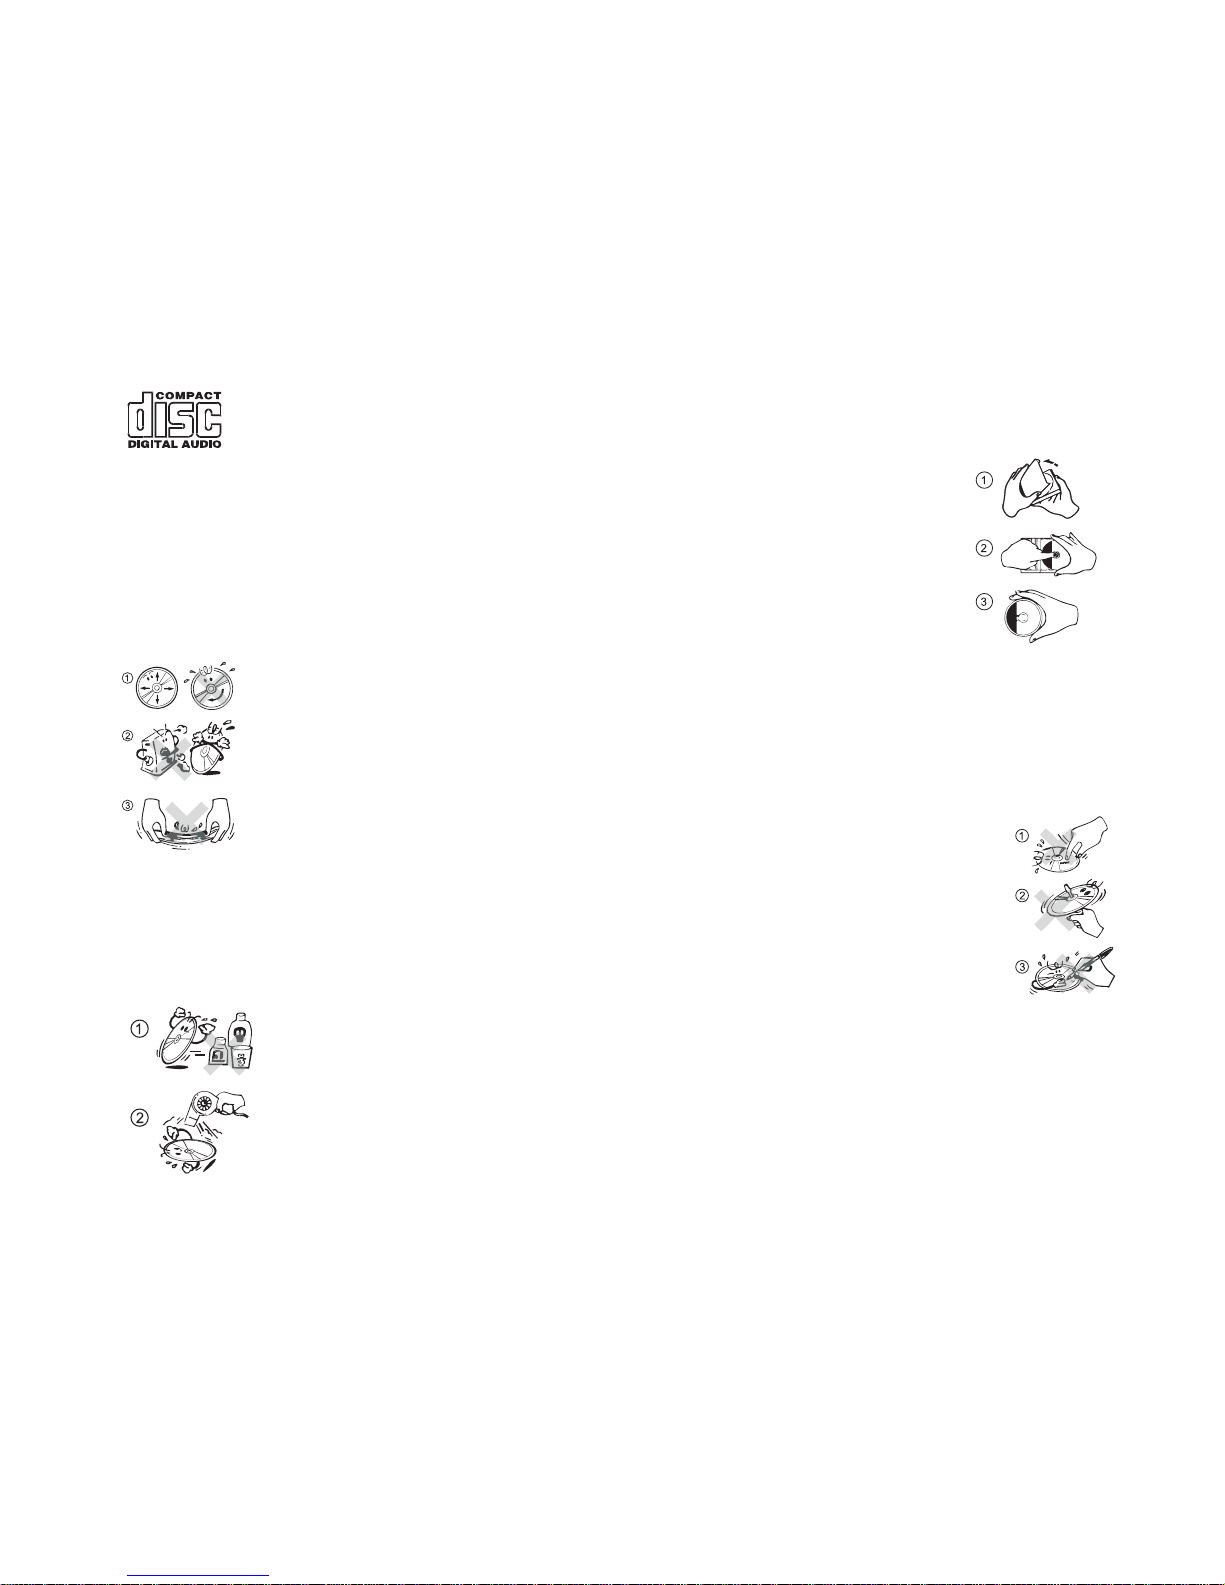
HANDLING COMPACT DISCS
This unit has been designed to play compact discs bearing the identification logo shown
at the left. No other discs can be played.
1. Open a disc case by holding the bottom left and right sides with the right hand,
and then lifting the top cover with the left hand.
2. Press down on the center of the case and lift the disc out carefully.
3. Hold by the edges without touching the recording surface (Rainbow lighting side
is to play).
1. Foreign objects, dust and finger prints should be carefully wiped off in a straight
motion from the inside to the out side of the recorded side of the disc with a soft
cloth before use.
2. Do not expose discs to direct sun light, heating implements and high temperatures.
3. Do not bend the disc.
1. Avoid serious scratches that could cause the laser pickup to skip.
2. Do not attempt to widen the center hole in the disc. It will result in damage to the disc.
3. Do not write anything with a ballpoint pen or pencil on the disc (level) surface.
1. Never use chemicals such as record sprays, antistatic sprays or fluid, benzine or
thinner to clean compact discs. Such chemicals would irrepairably damage the disc’s
plastic surface.
2. If a disc is suddenly removed from a cold to a hot area, it will not be played due to
moisture on the disc surface. So wipe off with a soft cloth. Do not use a hair dryer to
dry moisture on discs.
HANDLING THE DISC
A. Remove the CD from the Disc tray of your unit, if it is not going to be used for a long period.
B. Keep the disc in a disc case when storing.
C. Do not store the disc where it may be exposed to:
1. Direct sunlight for a long time.
2. High temperatures via any heating implements.
3. High humidity.
Page 6
E-5
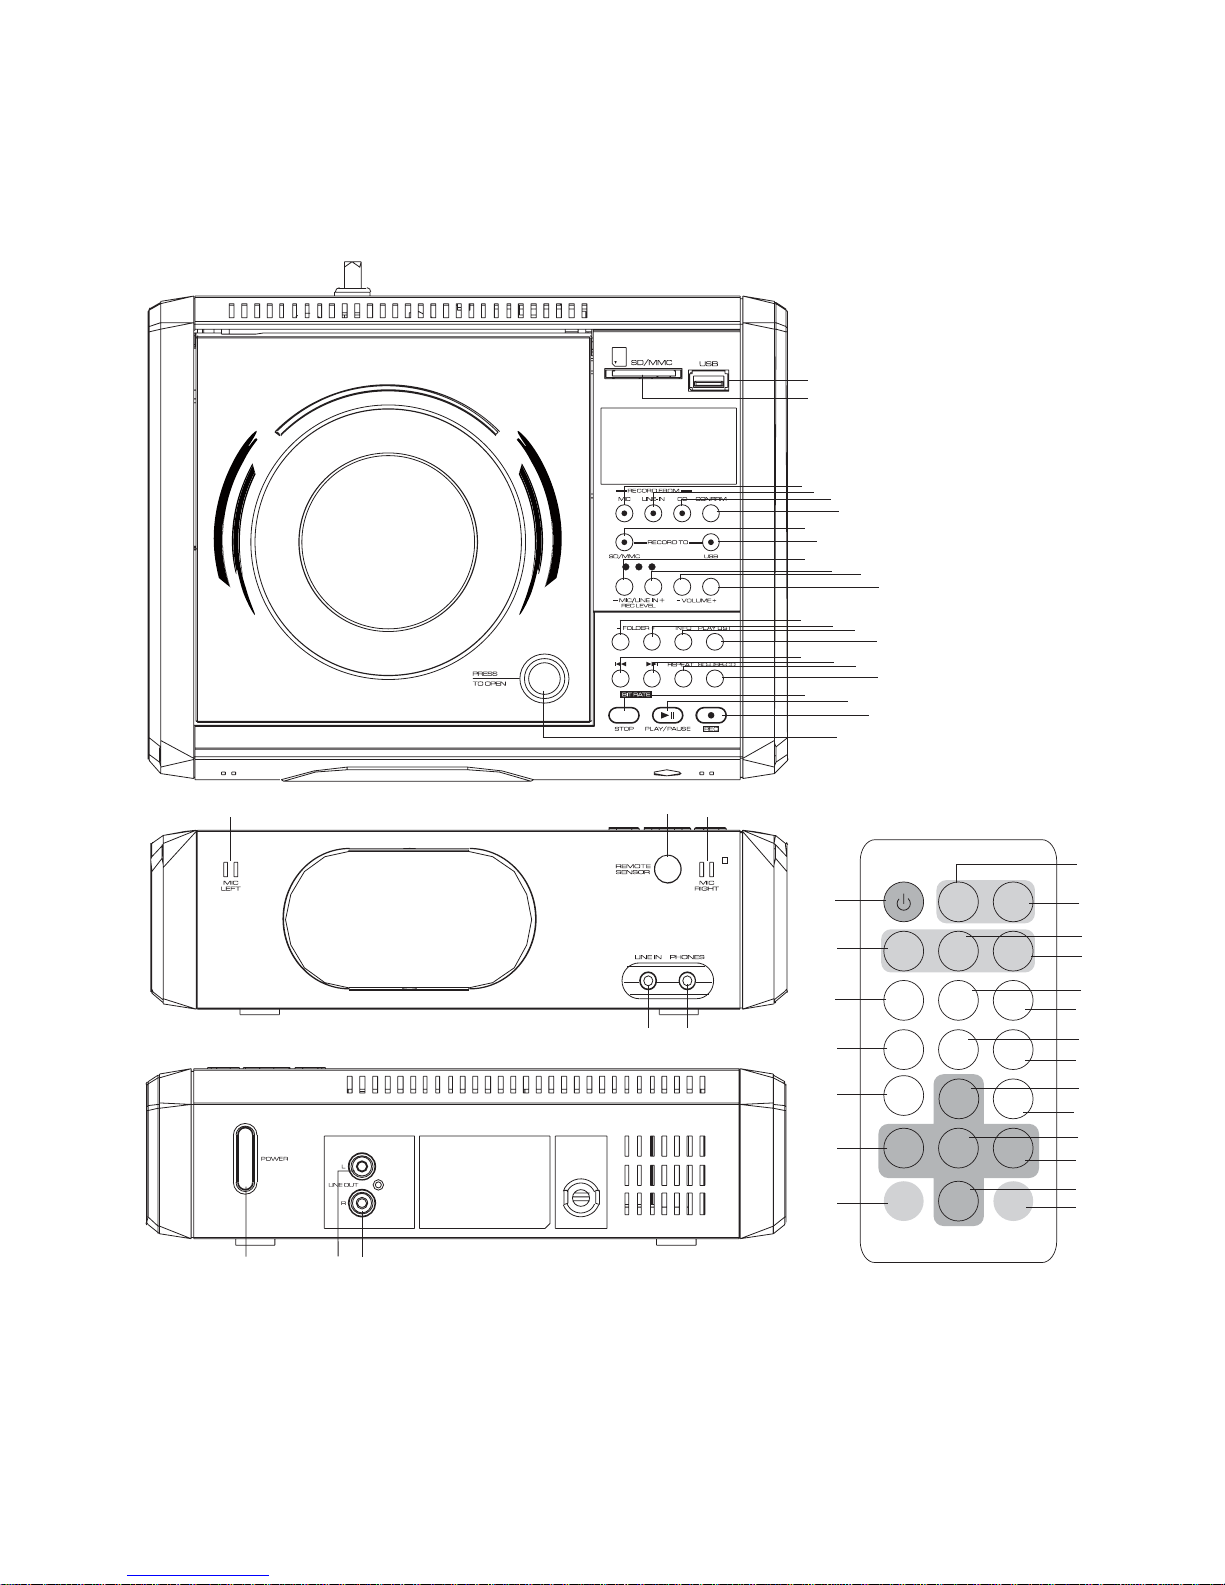
3. CONTROL AND INDICATORS
1
2
3
4
5
6
7
8
9
10
11
12
13
14
15
16
17
18
19
20
21
22
23
24
25
26
27
28
29
30
31
32
1
2
3
4
5
6
7
8
9
10
11
12
13
14
15
16
17
18
19
20
21
Page 7
E-6
3.1 CD ENCODER 10 MAIN UNIT
1. USB SOCKET
2. SD/MMC SOCKET
3. RECORD FROM MIC key
4. RECORD FROM LINE-IN key
5. RECORD FROM CD key
6. CONFIRM key
7. RECORD TO SD/MMC key
8. RECORD TO USB key
9. MIC/LINE IN REC LEVEL- key
10. MIC/LINE IN REC LEVEL+ key
11. VOLUME- key
12. VOLUME+ key
13. FOLDER- key
14. FOLDER+ key
15. INFO key
16. PLAY LIST key
17. PREVIOUS key
18. NEXT key
19. REPEAT key
20. SD-USB-CD key
21. STOP Key
22. PLAY/PAUSE Key
23. RECORD key
24. OPEN/CLOSE BUTTON
25. LEFT MIC
26. REMOTE SENSOR : To receive
signals from the remote control.
27. RIGHT MIC
28. LINE IN JACK
• Audio Input Jack 3.5mm.
29. PHONES JACK
• Connection for phones
30. POWER button
• Press to turn the power ON/OFF
31. LINE OUT LEFT
32. LINE OUT RIGHT
3.2 REMOTE CONTROL
1. STANDBY/ON key
2. RECORD TO SD/MMC key
3. RECORD TO USB key
4. RECORD FROM MIC key
5. RECORD FROM LINE-IN key
6. RECORD FROM CD key
7. FOLDER + key
8. REC LEVEL+ key
9. VOLUME + key
10. FOLDER - key
11. REC LEVEL- key
12. VOLUME - key
13. SD-USB-CD key
14. REPEAT key
15. PLAY LIST key
16. REW key
17. PLAY/PAUSE key
18. FF key
19. INFO/CONFIRM key
20. STOP key
21. RECORD key
Page 8

E-7
4. GETTING START
4.1 INSTALLATION
• Unpack all parts and remove protective material.
• Insert the batteries (CR2025) into the remote control transmitter as shown in the
battery compartment.
• Do not connect the unit to the mains before checking the main voltage or before all
other connections have been made.
• Do not cover any vents and make sure that there is a space of 10 centimeters
around the unit for ventilation.
4.2 CONNECTIONS
A. LINE-IN input. For connection of other sound sources. (e.g. TV or VCR audio output).
B. LINE-OUT. For connection to other amplifier as sound sources.
4.3 POWER ON/OFF
When you first plug the unit into the mains, the unit will go into standby mode.
• You can press POWER (main unit) or STANDBY/ON (Remote Control) to switch
on the unit.
• The unit will remain standby it is switched on.
• Pull the main plug out of the wall socket if you want to switch off the main voltage
completely.
5. OPERATION: COMPACT DISC/MP3/WMA
Press SD-USB-CD key to select CD/MP3 mode.
5.1 INSERTING THE MP3/WMA-CD/CD DISC
1. Press OPEN/CLOSE to open the CD door.
2. Insert an MP3-CD/CD in the tray.
3. Press OPEN/CLOSE again to close the CD door.
4. The MP3-CD/CD-player starts and scans the contents list of the MP3/WMA-CD/CD.
FOR CD:
After a few seconds, the total playing time and number of tracks will appear on the display.
FOR MP3/WMA:
After a few seconds, the total number of tracks, albums and MP3 or WMA will appear on the
display.
5.2 PLAYING THE ENTIRE DISC
1. Press PLAY/PAUSE .
• Play starts with the first track.
• The display shows the current track number and its elapsed playing time.
Page 9
E-8
• When all the tracks have been played, the MP3-CD/CD stops and returns to pristine
display.
2. To stop play, press STOP .
3. To interrupt play, press PLAY/PAUSE .
4. To resume play, press PLAY/PAUSE again.
5.3 SELECTING A DIFFERENT TRACK DURING PLAY
• Press or until the required track number appears in the display.
• MP3-CD mode only:
Press FOLDER+ or FOLDER-once or more to find your desired album. Starting again with
the track that is currently playing by pressing once. The track will be started again from the
beginning.
Searching for a passage during play by holding or to search for the required
passage. If you release the button, play will continue.
TEXT DISPLAY (ID3 DISPLAY)
During MP3/WMA-CD playing, press INFO key (on the main unit) or INFO/CONFIRM key (on
the remote) to switch text display mode, it will show the filename / title / artist name / album of
the current track. Press INFO key (on the main unit) or INFO/CONFIRM key (on the remote)
again to return to the track playing time. ID3 information: File name / Title / Artist name / Album.
5.4 PROGRAMMING TRACKS
Up to 32 tracks can be stored in the memory.
1. Load an MP3/WMA-CD/CD as described previously.
2. Press PLAY LIST to start programming.
3. Press or to locate a particular track or album/track (for WMA or MP3). Press PLAY
LIST to store it in the memory.
4. Continue this process until you have selected all the tracks you require.
5.5 PLAYING A PROGRAM
1. Press PLAY/PAUSE
.
2. Play starts with the first track of the program.
3. When all tracks have been played, the MP3/WMA-CD/CD player stops.
5.6 CLEAR PROGRAM TRACKS
Press STOP or open and close the CD tray will erase all programmed tracks
5.7 REPEAT PLAY (For CD)
If at any time you wish to listen to a disc or program over and over again, the REPEAT function
will allow you to do so.
1. Press REPEAT once.
2. "REPEAT1" will be displayed on the LCD.
3. Press REPEAT twice, "REPEAT ALL" will be displayed on the LCD.
4. Press REPEAT again to cancel the repeat function.
Page 10
E-9
5.8 REPEAT PLAY (For MP3/WMA-CD)
1. Press REPEAT button once.
2. "REPEAT 1" will be displayed on the LCD.
3. Press REPEAT twice, "
REPEAT ALBUM
" will be displayed on the LCD.
4. Press REPEAT three times, "
REPEAT ALL
" will be displayed on the LCD.
5. Press REPEAT four times to cancel the repeat function.
6. OPERATION: USB/SD/MMC
6.1 INSERTING THE USB MEMORY/SD/MMC CARD
1. Insert a USB memory into the USB socket.
2. Insert a SD/MMC memory card into the SD/MMC slot.
6.2 SELECT USB OR SD/MMC
1. Press SD-USB-CD continuously to select USB or CARD mode.
2. If there’s a USB inserted, and you select the USB mode, the information of USB, the
total number of tracks, albums and USB, MP3 (or WMA) will appear on the display.
3. If there’s a SD/MMC inserted, and you select the CARD mode, the information of
SD/MMC, the total number of tracks, CARD, MP3 (or WMA) will appear on the display.
6.3 PLAYING THE USB OR SD/MMC
1. Press PLAY/PAUSE .
• Play starts with the first track.
• The display shows the current track number and its elapsed playing time.
• When all the tracks have been played, the USB
or
SD/MMC stops and returns
pristine display.
2. To stop play, press STOP .
3. To interrupt play, press PLAY/PAUSE .
4. To resume play, press PLAY/PAUSE again.
6.4 SELECTING A DIFFERENT TRACK DURING PLAY
1. Press or until the required track number appears in the display.
2. Press FOLDER+ or FOLDER- once or more to find your desired album. Starting again
with the track that is currently playing by pressing once. The track will be started
again from the beginning.
Searching for a passage during play by holding or to search for the required
passage. If you release the button, play will continue.
TEXT DISPLAY (ID3 DISPLAY)
During MP3/WMA-CD playing, press INFO key (on the main unit) or INFO/CONFIRM key (on
the remote) to switch text display mode, it will show the filename / title / artist name / album of
the current track.
Press INFO key (on the main unit) or INFO/CONFIRM key (on the remote) again to return to the
track playing time. ID3 information: File name / Title / Artist name/ Album.
Page 11

E-10
6.5 PROGRAMMING TRACKS
Up to 32 tracks can be stored in the memory.
1. Load a
USB
or
SD/MMC
as described previously.
2. Press PLAY LIST to start programming.
3. Press or to locate a particular track or album/track.
4. Press PLAY LIST to store it in the memory.
5. Continue this process until you have selected all the tracks you require.
6.6 PLAYING A PROGRAM
1. Press PLAY/PAUSE
.
2. Play starts with the first track of the program.
3. When all tracks have been played, the
USB
or
SD/MMC
player stops.
6.7 REPEAT PLAY
1. Press REPEAT button once.
2. "REPEAT1" will be displayed on the LCD.
3. Press REPEAT twice, "
REPEAT ALBUM
" will be displayed on the LCD.
4. Press REPEAT three times, "
REPEAT ALL
" will be displayed on the LCD.
5. Press REPEAT four times to cancel the repeat function.
7. OPERATION: RECORDER
7.1 REC FROM CD/MP3
1. Press SD-USB-CD key to select CD after reading TOC.
Three record modes can be selected.
-The entire DISC record. Start from STOP mode, go to step no. 2.
-The desire track record. Select desire track to play then go to step no. 2.
-Program record. Program desire track and enter program playing then go to step no. 2.
2. Press REC key, “REC FROM” will display on the LCD. Press “RECORD FROM CD”
key to select record from CD. “X1” “X2” will display on the LCD. Press or to
select synchronize record or double speed record. Press CONFIRM key to confirm.
“BIT RATE” will display on the LCD. Press or to select BIT RATE (64-96-128192-256) kbps for synchronize (X1) record, (64-96) kbps for double speed record,
press CONFIRM key to confirm, “USB” “CARD” will display on the LCD, then press
RECORD TO SD/MMC or USB key to select record to CARD or USB. “REC”, “USB”
or “SD” will flash on the LCD. Press INFO key (on the main unit) or INFO/ CONFIRM
key (on the remote) to switch text display mode. It will show the file name of current
track.
3. When the track ends, the audio track will be made automatically MP3 format and
saved as the last song in the USB or CARD AUDIO folder.
Note: - While recording CD song, pressing STOP key will cannel recording.
-There will be no sound from the speaker when in double speed recording.
4. While recording MP3/DISC, the MP3/WMA file of DISC will be copied to USB or CARD.
Percentage of complete will be displayed on the LCD. There will be no sound from the
speaker. Files will be saved in the USB or CARD FCOPY folder.
7.2 REC FROM LINE IN
1. Press REC key. “REC FROM” will display on the LCD. Press RECORD FROM LINE-
IN key to select record from LINE IN. “BIT RATE” will display on the LCD. Press or
Page 12

E-11
to select BIT RATE (64-96-128-192-256) kbps. Press CONFIRM key to confirm.
“USB” “CARD” will display on the LCD, then press RECORD TO SD/MMC or USB key
to select CARD or USB. Press INFO key (on the main unit) or INFO/CONFIRM key (on
the remote) to switch text display mode and to show the file name of current track.
2. Press REC LEVEL +/- key to adjust LINE-IN record level. Green/Yellow/ Red LEDs
indicate record Level: Low/Middle/High.
NOTE: - Adjusting REC LEVEL will affect the speaker sound level.
- Avoid letting the record level indicator reach Red. This can prevent distortion
on the recording
3. Press STOP key to stop recording. The MP3 file will be saved in the USB or CARD
AUDIO folder. Thus, the unit will return to previous mode.
7.3 REC FROM BUILT-IN MIC
1. Press REC key, “REC FROM” will display on the LCD. Press RECORD FROM MIC
key to select record from MIC. “BIT RATE” will display on the LCD. Press or to
select BIT RATE (64-96-128-192-256) kbps. Press CONFIRM key to confirm. “USB”
“CARD” will display on the LCD. Press RECORD TO SD/MMC or USB key to select
CARD or USB. Press INFO key (on the main unit) or INFO/CONFIRM key (on the
remote) to switch text display mode. It will show the file name of current track.
2. Press
MIC/LINE IN REC LEVEL
+/- key to adjust MIC record level. Green/Yellow/
Red LEDs indicate record level: Low/Middle/High.
NOTE: - Adjusting REC LEVEL will affect the speaker sound level.
- Avoid letting the record level indicator reach Red. This can prevent distortion
on the recording
3. Press STOP key to stop recording. File will be saved in the USB or CARD AUDIO
folder. Thus, the unit will return to previous mode.
7.4 COPY FROM USB TO SD/MMC
1. Press SD-USB-CD key to select USB. Three copy modes can be selected.
-All track copy. Start from STOP mode and go to step no.2.
-The desire track copy. Select desire track to playing and go to step no.2.
- Program copy. Program desire track and enter program playing. Then go to
step no.2
2. Press REC key, “REC FROM” will display on the LCD. Press SD/MMC key, the
MP3/WMA file of USB will be copied to SD/MMC. Percentage of complete will display
on the LCD. There will be no sound from the speaker. File will be saved in the
SD/MMC FCOPY folder.
7.5 COPY FROM SD/MMC TO USB
1. Press SD-USB-CD key to select SD/MMC. Three copy modes can be selected.
-All track copy. Start from STOP mode and go to step no.2.
-The desire track copy. Select desire track to playing and go to step no.2.
- Program copy. Program desire track and enter program playing. Then go to
step no.2
2. Press REC key, “REC FROM” will display on the LCD. Press USB key, the
MP3/WMA file of SD/MMC will be copied to USB. Percentage of complete will
display on the LCD. There will be no sound from the speaker. File will be saved in
the USB FCOPY folder.
Page 13

E-12
7.6 DELETE FILE OF USB OR SD/MMC
- Press SD-USB-CD key select to USB or CARD.
- In Stop mode, press and hold REC key. “DEL- -01” will display on the LCD.
- Press or select delete track.
- Press REC key again. “YES” “NO” will display on the LCD.
- Press or select YES
- Press REC key again. The track will be deleted.
7.7 FORMAT USB OR SD/MMC
- Press SD-USB-CD key select to USB or CARD.
- In Stop mode, press and hold REC key. “DEL- -01” will display on the LCD.
- Press and hold REC key again “FORMAT Y/N” will display on the LCD.
- Press or select Y
- Press REC key again, “FORMAT” will display on the LCD and finish after 5 seconds.
“NO FILE” will display on the LCD.
Page 14

E-13
8. SPECIFICATIONS
Power Supply 240V/50Hz
Output Power (Per Channel) 2 watts RMS into 8 ohm
Power Consumption 17 W
Compact Disc Section
Frequency Response (-6dB) 20-15,000 Hz
Signal-to-noise Ratio 50 dB
Harmonic Distortion 0.4%
Channel Separation 40 dB
CD & MP3 /WMA FUNCTIONS
Maximum Supported Device Capacity 8GB (USB)
4GB(SD/MMC) (SDHC supported)
Playing Disc CD-DA
MP3 (MPEG1/2/2.5 Layer 2/3)
WMA (Version 7.0 /8.0/9.0)
Pressed CD/CD-R/CD-RW, Multi-session
Disc
Bit Rate Support full range of MP3
/ WMA bit rate (8~384kbps)
Support Variable Bit Rate
MP3 Encoding:
64~256 kbps
Frequency MP3 / WMA Sampling Frequency
32/44.1/48 KHz
16/22.05/24 KHz
8/11.025/12 KHz
MP3 Encoding: 44.1kHz
Directory Depth Support 16 levels of directories for MP3 /
WMA disc. Total 99 directories and 999 files
playable. (Depend on Filename length)
Page 15

CONTENU
1. CONSIGNES DE SÉCURITÉ ET RECYCLAGE ………………………………………………
F-2
1.1 Conseil important concernant le recyclage ………………………………………………..
F-2
1.2 Conseils importants sur les piles et leur recyclage ……………………………………….
F-2
2. VOTRE NOUVEL ENCODEUR ………………………………… ……………………………..
F-3
2.1 Chère cliente, Cher client, ……………………………… …………………… …………….
F-3
2.2 Caractéristiques ……………………………………………………………………………..
F-3
2.3 Contenu ………………………………………………………………………………….......
F-3
3. DONNÉES TECHNIQUES ……………………………………………………………………..
F-3
4. DÉTAILS DU PRODUIT ………………………………………………………………………..
F-4
5. DÉTAILS DU PRODUIT ………………………………………………………………………...
F-5
5.1 Ports mémoires externes …………………………………………………………………...
F-5
5.2 Choix type enregistrement(RECORD FROM) ……………………………………………
F-5
5.3 Choix media stockage (RECORD TO) …………………………………………………....
F-5
5.4 Touches réglage de volume …………………………………………………………….....
F-5
5.5 Touches de lecture ………………………………………………………………………....
F-5
5.6 Face avant ………………………………………………………………………………......
F-5
5.7 Arrière ……………………………………………………………………………………......
F-5
6. PRÉPARATION ……………………………………………………………………………........
F-5
6.1 Montage ………………………………………………………………….......…………......
F-5
6.2 Branchement avec d’autres appareils ………………………………….......………….....
F-5
6.3 Allumer/éteindre ………………………………………………………….......………….....
F-5
7. LECTURE …………………………………………………………………….......………….....
F-6
7.1 Lecture d’un CD ………………………………………………………….......………….....
F-6
7.2 Lecture d’une carte SD ou MMC ………………………………………………………….
F-6
7.3 Lecture d’un appreil USB ……………………………………………………………….....
F-6
7.4 Commencer une lecture ……………………………………………………………………
F-6
7.5 Sélection fichier, titre ou dossier …………………………………………………………..
F-6
7.6 Afficher informations titre fichier …………………………………………………………..
F-6
7.7 Répéter une lecture …………………………………………………………………..........
F-6
7.8 Créer une liste de lecture ……………………………………………………...................
F-7
8. ENREGISTREMENT …………………………………………………………….....................
F-7
8.1 Enregistrer un CD ………………………………………………………….......................
F-7
8.2 Enregistrer une entrée auxiliaire …………………………………………......................
F-8
8.3 Enregistrer l’entrée microphone …………………………………………………………..
F-8
8.4 Copier depuis une mémoire USB vers une carte SD/MMC …………………………….
F-8
8.5 Copier depuis une carte SD/MMC vers un appareil USB ………………………………
F-9
8.6 Supprimer des fichiers d’appareils USB et cartes mémoires ………………………….
F-9
8.7 Formater un appareil USB ou une carte mémoire ………………………………………
F-9
9. ANNEXE …………………………………………………………………………………………
F-10
9.1 Changer la pile de la télécommande ……………………………………………………..
F-10
9.2 Dépannage au branchement des cartes et mémoires USB …………………………….
F-10
F-1
Page 16
F-2
1. CONSIGNES DE SÉCURITÉ ET RECYCLAGE
• Ce mode d’emploi vous permet de vous servir correctement du produit.Gardez-le
précieusement an de pouvoir le consulter à tout moment.
• Ne démontez pas l’appareil, sous peine de perdre toute garantie.
• N’essayez pas de réparer l’appareil vous-même. Ne le modiez pas.Risque de blessure!
• Faites attention lorsque vous manipulez votre produit. Une chute ou un coup peuvent
l’abîmer.
• Ne l’exposez pas à l’humidité ni à la chaleur. Ne pas recouvrir. Ne le plongez pas dans
l’eau.
• Maintenez hors de portée des enfants. Ce produit n’est pas un jouet.
ATTENTION: N’utilisez l’appareil que comme indiqué dans la notice. Aucune
garantie ne pourra être appliquée en cas de mauvaise utilisation. Nous ne
sommes pas responsables des conséquences inhérentes à un dommage.Le
fabricant se réserve le droit de modier les caractéristiques techniques sans notication
préalable pouvant ainsi entraîner des divergences dans ce manuel.
1.1 Conseil important concernant le recyclage
Cet appareil électronique ne doit PAS être jeté dans la poubelle de déchets ménagers. Votre
nouveau produit a été développé avec le plus grand soin et avec des composants de haute
qualité. Il devra cependant être un jour recyclé. Le symbole de la poubelle barrée signie
que votre produit devra être recyclé séparément des ordures ménagères à la n de sa
durée de vie. A l’avenir, veuillez amener tous les appareils électriques ou électroniques aux
points de ramassage publics de votre municipalité. Ceux-ci prennent en charge vos déchets
pour un recyclage écologique. Vous évitez ainsi les conséquences négatives sur l’homme
et l’environnement pouvant découler d’une mauvaise prise en charge des produits à la n
de leur durée de vie. Les détails concernant l’emplacement de tels points de ramassage et
des éventuelles restrictions de quantité existantes par jour/mois/année ainsi que sur des frais
éventuels de collecte sont disponibles dans votre municipalité.
1.2 Conseils importants sur les piles et leur recyclage
Les piles ne doivent PAS être jetées dans la poubelle classique. Chaque consommateur est
aujourd’hui obligé de jeter les piles utilisées dans les poubelles spécialement prévues à cet
effet.
Vous pouvez laisser vos piles dans les déchetteries municipales et dans les lieux ou elles sont
vendues.
• Ne pas ouvrir les piles, ne pas les jeter au feu.
• Les piles dont s’échappe du liquide sont dangereuses. Ne les manipulez pas sans gants
adaptés.
• Maintenez les piles hors de portée des enfants.
• Sortez les piles de l’appareil, si vous ne comptez pas l’utiliser pendant un long moment.
consignes de sécurité et recyclage
Page 17

F-3
2. VOTRE NOUVEL ENCODEUR
2.1 Chère cliente, Cher client,
Nous vous remercions pour l’achat de cet encodeur CD professionnel. Cet appareil haut de
gamme de DJ-Tech convertit vos CDs favoris au format MP3 et lit vos CDs et MP3 avec un
son parfait. Transférez directement la musique d’un CD vers un lecteur MP3 sans passer par
un ordinateur.
An d’utiliser au mieux votre nouvel appareil, veuillez lire attentivement ce mode d’emploi et
respecter les consignes et astuces suivantes.
2.2 Caractéristiques
• Enceintes stéréo intégrées
• Lecture directe depuis les appareils USB et cartes SD
• Copie la musique directement depuis le CD
• Aucun logiciel requis
• Grand écran
2.3 Contenu
• Encodeur et lecteur CD
• Télécommande
• Pile
3. DONNÉES TECHNIQUES
Fréquence: 20-15000 Hz
Rapport signal/bruit: 50 dB
Distorsion: 0,4 %
Support USB: jusqu’à 8 Go
Support SD/MMC: jusqu’à 4 Go
Format de lecture: MP3 (MPEG 1/2/2.5) WMA (Version 7.0/8.0/9.0)
Vitesse de transfert: 64 à 256 kbps
Fréquences: 32/44,1/48 KHz, 16/22,05/24 KHz, 8/11,025/12 KHz
Puissance RMS: 2 W
Page 18
F-4
4. DÉTAILS DU PRODUIT
Page 19

F-5
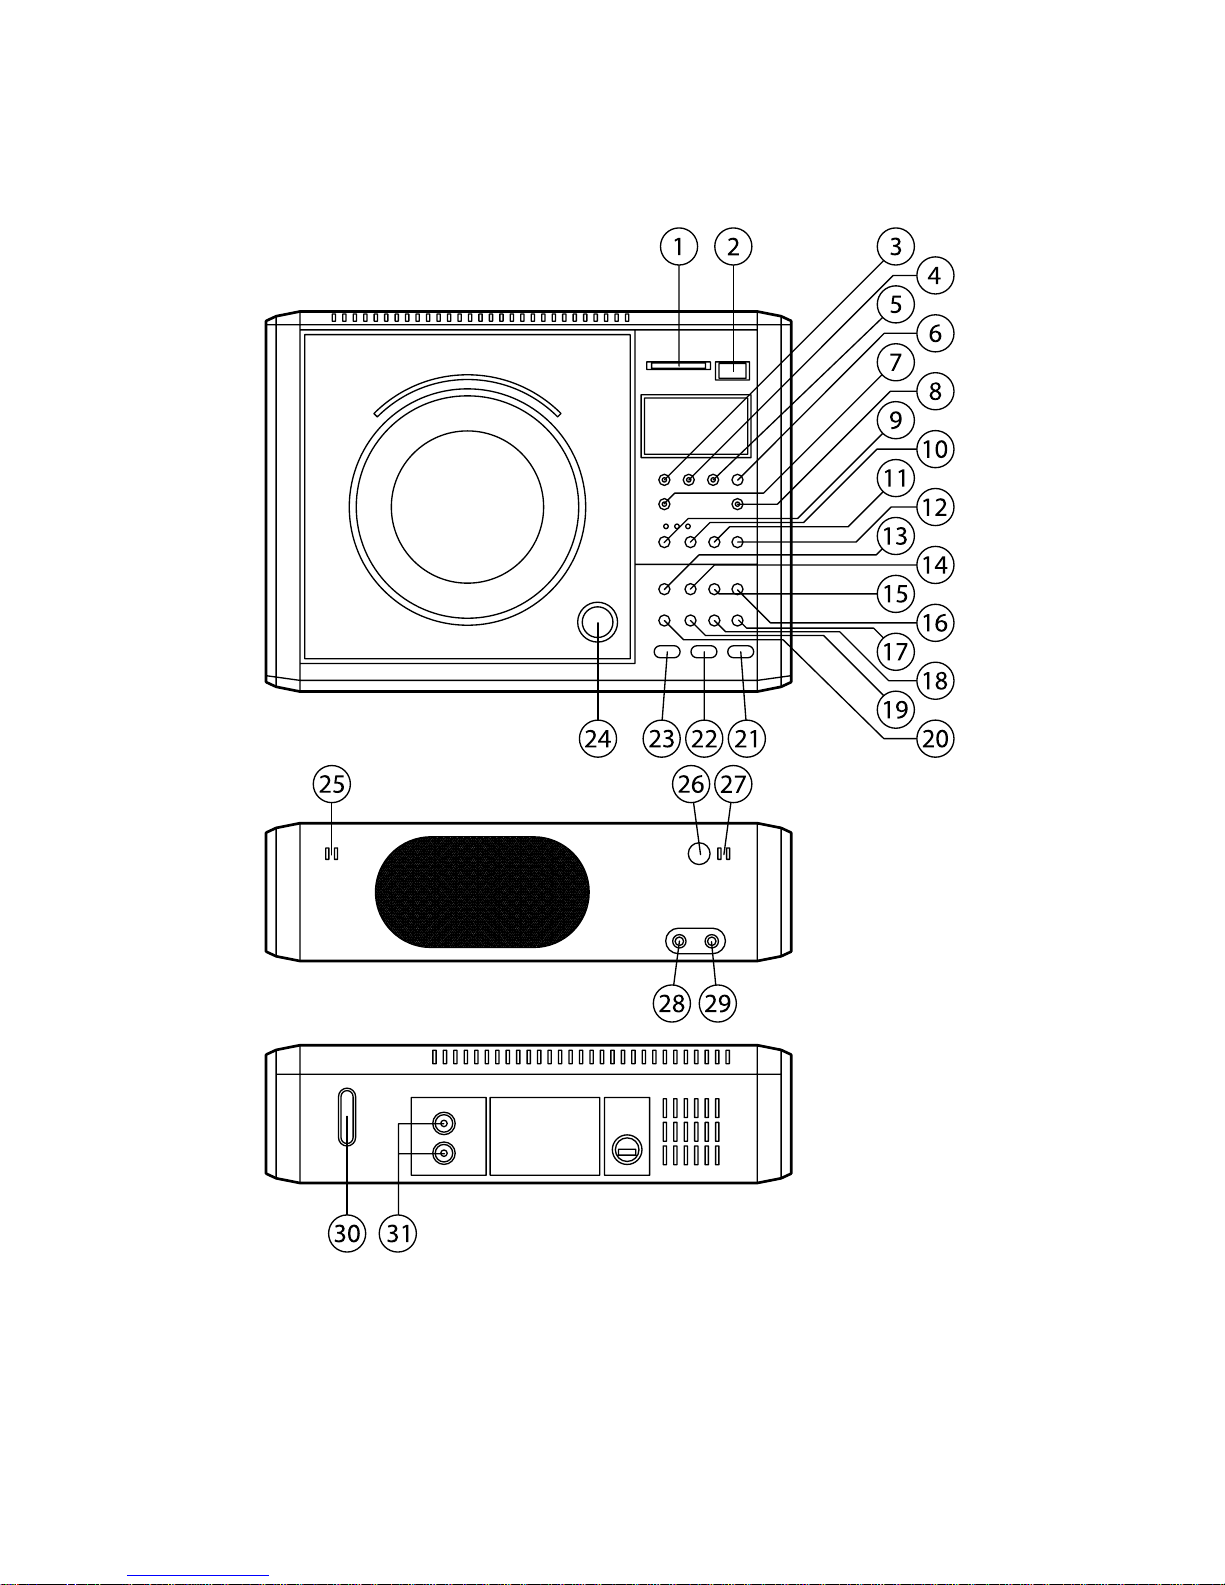
5.1 Ports mémoires externes
1. Port USB
2. Port SD/MMC
5.2 Choix type enregistrement
(RECORD FROM)
3. MIC: enregistrer le micro
4. LINE-IN: enregistrer l’entrée
auxiliaire
5. CD: enregistrer un CD
6. CONFIRM: conrmer choix
5.3 Choix media stockage (RECORD TO)
7. SD/MMC : enregistrer vers carte
mémoire
8. USB: enregistrer vers mémoire USB
5.4 Touches réglage de volume
9. MIC REC LEVEL-: baisser volume
micro
10. MIC/REC LEVEL+: augmenter
volume micro
11. VOLUME- : baisser volume
12. VOLUME+: augmenter volume
5.5 Touches de lecture
13. FOLDER- : dossier précédent
14. FOLDER+: dossier suivant
15. INFO: Info
16. PLAY LIST: Liste de lecture
17. SD-USB-CD: choix média de
lecture
18. REPEAT: répéter
19. F NEXT: suivant
20. B REW: précédent
21. RECORD: Enregistrer
22. RP PLAY/PAUSE : Lecture/Pause
23. C STOP: Stop
24. PRESS TO OPEN: Ouvrir lecteur
CD
5.6 Face avant
25. Microphone gauche
26. REMOTE SENSOR: Récepteur
télécommande
27. Microphone droite
28. LINE IN: Entrée auxiliaire
29. PHONE: port casque
5.7 Arrière
30. POWER: Marche/Arrêt
31. LINE OUT: Sortie signal
6. PRÉPARATION
6.1 Montage
1. Retirez le lm de protection et placez les piles dans la télécommande Respectez les
consignes du paragraphe „Changer la pile de la télécommande“ (voir p. F-10).
2. Branchez l’encodeur CD avec tous les périphériques voulus.
3. Vériez que les aérations ne soient pas bloquées et que l’appareil ne soit pas dans un
endroit trop conné (10 cm de chaque côté minimum).
4. Branchez l’encodeur CD au réseau électrique. L’appareil est en mode „Standby“.
6.2 Branchement avec d’autres appareils
LINE-IN: branchez une source audio externe comme un lecteur MP3 ou un ordinateur par
exemple.
PHONE: port microphone.
LINEOUT: branchez un amplicateur ou autre appareil de diffusion audio.
6.3 Allumer/éteindre
Une fois l’encodeur CD branché à l’alimentation, il est en mode „Standby“ (veille). Vous pouvez
allumer l’encodeur CD avec la touche Marche/Arrêt à l’arrière ou sur la télécommande. L’écran
afche „Hello“.
5. DÉTAILS DU PRODUIT
Page 20

F-6
Une nouvelle pression de la touche passe l’appareil en mode „Standby“. L’écran afche le
message „Good Bye“. Pour éteindre totalement l’appareil, débranchez l’alimentation.
NOTE: ne coupez pas l’alimentation pendant que l’encodeur CD est en marche.
7. LECTURE
L’encodeur CD peut lire les chiers WAVE, MP3 et WMA depuis les CDs, cartes mémoires et
mémoires USB.
7.1 Lecture d’un CD
Insérez un CD dans le lecteur. Appuyez sur la touche „SD-USB-CD“ jusqu’à ce que l’écran
afche „CD“ en haut à gauche. Le nombre de morceaux et le temps total du CD apparaît après
quelques secondes.
7.2 Lecture d’une carte SD ou MMC
Insérez une carte SD ou MMC dans la fente SD de l’encodeur CD. Appuyez sur la touche „SDUSB-CD“ jusqu’à ce que l’écran afche „SD“ en haut à gauche. Le nombre de morceaux MP3
et WMA ainsi que les dossiers de la carte mémoire apparaissent après quelques secondes.
7.3 Lecture d’un appreil USB
Branchez un appareil USB (comme une clé USB ou un lecteur MP3) au port USB de l’encodeur
CD. Appuyez sur les touches „SD-USB-CD“ jusqu’à ce que l’écran afche „USB“ en haut à
gauche. Le nombre de morceaux MP3 et WMA ainsi que les dossiers de la carte mémoire USB
apparaissent après quelques secondes.
7.4 Commencer une lecture
Appuyez sur la touche RP „PLAY“. La lecture démarre avec le premier chier en enchaîne
la lecture dans l’ordre. La lecture s’arrête quand tous les chiers ont été lus. Appuyez sur la
touche C „STOP“ pour stopper la lecture ou RP „PLAY“ pour la suspendre.
Reprenez ensuite la lecture avec la touche RP „PLAY“.
7.5 Sélection chier, titre ou dossier
Appuyez sur B „REW“ ou F „NEXT” pour passer au chier précédent/suivant. Lors de la
lecture de chiers MP3, changez de dossier avec la touche „FOLDER“.
7.6 Afcher informations titre chier
Appuyez sur la touche „INFO“ pour afcher les informations du chier en lecture. Si les
informations sont disponibles, elles s’afchent dans l’ordre „Nom chier/Titre/Artiste /Album“.
Appuyez à nouveau sur la touche „INFO“ pour revenir à l’afchage normal.
7.7 Répéter une lecture
Lors de la lecture d’un CD ou d’une liste de lecture, appuyez sur la touche „REPEAT“ pour
dénir le type de répétition. Appuyez une fois sur la touche „REPEAT“ pour répéter le titre
actuel. L’écran afche „REPEAT 1“. Appuyez sur la touche „REPEAT“ une seconde fois
et le CD complet ou la liste de lecture sera répétée en boucle. L’écran afche le message
„REPEAT ALL“. Appuyez une troisième fois sur la touche „REPEAT“ pour annuler la fonction
de répétition.
Page 21

F-7
NOTE: Lors de la lecture sur des médias de stockage qui contiennent des dossiers,
le message „REPEAT ALBUM“ peut aussi apparaître. Sélectionnez cette option de
répétition pour répéter les titres d’un même dossier.
7.8 Créer une liste de lecture
Une liste de lecture peut contenir jusqu’à 32 titres.
1. Insérez un CD ou une mémoire USB ou SD puis sélectionnez la source avec la touche
„SD-USB-CD“.
2. Appuyez sur la touche „PLAYLIST“.
3. Sélectionnez maintenant els titres comme décrit dans le paragraphe „Sélection chier titre
ou dossier“ (voir p. F-6).
4. Une fois un titre sélectionnez, appuyez sur la touche „PLAYLIST“ pour l’ajouter à la liste de
lecture. Continuez ainsi en sélectionnant un titre après l’autre.
5. Appuyez maintenant sur la touche RP „PLAY“ pour démarrer la lecture de la liste.
6. Appuyez sur les touches
B „REW“ ou F „NEXT” pour passer d’un titre à l’autre.
7. Si vous appuyez sur la touche
C „STOP“ ou que vous débranchez le média de stockage, la
liste de lecture est stoppée et supprimée.
8. ENREGISTREMENT
8.1 Enregistrer un CD
1. Insérez un CD dans le lecteur. Appuyez sur la touche „SD-USB-CD“ jusqu’à ce que l’écran
afche „CD“ en haut à gauche. Vous pouvez choisir parmi trois options d’enregistrement:
- Copier le CD complet: passez au point 2.
- Copier certains titres: Sélectionnez un titre. Voir le paragraphe „Sélection chier titre
ou dossier“ (voir p. F-6). Passez ensuite au point 2.
- Enregistrer une liste de lecture: Créez une liste de lecture. Voir paragraphe „Créer une
liste d electure“ (voir p. F-6). Passez ensuite au point 2.
2. Appuyez sur la touche „REC“.
3. L’écran afche maintenant le message „REC FROM“. Appuyez sur la touche „CD“.
4. L’écran afche „X1“ „X2“. Appuyez sur les touches
B „REW“ et F „NEXT” pour dénir
si l’enregistrement doit se faire en vitesse normale ou double. Conrmez en appuyant sur
„CONFIRM“. Pendant un enregistrement de chiers WAV en vitesse normale, ceux-ci sont
lus en même temps.
5. L’écran afche le message „BIT RATE“. Appuyez sur les touche B „REW“ et F „NEXT”
pour conrmer le Bit-Rate de l’enregistrement puis conrmez avec la touche „CONFIRM“.
Plus le Bit-Rate est élevé plus la qualité et la taille du MP3 est élevée.
6. L’écran afche le message „USB CARD“. Insérez une carte ou une mémoire USB dans
l’encodeur CD.
7. Utilisez les touches de choix de type de stockage (RECORD TO) pour sélectionner „SD/
MMC“ ou „USB“. L’écran afche le message „REC“ et l’enregistrement commence.
8. Les chiers WAV sont convertis au format MP3 puis stockés sur la carte ou la mémoire
USB. Les chiers MP3 sont copiés directement. Appuyez sur la touche C „STOP“ pour
mettre n à l’enregistrement. Les chiers enregistrés sont placés sur le média de stockage
choisi dans un dossier nommé „FCOPY“.
Page 22

F-8
8.2 Enregistrer une entrée auxiliaire
1. Branchez une source audio externe dans l’entrée auxiliaire. Appuyez sur la touche
„REC“.
2. L’écran afche le message „REC FROM“. Appuyez sur la touche „LINE-IN“.
3. L’écran afche le message „BIT RATE“. Appuyez sur les touches B „REW“ et F „NEXT”
pour conrmer le Bit-Rate de l’enregistrment et conrmezavec „CONFIRM“.
4. L’écran afche le message „USB CARD“. Insérez une carte ou une mémoire USB dans
l’encodeur CD.
5. Utilisez les touches de choix de type de stockage (RECORD TO) pour sélectionner „SD/
MMC“ ou „USB“. L’écran afche le message „REC“ et l’enregistrement commence.
6. Modiez le volume de l’enregistrement avec les touches „MIC REC LEVEL“. Les LEDs au
dessus des touches s’allument en vert pour un volume faible, jaune en moyen et rouge
pour élevé. Si la LED est rouge,baissez le volume pour obtenir une meilleure qualité
d’enregistrement.
7. Appuyez sur la touche C „STOP“ pour stopper l’enregistrement. Les enregistrements sont
stockés dans le nouveau dossier „AUDIO“.
8.3 Enregistrer l’entrée microphone
1. Branchez un micro dans l’entrée signal. Appuyez sur la touche „REC“.
2. L’écran afche le message „REC FROM“. Appuyez sur la touche „MIC“.
3. L’écran afche „BIT RATE“. Appuyez sur les touches B „REW“ et F „NEXT” puis
conrmez le Bit-Rate de l’enregistrement avec la touche „CONFIRM“. Plus le Bit Rate est
élevé, plus la qualité et la taille du MP3 est élevée.
4. L’écran afche le message „USB“ „CARD“. Insérez une carte ou une mémoire USB dans
l’encodeur CD.
5. Utilisez les touches de choix de type de stockage (RECORD TO) pour sélectionner „SD/
MMC“ ou „USB“. L’écran afche le message „REC“ et l’enregistrement commence.
6. Modiez le volume de l’enregistrement avec les touches „MIC REC LEVEL“. Les LEDs au
dessus des touches s’allument en vert pour un volume faible, jaune en moyen et rouge
pour élevé. Si la LED est rouge,baissez le volume pour obtenir une meilleure qualité
d’enregistrement.
7. Appuyez sur la touche C „STOP“ pour stopper l’enregistrement. Les enregistrements sont
stockés dans le nouveau dossier „AUDIO“.
8.4 Copier depuis une mémoire USB vers une carte SD/MMC
1. Branchez une mémoire USB dans l’encodeur CD ainsi qu’une carte SD ou MMC. Appuyez
plusieurs fois sur la touche „SD-USB-CD“ jusqu’à ce que l’écran afche „USB“.
- Copier tous les titres de la mémoire USB: passez au point 2.
- Copier certains titres: sélectionnez un titre. Voir paragraphe „Sélection chier titre ou
dossier“ (voir p. F-6). Passez ensuite au point 2.
- Enregistrer une liste de lecture: Créez une liste de lecture. Voir paragraphe „Créer une
liste de lecture“ (voir p. F-6). Passez ensuite au point 2.
2. Appuyez sur la touche „REC“. L’écran afche le message „REC FROM“. Appuyez sur la
touche „SD/MMC“. Les chiers sont copiés.
3. Appuyez sur la touche C „STOP“ pour stopper l’enregistrement. Les enregistrements sont
stockés sur la carte mémoire dans le nouveau dossier „AUDIO“.
Page 23

F-9
8.5 Copier depuis une carte SD/MMC vers un appareil USB
1. Branchez une mémoire USB dans l’encodeur CD ainsi qu’une carte SD ou MMC. Appuyez
plusieurs fois sur la touche „SD-USB-CD“ jusqu’à ce que l’écran afche „SD“.
a. Copier tous les titres de la carte mémoire: passez au point 2.
b. Copier certains titres: sélectionnez un titre. Voir paragraphe „Sélection chier titre ou
dossier“ (voir p. F-6). Passez ensuite au point 2.
c. Enregistrer une liste de lecture: Créez une liste de lecture. Voir paragraphe „Créer une
liste de lecture“ (voir p. F-6). Passez ensuite au point 2.
2. Appuyez sur la touche „REC“. L’écran afche le message „REC FROM“. Appuyez sur la
touche „USB“. Les chiers sont copiés.
3. Appuyez sur la touche C „STOP“ pour stopper l’enregistrement. Les enregistrements sont
stockés sur la mémoire USB dans le nouveau dossier „AUDIO“.
8.6 Supprimer des chiers d’appareils USB et cartes mémoires
1. Branchez une mémoire USB ou une carte mémoire dans l’encodeur CD.
2. Choisissez le média de stockage voulu avec les touches „SD-USB-CD“ („USB“ ou „SD“).
3. Maintenez la touche „REC“ enfoncée cinq secondes.
4. L’écran afche le message „DEL-01“. Sélectionnez un titre avec les touches B „REW“ ou
F „NEXT”.
5. Appuyez sur la touche „REC“ après avoir choisi un titre.
6. L’écran afche „YES“ „NO“. Utilisez les touches B „REW“ ou F „NEXT” pour conrmer
„YES“ ou annuler „NO“ la suppression.
7. Appuyez à nouveau sur la touche „REC“. Le titre est supprimé.
8.7 Formater un appareil USB ou une carte mémoire
1. Branchez une mémoire USB ou une carte mémoire dans l’encodeur CD.
2. Choisissez le média de stockage voulu avec les touches „SD-USB-CD“ („USB“ ou „SD“).
3. Maintenez la touche „REC“ enfoncée cinq secondes.
4. L’écran afche le message „DEL-01“. Maintenez la touche „REC“ enfoncée 5 secondes.
5. Le message „FORMAT Y/N“ apparaît. Utilisez les touches B „REW“ ou F „NEXT” pour
conrmer „YES“ ou annuler „NO“ le formatage.
6. Appuyez à nouveau sur la touche „REC“. L’écran afche le message „FORMAT“ et toutes
les données de la carte ou de la mémoire USB sont supprimées.
7. Le message „NO FILE“ apparaît. Le formatage est terminé.
ATTENTION: Le formatage d’un support de mémoire supprime toutes les
données contenues. Utilisez cette fonction avec précaution. Nous déclinons
toute responsabilité en cas de perte de données.
Page 24
F-10
9. ANNEXE
9.1 Changer la pile de la télécommande
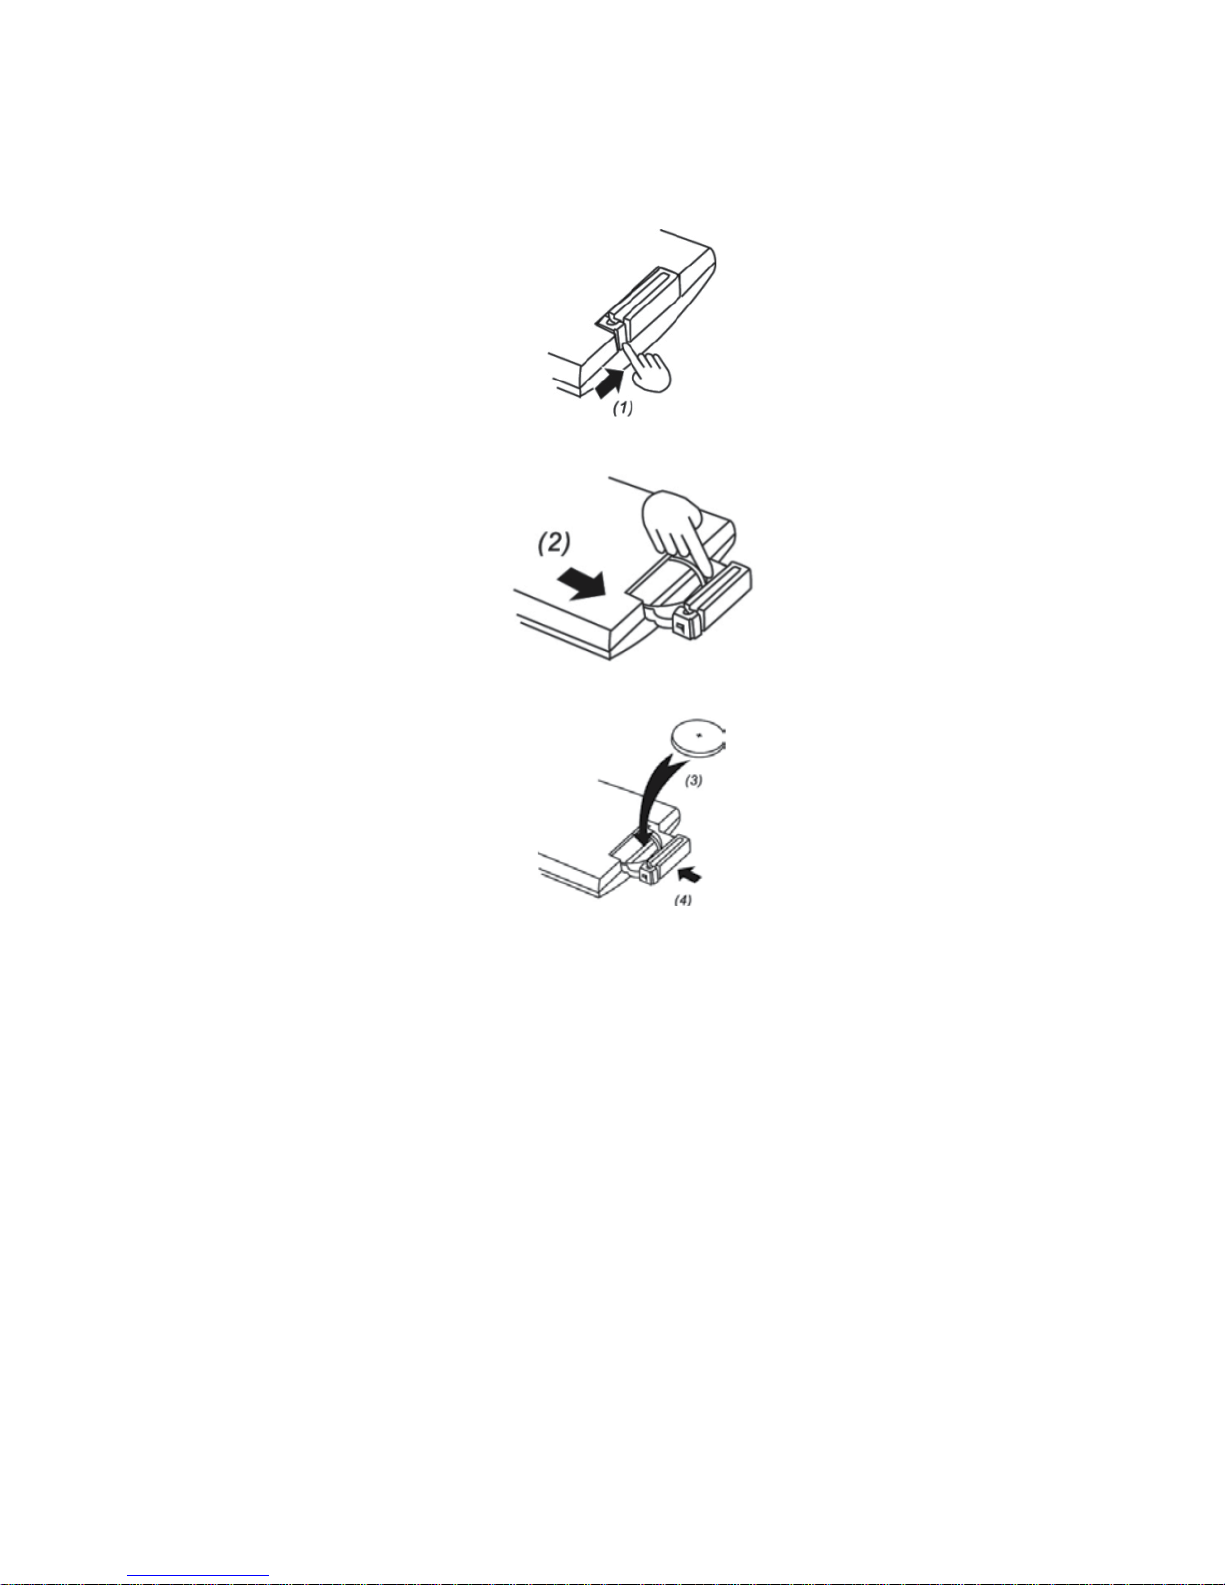
Poussez le petit levier du logement pile dans le sens de la èche comme indiqué ci-contre.
Glissez le logement pile vers l’extérieur.
Placez une nouvelle pile lithium 3V type CR2025 dans le logement. Le pôle plus doit pointer
vers le haut.
Repoussez le logement dans la télécommande jusqu’à ce qu’il soit calé.
9.2 Dépannage au branchement des cartes et mémoires USB
• Une mémoire USB n’est pas reconnue.
1. Vériez que l’appareil soit allumé.
2. Si vous branchez l’appareil sur un hub USB, tentez plutôt un branchement direct sur
l’encodeur.
3. Certains disques durs USB consomment beaucoup d’énergie. Les ports USB de
l’encodeur délivrent peu d’énergie. Utilisez alors l’adaptateur secteur fourni avec votre
disque dur.
• Une carte mémoire n’est pas reconnue.
1. Vériez que la carte mémoire ne soit pas sur „LOCK“.
2. si la carte mémoire est branchée à un hub ou lecteur de carte, préférez un
branchement direct sur l’encodeur CD.
• Impossible de transférer des données
Vériez la capacité mémoire de l’appareil cible. Libérez de l’espace si besoin.
Page 25

Inhalt
1. SICHERHEITSHINWEISE UND GEWÄHRLEISTUNG ………………………………………
D-2
1.1 Wichtige Hinweise zur Entsorgung ………………………………………………..............
D-2
1.2 Wichtige Hinweise zu Batterien und deren Entsorgung ………………………………….
D-2
2. IHR NEUER CD-ENCODER ………………………… ……… …………………………….......
D-3
2.1 Sehr geehrte Kunden, …………………………………………………………………........
D-3
2.2 Eigenschaften …………………………………………………………………………….....
D-3
2.3 Lieferumfang ………………………………………………………………………………..
D-3
3. TECHNISCHE DATEN …………………………………………………………………….......
D-3
4. PRODUKTDETAILS ……………………………………………………………………….......
D-4
5. PRODUKTDETAILS ……………………………………………………………………….......
D-5
5.1 Speicheranschlüsse ………………………………………………………………….........
D-5
5.2 Aufnahmeauswahl-Tasten(RECORD FROM) …………………………………………..
D-5
5.3 Speicherauswahl-Tasten(RECORD TO) …………………………………………………
D-5
5.4 Lautstärkeregler-Tasten ……………………………………………………………..........
D-5
5.5 Abspiel-Tasten ………………………………………………………………………..........
D-5
5.6 Vorderseite ……………………………………………………………………………….....
D-5
5.7 Rückseite ……………………………………………………………………………………
D-5
6. VORBEREITUNGEN …………………………………………………………………………..
D-5
6.1 Aufbau ………………………………………………………………….......…………........
D-5
6.2 Verbindung mit anderen Geräten ………………………………….......…………...........
D-5
6.3 Ein-/Ausschalten ………………………………………………………….......…………....
D-6
7. WIEDERGABE …………………………………………………………………….......………..
D-6
7.1 Wiedergabe von einer CD ………………………………………………………….......….
D-6
7.2 Wiedergabe von einer SD- oder MMC-Speicherkarte …………………………………..
D-6
7.3 Wiedergabe von einem USB-Gerät ……………………………………………………….
D-6
7.4 Eine Wiedergabe starten …………………………………………………………………..
D-6
7.5 Dateien/Titel und Ordner auswählen ……………………………………………………...
D-6
7.6 Titel-/Datei-Informationen abrufen ………………………………………………………..
D-7
7.7 Eine Wiedergabe wiederholen ………………………………………………………….....
D-7
7.8 Eine Playlist erstellen ……………………………………………………..........................
D-7
8. AUFNAHMEN …………………………………………………………….................................
D-7
8.1 Von einer CD aufnehmen ………………………………………………………….............
D-7
8.2 Vom Signaleingang aufnehmen ………………………………………….........................
D-8
8.3 Vom Mikrofoneingang aufnehmen ………………………………………………………...
D-8
8.4 Von einem USB-Gerät auf eine SD/MMC-Speicherkarte kopieren ……………………..
D-9
8.5 Von einer SD/MMC-Speicherkarte auf ein USB-Gerät kopieren ………………………
D-9
8.6 Dateien von USB-Geräten und Speicherkarten löschen ………………………….........
D-9
8.7 Ein USB-Gerät oder eine Speicherkarte formatieren ………………………………...…
D-10
9. ANHANG …………………………………………………………………………………………
D-10
9.1 Wechseln der Batterie der Fernbedienung ………………………………………………..
D-10
9.2 Problemlösungen beim Anschluss von USB-Geräten und Speicherkarten …………….
D-11
D-1
Page 26
D-2
1. SICHERHEITSHINWEISE UND GEWÄHRLEISTUNG
• Diese Bedienungsanleitung dient dazu, Sie mit der Funktionsweise dieses Produktes
vertraut zu machen. Bewahren Sie diese Anleitung daher stets gut auf, damit Sie jederzeit
darauf zugreifen können.
• Sie erhalten bei Kauf dieses Produktes zwei Jahre Gewährleistung auf Defekt bei sachgemäßem
Gebrauch. Bitte beachten Sie auch die allgemeinen Geschäftsbedingungen!
• Bitte verwenden Sie das Produkt nur in seiner bestimmungsgemäßen Art und Weise. Eine
anderweitige Verwendung führt eventuell zu Beschädigungen am Produkt oder in der
Umgebung des Produktes.
• Ein Umbauen oder Verändern des Produktes beeinträchtigt die Produktsicherheit. Achtung
Verletzungsgefahr!
• Öffnen Sie das Produkt niemals eigenmächtig und führen Sie Reparaturen nie selber aus!
• Behandeln Sie das Produkt sorgfältig. Es kann durch Stöße, Schläge oder den Fall aus
bereits geringer Höhe beschädigt werden.
• Halten Sie das Produkt fern von Feuchtigkeit und extremer Hitze.
ACHTUNG: Es wird keine Haftung für Folgeschäden übernommen.
Technische Änderungen und Irrtümer vorbehalten!
1.1 Wichtige Hinweise zur Entsorgung
Dieses Elektrogerät gehört NICHT in den Hausmüll. Für die fachgerechte Entsorgung wenden
Sie sich bitte an die öffentlichen Sammelstellen in Ihrer Gemeinde.
Einzelheiten zum Standort einer solchen Sammelstelle und über ggf. vorhandene
Mengenbeschränkungen pro Tag/ Monat/ Jahr sowie über etwa anfallende Kosten bei Abholung
entnehmen Sie bitte den Informationen der jeweiligen Gemeinde.
1.2 Wichtige Hinweise zu Batterien und deren Entsorgung
Batterien gehören NICHT in den Hausmüll. Als Verbraucher sind Sie gesetzlich verpichtet,
gebrauchte Batterien zur fachgerechten Entsorgung zurückzugeben.
Sie können Ihre Batterien bei den öffentlichen Sammelstellen in Ihrer Gemeinde abgeben oder
überall dort, wo Batterien der gleichen Art verkauft werden.
• Versuchen Sie nicht, Batterien zu öffnen und werfen Sie Batterien nicht in Feuer.
• Batterien, aus denen Flüssigkeit austritt, sind gefährlich. Berühren Sie diese nur mit
geeigneten Handschuhen.
• Batterien gehören nicht in die Hände von Kindern.
• Nehmen Sie die Batterie aus dem Gerät, wenn Sie es für längere Zeit nicht benutzen.
Page 27

D-3
2. IHR NEUER CD-ENCODER
2.1 Sehr geehrte Kunden,
vielen Dank für den Kauf dieses professionellen CD-Encoders. Dieses hochwertige Gerät von
DJ-Tech kann all Ihre Lieblings-CDs in MP3-Dateien von hervorragender Qualität umwandeln
und spielt sowohl CDs als auch MP3-Dateien in perfekter Klangqualität ab. So können Sie
Musik direkt von einer CD auf Ihren MP3-Player übertragen, ohne dafür einen Computer zu
benötigen.
Bitte lesen Sie diese Bedienungsanleitung aufmerksam durch und befolgen Sie die Hinweise
und Tipps damit Sie Ihren neuen CD-Encoder optimal nutzen können.
2.2 Eigenschaften
• Integrierte Stereo-Lautsprecher
• Spielt direkt von USB-Geräten und SD-Speicherkarten
• Kopiert Musik direkt von der CD
• Keine Software benötigt
2.3 Lieferumfang
• CD-Encoder und Player
• Fernbedienung
• Batterie
3. TECHNISCHE DATEN
Frequenzgang: 20-15000 Hz
SNR: 50 dB
Klirrfaktor: 0,4 %
Rauschabstand: 40 dB
USB-Unterstützung: bis 8 GB
SD-/MMC-Unterstützung: bis 4 GB
Wiedergabeformate: MP3 (MPEG 1/2/2.5) WMA (Version 7.0/8.0/9.0)
Datenübertragungsrate: 64 bis 256 kbps
Abtastrate: 32/44,1/48 KHz, 16/22,05/24 KHz, 8/11,025/12 KHz
RMS-Leistung: 2 W
Page 28
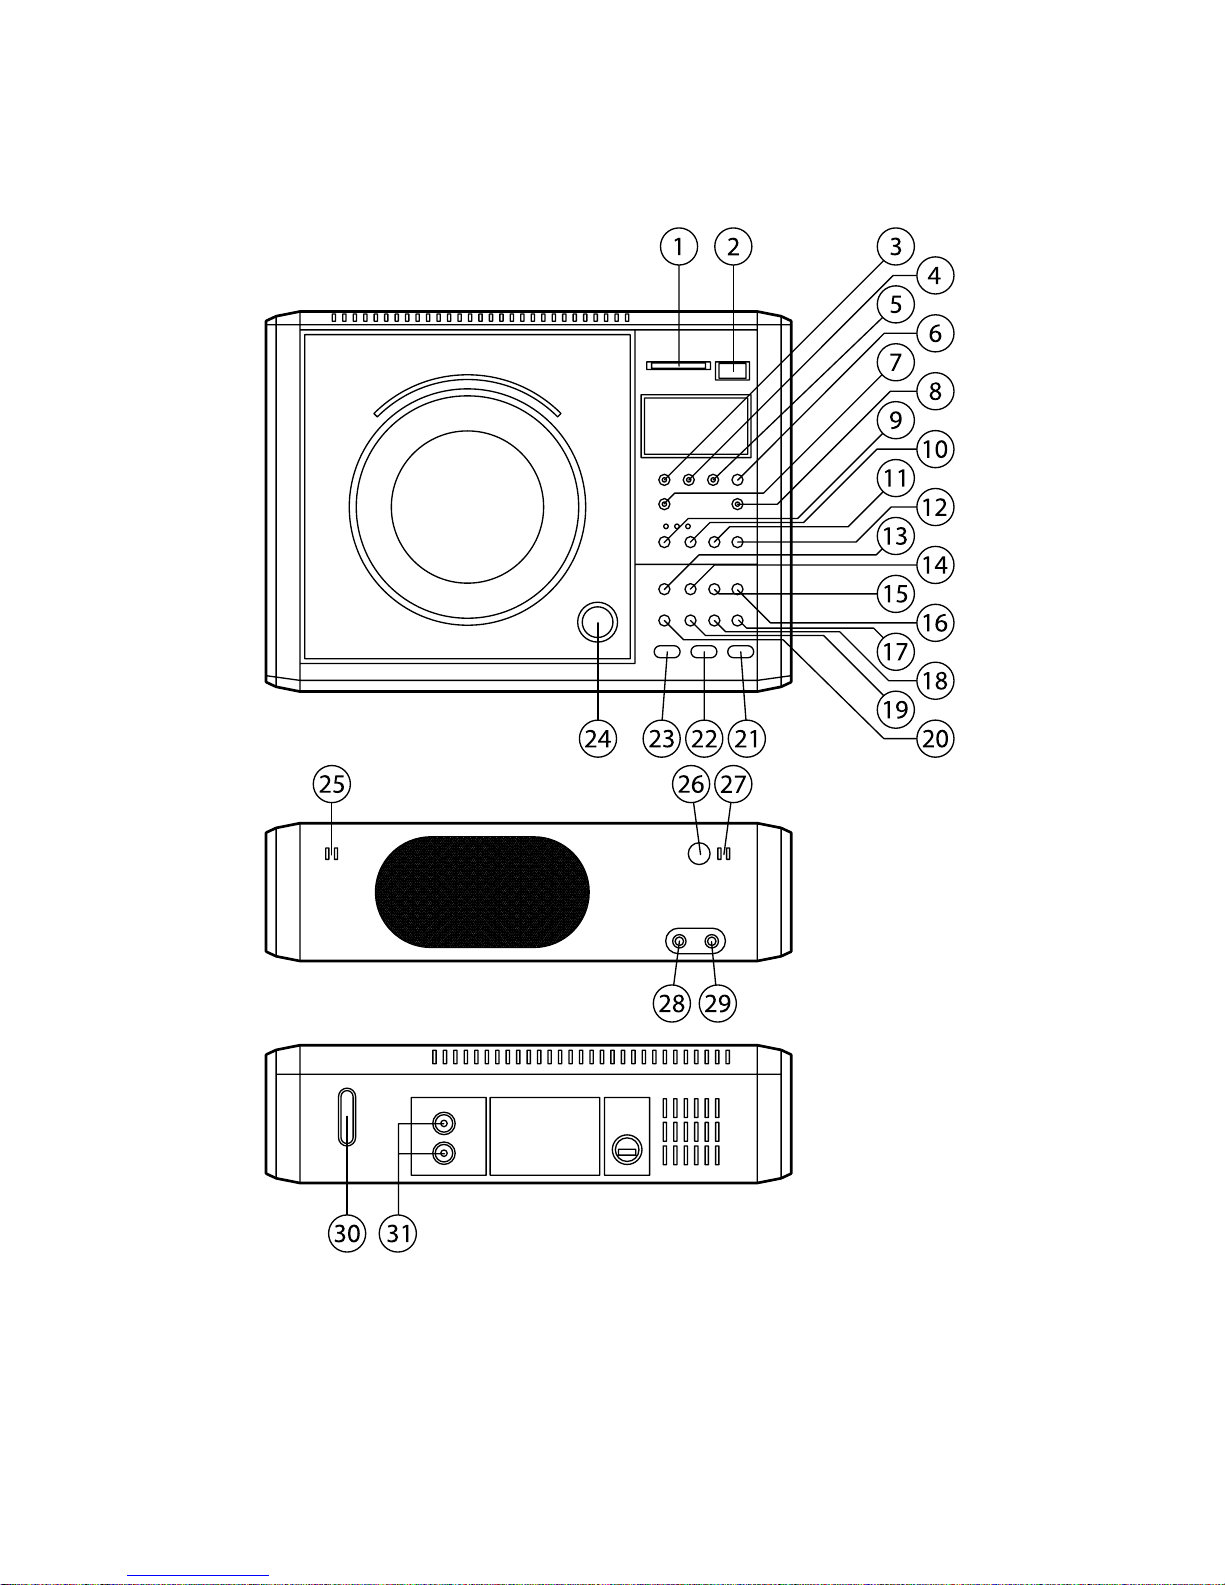
D-4
4. PRODUKTDETAILS
Page 29

D-5
5.1 Speicheranschlüsse
1. USB-Port
2. SD-/MMC-Slot
5.2 Aufnahmeauswahl-Tasten
(RECORD FROM)
3. MIC: Vom Mikrofon aufnehmen
4. LINE-IN:Vom Signaleingang aufnehmen
5. CD: Von einer CD aufnehmen
6. CONFIRM: Auswahl bestätigen
5.3 Speicherauswahl-Tasten
(RECORD TO)
7. SD/MMC:Auf eine Speicherkarte
aufnehmen
8. USB: Auf ein USB-Gerät
aufnehmen
5.4 Lautstärkeregler-Tasten
9. MIC REC LEVEL-:
Aufnahmelautstärke senken
10. MIC/REC LEVEL+:
Aufnahmelautstärke erhöhen
11. VOLUME- : Lautstärke senken
12. VOLUME+: Lautstärke erhöhen
5.5 Abspiel-Tasten
13. FOLDER- : Letzter Ordner
14. FOLDER+: Nächster Ordner
15. INFO: Info
16. PLAY LIST: Playlist
17. SD-USB-CD: WiedergabeMedium auswählen
18. REPEAT: Wiederholen
19. NEXT F: Weiter
20. REW B: Zurück
21. RECORD: Aufnahme starten
22. PLAY/PAUSE RP : Wiedergabe/
Pause
23. STOP C: Beenden
24. PRESS TO OPEN: CD-Fach
öffnen
5.6 Vorderseite
25. Linkes Mikrofon
26. REMOTE SENSOR:
Fernbedienungsempfänger
27. Rechtes Mikrofon
28. LINE IN: Signaleingang
29. PHONE: Kopfhöreranschluss
5.7 Rückseite
30. POWER: Ein/Aus-Taste
31. LINE OUT: Signalausgang
6. VORBEREITUNGEN
6.1 Aufbau
1. Entfernen Sie die Schutzfolien und setzen Sie die Batterie in die Fernbedienung
ein. Beachten Sie hierzu auch die Hinweise im Abschnitt „Wechseln der Batterien der
Fernbedienung“ (siehe S. D-10).
2. Verbinden Sie den CD-Encoder mit allen Peripheriegeräten welche Sie anschließen
wollen.
3. Versichern Sie sich, dass die Lüftungsöffnungen nicht blockiert sind und dass das Gerät in
alle Richtungen wenigstens 10 cm Platz hat.
4. Schließen Sie den CD-Encoder an die Stromversorgung an. Das Gerät geht jetzt in den
„Standby“-Modus.
6.2 Verbindung mit anderen Geräten
LINE-IN: Hier können Sie Audio-Quellen wie Fernseher, Radios oder auch Ihren Computer
anschließen.
PHONE: Hier können Sie ein Mikrofon anschließen.
LINEOUT: Schließen Sie hier einen Verstärker oder andere Audio-Wiedergabegeräte an.
5. PRODUKTDETAILS
Page 30

D-6
6.3 Ein-/Ausschalten
Nachdem der CD-Encoder mit der Stromversorgung verbunden wurde bendet er sich im
„Standby“-Modus (Betriebsbereitschaft). Sie können den CD-Encoder nun mit der Ein/AusTaste an der Rückseite oder auf der Fernbedienung einschalten. Das Display zeigt nun die
Meldung „Hello“.
Durch erneutes Drücken der Taste versetzen Sie das Gerät wieder in den „Standby“-Modus.
Das Display zeigt nun die Meldung „Good Bye“. Um das Gerät vollständig auszuschalten
trennen Sie dieses von der Stromversorgung.
HINWEIS: Unterbrechen Sie die Stromversorgung niemals, während der CDEncoder noch arbeitet.
7. WIEDERGABE
Der CD-Encoder kann WAVE-, MP3- und WMA-Dateien von CDs, Speicherkarten oder
angeschlossenen USB-Speichermedien wiedergeben.
7.1 Wiedergabe von einer CD
Legen Sie eine CD in das CD-Fach ein. Drücken Sie die Taste „SD-USB-CD“ unter den
Auswahltasten bis links oben im Display die Meldung „CD“ erscheint. Nach einigen Sekunden
erscheinen die Anzahl der Stücke auf der CD und die gesamte Spielzeit im Display.
7.2 Wiedergabe von einer SD- oder MMC-Speicherkarte
Legen Sie eine SD- oder MMC- Speicherkarte in den SD-Slot des CD-Encoders ein. Drücken
Sie die Taste „SD-USB-CD“ unter den Auswahltasten bis links oben im Display die Meldung
„SD“ erscheint. Nach einigen Sekunden erscheinen die auf der Speicherkarte vorhandene
Anzahl der MP3- und WMA-Dateien sowie der Ordner im Display.
7.3 Wiedergabe von einem USB-Gerät
Schließen Sie ein USB-Gerät (wie einem USB-Stick oder MP3-Player) an den USB-Port des
CD-Encoders an. Drücken Sie die Taste „SD-USB-CD“ unter den Auswahltasten bis links oben
im Display die Meldung „USB“ erscheint. Nach einigen Sekunden erscheint die auf dem USBDatenträger gespeicherte Anzahl der MP3- und WMA-Dateien sowie der Ordner im Display.
7.4 Eine Wiedergabe starten
Drücken Sie die RP „PLAY“-Taste. Die Wiedergabe startet bei der ersten Datei bzw. dem
ersten Titel und spielt der Reihe nach alle Dateien/Titel auf dem Datenträger ab.Nachdem alle
Dateien/Titel abgespielt wurden stoppt die Wiedergabe. Drücken Sie die C „STOP“-Taste, um
die Wiedergabe zu beenden oder die RP „PLAY“-Taste um die diese zu pausieren.
Mit der RP „PLAY“-Taste können Sie die Wiedergabe dann neu starten bzw. fortsetzen.
7.5 Dateien/Titel und Ordner auswählen
Drücken Sie die B „REW“- oder F “NEXT”-Taste, um zur vorherigen/nächsten Datei zu
springen. Beim Abspielen von MP3-Dateien kann mit den „FOLDER“-Tasten zwischen Ordnern
gewechselt werden.
Page 31

D-7
7.6 Titel-/Datei-Informationen abrufen
Drücken Sie die „INFO“-Taste, um sich Informationen über die aktuell abgespielte Datei
anzeigen zu lassen. Wenn die Informationen in der Datei verfügbar sind, werden diese jetzt im
Format „Dateiname/Titel/Künstler/Album“ angezeigt. Drücken Sie erneut auf die „INFO“-Taste,
um zur normalen Anzeige zurück zu kehren.
7.7 Eine Wiedergabe wiederholen
Bei der Wiedergabe einer CD oder Playlist können Sie durch Drücken der „REPEAT“-Taste
einstellen, dass sich die Wiedergabe ständig wiederholen soll. Drücken Sie einmal auf die
„REPEAT“-Taste um den aktuellen Titel zu wiederholen. Das Display zeigt jetzt die Meldung
„REPEAT 1“. Drücken Sie die „REPEAT“-Taste erneut und es wird die gesamte CD oder Playlist
in einer Endlosschleife wiedergegeben. Im Display erscheint die Meldung „REPEAT ALL“.
Drücken Sie die „REPEAT“-Taste ein drittes Mal, um die Wiederholungsfunktion zu beenden.
HINWEIS: Bei der Wiedergabe von Datenträgern auf denen Dateiordner gespeichert
sind erscheint auch die Meldung „REPEAT ALBUM“. Wählen Sie diese aus, um alle
Titel aus einen einzelnen Ordner abzuspielen und zu wiederholen.
7.8 Eine Playlist erstellen
Eine Playlist kann bis zu 32 Titel enthalten.
1. Legen Sie eine CD ein oder schließen Sie ein USB- oder SD-Speichermedium an und
wählen Sie dieses wie zu Beginn dieses Kapitels beschrieben mit der „SD-USB-CD“-Taste
an.
2. Drücken Sie die „PLAYLIST“-Taste.
3. Wählen Sie nun einzelne Titel wie unter „Dateien/Titel und Ordner auswählen“(Seitenhinw
eis) beschrieben.
4. Wenn Sie einen Titel ausgewählt haben drücken Sie die „PLAYLIST“-Taste um diesen der
Playlist hinzuzufügen. Fahren Sie fort bis alle gewünschten Titel ausgewählt wurden.
5. Drücken Sie nun die
RP „PLAY“-Taste um die Wiedergabe der Playlist zu starten.
6. Mit der B „REW“- Taste und der F „NEXT”-Taste können Sie zwischen den Titeln
wechseln.
7. Durch Drücken der
C „STOP“-Taste oder das Entfernen des Datenträgers, wird die Playlist
beendet und gelöscht.
8. AUFNAHMEN
8.1 Von einer CD aufnehmen
1. Legen Sie eine CD in das CD-Fach ein. Drücken Sie die Taste „SD-USB-CD“ unter den
Auswahltasten, bis links oben im Display die Meldung „CD“erscheint. Sie können zwischen
drei verschiedenen Aufnahmeoptionen wählen:
- Die gesamte CD kopieren: Gehen Sie direkt weiter zu Punkt 2.
- Einen einzelnen Titel kopieren: Wählen Sie einen Titel aus. Beachten Sie hierzu die
Hinweise im Abschnitt „Dateien/Titel und Ordner auswählen“ (siehe D-7). Gehen Sie
dann weiter zu Punkt 2.
- Eine Playlist aufnehmen: Erstellen Sie eine Playlist. Beachten Sie hierzu die Hinweise
im Abschnitt „Eine Playlist erstellen“ (siehe D-7). Gehen Sie dann weiter zu Punkt 2.
2. Drücken Sie die „REC“-Taste.
3. Im Display erscheint jetzt die Meldung „REC FROM“. Drücken Sie die „CD“-Taste unter den
Aufnahmeauswahl-Tasten.
Page 32

D-8
4. Auf dem Display erscheint jetzt „X1“ „X2“. Wählen Sie mit der B „REW“- und F „NEXT”Taste ob die Aufnahme mit normaler oder doppelter Geschwindigkeit durchgeführt werden
soll. Bestätigen Sie Ihre Auswahl durch Drücken der „CONFIRM“-Taste. Bei einfacher
Aufnahmegeschwin-digkeit von WAV-Dateien wird die Musik abgespielt während diese
kopiert wird.
5. Auf dem Display erscheint jetzt die Meldung „BIT RATE“. Wählen Sie mit der B „REW“und F „NEXT”-Taste die Bit-Rate der Aufnahme und bestätigen Sie mit der „CONFIRM“Taste. Je höher Sie die Bit-Rate einstellen desto höher ist die Qualität und Größe der
erstellten MP3-Dateien.
6. Im Display erscheint jetzt die Meldung „USB CARD“. Legen Sie eine Speicherkarte ein
oder verbinden Sie ein USB-Speichermedium mit dem CD-Encoder.
7. Wählen Sie dann unter den Speicherauswahl-Tasten (RECORD TO) die „SD/MMC“ oder
die „USB“-Taste. Das Display zeigt jetzt die Meldung „REC“ und die Aufnahme beginnt.
8. WAV-Dateien werden ins MP3-Format umgewandelt und auf dem USB-Gerät oder der
Speicherkarte abgespeichert. MP3-Dateien werden direkt kopiert. Durch Drücken der C
„STOP“-Taste können Sie die Aufnahme abbrechen. Die aufgenommenen Dateien werden
auf dem Datenträger im neu erstellten Ordner „FCOPY“ gespeichert.
8.2 Vom Signaleingang aufnehmen
1. Schließen Sie ein Gerät an den Signaleingang an. Drücken Sie die „REC“-Taste.
2. Im Display erscheint jetzt die Meldung „REC FROM“. Drücken Sie die „LINE-IN“-Taste
unter den Aufnahmeauswahl-Tasten.
3. Auf dem Display erscheint jetzt die Meldung „BIT RATE“. Wählen Sie mit der F „REW“- und
der F „NEXT”-Taste die Bit-Rate der Aufnahme und bestätigen Sie mit der „CONFIRM“Taste.
4. Im Display erscheint jetzt die Meldung „USB CARD“. Legen Sie eine Speicherkarte ein
oder verbinden Sie ein USB-Speichermedium mit dem CD-Encoder.
5. Wählen Sie dann unter den Speicherauswahl-Tasten (RECORD TO) die„SD/MMC“ oder
die „USB“-Taste. Das Display zeigt jetzt die Meldung „REC“ und die Aufnahme beginnt.
6. Mit den „MIC REC LEVEL“-Tasten können Sie die Lautstärke der Aufnahme festlegen. Die
LEDs über den Tasten leuchten grün bei niedriger Einstellung, gelb bei mittlerer Einstellung
und rot bei hoher Einstellung. Senken Sie die Aufnahmelautstärke wenn die Anzeige rot
leuchtet um eine möglichst hohe Aufnahmequalität zu erreichen.
7. Durch Drücken der C „STOP“-Taste können Sie die Aufnahme abbrechen. Die Aufnahmen
werden im neu erstellten Ordner „AUDIO“ gespeichert.
8.3 Vom Mikrofoneingang aufnehmen
1. Schließen Sie ein Gerät (Mikrofon oder Audioquelle) an den Signaleingang an. Drücken
Sie die „REC“-Taste.
2. Im Display erscheint jetzt die Meldung „REC FROM“. Drücken Sie die „MIC“-Taste unter
den Aufnahmeauswahl-Tasten.
3. Auf dem Display erscheint jetzt die Meldung „BIT RATE“. Wählen Sie mit der B „REW“- und
der F „NEXT”-Taste die Bit-Rate der Aufnahme und bestätigen Sie mit der „CONFIRM“Taste. Je höher Sie die Bit Rate einstellen desto höher ist die Qualität und Größe der
erstellten MP3-Dateien.
4. Im Display erscheint jetzt die Meldung „USB“ „CARD“. Legen Sie eine Speicherkarte ein
oder verbinden Sie ein USB-Speichermedium mit dem CD-Encoder.
5. Wählen Sie dann unter den Speicherauswahl-Tasten (RECORD TO) die „SD/MMC“ oder
die „USB“-Taste. Das Display zeigt jetzt die Meldung „REC“ und die Aufnahme beginnt.
6. Mit den „MIC REC LEVEL“-Tasten können Sie die Lautstärke der Aufnahme festlegen. Die
Page 33

D-9
LEDs über den Tasten leuchten grün bei niedriger Einstellung, gelb bei mittlerer Einstellung
und rot bei hoher Einstellung. Senken Sie die Aufnahmelautstärke wenn die Anzeige rot
leuchtet um eine möglichst hohe Aufnahmequalität zu erreichen.
7. Durch Drücken der C „STOP“-Taste können Sie die Aufnahme abbrechen. Die Aufnahmen
werden im neu erstellten Ordner „AUDIO“ gespeichert.
8.4 Von einem USB-Gerät auf eine SD/MMC-Speicherkarte kopieren
1. Schließen Sie ein USB-Speichermedium an den CD-Encoder an und legen Sie eine SDoder MMC-Speicherkarte in diesen ein. Drücken Sie die „SD-USB-CD“-Taste mehrmals bis
im Display die Meldung „USB“ angezeigt wird.
a. Alle Titel auf dem USB-Speichergerät kopieren: Gehen Sie direkt weiter zu Punkt 2.
b. Einen einzelnen Titel kopieren: Wählen Sie einen Titel aus. Beachten Sie hierzu die
Hinweise im Abschnitt „Dateien/Titel und Ordner auswählen“ (siehe S. D-7). Gehen
Sie dann weiter zu Punkt 2.
c. Eine Playlist aufnehmen: Erstellen Sie eine Playlist. Beachten Sie hierzu die Hinweise
im Abschnitt „Eine Playlist erstellen“ (siehe S. D-7). Gehen Sie dann weiter zu Punkt 2.
2. Drücken Sie die „REC“-Taste. Im Display erscheint jetzt die Meldung „REC FROM“. Drücken
Sie die „SD/MMC“-Taste unter den Aufnahmeauswahl-Tasten. Die Dateien werden jetzt
kopiert.
3. Durch Drücken der C „STOP“-Taste können Sie die Aufnahme abbrechen Die Aufnahmen
werden im neu erstellten Ordner „FCOPY“ auf der Speicherkarte gespeichert.
8.5 Von einer SD/MMC-Speicherkarte auf ein USB-Gerät kopieren
1. Schließen Sie ein USB-Speichermedium an den CD-Encoder an und setzen Sie eine SDoder MMC-Speicherkarte in diesen ein. Drücken Sie die „SD-USB-CD“-Taste mehrmals bis
im Display die Meldung „SD“ angezeigt wird.
a. Alle Titel auf der Speicherkarte kopieren: Gehen Sie direkt weiter zu Punkt 2.
b. Einen einzelnen Titel kopieren: Wählen Sie einen Titel aus. Beachten Sie hierzu die
Hinweise im Abschnitt „Dateien/Titel und Ordner auswählen“ (siehe S. D-7). Gehen
Sie dann weiter zu Punkt 2.
c. Eine Playlist aufnehmen: Erstellen Sie eine Playlist. Beachten Sie hierzu die Hinweise
im Abschnitt „Eine Playlist erstellen“ (siehe S. D-7). Gehen Sie dann weiter zu Punkt 2.
2. Drücken Sie die „REC“-Taste. Im Display erscheint jetzt die Meldung „REC FROM“.
Drücken Sie die „USB“-Taste unter den Aufnahmeauswahl-Tasten. Die Dateien werden
jetzt kopiert.
3. Durch Drücken der C „STOP“-Taste können Sie die Aufnahme abbrechen Die
Aufnahmenwerden im neu erstellten Ordner „FCOPY“ auf dem USB-Gerät gespeichert.
8.6 Dateien von USB-Geräten und Speicherkarten löschen
1. Schließen Sie ein USB-Speichermedium an den CD-Encoder an oder legen Sie eine
Speicherkarte in diesen ein.
2. Wählen Sie mit der „SD-USB-CD“-Taste „USB“ oder „SD“ um das Speichermedium
auszuwählen.
3. Drücken Sie die „REC“-Taste für etwa fünf Sekunden.
4. Auf dem Display erscheint jetzt die Meldung „DEL-01“. Wählen Sie mit der B „REW“- oder
der F „NEXT”-Taste einen Titel.
5. Drücken Sie die „REC“-Taste nachdem Sie einen Titel ausgesucht haben.
6. Auf dem Display erscheint nun die Anzeige „YES“ „NO“. Wählen Sie mit der B „REW“oder der F „NEXT”-Taste „YES“ um den Titel zu löschen oder „NO“ um den Vorgang
abzubrechen.
Page 34
D-10
7. Drücken Sie erneut die „REC“-Taste. Der Titel wird nun gelöscht.
8.7 Ein USB-Gerät oder eine Speicherkarte formatieren
1. Schließen Sie ein USB-Speichermedium an den CD-Encoder an oder legen Sie eine
Speicherkarte in diesen ein.
2. Wählen Sie mit der „SD-USB-CD“-Taste „USB“ oder „SD“ um das Speichermedium
auszuwählen.
3. Drücken Sie die „REC“-Taste für etwa fünf Sekunden.
4. Auf dem Display erscheint jetzt die Meldung „DEL-01“. Drücken Sie die „REC“-Taste erneut
für etwa 5 Sekunden.
5. Die Meldung „FORMAT Y/N“ erscheint im Display. Wählen Sie mit der B „REW“- oder der
F „NEXT”-Taste „YES“ um den Datenträger zu formatieren oder „NO“ um den Vorgang
abzubrechen.
6. Drücken Sie die „REC“-Taste. Das Display zeigt jetzt „FORMAT“ an und alle Daten auf der
Speicherkarte oder dem USB-Gerät werden gelöscht.
7. Die Meldung „NO FILE“ erscheint im Display. Der Vorgang ist jetzt abgeschlossen.
ACHTUNG: Durch das Formatieren des Datenträgers werden alle auf dem
Datenträger gespeicherten Daten gelöscht.
9. ANHANG
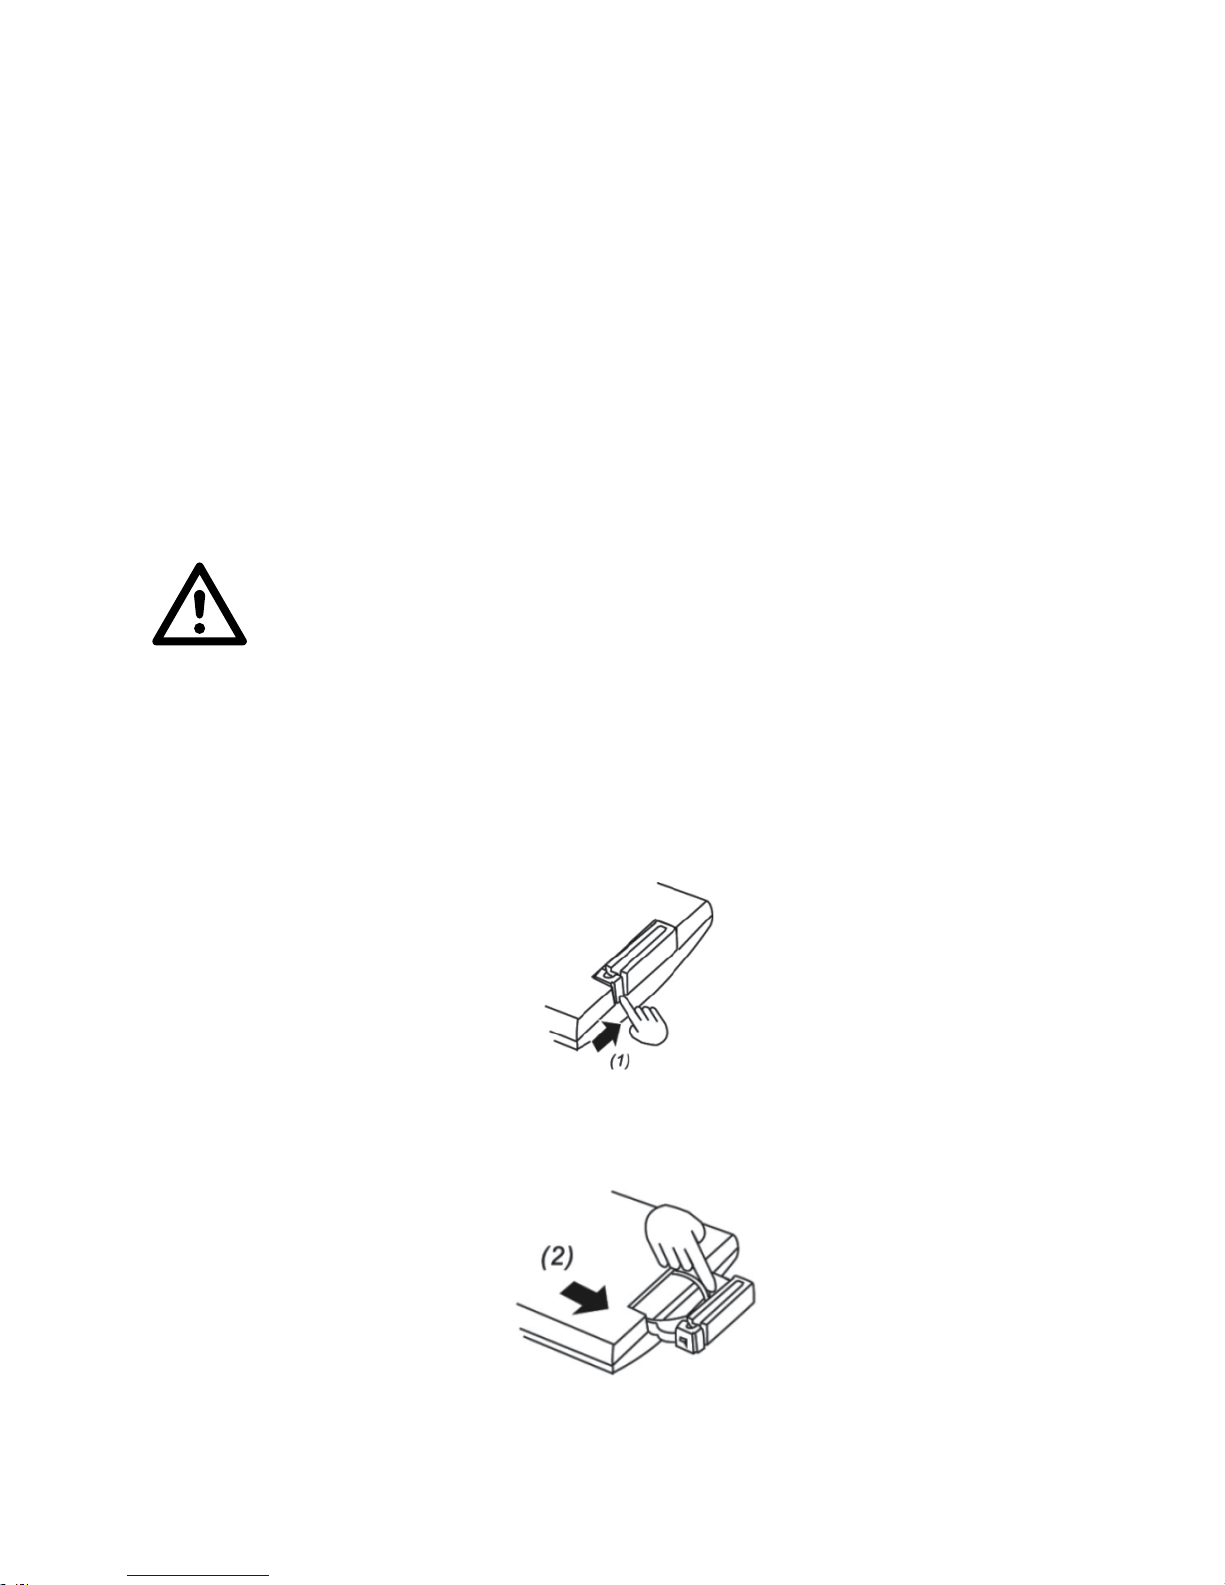
9.1 Wechseln der Batterie der Fernbedienung
Drücken Sie den kleinen Verschlusshebel des Batteriefachs, wie auf dem Bild gezeigt, in
Pfeilrichtung.
Schieben Sie zugleich das Batterie fach heraus.
Page 35

D-11
Setzen Sie eine neue 3V-Lithium Batterie des Typs CR2025 in die Halterung ein. Der Pluspol
muss nach oben zeigen.
Schieben Sie dann das Batteriefach wieder in die Fernbedienung, bis es einrastet.
9.2 Problemlösungen beim Anschluss von USB-Geräten und Speicherkarten
• Ein angeschlossenes USB-Gerät wird nicht erkannt.
1. Überprüfen Sie, ob das USB-Gerät eingeschaltet ist.
2. Wenn das Gerät an einen USB-Hub angeschlossen ist, schließen Sie es stattdessen
direkt an den CD-Encoder an.
3. USB-Geräte können viel Strom verbrauchen. Wenn Sie z.B. eine externe Festplatte an
den CD-Encoder anschließen muss diese über ein externes Netzteil mit
Strom versorgt werden.
• Eine angeschlossene Speicherkarte wird nicht erkannt.
1. Überprüfen Sie ob die Speicherkarte auf „LOCK“ gestellt ist.
2. Wenn die Speicherkarte an einen Hub oder Kartenleser angeschlossen eingesteckt
ist, legen Sie diese stattdessen in den Kartenslot des CD-Encoder ein.
• Es können keine Daten auf das USB-Gerät oder die Speicherkarte übertragen werden.
Überprüfen Sie die Speicherkapazität des Datenträgers. Löschen Sie nicht benötigte
Dateien oder übertragen Sie diese auf einen anderen Datenträger.
 Loading...