


ZENMUSE X5R
V1.0
2016.03
User Manual

2
©
2016 DJI. All Rights Reserved.
Using this manual
Legends
Warning Important Hints and Tips Reference
Before Flight
Read the following documents before using the Zenmuse X5R:
1. Zenmuse X5R In the Box
2. Zenmuse X5R User Manual
3. Zenmuse X5R Safety Guidelines and Disclaimer
Check that all of the items are included in the package. We recommend that you watch all
tutorial videos on the official DJI website and read the Disclaimer and Safety Guidelines
before you y. Refer to the User Manual for more detailed information.
Watch the Video Tutorials
Please watch the tutorial videos at the link below, which demonstrates how to use Zenmuse
X5R safely:
http://www.dji.com/product/zenmuse-x5s/info#video
Searching for Keywords
Search for keywords such as “battery” and “install” to nd a topic. If you are using Adobe
Acrobat Reader to read this document, press Ctrl+F on Windows or Command+F on Mac to
begin a search.
Navigating to a Topic
View a complete list of topics in the table of contents. Click on a topic to navigate to that
section.
Printing this Document
This document supports high resolution printing.

©
2016 DJI. All Rights Reserved.
3
Contents
Using this manual
2
Legends
2
Before Flight
2
Watch the Video Tutorials
2
Product Prole
4
Overview
4
In the Box
5
Optional Accessories
5
Components
6
Getting Started
7
Read the information below before setting up your Zenmuse X5R
7
Supported Devices
7
Supported Lenses for the Inspire 1
7
Required Lens Accessories
7
Supported Micro SD Cards
8
Supported X5R SSD
8
Installing the Camera Lens
8
Mounting the Zenmuse X5R to the Inspire 1
10
Replace the Inspire 1 Gimbal Mounting Plate
10
Attach the Zenmuse X5R
11
Mechanical Range
11
Operating the Camera
12
Camera Panel
12
Basic Shooting
12
Taking Photos
12
Recording Videos
12
Advanced Settings
13
Exposure Modes
13
Photo Styles
13
White Balance
13
List of Settings
14
Managing your Photos and Videos
15
Playback
15
Downloading your Files from Micro SD Card
15
DJI CineLight and your X5R SSD Files
16
Installing DJI CineLight
16
System Requirements
16
Installation (Installer is included on the X5R SSD)
16
Accessing your Files
17
Post-Processing with DJI CineLight
17
Appendix
22
Specications
22

4
©
2016 DJI. All Rights Reserved.
Product Prole
Overview
The Zenmuse X5R is the world's first fully integrated flying gimbal and camera system
capable of capturing video in 4K Cinema RAW for high-end professional video production.
The Type 4/3 CMOS sensor supports lossless 4K RAW video and 16 MP still photos, with
shooting modes including burst, AEB and timelapse.
Integrated into the system is a dedicated 512GB X5R SSD that stores lossless 4K RAW
video at up to 2.4Gbps and can be synced with DJI CineLight for post-processing RAW
les. The optional lens kit includes the DJI MFT 15mm f/1.7 ASPH (30mm in 35mm format)
with a 72-degrees eld of view.
When mounted on the Inspire 1 series, the 3-axis gimbal provides a stable platform for the
camera to get clear shots even during maneuvers. The gimbal tilts the camera across a -90°
to +30° pitch angle and pans ±320° in both directions. Live HD video from the camera is
streamed to the DJI GO app.
ZENMUSE X5R User Manual
©
2016 DJI. All Rights Reserved.
5
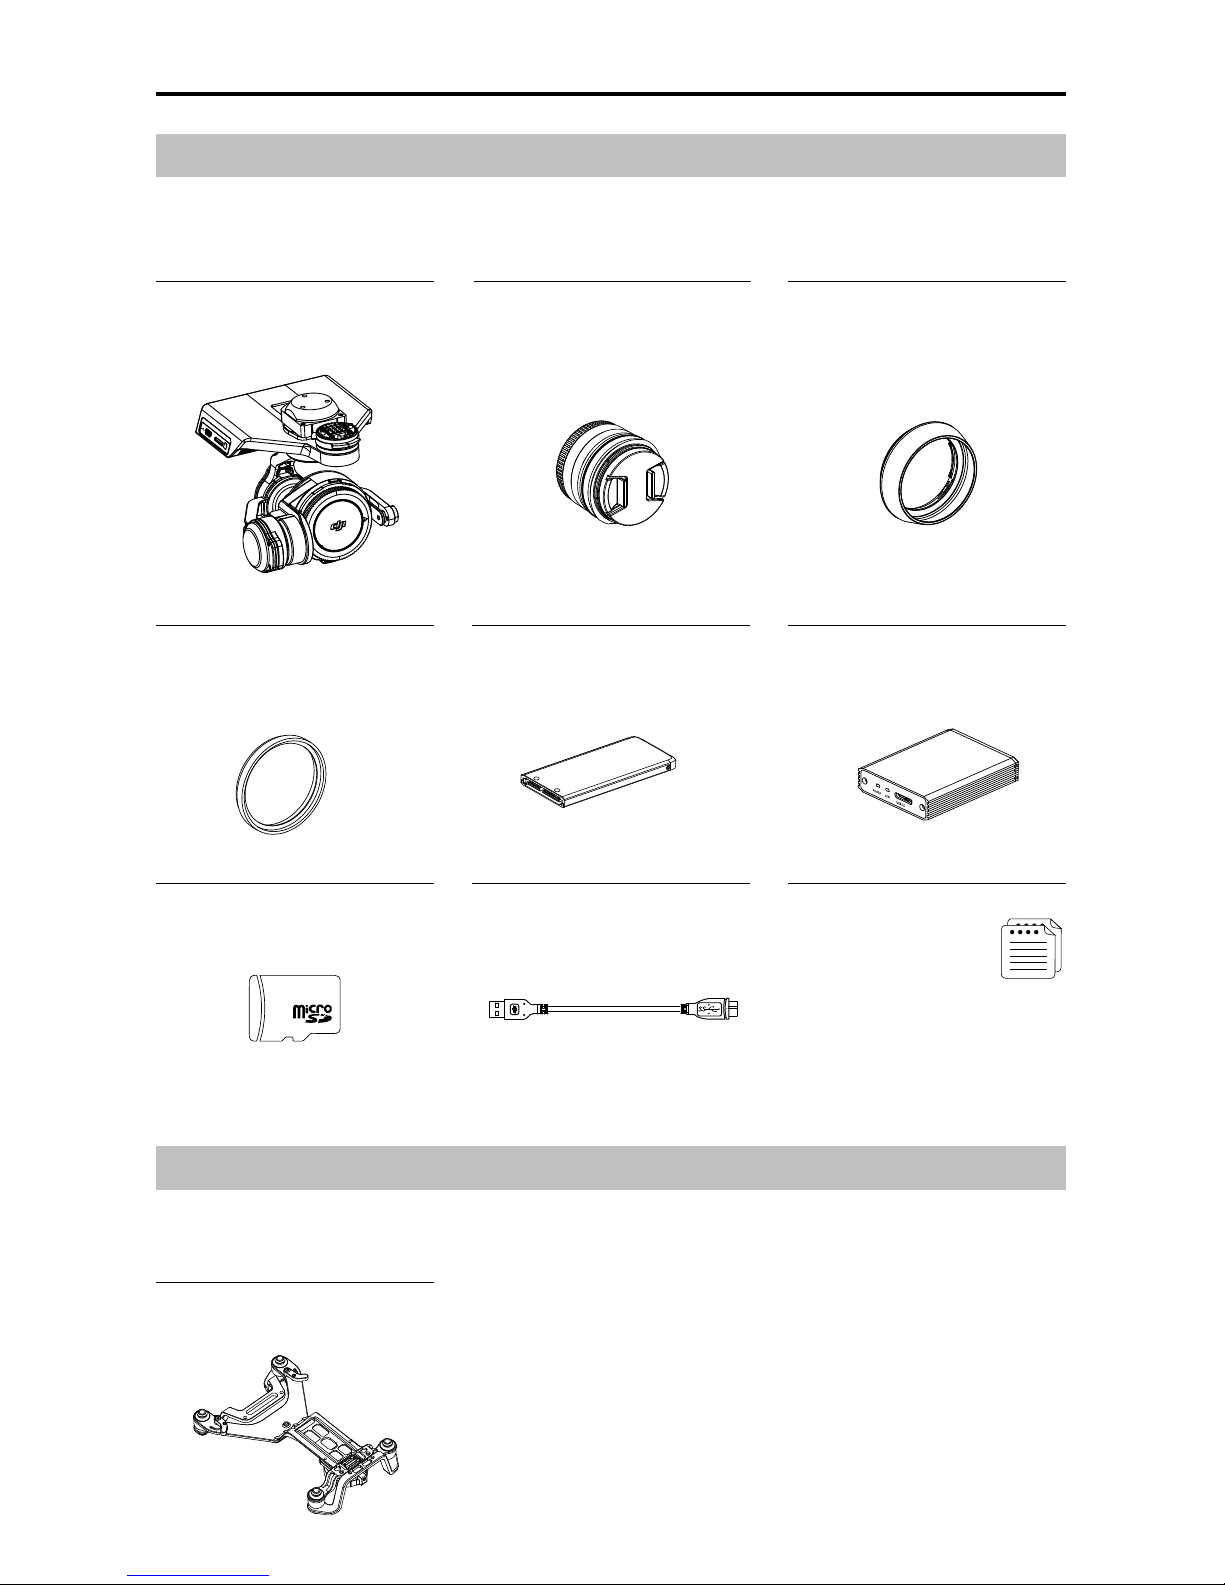
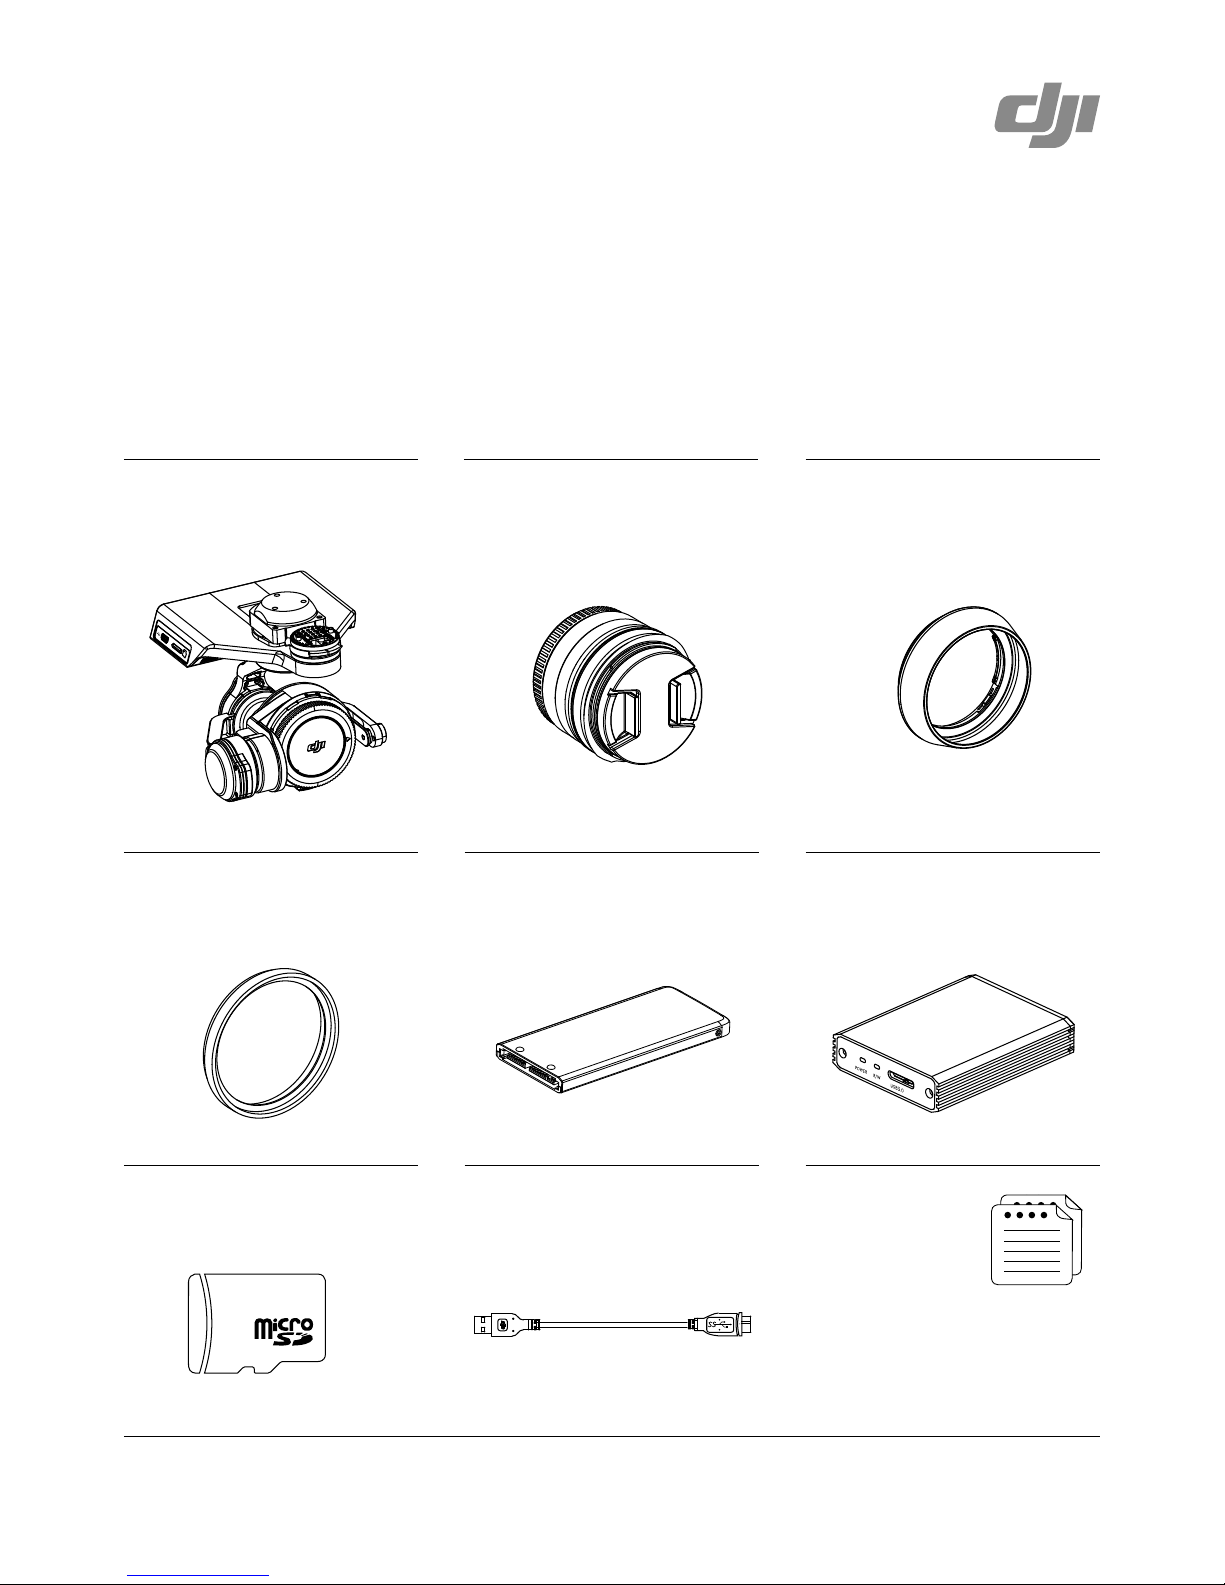
In the Box
Check that all of the following items are in your package. If any item is missing, please
contact DJI or your local dealer.
Camera Balancing Ring* ×1
(BR-Φ46-10)
16GB Micro SD Card ×1
512GB X5R SSD ×1
USB 3.0 Cable ×1
Zenmuse X5R Camera Body ×1
Inspire 1 Gimbal Mounting
Plate ×1
DJI MFT 15mm f/1.7 ASPH
Lens* ×1
Lens Hood* ×1
Optional Accessories
The Zenmuse X5R can be mounted on the Inspire 1 aircraft with the following accessory
which is available on the DJI Store.
X5R READER ×1
Manuals
ZENMUSE X5R In the Box
ZENMUSE X5R Disclaimer and Safety Guidelines
* The original lens, balancing ring and lens hood are only included in the Zenmuse X5R lens kit. Accessories for other supported
lenses can be purchased separately on the DJI Store.
ZENMUSE X5R User Manual
6
©
2016 DJI. All Rights Reserved.
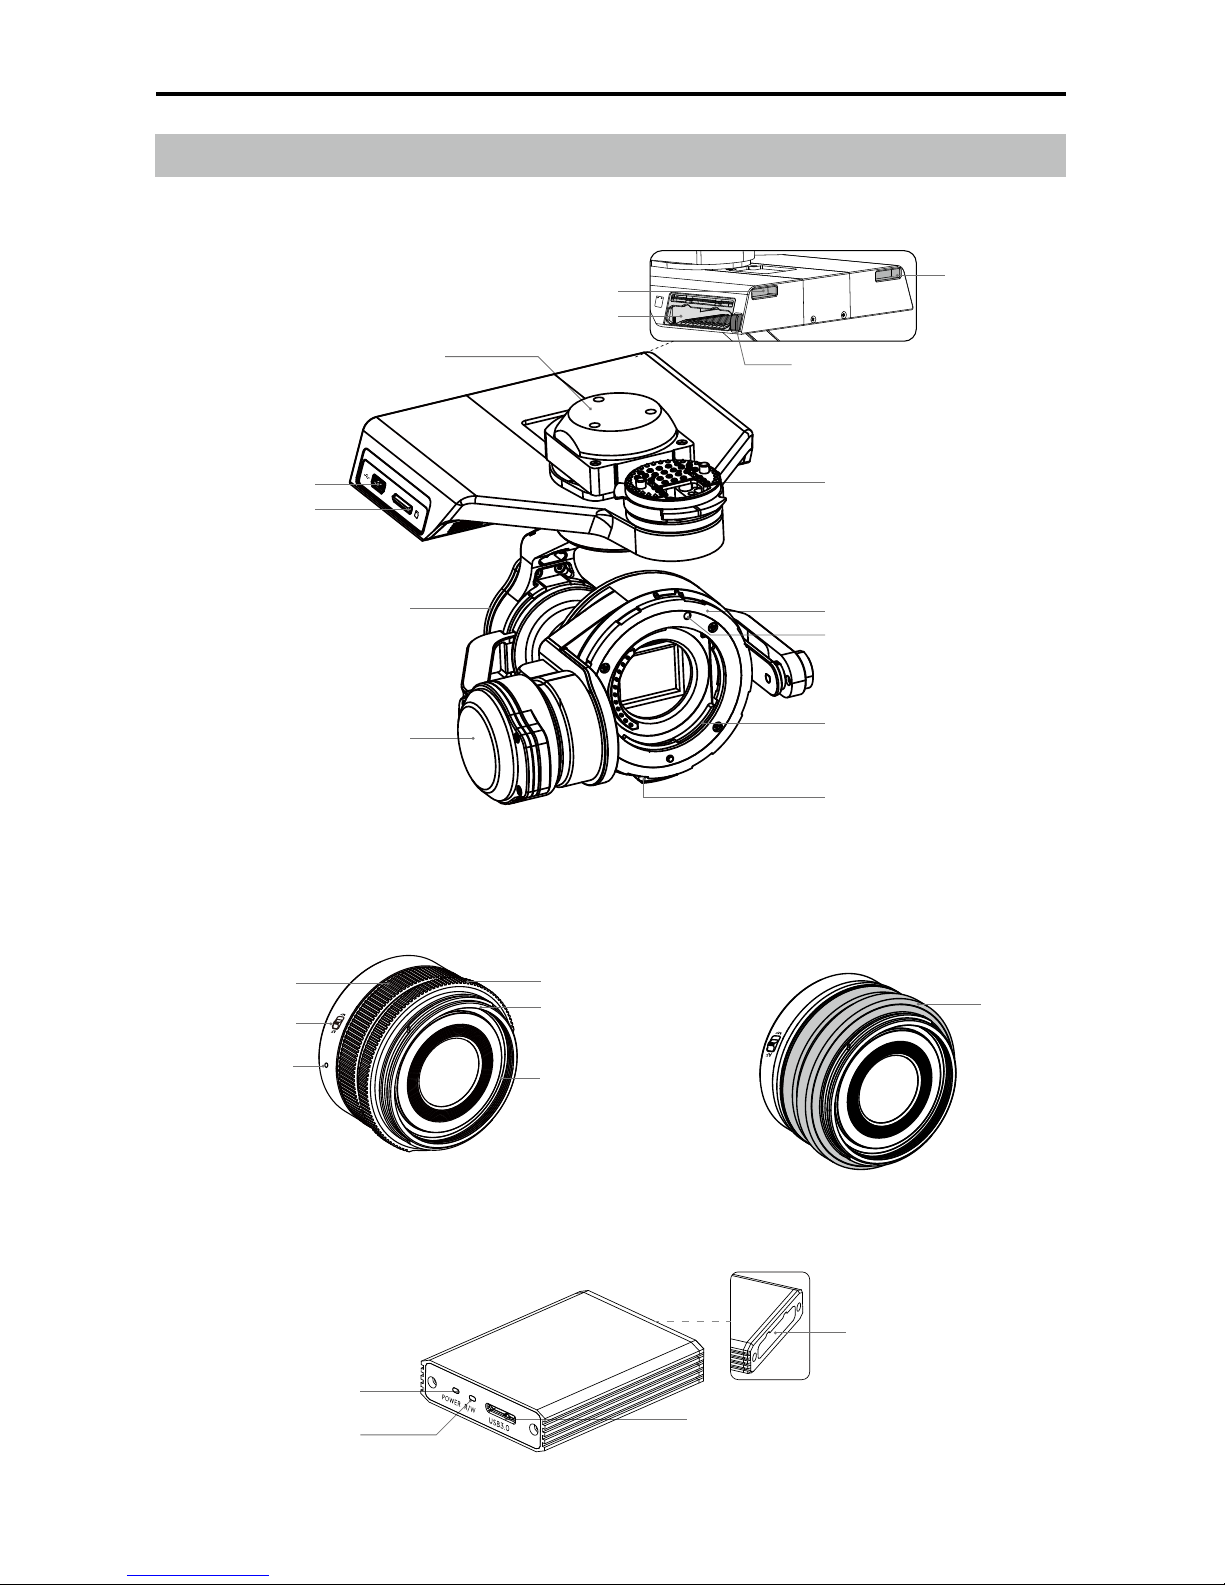
Components
Zenmuse X5R Gimbal and Camera
Dust Cover
46mm Lens Filter Thread
Lens Hood Thread
Aperture Ring
Focusing Ring
Lens Mount Index
AF/MF Switch
DJI MFT 15mm f/1.7 ASPH Lens
Pan Motor
Tilt Motor
Gimbal Connector
Micro SD Card Slot
Lens Lock
Lens Mount Index
Lens Mount
Lens Release Button
Roll Motor
Micro USB Port
X5R Reader
Power LED
Working Status LED
USB Port
X5R SSD Release Button
X5R SSD Slot
Slot
Slot
X5R SSD Slot

©
2016 DJI. All Rights Reserved.
7
Getting Started
Read the information below before setting up your Zenmuse X5R
Supported Devices
The Zenmuse X5R can be attached to the following device, Zenmuse X5R may be compatible
with other DJI devices in future.
DJI Inspire 1
Supported Lenses for the Inspire 1
The Zenmuse X5R currently supports the following lenses, and will continue to support more
lenses in future.
DJI MFT 15mm f/1.7 ASPH
Panasonic Lumix G Leica DG Summilux 15mm f/1.7 ASPH
Olympus M.Zuiko Digital ED 12mm f/2.0
Olympus M.Zuiko Digital ED 17mm f/1.8
Olympus M.Zuiko Digital ED 25mm f/1.8
Olympus M.Zuiko Digital ED 45mm f/1.8 (For still photography)
Olympus M.Zuiko Digital ED 14-42mm f/3.5-5.6 EZ (For still photography)
Required Lens Accessories
The following table shows the recommended DJI Balancing Ring and filter and lens hood
requirement for each lens model.
Attach either a DJI Balancing Ring or lter only. Attach a lens hood only if required. The listed
Balancing Rings can be purchased on the DJI Store.
Model DJI Balancing Ring
Filter
Lens Hood
Thread Size Weight
DJI MFT 15mm f/1.7 ASPH BR-Φ46-10 46 mm 10 g Required
Panasonic Lumix G Leica DG
Summilux 15mm f/1.7 ASPH
BR-Φ46-10 46 mm 10 g Required
Olympus M.Zuiko Digital ED
12mm f/2.0
BR-Φ46-10 46 mm 10 g Not required
Olympus M.Zuiko Digital ED
17mm f/1.8
BR-Φ46-33 46 mm 33 g Not required
Olympus M.Zuiko Digital ED
25mm f/1.8
Not required 46 mm 10 g Not required
Olympus M.Zuiko Digital
ED 45mm f/1.8 (For still
photography)
Not required 37 mm 14 g Not required
Olympus M.Zuiko Digital
ED 14-42mm f/3.5-5.6 EZ
(For still photography)
BR-Φ37-23 37 mm 23 g Not required
ZENMUSE X5R User Manual
8
©
2016 DJI. All Rights Reserved.
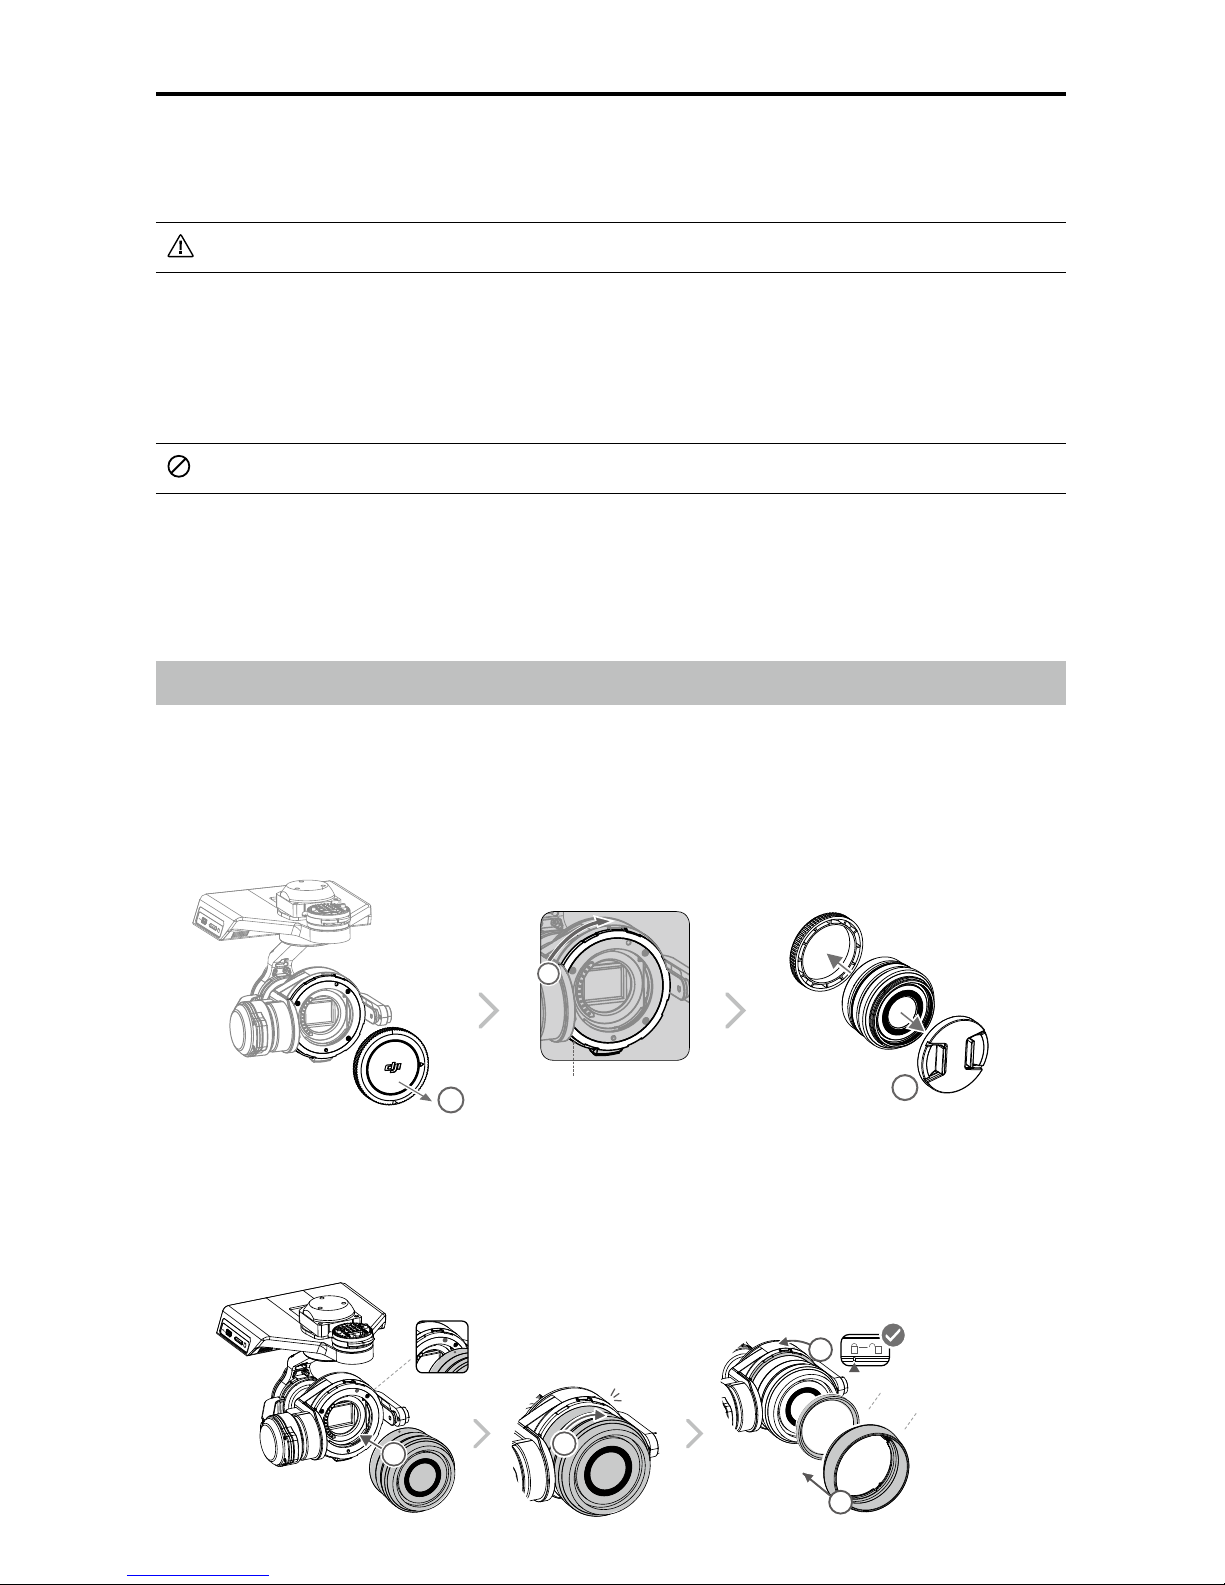
4. Align the two Lens Mount Indexes on the camera body and camera lens, and insert the
camera lens into the body of the camera.
5. Rotate the camera lens clockwise until you hear a click.
6. Rotate the Lens Lock counterclockwise to lock it.
7. Mount the Balancing Ring (or a lter) and the Lens Hood.
6
5
4
7
Click
Balancing Ring (or Filter)
Lens Hood
The thread size and weight of the Balancing Ring are included in the model number (i.e. BR-
Φ46-10 has a thread size of 46 mm and a weight of 10 g).
The Balancing Ring must be installed on the camera lens when a lter is not used.
Supported Micro SD Cards
The Zenmuse X5R comes with a 16GB Micro SD card, but also supports Micro SD cards
with a capacity of up to 64GB. We recommend using a UHS-1 Micro SD card to minimize the
delay when reading and writing high resolution video data.
DO NOT remove the Micro SD card from the Zenmuse X5R when it is powered on.
Supported X5R SSD
The Zenmuse X5R comes with an integrated 512GB X5R SSD for storing lossless and
uncompressed footage. Note that its operating temperature is 32° to 158° F (0° to 70° C).
Installing the Camera Lens
The following steps use the DJI MFT 15mm f/1.7 ASPH as illustration of how to mount the
camera lens to the camera body. Be sure to power off the battery before installation.
1. Remove the camera body cap.
2. While holding down the Lens Release Button, rotate the Lens Lock clockwise to unlock it.
3. Remove the lens cap and rear cap.
Lens Release Button
1
2
3
ZENMUSE X5R User Manual
©
2016 DJI. All Rights Reserved.
9
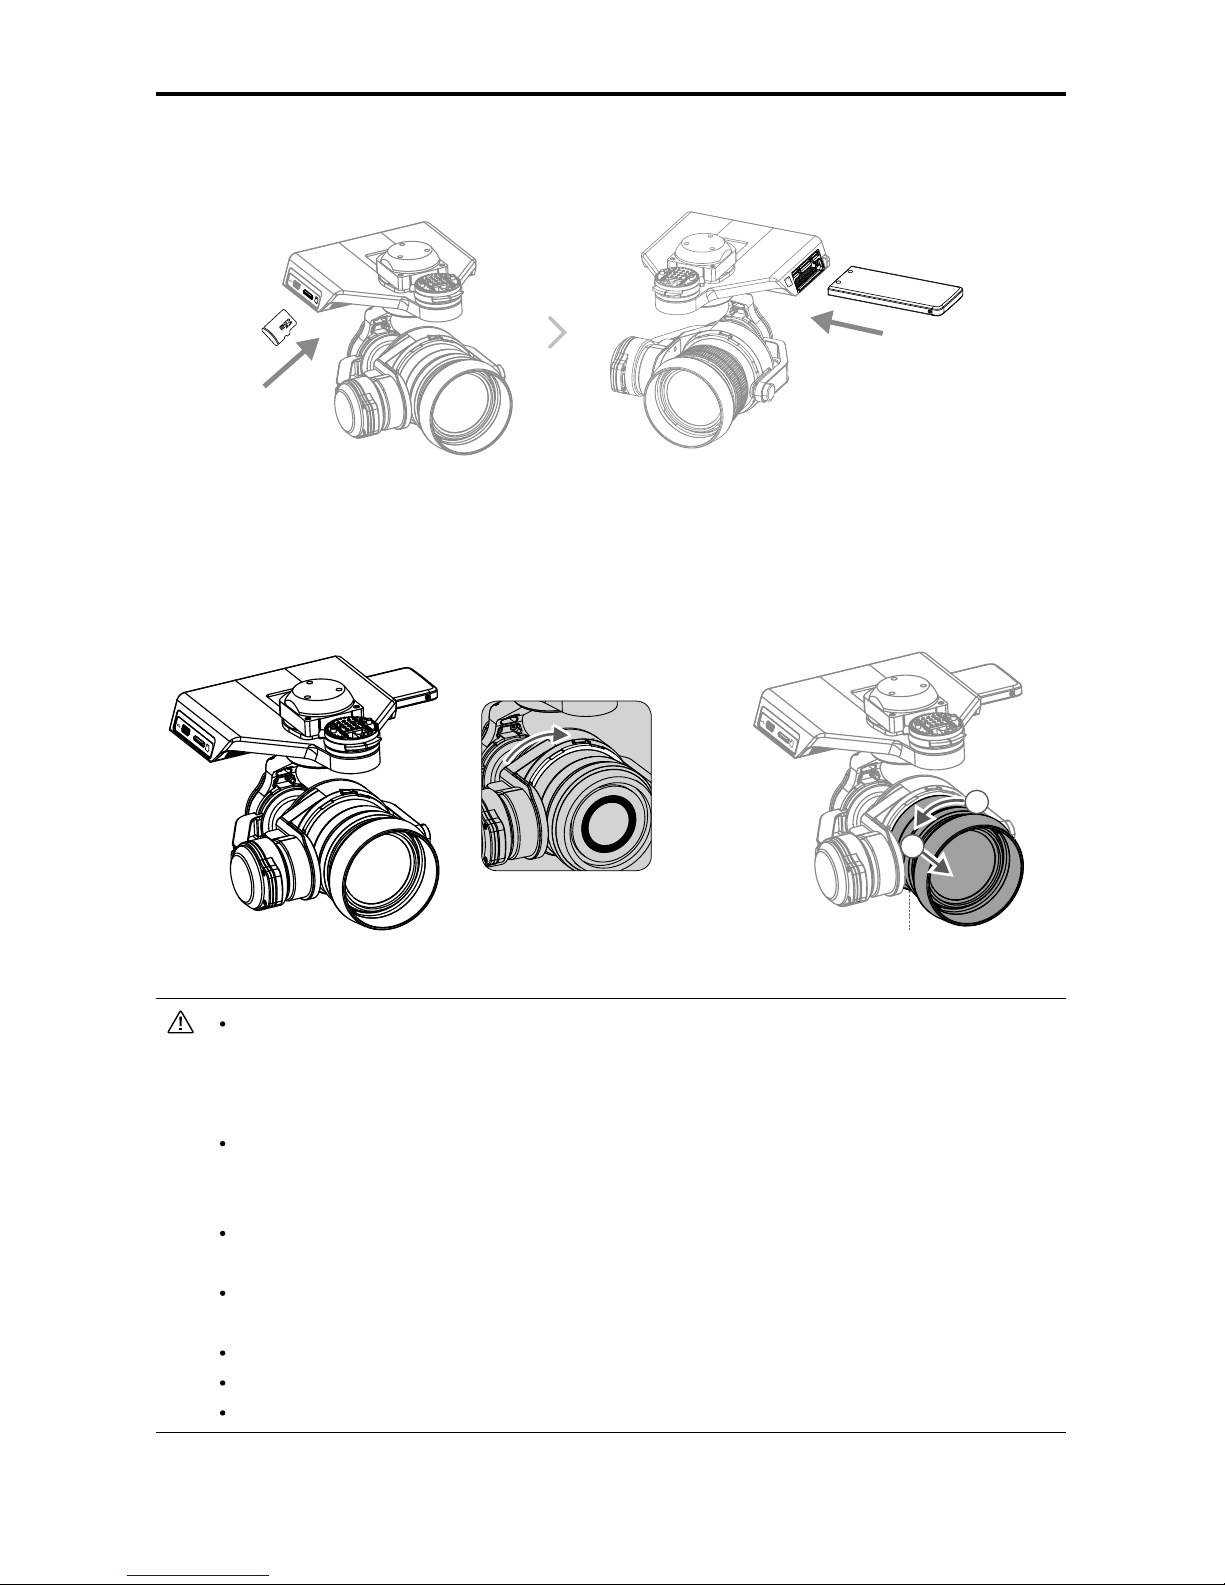
To remove the camera lens, power off the battery and then:
1. While holding down the Lens Release Button, rotate the Lens Lock clockwise to unlock it.
2. While holding down the Lens Release Button, rotate the camera lens counterclockwise to
detach it.
It is recommended to wrap a dust cover around the lens to prevent contamination.
DJI produces dedicated dust covers for the DJI MFT 15mm f/1.7 ASPH and the
Panasonic Lumix G Leica DG Summilux 15mm f/1.7 ASPH. Other lenses may require
you to purchase a third-party dust cover.
It is important to tighten the Lens Lock after attaching the camera lens, as this can
reduce the vibrations of the lens when the aircraft is moving in ight. Always loosen
the Lens Lock before attaching and detaching the camera lens.
A lter can be installed in place of the Camera Balancing Ring. Remember to use a
lter that fullls the weight requirement.
Some lenses must not be used with a lens hood. Be sure to check the table above
for the accessory requirements for your lens.
Be sure to set the lens to AF mode.
Always hold down the Lens Release Button before rotating the Lens Lock to unlock it.
Always hold down the X5R SSD Release Button before removing the X5R SSD.
Lens Release Button
B
A
8. Insert the Micro SD card and the X5R SSD.
8
9

ZENMUSE X5R User Manual
10
©
2016 DJI. All Rights Reserved.
4. Attach the new gimbal mounting plate as shown below. With their flat sides facing
outwards, align the rear mounting plates with the rear bracket's screw holes. Tighten the
screws with a screwdriver.
5. Connect the 8-PIN cable and 10-PIN cable in order.
6. Place the front mounting bracket to the front bracket with its grooved side facing inwards.
Adjust the 8-PIN cable and 10-PIN cable to avoid protrusion, and then tighten the screws.
Mounting
Position
Front Mounting
Plate
Rear Mounting
Plate
Mounting the Zenmuse X5R to the Inspire 1
(Watch Video: http://www.dji.com/product/zenmuse-x5s/info#video)
Replace the Inspire 1 Gimbal Mounting Plate
1. Remove the two black dampers at the front.
2. Disconnect the 10-PIN cable and 8-PIN cable in order. Be careful not to damage the
gimbal cables.
3. Remove the other two black dampers.
ZENMUSE X5R User Manual
©
2016 DJI. All Rights Reserved.
11
Be careful not to damage the Gimbal Connector and its metal contacts when
attaching or storing the Zenmuse X5R.
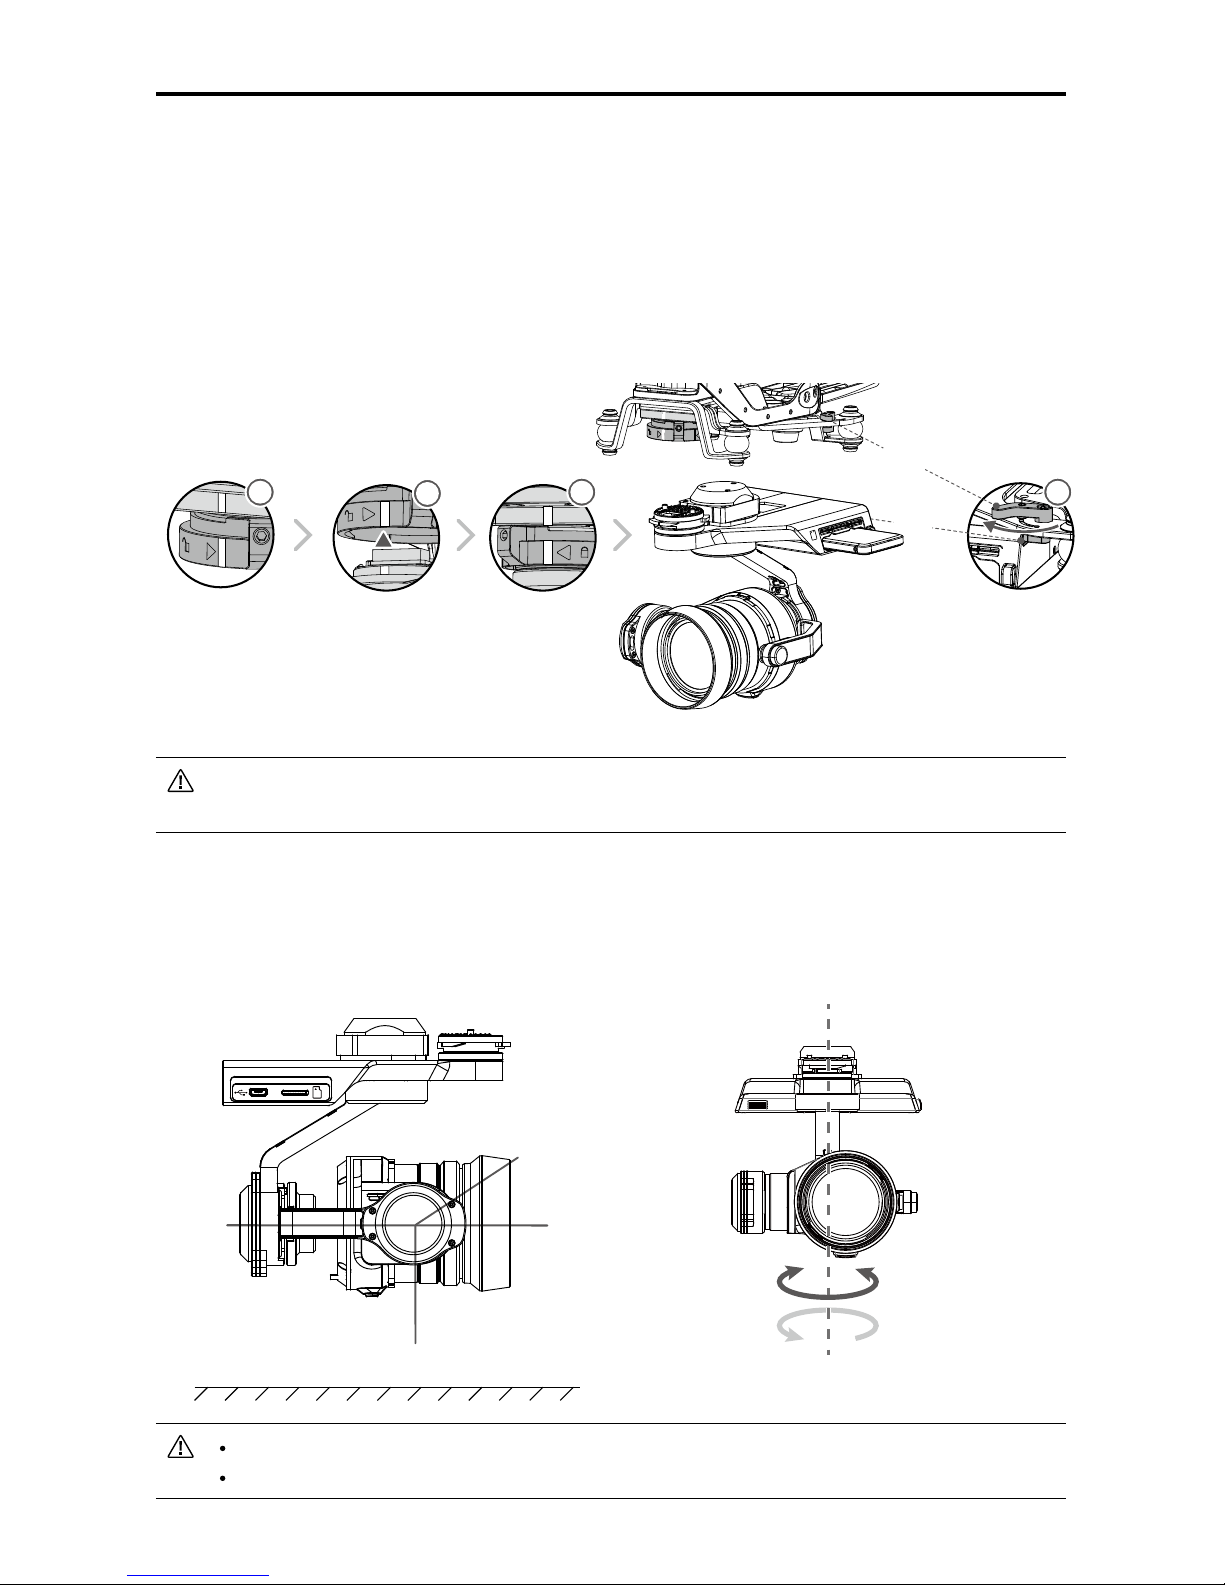
Mechanical Range
The 3-axis gimbal provides an incredibly stable and mobile platform for the camera system
to capture silky smooth video. The gimbal can tilt the camera up to 120 degrees and pan 320
degrees in either direction, providing 640 degrees of yaw rotation.
DO NOT attach or detach the Zenmuse X5R when the aircraft is powered on.
Take off from a at, open area and protect the gimbal after powering up.
Attach the Zenmuse X5R
Power off the aircraft.
1. Rotate the Gimbal Lock to the unlocked position.
2. While aligning the white lines on the Gimbal Connector and Gimbal Lock, insert the Gimbal
Connector.
3. Rotate the Gimbal Lock to the locked position.
4. Turn the two keys on the other end of the mounting plate 90 degrees into the slots.
Ground Level
4
1
Key
Slot
3
2
+
320°
-320°
+
30°
-90°
0°
12
©
2016 DJI. All Rights Reserved.
Operating the Camera
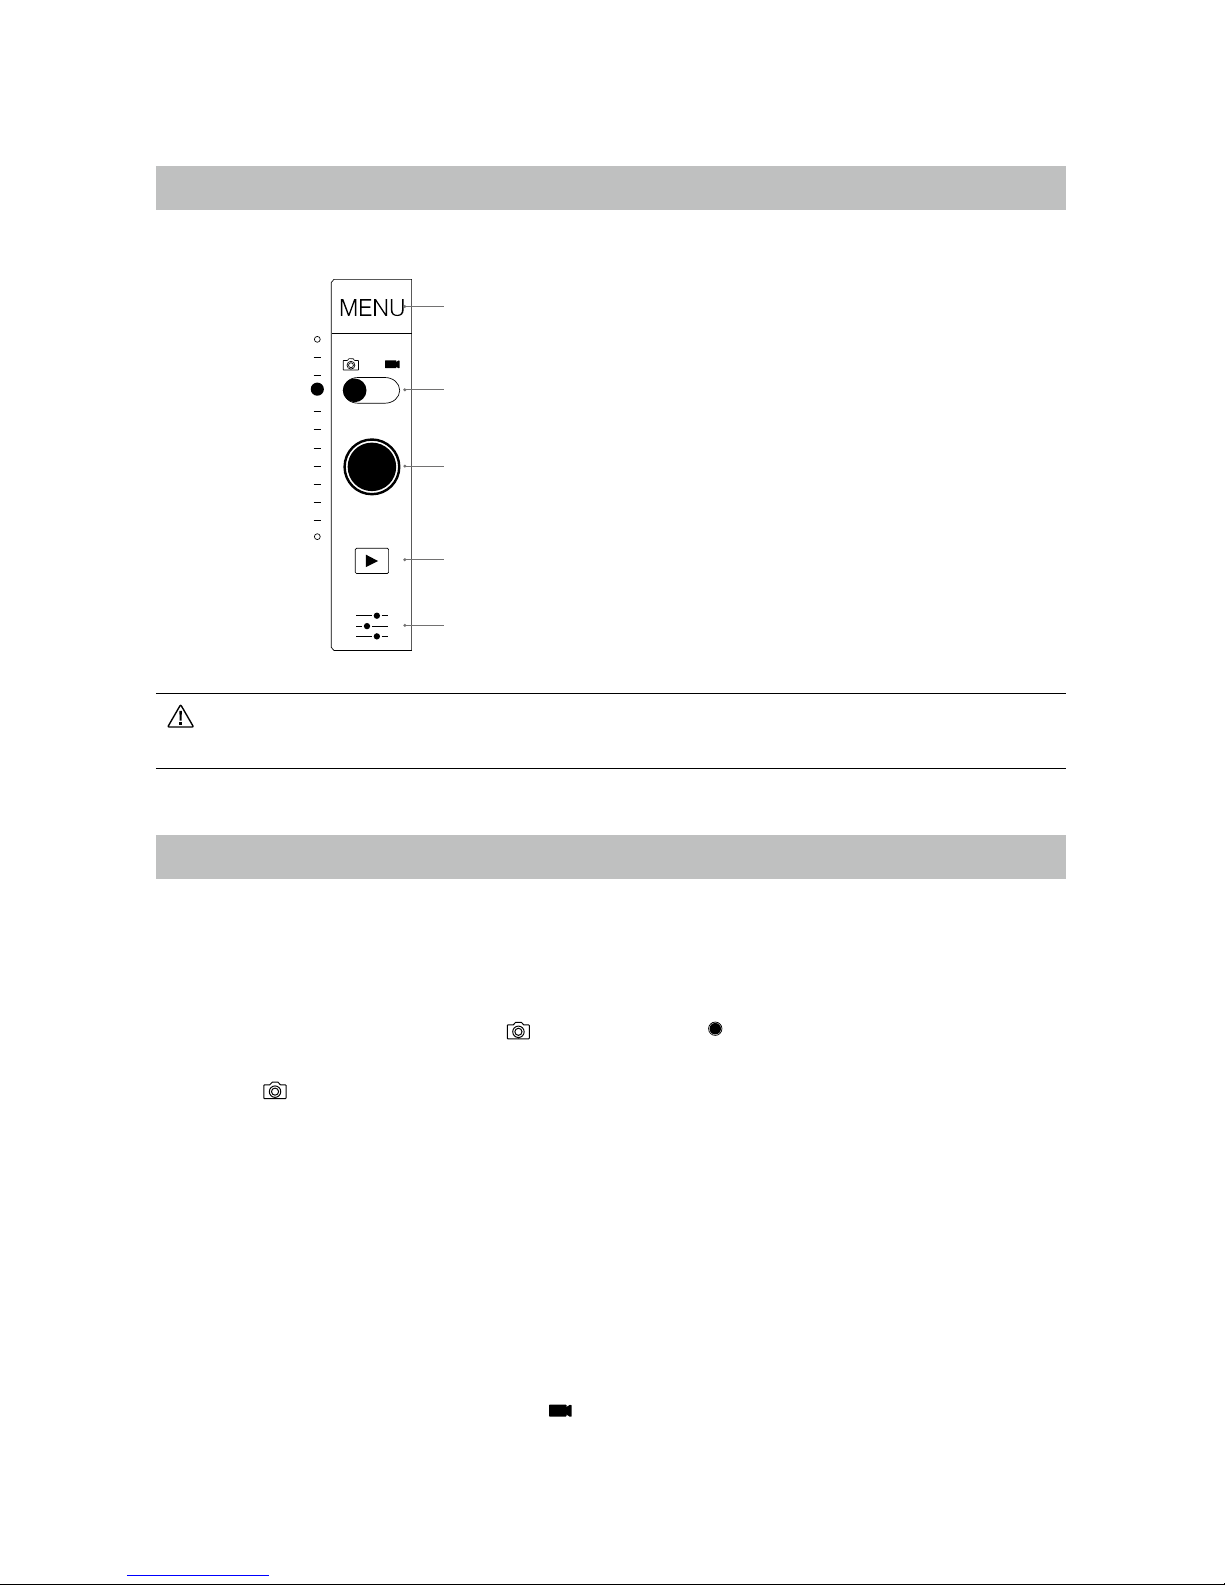
Camera Panel
All camera operations are done on the Camera Panel in Camera View of the DJI GO app.
Always set the camera lens to AF mode. The focus and aperture will be controlled by
the DJI GO app digitally.
Basic Shooting
Ensure the Micro SD card is inserted to enable camera operations. Photos are saved on the
Micro SD card, while videos are saved on both the Micro SD card and X5R SSD.
Taking Photos
Slide the Photo/Video Switch to the position. Tap the button or the shutter button on the
remote controller to take a single photo. Choose from one of the shooting modes by tapping
“MENU” -> -> Photo.
1. Burst Mode
Take 3, 5, or 7 shots in a row.
2. AEB (Auto Exposure Bracketing)
Take 3 or 5 bracketed frames with ±0.7EV steps for exposure compensation.
3. Time-lapse
Take photos in 5, 7, 10, 20 or 30 second intervals.
Recording Videos
Slide the Photo/Recording Switch to the position. Tap the icon or the Record Button on the
remote controller to start or stop recording video.
[1] Menu
[2] Photo/Video Switch
[3] Shutter/Record Button
[4] Playback
[5] Settings
[1]
[2]
[3]
[4]
[5]

ZENMUSE X5R User Manual
©
2016 DJI. All Rights Reserved.
13
Advanced Settings
Exposure Modes
Tap to choose from the following exposure modes:
1. AUTO
The shutter speed and aperture are set automatically to obtain the correct exposure.
2. S (Shutter Priority)
Set your desired shutter speed, while the camera chooses the aperture automatically. This
mode is ideal for freezing action, creating motion blur or low-light shots.
3. A (Aperture Priority)
Set your desired aperture, while the camera chooses the shutter speed automatically. This
mode provides more control over depth of eld and can be used to blur out backgrounds.
4. M (Manual Exposure)
In general, increase the ISO for low light environments, and decrease the ISO if the
surroundings are very bright.
Photo Styles
Tap MENU -> -> Style to choose from the following styles:
1. Standard
A general-purpose style for most scenes.
2. Landscape
The camera will focus on as much of the scene as possible by using a large depth of eld.
3. Soft
Suitable for scenes with natural or soft colors.
4. Custom
Sharpness: -3 to +3
Contrast: -3 to +3
Saturation: -3 to +3
White Balance
Tap MENU -> ->White Balance to choose from the following modes:
1. Auto
The camera adjusts the white balance automatically.
2. Sunny / Cloudy / Incandescent / Neon
Choose one of these modes if natural-looking colors cannot be achieved.
3. Custom (2000K~10000K)
Set a value between 2000K and 10000K to compensate for a specic light source.

ZENMUSE X5R User Manual
14
©
2016 DJI. All Rights Reserved.
List of Settings
Photo
Shooting Modes
Single Shot, HDR Shot, Burst Mode (3/5/7),
AEB (3/5 bracketed frames), Timed-lapse(5s/7s/10s/20s/30s)
Image Size 4:3, 16:9
Image Format RAW, JPEG, JPEG+RAW
White Balance Auto, Sunny, Cloudy, Incandescent, Neon, Custom (2000K~10000K)
Style Standard, Landscape, Soft, Custom (Sharpness/Contrast/ Saturation)
Color
D-Log, D-Cinelike, None, Art, B&W, Vivid, Beach, Dream, Classic,
Nostalgia
Video
Video Size
4K (SSD RAW): 4096 × 2160 24p, (3840 × 2160) 24/30p
2.7K (SSD RAW): 2704 × 1520 24/30p
1080P (SSD RAW): 1920 × 1080 24/30/48/60p
Video Format
Micro SD: MP4/MOV (Codec: H.264)
X5R SSD: CinemaDNG (Codec: Lossless JPEG)
NTSC/ PAL PAL, NTSC
White Balance Auto, Sunny, Cloudy, Incandescent, Neon, Custom (2000K~10000K)
Style Standard, Landscape, Soft, Custom (Sharpness/Contrast/ Saturation)
Color
D-Log, D-Cinelike, None, Art, B&W, Vivid, Beach, Dream, Classic,
Nostalgia
General
Quick Preview Off, 1s, 2s, 3s, 4s, 5s
Anti-Flicker Auto, 50Hz and 60Hz
Show Grid Off, Grid Line, Grid + Diagonal, Center Point
File Index Mode Reset, Continuous
Others
Histograms, Video Captions, Over Exposure Warning, AF Assisted
Focus, MF Assisted Focus, Lens Profile, Calibration, Reset Settings,
Format SD Card, Format SSD
Note: Be sure to calibrate the camera lens in the DJI GO app for manual zoom to work properly.

ZENMUSE X5R User Manual
©
2016 DJI. All Rights Reserved.
15
Managing your Photos and Videos
Playback
Tap in the DJI GO app or press the Playback Button on the remote controller to review
photos and videos that you have captured. Press the same button again to return to capturing
images.
The camera must be powered on to access the les.
You can view and delete les on the Micro SD card.
Downloading your Files from Micro SD Card
Download your photo and video les to your PC via the Micro USB Port or using a Micro SD
card reader.
16
©
2016 DJI. All Rights Reserved.
DJI CineLight and your X5R SSD Files
Files on the X5R SSD must be exported with DJI CineLight*.
Installing DJI CineLight
System Requirements
Mac OS X 10.10~10.10.5, 10.11.4 or later
6G of memory
Intel i5/i7 with 4+ cores
1440x900 resolution
Mac Pro, iMac and MacBook Pro recommended
Devices supporting USB3.0 recommended
Discrete graphics card recommended
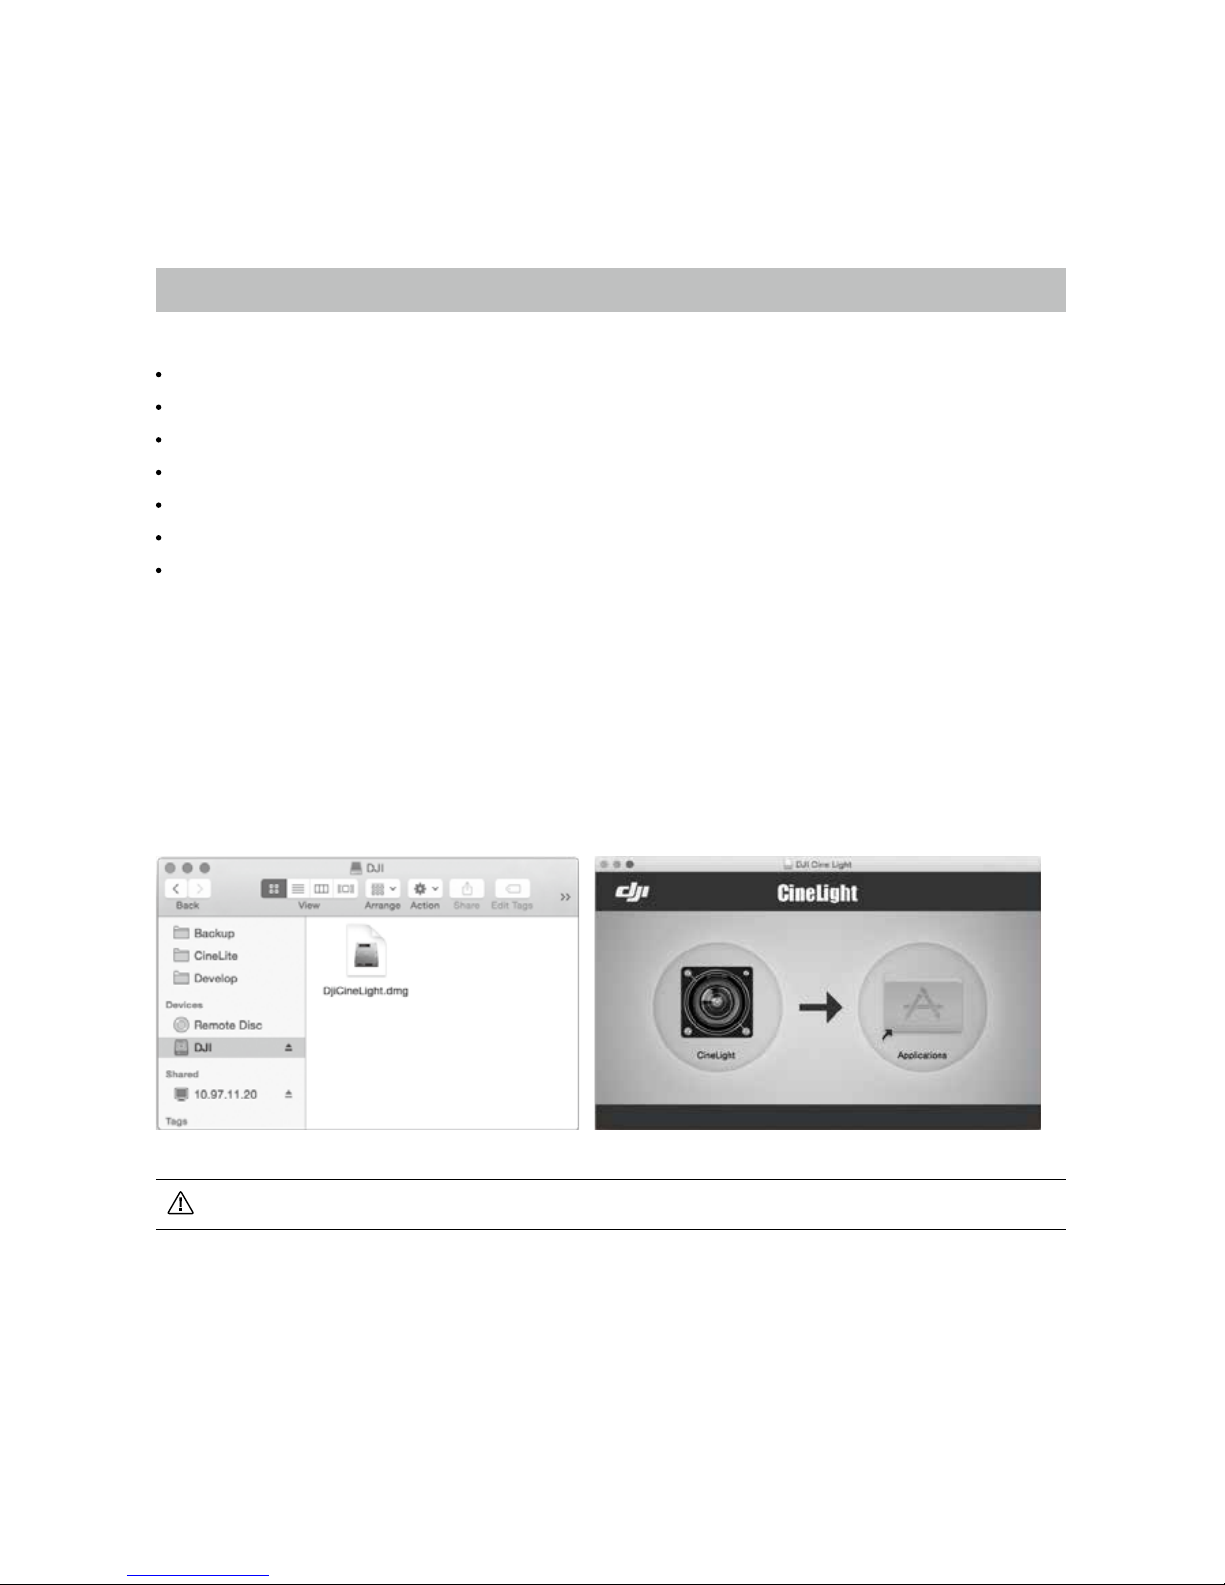
Installation (Installer is included on the X5R SSD)
1. Plug the X5R SSD into the X5R Reader.
2. Connect the X5R Reader to your computer with a USB cable.
3. Select the “DJI” device.
4. Click to mount “DjiCineLight.dmg” in Finder.
5. Drag “CineLight.app” to /Applications/.
You will be prompted if an update is available when DJI CineLight launches.
* Install the corresponding software according to your operation system.
For Windows: Install DJI Camera Exporter and refer to DJI Camera Exporter User Manual for instructions.
ZENMUSE X5R User Manual
©
2016 DJI. All Rights Reserved.
17
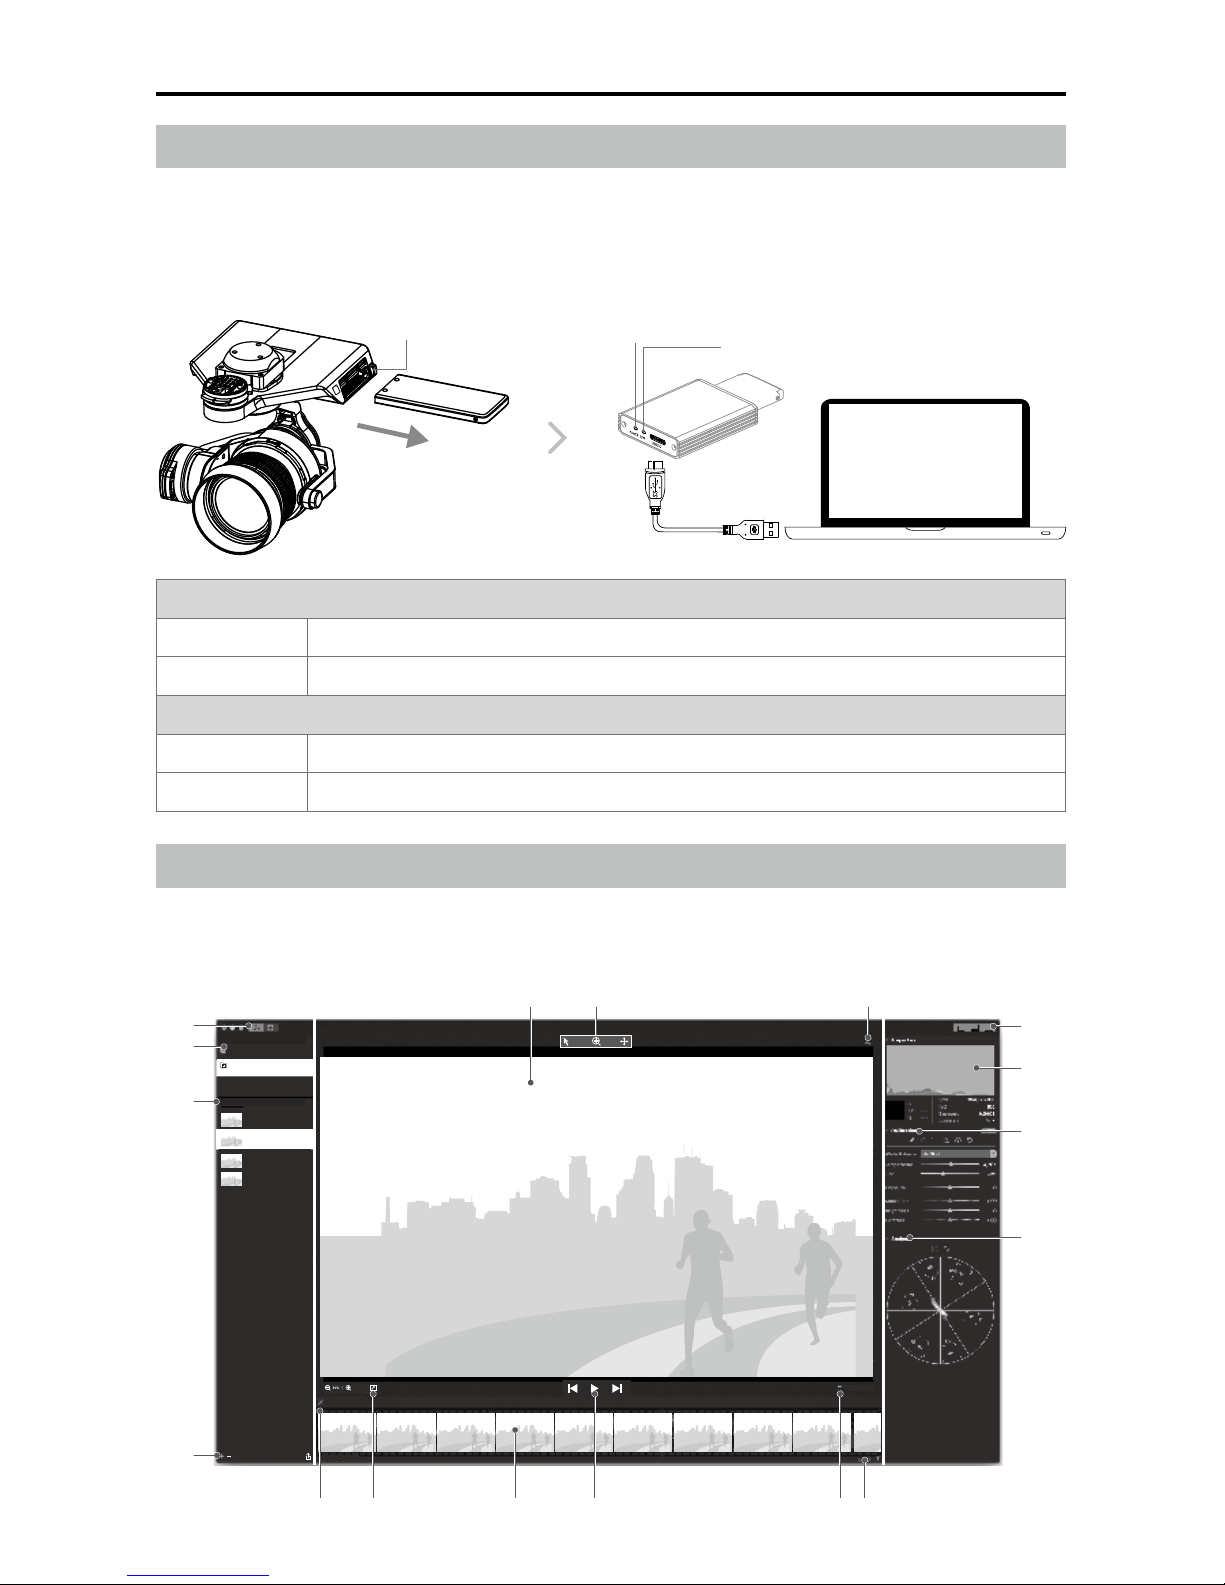
Accessing your Files
1. Power off the Zenmuse X5R. While holding down the X5R SSD Release Button, remove the X5R SSD.
2. Insert the X5R SSD into the X5R Reader.
3. Connect the X5 Reader to your computer with a USB cable.
4. Launch DJI CineLight.
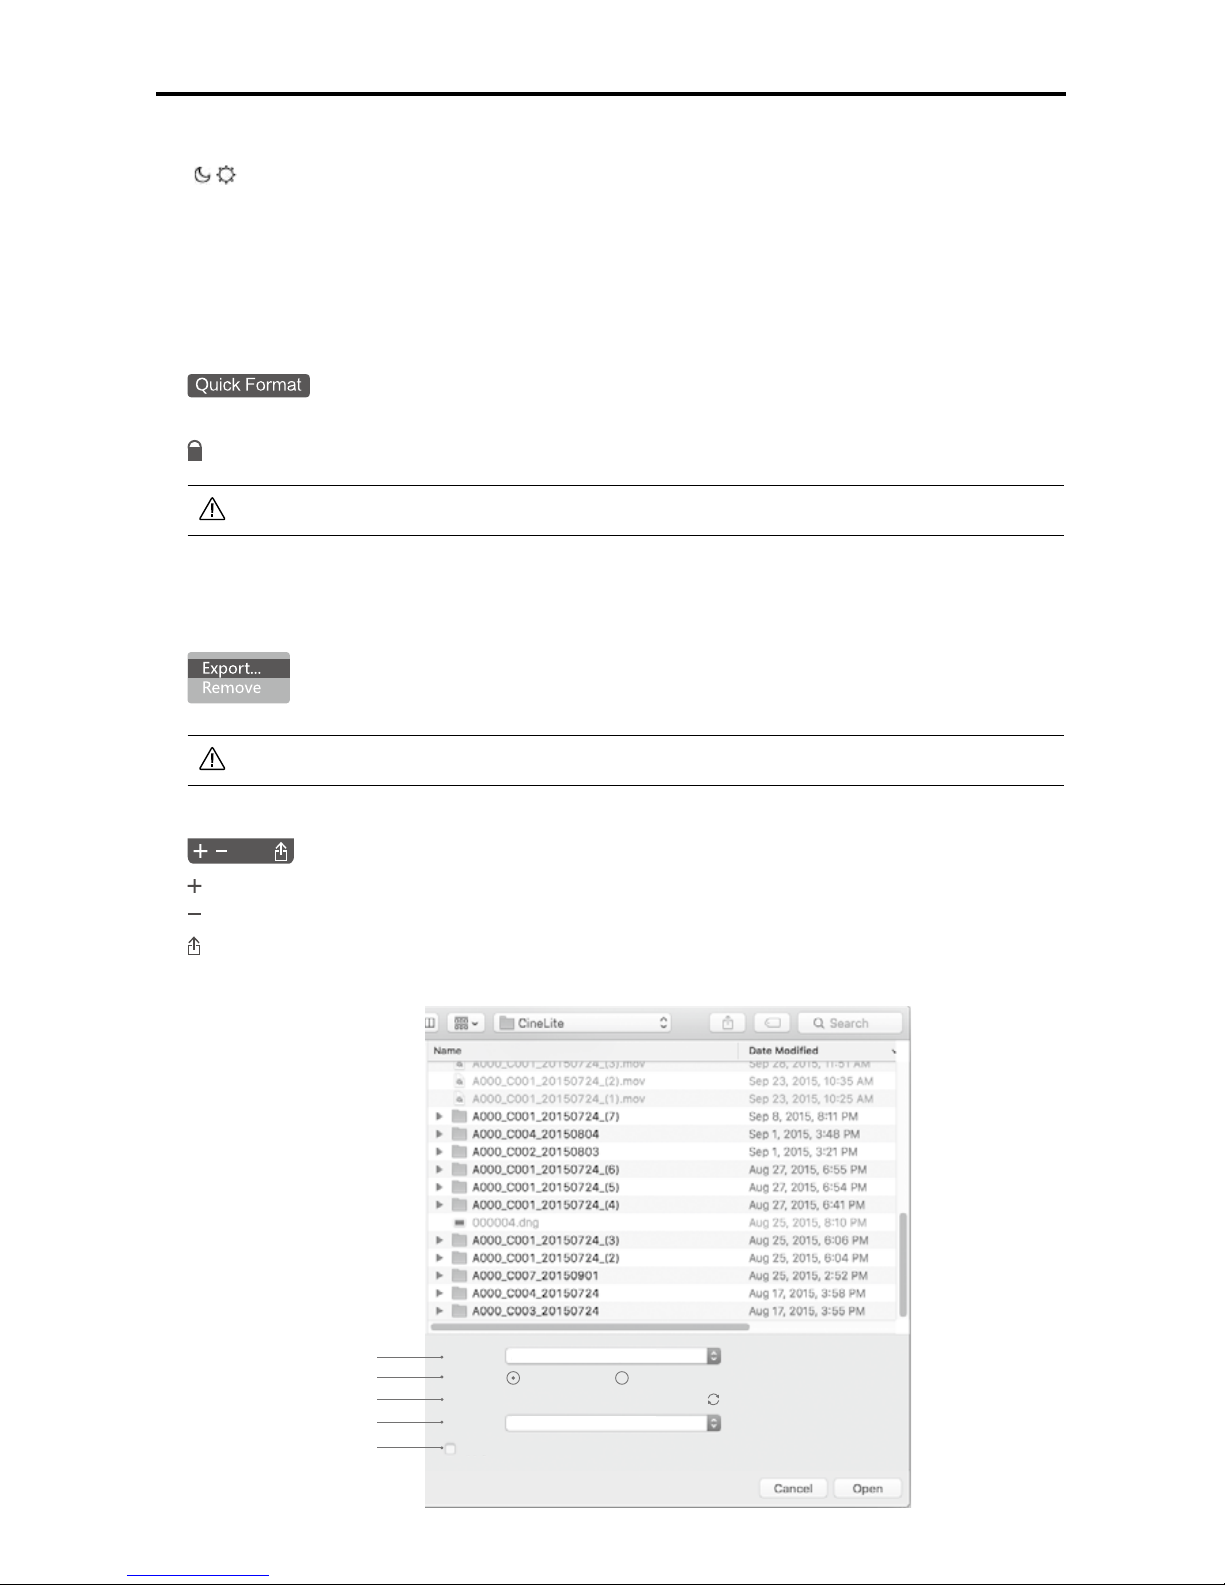
Post-Processing with DJI CineLight
Using DJI CineLight, you can import Adobe DNG les on the X5R SSD or your computer, add effects and
enhancements, and then export them as a DNG sequence or high quality QuickTime video.
[1]
[2]
[3]
[4]
[5][6]
[7] [8] [9] [10] [11][12]
[13]
[14]
[15]
[16]
[17]
●
dng2号
00:01.53
Movie Clips
Libraries
●
DJI201023
Free:299.37 GB / Total:476.21GB
●
Local Library
Total:30 clips
●
TooFsat
00:02.53
●
TooFsat
00:02.53
●
A00_C01
00:00.03
SELECTION
DJI_A000121_23_20160301
FRAME SKIP
00:00.00 / 00:00.10
Power LED
Working Status LED
X5R SSD Release Button
Power LED
Off X5R Reader does not have power / X5R SSD not inserted.
Solid Blue The X5R Reader is powered on and the X5R SSD is inserted correctly.
Working Status LED
Off Idle.
Blinking Blue Read and write in progress.
ZENMUSE X5R User Manual
18
©
2016 DJI. All Rights Reserved.
[1] Theme Switch
[ ]
:
Toggle
between the day and night themes.
[2] Libraries
Shows a list of connected devices (such as the X5R SSD) and your computer’s local library.
Connected Devices:
Displays the device’s name, read-only mode, free disk space and total disk
space.
Computer:
Displays saved DNG sequences.
: Right click the device name and choose “Quick Format” to reformat the
connected device.
:
Indicates that the connected device is read-only and cannot be reformatted.
Reformatting the device will cause all your les to be lost.
[3] Movie Clips
Displays all the contents in the current library (includes the name, thumbnail, and total time).
Movie clips are saved as DNG sequences but DJI CineLight offers video playback.
: Right click to “Export” or “Remove” the movie clip.
A red mark will appear over the movie clip if its format is unknown.
[4] Movie Clip Tools
:
Import movie clips to the selected library. Only DNG sequences on your computer can be imported.
:
Remove the selected movie clips.
:
Export the selected movie clips.
Format:
Resolution:
Range:
FrameRate:
Adobe DNG(Raw) sequence
29.97
Apply calibrations
Original Size Half Size Preview
0-9354
A
B
C
D
E
ZENMUSE X5R User Manual
©
2016 DJI. All Rights Reserved.
19
√ Adobe DNG(raw) sequence
Adobe DNG (raw) sequence compatible with Premiere
TIFF sequence
Apple QuickTime video in ProRes 422 Proxy
Apple QuickTime video in ProRes 422 LT
Apple QuickTime video in ProRes 422
Apple QuickTime video in ProRes 422 HQ
Apple QuickTime video in ProRes 4444
Apple QuickTime video in ProRes 4444XQ
A. Export Format Options
DNG Sequence:
Export the DNG sequence.
TIFF Sequence:
Convert the DNG sequence to TIFF format and export.
ProRes:
Export the DNG sequence as a movie clip encoded in ProRes.
B. Select “Original Size” to export the movie clip in its original resolution; select “Half Size
Preview” to export the movie in half of its original resolution.
C. Click to synchronize the DNG sequence with the proxy les (on your Micro SD card with
the same le names) to eliminate any misaligned frames. The “Range” indicates the rst and
last frames.
D. Select a frame rate for the exported movie clip.
E. Check this box to apply your effects to the exported clip. Note that this option is disabled
when exporting in DNG sequence.
You can only import and delete les in your Local Library.
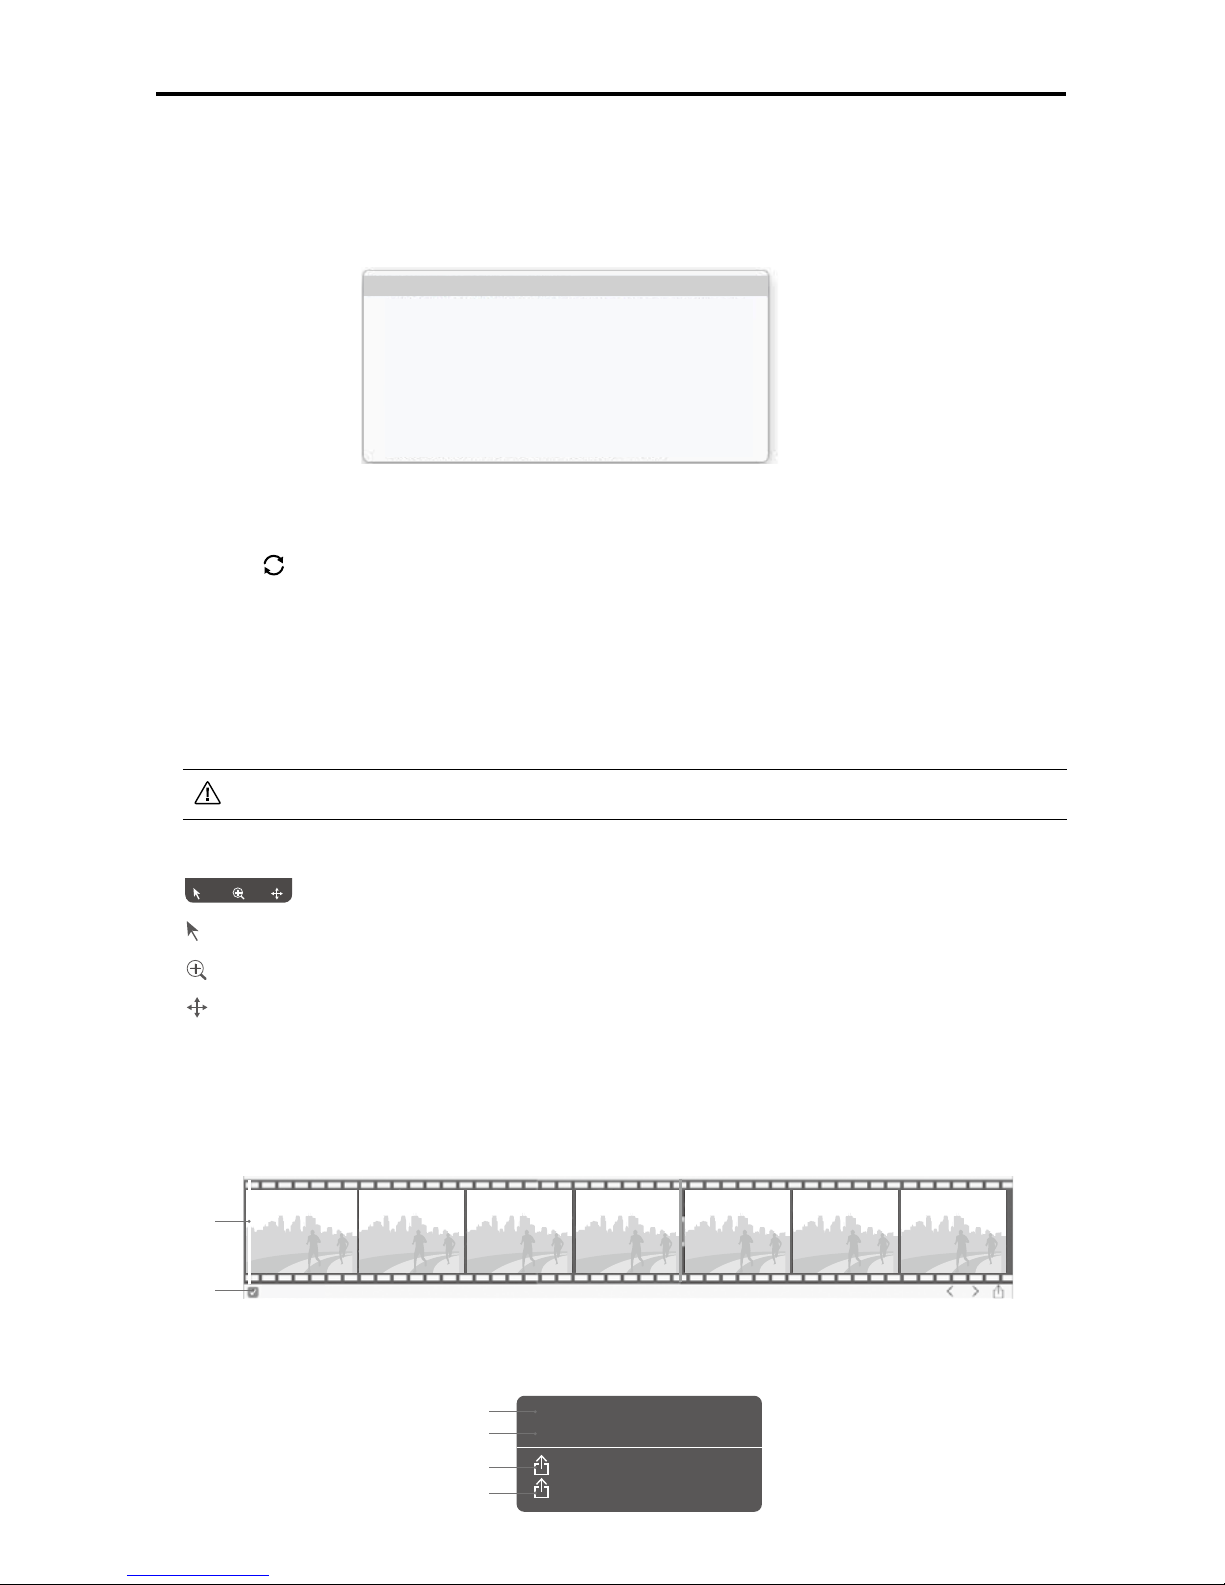
[5] Cursor Mode
:
Cursor.
: Zoom. Left click to zoom out; Alt + left click to zoom in.
: Drag.
[6] Selected Frame
Display the frame that is currently selected.
[7] Timeline View
SELECTION
A
B
Start Selection Here
End Selection Here
Export Shot...
Export Selected Range...
Set the starting point
Set the ending point
Export the entire move clip
Export a section of the movie clip
A. Click to move the frame indicator.
B. The Selection Tool allows users to select and export a section of the movie clip.
ZENMUSE X5R User Manual
20
©
2016 DJI. All Rights Reserved.
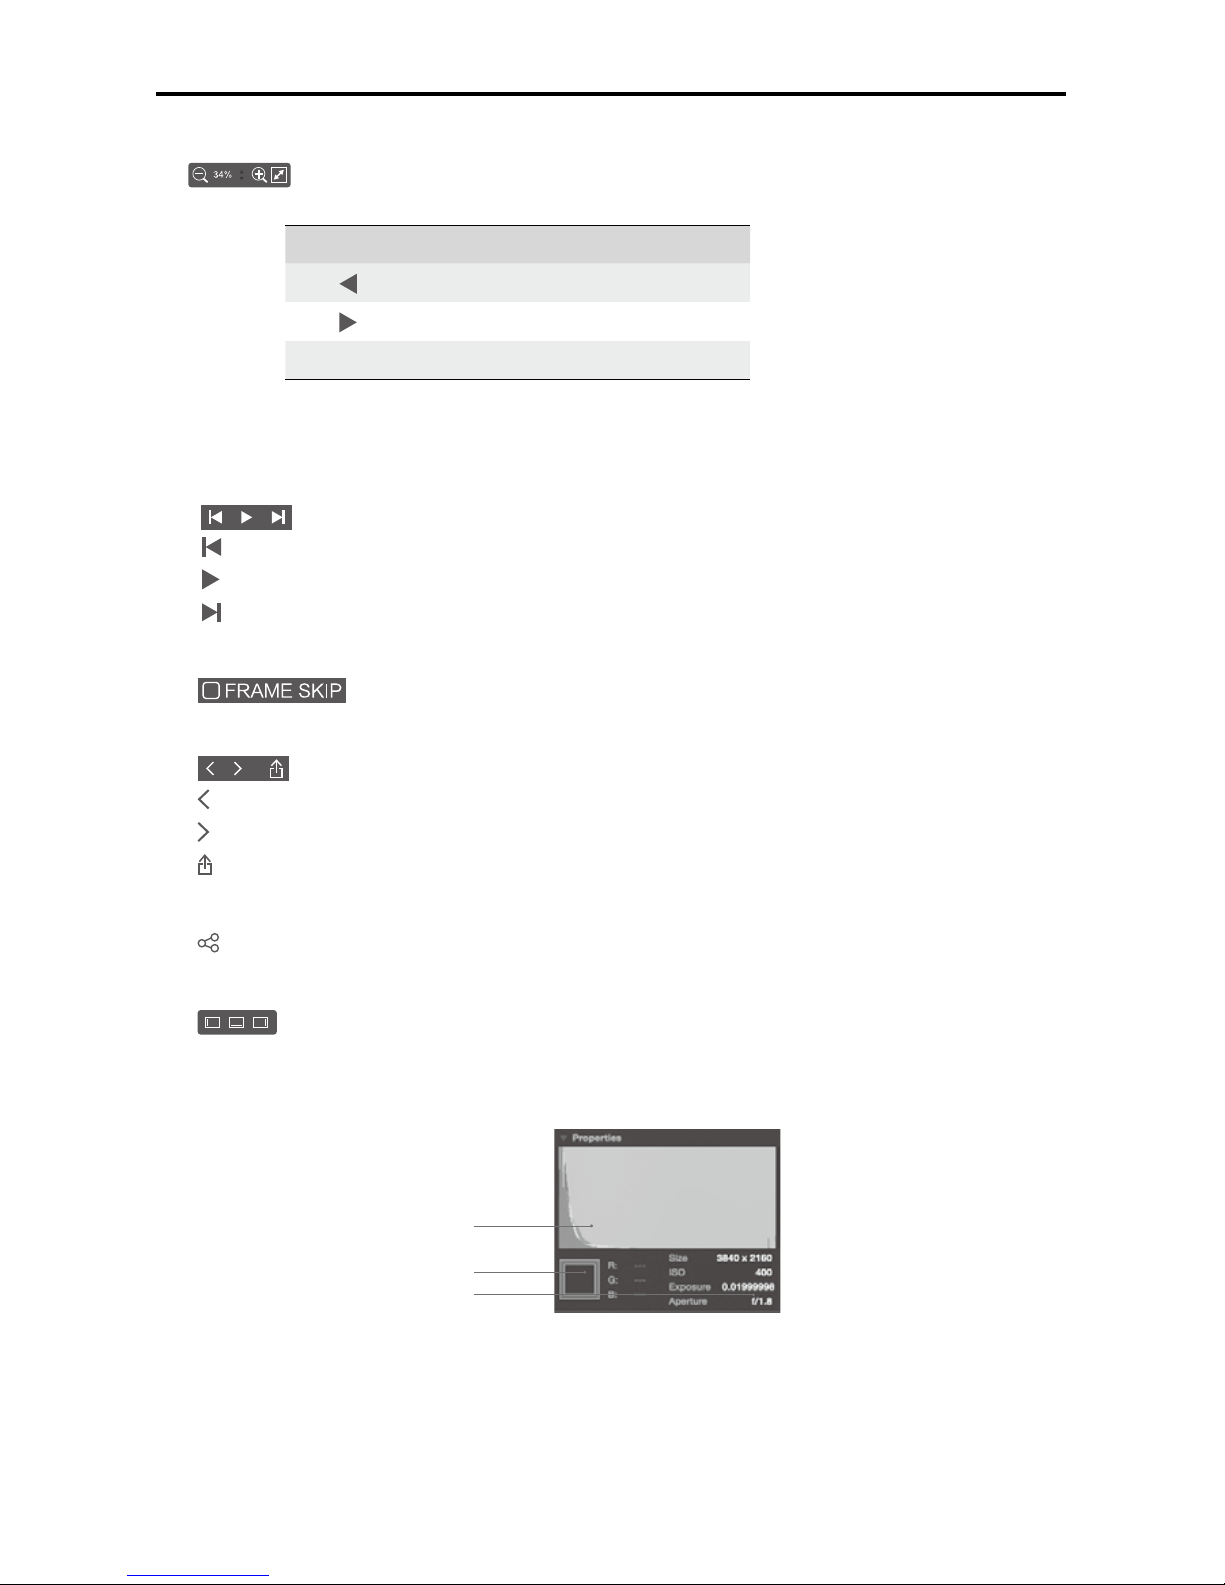
[8] Display Controls
: Zoom in or out, scale or auto t.
Space Bar Play/Pause
Play previous frame
Play next frame
Trackpad Drag les, zoom in or zoom out.
[9] Thumbnails
[10] Playback Controls
:
Play previous frame
:
Play/Stop
:
Play next frame
[11] Skip Frame Option
: Options to play the movie clip frame by frame or according to time.
[12] Timeline Actions
: Move to previous frame
: Move to next frame
: Export the selected frames
[13] Share
: Share image with friends, move to folder or send by email.
[14] Layout
: Show/hide the left, right or timeline panes.
[15] Properties
A
B
C
A. RGB Histogram
B. Hover Pixel Color
C. Image Infomration
ZENMUSE X5R User Manual
©
2016 DJI. All Rights Reserved.
21
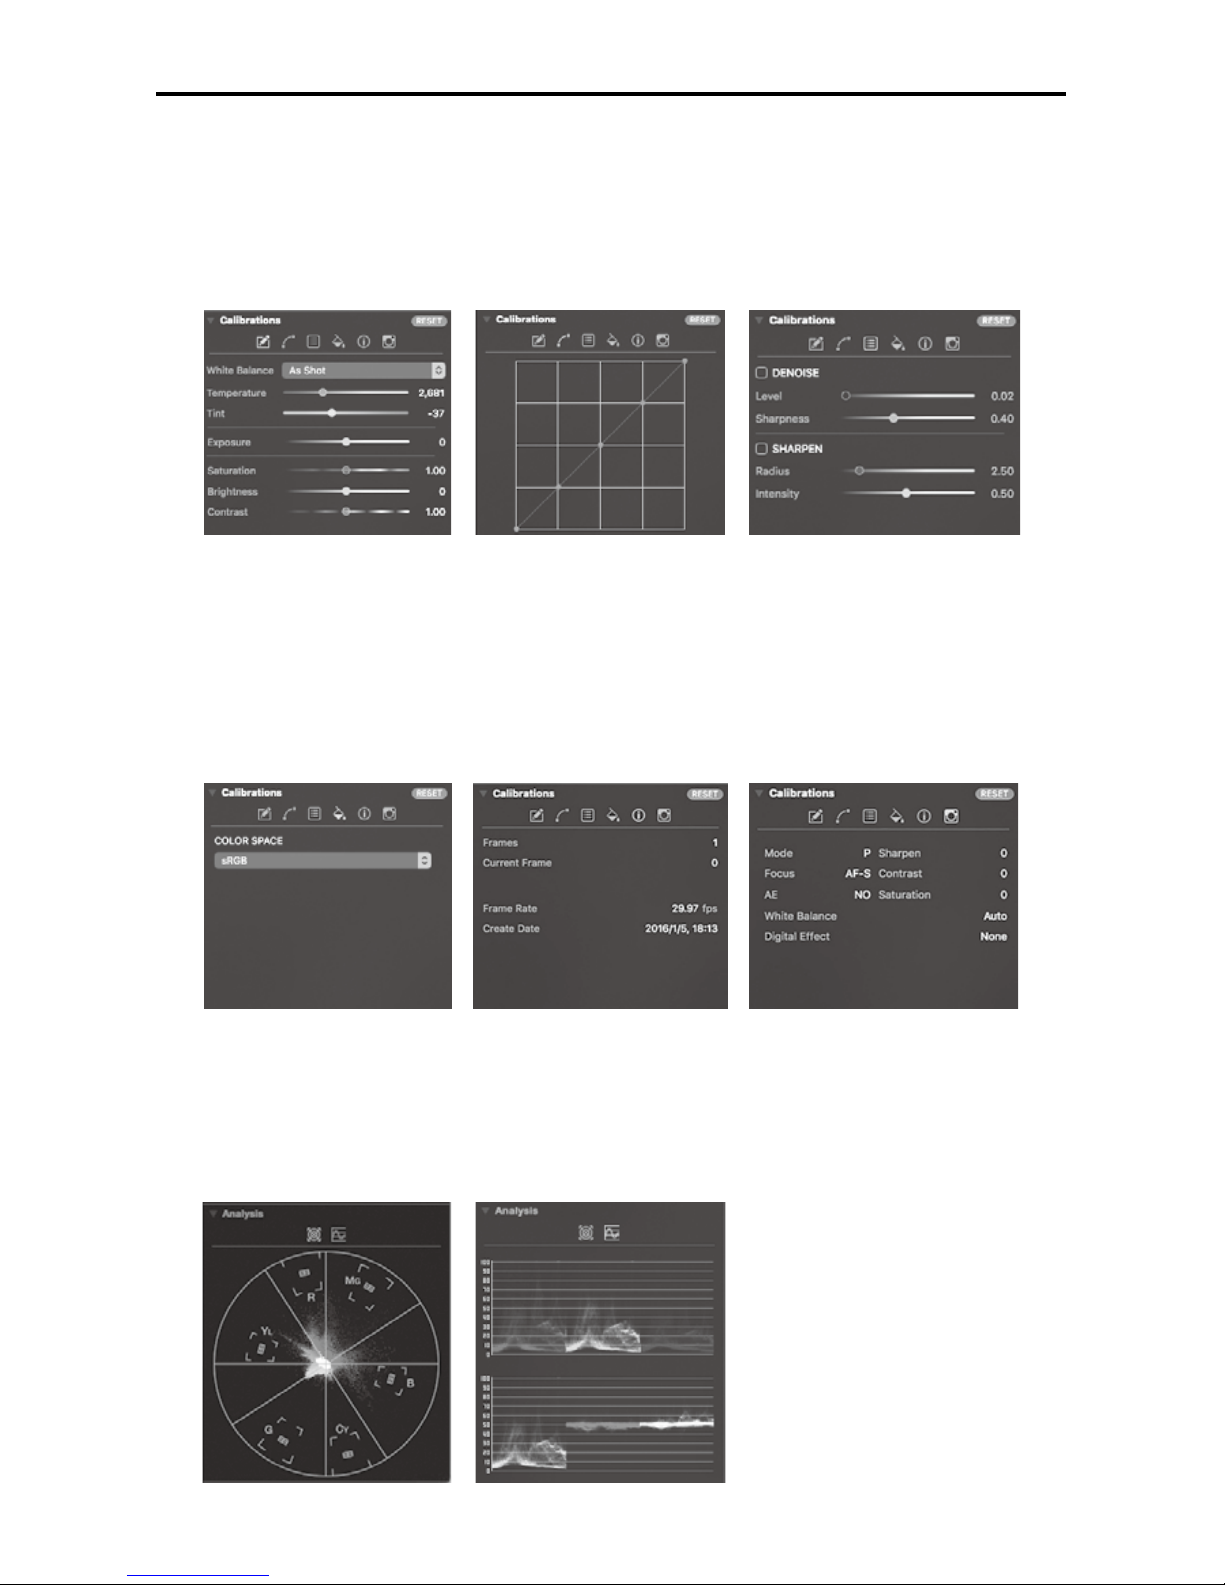
[16] Color Calibrations
A. Basic: Adjust the white balance, exposure and saturation.
B. Tone Curve: Adjust up to 5 points on the tone curve.
C. Denoise and Sharpen
Adjust the denoise and sharpening values.
A B C
D. Color Management
Select the output color space.
E. Image Information
Detailed information of the movie clip.
F. Camera setting parameters when shooting.
D E F
[17] Analysis
A. Vector Scope
B. RGB and YCbCr Parades
A B

22
©
2016 DJI. All Rights Reserved.
Appendix
Specifications
General
Name Zenmuse X5R
Dimensions 136 (W) × 125 (H) × 131 (D) mm
Weight
Approx. 583 g (Including original lens, balancing ring, lens
hood, Micro SD card, X5R SSD)
Operating Temperature 32° to 104° F (0° to 40° C)
Camera
Lens
Replaceable lens
M43 mount supporting auto-focus
Supported Lenses
DJI MFT 15mm f/1.7 ASPH
Panasonic Lumix G Leica DG Summilux 15mm f/1.7 ASPH
Olympus M.Zuiko Digital ED 12mm f/2.0
Olympus M.Zuiko Digital ED 17mm f/1.8
Olympus M.Zuiko Digital ED 25mm f/1.8
Olympus M.Zuiko Digital ED 45mm f/1.8
(For still photography)
Olympus M.Zuiko Digital ED 14-42mm f/3.5-5.6 EZ
(For still photography)
Sensor Type 4/3 CMOS sensor
Effective Pixels 16 M
Image Size 4:3, 16:9
ISO Range
Photo: 100 to 25600
Video: 100 to 6400
Electronic Shutter Speed
Photo: 8 to 1/8000 s
Video: 1/25 to 1/8000 s
Field of View DJI MFT 15mm f/1.7 ASPH 72°
Still Photography Modes
Single Shot, HDR Shot, Burst Mode (3/5/7),
AEB (3/5 bracketed frames at 0.7EV bias),
Timed-lapse(5s/7s/10s/20s/30s)
Video Resolution
4K (SSD RAW): 4096 × 2160 24p, (3840 × 2160) 24/30p
2.7K (SSD RAW): 2704 × 1520 24/30p
1080P (SSD RAW): 1920 × 1080 24/30/48/60p
Max Video Bitrate
Micro SD: 60 Mbps
X5R SSD: 2.4 Gbps (Average: 1.7 Gbps)

ZENMUSE X5R User Manual
©
2016 DJI. All Rights Reserved.
23
Supported File Systems Micro SD: FAT32 (<=32 GB); exFAT (>32 GB)
Photo Formats RAW, JPEG, JPEG+RAW
VideoFormats
Micro SD: MP4/MOV (Codec: H.264)
X5R SSD: CinemaDNG (Codec: Lossless JPEG)
Supported Micro SD Cards
Class 10 or UHS-1 or above Micro SD cards
Max capacity of 64 GB
Supported X5R SSD
Capacity: 512 GB
Dimensions: 84.25 mm × 38 mm × 6.5 mm
Weight: 33 g
Operating temperature: 32° - 158° F (0° - 70° C)
Storage temperature: -40° - 185° F (-40° to 85° C)
Humidity: 5% -95%, non-condensing
X5R READER
Dimensions: 73.6 mm × 56 mm × 15 mm
Weight: 70 g
Operating Temperature: 0° to 40° C
Default Lens
Name DJI MFT 15mm f/1.7 ASPH
Focal length f=15 mm (35 mm format equivalent 30 mm)
Aperture type 7 diaphragm blades/circular aperture diaphragm
Maximum aperture F1.7
Minimum aperture value F16
Lens construction 9 elements in 7 groups (3 aspherical lenses)
In focus distance 0.2 m to ∞ (from the focus distance reference line)
Mount Micro Four Thirds Mount
Angle of view 72°
Max. diameter Approx. 2.26 inches (57.5 mm)
Overall length Approx. 1.42 inches (36 mm)
Mass 115 g
Gimbal
Angular Vibration Range ±0.02°
Mount Detachable
Controllable Range
Pitch:-90° to +30°
Pan:±320°
Max Controllable Speed
Pitch:120°/s
Pan:180°/s

©
2016 DJI. All Rights Reserved.
This content is subject to change.
Download the latest version from
http://www.dji.com/product/zenmuse-x5s
If you have any questions about this document, please contact DJI by
sending a message to
DocSupport@dji.com
.
DJI Support:
http://www.dji.com/support
In the Box
Lens Hood* ×1
Camera Balancing Ring* ×1
(BR-Φ46-10)
Zenmuse X5R Camera
Body ×1
DJI MFT 15mm f/1.7 ASPH
Lens* ×1
Check that all of the following items are in your package. If any item is missing, please
contact DJI or your local dealer.
512GB X5R SSD ×1
Manuals
X5R READER ×1
USB 3.0 Cable ×116GB Micro SD Card ×1
In the Box
Disclaimer and Safety Guidelines
* Only included in the Zenmuse X5R lens kit.
Printed in China.
© 2016 DJI. All Rights Reserved.
ZENMUSE X5R

ZENMUSE X5R
DISCLAIMER AND SAFETY GUIDELINES
HAFTUNGSAUSSCHLUSS UND SICHERHEITSVORSCHRIFTEN
CLAUSE D'EXCLUSION DE RESPONSABILITÉ ET CONSIGNES
DE SÉCURITÉ
LIMITAZIONI DI RESPONSABILITÀ E DIRETTIVE SULLA
SICUREZZA
RENUNCIA DE RESPONSABILIDAD Y DIRECTRICES DE
SEGURIDAD
免责声明和安全操作指引
免責事項および安全ガイドライン
고지 사항 및 안전 가이드
2016.03V1.0

EN
CH
JP
KR
DE
FR
IT
ES
DISCLAIMER AND SAFETY GUIDELINES 04
HAFTUNGSAUSSCHLUSS UND
SICHERHEITSVORSCHRIFTEN 11
CLAUSE D'EXCLUSION DE RESPONSABILITÉ ET
CONSIGNES DE SÉCURITÉ 19
LIMITAZIONI DI RESPONSABILITÀ E DIRETTIVE SULLA
SICUREZZA 27
RENUNCIA DE RESPONSABILIDAD Y DIRECTRICES DE
SEGURIDAD 35
免责声明和安全操作指引
43
免責事項および安全ガイドライン
51
고지 사항 및 안전 가이드
58
Contents
Compliance Information 65
4
©
2016 DJI. All Rights Reserved.
EN
Notice
All instructions and other collateral documents are subject to change at the sole
discretion of SZ DJI TECHNOLOGY CO., LTD. For up-to-date product information,
visit http://www.dji.com and go to the Zenmuse X5R product page for this product.
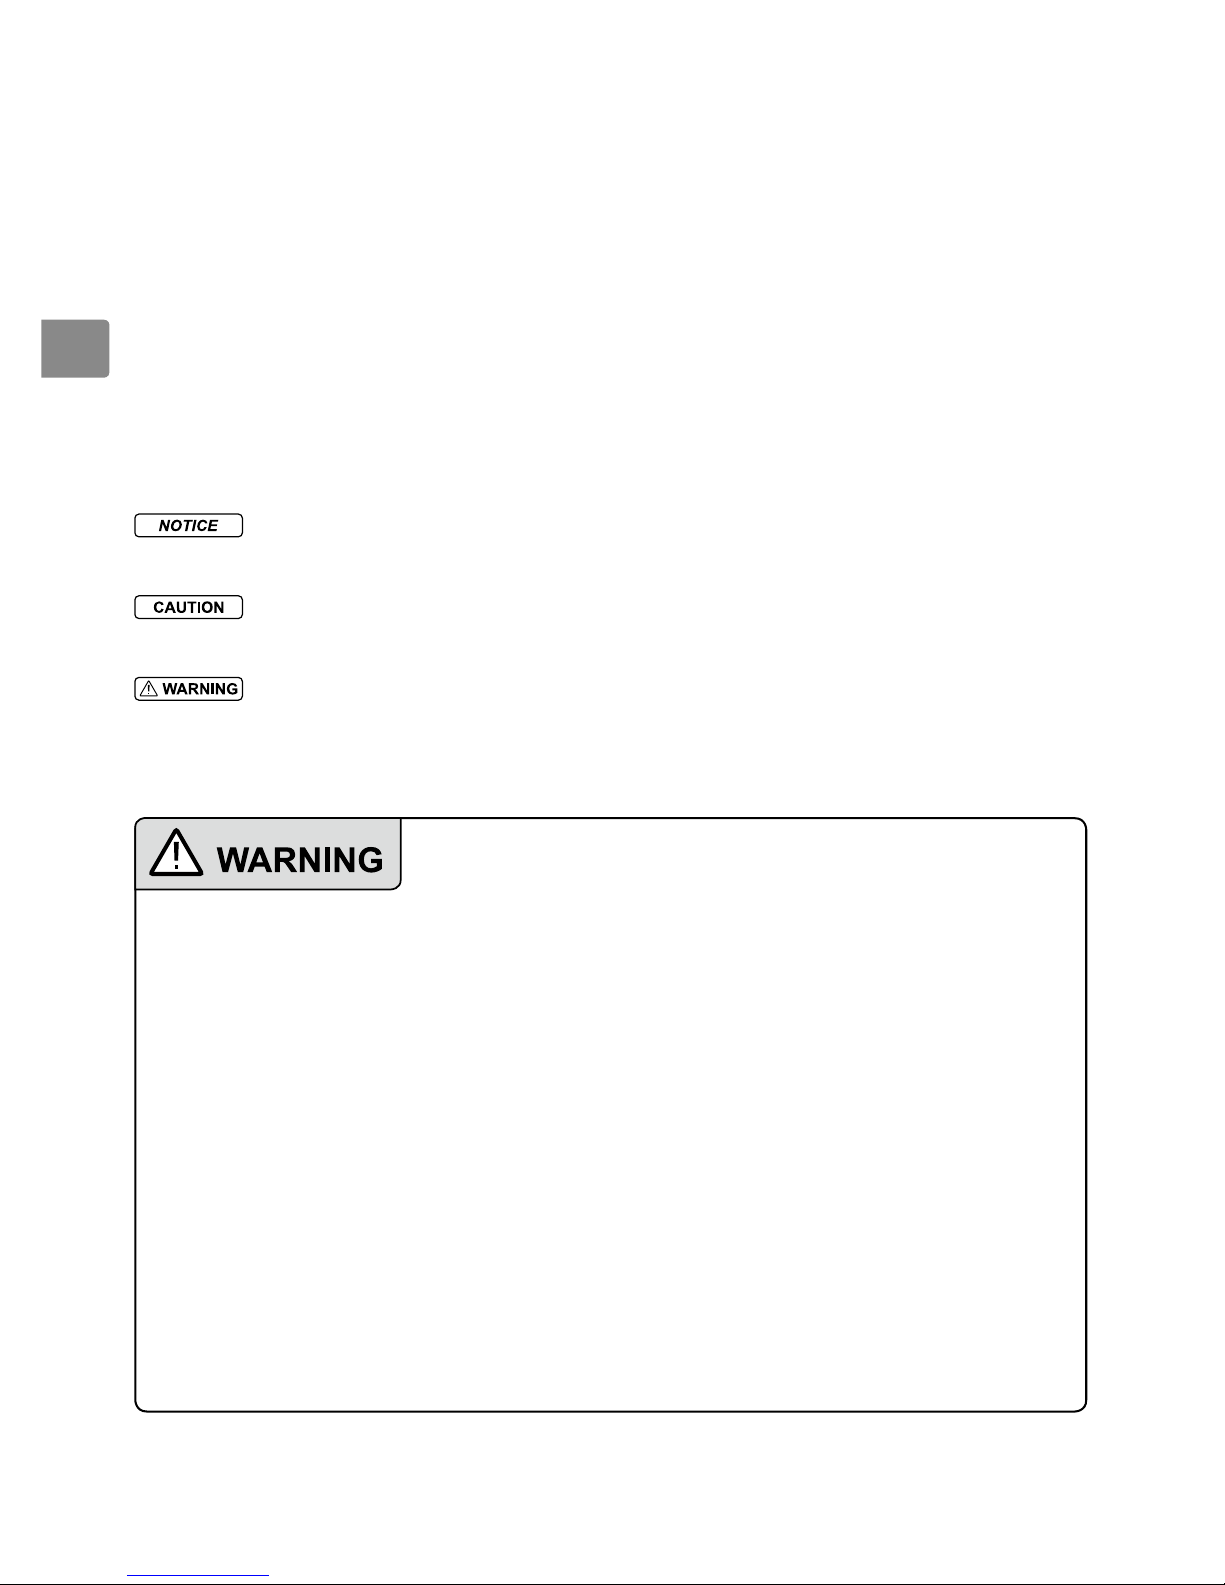
Glossary
The following terms are used throughout the product literature to indicate
various levels of potential harm when operating this product:
NOTICE: Procedures, which if not properly followed, create a possibility
of physical property damage AND little or no possibility of injury.
CAUTION: Procedures, which if not properly followed, create the probability
of physical property damage AND a possibility of serious injury.
WARNING: Procedures, which if not properly followed, create the
probability of property damage, collateral damage, and serious injury
OR create a high probability of supercial injury.
Read the ENTIRE user manual to become familiar
with the features of this product before operating.
Failure to operate the product correctly can result in damage to the product
or personal property and cause serious injury.
This is a sophisticated product. It must be operated with caution and
common sense and requires some basic mechanical ability. Failure to
operate this product in a safe and responsible manner could result in injury
or damage to the product or other property. This product is not intended
for use by children without direct adult supervision. Do not use with
incompatible components or alter this product in any way outside of the
documents provided by SZ DJI TECHNOLOGY CO., LTD. These Safety
Guidelines contain instructions for safety, operation and maintenance. It is
essential to read and follow all of the instructions and warnings in the user
manual, prior to assembly, setup or use, in order to operate the product
correctly and avoid damage or serious injury.
Age Recommendation: Not for children under the age of 18.

©
2016 DJI. All Rights Reserved.
5
EN
Disclaimer & Warning
Congratulations on purchasing your new DJI product. The information in this
document affects your safety and your legal rights and responsibilities. Read this
entire document carefully to ensure proper conguration before use. Failure to read
and follow instructions and warnings in this document may result in serious injury to
yourself or others, or damage to your DJI product or damage to other objects in the
vicinity. The User Manual and all other collateral documents are subject to change at
the sole discretion of DJI. For up-to-date product information, visit http://www.dji.com
and click on the product page for this product.
Safe Use
If used with an aircraft, read the aircraft’s Disclaimer and Safety Guidelines carefully.
Make sure to operate your aerial system in the safest manner possible. We strongly
recommend that you remove all propellers and keep children away when calibrating
and conguring Zenmuse X5R. Observe the procedures contained in the manual and
the online tutorials to mount and connect the Zenmuse X5R to your aircraft. Ensure
the Zenmuse X5R is mounted to the aircraft before powering on your aircraft.
By using this product, you hereby signify that you have read this disclaimer
carefully, and that you understand and agree to abide by the terms and
conditions herein. You agree that you are solely responsible for your own
conduct while using this product, and for any consequences thereof. You agree
to use this product only for purposes that are proper and in accordance with
all applicable laws, rules, and regulations, including international and domestic
airspace regulations, and all terms, precautions, practices, policies and
guidelines DJI has made and may make available.
DJI accepts no liability for damage, injury or any legal responsibility incurred
directly or indirectly from the use of this product. The user shall observe safe
and lawful practices including, but not limited to, those set forth in these Safety
Guidelines.

6
©
2016 DJI. All Rights Reserved.
EN
Before You Begin
The following documents have been produced to help you safely operate and
make full use of your DJI Zenmuse X5R:
ZENMUSE X5R In the Box
ZENMUSE X5R Disclaimer and Safety Guidelines
ZENMUSE X5R User Manual
Check all of the included parts listed in the ZENMUSE X5R In the Box document
and read the ZENMUSE X5R Disclaimer and Safety Guidelines before use.
Then prepare for your first use by using the ZENMUSE X5R User Manual and
watching all of the tutorial videos on the product page of DJI website (http://
www.dji.com). Make sure you fully understand the functionality of each individual
part, the conditions of use, the key contingency warning functions or systems,
and all applicable government regulations before use. If you have any questions
or problems during the installation, maintenance or use of this product, please
contact DJI or a DJI authorized dealer.
Individual Parts
Functional Parts
To avoid component malfunction, serious injury, and property damage, observe
the following rules:
1. Only use genuine DJI parts or parts certied by DJI. Unauthorized parts or
parts from non-DJI-certied manufacturers may cause system malfunctions
and compromise safety.
2. Ensure the Zenmuse X5R and its components are free of foreign objects
(water, oil, soil, sand, etc.).
 Loading...