

Page 1
ZENMUSE Z30
User Manual
v1.2
2019.09
Page 2
Searching for Keywords
Search for keywords such as “battery” and “install” to find a topic. If you are
using Adobe Acrobat Reader to read this document, press Ctrl+F on Windows or
Command+F on Mac to begin a search.
Navigating to a Topic
View a complete list of topics in the table of contents. Click on a topic to navigate to
that section.
Printing this Document
This document supports high resolution printing.
Using this manual
Legends
Warning Important
Before Use
Read the following documents before using the ZENMUSE
1. Zenmuse Z30 Quick Start Guide
2. Zenmuse Z30 User Manual
Check that all of the items are included in the package. Refer to the User Manual
for more detailed information.
TM
Z30:
Page 3

Contents
Using this manual
Legends 2
Before Use 2
Product Profile
Overview 4
In the Box 4
Components 4
Installation
Getting Started 5
Installing the Zenmuse Z30 5
Remote Controller Controls
DJI GO App Controls
Downloading DJI GO 7
Connecting to DJI GO 7
Operating the Camera 8
Managing your Photos and Videos 11
Upgrading the Firmware 11
Specifications
2
4
5
6
7
13
Page 4
Product Prole
Overview
The Zenmuse Z30 gimbal and camera features an optical zoom lens. It provides
a 30× optical zoom and 6× digital zoom. The Type 1/2.8 CMOS sensor supports
approx. 2.13 million effective pixels. As with other DJI modular cameras, the
Zenmuse Z30 can be mounted onto a DJI aircraft and stream live HD video to the
DJI GO app.
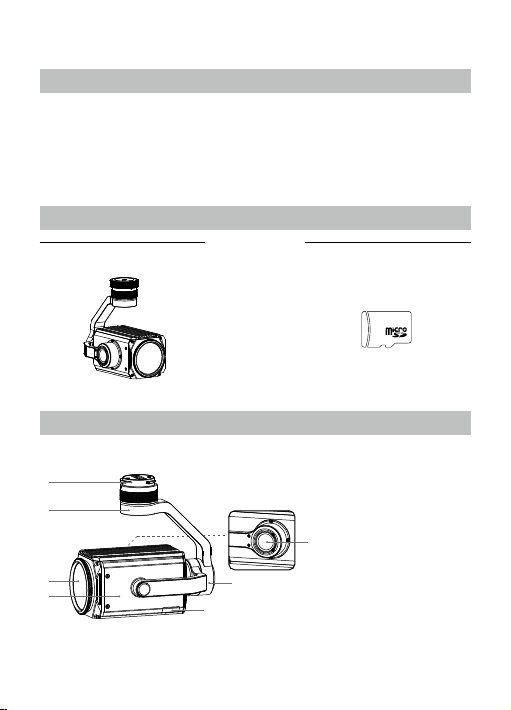
In the Box
Gimbal and Camera ×1
Components
1
2
3
4
4
© 2018 DJI All Rights Reserved.
16GB Micro SD Card ×1
1. Gimbal Connector
2. Pan Motor
3. Lens
7
4. Camera
6
5
5. Micro SD Card Slot
6. Roll Motor
7. Tilt Motor
Page 5
Installation
Getting Started
The Zenmuse Z30 can be used with the following DJI aerial platforms:
Matrice 100 (M100)
Matrice 600 (M600)
M100 and M600 Gimbal Mounting Kits can be purchased separately on
the ocial DJI Online Store.
Supported Micro SD Cards
The Zenmuse Z30 comes with a 16GB Micro SD card, but also supports Micro SD
cards with a capacity of up to 64GB. We recommend using a UHS-1 Micro SD card
to minimize the delay when reading and writing high resolution video data.
DO NOT remove the Micro SD card from the Zenmuse Z30 when it is
powered on.
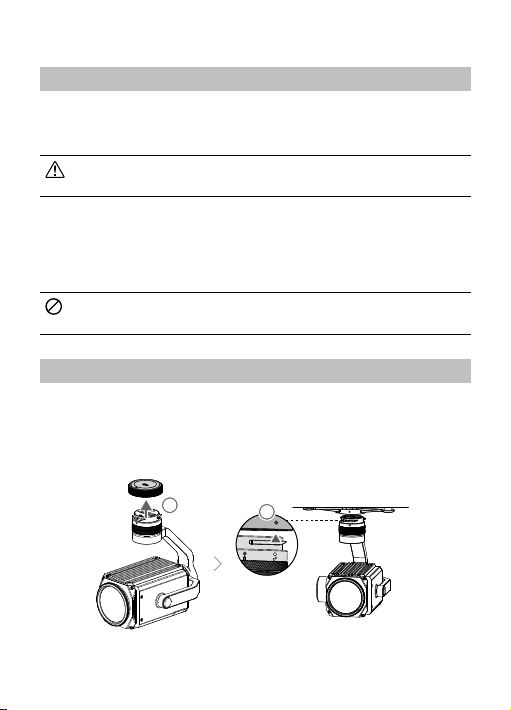
Installing the Zenmuse Z30
1. Remove the Gimbal Cap.
2. Align the white dot on gimbal connector and red dot on the aircraft, then insert
the gimbal.
11
2
© 2018 DJI All Rights Reserved.
5
Page 6

3. Rotate the gimbal lock to the locked position with red dots aligned.
4. Attach the Micro SD card. Default Micro SD card is recommended.
3
4
1
Remote Controller Controls
To adjust the zoom, press the C2 Button and rotate the Left Dial. Press the Shutter
Button to capture photos or the Record Button to record video. Adjust the camera’s
tilt using the Left Dial.
1. Left Dial
5
2. Record Button
1
2
[1] Left Dial
Turn to adjust the camera’s tilt
or pan.
4
3
3. Shutter Button
4. Playback Button
5. C2 Button
6
© 2018 DJI All Rights Reserved.
Page 7

[2] Record Button
Press to start/stop recording video.
[3] Shutter Button
Press to take photos.
[4] Playback Button
Press to view photos and videos on your Micro SD card. Press again to exit.
[5] C2 Button
To adjust zoom, press the C2 button and rotate the Left Dial.
DJI GO App Controls
Downloading DJI GO
Search for ‘DJI GO’ on the App Store or Google Play and download the app to your
mobile device.
DJI GO supports iOS 8.0 (or later) or Android 4.1.2 (or later).
Connecting to DJI GO
1. Turn on the aircraft and the remote controller.
2. Connect your mobile device to the remote controller using a USB cable.
3. Launch DJI GO and enter Camera View. You will see real-time video from the
camera when a connection is established.
© 2018 DJI All Rights Reserved.
7
Page 8

Operating the Camera
EV
WB
ISO
SHUTTER
SD TIME
Camera Panel
The touch interface can be used for capturing photos, recording videos and
playback. Professional photography controls are also available.
1 2 3 4 5 6
READY TO GO (GPS)
800 30 20:12
0.3 Auto
GPS
09:29
1080P/30
12
61%
AF/MF
AE
7
8
9
10
11
12
14
13
1. Live HD Video
2. Photography
Congurations Display
3. Spot Metering/TapZoom
Switch
4. AF/MF Switch
5. Defog Button
6. AE Lock
7. Gimbal slider
8. Photo / Video Toggle
9. Shutter / Record Button
10. Parameter Settings
11. Playback
12. Manual Focus
(in MF mode)
13. 1× Zoom Button
14. Zoom
Basic Shooting
Taking Photos
Tap the Photo/Video Switch to the
Choose from one of the shooting modes by tapping "
position. Tap the button to take a single photo.
" -> -> Photo.
1. Burst Mode
Take 3 or 5 shots in a row.
2. Interval
Take photos in 2, 3, 4, 7 ,10, 15, 20 or 30 second intervals.
8
© 2018 DJI All Rights Reserved.
Page 9

Recording Videos
Slide the Photo/Recording Switch to the
stop recording video.
Single photo can be taken during recording, as the Photo / Video Toggle will
change to be the Photo Button .
Lens Zoom
Tap Buttons “T” and “W” for zoom.
Advanced Settings
Exposure Modes
to choose from the following exposure modes:
Tap
1. AUTO
The shutter speed and aperture are set automatically to obtain the correct
exposure.
2. A (Aperture Priority)
Set your aperture. The selected aperture will then be used for photos. Shutter
speed will be automatically adjusted accordingly.
3. S (Shutter Priority)
Set your desired shutter speed, while the camera chooses the aperture
automatically. This mode is ideal for freezing action, creating motion blur or low-
light shots.
4. M (Manual Exposure)
In general, increase the ISO for low light environments, and decrease the ISO if
the surrounding is very bright.
White Balance
Tap -> ->White Balance to choose from the following modes:
1. Auto
The camera adjusts the white balance automatically.
2. Sunny / Cloudy / Incandescent
Choose one of these modes if natural-looking colors cannot be achieved by
setting Photo Style.
3. Custom (2000K - 10000K)
Set a value between 2000K and 10000K to compensate for a specic light source.
position. Tap the button to start or
© 2018 DJI All Rights Reserved.
9
Page 10

List of Settings
Photo
Shooting
Modes
Image Format JPEG
White Balance
Video
Video Size FHD: 1920×1080 25/30p
Video Format MOV, MP4
White Balance
General
Video Captions Supported
Over Exposure
Warning
Grid O, Grid Line, Grid + Diagonal
Center Point
Anti-Flicker Auto, 60Hz, and 50Hz
Format SD Card Supported
Reset Settings Supported
Single shot, Burst shooting: 3/5 frames,
Interval (2/3/4/7/10/15/20/30 sec)
Auto, Sunny, Cloudy, Incandescent, Custom
(2000K - 10000K)
Auto, Sunny, Cloudy, Incandescent, Custom
(2000K - 10000K)
Supported
None, Circle, Cross, Narrow Cross, Square (No Center
Point), Square (w. Center Point), Bracket (No Center Point),
Bracket (w. Center Point)
Center Point Color: White, Yellow, Red, Blue, Green
10
© 2018 DJI All Rights Reserved.
Page 11

Managing your Photos and Videos
Playback
Tap in the DJI GO app to review photos and videos that you have captured.
Press the same button again to return to capturing images.
Downloading your Files
Download your photo and video les to your PC using a Micro SD card reader.
Micro SD Slot
Upgrading the Firmware
Mount the gimbal and camera to the aircraft and follow the steps below to upgrade
the rmware using a Micro SD card. Using the Matrice 600 as an example.
Keep the power supply switched on during the upgrade.
Ensure that there is only one version of update file in the Micro SD
card, or else there will be an update error.
The Z30 rmware is only for upgrading the camera and gimbal, not for
the aircraft.
Step 1- Check the Battery Level and Micro SD Card Storage
a. Ensure that the Intelligent Flight Batteries have at least 50% power level.
Power on one of the batteries and ensure that other batteries are triggered
automatically. If not, nd solutions in the DJI GO app.
b. Ensure that there is at least 100MB of free space on the Micro SD card.
© 2018 DJI All Rights Reserved.
11
Page 12

Step 2- Prepare the Firmware Update Package
a. Download the rmware update package from the Matrice 600 page on the
DJI website.
(http://www.dji.com/matrice 600/info#downloads)
b. Insert the Micro SD card into your PC. Extract all the downloaded les into
the root directory of the Micro SD card. While the Matrice 600 is powered off,
remove the Micro SD card from your PC and insert it into the Micro SD card
slot on the gimbal.
Step 3- Upgrade the Firmware
a. Ensure the remote controller is powered off and then power on one of the
Intelligent Flight Batteries. The firmware upgrade will begin automatically
once all the Intelligent Flight Batteries are triggered.
b. It will take approximately 5 minutes to complete the rmware upgrade. The
gimbal will repeat a beeping pattern of four fast beeps to indicate that the
upgrade is in progress, and emit one slow beep followed by two fast beeps
to indicate that the upgrade has been completed successfully.
c. Check the upgrade status by opening the .txt file that is automatically
generated after the upgrade. You should see the text “result: successful”
in the .txt file if the upgrade is successful. Otherwise, try upgrading the
rmware again if you see the text “result: failed” in the text le or the gimbal
sounds a long beeping sound.
12
© 2018 DJI All Rights Reserved.
Page 13

Specications
General
Name Zenmuse Z30
Dimensions 152×137×61 mm
Weight 556 g
Gimbal
Angular Vibration Range ±0.01°
Mount Detachable
Controllable Range Tilt: +30° to -120°, Pan: ±320°
Mechanical Range Tilt: +50° to -140°, Pan: ±330°, Roll: +90° to -50°
Max Controllable Speed Tilt: 180°/s, Pan: 180°/s
Camera
Sensor
Lens
FOV 63.7° – 2.3°
Digital Zoom 6×
Min. Focus Distance 10 mm – 1200 mm
Photo Formats JPEG
Video Formats MOV, MP4
Working Modes Capture, Record, Playback
CMOS, 1/2.8"
Eective Pixels: 2.13 M
30× Optical Zoom
F = 4.3 mm – 129 mm
(29 mm – 872 mm equivalent)
F1.6 – F4.7
Zoom Movement Speed:
Optical Wide – Optical Tele: 4.6 sec
Optical Wide – Digital Tele: 6.4 sec
Digital Wide – Digital Tele: 1.8 sec
Focus Movement Time (∞ – near): 1.1 sec
© 2018 DJI All Rights Reserved.
13
Page 14

Still Photography Modes
Video Resolution FHD: 1920×1080 25/30p
Exposure Mode Auto, Manual, Shutter priority, Aperture priority
Exposure Compensation ±2.3 (1/3 increments)
Photo Resolution 16:9, 1920×1080
Metering Mode
AE Lock Supported
Electronic Shutter Speed 1/30 – 1/6000 s
White Balance
Video Captions Supported
TapZoom Supported
TapZoom Range 1– 5
Defog Supported
One Key to 1× Image Supported
Anti-icker Auto, 50 Hz, 60 Hz
PAL/NTSC Supported
Supported SD Cards
Supported File Systems
Environmental
Operating Temperature 14° to 113° F (-10° to 45° C)
Storage Temperature -4° to 140° F (-20° to 60° C)
Single shot, Burst shooting: 3/5 frames,
Interval (2/3/4/7/10/15/20/30 sec)
Center-weighted metering,
Spot metering (Area option 12×8)
Auto, Sunny, Cloudy, Incandescent,
Custom (2000K – 10000K)
Micro SD (SD / SDHC / SDXC)
Max. Capacity: 64 GB,
Class 10 or UHS-1
FAT32 (≤ 32 GB)
exFAT (> 32 GB)
14
© 2018 DJI All Rights Reserved.
Page 15

DJI Support
www.dji.com/support
This content is subject to change.
Download the latest version from
http://www.dji.com/zenmuse-z30
is a trademark of DJI.
ZENMUSE
Copyright © 2016 DJI All Rights Reserved.
 Loading...