

Page 1
DJI
Remote Start/Stop
User Guide
2016.06
V1.0
Page 2

Disclaimer and Warning
Congratulations on purchasing your new
DJITM product. The information in this
document affects your safety and your
legal rights and responsibilities. Read this
entire document carefully to ensure proper
conguration before use. Fail ure to read
and follow instructions and warnings in
this document may result in serious injury
to yourself or others, or damage to your
DJI product or damage to other objects
in the vicinity. This User Guide and all
other collateral documents are subject
to change at the sole discretion of DJI.
For up-to-date product information, visit
http://www.dji.com and click on the
product page for this product.
By using this product, you hereby signify
that you have read this disclaimer and
warning carefully and that you understand
and agree to abide by the terms and
conditions herein. You agree that you are
2
© 2016 DJI All Rights Reserved.
Page 3

solely responsible for your own conduct
while using this product, and for any
consequences thereof. You agree to
use this product only for purposes that
are proper and in accordance with all
applicable laws, rules, and regulations, and
all terms, precautions, practices, policies
and guidelines DJI has made and may
make available.
DJI accepts no liability for damage, injury or
any legal responsibility incurred directly or
indirectly from the use of this product. The
user shall observe safe and lawful practices
including, but not limited to, those set forth
in this document.
DJI is a trademark of SZ DJI TECHNOLOGY
CO., LTD. (abbreviated as “DJI”) and its
affiliated companies. Names of products,
brands, etc., appearing in this document
are trademarks or registered trademarks of
their respective owner companies.
© 2016 DJI All Rights Reserved.
3
Page 4
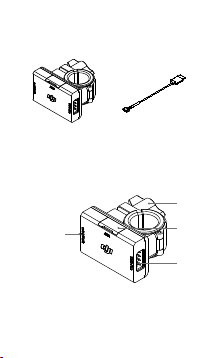
In the Box
Remote Start/Stop ×1 Power Cable ×1
Introduction
The DJI Remote Start/Stop is designed to
be used with a RONINTM series gimbal or
DJI Focus to control the camera for video
recording or taking photos.
1
1. Power Port
(CAN Port)
2. Camera Port
3. Reserved Port
4. Quick-Release Mount
4
© 2016 DJI All Rights Reserved.
4
3
2
Page 5
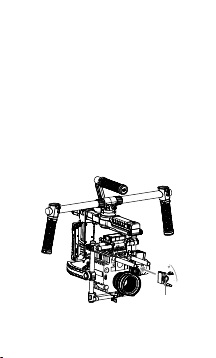
Using with the Ronin Series
Gimbal
Installation
1. Loosen the knob on the Quick-Release
Mount of the Remote Start/Stop, then
attach the Remote Start/Stop to one
of the extension rods on the gimbal.
Choose a rod that provides enough
room to connect the Control Cable to
your camera.
Adapter
© 2016 DJI All Rights Reserved.
5
Page 6

The extension rod is not included
in the Ronin-MX or Ronin-M’s
package. Visit the Official DJI
Online Store for more information.
The Remote Start/Stop can be
clamped to a 15 or 19 mm rod.
To clamp the Remote Start/Stop
to a 19 mm rod, rst remove the
step-down adapter on the Quick-
Release Mount.
If necessary, the Quick-Release Mount can
be removed to mount the Remote Start/
Stop to a desired position.
To remove the Quick-Release Mount,
loosen the knob on the Quick-Release
Mount all the way and remove the screw.
6
© 2016 DJI All Rights Reserved.
Page 7

2. Connect the Power Port on the Remote
Start/Stop to the LB Port on the gimbal
by using the provided Power Cable for
power supply and communication.
Power Port
Camera Port
3. Connect the Camera Port on the
Remote Start/Stop to the camera by
using the proper Control Cable for your
camera. The following section describes
which Control Cable corresponds to
which camera model, and how to set
up your camera properly.
© 2016 DJI All Rights Reserved.
7
Page 8

Control Cables
Type Supported Camera
Control Cable for
BMCC
Control Cable for
Canon
Control Cable for
Hasselblad
Control Cable for
Panasonic
Control Cable for
RED
Control Cable for
Sony
BMCC/BMPCC
Canon 5D/6D/7D
Hasselblad A5D
Panasonic GH3/
GH4
RED
Sony Alpha 7
Series
Visit the Ocial DJI Online Store
for more information about the
Control Cable.
8
© 2016 DJI All Rights Reserved.
Page 9

Camera Settings and Connections
1. BMCC/BMPCC
No required settings. Connect the
Control Cable to the Remote Port on
the camera.
2. Canon 5D/6D/7D
Set the camera to Video Recording Mode
and Infrared Control Mode (Self-timer
Mode). Then point the infrared light from
the Control Cable to the camera’s receiver.
3. Hasselblad A5D
No required settings. Connect the
Control Cable to one of the Control
Connector Ports on the camera.
4. Panasonic GH3/GH4 Cameras
Set the camera to Video Recording
Mode and connect the Control Cable to
the camera’s Remote port.
5. RED Camera
Go to Menu > Settings > Setup >
Communication. Select the Serial tab
and then choose REDLINK Command
© 2016 DJI All Rights Reserved.
9
Page 10

Protocol from the Serial Protocol drop-
down menu.
Connect the Control Cable to the CTRL
Port of the camera.
6. Sony Alpha 7 Series Camera
Enable the Remote Control function on the
camera and point the infrared light from
the Control Cable to the camera’s receiver.
Operation
1. When using with the Ronin series
gimbal on the ground, toggle the
FUNCTION switch quickly from Position
2 to Position 1 and back to Position 2
to take photos. Toggle the FUNCTION
switch quickly from Position 2 to
Position 3 and back to Position 2 to
start/stop video recording.
1
2
3
Take Photos Start/Stop
10
© 2016 DJI All Rights Reserved.
Video Recording
Page 11

Operating the Remote Start/
Stop will not aect the primary
operations of the FUNCTION
Switch.
2. When using the Remote Start/Stop
with the Ronin-MX and Matrice 600,
press the Shutter button or the Video
Recording button to take photos or
record video.
Using with the DJI Focus
Installation
1. Attach the Remote Start/Stop to the
extension rod.
2. Connect the Power Port on the Remote
Start/Stop to one of the communication
ports on the DJI Focus Motor by
using the dedicated Power Cable
(not provided) for power supply and
communication.
3. Connect the Camera Port on the
© 2016 DJI All Rights Reserved.
11
Page 12

50.0%
Calibrate Menu
Remote Start/Stop to the camera
by using the proper Control Cable.
The required camera settings and
connections are the same as when
using the Ronin series gimbal.
Visit the Ocial DJI Online Store
for more information about the
dedicated Power Cable.
Operation
1. On the DJI Focus remote controller, go
to Menu > Settings > Camera Control
> On to enable remote camera control.
2. Press the D button once to start/stop
recording. Press and hold the D button
to take photos.
12
© 2016 DJI All Rights Reserved.
Page 13

Specications
Dimensions 40 mm × 21 mm × 44 mm
Weight 37 g
Operation
4.5 - 16 V
Voltage
Operation
30 mA@12 V
Current
Operation
5° to 131° F (-15° to 55° C)
Temperature
© 2016 DJI All Rights Reserved.
13
Page 14

FCC Compliance
This device complies with Part 15 of the
FCC Rules. Operation is subject to the
following two conditions: (1) This device
may not cause harmful interference, and (2)
This device must accept any interference
received, including interference that may
cause undesired operation.
Any changes or modications not expressly
approved by the party responsible for
compliance could void the user’s authority
to operate the equipment.
EU Compliance Statement
SZ DJI TECHNOLOGY CO., LTD. hereby
declares that this device is in compliance
with the essential requirements and other
relevant provisions of the EMC Directive.
A copy of the EU Declaration of Conformity
is available online at www.dji.com/euro-
compliance.
14
© 2016 DJI All Rights Reserved.
Page 15

EU contact address: DJI GmbH, Industrie
Strasse. 12, 97618, Niederlauer, Germany
© 2016 DJI All Rights Reserved.
15
Page 16

DJI Support
http://www.dji.com/support
The content is subject to change.
Download the latest version from
http://www.dji.com/product/ronin-mx
If you have any questions about this
document, please contact DJI by sending
a message to DocSupport@dji.com.
TM
is a trademark of DJI.
RONIN
Copyright © 2016 DJI All Rights Reserved.
 Loading...