

Page 1

Quick Start Guide
V1.0
V2.0
Page 2
Phantom 4 Pro V2.0
The DJI PHANTOMTM 4 Pro V2.0 is a smart prosumer flying camera capable of shooting 4K video at 60 fps and at up
to 100 Mbps, and capturing 20 megapixel stills. 4 directions of obstacle avoidance allow it to intelligently avoid
obstacles during flight. Using TapFly
your screen or track a moving subject smoothly and easily with a simple tap. The camera uses a 1-inch CMOS sensor
offering unprecedented clarity, lower noise, and better quality images.
In addition to the above features, improved propulsion system efficiency means aircraft noise is 4dB (60%) lower than
on the Phantom 4 Pro V2.0.
TM
and ActiveTrackTM through the DJI GOTM 4 app, you can fly anywhere visible on
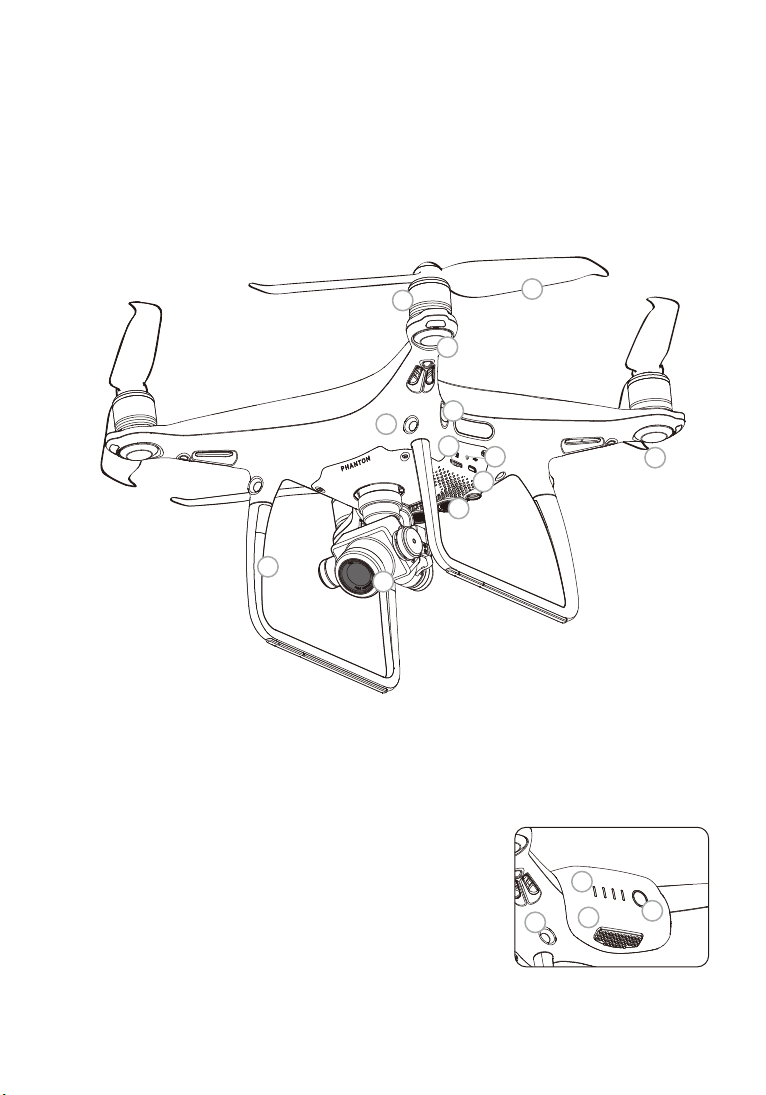
1. Gimbal and Camera
2. Downward Vision System*
3. Micro USB Port
4. Camera/Linking Status Indicator
and Link Button
5. Camera Micro SD Card Slot
6. Forward Vision System
7. Infrared Sensing System*
8. Front LEDs
6
12
9. Motors
10. Propellers
11. Aircraft Status Indicators
12. Antennas
13. Rear Vision System
14. Intelligent Flight Battery
15. Power Button
16. Battery Level Indicators
1
9
10
8
7
5
4
11
3
2
16
14
13
15
* The Vision and Infrared Sensing Systems are affected by surrounding conditions. Read the Disclaimer and Safety Guidelines and watch the
tutorials in the DJI GO 4 app or on the official DJI website to learn more.
http://www.dji.com/phantom-4-pro-v2
Page 3
Remote Controller
The powerful remote controller of the Phantom 4 Pro V2.0 has a transmission range extending up to 4.3 mi (7 km)*. It
features physical buttons and dials to control exposure, camera tilt, photo capture, and video recording.
Built into the remote controller is DJI's latest long-range transmission technology OCUSYNC
with a compatible mobile device gives you a live HD view from the Phantom’s camera. Dual frequency support makes
the HD video downlink more stable.
TM
, which when paired
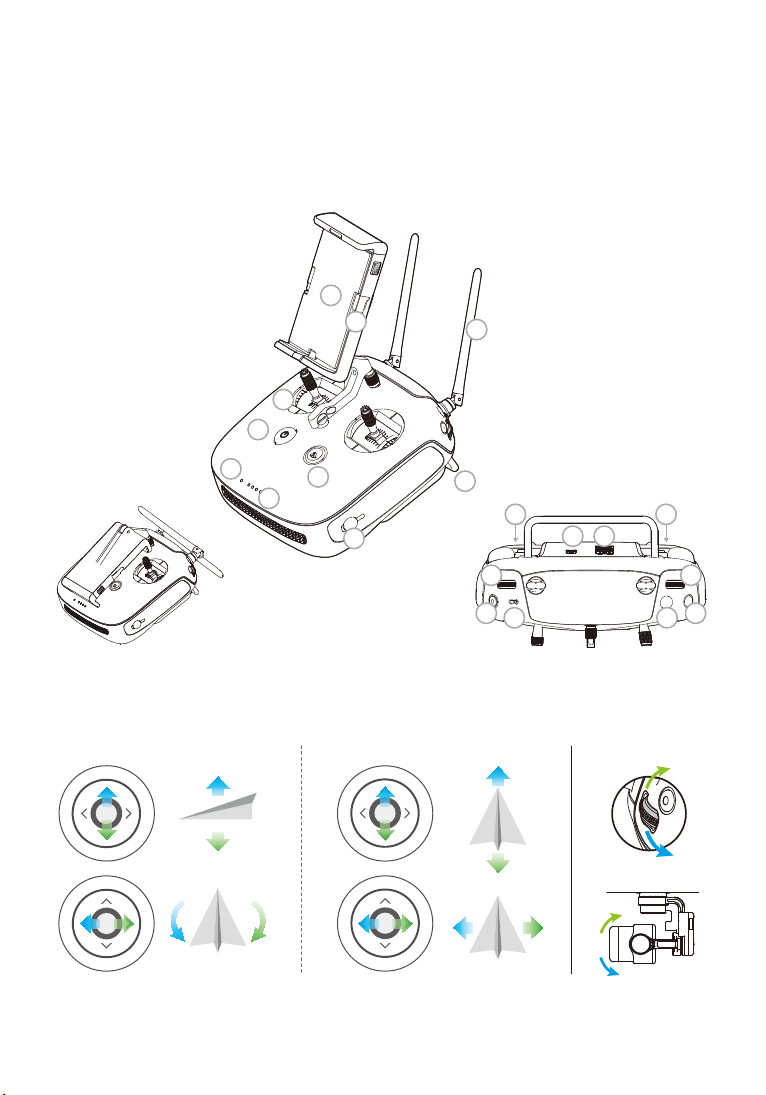
1. Power Button
2. Return-to-Home (RTH) Button
3. Control Sticks
4. Status LED
5. Battery Level LEDs
6. Power Port
7. Mobile Device Holder
8. Small Device Positioning Tabs
(for mobile phones)
9. Antennas
10. Handle Bar
7
8
9
3
1
4
2
10
11. Gimbal Dial
12. Camera Settings Dial
13. Record Button
14. Flight Mode Switch
15. Shutter Button
16. Intelligent Flight Pause Button
17. C1 and C2 Buttons
(customizable)
18. USB Port
19. Micro USB Port
5
17
6
1819
11
13
14
Folded
The default flight control is known as Mode 2. The left stick controls the aircraft’s altitude and heading, while the right
stick controls its forward, backward, left and right movements. The gimbal dial controls the camera’s tilt.
Left Stick Right Stick
P
U
a
w
r
r
d
o
F
17
15
Gimbal Dial
12
16
B
a
d
r
n
D
o
w
t
f
e
L
n
r
u
T
* The remote controller is able to reach its maximum transmission distance (FCC) in a wide open area with no Electro-Magnetic Interference, and at
an altitude of about 400 feet (120 meters).
T
u
r
n
R
i
g
h
t
c
a
k
w
R
t
f
e
L
i
g
h
t
Page 4

Using Phantom 4 Pro V2.0
1. Download the DJI GO 4 App
Search for ‘DJI GO 4’ on the App Store or
Google Play, and install the app on your mobile
device.
DJI GO 4 App
●
DJI GO 4 supports iOS 9.0 (or later) or Android 4.4 (or later).
2. Watch the Tutorial Videos
Watch the tutorial videos at www.dji.com or in
the DJI GO 4 app.
3. Check the Battery Levels
Low
Battery Level
Press once to check the battery level. Press once, then again and hold to turn on/off.
High
Tutorial Videos
Low
Battery Level
High
4. Charge the Batteries
Power Outlet
100 - 240V
A
Remove the battery.
●
When charging is complete, the battery level indicators will automatically turn off.
Charge Time:
~1 hr 20 min
B
A
Charge Time:
~3 hr 40 min
B
Page 5

5. Prepare the Remote Controller Specifications
2
Place your mobile device
and adjust the clamp to
secure.
Connect your mobile
3
device with a USB cable.
Strong
Unfold
Weak
Press the button to
release the clamp.
1
6. Prepare for Takeoff
DJI GO 4
App
Launch DJI GO 4, complete
Remove the gimbal clamp from
the camera.
First-time activation requires your DJI account and internet connection.
Internet
Power on the remote controller and
the aircraft.
the first-time setup, and tap
GO FLY.
Black propeller
rings go on motors
with black dots.
●
Check that the propellers are secure
before each flight.
Silver propeller
rings go on motors
without black dots.
Press the propeller down
onto the mounting plate and
rotate in the lock direction
until secure.
Page 6

7. Flight
Ready to Go (GPS)
Before taking off, make sure the Aircraft Status Bar in the DJI GO 4 app
indicates ‘Ready to Go (GPS)’ or ‘Ready to Go (Vision)’ if flying indoors.
In the DJI GO 4 App:
Auto Takeoff
The aircraft will take off and hover at
an altitude of 4 feet (1.2 meters).
Return-to-Home (RTH)
Bring the aircraft back to the Home
Point. Tap again to stop the procedure.
TapFly
Tap on your screen to fly your Phantom
in that direction, avoiding obstacles as it
flies.
●
Watch the tutorial in the DJI GO 4 app or on the official DJI website to learn more.
●
Always set an appropriate RTH altitude before takeoff. When the aircraft is returning to the Home Point, you should
guide it with the control sticks. Refer to the Disclaimer and Safety Guidelines for more details.
Manual Takeoff
Auto Landing
The aircraft will land vertically and stop its
motors.
Normal
You are in control of the Phantom, with
satellite and Return-to-Home support.
ActiveTrack
Mark an object on your screen to track it
as it moves.
Manual Landing
OR
Combination Stick Command
to start/stop the motors
●
Rotating propellers can be dangerous. Do not start the motors when
there are people nearby.
●
Always keep your hands on the remote controller so long as the motor
is still spinning.
●
Stop motor mid-flight: Pull the left stick to the bottom inside corner
while simultaneously pressing the RTH button. Only stop motors
mid-flight in emergency situations when doing so can reduce the risk
of damage or injury. Refer to the user manual for details.
It’s important to understand basic flight guidelines, for the safety of both you and those around you.
Don't forget to read the Disclaimer and Safety Guidelines.
Left stick up (slowly)
to take off
Left stick down (slowly)
until you touch the ground
Hold a few seconds to
stop the motors
Stop motor mid-flight
Page 7

●
Aircraft
Weight (Battery & Propellers Included) 1375 g
Max Ascent Speed S-mode: 6 m/s; P-mode: 5 m/s
Max Descent Speed S-mode: 4 m/s; P-mode: 3 m/s
Max Speed 45 mph (72 kph) (S-mode); 36mph (58 kph) (A-mode);
31 mph (50 kph) (P-mode)
Max Service Ceiling Above Sea Level 19685 ft (6000 m)
Max Flight Time Approx. 30 minutes
Operating Temperature 32° to 104° F ( 0° to 40° C)
GNSS GPS+GLONASS
Operating Frequency 2.400 - 2.483 GHz and 5.725 - 5.850 GHz
Transmitter Power (EIRP) 2.4 GHz: ≤26 dBm (FCC); ≤20 dBm (CE); ≤20 dBm (SRRC)
5.8 GHz: ≤26 dBm (FCC); ≤14 dBm (CE); ≤26 dBm (SRRC)
Hover Accuracy Range Vertical: ±0.1 m (With Vision Positioning); ±0.5 m (With GPS Positioning)
Horizontal: ±0.3 m (With Vision Positioning); ±1.5 m (With GPS Positioning)
●
Gimbal
Controllable Range Pitch: -90° to +30°
●
Vision System
Velocity Range ≤31 mph (50 kph) at 6.6 ft (2 m) above ground
Altitude Range 0 - 33 ft (0 - 10 m)
Operating Range 0 - 33 ft (0 - 10 m)
Obstacle Sensory Range 2 - 98 ft (0.7 - 30 m)
Operating Environment Surfaces with clear patterns and adequate lighting (> 15 lux)
●
Infrared Sensing System
Obstacle Sensory Range 0.6 - 23 ft (0.2 - 7 m)
Operating Environment Surface with diffuse reflection material, and reflectivity > 8% (such as wall, trees, humans, etc.)
●
Camera
Sensor 1’’ CMOS; Effective pixels: 20M
Lens FOV (Field of View) 84°, 8.8 mm (35 mm format equivalent: 24 mm), f/2.8 - f/11, auto focus at 1 m - ∞
ISO Range Video: 100 - 3200 (Auto); 100 - 6400 (Manual); Photo: 100 - 3200 (Auto); 100 - 12800 (Manual)
Mechanical Shutter 8 - 1/2000 s
Electronic Shutter 8 - 1/8000 s
Max Image Size 3:2 Aspect Ratio: 5472×3648; 4:3 Aspect Ratio: 4864×3648; 16:9 Aspect Ratio: 5472×3078
Still Photography Modes Single Shot
Burst Shooting: 3/5/7/10/14 frames
Auto Exposure Bracketing (AEB): 3/5 bracketed frames at 0.7EV Bias
Interval: 2/3/5/7/10/15/30/60 s
Video Recording Modes H.265 H.264
・C4K: 4096×2160 24/25/30p ・C4K: 4096×2160 24/25/30/48/50/60p
・4K: 3840×2160 24/25/30p ・4K: 3840×2160 24/25/30/48/50/60p
・2.7K: 2720×1530 24/25/30/48/50/60p ・2.7K: 2720×1530 24/25/30/48/50/60p
・FHD: 1920×1080 24/25/30/48/50/60/120p ・FHD: 1920×1080 24/25/30/48/50/60/120p
・HD: 1280×720 24/25/30/48/50/60/120p ・HD: 1280×720 24/25/30/48/50/60/120p
Video Storage Bitrate 100 Mbps
Supported File Systems FAT32 (≤ 32 GB); exFAT (> 32 GB)
Photo JPEG, RAW (DNG), JPEG + RAW
Video MP4/MOV (AVC/H.264; HEVC/H.265)
Supported SD Cards Micro SD, Max Capacity: 128 GB. Class 10 or UHS-1 rating required
Operating Temperature 32° to 104° F (0° to 40° C)
●
Remote Controller
Operating Frequency 2.400 - 2.483 GHz and 5.725 - 5.850 GHz
Max Transmission Distance 2.4 GHz: 4.3 mi (7 km, FCC); 2.5 mi (4 km, CE); 2.5 mi (4 km, SRRC)
5.8 GHz: 4.3 mi (7 km, FCC); 1.2 mi (2 km, CE); 3.1 mi (5 km, SRRC) (Unobstructed, free of interference)
Operating Temperature 32° - 104° F (0° - 40° C)
Battery 6000 mAh LiPo 2S
Transmitter Power (EIRP) 2.4 GHz: ≤26 dBm (FCC); ≤20 dBm (CE); ≤20 dBm (SRRC)
5.8 GHz: ≤26 dBm (FCC); ≤14 dBm (CE); ≤20 dBm (SRRC)
Operating Voltage 1.2 A @ 7.4 V
●
Charger
Voltage 17.4 V
Rated Power 100 W
●
Intelligent Flight Battery (PH4-5870mAh-15.2V)
Capacity 5870 mAh
Voltage 15.2 V
Battery Type LiPo 4S
Energy 89.2 Wh
Net Weight 468 g
Charging Temperature Range 41° to 104° F (5° to 40° C)
Max Charging Power 100 W
Download the user manual for more information:
http://www.dji.com/phantom-4-pro-v2
※ This Quick Start Guide is subject to change without prior notice.
2
8
9.5 mm
m
m
2
8
1
1
7
2
mm
71 mm
is a trademark of DJI.
PHANTOM
Copyright © 2018 DJI All Rights Reserved.
Designed by DJI. Printed in China.
9.
28
136 mm
196 mm
mm
5
YC.BZ.SS000354.02
Page 8

V2.0
www.dji.com
 Loading...