

Page 1
1
Maintenance & Operating Instructions
For
BAYCO 5204 A.P.I. VALVES
Part Numbers
USA:
Dixon Bayco USA
Chestertown, Maryland
Phone: 410-778-2000
Fax: 410-778-4702
Toll Free: 800-355-1991
E-mail: dixonbayco@dixonvalve.com
www.dixonbayco.com
Canada:
Dixon Group Canada Limited
Innisfil (Barrie), Ontario
Phone: 705-436-1125
Fax: 705-436-6251
Toll Free: 877-963-4966
E-mail: isales@dixongroupcanada.com
www.dixongroupcanada.com
Mexico:
Dixva, S. de R.L. de C.V.
Monterrey, N.L
Phone: 01-800-00-DIXON (34966)
Fax: 01-81-8354-8197
E-mail: contactenos@dixonvalve.com.mx
www.dixonvalve.com
Europe:
Dixon Group Europe Ltd
Preston, England
Phone: +44 (0)1772 323529
Fax: +44 (0)1772 314664
E-mail: enquiries@dixoneurope.co.uk
www.dixoneurope.co.uk
Asia Pacific:
Dixon (Asia Pacific) Pty Ltd
Wingfield, South Australia
Phone: +61 8 8202 6000
Fax: +61 8 8202 6099
E-mail: enquiries@dixonvalve.com.au
www.dixonvalve.com.au
For Sales & Service Contact
5204L ........................ ‘load only’, with sight glass
5204LNG................... ‘load only’, no sight glass
5204LNGV ................ ‘load only’, no sight glass, Poppet O-ring, for B100
Load / Unload
Load only
5204 ....................... fixed handle, with sight glass
5204C .................... detachable handle, with sight glass
5204NG ................. fixed handle, no sight glass
5204NGC .............. detachable handle, no sight glass
5204T .................... fixed handle, with sight glass, PTFE seals, SS spring
5204TC .................. detachable handle, with sight glass, PTFE seals, SS spring
5204NGT............... fixed handle, no sight glass, PTFE seals, SS spring
5204NGTC ............ detachable handle, no sight glass, PTFE seals, SS spring
5204B .................... fixed handle, sight glass, Bayloy nose ring
5204BC ................. detachable handle, with sight glass, Bayloy nose ring
5204BNG .............. fixed handle, no sight glass, Bayloy nose ring
5204BNGC ............ detachable handle, no sight glass, Bayloy nose ring
5204SNG……… …fixed handle, no sight glass, stainless steel main spring
5204NGV…………fixed handle, no sight glass, Poppet O-ring, for B100
5204NGCV ........... detachable handle, no sight glass, Poppet O-ring, for B100
5204BNGV ......... fixed handle, no sight glass, Bayloy nose ring, Poppet O-ring, for B100
5204BNGCV ...... detachable handle, no sight glass, Bayloy nose ring, Poppet O-ring, for B100
5204SNGV …… …fixed handle, no sight glass, stainless steel main spring, Poppet O-ring, for B100
5204P .................... fixed handle, with sight glass, drain plug
090085 Rev 23
Page 2
IMAGE
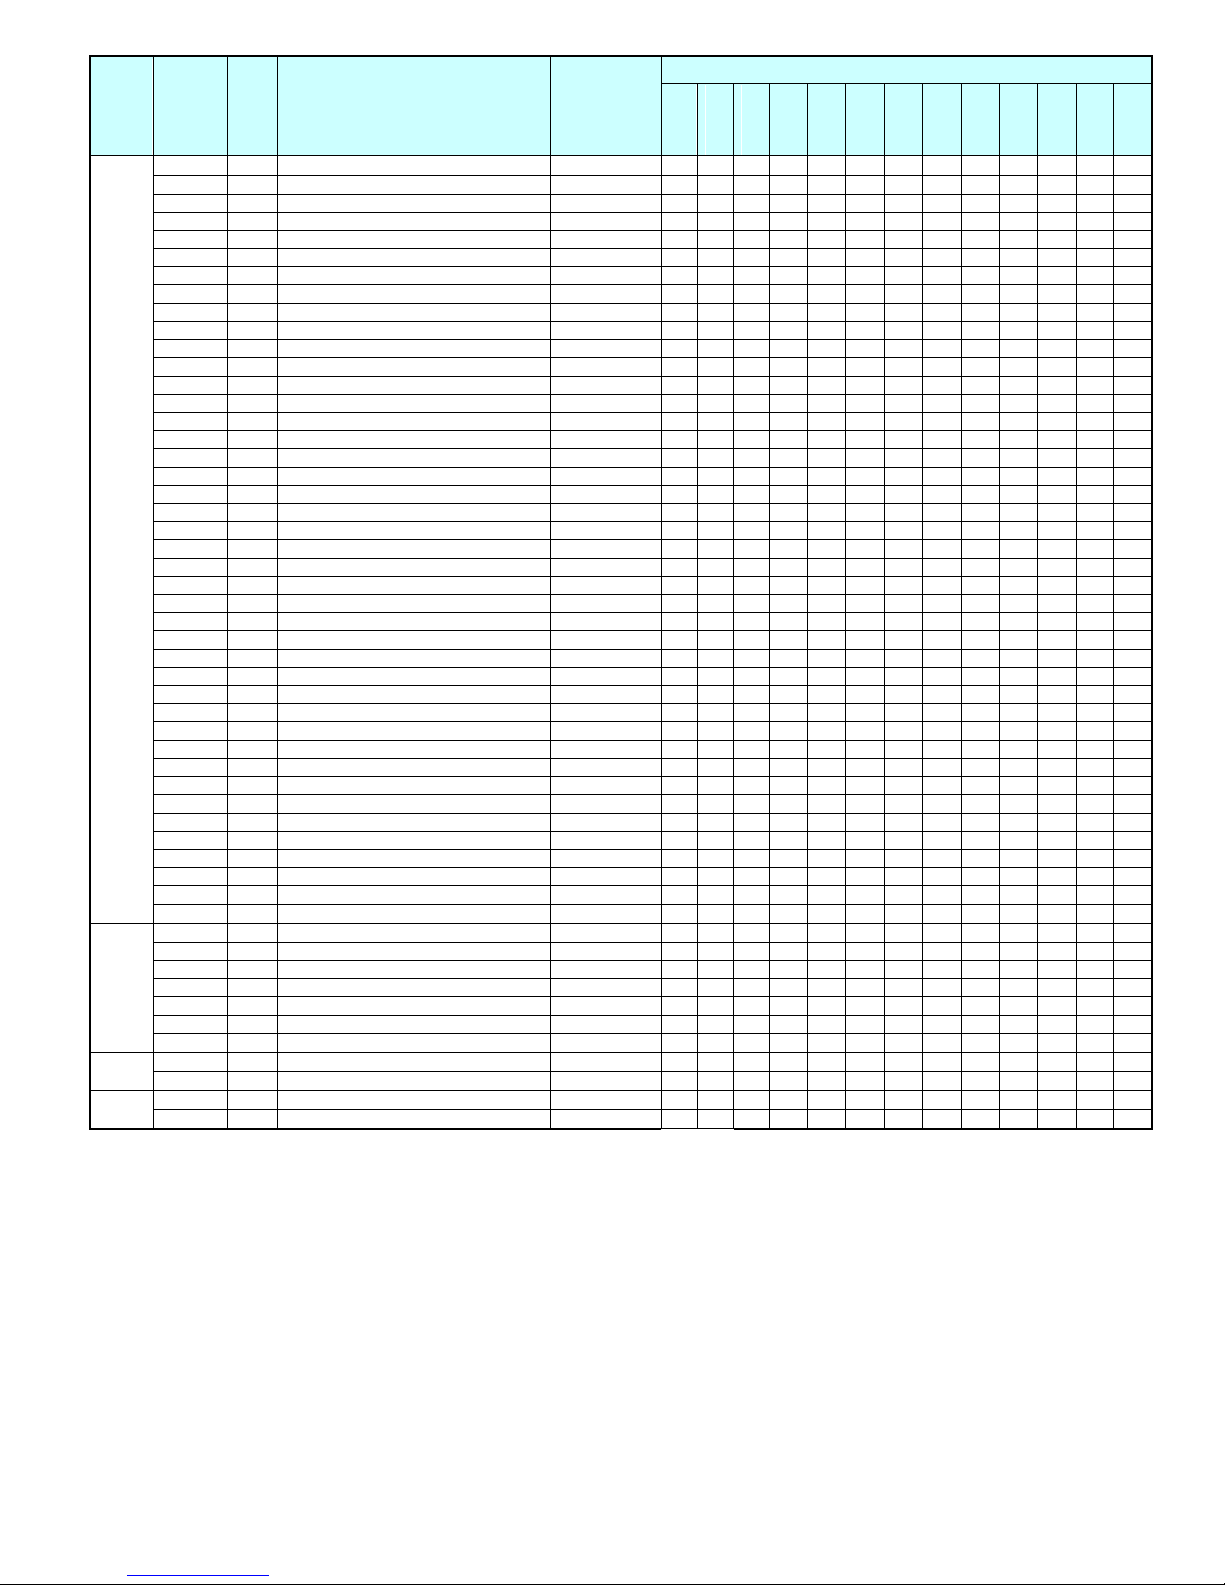
ITEM
QTY.
DESCRIPTION
PART NO.
REPAIR KITS
5204K1
5204K2
5204K3
5204K4
5204K5
5204K6
5204K7
5204K8
5204K9
5204K11
5204K12
5204KV1
5204KV2
1
1
1
Body - Pipe End
Body w/ Sight Glass
341614
Body w/ No Sight Glass
341634
Body Load Only w/ S/G
341649
Body Load Only w/ No S/G
341650
2
1
Nose Ring
*
Y
3
1
Shaft
390812
4 1
Handle Pin
*
Y 5 1
Shaft Spacer
390813
6 1
Shaft Bearing
*
Y
Y 7
1
Stop Pin
390814
8
1
Handle * Y
9
1
Poppet Subassembly
341617
Poppet, Subassembly - Load Only
341651
Poppet Subassembly with PTFE
400624
10
1
-Poppet Bearing
*
Y
Y 11
1
Cam
111550
12
1
Sight Glass
*
Y 13
1
-Poppet Roller
*
Y Y
14
1
-Poppet Roller Bearing
*
Y Y
15
1
Retaining Ring
111560
16
1
-O-Ring
*
Y Y Y
Y Y 17
1
O-Ring
111554
Y Y
Y Y Y 18
1
O-Ring * Y Y
Y 19
2
Roll Pin
111567
20
1
-Pin
111566
21
1
Grease Fitting
111561
22
6
Screw
111570
Y 23
8
Screw * Y Y
Y 24
1
O-Ring * Y Y
Y Y 25
5
Washer * Y Y (2) Y
26
1
Cotter Pin
*
Y
27A
1
Main Spring
111564
27B
1
Main Spring – Stainless (for 5204SNG)
111542
28
1
Handle Spring
*
Y
29
1
O-ring * Y
Y 30
14
Lock Washer
111569
Y
Y Y Y 31
1
Washer *
Y Y
Y
32
1
Washer
111574
33
1
Back-up Ring
111579
34
1
U-Cup * Y
Y 36
1
Float Ball
*
Y
2 37
1
Detachable Handle
*
Y
38
1
Bracket * Y
39
1
Clevis Pin
*
Y
40
1
Flat washer
*
Y
41
1
Cotter Pin
*
Y
42
1
Torsion Spring
*
Y
43
1
Pin * Y
3 44
1
Threaded Nose Ring
*
Y
45
1
Wear Ring
*
Y
4 46
1
Sight Glass Delete Kit – Blank Plate
*
Y 47
1
Sight Glass Delete Kit – Gasket
*
Y
*Use Relevant Repair Kit
Repair kit 5204K1: Poppet o-ring
Repair kit 5204K2: Complete rebuild kit; all o-rings and bearings
Repair kit 5204K3: Anodized nose ring with screws
Repair kit 5204K4: Bayloy nose ring with screws
Repair kit 5204K5: Detachable handle assembly
Repair kit 5204K6: PTFE encapsulated seals
Repair kit 5204K7: Fixed handle repair kit
Repair kit 5204K8: Sight glass repair kit
Repair kit 5204K9: Sightglass delete kit
Repair kit 5204K11: Nose ring hardware kit
Repair kit 5204K12: Sight glass hardware kit
Repair kit 5204KV1: Poppet o-ring rebuild-kit for B100
Repair kit 5204KV2: Complete rebuild kit; (including poppet o-rings and bearings for B100)
2 090085 Rev 23
Page 3
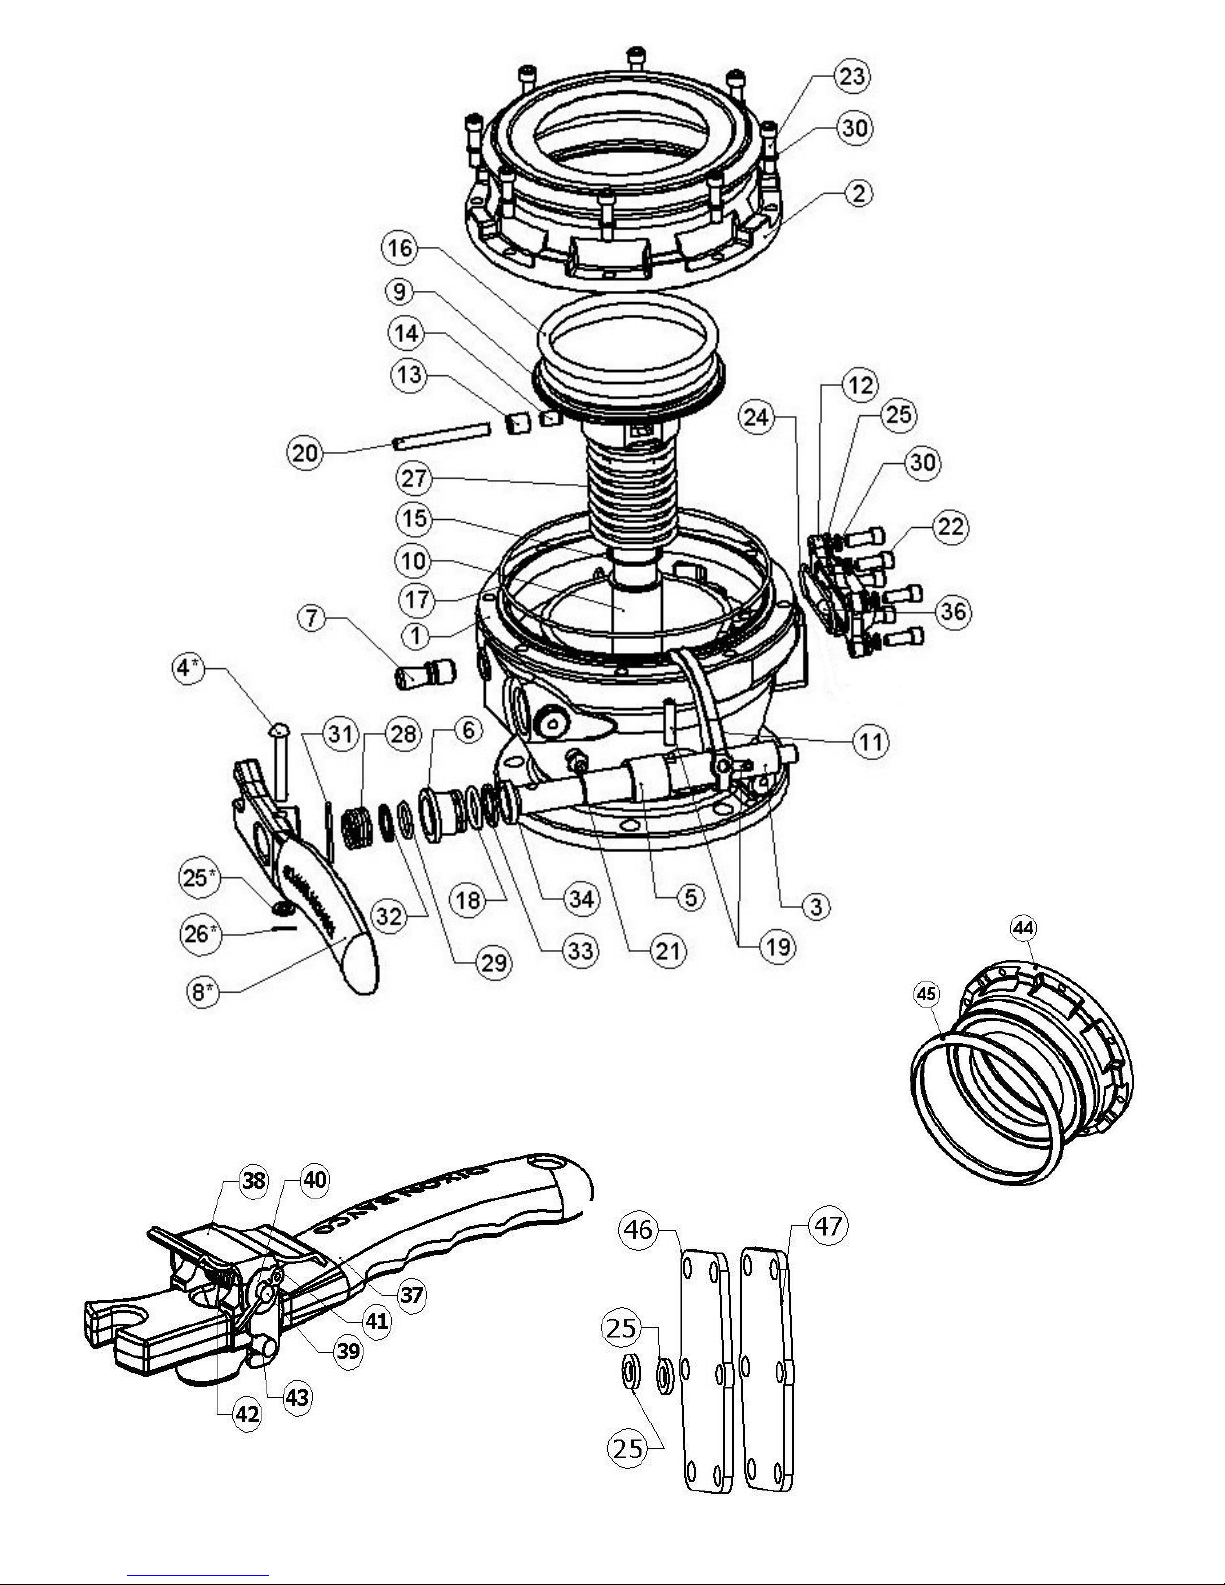
Image 3
Threaded nose ring
* Fixed-handle version only
Image 2
Detachable handle
Image 4
Sight Glass Delete
Kit
3 090085 Rev 23
Page 4

These instructions and recommendations are provided to ensure proper operation and long service life
of Bayco 5204 API. Parts are identified by the item number on the assembly drawing and part list.
MAINTENANCE AND PART REPLACEMENT FOR BAYCO 5204 API
The following instructions cover both the load/unload and load only API valves. For the load only
versions, please disregard items in italics.
I. SEMI-ANNUAL INSPECTION
1. Visual inspection of the valve operation can be done while the valve is still attached to the tank. All
safety precautions that apply to the use of the valve must be followed and all the lines must be
empty.
Visually examine 5204 API for worn or damaged parts, or any other condition that may affect the
operation of the valve.
Visually examine nose ring (2) for cavities, scratches, or other deformation of the sealing surface.
Visually examine shaft (3) for significant dirt accumulation that could cause shaft seal leakage.
Check that the handle (8) automatically positions at an angle to the valve body (1) with detent end
away from the stop pin (7).
Visually examine stop pin (7) for signs of wear and deformation. When the handle is moved to open
position, it should remain firmly latched on the stop pin (7). If the handle cannot stay securely in the
latched open position due to stop pin (7) wear, stop pin (7) should be replaced. Locking pliers can
be used to unscrew the stop pin (7).
2. To check the handle performance, open and close the API valve a few times. The handle should
move unobstructed and smoothly.
3. When released from the latched (or open) position, the poppet (9) should instantly close and center.
4. Using a non-scratching tool, (piece of wood), push the poppet open without using the operating
handle. Push the poppet to the side and make sure that the poppet reseats and centers itself when
closed slowly.
If any of the checks described above fails, additional maintenance is required.
II. YEARLY INSPECTION AND MAINTENANCE
The 5204 API can be disassembled and the seals may be replaced while the valve is still attached to
the trailer.
It is recommended to draw a line (using a felt-tip pen) across the joint between the pipe end (1) and the
nose ring (2). The line is used later in assembly to rotate the nose ring (2) from the starting position,
which helps balance out wear of the coupling surface.
4 090085 Rev 23
Page 5

DISASSEMBLY – PART I
CAUTION! THE POPPET IS HELD UNDER CONSIDERABLE SPRING TENSION. WHENEVER
THE NOSE RING (2) OR POPPET (9) ARE REMOVED OR REASSEMBLED, THE
VALVE MUST BE LATCHED IN THE OPEN POSITION OR THE POPPET
OTHERWISE RESTRAINED (LOAD ONLY). PERSONAL INJURIES MAY RESULT IF
THIS PRECAUTION IS NOT TAKEN.
ATTENTION! WHERE POLISHING IS INDICATED, USE NOT LESS THAN 600 GRIT POLISHING
CLOTHS.
Inspect nose ring (2) for scratches on sealing surface. If there are any scratches on the sealing
surface, the nose ring (2) should be replaced to avoid valve leakage. Faces without hard coating
should be polished around the bore and only in circumferential direction.
Poppet (9) should be inspected for scoring or raised metal on the stem. Any raised metal on the
poppet stem should be removed with a fine flat file and polished in axial direction.
Inspect poppet bearing (10) for intrusion of any foreign material on the inside diameter. Any foreign
material on the inside diameter should be carefully removed with a sharp tool and polished.
On completion of poppet (9) and poppet bearing (10) inspection, test the bearing (10) on the poppet (9)
without the spring (27) to make sure that the bearing (10) smoothly slides along the poppet (9) stem. If
this is not the case, the bearing should be replaced.
Test rotation of the poppet roller (13) around the pin (20). If the rotation is difficult, the roller bearing
should be replaced. To access the roller bearing, support the poppet (9) and release the pin (20) using
a ¼” pin punch.
Check the handle (8) for free and easy movement of the opening and closing cycle. Operation of the
handle (8) normally requires limited effort. If operating the handle (8) involves stronger force, it implies
the need to clean and possibly replace the shaft bearing (6) and the shaft (3).
Poppet o’ring (16) and main o’ring (17) should be inspected for cracks, scratches, missing material,
unusual hardness, softness, roughness, and other signs of chemical damage. Do not remove poppet
o’ring from the poppet at this stage.
At this point it may be decided to replace the main o’ring (17) and reassemble the valve if the first part
of the inspection did not reveal any damage or malfunction of the parts, or to continue with Part II of
disassembly and replace all the o’rings if there are any additional concerns regarding the performance
of the valve. Steps 5 through 8 of the Assembly section describe how to assemble the valve from this
point.
DISASSEMBLY – PART II
To remove two roll pins (19), turn the handle until the pin is accessible and drive out each pin in turn
using ¼” pin punch. If this is done with the valve attached to the tank, take precautions to ensure that
the pins (19) do not enter upstream piping. To remove the cam arm roll pin (19), ensure that the
handle is rotated to a position such that the roll pin will be clear of the deflector cone (valve body) as it
is driven out. If the roll pin appears not to drive further than approximately ¼”, check for contact
between the roll pin and deflector cone and slightly adjust the rotation of the handle to allow sufficient
clearance.
Take out handle (8) with shaft assembly, shaft spacer (5) and cam (11).
5 090085 Rev 23
Page 6

Remove shaft bearing (6), o’ring (18), back-up ring (33) and u-cup (34) from the pipe end (1) stuffing
box.
Examine stuffing box area of the pipe end (1) for corrosion and, if required, polish in circumferential
direction.
To disassemble handle from shaft assembly, remove cotter pin (28), washer (27), handle pin (4),
washer (31), spring (28), washer (32), and o’ring (29).
Polish sealing surfaces of the shaft (3) in a circumferential direction. Remove any burrs that might
have occurred during pin punching.
Carefully remove poppet o’ring (16) without damaging the sealing surface of the poppet (9). Even the
smallest scratches on the o’ring groove will cause leakage.
CLEANING, INSPECTION AND REPLACEMENT OF DISSASEMBLED PARTS
Clean well and visually examine all the parts of the API. Remove any burrs and sharp edges that could
damage the seals during reassembly. Replace any damaged parts.
ASSEMBLY
1. Before assembly, apply lubricant to the inside diameter of the pipe end stuffing box (1), to the u-cup
(34), back-up ring (33), o’ring (18), and shaft bearing (6). Insert u-cup (34) followed by back-up ring
(33), o’ring (18), and shaft bearing (6) inside pipe end stuffing box (1).
2. Lubricate shaft (3) and install it through the bearing (6) into the body (1) driving it through the shaft
spacer (5) and the cam (11). Insert pins (19) into the shaft holes.
3. Lubricate o’ring (29) and install it on the shaft (3). Continue installing washer (32), spring (28),
washer (31), and handle (8). Insert handle pin (4). Position handle with detent end away from the
stop pin and then install washer (25) and cotter pin (26).
4. Liberally lubricate poppet o’ring (16) and install it on the poppet (9) preventing torsion of the o’ring
during assembly as it may cause leakage. It is recommended to press on the full edge of the o’ring
(16) until it snaps around the poppet (9), and then push it into the o’ring groove from opposite sides.
5. Install spring (27) and poppet (9) into the pipe end (1). Lead the cam (11) over poppet roller (13)
and latch the handle (8) in the open position.
6. With lock washers (30) installed on each of the eight screws (23), apply ‘never-seize’ on the screw
threads.
7. Liberally grease o’ring (17) and install it on the nose ring (2). Use the radial line drawn in the step 1
of disassembly and starting from the initial alignment, rotate the nose ring (2) one bolt hole
clockwise. Bolt screws with washers and ‘anti-seize’ applied to the screw threads. Tighten using a
criss-cross flange torquing sequence.
8. To ensure proper operation of the valve, repeat the steps of the Semi-annual inspection.
6 090085 Rev 23
Page 7

FLUID LEVEL INDICATOR
If no liquid is visible, fluid
level in valve is below level
of adapter outlet.
Fluid level in the valve
is above adapter
outlet.
7 090085 Rev 23
Page 8

Valve closed
Valve semi-open
Valve fully open
HANDLE OPERATING POSITIONS
DIXON BAYCO WARRANTY:
For Warranty Information, please refer to the inside back cover of the latest Dixon
Catalogue.
8 090085 Rev 23
Page 9

1
Entretien & Mode d’emploi
pour
VALVES A.P.I 5204 BAYCO
Numéro des pièces
E-U:
Dixon Bayco USA
Chestertown, Maryland
Téléphone: 410-778-2000
Fax: 410-778-4702
Sans frais: 800-355-1991
E-mail: dixonbayco@dixonvalve.com
www.dixonbayco.com
Canada:
Dixon Group Canada Limited
Innisfil (Barrie), Ontario
Téléphone: 705-436-1125
Fax: 705-436-6251
Sans frais: 877-963-4966
E-mail: isales@dixongroupcanada.com
www.dixongroupcanada.com
Mexique:
Dixva, S. de R.L. de C.V.
Monterrey, N.L
Téléphone: 01-800-00-DIXON (34966)
Fax: 01-81-8354-8197
E-mail: contactenos@dixonvalve.com.mx
www.dixonvalve.com
Europe:
Dixon Group Europe Ltd
Preston, England
Téléphone: +44 (0)1772 323529
Fax: +44 (0)1772 314664
E-mail: enquiries@dixoneurope.co.uk
www.dixoneurope.co.uk
Asie et Pacifique:
Dixon (Asia Pacific) Pty Ltd
Wingfield, South Australia
Phone: +61 8 8202 6000
Fax: +61 8 8202 6099
E-mail: enquiries@dixonvalve.com.au
www.dixonvalve.com.au
Pour vente & service contactez
5204L ........................ Modèle de chargement (load only), avec vitre transparente
5204LNG................... Modèle de chargement (load only), sans vitre transparente
5204LNGV ................ Modèle de charg. (load only),sans vitre transp. joint torique du clapet pour B100
Modèles de chargement/
déchargement
”Load/ Unload”
Modèle de chargement
”Load only”
5204 ....................... manche fixe avec vitre transparente
5204C .................... manche détachable avec vitre transparente
5204NG ................. manche fixe sans vitre transparente
5204NGC .............. manche détachable sans vitre transparente
5204T .................... manche fixe avec vitre transparente, sceau de PTFE, ressort d’acier inoxydable
5204TC .................. manche détachable avec vitre transparente, sceau de PTFE, ressort d’acier inox.
5204NGT............... manche fixe sans vitre transparente, sceau de PTFE, ressort d’acier inox.
5204NGTC ............ manche détachable sans vitre transparente, sceau de PTFE, ressort d’acier inox.
5204B .................... manche fixe avec vitre transparente, anneau du nez de Bayloy
5204BC ................. manche détachable avec vitre transparente, anneau du nez de Bayloy
5204BNG .............. manche fixe sans vitre transparente, anneau du nez de Bayloy
5204BNGC ............ manche détachable sans vitre transparente, anneau du nez de Bayloy
5204SNG……… …manche fixe sans vitre transparente, ressort principal d’acier inoxydable
5204NGV…………manche fixe sans vitre transparente, joint torique du clapet pour B100
5204NGCV ........... manche détachable sans vitre transparente, joint torique du clapet pour B100
5204BNGV ......... manche fixe sans vitre transparente, anneau du nez de Bayloy, joint
torique du clapet pour B100
5204BNGCV ...... manche détachable sans vitre transparente, anneau du nez de Bayloy, joint
torique du clapet pour B100
5204SNGV …… …manche fixe sans vitre transparente, ressort d’acier inox. Joint torique de clapet
pour B100
5204P .................... manche fixé avec vitre transparente avec bouchon
090085(fr) Rev 23
Page 10

IMAGE
PIÈCE
QTÉ.
DESCRIPTION
PARTIE.
TROUSSES DE REPARATIONS
5204K1
5204K2
5204K3
5204K4
5204K5
5204K6
5204K7
5204K8
5204K9
5204K11
5204K12
5204KV1
5204KV2
1
1
1
Corps – entrée du tuyau
Corps avec vitre transparente
341614
Corps sans vitre transparente
341634
Corps avec modèle de chargement
(load only) et vitre transparente
341649
Corps avec modèle de chargement
(load only) sans vitre transparente
341650
2 1 Anneau du nez
* O
3
1
Arbre
390812
4 1
Goupille du manche
* O
5 1 Entretoise de l’arbre
390813
6 1
Roulement de l’arbre
* O O 7 1 Goupille d’arrêt
390814
8 1
Manche
* O
9 1 Sous-ensemble du clapet
341617
Sous-ensemble du clapet- modèle
De chargement (load only)
341651
Sous-ensemble avec PTFE
400624
10 1 -Roulement du clapet
* O
O
11
1
Came
111550
12 1 Vitre transparente
* O
13 1 -Rouleau du clapet
* O O 14 1 -Rouleau de roulement du clapet
* O O 15 1 Anneau de retenu
111560
16 1 -Joint torique
* O O O O
O
17
1
Joint torique
111554
O O O O O
18 1 Joint torique
* O O
O
19 2 Goupille cylindrique
111567
20 1 -Goupille
111566
21 1 Graisseur
111561
22 6 Vis
111570
O
23
8
Vis
* O O O 24 1 Joint torique
* O O O
O
25 5 Rondelle
* O
O (2) O
26 1 Goupille
* O 27A 1 Ressort principal
111564
27B 1 Ressort principal-acier inoxydable (pour 5204SNG)
111542
28
1
Ressort du manche
* O 29 1 Joint torique
* O
O
30
14
Rondelle de verrouillage
111569
O O O O
31 1 Rondelle
* O O O 32 1 Rondelle
111574
33 1 Anneau supplémentaire
111579
34
1
U-Cup
* O O 36
1
Flotteur
* O
2 37
1
Manche détachable
* O 38
1
Support
* O
39 1 Axe de chape
* O 40 1 Rondelle plate
* O 41 1 Goupille
* O 42 1 Ressort de torsion
* O 43 1 Goupille
* O
3 44 1 Anneau du nez fileté
* O
45
1
Bague d’usure
* O
4
46
1
Trousse d’enlèvement pour vitre transparente –
Plaque vide
* O
47
1
Trousse d’enlèvement pour vitre transparente-
Joint d’étanchéité
* O
*Utilisent une trousse de réparation appropriée O: OUI
Trousse de réparation 5204K1: Joint torique du clapet
Trousse de réparation 5204K2: Trousse complète de reconstruction; Tous les joints torique et les roulements
Trousse de réparation 5204K3: Anneau du nez anodisé avec vis
Trousse de réparation 5204K4: Anneau du nez de Bayloy avec vis
Trousse de réparation 5204K5: Assemblée de manche détachable
Trousse de réparation 5204K6: Sceau de PTFE encapsulé
Trousse de réparation 5204K7: Trousse de réparation pour manche fixe
Trousse de réparation 5204K8: Trousse de réparation pour vitre transparente
Trousse de réparation 5204K9: Trousse d’enlèvement pour vitre transparente
Trousse de réparation 5204K11: Trousse de quincaillerie pour l’anneau du nez
Trousse de réparation 5204K12: Trousse de quincaillerie pour la vitre transparente
Trousse de réparation 5204KV1: Trousse de reconstruction pour joint torique du clapet pour B100
Trousse de réparation 5204KV2: Trousse complète de reconstruction; (incluant joint torique du clapet et les roulements pour B100)
2 090085(fr) Rev 23
Page 11

* Version avec manche fixé
Image 2
Manche détachable
Image 3
Anneau du nez fileté
Image 4
Trousse
d’enlèvement de la
vitre transparente
3 090085(fr) Rev 23
Page 12

Ces instructions et ces recommandations sont fournies pour assurer un bon fonctionnement et un long
service du 5204 API Bayco. Les parties sont identifiées par des numéros de pièces sur le dessin
d’assemblement et la liste des pièces.
ENTRETIEN ET REMPLACEMENT DES PIÈCES POUR LES 5204 API BAYCO
Les instructions suivantes couvrent les deux modèles : valve à modèle chargement/déchargement
(load/unload) API et valve à modèle de chargement (load only) API. Pour la version de chargement ne
porter pas attention aux pièces en italiques.
I. INSPECTION SEMI-ANNUELLE
1. Une inspection visuelle de fonctionnement de la valve d’opération est possible lorsque la valve est
installée sur le réservoir. Toutes les mesures de sécurités qui sont en place pour l’usage de la valve
doivent être appliquées et tous les conduits doivent être vidés.
Inspectez visuellement le 5204 API pour l’usure ou des pièces endommagées ou n’importe quelle
condition qui pourrait affecter le fonctionnement de la valve.
Inspectez visuellement l’anneau du nez (2) des cavités, des égratignures ou n’importe quelle
déformation de la surface d’étanchéité.
Inspectez visuellement l’arbre (3) pour l’accumulation de saleté qui pourrait causer à l’étanchéité
de l’arbre d’avoir une fuite.
Vérifiez que le manche (8) de la valve (1) soit positionné automatiquement à un angle où l’entaille
sera dans le sens opposé de la goupille d’arrêt (7).
Inspectez visuellement la goupille d’arrêt (7) pour des signes d’usures ou de déformations. Lorsque
le manche est en position ouverte, il devrait rester accroché à la goupille d’arrêt (7). Si le manche
ne peut pas rester sécurisé au loquet de façon sécuritaire dû à l’usure de la goupille de d’arrêt (7),
la goupille devrait être remplacée. Vous pouvez utilisez des pinces-étaux pour dévisser la goupille
d’arrêt (7).
2. Vérifiez la performance du manche, ouvrez et fermez la valve API une couple de fois. Le manche
devrait bouger sans obstruction et facilement.
3. Lorsque le manche est relâché (ouvert) de la goupille d’arrêt, le clapet (9) devrait se centrer et se
fermer immédiatement.
4. Pour ne pas endommager le clapet (9), appuyez sur le clapet (9) (en utilisant un morceau de bois)
sans utiliser le manche. Pressez le clapet sur le coté en vous assurant qu’il se rassoit et se recentre
lorsqu’il est fermé.
Si l’un des points ci-dessus échoue, un entretien supplémentaire sera nécessaire.
4 090085(fr) Rev 23
Page 13

II. INSPECTION ANNUELLE ET ENTRETIEN
La soupape 5204 API peut être désassemblée et les étanchéités peuvent être remplacées lorsque la
valve est attachée au pétrolier.
Il est recommandé que vous traciez une ligne (avec un marqueur) à travers le joint entre le tuyau (1) et
l’anneau du nez (2). La ligne est utilisée pour tourner la position de l’anneau du nez de sa position
initiale, ceci aide à balancer l’usure de la surface de la valve.
DÉMONTAGE – ÉTAPE 1
ATTENTION! LE CLAPET EST RETENU PAR UNE TENSION DE RESSORT CONSIDERABLE.
AVANT QUE L’ANNEAU DU NEZ (2) OU LE CLAPET (9) SOIENT RETIRÉS OU
RÉSASSEMBLÉS, EN UTILISANT LE MANCHE, LA VALVE DOIT ÊTRE EN
POSITION OUVERTE ET LE MODÈLE SANS MANCHE DOIT AVOIR LE CLAPET
OUVERT. UN ACCIDENT POURRAIT EN RESULTER SI VOUS NE PRENEZ PAS
LES PRÉCAUTIONS NÉCESSAIRES.
ATTENTION! N’UTILISER PAS UN CHIFFON À MOINS DE 600 GRAINS LORS DU POLISSAGE.
Inspectez l’anneau du nez (2) pour des égratignures sur la surface d’étanchéité. S’il y a des
égratignures sur la surface d’étanchéité l’anneau du nez (2) devrait être remplacé pour éviter des
fuites. La surface sans revêtement devrait être polie autour de l’alésage dans une direction
circonférentielle.
Le clapet (9) devrait être inspecté pour des signes d’usures et des dommages à la tige. Toutes
accumulations de métal sur la tige devraient être limé et polie dans la même direction que l’axe.
Inspectez le roulement (10) du clapet pour l’intrusion de matériaux étranger à intérieure du diamètre.
Tout matériel à l’intérieure du diamètre devrait être retiré soigneusement avec un objet pointu et polie.
Lorsque l’inspection du clapet (9) et du roulement du clapet (10) sont complet, testez le roulement du
clapet (10) sans ressort (27) pour vous assurez que le roulement (10) glisse facilement au long de la
tige du clapet (9). Si ce n’est pas le cas le roulement devrait être remplacé.
Testez le rouleau du clapet (13) autour de la goupille (20). Si la rotation est difficile, le rouleau du
clapet devrait être remplacé. Pour avoir accès au rouleau du clapet, supportez le clapet et retirez la
goupille (20) en utilisant un poinçon de ¼”.
Vérifiez le manche (8) pour un mouvement libre et facile durant l’ouverture et la fermeture. L’opération
normale du manche (8) demande un effort limité. Si le fonctionnement du manche (8) demande plus de
force, cela indique le besoin de nettoyer ou possiblement de remplacer le roulement de l’arbre (6) ou
l’arbre (3).
Le joint torique du clapet (16) et le joint torique principal (17) devraient être inspectés pour des
craques, des égratignures, pièces manquantes, la dureté inhabituelle, la mollesse, rugosité et d’autres
dommages causés par des produits chimiques. Ne retirez pas le joint torique du clapet à cette étape.
A ce stade vous pouvez décider de remplacer le joint torique principal (17) et réassembler la valve si la
première partie de l’inspection ne révèle aucun dommage ou un mauvais fonctionnent des pièces ou
de continuer avec la deuxième partie du démontage et remplacez tout les joints toriques s’il y a des
concernes additionnels regardant la performance de la valve. Les étapes de 5 à 8 de la section
d’assemblement décrivent comment assembler la valve à partir de ce point.
5 090085(fr) Rev 23
Page 14

DÉMONTAGE – ÉTAPE II
Pour retirez les deux goupilles cylindriques (19), tournez le manche jusqu’à ce que la goupille soit
accessible et retirez les goupilles en utilisant un poinçon de ¼”. Si vous faites ceci avec la valve
attaché au pétrolier, prenez les mesures nécessaires pour que les goupilles (19) n’entrent pas dans la
tuyauterie. Pour retirer la goupille cylindrique (19) du bras de la came, assurez-vous que le manche
soit tourné en position pour que la goupille cylindrique ne soit pas obstruer par le cône déflecteur
(corps de la valve) en la retirant. Si la goupille cylindrique ne sort pas plus que ¼”, vérifiez s’il y a un
contact entre la goupille cylindrique et le cône déflecteur et ajuster la rotation légèrement pour
permettre un dégagement suffisant.
Retirez le manche (8) avec l’assemblé de l’arbre, entretoise d’arbre (5) et la came (11).
Retirez le roulement de l’arbre (6), joint torique (18), l’anneau supplémentaire et capsule en U (34) du
bout du tuyau (1) du presse-étoupe.
Examinez le presse-étoupe au bout du tuyau (1) pour de la corrosion et polissez si nécessaire dans
une direction circonférentielle.
Pour démonter le manche de l’assemblé de l’arbre, enlevez la goupille (26), rondelle (27), goupille du
manche (4), rondelles (31), ressort (28), rondelle (32) et joint torique (29).
Polissez la surface d’étanchéité de l’arbre (3) dans une direction circonférentielle. Retirez toutes les
bavures qu’il aurait pu avoir durant le poinçonnage de la goupille.
Délicatement retirez le joint torique du clapet (16) sans endommager la surface d’étanchéité du clapet
(9). Même la plus petite égratignure de la rainure du joint torique peut causer une fuite.
NETTOYAGE, INSPECTION ET REMPLACEMENT DES PARTIES DÉMONTÉS
Nettoyez bien et examinez visuellement toutes les parties de la valve API. Retirez toutes les bavures et
les bordures aiguisées qui pourraient endommager les joints d’étanchéités durant le réassemblage.
Remplacez toutes les pièces endommagées.
ASSEMBLAGE
1. Avant l’assemblage, lubrifiez le diamètre intérieur du presse-étoupe (1), la capsule en U (34),
l’anneau de réserve (33), joint torique (18) et le roulement de l’arbre (6). Insérez le capsule en U
(34) suivit par l’anneau de réserve (33), joint torique (18) et l’arbre de roulement (6) à l’intérieure du
presse-étoupe(1).
2. Lubrifiez l’arbre (3) et installez-le à travers le roulement (6) à l’intérieur du corps (1) à travers
l’entretoise (5) et la came (11). Insérez les goupilles (19) dans les trous de l’arbre.
3. Lubrifiez le joint torique (29) et installez-le sur l’arbre (3). Continuez à installer la rondelle (32),
ressort (28), rondelle (31) et le manche (8). Insérez la goupille du manche (4). Positionnez la
manche avec l’embouchure dans la direction opposée de la goupille d’arrêt et ensuite installer la
rondelle (25) et le goupille (26).
4. Lubrifiez le joint torique du clapet (16) et installez-le sur le clapet (9) en évitant la torsion du joint
torique durant l’assemblage car une fuite pourrait en résulter. Il est recommandé que vous
appuyez complètement sur le joint torique (16) jusqu’à ce qu’il soit en place autour du clapet (9),
ensuite appuyez sur l’autre coté de la rainure du clapet.
6 090085(fr) Rev 23
Page 15

5. Installez le ressort (27) et le clapet (9) au bout du tuyau (1). Mettez la came (11) sur le rouleau du
clapet (13) et sécurisez le manche (8) dans la position ouverte.
6. Avec une rondelle de verrouillage (30) installé sur chacune des huit vis (23), appliquez un lubrifiant
anti-grippant sur les vis.
7. Lubrifiez le joint torique (17) et installez-le sur l’anneau du nez (2). Servez-vous de la ligne que vous
avez tracez à la première étape du démontage et en commençant par l’alignement initial, tournez
l’anneau du nez (2) d’un trou de boulon au sens des aiguilles d’une montre. Appliquez du lubrifiant
anti-grippant aux boulons et aux rondelles. Serrez les boulons de la bride de façon sillonnée.
8. Pour assurer un bon fonctionnement de la valve, répétez les étapes de l’inspection semi- annuelle
Indicateur du niveau de fluide
S’il n’y a pas de liquide
visible, le niveau du
fluide dans la valve est
inférieur au niveau dans
la sortie pour
Le niveau de fluide dans
la valve est au-dessus
du niveau à sortie pour
l'adaptateur.
l’adaptateur.
7 090085(fr) Rev 23
Page 16

Valve fermée
Valve semi-ouverte
Valve complètement
ouverte
POSITIONS DE FONCTIONNEMENT POUR LE MANCHE
GARANTIE DIXON:
Pour plus d’informations complètes sur la garantie, s’il vous plait se référer à la
couverture intérieure de la dernière page du dernier catalogue Dixon.
8 090085(fr) Rev 23
 Loading...