

Page 1

Quick Start Guide
SR400ac
This Quick Start Guide shows
you how to set up and start using
your new gateway.
Page 2
3
2 2
1
4
21
Installation
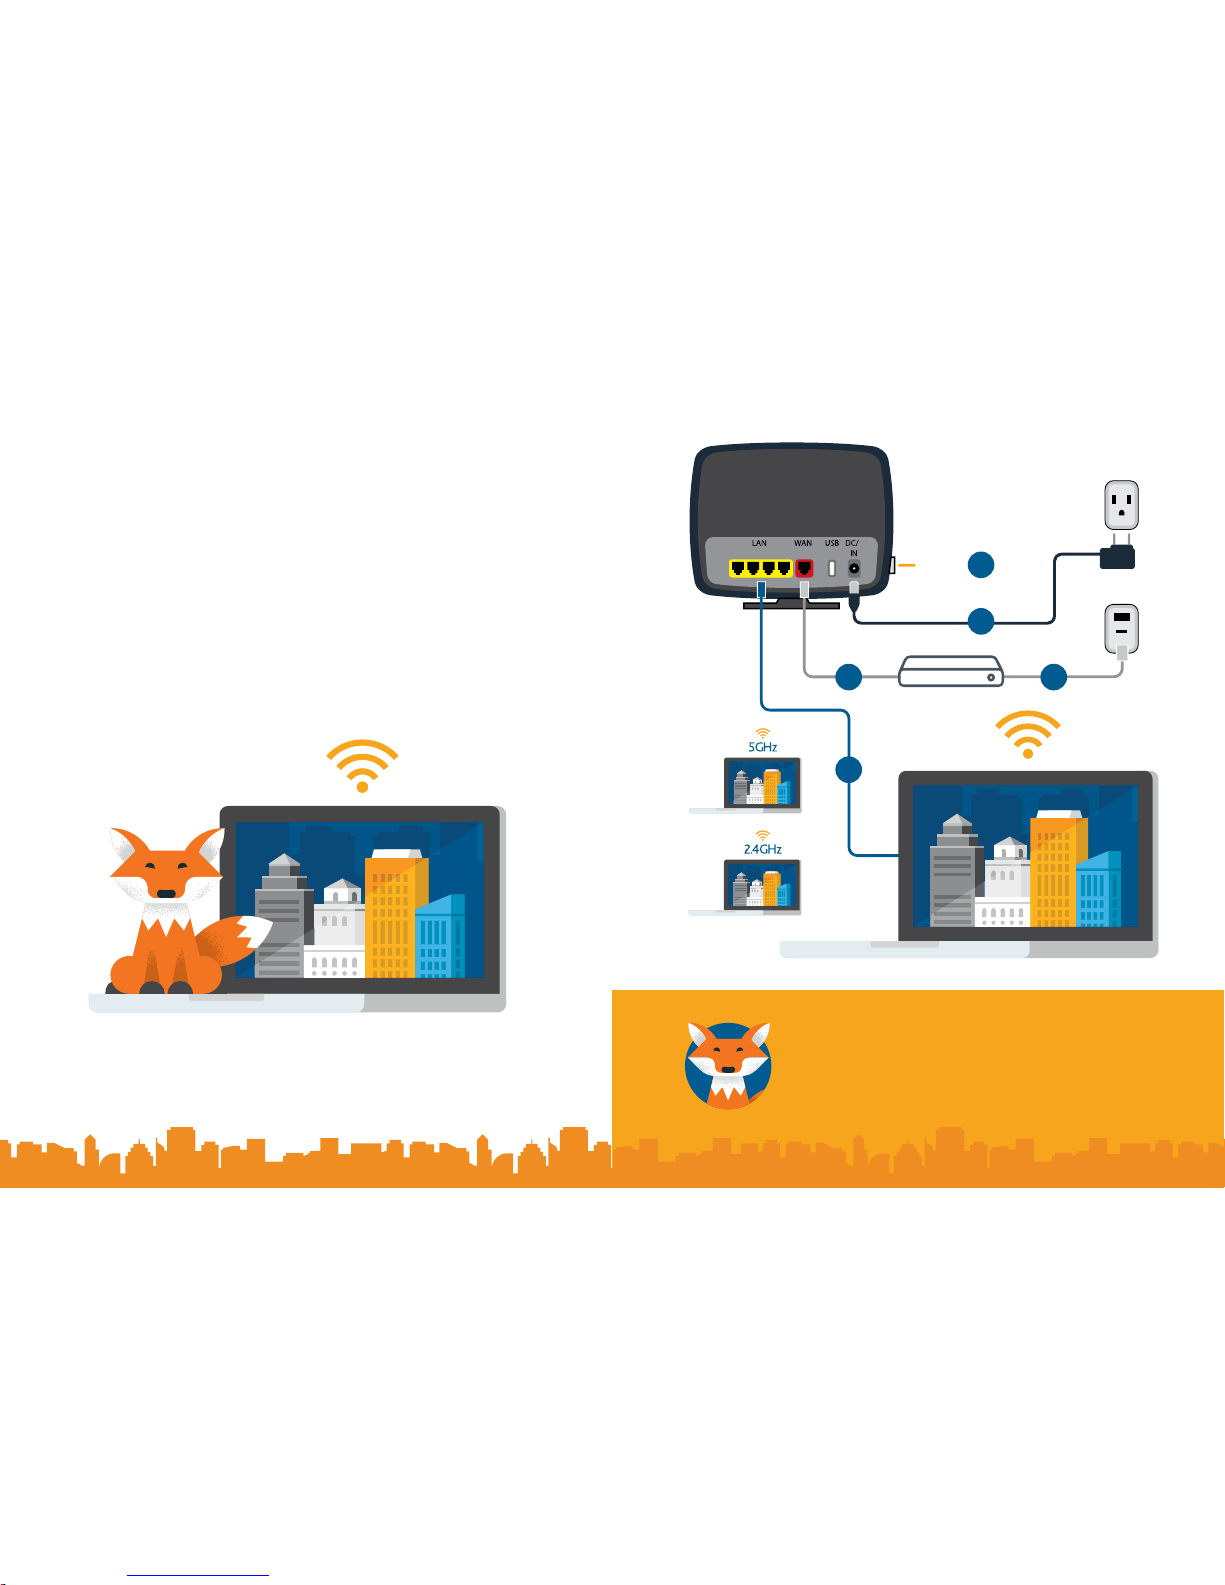
1. Plug the power adapter to the wall outlet and then connect the other end of it to the
Power port of the gateway.
2. To connect the modem:
• Connect one end of an Ethernet cable to the WAN port on the SmartRG gateway
and connect the other end of the cable to the modem.
• Connect one end of the cable supplied by Distributel to the modem and connect
the other end of the cable to the wall jack installed by Distributel.
3. Connect a LAN port on the SmartRG gateway to the network card of your PC using an
Ethernet cable.
4. Turn on the unit by pressing the Power button on the side of the gateway.
Your gateway is now automatically being set up to connect to the
Internet. This process may take a few minutes to complete before you
can begin using your Internet applications (browser, email, etc.).
If you are unable to connect to the Internet, confirm that all cable
connections are in place and the gateway’s power is turned on.
On/Off
Page 3
43
Quick Gateway Configuration
Logging in to your gateway
To change the settings on your gateway, you must log into the gateway’s interface. Make sure
that you have completed the steps in “Installation” before you begin.
1. Open your internet browser application and type 192.168.1.1 into the address line.
The Please sign in dialog box appears.
2. Enter the credentials shown below and click Sign in. Distributel may use other
settings. If so, contact your provider for details.
User Name: admin Password: admin
Configuring the WAN manually
If the automatic connect process is unsuccessful, refer to the “WAN Configuration” section of
the SmartRG SR400AC Gateway User Manual to manually establish a connection.
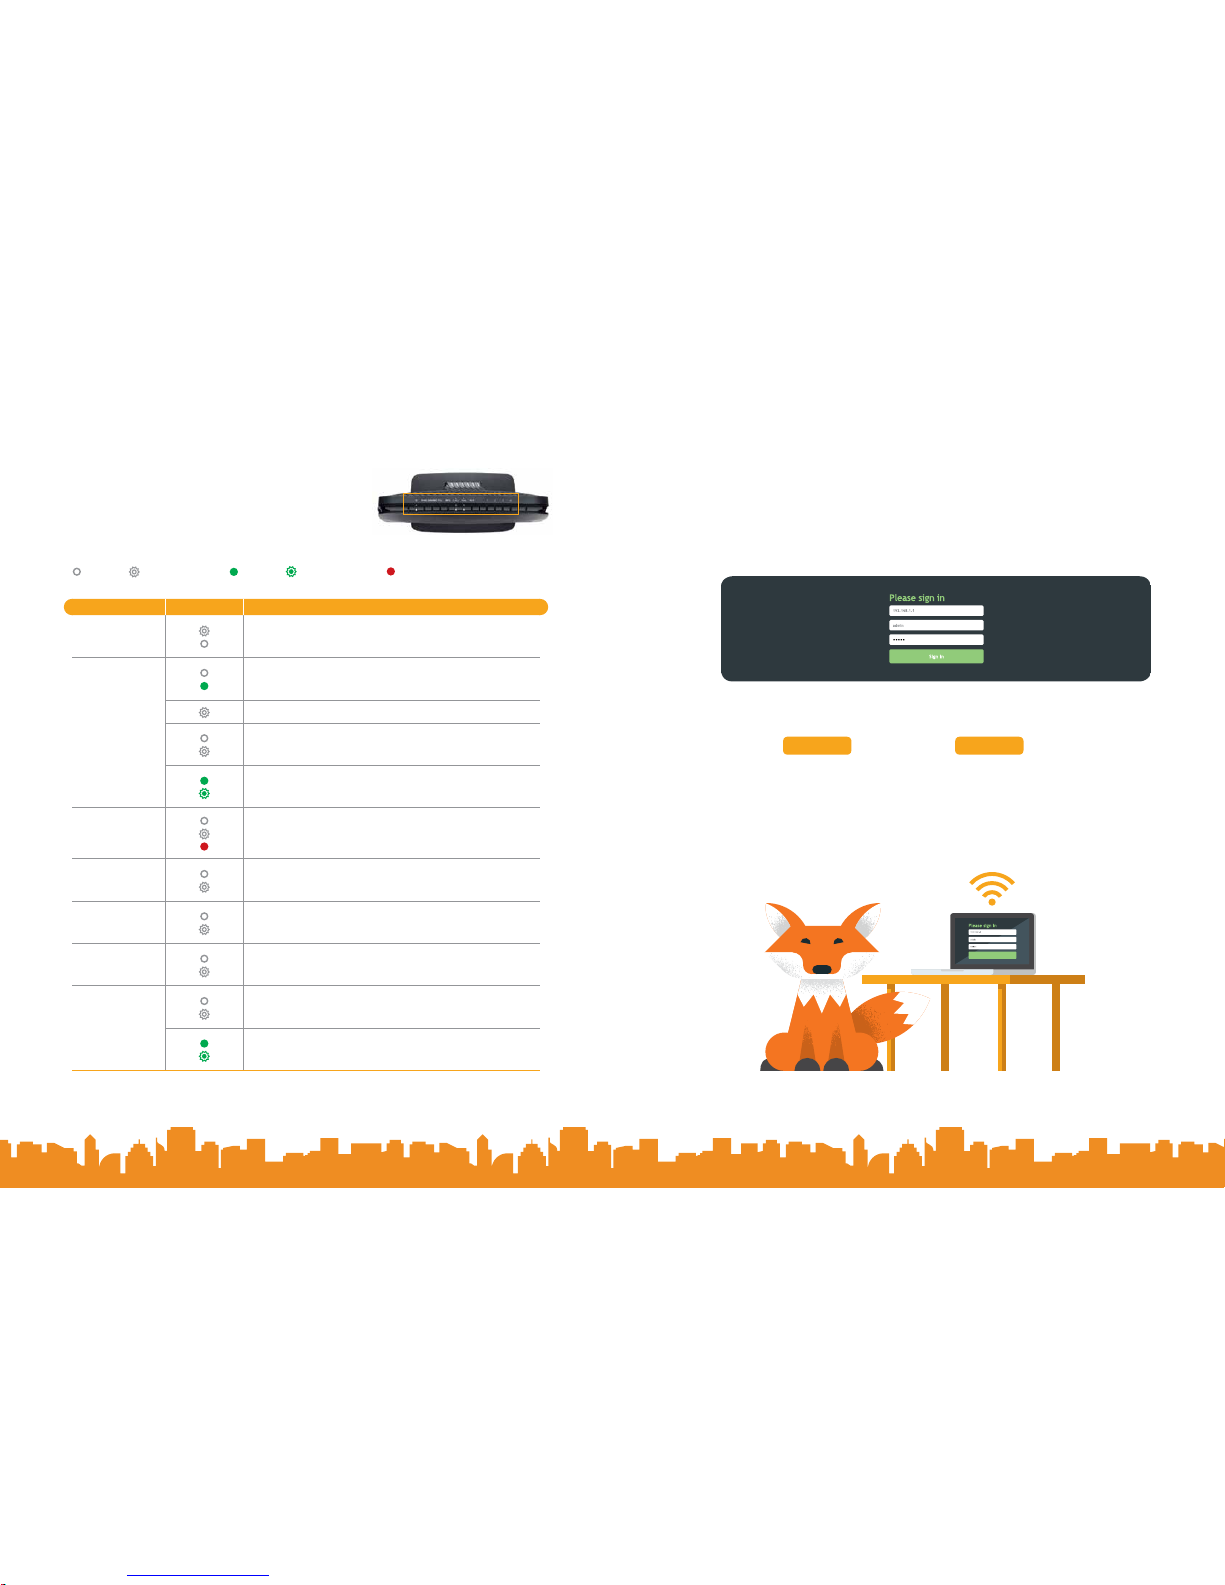
LED Indicators
The LEDs on the top of the SR400ac can assist you
in better understanding the current state of your gateway.
LEGEND
White White blinking Green Green blinking Red
LED Action Explanation
POWER
Device in CFE mode
Device powered on and ready for use
WAN
Device online (at 1000 BASE-T)
Device online (at 10/100 BASE-T)
Network activity
WAN Ethernet connected (at 1000 BASE-T)
Data being transferred (at 1000 BASE-T)
WAN Ethernet connected (at 1000 BASE-T)
Data being transferred (at 1000 BASE-T)
Internet
DSL sync acquired and gateway online
Data being transferred
Internet authentication / connection has failed
USB / USB 3.0
USB device connected
Data being transferred
2.4 GHZ
5 GHZ
WiFi enabled
Data being transferred
LOCKED WiFi
(WPS)
WPS enabled
Data being transferred
LAN 1-4
LAN Ethernet connected (at 1000 BASE-T)
Data being transferred (at 1000 BASE-T)
LAN Ethernet connected (at 10/100BASE-T)
Data being transferred (at 10/100BASE-T)
Page 4
1
3
2
4
65
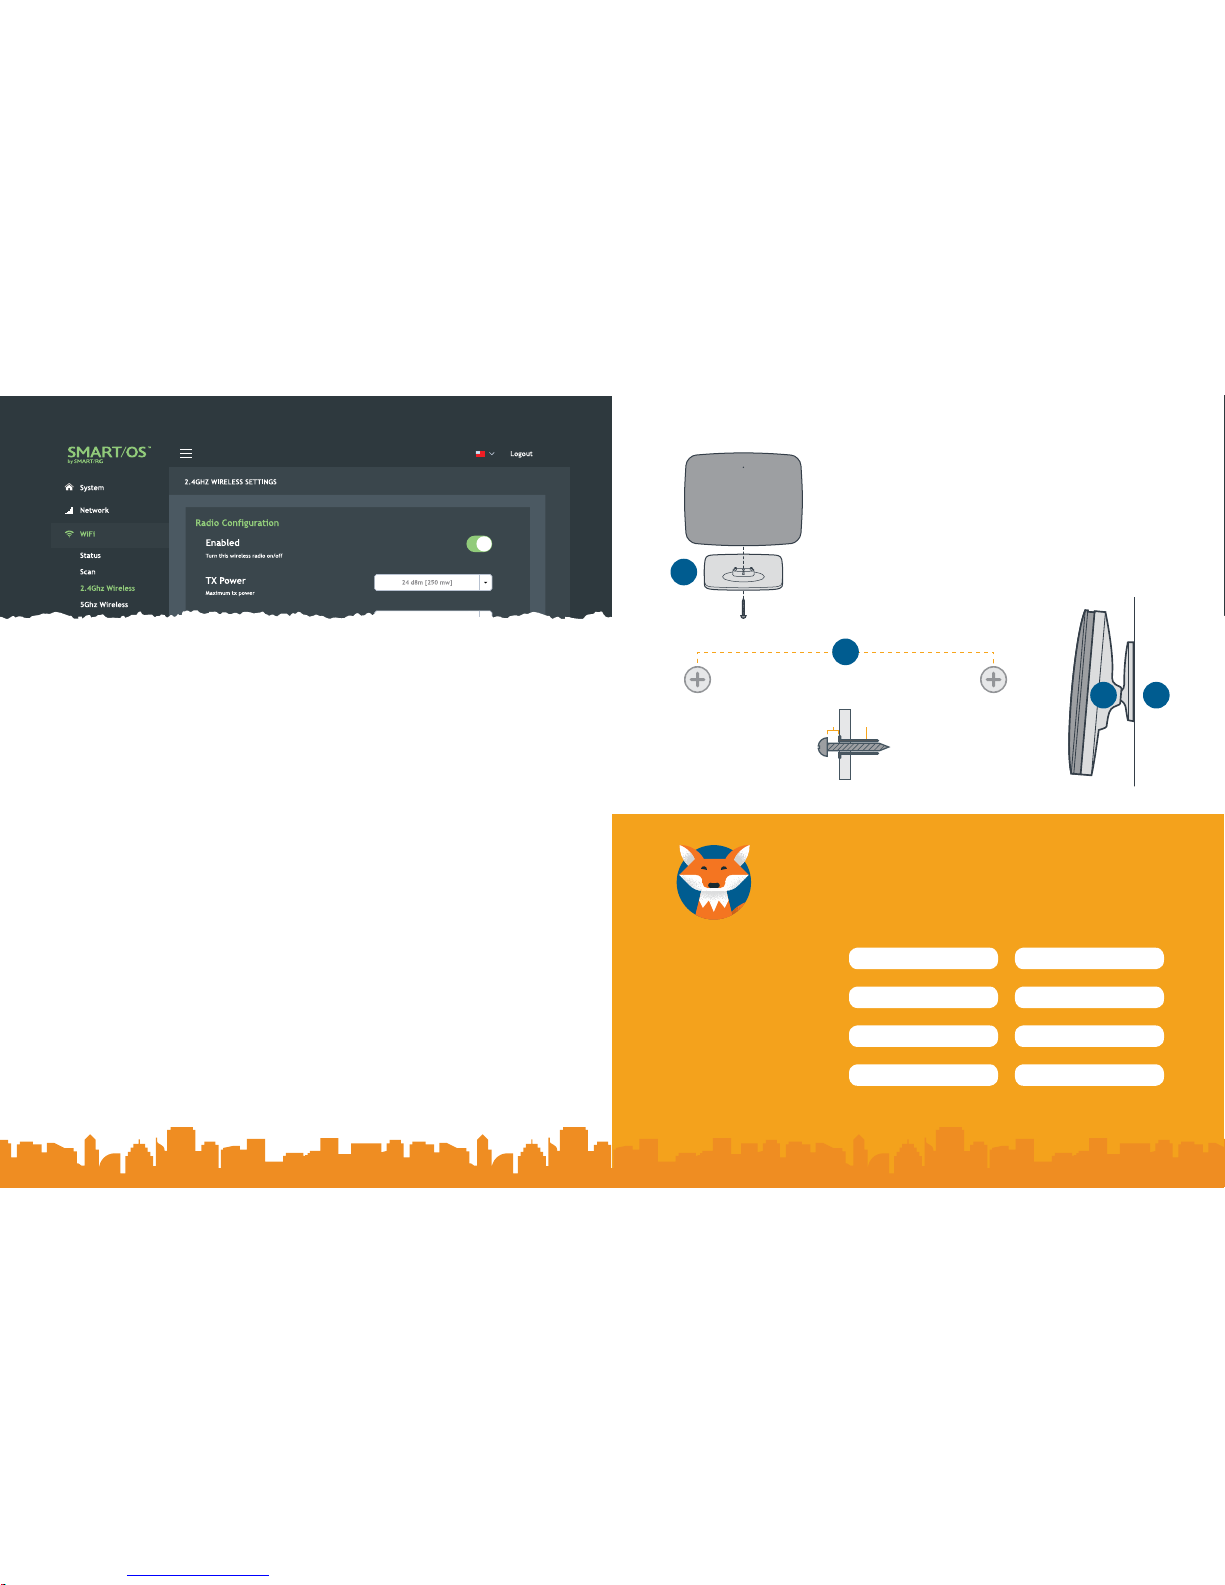
Optional Wall Mount
1. Using a Phillips-head screwdriver, remove the mount from
its present location on the bottom of the gateway.
2. Slide the mount onto the back of the gateway and tighten
the screw located in the bottom of the mount.
3. Using the template below, attach the two included screws
to the wall. Using wall anchors is recommended.
4. Slide the back of the mount down on the screws.
WiFi Setup
1. In the left menu, click WiFi > 2.4Ghz Wireless or 5Ghz Wireless to select the channel that
you want to configure. The fields are the same for both options.
The 2.4Ghz band works for most environments. You can also configure a 5Ghz connection
if needed, following instructions in this guide.
2. Modify the fields in the Radio Configuration section as desired.
3. In the Primary SSID Configuration section:
a. Accept the default ID shown in this field or enter the SSID for the network that you
wish to configure. You will need this ID for Step 6.
b. Select the desired Encryption. Make sure that the host devices you intend to use
support the selected authentication type. The default encryption method works for
most environments.
c. Choose a passphrase and type it in to the Key field. You will need this passphrase for
Step 6.
4. To enable a guest WiFi network:
a. Click Enable in the Guest SSID Configuration section.
b. Fill in the fields as explained in Step 3.
5. Click Apply.
6. Follow the WiFi connection instructions provided with your client device to connect to the
gateway. Use the SSID name you selected in Step 3a. Then enter the passphrase that you
created in Step 3c in the appropriate location on the network setup screen of your WiFi
client device.
4 1/8” (104mm)
1/16” (2-3mm) Wall Anchor
Gateway Front
Primary WiFi network name (SSID)
Primary Network key (password)
Guest WiFi network name (SSID)
Guest Network key (password)
Predefined
wireless settings
If you change the
preset wireless settings
Record Your SR400ac WiFi Settings
Page 5
Contact us
We are here to help,
feel free to contact us
with questions or to
provide feedback.
For additional information, please visit the FAQ section
of our website at www.distributel.ca. To provide feedback,
please submit a customer review via our website or our
Facebook page. For other questions, please call our
Customer Experience team at 1-877-810-2877. You can
also receive Technical Support at the same number, or
send an email to [email protected].
 Loading...