

Page 1
Model 2500 Quick Start
Manual
Document: 3825-0002
Revision: C
© 2017 Distek, Inc. All Rights Reserved
Quick Start
Manual
Page 2
1
Height Adjustment
The apparatus height is set and configured for baskets and paddles
purchased at Distek, and should not have to be changed unless the height is
out of specification.
Always use paddle blades to set the shaft height initially before switching to
baskets.
For better height adjustment reproducibility, it is recommended to keep vessels
in the same position after emptying and washing.
Height AdjustmentModel 2500 Quick Start Manual 2
Follow the procedure below to set the height using paddles or baskets:
Initial Adjustment (Using Paddles)
1 Turn the Easy Drive Lift knob about 1/2 turn following the direction of the "Released"
indicator.
2 Fully raise the drive head and turn the Easy Drive Lift knob following the direction of the
"Lock" indicator, to lock the drive head in place.
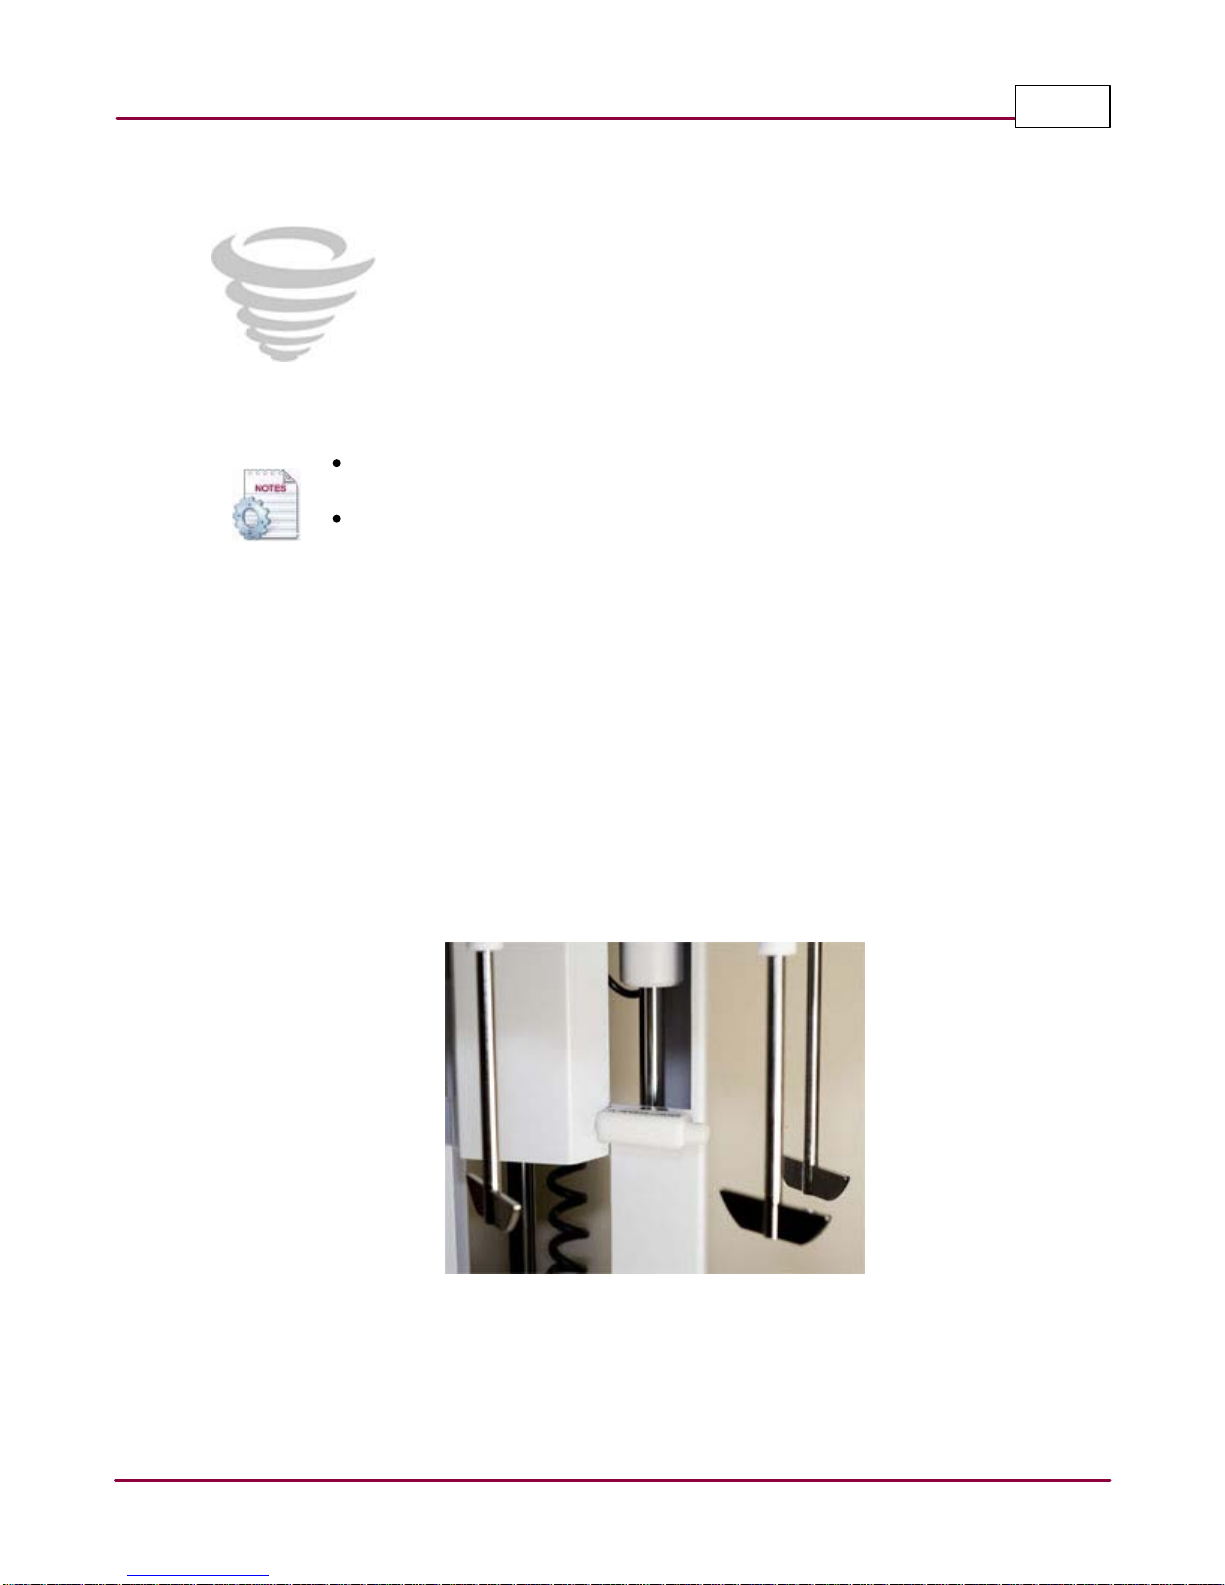
3 Position the height setting to Neutral by positioning the Quick Height Adjustment block to
horizontal position. See figure below for reference.
Height adjustment block in horizontal position
4 Gently slide each shaft halfway up through each spindle. If shafts are hard to to slide, a
very thin film of vacuum grease applied on the top end of the shaft will allow it to slide
smoothly.
© 2017 Distek, Inc. All Rights Reserved
Page 3
Height AdjustmentModel 2500 Quick Start Manual 3
5 Loosely install the locking collar on each shaft.
6 Install and secure (finger tight) the paddle blades.
7 With vessels in place, gently push down each shaft until the paddle blade touches the
bottom of each vessel.
8 Lock each shaft collar using 5/64 inch hex wrench. Do not over-tighten the set screws on
the shaft collars and avoid putting any weight on the drive head when performing this
step.
For Paddles
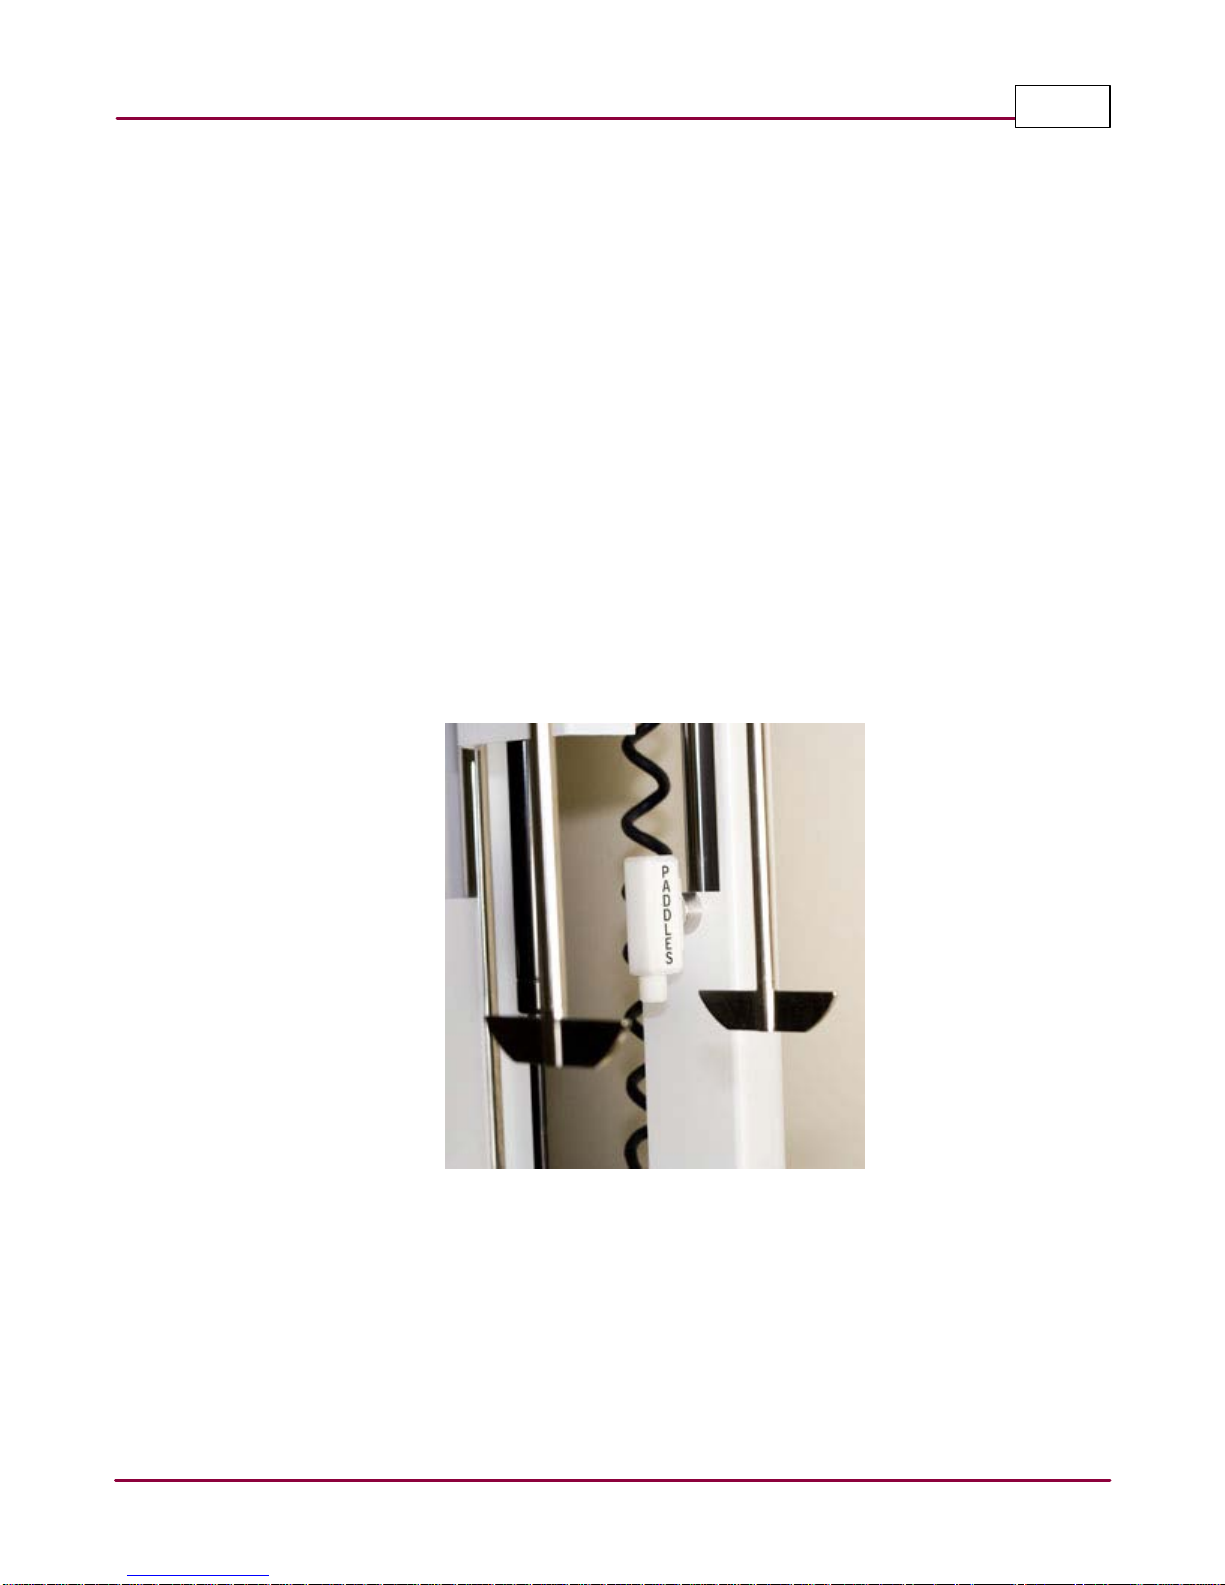
1 With the drive head fully raised, position the Quick Height Adjustment block to USP 2
Paddles.
2 Install and secure (finger tight) the paddle blades.
3 Lower the drive head and turn the knob to lock position. The distance of 25±2 mm
between the blade and the inside bottom of the vessel is set and maintained during the
test.
Height adjustment block position for paddles
© 2017 Distek, Inc. All Rights Reserved
Page 4
Height AdjustmentModel 2500 Quick Start Manual 4
For Baskets
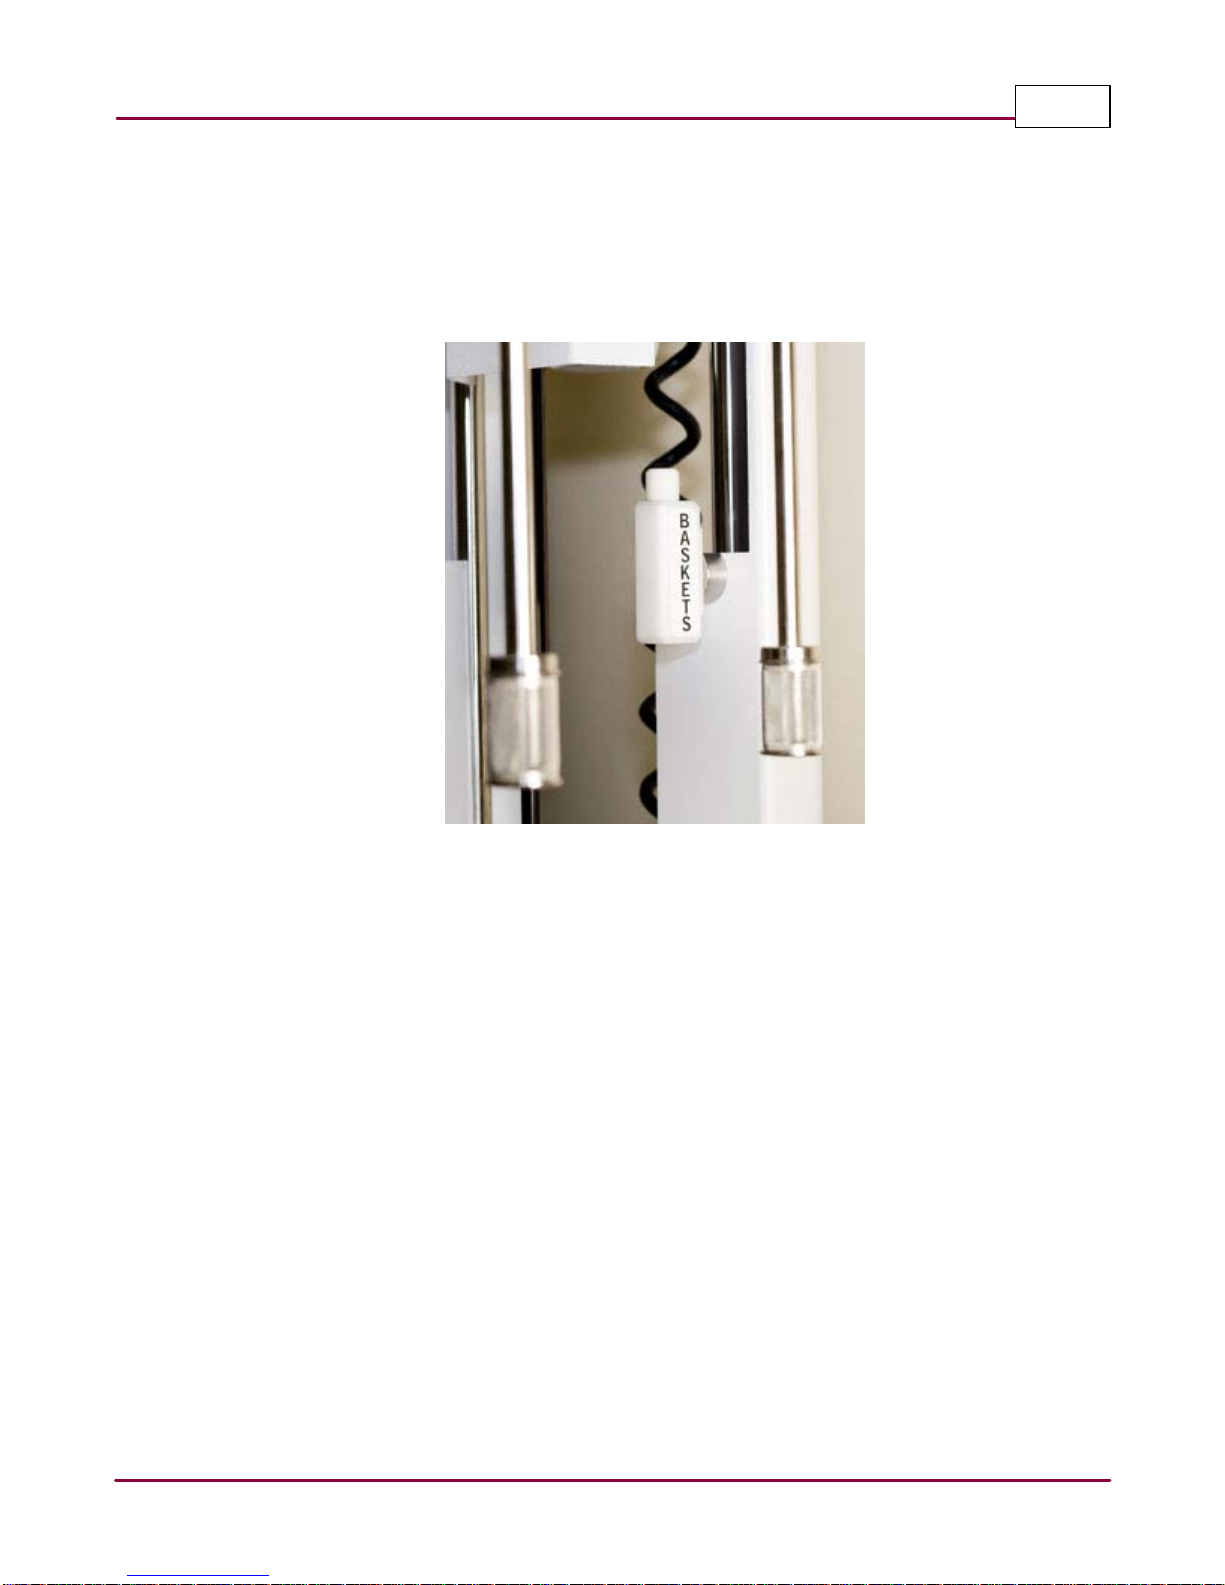
1 With the drive head fully raised, position the Quick Height Adjustment block to USP 1
Baskets.
Height adjustment block position for baskets
2 Install and secure (finger tight) the basket adapter. The baskets must be kept dry prior to
starting the test.
3 Lower the drive head and turn the knob to lock position. The distance of 25±2 mm
between the blade and the inside bottom of the vessel is set and maintained during the
test.
© 2017 Distek, Inc. All Rights Reserved
Page 5
2
Create a New Method
This section describes how to create and save a method for future dissolution
sessions. By simply loading your method, all the setup parameters for a
particular test will be stored in the system. A library of up to 100 methods
facilitates routine dissolution tests.
Create New MethodModel 2500 Quick Start Manual 5
This section describes how to create and save a method for future dissolution sessions. By simply
loading your method, all the setup parameters for a particular test will be stored in the system. A
library of up to 100 methods facilitates routine dissolution tests.
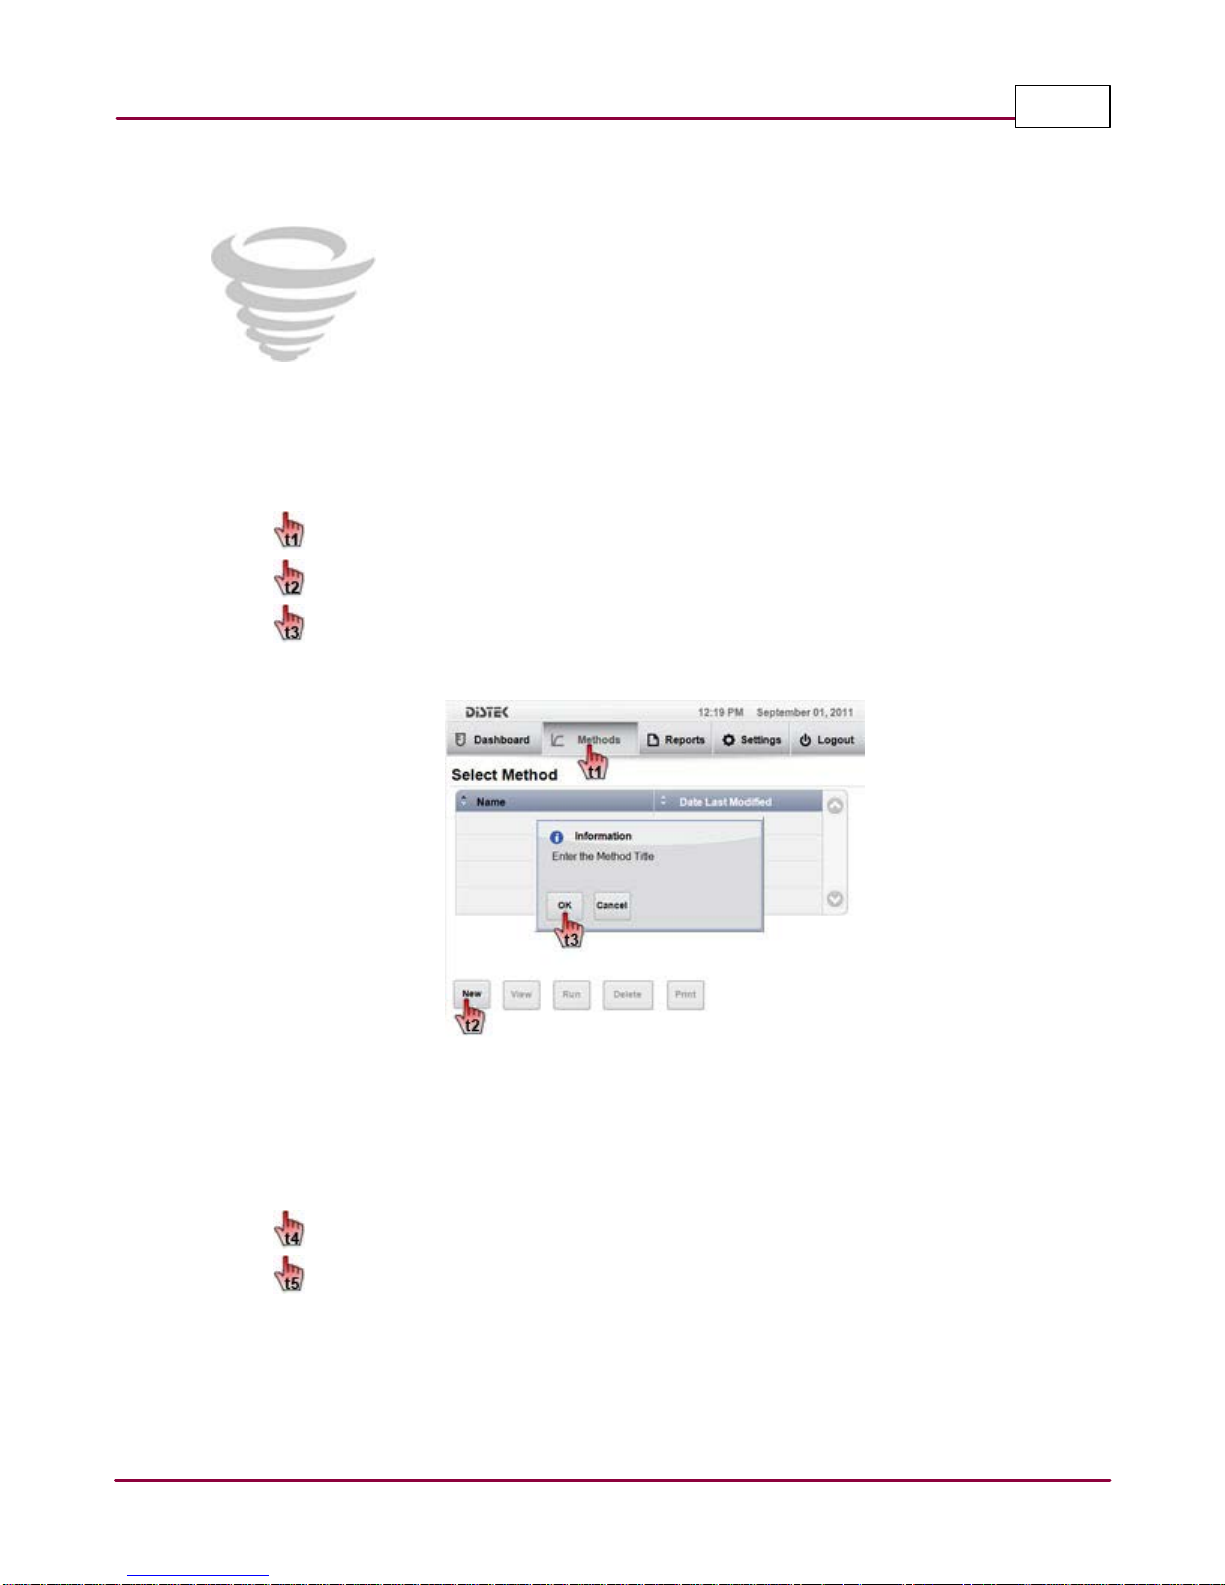
1 Choose the Methods tab.
Select New.
You will be prompted to enter a Method Title. An on-screen keyboard will be
displayed to enter the name of the method. Press Enter to accept the method name.
New Method Title
2 The Create New Method screen will be displayed. This screen contains the dissolution
test parameters. The display is divided in three parts. The left side shows parameter
name and data; the right side shows input display; the bottom section shows command
buttons.
Select the parameter(s) you want to change in the method.
Once all bath parameters meets criteria, Save the method.
© 2017 Distek, Inc. All Rights Reserved
Page 6
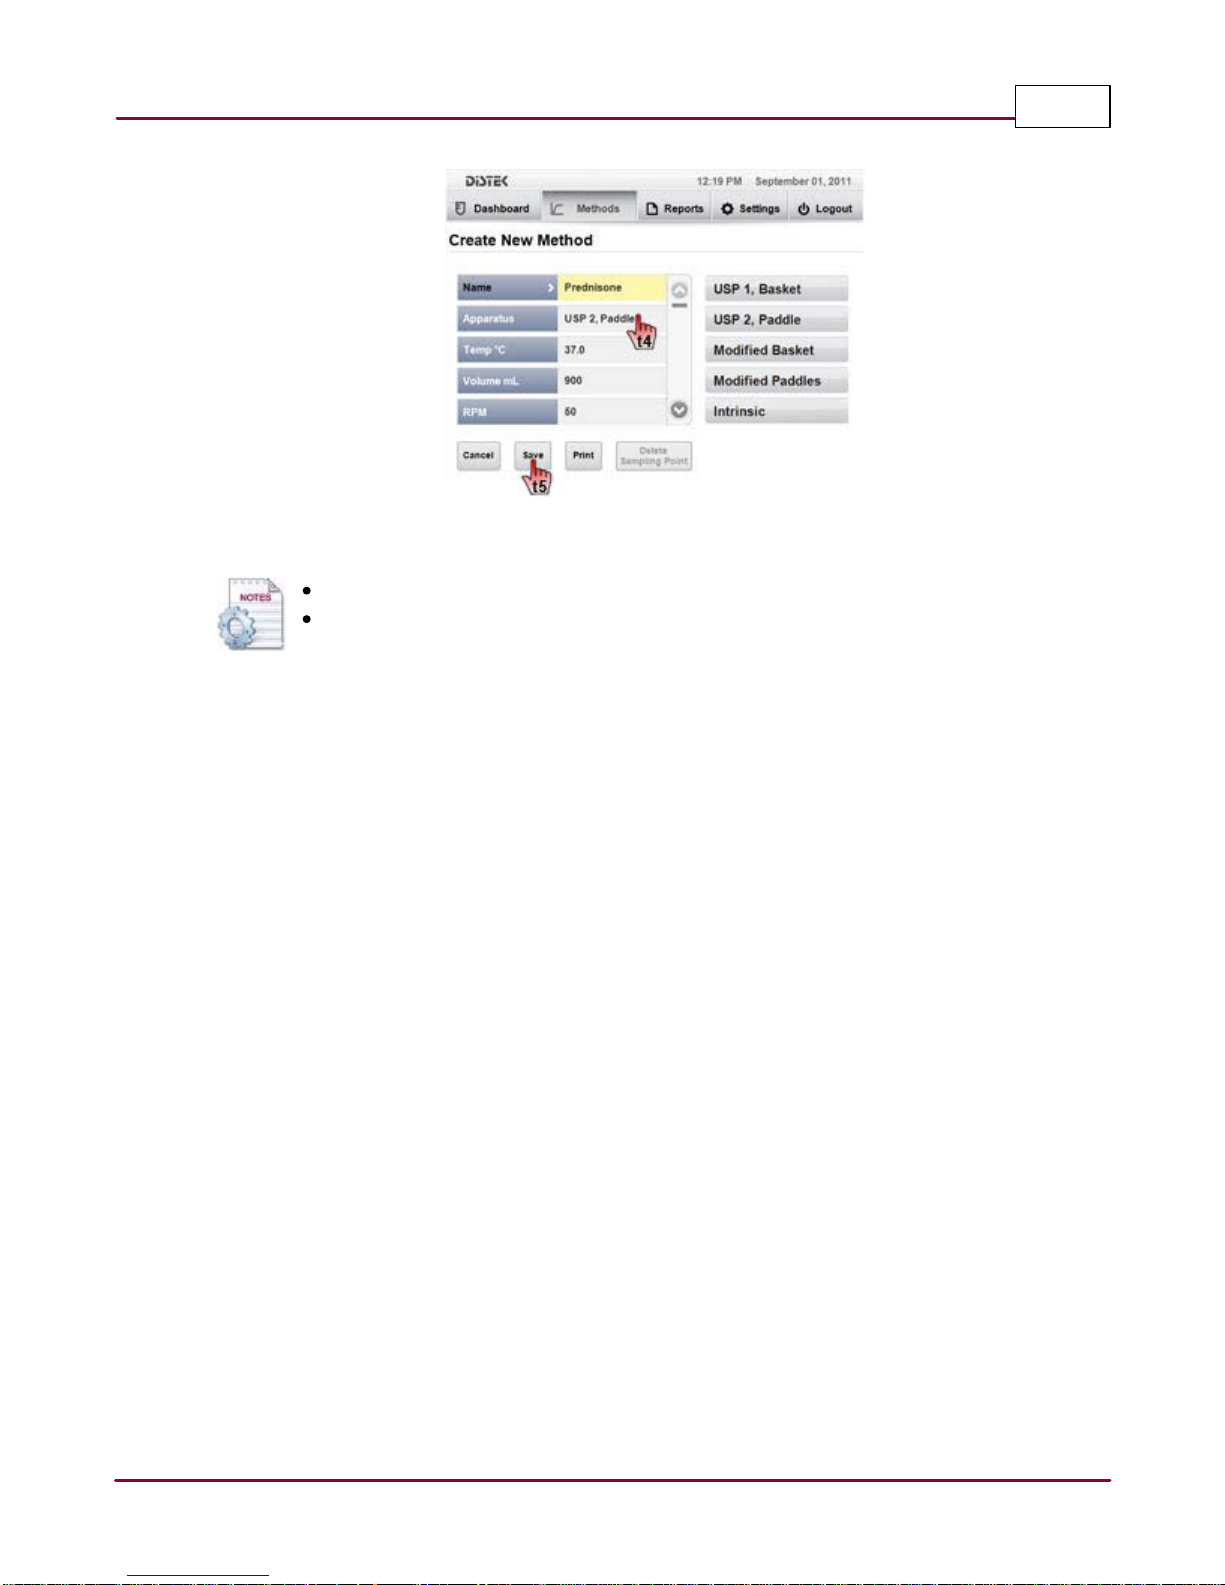
Create New Method Screen
You can also create a new method by using the Settings tab then Methods icon.
If you enter the wrong data, a popup message alerts you about the range of a
particular parameter.
Create New MethodModel 2500 Quick Start Manual 6
© 2017 Distek, Inc. All Rights Reserved
Page 7
3
Method Run
This section describes how to load pre-programmed methods for quick and easy
setup and operation of the instrument.Samples can be introduced
simultaneously or staggered when starting a test.
Use the scroll bar if the instrument has more that 4 created methods.
The method list can be sorted alphabetically by Name or Date Last Modified. Simply
point to Name title field for sorting by name and Date Last Modified title field for
sorting by date.
Method RunModel 2500 Quick Start Manual 7
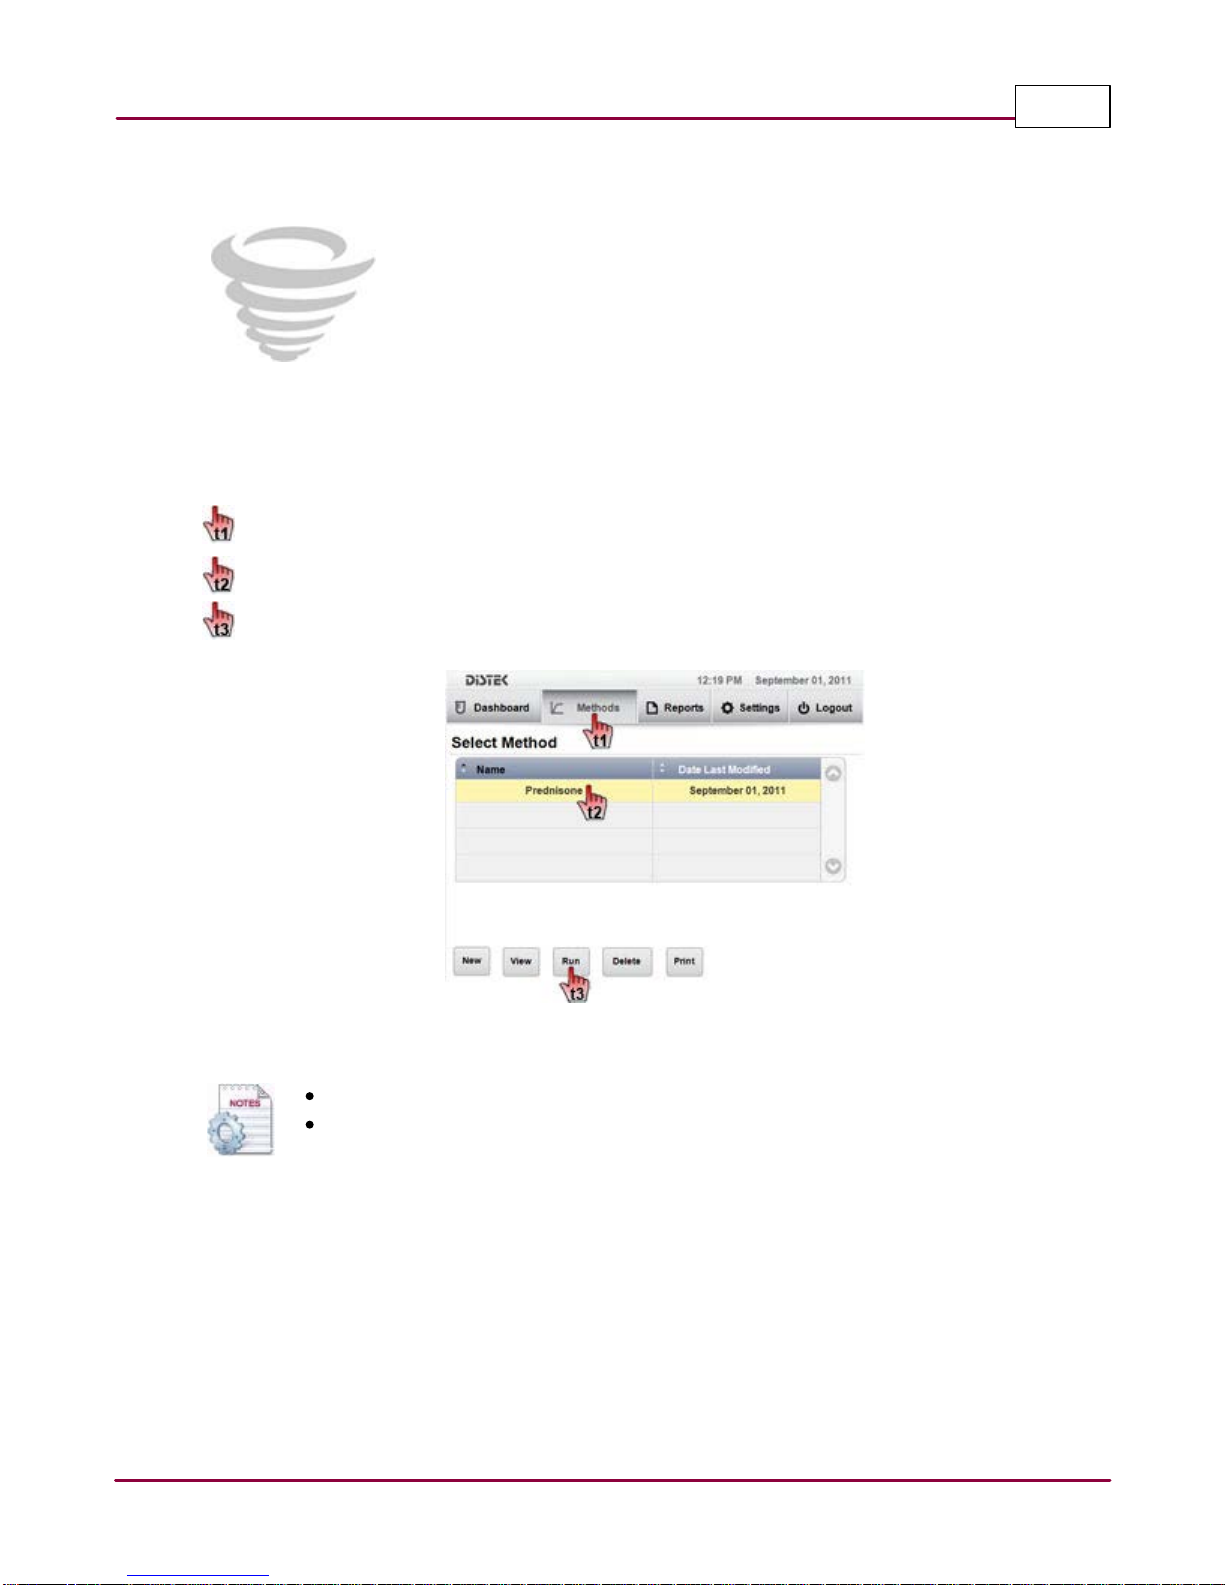
Follow the procedure below to load a method:
Choose Methods tab. The Select Method screen displays the method listing.
Select the desired method you want to run.
Press Run to start the test.
Edit a Method
© 2017 Distek, Inc. All Rights Reserved
Page 8
4
Manual Test
This section describes how to use Manual Run for quick and easy setup and
operation of the instrument. The tests start in different ways, depending on
whether the user wants to introduce the sample using paddles or baskets.
Manual TestModel 2500 Quick Start Manual 8
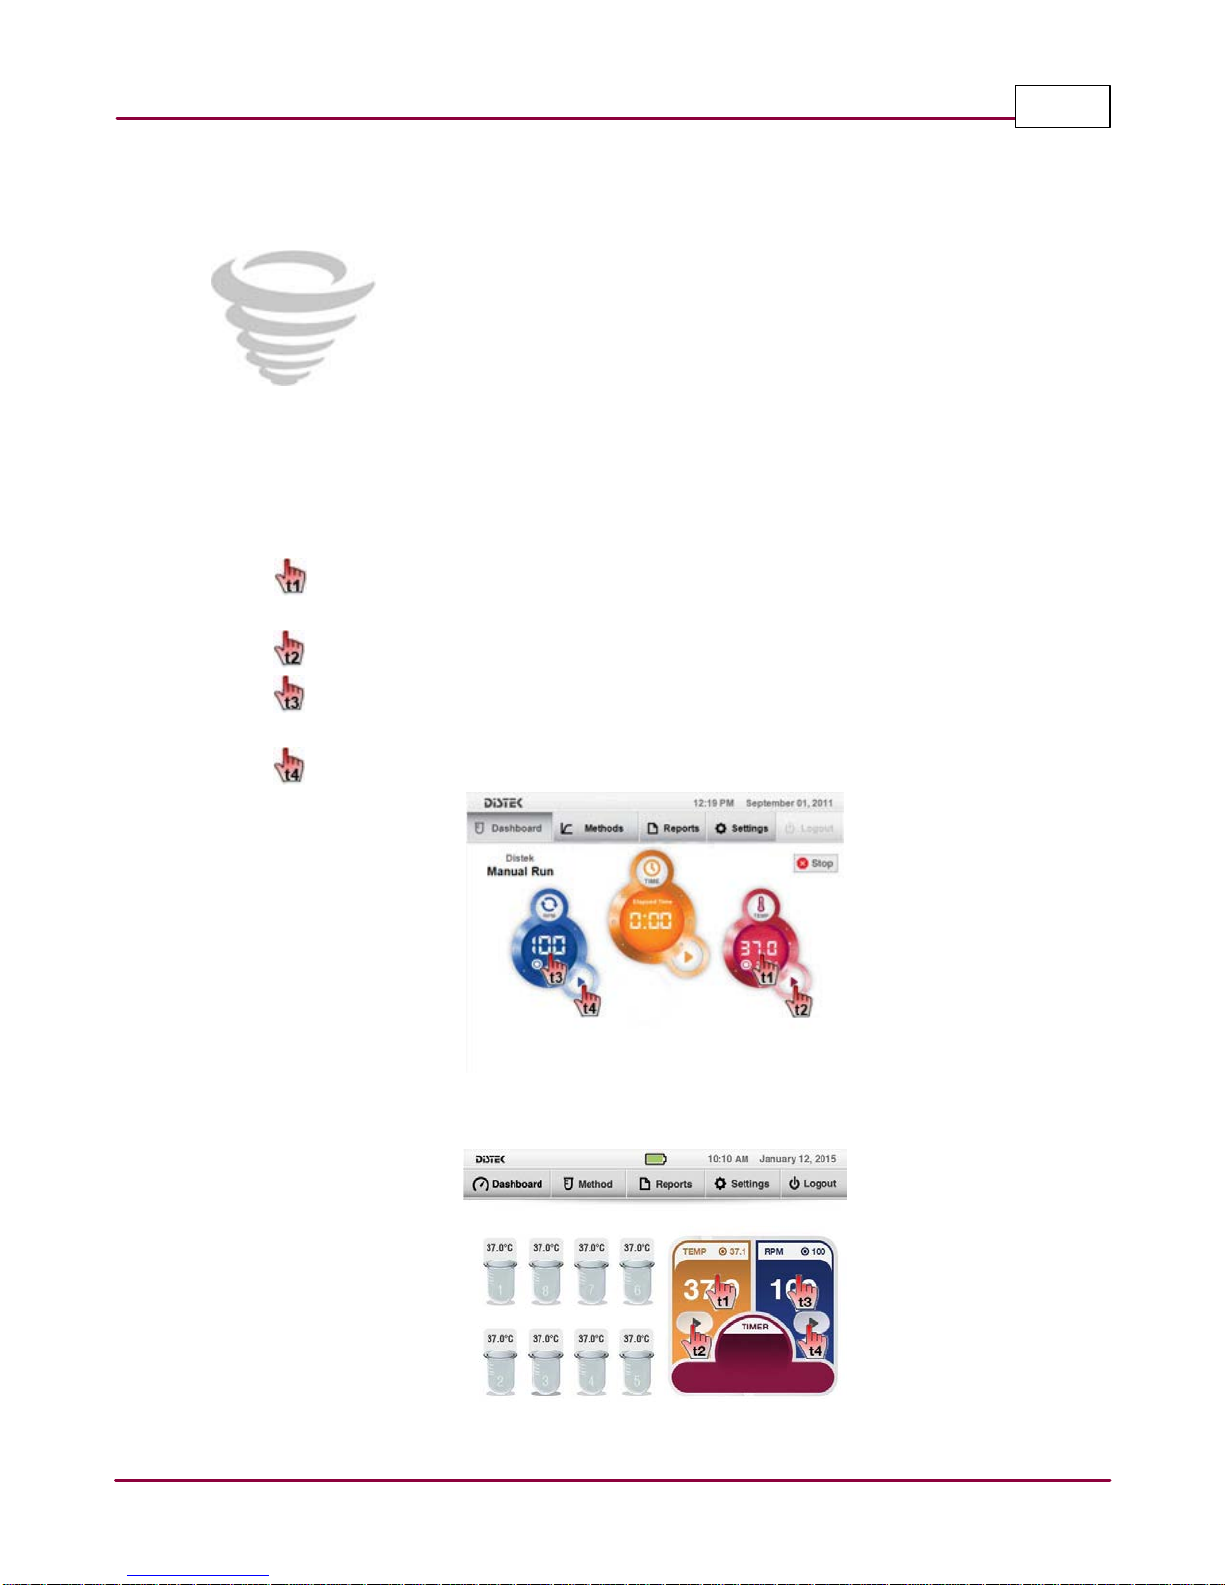
Follow the procedure below to start a manual test:
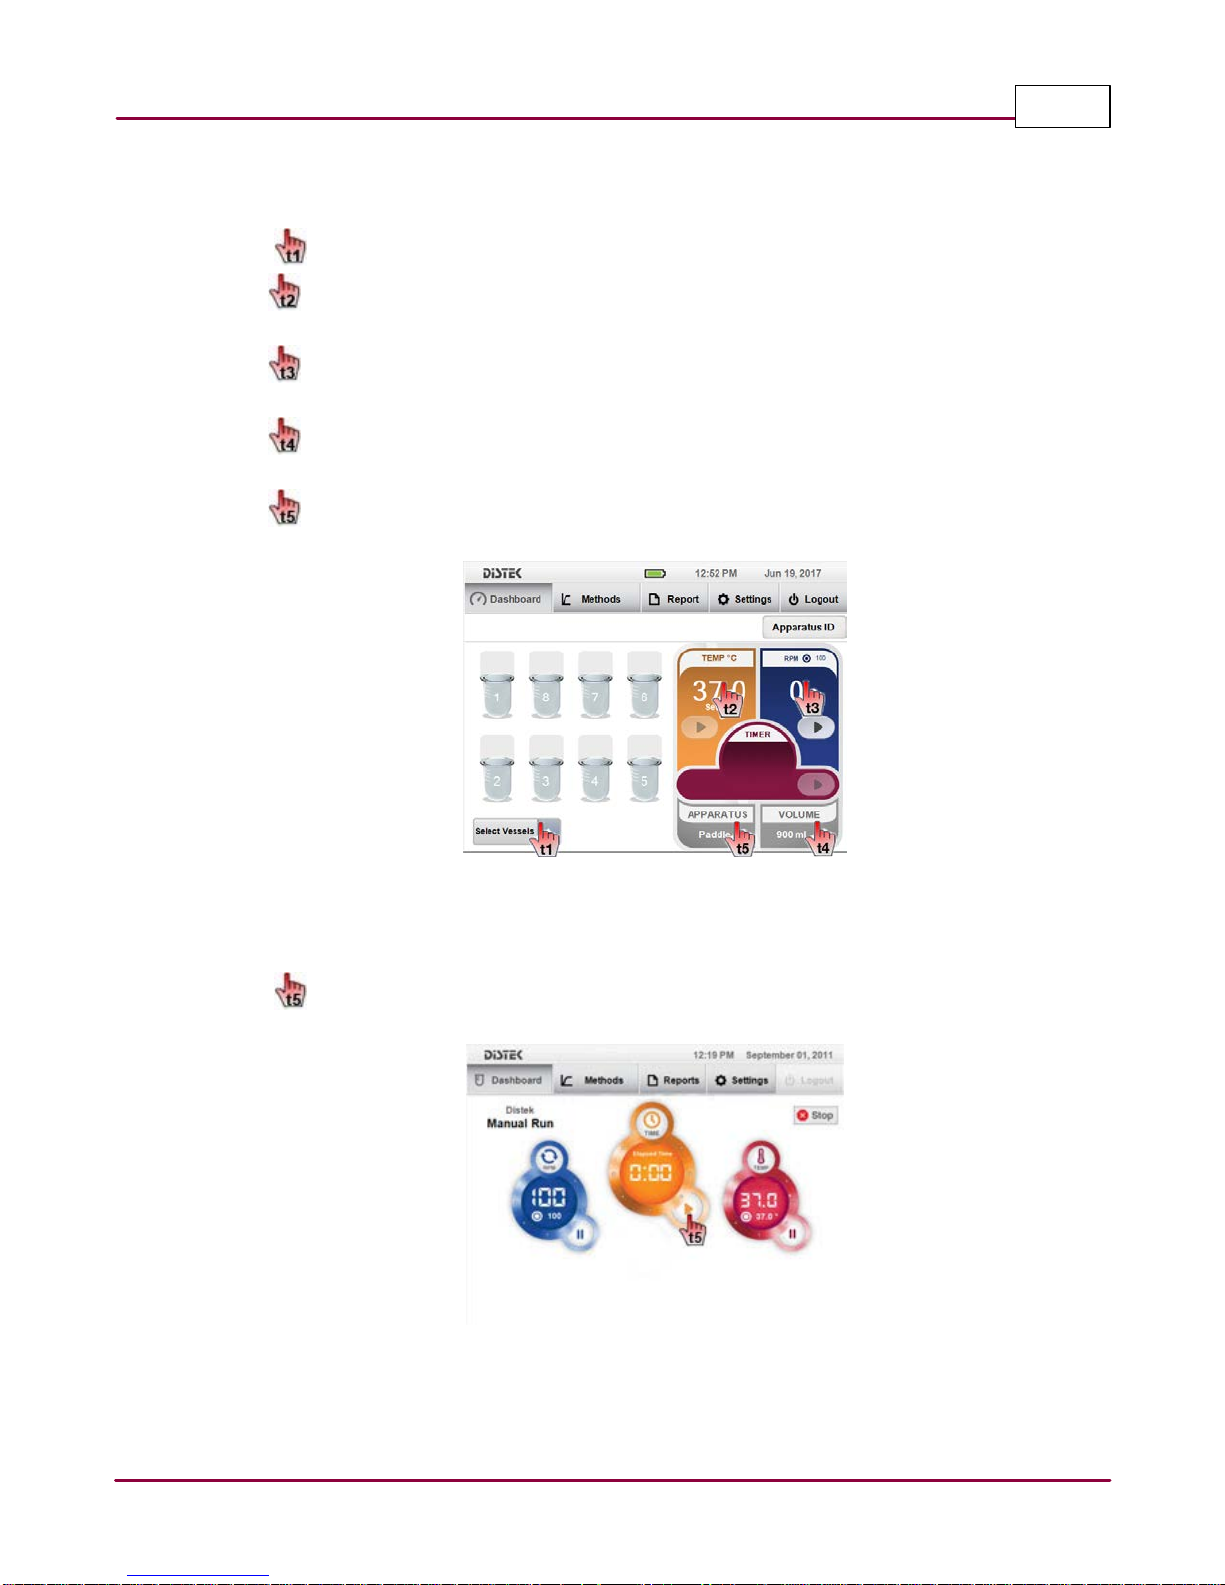
1 For 2500 and 2500RTD
From the Dashboard, set the temperature by selecting temperature display.
Enter the desired temperature using the on-screen keypad.
Start heating by selecting the Play button.
Set the stirring speed by selecting RPM display.
Enter the desired temperature using the on-screen keypad.
Start stirring by selecting the Play button.
2500 Manual Run
2500RTD Manual Run
© 2017 Distek, Inc. All Rights Reserved
Page 9
Manual TestModel 2500 Quick Start Manual 9
For 2500 Select
From the Dashboard, click Select Vessels to enable desired number of vessels.
Set the temperature by selecting TEMP°C gauge.
Enter the desired temperature using the on-screen keypad.
Set the stirring speed by selecting RPM gauge.
Enter the desired RPM using the on-screen keypad.
Set the vessel volume by selecting VOLUME gauge.
Enter the desired volume using the on-screen keypad.
Set which apparatus will be use by selecting APPARATUS gauge.
Select the desired apparatus in the pop up window.
2 For 2500 and 2500RTD
If a timer is needed during Manual Run, select the Play button of the Timer control
display.
2500 Manual Run
2500 Manual Run Start Timer
© 2017 Distek, Inc. All Rights Reserved
Page 10
2500RTD Manual Run Start Timer
Press Pause icon on the RPM control display to stop stirring to introduce the
samples (on any apparatus used), then restart stirring.
Press Pause icon on the Timer control display to stop the timer momentarily if
needed (use for adding or changing media). Continue the timer by pressing the
Play button.
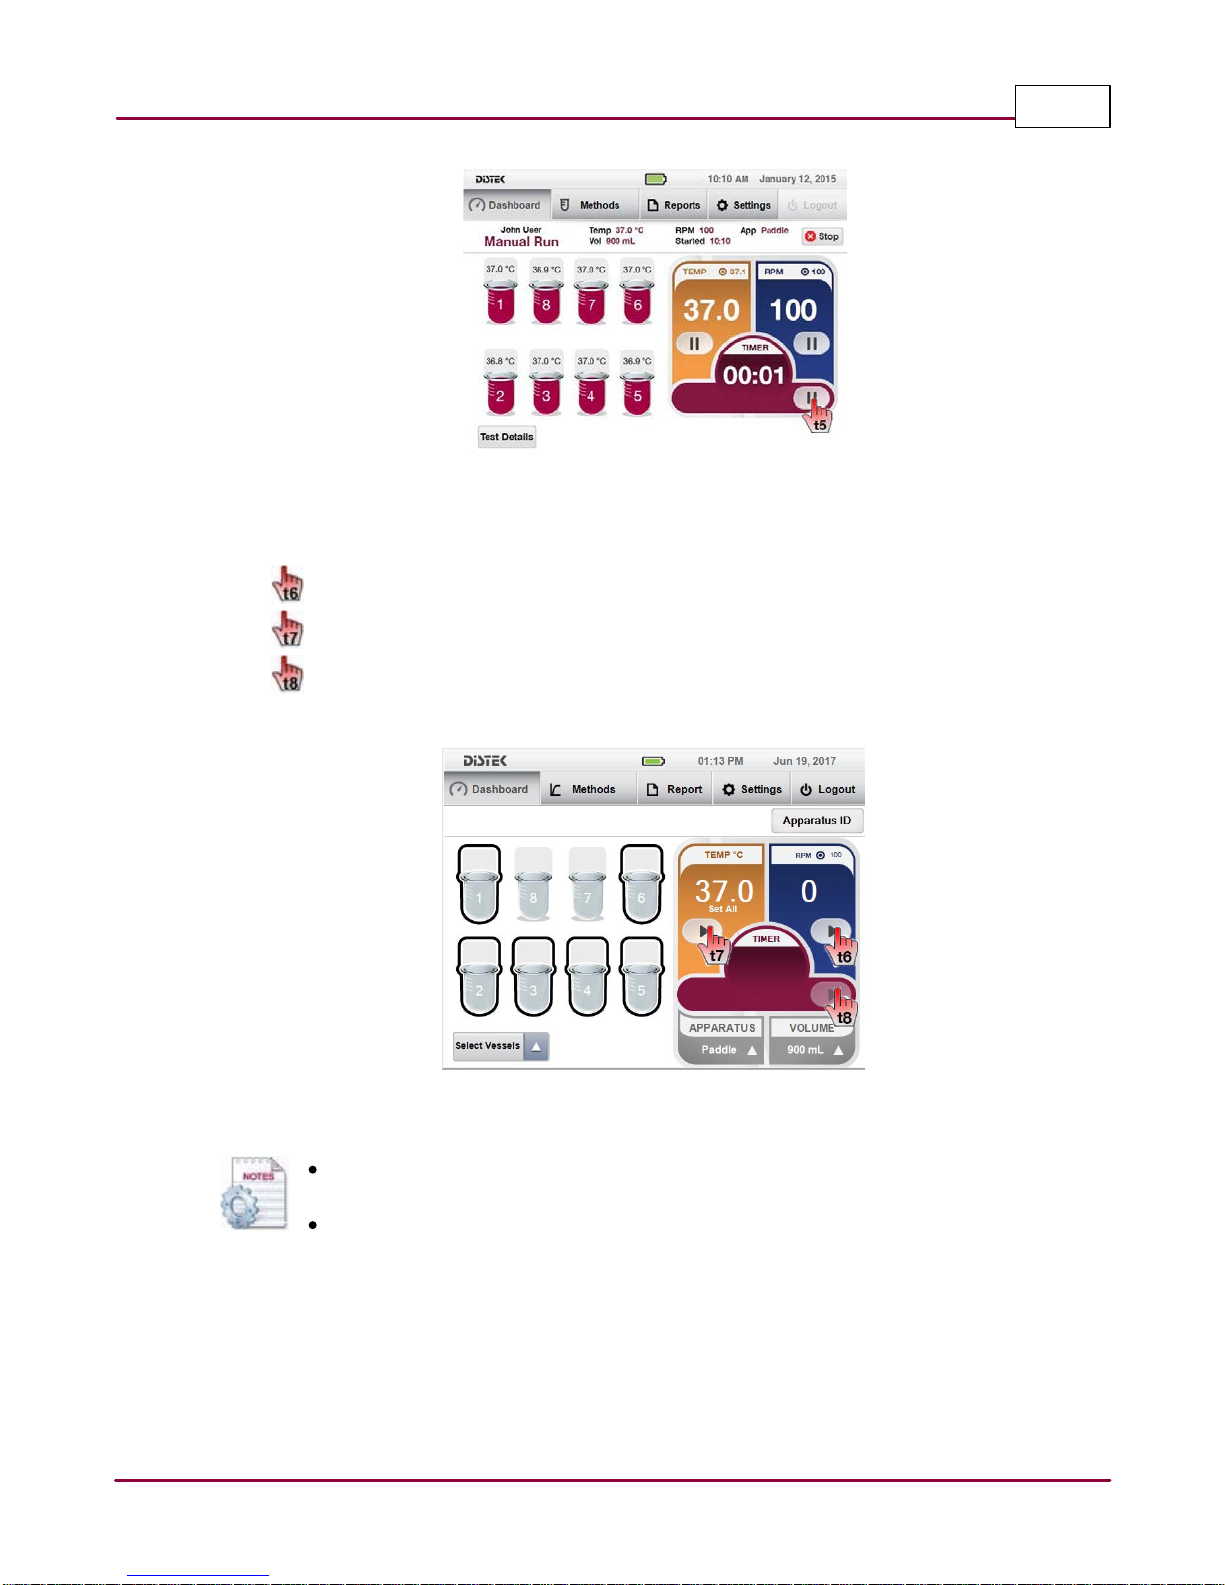
For 2500 Select
Start stirring by selecting the RPM Play button.
Start heating by selecting the TEMP°C Play button.
If a timer is needed during Manual Run, select the TIMER Play button.
Manual TestModel 2500 Quick Start Manual 10
Manual Run Setup Screen
© 2017 Distek, Inc. All Rights Reserved
 Loading...