

Page 1
Custom Projector
Enclosure
Installation Manual
READ ALL INSTRUCTIONS BEFORE BEGINNING INSTALLATION
tel: 303.412.0399 www.displaydevices.com
fax: 303.412.9346 tech@displaydevices.com
5880 Sheridan Blvd., Arvada, Colorado 80003
Page 2
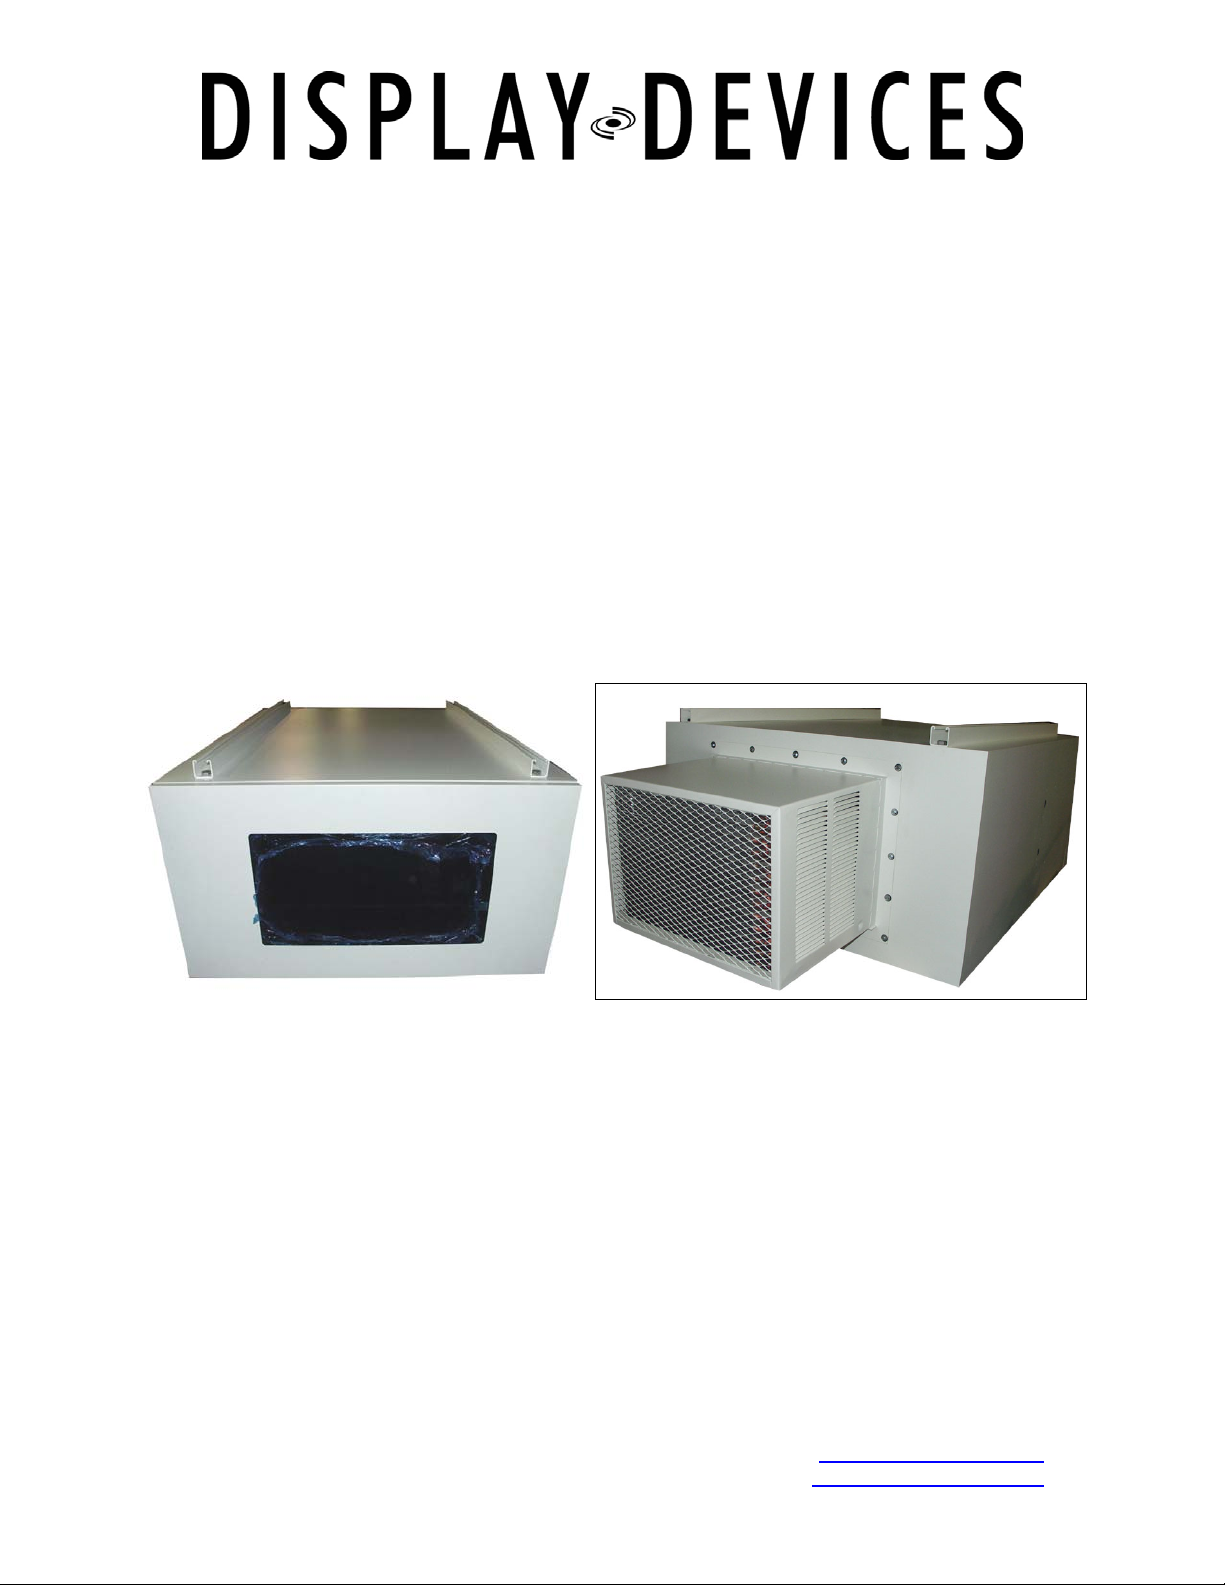
Custom Projector Enclosure
A
Thank you for purchasing this Display Devices product. Our products are designed to be maintenancefree, saving you future service time. If you experience any difficulties, please contact us at 303-412-
0399. Thank you for your support.
It is the responsibility of the dealer installer to ensure this product is properly supported and
meets all local building codes. Ensure the ceiling structure is capable of holding at least four
times the combined weight of the enclosure (300 lbs.) and projector (100 lbs). This is a
minimum requirement. Follow any local or state codes that apply to your specific area.
Tools required:
Philips Head Screwdriver
Wire-management tools (stripper/crimper, etc.)
Wrench Set – based upon your mounting hardware
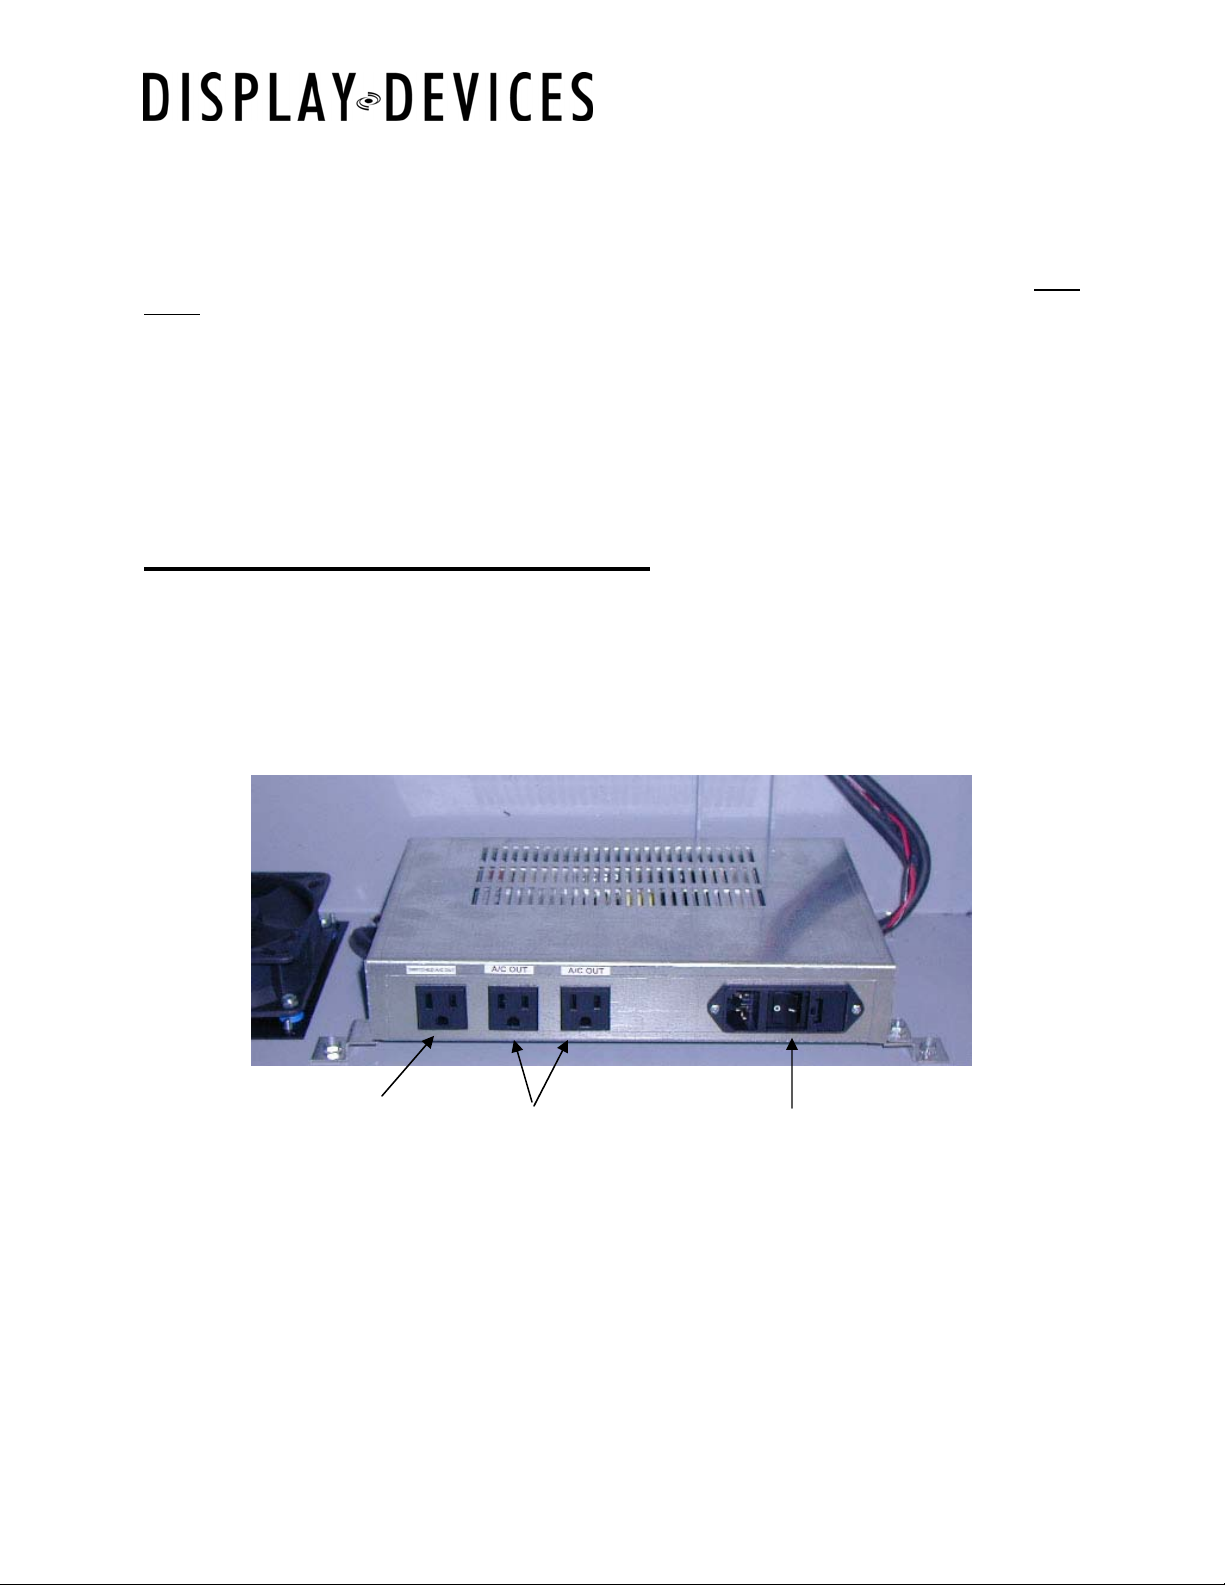
Temperature Control Operation
The Temperature Controller in its basic configuration controls and displays the temperature of the
enclosure.
To start operation, turn on the AC switch on the power supply. The controller will sound an alarm (if
enabled), turn on the air conditioning for 10 to 20 seconds, and then reset the system to a start state.
Switched AC
Unswitched AC
C input - On/Off Switch
While operating, the display will show the current temperature and alarm status, if any.
8/15/2005
Page 3
Custom Projector Enclosure
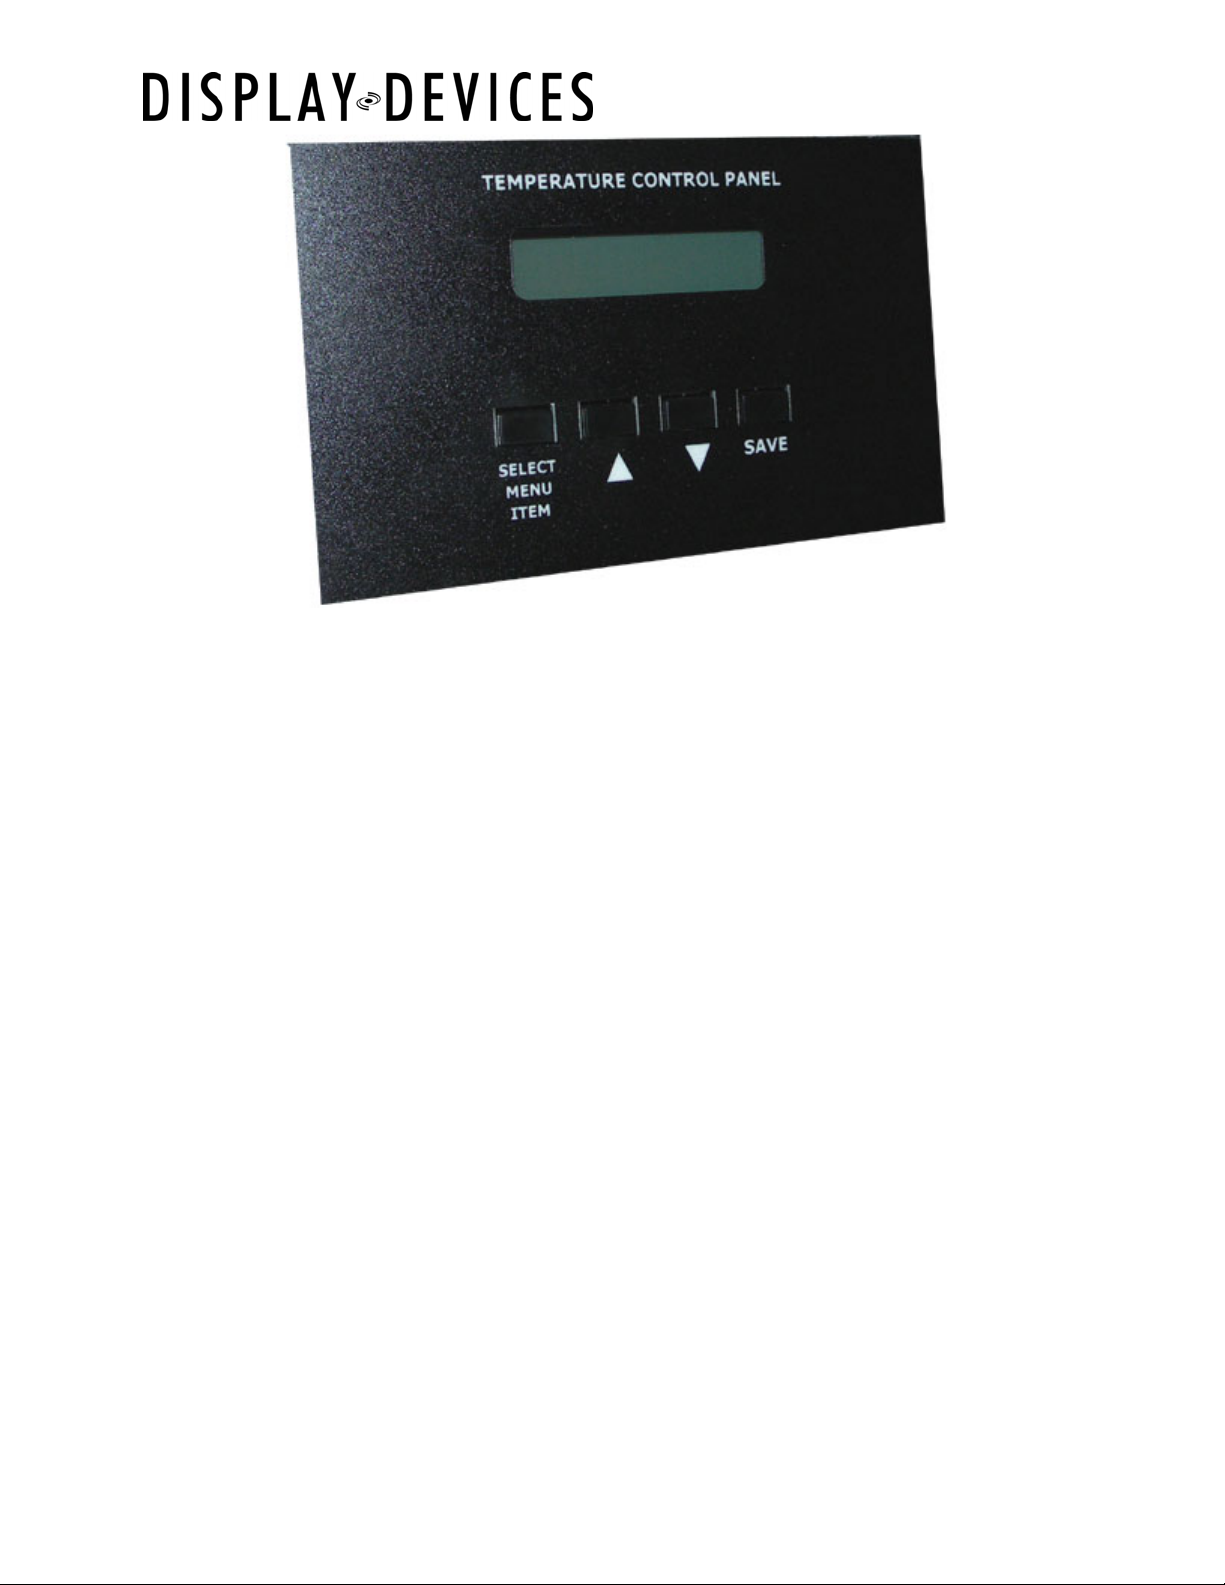
Control Panel
There are five parameters to set for your desired operation. Each is set the same way. On the operators
panel there are four buttons. The left-most button selects the parameter to adjust (will show current
setting). The next button (up arrow) will change the level up, and the next button (down arrow) will
change the level down. The last button (most right) will save the level after adjustment. If you do not
press the SAVE button, then the changes made will be lost. The five parameters are as follows:
Set A/C: Temperature at which the air conditioning will come on. Factory setting is 80 degrees (all
settings in Fahrenheit).
Set Heat: Non-functional in this unit.
Set Alarm Level: Temperature at which the alarm will sound. There is an onboard alarm, which may
be disabled, and a dry contact out to tie into an external alarm system. Factory setting is 110 degrees.
Set Power Level: Temperature at which the switched AC outlet on the power supply will turn off. A
last measure attempt to prevent damage to equipment by turning off power. Factory setting is 120
degrees.
Temperature Readout: Select either Fahrenheit or Celsius. Factory setting is Fahrenheit.
NOTE: BE SURE THE AIR CONDITIONER CONTROL PANEL IS SET TO THE
LOWEST TEMPERATURE SETTING POSSIBLE.
8/15/2005
Page 4

Custom Projector Enclosure
Adj
Installing the Projector
NOTE: The projector may be installed into the enclosure prior to hanging the enclosure. It
just depends upon the situation you are in.
1. Unlatch door and open to the left (as facing the glass window)
2. To extend the projector cage, loosen the thumbscrew connected to the safety bracket (shown below)
and slide the clamp to the left. This will allow you to slide the cage out for easy access.
Thumbscrew
3. Use two hands and pull the AVStack cage. Be careful when fully extended out that the entire
enclosure cannot tip forward.
4. Place the projector onto the mounting pan within the frame, align mounting pan holes with the
projector mounting points, and attach with enclosed mounting hardware.
5. To align projector, remove the side access panel, slide the AVStack cage into the enclosure and lock
tighten the thumbscrew on the safety brack.
6. Turn the thumbwheels on the AVStack to adjust pitch, height and tilt.
7. Replace the access panel.
Pitch and height
ustment
Tilt and height
Adjustment
Pitch and height
Adjustment
8/15/2005
Page 5

Custom Projector Enclosure
Hanging the Enclosure
1. Use the two Unistrut channels on the top of the enclosure to attach to your structural
ceiling/truss. We recommend ½” strut hardware. You may attach rated C-Clamps or
Cheesboroughs to these structural channels.
Structural
mounting
channel
Structural
mounting
channel
2. Raise the unit with an equipment lift (or lower truss to enclosure).
3. Tighten all hardware.
4. Bring cabling through the holes on the side of the enclosure – secure both power and signal
cables with strain relief.
8/15/2005
Page 6

6. CUSTOMER RESPONSIBLE FOR INSTALLATION TO ANY APPLICABLE
CODES/BUILDING REQUIREMENTS.
5. CUSTOMER TO PROVIDE LIQUID/AIR TIGHT FITTINGS AT AC AND
VIDEO/CONTROL OPENINGS.
4. POWER REQUIREMENTS: 120VAC, 60HZ, 20A.
3. MAXIMUM ABIENT AIR TEMPERATURE: 100 F.
2. PROJECTOR: SANYO PLC-XF45 (PROVIDED BY CUSTOMER).
1. ESTIMATED UNIT WEIGHT: 280LB (WITHOUT PROJECTOR).
NOTES:
SHOW POSITION
6/30/2005, 4:07 PM
FINISH
MATERIAL
CHECKED
DRAWN
CRH
SERVICE POSITION
DISPLAY DEVICES, INC IS
PROHIBITED
IN THIS DRAWING IS THE
PROPERTY OF DISPLAY
DEVICES, INC. ANY
THE INFORMATION CONTAINED
REPRODUCTION IN PART
OR WHOLE WITHOUT THE
WRITTEN PERMISSION OF
REV ECO DESCRIPTION DRAW N CHECKED APPROVED DATE
A X1 - RELEA SE FOR C USTOM ER A PPROV AL CR H 6 /3 0/ 20 05
SCALE
B
NONE
FILE NAME
105-100
.SLDDRW
DATE
105-100
DATE
ANGLE =
6/30/2005
0.5
SIZE
DRAWING NO.
.XXX = .010
.XXXX = .0050
PROJECTOR ENCLOSURE
DIMENSIONS ARE IN INCHES.
UNLESS OTHERWISE SPECIFIED
TOLERANCES:
.XX = .02
TITLE
5880 SHERIDAN BLVD
ARVADA, CO 80003
4.0
DRAWING REVISION BLOCK
REV C 4/26/04
SHEET
1
OF
3
AX1
REV
Page 7

A/C CONDENSATION
DRAIN HOLE
1/2" EMT KNOCK-OUT
FOR POWER
25.0
1/2" EMT KNOCK-OUT
FOR VIDEO/CONTROL
6/30/2005, 4:07 PM
37.6
21.0
30.0
45.0
20.0
P1000 UNISTRUT
FINISH
NONE
REAR ACCESS PANEL
CHECKED
CRH
DATE
6/30/2005
DRAWN
OR WHOLE WITHOUT THE
WRITTEN PERMISSION OF
DISPLAY DEVICES, INC IS
PROHIBITED
DATE
.XX = .02
.XXX = .010
.XXXX = .0050
ANGLE = 0.5
THE INFORMATION CONTAINED
REPRODUCTION IN PART
IN THIS DRAWING IS THE
PROPERTY OF DISPLAY
DEVICES, INC. ANY
UNLESS OTHERWISE SPECIFIED
DIMENSIONS ARE IN INCHES.
TOLERANCES:
MATERIAL
47.0 15.5
AIR CONDITIONING UNIT
SCALE
B
SIZE
DRAWING NO.
TITLE
PROJECTOR ENCLOSURE
REV C 4/26/04
105-100.SLDDRW
SHEET 2 OF 3
FILE NAME
105-100
AX1
5880 SHERIDAN BLVD
ARVADA, CO 80003
REV
Page 8

UNIT EXTENDED FOR SERVICE
6/30/2005, 4:07 PM
FINISH
MATERIAL
CHECKED
CRH
DATE
6/30/2005
85.5
DRAWN
OR WHOLE WITHOUT THE
WRITTEN PERMISSION OF
DISPLAY DEVICES, INC IS
PROHIBITED
DATE
.XX = .02
.XXX = .010
.XXXX = .0050
ANGLE = 0.5
THE INFORMATION CONTAINED
REPRODUCTION IN PART
IN THIS DRAWING IS THE
PROPERTY OF DISPLAY
DEVICES, INC. ANY
UNLESS OTHERWISE SPECIFIED
DIMENSIONS ARE IN INCHES.
TOLERANCES:
REV C 4/26/04
NONE
105-100.SLDDRW
SHEET 3 OF 3
SCALE
FILE NAME
B
105-100
AX1
SIZE
DRAWING NO.
TITLE
PROJECTOR ENCLOSURE
5880 SHERIDAN BLVD
ARVADA, CO 80003
REV
Page 9

Custom Projector Enclosure
Temperature Controller with
Active AC and Heater
RS232 Interface
Hardware
Standard three pin hookup, 2,3,5, on DB9. Baud rate 9600,N,8,1. No handshaking.
Software
ASCII letters followed by a delimiter, carriage return (ASCII 13).
Commands from Host to Controller:
Command Description Example
Q Request Current Temperature
Axxx Set Level that AC turns on/off at
(will turn on if temp above this level)
Bxxx Set Level that Heater turns on/off at
(will turn on if temp below this level)
Cxxx Set Alarm Level (alarm on if hotter than this level)
Dxxx Set Power Cutoff Level (cutoff if above this level)
xxx-temperature ↵ Carriage Return (13)
Communications from Controller to Host:
Command Description Example
Txxx Current Temperature
G AC On
H Heater On
I Alarm On
J Power has been switched off
S (O,C) Door Switch is Open/Closed
M Motion Sensor Tripped
K Received Set command, Executed OK
X Can not understand Command
xxx-temperature ↵ Carriage Return (13)
Notes: All temperatures are in Fahrenheit. Host program to convert to Celsius if required. G,H,I,J are
sent every few seconds when those levels have been tripped. S is sent upon change of state. M is sent
upon shock sensor being tripped. Temperatures range is from 1 to 250. Temperature and settings are
in two degree increments. On reporting only, if current temp is negative, then response will be T-015.
Do not set Axxx equal or below Bxxx !
Heater will turn off when door is open.
Q↵
A080↵
B050↵
C110↵
D120↵
T073↵
G↵
H↵
I↵
J↵
SO↵
SC↵
M↵
K↵
X↵
8/15/2005
 Loading...