

Page 1

DCD6000-C
CD PLAYER
User’s Guide
DCD6000.O/M.QXD 1/24/03 4:22 PM Page 23
Page 2
1
QUICK REFERENCE
Disney Elements © Disney
The Quick Reference is given to provide basic operation of the unit.
Please completely read this User’s Guide to take advantage of all
the features this unit has to offer.
DCD6000.O/M.QXD 1/24/03 4:22 PM Page 1
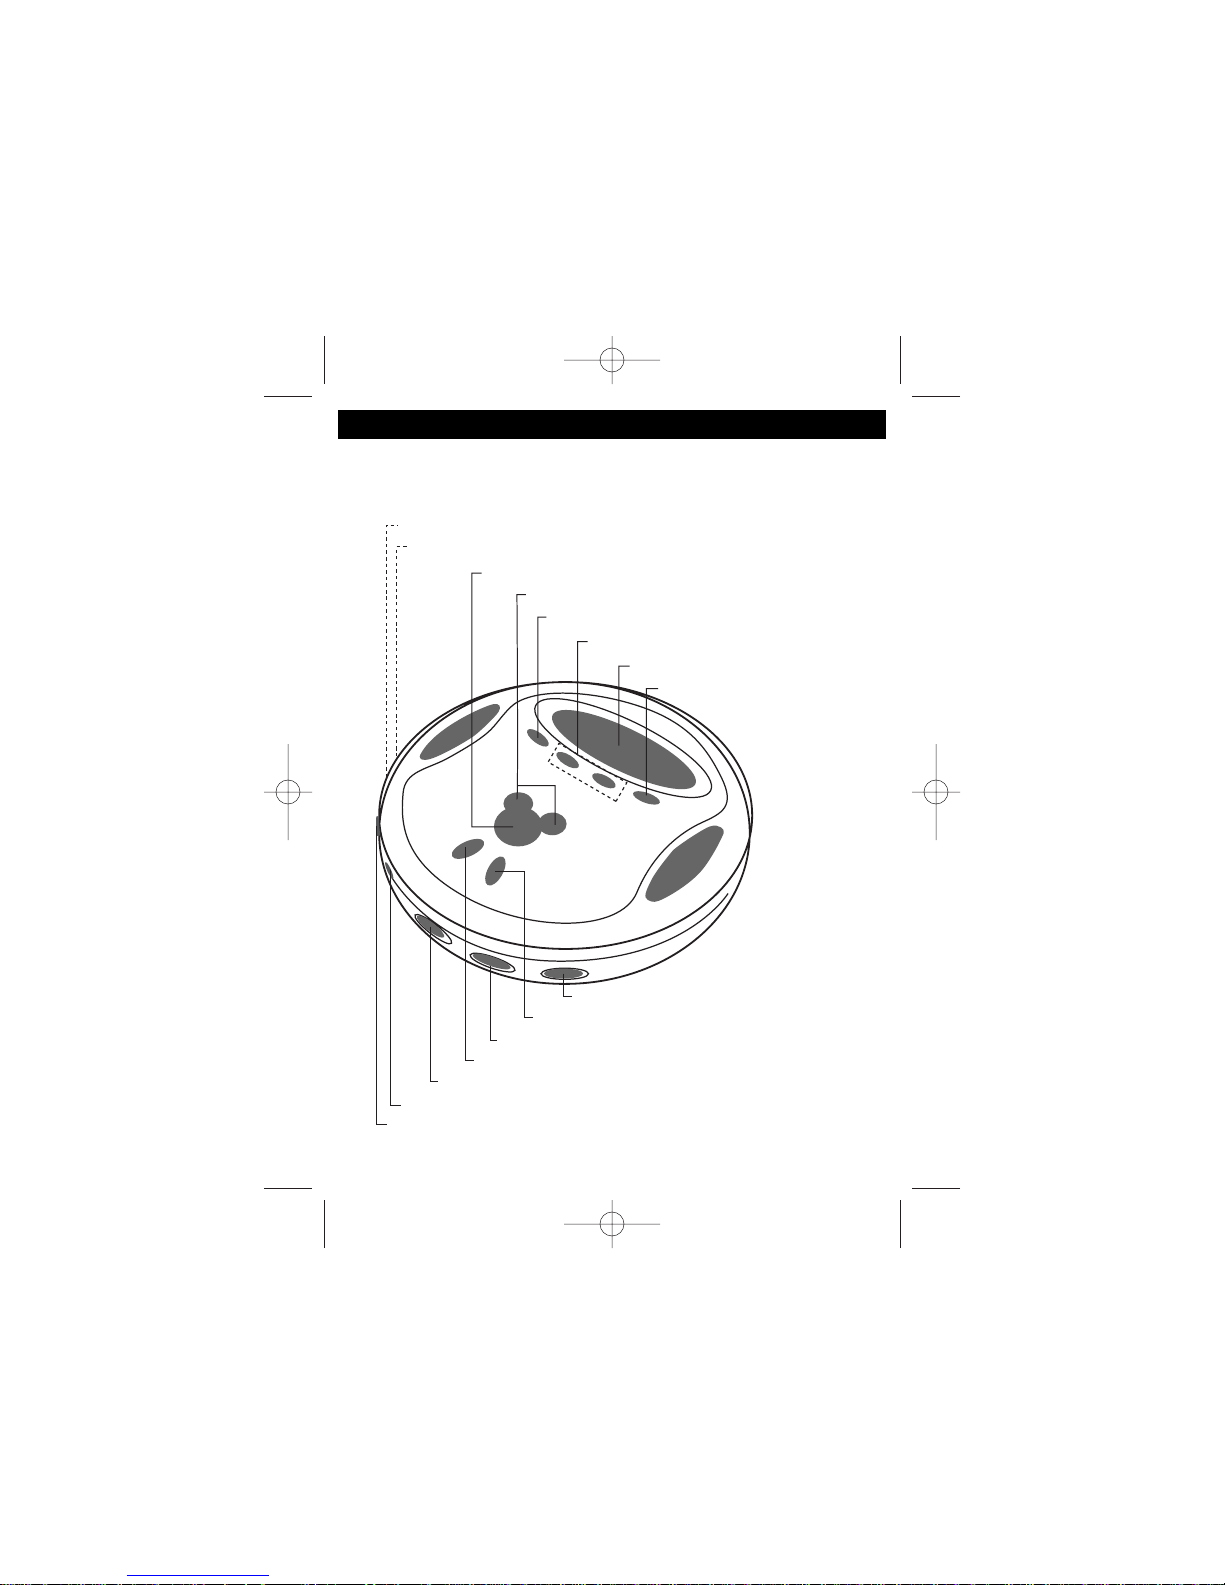
Connect headphone(s) to these jacks
Connect to listen through an external audio system (Line Out)
Play the CD
Select track/select radio station
Select CD mode/turn FM Stereo On or Off
Select a radio preset
Display
Program the CD memory
Turn Bass Boost On or Off
Adjust the Volume
Select CD or Radio
Stop CD playback/turn the unit Off
Disable buttons while listening to CD
Turns ESP On or Off/selects AM/FM
Open the CD Compartment
Page 3
2
QUICK REFERENCE (CONTINUED)
TO TURN THE UNIT ON:
1. Press the PLAY/PAUSE ( ) /POWER ON button to turn the unit on.
TO LISTEN TO THE RADIO:
1. Press the PLAY/PAUSE ( ) /POWER ON button to turn the unit on.
2. Slide the FUNCTION switch to the RADIO position.
3. Press the ESP /BAND button to select the AM or FM band.
4. If listening to FM, press the MODE button to turn Stereo On or Off.
5. Press and release the SKIP/ SEARCH/Tuning – or +
button to tune a station. Press and hold the SKIP/SEARCH/ Tuning
– or + button for 1 second, then release for rapid search
tuning and tune a station.
6. Adjust the VOLUME control and DBBS switch as desired. If FM
STEREO reception is weak/noisy, press the MODE button to turn off
Stereo, in this case the reception will be monaural.
7. To turn the radio off, press the STOP (■)/POWER OFF button.
TO PLAY A CD:
1. Slide the FUNCTION switch to the CD position and slide the CD
Door Open switch to open the CD door and insert a CD.
2. Press the PLAY/PAUSE ( ) /POWER ON button to start
playback.
3. To skip forward or backward through the tracks on the disc, press
the SKIP/SEARCH – or + button. To search forward or
backward through a specific track on the disc, press and hold the
SKIP/SEARCH – or + button.
4. When the disc is through playing, it will stop. Press the STOP
(■)/POWER OFF button to stop the disc before it is finished. Press
the STOP (■)/POWER OFF button again while in the stop mode to
turn the unit off.
Disney Elements © Disney
DCD6000.O/M.QXD 1/24/03 4:22 PM Page 2
Page 4
3
SAFETY PRECAUTIONS
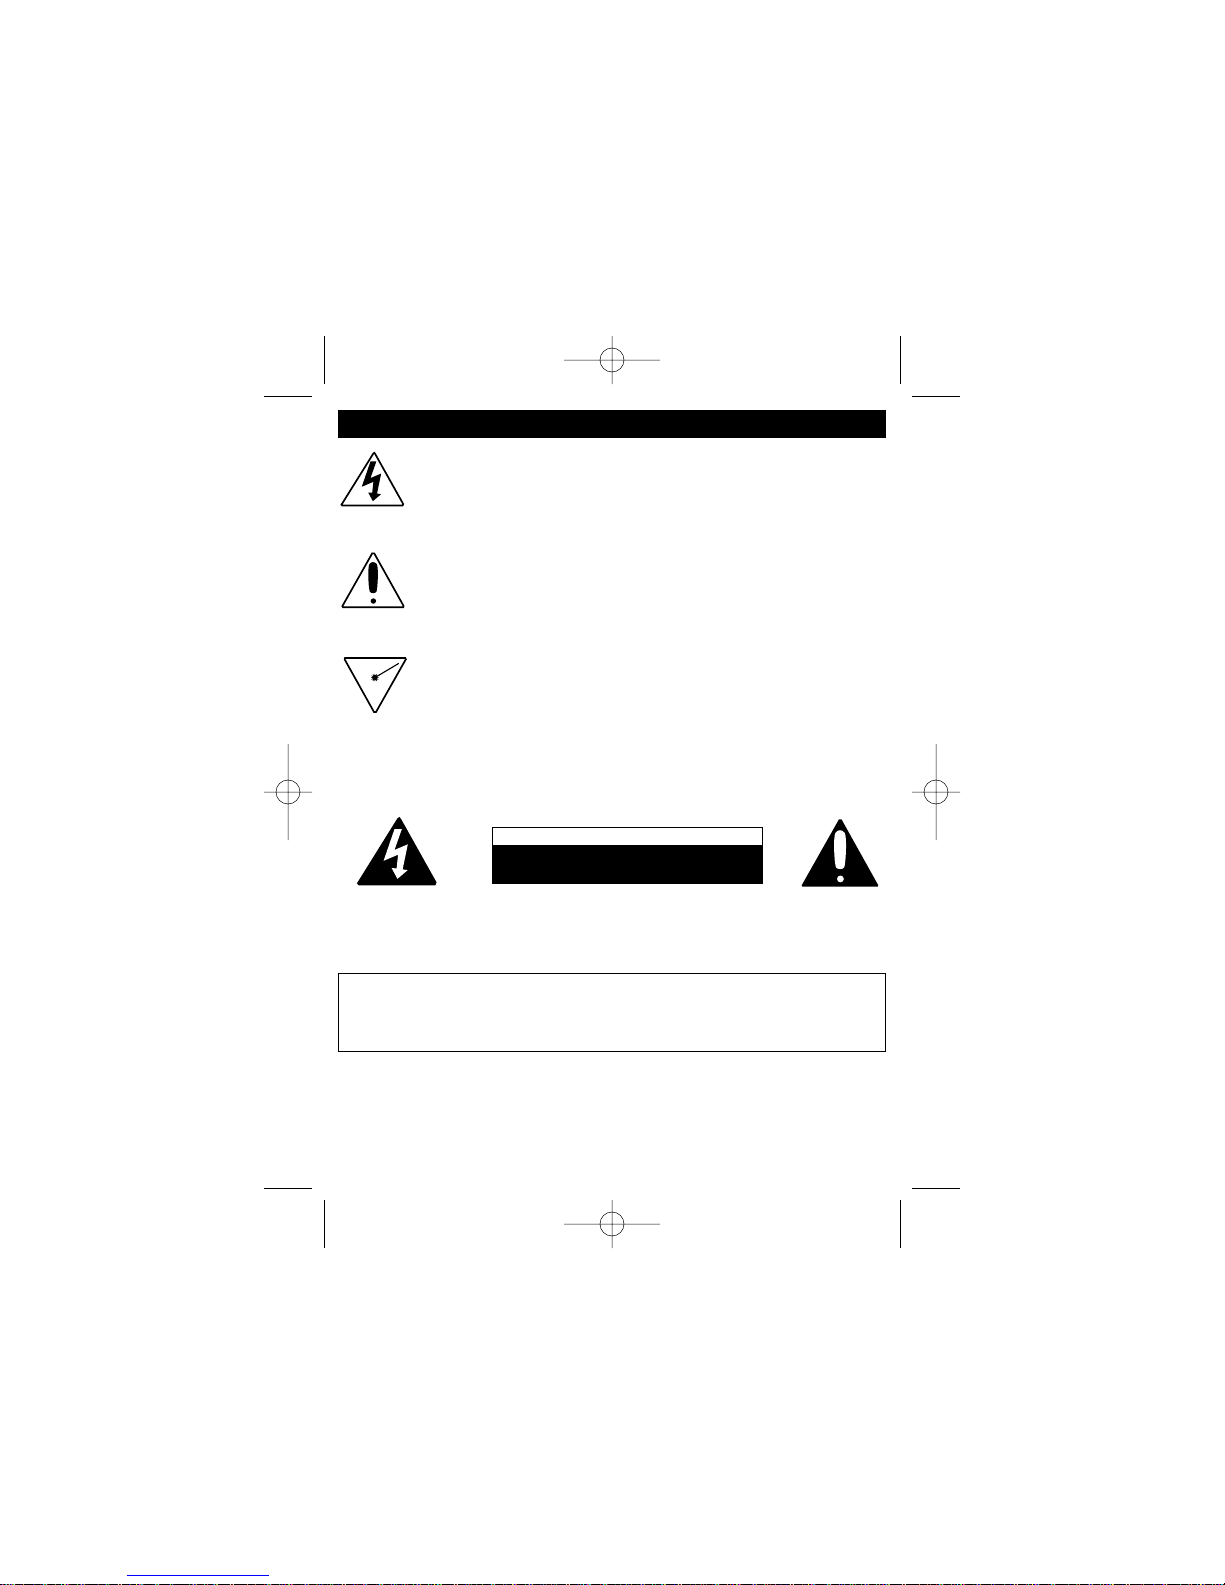
DANGEROUS VOLTAGE:
The lightning flash with arrowhead symbol, within an equilateral
triangle is intended to alert the user to the presence of uninsulated
dangerous voltage within the product’s enclosure that may be of
sufficient magnitude to constitute a risk of electric shock to persons.
ATTENTION:
The exclamation point within an equilateral triangle is intended to
alert the user to the presence of important operating and
maintenance (servicing) instructions in the literature accompanying
the appliance.
DANGER:
This product utilizes a Class 1 laser to read Compact Discs. This
laser Compact Disc Player is equipped with safety switches to
avoid exposure when the CD door is open and the safety interlocks
are defeated. Invisible and hazardous laser radiation when open
and interlock failed or defeated. Avoid direct exposure to beam.
Please do not attempt to defeat or bypass the safety switches.
CAUTION: TO REDUCE THE RISK OF ELECTRIC SHOCK, DO NOT
REMOVE COVER (OR BACK). NO USER-SERVICEABLE PARTS INSIDE.
REFER SERVICING TO QUALIFIED SERVICE PERSONNEL.
CAUTION
RISK OF ELECTRIC SHOCK
DO NOT OPEN
SURGE PROTECTORS:
It is recommended to use a surge protector for AC connection. Lightning
and power surges ARE NOT covered under warranty for this product.
DCD6000.O/M.QXD 1/24/03 4:22 PM Page 3
Page 5
4
SAFETY PRECAUTIONS (CONTINUED)
INFORMATION:
This equipment has been tested and found to comply with the limits
for a Class B digital device, pursuant to Part 15 of the FCC Rules.
These limits are designed to provide reasonable protection against
harmful interference in a residential installation. This equipment
generates, uses, and can radiate radio frequency energy and, if not
installed and used in accordance with instructions, may cause
harmful interference to radio communications. However, there is no
guarantee that interference will not occur in a particular installation.
If this equipment does cause harmful interference to radio or
television reception, which can be determined by turning the
equipment off and on, the user is encouraged to try to correct the
interference by one or more of the following measures:
• Reorient or relocate the receiving antenna.
• Increase the separation between the equipment and receiver.
• Connect the equipment into an outlet on a circuit different from that
to which the receiver is connected.
• Consult the dealer or an experienced radio/TV technician for help.
• Do not open the CD compartment while the CD is rotating.
• Always keep the CD compartment closed when not in use.
• Keep all foreign objects out of the CD compartment.
• Place the unit on a stable surface.
• Avoid installing the unit is locations described below:
• Places exposed to direct sunlight or close to heat radiating
appliances such as electric heaters.
• On top of other stereo equipment that radiates too much heat.
• Places lacking ventilation or dusty places.
• Places subject to constant vibration.
• Humid or moist places.
DCD6000.O/M.QXD 1/24/03 4:22 PM Page 4
Page 6
5
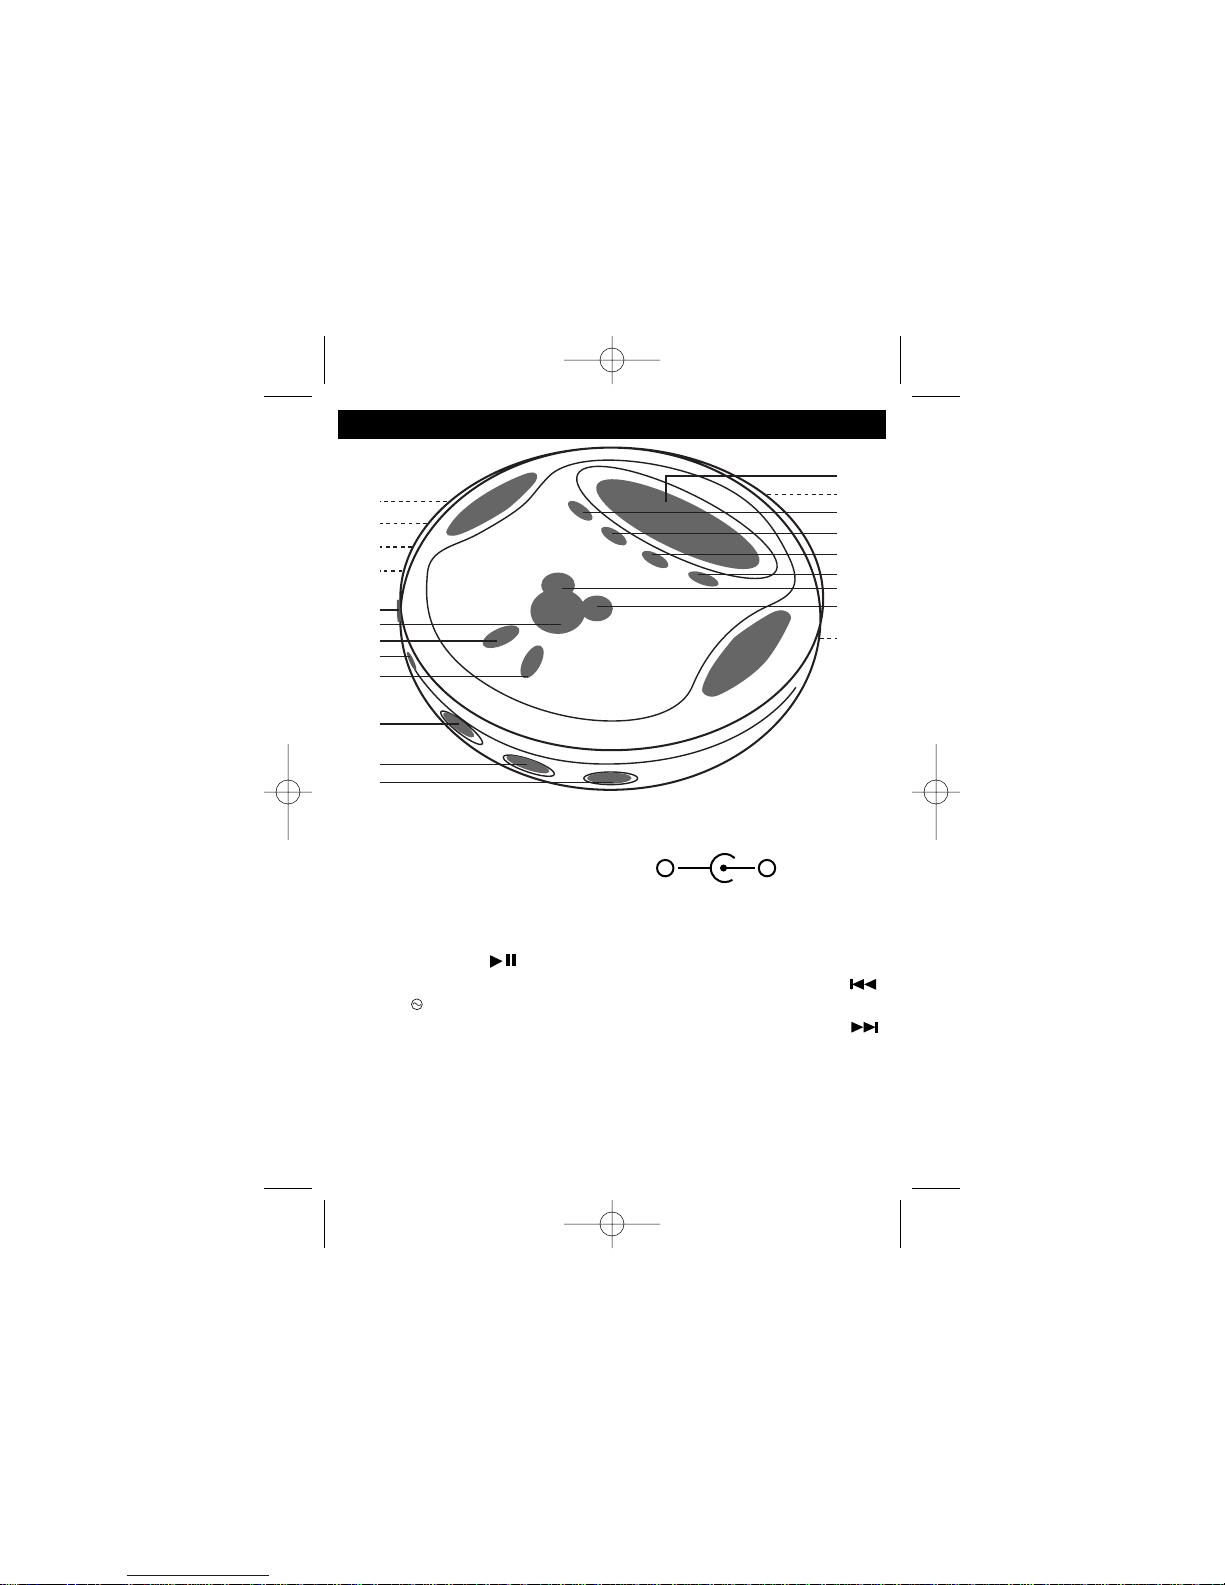
LOCATION OF CONTROLS
1. Hand Strap Hole
2. LINE OUT Jack (Side of Unit)
3. Headphone 2 Jack (Side of
Unit)
4. Headphone 1 Jack (Side of
Unit)
5. VOLUME Control
6. PLAY/PAUSE ( )/ POWER
ON Button
7. ESP /BAND Button
8. DBBS (Bass Boost) Switch
9. STOP (■)/ POWER OFF Button
10. CD Door Open Switch
11. HOLD Switch
12. FUNCTION (CD/RADIO)
Switch
13. Display
14. DC 4.5V Jack (Rear of Unit)
15. MODE Button
16. PRESET DOWN Button
17. PRESET UP Button
18. PROGRAM Button
19. SKIP/SEARCH/Tuning – (
) Button
20. SKIP/SEARCH/Tuning + (
) Button
21. Battery Compartment (Bottom
of Unit)
DCD6000.O/M.QXD 1/24/03 4:22 PM Page 5
1
2
3
4
5
6
7
8
9
10
11
12
13
14
15
16
17
18
19
20
21
–
+
Page 7
6
INSTALLATION
This CD player can be powered by either two (2) “AA” batteries or an AC
adapter.
AC Operation
To operate the unit using AC power, connect an AC adapter (not included)
to the DC 4.5V jack on the rear of the CD Player and to a wall outlet having
120V, 60Hz AC only. The batteries are automatically disconnected when the
AC adapter is used.
NOTE: There is no AC adapter provided with this unit. Please make sure the
AC adapter is 4.5V with a positive center.
Battery Installation
Batteries need to be replaced when the Low Battery indicator
appears in the display.
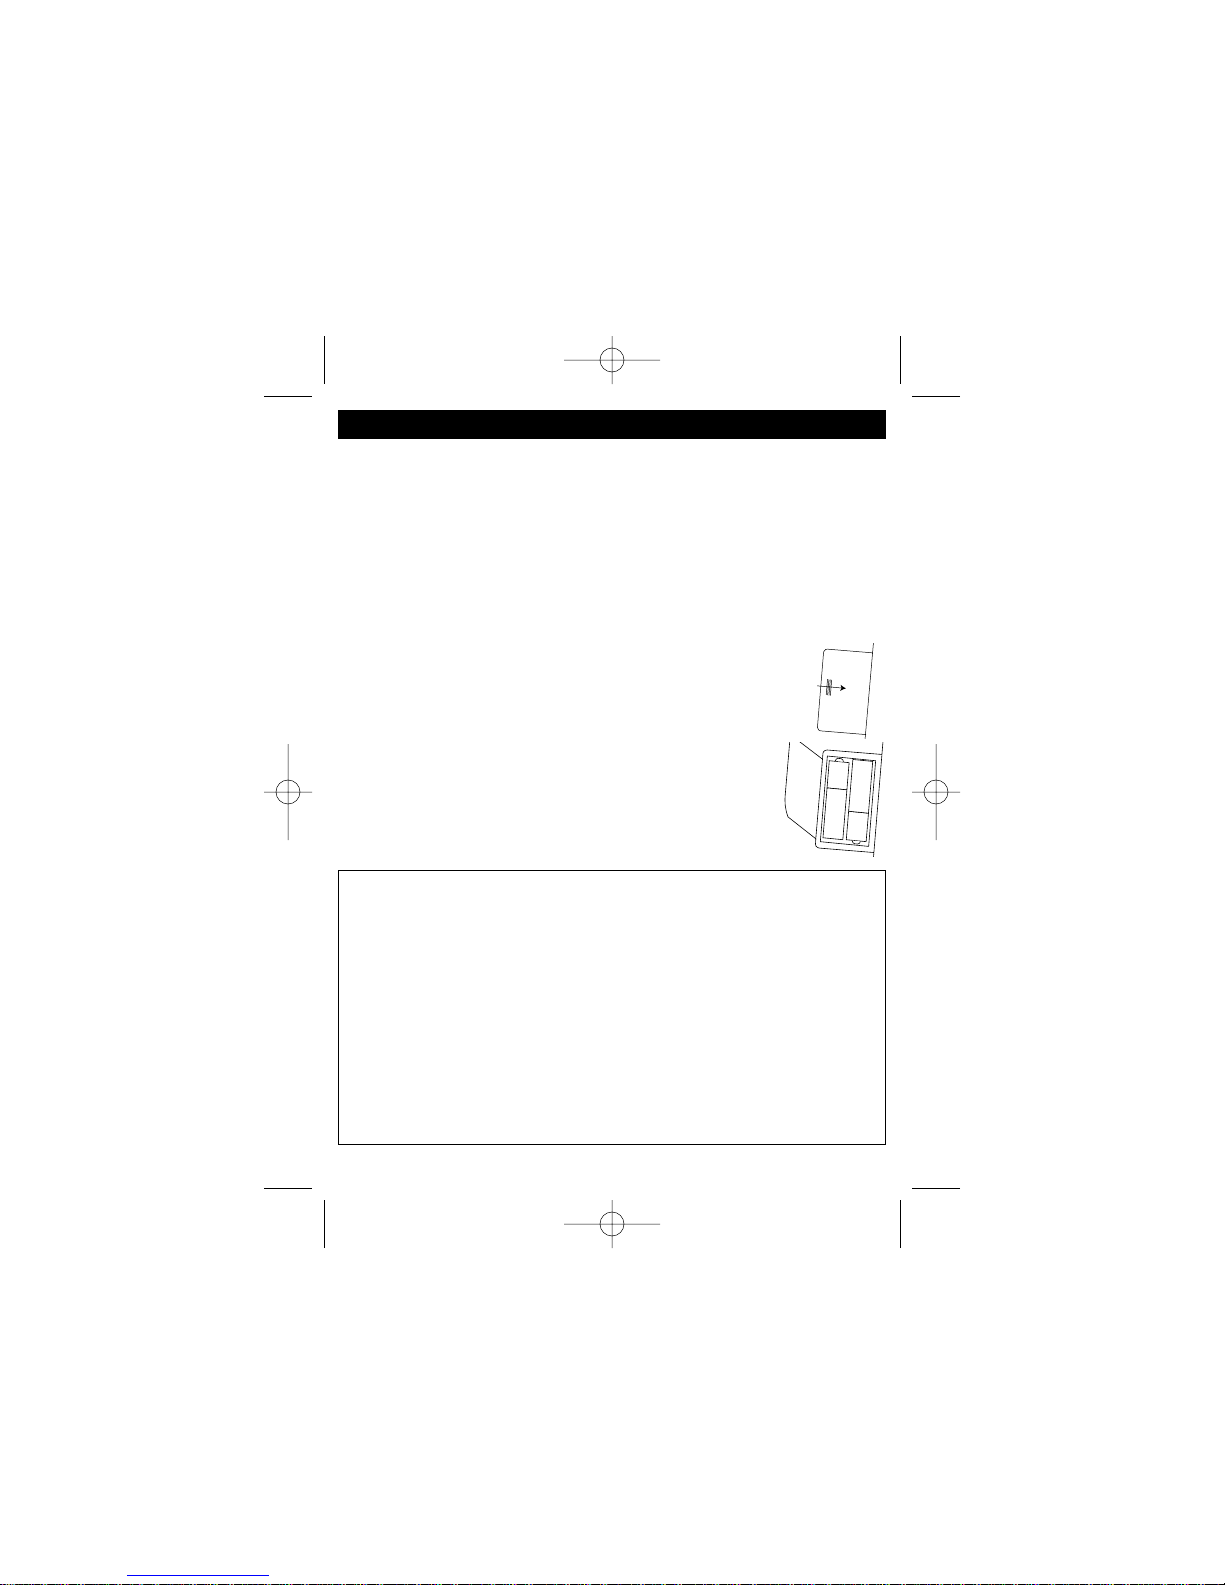
1. Open the battery compartment door on the bottom of the unit
by sliding it out and then lifting it. To prevent the
possibility of losing the cover, it cannot be removed.
2. Insert two (2) “AA” batteries (not included) according to the
polarity diagram. Alkaline batteries are recommended for
longer playing time.
BATTERY PRECAUTIONS
Follow these precautions when using batteries in this device:
1. Use only the size and type of batteries specified.
2. Be sure to follow the correct polarity when installing the batteries as
indicated next to the battery compartment. Reversed batteries may
cause damage to the device.
3. Do not mix different types of batteries together (e.g. Alkaline and
Carbon-zinc) or old batteries with fresh ones.
4. If the device is not to be used for a long period of time, remove the
batteries to prevent damage or injury from possible battery leakage.
5. Do not try to recharge batteries not intended to be recharged; they can
overheat and rupture. (Follow battery manufacturer’s directions.)
DCD6000.O/M.QXD 1/24/03 4:22 PM Page 6
+
–
+
–
–
–
+
+
Page 8
7
INSTALLATION (CONTINUED)
Playback Through a Home Audio System
By using a home audio connection cable, superb CD sound can be heard
through your home audio system. Before making any connections, turn off
the power to all equipment.
Plug a connection cable (not included) between the LINE OUT jack on the
side of the CD player and the amplifier’s CD or AUX input jacks. (Do not
connect it to the amplifier’s PHONO jacks.)
NOTE: If the CD player interferes with TV or radio reception, move the CD
player away from the TV or radio or turn off the power to the CD player.
Headphones
Insert the supplied headphones (one pair of wrap-around headphones
included) into one of the Headphones jacks. There is a separate volume
control on the wrap-around headphones, so adjust as desired .
Insert a second pair of headphones into the other Headphones jack to enjoy
listening with a friend.
Use your common sense when using headphones:
• Hearing Safety: Do not play your unit at high volume. Hearing experts
advise against continuous extended play. If you experience a ringing in
your ears, reduce the volume or discontinue use.
• Traffic Safety: Do not use while operating a motor vehicle. It may create a
traffic hazard and it is illegal in many areas. You should use extreme
caution or temporarily discontinue use in potentially hazardous situations.
Even if your headset is an open-air type designed to let you hear outside
sounds, do not turn up the volume so high that you can’t hear what’s
around you.
DCD6000.O/M.QXD 1/24/03 4:22 PM Page 7
Page 9
8
INSTALLATION (CONTINUED)
TO USE THE HAND STRAP
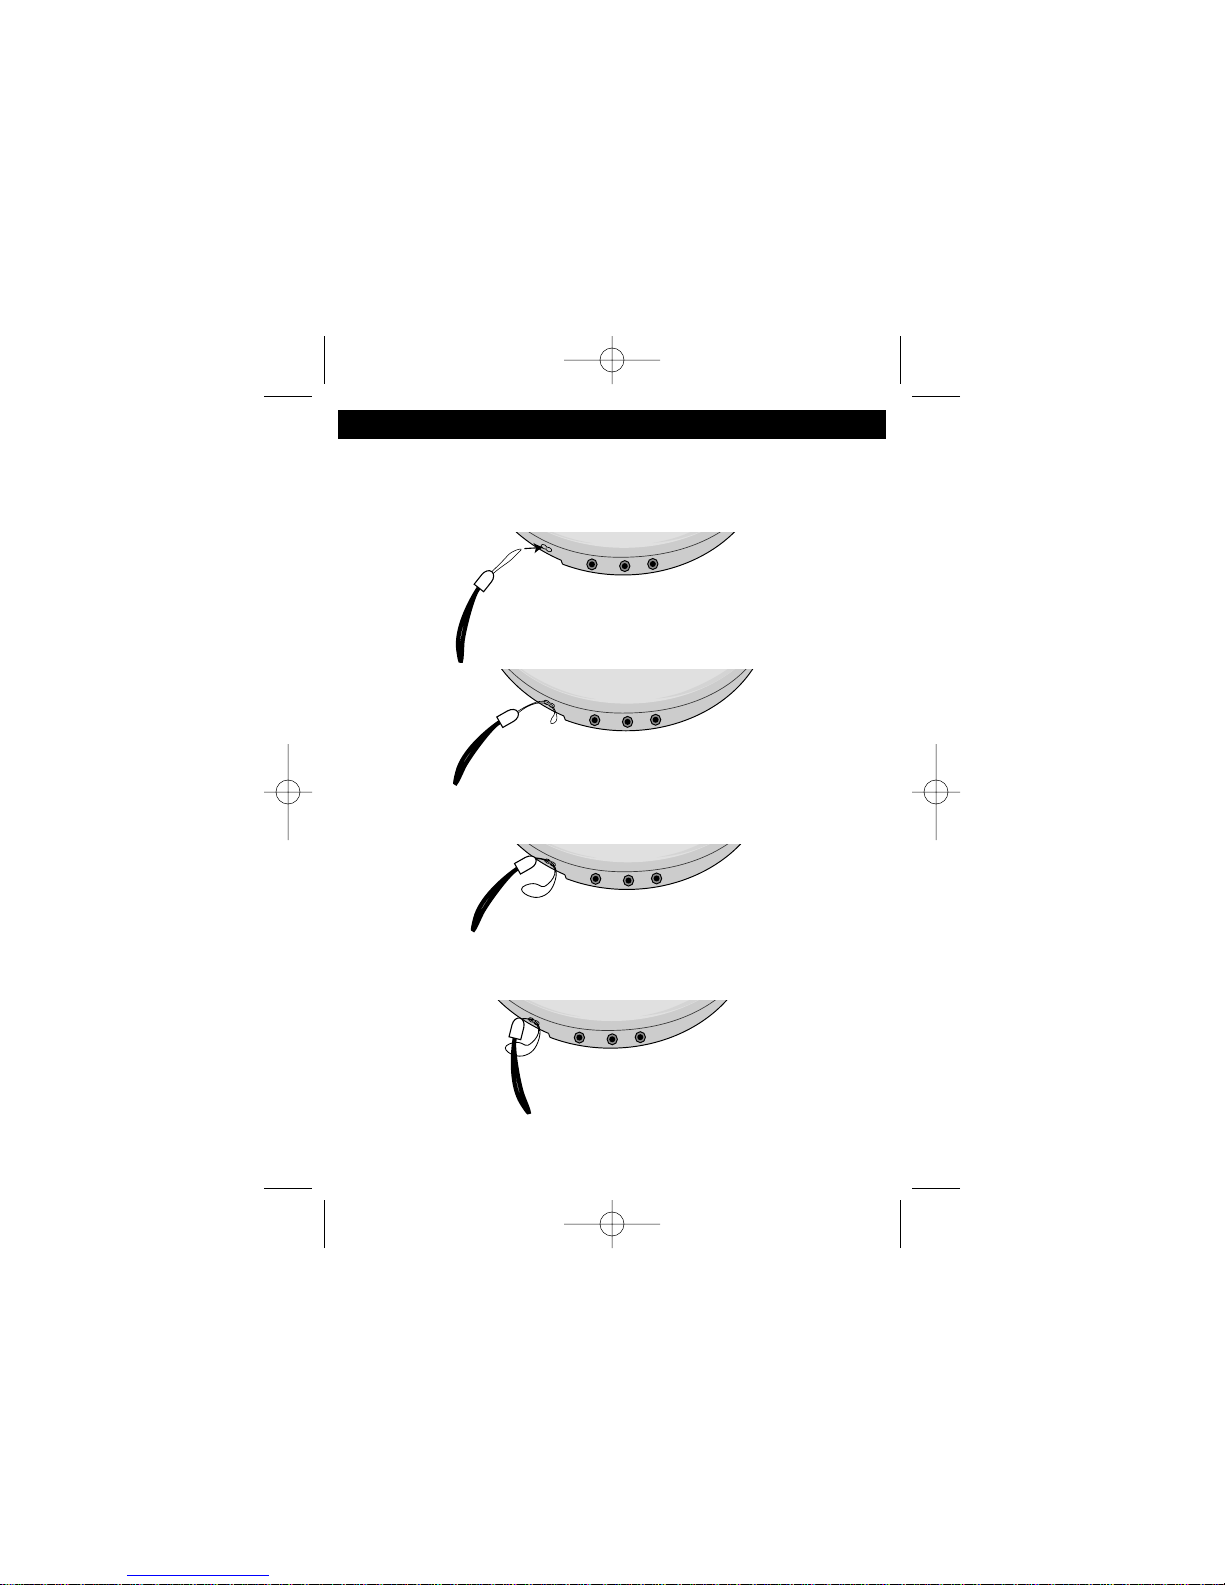
Follow the instructions below to use the hand strap:
1. Insert the hand strap through the hole and shown in figures 1 and 2.
2. Loop the strap around the pin in the hole as shown in figure 3.
3. Insert the thick strap through the thin strap’s loop and then pull until tight
and secure as shown in figure 4.
Figure 1
Figure 2
Figure 3
Figure 4
DCD6000.O/M.QXD 1/24/03 4:22 PM Page 8
Page 10
9
OPERATION
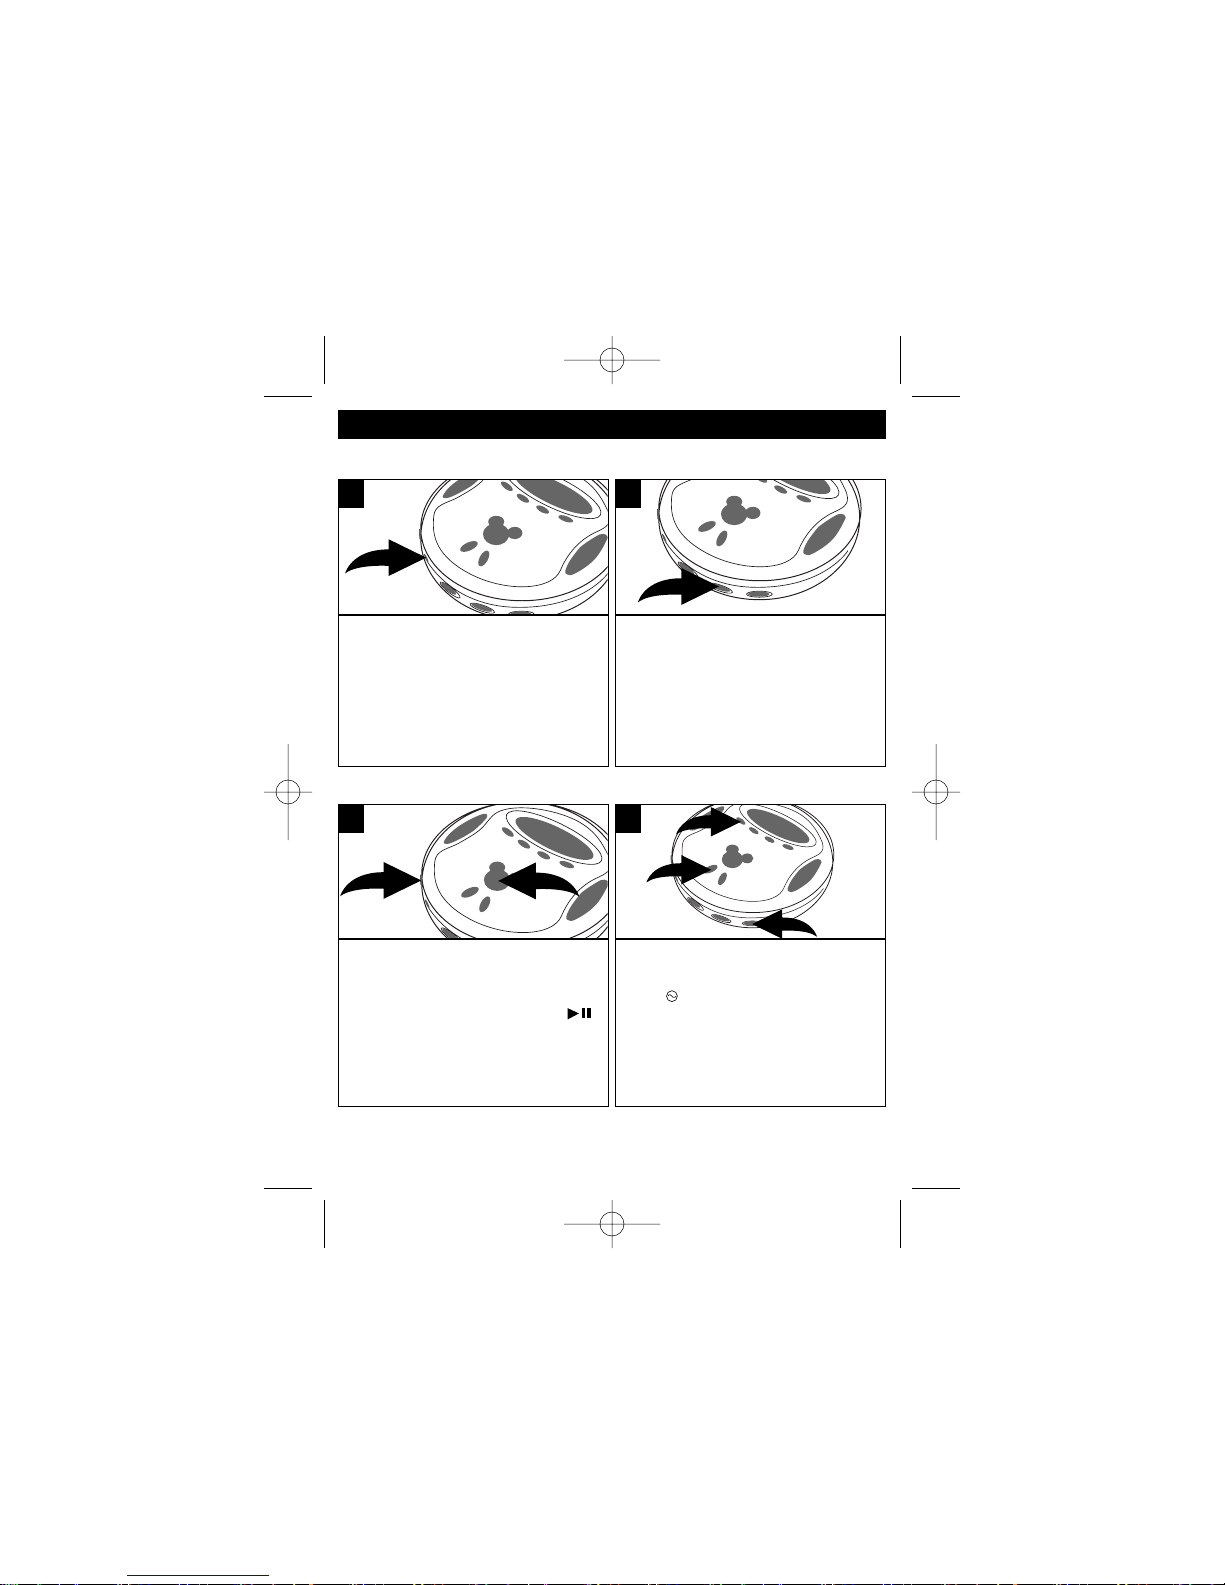
Set the VOLUME control ❶ to
minimum and plug the headphone
into one of the Headphone jacks.
Press the PLAY/PAUSE
()
/POWER ON button ❷ to turn the
unit on.
1
Slide the FUNCTION switch ❶ to
the RADIO position. Press the
ESP /BAND button ❷ to select
a band (AM or FM).
If listening to FM, press the
MODE button ❸ to turn FM
Stereo ON or OFF.
2
TO LISTEN TO THE RADIO
CONTINUED ON THE NEXT PAGE
Slide the DBBS switch to the ON
position to enhance the overall bass
sound.
1
To prevent accidentally pressing a
button while walking, etc. When
listening to a CD, slide the HOLD
switch to the ON position. When
you want to use these buttons
again, slide the HOLD switch back
to the OFF position.
1
DBBS (Bass Boost) Switch
HOLD Switch
DCD6000.O/M.QXD 1/24/03 4:22 PM Page 9
1
2
3
2
1
Page 11
10
OPERATION (CONTINUED)
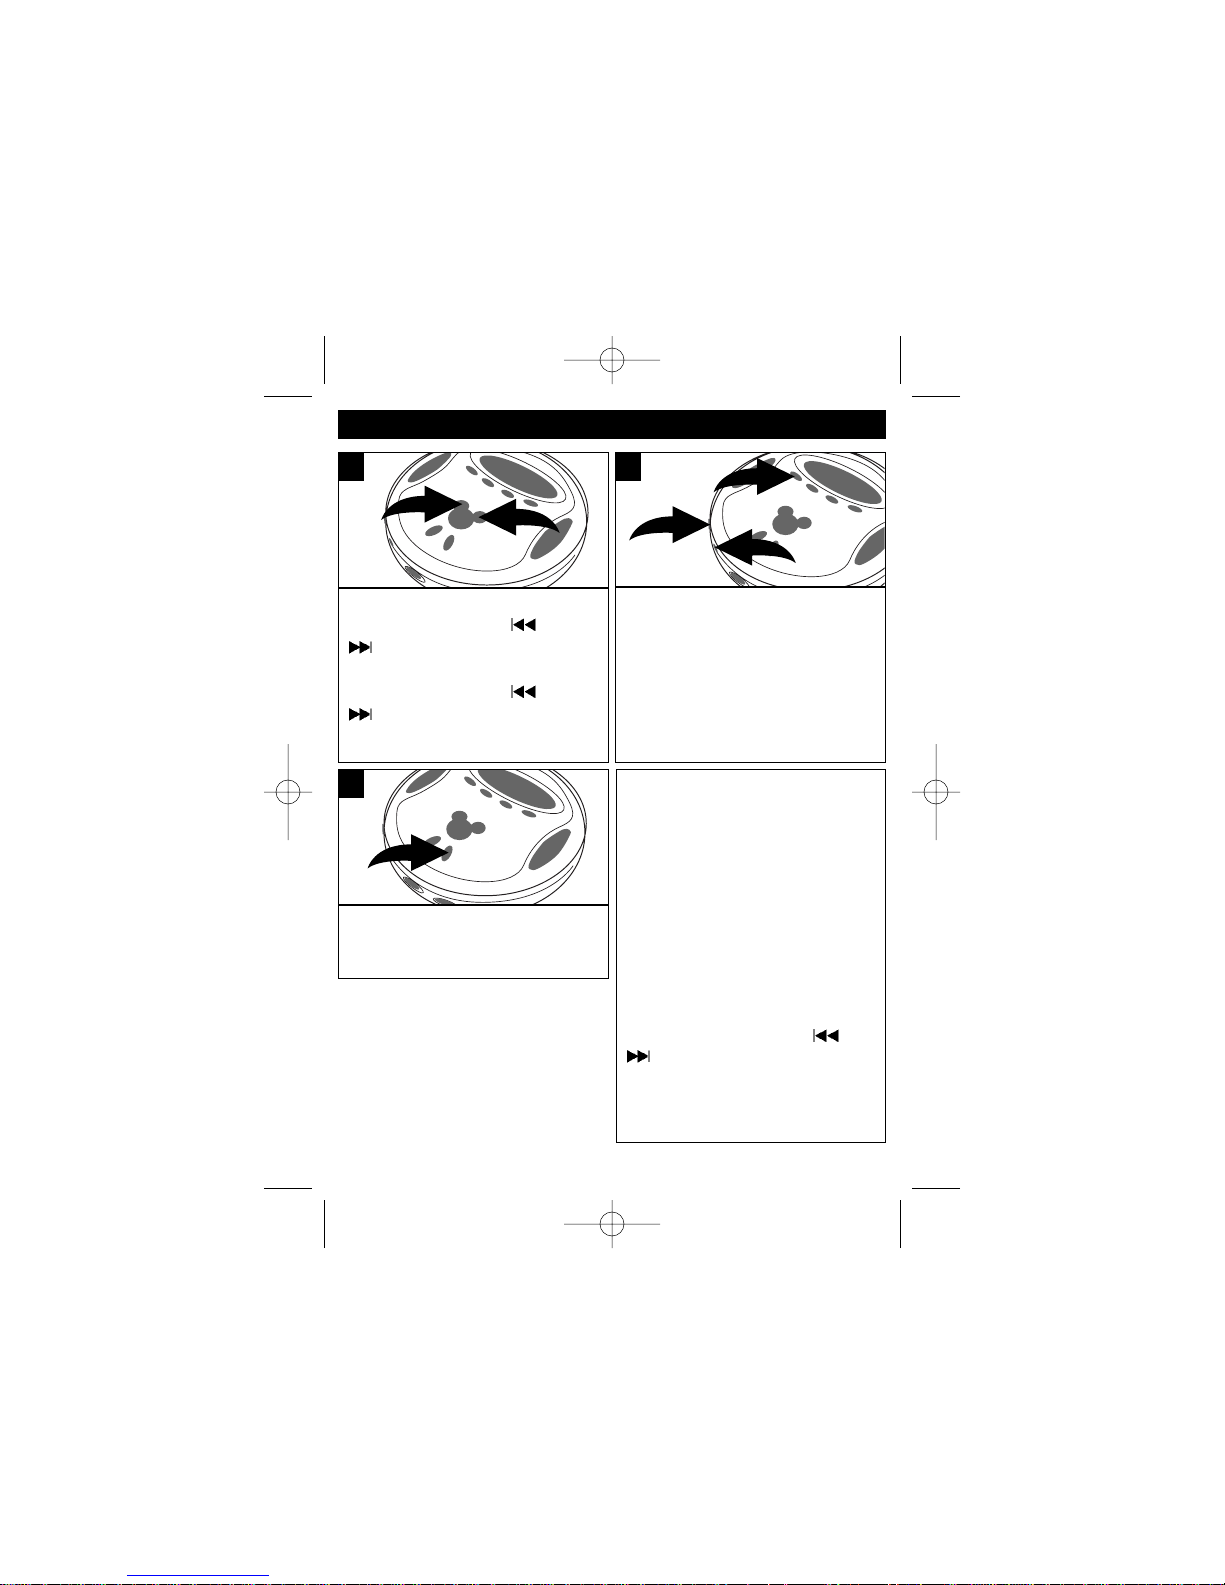
Press and release the SKIP/
SEARCH/Tuning – ❶ or +
button ❷ to tune a station.
Press and hold the SKIP/
SEARCH/Tuning – ❶ or +
button ❷ for 1 second, then
release for rapid search tuning.
3
Adjust the VOLUME control ❶ and
DBBS switch ❷ as desired. If FM
STEREO reception is weak/noisy,
press the MODE button ❸ to turn
off Stereo, in this case the
reception will be monaural.
4
To turn the radio off, press the
STOP (■)/POWER OFF button.
5
ANTENNAS
AM – This unit has a built-in ferrite
bar antenna, which provides
adequate reception in most areas. If
reception is weak, turn the unit to
improve reception.
FM – The headphones act as an
antenna for FM. Extend the
headphone wire for best FM
reception.
AUTO SCAN
Press and hold the
SKIP/SEARCH/Tuning – or +
button for approximately one
second and the unit will
automatically search for the next
available station.
DCD6000.O/M.QXD 1/24/03 4:22 PM Page 10
1
3
2
1
2
Page 12
11
OPERATION (CONTINUED)
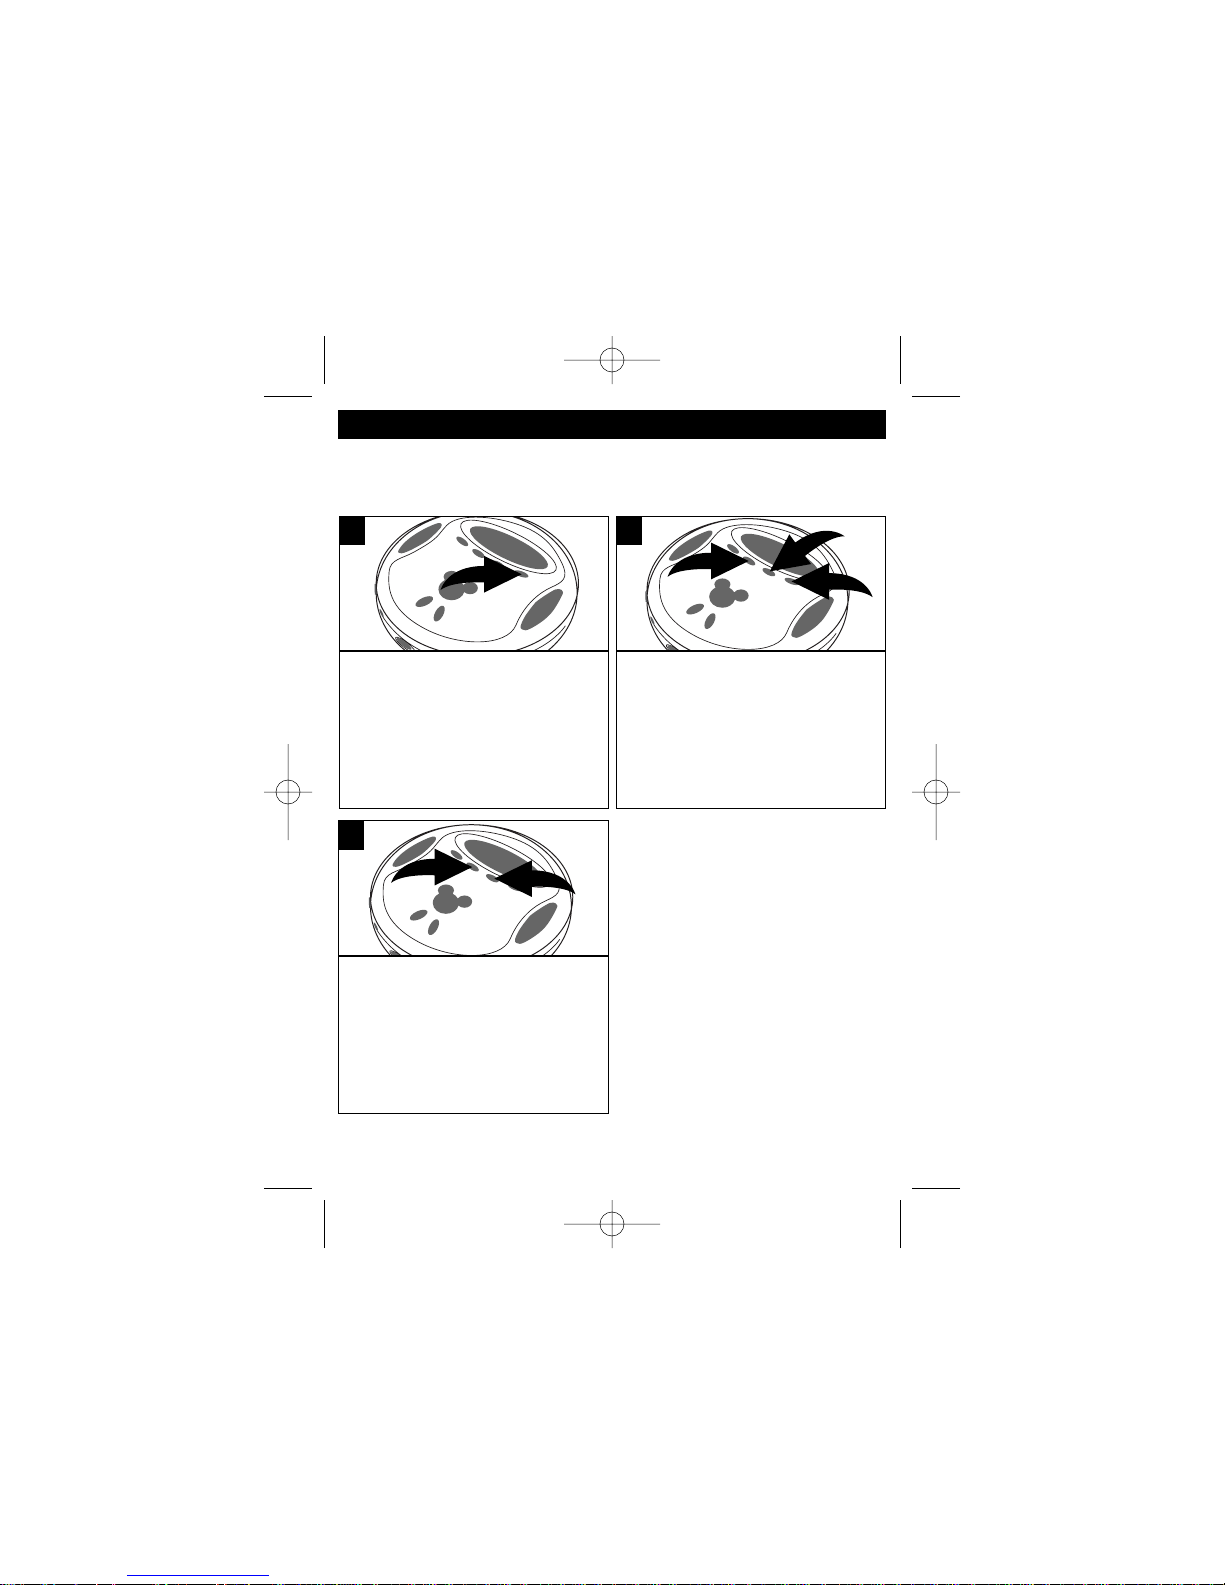
Tune a desired station as
described in the previous
section. Press the PROGRAM
button; the PROGRAM indicator
will blink in the display.
1
While the PROGRAM indicator
is blinking, select the desired
preset using the PRESET UP ❶
or DOWN button ❷, then press
the PROGRAM button ❸ to set
the memory.
2
To receive a preset station,
simply press the PRESET UP
❶ or DOWN button ❷ to select
the desired preset.
3
TO SET AND RECEIVE A STATION INTO MEMORY
Up to 10 AM and 10 FM stations can be preset as follows:
DCD6000.O/M.QXD 1/24/03 4:22 PM Page 11
2
2
1
3
1
Page 13
12
OPERATION (CONTINUED)
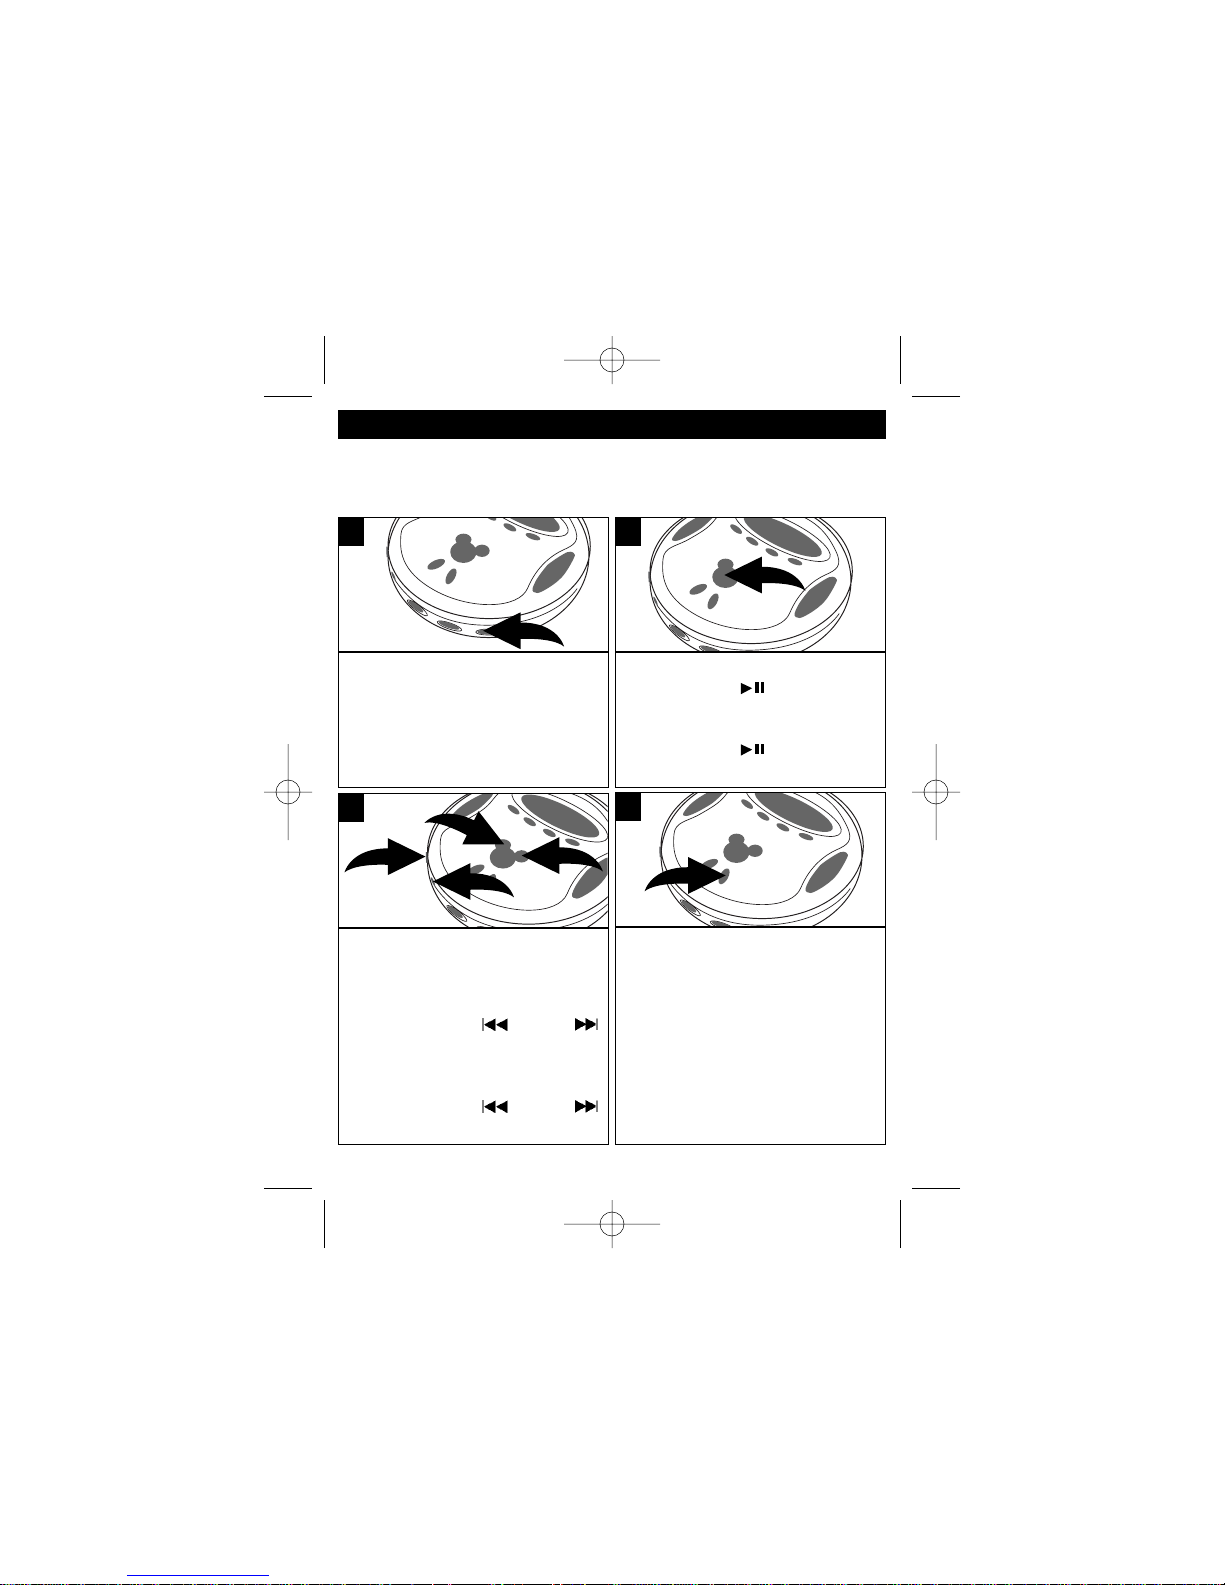
Gently insert a CD, label side up,
into the compartment until it
snaps in place. Insert headphones into the Headphones
jack(s). Slide the FUNCTION
switch to the CD position.
1
While the unit is off, press the
PLAY/PAUSE ( ) /POWER ON
button to start playback. To
pause PLAYBACK, press the
PLAY/PAUSE ( ) /POWER ON
button again, the display will blink.
2
Adjust the VOLUME control ❶ and
DBBS switch ❷ as desired. To skip
forward or backward through the
tracks on the disc, press the
SKIP/SEARCH – ❸ or +
button ❹. To search forward or
backward through a specific track on
the disc, press and hold the
SKIP/SEARCH – ❸ or +
button ❹.
3
When the disc is through playing, it
will stop. Press the STOP
(■)/POWER OFF button to stop the
disc before it is finished; the total
number of tracks and playing time
will appear. Press the STOP
(■)/POWER OFF button again
while in the stop mode or wait
approximately 60 seconds to turn
the unit off.
4
TO INSERT AND PLAY A CD
This CD player is designed to play all kinds of Audio Discs, such as CD recordables and rewritables. Do not try to play CDI, CDV, DVD or computer CDs.
DCD6000.O/M.QXD 1/24/03 4:22 PM Page 12
1
3
2
4
Page 14
13
OPERATION (CONTINUED)
CD PLAYBACK NOTES:
• This unit is capable of playing standard
CDs or 3” singles; no adapter is required.
• If a disc is inserted incorrectly, dirty,
damaged or not present at all, the display
will show “no disc”.
• As each track is played, the track number
and elapsed time are shown in the display.
• To remove the disc, open the CD
Compartment, hold the edge of the CD and
gently press the center pivot and lift the
CD.
• The maximum time of a CD is 74 minutes
for this unit.
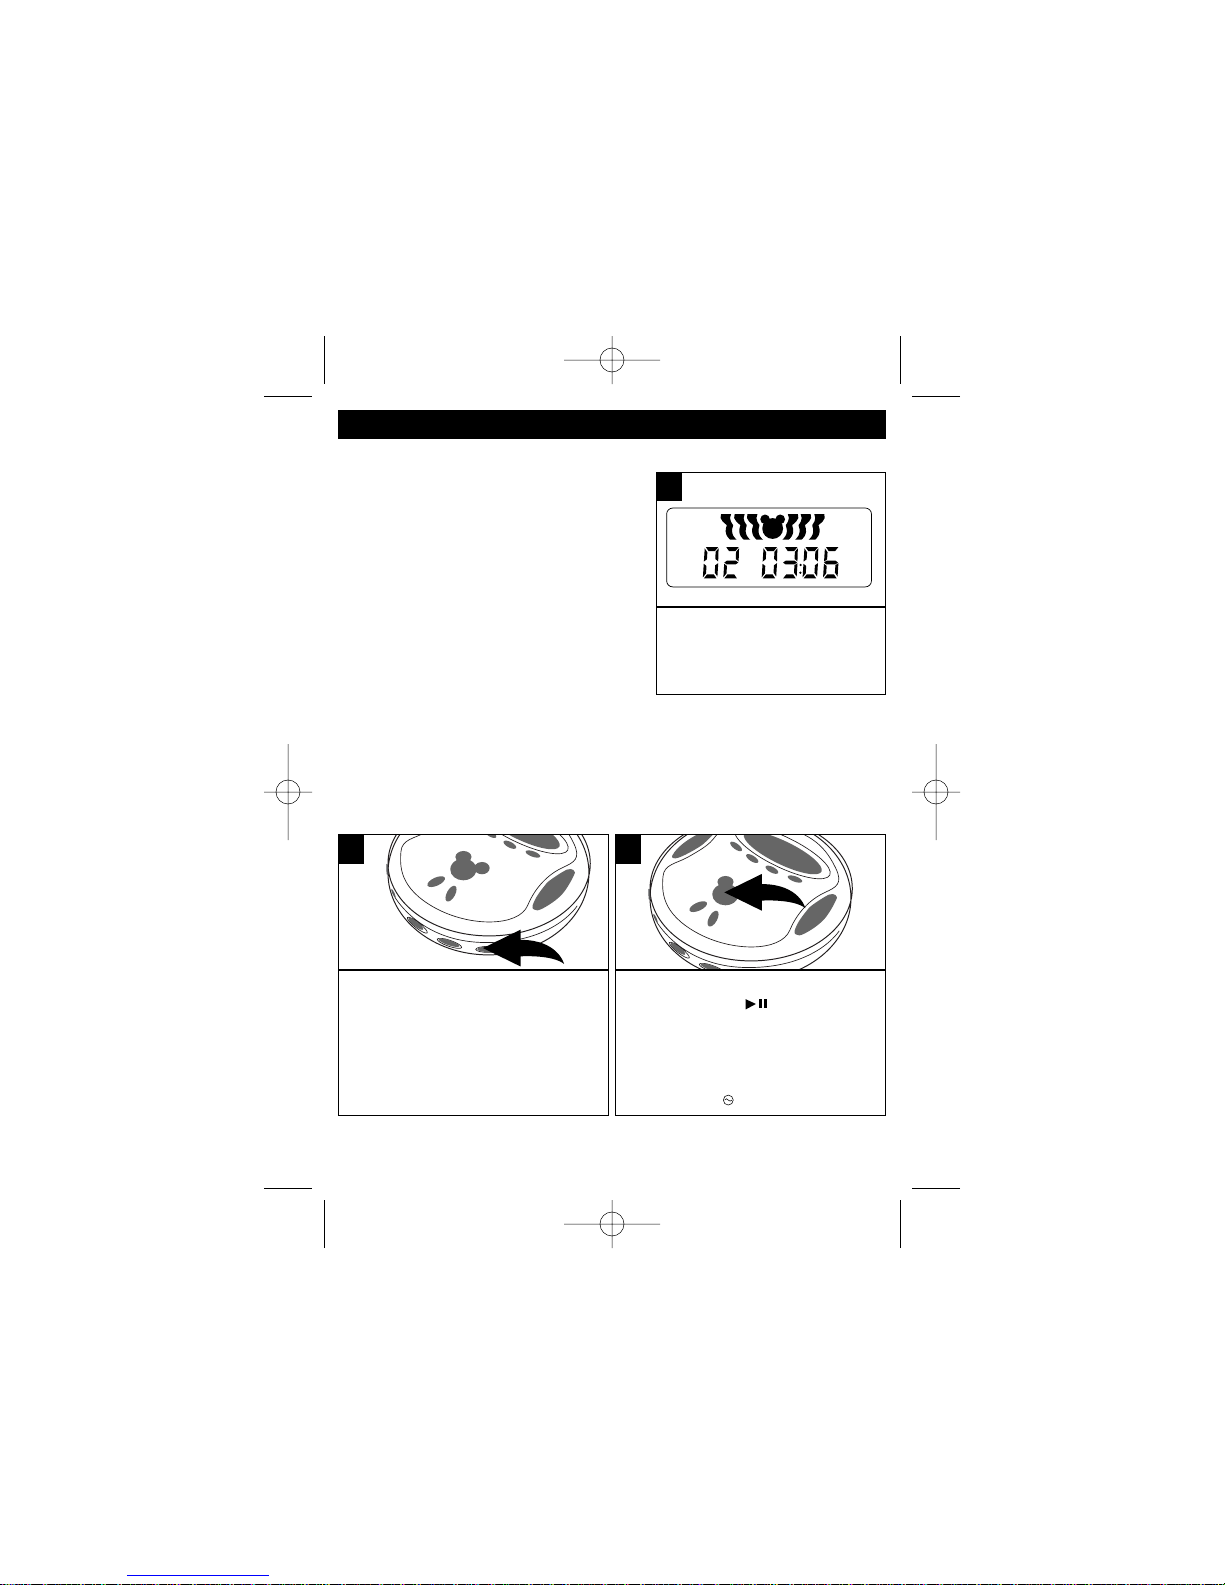
Insert a CD as described in the TO
INSERT AND PLAY A CD section
and slide the FUNCTION switch to
the CD position.
1
With a CD inserted, press the
PLAY/PAUSE ( )/POWER ON
button to turn the unit on. The
Electronic Anti-Shock Protection will
start automatically, the sound will
mute for a moment and the display
will show the indicator.
2
45 SECOND ELECTRONIC ANTI-SHOCK SYSTEM
This CD player has a built-in Electronic Anti-Shock System that cuts down
on CD skipping. This feature is useful when using the CD player during
activities that could potentially cause skipping. Follow the steps below to
activate and understand the Anti-Shock System.
CONTINUED ON THE NEXT PAGE
To indicate a CD is playing,
the display will show an
animation as shown above.
1
ANIMATED DISPLAY
DCD6000.O/M.QXD 1/24/03 4:22 PM Page 13
Page 15
14
OPERATION (CONTINUED)
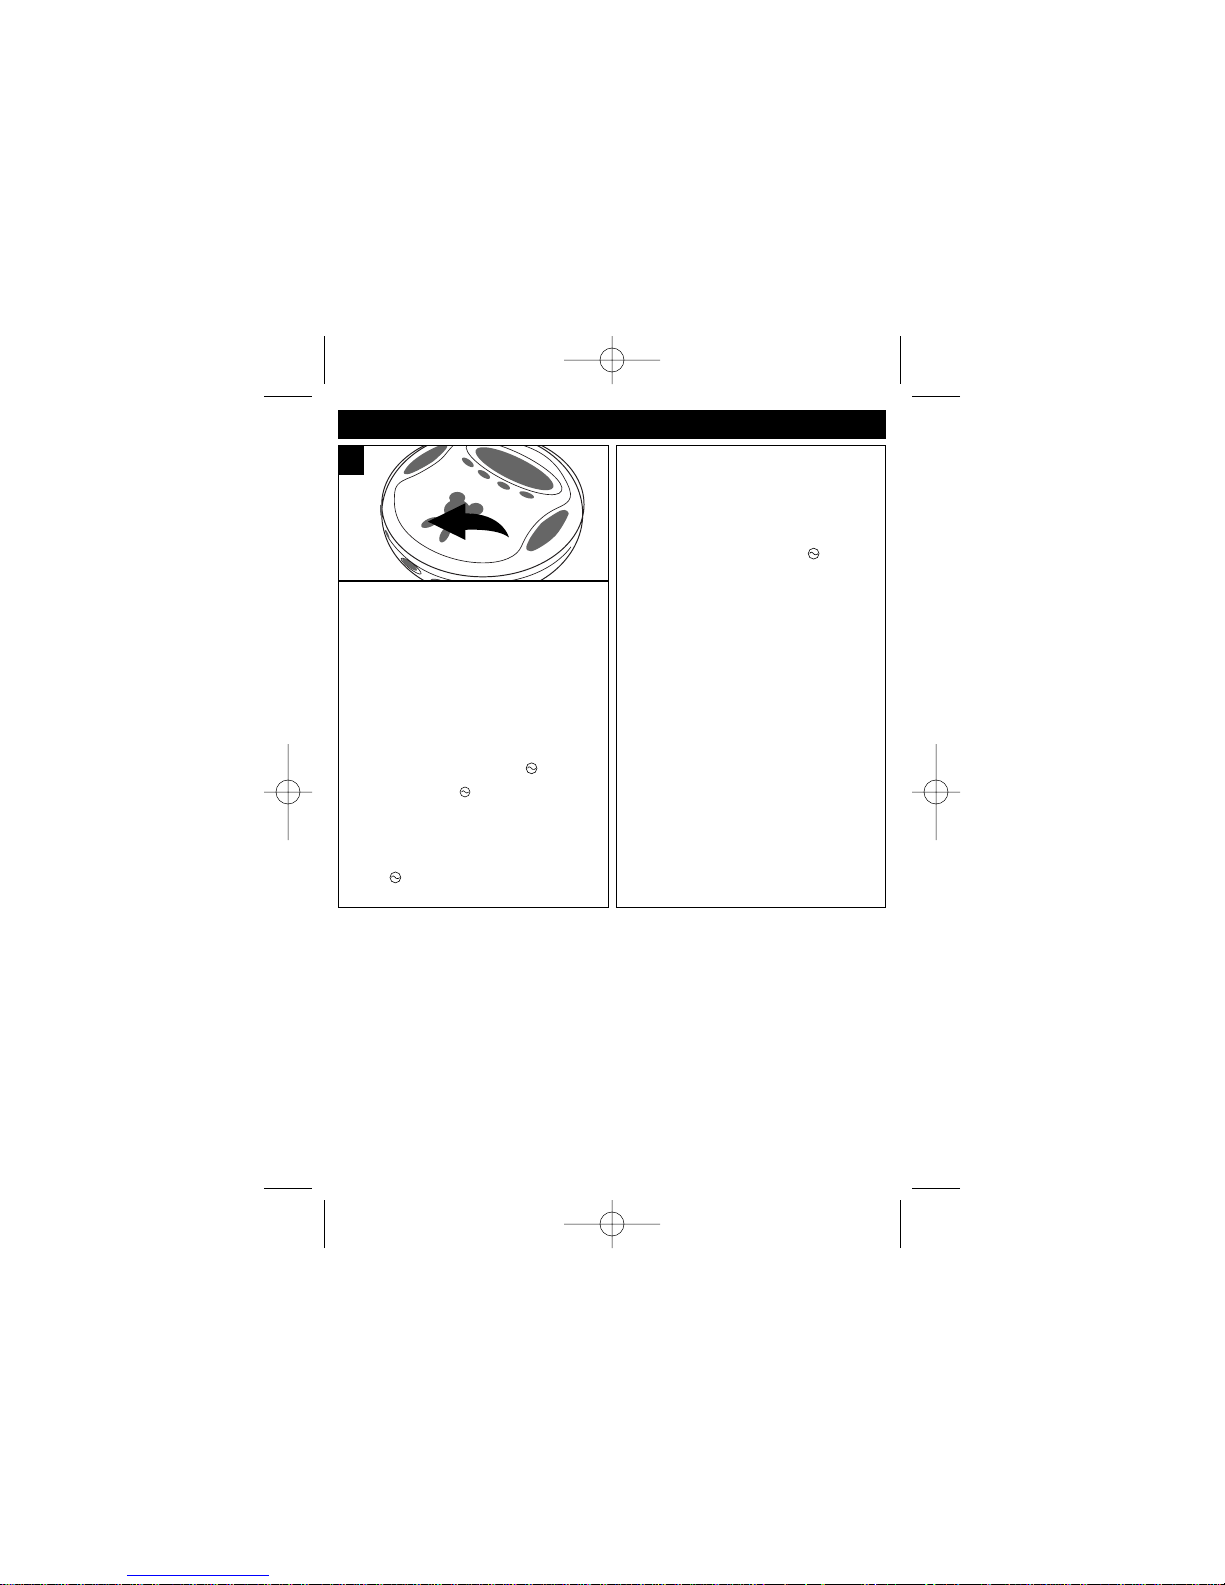
If the CD player is subject to
vibration during playback, the
music should continue to play
the signals stored in the
memory until the CD player can
read the music data properly
from the disc. To turn the
Electronic Anti-Shock System
off, press the ESP /BAND
button; the indicator will
disappear from the display.
To turn the Electronic AntiShock System on, press the
ESP /BAND button again.
3
NOTES:
• When the CD player is used
in a stable location, turn the
Anti-Shock System off by
pressing the ESP /BAND
button. When the Electronic
Anti-Shock System is off,
battery consumption is less.
• The Electronic Anti-Shock
System provides for
continuous sound output
when unit is subject to
vibration, but it will not
correct errors, such as a
defective or dirty CD.
DCD6000.O/M.QXD 1/24/03 4:22 PM Page 14
Page 16
15
OPERATION (CONTINUED)
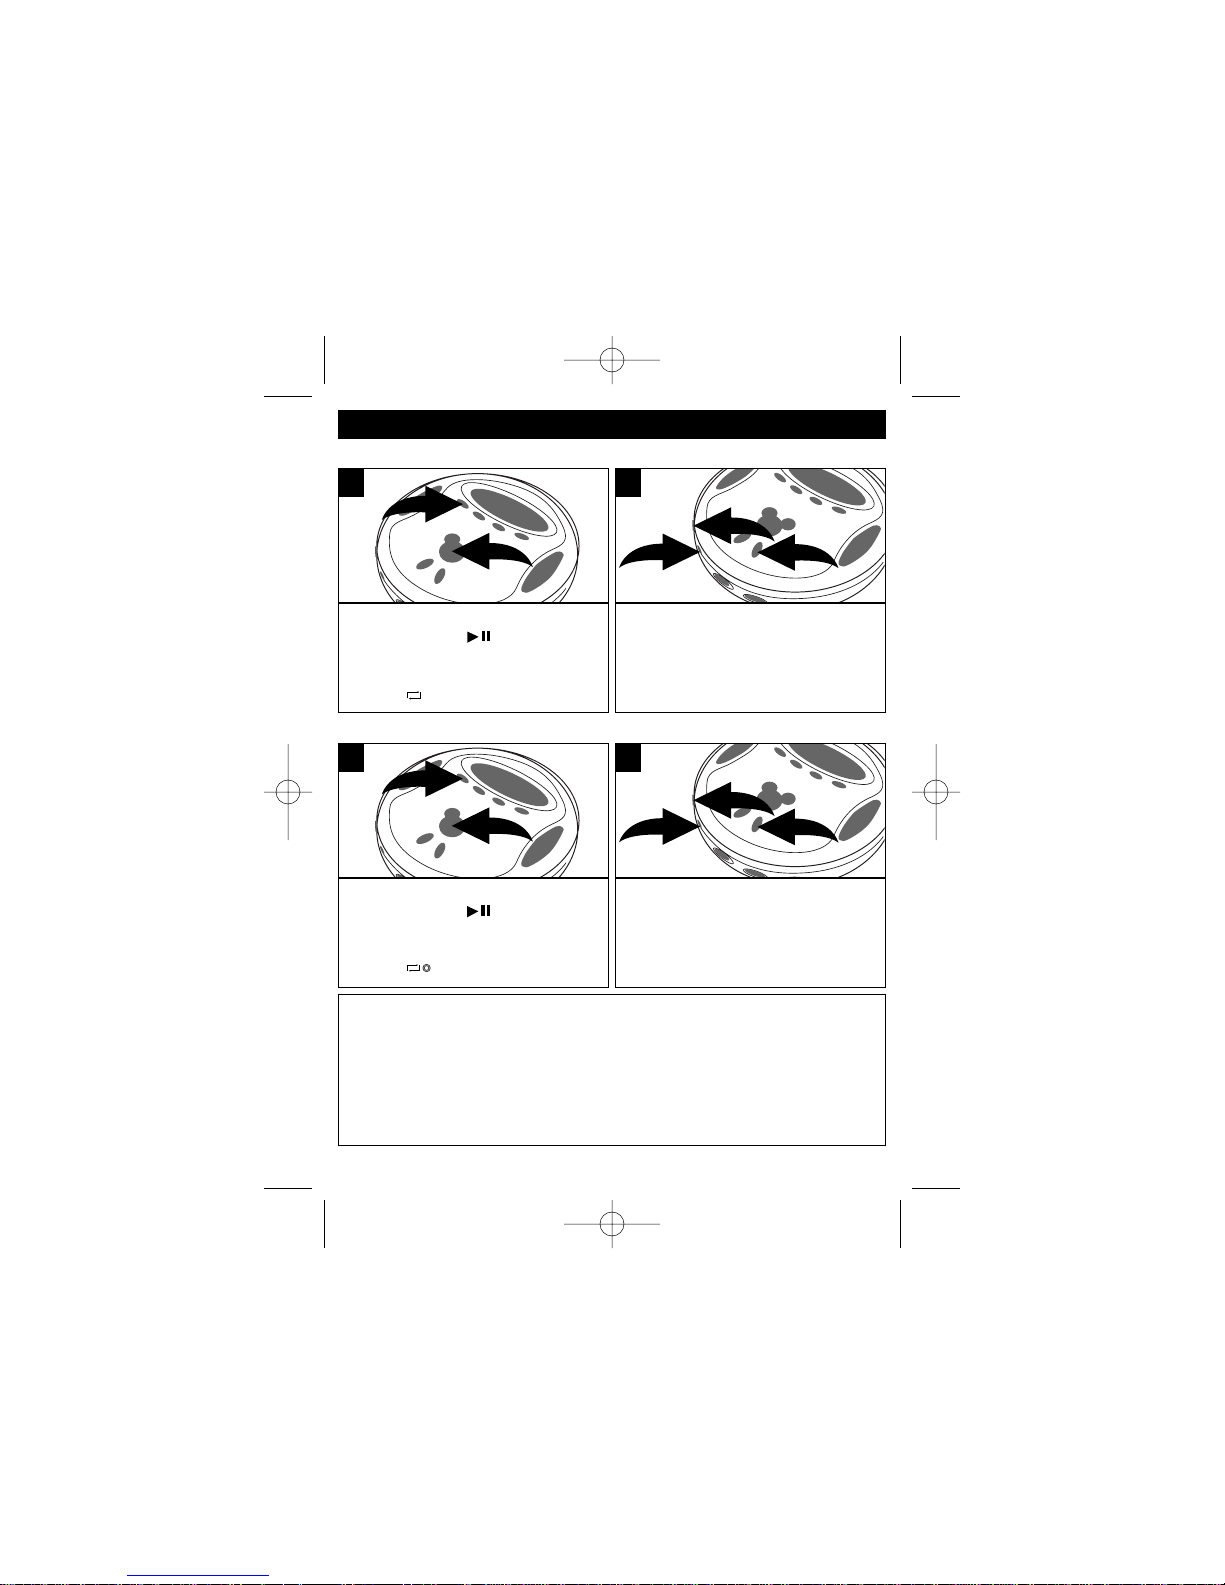
TO REPEATEDLY PLAY BACK ONE TRACK
With a CD inserted, press the
PLAY/PAUSE ( )/POWER ON
button ❶ to turn the unit on. Press the
MODE button ❷ once; the Repeat 1
indicator will appear in the display.
1
The unit will then play the same track
over and over until the STOP
(■)/POWER OFF button ❶ is
pressed. Adjust the VOLUME control
❷ and DBBS switch ❸ as desired.
2
TO REPEATEDLY PLAY BACK ALL TRACKS
TO CANCEL OR STOP REPEAT PLAYBACK
• TO STOP REPEAT PLAYBACK, press the STOP (■)/POWER OFF button once.
• TO CANCEL REPEAT PLAYBACK, press the MODE button three times
(Repeat ALL indicator will disappear from the display) to cancel Repeat All
playback and continue normal playback. Press the MODE button four times
(Repeat 1 indicator will disappear from the display) to cancel Repeat 1 playback
and continue normal playback.
With a CD inserted, press the
PLAY/PAUSE ( )/POWER ON
button ❶ to turn the unit on. Press the
MODE button ❷ twice; the Repeat All
indicator will appear in the display.
1
The unit will then play all the tracks
on the CD over and over until the
STOP (■)/POWER OFF button ❶ is
pressed. Adjust the VOLUME control
❷ and DBBS switch ❸ as desired.
2
DCD6000.O/M.QXD 1/24/03 4:22 PM Page 15
2
2
1
3
1
2
2
1
3
1
Page 17
16
OPERATION (CONTINUED)
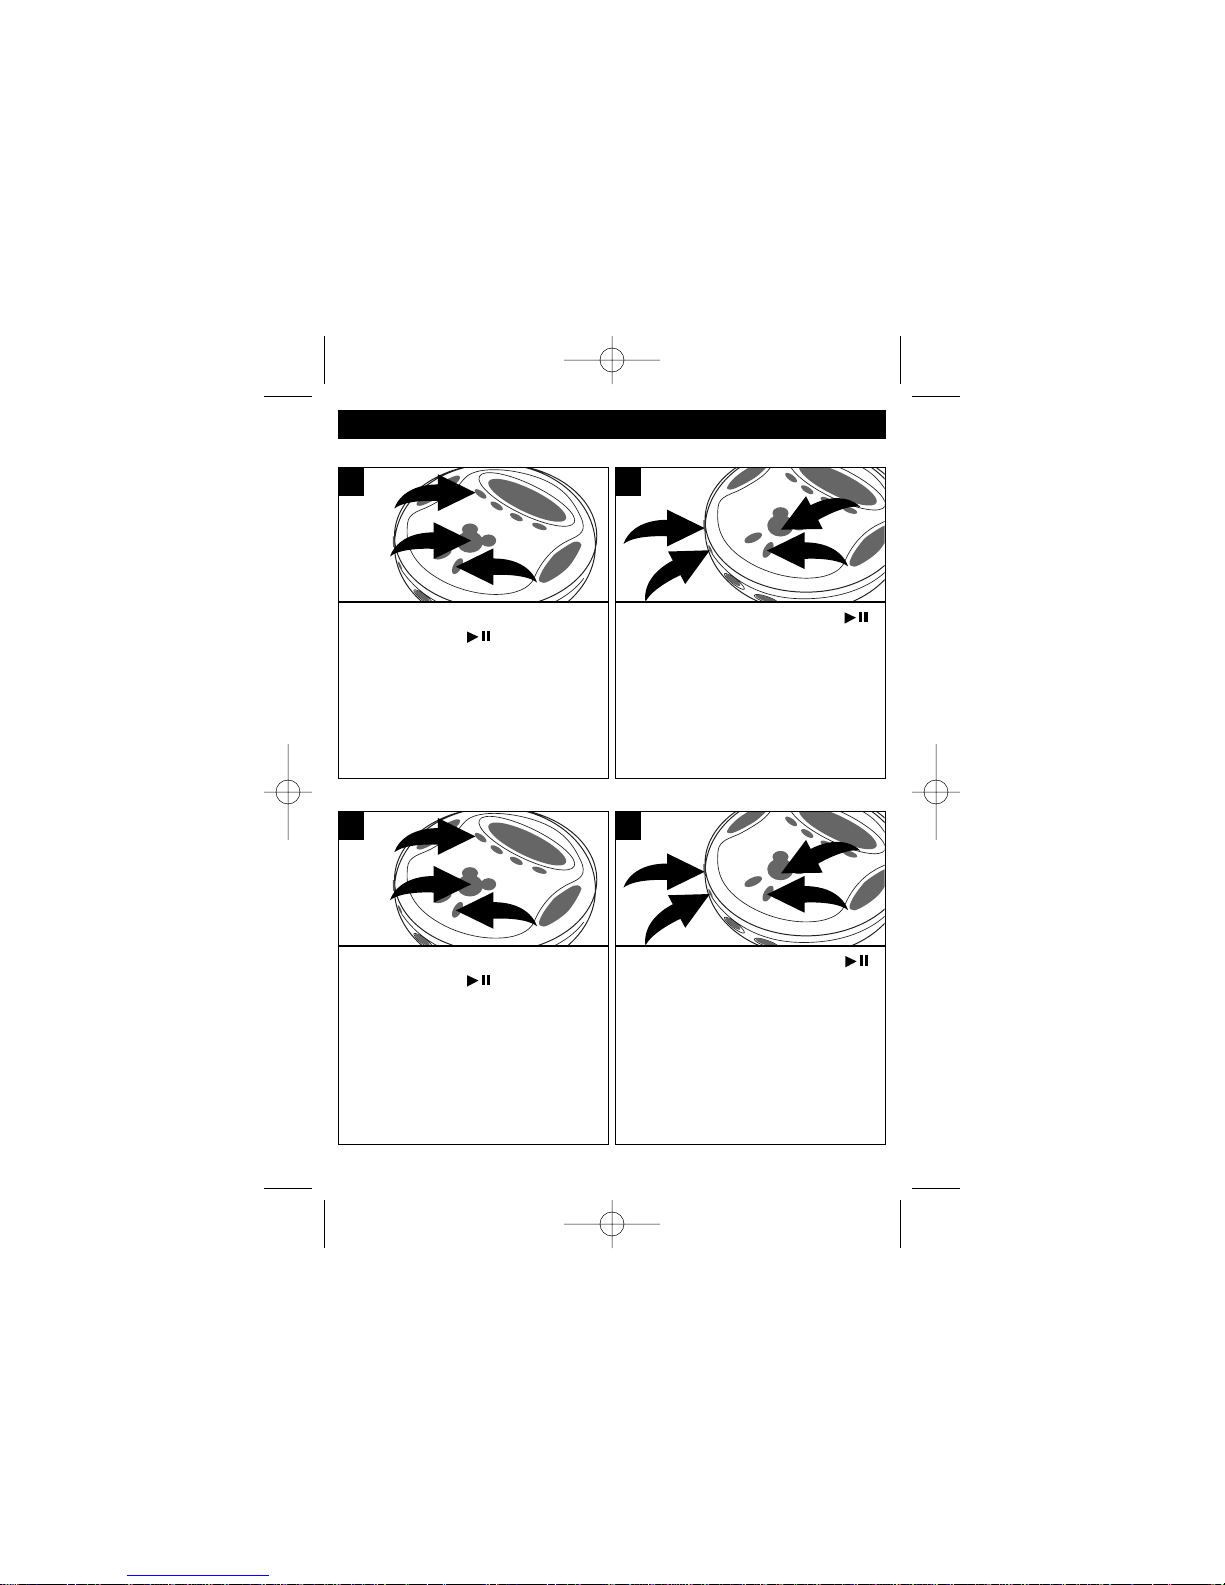
TO INTRO PLAY
TO RANDOMLY PLAY BACK A CD
With a CD inserted, press the
PLAY/PAUSE ()/POWER ON
button ❶ to turn the unit on and
press the STOP (■)/POWER OFF
button ❷ to stop auto playback.
Press the MODE button ❸ 3 times;
the INTRO indicator will blink in the
display.
1
Press the PLAY/PAUSE ()
/POWER ON button ❶ to begin
playback. The unit will play the first
10 seconds of each track. Adjust
the VOLUME control ❷ and DBBS
switch ❸ as desired. Press the
STOP (■)/POWER OFF button ❹ to
stop Intro playback.
2
With a CD inserted, press the
PLAY/PAUSE ()/POWER ON
button ❶ to turn the unit on and
press the STOP (■)/POWER OFF
button ❷ to stop auto playback.
Press the MODE button ❸ 4 times;
the RANDOM indicator will blink in
the display.
1
Press the PLAY/PAUSE ( )
/POWER ON button ❶ to begin
playback. The unit will play all the
tracks in random order. Adjust the
VOLUME control ❷ and DBBS switch
❸ as desired. When all the tracks
have been played, the unit will stop.
Press the STOP (■)/POWER OFF
button ❹ to stop Random playback.
2
DCD6000.O/M.QXD 1/24/03 4:22 PM Page 16
3
1
2
2
3
1
4
3
1
2
2
3
1
4
Page 18
17
OPERATION (CONTINUED)
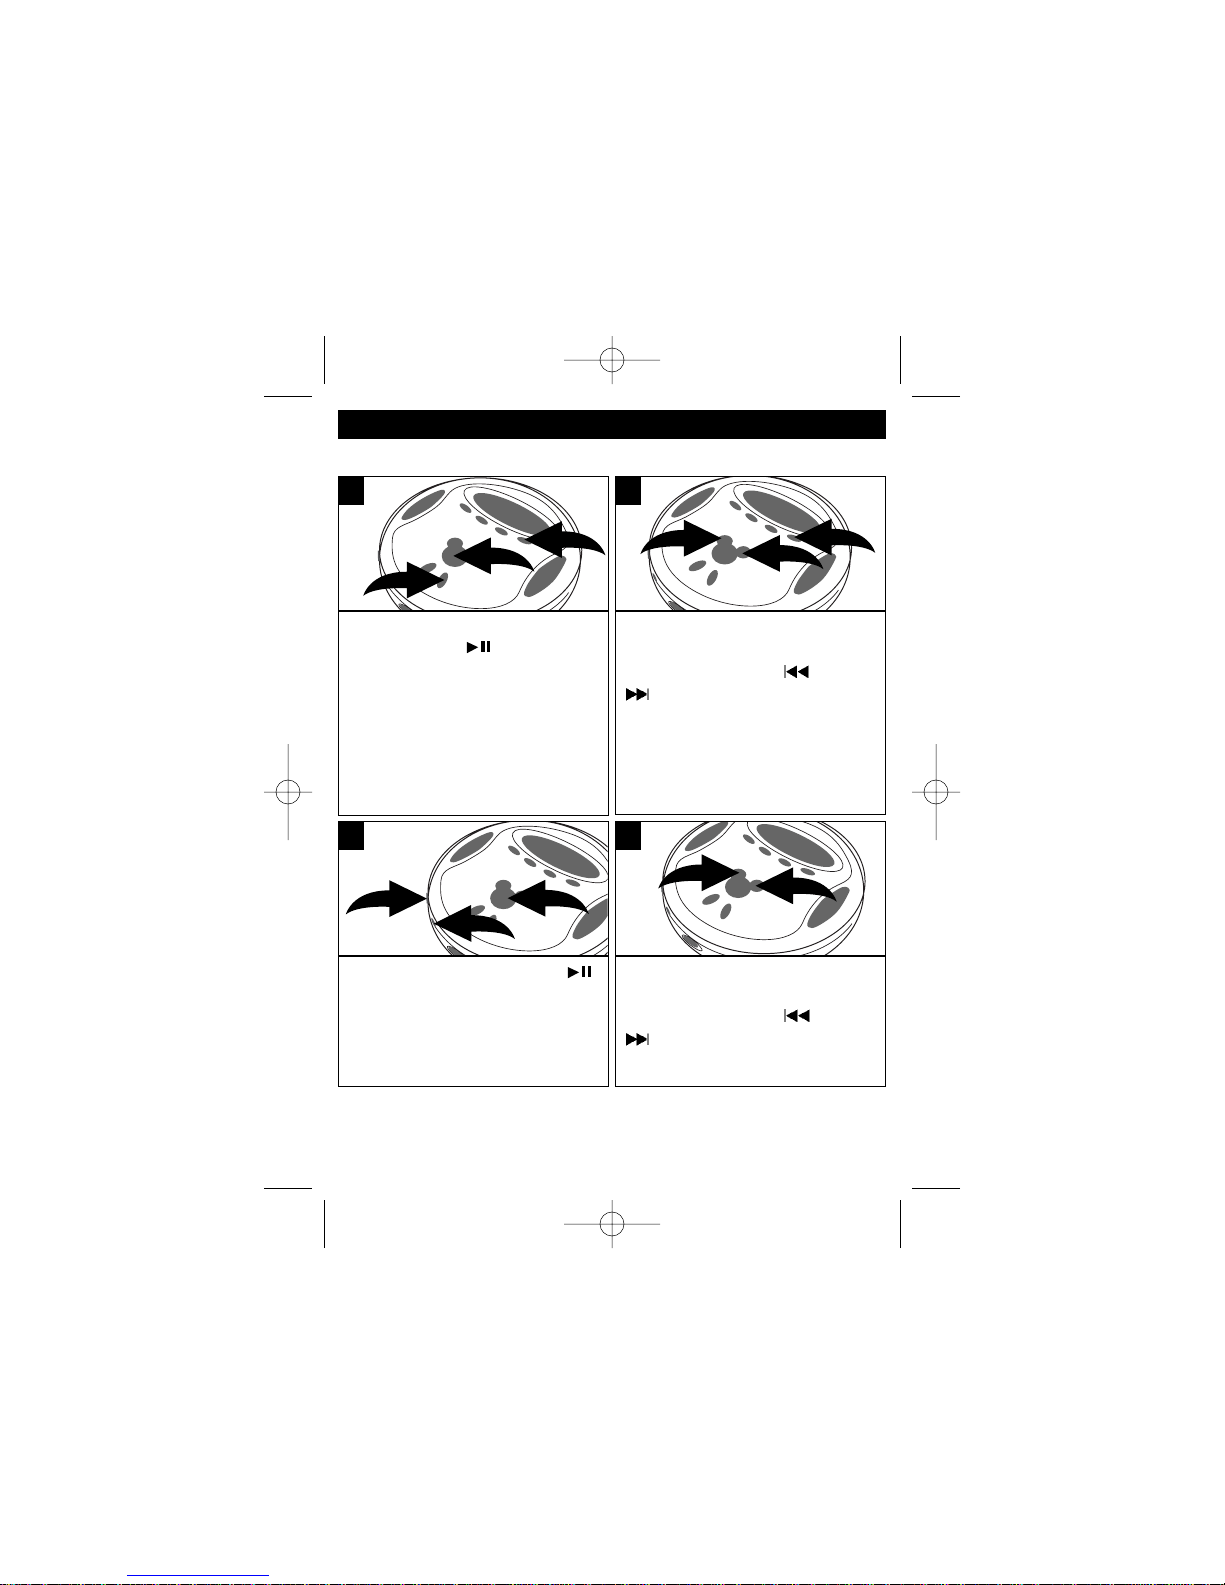
With a CD inserted, press the
PLAY/PAUSE ( )/POWER ON
button ❶ to turn the unit on and
press the STOP (■)/POWER
OFF button ❷ to stop auto
playback. Press the PROGRAM
button ❸; the PROGRAM
indicator will appear in the CD
display.
1
Select the first track to be
played back using the
SKIP/SEARCH – ❶ or +
button ❷, then press the
PROGRAM button ❸ again.
Repeat this step to program
additional tracks up to a
maximum of 24 tracks.
2
Press the PLAY/PAUSE( )
/POWER ON button ❶ to begin
Program playback and adjust
the VOLUME control ❷ and
DBBS switch ❸ as desired.
3
To skip forward or backward
through the programs, press the
SKIP/SEARCH – ❶ or +
button ❷.
When the disc is
through playing, it will stop.
4
TO PROGRAM THE MEMORY (UP TO 24 TRACKS)
See the top of the following page for notes on Program playback.
DCD6000.O/M.QXD 1/24/03 4:22 PM Page 17
1
2
2
3
3
1
1
1
3
2
2
Page 19
18
OPERATION (CONTINUED)
NOTES ON PROGRAM PLAYBACK:
• Press the
STOP (■)/POWER OFF button
to stop the disc before
it is finished.
• As each program is played, the track number is shown in the
display.
• To clear the memorized program:
press the
STOP (■)/POWER
OFF button
again while in the stop mode, wait approximately 60
seconds and the unit will turn off or open the CD compartment.
• Programming is the ability to preselect the order in which a
series of tracks will be played.
• Each track may be stored in the program memory as many
times as desired (up to 24 tracks).
DCD6000.O/M.QXD 1/24/03 4:22 PM Page 18
Page 20
19
CARE AND MAINTENANCE
Caring for Compact Discs
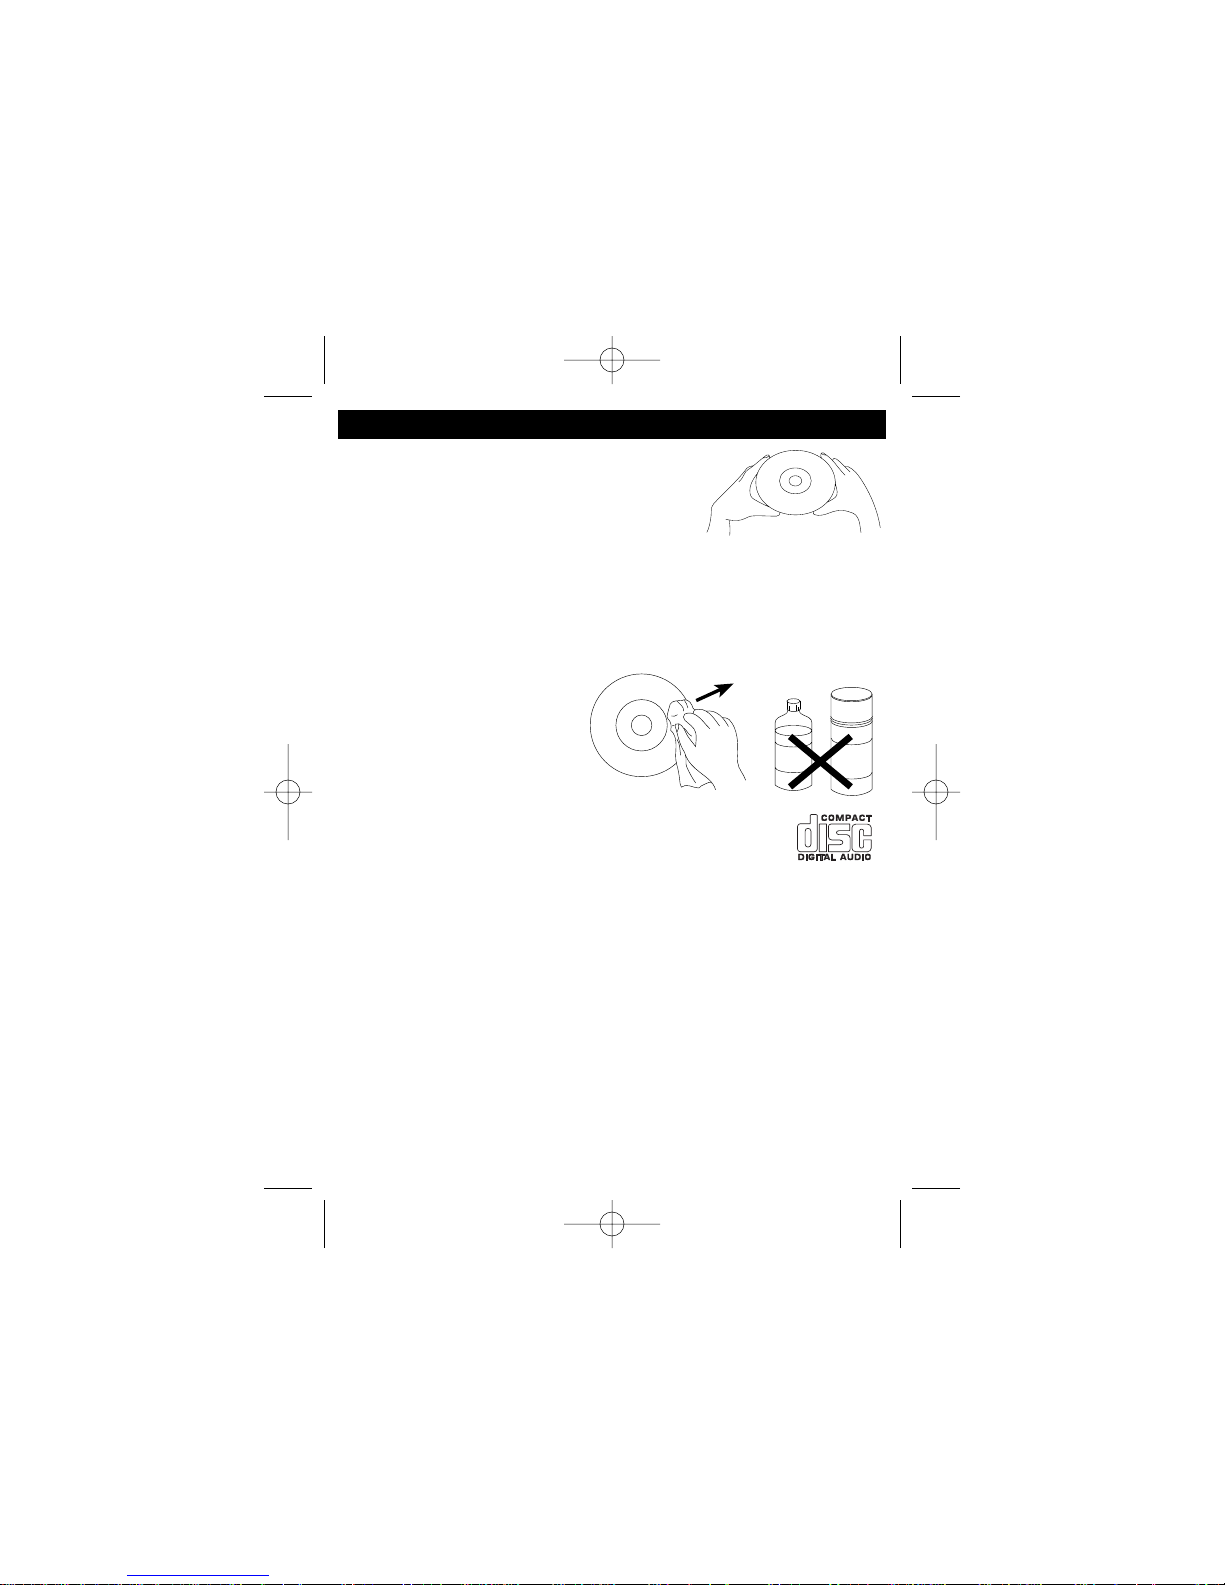
• Treat the compact disc carefully. Handle the
compact disc only by its edges. Never allow your
fingers to come in contact with the shiny,
unprinted side of the compact disc.
• Do not attach adhesive tape, stickers, etc. to the compact disc label.
• Clean the compact disc periodically with a soft, lint-free, dry cloth. Never
use detergents or abrasive cleaners to clean the compact disc. If
necessary, use a CD cleaning kit.
• If a compact disc skips or gets stuck on a section of the disc, it is
probably dirty or damaged (scratched).
• When cleaning the compact
disc, wipe in straight lines
from the center of the compact
disc to the outer edge of the
compact disc. Never wipe in
circular motions.
• This unit is designed to play
only compact discs bearing
the identification logo as shown here. Other compact discs
may not conform to the CD standard and may not play
properly.
• Compact discs should be stored in their cases after each use to avoid
damage.
• Do not expose compact discs to direct sunlight, high humidity, high
temperatures, or dust, etc. Prolonged exposure or extreme temperatures
can warp the compact disc.
• Do not stick or write anything on either side of the compact disc. Sharp
writing instruments, or the ink may damage the surface.
Cleaning the unit
• To prevent fire or shock hazard, disconnect your unit from the AC power
source when cleaning.
• The finish on your unit may be cleaned with a dust cloth and cared for as
other furniture. Use caution when cleaning and wiping the plastic parts.
• Mild soap and a damp cloth may be used on the front panel.
DCD6000.O/M.QXD 1/24/03 4:22 PM Page 19
C
L
R
E
E
A
B
E
N
Z
N
E
N
E
Page 21
20
TROUBLESHOOTING GUIDE
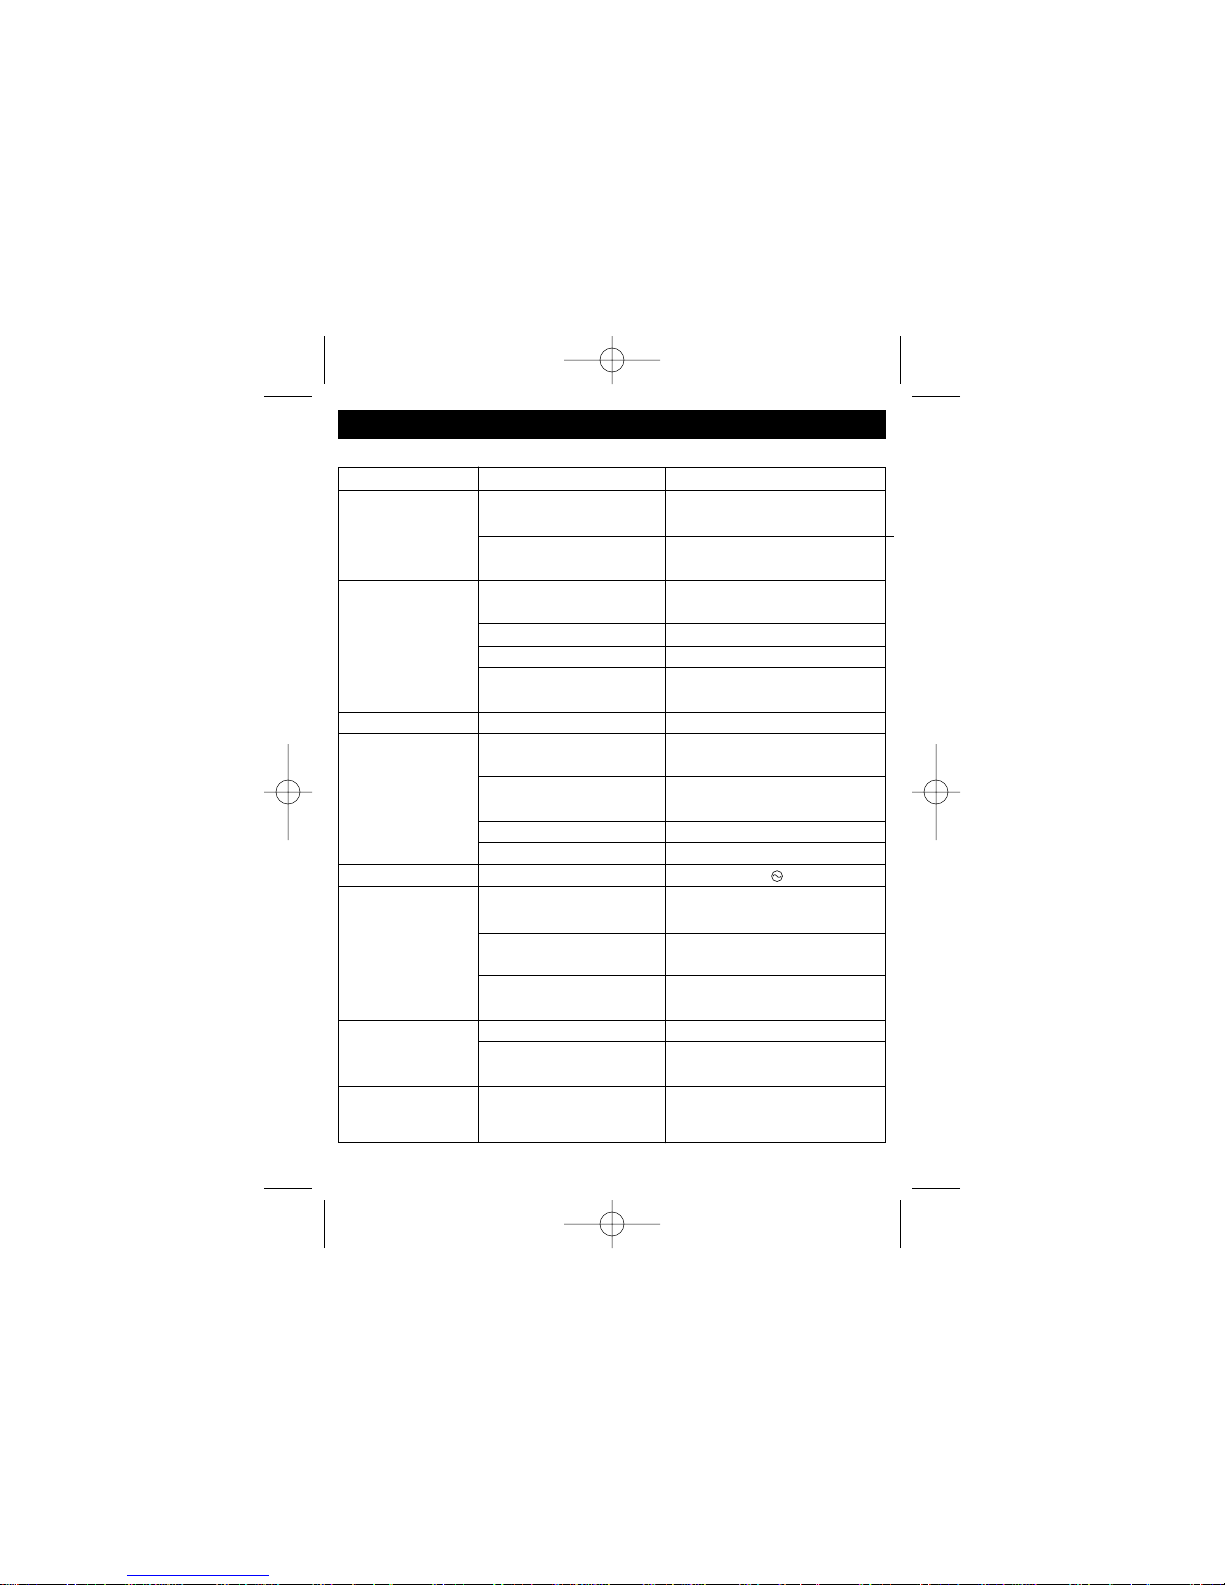
Should this unit exhibit a problem, check the following before seeking service:
SYMPTOM CAUSE SOLUTION
Unit will not Weak or dead batteries Replace batteries and insert
turn on. or inserted incorrectly. correctly.
AC adapter Check AC adapter
not connected. connection.
Disc will not play. CD compartment Close CD compartment.
not closed.
Disc inserted incorrectly. Reinsert disc correctly.
Dirty or defective disc. Try another disc.
Moisture condensation Wipe disc with soft cloth.
on disc.
Erratic CD play. Dirty or defective disc. Clean or replace disc.
No sound from Headphone plug(s) Reinsert headphone
headphones. not inserted correctly. plug(s) correctly.
VOLUME control set Increase volume.
to minimum.
Weak batteries. Replace batteries.
Defective disc. Try another disc.
ESP not working. ESP is not activated. Press the ESP /BAND button.
Noise or sound Station not tuned Retune AM or FM
distorted on radio.
properly for AM or FM
. broadcast station.
FM: Headphone wire Extend Headphone wire.
not extended.
AM: Unit is not Rotate unit until best
positioned correctly. reception is obtained.
STEREO ind. Poor FM signal. Retune station.
does not light. MODE button not set Press MODE button to turn
to Stereo (ON). Stereo on.
No sound. FUNCTION switch is not Set FUNCTION switch to the
in the desired position. desired function.
DCD6000.O/M.QXD 1/24/03 4:22 PM Page 20
Page 22
For additional set-up or operating assistance, please visit our website
at www.memorexelectronics.com or contact customer service at 1-877DISNYCE (1-877-347-6923).
Please keep all packaging material for at least 90 days in case you need
to return this product to your place of purchase or Memcorp.
For parts and accessories, contact Fox International at 1-800-321-6993.
Distributed by Memcorp Inc., Weston Fl
Disney Elements © Disney 2003.
DCD6000.O/M.QXD 1/24/03 4:22 PM Page 21
 Loading...