

Disney D100 Instruction Manual

insuction manual
D100 mobile telephone

Menu items
The menu provides access to many options and settings.
To use the menu
• From the standby screen, press
c
to display the
first main menu option: Messaging.
• Then use
d
and e to highlight an option and
press c to select it.
Phonebook
Vie w Names ................................................. pg 18
My Number.................................................. pg 19
Add Number ..........................................
h
.. pg 38
Che ck Memo ry .......................................
h
.. pg 41
Sav e Nos. To .........................................
h
.. pg 41
Call Logs
Mis sed Cal ls ................................................ pg 26
Rec eived C alls ............................................. pg 26
Dia lled Nu mbers ........................................... pg 26
Vir tual Ti mer ............................................... pg 26
Cal l Info ...............................................
h
.. pg 48
Settings
Pro file ....................................................... pg 28
Dis play ....................................................... pg 31
Sec urity L evel ............................................ pg 34
Sec urity ..............................................
h
.. pg 34
Res tore Se ttings ..................................
h
.. pg 48
Net work Se tting s ........................................ pg 32
Clock
Ala rm ......................................................... pg 27
Tim e and D ate .......................................
h
.. pg 44
Sch ool Hou rs ........................................
h
.. pg 46
Messaging
Cre ate New Msg ................................................. pg 22
Inb ox......................................................... pg 24
Sen t Items ................................................. pg 24
Pre set Mes sages ........................................ pg 25
Mes sage Se ttings ................................
h
.. pg 41
Voi cemail ................................................ .... pg 26
Menu options marked
h
are not available in normal mode.

1
Contents
Welcome...
...to the magical world of Disney
®
................. 3
A note to parents and guardians ............................... 4
Emergency calls ....................................................... 5
Getting started
Fitting your SIM card ...............................................7
Fitting and charging the battery ................................ 8
Connecting the optional headset .............................. 9
Changing the covers and keypad............................ 10
Switching on and off ..............................................12
Your mobile display .............................................. 12
Using the menu ...................................................... 13
Using your mobile
Making calls........................................................... 14
Receiving calls ....................................................... 15
Ending calls ...........................................................15
During a call........................................................... 16
Call log ..................................................................16
Voice recording ...................................................... 17
Keypad lock (12 keypad only) ................................17
Your phonebook ..................................................... 18
To use your phonebook ..................................... 18
Messaging .............................................................20
Reading messages ............................................ 20
Message options ............................................... 21
Creating a message ........................................... 22
Managing your inbox and sent items ................ 24
Sending preset messages .................................. 25
Voicemail (12 keypad only) .................................... 26
Call logs and virtual timer ..................................... 26
Alarm clock ............................................................ 27
continued

2
Special stuff
Customising your mobile ....................................... 28
Tones ................................................................. 28
Colour patterns.................................................. 29
Wallpapers and screensavers ............................ 29
Vibrate ............................................................... 30
Volume control .................................................. 30
Minute reminder ................................................ 30
Backlight ...........................................................31
Screen contrast ................................................ 31
Language........................................................... 31
Network settings ................................................ 32
Cleaning your mobile ............................................. 32
Parent’s section
h
Security ................................................................. 34
Changing modes ............................................... 34
Temporary unrestriction .................................... 37
Phonebook configuration ....................................... 38
Using international notation ..............................39
Messaging configuration........................................ 41
Administration via the website................................ 43
Other settings ......................................................... 44
Time .................................................................. 44
Date ................................................................... 45
Auto clock update .............................................. 45
School hours ..................................................... 46
Virtual timer....................................................... 47
Call costs ..........................................................48
Restore settings ................................................. 48
Other information
Solving problems ................................................... 49
Technical specifications ......................................... 50
Important safety information .................................. 51
Character copyright notices.................................... 57
Ringtone copyright notices..................................... 57

3
Welcome...
...to the magical world of Disney
®
Your Disney D100 mobile provides the freedom of
communication that your child desires allied with
the extra reassurance that every parent or guardian
requires. Combining ease of use, unique parental
controls and easily changeable keypads and covers,
your Disney D100 mobile will safely keep you in touch
and always remain in style.
Please take a moment to read the important notices
provided at the rear of this manual.
Please use your mobile responsibly
With freedom comes responsibility. Your Disney D100
mobile should be used only by children who are aware
of when and how to use it correctly.
Your Disney D100 mobile enables calls to be made to
the emergency services. As a parent or guardian you
must ensure that your child is aware of the correct use
of your mobile and these services. If your mobile is
misused by your child, you may be liable for any fines
or penalties that are incurred.
Your Disney D100 mobile is not a child management
device and should never be considered as a substitute
for adult supervision.
Due to small parts this product is not suitable for
children under 36 months.
Warranty
Your Disney D100 mobile is covered by a limited warranty. Please see the supplied warranty card for details.

4
School hours feature
To ensure that your child’s mobile never interferes with
school lessons, you can determine the hours of every
day when it should not ring.
Virtual timer
To help you advise your child on limiting their calls,
the virtual timer feature allows you to set a total for
their call times that they should try not to exceed.
No mobile internet access
For further piece of mind, your mobile does not allow
access to any mobile internet features.
A note to parents and guardians
Your Disney D100 mobile has been specifically created
to be expandable to meet the needs of children of varying ages and manageable to provide the overall control
that you require:
Operation to suit
Two types of keypad (4 key or 12 key) and two security
levels (normal or administrator) allow you to determine
the mode of operation that best suits your child. A
special code is required to change between the two
levels of operation. In this user guide, all features that
are available only at administrator level are marked
with this
h
icon.
Call and message control
The phonebook can hold up to 20 contact numbers,
which are programmable only at administrator level.
When your mobile is then changed to normal level,
calls and messages may only be made to, or received
from the contact numbers held within the phonebook.
Call and message override
As a parent or guardian you retain an option to
remotely override the call and message control, using
either the d100mobile.com website or a speciallyformatted text message, just in case you need to make
contact when away from your usual telephone.

5
Emergency calls
Your mobile, like any wireless phone, operates using
radio signals, wireless and landline networks, and
user-programmed functions. Because of this, connections in all conditions cannot be guaranteed. Therefore,
you should never rely solely on any wireless phone for
essential communications (e.g. medical emergencies).
Remember, to make or receive any calls, your mobile
must be switched on and be used in a service area that
has adequate signal strength. Emergency calls might
not be possible on all wireless phone networks or when
certain network services and/or mobile features are in
use. Check with local service providers.
Note : If certain features are in use (Auto key lock, call
restrictions, and so on), you might first need to turn
those features off before you can make an emergency
call. Consult this guide and your local service provider.
When making an emergency call, remember to give all
of the necessary information as accurately as possible.
Remember that your mobile might be the only means
of communication at the scene of an accident. Do not
terminate the call until given permission to do so.
To make an emergency call (4 key keypad)
1 Press the 3 key three times in succession. The
display will show Emergency Only. Press the a
button to dial the emergency number.
To make an emergency call (12 key keypad)
1 From the standby screen, enter the emergency
number for your present location (for example, 112)
and press the a button to dial.

6
Your Disney mobile
POWER/END/CANCEL BUTTON
MENU/SELECT BUTTON
NAVIGATION BUTTON
CHANGEABLE KEYPAD (12 KEYPAD SHOWN)
MICROPHONE
HEADSET & CHARGER SOCKETS
2
1
3
4
7
8
0
#
*
5
A
B
C
D
EF
G
H
I
M
N
O
PQRS
TUV
WXYZ
JK L
12 : 3
2
LANYARD LOOP
EARPIECE
DISPLAY
SEND/OK BUTTON
VOLUME BUTTONS (& VOICE RECORD)
SPEAKER

7
Getting started
Before you can begin making and receiving calls,
please take a moment to prepare your mobile by following the basic steps outlined in this chapter.
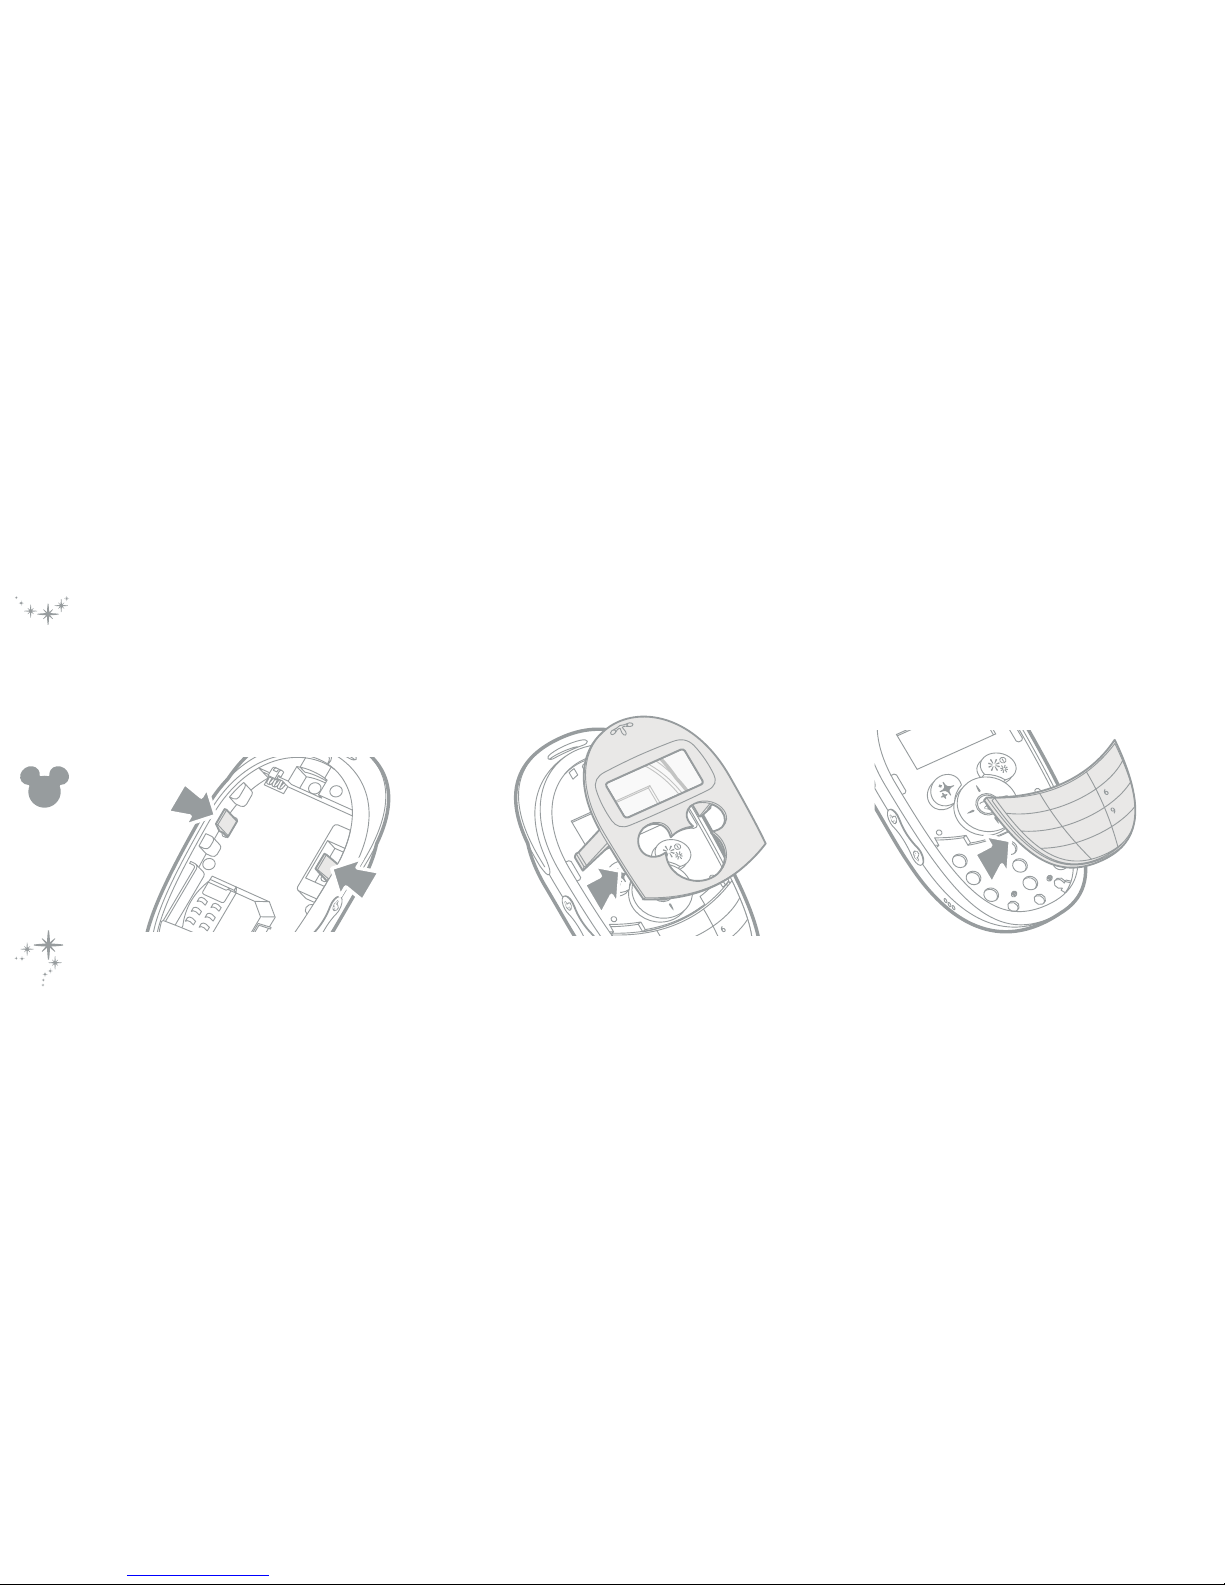
To remove the rear panel
1 Slide the release clip towards the lanyard loop and
simultaneously lift the rear cover away from the
main body.
Fitting your SIM card
To insert your SIM card
1 Orientate your SIM card with its gold contacts fac-
ing downwards and push it fully into the holder as
shown below.
2 Replace the battery and rear panel.
To remove your SIM card
1 Press down lightly on the clip adjacent to the SIM
card and as you do so, push the SIM card out of the
holder.

8
Fitting and charging the battery
Important: To prevent injury or burns, do not allow
metal objects to contact the battery terminals. Do
not disassemble the battery. Use only the original
battery or an approved replacement. Batteries which
are no longer in use must be disposed of correctly in
accordance with local regulations.
To remove the battery
1 Ensure that your mobile is switched off.
2 Lift up the base of the battery and then pull it away
from the main body.
To fit the battery
1 Orientate the three gold contacts at the top of the
battery with those of the battery compartment.
2 Press the top of the battery into the compartment
and then seat the base into place.

9
To charge the battery
1 Insert the charger lead into the larger of the two
sockets at the base of your mobile.
2 Plug the charger into a nearby mains socket.
On the standby screen you should see the battery
symbol scrolling – it will cease when the
battery is full.
Note: Your mobile can be switched on or off whilst
charging.
The initial charge should take roughly four hours,
subsequent charging times will be shorter. You
will need to recharge whenever the battery symbol
shows its low state:
2
7
8
0
#
*
5
A
GHI
PQRS
TU
V
W
JK L
2
1
4
7
8
0
#
*
5
A
GHI
PQRS
TU
V
W
JK L
Connecting the optional headset
1 Insert the lead of your optional headset (not sup-
plied as standard) into the small circular connector
at the base of your phone.
10
Changing the covers and keypad
Removing the covers and keypad
1 Remove the rear panel and battery.
2 Press the two clips inwards and as you do so, press
down slightly on each to release the front panel.
3 Gently lift the front panel away from the main body.
4 At the top edge of the keypad, lift it away from the
main body.
3
A
B
C
D
E
F
M
N
O
2
1
3
4
7
8
0
#
*
5
A
B
C
D
EF
G
HI
M
N
O
PQRS
TUV
WXYZ
JK L

11
Fitting the keypad and covers
1 Beginning with one of the top corners of the keypad,
insert the studs at its rear into the corresponding
holes in the main body.
2 As you continue around the perimeter of the keypad,
ensure that its four side tabs locate correctly. If any
key sticks up then its stud may not be correctly
seated.
3 Orientate the front panel with the main body and
insert its locking arms into the corresponding holes
of the main body. Carefully press the panel into
place until you hear a click on each side.
4 Replace the battery (see previous section) and then
attach the rear cover. Place its lower tabs into place
first and then press the top of the cover until it
clicks shut.
2
1
3
4
7
8
0
#
*
5
A
B
C
D
EF
G
H
I
M
N
O
PQRS
TUV
WXYZ
JK L

12
Switching on and off
1 Press and hold
b
until the display responds.
Note: If the battery has been previously removed,
your mobile will first ask you to Select Keypad
Mode. If so, depending on which keypad you have
fitted, press either a (4Key) or b (12Key).
If you are asked for a PIN code
Enter a valid code for your SIM card in one of two
ways:
• If you are using the 12 keypad: Enter the code using
the numeric keys and press
a
(
OK).
• If you are using the 4 keypad: Use
g
and f to
highlight each digit and press c to select. Press
a
(
OK) when all digits have been entered.
Your mobile display
The standby screen
When your mobile is switched on but not involved
in any activity, it reverts to its standby screen (if the
screensaver is playing - press any key):
Ne t w ork
1 2 : 3 2

13
On the standby screen you can see the current network
name, the time and date as well some of the following
indicators:
Signal strength indicator
Battery charge level
Roaming on another network
Unread text message(s)
New voicemail message(s)
An alarm is set
Vibrator (or vibrator & tone) enabled
Key lock on
School hour mode active
Using the menu
The menu provides access to many
options and settings.
To use the menu
1 From the standby screen, press
c
to display the first main
menu option:
Messaging.
2 Control the menu options as
shown here:
PRESS TO CHANGE
BETWEEN OPTIONS
PRESS TO SELECT
PRESS TO EXIT
FROM AN OPTION

14
Using your mobile
You can make or receive calls whenever your mobile is
switched on, a valid SIM card is inserted, the standby
screen (below) is displayed and the signal icon is
shown with between 0 and 5 bars of signal strength.
The standby screen
Making calls
There are three main ways to make a call (from the
standby screen):
• One touch dialling Press and hold any number
key to dial a pre-set number from your phonebook.
Notes:
Phonebook entries need to be assigned to each
number key. See the ‘Parent’s section’ for details.
If you are using the 12 keypad, key 1 is used for
recovering your voicemail messages.
• Phonebook Press
d
or e to show your
phonebook entries. Highlight the required entry
and press c. You can alternatively enter your
phonebook via the menu and select a contact from
there. See ‘Your phonebook’.
• Dial a number (12 keypad only) Use the keypad
to enter the required number and then press
a
.
If you make a mistake when dialling, press g to
erase a digit.
Note: Full freedom to dial any number
is only available in Administrator mode. In Normal
mode you can only dial numbers that are listed
within your phonebook.
Ne t w ork
1 2 : 3 2

15
Receiving calls
When someone calls you, your mobile will alert you in
one or more of these ways: the display will light up or
flash, a ringtone will be played and/or it will vibrate.
The name or number of the person calling will usually
be shown on the display.
• To accept the call, press
a
• To reject the call, press
b
• Alternatively, you can press
c
and choose an
option:
Answer, Rejec t or I Am Busy. The latter
option will redirect the incoming call to your
voicemail, if it is configured, otherwise it will reject
the call.
Notes:
In normal mode you can only receive phone calls from
people who are listed in your phonebook.
You can change the way in which your mobile alerts
you to calls - See ‘Special stuff’. You can even make
it respond in special ways to different people listed in
your phonebook. See ‘Your phonebook’.
Your mobile has a ‘School Hours’ feature which, when
active, will display the icon and automatically
switch off your ringtones during school hours. Incoming calls are indicated only by the display backlight.
Ending calls
Press
b
. When you end a call, the display will briefly
show the duration of the call.

16
During a call
You can do other things while your call is taking place.
1 Press
c
to view the in-call menu.
2 Use
d
and e to highlight an option and c to
select:
Volume Adjust the loudness of the earpiece. You
can also use the side volume buttons.
Hold Place the current call on hold while you make
another call – Note: This option requires a special
service from your phone network.
End All Calls Ends all active and held calls.
Mute Switches off your microphone so that the
other person cannot hear you. Use the Unmute
option to switch on the microphone.
DTMF Off Prevents the key tones from being heard
if you enter numbers during a call.
Main Menu Provides access to the Messaging and
Phonebook options during a call.
Call log
You can view the list of all recent dialled, received and
missed calls.
1 From the standby screen, press
a
. Each list entry
has an icon:
¯
dialled, ° received, ± missed.
2 Use
d
and e to highlight an entry. You can
then:
• Press
a
to dial the entry.
• Press
c
to view the call time and date.
• Press
g
to exit.
 Loading...