

Disney Cars 2 CR-310 User Manual
Model: CR-310 (Front)
Instruction Manual
Date : Mar 15, 2011
Scale: 1:1
Color: Print Black
KIDdesigns warrants this product to be free from defects in
workmanship and materials, under normal use and conditions, for
a period of one year from the date of original -purchase.
Should service be required by reason of any defect or malfunction,
it is best to first return this product and all parts thereof to the store
where it was originally purchased. If you need to send the product
for service during the warranty period, KIDdesigns will repair or, at
its discretion, replace this product without charge (except for a $6.00
charge for handling, packing, return UPS/postage and insurance).
This decision is subject to verification of the defect or malfunction
upon delivery of this product to the Factory Service Center listed
below. The product must include proof of purchase, including date
of purchase.
Before returning this product for service, please first replace the
batteries (if applicable) with fresh ones, as exhausted or defective
batteries are the most common cause of problems encountered.
If service is still required:
1. Remove batteries (if applicable) and pack unit in a well-padded,
heavy corrugated box.
2. Enclose a photocopy of your sales receipt, credit card statement,
or other proof of the date of purchase.
3. Enclose a check or money order payable to the order of
KIDdesigns, for the sum of $6.00.
4. Send the unit prepaid to the Factory Service Center listed below.
NOTE: This warranty is valid only if the product is used for the
purpose for which it was designed. It does not cover (i) products
which have been damaged by negligence, misuse or accident, or
which have been modified or repaired by unauthorized persons; (ii)
cracked or broken cabinets, or units damaged by excessive heat;
(iii) damage to tape cassettes (if applicable); (iv) the cost of shipping
this product to the Factory Service Center and its return to the owner.
This warranty is valid only in the United States of America and does
not extend to owners of the product subsequent to the original
purchaser. Any applicable implied warranties are also limited to one
year, and KIDdesigns will not be liable for consequential damages.
(Some states do not allow limitations on implied warranties or
exclusion of consequential damages, so these restrictions may not
apply to you.) This warranty gives you specific legal rights, and you
may also have other rights which vary from state to state.
Send unit to:
Consumer Repair Department
KIDdesigns, Inc.
1330 Goodyear Dr.
El Paso, TX 79936-6420
© Disney/Pixar
Visit disney.com/cars
Distributed by KIDdesigns, Inc. Rahway, NJ 07065-5024
eKids is a wholly owned subsidiary of KidDesigns, Inc,
1299 Main Street Rahway NJ 07065
• Protect your furniture when placing the clock on natural
wood or a lacquered wood finish. A cloth or other protective
material should be placed between the unit and the
furniture.
• Clean the casing with a soft cloth moistened only with mild
soap and water. Stronger cleaning agents may damage the
surface of the case.
• If the clock is not to be used for a prolonged period, remove
the batteries to prevent possible corrosion. Should the
battery compartment become corroded or dirty, clean it
thoroughly and replace the batteries.
Maintenance
This device complies with Part 15 of the FCC rules. Operation
is subject to the following two conditions: (1) this device may
not cause harmful interference, and (2) this device must accept
any interference received, including interference that may
cause undesired operation.
NOTE: This equipment has been tested and found to comply
with the limits for a Class B digital device, pursuant to Part 15
of the FCC rules. These limits are designed to provide
reasonable protection against harmful interference in a
residential installation. This equipment generates, uses, and
can radiate radio frequency energy and, if not installed and
used in accordance with the instructions, may cause harmful
interference to radio communications. However, there is no
guarantee that interference will not occur in a particular
installation. If this equipment does cause harmful interference
to radio or television reception, which can be determined by
turning the equipment off and on, the user is encouraged to
try to correct the interference by one or more of the following
measures:
• Reorient or relocate the receiving antenna.
• Increase the separation between the equipment and
receiver.
• Connect the equipment into an outlet on a circuit different
from that to which the receiver is connected.
• Consult the dealer or an experienced radio/TV technician
for help.
WARNING: Changes or modifications to this unit not expressly
approved by the party responsible for compliance could void
the user's authority to operate the equipment.
This Class B digital apparatus complies with Canadian
ICES-003.
FCC Information
For questions or comments regarding this or other KIDdesigns
products, please call our toll-free number: 1-888-TOP-TOYS.
Please also visit our web site: www.kiddesigns.com.
Questions or Comments
One-Year Limited Warranty Information
Important Message to Customers
Thank you for purchasing one of Disney/Pixar’s many top-quality electronic products. We would appreciate it if you take
a few moments to read through these instructions. This will help you explain to the child the safe and proper way to use
this toy, and to help give it the long-lasting life that Disney/Pixar products are designed for.
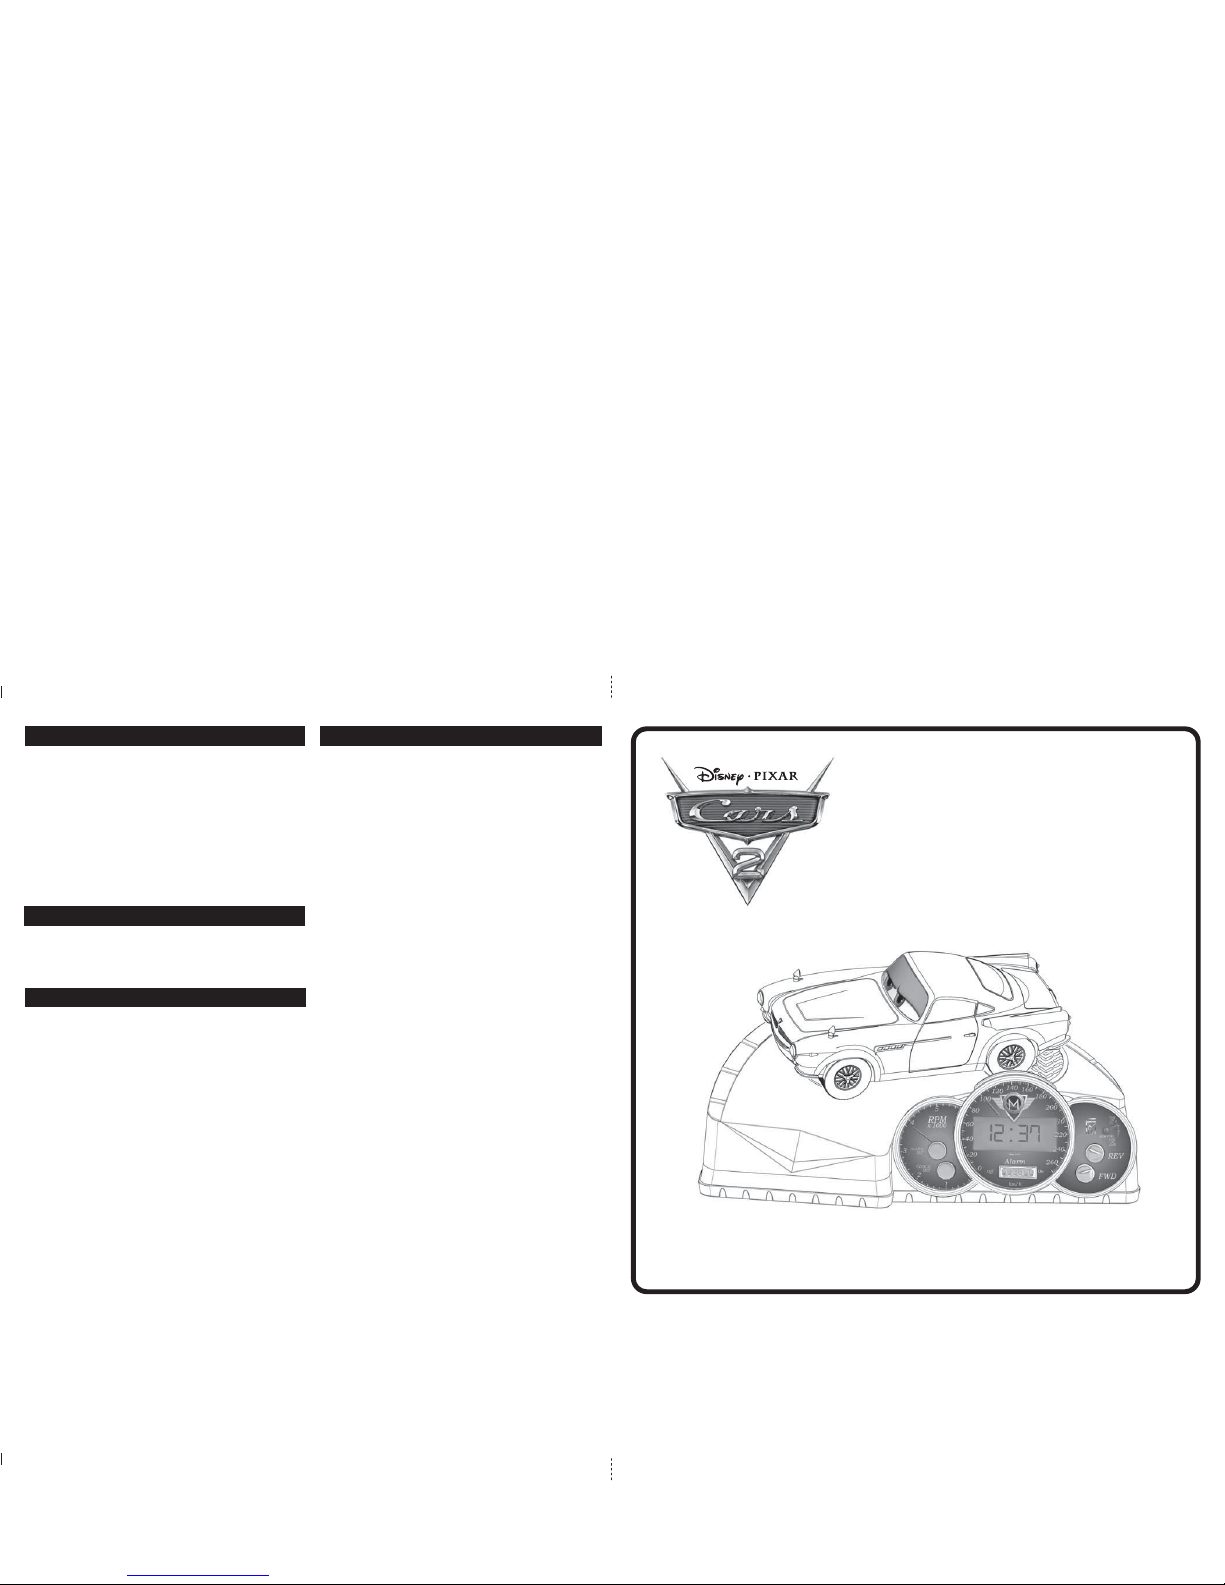
Model CR-310
START YOUR ENGINES
ANIMATED
ALARM CLOCK
Model: CR-310 (Back)
Instruction Manual
Date : Mar 15, 2011
Scale: 1:1
Color: Print Black
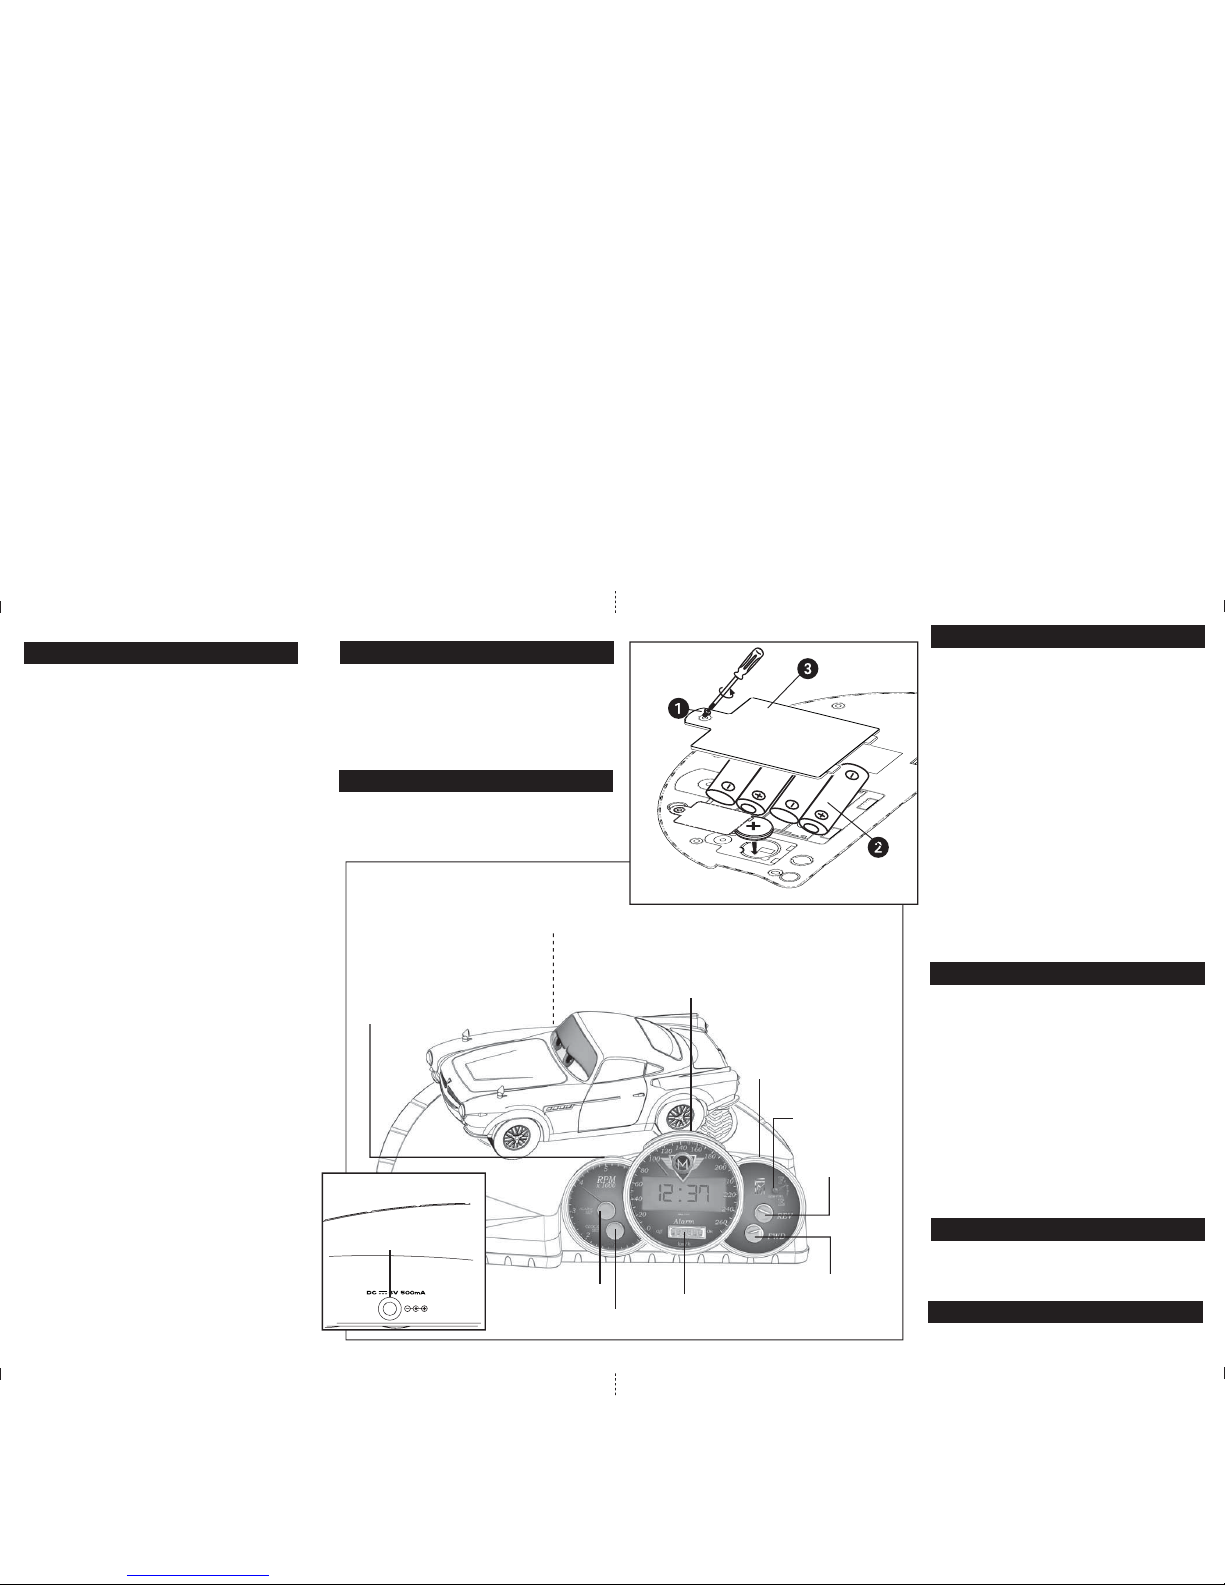
The Alarm Clock operates on 4 “AA” (LR6) batteries
(included for demo purpose only) or on a DC 6V 0.5A center
positive AC adaptor (not included). The included batteries
are for demo purposes only, and should be replaced with 4
fresh batteries when you get the unit home.
Low Battery Indicator
When the Low Battery Indicator on the right of the display
lights, it is time to replace the AA batteries.
Installing/Replacing Batteries:
1. The battery compartment is located on the bottom of the
cabinet. Open the battery compartment door with a
Phillips screw driver.
2. Install 4 “AA” (LR6) batteries, making sure that the positive
and negative (+/–) polarities match up with the diagram
inside the battery compartment (see right).
3. Close the battery compartment door with screw driver.
Do not over-tighten.
Installing/Replacing the Backup Battery:
The Alarm Clock
comes with a CR2032 battery installed for
backup to provide continuous clock settings in the event of
a power failure. If the Backup Battery has been installed and
a power failure occurs or the AC cord is accidentally
disconnected, the display backlight will not remain lit and the
alarm will not sound, but current time and alarm time settings
will be temporarily maintained. Otherwise, you must reset
the time and alarm settings.
1. The backup battery compartment is located on the bottom
of the cabinet. Open the backup battery compartment
door with a Phillips screw driver.
2. Remove current battery and replace with fresh CR2032
battery, making sure that the + side is facing up (see right).
3. Close the backup battery compartment door with screw
driver. Do not over-tighten.
For the Best Possible Performance:
• We recommend the use of ALKALINE batteries for longer
life.
• Different types of batteries or new and used batteries
are not to be mixed.
• Batteries are to be inserted with correct polarity.
• Remove exhausted batteries from the unit.
• Do not attempt to recharge non-rechargeable batteries.
• Remove rechargeable batteries from the unit before
charging.
• The supply terminals are not to be short-circuited.
• Batteries should be removed if the item is not going
to be needed for an extended period of time
(approximately 30 days or more) to prevent leakage or
damage to the unit.
• Rechargeable batteries are only to be recharged under
adult
supervision.
Battery cautions – As with all small batteries, the batteries
used with this product should be kept away from small children
who still put things in their mouths. If they are swallowed,
promptly see a doctor and have the doctor phone (202)
625-3333 collect. If you reside outside the United States,
have the doctor call your local poison control
center.
Battery Installation
Installing the Batteries
Remove Demo Tab
Setting Alarm Time
1. Press and hold the Alarm Set Button for several
seconds until the display flashes. If no alarm-set buttons
are pressed within about ten seconds, the display will
stop flashing and return to normal mode.
2. Press the FWD Button or the REV Button repeatedly
to set the time (press and hold for rapid setting). Make
sure to set the correct AM or PM alarm time. The PM
Indicator is on the lower right of the display; there is no
AM indicator.
3. Press the Alarm Set Button to confirm alarm setting and
return to the regular clock display
Turning On the Alarm
1. After setting the alarm time, set the Alarm ON/OFF
Switch to Alarm ON to turn on the alarm. The Alarm
ON Indicator Icon will appear on the display, showing
that the alarm is active.
Turning Off the Alarm
1. After the alarm sounds, press the Alarm Set Button to
turn it off and automatically reset it for the same time
the following day.
2. To turn off the alarm without setting it for the following
day, switch the Alarm ON/OFF Switch to Alarm
OFF. The Alarm ON Indicator Icon will disappear.
3. To operate the snooze feature, press the Snooze/Light
Button. The alarm will shut off for about nine minutes
before sounding again. You may repeat this several
times during the one-hour snooze cycle.
1. During normal operation (when alarm is not sounding)
press the Snooze/Light Button to turn on the display back
light for approx. 30 seconds. Press again to turn light off
right away.
Back Light Operation
1. Press either of the Sound Effects Buttons to play the
built in sound effects.
Playing the Built-in Sound Effects
Operating the Alarm
SNOOZE /LIGHT Button
SOUND EFFECTS Button
LOW BATTERY
INDICATOR
CLOCK SET Button
FWD Button
REV Button
ALARM ON/OFF switch
ALARM SET Button
SOUND EFFECTS Button
DC Jack
All of the clock and alarm functions are controlled using the
buttons on the front of cabinet (see graphic)
Setting Clock Time
1. Press and hold the Clock Set Button for several
seconds until the display flashes. If no time-set buttons
are pressed within about ten seconds, the display will
stop flashing and return to normal mode.
2. Press the FWD Button or the REV Button to set the
time (press and hold for rapid setting). Make sure to set
the correct AM or PM time. The PM Indicator is
on the lower right of the display; there is no AM indicator.
3. Press the Clock Set Button to confirm clock setting.
Setting Clock Time and Alarm Time
Before using this toy, remove the Demo Tab located on the
bottom of the unit by pulling it away from the unit. Make sure
to dispose of demo tab properly.
Optional AC Adaptor Connection
NOTE: The AC adaptor should only be connected by
an adult.
• Connect a DC 6V 0.5A center positive AC adaptor
(not included) into the DC Jack located on the back of the
unit, then plug the AC adaptor into a working outlet.
• NOTE: If the AC adaptor is plugged into the back of the
unit but not the outlet, the alarm will NOT ring.
back view
DC Jack
 Loading...