

Page 1
Receiver and Remote Controls
About Your Satellite Receiver
What you’ll find in this chapter:
• SATELLITE RECEIVER OVERVIEW
• DUAL AND SINGLE MODES
• REMOTE CONTROL
• SATELLITE RECEIVER FRONT PANEL
• SATELLITE RECEIVER BACK PANEL
• USING THE MENUS
• USING TEXT FIELDS
11
Page 2

Chapter 2
Satellite Receiver Overview
Satellite Receiver Overview
This section gives you an overview of your DISH Network satellite TV receiver system.
Satellite Receiver
The ViP622 DVR and ViP722 DVR are dual-tuner satellite receivers with digital video recorders.
With either receiver you can view/record standard-definition (SD) and high-definition (HD)
DISH Network programming on two TVs or view/record over-the-air digital/HD broadcasts on the
nearby HDTV.
• Nearby TV (TV1)—Connect to an HDTV to view SD and HD DISH Network programming and
over-the-air digital/HD broadcasts. Programming from the receiver is delivered to the nearby
TV using short audio/video cables.
• Remote TV(s) (TV2)—Connect to an SDTV to view SD and down-converted HD broadcasts.
Programming from the receiver is usually delivered to the r emote TV(s) using existing in-home
coaxial cable.
Remote Controls
Two remote controls come with your receiver:
• Remote Control 1 - An Infrared (IR) remote to control programming for the nearby TV (TV1).
This remote control is labeled with a green number 1, which matches similar markings on the
receiver output connections and the menus for the nearby TV.
• Remote Control 2 - An Ultra-High Frequency Pro (UHF Pro) remote to contro l programming at
a remote TV (TV2). This remote control is labeled with a blue number 2, which matches similar
markings on the receiver output connections and the menus for the remote TV. Be sure to set
up the remote control to operate the receiver (see page 72).
12
Dual and Single Modes
Your satellite receiver includes two modes of operation: Dual and Single. These modes increase
your entertainment options because you’ll be able to choose how you watch and record your favorite programs.
Dual Mode
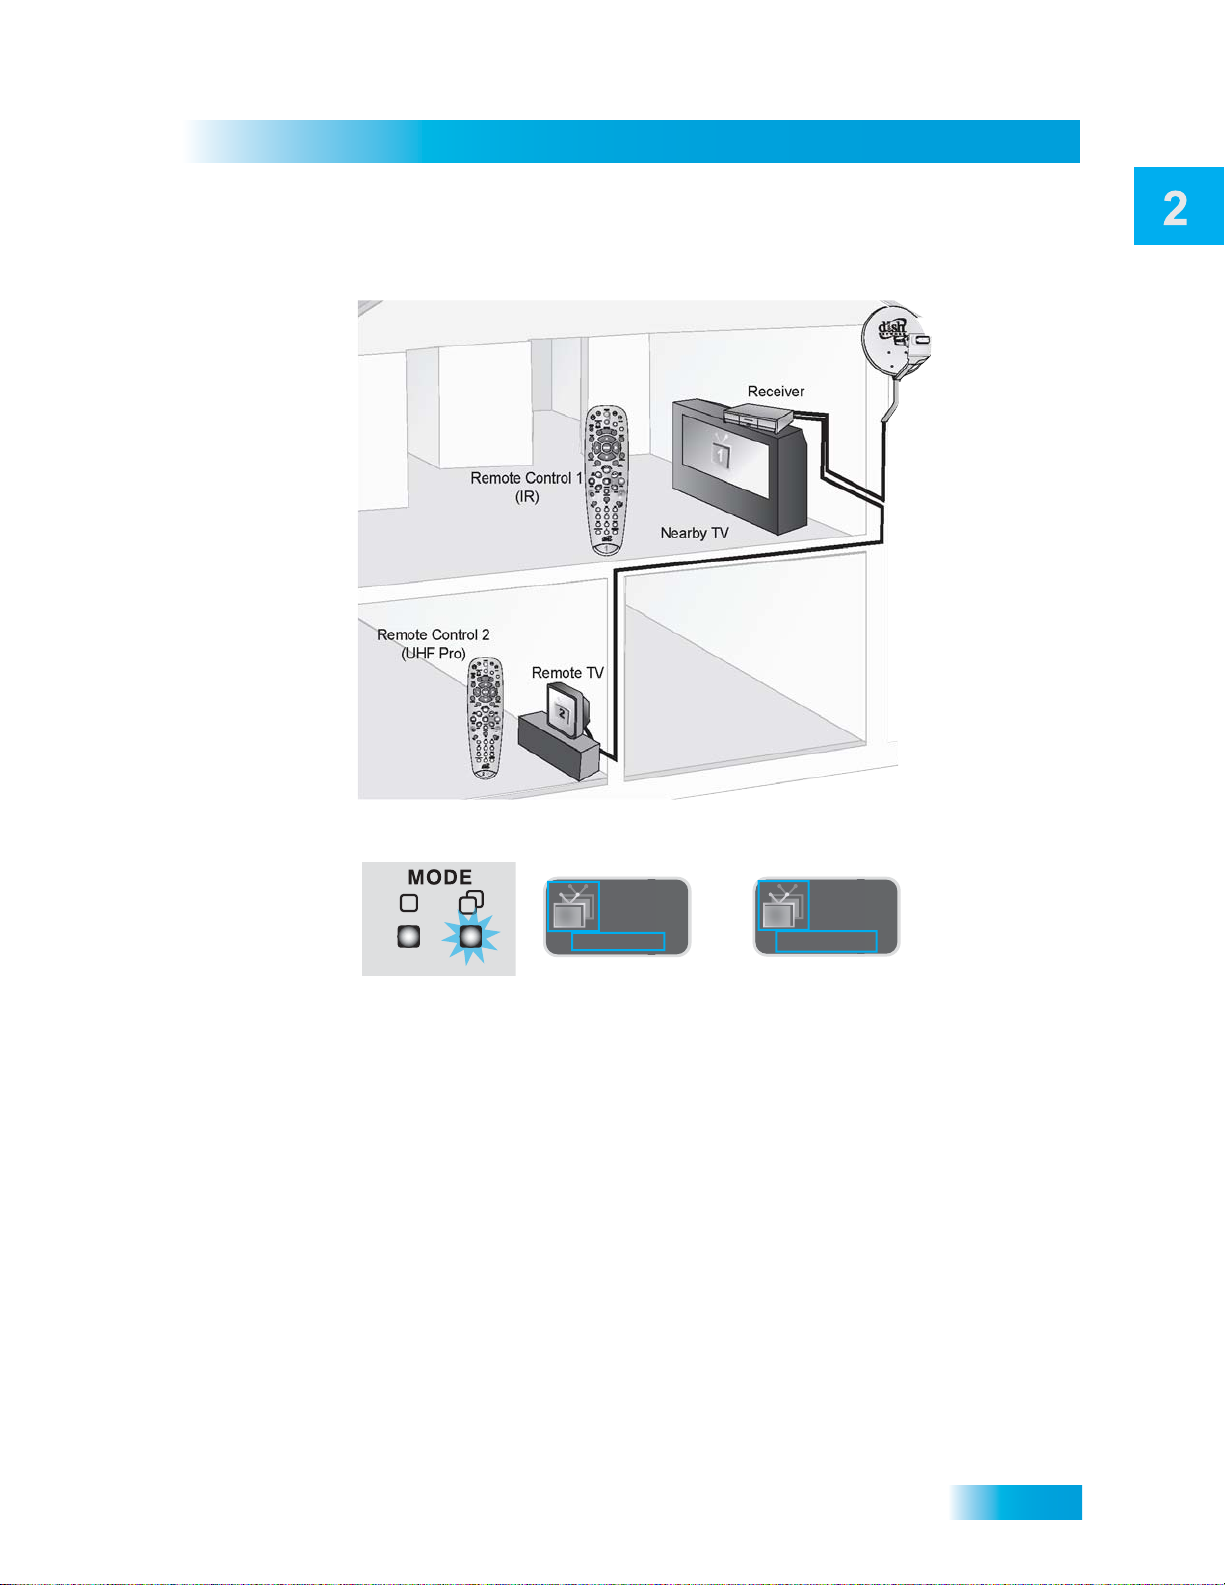
While in Dual Mode, you can use this dual-tuner satellite receiver to watch different programming
in two separate locations:
• Nearby TV—Programming from the receiver is delivered to the TV near the receiver using
short audio/video cables and is controlled using Remote Control 1. The nearby TV is also
referred to as “TV1.”
• Remote TV—Programming from the receiver is delivered to a TV located in another room
using existing in-home coaxial cable and is controlled using Remote Control 2. The video
displayed on the remote TV is always in standard definition (SD). High-definition stellite
Page 3
Satellite Receiver
Dual and Single Modes
programming can be viewed on the remote TV; however, it is down-converted for viewing on
the remote TV. The remote TV is also referred to as “TV2.”
1
2
You can tell your receiver is in Dual Mode because the front panel mode indicator will light and the
menu and other screens will display Dual Mode (as shown below).
TUE 3/19
1
6:25 pm
Dual Mode
TUE 3/19
2
6:25 pm
Dual Mode
Single Mode
13
Page 4
Chapter 2
Dual and Single Modes
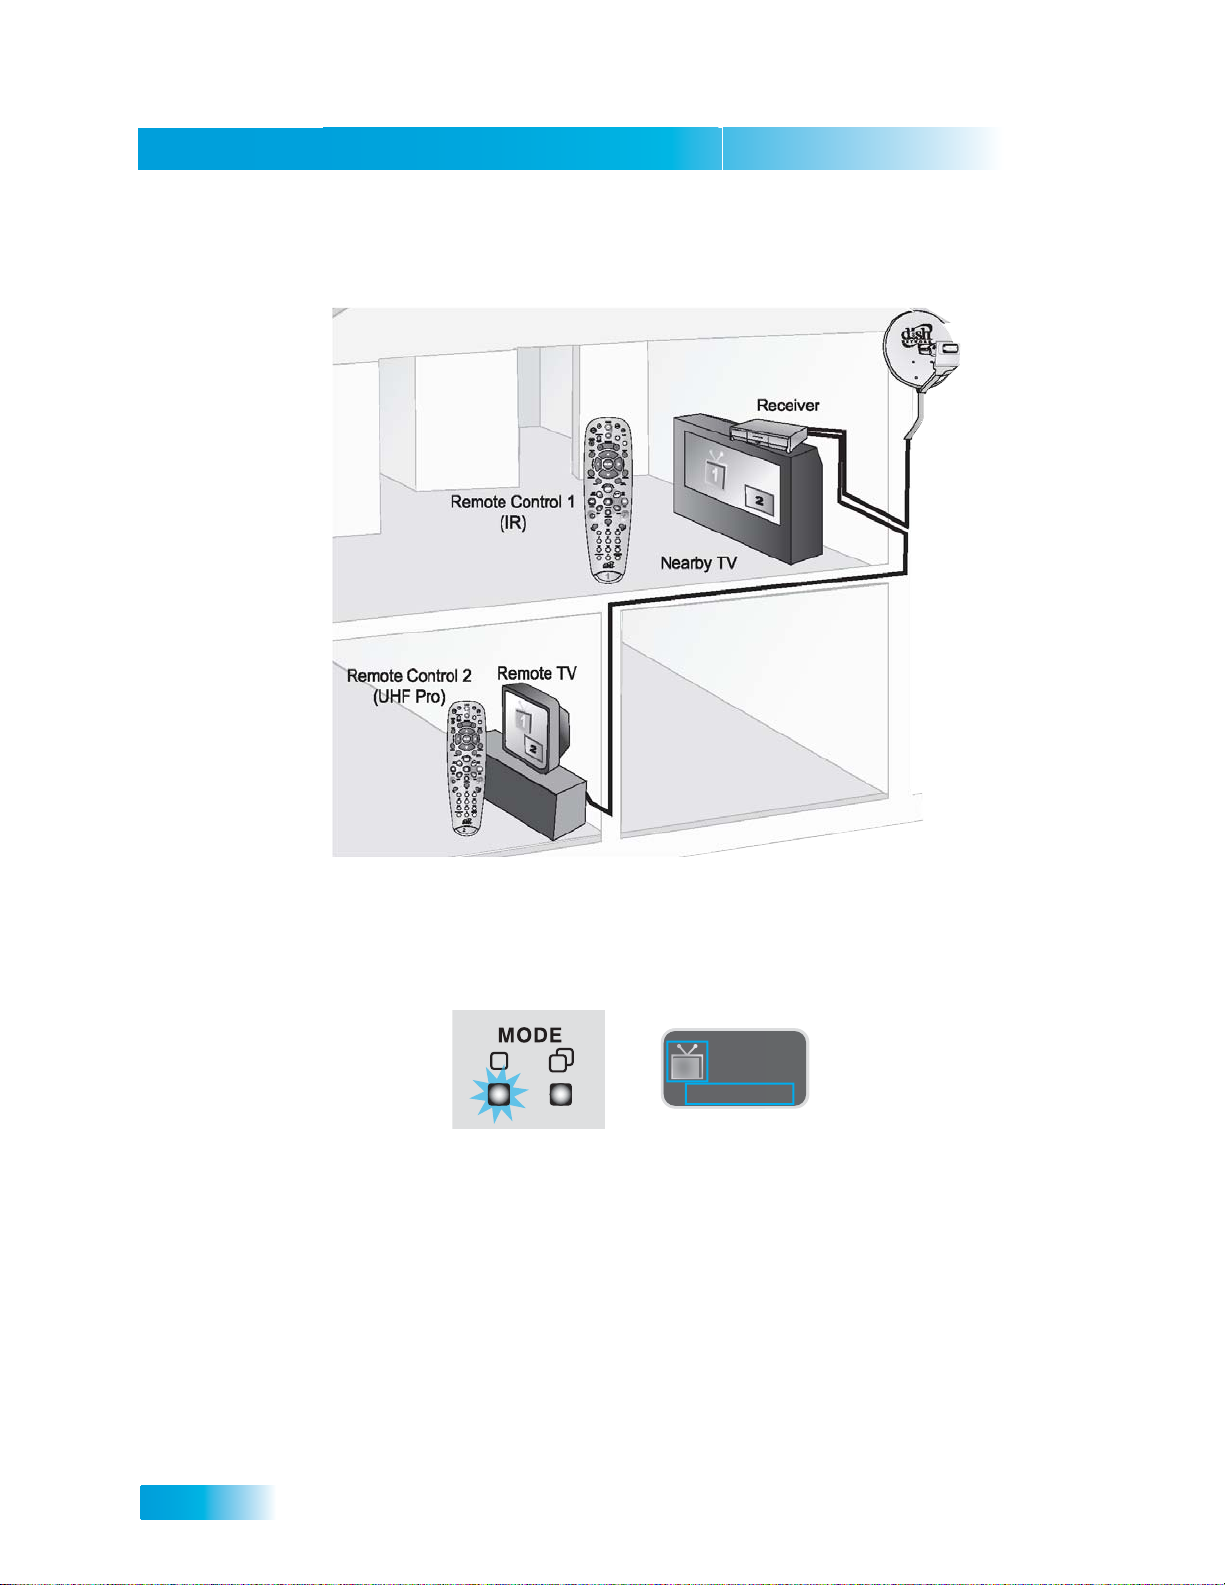
Single Mode provides dual-tuner receiver features—like Picture-in-Picture (PIP) and the ability to
watch one live program while recording another—to all connected TVs.
1
2
Single Mode delivers the same programming to all of the TVs connected to the satellite receiver
and allows control by either remote control. The format of the programming shown on the remote
TV(s) is standard-definition (SD); high-definition (HD) is shown only on the nearby TV. High-definition programming can be viewed at either TV location; however, it is down-converted for viewing
on the remote TV. Y ou can tell you are in Single Mode because the front panel mode indicator will
light and the menus and other screens will display Single Mode (as shown below).
TUE 3/19
1
6:25 pm
Single Mode
14
Page 5
Satellite Receiver
Remote Control
Switching Between Dual and Single Mode
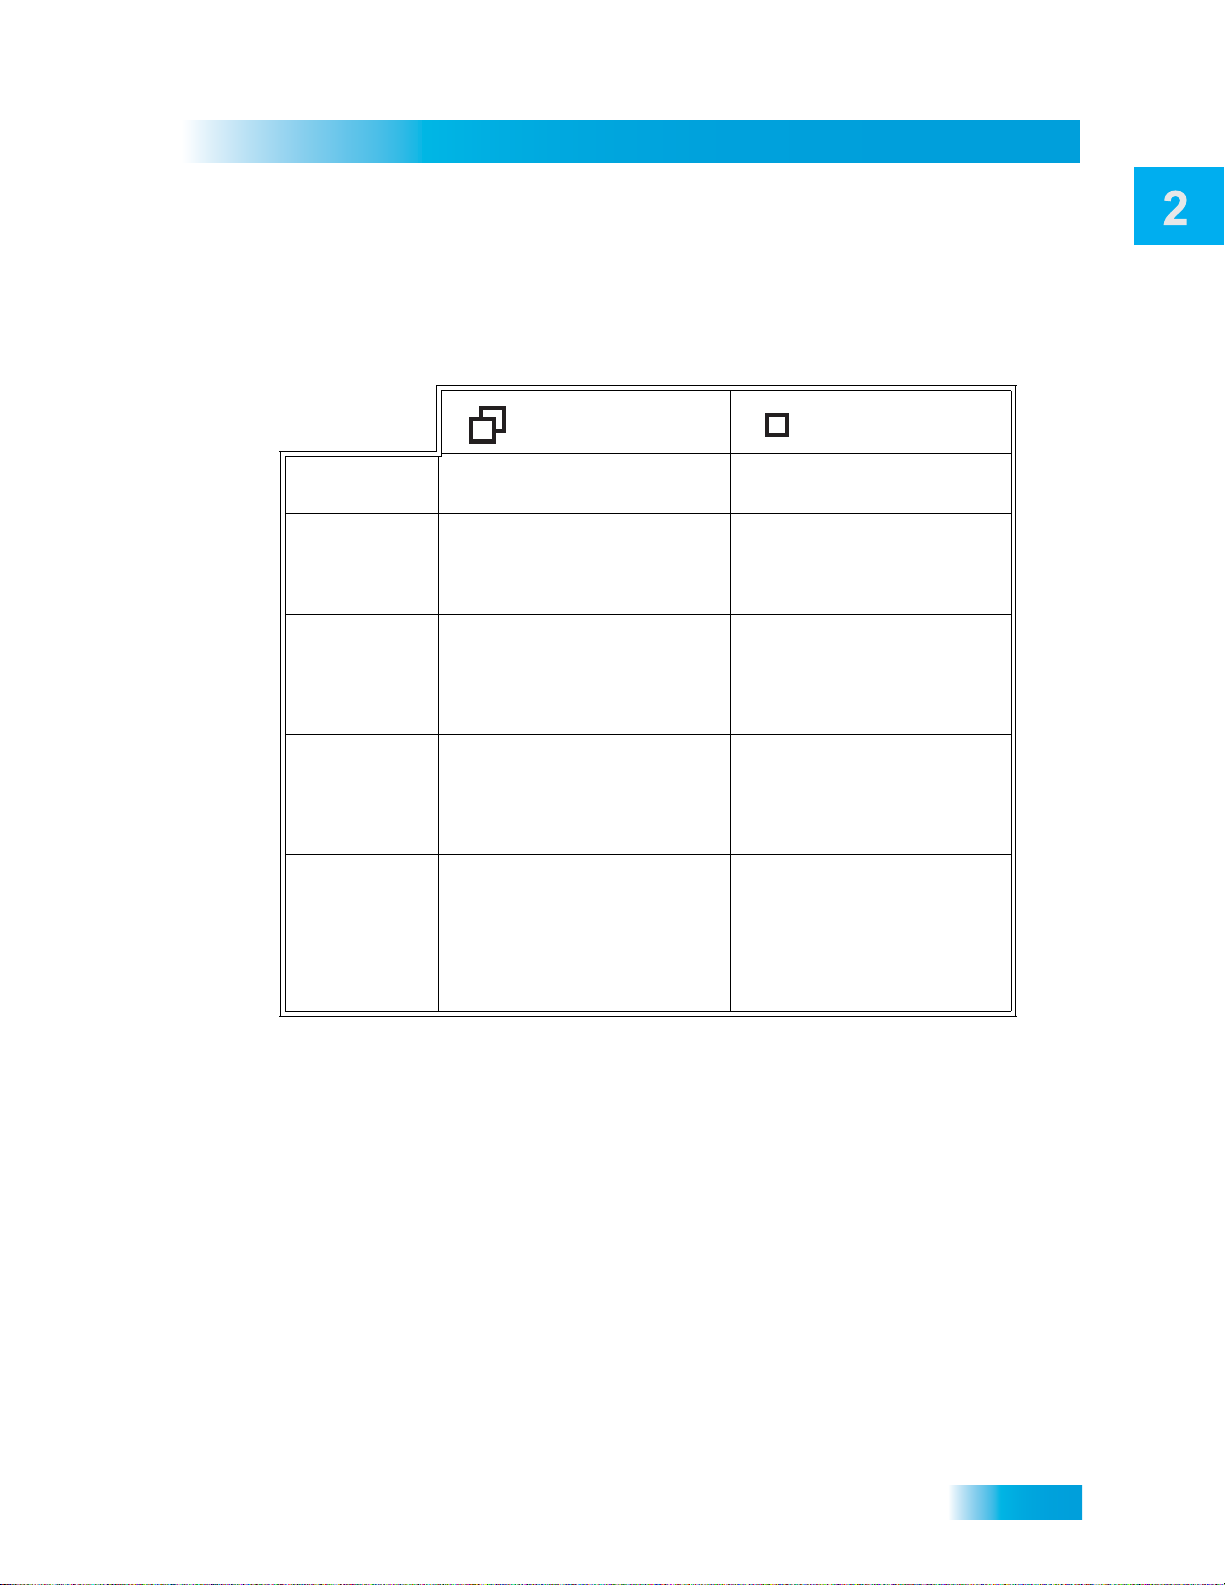
Put the satellite receiver in Single or Dual Mode by pressing the front panel MODE button. Keep
the following items in mind when switching the satellite receiver between Dual and Single Mode:
Dual Mode Single Mode
Indications
Recording
Favorites
Lists
Locks
Closed
Captioning
Note: If someone is viewing the remote TVs while the receiver is in Dual Mode, you will see a
popup on the nearby TV warning you that you are about to disrupt the use of the TV2 outputs.
Dual Mode front panel
indicator lights.
The Recording front panel
indicator lights to show
whether TV1, TV2, or both
are currently recording.
Favorites Lists set up for
both outputs (TV1 and TV2)
are available.
Locks set up for both outputs
(TV1 and TV2) are available.
Closed Captioning (CC)
from SD and HD
programming is available on
TV1. CC from only SD
programming is available on
TV2 (CC must be enabled
on the TV).
Single Mode front panel
indicator lights.
The TV1 Recording front
panel indicator lights when
you are recording from one
or both tuners.
Only Favorites Lists set up
for TV1 are available. The
lists for TV2 are not lost,
they are simply unavailable
in Single Mode.
Locks set up for only TV1
are available. The locks for
TV2 are not lost, they are
simply unavailable in Single
Mode.
Closed Captioning from the
receiver is available on
both outputs (TV1 and
TV2).
Remote Control
The two remote controls give you access to all the features of your satellite receiver. You can set
up each remote to control the satellite receiver and up to three other devices (see page 75). These
devices can be a TV, a VCR or DVD player, and a third device.
This section describes how to use the various features on the two types of remote controls
included with your satellite TV system.
15
Page 6
Chapter 2
2
UHF
PRO
Remote Control
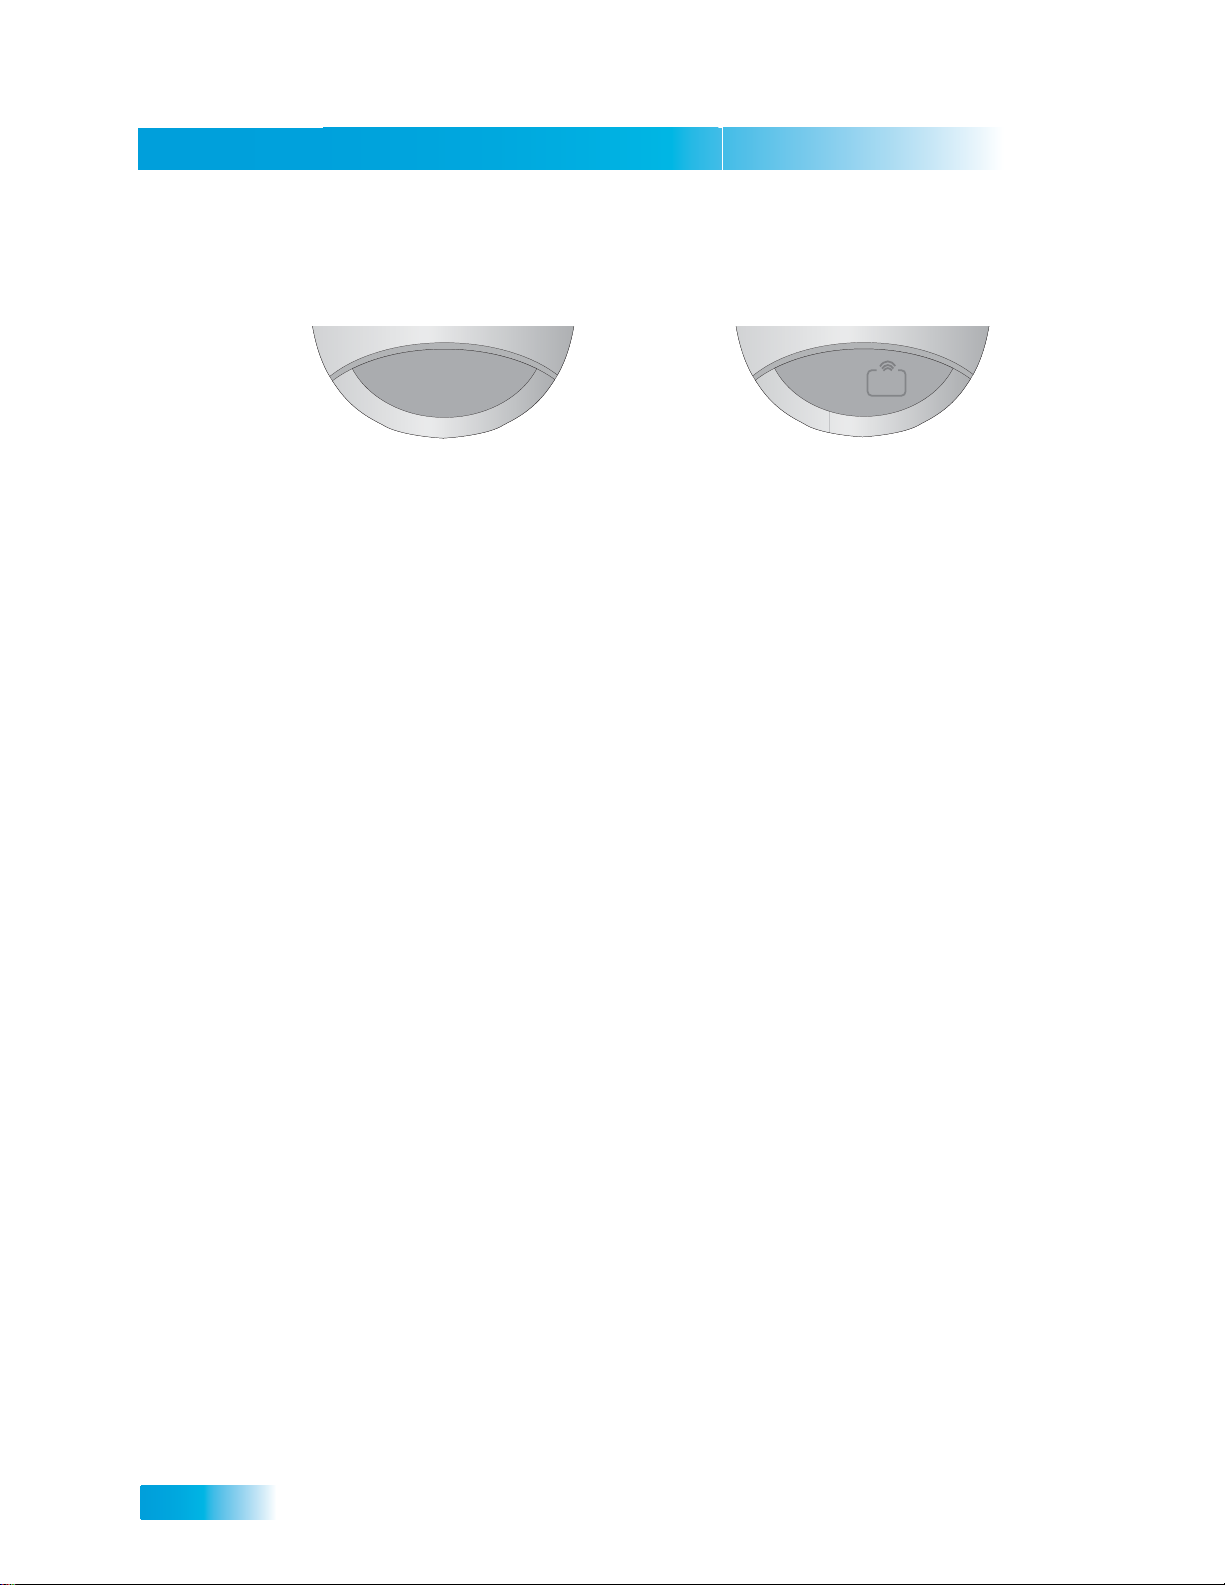
Types of Remote Controls
1
Remote Control 1 uses infrared (IR)
signals to:
• Control TV1 menus for the nearby
TV in Dual Mode.
• Control the satellite receiver in
Single Mode.
IR signals travel only short distances
(60 feet or less), and cannot go
through walls or other solid objects.
You must point the remote control
directly at the receiver , with no objects
blocking the line of sight.
Remote Control 1 uses IR signals
to control the receiver and other
devices it is programmed to operate.
This remote control is identified by the
green number 1 at the bottom of the
remote control.
Remote Control 2 uses UHF Pro
signals to:
• Control TV2 menus for the remote
TVs in Dual Mode.
• Control the satellite receiver in
Single Mode.
UHF Pro signals travel long distances
and go through walls and other solid
objects.
To use Remote Control 2 to control
the receiver, you must attach the
remote control antenna to the receiver
back panel (see page 17).
Remote Control 2 uses IR signals to
operate other devices programmed
into the remote control. You must
point the remote control directly at
these devices, with no objects
blocking the line of sight.
This remote control is identified by the
blue number 2 at the bottom of the
remote control.
16
Page 7
Satellite Receiver
Remote Control
Remote Control Batteries
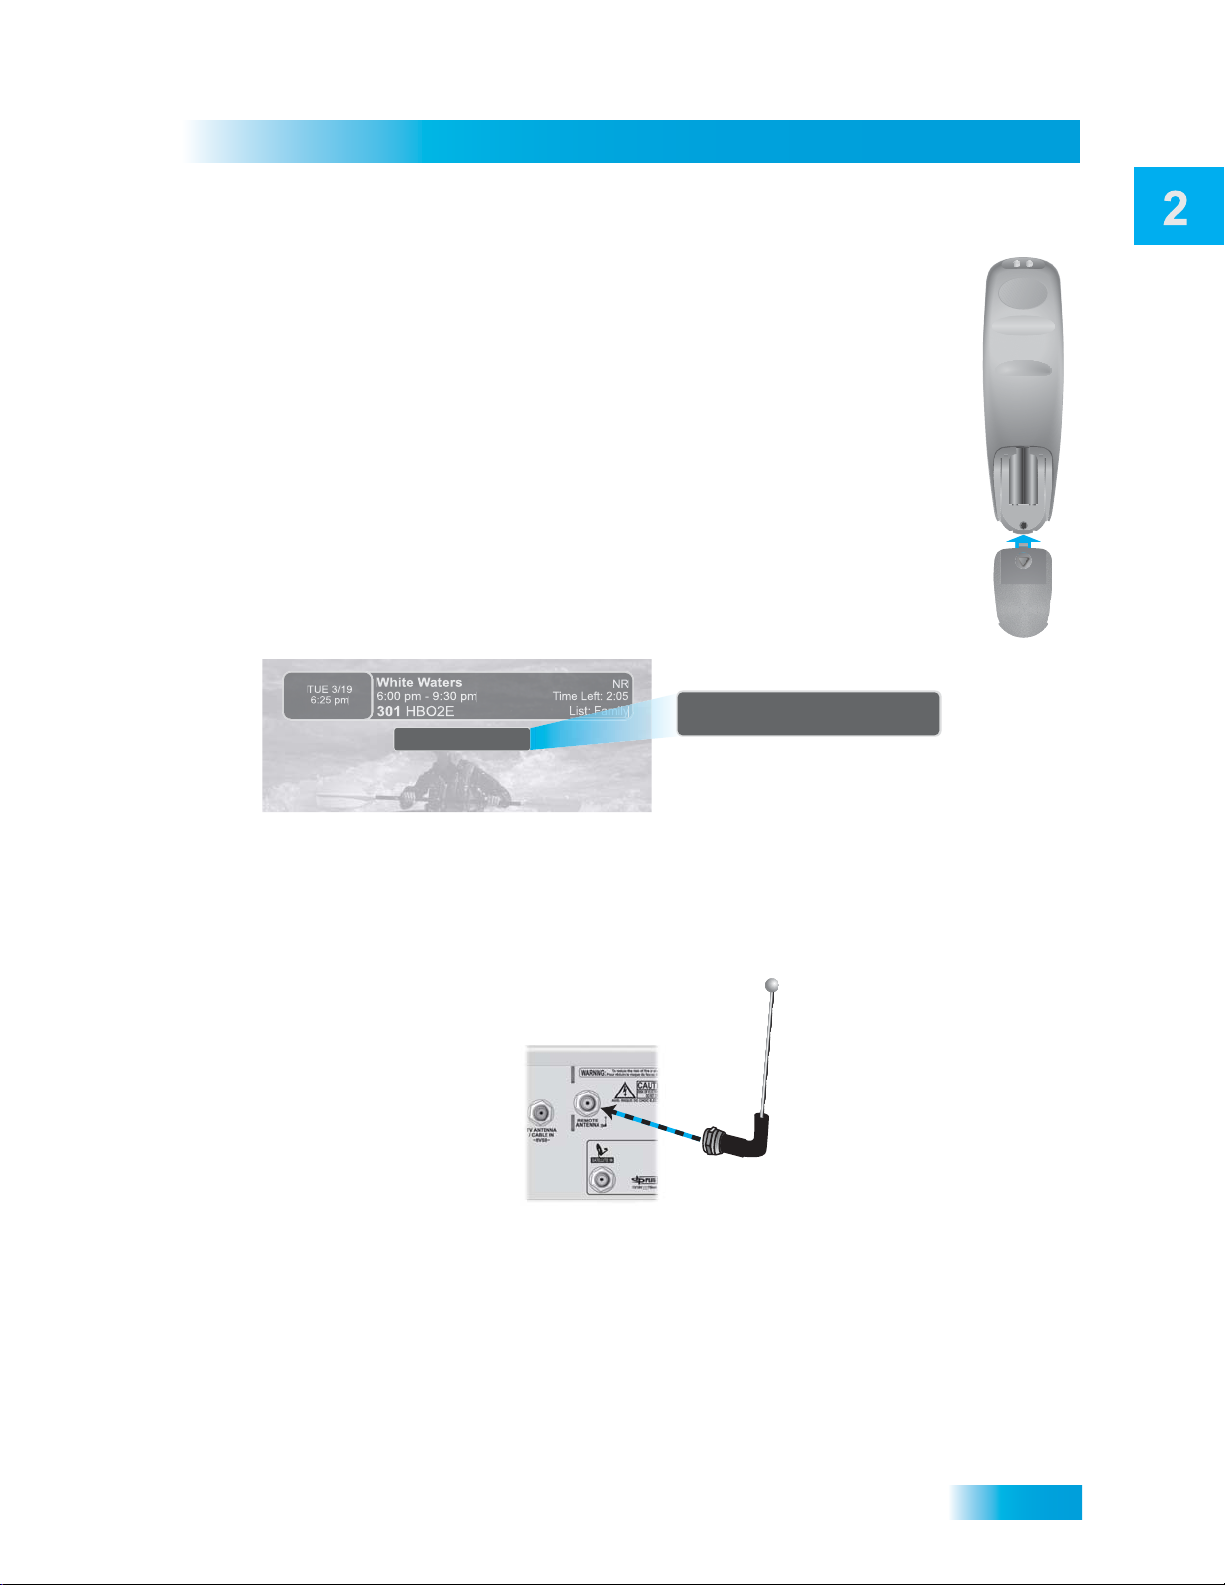
The remote control comes with AAA batteries. When you replace old batteries, you
should replace all of the batteries. Use batteries of the same kind, for example,
alkaline or carbon zinc. Don’t mix batteries of different kinds. Alkaline batteries last
longer.
1. Press down on the top of the battery cover and slide the cover off.
2. Take out all of the old batteries.
3. Put the new batteries in. Make sure you match the plus (“+”) ends with
the plus markings on the battery case.
4. Slide the cover back into place.
Low Battery Warning
When you see a low battery warning message on your screen below the Program
Banner, the batteries in your remote control are weak and need to be replaced.
Remote Battery Low
Remote Battery Low
Attach the Remote Antenna
Attach the remote control antenna to the rece iver' s back p anel REMOTE ANTENNA input so you can
use your UHF Pro Remote Control 2. Without the remote control antenna, you cannot use the
remote to control the receiver. See Adjusting the Remote Control Antenna on page 73 for more
detailed information about improving the performance of your UHF Pro Remote Control 2.
17
Page 8
Chapter 2
Remote Control
Remote Control Buttons
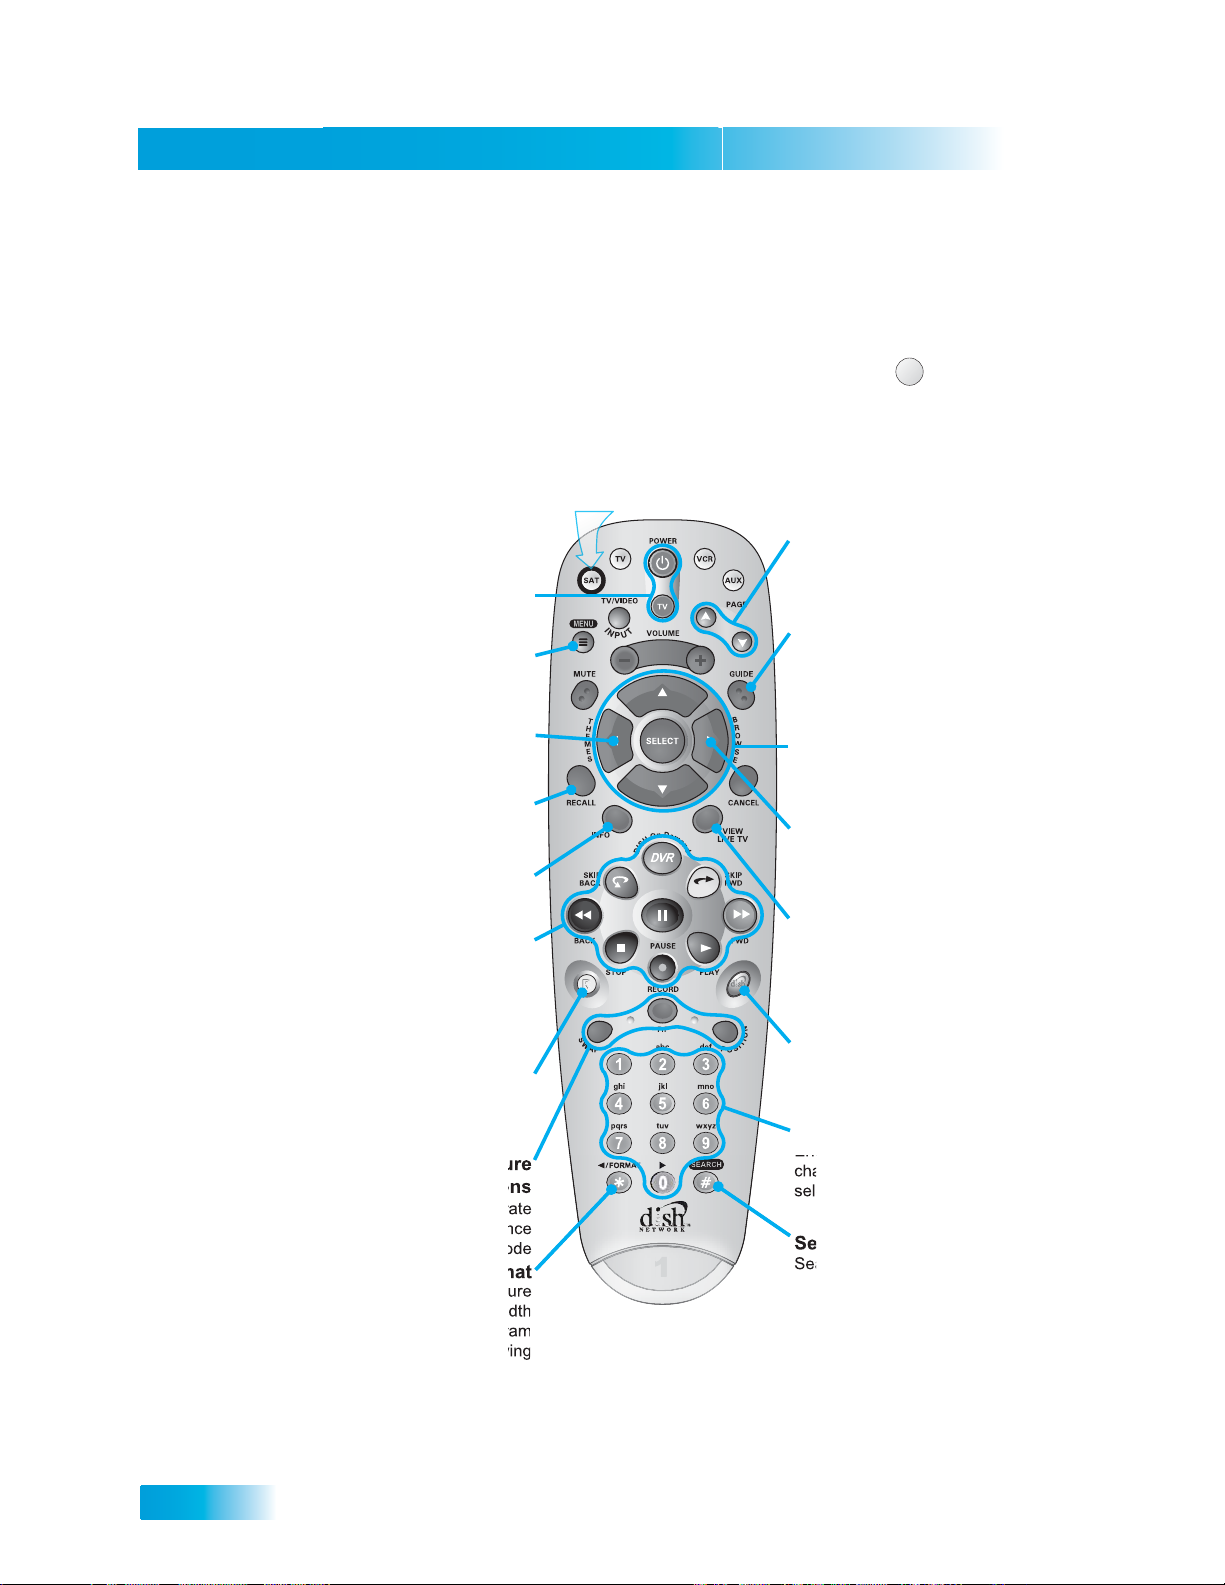
SAT Mode
To use the features described in this section, make
sure you are in SAT mode by pressing the SAT Mode button.
Receiver Power
& TV Power
Top button turns
the receiver on/off,
bottom button
turns the TV on/off
Programming required
Menu
Access receiver
features and settings
Themes
Search for programs
using Themes
Recall
Go back to last
channel viewed
Info
Display program
information
Digital Video
Recorder (DVR)
Buttons
Pause live TV and
play or record
programming
Recover
Recovers satellite
programming if your TV
input or channel has changed
Picture-In-Picture
(PIP) Buttons
Watch two separate
programs at once
in single mode
Format
Format the picture
to the desired width
to match the program
you are viewing
Volume & Mute Buttons
Press this
button for
SAT Mode
Remote key may
be different than shown
1
here
Control TV volume
Programming required
Page Buttons
Page up/down in menus
and display options
Program Guide
Display current and
future satellite program
listings
Arrows/Select
Buttons
Channel up/down,
navigate through
menus/guides and
select a desired
option
Browse
See what is on other
channels while
watching TV
View Satellite
Programming
Exit out of any menu/
guide and go back to
viewing live TV
DISH
Explore interactive
TV features
Number Buttons
Enter a desired
channel number, or
select menu items
Search
Search for a program
SAT
18
Page 9
TV Mode
Satellite Receiver
Remote Control
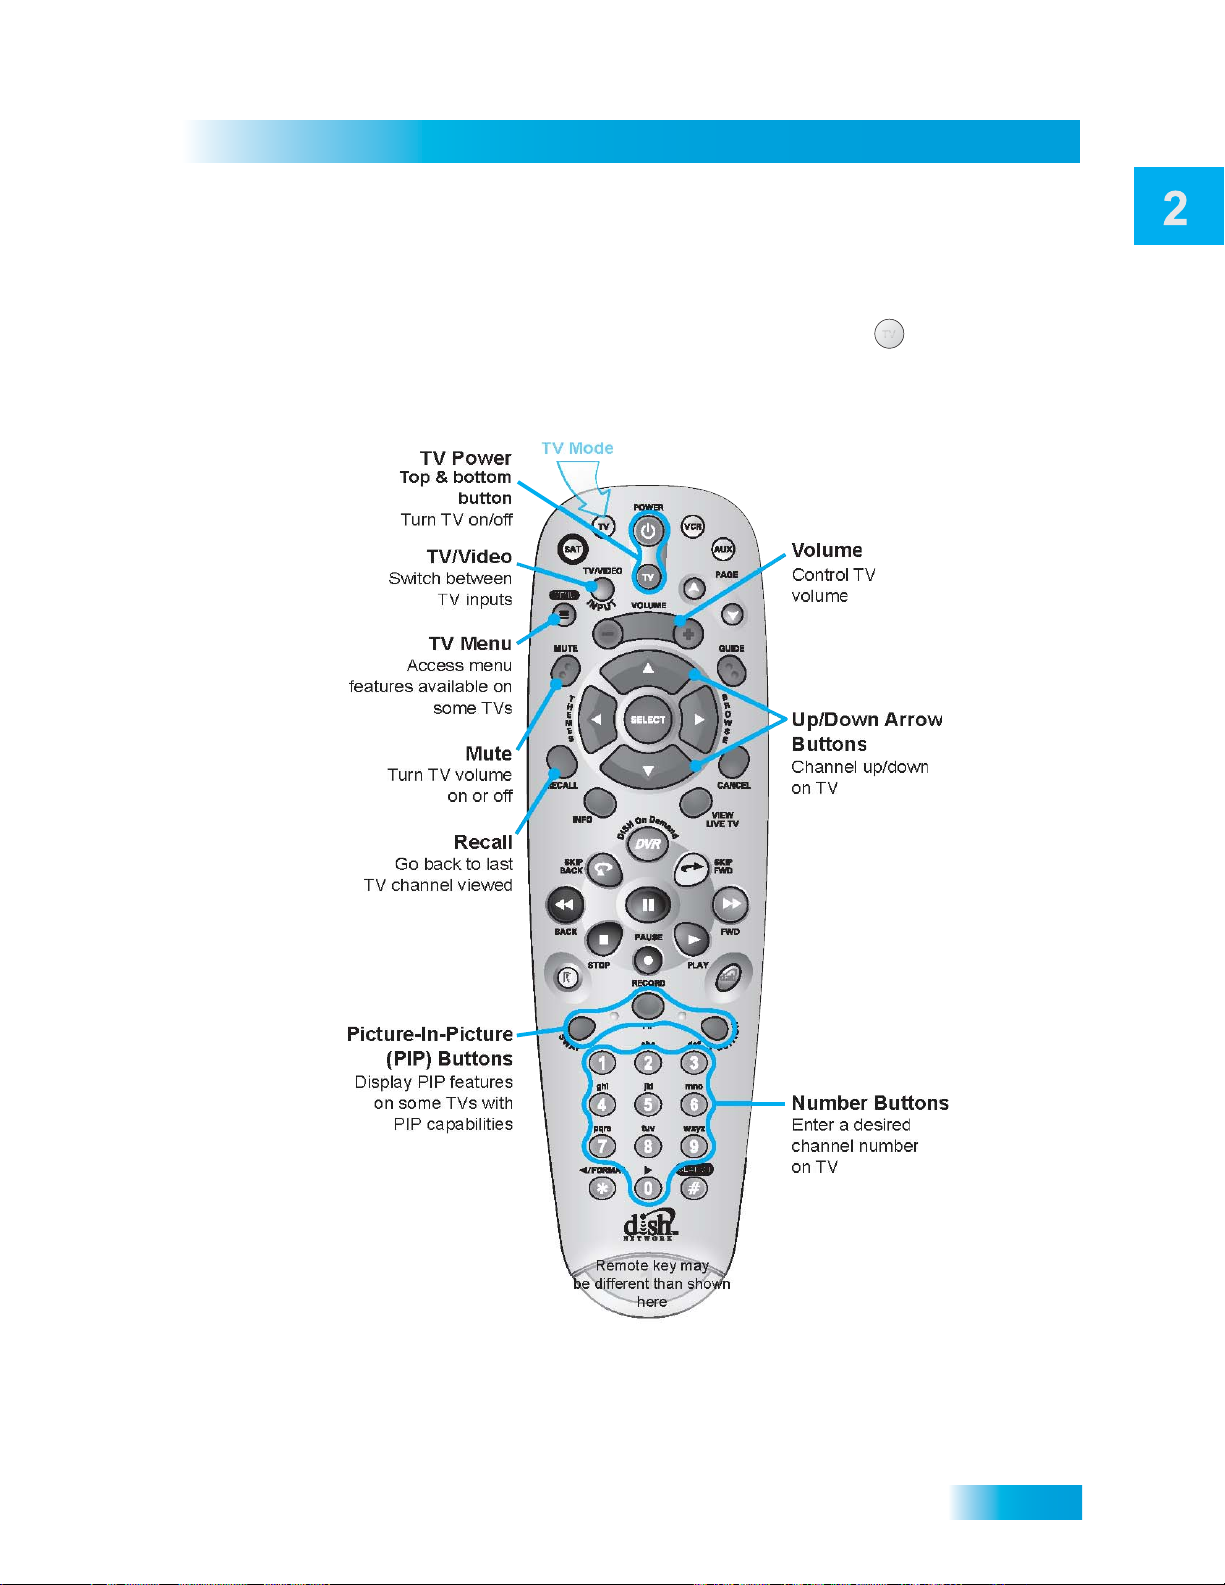
To use the features described in this section, make
sure you are in TV mode by pressing the TV Mode button.
Remote programming is required.
Press this
button for
TVTV
Remote key may
be different than shown
here
19
Page 10
Chapter 2
Remote Control
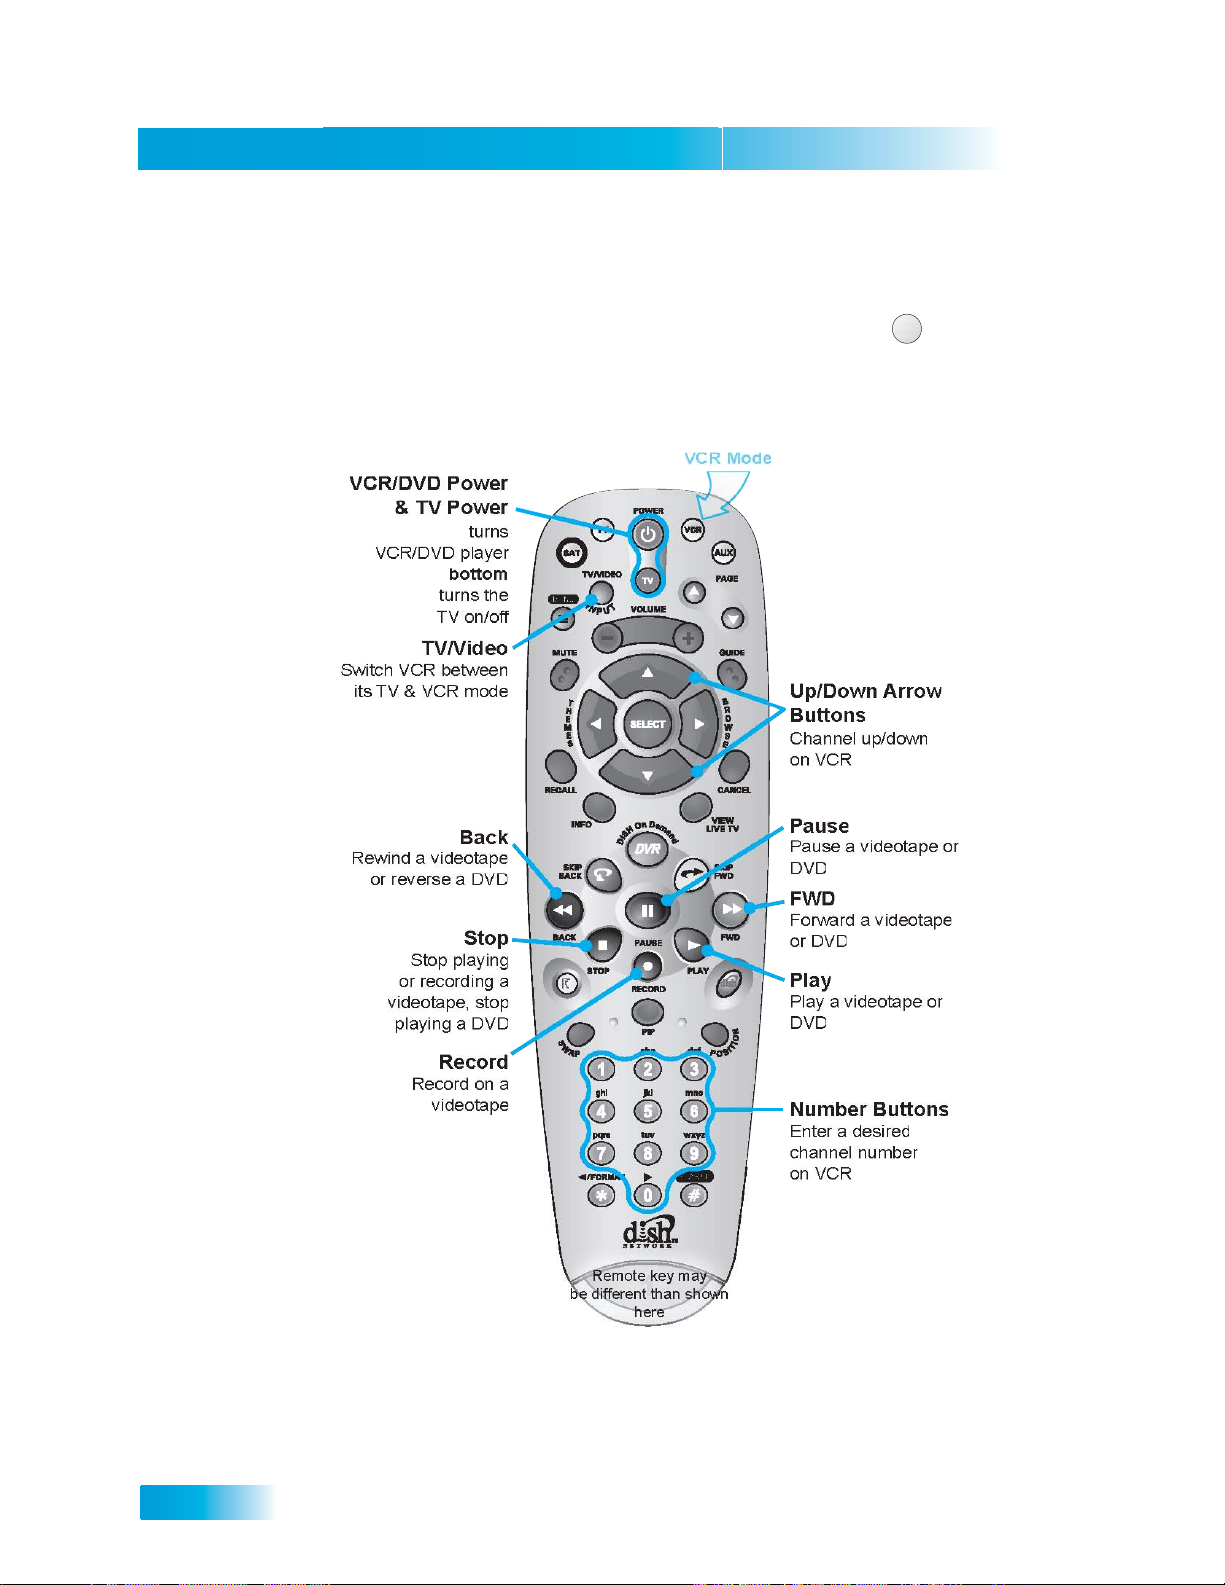
VCR Mode
To use the features described in this section, make
sure you are in VCR mode by pressing the VCR Mode button.
You can use this mode to operate your DVD player instead of a VCR.
Remote programming is required.
Press this
button for
Top button
on/off,
button
VCR
20
Remote key may
be different than shown
here
Page 11
Satellite Receiver
A
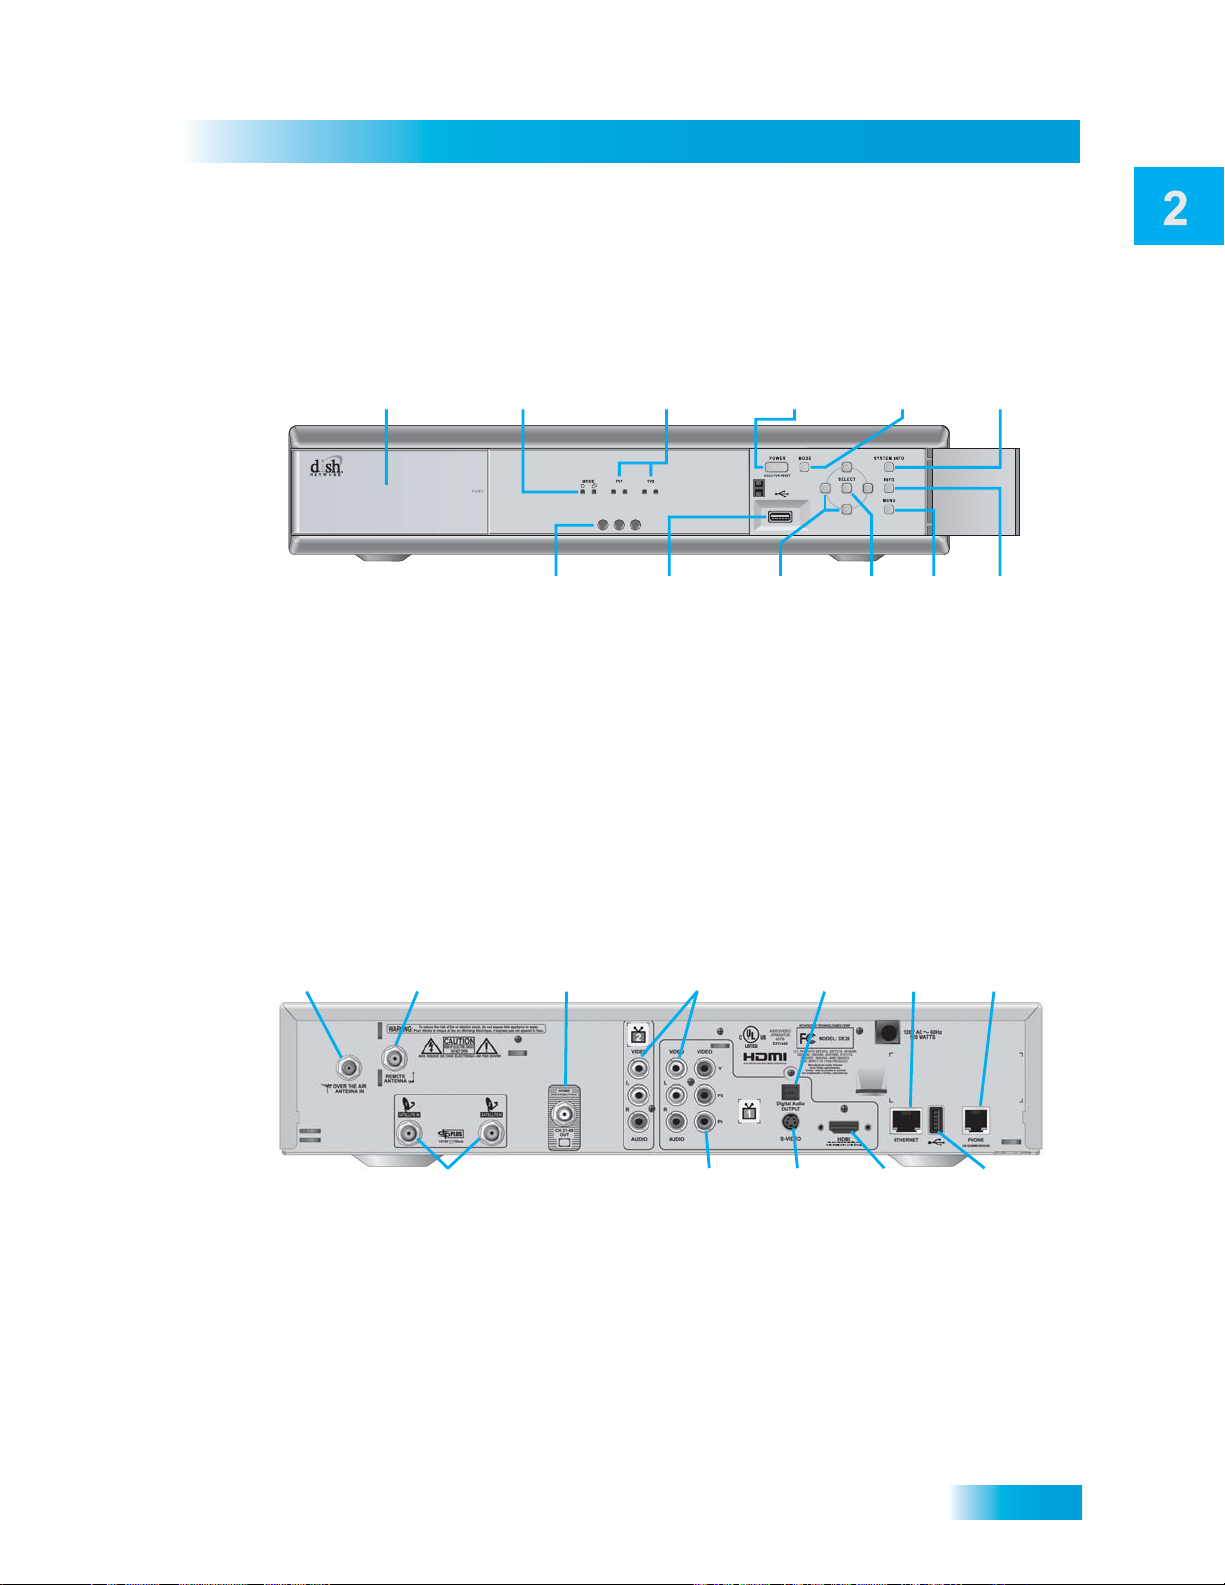
Satellite Receiver Front Panel
Satellite Receiver Front Panel
TV1 and TV2
Smart Card Door
Slot for a future
smart card
Dual and Single
Mode Indicators
Left light indicates
Single Mode, right
indicates Dual Mode
Infrared
Sensor/Blaster
Receives IR Signals
from your remote and
sends IR signals to
other components
Power and
Record Lights
Left light indicates
power is on, right red
light indicates recording
USB Port
Connection to
other
multimedia
devices*
Power
Turns receiver
power on/off;
press and hold
to reset receiver
Arrows
Change channels
up/down, and move
around in on-screen
menus and guides
Switches receiver
between Single
and Dual Mode
Select
Selects
menu
items
Note: Your receiver may be a differerent color than the unit pictured in the diagram.
Satellite Receiver Back Panel
Audio/Video
Output TV1/TV2
ntenna/CATV
Input
Connection to
over-the-air
antenna
Remote
Antenna
Connection to
remote control antenna
In-home
distribution
output
High quality
standard
definition
connection
to your TV
audio and video
input
Digital Audio
Output
connection to
a high-quality
digital sound
decoding system
Mode
Menu
Displays
the Main
Menu
Ethernet
Port
For future
use
System Info
Displays the
System
Information
Screen
Info
Displays
program
information
Phone
Jack
Connect
to your
telephone
line
Satellite In
Connection to
your satellite
dish
YPbPr/
Component
Output
Optional
connection to
your high
definition TV
video input
S-Video
High quality
standard-
definition
connection
to your TV
video input
HDMI Output
Provides digital
audio and video
to an HDTV
USB
Port
Connect to
other
multimedia
devices*
*Some USB multimedia devices may not be compatible.
21
Page 12
Chapter 2
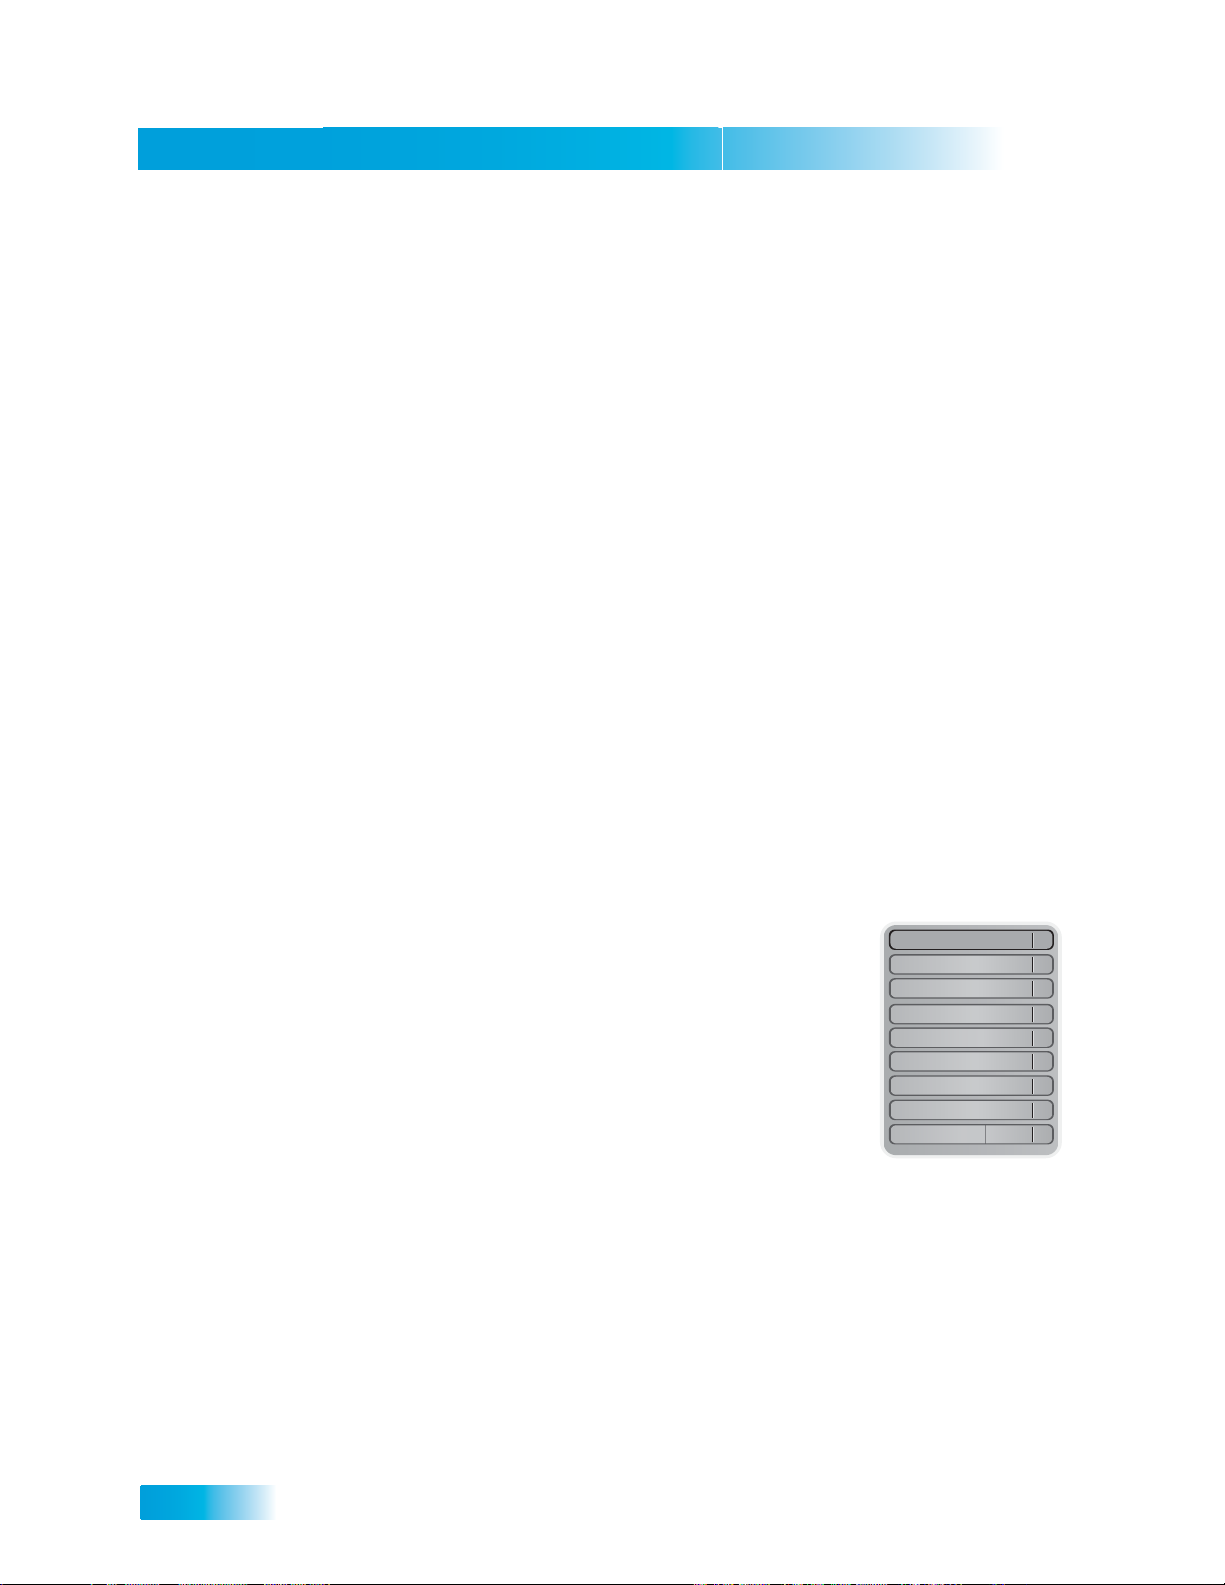
Program Guide
1
Themes & Search
2
Customer Support
3
Multimedia
4
Locks
5
System Setup
6
Daily Schedule
7
Preferences
8
Cancel
0
Using the Menus
Using the Menus
The menus make using the receiver and selecting programs quick and easy. Use the menus to
control the receiver and to use its features, such as setting locks, choosing a pro gram, or crea tin g
a favorites list.
Open and Close Menus
You can open the menus in either of two ways:
• Press MENU to open the Main Menu, then open any of the other menus from the Main Menu.
• Use the following buttons on the remote control:
To close a menu and return to watching a program, press VIEW LIVE TV.
– Press GUIDE to open the Program Guide.
– Press THEMES (LEFT ARROW) when watching a program to open the Themes
and Search menu.
– Press BROWSE (RIGHT ARROW) to display the Browse Banner.
22
Highlighting Menu Options
Use the remote control ARROWS to move the on-screen highlight to the menu option. When you
move the on-screen highlight, the option becomes orange.
Selecting Menu Options
When you select a menu option, that option takes effect right away. You can select a menu option
in either of two ways:
• Move the highlight to the menu option using the remote control
ARROWS. Then press SELECT. In the example, Program Guide is
highlighted.
• If the option has a number next to it, press the number on the
NUMBER PAD button that matches this number. When you use the
NUMBER PAD, you do not need to highlight the option first.
List of Choices in the Menus
When you make a choice in a list, the receiver does not apply the change until you select Save or
Done. If you do not want to save any changes, select Cancel to discard all the changes made in
the menu.
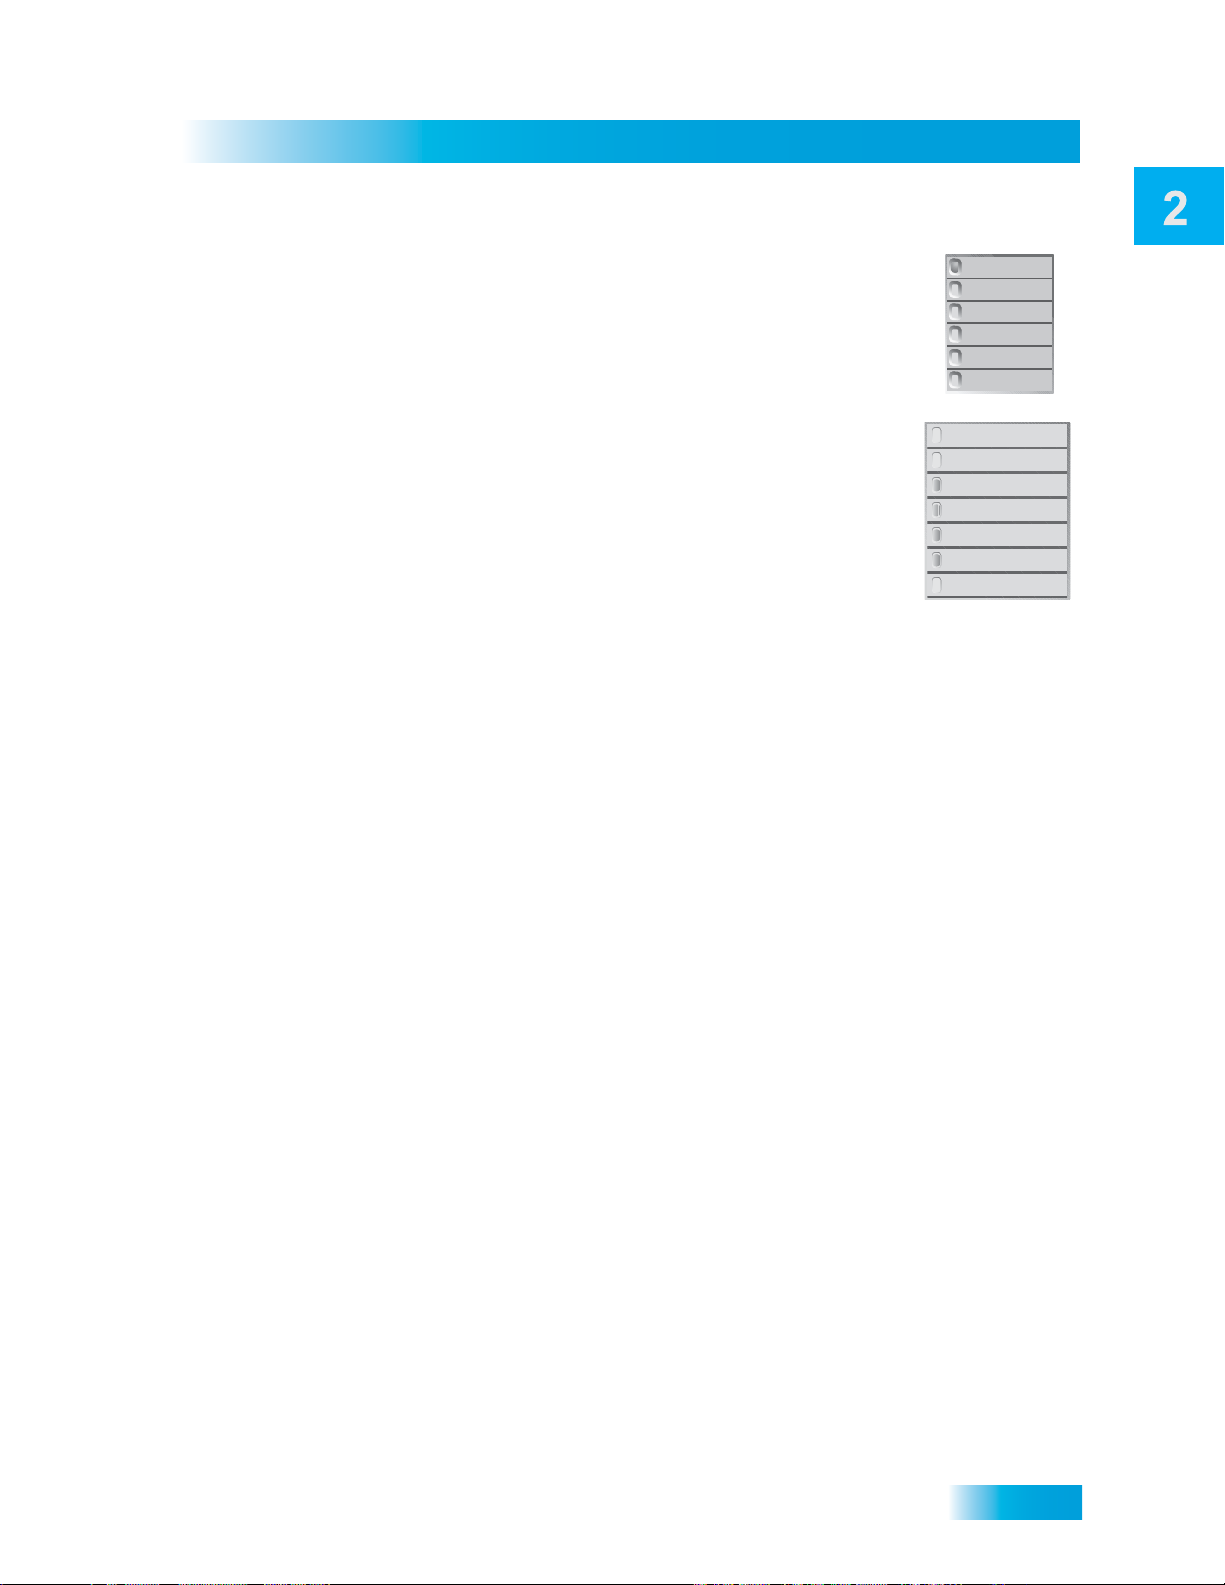
There are two types of lists:
Page 13
Satellite Receiver
Using Text Fields
• A single choice list allows you to select only one choice at a time. If you
select another choice, your previous choice is deselected.
• A multiple choice list allows you to select more than one choice at one
time. If you select another choice, your previous choice(s) stays selected.
All Episodes
New Episodes
Once
Weekly
Daily
Mon-Fri
632 - MLB
631 - MLB
630 - MLB
629 - MLB
628 - MLB
627 - MLB
626 - MLB
Canceling a Procedure
You can cancel a procedure in any of three ways:
• If you want to return to watching a program, press VIEW LIVE TV.
• If you want to return to the previous menu, press CANCEL.
• Wait a few moments and the menu will close automatically, discarding any changes you have
made.
Using Text Fields
When you use features on the receiver, you might be required to enter information, such as the
name of a movie when using Search, into areas known as text fields. Your receiver has two basic
ways to enter the information:
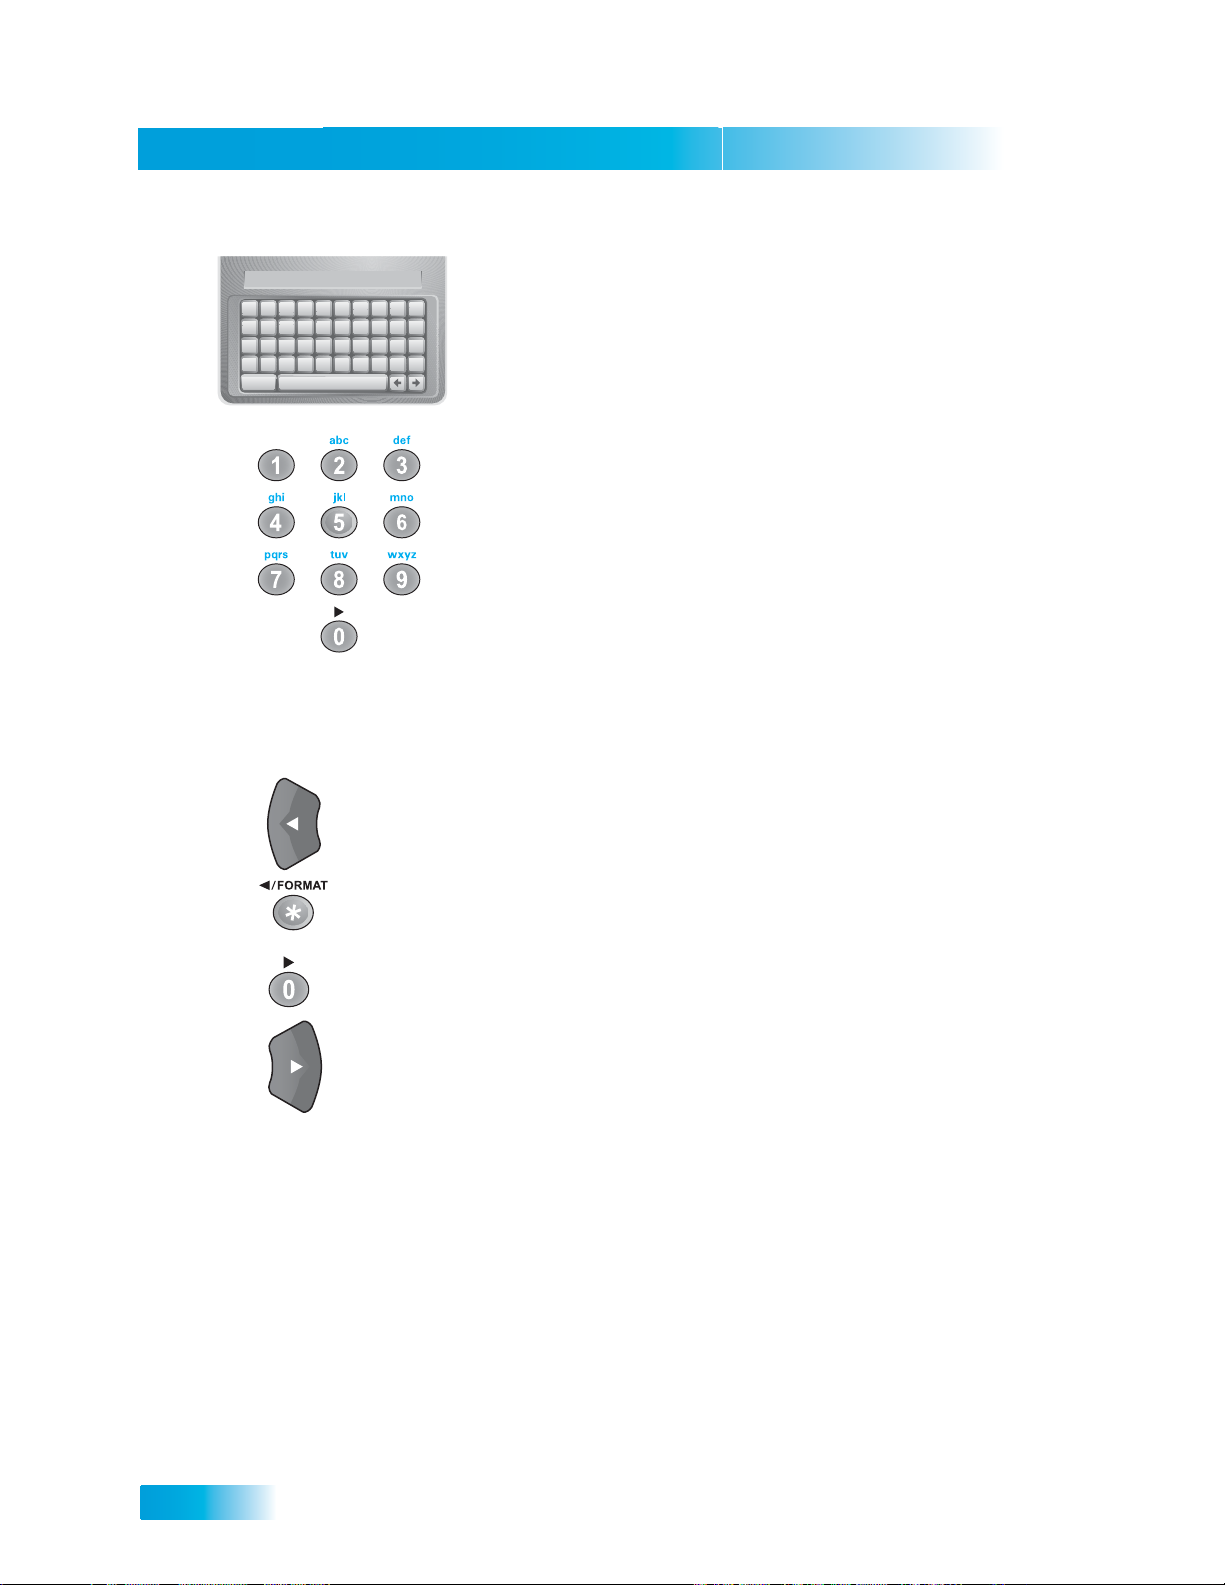
• Virtual Keyboard
• Remote Control NUMBER PAD
23
Page 14
Chapter 2
A B C D E F G H I J
K L M N O P Q R S T
U V W X Y Z ' - . &
1 2 3 4 5 6 7 8 9 0
Space
Back
Cheers_
While in the Text Field
When the cursor is in the text field:
Using the Virtual Keyboard
Use the virtual keyboard letters to type the information. Use the LEFT,
RIGHT, UP, and DOWN ARROWS to navigate around the keyboard.
Press SELECT to choose each character.
Using the Number Pad
Use the letters printed above the NUMBER PAD on the remote control—just like on a telephone—while the highlight is in the field. For
example, when looking for the channel and times to watch Rudy Friml
Presents, you press 7 three times for an R, 8 two times for a U, 3 one
time for a D, and 9 three times for a Y to spell the word “Rudy.”
• Press the LEFT ARROW to delete characters.
24
• Press FORMAT/* to backspace without deleting characters.
• Press 0 to enter a blank space, such as between words.
• Use the RIGHT ARROW to forward space without deleting characters.
Page 15
Satellite Receiver
Tips
Tips
• You can use the Front Panel Locks to prevent the mode from being changed
accidentally. See page 49 for instructions.
• The only way to turn off the TV2 outputs is by pressing POWER on Remote
Control 2.
• In Dual Mode, Remote Control 1 is used to control TV1 menus on the nearby TV. Remote
Control 2 is used to control TV2 menus on the remote TVs.
• If you would like to put the receiver in a remote location (such as a closet or cabinet), be sure
to get the replacement remote control that uses UHF Pro signals to control TV1. Call your
DISH Network retailer or go to www.dishnetwork.com
Accessories.
• If you do not do anything in a menu for several minutes, the menu automatically closes. This
will discard any changes you made, and display the program you were watching.
• To use Remote Control 2, be sure to attach the Remote Control Antenna. See page 17 for
details.
• On Remote Control 2, press FORMAT/* to change the aspect ratio (display shape) of HD
channels displayed on remote TV(s).
, select Our Products, and then click on
Questions
• Why put the receiver in Single Mode? When the receiver is in Single Mode, you can use the
PIP functions.
• How can I watch and use the DVR functions on the same program on all of the TVs in
my house? Put the receiver in Single Mode (page 15) and then enable Shared View
(page 88).
25
Page 16

Chapter 2
Notes
Notes
26
 Loading...