

Page 1
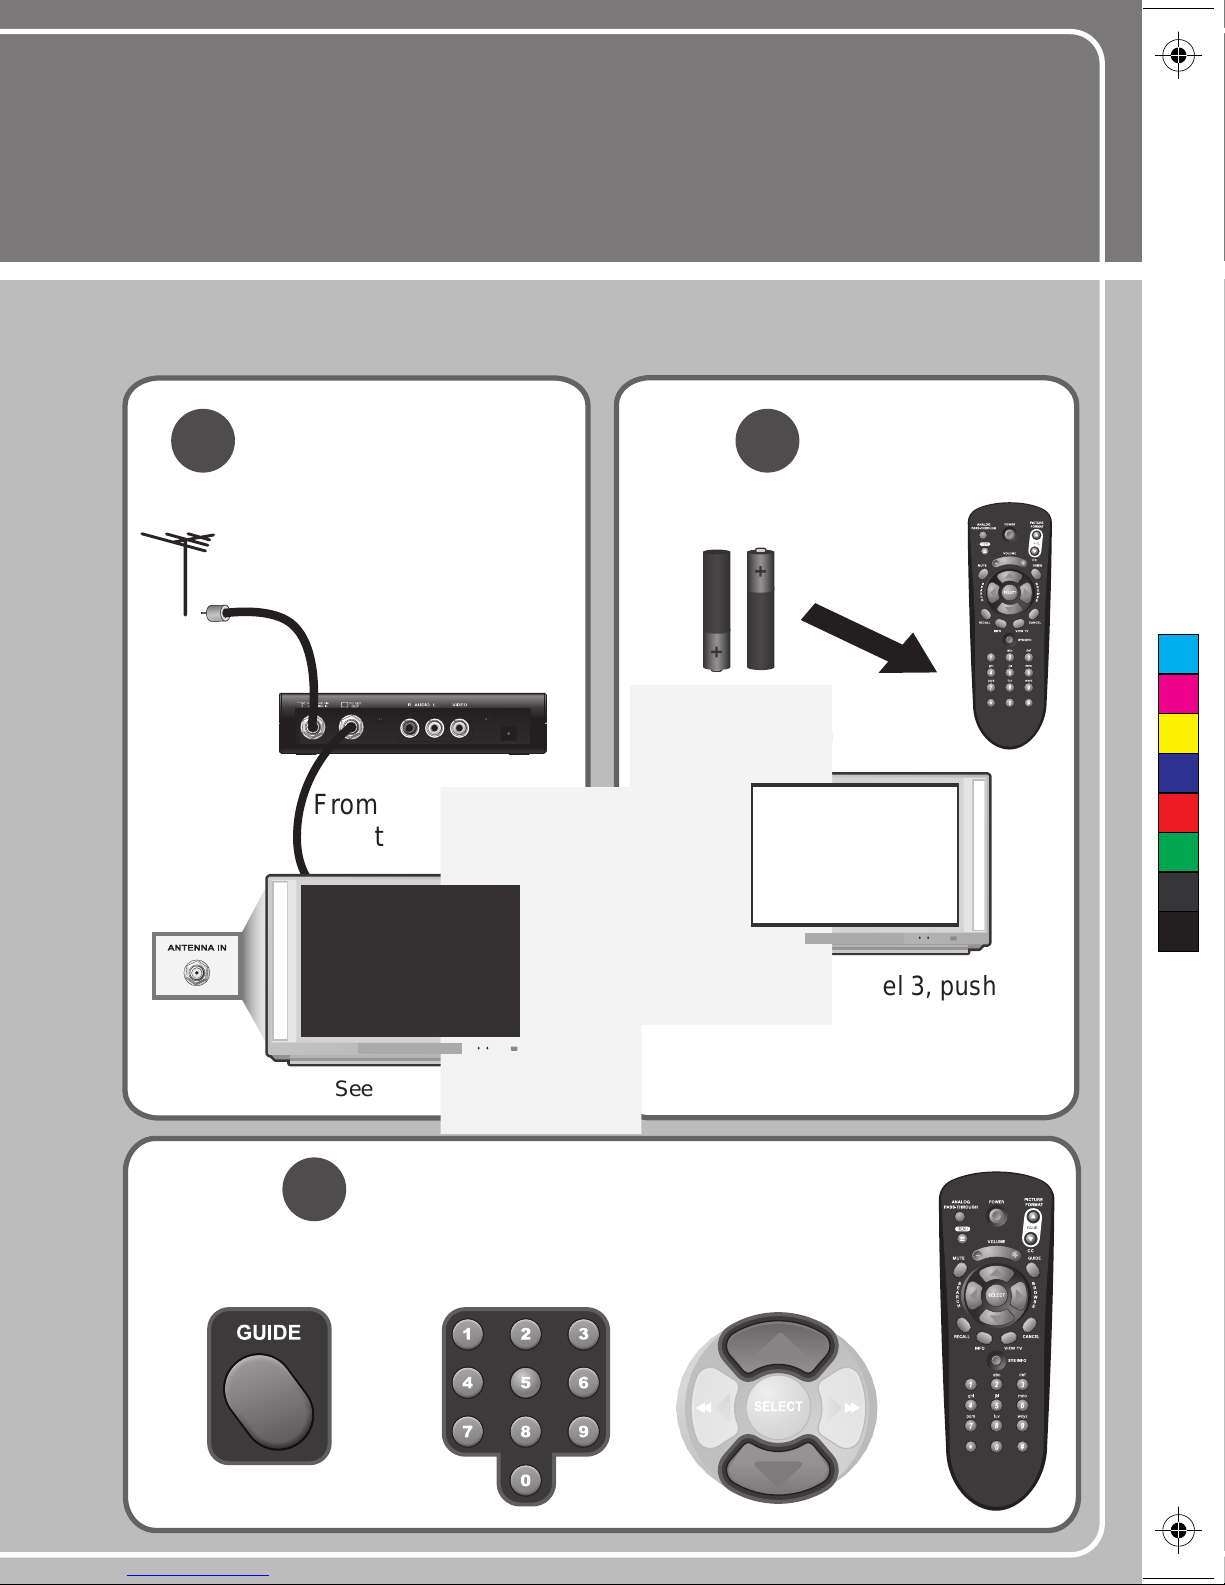
Enjoying your converter is as easy as 1-2-3!
CONNECTIONS
1
From the antenna
to the converter
From the converter
to the TV
See pages 2 & 3
Set TV to channel 3, push
POWER on the TR-40CRA remote,
and follow the on-screen instructions
Install batteries
in back of remote
SET UP
2
See pages 3 & 4
FINDING A CHANNEL
3
Program Guide
Channel Up/DownNumber Pad
See pages 5-7
Enjoying your converter is as easy as 1-2-3!
TR-40CRA
User
Guide
Page 2
Warning and Attention Symbols
You must be aware of safety when you install and use this system. This User Guide
provides various procedures. If you do some of these procedures carelessly , you could
injure or kill yourself or damage equipment or property. Some other procedures require
special attention.
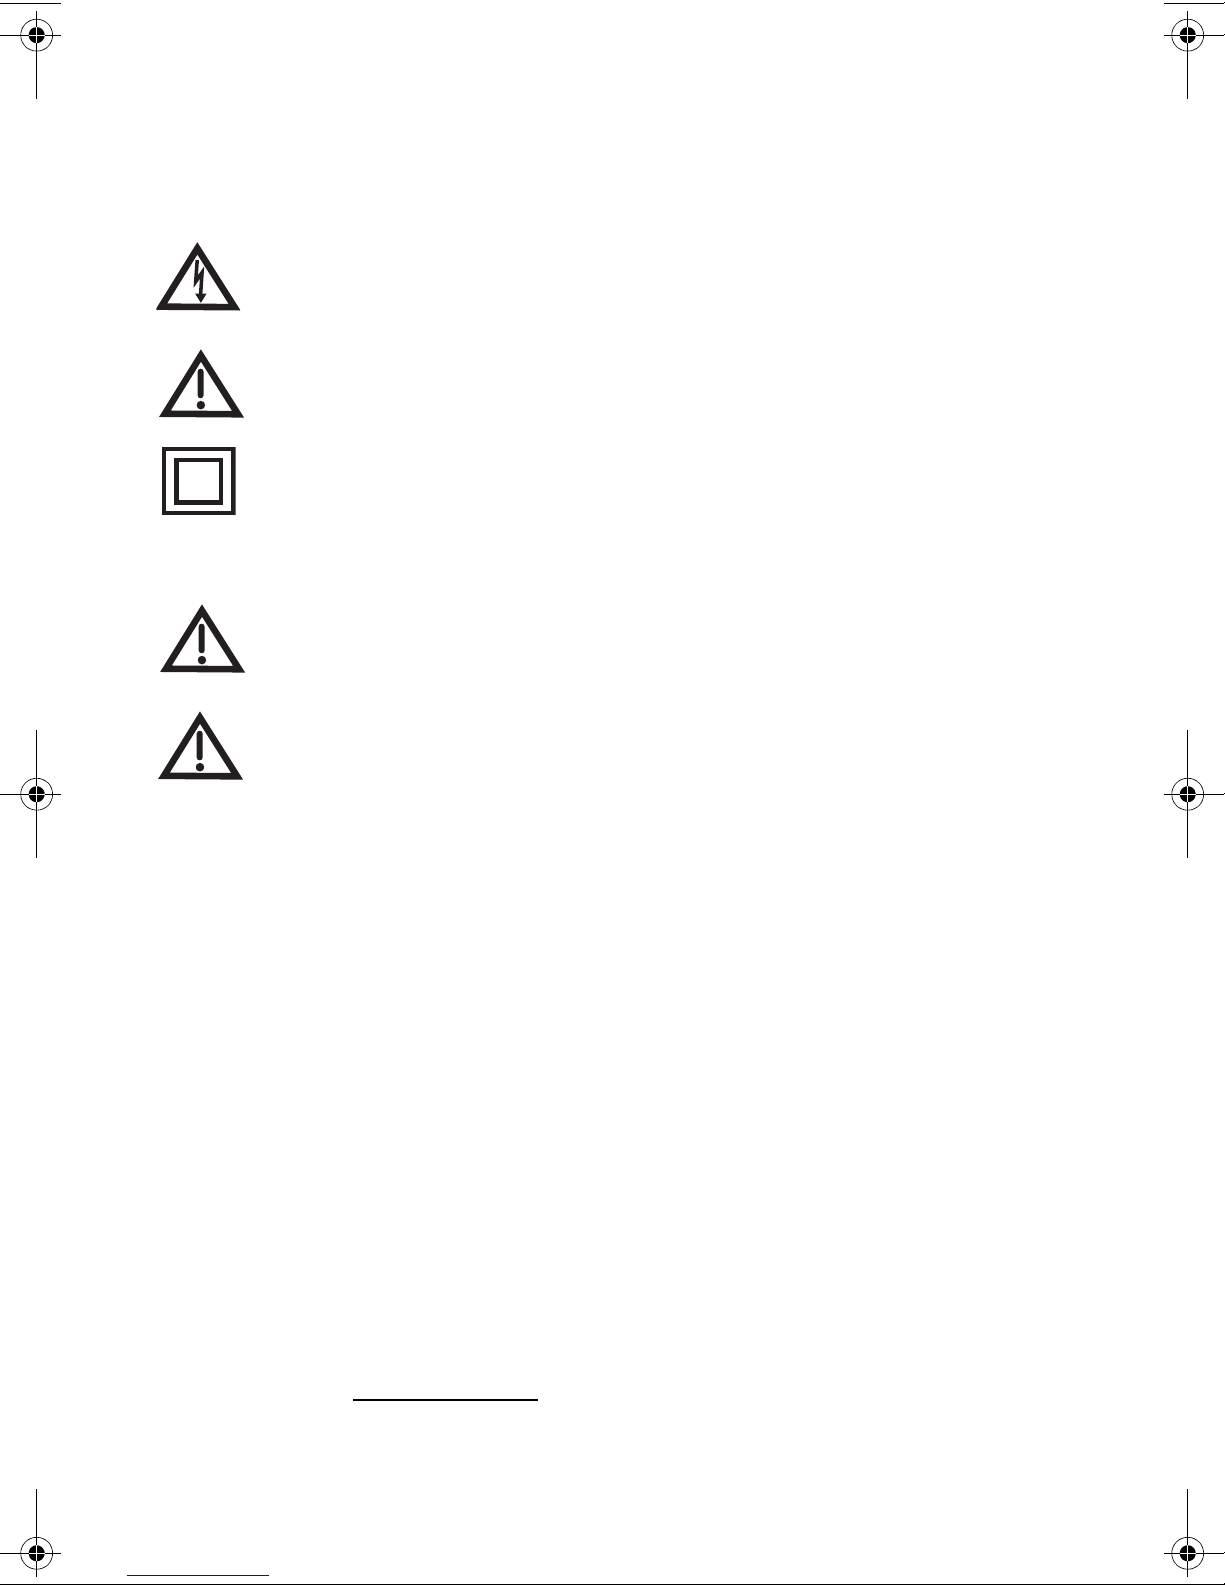
The lightning flash with arrowhead symbol, within an eq uilateral triangle, is
intended to alert the user to the presence of uninsulated “dangerous voltage”
within the product’s enclosure that may be of sufficient magnitude to
constitute a risk of electric shock to persons.
The exclamation point within an equilateral tri angle is intended to alert the
user to the presence of important operating and maintenance (servicing)
instructions in the literature accompanying the apparatus.
The class II equipment symbol means that the equipment has additional
insulation and does not need to be grounded.
For Your Safety
Do not try to open the case of the power adapter or receiver. There is risk of
electrical shock, which may cause damage to the apparatus and/or personal
injury or death to you. There are no user-serviceable parts inside. Opening
the case or making unauthorized changes will void the warranty.
Warning: To reduce the risk of fire or electric shock, do not expose this
apparatus to rain or moisture.
Important Software Notice
As with all software controlled products, unexpected behavior could arise if the user
tries to perform operations in a non-routine manner. This product, like almost any other
high tech product, is subject to bugs and hence DISH Network CANNOT AND DOES
NOT GUARANTEE OR WARRANT THAT ALL FEATURES, SUCH AS PARENTAL
CONTROL, WILL WORK AS INTENDED UNDER ALL CIRCUMSTANCES. In
compliance with the terms of the GNU Public License (GPL), DISH Network is making
some source code available to the public to download from www.dishnetwork.com.
Equipment and Software Covered by this Guide
This User Guide covers the TR-40CRA Digital-to-Analog TV Converter. This Guide
may cover other devices, not listed here. The information in this User Guide may
change without notice. We may issue revisions to tell you about such changes.
Copyright Notice
Part Number: 164835
Copyright © 2008 EchoStar Technologies L.L.C., Englewood, Colorado 80112. All
rights reserved.
The software embedded in this product includes code that is copyright © 2005 the
FreeType Project (www.freetype.org
Project Licence of January 27, 2006.
Manufactured under license from Dolby Laboratories. “Dolby” and the double-D
symbol are trademarks of Dolby Laboratories.
) and which is licensed under the FreeType
Page 3
TR-40CRA DIGITAL-TO-ANALOG TV CONVERTER
Table of Contents
CONTENTS C
Important Safety Instructions........................... ii
TR-40CRA Top Tips........................................... v
Introduction........................................................ 1
Guide Conventions.................................. 1
Getting Started......................................... 1
Installation................................................ 2
The Remote Control ......................................... 5
Remote Control Buttons......................... 6
Using the Menus................................................ 9
Watching TV........................................... 10
Finding Programs.................................. 10
Using Event Timers............................... 12
Customizing Your TR-40CRA......................... 13
Locks...................................................... 14
System Setup........................... .............. 16
Audio Setup ........................................... 18
Closed Caption...................................... 18
Troubleshooting.............................................. 19
TV Guide On Screen or Guide Plus Setup .... 23
Limited Warranty............................................. 31
FCC Compliance.............................................. 34
FCC Digital Television Transition Notice...... 37
Page i
Page 4
TR-40CRA DIGITAL-TO-ANALOG TV CONVERTER
IMPORTANT SAFETY INSTRUCTIONS
Important Safety Instructions
SAFETY S
IMPORTANT SAFETY INSTRUCTIONS
1 Read these instructions.
2 Keep these instructions.
3 Heed all warnings.
4 Follow all instructions.
5 Do not use this apparatus near water.
6 Clean only with a dry cloth.
7 Do not block any ventilation openings. Install in accordance with the manufacturer’s
instructions.
8 Do not install near any heat sources such as radiators, heat registers, stoves, or other
apparatus (including amplifiers) that produce heat.
9 Do not defeat the safety purpose of the polarized or grounding-type plug. A polarized
plug has two blades with one wider than the other. A grounding-type plug has two
blades and a third grounding prong. The wide blade or the third prong are provided for
your safety. If the provided plug does not fit into your outlet, cons ult an electrician for
replacement of the obsolete outlet.
10 Protect the power cord from being walked on or pinched, particularly at plugs,
convenience receptacles, and the point where they exit from the apparatus.
11 Use only attachments/accessories specified by the manufacturer.
12 Unplug this apparatus during lightning storms or when unused for long periods of time.
13 Refer all servicing to qualified service personnel. Servicing is required when the
apparatus has been damaged in any way, such as the power supply cord or plug is
damaged, liquid has been spilled or objects have fallen into the apparatus, the
apparatus has been exposed to rain or moisture, does not operate normally, or has
been dropped.
Apparatus shall not be exposed to dripping or splashing and no objects filled
with liquids, such as vases, shall be placed on the apparatus.
Page ii
Page 5
TR-40CRA DIGITAL-TO-ANALOG TV CONVERTER
IMPORTANT SAFETY INSTRUCTIONS
IMPORTANT SAFETY INSTRUCTIONS
• Only connect the original power adapter to the TV converter. Other power adapters
may damage the TV converter and cause a fire risk.
• Do not install the power adapter or TV converter in any area where the temperature
can be less than 40°F or more than 113°F, and do not cover them.
• Connect the power adapter only to the type of power source indicated on its label. The
power adapter must be readily accessible so that the equipment can be easily
disconnected from the AC power. Unplug the power adapter by gripping the power
adapter, not the cable.
• Do not overload wall outlets or extension cords; this can result in a risk of fire or
electrical shock.
• Do not attempt to service the power adapter or TV converter yourself, as opening or
removing covers may expose you to dangerous voltage, and will void the Limited
Warranty.
• Unplug the power adapter from the AC power outlet before cleaning. The power
adapter is still connected to the AC power whenever it is plugged in to a live power
outlet, even if the TV converter is turned off.
• Do not place naked flame sources such as lighted candles on or near the TV converter
or power adapter.
• Do not expose the remote control batteries to excessive heat or fire.
Page iii
Page 6
TR-40CRA DIGITAL-TO-ANALOG TV CONVERTER
IMPORTANT SAFETY INSTRUCTIONS
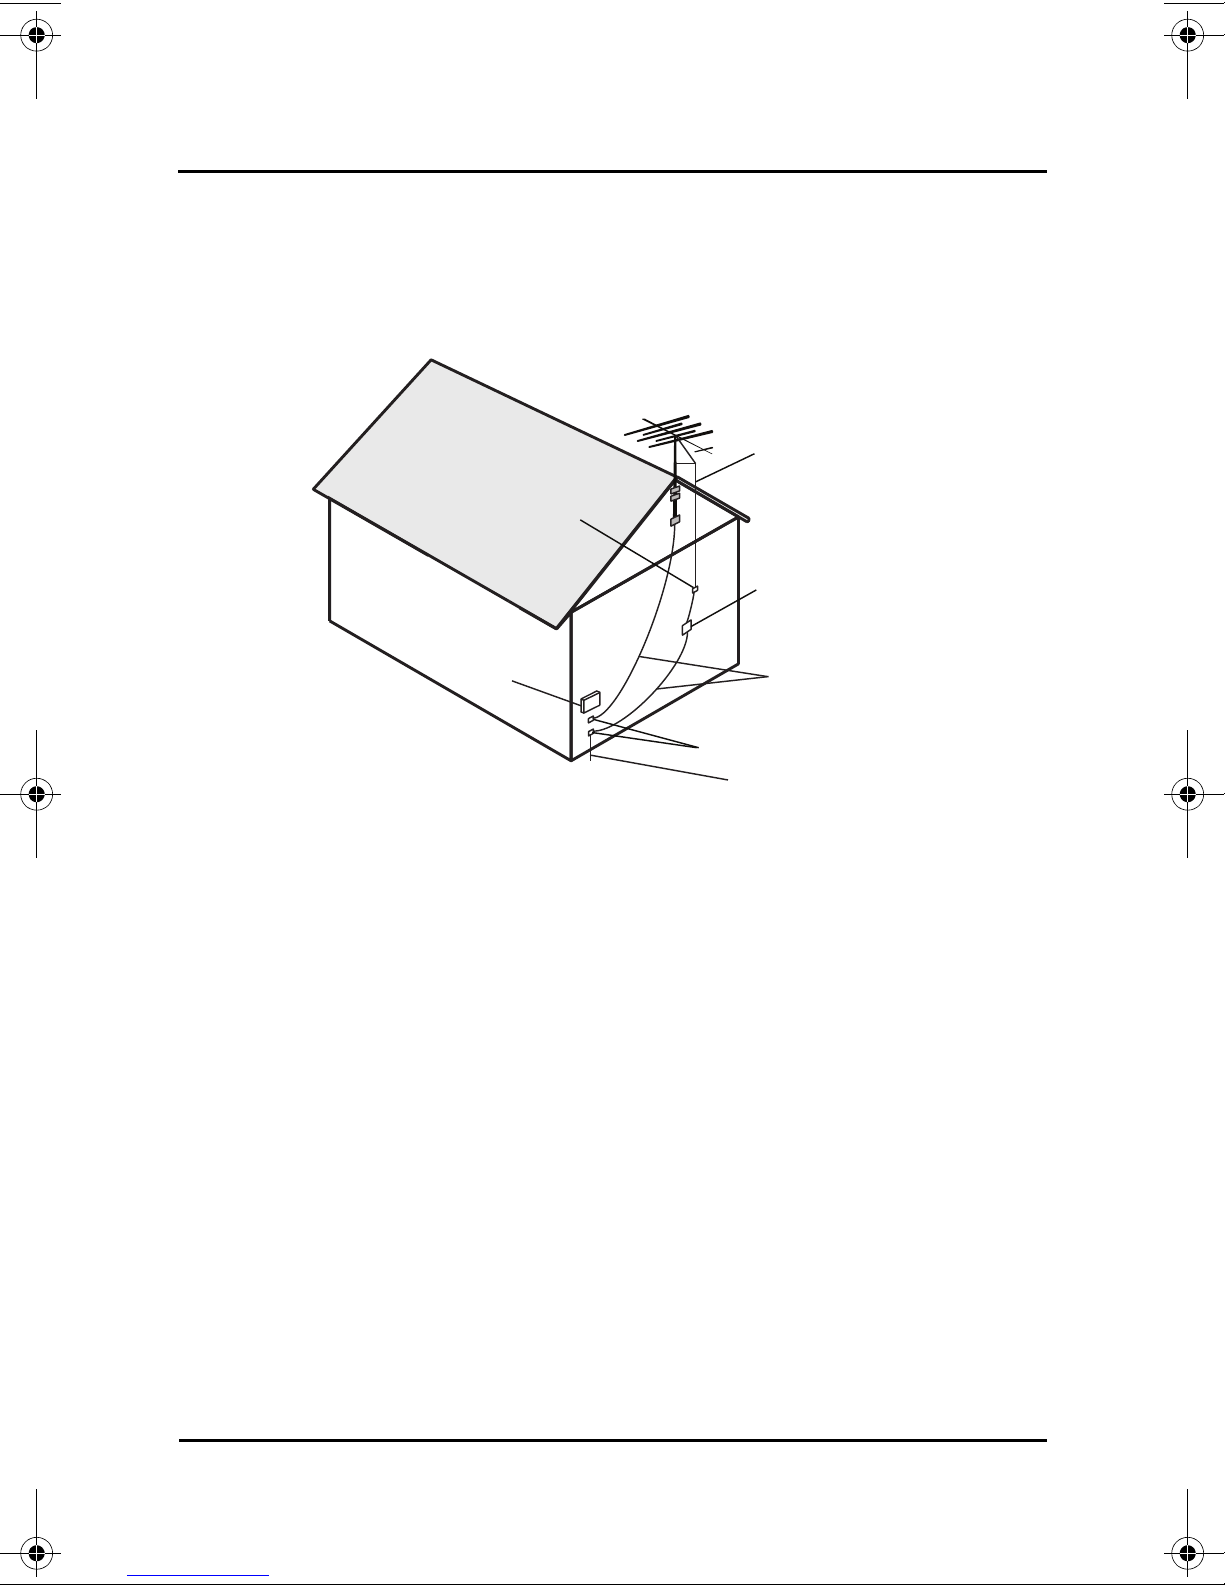
Note to Inst aller: This reminder is provided to call the installer's attention to Article
810 section II of the National Electrical Code (NEC) that provides guidelines for proper
grounding and, in particular, specifies that the cable ground shall be connected to the
grounding system of the building as close to the point of cable entry as practical.
Example of Antenna Grounding
National Electrical Code, 2008
Antenna
Lead in Wire
Ground Clamp
Antenna
Discharge
Unit
(NEC Section 810-20)
Electric
Service
Equipment
Grounding
Conductors
(NEC Section 810-21)
Ground Clamp
Power Service Grounding
Electrode System
(NEC Art. 250, Part H)
• Do not locate the antenna near overhead light or power circuits, or where it can fall into
such power lines or circuits. When installing the antenna, take extreme care to avoid
touching such power lines or circuits, as contact with them can be fatal.
Proper Care of Your Equipment
• Locate the TV converter in an open, well-ventilated area.
• If the TV converter is cold to the touch, do not plug it in immediately. Let it sit unplugged
at room temperature for at least 30 minutes before plugging it in.
• Always handle the TV converter and power adapter carefully.
• Unplug the power adapter from the AC power outlet before cleaning.
• Always turn the TV converter off and unplug it before moving it.
• The use of accessories or attachments not recommended by the TV converter
manufacturer will void the Limited Warranty.
• Use an outlet that contains surge suppression or ground fault protection. During an
electrical storm or when the TV converter is left unattended and unused for long
periods of time, unplug the adapter from the wall outlet, and disconnect the lines
between the TV converter and the antenna. This will provide additional protection
against damage caused by lightning or power line surges.
Page iv
Page 7
TR-40CRA DIGITAL-TO-ANALOG TV CONVERTER
TR-40CRA TOP TIPS
TR-40CRA TOP TIPS
Quick Tips to Get You Started
The TR-40CRA converts your local digital over-the-air TV broadcasts into a
format that can be viewed on your analog TV so you will be able to continue to
watch your local TV channels after the FCC-mandated digital transition.
The TR-40CRA is easy-to-use and takes your TV to the next level with built-in
features to make your life easier. Get the most out of your TR-40CRA with these
helpful tips.
USING YOUR ON-SCREEN PROGRAM GUIDE
The TR-40CRA converter’s easy-to-use Program Guide is a great source of
programming information displaying a complete list of available channels and
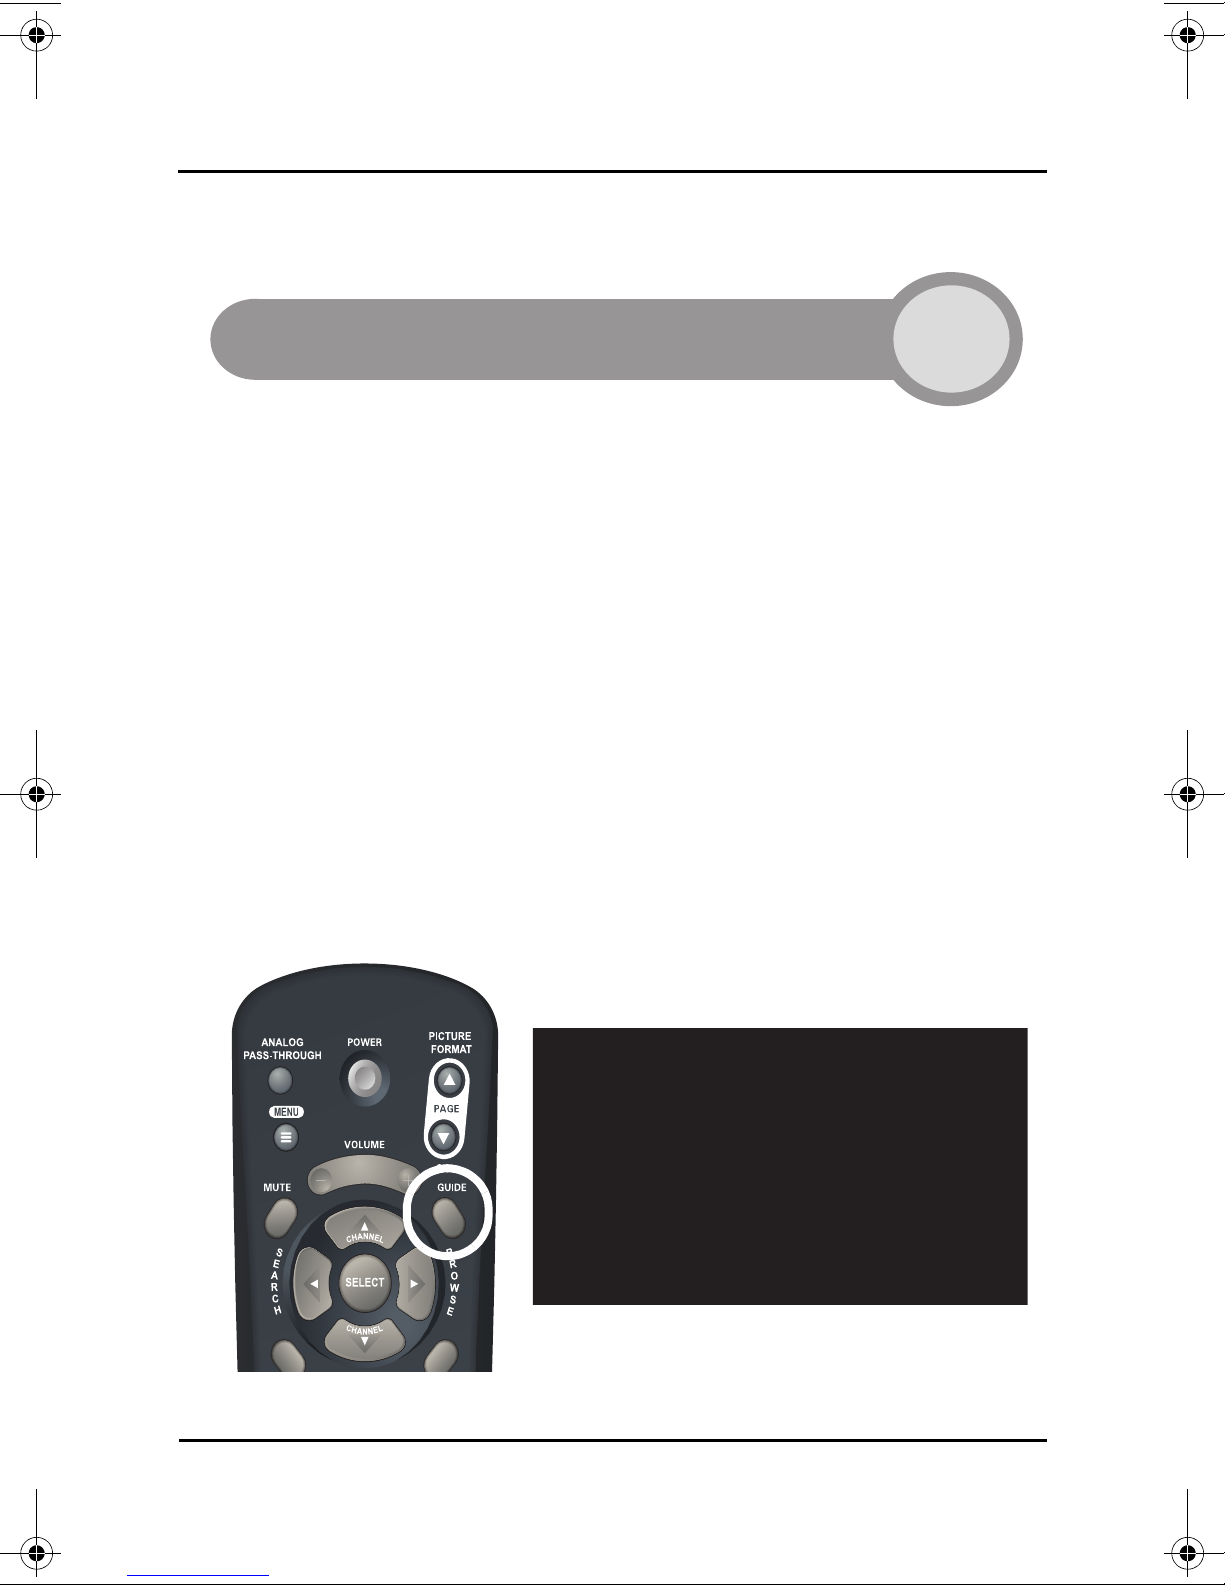
programs. Press GUIDE on the TR-40CRA remote control to open the Program
Guide and browse programs many hours in advance. Use the ARROW buttons
on the remote control to move through the Program Guide.
See page 10 for more information on the Program Guide.
Page v
Page 8
TR-40CRA DIGITAL-TO-ANALOG TV CONVERTER
TR-40CRA TOP TIPS
EVENT TIMERS
Never worry about having to
remember when your favorite shows
start! The TR-40CRA converter’s
Event Timer feature automatically
changes the channel to your favorite
program at the time it is scheduled to
begin. While in the Program Guide,
press SELECT on a future program
to create an event timer. Timers can
be created to tune to a channel one-time, daily, Monday-Friday, or weekly. See
page 12 for more information on Event Timers.
PARENTAL CONTROL
Block content you believe is
inappropriate for your household by
creating Locks. The Locks feature
requires a password to view content
you deem inappropriate. Access the
Locks menu by pressing MENU on
the remote control, selecting Setup,
then selecting Locks. See page 14
for more information on the TR40CRA converter’s Locks feature.
ANALOG PASS-THROUGH
Your TR-40CRA supports analog pass-through, allowing you to easily view
channels that still broadcast using an analog signal. To view analog over-the-air
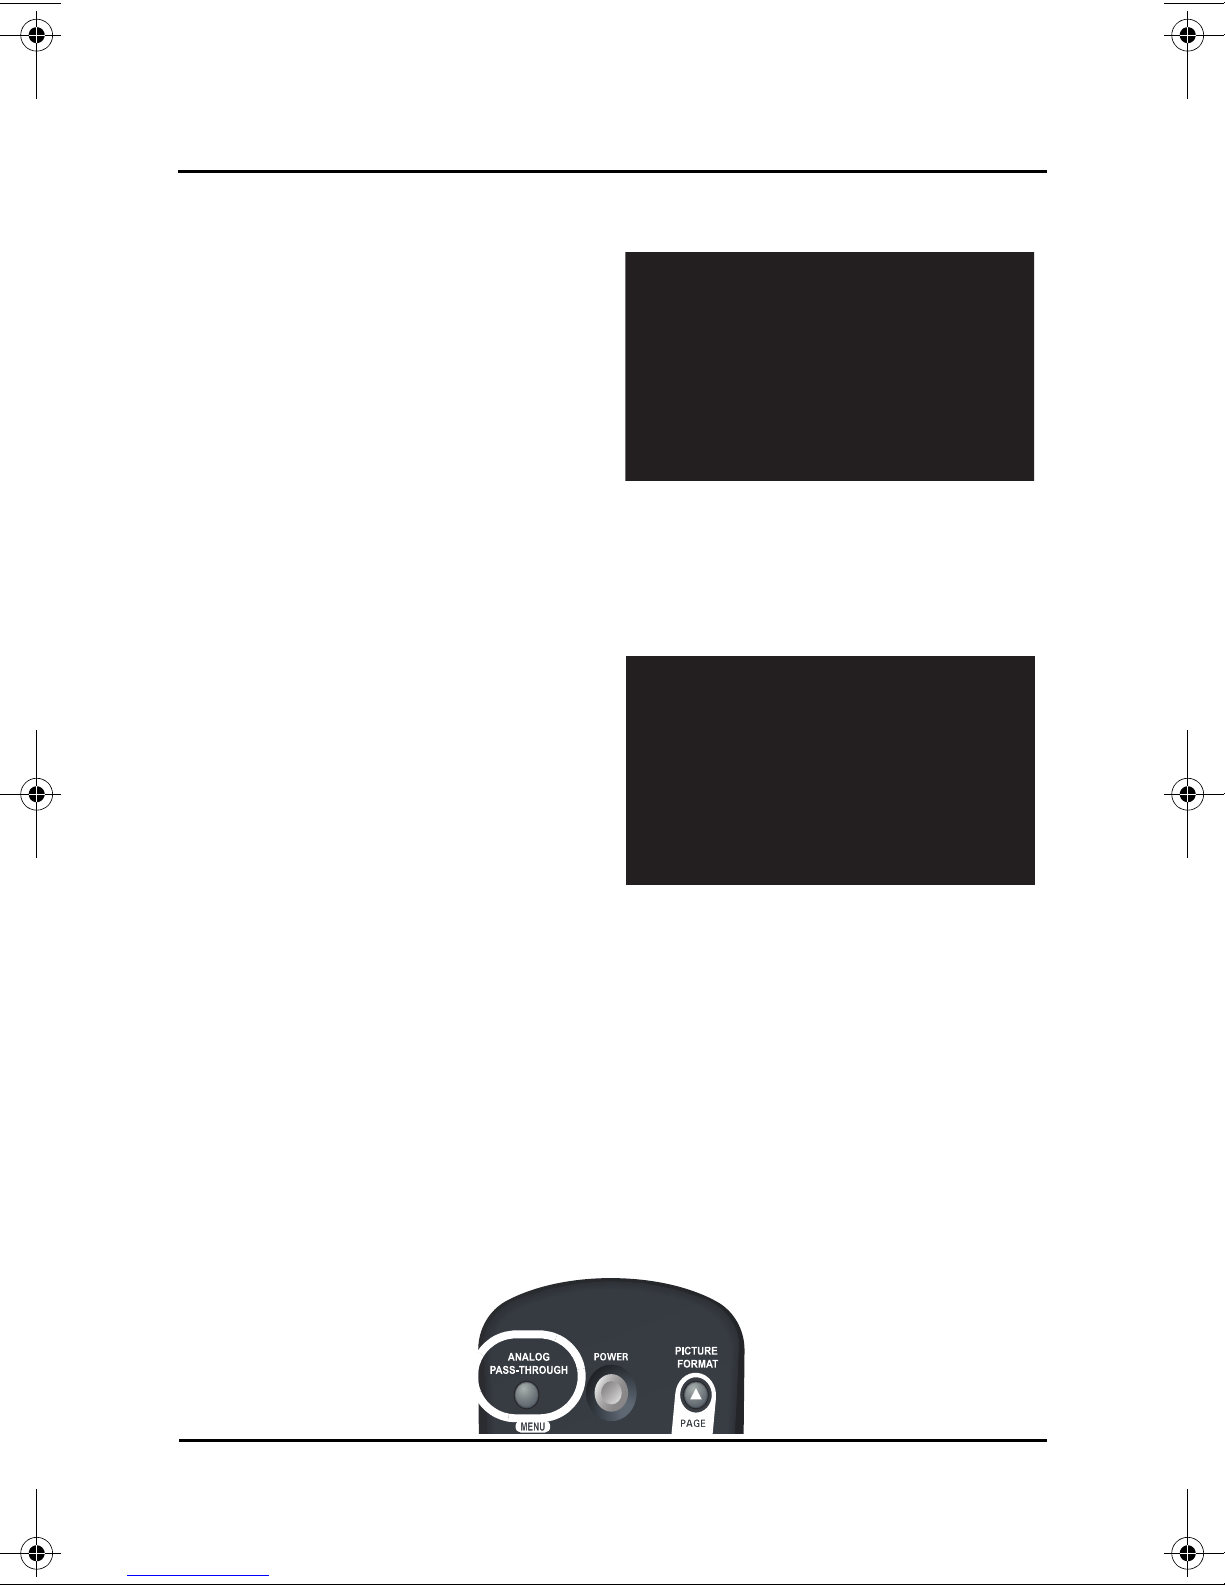
channels, simply press the ANALOG PASS-THROUGH button on the remote
control, then change channels using the remote control for your TV.
To resume viewing digital over-the-air channels, turn your TV back to channel 3,
4 or the alternate video input used to view your TR-40CRA, then press the
ANALOG PASS-THROUGH button on the TR-40CRA remote control again.
See pages 2 and 7 for more information on analog pass-through.
Page vi
Page 9
TR-40CRA DIGITAL-TO-ANALOG TV CONVERTER
TR-40CRA TOP TIPS
QUICK TROUBLESHOOTING TIPS
If You Get a Black or Blank Screen
• Make sure your TR-40CRA is powered on. There should be a green light
on the front panel of the TR-40CRA converter. If not, press the POWER
button on your TR-40CRA remote control.
• Make sure your TV is on the correct channel for viewing your TR-40CRA.
Your TV needs to be on either channel 3 or 4 (if connected using coax
cable) or a video input (if connected using RCA cables).
• Your TR-40CRA might need a simple "reset". Simply unplug the TR40CRA from your power outlet for 30 seconds and then plug it back in.
Y our TR-40CRA will reset and should be ready to use again within minutes.
Not Receiving a Digital Signal During Your Installation/
Set Up
Please note: Not all broadcasters are currently broadcasting a digital signal and
the source of the digital signal may move at any time. Go to
www.antennaweb.org
channels in your area are broadcasting a digital signal.
• If you are not able to receive a
digital TV signal for ANY of your
local channels and you see "The
receiver is unable to detect a
signal in your area" message on
your screen, it is possible that
you do not have the correct overthe-air antenna to receive a
digital signal or are out of range
for digital broadcasts. Go to www.antennaweb.org
which over-the-air antenna is best for your area or visit your nearest
electronics retailer.
• If you are not able to receive a digital TV signal for SOME of your local
channels you may simply need to adjust your over-the-air antenna or get
an over-the-air antenna that is optimized for your area. Go to
www.antennaweb.org
is correct for your area or visit your nearest electronics retailer .
or contact your local broadcaster to find out which
for more information on
for more information on which over-the-air antenna
Page vii
Page 10

TR-40CRA DIGITAL-TO-ANALOG TV CONVERTER
TR-40CRA TOP TIPS
No Longer Receiving a Digital Signal After Your Installation/Set Up
• If you are no longer able to receive a digital TV signal for some or all of your
local channels and your TR-40CRA Digital-toAnalong TV Converter is
hooked up correctly, it is possible that you will need to adjust your over-theair antenna or get an over-the-air antenna that is optimized for your area as
the source of the digital signal may have moved. Go to
www.antennaweb.org
is best for your area or visit your nearest electronic retailer.
• You can easily check the signal
strength of a local channel by
pressing BROWSE on your
remote control when tuned to the
channel on your TR-40CRA.
The signal strength for that
channel appears in the upper
right hand corner of your TV
screen.
for more information on which over-the-air antenna
For more helpful troubleshooting information go to page 19 in this manual.
MORE INFORMATION/CUSTOMER SUPPORT
1-888-667-0633 or www.dtvp al.com.
UPGRADE TO DISH NETWORK
Although the TR-40CRA is a great digital-to-analog TV converter box, you may
not be able to receive any or all digital over-the-air signals. Get over 100 or
more of the most popular national channels, such as Discovery, CNN, and
ESPN, and your local channels* by getting your programming through DISH
Network. Call 1-888-638-9912 or visit www.dishnetwork.com/dtvpal
get DISH Network for the lowest all-digital price nationwide...every day!
*where available
today and
Page viii
Page 11
TR-40CRA DIGITAL-TO-ANALOG TV CONVERTER
INTRODUCTION
Introduction and Installation
CHAPTER 1
Getting to Know the TR-40CRA and Connecting It to Your TV
INTRODUCTION
Welcome and thank you for choosing TR-40CRA Digital-to-Analog Converter!
Your TR-40CRA is a TV converter that connects between your new or existing
over-the-air antenna and TV. The TR-40CRA converts your local digital overthe-air TV broadcasts into a format for viewing on your standard-definition
analog TV.
This chapter walks you through connecting your TR-40CRA to you r TV and
provides an introduction to the features of the TR-40CRA. If you experience any
issues connecting the TR-40CRA, refer to Troubleshooting on page 19 for
assistance.
GUIDE CONVENTIONS
• The names of remote control buttons are all uppercase.
Example: Press SELECT.
• On-screen menu options are bold.
Example: Choose the Setup option.
• “Select” means to move the on-screen highlight using the remote control’s
ARROW buttons then press SELECT on the remote control.
Example: Select the Locks option.
GETTING STARTED
• To learn about the remote control, refer to Chapter 2 on page 5.
• To learn about using the features of your TR-40CRA converter, refer to
Chapter 3 on page 9.
• If you experience any issues using your TR-40CRA converter, refer to the
Troubleshooting steps on page 1 9.
• If your analog TV supports TV Guide On Screen or Guide Plus, refer to
page 23 for setup instructions.
Page 1
Page 12
TR-40CRA DIGITAL-TO-ANALOG TV CONVERTER
INSTALLATION
INSTALLATION
Note: These instructions assume you already have an over-the-air antenna
installed. If you need help choosing or installing an over-the-air antenna, refer to
www.antennaweb.org
Connecting Your TR-40CRA to Your TV
Important Safety Note: Do not connect your TV or your TR-40CRA
converter to a power supply until after you have properly connected all
of the cables using the following instructions.
or your local retailer.
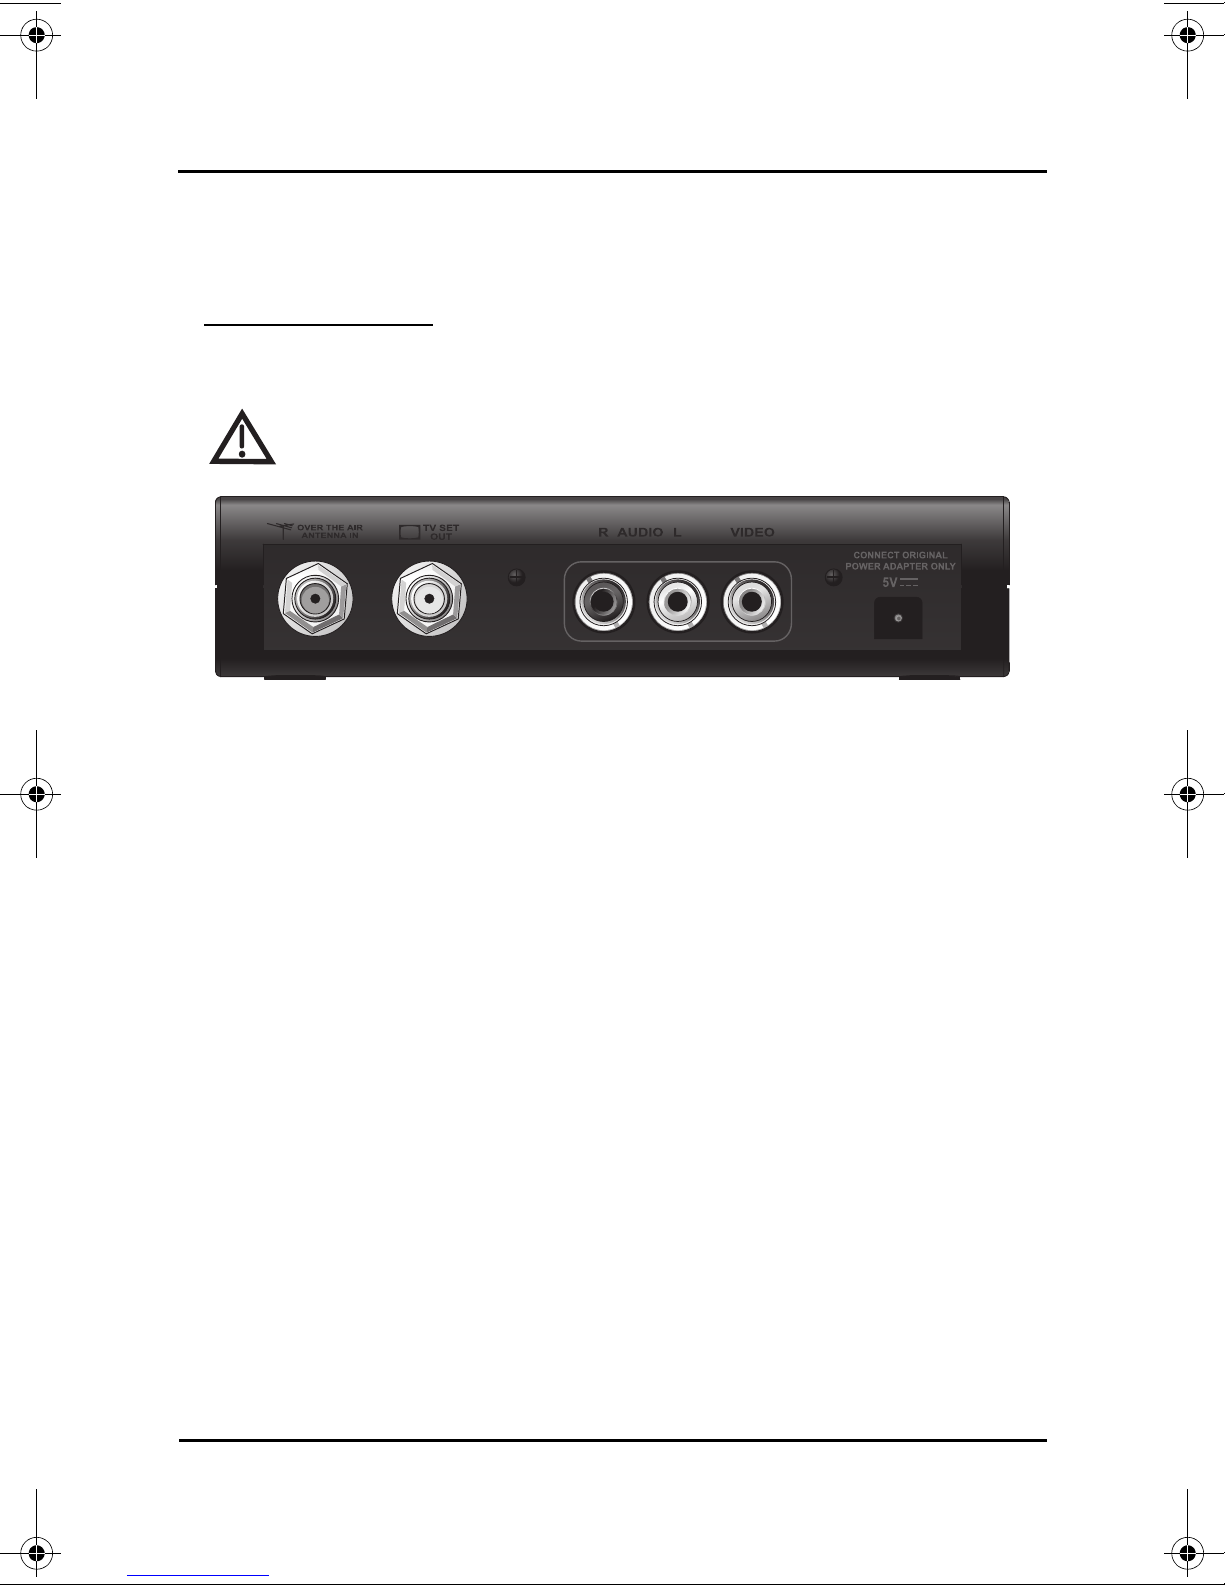
TR-40CRA Back Panel Connections
1 On the back of your TV, locate the ANTENNA IN connection, which connects
your TV to your over-the-air antenna. This connection may be labeled
VER-THE-AIR ANTENNA IN, CABLE IN, COAX IN, or another name. Refer to
O
your TV’s User Guide for help locating this connection.
2 Disconnect the coaxial cable from your TV’s ANTENNA IN connection.
Note: If your TV uses twin-lead (300 ohm) connections, you will need to
obtain and install a 75 ohm to 300 ohm converter on your TV. This
converter can be found at most consumer electronics stores.
3 Look at the back of the TR-40CRA, and locate the OVER-THE-AIR ANTENNA
IN connection (refer to image above). Connect the coaxial cable from
step 2 to the O
not use a wrench to tighten this connection.
Note: The TR-40CRA includes only a digital over-the-air tuner. If channels
in your area are still broadcasting analog signals, you can view these
channels by pressing the ANALOG PASS-THROUGH button on the TR40CRA remote, and then changing channels using the TV’s remote control.
4 Determine the connection type you’ll use to connect your converter to your
TV. The TV SET OUT connection uses a coaxial cable to connect to a TV’s
ANTENNA IN connection, and carries video and mono audio on RF channels
3 or 4 (step 5). Alternatively, if your TV has RCA connectors for audio and
video, you can use RCA cables to connect from the A
connection (RCA-type) on your converter to your TV’s video input (go to
step 6).
VER-THE-AIR ANTENNA IN connection on the TR-40CRA. Do
UDIO/VIDEO
Page 2
Page 13
TR-40CRA DIGITAL-TO-ANALOG TV CONVERTER
Installation Wizard
INSTALLATION
5 To connect your TR-40CRA converter to your TV using a coaxial cable:
a Connect one end of the coaxial cable to the TV’s A
b Connect the other end of the coaxial cable to the TV S
on your TR-40CRA converter.
6 To connect your TR-40CRA converter to your TV using composite cables
(red, white, and yellow RCA-type).
a Connect the composite cables to the TV’s RCA-type composite input.
b Connect the other end of the cables to the AUDIO/VIDEO connections on
your TR-40CRA converter.
7 Plug the TR-40CRA power adapter into the power adapter plug on the back
of your TR-40CRA converter. Plug the other end into an electrical outlet.
Make sure your TV also is plugged in to power.
NTENNA IN connection.
ET OUT connection
Using the Installation Wizard
8 Install the two included AAA batteries in the TR-40CRA remote control. Be
sure to follow the battery installation diagram printed on the remote control.
9 Turn on your TV using the TV’s remote control or front panel button.
10 Change your TV to the correct channel or input to view your TR-40CRA.
a If your TV is connected to your TR-40CRA converter using the coaxial
connection (step 5), set the TV to channel 3, which is the default output
channel for the TR-40CRA.
Note: If you have a local or cable channel that broadcasts on channel 3,
you can change the output setting for your TR-40CRA converter to
channel 4 during the Installation Wizard, described below.
b If your TV is connected using the RCA-type connection (step 6), you will
need to set the TV to the correct video input or source. Most TV remote
controls have a VIDEO, INPUT, or SOURCE button that you can use to
change the TV’s video input or source. Refer to your TV’s user guide for
additional help changing the TV’s input or source.
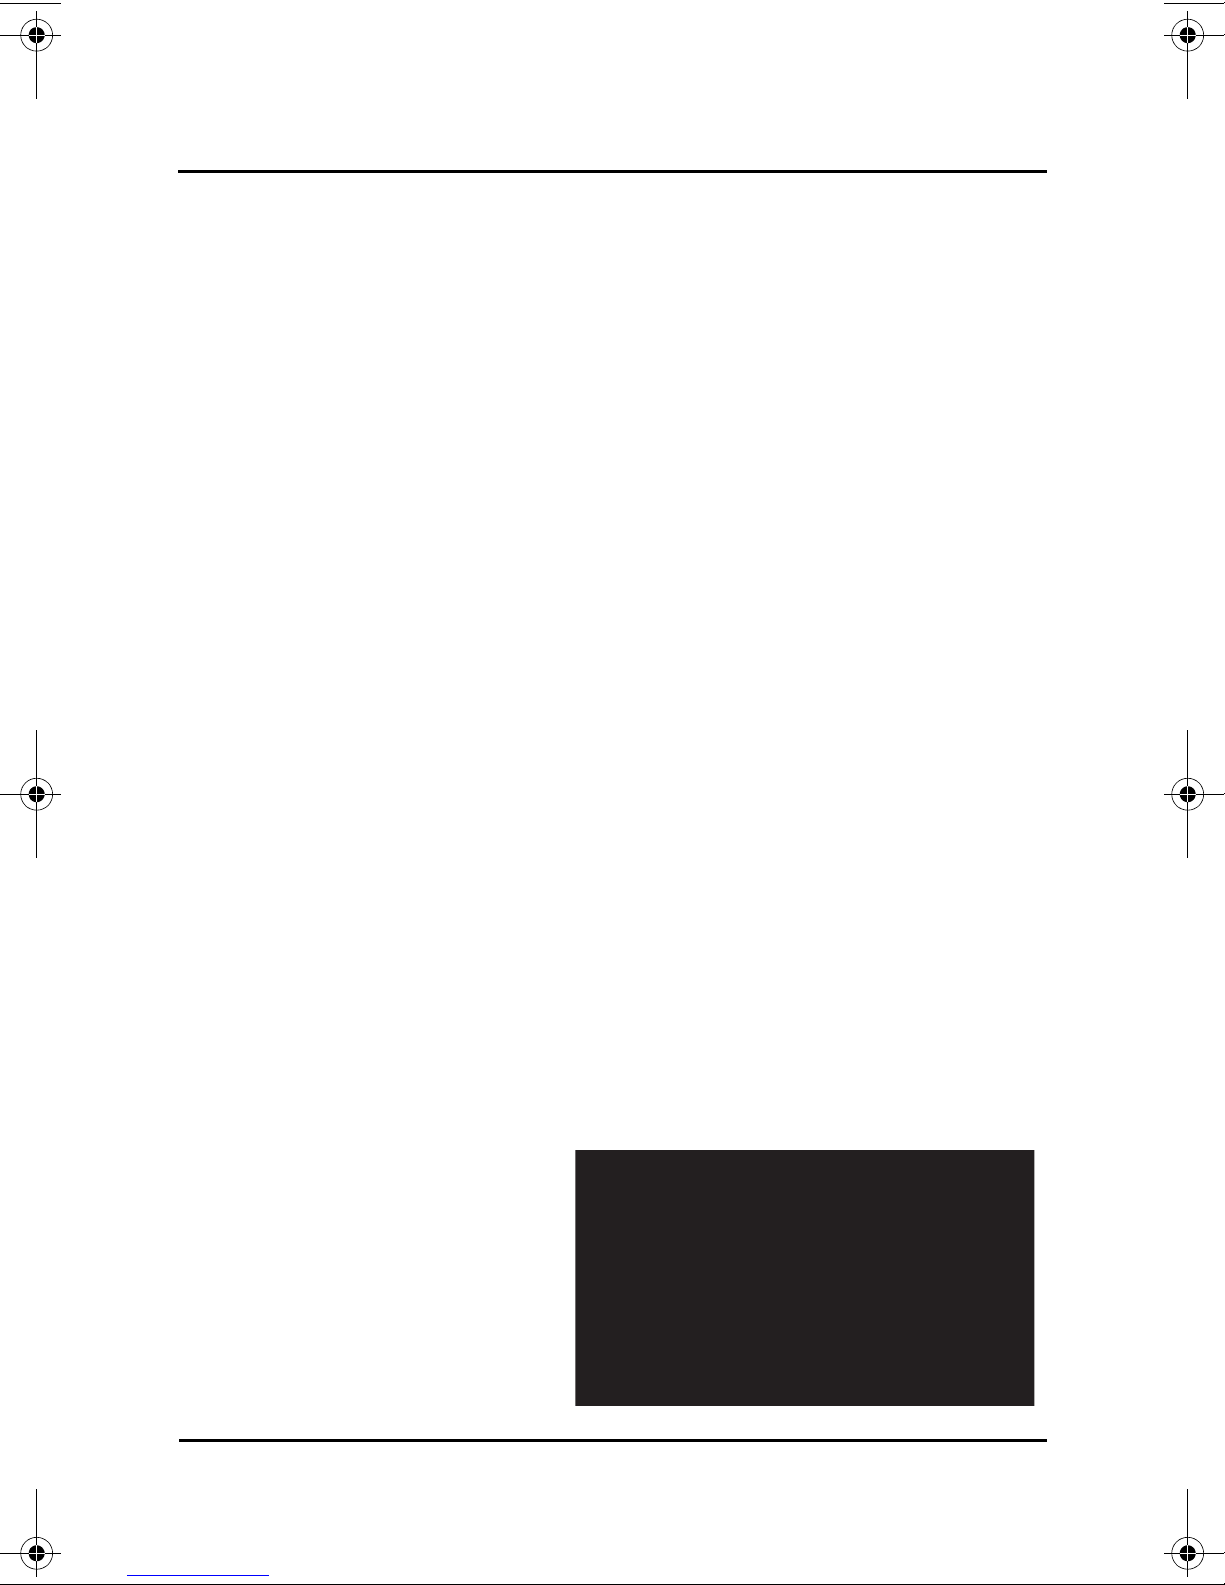
11 The first time your
converter turns on, an
Installation Wizard screen
appears and guides you
through the setup process.
The Installation Wizard
scans for local digital overthe-air channels, and helps
you set up the time zone
and TV display settings.
Page 3
Page 14
TR-40CRA DIGITAL-TO-ANALOG TV CONVERTER
Navigation Buttons
Downloading Guide
INSTALLATION
12 To navigate through the Installation Wizard,
use the SELECT button on your TR-40CRA
remote control to choose the highlighted
(orange) on-screen option. To highlight other
options, use the ARROW buttons.
13 Select Continue to begin the Wizard.
14 The Installation Wizard scans for local digital
over-the-air channels.
15 After the channel scan completes, you will be taken to the Set Time Zone
screen. Use the UP and DOWN ARROW buttons to find your time zone
and to set if your area follows Daylight Savings time. Select Next once
you’ve made these settings and to go to the next step.
16 The Channel 3-4 Setup screen is used to change the output channel of the
TV SET OUT connection on your TR-40CRA converter. The channel setting
on the Channel 3-4 Setup screen must match your TV’s channel. If you
have a local or cable channel that broadcasts on channel 3, be sure to
change this setting to channel 4. If you do this, you will also need to change
your TV channel to 4. Select Next.
17 Use the ARROWS or NUMBER PAD to enter your ZIP code. Select Next.
18 The TR-40CRA begins to
download the Program
Guide information. This
takes a few minutes. After
the Program Guide has
downloaded, the TR-40CRA
will exit out to a channel.
19 Congratulations! Your
converter is now installed
and ready to use! To start
watching TV, press either
the UP or DOWN ARROW buttons on the remote control to change
channels, or enter the channel number using the NUMBER PAD.
Note: Some broadcasters choose to send several channels in their
broadcast range rather than just a single channel. These additional
channels are referred to as sub-channels, and are identified by a dash and
then a number (for example, channel 9-2 is a sub-channel of channel 9). To
change to a sub-channel, enter “0” before entering the channel number.
For example, to change to channel 9-2, enter “0092” on the NUMBER PAD.
Page 4
Page 15
TR-40CRA DIGITAL-TO-ANALOG TV CONVERTER
CHAPTER 2
Remote Control
Using Your TR-40CRA Remote Control
THE REMOTE CONTROL
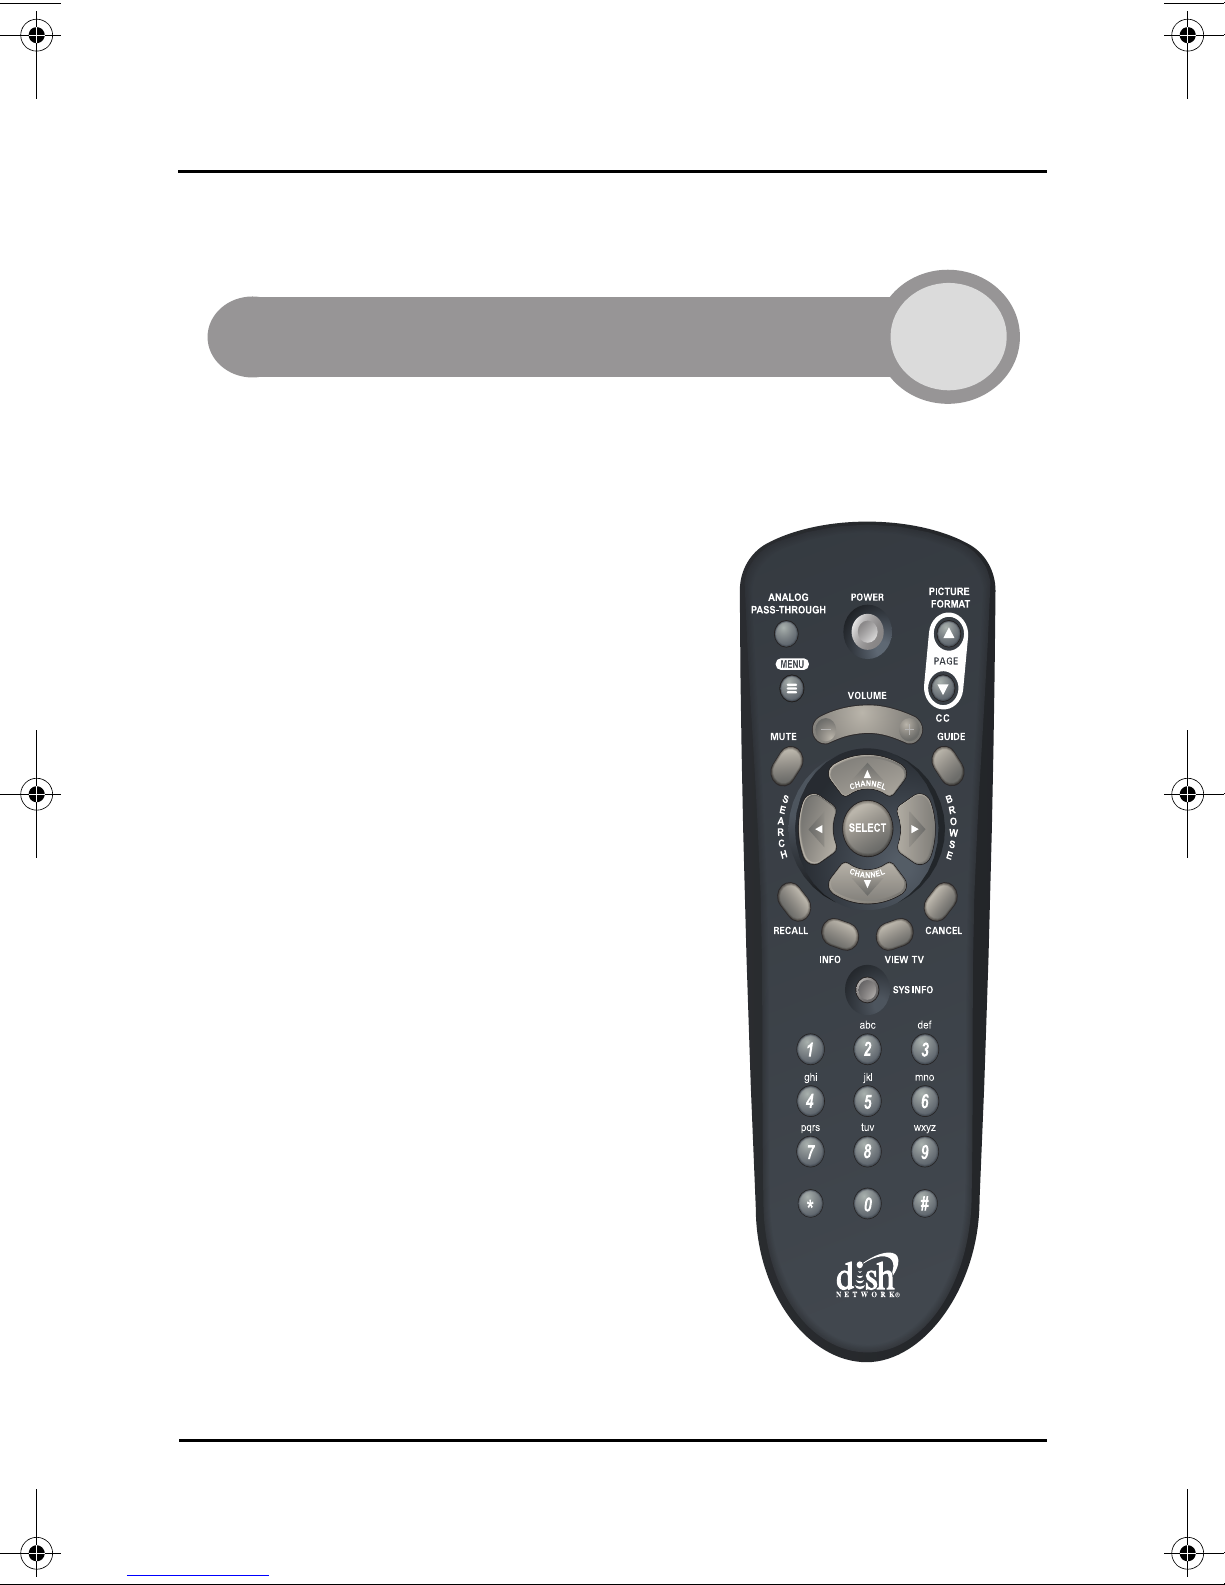
The remote control that came with your TR40CRA will operate only your TR-40CRA
Digital-to-Analog Converter. If you own a
universal remote control, you may be able to
program your universal remote control to
operate your TR-40CRA converter as well as
your TV. Review the device codes provided
in your universal remote control’s User
Guide. Look for the codes listed for
EchoStar, EchoSphere, or DISH Network.
THE REMOTE CONTROL
Page 5
Page 16
TR-40CRA DIGITAL-TO-ANALOG TV CONVERTER
REMOTE CONTROL BUTTONS
REMOTE CONTROL BUTTONS
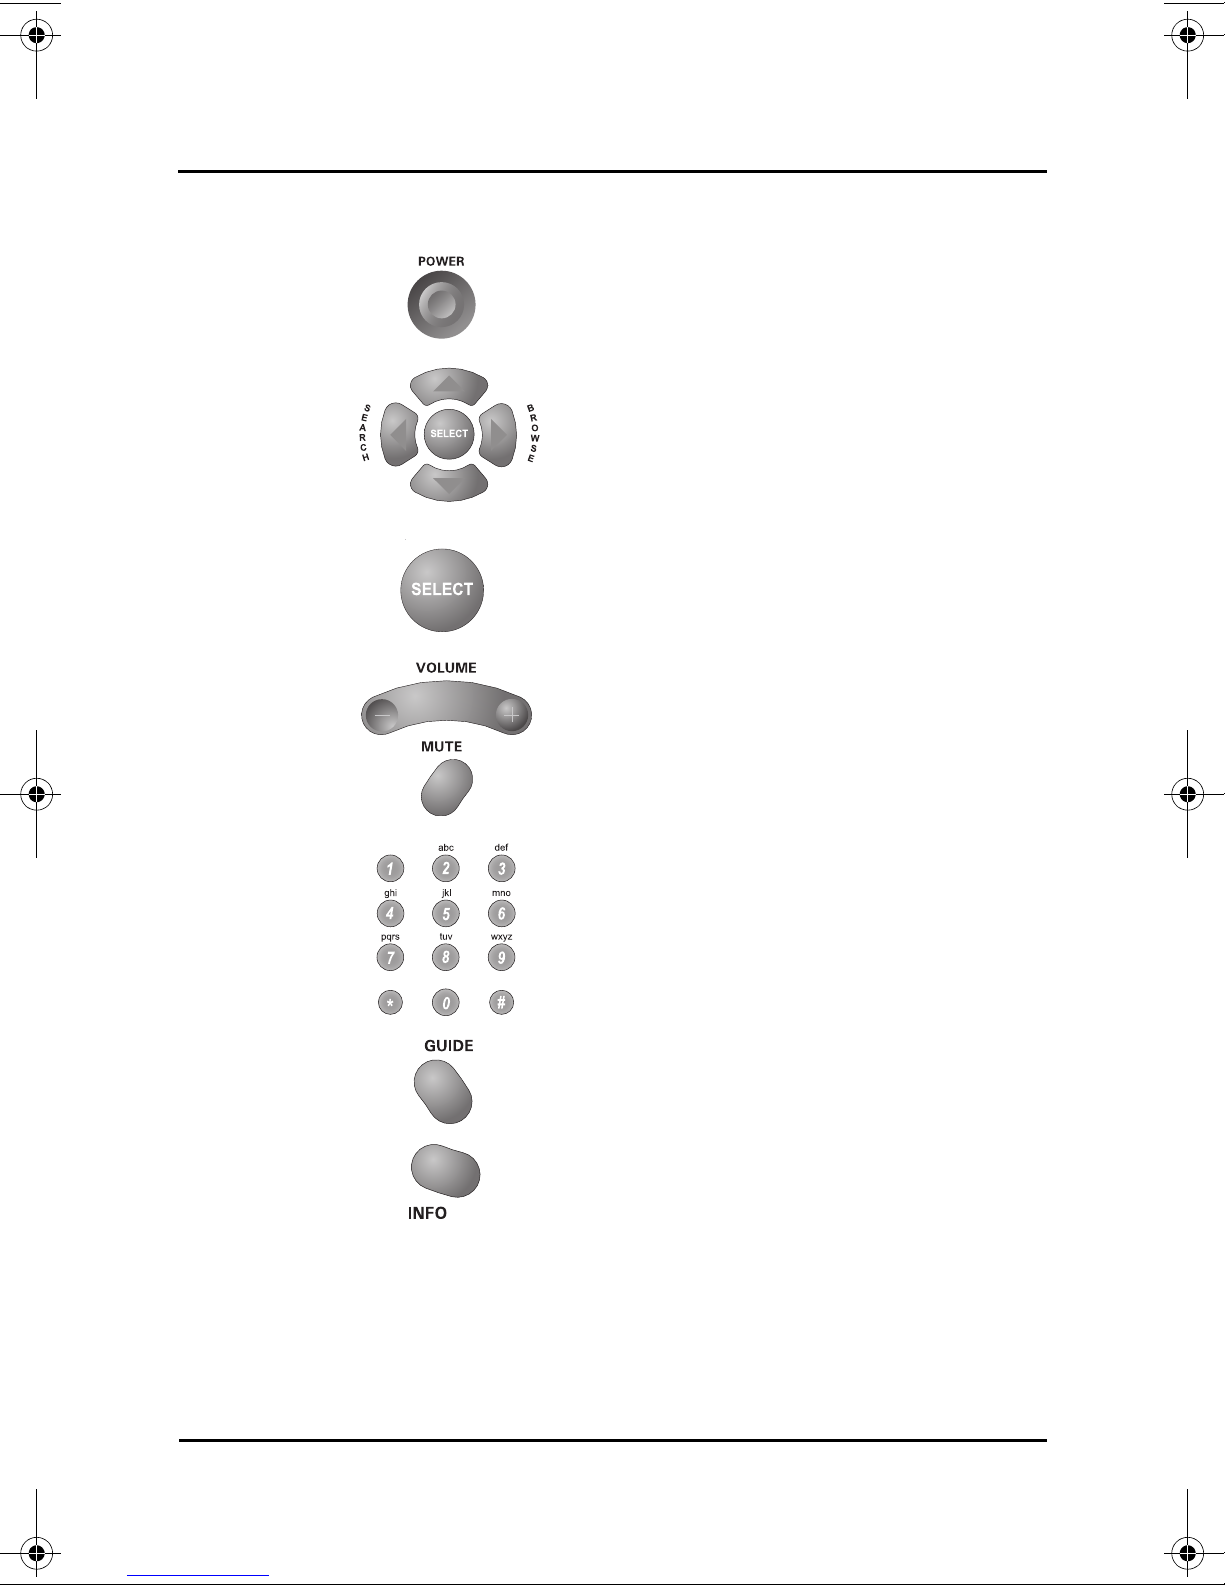
POWER Turns your TR -4 0 CRA converter on or off.
Use the UP and DOWN ARROWS to
quickly change channels. The ARROW
ARROWS
SELECT
buttons also allow you to move through onscreen menus and highlight different
options.
Selects a highlighted on-screen option or, if
pressed while viewing a channel, displays
the program information banner.
VOLUME
and MUTE
NUMBER
PAD
GUIDE
INFO Displays program information.
Adjusts the volume level of the TR-40CRA
converter or mutes its volume.
Quickly change channels by entering the
channel number, or choose numbered onscreen options.
Note: The STAR (*) and POUND (#)
buttons are not used by th e TR -4 0CRA
converter.
Opens the on-screen Program Guide,
which displays this list of available channels
and programs.
Page 6
Page 17
TR-40CRA DIGITAL-TO-ANALOG TV CONVERTER
PAGE UP
and DOWN
(PICTURE
FORMAT
and CC)
MENU
REMOTE CONTROL BUTTONS
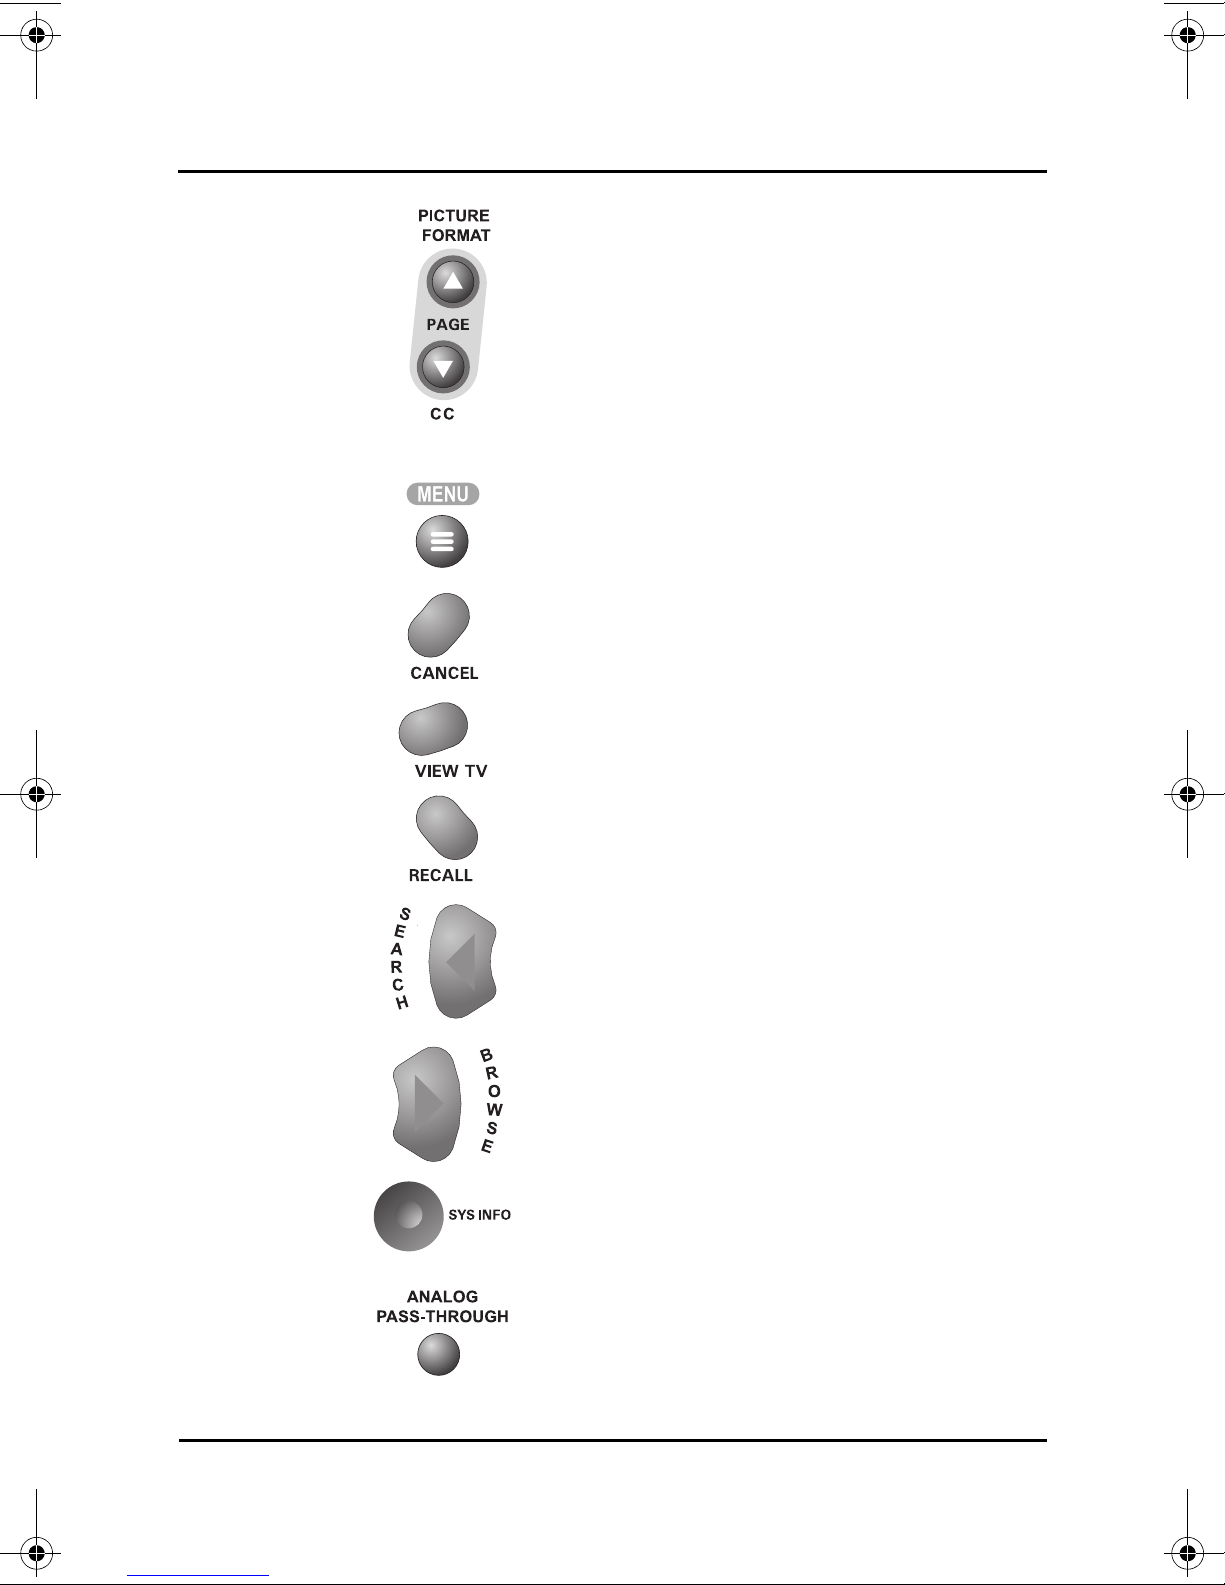
Up PAGE UP or PAGE DOWN while in the
Program Guide and other menus to move
through the menus one page at a time.
While watching TV, pressing PAGE UP/
PICTURE FORMAT adjusts formatting of
programs to fit your TV screen.
Pressing PAGE DOWN/CC while watching
TV turns closed captioning on or off.
Opens your TR-40CRA main menu, which
allows you to open all other TR-40CRA
menus.
CANCEL
VIEW TV
RECALL Returns you to the previous channel.
SEARCH
BROWSE
SYS INFO
Allows you to exit out of any menu without
saving changes.
Quickly exits you all the way out of menus
to return to viewing TV.
Quickly opens the Event Search screen.
See page 11 for more details on Event
Search.
Displays the Browse Banner, allowing you
to see what is showing on other channels.
See page 11 for more det ails on the Browse
Banner.
Opens the System Information screen,
which provides technical details on your
TR-40CRA Digital-to-Analog TV Converter.
ANALOG
PASSTHROUGH
Provides the ability to pass-through the
analog antenna signal directly to the TV,
allowing the TV’s tuner to be used for
analog channels.
Page 7
Page 18
TR-40CRA DIGITAL-TO-ANALOG TV CONVERTER
NOTES
NOTES
Page 8
Page 19
TR-40CRA DIGITAL-TO-ANALOG TV CONVERTER
CHAPTER 3
TR-40CRA Main Menu
USING THE MENUS
Features and Menus
Using Your TR-40CRA Menus and Features
USING THE MENUS
Opening the Menus
• Press the MENU button on the remote control to open your TR40CRA converter’s Main Menu. You can open all other menus and
options from the Main Menu.
• While watching TV, other remote control buttons provide quick access to
certain menus of your TR-40CRA.
– GUIDE opens the Program Guide.
– SEARCH opens the Event Search screen.
– BROWSE opens the Browse Banner.
Navigating the Menus and Selecting Options
• Use the remote control ARROW buttons to move the highlight to your
desired option. The option that is highlighted will be orange in color. In the
Program Guide, the highlighted program is dark blue.
• To choose a highlighted option, press SELECT.
• If the option has a number on it, you can quickly select the option by
pressing that number on the NUMBER PAD.
Page 9
Page 20

TR-40CRA DIGITAL-TO-ANALOG TV CONVERTER
Program Guide
WATCHING TV
Closing the Menus
There are several ways to exit out of the on-screen menus.
• Select Done to save any changes you’ve made in a menu.
• Press CANCEL (or select Cancel) to exit a menu without saving changes.
• Press VIEW TV to exit out of all the menus and return to watching TV.
• Menus will automatically close after several minutes of inactivity.
WATCHING TV
Press the UP or DOWN ARROWS to move through the available channels one
channel at a time. If you know the channel’s number, you can enter the channel
number using the remote control’s NUMBER PAD.
To change to a sub-channel, enter “0” before entering the channel number. For
example, to change to channel 9-2, enter “0092” on the NUMBER PAD. See
page 4 for an explanation of sub-channels.
Press INFO while watching TV or while in the Program Guide to view additional
information on the program.
Note: To view Closed Captioning information, you must either enable Closed
Captions through your TR-40CRA converter’s menus (press the CC button on
the remote control or see page 18), or enable the display of Closed Captioni ng
using your TV’s menus (refer to your TV’s user guide).
FINDING PROGRAMS
Finding Programs Using
the Program Guide
The Program Guide displays the
list of digital over-the-air channels
and programs. The top of the
Program Guide displays the date,
time, and title of the program that
is highlighted.
Note: Program Guide information
is provided by the local channel
broadcasters. The amount of guide information available varies by channel.
• Use the ARROW buttons to move through the Program Guide.
• Use the PAGE UP or PAGE DOWN buttons to move through the Program
Guide one page at a time.
Page 10
Page 21
TR-40CRA DIGITAL-TO-ANALOG TV CONVERTER
Browse Banner
Event Search
FINDING PROGRAMS
• Press SELECT on a highlighted program to view program. Press SELECT
on a future program to create an event timer for the program.
• Press INFO to view additional information about the highlighted program.
• Use the NUMBER PAD to quickly move to a specific channel.
• Exit the Program Guide by pressing VIEW TV or CANCEL.
Finding Programs using Browse
You can see what’s showing on
other channels without having to
use the Program Guide by
opening the Browse Banner.
Press the BROWSE (RIGHT
ARROW) button on the remote
control. You can see the current
and upcoming programs on
other channels at the bottom of
the screen. The information for
the channel you are currently
watching appears at the top of the screen.
To view what’s showing on other channels, press the UP or DOWN ARROW
while the Browse Banner is open.
Finding Programs Using Event Search
Event Search lets you search for
programs by a specific name or
description. Open Event Search
by pressing SEARCH (LEFT
ARROW), or press MENU, then
select Event Search.
• Search lets you enter a
program name or
description using the on screen keypad.
• History displays previous searches you have saved.
• Options lets you narrow your search by title, description, or both.
• Save lets you store a search so you can search using the same keyword in
the future without having to re-enter it.
• Select Done to exit when you’ve finished searching for programs.
Page 11
Page 22
TR-40CRA DIGITAL-TO-ANALOG TV CONVERTER
Timers List
Create Timer Screen
Reminder Popup
USING EVENT TIMERS
USING EVENT TIMERS
You can create a timer to automatically change channels at a certain time.
Creating an Event Timer
1 Select a program coming on
in the future from the
Program Guide, Browse
Banner, or the Event
Search results. Or , to create
a timer from the Timers
menu, press the MENU
button, select Setup, then
select Timers.
Note: From the Timers screen, you can delete existing timers by selecting
them from the Timers List, then selecting Delete.
2 For a new timer, select
Create. To edit an existing
timer, select it from the list of
timers, then select Edit.
3 Select how often you want
the timer to occur under
Repeat. Choose Once for
one-time events (this is the
default choice if creating a
timer through the Program
Guide), Daily for programs
on at the same time every day, Weekly for programs on once a week, or
Mon-Fri for programs on Monday through Friday.
4 Select the channel you want to change to when the event time r occurs,
then select Next.
5 Choose the Time and Date for when you want the timer to occur. Select
Done to create the event timer.
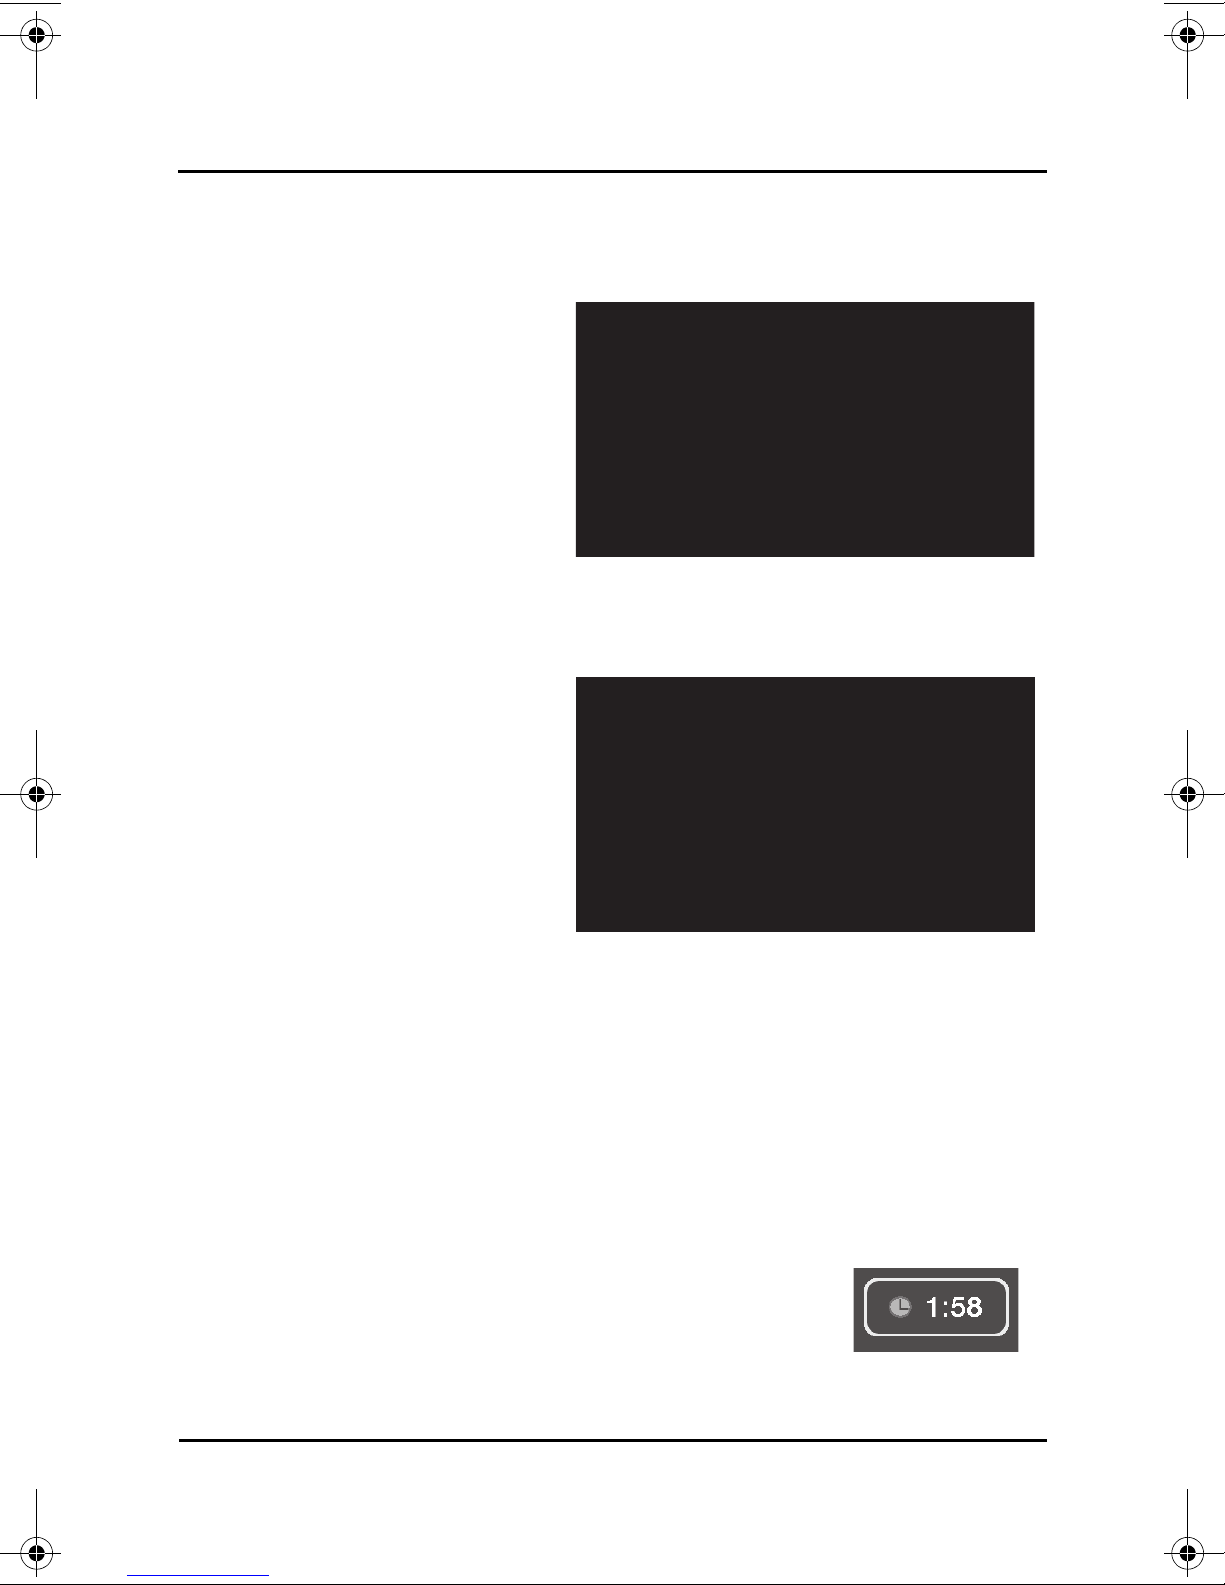
When the Event Timer Occurs
A few minutes before the event timer occurs, you will
receive a reminder popup. If you press SELECT on the
popup, a menu appears where you can select the Timer
Icon to dismiss the popup (the timer will still occur), select
Watch to change to the channel right away, or select
Stop Timer to dismiss the popup and ignore the timer.
Page 12
Page 23
TR-40CRA DIGITAL-TO-ANALOG TV CONVERTER
Setup Menu
CUSTOMIZING YOUR TR-40CRA
Customizing Your TR-40CRA
CHAPTER 4
Customizing Your TR-40CRA Settings to Fit Your Needs
CUSTOMIZING YOUR TR-40CRA
There are several options to customize your TR-40CRA. This chapter walks you
through setting up preferences on your TR-40CRA to match your viewing
needs.
Setup Menu
Access the Setup menu by
pressing MENU on the remote
control and selecting Setup from
the TR-40CRA converter’s main
menu.
The Setup menu includes the
following options:
• Locks—prevent specific
channels or programs from
being viewed based on
settings you choose. See
the Locks section on page 14.
• System Setup—includes additional menus for customizing your TR-
40CRA converter. See the System Setup section on page 16.
• Audio Setup—allows you to choose the language and the audio output
type (mono or stereo) for the composite (RCA-type) connections on the
TR-40CRA converter.
• Ti mers—allows you to create an event timer. See Using Event Timers on
page 12.
• Closed Captions—enables display of closed captions through your TR-
40CRA converter. See Closed Caption on page 18.
Page 13
Page 24
TR-40CRA DIGITAL-TO-ANALOG TV CONVERTER
Locks Menu
Channel Settings
LOCKS
LOCKS
Locks allow you to block channels or programs by requiring a password to be
entered before they can be viewed.
Access the Locks menu by
pressing MENU on the remote
control, selecting Setup, then
selecting Locks, then following
the steps below . If you previously
set a password, you’ll need to
enter the password to access the
Locks menu. After you choose
your Locks settings, you’ll need
to create a password and lock
the system for the Locks to take
effect.
Locking Specific Channels
To require a password to be entered to view specific channels:
1Select Channel Settings
from the Locks menu.
2 Use the UP and DOWN
ARROWS to find the
channels you want to block.
Press SELECT to include
the channel in the list of
locked channels. A channel
is selected when it has a
filled-in box next to it.
3 If you want to hide the
selected channels from being displayed in the Program Guide and other
channel lists, select Yes under Hide Restricted Channels. Select Done to
save your changes.
4 Follow the steps in Locking the Converter to apply the channel locks.
Locking Programs Based on Ratings
Your TR-40CRA converter supports a variety of ratings categories. These
ratings depend on information about the program included by the broadcaster.
Broadcasters may use the Age and Content Guidelines, or the MPAA (Motion
Picture Association of America) Guidelines.
Page 14
Page 25
TR-40CRA DIGITAL-TO-ANALOG TV CONVERTER
Ratings Settings
System Lock Password
LOCKS
• Entire Audience—Includes rating categories None, TV-G, TV-PG, TV-14,
and TV-MA.
• Children—Includes rating categories TV-Y and TV-Y7.
• MPAA (Motion Picture Association of America)—Includes rating categories
N/A, G, PG, PG-13, R, and NC-17.
• Extended—Includes rating categories Dialog, Language, Sex, Violence,
and Fantasy Violence.
To block programs based on rating, use the following steps:
1Select Ratings Settings
from the Locks menu.
2 To easily lock (or unlock) all
categories select Block All
or Unblock All.
3 To edit a specific category,
highlight the category.
4 For that Category, press
SELECT on the highest
Rating you want to be
viewed without a password. Anything with a rating higher than that will
require entering your password before viewing. For example, if you select
TV-G, programs with None or TV-G can be viewed without a password.
5Select Done to save your changes.
6 Follow the steps in Locking the Converter to apply the ratings locks.
Locking the Converter
After you set the channel locks
and the ratings locks, you must
lock the TR-40CRA converter for
the settings to take effect. To
lock the receiver, select Lock
System on the Locks menu.
• If you already have a
password, enter it using the
remote’s NUMBER PAD.
• Enter a password using the
NUMBER PAD on the remote control in the Password field.
• Enter the new password again when prompted. Your TR-40CRA converter
is now locked.
Page 15
Page 26
TR-40CRA DIGITAL-TO-ANALOG TV CONVERTER
System Setup Menu
Installation Menu
Channel Setup
SYSTEM SETUP
SYSTEM SETUP
The System Setup menu has
additional customization options.
Open the System Setup menu
by pressing MENU on the
remote control, selecting Setup,
then selecting System Setup.
System Setup—
Installation
The Installation menu contains the menus for the settings that were chosen
during the Installation Wizard initial setup.
• Select Setup Wizard to run
the Installation Wizard
again.
• Select ZIP Code Setup to
change or enter your ZIP
code.
• Select Set T ime Zone to
change or enter your time
zone.
• Select Chan nel 3-4 Setup
to change the output channel of the TV S
needs to be tuned to the same channel set here (either 3 or 4).
ET OUT connection. Your TV
System Setup—Channel Setup
The Channel Setup menu provides several options to manage the channels in
your program guide. Select Channel Setup from the System Setup menu.
• Select Channe l List to
rename or delete channels
in your Program Guide.
• Select Find New Channels
to have your TR-40CRA
scan for new channels.
• Select Add a New Channel
to add an over-the-air
channel by entering specific
channel information.
Page 16
Page 27
TR-40CRA DIGITAL-TO-ANALOG TV CONVERTER
Inactivity Standby
System Information Screen
Resetting Factory Defaults
SYSTEM SETUP
System Setup—Inactivity Standby
Inactivity St andby automatically turns off your TR-40CRA converter when it has
not been used for a specified number of hours (default is four hours). It is
recommended to leave this setting on Enable, as it allows the receiver to
perform basic maintenance. Basic maintenance may delay or interrupt Inactivity
Standby . If Inactivity Standby is interrupted, the green light on the TR-40CRA
converter will be lit briefly.
To change or disable this feature, select In activity Standby from the System
Setup menu.
• Select Enable to turn this
feature on or Disable to turn
this feature off.
• Adjust how long your TR40CRA converter waits
before automatically turning
off by changing the setting
under Inactivity Duration.
System Setup—System
Information
The System Information screen
displays technical information
about your TR-40CRA converter.
To open the System Information
screen, select System
Information from the System
Setup menu, or press the SYS
INFO button on the TR-40CRA
remote control.
System Setup—Factory
Defaults
Use Factory Defaults to reset
your converter to its original
settings. Select Factory
Defaults from the System Setup
menu. A pop-up window appears—select Yes to reset to Factory Defaults.
Note: You will need to rescan your channels (see page 16) after resetting
factory defaults.
Page 17
Page 28
TR-40CRA DIGITAL-TO-ANALOG TV CONVERTER
Audio Setup Screen
Closed Caption Setup
AUDIO SETUP
System Setup—TV Guide Setup
If your analog TV supports TV Guide On Screen or Guide Plus, use this option
to set up your TR-40CRA converter to continue using the TV Guide On Screen
and Guide Plus listings. See page 23 for detailed setup instructions.
AUDIO SETUP
Use the Audio Setup menu to
choose the language setting and
the audio output mode.
• Audio Language: Choose
Primary to hear the primary
audio language. Choose
Alternative to hear the
alternate audio, which may
include an alternate
language, if provided by the broadcaster.
• Output: Sets the audio output type for the composite (RCA-type) audio
outputs. Choose Stereo if you have a stereo TV . Choose Mono if your TV
only supports mono audio output. Refer to your TV’s User Guide to
determine if your TV supports mono or stereo audio.
CLOSED CAPTION
Use the Closed Caption menu to
use your converter to display
closed captions, if available on
that channel.
• Captions Off (or On):
Choose On to display
closed captions or Off to
disable closed captions.
• Caption Font: Select a desired font size and style.
• Caption Opacity: Set the background and foreground opacity of closed
captions.
• Caption Colors: Choose the background and foreground colors of closed
captions.
• Caption Edge Style: Set the edge style and color of closed caption text.
• Caption Service: Select the service you want to use.
• Reset CC Defaults: Reset all closed caption settings to the default setting.
Page 18
Page 29
TR-40CRA DIGITAL-TO-ANALOG TV CONVERTER
TROUBLESHOOTING
Troubleshooting & Reference
CHAPTER 5
Solving Common Problems
TROUBLESHOOTING
If you experience a problem while using your TR-40CRA Digital-to-Analog TV
Converter, review these troubleshooting tables. Look under the Symptom
column, and find a description that matches your problem. Then, follow the
steps for that issue under Troubleshooting Steps.
Symptom Troubleshooting Steps
The remote
control doesn’t
work.
The TR-40CRA
converter won’t
turn on.
1 Verify the batteries are installed according to the battery
diagram on the remote control.
2 Try changing batteries in the TR-40CRA remote control.
3 Make sure you are pointing the remote control directly at
the front panel of your TR-40CRA converter. The remote
control uses infrared (IR) signals to operate the TR-
40CRA, and must have line of sight to the TR-40CRA
converter.
1 Ensure the power cord for the TR-40CRA converter is
plugged into a working electrical outlet.
2 Ensure the power cord is plugged fully into the TR-
40CRA power converter port.
3 Put new batteries in your TR-40CRA remote control, and
try pressing POWER on the remote control.
4 Try plugging the power cord for the TR-40CRA converter
into a different electrical outlet.
Page 19
Page 30
TR-40CRA DIGITAL-TO-ANALOG TV CONVERTER
TROUBLESHOOTING
Symptom Troubleshooting Steps
Y ou’re receiving a
“signal loss”
message on
some or all
channels.
1 Try a different channel. Sometimes, just one channel
may be experiencing a problem, while other channels are
fine.
2 Verify that the cable connecting to the O
NTENNA IN connection is hand tight, and is connecting
A
VER THE AIR
to your over-the-air antenna.
3 Verify that your over-the-air antenna is still in place, and
does not appear to have moved. If the antenna is moved
out of alignment, you may receive signal loss messages
on some or all of your channels.
4 Try resetting your TR-40CRA converter. Press the
POWER button on the TR-40CRA remote control to turn
it off, then unplug the your TR-40CRA converter from the
power outlet for 15 seconds, plug it back in, and turn it
back on.
5 Check the signal strength on your over-the-air channels.
Using your TR-40CRA remote control, press MENU,
select Setup, System Setup , Channel Setup, then Add
a New Channel. Find the channel that is experiencing
problems, and verify that it has a strong signal. Channels
with signal strength below 54% will experience loss of
video.
Page 20
6 Your over-the-air antenna may need to be adju s ted.
Contact your local retailer for assistance. If you want to
try adjusting the antenna yours elf, refe r to
www.antennaweb.org for antenna recommendations and
antenna alignment information.
Page 31
TR-40CRA DIGITAL-TO-ANALOG TV CONVERTER
TROUBLESHOOTING
Symptom Troubleshooting Steps
Some of my local
over-the-air
channels are not
available through
my TR-40CRA
converter.
I have a snowy,
blue, or black
screen.
1 Your TR-40CRA converter is only able to tune in the
digital over-the-air channels. It is possible that some of
the channels you are missing are channels that are still
broadcasting analog signals.
2 You can go to the website www.antennaweb.org to find
out which channels in your area are currently
broadcasting a digital signal. If the channel you are
missing is still in analog, you can view the channel using
the TV’s tuner. To view analog channels, press the
ANALOG PASS-THROUGH button on the TR-40CRA
remote control, then change channels on your TV using
your TV’s remote control. When you want to return to
watching digital channels using your TR-40CRA
converter, change back to the correct channel (3 or 4) or
input, and press the ANALOG PASS-THROUGH button
again.
1 Make sure your TR-40CRA converter is powered on.
Press POWER on the TR-40CRA remote control.
2 Make sure the TV is on the correct channel or video input
to view your TR-40CRA converter. If your TR-40CRA
converter is connected to your TV using the TV S
connection, the TV needs to be on channel 3 or 4. If
connected using the AUDIO/VIDEO (RCA-type)
connection, the TV needs to be on a video input or
source.
ET OUT
3 Check the connections between your TR-40CRA
converter and your TV.
Page 21
Page 32
TR-40CRA DIGITAL-TO-ANALOG TV CONVERTER
TROUBLESHOOTING
Symptom Troubleshooting Steps
My audio quality
is poor or I don’t
have any audio at
all.
1 Make sure you haven’t accidentally muted the volume of
your TR-40CRA converter. Press the VOLUME UP
button on the TR-40CRA remote control.
2 Make sure you haven’t accidentally muted the TV’s
volume. Press the VOLUME UP button on the TV’s
remote control.
3 Try a different channel. Sometimes a specific channel
can experience audio problems.
4 If using RCA cables (red, yellow, white cables) to connect
your TR-40CRA converter to your TV, check to make
sure the audio cables are connected between the TV and
your TR-40CRA converter.
5 Check your TR-40CRA converter’s Audio setting. If
you’ve set this to an alternate audio track, and the
broadcaster does not have any audio for that track, you
may hear no sound. Press MENU on your TR-40CRA
remote control, select Setup, and select Audio Setup. If
the audio is set to something other than Primary, try
selecting Primary to see if this resolves the problem.
I forgot the Locks
password.
1 Locate the Receiver ID number by pressing MENU on
the TR-40CRA remote control, selecting Setup, System
Setup, then System Information. Write down the last four
digits of the Receiver ID (before the dash).
2 To reset your password, press MENU on the TR-40CRA
remote control, select Setup, then Locks. Enter the last
four digits of your Receiver ID, then select Change
Password to choose a new password.
Page 22
Page 33
TR-40CRA DIGITAL-TO-ANALOG TV CONVERTER
TV GUIDE ON SCREEN OR GUIDE PLUS SETUP
You only need to perform the following steps if you have a TV, DVD recorder, or
VCR that includes TV Guide On Screen or Guide Plus. If you do not have a TV
Guide On Screen or Guide Plus device, you will be able to use the built-in
Program Guide in your TR-40CRA Digital-to-Analog TV Converter.
TV GUIDE ON SCREEN OR GUIDE PLUS SETUP
If you are currently using TV Guide On Screen or Guide Plus in your analog TV,
DVD recorder, or VCR for over-the-air TV reception (not cable or satellite
service), you will need to change your TV Guide On Screen/Guide Plus setup
option to continue receiving your TV Guide On Screen/Guide Plus listings.
The steps provided walk you through the changes you need to make to
continue receiving show listings when your TR-40CRA converter is connected
to your Guide-enabled product.
For more detailed instructions or updated support information, refer to
www.tvgos.com/support.
Getting Started
To set up the TV Guide On Screen to communicate with your TR-40CRA
converter, you’ll need:
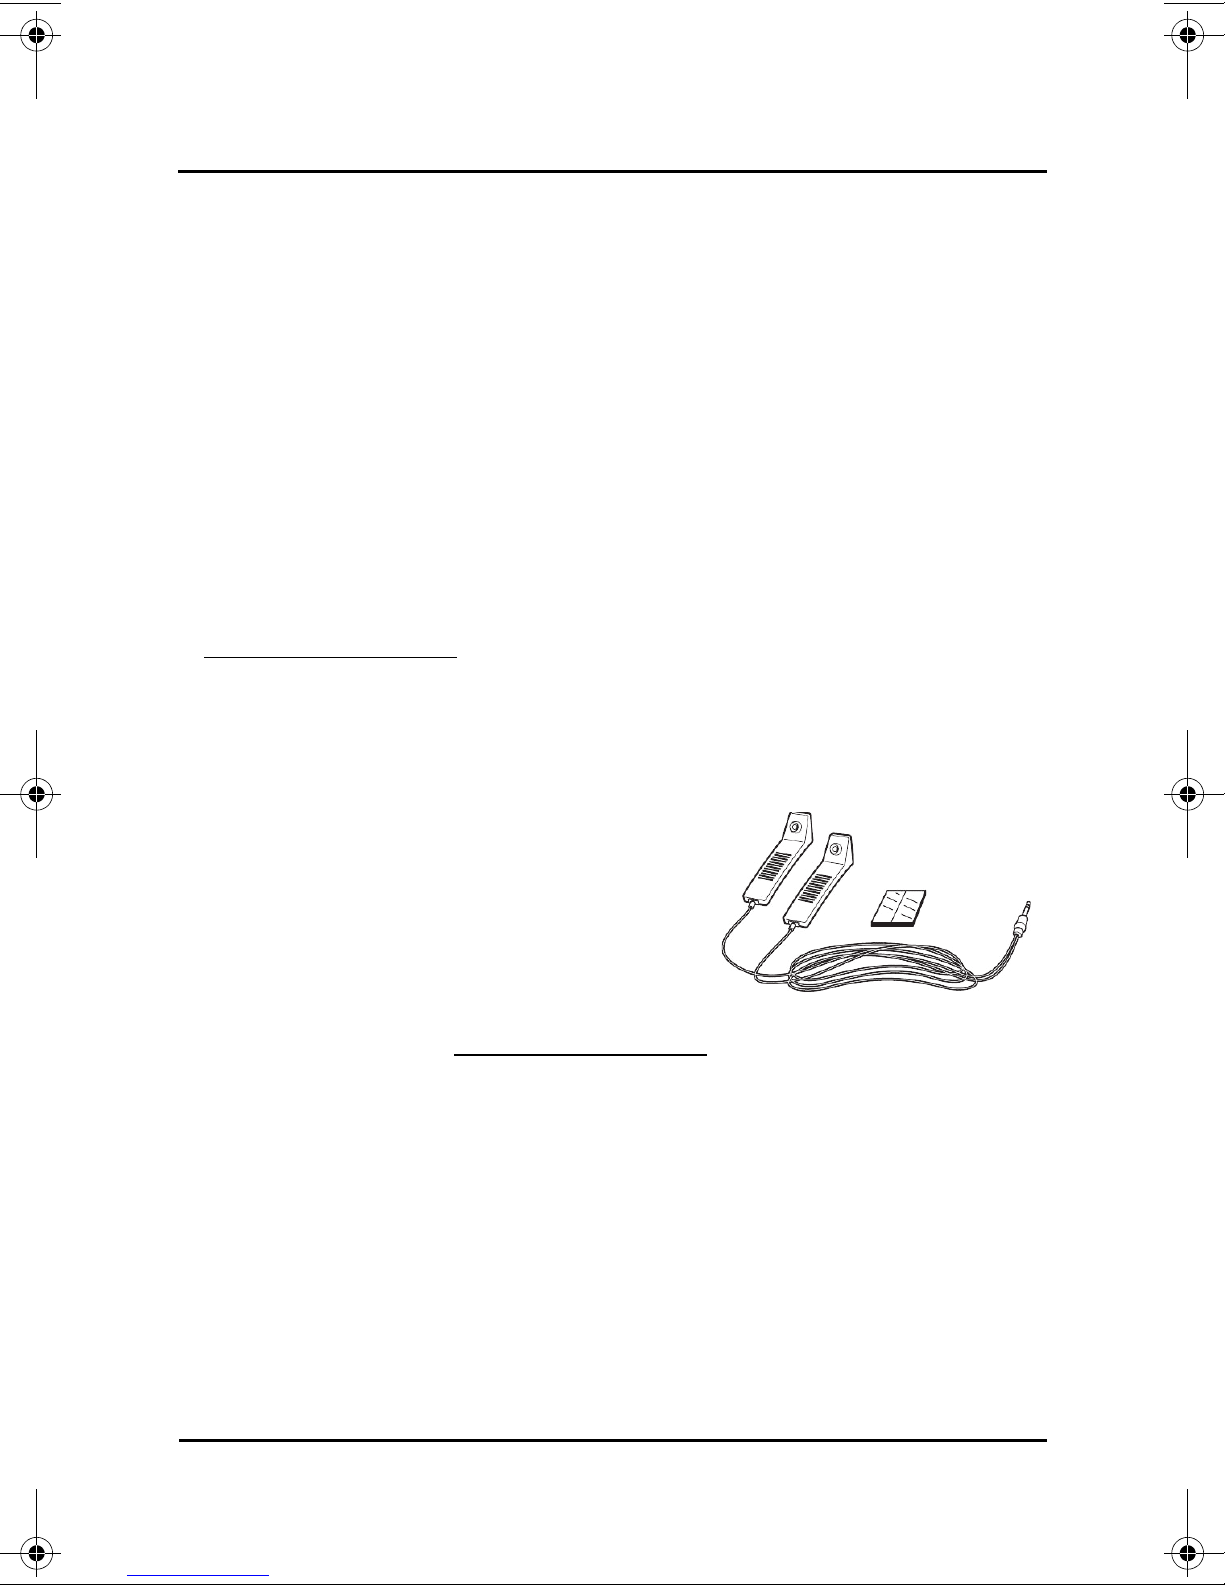
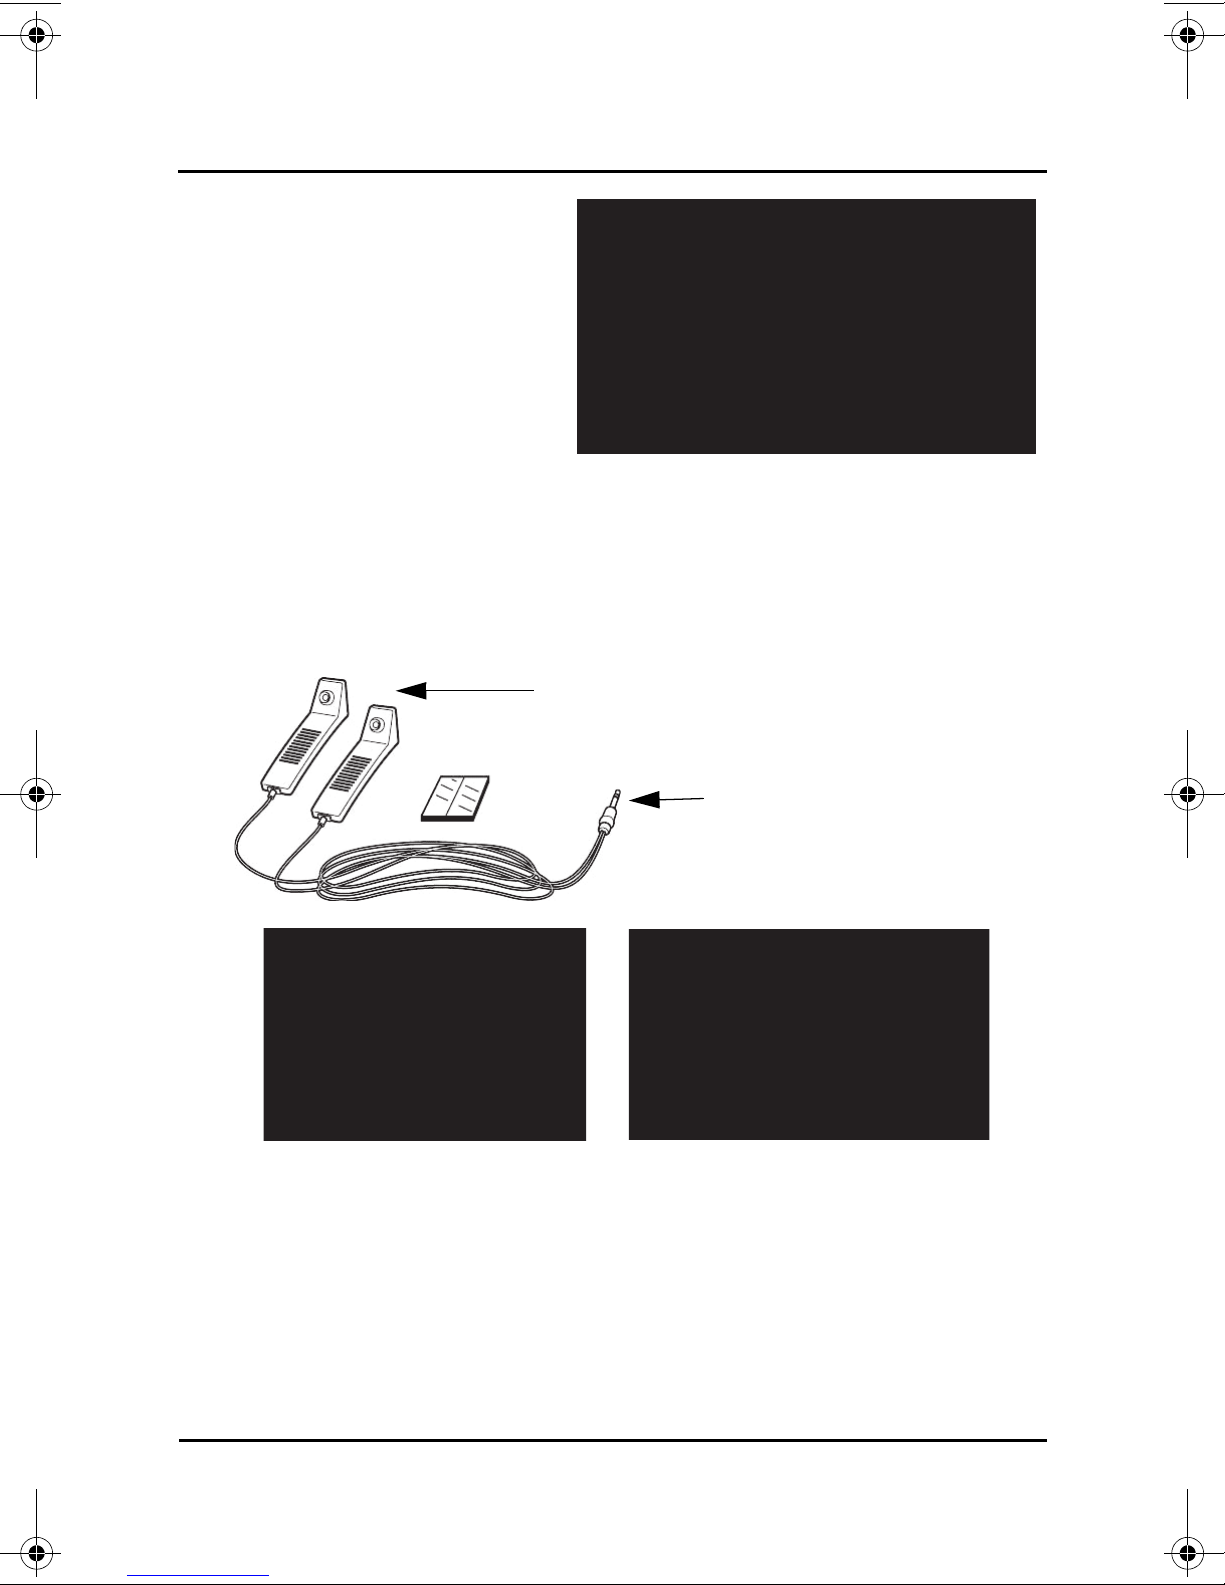
- G-LINK Cable—this cable is required
to continue receiving TV Guide On
Screen/Guide Plus listings in your
Guide-enabled product.
The G-LINK cable was shipped with
your original TV Guide On Screen/
Guide Plus-enabled TV, DVD recorder,
or VCR. If you no longer have the GLINK cable, visit www.tvgos.com/support
- Substitute ZIP Code—you will need the five-digit code associated with
your broadcast area. During setup, you will enter the Substitute ZIP
Code in place of your actual ZIP code. These codes are provided on
page 28 of this User’s Guide.
.
Setting Up Your TR-40CRA
1 Connect your TR-40CRA converter using the instructions on page 2. You
should have connected the TV S
corresponding input on your Guide-enabled TV, DVD recorder, or VCR.
ET OUT or AUDIO/VIDEO output to the
Page 23
Page 34
TR-40CRA DIGITAL-TO-ANALOG TV CONVERTER
TV Guide Setup
G-LINK Wand(s)
Connect plug to Guide-
enabled product
TV GUIDE ON SCREEN OR GUIDE PLUS SETUP
2 Using your TR-40CRA
remote control, press
MENU, select Setup, then
System Setup, TV Guide
Setup, then TV Guide &
Guide +.
Connecting the G-LINK Cable
1 Connect the G-LINK cable to the G-LINK jack on the back of your TV
Guide-enabled TV, DVR recorder, or VCR.
Page 24
Page 35
TR-40CRA DIGITAL-TO-ANALOG TV CONVERTER
TV GUIDE ON SCREEN OR GUIDE PLUS SETUP
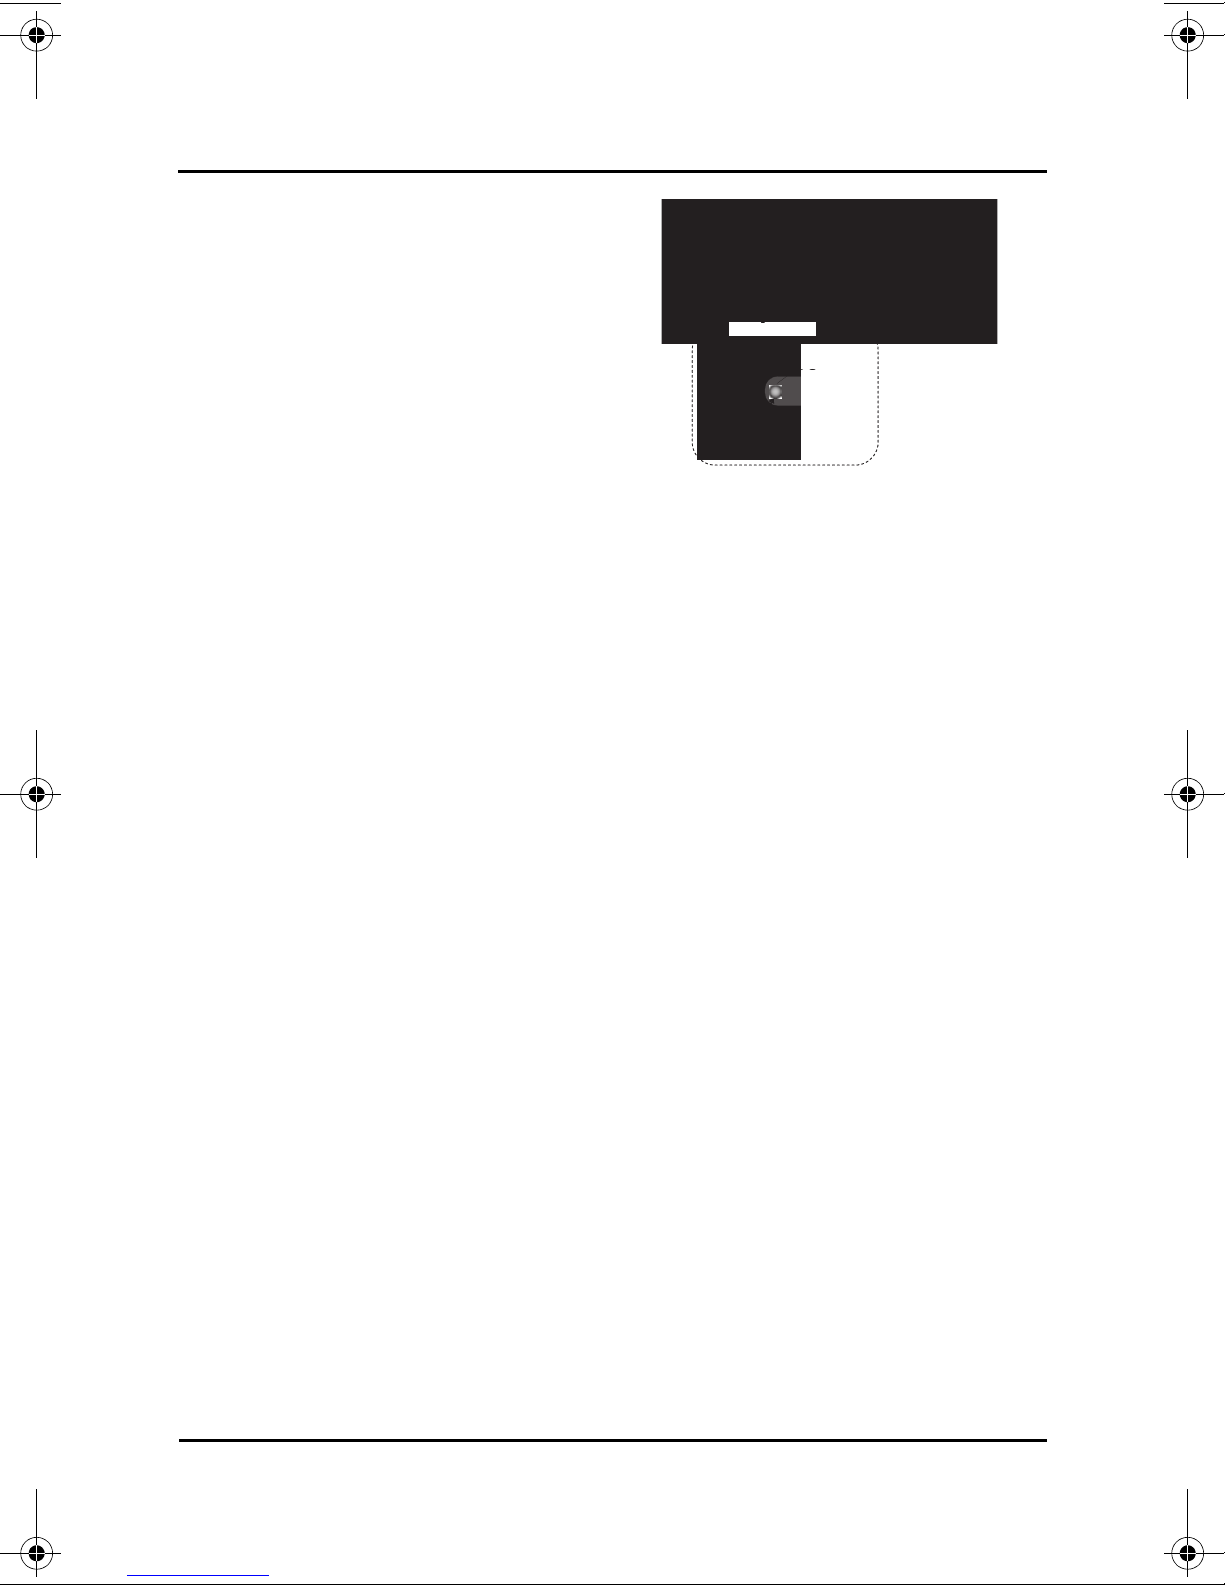
2 Place the G-LINK wand
approximately one inch in front of
the remote control sensor on your
TR-40CRA converter. Use tape to
secure the G-LINK wand to the TR-
G-
LINK Wand
40CRA front panel.
IR Sensor
IR Sensor
G-
G-
LINK Wand
LINK Wand
Note: The remote control sensor is
located on the middle of your TR-
1 inch
1 inch
40CRA converter’s front panel.
Updating TV Guide On Screen
and Guide Plus Setup
After connecting your TR-40CRA converter to your TV Guide On Screen or
Guide Plus-enabled device, use these steps to complete the setup.
Note: The menu options on your Guide-enabled devi c e may differ from the
ones described here.
1 Using the remote control for your Guide-enabled TV, DVD recorder, or
VCR, press GUIDE to open your Guide Listings screen.
2 On the Service Bar, select Setup, then Change System Settings.
3 If available, select No, repeat setup. Otherwise, follow the on-screen
prompts.
Entering Your Location
The Guide uses setup information to provide TV show listings and channel
lineups for your area.
1Select USA as the country.
2 Use the remote control NUMBER PAD or the UP and DOWN ARROWS to
enter the Substitute ZIP Code for your area. See page 28 for the ZIP code
listing.
Set Up Your TR-40CRA
For your Guide to communicate with your TR-40CRA converter, the Guide must
be set up as though the TR-40CRA converter is a cable box, even though you
do not have cable service. Use these steps to finish setting up your TR-40CRA
converter.
1Select Cable with a Cable Box or Yes I have cable.
2 If asked, select the type of audio/video input you used to connect your TR-
40CRA to your Guide-enabled device, then follow the on-screen prompts.
Page 25
Page 36
TR-40CRA DIGITAL-TO-ANALOG TV CONVERTER
TV GUIDE ON SCREEN OR GUIDE PLUS SETUP
3 If a connection diagram displays, verify the G-LINK cable is connected as
shown.
4 For brand of cable box, select Scientific Atlanta.
5 Follow the on-screen instructions and verify that your TR-40CRA converter
changed channels.
6 When asked if the device has tuned to Channel 9, select Yes.
7 On the confirmation screen, select Yes, continue/finish setup process. If
you are asked about setting up a VCR, select the appropriate answer for
your installation.
Completing Setup
- After setup is complete, exit the Guide setup screen. To begin receiving
listings, be sure to turn off the Guide-enabled device when not in use.
- Within 24 hours, you will begin receiving TV show listings. It may take up
to six days to receive the full eight days of initial show listings.
- Show listings are updated several times per day. Be sure to leave your
TR-40CRA converter powered on to have the most updated listings
information. It is normal for your TR-40CRA converter to change
channels while the Guide-enabled device is powered off and is setting up
or receiving new data.
Note: When you receive your new Guide listings, you will notice that your
channel numbers have changed. Refer to Tuning to Your New Channel
Numbers, below, or visit www.tvgos.com/support for more details.
Tuning to Your New Channel Numbers
After connecting your Guide-enabled TV or DVD recorder to your TR-40CRA
converter or VCR, the channel numbers used in your Guide Listings will
change.
Understanding Your New Channel Numbers
Your analog TV, DVD recorder, or VCR does not know how to tune to digital
channels. The channel number assigned to your channel lineup allows your TR40CRA converter to find the correct digital channels.
Finding Channel Numbers
In any Guide version, you can identify the channel number using the Channel
Editor.
1 On the Service Bar, highlight Listings. Press MENU on the Guide-enabled
device’s remote control, then select Edit Channel.
Page 26
Page 37
TR-40CRA DIGITAL-TO-ANALOG TV CONVERTER
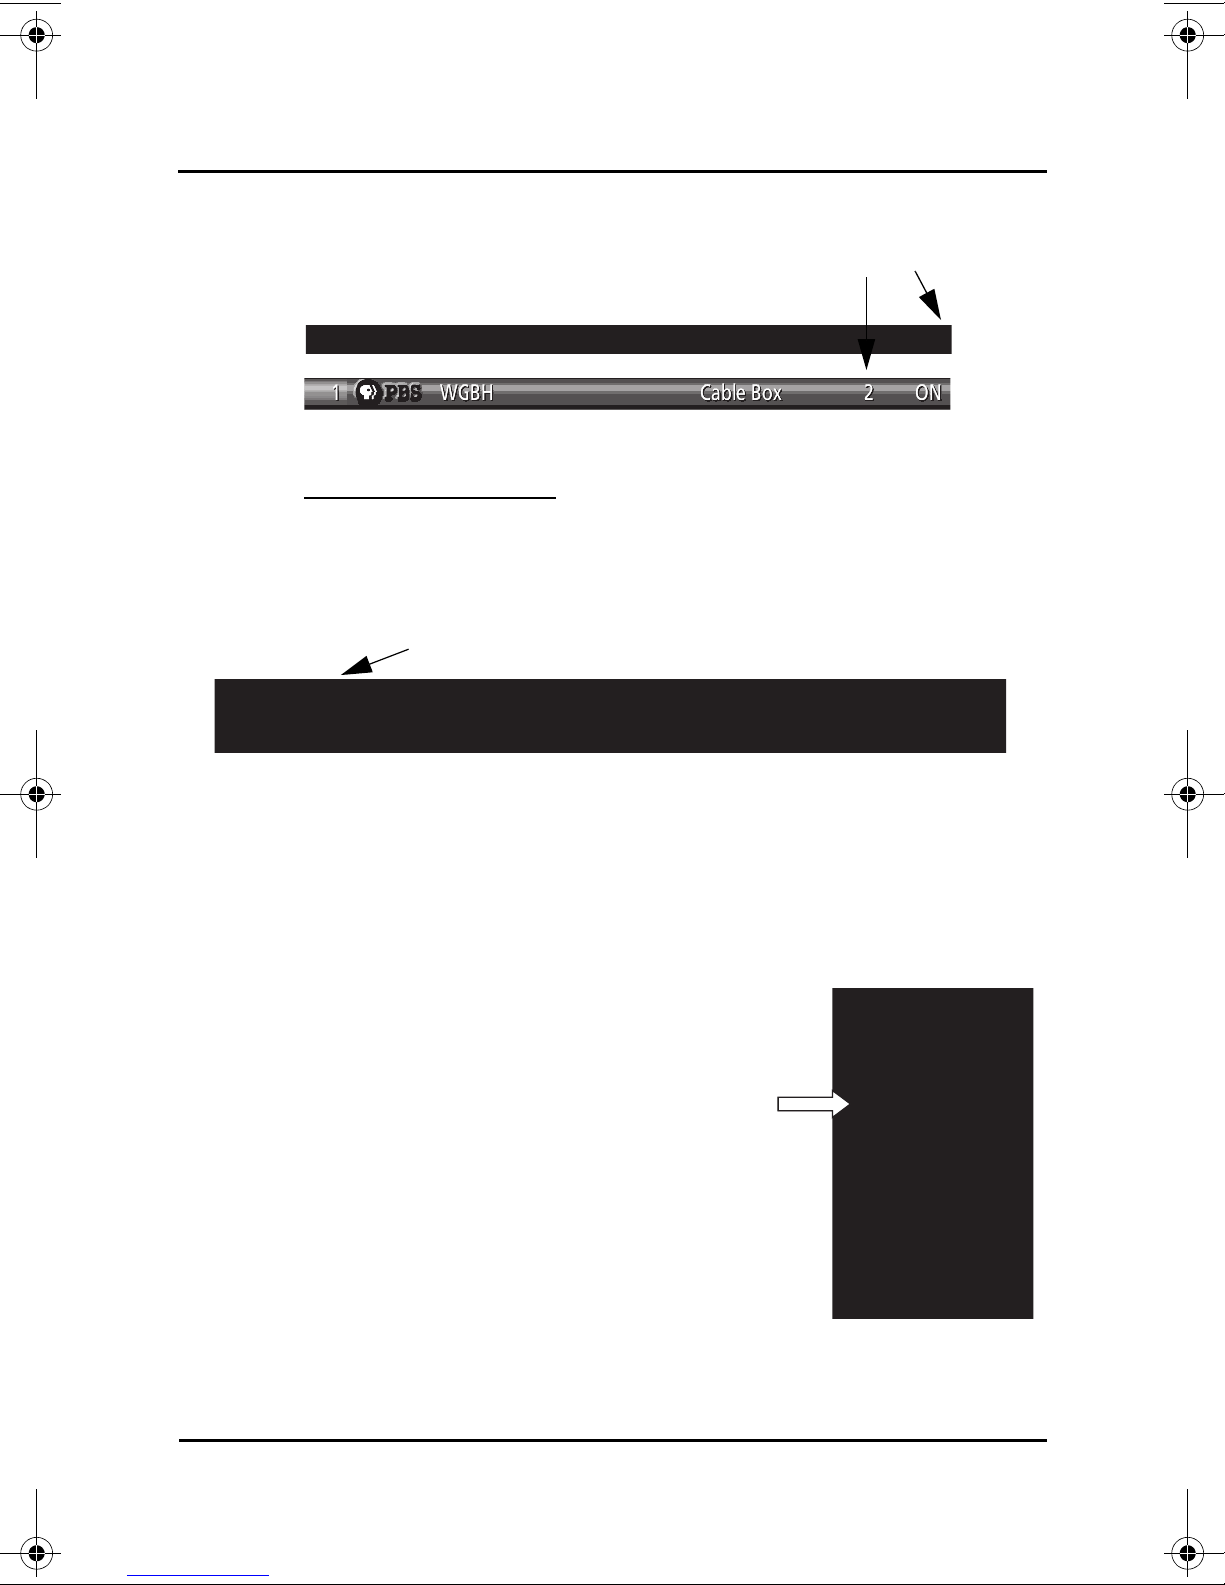
Channel Number
Channel Logo and Number
TV GUIDE ON SCREEN OR GUIDE PLUS SETUP
2 The Channel Editor displays. Note the Guide channel number for each
channel.
Note: You need this channel number to go to a specific channel in the
Listings screen or if you are scheduling a manual reminder or recording.
Visit www.tvgos.com/support for more information.
Displaying Channel Numbers in Listings
Your Guide version may or may not have the ability to display channel numbers
in the Listings grid.
To determine if you can display the new channel numbers:
1 Highlight Listings (or any channel’s logo), then press MENU on the Guide-
enabled device’s remote control.
2 The Listings Options (or Channel Options) menu appears. If there is a
Channel ID field, you can press the LEFT or RIGHT ARROW to select a
channel display option:
– Both—displays both the channel logo and
number.
– Logo—displays only the channel logo.
– Number—displays only the channel
number.
Page 27
Page 38
TR-40CRA DIGITAL-TO-ANALOG TV CONVERTER
TV GUIDE ON SCREEN OR GUIDE PLUS SETUP
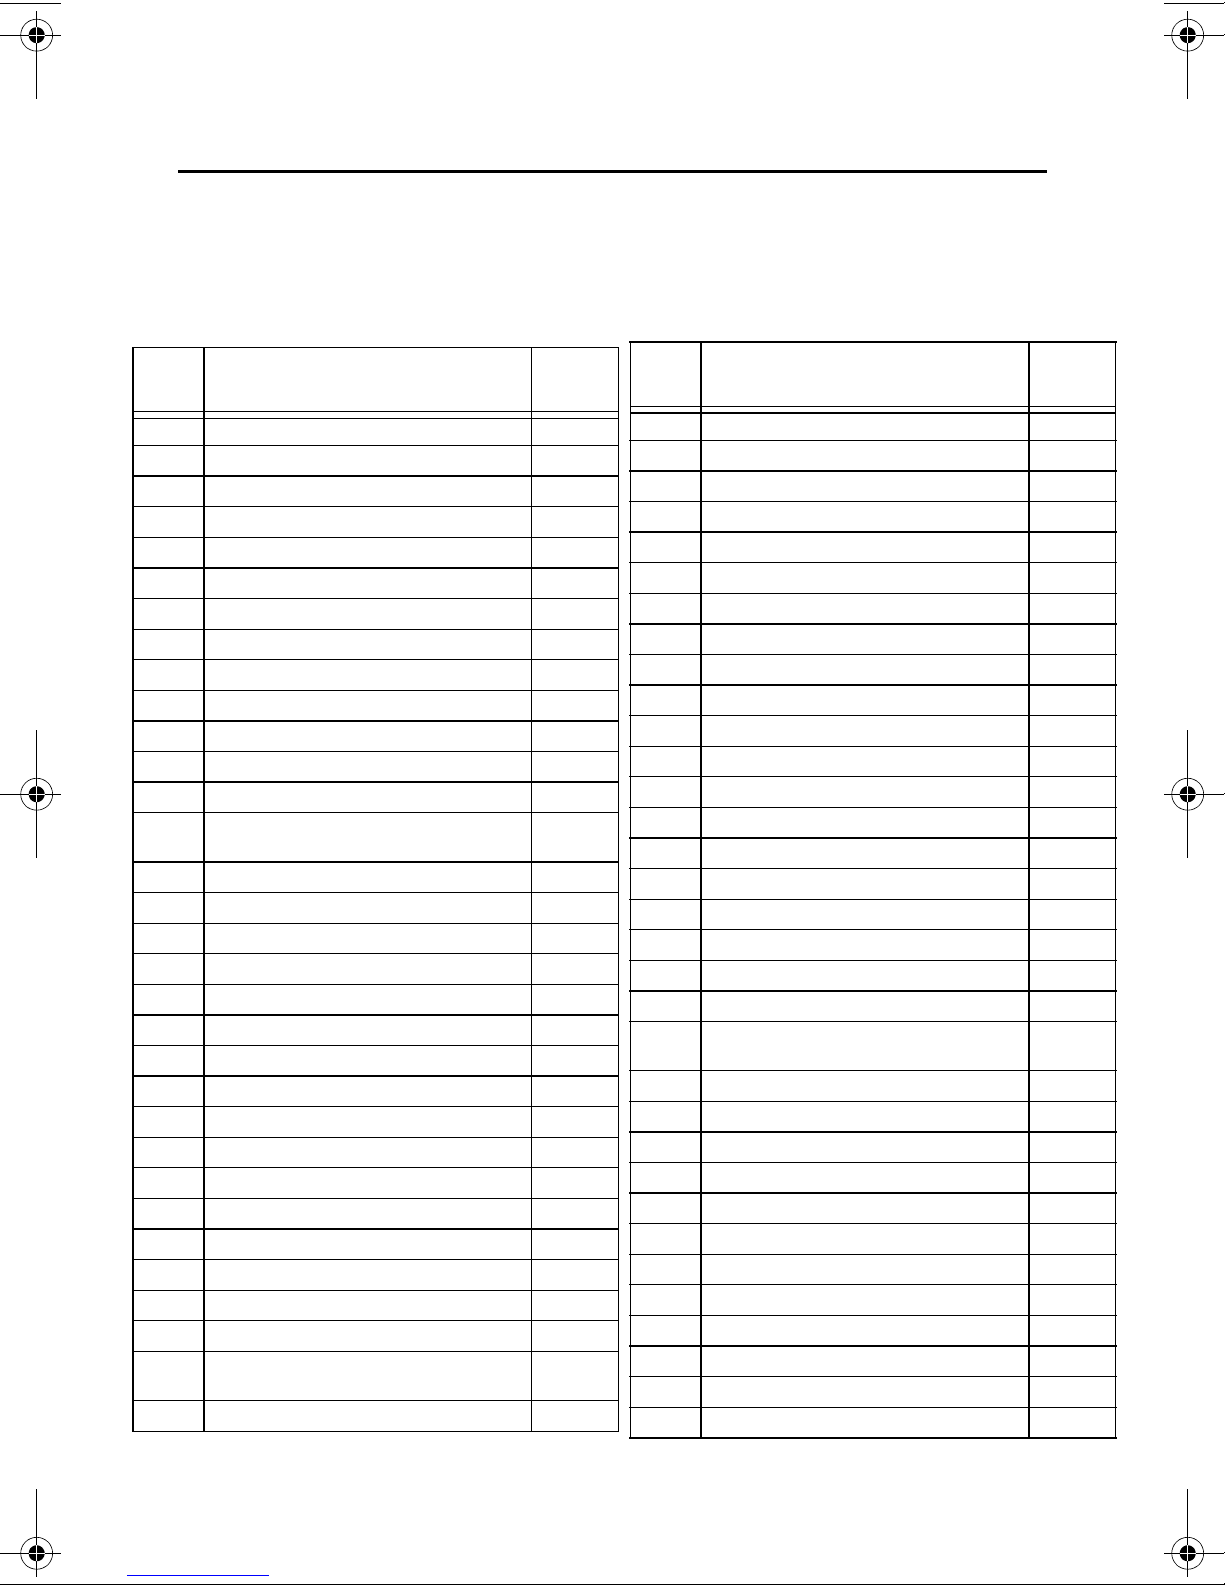
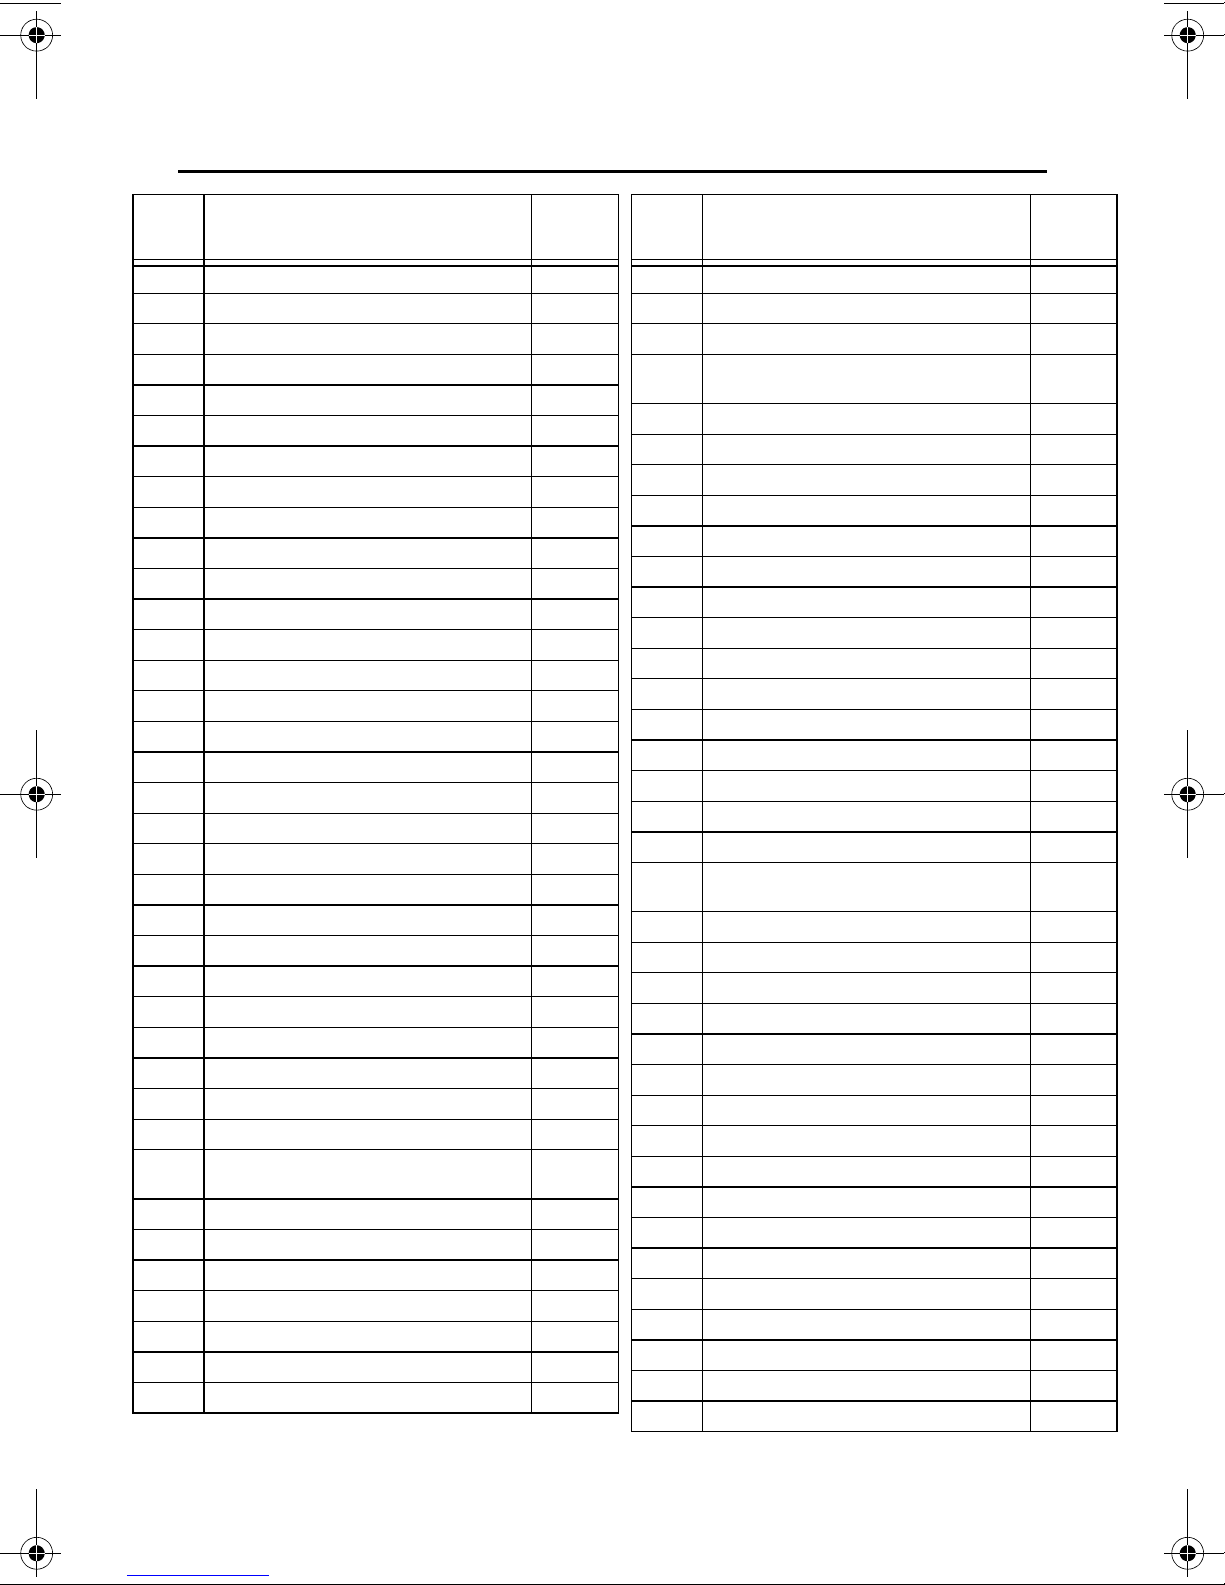
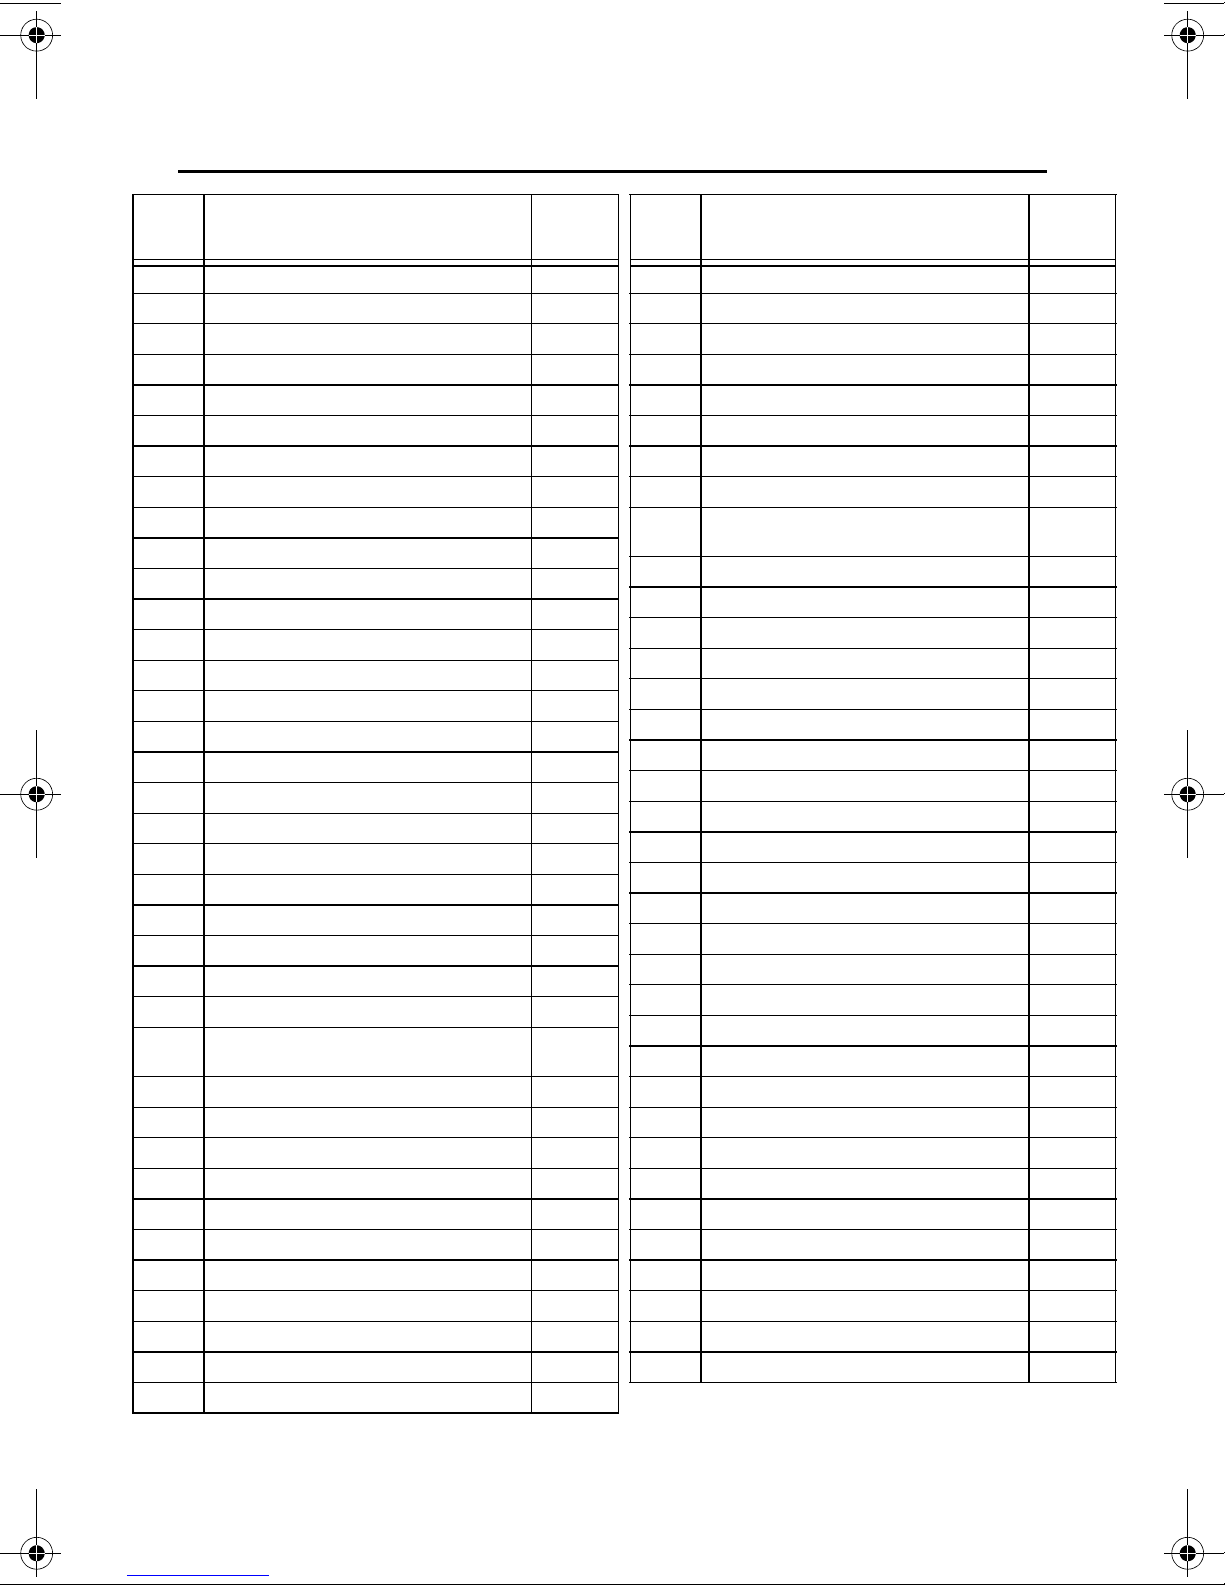
Substitute ZIP Codes
Locate the major broadcast area closest to your location. Note the substitute ZIP code
associated with this ar ea an d en te r i t as your ZIP code during the TV Guide On Screen/
Guide Plus Setup.
State Broadcast Area
AK Anchorage 00218
AK Fairbanks 00224
AK Juneau 00223
AK Sitka 00211
AL Anniston 00195
AL Birmingham 00050
AL Dothan 00165
AL Dothan 00207
AL Huntsville-Decatur-Florence 00081
AL Mobile-Pensacola-Ft Walt 00058
AL Montgomery-Selma 00111
AL Phenix City 00219
AL Tuscaloosa 00186
AR
AR Jonesboro 00177
AR Little Rock-Pine Bluff 00056
AZ Phoenix 00021
AZ Tucson-Sierra Vista 00079
AZ Yuma-El Centro 00178
CA Bakersfield 00130
CA Chico-Redding 00125
CA El Centro 00192
CA Eureka 00187
CA Fresno-Visalia 00057
CA Los Angeles 00002
CA Palm Springs 00162
CA Sacramento-Stockton-Modesto 00019
CA Salinas-Monterey 00103
CA San Diego 00024
CA San Francisco-Oakland-San Jose 00005
CA
CO Colorado Springs-Pueblo 00097
Ft. Smith-Fayetteville-SpringdaleRogers
Santa Barbara-Santa Maria-San Luis
Obispo
ZIP
Code
00117
00112
State Broadcast Area
CO Denver 00020
CO Grand Junction-Montrose 00188
CT Hartford-New Haven 00025
DC Washington 00007
FL Ft. Myers-Naples 00087
FL Gainesville 00166
FL Jacksonville 00054
FL Miami-Fort Lauderdale 00015
FL Orlando-Daytona Beach-Melbourne 00023
FL Panama City 00164
FL Tallahassee-Thomasville 00115
FL Tampa-St. Petersburg-Sarasota 00016
FL West Palm Beach-Ft. Pierce 00046
GA Albany 00154
GA Atlanta 00011
GA Augusta 00110
GA Columbus 00122
GA Macon 00119
GA Savannah 00101
HI Honolulu 00210
IA
IA Des Moines-Ames 00068
IA Ottumwa-Kirksville 00200
IA Sioux City 00140
ID Boise 00132
ID Idaho Falls-Pocatello 00158
ID Twin Falls 00201
IL Champaign-Springfield-Decatur 00075
IL Chicago 00003
IL Davenport-Rock Island-Moline 00084
IL Marshall-Robinson 00217
IL Peoria-Bloomington 00107
IL Quincy-Hannibal-Keokuk 00159
Cedar Rapids-Waterloo-Iowa CityDubuque
ZIP
Code
00082
Page 28
Page 39
TR-40CRA DIGITAL-TO-ANALOG TV CONVERTER
TV GUIDE ON SCREEN OR GUIDE PLUS SETUP
State Broadcast Area
IL Rockford 00134
IN Evansville (no DST) 00215
IN Evansville (with DST) 00094
IN Ft. Wayne 00102
IN Indianapolis 00026
IN Scottsburg-Madison 00213
IN South Bend-Elkhart 00083
IN Terre Haute 00138
KS Topeka 00139
KS Wichita-Hutchinson 00062
KY Bowling Green 00181
KY Lexington 00070
KY Louisville 00047
LA Alexandria 00169
LA Baton Rouge 00095
LA Lafayette 00120
LA Lake Charles 00174
LA Monroe-El Dorado 00131
LA New Orleans 00039
LA Shreveport 00071
MA Boston-Manchester 00006
MA Springfield-Holyoke 00098
MD Baltimore 00022
MD Salisbury 00163
ME Bangor 00155
ME Portland-Auburn 00076
ME Presque Isle 00205
MI Detroit 00009
MI Flint-Saginaw-Bay City 00060
MI
MI Ironwood 00222
MI Lansing 00105
MI Marquette-Escanaba 00175
MI Traverse City-Cadillac 00121
MN Duluth-Superior 00126
MN Minneapo lis-St. Paul 00014
MN Rochester-Mason City 00148
Grand Rapids-Kalamazoo-Battle
Creek
ZIP
Code
00037
State Broadcast Area
MO Columbia-Jefferson City 00151
MO Joplin-Pittsburg 00146
MO Kansas City 00029
MO
MO Springfield 00080
MO St. Joseph 00193
MO St. Louis 00018
MS Biloxi-Gulfport-Pascagoula 00180
MS Columbus-Tupelo-West Point 00127
MS Greenwood-Greenville 00179
MS Hattiesburg-Laurel 00167
MS Jackson 00088
MS Meridian 00183
MT Billings 00171
MT Butte-Bozeman 00189
MT Glendive 00221
MT Great Falls 00182
MT Missoula 00176
NC Charlotte 00030
NC
NC Greenville-New Bern-Washington 00104
NC Raleigh-Durham-Fayetteville 00032
NC Wilmington 00143
ND Fargo-Valley City 00109
ND Minot-Bismarck-Dickinson-Williston 00152
NE Lincoln-Hastings-Kearney 00099
NE Omaha 00073
NM Albuquerque-Santa Fe 00048
NM Clovis 00220
NV Las Vegas 00074
NV Reno 00118
NY Albany-Schenectady-Troy 00053
NY Binghamton 00135
NY Buffalo 00038
NY Elmira 00172
NY New York 00001
NY Rochester 00069
Paducah-Cape GirardeauHarrisonburg
Greensboro-High Point-Winston
Salem
ZIP
Code
00077
00049
Page 29
Page 40
TR-40CRA DIGITAL-TO-ANALOG TV CONVERTER
TV GUIDE ON SCREEN OR GUIDE PLUS SETUP
State Broadcast Area
NY Syracuse 00067
NY Utica 00161
NY Watertown 00170
OH Cincinnati 00031
OH Cleveland-Akron-Canton 00012
OH Columbus 00034
OH Dayton 00052
OH Toledo 00064
OH Youngstown 00092
OK Oklahoma City 00043
OK Tulsa 00059
OR Bend 00202
OR Eugene 00116
OR Medford-Klamath Falls 00145
OR Portland 00027
PA Erie 00142
PA Harrisburg-Lancaster-Lebanon-York 00044
PA Johnstown-Altoona 00089
PA Philadelphia 00004
PA Pittsburgh 00017
PA Wilkes Barre-Scranton 00051
RI Providence 00045
SC Charleston 00106
SC Columbia 00086
SC Florence-Myrtle Beach 00136
SC
SD Rapid City 00168
SD Sioux Falls-Mitchell 00108
TN Chattanooga (CT) 00208
TN Chattanooga (ET) 00085
TN Jackson 00185
TN Knoxville 00063
TN Memphis 00042
TN Nashville 00033
TN Tri-Cities Tn-Va 00091
TX Abilene-Sweetwater 00157
TX Amarillo 00129
Greenville-Spartanburg-AshevilleAnderson
ZIP
Code
00035
State Broadcast Area
TX Austin 00065
TX Beaumont-Port Arthur 00137
TX Corpus Christi 00123
TX Dallas-Ft. Worth 00008
TX El Paso 00100
TX Houston 00010
TX Laredo 00198
TX Lubbock 00149
TX
TX Odessa-Midland 00150
TX San Antonio 00036
TX Sherman-Ada 00156
TX Tyler-Longview-Lufkin-Nacogdoches 00114
TX Waco-Temple-Bryan 00096
TX Wichita Falls 00141
UT Salt Lake City 00041
VA Charlottesville 00197
VA Harrisonburg 00173
VA Norfolk-Portsmouth-Newport News 00040
VA Richmond-Petersburg 00061
VA Roanoke-Lynchburg 00066
VT Burlngton-Plattsburg 00093
WA Seattle-Tacoma 00013
WA Spokane 00078
WA Yakima-Pasco-Richland-Kennewick 00124
WI Green Bay-Appleton 00072
WI La Crosse-Eau Claire 00128
WI Madison 00090
WI Milwaukee 00028
WI Wausau-Rhinelander 00133
WV Bluefield-Beckley-Oak Hill 00147
WV Charleston-Huntington 00055
WV Clarksburg-Weston 00160
WV Wheeling 00144
WY Casper-Riverton 00194
WY Cheyenne-Scottsbluf 00196
McAllen-Harlingen-WeslacoBrownsville
ZIP
Code
00113
Page 30
Page 41
TR-40CRA DIGITAL-TO-ANALOG TV CONVERTER
Appendix
APPENDIX A
Warranty and FCC Compliance
LIMITED WARRANTY
This Limited Warranty is a legal document. Keep it in a safe place.
Remember to retain your Bill of Sale for warranty service! Any items
returned without a copy of the Proof of Purchase will be considered out of
warranty.
What the Warranty Covers
LIMITED WARRANTY
This warranty extends only to the original user of the equipment and is limited to the
purchase price of each part. DISH Network Corporation and its affiliated companies
(“DISH Network”) warrant this system against defects in materials or workmanship as
follows:
• Labor: For a period of 90 days from the original date of purchase, if DISH Net-
work determines that the equipment is defective subject to the limitations of this
warranty, it will be replaced at no charge for labor. DISH Network warrants any
such work done against defects in materials or workmanship for the remaining
portion of the original warranty period.
• Parts: For a period of 90 days from the original date of purchase, DISH Network
will supply, at no charge, new or re-manufactured parts in exchange for parts
determined to be defective subject to the limitations of this warranty. DISH Network warrants any such replacement parts against defects in materials or workmanship for the remaining part of the original warranty period.
Note: “Parts” means items included in this package, which may include the TV
converter and remote control. It does not include other parts purchased separately.
What the Warranty Does Not Cover
• This warranty does not cov er inst allation o f the sys tem. If ap plicable, su ch inst allation will be warranted under a separate installation agreement.
• This warranty does not cover consumer instruction, physical setup or adjustment
of any consumer electronic devices, remote control bat teries, signal reception
problems, loss of use of the system, or unused programming charges due to system malfunction.
• This warranty does not cover cosmetic damage, damage due to lightning, electrical or telephone line surges, battery leakage, fire, flood, or other acts of Nature,
accident, misuse, abuse, repair or alteration by other than authorized factory service, use of accessories not recommended by the TV converter manufacturer,
Page 31
Page 42
TR-40CRA DIGITAL-TO-ANALOG TV CONVERTER
LIMITED WARRANTY
negligence, commercial or institutional use, or improper or neglected maintenance.
• This warranty does not cover equipment sold AS IS or WITH ALL FAULTS, shipping and handling, removal or reinstallation, shipping damage if the equipment
was not packed and shipped in th e manner prescribed, nor equ ipment purchased,
serviced, or operated outside the continental United States of America.
If You Need Assistance
1 Call the customer support number at 1-888-667-0633 or visit our website
www.DTVPal.com
able. Press the SYSTEM INFO button on the remote control to display the
receiver ID number.
2 A Customer Service Representative will assist you. If the Representative deter-
mines you should return any equipment, you will be given steps and an address
for which to return your equipment. Whether under warranty or not, you will be
responsible for the cost of shipping back the defective equipment.
3 Returned equipment must be packaged properly, using either the original shipping
materials or other appropriate packaging. Include a copy of the Bill of Sale. Any
items returned without a copy of the Proof of Purchase will be considered out of
warranty.
4 Follow the instructions given to you by the Customer Service Representative
when returning your equipment for service.
. Have the date of purchase and your receiver ID number avail-
Legal Limitations
REPLACEMENT AS PROVIDED UNDER THIS WARRANTY IS YOUR EXCLUSIVE
REMEDY. DISH NETWORK SHALL NOT BE HELD LIABLE FOR ANY INCIDENTAL
OR CONSEQUENTIAL DAMAGES FOR BREACH OF ANY EXPRESSED OR
IMPLIED WARRANTY ON THIS SYSTEM, NOR FOR ANY INCIDENTAL OR
CONSEQUENTIAL DAMAGES RESULTING FROM THE USE OF, OR INABILITY TO
USE, THIS SYSTEM. UNDER NO CIRCUMSTANCES SHALL DISH NETWORK'S
LIABILITY, IF ANY, EXCEED THE PURCHASE PRICE PAID FOR THIS SYSTEM.
EXCEPT TO THE EXTENT PROHIBITED BY APPLICABLE LAW, ANY IMPLIED
WARRANTY OF MERCHANT ABILITY OR FITNESS FOR A P ARTICULAR PURPOSE
ON THIS SYSTEM IS LIMITED IN DURATION TO THE PERIOD OF THIS
WARRANTY. DISH NETWORK RESERVES THE RIGHT TO REFUSE TO HONOR
THIS WARRANTY IF DISH NETWORK DETERMINES ANY OF THE ABOVE
EXCEPTIONS TO HAVE CAUSED THIS SY STEM NOT TO HAVE PERFORMED
PROPERLY. THIS WARRA NTY SHALL BE VOID IF ANY FACTORY-APPLIED
IDENTIFICATION MARK, INCLUDING BUT NOT LIMITED TO SERIAL OR
CONDITIONAL ACCESS NUMBERS, HAS BEEN ALTERED OR REMOVED. THIS
WARRANTY SHALL ALSO BE VOID IF THE TV CONVERTER HAS BEEN OPENED
BY AN UNAUTHORIZED PERSON.
Page 32
Page 43
TR-40CRA DIGITAL-TO-ANALOG TV CONVERTER
LIMITED WARRANTY
This page intent io nall y left blank
Page 33
Page 44
TR-40CRA DIGITAL-TO-ANALOG TV CONVERTER
FCC COMPLIANCE
FCC COMPLIANCE
The following text is extracted from Federal Communications Commission
(FCC) regulations, as of the publication date of this Guide. Contact the FCC
(see following) or your library for the complete text of the regulations.
Compliance Information Statement
DISH Network Corporation, 9601 S. Meridian Blvd, Englewood, CO., (303) 723-1000,
declares that: This device co mplies with Part 15 of the FCC Rules. Operati on is subject
to the following two conditions: (1) this devi ce may not cause harmful in terference, and
(2) this device must accept any interference received, including interference that may
cause undesired operation.This equipment has been tested and found to comply with
the limits for a Class B digital device, pursuant to Part 15 of the FCC Rules. These
limits are designed to provide reasonable protection against harmful interference in a
residential installation. This equipment generates, uses and can radiate radio
frequency energy and, if not installed and used in accordance with the instructions,
may cause harmful interference to radio communication s. However, there is no
guarantee that interference will not occur in a particular installation. If this equipment
does cause harmful interference to radio or television reception, which can be
determined by turning the equipment off and on, the user is encouraged to try to
correct the interference by one or more of the following measures:
• Reorient or relocate the receiving antenna.
• Increase the separation between the equipment and TV converter.
• Connect the equipment into an outlet on a circuit different from that to which the
TV converter is connected.
• Consult the dealer or an experienced radio/TV technician for help.
Do not make changes or modifications to this equipment. This could void the user’s
authority to operate the equipment.
There are many devices that allow you to connect your antenna to your in-home
distribution system such as splitters, and amplifiers. The FCC requires that the
isolation between the antenna port and the network port of your system meet the
following:
• 80dB from 54 MHz to 216 MHz, at least
• 60dB from 216 MHz to 550 MHz and at least
• 55dB from 550 MHz to 806 MHz
Measuring the isolation of a device requires spec ialized equipment . In most cases, it is
easier to purchase a splitter or amplifier wi th t he co rrectl y spec if ie d iso latio n from yo ur
local television retai ler. The above requirements are extracted from 47CFR15.115. For
the complete text please visit WWW.FCC.GOV.
Page 34
Page 45
TR-40CRA DIGITAL-TO-ANALOG TV CONVERTER
Index
INDEX I
A
Adding Channels 16
Audio Setup 13, 18, 22
B
Back Panel Connections 2
Browse 7, 11
Browse Banner 11
C
Change Password 15
Changing Languages 13
Channel 3-4 Setup 4, 16
Channel Scan 16
Channel Setup Menu 16
Closed Captions 13, 18
Connecting Your TR-40CRA 1
Creating an Event Timer 12
Customizing Your TR-40CRA 13
D
Digital Over-the-Air Tuner 1, 2
E
Event Search 11
Event Timers 12
Creating 12
When the Event Timer Occurs
12
F
Factory Defaults 17
FCC Compliance 34
Compliance Statement 34
Finding New Channels 16
Finding Programs 10
Browse 11
Event Search 11
G
Getting Started 1
Guide Conventions 1
Guide Plus 23
H
Hide Channels 14
I
Important Safety Instructions ii, iii
Inactivity Standby 17
Installation 2
Channel Scan 4
Coaxial Cable 3
Connecting Your TR-40CRA to
Your TV
RCA Cables 3
Set Time Zone 4
System Setup 16
Installation Menu 16
Installation Wizard 3, 16
Introduction 1
2
Page 35
Page 46
TR-40CRA DIGITAL-TO-ANALOG TV CONVERTER
L
Limited Warranty 31
What the Warranty Covers 31
What the Warranty Does Not
Cover 31
Locking Specific Channels 14
Locking the Receiver 15
Locks 13
Channel Locks 14
Hide Locked Channels 14
Ratings 14
Reset Password 22
M
Menus 9
Closing the Menus 10
Navigating 9
Opening the Menus 9
Selecting Options 9
O
On-screen Menu Options 1
System Information 7, 17
System Setup 13, 16
T
Themes 7
Timers 13
Troubleshooting
Audio
Channel Setup 20
TR-40CRA won’t turn on 19
Missing Channels 21
Remote Control 19
Signal loss 20
Snowy Screen 21
Video Problems 21
TV Guide 23
Substitute ZIP Codes 28
Tuning to New Channel Numbers
Updating TV Guide 25
TV Guide On Screen 18, 23
TV Guide Plus 18
22
26
P
Parental Controls 13
Program Guide 10
Proper Care of Your Equipment iv
R
Ratings Locks 14
Remote Control 5
Buttons 6
Universal Remote Control 5
Remote Control Buttons 1
Reset Settings 17
S
Set Time Zone 16
Setting Up Your TR-40CRA 3
Setup Menu 13
U
Using the Menus 9
W
Watching TV 10
Finding Programs 10
Z
ZIP Code Setup 16
Page 36
Page 47
TR-40CRA DIGITAL-TO-ANALOG TV CONVERTER
FCC DIGITAL TELEVISION TRANSITION NOTICE
February 17, 2009 marks the date when local over-the-air full-power TV
broadcasts will transition from analog to digital within the United States.
Consumers with analog TVs, who rely on an over-the-air antenna to receive
their local broadcast TV programming will need a digital-to-analog converter
box, a digital TV with a digital tuner, or subscribe to a pay TV service like DISH
Network to display those digital broadcasts. Analog TVs that do not use one of
those methods to get a digital signal will continue to work for other purposes,
including watching low-power TV stations still broadcasting in analog, watching
pre-recorded movies with a DVD player or VCR, or playing video games.
Great news!
Your new TR-40CRA Digital-to-Analog Converter allows you to continue
enjoying the over-the-air digital broadcasting programming available in your
area. You r ne w TR-40 CRA converter also allows you to receive analog
broadcasts simply by pushing the Analog Pass-Through on your remote. This is
a great feature to view those low-power TV stations that do not convert to digital
on 2/17/09.
Additional information regarding the digital television transition, including free
$40 coupons for digital-to-analog converter boxes, is available at
www.dtvpal.com
1-888-CALL-FCC.
, www.DTV.gov, www.dtv2009.gov, 1-888-DTV-2009, or
Printed in
Page 37
Page 48
TR-40CRA DIGITAL-TO-ANALOG TV CONVERTER
This page intent io nall y left blank
Page 38
Page 49
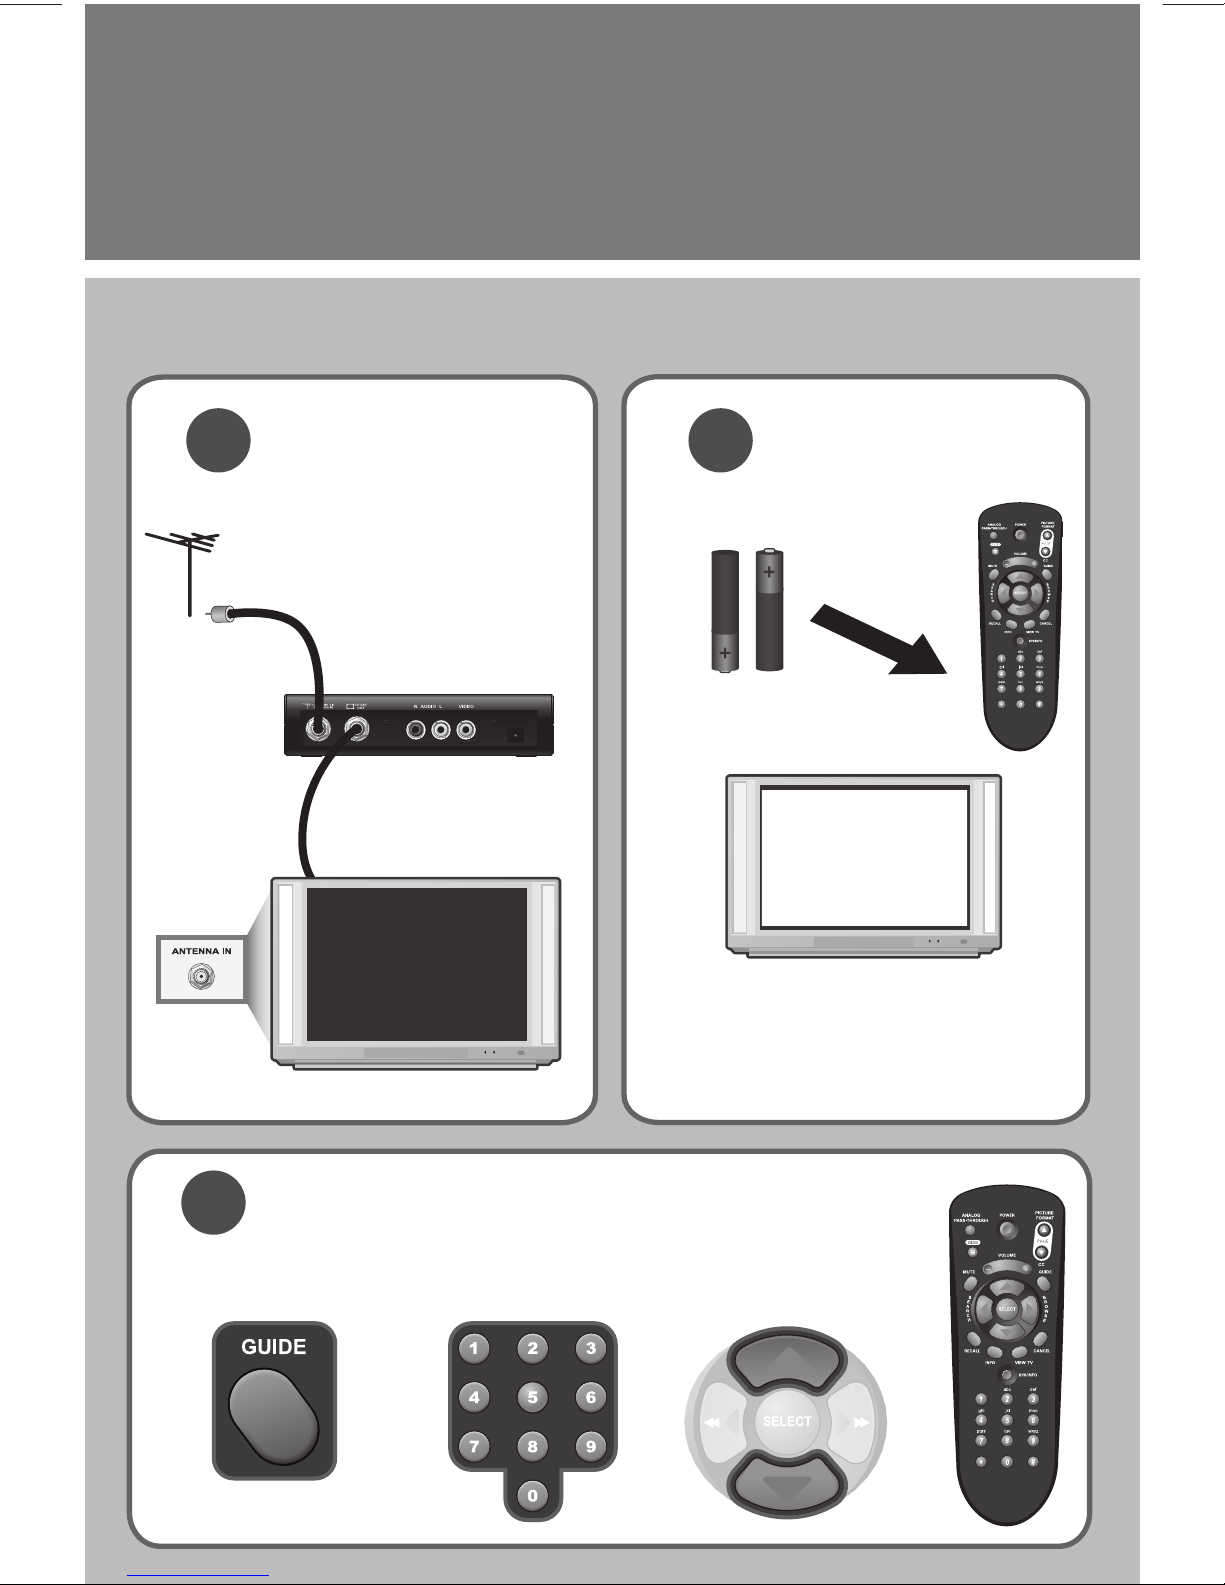
Guía del
TR-40CRA
¡Disfrutar su convertidor es tan sencillo como el
¡Disfrutar su convertidor es tan sencillo como el 1-2-3!
1
CONEXIONES
De la antena
al convertidor
usuario
2
Instalar baterias
al dorso del remoto
CONFIGURAR
1-2-3!
Del convertidor
a su TV
Ver páginas 2 & 3
3
Guía de programación Canal Arriba / AbajoNumeración
ENCONTRANDO EL CANAL
Sintonice su TV en el canal 3, presione
POWER en el control remoto,
y siga las instrucciones en la pantalla
Ver páginas 3 & 4
Ver páginas 5-7
Page 50
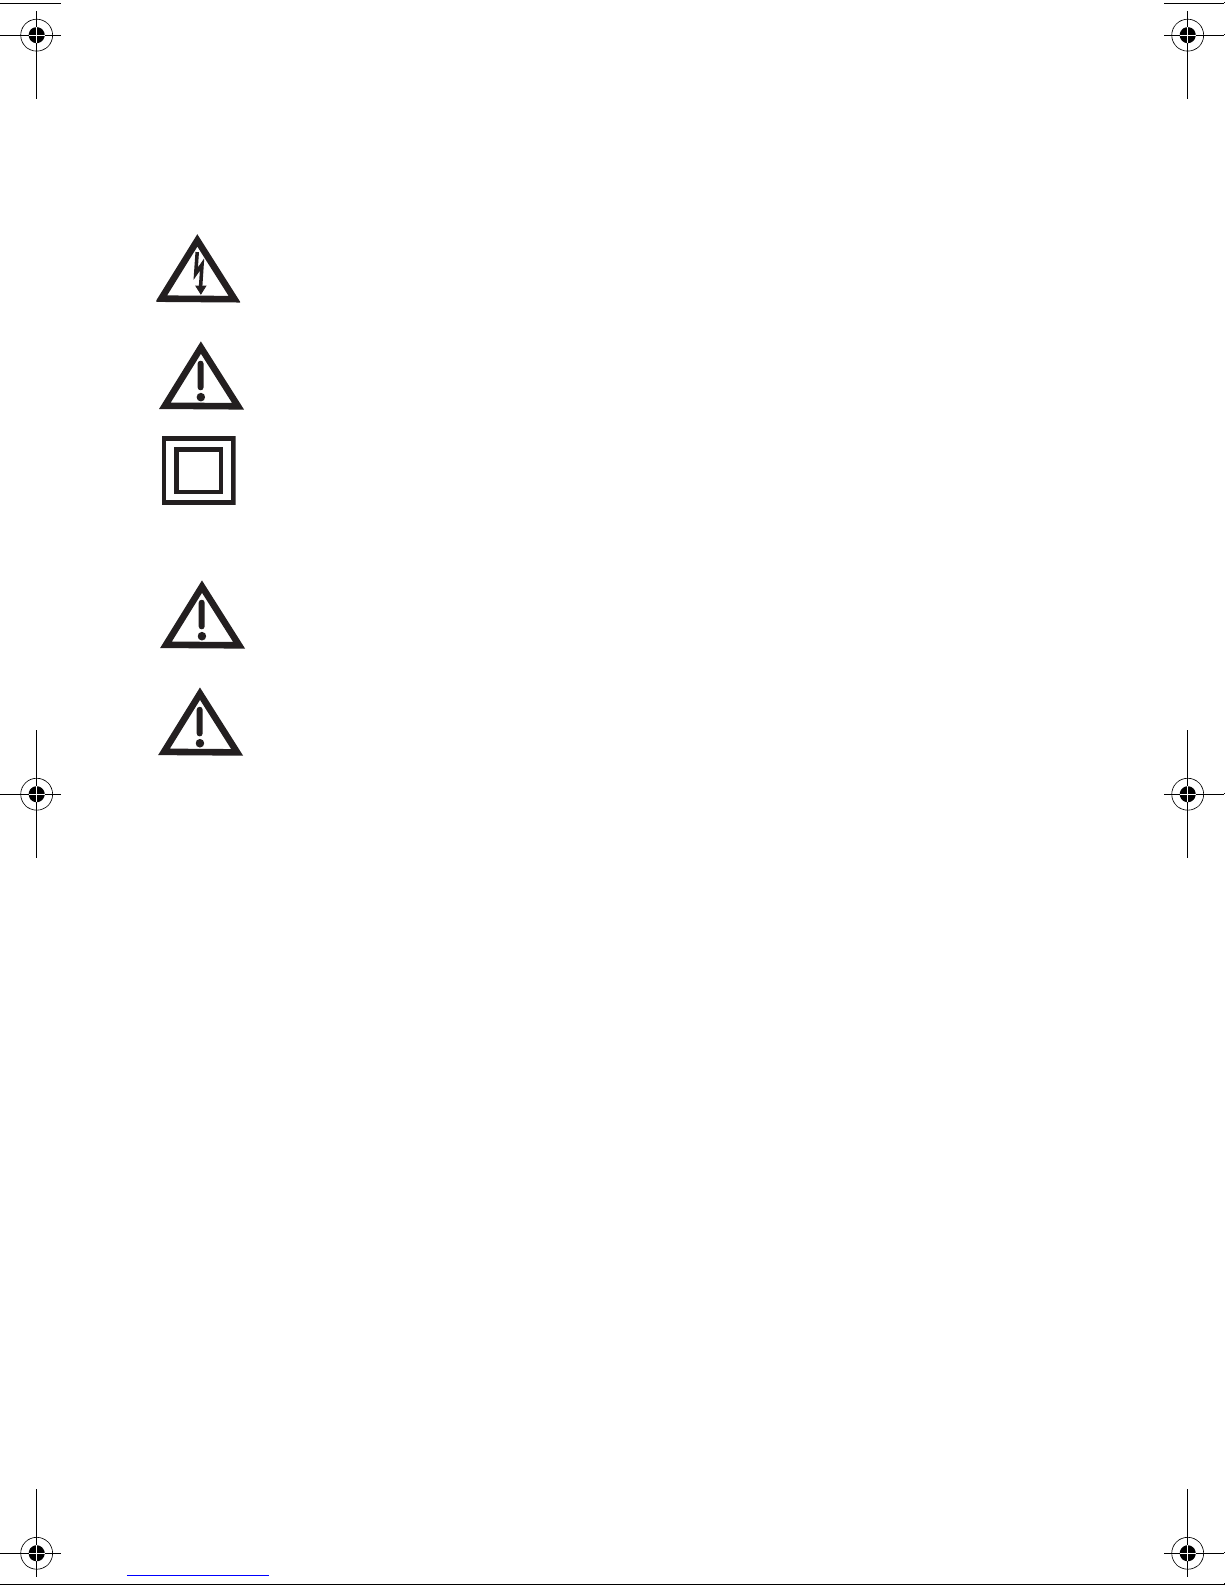
Advertencias y símbolos que requieren atención
Usted debe estar informado de las reglas de seguridad al instalar y usar el sistema. La
guía del usuario le provee con varios procedimientos. Si usted procede sin cuidado,
usted podría herirse usted mismo, o destruir el equipo o su propiedad. Algunos otros
procedimientos requieren atención especial.
El símbolo de relámpago con punta de echa, dentro de un triangulo
equilátero, alerta al usuario sobre la presencia de “voltaje inestable y
peligroso” dentro del producto y con la suciente magnitud para constituir un
riesgo de descarga eléctrica al usuario.
El símbolo de exclamación dentro de un triangulo equilátero alerta al usuario
sobre la presencia de instrucciones muy importantes sobre el
mantenimiento y operación, dentro de la literatura que acompaña al aparato.
El símbolo de equipo Clase II, signica que el equipo posee el suciente
aislamiento y no requiere conexión a tierra.
Para su seguridad
No intente abrir el adaptador de poder o el receptor. Existe el riesgo de
descarga eléctrica, el cual puede causar daño personal o al aparato. No hay
partes que puedan ser reparadas por el usuario dentro del equipo. Abrir la
caja y hacer cambios no autorizados terminarán la garantía.
Advertencia: Para reducir el riesgo de descarga eléctrica, no exponga el
aparato a la lluvia o humedad.
Aviso importante sobre el sistema operativo
Como en todos los equipos controlados por un sistema operativo, un comportamiento
no deseado puede aparecer si el usuario intenta ejecutar acciones que no estén
dentro de la rutina del sistema. Este producto, tal como cualquier otro producto
tecnológico, está sujeto a defectos y subsecuentemente DISH Network NO
GARANTIZA QUE TODAS LAS FUNCIONES, TALES COMO CONTROL DE
PADRES, TRABAJARAN EN TODO MOMENTO. En acuerdo con los términos de la
licencia pública de la GNU (GPL), DISH Network ha puesto disponible en
www.dishnetwork.com, el código fuente para ser bajado por el público.
Equipos y programas cubiertos en esta guía
Esta guía del usuario cubre al convertidor de señal de televisión digital a análoga TR40CRA. Esta guía puede cubrir otros equipos no listados aquí. La información de esta
guía del usuario puede cambiar sin ningún aviso. Nosotros podemos crear re visiones
para dejarle saber de dichos cambios.
Avis o sobre los derechos
Número de parte 164835
Copyright © 2008 EchoStar Technologies L.L.C., Englewood, Colorado 80112.
Todos los derechos reservados.
La programación dentro de este equipo posee código con copyright © 2005, el
proyecto FreeType (www.freetype.org) y el cual está licenciado bajo el proyecto
FreeType el 27 de enero de 2006.
Está licenciado de manufactura de Dolby Laboratories. “Dolby” y el símbolo Double-D,
son marcas registradas de Dolby Laboratories.
Page 51
TR-40CRA CONVERTIDOR DE TV DIGITAL A ANÁLOGA
TABLA DE CONTENIDOS
CONTENIDOS C
Instrucciones de seguridad muy importantes.......ii
Los Mejores Consejos del TR-40CRA.....................v
Introducción..............................................................1
Guía de convenciones...................................1
Comenzando ..................................................1
Instalación......................................................2
El control remoto......................................................5
Botones del control remoto..........................6
Usando los menús....................................................9
Viendo televisión .........................................10
Encontrando programas.............................10
Usando el programador de sucesos..........12
Personalizando su TR-40CRA...............................13
Seguros de programación ..........................14
Configuración del sistema..........................16
Cofiguración del sonido..............................18
Subtítulos .....................................................18
Solución a problemas ............................................19
Guía de programación en pantalla
y configuración de la Guía PLUS..........................23
Garantía limitada.....................................................31
Acuerdo con la FCC ...............................................34
Anuncio de transición de televisión digital
de la FCC.................................................................37
Página i
Page 52
TR-40CRA CONVERTIDOR DE TV DIGITAL A ANÁLOGA
INSTRUCCIONES DE SEGURIDAD MUY IMPORTANTES
INSTRUCCIONES DE SEGURIDAD MUY IMPORTANTES
SEGURIDAD S
INSTRUCCIONES DE SEGURIDAD MUY IMPORTANTES
1 Lea estas instrucciones.
2 Guarde estas instrucciones.
3 Ponga atención a todas las advertencias.
4 Siga todas las instrucciones.
5 No use este aparato cerca del agua.
6 Limpie solamente con una toalla seca.
7 No obstruya ningún espacio de ventilación. Instale de acuerdo con las instrucciones de
fabricante.
8 No instale cerca de ninguna fuente de calor tales como radiadores, medidores de
calefacción, hornos, o ningún otro aparato (incluyendo amplificadores) que produzca
calor
9 No desprenda del enchufe el conector de seguridad de polarización o conexión a
tierra. Un enchufe polarizado posee dos conectores, uno más ancho que el otro. El
enchufe de conexión a tierra posee conectores más otro que conecta a tierra. El ancho
del conector o tercer conector son provistos para su seguridad. Si el enchufe no encaja
en la apertura consulte a un electricista para obtener un reemplazo.
10 Proteja el cordón de poder ser pisado, particularmente los conectores, receptores, y el
punto de salida del aparato.
11 Use solamente los accesorios especificados por el fabricante.
12 Desconecte el aparato durante tormentas eléctricas o cuando no haya sido usado por
un largo tiempo.
13 Refiera todos el mantenimiento a personal calificado. Mantenimiento es necesario
cuando los aparatos hayan sufrido cualquier daño, tales como los cordones de poder
hayan sido dañados, cualquier líquido haya sido derramado en el equipo, el equipo
haya sido expuesto a lluvia o humedad, cuando el aparato no funcione normalmente o
este se haya caído.
Ningún objeto debe ser colocado sobre los aparatos, además no deben ser
expuestos a aparatos que goteen o ningún objeto con líquidos, como vasijas.
Página ii
Page 53
TR-40CRA CONVERTIDOR DE TV DIGITAL A ANÁLOGA
INSTRUCCIONES DE SEGURIDAD MUY IMPORTANTES
INSTRUCCIONES DE SEGURIDAD MUY IMPORTANTES
• Conecte solamente el conector original de poder al convertidor de TV. Otros
convertidores pueden dañar el convertidor del televisor o causar un incendio.
• No instale el adaptador a poder o convertidor de televisión en ninguna área donde la
temperatura sea menor de 40°F o m
• Conecte el adaptador de poder solamente al tipo de fuente indicado en la etiqueta. El
adaptador de poder debe ser accesible de manera que el equipo pueda ser fácilmente
desconectado de la fuente de poder. Desconecte el enchufe del adaptador de poder y
no del cable.
• No sobrecargue el muro con toma corrientes, esto puede resultar en un incendio o en
una descarga eléctrica.
• No trate de hacer mantenimiento en el adaptador de poder o el convertidor de TV
usted mismo, ya que al quitar las tapas puede ser expuesto a una descarga eléctrica y
terminar la garantía del producto.
• Desconecte el adaptador de poder antes de hacer limpieza. El adaptador de poder
sigue conectado al toma corriente en cualquier momento mientras que siga conectado
a una fuente de poder, incluso si el convertidor de poder está apagado.
ás de 113°F, y no los cubra.
• No coloque fuetes incendiarias como candelabros cerca del convertidor de TV o el
adaptador de poder.
• No exponga las baterías del control remoto a fuego o temperaturas extremas.
Página iii
Page 54
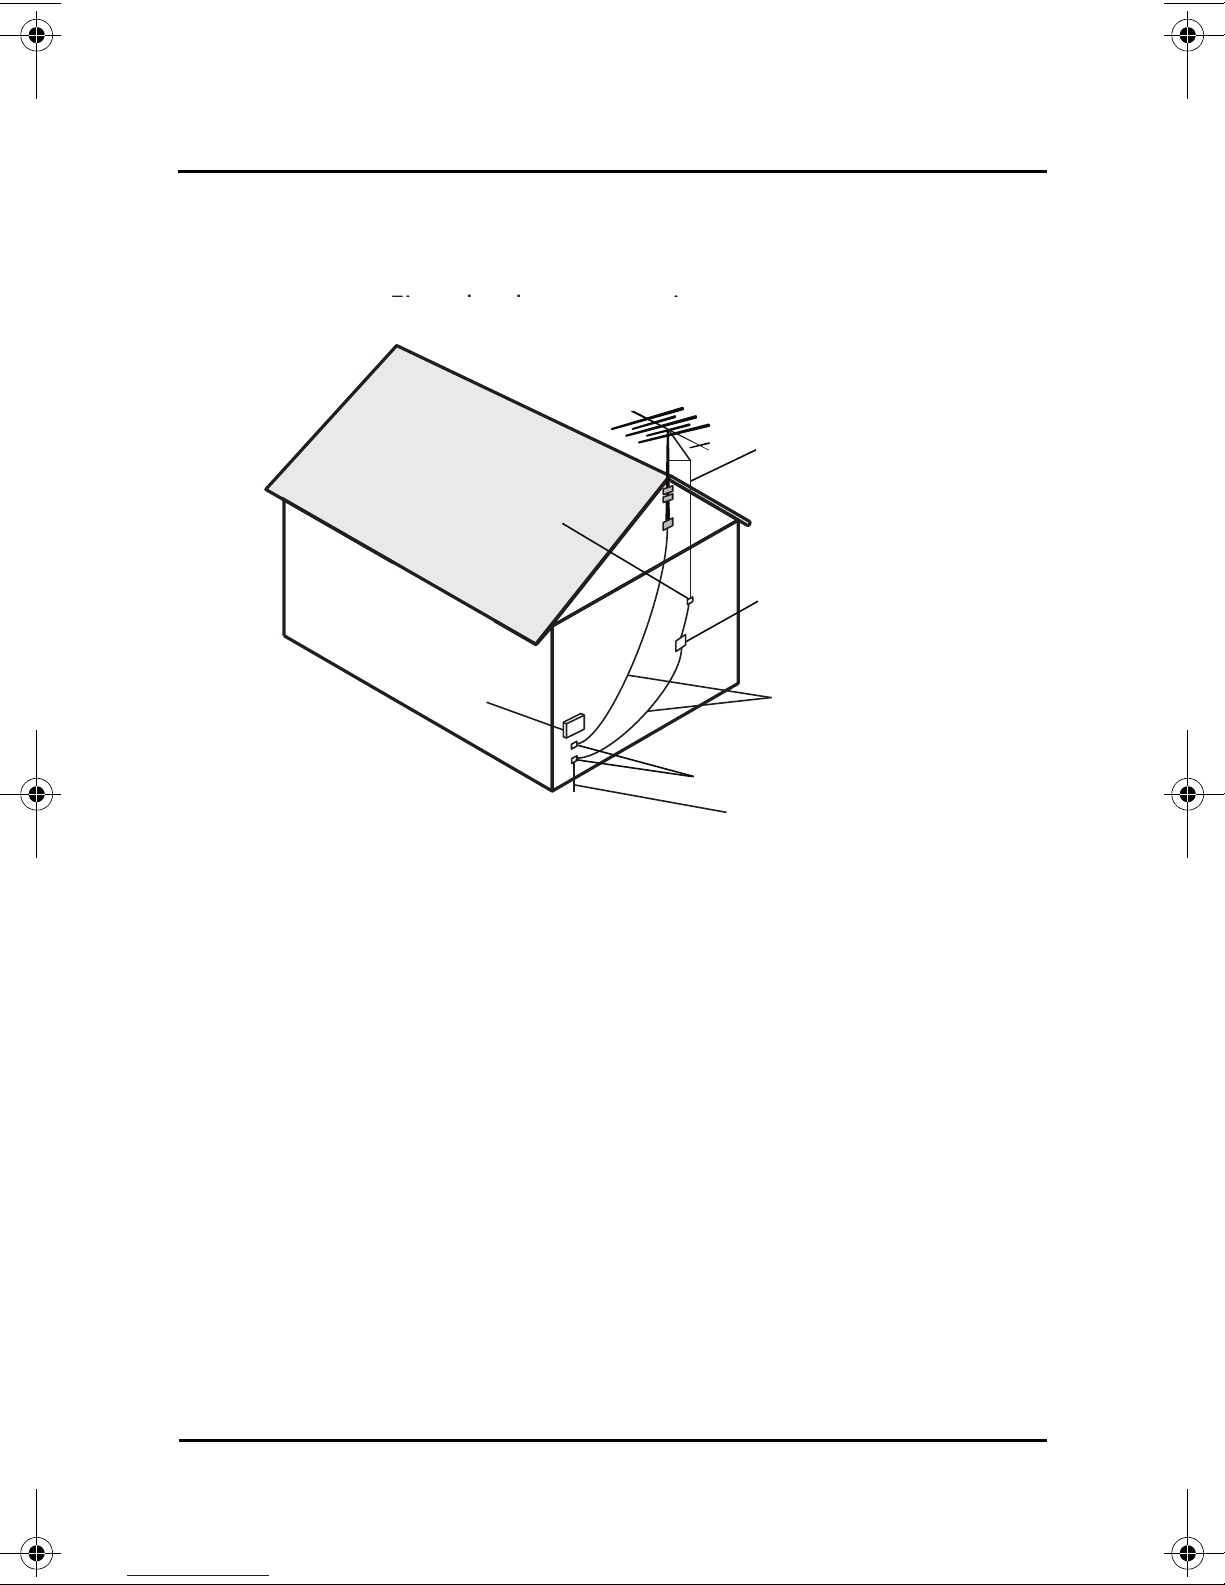
TR-40CRA CONVERTIDOR DE TV DIGITAL A ANÁLOGA
Ejemplos de antenas a tierra
Antena con cable
conductor (lead in wire)
Antena con unidad
de descarga
(NEC Sección 810-20)
Grapa a tierra
Grapa a tierra
Conductores a tierra
(NEC Sección 810-21)
Equipos de
servicio
eléctrico
Sistema de poder de
electrodos a tierra
(NEC Art. 250, Parte H)
Código nacional de electricidad, 2008
INSTRUCCIONES DE SEGURIDAD MUY IMPORTANTES
Nota al instalador: Este recordatorio fue creado para llamar la atención del instalador del
artículo 810, sección II del código nacional de electricidad (NEC) el cual provee guías pa ra la
conexión apropiada a tierra y, en particular, especifica que los cables a tierr a deben ser conect ados
al sistema de tierra del edificio tan cerca como sea posible al punto de entrada a cable.
Ejemplos de antenas a tierra
Código nacional de electricidad, 2008
Antena con cable
conductor (lead in wire)
Grapa a tierra
Antena con unidad
de descarga
(NEC Sección 810-20)
Equipos de
servicio
eléctrico
Conductores a tierra
(NEC Sección 810-21)
Grapa a tierra
Sistema de poder de
electrodos a tierra
(NEC Art. 250, Parte H)
• No acerque la antena a los circuitos de poder , o en don de pueda caer cerca d e las líneas de pod er.
Cuando instale la antena, tome debidas precauciones que le ayuden a evitar tocar las líneas de
poder o circuitos, ya que el contacto con ellos pudieran ser fatales.
Una Atención adecuada de Su Equipo
• Coloque el convertidor de televisión en una zona abierta y bien ventilada.
• Sí el convertidor de TV está frió al contacto, no lo conecte inmediatamente. Déjelo
desconectado en un cuarto con temperatura normal por lo menos 30 minutos antes de
desconectarlo.
• Siempre maneje el convertidor de TV y adaptador de poder con cuidado.
• Desconecte el adaptador de poder del toma corriente antes de limpiar.
• Siempre apague el convertidor de TV y desconecte antes de moverlo.
• TEl uso de accesorios y aditamentos no recomendados por el fabricante del
convertidor de TV terminarán la garantía.
• Use un toma corriente que controle sobrecargas o que posea protección a errores a
tierra. Durante una tormenta eléctrica o cuando el convertidor no sea usado por un
largo tiempo, desconecte el adaptador del toma corriente, y desconecte los cables
entre el televisor y la antena. Esto proveerá protección adicional que haya podido ser
causada por tormentas o descargas eléctricas.
Página iv
Page 55
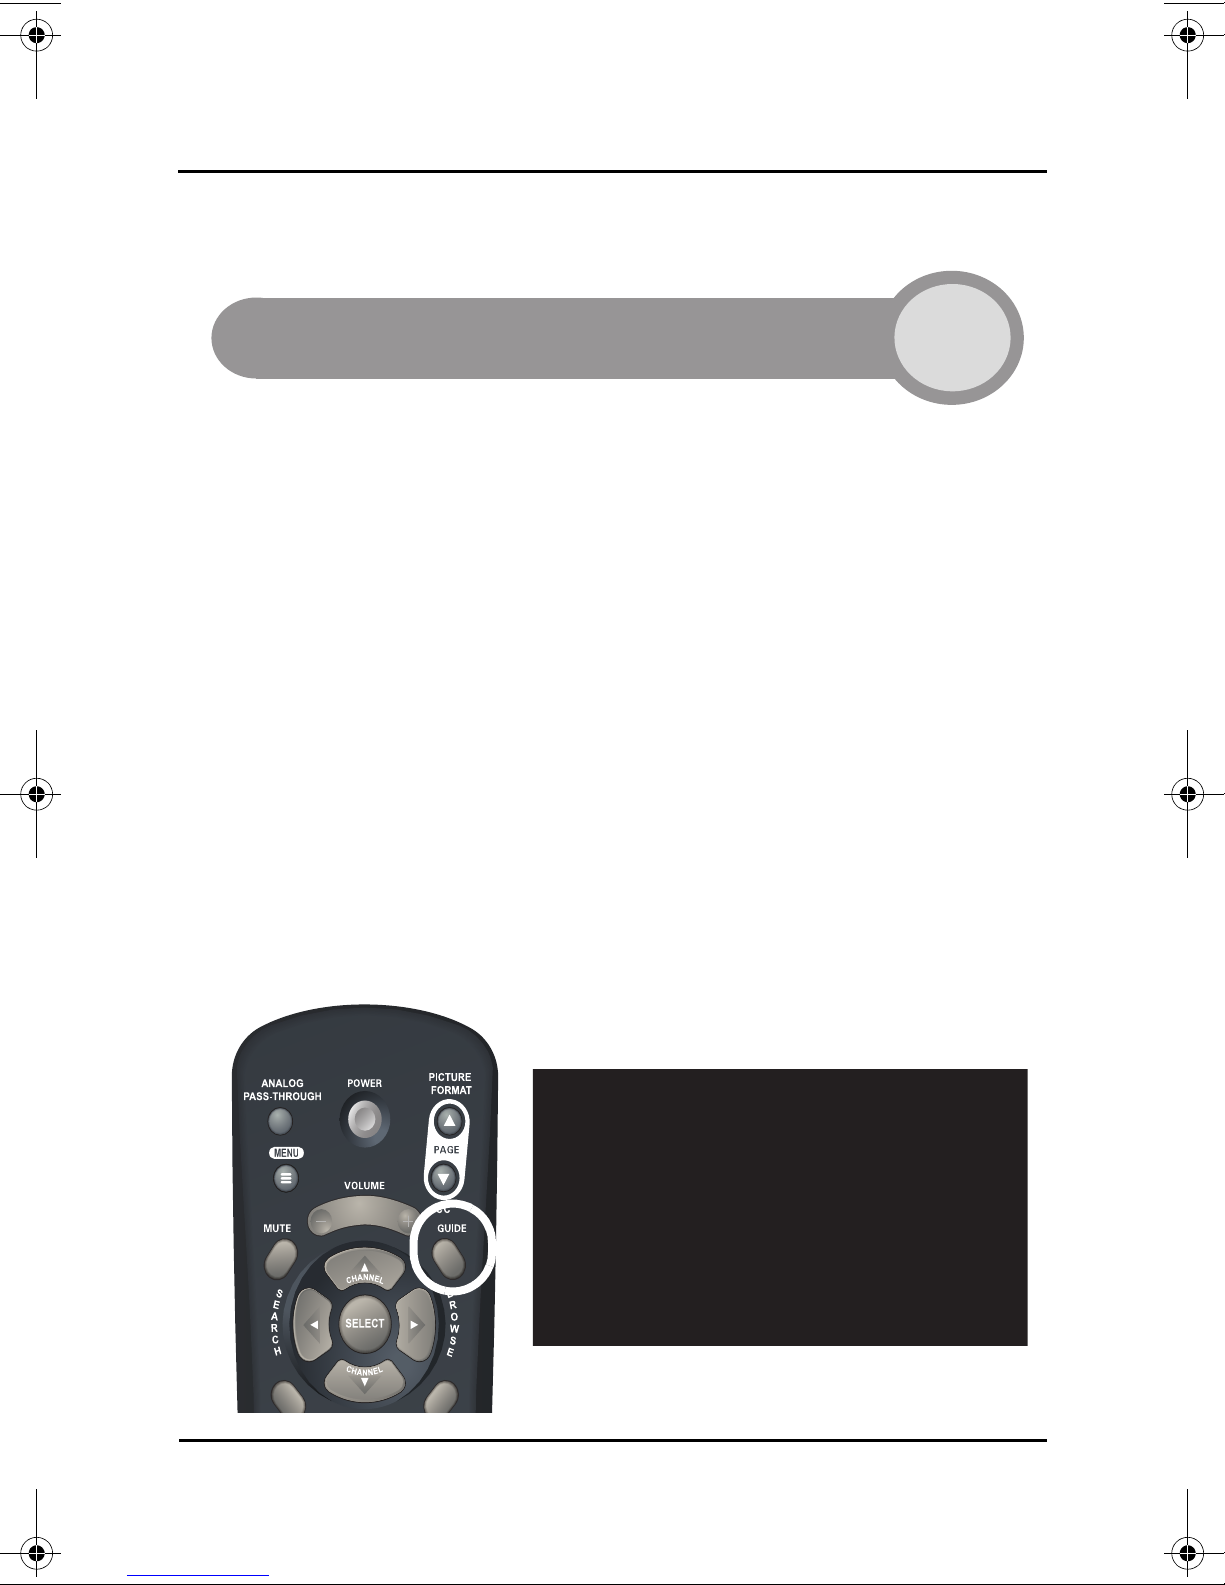
TR-40CRA CONVERTIDOR DE TV DIGITAL A ANÁLOGA
LOS MEJORES CONSEJOS DEL TR-40CRA
del
Los Mejores Consejos
Consejos rápidos para que Usted esté listo para comenzar
El TR-40CRA convierte la señal de TV digital local (over-the-air) a un formato que
puede ser visto en su TV análoga para que usted pueda continuar viendo sus
canales locales de TV después de la transición digital mandatoria de la FCC.
El TR-40CRA convertidor es fácil de usar y lleva su TV al siguiente nivel con
funcionalidades incluidas para hacer su vida más fácil. Aproveche su TR-40CRA
convertidor al máximo con éstos útiles con sej os.
TR-40CRA
UTILIZANDO SU GUÍA DE PROGRAMACIÓN EN
PANTALLA
La guía de programación fácil de usar del TR-40CRA es una gran fue nte de
información sobre la programación que despliega una lista completa de todos los
canales y programas que están disponibles. Presione 'GUIDE' en el control
remoto del TR-40CRA para abrir la Guía de Programas y revise los programas
por adelantado. Utilice los botones de flech a 'ARROW' en el control remoto para
moverse a través de la Guía de Programas. Vea la página 10 de este manual
para más información sobre la Guía de Programación.
Página v
Page 56
TR-40CRA CONVERTIDOR DE TV DIGITAL A ANÁLOGA
LOS MEJORES CONSEJOS DEL TR-40CRA
MARCADORES DE TIEMPO DE EVENTOS (EVENT
T
IMERS)
Nunca se preocupe por recordar
cuando comienzan sus programas
favoritos! El Marcador del Tiempo del
TR-40CRA automáticamente cambia
el canal a su programa favorit o a la
hora que está programado para
comenzar. Para crear un Marcador de
Tiempo de Eventos, presione
'SELECT' en la Guía de
Programación, en un programa que vaya a comenzar después. Los Marcadores
de Tiempo pueden ser creados para sintonizar un canal una sola vez, a diario, de
lunes a viernes o semanalmente. Vea la página 12 de este manual para más
información sobre los Marcadores de Tiempo de Eventos.
CONTROL DE PADRES
Bloquee el contenido que usted
considere inapropiado para su hogar
creando candados (Locks). La
funcionalidad del candado (Lock s)
requiere una contraseña para ver el
contenido que usted identificó como
inapropiado. Para accesar al menú de
candados (Locks), presione 'MENU'
en su control remoto, seleccione
'Setup' y después seleccione 'Locks'.
Vea la página 14 de este manual para más información sobre control de padres
en el TR-40CRA convertidor.
PASE DE TRANSMISIÓN ANÁLOGA
Su TR-40CRA permite el pase de transmisión análoga, permi ti éndole ver
fácilmente los canales que todavía se transmite n util izando señal análoga. Para
ver canales análogos (over-the-air), sólo presione en su control remoto el botón
'ANALOG PA SS-THROUGH' luego cambie de canales utilizando el control
remoto de su TV.
Para volver a ver los canales digitales (over-the-air), regrese al canal 3 en su TV,
canal 4 o a la entrada alterna de video que es util i z ada para ver su TR-40CRA y
después presione de nuevo el botón 'ANALOG PASS-THROUGH' en su control
Página vi
Page 57
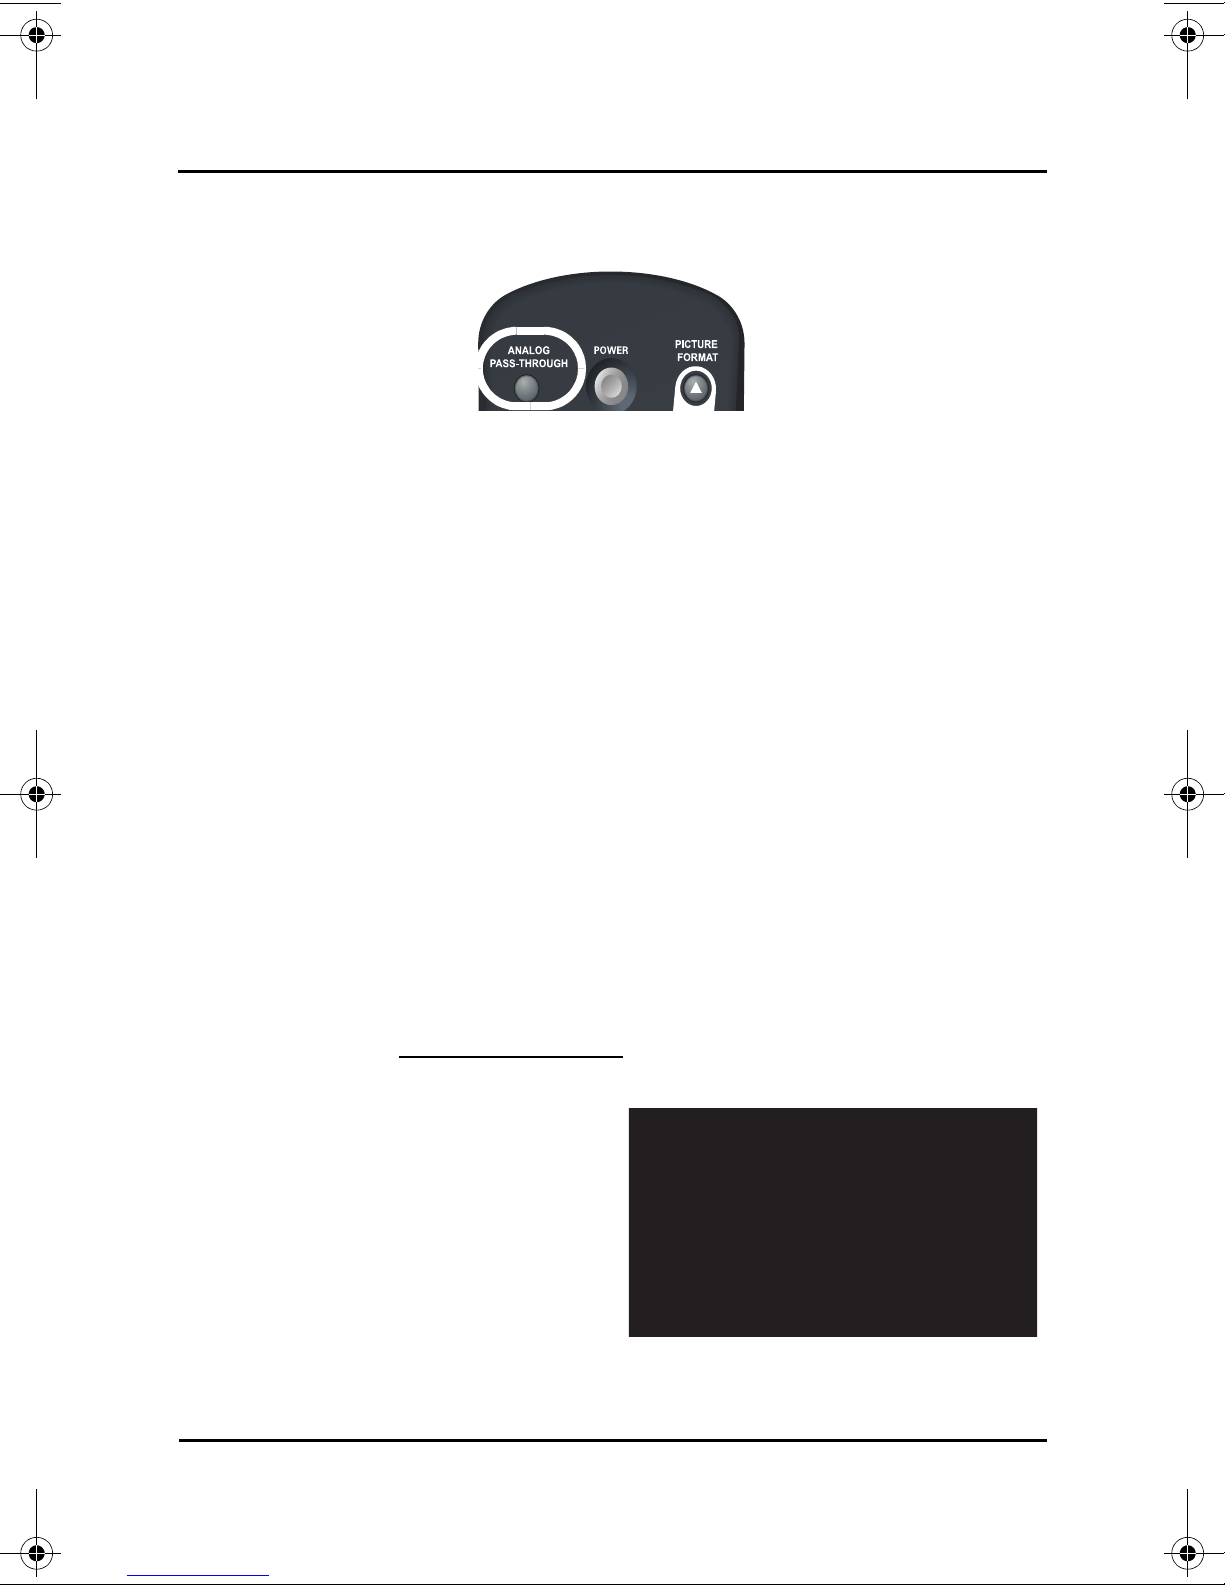
TR-40CRA CONVERTIDOR DE TV DIGITAL A ANÁLOGA
LOS MEJORES CONSEJOS DEL TR-40CRA
remoto de su TR-40CRA. Vea las páginas 2 y 7 de este manual para más
información sobre el pase de transmisión anál oga.
CONSEJOS RÁPIDOS PARA LA RESOLUCIÓN DE
PROBLEMAS
Si Usted Tiene una Pantalla Negra o Vacía
• Asegúrese que su TR-40CRA esté prendido. Debe haber una luz verde en
la parte de enfrente de su TR-40CRA. Si no, presione el botón de 'P OWE R'
en el control remoto de su TR-40CRA.
• Asegúrese que su TV esté en el canal correcto para sintonizar su TR40CRA. Su TV necesita estar en el canal 3 ó en el canal 4 (en caso de que
esté conectada uti liz ando u n cabl e c oaxia l) o una entr ad a de v ide o ( en c aso
de que esté conectada utilizando cables RC A).
• Su TR-40CRA podría necesitar un simple "reset". Sólo desconecte el TR40CRA convertidor de su enchufe por 30 segundos y vuelva a conectarlo.
Su TR-40CRA será reiniciado y debería estar listo para usarse de nuevo en
unos cuantos minutos.
Cuando la Señal Digital no se Re cibe Durante la Instalación/
Configuración
Por favor tome nota: No todos los programadores están utilizando señal digital y
la fuente de la señal digital puede moverse en cualqui er momento. Vaya a la
página de Internet www.antennaweb.org
averiguar cuáles canales en su área están transmitiendo en señal digital.
• Si usted no recibe señal digital de
TV en NINGUNO de sus canales
locales y Usted ve el mensaje
"The receiver is unable to detect a
signal in your area (el receptor es
incapaz de dete ctar la se ñal en su
área)" en su pantalla, es posible
que usted no tenga la antena
over-the- air apropiada para
recibir señal digital o está fuera del rango de las transmisiones digitales.
Vaya a la página de Internet www.antennaweb.org para más informació n
o contacte a su programador local para
Página vii
Page 58

TR-40CRA CONVERTIDOR DE TV DIGITAL A ANÁLOGA
LOS MEJORES CONSEJOS DEL TR-40CRA
sobre cuál antena over-the-air es la mejor para su área o visite su tienda de
electrónicos más cercana.
• Si usted no recibe señal digital de TV en ALGUNOS de sus canales locales,
usted sólo necesita ajustar la antena over-the-air o tener una antena overthe-air que sea la más óptima para su área. Vaya a la página de Internet
www.antennaweb.org para más información sobre cuál antena over-the-air
es la correcta para su área o visite su tienda de electrónicos más cercana.
Si Después de la Instalación/Configuración ya no Recibe Señal
Digital
• Si usted ya no está recibiendo la señal digital de TV de algunos o de todos
sus canales locales y su TR-40CRA está conectado correctamente, es
posible que usted necesite ajustar su antena over-the-air o tener una antena
over-the-air que sea más óptima para su área ya que la fuente de la señal
puede haberse movido. Vaya a la página de Internet www.antennaweb.org
para más información sobre cuál antena over-the-air es la mejor para su
área o visite su tienda de electrónicos más cercana.
• Usted puede verificar fácilmente
la fuerza de transmisión de la
señal de un canal local, sólo
presione en su control remoto el
botón 'BROWSE' cuándo este
sintonizando el canal en su TR40CRA. La fuerza de transmisión
de la señal para ese canal
aparece en la esquina superior
derecha de la pantalla de su TV.
Para más información útil sobre la resolución de problemas vaya a la página 19
de este manual.
MÁS INFORMACIÓN/AYUDA AL CLIENTE
1-888-667-0633 o www.dtvpal.com.
SUSCRÍBASE A DISH NETWORK
Aunque el TR-40CRA es una gran caja de conversión de señal digital a análoga,
usted podría no recibir alguna o todas las señales digitales over-the-air. Obtenga
más de 100 de los canales nacionales más populares, como Discovery, ESPN, y
CNN, así como sus canales locales* suscribiéndose a DISH Network. Llame al 1888-638-9912 ó vaya hoy mismo a la pág ina de Internet www.dishnetwork.com/
dtvpal y obtenga DISH Network por el precio todo-digital más bajo en todo el
país... todos los días!
*donde estén disponibles
Página viii
Page 59
TR-40CRA CONVERTIDOR DE TV DIGITAL A ANÁLOGA
Introducción e Instalación
CAPITULO 1
Conociendo su TR-40CRA y Conectando su TR-40CRA
INTRODUCCIÓN
¡Bienvenido y gracias por preferir el TR-40CRA convertidor de televisión análoga a
digital!
Su TR-40CRA es un convertidor de TV, el cual conecta su nuevo o ya antena existente
de conejo a su televisor. El TR-40CRA convierte su señal local digital a una señal que
pueda ser vista en su televisión análoga.
Este capitulo le llevara a través del proceso de conexión de su TR-40CRA convertidor a
su televisor y le proveerá una introducción a los atributos del TR-40CRA. Si enfrenta
cualquier problema conectando su TR-40CRA convertidor, vaya a la sección de
Resolviendo Problemas Comunes en la página 19.
GUíA DE CONVENCIONES
• Todos los botones en el control remoto están en letra mayúscula.
Ejemplo: presione SELECT.
• En pantalla, el menú de opci ones, se encuentra en negrilla.
Ejemplo: escoja la opción de configurar (Setup).
• “Seleccionar” significa que usted debe navegar por las opciones activas en
pantalla con el control remoto con los botones de FLECHAS y luego
oprimir el botón SELECT en el control remoto.
Ejemplo: Seleccione la opción de Locks.
COMENZANDO
• Para aprender más sobre el control remoto vaya al capitulo 2, página 5.
• Para aprender mas sobre las características del TR-40CRA convertidor,
vaya al capitulo 3, página 9.
• Si enfrenta algún problema con su TR-40CRA convertidor, vaya a la
sección de “solución de problemas” en la página 19.
• ISi su TV análoga soporta el guía en pantalla o la guía Plus, vaya a la
página 23 por más instrucciones.
Página 1
Page 60
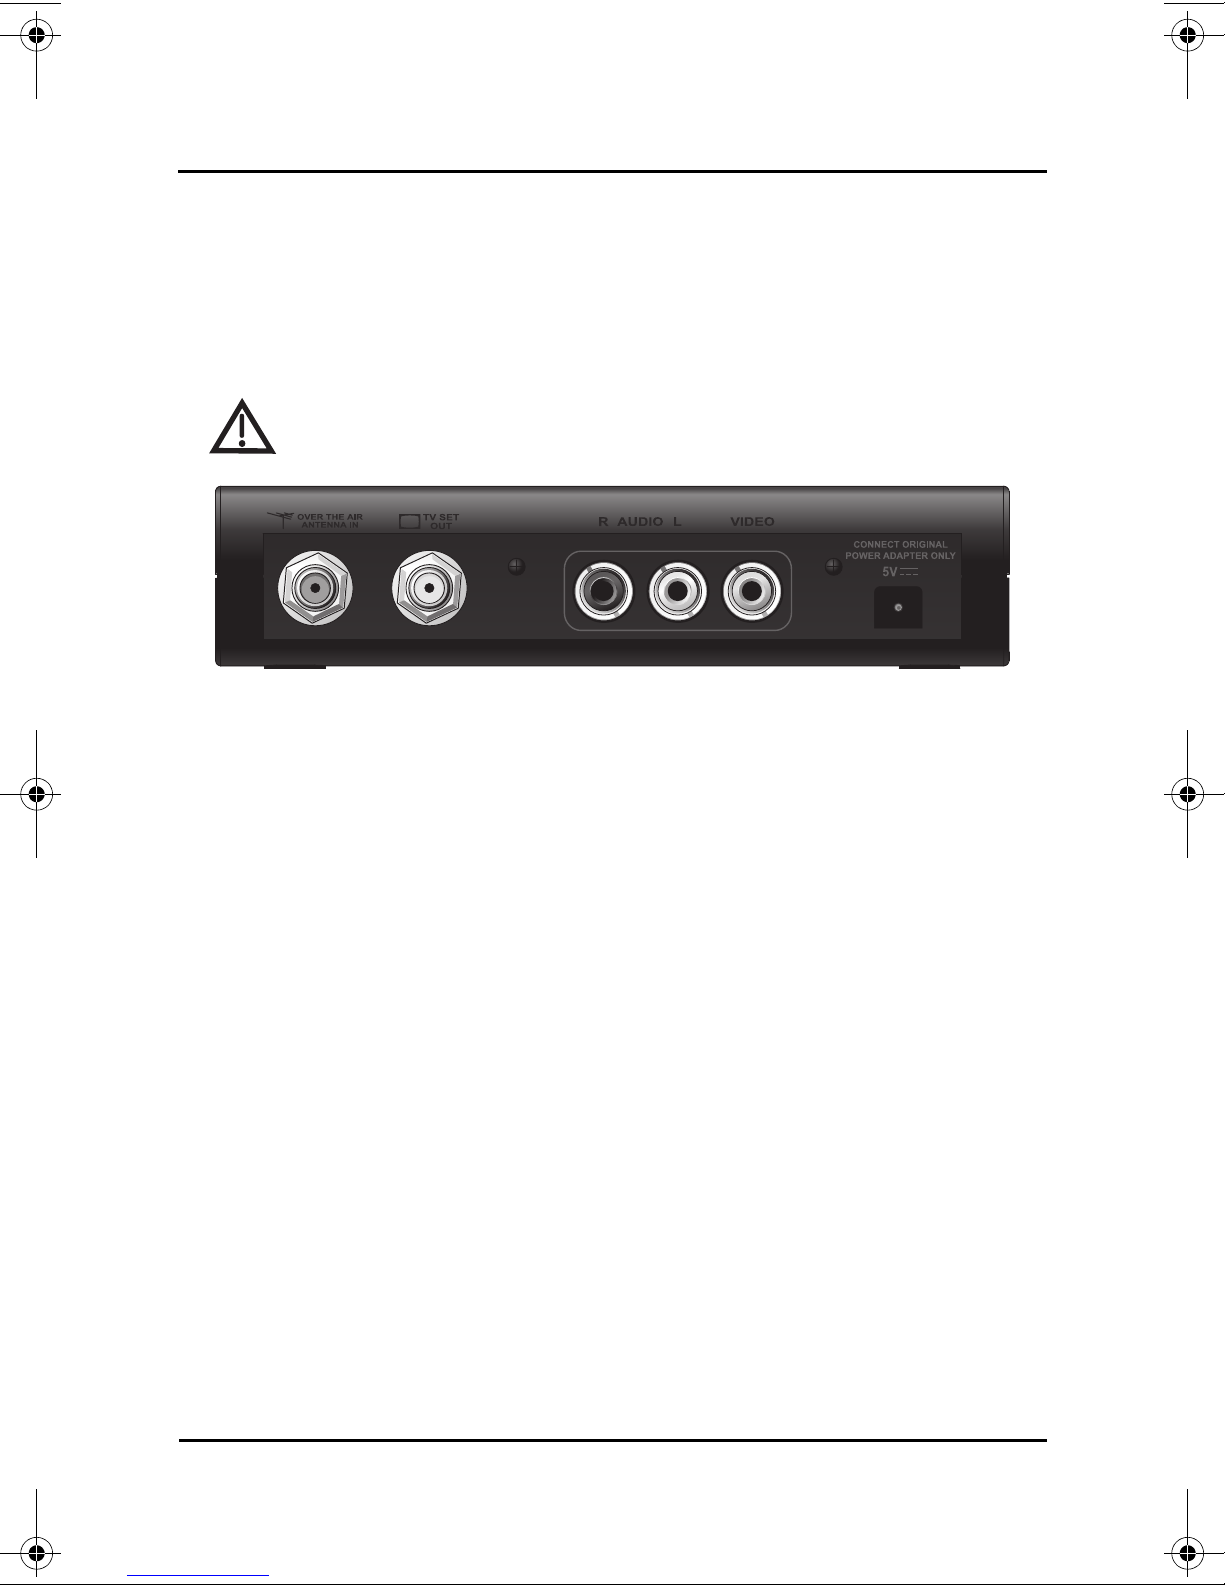
TR-40CRA CONVERTIDOR DE TV DIGITAL A ANÁLOGA
INSTALACIÓN
Nota: Estas instrucciones a sumen que usted ya posee instalada una antena de conejo.
En el caso de necesitar ayuda de cómo instalar o escoger una antena de conejo, por
favor vaya al sitio Web www.antennaweb.org o a su distribuidor de equipos local.
Conectando su TR-40CRA a su TV
Noticia importante de seguridad: No conecte su TR-40CRA
convertidor o televisor a la fuente de poder, primero conecte todos los
cables adecuadamente, siguiendo las siguientes instrucciones.
Conexiones al dorso del TR-40CRA
1 En el dorso de su TV, lo calice la conexión ANTENNA IN, la cual conecta
su TV a la antena de conejo. Esta entrada también puede ser llamada
OVER-THE-AIR ANTENNA IN, CABLE IN, COAX IN, o cualquier otro
nombre. Vaya a la guía de su TV para ayudarlo a buscar esta conexión.
2 Desconecte el cable coaxia l de la con e x i ón ANTENNA IN de su TV..
Nota: si su TVusa una entrada gemela (300 ohm), usted necesitará instalar
un convertidor de 75 OHM a 300 OHM a su TV, este puede ser encontrado
en cualquier tienda cercana de servicios electrónicos.
3 Vaya al dorso del TR-40CRA convertidor, y localice la conexión OVER-
THE-AIR ANTENNA IN (vea la imagen superior), conecte el cable coaxial
del paso 2 a la conexión OVER-THE-AIR ANTENNA IN de su TR-40CRA.
No use llaves para apretar la conexión, ya que puede dañar su TR-40CRA.
Nota: Su TR-40CRA convertidor sólo incluye un sintonizador de antena de
conejo. Si sus canales locales siguen transmitiendo señales an álogas,
usted podrá ver estos canales con solo presionar el botón ANALOG PASSTHROUGH, en el control remoto del TR-40CRA y cambiando al canal por
medio del control remoto.
4 Determine que tipo de conexión usará para conectar su TR-40CRA
convertidor a la TV. La entrada del TV puede usar cable coaxial con
entrada ANTENNA IN, la cual lleva la señal de video y de audio
monofónico en RF a los canales 3 ó 4 (paso 5). alternativamente, si su TV
posee conexión RCA para audio y video, usted podrá usar los cables RCA
para conectar el A
medio de entradas auxiliares (Ver paso 6).
UDIO/VIDEO de su TR-40CRA convertidor a su TV por
Página 2
Page 61
TR-40CRA CONVERTIDOR DE TV DIGITAL A ANÁLOGA
Asistente de instalación
5 Para conectar su TR-40CRA convertidor usando cables coaxiales:
a Conecte uno de los extremos del cable coaxial a ala conexión ANTENNA IN del
TV.
b Conecte el otro extremo del cable coaxial a la conexión TV SET OUT del TR-
40CRA convertidor.
6 Para conectar su TR-40CRA convertidor usando cables compuestos (Cables tipo
RCA Amarillo, Rojo y blanco):
a Conecte un extremo de los cables compuestos de tipo RCA a la entrad de su TV.
b Conecte el otro extremo de los cables al a conexión de AUDIO/VEIDEO de su
TR-40CRA convertidor.
7 Conecte el cable de poder de su TR-40CRA convertidor al dorso del aparato y al
toma corriente. Plug the other end into an electrical outlet. Make sure your TV is
connected to power.
Usando el Asistente de Instalación
8 Instale las dos baterías AAA en el control remoto de su TR-40CRA. Asegúrese de
seguir el diagrama de instalación de baterías en el control remoto.
9 Encienda su TV con el control remoto del TV o del panel frontal.
10 Cambie en su TV al canal correcto o modo de video adecuado para ver su TR-
40CRA convertidor.
a Si su TV esta conectado al TR-40CRA convertidor usando cables coaxiales
(paso 5), coloque su TV en el canal 3, el cual está predeterminado por el TR40CRA.
Nota: Sí usted posee un canal local o de cable que transmita a través del canal
3, usted puede cambiar el canal de transmisión del TR-40CRA convertidor al
canal 4 durante el asistente de instalación.
b Si su TV está conectado al TR-40 convertidor por medio de cables tipo RCA
(paso 6), usted necesitara colocar su TV a modo VIDEO, presionando el botón de
INPUT o SOURCE. Most TV remote controls have a VIDEO, INPUT, or SOURCE
button that you can use to change the TV’s video input or source. Revise la guía
de usuario de su TV de cómo hacerlo.
11 La primera vez que su TR-
40CRA convertidor se
encienda, el asistente de
instalación aparecerá en la
pantalla y lo guiará a través
del proceso de instalación. El
asistente hará una búsqueda
de señales de canales locales
y le ayudará en la
configuración de la zona
horaria y atributos del
televisors.
Página 3
Page 62
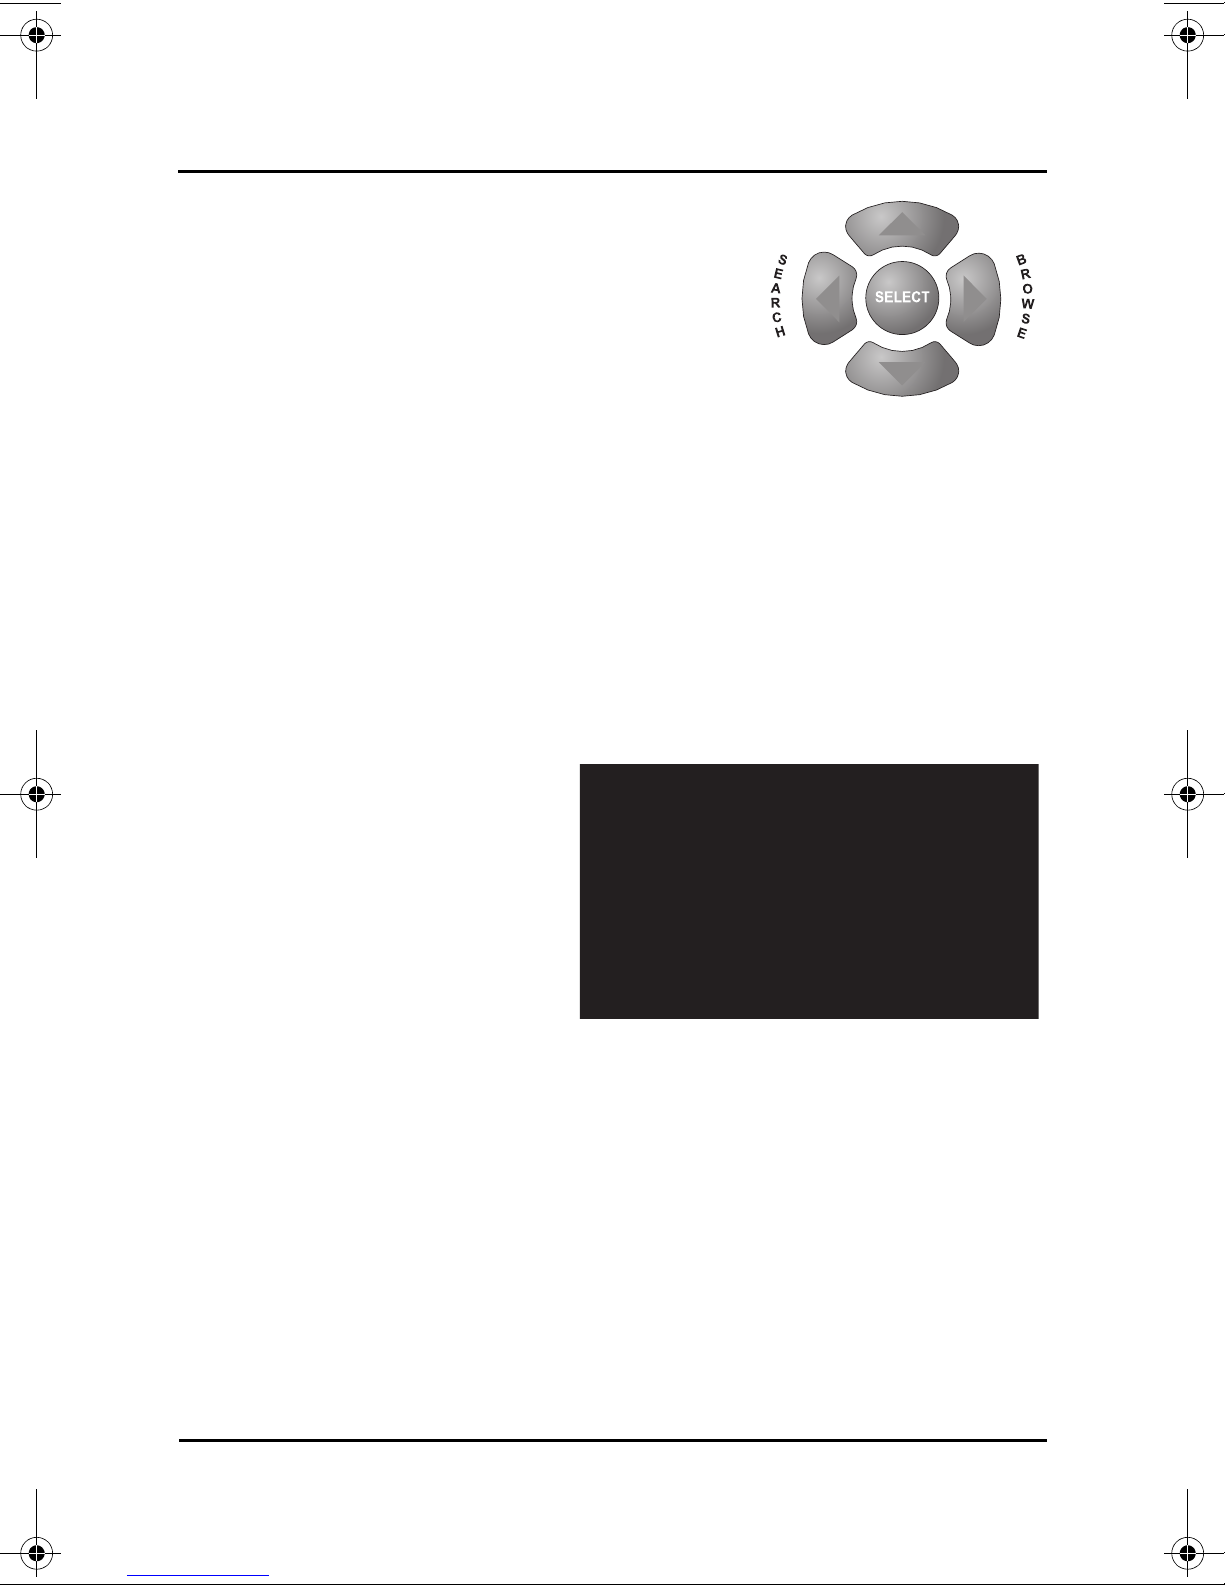
TR-40CRA CONVERTIDOR DE TV DIGITAL A ANÁLOGA
Botones de navagación
Guía de descarga
12 Para navegar a través del asistente de instalación,
use el botón SELECT en el control remoto de su TR40CRA convertidor y escoja las opciones activas
(naranjas) en la pantalla. Para activas otras
opciones, use losbotones de FLECHAS.
13 Seleccione continuar para comenzar la instalación.
14 El asistente de instalación buscará los canales
disponibles.
15 Después de que la búsqueda termine, usted será
llevado a la configuración de la zona horaria. Use los botones de flechas UP/DOWN
del control para encontrar la zona y el área, seguido de la configuración cambio
horario. Seleccione Siguiente una vez que haya hecho los cambios y siga al
siguiente paso.
16 La pantalla para configurar del canal 3-4, es usada para cambiar la conexión TV
SET OUT del TR-40CRA convertidor. La configuración del canal 3-4 debe ser al
canal de su TV. Si usted posee un canal local o cable que transmita en el canal 3,
asegúrese de configurar en el canal 4. Sí hace esto, usted necesitará cambiar el
canal del TV al 4. Seleccione siguiente.
17 Use las FLECHAS o los NUMERALES, para entrar el código postal. Seleccione
siguiente.
18 El TR-40CRA convertidor
comenzará a descargar la
información de la guía de
programación. Esto tomara
unos cuantos minutos. Una vez
que la guía sea descargada
completamente, el TR-40CRA
saldrá del asistente a alguno de
los canales.
19 ¡Felicitaciones! Su TR-40CRA
convertidor está instalado y listo
para ser usado. Comience a ver
TV, presione las flechas UP/DOWN para cambiar los canales, o entre el numero del
canal por medio de los numerales del control remoto.
Nota: Algunas estaciones prefieren enviar varios canales en su rango de
transmisión en vez de uno. Todos estos canales adicionales son referidos a
subcanales, y son identificados por medio de un guión y luego el número ( Por
ejemplo, el canal 9-2 es un subcanal del canal 9). Para cambiar al subcanal, primero
presione 0 antes de presionar el número del canal. Por ejemplo, para cambiar al
canal 9-2, ingrese “0092” en los numerales del control remoto.
Página 4
Page 63
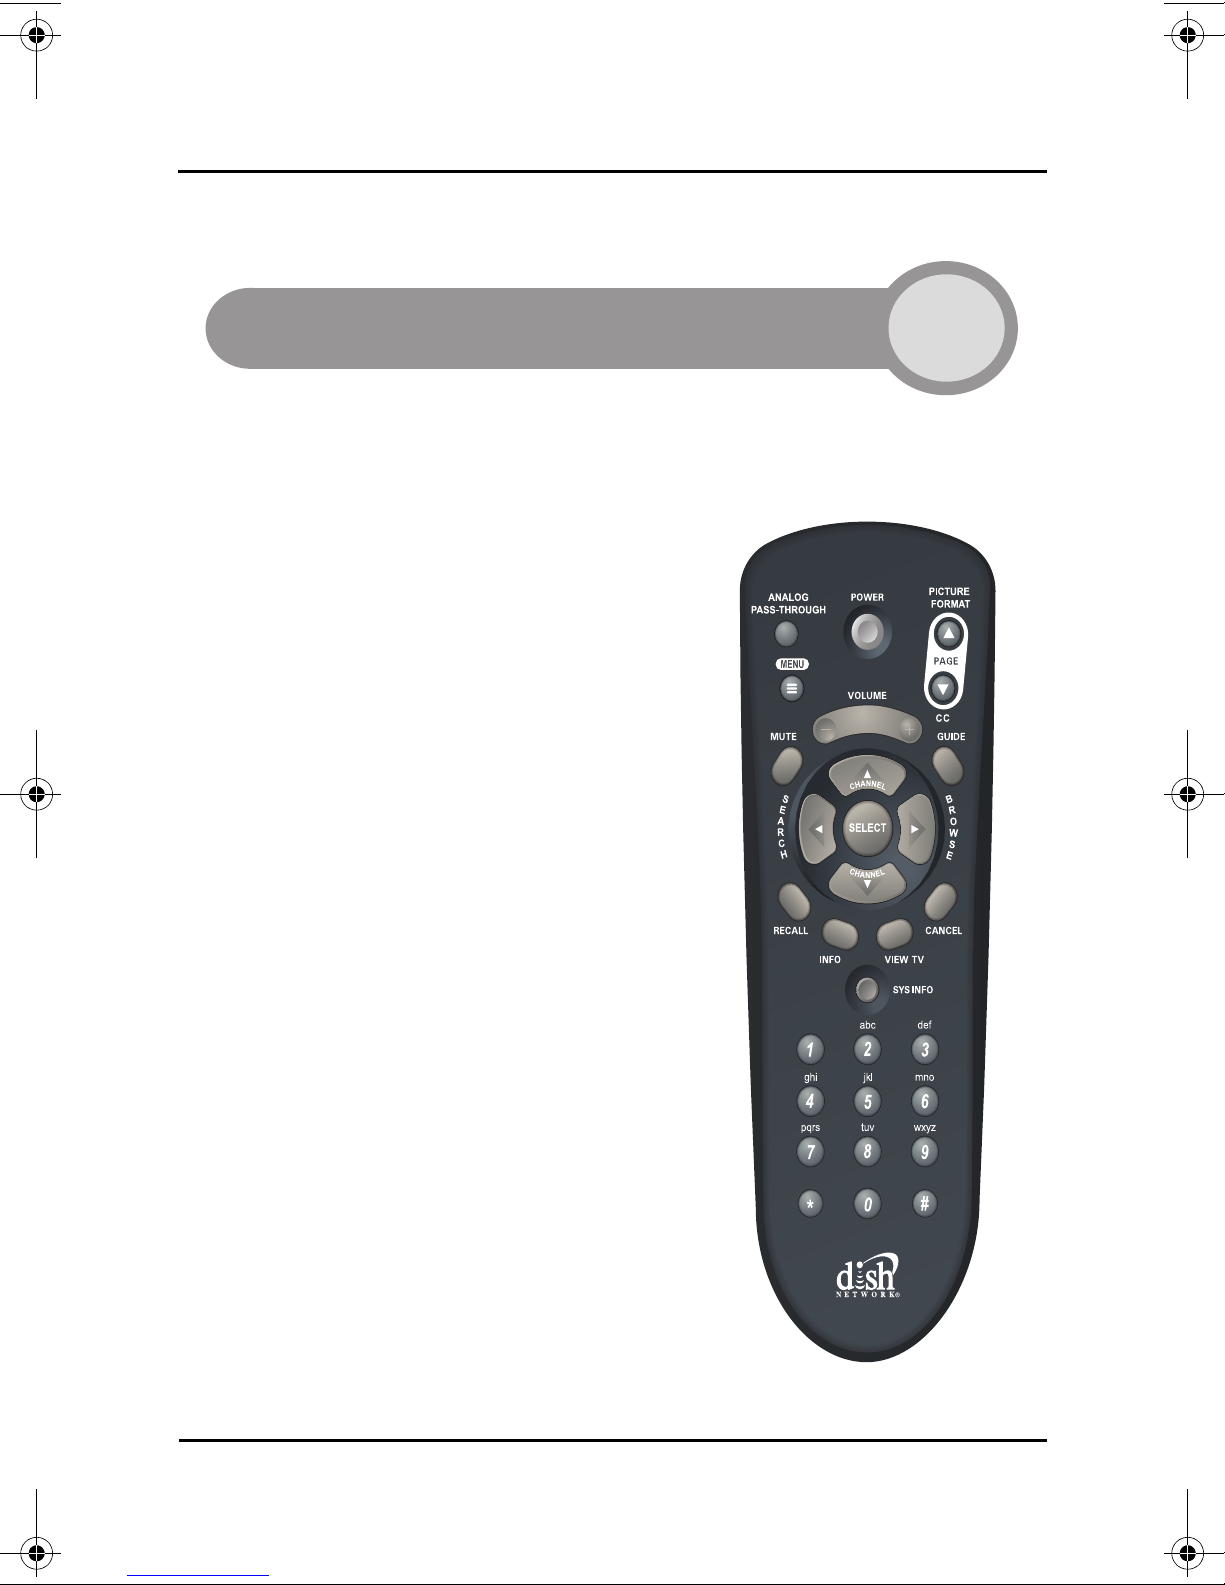
TR-40CRA CONVERTIDOR DE TV DIGITAL A ANÁLOGA
CAPITULO 2
CONTROL REMOTO
Usando el control remoto del TR-40CRA
CONTROL REMOTO
El control remoto que viene con su sistema
TR-40CRA opera solamente con el
convertidor de TV análoga a digital TR40CRA. Si usted posee un control universal,
usted tal vez pueda configurar su control
universal para que trabaje con su TR-40CRA
convertidor. Revise los códigos provistos en
la guía de su control remoto. Busque por los
códigos listados por EchoSt ar, EchoS phere o
DISH Network.
Página 5
Page 64
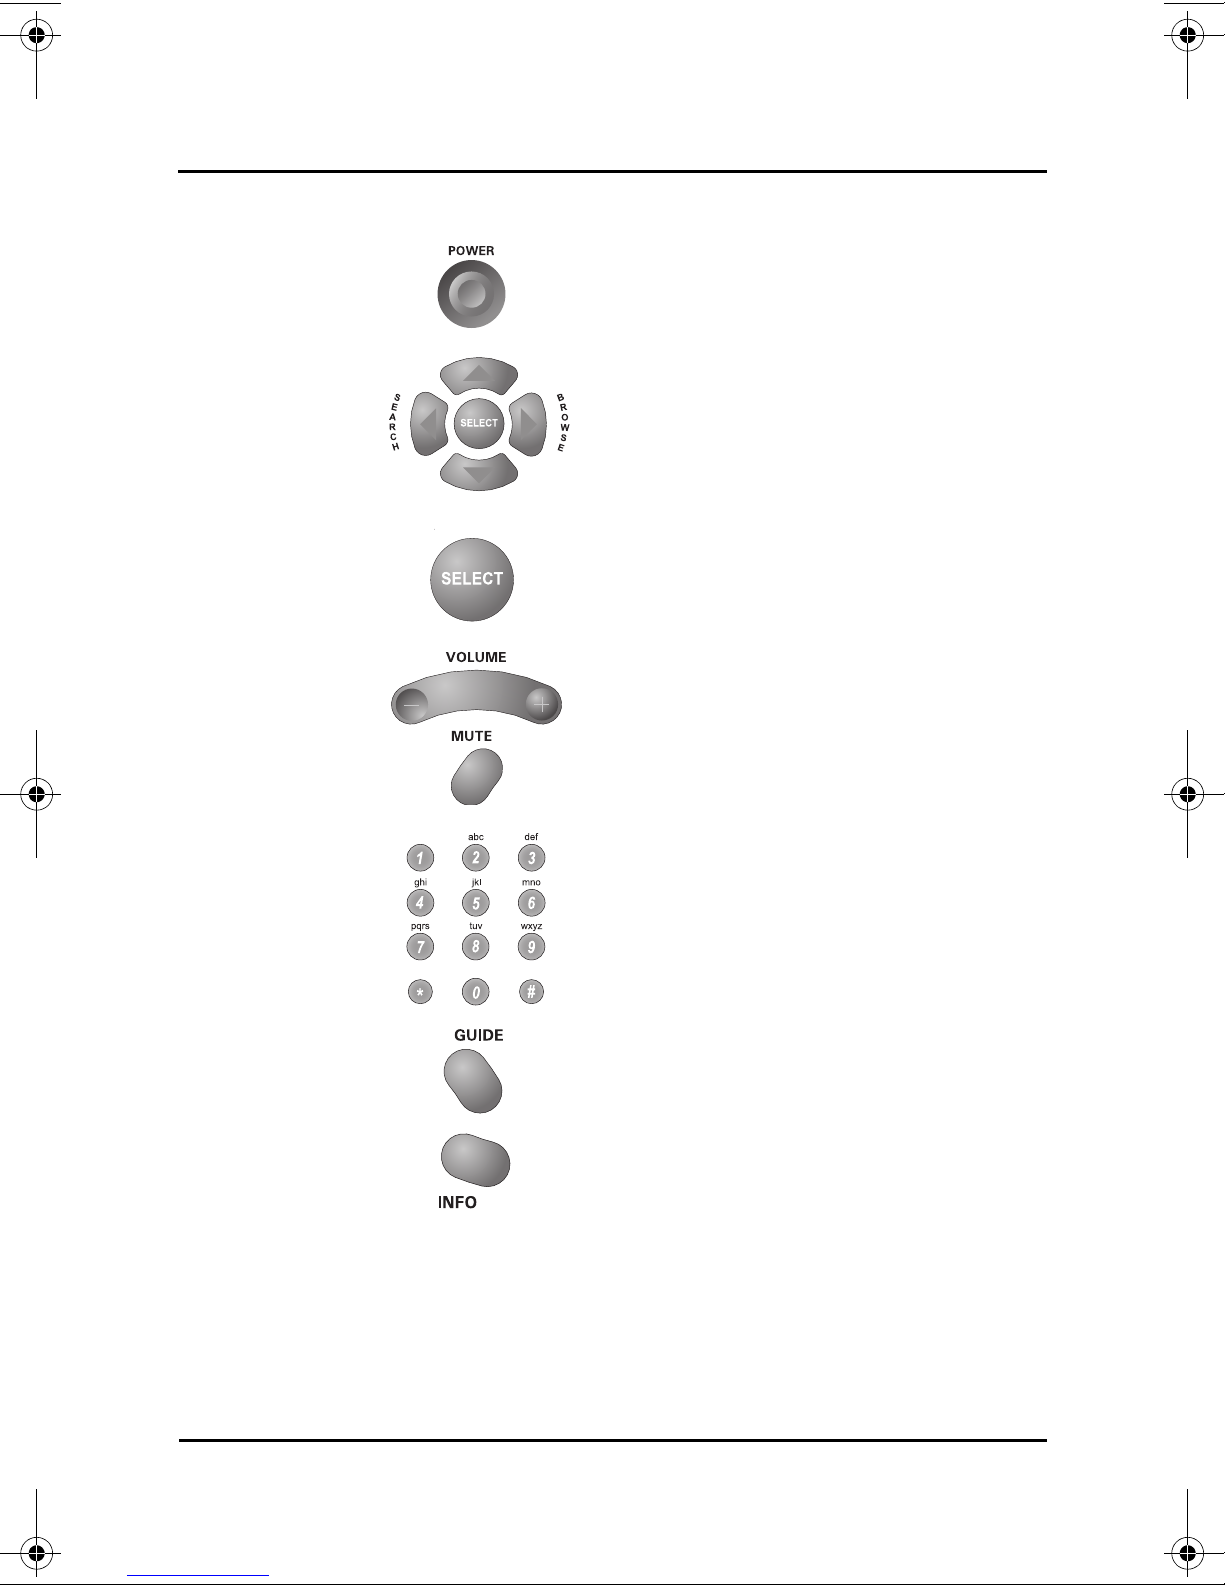
TR-40CRA CONVERTIDOR DE TV DIGITAL A ANÁLOGA
BOTONES DEL CONTROL REMOTO
PODER El botón de PODER enciende y apaga su TR-
40CRA convertidor.
FLECHAS Las flechas ARRIBA y ABAJO sirven para
cambiar rápidamente de canal. También le
permitirán desplazarse entre los menús en
pantalla y seleccionar las diferentes opciones.
SELECCIONAR El botón SELECCIONAR, selecciona las
opciones activas en pantalla, si se presiona
mientras se ve un canal, presenta dentro de un
recuadro la información del programa
VOLÚMEN y
MUTE (NO
SONIDO)
NUMERALES NUMERALES, cambian el canal rápidamente
VOLUME y MUTE (No Sonido) controlan los
niveles de audio del más alto hasta sin sonido.
ingresando el número del canal, o seleccionando
las opciones en pantalla.
Nota: La estrella (*) el símbolo de numeral (#)
no son usados por el TR-40CRA.
GUÍA GUIDE (GUÍA) abre el menú de guía de
programación en pantalla, la cual presenta los
canales disponibles y su programación.
INFO INFO, presenta información del programa.
Página 6
Page 65
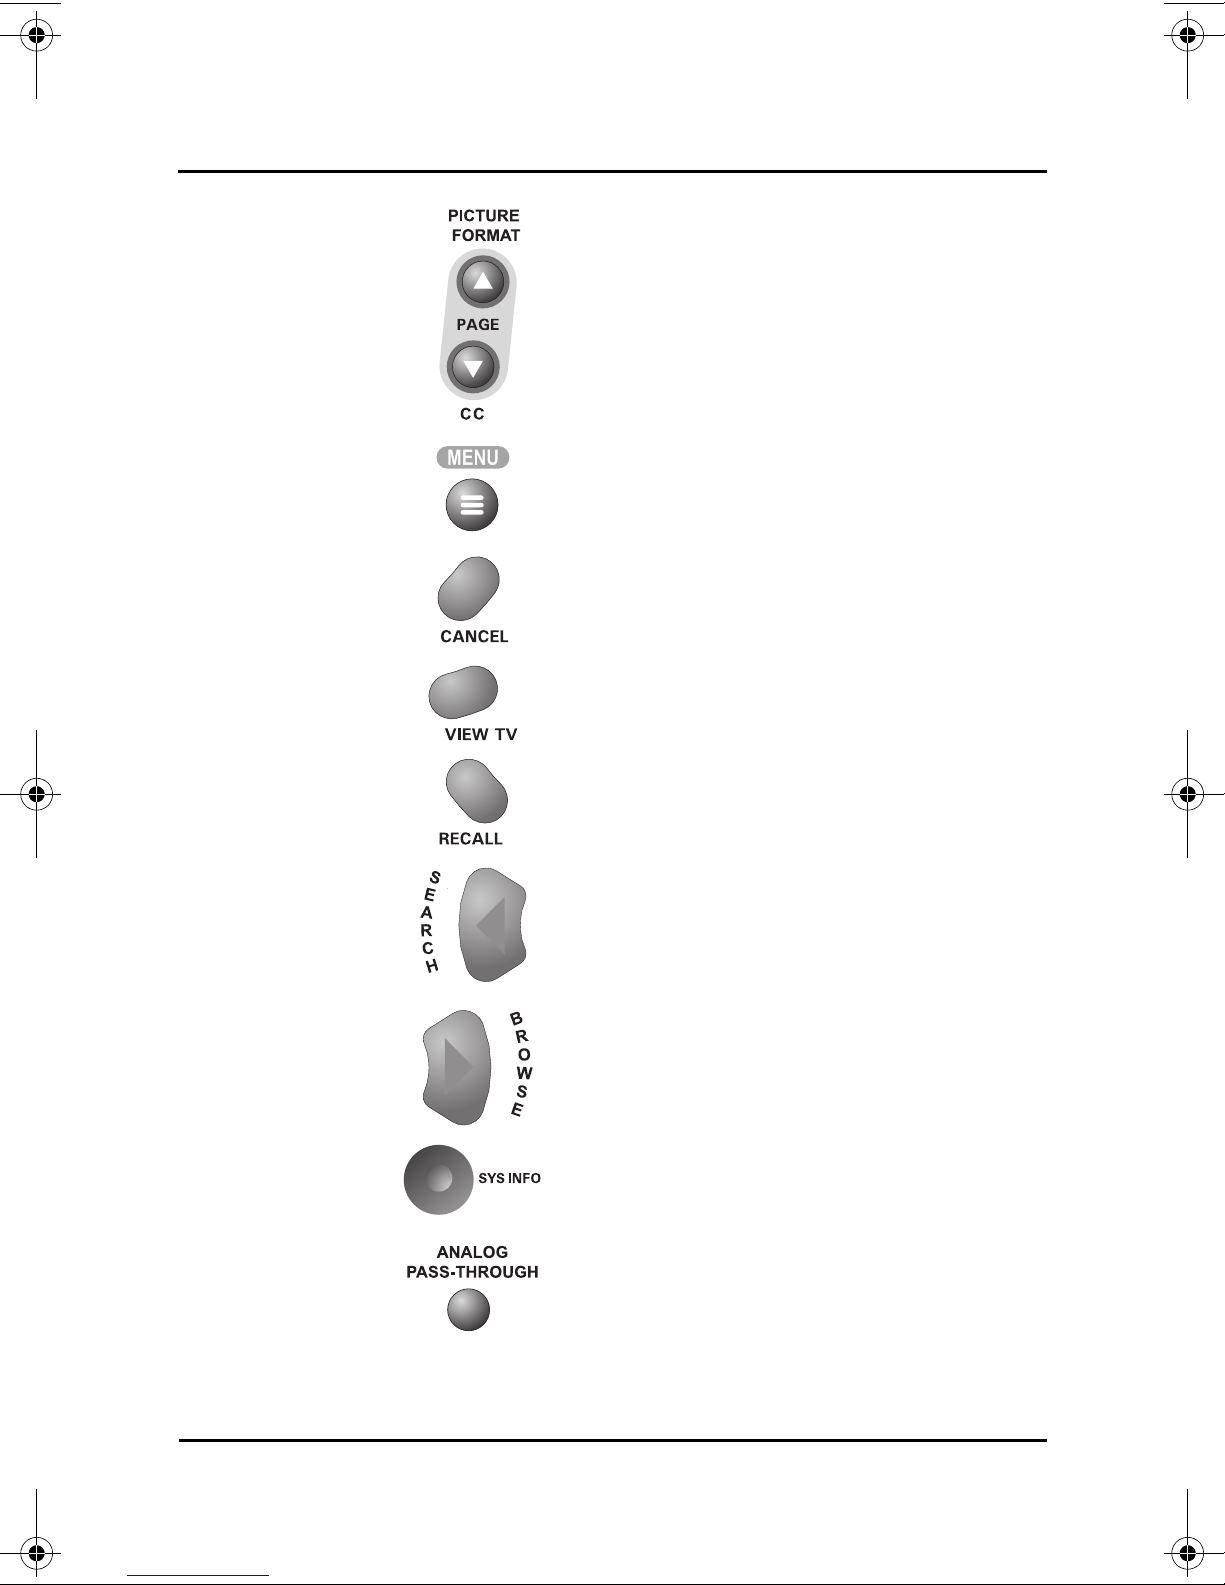
TR-40CRA CONVERTIDOR DE TV DIGITAL A ANÁLOGA
PÁGINA
ARRIBA /
ABAJO
(FORMATO DE
LA IMAGEN y
CC)
MENU MENÚ. Abre el menú principal del TR-40CRA
CANCEL CANCELAR. Le permite salir del menú sin
VER TV VER TV. Cierra cualquier menú y lo lleva a ver
RECALL RECALL. Lo lleva de vuelta al canal anterior.
PÁGINA ARRIBA / ABAJO (FORMATO DE LA
IMAGEN y CC) En el momento de estar en la
guía de programación y en otros menús, estos
botones cambian su posición una pantalla a la
vez. Si son presionados mientras ve TV, ajust a el
formato o enciende y apaga los subtítulos.
convertidor.
guardar ningún cambio.
TV.
BUSCAR BÚSQUEDA (SEARCH). Abre el menú de
búsqueda de eventos en la pantalla. Para más
información vaya a la página 11.
ESCOGER ESCOGER (BROWSE). Presenta el recuadro
para que usted elija una opción, permitiéndole
que usted vea que hay en los otros canales.
Para más información vaya a la página 11.
SYS INFO INFORMACIÓN DEL SISTEMA. Abre la p antalla
con información del sistema la cual provee
detalles técnicos sobre el TR-40CRA.
PASAR A
ANÁLOGO
PASAR A ANÁLOGO (ANALOG PASSTHROUGH). Le facilita pasar de la señal
análoga y usar el receptor del TV para ver
canales de baja potencia.
Página 7
Page 66
TR-40CRA CONVERTIDOR DE TV DIGITAL A ANÁLOGA
NOTAS
NOTAS
Página 8
Page 67
TR-40CRA CONVERTIDOR DE TV DIGITAL A ANÁLOGA
Menú principal del TR-40CRA
Menús y Funciónes
CAPITULO 3
USANDO LOS MENÚS
USANDO LOS MENÚS
Abriendo los Menús
• Presione el botón menú, en su control remoto, para abrir el menú
principal de su TR-40CRA convertidor. Usted tendrá acceso a
todos los otros menús desde el menú principal.
• Mientras ve TV, algunos botones le proveen acceso más rápido a otros
menús del TR-40CRA.
– GUÍA (GUIDE), abre la guía de programación.
– BÚSQUEDA, lo lleva a la pantalla para buscar sucesos.
– ESCOGER (Browse), abre el recuadro para escoger opciones.
Navegando por los menús y las opciones de selección
• Use los botones de flechas para que la opción deseada se ilumine (tomará
un color naranja, en la guía de programación, el color es azul).
• Para seleccionar la opción iluminada, presione el botón SELECCIONAR.
• Sí la opción posee un numero en ella, usted puede seleccionarla
apretando las teclas numerales de su control remoto.
Página 9
Page 68

TR-40CRA CONVERTIDOR DE TV DIGITAL A ANÁLOGA
GUÍA DE PROGRAMACIÓN
Cerrando los menús
Hay varias formas de cerrar los menús en pantalla.
• Seleccione
• Presione
cambios guardar los cambio.
• Presione
• Los menús se cierran automáticamente después de varios minutos de inactividad.
TERMINAR para guardar los cambios que hizo en el menú.
CANCELAR (o seleccione cancelar) para salir del menú sin guardar los
VER TV para salir del menú y volver a la programación.
VIENDO TV
Presione los botones de flechas para ver los canales disponibles, uno a la vez. Si usted
sabe el número del canal use las teclas con números en su control remoto.
Para cambiar a un sub-canal presione el “0” antes de ingresar el número del canal. Por
ejemplo, para cambiar al canal 9-2, ingrese el “0092” en las teclas numerales. Vea la
página 4 para una explicación de los sub-canales. Presione la tecla INFO mientras ve TV
y obtener más información del programa.
Nota: Para ver los subtítulos, usted debe tener los subtítulos en su TR-40CRA
convertidor activos (presione la tecla CC de su control remoto, para más información
vaya a la página 18), o puede activar la opción a través de su TV.
ENCONTRANDO PROGRAMAS
Encontrando programas usando la guía de
programación
La guía de programación presenta el
listado de canales y programas que
hay disponibles. La parte posterior de
la guía presenta el día, hora, tiempo
de duración y titulo de lo que este
sobresaltado.
Nota: La guía de programación es
provista por los canales mismos que
transmiten la señal. La cantidad de información varía por cada canal.
• Use los botones con flechas para navegar por la guía.
• Use los botones PAGE UP o PAGE DOWN para navegar por la guía una pantalla a
la vez.
• Presione
programa por venir para programar un recordatorio de evento.
• Presione INFO para ver información adicional sobre el programa resaltado.
• Use las teclas numerales para ver rápidamente un canal específico.
• Salga de la guía de programación presionando el botón VIEW TV o CANCELAR.
SELECT en el programa resaltado para verlo. Presione SELECT en un
Página 10
Page 69
TR-40CRA CONVERTIDOR DE TV DIGITAL A ANÁLOGA
RECUADRO PARA REVISAR
BUSCADO DE EVENTOS
Encontrar programas por medio de la opción para
revisar
Usted puede ver que hay en otros
canales sin necesidad de la guía de
canales, usted puede abrir el
recuadro de escoger.
Presione el botón BROWSE en su
control remoto (en este momento)
Usted podrá ver la programación
actual y por venir al pie de la
pantalla. La información del
programa que usted está viendo
aparece en la parte superior de la
pantalla.
Para ver que hay en otros canales presione las flechas ARRIBA y ABAJO mientras el
recuadro para revisar se encuentra abierto.
Encontrando programas usando la búsqueda de eventos
La opción de búsqueda de sucesos le
permite buscar programación por
nombre específico o descripción.
Abra el buscador de eventos
presionando SEARCH (flecha
izquierda), o presionando MENU, y
luego seleccionando búsqueda de
evento.
Buscar. Le permite encontrar
•
el programa por nombre
descripción en el teclado de la
pantalla.
Historia. Le muestra las búsquedas anteriores que haya guardado.
•
Opciones. Le permite mesorar su búsqueda por titulo, descripción o ambos.
•
Guardar. Le permite guardar las búsquedas, y así usar las mismas palabras para
•
futuras ocasiones.
• Seleccione
.
terminar, para salir una vez que haya terminado con su búsqueda
USANDO EL PROGRAMADOR DE SUCESOS
Usted puede crear un suceso que cambia el canal a una hora determinada.
Página 11
Page 70
TR-40CRA CONVERTIDOR DE TV DIGITAL A ANÁLOGA
Lista de eventos
Pantalla de creació n de eventos
Ventana recordatoria
Creando un suceso
1 Seleccione el programa que
viene en la guía de
programación, en el
recuadro para escoger , o en
los resultados de búsqueda
de eventos. T ambien puede
crear un suceso por medio
del menú de eventos,
presionando el botón de
MENÚ, seleccione configurar y luego sucesos.
Nota: Usted puede eliminar eventos ya existentes seleccionándolos en la
lista de eventos, y luego presionando eliminar.
2 Para nuevos sucesos,
seleccione crear. Para
editar un suceso ya
existente, selecciónelo de la
lista, y luego escoja editar.
3 Escoja que tan seguido
desea que el evento ocurra.
Elija una vez si el evento
sólo pasará una vez (esta es
la opción predeterminada
del guía); diario, si el
programa es transmitido todos los días; semanal, si el programa ocurre
cada semana o de lunes a viernes si el programa pasa de lunes a
viernes.
4 Seleccione el canal al que usted desea que cambie cuando el evento
ocurra, y luego escoja siguiente.
5 Escoja la hora y el día cuando desea que pase. Seleccione Terminar para
crear el evento.
Cuando el suceso ocurre
Algúnos minutos antes de que ocurra el suceso, una
ventana emergerá para recordarle. Sí usted presiona
SELECT en la ventana emergente, un icono aparecerá
para cerrar esta ventana (el suceso aún así ocurrirá),
seleccione
instante, o seleccione
suceso.
ver para cambiar al programa en ese mismo
parar el suceso, e; cual ignorará el
Página 12
Page 71
TR-40CRA CONVERTIDOR DE TV DIGITAL A ANÁLOGA
Menú de configuración
Personalizando su TR-40CRA
CAPITULO 4
Configuración que se ajusta a sus necesidades
PERSONALIZANDO SU TR-40CRA
Hay varias opciones para personalizar su TR-40CRA convertidor, este capitulo
lo llevará a través de cómo hacer que su TR-40CRA se acoja a sus
necesidades.
Menú de configuración
Entre al menú de configuración
(SETUP) presionando la tecla
MENÚ en su control remoto y
luego seleccionando
configuración en el m en ú
principal de su TR-40CRA
convertidor .
El menú de configuración
(SETUP) incluye las siguientes
opciones:
• Seguros—Los cuales
evitan que los Canals sean visitos, de acuerdo con la configuración que
usted elija. Para más información vaya a la página 1 4.
• Configuración del sistema—Incluye menús adicionales para su receptor .
V ea más información en la página 16.
• Configuración de audio—Le ayuda a escoger el lenguaje y el tipo de
audio (mono o estereo) para sus conexiones compuestas (tipo RCA).
• Sucesos—Le permite programar eventos. Para más información vaya a la
página 11.
• Subtítulos (Closed Captions)—Le permite que su TR-40CRA convertidor
presente subtítulos. Para más infomación vaya a la página 18.
Página 13
Page 72
TR-40CRA CONVERTIDOR DE TV DIGITAL A ANÁLOGA
Menús de seguros
Opciones de canales
SEGUROS / BLOQUEOS
Los seguros le permiten bloquear canales y programas por medio de contraseñas.
Para obtener acceso al menú de
seguros presione
control remoto, seleccione configurar
(
SETUP), luego seguros (LOCKS),
y luego siga las instrucciones a
continuación. Si configura una
contraseña con anterioridad, usted
necesitará escribirla antes de
ingresar al menú de seguros. Una
vez configurado, usted necesitará
crear una contraseña y asegurar el
sistema para que los cambios
tengan efecto.
Bloqueando canales específicos
MENÚ en el
Para pedir una contraseña antes de ver el canal:
1 Seleccione las
de canal
uros.
2 Con las fechas
opciones
del menú de seg-
ARRIBA /
ABAJO encuentre los
canales que desea bloquear.
Presione
control remoto para añadir a
la lista de canales bloqueados. Un canal esta seleccionado en el momento que
tenga una caja seleccionada
junto al nombre del canal.
3 Si usted desea esconder el canal para no ser visto en la guía de programación y
otras listas, seleccione Si (
Presione terminar para guardar los cambios.
4 Siga los pasos en Asegurando el convertidor, para aplicar los bloqueos de
canales.
SELECT en el
YES) bajo la opción de esconder canales restringidos.
Bloqueando programas basándose en los Raitings
Su TR-40CRA soporta una amplia variedad de categorías y Raitings. Estos dependen en
la información incluida en el programa por el canal. Los canales pueden usar guías de
edad y contenido o las guías de la MPAA (Motion Picture Association of America).
Página 14
Page 73
TR-40CRA CONVERTIDOR DE TV DIGITAL A ANÁLOGA
Opciones de raitings
Contraseña para asegurar el sistema
• Todas las audiencias—Incluye los Raitings de ninguno, TV-G, TV-PG, TV-14,
TV-MA.
• Niños—Incluye las categorías TV-Y & TV-Y7.
• La MP AA (Motion Picture Association of America)—incluye las siguientes categorías
N/A, G, PG, PG-13, R, NC-17.
• Extendido—Incluye las categorías DIALOGO, LENGUAJE, SEXO, VIOLENCIA y
FANTASÍA VIOLENTA.
Para bloquear los programas basados en los Raitings:
1 Seleccione
Raitings del menú de seguros.
2 Para bloquear o desbloquear
todas las categorías, escoja
bloquear todo o desbloquear todo.
3 Para escoger una categoría
específica vaya a la categoría,
presione
Raiting mas alto que usted desea
ser visto sin contraseña.
4 Cualquier programa con Raiting
mas alto requerirá una contraseña. Por ejemplo, si usted elige TV-G, todos los
programas sin Raiting o TV-G podrás ser visto sin contraseña.
5 Seleccione
6 Siga los pasos para Asegurando el convertidor, y aplicar los cambios de los raitings.
Opciones de
SELECCIONAR en el
Terminar para guardar los cambios.
Asegurando el convertidor
Una vez que usted haya creado los
seguros y los bloqueos por Raitings,
usted debe asegurar el receptor para
que los cambios tomen efecto. Para
asegurar el receptor, seleccione
asegurar el sistema en el menú
de seguros.
• Si usted ya tiene una
contraseña, escríbala con los
botones numerales del control
remoto.
• Para una nueva contraseña de
escríbala también con los botones numerales y una vez hecho el TR-40CRA
convertidor le confirmará que su sistema ha sido asegurado.
Página 15
Page 74
TR-40CRA CONVERTIDOR DE TV DIGITAL A ANÁLOGA
Menú de configuración del sistema
Menú de instalación
Configuración de canal
CONFIGURACIÓN DEL
ISTEMA
S
La configuración del sistema tiene
opciones adicionales. Abra el menú
de configuración del sistema
presionando MENÚ en el control
remoto, seleccione
luego
configuración del
sistema.
Cofiguración del
sistema—Instalación
El menú de instalación contiene las opciones escogidas durante el asistente de
instalación inicial .
configurar y
• Seleccione
ayudante de
configuración para correr el
asistente de instalación, una vez
más.
• Seleccione la
configuración
del código postal si desea
hacer cambios en el código postal.
• Seleccione
para hacer cambios en su zona
horaria.
• Seleccione configuración del
la zona horaria
canal 3-4 para cambiar el canal en que se podrá ver la señal del TR-40CRA. Su
Televisor necesitará estar en ese canal para poder ver la imagen (canal 3 – 4).
Configuración del sistema—Los Canales
El menú para configurar los canales le presenta varias opciones para manejar su guía de
canales. Seleccione
• Seleccione configurar
canales
configuración del sistema.
configurar y luego configuración los canales.
del menú de
• Seleccione
encontrar
nuevos canales
nuevos canales
ingresando la información
específica de cada canal.
Página 16
y añadir
abiertos
Page 75
TR-40CRA CONVERTIDOR DE TV DIGITAL A ANÁLOGA
Pausa por inactividad
Pantalla con información sistema
Opciones predeterminadas por el fabricante
Pausa por inactividad
La pausa por inactividad apaga automáticamente su TR-40CRA convertidor, cuando no
ha sido usado por un cierto número de horas (4 como predeterminado). Se recomienda
dejar activada esta opción ya que permite al receptor hacer mantenimiento básico a si
mismo. El mantenimiento básico puede retrasar o interrumpir el recurso seguro de la
inactividad. Si se interrumpe el recurso seguro de la inactividad, la luz verde en el TR40CRA convertidor será encendida brevemente.
Para cambiar o desactivar esta
función, seleccione
inactividad del menú de
configuración del sistema.
Pausa por
• Seleccione
opción funcione o
para que deje de funcionar.
• Ajuste que tanto su TR-40CRA
convertidor debe esperar antes
de apagarse, cambiando la
configuración de
activar para que la
desactivar
inactividad.
Información del sistema
La pantalla con información del
sistema presenta información técnica
del TR-40CRA convertidor. Para
abrir la pantalla de información del
sistema presione la tecla
en su control remoto.
SYS INFO
Opciones predeterminadas por el fabricante
Use las opciones predeterminadas
por el fabricante para regresar a las
opciones con las que el TR-40CRA
llego a sus manos. Seleccione del
menú del sistema
DEFAULTS
emergente aparecerá.
Seleccione
opciones.
SI para regresar a estas
FACTORY
y una ventana
Nota: Usted necesitará buscar de nuevo sus canales abiertos (vea la página 16) antes
de volver a las opciones primarias.
Página 17
Page 76
TR-40CRA CONVERTIDOR DE TV DIGITAL A ANÁLOGA
Configuración del Audio
Configuración de los Subtítulos
Configuración de la guía de TV
Si su TV soporta la guía en pantalla y la Guía Plus, use esta opción para que su TR40CRA convertidor siga usando los listados de la Guía en pantalla y la guía Plus. Vea la
página 23 para más detalles.
CONFIGURACIÓN DEL
AUDIO
Use la opción de configuración de
audio para escoger el lenguaje y el
tipo de salida de audio.
•
Audio Lenguaje: Escoja
cual es el lenguaje
que usted desea escuchar.
Escoja audio
cual incluirá un idioma adicional
si el canal lo posee.
•
Tipo de salida: Configura que tipo de sonido tendrá la conexión de salida (para
tipo RCA). Escoja Estereo si posee un TV en Estereo, escoja Mono si su TV
solamente soporta salida monofónica. Vaya a la guía de usuario de su TV para ver
que tipo de salida posee.
principal
alternativo, el
SUBTÍTULOS
Escoja esta opción para que el
convertidor presente subtítulos,
deben estar disponibles por el canal.
•
Apagar subtítulos: Al
seleccionar esta opción, los
subtítulos dejarán de aparecer.
•
Fuente del subtítulo: Esta
opción determina que tipo de
fuente es usada por los
subtítulos.
•
Oscuridad del fondo del sub t ítu lo: Con esta opción podrá determinar que
tan oscuro es el fondo que rodea los subtítulos.
•
Colores del subtítulo: Escoja el color del fondo y de la letra del subtitulo.
Estilo de las esquinas: Esta opción le permite escoger el estilo y color de las
•
esquinas de los subtítulos.
Servicio de subtítulos: Esta opción le deja escoger que tipo de subtítulos
•
puede usar.
Regresar a los predeterminados: Regresa a los predeterminados por el
•
fabricante.
Página 18
Page 77
TR-40CRA CONVERTIDOR DE TELEVISIÓN DIGITAL A ANÁLOGA
RESOLVIENDO PROBLEMAS COMUNES
Resolviendo problemas comunes
CAPITULO 5
Solución de Problemas
RESOLVIENDO PROBLEMAS COMUNES
Si ocurre algún problema mientras usa su TR-40CRA convertidor, revise le siguiente
información. Bajo la columna de Síntoma, encuentre la descripción a su problema.
Luego, siga los Pasos para Solucionarlos..
Síntoma Pasos para Solucionar Problemas
El control
remoto
no funciona.
El TR-40CRA
convertidor no
enciende
.
1 V erifique que las baterías están instaladas de acuerdo
al diagrama del control remoto de su TR-40CRA
convertidor .
2 Cambiase baterías en el con trol remoto de su TR-
40CRA.
3 Asegúrese de apuntar el control remoto directamente
al panel frontal de su TR-40CRA convertidor. El control
remoto usa señal infrarroja para operar y debe poder
ver este panel de su sistema.
1 Asegúrese que los cordones de poder del TR-40CRA
convertidor están conectados al sistema y a al toma de
corriente.
2 Asegúrese que los cordones de poder están
conectados al adaptador del sistema.
3 Asegurese de que el control remoto del TR-40CRA
tenga baterías y presione el botón POWER del control
remoto para encenderlo.
4 Intente conectar el cable de poder a otro toma
corriente.
Página 19
Page 78
TR-40CRA CONVERTIDOR DE TELEVISIÓN DIGITAL A ANÁLOGA
RESOLVIENDO PROBLEMAS COMUNES
Síntoma Pasos para Solucionar Problemas
Usted recibe el
mensaje
“pérdida de
señal” en
alguno or todos
los canales.
1 Intente sintonizar otros canales, en algunas ocasiones
un solo canal puede estar experimentando fallas
técnicas, mientras que otros canales pueden estar
funcionando.
2 Asegúrese que el cable a la antena está bien
conectado al TV y a la antena de conejo.
3 Asegúrese que la antena de conejo esté en el lugar
adecuado para recibir señal. Sí la antena se ha movido
y no se encuentra en un lugar adecuado para recibir
señal, talvez, ésta es la razón por la cual ningún canal
tiene señal.
4 Intente apagando su TR-40CRA convertidor,
desconectarlo del toma corriente, déjelo en estado de
reposo por lo menos 15 segundos y vuelva a reiniciar.
5 Revise que la señal del canal posee la fuerza
suficiente de transmisión, para hacer esto Presione
MENÚ, seleccione Setup, System Setup, Channel
Setup y luego Add a New Channel. Busque el canal
que ha perdido y verifique que la señal tiene la fuerza
necesaria. Canales con menos de un 54% de poder
pueden perder video y/o audio.
Página 20
6 Su antena puede necesitar un ajuste. Contacte a su
distribuidor de componentes mas cercano para que lo
asiste en este proceso, si intenta hacerlo usted mismo,
vara a la página de Internet www.antennaweb.org la
cual le dará guías de como posicionar la antena.
Page 79
TR-40CRA CONVERTIDOR DE TELEVISIÓN ANÁLOGA A DIGITAL
RESOLVIENDO PROBLEMAS COMUNES
Síntoma Pasos para Solucionar Problemas
Algunos
canales locales
no están
disponibles en
mi TR-40CRA
convertidor .
La pantalla
está borrosa
o negra.
1 Su TR-40CRA convertidor sólo capta canales digitales
abiertos. Es posible que los canales que le faltan aún
estén transmitiendo analógicamente.
2 Vaya al sitio www.antennaweb.org para ver que
canales en su área están transmitiendo señal digital. Si
su canal no está listado es porque está transmitiendo
en señal análoga y usted puede ver este canal con el
sintonizador de su TV. Para ver canales análogos
presione el botón ANALOG PASS-THROUGH en el
control remoto de su TR-40CRA y cambie los canales
con el control remoto de su TV. Para voler a ver
canales digitales, recuerde regresar al canal de su TR40CRA convertidor (3 ó 4) o presione de nuevo el
botón ANALOG PASS-THROUGH.
1 Asegúrese que su TR-40CRA convertidor está
encendido, presione el botón de POWER en su control
remoto.
2 Asegúrese que su TV está en el canal correcto para
ver señal de su TR-40CRA convertidor . Sí usted ve
programación por señal coaxial sintonice los canales 3
ó 4; sí usted ve por medio de cables RCA, sintonice la
opción VIDEO en su TV.
3 Revise todas las conexiones entre el TV y el TR-
40CRA convertidor.
Página 21
Page 80
TR-40CRA CONVERTIDOR DE TELEVISIÓN DIGITAL A ANÁLOGA
RESOLVIENDO PROBLEMAS COMUNES
Síntoma Pasos para Solucionar Problemas
La calidad del
sonido es mala
o no hay
sonido.
1 Asegúrese que accidentalmente no presiono el botón
MUTE en el control remoto del TR-40CRA. Presione
los botones para subir el volumen de su control
remoto.
2 Asegúrese que no presionó accidentalmente el botón
MUTE en el control remoto de su TV, suba el volumen
con su control remoto.
3 Vaya a otros canales, en algunas ocasiones los
canales pueden estar experimentando fallas técnicas.
4 Sí está usando cables RCA (amarillo, blanco y rojo)
asegúrese que están bien conectados al TV.
5 Revise las opciones de audio de su TR-40CRA
convertidor, si usted configuró para tener audio
alternativo y el programador no lo tiene, talvez por esto
no tenga sonido. Vaya al menú de configuración
Setup, seleccione Audio Setup. Si intente asignar
otro tipo de audio, seleccione Primary para intentar
solucionar el problema.
Olvido la
contraseña de
los seguros.
1 Localice el ID del receptor presionando MENU en el
control remoto, seleccione configuración >
configuración del sistema > Información del sistema.
Escriba los 4 últimos dígitos del ID (antes del guión).
2 Para reiniciar la contraseña, presione MENU en el
control remoto, seleccione Setup, luego Locks.
Ingrese los 4 últimos dígitos de su receptor y luego
cambiar contraseña.
Página 22
Page 81
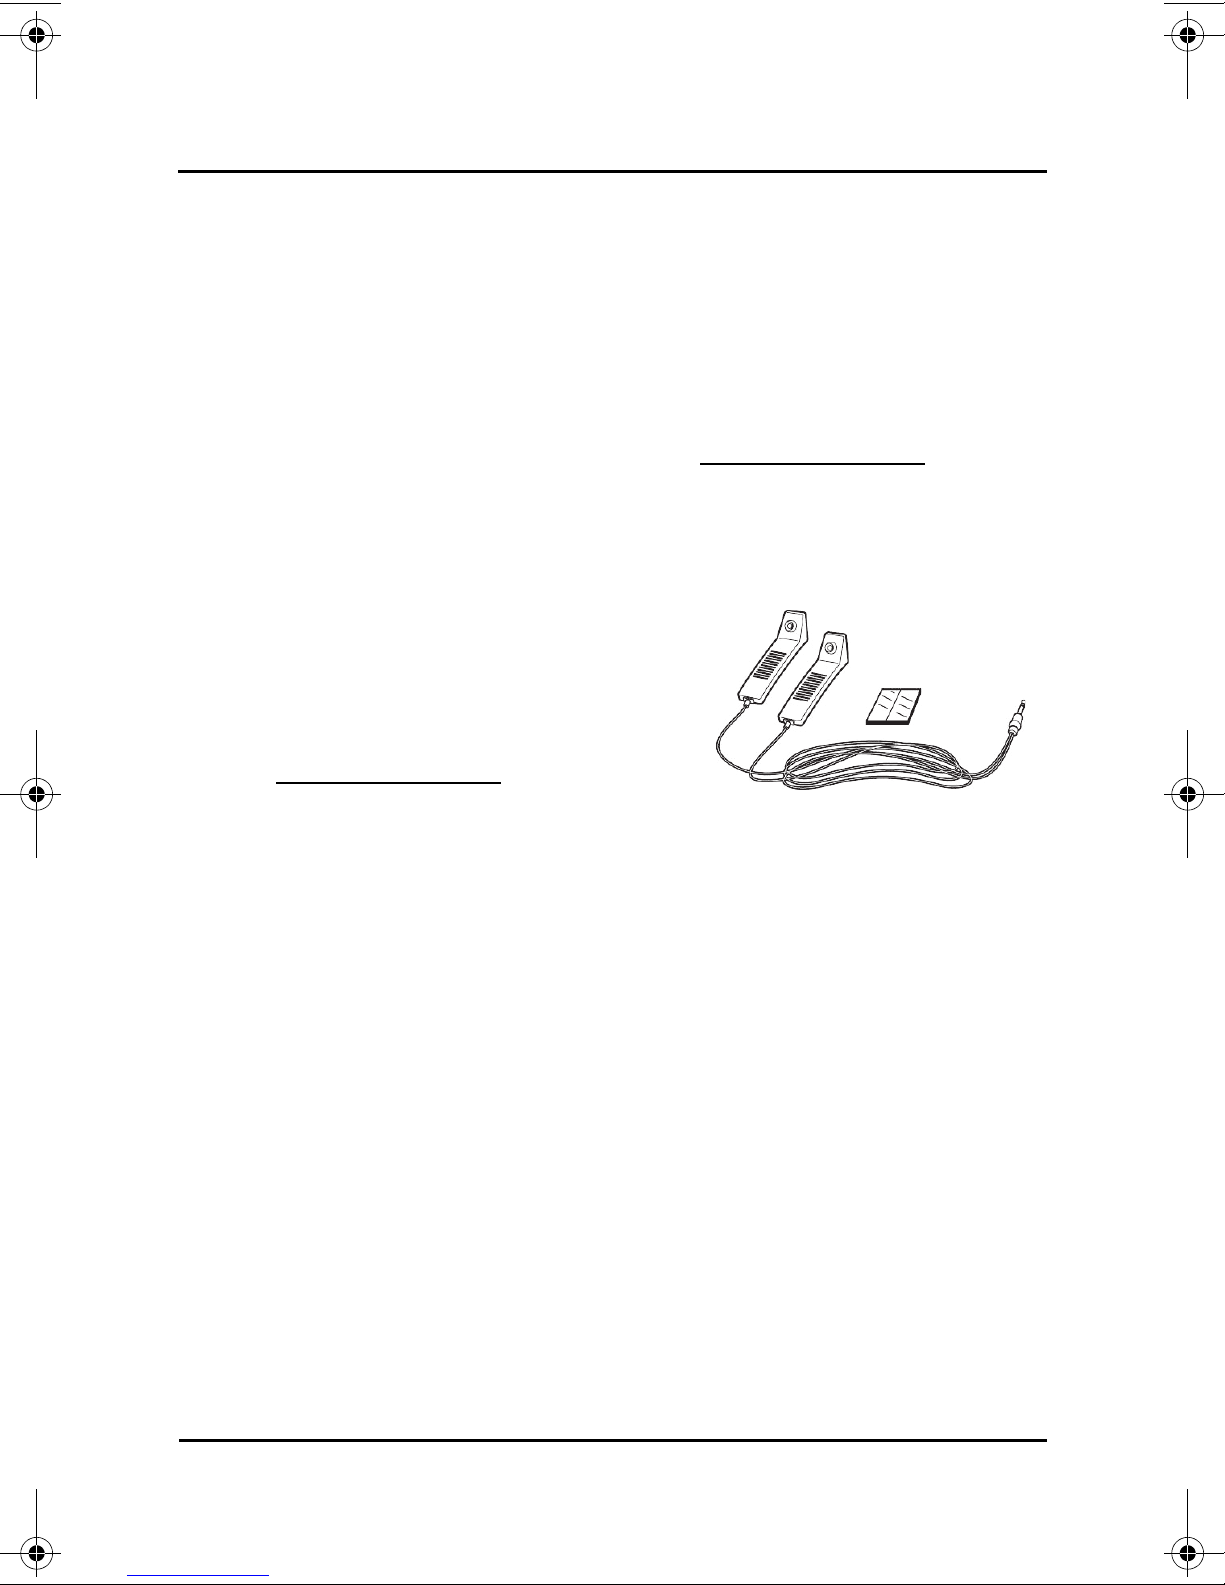
TR-40CRA CONVERTIDOR DE TELEVISIÓN ANÁLOGA A DIGITAL
CONFIGURACIÓN GUÍA DE PROGRAMACIÓN EN PANTALLA Y GUÍA PLUS
Usted sólo necesita hacer este paso si usted posee un TV, grabador de DVD o VCR que
incluya guía de programación o guía plus. Si usted no posee ninguno de estos, usted
podrá usar la guía del TR-40CRA convertidor.
CONFIGURACIÓN GUÍA DE PROGRAMACIÓN EN PANTALLA Y
UÍA PLUS
G
Sí usted actualmente posee la guía en pantalla o guía plus en su TV análogo, grabador
de DVD o VCR para la señal abierta (No incluye cable o satélite) usted necesitará hacer
cambios a su guía de programación o guía plus. Los siguientes pasos lo ayudarán a
hacer dichos cambios, para más información vaya a www.tvgos.com/support
Comenzando
Para que su Guia de programación en pantalla se comunique con su TR-40CRA
convertidor, usted necesitará:
–
Cable G-LINK—este cable es necesario
para continuarrecibiendo los listados en la
guía en pantalla.
Este cable debió haberse empacado con el
producto que usted posee (TV, grabador
DVD, VCR). Si usted no lo tiene visite
www.tvgos.com/support
.
.
–
Sustituto del código postal—usted
necesitará un número de 5 dígitos asociado con su área de recepción. Durante la
configuración, usted ingresará el código sustituto en vez del código postal. Estos
códigos se encuentran en la página 28.
Configurando Su TR-40CRA
1 Conecte su TR-40CRA convertidor siguiendo las instrucciones del a página 2. Usted
debió haber conectado las salidas de audio/video a las correspondientes entradas
en su TV de guía plus, grabador de DVD o VCR.
Página 23
Page 82
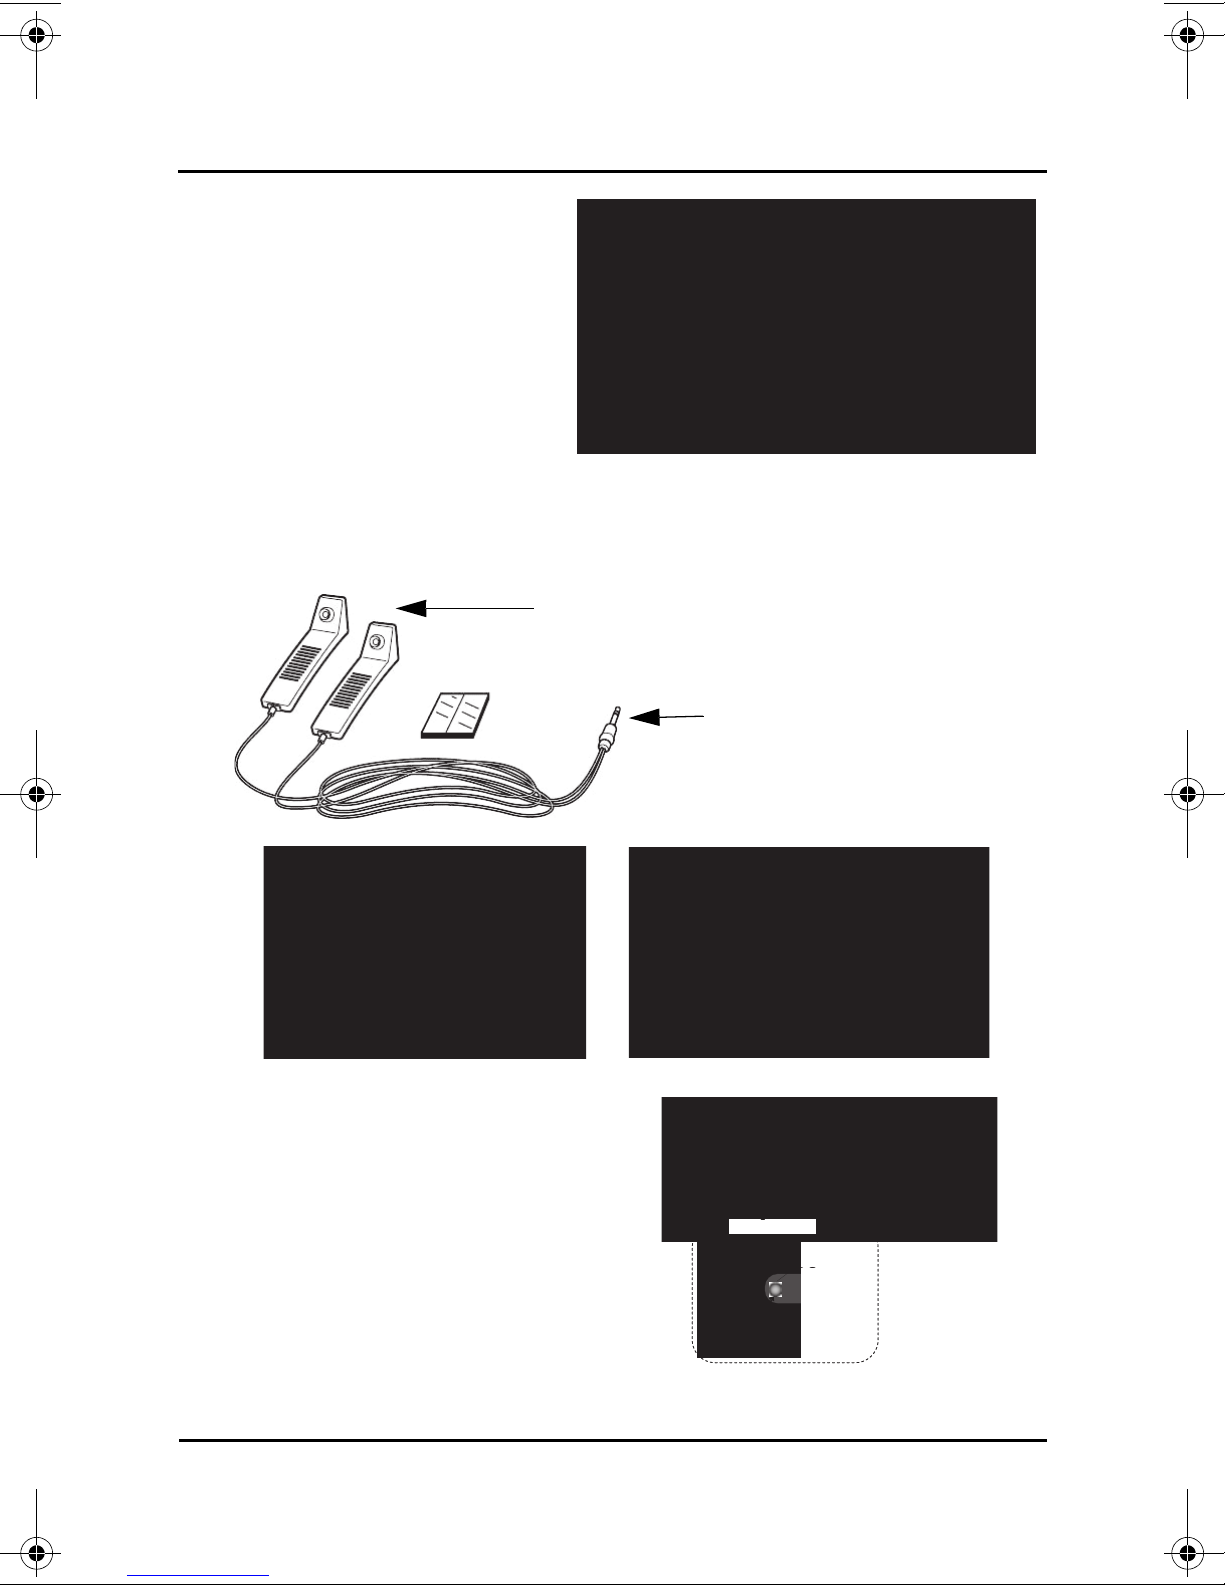
TR-40CRA CONVERTIDOR DE TELEVISIÓN DIGITAL A ANÁLOGA
Configuración Guía de TV y Guía Plus
Bastoncillos G-LINK
Conexión para aparatos
activos con guía
CONFIGURACIÓN GUÍA DE PROGRAMACIÓN EN PANTALLA Y GUÍA PLUS
2 Usando el control remoto
presione
Setup, luego System
Setup, TV Guide Setup y
luego
MENU, seleccione
TV Guide & Guide +,.
Conectando el Cable G-LINK
1 Conecte el cable al dorso del TV, grabador de DVD o VCR
2 Coloque el aparato G-LINK
aproximadamente una pulgada cerca
del sensor del control remoto del TR40CRA convertidor, use cinta para
asegurar el bastoncillo al panel frontal
del TR-40CRA convertidor.
Nota: El sensor del control remoto está
localizado en el medio del panel frontal.
Página 24
G-
LINK Wand
1 inch
1 inch
IR Sensor
IR Sensor
G-
G-
LINK Wand
LINK Wand
Page 83
TR-40CRA CONVERTIDOR DE TELEVISIÓN ANÁLOGA A DIGITAL
CONFIGURACIÓN GUÍA DE PROGRAMACIÓN EN PANTALLA Y GUÍA PLUS
Actualizando la Configuración de la Guía en Pantalla
Después de haber conectado su TR-40CRA convertidor al aparato con capacidad de
Guía en Pantalla y Guía Plus, siga los siguientes pasos para terminar.
Nota: El menú en pantalla puede ser distinto al descrito a continuación
1 Usando el control remoto para su aparato con capacidad de guía en pantalla,
presione GUIDE, para abrir la pantalla con listados.
2 En la barra de servicio, seleccione
Setup, luego Change System Settings.
3 Si está disponible, presione
pantalla.
No, repeat setup. De otro modo siga los pasos en
Ingresando Su Locación
La guía usa información provista por los canales en su área, para llenar el listado.
1 Seleccione
2 Use las teclas numerales del control remoto y las flechas ARRIBA/ABAJO para
ingresar el código sustituto de su área. Mas información en la página 28.
USA como país.
Configurando Su TR-40CRA
Para que la guía se comunique con su TR-40CRA convertidor, la guía debe estar
conectada a través de la caja del TR-40CRA. Aún sin tener servicio de cable. Siga los
siguientes pasos.
1 Selecciones
2 Si se pregunta, seleccione el tipo de audio/video al cual está conectado el TR-
40CRA convertidor al aparato con capacidad de Guía en pantalla, siga los pasos
que aparecen en pantalla.
3 Cuando aparezca el diagrama de conexión, asegúrese que el cable G-LINK esté
conectado.
4 Para la caja de fabricante seleccione
5 Siga las instrucciones en pantalla y verifique el TR-40CRA convertidor haya
cambiado los canales.
6 Cuando le pregunte por el canal 9, responda
Cable with a Cable Box o Yes I have cable.
Scientific Atlanta.
Yes.
7 En la pantalla de confirmación, seleccione
process.
para hacerlo.
Si le preguntar por la configuración del VCR, siga los pasos apropiados
Y e s , co ntinue/finish setup
Página 25
Page 84
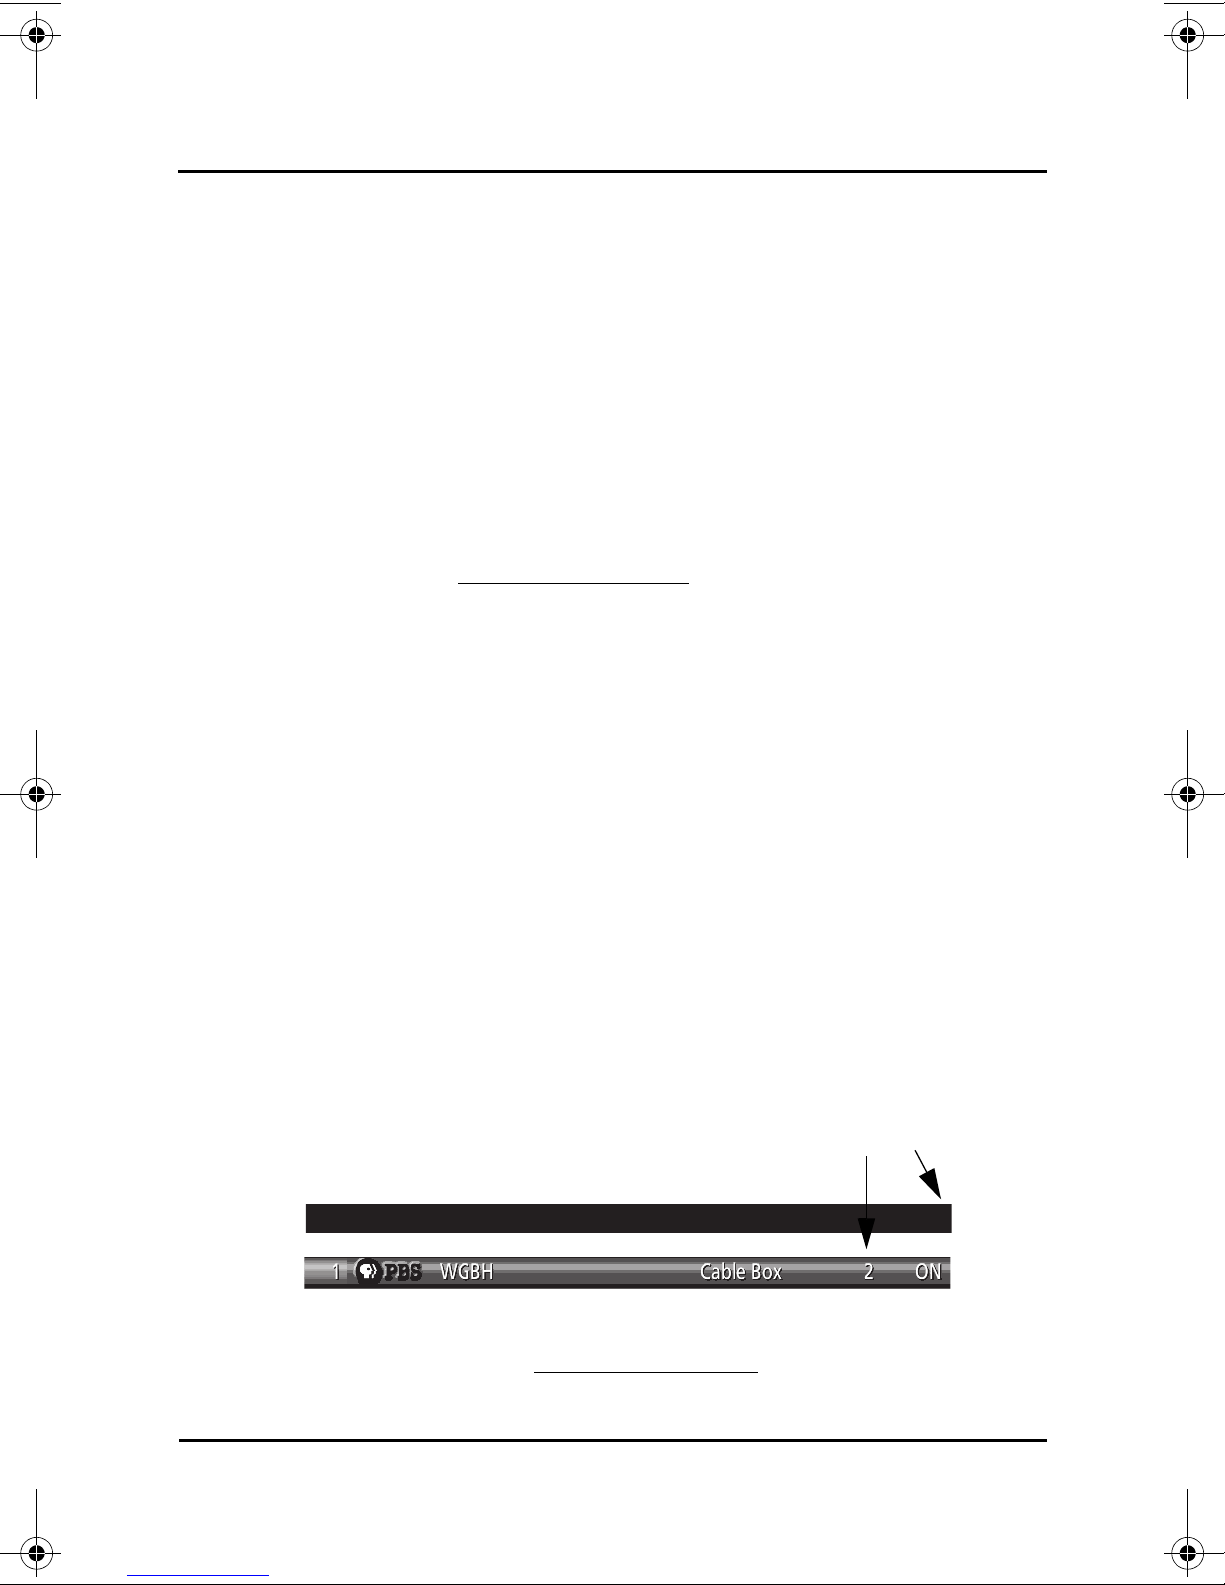
TR-40CRA CONVERTIDOR DE TELEVISIÓN DIGITAL A ANÁLOGA
Número de Canal
CONFIGURACIÓN GUÍA DE PROGRAMACIÓN EN PANTALLA Y GUÍA PLUS
Completando la Configuración
– Una vez que la configuración haya terminado, salga de la pantalla de
configuración de la guía. Para recibir los listados, asegúrese de apagar el
activador de guía cuando no este en uso.
– Dentro de 24 horas, usted comenzará a recibir los listados de programación.
Puede tomar hasta 6 días en recibir los 8 días de programación inicial.
– Los listados son actualizados varias veces al día. Asegúrese de que su TR-
40CRA convertidor esté conectado para recibir duchos listados. Es normal que su
TR-40CRA convertidor cambie canales cuando el activador de la guía esté
apagado y se esté configurando o recibiendo nueva información.
Nota: Cuando usted recibe su nueva guía de listados, notará que los números
de canales han cambiado. Vaya a Sintonizando los Nuevos Números de Canales
mas abajo, o visite www.tvgos.com/support
para más información
Sintonizando los Nuevos Número de Canales
Después de conectar la guía de TV o su grabador de DVD a su TR-40CRA convertidor o
VCR, el número de canal usado en su guía cambiará.
Comprendiendo los Nuevos Números de Canales
Su TV análoga, grabador de DVD o VCR no sabe cómo sintonizar los canales digitales.
Los números de canales asignados en la alineación, le permiten al TR-40CRA
convertidor encontrar el canal digital correcto.
Encontrando Nuevos Canales
En cualquier versión de la guía de canales, usted podrá identi_car el número del
canal por medio del editor de canales.
1 En la barra de servicio, seleccione
control remoto, y luego seleccione
2 El editor de canal se vera. Note el número de la guía de canales para cada canal.
Listings. Presione MENU en la guía activa del
Edit Channel.
Nota: Usted necesita el número de canal para ir al canal específico en la pantalla
de listados p en el caso de que usted quiera programar un recordatorio o grabar.
Para más información vaya a www.tvgos.com/support
Página 26
Page 85
TR-40CRA CONVERTIDOR DE TELEVISIÓN ANÁLOGA A DIGITAL
Número de Canal y Logo
CONFIGURACIÓN GUÍA DE PROGRAMACIÓN EN PANTALLA Y GUÍA PLUS
Mostrando los Números de Canales en Forma de Listados
La versión de su guía talvez o tal vez no pueda mostrar los números de canales
listados en una tabla.
Para determinar si es posible mostrar los números de los canales:
1 Resalte el listado (o algún logo de canal), luego presione MENU en la guía activa
del control remoto.
2 Las Listings Options (o Channel Options) aparecen
aparece, usted puede presionar las flechas de IZQUIERDA o DERECHA para
seleccionar la opción a mostrar:
–
Both— muestra tanto el logo del canal como el
número.
en el menú. Sí Channel ID
–
Logo— muestra el logo del canal.
– Number— muestra el número del canal.
Página 27
Page 86
TR-40CRA CONVERTIDOR DE TELEVISIÓN ANÁLOGA A DIGITAL
CONFIGURACIÓN GUÍA DE PROGRAMACIÓN EN PANTALLA Y GUÍA PLUS
Sustituto de los Códigos Postales
Localice la área de transmisión más cercana. Asocie el código postal sustituto con el área y su
código postal en el momento de configurar su guía de TV en pantalla y la Guía Plus.
Estado
AK Anchorage 00218
AK Fairbanks 00224
AK Juneau 00223
AK Sitka 00211
AL Anniston 00195
AL Birmingham 00050
AL Dothan 00165
AL Dothan 00207
AL Huntsville-Decatur-Florence 00081
AL Mobile-Pensacola-Ft Walt 00058
AL Montgomery-Selma 00111
AL Phenix City 00219
AL Tuscaloosa 00186
AR
AR Jonesboro 00177
AR Little Rock-Pine Bluff 00056
AZ Phoenix 00021
AZ Tucson-Sierra Vista 00079
AZ Yuma-El Centro 00178
CA Bakersfield 00130
CA Chico-Redding 00125
CA El Centro 00192
CA Eureka 00187
CA Fresno-Visalia 00057
CA Los Angeles 00002
CA Palm Springs 00162
CA Sacramento-Stockton-Modesto 00019
CA Salinas-Monterey 00103
CA San Diego 00024
CA San Francisco-Oakland-San Jose 00005
CA
CO Colorado Springs-Pueblo 00097
Área de transmisió n
Ft. Smith-Fayetteville-SpringdaleRogers
Santa Barbara-Santa Maria-San
Luis Obispo
Código
Postal
00117
00112
Estado
CO Denver 00020
CO Grand Junction-Montrose 00188
CT Hartford-New Haven 00025
DC Washington 00007
FL Ft. Myers-Naples 00087
FL Gainesville 00166
FL Jacksonville 00054
FL Miami-Fort Lauderdale 00015
FL Orlando-Daytona Beach-Melbourne 00023
FL Panama City 00164
FL Tallahassee-Thomasville 00115
FL Tampa-St. Petersburg-Sarasota 00016
FL West Palm Beach-Ft. Pierce 00046
GA Albany 00154
GA Atlanta 00011
GA Augusta 00110
GA Columbus 00122
GA Macon 00119
GA Savannah 00101
HI Honolulu 00210
IA
IA Des Moines-Ames 00068
IA Ottumwa-Kirksville 00200
IA Sioux City 00140
ID Boise 00132
ID Idaho Falls-Pocatello 00158
ID Twin Falls 00201
IL Champaign-Springfield-Decatur 00075
IL Chicago 00003
IL Davenport-Rock Island-Moline 00084
IL Marshall-Robinson 00217
IL Peoria-Bloomington 00107
IL Quincy-Hannibal-Keokuk 00159
Área de transmisión
Cedar Rapids-Waterloo-Iowa CityDubuque
Código
Postal
00082
Página 28
Page 87
TR-40CRA CONVERTIDOR DE TELEVISIÓN DIGITAL A ANÁLOGA
CONFIGURACIÓN GUÍA DE PROGRAMACIÓN EN PANTALLA Y GUÍA PLUS
Estado
IL Rockford 00134
IN Evansville (no DST) 00215
IN Evansville (with DST) 00094
IN Ft. Wayne 00102
IN Indianapolis 00026
IN Scottsburg-Madison 00213
IN South Bend-Elkhart 00083
IN Terre Haute 00138
KS Topeka 00139
KS Wichita-Hutchinson 00062
KY Bowling Green 00181
KY Lexington 00070
KY Louisville 00047
LA Alexandria 00169
LA Baton Rouge 00095
LA Lafayette 00120
LA Lake Charles 00174
LA Monroe-El Dorado 00131
LA New Orleans 00039
LA Shreveport 00071
MA Boston-Manchester 00006
MA Springfield-Holyoke 00098
MD Baltimore 00022
MD Salisbury 00163
ME Bangor 00155
ME Portland-Auburn 00076
ME Presque Isle 00205
MI Detroit 00009
MI Flint-Saginaw-Bay City 00060
MI
MI Ironwood 00222
MI Lansing 00105
MI Marquette-Escanaba 00175
MI Traverse City-Cadillac 00121
MN Duluth-Superior 00126
MN Minneapo lis-St. Paul 00014
MN Rochester-Mason City 00148
MO Columbia-Jefferson City 00151
Área de transmisió n
Grand Rapids-Kalamazoo-Battle
Creek
Código
Postal
00037
Estado
MO Joplin-Pittsburg 00146
MO Kansas City 00029
MO
MO Springfield 00080
MO St. Joseph 00193
MO St. Louis 00018
MS Biloxi-Gulfport-Pascagoula 00180
MS Columbus-Tupelo-West Point 00127
MS Greenwood-Greenville 00179
MS Hattiesburg-Laurel 00167
MS Jackson 00088
MS Meridian 00183
MT Billings 00171
MT Butte-Bozeman 00189
MT Glendive 00221
MT Great Falls 00182
MT Missoula 00176
NC Charlotte 00030
NC
NC Greenville-New Bern-Washington 00104
NC Raleigh-Durham-Fayetteville 00032
NC Wilmington 00143
ND Fargo-Valley City 00109
ND Minot-Bismarck-Dickinson-Williston 00152
NE Lincoln-Hastings-Kearney 00099
NE Omaha 00073
NM Albuquerque-Santa Fe 00048
NM Clovis 00220
NV Las Vegas 00074
NV Reno 00118
NY Albany-Schenectady-Troy 00053
NY Binghamton 00135
NY Buffalo 00038
NY Elmira 00172
NY New York 00001
NY Rochester 00069
NY Syracuse 00067
Área de transmisión
Paducah-Cape GirardeauHarrisonburg
Greensboro-High Point-Winston
Salem
Código
Postal
00077
00049
Página 29
Page 88
TR-40CRA CONVERTIDOR DE TELEVISIÓN ANÁLOGA A DIGITAL
CONFIGURACIÓN GUÍA DE PROGRAMACIÓN EN PANTALLA Y GUÍA PLUS
Estado
NY Utica 00161
NY Watertown 00170
OH Cincinnati 00031
OH Cleveland-Akron-Canton 00012
OH Columbus 00034
OH Dayton 00052
OH Toledo 00064
OH Youngstown 00092
OK Oklahoma City 00043
OK Tulsa 00059
OR Bend 00202
OR Eugene 00116
OR Medford-Klamath Falls 00145
OR Portland 00027
PA Erie 00142
PA Harrisburg-Lancaster-Lebanon-York 00044
PA Johnstown-Altoona 00089
PA Philadelphia 00004
PA Pittsburgh 00017
PA Wilkes Barre-Scranton 00051
RI Providence 00045
SC Charleston 00106
SC Columbia 00086
SC Florence-Myrtle Beach 00136
SC
SD Rapid City 00168
SD Sioux Falls-Mitchell 00108
TN Chattanooga (CT) 00208
TN Chattanooga (ET) 00085
TN Jackson 00185
TN Knoxville 00063
TN Memphis 00042
TN Nashville 00033
TN Tri-Cities Tn-Va 00091
TX Abilene-Sweetwater 00157
TX Amarillo 00129
TX Austin 00065
TX Beaumont-Port Arthur 00137
Área de transmisió n
Greenville-Spartanburg-AshevilleAnderson
Código
Postal
00035
Estado
TX Corpus Christi 00123
TX Dallas-Ft. Worth 00008
TX El Paso 00100
TX Houston 00010
TX Laredo 00198
TX Lubbock 00149
TX
TX Odessa-Midland 00150
TX San Antonio 00036
TX Sherman-Ada 00156
TX
TX Waco-Temple-Bryan 00096
TX Wichita Falls 00141
UT Salt Lake City 00041
VA Charlottesville 00197
VA Harrisonburg 00173
VA Norfolk-Portsmouth-Newport News 00040
VA Richmond-Petersburg 00061
VA Roanoke-Lynchburg 00066
VT Burlngton-Plattsburg 00093
WA Seattle-Tacoma 00013
WA Spokane 00078
WA Yakima-Pasco-Richland-Kennewick 00124
WI Green Bay-Appleton 00072
WI La Crosse-Eau Claire 00128
WI Madison 00090
WI Milwaukee 00028
WI Wausau-Rhinelander 00133
WV Bluefield-Beckley-Oak Hill 00147
WV Charleston-Huntington 00055
WV Clarksburg-Weston 00160
WV Wheeling 00144
WY Casper-Riverton 00194
WY Cheyenne-Scottsbluf 00196
Área de transmisión
McAllen-Harlingen-WeslacoBrownsville
Tyler-Longview-LufkinNacogdoches
Código
Postal
00113
00114
Página 30
Page 89
TR-40CRA CONVERTIDOR DE TV DIGITAL A ANÁLOGA
Apéndice
APÉNDICE A
Garantía y Cumplimiento FCC
GARANTÍA LIMITADA
Esta Garantía Limitada es un documento legal. Manténgala en un lugar
seguro. ¡Recuerde de guardar su recibo de compra para recib ir el servi ci o
de garantía! Los elementos que regresen sin una copia del comprobante
de compra se conside rarán fuera de garantía.
Lo que cubre la garantía
GARANTÍA LIMITADA
Esta garantía se extiende sólo al primer usuario del equipo y se limita al precio de
compra de cada parte. La Corporacion DISH Network y sus compañías afiliadas
("DISH Network") garantizan este sistema en con tra de defectos en materia les o mano
de obra de la siguiente manera:
• Trabajo: Durante un período de 90 días a partir de la fecha de compra origina l,
en caso de DISH Network determine que el equipo está defectuoso sujeto a las
limitaciones de esta garantía, se reemplazará el equipo sin cargo alguno por el
trabajo de partes. DISH Network garantiza de cualquier trabajo de este tipo realizado contra defectos de materiales o mano de obra por la parte restante del
período de garantía original.
• Las piezas: Durante un período de 90 días a partir de la fecha de compra origi-
nal, DISH Network le proveerá, sin costo alguno, las partes nuevas o remanufacturadas a cambio de partes defectuosas que se determinará con sujeción a las
limitaciones de est a garantía. DISH Network justifica cualquier sustitució n de piezas contra defectos de materiales o mano de obra para la parte restante del
período de garantía original.
Nota: "las partes", se refiere a artículos incluidos en este paquete, que puede
incluir el convertidor de TV y control remoto. No incluye otras partes y pueden
adquirirse por separado.
Lo que la garantía no cubre
• Esta garantía no cubre la instalación del sistema. Si procede, la instalación de
este tipo se justifica en virtud de un acuerdo de instalación.
• Esta garantía no cubre las instrucción del consumidor, la configuración física o
ajuste de cualquier dispositivo electrónico de consumo, baterías control remoto,
problemas de recepción de señal, la pérdida de uso del sistema, o cargos por
programación no utilizada debido al mal funcionamiento del sistema.
• Esta garantía no cubre daños cosméticos, daños ocasionados por rayos, descargas eléctricas o de la línea telefónica, fuga de la batería, in cendios, inundaci ones,
u otros actos de desastre natural, accidente, mal uso, abuso, la reparación o
Página 31
Page 90
TR-40CRA CONVERTIDOR DE TV DIGITAL A ANÁLOGA
GARANTÍA LIMITADA
modificación que no sea autorizada por el servic io de fábrica, el uso de accesorios no recomendados por el fabricante del convertido r de TV, negligencia, uso
comercial o institucional, o mantenimiento inadecuado o descuidado.
• Esta garantía no cubre los e qui pos v endi dos COMO ESTAN o CON TODAS LAS
FALLAS, el envío y la manipulación, traslado o reinstalación, daño durante el
envío si el equipo no fue empacado y expedido en la forma prescri ta , ni el equipo
adquirido, servido u operado fuera de la parte continental de los Unidos Estados
de América.
Si Necesita Asistencia
1 Llame al número de atención al cliente al 1-888-667-0633 o visite nuestro sitio
web www.DTVPal.com
de su receptor a la mano. Presione el botón SISTEMA DE INFORMACIÓN en el
control remoto para mostrar el número de identificación de receptor.
2 Un representante del servicio de atención al cliente le asistirá. Si el Represen-
tante determina que debe devolver cualquier equipo, se le dará pasos a seguir y
una dirección para que regrese el equipo. Ya sea que tenga garantía o no, usted
será responsable por los gastos de transporte por devolución del equipo defectuoso.
. Tenga la fecha de compra y el número de identificación
3 El equipo regresado debe ser adecuadamente empadado, ya sea en el envío
original o con otros materiales de embalaje apropiados. Incluya una copia del
comprobante de Venta. Cualquier artículo regresado sin una copia del Comprobante de compra se considerará fuera de garantía.
4 Siga las instrucciones dadas a usted por el Representante de Servicio al Cliente
al regresar su equipo para servicio.
Limitaciones Legales
REEMPLAZO DE CONFORMIDAD CON LO DISPUESTO EN ESTA GARANTÍA ES
SU ÚNICO RECURSO. DISH NETWORK NO SERÁ RESPONSIBLE DE NINGÚN
DAÑO INCIDENTAL O CONSECUENCIAL DAÑOS Y PERJUICIOS POR
INCUMPLIMIENTO DE CUALQUIER GARANTÍA EXPRESA O IMPLÍCITA EN ESTE
SISTEMA, NI DE LOS DAÑOS INCIDENT ALES O CONSECUENTES RESULT ANTES
DEL USO O LA IMPOSIBILIDAD DE USAR ESTE SISTEMA. BAJO NINGUNA
CIRCUNSTANCIA, LA RESPONSABILIDAD DEL DISH NETWORK, PUEDE,
SUPERAR EL PRECIO DE COMPRA PAGADO POR ESTE SISTEMA. EXCEPTO EN
LA MEDIDA PROHIBIDA POR LA LEY APLICABLE, CUALQUIER GARANTIA DE
COMERCIABILIDAD O APTITUD PARA UN PROPÓSITO PARTICULAR DE ESTE
SISTEMA ES DE DURACIÓN LIMITADA A LA DURACIÓN DE ESTA GARANTÍA.
DISH NETWORK SE RESERVA EL DERECHO A NEGARSE A HONRAR ESTA
GARANTÍA SI DISH NETWORK DETERMINA SI ALGUNA DE LAS EXCEPSIONES
ANTERIORMENTE HAN CAUSADO A ESTE SISTEMA, A QUE SE REALICEN
INCORRECTAMENTE. ESTA GARANTÍA SERÁ NULA SI CUALQUIER FÁBRICA A
APLICADO MARCA DE IDENTIFICACIÓN, INCLUYENDO PERO NO LIMITADO A LA
SERIE O NÚMERO DE ACCESO CONDICIONAL, HA SIDO ALTERADO O
REMOVIDO. ESTA GARANTÍA TAMBIEN SERA NULA SI EL CONVERSOR DE TV
SE HA ABIERTO POR UNA PERSONA NO AUTORIZADA.
Página 32
Page 91
TR-40CRA CONVERTIDOR DE TV DIGITAL A ANÁLOGA
GARANTÍA LIMITADA
This page intent io nall y left blank
Página 33
Page 92
TR-40CRA CONVERTIDOR DE TV DIGITAL A ANÁLOGA
CUMPLIMIENTO FCC
CUMPLIMIENTO FCC
El siguiente texto está extraído los reglamentos de la Comisión Federal de
Comunicaciones (FCC), en la fecha de publicación de esta Guía . Póngase en
contacto con la FCC (Ver siguiente) o con su biblioteca para el texto completo
de la reglamentación.
Declaración de Información de Cumplimiento
DISH Network Corporation, 9601 S. Meridian Blvd, Englewood, CO., (303) 723-1000,
declara que: Este dispositivo cumple con la Parte 15 del Reglamento de la FCC. El
funcionamiento está sujeto a las dos condiciones siguientes: (1) Este dispositivo no
puede causar interferencias perj udiciales, y (2) este dispositivo debe ac eptar cualqu ier
interferencia recibida, incluyendo interferencias que puedan provocar un
funcionamiento. Este equipo ha sido probado y cumple con los límites para
dispositivos digitales de Clase B, en virtud de la Parte 15 del Reglamento de la FCC.
Estos límites están diseñados para proporcionar una protección razonable contra
interferencias perjudiciales en una i nstalación resi dencial. Este equipo genera, u tiliza y
puede irradiar energía de radiofrecuencia y, si no se instala y utiliza de acuerdo con
las instrucciones, puede causar int erferencias perjudici ales en las comunicaci ones por
radio. Sin embargo, no hay garantía de que no se produzcan interferencias en una
instalación particular. Si este equipo causa in terferencias perjudiciales para la
recepción de radio o televisión, lo que puede ser determinado por el equipo de
inflexión en off y on, se le anima usuario que t rate de corregir la i nterferencia po r una o
varias de las siguientes medidas:
• Reorientar o reubicar la antena de recepción.
• Aumentar la separación entre el equipo y el convertidor de TV.
• Conecte el equipo a una toma de corriente de un circuito diferente al que la tele-
visión convertidor está conectado.
• Consultar al distrib uidor o a un experto en radio / TV con ex periencia para obten er
ayuda.
No se deben hacer cambios o modificaciones a este equipo. Esto podría anular la
autorización del usuario para operar el equipo.
Hay muchos dispositivos que permiten la conexión de su ant ena a su casa-en sistema
de distribución, como divisores, y amplificadores. La FCC exige que el aislamiento
entre la antena y el puerto de puerto de red de su sistema cumpla con los siguientes:
• 80dB desde 54 MHz hasta 216 MHz, por lo menos
• 60dB desde 216 MHz hasta 550 MHz y por los menos
• 55dB desde 550 MHz hasta 806 MHz
Medición del aislamiento de un dispositivo requiere equipo especializado. En la
mayoría de los casos, es más fácil adquirir por parte de su distribuidor local de
televisión, un separador o amplifacador con el aislamiento correctamente
especificado. Los requisitos mencionados se extraen de 47CFR15.115. Para el texto
completo, por favor visite WWW.FCC.GOV
.
Página 34
Page 93
TR-40CRA CONVERTIDOR DE TELEVISIÓN DIGITAL A ANÁLOGA
ÍNDICE I
Índice
A
Abriendo menús 9
Actualizando la guía de canales 25
Añadiendo canales 16
Anuncio de conformidad 34
Asegurando el receptor 15
Asistente de instalación 3, 16
B
Banner de navegación 11
Bloqueando canales especificos 14
Bloqueo por clasificación de
programas 14
Botones del control remoto 1
Buscador de sucesos 11
Búsqueda de canal 16
Búsqueda por programación 11
C
Cable coaxial, cables RCA 3
Cambiando a nuevos canales 26
Cambiar configuración canal 3-4 4, 16
Cambiar idioma 13
Cambiar la contraseña 15
Canales perdidos 21
Cerrando los Menús 10
Códigos postales sustitutos 28
Comenzando 1
Conectando su TR-40CRA a su TV 2
Conexiones del panel trasero 2
Configuración de canal 20
Configuración del código postal 16
Configuración de la pausa por
inactividad 17
Configuración del sistema 13, 16
Configuración del sonido 13, 18, 22
Configurando la zona horaria 4, 16
Configurando convertidor 3
Conformidad con la FCC 34
Control de padres 13
Control remoto 5
Botones 6
Control remoto universal 5
Creación 12
Cuando un evento programado ocurre
12
Cuidando su equipo iv
D
Defectos de fabricación 17
Digital OTA 1, 2
E
El convertidor no enciende 19
Encontrando nuevos canales 16
Encontrando programas 10
Búsqueda de programas 11
Búsqueda por evento 12
F
FCC Aviso, Transición a Televisión
Digital
34, 37
Página 35
Page 94
TR-40CRA CONVERTIDOR DE TELEVISIÓN DIGITAL A ANÁLOGA
G
Garantía Limitada 31
Guía de normas 1
Guía de programas 10
Guía de TV 23
Códigos postales sustitutos 28
Sintonizando nuevos números 26
Guía de TV en pantalla 18, 23
Guía de TV Plus 18
Guía Plus 23
I
Importante ii, iii
Inactividad 17
Información del sistema 7, 17
Instalación 2
Instrucciones importantes de
seguridad ii, iii
Introducción 1
M
Menú de configuración 13
Menú de instalación 16
Menú para configurar el canal 16
Menús 9
N
Navegando 11
O
Ocultar canales 14
Ocultar canales bloqueados 14
Opciones de menú en pantalla 1
Q
Que cubre la garantía 31
Que no cubre la garantía 31
R
Raitings 14
Reiniciando la configuración 17
Reiniciando la contraseña 22
S
Seguros 13
Bloqueo de canales 14
Seguros de raitings 14
Seleccionando las opciones 9
Sintonizador digital OTA 1, 2
Solución de problemas 20
Canales perdidos 21
El TR-40CRA no enciende 19
Pantalla borrosa 21
Perdida de señal 20
Problemas de video 21
Sonido 22
Subtítulos 13, 18
Suspensión por inactividad 17
T
Temas 7
Transición a Televisión Digital FCC
Aviso 37
“TV Guide”
“TV Guide +” 18
18, 23
U
Usando los menús 9
P
Pausa por inactividad 17
Personalizando su TR-40CRA 13
Predeterminado del fabricación 17
Programando el horario de un evento
12
Página 36
W
Viendo TV 10
Z
Zona horaria 16
Page 95
TR-40CRA CONVERTIDOR DE TV DIGITAL A ANÁLOGA
TRANSICIÓN A TELEVISIÓN DIGITAL FCC AVISO
El 17 de febrero de 2009 marca la fecha en la cual la señal de la TV local hará
la transición de análoga a digital dentro de los Estados Unidos. Los
consumidores con televisores análogos, que dependen de una antena de
conejo para recibir la programación de la televisión abierta local necesitarán un
convertidor de digital a análogo, una televisión digital con un sintonizador
digital, o suscribirse a un servicio de televisión de paga como DISH Network
para ver estas emisiones. Televisores Análogos que no usen uno de estos
métodos seguirán trabajando con otros fines, como ver TV de baja potencia en
las estaciones locales, ver películas con un reproductor de DVD o VCR, o para
jugar vídeo juegos.
¡Buenas noticias!
Su nuevo TR-40CRA convertidor le permite continuar disfrutando de los
programas de alta potencia de radiodifusión digital disponibles en su área. Su
nuevo TR-40CRA convertidor también le permite recibir emisiones análogas
simplemente pulsando el botón análogo a través de su control remoto. Esta es
una gran característica para ver los canales de televisión de baja potencia que
no se convierten a la tecnología digital sobre la fecha del 17 de febrero de
2009.
Información adicional acerca de la transición de televisión digital, incluyendo
$ 40 gratis en cupones para cajas convertidoras de digital a análogo, estará
disponible en www.dtvpal.com
1-888-DTV-2009 ó 1-888-CALL-FCC.
, www.DTV.gov, www.dtv2009.gov,
Impreso en
Página 37
 Loading...