

Page 1
Page 2
Attention and Warning Symbols
Yo u must be aware of safety when you install and use this system. This Installation Guide provides various
procedures. If you do some of these procedures carelessly, you could injure or kill yourself or damage equipment
or property. Some other procedures require special attention.
The
WARNING! symbol means that if you are not careful,
You could injure or kill yourself, or
You could damage equipment or property.
The
ATTENTION! symbol means you should pay special attention to:
Important instructions for using the system, or
Important instructions for maintaining the system.
Copyright Notice
Copyright © 2004 EchoStar Technologies Corporation, Englewood, Colorado 80112. All rights reserved.
The information in these Installation Guide may change without notice. We may issue revisions to tell you about
such changes.
Please send comments or questions about this Installation Guide to: Technical Publications, EchoStar
Technologies Corporation, 94 Inverness Terrace East, Englewood, Colorado 80112.
Part Number: 134950
Printed in the United States of America.
DISH Network is a registered trademark of EchoStar Satellite L.L.C. For information about DISH Network, please
visit our website at www.dishnetwork.com.
We acknowledge all product names, trade names, or corporate names we mention in this Installation Guide to be
the proprietary property of the registered owners.
Page 3

Table of Contents
Safety Instructions................................................................................iii
Installation Instructions.........................................................................1
Overview .................................................................................................................... 1
Satellite Receivers ..................................................................................................... 1
Finding the Satellites .................................................................................................. 2
Assemble the Dish Antenna System .......................................................................... 2
Aiming the Dish for the Strongest Signal ................................................................... 3
SuperDISH Angles Tables...................................................................17
Appendix...............................................................................................29
Page i
Page 4

Notes
Page ii
Page 5
Safety Instructions
(
)
1. Read these instructions.
2. Keep these instructions.
3. Heed all warnings.
4. Follow all instructions.
5. Use only attachments/accessories specified by the manufacturer.
6. Refer all servicing to qualified service personnel.
Attention! These installation instructions are intended for use by qualified professional technicians due
to the complexity of the installation and compliance to national/local building and electrical codes.
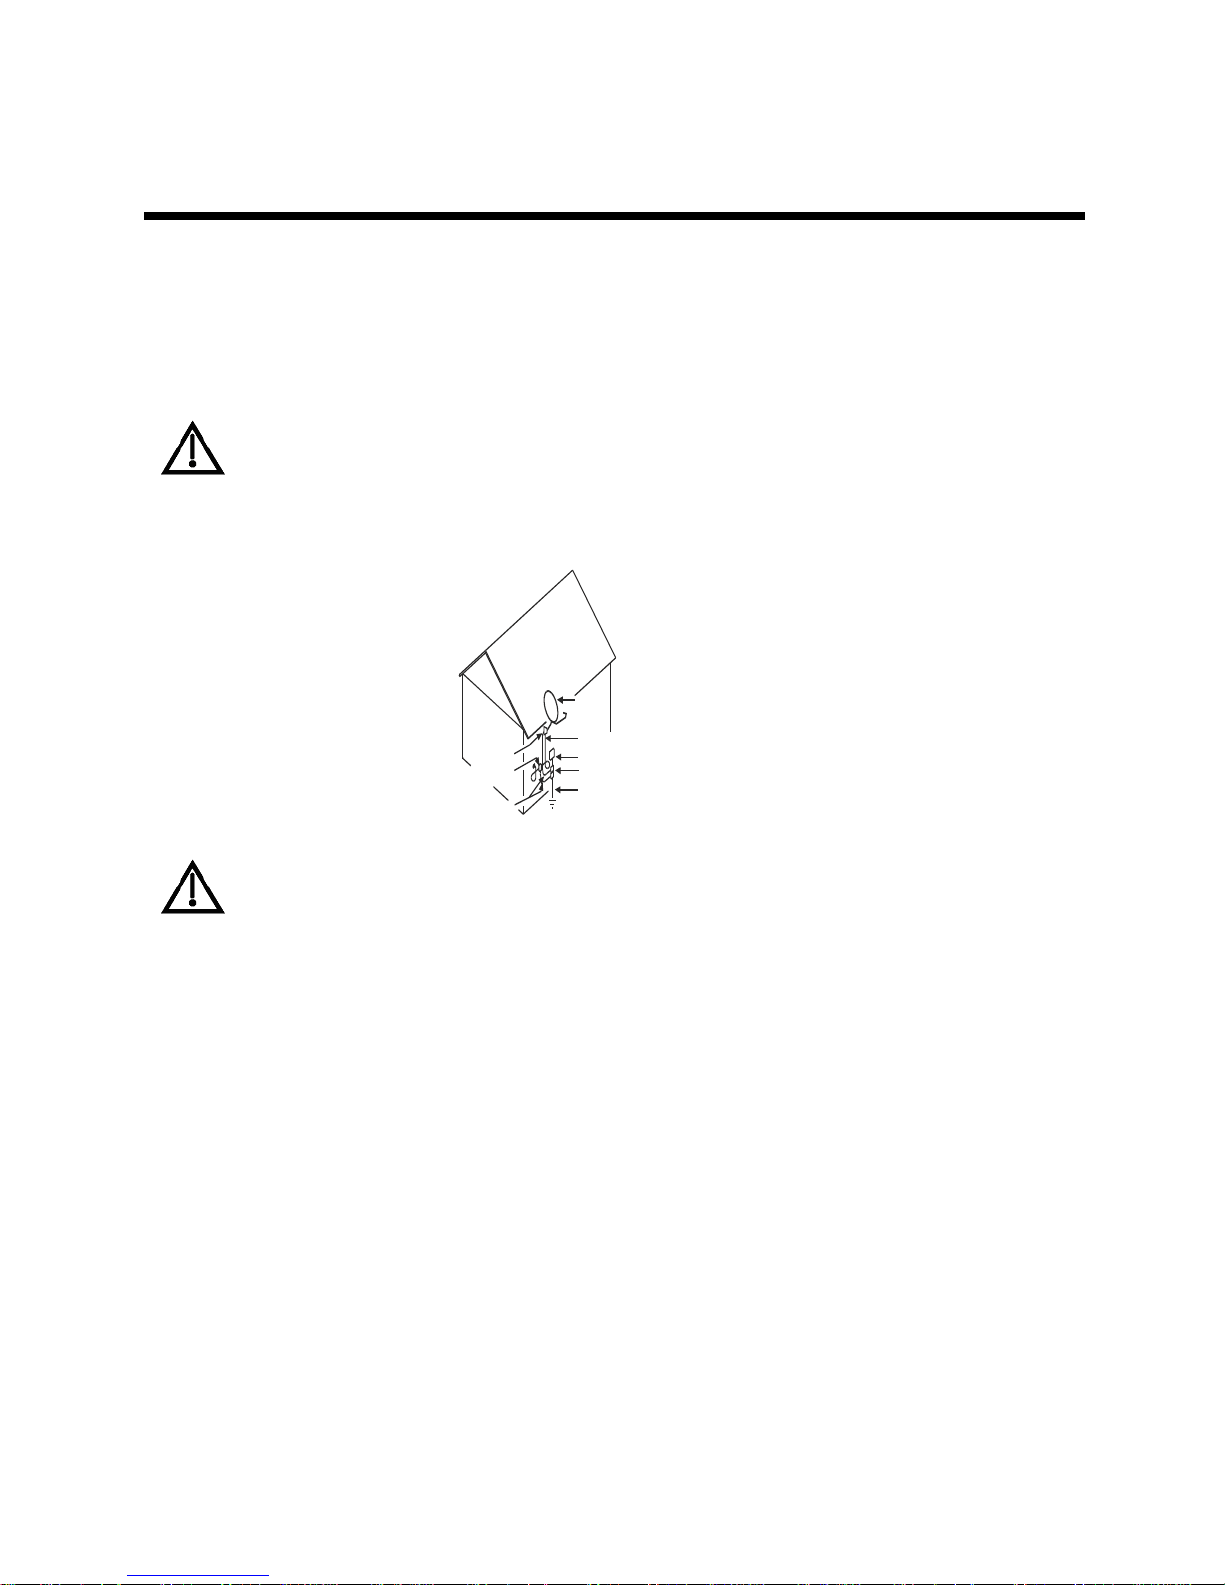
Note to Satellite TV System Installer: This reminder is provided to call the satellite TV system installer’s attention to
Article 820-40 of the National Electrical Code (NEC) that provides guidelines for proper grounding and, in particular,
specifies that the cable ground shall be connected to the grounding system of the building as close to the point of cable entry
as practical.
Satellite Dish
Coaxial Cable
Ground Clamp
Antenna Discharge
Unit
Grounding Conductors
NEC Section 810-21
from Satellite Dish
Electric Service Equipment
Ground Clamps
Power Service Grounding
Electrode S ystem
(NEC Art. 250, Part H)
You can get safety guidelines from the Occupational Safety and Health Administration (OSHA). To
contact OSHA, please see the blue pages of your phone book, under United States Government,
Occupational Safety and Health Administration.
• Assemble the satellite dish in a safe place before you climb up to where you install the dish.
• If you use a ladder, follow the safety instructions that come with the ladder.
• Use only a fiberglass ladder to keep from getting shocked if the ladder touches any overhead power lines, lights, or
power circuits.
• Use the right tools. Follow the safety instructions that come with the tools.
• While you work, don’t wear loose-fitting clothes and do wear safe shoes.
• If you put the satellite dish on a roof, you should be in good enough shape to climb up to, and work on the roof.
• Beware of small holes in the roof or loose shingles, which could cause you to fall; keep tools within easy reach for
convenience and safety; use a safety harness; wear sturdy shoes with good tread for sure footing and traction;
don’t work on a roof that’s wet or icy.
• If the roof is sloped or made of tile or metal, use slide guards.
• Before you drill any holes in your building, make sure there are no wires or pipes near the holes. Before you dig
any holes in the ground, ask the local gas, electric, and phone companies to help you find underground gas,
electric, water, and phone lines.
• Install the equipment in accordance with the local building and electrical codes. If you aren’t sure, call a licensed
building inspector or electrician for help.
• As you work, be aware of what’s around you. Be careful to avoid hurting yourself or damaging buildings,
structures, or equipment.
• Never install the satellite dish near power lines.
• Don’t install the satellite dish on composite materials such as strand, chip, fiber, or particle board unless the
fastener attaches securely to a wall stud, rafter, or other foundation material beneath the surface.
Page iii
Page 6

Notes
Page ivage iv
Page 7
Installation Instructions
Attention! These installation instructions are intended for use by qualified professional
technicians due to the complexity of the installation and compliance to national/local
building and electrical codes.
Overview
These instructions guide you through the installation of a DISH Network SuperDISH antenna
system. This antenna system is capable of receiving digital television signals from three satellite
locations. There are two classes of antenna systems:
• 105 SuperDISH Antenna – Supports reception from satellite locations 119W (DBS), 110W
(DBS), and 105W (FSS).
•
121 SuperDISH Antenna – Supports reception from satellite locations 121W (FSS), 119W (DBS),
and 110W (DBS).
The antenna system class must be selected by the technician based on the programming required by the
customer. Additionally, there are two types of antenna systems for each three-satellite class: Type 1,
which uses a metal reflector (Figures 1a, 1b, 2a, and 2b), and Type 2, which uses a composite reflector
(Figures 1c and 2c). The minor installation differences for each type are covered in these instructions.
It is important to note that most parts are not interchangeable between different antenna systems;
therefore, it is important to use part numbers when ordering replacement parts for these systems.
These instructions cover wall mounting only. For other mounting options (for example, pole mounting,
struts, non-penetrating mounting), see DNS training material, which is also available on the retailer
website.
To meet requirements of withstanding 100 m.p.h. wind, attachment to a wall must
withstand a 220 lb. force applied in any direction to the end of the mast.
Satellite Receivers
While all DISH Network satellite receivers can be connected to any SuperDISH antenna to receive
110W/119W programming, only the following models will support receiving and displaying
programming from the 105W or 121W satellite locations:
DISH Pro and DISH Pro Plus receiver models which can be identified by the logos shown
•All
below.
• The following Legacy receiver models which do not have the above logos: 2700, 2800, 3700,
3800, 3900, 4700, 4900, and 6000.
Note: If you are trying to connect a Legacy receiver (no DISH Pro or DISH Pro Plus logo) to a DISH
Pro LNBF or switch, you will need a DISH Pro Adapter. Contact DISH Network at call 1-800-333DISH (3474) for information on obtaining a DISH Pro Adapter. You will not need this adapter if
connecting to a DISH Pro Plus LNBF or switch.
Page 1
Page 8

Note: You can have as much as 200 feet of cable between the DISH Pro or DISH Pro Plus LNBFs and
the receiver. However, you must use only RG-6 coaxial cables rated for 950 to 2150 MHz. Some
cables may say "Swept tested for 2150 MHz." Do not use cable company TV cables or cables from
other satellite TV systems not rated for 950-2150 MHz. These other cables may cause signal loss. Do
not use existing cables such as RG-59. Be sure that any outdoor connections are made using
waterproof F-connectors.
Finding the Satellites
Use the Angles Tables starting on page 17 to find the azimuth, elevation, and skew angles using the
ZIP code from your location and the FSS satellite location to be installed. Write the angles in the space
provided below.
Azimuth: Elevation: Skew:
Using these azimuth and elevation angles, find a mounting location for the satellite dish, which can be
pointed towards the satellites located at these angles. Use a compass and the azimuth angle to find the
direction along the horizon that the dish should be pointed. Then use the elevation angle to find out
how high the satellites are in the sky from your location. Make sure nothing blocks the line of site
between the dish and the satellites and make sure this line of sight will not be blocked by future growth
of nearby trees or other foliage. Also make sure your mounting location provides sufficient clearance
to rotate the reflector as needed to point toward the satellites.
Assemble the Dish Antenna System
Refer to Figure 1a, 1b, 1c, 2a, 2b or 2c, depending on your equipment and complete the following
recommended assembly steps. If you are assembling a Type 1 dish antenna, look carefully at the
circled areas in Figures 1a, 1b, 2a, and 2b.
1. Mount the mast to a solid surface so that the dish antenna cannot move or be bumped out of
adjustment. Make sure the dish is mounted where physical and environmental conditions will not
keep your satellite dish from receiving a clear satellite signal. The conditions to be aware of are:
eaves and overhangs on the building or house, wind, plant growth, and deterioration of the
mounting surface. Never mount to a tree.
2. Align the top part of the mast so that it is absolutely vertical. If the top part of the mast is off
vertical by only a few degrees, it will be difficult or maybe even impossible to find the satellites.
Confirm the vertical position by taking at least two readings with a bubble level, on the upper
mast, that are 90° apart from one another.
3. Connect the reflector to the skew plate, using four bolts provided for your equipment. Washers
may also need to be installed. Refer to Figures 1a, 1b, 1c, 2a, 2b, and 2c for the SuperDISH
antenna assembly overview. Refer to Figures 3a through 3d for a diagrams of required hardware.
4. Set the skew by rotating the skew plate to align the skew pointer with the required angle on the
skew scale. Refer to Figures 4a and 4b depending on your equipment. Tighten the four skew plate
bolts securely to keep the dish from rotating.
Note: Do not loosen the skew bolts by more than 1½ turns because the clips can become
disengaged from the elevation bracket (see Figures 7 and 8).
Note: Make sure that you center the skew ring as you tighten the bolts. An improperly centered
skew ring can cause the skew angle to be incorrect.
Note: After you have set the skew angle, do not loosen the skew bolts. Do not try to fine-tune
the skew angle because this will affect the azimuth and elevation settings, as well as the polarity of
the FSS LNB.
5. Set the elevation by tilting the mounting bracket to align the marked edge with the required angle
on the elevation scale. Tighten both elevation bolts to keep the dish from tilting. See Figure 5.
6. Mount the reflector assembly on the mast. Do not tighten the bolts on the mast clamp at this time.
Page 2
Page 9

7. Make three cables with F-connectors with sufficient length to go between the LNBs and the
switch. Be sure to mark cables with the satellite location for the LNB it connects to (for example,
105W, 119W, etc.), which will be important during dish peaking.
8. Connect the LNB assembly to the top of the support arm. If you are using a Type 1 assembly, refer
to the circled areas in Figures 1a, 1b, 2a, and 2b to determine which Type 1 assembly you have.
Type 2 has a rib on top (refer to Figures 1c and 2c).
9. Connect cables to the three LNBs.
10. Connect the lower shroud section to the LNB assembly, as you route the cables from the LNBs
through the lower shroud and down the support arm.
11. Attach the cables to the support arm with the included clips.
12. Connect the remaining shroud sections (front plate and then the top) to the LNB assembly.
13. Attach the LNB/support arm assembly to the reflector assembly.
For Type 1 SuperDISH Antennas only: Insert and hand tighten the bolts into the support arm
before fully tightening to maintain proper bolt alignment.
Aiming the Dish for the Strongest Signal
Note: While you may use a peaking meter for various steps in this procedure, use of the satellite
receiver is critical for confirming that signal from the correct satellites is being obtained.
1. Point the dish to the approximate azimuth angle you wrote on page 2.
2. Connect the coaxial cable from the outermost DBS LNB to the LNB port 1 on a DISH Pro or
DISH Pro Plus multi-dish switch (either a DP34 or DP+44). Connecting to port 1 is necessary to
ensure the signal is passing through the switch to the receiver while peaking.
Note: The outermost LNB for the 105W SuperDish Antenna is the 119W LNB. The outermost
LNB for the 121W SuperDish Antenna is the 110W LNB.
3. Connect a coaxial cable(s) between the receiver port(s) of the multi-dish switch and the S
port(s) on the back of the receiver. If you are connecting a Legacy (non-DISH Pro) receiver to a
DISH Pro switch (for example, DP34), connect a DISH Pro Adapter using the instructions that
came with the adapter. See the guide that came with the switch(es) for further instructions.
AT IN
Note: For DISH Pro Plus two-tuner receivers, ensure both SAT IN ports are connected to the
switch at this time.
4. Connect and turn on TV and satellite receiver. Make sure you're on the
Strength
screen.
5. For DISH Pro and DISH Pro Plus receivers only, run check switch. Make sure the
Summary
6. From the
screen correctly identifies your switch and the connected LNB on port 1.
Point Dish/Signal Strength screen, select the DBS satellite that corresponds to the
Point Dish/Signal
Installation
connected outermost DBS LNB. Depending on your receiver, this may be shown as a checked box
or filled circle.
7. Enter a transponder greater than 10.
8. Peak the dish (azimuth and elevation settings) to maximize signal on the outermost DBS LNB
using the signal strength bar. Confirm that signal from the correct satellite is being received as
indicated by a green signal strength bar.
9. Mark on the dish or record elevation and azimuth settings. This will be helpful when you are
peaking the FSS LNB in a later step.
10. Take a receiver software upgrade either by exiting the
Point Dish/Signal Strength screen or by
turning off the satellite receiver and waiting for the upgrade. The upgrade takes about 20 minutes.
11. After taking the software upgrade, confirm that the
Point Dish/Peak Angles screen shows options
for the 105W and 121W FSS satellites. Refer to Figure 6.
Page 3
Page 10

12. Connect the coaxial cable from the FSS LNB (105W or 121W) to the LNB port 1 on a DISH Pro
or DISH Pro Plus multi-dish switch (either a DP34 or DP+44). Connecting to port 1 is necessary to
ensure the signal is passing through the switch to the receiver while peaking.
Note: The FSS LNB is the one located directly in line with the LNB support arm.
13. From the
Point Dish/Signal Strength screen, select the FSS satellite that corresponds to the
FSS LNB (105W or 121W). Depending on your receiver, this may be may be shown as a checked
box or filled circle.
14. Select a transponder as follows:
• Select transponder 2, 7, 18, or 23 for 105W FSS LNB.
• Select transponder 15, 16, 20, or 21 for 121W FSS LNB.
Note: You should be able to peak on any one of the above transponders. If you are unable to peak
on any of these transponders, call the Customer Service Center for a complete list.
15. You should only need to make minor (less than one degree) adjustments to the dish azimuth/
elevation settings to peak the FSS LNB signal. As such, fine-tune the dish back and forth within
one degree until the signal from the desired FSS satellite is obtained. Adjust the azimuth and
elevation settings as needed to maximize this signal. Record the peak level observed. Do not
adjust the skew angle
Note: You must wait between 5 and 10 seconds after each adjustment for the satellite receiver to
.
acquire and display accurate signal strength.
16. Tighten the mast clamp and elevation bolts as required. Refer to Figures 1a, 1b, 1c, 2a, 2b, and 2c
for the SuperDISH antenna assembly overview.
17. Repeat steps 2, 6, and 7 and confirm signal from the outermost DBS LNB is at least as good or
better than the FSS signal you obtained in step 15.
Note: Leave the outermost DBS LNB connected to switch Port 1 to ensure that step 22 is
successful.
18. Connect the remaining two coaxial cables from the LNBs to the LNB ports on the DISH Pro or
DISH Pro Plus multi-dish switch (either a DP34 or DP+44).
19. From the
20. Select the
Point Dish/Signal Strength screen, select Check Switch.
Super Dish option if this option is shown on your screen. Your receiver may display
additional options identified below. If it does, chose the option appropriate for your installation:
SuperDISH 3 Sat - Only checks for DISH Pro 34 switch or ports 1-3 on a DISH Pro Plus 44
•
switch. Detects these switches as an SW64 switch only.
•
SuperDISH 4 Sat - Checks for DISH Pro 34 switch and all four DISH Pro Plus 44 switch
ports. Detects these switches as SW64/SW21 cascaded.
SuperDISH Full - Detects all switch types and satellites.
•
Note: Check Switch with the SuperDISH Full option selected can take a long time. Only use
this option if you do not know the type of switch(es) connected in your system.
21. Run check switch. Make sure the
Installation Summary screen shows reception is verified for all
connected satellites.
Note: The Installation Summary screen may show "FEED" for some of the LNBs. This summary
is OK.
Note: The Installation Summary screen for a Legacy receiver may identify your switch as an
SW64 or SW64/SW21. This summary is OK.
22. For each satellite receiver added to the system, make sure you take a software upgrade, select the
SuperDish option, and run check switch. If you are connecting a Legacy (non-DISH Pro) receiver
to a DISH Pro switch (for example, DP34), connect a DISH Pro Adapter using the instructions that
came with the adapter.
Page 4
Page 11
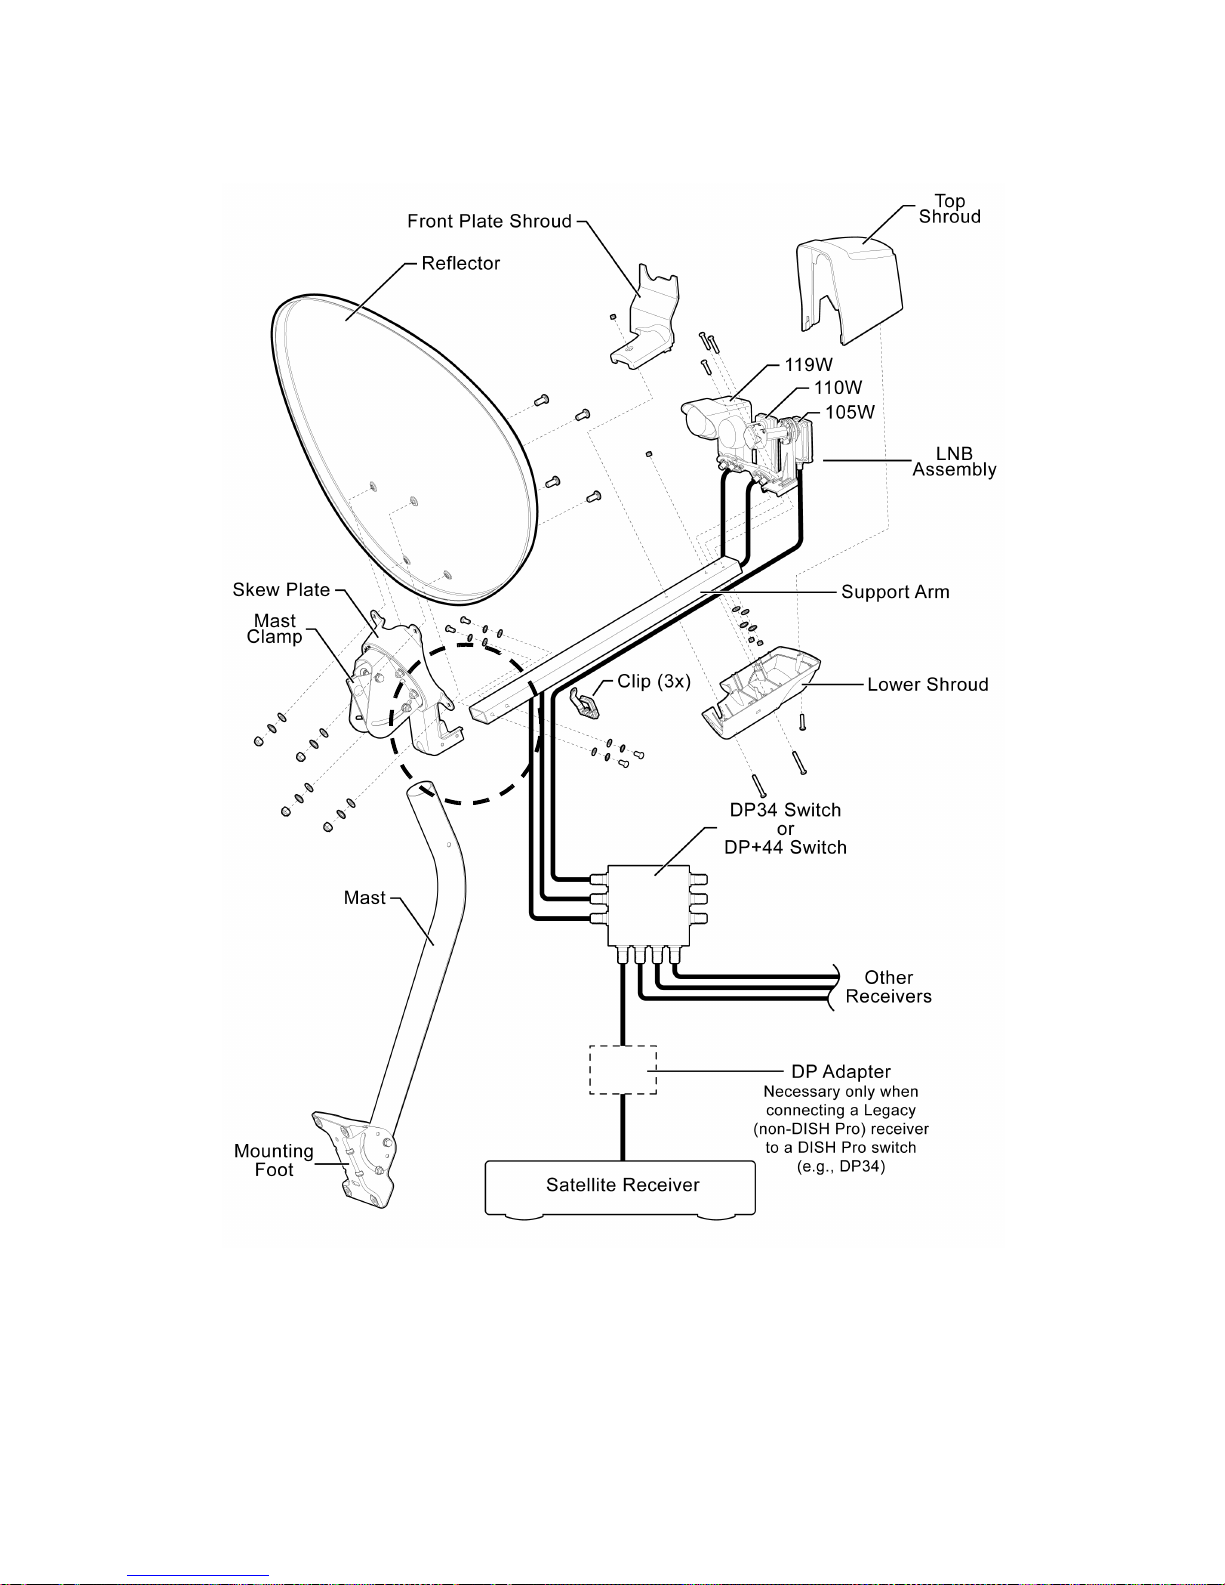
Figure 1a. 105W SuperDISH Antenna Assembly Overview - Type 1
Page 5
Page 12
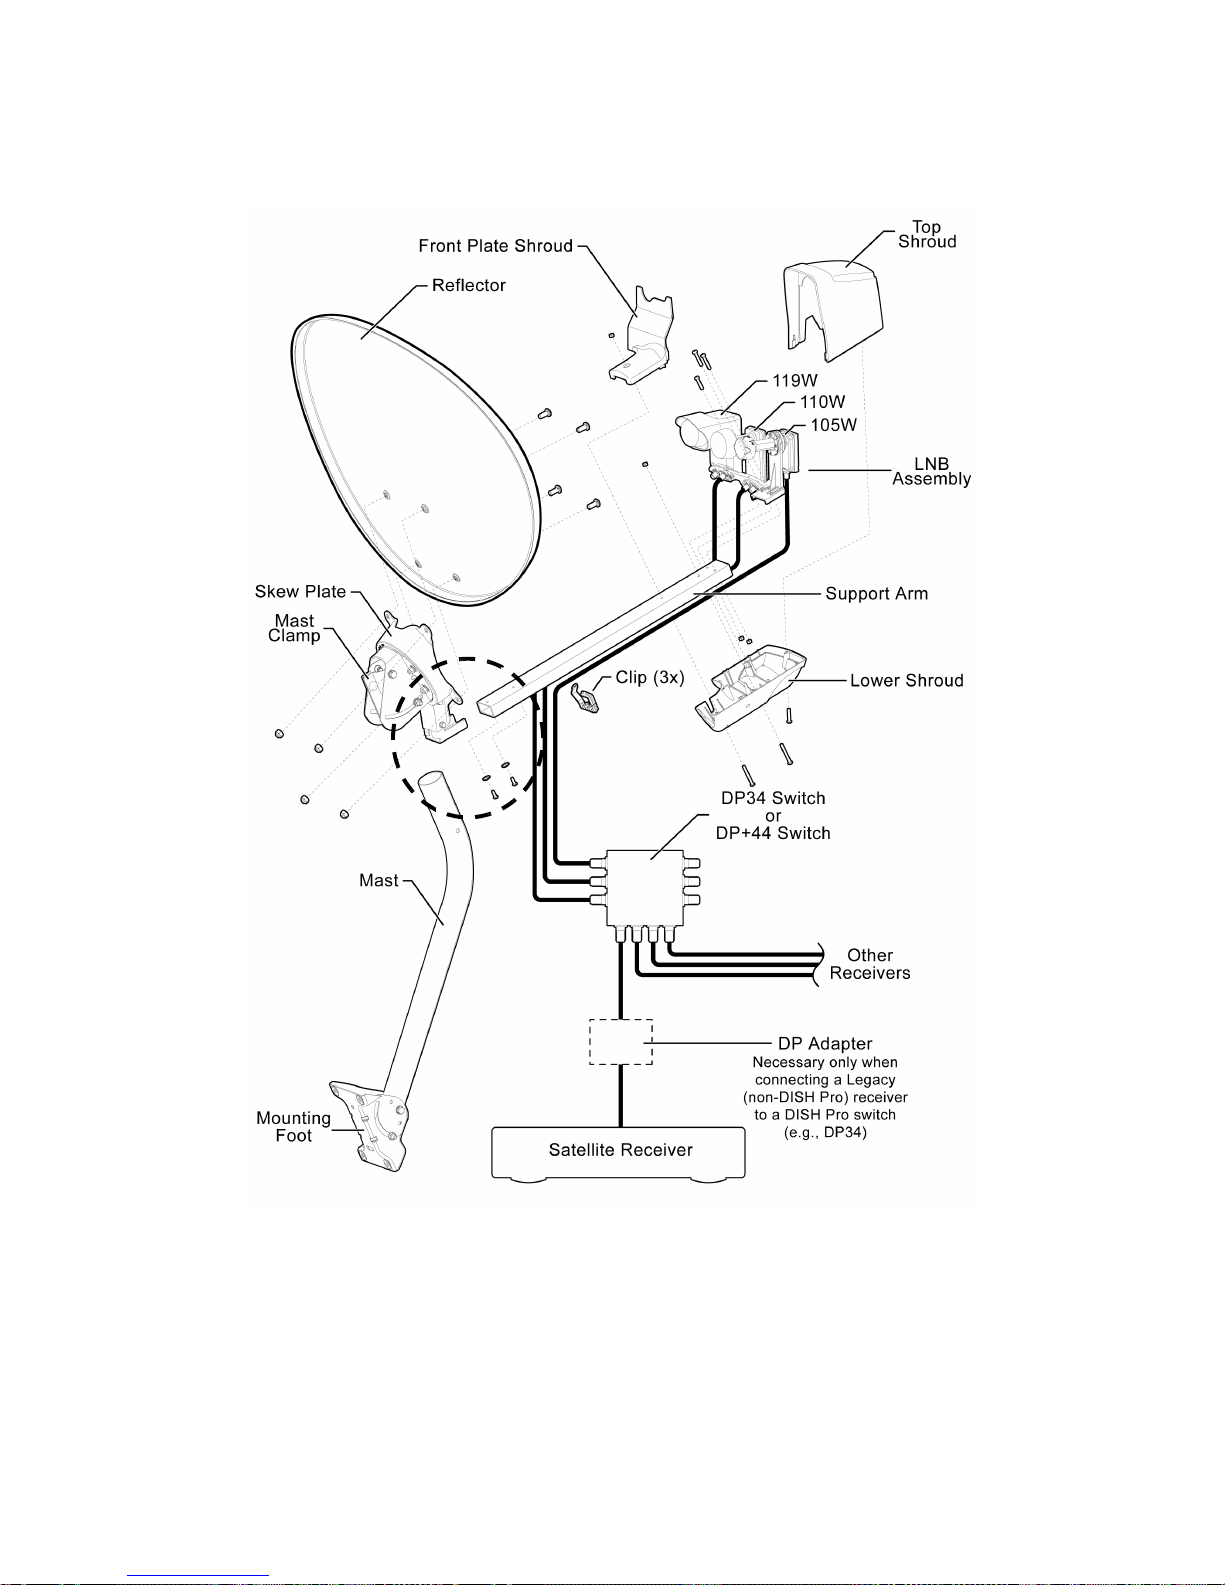
Figure 1b. 105W SuperDISH Antenna Assembly Overview - Type 1
Page 6
Page 13
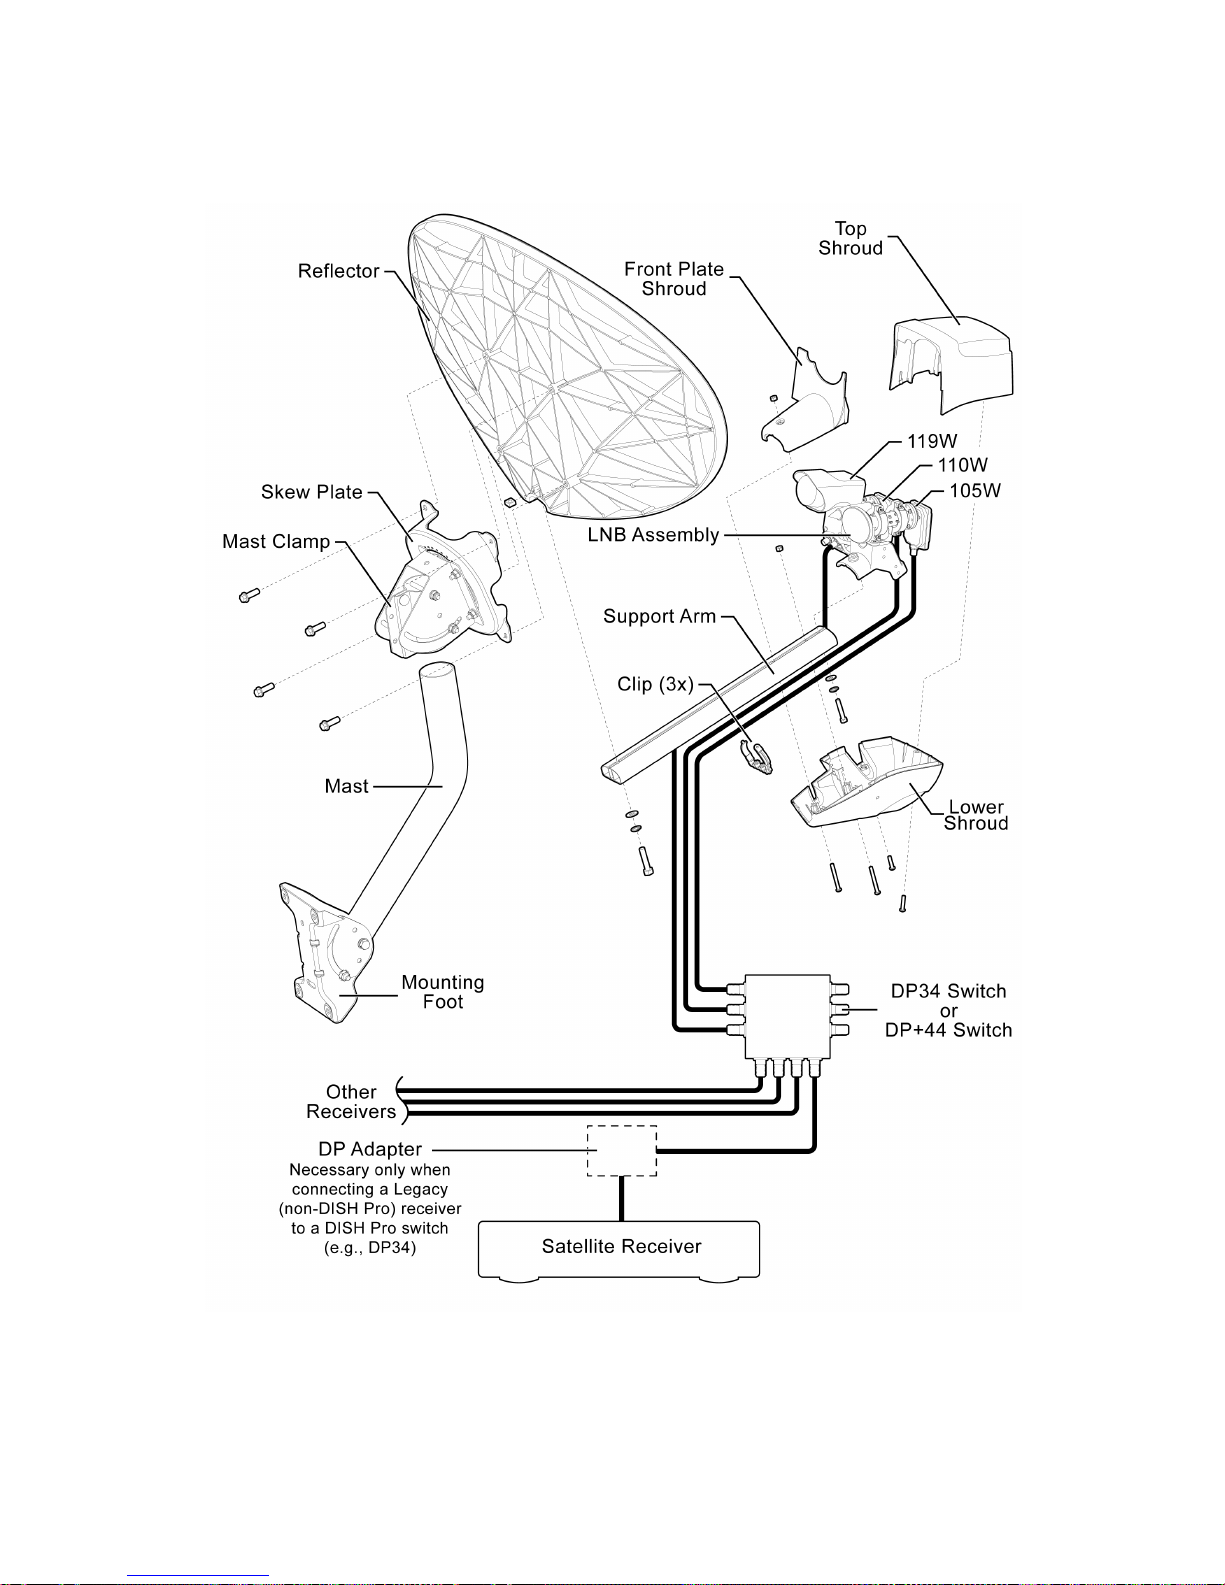
Figure 1c. 105W SuperDISH Antenna Assembly Overview - Type 2
Page 7
Page 14
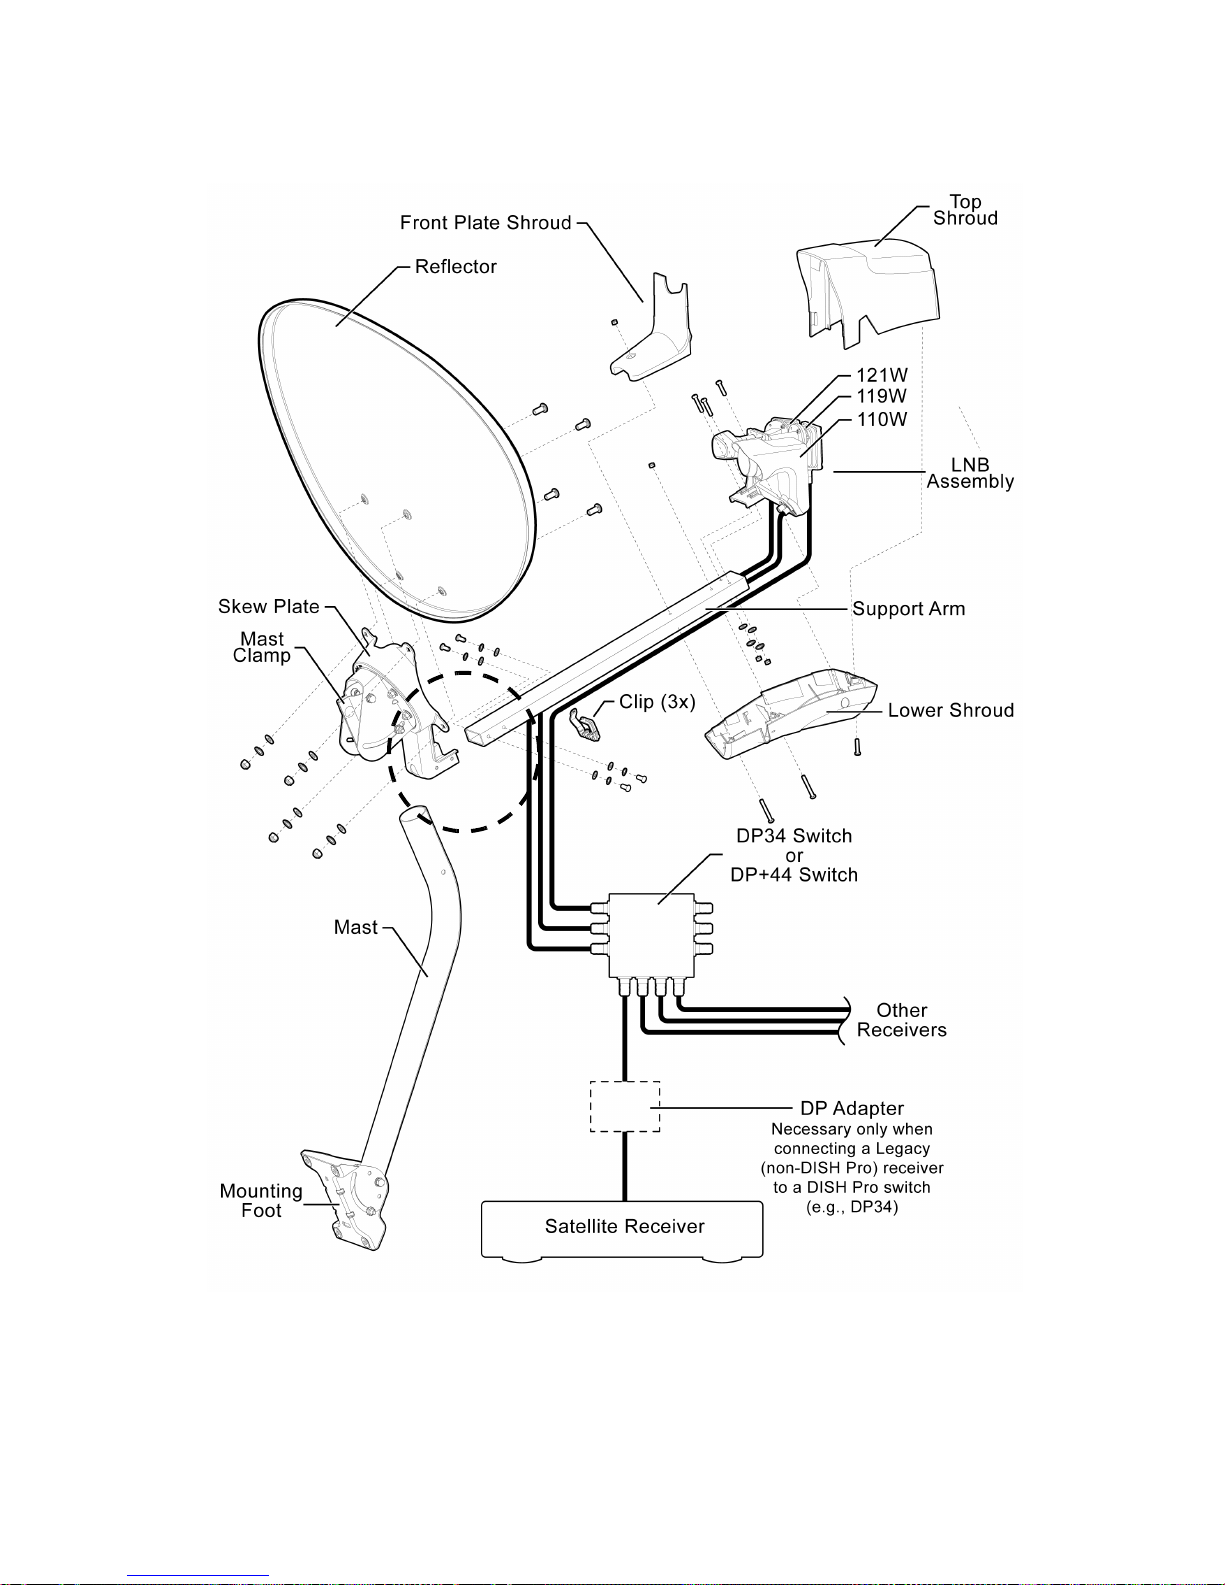
Figure 2a. 121W SuperDISH Antenna Assembly Overview - Type 1
Page 8
Page 15
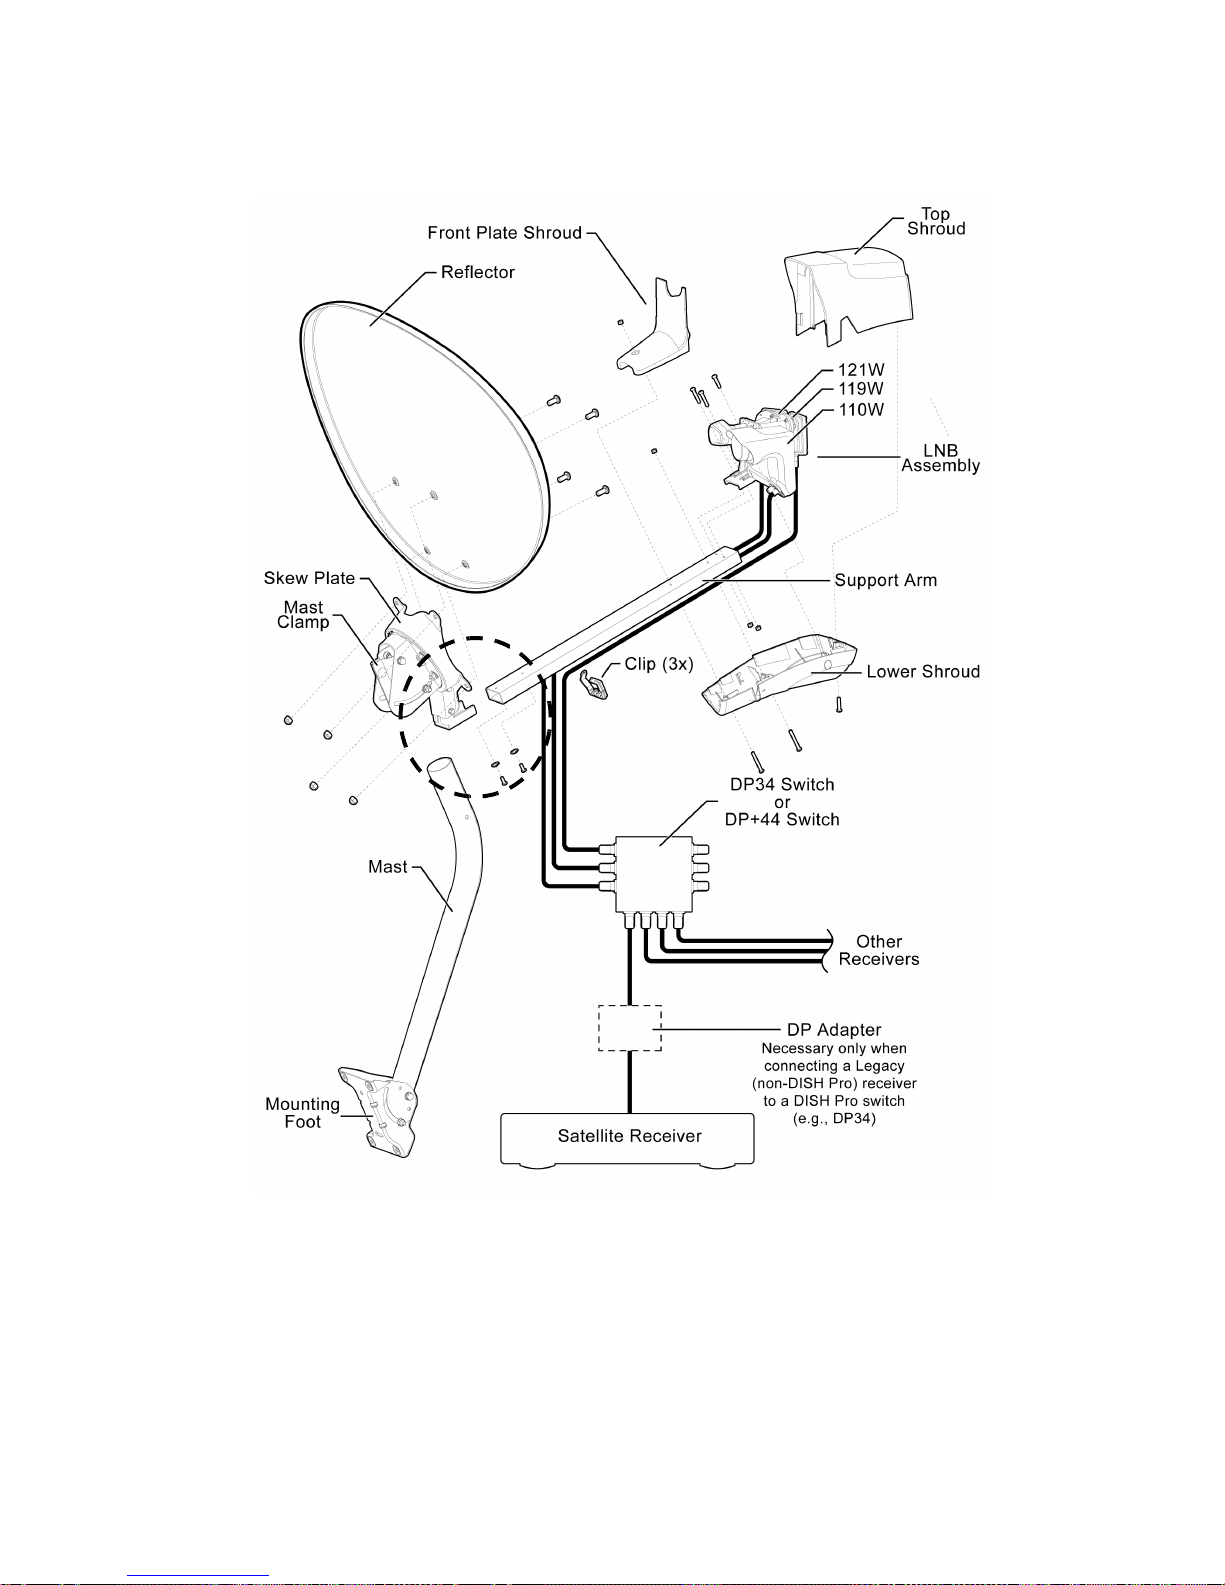
Figure 2b. 121W SuperDISH Antenna Assembly Overview - Type 1
Page 9
Page 16
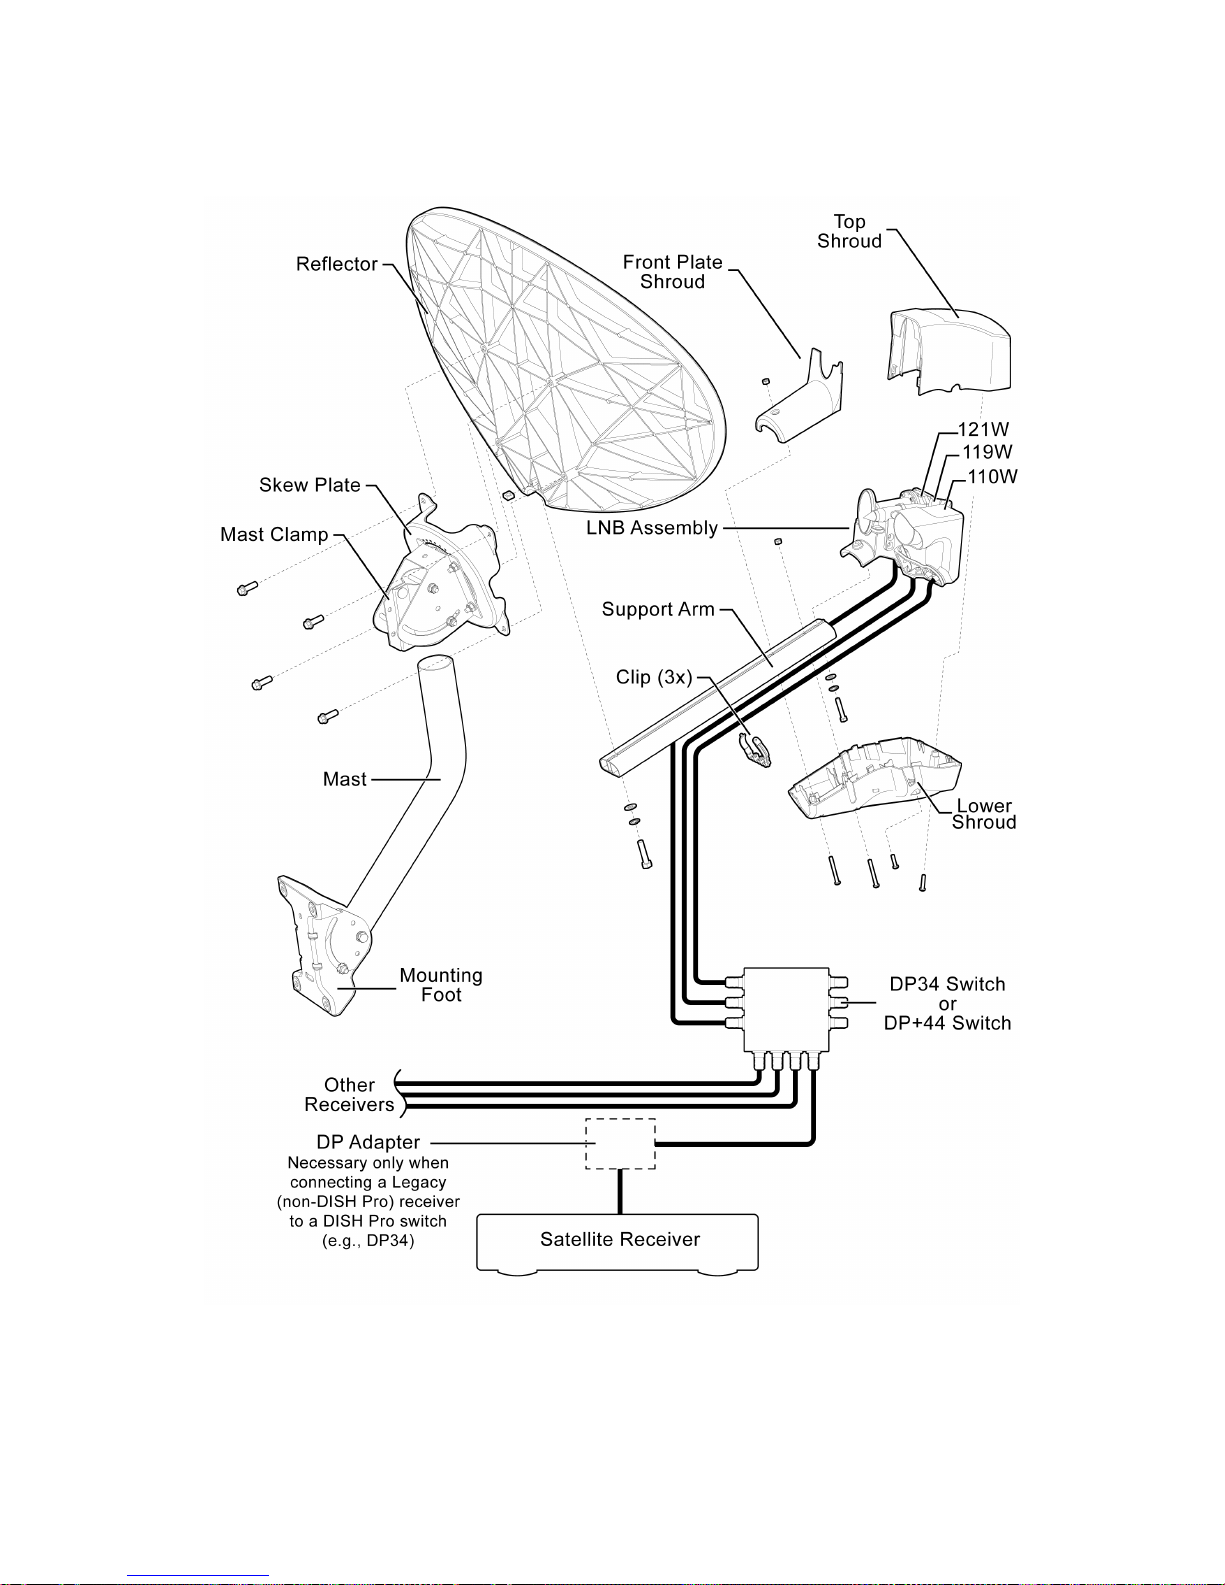
Figure 2c. 121W SuperDISH Antenna Assembly Overview - Type 2
Page 10
Page 17
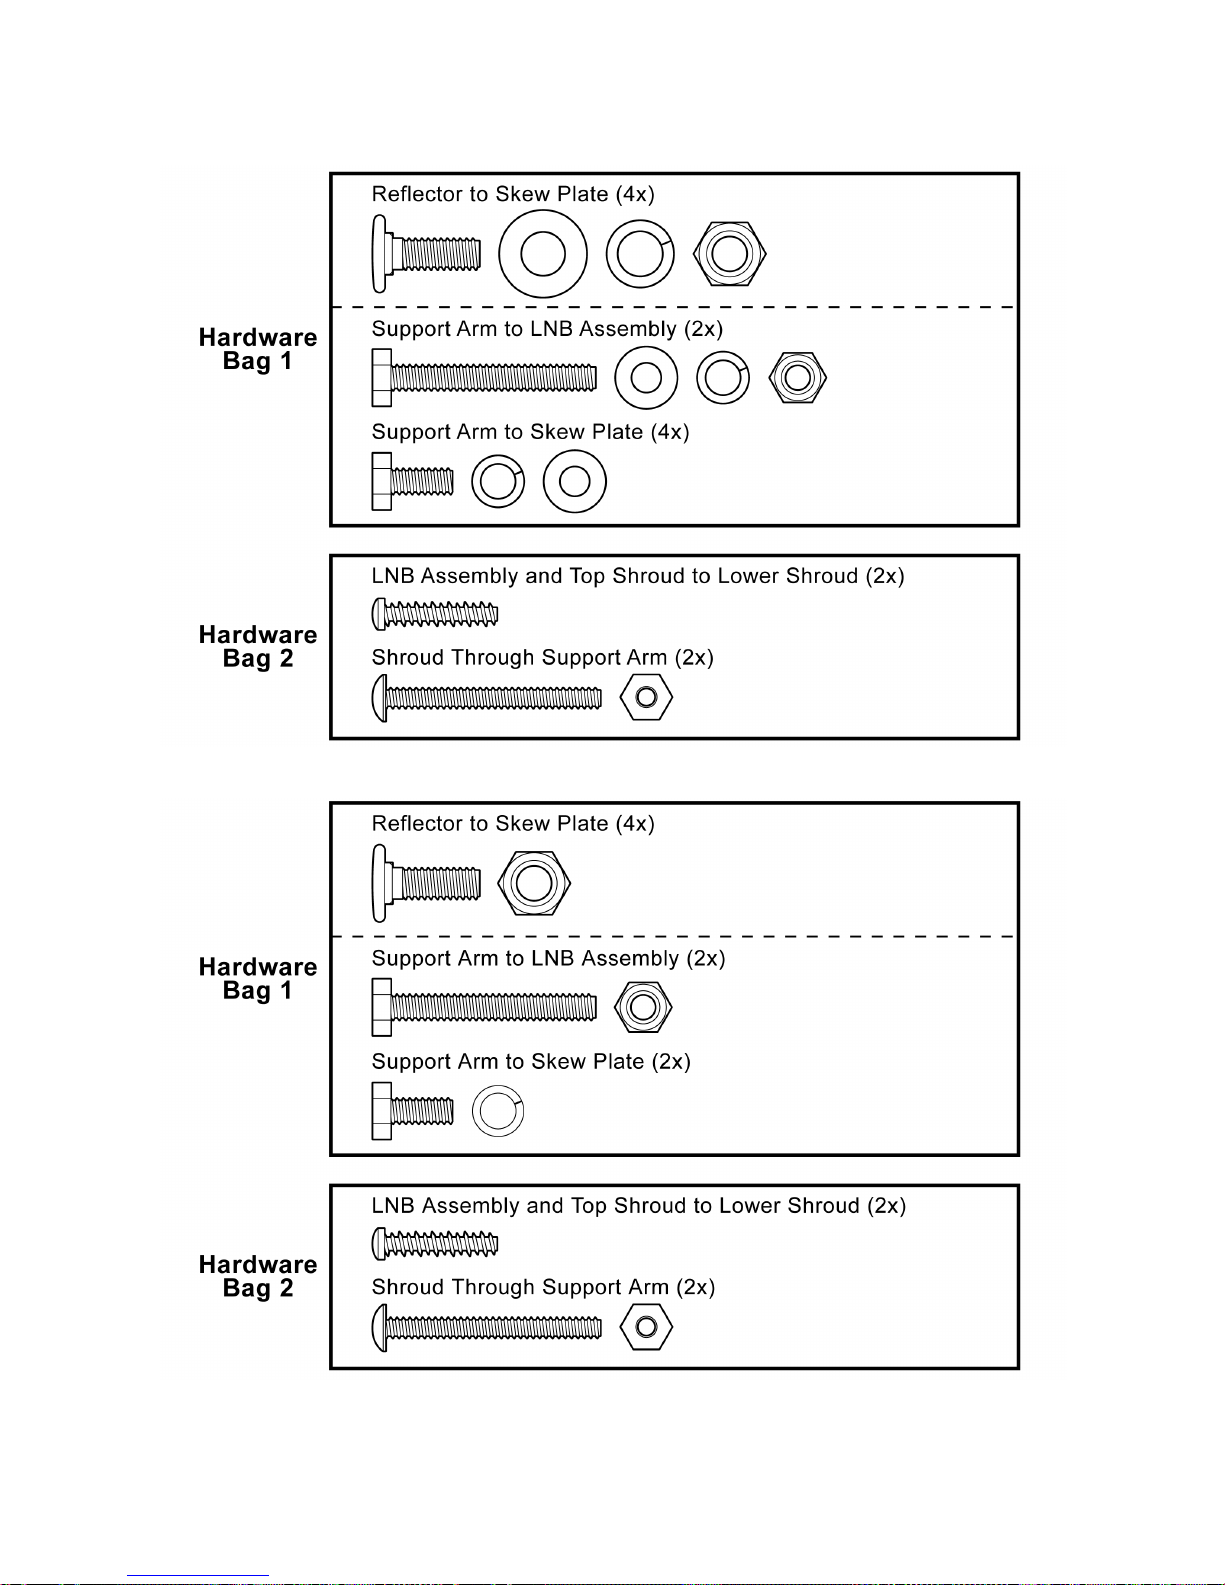
Figure 3a. 105W SuperDISH Antenna Assembly Hardware - Type 1 (See Figure 1a)
Figure 3b. 105W SuperDISH Antenna Assembly Hardware - Type 1 (See Figure 1b)
Page 11
Page 18
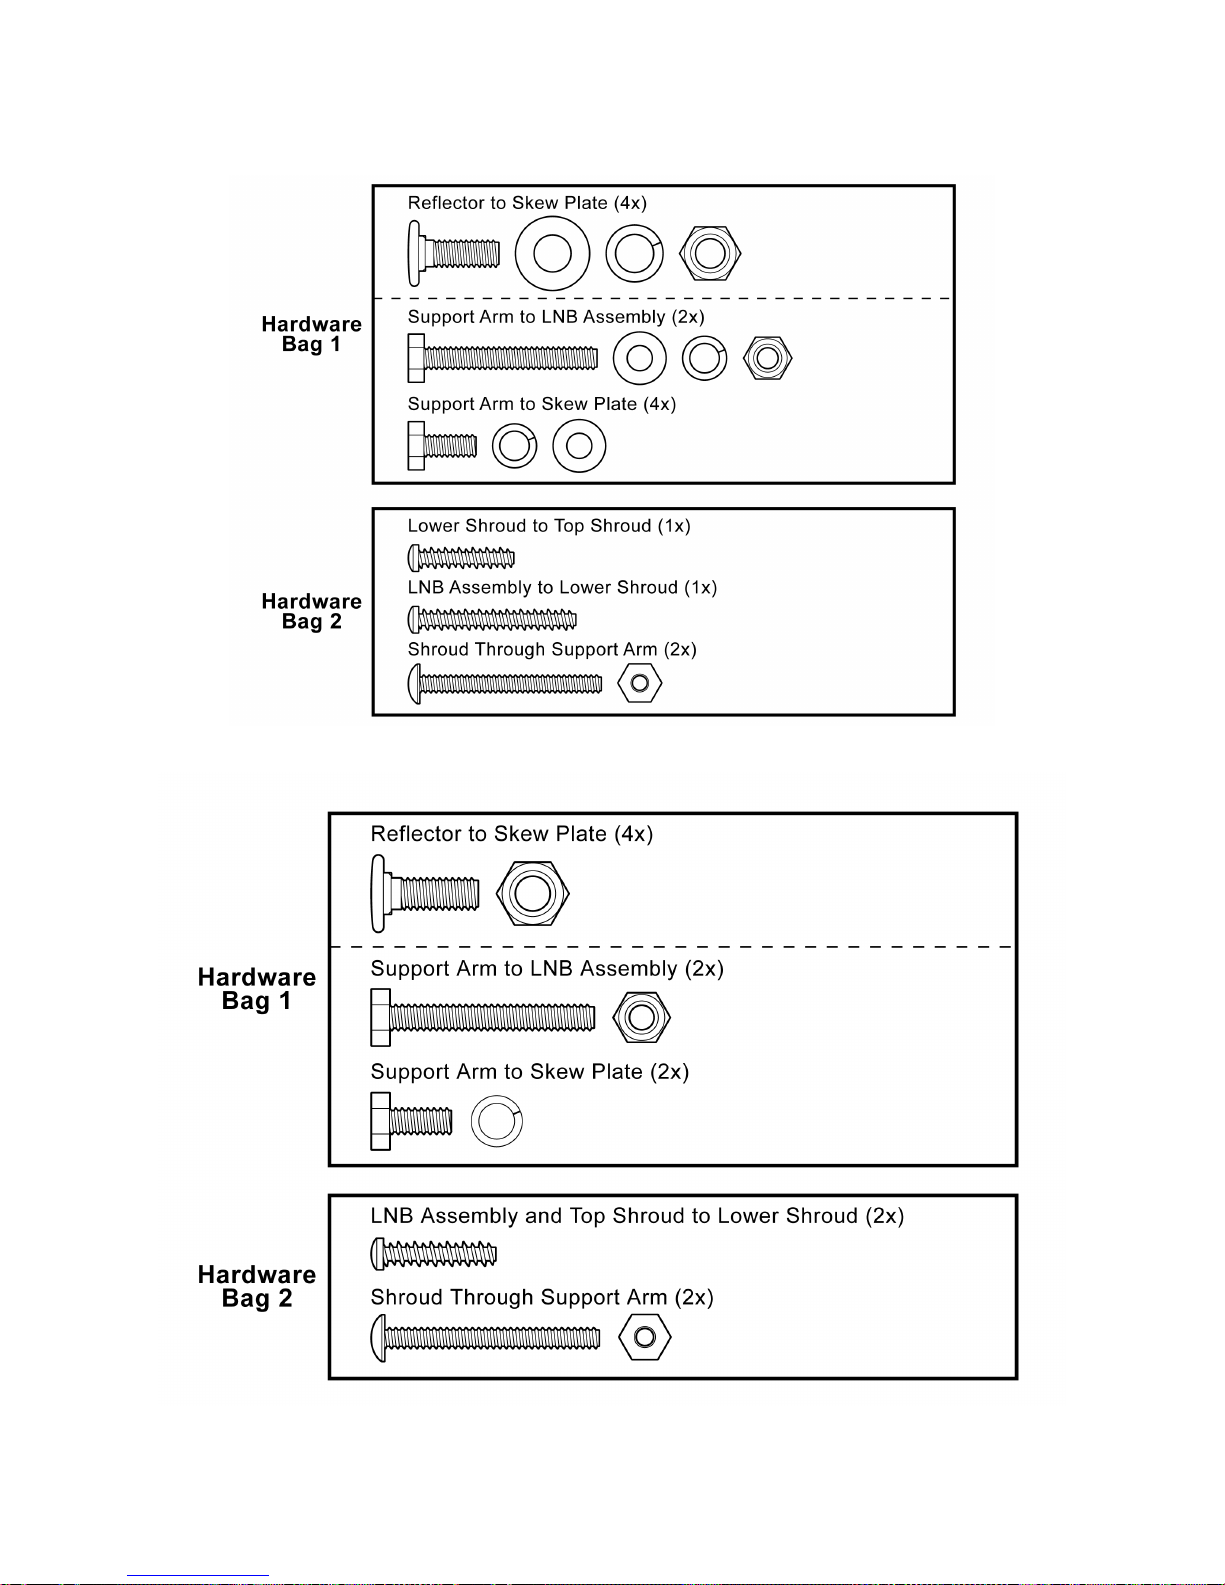
Figure 3c. 121W SuperDISH Antenna Assembly Hardware - Type 1 (See Figure 2a)
Figure 3d. 121W SuperDISH Antenna Assembly Hardware - Type 1 (See Figure 2b)
Page 12
Page 19
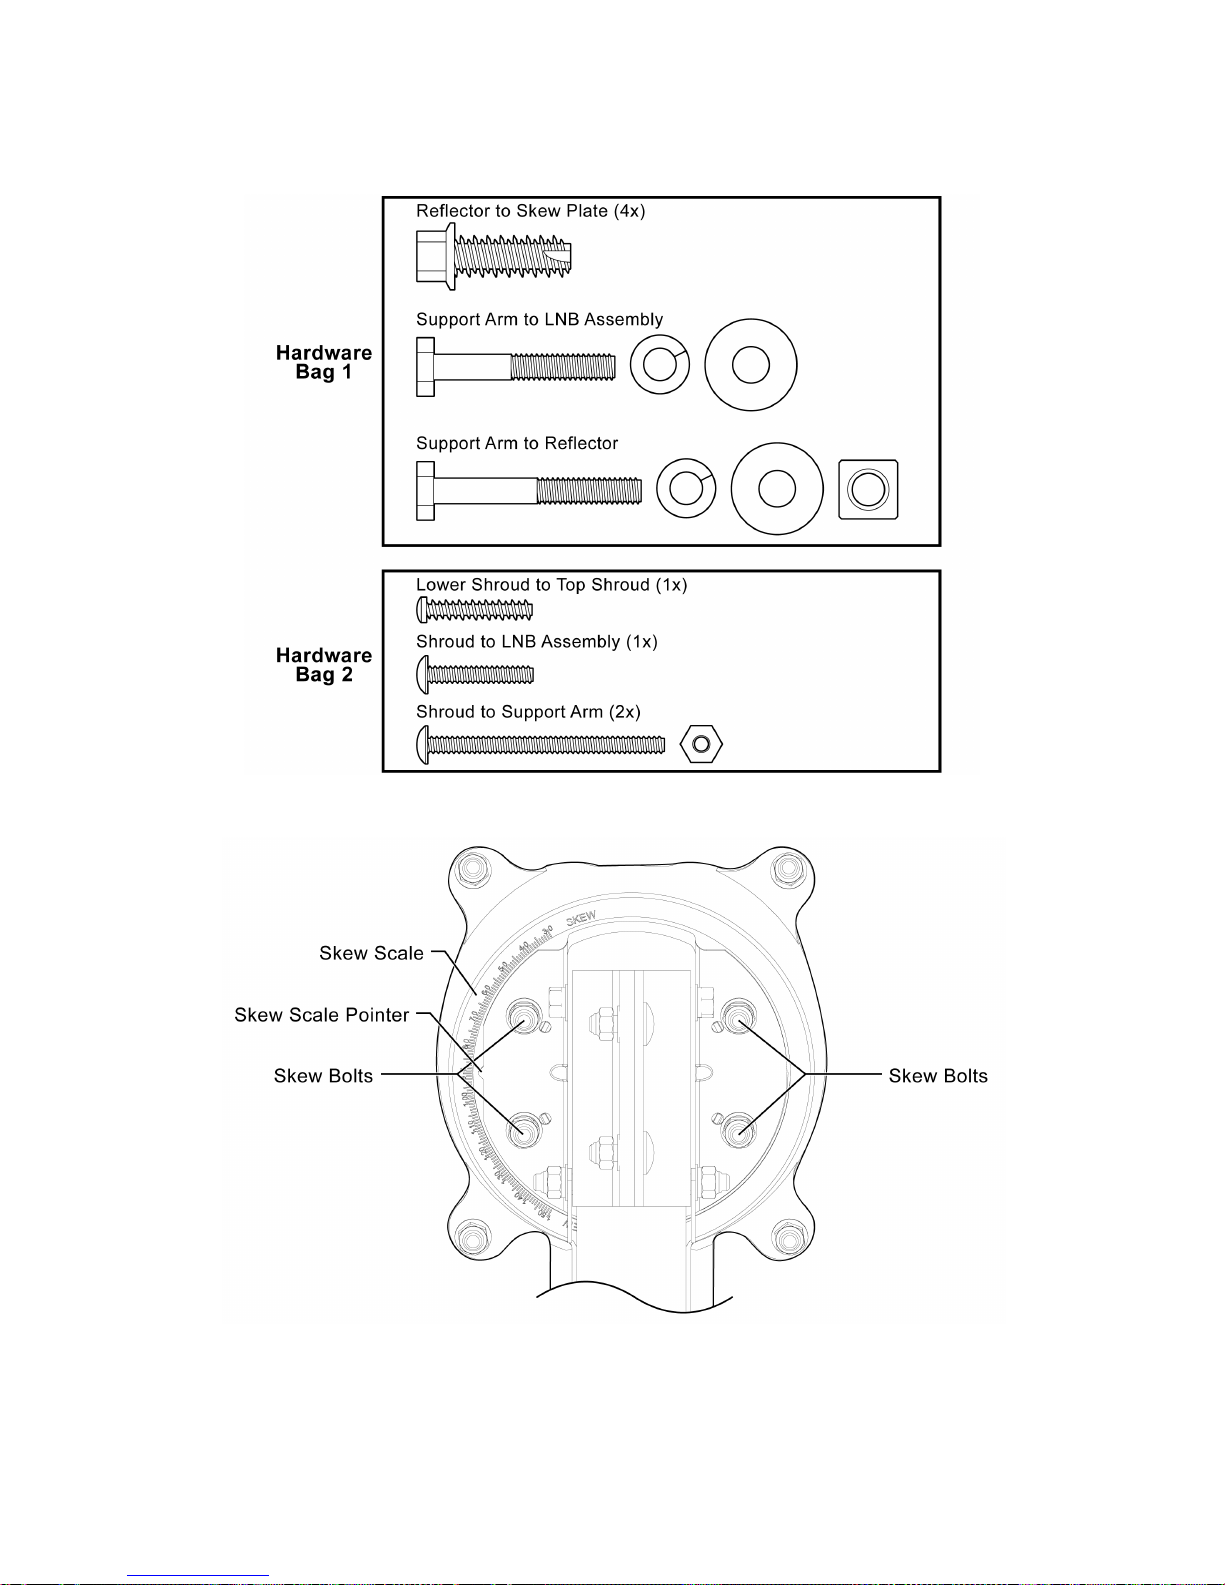
Figure 3e. SuperDISH Antenna Assembly Hardware - Type 2
Figure 4a. Skew Plate - Type 1
Page 13
Page 20
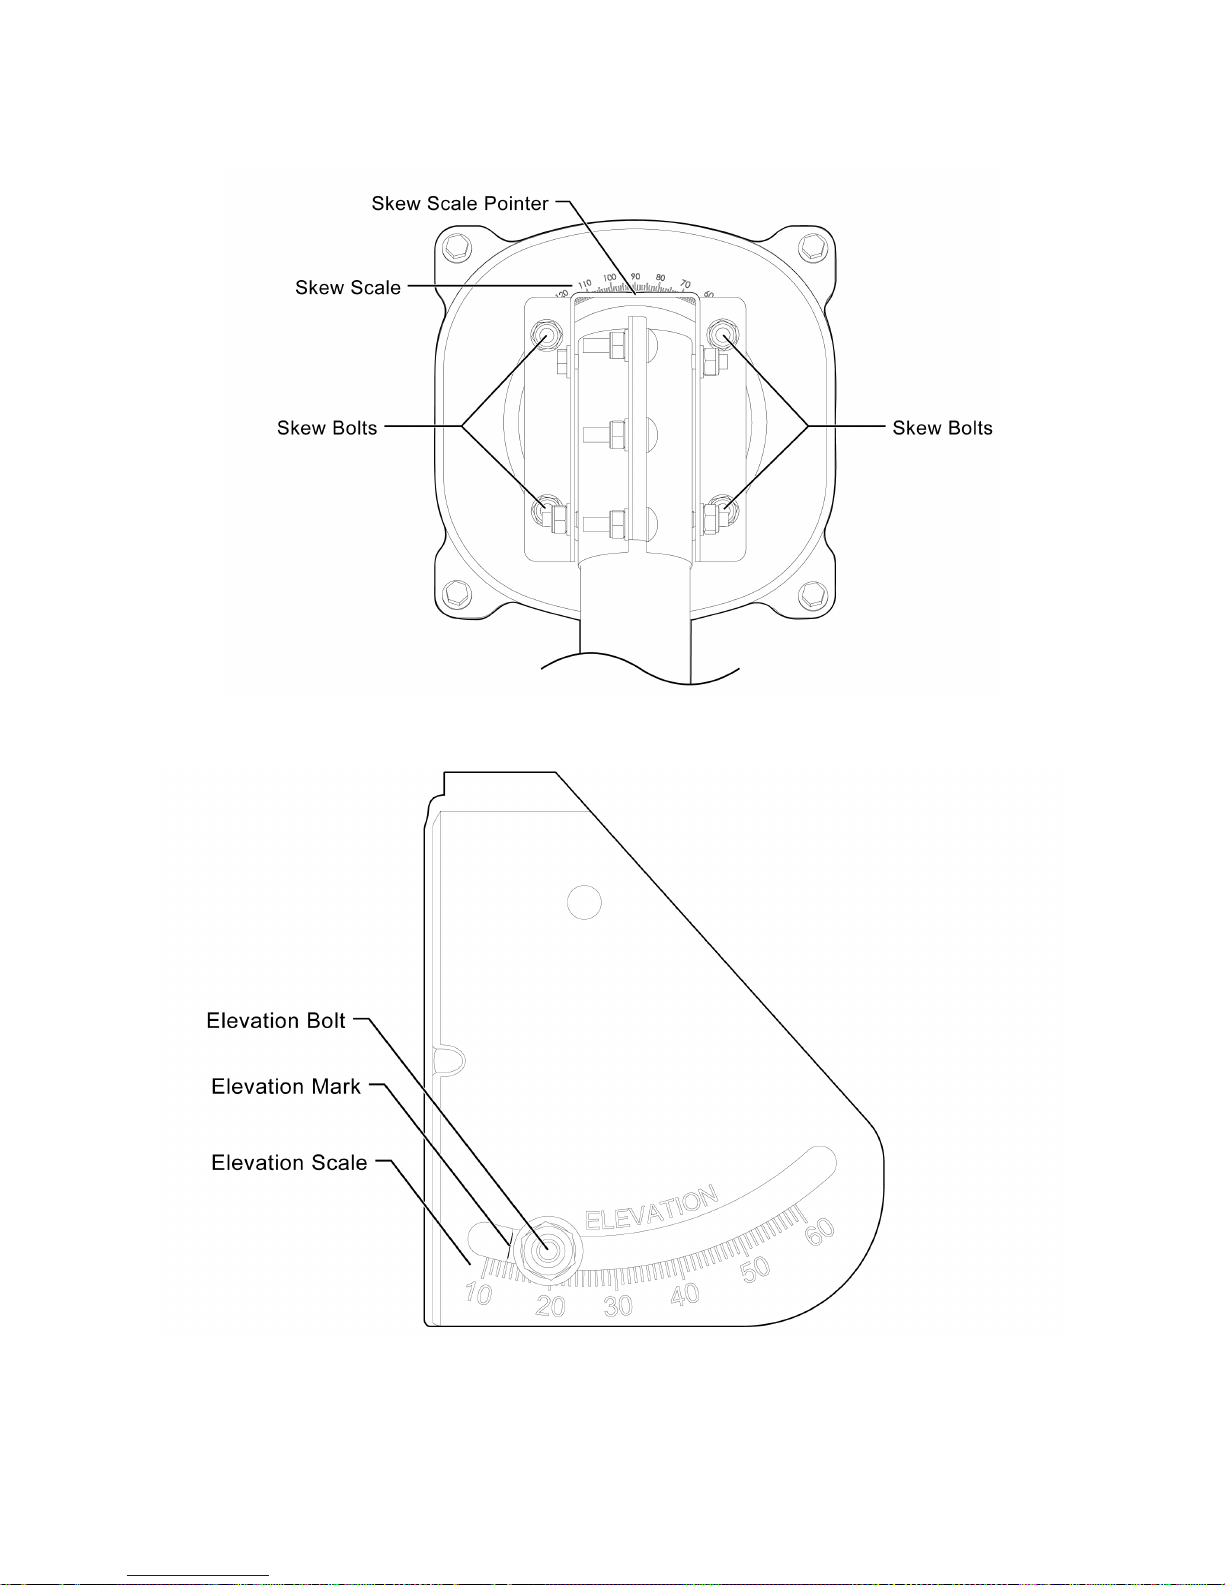
Figure 4b. Skew Plate - Type 2
Page 14
Figure 5. Elevation Scale
Page 21
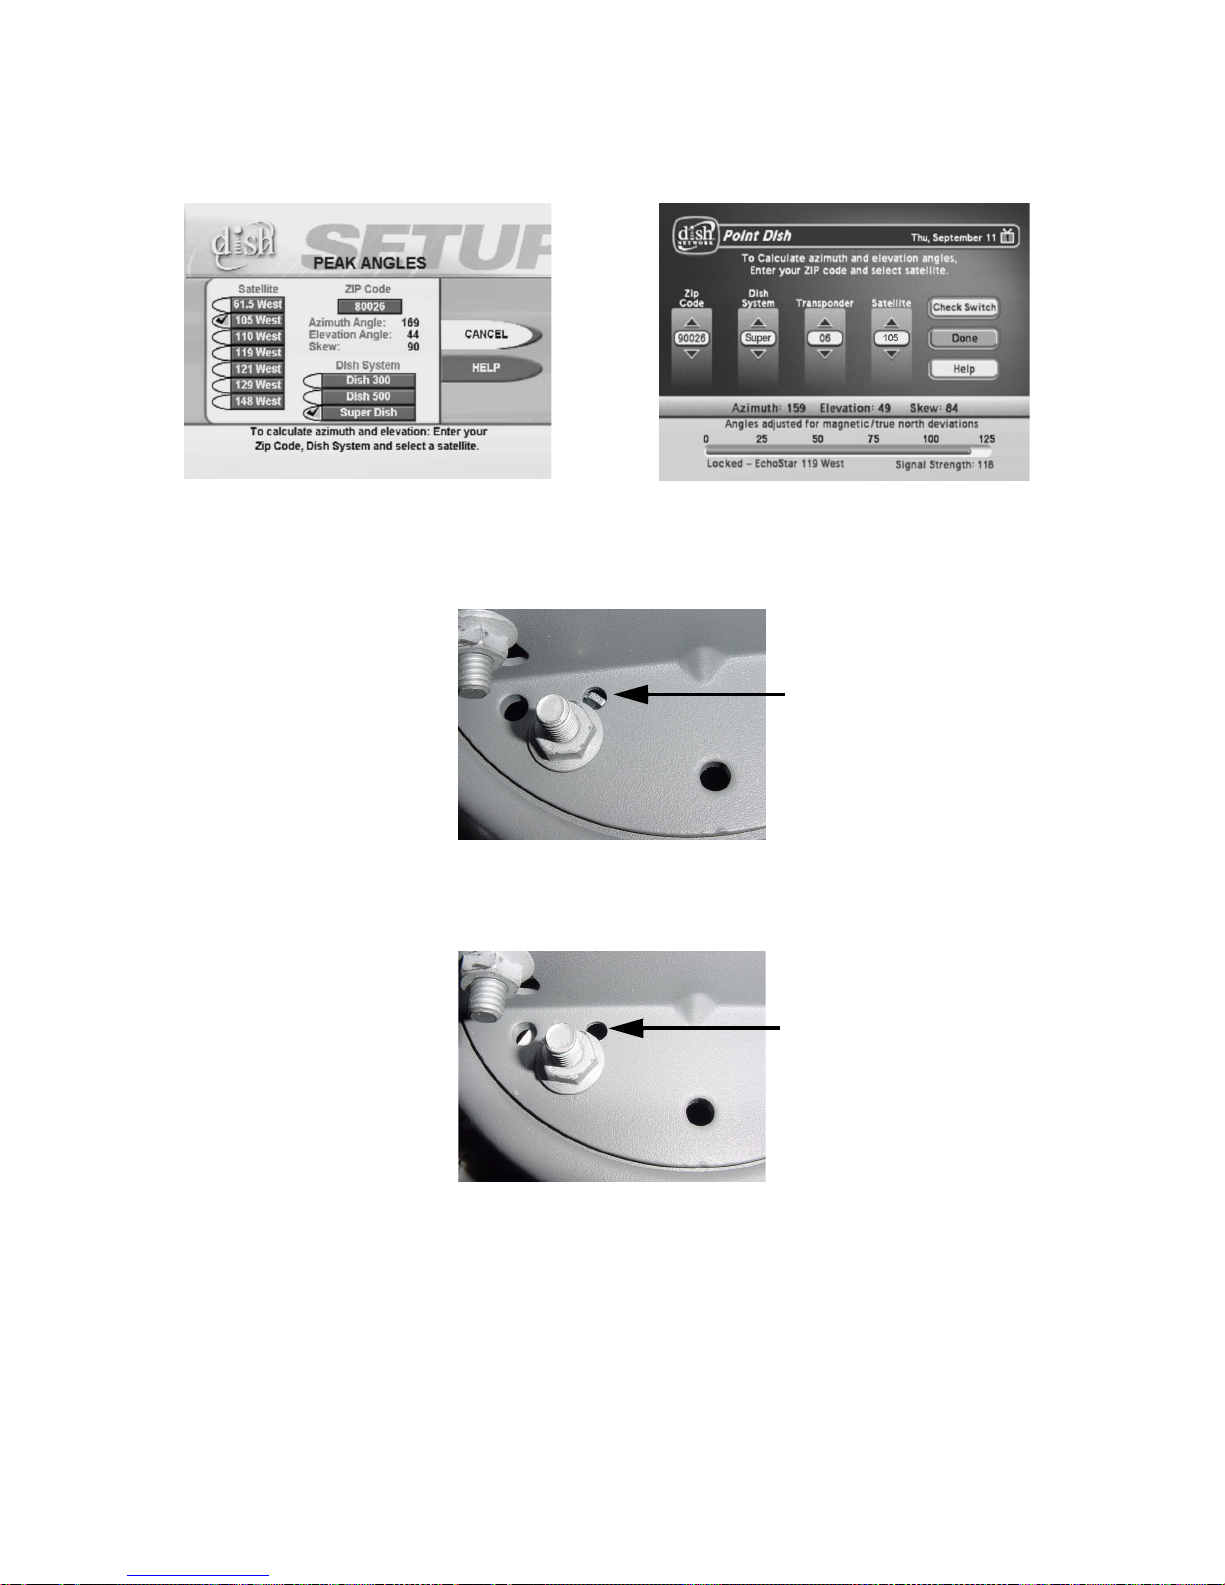
Figure 6. Peak Angles/Point Dish Screen
Note: Depending on the receiver model, you may have to toggle through satellite options to determine
whether 105W and 121W are available.
Clip engaged
Figure 7. Skew Bolt Clip Inserted
Clip disengaged
Page 15
Figure 8. Skew Bolt Clip Disengaged
Page 22

Notes
Page 16
Page 23
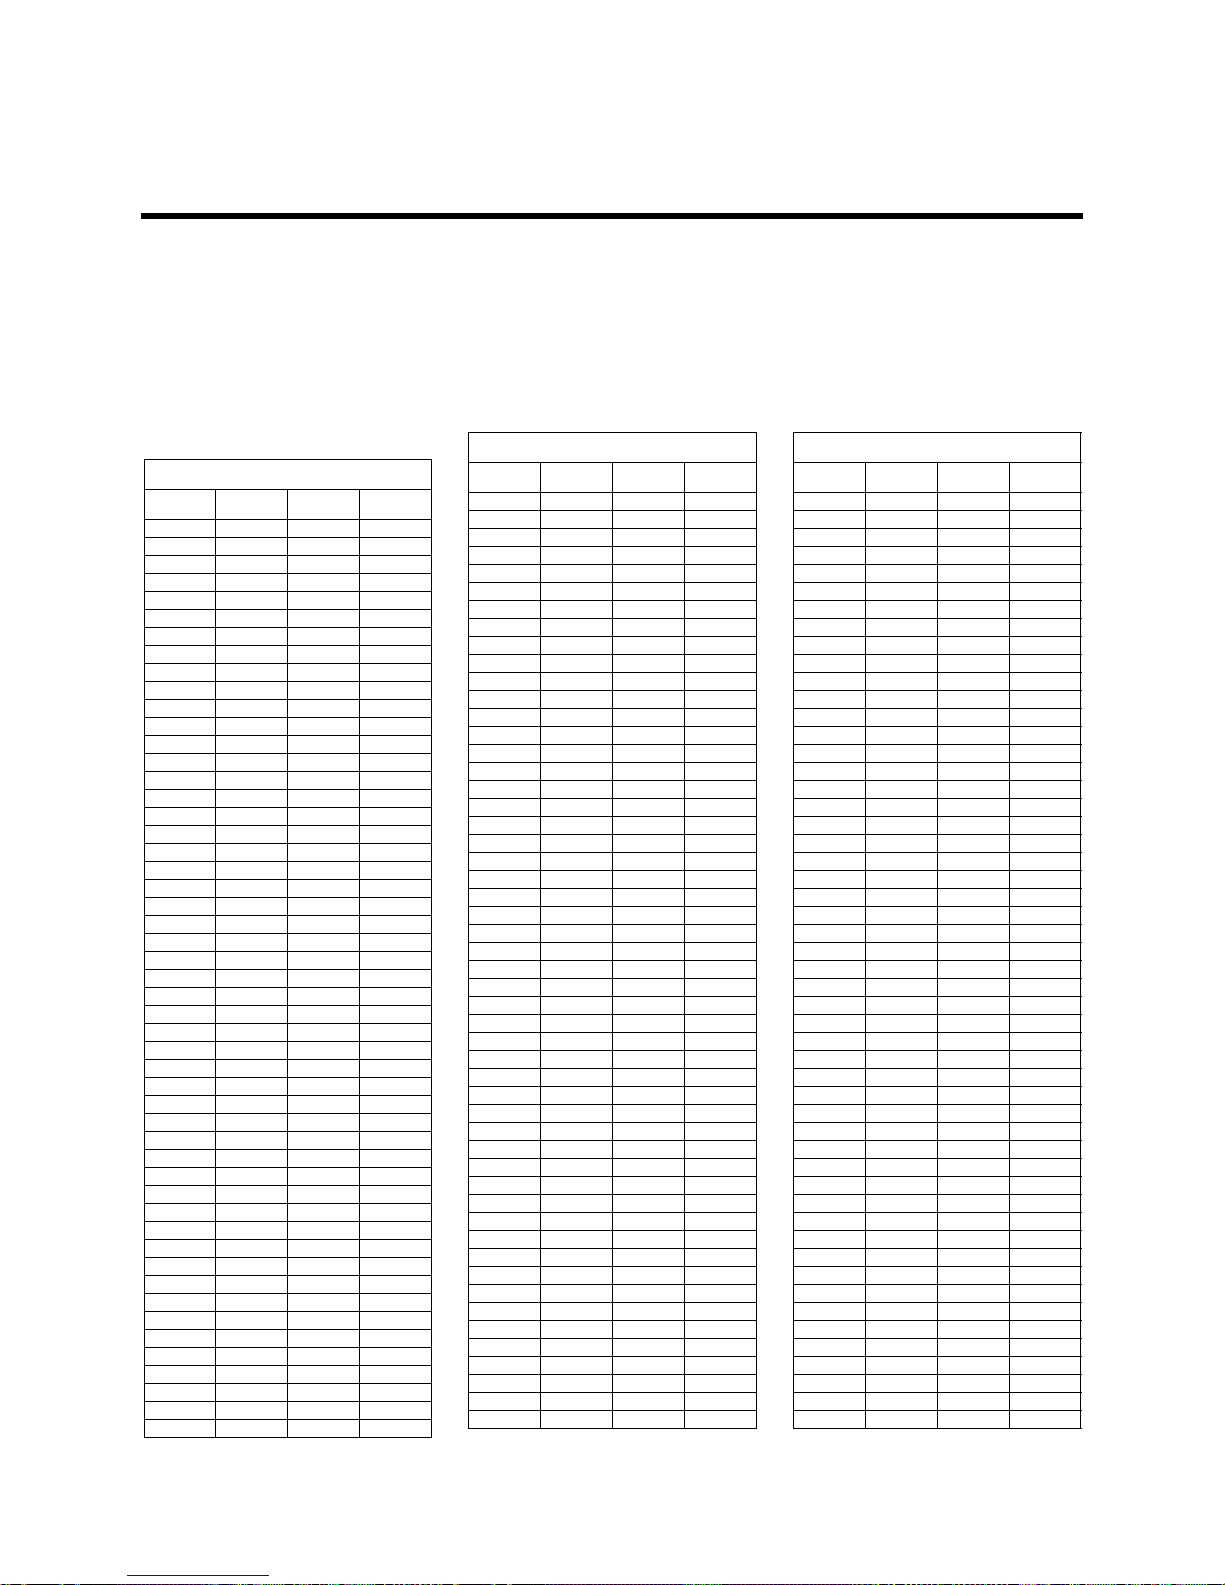
SuperDISH Angles Tables
Use the tables below as follows:
1. Locate the tables that go with the FSS satellite location to be installed (105W or 121W).
2. Find the ZIP code of your location.
3. Find the row that contains the angles for your SuperDISH antenna installation. Most of the ZIP codes
are listed as three digits followed by XX to save space in this guide. The XX represents 00-99 in the
ZIP code. For example, if your ZIP code is 00645, find 006XX and use the angles as listed.
105W Angles
Satellite: 105W
Zip Az Elev Skw
00001 103 9 66
00002 106 9 74
00003 103 11 64
00004 106 11 67
00006 107 11 70
00007 103 5 74
00008 124 23 74
00010 102 6 67
00011 107 12 68
00013 141 42 72
00019 140 40 73
00020 142 44 72
00022 135 40 69
00025 140 39 73
00028 140 41 72
00031 139 45 69
00032 141 46 70
00033 141 42 72
00034 137 38 71
00035 139 39 72
00037 137 40 70
00038 138 40 71
00039 136 40 70
00040 142 43 72
00044 141 43 72
00047 138 41 70
00048 137 41 70
00049 136 38 70
00050 136 39 70
00051 140 42 72
00052 140 42 72
00054 136 39 70
00055 136 39 70
00058 142 44 72
00065 140 41 72
00087 228 48 128
00097 229 50 130
00116 201 53 112
00119 205 53 114
00120 205 53 114
00124 202 51 111
00125 244 26 119
00126 242 28 119
00127 246 27 121
00128 241 28 119
00130 245 26 120
00132 243 27 119
00133 242 28 119
00134 246 27 121
00135 244 27 119
00136 244 26 119
Satellite: 105W
Zip Az Elev Skw
00137 246 26 119
00138 245 26 120
00139 241 28 119
00140 242 28 119
00141 245 27 120
00145 243 27 119
00147 242 28 119
00148 245 25 119
00151 246 26 121
00152 234 36 122
00155 232 36 121
00156 232 36 121
00157 231 36 121
00159 241 31 122
00160 199 33 103
00161 197 33 102
00164 188 34 98
00165 189 33 99
00166 189 34 99
00168 241 29 120
00169 241 29 119
00170 241 28 119
00172 241 29 120
00173 241 29 119
00174 241 29 119
00176 241 29 119
00177 241 29 119
00179 241 29 119
00180 241 29 119
00181 241 29 119
00182 241 29 119
00183 241 29 119
00184 241 29 119
00185 240 29 119
00186 240 29 119
00187 240 28 119
00188 190 57 105
00189 190 57 104
00190 240 29 118
00191 240 29 119
00192 240 29 119
00195 135 33 73
00198 107 12 69
00199 154 51 78
00200 153 52 78
00201 158 52 81
00203 143 46 72
00205 143 44 72
00206 142 47 71
00214 140 47 69
00215 140 47 69
00216 141 47 69
Satellite: 105W
Zip Az Elev Skw
00217 143 46 72
00218 139 41 71
00219 169 45 90
00222 225 47 125
00223 229 49 130
00225 228 48 127
00226 229 50 131
00228 230 49 130
00229 224 48 125
00232 225 49 127
00234 229 49 130
00236 147 39 78
00238 203 51 112
00241 196 33 101
00243 209 50 116
00246 155 35 84
00250 166 49 88
00252 166 52 88
00255 184 49 99
00257 136 36 72
00258 138 37 73
00259 138 38 72
00260 138 35 74
00266 156 43 83
00267 139 32 76
00268 141 35 77
00270 140 35 75
00276 157 38 84
00277 140 32 77
00278 138 36 73
00279 156 39 84
00280 141 42 72
00281 156 41 83
00282 157 41 83
00283 222 36 115
00284 238 29 118
00285 236 33 121
00286 230 40 123
00401 236 33 120
00501 238 33 121
00544 238 33 121
006XX 260 42 152
007XX 260 42 152
008XX 263 40 153
009XX 260 41 152
010XX 238 31 120
011XX 238 31 120
012XX 237 32 120
013XX 238 31 120
014XX 239 31 121
015XX 239 31 121
016XX 239 31 121
Page 17
Page 24
Satellite: 105W
Zip Az Elev Skw
017XX 241 31 121
018XX 241 30 121
019XX 241 30 121
020XX 241 30 121
021XX 241 30 121
022XX 241 30 121
023XX 241 30 122
024XX 241 31 122
025XX 242 31 122
026XX 242 30 122
027XX 240 31 122
028XX 240 31 122
029XX 240 31 121
030XX 240 30 121
031XX 240 30 120
032XX 240 30 120
033XX 240 30 120
034XX 238 31 120
035XX 240 29 119
036XX 238 30 120
037XX 239 30 119
038XX 240 30 120
039XX 241 29 121
040XX 242 29 120
041XX 242 29 121
042XX 242 28 120
043XX 243 28 120
044XX 245 27 120
045XX 243 28 121
046XX 246 27 121
047XX 246 26 119
048XX 244 28 121
049XX 243 28 120
050XX 239 30 119
051XX 238 30 119
052XX 237 31 119
053XX 238 31 120
054XX 238 30 118
055XX 241 30 121
056XX 238 30 119
057XX 237 30 119
058XX 239 29 119
059XX 240 29 119
060XX 237 32 121
061XX 238 32 121
062XX 239 31 121
063XX 239 32 121
064XX 238 32 121
065XX 237 32 121
066XX 237 32 121
067XX 237 32 120
068XX 236 33 121
069XX 236 33 121
070XX 235 33 120
071XX 235 33 121
072XX 235 33 121
073XX 236 33 121
074XX 235 33 120
075XX 235 33 120
076XX 236 33 120
077XX 236 34 121
078XX 234 33 120
079XX 235 34 120
080XX 234 35 121
081XX 234 35 121
082XX 235 35 121
083XX 234 35 121
084XX 235 35 122
Satellite: 105W
Zip Az Elev Skw
085XX 234 34 121
086XX 234 34 121
087XX 235 34 121
088XX 234 34 120
089XX 234 34 121
100XX 236 33 121
101XX 236 33 121
102XX 236 33 121
103XX 236 33 121
104XX 236 33 121
105XX 236 33 120
106XX 236 33 121
107XX 236 33 121
108XX 236 33 121
109XX 238 33 120
110XX 236 33 121
111X X 23 6 33 12 1
112XX 236 33 121
113XX 236 33 121
114XX 236 33 121
115XX 236 33 121
116XX 236 33 121
117XX 236 33 121
118XX 236 33 121
119XX 238 32 122
120XX 236 32 119
121XX 236 32 119
122XX 236 32 119
123XX 236 32 119
124XX 235 32 119
125XX 236 32 120
126XX 235 32 120
127XX 234 33 119
128XX 235 31 118
129XX 236 30 117
130XX 231 33 117
131XX 231 33 117
132XX 231 32 117
133XX 233 32 118
134XX 233 32 118
135XX 233 32 118
136XX 233 31 117
137XX 232 33 118
138XX 232 33 118
139XX 232 33 118
140XX 226 34 115
141XX 226 34 115
142XX 226 34 115
143XX 226 34 115
144XX 228 33 116
145XX 228 33 116
146XX 228 33 116
147XX 226 35 116
148XX 229 34 117
149XX 230 34 117
150XX 224 37 116
151XX 224 37 116
152XX 224 37 116
153XX 223 37 116
154XX 224 37 117
155XX 226 37 118
156XX 224 37 117
157XX 226 36 117
158XX 226 35 117
159XX 226 36 117
160XX 224 36 116
161XX 223 36 115
162XX 225 36 116
Satellite: 105W
Zip Az Elev Skw
163XX 225 35 116
164XX 223 35 115
165XX 223 35 115
166XX 227 36 118
167XX 227 35 116
168XX 228 35 117
169XX 229 34 117
170XX 229 35 119
171XX 230 35 119
172XX 229 36 118
173XX 230 36 119
174XX 230 35 119
175XX 231 35 120
176XX 231 35 120
177XX 230 34 118
178XX 230 35 118
179XX 231 35 119
180XX 233 34 120
181XX 233 34 120
182XX 232 34 119
183XX 233 34 119
184XX 233 33 119
185XX 232 34 119
186XX 232 34 119
187XX 232 34 119
188XX 232 33 118
189XX 234 34 120
190XX 234 35 120
191XX 234 34 120
192XX 234 35 120
193XX 232 35 120
194XX 233 34 120
195XX 232 35 120
196XX 232 35 120
197XX 232 35 120
198XX 232 35 120
199XX 233 36 121
200XX 230 36 120
201XX 229 37 120
202XX 230 36 120
203XX 230 36 120
204XX 230 36 120
205XX 230 36 120
206XX 231 37 121
207XX 230 36 120
208XX 230 36 120
209XX 230 36 120
210XX 230 36 120
211XX 230 36 120
212XX 230 36 120
214XX 231 36 120
215XX 226 37 118
216XX 232 36 121
217XX 229 36 119
218XX 233 36 122
219XX 232 35 120
220XX 229 37 120
221XX 229 37 120
222XX 230 36 120
223XX 230 37 120
224XX 230 37 121
225XX 230 37 121
226XX 228 37 119
227XX 228 37 120
228XX 226 38 119
229XX 227 38 119
230XX 230 38 121
231XX 230 38 121
Page 18
Page 25
Satellite: 105W
Zip Az Elev Skw
232XX 230 38 121
233XX 232 37 122
234XX 232 37 122
235XX 232 38 122
236XX 232 38 122
237XX 232 38 122
238XX 230 38 121
239XX 228 39 120
240XX 225 40 119
241XX 225 40 119
242XX 220 41 117
243XX 222 40 118
244XX 226 38 119
245XX 226 39 120
246XX 220 40 117
247XX 222 40 118
248XX 221 40 117
249XX 224 39 118
250XX 221 39 117
251XX 221 39 117
252XX 221 39 116
253XX 221 39 116
254XX 228 37 119
255XX 219 40 116
256XX 220 40 117
257XX 219 40 116
258XX 222 40 117
259XX 222 40 117
260XX 222 37 116
261XX 221 38 116
262XX 224 38 118
263XX 223 38 117
264XX 223 38 117
265XX 224 37 117
266XX 222 39 117
267XX 226 37 118
268XX 226 37 118
270XX 224 41 119
271XX 224 41 120
272XX 226 40 120
273XX 226 40 120
274XX 226 40 120
275XX 227 40 121
276XX 227 40 121
277XX 227 40 121
278XX 230 39 122
279XX 232 38 123
280XX 223 42 120
281XX 223 42 120
282XX 223 42 120
283XX 227 41 122
284XX 229 41 123
285XX 231 40 124
286XX 222 41 119
287XX 219 43 118
288XX 219 42 118
289XX 217 43 117
290XX 224 43 121
291XX 224 43 121
292XX 224 43 121
293XX 221 43 119
294XX 225 43 123
295XX 227 42 122
296XX 220 43 119
297XX 223 42 120
298XX 222 44 121
299XX 225 44 122
300XX 216 45 118
Satellite: 105W
Zip Az Elev Skw
301XX 215 45 117
302XX 216 45 118
303XX 216 45 118
304XX 222 45 121
305XX 218 44 118
306XX 219 44 119
307XX 214 44 116
308XX 221 44 120
309XX 222 44 120
310XX 219 46 120
311XX 217 45 118
312XX 219 45 119
313XX 224 45 123
314XX 224 45 123
315XX 222 46 122
316XX 221 47 122
317XX 218 47 120
318XX 216 46 118
319XX 216 46 118
320XX 223 47 124
321XX 225 47 125
322XX 225 46 124
323XX 219 48 121
324XX 216 49 119
325XX 213 49 117
326XX 223 48 124
327XX 226 48 126
328XX 226 48 126
329XX 228 48 128
330XX 229 49 131
331XX 230 49 131
332XX 230 49 131
333XX 230 49 130
334XX 230 48 130
335XX 225 49 126
336XX 224 49 126
337XX 223 49 126
338XX 226 49 127
339XX 226 50 128
342XX 224 50 126
344XX 224 48 125
346XX 223 49 125
347XX 225 48 126
349XX 229 48 129
350XX 211 46 115
351XX 211 46 115
352XX 211 46 115
354XX 210 47 114
355XX 209 46 114
356XX 209 45 114
357XX 212 45 115
358XX 211 45 114
359XX 213 45 115
360XX 214 47 117
361XX 213 47 117
362XX 213 46 116
363XX 215 48 119
364XX 212 49 117
365XX 210 49 116
366XX 210 50 116
367XX 211 48 115
368XX 215 47 118
369XX 208 48 115
370XX 210 44 113
371XX 210 44 113
372XX 210 44 113
373XX 214 44 115
374XX 214 44 116
Satellite: 105W
Zip Az Elev Skw
375XX 203 46 110
376XX 220 41 117
377XX 216 42 116
378XX 216 42 116
379XX 216 43 116
380XX 205 46 110
381XX 203 46 110
382XX 205 45 111
383XX 206 45 111
384XX 209 45 113
385XX 213 43 114
386XX 204 47 111
387XX 203 48 110
388XX 206 46 112
389XX 204 48 111
390XX 204 49 112
391XX 204 49 112
392XX 204 49 112
393XX 207 48 114
394XX 206 50 114
395XX 207 50 115
396XX 204 50 112
397XX 207 47 113
399XX 216 45 118
400XX 213 41 113
401XX 211 42 112
402XX 212 41 113
403XX 215 41 114
404XX 215 41 115
405XX 214 41 114
406XX 214 41 113
407XX 215 42 115
408XX 218 41 116
409XX 217 42 116
410XX 215 40 114
411XX 218 40 115
412XX 219 40 116
413XX 217 41 115
414XX 217 41 115
415XX 219 41 117
416XX 219 41 116
417XX 217 41 116
418XX 218 41 116
420XX 206 44 111
421XX 212 43 113
422XX 209 43 112
423XX 209 43 112
424XX 207 43 111
425XX 215 42 115
426XX 215 42 115
427XX 212 42 113
430XX 217 38 114
431XX 217 39 114
432XX 217 38 114
433XX 216 38 113
434XX 218 37 113
435XX 215 38 112
436XX 216 37 112
437XX 220 38 115
438XX 219 38 115
439XX 222 37 116
440XX 220 36 114
441XX 220 37 114
442XX 220 37 114
443XX 220 37 114
444XX 221 36 115
445XX 223 36 115
446XX 221 37 115
Page 19
Page 26
Satellite: 105W
Zip Az Elev Skw
447XX 221 37 115
448XX 218 37 113
449XX 218 38 114
450XX 215 40 113
451XX 215 40 114
452XX 215 40 113
453XX 214 39 113
454XX 215 39 113
455XX 215 39 113
456XX 218 39 115
457XX 220 39 116
458XX 214 38 112
459XX 214 40 113
460XX 210 40 111
461XX 210 40 111
462XX 210 40 111
463XX 208 39 109
464XX 208 39 109
465XX 210 38 110
466XX 210 38 110
467XX 212 38 111
468XX 212 38 111
469XX 211 39 110
470XX 213 40 113
471XX 211 41 112
472XX 212 41 112
473XX 212 39 112
474XX 210 41 111
475XX 209 42 111
476XX 208 42 111
477XX 208 42 111
478XX 208 41 110
479XX 209 40 110
480XX 217 36 112
481XX 215 37 112
482XX 217 36 112
483XX 216 36 112
484XX 216 36 111
485XX 216 36 111
486XX 214 35 110
487XX 216 35 111
488XX 213 36 110
489XX 214 37 111
490XX 212 37 110
491XX 210 38 109
492XX 214 37 111
493XX 211 36 109
494XX 210 37 109
495XX 211 37 109
496XX 211 35 108
497XX 214 34 109
498XX 207 34 106
499XX 204 34 105
500XX 193 41 102
501XX 193 41 103
502XX 193 40 103
503XX 193 41 102
504XX 194 39 102
505XX 191 40 101
506XX 195 39 103
507XX 196 39 103
508XX 191 41 102
509XX 193 41 102
510XX 187 40 100
511XX 187 40 99
512XX 187 39 99
513XX 189 39 100
514XX 190 40 101
Satellite: 105W
Zip Az Elev Skw
515XX 189 41 100
516XX 190 42 101
520XX 199 39 105
521XX 197 38 104
522XX 197 40 104
523XX 197 40 104
524XX 198 40 104
525XX 196 41 104
526XX 198 41 105
527XX 200 40 105
528XX 200 40 106
530XX 205 37 107
531XX 205 38 107
532XX 205 37 107
534XX 206 38 108
535XX 202 38 106
537XX 202 38 106
538XX 199 39 105
539XX 202 37 106
540XX 195 37 102
541XX 205 36 106
542XX 206 36 107
543XX 206 36 106
544XX 201 36 105
545XX 201 35 104
546XX 199 37 104
547XX 198 37 103
548XX 197 35 102
549XX 204 37 106
550XX 194 37 102
551XX 194 37 102
553XX 192 37 101
554XX 193 37 101
555XX 192 37 101
556XX 199 34 102
557XX 194 34 101
558XX 195 35 102
559XX 196 38 103
560XX 192 38 101
561XX 188 39 99
562XX 188 37 99
563XX 190 36 100
564XX 190 35 100
565XX 186 35 98
566XX 190 34 99
567XX 185 34 98
570XX 186 39 98
571XX 186 39 99
572XX 185 38 98
573XX 183 39 97
574XX 181 37 96
575XX 178 39 95
576XX 175 37 94
577XX 172 39 92
580XX 184 36 97
581XX 185 36 98
582XX 183 34 97
583XX 180 34 95
584XX 180 36 96
585XX 176 36 94
586XX 172 36 92
587XX 175 34 93
588XX 170 35 91
590XX 161 37 86
591XX 161 37 87
592XX 167 34 90
593XX 166 37 90
594XX 156 35 84
Satellite: 105W
Zip Az Elev Skw
595XX 158 34 86
596XX 155 36 84
597XX 154 37 83
598XX 150 35 81
599XX 150 34 82
600XX 205 38 108
601XX 205 39 108
602XX 206 38 108
603XX 206 39 108
604XX 206 39 108
605XX 205 39 108
606XX 206 39 108
607XX 206 38 108
609XX 206 40 109
610XX 202 39 106
611XX 203 39 107
612XX 201 40 106
613XX 203 40 107
614XX 201 40 106
615XX 202 40 107
616XX 203 40 107
617XX 204 40 108
618XX 206 40 109
619XX 205 41 109
620XX 202 42 108
622XX 203 43 108
623XX 199 41 106
624XX 206 42 109
625XX 204 41 108
626XX 202 41 107
627XX 202 41 108
628XX 205 42 109
629XX 205 43 110
630XX 200 43 107
631XX 202 43 108
633XX 200 43 107
634XX 198 42 105
635XX 196 42 104
636XX 201 44 108
637XX 203 44 109
638XX 204 45 109
639XX 201 45 108
640XX 193 43 103
641XX 191 43 102
644XX 191 42 102
645XX 191 43 102
646XX 194 42 103
647XX 192 44 103
648XX 192 46 104
649XX 191 44 103
650XX 197 44 105
651XX 197 43 106
652XX 197 43 105
653XX 194 43 104
654XX 198 44 106
655XX 198 44 106
656XX 195 45 105
657XX 195 45 105
658XX 195 45 105
660XX 191 44 102
661XX 191 43 102
662XX 191 44 102
664XX 188 43 101
665XX 188 44 101
666XX 189 44 101
667XX 191 45 103
668XX 188 45 101
669XX 184 43 99
Page 20
Page 27
Satellite: 105W
Zip Az Elev Skw
670XX 185 46 99
671XX 185 46 99
672XX 185 46 100
673XX 189 46 102
674XX 184 44 99
675XX 182 45 98
676XX 181 44 97
677XX 177 44 95
678XX 178 46 96
679XX 177 47 95
680XX 187 41 100
681XX 187 41 100
683XX 186 42 99
684XX 187 42 100
685XX 187 42 99
686XX 184 41 98
687XX 184 41 98
688XX 181 42 97
689XX 181 43 97
690XX 177 43 95
691XX 176 42 94
692XX 177 41 95
693XX 172 41 92
700XX 206 52 114
701XX 206 51 114
703XX 204 52 113
704XX 205 51 113
705XX 200 52 111
706XX 199 52 109
707XX 203 51 112
708XX 203 51 112
710XX 197 50 107
711XX 196 50 107
712XX 200 50 109
713XX 200 51 110
714XX 198 51 109
716XX 200 48 109
717XX 197 49 108
718XX 195 49 106
719XX 196 48 106
720XX 199 47 108
721XX 199 47 108
722XX 198 47 107
723XX 202 46 109
724XX 201 46 109
725XX 199 46 107
726XX 196 46 106
727XX 193 46 104
728XX 196 47 106
729XX 193 47 105
730XX 185 48 100
731XX 186 48 100
733XX 187 54 102
734XX 188 49 101
735XX 184 49 99
736XX 182 48 98
737XX 184 47 99
738XX 181 47 97
739XX 177 47 95
740XX 189 47 102
741XX 189 47 102
743XX 192 46 103
744XX 191 47 103
745XX 190 49 103
746XX 187 47 100
747XX 191 49 104
748XX 188 48 102
749XX 193 48 104
Satellite: 105W
Zip Az Elev Skw
750XX 189 51 102
751XX 190 51 103
752XX 189 51 102
753XX 189 51 102
754XX 190 50 104
755XX 194 50 106
756XX 194 51 106
757XX 192 51 105
758XX 191 52 105
759XX 195 52 107
760XX 188 51 102
761XX 187 51 102
762XX 187 50 101
763XX 184 50 99
764XX 185 51 100
765XX 188 53 102
766XX 188 52 103
767XX 188 52 102
768XX 183 53 99
769XX 180 53 97
770XX 193 54 106
772XX 193 54 106
773XX 193 53 106
774XX 192 54 106
775XX 195 54 107
776XX 196 53 108
777XX 196 53 108
778XX 191 53 104
779XX 189 55 104
780XX 186 55 101
781XX 187 55 102
782XX 186 55 101
783XX 188 57 103
784XX 189 57 104
785XX 188 58 104
786XX 187 54 102
787XX 187 54 102
788XX 182 55 99
789XX 190 54 104
790XX 177 49 95
791XX 176 49 94
792XX 180 50 96
793XX 176 51 94
794XX 177 51 95
795XX 181 52 97
796XX 182 52 98
797XX 176 53 94
798XX 171 54 91
799XX 167 53 88
800XX 169 44 90
801XX 169 44 90
802XX 169 44 90
803XX 169 44 90
804XX 167 44 89
805XX 169 43 90
806XX 170 43 90
807XX 173 43 92
808XX 171 45 91
809XX 169 45 90
810XX 172 46 91
811XX 167 47 88
812XX 167 45 89
813XX 162 46 86
814XX 163 45 86
815XX 161 45 86
816XX 164 44 87
820XX 169 42 90
821XX 157 38 84
Satellite: 105W
Zip Az Elev Skw
822XX 170 41 90
823XX 164 42 88
824XX 161 39 87
825XX 160 40 86
826XX 166 40 88
827XX 168 39 90
828XX 164 38 88
829XX 159 42 85
830XX 157 39 84
831XX 158 41 84
832XX 154 40 82
833XX 151 40 80
834XX 155 39 83
835XX 147 36 79
836XX 147 38 79
837XX 147 38 79
838XX 147 34 80
840XX 156 43 83
841XX 156 42 82
842XX 154 42 82
843XX 154 41 82
844XX 154 42 82
845XX 159 45 83
846XX 155 44 82
847XX 154 45 80
850XX 155 50 80
852XX 156 51 80
853XX 153 50 78
855XX 158 51 82
856XX 158 52 81
857XX 157 52 81
859XX 159 50 83
860XX 156 48 81
863XX 154 49 80
864XX 152 48 77
865XX 160 48 84
870XX 166 49 87
871XX 166 49 88
872XX 166 49 88
873XX 162 49 85
874XX 163 47 86
875XX 167 48 89
877XX 169 48 90
878XX 164 50 86
879XX 165 52 87
880XX 164 52 86
881XX 173 50 92
882XX 172 52 92
883XX 169 51 89
884XX 172 49 92
885XX 167 53 88
889XX 149 47 76
890XX 149 46 76
891XX 149 47 76
893XX 149 43 78
894XX 143 42 74
895XX 141 42 73
897XX 141 42 73
898XX 148 41 78
900XX 143 48 71
902XX 143 48 71
903XX 143 48 71
904XX 143 48 71
905XX 143 48 71
906XX 143 48 72
907XX 143 48 71
908XX 143 48 71
910XX 143 48 72
Page 21
Page 28
Satellite: 105W
Zip Az Elev Skw
911XX 143 48 72
912XX 143 48 71
913XX 143 48 71
914XX 143 48 71
915XX 143 48 71
916XX 143 48 71
917XX 144 48 72
918XX 143 48 72
919XX 146 50 72
920XX 146 49 72
921XX 145 50 72
922XX 148 49 74
923XX 146 48 73
924XX 145 48 73
925XX 145 49 73
926XX 144 48 72
927XX 144 48 72
928XX 144 48 72
930XX 142 47 70
931XX 141 47 70
932XX 142 46 71
933XX 143 46 71
934XX 139 46 69
935XX 144 46 72
936XX 141 45 71
937XX 141 45 71
938XX 141 45 71
939XX 138 44 69
940XX 137 43 69
941XX 137 43 69
942XX 139 42 71
943XX 137 43 69
944XX 137 43 69
945XX 137 43 69
946XX 137 43 69
947XX 137 43 69
948XX 137 42 69
949XX 137 42 69
950XX 138 43 69
951XX 137 43 69
952XX 139 43 71
953XX 140 43 71
954XX 137 41 69
955XX 135 39 70
956XX 139 42 71
957XX 139 42 71
958XX 139 42 71
959XX 139 41 71
960XX 138 40 71
961XX 141 41 73
967XX 90 27 26
968XX 89 26 26
970XX 137 35 74
971XX 136 34 73
972XX 137 35 74
973XX 136 35 73
974XX 136 36 72
975XX 136 38 71
976XX 140 38 73
977XX 140 37 74
978XX 143 36 77
979XX 145 38 77
980XX 137 33 75
981XX 137 33 75
982XX 137 32 75
983XX 137 33 75
984XX 137 33 75
985XX 136 33 74
Satellite: 105W
Zip Az Elev Skw
986XX 137 34 74
988XX 141 33 77
989XX 140 34 76
990XX 144 34 79
991XX 144 34 79
992XX 144 34 79
993XX 142 35 77
994XX 145 36 79
995XX 104 10 66
996XX 103 9 66
997XX 104 7 72
998XX 119 19 73
999XX 122 22 73
121W Angles
Satellite: 121W
Zip Az Elev Skw
00001 119 15 72
00002 122 12 79
00003 119 17 70
00004 122 16 73
00006 123 16 76
00007 119 9 79
00008 142 26 84
00010 118 12 71
00011 124 18 74
00013 165 45 91
00019 164 43 91
00020 168 46 92
00022 159 44 87
00025 163 42 90
00028 164 44 90
00031 165 49 90
00032 168 49 92
00033 165 44 91
00034 160 42 87
00035 162 42 89
00037 160 44 88
00038 162 44 89
00039 160 43 87
00040 167 46 92
00044 166 45 91
00047 162 44 88
00048 161 44 88
00049 159 42 87
00050 159 42 87
00051 165 45 91
00052 165 45 91
00054 159 42 87
00055 160 43 87
00058 167 46 92
00065 164 44 90
00087 245 35 141
00097 246 37 143
00116 224 43 130
00119 228 42 132
00120 227 43 132
00124 224 42 129
00125 259 17 126
00126 258 18 127
00127 261 17 128
00128 256 19 127
00130 260 17 127
00132 259 18 127
00133 258 18 127
00134 261 17 128
00135 259 17 127
Satellite: 121W
Zip Az Elev Skw
00136 260 17 127
00137 261 16 127
00138 260 16 127
00139 257 19 128
00140 258 18 127
00141 261 17 128
00145 258 18 127
00147 258 18 127
00148 261 16 126
00151 261 17 129
00152 250 25 132
00155 248 26 132
00156 248 26 132
00157 248 26 131
00159 256 21 131
00160 218 28 114
00161 216 28 114
00164 208 29 111
00165 209 29 111
00166 209 29 111
00168 257 19 128
00169 256 19 128
00170 256 19 127
00172 256 19 128
00173 256 19 128
00174 256 19 128
00176 256 19 128
00177 256 19 128
00179 256 19 128
00180 256 19 128
00181 256 19 128
00182 256 19 128
00183 256 19 128
00184 256 19 128
00185 256 19 127
00186 256 19 127
00187 256 19 127
00188 217 49 128
00189 217 49 128
00190 256 19 127
00191 256 19 127
00192 256 19 127
00195 156 37 87
00198 124 17 76
00199 183 51 103
00200 183 52 102
00201 187 51 106
00203 170 49 93
00205 168 47 93
00206 169 50 93
00214 167 50 91
00215 168 51 91
00216 168 50 92
00217 169 48 93
00218 164 44 90
00219 194 42 109
00222 243 35 138
00223 246 36 143
00225 245 35 140
00226 246 36 143
00228 247 36 143
00229 242 36 138
00232 243 37 140
00234 246 36 142
00236 170 40 95
00238 225 42 130
00241 216 28 113
00243 230 40 132
Page 22
Page 29
Satellite: 121W
Zip Az Elev Skw
00246 177 34 99
00250 193 46 109
00252 195 49 111
00255 209 43 119
00257 158 39 87
00258 160 39 89
00259 161 41 88
00260 160 38 89
00266 181 43 101
00267 160 34 90
00268 163 36 91
00270 161 37 90
00276 179 37 100
00277 161 34 91
00278 160 39 89
00279 179 38 100
00280 166 45 91
00281 179 40 100
00282 180 41 101
00283 240 27 126
00284 254 20 127
00285 252 23 130
00286 247 29 134
00401 252 23 130
00501 253 22 130
00544 253 22 130
006XX 269 26 158
007XX 269 26 158
008XX 271 24 158
009XX 269 25 158
010XX 254 21 129
011XX 254 21 129
012XX 253 22 129
013XX 254 21 129
014XX 255 21 129
015XX 255 21 130
016XX 255 21 129
017XX 256 21 130
018XX 256 20 129
019XX 256 20 130
020XX 257 20 130
021XX 256 20 130
022XX 256 20 130
023XX 257 20 130
024XX 257 20 130
025XX 257 20 131
026XX 258 20 131
027XX 256 21 130
028XX 255 21 130
029XX 255 21 130
030XX 256 20 129
031XX 256 20 129
032XX 255 20 128
033XX 256 20 129
034XX 254 21 129
035XX 256 19 127
036XX 254 21 128
037XX 255 20 128
038XX 256 20 129
039XX 256 20 129
040XX 257 19 129
041XX 258 19 129
042XX 257 19 128
043XX 259 18 128
044XX 260 17 128
045XX 258 18 129
046XX 261 17 129
047XX 261 16 127
Satellite: 121W
Zip Az Elev Skw
048XX 259 18 129
049XX 259 18 128
050XX 255 20 128
051XX 254 21 128
052XX 253 21 128
053XX 254 21 128
054XX 254 20 127
055XX 256 20 129
056XX 254 20 127
057XX 253 21 128
058XX 254 20 127
059XX 256 19 127
060XX 253 22 129
061XX 253 22 130
062XX 255 21 130
063XX 255 21 130
064XX 253 22 130
065XX 253 22 130
066XX 253 22 130
067XX 253 22 130
068XX 252 23 130
069XX 252 23 130
070XX 251 23 130
071XX 252 23 130
072XX 252 23 130
073XX 252 23 130
074XX 251 23 130
075XX 251 23 130
076XX 252 23 130
077XX 252 23 130
078XX 250 24 130
079XX 251 23 130
080XX 250 24 131
081XX 250 24 130
082XX 251 24 131
083XX 250 25 131
084XX 251 24 131
085XX 250 24 130
086XX 250 24 130
087XX 251 24 131
088XX 250 24 130
089XX 250 24 130
100XX 252 23 130
101XX 252 23 130
102XX 252 23 130
103XX 252 23 130
104XX 252 23 130
105XX 252 23 130
106XX 252 23 130
107XX 252 23 130
108XX 252 23 130
109XX 254 23 129
110XX 252 23 130
111XX 252 23 130
112XX 252 23 130
113XX 252 23 130
114XX 252 23 130
115XX 252 23 130
116XX 252 23 130
117XX 252 23 130
118XX 252 23 130
119XX 254 22 131
120XX 252 22 128
121XX 252 22 128
122XX 252 22 128
123XX 252 22 128
124XX 251 23 129
125XX 252 22 129
Satellite: 121W
Zip Az Elev Skw
126XX 251 23 129
127XX 251 23 129
128XX 252 21 127
129XX 252 21 126
130XX 248 23 127
131XX 247 23 127
132XX 248 23 127
133XX 249 23 127
134XX 249 23 127
135XX 249 23 127
136XX 250 22 126
137XX 249 23 128
138XX 248 23 128
139XX 248 24 128
140XX 243 25 126
141XX 243 25 126
142XX 243 25 126
143XX 243 25 125
144XX 245 24 126
145XX 245 24 126
146XX 245 24 126
147XX 243 25 126
148XX 246 24 127
149XX 246 24 127
150XX 241 27 127
151XX 241 27 127
152XX 241 27 127
153XX 241 28 128
154XX 242 27 128
155XX 244 27 128
156XX 242 27 128
157XX 243 27 128
158XX 243 26 127
159XX 243 27 128
160XX 241 27 127
161XX 241 27 126
162XX 243 27 127
163XX 242 26 126
164XX 240 26 126
165XX 240 26 126
166XX 244 26 128
167XX 244 26 127
168XX 245 26 128
169XX 246 25 127
170XX 246 25 129
171XX 246 25 129
172XX 246 26 129
173XX 247 26 130
174XX 247 25 130
175XX 248 25 130
176XX 248 25 130
177XX 247 25 128
178XX 247 25 129
179XX 248 25 129
180XX 249 24 129
181XX 249 24 130
182XX 249 24 129
183XX 249 24 129
184XX 249 24 129
185XX 249 24 129
186XX 249 24 129
187XX 249 24 129
188XX 248 24 128
189XX 250 24 130
190XX 250 24 130
191XX 250 24 130
192XX 250 24 130
193XX 249 25 130
Page 23
Page 30
Satellite: 121W
Zip Az Elev Skw
194XX 250 24 130
195XX 248 25 129
196XX 248 25 130
197XX 249 25 130
198XX 249 25 130
199XX 249 25 131
200XX 247 26 130
201XX 246 26 130
202XX 247 26 130
203XX 247 26 130
204XX 247 26 130
205XX 247 26 130
206XX 247 26 131
207XX 247 26 131
208XX 247 26 130
209XX 247 26 130
210XX 247 26 130
211XX 247 26 130
212XX 247 26 130
214XX 247 26 131
215XX 244 27 129
216XX 249 26 131
217XX 246 26 130
218XX 250 26 132
219XX 249 25 130
220XX 246 27 130
221XX 246 27 130
222XX 247 26 130
223XX 247 26 131
224XX 247 27 131
225XX 247 27 131
226XX 245 27 130
227XX 245 27 130
228XX 243 28 130
229XX 244 28 131
230XX 247 27 132
231XX 247 27 132
232XX 246 27 132
233XX 249 26 133
234XX 249 26 133
235XX 249 27 133
236XX 249 27 133
237XX 249 27 133
238XX 247 28 132
239XX 245 28 132
240XX 242 29 131
241XX 242 30 131
242XX 238 31 129
243XX 240 30 130
244XX 243 28 130
245XX 243 29 131
246XX 238 31 130
247XX 240 30 130
248XX 240 30 129
249XX 241 29 130
250XX 239 30 129
251XX 239 30 129
252XX 239 30 128
253XX 239 30 128
254XX 245 27 129
255XX 237 30 128
256XX 238 30 129
257XX 237 30 128
258XX 240 30 129
259XX 240 30 129
260XX 240 28 127
261XX 239 29 128
262XX 241 28 129
Satellite: 121W
Zip Az Elev Skw
263XX 240 29 128
264XX 241 28 128
265XX 241 28 128
266XX 240 29 129
267XX 243 27 129
268XX 243 28 129
270XX 241 30 131
271XX 242 30 132
272XX 243 30 132
273XX 243 30 132
274XX 243 30 132
275XX 244 29 133
276XX 244 29 133
277XX 244 29 132
278XX 246 28 133
279XX 248 27 134
280XX 240 31 132
281XX 241 31 132
282XX 241 31 132
283XX 245 30 133
284XX 246 30 135
285XX 247 29 134
286XX 240 31 131
287XX 238 32 131
288XX 238 32 131
289XX 236 34 130
290XX 242 32 134
291XX 242 32 134
292XX 241 32 133
293XX 239 32 132
294XX 243 32 135
295XX 244 31 134
296XX 238 33 132
297XX 241 32 132
298XX 240 33 133
299XX 242 33 135
300XX 235 35 131
301XX 235 35 131
302XX 235 35 132
303XX 235 35 131
304XX 240 34 134
305XX 236 34 131
306XX 237 34 132
307XX 234 35 130
308XX 240 34 133
309XX 240 33 133
310XX 238 35 133
311XX 236 35 132
312XX 238 35 133
313XX 241 34 135
314XX 242 33 135
315XX 240 35 136
316XX 239 36 135
317XX 237 36 134
318XX 236 36 133
319XX 236 36 133
320XX 241 35 137
321XX 243 35 138
322XX 242 35 137
323XX 238 37 135
324XX 236 38 134
325XX 233 39 133
326XX 241 36 137
327XX 243 35 139
328XX 244 35 139
329XX 245 35 140
330XX 246 36 143
331XX 247 36 143
Satellite: 121W
Zip Az Elev Skw
332XX 247 36 143
333XX 246 36 143
334XX 247 36 142
335XX 243 36 139
336XX 242 37 139
337XX 241 37 139
338XX 243 36 140
339XX 244 37 141
342XX 242 37 140
344XX 242 36 138
346XX 241 37 139
347XX 243 36 139
349XX 246 35 141
350XX 231 37 130
351XX 231 37 130
352XX 231 37 130
354XX 230 38 130
355XX 230 37 129
356XX 230 36 128
357XX 231 35 129
358XX 231 36 129
359XX 232 35 130
360XX 234 37 132
361XX 233 37 132
362XX 233 36 131
363XX 235 37 133
364XX 232 38 132
365XX 231 39 132
366XX 231 40 132
367XX 231 38 131
368XX 234 36 132
369XX 229 39 131
370XX 230 35 127
371XX 230 35 127
372XX 230 35 127
373XX 233 34 129
374XX 233 34 130
375XX 224 38 126
376XX 238 32 130
377XX 235 33 129
378XX 235 33 129
379XX 235 33 129
380XX 226 37 126
381XX 224 38 126
382XX 226 36 126
383XX 227 36 127
384XX 229 36 128
385XX 232 34 128
386XX 225 38 127
387XX 224 39 127
388XX 227 37 128
389XX 225 39 127
390XX 226 40 129
391XX 226 40 129
392XX 226 40 129
393XX 229 39 130
394XX 228 40 131
395XX 229 40 132
396XX 226 41 130
397XX 228 38 129
399XX 235 35 131
400XX 232 32 126
401XX 231 33 126
402XX 231 33 126
403XX 234 32 127
404XX 234 32 128
405XX 233 32 127
406XX 233 32 127
Page 24
Page 31
Satellite: 121W
Zip Az Elev Skw
407XX 234 32 128
408XX 236 32 129
409XX 236 32 129
410XX 234 31 126
411XX 237 31 128
412XX 237 31 128
413XX 236 32 128
414XX 236 31 128
415XX 238 31 129
416XX 237 31 129
417XX 236 32 129
418XX 236 31 129
420XX 227 35 125
421XX 231 34 127
422XX 229 34 126
423XX 229 34 126
424XX 227 34 125
425XX 234 33 128
426XX 234 33 128
427XX 231 33 127
430XX 236 29 126
431XX 236 30 126
432XX 236 30 126
433XX 235 29 125
434XX 236 29 124
435XX 234 29 124
436XX 234 29 124
437XX 238 29 127
438XX 238 29 126
439XX 240 28 127
440XX 238 28 126
441XX 238 28 125
442XX 238 28 126
443XX 238 28 126
444XX 239 27 126
445XX 240 27 126
446XX 239 28 126
447XX 239 28 126
448XX 236 29 125
449XX 237 29 126
450XX 233 31 126
451XX 234 31 126
452XX 234 31 126
453XX 233 30 125
454XX 234 31 126
455XX 234 30 126
456XX 236 30 127
457XX 238 29 127
458XX 233 30 125
459XX 233 31 126
460XX 229 31 124
461XX 229 32 124
462XX 229 32 124
463XX 227 31 122
464XX 227 31 122
465XX 230 30 123
466XX 229 30 122
467XX 231 30 124
468XX 231 30 124
469XX 230 31 123
470XX 232 32 126
471XX 230 33 126
472XX 231 32 125
473XX 231 31 125
474XX 229 33 125
475XX 228 33 125
476XX 228 34 125
477XX 228 34 125
Satellite: 121W
Zip Az Elev Skw
478XX 227 33 124
479XX 228 32 123
480XX 235 28 124
481XX 234 28 124
482XX 235 28 124
483XX 235 28 123
484XX 234 27 123
485XX 234 28 123
486XX 232 28 122
487XX 234 27 122
488XX 232 28 122
489XX 232 29 123
490XX 231 30 122
491XX 229 30 122
492XX 233 29 123
493XX 230 29 121
494XX 229 29 121
495XX 230 29 122
496XX 229 28 120
497XX 232 26 120
498XX 226 27 118
499XX 223 28 116
500XX 214 34 117
501XX 214 34 117
502XX 214 34 117
503XX 214 34 117
504XX 214 33 116
505XX 212 34 116
506XX 216 33 117
507XX 217 33 117
508XX 212 35 117
509XX 214 34 117
510XX 209 35 115
511XX 208 35 114
512XX 208 34 114
513XX 210 34 115
514XX 211 35 116
515XX 211 36 116
516XX 211 36 117
520XX 220 32 118
521XX 217 32 117
522XX 218 33 118
523XX 218 33 118
524XX 218 33 118
525XX 217 34 119
526XX 219 34 119
527XX 220 33 119
528XX 220 33 120
530XX 224 30 120
531XX 224 31 120
532XX 225 30 120
534XX 226 30 120
535XX 222 31 119
537XX 222 31 119
538XX 220 32 118
539XX 222 31 119
540XX 216 31 115
541XX 224 29 118
542XX 225 29 119
543XX 225 29 119
544XX 221 30 117
545XX 220 29 116
546XX 219 31 117
547XX 218 31 116
548XX 217 30 115
549XX 223 30 118
550XX 214 31 115
551XX 214 31 115
Satellite: 121W
Zip Az Elev Skw
553XX 212 32 114
554XX 214 31 115
555XX 212 32 114
556XX 218 28 114
557XX 214 29 113
558XX 215 29 114
559XX 216 32 116
560XX 212 33 115
561XX 209 33 114
562XX 209 32 113
563XX 211 31 113
564XX 210 30 113
565XX 206 31 111
566XX 210 29 112
567XX 206 30 110
570XX 207 34 113
571XX 207 34 113
572XX 206 33 112
573XX 204 35 112
574XX 202 33 110
575XX 200 35 110
576XX 197 34 108
577XX 194 36 107
580XX 204 32 111
581XX 206 31 111
582XX 203 30 109
583XX 200 31 108
584XX 201 32 109
585XX 197 33 108
586XX 193 33 106
587XX 195 31 106
588XX 191 32 105
590XX 183 36 102
591XX 183 36 102
592XX 188 32 103
593XX 188 35 104
594XX 177 34 99
595XX 179 33 100
596XX 176 36 98
597XX 176 37 98
598XX 172 36 96
599XX 171 34 96
600XX 225 31 121
601XX 225 31 121
602XX 225 31 121
603XX 225 31 121
604XX 226 31 121
605XX 225 31 121
606XX 226 31 121
607XX 225 31 121
609XX 226 32 122
610XX 222 32 120
611XX 223 31 120
612XX 221 33 120
613XX 223 32 121
614XX 221 33 120
615XX 222 33 121
616XX 223 33 121
617XX 224 33 122
618XX 226 33 123
619XX 225 33 123
620XX 223 35 122
622XX 223 35 123
623XX 220 34 121
624XX 226 34 124
625XX 224 34 122
626XX 222 34 122
627XX 223 34 122
Page 25
Page 32
Satellite: 121W
Zip Az Elev Skw
628XX 226 34 124
629XX 226 35 124
630XX 221 35 122
631XX 223 35 122
633XX 221 35 122
634XX 219 35 120
635XX 217 35 119
636XX 222 36 123
637XX 224 36 124
638XX 225 36 125
639XX 222 37 124
640XX 215 37 119
641XX 213 37 119
644XX 212 36 118
645XX 213 37 118
646XX 215 36 119
647XX 214 38 120
648XX 215 39 121
649XX 213 37 119
650XX 218 36 121
651XX 218 36 121
652XX 218 36 120
653XX 216 37 120
654XX 219 37 122
655XX 219 37 122
656XX 217 38 122
657XX 217 38 122
658XX 217 38 121
660XX 213 38 118
661XX 213 37 118
662XX 213 37 119
664XX 210 38 117
665XX 210 38 117
666XX 211 38 118
667XX 214 39 119
668XX 210 39 118
669XX 207 38 115
670XX 208 40 117
671XX 208 40 117
672XX 209 40 117
673XX 212 39 119
674XX 207 39 116
675XX 205 40 115
676XX 204 39 114
677XX 201 40 112
678XX 202 41 114
679XX 201 42 114
680XX 209 36 115
681XX 209 36 116
683XX 209 37 115
684XX 209 37 116
685XX 209 37 115
686XX 206 36 114
687XX 206 36 113
688XX 204 37 113
689XX 204 38 114
690XX 200 39 112
691XX 199 38 111
692XX 200 37 111
693XX 195 38 109
700XX 228 42 132
701XX 228 41 132
703XX 227 42 131
704XX 228 41 131
705XX 224 43 129
706XX 222 43 128
707XX 225 42 130
708XX 226 42 130
Satellite: 121W
Zip Az Elev Skw
710XX 220 42 126
711XX 219 42 126
712XX 223 41 127
713XX 223 42 128
714XX 222 42 127
716XX 222 40 126
717XX 220 41 125
718XX 218 41 124
719XX 219 40 124
720XX 221 39 125
721XX 221 39 125
722XX 221 39 124
723XX 224 38 126
724XX 223 37 125
725XX 221 38 124
726XX 218 39 123
727XX 216 39 122
728XX 218 40 123
729XX 216 40 122
730XX 210 42 119
731XX 210 42 119
733XX 214 47 124
734XX 212 43 121
735XX 209 43 119
736XX 206 43 117
737XX 208 41 118
738XX 205 42 116
739XX 202 43 114
740XX 212 40 120
741XX 212 40 120
743XX 214 40 120
744XX 214 41 121
745XX 214 42 122
74 6XX 211 41 118
747XX 215 42 122
748XX 212 42 120
749XX 216 40 122
750XX 214 44 122
751XX 214 44 123
752XX 214 44 122
753XX 214 44 122
754XX 215 43 123
755XX 217 42 124
756XX 218 43 125
757XX 217 43 124
758XX 216 44 125
759XX 219 44 126
760XX 213 44 122
761XX 212 44 122
762XX 212 44 121
763XX 209 44 119
764XX 211 45 121
765XX 214 46 123
766XX 214 45 123
767XX 214 45 123
768XX 210 47 121
769XX 207 47 120
770XX 218 45 127
772XX 218 45 127
773XX 218 45 126
774XX 218 46 127
775XX 220 45 127
776XX 220 44 128
777XX 220 44 128
778XX 216 45 125
779XX 216 47 126
780XX 213 48 124
781XX 214 48 125
Satellite: 121W
Zip Az Elev Skw
782XX 213 48 124
783XX 216 49 127
784XX 217 48 127
785XX 217 50 128
786XX 213 47 124
787XX 213 47 124
788XX 210 49 122
789XX 216 46 125
790XX 202 44 115
791XX 202 44 115
792XX 205 45 117
793XX 203 46 116
794XX 203 46 116
795XX 207 46 119
796XX 208 46 120
797XX 203 48 117
798XX 200 50 115
799XX 196 50 112
800XX 193 41 108
801XX 194 41 109
802XX 193 41 108
803XX 193 41 108
804XX 191 41 107
805XX 193 40 108
806XX 193 40 108
807XX 197 40 110
808XX 196 41 110
809XX 194 42 109
810XX 197 43 111
811XX 193 44 108
812XX 192 43 108
813XX 188 45 106
814XX 188 43 106
815XX 186 43 105
816XX 189 42 106
820XX 192 40 107
821XX 180 38 100
822XX 193 38 107
823XX 187 40 105
824XX 184 37 102
825XX 183 39 103
826XX 189 38 105
827XX 190 36 106
828XX 187 37 104
829XX 183 40 102
830XX 180 39 101
831XX 181 40 101
832XX 178 40 99
833XX 174 40 97
834XX 178 38 99
835XX 169 37 94
836XX 170 39 95
837XX 170 39 95
838XX 168 35 94
840XX 181 42 101
841XX 180 42 100
842XX 178 41 100
843XX 178 41 100
844XX 179 41 100
845XX 184 44 103
846XX 180 43 101
847XX 179 45 100
850XX 184 50 103
852XX 185 50 104
853XX 181 50 102
855XX 187 50 106
856XX 187 51 106
857XX 186 51 105
Page 26
Page 33
Satellite: 121W
Zip Az Elev Skw
859XX 187 49 106
860XX 183 47 103
863XX 182 49 102
864XX 179 48 100
865XX 187 47 105
870XX 193 46 109
871XX 193 46 109
872XX 193 46 109
873XX 189 47 107
874XX 189 45 106
875XX 194 45 110
877XX 195 45 111
878XX 192 48 109
879XX 193 49 110
880XX 193 50 110
881XX 199 46 114
882XX 200 48 114
883XX 197 48 112
884XX 198 45 112
885XX 196 50 112
889XX 176 48 98
890XX 175 47 97
891XX 176 48 98
893XX 174 44 97
894XX 167 44 92
895XX 166 44 91
897XX 166 45 92
898XX 172 42 96
900XX 171 50 94
902XX 171 50 94
903XX 171 50 94
904XX 170 50 94
905XX 171 51 94
906XX 171 50 94
907XX 171 51 94
908XX 171 51 94
910XX 171 50 94
911XX 171 50 94
912XX 171 50 94
913XX 170 50 94
914XX 170 50 94
915XX 171 50 94
916XX 171 50 94
917XX 172 50 95
918XX 171 50 94
919XX 175 52 96
920XX 174 51 96
921XX 174 52 96
922XX 176 51 98
923XX 173 50 96
924XX 173 50 95
925XX 173 51 96
926XX 172 51 95
927XX 172 51 95
928XX 172 51 95
930XX 169 50 93
931XX 168 50 92
932XX 168 48 92
933XX 169 49 93
934XX 166 49 91
935XX 171 49 94
936XX 167 47 92
937XX 167 47 92
938XX 167 47 92
939XX 164 48 89
940XX 162 47 88
941XX 162 46 88
942XX 163 45 89
Satellite: 121W
Zip Az Elev Skw
943XX 162 47 89
944XX 162 46 88
945XX 162 46 89
946XX 162 46 88
947XX 162 46 88
948XX 162 46 88
949XX 161 46 88
950XX 163 47 89
951XX 163 47 89
952XX 164 46 90
953XX 165 46 90
954XX 161 45 87
955XX 159 43 87
956XX 164 45 90
957XX 164 45 90
958XX 163 45 89
959XX 163 44 89
960XX 161 43 89
961XX 165 44 91
967XX 101 43 33
968XX 100 42 33
970XX 159 38 89
971XX 158 38 88
972XX 159 38 88
973XX 158 38 88
974XX 158 40 87
975XX 159 41 88
976XX 163 41 90
977XX 163 40 90
978XX 165 38 92
979XX 168 39 94
980XX 158 35 89
981XX 158 35 89
982XX 158 34 89
983XX 158 35 88
984XX 158 36 89
985XX 157 36 88
986XX 159 37 89
988XX 162 35 91
989XX 162 36 90
990XX 166 35 93
991XX 165 35 93
992XX 166 35 93
993XX 164 37 92
994XX 167 37 94
995XX 120 16 72
996XX 119 15 72
997XX 120 12 77
998XX 137 23 82
999XX 141 26 83
Page 27
Page 34

Notes
Page 28
Page 35

Appendix
Limited Warranty
This Limited Warranty is a legal document. Keep it in a safe place. Remember to keep your Sales
Receipt for warranty service. We will consider any items you return without a copy of the Proof of
Purchase to be out of warranty.
This warranty extends only to the original user of the DISH Network SuperDISH antenna (“you,”
“your”) and is limited to the purchase price of the SuperDISH antenna. EchoStar Technologies
Corporation and its affiliated companies (“we,” “our,” “us”) warrant this SuperDISH antenna against
defects in materials or workmanship as follows.
For one year from the original date of purchase, if we find the SuperDISH antenna is defective subject
to the limits of this warranty, we will replace the SuperDISH antenna at no charge for parts or labor. We
warrant any such work done against defects in materials or workmanship for the remaining part of the
original warranty period.
This warranty does not cover installation of the DISH Network System; consumer instruction; physical
set up or adjustment of any consumer electronic device; signal reception problems; loss of use of the
equipment; unused programming charges due to equipment malfunction; cosmetic damage; damage
due to lightning, electrical or telephone line surges, fire, flood, or other acts of Nature; accident;
misuse; abuse; repair or alteration by other than our factory service; negligence; commercial or
institutional use; improper or neglected maintenance; equipment sold AS IS or WITH ALL FAULTS;
equipment removal or reinstallation; shipping damage if the equipment was not packed and shipped in
the manner we prescribe; nor equipment purchased, serviced, or operated outside the contiguous
United States of America.
REPLACEMENT AS PROVIDED UNDER THIS WARRANTY IS YOUR EXCLUSIVE REMEDY.
WE SHALL NOT BE HELD LIABLE FOR ANY INCIDENTAL OR CONSEQUENTIAL
DAMAGES FOR BREACH OF ANY EXPRESSED OR IMPLIED WARRANTY ON THIS
DEVICE, NOR FOR ANY INCIDENTAL OR CONSEQUENTIAL DAMAGE RESULTING FROM
THE USE OF, OR INABILITY TO USE, THIS DEVICE. UNDER NO CIRCUMSTANCES SHALL
OUR LIABILITY, IF ANY, EXCEED THE PURCHASE PRICE PAID FOR THIS DEVICE. EXCEPT
TO THE EXTENT PROHIBITED BY APPLICABLE LAW, ANY IMPLIED WARRANTY OF
MERCHANTABILITY OR FITNESS FOR A PARTICULAR PURPOSE ON THIS DEVICE IS
LIMITED IN DURATION TO THE DURATION OF THIS WARRANTY. WE RESERVE THE
RIGHT TO REFUSE TO HONOR THIS WARRANTY IF WE DETERMINE ANY OF THE ABOVE
EXCEPTIONS TO HAVE CAUSED THIS DEVICE NOT TO HAVE PERFORMED PROPERLY.
THIS WARRANTY SHALL BE VOID IF ANY FACTORY-APPLIED IDENTIFICATION MARK,
INCLUDING BUT NOT LIMITED TO SERIAL OR CONDITIONAL ACCESS NUMBERS, HAS
BEEN ALTERED OR REMOVED.
This warranty gives you specific legal rights which may vary from state to state. Some states do not
allow the exclusion or limitations of incidental or consequential damages, or allow limitations on the
duration of an implied warranty, so those limitations may not apply to you.
Advance Exchange Program
The Advance Exchange Program allows you to have replacement equipment shipped immediately to
you (depending upon where you live, it could take three to five business days). Along with replacement
equipment, you will receive a prepaid shipping label and instructions on how to return the defective
equipment.
The shipping charge, for receiving replacement equipment and returning the defective equipment, is a
one time fee based on EchoStar's competitive bulk shipping rates (additional charges may apply
outside of the continental US). This fee will be charged to your billing account or your valid credit
card.
Page 29
Page 36

If you do not ship the defective equipment to EchoStar within ten days after receiving the replacement,
your billing account or credit card will be charged the market price of the replacement. If you return
the defective equipment after ten days, you will receive a full refund less an administrative fee.
If your equipment is out of warranty and can be repaired your billing account or credit card will be
charged the standard repair fee for the replacement. If damage to the defective equipment is found,
which EchoStar in its sole discretion determines has voided the warranty, or makes the equipment
unrepairable, your billing account or credit card will be charged the market price of the replacement.
Post Receipt Exchange Program
You may choose to ship the equipment to us at your cost. To provide faster service, upon receipt of
your equipment you will be shipped a replacement. Your original equipment will not be available for
return.
The equipment you return will be checked to verify whether it is covered under this warranty. If the
defective equipment is covered under this warranty, it will be replaced and shipped back to you at no
additional cost (additional charges may apply outside of the continental US).
If your equipment is out of warranty and can be repaired your billing account or credit card will be
charged the standard repair fee for the replacement. If damage to the defective equipment is found,
which EchoStar in its sole discretion determines has voided the warranty, or makes the equipment
unrepairable, your billing account or credit card will be charged the market price of the replacement.
Accessory Warranty
An accessory is any DISH Network branded equipment, displaying the DISH Network logo, excluding
the cables and hookups, and non-mechanical components. A one-year warranty becomes effective
upon the activation of the DISH system or date of purchase, if bought separately. A proof of purchase
is required to verify the purchase date. If an accessory has an expired warranty, no exchange will be
issued. You may purchase replacement accessories from DISH Network or your local retailer.
Page 30
Page 37

Notes
Page 31
Page 38

Notes
Page 32
Page 39

Notes
134950
 Loading...