

Page 1

Contents
Safety Instructions ..............................................................v
Chapter 1 - How to Get Started ..........................................1
Welcome! .....................................................1
Overview ......................................................2
New Features Video .....................................2
Getting Started .............................................3
Quick Tour of Basic Features .......................4
Quick Tour of the Menus ..............................6
Quick Tour of DishDVR Features .................10
Chapter 2 - Parts of the System .........................................15
The Receiver ................................................15
Remote Control ............................................20
Receiver Menus ...........................................27
TV and VCR Connections ............................29
Chapter 3 - Using t he System............................................. 31
Change Channels . ........................................31
Use the Program Guide ................................31
Use the Program Banner ..............................34
Use the Browse Banner ...............................34
Buy a Pay Per View Program .......................36
Use Themes .................................................37
Use Favorites Lists .......................................38
Use the Search Feature ...............................40
Use Locks .....................................................42
Use Event Timers .........................................48
Use Caller ID ................................................58
Use Dolby® Digital Sound ............................59
Use the DishDVR Features ..........................60
Control O th er Devices with the Remote .......68
Upgrade the Re ceiver Software ...................79
Reset the Receiver .......................................80
Change Program Language s .......................80
Set Up the Accessory Jack ..........................81
Dish Home Interactive TV Applications ........81
Page iii
Page 2

Contents
Chapter 4 - Installation Instructions ................................. 83
How to Use these Instructions .....................83
Installing a DISH 500 Antenna .....................83
DishPro Wiring Diagrams ............................. 94
Running Coaxial Cable ................................101
Connecting Each Receiver to a P hone Line 102
Chapter 5 - Re ference ......................................................... 105
Use the Troubleshooting Tabl es ..................105
Test the System ...........................................119
Device Codes ............................................... 120
Appendix A .......................................................................... 125
Appendix B .......................................................................... 127
Limited Warranty .......................................... 127
What the Warranty Covers ........................... 127
What the Warranty Does Not Cover ............ 127
Residential Customer Agreem ent ................ 13 0
Staying Legal ............................................... 136
FCC C ompliance ..........................................137
Radio Interference ....................................... 138
Index .................................................................................... 139
Page iv
Page 3

Important Safety Instructions
1. Read these instructions.
2. Keep these instructions.
3. Heed all warnings.
4. Follow all instructions.
5. Do not use this apparatus near water.
6. Clean only with a dry cloth.
7. Do not block any ventilation openings. I nstall in a ccordance with the
manufacturer’s instructions.
8. Do not install near any heat sources such as radiators, heat registers,
stoves, or other apparatus (including amplifiers) that produce heat.
9. Do not defeat the safety purpose of the polarized or grounding-type
plug. A polarized plug has two blades with one wider than the other. A
grounding-type plug has two blades a nd a third grounding prong. The
wide blade or the third prong are provided for your safety. If the
provided plug does not fit into your outlet, c onsult an electrician for
replacement of the obsolete outlet.
10. Protect the power cord from being walked on or pinched, particularly at
plugs, convenience receptacles, and the point where they exit from the
apparatus.
11. Use only attachments/accessories specified by the manufacturer.
12. Unplug this apparatus during lightning storms or when unused for long
periods of time.
13. Re fer all servicing to qualified service personnel. Servicing is required
when the apparatus has been damaged in any way, such as the power
supply cord or plug is damaged, liquid has been spilled or objects have
fallen into the apparatus, the apparatus has been exposed to rain or
moisture, does not operate normally, or has been dropped.
Apparatus shall not be exposed to dripping or splashing and
no objects filled w ith liquids, such as vases, shall be placed
on the apparatus.
Page v
Page 4

Safety
Note to Satellite TV System Installer: This reminder is provided to call the
satellite TV system installer’s attention to Article 820-40 of the National
Electrical Code (NEC) that provides guidelines for proper grounding and, in
particular, specifies that the cable ground shall be connected to the grounding
system of the building as close to the point of cable entry as practical.
Sate llite Dis h
Coaxial Cable
Ground C lamp
Antenna Discharge
Unit
Grounding Cond uctors
(NEC Se ction 810-21)
Safety Tips
• Unplug the receiver from the AC power outlet before cleaning.
• The use of accessories or attachments not recommended by the receiver
manufacturer will void the Limited Warranty.
•Donot place the receiver in an enclosure such as a cabinet without proper
ventilation.
• Do not install the receiver in any area where the temperature can be less than
40°F or more than 113°F.
•Donot stack the receiver on top of or below other electronic devices.
•Donot place candles or other meltable objects on top of the receiver.
• Operate the receiver using only the type of power source indicated on the
marking label. Unplug the receiver power cord by gripping the power plug, not
the cord.
•Donot overload wall outlets or extension cords, as this can result in a risk of
fire or electrical shock.
• Never insert objects of any kind into the receiver through openings, as the
objects may touch dangerous voltage points or short out parts. This could cause
fire or electrical shock.
• Make sure that the outdoor parts of the antenna system are grounded in
accordance with local, state, federal, and National Electrical Code (NEC)
requirements.
•Donot locate the antenna near overhead light or power circuits, or whe re it can
fall into such power lines or circuits. When installing the antenna, take extreme
care to avoid touching such power lines or circuits, as contact w ith them can be
fatal.
•Donot attempt to service the receiver yourself, as opening or removing covers
may expose you to dangerous voltage, and will void the Limited Warranty.
Refer all servicing to authorized service personnel.
• Use an outlet that c ontains surge suppression or ground fault protection. For
added protection during a lightning storm, or when the receiver is left
unattended and unused for long periods of time, unplug the power cord from
the wall outlet, disconnect the lines between the receiver and the antenna, and
disconnect the telephone line. This will provide some protection against
damage caused by lightning or power line surges.
from SatelliteDish
Electric Servic e Equip ment
Ground Clamps
Power Service Grou nding
Electrod e Sys tem
(NEC Art. 250, Part H)
Page vi
Page 5

Chapter 1
How to Get Started
Welcome!
You’re about to enjoy a Digital Video Recorder!
This satellite receiver lets you decide how you watch TV. You can record and
play back audio and video with full digital quality. You can pause a live
program and not miss any of the action or you can record a program to watch
later, without a VCR.
This device is also an advanced satellite receiver, with features like a UHF/IR
remote control, on-screen program information, themes to select programs,
favorite lists, program locks, Dolby
®
Digital sound, and more.
IMPORTANT INFORMATION ABOUT THIS RECEIVER
• Always handle the satellite receiver carefully. Avoid
excessive shock and vibration at all times as this can
damage the hard drive.
• If you have the receiver turned on a nd need to move it,
be sure to unplug the receiver and letitsitforatleast
30 seconds before moving it.
• Do not install the receiver in any area where the
temperature can be less than 40°F or more than 113°F
while the unit is operating.
• If the receiver is cold to the touch, do not plug it in
immediat ely. Let it sit unplugged a t room temperature
for at least 45 minutes before plugging it in.
• Avoid installing the receiver on top of or underneath
another electronic device (such as a stereo receiver) as
this can cause he at build-up and vibration.
Note: Portions of your system may be marked with DishPVR and PVR or
DishDVR and DVR. Either way, the system works just the same.
Welcome to
this Us er
Guide! We
have placed
tips in the gray
bars on most
pages to help
you.
Page 1
Page 6

Chapter 1
How to Get Started
Overview
Before you use your satellite receiv er, you need to install the system or
have it installed by a professional technician. F or a professional installation,
please call the Customer Service Center at 1-800-333-DISH (3474). If you
install the system yourself, use the instructions in Chapter 4.
A vital part of the installation is to set up the receiver to get
the latest software via the satellite signal. You cannot use the
receiver’s features until you do! If you are installing a new
system and follow the instructions in Chapter 4, your receiver
will automatically get this software.
• After you install your system (or add this receiver to an existing system),
all you need to do is order your program packages using the instructions
on page 3.
Tip: Notice that
menus and
other screen
pictures shown
in this guide are
for exam ple
only. What you
see on your TV
maylookabit
different.
•TaketheQuick Tours that begin on page 4 to become familiar with
product operation and features.
• To learn about the parts of the system, see Parts of the System on
page 15.
• To learn how to use the system, see C hapter 3, How to Use the System
on page 31.
• To troubleshoot the system, see C hapter 5, Re ference on page 105.
• Tune to the DISH Network info channels or visit our Web site at
www.dishnetwork.com for info.
• For more help, call the C ustomer Service Center at 1-800-333-DISH
(3474).
New Features Video
Your new receiver comes with New Features Video software. This new
software allows us to download information to your hard drive in the form of
short, video messages which will appear in your
messages to tell you when we’ve updated your receiver to a dd exciting new
features and capabilities. Be sure to look for these events whenever you
access you r recorded events — to see what’s new for you fro m the DISH
Network!
DVR List.Wewillusethese
Page 2
Page 7

Getting Started
Order Your Program Packages
1. Turn on the receiver and your TV.
2. Press the SYS INFO button on the receiver front panel
to open the
the TV screen. Leave the menu open while you do steps
3 and 4.
Note: The num bers in the figure below are for example only. Use the
numbers on the
your TV.
Important S ystem Information screen on
Important System Information screen displayed on
Getting Started
3. Call 1-800-333-DISH (3474) to tell us you’ve installed the system and
want to get services. We’ll explain what program packages you can buy.
You’ll need to verify the information on the
Information
screen.
Important System
4. We’ll turn your services on via the satellite signal. This process usually
takes just a few minutes. When we finish, you’ll be able to watch your
programs.
5. Press the SELECT button on the remote control or receiver
front panel to clear the
Important S ystem Information
menu from the TV screen.
Page 3
Page 8

Chapter 1
How to Get Started
The Program
Guideisyour
key to satellite
TV programs.
The receiver
displays the
Program Guide
on the TV
screen.
Choose a Program to Watch
1. Make sure the receiver is on and its green front panel POWER light is
on. Also, make sure you turn on the TV.
2. Press the remote control GUIDE button to open the receiver’s
Program Guide on the TV screen.
You’ll find a
quick tour of
basic features
here, and a
quick tour of
DVR features
beginning on
page 10.
Whenever you
want to go back
to the las t
channel you
watched, just
press the
RECALL button.
3. Use the r emote control A RROW buttons to
move the highlight around the
Guide
, and to highlight a program that is on
Program
now.
4. Press the remote control SELECT button to
watch the program you just highlighted.
Quick Tour of Basic Features
1. Make sure the TV is on.
2. Press the UP or DOWN ARROW button to change
channels.
3. Press the RECALL buttontogobacktothelast
channel you watched.
Page 4
Page 9

4. Press the THEME (LEFT arrow) button to open the
Themes menu.
5. For example, press the 1 buttontoseealistofmovies.
Quick Tour of Basic Features
6. Press the VIEW button to go back to watch a program.
7. Press the INFO button to see info about the program.
8. Press the CANCEL buttontogobacktowatchthe
program.
9. Press the BROWSE (RIG HT arrow) button to open the
Browse Banner.
In this example, the
Browse Banner shows info on a
program we’re watching at the top, and info on another
program at the bottom.
Page 5
Page 10

Chapter 1
How to Get Started
10. P ress the UP or DOWN A RROW button to change the channel
information you see at the bottom of the TV screen. Until you do, the
bottom info is the same as the top info.
11. Press the RIGHT ARROW button to change the
channel information you see at the bottom of the
TV screen for the program coming next. Press the
LEFT ARROW button to got back to the
program on now.
Tip: The Main
Menu is your
key to the
menus the
receiver
displays on the
TV screen.
12. P ress the VIEW button to clear the
Banner
from the TV screen and to g o back to watching a
program.
Quick Tour of the Menus
1. Press the remote control MENU
button to open the
2. Press the 1 buttontoselectthe
Program Guide optionontheMain Menu. This opens the
Program Guide on the TV screen.
You can use the
For now, though, go on with this tour.
Main Menu.
Program Guide to find a program to watch.
Browse
Page 6
Page 11

3. Press the MENU buttontogobacktotheMain Menu.
Quick Tour of the Menus
Any time you’re
in a menu and
want to go
directly back to
watching your
program, just
VIEW on
press
the remote.
4. Press the 2 button to select the
on the
Main Menu. This opens the Themes m enu on the TV
Themes and Search option
screen.
5. For example, press the 1 buttontoseealistofmovies.
Tip: Themes let
you get a list of
just movies,
just sports
events, or just
programs in
several other
categories.
Page 7
Page 12

Chapter 1
How to Get Started
Tip: You can set
up a Favorites
List of your
favorite
channels. Then,
when you use
this list as yo ur
program guide,
you see only
those channels
that really
interest you.
6. Press the MENU buttontogobacktotheMain Menu.
7. Back on the
Main Menu, notice the Mail option. The mail
feature is for DISH Network to send you m essages, and
only at special times.
8. Press the 4 buttontoselectthe
to open the Favorite Lists menu.You can use Favorite
Menu
Lists
to make the Program Guide and other on-screen lists
Favorites option on the Main
show only your favorite channels.
9. Press MENU to go back to the
Main Menu.
Tip: The
System Setup
menu lets you
set up the
system the way
you want!
10. P ress the 5 buttontoselectthe
Menu.
This opens the Locks menu on the TV screen.
Locks option on the Main
This menu is used to set a lock.
11. Press MENU to go back to the
12. P ress the 6 buttontoselectthe
Main Menu. This ope ns the System Setup menu.
Main Menu.
System Setup option on the
Use this menu to set up the system the way you want.
Page 8
Page 13

13. Press MENU to go back to the Main Menu.
14. Press the 7 buttontoselectthe
to open the Event Timer Mana gement m enu.
Menu
Timers option on the Main
Quick Tour of the Menus
Tip: You can
press the
CANCEL
buttontoback
outofany
menu. Unless
you’re in the
Important
System
Information
screen, if you
want to
immediately go
back to
watching a
program no
matter where
you are in the
menus, press
VIEW
the
button.
This menu is used for creating and c hanging timers used to trigger
automatic recordings.
15. Press MENU to go back to the
Note: Your screen may show PVR instead of DVR, but the receiver
Main Menu.
operates the same way.
16. Press the 8 buttontoselectthe
on the
Events
Main Menu. This opens the DishDV R Recorded
menu, which allows you to select and play back
DVR E vents option
programs you recorded.
Page 9
Page 14

Chapter 1
How to Get Started
Quick Tour of DishDVR Features
Tip: You can
pausealive
program to
answer the
phone or get a
snack!
L
17. P ress the VIEW buttontogobacktowatchingaprogram.
1. Watch a program for just a few minutes.
2. Press the PAUSE button to pause the program.
Page 10
3. Press the PLAY button to watch the program from the point
where you paused it.
4. Press the VIEW button to go back right away to the “live”
program.
5. Press the SKIP BACK button to skip back about ten seconds
in the program.
Page 15

Quick Tour of DishDVR Features
6. Press the PAUSE button and then press the BACK button to reverse t he
program in slow m otion. Press the BACK button once to reverse the
program 1/4 the speed as normal play. Press the BACK button twice to
reverse at normal speed. If you press the BACK button again, the
program reverses as described in step 7.
7. Press the BACK button once to reverse the program
four times as fast as normal play. Press the BACK
button twice to r everse at 15 times normal spe ed, three
times to reverse at 60 times normal speed, and four
times to reverse at 300 times normal speed.
8. Press the PLAY button.
Page 11
Page 16

Chapter 1
How to Get Started
9. Press the SKIP AHEAD buttontoskipaheadabout30
seconds in the play back.
Note: You cannot skip ahead if you are watching live TV.
10. P ress the PAUSE button and then press the FWD button to forward the
program in slow motion. W hen you press the FWD button once the
program advances at 1/15 the speed of normal play. Press the FW D
button twice to forward at 1/4 as fast as normal play. Press the FWD
button three times to play the program at normal speed. If you press the
FWD button a gain, the program advances as described in step 11.
Tip: The
DishDVR has
features that
let you decide
how to watch
TV!
Page 12
11. Press the FWD (“FORWARD”) button once to forward
the program four times as fast as normal play. P ress the
FWD button twice to forward at 15 times normal speed,
three times to forward at 60 times normal speed, and
four times to forward at 300 times normal speed.
Page 17

Quick Tour of DishDVR Features
12. Press the VIEW button to go back r ight away to the program in
progress.
13. Press the RECORD button to start recording the program right now.
14. The
Start Recording Options menu displays. Select Manual
user stop
. S ee page 48 for an explanation of the other
recording options.
15. Select
Done to start recording the program. Notice the receiver’s front
panel RECO RDING light turns on.
16. If you want, press the STOP button. This stops the receiver
from recording the program.
Notice the receiver’s front panel RECORDING light turns
off.
17. Now, if you want to take the time, use the
Program Guide to find
another program set to start in the next few minutes.
Note: Start watching the program when it starts. Watch the program for
a few minutes.
18. Press the BACK button to reverse the program.
Note: Le t the program reverse all the way to its start.
19. Press the RECORD button. The receiver stores a
recording of all of the program broadcast so far, and keeps on
recording the program. You can record all of the program,
even though you didn’t start recording until after the program
started.
20. Press the DVR button. This opens the
Recorded Events
menu on the TV screen.
Note: Even though the button on your r emote control may be
marked DVR or PVR, the remote control works the same way.
Tip: The
DishDVR
features let yo u
record
programs
without using a
VCR!
This is
important: If
you don’t tune
to a program
until after it
starts, you can
record only the
part of the
program that
comes after
youtunetoit.
Page 13
Page 18

Chapter 1
How to Get Started
21. Use the remote control arrow buttons to
highlight an event on the
menu (it’s OK to highlight an event you’re
recording).
Recorded Events
22. P ress the remote control SELECT button to select the event
you highlighted. This opens a menu of info about that
event.
23. P ress VIEW to return to your live programming.
Conclusion
This is the end of the quick tours. Continue on to the next chapter, Parts of
the System, for a detailed description of your DishDVR receiver.
Page 14
Page 19

Chapter 2
Parts of the System
The Receiver
Receiver Front Panel
Smart Card Door
The Smart Card is behind the door on the front panel.
Note: Leave the Smart Card in, and keep the door closed.
Front Panel Buttons
The front panel buttons work the same way as the buttons on the
remote, to control the receiver. For m ore information on the remote
control buttons, see Remote Control on page 20 of this User Guide.
Info Button
Press the INFO button to see information about a program
you watch or a program you highlight in a menu.
The information may include one or m ore of these signs:
for a program you can’t buy
for a blacked-out program
for a pay per view program
for a program with an ev ent timer
for a locked program
Menu Button
Press the MENU button to open the Main Menu.
Page 15
Page 20

Chapter 2
Parts of the System
Tip: First, you
move the
highlight to an
item with the
Arrow buttons,
andthenyou
press the
SELECT
button to
select that
item.
Arrow Buttons
Use the ARROW buttons to move a menu
highlight to an option or a program.
Use the UP and DO WN ARROW buttons to
change channels while wa tching a program.
When watching a program, pressing the LEFT
ARROW button opens the
the RIGHT ARROW button opens the
Banner
.
Themes menu and
Browse
Select Button
Press the SELECT button to select an item you highlight in a
menu.
Sys Info Button
Press the SYS INFO button to open the Important System
Information
menu.
Power Button
Press the POWER button to turn the receiver on or off.
Power Light
The POWER LED lights up when you turn the receiver on
and turns off when you turn it off.
Note: Even when the POWER light is off, the receiver
continues to work and requires power. Don’t unplug the
receiver unless you need to move it!
Recording Light
The REC ORDING LED lights up whenever you
are recording a program.
IR Sensor and IR Blasters
The IR SENSOR receives IR signals f rom the remote control. For
information on the IR BLASTERS, please see Control a VCR on page 56.
Page 16
Page 21

Receiver Back Panel
The receiver back panel has ports you can use to connect the receiver to
other devices ( you may not need to use some of these ports). The back panel
also has the power cord and phone jack.
Tighten the connections only by hand. If you use a wrench
you might over-tighten the connections and cause damage
that would not be covered by the Limited Warranty.
The Receiver
Receiver Fan and Air Holes
The receiver has a fan behind the air holes. The fan turns on
and off as needed to cool the recei ver.
Don’t block the air holes! If you do, the receiver
could over-heat!
Satellite In
Connect the cable from the satellite dish to the SATELLITE IN
port.
Channel 3/4 Switch
If you use TV SET OUT to connect the receiver to a TV,
set this switch to the channel you want to tune to on
your TV. Choose a channel that isn’t used by a cable or
local TV station. If you connect the receiver to a VCR
that has a channel switch, set both switches to the same
channel.
Note: I f you are connecting multiple r eceivers to multiple TVs, these
receivers and TVs c an all be set to the same c hannel (3 or 4) to avoid
interferen ce with local b roadcasts.
Page 17
Page 17
Page 22

Chapter 2
Parts of the System
TV Set Out
This connection provides good picture quality and good mono
sound quality (even if you have a TV or other devices that
provide stereo sound).
If you use TV S
ET OUT to watch satellite channels, you must
keep the TV(s) tuned to the same channel (either channel 3 or
4) as you selected on the Channel 3/4 Sw itch of the satellite
receiver.
The TV S
signal on the TV A
ET OUT ca n be switched between satellite programming and the
NTENNA/CABLE IN connection using the TV/VIDEO
button on the remote control.
TV Antenna/Cable In
Use the TV ANTENNA/CABLE IN to connect a broadcast TV
antenna or cable TV box to the receiver. The TV A
C
ABLE IN connection is only available through the TV SET
NTENNA/
OUT as described above.
Phono (RCA) Audio/Video Outputs
These outputs provide high-quality picture and stereo
sound.
• If the TV has only one input for this type of audio,
connect it to the receiver’s R
• If you use these outputs to connect the receiver to other devices, be sure
to follow the instructions in the devices’ user manuals.
IGHT AUDIO output.
Super Video (S-Video) Output
The receiver provides S-Video, which is the highest quality video
available. If you use this output for video, you must still connect
the audio with the P
HONO (RCA) AUDIO OUTPUTS or the DOLBY
®
DIGITAL output.
Dolby®Digital Output
The receiver provides Dolby®Digital encoded output and linear
Pulse Code Modulation (PCM) for an audio a mplifier/decoder
that can process this kind of output.
Phone Jack
Connect a phone cable with a standard RJ-11 phone plug to the
receiver here, and then connect the cable to an active phone
jack.
Note:Youmust keep the receiver connected to a phone line at all times to
buy Pay Per View programs or use exciting interactive features.
Expansion Port
This port is reserved for future use.
Page 18
Page 23

Accessory Jack
Ifyouconnectamulti-dishswitchtotheACCESSORY JACK,or
if you use an IR extender, you must set up the receiver properly.
See Set Up t he Accessory Jack on page 81.
Power Cord
Even whe n the receiver front panel’s g reen POWER LED is off, the
receiver keeps working and it needs power. So, don’t unplug the receiver ’s
power cord unless you need to move the receiver or if it will not be used for
an extended period of time.
Before m oving the receiver, unplug the power cord
and le t t he receiver sit for at least 30 seconds! Always
handle the receiver ge ntly to protect the delicate parts it has
inside.
UHF Remote Antenna Input
The receiver uses the antenna to get UHF signals
from the remote c ontrol. Connect the UHF antenna
here, and set it so it doesn’t touch anything. Set the
antenna straight up so you can use the remote
control as far away as pos sible.
The Receiver
Attach an Attenuator
Stray UHF signals (from your neighbor’s remote control, for example) can
block signals from the remote control to the receiver. To help prevent
blocks, you can install a 10 dB attenuator ( you can buy one from a consumer
electronics parts store).
Note: This will help keep out stray UHF signals, but also cut down how far
away you can use the remote control.
1. Take the UHF antenna off of the
receiver’s back panel UHF REMOTE
ANTENNA input.
Put a 10 dB attenuator onto the
2.
UHF REMOTE ANTENNA input.
3. Put the UHF antenna onto the attenuator.
Tip: If the
receiver does
unexpected
things (for
example,
changes
channels,
starts DVR
features
randomly), you
may have to
install a 10 dB
attenuator to
block stray
UHF signals.
You can buy
one of these
attenuators at
almost any
electronic parts
store.
Page 19
Page 19
Page 24

Chapter 2
Parts of the System
Remote Control
Tip: If the
receiver does
unexpected
things (for
example,
changes
channels, starts
DVR features
randomly), you
may have to
change the
remote control
address. See
Change the
Address on page
26.
This section describes the remote control and its buttons used to control the
receiver. To find out how to use the r emote to control other devices, see
Control Other Devices with the Remote, beginning on page 68. The remote
control we pack with the receiver may look a bit different than the one
shown on page 22.
If you lose or damage the remote control,
you can
use the
receiver’s front panel buttons to operate many of the receiver's
features. Call the Customer Service Center at 1-800-333-DISH
(3474) to order a new remote.
The remote control uses both Ultra High Frequency (UHF) radio signals and
infrared (IR) light signals to c ontrol the receiver but uses only IR signals to
control other devices.
• IR signals travel only short distances (40 feet or less), and can’t go
through walls or other solid objects. You must point the remote control
directly at the de vice you want to control, with no objects to block the
signal path.
• UHF signals travel long distances (100 feet or more) and can go through
walls and other solid objects. B ecause UHF signals travel so far, the
receiver may respond to signals from other nearby remote controls (for
example, your neighbor’s remote control). To handle this problem,
please see Change the Address on page 26. If this doesn’t work, please
see Attach an Attenuator on page 19.
Note: To use UHF capabilities, you need to connect your UHF antenna
as described on page 19.
Page 20
Page 25

Remote Control Batteries
The remote control comes with AAA batteries. When you replace old
batteries, you should replace all of the batte ries. Use batteries of the same
kind, for example alkaline or carbon zinc, and don’t mix batteries of
different kinds. Alkaline batteries last longer.
Changing the Batteries
1. Press down on the battery cover’s top latch and
lift the cover off.
2. Take out all of the old batteries.
3. Put the new batteries in. M ake sure you match the
plus (“+”) ends with the plus m arkings on the
battery case.
4. Fit the battery cover’s bottom tab back into the
slot at the bottom of the battery case, and snap the
cover back into place.
Low Battery Warning
Remote Control
When you see a low ba ttery warning message on the bottom line of the
Program Banner, the batteries in your remote c ontrol are weak and need
to be replaced.
Page 21
Page 21
Page 26

Chapter 2
Parts of the System
Page 22
Remote Control Buttons
SAT Mode Button
Press this button to set the remote to SAT
SAT mode button’s back light lights up for two seconds to show
you’ve set the remote
SAT mode, the remote c ontrol buttons operate as de scribed below
to control satellite receiver functions.
to SAT mode. While the remote control is in
(“satellite”) mode
.The
Page 27

Power Buttons
Press the blank POWER button to turn the receiver on or off.
Use the TV POW ER button to turn the TV on or off. See Set Up
the Remote to Control O ther Devices for
instru ctions on
programming the remote to control your TV.
Menu Button
Press this button to open the Main Menu.
TV/Video Button
If you connect a second video source, such as cable or a broadcast
antenna, to the receiver ’s back panel TV A
NTENNA/CABLE IN
port,you can use this button to switch the receiver between the
satellite signal and the another video signal.
Note: The signal from the second video source will only be a vailable on the
TV S
ET OUT port, not on the S-VIDEO or RCA output connectors.
Page Up and Page Down Buttons
Remote Control
Press the PAGE UP button or the PAGE DOWN button
to scan, page by page, through the
Themes
list,
a Favorite List,anEvent Timers list, or a
Program Guide,
a
list of channels.
Mute Button
Press this button to turn the TV sound off or on. To use this
button, you must set up the remote to control your TV. See Set Up
the Remote to Control O ther Devices for
instru ctions.
Vol ume Bu t to n
Press this button to change the TV volume. To use
this button, you must set up the remote to control
your TV. See Set Up the Remote to Control Other
Devices for
instructions.
Guide Button
Press this button to open the Program Guide.
the
Program Guide
open,
press this button again to change the
Favorites Lists.
When you have
Arrow Buttons
• Press these buttons to highlight an option in
the menus, the Program Guide,andthe
Browse Banner.
• While watching a program, press the UP or
DOWN ARROW button to change channels.
• While watching a program, press the
BROWSE button (the RIGHT ARROW
button) to open the
Browse Banner.
Tip: The Guide
button opens
the Program
Guide. Use it
to get
informationon
programs that
are on now
and that will
be on in the
future.
Page 23
Page 23
Page 28

Chapter 2
Parts of the System
• While watching a program, press the THEME button (the LEFT
ARROW button) to open
• To enter a number in a menu, highlight the place where you need to
enter the number. Then, press the UP or DOWN A RROW button to
increase or decrease the number in the highlighted place. Or, you can
use the number buttons.
the
Themes
menu.
Select Button
Press this button to select the option you highlight in a menu,
Program Guide,orBrowse Banner.
Recall Button
Press this button to
watched. Press it again to switch be tween the last two receiver
channels you watched.
go back
to the last re ceiver channel you
Info Button
•PresstheINFO button for more information a bout the show
you are watching.
•PresstheINFO button for more
highlighted in the
Recorded E vents list.
•
If a menu has
that menu.
Program Guide, Browse Banner,Themes,or
a Help option, press this button to see help
inform ation
about a program you have
information
View Button
• While watching a program, press this button to briefly
display the Program Ba nner.
• When you use a menu, press this button to cancel out of the menu and
go back to watching a program.
for
Page 24
Page 29

Cancel Button
Press this button to cancel a nd return to the previous menu or to
watch a program if there are no previous menus.
Number Buttons
• While watching a program, using the
Program Guide,orusingtheBrowse
Banner, use these buttons to enter a channel
number.
• When you have the Program G uide open,
enter a number of hours you want to skip
forward with these buttons, and then press the
RIGHT ARROW
quickly move the
T o move back, enter the number of hours you
want to move back and then press the
ARROW
button.
• If a m enu option has a number, press the button with the same num ber
to select that option.
button. This is how you can
Program Guide
forward.
LEFT
Remote Control
Tip: When
you’re in the
Program
Guide, you
can skip
ahead 24
hours just by
pressing the
SKIP AHEAD
buttononthe
remote.
If you skip
ahead, you
can skip back
24 hours by
pressing the
SKIP BACK
button.
• Use these buttons to enter numbers in a blank field.
Star (*) Button
PressthisbuttontobackspacewhileusingtheSearch function
of your receiver.
Zero Button
Press this button to move one character forward while using the
Search function of your receiver.
Pound (#) Button
Press this button to display the Search screen. Also, you use this
button in several procedures described in this User’s Guide.
Dish Button
Press this button to use the Dish Home Interactive TV
applications. See page 81 for information on using this exciting
new feature.
DVR Buttons
Use these buttons to record or play back a DVR
program. See Use the DVR Features for details.
Note: Eve n if the top button says “PVR” instead
of “DVR,” it works the same.
Tip: DVR
buttons let you
take control of
television. You
can use them
to pause live
TV, go back in
time, skip
ahead, and
more!
Page 25
Page 25
Page 30

Chapter 2
Parts of the System
Change the Address
Because UHF signals travel long distances and go through walls, a
neighbor’s remote could control your receiver by m istake. To handle this
problem, you can change the address on the remote and receiver as follows:
1. Make sure you turn on the TV and receiver.
2. Open the
Important System Information menu by
pressing the receiver’s front panel SYS INFO button.
3. The
Important System I nform ation menu shows a
Remote Address.
Write down this number:
4. Press a nd hold the SAT mode button a bout three seconds, until
all the mode buttons light up, and then let go of the SAT button.
5. Use the num ber buttons to enter any number from 1 to 16, but
not the one you wrote in step 3.
Write down the number you enter:
6. Press the POUND (#) button. If you entered the address correctly, the
SAT mode button flashes three times.
7. Press the RECORD button.
8. Make sure the
Information
Remote Address you see on the Important System
menu now is the same as the one you entered in step 5. If
the addres ses are not the same, repeat step 7.
9. To check the address in the remote control, press and hold the SAT
mode button for three seconds. Then, le t go of the SAT button, and
press the POUND (#) button twice. The SAT mode button flashes the
same number of times a s the address you entered in step 5.
Page 26
Press the SELECT button to close the
menu.
Important S ystem Information
Page 31
Receiver Menus
Receiver Menus
This section shows examples of
the key menus
the recei ver displays on the
TV screen and how to use them.
Open or Close a Menu
•PresstheMENU button to open the Main Menu. You can open any
other menu starting from the
Main Menu.
•PresstheCANCEL button to close a menu.
Make a Choice in a Menu
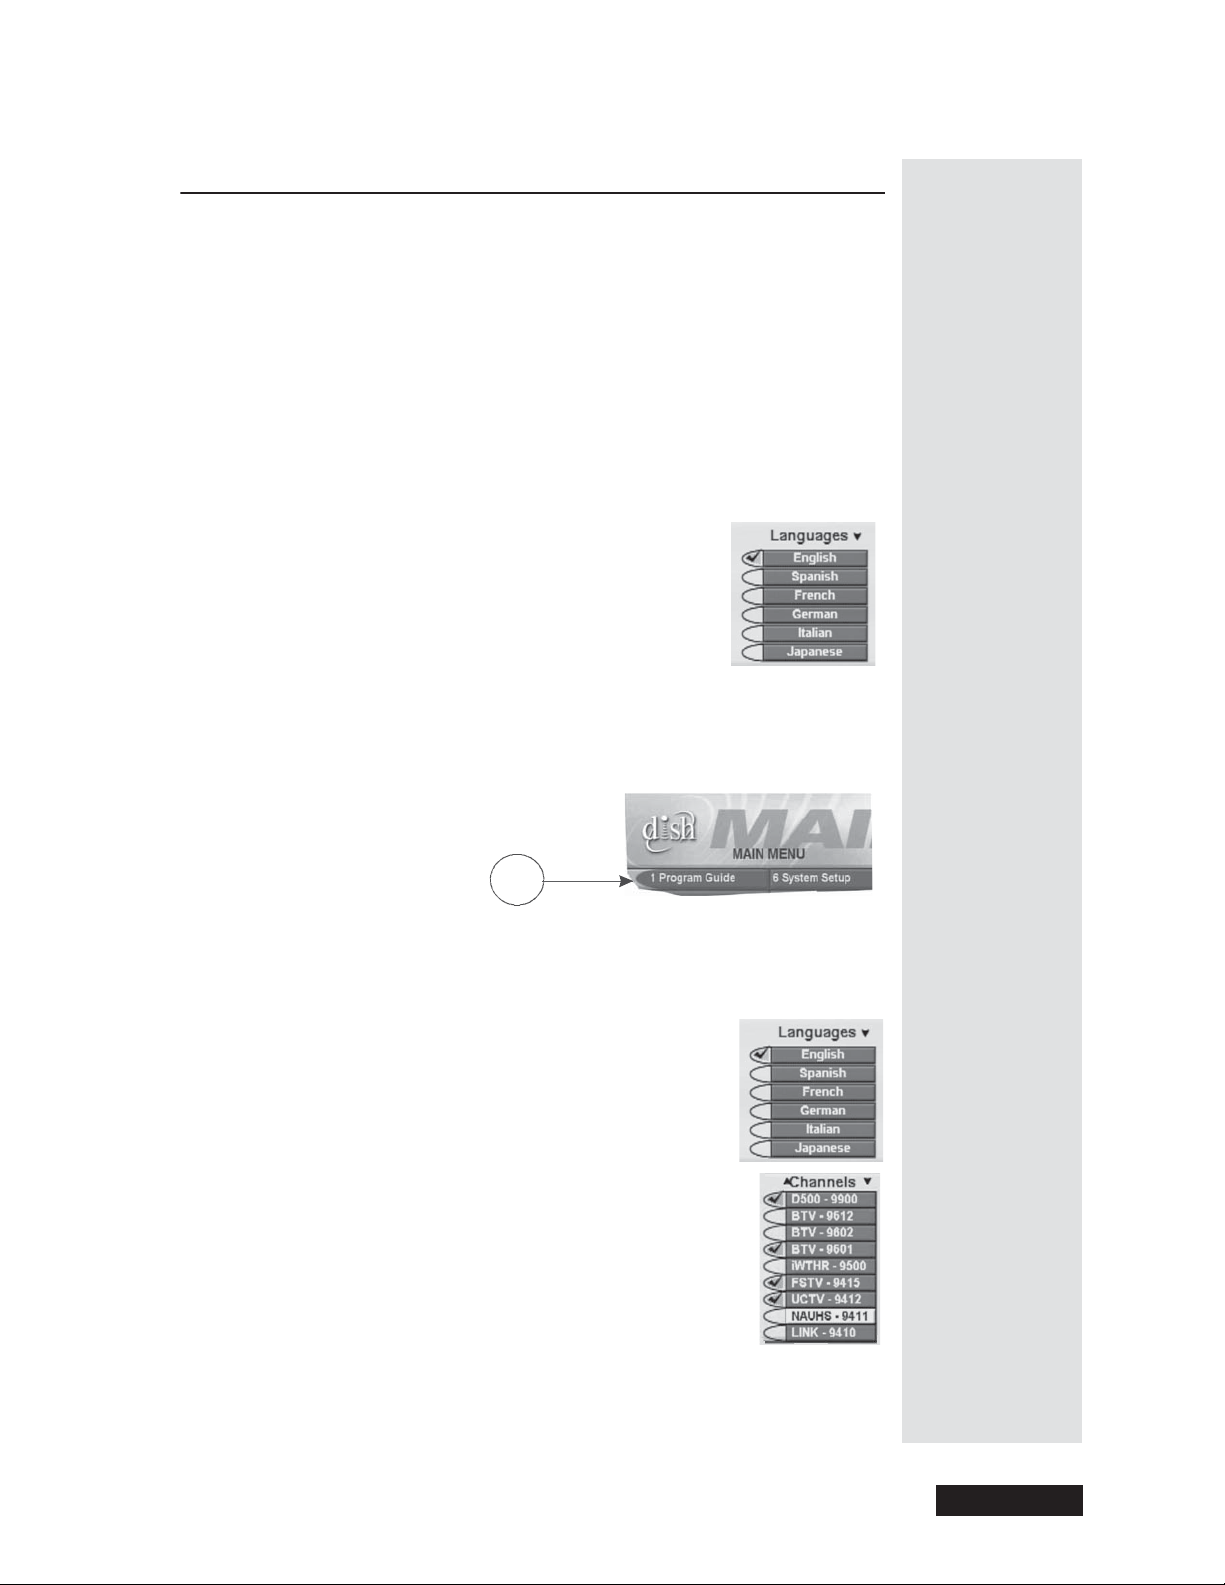
1. Use the remote control ARROW buttons
highlight
a m enu option. An option you highlight
looks like the English option shown below.
2. Press the remote control SELECT buttontoselect
the option you highlight.
Note: If a menu option has a number, you can press the
remote control’s numbe r to select that option. If you do
this, you don’t have to highlight the option first. For example, to select the
Program Guide option on the Main Menu, just press the remote c ontrol 1
button.
to
Tip:
Whenever a
menu option
has a number
next to it, you
can just
press that
number on
theremoteto
instantly
access it.
1
Make a Choice in a List
The menus have two types of lists, like these examples:
•Asingle choice list lets you make only one choice at a
time. I f you make another choice, you don’t keep your
earlier choice.
•Amultiple choice list lets you make more than one
choice at a time. If you make another choice, you keep
your earlier choice(s).
Page 27
Page 27
Page 32
Chapter 2
Parts of the System
Tip: Any time
you’re in a
menu and
want to
immediately
go back to
watching your
program, just
press the View
button.
Cancel a Procedure
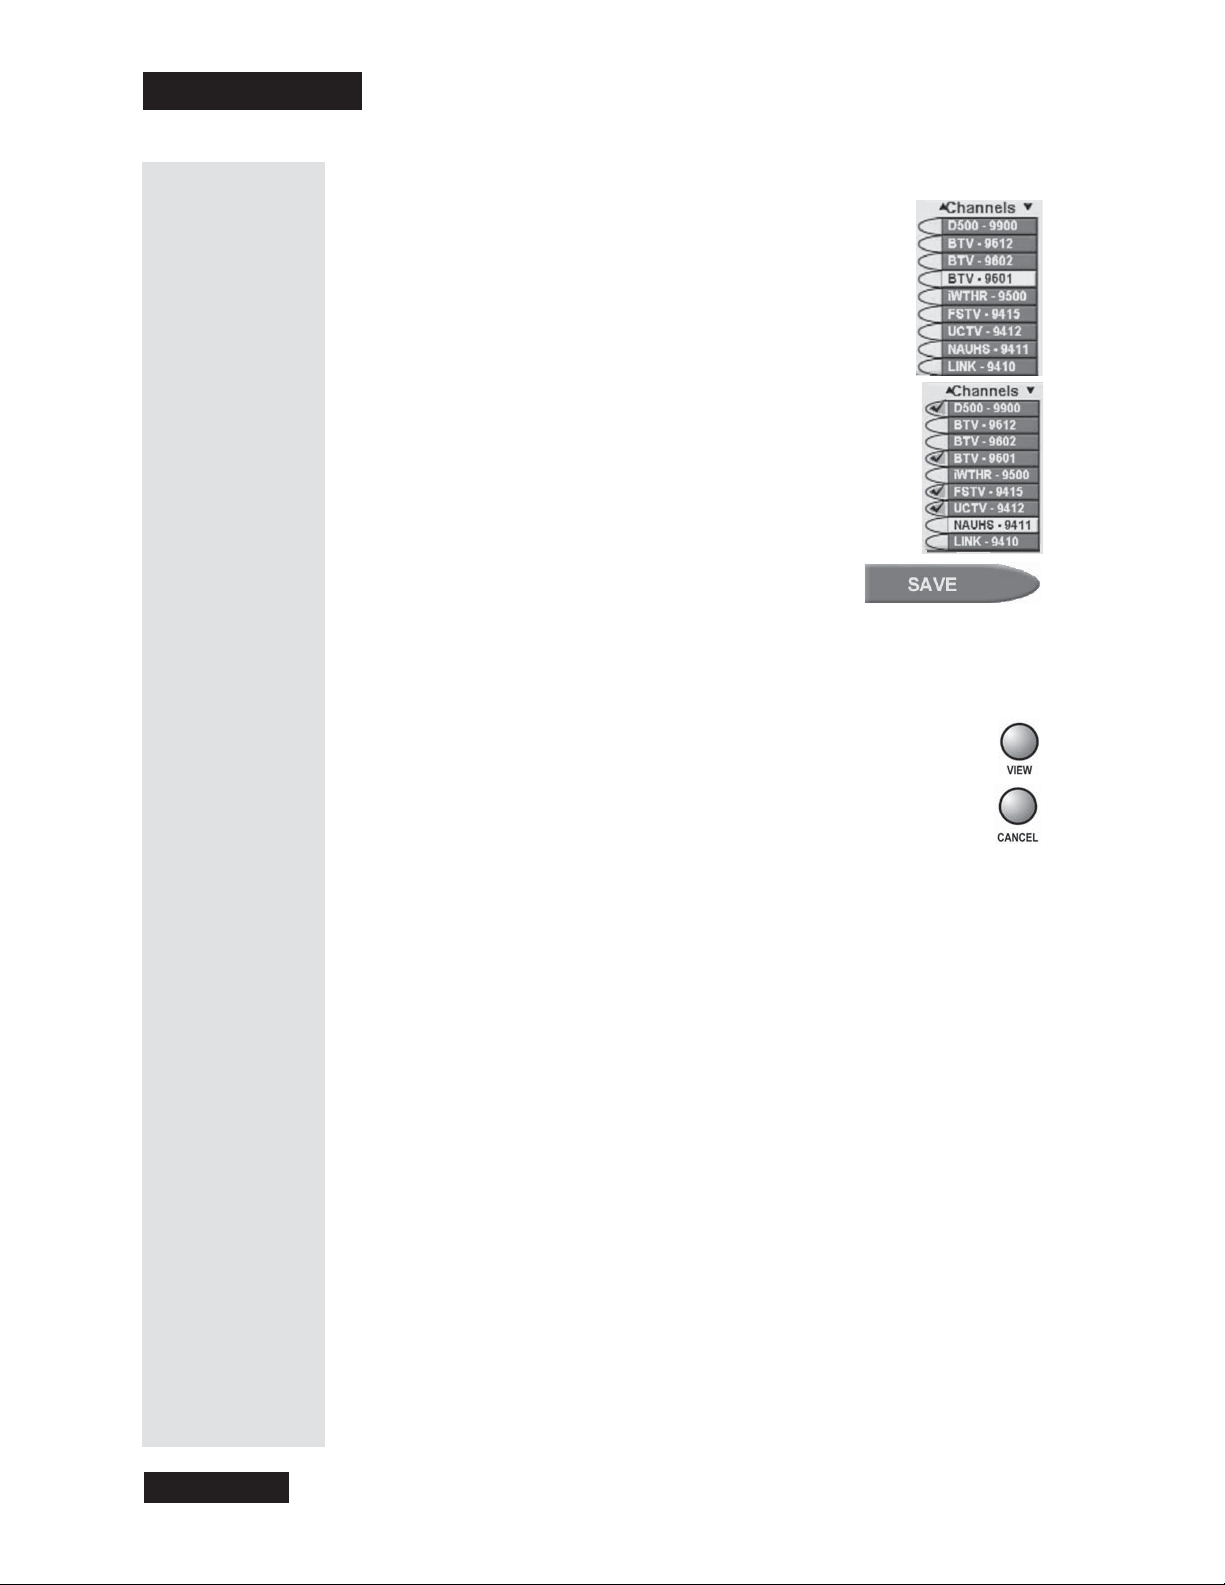
Here’s what to do:
1. Use the A RROW buttons to highlight an option.
2. Press SELECT to choose the option(s).
3. S elect Save.
To cancel a procedure, press the remote control CANCEL or VIEW
button before you do the last step of the procedure.
• Togobacktowatchaprogram,presstheVIEW button.
• To go back to the previous menu, press the CANC EL button.
Note: If you don’t do anything in a menu for several minutes, the
menu times out. This throws away any change you made, and
displays the last c hannel you watched.
Page 28
Page 33
TV and VCR Connections
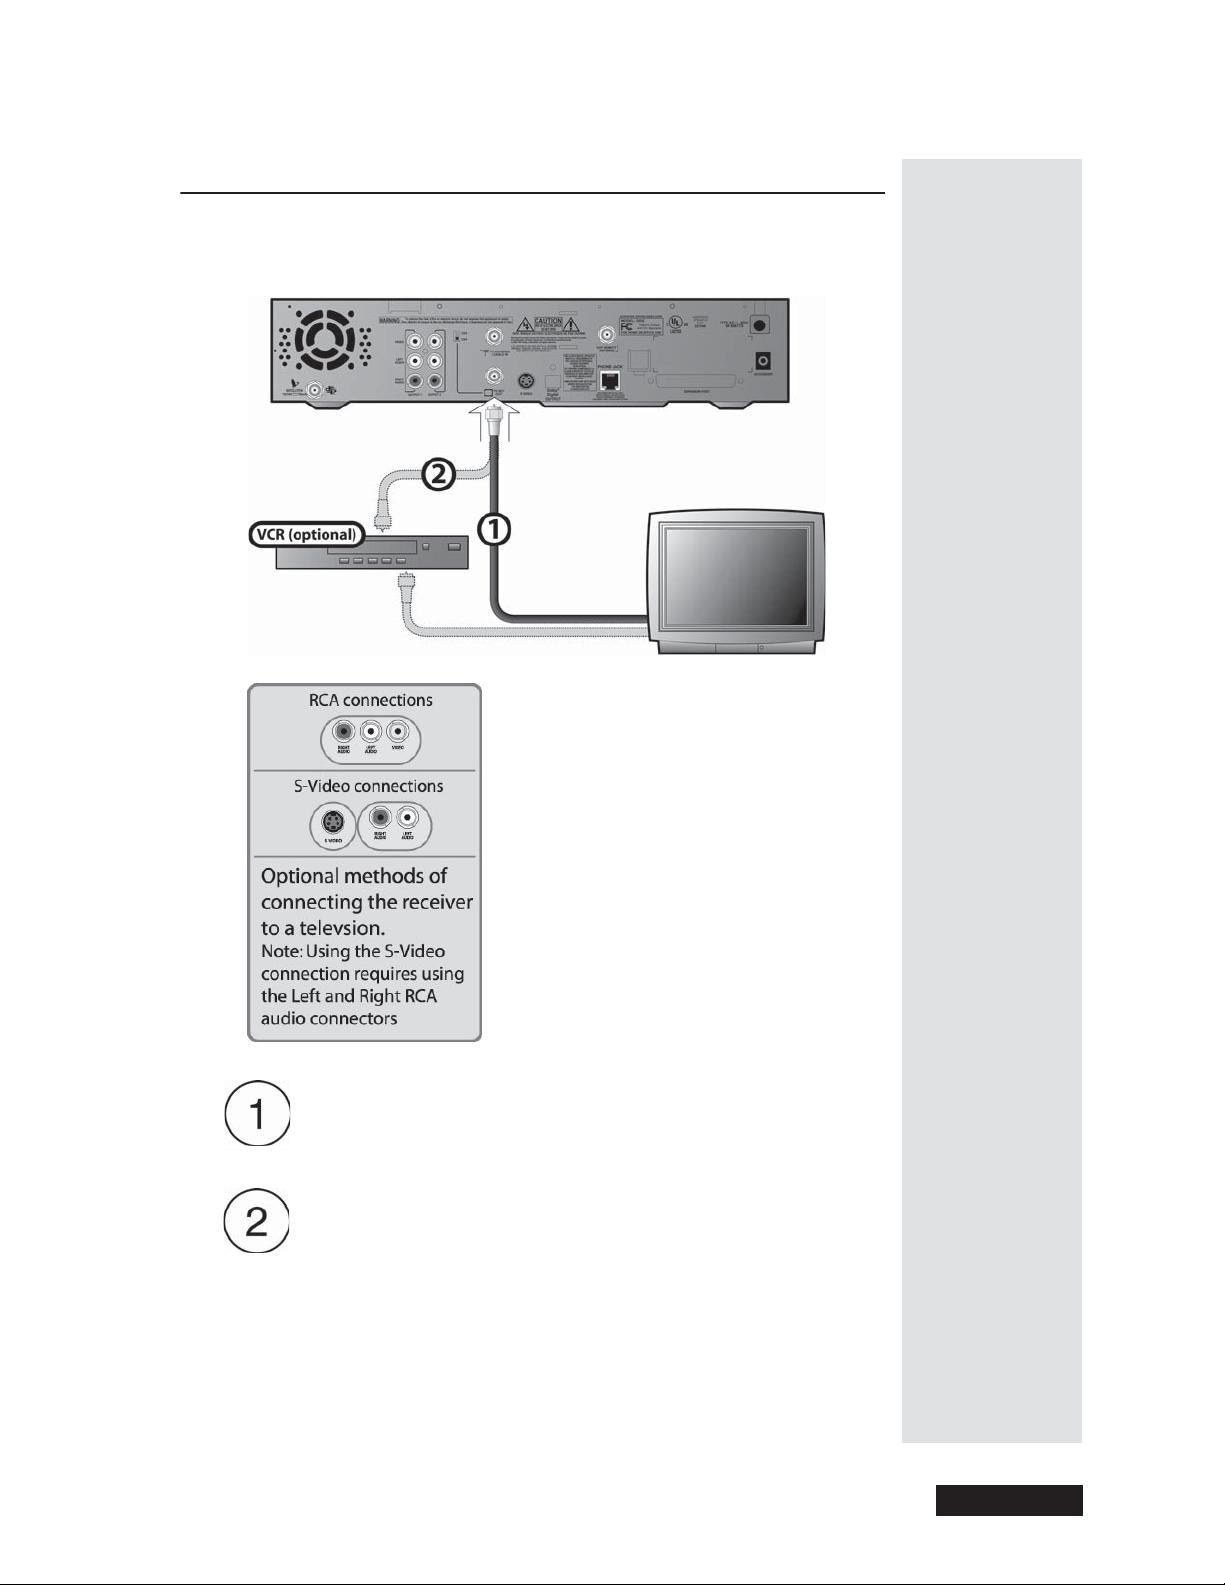
Use the following diagram and instructions to connect the satellite receiver
to a TV and VCR (optional).
TV and VCR Connections
TV Set Out to a TV - Connect a coaxial cable between the TV
S
ET OUT on the receiver a n the TV’s input. Be sure to set the
CHANNEL 3/4 switch on the receiver to the channel you use to
watch satellite TV.
TV Set Out to a VCR (Optional) - C onnect a coaxial cable
between the TV S
ET OUT on the receiver and the VCR’s input.
Connect another cable between the VCR’s output and the TV’s
input. Be sure to set the CHANNEL 3/4 switches on the receiver
and VCR to the channel you use to watch satellite TV.
Page 29
Page 29
Page 34

Chapter 2
Parts of the System
Notes
Page 30
Page 35
Chapter 3
Using the System
Change Channels
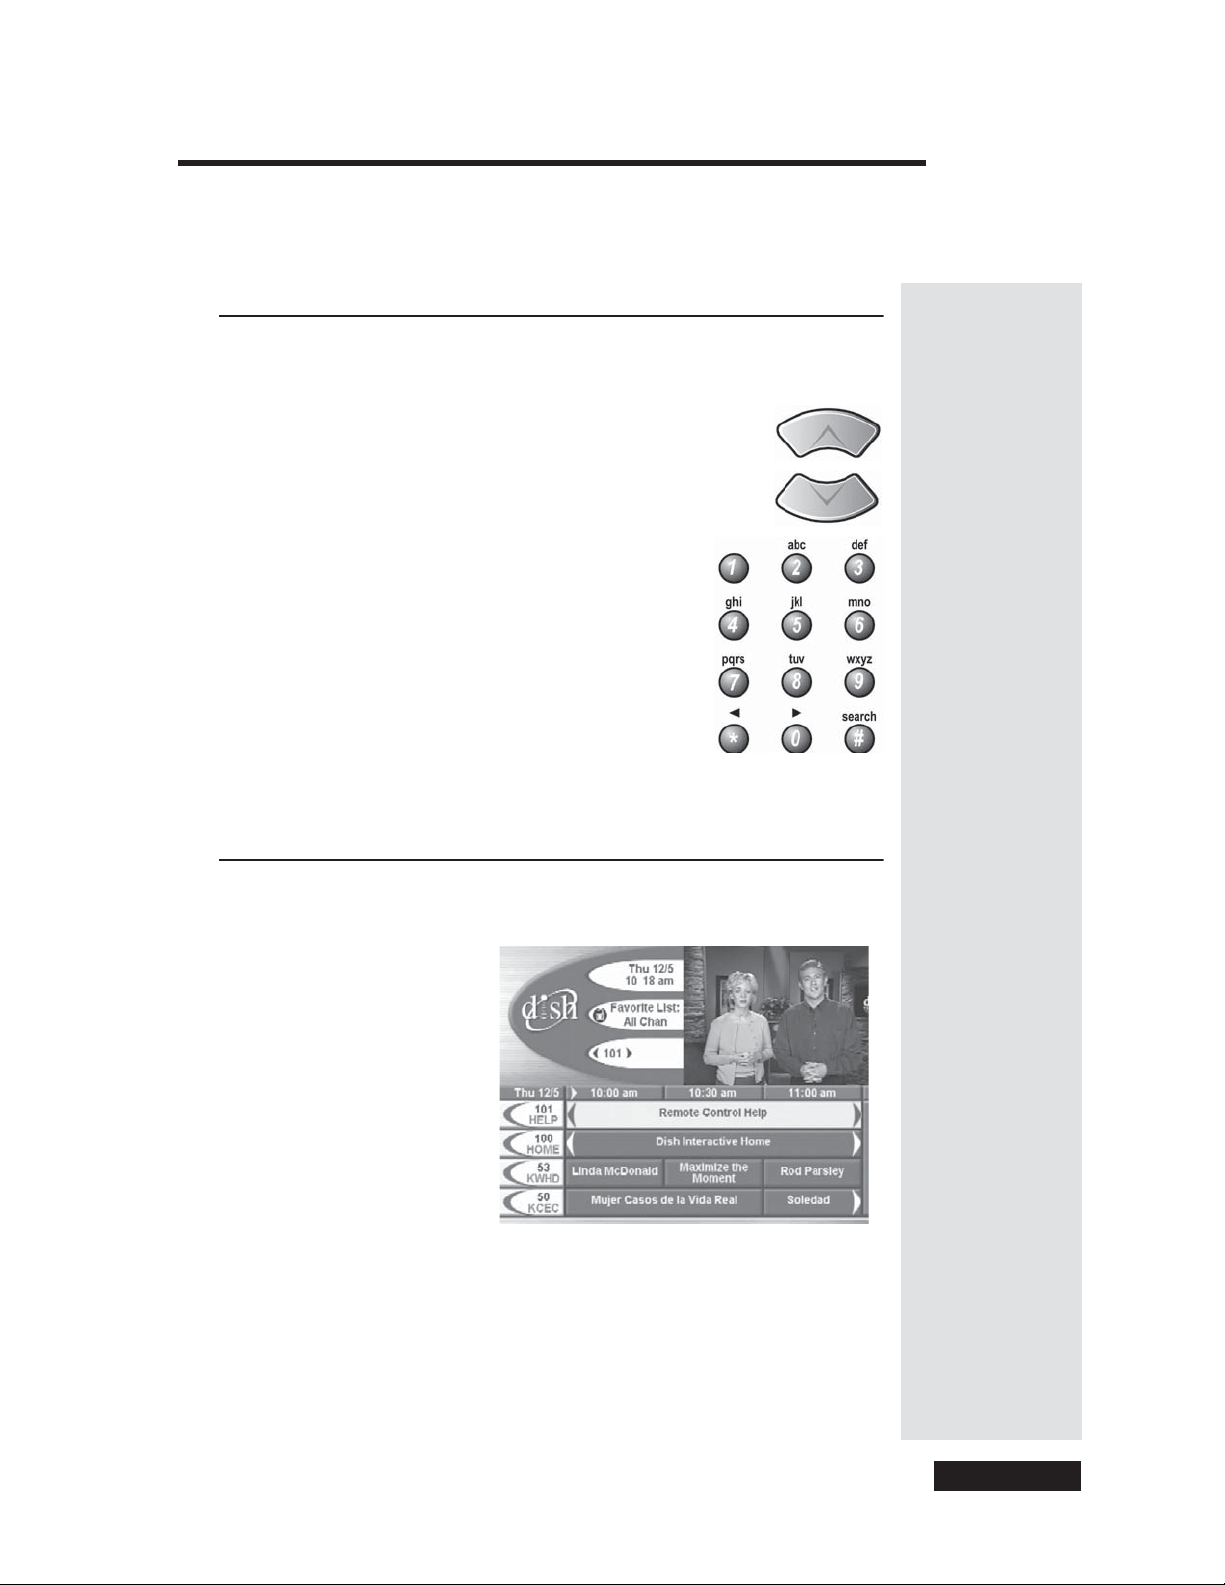
You can change channel on your satellite receiver while watching a
program by doing one of the following:
• Press the remote control UP or DOWN A RROW
button to change the channel.
•UsetheNUMBER PAD buttons to enter the
channel number you want.
Note: If you apply a Favorites List , you can
use the UP or DOWN ARROW buttons to
change channels on the list you apply, or use
the number buttons to change to any channel,
even if it is not on your applied list. The
receiver skips over blocked channels if you
hide them and lock the receiver. See page 38
for information on
Favorites Lists.
Use the Program Guide
You can use the Program Guide to se e what programs are on and to
change channels.
• The first time you use the receiver, it will take a little while to
display the
indicating that the
normal.
•Ared background behind a c hannel usually means you haven’t
subscribed to the channel. Once you buy a channel, you can tune to
it. To order a channel, please call 1-800-333-DISH (3474) or use
the
Dish button to order through the Customer Support application.
Program Guide. A message may be displayed
Program Guide needs to be updated. This is
Tip: The
Program
Guideisyour
key to satellite
TV programs.
The receiver
displays the
Program
Guide on the
TV screen.
Page 31
Page 36
Chapter 3
Using the System
Tip: Be sure to
turn off the
receiver (so
the green
power light is
off) when
you’re not
using it. This
way, the
Program Guide
will be
automatically
updated, and
you won ’t have
to wait for it to
be updated
when you’re
watching a
program.
•TheProgram Guide shows which F avorites List you apply. Pressing
GUIDE scrolls through the available
All Chan - Displays all of the c hannels a vailable on DISH Network.
•
All Sub - Displays all of the channels in your subscription.
•
Other Favorites Lists -Displaysonly the channels on a particular
•
Favorites Lists:
list. See Use Favorites Lists for m ore information.
•The
Program Guide shows programs that are on now and those that
will be on during the next seven to nine days. The guide doesn’t show
programs that have ended.
Note: You can only get the seven to nine-day Program Guide from the
110 West sa tellite. If your system does not receive 110 West, the
Program Guide w ill display information on programs for only two
days.
• You c an hide adult channels so the
Program Guide doesn’t show them.
Please see Hide or Show All Adult Channels on page 47.
• You will find any of the following symbols in the Program Guide:
(DD) in the programming titles means a program has Dolby
•
®
Digital
sound.
• for a program you can’t buy
• for a blacked-out program
• for a pay per view program
• for a program with an event timer
• for a locked program
Display the Last C hannel You Watched in the Program Guide
YoucansetuptheProgram Guide to either show or not show the channel
you are watching in its upper right-hand corner.
1. Press the MENU button.
2. S elect the
3. S elect the
4. S elect the
option or the Full guide without
video
5. S elect the
System Setup option.
Guide Displays option.
Partial guide with video
option.
Save option.
or:
Page 32
Page 37
Set the Channel Or der in the Program Guide
You c a n s e t u p t he Program Guide to list channels in ascending order (with
the highest channel number at the top), or in descending order (with the
highest channel num ber at the bottom).
Note: If you don’t set a channel order, the Program Guide lists the channels
in descending order.
1. Press the MENU button.
Use the Program Guide
2. Select the
3. Select the
4. Select the
5. Select the
System Setup option.
Channel Order option.
Ascending or Descending option.
Save option.
Select a Program in the Program Guide
1. Press GUIDE to open the Program Guide.
2. Move around the
the following ways:
•UsetheNUMBER PAD buttons to enter the
channel number you want. This will move the
Program Guide to show the channel you
enter and some others.
•UsetheARROW buttons to move the
highlight around the
Program Guide to highlight a program using
Program Guide.
• Jump through the
Program Guide in large
steps forward or backward in time:
a. Use the NUMBER PAD to enter the number of hours you want
to skip. Press the RIGHT ARROW buttontoskipforward,and
then the LEFT ARROW button to skip backward.
b. Use the SKIP AHEAD or SKIP BACK feature to
move the
Program Guide ahead or back a full 24
hours.
Page 33
Page 33
Page 38
Chapter 3
Using the System
Use the Program Banner
Note: When you use the Program Guide, if the receiver needs to get
the latest information (which might take a few minutes), it’ll display a
message that asks you to let it download new program information. As
it downloads, the receiver displays a status bar. To avoid getting this
message, turn the receiver off when you’re not using it. It’ll get the
latest information by itself and maintain an updated
Program Guide.
3. After you have highlighted the program you wa nt, you can press the
INFO button for more information about the program. If you do, press
the CANCEL buttontogobacktotheProgram Guide.
4. Press the SELECT button to change to the highlighted program. I f you
select a program that is on in the future, the receiver will display a
message to create a timer. See User Event Timers on page 48.
5. Press the CANCEL or VIEW buttontoclosethe
Program Guide.
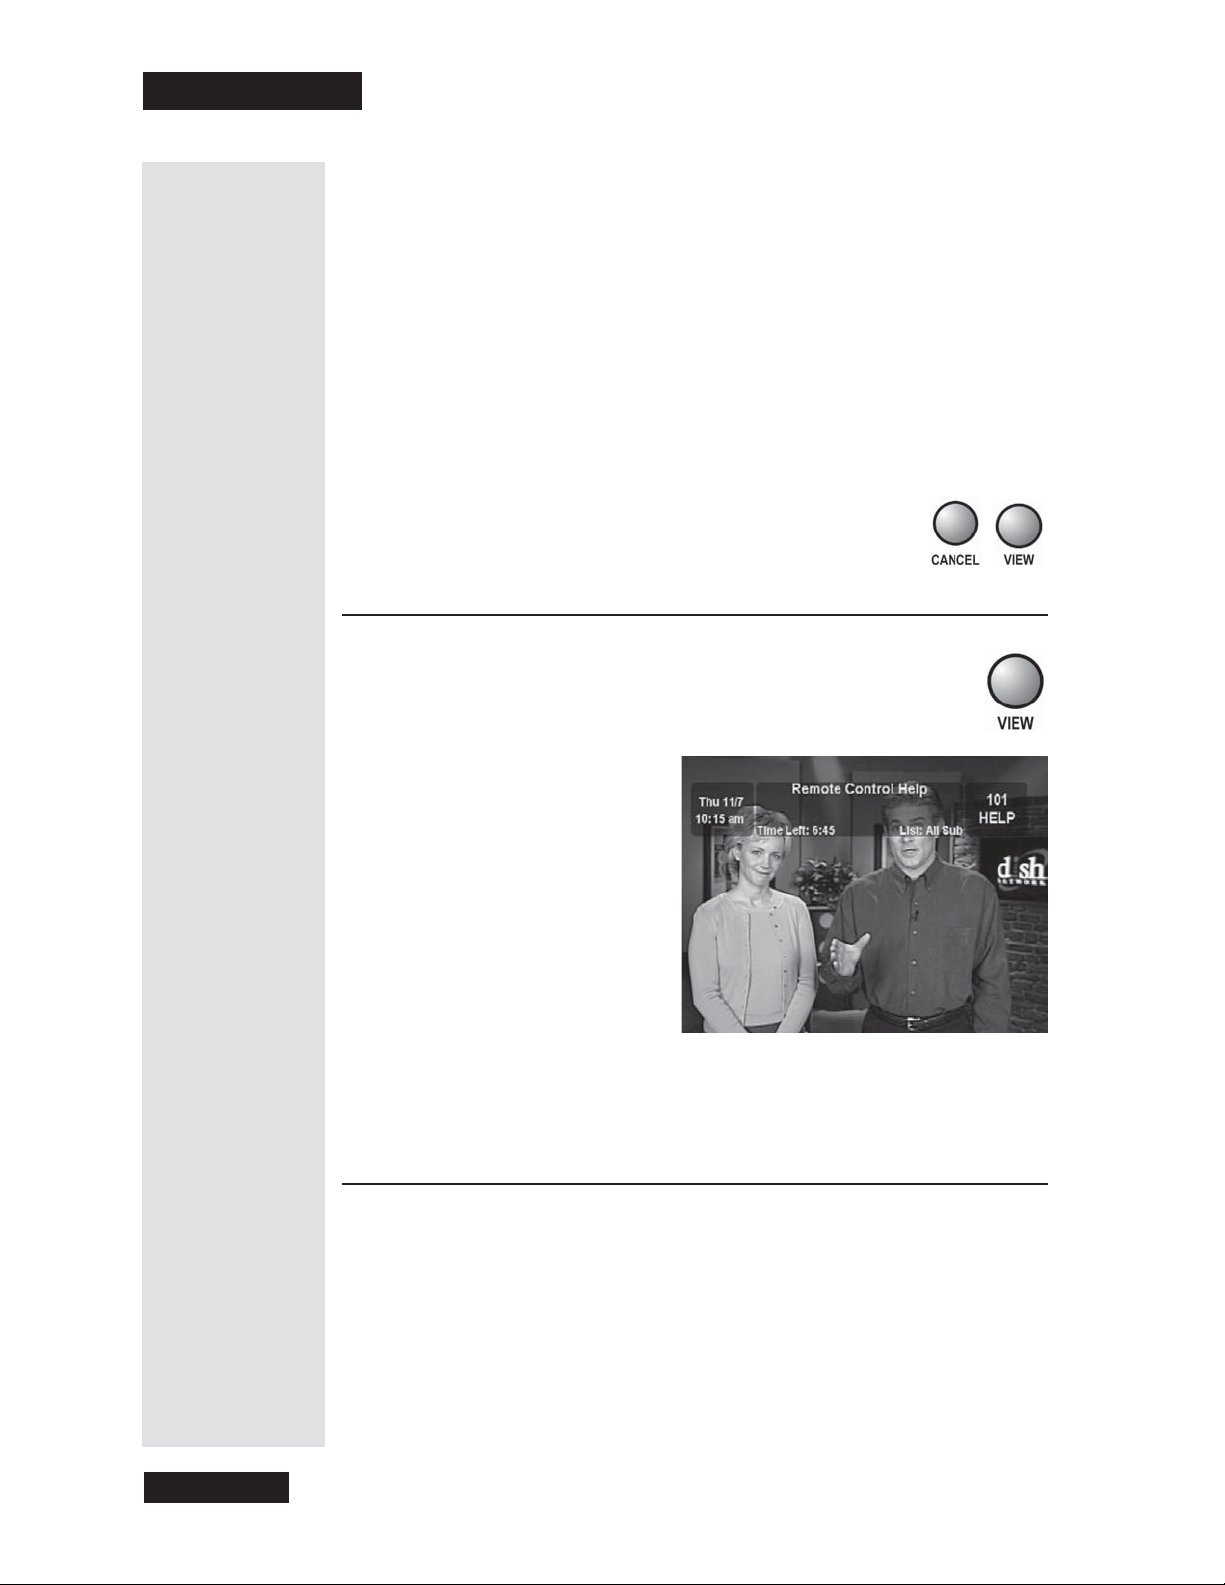
You can use the Program Banner to find out more about a
program you watch, while you watch it. The receiver displays the
Program Banner for a few seconds at the top of the TV screen
every time you change the channel or press the VIEW button.
Tip: Whenever
you change
channels, the
Program Banner
appears for a
few seconds
with information
on the program
that’s playing on
that channel.
Note: When you see a low battery warning message on the bottom line of
the Program Banner, the batteries in your remote control a re weak and
need to be replaced.
Use the Browse Banner
You can use the Browse Banner to see what other programs are on and not
miss any of a program you are watchi ng. The
information on the pr ogram you are watching at the top of the TV screen,
and information on other programs at the bottom of the TV screen. The
Browse Banner stays on the TV screen until you close it.
Browse Banner shows
Page 34
Page 39
Use the Browse Banner
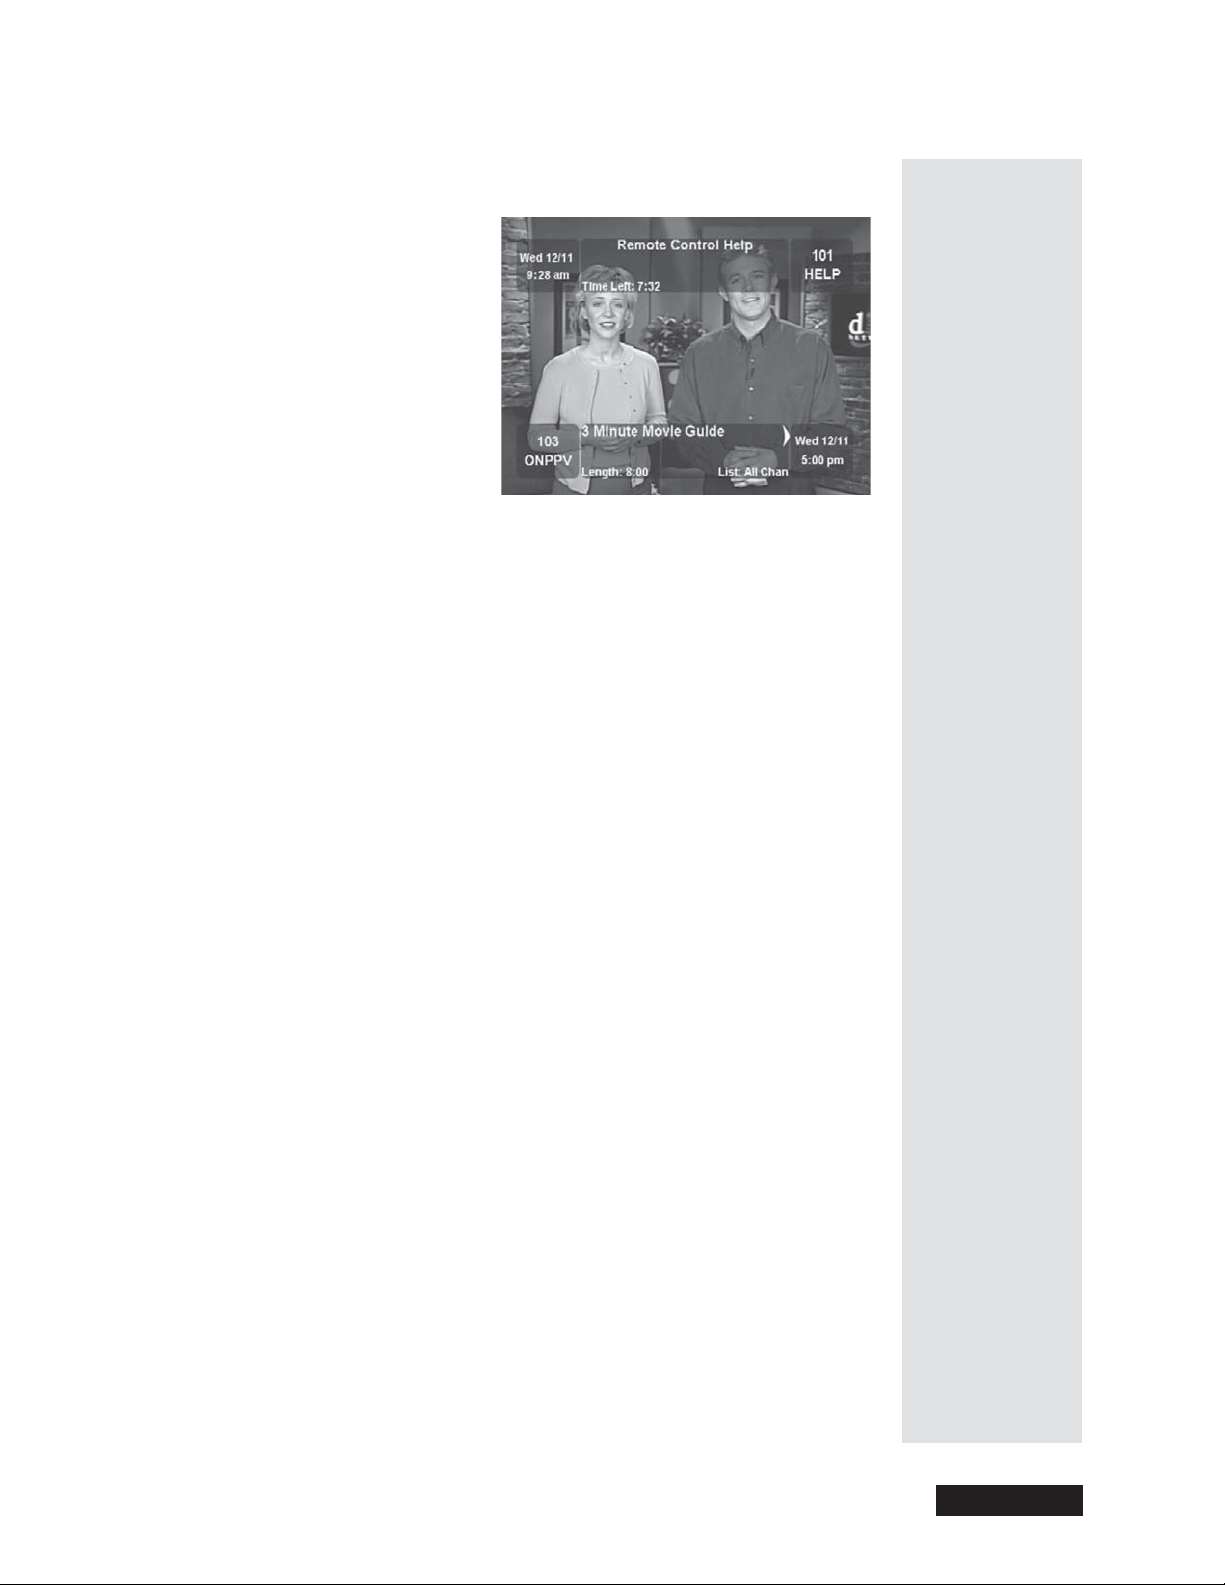
In this e xample, the
Browse Banner shows information on a program we’re
watching at the top, and information on another program at the bottom.
The bottom
applied. If the
channels. If another
Browse Banner displays the Favorites List that is currently
All Chan list is applied, the Browse Banner shows all
Favorites List is applied, the banner shows only the
channels on that list. If you hide adult channels and lock the receiver, the
banner doesn’t show adult channels.
Select a Program with the Browse Banner
While you watch a program,presstheBROWSE (right arrow) button to get
information on other programs.
With the Browse Banner open:
1. Move through the programs and highlight a desired program by doing
the following:
•PresstheUP or DOWN ARROW button to change the channel
information you see at the bottom of the TV screen, or use the
number buttons to enter a channel number. The
Browse Banner
shows information about the program on now on that channel, at the
bottom of the TV screen.
•PresstheRIGHT ARROW button to see information about the next
program on the channel you chose. If you do this, press the LEFT
ARROW button to go back to the current program on now on that
channel.
2. Press the INFO button for more information about the highlighted
program at the bottom of the TV screen. If you do this, pr ess the
CANCEL buttontogobacktothe
3. Select a highlighted program with the
Browse Banner.
Browse Banner:
If the program is on now, the channel will change to the selected
program.
If the program occurs in the future, this opens a menu w here you can set
an Even t Timer for the program, as desc ribed on page 48.
4. To exit the
Browse Banner,presstheCANCEL button.
Page 35
Page 35
Page 40
Chapter 3
Using the System
Buy a Pa y Per View Program
Once you confirm a n order for a pay per view program, you
can’t ca ncel thereafter a nd we’ll bill you for it.
Tip: If you
have a DSL
line, the
receiver’s
modem may
not be able to
dial out. If so ,
you will need
to ge t a DSL
filter and
install it
between the
receiver and
thephonewall
jack. You
should be able
to ob tain one
of these fi lter s
from your DSL
provider.
You must pay for a ll programs you or anyone else buys with the
receiver. To lock pay per view, see Lock or Unlock All Pay Per
View Programs on page 46.
To buy pa y per view pr ograms, you must connect the r eceiver to an active
phone line.
You can watch a pay per view program on TVs connected to as many as six
different receivers. You will pay for the program only once, but you must
order the program for all the receivers you will watch it on.
HowtoBuyaPayPerViewProgram
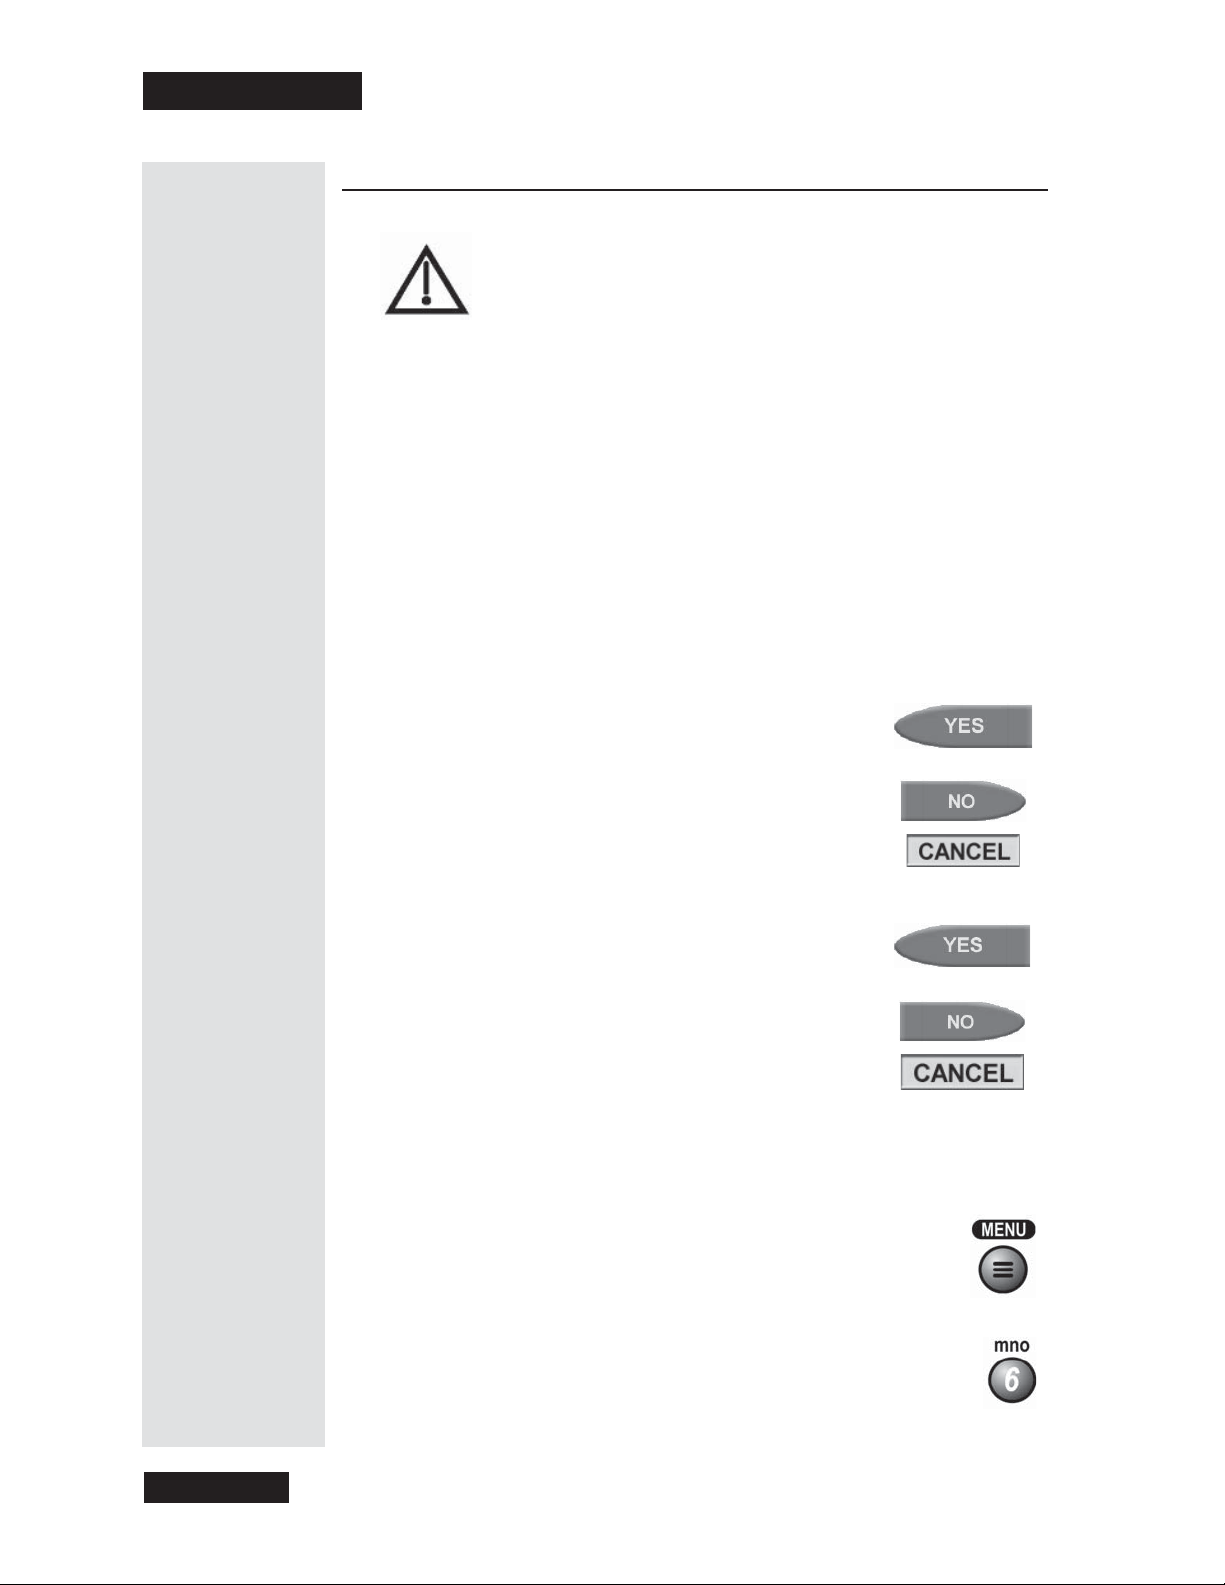
1. Select a pay per view program in the Program Guide.Payperview
programs are marked “ PPV” in the
2. To buy the pay per view program, select the
option. If you don’t want to buy the pay per view
program, select the
No or Cancel option.
Program Guide.
Yes
or
Remember:
Enjoy your
Pay Per View
events b ut be
careful. You
cannot cancel
the purchase
of any Pay Per
View events
once you
confirm.
3. A menu displays asking you to confirm your order.
Select the
willbillyouforit.Selectthe
cancel the order.
Yes optiontoconfirmtheolderandwe
No or Cancel option to
or
Review Pay P er View Programming You Have Purchased
1. Press the ME NU button.
2. Select the
System Setup option.
Page 36
Page 41
Use Themes
3. Select the
Purchase Info option. This opens a list of
shows you’ve bought, both the ones you’ve watched
and the ones you ha ven’t wa tched yet.
4. Select the
Cancel option to close the list.
Use Themes
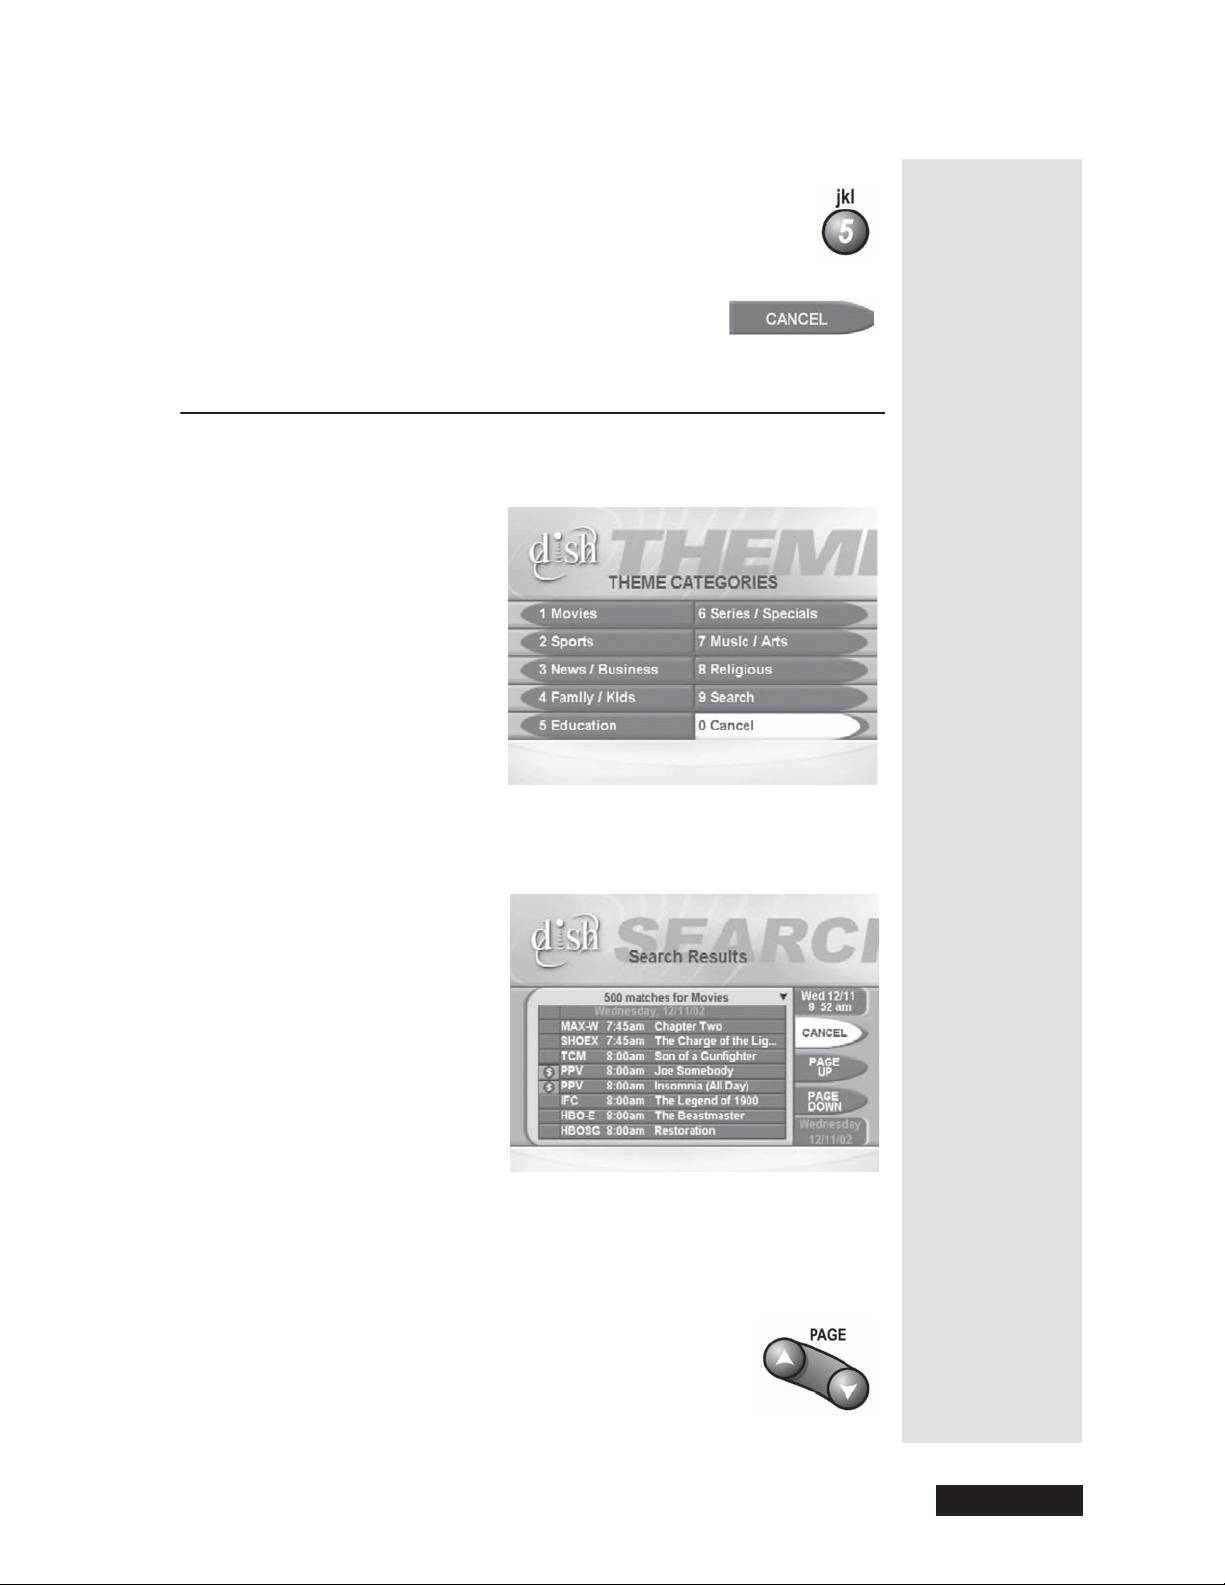
1. While you watch a program,presstheTHEME (LEFT ARROW)
button to open the
Themes (Theme Categories) m enu.
2. Select a
Theme you selected like this example.
Note: I f you hide adult channels and lock the receiver, T hemes lists
Theme category. This opens a list of programs that match the
will not show pr ograms on adult channels.
Note: P rograms colored in red are those that are not in your
subscription.
3. Move through the list of programs using the UP and
DOWN A RROW buttons or a page at a time using the
PAGE UP and PAGE DOWN buttons on the remote
control.
Page 37
Page 37
Page 42

Chapter 3
Using the System
Tip: Favorites
Lists let you
set up lists of
your favorite
channels.
When you
apply one of
these lists in
your Program
Guide, you see
only your
favorite
channels —
making it much
easier to fi nd
programs to
watch.
4. Highlight the program you wa nt. You can press the INFO button for
more information about the program you highlight. If you do, press the
CANCEL buttontogobacktothelistofprograms.
5. Press the SELECT button to watch the program or set a timer.
Use Favorites Lists
You can set up lists of your favorite channels to appear in the Program
Guide
. These lists can include any channels you want.
Note: If you hide adult channels and lock the receiver, no Favorites List
will show adult channels.
You must do two things to use Favorites Lists:
1. Set up the list(s) you wa nt. Please see Set Up or Change a Favorites List
on page 39.
2. Apply a list. See Apply a Favorites List on page 40.
About Favorites Lists
• When you apply a Favorites List, the Program Guide shows only the
channels in that list. To choose channels in the list, press the remote
control UP or DOWN ARROW button.
• To choose a channel whether or not it is on the
Favorites List you
apply, use the number buttons to enter the channel number.
•The
•The
All Chan list includes all the channels. You can’t make any changes
to the
All Chan list.
All Sub list includes all the channels you buy. You can’t make any
changes to the
All Sub list unless you change what you buy. To do so,
please call 1-800-333-DISH (3474) or press the DISH buttontogoto
Dish Home Interactive TV Applications.
• You can use up to four c ustom Favorites Lists. You can give each list a
name. When you first get the receiver, the four lists have the names
1
, List 2, List 3,andList 4. The lists are empty until you add channels
List
to them.
• You can add as many channels as you want to each list.
Page 38
Page 43
SetUporChangeaFavoritesList
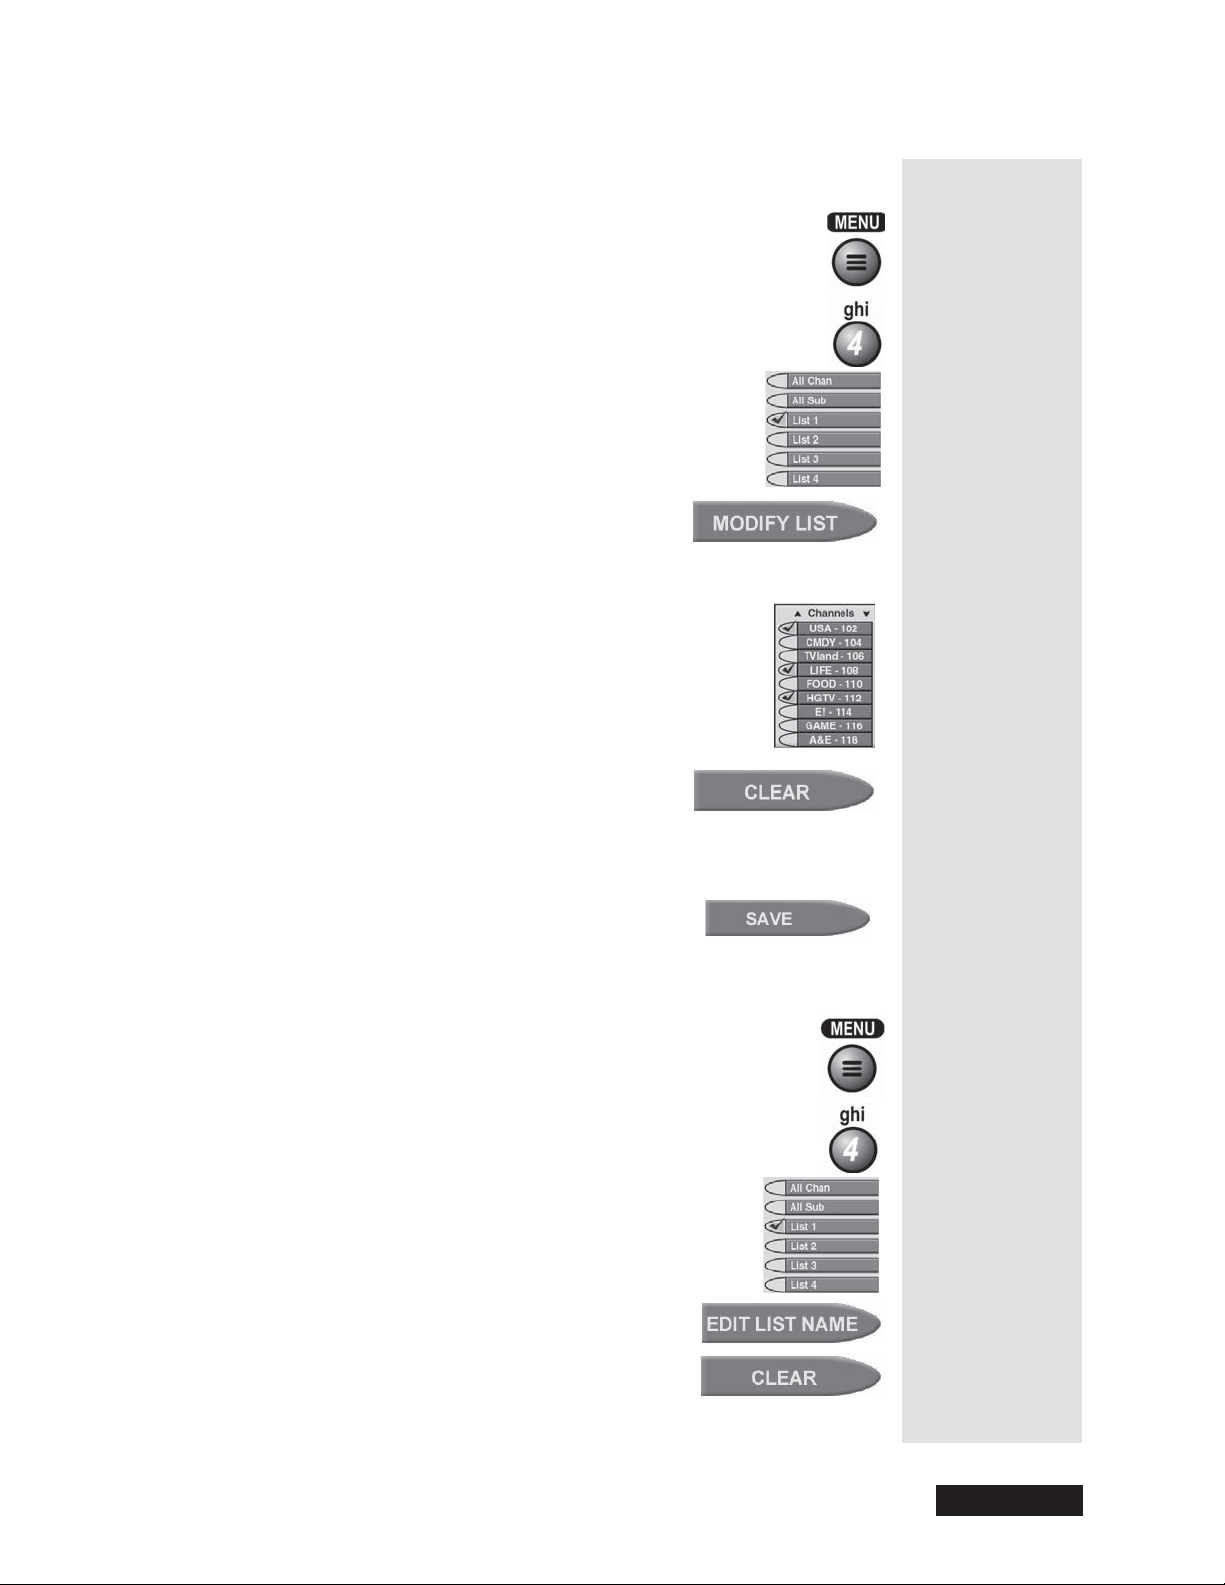
1. Press the MENU button.
2. Open the
3. Select the list you want to change. A check mark
showsupnexttothelist.For example, here we
selected
Favorites Lists menu.
List 1.
UseFavoritesLists
Tip: Be su re to
set up a list of
your favorite
channels
because it
makes finding
programs to
watch much
easier!
4. Select the
Note: You cannot modify the All Chan and
All Sub lists.
5. In the
Modify List option.
Channels list, select a channel or c hannels you
want to add to the list. A check mark shows up next to
each channel. For example, here we selected
LIFE - 108,andHGTV - 112.
You can select th e
Clear option to remove all
the channels from the channels list.
6. To delete a channel, select the channel again.
The check mark next to the channel goes away.
7. Select the
Save option to save your changes.
Change a Favorites List’s Name
1. Open the Favorites Lists menu.
USA - 102,
2. Select the list whose name you want to change. A
check mark shows up next to the list. For example,
here we selected
3. Select the
4. Select the
List 1.
Edit List Name option.
Clear option if you wa nt to clear the
list’s name.
Page 39
Page 39
Page 44
Chapter 3
Using the System
Tip: It’s easy
to apply a
Favorites List.
Just press
GUIDE on the
remote
repeatedly,
and watch for
the n ame of
your list to
appear in the
upper left
most area of
the Program
Guide
ApplyaFavoritesList
5. Select a letter on the on-screen keypad (it’s
just like selecting a menu option). For
example, here we selected
B.Dothisagain
to spell out the name. You can enter up to
eight letters, numbers, or spaces. If you
need to, select the
space in the name or the
space option to insert a
back option to
correct a letter.
6. S elect the
To apply a Favorites List, do the following:
•Ifthe
the list you want appears. The
Save option to save your changes.
Program Guide is open, press the GUIDE button repeatedly until
Program Guide shows which list you
apply.
Note: Unless you add channels to at least one custom list, you can
apply only the
All Chan list or the All Sub list.
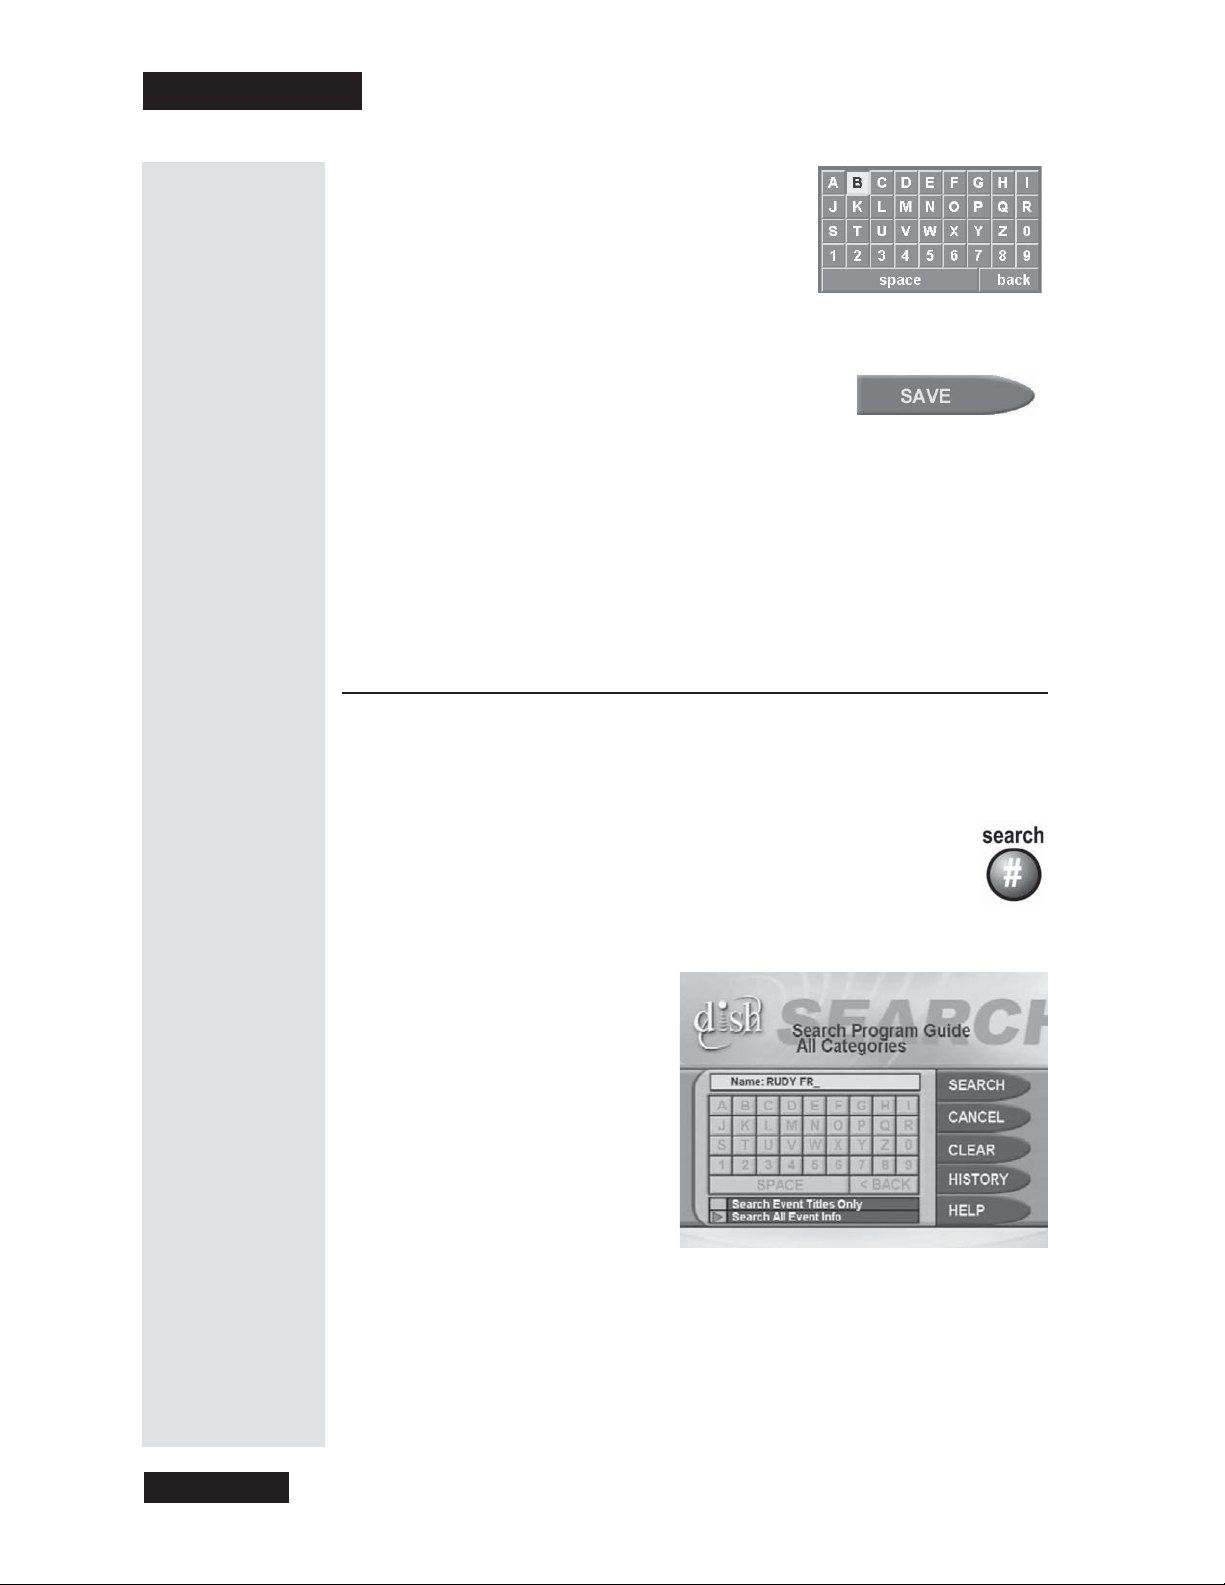
Use the Search Feature
The Search feature allows you to search the Program Guide for programs
or program information.
1. Press the SEARCH button.
2. The Search menu will open.
Page 40
3. Move the highlight to the
Name box.
Page 45
Use the Search Feature
4. There are two ways to enter the name of the program you want to find:
•UsetheUP, DOWN, LEFT,andRIGHT ARROWS to scroll
around on the virtual keyboard and then select the letters you want.
• Use the remote control num ber pad to enter the letters in the
Name
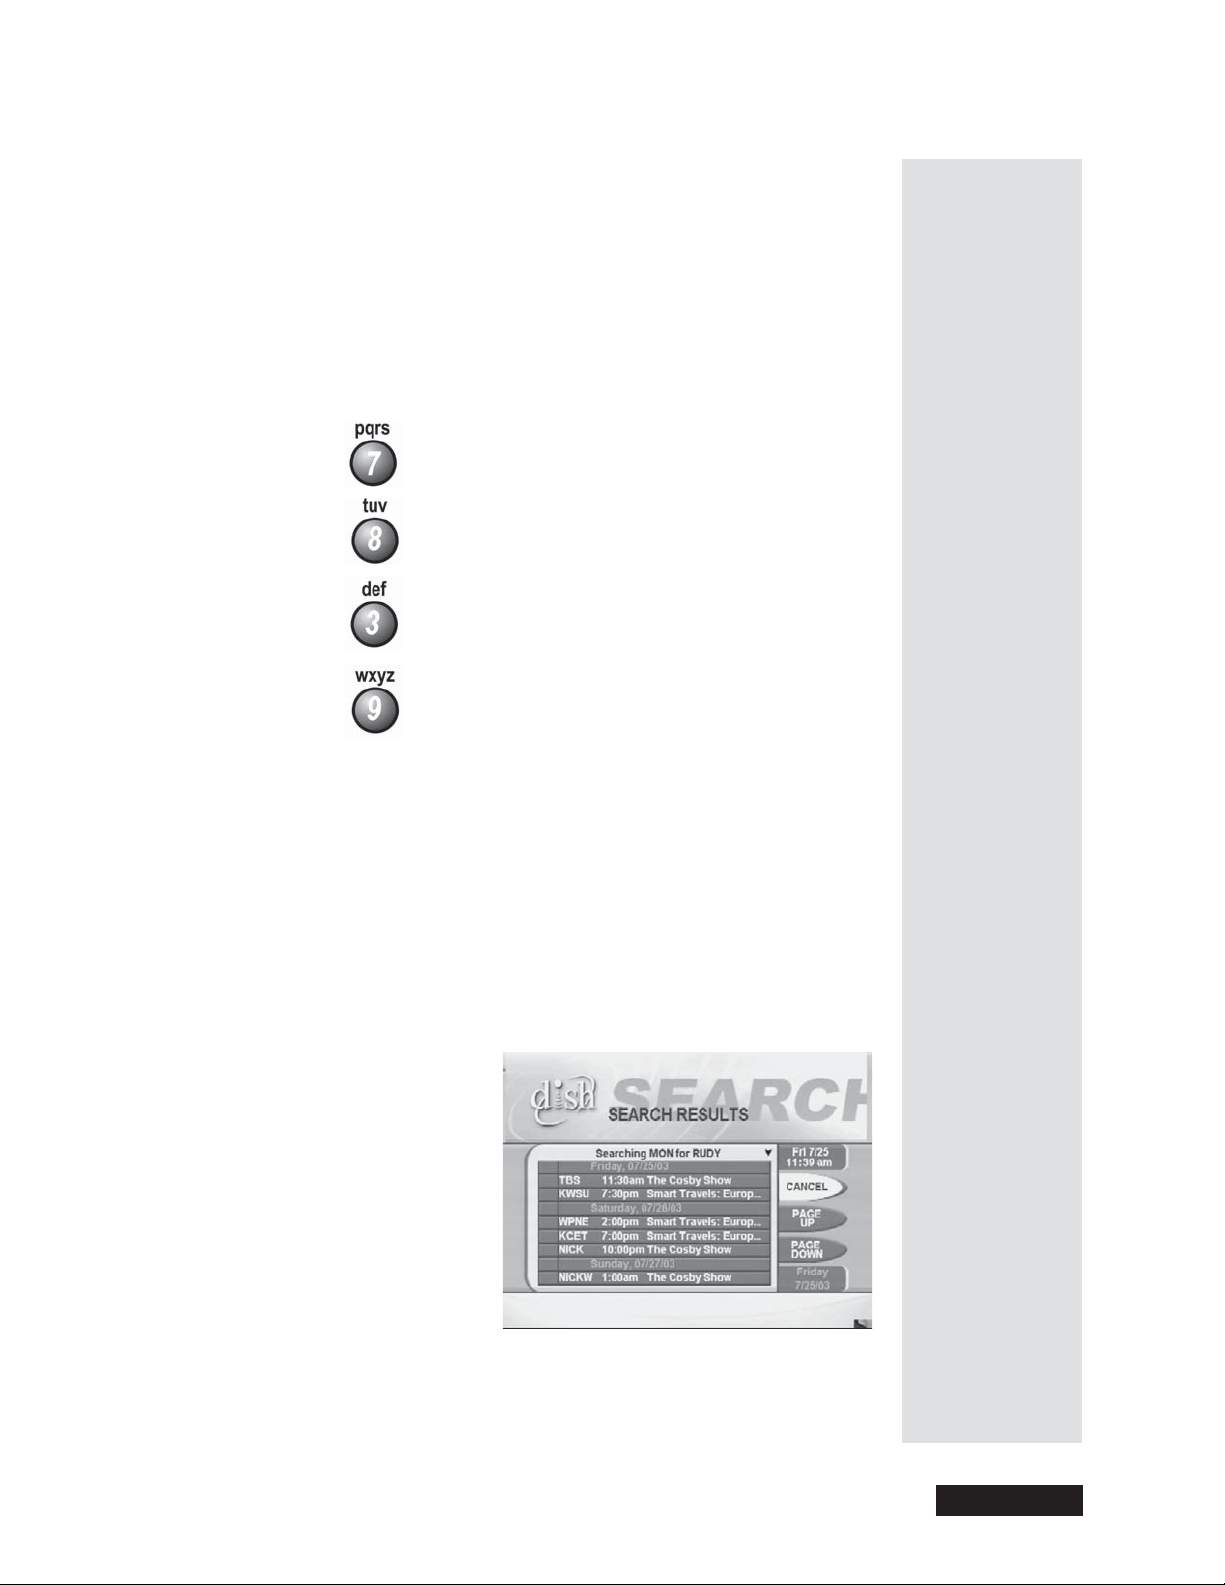
box. Numbers 2 through 9 have telephone-style numbers written
above them. To enter a n H, for example, press 4 twice because H is
the second letter listed above the 4 on the number pad. For example,
if you are searching for Rudy:
Press three times for an R.
Press twice for a U.
Press once for a D.
Press three times for a Y.
Note: Enter up to 14 characters (letters and spaces) for your search.
5. When you have entered the name, scroll down to choose between two
options:
• Search Event Titles Only - Select this option when you are sure
the word(s) you entered are part of the event title.
• Search All Event Info - Select this option if you want to search
event titles and information for the word(s) you entered.
6. Select the Search option. When the search completes, you will see a
screen listing the name of the program(s) and the start and stop times.
7. Highlight the program you want to watch or record and press SELECT.
Page 41
Page 41
Page 46
Chapter 3
Using the System
8. If the Create An Event Timer menu opens, select Create to record
the program. See Use Event Timers for more options on setting up
timers.
Tip: You can
lock out
programs by a
rating such as
PG-13, or you
can lock out
entire
channels.
9. After setting up the timer, select Cancel to exit the menu or press
to go back to watching a program.
Use Locks
The Locks f eature allows you to lock out certain programming, channels, or
receiver functions. The locks can be unlocked using a special password.
Note: You can set up a Personal Identification Number (PIN) with the
Customer Service Center so only you can order services by phone. See
Personal Identification Number on page 48 for more information.
• You can set locks and lock the receiver so only someone who knows the
password can get to locked channels or programs.
You must do two things to use locks:
1. Set up the locks you want (see the next few pages).
Lock the rece iver. This is how you apply the locks you set
2.
up (that is, how you make them work). See Lock or Unlock
the Rece iver on page 47.
Open the Locks Menu
View
1. Press the MENU button.
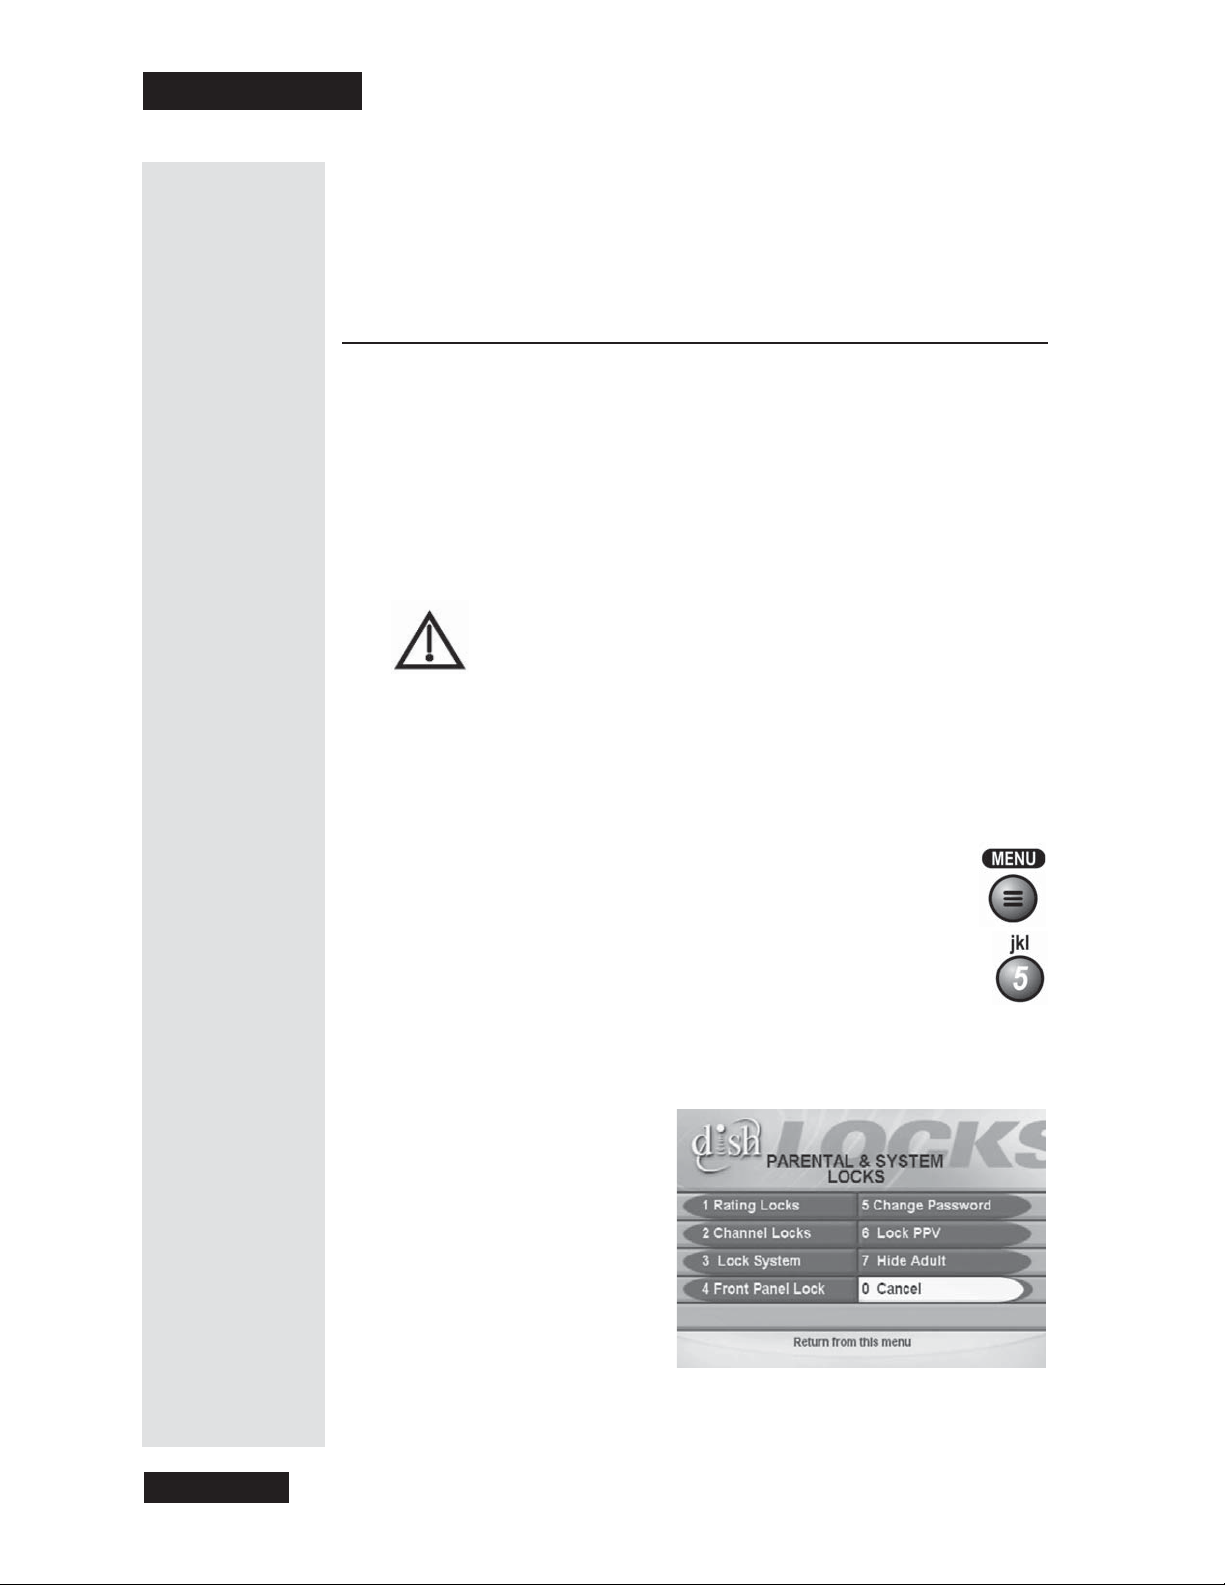
2. S elect the
This opens the
Note: If you’ve locked the receiver pre viously, you must enter the
password to open the
3. On the
Locks option.
Locks (Parental and System Locks) m enu.
Locks menu.
Locks menu, select the option for the lock you want to set.
Page 42
Page 47
Set or Change the Password
Use Locks
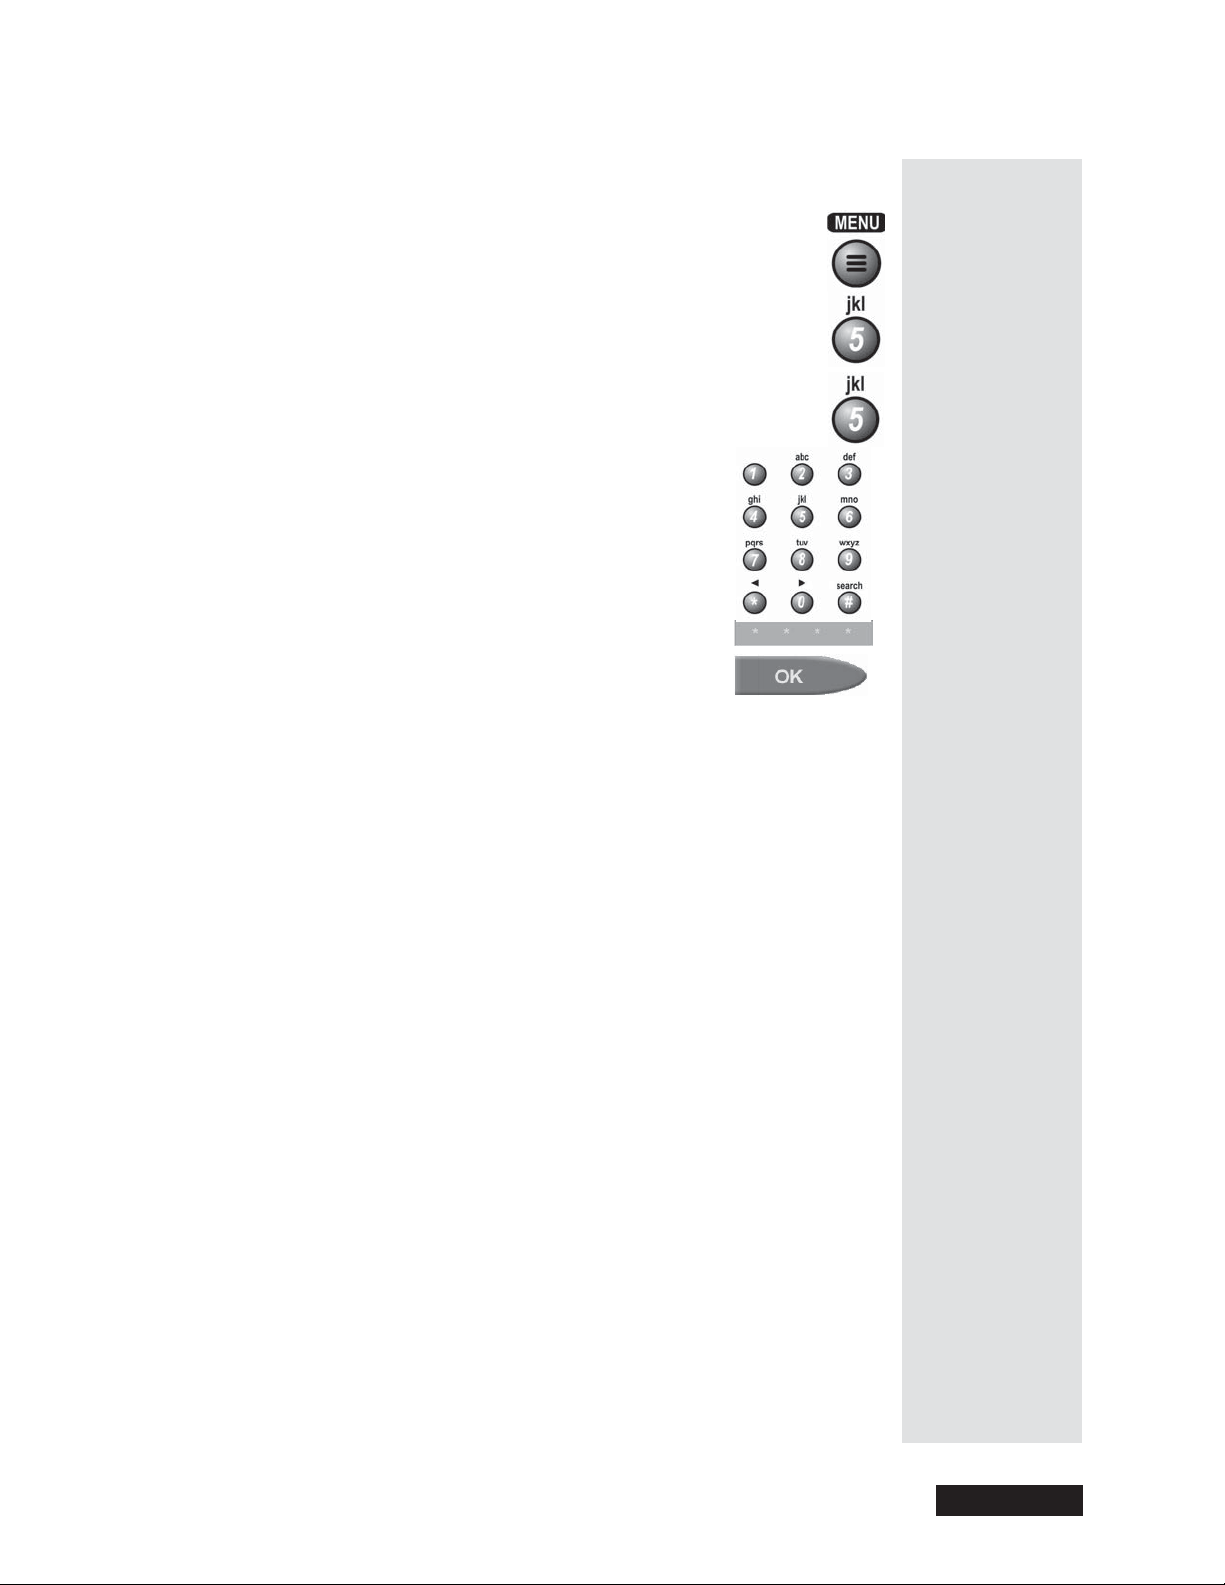
1. Press ME NU and then select the Locks menu.
Note: I f you’ve locked the receiver previously, you must enter
the existing password to open the
Locks menu. S o, unless you
know the password you can’t change it.
2. Select the
Change Password option.
3. Use the number buttons to enter the password you
have now. The receiver displays stars (*) as you
enter the digits of the password. When you enter
the last digit of the password, the receiver
highlights the
OK option. Press the SELECT
button.
4. Enter the new password.
5. Enter the new password again to confirm your
choice.
6. Select the
OK option again.
7. Memorize your new password.
Important: If
you create a
password, be
sureto write it
down and put
it away some
where safe, as
you will not
be able to
change any
locks or
unlock the
receiver
without it.
If You Forget the Password
If you forget the password, call the Customer Service Center at
1-800-333-DISH (3474). You may need to give us information such as your
name, your a ddress, your telephone number, the receiver serial number (see
Order Your Program Packages on page 3), and your Personal Identification
Number (PIN), if you use one (see page 48).
Rating Code Locks
• Rating c ode locks use the codes the original program providers assign
to the programs. The actual content of the programs may be different
from the assigned ratings.
Note: No rating system can guarantee that all unwanted material is
screened out.
• Like all other locks, these locks work only when you lock the receiver.
• You can lock any satellite program, even a pay per view program.
• The locks built into some TVs (“V chip” locks) don’t work f or satellite
programs.
• TV program ratings are different from movie ratings.
Tip: If you
forget your
password, call
Customer
Service at
1-800-333DISH (3474)
• Receiver locks don’t work for TV programs.
Page 43
Page 43
Page 48
Chapter 3
Using the System
Set or Change Rating Code Locks
• Rating Codes:
G: General Audience. Suitable for young children.
PG: Parental Guidance suggested.
PG-13: Parental Guidance suggested. Not recommended for
children under 13.
R: Restricted. Not recommended for children under 17 unless
accompanied by an adult.
NC-17: Not recommended for Children under the age of 17.
NR/AO: Not Rated/Adult Oriented
Expanded Ratings:
L: Language. Adult language.
V: Viol e nce. Graphic Violence.
SC: Sexual Content. Sexual scenes.
N: Nudity. Nude scenes.
1. Press MENU andthenselecttheLocks menu.
Tip: If you
have the
password,
you can lock
and unlock
any channel,
including pay
per view
channels.
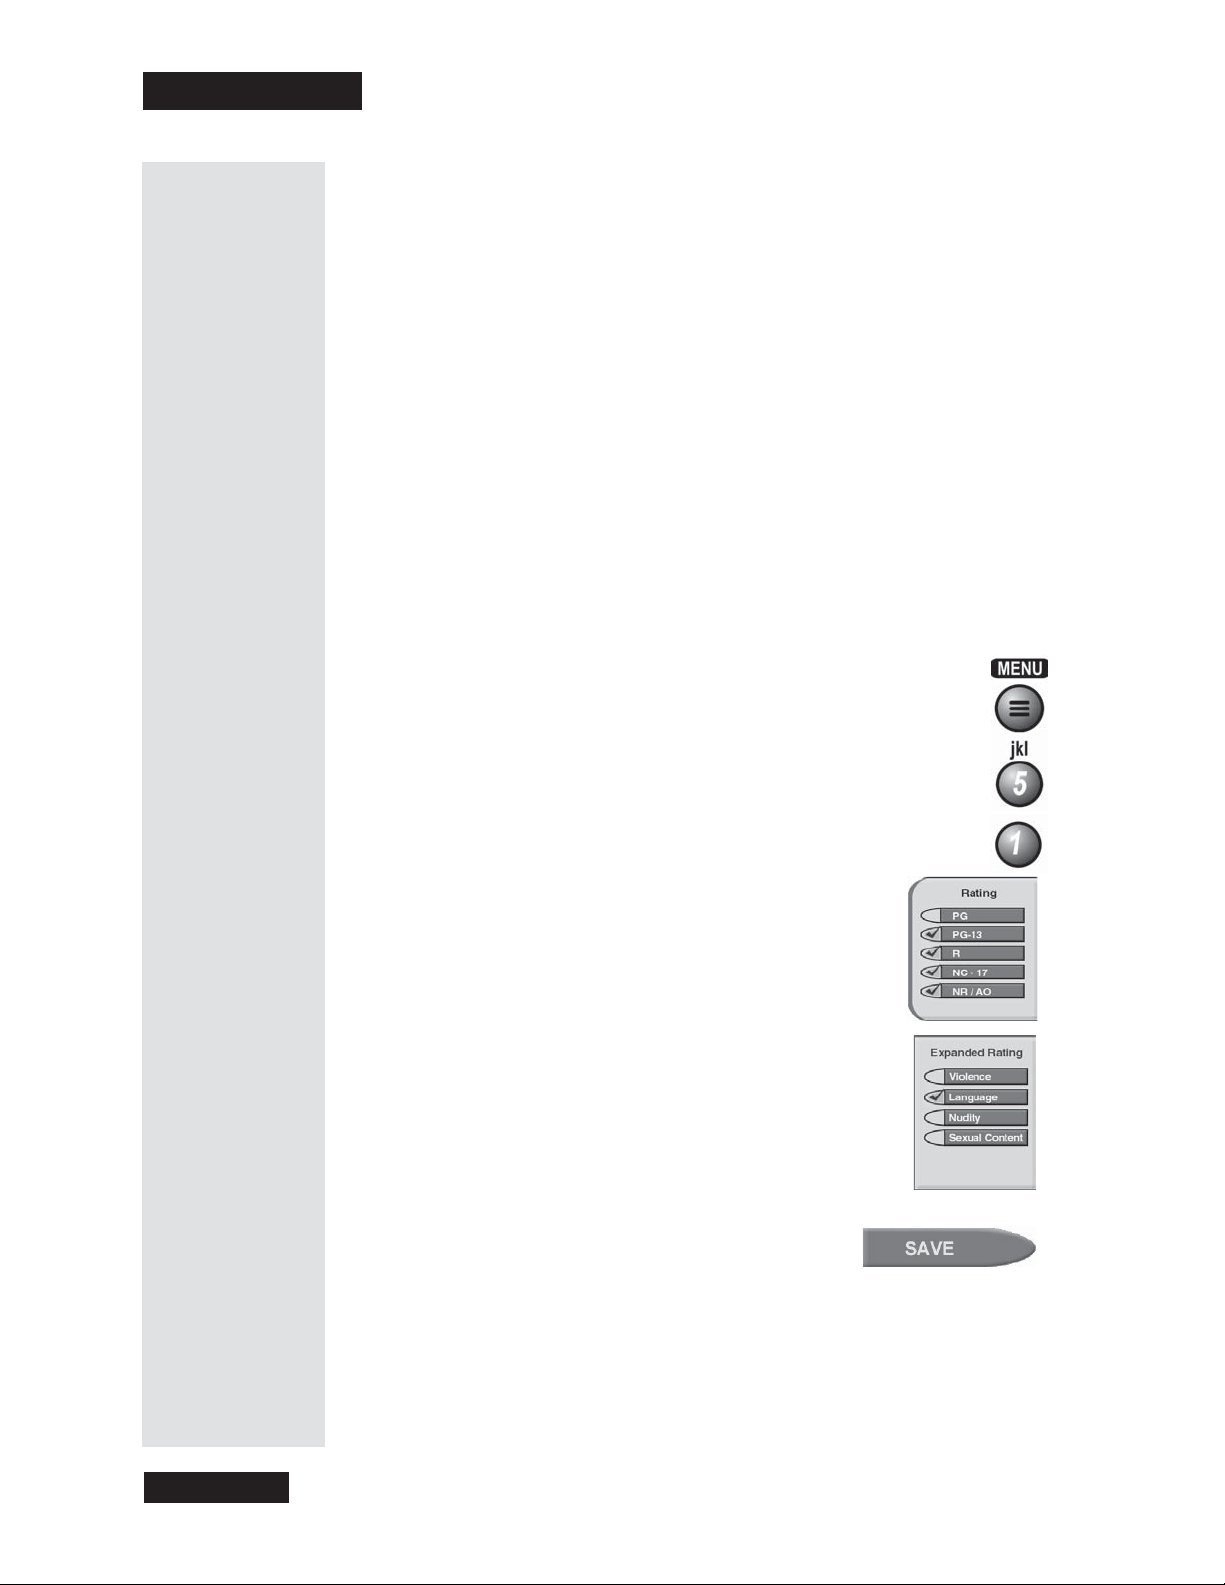
2. S elect the
3. Select the rating for the youngest viewers you want to
protect. This also selects ratings f or programs for
more mature viewers. In the example here, if you lock
PG-13 r ated programs, you also lock all programs
with the R, NC-17, a nd NR/AO ratings.
4. Select the expanded rating code(s), if you want to
lock these ratings too. For example, here we selected
Language.
Note: You can select any, all, or none of these rating
codes.
5. To unlock a rating code, select the code.
6. S elect the
7. You must lock the receiver to apply the lock you
just set. See Lock or Unlock the Receiver on
page 47.
Ratings Locks option.
Save option to save your c hanges.
Page 44
Page 49
Set or Change Channel Locks
Note: You can lock any channel, even a pay per view channel.
Use Locks
1. Press ME NU and then select the
2. Select the
Channel Locks option. Select the
Locks menu.
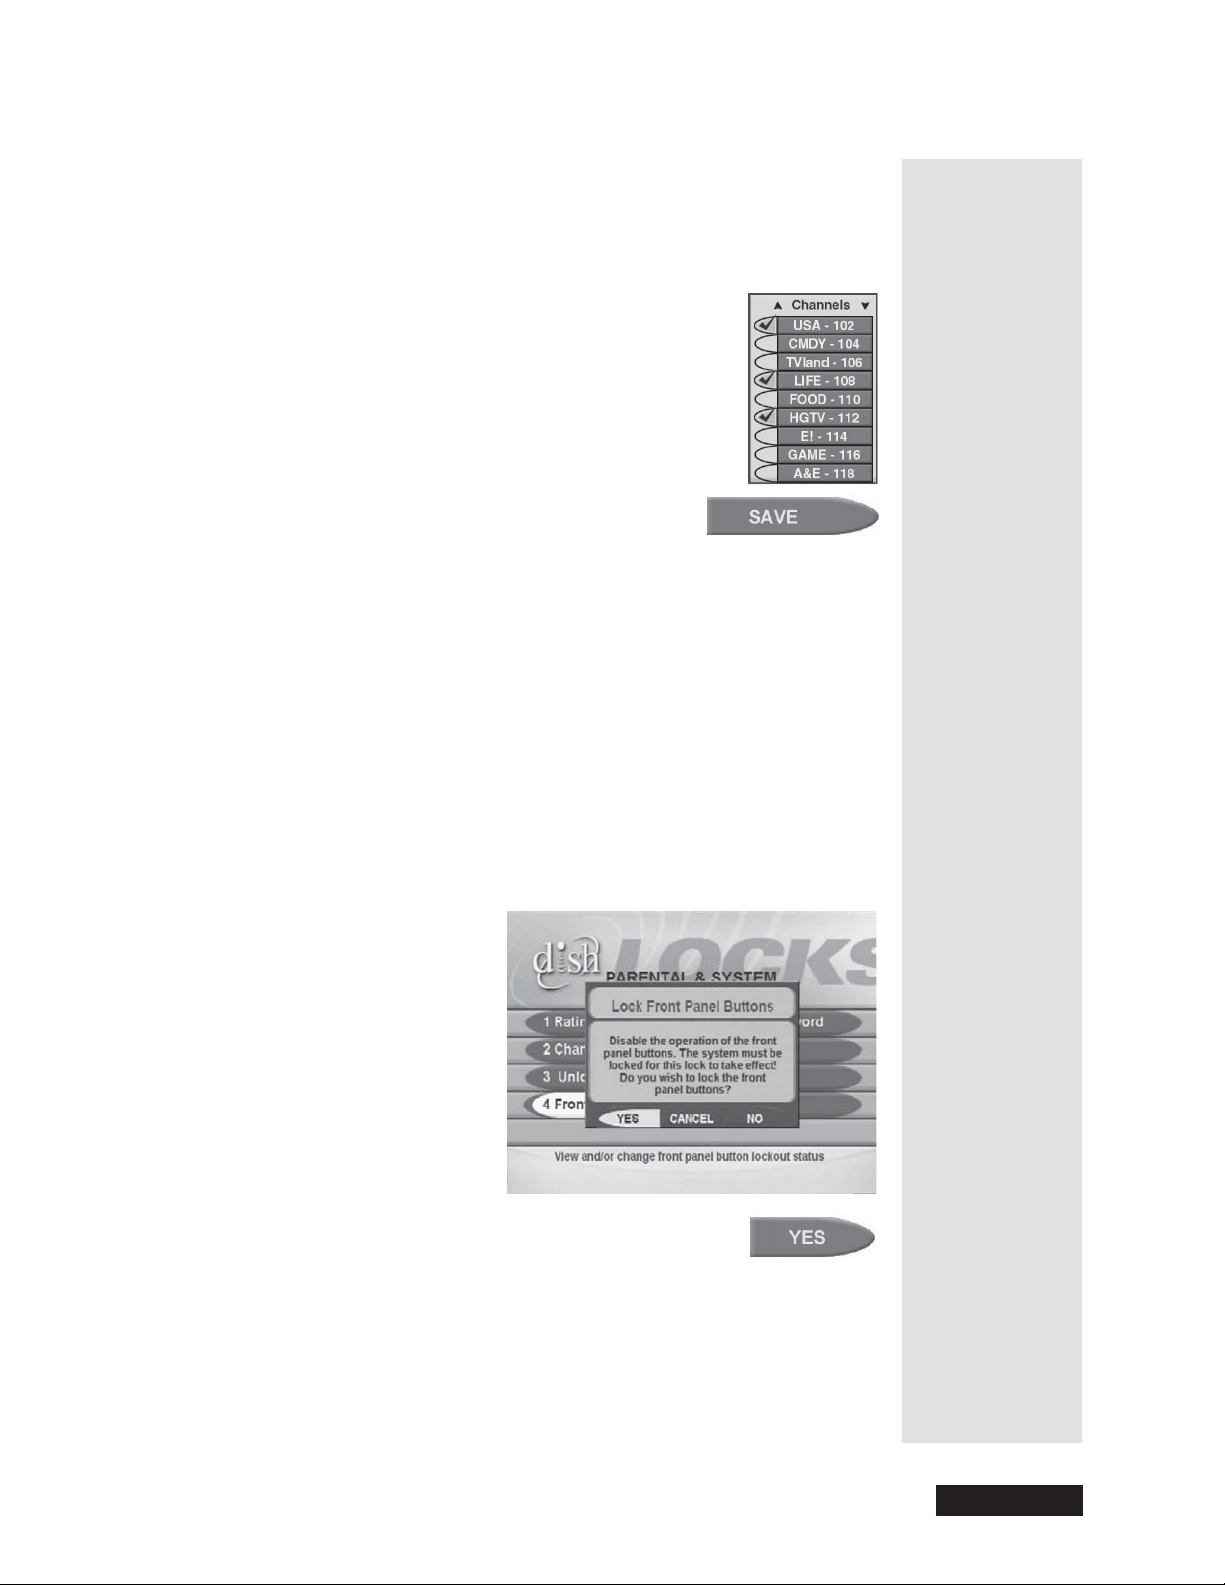
channel(s) you want to lock. A checkmark shows up
next to the channel(s), as you can see in this e xample.
3. To unlock a channel, select that channel. The
checkmark next to the channel goes away.
4. Select the
Save option to save your changes.
5. You must lock the receiver to apply the lock you just set. See Lock or
Unlock the Receiver on page 47.
Lock or Unlock the Receiver Front Panel Buttons
Note: You c an lock the receiver buttons and hide the remote to limit how
people use the receiver.
Note: Even if you lock the receiver front panel buttons, the POWER button
will continue to work.
1. Press ME NU and then select the
Locks menu.
2. Select the
Front Panel Lock option. The Lock Front Panel Buttons
pop-up displays.
3. Select the
Yes option.
4. You must lock the receiver to apply the lock you just set. See Lock or
Unlock the Receiver on page 47.
Page 45
Page 45
Page 50
Chapter 3
Using the System
To unlock the receiver front panel buttons:
1. Press MENU andthenselectthe
2. S elect the
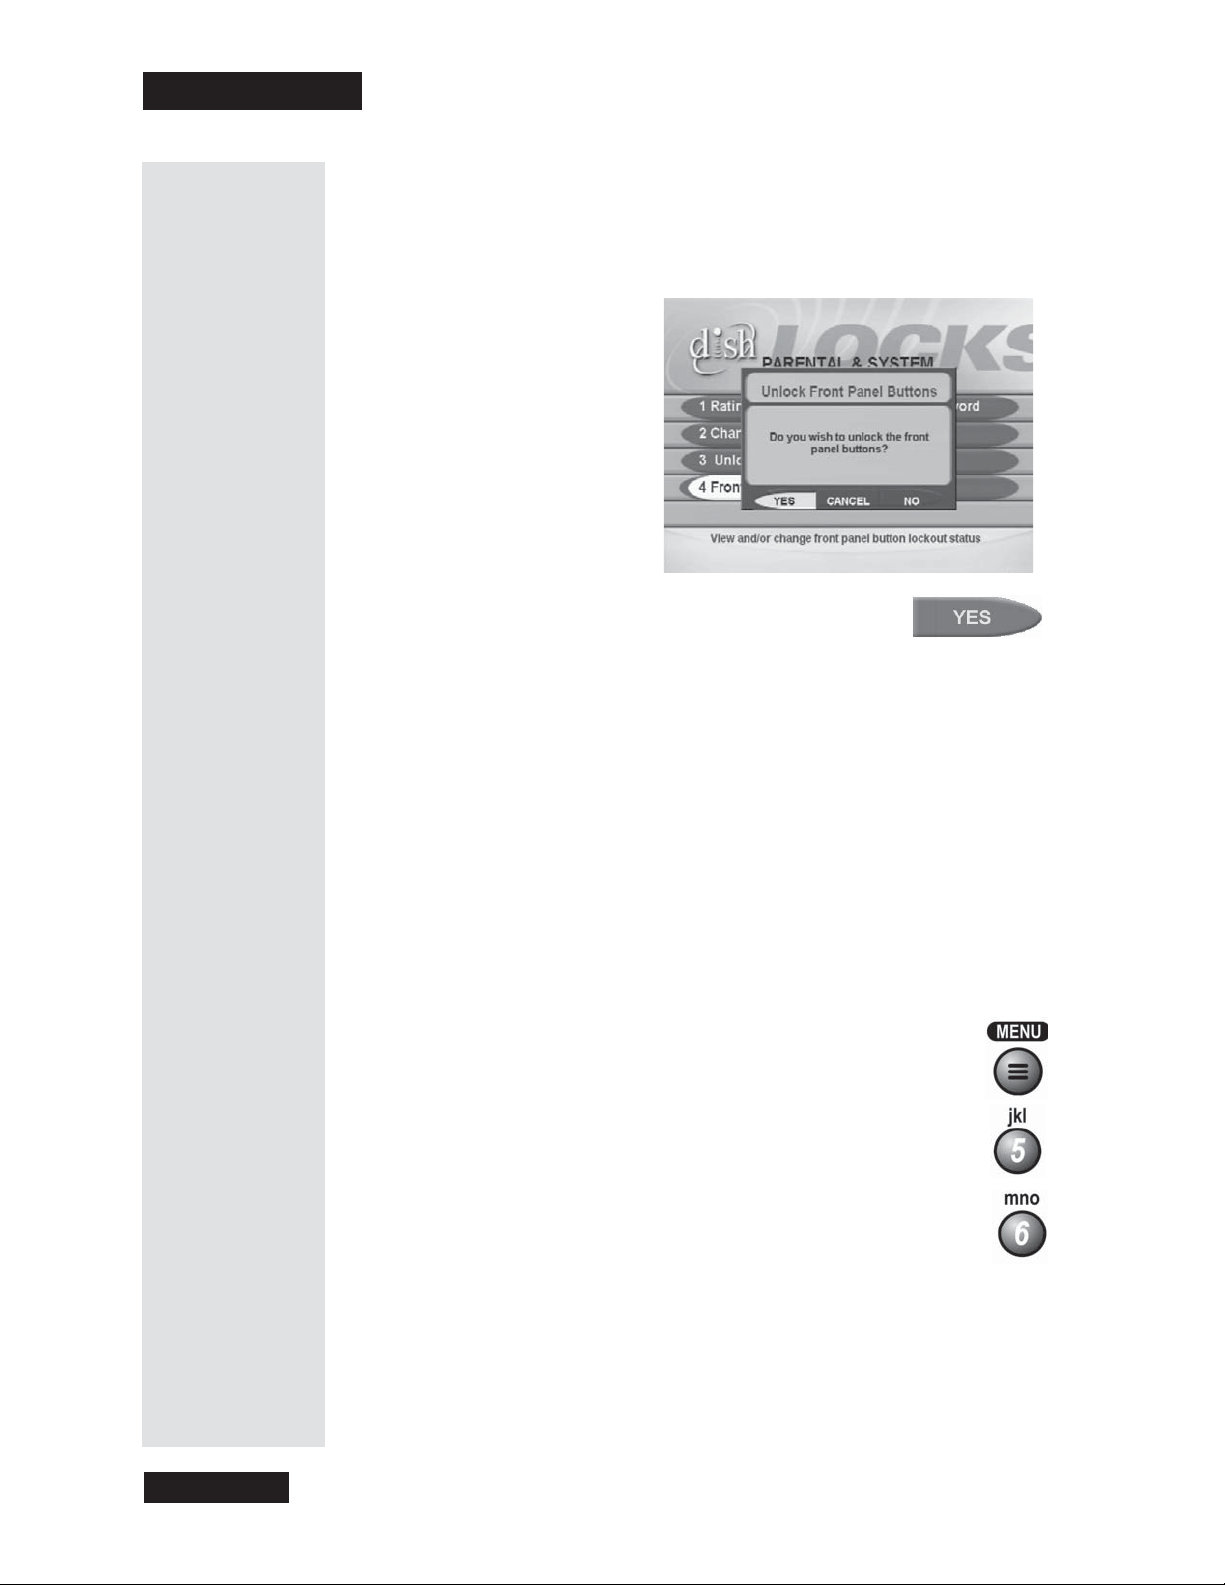
Front Panel Lock options Unlock Front Panel Buttons pop-
Locks menu.
up displays.
3. S elect the
Yes option.
Lock or Unlock All Pay Per View Programs
Note: This locks all pay per view channels. You c an lock one or more
channel(s) with channel locks or rating code locks.
To lock all pay per view programs:
1. Press MENU andthenselectthe
2. S elect the
Lock PPV option.
Locks menu.
3. You must lock the receiver to apply the lock you just set. Please see
Lock or Unlock the Receiver on page 47.
To unlock all pay per view programs:
1. Press MENU andthenselectthe
2. S elect the
Unlock P PV option.
Locks menu.
Page 46
Page 51

Use Locks
Hide or Show All Adult Channels
You can keep the Program Guide, Themes lists, Favorites Lists,andthe
Browse Banner from showing any adult channels. This m eans no one can
tune to adult cha nnels with the remote control UP or DOWN ARROW
button or number buttons.
Note: This locks all adult channels. You can lock one or m ore adult
channel(s) with channel locks or rating code locks.
To hide all adult channels:
1. Open the Lo cks menu.
2. Select the
Hide Adult option.
3. You must lock the receiver to apply the lock you just set. Please see
Lock or Unlock the Recei ver,below.
To show all adult channels:
1. Open the
2. Select the
Locks menu.
Unhide Adult option.
Lock or Unlock the Receiver
To lock the receiver:
1. Press ME NU and then select the
2. Select the
Lock System option. The receiver displays a message that
tells you to enter the password.
Locks menu.
Tip: You can lock
single adult
channels or all
adult channels.
Just remember
that you will
need the
password to
unlock them.
Tip: To use
Locks, you
must set the
locks you
want, and then
lock the
receiver.
3. Use the number buttons to enter the password. The receiver displays
stars (*) as you enter the digits of the password. W hen you enter the last
digit of the password, the receiver highlights the
OK option. Press the
SELECT button.
4. The r eceiver displays a message that tells you to enter the password
again. Do so, and then select the
OK option again. This applies all the
locks you set.
To unlock the receiver:
1. Press ME NU and then select the
Locks menu.
2. Because the receiver is locked, it displays a message that tells
you to enter a password. The receiver displays stars (*) as you
enter the digits of the password. When you enter the last digit of
the password, the receiver highlights the
OK option. Press the
SELECT button.
3. Select the
Unlock System option.
Page 47
Page 47
Page 52
Chapter 3
Using the System
When You’ve Locked the Receiver
• If you try to watch a locked channel or program, erase a protected
DishDVR recording, or open the
message that tells you to enter the password.
• The receiver gives you three tries to enter the right password. If you
can’t do this, the receiver doesn’t let you try again for several minutes.
If you enter the right password, you can watch a locked channel or
program or open the
Locks menu.
Locks menu, the r eceiver displays a
• If you leave a locked channel or program or the
enter the password again to see the channel, program, or
again.
• If you unlock the receiver, leave the locks unchanged, a nd then lock the
receiver again, you apply the same locks as before.
Locks menu, you must
Locks menu
Personal Identification Number
You can set up a P ersonal Identification Number (PIN) for call-in requests
only. Anyone who calls the Customer Service Center must provide this PIN
to make any changes to your a ccount, to buy services, or to get information.
You can call the Customer Service Center at 1-800-333-DISH (3474) at any
time to set up a P IN.
If you forget your PIN, you must cal l the Customer Service Center. We may
ask for more information to make sure it’s okay for you to make changes to
your account.
Use Event Timers
Many satellite TV programs and films a re copyrighted. In some
cases, copyright law may apply to private, in-home recording.
Page 48
Event timers let you set up the receiver to tune in future programs and/or
record them, with the DishDVR features or a VCR.
• An “event” is a program, sports event, pay per view movie, or anything
else on satellite TV.
• You can quickly set a one-time event timer with Quick Record.See
page 50.
• You can set an automatic event timer for a program listed with start and
stop times in the
each day or each week. See page 51.
•Amanual event timer lets you set custom start and stop times for a
timer. You can use a manual timer to record part of a program, several
programs together, or parts of several programs. See page 52.
Program Guide. This can be a program that comes on
Page 53

• If you use an event timer, you can record only the channel you’ve got
tuned. This means you can’t record one pro gram and watch or record
another “live” program at the same time.
• If you open a m enu while you record to a VCR, the tape may record th e
menu. If you change the volume or press the MUTE button, the tape
may record the c hange depending on how your VCR is connected in
your system.
Note: I f you want to have Event Timer record to a VCR, you must set
up the receiver to control the VCR. See Control a VCR on page 56.
Note: Even if the systems shows “PVR” instead of “DVR,” it works the
same way.
Use Event Timers
Event Timer Types
DVR Reminds you a program is about to start; tunes the receiver to
the program when it begins; records the program with the
DishDVR features.
Auto-Tune Reminds you a program is about to start; tunes the receiver to
the program when it begins.
Reminder Reminds you a program is about to start.
VCR Reminds you a program is about to start; tunes the receiver to
the program when it begins; starts a VCR to record the
program.
Event Timer Frequencies
Once Works for a one-time program. If the program time changes,
this timer works a t the new time. The receiver deletes this
timer right after the timer works.
a program, not a time. So even if the program comes on late,
the timer works for it.
Weekly Works once a week on the same channel at the same time on
the same day. You can set this timer for a program that co mes
on once a week.
Daily Works on Monday through S unday on the same channel at
the same time each day. You can set this timer for a program
that comes on every day.
Note: A Once timer keys on
Tip: Want to
make s ure
you never
miss an
episode of
your favorite
show? Just
set a Weekly
Event Timer
once, and the
receiver will
automatically
record it
every week!
Mo.-Fr. Works on Monday through Friday on the sa me channel at the
same time each day. You can set this timer for a program that
comes on every weekday.
Page 49
Page 49
Page 54
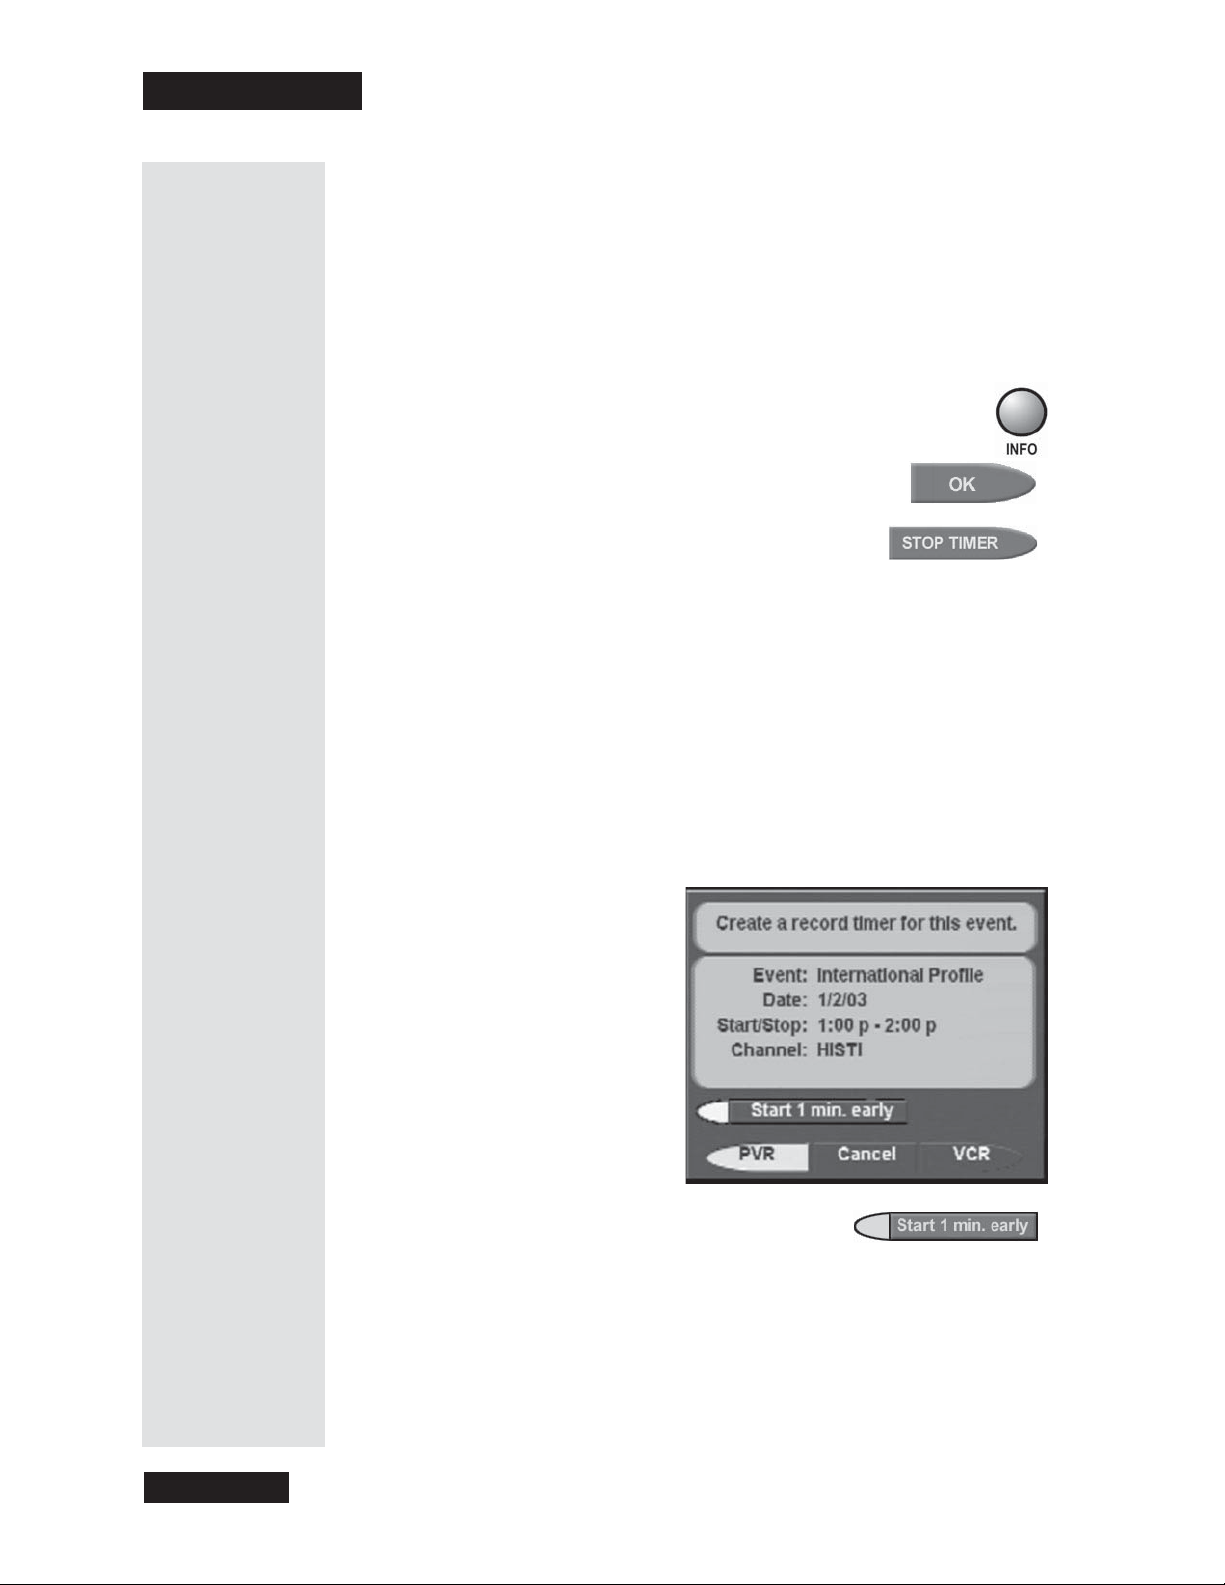
Chapter 3
Using the System
When an Event Timer Works
Only during the five minutes right before an event timer works, you’ll see a
small picture of a clock blinking on the TV screen. This clock goes away
when the program begins. While you see the clock, you can do either one of
the following:
• Press the remote control CANCEL button to clear the clock from the
TV screen. This doesn’t change the timer; it will still work.
Tip: You can
also press
the
SELECT
button to see
more
information
about the
event timer.
Tip: Quick
Record is the
fastest and
easiest way to
record one
program once.
Just find the
program you
want to record,
press
RECORD and
then you’re
done. It’s that
simple!
• Press the remote control INFO button to see more information
on the event timer. If you do this, you’ll have these two choices:
• Select the
OK option to continue with the event
timer, or
• Select the
Stop Timer optiontostoptheevent
timer.
Use Quick Record
You c an us e Quick Record to very quickly set a one-time, one-program DVR
Event Timer or VCR Event Timer.
1. Highlight but don’t select a future pr ogram in the
Program Guide or in a Themes list.
the
Note: If you select a future program, you open a menu where you can
set an automatic event timer. This is almost as fast a s Qui ck Record.
2. Press the RECORD button.
3. This opens a menu where you can set an event timer.
Browse Banner,in
Page 50
4. If you wa nt to start the timer one minute early,
select the
Note: This lets you make sure the timer records a program’s start.
Note: You can start any timer (except one for a pay pe r view program)
Start 1 m in. early option.
one minute early. But, if you set a timer that works right after a nother
timer and the second one starts early, the first one will end early.
5. S elect the
DVR or VCR option.
Page 55
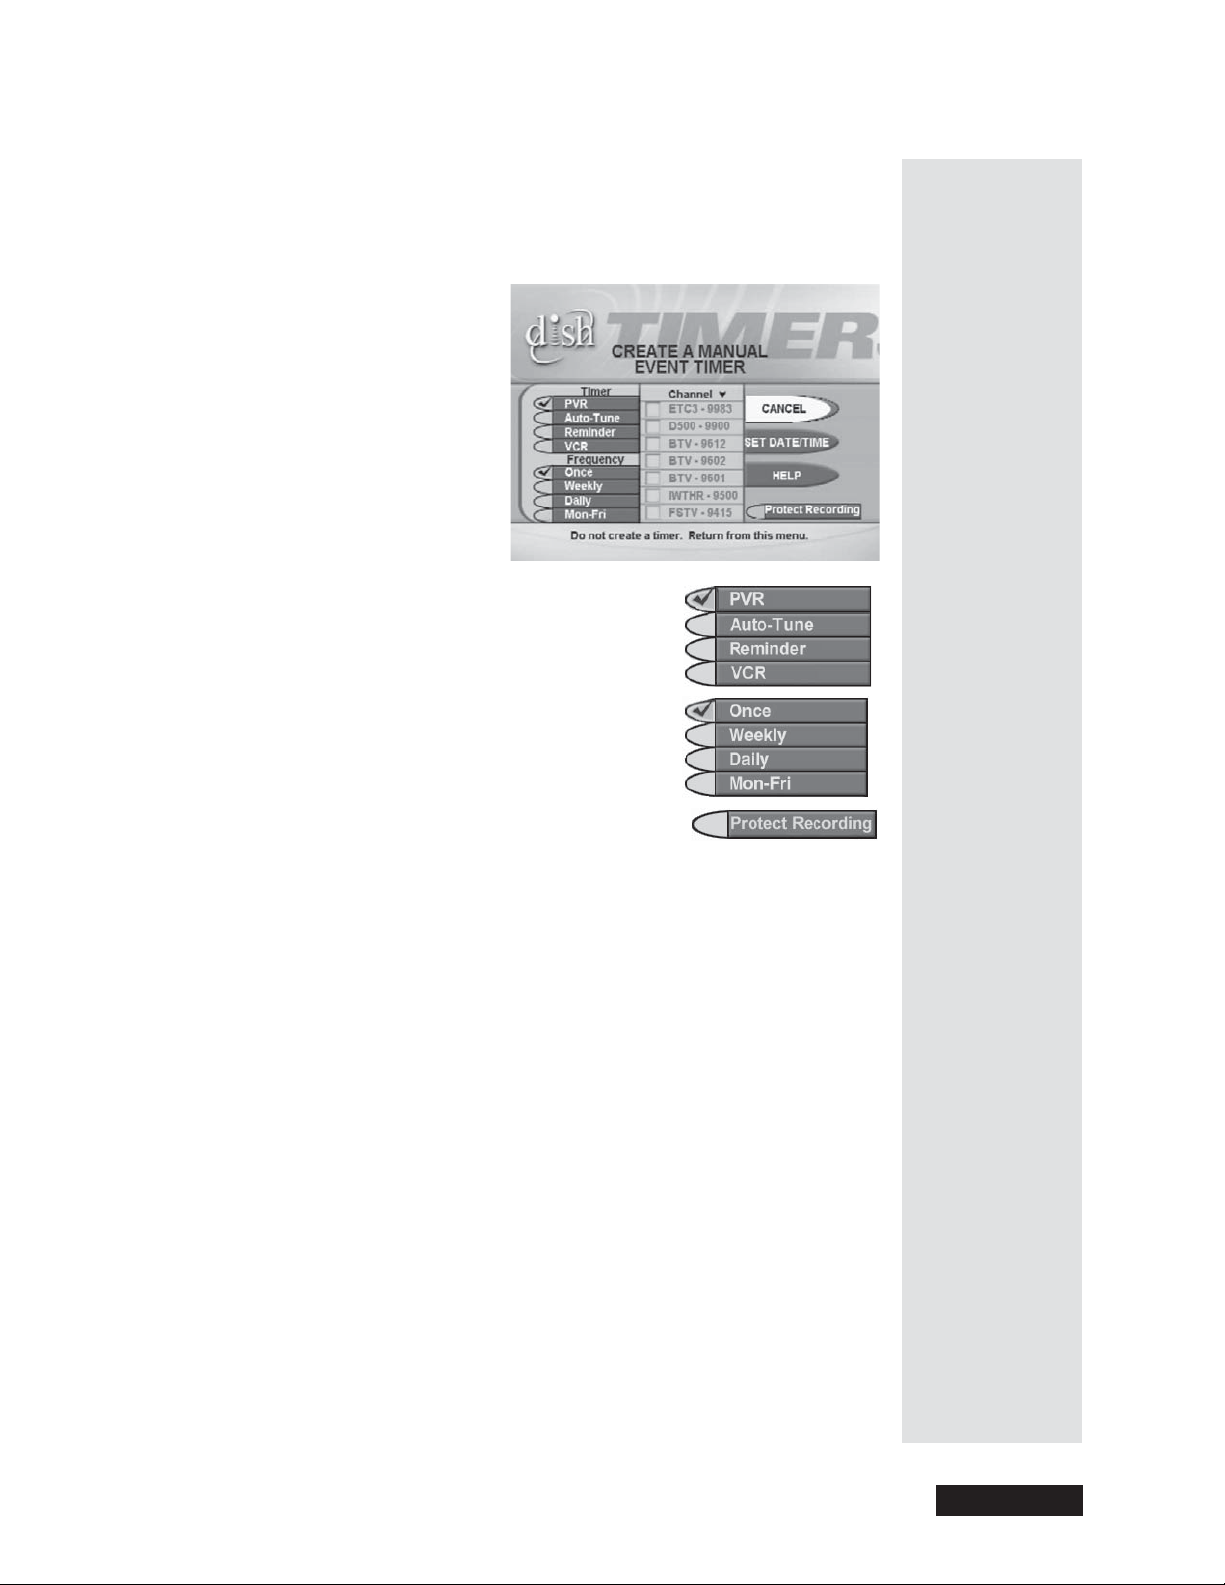
Set an Automatic Event Timer
1. Highlight and select a future program in the Browse Banner,inthe
Program Guide, or in a Themes list.
This opens the
2. Select a
shows up next to the option you select. For
example, here we selected the
3. Select a
mark shows up next to the option you select.
For example, here we selected the
option.
4. Only for a Onc e (one-time), DVR Event Timer,
you can select the
box. If you do this, a check mark shows up in
the box.
Create an Event Timer menu.
Timer Type option. A check m ark
DVR option.
Timer Frequency option. A check
Once
Protect Recording check
Use Event Timers
Tip: You can
protect any
recording so
that the
receiver will
not record
over it
without
asking you
first. Just
select Protect
Recording on
the Create an
Event Timer
menu.
Note: When you protect a recorded program, the receiver will ask you
before it records over that program.
5. Select the
on the program in the
Create option to set the event timer. You’ll see a clock picture
Program Guide, and also when you press the
INFO button to get information about the program.
Page 51
Page 51
Page 56
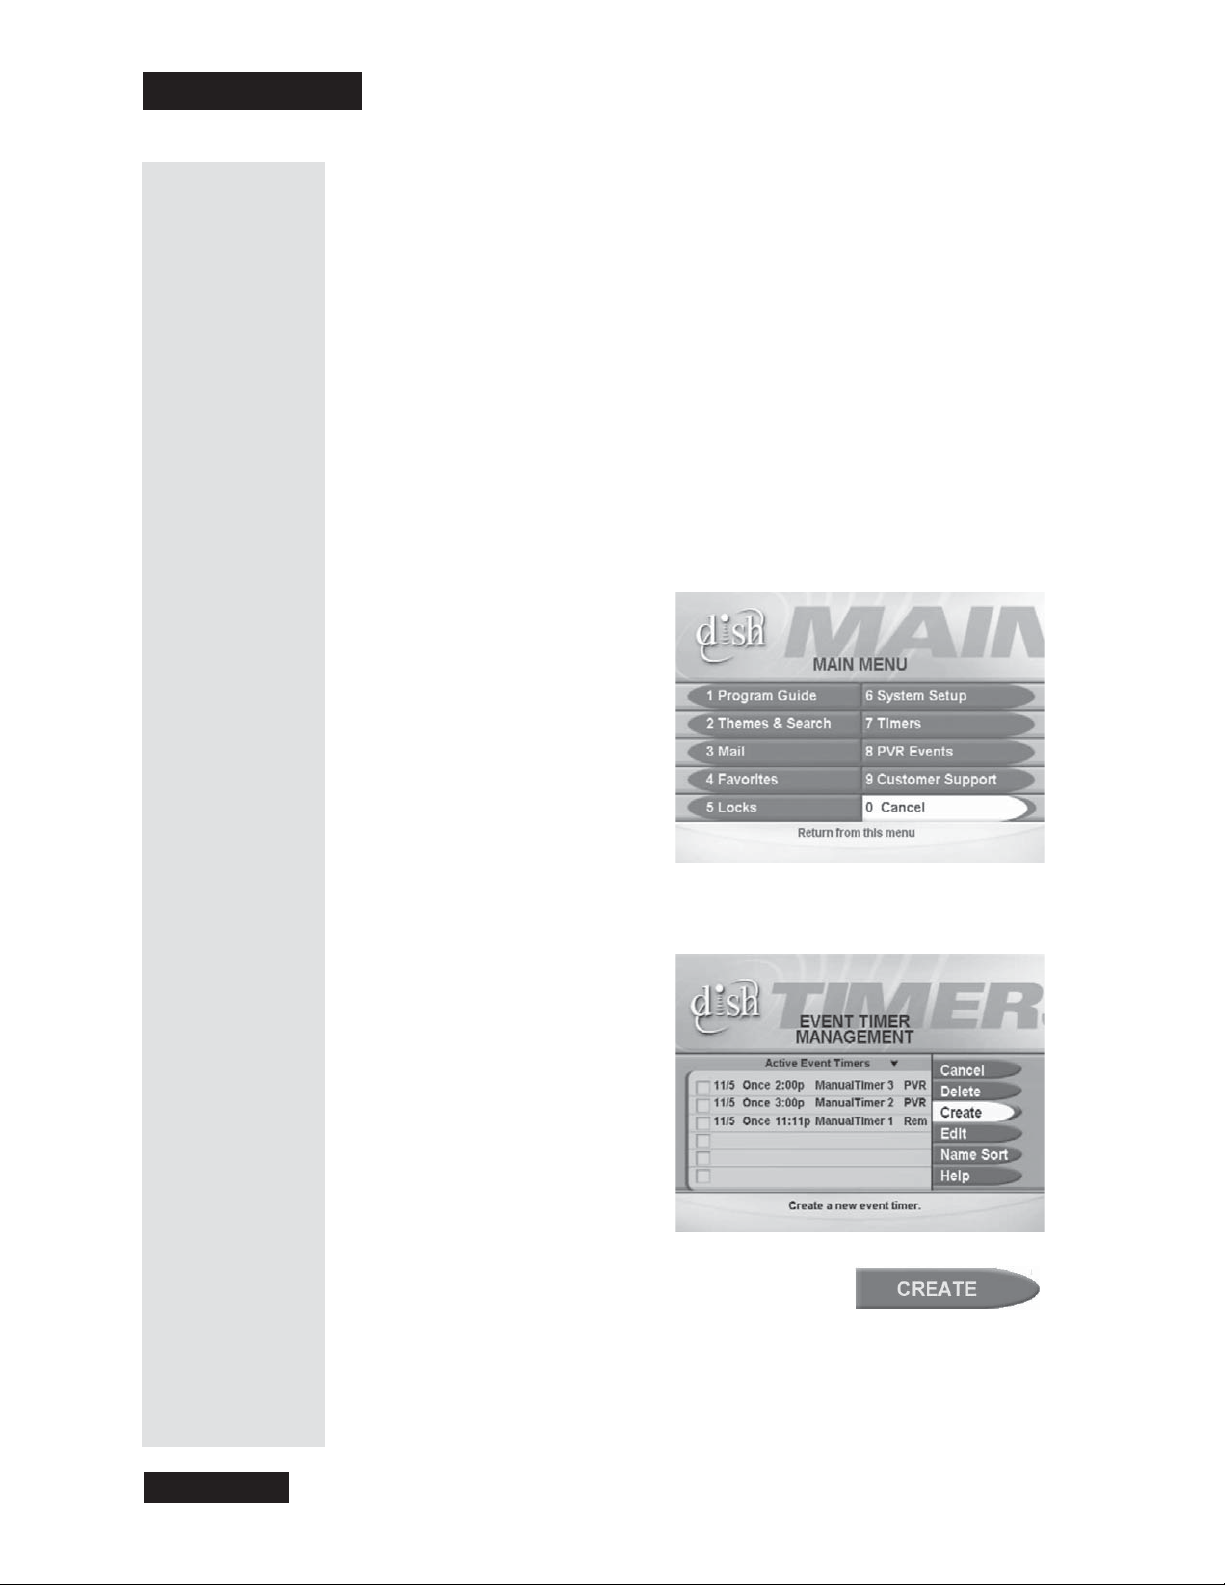
Chapter 3
Using the System
Set a Manual Event Timer
Use a manual event timer to manually set the start and stop time of a
recording. This is useful for recording all of a sports event, even if it g oes
into overtime. Or, you can record part of a program, or several programs one
after the other.
Notes:
• Before you set a manual timer, use the Program Guide or program lists
to find the start a nd end times you want to set.
•Youcan’t set a manual timer for a pay per view program.
•Youmust set the end time after the start time, and set the end time at
least one minute later than the start time.
Here’s what to do:
Tip: You can
use Event
Timers to
record
programs
automatically,
or you can set
amanual
event timer to
record several
programs that
are on one
after another
on the same
channel.
1. Press the MENU button.
2. S elect the
This opens the
Timers option.
Event Timer Management menu.
Page 52
3. S elect the
This opens the
Create option.
Create a Manual Event Timer me nu.
Page 57
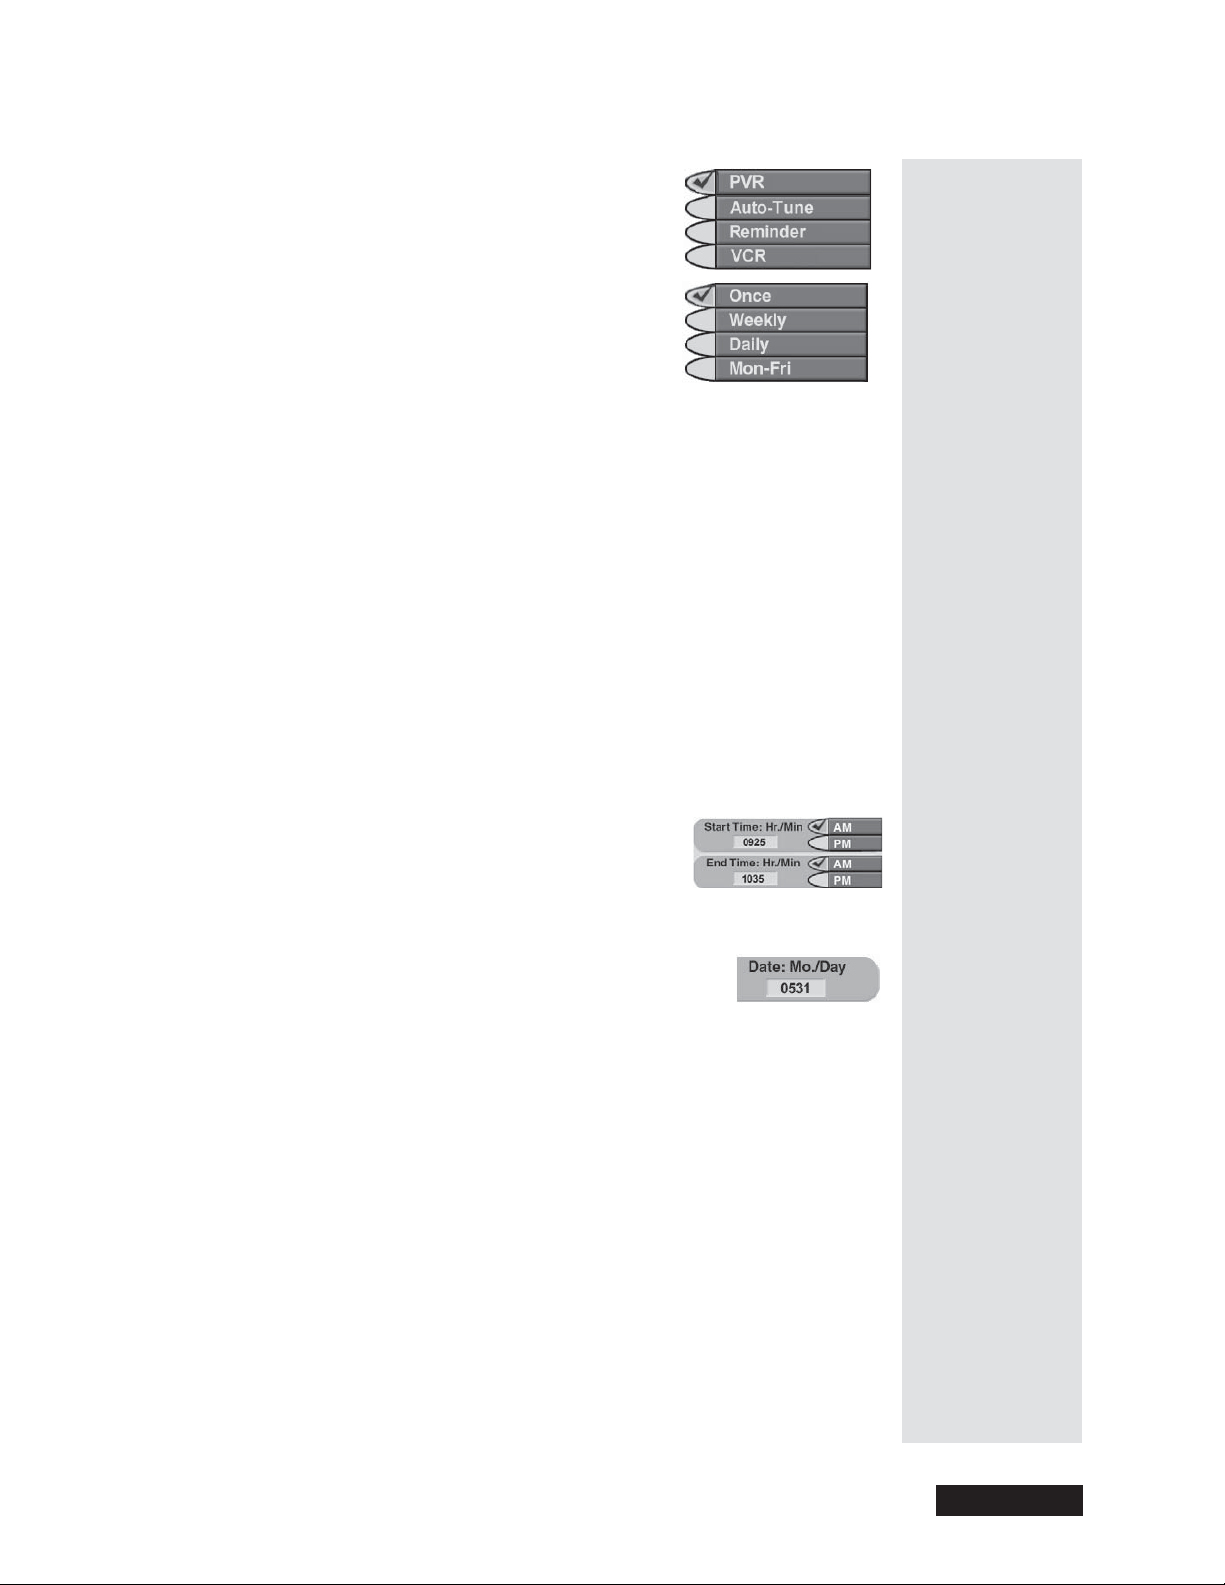
Use Event Timers
4. Select a
Timer Type option. A check m ark
shows up next to the option you select. For
example, here we selected the
5. Select a
Timer Frequency option. A check
DVR option.
mark shows up next to the option you select.
For example, here we selected the
Once
option.
6. Select a channel:
Either:UsetheUP or DOWN A RRO W button to highlight a channel.
Then, press the SELEC T button.
Or: Use the number buttons to e nter a channel number.
7. Only for a Once (one-time), DVR Event Timer, you can select the
Protect Record in g check box. If you do this, a check mark shows up in
the box.
Note: I f you want to delete a protected program, the receiver will a sk
you if you are sure you want to delete the event.
8. Select the
Set Date/Time option.
This opens the
9. Use the number buttons to enter the
Set Date/ Time for M anu al Timer menu.
Start Time
(make sure you se lect AM or PM)andtheEnd
, (make sure you select AM or PM). Note:
Time
The menu displays ze roes for you in numbers
like “07”.
10. Use the number buttons to enter the
11. Select the
12.
Either: To set another event timer, select the Create option again.
Or: If you don’t want to set another e vent timer, press the CANCEL
Create Timer option.
Date.
button.
When Event Timers Overlap
If you try to set event timers for programs on a t the same time and date, the
receiver displays a conflict menu with the da tes and times of both programs.
To resolve the conflict, pick which timer to keep and which timer to delete.
Note: The receiver deletes one-time event timers right after they work. You
must delete all other types of timers yourself.
Tip: You can
use a Manual
Event Timer to
record a
“block” of
programs on
the same
channel, or to
make sure you
don’t miss the
last few
minutes of a
sports event
that goes into
overtime.
Page 53
Page 53
Page 58
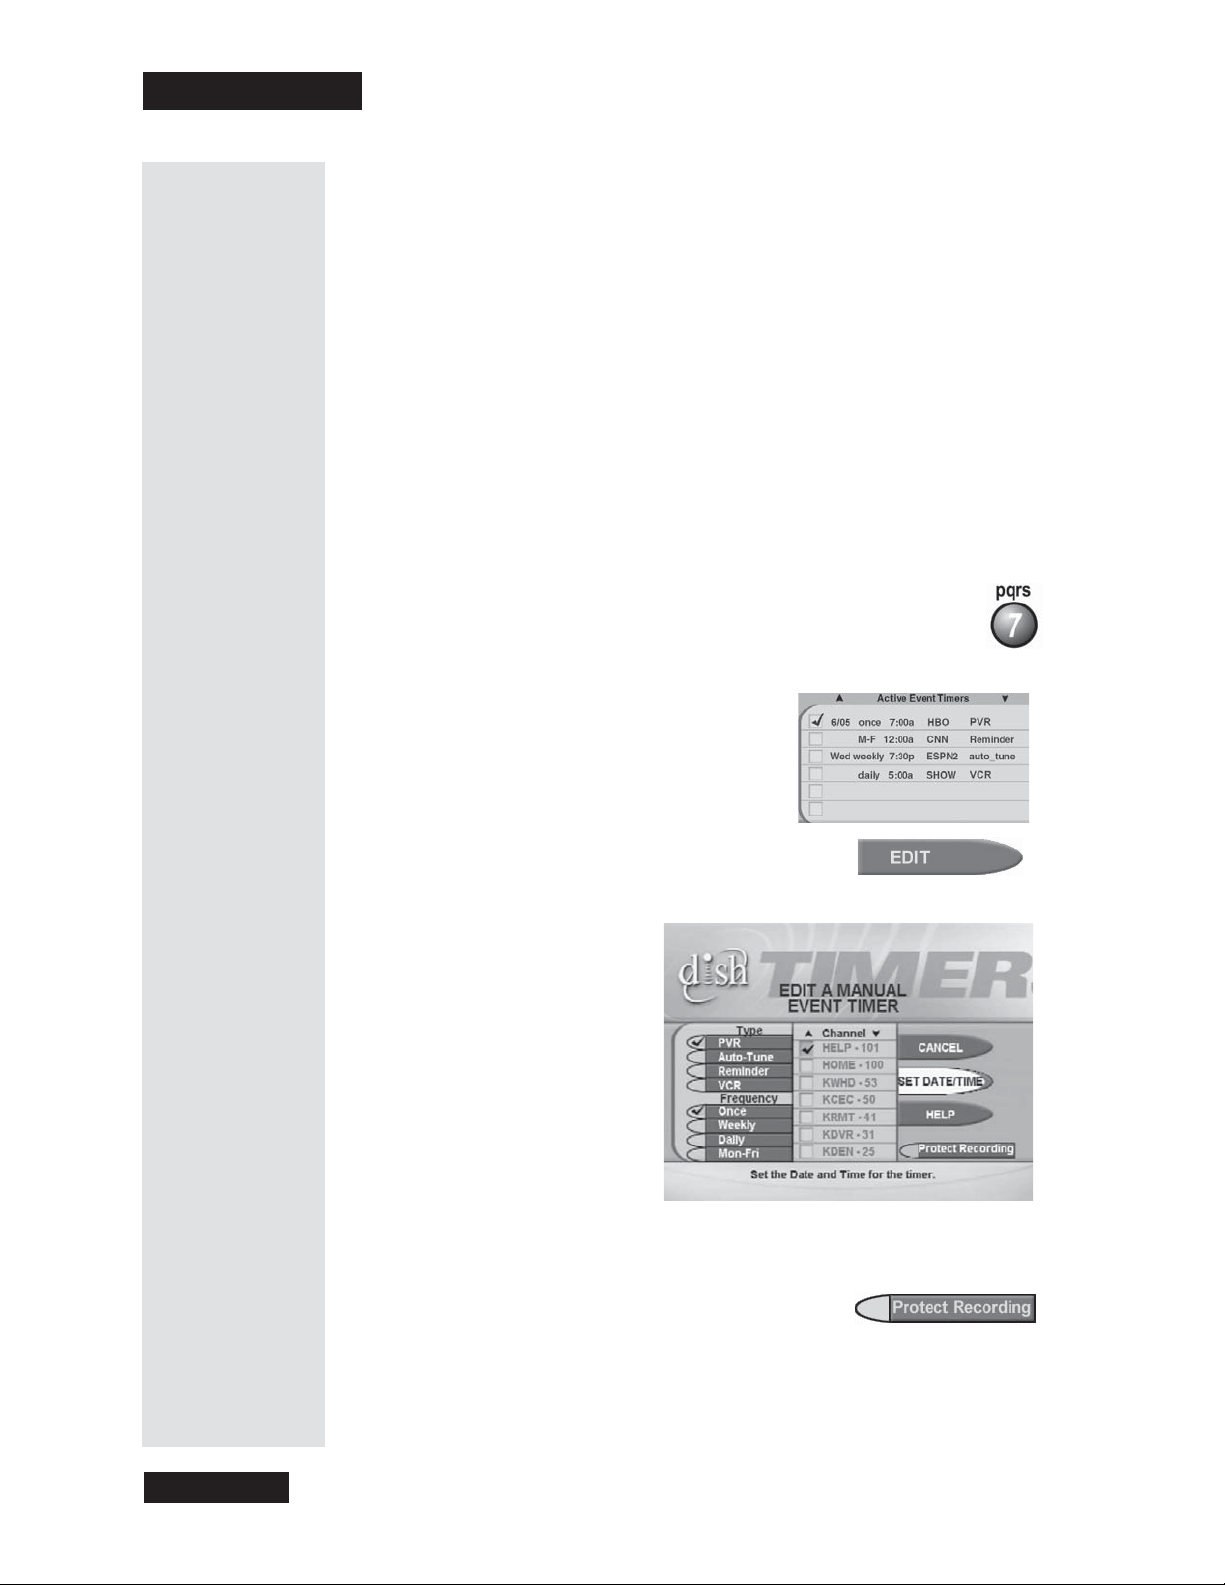
Chapter 3
Using the System
Edit an Event Timer
• You can edit any type of event timer.
• You can change any feature of an event timer.
• When you edit a n automatic event timer you c hange it to a manual event
• You c an change one type of event timer to any other type of event timer and
timer. A manual timer works at the times you set, which don’t have to be the
actual program times.
back, within the limits on each type of timer. Each type of timer has its own
limits, so please be careful! Also, you can’t change a manual timer to an
automatic timer.
Here’s what to do:
1. Press the MENU button.
2. S elect the
This opens the
Timers option.
Event Timer Management menu.
3. Select the event timer you want to edit. A
checkmarkshowsupintheboxnextto
the event timer. For e xample, here we
selected a DVR event timer.
4. S elect the
This opens the
Edit option.
Edit a Manual Event Timer menu.
Page 54
5. You can change the
Timer Type, Timer Frequency,orChannel .Todo
this, select each option you want.
6. Only for a Once (one-time), DVR Event Timer,
you can select the
Protect Recording check
box. If you do this, a check mark shows up in
the box.
Note: When you protect a recorded program, the receiver will ask you
before it records over that program.
Page 59
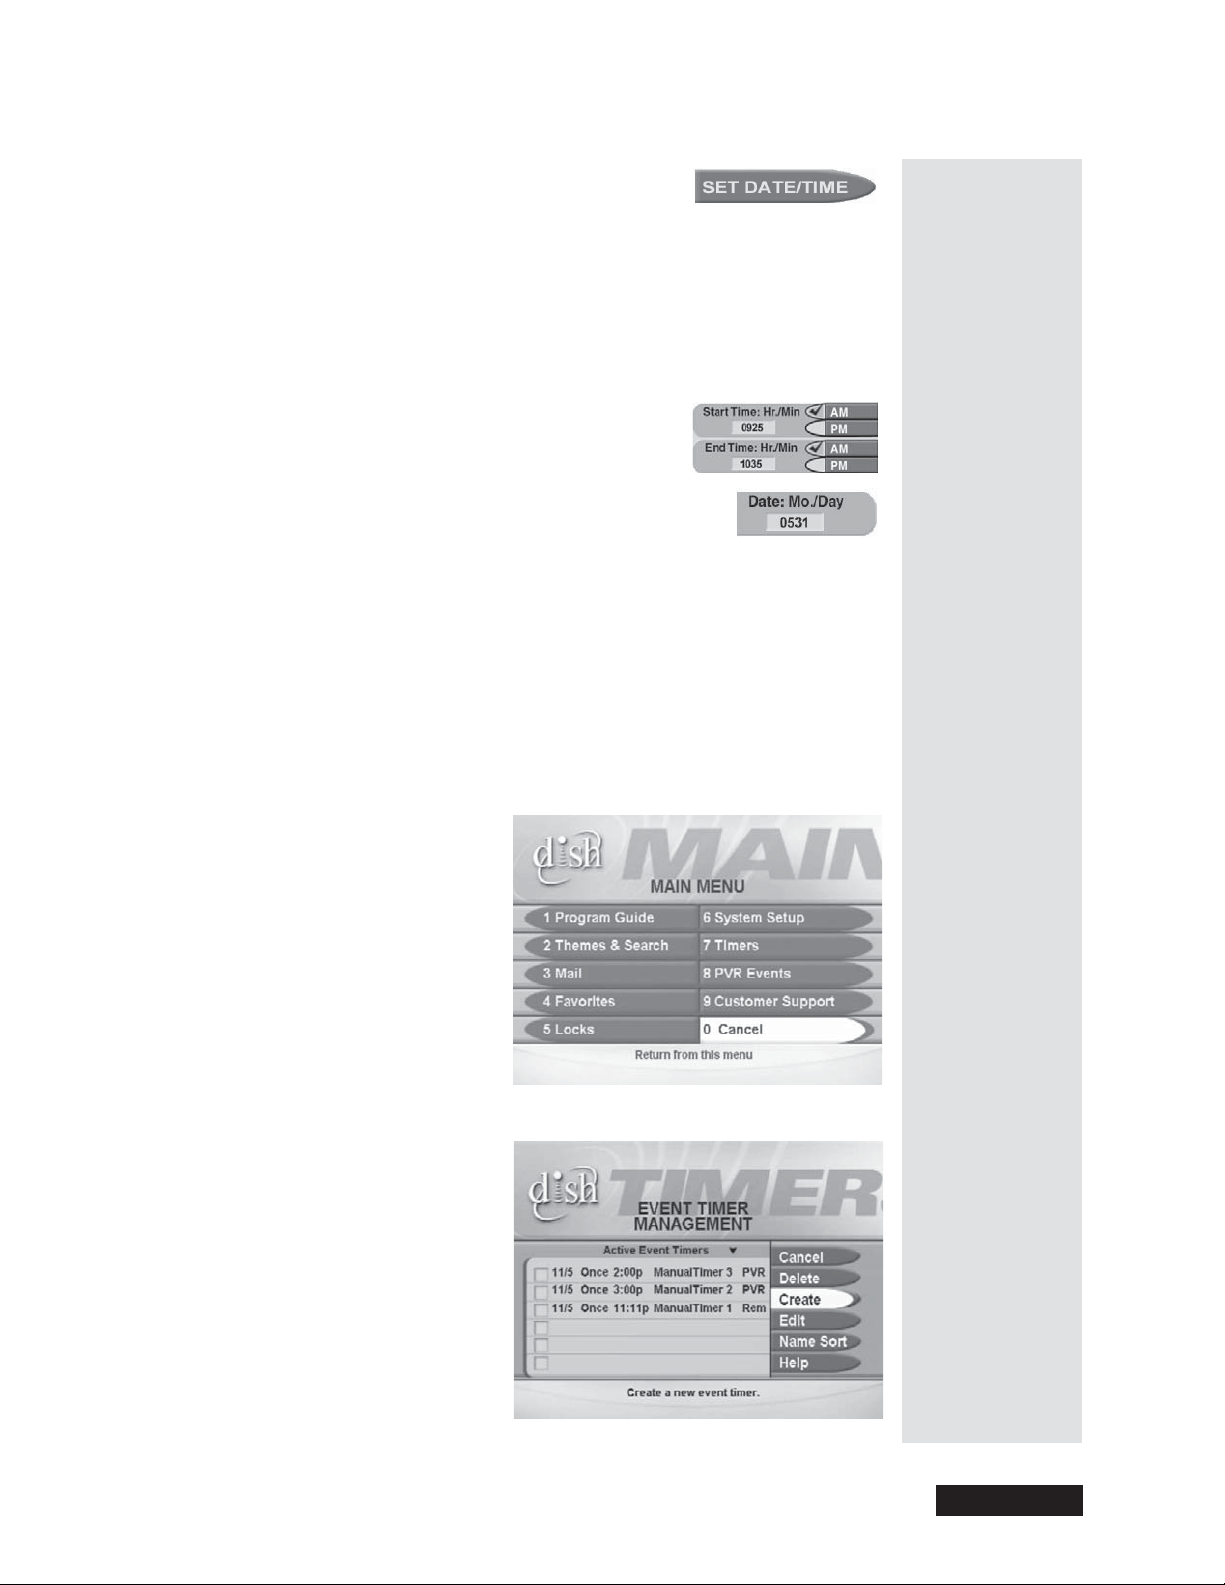
Use Event Timers
7. If you want to change the
Time
,ortheDate, select the Set Date/Time
Start Time,theEnd
option. This opens the Set Date/Time for
Manual Timer
Note: I f you don’t want to change the date or time, please skip to step
menu.
10.
8. Use the number buttons to enter the
AM or PM)andtheEnd Time, (make sure you select AM or PM).
Note: The m enu displays zeroes for you in
Start Time (make sure you select
numbers like “0925”.
9. Use the number buttons to enter the
10. Select the
Either: To edit another event timer, highlight the timer and select the
11.
Edit option again.
Or: If you don’t want to edit another e vent timer, press the CANCEL
Create Timer option.
Date.
button.
Delete an Event Timer
1. Press the MENU button.
2. Select the
Timers option to open the Event Timer Management Menu.
Page 55
Page 55
Page 60

Chapter 3
Using the System
3. S elect an event timer you want to delete. A check mark shows up in the
box next to the event timer. For example, here we selected a DVR event
timer.
4. S elect any other timer(s) you want to delete.
Tip: You must
buyaPayPer
View event
before you can
set an
automatic
event timer for
it. And you
cannot set a
manual event
timer for any
Pay Per View
event.
5. S elect the
Delete option to delete the timer(s) you selected.
Pay Per View Programs and Locked Programs
• You must buy a pay per view pr ogram before you can set an automatic event
timer for it. You can’t set a manual event timer for a pay pe r view program.
You can’t edit an event timer for a pay per view program.
• When you’ve locked the receiver, you must enter the pa ssword before you
can set an automatic event timer for a locked program. You can set a manual
event timer for a locked program and not enter the password. If you do set a
timer like this, when the timer works the receiver m ay display only an error
message or a password entry menu. If you’ve set a DVR Event Timer or a
VCR Event Timer, the recording will show only the e rror message or
password menu.
• If you use a DVR Event Timer to record a locked program, you must enter
the password to play ba ck the program. If you record a block of two or m ore
programs and just one of them is locked, you must enter the password to
play back any of them. For example, if you set an event timer to record a
block of three programs and one of them is an adult movie, you must enter
the password to watch any of the three programs.
Power Off and Event Timers
• If the receiver is off when a DVR Event Timer, Auto-Tune Event Timer,or
VCR Event Timer works, the receiver will turn on. When the program ends,
the receiver will turn off unless you press any remote control or front panel
buttons while the timer is in operation.
• If the receiver is off when a Reminder Ev ent Timer starts, the receiver will
turn on and stay on.
How Many Event Timers You Can Set
You can set a limited number of event timers. If you try to set more, the
receiver d isplays a menu where you can delete an existing timer. If you
don’t delete a n existing timer, you won’t be a ble to set any new ones.
Control a VCR
Note: R emember, you can use the DishDVR features to record a program
without aVCR!
•TouseVCR Event Timers, you must connect the re ceiver’s back panel
audio/video outputs to the audio/video inputs on the VC R. See page 29
for the recommended c onnection to a VC R.
Page 56
Page 61
•TouseVCR Event Timers, you must set up the receiver to control the
VCR (see below). If the receiver can’t control the VCR, use an Auto-
Tune Event Timer to tune the receiver to the c hannel you want to record.
Use the timers built into the VC R to start and stop the VCR at the right
times.
• The receiver’s front panel IR BLASTER sends an IR signal to control
the VCR. This signal can bounce off walls or other objects on its way to
the VC R. This works in most home setups. But, shelves or smoked glass
doors between the receiver and the VC R can block the signal. If the
signal has to cross a very large room, or bounce off curtains, it may not
be strong enough to control the VC R. Make sure nothing blocks the
signal, and the signal can bounce off nearby, light-colored, sm ooth
surfaces.
• If you can’t set up the IR BLASTER to control the VCR, maybe you
can use an IR extender you connect to the receiver ACCESSORY
JACK. An IR extender is a cable that carries the infrared signal from the
receiver to the IR sensor on the VCR. You can buy extenders from the
Customer Service Center. You must set up the receiver to send the right
signals out via the ACCESSORY JACK.PleaseseeSet Up the
Accessory Jack on page 81.
Use Event Timers
Here’s what to do:
The recei ver starts the VCR to record, but doesn’t
turn the VCR on. So, you must leave the V CR turned on!
1. Get the VCR device code from the table in Device Codes starting on
page 121.
2. Press the MENU button.
3. Select the
4. Select the
5. Select the
System Setup option.
Installation option.
VCR Setup option.
6. Use the number buttons to enter the VCR device code.
7. Make sure you turn on the VCR. If you are using the
TV Set Out on the
receiver to provide audio/video to the VCR, set its channel switch to 3
or 4 to match the receiver back panel channel 3/4 switch and make sure
the VCR is set to record on this c hannel. Put in a rewound videotape
that you can record on.
Page 57
Page 57
Page 62
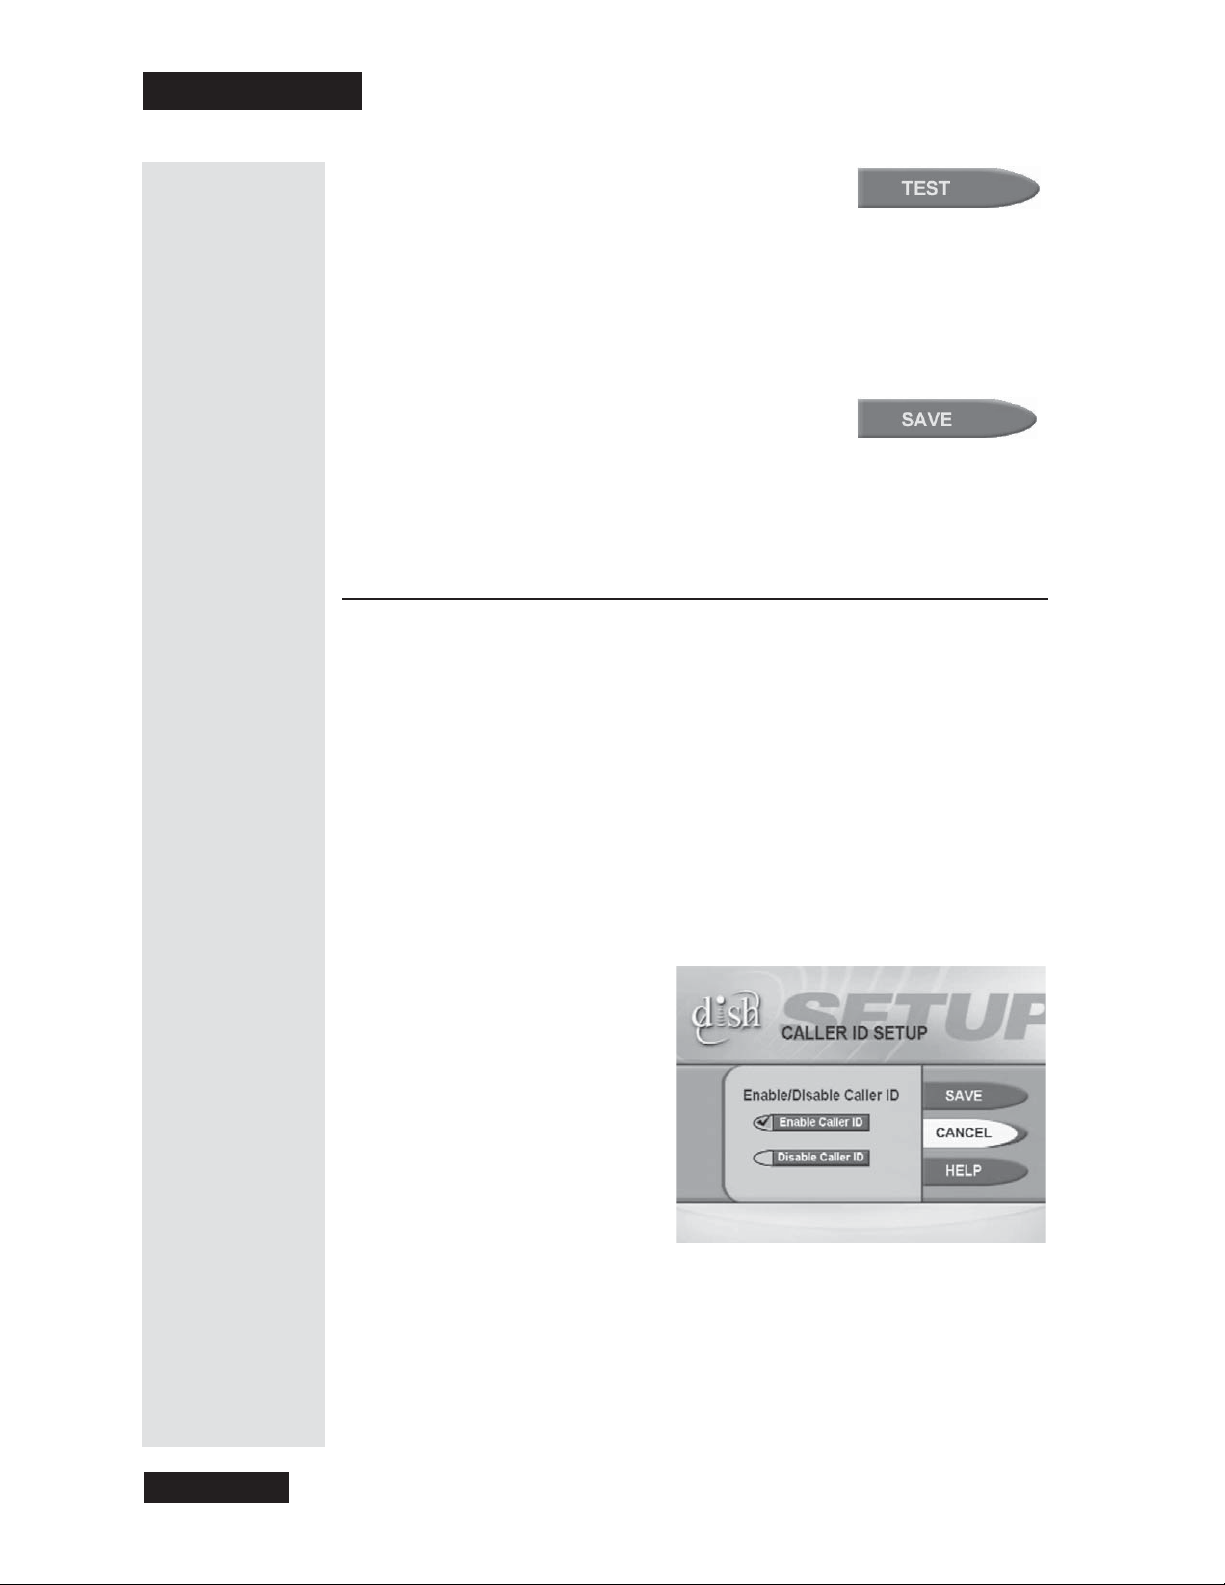
Chapter 3
Using the System
Use Caller ID
8. To test the device code, highlight the Test
option. The receiver displays a message that
warns you to make sure you turn the VCR on.
9. Press the SELECT button to start the test. The VCR records for a few
seconds, stops, and then rewinds.
10. The receiver displays a message that says the VCR test is done. Do what
the message says. If the VCR did not do the test, enter another device
code from the table, and then do step 8, step 9, and this step again.
11. Once you find the right VCR code, select the
Save option to save the VCR code you entered.
12. S et the VCR Event Timer(s) you want.
Remember, you must leave the VC R turned on with a blank tape
inserted ready to record.
Caller ID displays on your TV the names of people as they call you if you
subscribe to Caller ID from your local phone company.
Enable Caller ID
1. Make sure you have an active phone line connected to the DishDVR
receiver.
2. Make sure your system is properly grounded. Sometimes an improperly
grounded system will cause problems with the Caller ID feature.
3. Press MENU on the remote and select
then Caller ID, or press MENU-6-1-8 on the remote.
4. When the Caller ID menu opens, move the highlight to Enable and
press SELECT to save your choice. Press VIEW to go back to watching
a program.
System Setup, Installation,and
Page 58
Page 63
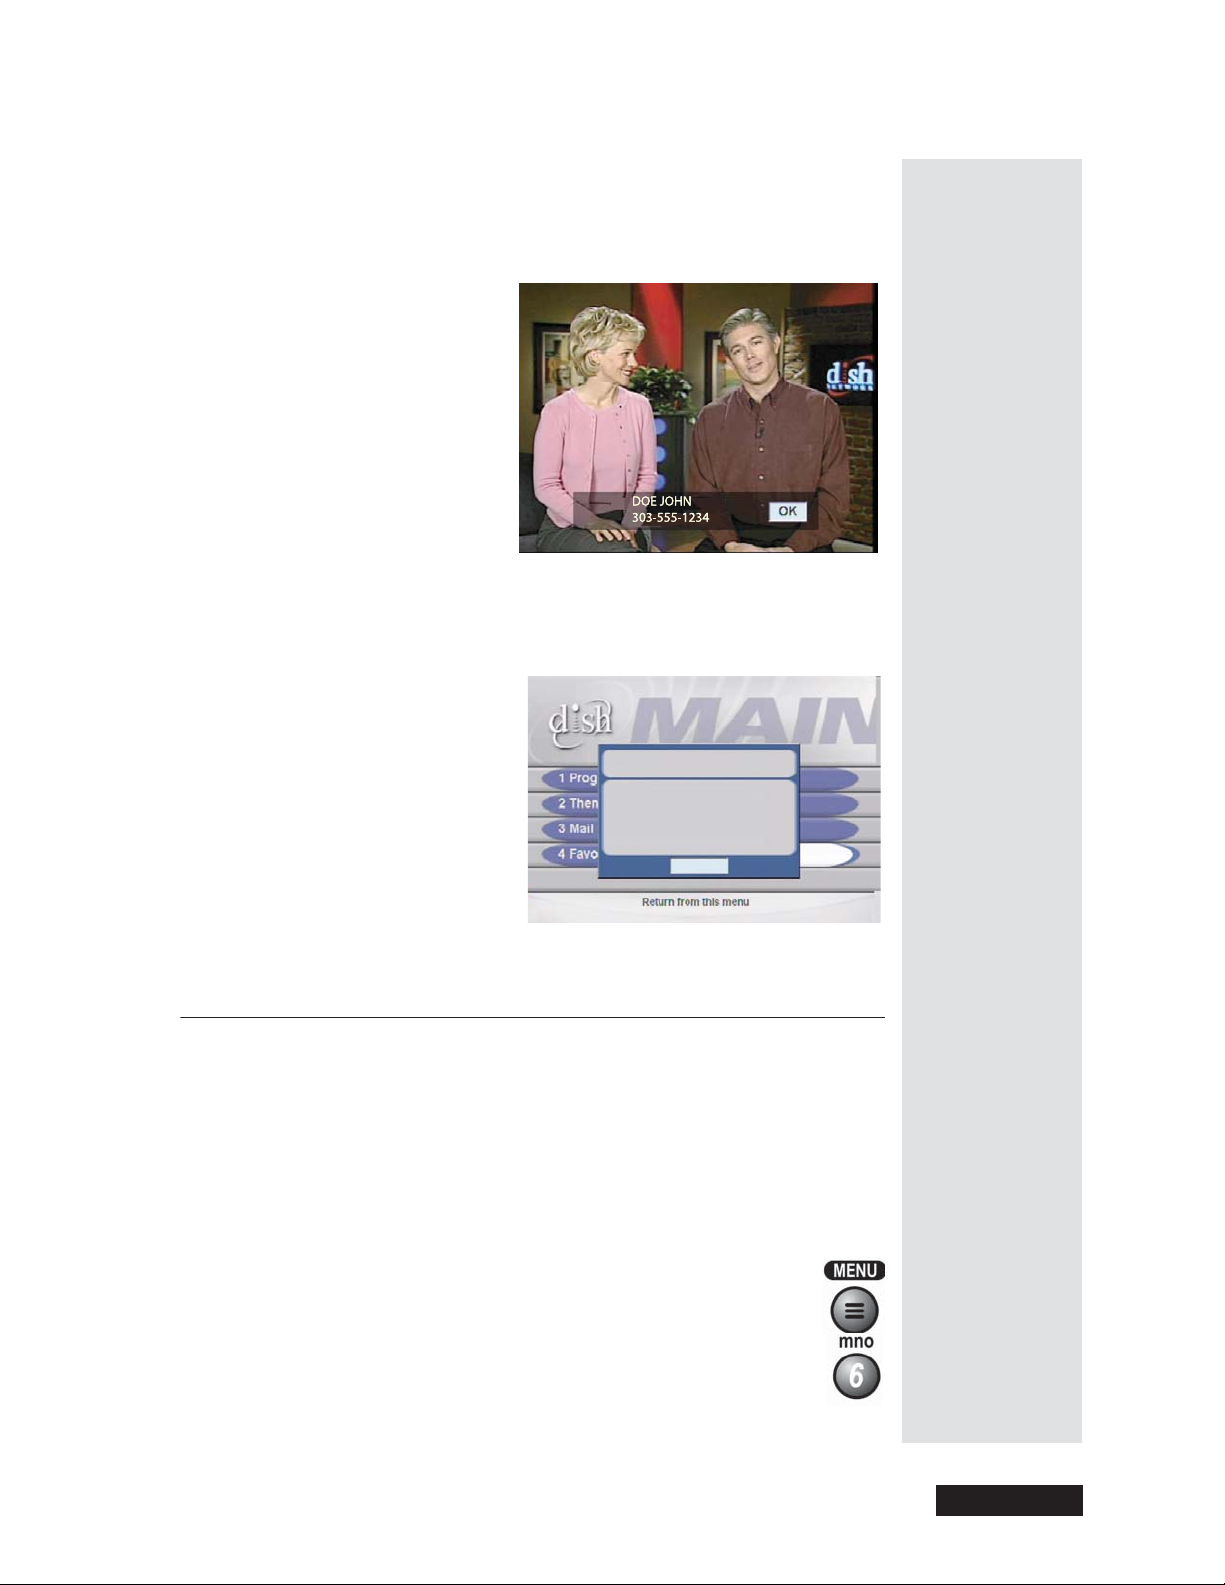
Use Dolby®Digital Sound
When You Get a Call
When you receive a c all, you will see a Caller ID popup with the same kind
of information you see on your regular phone or Caller ID device.
You ca n s e le c t
OK to close the message. If you do nothing, it will disappear
after 20 seconds.
If you are in a menu when a call comes in, you will see a different
popup screen.
Attention
Incoming call:
Name: DOE JOHN
Phone: 303-555-1234
OK
Use Dolby®Digital Sound
Dolby®Digital lets you use Dolby®Surround sound in an audio/video
system. The receiver has a Dolby
have Dolby
®
Digital sound. The receiver provides Dolby®Digital and
Linear PCM (regular m ono or stereo sound) for a sound system or audio
amplifier/decoder that can process suc h audio.
®
Digital output, although not all programs
Caller ID
1. Connect an amplifier/decoder that can process Dolby
®
the receiver’s back panel DOLBY
DIGITAL output.
2. Press the MENU button.
3. Select the
System Setup option.
®
Digital signals to
Page 59
Page 59
Page 64
Chapter 3
Using the System
4. S elect the Dolby
®
Digital option.
5. Select one of the options below.
If you select the
Dolby®Digital/PCM option and
the amplifier can’t process both types of signals, you could
damage the speakers. Please see the user ’s m anual that
came with your amplifier for more details.
•
Dolby®Digital Only - Select this option if the amplifier can
process only Dolby
•
PCM Only - Select this option only if the amplifier can’t process
®
Digital (AC3) signals.
Dolby Digital signals.
•
Dolby®Digital/PCM - Select this option only if the amplifier
can process both Dolby
6. S elect the Save option to save the setup.
Use the DishDVR Features
Most satellite TV programs and films are copyrighted.
In some cases, copyright law may apply to private,
in-home recording.
®
Digital and Linear P CM signals.
The DishDVR features let you decide how to watch TV. You can pause,
reverse, or skip back through a program. Then you can go back to watch,
fast forward, or skip ahead through the programed can rec ord and play back
programs with full digital audio and video quality, without aVCR.
Auto Recording
If you get a phone call while you watch a live program, you can pause the
program, answer the phone, go back to watch the program, and not miss any
of the action.
You can pause, reverse, or skip back through a live program. Then you can
go back to watch, fast forward, or skip ahead through the program.
You can also use slow motion forward and backward, a nd frame advance
and reverse while using the DishDVR’s auto recording feature.
For more information, please see Use Auto Recording,below.
Page 60
Page 65
Use the DishDVR Features
On-Demand Recording
You can record a program on now or a future program to watch later, or you
can keep your recording.
You can pause, go back to play, reverse, skip back, fast forward, or skip
ahead through a recorded program.
You can also use slow motion forward and backward, and frame advance
and reverse while using the DishDVR’s auto recording feature.
You can play back a program you already recorded and record a new
program at the same time.
For more information, see page 62.
Auto Recording and On-Demand Recording at the Same Time
You can pause, go back to watch, reverse, skip back through, fast forward,
or skip ahead through a “live” program and record that program at the same
time. For more information, see page 66.
Use Auto Recording
Tip: Auto
recording is
what happens
automatically
while you’re
watching a
program. It
includes
features like
Pause, Back,
Forward and
Skip Forward.
On-demand
recording is
what you use
with
programs
you’ve
already
recorded.
Turn the receiver on and tune it to a channel. Then you can use the remote
control’s DishDVR buttons.
Note: When you press any one of these buttons, you’ll see a sm all sign on
the TV screen.
Press the PAUSE button to pause the pr ogram. Press this button
again to watch the program from where it paused.
Note: For a “live” program, the on-screen pause timer shows how
long you’ve paused the program. If you’ve paused the program
more than once, the pause timer shows the total time you’ve paused. If you
pause after you reverse or forward, the pause timer shows how far you’re
behind the “live” program.
Press the BACK button once to reverse the program four times
as fast as normal play. Press the BACK button twice to reverse
at 15 times normal speed, three times to reverse at 60 times
normal speed, and four times to r everse at 300 times normal
speed. The on-screen bar shows how far you’ve gone.
Press the PAUSE button and then press the BACK buttontoreversethe
program in slow m otion. Press the BACK button once to reverse the
program 1/4 the speed as normal play. Press the BACK button twice to
reverse at normal speed.
Press the FWD (“FORWARD”) button once to forward the
program four times as fast as normal play. Press the FWD
button twice to forward at 15 times normal speed, three times to
forward at 60 times normal speed, and four times to forward at
300 times normal speed. The on-screen bar shows how far you’ve gone.
Page 61
Page 61
Page 66
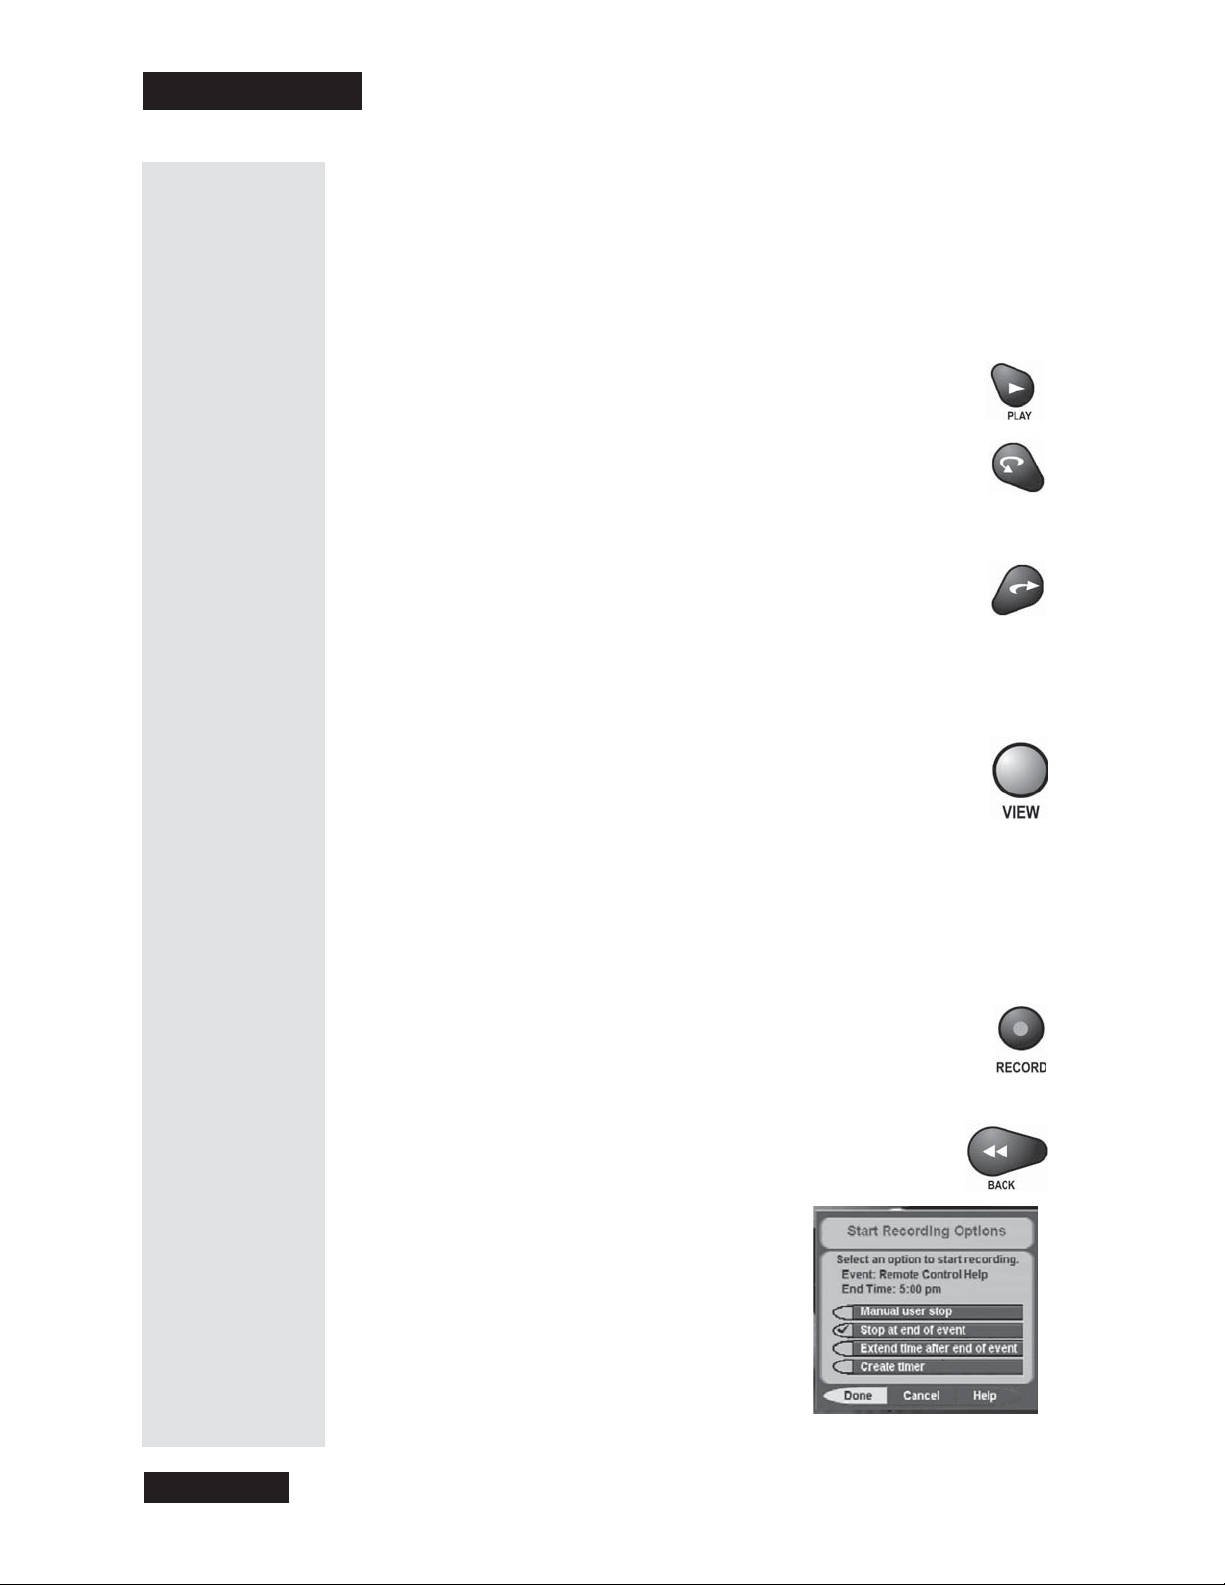
Chapter 3
Using the System
Press the PAUSE button and then press the FWD button to forward the
program in slow motion. When you press the FWD button once the program
advances at 1/15 the speed of normal play. Press the FWD button twice to
forward at 1/4 as fast as normal play. Press the FWD button three times to
play the program.
Note: Of course, you can’t “forward” into the part of a “live” program that
hasn’t been broadcast yet.
Press the PLAY button to watch the program. Also, press this
button to switch from pause, forward, or reverse to play.
Press the SKIP BACK button to skip back about ten seconds in a
recorded program. Press this button again to skip back again.
Press the PAUSE button and then press the skip back button to
reverse the recording one frame at a time.
Press the SKIP AHEAD button to skip a head about 30 seconds in
the program. Press this button again to skip ahead a gain.
Press the PAUSE button and then press SKIP AHEAD to advance
the recor ding one frame at time.
Note: Of course, you c an’t “forward” into the pa rt of a “live” program that
hasn’t been broadcast yet.
Press the VIEW button to catch up with the program as it’s showing
now.
Use On-Demand Recording
Turn the receiver on and tune it to a channel.
Note: If you record a locked program while you have the receiver locked,
you’ll have to enter the password to play back that program.
Start Recording a Program
• At a program’s start, press the remote control’s RECORD
button.
If you’ve watched a program from its start, up to about one
hour after it’s started, you can reverse to its start:
1. Press the BACK button.
2. Let the program reverse to its start.
3. Press the RECORD button.
You’ll get all of the program on
your recording.
Page 62
Note: If you don’t tune to a program
until after it starts, you can record only
the part of the program that comes
after you tune to it.
Page 67
Use the DishDVR Features
Stop Recording a Program
• Press the remote control’s STOP button.
When you press the RECORD button, you control how long the
receiver records. The receiver won’t stop recording too soon.
This also means you must remember to stop the recording! You
can use an Event Timer to start and stop the recording:
•UseQuick Record to set a one-time DVR event timer for a future
program. Please see page 50.
•Setanautomatic DVR event timer to record a future program that
comes on each day or each week. Please see page 51.
•Setamanual DVR event timer to make a future recording with start
and stop times you set. This lets you record part of a program or a
block of several programs, one after the other. S ee page 52.
Use the DVR Recorded Events Menu
Press the DVR button to open the DishDVR Recorded
Events
menu.
• “Events” are recorded pr ograms or other recordings you
make.
• If you hide adult channels and lock the receiver, this menu doesn’t
list any adult programs by name.
• To review programs you record only with the DishDVR features,
use this menu. To see all event timers, including DishDVR timers,
use the
DishDVR Recorded Events menu shows you:
The
Event Timer Management menu.
• A list of recorded events that includes the one you’re r ecording
now, if any.
Note: You can sort events either by date or the name of the event.
• Approximately how much time you can still record. We call this the
“time left.”
Note: The receiver needs more room to record programs with
more action. So, the “time left” isn’ t exact.
•
If you select any one of the events on the DishDVR Recorded
Events m enu
information menu for that event.
Note: This is just an example of the information menu. The
(even an event you’re recording), you open an
information menu shows only the options for the event you select.
For a different event, you’ll see different options. You’ll see some
(not all) of the options we list below. You won’t see an option to
start recording; to do that, you must press the remote control
RECORD button or set an event timer.
Note:Ifyou record a locked program while you have the
receiver locked, you’ll have to enter the password to play back
that program
.
Tip: Press
DVR on the
remote to see
alistofthe
events yo u’ve
recorded. To
view one of
these events,
just S elect it.
You can then
Start the
recording,
Start Over,
Stop or
Resume play.
Page 63
Page 63
Page 68
Chapter 3
Using the System
• Select the Start optiontoplaybacktheeventfromits
start.
• Select the
Start Over option to play back the event
from its start.
• Select the
Stop option to stop play back and go back to
the event’s information menu.
• Select the
Resume optiontoplaybacktheeventfrom
where you stopped it before, if ever.
• Select the
Protect option to “protect” the event. The
receiver w ill ask you be fore it records over the event.
• Select the
Note: To unprotect a n event or to erase a protected
Unprotect option to “unprotect” the event.
event when you’ve locked the receiver, you must enter the
password.
• Select the
Erase option to e rase the event.
• Select the
View optiontogobacktothelastsatellite
TV channel you watched. If you’re recording an event,
the receiver tunes to that event’s channel.
• Select the
Recorded Events
Cancel option to go back to the DishDVR
menu.
While Playing Back or Recording an Event
•PressthePAUSE buttontopausetheplayback.Pressthis
button again to go on with the play ba ck.
•PresstheBACK button once to reverse the program four
times as fast as normal play. Press the BACK button twice to
reverse at 15 times normal speed, three times to reverse at 60
times normal speed, a nd four times to reverse at 300 times
normal speed.
•PressthePAUSE button and then press the BACK buttontoreversethe
program in slow motion. Press the BACK button once to r everse the
program 1/4 the speed as normal play. Press the BACK button twice to
reverse at normal speed.
•PresstheFWD ( “FORWARD”) button once to forward the
program four times a s fast as normal play. Press the FWD
button twice to forward at 15 times normal speed, three
times to forward at 60 times normal speed, and four times to
forward at 300 times normal speed.
Page 64
•PressthePAUSE button and then press the FWD button to forward the
program in slow motion. W hen you press the FWD button once the
program advances at 1/15 the speed of normal play. Press the FW D
button twice to forward at 1/4 as fast as normal play. Press the FWD
button three times to play the program.
Note: Of course, you c an watch any part of an event you’ve already
recorded.
Page 69
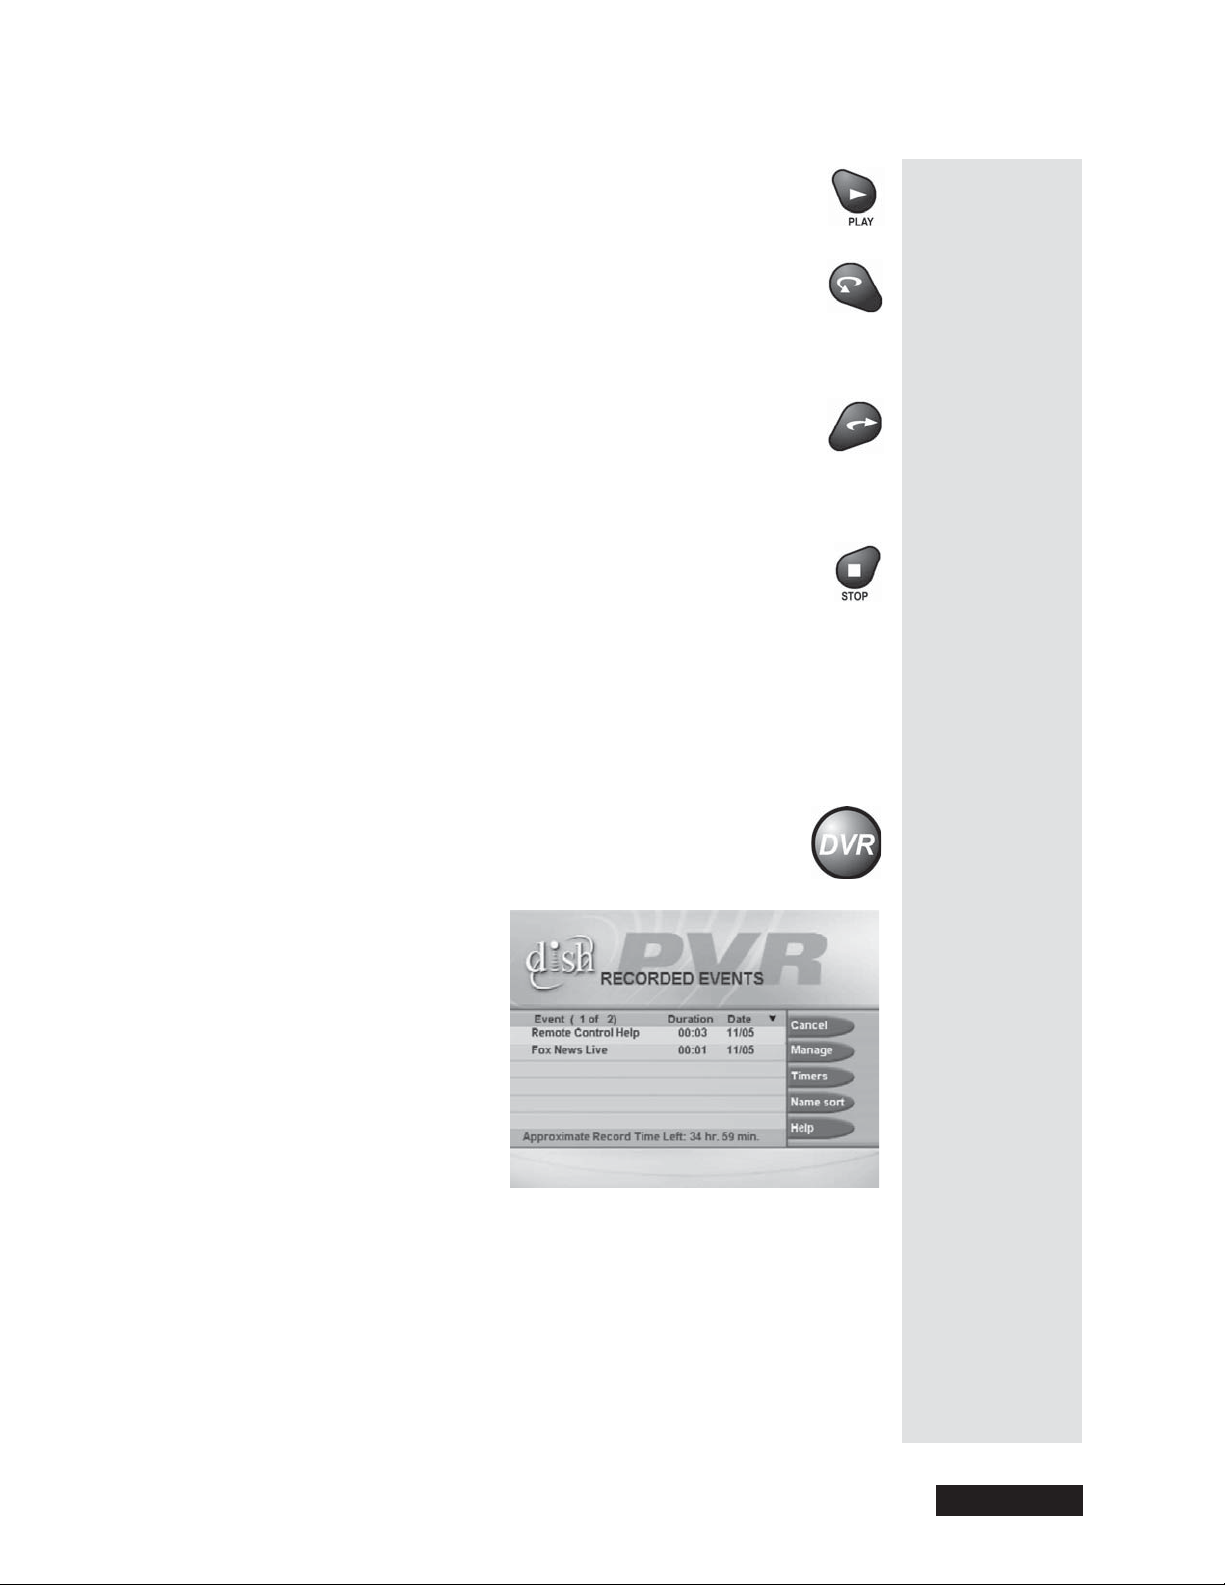
Use the DishDVR Features
•PressthePLAY button to play back or go on with a paused play
back. Also, press this button to switch from fast forward or
reverse back to normal play back.
•PresstheSKIP BACK button to skip back a bout ten seconds in
the event. Press this button again to s kip back again.
•PressthePAUSE button and then press the SKIP BACK
button to reverse the recording one frame at a time.
•PresstheSKIP AHEAD button to skip ahead about 30 seconds
in the event. P ress this button again to skip ahead again.
•PressthePAUSE button and then press the SKIP AHEAD
button to advance the recording one frame at a time.
•PresstheSTOP buttontostopplayback.
Play Back a Recorded Event and Record Another Event
1. Set up the receiver to make an on-demand recording.
Note:YoucanpresstheRECORD button or you can use any kind
of event timer except a VCR event time r.
2. Press the DVR button. This opens the
Events
3. Select an event on the
menu.
DishDVR Recorded Even ts menu (not the
one you’re recording). This opens an information m enu for that
event.
DVR Recorded
Tip: With the
DishDVR
receiver, you
can even
watch one
recorded
event while
recording
another at the
same time!
4. Select the
event.
Start, Start Over,orResume optiontoplaybackthe
Page 65
Page 65
Page 70

Chapter 3
Using the System
More About the DVR Features
Auto Recording
• Whenever you turn the receiver on, it’s auto recording.
• Withautorecord,youcanrecorduptoabout an hour of a program. This
total recording time applies to auto recording only.
• The receiver needs m ore room to record programs with more a ction. So,
the total recording time isn’t exact.
•Afterabout an hour, the receiver starts to record over its oldest audio
and video to have room for new audio and video.
• If one program ends and the next one starts on the same channel, the
receiver continues to record the next program.
• If you change the channel, you erase the recorded audio and video, and
start recording the new channel.
On-Demand Recording
• On-demand recording works only whe n you set it up.
•Thereceivermust have enough room to record:
• When you make a one-time DishDVR recording, you can set the
receiver t o ask you before it records over what you record. This is
how you “protect” a recorded event.
• If the receiver needs room to record a new event, it’ll record over
the oldest “unprotected” recorded e vent(s) to m ake room.
• If the receiver is out of room, and you don’t let it record over any
old recorded events, it won’t be able to record a new event.
• To free up space on the receiver, you can erase events by opening
the
Events Informati on menu and selecting the Erase option.
Auto and On-Demand Record at the Same Time
If you record a live program using the on-demand option, you can use auto
recording to pause, go back to play, reverse, skip back through, fast forward,
or skip ahead through the same program at the same time.
Page 66
Page 71
Copy Recordings to Videotape
Use the DishDVR Features
You may want to keep a videotape copy of a recording you made
on the DishDVR. Or, if the receiver is out of room,
maybe you’ll want to move recordings to a videotape to store them.
Many satellite TV programs and films are copyrighted. In some
cases, copyright law may apply to private, in-home r ecording.
You wil l not be able to play back events with full digital audio
and video quality from a videotape.
Here’s what to do:
1. Connect the receiver’s back panel audio/video outputs to the VCR’s
audio/video inputs.
2. Put a rewound tape into the VCR.
3. Turn the VCR on.
4. Press the remote control DVR button. This opens the
DishDVR Recorded Events menu.
5. Select an event on the
DishDVR Recorded Even ts menu. This opens
an informati on menu for that event.
6. Start the VCR to record onto the ta pe.
Tip: If you
want to
“archive” an
event to save
it for a long
time, you can
move it from
the receiver to
aVCR.
7. On the event’s information menu, select the
The receiver begins to play back the event.
8. When the play back is done,
either: Select another event to copy, or:If
you don’t have another copy to make, stop the VC R.
Start option.
Page 67
Page 67
Page 72
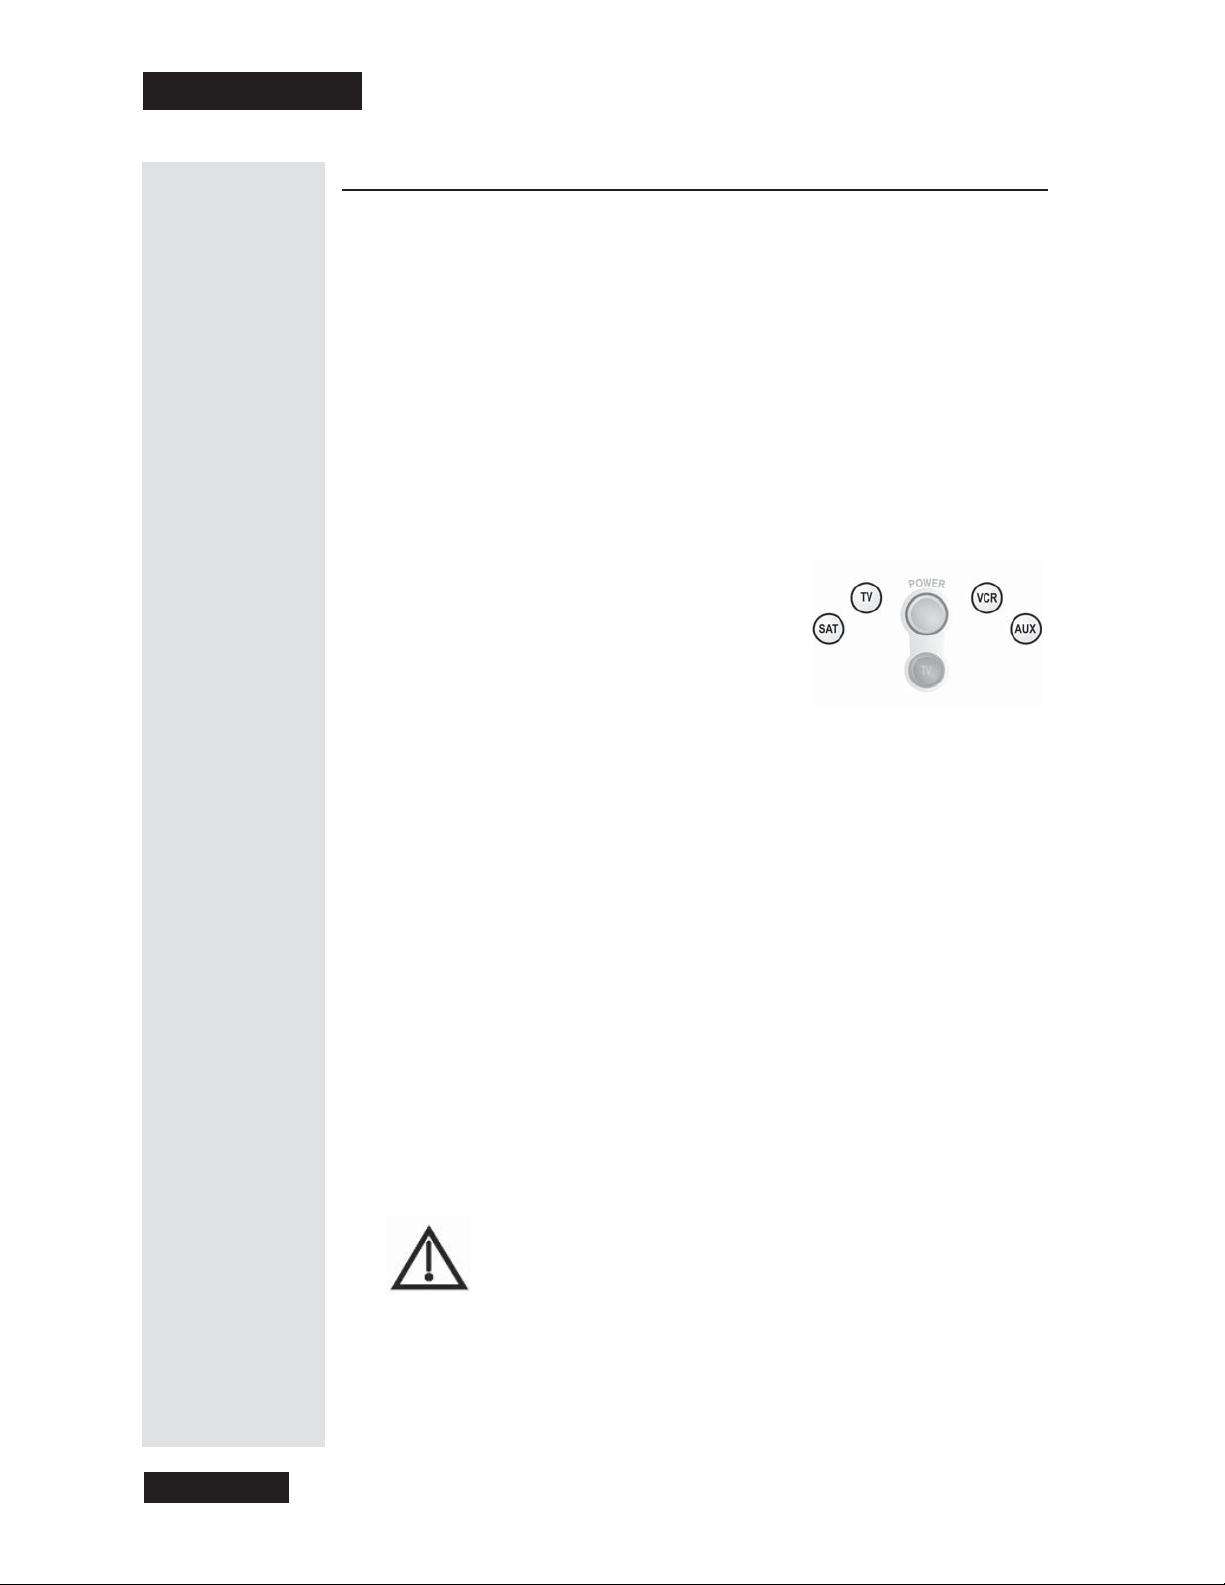
Chapter 3
Using the System
Control Other Devices with the Remote
Remote Control Modes
This section describes how to use the remote to control a TV, a VCR, or
other devices. For information on how to use the remote to control the
receiver, see Remote Control on page 20. You can set up the remote to
control the satellite TV receiver and up three other devices. These devices
can be a TV, a VCR or DVD player, and a third device.
You can set the remote to four different m odes to control the receiver or
other dev ices.
You must set up the remote to control a device like a TV or a VCR. See Set
Up the Remote to Control Oth er Devices,below.
Use the remote control’s mode buttons, SAT
(satellite receiver), TV, VCR (for a VCR or a
DVD player), and AUX (“auxiliary,” for a
cable TV box, a tuner, or an audio amplifier)
to set the remote to the right mode for the
device. To change the mode, press the button
for the device you want the remote to control.
The m ode button lights for two seconds to
show you’ve set the remote to that m ode.
Limited Mode
You can program your remote control in limited mode to keep from
accidentally changing the channel on your TV or VCR. When you use the
remote to control your TV in limited m ode, you will only be able to use the
POWER, MUTE,andVOLUME buttons. Also, when you use the remote to
control your VCR in limited mode, you will only be able to use the
POWER and VCR tape control buttons.
The section Set Up the Remote Control has a step that tells the remote
control to go into limited mode.
Note: Limited mode is not used with cable boxes or amplifiers.
Set Up the Remote to Control Other Devices
Over the next few pages we tell you how to use the remote to c ontrol a TV, a
VCR, a cable TV box, a tuner, or an amplifier.
When you get the r emote it’s already set up to control the
receiver. But, you must set up the remote to control the TV
before you can control the TV’s POWER, MUTE, and
VOLUME buttons.
To use the remote to control other devices, you must first program it to
control these other devices. You can do this by e ither following the
instruction in Set Up the Remote Control below, or Scan for Device Codes
procedure described on page 70.
Page 68
Page 73

Control Other Devices with the Remote
Set Up the Remote Control
You can set up the remote to control other devices using the de vice codes
listed on page 120.
1. Turn the device on. Use the device’s f ront panel buttons
or its remote control.
2. Find the brand name of the
device in the tables starting on
page 120.
3. Press and hold the mode
button until all the other mode
buttons light up, and then let
go of the button.
The m ode button flashes.
4. For AUX mode only.Press0
forasecondTV,or1fora
second VCR, or 2 for a tuner,
amplifier, or cable box.
5. Enter one of the three-digit
device codes from the table
using the number buttons.
6. If you want to program
limited mode, press 1. If not,
skip to step 7.
7. Press the POUND (#) button. If you entered the code correctly,
If the brand isn’t listed, see Scan for
Device Codes on page 70.
For example, hold the TV mode
button for a TV until all of the other
mode buttons light. When you let
go, the TV mode light will flash.
This step is for programming which
kind of device that should be
programmed in AUX mode. If
you’re not programming in AUX
mode, skip to step 5.
The three-digit device code should
be f or the brand name of your device
that you found in step 2.
See Limited Mode for more
information.
the mode button flashes three times.
8. Press the blank POWER
buttontoturnoffthedevice.If
the device does not turn off,
go to step 10.
9. Turn the device back on an d
try some other buttons to
make sure they work. If the
code works for other buttons,
stop here.
10. If the code doesn’t work, redo
steps 3 through 9 with another
device code from the tables.
11. If you can’t find a code that
works try, Scan for Device
Codes below.
If the code works, the device should
turn off.
Sometimes the blank POWER
button works when other buttons
don’t.
Try every code listed for you brand
until one works for your device.
Page 69
Page 69
Page 74

Chapter 3
Using the System
Scan for Device Codes
If the code for your device is not listed in the tables starting on page 120, use
this procedure to sc an the remote control’s memory for the device code.
1. Turn the device on. Use the device’s f ront panel buttons
or its remote control.
Tip: The
receiver
deletes onetime event
timers right
after they work .
You m u st
delete all other
types of timers
yourself.
2. Press and hold the mode
button until all the other mode
buttons light up, and then let
go of the button.
The mode button flashes.
3. For AUX mode only.Press0
forasecondTV,or1fora
second VCR, or 2 for a tuner,
amplifier, or cable box. Then
press the STA R (*) button.
4. Press the blank POWER
button.
5. Press the UP or DOWN
ARROW button repeatedly
until the device turns off.
For example, hold the TV mode
button for a TV until all of the other
mode buttons light. When you let
go, the TV mode light will flash.
This step is for programming which
kind of device that should be
programmed in AUX mode. If
you’re not programming in AUX
mode,skiptostep4.
This puts your remote in the scan
mode.
As you press the UP or DOW N
ARROW button, the remote is
trying each code in the memory to
see if it can turn off your device.
When the device turns off, you have
found a code that might work.
Note: The mode button for the
device will flash rapidly eight times
when you’ve scanned all the codes
for that device.
Page 70
6. Press the Pound (#) button. This stores the c ode you found.
7. Turn the device back on an d
try some other buttons to
make sure they work.
Press the blank POWER button to
turn the device ba ck on. Try some
other buttons to make sure they
work. Sometimes, the blank
POWER button works when other
buttons don’t.
8. Repeat this procedure until
you’ve tried all the codes.
You may need to repeat the scan to
find the best code for your device.
Page 75

Control Other Devices with the Remote
ChecktheDeviceCodes
You can find out what device code you’ve set for each remote control m ode.
1. Press and hold the mode
button until all the other mode
buttons light up, and then let
go of the button.
The mode button flashes.
2. Press the Pound (#) button
twice.
Watch the mode light to
determine your code. The
mode button flashes the
number for each digit of the
device code, with a pause
between the groups of flashes.
A quick flash is for zero.
3. For AUX mode only.The first
group of flashes tells you what
the AUX mode controls. A
quick flash (zero) before the
three-digit code is for a TV;
one regular flash is for a VCR;
and two flashes is for a tuner,
amplifier, or cable box.
For example, hold the TV mode
button for a TV until all of the other
mode buttons light. When you let
go, the TV mode light will flash.
For example, if the code is 570, the
mode button flashes five times,
pauses, flashes seven times, pauses,
and flashes once quickly.
For example, if the TV code is 570,
the AUX mode button flashes once
quickly (indicating 0 for TV),
pauses, flashes five times, pauses,
flashes se ven times, pauses, and
flashes once quickly.
Page 71
Page 71
Page 76
Chapter 3
Using the System
Remote Control Buttons
Control the Receiver
When you get the remote it’s already set up to control the
receiver. But, you must set up the remote to control the TV
before you can use the MUTE and VOLUME buttons.
For information on the remote buttons that control the
receiver, please see Remote Control on page 20.
Control a TV (or a Second TV)
Only the buttons described here control a TV. Some of the
buttons described he re may not control your TV. Please see
your TV user ’s manual for information about the TV’s
features.
TV Mode Button
Tip: If yo u set
up the remote
to control a TV,
the TV POWER,
MUTE, and
VOLUME
buttons will
control the TV
volume when
you’re in most
other modes.
You must first set up the remote to control the TV. Please see Set Up
the Remote to Control Other Devices, beginning on page 68. Then,
you must press the TV m ode button to set the remote to TV mode. The TV
mode button lights for two seconds to show you’ve set the remote to TV
mode. M ake sure you ke ep the remote in TV mode to use the buttons
described h ere.
Note: You can set up the remote to control a second TV in AUX mode, the
same way it controls the first TV in TV mode. See Set Up the Remote to
Control Devices beginning on page 68.
TV/Video Button
If the TV has video input options, use this button to switch the TV
video input.
Power Buttons
Press either POWER button to turn the TV on or off.
Note: If you set up the remote to control one TV in TV mode
and an additional TV in AUX mode, pressing the TV POWER
button controls only the TV you set up in TV mode.
Mute Button
Press this button to turn the TV sound on or off.
Page 72
Volume Button
Press this button to raise ( +) or lower (-) the TV sound
volume.
Page 77
Control Other Devices with the Remote
Up/Down Arrow Buttons
Use these buttons to change channels on the TV.
Note: The se buttons do not change the channels on the TV if
the remote control is in limited m ode.
Select Button
The SELECT button works as the ENTER button for a TV.
Recall Button
Press this button to go back to the last TV channel you watched.
Press it again to switch between the last two TV c hannels you
watched.
Number Buttons
Use these buttons to directly enter a different
channel.
Note: The se buttons do not change the channels on
the TV if the r emote control is in limited m ode.
Control a VCR (or a Second VCR or a
DVD Player)
Only the buttons described here control a VCR or DVD
player. Some of the buttons described here ma y not control
your VCR or DVD player. See the user ’s manual that came
with your VCR or DVD player for information about the
features.
VCR Mode Button
You must first set up the remote to control the VCR. See Set Up the
Remote to Control Devices, beginning on page 68. Then, you must
press the VCR mode button to set the remote to VCR mode. The VCR
mode button lights for two seconds to show you’ve set the remote to VCR
mode. Make sure you keep the remote in VCR mode to use the buttons
described here.
Note: You can set up the remote to control a second VCR in AUX mode, the
same way it controls the first VCR in VCR mode. See Set Up the Remote to
Control Devices beginning on page 68.
Note:Youmust set the remote to VCR mode to set it up to control a DVD
player. Once you do this, you must set the remote to VCR mode to control a
DVD player.
Page 73
Page 73
Page 78
Chapter 3
Using the System
TV/Video Button
Use this button to switch the VCR between its TV mode and its
VCR mode (see your VCR user’s manual for information).
Power Button
Press the blank Power button to turn the VCR on or off. Press
the TV power button to turn the TV on or off.
Mute Button
Press this button to turn the TV sound off or on.
Up/Down Arrow Buttons
Use these buttons to change channels on the VCR.
Note: If you are using the remote control in Limited Mode,
the TV will not change channels.
Recall Button
Press this button to go back to the last VCR channel you used.
Press it again to switch between the last two VCR channels you
used.
VCR Buttons
•PresstheBACK button to rewind a videotape.
•PressthePAUSE button to pause a videotape. P ress this
button or the PLAY button to go back to play the tape.
•PresstheFWD (“forward”) button to forward a videotape.
•PresstheSTO P buttontostopplayingorrecordingona
videotape.
Page 74
•PresstheRECORD button to record on a videotape.
•PressthePLAY buttontoplayortogobacktoplaya
videotape.
Page 79
Control Other Devices with the Remote
Number Buttons
Use these buttons to enter channel numbers.
Note: If you are using the remote control in Limited
Mode, the TV will not change channels.
Control a Cable TV Box
Only the buttons described here control a cable TV box. S ome
of the buttons de scribed here m ay not control your cable TV
box. Please see your cable box user’s manual for information
about the box’s features.
AUX Mode Button
You must f irst set up the remote to control the cable TV box. Please
see Set Up the Remote to Control Devices, beginning on page 68.
Then, you must press the AUX mode button to set the remote to AUX mode.
The AUX mode button lights for two seconds to show you’ve set the remote
to AUX mode. M ake sure you keep the remote in AUX mode to use the
buttons described here.
TV/Video Button
Use this button to switch the cable box between its TV mode and
its video mode.
Power Button
Press the blank POWER button to turn the cable box on or off.
Mute Button
Press this button to turn on or off the sound from the cable box.
Vol ume Bu t to n
Press this button to raise (+) or lower (-) the sound
volume from the c able box.
Page 75
Page 75
Page 80
Chapter 3
Using the System
Up/Down Buttons
Use these buttons to change channels on the cable box.
Select Button
Press the Select button in place of the ENTER button for the cable
box.
Recall Button
Press this button to go back to the last cable box channel you used.
Press it again to switch between the last two cable box channels
you used.
Number Buttons
Use these buttons to enter channel numbers.
Control a Tuner or Amplifier
Only the buttons described here control a tuner or amplifier.
Some of the buttons described here may not control your tuner
or amplifier. Please se e the user’s manual that came with your
tuner or amplifier for more information.
AUX Mode Button
You must first set up the remote to control the device. See Set Up the
Remote to Control Devices, beginning on page 68. Then, you must
press the AUX mode button to set the remote to AUX m ode. The AUX mode
button flashes once to show you’ve set the remote to AUX mode. Make sure
you keep the remote in AUX mode to use the buttons described here.
Power Button
Press the blank POWER button to turn the tuner or amplifier on
or off. Press the TV power button to turn the TV on or off
Page 76
Page 81
Control Other Devices with the Remote
Mute Button
Press this button to turn the sound off or on.
Vol ume Bu t to n
Press this button to raise (+)orlower(-) the volume.
Up/Down Arrow Buttons
Use these buttons to change channels on the tuner or
amplifier.
Select Button
This button works as the INPUT SELECT button f or the tuner or
amplifier.
Other Remote Control Features
Switch Between TV and AUX Device Volume Control
When you set up the remote to control a TV, the mute and volume buttons
control the TV volume. However, if you want to use the AUX mode to
control a tuner or amplifier and the device has a volume setting, you can se t
up the remote to control the device’s volume instead of the TV volume.
To set the remote to control the de vic e’s volume:
1. Press and hold the AUX mode button for three seconds, and
then let go of it. The AUX mode button will blink.
2. Press the POUND (#) button.
3. Press the plus (+) side of the VOLUME button.
4. Press the 0 number button.
Page 77
Page 77
Page 82
Chapter 3
Using the System
5. Press the POUND (#) button.
The AUX mode button flashes three times.
6. Press the SAT mode button.
7. Press the plus (+) and minus (-) sides of the VOLUME button.
The device’s volume changes and the AUX mode button lights instead
of the TV mode button.
To set the remote back to control the TV volume:
1. Press and hold the TV mode button for three seconds, and then
let go of it. The TV mode button will blink.
2. Press the POUND (#) button.
3. Press the plus (+) side of the VOLUME button.
4. Press the 0 number button.
5. Press the POUND (#) button.
The TV mode button flashes three times.
6. Press the SAT mode button.
7. Press the plus (+) and minus (-) sides of the VOLUME button.
The TV’s volume changes and the TV mode button lights
instead of the AUX mode button.
Page 78
Page 83
Upgrade the Receiver Software
Upgrade the Receiver Software
Once in a while, we may upgrade your receiver’s software for free. You can
set up the receiver to Receive a Software Upgrade and/or Set Up the
Receiver to Tell You About Upgrades.
Receive a Software Upgrade
1. Make sure you turn the receiver off, so its green front panel POWER
light is off. To do this, press the remote control’s blank POWER button
while the remote control is in SAT mode.
2. While the receiver is taking the upgrade, the receiver’s
front panel POWER light will blink. Don’t disturb or
unplug the receiver while the new software is
downloading.
Note: The software upgrade m ay take up to a bout half an hour.
Set Up the Receiver to Tell You About Upgrades
You c an set up the receiver to tell you when you can get a software upgrade;
it’ll ask you to let it get the software. Unless you set up the receiver to a sk
you, automatically download new software without asking.
1. Press the MENU button.
2. Select the
3. Select the
4. Select the
5. Select the
System Setup option.
Installation option.
System Upgrades option.
Ask before downloading
option or the Without my permission
option.
Note: A “download” is the same as a n
or:
upgrade.
6. Select the
Save option to save your choice.
Page 79
Page 79
Page 84
Chapter 3
Using the System
Reset the Receiver
You can reset the receiver with the setup it had when you bought it.
If you reset the receiver, you throw aw ay all Favorites Lists
except
All Chan and All Sub.
If you reset a locked receiver, you keep the locks. If you reset
an unlocked receiver, you throw away the locks.
If you lock the receiver, even resetting it won’t bypass a lock
or unlock the receiver. You can’t reset the recei ver to get rid of
a password you forget.
1. Press the MENU button.
2. S elect the System Setup option.
3. S elect the Installation option.
When you
record to a
VCR, the VCR
records only
what you see
on the TV
screen. If you
try to play
back a
program and
record a new
program to a
VCR at the
same time,
the VC R will
record what
you play back,
not the new
program.
4. S elect the Factory Defaults option (“Factory Defaults” refers
to the receiver’s original settings).
5. S elect the
Yes option to confirm the reset.
Change Program Languages
You can choose a language other than English for some programs. Some
programs, like movies, show at the start if you can choose another language.
Note: You can choose another language for a program but not for the
menus.
1. Press the MENU button.
2. S elect the System Setup option.
3. S elect the
Alternate Audio option.
Page 80
Page 85
Set Up the Accessory Jack
4. Select a language in the
Languages list. A check mark
shows up in the box ne xt to the language. For example,
here we selected
Note: If the program is broadcast in a language that
isn’t listed, select the
Spanish.
Alternate option to hear that
language. If the program is broadcast only in the listed
languages, select the
5. Select the
Save option to save your choice.
Alternate option to hear English.
Set Up the Accessory Jack
If you connect a multi-dish switch to the ACCESSORY JACK,orifyou
use an IR extender, you must set up the receiver for these options.
1. Press the MENU button.
2. Select the System Setup option.
3. Select the
Accessory Jack option.
4. Select the
extender. Select the
IR Extender option to use a n IR
Switchbox (multi-dish
switch) option if you connect a multi-dish
switch to the ACCESSORY JACK.
5. Select the
Save option.
Dish Home Interactive TV Applications
Press the DISH button on your remote control to use the Dish
Home Interactive Applications
check the news and weather, and even play games.
. You can order channels,
or:
Page 81
Page 81
Page 86

Chapter 3
Using the System
Notes
Page 82
Page 87
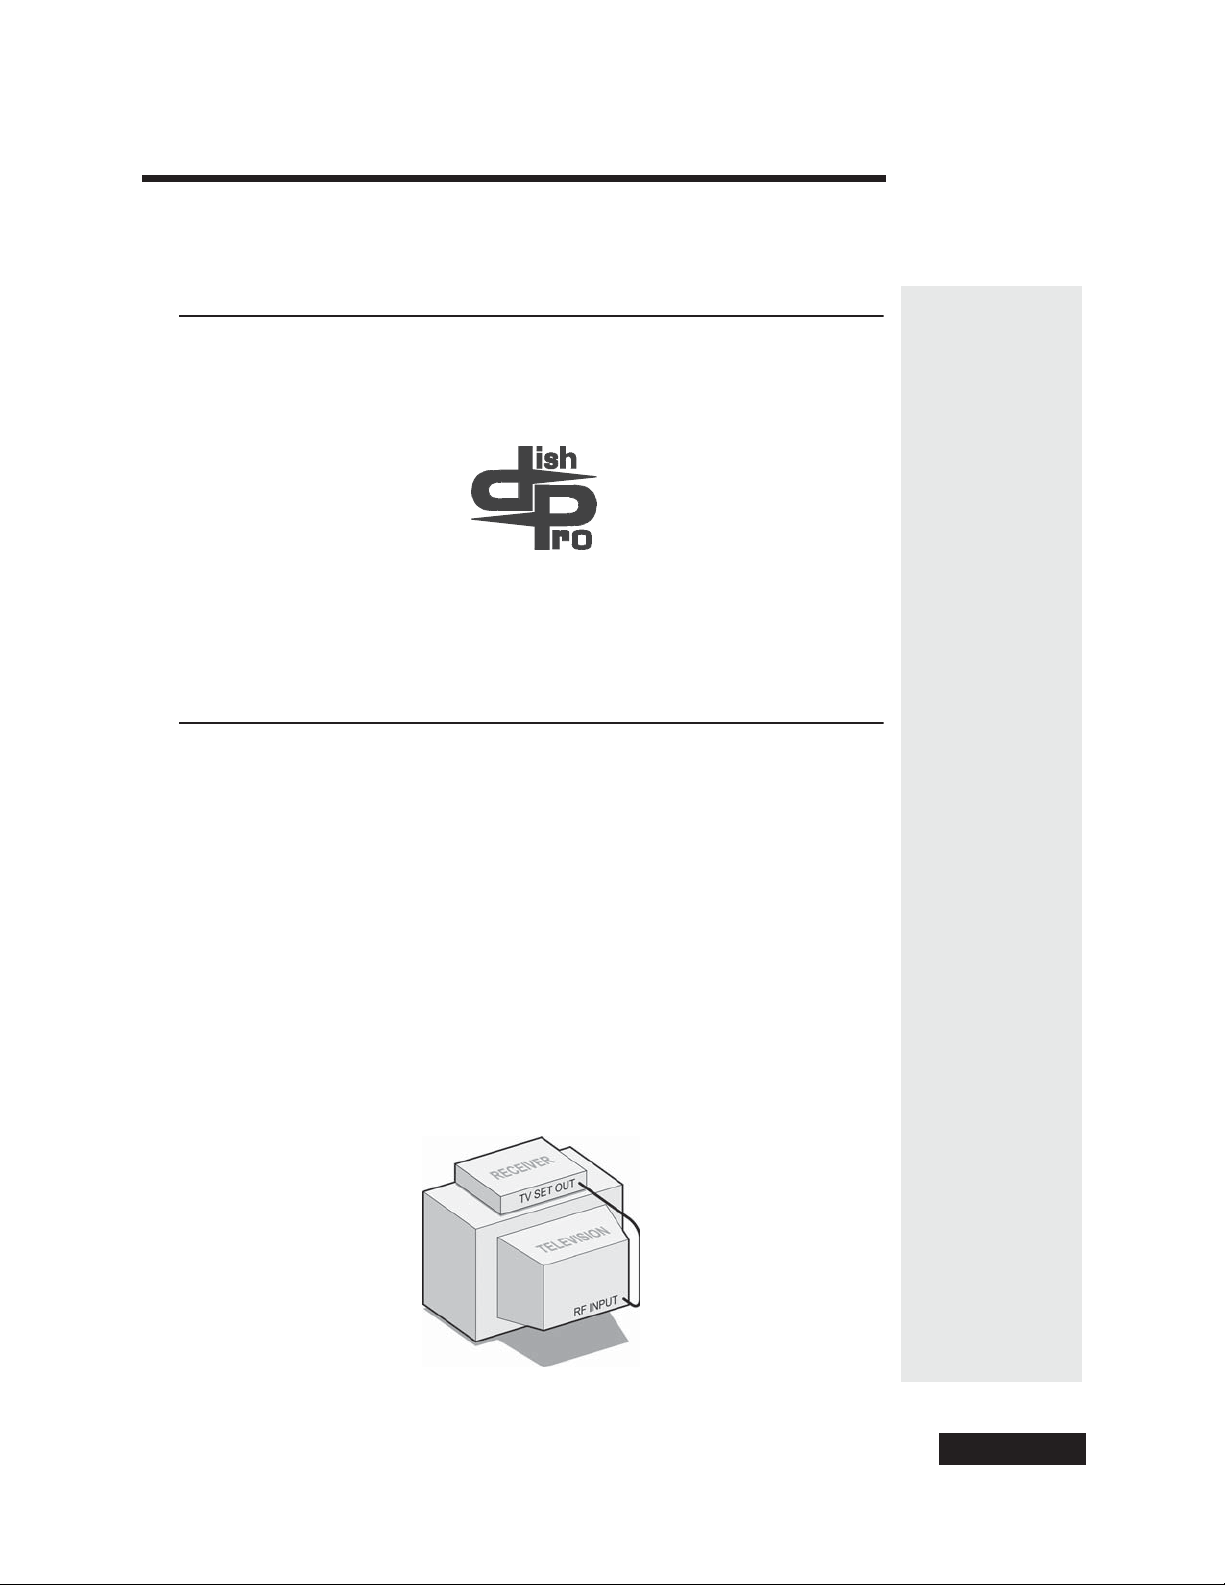
Chapter 4
Installation Instructions
How to Use these Instructions
These instructions guide you through the installation of a satellite system which
includes your DishPro receiver ( included with this manual), and a
antenna system that can be identified by the DishPro logo shown below.
Note: If you have a Dish antenna system already installed, and the dish has been
pointed for the strongest possible signal strength, you can skip this chapter and
go directly to Appendix A to install the satellite receiver in an existing system.
Installing a DISH 500 Antenna
DishPro
The first step in installing your dish antenna is to assemble the satellite dish,
mount it, and point it in the general direction of a satellite. To do this, follow
these instructions:
Finding the Satellites
You need to f ind the satellites in the sky. To do this, you need to know the
azimuth angle (the south, southeast, or southwest direction to the satellites) and
the elevation a ngle (the angle up to the satellites) from your location, and the
skew angle.
1. Connect the TV S
RF T
UNER INPUT using a coaxial cable. Make sure that the TV is tuned to
the same channel as the C
(for example, if this switch is on “3,” the TV m ust be tune to Channel 3).
ET OUT on the receiver’s back panel to the television’s
HANNEL 3/4 SWITCH on the receiver’s back panel
Page 83
Page 88
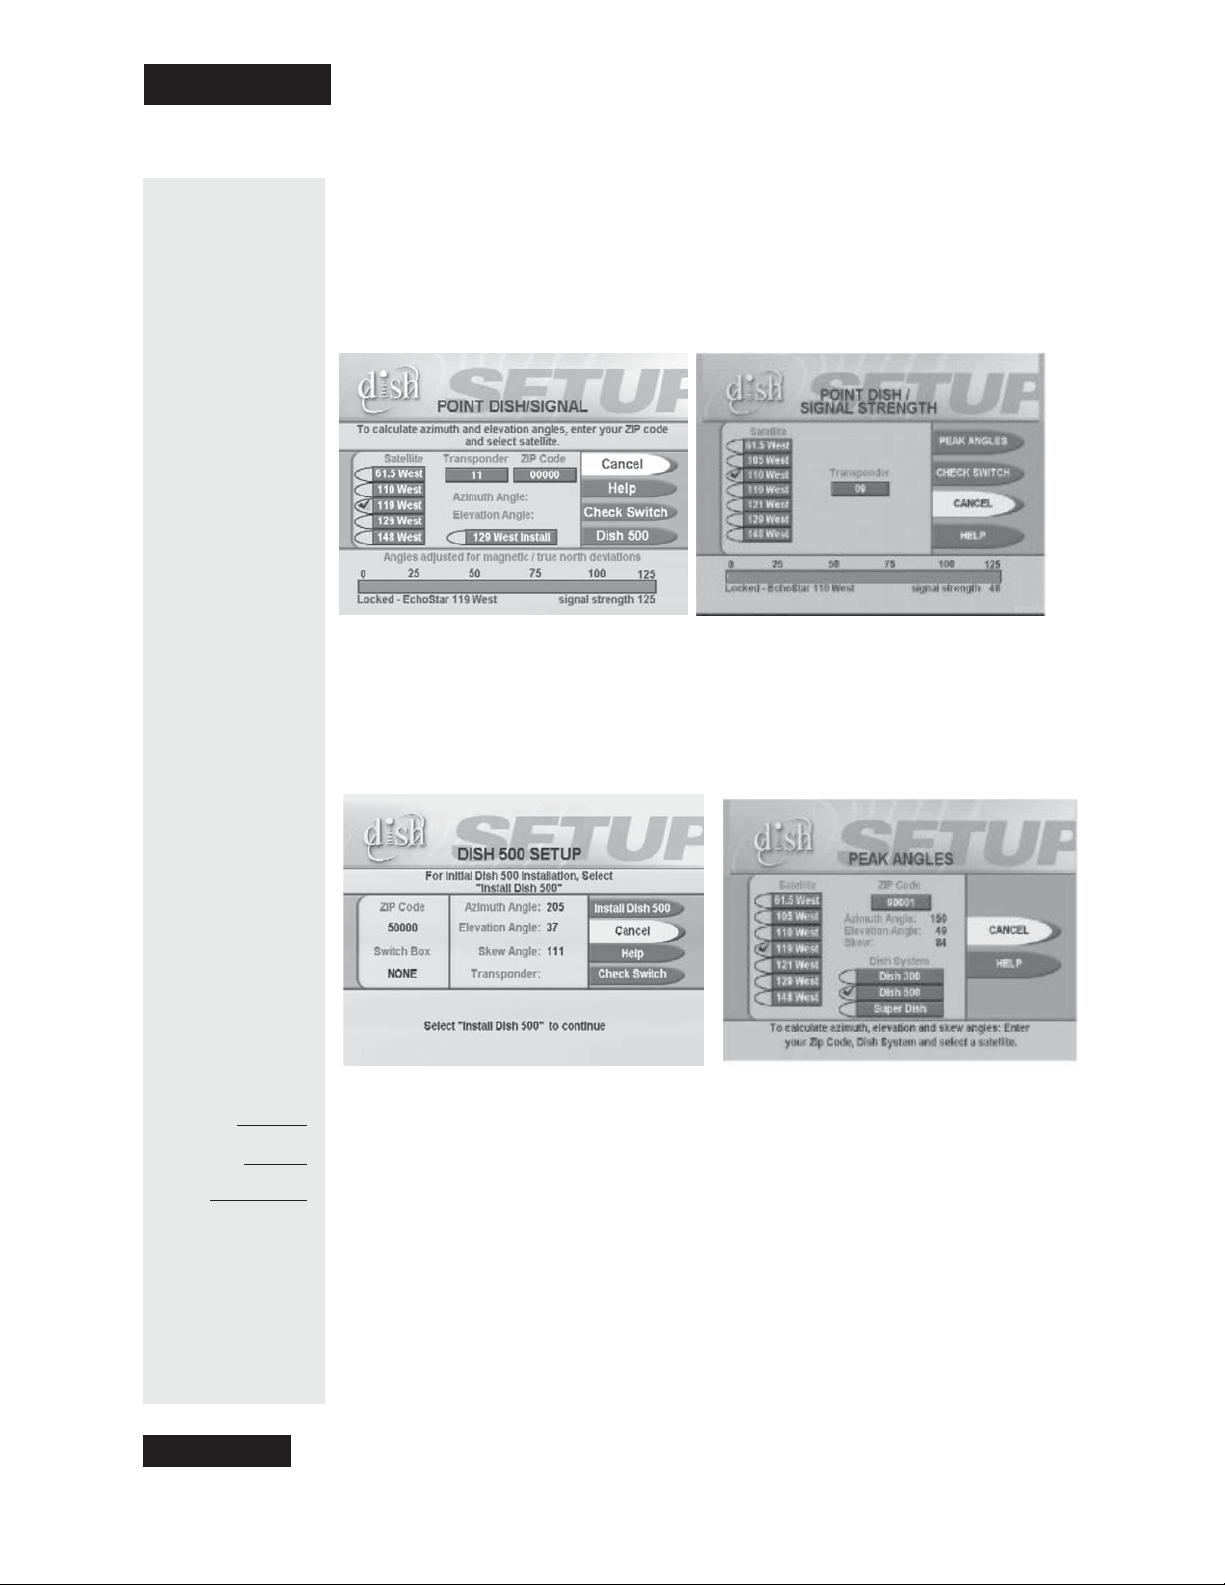
Chapter 4
Installation Instructions
2. Make sure that the remote control batteries are fresh, and are installed
properly. If needed, make sure that the remote is in SAT mode to control the
satellite receiver.
3. Turn ON the television and receiv er.
4. Display the
Point Dish and Signal Strength menu by pressing MENU and
and then 6-1-1 ( unless the receiver already displays this menu).
5. If you P oint Dish/Signal screen looks like the one on the left, continue to
step 6. If your Point Dish/Signal screen looks like the one on the right,
select
Peak Angles.
6. Enter your ZIP code in the
7. S elect the
Dish 500 option.
ZIP Code field.
Azimuth:
Elevation:
Skew:
Page 84
8. The menu displays the azimuth, elevation, and skew angles. Write down
these numbers in the blanks provided in the margin.
9. S elect Cancel to exit out of this menu and return to the Point
Dish/Signal menu.
10. Go to Mounting the Dish on page 85.
Page 89
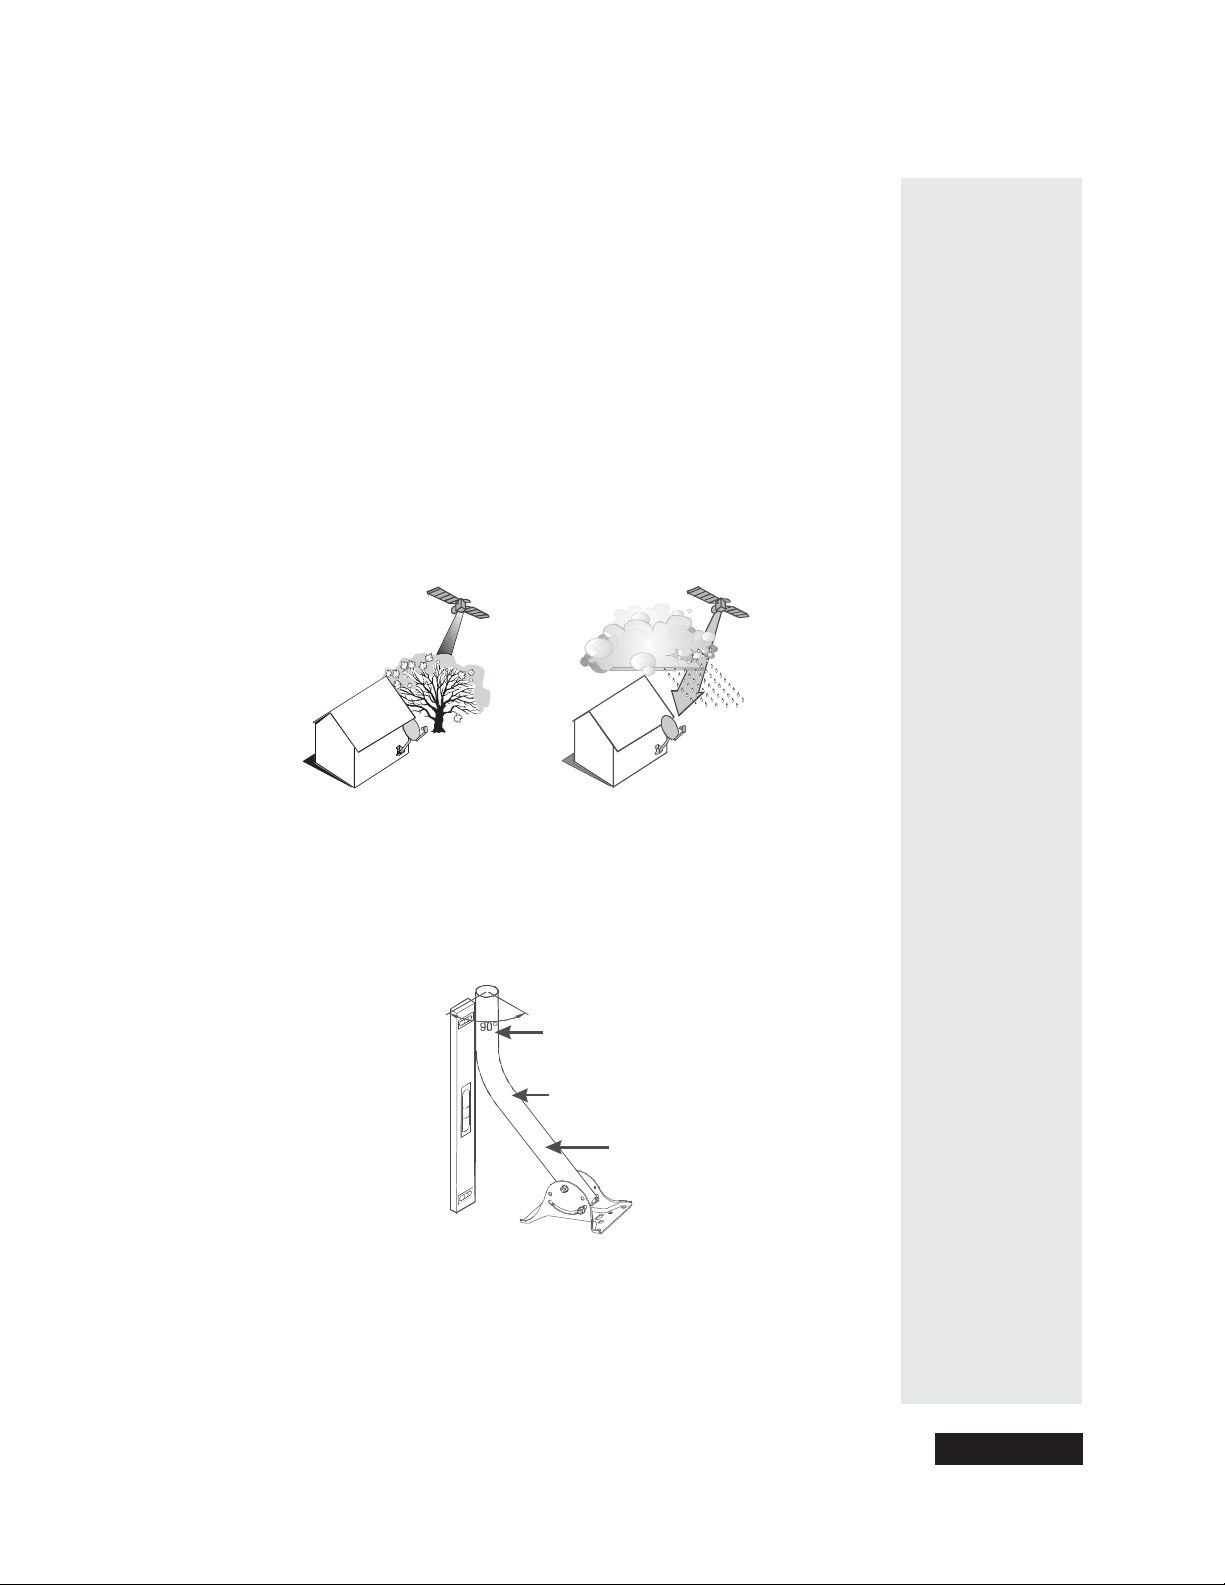
Installing a DISH 500 Antenna
Mounting the Dish
1. Using these azimuth and elevation angles, find a location for the satellite
dish which can be pointed towards the satellites located at these angles.
With a compass, find the required azimuth angle. Then, use the elevation
angle to find out how high the satellites are in the sky from your location.
Make sure nothing blocks the line of sight between the dish and the
satellites.
2. Mount the mast to a solid surface so that the dish antenna cannot move or be
bumped out of adjustment. Keep in mind that physical and environmental
conditions can block your satellite dish’s ability to receive a clear satellite
signal. The conditions to be aware of are: Eaves and overhangs on your
building or house, wind, plant growth, and deterioration of the m ounting
surface. Never m ount to a tree.
NO YES
3. Align the top part of the mast so that it is absolutely vertical, a s shown
below. If the top part of the mast is off vertical by only a few de grees, it will
be difficult or maybe even im possible for you to find the satellites. Take at
least two readings with a bubble level, on the upper mast, that are 90
degrees apart from one another.
Top Pa rt
of Mast
Bubble Level
Mast
Page 85
Page 90
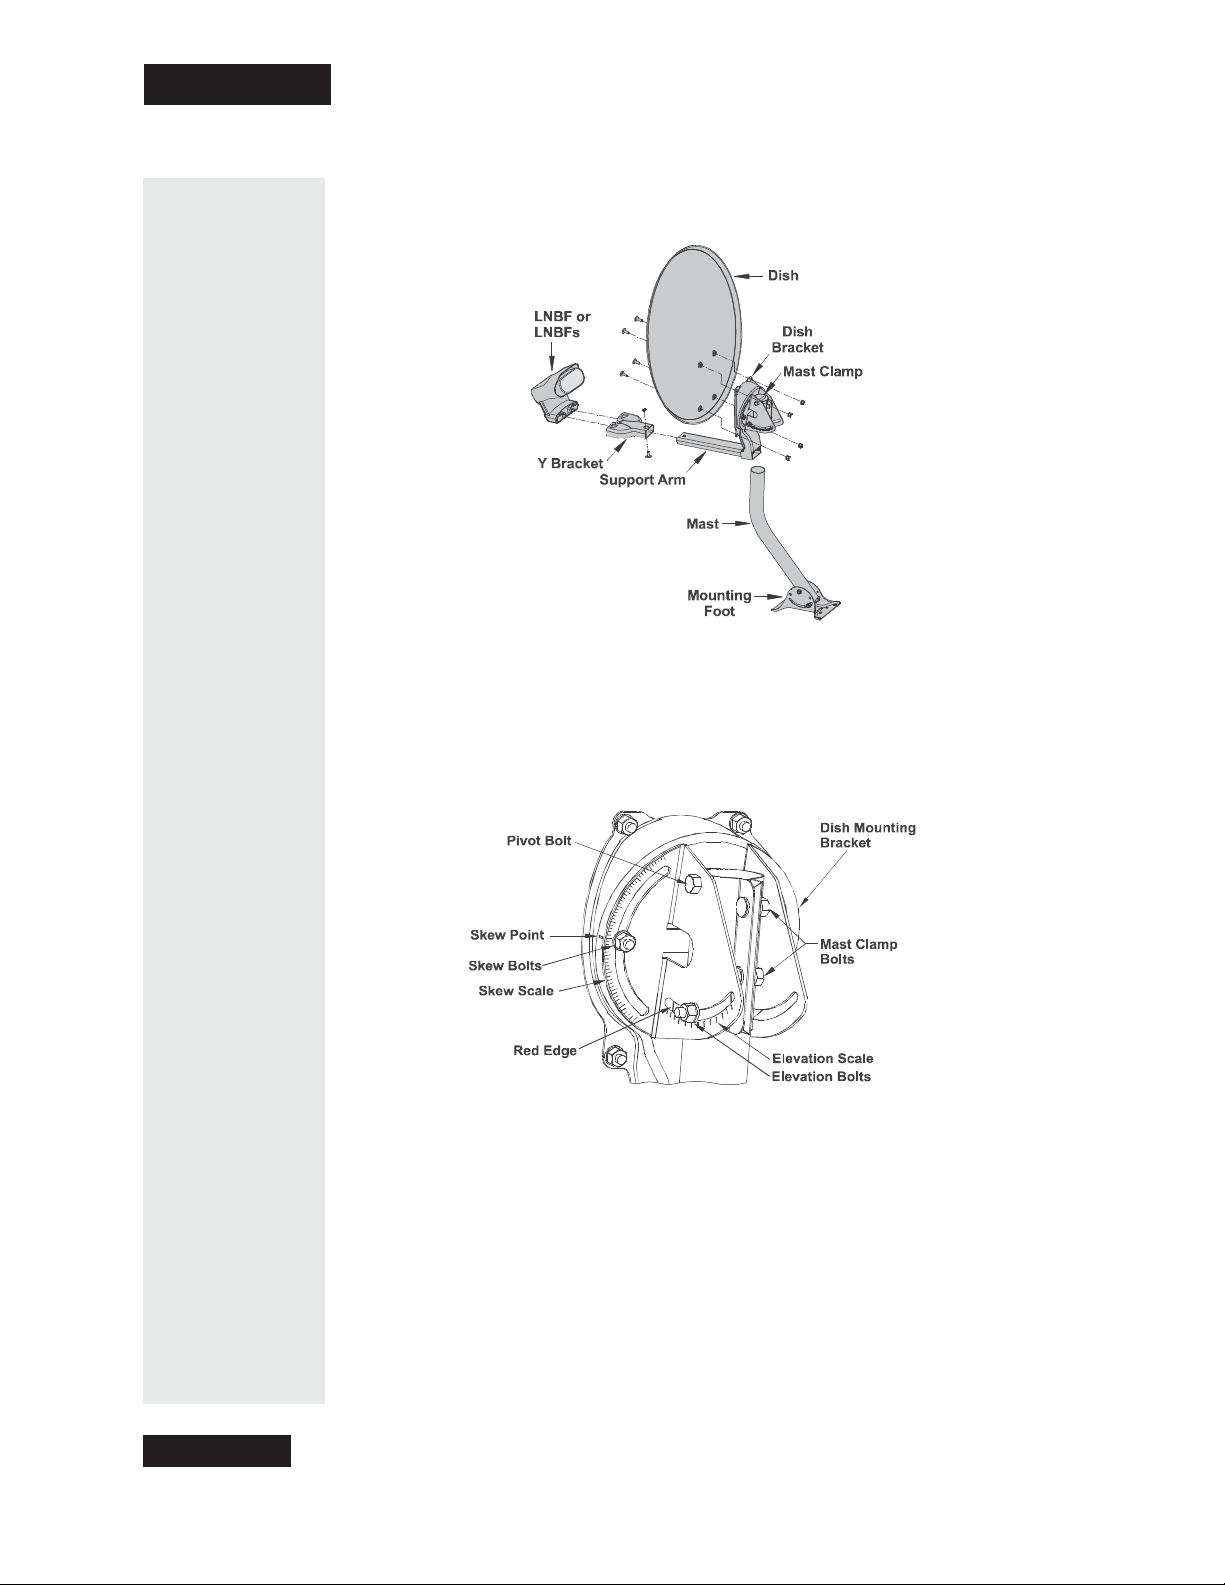
Chapter 4
Installation Instructions
4. Assemble the satellite dish as shown belo w, except do not attach the Ybracket or LNBF at this time.
5. Loosen both skew bolts and set the skew by r otating the dish mounting
bracket to align the red mark with the required angle on the skew scale
which you wrote down on 84. Tighten the skew bolts securely to keep the
dish from rotating. Once the skew is set, do not try to fine-tune this angle
when aiming the dish.
Page 86
6. Set the elevation by tilting the dish m ounting bracket to align the red edge
with the required angle from page 84 on the elevation scale. Tighten the
elevation bolts, but do not tighten the pivot bolt at this time.
Page 91
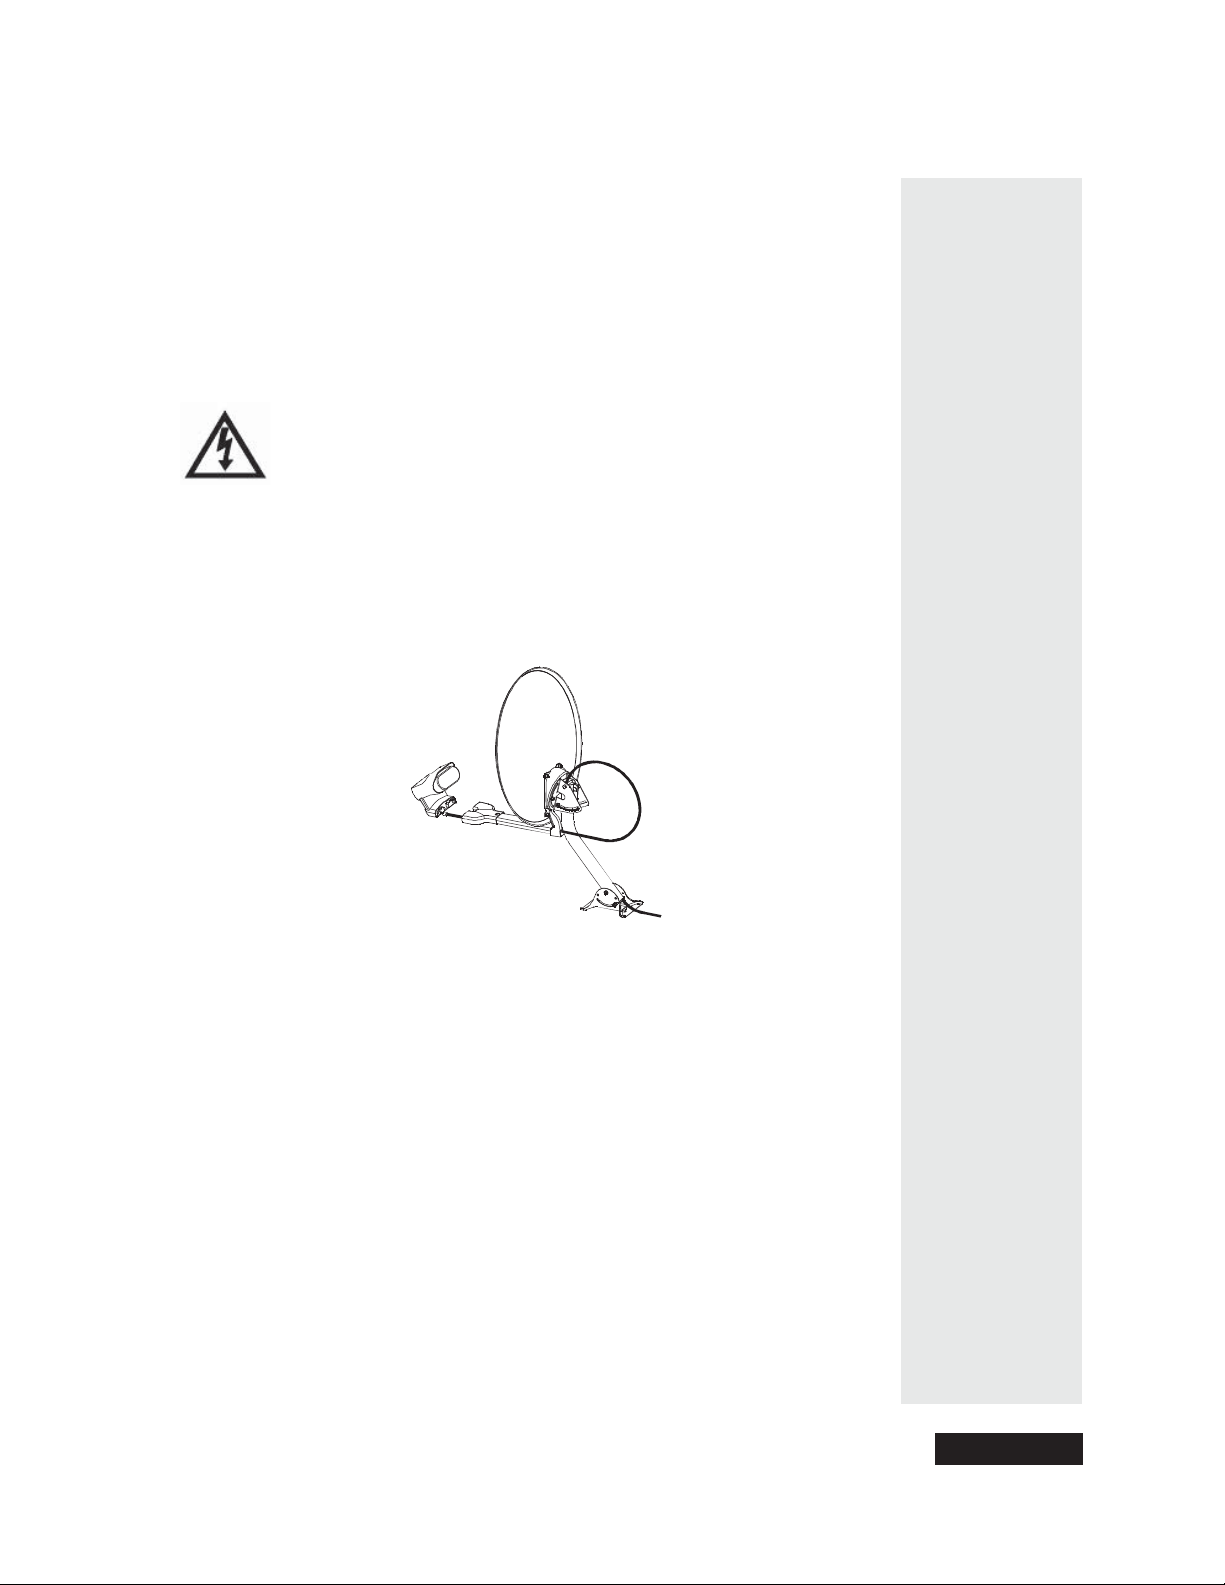
Installing a DISH 500 Antenna
Note: You can have as much as 200 f eet of cable between the DishPro LNB F
and the DishPro receiver. However, you must use only RG-6 coaxial cables
rated for 950 to 2150 M Hz. Some cables may say "Swept tested for 2150 MHz."
If you have any doubt about this, ask your DISH retailer, or look on the
container the cable came in. Do not use cable company TV cables or cables
from other satellite TV systems not rated for 950-2150 MHz. These other cables
may cause signal loss. Do not use existing cables such as RG-59. Also, be sure
that any outdoor c onnections a re made using waterproof F-connectors.
Tighten all of the coaxial cable connection only by hand. If you use a
wrench, you may over-tighten the connections and damage your
equipment. Such damage is not coveredbytheLimitedWarranty.
7. Thread the RG-6 coaxial cable through the mast support arm and
the Y-bracket. This cable should be long enough to run from your receiver
to your LNBF.
Note:SeeRunning Coaxial C ables on page 101 for cable installation
guidance.
8. At tach the Y-bracket, using the Y-bracket screw.
9. Connect the RG-6 cable f rom the DISHPro S
AT IN connection on the back
of the receiver directly to port 1 of the DISHPro Twin LNBF, as shown
Page 87
Page 92
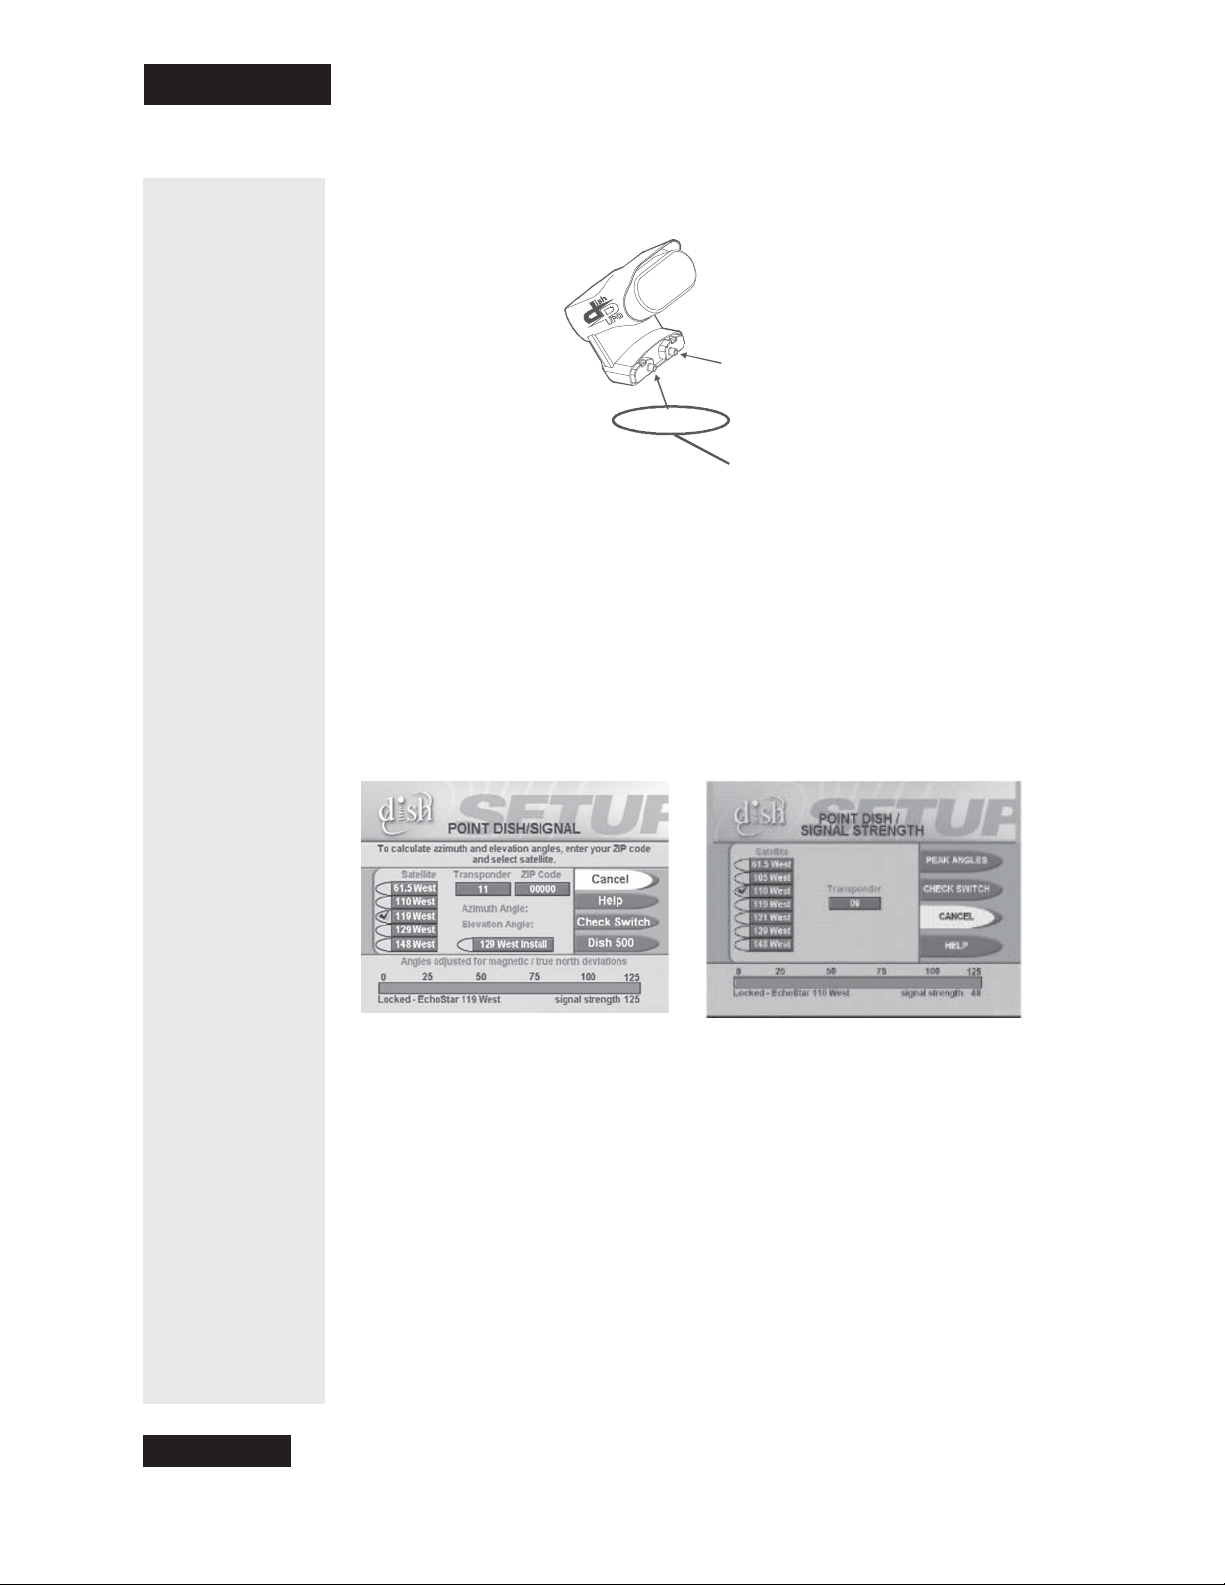
Chapter 4
Installation Instructions
below. B e sure there are no multi-dish switches between the LNBF and the
receiver.
10. Attach the LNBF to the Y-bracket using the two LNBF screws.
11. Slide the dish assembly down onto the mast. Make sure the pivot bolt rests
on the top of the mast. Turn the dish assembly so that it points in the general
direction of the sa tellites, using the azimuth angle from 84.
Port 2
Port 1
Connect to Port 1. It’s on
the left when the LNBF is
pointed towards you
12. You should see the
Point Dish/Signal menu. If not, open the Main Menu,
select System Setup,thenInstallation,thenPoint Dish/Signal (press
MENU andthenpress6-1-1 on the remote).
13. S elect
14.
Check Switch.TheCheck Switch screen will open.
Select Check or Te s t . The receiver shows you a message that it is checking
the switches. Go to step 15.
15. Whe n the check switch procedure finishes, you will see an installation
summary screen similar to the one below. In the Satellite line, you will se e
“Conn.” In the Device line, you will “Twin” twice. This indicates that your
receiver has confirmed the connection with your DishPro Twin LNBF is
working. The Transponder line ma y show two “Xs.” This is OK and doe s
not indicate a problem with the receiver.
Page 88
Page 93
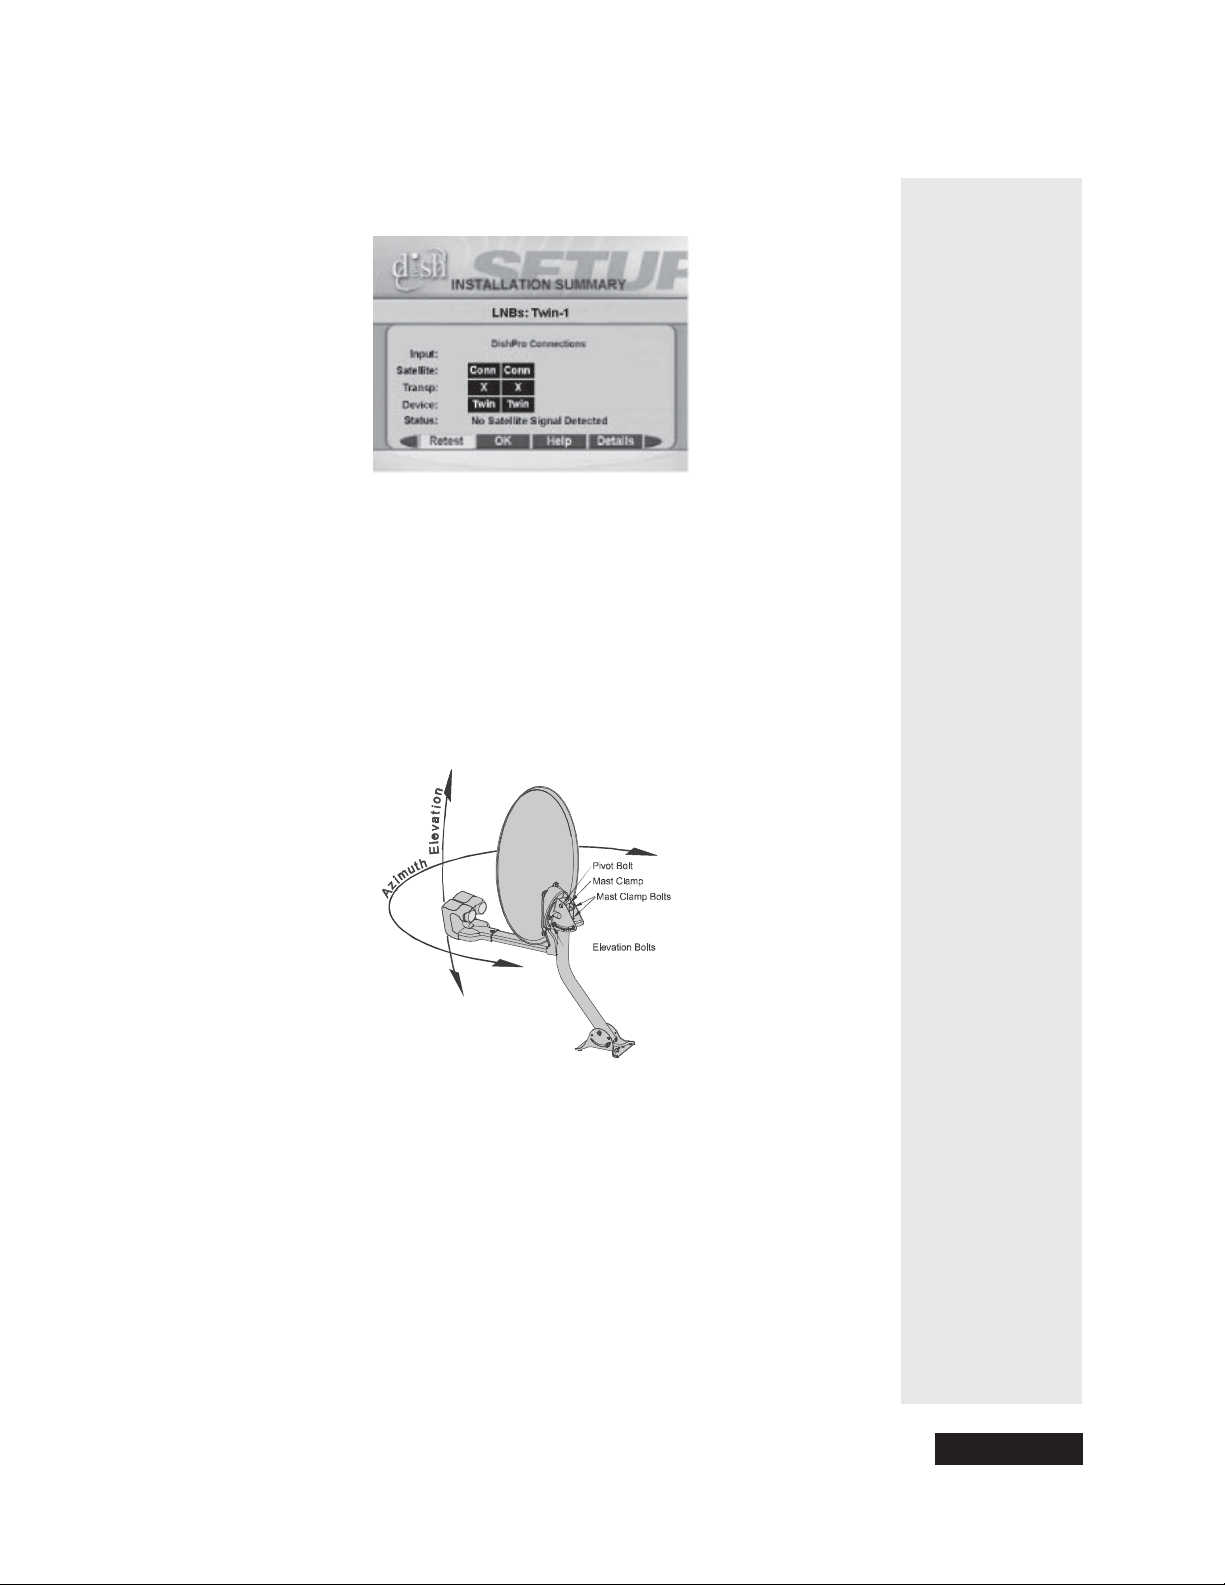
Installing a DISH 500 Antenna
16. Select Cancel or OK to return to the P oint Dish/Signal screen. Make sure
the check mark is next to 119 West. If not, move the highlight to 119
West and press SELECT. Notice the signal strength bar. This is used to
help you aim the dish by showing the strength of the signal you are
receiving. Look at the signal strength bar while you aim the dish. Don’t
stand in front of the dish while you aim it, because your body will block the
satellite signal. After you adjust the aim, let go of the dish so that you c an
get a good signal reading after the dish settles back in place by itself. Do not
change the skew setting.
17. Turn the dish back and forth very slowly, until the signal strength bar turns
green. This shows you’ve found the signal.
Tip: Have one
person aim the
dish while
another watches
the sign al
strength or
listens to t he
signal tone.
Note: I f you cannot find the signal, turn the dish back to the first azimuth
angle. Then, loosen both elevation bolts just enough so you can tilt the dish.
Tilt the dish elevation up by two degrees, and then tighten both bolts. Now,
turn the dish back and forth again. If you still can’t find the signal, tilt the
dish up again very slightly and turn the dish back and forth until you find the
signal.
18. Once the signal strength bar is green, turn the dish back and forth just a
little, to where the signal strength bar shows the strongest signal. When you
find the strongest signal, tighten both mast clamp bolts. Then loosen both
elevation bolts, just enough so you can tilt the dish. Tilt the dish up and
down just a little, to where the signal strength bar shows the strongest
signal. Do not adjust the skew. When you find the strongest signal, tighten
all bolts in the dish assembly so the dish cannot be moved.
Page 89
Page 94
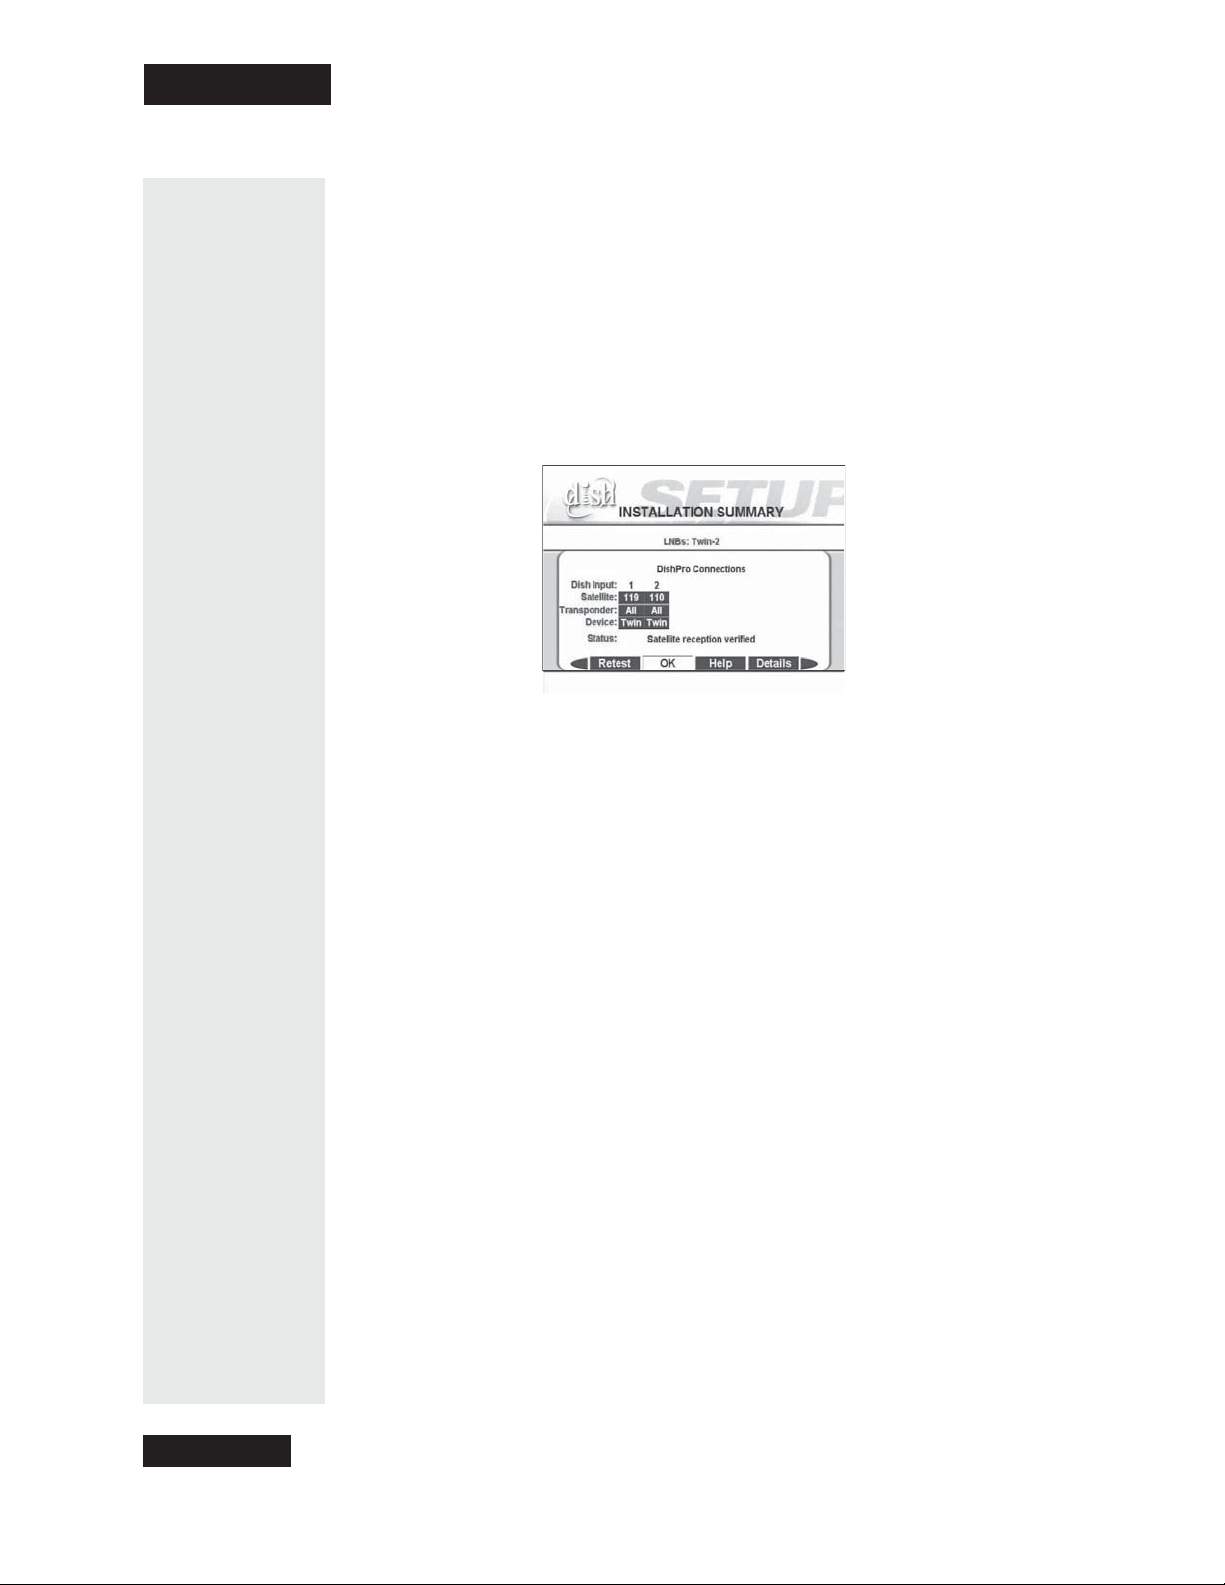
Chapter 4
Installation Instructions
19. You are now ready to verify reception from both satellites. Select the
Check Switch option. When the Check Switch menu opens, select
Check or Test. The receiver shows you a message that it is checking the
switches. When the procedure is finished, you will see an Installation
Summary screen. This screen may look different than the one shown
below. However, you must see that you have signals from both the 110
West and 119 West Satellites, you see “All” twice in the Transponder
line, and the message “Satellite re ception verified. Press CANCEL or OK
to exit this menu.”
20. I f you do not se e “110” under
• Make sure the skew angle you wrote down on page 84 is exactly the
same as the skew angle you set in step 5 on page 86. If it is not, reset the
skew angle as desc ribed on page 86. After you reset the skew angle, go
back page 89 and start over from step 16.
• If “119” is shown under
to the east and restart the procedure at step 12.
21. Look at the Point Dish/Signal menu. If you have good signal strength
with the check mark in 119 West , move the check mark to 110 West.If
you have good signal strength on 110 West,gotostep22.
If you do not have good signal strength with the check mark in 110 West,
go back to Step 17, and fine-tune the dish but with the check mark in 11 0
West instead of 119 Wes t. While the 110 West and 119 West signals will
not be equal, you should be able to fine-tune the dish until you have the
strongest possible signal from both satellites.
22. S elect Cancel to exit the Point Dish/Signal menu. An Attention screen
will open asking the mounting a nd positioning of your dish is complete with
a “Locked” indication in the Point Dish/Signals screen. If the answer is ye s,
select Yes.
If the answer is No, you will need to repoint your dish following the
preceding steps until the mounting and positioning is complete and you do
have the “Locked” indication.
Dish Input 2:
Dish Input 2, move the dish a pproximately 9°
Page 90
Page 95

Installing a DISH 500 Antenna
23. After you se lect Yes, the receiver will begin taking a software upgrade. You
will see a Warning that “Vital program information will now be
downloaded into your receiver.” You will also see a status bar showing the
progress of this upgrade.
24. Once the software upgrade is complete, you will see a message that your
receiver’s memory is being upgraded.
Do not disturb the receiver while the receiver’s memory is being upgraded.
Note: If you are installing other DishPro receivers, be sure to run
Switch
on all of them, and allow them to take the necessary software
Check
upgrade.
If you will be installing a multi-dish system, follow the instructions that
begin below.
Installing a Multiple Dish DishPro System
Note: You cannot use DishPro LNBFs and switches (those ma rked with the
DishPro logo) with Legacy (non-DishPro) switches and LNBFs (those without
the DishPro logo). You must install your DISH antenna system with either all
DishPro LNBFs and switches or all Legacy LNBFs and switches. If you mix the
two, the system will not work.
Note: You can have as much as 200 f eet of cable between the DishPro LNB F
and the DishPro receiver. However, you must use only RG-6 coaxial cables
rated for 950 to 2150 M Hz. Some cables may say "Swept tested for 2150 MHz."
If you have any doubt about this, ask your DISH retailer, or look on the
container the cable came in. Do not use cable company TV cables or cables
from other satellite TV systems not rated for 950-2150 MHz. These other cables
may cause signal loss. Do not use existing cables such as RG-59. Also, be sure
that any outdoor c onnections a re made using waterproof F-connectors.
Once you have installed the DISH 500 with its DishPro Twin LNBF using the
preceding instructions, you can install a DISH 300 with a DishPro LNBF a s
follows:
1. Turn on the television and the receiver if they are not already on. You
should see the
Point Dish/Signal screen. I f not, open the Main Menu and
press 6-1-1 on the r emote.
Page 91
Page 96
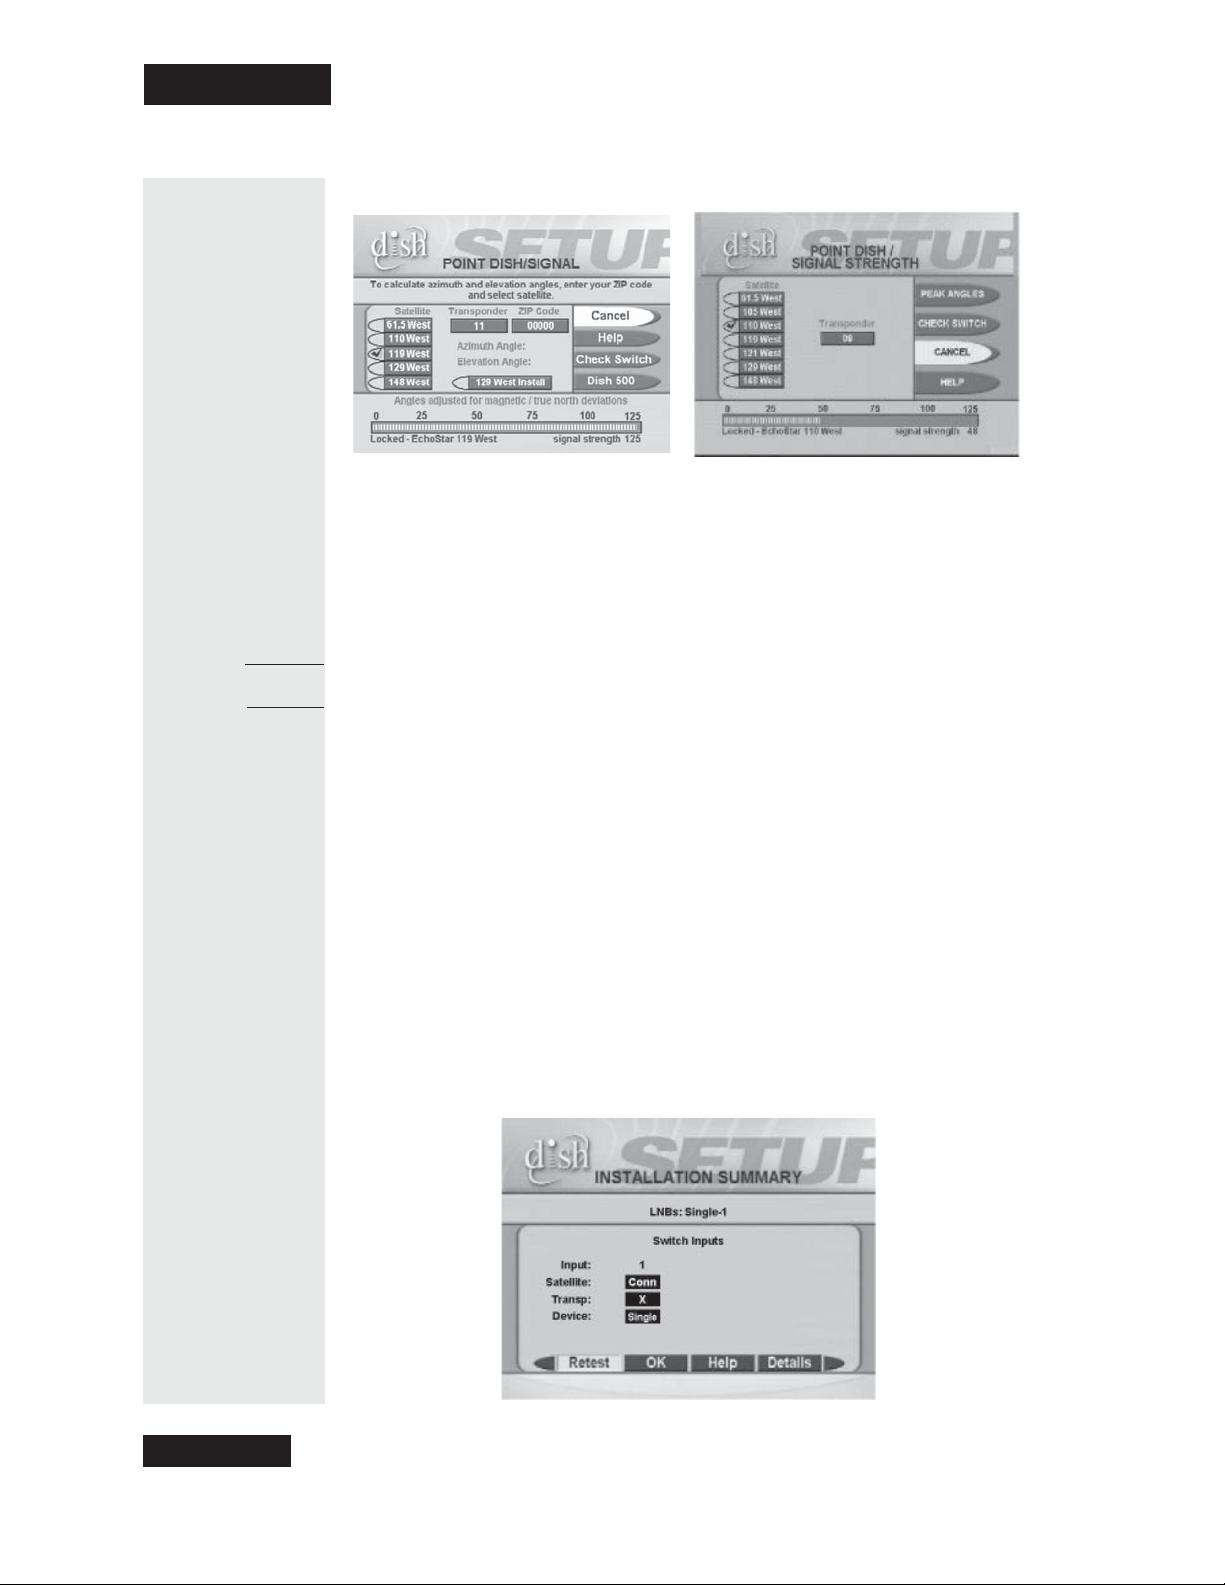
Chapter 4
Installation Instructions
2. Make sure the check mark is next to the satellite your dish w ill be pointed
toward.
Azimuth:
Elevation:
3. If your
step 4. If your
select
4. S elect
Point Dish/Signal screen looks like the one on the left, continue to
Point Dish/Signal screen looks like the one on the right,
Peak Angles and the Dish 300 option.
Peak Angles.
5. Use the num ber buttons on the remote to enter your ZIP code to get the
necessary azimuth and elevation. Write these numbers down in the spaces
provided in the margin.
6. Mount the dish a ntenna following the m ounting instructions that came with
it.
7. Connect an RG-6 cable from the DishPro S
directly to the DishPro LNBF on the Dish 300.
AT IN connection on the receiver
Make sure there are no
multi-di sh switches between the LNBF and the Di shPro receiver.
8. S elect
9. When
Check Switch from the Point Dish/Signal menu. When the Check
Switch
screen opens, select Check.
Check Switch is complete, you will see an I nstallation Summary
screen similar to the one shown next. It will show a connection (“Conn”
next to satellite) and
Single device under 1 (Dish Input). It may also show
an X on the Transponder line. This is okay a nd does not m ean there is a
problem with the system.
Page 92
Page 97

Installing a DISH 500 Antenna
10. Press CANCEL to exit back to the Point Dish/Signal m enu.
11. Point the dish for the strongest possible signal, following the instructions
that came with it and the DishPro wiring diagrams that start on page 94.
12. Connect any switches in your system, using the instructions which c ame
with the switch(es).
13. Select Check Switch from the Point Dish/Signal menu. When the
Check Switch menu opens, select Check or Tes t. When the procedure
completes, you will see the Installation Summary screen again. This
time you should see confirmation for all satellites your dishes are pointed at,
and “Satellite reception verified.” You should also see that the switch(es) in
your system has bee n correctly identified.
Refer to the DishPro wiring diagrams for e xamples of installation summary
screens.
14. Press CANCEL to exit this menu, and then Cancel to exit the Point
Dish/Signal screen.
If you have any other receivers in your system, make sure you run Che ck
Switch on ea ch of them, a nd allow each to take the software upgrade, as
needed.
Page 93
Page 98
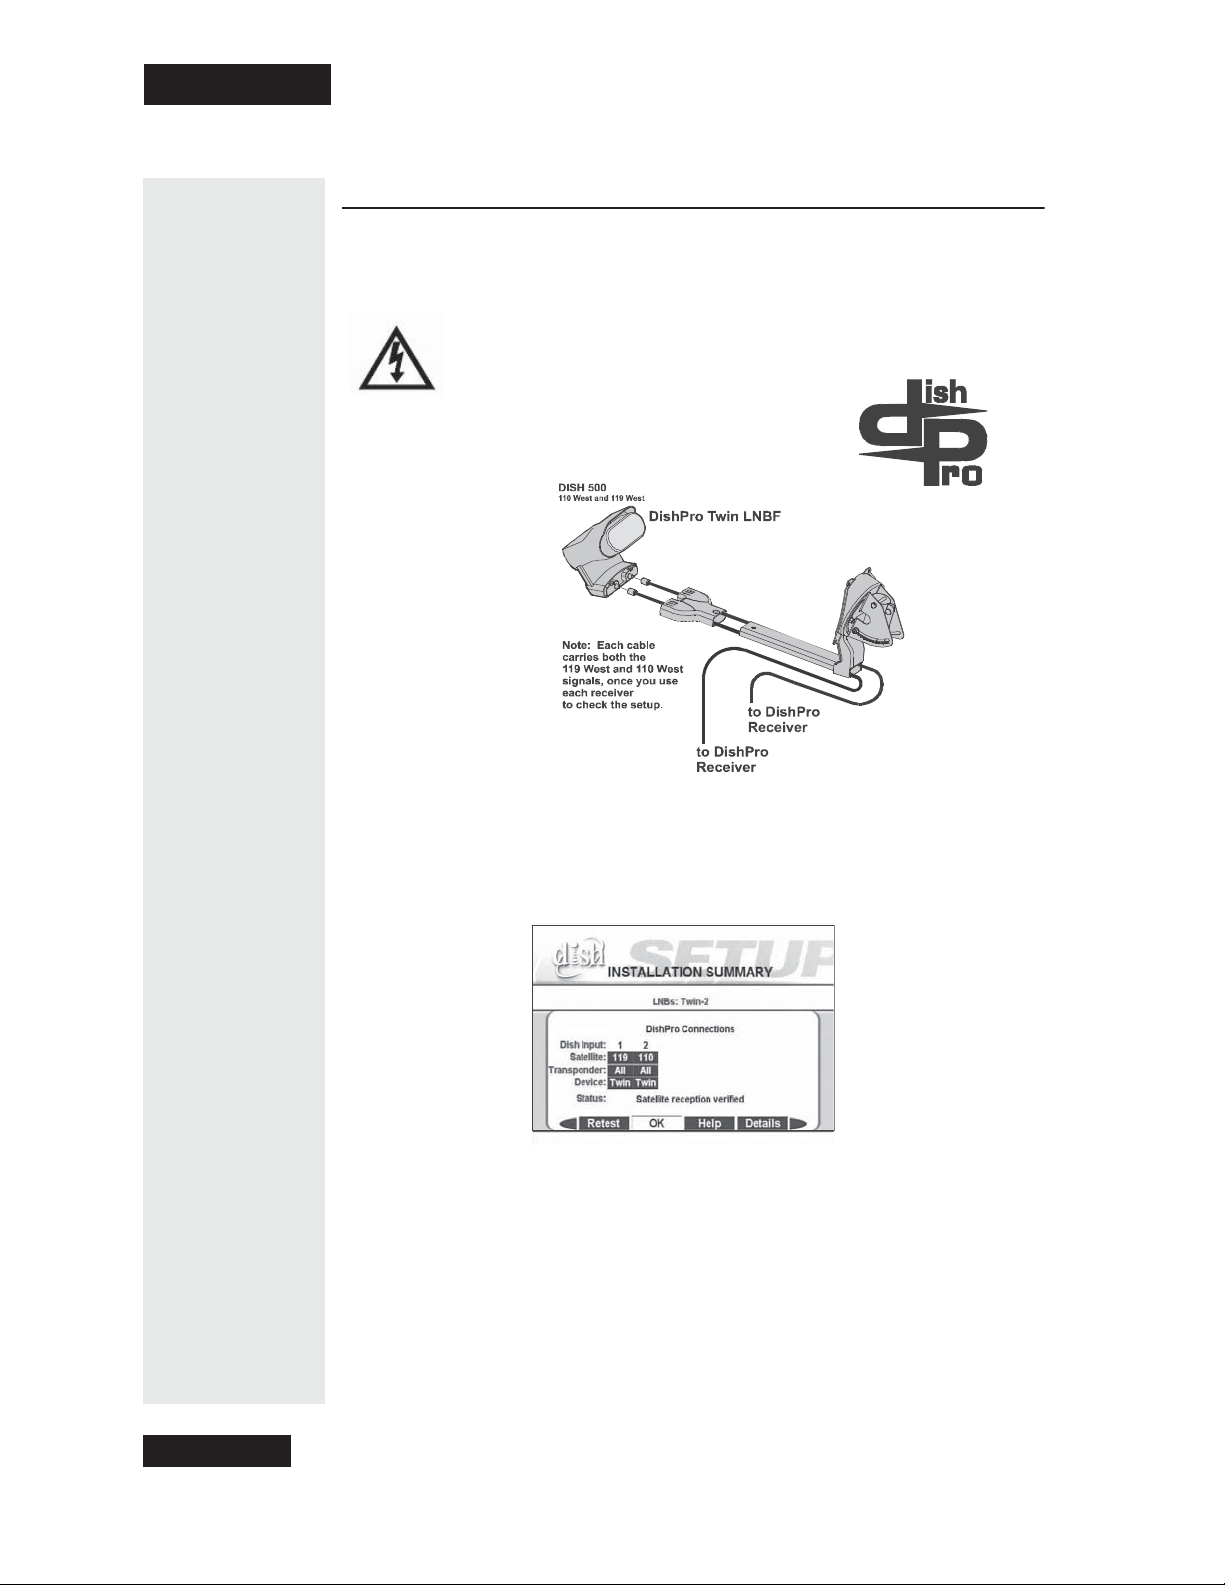
Chapter 4
Installation Instructions
DishProWiringDiagrams
DISH 500, One DishPro Twin LNBF, Two DishPro Receivers
This diagram leaves out grounding to be clear. Make sure you
ground the system per the National Electrical Code (NEC) and all
local electrical codes.
When you set up your system following this diagram and run Che ck S witch
the Installation Summary screen should look similar to the one shown
below.
Page 94
Page 99
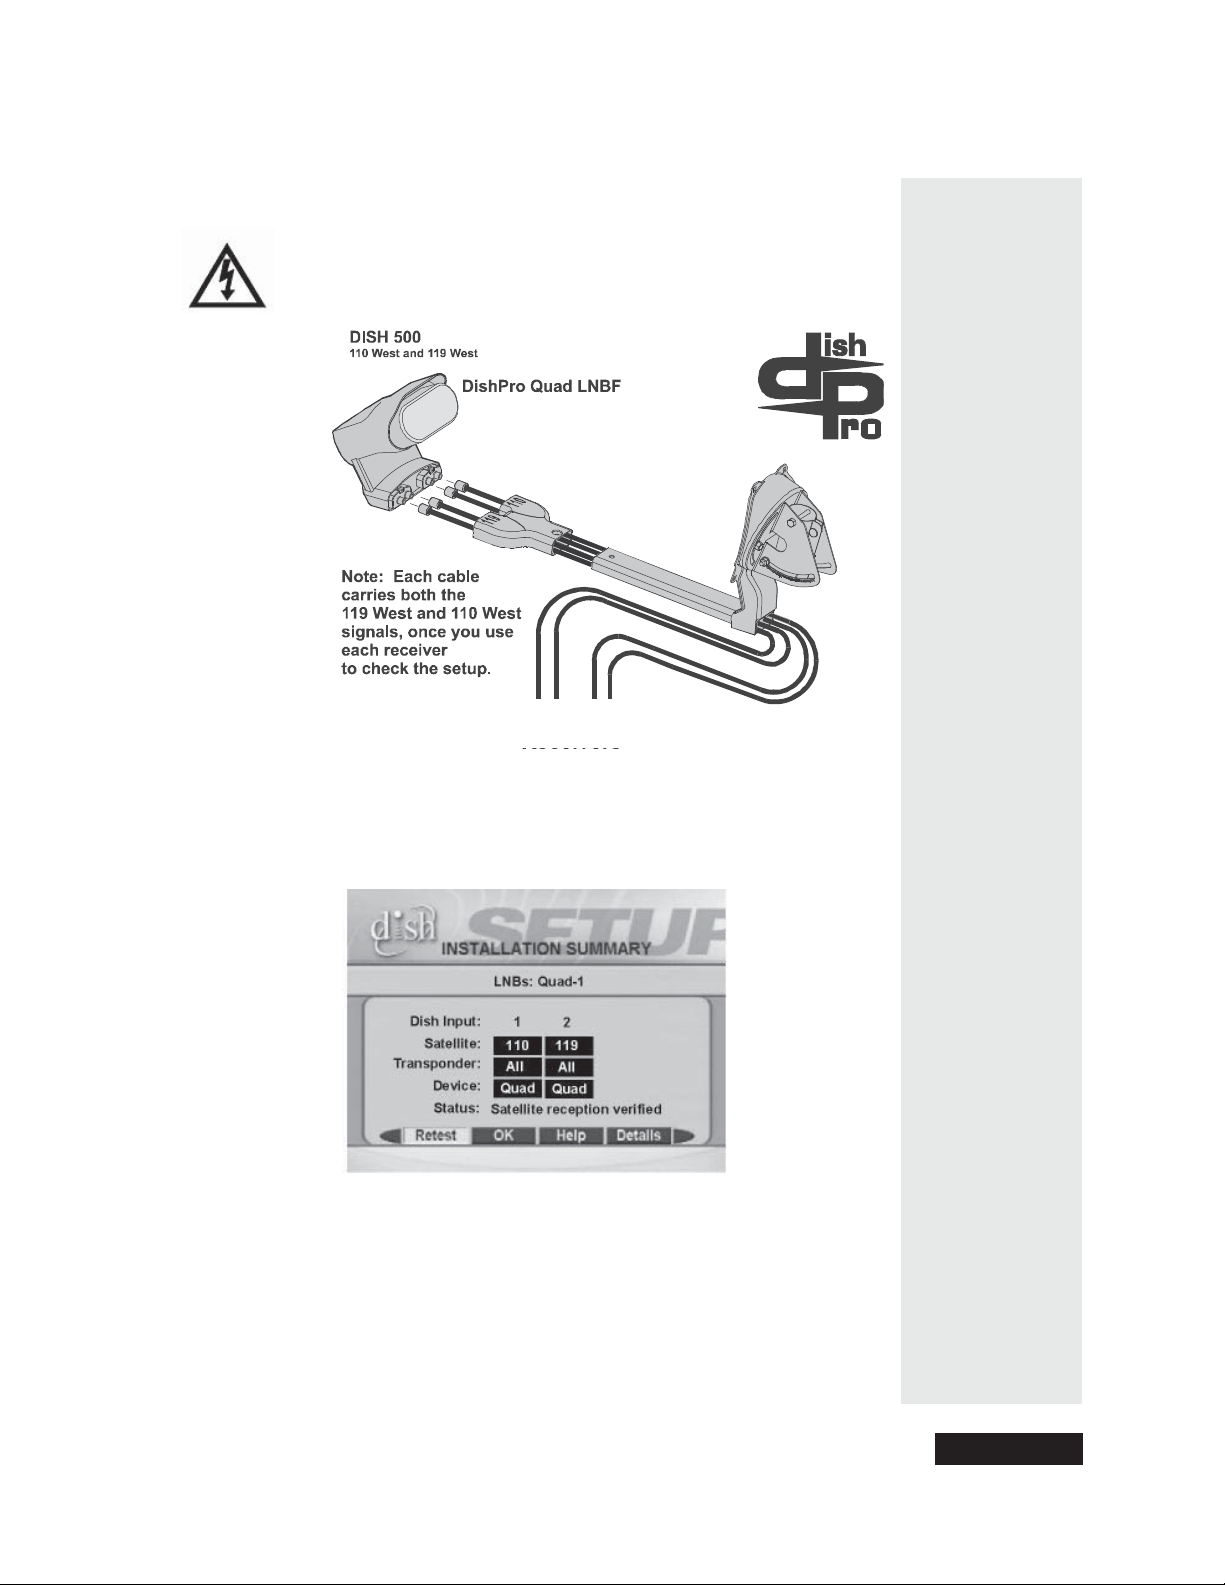
DISH 500, One DishPro Quad LNBF, Four DishPro Receivers
This diagram leaves out grounding to be clear. Make sure you
ground the system per the National Electrical Code (NEC) and all
local electrical codes.
DishPro Wiring Diagrams
To four DishPro receivers
When you set up your system following this diagram and run Check Switch
the Installation S umma ry screen should look similar to the one shown
below.
Page 95
Page 100
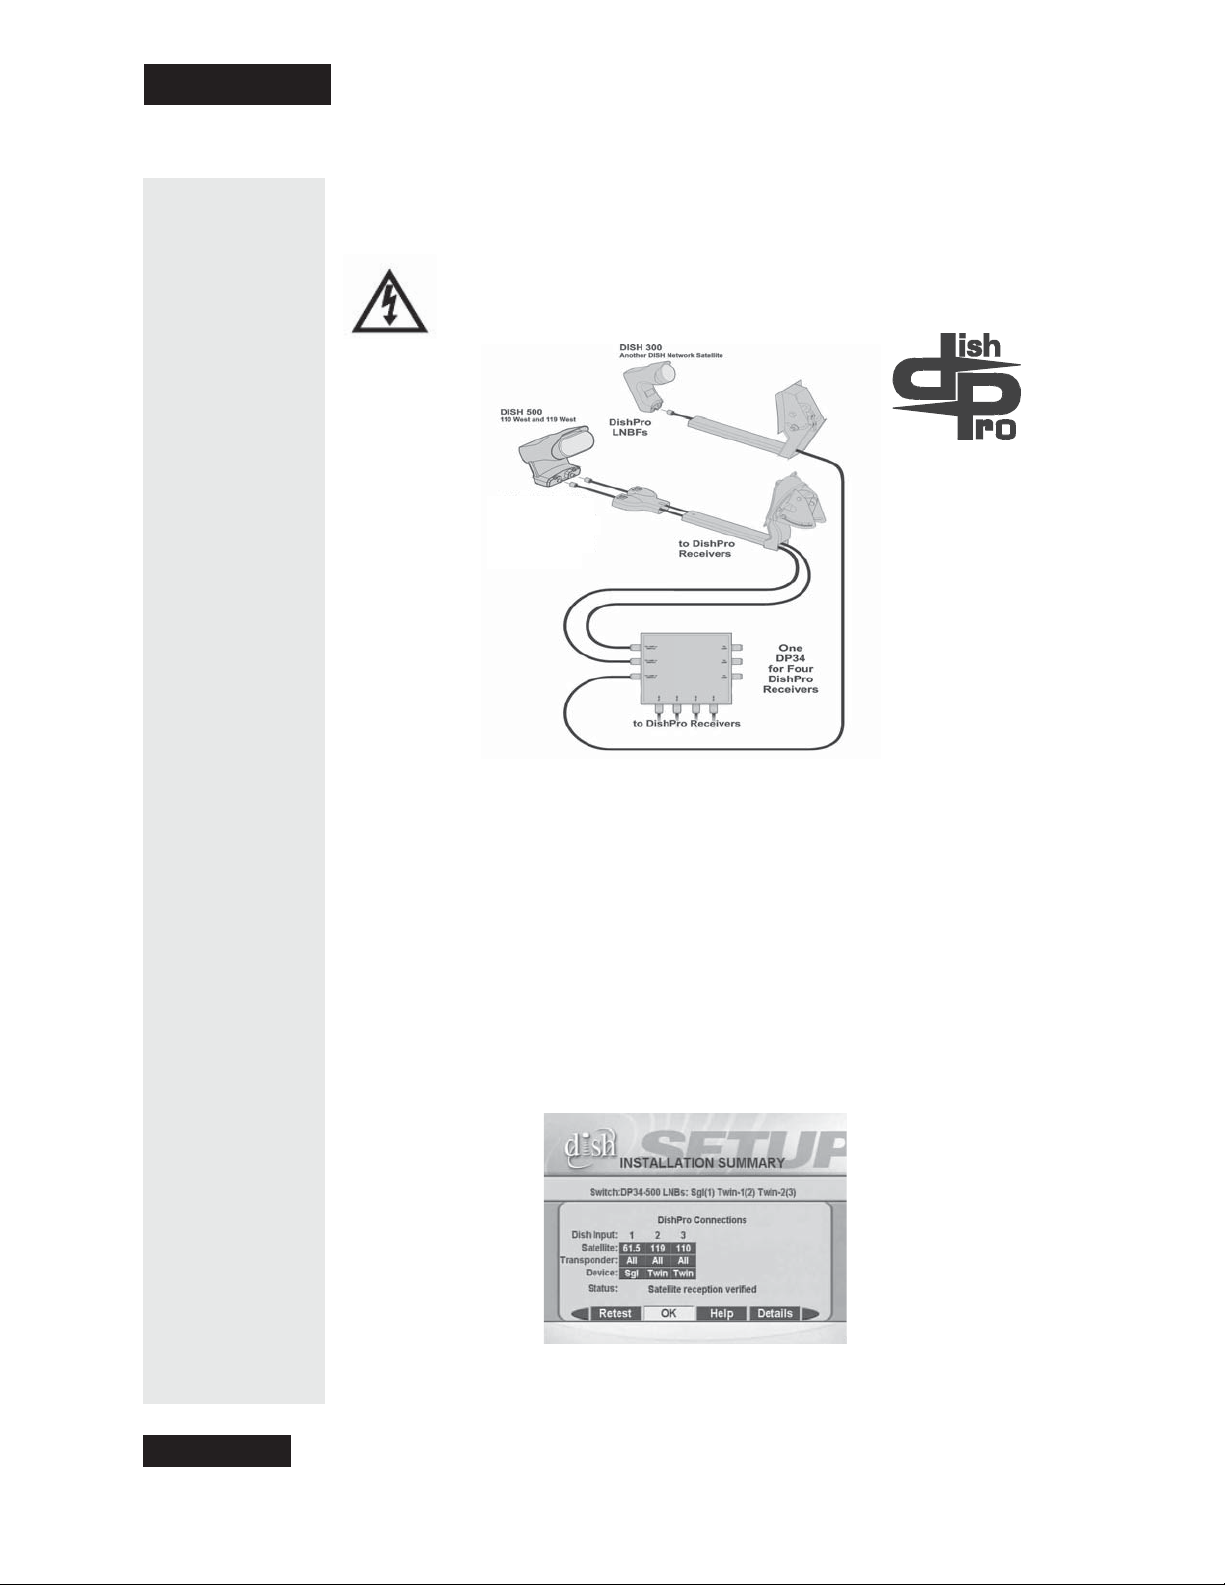
Chapter 4
Installation Instructions
DISH 500 with a DishPro Twin LNBF, One DISH 300 with a DishPro
LNBF, DP34 Switch, Four DishPro Receivers
This diagram leaves out grounding to be clear. Make sure you
ground the system per the National Electrical Code (NEC) and all
local electrical codes.
Two DP 34 s for
Eight DishPro Receivers
Three DP34s for
Twelve DishPro Receivers
When you set up your system following this diagram and run Che ck Switch
the Installation Summary screen should look similar to the one shown
below.
Page 96
 Loading...