

Page 1

SAFETY III
PORTABLE MEDIA RECORDER 1
GETTING STARTED 5
DISH NETWORK AUDIO/VIDEO 17
SECOND SOURCE AUDIO/ VID EO 23
THE PHOTO ALBUM 37
THE BROWSER 45
THE VIDEOCORDER 49
THE SCHEDULER 53
THE AUDIOCORDER 57
SYSTEM SETUP 63
TROUBLESHOOTING 71
APPENDIX A-1
ii
Table of Contents
NOTES
Page 2

iii
SAFETY
SAFETY CONVENTIONS
Throughout this user guide, there may be blocks of text indicated by symbols and printed in a
different way th an the su rro unding text. These blocks of tex t re quir e the at tent ion of the reader to
avoid hazardous situations. The hazard levels are indicated as:
BATTERY SAFETY
Your PocketDISH has a rechargeable Lithium Polymer (LiPo) battery.
This warning indicates a hazardous situation which, if not avoided, could result in serious injury.
This caution indicates a situation which, if not avoi ded, could dam age the equi pment or other prop ertie s.
This note indicates additional information to make you aware of possible problems and information of
any importance to help you to understand, to use and to maintain the PocketDISH.
The LiPo battery is a high capacity power source.
For your safety:
■ To charge the LiPo battery, only use the AC/DC adapter that came with the PocketDISH
■ Never leave the PocketDISH in a hot environment like your car. Ambient may not exceed 140F/60C.
Failing to do so can cause permanent damage to equipment and can result in serious personal injury.
Important Safety Precautions
iv
Safety
GENERAL SAFETY
1 Read and keep these instructions.
2 Heed all warnings and follow all instructions.
3 Do not use this product near water or in extreme cold.
4 Clean only with a dry cloth.
5 Do not install near any heat sources such as radiators, heat registers, stoves, or other
equipment (including amplifiers) that produce heat.
6 Protect the power cord from being walked on or pinched, particularly at plugs,
convenience receptacles, and the point where they exit from this product.
7 Use only attachments/accessories specified by the manufacturer.
8 Disconnect the AC/DC adapter from the power during lightning st or ms or when unus ed
for long periods of time.
9 To help avoid possible damage to the PocketDISH electronics, do not expose the
PocketDISH to excessive vibration or any magnetic objects, such as speakers, electric
motors, transformers, etc.
10 Refer all servicing to qualified se rvice personne l. Servicin g is required when thi s product
or its accessories have been damaged in any way, such as the power cord or plug is
damaged, liquid has been spill ed or object s have fall en into the product, the pr oduct has
been exposed to rain, or to moisture, does not operate normally, or has been dropped.
Do not expose the AC/DC ada pter to r ai n or e xc es siv e moisture to avoid t he r i s k o f s hoc k or
permanent damage.
Page 3

v
AVOID HEARING DAMAGE
SAFE USE
SAFE DISPOSAL
Your PocketDISH respects the current regulations for limiting the output volume of consumer audio
devices to a safe level while using the headset that came with the PocketDISH. Permanent damage to
your ears will occur if headphones or ear b uds are used at a high volume level. Over time you might get
used to a higher volume level that may sound normal, but the risk of permanent damage to your ears is
still present. Set the volume level of your PocketDISH to a safe level before permanent damage to your
ears has occurred. If you start to hear ringing in your ears, reduce the volume level or stop using the
headphones or ear buds.
Do not use headsets or ear buds while you drive. The use of headsets or ear buds can be disruptive or
distracting when you have to pay attention. Therefore the use of headsets or ear buds is not
recommended while you drive or even if you are just a pedestrian. Please note that in some areas the
use of headsets or ear buds is considered to be illegal.
Your PocketDISH has a rechargeable Lithium Polymer (LiPo) battery. Dispose of the PocketDISH and
it’s batteries in accordance with local regulations. Make sure the LiPo battery is fully discharged before
disposal to avoid the possibility of a short-induced fire after disposal.
vi
Safety
NOTES
Page 4

1
PORTABLE MEDIA RECORDER
This chapter gives you an overview and a description of your Portable Media
Recorder.
•OVERVIEW
•CONTROLS AND INDICATORS
•CONNECTORS - POCKETDISH
•C
ONNECTORS - DOCKING STATION
Portable Media Recorde r
About Your PocketDISH
2
Chapter 1
OVERVIEW
Features include the fo llowing :
■ Video Recorder & Player:
DISH Network content,
WMV and MPEG-4.
■ Music Recorder & Player:
DISH Network content,
MP3, WMA, WAV.
■ Photo Viewer/Slideshow:
JPG, JPEG, BMP.
■ Scheduler:
to set your timers for
scheduled recording.
■ Games Console:
Mophun 2D/3D Games;
■ Built-in Help:
Additional on-screen
information.
■ Browser:
USB Mass Storage Device
for any file type.
Page 5

3
Portable Media Recorder
CONTROLS AND INDICATORS
1
ON: shows that the PocketDISH is turned on.
2
HDD: shows that the hard drive is active.
3
CHG: a solid light shows that the PocketDISH is connected to the battery charger. If charging is
complete the light flashes.
4
TV OUT: shows that the screen content is displayed on a TV.
5
ON: turns on the PocketDISH.
Play: start s the playback of a selection.
Enter: acknowledges a selection.
6
OFF: shuts down the PocketDI SH.
Sto p: stops the playback of a sel e ction.
Escape: quits a selec ti on without saving.
Exit: exits a game.
7
Upper, Center and Bottom Setup keys: to open and navigate through the Setup menus, sub menus and options to personalize your settings. The upper and bottom Setup key are also used
as Game Control key.
8
Remote control eye: recei ves the commands from the remote control unit.
9 Page Down: moves the curs or do wn one page (Disabled during Games).
10
: moves the cursor left or right.
Previous, Next: makes a selection, advances or reverses quickly through a file.
: moves the cursor up or down or increases/decreases the volume (+/-).
11 Page Up: moves the cursor up one page (Disabled during Games).
12
Speak er: reproduces the audio.
13
TV/LCD key: switches bet ween the PocketDISH screen or a TV.
14
Speak er: reproduces the audio.
4
Chapter 1
CONNECTORS - POCKETDISH
C
ONNECTORS - DOCKING STATION
The USB Host and Device connector type s used on the PocketDISH are: USB Mini Type A (USB-A) and
USB Mini Type B (USB-B).
Power (DC IN): connect to the AC/DC power ad apter t hat came wi th the Pock etD ISH.
USB-A (Host): connect USB (mass storage device) compatible equipment, like a
camcorder, digital photo camera or a USB stick.
Headphone (center jack): connect to the ear buds that came with the PocketDISH.
Multi-connection: connect the multi-connector from the docking station for use with
other multimedia devices.
USB-B (Device): connect to a DISH Player-DVR satellite receiver or computer.
Power (DC IN): connect to the AC/DC power ad apter t hat came wi th the Pock etD ISH.
Video: record the video only from a TV. For recording audio, also connect the analog
AV-cable to the AV in connector.
AV out: send the audio and video from the PocketDISH to a TV.
AV in: record audio and video from a TV or audio device onto the PocketDISH.
Page 6

5
GETTING STARTED
Use this information to get started and connect your PocketDISH to other devices.
•UNPACK THE POCKETDISH
•F
IRST TIME USE
•BASIC OPERATION
•CONNECT A DISH PLAYER-DVR SATELLITE RECEIVER
•CONNECT A COMPUTER
•CONNECT A TV
•C
ONNECT AN AUDIO DEVICE
•CONNECT THE DOCKING STATION
•CONNECT A USB MASS STORAGE DEVICE
•MAIN MENU STRUCTURE
•THE REMOTE CONTROL UNIT (RCU)
Getting Started
Connections and Setup
6
Chapter 2
UNPACK THE POCKETDISH
Carefully unpac k the contents of the box and confirm that all the parts are included. Examine all
parts for damage that may have occurred during shipment. If you find any damage, stop
unpacking the box and contact the store where you bought the PocketDISH.
Keep the plastic packaging away from children . The plastic packaging may cling to the nose and mouth
and cause suffocation.
Keep the packaging materials for a period of time. In case of warranty claims, return the PocketDISH in
the original packaging to protect the electronics. Failing to do so might void the warranty.
CONTENTS OF THE BOX
1 PocketDISH
2 Stereo ear buds
3 Analog AV (audio/video) cable
red = right (R), white = left (L), yellow = video
4 Docking station
5 AC/DC adapter
6 USB cable
7 USB adapter cable
8 Documentation (not sho wn)
9 Remote Control with batteries (not shown)
10 Travel case (not shown)
Page 7

7
Getting Started
FIRST TIME USE
Your PocketDISH has a rechargeable LiPo ba ttery. Before first use , charg e t he batte ry accor ding
the given instructions.
The LiPo battery is a high capacity p ower source. Do not use another batte ry charger or AC/DC adapt er.
For your safety, charge the LiPo battery only with the AC/DC adapter that came with the PocketDISH.
Failing to do so can cause permanent damage to equipment and can result in serious personal injury.
1 On the PocketDISH, install the DC plug into the
DC IN socket.
2 On the AC/DC adapter, flip down the pins.
3 Insert the AC plug into a 110Vac/60Hz wall
socket (power).
4 On the PocketDISH, note that the CHG indicator
comes on.
5 Wait until the CHG indicator starts to flash.
This can take up to 4 hours. Now the battery is
charged and the PocketDISH is ready for use.
6 Remove the AC plug from the 110Vac/60Hz
wall socket.
7 Remove the DC plug from the DC IN socket.
8
Chapter 2
BASIC OPERATION
The PocketDISH has a battery saver which shuts down the display or the entire PocketDISH after a
certain period of time. You can change these settings in the Setup - Power menu. Note that any change
will influence battery power life span.
ON
1 Press the ON key for at least four seconds.
2 The ON indicator comes on.
3 Allow the PocketDISH time for the desktop
to display.
4 If the PocketDISH does not start up or
shuts down immediately, use the AC/DC
adapter to power the PocketDISH and
charge the battery.
OFF
1 Press the OFF key for at least four seconds.
2 The shut down screen displays.
3 Allow the PocketDISH time to shut down.
4 Connect the AC/DC adapter as described
to make sure that the battery stay s charged
and ready for use.
BASIC NAVIGATION
1 Use the keys to navigate.
2 P ress ON to access a feature.
3 Press OFF to exit a feature.
POWER SETTINGS - BATTERY SAVING
1 P ress the upper Set up key to open the
Setup menus.
2 Use the upper and bottom Setup key to
select the Display setup screen option.
3 Press the center S et up key and use th e
keys to select the Power icon and
press ON.
4 Use the keys to navigate through the
Battery and DC-power operation settings
for Power Off, Standby, Backlight Off and
Hard Drive.
5 Use the keys to change the setting.
6 Press OFF to activate the settings and exit
the menu.
Page 8

9
Getting Started
CONNECT A DISH PLAYER-DVR SATELLITE RECEIVER
When connected to an external device, the PocketDISH uses more power than normal. Therefore
connect the PocketDISH to power to prevent an unwanted shutdown.
1 Connect the PocketDISH to power.
2 Turn the receiver and the PocketDISH on.
3 On the receiver, locate the USB port and
connect the USB cable.
4 On the PocketDISH, locate the USB-B port
and connect the USB cable.
5 On the receiver, the USB connection pop-up
displays.
6 On the PocketDISH, the "USB cable attached"
pop-up displays. The PocketDISH keys are
temporarily disabled.
7 Now you can transfer the selected files from
the receiver to the PocketDISH or manage the
content on the PocketDISH via the receiver.
8 Using the DISH Network remote control unit:
a Select Add and press the SELECT key i f you
want to transfer D ISH Netwo rk conten t to th e
PocketDISH.
b Select Manage and press the SELECT key if
you want to view or delete content on the
PocketDISH.
10
Chapter 2
CONNECT A COMPUTER
When connected to an external device, the PocketDISH uses more power than normal. Therefore,
connect the PocketDISH to power to prevent an unwanted shutdown.
The PocketDISH is compatible with Windows ME/2000/XP and Mac OS 10.2.4 or higher. Note that on
some Windows versions the PocketDISH displays in the Windows Explorer as a Removable Disk.
1 Connect the PocketDISH to power.
2 Turn the computer and the PocketDISH on.
3 On the comput er:
a Close all programs.
b Locate the USB port and connect the USB cable.
4 On the PocketDISH:
a L ocate the USB-B p ort and con nect the US B cable.
b Now the "USB cable attached" pop-up displays.
c The PocketDISH keys are temporarily disabled.
WINDOWS PC
5 Open Windows Explorer and locate the PocketDISH
drive.
6 Double click the PocketDISH drive to get full access
to its hard drive as if you are working on your PC.
MAC
5 On the desktop, locate the PocketDISH icon.
6 Double click the PocketDISH icon to get full access to
its hard drive as if you are working on your Mac.
Page 9

11
Getting Started
CONNECT A TV
When connected to an external device, the PocketDISH uses more power than normal. Therefore,
connect the PocketDISH to power to prevent an unwanted shutdown.
1 Connect the PocketDISH to power.
2 Turn the PocketDISH on.
PLAYBACK
3 Install the analog AV-cable directly in the AV
connection (center jack) of the PocketDISH.
4 On your TV, locate the red (R), white (L) and
yellow (video) RCA connectors (Out).
5 Connect the RCA connectors of the analog
AV cable, and match the colors with the
applicable connectors on your TV.
6 Press the TV/LCD key for at least three seconds
to toggle between LCD and TV. When TV is
selected, the TV OUT indicator comes on.
RECORDING (VIDEOCORDER, SCHEDULER)
For detailed instructions, pl ease refer to Getting
Started - Connect the Docking Station on page 13.
12
Chapter 2
CONNECT AN AUDIO DEVICE
When connected to an external device, the PocketDISH uses more power than normal. Therefore,
connect the PocketDISH to power to prevent an unwanted shutdown.
1 Connect the PocketDISH to power.
2 Turn the PocketDISH on.
PLAYBACK
3 Install the analog AV-cable directly in the AV
connection (center jack) of the PocketDISH.
4 On your audio device, locate the red (R) and
white (L) RCA connectors (Out).
5 Connect the RCA connectors of the analog
AV cable, and match the colors with the
applicable connectors on your audio device.
6 Do not install the yellow (video) connector.
RECORDING (AUDIOCORDER, SCHEDULER)
For detailed instructions, please refer to Getting
Started - Connect the Docking Station on page 13.
Page 10

13
Getting Started
CONNECT THE DOCKING STATION
When connected to an external device, the PocketDISH uses more energy than normal. Therefore
always connect the PocketDISH to the power to prevent an unwanted shutdown.
If you want to record from the S-VHS connection (Video), please note that this connection operates as a
video in connection only. Do not forget to connect the analog AV cable for the audio as well.
1 Connect the PocketDISH to the docking station.
3 Connect the analog AV cable to the docking
station (AV in).
4 Connect the docking station (DC in) to power.
5 Turn the PocketDISH ON.
RECORDING (AUDIOCORDER, SCHEDULER)
6 On your audio device, locate the red (R) and
white (L) RCA connectors (Out).
7 Connect the RCA connectors of the analog
AV cable, and match the colors with the applicable
connectors on your audio device.
8 Do not install the yellow (video) connector.
RECORDING (VIDEOCORDER, SCHEDULER)
6 On your video device, locate the red (R), white
(L) and yellow (video) RCA connectors (Out).
7 Connect the RCA connectors of the analog
AV cable, and match the colors with the
applicable connectors on your
video device
.
14
Chapter 2
CONNECT A USB MASS STORAGE DEVICE
A USB mass storage device, is a digital multimedia device that can communicate with another multimedia
device. For example, connecting to a computer without the need to install additional software.
Consult the user’s guide that c ame wi th your USB stick, MP3 player, digital photo or video came ra if it is
compliant with the USB mass storage device protocol. If yes, the PocketDISH can get the files from it.
1 Connect the PocketDISH to power.
2 Turn the PocketDISH and the USB device on.
3 Connect the USB adapter cable to the USB
cable.
4 On the USB device, locate the USB port and
connect the USB cable.
5 On the PocketDISH, locate the USB-A port
and connect the USB adapter cable.
6 Allow the two devices time to recognize each
other.
7 On the PocketDISH:
a The "USB device connected - Please wait ..."
pop-up displays.
b Wait until the browser screen displays.
c Now you can transfer files from the USB
device to the PocketDISH .
Page 11

15
Getting Started
MAIN MENU STRUCTURE
The operation of your PocketDISH is done via selection and installation menus. The options are
shown on the desktop (which appears directly after power up), are:
Some menus have sub-menus which may be displayed at the right side of your screen. With the Setup keys,
depending on the menu, you can lock and unlock the keys, access additional file info, delete or rename a
file, hide/show thumbnails, start a recording manually or create another folder to organize your files.
Video: access the folder that holds
the video files.
Scheduler: access the scheduler
from where you can set your timers.
Music: access the ARCLibrary that
holds the folders for the audio files.
AudioCorder: access the audio
recorder.
Photo: access the folder that holds
the digital photos and images.
Help: access the on-screen help.
Browser: access to display all folders
and playlists on the hard drive.
Setup: access the setup menu to
personalize the system settings. You
can modify the Display, Appearance,
Sound, PlayMode, Clock, Power,
Rating locks and System se ttings.
Games: access the game console.
Resume: continue from the last
played audio or video file.
Built-in speaker on/off: toggles
between speaker (off) and headset
(on).
VideoCorder: access the video
recorder.
Lock keyboard:
locks or unlocks the
keys for use. The
keys still
function to set the volume.
16
Chapter 2
THE REMOTE CONTROL UNIT (RCU):
RCU Function RCU AV700E
Standby/ON: when on AC power, set the PocketDISH on or in
standby.
OFF: when on battery power, shut down the PocketDISH.
Number keys: enter numerical data. 0..9
TV:
switches between the PocketDISH screen or a TV.
Play: starts the playback of a selection.
Enter: acknowledges a selection.
Page Up: moves the cursor up one page.
: to move the cursor Left, Right, Up or Down.
Page Down: moves the cursor down one page.
Stop: stops the playback of a selection.
Escape: quits a selection without saving.
Upper, Center and Bottom Setup keys: to open and navigate
through the Setup screens.
TV:
not used.
?: opens the Setup menu.
Volume +/-: increase s or decre a se s the sou nd lev el.
Volume Mute: shuts down the sound temporarily.
Page 12

17
DISH NETWORK AUDIO/VIDEO
This chapter helps you learn how to transfer and playback DISH Network audio and
video recordings.
•INTRODUCTION
•SEND MY RECORDINGS FROM THE DISH NETWORK RECEIVER
•PLAYBACK THE DISH NETWORK RECORDINGS
•ADDITIONAL FEATURES
DISH Network Audio/Video
Transfer and Playback
18
Chapter 3
INTRODUCTION
It is possible to transfer your recorded programs from your compatible DISH Network receiver
onto the PocketDISH when connected with the USB cable. Please note that recorded content
from the DISH Network audio will also appear in the Video folder of the PocketDISH.
After you connect the PocketDISH to your compatible receiver, a pop-up message displays that
asks you what you want to do: Manage or Add the PocketDISH content.
If you select and confirm the Manage option, you can access the Video, Music and Photo folder
on the PocketDISH.
If you select and c onfir m the Add option, you c an ac cess the " My Re cordin gs" list of the re ceiv er,
which is where you can send files to the PocketDISH.
When connected, you can acce ss the PocketD ISH co nten t from t he recei ver’s Mult imedi a optio n
in the Main Menu.
For the recordings available in the "My Recordings" list of the receiver, it is only possible to transfer
content from this list to the PocketDISH, and not vice-versa.
Page 13

19
DISH Network Audio/Video
SEND MY RECORDINGS FROM THE DISH NETWORK RECEIVER
1 Use the USB cable to connect the PocketDISH to the receiver.
2 On the receiver’s PocketDISH pop-up, select Add. The "My Recordings" list displays.
3 On the receiver’s remote control, use UP and DOWN ARROW and SELECT to select the
recordings that you want to transfer. Before each selected event, a mark in the check box
displays.
4 Press RIGHT ARROW to Select Send Video and press SELECT. On the TV, the
"Transferring PocketDISH Events" pop-up displays.
5 Allow the receiver time to transfer the selected recordings until DONE displays.
6 On the remote control, press SELECT.
CONNECT THE POCKETDISH SELECT RECORDINGS EVENT TRANSFER IS COMPLETED
20
Chapter 3
PLAYBACK THE TRANSFERRED DISH NETWORK RECORDINGS
BASIC OPERATION
The PocketDISH always remembers where you sto pped the las t file for playb ack. On the desktop , select
Resume to start playback from that point forwards.
1 Turn the PocketDISH on.
2 Allow the PocketDISH time for the desktop to display.
3 Select the Video icon (also used for playback of DISH Network audio recordings).
4 Press ON to view the folder content.
5 Select the DISH Network folder and press ON to view the video files.
6 Select the desired video file.
7 Press ON to playback the DISH Network video or audio file.
8 Press OFF to end playback.
SELECT DISH NETWORK SELECT YOUR FILES ADDITIONAL OPTIONS
Page 14

21
DISH Network Audio/Video
ADDITIONAL FEATURES
WHEN VIEWING THE VIDEO FOLDER WHEN VIEWING THE VIDEO FILE
■ Info: displays additional information. ■ Info: to show additional information.
■ Folder management: accesses the
folder options (if available).
■ File management: accesses the file
options (if available).
- Create: makes a new folder. - Delete file: deletes the file.
- Delete: deletes the folder and
its content.
- Rename file: renames the file.
- Rename: renames the folder. - Create Folder:
makes a new folder.
■
Hide thumbnails: displa y only
the folder and file names.
■ Show thumbnails: display
the available thumbnails.
■
Hide thumbnails: disp lay only
the folder and file names.
■ Show thumbnails: display the
available thumbnails.
■ Reset thumbna ils : d el et e the cu rrent
thumbnails and replace them with
new ones.
■ Reset thumbnails: delete the current
thumbnails and replace them wit h new
ones;
■ Built-in speaker on/off:
toggles between speaker
(off) and headset (on).
■ Built-in speaker o n/off: toggles
between speaker (off ) and
headset (on).
■ VideoCorder: access the
VideoCorder menu.
■ VideoCorder: access the VideoCorder
menu.
22
Chapter 3
SPECIAL KEY FUNCTIONS
WHEN VIEWING THE VIDEO
■ Video settings: access the PlayMode (Single, Folder, All), Sound (Bass Boost,
Bass, Treble, Balance) and LCD (LCD Brightness, Video OSD) settings.
■ Built-in speaker on, Built -i n speaker off,: toggl e s between speaker (off) and
headset (on).
■ Video speed: set Normal speed (default) or slow motion (1/2, 1/4 or 1/8). Notice
that the sound is muted during playback in slow motion.
■ Video format: set Auto (Best playback size with respect to source), Maximized
image (scaled playback with respect to source, some clipping might occur), Full
picture format (playback in original size, no clipping or scaling).
■ Set bookmark: set a bookmark manually. You can always start future playback
from this point forward.
■ Save frame as thumbnail: save t he current scene as a thumbnail for presentation
in the video browser.
■
Hide text overlay: remove the on- screen menu tempo rarily . Dep ending on the Vi deo
settings, the on-screen menu can disappear automatically after a period of time.
ON key:
■ Pause: pauses the playback.
■ Play: continues from pause.
keys:
■ Fast Forward: advance
quickly through a file.
■ Fast reverse: reverse quickly
through a file.
keys:
■ V o lume: increases or
decreases the volume.
Page 15

23
SECOND SOURCE AUDIO/VIDEO
This chapter gives you the proced ure how to trans fer audio or vide o files from dif ferent
multimedia devices and play them back on the PocketDISH.
•INTRODUCTION
•INTERNET LINKS
•TRANSFER AUDIO/VIDEO FILES
•PLAYBACK A COMPATIBLE VIDEO FILE
•ADDITIONAL FEATURES
•PLAYBACK A COMPATIBLE SONG
•CREATE PLAYLISTS
•PLAYBACK PLAYLISTS
•INSTALL THE MPEG-4 TRANSLATOR
Second Source Audio/Video
Transfer and Playback
24
Chapter 4
INTRODUCTION
With your PocketDISH you can transfer video files from your computer, your camcorder, USB
stick or any other multimedia device which operates as a USB mass storage device.
The PocketDISH cannot handle all video formats, but the MPEG-2 and the DivX/XviD simple
profile MPEG-4 format are supported. If you encounter a format that is not supported, it is
possible to convert the file into a format that the PocketDISH will playback.
On the hard drive of the Poc ketDISH y ou wil l find a set of P C tools ( MPEG-4 Translator) that you
can use to convert video files into a playable format. You have to transfer the folder onto your
computer, from where you can install the conversion tools.
Detailed instructions are given in the next chapter.
INTERNET LINKS
In addition to the playback of DISH Network content, the PocketDISH can also playback DivX/XviD
simple profile MPEG-4
encoded video files from other sources.
www.archos.com To buy your games and to get more information about your
PocketDISH and it’s available accessories.
www.apple.com Get more information for iTunes and Mac compatibility.
www.divx.com Get more information about the DivX video compression/downloads.
www.xvid.org Get more information about the XviD video compression/downloads.
www.virtualdub.com Get more information about VirtualDub video conversion/downloads.
www.free-codecs.com Get the latest compression/decompression (codecs) plug-ins.
www.digit al-digest.com Get the latest infor ma tion ab out d igit a l aud io and v ide o dev elo pment s .
Page 16
25
Second Source Audio/Video
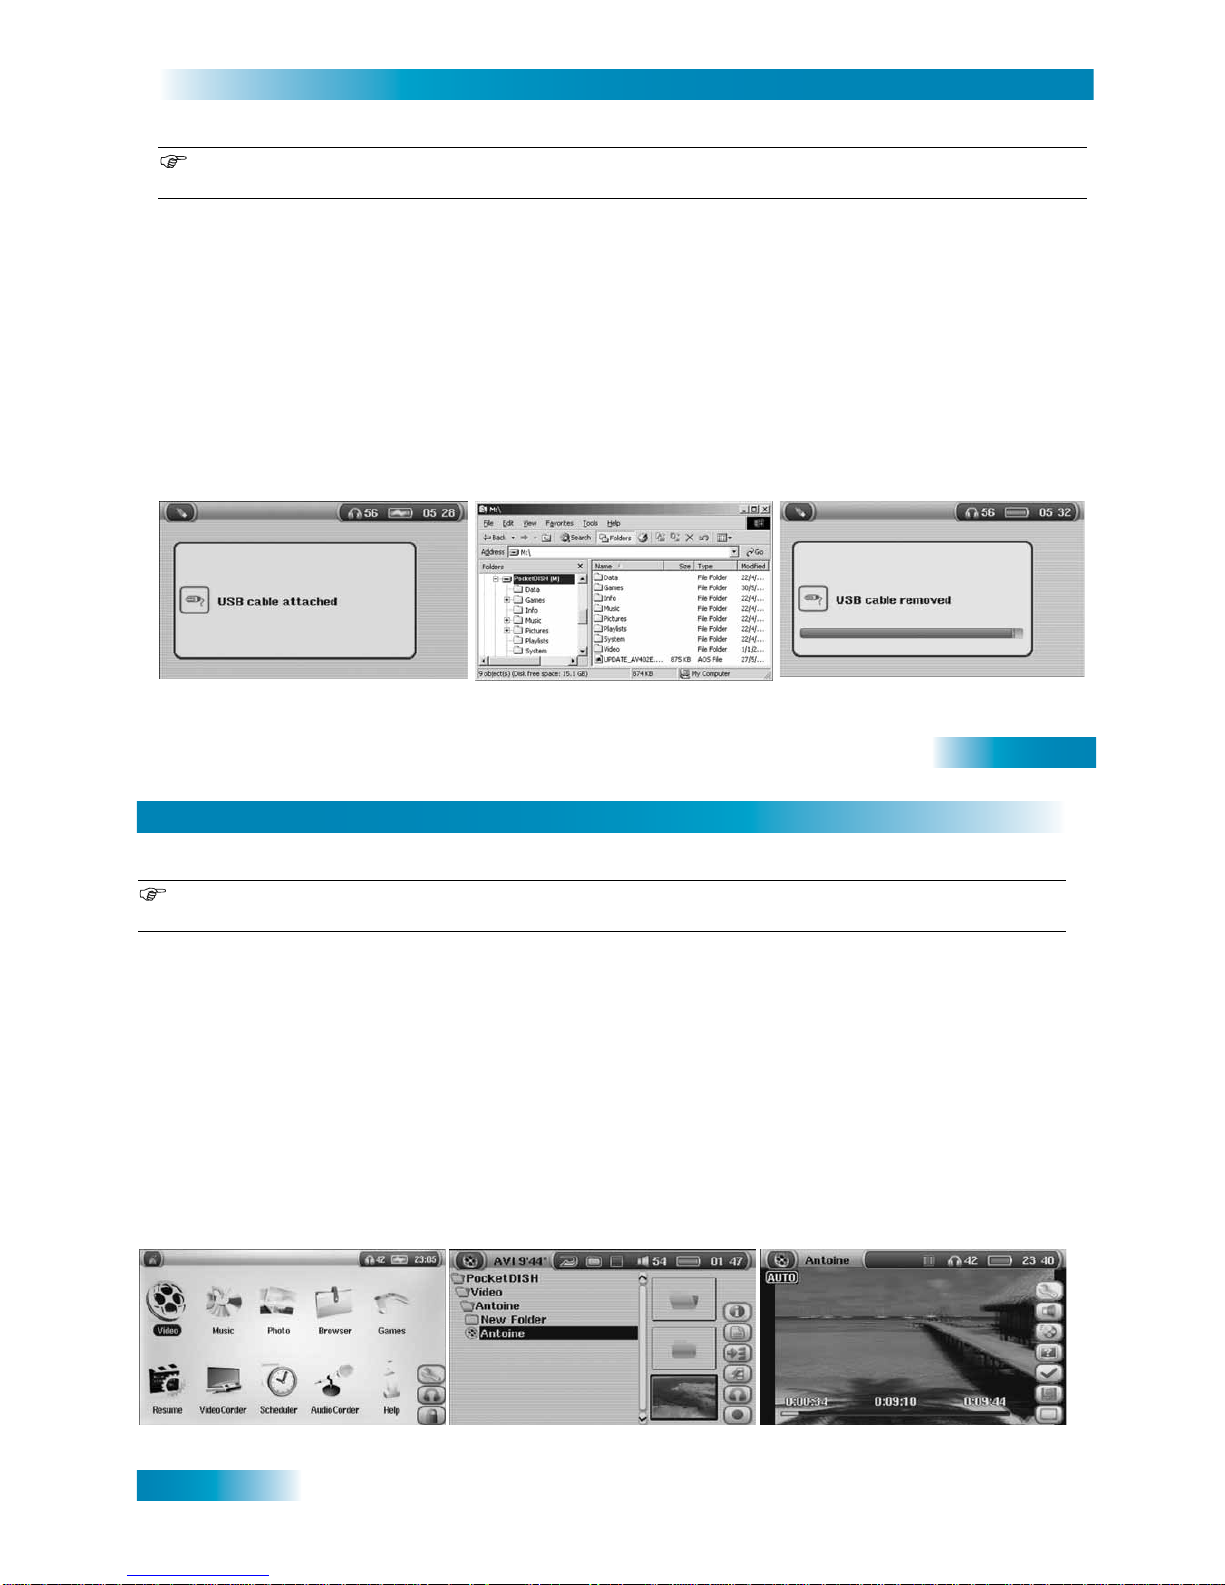
TRANSFER AUDIO/VIDEO FILES
Note that the PocketDISH can display on your computer under different names. Possible names are
PocketDISH or Removable Disk.
1 Onto your PC, shut down all programs before you start.
2 Use the USB cable to connect the PocketDISH to the PC.
3 Turn the PocketDISH on. Wait until the USB pop-up displays.
4 Your PC should recognize the PocketDISH.
5 Open Windows Explorer and notice that the PocketDISH displays as a drive.
6 Locate the folder in which you keep the Audio and Video files which you want to transfer.
7 J ust copy the desired files into the correct folder s on the PocketDISH.
8 I n the PC system tray (next to the clock), locate and click the "Safely remove Hardware" icon.
9 Disconnect the PocketDISH and wait until the automatic file update is completed.
POCKETDISH CONNECTED TRANSFER YOUR FILES (FOLDERS)SAVE DISCONNECT
26
Chapter 4
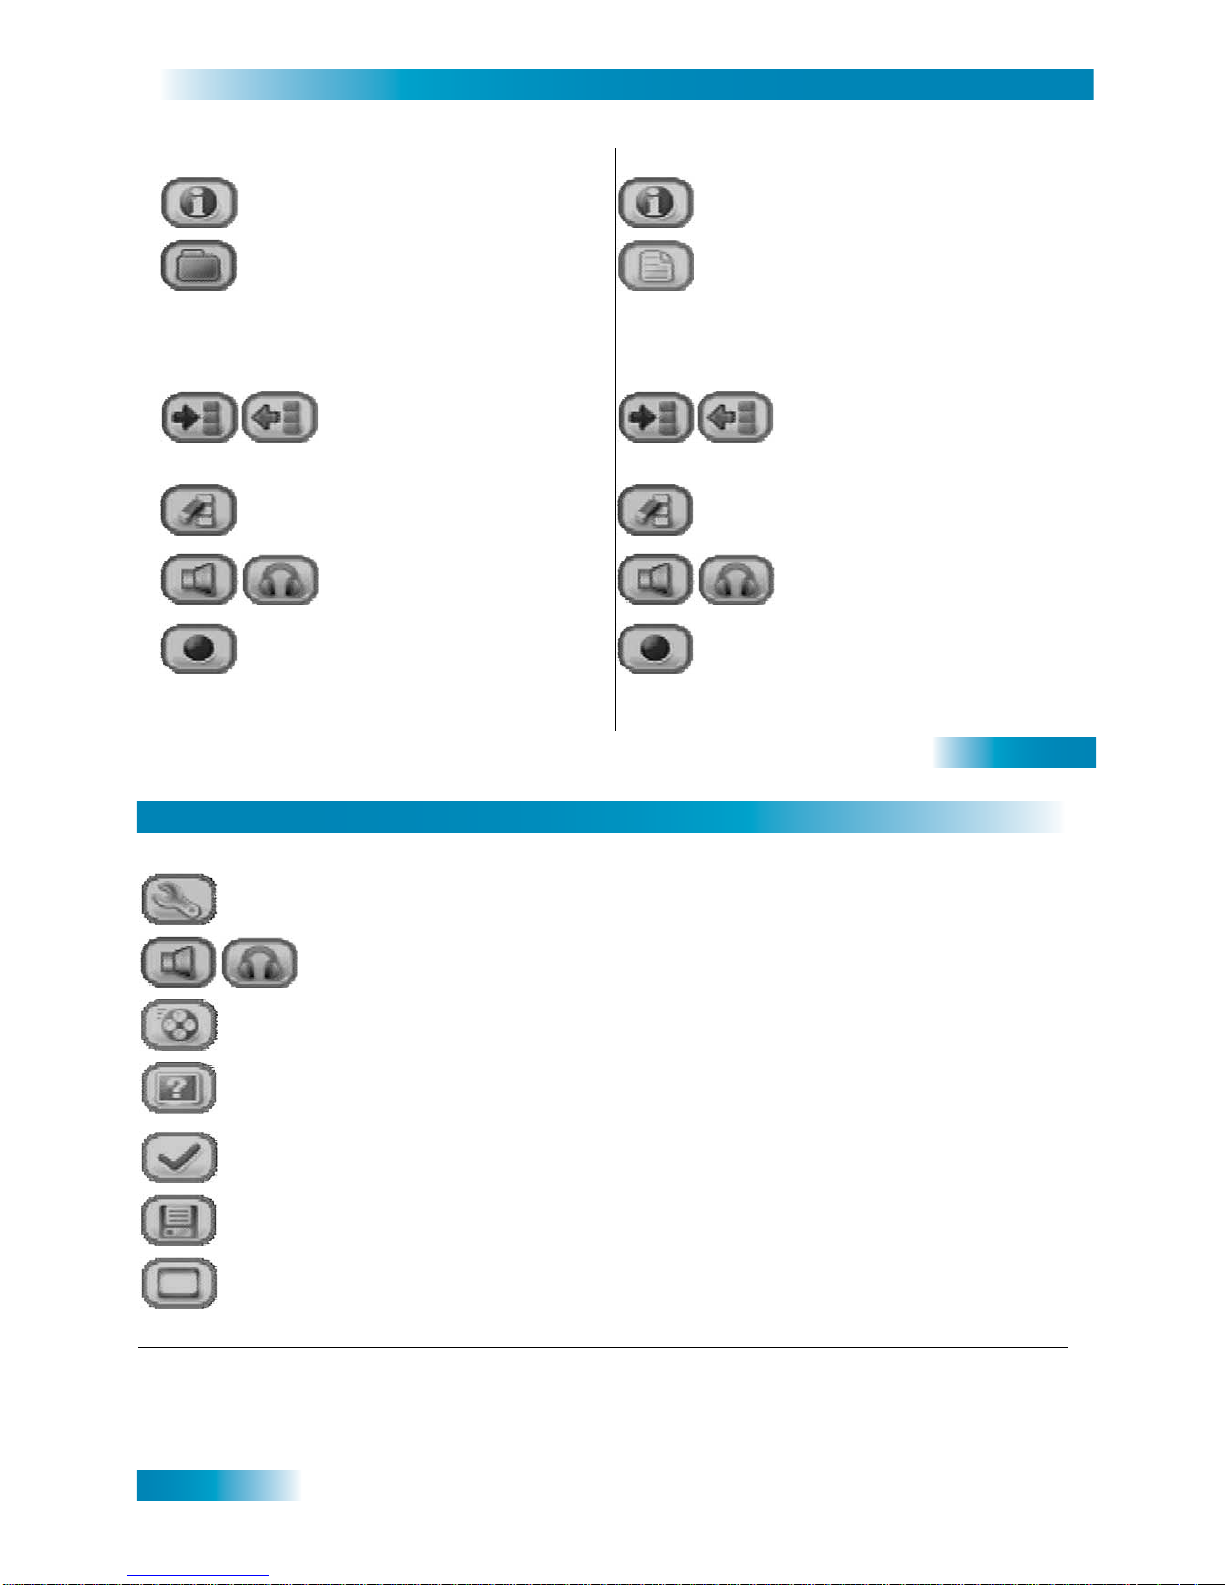
PLAYBACK A COMPATIBLE VIDEO FILE
BASIC OPERATION
The PocketDISH always remembers where you sto pped the las t file for playb ack. On the desktop , select
Resume to start the playback from that point forward.
1 Turn the PocketDISH on.
2 Allow the PocketDISH time for the desktop to display.
3 Select the Video icon.
4 Press ON to access the content.
5 Select the desired video file.
6 Press ON to playback the video file.
7 Press OFF to end playback.
SELECT VIDEO SELECT YOUR FILES (FOLDER) PLAYBACK YOUR VIDEO
Page 17
27
Second Source Audio/Video
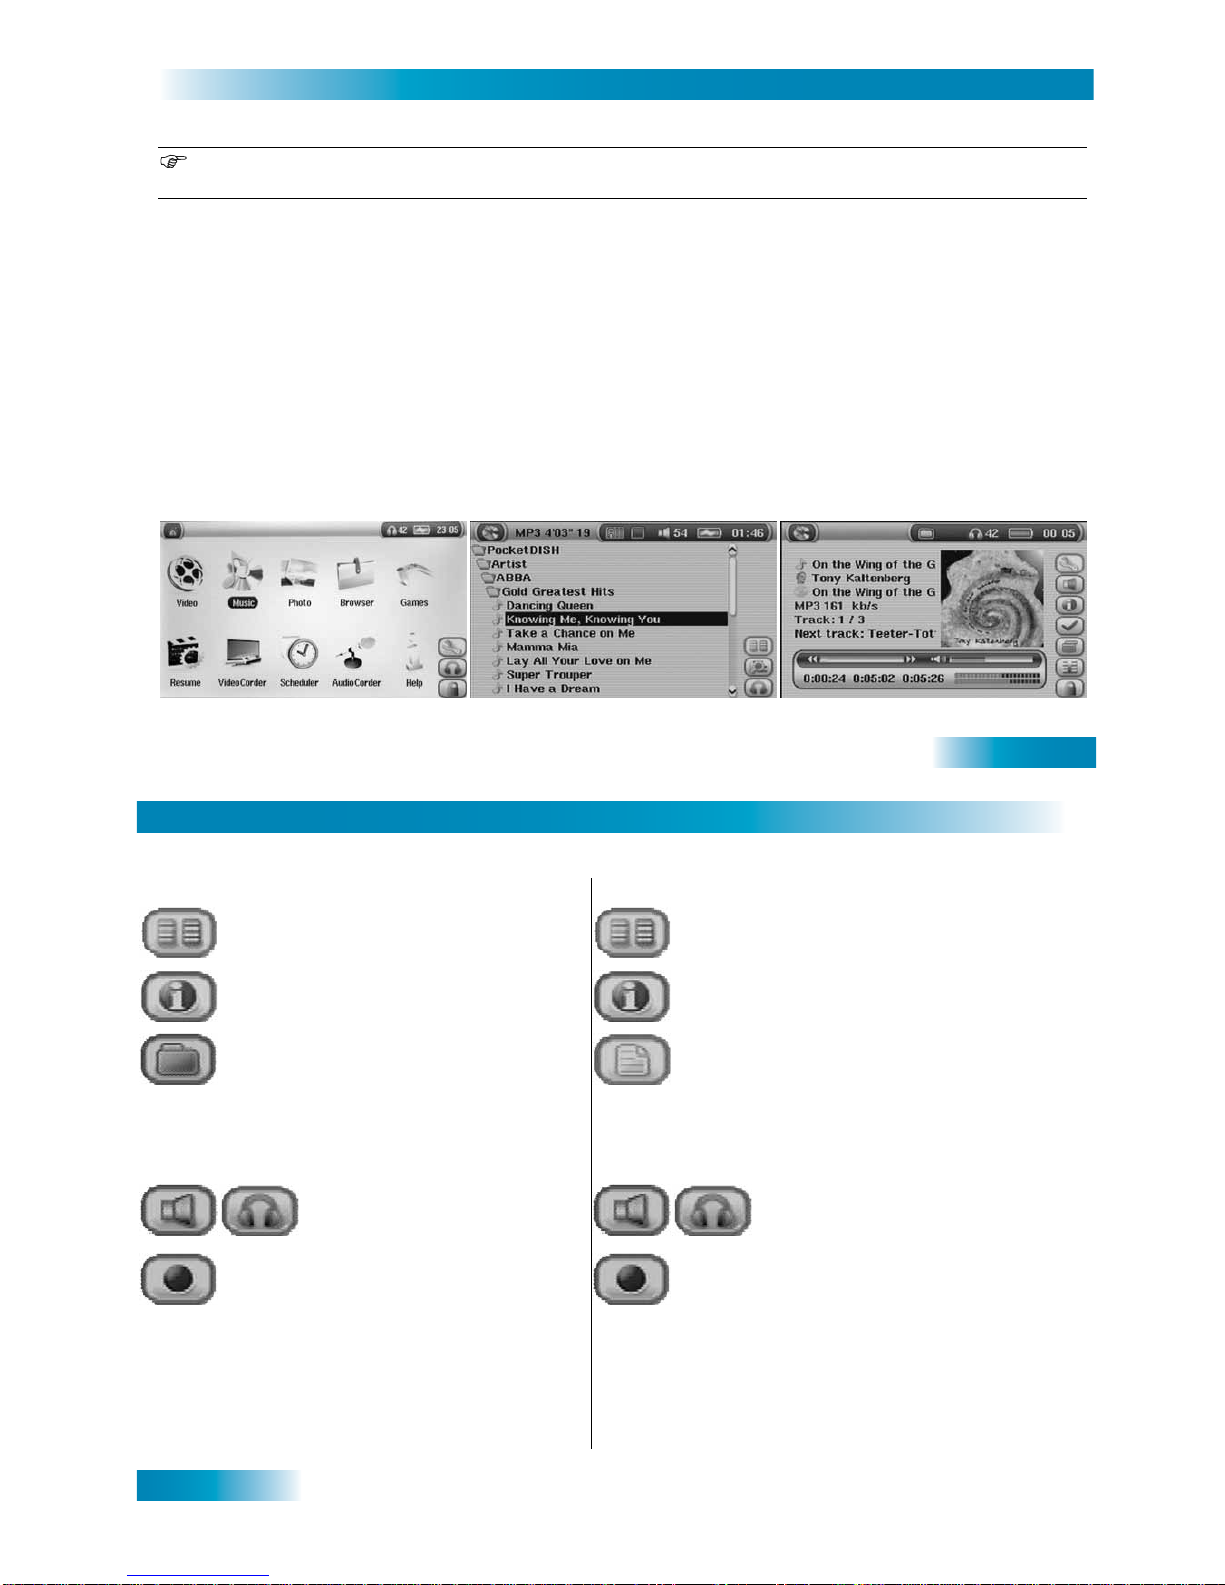
Additional Features
WHEN VIEWING THE VIDEO FOLDER WHEN VIEWING THE VIDEO FILE
■ Info: displays additional information. ■ Info: displays additional information.
■ Folder management: accesses the
folder options (if available).
■ File management: accesses the file
options (if available).
- Create: makes a new folder. - Delete file: deletes the file.
- Delete: deletes the folder and
its content.
- Rename file: renames the file.
- Rename: renames the folder. - Create Folder:
makes a new folder.
■
Hide thumbnails: displa y only
the folder and file names.
■ Show thumbnails: display
the available thumbnails.
■
Hide thumbnails: disp lay only
the folder and file names.
■ Show thumbnails: display the
available thumbnails.
■ Reset thumbna ils : d el et e the cu rrent
thumbnails and replace them with
new ones.
■ Reset thumbnails: delete the current
thumbnails and replace them wit h new
ones.
■ Built-in speaker on/off:
toggles between speaker
(off) and headset (on).
■ Built-in speaker on/off: toggles
between speaker (off ) and
headset (on).
■ VideoCorder: access the
VideoCorder menu.
■ VideoCorder: access the VideoCorder
menu.
28
Chapter 4
SPECIAL KEY FUNCTIONS
WHEN VIEWING THE VIDEO
■ Video settings: access the PlayMode (Single, Folder, All), Sound (Bass Boost,
Bass, Treble, Balance) and LCD (LCD Brightness, Video OSD) settings.
■ Built-in speaker on, Built-i n speaker off: toggles between speaker (off) and
headset (on).
■ Video speed: set Normal speed (default) or slow motion (1/2, 1/4 or 1/8). Notice
that the sound is muted during playback in slow motion.
■ Video format: set Auto (Best playback size with respect to source), Maximized
image (scaled playback with respect to source, some clipping might occur), Full
picture format (playback in original size, no clipping or scaling).
■ Set bookmark: set a bookmark manually. You can always start future playback
from this point forward.
■ Save frame as thumbnail: save t he current scene as a thumbnail for presentation
in the video browser.
■
Hide text overlay: remove the on- screen menu tempo rarily . Dep ending on the Vi deo
settings, the on-screen menu can disappear automatically after a period of time.
ON key:
■ Pause: pauses the playback.
■ Play: continues from pause.
keys:
■ Fast Forward: advance
quickly through a file.
■ Fast reverse: reverse quickly
through a file.
keys:
■ V o lume: increases or
decreases the volume.
Page 18
29
Second Source Audio/Video
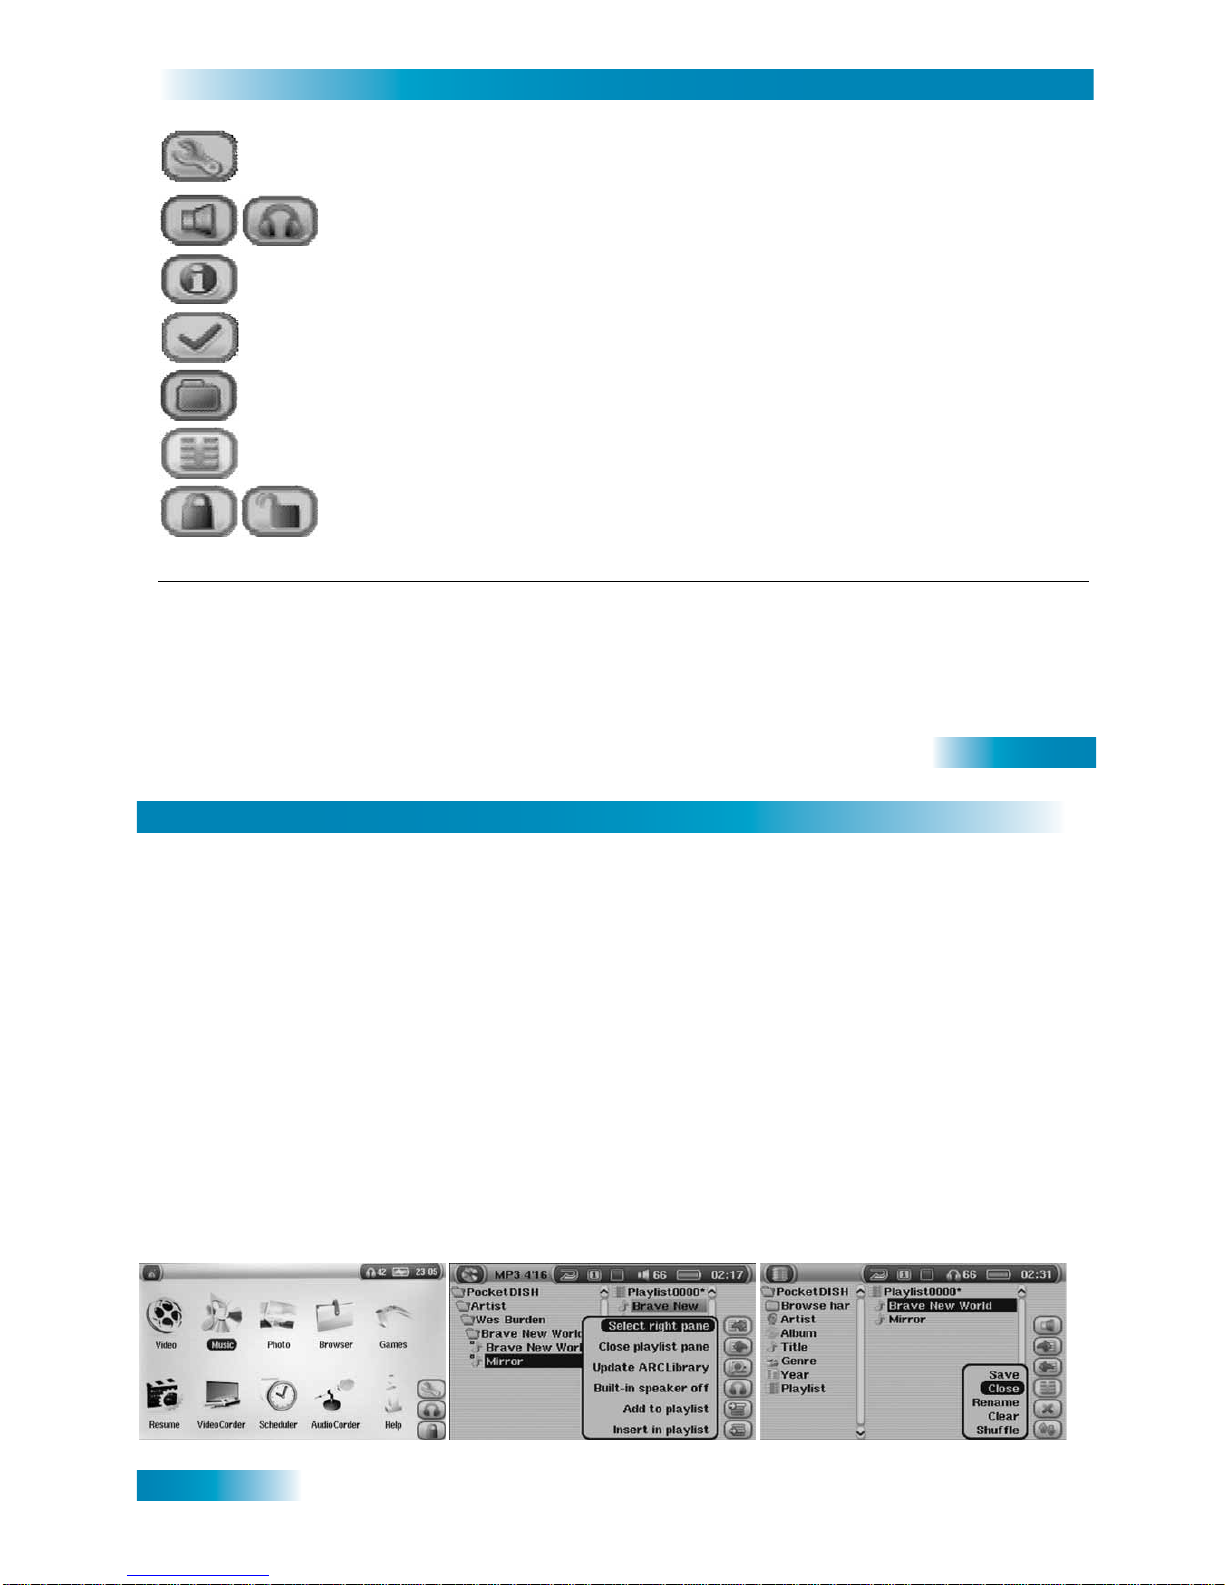
PLAYBACK A COMPATIBLE SONG
BASIC OPERATION
The PocketDISH always remembers where you stopped the last f ile for playback. On t he desktop, select
Resume to start the playback from that point forward.
1 Turn the PocketDISH on.
2 Allow the PocketDISH time for the desktop to display.
3 Select the Music icon and press ON to acce ss the content.
4 Make your selection from the library.
5 Press ON to access the content.
6 Select the desired song.
7 Press ON to playback the song.
8 Press OFF to end playback.
SELECT MUSIC SELECT YOUR SONG (FOLDER) PLAYBACK YOUR SONG
30
Chapter 4
Additional Features
WHEN VIEWING THE AUDIO FOLDER WHEN VIEWING THE SONGS
■ Open playlist pane: opens the playlist. ■ Open playlist pane: opens the playlist.
■ Info: to show additional information. ■ I n fo : to sh ow ad d itional informat io n .
■ Folder management: accesses the
folder options (if available).
■ File management: accesses the file
options (if availabl e).
- Create: makes a new folder. - Delete file: deletes the file.
- Delete: deletes the folder and
its content.
- Rename file: renames the file.
- Rename: renames the folder. - Create Folder:
makes a new folder.
■ Built-in speaker on/off:
toggles between speake r
(off) and headset (on).
■ Built-in speaker on/off: toggles
between speaker (off) and
headset (on).
■ AudioCorder: access the VideoCorde r
menu.
■ AudioCorder: access the VideoCorder
menu.
Page 19
31
Second Source Audio/Video
SPECIAL KEY FUNCTIONS
WHEN PLAYING THE SONGS
■ Audio settings: access the PlayMode (Single, Folder, All), Repeat & Shuffle
(Normal, Repeat, Shuffle) Intro duration, Bass Boost, Bass, Treble and Balance
settings.
■ Built-in speaker on/off: toggles between speaker (off) and headset (on).
■ Current song info: displays additional informatio n.
■ Set bookmark: set a bookmark manually. You can always start future playba ck
from this point forward.
■ Display Browser: displays the Browser menu.
■ Display playlist editor: opens the playlist editor.
■
Lock keyboard: locks or unlocks the keys for use. The
keys still function to
set the volume.
ON key:
■ Pause: pauses the playback.
■ Play: continues from pause.
keys:
■ Previous: starts the previous
song.
■ Next: starts the next song.
keys:
■ Volume: increases or
decreases the volume.
32
Chapter 4
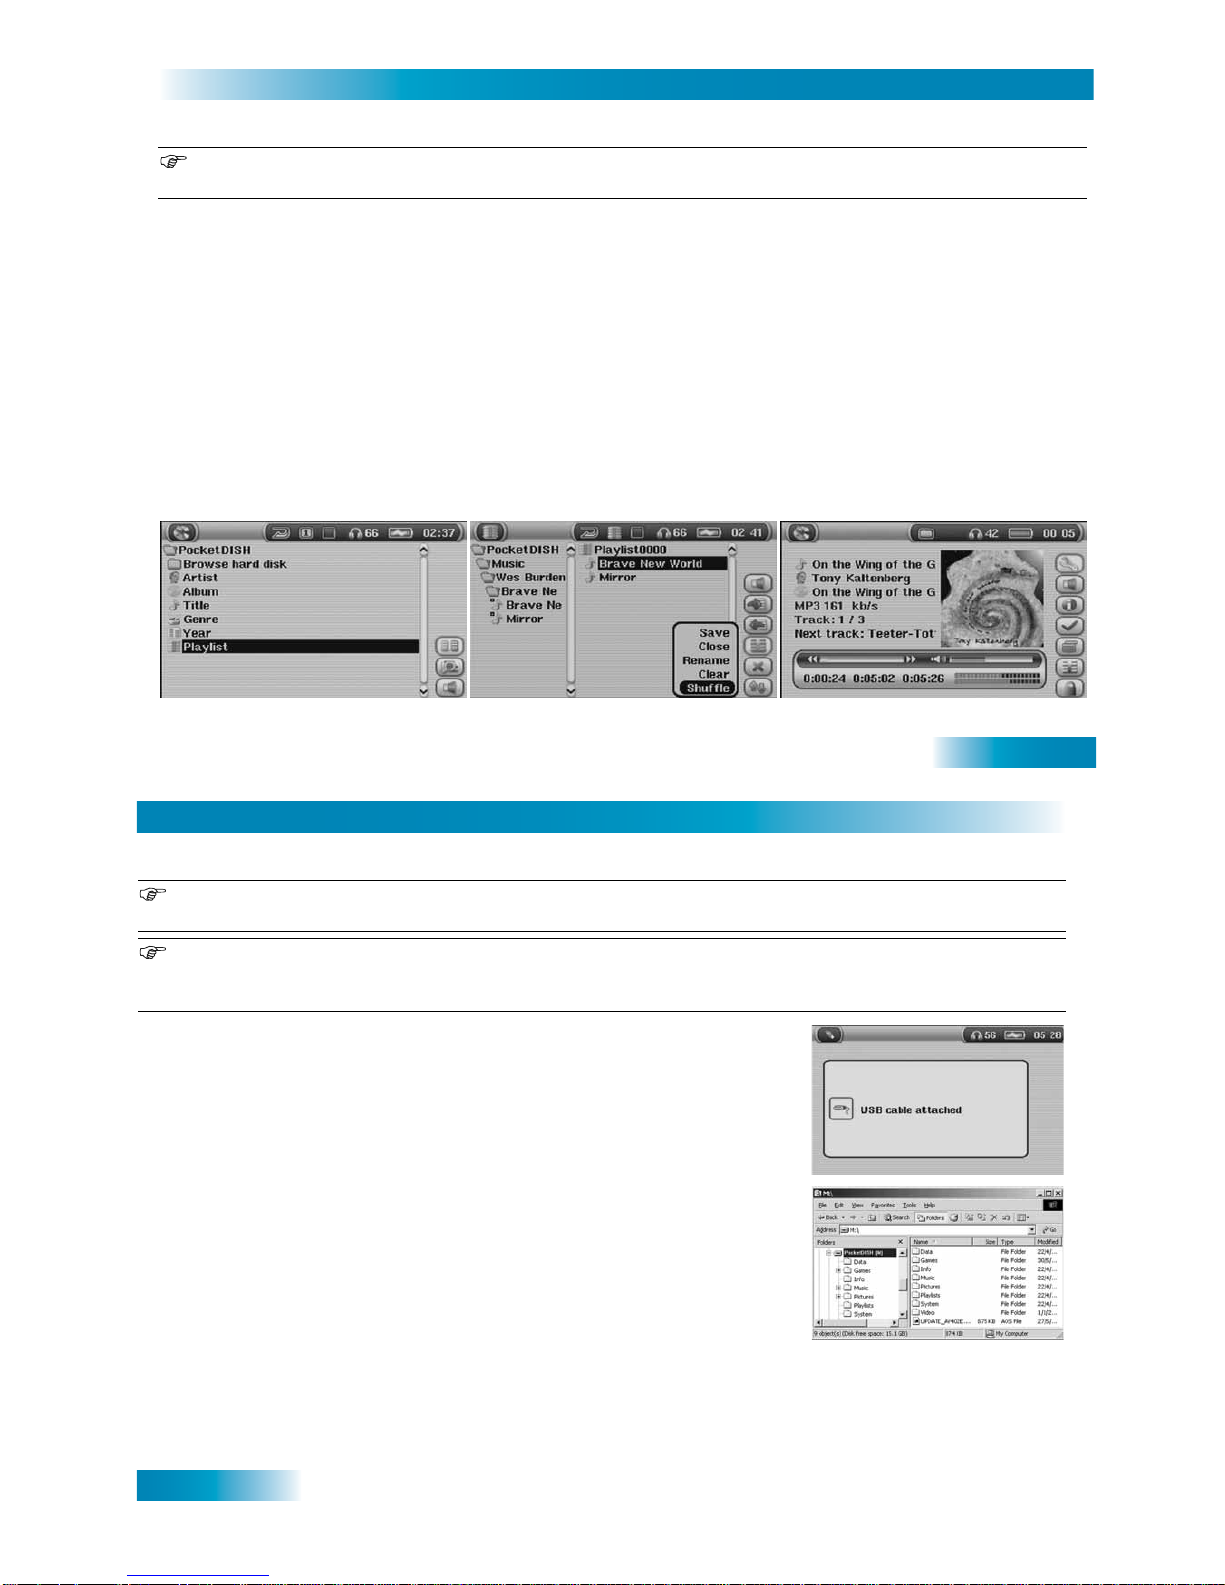
CREATE PLAYLISTS
1 Turn the PocketDISH on.
2 Allow the PocketDISH time for the desktop to display.
3 Select the Music icon and press ON to access the content.
4 Press the upper Setup key to access the Setup menus.
5 Use the upper and bottom Setup key to select the "Open playlist pane" option.
6 Press the center Setup key to access the Playlist menu and select the desired song.
7 Use the Setup keys to add the song to the Playlis t.
8 Use the
keys
to add the following song.
9
When you have finished, press the upper Setup key
to select the "Select right pane" option
and press the center Setup key.
10 Use the Setup keys again to select
"
Playlist management" and press the center Setup key.
11 Select the Save option, press the center Setup key and use the Setup keys to save the playlist.
12 Use the Setup keys to select
"
Playlist management" and press the center Setup key.
13 Select the Close option, press the center Setup key to exit.
SELECT MUSIC SELECT AND ADD YOUR FILES CLOSE THE PLAYLIST
Page 20
33
Second Source Audio/Video
PLAYBACK PLAYLISTS
Before a song from the Playlist plays back, you can change the playback sequence. Press the upper
Setup key to access the Setup menu. Select the option Playlist management and select Shuffle.
1 Turn the PocketDISH on.
2 Allow the PocketDISH time for the desktop to display.
3 Select the Music icon and press ON to acce ss the content.
4 Select the Playlist and press ON.
5 Select the desired playlist for playback and press ON.
6 If desired, use the Setup keys to select "Playlist management" and select Shuffle an press
the center Setup key.
7 Press ON again to playback the songs in the selected Playlist.
8 Press OFF to end playback.
SELECT PLAYLIST SHUFFLE YOUR PLAYLIST PLAYBACK FROM THE PLAYLIST
34
Chapter 4
INSTALL THE MPEG-4 TRANSLATOR
When connected to an external device, the PocketDISH uses more power than normal. Therefore,
connect the PocketDISH to power to prevent an unwanted shutdown.
The MPEG-4 Translator is only available for personal computers (PC). Note that on some Windows
versions the PocketDISH displays in the Windows Explorer as a Removable Disk.
For Mac there are conversion tools available for purchase from www.divx.com.
1 Connect the PocketDISH to power.
2 Turn the computer and the PocketDISH on.
3 On the PocketDISH:
a. Locate the USB-B port and connect the USB cable.
b. Now the "USB cable attached" pop-up displays.
c. The PocketDISH keys are temporarily disabled.
4 On the PC:
a. Clos e al l pro gr am s.
b. Locate the USB port and connect the USB cable.
c. Create two new folders:
-
C:\PocketDISH\source
- C:\PocketDISH\codec\divx
d. On the PocketDISH drive, locate the folder: PocketDISH
drive\Data\Installation software
.
e. Copy the folder and its contents to
C:\PocketDISH\source.
Page 21

35
Second Source Audio/Video
WINDOWS MEDIA PLAYER (MP9, MP10)
Windows MediaPlayer 10 will only run on a PC with Windows XP or higher.
1 In the folder
C:\PocketDISH\source\PC software\MP9 or MP10. Double click your language
and locate the .exe file.
2 Double click the .exe file and follow the on-screen instructions.
DIVX CODEC
1 On www.divx.com, click the DivX tab and follow the on-screen instructions to download the
free standard DivX codec into
C:\PocketDISH\source\codec\divx.
2 Shut down all programs including e-mail, internet and anti-virus programs before
installation.
3 In the folder
C:\PocketDISH\source\codec\divx
locate the .exe file.
4 Double click the .exe file and follow the on-screen instructions.
VIRTUALDUB PROGRAM
For a seamless installation with the MPEG-4 Translator, install VirtualDub in its default folder
C:\Program Files\VirtualDub when prompted.
1 In the folder
C:\PocketDISH\source\PC software\VirtualDub, locate the .exe file.
2 Double click the .exe file and follow the on-screen instructions.
MPEG-4 TRANSLATOR
This program uses the MP3 codec that came with Windows MediaPlayer.
1 In folder
C:\PocketDISH\source\PC software\MPEG4-Translator, locate the .exe file that suits
your language.
2 Double click the .exe file and follow the on-screen instructions.
36
Chapter 4
NOTES
Page 22
37
THE PHOTO ALBUM
This chapter gives you the procedure how to transfer photos or images from different
multimedia devices and play them back on the PocketDISH.
•INTRODUCTION
•TRANSFER DIGITAL PHOTOS/IMAGES FROM THE COMPUTER
•TRANSFER DIGITAL PHOTOS FROM YOUR CAMERA
•VIEW A COMPATIBLE PHOTO OR IMAGE
•VIEW A SLIDESHOW
The Photo Album
Transfer and Playback
38
Chapter 5
INTRODUCTION
With your PocketDISH you can transfer digital photos (images) from your computer, camera,
camcorder, USB stick or any other multimedia device which operates as a mass storage device.
The PocketDISH cannot handle all digital formats, but most of the JPEG and BMP formatted
photos (images) fro m any ca mera are supp orted . If y ou encounter a for mat that is not su pported,
it is possible to convert the file with use of commercially available programs such as Adobe
Photoshop and Paint Shop Pro into a format that the PocketDISH will playback.
When you convert a photo (image) to JPEG or BMP, make sure you use the RGB color or
Greyscale mode setting. Consult the user’s guide that came with the program for detailed
instructions.
If you have photos (images) that are not digitally available to you, you can use a scanner to
digitalize them. Onc e y ou s av ed t he sc anned photo (image) as .JPG or .B MP, you can transfer it
to the PocketDISH for viewing. Consult the user’s guide that came with the scanner for detailed
instructions.
Once the photos (images) are transferred to the PocketDISH, it is possible to view them
separately or in a slideshow.
To display the photos (images) on a TV, it is recommended you change the Photo browser Image Display settings to Progressive to avoid screen flickering. Detailed instructions are given
in the following section of this chapter.
In addition to the playback of DISH Network content, the PocketDISH can also display phot os or images
from other sources. These photos (images) need to be either in JPEG (.JPG) or BMP (.BMP) format.
Page 23
39
The Photo Album
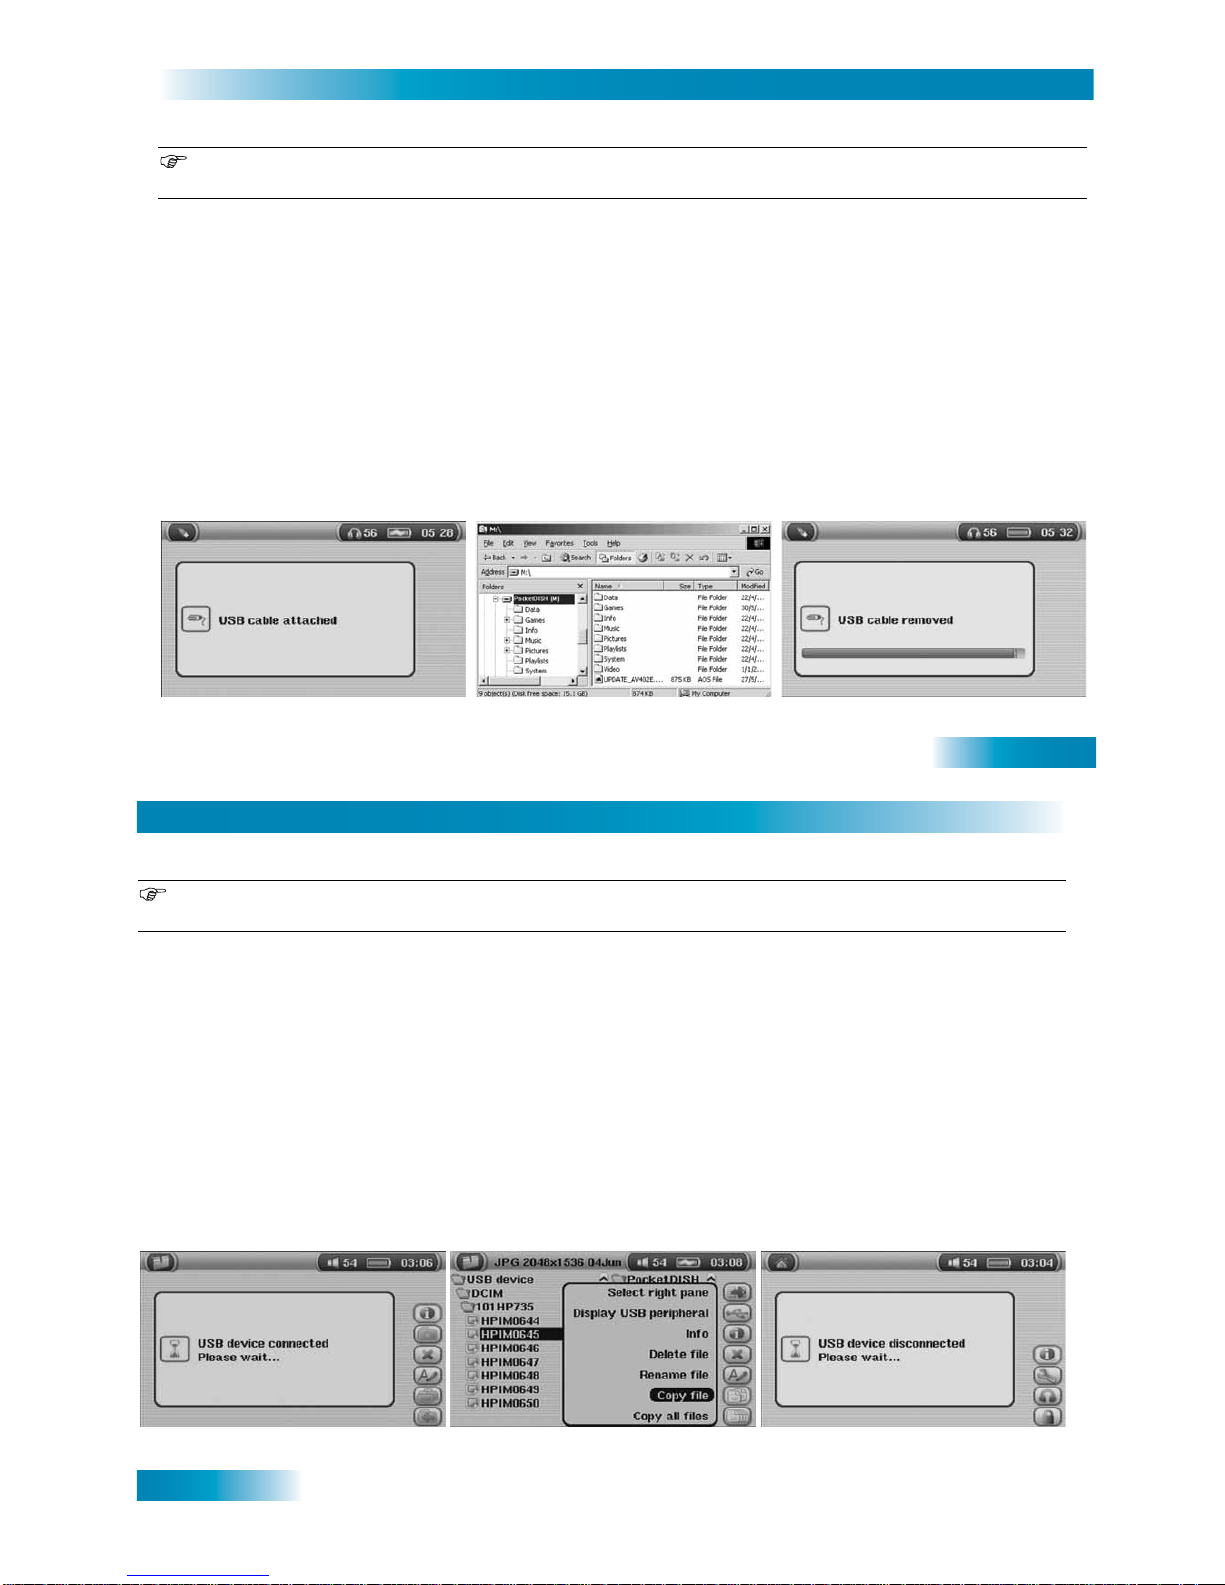
TRANSFER DIGITAL PHOTOS/IMAGES FROM THE COMPUTER
Note that the PocketDISH can display on your computer under different names. Possible names are
PocketDISH or Removable Disk.
1 On your PC, shut down all programs before you start.
2 Use the USB cable to connect the PocketDISH to the PC.
3 Turn the PocketDISH on and wait until the "USB cable attached" pop-up displays.
4 Open Windows Explorer and notice that the PocketDISH displays as a drive.
5 Locate the folder in which you keep the photos and images which you want to transfer.
6 Copy the desired files into the Pictures folder on the PocketDISH.
7 In the PC system tray (next to the clock), locate and click the "Safely remove Hardware" icon.
8 Disconnect the PocketDISH and wait until the automatic file update is completed.
POCKETDISH CONNECTED TRANSFER YOUR FILES (FOLDERS)SAFE DISCONNECT
40
Chapter 5
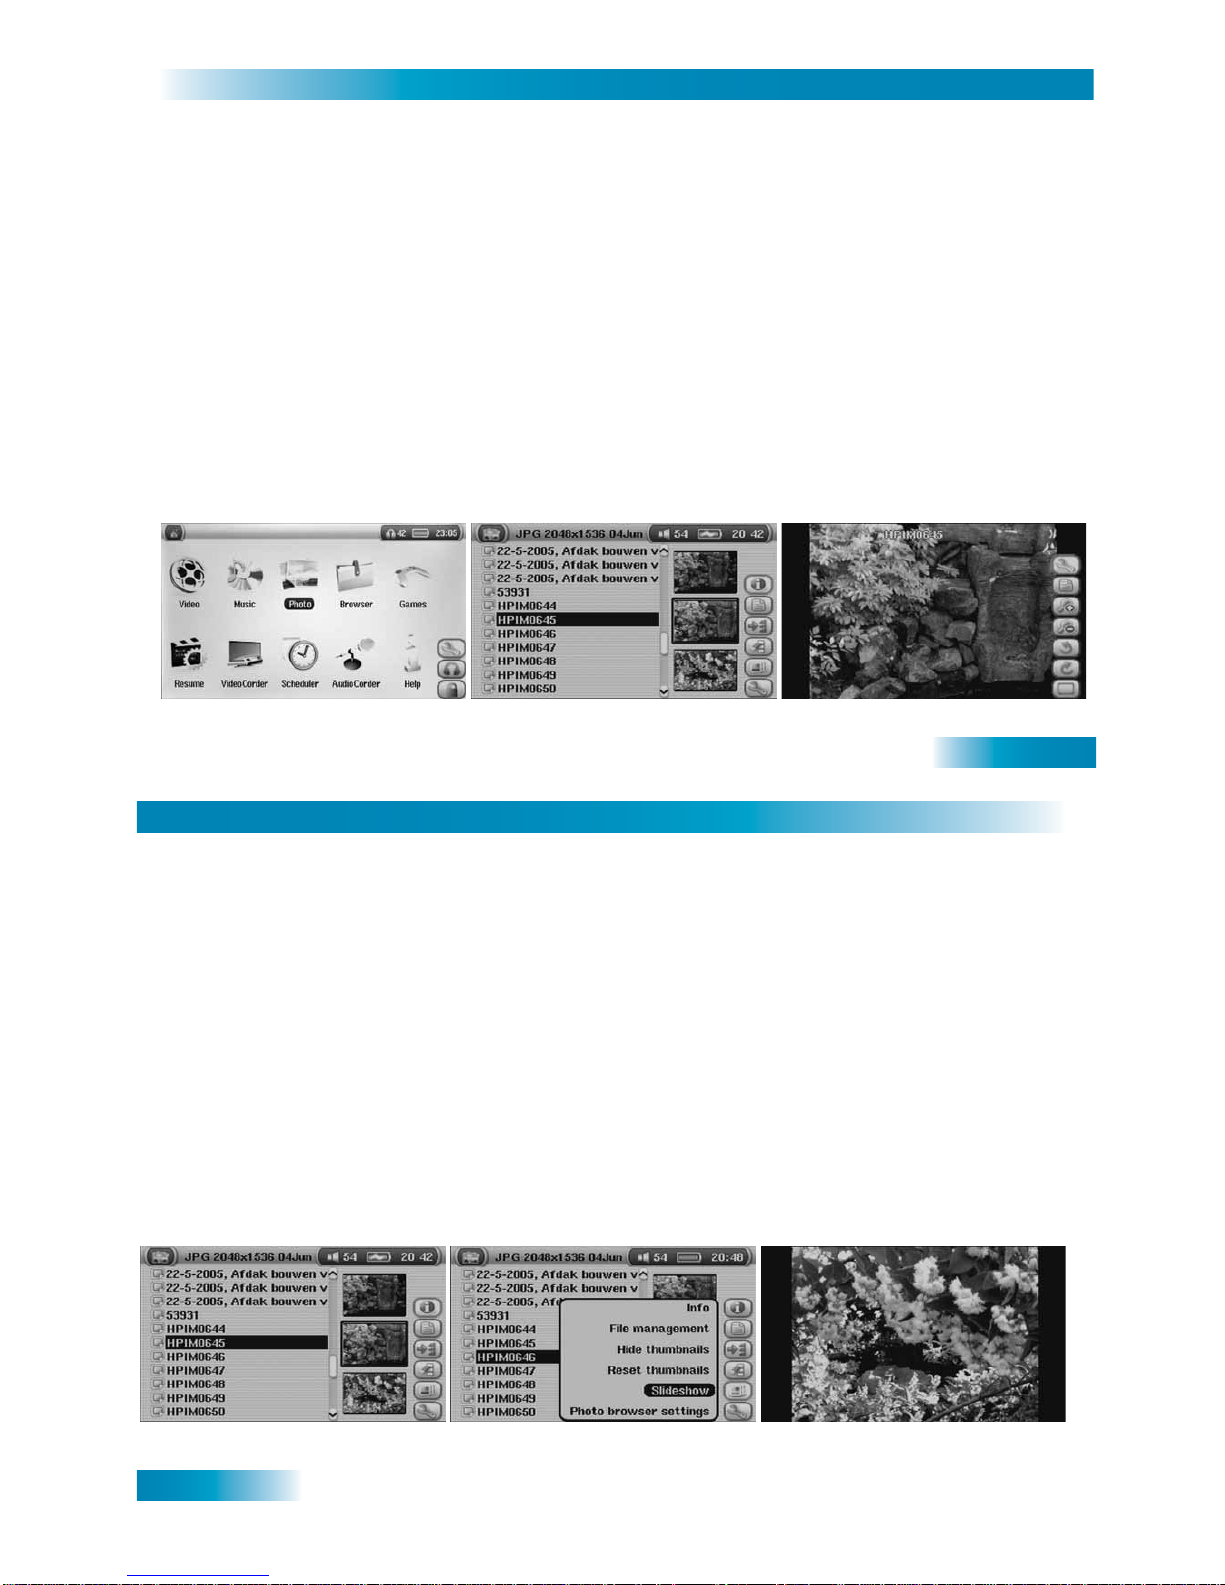
TRANSFER DIGITAL PHOTOS FROM YOUR CAMERA
With your PocketDISH you can transfer digital photos and images from your computer, camera,
camcorder, USB stick or any other multimedia device which operates as a mass storage device.
1 Connect the PocketDISH to your camera as described in Getting Started - Connect a USB
Mass Storage Device on page 14.
2 On the PocketD ISH, in the left browser section (US B device), use the and ON keys to
locate the photos (images).
3 Use the Setup keys to activate the right section (PocketDISH) and select the Pictures folder.
4 Press ON and select the desired folder.
5 Use the Setup keys to activate the left section and select the photo that you want to transfer.
6 Use the Setup keys to select "Copy file" or "Copy all files" as desired.
7 Press the center Setup key to execute the transfer from your camera to the PocketDISH,
notice that the "Copying File: file name" pop-up displays. Wait for the transfer to complete.
8 Turn the camera OFF and noti ce t hat the " USB de vice discon nected - Plea se Wait ..." pop-up
displays. Now you safely can remove the USB cable.
CAMERA (USB DEVICE) CONNECTED TRANSFER YOUR FILES (FOLDERS)SAFE DISCONNECT
Page 24
41
The Photo Album
VIEW A COMPATIBLE PHOTO OR IMAGE
BASIC OPERATION
1 Turn the PocketDISH on, allow the PocketDISH time for the desktop to display.
2 Select the Photo icon and press ON to access the content.
SETTING UP THE DISPLAY
1 Press the bottom Setup key and select the Photo browser settings.
2 Press the center Setup key to open the Photo browser settings.
3 Select Image Display and change the setting to Progressive to prevent screen flickering.
4 Press OFF to exit the Photo browser settings.
VIEWING A SINGLE PHOTO
1 Select the desired photo.
2 Press ON to view the photo.
3 Press OFF to exit the Photo viewer.
SELECT PHOTO SELECT YOUR PHOTO (FOLDER)VIEW YOUR PHOTO
42
Chapter 5
VIEW A SLIDESHOW
BASIC OPERATION
1 Turn the PocketDISH on, allow the PocketDISH time for the desktop to display.
2 Select the Photo icon and press ON to access the content.
SETTING UP THE SLIDESHOW
1 Press the bottom Setup key and select the Photo browser settings.
2 Press the center Setup key to open the Photo browser settings.
3 Select Image Display and change the setting to Progressive.
4 Select Picture Pause and select the desired viewing time.
5 Press OFF to exit the Photo browser settings.
VIEWING THE SLIDESHOW
1 Press the bottom Setup key and select the Slideshow option.
2 Press the center Setup key to view the slideshow.
3 Press OFF to exit the Slideshow.
SELECT PHOTO SELECT SLIDESHOW VIEW YOUR SLIDESHOW
Page 25
43
The Photo Album
Additional Features
WHEN VIEWING THE FOLDERS WHEN VIEWING THE FILES
■ Info: displays additional information. ■ Info: displays additional information.
■ Folder management: accesses the
folder options (if available).
■ File management: accesses the file
options (if available).
- Create: makes a new folder.
- Delete: deletes the file.
- Delete: deletes the folder and
its content.
- Rename: renames the file.
- Rename: renames the folder. - Create Folder:
makes a new folder.
■
Hide thumbnails: displa y only
the folder and file names.
■ Show thumbnails: display
the available thumbnails.
■
Hide thumbnails: disp lay only
the folder and file names.
■ Show thumbnails: display the
available thumbnails.
■ Reset thumbna ils : d el et e the cu rrent
thumbnails and replace them with
new ones.
■ Reset thumbnails: delete the current
thumbnails and replace them wit h new
ones.
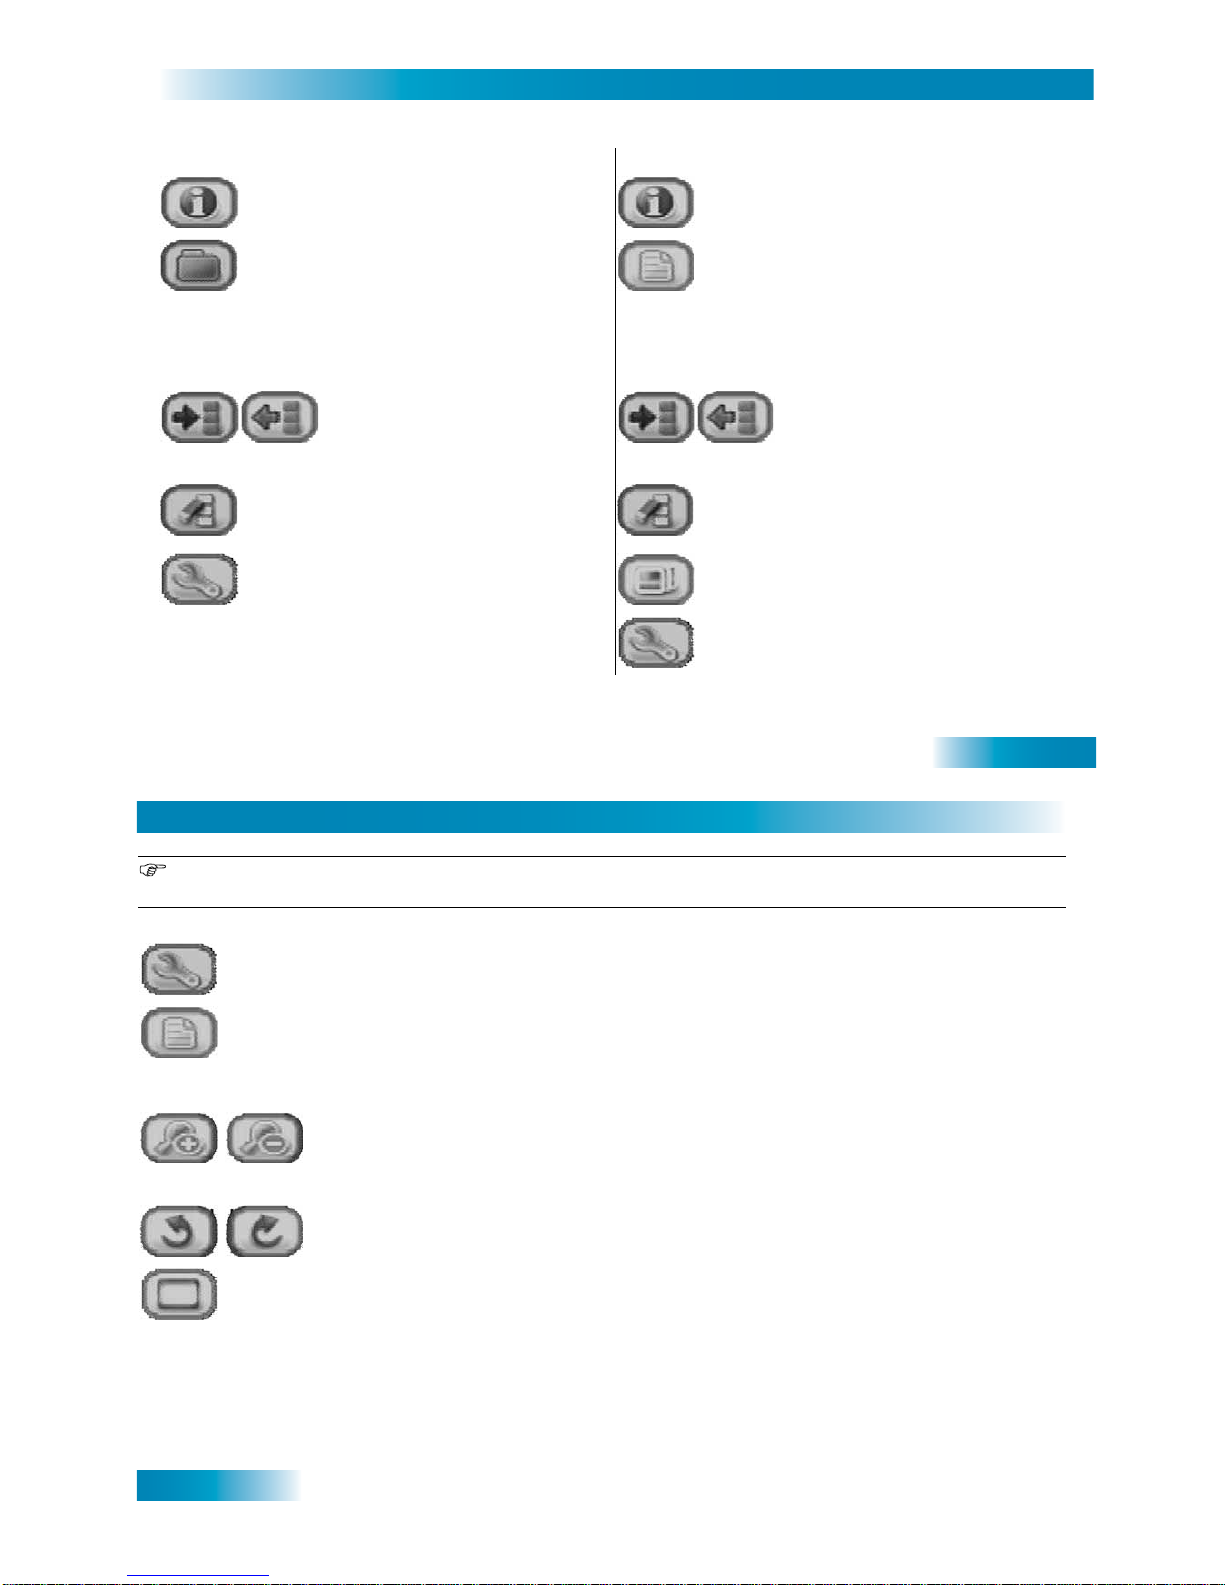
■ Photo browser set tings: opens the
Photo browser set tings menu.
■ Slideshow: starts the Slideshow from
the selected photo (image) forward.
■ Photo browser set tings: opens the
Photo browser set tings menu.
44
Chapter 5
Magnifying a photo might result in a poorer quality when viewing. This is related to the resolution of the
original photo size. The bigger the file size, the better the magnification view will be.
W
HEN VIEWING THE PHOTOS
■ Display settings: opens the Display settings menu (Image Display - Progressive or
Interlaced, Picture Pa use - 2-30 seconds, Pictures to display - 1, 4 or 9 at the time)
■ File management: accesses the file options (if available).
-Info: displays additional information.
- Save as wallpape r: sa ve s and acti vates the c urr ent pho to as a desk top ba ckgr ound.
- Delete: deletes the file.
■
Zoom in: magnifies the photo up to three times (refer to the + marks in the
display).
■ Zoom out: minimizes the photo. Note that beyo nd original size, more photo s are
shown, up to 9 at the time.
■
Rotate Picture: r o tates the photo counter-clockwise
(1-Pic view only)
.
■
Rotate Picture: rotates the photo clockwise
(1-Pic view only)
.
■
Hide text overlay: removes the on-screen menu temporarily
(1-Pic view only)
.
Page 26

45
THE BROWSER
This chapter gives you the description and operation for the PocketDISH Browser.
•DESCRIPTION
•HOW TO USE THE BROWSER
•ADDITIONAL FEATURES
The Browser
Description and Operation
46
Chapter 6
DESCRIPTION
Y o u can use the Brows er to access any file ty pe as if you ar e using a compu ter . The fi le operatin g
system is much like Microsoft Windows Explorer.
The out-of-the box file system already has some system folders which can have sub-folders for
easy navigation and file retrieval. The system folders are:
■ Data: hold s any file as if you are using a USB memory stick.
■ Info: holds all on-screen help information.
■ Mophun: holds all the downloaded games fr o m www.archos.com.
■ Music: holds the songs that you have transferred or the audio that you have recorded with the use
of the AudioCorder.
■ Pictures: holds the photos (images) that you have tran sferred.
■ Playlists: holds the playlists for easy listening of your songs.
■ Video: holds the (DISH Network) video files that you have tr ansferred or the video that you hav e
recorded with the use of the VideoCorder.
In the Browser itself, one file (UPDATE_AV700E.AOS) is displayed. This file is mandatory and
may not be deleted! This file is required to recover the PocketDISH after a system crash or to
facilitate future software upgrades.
You can extend the file system with your own created main folders and sub-folders as desired.
Page 27
47
The Browser
HOW TO USE THE BROWSER
BASIC OPERATION
Do not delete the system folders. They are directly connected to the icons on the desktop.
1 Turn the PocketDISH on.
2 Allow the PocketDISH time for the desktop to display.
3 S elect the Browser icon.
4 Press ON to access the folder list.
5 Use the Setup keys to edit the files and folders as desired.
6 Make your selections as appl ic ab le. Please note that unsupported file formats can b een seen
in the folder, but the PocketDISH will not play or display the file content. These files can be
viewed or played once trans ferr ed to a c omputer, which has the programs that go with the fi le
(For example, *.doc is used by Micro s oft Word).
7 To exit the application, press OFF repeatedly until the desktop displays.
SELECT BROWSER SELECT YOUR FOLDER SELECT/PLAYBACK YOUR FILE
48
Chapter 6
Additional Features
WHEN VIEWING THE FOLDER WHEN VIEWING THE FILE
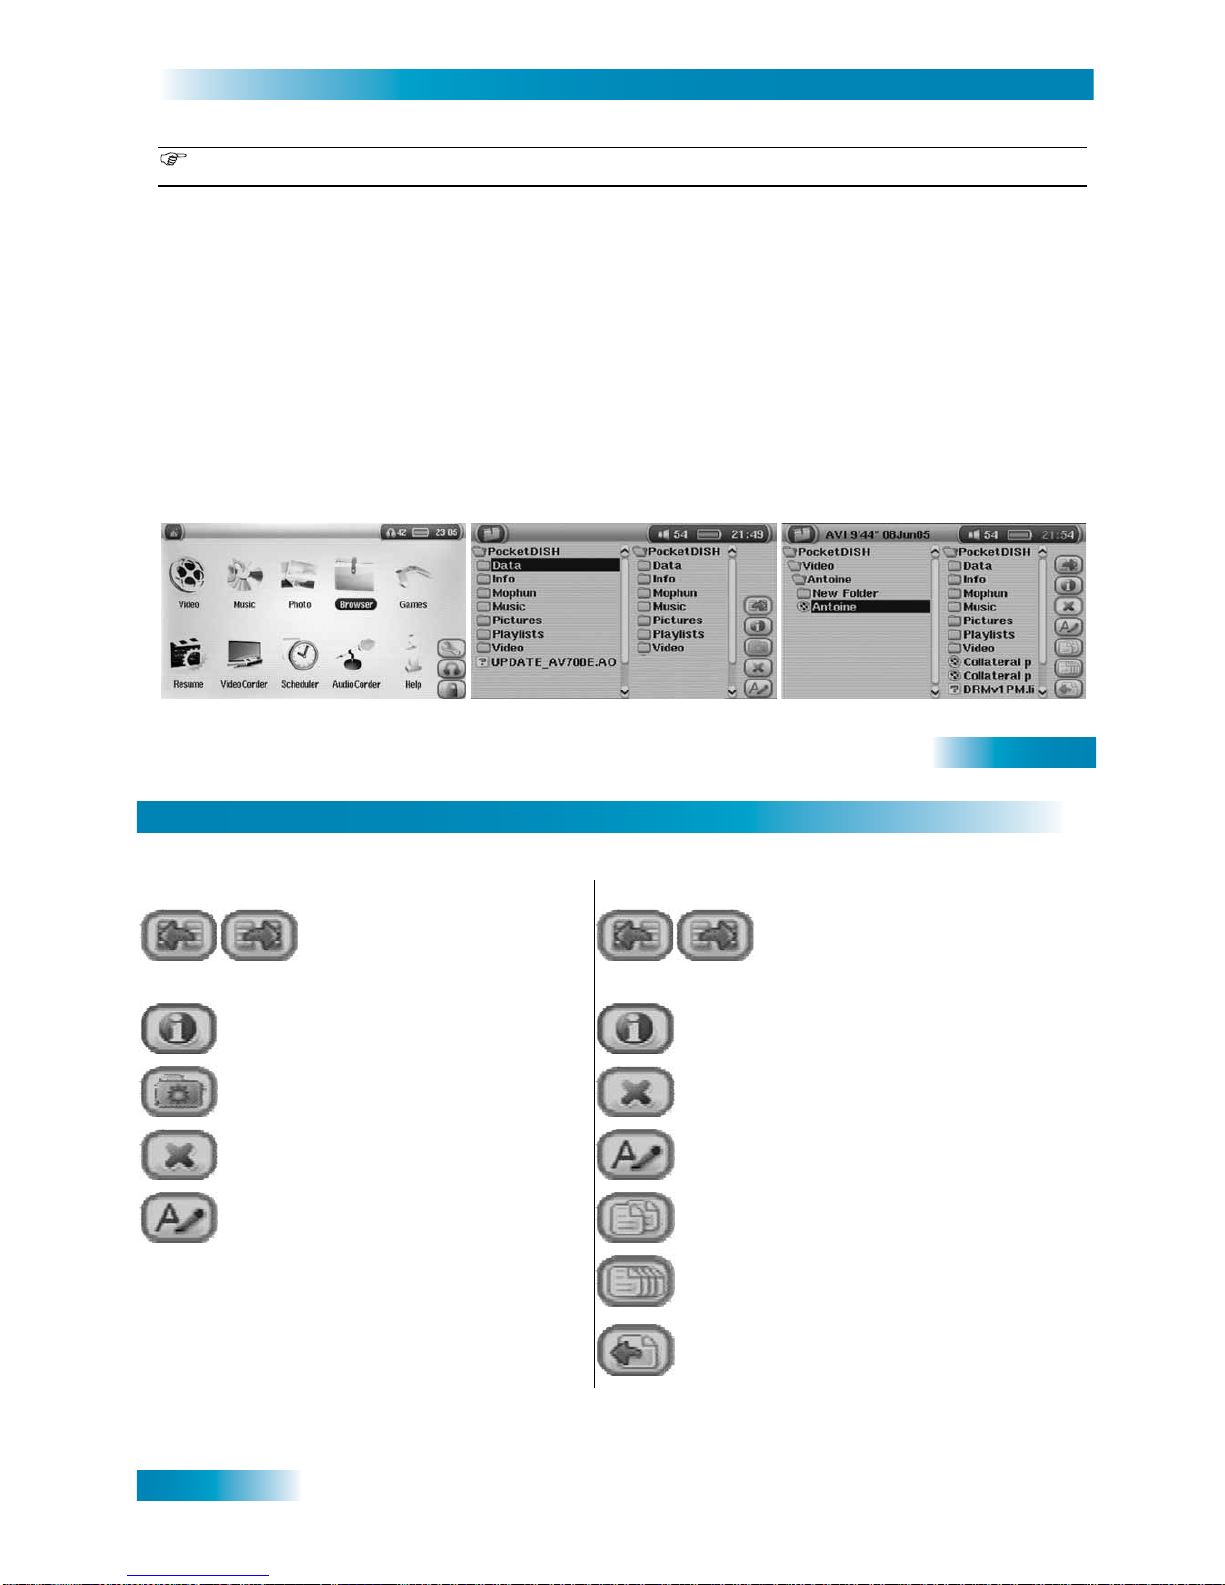
■ Select left pane: activates
left column for selections.
■ Select right pane: activates
right column for selections.
■ Select left pane: activates left
column for selections.
■ Select right pane: activates
right column for selections.
■ Info: displays additional information. ■ Info: displays additional information.
■ Create folder: makes a new folder .
■ D e le te file : deletes the file.
■ Delete folder: deletes the folder and
its content.
■ Rename file: renames the file.
■ Rename folder: renames the folder.
■ C opy file: copies a file to the active
folder in the other pane.
■ Copy all files: copies all file of the
selected folder to the active folder in
the other pane.
■ Move files: moves the selection to
another location.
Page 28

49
THE VIDEOCORDE R
This chapter gives you the description and operation for the VideoCorder.
•DESCRIPTION
•OPERATION
The VideoCorder
Description and Operation
50
Chapter 7
DESCRIPTION
PocketDISH can record video from almost any source using the docking station and the analog
AV-cable. When you use the analog AV-cable, make sure you use the source’s Line-out
connection (which is not amplified).
USING THE DOCKING STATION AND ANALOG AV-CABLE
With the docking station connected to power, you can make audio recordings from almost any
video source that has a Line-out connection.
FILE LOCATION
All recordings are stored in the Video folder. You can access this folder from the desktop by
selecting the Video icon.
Page 29
51
The VideoCorder
OPERATION
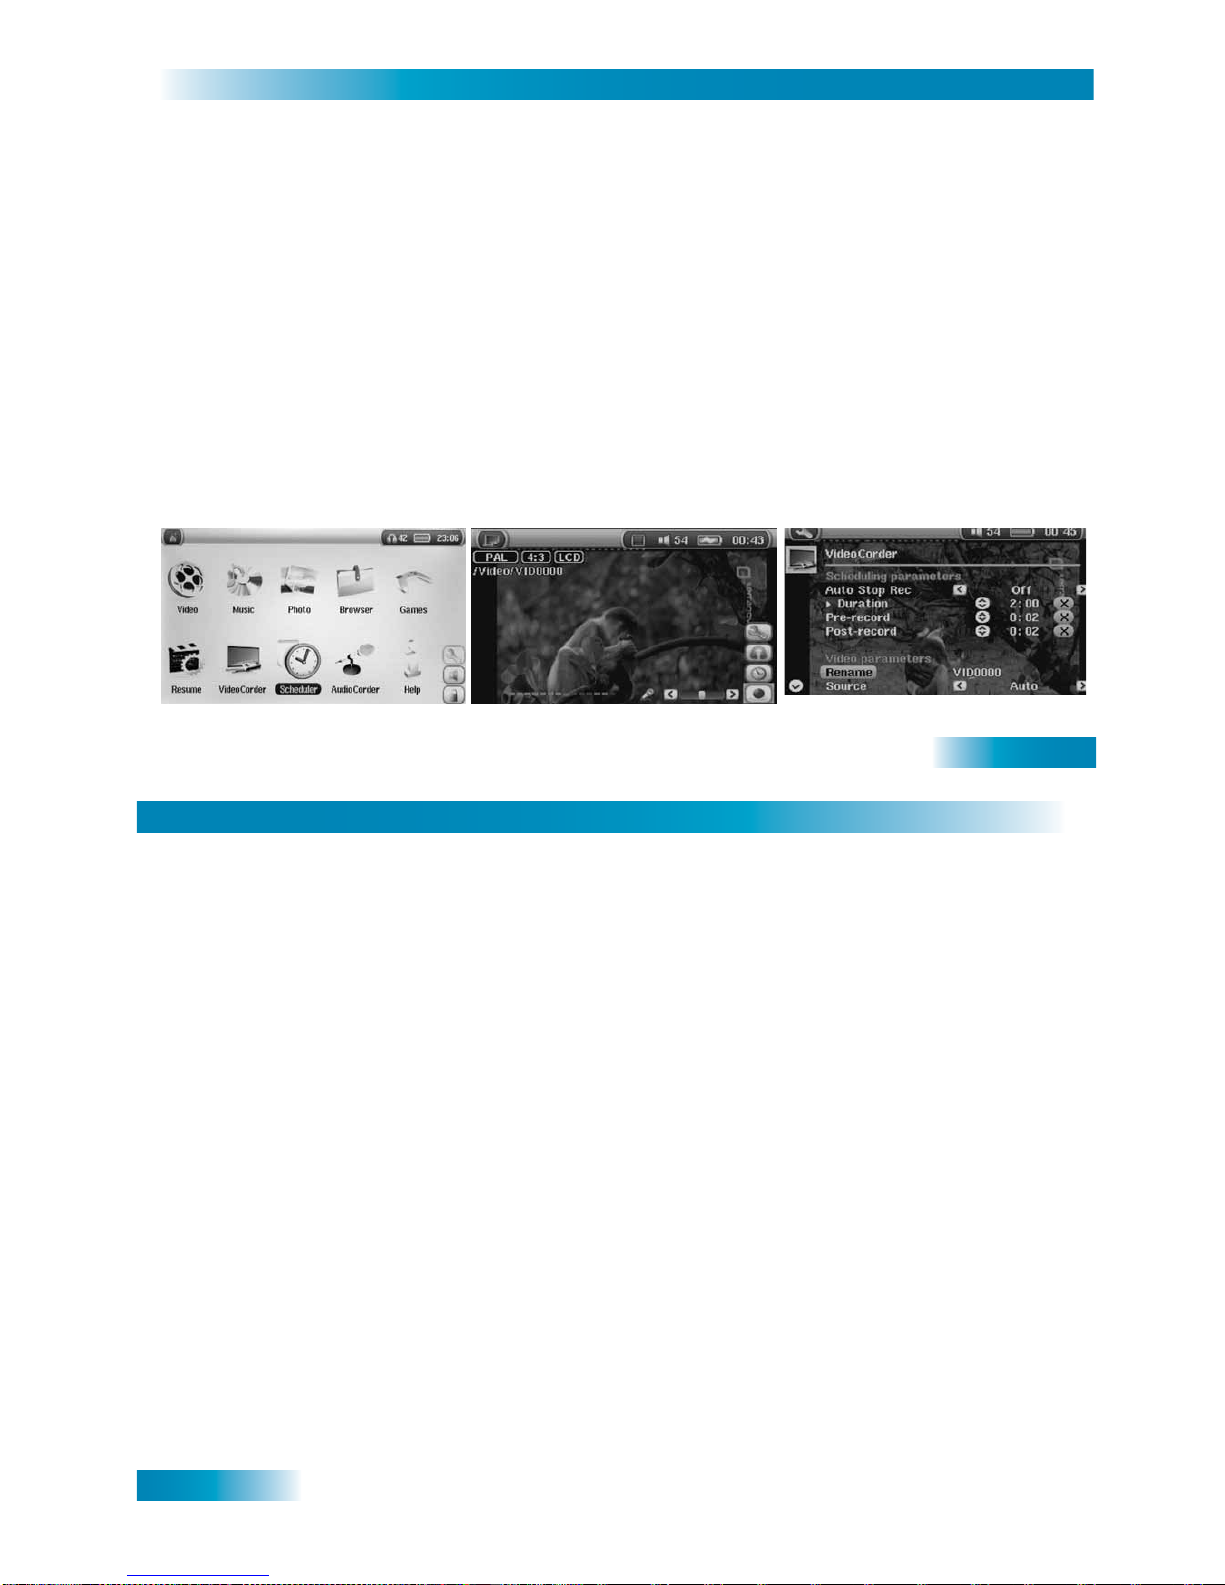
1 Connect the PocketDISH as described in Getting Started - Connect the Docking Station on
page 13.
2 Allow the PocketDISH time for the desktop to display.
3 Select the VideoCorder icon and press ON.
4 In the pre-record screen, if necessary, use the keys to set the recording level.
5 Press the center Setup key to access the VideoCorder Settings menu.
6 In the VideoCorder Settings menu, use the keys to select:
a. For direct recordings, do not set the Scheduling parameters.
b. The Rename option: press ON to rename the recording .
c. The Source: (Auto, Composite [yellow RCA], S-Video, Black & White).
d. The Format (Aspect ratio): (Auto, 4:3, 5;3, 16:9, 2.35).
7 Press OFF to return to the pre-record screen and press the bottom Setup key.
8 Select the Record icon and press the center Setup key to start the recording.
9 Press OFF to exit the session.
SELECT AUDIOCORDER DEFINE THE RECORDING LEVEL SET THE RECORDING NAME/SOURCE
52
Chapter 7
NOTES
Page 30

53
THE SCHEDULER
This chapter gives you the description and operation for the Scheduler.
•DESCRIPTION
•OPERATION
The Scheduler
Description and Operation
54
Chapter 8
DESCRIPTION
With the PocketDISH you can make timed recordings. The Scheduler contains the timers which
you can set with use of the number keys on the PocketDISH remote control unit or with the
keys.
Page 31
55
The Scheduler
OPERATION
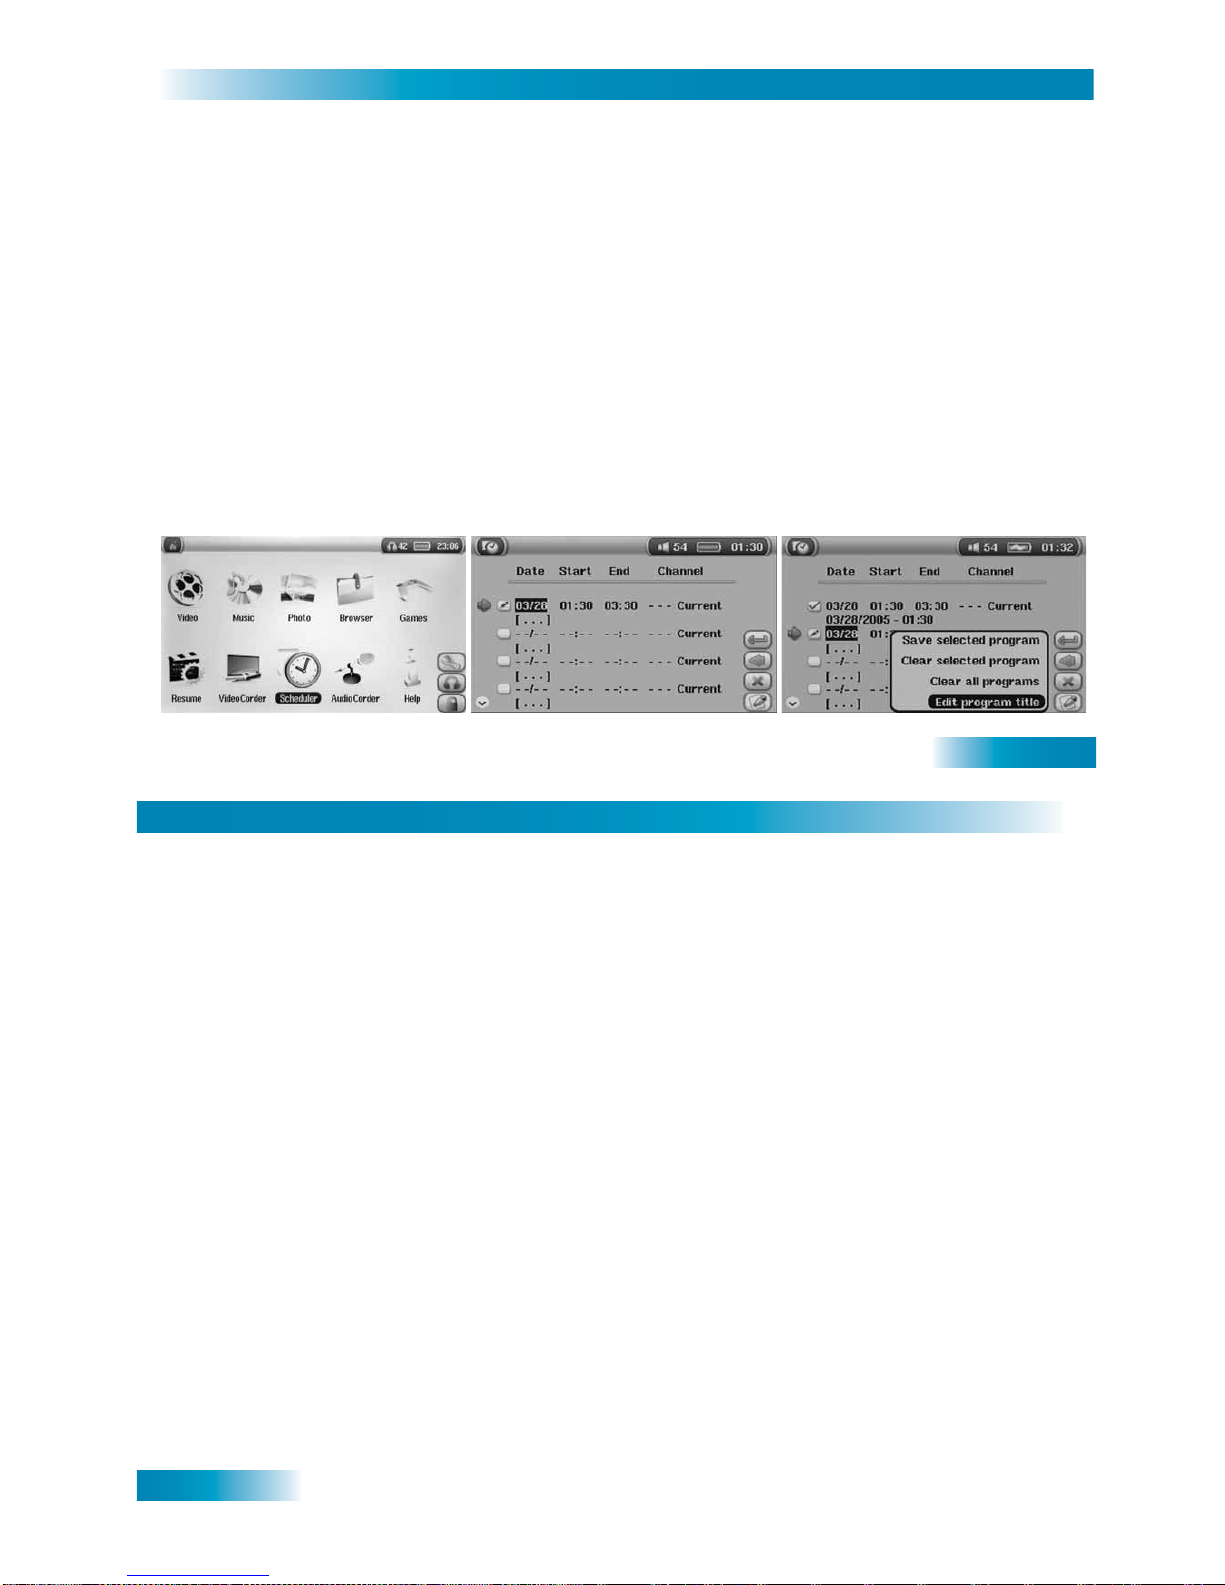
1 Connect the PocketDISH to your receiver as described in Getting Started - Connect a DISH
Player-DVR satellite receiver on page 9.
2 Allow the PocketDISH time for the desktop to display.
3 Select the Scheduler icon and press ON to access the timers.
4 Select a timer and press the key to open the timer.
5 Use the PocketDISH remote control unit to make the settings. It is also possible to use the
keys to make the desi red settings.
6 Press the upper Setup key to open the Setup menu.
7 Us e th e Setup keys to make save or clear the timer.
8 Press OFF to exit the Scheduler.
SELECT SCHEDULER SET THE TIMER SAVE/EDIT THE TIMER
56
Chapter 8
NOTES
Page 32

57
THE AUDIOCORDER
This chapter gives you the description and operation for the AudioCorder.
•DESCRIPTION
•OPERATION
•INCREMENTAL RECORDING
•EDITING
The AudioCorder
Description and Operation
58
Chapter 9
DESCRIPTION
PocketDISH can record audio from almost any source using the docking station and the analog
AV-cable. When you use the analog AV-cable, make sure you use the source’s
Line-out connection (which is not amplified).
USING THE DOCKING STATION AND ANALOG AV-CABLE
With the docking station connected to power, you can make audio recordings from almost any
audio source that has a Line-out connection.
INCREMENTAL RECORDING
While recording the "Save fil e and st art a new r ecordi ng" opti on l ets you stop a current recordi ng
and instantly start a new one (For example, breaking up a lengthy track or a live concert into
separate digital files).
FILE EDITING
The PocketDISH lets you edit your audio files. You can cut out a section from a recording that
you want to keep.
FILE LOCATION
All recordings are stored in the Music folder. You can access this folder from the desktop by
selecting the Music icon. Select the folder:
"
Browse hard drive" to locate the recordings.
Page 33
59
The AudioCorder
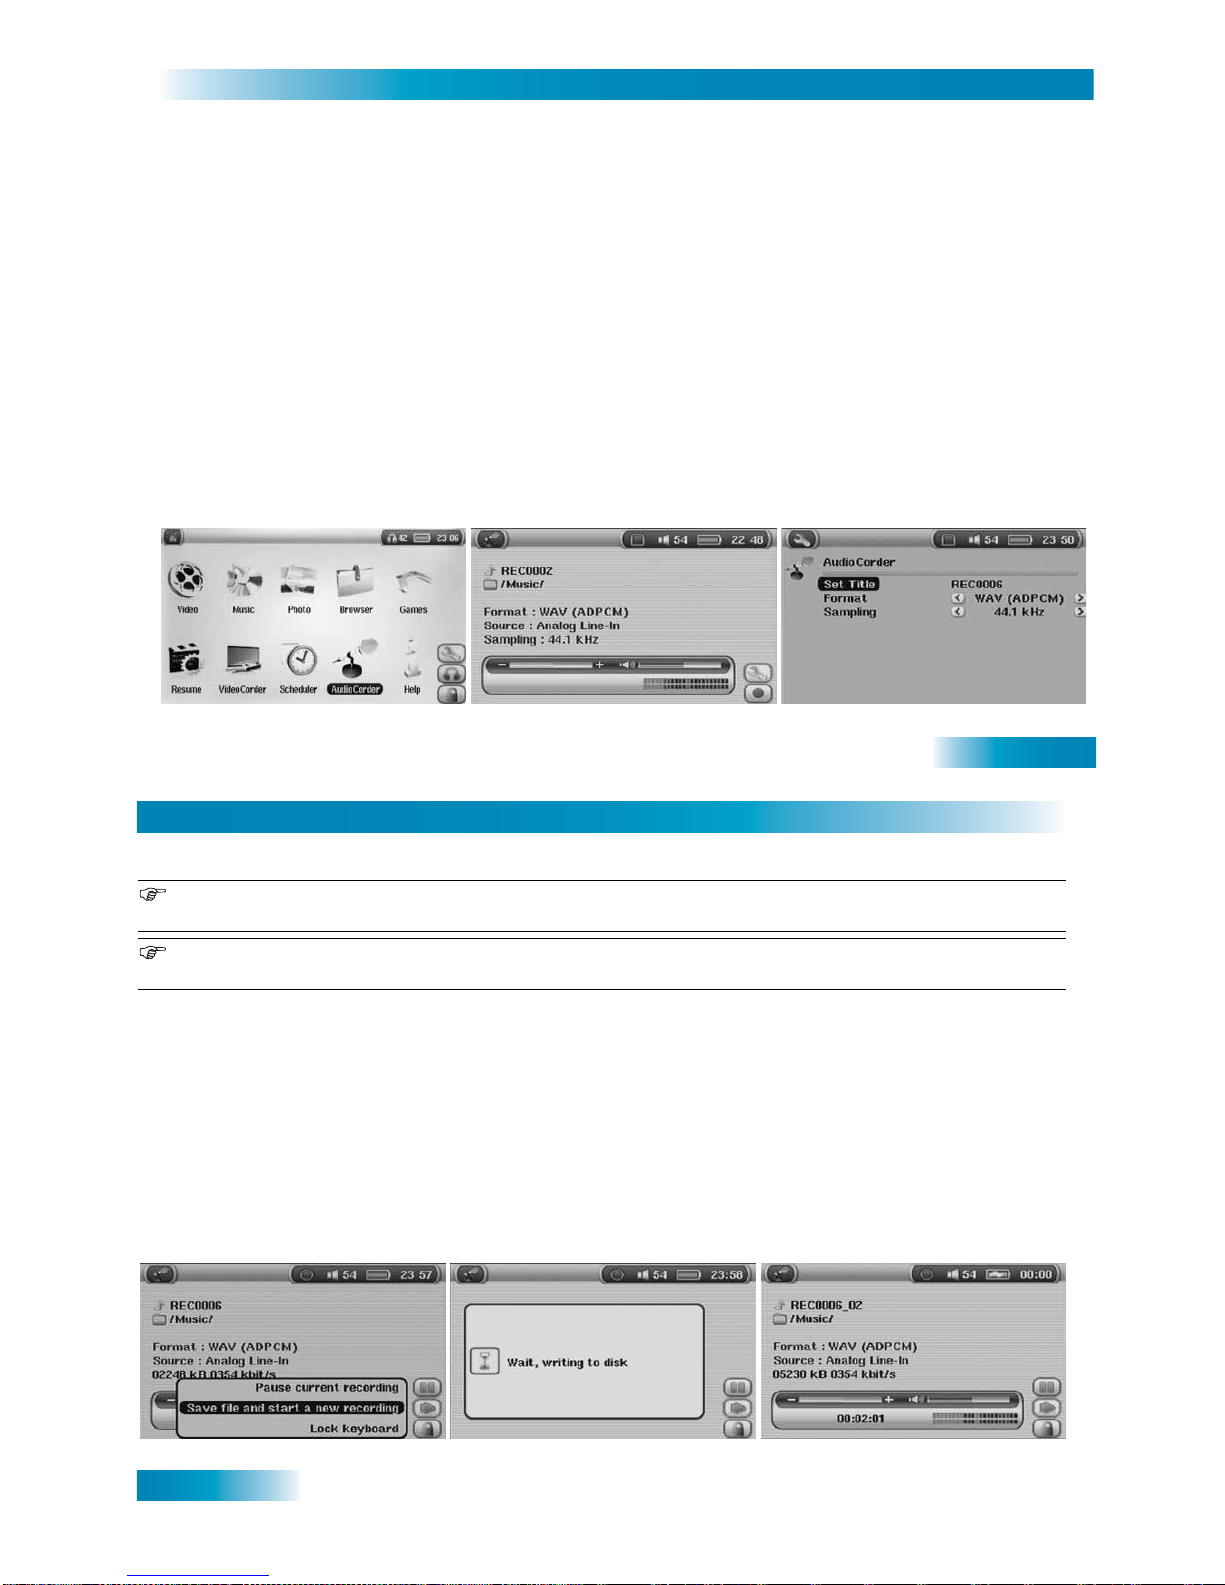
OPERATION
1 Connect the PocketDISH as described in Getting Started - Connect the Docking Station on
page 13.
2 Allow the PocketDISH time for the desktop to display.
3 On the desktop, select the AudioCorder icon and press ON.
4 In the pre-record screen, if necessary, use the keys to set the recording level.
5 Press the center Setup key to access the AudioCorder Settings menu.
6 In the AudioCorder Settings menu, use the keys to select:
a. In the Set Title option, press ON to rename the recording.
b. The Recording Format (WAV PCM = best quality, WAV ADPCM = good quality)
c. Your input source (Analog Line-In for an audio device).
d. The Sampling (the higher the value, the better the quality, the bigger the file size).
7 Press OFF to return to the pre-record screen and press the bottom Setup key.
8 Select the Start recording option. Press the center Setup key to start the recording.
9 Press OFF to exit the session.
SELECT AUDIOCORDER DEFINE THE RECORDING LEVEL SET THE RECORDING NAME/SOURCE
60
Chapter 9
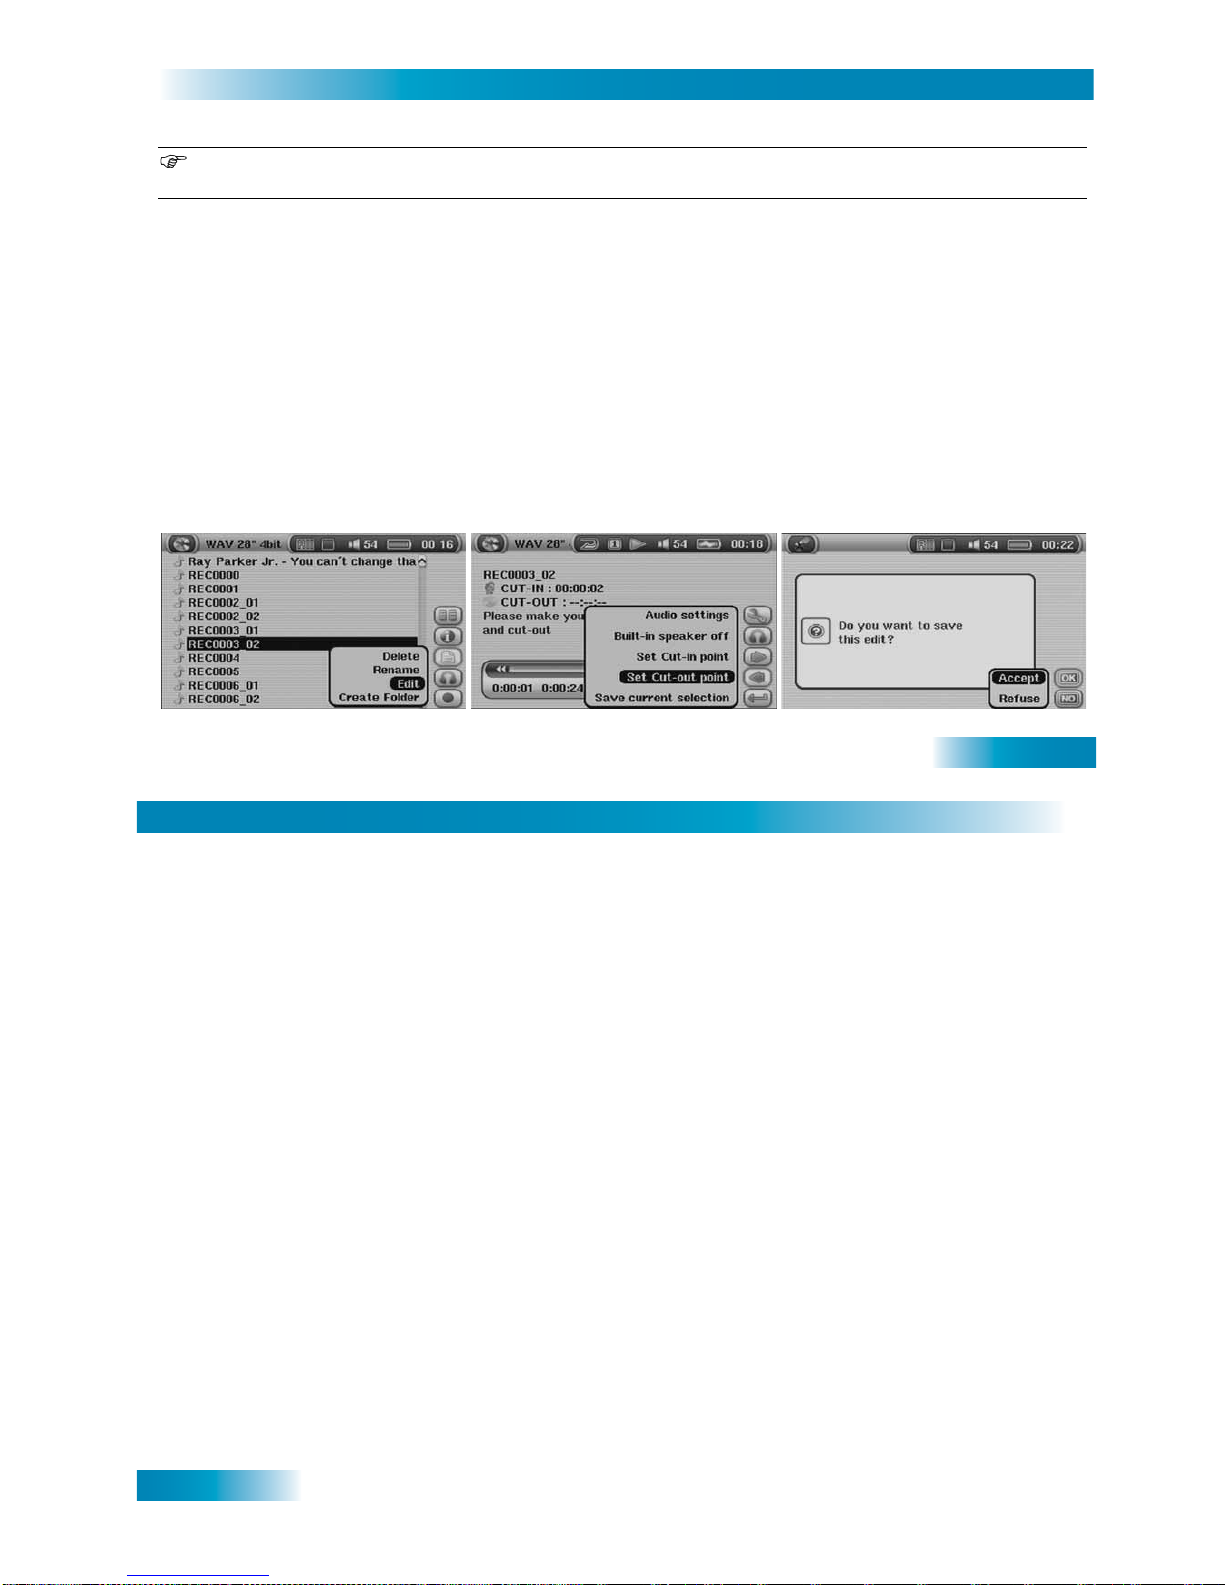
INCREMENTAL RECORDING
1 While recording, press the bottom Setup key to open the Setup menu.
2 Select the "Save file and start a new recording" option
3 T o end the current recor d ing and start a new one instan tl y, press center Setup key. The "Wait,
writing to disk" pop-up displays and the next recording is started.
4 To pause the recording:
a. Press the bottom Setup key to open the Setup menu.
b. Select the Pause current recording option.
c. Press the center Setup key.
5 When you want to continue the same recording, press center Setup key again (Resume).
Once the recordings have been completed, you can rename the files through the Music icon on the
desktop. Select the Browse hard disk option and use the Setup keys to rename the recordings.
Once the PocketDISH is connected to the computer, you also can use the computer to rename the files
or folders.
S
TOP CURRENT/START NEXT SONG SAVING THE CURRENT SONG RECORDING THE NEXT SONG
Page 34
61
The AudioCorder
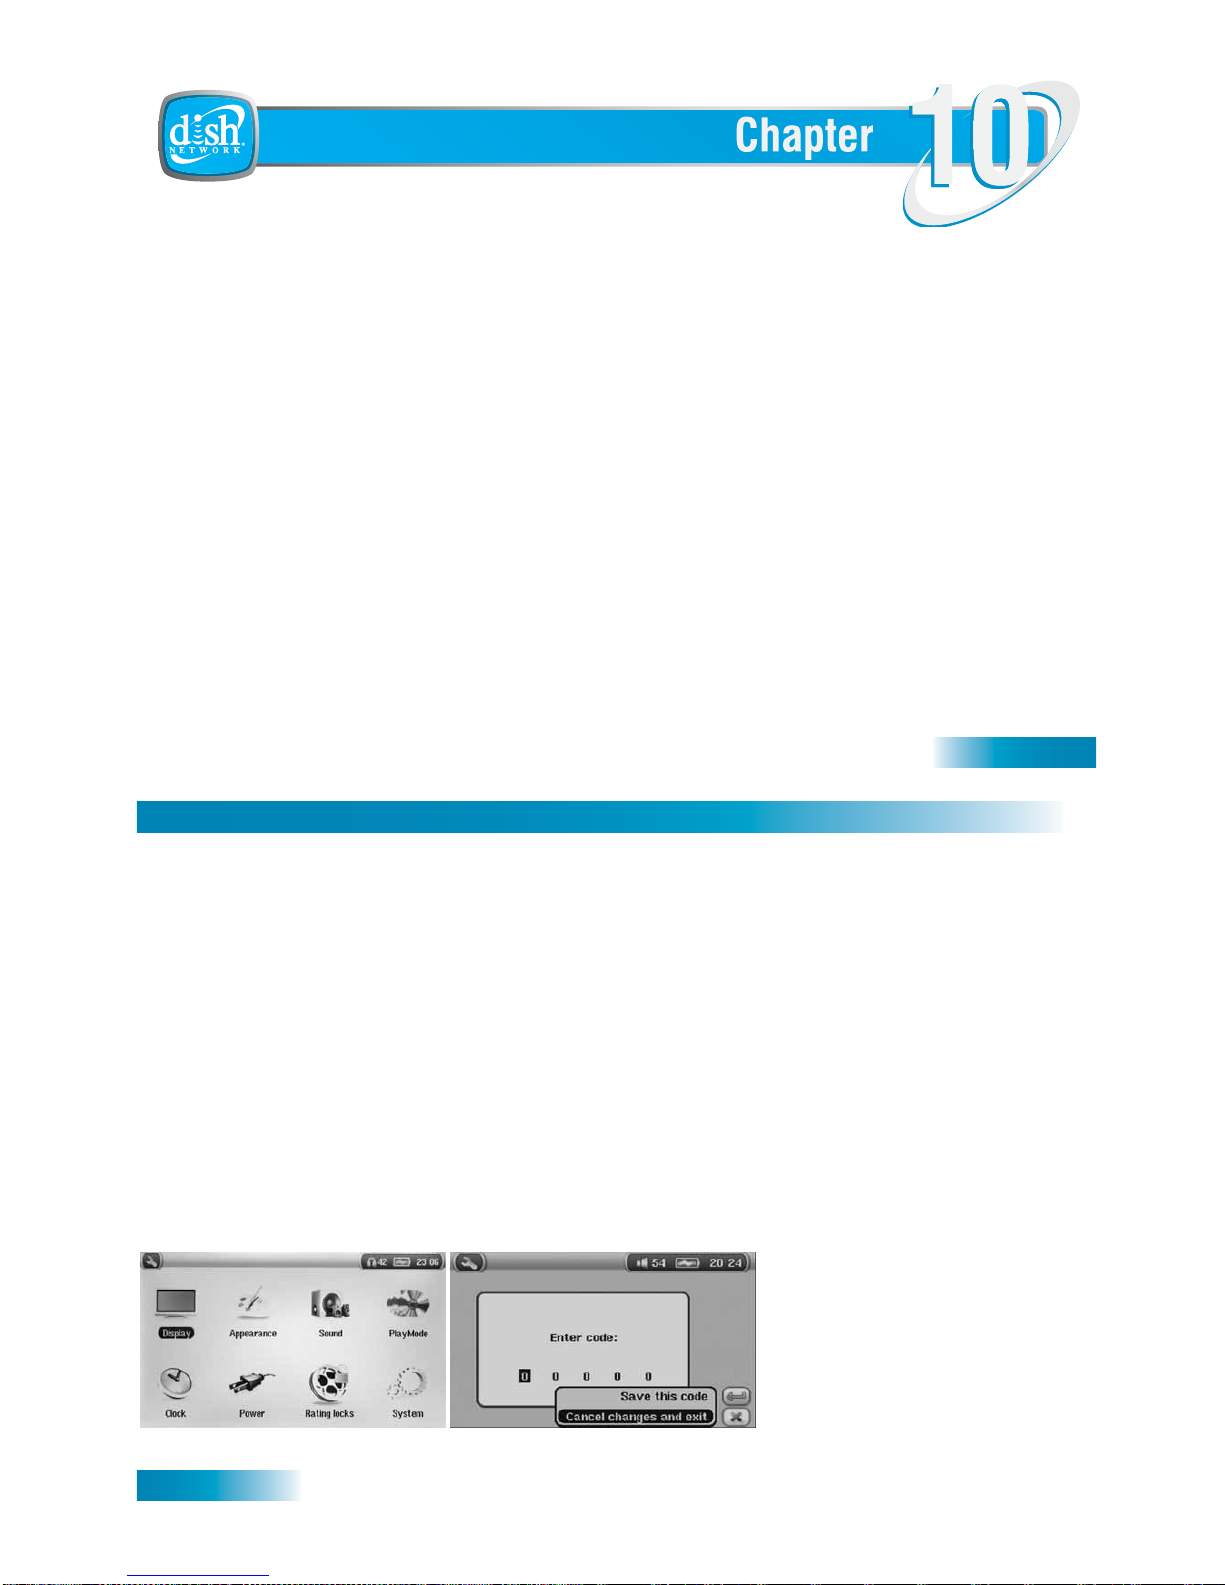
EDITING
You can only edit the analog recordings, which have been made with use of the analog AV cable. You
cannot edit transferred songs.
1 On the desktop, select the Music icon and press ON.
2 Select the Browse hard drive folder and press ON.
3 Use the keys to highlight the recording that you want to edit.
4 Press the bottom Setup key to open the Setup menu.
5 Select the File management option and press the center Setup key.
6 Select the Edit option.The recording starts to playback.
7 Use the keys to locate the start point for the section that you want to edit.
8 Use the Setup keys to select the start point for cutting (Set Cut-in option).
9 Use the keys to locate the end point for the section that you want to edit.
10Use the Setup keys to select the end point for cutting (Set Cut-out option).
11 Use the Setup keys to save the cut recording. Note that the original file is untouched.
SELECT THE EDIT OPTION SELECT CUT-IN/CUT-OUT SAVE THE CUTTED FRAGMENT.
62
Chapter 9
NOTES
Page 35
63
SYSTEM SETUP
This chapter explains how to personalize and set up your PocketDISH.
•DESCRIPTION
•SOUND MENU
•POWER MENU
•PLAYMODE MENU
•DISPLAY MENU
•DISPLAY APPEARANCE MENU
•SYSTEM MENU
•INSTALL A PERSONAL WALLPAPER
•SOFTWARE UPGRADES FROM THE INTERNET
System Setup
Description and Operation
64
Chapter 10
DESCRIPTION
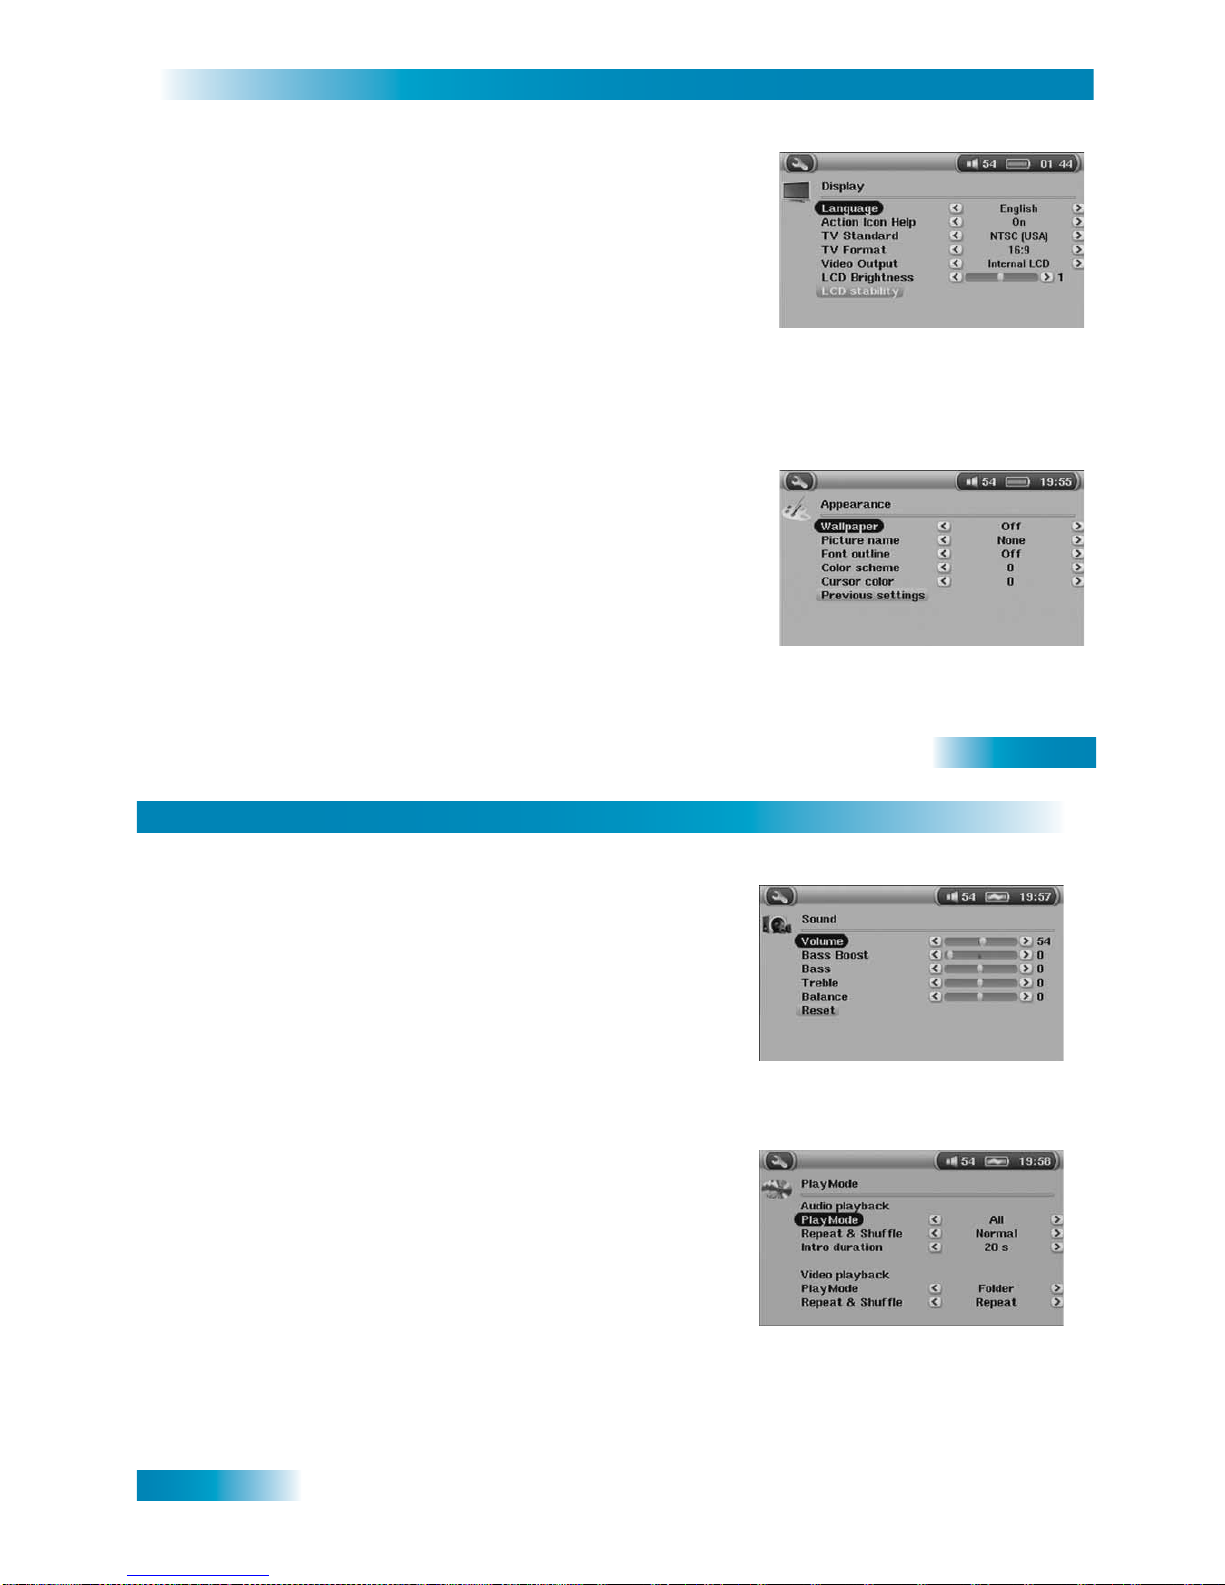
From the desktop, you can use the Setup menu to personalize your PocketDISH. You can open
the Setup menu with the Setup keys on the right side of the LCD screen.
The Setup menu gives access to:
■ Display: sets the Langua ge, the TV settings and the Video Output.
■ Appearance: sets the look and feel of the on-screen menus.
■ PlayMode: tells the PocketDISH how to playba ck the files.
■ Sound: sets your sound prefer ences.
■ Clock: sets the local ti m e.
■ Power: sets the Battery and DC-power options.
■ Rating locks: sets the age based vi ew ratings and allows for changing the Password. The
Password on the receiver is not the same Password as on the PocketDISH.
■ System: set, upgrade and review the system data (firmware).
THE SETUP MENU CHANGE PASSWORD
Page 36
65
System Setup
DISPLAY MENU
APPEARANCE MENU
In the Display menu, you can set:
■ Language: sets the menu language.
■ Action Icon Help: sets the Setup menu explanation on or off.
■ TV Standard: sets the NTSC (USA) or PAL (Europe) standard.
■ TV Format: sets the aspec t rat io 4:3, 16: 9 or Wide screen ( PAL).
■ Video Output: selects the PocketDISH or TV set for viewing.
■ LCD Brightness: sets the intensity of the LCD screen, the
battery lasts longer on a lower setting.
With the LCD Stability option, you can reduce the LCD
flickering.
THE DISPLAY MENU
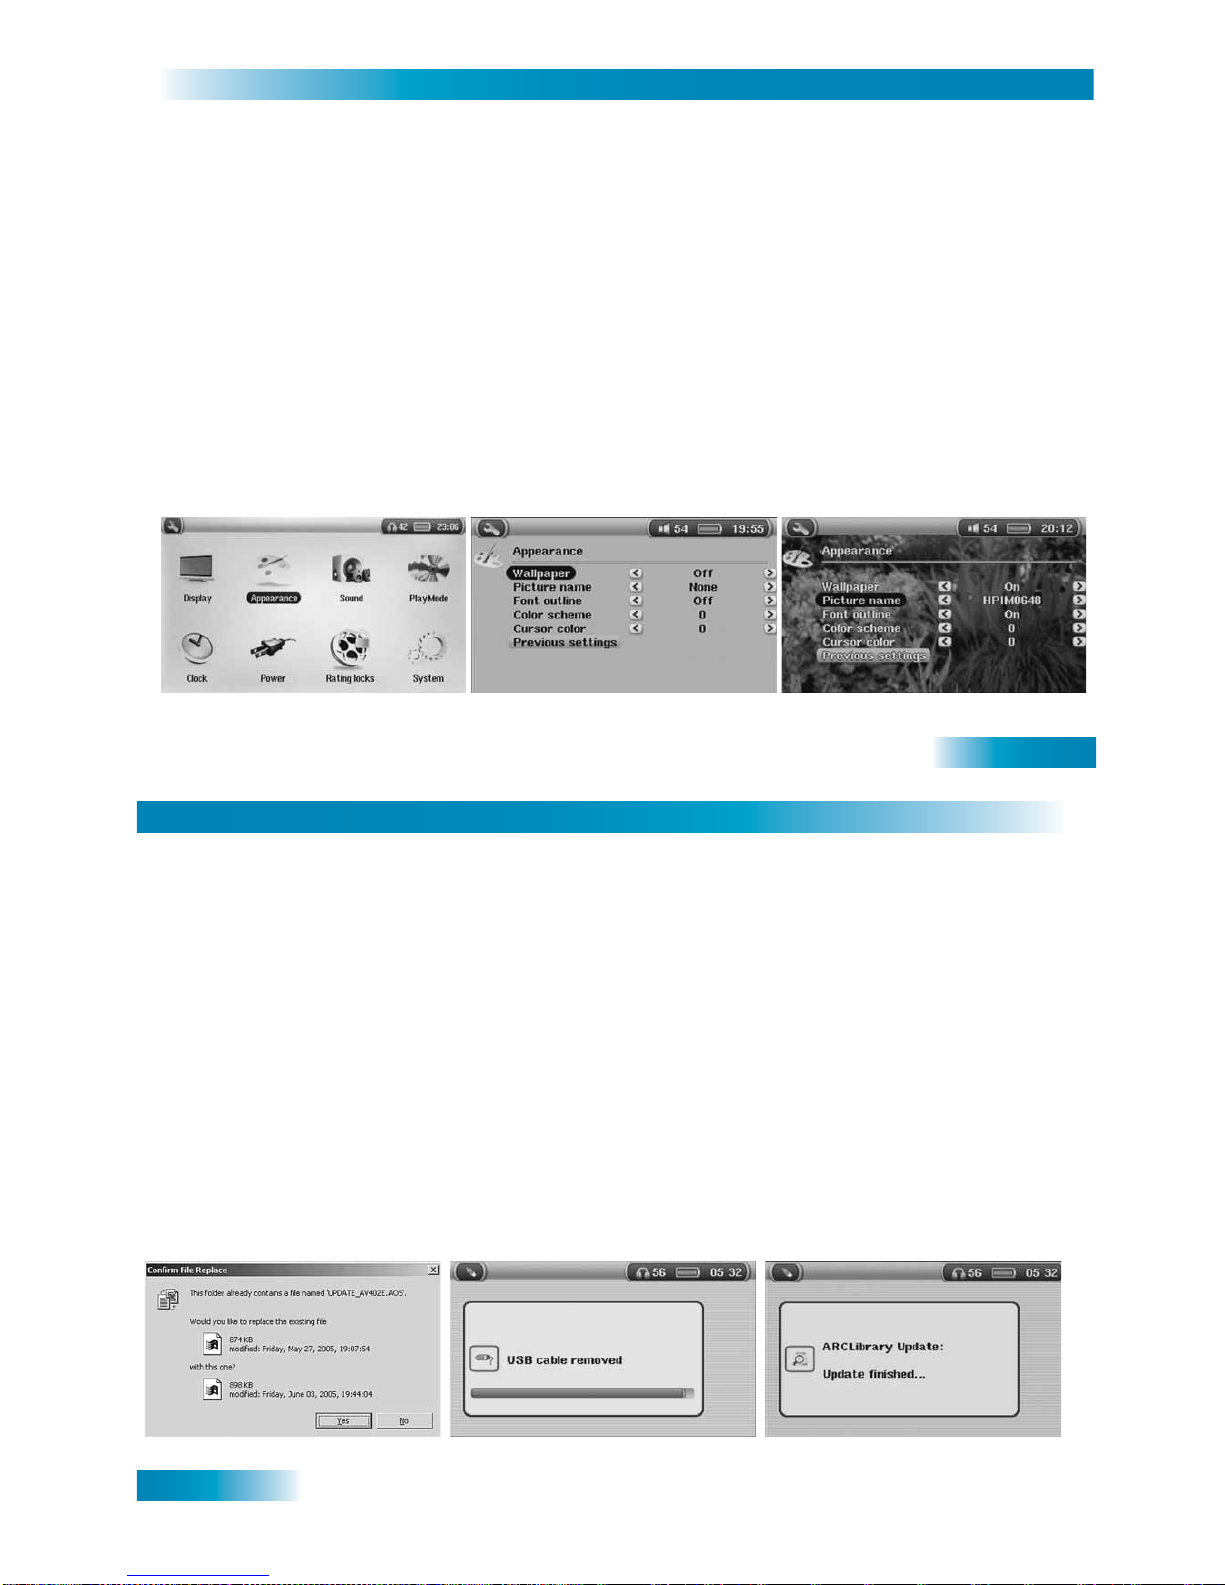
In the Appearance menu, you can set:
■ Wallpaper: selects a personal background as defined in the
Picture name option.
■ Picture name: select s a JPEG picture as a wallpaper.
■ Font outline: emphasizes the black on-screen texts.
■ Color scheme: selects another pre-defined menu header color.
■ Cursor color: select s another pre-defined cur sor color.
With the Previous settings option, you can delete the changes
and recall the latest settings.
THE APPEARANCE MENU
66
Chapter 10
SOUND MENU
PLAYMODE MENU
In the Sound menu, you can set your personal preferences for:
■ Volume: sets the overall sound level.
■ Bass Boost: increases the current Bass level.
■ Bass: sets the lower sound frequencies.
■ Treble: sets the higher sound frequencies.
■ Balance: sets the balance between the left and right speaker.
With the Reset option you can return to the initial factory
settings.
THE SOUND MENU
In the Audio playback you can set your preferences for:
■ PlayMode: sets the playback mode to Singl e, Fo ld er, All, Queue
(during the playb ack of t he song , you can sele ct t he next song fo r
playback), or Scan (plays back only the intro of each song).
■ Repeat/Shuffle: sets the playback order to Normal, Repeat or
Shuffle.
■ Intro duration: sets playback time for ea c h intr o .
In the Video playback you can set your preferences for:
■ PlayMode: sets the playback mode Single, Folder and All.
■ Repeat/Shuffle: sets the playback to Normal or Repeat.
THE PLAYMODE MENU
Page 37
67
System Setup
CLOCK MENU
POWER MENU
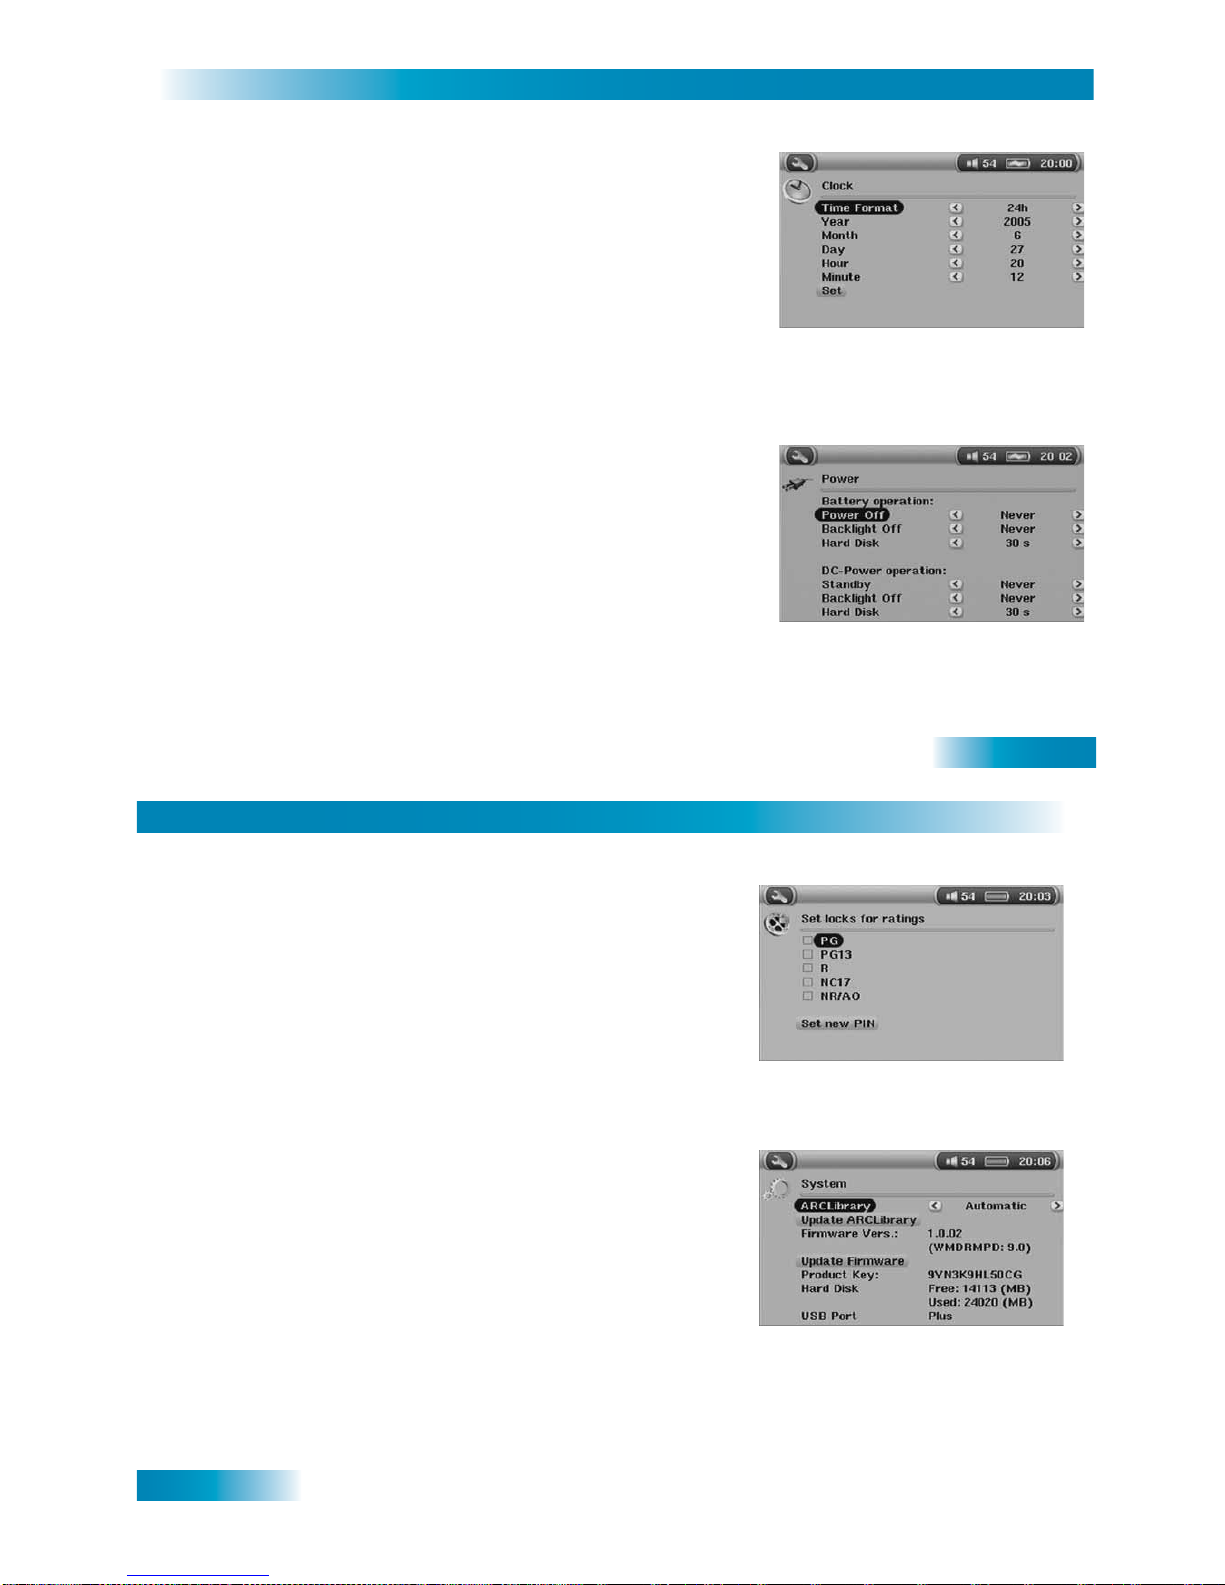
In the Clock menu, you can set the local time:
■ Time Format: sets the 24 hour or 12 hour clock.
■ Year: sets the current year.
■ Month: sets the current month.
■ Day: sets the current da y.
■ Hour: sets the current hour.
■ Minute: sets the current minute.
With the Set option you must confirm the changes before they
become active.
THE CLOCK MENU
In the Power menu, you can set the power save mode for
battery operation as well as for DC-power operation:
■ Power Off: Battery operation only, sets the inactive usage time
before the PocketDISH completely shuts down automatically.
■ Backlight Off: sets the inactive usage time before the
PocketDISH turns off the display only.
■ Hard Drive: sets the inactive usage time be fore the Poc ketDISH
turns off the har d drive only. Note that this setting will af fect the
response time for file access.
■ Standby: DC- Power operat i on onl y, sets the inactiv e usage ti me
before the PocketDISH goes into standby automatically.
THE POWER MENU
68
Chapter 10
RATING LOCKS
SYSTEM MENU
In the Rating locks menu, you can set your Rating locks and
change your Password:
■ PG: Parental Guidance suggested (maybe not for all ages).
■ PG13: Parents strongly cautioned (not for under age of 13).
■
R
: Restricted, guidance suggested (maybe not for under age of 17).
■ NC17: Not admitted for under age of 17.
■ NR/AO: Not Rated - Adults Only.
With the Set new Password option, you can change the Password.
THE SYSTEM MENU
In the System menu, you can set or review:
■ ArcLibrary: set the update method.
With the Update ArcLibrar y option, you can manua lly update the
file system after you have transferred files to the PocketDISH.
■ Firmware version: to review the current software version.
With the Update Firmware opt ion, you can manually upda te the
software version once it is downloaded in the PocketDISH.
■ Product key : to review the product key that is required when
you buy a game or need help from the Customer Se rvice Center.
■ Hard Drive: to review the Free/Used status of the hard drive.
■ USB Port: to review the USB port status.
THE SYSTEM MENU
Page 38
69
System Setup
INSTALL A PERSONAL WALLPAPER
1 Look up a photo as described in the The Photo Album - View a Compatible Photo or Image
on page 41.
2 When the photo (image) is on-screen, press the upper Setup key to open the Setup menu.
3 Select File manage ment, press the ce nter key, select Save as wallpa per and press the center
key again.
4 Press OFF repeatedly to exit the session.
TO CHANGE THE WALLPAPER SETTINGS
1 On the desktop, press the upper Setup key to access the Setup menus.
2 Use the upper an d bo ttom Setup key to select the Display setup screen option and press the
center Setup key.
3 In the Setup menu, select the Appearance option and press ON.
4 In the Appearance menu, select your wallpaper (Wallpaper: On, Picture name: as desired).
5 Change the Font outline, Color scheme and Cursor color as appropriate.
6 Press OFF repeatedly until the desktop displays.
SELECT APPEARANCE MENU SELECT WA LLPAPER SELECT PICTURE NAME
70
Chapter 10
SOFTWARE UPGRADES FROM THE INTERNET
1 Download the latest software version from www.archos.com. to you computer.
2 Connect the PocketDI SH to the comp uter. Note that the "USB cable att a ch ed" p op-up displa ys.
3 On the computer, locate the PocketDISH drive and double click.
4 Note that a file called UPD ATE_AV700E.AOS is present.
5 On the computer, unzip the new software and copy it onto the PocketDISH drive.
6 When prompted, overwrite the current file.
7 In the PC system tray ( nex t to the clock), locate a nd click the "Safel y r e mov e Hardware" icon.
8 Safely disconenct the USB cable from the PocketDISH and do not touch any keys.
9 Note that the PocketDISH automatically installs the new software.
10 Wait until the desktop displays.
.
CONFIRM FILE REPLACEMENT DISCONNECT THE POCKETDISH UPDATE FINISHED
Page 39

71
TROUBLESHOOTING
This chapter provides help for questions or problems you may have.
•POWER
•DISH N
ETWORK
•CONNECTIONS
•FILES
•GAMES
•MULTIMEDIA
•COMPUTER
•IF NOTHING HELPS
Troubleshooting
Tips and Tricks
72
Chapter 11
Power
Question Possible Cause How to Resolve
1 The battery does not last
as long as I ex pected.
The unit has been connected
to an external device.
■
When connected to an
external device, the
PocketDISH uses more
power than normal.
Therefore, always connect
the PocketDISH to power to
prevent an unwanted
shutdown.
2 The PocketDISH switches
off automatically.
The battery power is down. ■
Connect the AC/DC adapter
that came with the
PocketDISH.
Power settings are set to save
battery power.
a.Turn on the PocketDISH.
b.Select the Setup icon.
c.Press ON once.
d.Select the Power icon.
e.Press ON once.
f. Set the Battery / DC power
operation options to a
convenient value.
g.Press OFF twice or u ntil the
desktop displays.
Page 40

73
Troubleshooting
Question Possible Cause How to Resolve
3 The display turns black
after a few seconds.
Power settings are se t to save
battery power.
a.Turn on the PocketDISH.
b.Select the Setup icon.
c.Press ON once.
d.Select the Power icon.
e.Press ON once.
f. Set the Battery / DC power
operation options to a
convenient value.
g.Press OFF twice or until the
desktop displays.
4 It seems that the battery
does not charge.
You did not use the correct
AC/DC adapter.
■
You can only use the AC/DC
adapter that came with the
PocketDISH.
You did not install the AC/DC
adapter correctly.
■
On the PocketDISH, make
sure the CHG indicator is on.
■
Make sure the connections
are made correctly.
General power failure. ■
Check your circuit breaker
and make sure power is
available.
74
Chapter 11
DISH Network
Question Possible Cause How to Resolve
4 It seems that the battery
does not charge.
LiPo battery is worn out.
■
Please contact our Customer
Service Center.
5 Can I use PocketDISH and
AC/DC adapter abroad?
■
Yes you can. The AC/DC
adapter can be used between
100Vac-240Vac / 50Hz-60Hz.
Question Possible Cause How to Resolve
1 I cannot transfer the DISH
Network content from the
PocketDISH to another
device.
DISH Network conten t is
encrypted and meant for
private use only.
■
This is normal. The content
that you have subscribed to
cannot be transferred to
another device.
2 I cannot find my DISH
Network audio recordings.
These recordings are listed in
the Video folder of the
PocketDISH.
■
This is normal. On the
receiver, the
DISH Network
audio
recordings are also
saved in the “My Recordings”
list.
3 I don’t hear any sound from
my headset.
The in-line volume control of
the headset is set to minimum.
■
Adjust the in-line volume
control to a higher level until
sound is heard.
Page 41

75
Troubleshooting
Connections
Question Possible Cause How to Resolve
1 There seems to be no
connection between
devices.
Your cable might be damaged.
■
Use another cable.
2 The USB cable does not fit
between the external
device and the
PocketDISH.
You did not use the USB
adapter cable.
■
Install the USB adapter cable
between the external device
and the PocketDISH.
3 I cannot recor d from m y TV
or audio device.
You have made the wrong
connections.
a.Install the docking station
first.
b.Install the AV-cable into the
AV in connection.
c.Ma tch the colors of the red
and white RCA connectors.
4 There is no video/audio on
my TV or audio device.
You have made the wrong
connections.
a.If connected, check the
docking station connections.
b.Install the AV-cable into the
AV out connection.
c.Ma tch the color s of the RCA
connectors.
5 I don’t hear any sound from
my headset.
The in-line volume control of
the headset is set to minimum.
■
Adjust the in-line volume
control to a higher level until
sound is heard.
76
Chapter 11
Question Possible Cause How to Resolve
6 The PocketDISH content
does not display on my TV
screen.
On the PocketDISH, you did
not select the corre ct Video out
option.
a.Press and hold the TV/LCD
key for at least three
seconds.
b.Now the TV screen displays.
c.Use the PocketDISH ke ys or
the PocketDISH remote
control unit as usual to select
your video.
d.On shut down, the
PocketDISH automatically
reverts to its own LCD
screen.
7 Are USB hubs supported?
■
The PocketDISH will only
work correctly when directly
connected to the computer’s
USB connector.
Page 42

77
Troubleshooting
Files
Question Possible Cause How to Resolve
1 I cannot play a file. You have a file format that is
not supported by the
PocketDISH.
■
Use the MPEG-4 translator or
Windows Media Player to
convert your multimedia file
into a playable format.
■
PocketDISH only supports
the formats as specified in
this manual.
You are limited by the Rating
locks.
■
Enter your Password to view
the file.
2 I cannot see a file but I
know it must be there.
You have a file format that is
not supported by the
PocketDISH.
■
On the desktop, select the
Browser icon and review the
folder. Unsupported files
should be transferred to and
kept in the Data folder (mass
storage).
3 I cannot play i-Tunes You have purchased protected
(Apple-only encr ypted) music.
■
There is no solution.
78
Chapter 11
Games
Multimedia
Question Possible Cause How to Resolve
1 I cannot install new games. You do not have an Archos
licensed game.
■
Only use Archos licensed
games.
2 The game does not play all
levels (restricted use).
You are using a playable
demo.
■
Buy the full version from
Archos.
3 Where can I buy games? ■
Please visit on the Internet
www.archos.com
Question Possible Cause How to Resolve
1 I cannot transfer files from
my external device (e.g.
camera) to the
PocketDISH.
The external device is not a
USB generic mass storage
device. It needs drivers to
operate correctly.
■
You only can transfer files
from generic USB mass
storage devices to the
PocketDISH.
■
Transfer the files first to a
computer and from there onto
the PocketDISH.
2 I cannot synchronize with
Windows Media Player.
You only can synchronize from
Windows Media Player to your
PocketDISH.
■
In Windows Media Player
locate the Sync tab and follow
the on-screen instructions.
Page 43

79
Troubleshooting
Computer
Question Possible Cause How to Resolve
3 I cannot translate a fil e i nto
a format for the
PocketDISH.
Windows Media Player cannot
translate the file b ecause it is a
protected file.
■
There is no solution for this
issue.
If your problem or question is not listed in this section, please refer to the user’s guide that came with
your computer or consult your computer retailer for advice.
Question Windows Mac
1 Which operating system is
supported?
Microsoft Windows ME/2000/
XP or higher.
Mac OS 10.2.4 or higher
2 Which USB drivers do I
need?
The PocketDISH acts as a
mass storage device that is
recognized by the listed
operating systems.
The PocketDISH acts as a
mass storage device that is
recognized by the listed
operating systems.
3 The computer does not
recognize the PocketDISH.
Make sure the USB driver s that
come with the computer’s
operating system are installed
completely.
Make sure the USB driv ers that
come with the Mac operating
system are installed
completely.
80
Chapter 11
Question Windows Mac
4 File transfer seems to be
slow.
Your computer might only be
USB 1.1 compatib le whic h has
a lower transfer speed than
USB 2.0.
Your computer might only be
USB 1.1 compatible which has
a lower transfer speed than
USB 2.0.
5 Where can I get additional
technical support?
www.microsoft.com www.apple.com
6 My PocketDISH or
computer has strange file
names.
You have not disconnected the
PocketDISH properly.
In the PC
system tray (next to the clock),
locate and click the "Safely
remove Hardware" ico n.
You have not disconnected the
PocketDISH properly. In the
Finder, please use the Eject
button that display s b ehi nd the
PocketDISH drive.
7 On the PocketDISH, I see
files that I did not create.
This is normal, sometimes the
computer transfers files for
proper operation of the
devices.
This is normal, s ometimes the
computer transfers files for
proper operation of the
devices.
8 I have trouble installing
Windows Media Player 10.
You are not running
Windows XP or higher. Use
Windows Media Player 9 or
upgrade to Windows XP.
You cannot use the Windows
Media Player, please use the
Mac iTunes player together
with the iT unes plug-in that you
can download from
www.archos.com.
Page 44

81
Troubleshooting
If nothing helps
Question Possible Cause How to Resolve
1 The PocketDISH is frozen,
none of the buttons work.
You have activated the “Lock
keyboard” option.
■
Press the bottom Setup key
until the padlock icon is
selected.
■
Press the center Setup key to
unlock the keys.
■
Press and hold OFF for at
least 10 seconds or until the
PocketDISH shuts down.
■
If you still need assistance
after you have consulted the
troubleshooting section, call
Customer Service Center at:
1-877-300-8879 (toll free).
2 I forgot my Password. ■
Call the Customer Service
Center at:
1-877-300-8879 (toll free).
82
Chapter 11
NOTES
Page 45
A-1
APPENDIX
This appendix informs you about warranty, compliance and agreements.
•EXTENT OF LIMITED WARRANTY
•LIMITATIONS OF WARRANTY
•LIMITATIONS OF LIABILITY
•LOCAL LAW
• FCC COMPLIANCE
•SOFTWARE DOWNLOADS
• LCD PIXEL POLICY
•COPYRIGHT AND TRADEMARKS
•IF YOU NEED ASSISTANCE
A-2
Appendix
A
EXTENT OF LIMITED WARRANTY
Archos warrants to the end user customer that Archos products will be free from defects in materials and
workmanship for the duration of two years, which begi ns on the date of pur chase by the customer. Customer
is responsible for maintaining proof of date of purchase.
For software product s, A rchos' limited warr anty appl ies onl y to a fail ure to e xecute pro gramming i nstruction s.
Archos does not warrant that the operation of any product will be uninterrupted or error free.
Archos' limited warranty covers only those defects which arise as a result of normal use of the product, and
do not apply to any:
■ improper or inadequate maintenance or modification.
■ software, interfacing, media, parts, or supplies not provided or supported by Archos, or
■ operation outside the product's specifica ti ons.
If Archos receives, during the app licable warran ty period, no tice of a defect in any hardwar e product, whi ch is
covered by Archos' warranty, Archos shall either repair or replace the defective product at Archos' option.
If Archos is unable to repair or replace, as applicable, a defective product which is covered by Archos'
warranty, Archos shall within a reasonable time after being notified of the defect, refund the purchase price
for the product.
Archos shall have no obligation to repa ir, replace or refund until the customer returns the defective product to
Archos.
Any replacement product may be either new or like-new, provided that it has functionality at least equal to
that of the product being replaced.
Archos' limited warranty is only valid in the country of purchase.
This Limited Warr anty i s a l egal do cume nt. Keep i t i n a safe pl ace. Remember to retain your Bill of Sale
for warranty service! Any items returned without a copy of the Proof of Purchase will be considered out
of warranty.
Page 46

A-3
Warranty, Compliance and Agreements
LIMITATIONS OF WARRANTY
To the extent allowed by local law, neither Archos nor its third party suppliers make any other warranty or
condition of any kind, whether express or implied, with respect to the Archos products, and specifically
disclaim the implied warranties or conditions of merchantability, satisfactory quality, and fitness for a
particular purpose.
LIMITATIONS OF LIABILITY
To the extent allowed by local law, the remedies provided i n th i s Warranty Statement are the customer's sole
and exclusive remedies.
To the extent allowed by local law, except for the obligations specifically set forth in this warranty statement,
in no event shall Archos or it's third party suppliers be liable for direct, indirect, special, incidental, or
consequential damages, whether bas ed on cont act, tort, or any other legal theory and wheth er advised o f the
possibility of such damages.
LOCAL LAW
This Warranty Statement gives the customer specific legal rights. The customer may also have other rights
that vary from state to state in the United States, from province to province in Canada, and from country to
country elsewhere in the world.
To the extent that this Warranty Statement is inconsistent with local law, this Warranty Statement shall be
deemed modified to be consistent with such local law. Under such local law, certain disclaimers and
limitations of this Warranty Statement may not apply to t he cust omer. For example, some states in the United
States, as well as some governments outside the United States (including provinces in Canada), may:
■ preclude the disclaimers and limitations in this Warranty Statement from limiting the statutory rights of a
consumer (e.g., the United Kingdom).
■ o therwise restrict the ability of a manufacturer to enforce such discla ime r s or limitations, or
■ grant the customer additional warranty rights, specify the duration of implied warranties which the
manufacturer cannot disclaim, or not allow limitations on the duration of implied warranties.
A-4
Appendix
FCC COMPLIANCE
This equipment has been tested and found to comply with limits for a Class B digital device, pursuant to
Part 15 of the FCC Rules. These limits are designed to provide reasonable protection against harmful
interference in a residential installation. This equipment generates, uses and can radiate radio frequency
energy and, if not install ed and used in accordan ce with instructi ons, may cause harmful i nterference to r adio
communications. However, there is no guarantee that interfere nce will not occur in a particular installation. If
this equipment does cause harmful interference to radio or television reception, whic h can be de term i ned by
turning the equipment off and on, the user is encouraged to try to correct the interference by one or more of
the following measures:
■ Reorient or relocate the receiving antenna.
■ Increase the separation between the equipment and receiver.
■ Connect the equipment into an outlet on a circuit different from that to which the receiver is connected.
■ Consult the dealer or an authorized service center technician for help.
SOFTWARE DOWNLOADS
EchoSt ar Technologies Corporat ion as desire s to supply you with sof tware updates to keep your Po cketDISH
as up-to-date as technically possible. EchoStar Technologies Corporation makes no warranties with respect
to the use of the supplied software downloads and specifically disclaims any implied warranties, including
without limitation any warranties of mer chantability or fitness for any particular purpose.
EchoStar Technologies Corporation reserves the right, for whatever reason, to revise, change or modify the
software that can be used by your PocketDISH without the obligation to notify or warrant any person or
organization of such change. Therefore, please check the downloads that come via the EchoStar satellite or
visit the internet site www.archos.com, on a regular basis, for the latest software available.
Modifications not authorized b y the manufacturer or EchoStar Technologies Corporatio n m ay voi d users
authority to operate this device. FCC Part 15 - Operation is subject to the following two conditions:
1 This device may not cause harm fu l interference.
2 This device must accept any interference received including interference that may cause undesired operation.
Page 47

A-5
Warranty, Compliance and Agreements
LCD PIXEL POLICY
The LCD screen on your PocketDISH AV402E unit has been manufactured to rigorous standards to provide
a high quality viewing experience. Neverthel ess, your LCD screen may have slight imperfections. This is not
particular to the Archos screen, but to all devices which have LCD screens regardless of the original
manufacturer of the LCD. Each product ven dor guarante es that his screen will cont ain no more than a cert ain
number of defective pixels. Each screen pixel cont ains three dot element s (Red, Blue, and Green) . One or all
of the dots in a given pixel ma y be stuck on or stuck of f. A sing le dot s tuck of f i s the least no ticeable . All th ree
dots of a pixel stuck on is the most noticeable. Archos guarantees that its PocketDISH AV402E screen will
have no more than 1 defective pixel (regardless if that pixel has one or more defecti ve dots). Thi s means that
during the period of guarantee for your country or jurisdiction, if the screen on your product has two or more
defective pixels, Archos will repair or replace your PocketDISH AV402E product at its cost. Thus, one
defective pixel is not grounds for replacement or repair of the product.
COPYRIGHT AND TRADEMARKS
© 2005 EchoStar Technologies Corporation. All rights reserved worldwide. This user’s guide has been
provided pursuant to an agreement containing restrictions on its use. This user’s guide is also covered by
Federal Copyright Law.
No part of this user’s guide may be copied, distributed, transmitted, stored in a retrieval system or translated
into any human or computer language, in any form or by any other means, electronically, mechanically,
magnetically, manually or otherwise or disclosure to third parties without the express written permission of
EchoStar Technologies Corporation.
EchoStar Technologies Corporation is possibly in the possession of patents, requests for patent approval,
trademarks, copyrights and other intellectual property with respect to the contents within this user manual.
The submission of this User’s guide does not imply you have got any license or other legal right for the use of
the here above mentioned without the express written permission of EchoStar Technologies Corporation.
All other trademarks are the property of their respective owners or companies.
A-6
Appendix
IF YOU NEED ASSISTANCE
1 Call the Customer Service Center at
1-877-300-8879 (toll free)
.
2 A Customer Service Representative will assist you.
3 Returned equipment must be packaged properly, using either the original shipping materials or the pack-
aging in which the replacement equipment is shipped. Include a copy of the Bill of Sale. Any items
returned without a copy of the Pro o f of Pu r cha s e w ill be considered out of warranty. Follow the instructions given to you by the Customer Service Representative.
 Loading...