

Page 1

Remote Control
User Guide
Remote Control
User Guide
SAT
Page 2

Page 3

Table of Contents
Quick Setup
Confirm Your Receiver Model ...............................................S-1
Install Your Selected Key.......................................................S-2
Insert the Batteries.................................................................S-2
Making the Remote Work with Your Receiver .......................S-3
Program the Remote to Control Your TV...............................S-4
Programming the Recover Button for TV2 Operation............S-5
Placing Your Remote in Limited Mode...................................S-6
Operation
If You Lose Your Picture ........................................................S-6
SAT Mode..............................................................................S-7
TV Mode................................................................................S-8
VCR Mode.............................................................................S-9
Remote Control Overview......................................................... 1
Using the Guide........................................................................ 1
Remote Control Modes............................................................. 1
How the Remote Communicates.............................................. 2
Programming for Other Equipment...........................................2
Combination Equipment (for example, TV/VCR)......................2
Limited Mode............................................................................ 3
Fixed Channel Mode................................................................. 3
Setting (or Changing) Fixed Channel Mode for TV/VCR..........3
Removing Fixed Channel Mode for TV/VCR............................ 3
Programming Using Equipment Code Tables...........................4
Scanning for Equipment Codes................................................ 6
Switching Between TV and Amplifier Volume
Control................................................................................ 7
Programming the Remote to Control a Second Receiver
in AUX Mode......................................................................8
Reading Out the Remote Control Codes.................................. 9
Discrete Codes for Learning Remotes.....................................11
Avoiding Remote Conflicts...................................................... 12
Changing the Remote and Receiver Address ........................ 12
Changing the UHF Frequency Using the A/B Switch—
DISH Player-DVR 942, Duo ViP
DuoDVR™ ViP
DuoDVR™ ViP
Setting Up a TV1 UHF Pro Remote for the
DuoDVR™ 522 and DuoDVR™ 625 Only ....................... 14
Equipment Codes ................................................................... 16
Troubleshooting...................................................................... 24
Limited Warranty..................................................................... 26
Your Remote Control Codes..........................Inside Back Cover
®
622 DVR, and
®
722 DVR Only ...................................... 13
®
222,
Page 4

Use the key that
looks like this
Use the key that
looks like this
1
If your
receiver
looks like
one of
these...
If your
receiver looks
like one of
these...
If your
receiver looks
like one of
these...
If your
receiver looks
like one of
these...
If your
receiver looks
like this...
Use the key that
looks like this
DISH 501 & DISH 508
/ DISH Player-DVR 510
DISH 6000
DISH 721
DuoDVR™ 522
DuoDVR™ 625
Use the key that
looks like this
S-1
Solo ViP® 211k
DISH 411 & Solo ViP
®
211
then
Select the Right Key
Remote keys are included in this replacement remote kit.
Quick Setup
Keys have two sides.
Look on both sides to find
the right key for your remote.
OR
IR
UHF
Pro
OR
IR
UHF
Pro
Solo DVR ViP® 612
Use the key that
looks like this
Confirm Your Receiver Model
Duo ViP® 222 & DuoDVR™ ViP® 622
DuoDVR™ ViP
®
722
DISH JVC IRR
The remote functions as needed in regards to watching your
satellite television and VCR. It does not rewind or fast forward
while watching a recorded VCR tape.
Page 5

A
B
1
S-2
A
B
Battery
Battery
1
A
B
Battery
Battery
Separate the key
from the remote
by inserting your
thumbnail or a coin
in the crease.
Remove the key by
grasping at the bottom.
Insert face up
the key you
selected on
the previous
page.
Pull the
remote
battery
cover off.
Note: If you are using the blue TV2 key that comes
already installed in your remote, skip this step and
proceed with the next step (Insert the Batteries).
Install Your Selected Key
2
Insert the Batteries
3
1 2
1
Replace
the
remote
battery
cover.
Insert 4 AAA
batteries,
making sure
to match the
plus (+) ends
with the plus
markings on
the battery
case.
2
Quick Setup
3
Page 6

S-3
Quick Setup
RECORD
Turn your receiver and
TV on, and press
SYSTEM INFO on the
front of the receiver.
Confirm that you
see the System
Information screen.
Press RECORD on
your remote. The remote
address probably
changes on the screen.
Using your remote, select Done on the
System Info screen to confirm that
your remote operates your receiver.
If your remote has a blue number 2
key, you may need to go to your
remote TV2 location to confirm your
remote operates your receiver. If this
is not working, go back to step
5.
Making the Remote Work
With Your Receiver
4
3
2
1
5
6
4
REMOTE
ANTENNA
If you installed a
UHF key, make sure
the UHF antenna is
installed on the back
of the receiver.
Green
(not black)
UHF Pro Symbol
If you installed one of these keys,
continue with step 2 on this page.
If you installed this
key, go to page 14
inside this guide.
Page 7

S-4
Quick Setup
Turn your
TV on.
Press & hold the
TV Mode button
until all Mode
buttons light up.
Press
POWER.
Press the UP ARROW
on the remote repeatedly
(about 1 press per second)
until your TV turns off.
Press
POUND.
The TV Mode button
flashes three times.
Press the POWER
button to turn the TV on
and try other buttons
to make sure the code
works. If you want to try
another code, start over
from step 1.
Program the Remote to
Control Your TV
1
2
3
4
5 6
Page 8

S-5
Quick Setup
Programming the
Recover Button for
TV2 Operation
For TV2 Remote Controls on
DuoDVR™ 522, DuoDVR™ 625,
Duo ViP® 222, DuoDVR™ ViP® 622 DVR,
and DuoDVR™ ViP® 722 DVR Receivers
Press
STAR.
Press
POUND.
1 2
Press & hold the
TV Mode button
until all Mode
buttons light up.
Enter the channel
number you tune
your TV to when you
watch satellite
programming.
4
3
Use the RECOVER button as described in
If You Lose Your Picture on the next page (S-6).
Programming your RECOVER button allows you
to easily regain satellite programming if you
accidentally change TV channels or inputs.
Page 9

Quick Setup/Operation
S-6
SELECT
Press and hold RECOVER until all
mode buttons light up.
If you see System Info, live
television, or the standby
screen, proceed to step 4.
Otherwise, continue to step 3.
Press RECOVER again & wait until
the mode lights stop flashing. If you
see System Info, live television, or
the standby screen, go to step 4. If
not, repeat this step until you do.
Press SELECT to resume watching TV.
Use the RECOVER button to get back to watching
satellite programming if you accidentally change
channels or inputs on your TV.
Placing Your Remote
in Limited Mode
If You Lose Your Picture
(How to Use the RECOVER Button)
Press
POUND.
Press & hold the
TV Mode button
until all Mode
buttons light up.
2
3
1
1
2
3
4
Press the
PAGE UP
button.
PAGE
To take the remote out of Limited Mode, use the PAGE DOWN
button instead of the PAGE UP button in step 2.
(Your screen may be different)
Limited Mode locks out all the TV mode operations except
for TV power, Mute, and Volume. This prevents you from
accidentally tuning away from satellite programming.
Page 10

S-7
Operation
Remote Operation
SAT Mode
SAT
SAT
Remote key may
be different than
what is shown here
Receiver Power
& TV Power
Receiver Menu
Program Guide
Arrows/Select
Buttons
View Satellite
Programming
Digital Video
Recorder (DVR)
Buttons
Picture-In-Picture
(PIP) Buttons
Number Buttons
Top button turns the
receiver on and off
Bottom button turns
the TV on and off
Programming required
(see S-4)
Channel up/down,
navigate through
menus/guides and
select a desired
option
Exit out of any menu/
guide and go back to
viewing live TV
DISH
Explore interactive
TV features
Browse
See what is on other
channels while
watching TV
Enter a channel
number or select
menu items
Search
Search for a program
Watch two separate
programs at once
(in Single Mode if available
on your receiver)
Recover
Recovers satellite
programming if your
TV input or channel
has changed
Format
Format the picture
to the desired width
to match the program
you are viewing
(this feature varies by receiver)
Display current and
future satellite
program listings
Page Buttons
Page up/down in
menus
Control TV volume
Programming required (see S-4)
Access receiver
features and settings
Themes
Search for programs
using Themes
Recall
Go back to last
channel viewed
Info
Display program info
Pause live TV and
play or record
programming
Volume & Mute Buttons
To use the features described in this section, make
sure you are in SAT mode by pressing the SAT Mode button.
Note: Some features may not be available depending on your receiver model.
Press this
button for
SAT Mode
Page 11

S-8
Operation
Remote Operation
TV Mode
TV Power
TV Menu
Up/Down Arrow
Buttons
Picture-In-Picture
(PIP) Buttons
Number Buttons
Top & bottom
button
Turn TV on/off
Channel up/down
on TV
Enter a desired
channel number
on TV
Display PIP features
on some TVs with
PIP capabilities
Volume
Control TV
volume
Access menu
features available on
some TVs
TV/Video
Switch between
TV inputs
(not available
on all TVs)
Mute
Turn TV volume
on or off
Recall
Go back to last
TV channel viewed
To use the features described in this section, make
sure you are in TV mode by pressing the TV Mode button.
Remote programming is required. See S-4 for instructions.
TVTV
TV
Note: Remote operation is different on DISH Network TVs.
See your DISH Network TV User's Guide for proper operation.
Press this
button for
TV Mode
Remote key may
be different than
what is shown here
Page 12

Remote key may
be different than
what is shown here
S-9
Operation
Remote Operation
VCR Mode
VCR
VCR
VCR/DVD Power
& TV Power
TV/Video
Up/Down Arrow
Buttons
FWD
Number Buttons
Top button turns
the VCR/DVD
player on and off
Bottom button turns
the TV on and off
Channel up/down
on VCR
Forward a videotape
or DVD
Play
Play a videotape
or DVD
Pause
Pause a videotape
or DVD
Enter a desired
channel number
on VCR
Switch VCR between
its TV & VCR mode
Back
Rewind a videotape
or reverse a DVD
Stop
Stop playing
or recording a
videotape, or stop
playing a DVD
Record
Record on a
videotape
To use the features described in this section, make
sure you are in VCR mode by pressing the VCR Mode button.
You can use this mode to operate your DVD player instead of a VCR.
Remote programming is required. See page 2 for instructions.
Press this
button for
VCR Mode
Page 13

REMOTE CONTROL OVERVIEW
Great Idea: Whenever you finish using
other equipment (TV, VCR, DVD, etc.) be
sure to put the remote back in SAT mode.
Use this full-function remote to control a variety of DISH Network
receivers. Also, you can program the remote to control most of the
popular brands of audio/video equipment like a TV, VCR, DVD player,
or a second DISH Network satellite receiver. See Programming for
Other Equipment on page 2.
Note: This remote control may have features not used by your
receiver.
USING THE GUIDE
This guide makes it easy to set up and use your remote control. By now
you’ve noticed that the pages at the beginning of this User Guide
contain information on quick set up and remote control operation.
The rest of the guide contains in-depth information to help you get the
most from your remote control, including controlling other equipment
like TVs, VCRs, and DVD players.
REMOTE CONTROL MODES
Use the remote control’s mode buttons to set the remote to the correct
mode for the equipment. Be sure to program the remote to control other
equipment as described on page 2.
To change the mode, press the button for the equipment you want to
control. The mode button lights for two seconds to show you’ve set the
remote to that mode.
1
Page 14

If you program the remote to control other equipment, refer to the
following for remote control operation instructions:
• TVs, page S-8 (at the beginning of this guide).
• VCRs and DVD players, page S-9.
• DISH Network satellite receivers, page S-7.
• Stereo equipment uses only these buttons: SELECT (to change
inputs), MUTE, VOLUME, and POWER.
HOW THE REMOTE COMMUNICATES
Depending on how the remote is set up, the remote control may use
UHF radio signals, IR signals, or both to control the receiver. However ,
only IR signals are used to control other equipment.
• IR signals travel short distances (up to 40 feet) and cannot go
through walls or other solid objects. Point the remote control
directly at the equipment you want to control, with no objects to
block the signal path.
• UHF signals travel longer distances than IR signals and can go
through walls and other solid objects. Because these signals
travel so far, the receiver may respond to signals from other
nearby remote controls. To handle this problem, you may want to
change the remote and receiver addresses (see page 12).
• If you’re set up to use UHF, make sure that the UHF remote
antenna is attached to the receiver’s back panel R
ANTENNA input so it can receive the UHF remote signals.
EMOTE
PROGRAMMING FOR OTHER EQUIPMENT
Page S-4 at the beginning of this guide shows you how to program the
remote to control a TV. The following section uses a different method
to program the remote to control a TV or other equipment (such as a
VCR, DVD player, tuner , amplifier , or a second TV). You can program
the remote by either following the instructions in Programming Using
Equipment Code Tables on page 4, or the Scanning for Equipment
Codes procedure described on page 6.
COMBINATION EQUIPMENT (FOR EXAMPLE, TV/VCR)
When programming the remote to control combination equipment,
such as a TV/VCR or a TV/DVD, program the remote control in one
mode, and then repeat the procedure in the other mode. For example, to
program the remote to control a Magnavox TV/VCR using code 887,
follow the instructions to program the remote to control the TV using
2
Page 15

code 887, and then repeat the instructions for the VCR using code 797.
Put the remote in TV mode to use the TV or VCR mode to use the
VCR.
LIMITED MODE
You can program your remote control in Limited Mode to keep from
accidentally changing the channel on your TV or VCR. When Limited
Mode is enabled, you cannot select TV mode. If you press the TV
button while TV mode is programmed in Limited Mode, the TV button
flashes and the SAT button lights, telling you cannot switch to TV
mode. The remote then moves back to SAT mode.
When you use the remote to control your TV in Limited Mode, you are
only able to use the POWER, MUTE, and VOLUME buttons to
control your TV. Also, when you use the remote to control your VCR
in Limited Mode, you are only able to use the POWER and VCR
function buttons. The section Programming Using the Equipment Code
Tables has a step that tells the remote control to go into Lim ited Mode .
Also, a quick way to put the remote in Limited Mode is on page S-6.
Note: Limited Mode cannot be used with audio amplifiers.
FIXED CHANNEL MODE
You can program your remote control in Fixed Channel Mode to
automatically set the TV and/or VCR to a given channel when you
press either RECOVER or the SAT button.
SETTING (OR CHANGING) FIXED CHANNEL MODE FOR TV
AND/OR VCR
1 Press and hold the TV or VCR mode button until all four mode
lights illuminate.
2 Press the STAR key (* ). Enter a channel, using two or th ree digits
between 02 and 125. For example, to set channel 25, enter *25.
3 Press the POUND (#) key. The TV or VCR mode button flashes
three times.
3
Page 16

R
EMOVING FIXED CHANNEL MODE FOR TV AND/OR VCR
1 Press and hold the TV or VCR mode button until all four mode
lights illuminate.
2 Press the STAR (*) key followed by two zeros (*00).
3 Press the POUND (#) key. The TV or VCR mode button flashes
three times.
PROGRAMMING USING EQUIPMENT CODE TABLES
You can set up the remote to control other equipment using the
equipment code tables listed on page 16 and the modes as shown on
page 1. To control a receiver in AUX mode, see page 8.
Instructions Additional Information
1 Turn the equipment on. Use the equipment’s front panel
buttons or its remote control.
2 Find the brand name of the
equipment in the tables
starting on page 16.
3 Press and hold the mode
button until all the other
mode buttons light up, and
then let go of the button.
The mode button flashes.
4 For AUX mode only. Press
0 for a second TV, or 1 for a
second VCR, or 2 for a
tuner, or amplifier.
5 Enter one of the three-digit
equipment codes from the
table using the number
buttons.
4
If the brand isn’t listed, see
Scanning for Equipment Codes
on page 6.
For example, hold the TV mode
button for a TV until all of the
other mode buttons light. When
you let go, TV mode button
flashes.
This step is for programming
the kind of equipment that
should be programmed in AUX
mode. If you’re not
programming in AUX mode,
skip to step 5.
The three-digit equipment code
should be for the brand name of
your equipment that you found
in step 2.
Page 17

Instructions Additional Information
6 If you want to program
Limited Mode, press 1.
See Limited Mode on page 3 for
more information.
If not, skip to step 7.
7 Press POUND (#). If you entered the code
correctly, the mode button
flashes three times.
8 Press POWER to turn off
the equipment. If the
If the code works, the
equipment should turn off.
equipment does not turn
off, go to step 10.
9 Turn the equipment back
on and try some other
buttons to make sure they
For example, sometimes
POWER works when other
buttons don’t.
work. If the code works for
other buttons, stop here.
Note: If you have
programmed your remote in
Limited Mode, only the
MUTE and VOLUME
buttons work.
10 If the code doesn’t work,
repeat steps 3 through 9
with another equipment
Try every code listed for your
brand until one works for your
equipment.
code from the tables.
11 If you can’t find a code that
works, try Scanning for
Equipment Codes that
follows.
5
Page 18

SCANNING FOR EQUIPMENT CODES
Instructions Additional Information
1 Turn the equipment on. Use the equipment’s front panel
buttons or its remote control.
2 Press and hold the mode
button until all the other
mode buttons light up, and
then let go of the button.
The mode button flashes.
3 For AUX mode only. Press
0 for a second TV, 1 for a
second VCR, or 2 for a
tuner, or amplifier. Then
press the STAR (*) button.
4 Press POWER. This step puts your remote in
5 Press either the UP or
DOWN ARROW
repeatedly until the
equipment turns off.
For example, hold the TV mode
button for a TV until all of the
other mode buttons light. When
you let go, TV mode button
flashes.
This step is for programming
the kind of equipment that
should be programmed in AUX
mode. If you’re not
programming in AUX mode,
skip to step 4.
the scan mode.
As you press the UP or DOWN
ARROW, the remote tries each
code in the memory to see if it
can turn off your equipment.
When the equipment turns off,
you have found a code that
might work.
Note: The mode button for the
equipment flashes rapidly eight
times when you’ve scanned all
the codes for that equipment.
6 Press POUND (#). The mode button flashes three
6
times if you have entered the
code correctly. This step stores
the code you found.
Page 19

Instructions Additional Information
7 Turn the equipment back
on and try some other
buttons to make sure they
work.
8 If necessary, repeat this
procedure until you’ve tried
all the codes.
9 Once you find a code that
works, consider using
Limited Mode.
Press POWER to turn the
equipment back on. Try some
other buttons to make sure they
work. Sometimes POWER
works when other buttons
don’t.
Y ou may need to repeat the scan
to find the best code for your
equipment.
See page S-6, Placing Your
Remote in Limited Mode for
putting your remote in Limited
Mode.
SWITCHING BETWEEN TV AND AMPLIFIER VOLUME
C
ONTROL
When you set up the remote to control a TV, the MUTE and VOLUME
buttons control the TV volume, even if your remote control is in SAT
mode. However, if you want to use the AUX mode to control a tuner or
amplifier that has a volume setting, you can set up the remote to control
the tuner or amplifier’s volume instead of the TV volume while your
remote control is in SAT mode. Follow the instructions in the left
column to switch controlling volume in AUX mode. To change back to
controlling the TV volume in SAT mode, follow the instructions in the
right column.
Control Amplifier Volume Control TV Volume
1 Press and hold the AUX
mode button for three
seconds, and then let go of
it. The AUX mode button
blinks.
2 Press the POUND (#)
button.
1 Press and hold the TV
mode button for three
seconds, and then let go of
it. The TV mode button
blinks.
2 Press the POUND (#)
button.
7
Page 20

Control Amplifier Volume Control TV Volume
3 Press the plus (+) side of
the VOLUME button.
3 Press the plus (+) side of
the VOLUME button.
4 Press the 0 number button. 4 Press the 0 number button.
5 Press the POUND (#)
button.
The AUX mode button
flashes three times.
AKE SURE THE REMOTE
M
CONTROLS THE AMPLIFIER’S
VOLUME:
6 Press the SAT mode
button.
7 Press the plus (+) and
minus (-) sides of the
VOLUME button.
8 The equipment’s volume
changes and the AUX mode
button lights instead of the
TV mode button.
5 Press the POUND (#)
button.
The TV mode button
flashes three times.
M
AKE SURE THE REMOTE
CONTROLS THE TV’S VOLUME:
6 Press the SAT mode
button.
7 Press the plus (+) and
minus (-) sides of the
VOLUME button.
8 The TV’s volume changes
and the TV mode button
lights instead of the AUX
mode button.
PROGRAMMING THE REMOTE TO CONTROL A SECOND
ECEIVER IN AUX MODE
R
If you have another DISH Network satellite receiver installed, you can
use this remote in AUX mode to control it along with your new
receiver. When you program the remote to control the other receiver,
the remote sends out IR and UHF (not UHF Pro) signals to the receiver .
You can program the remote to control any other DISH Network
satellite receiver, exce pt for following:
• TV2 on Duo 322, DuoDVR 522 (also known as DISH Player-
DVR 522), DuoDVR 625 (also known as DISH Player-DVR
625), DISH Player-DVR 942, Duo ViP 222 (also known as ViP
222), DuoDVR ViP 622 DVR (also known as ViP 622 DVR) ,
and DuoDVR ViP 722 DVR (also known as ViP 722 DVR)
• DishPlayer 7100/7200
1 Turn on the other receiv er. Use the SYSTEM INFO button on the
front panel to open the System Info screen.
8
Page 21

Note: If you aren’t sure how to access the System Info screen or
if there isn’t a SYSTEM INFO button on the front panel of your
receiver, check your receiver’s User Guide.
Write down the address shown:
2 Press and hold the AUX button until all the other mode buttons
light up, and then let go of the button. The AUX button flashes.
3 Press the 3 button.
4 Use the NUMBER PAD to enter the address you wrote in
step 1.
5 Press POUND (#). The AUX button blinks three times.
6 Press RECORD to make sure the address in the remote matches
the address on the receiver.
READING OUT THE REMOTE CONTROL CODES
These instructions explain how to check the remote control code you
put in the remote control when you set it up. Be sure to write them in
the spaces provided on the inside back cover.
Instructions Additional Information
1 Press and hold the mode
button for the equipment
you want the remote to
control. When all the other
mode buttons light up, let
go of the mode button—
that mode button should
now be flashing.
2 Press the POUND (#)
button twice. The mode
button flashes the number
for each digit of the
equipment code, with a
pause between the groups
of flashes. A quick flash is
for zero.
For example, hold the TV mode
button for a TV until all of the
other mode buttons light. When
you let go, the TV mode button
flashes.
For example, if the code is 570,
the mode button flashes five
times, pauses, flashes seven
times, pauses, and quick flashes
for zero.
9
Page 22

Instructions Additional Information
For AUX mode, the first
group of flashes tells you
what type of device the
AUX mode controls, then
the following flashes tell
you each digit of the
equipment code. A quick
flash (zero) before the
three-digit code is for a TV ;
one regular flash is for a
VCR or DVD player; and
two flashes is for a tuner or
amplifier.
For a satellite receiver
programmed in AUX mode,
the group of flashes tells
you the address number.
For example, if the TV
code is 570, the AUX mode
button flashes once quickly,
pauses, flashes five times,
pauses, flashes seven times,
pauses, and quick flashes
for zero.
For example, if the AUX
mode button is set to
control a satellite receiver
with address 5, the AUX
mode button flashes five
times.
10
Page 23

DISCRETE CODES FOR LEARNING REMOTES
Note: Discrete codes are only used by IR remotes (either the TV1
remote or a universal remote).
Remote control discrete On and Off IR commands are used by
installers when programming macro commands into universal remotes.
Using an On-only or Off-only command is more effective than a toggle
On/Off command when trying to ensure the satellite receive r is reliably
in one state or the other. To use discrete power commands, complete
the following:
1 Program the DISH Network remote to the desired remote address
(see Changing the Remote and Receiver Address in the next
section).
2 Hold the SAT mode button until al l mode buttons light, then
release.
3 Press POWER (not TV POWER).
4 Press VOLUME UP for discrete power on, or VOLUME DOWN
for discrete power off.
5 Press any other button when done to end this procedure.
11
Page 24

AVOIDING REMOTE CONFLICTS
When your remote control uses UHF, you may exp erience interference
from other nearby remotes. In situations where neighbors are near
(apartments, townhouses, etc.), your receiver could be picking up
signals from your neighbors’ remotes. The instructions in this section
describe how to avoid remote conflicts.
CHANGING THE REMOTE AND RECEIVER ADDRESS
One quick way to avoid remote conflicts is by changing the address on
your remote and receiver. If you notice that your receiver is changing
channels or opening menus but you’re not using the remote control, a
quick change of address should fix the problem.
1 Press SYSTEM INFO on the receiver's front panel. The System
Info screen displays and shows the Remote Address.
Note: If you aren’t sure how to access the System Info screen or
if there isn’t a SYSTEM INFO button on the front panel of your
receiver, check your receiver’s User Guide.
Write down the remote address of the UHF remote:
2 Press and hold SAT on your UHF remote control (associated with
the TV which is having interference issues) for about three
seconds, until all of the mode buttons light up, and then let go of
SAT.
3 Use the NUMBER PAD to enter any number between 1 and 16,
but not the one you wrote in step 1.
4 Press POUND (#). If you entered the address correctly, SAT
flashes three times. Write down the number you entered in the
space provided on the inside back cover.
5 Press RECORD. Make sure the Remote Address you see on
the System Info screen is the same as the one you entered in step
3. If it isn't, the remote cannot control the receiver. Press
RECORD a second time.
6 Select Done to close the System Info screen.
12
Page 25
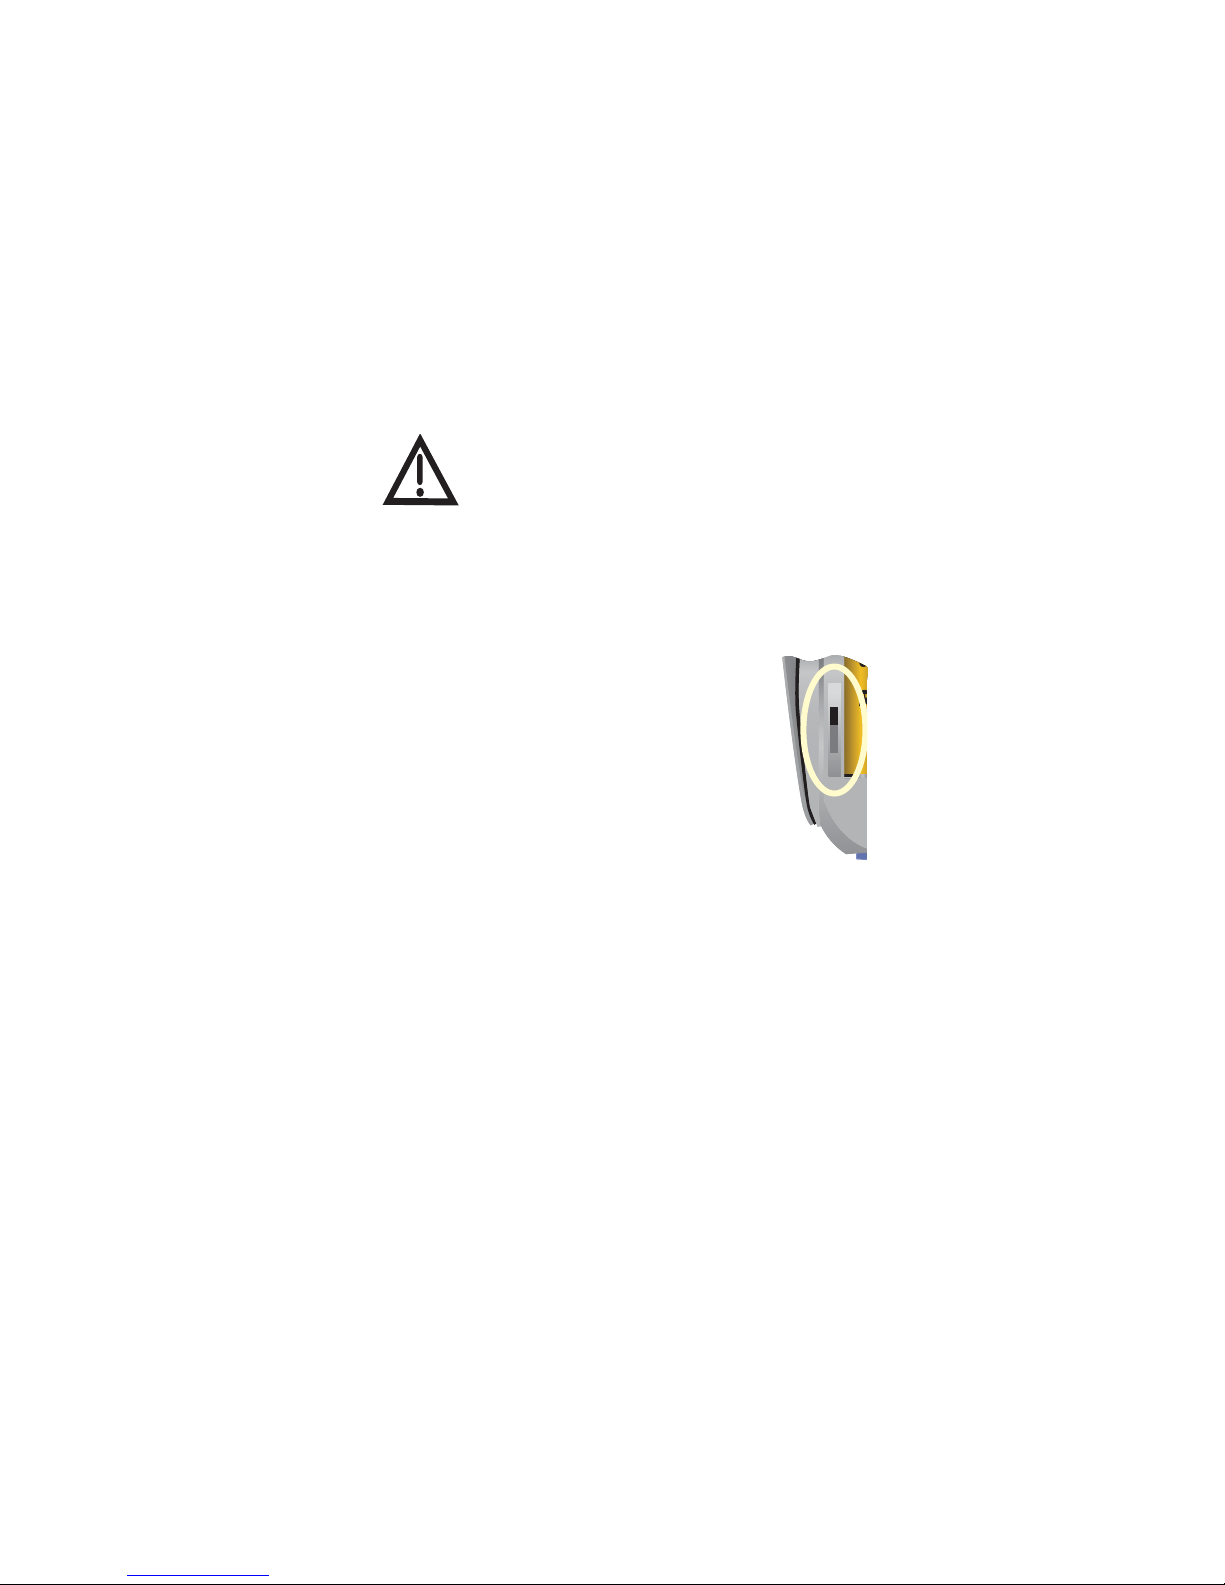
CHANGING THE UHF FREQUENCY USING THE A/B
Battery
A
B
WITCH—DISH PLAYER-DVR 942, DUO VIP 222,
S
UODVR VIP 622 DVR, AND DUODVR VIP 722
D
DVR O
Your remote has a switch to change the UHF frequency that your
remote control uses. It comes preset to the A position but you can
change the setting to the B position to lessen the likelihood of any other
UHF remote interfering with yours.
1 Remove the battery cover from the remote control.
2 Use a small screwdriver or a paper clip to carefully
change the setting.
3 Put the battery cover back on the remote control.
4 Use the SYSTEM INFO button on the front panel
to open the System Info screen.
5 Press RECORD on the remote control.
6 Make sure the remote address on the System Info
screen shows the correct band information:
NLY
All receiver models, except the DISH Player-DVR
942, ViP 222, ViP 622 DVR, and ViP 722 DVR,
must use switch position A or the remote does not
control the receiver.
• Switch Position A—IR/UHF Pro Band A
• Switch Position B—IR/UHF Pro Band B
13
Page 26
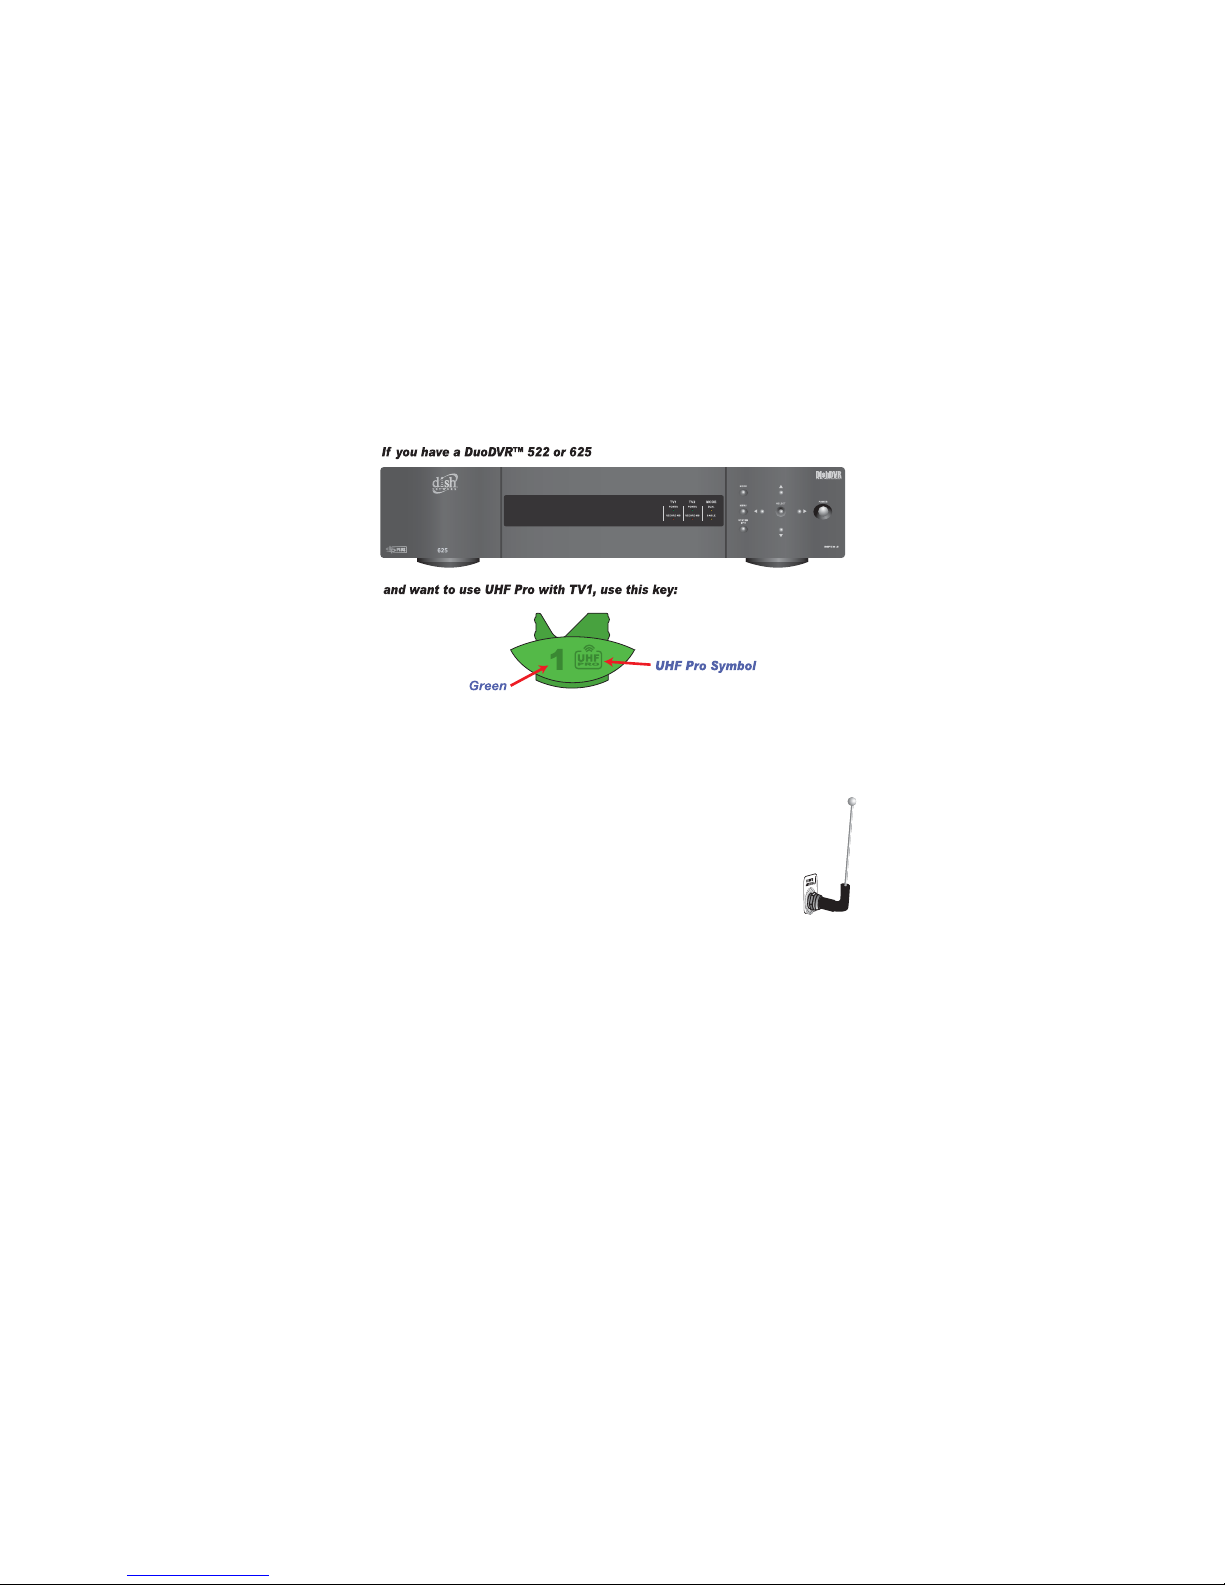
SETTING UP A TV1 UHF PRO REMOTE FOR THE
DUODVR 522 AND DUODVR 625 ONLY
Use these special instructions only if you are going to use the green 1
UHF Pro key to control the TV1 side of your DuoDVR 522 or 625
(also known as DISH Player-DVR 522 or 625).
When you are finished setting up the remote control, you’ll be able to
operate the TV1 side of your DuoDVR 522 or DuoDVR 625 from long
distances.
1 Make sure the key is installed as described on pages
S-1 and S-2.
2 Make sure the UHF Antenna is attached to the
EMOTE ANTENNA input on the back of the receiver.
R
3 Using the receiver’s front panel buttons, press MENU. Select the
following on-screen items in this sequence:
a. System Setup
b. Installation
c. TV1 UHF Pro Setup
4 Select Enable from the TV1 UHF Pro Setup screen.
5 Select System Info to open the System Info screen.
14
Page 27
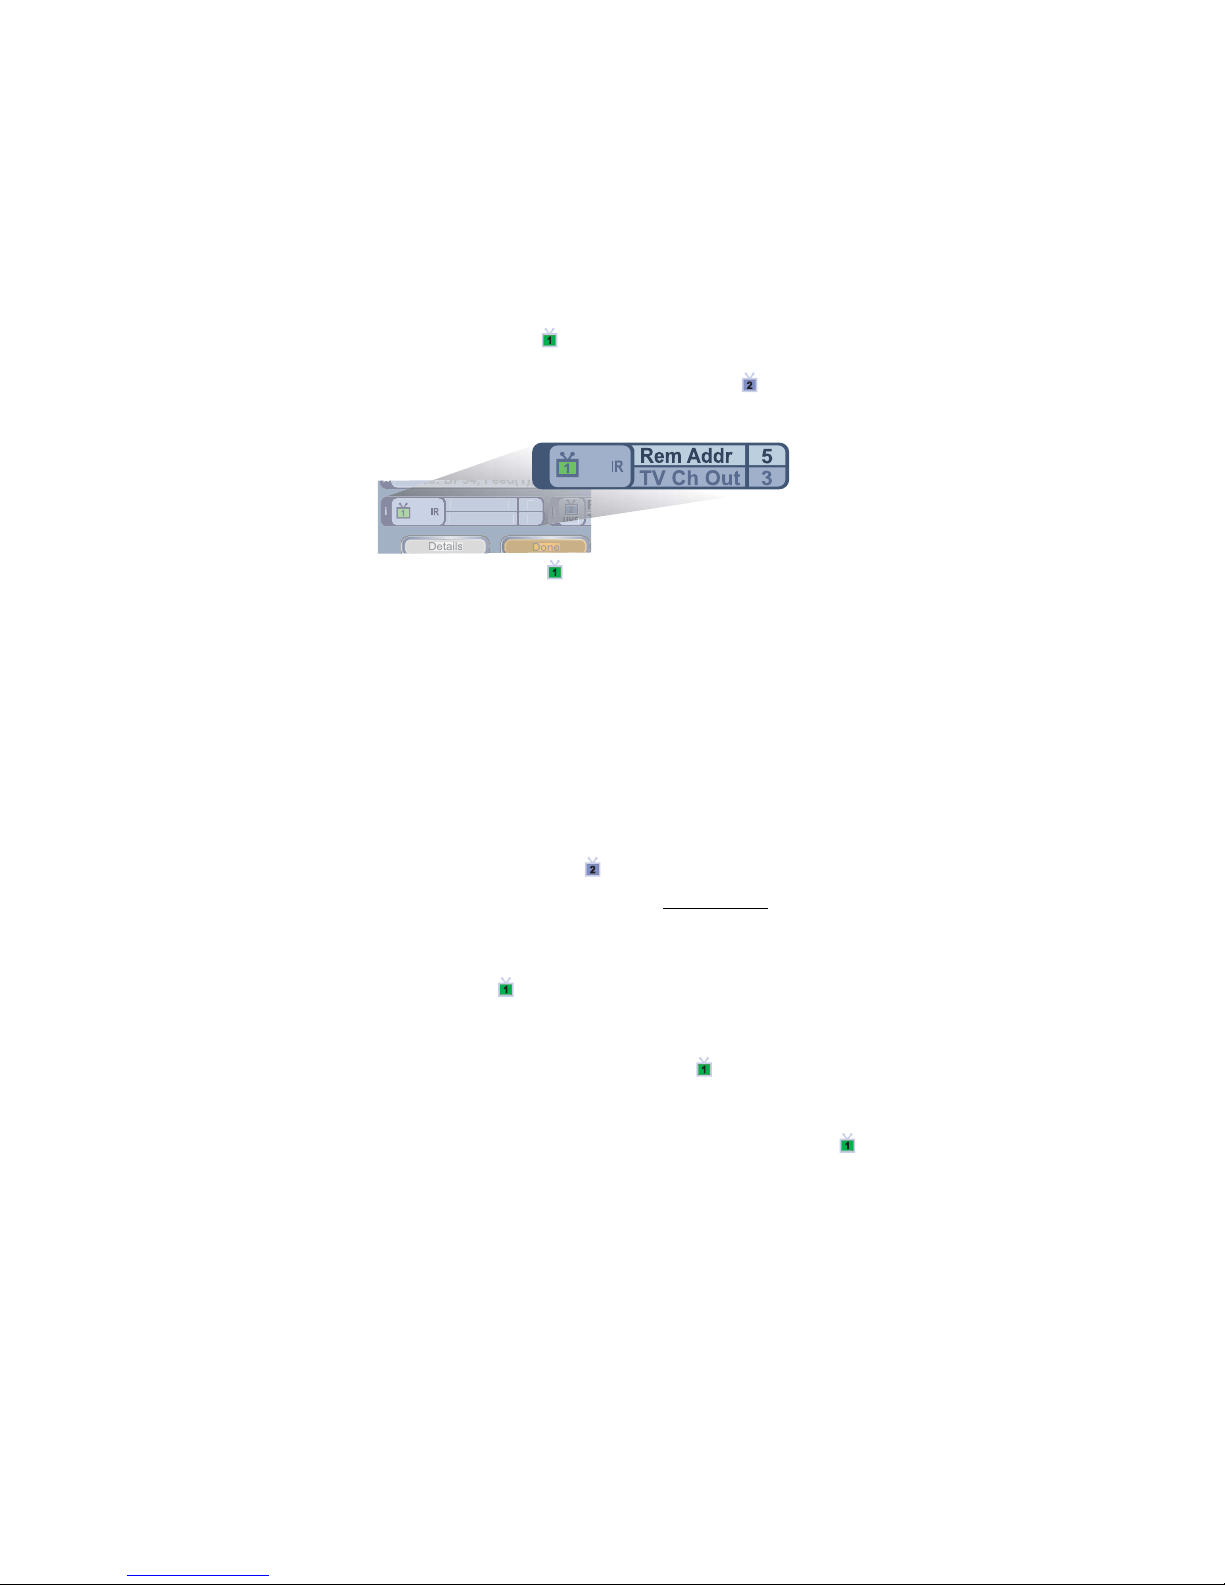
6 Use the ARROW buttons to move the highlight to the TV1
h
i
Device
Rem Addr
TV Ch Out
3
5
T
UHF
i
Note: Highlight the Rem Addr (the lighter area in the
graphic above) using the ARROW buttons on the remote.
remote address (the Rem Addr box as shown below). This is
important—if you do not move the highlight, your remote
changes the receiver's TV2 remote address (the Rem Addr
box) and causes your Remote Control 1 to control the TV2 side of
your receiver.
7 Press the RECORD button on the green TV1 remote control you
are setting up. If you get a warning that tells you to pick another
address, continue on to the next step. If no warning appears, go to
step 15 of this procedure.
8 Select OK using the front panel button to clear the warning
message and return to the System Info screen.
9 On the remote control, press and hold the SAT mode button for
about three seconds, until all the mode buttons light up, and then
let go of the SAT button. The SAT mode button blinks.
10 Use the number buttons to enter any number from 1 to 16, except
for the address shown for on your screen.
Write down the number you entered:
11 Press the POUND (#) button. If you entered the address correctly,
the SAT mode button flashes three times.
12 Highlight the Rem Addr using the ARROW buttons on the
front panel of the receiver.
13 Press RECORD.
14 Make sure the System Info screen shows UHF and that this
address matches the number you entered in step 10.
15 Using the remote, select Done to close the System Info screen. If
nothing happens, use the front panel buttons to highlight the
Rem Addr. Press RECORD, and then select Done.
15
Page 28

EQUIPMENT CODES
These tables contain the manufacturer codes for programming the
remote to control your TV, a VCR, DVD player, or audio amplifier.
Every attempt has been made to include all codes. If your equipment
brand is not listed or if the codes do not work, the remote may not
control your equipment. In some cases codes may operate some but not
all buttons shown in this guide.
TV CODES
Programming in AUX mode: Use these codes to program in TV
mode; however, if programming in AUX mode, press 0 before entering
the TV code.
Abex 730
Action 662
Admiral 521 605 675
Aiko 727
Akai 570 573 906 907 908
Alleron 682
A-Mark 620
Amtron 657
Anam National 509 541 620 651 657
698
AOC 505 506 519 520 573 620 627
652 653 654
Apex 743 744 745 757 814 815
Archer 620
Audiovox 620 657 662
Baycraft 536
Belcor 652
Bell & Howell 590 675 683
Bradford 657
Brockwood 627 652
Broksonic 562 748 752
Candle 506 523 525 536 627 652 654
Candle/Citizen 573
Capehart 519 627
Circuit City 627
Citizen 506 516 523 524 525 526 590
652 654 657 658 680 727
Colortyme 573 627 652 654
Concerto 523 652 654
Contec Cony 662
Contec/Cony 541 655 657 726
Craig 536 541 657 662 694
Crown 526 536 657
Curtis Mathes 506 516 526 573 590
641 645 650 652 654 658 680 683
703 708
CXC 541 657 662
Cytron 903 904
Daewoo 505 524 526 529 530 531
573 630 652 653 654 658 684 698
719 727 816
Daytron 526 627 652 654 658
16
Dell 772 773 774
Dimensia 645 650
DISH Network 722, 742, 763
Dixi 566 620
Dumont 501 627 652
Electrohome 526 573 651 652 654
656 709 728
Emerson 526 534 536 541 573 590
627 636 642 648 652 654 655 657
658 662 682 683 692 696 699 720
816
Envision 506 573 652 654
Fisher 542 590 683
Fortress 573
534 682 694
Fujitsu
4 541 657 662 682 694
Funai 53
Futuretech 541 657 694
GE 508 509 543 544 630 645 646 650
651 652 654 676 690 691 698 701
715 716 725 728 742 779 809 859
General Electric 627
Gibralter 501 652
Goldstar 505 523 526 545 546 566
573 652 653 654 655 656 658 693
730
Granada 627
Grand 627
Grunpy 657 682
Hallmark 627 652 654
Harman Kardon 561
Harvard 657
Hinari 534
Hisense 759
Hitachi 523 526 548 549 553 554 555
585 597 626 636 638 643 648 652
654 655 702 718 726 786 788 789
790 791 792 801 802
HP 911 912
IMA 657
Infinity 566
JBL 566
JC Penney 505 506 516 525 526
»
Page 29

TV CODES (CONTINUED)
JC Penney (Continued) 543 546 631
645 646 650 652 653
680 690 691 701 725 726 728 730
Jensen 556 573 652 654
JVC 508 557 559 642 649 655 676
726 735 736 737 812 817
Kawasho 548 561 573 652 654
Kenwood 506 573 652 654 656
Kloss 561 610
Kloss Novabeam 657 698 723 724
KTV 526 541 573 657 658 662 696
LG 653 766
Lloyds 627
Lloytron 526
Loewe 566
Logik 675
Luxman 523 652 654
LXI 563 566 590 595 617 631 635 645
646 650 654 683 691 701 725
Magnasonic 573
Magnavox 506 520 525 536 566 567
568 573 610 652 654 656 723 724
729 762 818 887 888
Majestic 675
Marantz 506 566 573 652 654
Megatron 627 654
Memorex 590 627 653 654 675 683
720
MGA 504 505 506 542 571 573 627
652 653 654 656 728
Midland 501 646 658 676 725 730
Mitsubishi 504 505 542 570 571 572
573 597 623 627 652 653 654 656
705 728 787 799 804
Mitsui 769
Montgomery Ward 500 505 506 534
543 567 568 675
Motorola 521 605 651
MTC 505 506 516 523 573 627 652
653 654 680
Multitech 657
NAD 502 617 627 631 635 637 654
National 509
NEC 505 506 507 517 523 573 627
651 652 653 654 731 732
Nikkai 612
Nikko 654 727
Normandic 717
Novabeam 561
NTC 727
Nyon 701
Olevia 910
Onwa 541 657
Optimus 637
Optonica 521 605 607
Orion 694
Osaki 612
654 658 676
Panasonic 508 509 512 566 644 651
662 676 685 689 698 700 716 734
765 780 784 811 819 820 821
761
822 823 867 868 869 870 871 872
873 874 875 876 877 878 879 880
881 882 883 884 885 886 889 890
900
Philco 505 506 525 536 568 573 610
651 652 653 654 655 656 723 724
729
Philips 525 566 651 652 655 656 690
723 724 729 770 782 824 825 826
827 828 891 892 893 894
Philips Magnavox 782 826 827 828
829
Pilot 652 658
Pioneer 502 548 576 636 637 648
652 654 708
Polaroid 766
Portland 505 526 573 652 653 654
658 727
Price Club 680
Prism 676
Proscan 645 646 650 691 725 742
857
Proton 513 519 526 536 585 627 652
654 655
ProView 902
Pulsar 501 652
Quasar 508 509 651 676 698 700 860
861 862 895 896
Radio Shack 526 541 590 607 612
645 662 683 698
Radio Shack/Realistic 590 607 650
652 654 655 657 658 683 730
RCA 503 505 548 630 633 634 636
641 645 646 648 650 651 652 653
654 656 691 698 701 708 715 716
725 742 749 776 805 830 831 832
863 864
Realistic 590 645 683
Runco 501
Sampo 506 519 652 654 658 698 730
746
Samsung 505 506 516 523 526 566
573 612 627 647 652 653 654 655
656 658 680 704 717 730 738 755
833 858 897
Samwon 620
Sansui 754 834
Sanyo 542 590 652 683
SBR 566
Schneider 566
Scotch 654
Scott 526 534 541 600 652 654 655
657 662 682 696 701
17
Page 30

TV CODES (CONTINUED)
Sears 523 534 542 563 590 595 601
604 617 627 631 635 645 646 650
652 654 656 682 683 688 691 703
725 726
Seimitsu 627
Sharp 521 526 585 605 607 628 629
652 654 655 658 739 740 741 777
794 803 835 836 898 913
Shogun 652
Signature 675
Silver 573
Simpson 525
Solavox 612
Sony 500 640 690 758 781 783 795
796 797 798 806 807 808 810 837
838 839 840 841 842 843 844 845
Soundesign 525 536 541 627 652
654 657 682
Spectricon 520 620
Squareview 694
SSS 505 541 573 652 657
Starlite 657
Supra 523
SVA 901 905
Sylvania 506 525 536 566 568 569
573 600 610 652 654 656 723 724
729 733 756 764
Symphonic 632 657 662 692 694
846
Tandy 521 605
Tatung 509 651 698
Technics 50 8 676
Techwood 523 573 652 654 676
Teknika 504 505 512 516 523 524
525 526 534 536 541 573 644 652
653 654 655 657 658 662 675 680
682 685 726 727
Tera 513
Thomas 627
Thompson 709
TMK 523 573 627 652 654
Toshiba 516 590 617 631 635 680
683 688 750 771 785 793 847 848
849 850 851 852 853 854 855 856
865 866 909
Totevision 526 658
Toyomenko 627
Universal 543 690
Vector Research 506
Victor 557
Video Concepts 570
Vidtech 505 573 627 652 653 654
Viewsonic 760
Vizio 766
Wards 536 573 607 645 650 652 653
654 656 675 682 690 715 723 724
729
White Westinghouse 816
Yamaha 505 506 573 652 653 654
656
York 627
Zenith 501 520 639 652 675 693 775
778 813 899
620
Zonda
VCR CODES
Programming in AUX mode: Use these codes to program in VCR
mode; if programming in AUX mode, press 1 before entering the VCR
code.
Adventura 588
Aiwa 588 622 623
Akai 513 515 516 517 518 568 682
American High 678
Amstrad 588
ASA 556
Asha 675
Audio Dynamics 592
Audiovox 676
Beaumark 675
Bell & Howell 581
Broksonic 559
Calix 676
Candle 534 594 675 676
Canon 554 678
Citizen 534 591 592 594 675 676
Colortyme 592
Craig 591 675 676
18
Curtis Mathes 554 592 594 605 607
675 678
Cybernex 675
Daewoo 534 547 559 588
DBX 592
Dimensia 607
Dumont 549
Dynatech 588
Electrohome 512 676
Electrophonic 676
Emerson 505 508 509 51 1 512 518
534 559 568 588 590 618 676 678
Finlandia 549
Finlux 549 556 588
Fisher 549 581 584 588 610
Fuji 678
Funai 588
Garrard 588
Page 31

VCR CODES (CONTINUED)
GE 551 552 554 572 591 605 607 675
678
Go Video 557 558 620
Goldstar 592 594 676
Goodmans 585
Gradiente 588
Granada 549 581
Grundig 556
Harley Davidson 588
Harman Kardon 568 592
Headquarter 581
Hitachi 536 538 539 540 588 595 597
682
Instant Replay 678
ITT 518
JC Penney 554 581 591 592 594 595
675 676 678
JCL 678
Jensen 595 682
JVC 561 562 581 592 594 682
Kenwood 562 581 592 594 600 682
Kodak 676 678
LG 676
Luxor 518
Lloyd’s 588
LXI 676
M. Wards 512 554 585 590 591
Maganvox 797
Magnavox 533 554 556 678 797 798
Magnin 676
Marantz 554 556 581 585 592 594
678
Marta 676
Matsushita 678
MEI 554 678
Memorex 533 549 554 566 581 585
588 675 676 678
MGA 512 567 568
MGN Technology 675
Midland 579
Minolta 595
Mitsubishi 512 562 567 568 570 595
Motorola 678
MTC 544 588 675
Multitech 579 588 675
Mutitech 591
NEC 562 581 592 594 682
Nikko 676
Noblex 675
Olympus 678
Optimus 676
Optonica 585
Panasonic 554 614 628 633 678 777
780 781 782 783 784 785 786 787
790 791 792 793 794 795
788 789
796 799 808 809
Pentax 592 595
Pentex Research 594
Perdio 588
Philco 554 678
Philips 554 556 585 678 801 802 803
804
Pilot 676
Pioneer 562 574 575 576
Proscan 605 607
Pulsar 533
Quarter 581
Quartz 581
Quasar 554 678 770 771 772 805 806
Radio Shack 512 607 610 676
Radio Shack/Realistic 581 584 588
675 676 678
Radix 676
Randex 676
RCA 518 525 591 595 605 607 615
649 675 678 773 774 775
Realistic 534 549 554 581 584 585
588 675 676 678
Ricoh 502
Runco 533
Salora 567 581
Samsung 515 517 534 579 591 675
755 807
Sanky 533
Sansui 544 562 682
Sanyo 549 581 583 675
SBR 556
Scott 508 534 559 590
Sears 549 581 584 595 610 676 678
Sharp 512 585 595 607
Shintom 595
Shogun 675
Singer 678
Sony 500 501 502 768 778
STS 678
Sylvania 554 556 567 588 678 756
Symphonic 588 594
Tandy 581 588
Tashiko 676
Tatung 594 682
Teac 588 594 682
Technics 554 633 678
Teknika 554 588 676 678
TMK 675
Toshiba 534 535 567 584 590 769
776
Totevision 591 675 676
Unitech 675
Vector Research 534 59
Victor 561 562
Video Concepts 534 568 592
Videosonic 591 675
Wards 534 588 595 675 676 678
XR-1000 588 678
2
19
Page 32

VCR CODES (CONTINUED)
Yamaha 581 592 594 682
Zenith 500 501 533 779
DVD PLAYER CODES
Programming in AUX mode: Use these codes to program in VCR
mode; if programming in AUX mode, press 1 before entering the DVD
Player code.
Aiwa 634 694
Alpine 653
Apex 654 655 744 757 835 839
Archos 885
BOSE 758 811
Broksonic 656 752
Clarion 696
Classic 695
CyberHome 833
Cytron 904
Daewoo 657 859
Denon 697 699 700
EchoStar 722
Emerson 658
Fisher 659
Funai 658
GE 702 703
Go Video 692 693 822
GPX 704
Hitachi 660 705 706 707 740 823 860
668
JVC 689 711 850 861 862 863
Konka 637 638 753
Koss 745
Magnavox 661
Memorex 709
Mintek 710
Mitsubishi 767 867
Norcent 711
Oritron 723
Panasonic 639 663 699 714 715 716
734 765 813 840 841 855 856 868
869 870 871 872 873 882
Philips 766 874
Pioneer 665 719 812 876 877 878
879 880
Proscan 720
Qwestar 723
RCA 666 690 749 816 842 854
Sampo 724
Samsung 652 667 668 691 705 740
741 820 821 844 845 866 875 881
Sansui 725 754
Sanyo 643
Sharp 669 865
Sony 617 645 670 671 729 730 731
817 818 830 831 832 836 837 838
843 847 848 849 851 852 853 857
858 864 883 884
Sylvania 658 764 829
Teac 732
Technics 733
Techwood 664
Toshiba 61
Yamaha 737 739
Zenith 673 824
6 646 672 735 736 814
815 819 825 826 827 828 834 846
TUNER/AMPLIFIER CODES
Programming in AUX mode: Press 2 before entering the tuner/
amplifier code.
Aiwa 636 641 656 687 718 720 725
726
BOSE 761 780
Carver 653
Citizen 709
Denon 647 674 759 760 762 807 809
814 835
20
Fisher 653
GE 711
Goldstar 677 690
Harman International 640 751
Harmon Kardon 672
Hitachi 717
JBL 640
Page 33

TUNER/AMPLIFIER CODES (CONTINUED)
JVC 637 703 725 786 827
Kenwood 676 691 726 728 774 795
828 829 830 831 832 840 842
Magnavox 654 705
Marantz 651 764 845
Nakamichi 671
NEC 716
Onkyo 642 660 662 678 785 788 790
791 792 796 801 846
Optimus 648 664
Panasonic 643 644 652 783 797 798
799 808 810 815 816 817 818 819
820 821 822 824 825 826 833 836
837 838 839
Pioneer 667 668 679 702 767 770
772 779 802 806 844
Proton 654 705
TV/VCR C
OMBO CODES
Quasar 652
RCA 635 638 704 727
Sharp 712 713 714 715
Sherwood 646 670
Sony 639 645 687 728 729 730 765
766 769 771 773 775 776 777 778
781 782 784 787 789 793 794 803
811 812 813
Soundmatters 763
Teac 684
Technic 652
Technics 643 644 652 768 804 805
843
Toshiba 710
Victor 703
Yamaha 663 730 731 732 733 823
834 841
Programming for combination equipment: Program the remote
control in TV mode using the TV code and then in VCR mode using
the VCR code.
TV Code VCR Code
Magnavox 887 797
888 798
Philips 891 801
892 802
893 803
894 804
Quasar 860 770
861 771
862 772
895 805
896 806
RCA 863 773
864 774
Samsung 755 755
897 807
Sylvania 756 756
21
Page 34
TV/DVD COMBO CODES
Programming for combination equipment: Program the remote
control in TV mode using the TV code and then in VCR mode (or
AUX—press 1 before entering the DVD code) using the DVD code.
TV Code DVD Code
Apex 757 757
Broksonic 752 752
Cytron 904 904
Panasonic 734 734
765 765
RCA 749 749
Sansui 754 754
Sylvania 764 764
Toshiba 865 814
866 815
TV/VCR/DVD COMBO CODES
Programming for combination equipment: Program the remote
control in TV mode using the TV code, then in VCR mode using the
VCR code, and then DVD in AUX mode (press 1 before entering the
DVD code) using the DVD code.
TV Code VCR Code DVD Code
Panasonic 900 810 882
TV/VCR/TUNER COMBO CODES
Programming for combination equipment: Program the remote
control in TV mode using the TV code, then in VCR mode using the
VCR code, and then tuner in AUX mode (press 2 before entering the
tuner code) using the tuner code.
TV Code VCR Code Tuner Code
Panasonic 867 796 797
868 799 798
869 808 799
870 780 839
871 781 838
872 782 837
Table continues on next page
22
Page 35
TV/VCR/TUNER COMBO CODES (CONTINUED)
TV Code VCR Code Tuner Code
Panasonic 873 783 836
874 784 833
875 785 826
876 786 825
877 787 824
878 788 822
879 789 821
880 790 820
881 791 819
882 792 818
883 793 817
884 794 816
885 795 815
889 809 808
VCR/DVD COMBO CODES
Programming for combination equipment: Program the remote
control in VCR mode using the VCR code and then DVD in AUX
mode (press 1 before entering the DVD code) using the DVD code.
VCR Code DVD Code
Go Video No Code 692
No Code 693
No Code 822
JVC No Code 689
RCA No Code 690
Samsung No Code 667
No Code 691
No Code 820
No Code 821
Sony 778 817
No Code 818
768 No Code
Toshiba No Code 219
Zenith 779 No Code
23
Page 36
TROUBLESHOOTING
What’s
Happening
While
performing a
remote control
procedure, the
remote control
stops working.
You cannot find
the key(s)
shown on page
S-1.
When you press
a button on the
remote control,
the equipment
doesn’t do what
you expect.
The receiver
does things
even though
you didn’t press
any remote
control buttons.
What’s Wrong What You Can Do
If you don’t press
a button for 20
seconds in a
programming
sequence, the remote
shuts off its
programming
function.
The keys have two
sides.
• The remote may
not be in the mode
for the equipment
you want to
control.
• The remote control
needs to be pointed
right at the TV (or
other equipment).
• The remote control
may be missing
batteries, the
batteries in the
remote may be
inserted the wrong
way, or maybe the
batteries are weak
or dead.
• The remote isn’t
set up to control
the equipment.
UHF signals from a
neighbor’s remote
may be controlling
your receiver.
Start over again.
Turn the keys over until you find the
correct key.
• Press the correct mode button to set the
remote to the mode for the equipment
you want to control.
• The remote control uses IR signals to
control all equipment except for the
receiver (when using UHF). IR signals
travel only 40 feet or less and can’t go
through walls or other solid objects.
You must point the remote control right
at the equipment, with no objects to
block the signal path.
• If the batteries are missing or dead, put
fresh AAA-size batteries in. If the
remote has fresh batteries, check
whether you put them in the right way.
If you didn’t, take them out and put
them in the right way.
• Make sure you set up the remote
to control all the equipment you want
to use. See Program the Remote to
Control Your TV on page S-4 and
Programming for Other Equipment on
page 2.
See Avoiding Remote Conflicts on page
12 for instructions to correct this
problem.
Your picture is
snowy (or blue
or black).
24
You have
accidentally changed
the channel on your
TV.
Make sure your TV (and VCR if
connected) is tuned to the correct
channel. Also try using the RECOVER
button as described on page S-6.
Page 37
What’s
Happening
What’s Wrong What You Can Do
Your remote
control isn’t
working
When you press
the remote
control MUTE
or VOLUME
button, nothing
happens.
Your UHF Pro
remote control
does not work
well from far
away.
• The remote control
is in the wrong
mode.
• You might be
using the wrong
remote control
(TV1 or TV2).
• Your batteries are
worn out.
• The remote
control’s A/B
switch is in the
wrong position.
• The remote control
may not be set up.
• Maybe you’re
trying to control
TV volume but
you set up the
remote to control a
tuner or amplifier
in AUX mode.
You may be
experiencing
interference from
objects near your
receiver antenna.
• Make sure the remote control is in the
correct mode. For example, if you want
to use the satellite receiver, put the
remote control in
Remote Control Modes on page 1).
• Make sure you are using the correct
remote control (TV1 or TV2) for your
locations (multi-room receivers only).
• Change the batteries as described on
page S-2.
• Check the A/B switch setting as
described on page 13.
•See Programming the Remote to
Control Your TV on page S-4 and
Programming for Other Equipment on
page 2.
• Set up the remote to control either
TV volume or tuner/amplifier volume,
whichever you want. See page 7.
• Make sure the UHF antenna is
connected to the receiver and not
touching anything else.
• Vary the tilt angle of the receiver's UHF
antenna. Locate the UHF antenna tip
away from other electronics equipment
or metal surfaces, even if separated by
wooden shelving.
• Move the receiver to different
locations. For best results, place the
receiver as high as possible, above all
other equipment in your entertainment
center.
• Place the UHF antenna outside the
entertainment center by using a coaxial
cable to connect it to the receiver.
• Move any nearby off-air antenna away
from the UHF remote antenna. Do not
place an off-air antenna on your
receiver.
SAT mode (see
For all receivers, except for the
DISH Player-DVR 942, ViP
222, ViP 622 DVR, and ViP
722 DVR, leave the A/B
switch in the A position.
Your PIP
(Picture-InPicture) button
isn’t working.
• Your receiver
doesn’t use PIP.
• Your receiver isn’t
in Single Mode.
• Upgrade to a receiver with this feature.
•Press the MODE button on the front
panel (if available).
25
Page 38

LIMITED WARRANTY
This Limited Warranty is a legal document. Keep it in a safe
place. Remember to keep your Sales Receipt for warranty service.
We will consider any items you return without a copy of the Proof
of Purchase to be out of warranty.
This warranty extends only to the original user (“you,” “your”) of the DISH
Network remote control and is limited to the purchase price of the remote
control. DISH Network and its affiliated companies (“we,” “our,” “us”) warrant
this remote control against defects in materials or workmanship as follows.
For one year from the original date of purchase, if we find the remote control is
defective subject to the limits of this warranty, we will replace the remote at no
charge for parts or labor. We warrant any such work done against defects in
materials or workmanship for the remaining part of the original warranty
period.
This warranty does not cover installation of the DISH Network System;
consumer instruction; physical set up or adjustment of any consumer electronic
equipment; remote control batteries; signal reception problems; loss of use of
the equipment; unused programming charges due to equipment malfunction;
cosmetic damage; damage due to lightning, electrical or telephone line surges,
fire, flood, or other acts of Nature; accident; misuse; abuse; repair or alteration
by other than our factory service; negligence; commercial or institutional use;
improper or neglected maintenance; equipment sold AS IS or WITH ALL
FAULTS; equipment removal or reinstallation; shipping damage if the
equipment was not packed and shipped in the manner we prescribe; nor
equipment purchased, serviced, or operated outside the contiguous United
States of America.
REPLACEMENT AS PROVIDED UNDER THIS WARRANTY IS YOUR EXCLUSIVE
REMEDY. WE SHALL NOT BE HELD LIABLE FOR ANY INCIDENTAL OR
CONSEQUENTIAL DAMAGES FOR BREACH OF ANY EXPRESSED OR IMPLIED
WARRANTY ON THIS DEVICE, NOR FOR ANY INCIDENTAL OR
CONSEQUENTIAL DAMAGE RESULTING FROM THE USE OF, OR INABILITY TO
USE, THIS DEVICE. UNDER NO CIRCUMSTANCES SHALL OUR LIABILITY, IF
ANY, EXCEED THE PURCHASE PRICE PAID FOR THIS DEVICE. EXCEPT TO THE
EXTENT PROHIBITED BY APPLICABLE LAW, ANY IMPLIED WARRANTY OF
MERCHANTABILITY OR FITNESS FOR A PARTICULAR PURPOSE ON THIS
DEVICE IS LIMITED IN DURA TION TO THE DURATION OF THIS WARRANTY. WE
RESERVE THE RIGHT TO REFUSE TO HONOR THIS WARRANTY IF WE
DETERMINE ANY OF THE ABOVE EXCEPTIONS TO HAVE CAUSED THIS
DEVICE NOT TO HAVE PERFORMED PROPERLY. THIS WARRANTY SHALL BE
VOID IF ANY FACTORY-APPLIED IDENTIFICATION MARK, INCLUDING BUT
NOT LIMITED TO SERIAL OR CONDITIONAL ACCESS NUMBERS, HAS BEEN
ALTERED OR REMOVED. THIS WARRANTY SHALL ALSO BE VOID IF THE
DEVICE HAS BEEN OPENED BY AN UNAUTHORIZED PERSON (with the exception
of opening the battery cover).
This warranty gives you specific legal rights which may vary from state to state.
Some states do not allow the exclusion or limitations of incidental or
consequential damages, or allow limitations on the duration of an implied
warranty, so those limitations may not apply to you.
26
Page 39

DISH NETWORK’S EXCHANGE PROGRAMS
DISH Network offers two options if you need to replace your remote control;
the Advanced Exchange Program and the Post Receipt Exchange Program.
Advance Exchange Program
The Advanced Exchange Program allows you to have a replacement remote
shipped immediately to you. Depending upon where you live, the remote should
arrive within 3 to 5 business days. You will not
remote to DISH Network using this program.
A shipping charge will be applied for shipping the replacement remote. This is a
one-time fee based on DISH Network’s competitive bulk shipping rates
(additional charges may apply outside the continental U.S.). This fee will be
charged to your billing account or valid credit card.
have to return your defective
Post Receipt Exchange Program
The Post Receipt Exchange Program does require that you send DISH Network
the defective remote control at your cost to determine if the equipment is
covered under warranty. To provide faster serv ice, upon receipt of your
equipment you will be shipped a replacement. Y o ur original equipment will not
be available for return.
If your equipment is not covered under warranty and can be repaired, your
billing account or credit card will be charged the standard repair fee for the
replacement. If damage to the defective equipment is found, which DISH
Network in its sole discretion determines has voided the warranty, or makes the
equipment unrepairable, your billing account or credit card will be charged the
market price of the replacement.
ACCESSORY WARRANTY
An accessory is any DISH Network branded equipment, displaying the DISH
Network logo, excluding the receiver, Smart Card, cables and hookups, and
non-mechanical components. A one-year warranty becomes effective upon the
activation of the DISH system or date of purchase, if bought separately. A proof
of purchase is required to verify the purchase date. If an accessory has an
expired warranty, no exchange will be issued. You may purchase replacement
accessories from DISH Network or your local retailer.
27
Page 40

IF YOU NEED HELP
1. Review this User Guide.
2. See Troubleshooting on page 24.
3. Call the Customer Service Center at 1-800-333-DISH (3474). Have the
date of purchase and your customer account number ready.
a. If the representative finds you should return the remote control,
you’ll get a telephone number to call for a Return Authorization
(RA) number. Before shipping any equipment to us, you must get a
Return Authorization number.
b. You must package returned equipment the right way. Follow the
instructions the representative gives you.
c. Write the RA number in large, clearly visible characters on the
outside of the shipping box used to return the equipment.
To avoid confusion and misunderstandings, we will return
shipments without an RA number clearly visible on the outside of
the box to you at your cost.
d. We will:
• Check the remote control, including whether it is covered under
the warranty.
• Replace any remote we find is defective with a new or
refurbished remote, if the defective remote is covered under the
warranty. We will ship the replacement remote at our expense.
• If a defective remote is not covered under the warranty,
we will tell you. We may assess you a flat rate charge for a
replacement remote, including shipping and insurance.
REGULATORY FACTORS
This device complies with Part 15 of FCC Rules. Operation is subject to the
following two conditions:
1. this device may not cause harmful interference, and
2. this device must accept any interference received, including
interference that may cause undesired operation.
Changes or modifications to this device may void your authority to operate this
equipment.
This equipment has been tested and found to comply with the limits for a Class
B digital device, pursuant to Part 15 of the FCC Rules. These limits are
designed to provide protection against harmful interference in a residential
installation. This equipment generates, uses and can radiate radio frequency
energy and, if not installed and used in accordance with the instructions, may
cause harmful interference to radio communications. However, there is no
guarantee that interference will not occur in a particular installation. If this
equipment does cause harmful interference to radio or television reception,
which can be determined by turning the equipment off and on, the user is
encouraged to try to correct the interference by one or more of the following
measures:
• Re-orient or relocate the receiving antenna.
• Increase the separation between the equipment and receiver.
• Connect the equipment into an outlet on a circuit different from that to
which the receiver is connected.Consult the dealer or an experienced
radio/TV technician for help.
28
Page 41

PUBLISHING INFORMATION
Copyright © 2009. EchoStar Technologies L.L.C., Englewood,
Colorado 80112. All rights reserved.
The information in this Guide may change without notice. Revisions
may be issued to tell you about such changes.
You should address comments or questions about this User Guide to
[email protected] or
Technical Publications, EchoStar Technologies Corporation, 90
Inverness Circle East, Englewood, Colorado 80112.
Document Number: 167820
Printed in
DISH Network is a trademark and service mark of DISH Network.
All product names, trade names, or corporate names mentioned in this
Guide are acknowledged to be the proprietary property of the
registered owners.
29
Page 42
Page 43
Page 44
Page 45
Page 46
Page 47
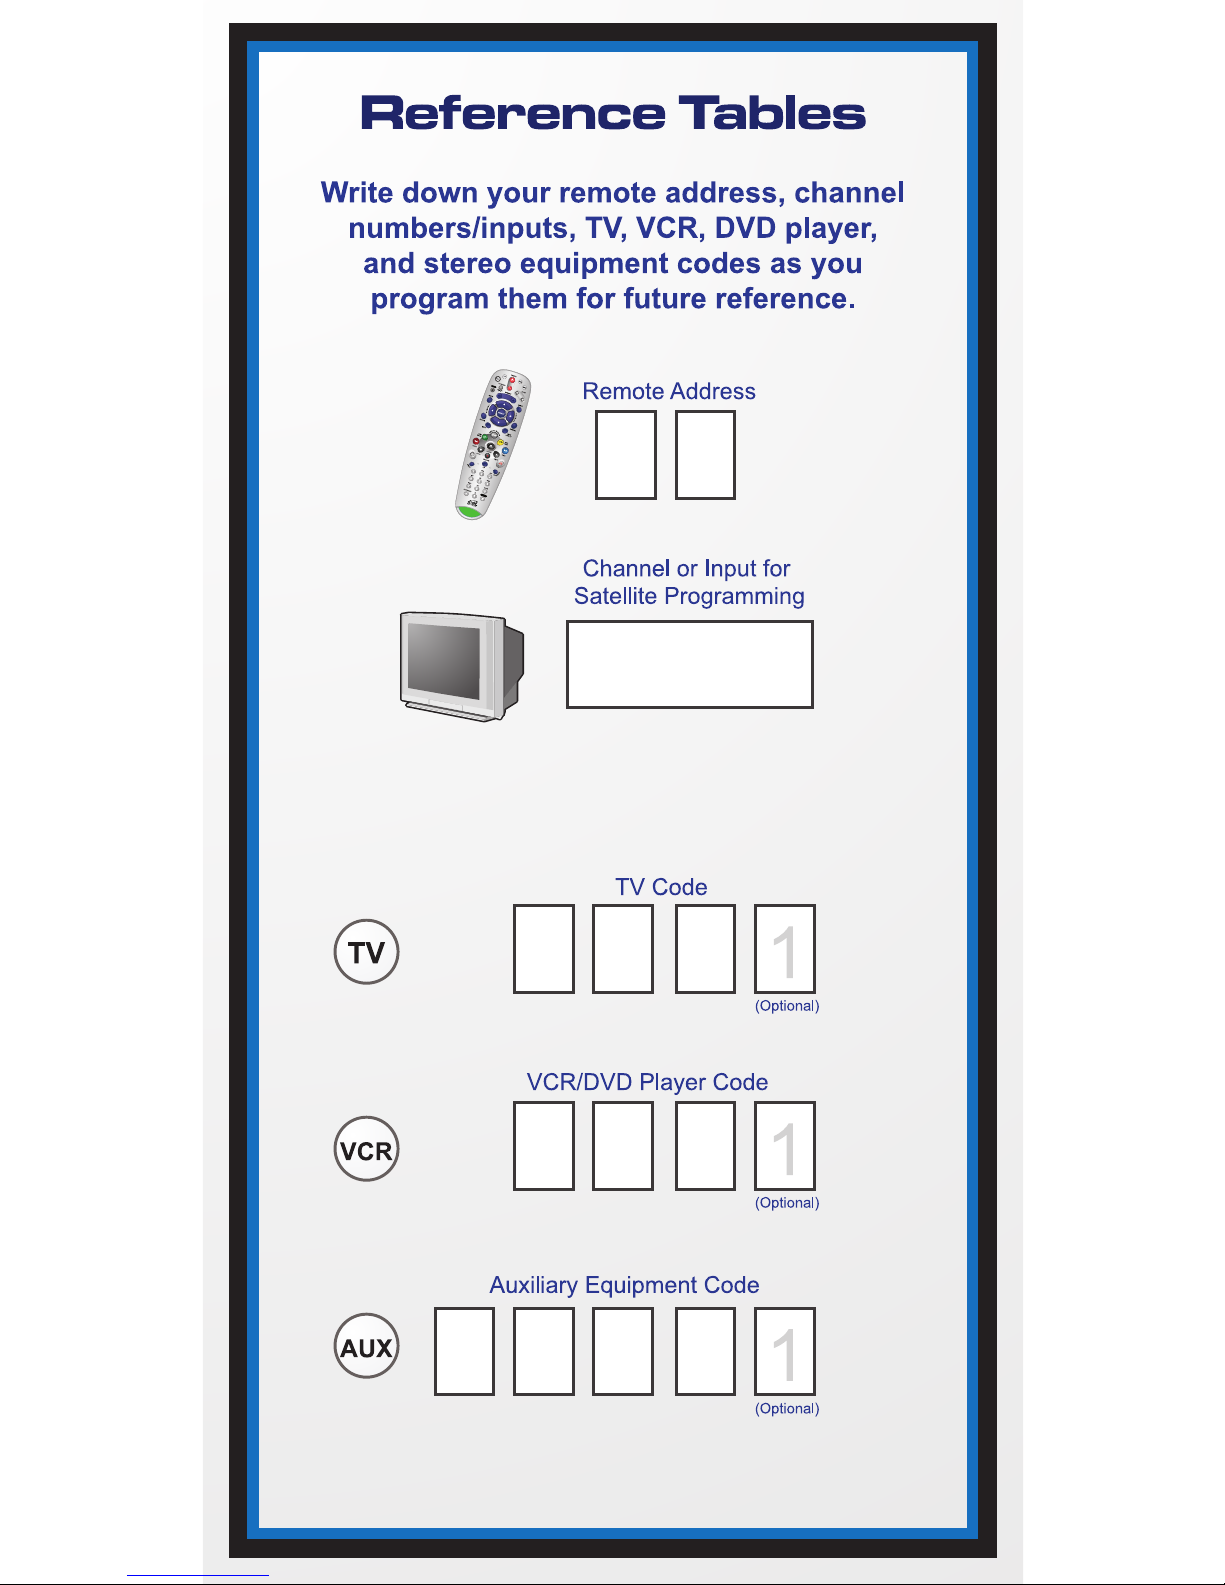
To read out your remote codes, see page 9 for instructions.
If you enter a “1” as the last number of your code,
your remote is in Limited Mode (see page 3 for more details).
Page 48

For all your customer needs,
call the Customer Service Center
at 1-800-333-DISH(3474)
167820
 Loading...