

Page 1
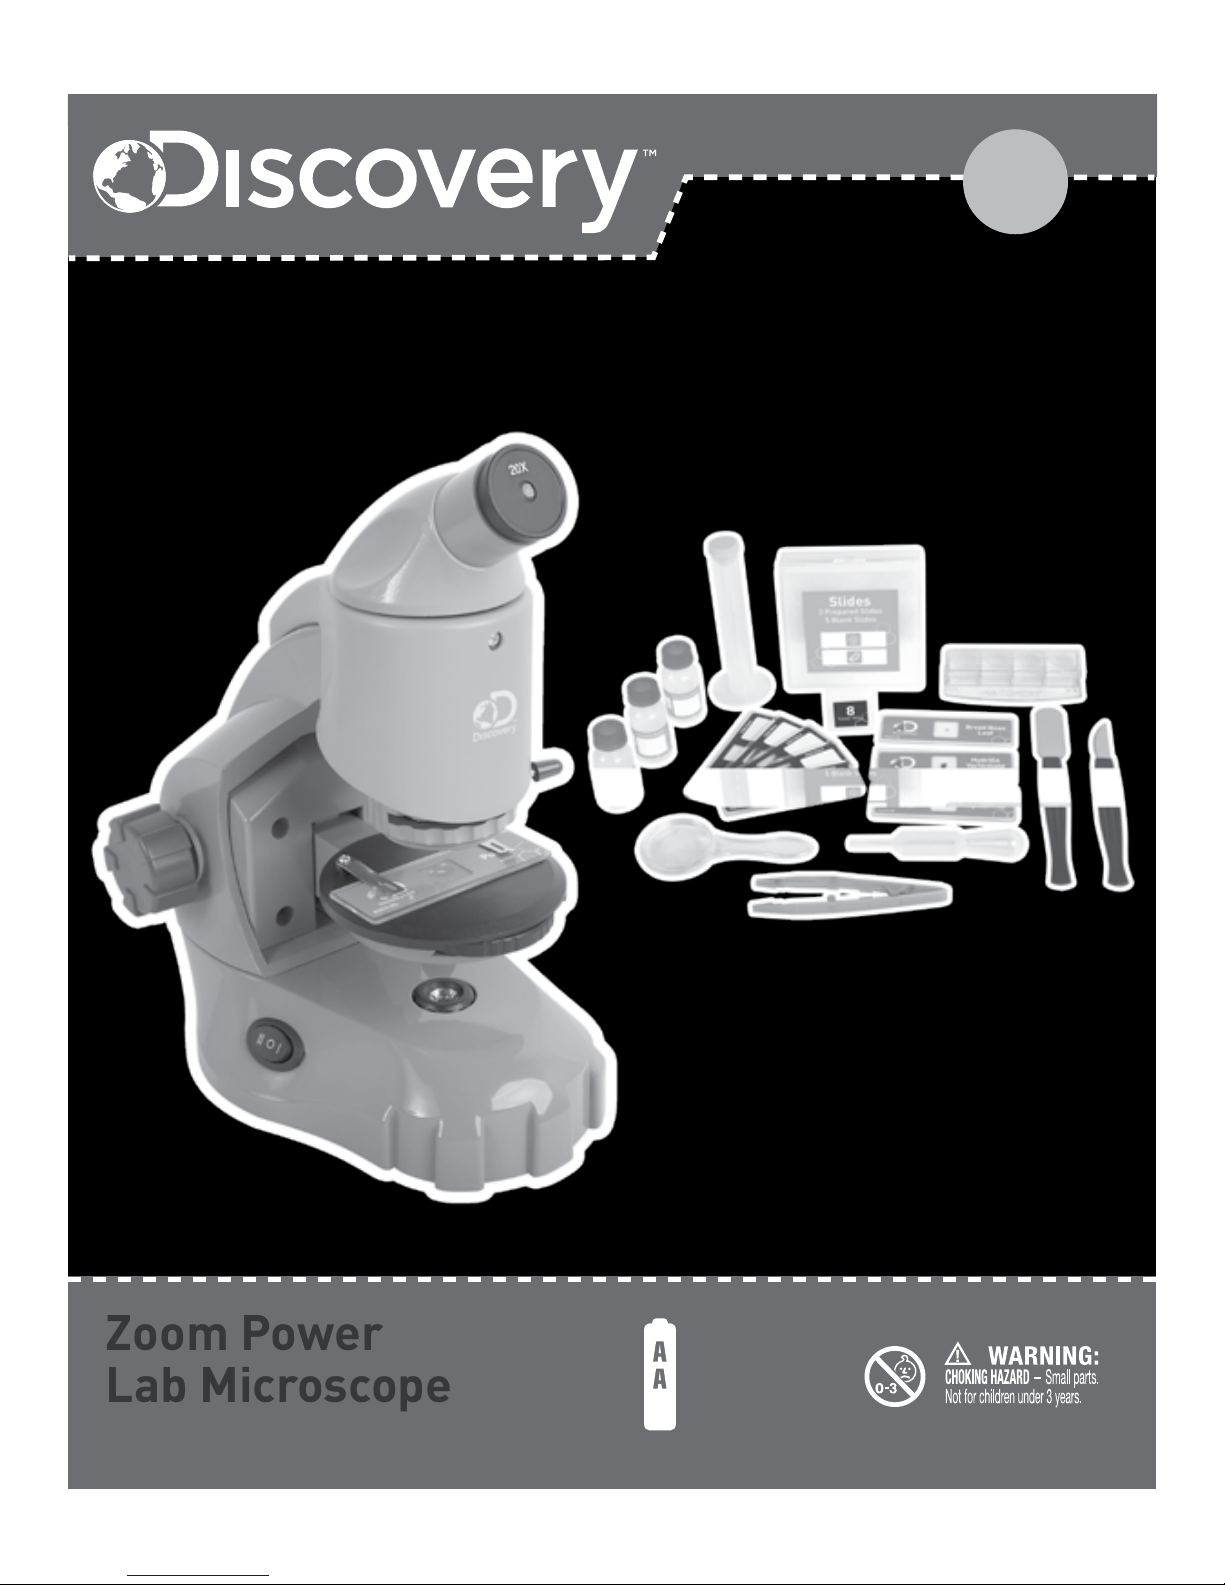
Biological Experiments Gear
Zoom Power
Lab Microscope
x 3
NOT INCLUDED
INSTRUCTION MANUAL
Zoom Power
Lab Microscope
10 +
AGES
Page 2

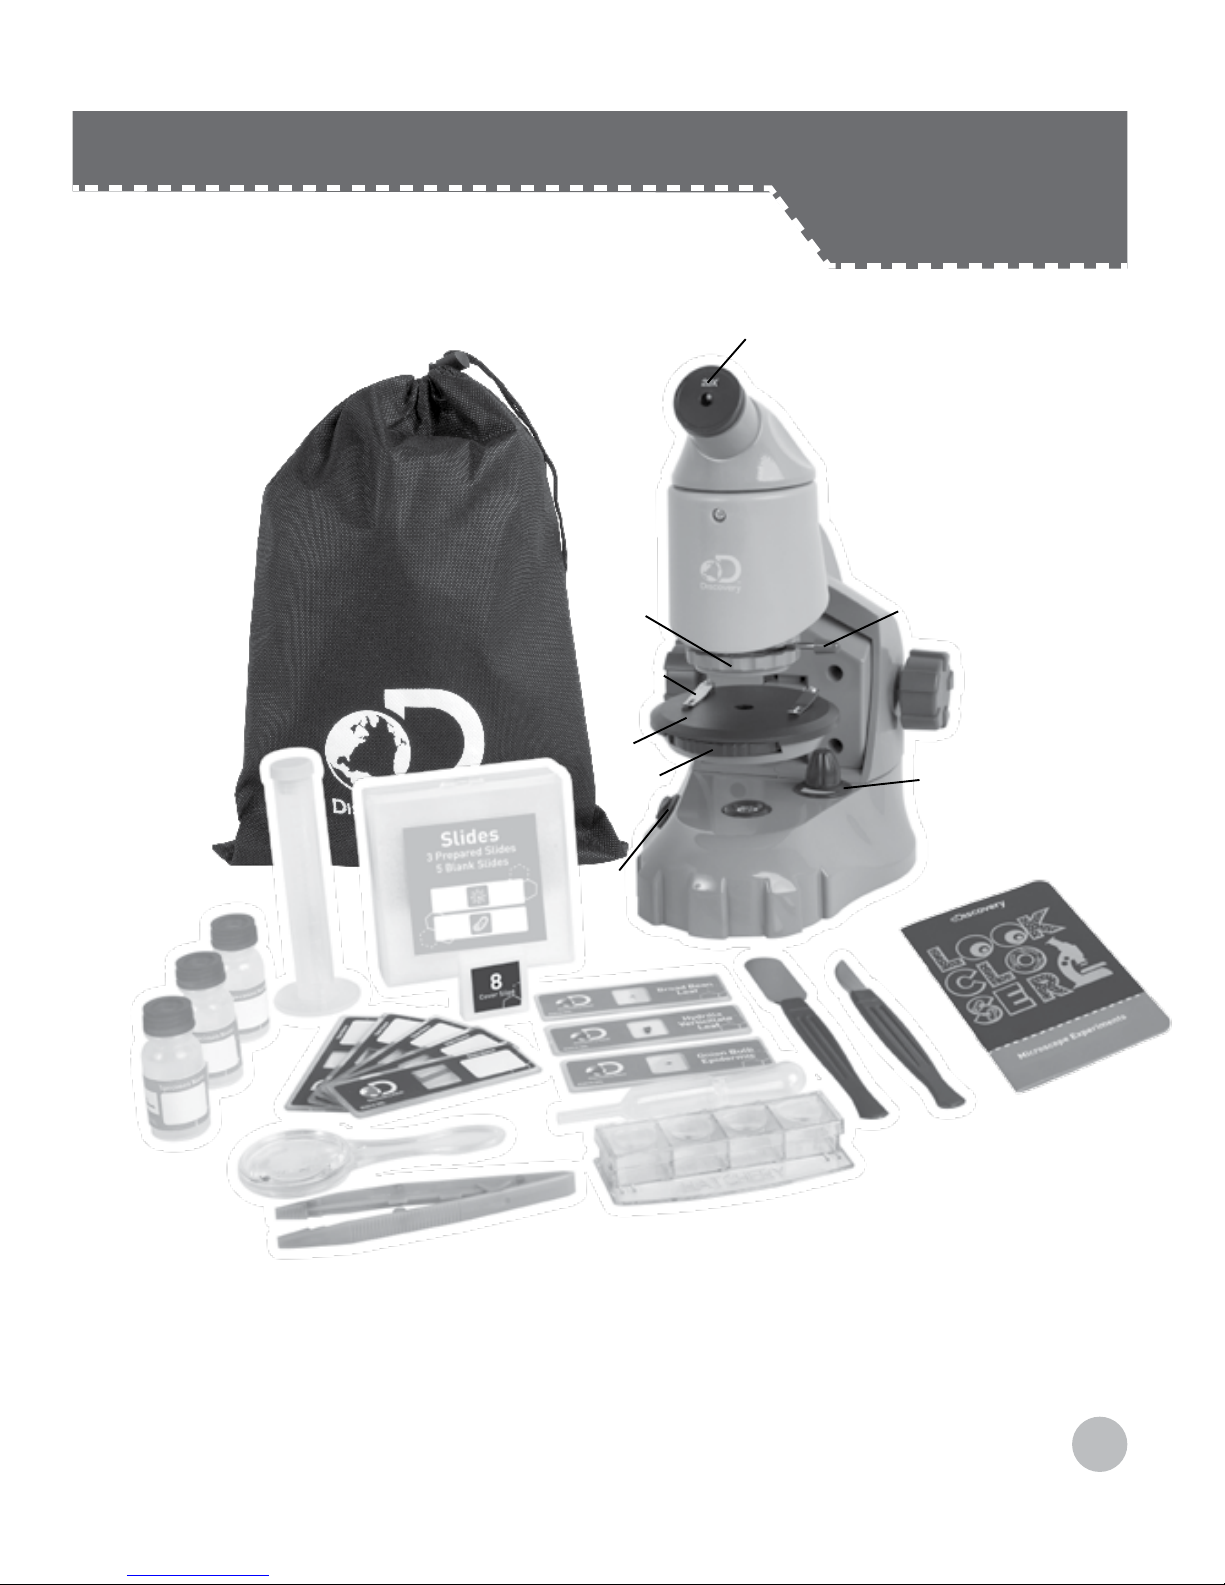
Microscope parts:
01 Eyepieces (Interchangeable 20x and 40x)
02 4x Zoom
03 Focus Wheel
04 Stage
05 Metal Stage Clips
06 Color Filter Wheel
07 Objective
08 Illumination On/Off Switch
09 Dimmer control
10 Base and Battery Compartment
Additional contents:
11 (3) Prepared Slides and (5) Blank Slides
12 Slide Covers
13 Slide Case
14 Tweezers*
15 Spatula
16 Scalpel*
17 (3) Empty vials
18 Magnifying glass
19 Pipette
20 Graduated Cylinder
21 Shrimp Hatchery
22 Drawstring Carry Bag
23 Experiment Booklet
*Not suitable for children under 3 years of age. Contains functional sharp points.
2
CONTENTS
Page 3
3
03
10
11
11
14
16
17
23
22
15
WARNING
CHOKING HAZARD – Small parts. Not for children under 3 years.
04
06
09
05
12
13
18
19
21
20
01
02
CONTENTS
07
08
Page 4

4
Welcome To The World Of Microscopy!
With the Discovery Zoom Lab Microscope Set, you can use magnifications ranging from
20x to 160x to see the extraordinary details in ordinary objects! Its 4x zoom feature lets
you smoothly transition between powers to fully explore your subject without losing focus.
This versatile microscope also has both upper and lower illumination to expand the types
of specimens you can investigate. Use the top light to study opaque specimens like coins,
sticks and insects. Use the bottom light to reveal unexpected structures in common
items like sand, salt and onion peels. This set will let you dive right into the world of
microscopy with prepared slides or launch your own investigations using the extensive lab
supplies and experiment guide! farthest away from the turret by rotating the focus knob.
Separating the stage and turret by rotating the focus knob will avoid causing damage to
the specimen slide or microscope. When starting an observation, always start with the 5x
objective in the rotating head.
How Do I Use My Microscope?
Before you use your microscope, make sure that the table, desk or surface that you place
it on is stable and is not subject to vibration. If the microscope needs to be moved, hold it
by the arm and base while carefully transferring it. Once the microscope is in a suitable
location and the batteries are installed in the compartment located in the base of the
microscope, check the light sources to make sure that they illuminate. Use a microfiber
cleaning cloth to gently wipe the lenses off. If the stage is dirty with dust or oil, carefully
clean it off.
How Do I Operate The Illumination?
This microscope is equipped with top and bottom lights that illuminate the specimen from
above and below. The power switch for the light is on the side of the base and a dimmer
control is located on the platform under the stage. This dimmer allows you to adjust the
brightness of the light. The color filter wheel is located in the middle of the microscope
stage. The filters help you when you are observing very bright or clear specimens. Using
these filters, you can choose various brightness levels and colors. This helps you better
recognize the components of colorless or transparent objects (e.g. sea salt).
INSTRUCTION MANUAL
Page 5
5
How Do I Adjust My
Microscope Correctly?
Place the microscope in a suitable
location as described above, and sit
in a comfortable viewing position.
Always start each observation with
the lowest magnification. Put in the
20x eyepiece and zoom all the way
out by sliding the zoom control. The
resulting magnification will be 20x.
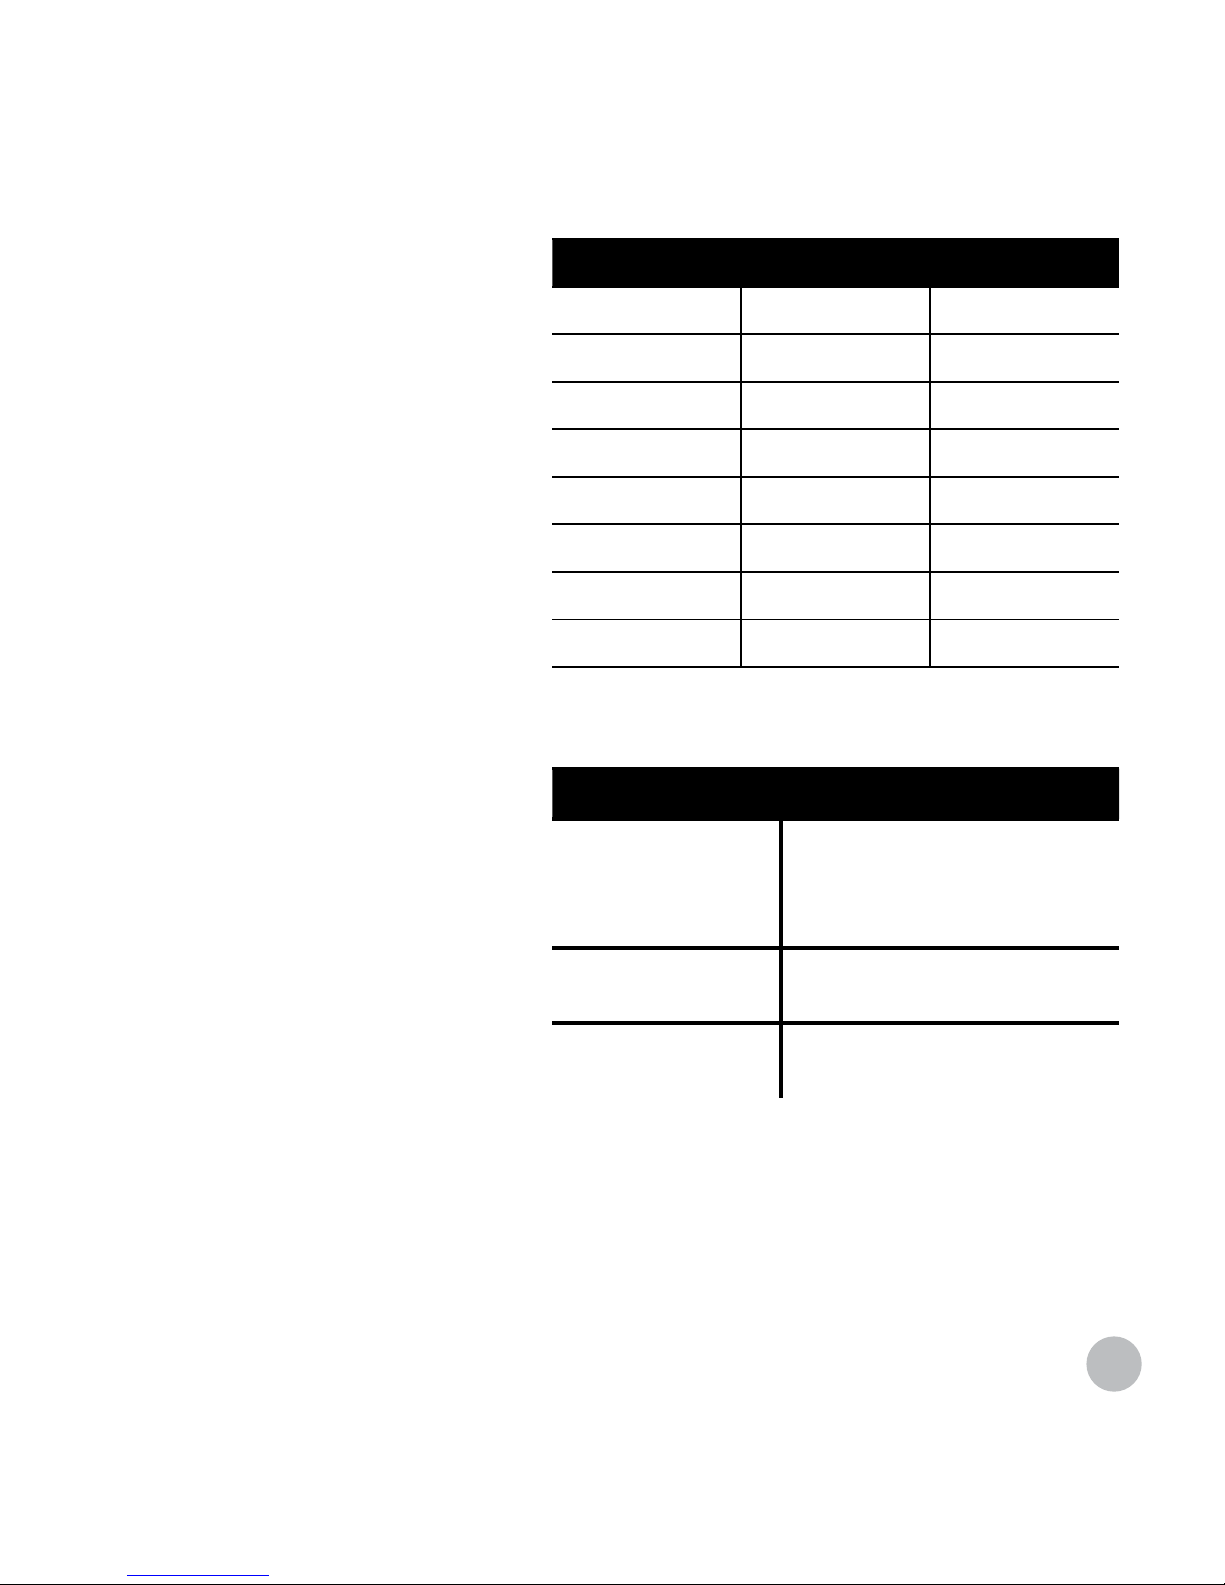
Magnification Guide
Eyepiece Objective Power
20x 1x 20x
20x 2x 40x
20x 3x 60x
20x 4x 80x
40x 1x 40x
40x 2x 80x
40x 3x 120x
40x 4x 160x
How Do I Observe The Specimen?
Turn on the appropriate illumination
source and adjust the brightness as
needed. Top illumination should be
used for opaque specimens like coins,
while the bottom light should be used
for translucent specimens or those with
cellular structures. Start with a simple
observation at the lowest magnification.
Position the object or specimen in the
middle of the stage under the stage clips,
centered over or under the appropriate light source. Focus the image by rotating the focus
wheel until a clear image appears in the eyepiece.
Place the prepared slide or specimen directly under the objective lens on the microscope
stage. Secure all slides with the stage clips. The specimen should be located directly over or
under the appropriate illumination source. Look through the eyepiece and carefully turn the
focus wheel until the image appears clear and sharp.
Troubleshooting Table
Problem Solution
No recognizable
image
• Turn on light
• Readjust focus
• Start with the lowest power
(20x eyepiece/1x zoom)
No image • Center object on slide under
lowest power objective
No light • Replace batteries
• Check on/off position
Did You Know?
The highest magnification is not
always the best for every specimen!
Page 6

6
Now you can select a higher magnification by moving the zoom control. By rotating the zoom
control in stages, you create a steady increase of magnification without overpowering the
view of the object. This microscope includes two eyepieces to offer an even broader range of
magnifications. When you switch from one to the other, always remember to reset the zoom
to its lowest power.
For transparent objects (e.g. sea salt), light is projected by the lower light traveling from
below the stage, through the objective and eyepiece, and finally into your eye. This process
of light transmission is known as microscopy. Some specimens will need to be prepared
for viewing. You can read more about creating specimens in the enclosed microscope
experiments booklet.
Cleaning Tips
To ensure your microscope has a long service life, clean the lenses (objective and eyepiece)
with only a soft, lint-free cloth, like a microfiber cloth. Do not press down too hard while
cleaning, as this might scratch the lens. Ask your parents to help if your microscope is really
dirty. To avoid causing damage to electrical components, do not apply cleaning fluids directly
to the device. If necessary, the cleaning cloth can be moistened with cleaning fluid and the
lens wiped clean using very little pressure. Make sure your microscope is always protected
against dust and dirt. After use, leave it in a warm room to dry off before storing. Batteries
should be removed from the device if it will not be used for a long period of time.
SAFETY WARNINGS
Page 7
7
SAFETY WARNINGS
SAFETY WARNINGS
• This microscope set is
intended for children
older than age 8. Children
should only use this device
under adult supervision.
Never leave a child
unsupervised with this
device. Accessories in the
experiment kit may have
sharp edges and tips.
Please store the device
and all of its accessories
and aids out of the
reach of young children
when not being used
due to a risk of injury.
• Chemicals: Any chemicals
and liquids used in
conjunction with the device
should be kept out of
reach of children. Do not
drink any of the chemicals
contained in this set.
Hands should be washed
thoroughly under running
water after working with
these chemicals. In case
of accidental contact
with eyes or mouth,
rinse the affected area
with water. Seek medical
treatment for ailments
arising from contact with
the chemical substance,
and take the chemicals
with you to the doctor.
• Choking hazard: Children
should only use device
under adult supervision.
Keep packaging materials
like plastic bags and rubber
bands out of the reach of
children as these materials
pose a choking hazard.
• Battery guidelines: This
device contains electronic
components that are
powered by batteries.
Batteries should be kept
out of children’s reach.
When inserting batteries,
please ensure the polarity is
correct. Insert the batteries
according to the displayed
+/- information. Never
mix old and new batteries.
Replace all batteries at
the same time. Never mix
alkaline, standard carbonzinc and rechargeable
nickel-cadmium batteries.
Never short circuit the
device or batteries or throw
either into a fire. Leaking
or damaged batteries can
cause injury if they come
into contact with the skin.
If you need to handle such
batteries, please wear
suitable safety gloves.
Remove batteries from the
product before extended
storage to prevent leaking.
Do not immerse the battery
compartment in water.
• Risk of fire: Do not place
device, particularly the
lenses, in direct sunlight.
The concentration of light
rays could cause a fire.
• Do not disassemble this
device. In the event of a
defect, please contact
your dealer. The dealer
will contact the Customer
Service Department and
can send the device in to
be repaired if necessary.
• Do not subject the
device to temperatures
exceeding 60° C (140° F).
• Disposal: Keep packaging
materials, like plastic bags
and rubber bands, away
from children as they a
pose a risk of suffocation.
Dispose of packaging
materials as legally
required. Consult the local
authority on the matter
if necessary and recycle
materials when possible.
Read and follow the instructions, safety rules, and first aid information.
Page 8

©2017 Discovery Communications, LLC. Discovery™ and the Discovery™ logo are
trademarks of Discovery Communications, LLC, used under license.
All rights reserved. discoverykids.com
©2017 Explore Scientific, LLC, a Journey North Company.
1010 S. 48th Street, Springdale AR 72762
All rights reserved. explorescientificusa.com | exploreone.com | 866.252.3811
Made in China
CONFORMS TO THE SAFETY REQUIREMENTS OF ASTM F963
 Loading...