

Page 1

Discover Video
User Guide
June 1, 2017
V4.5
Discover Video LLC
www.discovervideo.com
Page 2

DEVOS -- Enterprise Video System
Table of Contents
Purpose .............................................................................................. 7
General Description ......................................................................... 7
System Description and Architecture ........................................... 8
Basic Concepts .................................................................................. 9
Accounts ............................................................................................ 9
Active Directory ............................................................................... 9
Security Groups .............................................................................. 10
Media Settings ................................................................................ 10
Categories ....................................................................................... 10
Channels .......................................................................................... 10
Delegates ......................................................................................... 10
Team Share ..................................................................................... 11
Encoders .......................................................................................... 11
Streaming Protocols ...................................................................... 11
Players .............................................................................................. 11
Player Questions / Testing ............................................................ 11
Playlists ............................................................................................ 12
Digital Signage ............................................................................... 12
Scheduling ....................................................................................... 12
Documents ...................................................................................... 12
Images ............................................................................................. 12
Podcasting ....................................................................................... 12
Presentations .................................................................................. 13
Priority Alert ................................................................................... 13
Reports ............................................................................................ 13
Multi-Player .................................................................................... 13
Learning Path .................................................................................. 13
Set Top Box ..................................................................................... 14
Capacity ........................................................................................... 14
Signal Flow & Network Capacity Planning ................................ 14
Clustering ........................................................................................ 15
Public Internet ................................................................................ 15
Encryption ....................................................................................... 16
Installation ...................................................................................... 17
DEVOS Hardware ........................................................................... 17
DEVOS Software on Your Server or Virtual Server (VM) ......... 17
DEVOS Cloud .................................................................................. 17
Inside, Outside, and DMZ ............................................................. 17
Ports ................................................................................................. 18
Getting Started ............................................................................... 19
Administration ............................................................................... 20
Account Settings ............................................................................ 20
Profile .............................................................................................. 20
Account Settings ............................................................................ 21
Change Password ........................................................................... 21
YouTube .......................................................................................... 21
Dropbox........................................................................................... 22
Page 2
DEVOS
Page 3

DEVOS -- Enterprise Video System
Super Portal .................................................................................... 23
System Settings .............................................................................. 23
Landing Page Settings ................................................................... 24
Transcoder Settings ....................................................................... 25
System Notification ....................................................................... 25
Manage Priority Alert Zones ........................................................ 26
Media Categories ........................................................................... 26
Licenses ............................................................................................ 27
System Language ........................................................................... 27
TV Channel Guide ........................................................................... 28
Backup And Restore ...................................................................... 30
StreamPump ................................................................................... 31
About & Update ............................................................................. 32
Active Directory ............................................................................. 32
Active Directory Groups ................................................................ 33
Users ................................................................................................. 34
Privileges ......................................................................................... 35
Signage Approval ........................................................................... 35
Team Share ..................................................................................... 36
Manage Learning Path .................................................................. 36
Admin Style ..................................................................................... 37
Mass Transfer ................................................................................. 38
Email Configuration ....................................................................... 38
Cluster Setting ................................................................................ 39
Network Subnet ............................................................................. 40
Advanced Options .......................................................................... 41
Pull ................................................................................................... 41
Push .................................................................................................. 42
System Content .............................................................................. 43
Manage Channels ........................................................................... 44
Community Channel Share ........................................................... 45
Channel Embed Code & API ......................................................... 46
API .................................................................................................... 46
How To Create or Modify an Channel ........................................ 47
Organizing Channels ..................................................................... 48
Adding/Removing Content On Channels ................................... 49
Using Channels ............................................................................... 50
Understanding Channel Map and Sub-Channels ...................... 50
Simple Channel Manager .............................................................. 51
System Channel Landing Page ..................................................... 51
Channel Search ............................................................................... 52
Manage Live Streams .................................................................... 53
Multi-Player .................................................................................... 55
Live Chat, Attendance, Questions, and Polling ......................... 55
Multi-Player Recording ................................................................. 59
Manage Live Video ........................................................................ 60
Edit Live Video ................................................................................ 60
Live Viewer Report ......................................................................... 60
Page 3
DEVOS
Page 4

DEVOS -- Enterprise Video System
Live Questions ................................................................................ 60
Encoders .......................................................................................... 61
Add New Encoder .......................................................................... 62
CDN .................................................................................................. 64
Remote Encoder Control ............................................................... 65
Manage Video On Demand .......................................................... 67
Add New (YouTube) Video ........................................................... 67
Upload Video .................................................................................. 69
Download Video ............................................................................. 69
Closed Captions .............................................................................. 70
Bookmarks ...................................................................................... 70
Insert Questions Into Video .......................................................... 71
Edit Video ........................................................................................ 72
Video Trim ....................................................................................... 72
Video Information ......................................................................... 72
Report .............................................................................................. 73
Video Embed Code......................................................................... 73
Media Settings ................................................................................ 74
Priority Alert ................................................................................... 75
Schedule .......................................................................................... 77
Scheduling Streams and Recordings........................................... 77
Live Stream ..................................................................................... 77
Encoder ............................................................................................ 78
Multi-Player .................................................................................... 78
Remove Schedule ........................................................................... 79
IoT Control And Scheduling ......................................................... 79
Setting Up Brands .......................................................................... 80
IR Control ........................................................................................ 81
Setting Up Devices ......................................................................... 82
Setting Up Functions ..................................................................... 82
Setting Up Groups ......................................................................... 83
Testing iTach Devices .................................................................... 83
RS-232 Control ............................................................................... 84
Signage ............................................................................................ 85
Create Sign ...................................................................................... 85
Example Entry For Template 1 ..................................................... 86
Google Slides .................................................................................. 87
Displaying Signs ............................................................................. 88
Signage Media Player2 & SignStick2® ...................................... 88
Samsung Smart TV ......................................................................... 88
Roku Box ......................................................................................... 88
Web Browser................................................................................... 88
Controlling Your Sign .................................................................... 89
Master Signage ............................................................................... 90
Schedule Signage ........................................................................... 90
Presentations .................................................................................. 91
Live Presentations .......................................................................... 91
Invitations ....................................................................................... 94
Page 4
DEVOS
Page 5

DEVOS -- Enterprise Video System
Giving A Live Presentation ........................................................... 95
Polls .................................................................................................. 97
VoD Presentations ......................................................................... 99
Viewing Presentations ................................................................. 100
Live Presentation Viewing .......................................................... 100
Playlists .......................................................................................... 101
Manage Images ............................................................................ 103
PowerPoint.................................................................................... 104
Manage Documents ..................................................................... 105
Security .......................................................................................... 106
Manage Groups ............................................................................ 106
Delegate ........................................................................................ 107
Reports .......................................................................................... 108
Media Questions Report ............................................................. 109
System Report .............................................................................. 110
General........................................................................................... 110
System Statistics .......................................................................... 110
Recording Live Streams .............................................................. 111
Roku Set Top Box ......................................................................... 112
ADMIN STYLE INTERFACE .......................................................... 113
Digital Signage ............................................................................. 114
How To Upload A Video Using Web Upload ........................... 115
How To Upload A Video Using FTP ........................................... 116
HOW TO UPLOAD VIDEOS USING DROPBOX ......................... 117
How To Stream A Live Event ...................................................... 118
How To Add Test Questions To A Video .................................. 119
How To Record A Desktop Lecture ........................................... 121
How To Record A Classroom Lecture / Single Stream ........... 123
How To Record A Classroom Lecture / Multiple Streams ..... 124
How To Monitor Areas For Security.......................................... 125
How To Display Digital Signage In A Lobby ............................ 126
How To Stream Live or Record From iPad or iPhone ............. 128
How To Distribute TV .................................................................. 129
How To Distribute Live Video using IP Multicast ................... 130
How To Do Live Morning Announcements .............................. 131
How To Control A Broadcast Remotely .................................... 132
How To Conduct A Live "Webinar" ........................................... 133
How To Digitize A VCR Tape or DVD ........................................ 134
Streamsie Pro ................................................................................ 134
How To Mass Load Content From YouTube ............................ 135
How To Setup Common Channels ............................................. 136
How To Give A Live Video PowerPoint Presentation ............. 138
How To Use 3rd Party Encoder For Live Streaming ................. 140
Encoder RTMP Push ..................................................................... 140
Server Pull ..................................................................................... 140
How To Setup Lecture Capture with Multi-Player .................. 141
Products and Accessories ........................................................... 142
Available From Discover Video .................................................. 142
Page 5
DEVOS
Page 6

DEVOS -- Enterprise Video System
Available from Discover Video Partners and Suppliers ......... 142
Copyright Issues ........................................................................... 143
Encoding Content for VoD ......................................................... 144
Encoding Parameters ................................................................... 144
Quick Response (QR) Codes ....................................................... 145
Web Filters .................................................................................... 146
Closed Captions ............................................................................ 146
END-USER LICENSE AGREEMENT FOR DISCOVER VIDEO LLC PROGRAMS AND
COMPONENTS .............................................................................. 147
Page 6
DEVOS
Page 7

DEVOS -- Enterprise Video System
Chapter 1:
Introduction
This section will describe:
Purpose
General Description
System Description
Basic Concepts
Purpose
The Discover Video DEVOS is a powerful, multifunction, live and on-demand visual
communications platform for offices, schools, corporations, departments, government
agencies, and other enterprises. In addition to providing live and on-demand video to
desktops, Smartphones, Set Top Boxes and other devices, DEVOS provides an
emergency communications system called "Priority Alert", provides Digital Signage,
can broadcast video on the public Internet, and supports IoT and scheduling and
control. DEVOS delivers content to virtually all modern devices including PC, MAC,
iPhone, iPad, Android, and Roku boxes, and it can accept upload of live and VoD
content from desktops and mobile devices.
General Description
DEVOS consists of a physical server, VM, or hosted Cloud, and is available in multiple
sizes and capacities. Any number of optional low cost Streamsie PC/Mac/iOS, Mantis,
Hornet, or 3rd party encoders, may be used to create live or recorded video streams
that are distributed to viewers via the DEVOS server. The system is self-contained and
requires no special integration. It is generally "plug and play", allowing you to be up
and operational in minutes. It is used and managed via its web page interfaces which
are compatible with virtually all modern browsers.
Page 7
DEVOS
Page 8

DEVOS -- Enterprise Video System
System Description and Architecture
The DEVOS system consists of one or more DEVOS servers, one or more Streamsie,
Mantis, Hornet or other live encoders, and existing desktop computers, Smartphones
and tablets, iPads/iPhones, and other clients.
The DEVOS Media Server provides live and Video-on-Demand (VoD) delivery via
HTTP, RTMP, RTSP, HLS, HDS, DASH, and progressive download technologies. It is the
heart of the system and provides all database, administration, storage, control
functions, and user interfaces.
Live video streams are created using the Discover Video Streamsie, Mantis or Hornet
which can be controlled by DEVOS. Other live video streaming encoders may also be
used, as well as compatible existing public video streams. Video files are created using
encoders when capturing live events or when encoding a file from other sources.
Viewing of live video uses HTML or optionally Flash player (Version 11 or above),
while VoD content is viewed via HTML5.
PC Desktops may be equipped with the Discover Video Priority Alert program and
DEVOS may then issue video, text, or web page alerts to one, some, or all desktops
without the desktop user needing to take any action.
DEVOS supports video signage using the Discover Video SignStick2®, Signage Media
Player, the built-in Digital Signage web player. Limited signage may be displayed
using Roku boxes, and/or Samsung Smart TV. Digital Signage allows you to display
any live or VoD content, PowerPoint, Images, etc. on unattended TV's or computer
monitors and to display text, RSS feeds, or web pages.
DEVOS allows you to add YouTube videos to your VoD list, and to incorporate many
public live streams into your live video lineup. You may also synchronize (download)
your videos from a YouTube account automatically.
DEVOS supports Active Directory, and allows you to give publishing privileges to
multiple administrators, and to enable viewers to log in using their existing
credentials.
DEVOS configurations allow StreamPump® to be deployed at remote branch offices
to distribute live and VoD content. Each StreamPump then delivers the content to
office viewers locally rather than those viewers each consuming bandwidth and
capacity from the DEVOS master. This arrangement provides a highly scalable
solution for video distribution, even on bandwidth limited networks.
Page 8
DEVOS
Page 9

DEVOS -- Enterprise Video System
StreamPump, is completely automatic. Just plug them in and they contact the DEVOS
and exchange information. When a viewer in a location with a slave watches a live
video, it is automatically delivered from the StreamPump rather than from the master.
Clustering allows DEVOS to scale to virtually any size. When Clustering is used,
multiple DEVOS servers automatically replicate content and automatically balance the
load between the servers in a cluster.
DEVOS supports Internet of Things (IoT) to control virtually any device that can be
controlled using IP or IR (and using SignStick2 or 3rd party devices, RS232).
The DEVOS system supports full scheduling of streaming, recording, and control of 3rd
party devices. Scheduling allows you to start recording on the server, locally in the
encoder (Hornet, Mantis, Streamsie PC), or both, and to publish the recording to a
specified channel automatically. Scheduling allows you to control devices.
Basic Concepts
Accounts
The system operates with user accounts. Each user account has certain privileges.
Among the possible privileges is "Super", which provides access to the global system
configuration features, including user setup. There is no single "Super Administrator"
account. Rather, one or more users may become a Super Administrator. This allows
you to designate an alternate user to administrator the system, especially in cases
where the primary Super Administrator is not available. You should limit the Super
Admin privilege to a small number of trusted, trained, users. Accounts can be from
your Active Directory, from the DEVOS system, or from both.
An account may be set to have only certain privileges. For example, user A may be
allowed to publish VoD only, while user B may be allowed to publish VoD and also
broadcast live video.
Each user has their own account. If a user has privileges to publish content,
create Digital Signage, create Channels, and other functions, then that content
or function is "owned" by that user and other users cannot modify it. Team
Share feature allows common control of selected content.
Active Directory
Active Directory is a Microsoft directory for Windows domains and is an
implementation of the LDAP protocol. DEVOS supports Active Directory so that users
may be automatically added to the system when they log in using their domain
credentials.
Page 9
DEVOS
Page 10

DEVOS -- Enterprise Video System
DEVOS supports multiple AD domains, and AD groups and will parse many levels of
sub-groups.
Once AD groups are identified, they may be added to a DEVOS security Group.
Local uses (that is, users not within AD) may co-exist with AD users.
DEVOS operates with or without AD.
Security Groups
DEVOS allows you to create any number of Security Groups. A Security Group is
simply a list of desired AD groups and/or local users. A Security Group may be
applied to any video. For example, you may create a Security Group called "Group 1"
and add AD group "Smith", AD group "Jones", and some number of local users.
When this group is applied to a video, only members of that group may access the
content.
Media Settings
Each user may create multiple Media Settings. Media Settings are simply a collection
of values that control the behavior of a video, including whether the video will allow
viewers to comment or rate it, whether the video requires a viewer to log in to view it,
etc. This convenience allows you to select a pre-configured collection of commonly
used settings for your videos. For example, you may publish some content using a
Media Setting called "Private Content", and another template called "Public Content",
etc.
Categories
The Super Administrator may create categories and sub-categories. Once created, a
user that publishes a video may select a category for that video to make it possible
for a viewer to search and select videos by category.
Channels
Channels are collections of content and a landing pages where users can publish their
content. For example, you may create a Channel called "Science" where you publish
all science content. You may create sub-Channels to further organize your content.
For example, you can create a Channel called "Physics" under the "Science" Channel.
Delegates
A user may assign another user to manage certain features. For example, an
executive with a DEVOS account may delegate the management of VoD to an
assistant.
Page 10
DEVOS
Page 11

DEVOS -- Enterprise Video System
Team Share
The Super can create a special account called “Team Share” and can include specified
users in the team. Those members can then use a common “Team” account for such
things as Digital Signage, VoD, etc. Each member’s privilege limits their capabilities in
the team.
Encoders
DEVOS controls and manages Streamsie PC, Streamsie Mac, Hornet and Mantis
encoders. DEVOS also supports 3rd party encoders.
A DEVOS system can be authorized to support any number Streamsie accounts.
These Streamsie accounts can then be assigned to specific users. If more Streamsie
accounts are needed, they can be easily added by entering a product code by a Super
Administrator. If a Streamsie account is no longer needed by a user, the Super
Administrator can reassign it. Streamsie license is controlled by DEVOS and the
license is portable and may be used on any number of computers. For each Streamsie
account, only one Streamsie may be active at the same time.
Hornet and Mantis do not require DEVOS license.
Third-party encoders are supported by DEVOS, provided they support industry
standard H264/AAC, RTMP, RTSP, or AVC over TS. Windows Media, MPEG2, and
other types of live streams may be supported using the Discover Video StreamEngine.
Streaming Protocols
DEVOS delivers live video via streaming, and VoD via RTMP/T, HLS, DASH, or
progressive download (HTTP/HTTPS). Live stream ingest is typically RTMP (using port
1935).
Players
DEVOS uses HTML5 player, and optionally Flash for live. No special plug-ins, ActiveX
controls, or downloads are required.
Player Questions / Testing
Questions may be added to any video. Multiple-choice or textual questions may be
inserted at any point of a video, and the viewer is presented with your questions at
the proper point. The viewer has a certain time to answer the question and continue
to view the video until the next question. DEVOS automatically calculates the score
for each viewer and allows you to view the scores and details. Questions can be used
for learning or for actual testing, and can also be used to ensure and validate that a
viewer has actively viewed your content.
Page 11
DEVOS
Page 12

DEVOS -- Enterprise Video System
Playlists
A Playlist is an ordered list of live and VoD content. Playlist are used for Digital
Signage and/or desktop display. Playlists allow you display content one-after-theother, and to control the starting and ending position of each item in the list.
Digital Signage
An unlimited number of dynamic, template-based Digital Signs may be created by
each user with Digital Signage privilege. A sign may include a playlist of live and VoD
content, images (including PowerPoint slides), web pages, or text. Sign templates
may include news feeds from RSS providers. Digital Signage may be displayed using a
web browser, a SignStick2 or Media Player (physical box), or using certain Samsung
Smart TV models and the free Discover Video Signage App (available from the
Samsung App Store), or an inexpensive Roku box. Note that Roku and Samsung
consumer devices may have important limitations.
Scheduling
DEVOS supports scheduling of server-side and local recording of live video. You may
schedule a live video to be recorded once, daily, weekly, monthly, or yearly. The
system will automatically start a running Streamsie PC, Hornet or Mantis at the
scheduled time. Scheduling is ideal to automatically record classroom lectures, live
TV programs, etc.
Scheduling of multi-view streaming and recording is also supported.
DEVOS also supports time-of-day scheduling of Digital Signage.
Documents
You can upload documents, such as PDF, DOC, PPT, PPTX, etc. to the DEVOS system.
Once uploaded, you can include documents with a video, thus allowing a viewer to
download additional materials.
Images
You can upload images to DEVOS. Once uploaded, you can use an image for any
video thumbnail icon, for a Channel icon, etc. You can also specify an image from a
URL (e.g. an image found from a web search), and DEVOS will automatically download
the image and add it to your image library. You can also upload PowerPoint and the
server will convert your PowerPoint presentations.
Podcasting
Video podcasting is supported for channels. Videos uploaded to DEVOS (not external
video links or YouTube videos) are automatically added to a channel podcast when
enabled. This allows viewers to subscribe to your video podcast and automatically
receive new videos ("episodes") when you add them to a channel. Video podcasting
Page 12
DEVOS
Page 13

DEVOS -- Enterprise Video System
can eliminate streaming bandwidth concerns because the video is downloaded to the
podcast reader and can be viewed at any time, even when the viewer is offline.
Presentations
DEVOS supports synchronized video with PowerPoint slides. You can instantly give a
live presentation to your audience, or create a new VoD presentation. Live
presentations includes audience questions, chat, polling, and recording.
Priority Alert
Priority Alert allows you to cause live video, VoD, text messages, or a web page, to
appear on one, some or all computers without user action. It is used for emergency
communications, or to force target viewers to tune in (for example, for a live "Morning
Announcement" or corporate "CEO Address"). Priority Alert is based on zones, and
you can alert all zones, one zone, or some zones. A safe, small, free program is
installed on target computers (PC and Mac) to facilitate this function. Priority Alert
also appears on one, some, or all Digital Signage displays. At the conclusion of an
alert, it automatically closes desktop alerts, and Digital Signage displays return to
prior state.
Reports
DEVOS provides several built-in reports. Users can see statistics on their content, and
can drill down to see who has viewed what, and when. Content with questions/tests
have reports that show detailed test results. Super Users can access reports to
monitor all content and discover how content is being published and consumed.
Reports also allow you to download a CSV file so you can make your own custom
report in Excel or import to your own database.
Multi-Player
DEVOS supports up to four simultaneous live and on-demand videos in a useradjustable, synchronized player. Multi-player is used for lecture capture, performance
assessment applications, security and monitoring, and other uses.
Learning Path
Learning Path is an optional feature that empowers you to create
training/educational courses that takes a user through a learning journey that
you define. Using a powerful drag-and-drop graphical interface, you can
create a Learning Path that includes videos, documents, images, and tests.
Based on test results, the learner may have multiple branch points where they
might go to advanced material if they have a high score, or branch to remedial
training until they achieve a score you have defined. Learning Paths may be
assigned to individuals or groups and you can track and monitor their
progress.
Page 13
DEVOS
Page 14

DEVOS -- Enterprise Video System
Number Of Viewers
Network Bandwidth
1
0.5 Mbps
10
5.0 Mbps
100
50 Mbps
1,000
500 Mbps (0.5 Gbps)
5,000
2500 Mbps (2.5 Gbps)
10,000
5000 Mbps (5 Gbps)
Set Top Box
DEVOS supports a Discover Video Set Top Box (STB). The STB operates as a
conventional STB where the user can use a IR Remote Control to simply select
the live video they wish to view.
Capacity
System capacity is a function of available network bandwidth, network I/O, CPU, and
for VoD delivery, the disk storage system. In most cases you would reach network
capacity before the other items become meaningful factors. DEVOS is delivered as
hardware systems or as software for your server or virtual machine, and actual
capacity depends on the performance of the underlying hardware and network.
DEVOS is typically capable of supporting 2,500 or more streams. The actual number is
determined by network I/O capacity, CPU use, and by other processes. Generally, you
will run out of network I/O before you run out of DEVOS streaming capacity. To
increase simultaneous live streaming capacity, use clustering, StreamPump, or lower
the streaming rate (see below).
DEVOS places no limits on the number of accounts, users, streams, content,
signage, Channels, or other features and functions. However, unlimited does not
mean "infinite", and actual capacity depends on hardware, network, and various
configuration options.
Signal Flow & Network Capacity Planning
Live video streams flow from a remote encoder to the server, and then from the
server to the viewers. For example, a Streamsie PC may be sending a live video
stream at 500,000 bps to the server. In this case, the uplink speed from the Streamsie
encoder to the server is important.
When a viewer accesses a player (or the live video is used by Digital Signage, Priority
Alert, Roku, or other device), the server delivers 500,000 bps stream to each viewer. In
this case the downlink speed from the server to the viewer is important. The
following table illustrates theoretical network utilization for a 500 Kbps live stream:
Page 14
DEVOS
Page 15

DEVOS -- Enterprise Video System
Because of network protocol overhead and other factors, this theoretical usage
should be supported by a network capacity that is 20% to 50% higher. For example, to
support 5,000 live viewers the network should support 3 to 3.75 Gbps, plus network
capacity for users to perform other routine network actions. Also note that this
example uses a single stream at 500 Kbps. The number doubles if the stream is 1
Mbps, and consideration must be made for the total number of live streams available.
Experience shows that while there may be 5,000 possible viewers, the actual number
at any given instant is typically much smaller (because viewers tend to come-and-go,
and not all possible viewers actually participate). It is therefore possible to be
completely successful in a de-rated configuration. Live streaming capacity can be
greatly increased by placing Discover Video StreamPump® at strategic locations.
StreamPump will automatically receive the live stream and distribute it to viewers
within a network or sub-network, vastly reducing both the server's load and the
network utilization.
Viewing of Video-on-Demand is the same as live, except usage tends to be spread
out over time (there is no compelling reason to tune in "now"). Actual network usage
cannot be well predicted because it will be different for each use case, and network
professionals should monitor network usage and make adjustments as needed.
Generally, it is good practice to provide sufficient bandwidth capacity for the worsecase usage, but experience is the best guide.
For very large live streaming events, DEVOS also supports IP multicast, allowing
an unlimited number of viewers to view live streams using the bandwidth of
only one.
Clustering
Clustering increases performance by allowing multiple servers to behave as one.
When you add an additional DEVOS server to your system, the content is
automatically duplicated on all servers in your cluster and requests for viewing are
automatically spread out via "round robin" load balancing. Thus, if the capacity of
one server is 4 Gbps, the capacity of two such servers is 8 Gbps. Clustering also
provides increased resilience. Clustering can be configured for local on-premises
servers, or for off-premises hybrid premises/Cloud configurations.
Public Internet
If your DEVOS is available to viewers on the public Internet (e.g. home viewers,
consumers, etc.), then you should be concerned about WAN access bandwidth usage.
Your ability to serve many such viewers will be limited by how much public Internet
access capacity you have. For example, if your WAN is limited to 5 Mbps, then you
cannot deliver more than ten 500 Kbps streams to such viewers (and under this
Page 15
DEVOS
Page 16

DEVOS -- Enterprise Video System
condition, all other services that use a WAN will slow). Be sure you have enough
access bandwidth to serve your intended audience.
You can increase your streaming capacity to public Internet viewers by using
optional Arcus service, DEVOS Cloud clustering, or of course by increasing your
WAN bandwidth.
Encryption
You can install a certificate on DEVOS to enable https and configure the server to use
http/https or only https. Https (SSL, Secure Sockets Layer) provides end-to-end
encryption. Contact Discover Video for assistance.
Page 16
DEVOS
Page 17

DEVOS -- Enterprise Video System
Chapter 2:
Installation
This section will describe:
Installation
IP Address/Ports
Installation
DEVOS Hardware
Discover Video provides a complete turn-key server configuration. In this case, you
need only provide adequate physical space (i.e. rack or table top) and the static IP
address.
DEVOS Software on Your Server or Virtual Server (VM)
Discover Video can install DEVOS on your virtual machine or stand-alone server
hardware. The server must be Windows 2012 Server, must have at least 120G storage
for Drive C, and adequate storage for content on Drive D (suggest start with at least
100 GB). Minimum of 2 CPU's, 8G RAM, and adequate network I/O (e.g. at least 1G).
DEVOS Cloud
Discover Video Cloud is very popular when the viewers are geographically dispersed,
and when purely "behind the firewall" security is not mandatory. DEVOS Cloud can
be augmented with on-premises DEVOS StreamPump to provide distribution of
content to many viewers inside your LAN. For DEVOS Cloud, Discover Video provides
a domain URL to access the system.
Note that all DEVOS installations require that the server is able to access the
public Internet periodically for license and maintenance purposes.
Inside, Outside, and DMZ
The IP address assigned to DEVOS may be purely an inside address (e.g.
192.168.1.100), an outside IP address, or an address in your DMZ.
Commonly, the DEVOS is installed on an inside address and this address is NAT'ed to
an outside address.
Page 17
DEVOS
Page 18

DEVOS -- Enterprise Video System
Ports
The following TCP/IP ports are used by the system:
80, 8080 HTTP
443, HTTPS (optional, if you have certificate)
1935, RTMP
21, FTP (plus passive FTP ports)
3389, RDP (for maintenance)
Page 18
DEVOS
Page 19
DEVOS -- Enterprise Video System
Chapter 3:
Operation
This section will describe:
Getting Started
Administration
Operation
Getting Started
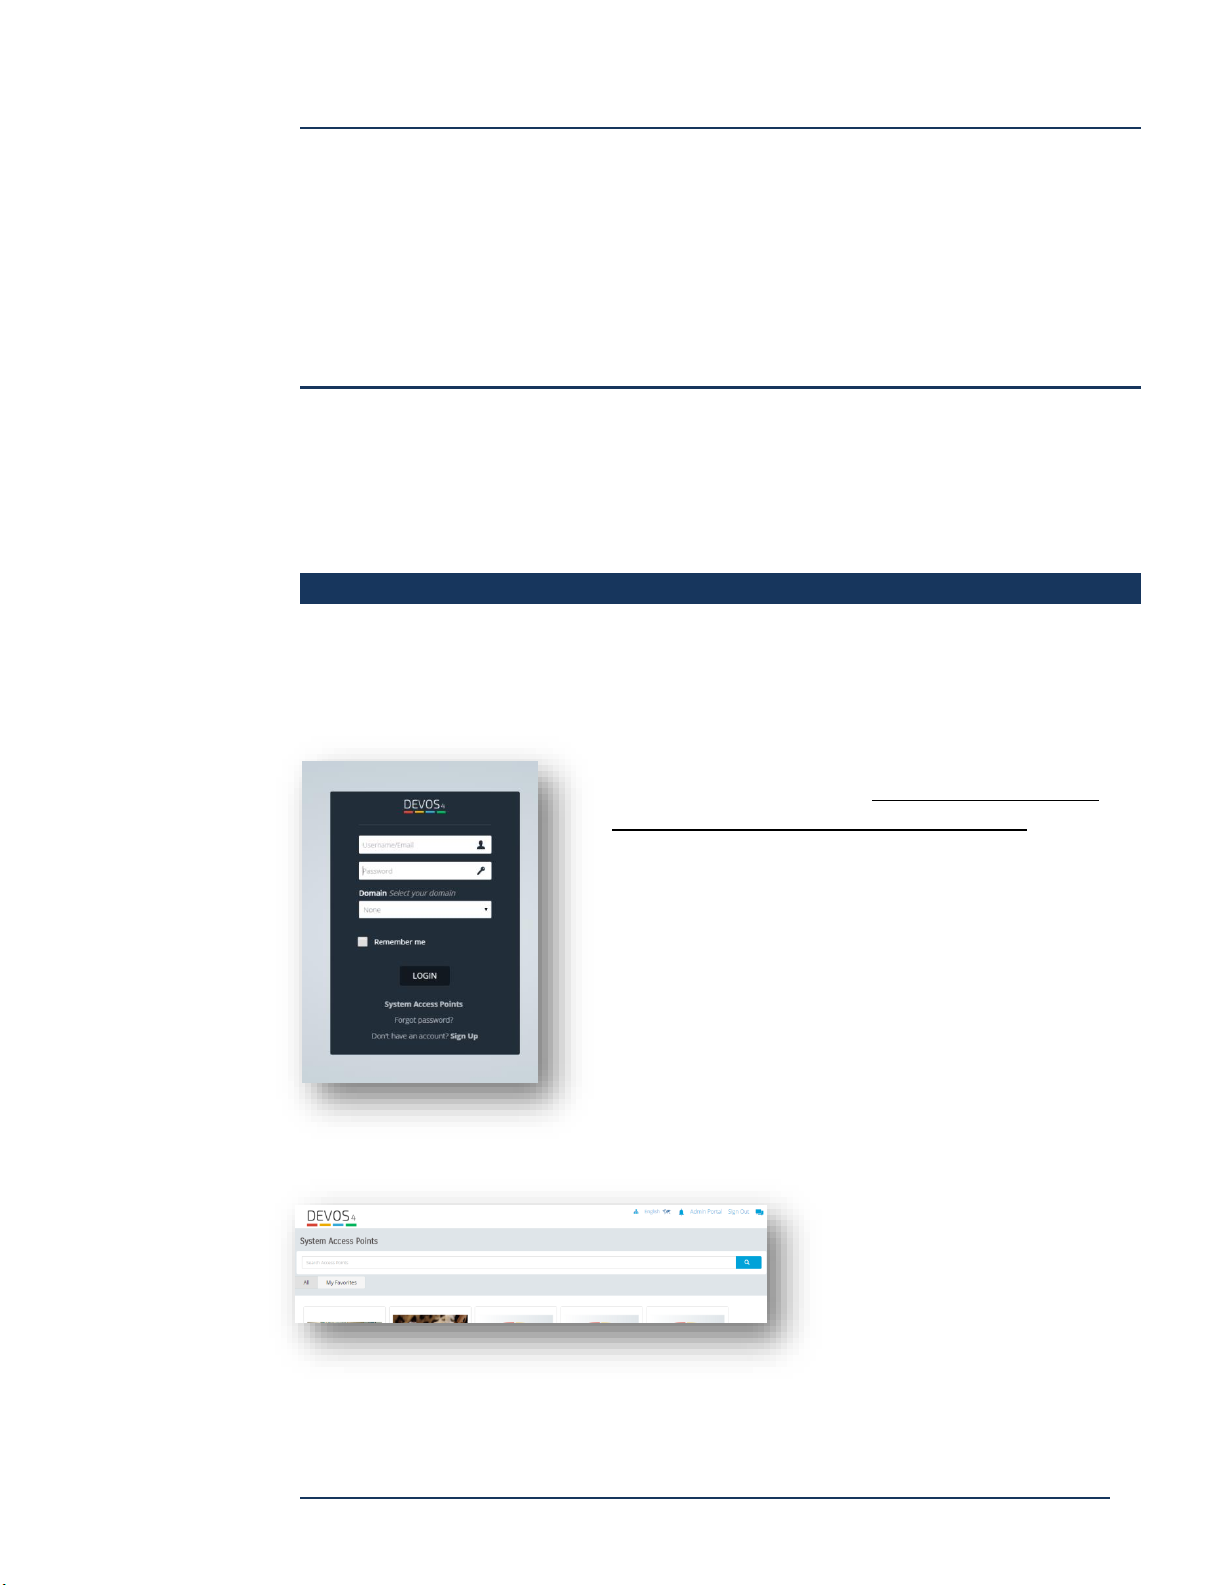
Log in to DEVOS by entering the system's IP address or URL in a browser. Depending
on system settings, this will bring you to a default landing page. The default landing
page may be a listing of Channels, a specific Channel, or a login screen. If not the
login screen, select "Login".
For username, enter "[email protected]". For
password, enter "asdasd". You should change this
password after logging in for the first time.
Leave Domain blank and select "Login".
This logs you in as initial setup user. You should not
use this account except for system administration.
Depending on system settings, login will bring you to
a content landing page. Because you have logged in
with an account that has special privileges, you may
select "Admin Portal" to begin to administer the
DEVOS system.
Page 19
DEVOS
Page 20
DEVOS -- Enterprise Video System
Administration
All functions are accessible from the left menu panel. Selecting an item from the
menu will expose additional functions.
Account Settings
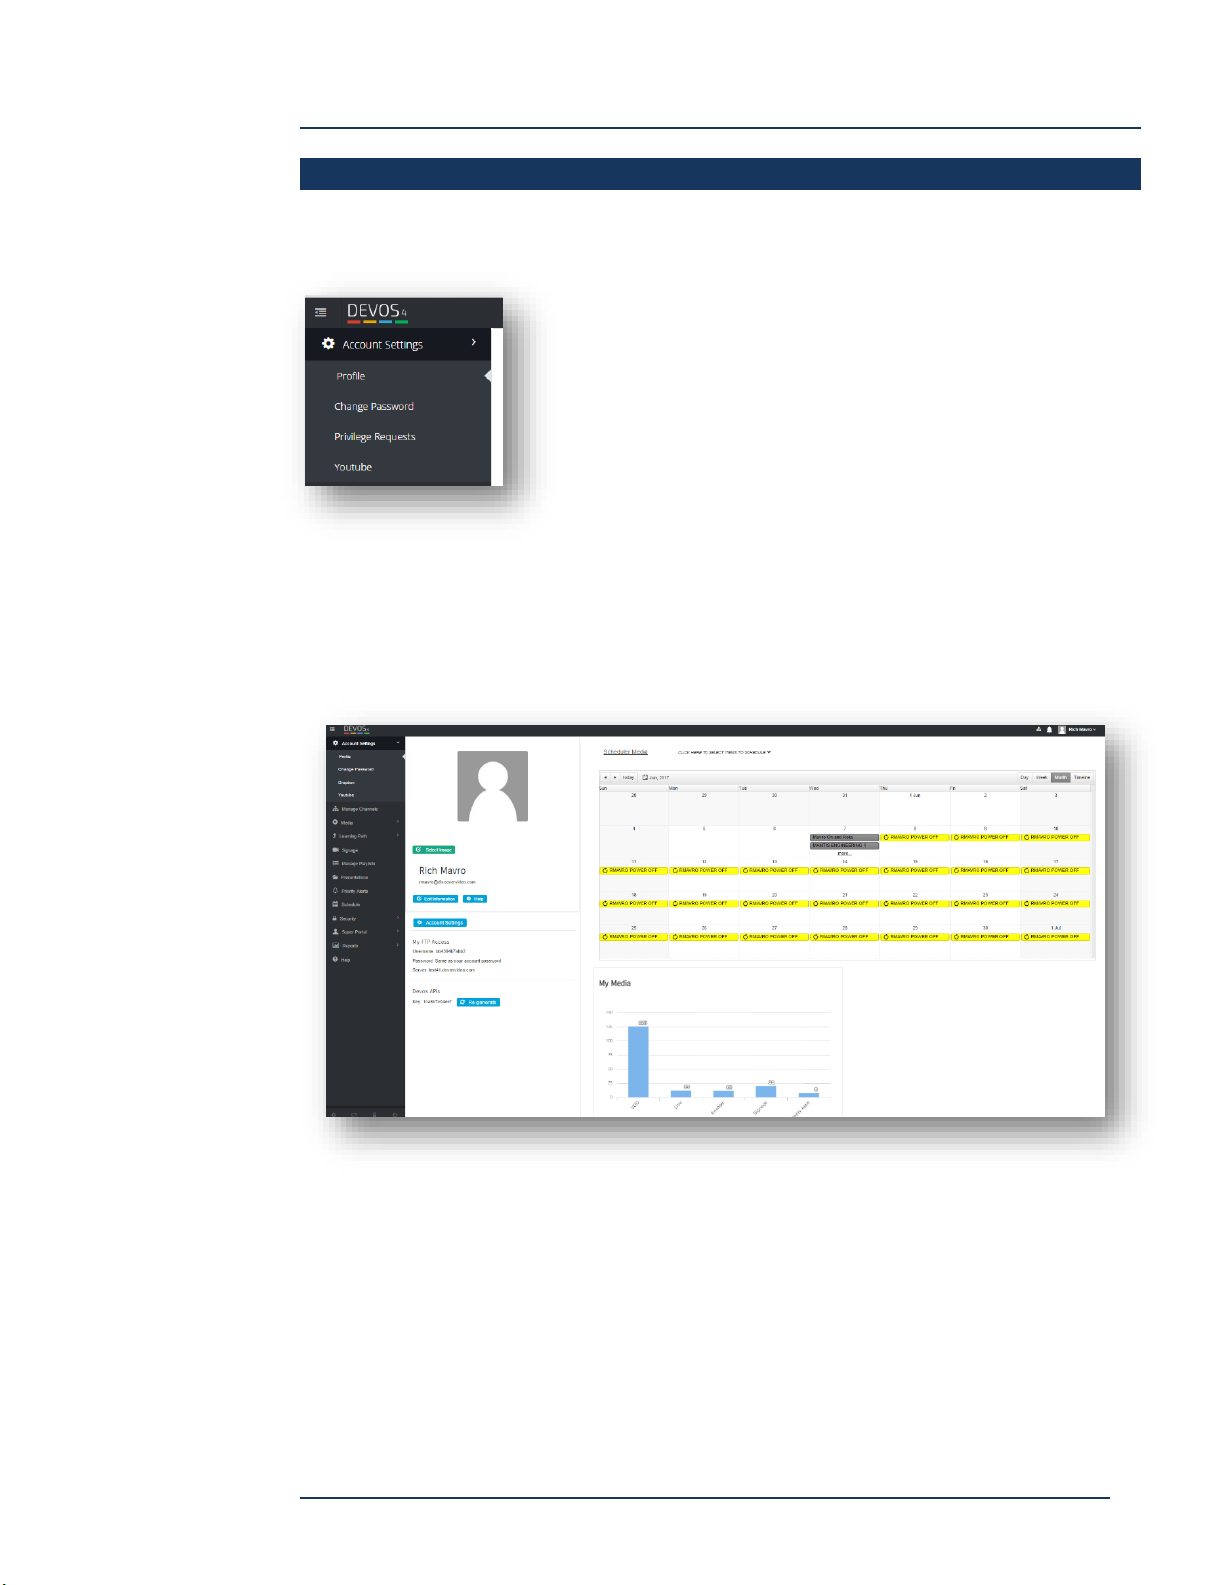
Every user has their own profile in the DEVOS system.
Profile
The profile page is illustrated below.
Access to scheduling calendar
Shows information about their media
Allows user to change their profile picture and edit their profile
Shows FTP credentials for the user account
Page 20
DEVOS
Page 21
DEVOS -- Enterprise Video System
Account Settings
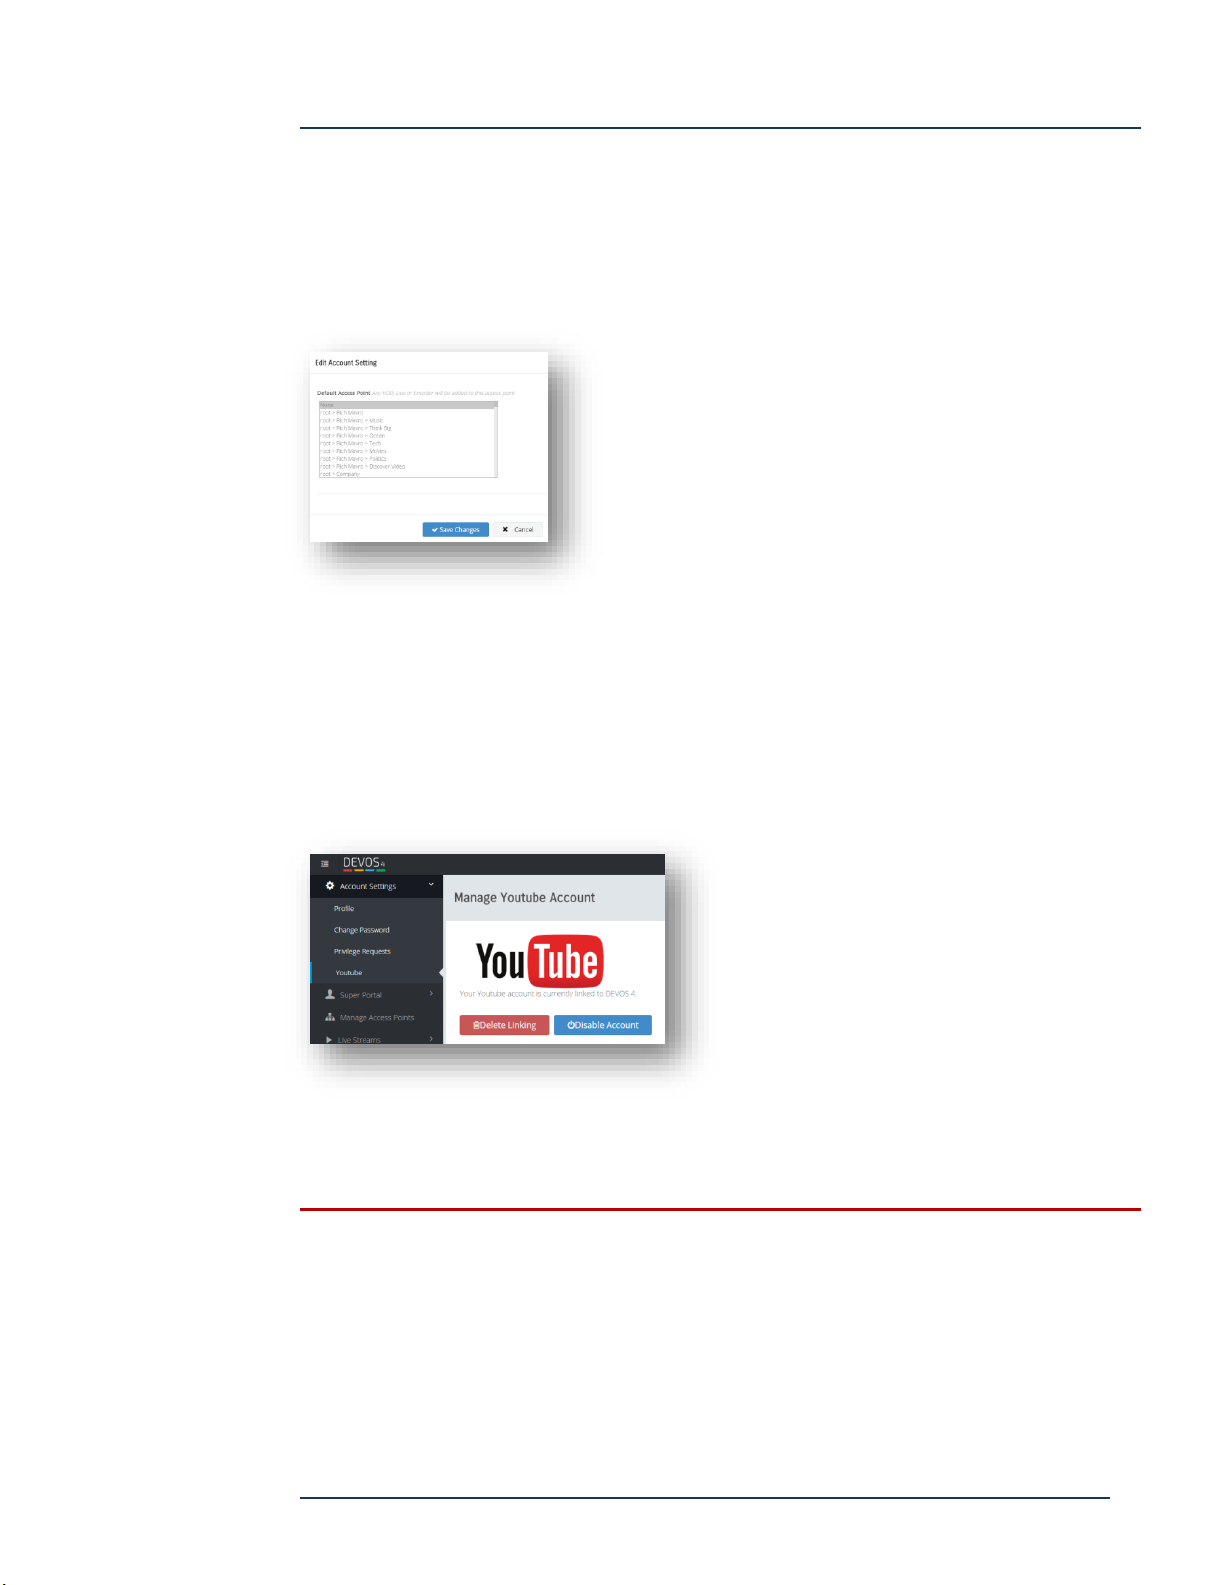
The account settings allow the user to set a default Channel for new content. Content
is always available in the user's account, and they may add content to any of their
Channels manually. By setting a default Channel, new content will be added to the
selected Channel automatically.
Change Password
The user may change their password (for non-Active Directory accounts).
YouTube
If the user has a YouTube account, they may link it to their DEVOS account. Once
linked, any content uploaded to YouTube will be automatically downloaded to the
user's DEVOS account.
To link your account, follow the on-screen instructions. NOTE: you may need to
disable popup blockers.
Some YouTube content may not download to a DEVOS account. Older content may not
be in H264 format, and content with special features may not work correctly. You can
only download content from a linked account. You can still use YouTube content in
DEVOS from non-linked accounts, but such content will be delivered to viewers from
YouTube and not downloaded to DEVOS.
Page 21
DEVOS
Page 22
DEVOS -- Enterprise Video System
Dropbox
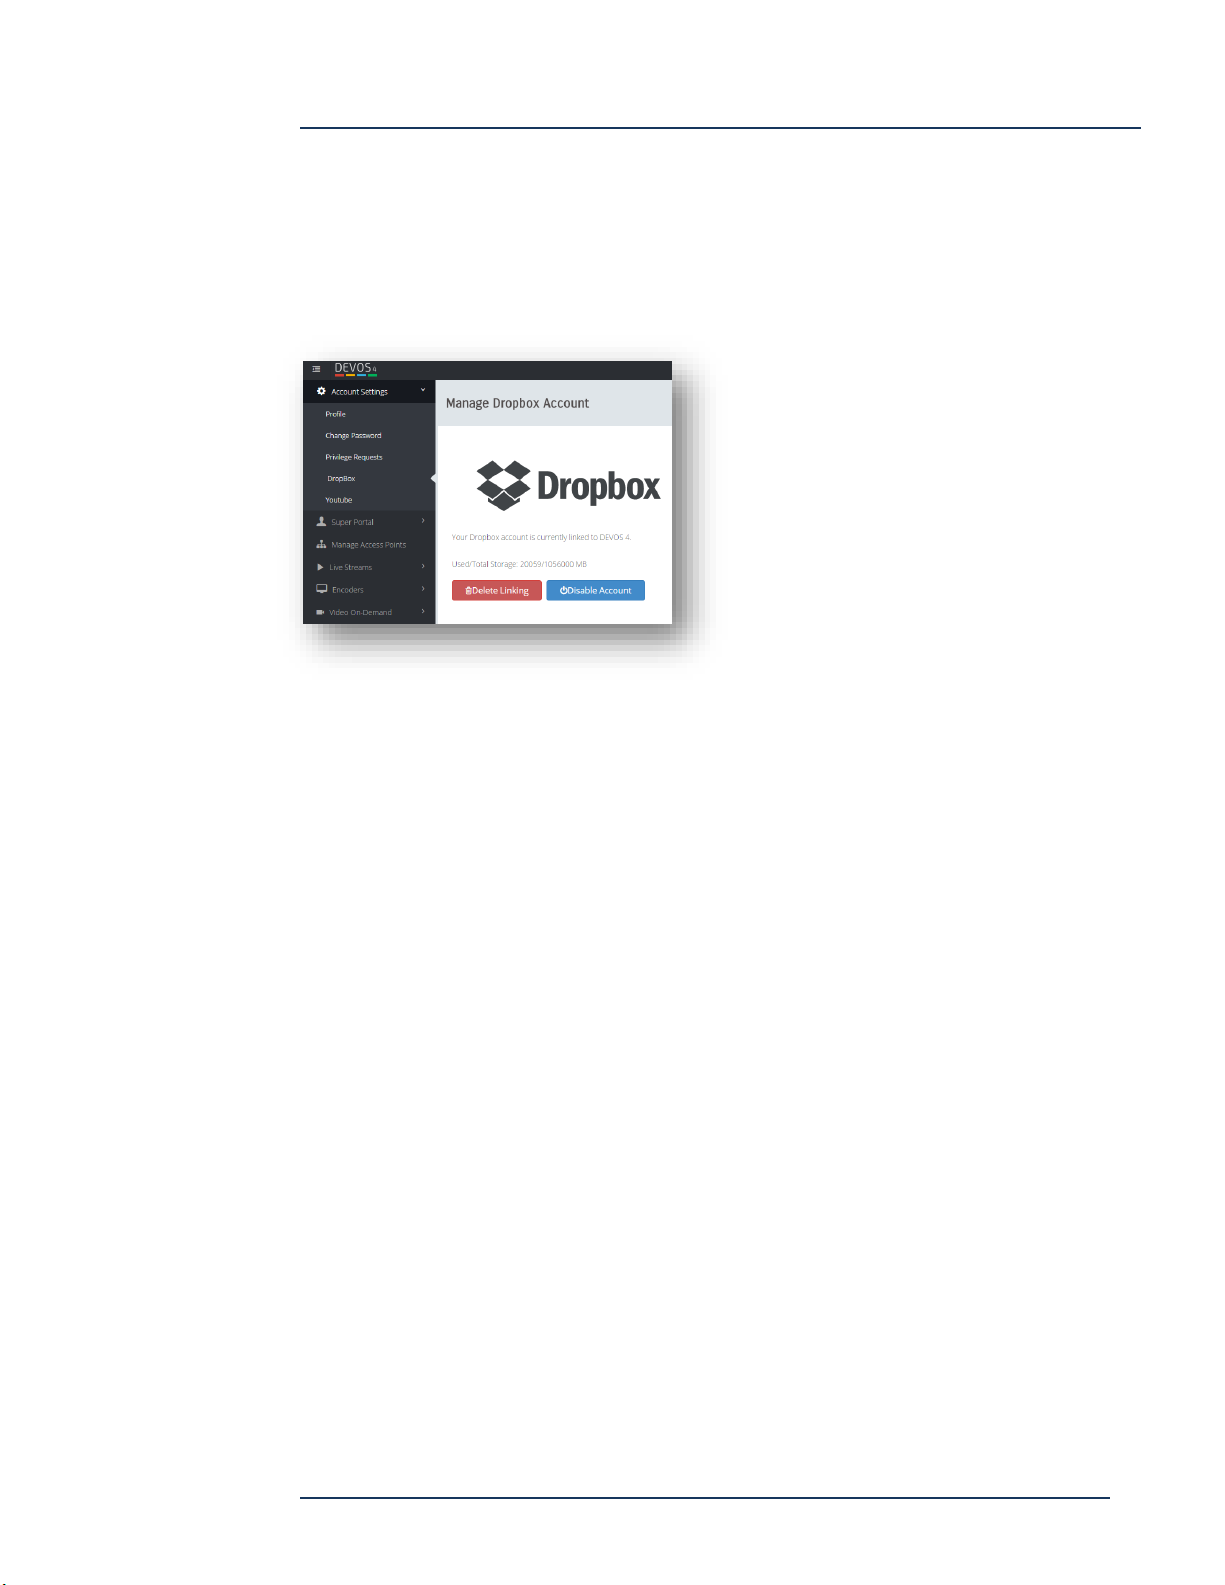
You can link your Dropbox account to DEVOS. Select Dropbox and follow instructions
to link your account (disable popup blockers). Once linked, you can create a folder in
Dropbox called "devos", and any video content you drop there will be automatically
added to your DEVOS Video-on-Demand account.
Page 22
DEVOS
Page 23
DEVOS -- Enterprise Video System
Super Portal
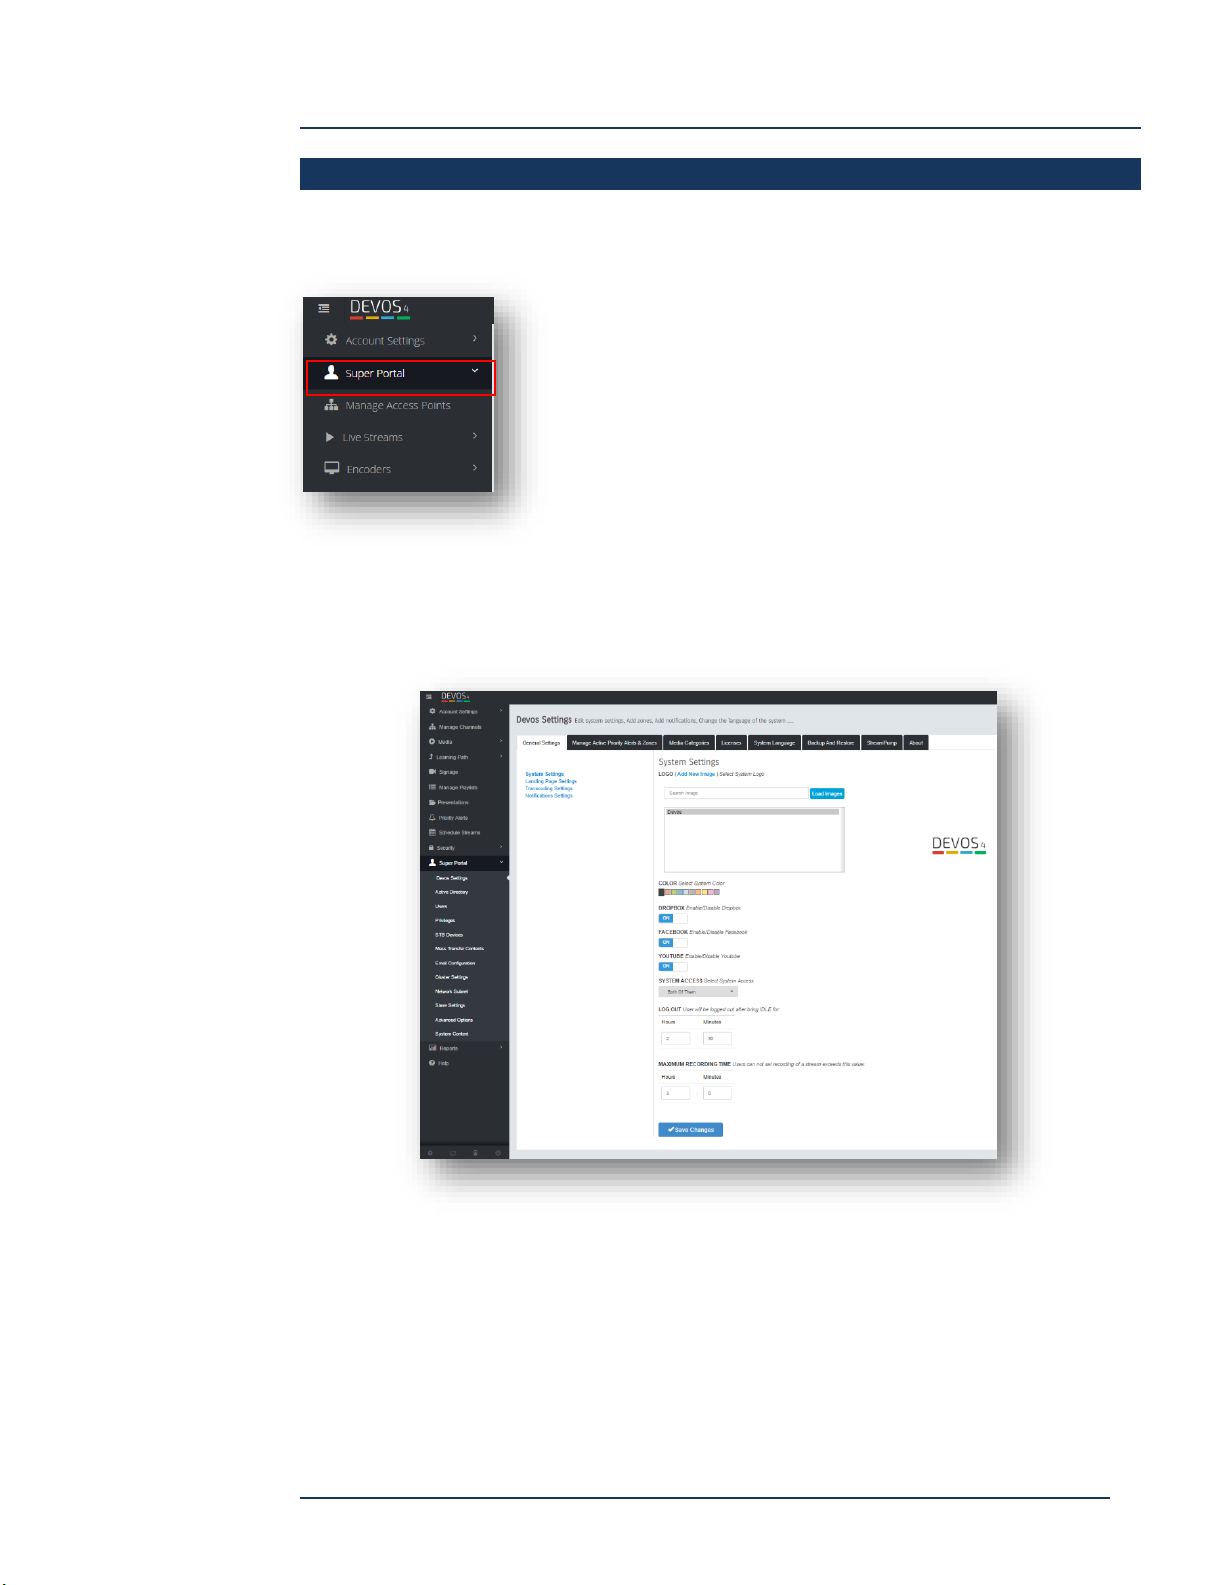
If the logged in user has Super Portal Privilege, then the Super Portal menu option
appears.
System Settings
System Settings are the global system configuration values for the DEVOS system.
System Logo -- Select an image to be used for the system logo. You can
upload new or select an image that you previously uploaded.
Color -- Select a color theme for the system.
Dropbox -- On enables users to synchronize their Dropbox account with their
DEVOS account.
Page 23
DEVOS
Page 24

DEVOS -- Enterprise Video System
Chat -- On enables chat feature.
Facebook -- On allows posting of video links to social media Facebook.
YouTube -- On allows users to link their YouTube account with DEVOS.
System Access -- Select to configure the system to use Active Directory only,
DEVOS users only, or both.
Logout -- Sets the duration for automatic user logout if no user activity.
Maximum Recording Time -- Sets the maximum server-side recording
duration (prevents disk filling up due to user not stopping a recording).
Landing Page Settings
You may set the initial DEVOS landing page.
Sign-in Page -- User is presented with login screen.
System Channel Page -- User is presented with listing of all Channels.
Specific Channel -- User is presented with one Channel page.
Examples:
You have created a Channel with content for the general public and set this as
default. Anyone reaching your DEVOS will be presented with this page. Users
with a DEVOS account (whether via Active Directory or local DEVOS user) can
still log in to gain access to authorized content.
You have created many Channels, some for the general public, some require
login. You set System Channels Page as default.
Page 24
DEVOS
Page 25
DEVOS -- Enterprise Video System
Transcoder Settings
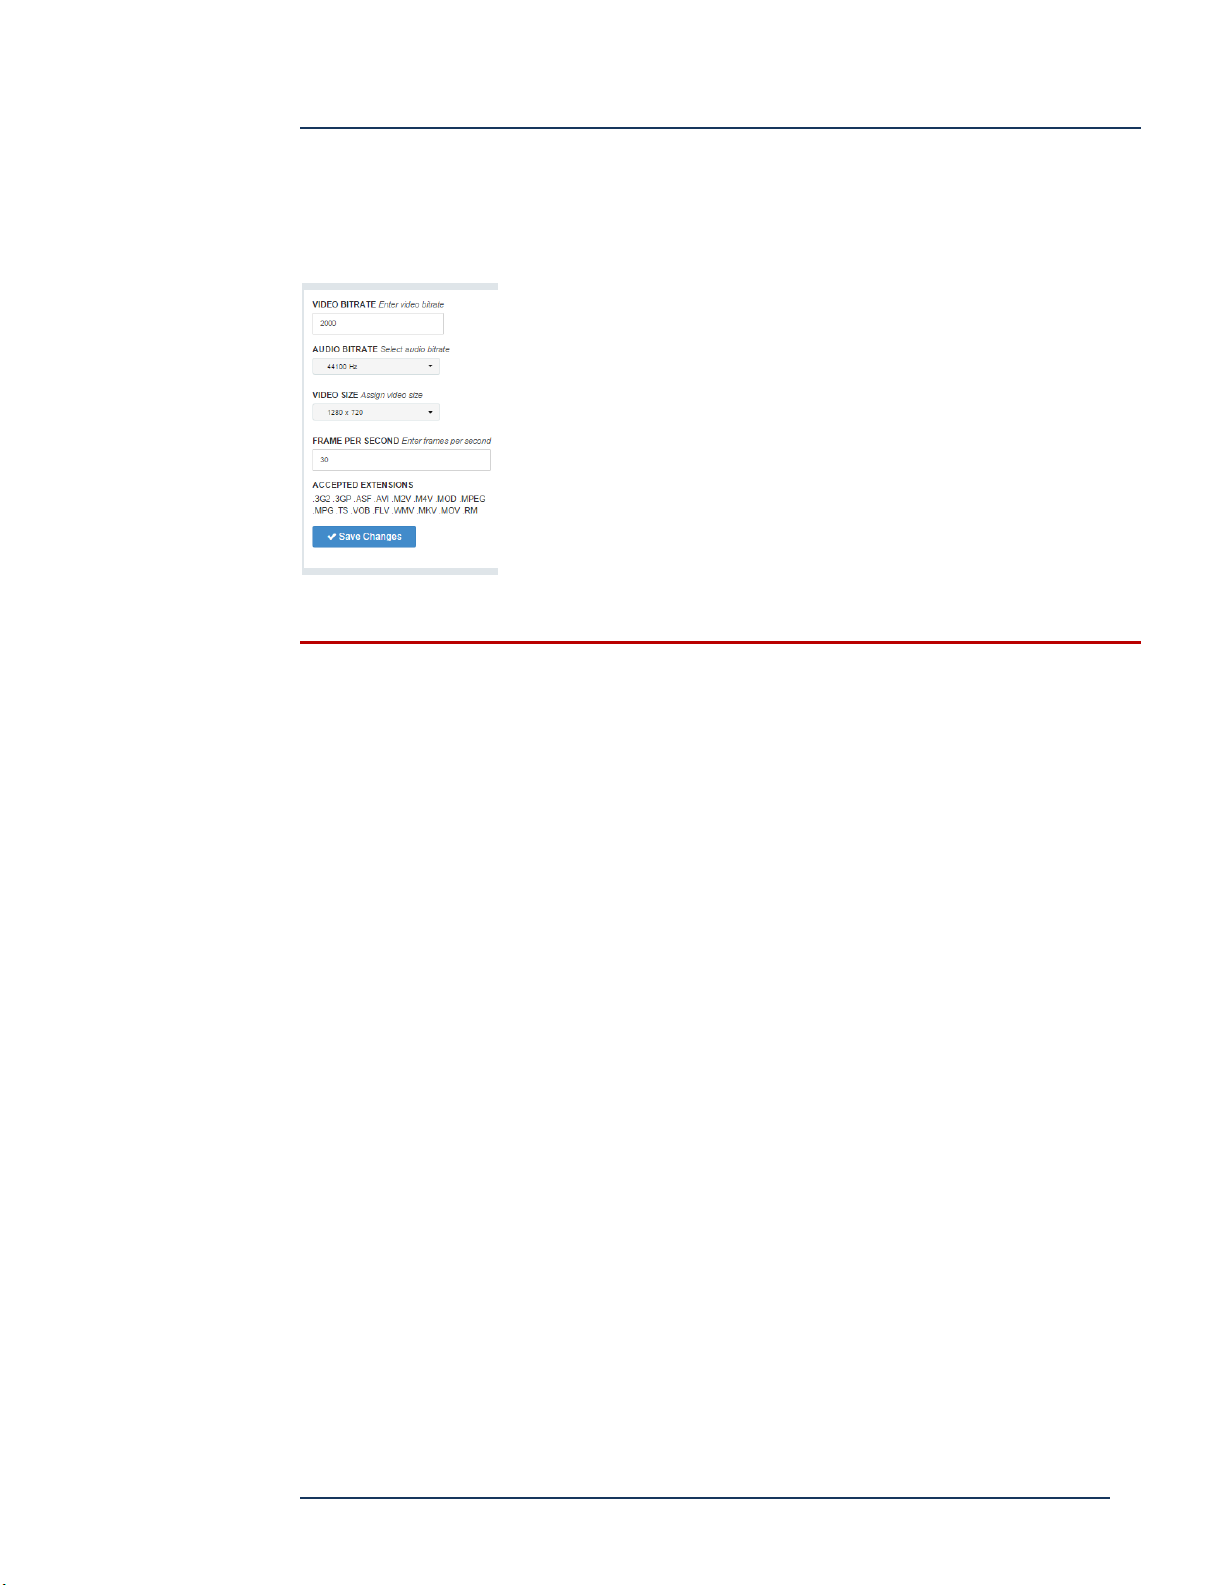
The transcoder allows users to upload videos that are not in H264/AAC format, and
the server will convert them automatically.
Video and Audio Bitrate -- sets the bit rate for converted video
Video Size -- sets the size of the converted video
Frames Per Second -- sets the FPS of the converted video
Accepted Extensions -- the acceptable file extension types they
may be uploaded
After upload, the video will appear in the video-on-demand manager and its
status will display. A few moments after upload, the transcoding process will
begin and the status of the file will change to "transcoding". If the process fails,
the status will indicate error. When transcoding is complete, the file will
become available for viewing. The transcoder won't repair a bad video file.
For mass upload, the transcoding function operates on files upload using the
Discover Video File Uploader and video files are upload via FTP.
System Notification
The Super Administrator may wish to notify all users of a system-wide event, such as a
scheduled system maintenance or update. The Super may create a notification and a
red "Bell" icon appears on all user screens where they may view such messages.
Page 25
DEVOS
Page 26
DEVOS -- Enterprise Video System
Manage Priority Alert Zones
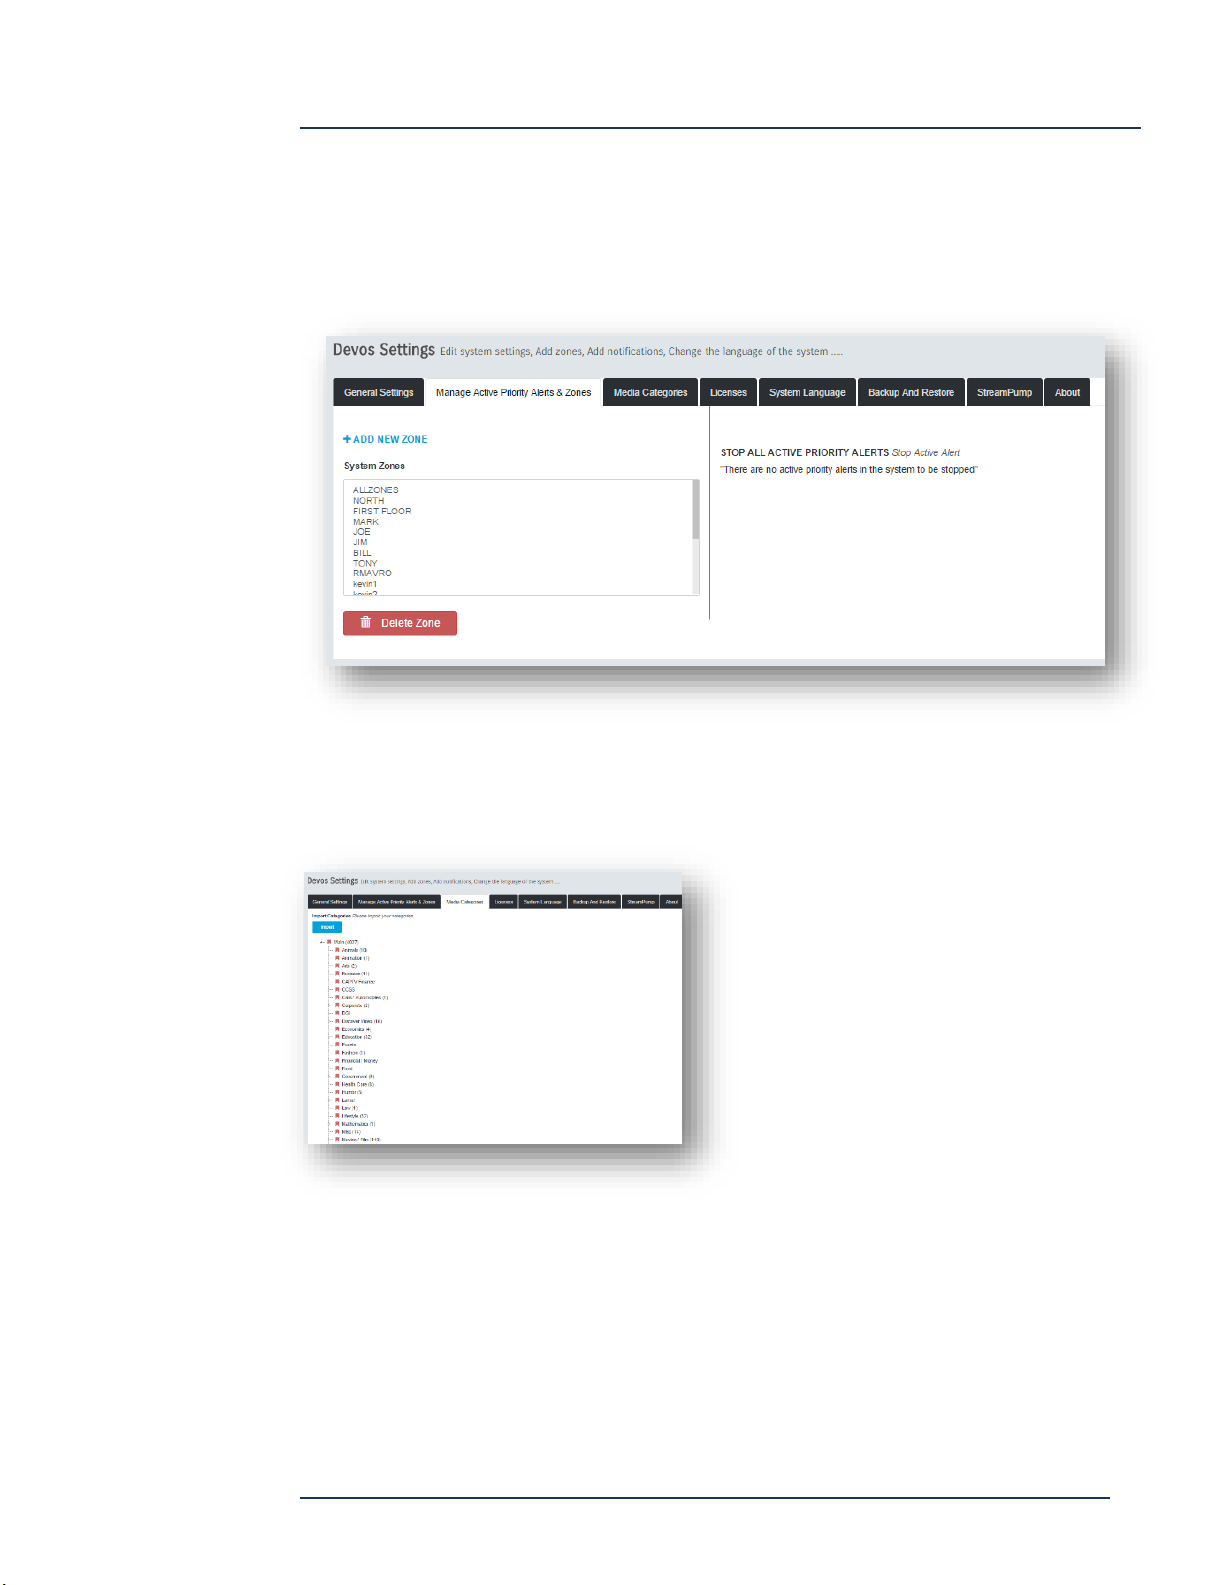
Priority Alert operates on zones. You may add or delete zones here. These zone
definitions are available for users to use in their Priority Alert configurations. You may
also use this function to stop any active alert, regardless of who issued it.
Media Categories
Categories allow publishers to select from a list of possible categories that the Super
Admin creates. This makes category selection uniform and makes content easy to
find.
To create categories, right-click on the
"Main" icon and select "Create New
Category", then rename the new
category as desired. To create a subcategory, simply right-click on an
existing icon and select "Create New
Category", then rename that.
You may also upload a text document
to define categories.
The form of the document must be one new category per line, with pipe separating
sub-category. For example, create a text file as “category.txt” and add:
Science
Science|Physics
Science|Physics|Astrophysics
Page 26
DEVOS
Page 27
DEVOS -- Enterprise Video System
Licenses
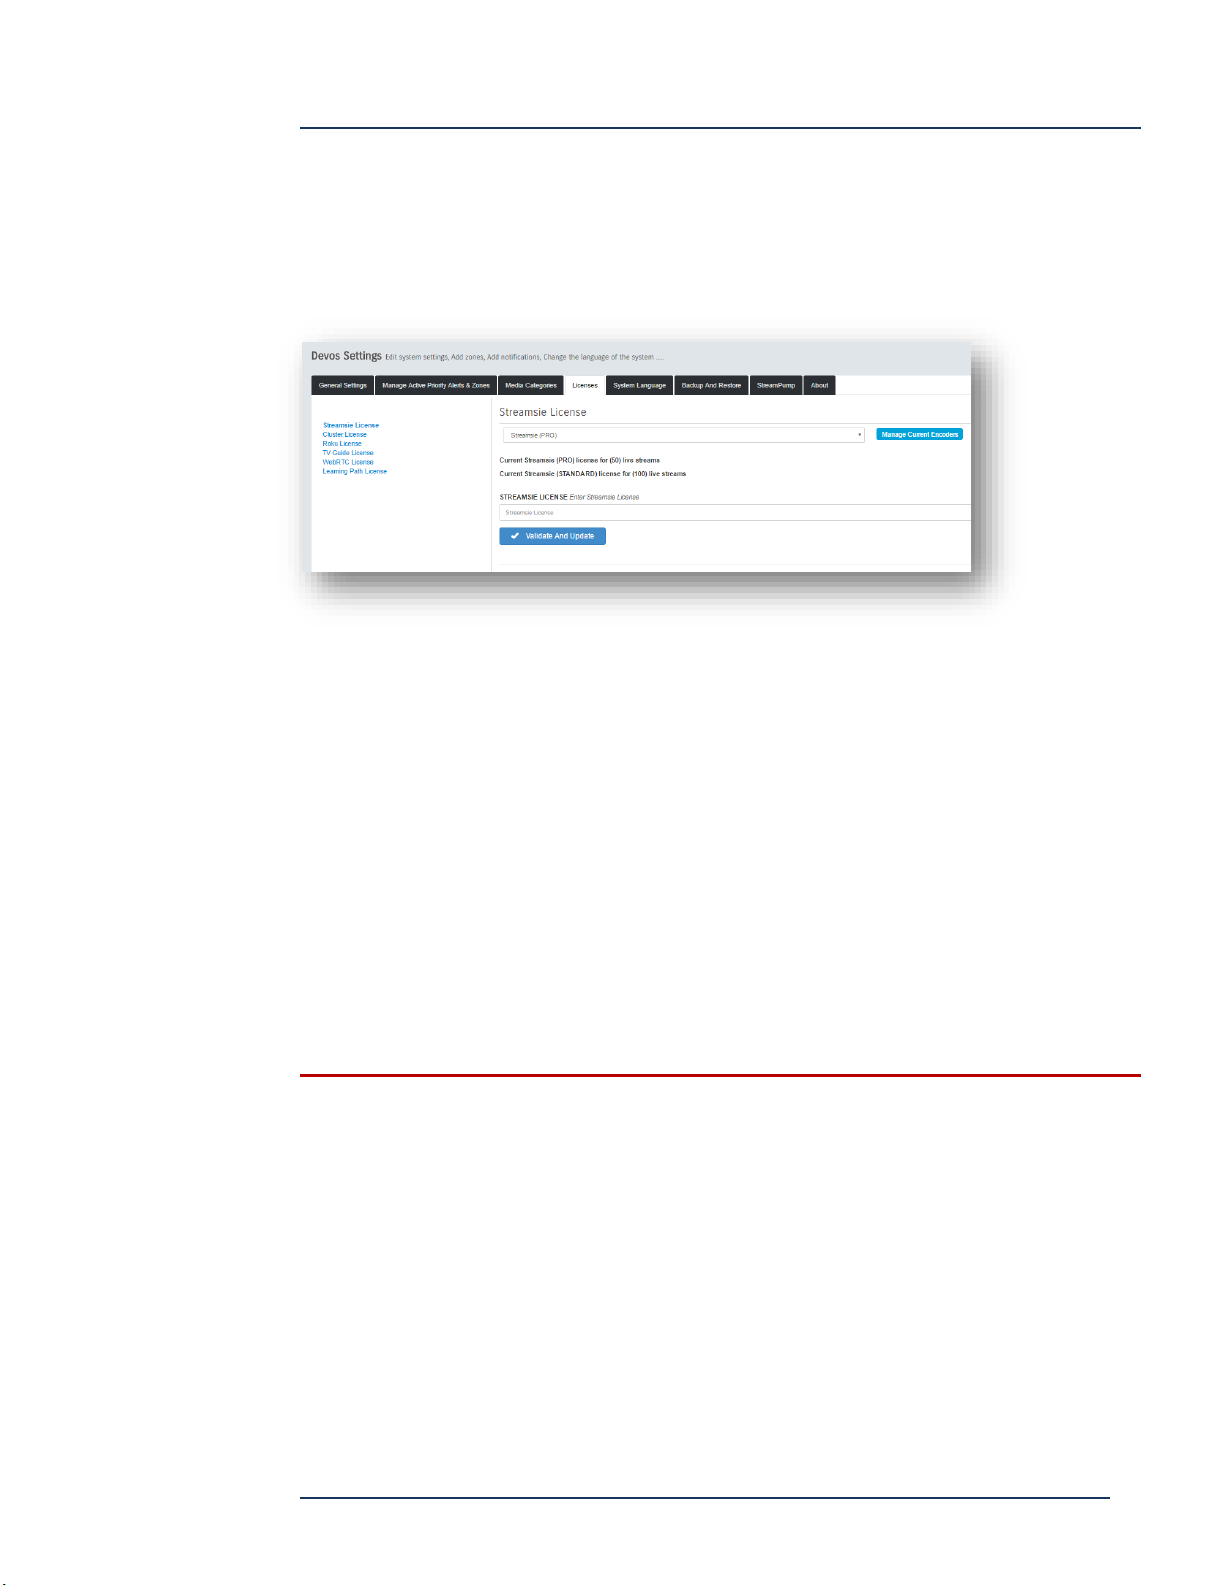
Optional license keys may be entered using the Licenses tab.
Optional licenses include:
Streamsie / Streamsie Pro -- The Streamsie License defines how many
Streamsie Accounts may be created on DEVOS. Adding licenses is a simple
copy-and-paste of a code provided by Discover Video. Account licenses may
be Streamsie Standard or Streamsie Pro.
Clustering – allows multiple servers to load balance
Roku – allows Roku devices to be used
TV Guide – enables display of program data for TV programs (see below)
Learning Path – enabled Learning Path feature
You can manage Streamsie licenses by selecting "Manage Current Encoders" to
expose the current owners, and you can delete any assignment thus making that
license available for reuse.
Note: Licenses are assigned on a first-come-first serve basis. If a user has encoder
privilege and creates a Streamsie account, they have consumed one license. Currently,
you cannot limit the number of licenses consumed by any one user, but if you delete a
license from a user it is available for the next first-come-first-serve user.
System Language
If you have multiple language packs installed, the user may select their desired
language and change it on-the-fly. The system setting for language simply sets the
default language for initial login. Ask Discover Video about language packs.
Page 27
DEVOS
Page 28
DEVOS -- Enterprise Video System
TV Channel Guide
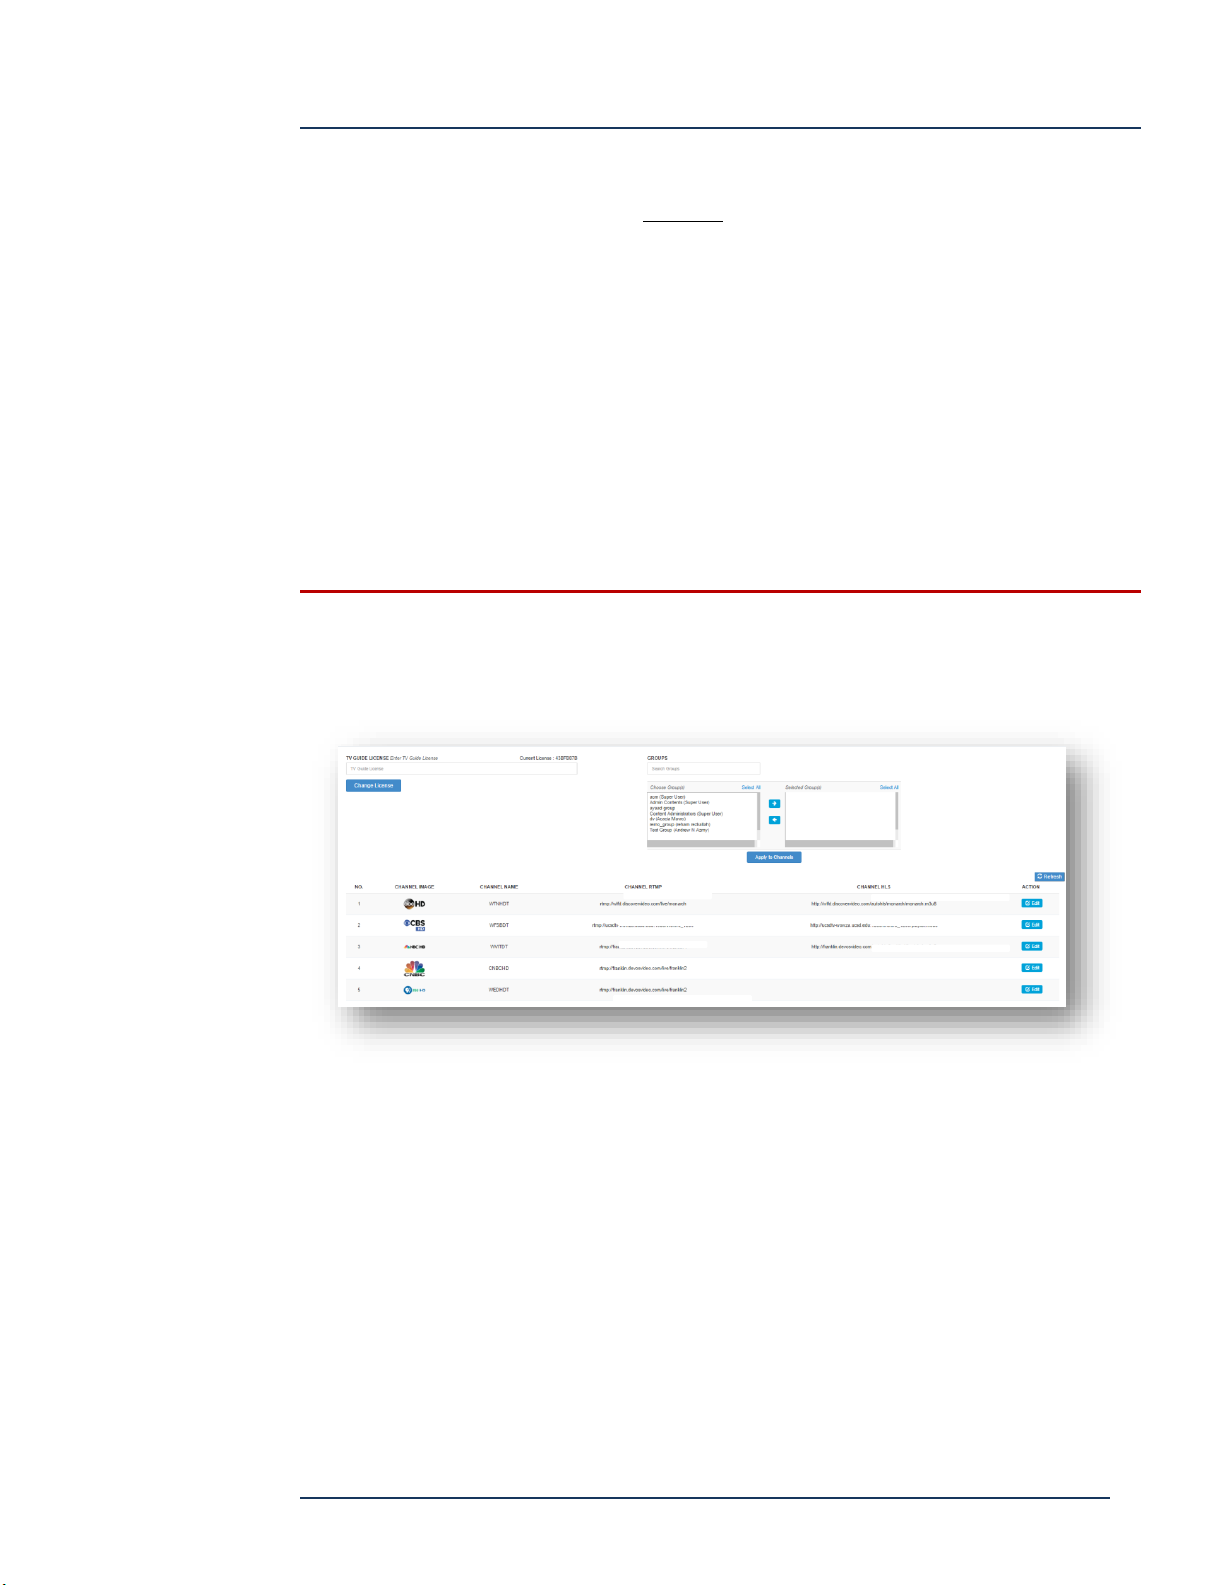
The TV Channel Guide provides an optional TV channel listing service that allows
viewers to tune in to a provided TV channel and to see “what’s on” now and for up to
6 days in the future (7 days total).
To enable the service, the customer must provide:
U.S. Zip code (e.g. 06492)
Content Provider (e.g. “Comcast Digital”, “Dish”, etc.)
Up to 10 TV Channel Identifiers (e.g. “WTNH”, “CNN”, etc.)
With this information, Discover Video can then generate a license that is unique to
your DEVOS system. Simply paste this license code into the System / TV Guide option
field.
TV channels are setup and controlled by a use with Super privilege. If enabled,
TV channels appear as the first channel on the system landing page.
After entering the code, your channels will appear. Select Edit for each channel and
enter the live RTMP and HLS stream URL’s (same as you would enter for a live stream).
For example, if you are sending a live stream from MCE, Mantis, or 3rd party encoder
to DEVOS using rtmp://123.1233.123.123/live/channel1, then enter this for the RTMP
stream, and enter http://123.123.123.123/autohls/channel1/channel1.m3u8 for the
HLS stream.
You may limit the viewing of the TV Channel Guide by applying Group permission.
When no groups are selected, anyone may view the TV channels. If you add Groups,
then you are limiting the viewers only to members of those groups. The available
groups are those created by all administrators, along with the owner of that group.
When TV Channel Guide is enabled, the first channel on the system landing page is
“TV Channels”.
Page 28
DEVOS
Page 29
DEVOS -- Enterprise Video System
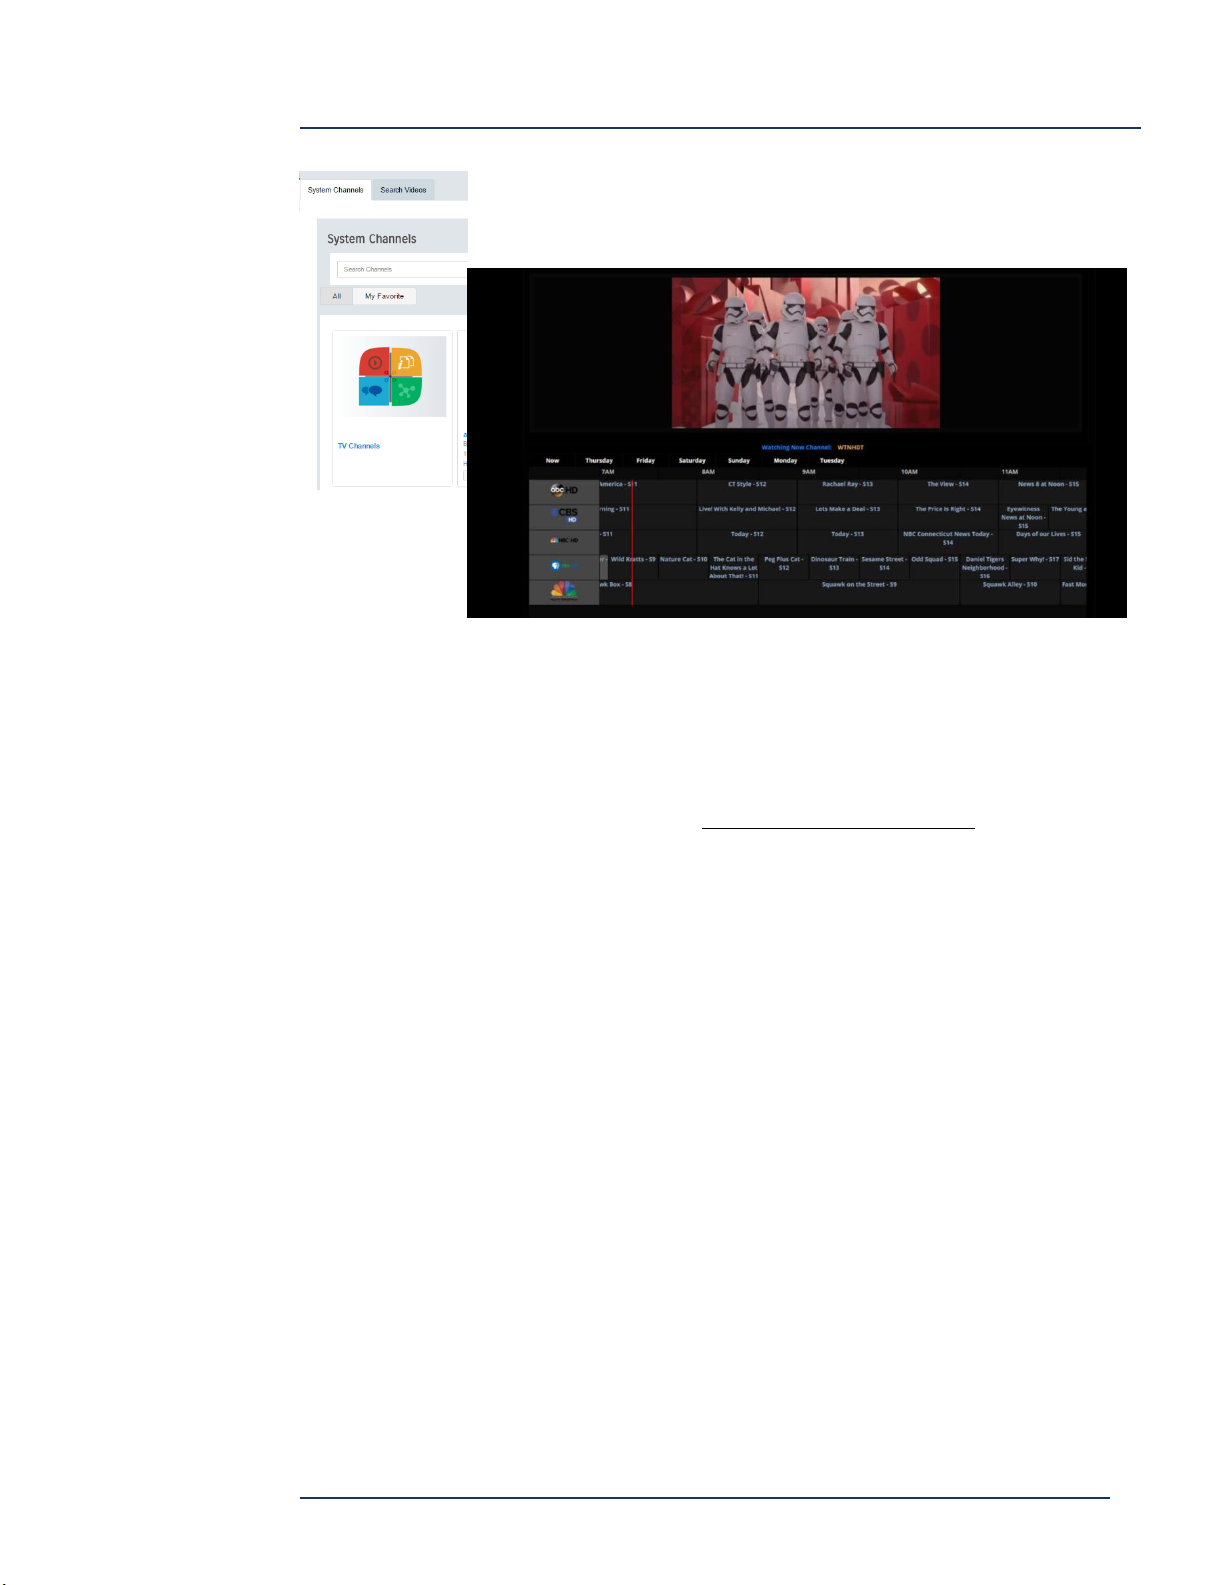
Opening this channel shows the live TV Channel Guide, illustrated
below.
The TV Channel display shows the live TV and a full program guide for each TV
channel. A red line indicates “now”. Mouse-over any time slot to reveal program
information, and click on any time slot to reveal program details.
If the viewer has logged in to the system and they have VoD privilege, then when they
click on a program, a Record button is available.
Recording a program causes that program to be added to that user’s Media / Video
on Demand manager. From this page they may view the program and/or add that
video to a channel.
Page 29
DEVOS
Page 30
DEVOS -- Enterprise Video System
Backup And Restore
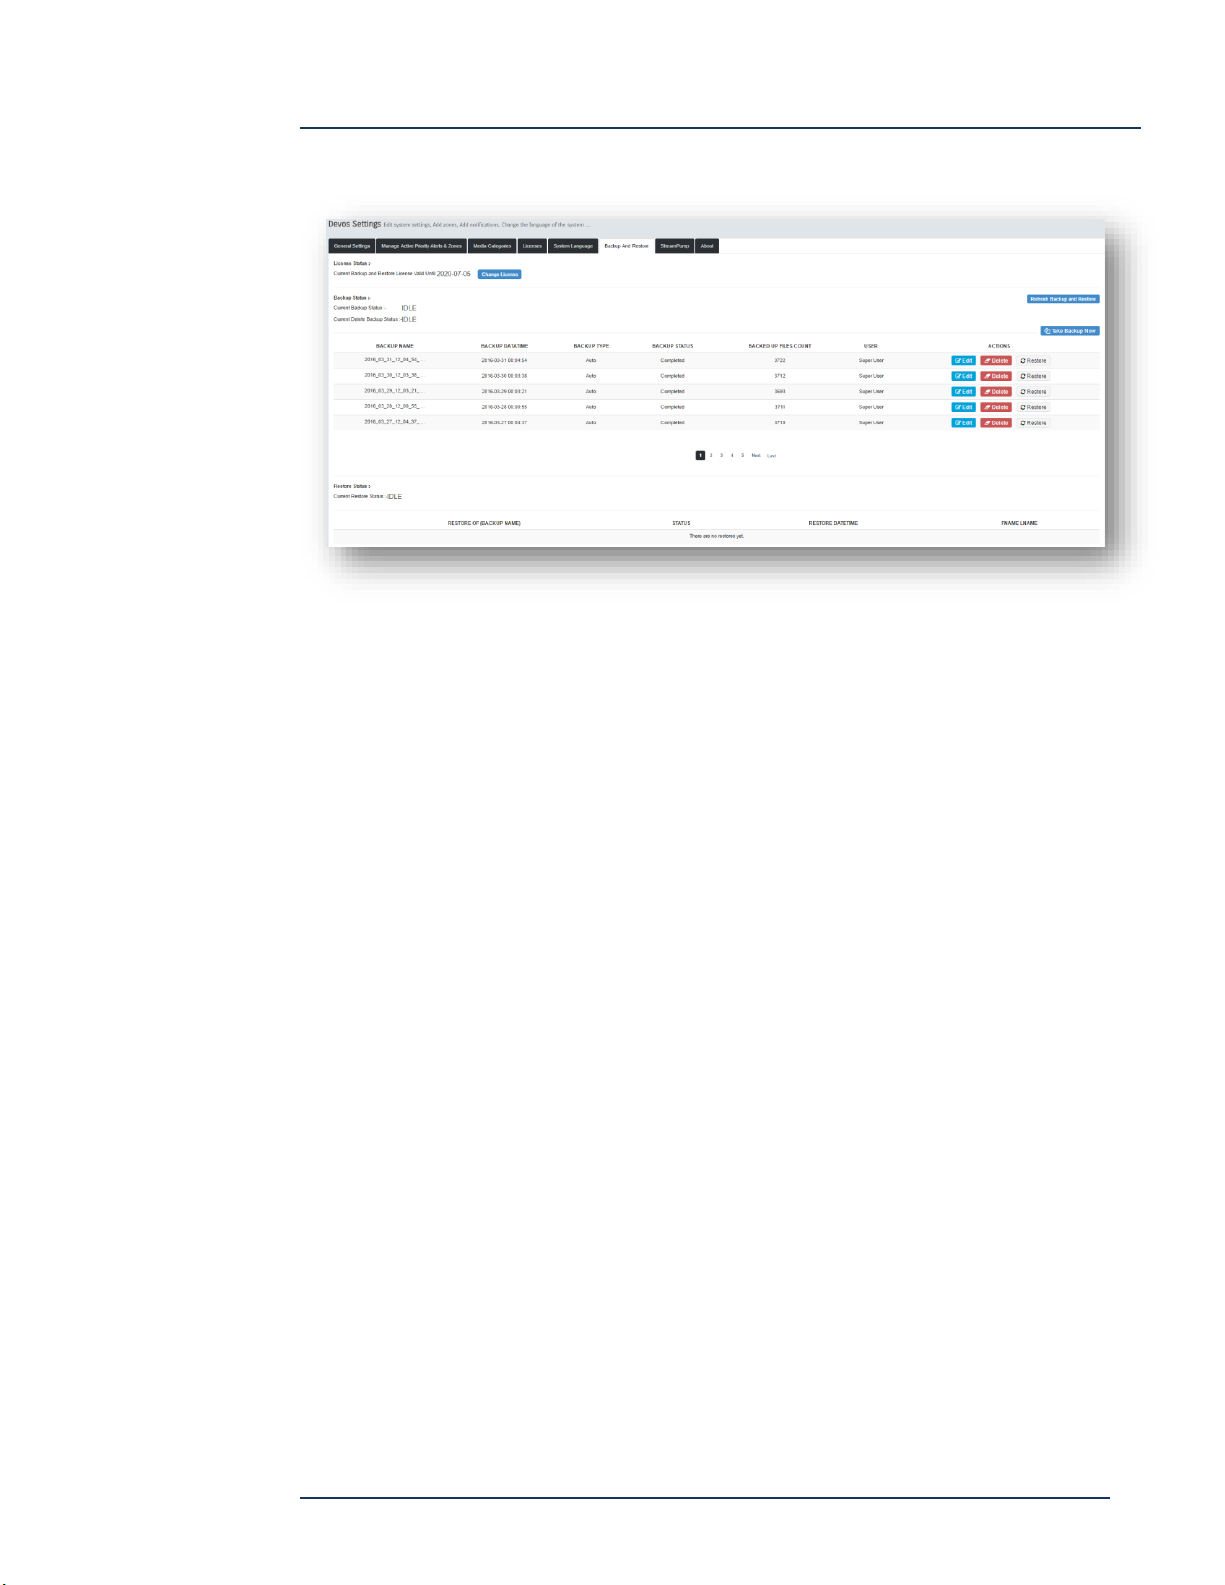
DEVOS supports optional Cloud backup and restore capability. To enable this feature,
you must enter a license key. Once enabled, the feature provides unlimited online
Cloud backup of your system database and all video files. The backups occur
automatically every evening, or upon command. Backups are incremental, so each
new backup only uploads changes. This keeps the time required to conduct each
backup low (depending on the number and size of your video files).
Cloud backups are listed so that you may select any available backup to restore to
your system.
If your system is a cluster, then you only configure the backup on the server
designated as the master.
Page 30
DEVOS
Page 31
DEVOS -- Enterprise Video System
StreamPump
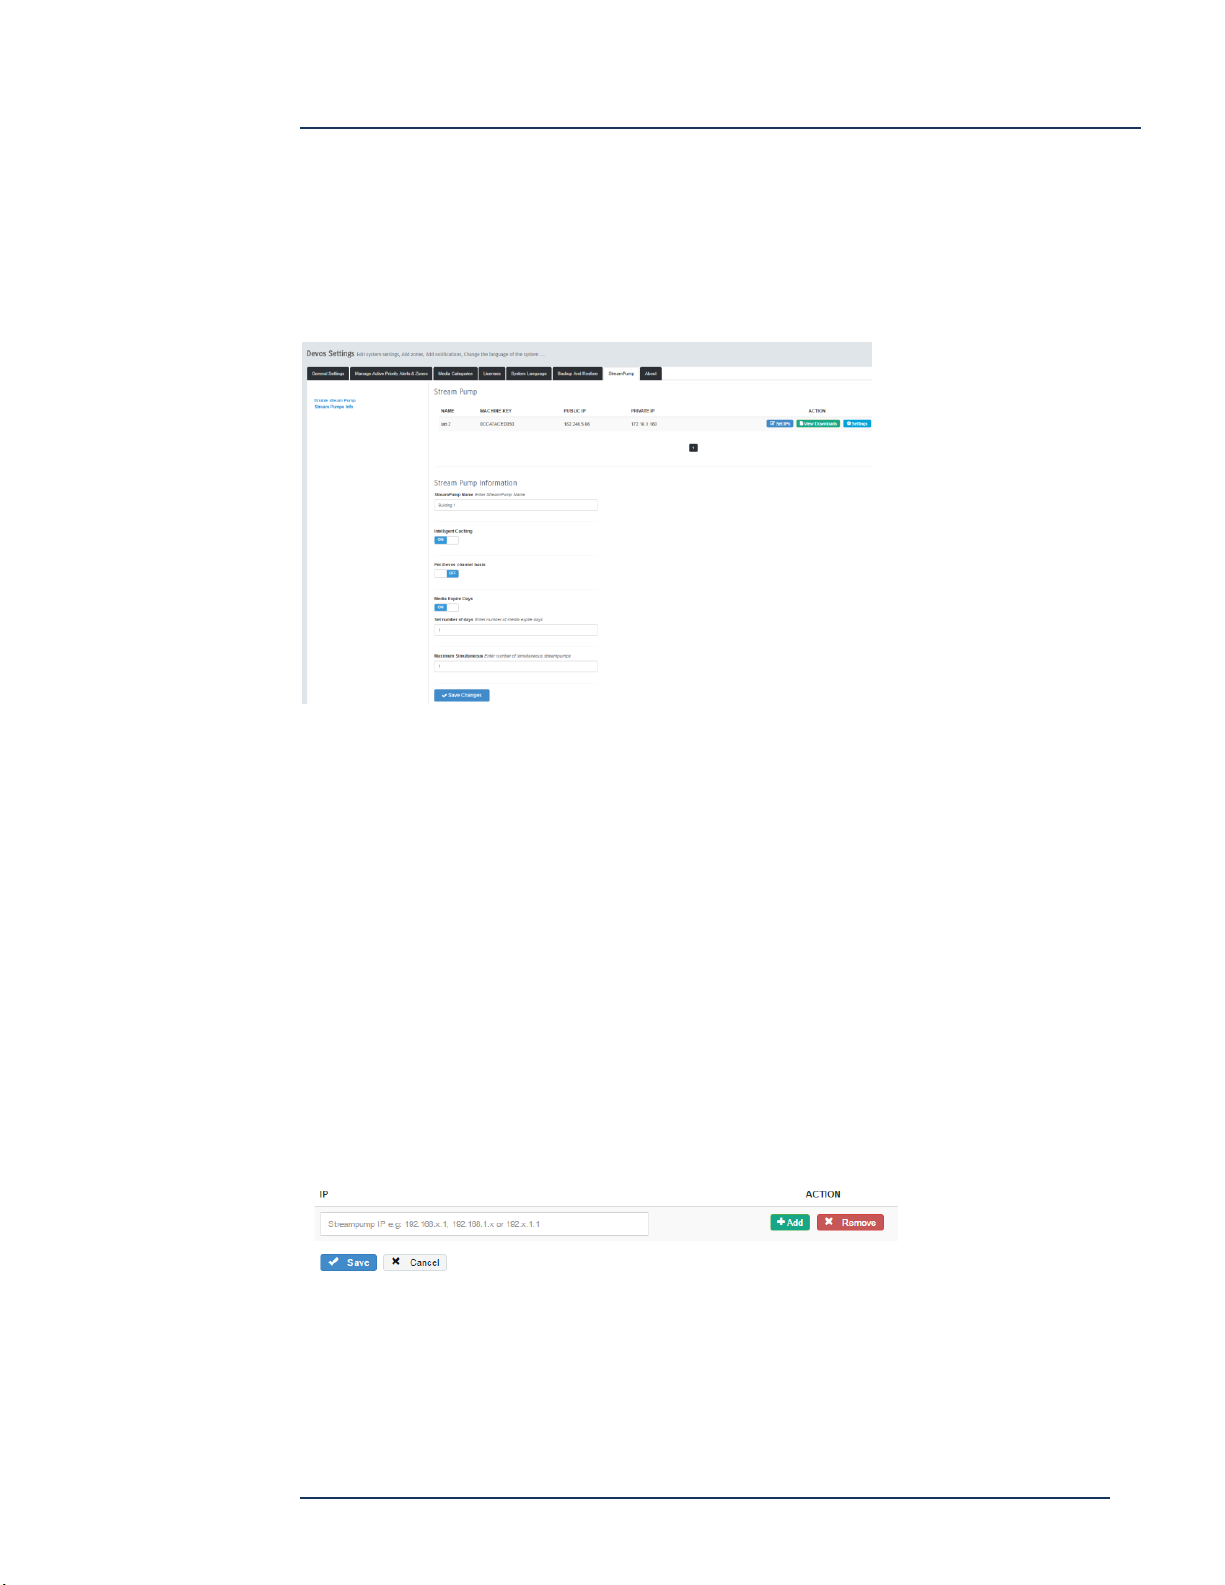
If you have StreamPump(s) configured, and if “Allow Remote” is enabled on the
StreamPumps, they will appear in the StreamPump sections, and you may manage
them from this page. Select StreamPump Info, and then Settings for each
StreamPump.
Name – change the name
Intelligent Caching – when set to ON, the StreamPump will cache content as
needed.
Per-Devos channel basis – when on, any channel that as “StreamPump”
enabled will have that content downloaded to the StreamPump at the
specified time (the time setting is shown when you select On).
Media Expire Days – When On, any content on the StreamPump will be
removed this number of days after it was downloaded to the StreamPump.
Maximum Simultaneous – sets the number of simultaneous downloads the
StreamPump may use. Default is 1.
Select “Set IP” for each StreamPump if you wish to modify which network the
StreamPump will serve. Enter the IP using the format shown.
This allows you to specify the portions of your network to be served by this
StreamPump. By default the StreamPump will serve everyone on the same network.
But if you want StreamPump to only serve those with an address 192.168.x then enter
that and add it.
Page 31
DEVOS
Page 32
DEVOS -- Enterprise Video System
About & Update
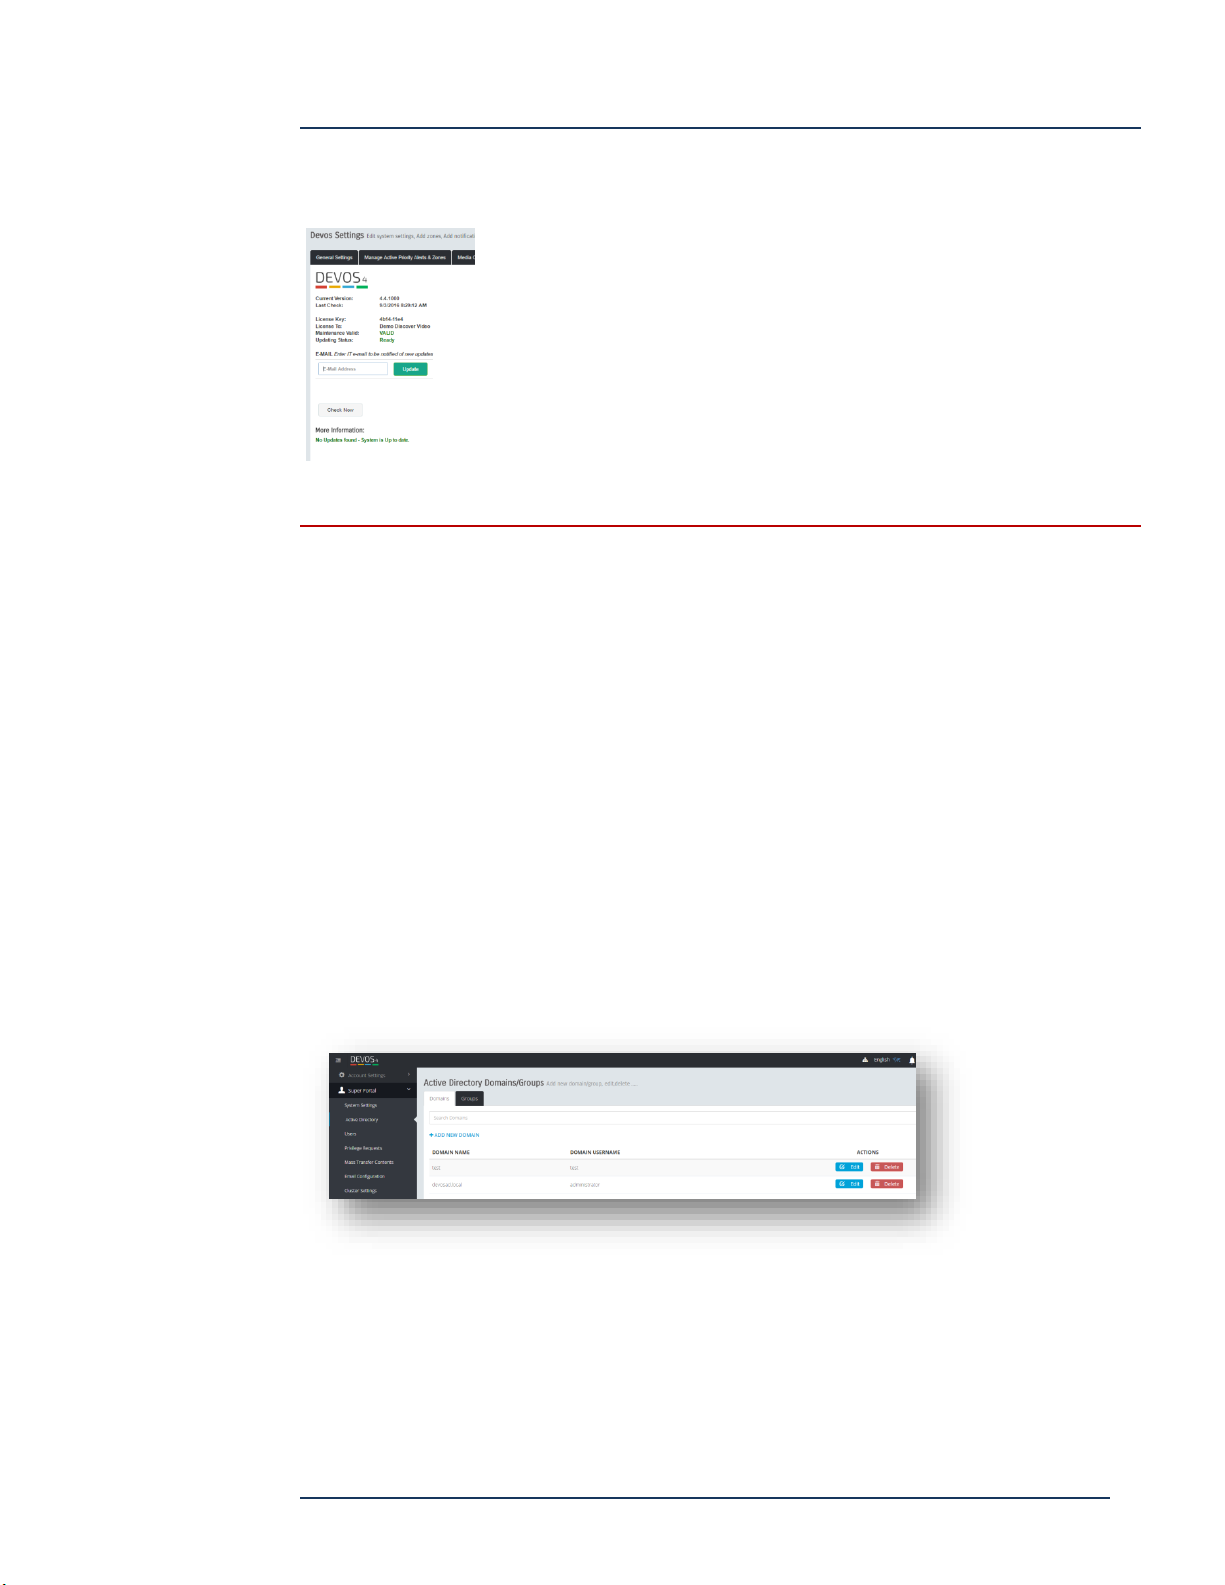
The About tab provides system information and automatic system
update capability. Select "Check Now" to learn if a new system
software update is available. The system will show if an update is
available, and what is new in the update. If an update is available,
"Update Now" button will appear and you can perform the update
by selecting this button when you are ready.
You may wish to use the System Notification feature to alert users that you will
do a system update. It is usually a good idea to conduct the update when the
system is not in use (e.g. evenings).
Be sure to enter proper email address to be notified about new updates.
Most system updates complete in less than 20 minutes, but you should use the
displayed message as your guide.
Active Directory
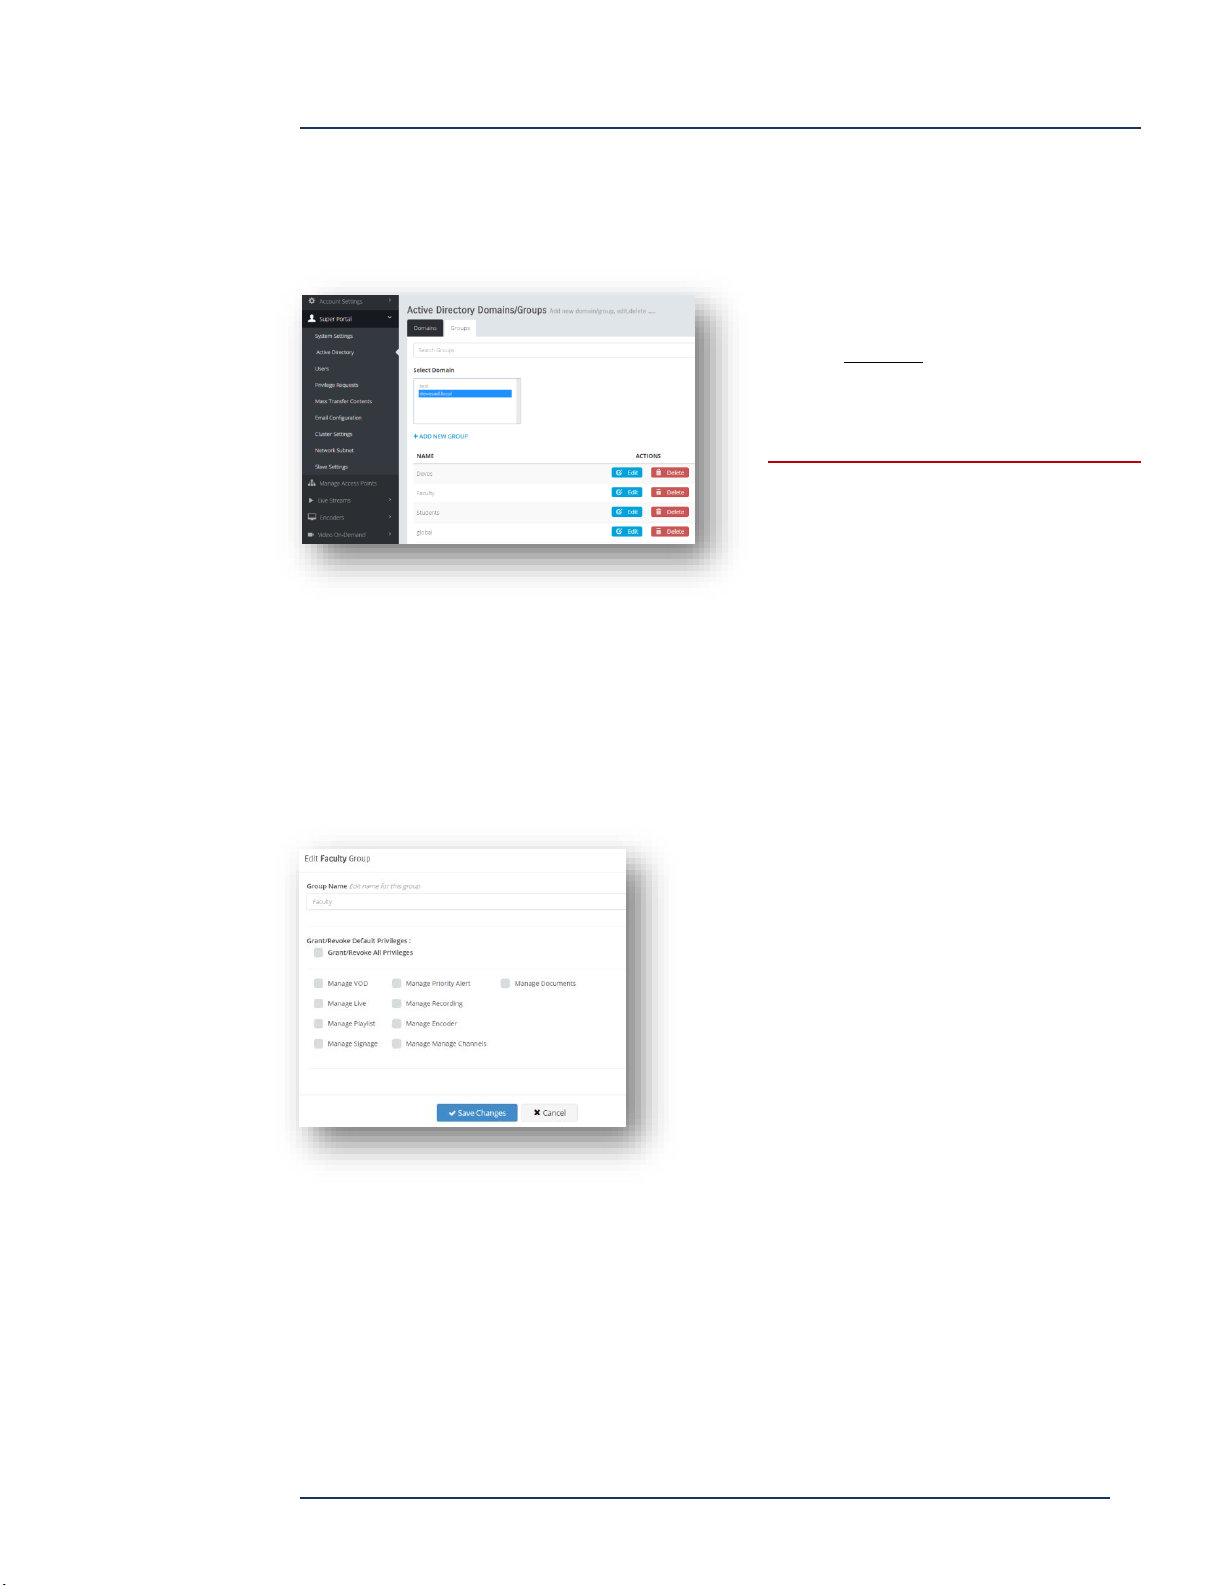
You may add one or more Active Directory domains to DEVOS. Simply select Add
New Domain, enter a name for the domain and the domain Username and Password.
You can edit or delete any domain.
Page 32
DEVOS
Page 33
DEVOS -- Enterprise Video System
Active Directory Groups
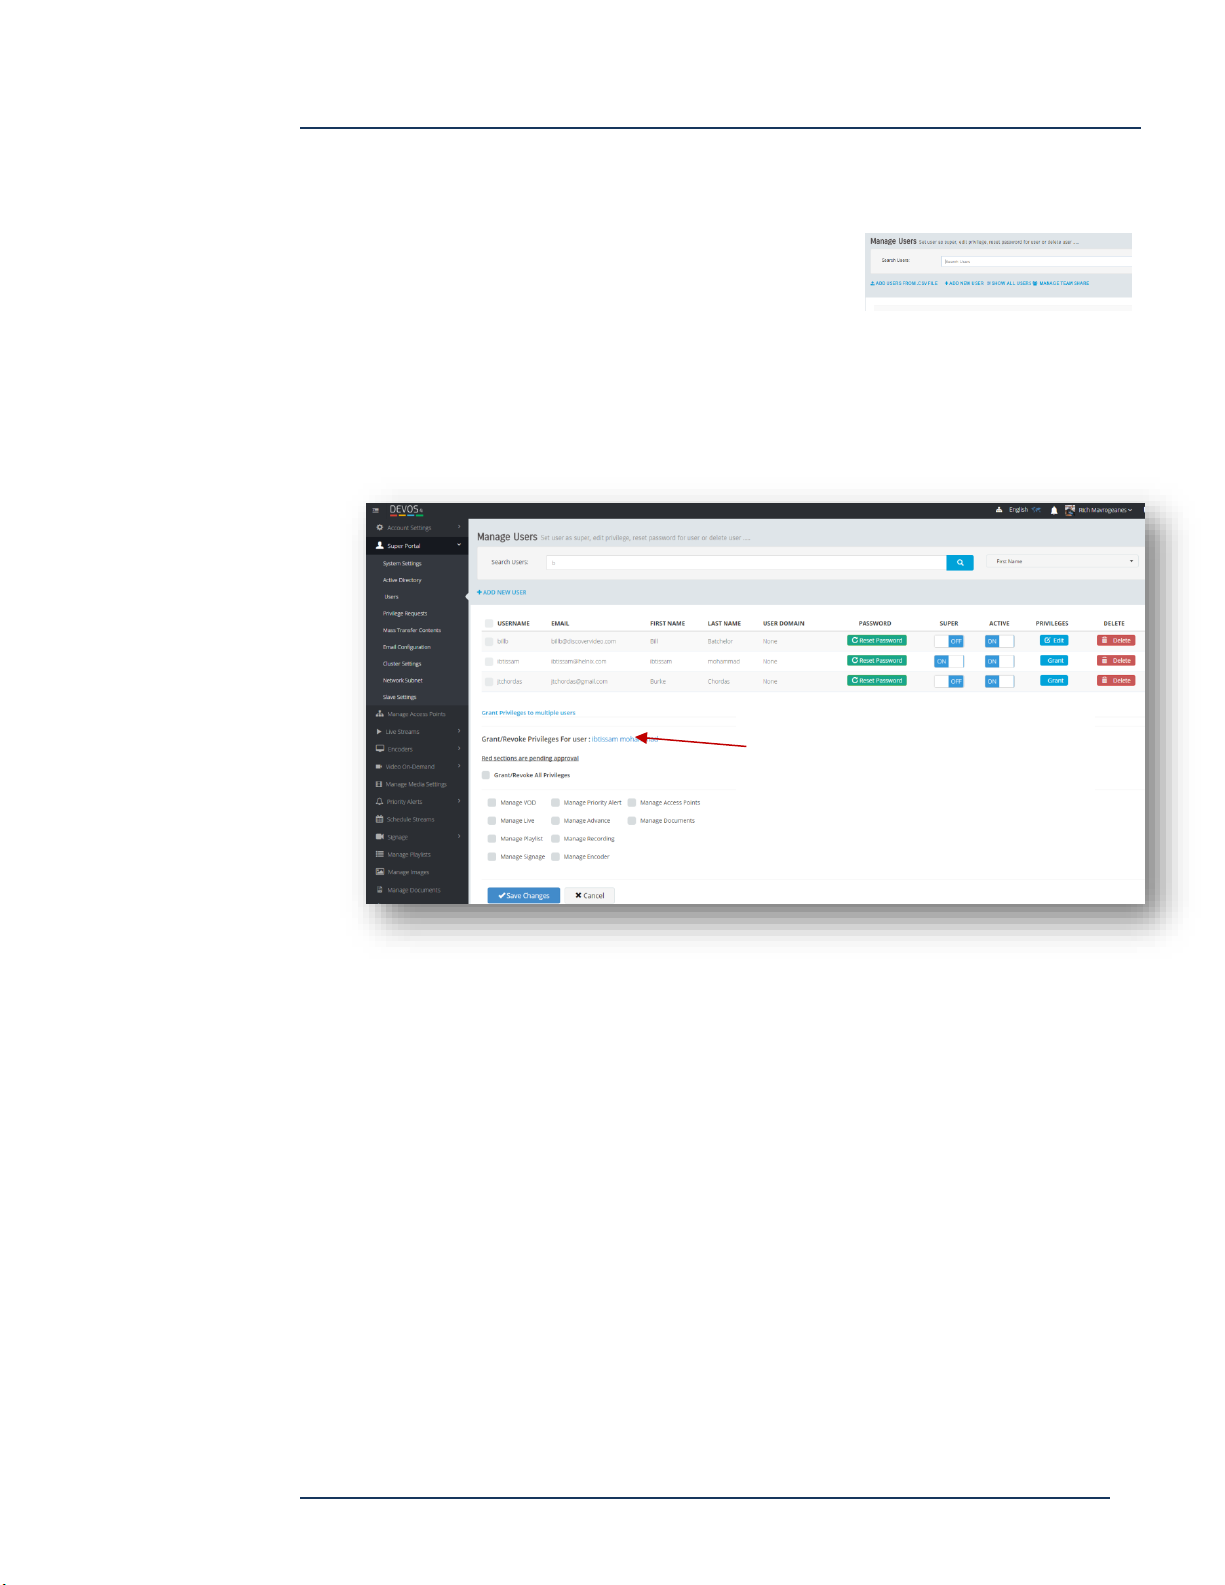
Once you have added a domain, you may then add Groups. For example, if you have
an AD group called "Devos", select Add New Group, type in "Devos", and save. You
can edit or delete any group.
To add all users in a domain, in most
cases you can use key word "Domain
Users".
DEVOS parses deep into groups and
will add all subgroups. For
example, if you have a structure
"one:two:three:four:five", and add
it as group "one", then all users in
group two, three, four, five will be included; if you add group "two" then group
two, three, four, and five will be included, etc. Providing granular group
definitions in your Active Directory can be useful because it can allow DEVOS
Security Groups to achieve granular user group access. For example, if you
create a group called "Mr. Jones" and populate it only with members that belong
to Mr. Jones', then that group can become a unique security group in DEVOS.
When you create or edit a Group, you may
assign default privileges. This feature gives
all members of that Group the desired
privileges without your needing to edit each
users manually.
Page 33
DEVOS
Page 34
DEVOS -- Enterprise Video System
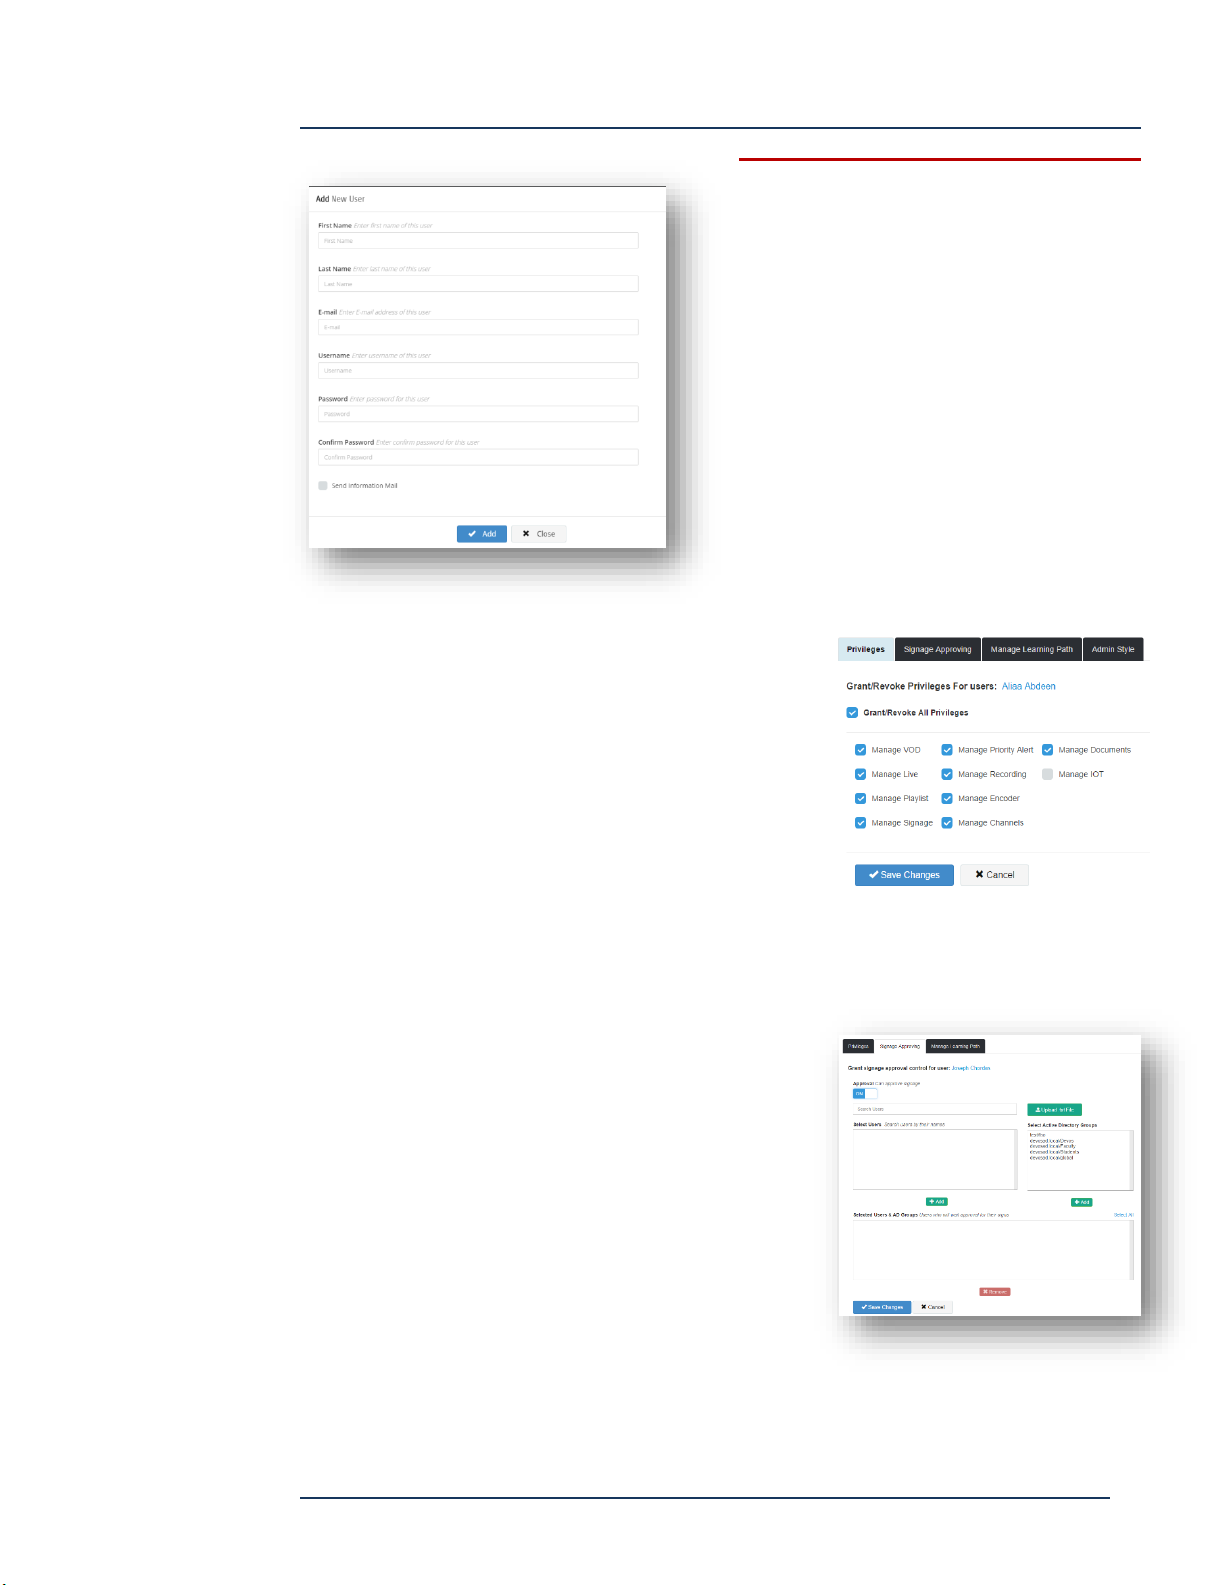
Super can select Edit then click
here to transform to the user and
manage user's content.
Users
The Users function allows you to create, delete, and manage users and user privileges.
To manage a user, simply enter the first few letters of
their first name, last name, username, or email (select
search style from the dropdown box). Email search and
name search do not operate the same way.
The illustration shows a result for firstname starting with "b". Select the user found
and you can reset password, give the user Super Privilege, make them Active/Inactive,
Edit their privilege, or delete the user.
You can add a new user to the DEVOS system by selecting Add New User and
entering their information:
Page 34
DEVOS
Page 35
DEVOS -- Enterprise Video System
Adding users to the system does not
affect Active Directory accounts. If
using AD and you want to add a local
user, then you must set system to
"Both Of Them".
Privileges
The Super can grant privileges to each user. For
example, the user may or may not have access to
Priority Alert, Manage Encoders, IoT, etc.
Note: for Active Directory users, initial privileges can
be set using the Active Directory settings.
Signage Approval
Setting Signage Approval for a user determines which user will require approval from
this user.
You can enter individual users, select a group of
users, or upload a .txt file which contains a list of
users.
Page 35
DEVOS
Page 36
DEVOS -- Enterprise Video System
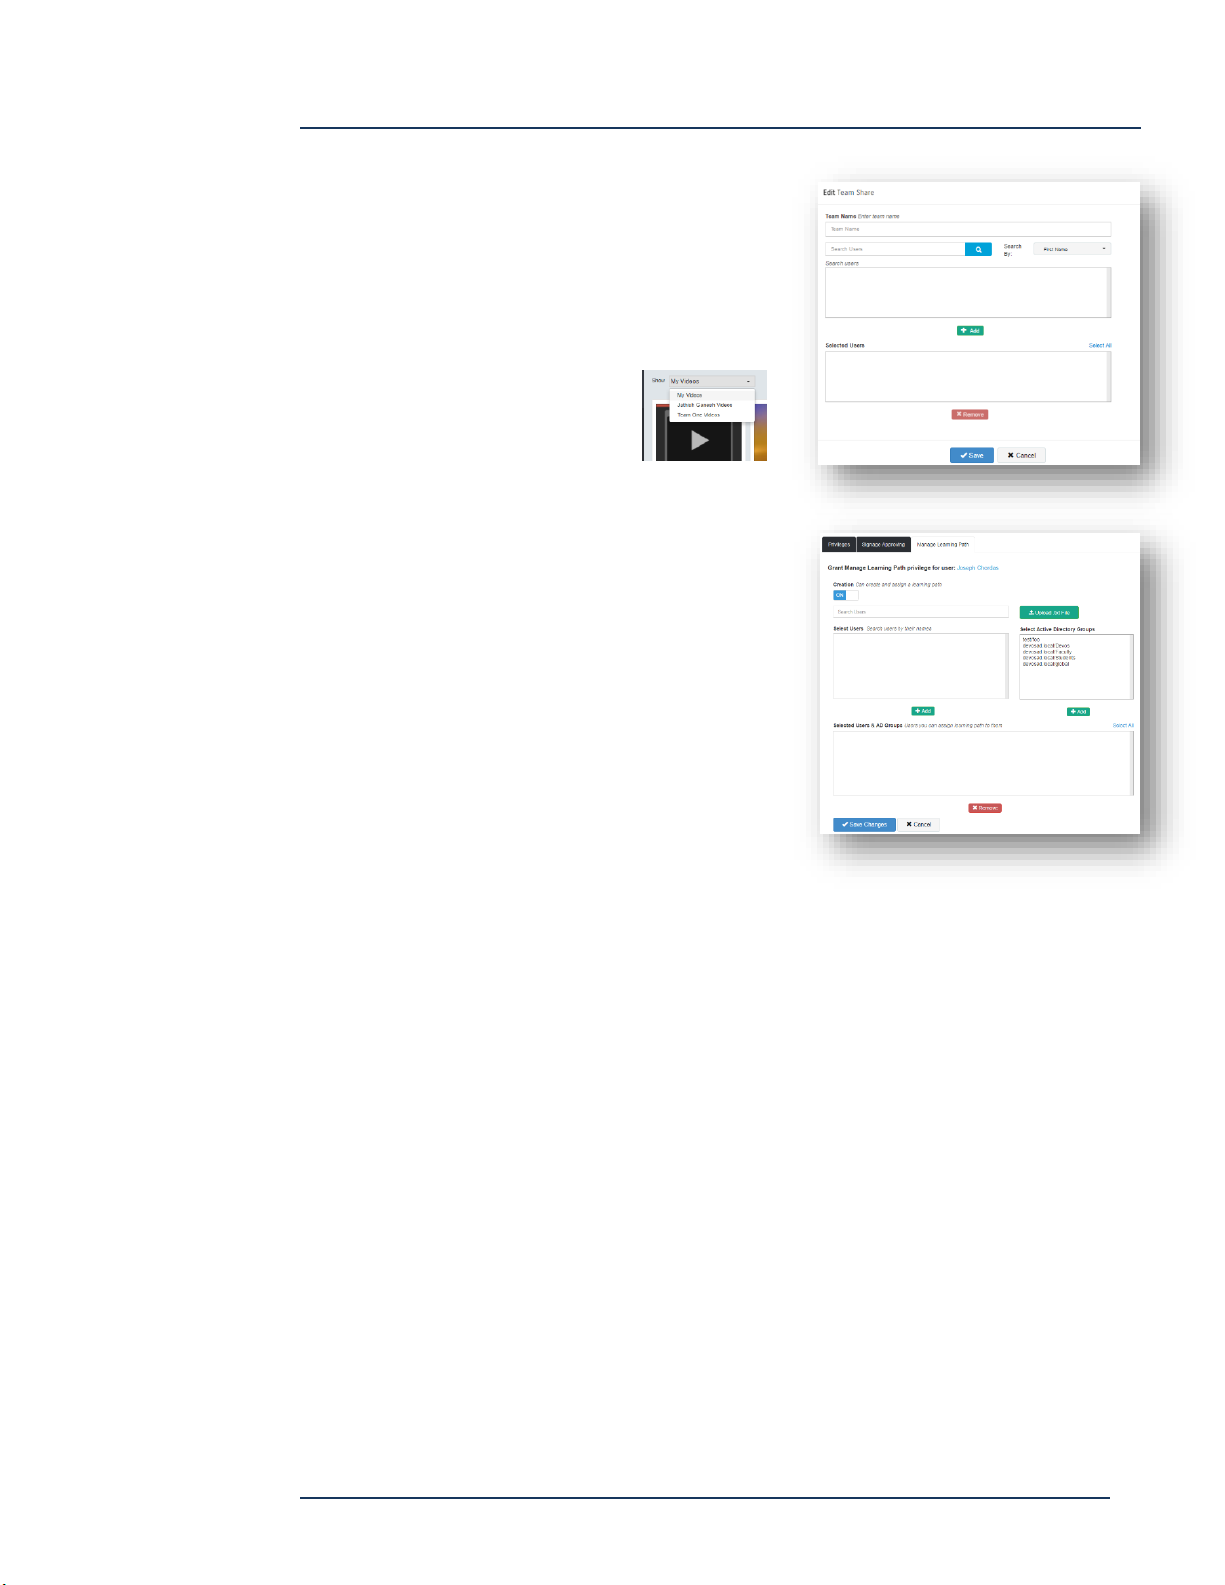
Team Share
Create a new Team Share, give it a name, and
search for users that you wish to add to the
team.
These users will be able to select the team name
when they upload or manage
content, signage, etc.
Manage Learning Path
If optional Learning Path is enabled, then you
can enable the feature for selected users.
For each user that has the feature enabled, you
must enter the users that this user may assign
lessons to. For example, user “Joe” may create
Learning Path lessons and then may assign
lessons to users “Fred”, “Mike” and “Jim”.
You can enter individual users, select a group of
users, or upload a .txt file which contains a list of
users.
Page 36
DEVOS
Page 37
DEVOS -- Enterprise Video System
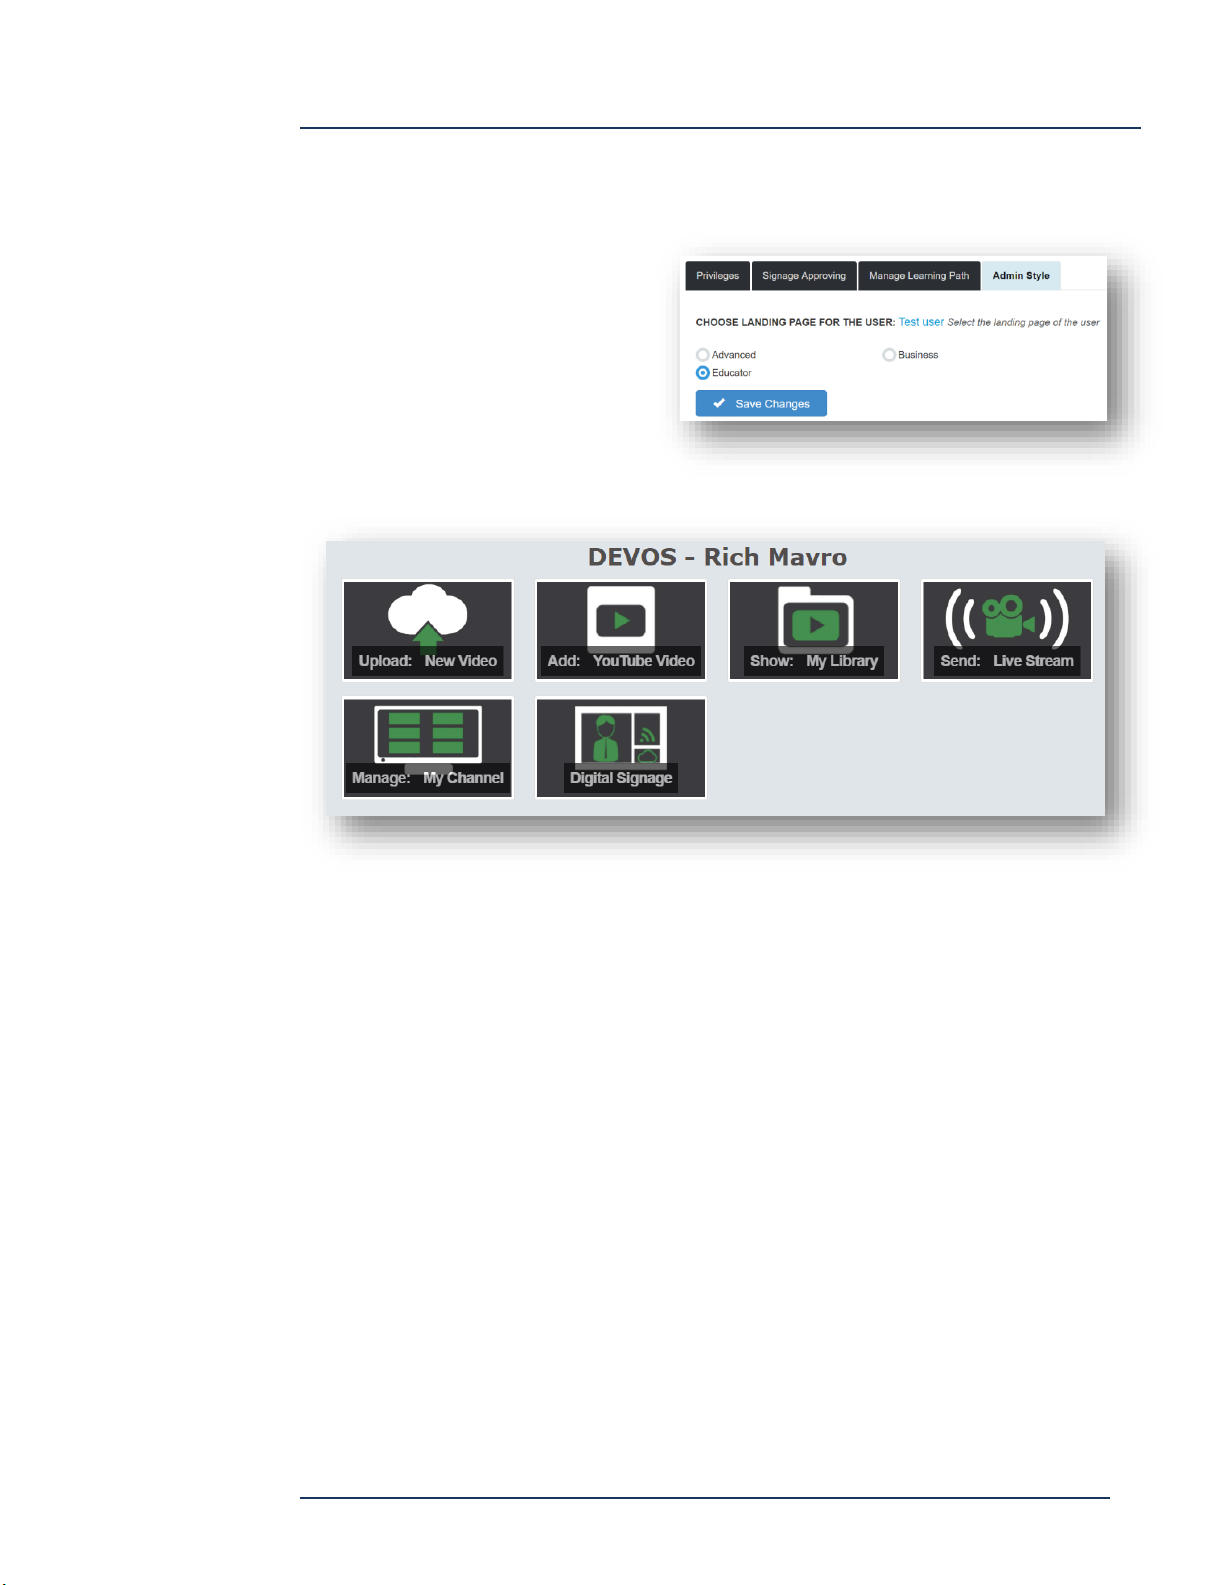
Admin Style
A user account may be configured to use a simplified administration interface that
presents simple buttons to access
the functions available to that
user.
Example:
Page 37
DEVOS
Page 38
DEVOS -- Enterprise Video System
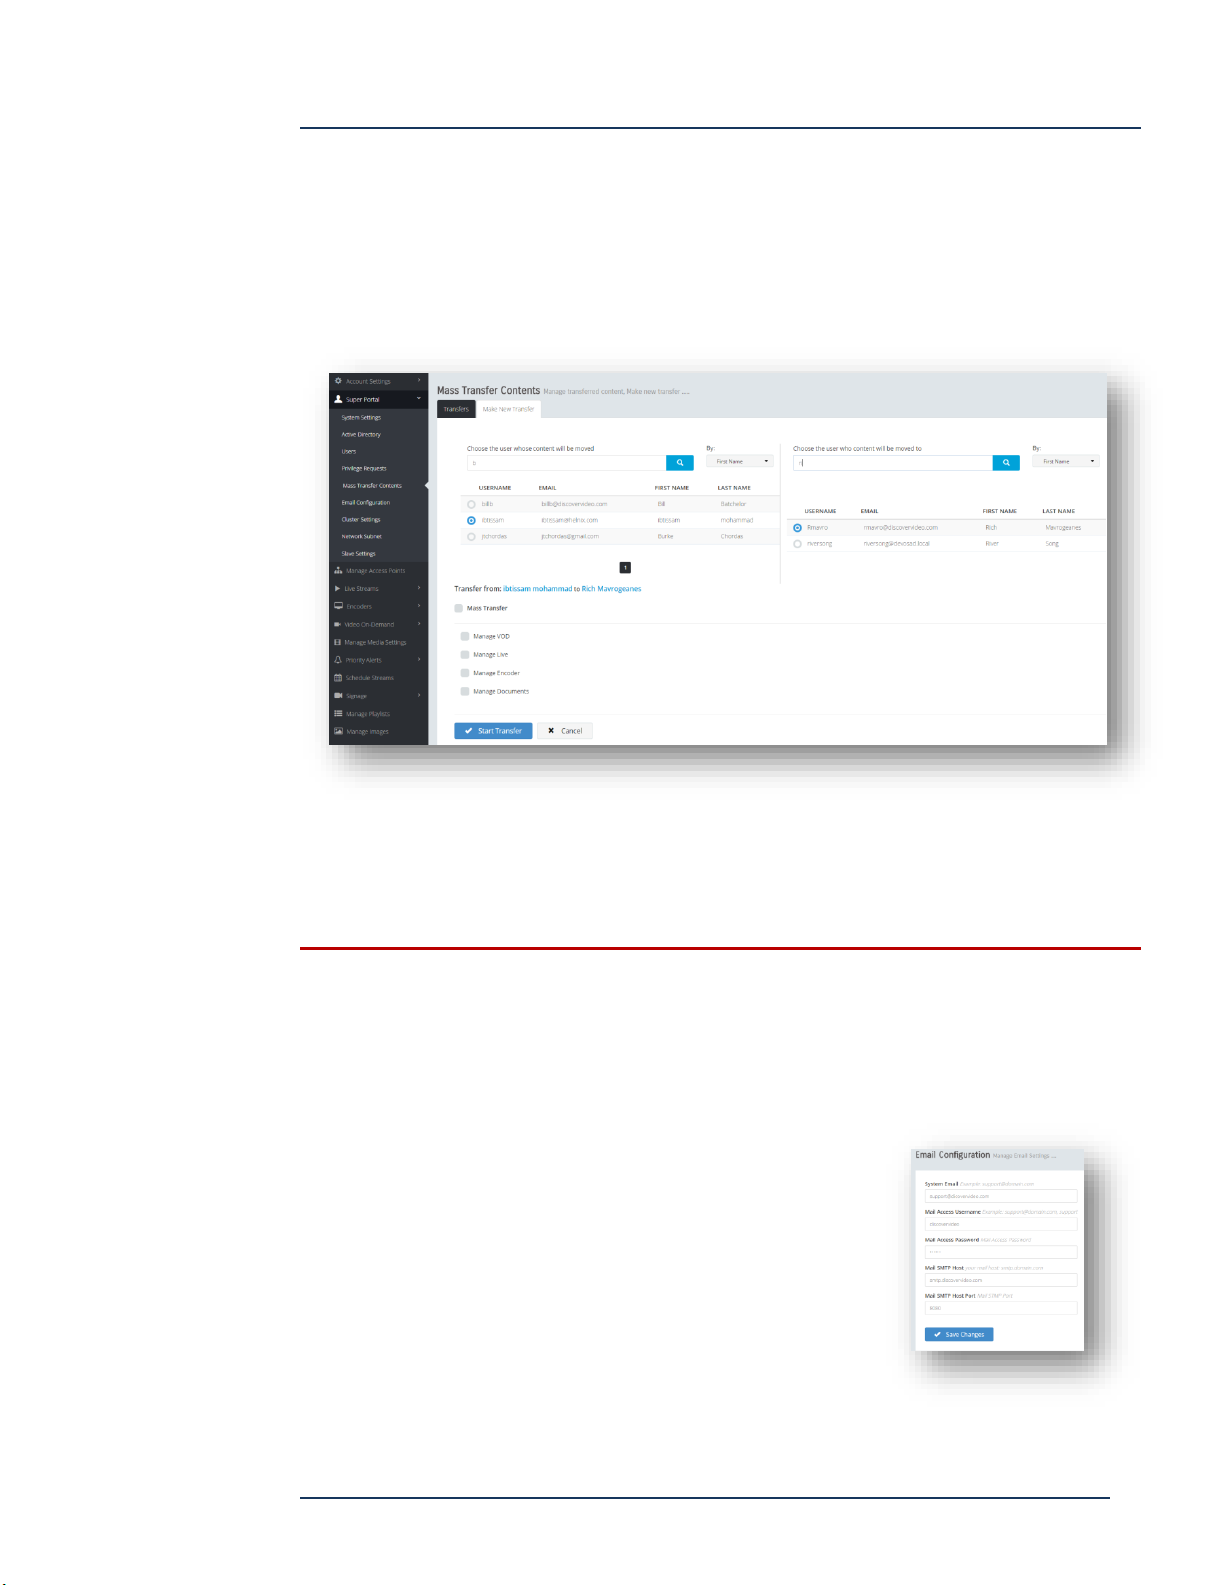
Mass Transfer
It is possible that a user of the system has left the organization, or has been denied
privileges. In this case, their content may be abandoned because it has no owner.
DEVOS provides a Mass Transfer capability where the Super User can transfer
ownership of the content from one user to another.
Select the user account that the content will be moved from, and the user the content
will be moved to. Select Mass Transfer, or select only VoD, Live, Encoder, or
Documents. Select Transfer to make the change.
CAUTION: This is a full transfer and cannot be undone. Use System Content
function to change ownership of just one video or channel.
Email Configuration
You should set up your SMTP server account to allow
users to receive password reset request responses.
You must enter credentials for your email server.
Page 38
DEVOS
Page 39
DEVOS -- Enterprise Video System
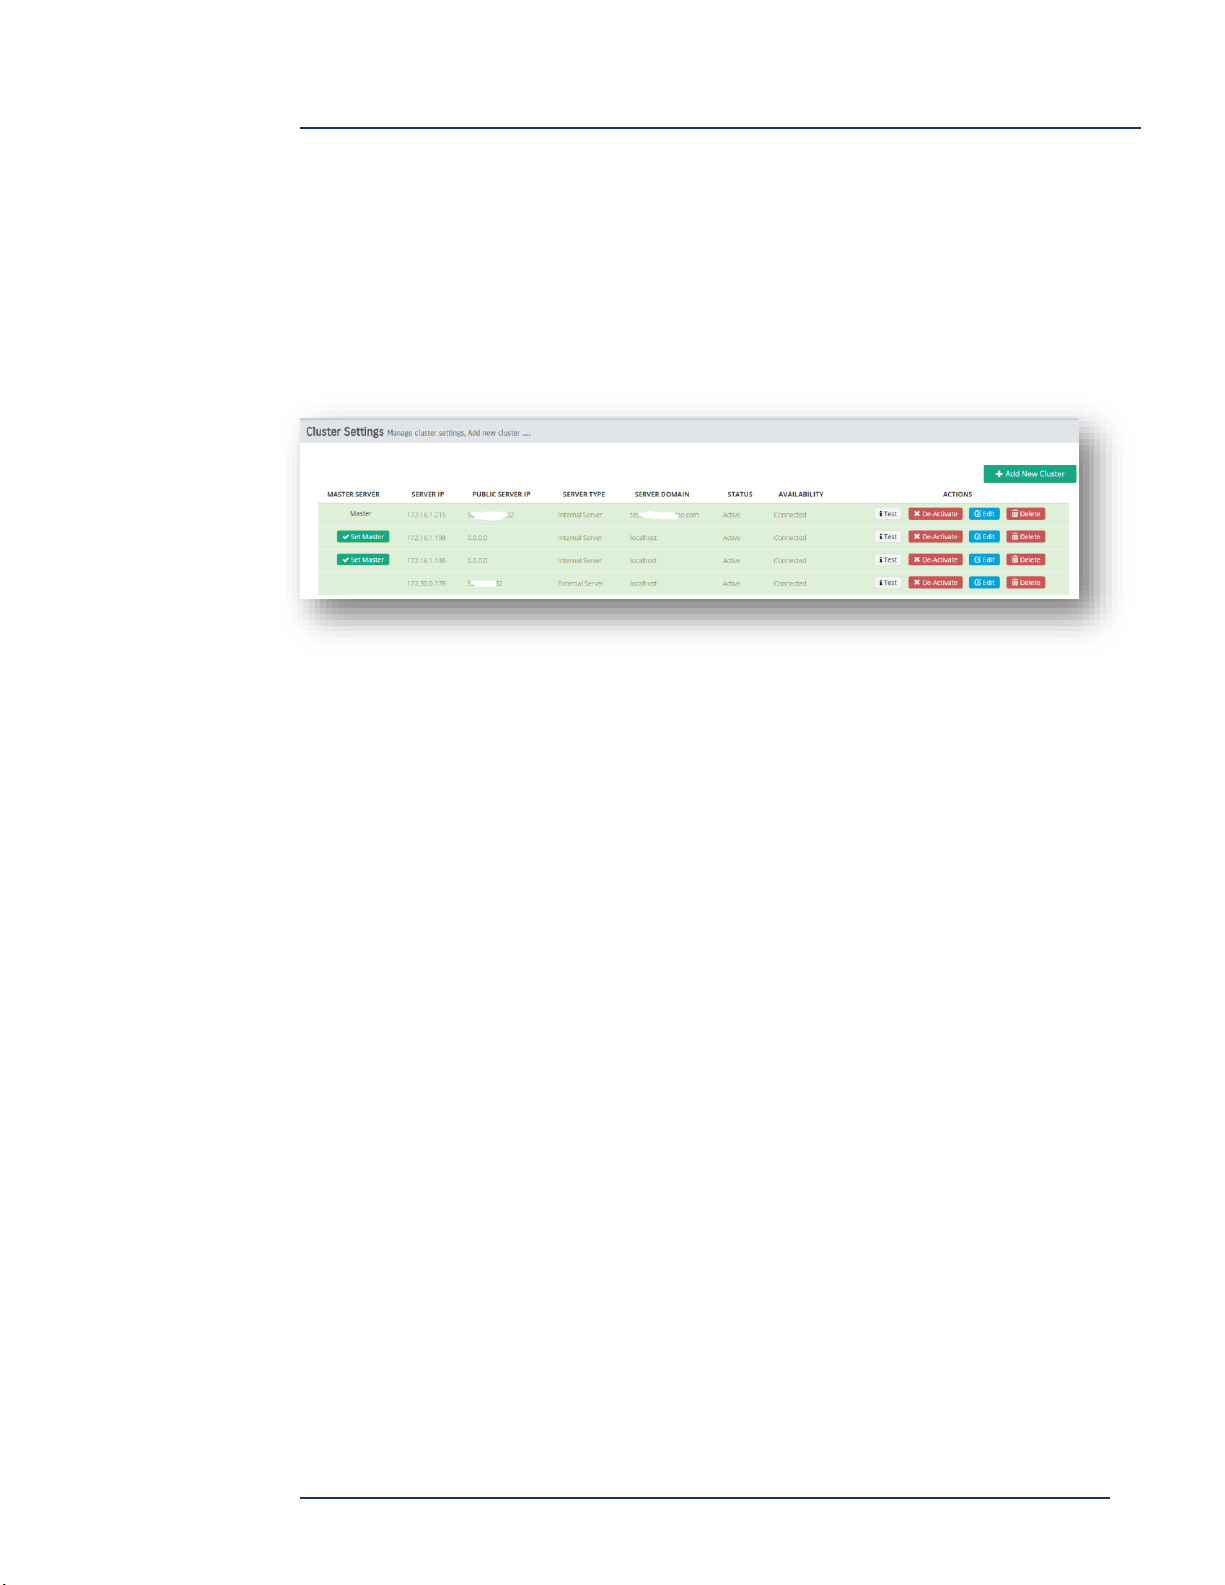
Cluster Setting
To add a DEVOS server to a cluster (assuming you have Cluster License), enter the
server IP, the server public IP (if an external or Cloud server), the type and domain.
Every cluster must have one server designated as Master. The Master server is the
one that is accessed by all users (i.e. delivers the web interface). Video content is
delivered round-robin.
Page 39
DEVOS
Page 40
DEVOS -- Enterprise Video System
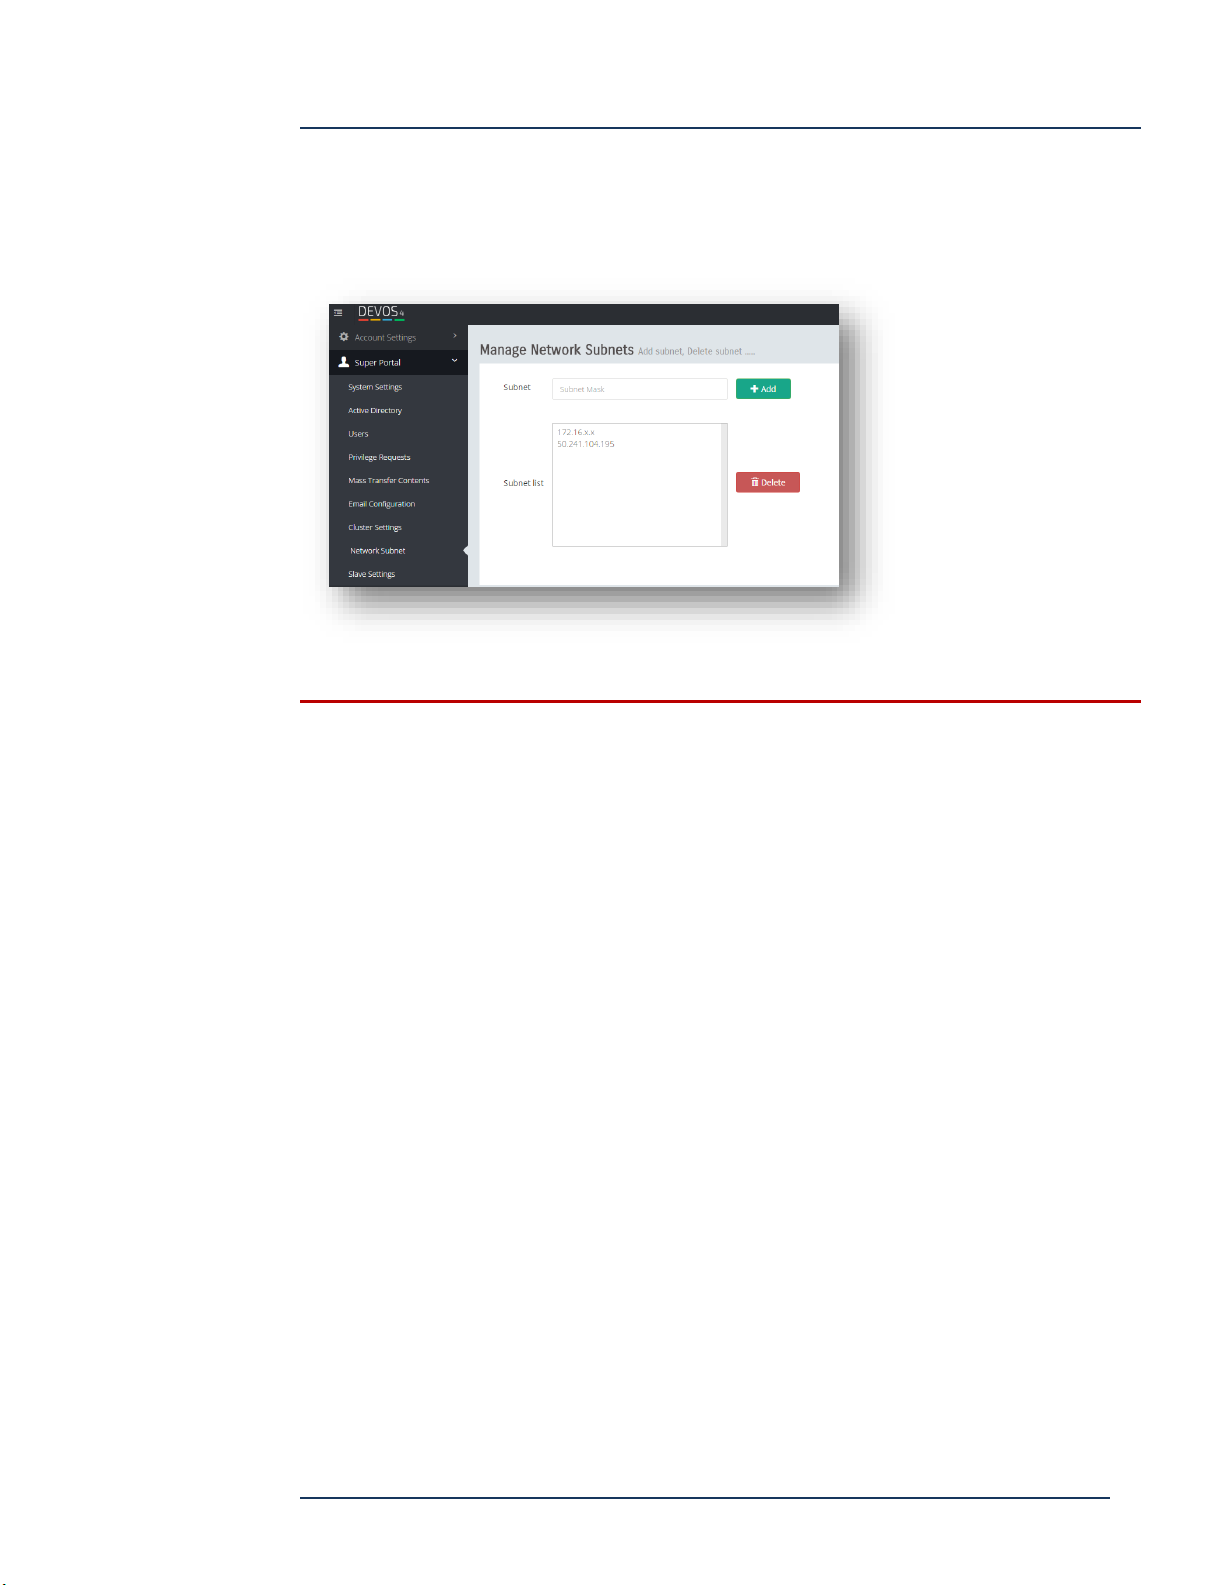
Network Subnet
The network subnet allows you to define what network and sub-networks are served
by a DEVOS server in a cluster. Simply add network IP address with ".x" wildcards.
Note that this is a "positive" filter. You cannot add an entry to deny access, but
you can enter multiple entries to cover a range of acceptable networks.
Page 40
DEVOS
Page 41
DEVOS -- Enterprise Video System
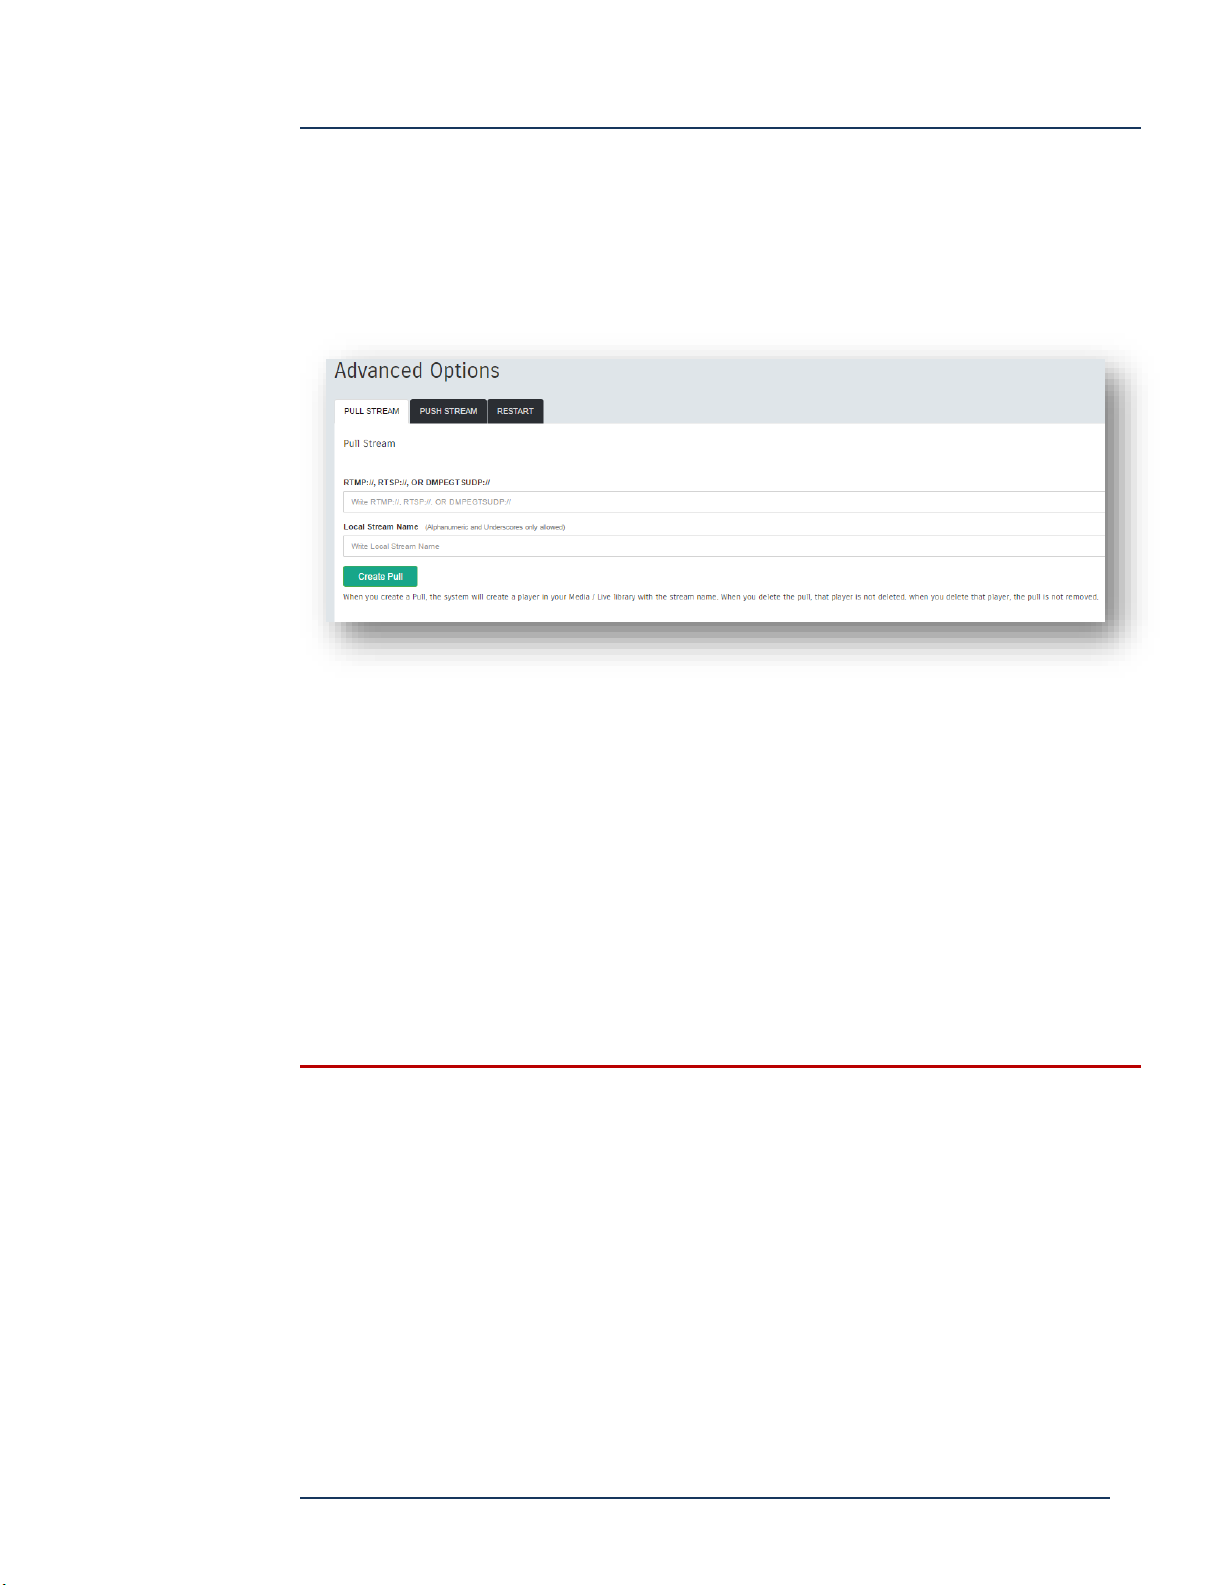
Advanced Options
The Super Admin may create Push and Pull streams, and may restart the streaming
server.
Pull
Pull is used to bring an external live stream into the system continuously
Use Pull when you want to bring a stream into the system.
RTMP://, RTSP:// OR DMPEGTSUDP:// -- enter rtmp:// or rtsp:// URL for the live
stream. To receive a multicast, enter “dmpegtsudp://IP:Port”.
Local Stream Name -- enter an arbitrary name that is not already in use (e.g.
"mystream_date".
When you create a Pull, DEVOS automatically creates a viewing page that you can
later edit with appropriate title, description, etc.
When you delete a Pull stream, the player is not deleted and you must manually
delete it from the live stream section.
Page 41
DEVOS
Page 42
DEVOS -- Enterprise Video System
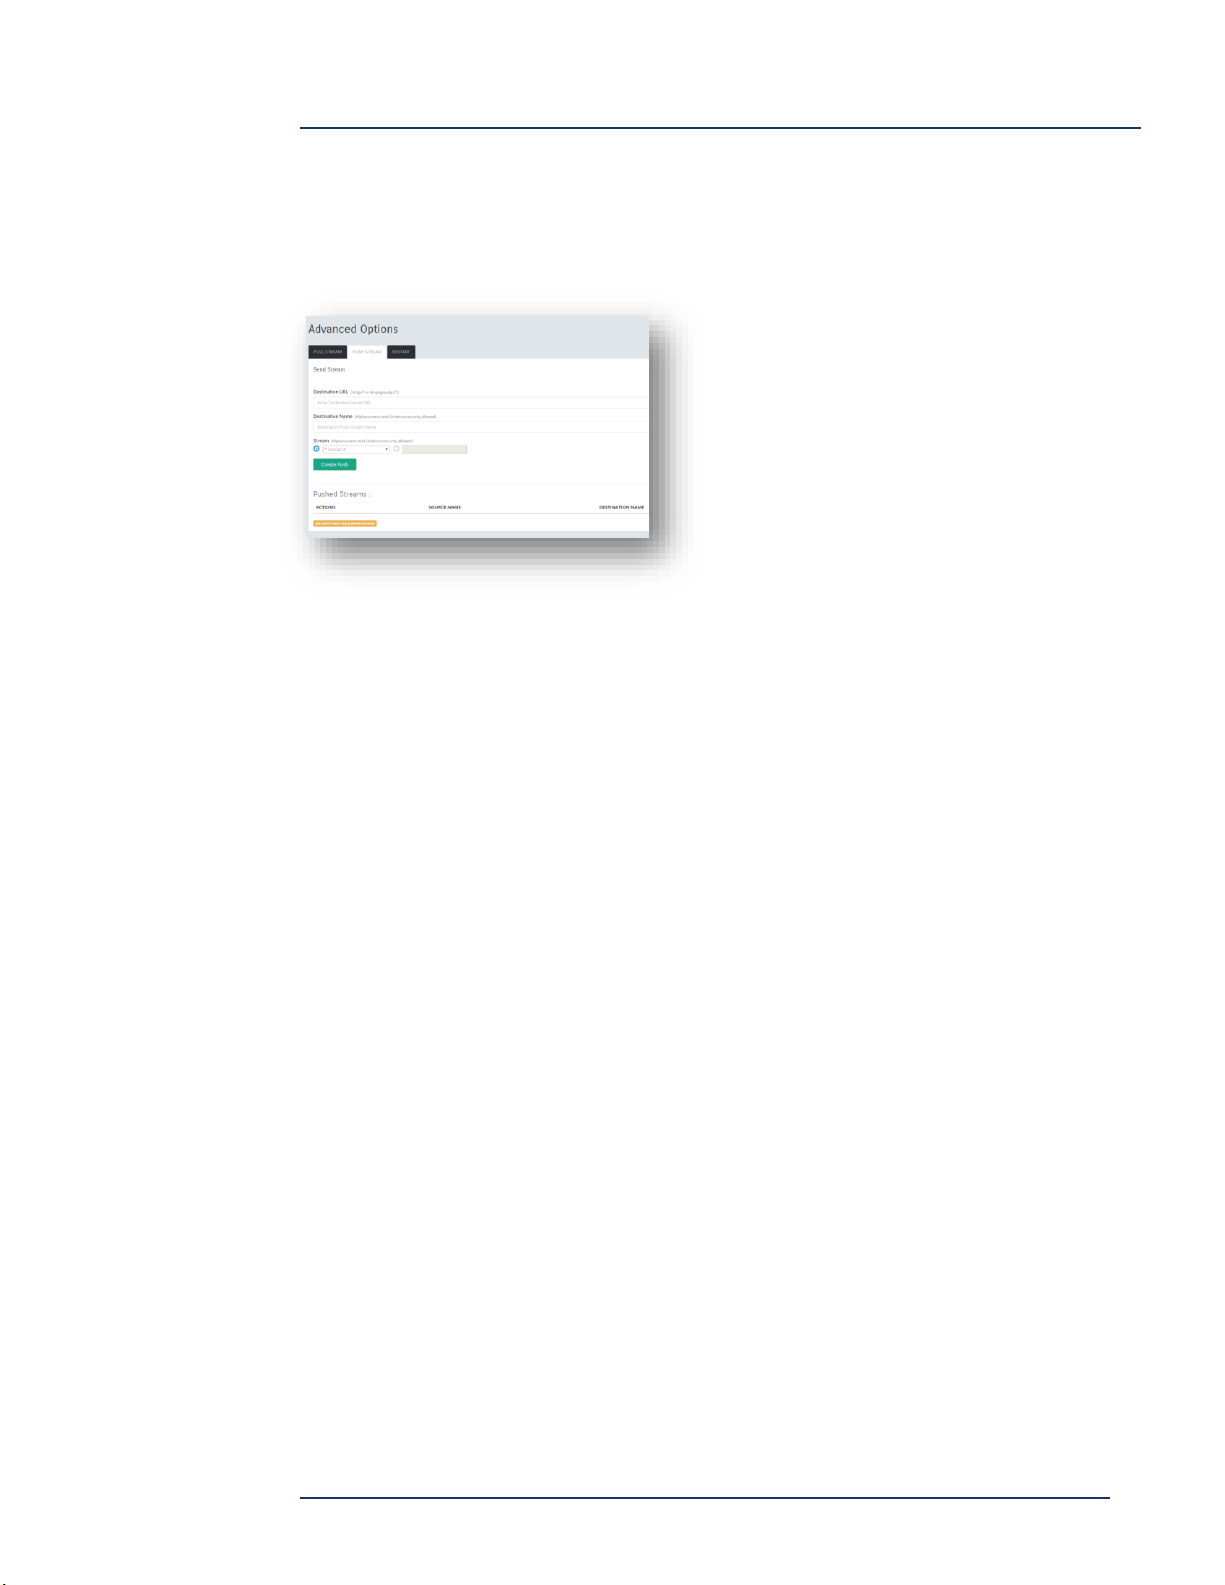
Push
Push is used to send a known live stream to Arcus, Streamsie Service, another DEVOS
server, or a 3rd party CDN. Push is also used to create IP Multicast streams in a local
network.
Destination URL -- Enter the RTMP URL (e.g. rtmp://server/app)
Destination Name -- Enter the stream name (e.g. "mystream")
Stream -- Select an existing live stream from the dropdown box, or enter streamname
Multicast: Enter Destination URL "mpegtsudp://[IP:PORT]" (see appendix)
Page 42
DEVOS
Page 43
DEVOS -- Enterprise Video System
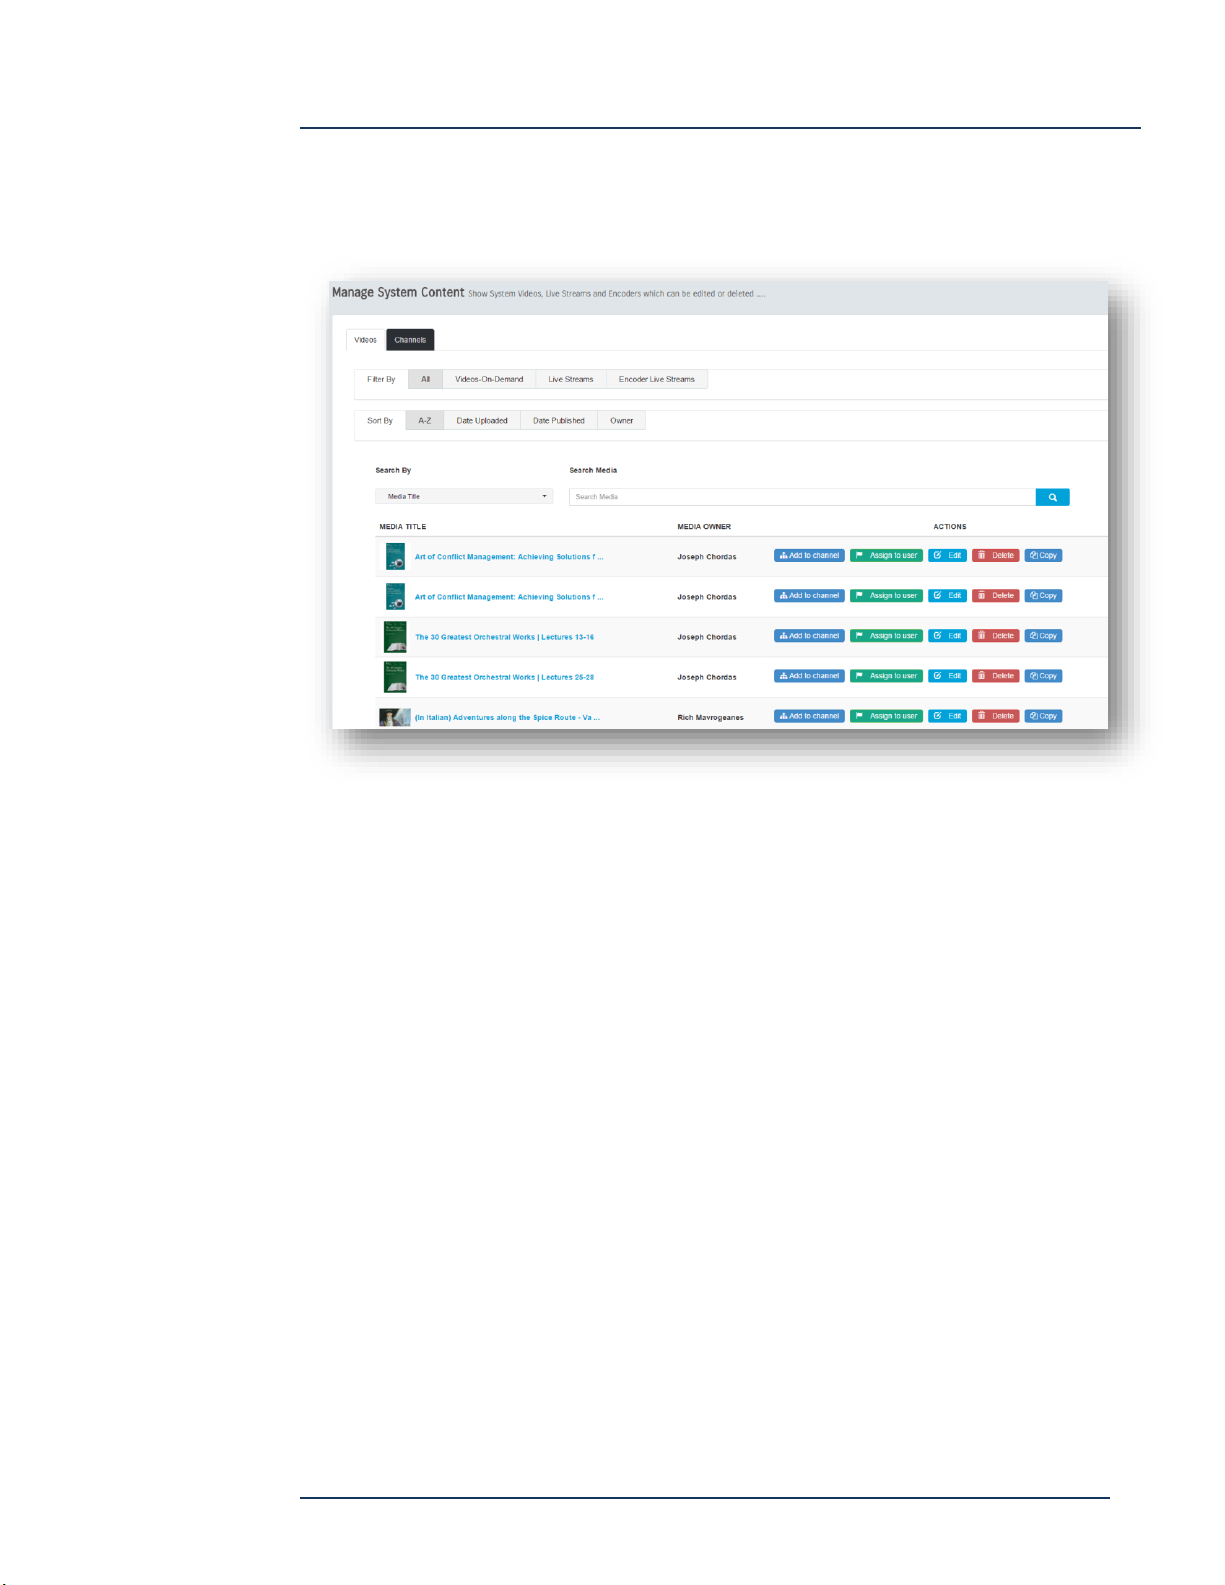
System Content
The Super’s System Content function gives access to all content and channels, and
allows you to search and sort the content in several ways.
You can filter by type, sort by title, date, owner, and then search by title, and owner’s
name.
For any video, you can add it to a channel, assign it to a user, edit it, delete it, or copy
it to another user.
Page 43
DEVOS
Page 44
DEVOS -- Enterprise Video System
Manage Channels
Channels are viewer entry points into the DEVOS System. If a user has Manage
Channel privilege, then they may create and manage their own Channel. (See Simple
Manager below for alternate interface).
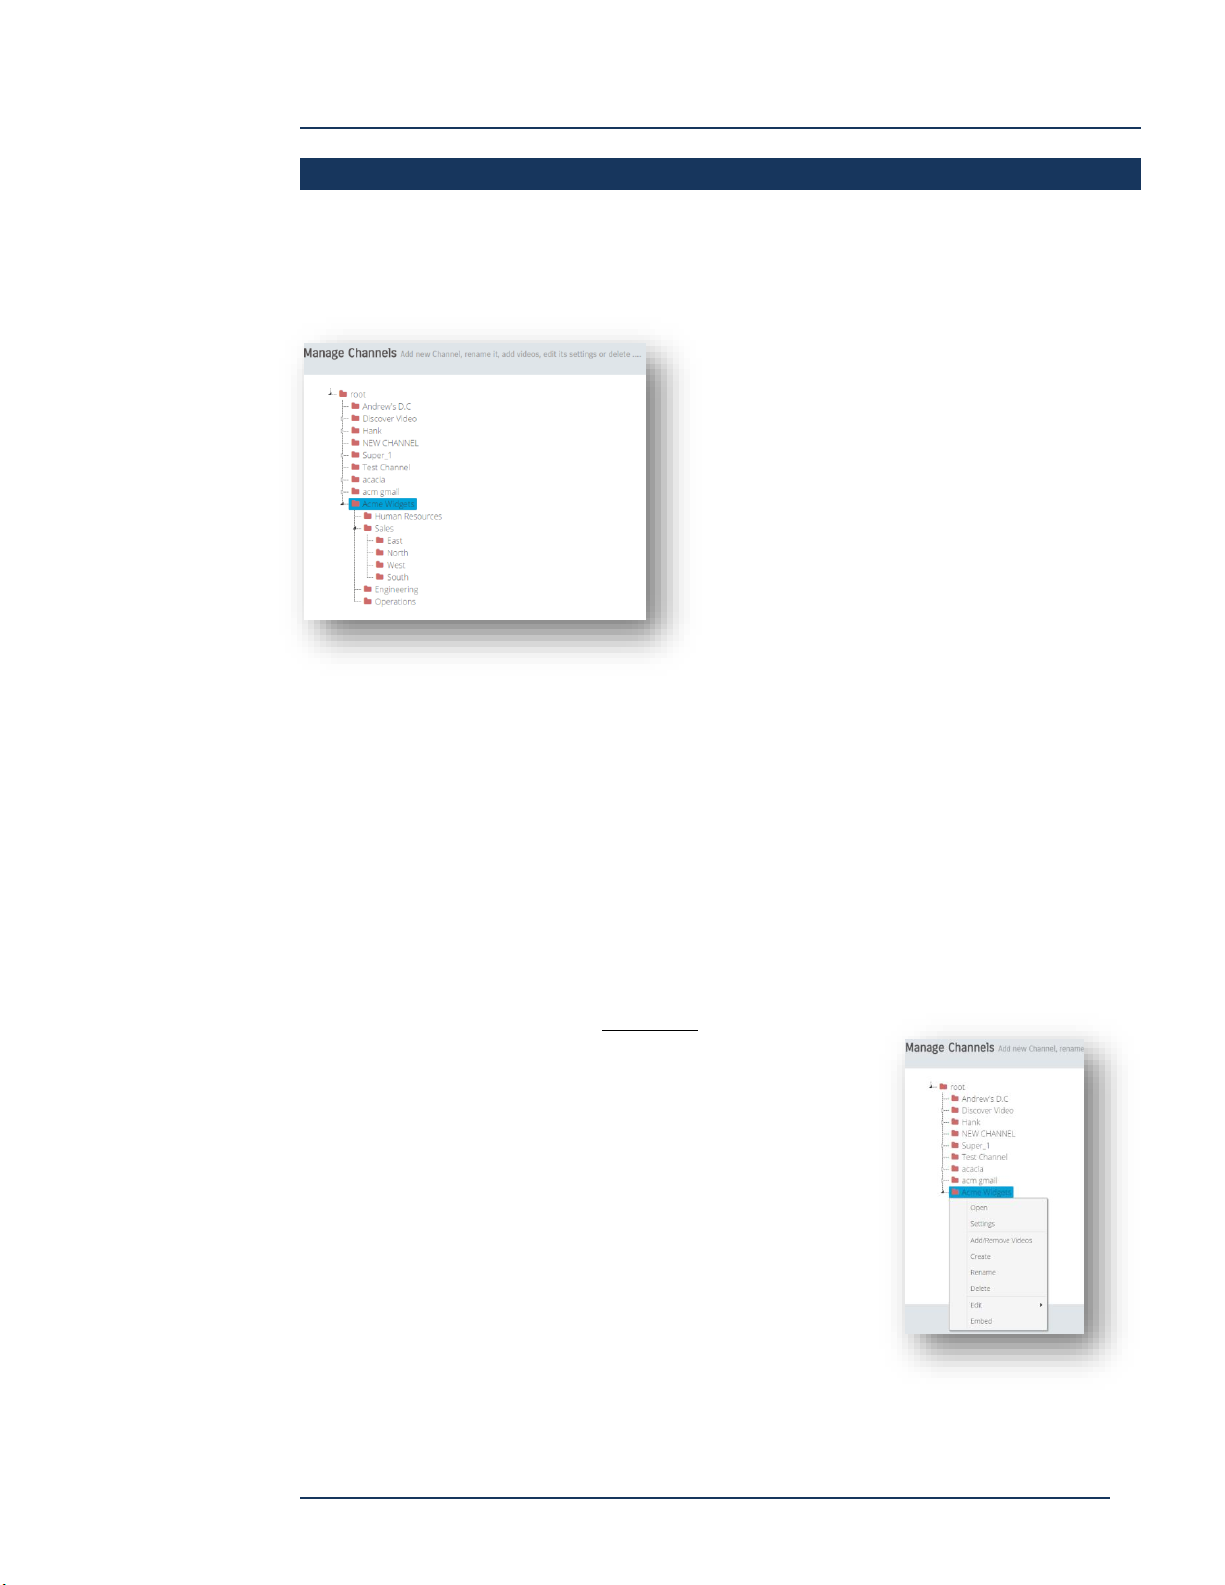
For example, a user may wish to create a
channel called "Acme Widgets", add
content to it, and give the web page
address to desired viewers, post the web
page address on social media, and/or
embed the web page in their own web site.
Channels can have many levels, or subChannels. The point at which a viewer
accesses a Channel determines whether
that viewer has access to sub-channels.
For example, you may have an channel
called "Acme Widgets", and under this you may have channels called "Human
Resources, Sales, Engineering, Operations". If you distribute the web page for "Acme
Widgets" then the viewer has access to the content there, and can also navigate to
sub-channels. If you distribute the web page for "Widget Details/Human Resources"
then the viewer cannot navigate "up" to "Acme Widgets".
When you select Manage Channels, you will see all channels, even those that do not
belong to you. This allows you to create a new channel under an existing one if the
owner of that channel allows it. It also allows you to see the names already in use, so
you can decide to make your channel name less confusing to potential viewers.
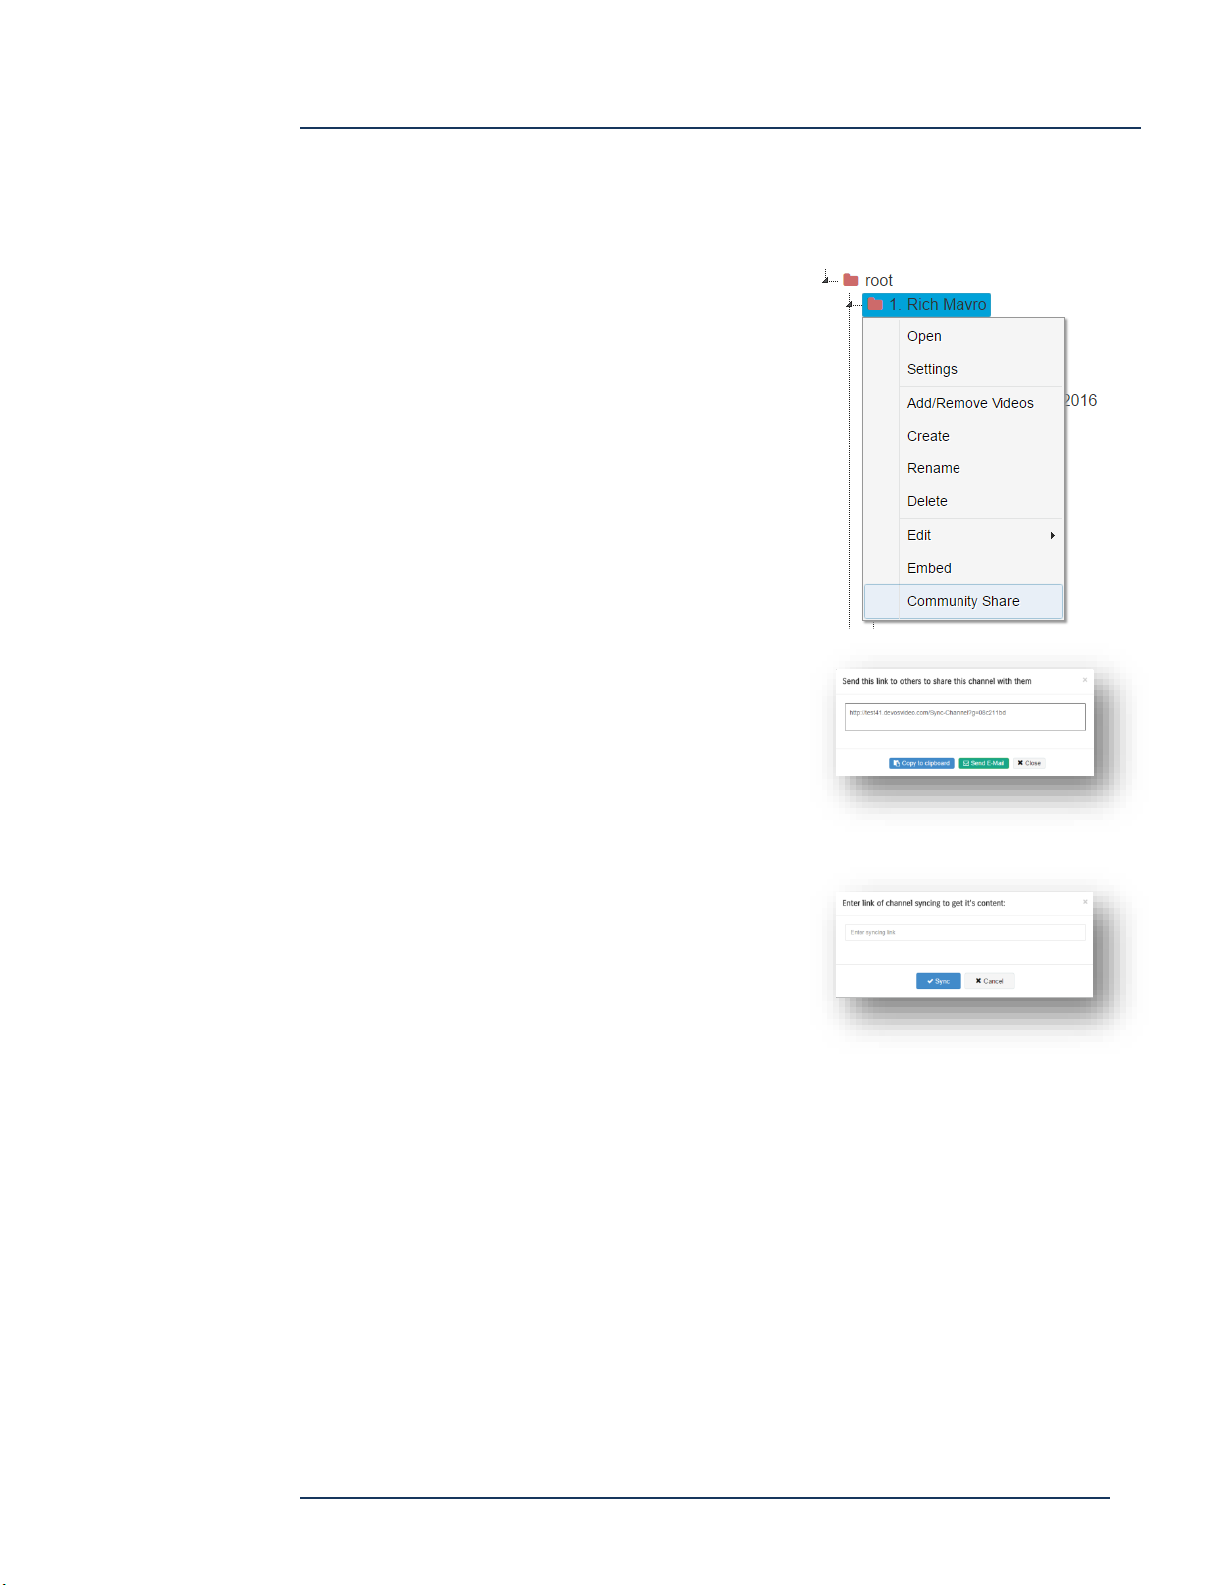
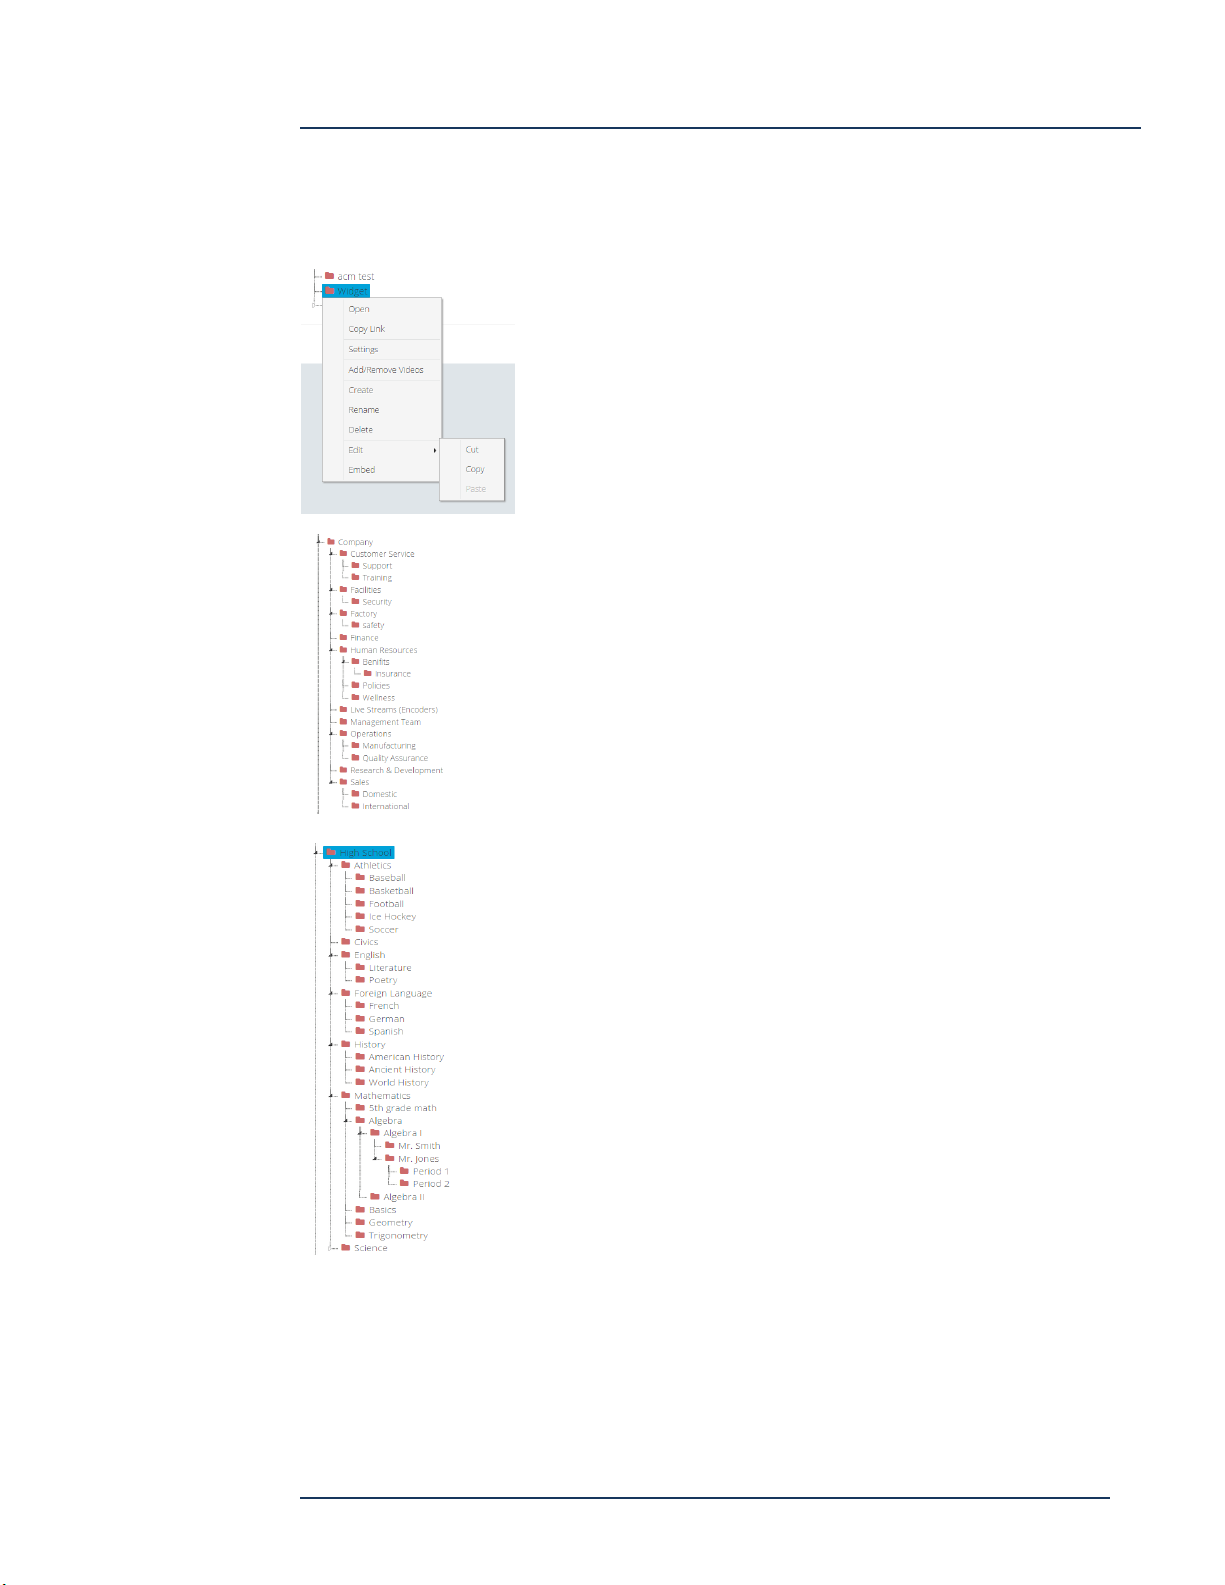
To create or mange a channel, right-click on a folder to
expose the menu.
Select desired function.
Open -- Opens the channel in a new window
Settings -- Access the channel settings
Add/Remove Videos -- allows you to manage the
videos in your channel
Create -- makes a new channel under the selected
channel
Rename -- renames an channel
Delete -- deletes an channel
Page 44
DEVOS
Page 45
DEVOS -- Enterprise Video System
Embed -- shows channel embed code
Community Channel Share
If "Shared Channel" then is check in the Channel
Settings, then it is eligible for Community Share.
Community Share allows another DEVOS system
to duplicate your channel on that system. The
shared channel content will be downloaded to the
other system, and will remain synchronized with
the source channel. This means that if the source
channel adds, deletes, or edits a video, the
changes will flow to other DEVOS systems that
have subscribed to your channel.
To share a channel, select Community Share by
right-click on the channel in the channel manager.
A dialog box will appear with a special channel
share URL. Copy this URL to your clipboard then
paste it to an email or document. Send this URL
to another DEVOS system owner.
To subscribe to Community Channel, right-click
on the root folder in the channel manager and
select Community Share. Paste the URL into the
dialog box and select save.
You can have any number of subscribers to a channel. For example, a headquarters
system might have a channel called "Human Resources", and a DEVOS system at
multiple divisions would subscribe and make that same content available on their
local system.
Page 45
DEVOS
Page 46
DEVOS -- Enterprise Video System
Channel Embed Code & API
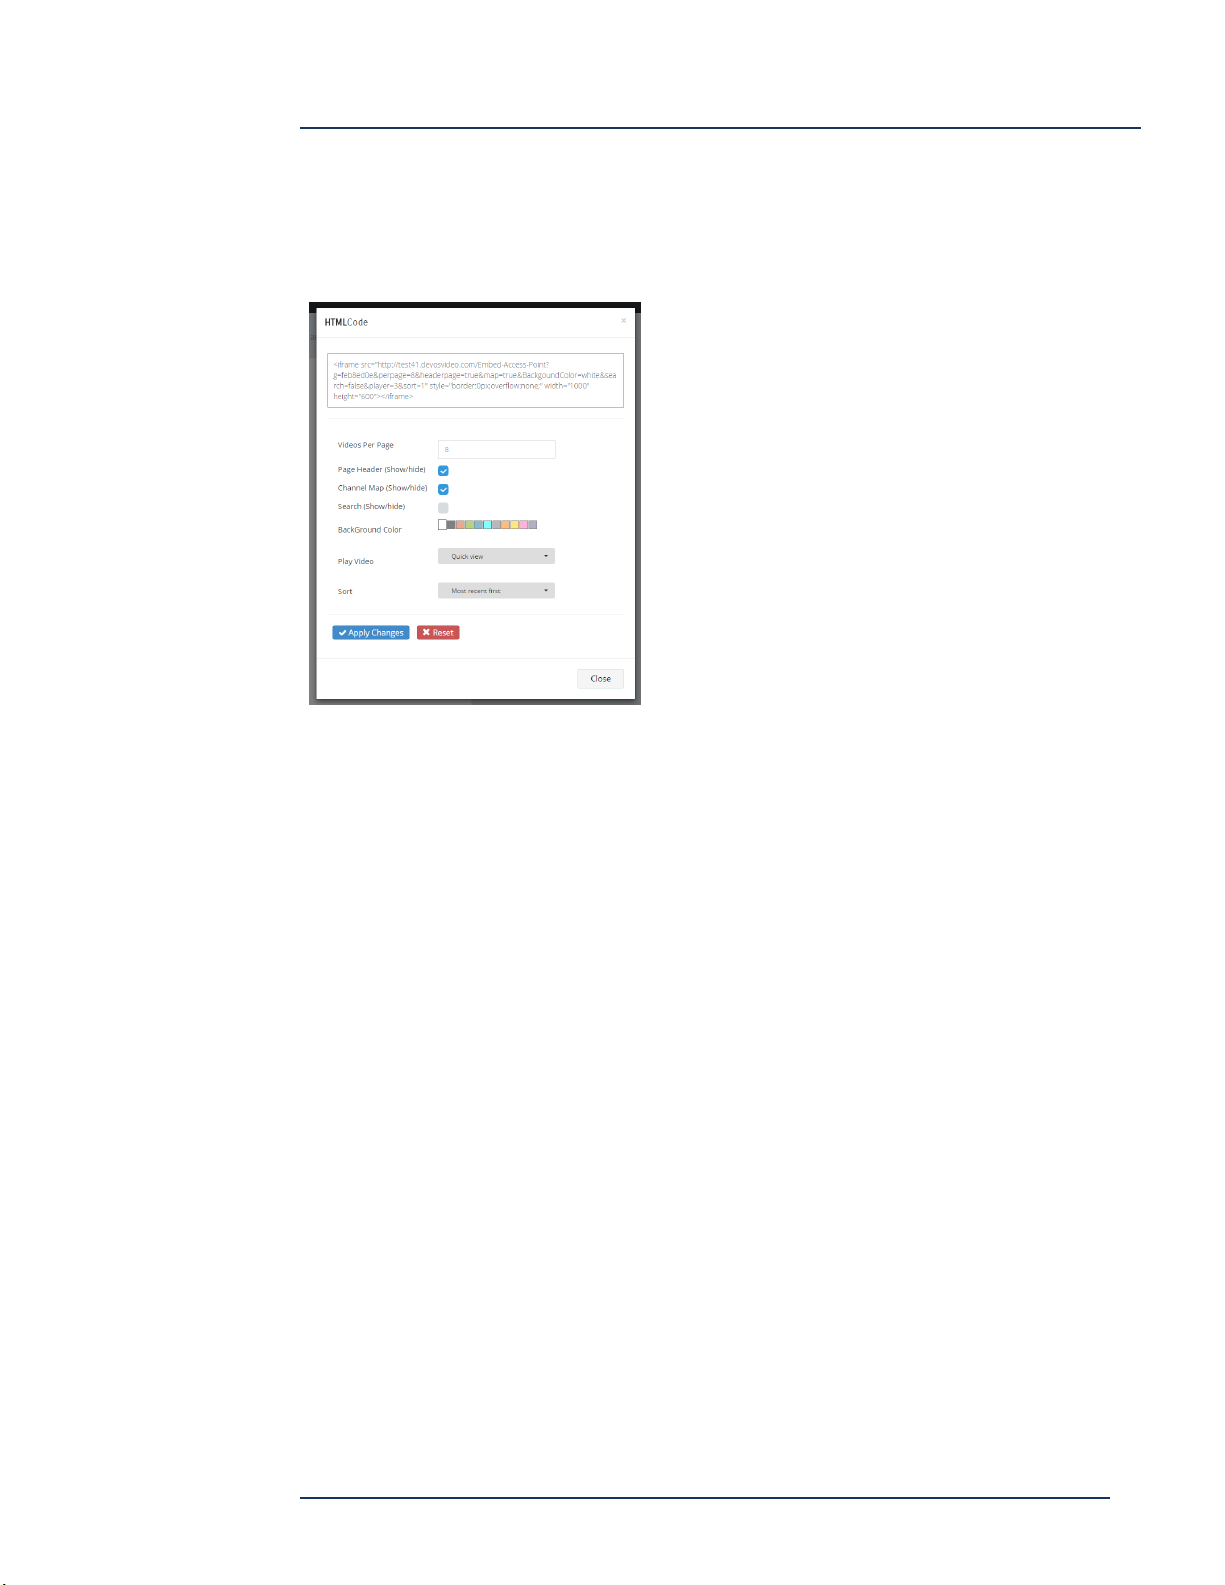
The Channel Embed Code give you many options for how your channel will appear if
you insert it in another system. The embed code
illustration shows the available options and
generates the desired embed code. Simply
copy/paste the code into a web page, a LMS,
SharePoint, etc.
Note that you may wish to adjust the iframe
width and height values to suite your preference.
API
The Application Program Interface is:
http://[DEVOS]/Embed-AccessPoint?g=[ChannelID]&perpage=[VideosPerPage]&headerpage=[Header]&map=[Map]&BackgoundColor=[BackgroundColor]&search=
[Search]&player=[Player]&sort=[Sort]
Where
DEVOS URL, is the DEVOS server address
Channel text, is the channel ID GUID
VideosPerPage number, is the number of videos to be shown per page
Header boolean, true/false, displays the header
Map boolean, true/false, displays the channel map
BackgroundColor text, sets the background color
Search boolean, true/false, displays the search box
Player number, sets the player style where 1 = open new page,
2 = show video in same page/frame, 3 = quick view
Sort number, 1=most recent first, 2=most recent last
Page 46
DEVOS
Page 47
DEVOS -- Enterprise Video System
How To Create or Modify an Channel
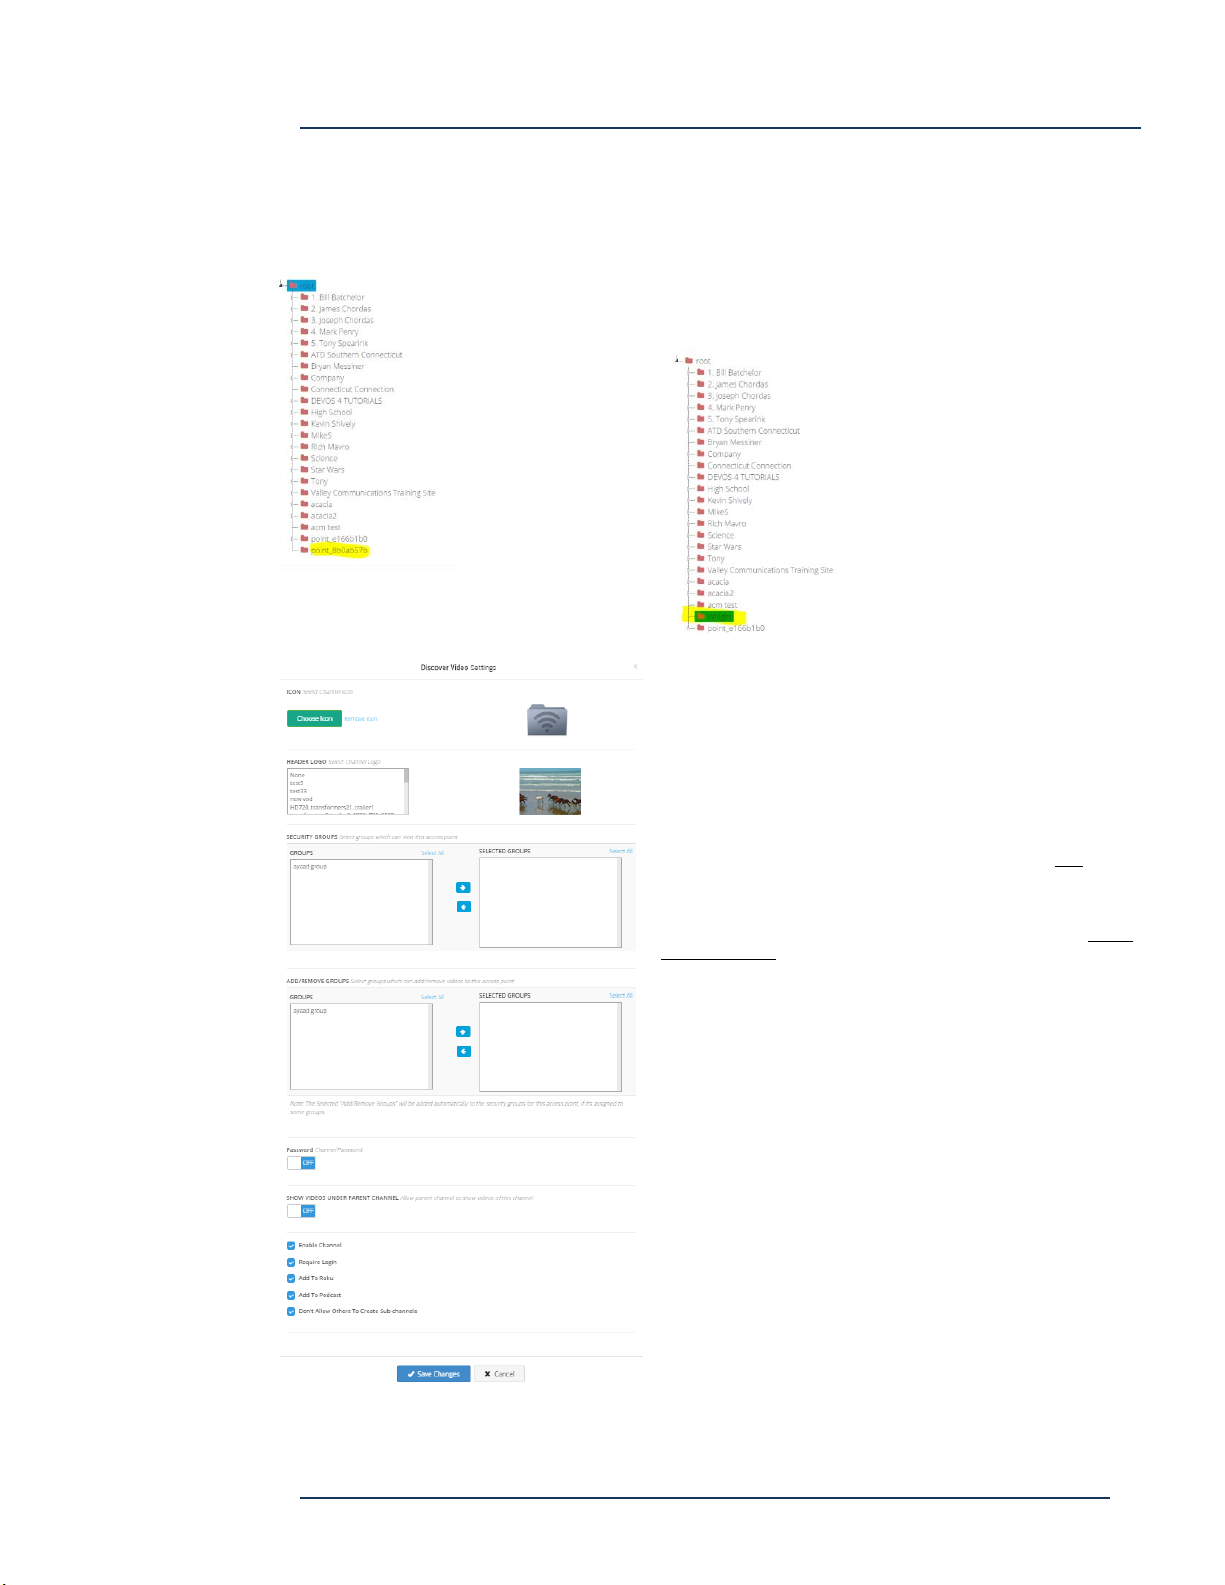
Right-Click on Root, or on an existing channel. Select Create. Open the folder (if needed)
and notice there is a new channel created with a code (see yellow highlight).
Next, right click on this newly created channel and select "Rename".
In our example here, we will rename it to "Widget".
Right-Click on Widget and select Settings.
Title -- Enter a title for the channel. This will display on the channel page
Icon -- Optional. Upload a .ico ("favorite") icon for this channel
Header -- Enter header text for this channel
Header Logo -- Select an image from your image library for this channel
Security Groups -- Select one or more security groups that may view this
channel. Select none if you do not wish to limit access (anyone may access
your channel).
Add/Remove Groups -- Select one or more security groups that may publish
or remove content in your channel. Selecting none means only you can
add/remove content for the channel.
Password -- Optional. Turn Password on and enter password if desired.
Viewers must know this password to access the channel (you would provide
it via email or other means).
Show Videos Under Parent Channel -- If this is a sub-channel, enabling this
will show all sub-channel videos in the parent channel.
Private -- if checked, then the channel will not appear in a system landing
page. Use "Open" to obtain the channel URL
Enable Channel -- If checked, channel will appear in the channel list,
otherwise it will not. Disabled Channels are not available to anyone, including
the owner.
Require Login -- If checked, viewers must log in to the system to view.
Add To Roku -- If checked, this channel will appear as a channel in your
private Roku channel.
Add To Podcast -- If checked, the channel is available as a video podcast.
Don't Allow Others To Create Subfolders -- If checked, then no one can add a sub-channel to your channel.
Page 47
DEVOS
Page 48
DEVOS -- Enterprise Video System
Save Changes -- Applies your changes to the channel.
Organizing Channels
.
You can move the channel folder by selecting Cut, and then
paste it to its new position.
You can organize your channel into many sub-levels. The
illustration on the left shows an example for a corporation. Note
that each channel could be "owned" by a different user (e.g.
Human Resources manages their own content).
The illustration on the left shows an example for a school. Notice
that in this case, the Mathematics folder has sub-folders that go all
the way to sub-folder Mr. Jones Period 1. Mr. Jones can create a
channel for each class if desired, and optionally he can give security
access only to members of that class.
For best results, do not create sub-channels that have no content.
Page 48
DEVOS
Page 49
DEVOS -- Enterprise Video System
Adding/Removing Content On Channels
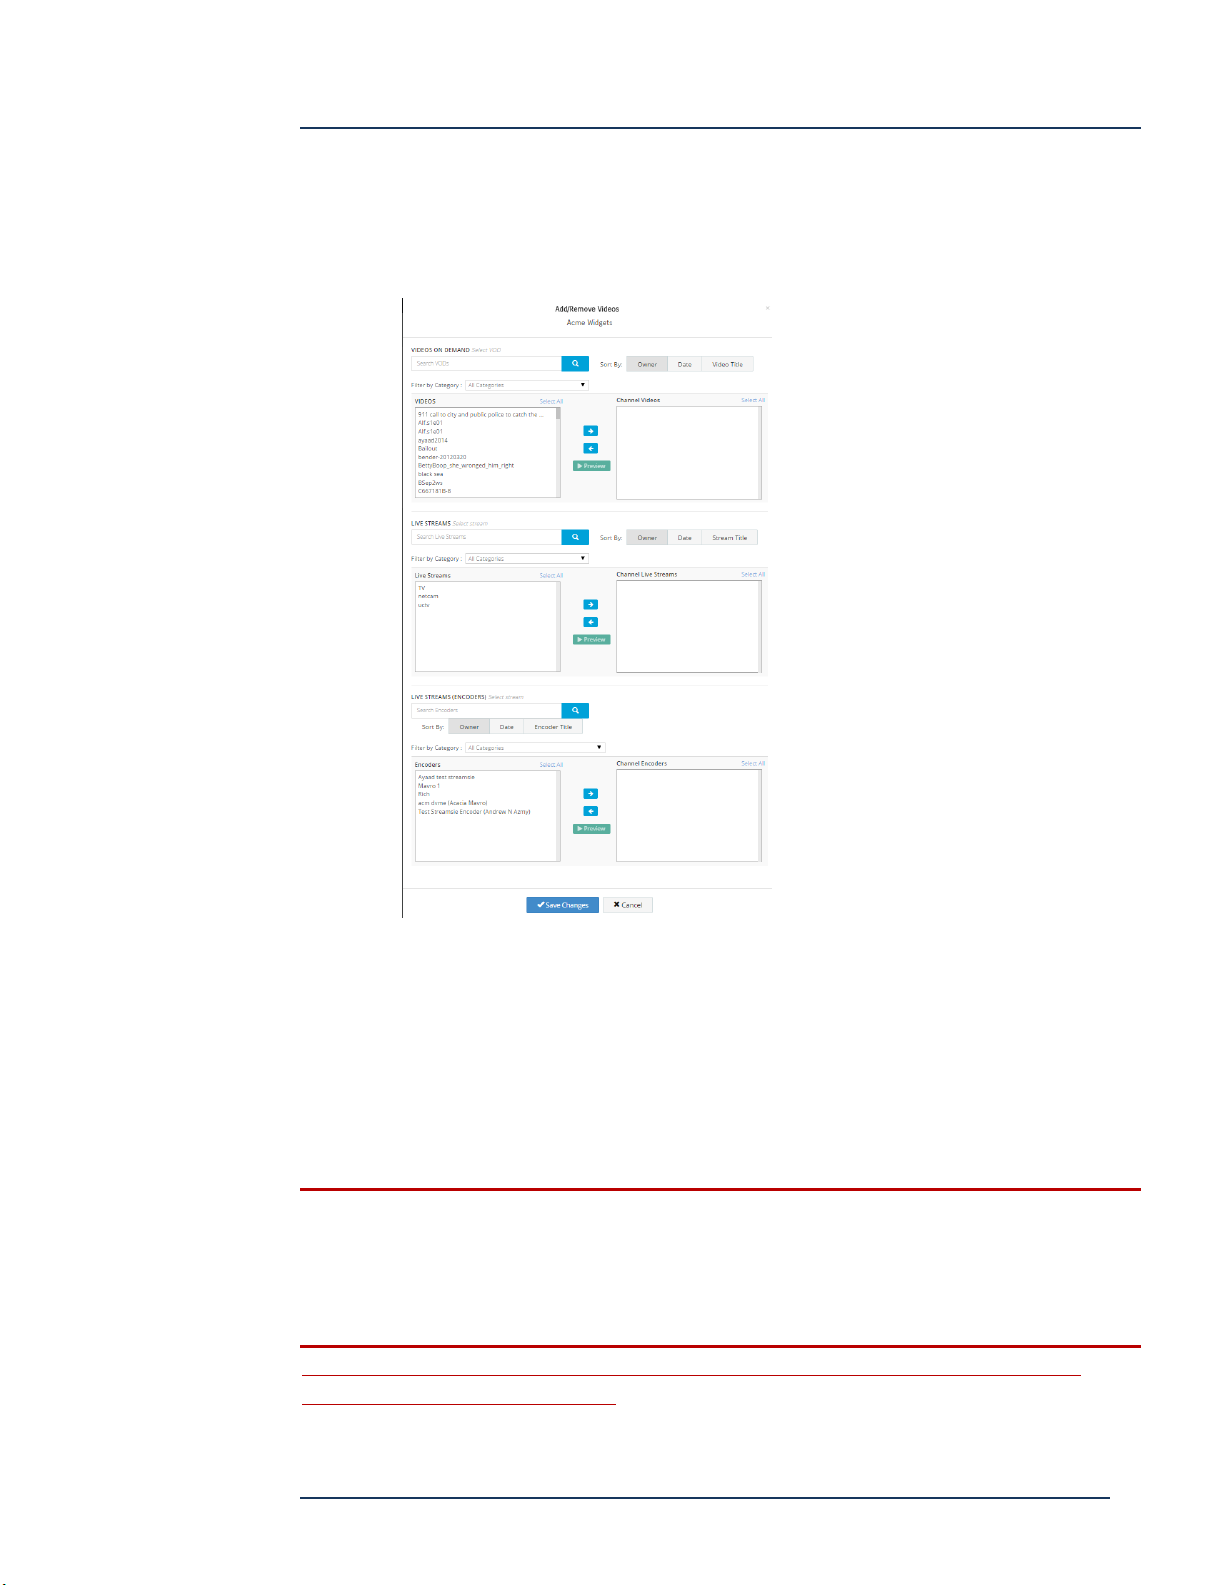
You can add Video on Demand, Live Streams and Live Encoder Streams to an
channel. Right-Click on an channel and select "Add/Remove Videos". Simply add or
remove content using the simple interface illustrated below.
You filter your selection by category and you can search and sort to find the video
you wish, and you can preview that video before adding to your channel to ensure
you are adding the one you wish.
Note that videos that are owned by someone else have the owner's name shown.
They appear here because that owner marked the video as "shared" (in their Media
Profile Setting), allowing you to include it in your channel.
You can only add videos to your channels, or to channels of others if they have
given you privilege.
A USER WITH SUPER PRIVILEGE MAY MANAGE ANY CHANNEL, INCLUDING
ADD/REMOTE AND SETTINGS.
Page 49
DEVOS
Page 50
DEVOS -- Enterprise Video System
Using Channels
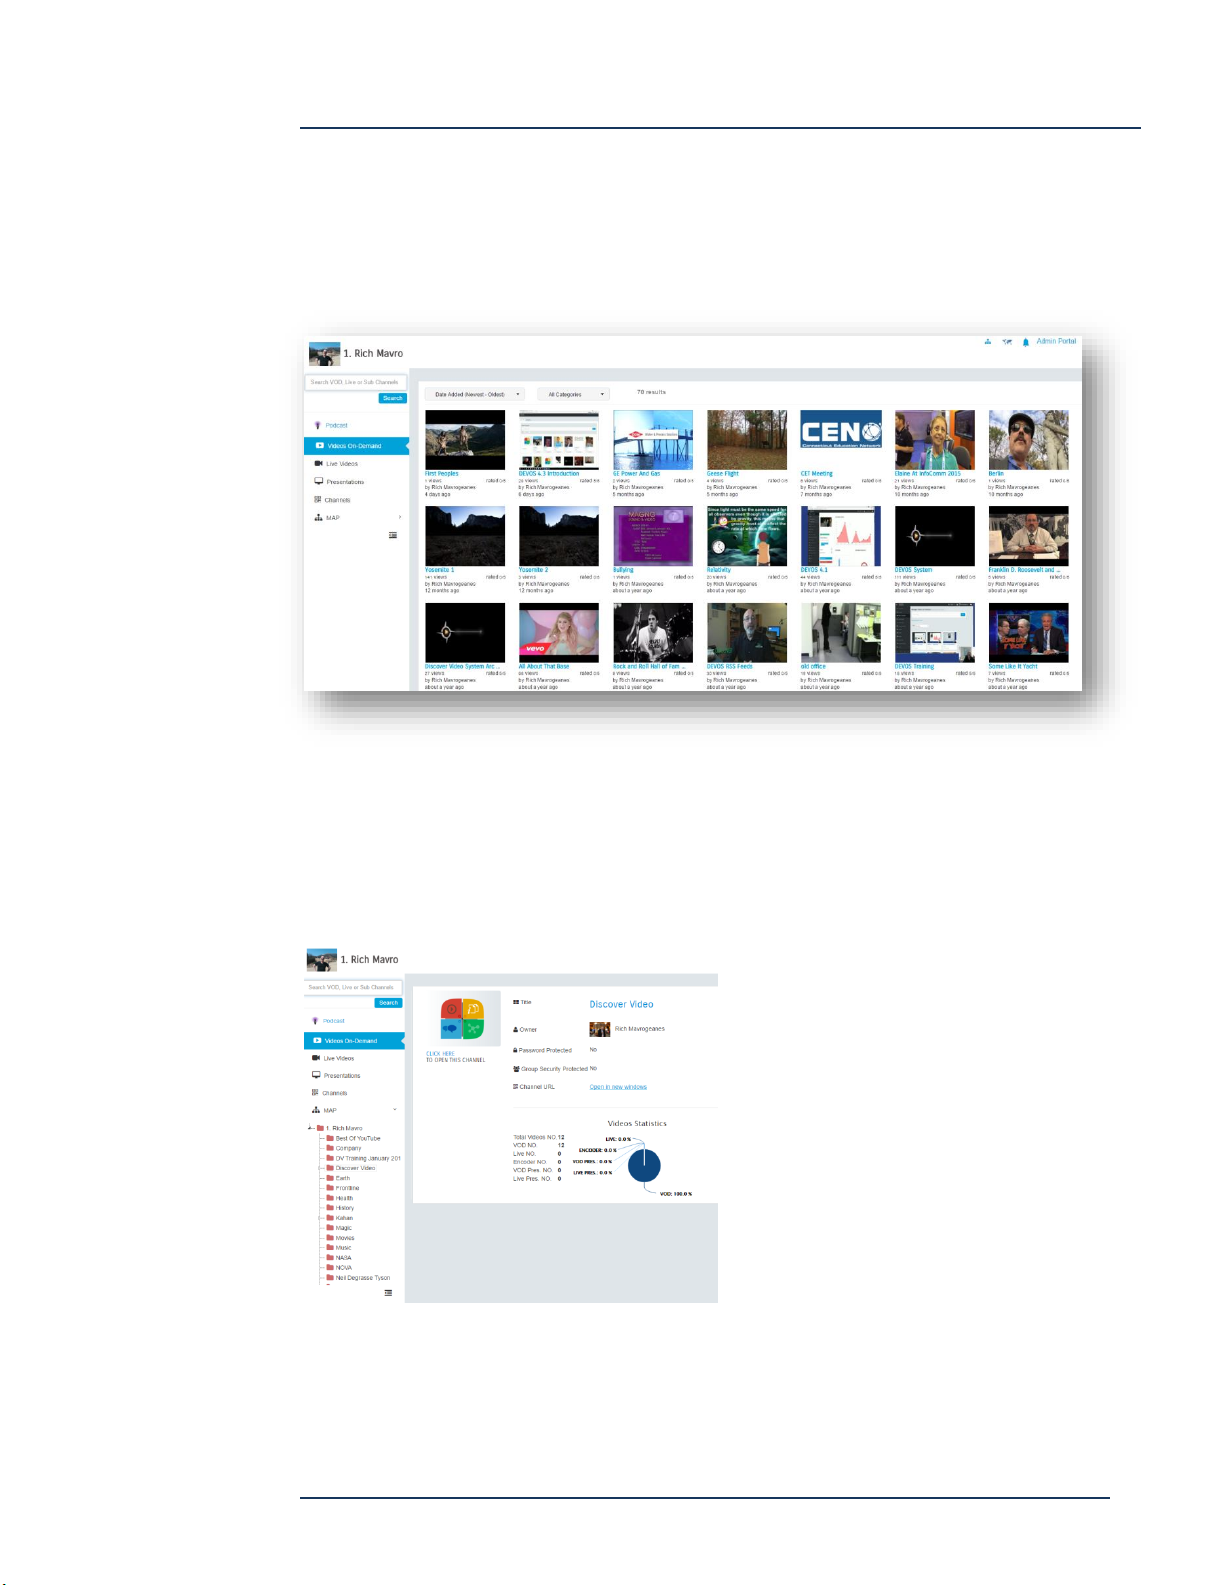
Simply open the channel web page (using the right-click function from the channel
manager) to view any channel. The channel page shows the content of the channel
organized as VoD, Live, Presentations, Channels and Map. The viewer may search and
sort, or select to view only desired categories.
Click on any video to view (or use Quick View). The left navigation panel is used to
select type of content to view.
Understanding Channel Map and Sub-Channels
Opening the Channel Map show a tree folder of all sub-channels. Clicking on any
sub-channel displays the selected sub-channel and information about that sub-
channel.
Clicking on the sub-channel image icon
opens that sub-channel.
When a sub-channel is opened, there is a
clickable navigation bar above the
content area that allows rapid navigation
back to higher-level channels.
Page 50
DEVOS
Page 51
DEVOS -- Enterprise Video System
Simple Channel Manager
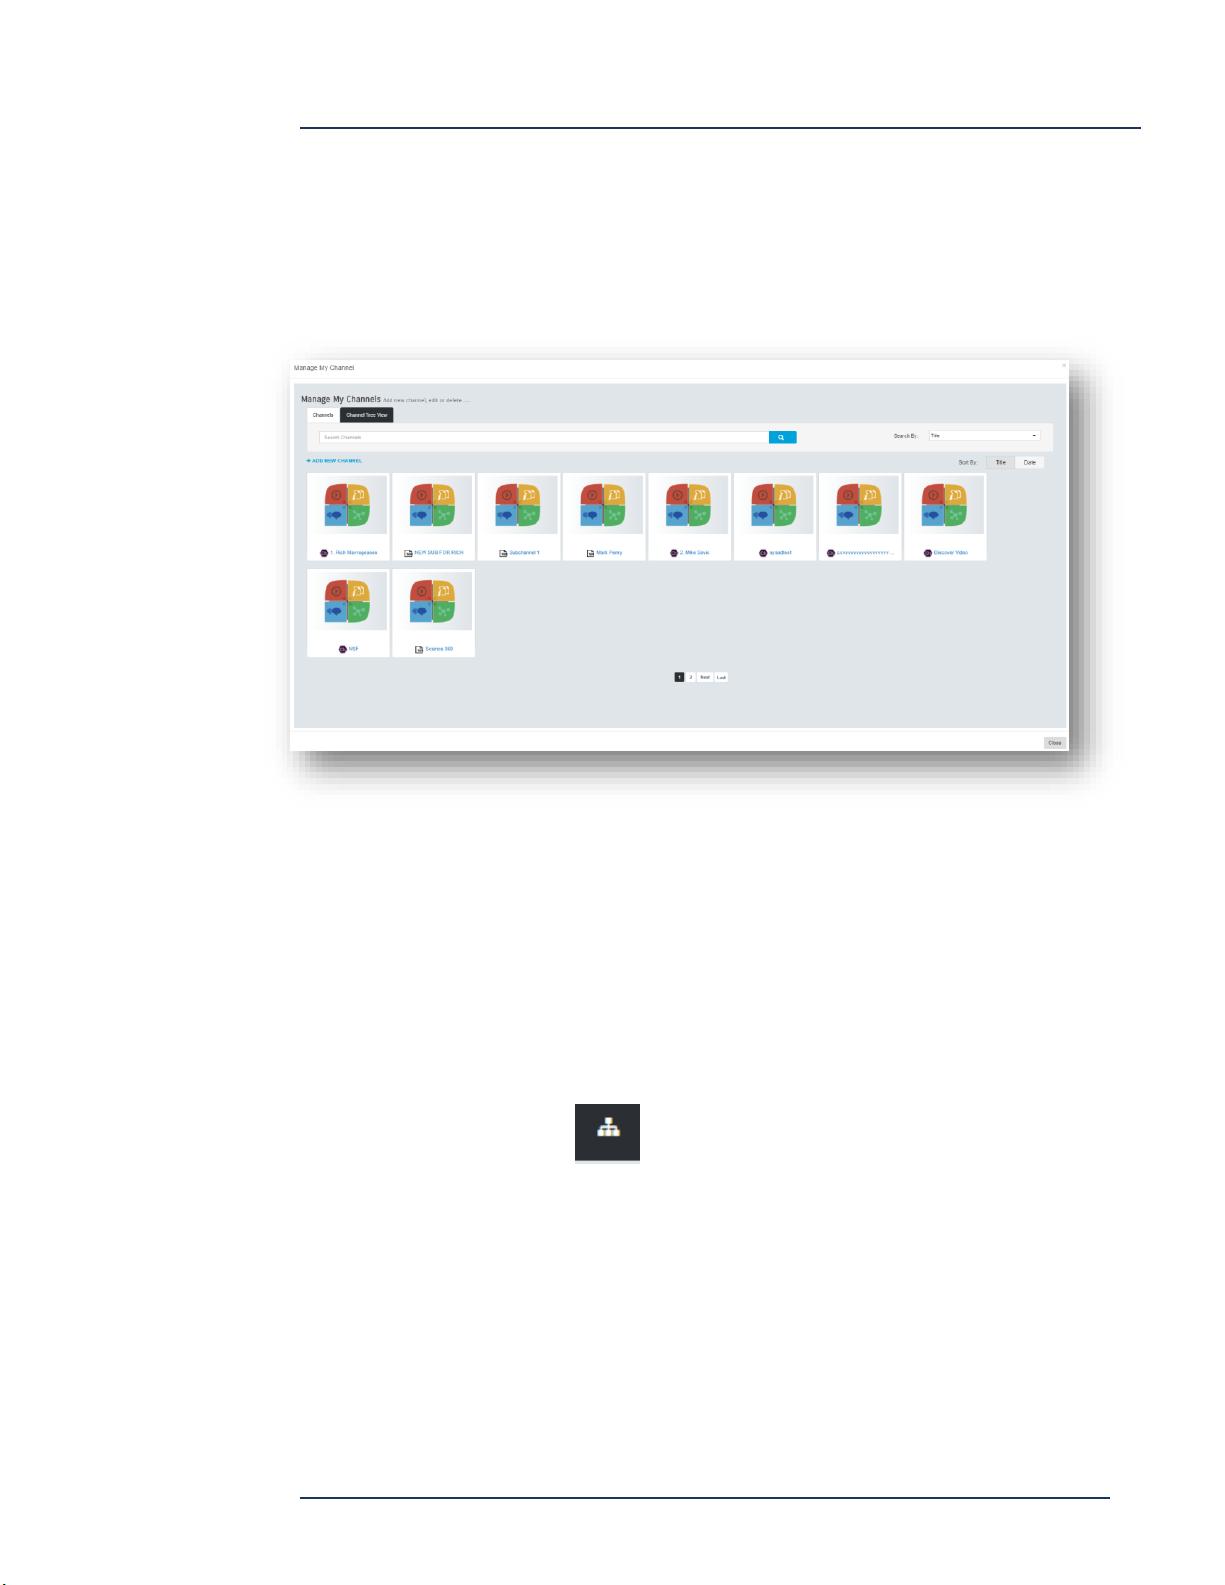
The simple User Interface (UI) channel manager is slightly different from the advanced
UI. All channels and sub-channels are shown and you can add a new channel by
selecting “ADD NEW CHANNEL”. The Tab at the top of the page provides access to
the same tree view as the advanced interface.
When you add a channel, you may specify the parent channel if desired.
System Channel Landing Page
The System Channels master landing page lists all non-private, active channels. It can
be found at http(s)://server/Show-Access-Points.
You can also access the System Channel page by selecting the icon on the admin
interface (upper right):
You can select any channel to make it a Favorite. Favorite channels appear under the
"My Favorites" tab.
The System Landing page gives users the ability to access any published channel by
simply clicking on it. They may make any channel a favorite for rapid access. By using
the Search Video tab, the viewer may search for any video, regardless of what channel
it is in, and they may narrow that search by date range.
Page 51
DEVOS
Page 52
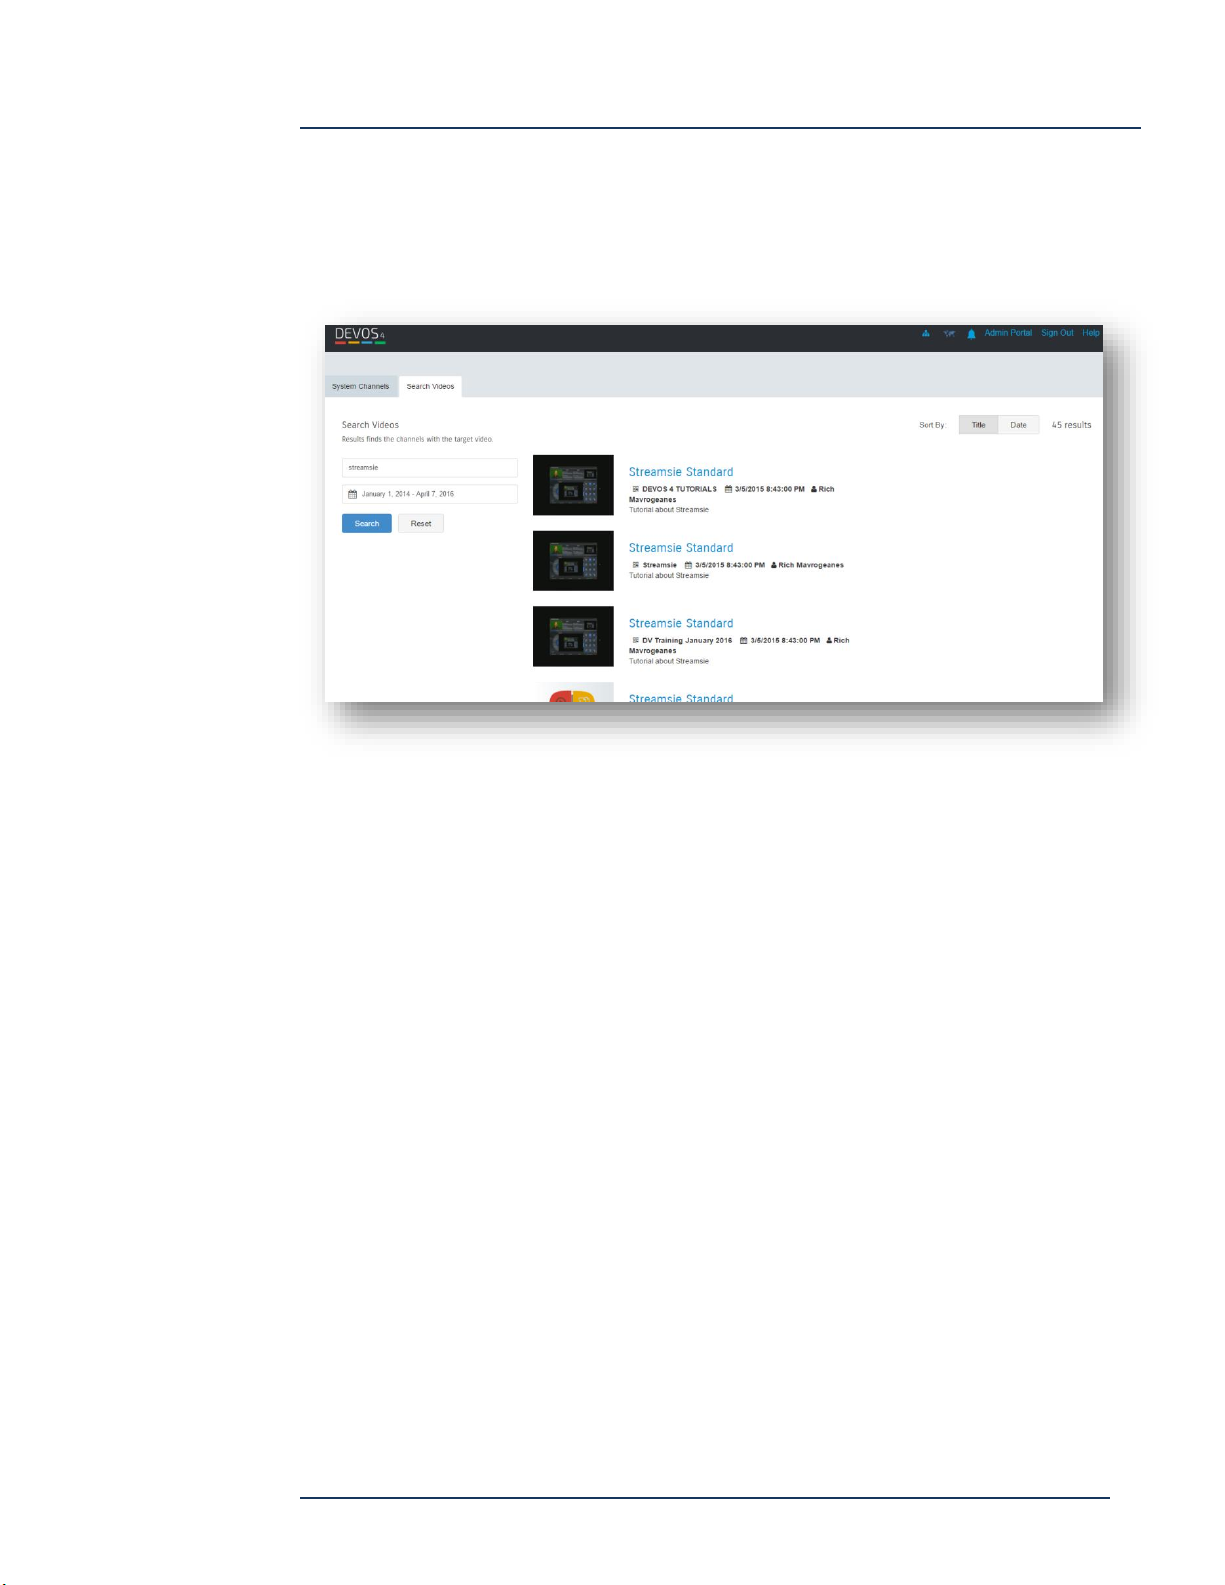
DEVOS -- Enterprise Video System
Channel Search
Select the Channel Search function on the system landing page. The search allows you
to rapidly find content by channels that match your search criteria.
Page 52
DEVOS
Page 53
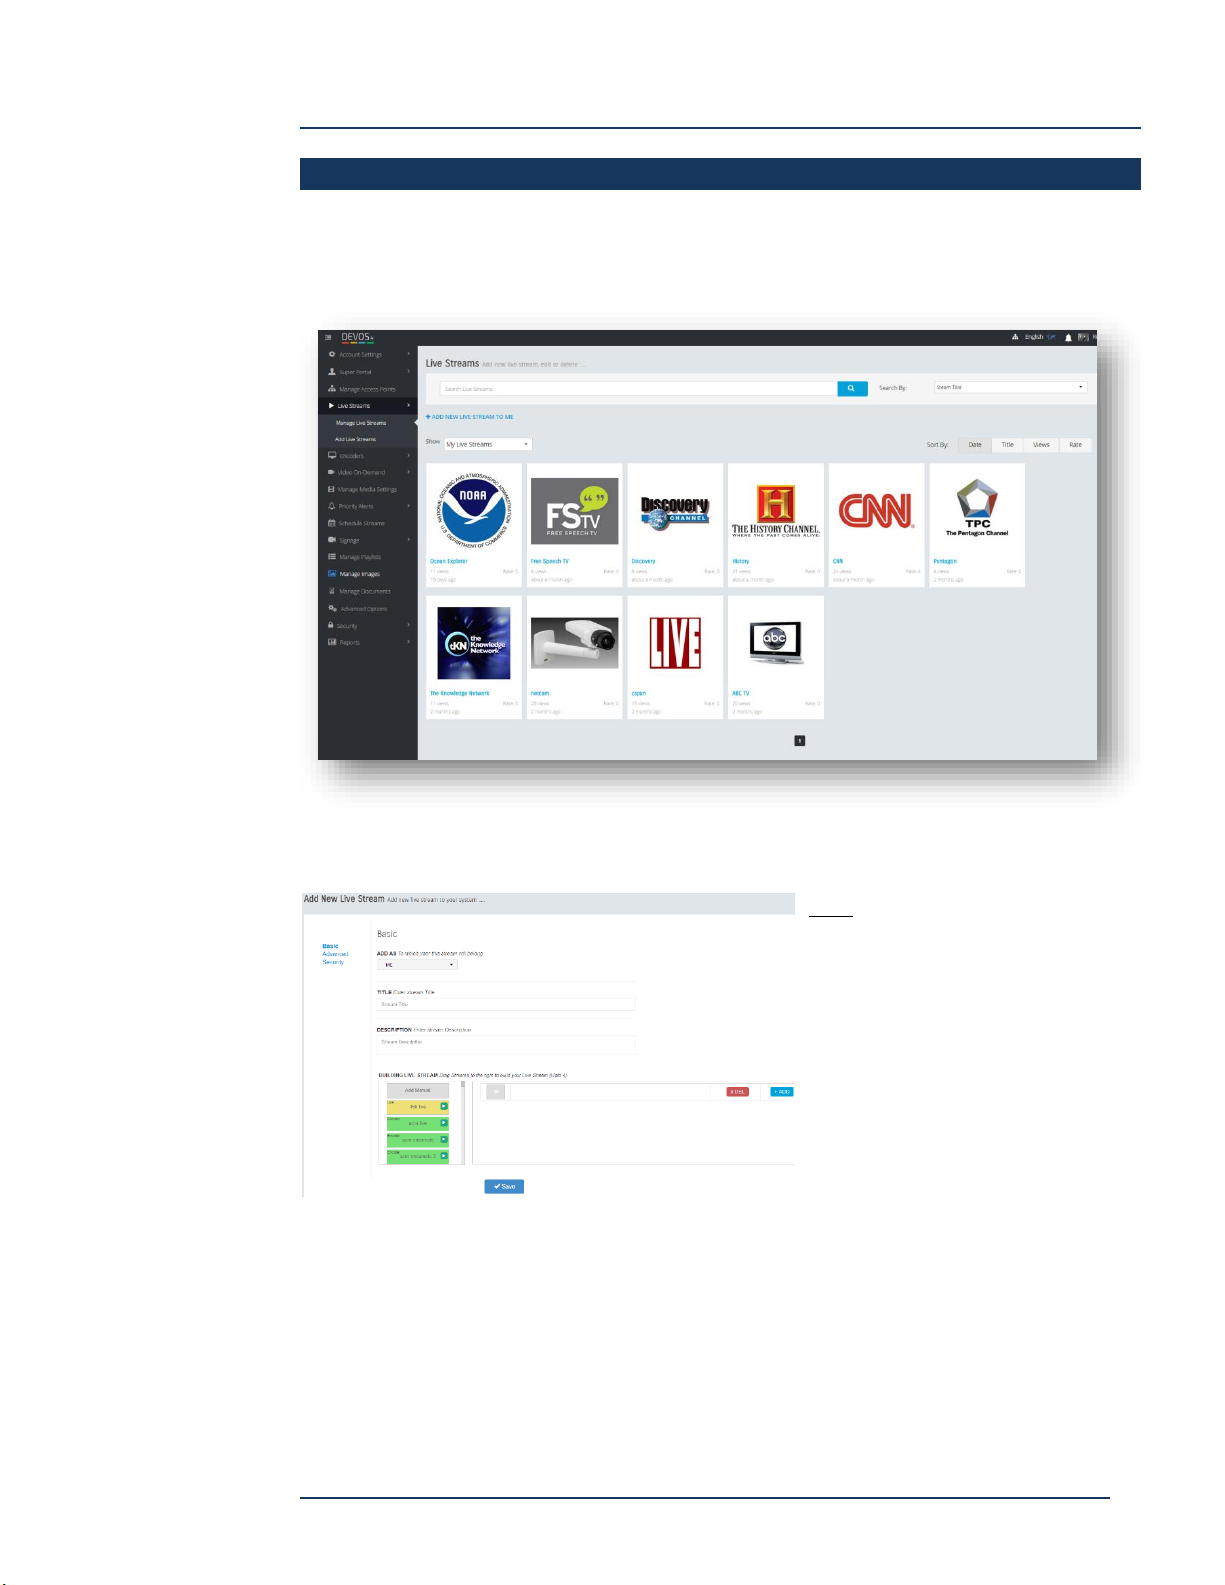
DEVOS -- Enterprise Video System
Manage Live Streams
Live Streams are streams from encoders such as the Discover Video Multi-Channel
Encoder (MCE), Mantis, streams from network cameras, 3rd party encoders, and
streams from the public Internet such as CSPAN, etc. Live Streams may be a
conventional single player or a multi-player. To create a new live stream, select Live
Stream, and Add Live Stream.
Basic
Add As – If you are a delegate for
someone else, select who you are
adding the stream for, otherwise
select “Me”.
Title -- Enter the title for your stream
Description -- Enter description
If you wish to manually enter the stream address, select the grey “Manual” box and drag and
drop it to the right to insert it. This is the most common case for a live stream. You must then
manually type in the RTMP and HLS address for the stream.
If you wish to create a multi-player stream, select “ADD” to create an additional stream slot,
then drag/drop an additional stream to the slot. All available live streams (yellow) and
encoder (green) are available. Up to four live streams may be selected.
Page 53
DEVOS
Page 54
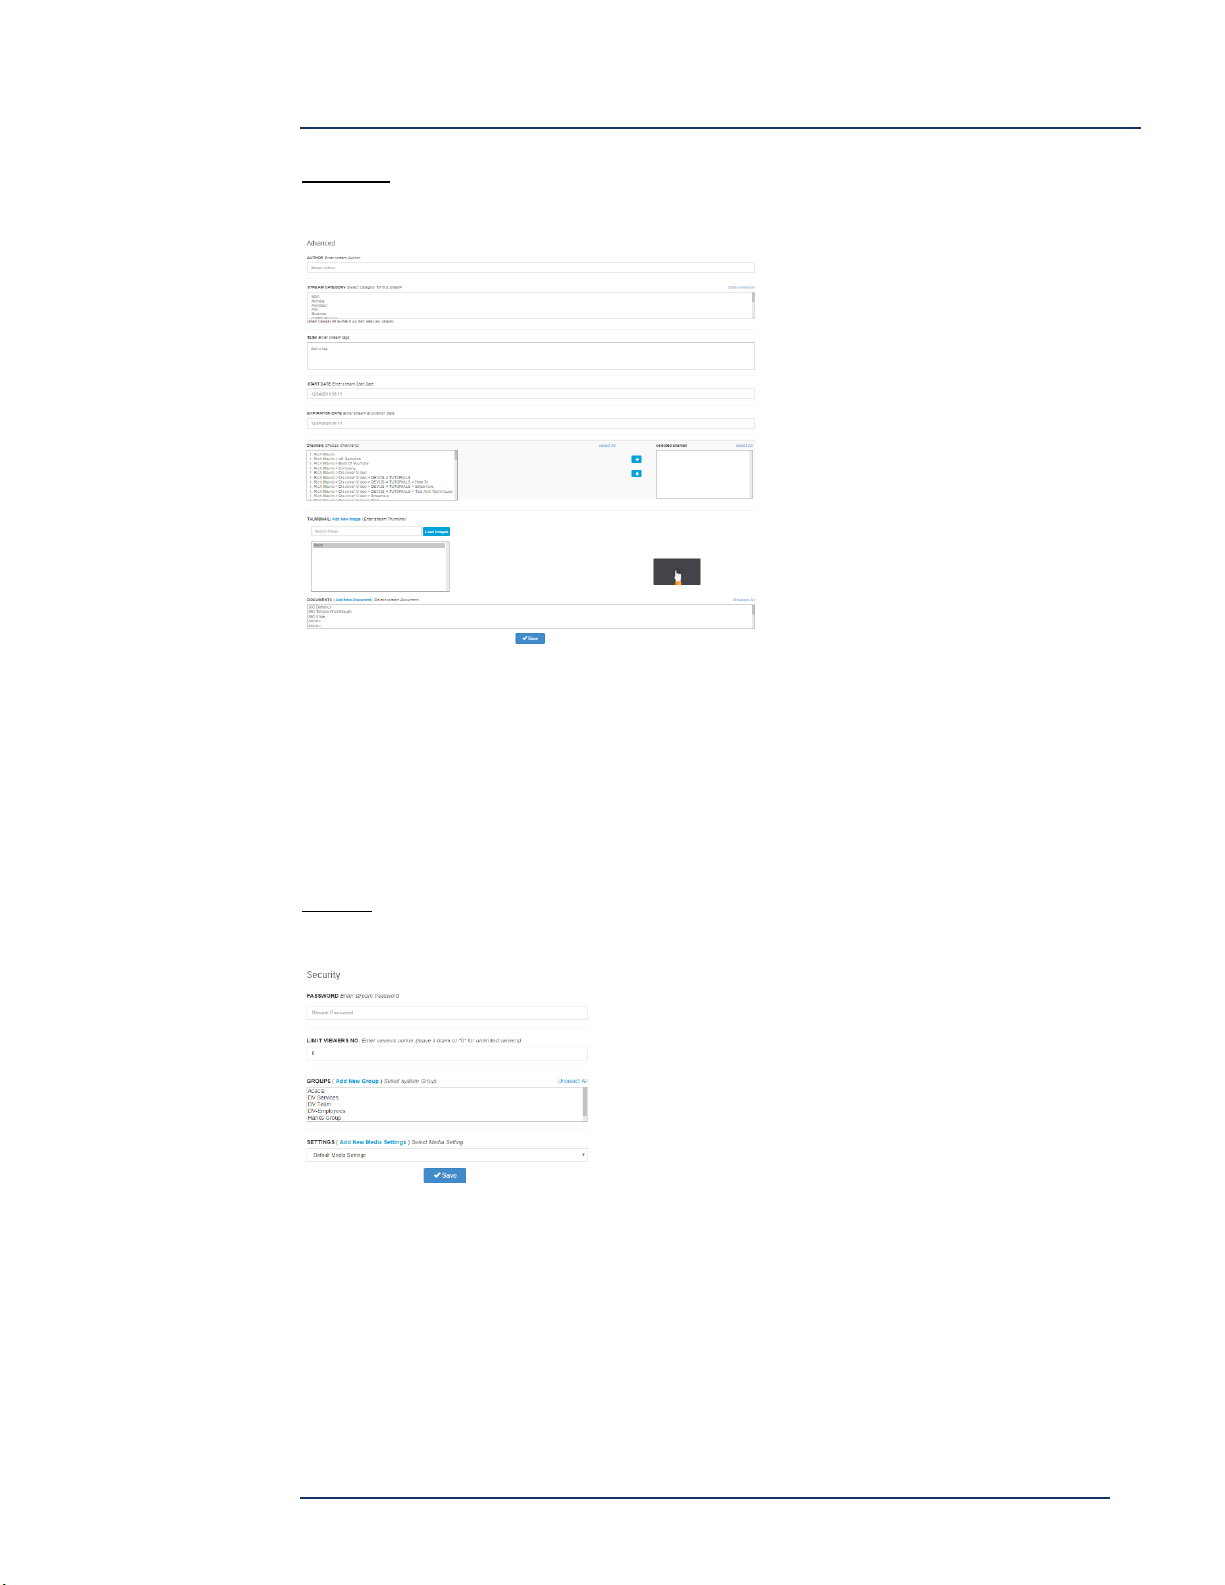
Advanced
Select Advanced to enter additional values.
Author -- Optional, enter author name
Tags -- Enter text separated by comma, for search criteria in Channel pages
Start Date -- Enter date/time when the live stream will appear in an AP.
Expiration Date -- Enter date/time when the live stream will be removed from an AP
Channel -- Select the Channel for this video (optional)
Thumbnail -- Select the desired image for the channel (optional, or upload new)
Documents -- Select (or add new) documents to be associated with this video.
Security
Select “Security” to enter security values.
DEVOS -- Enterprise Video System
Password -- Optional. Enter a password that the viewer must enter to view the video
Limit Viewers No. -- Enter the maximum number of simultaneous viewers. Leave blank or 0 for
no limit.
Groups -- Select (or add new) Security Group(s) that may access this video. Make no selection
for open access.
Settings -- Select (or add new) desired Media Settings. Media settings are templates you have
created to set common attributes.
Save -- Saves your setting.
Page 54
DEVOS
Page 55
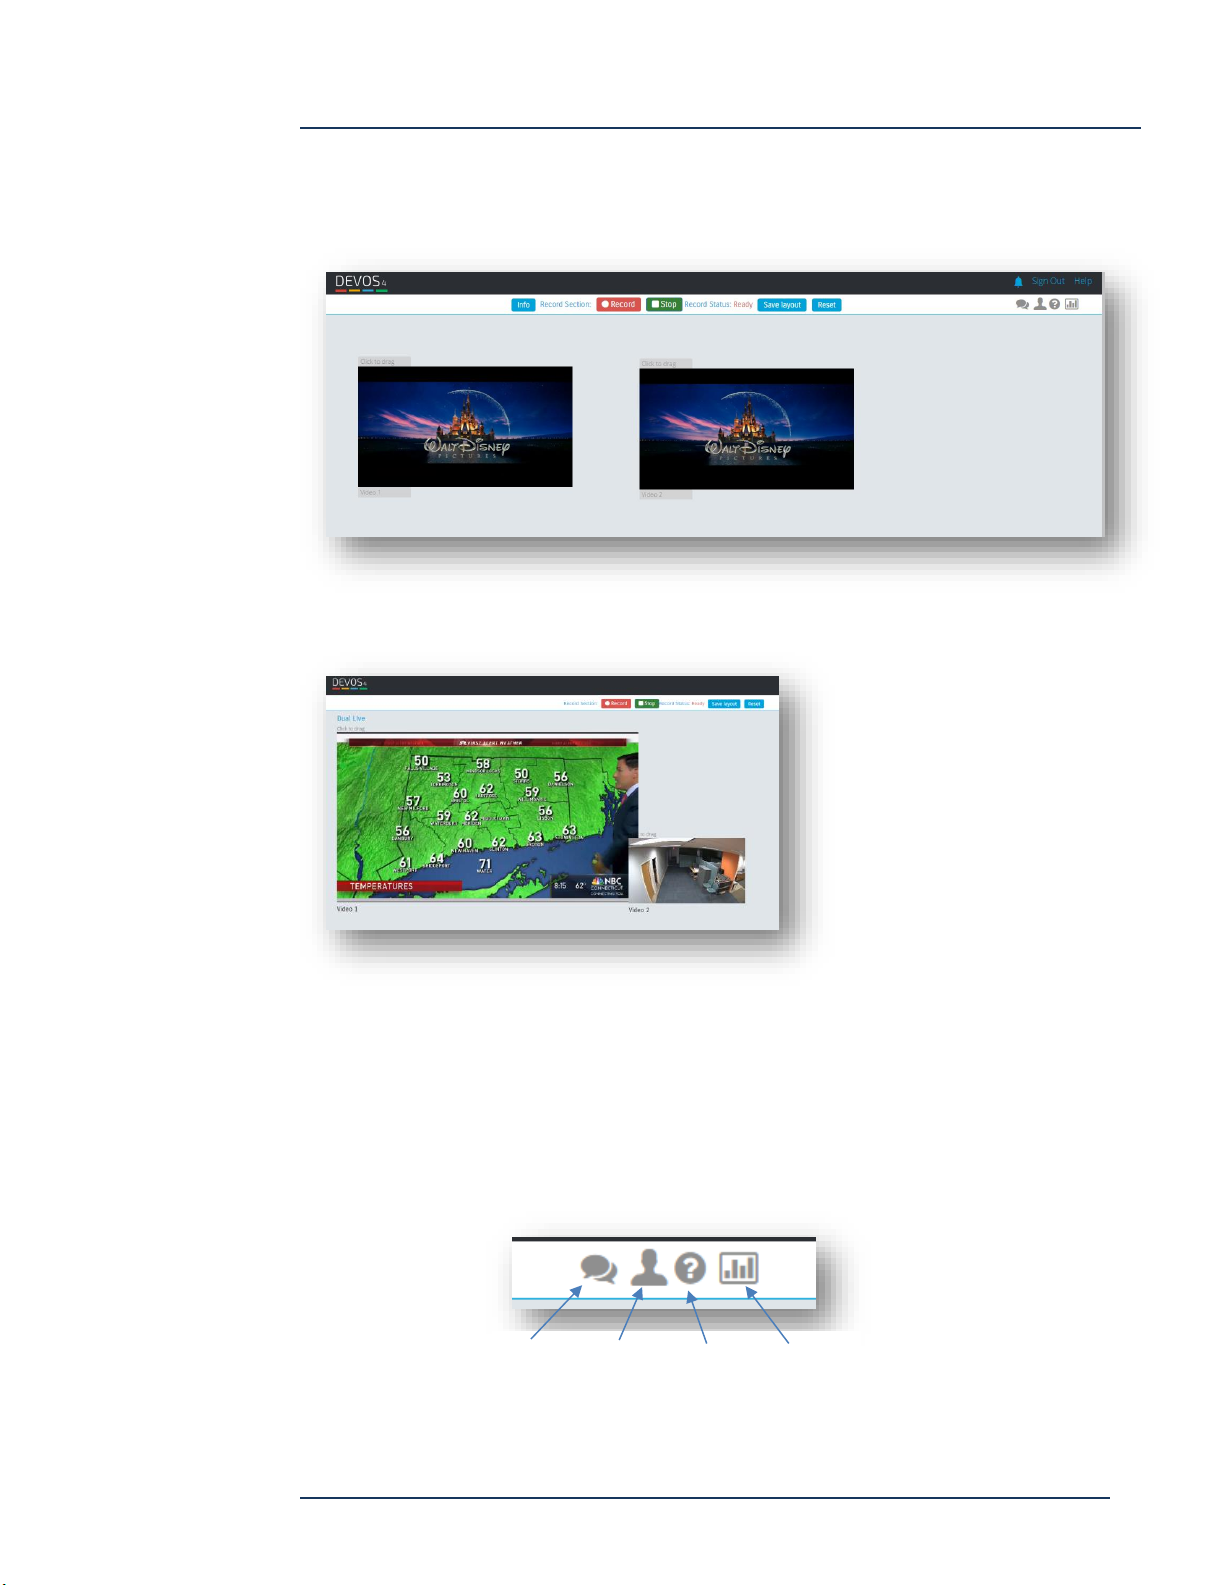
DEVOS -- Enterprise Video System
Chat Attendance Question Polling
Multi-Player
Multiple live streams will create a live player showing each of the live streams.
Drag each player into your desired position. Grab the lower right edge of each player
to resize it as desired.
When you are satisfied with the layout, select “Save Layout”.
Viewers will now have your saved layout, but they may adjust the layout (without
saving it) so they can customize the view as they wish.
Live Chat, Attendance, Questions, and Polling
For live multi-streams, the owner has real time control.
Page 55
DEVOS
Page 56
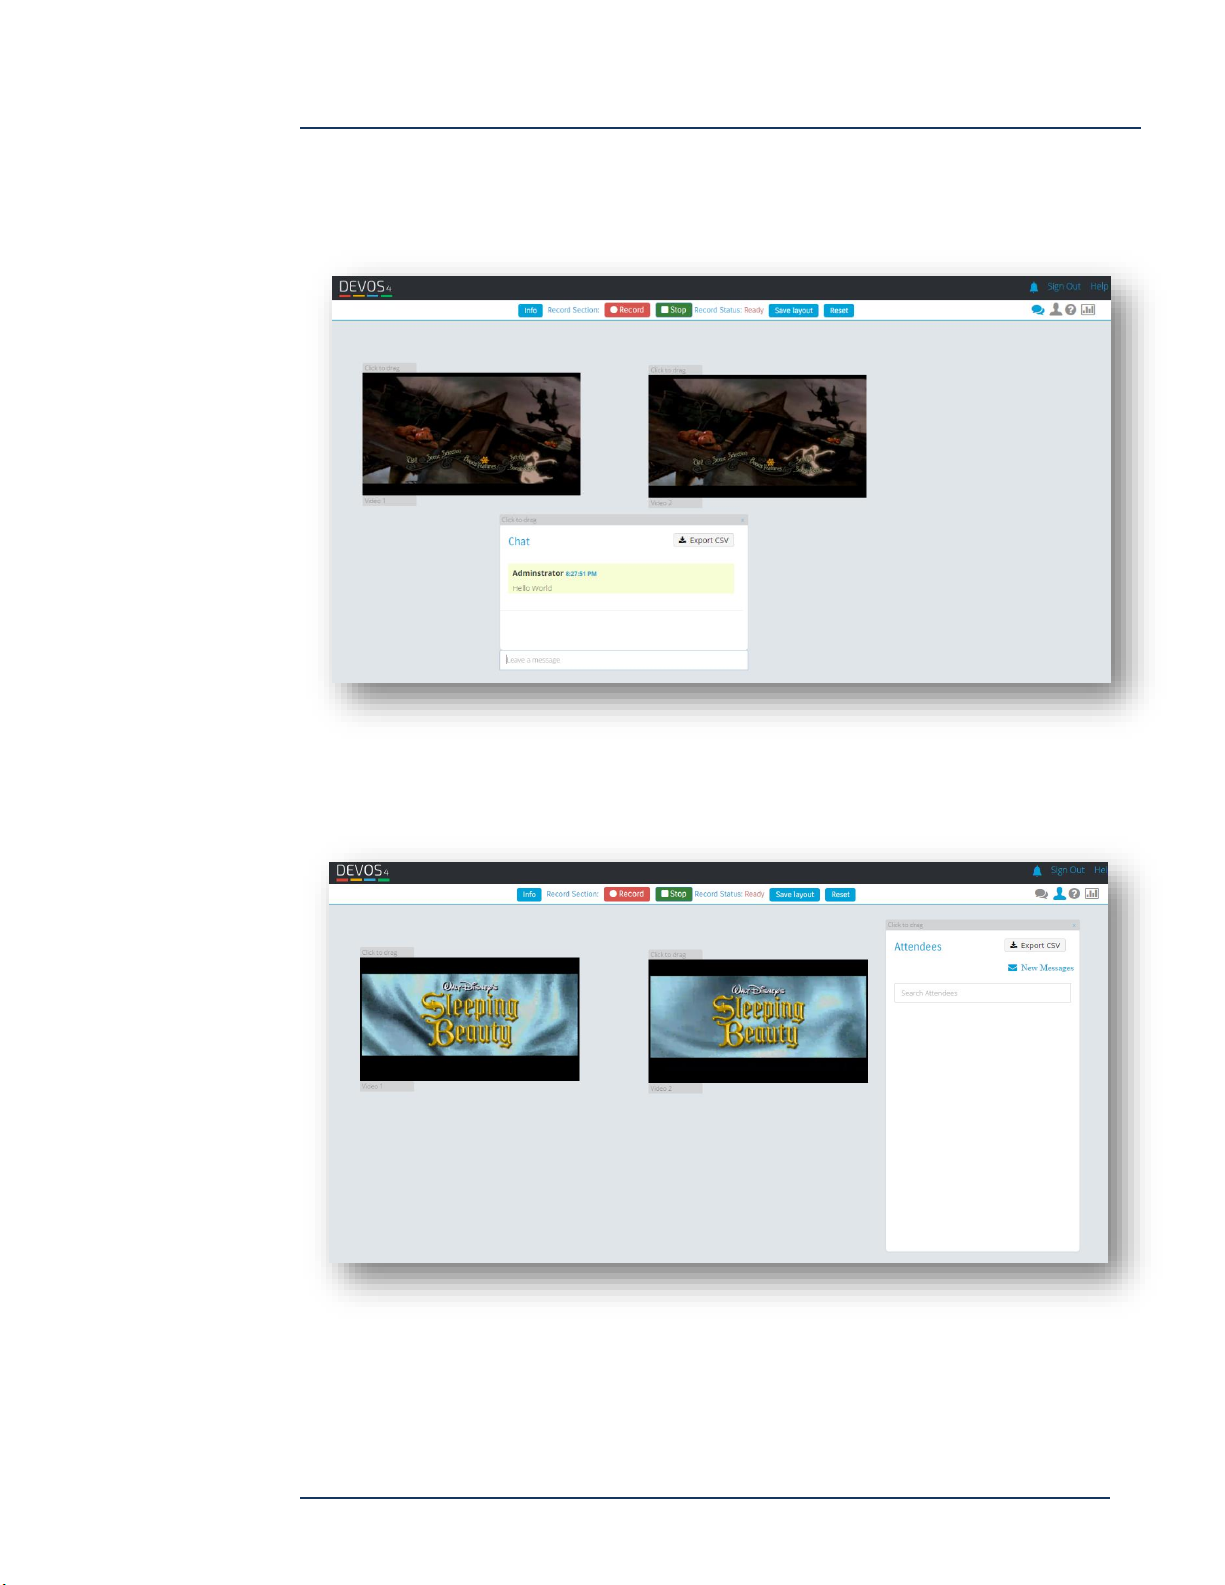
DEVOS -- Enterprise Video System
Press the chat button to turn on chat and a resizable window will open on your and
the viewer’s player. You can turn it on and off at will. If you wish to save the chat, use
the export chat function.
Press the Attendance button to see who is watching your live video. You can send a
private message to any attendee.
Viewers (not the owner/admin) have a “Ask Question” button where they can type in
questions. When they ask a question, the “Question” icon on your page shows you
Page 56
DEVOS
Page 57
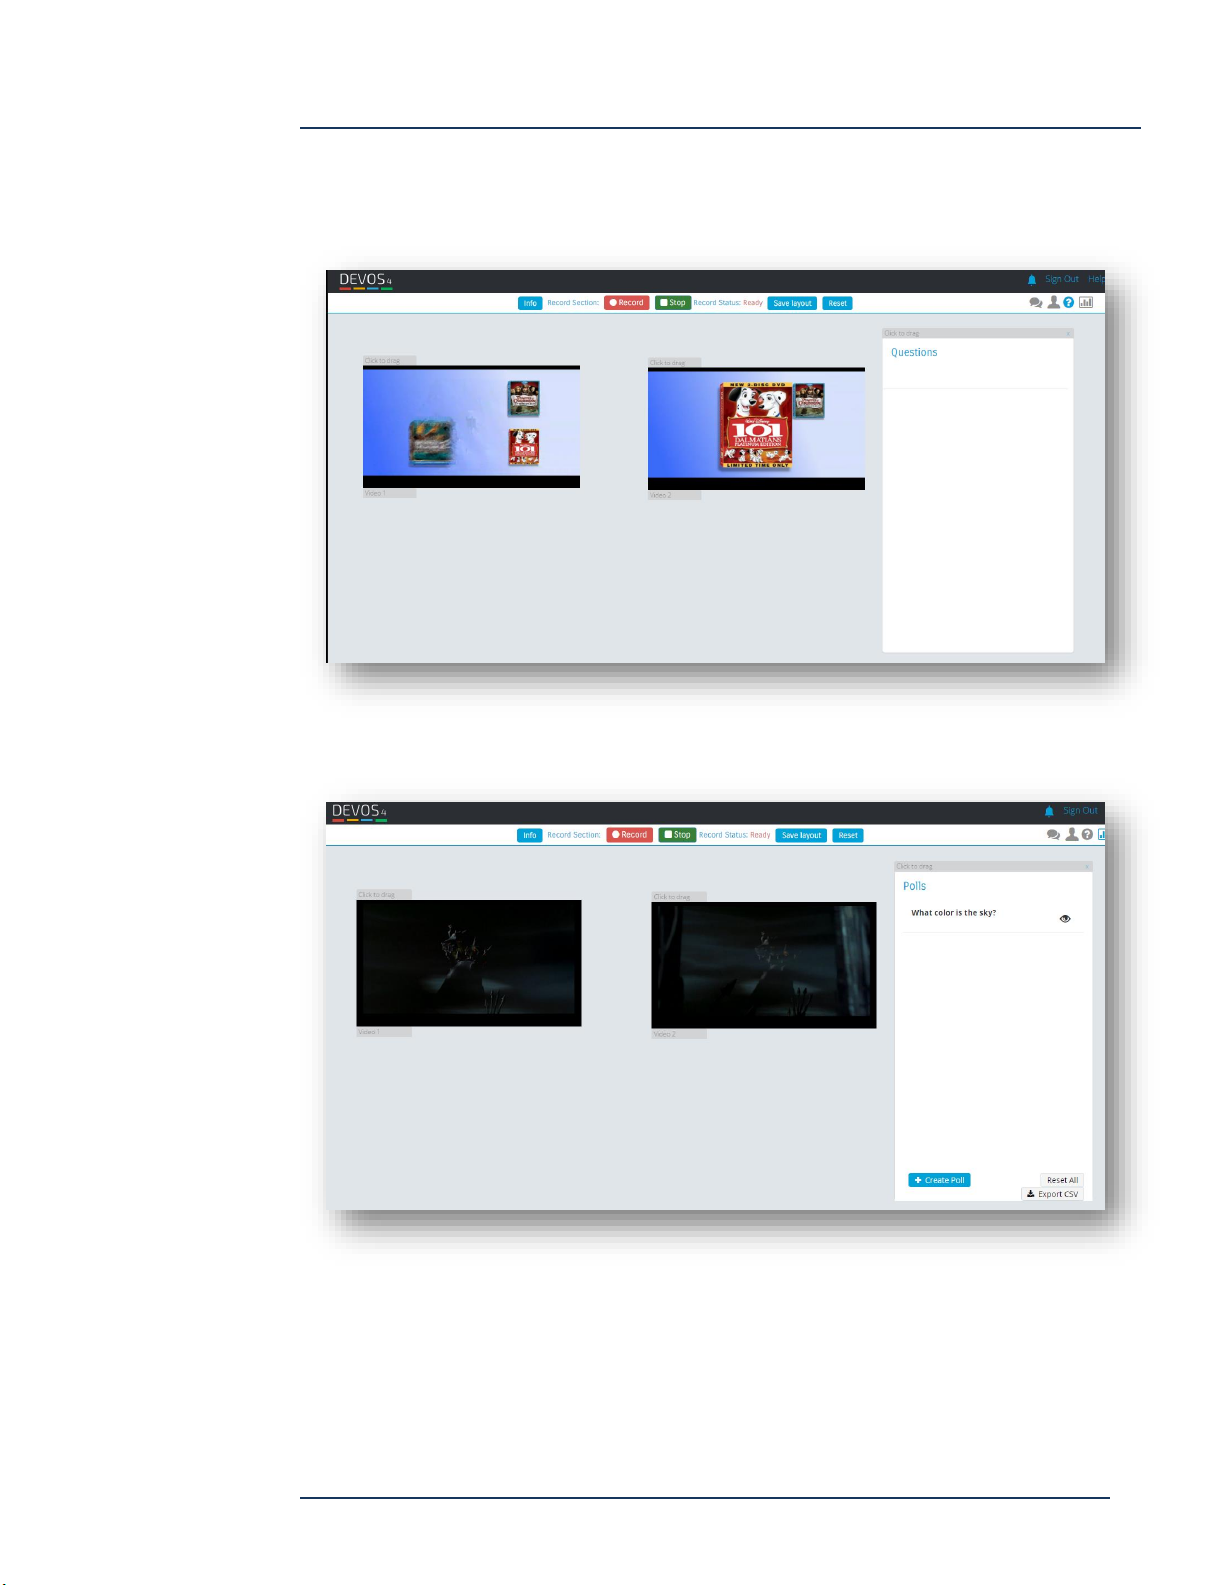
DEVOS -- Enterprise Video System
have a new question. You can open a resizable window to view (the audience does
not see questions).
Press the Poll button to open the poll dialog. If you are pre-existing polls, they will be
listed, otherwise, select Create New Poll.
Page 57
DEVOS
Page 58
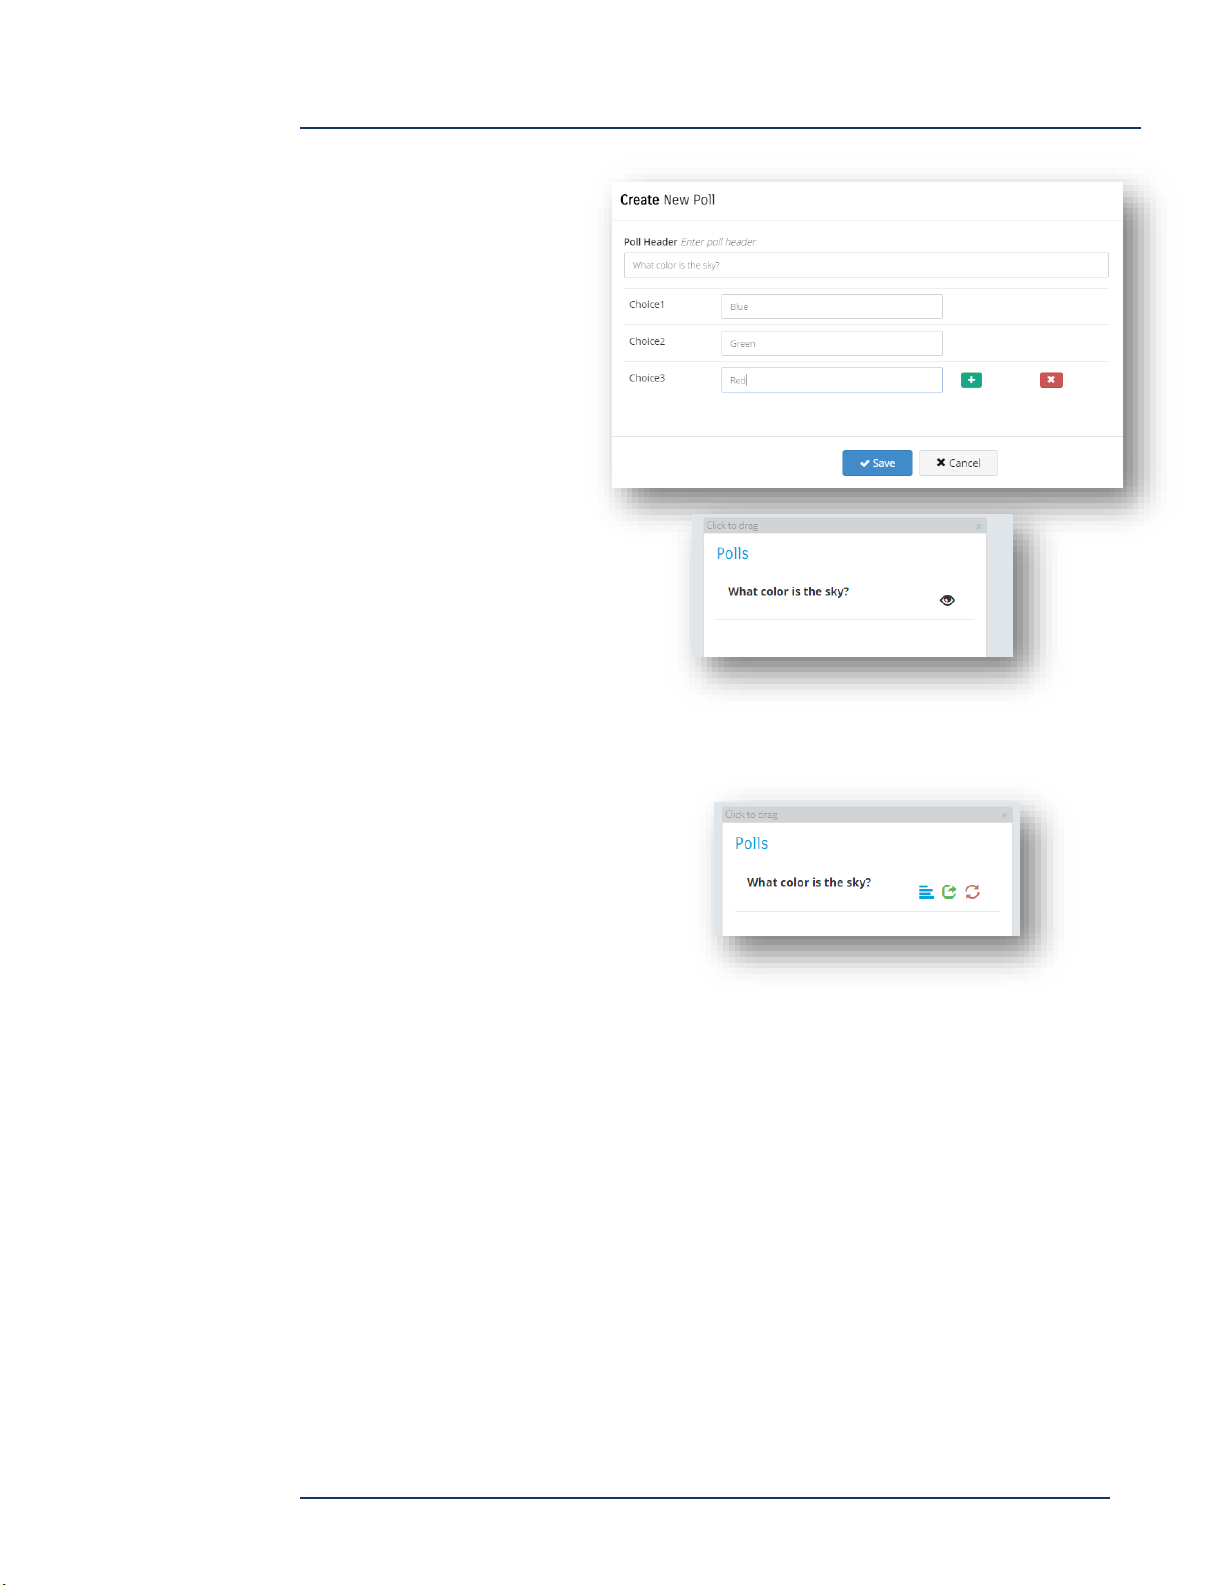
DEVOS -- Enterprise Video System
A poll is a multiple-choice
question that will be sent
to your viewers. Create a
poll and save it.
Start a poll by selecting the
“eye” icon. You will be
shown the poll and asked if this is
the one you want to show. Answer
Yes.
At this point, the poll will open on
all viewer’s screens. Give sufficient
time for your audience to answer and then close the poll by selecting the X icon.
You now may view the result in a bargraph. If you want to share the result,
select the center icon and the graphic
result will open for all viewers. You
can close the result viewing by
selecting the X icon. You can reset
the results with the third icon, and
you can reset the results of all polls with the Reset All function.
If you wish to save the results, use the Export function before you reset.
Page 58
DEVOS
Page 59
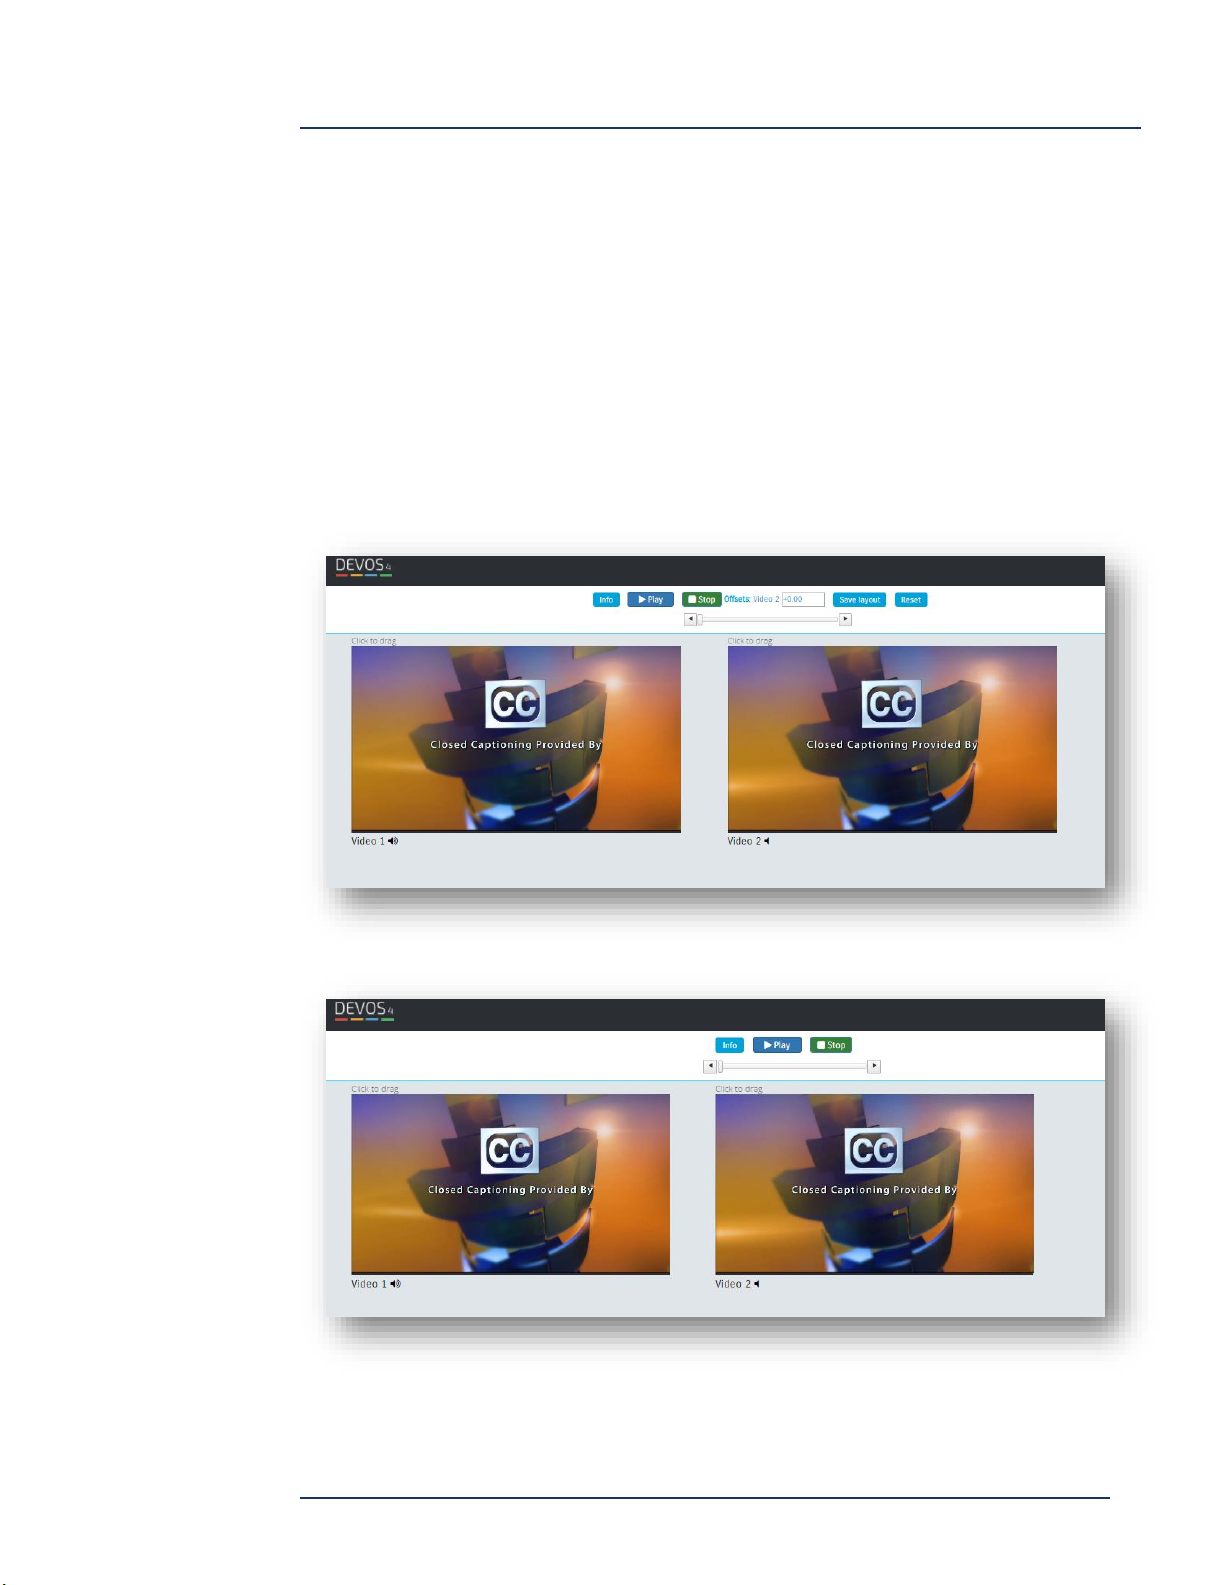
DEVOS -- Enterprise Video System
Multi-Player Recording
Simply select “Record” to start server-side recording, and “Stop” to end recording.
Your recorded video will become a new video in your Media / Video-on-Demand
manager, and you may add it to any channel. You can also schedule multi-player
recordings.
For multi-player recordings, you may adjust the offset for each video (the delay time
between video 1 and video 2, etc.), and change the layout when you are logged in to
the system and the video is owned by you:
Viewers do not have the ability to save layout settings:
You may click on the audio icon to mute/unmute any video.
Page 59
DEVOS
Page 60
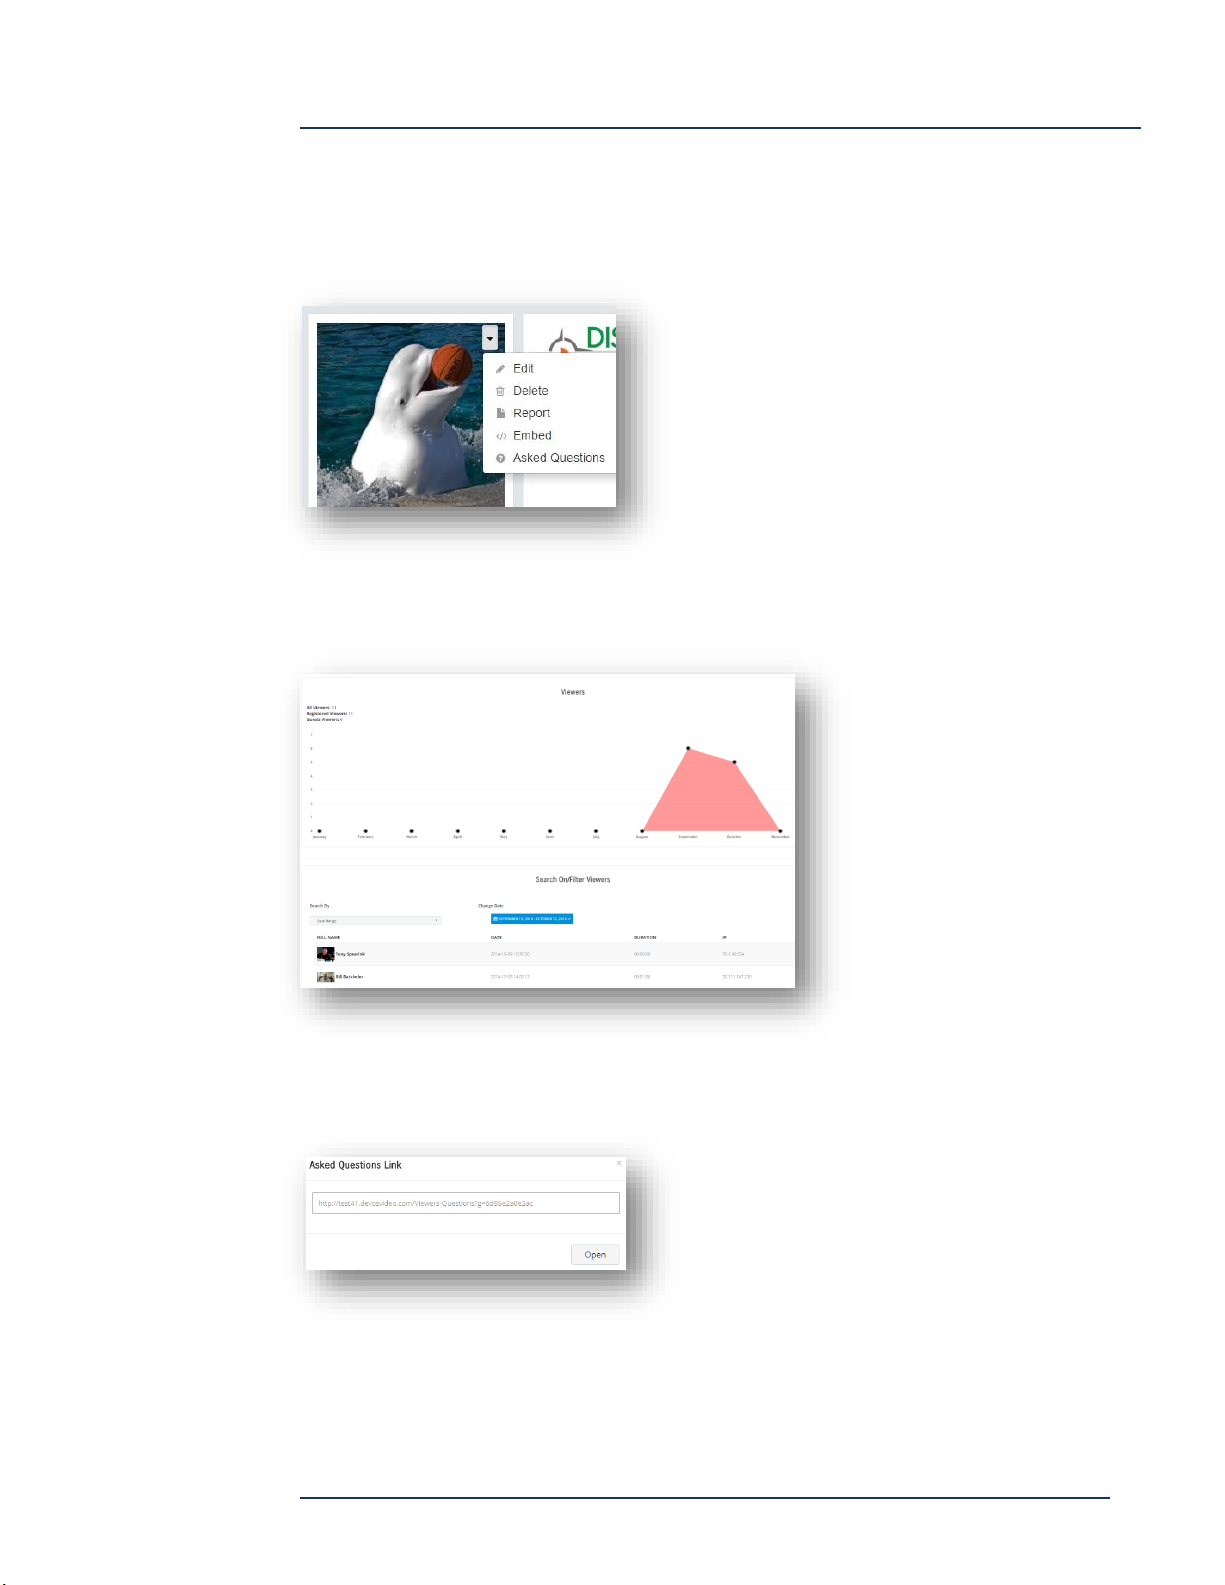
DEVOS -- Enterprise Video System
Manage Live Video
Edit Live Video
Mouse over any live video to expose the edit box.
-Select Edit to change any settings.
-Select Delete to delete the live video.
-Select Report to view report.
-Select Embed to get Embed code.
-Select Asked Questions to enable questions
and to view them.
Live Viewer Report
Select Report to view
detailed statistics of any
live video. The report shows
how many viewers watched
this live stream in
selectable periods, and
shows who viewed, for how
long, and also shows the IP
address of the network the
viewer came from.
Live Questions
Live videos include the ability of the viewer to ask
questions that only the owner of the video can
see. This is useful in a presentation environment
for near real-time audience feedback. To view
the live questions, select "Asked Questions" then
open the provided page. You may copy the URL
to another computer, for example the desktop of
an assistant that would read the questions, or make it available to the live presenter so they
can read the questions and respond to them visually and verbally. The ASK QUESTION button
only appears on the viewing page when this page is open.
Page 60
DEVOS
Page 61
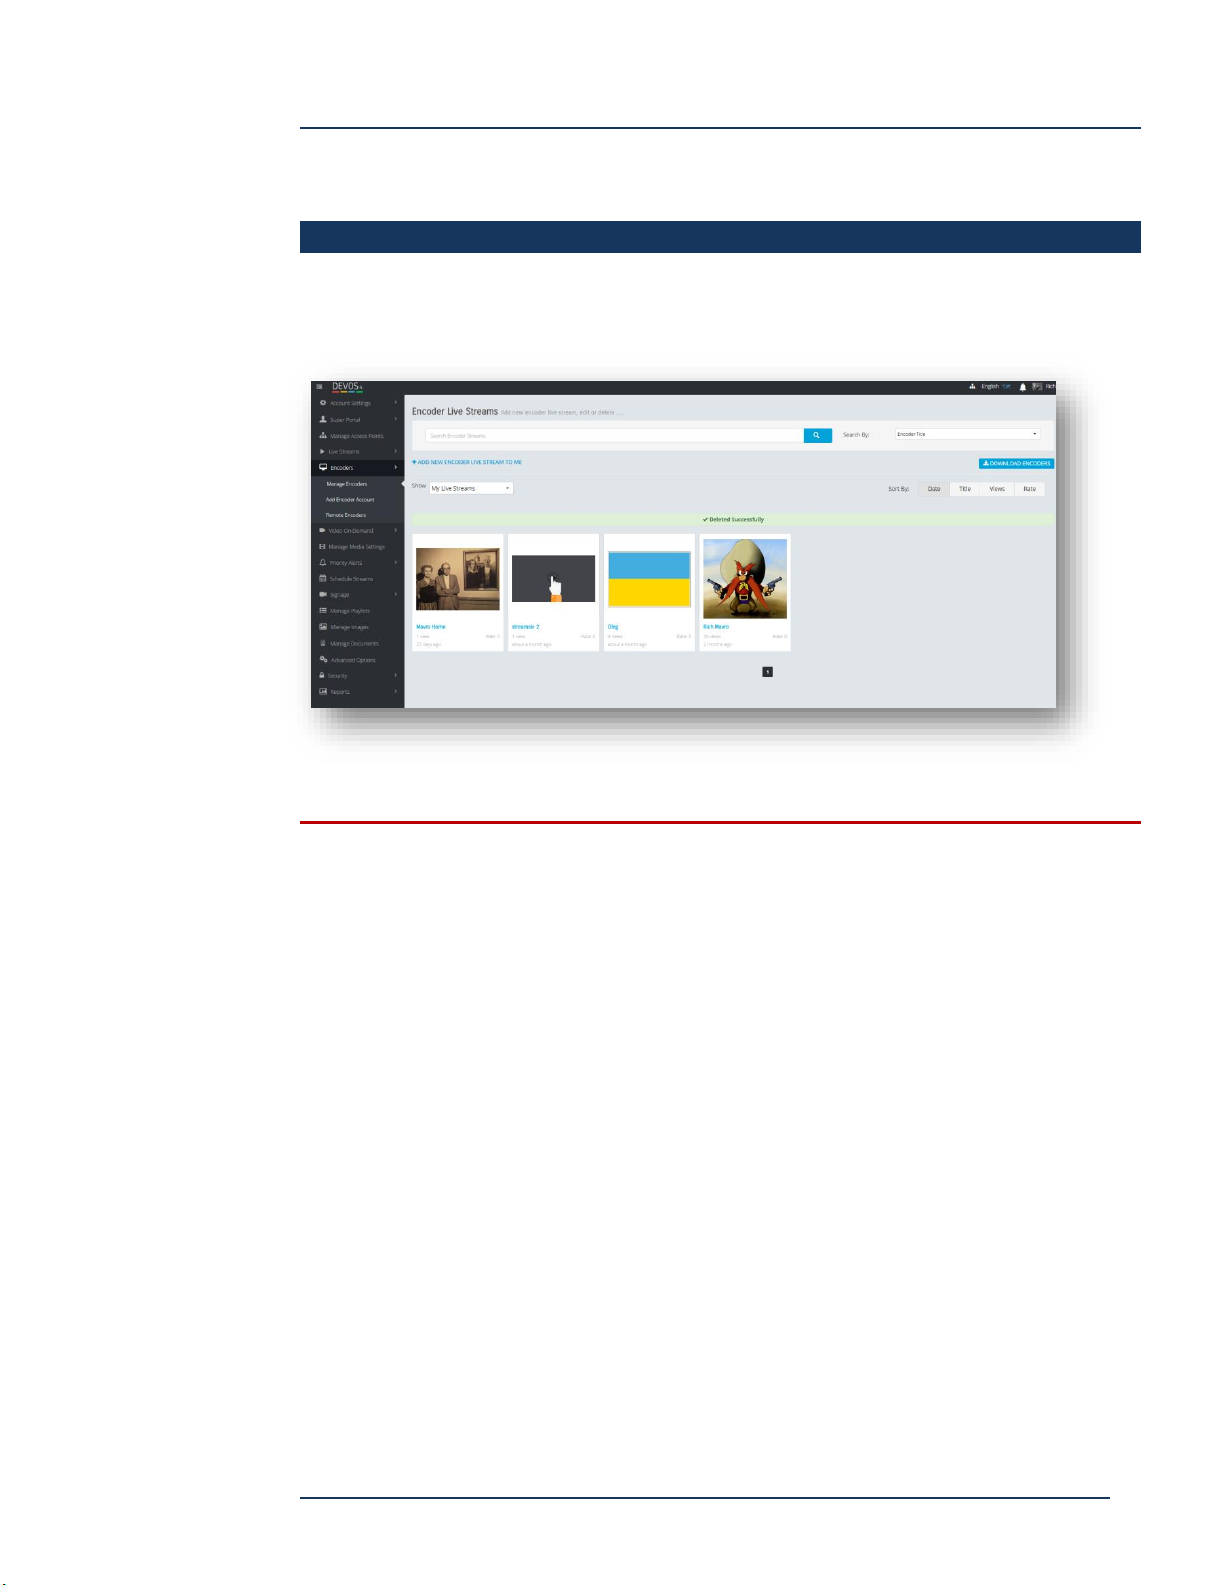
DEVOS -- Enterprise Video System
Encoders
Select Encoders to configure and manage Encoders. Encoders include Streamsie
software encoder, Hornet and Mantis.
Streamsie is licensed by the DEVOS server. The number of streaming accounts you can
configure for Streamsie PC/Mac depends on your Streamsie license. Streamsie PC/Mac
licenses are portable, and you can think of them as being licensed to a person. That
person can use Streamsie PC/Mac on multiple computers, but only one at a time.
Streamsie 2 iOS (for iPad/iPhone) is available for free from the iTunes store and it uses
a standard Streamsie account.
Streamsie PC is available as Streamsie Standard and Streamsie Pro. Streamsie
Pro provides professional features such as watermarks, chroma key, and video
file as input.
Streamsie and Streamsie Pro licenses are configured and managed by a Super
Administrator.
Page 61
DEVOS
Page 62
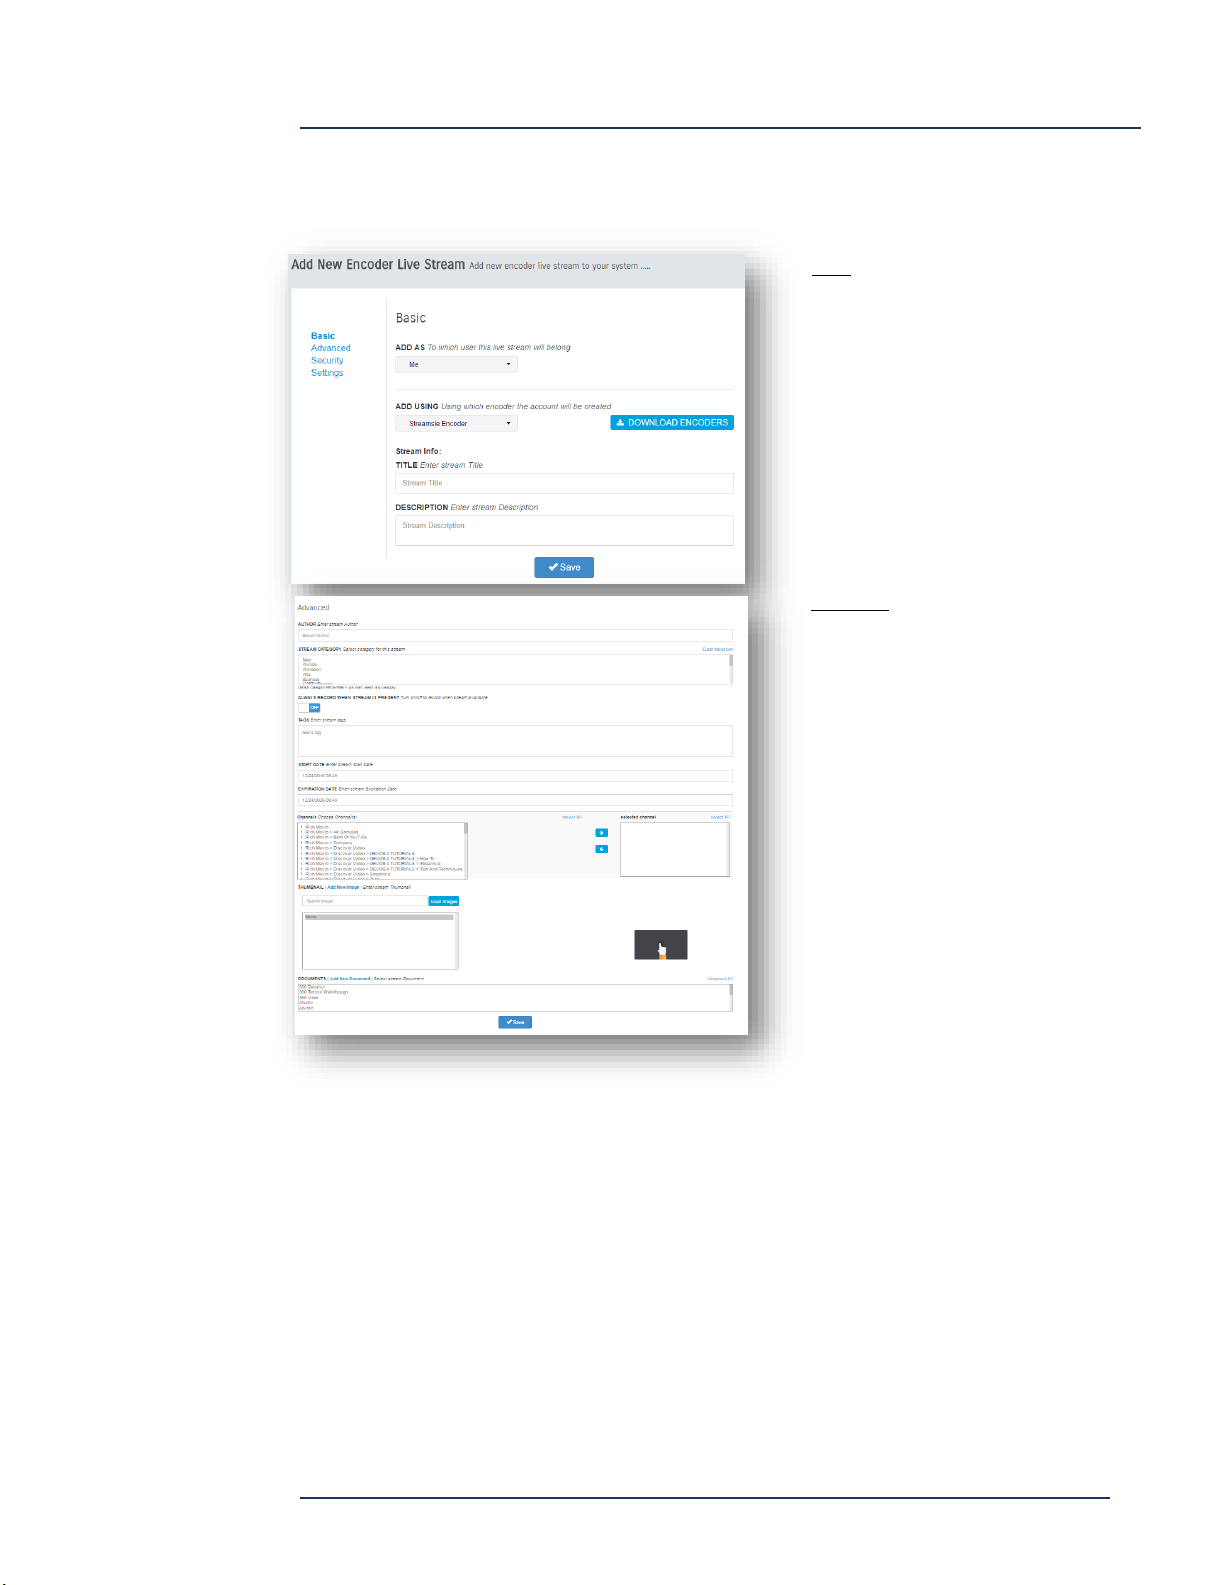
DEVOS -- Enterprise Video System
Add New Encoder
Streamsie PC/Mac or Mantis type.
Basic
Add As -- If you are a delegate, you may
add encoder to another account
Add Using – Select Streamsie, Streamsie
Pro, or Mantis.
Title – The title to be shown on the
player.
Description – the description to be
shown on the player.
Advanced
Author – the author to be shown on the
player.
Stream Category – select a category.
Start Date -- The date/time when the
video will appear in Channels.
Expiration Date -- The date/time when
the video will be removed from
Channels.
Tags -- Optional. Additional content
tags to search within Channels. Use
comma to separate entries.
Channels -- Select a channel where the encoder stream will appear (optional)
Thumbnail -- Select (or upload new) image for your video thumbnail
Documents -- Select (or upload new) document to be associated with the video.
Page 62
DEVOS
Page 63
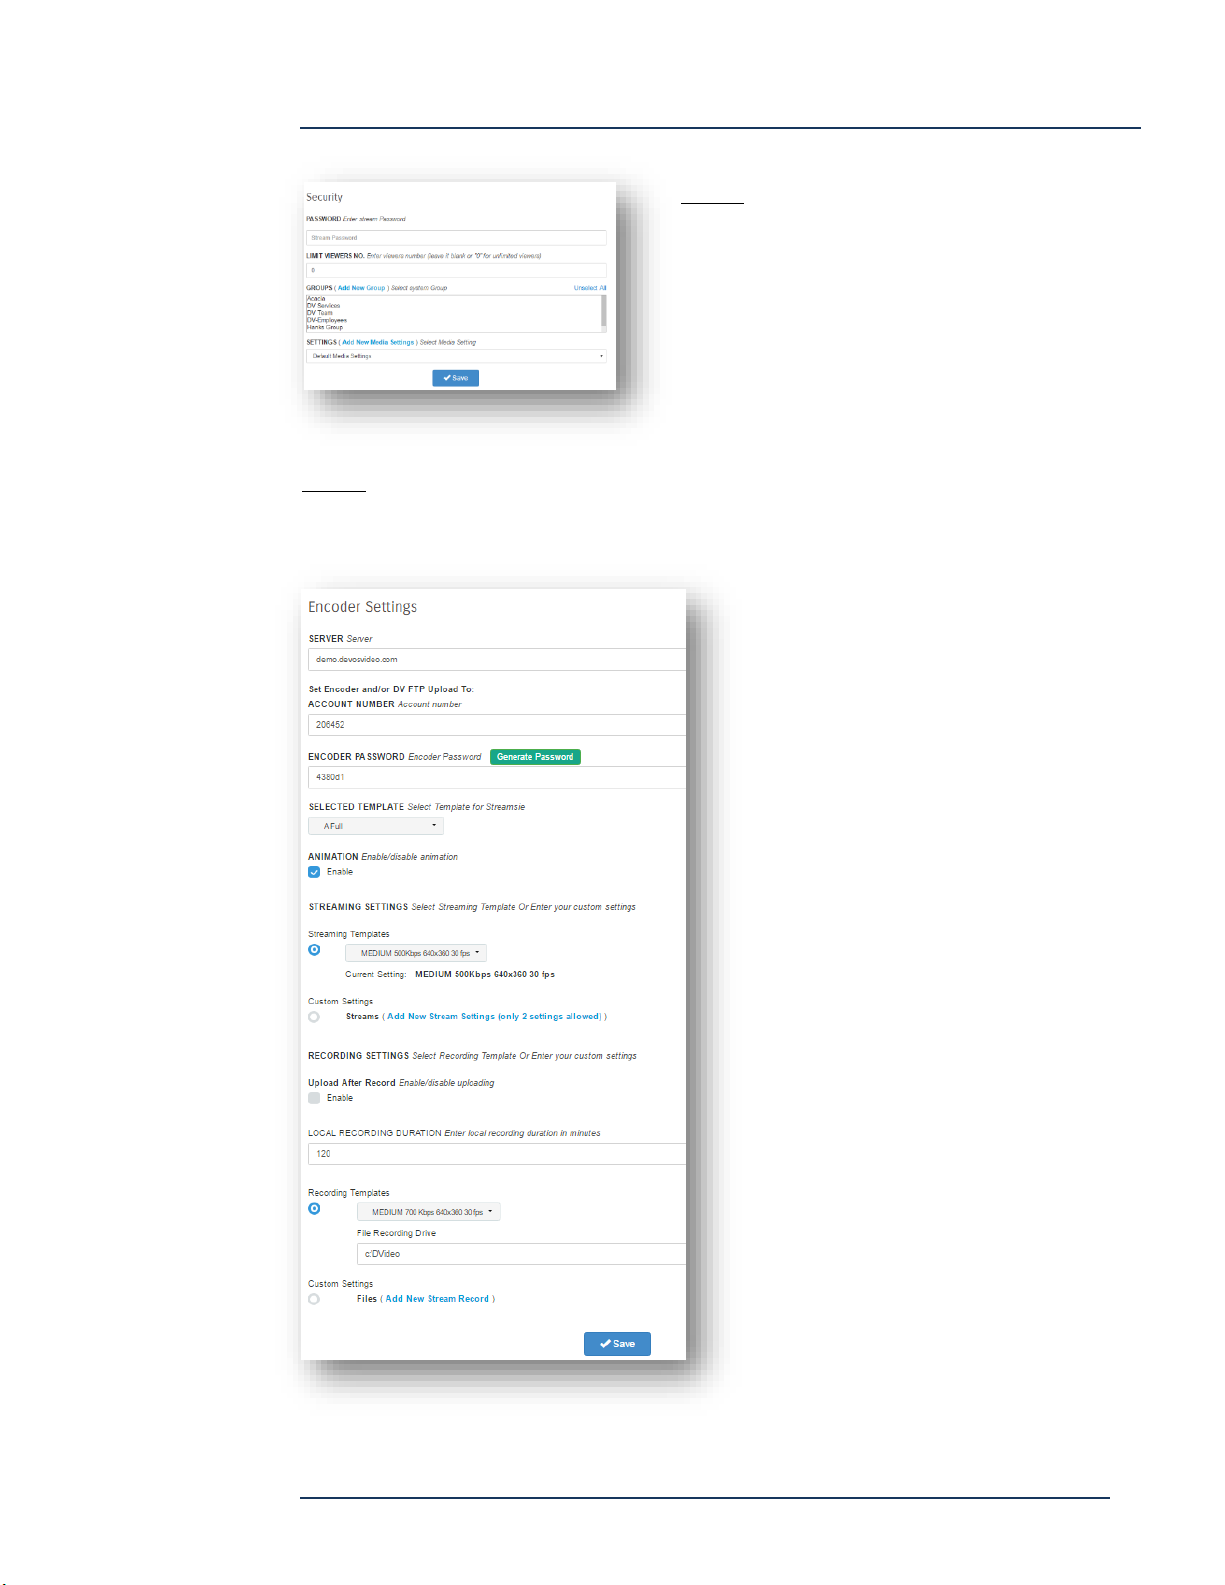
DEVOS -- Enterprise Video System
Security
Password – enter optional password required to view the
live stream.
Limit Viewers – enter the maximum number of live
viewers that will be supported from the web page player.
Groups – select the groups that are allowed to view the
live stream. Selecting none means the live stream is
unrestricted/open.
Settings
Select Settings to configure the encoder values.
For Streamsie:
Server – read only, enter this in Streamise
Account – read only, enter this in Streamsie
Encoder Password – read only, enter this in
Streamsie. You can select “Generate Password”
to change the password.
Selected Template – causes Streamsie to use
the selected layout.
Animation – when switching templates,
configures whether the video does quick cut or
animation.
Streaming Templates – Select live streaming bit
rate and resolution settings from dropdown list.
Select custom to create your own values.
Recording Templates – When recording locally
(on Streamsie computer), sets the bit rate and
resolution from template or custom values.
Upload After Record – if selected, then
Streamsie will automatically upload justrecorded video to the server.
Local Recording Duration – sets the duration
for any local Streamsie recording.
Page 63
DEVOS
Page 64
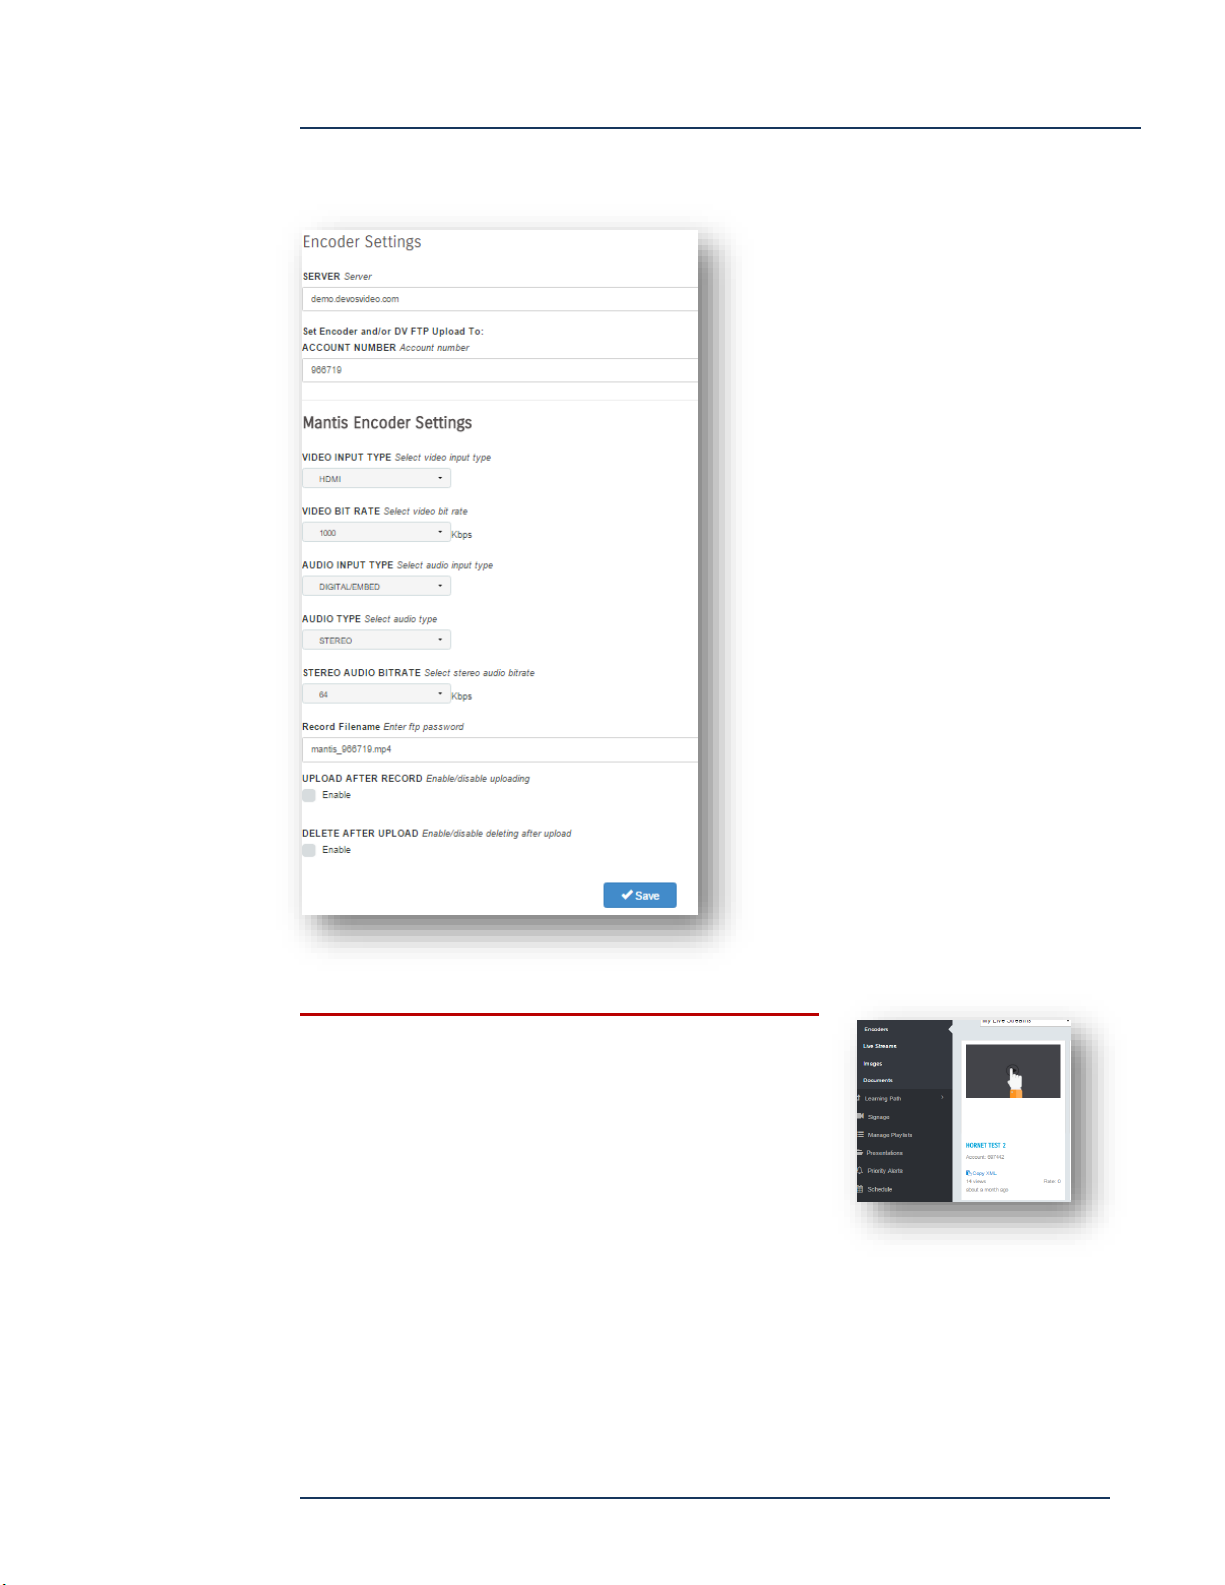
DEVOS -- Enterprise Video System
For Mantis and Hornet (Mantis shown, Hornet similar):
Server – read only.
Account Number – read only.
Video Input Type – selects the video input.
Video Bit Rate – selects the video bit rate.
Audio Input Type – selects audio input.
Audio Type – selects audio type.
Stereo Bitrate – selects audio rate.
Record Filename – automatic, do not change.
Upload After Record – enables upload after
local Mantis recording.
Delete After Upload – configure Mantis to
remove the local recorded file after successful
upload (to save disk space).
After creating Mantis or Hornet account, save it.
Click on the “Copy XML” link on the encoder
page, then paste this in to the Mantis or Hornet
XML control.
IMPORTANT! Allow up to 30 seconds for
changes to apply.
CDN
For Streamsie type encoder accounts, you have the option to use a CDN such as Arcus, Streamise Service,
or 3rd party. When using CDN, the live stream does not pass through the DEVOS streaming server.
Page 64
DEVOS
Page 65
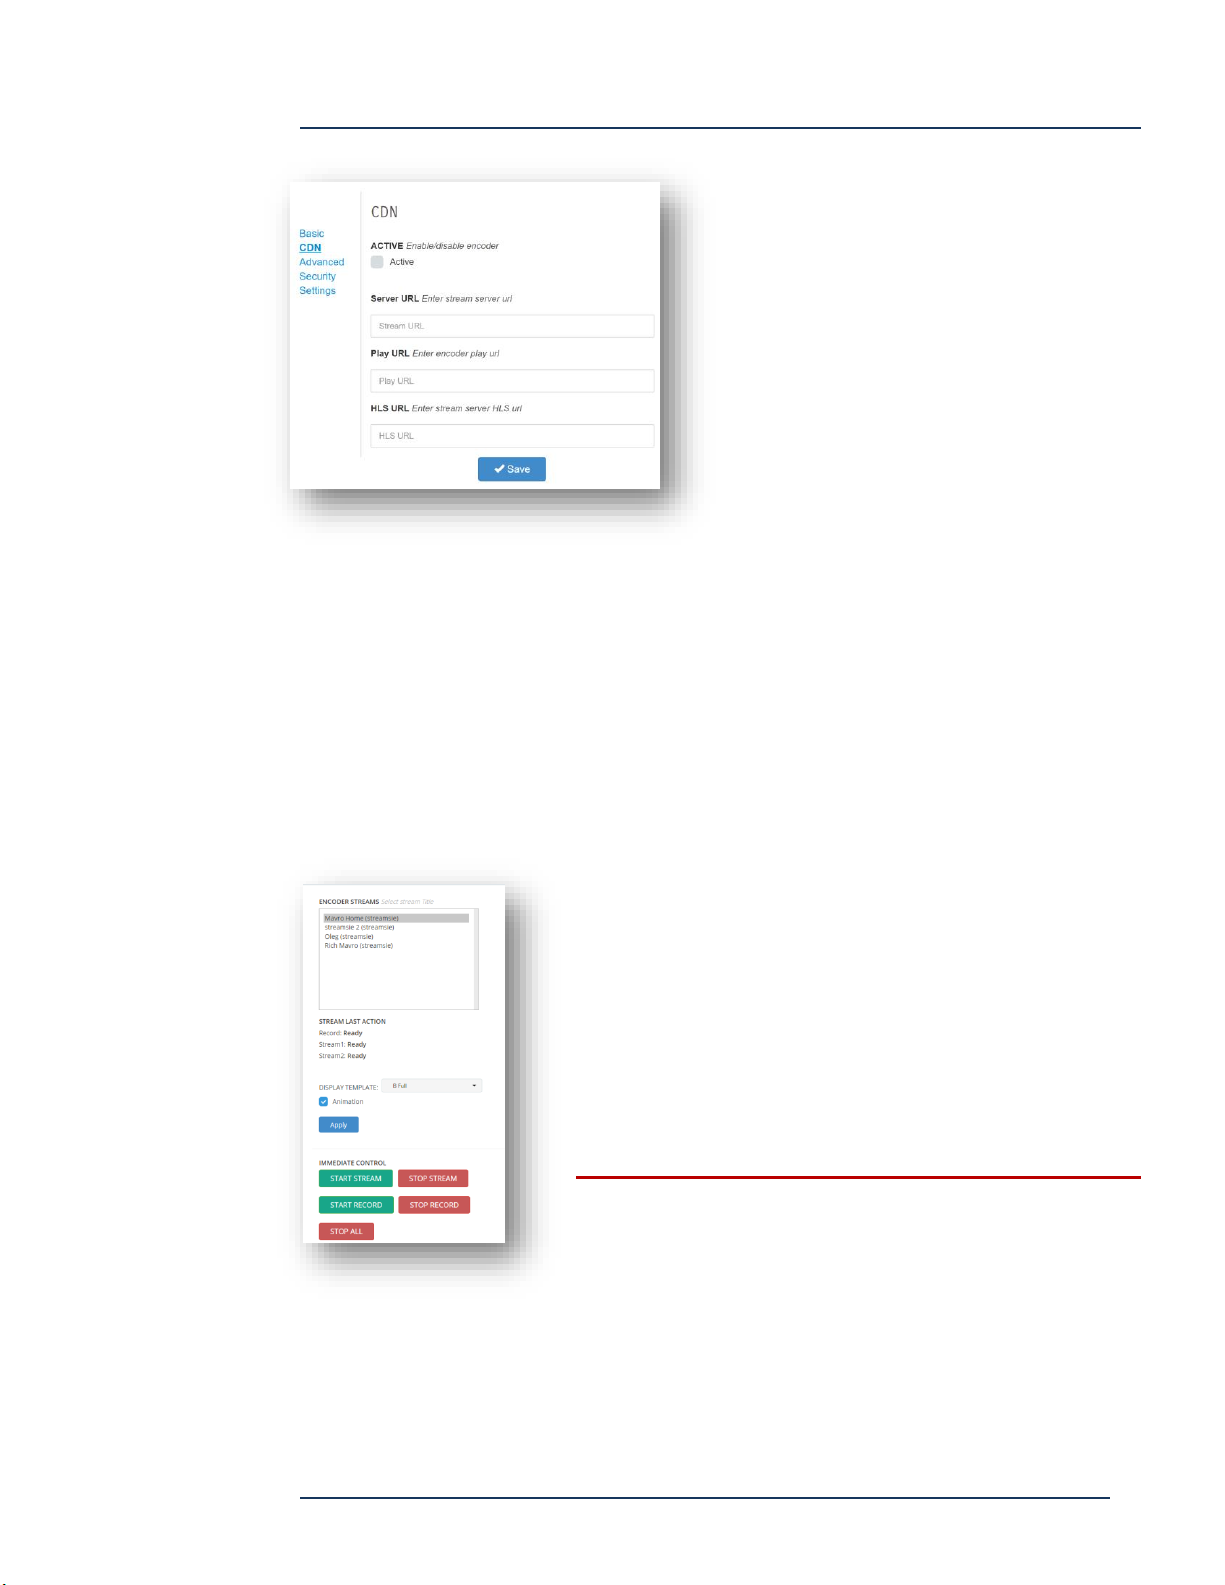
DEVOS -- Enterprise Video System
Server URL – enter the RTMP address that you want Streamsie encoder to push to.
Play URL – enter the RTMP address that will be used by the player (e.g. the distribution URL from the server)
HSL URL – enter the HLS address that will be used by mobile player
Remote Encoder Control
Select Encoder Remote from the Encoders page to control encoders from the server.
For Streamsie PC, you can start and stop streaming and
recording, and select the template in use.
Control is delayed by up to 30 seconds so please be
patient when using remote control.
For Mantis, remote recording is available when there is a
USB storage device inserted into the Mantis USB port.
Remote Control of Streamsie PC, Hornet and Mantis
is useful for managing streaming from remote,
unattended locations.
Page 65
DEVOS
Page 66

DEVOS -- Enterprise Video System
IMPORTANT
Recording is done on the encoder. If upload after recording is configured for
that encoder, then the just-recorded video will be uploaded after recording. The
function does not control server-side recording.
For Mantis and Hornet, you must have a USB storage inserted (Mantis must be
formatted FAT16 or FAT32).
Encoder upload uses passive FTP. Your DEVOS system must have passive FTP
configured for upload to occur.
See Scheduling for more information.
Page 66
DEVOS
Page 67
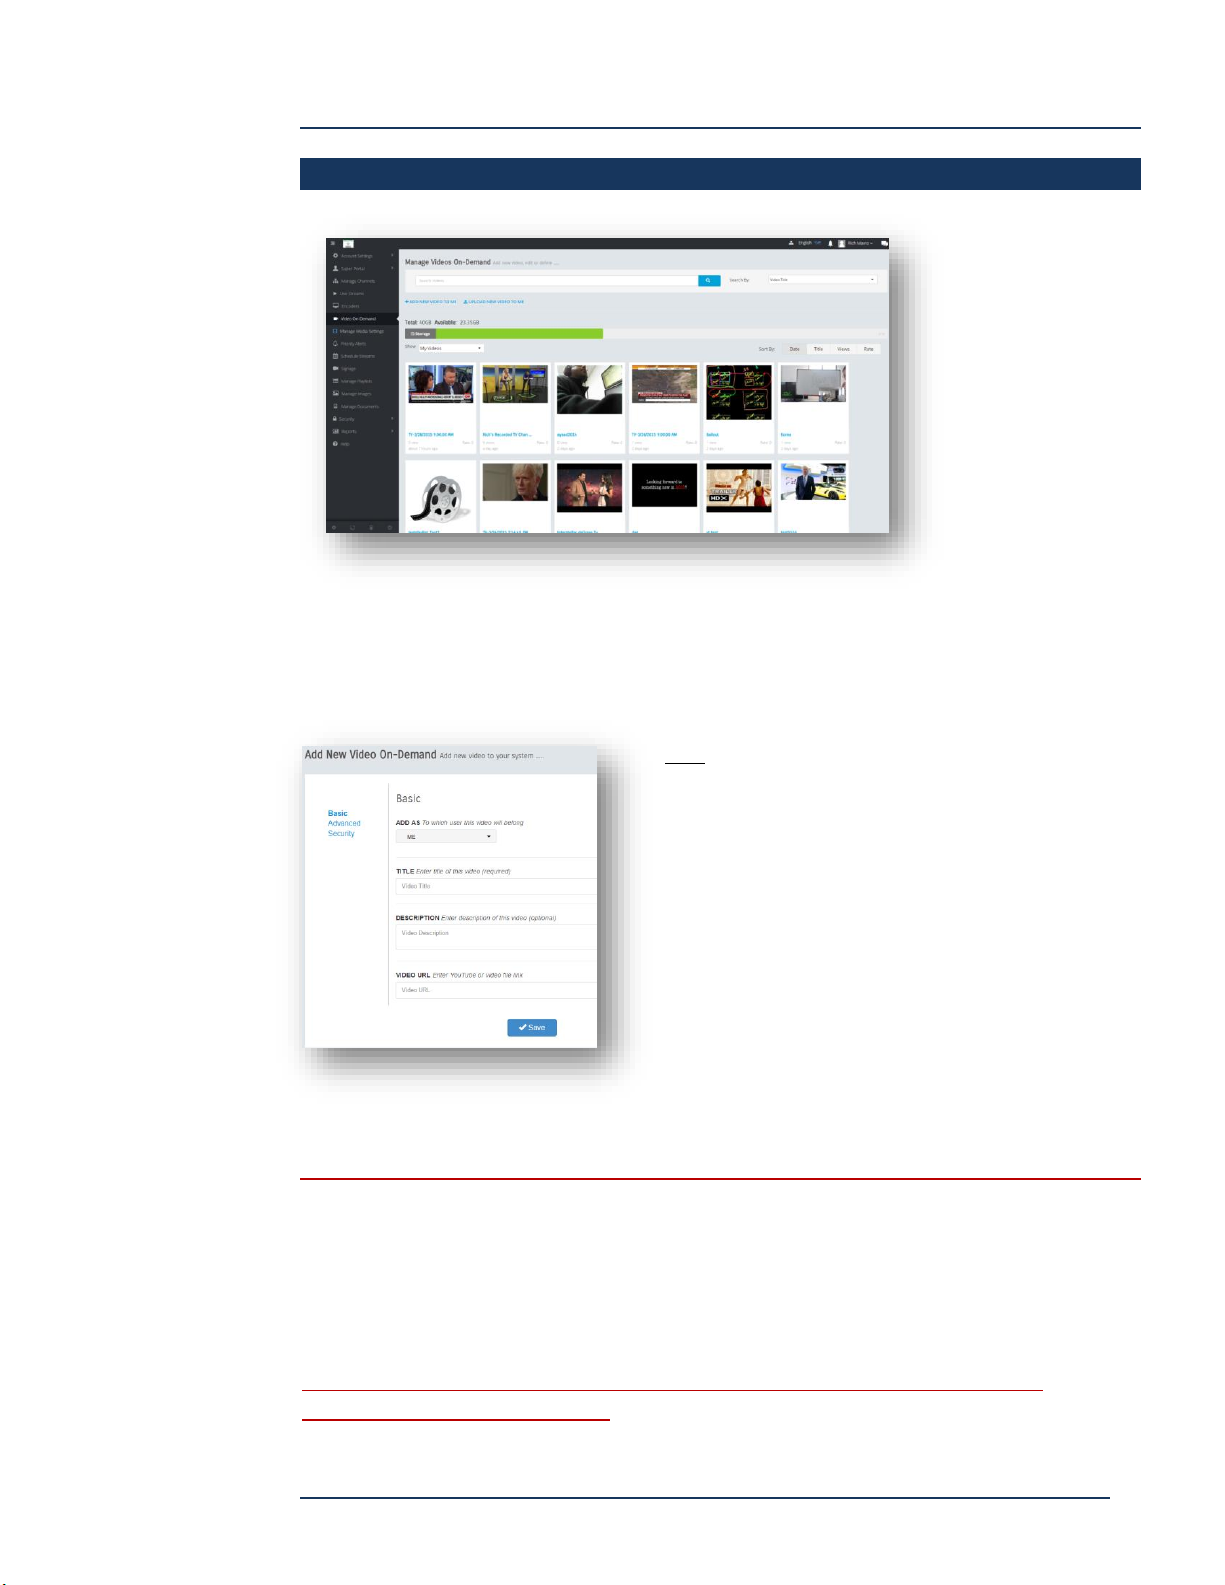
DEVOS -- Enterprise Video System
Manage Video On Demand
The Mange Video On Demand function allows you to upload and mange Video content. You can search
and sort your existing content, add YouTube or other foreign content, and view reports for any VoD
content.
Add New (YouTube) Video
Basic
Add As -- Select "ME", or if you are a delegate, you may
add it on behalf of someone else.
Title -- the Title for your video
Description -- the Description of your video
Video URL -- paste in video URL. The URL may be from any
available location, or from YouTube (e.g.
https://www.youtube.com/watch?v=LOYNf76ZKsE)
The video URL must point to a video file, not to a “web page” except for
YouTube you normally copy/paste the YouTube URL that points to one video
(not to a YouTube playlist). Not all YouTube video can be added. The target
video must be authorized for "embedding" (most are). Once added, YouTube
and other videos may then be added to playlists or published in Channels.
You can add quickly add YouTube videos using the DEVOS YouTube tool
available from the Help page.
Page 67
DEVOS
Page 68
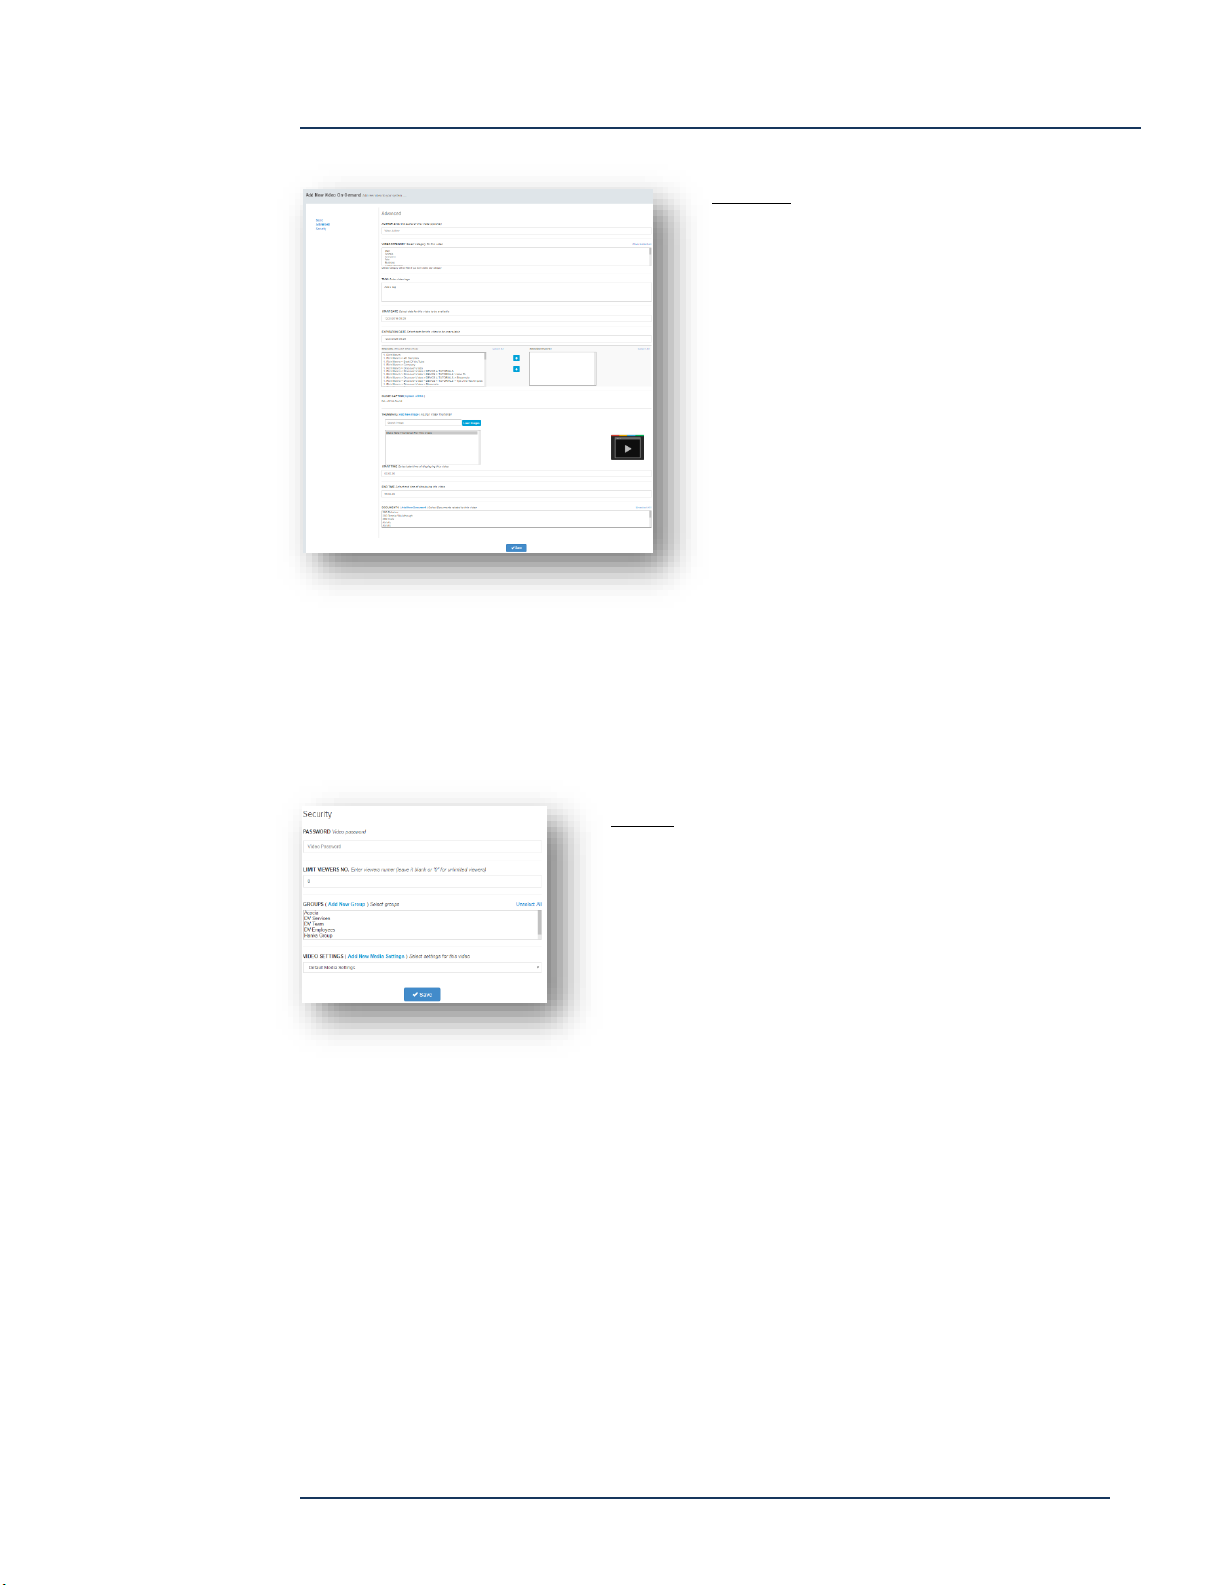
DEVOS -- Enterprise Video System
Advanced
Author -- the Author of the video
Category -- Select category
Tags -- enter text separated by comma. Tags are
search items in Channels
Start Date -- the date/time when the video will
appear in a Channel
Expiration Date -- the date/time when the video will
be removed from a Channel
Channel -- Select a channel where the video will
appear (optional)
Thumbnail -- select (or upload new) image. If you are adding YouTube video, image will be generated
automatically.
Documents -- Select (or upload new) document to be associated with this video
Security
Password -- Optional. If entered, then the viewer must enter it to
view.
Start Time -- the offset from the start of the video where
playback should begin
Limit Viewers No. -- The maximum number of simultaneous
viewers allowed. Enter 0 or leave blank for unlimited
Groups -- select (or add new) the group(s) that will have access to this video. Select no groups for open
access
Video Settings -- Select (or create new) Media Setting
Page 68
DEVOS
Page 69
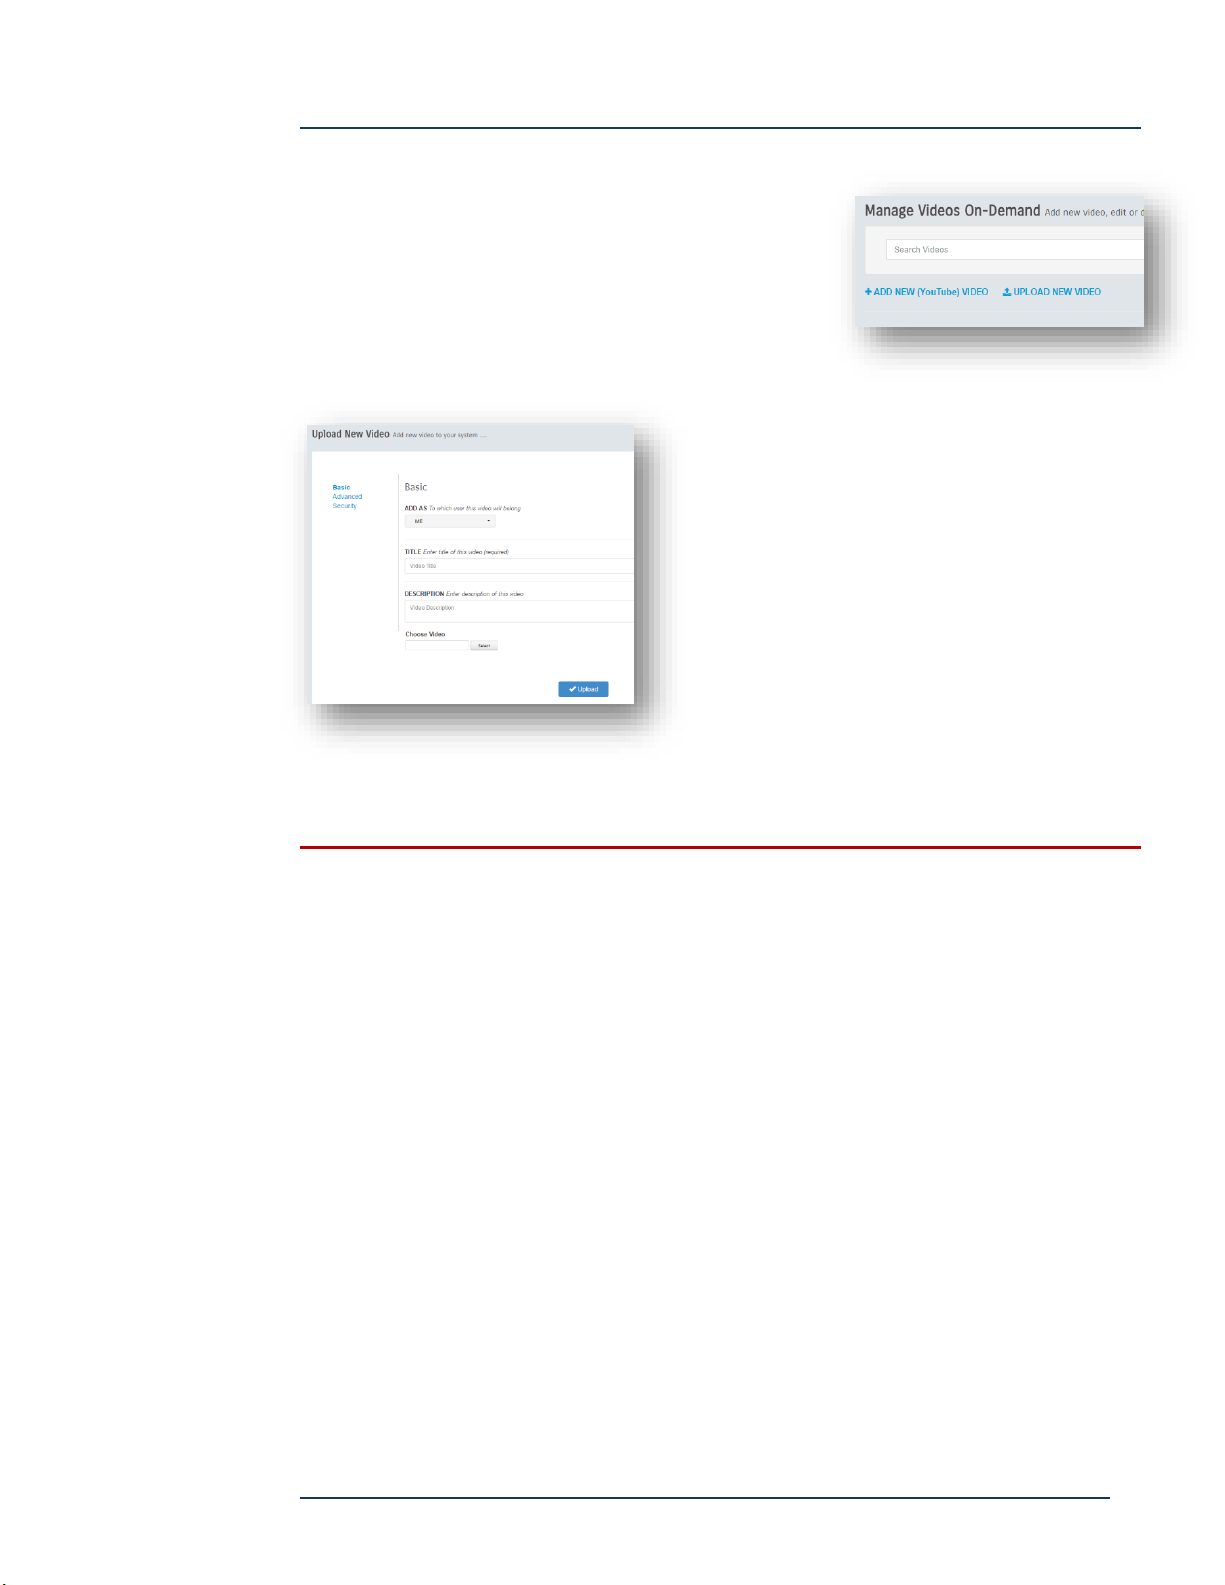
DEVOS -- Enterprise Video System
Upload Video
You may upload virtually any type of video file up to
2GB, providing it does not contain errors and
DEVOS will convert it to the proper format. Select
"Upload New Video" from the Video-on-Demand
administration page.
Complete all entries:
Add As – select “Me” unless you are a
delegate for another DEVOS user and wish
to add a video to their account.
Title -- the title for your video
Description -- the Description of your video
Choose Video – browse to a video file on
your computer then select Upload.
Prior to upload, you can make advanced and security settings.
Download Video
You may download a video that has been uploaded or recorded by selecting Edit for
the target video, the right-click on the "Download" link.
Page 69
DEVOS
Page 70
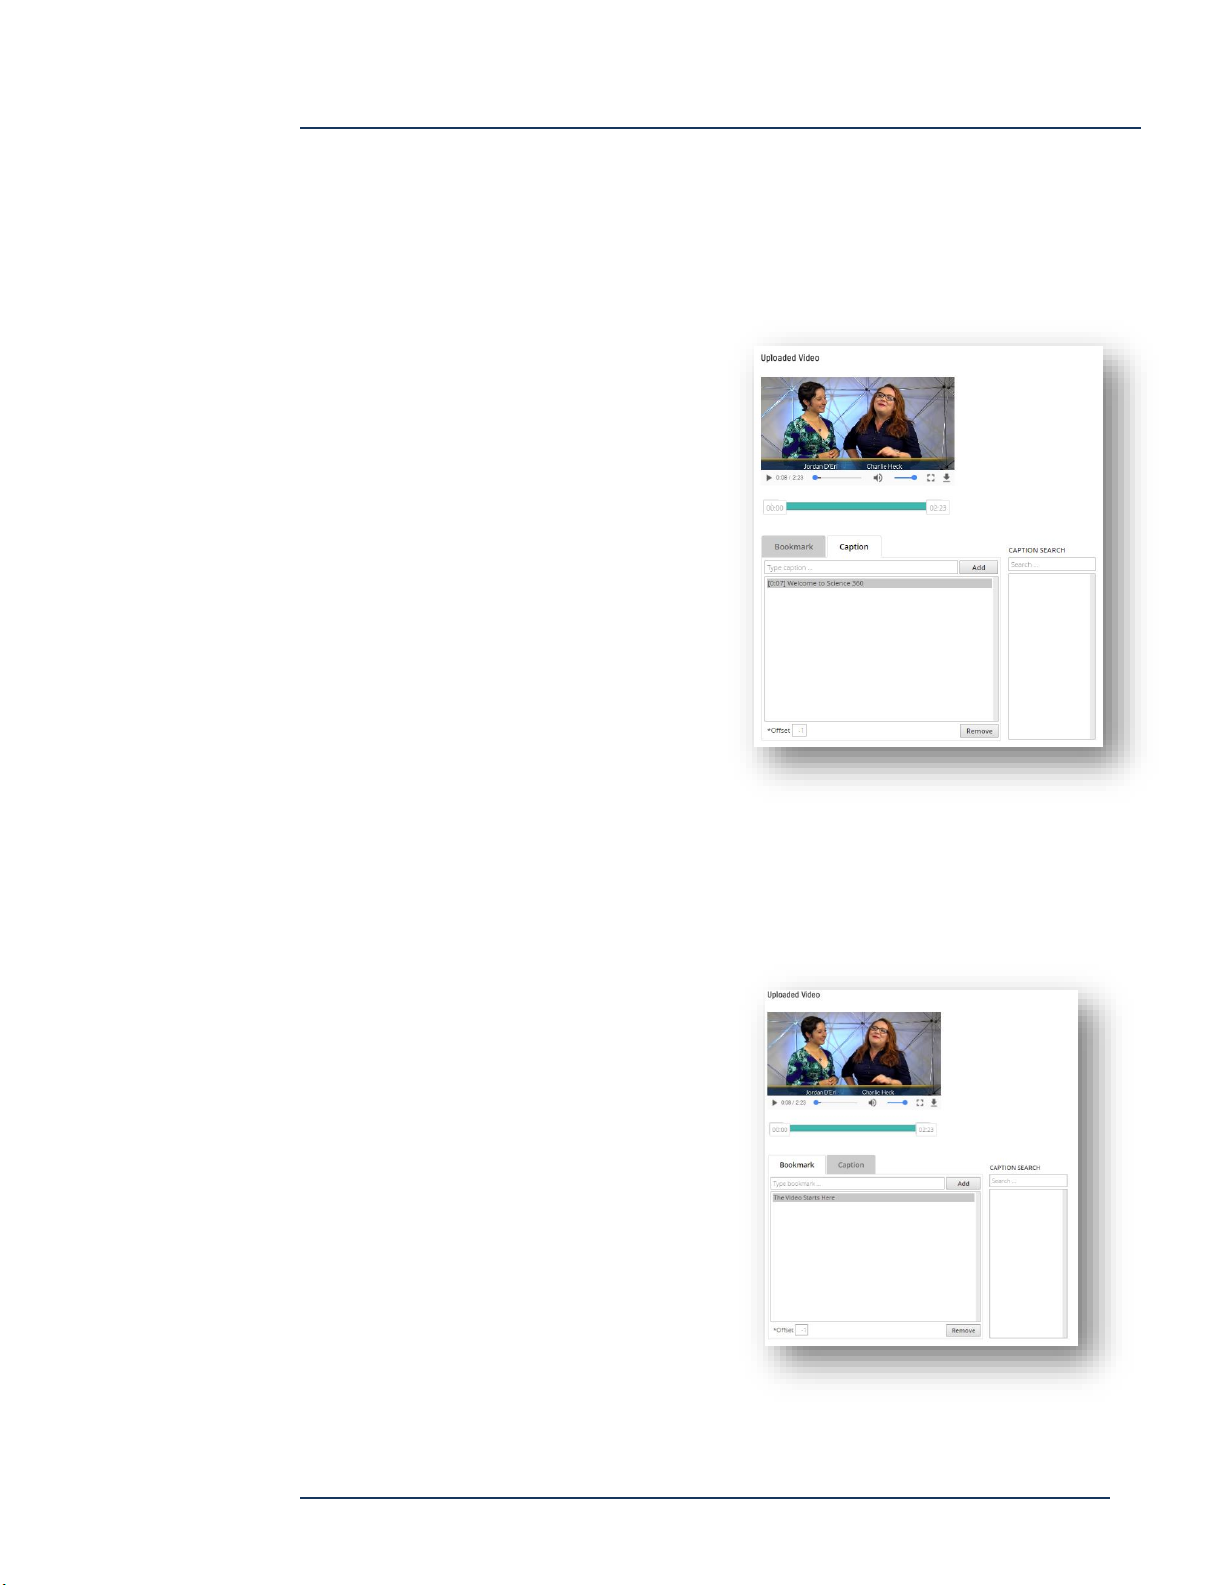
DEVOS -- Enterprise Video System
Closed Captions
Video on Demand can be enabled with Closed Captions by uploading a standard
WebVTT (.vtt) file.
You can add captions to any video that has been placed on the system by selecting
the video, Edit.
Press play and listen to the audio. After
you hear a sentence simply start typing in
the caption and the video will pause.
When you have completed your sentence,
press Enter to insert that caption at that
time and the video will start to play again.
Repeat until you have entered desired
captions.
You can remote, edit and search your
captions.
When done save the settings.
When captions are present, the player will
have a [CC] option where they can be turned on by the viewer.
Bookmarks
You can add bookmarks to any video that has been placed on the system by selecting
the video, Edit.
Play the video and navigate to a point
where you want to add a bookmark. Type
in the bookmark text and select Add.
You can remove any bookmark.
Save the settings when done.
When bookmarks are present, the viewer
can select it from a list and video will play
at the point where you entered the
bookmark.
Page 70
DEVOS
Page 71
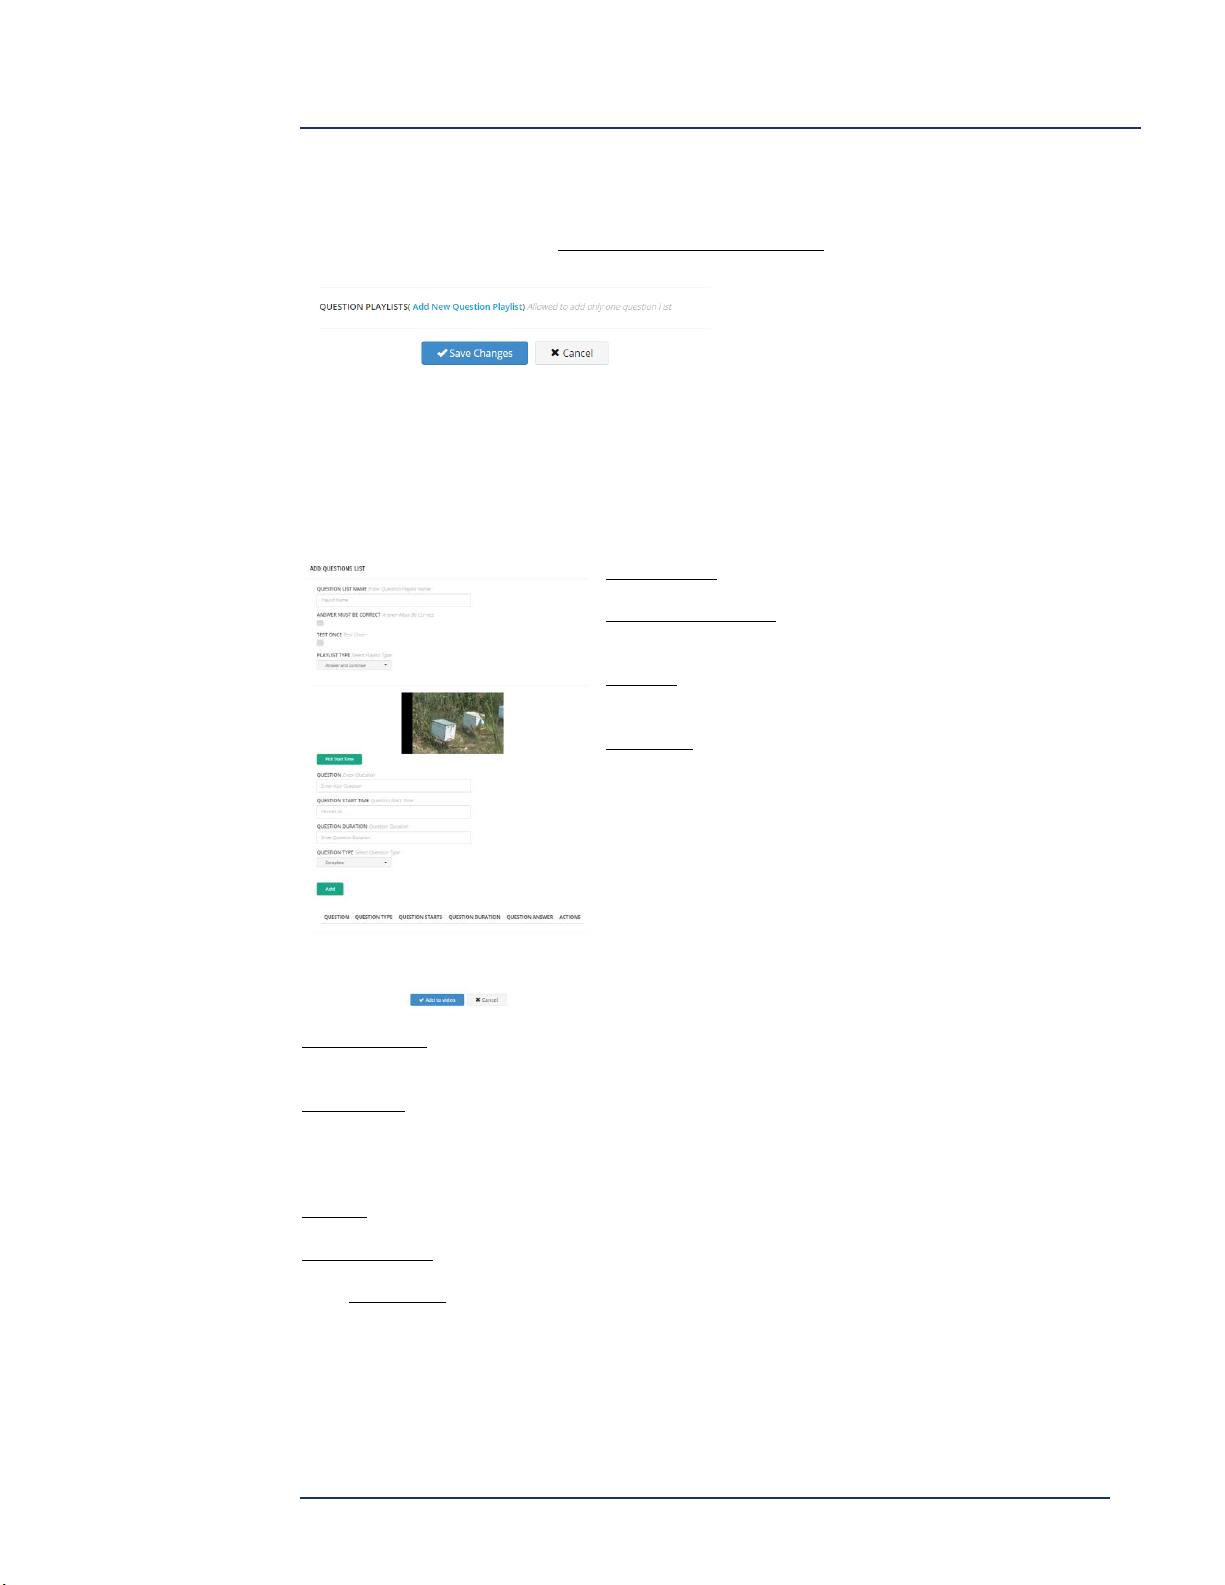
DEVOS -- Enterprise Video System
Insert Questions Into Video
You can create a Questions Playlist for any Video-on-Demand content, including
YouTube content. Select "Add New Questions Playlist" from the create or edit page.
Questions are multiple-choice or free-text questions that are embedded in the video.
Questions help you to determine if the viewer is understanding the content, but also
is used for assurance that the viewer actively viewed the material. Edit any video and
select Questions Playlist
Question Name -- a convenient name for your question list
Answer Must Be Correct -- if checked, the viewer must try again until they
answer correctly (used for learning, score will always be 100%)
Test Once -- if checked, then this user may only take the test once.
Subsequent visits to the video will not offer questions.
Playlist Type -- Answer and Continue, Duration Answer, or Answer At End:
Answer And Continue – The viewers is presented with question. They must
answer the question to continue playing the video. After the specified
duration, they are warned to answer the question.
Duration – The viewer is presented with the question. They must answer it
within the duration time or they will receive a 0 (not answered) score. The
video continues after the answer or when the duration expires.
Answer At End – The viewer is presented with the question at the end of
the video only.
Player / Pick Time -- move the slider to the point where you want to insert a question. Select pause. Then select "Pick
Start Time". This will insert the current player time into the Question Start Time box.
Question Type -- Choose (multiple-choice) or Complete (free text)
For Choose Type, enter answers 1 to 4 and select which is the correct answer. Select ADD to add this question to the
question playlist. Repeat for the next question, making sure you select the time in the video where you want the
question to appear.
Question -- Enter the question, such as "What color is a banana?"
Question Duration -- Enter the number of seconds the viewer has to answer.
Select Add To Video to complete the question.
Page 71
DEVOS
Page 72
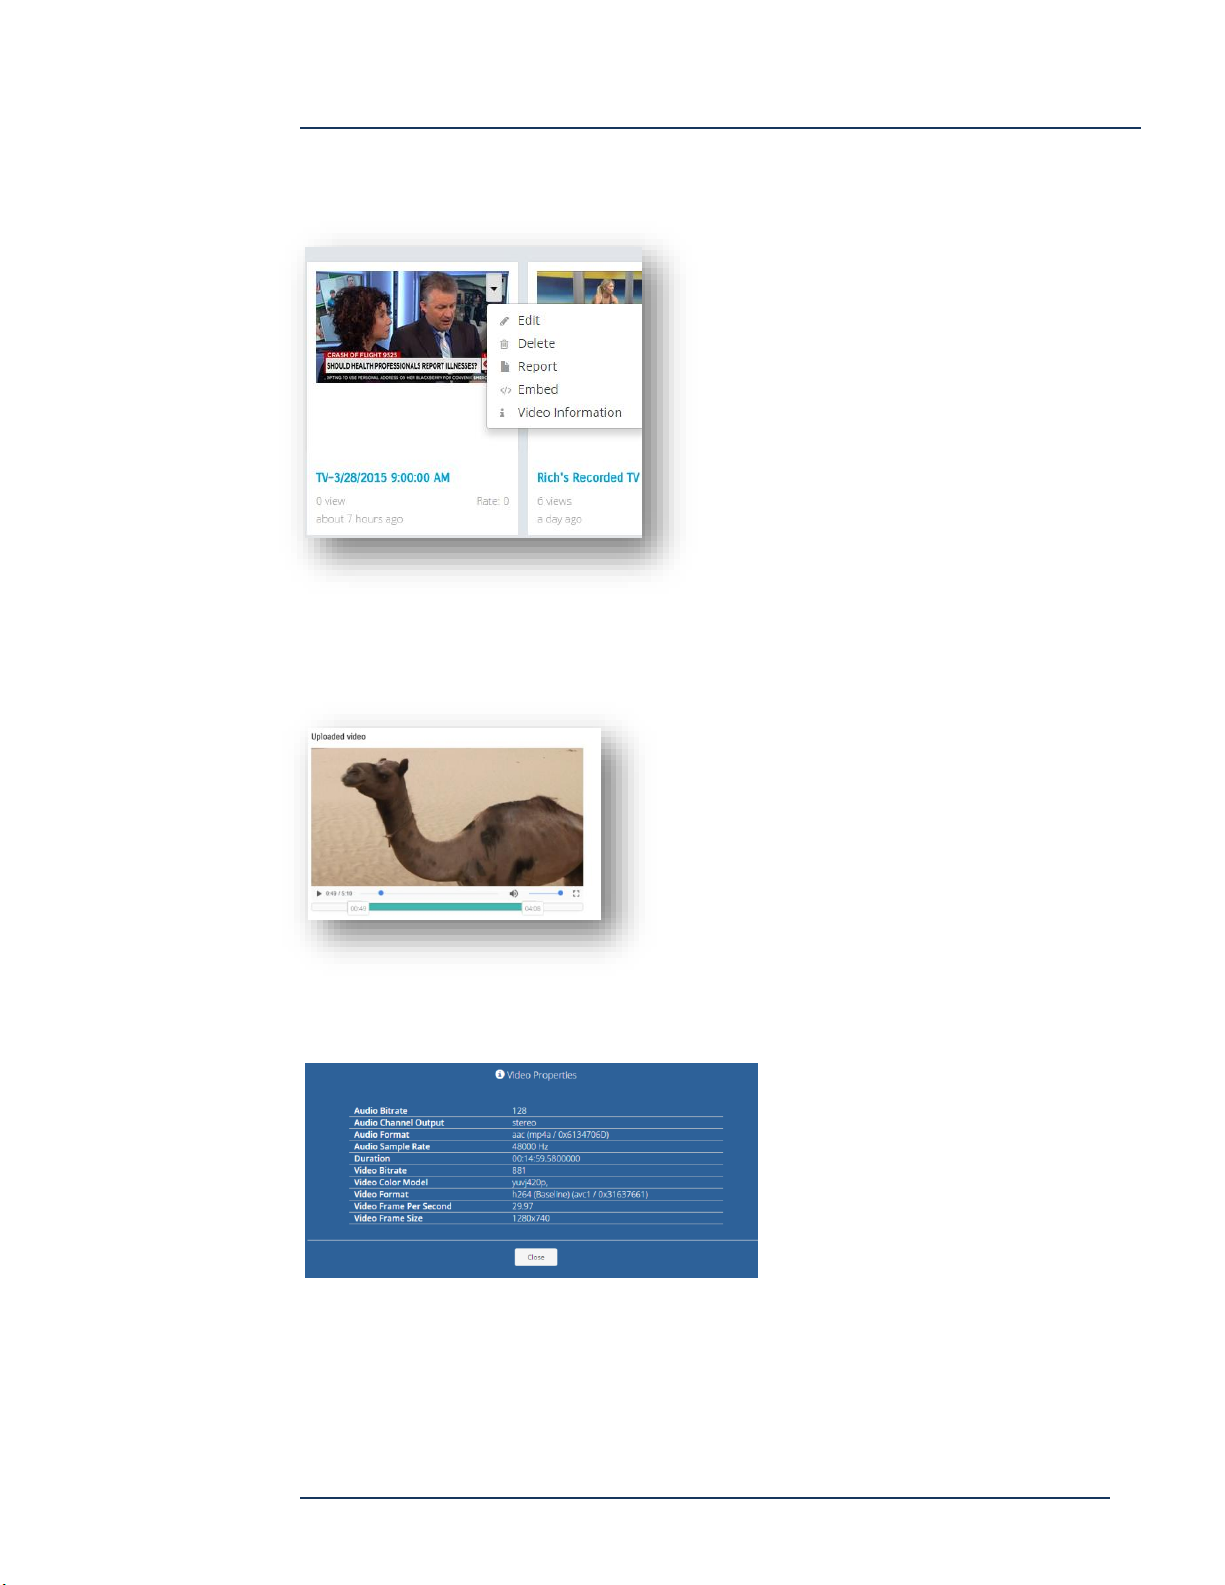
DEVOS -- Enterprise Video System
Edit Video
Mouse over any video to expose the menu. Select Edit to modify any value. Select
Delete to delete that video. Select Embed
to access the video embed code, and select
Video Information to get technical details.
Video Trim
When you edit a Video, you have the ability to trim the starting and ending point that will be shown to
viewers. Simply drag the player starting and ending position and save your edit.
Trimming is particularly useful for scheduled recordings of
live events when actual start time differs from the
schedule start time.
Video trimming is non-destructive: the original video file
is not altered.
Video Information
The video information give you details about the video, which can be very useful to
troubleshooting issues with playback and compatibility.
Page 72
DEVOS
Page 73
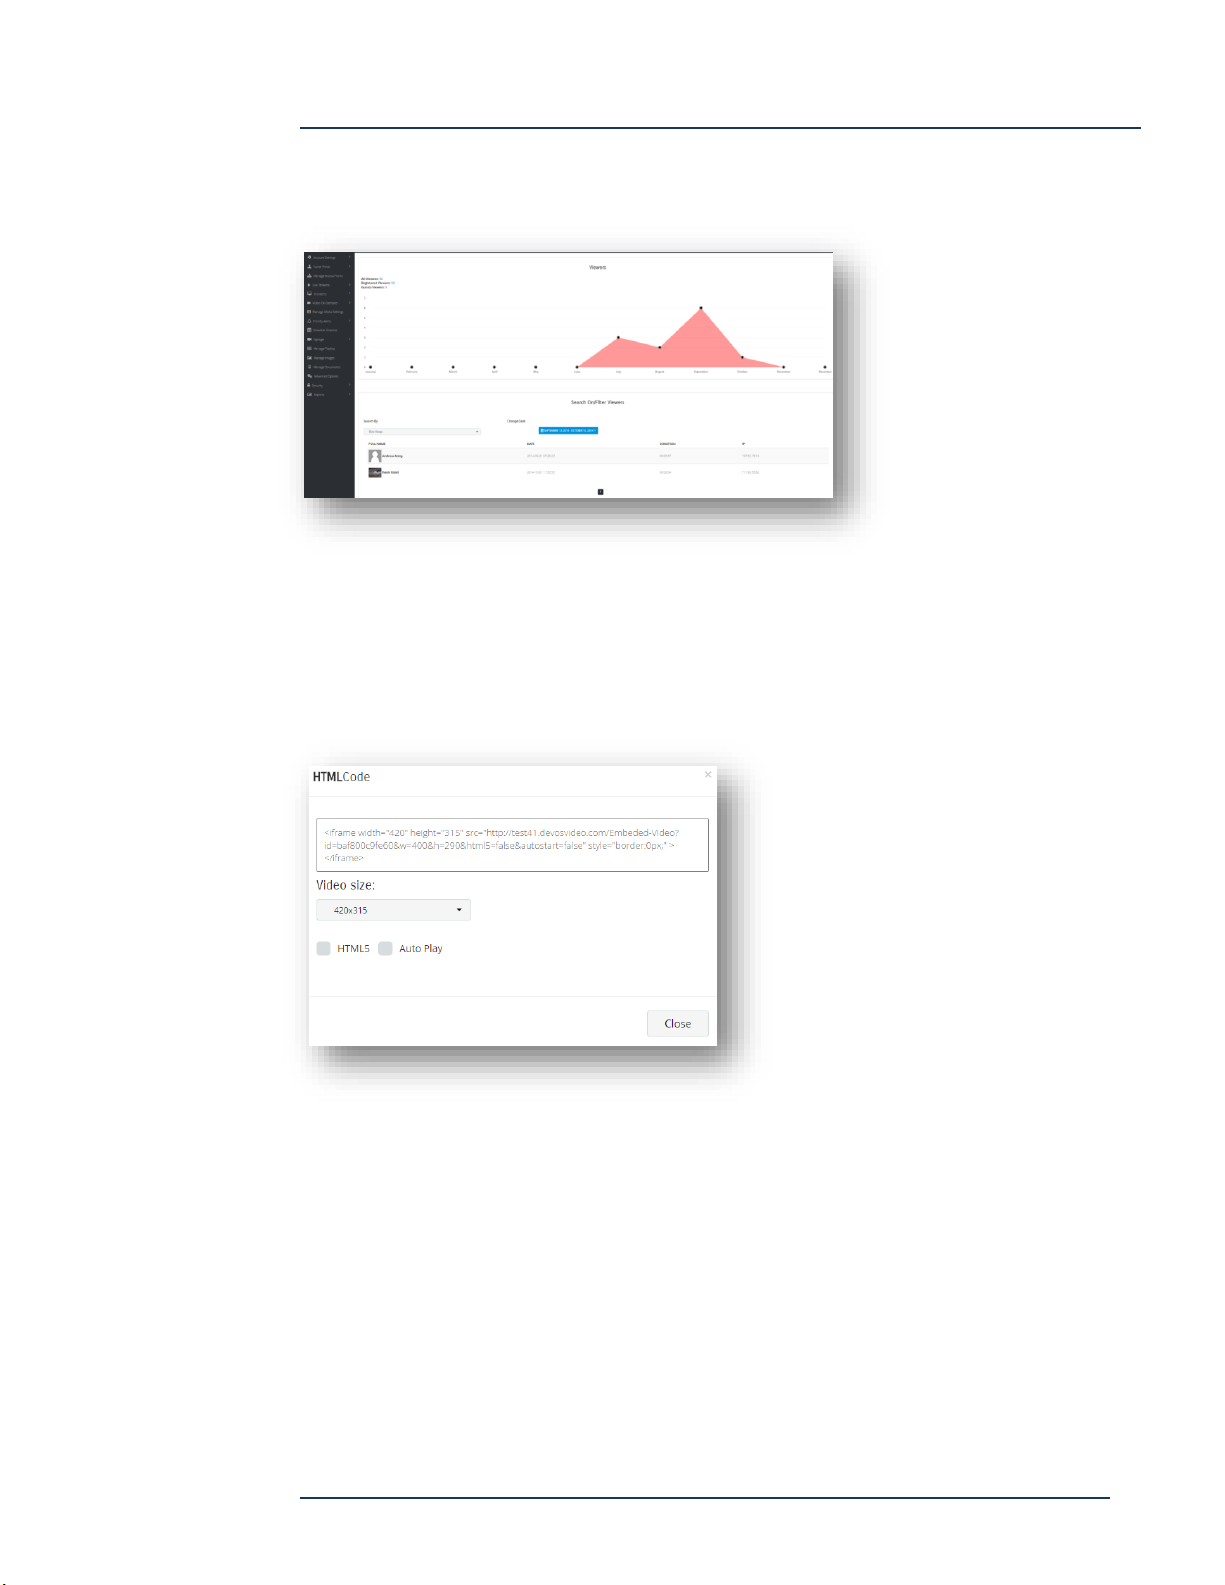
DEVOS -- Enterprise Video System
Report
Select Report to access a comprehensive report of viewing history for the selected
video.
Video Embed Code
Video embed code allows you to select a video, set the desired size, and copy the
embed code to your web page.
Select size, optional HTML5 player, and select Auto Play to cause the video to start
playing automatically.
Page 73
DEVOS
Page 74
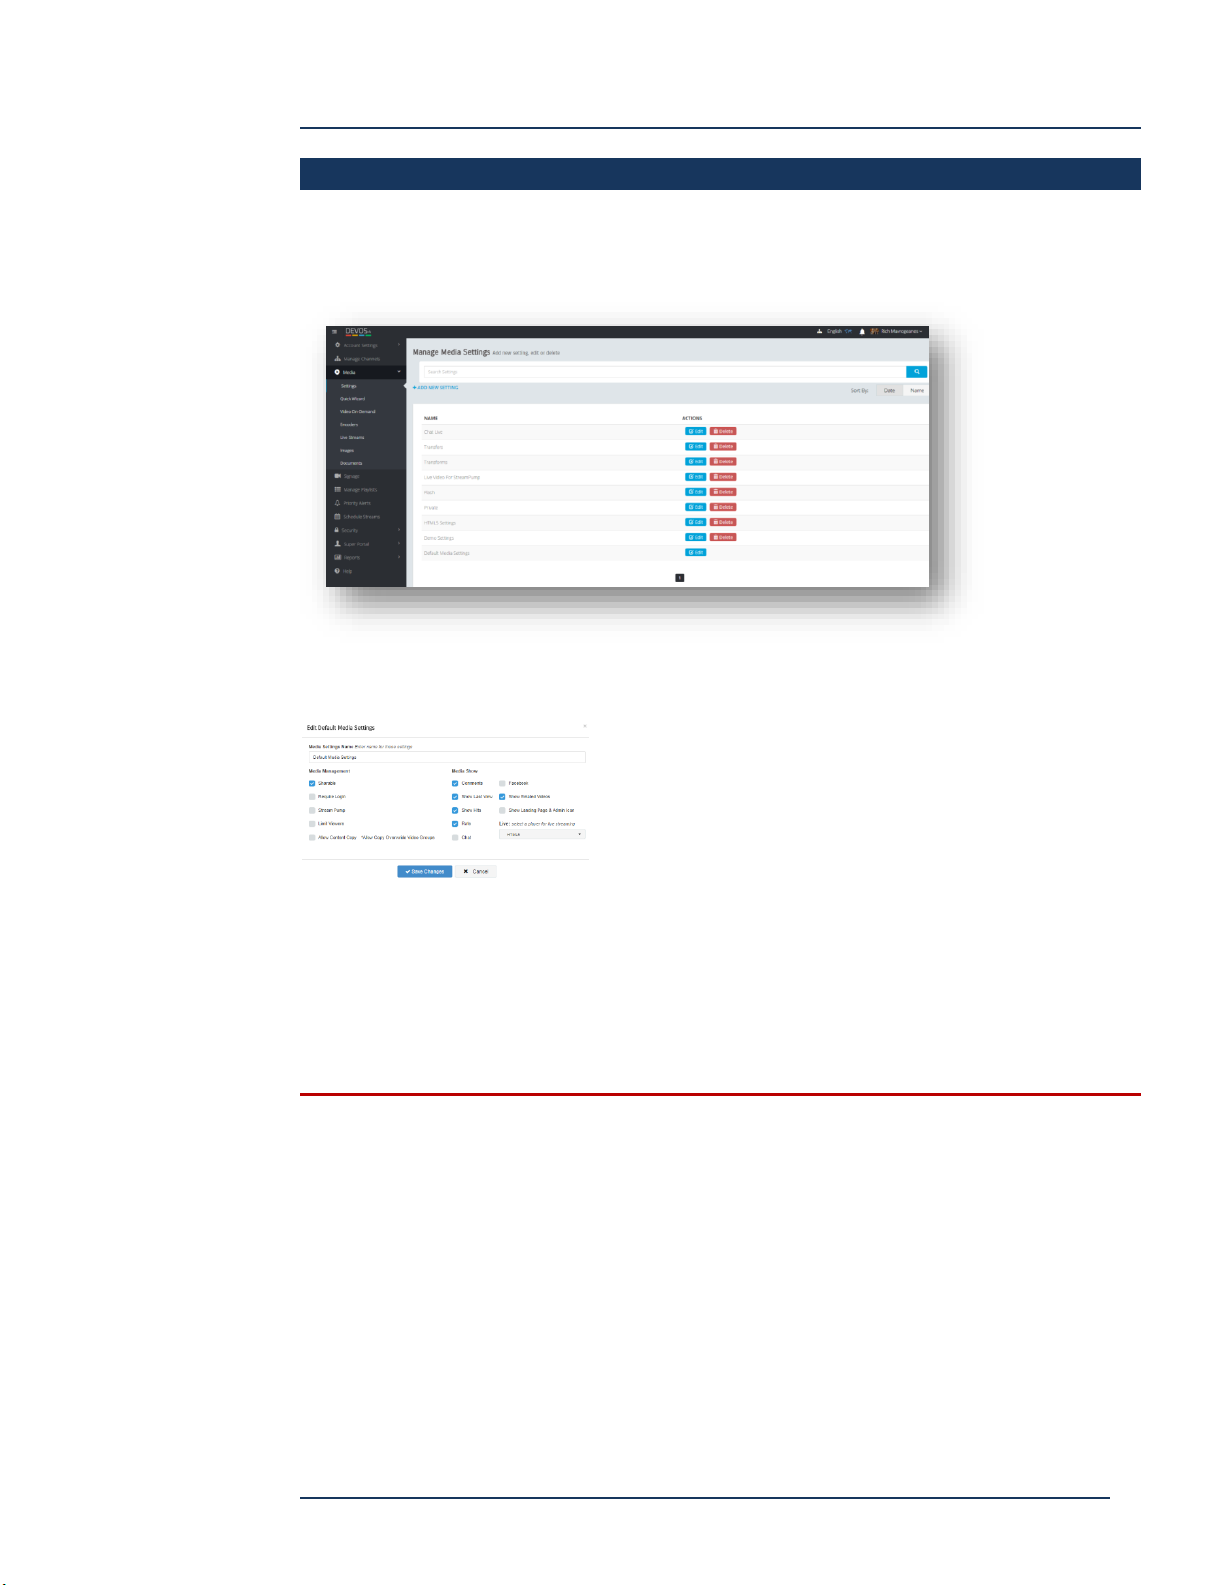
DEVOS -- Enterprise Video System
Media Settings
Media Settings are convenient templates of commonly used settings. Every system
comes with Default Media Settings, and you can edit these to your preference. You
can create new Media Settings that you can apply to content for different use cases.
When you edit or create new Media Setting, possible values are
Show Landing Page & Admin icon – for channels, sets whether a channel has a link allowing the viewer to access the top level landing
page
Limit Viewers -- Allows limiting of viewer count if value set on the video
Rate -- Allow viewers to rate the video
Live – for a live video, select HTML5 or Flash
Allow Copy – Sets ability of other users to copy your video to their account where they can use and edit the video without affecting
your copy.
Chat – allow chat on the viewing page
Sharable -- Allow others to use the video in Channels
Comments -- Allow viewers to post comments
Facebook -- Allows the video to be posted on social media (if enabled by Super)
Require Login -- Require viewers to login to view (allows you to collect reports on
who viewed)
Show Last View -- Sets whether the last view date/time is shown
Show Related Videos – Based on tags, sets whether the player shows related videos.
StreamPump -- Sets whether live videos are replicated to StreamPump
Show Hits -- Sets whether viewing hits are shown
VoD is always HTML5. Live video may be Flash or HTML5.
Digital Signage web player is currently Flash only.
Multi-view player is always Flash for live and HTML5 for VoD.
Page 74
DEVOS
Page 75
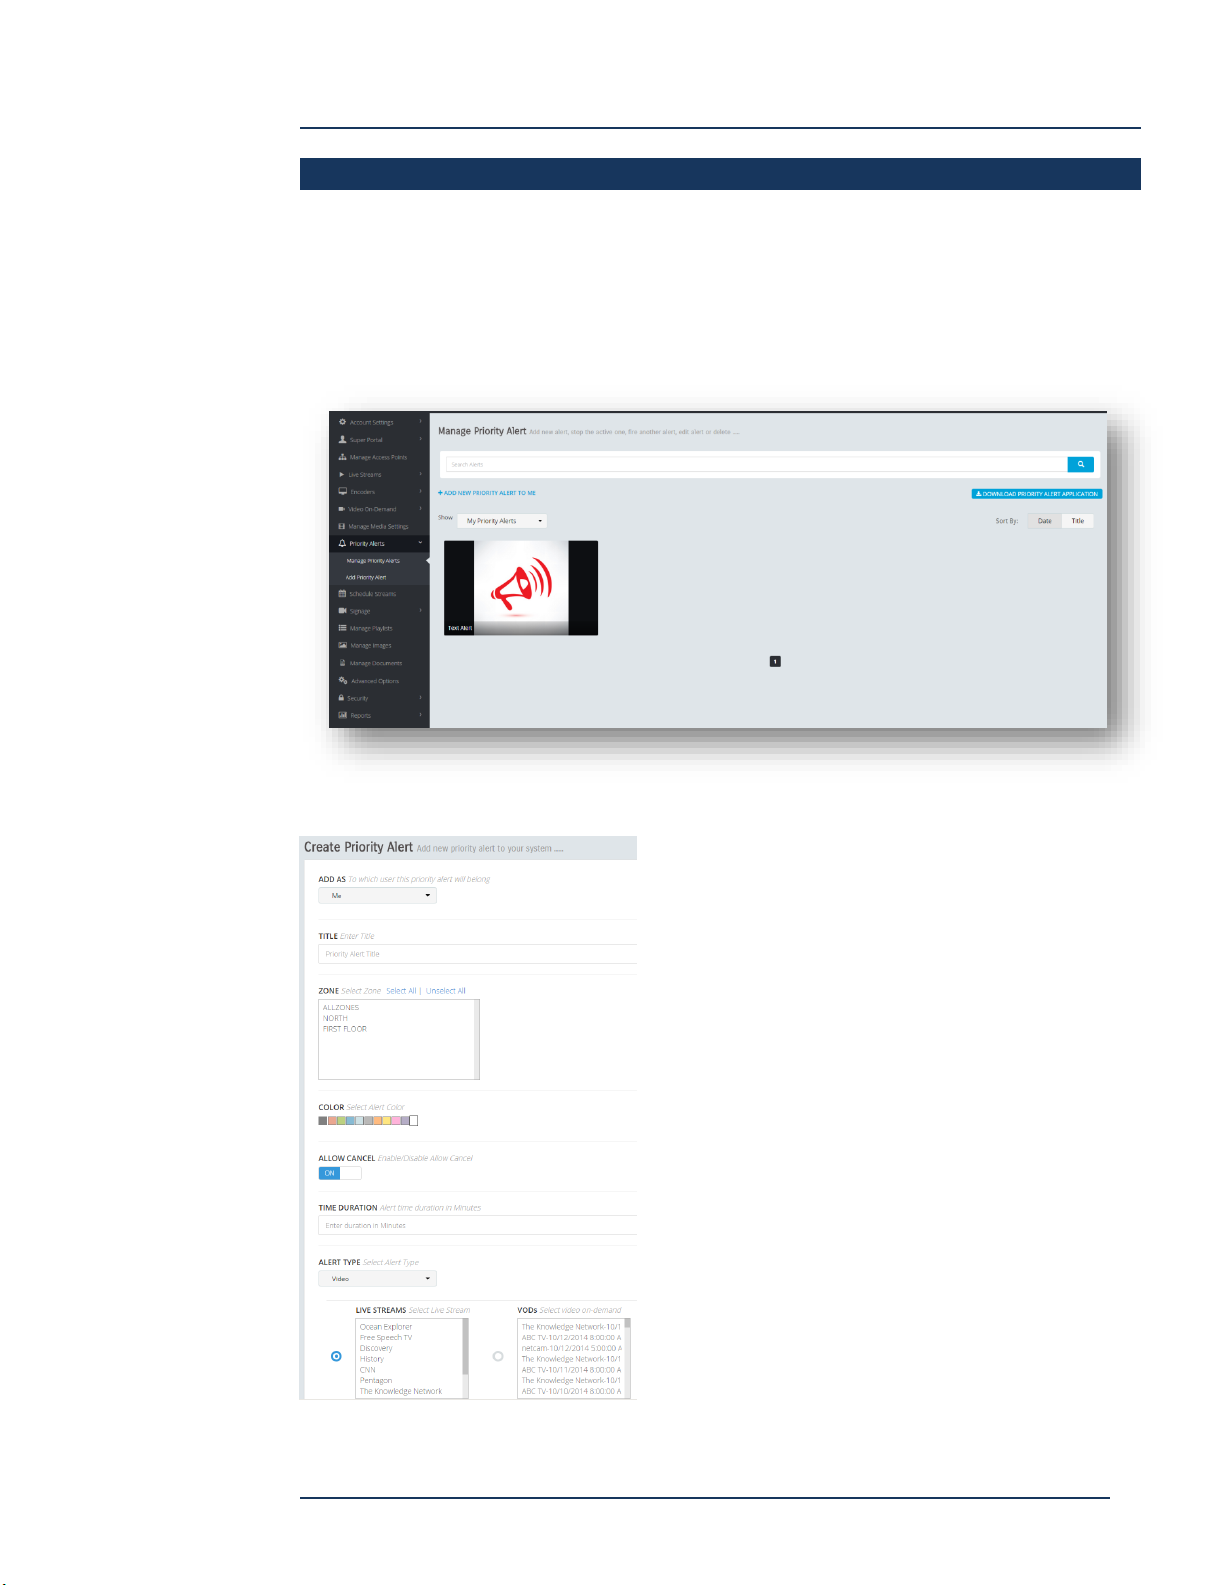
DEVOS -- Enterprise Video System
Priority Alert
Priority Alert causes a live video, an on-Demand video, a text message, or a web page,
to automatically appear on one, some or all desktops in an organization without the
desktop user needing to take any action.
To issue an alert, simply select the Alert Icon.
To create an alert button, select "Add New Priority Alert".
Add As -- create an alert as you or if you are a
delegate, then for another account.
Title -- The name of the alert (displayed in the button)
Zone -- The zones that the alert is for
Color -- The color to be displayed in Text alerts
Allow Cancel -- If on, then the viewer can close the
alert. Otherwise, the viewer cannot close and must
wait for it to expire or for you to end the alert
Time duration -- The number of minutes the alert will
last
Alert Type -- Video, Web, or Text
Live Stream / VoDs -- If type is Video, select the live or
VoD for the alert.
Page 75
DEVOS
Page 76
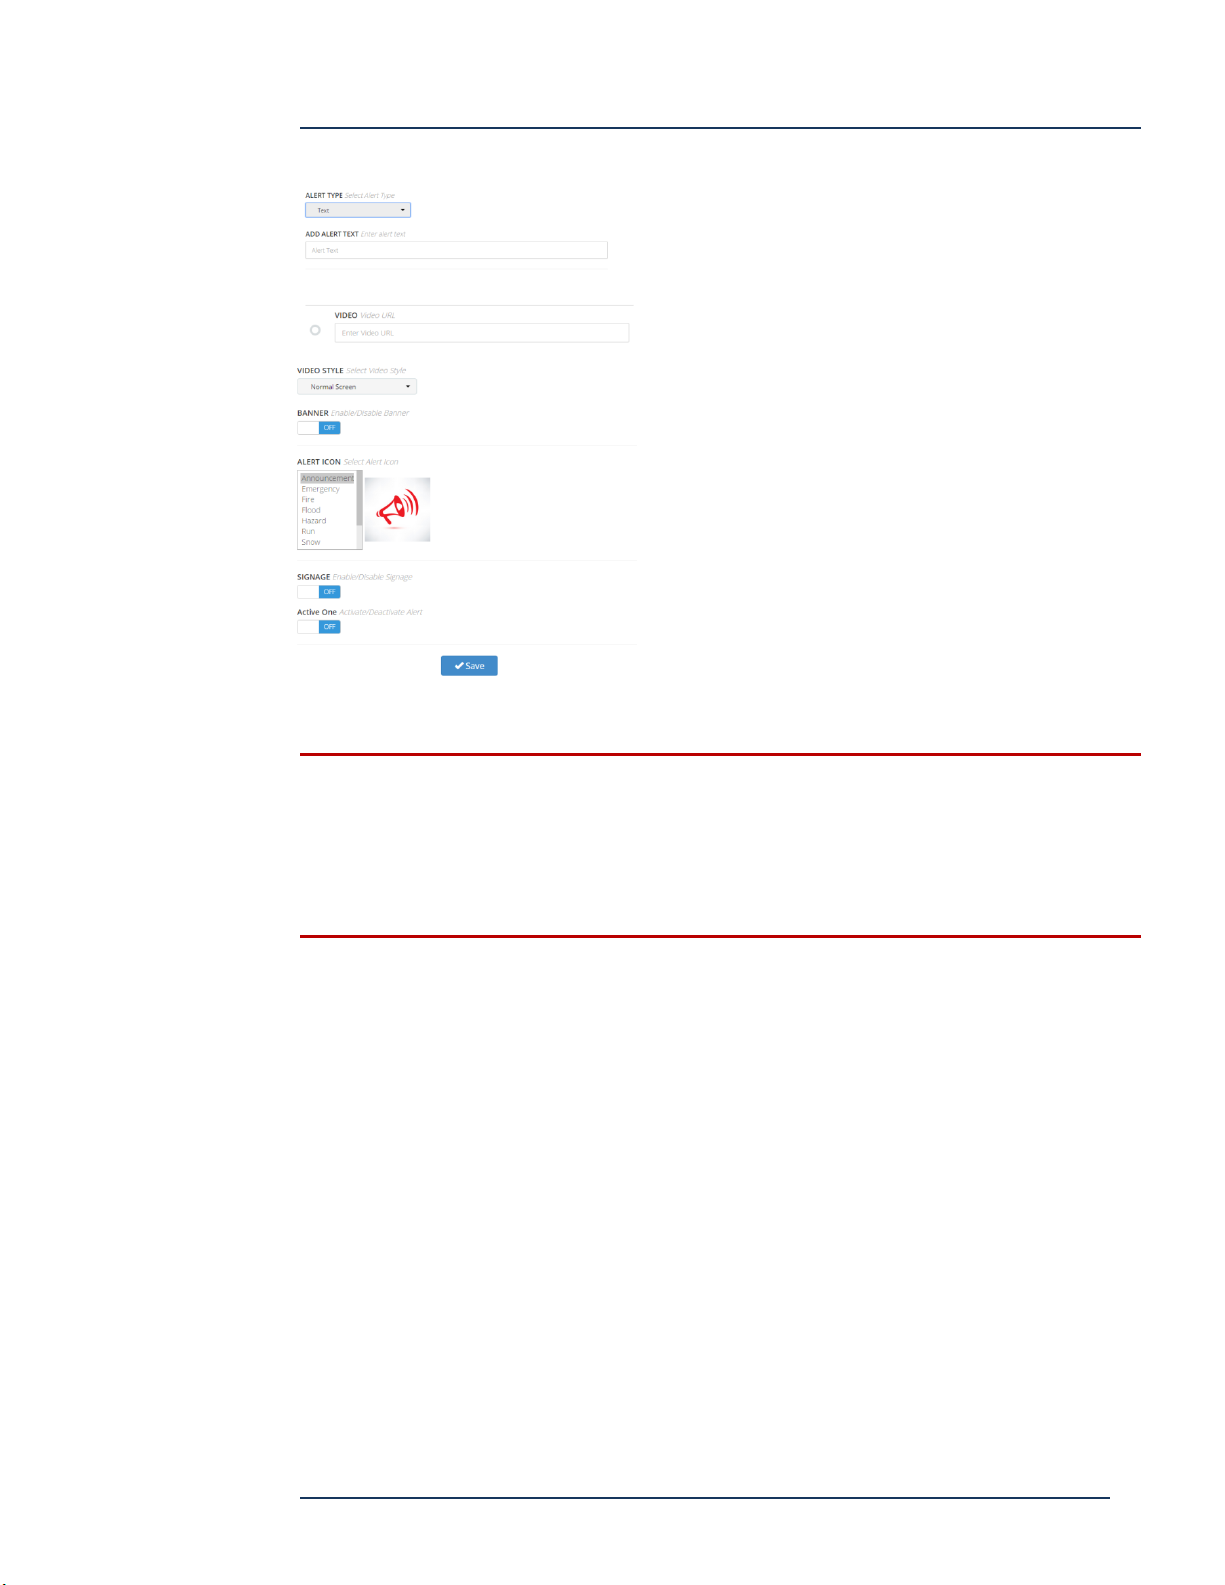
DEVOS -- Enterprise Video System
If type is text, enter the text to be displayed.
If type is Web, enter the web page URL
If type is video, you can enter a video URL
Video Style can be normal (which is a popup video
player) or full screen.
Banner is a text display for Digital Signage
Select Alert Icon
If Signage is enabled, select the sign(s) that will be
affected by this Alert (except SignStick which uses
zones)
Priority Alert Application can be freely downloaded and installed on Microsoft or
Apple computers. Follow the instructions for installation and configuration
provided on the Priority Alert manager screen.
NOTE! Priority Alert is a system-wide function. You cannot have an alert in two
different zones at the exact same time. You can, however, have an alert in zone
A, then start an alert for zone B after the prior alert has expired or has been
cancelled.
Page 76
DEVOS
Page 77
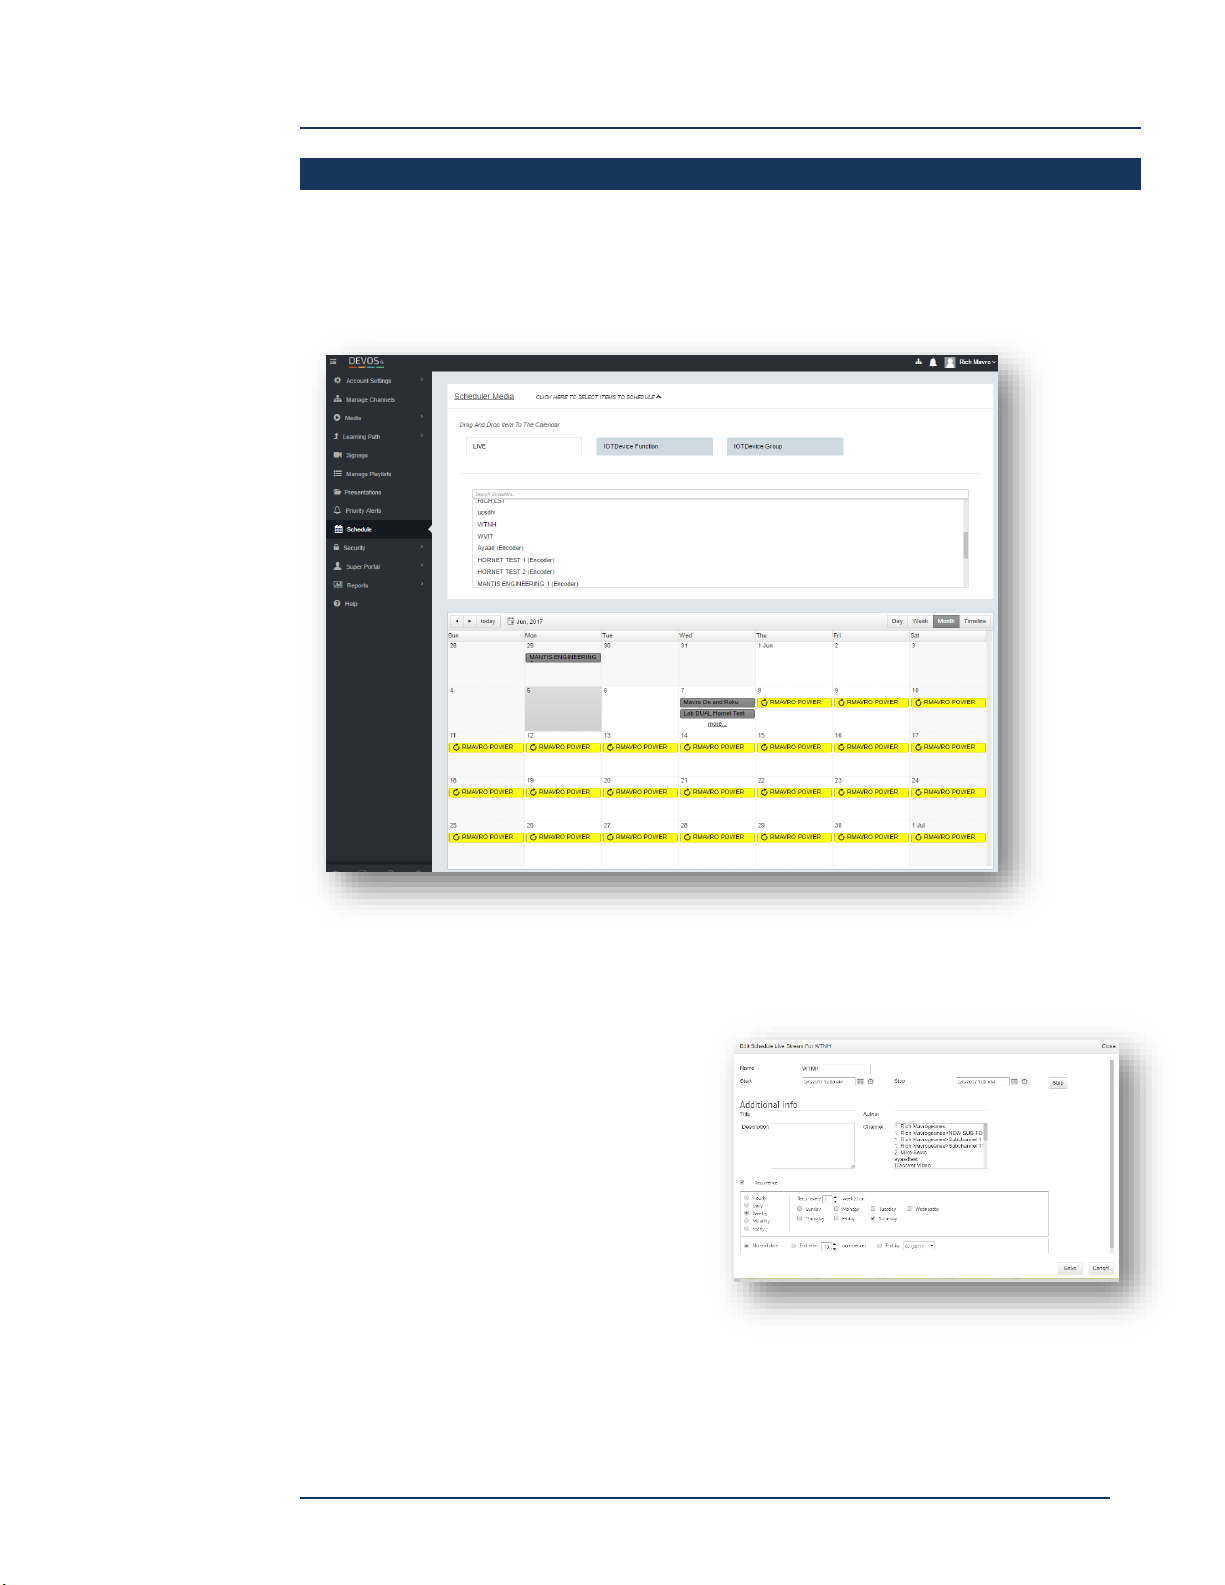
DEVOS -- Enterprise Video System
Schedule
DEVOS allows you to schedule Live Streams/Encoders for streaming and/or recording.
The schedule also provides the Internet of Things (IoT), which allows you to control
and schedule anything with an IP or IR control capability.
Scheduling Streams and Recordings
Select the Live tab which shows a list of all live streams and encoders.
Drag the desired stream to the
calendar, then double-click on it.
Live Stream
If you have selected a live stream, you
may set the start and end time for
recording this stream on the server. Set
the Title, Author, Description and
optionally the channel that you wish
this recording to be published to.
Checking Recurrence exposes options for scheduling this action on a recurring basis.
Save when done.
Page 77
DEVOS
Page 78
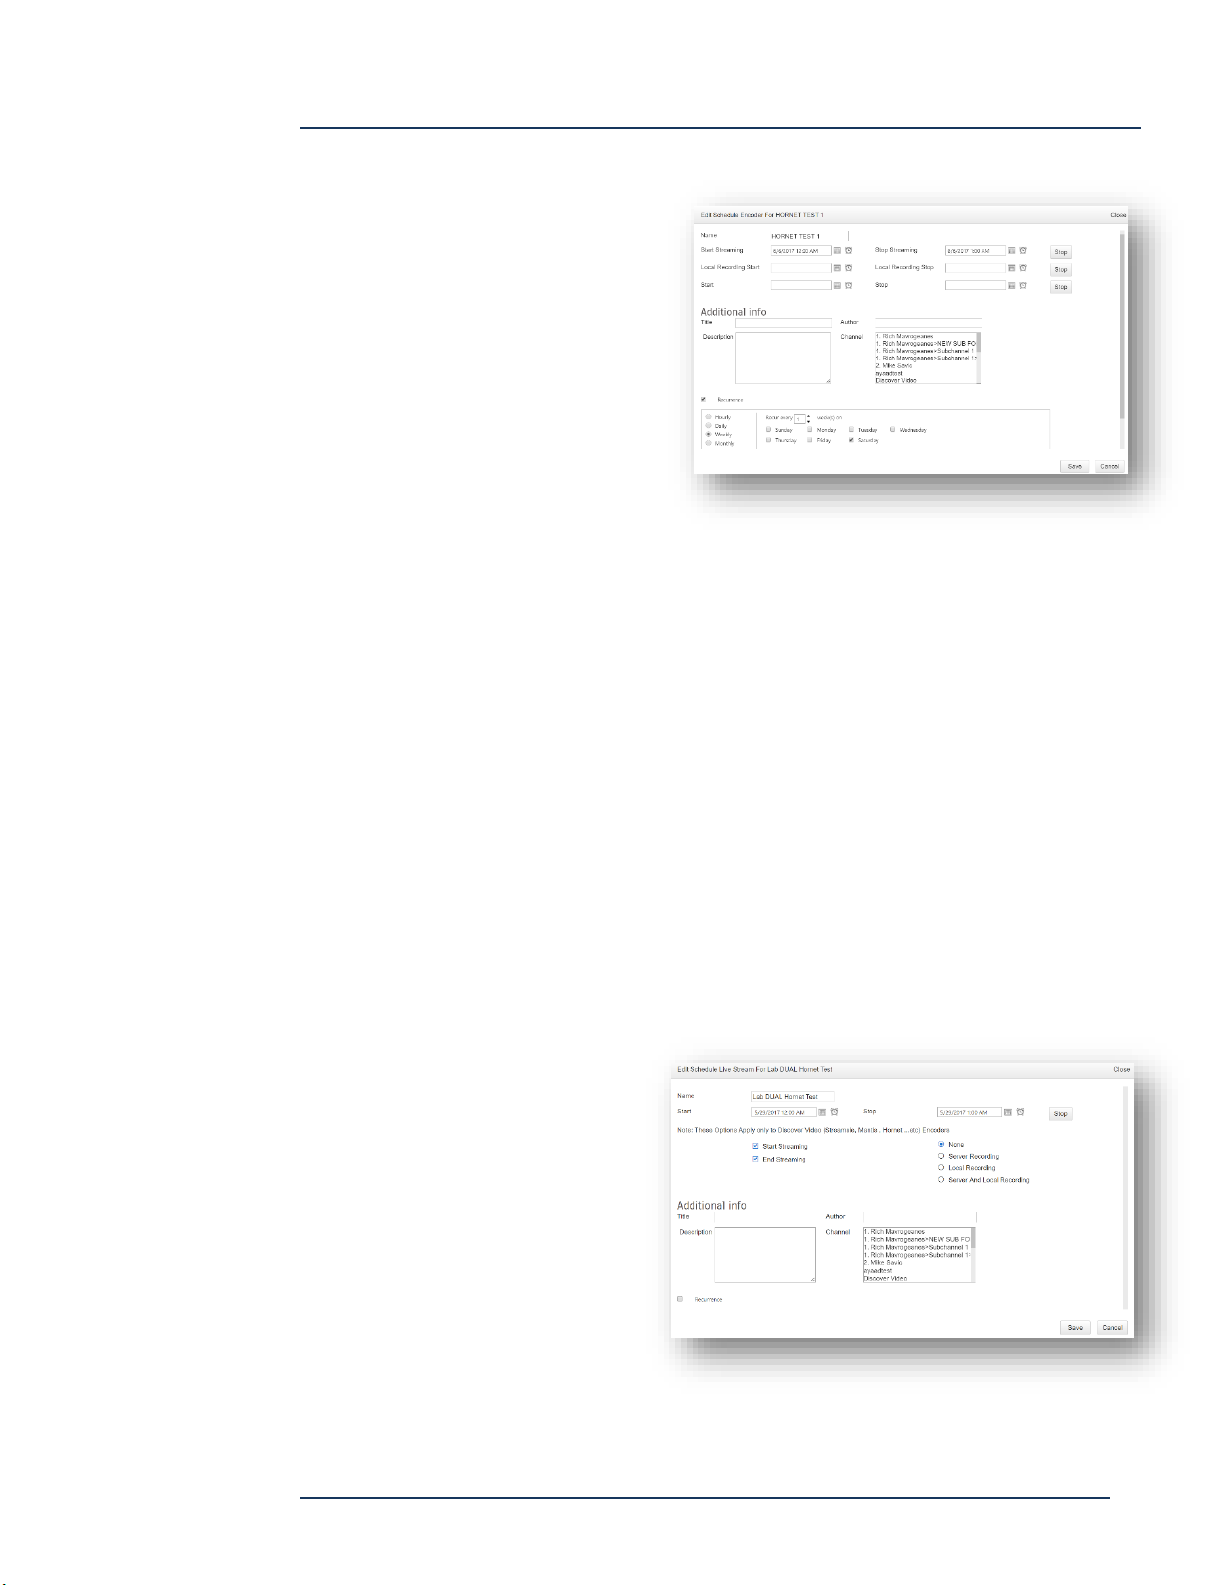
DEVOS -- Enterprise Video System
Encoder
If you selected a Hornet, Mantis, or
Streamise encoder, you may
schedule:
Streaming – sets when the encoder
will start and stop a live stream
Local Recording – sets when the
encoder will start and stop local
(non-server) recording. Streaming
need not be running. If the
encoder “Upload after record” is set,
the video will be published.
Server Recording – sets when the server will start recording the live stream (obviously,
live stream from the encoder must be present). If you do not want the encoder to
stop streaming, leave the stop field blank.
Enter Title, Author, Description, and select option channel(s) where the video will be
published.
Checking Recurrence exposes options for scheduling this action on a recurring basis.
Save when done.
Multi-Player
The scheduler supports multi-player configurations. A multi-player is a live stream
that includes 2, 3, or 4 live videos. If the videos are sourced from a DV encoder, then
they can be scheduled. An example would be a University lecture capture or a
Corporate event.
Enter start and end
date/time.
If you want the encoder
to start streaming at the
start time, select Start
Streaming checkbox; if
you want the encoder to
stop streaming at the end
time, select End
Streaming checkbox.
Page 78
DEVOS
Page 79
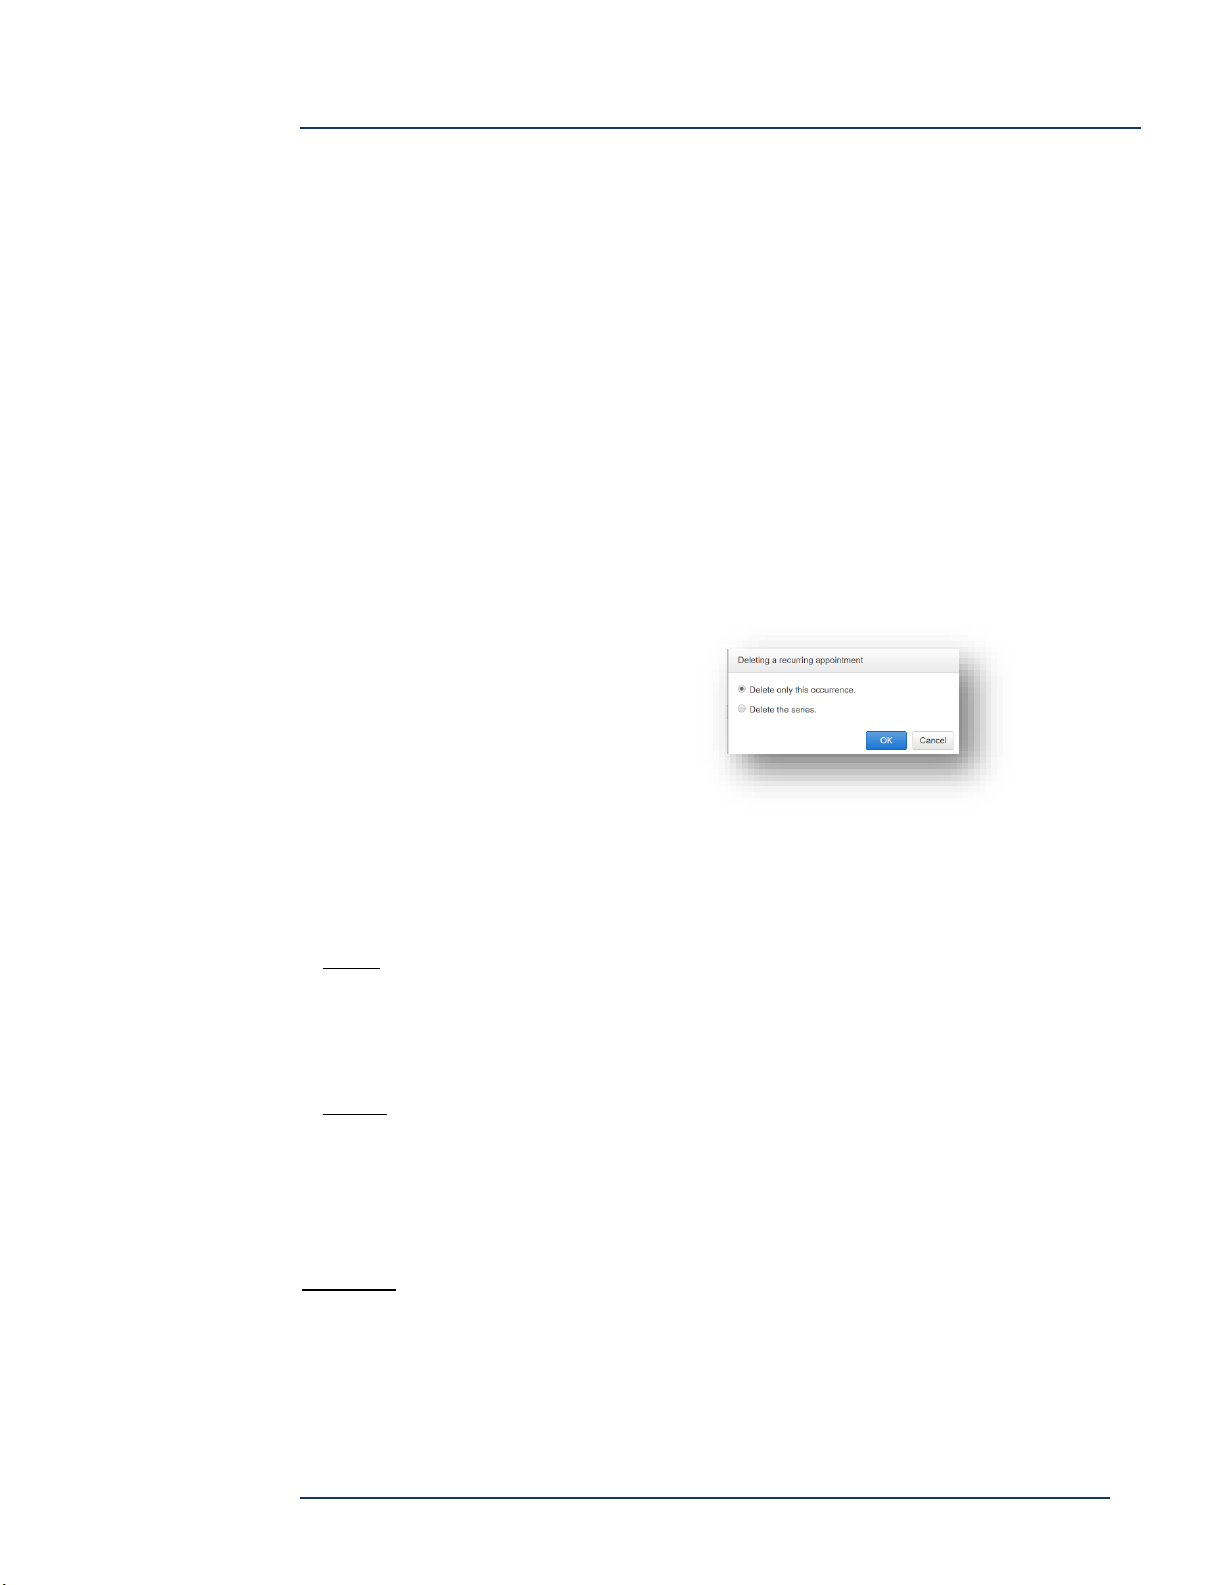
DEVOS -- Enterprise Video System
Select None for no recording
Select Server Recording to record the live stream on the server only.
Select Local Recording to record on the encoder only (assumes the encoder
has storage available).
Select Server and Local Recording to do both.
Enter Title, Author, Description, and optionally select a channel that the multi-
video will be published to.
Checking Recurrence exposes options for scheduling this action on a recurring
basis.
Save when done.
Remove Schedule
Click on the X for any item in the
schedule to remove it. If it is a
recurring item, you can delete the
series or only the selected occurrence.
IoT Control And Scheduling
Controlling things using DEVOS first requires you to understand Brands, Devices,
Functions, and Groups.
A Brand is a family of things. For example, a specific brand TV. You will be setting the
exact command that this Brand requires for each control that this Brand will do. For
example, you might create “Sony TV Model 1” and set the Power On command to
“XYZ-On”, and Power Off to “XYZ-Off”.
A Device is the thing that will receive the command. It has an IP address and IP Port.
For example, “TV Lobby”. When you define a Device, you also select the Brand you
created above. For example, “Lobby TV” might be at IP 123.123.123.123 Port 1234
and the Brand is Sony Model 1. A Device may also be an iTach which has an IP
address and port and translates IP commands to IR signals.
Functions is similar to Devices in that you can set the IP address and Port and the
Brand, but in this case you may select multiple controls. For example, the function
might be called “Start Up Lobby”, and you set IP 123.123.123.123 Port 1234, and you
include commands “Power On”, and “Input 1”. Thus, when you use this function, the
TV will turn on and switch to Input 1.
Page 79
DEVOS
Page 80
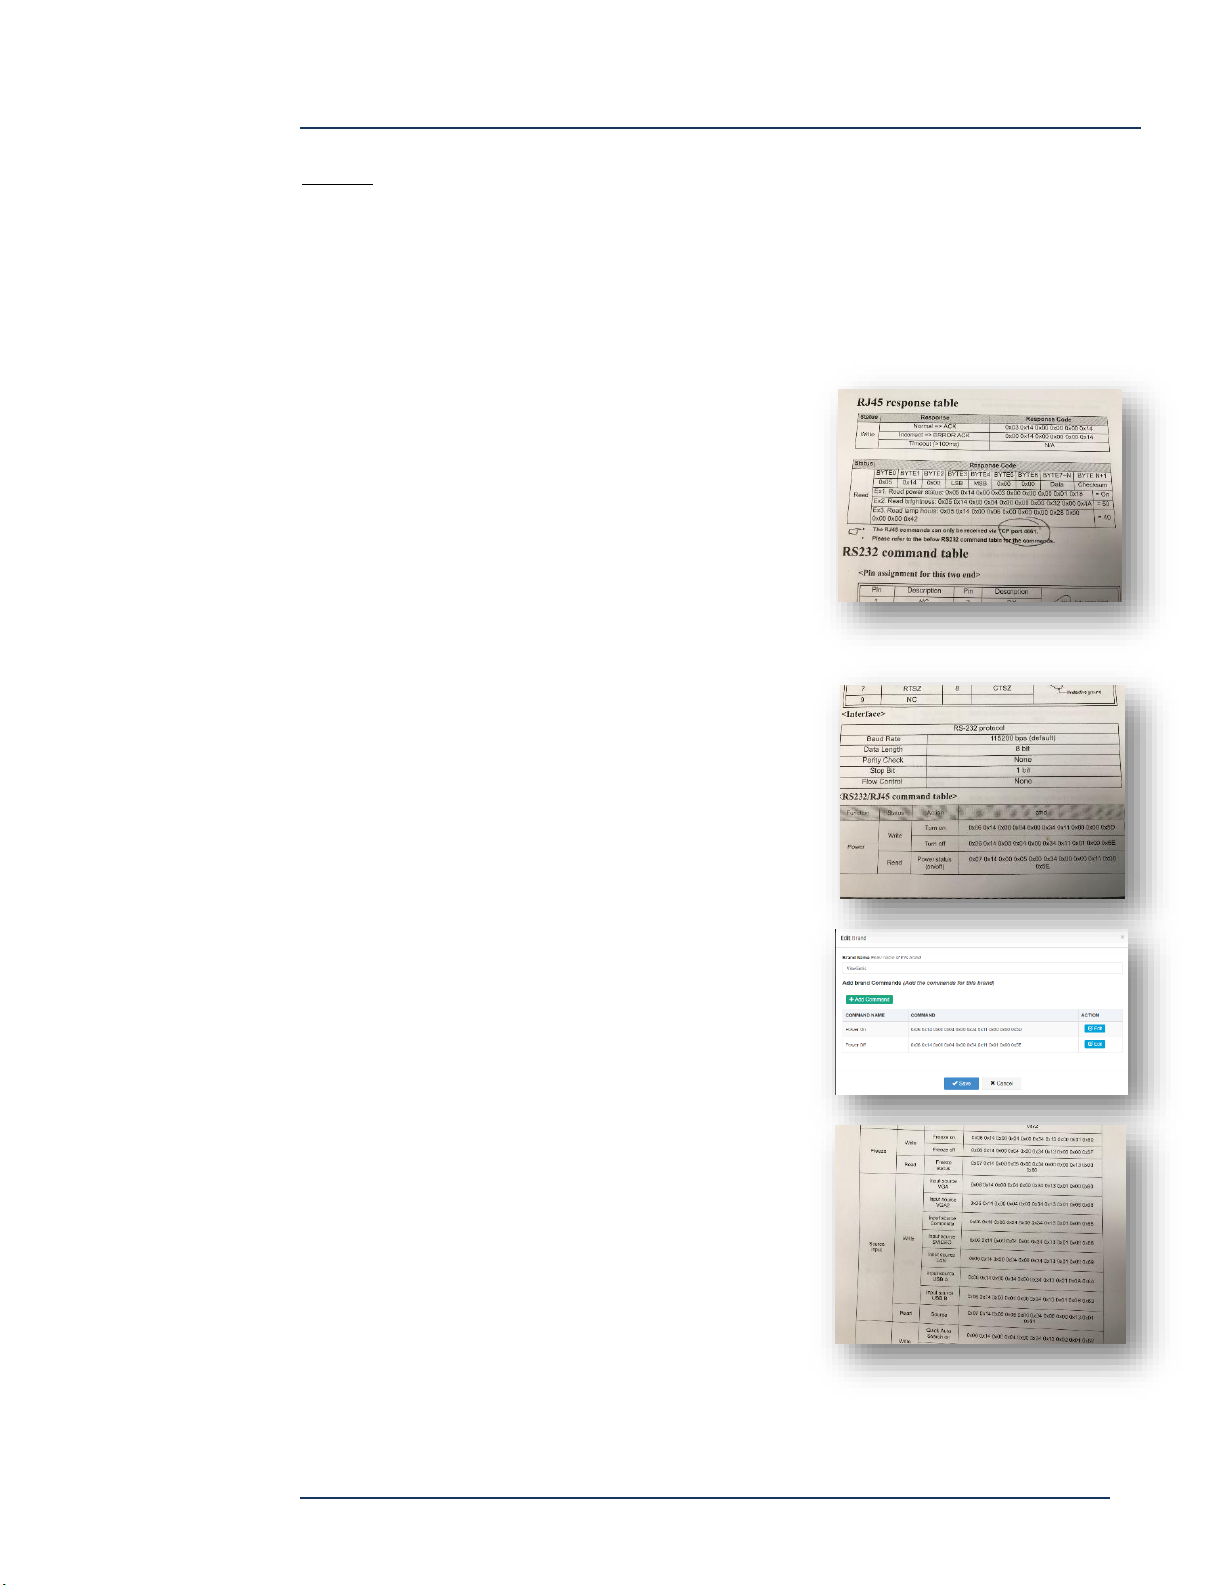
DEVOS -- Enterprise Video System
Groups are collections of Devices and Functions. For example, a Group might include
many Devices and a Power Off function. Thus, execution of a Group will turn off the
power on all TVs.
Setting Up Brands
For each command, you must enter either an ASCII string or a hex code. What you
enter depends on the device you wish to control.
Let’s start with a typical projector, in this case the
vendor is ViewSonic. Find the vendor’s product
manual and identify the IP port used for control.
This vendor refers to “IP” as “RJ45” and tells us to
use port 4661. You will need this when you set up
the device or function.
Next you must find the desired function. From the
illustration, notice that Power / Turn On function is
hex code:
0x06 0x14 0x00 0x04 0x00 0x34 0x11 0x00 0x00 0x5D
and the Turn Off hex code is:
0x06 0x14 0x00 0x04 0x00 0x34 0x11 0x01 0x00 0x5E
In DEVOS, create a brand (e.g. “ViewSonic”) and
enter the Power On and Power Off codes.
Using the same vendor manual, find other codes
that you wish to use, for example selecting HDMI
input. Use the “+Add Command” function to add
as many additional commands as desired.
Page 80
DEVOS
Page 81

DEVOS -- Enterprise Video System
Using the same vendor manual, find other codes
that you wish to use, for example selecting HDMI
input. Use the “+Add Command” function to add
as many additional commands as desired.
IR Control
When controlling devices via IR, the system must
communicate not with the controlled device directly, but with an iTach IR transmitter
which then sends the command via IR to the controlled device. The brand setup
procedure is similar, but you will enter ASCII command strings for the brand.
For example, for Samsung TVs, the commands are
Power On:
sendir,1:1,1,38000,1,1,172,172,22,64,22,64,22,64,22,21,22,21,22,21,22,21,22,21,22,64,22,64,22,64,22,21,22,21,22,21,22,2
1,22,21,22,64,22,21,22,21,22,64,22,64,22,21,22,21,22,64,22,21,22,64,22,64,22,21,22,21,22,64,22,64,22,21,22,1820
Power Off:
sendir,1:1,1,38000,1,1,173,173,21,65,21,65,21,65,21,21,21,21,21,21,21,21,21,21,21,65,21,65,21,65,21,21,21,21,21,21,21,2
1,21,21,21,21,21,21,21,21,21,65,21,65,21,21,21,21,21,65,21,65,21,65,21,65,21,21,21,21,21,65,21,65,21,21,21,1832
There are several methods to obtain these commands for your brand, including
learning it directly from a handheld IR remote control
(see http://demo1.devosvideo.com/show?video=ee41c48fc082).
Discover Video support can provide you with codes for virtually any brand and model
from our library. Contact support with the exact model number.
Save your brand when done.
Page 81
DEVOS
Page 82
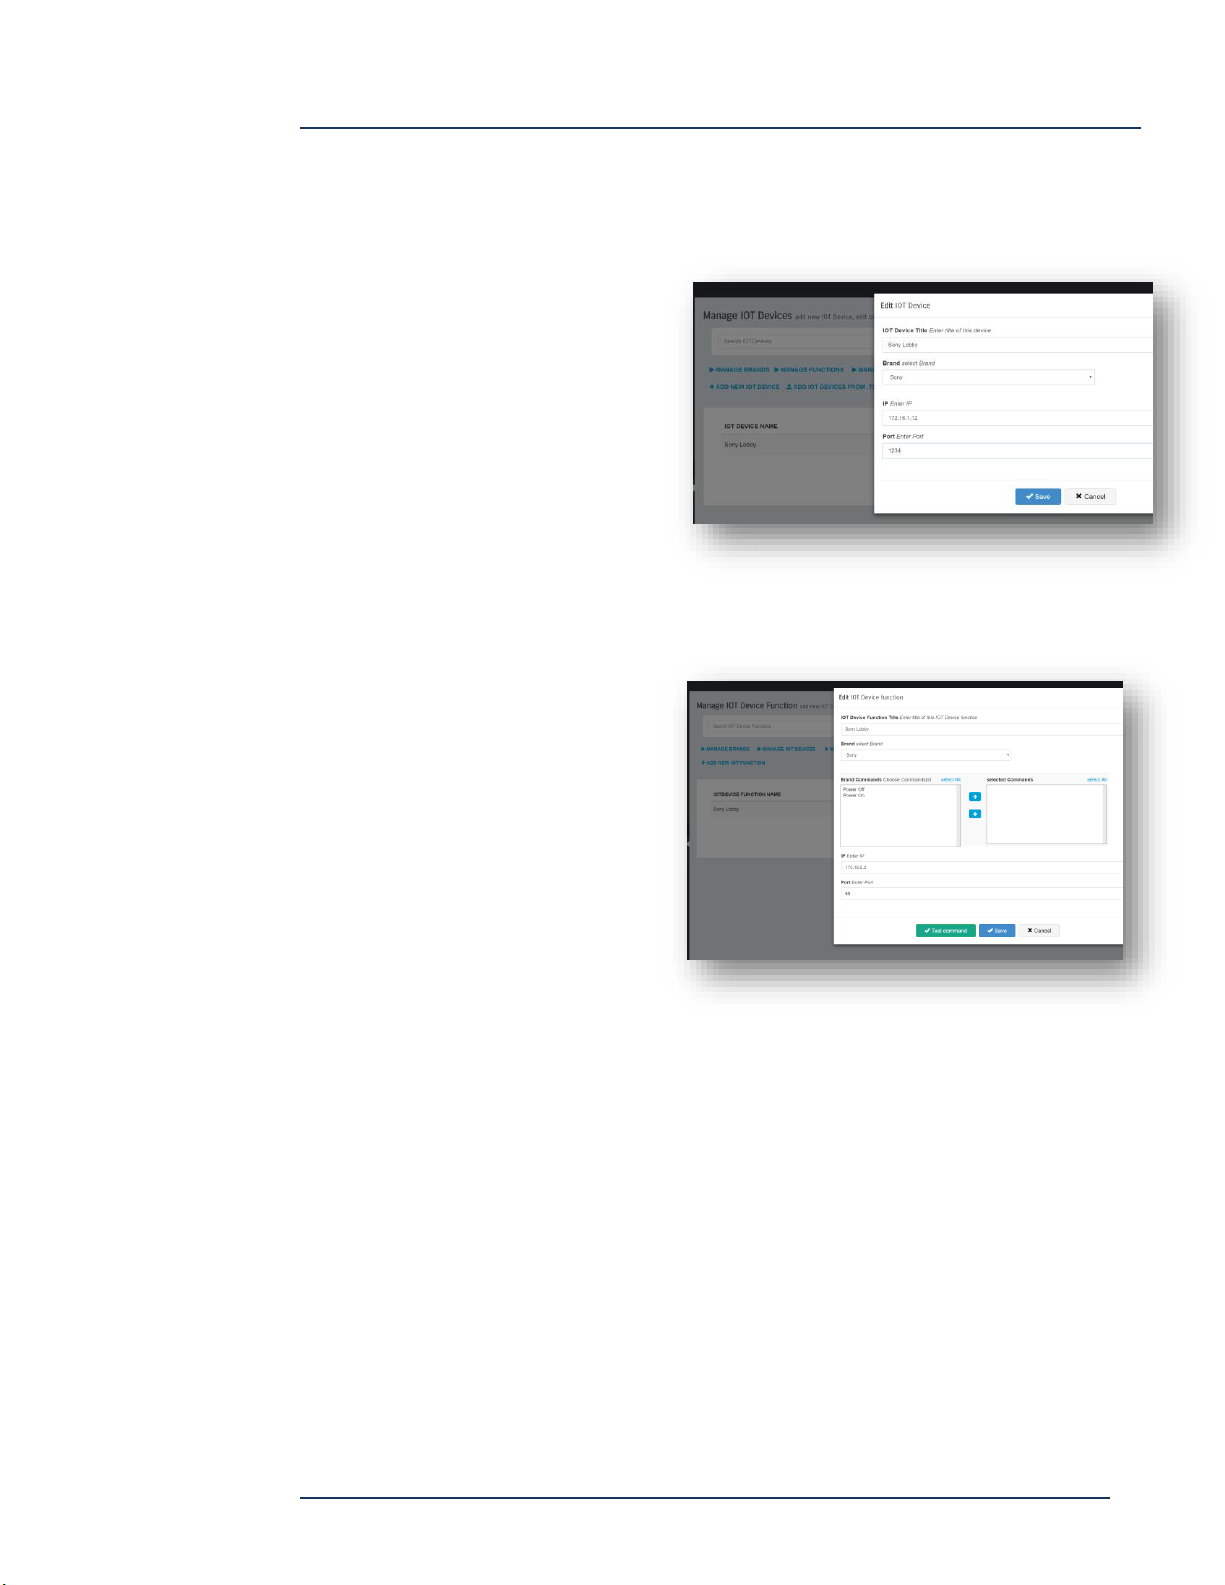
DEVOS -- Enterprise Video System
Setting Up Devices
To set up a device, select Add New IoT Device, give it a name, select the Brand, and
enter the IP address and Port. You should give it a meaningful name, such as “Lobby
TV”, “My Office TV”, etc.
Note: for iTach, the port is: 4998
Save when done.
Setting Up Functions
A function is one or more commands sent to a device. Select Add New IoT Function,
enter a meaningful name such as
“Lobby TV”, “My Office”, etc., select
the Brand, and then select the
Brand Commands to be sent.
Enter the IP and Port of the target
device.
You may test the function using
the Test Command button. Save
when done.
Page 82
DEVOS
Page 83
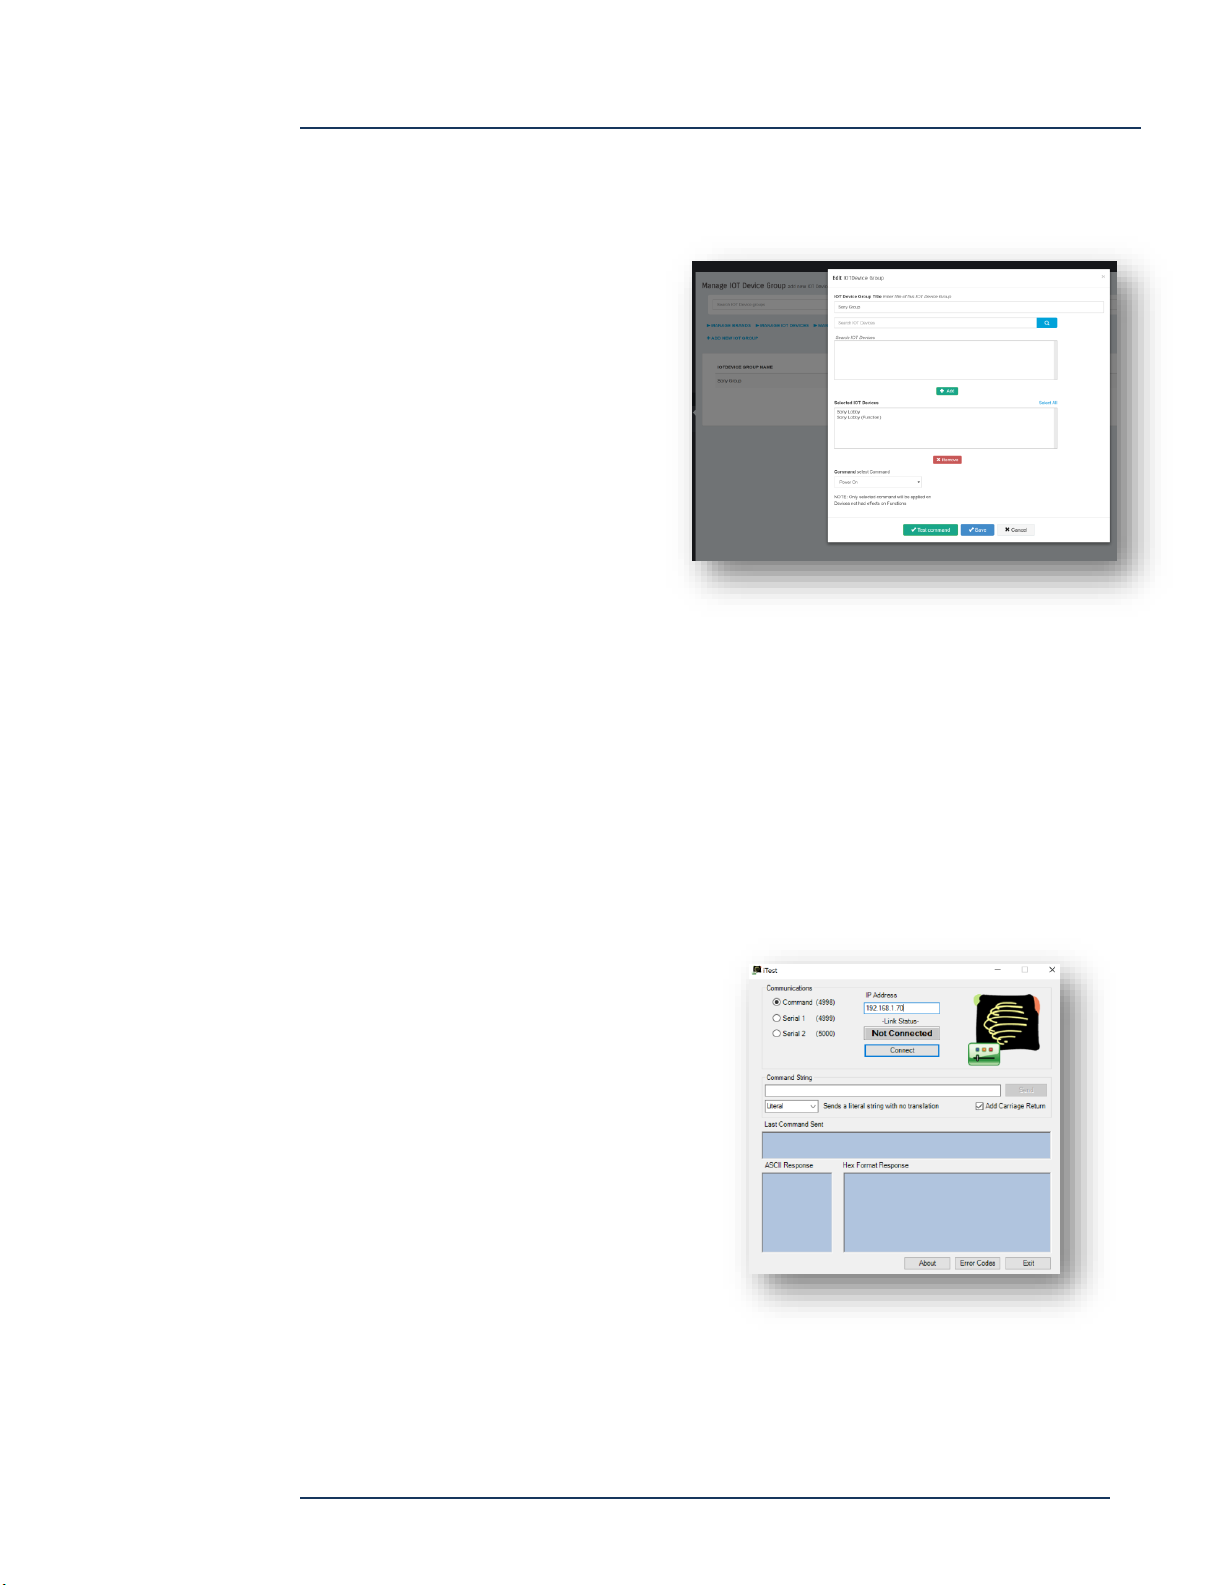
DEVOS -- Enterprise Video System
Setting Up Groups
A Group is simply a collection of functions that can be called at once. Rather than
scheduling to calling individual
functions, you can call a Group
(which might turn off all TV’s in
your building).
Select Add New IoT Group. Give it
a name.
Search for device or function by
name (or enter % to show all).
Add each device or group and save.
NOTE: Devices need not have a
function associated with them. Assuming you correctly entered the Power On and Off
code when you created a device, you can create a Group that directly sets power on
or off by selecting the Command from the dropdown. This command has no effect
on Functions: it operates on devices only.
Testing iTach Devices
When you have a iTach device connected and ready, it is handy to test it directly
without commanding DEVOS. This helps to give you confidence that the iTach is
working.
Simply use the iTest program and enter
the IP address of the iTach and select
Connect. If you cannot connect then you
know you have the wrong IP address or
you have a network error.
Paste in the command string, and press
Send.
The controlled device (e.g. TV) should
respond if the code you sent is right.
Page 83
DEVOS
Page 84

RS-232 Control
It is possible to schedule and control devices that accept command via RS-232 serial
ports. For example, SignStick2 can support a USB-to-RS232 adapter and it will accept
commands sent to it on port 4998. Of course, you will want to ensure the IP address
is static.
A classic terminal server commonly uses port 23 to telnet and you can schedule
devices this way.
DEVOS -- Enterprise Video System
Page 84
DEVOS
Page 85
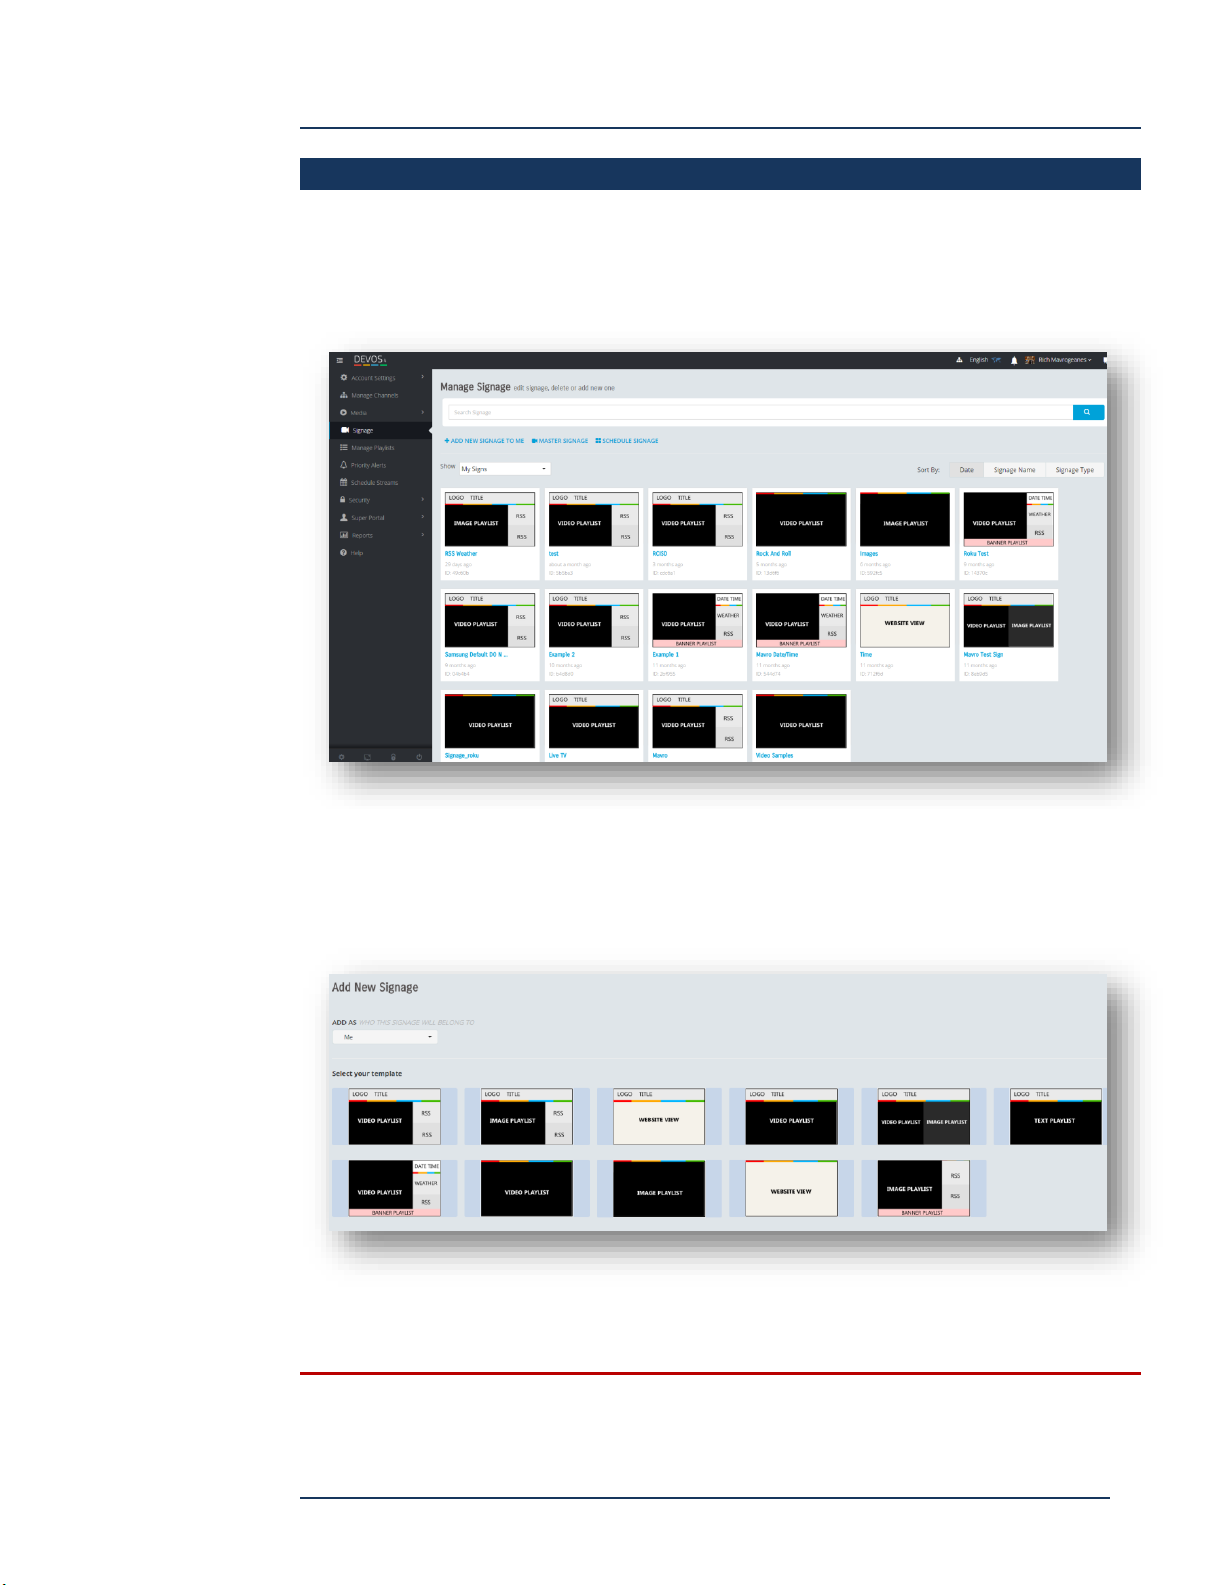
DEVOS -- Enterprise Video System
Signage
Digital Signage allows you to display desired content on TV's or monitors in common
areas, lobbies, or other locations. Each user can create and manage their own signs,
and there is no limit to the number or variety of signs available.
Create Sign
To create a new sign, select Add New Signage and select from one of the available
templates.
Each template is created using a wizard that prompts you for required values.
NOTE: Many templates use video playlists, text playlists, and banner playlists.
You should be sure you have created desired playlists prior to creating a sign.
Page 85
DEVOS
Page 86
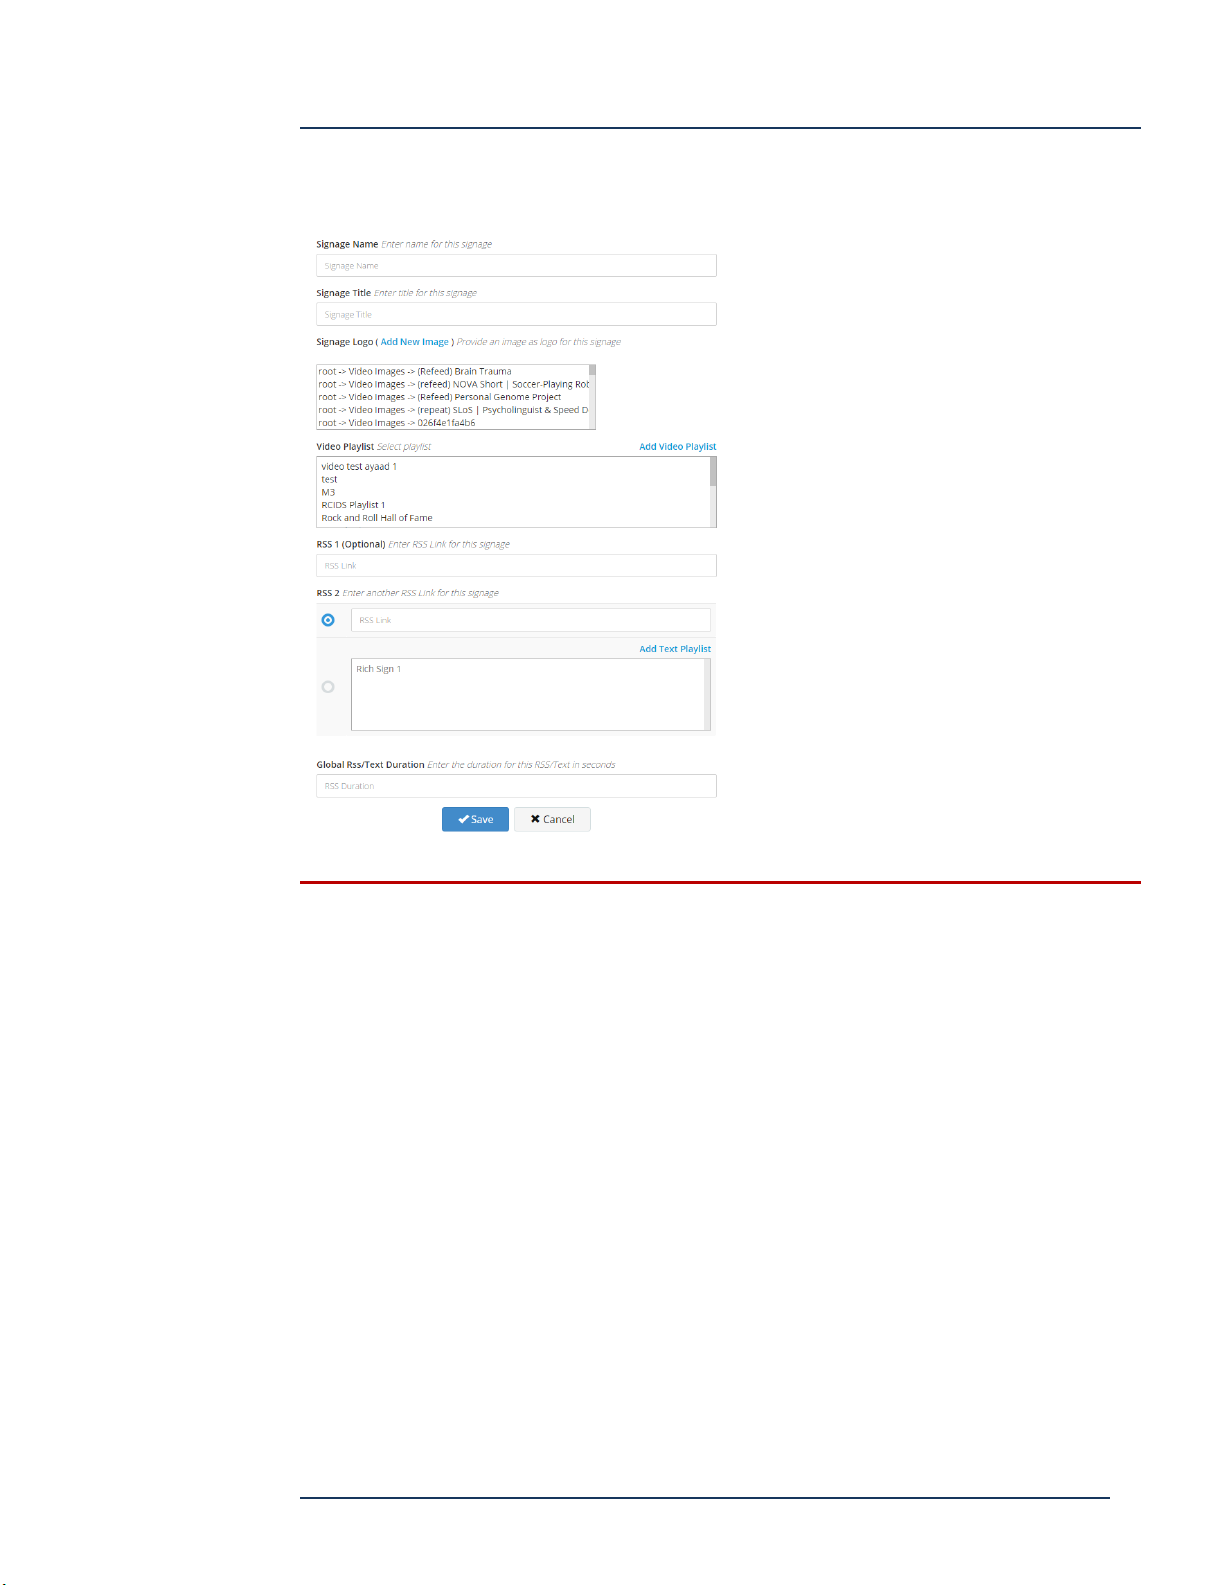
DEVOS -- Enterprise Video System
Example Entry For Template 1
Signage Name -- enter a reference name for the sign
Signage Title -- enter the text to appear as the title in the
sign
Signage Logo -- select or upload an image to be shown as
a logo in the sign
Video Playlist -- video signage uses pre-existing video
playlists. You must create a playlist to be used in the
signage before creating the sign. Select the desired
playlist.
RSS 1 -- Optional. Enter a valid RSS feed such as from a
public news aggregator (e.g. "CNN" or "NPR").
RSS 2 -- Enter 2nd RSS feed, or select text playlist (which
must have been previously created)
Global RSS Duration -- enter the number of seconds for
display of each RSS element (e.g. 15)
NOTE: Some RSS feeds will not operate properly in Digital Signage displays. RSS
feeds that attempt to display web links or show images or videos should be
avoided. Conventional text RSS feeds, such as NPR, CNN, and similar are usually
the most successful.
Page 86
DEVOS
Page 87
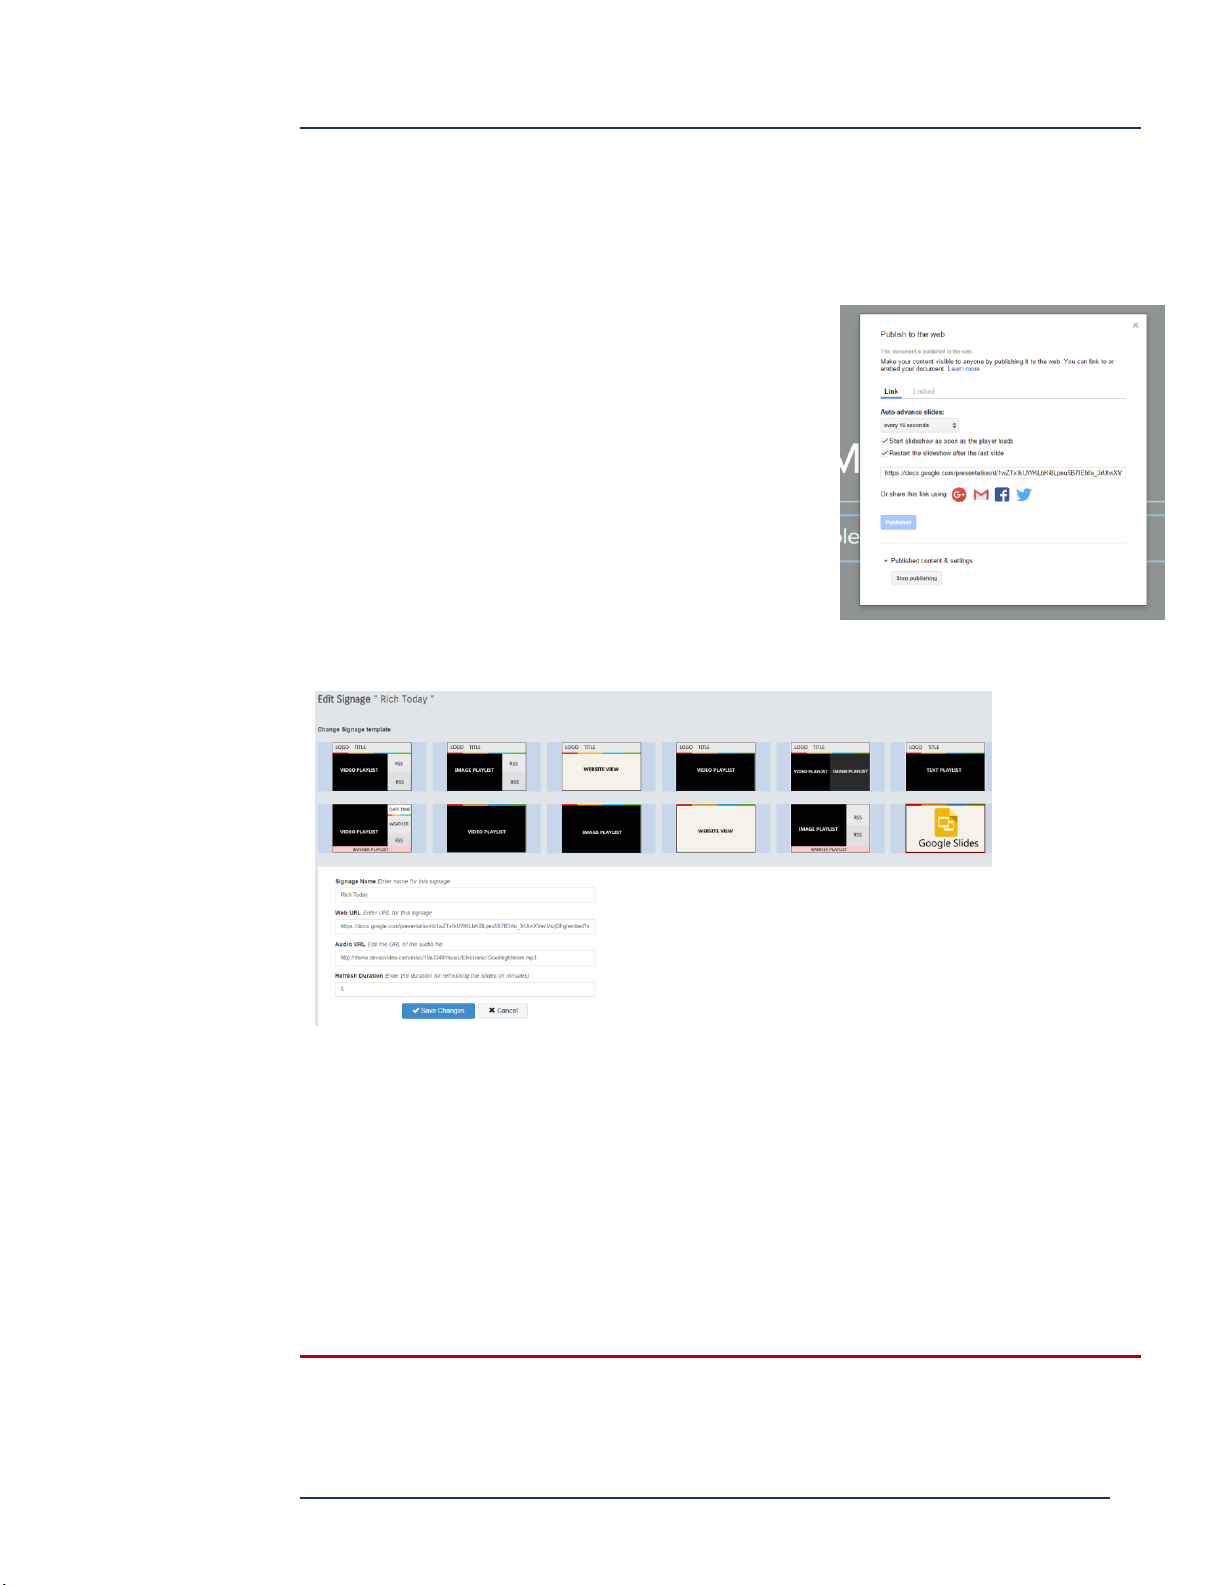
DEVOS -- Enterprise Video System
Google Slides
Digital Signage supports Google Slides, which provides an online alternative to
Microsoft PowerPoint and provides the ability to change the content on-the-fly. You
may also elect to share your Google Slides account so that multiple users can edit the
slides.
Create your presentation on Google Slides. When
done, select File / Publish To Web. Check the boxes
and set the slide advance time. Copy the URL using
Control-C or right-click/copy.
Select Google Slides from the template list.
Paste the URL as the Web URL, enter a title, and enter a link to optional audio. You
may get royalty-free music from http://discovervideo.com/music. You may also use a
popular Internet radio station link (must be .m3u type).
Set the refresh duration to set how often DEVOS should check your Google Slides for
changes. If you make changes rarely, use a large number. If you make changes every
hour, use 60 minutes, etc.
Google Slides will not display on Roku because Roku does not support web
types. It may not operate on Samsung Smart TVs.
Page 87
DEVOS
Page 88

DEVOS -- Enterprise Video System
Displaying Signs
Digital Signage may be displayed using all or any of these methods:
Signage Media Player2 & SignStick2®
These are small, compact computers designed for Digital Signage display. Follow the
setup instructions to configure them with the signage code.
These devices have the advantage of caching VoD content so they use minimal
bandwidth; in fact, after they have played once they are “loaded” and you can
disconnect the network and they will continue to play (obviously, not live video or
other real-time information).
Samsung Smart TV
Discover Video has published a free App called "Signage" available on the Samsung
Smart TV App Store, that you may download directly in your Smart TV (later models
of Samsung Smart TV and some Blu-Ray players come with the App already installed).
Simply start the App and press the "A" button on the Samsung remote control. Enter
your DEVOS server, and enter the desired digital signage ID code (displayed on the
DEVOS Signage page). See http://discovervideo.com/samsung
Roku Box
Discover Video has published a free App called "Signage" available on the Roku Box.
This inexpensive box delivers high quality audio/video. Simply install the Discover
Video Signage Channel on your Roku box, press the "A" button to set the DEVOS
server URL, and enter the signage ID code (shown for each sign on the Signage page
in DEVOS). See http://discovervideo.com/roku. NOTE: Web Templates including
Google Slides are not supported by Roku.
Note: both Roku and Samsung are consumer devices and will not exhibit the
durability or reliability most organizations demand, but for light or occasional
use they can be very useful.
Web Browser
Open the Digital Signage page by clicking on it. The signage will display in your web
browser. You may copy the URL to any computer and simply display the browser on
a monitor. Currently, the web page requires Flash player.
Page 88
DEVOS
Page 89

DEVOS -- Enterprise Video System
Controlling Your Sign
The Discover Video Digital Signage system in DEVOS will automatically change the
signage display when you edit your sign. You can change the contents of playlist, or
change the sign style without needing to visit each display to make configuration
adjustments.
The Priority Alert system will override what is displayed on your sign(s) if the alert has
been set to include selected sign(s).
Page 89
DEVOS
Page 90
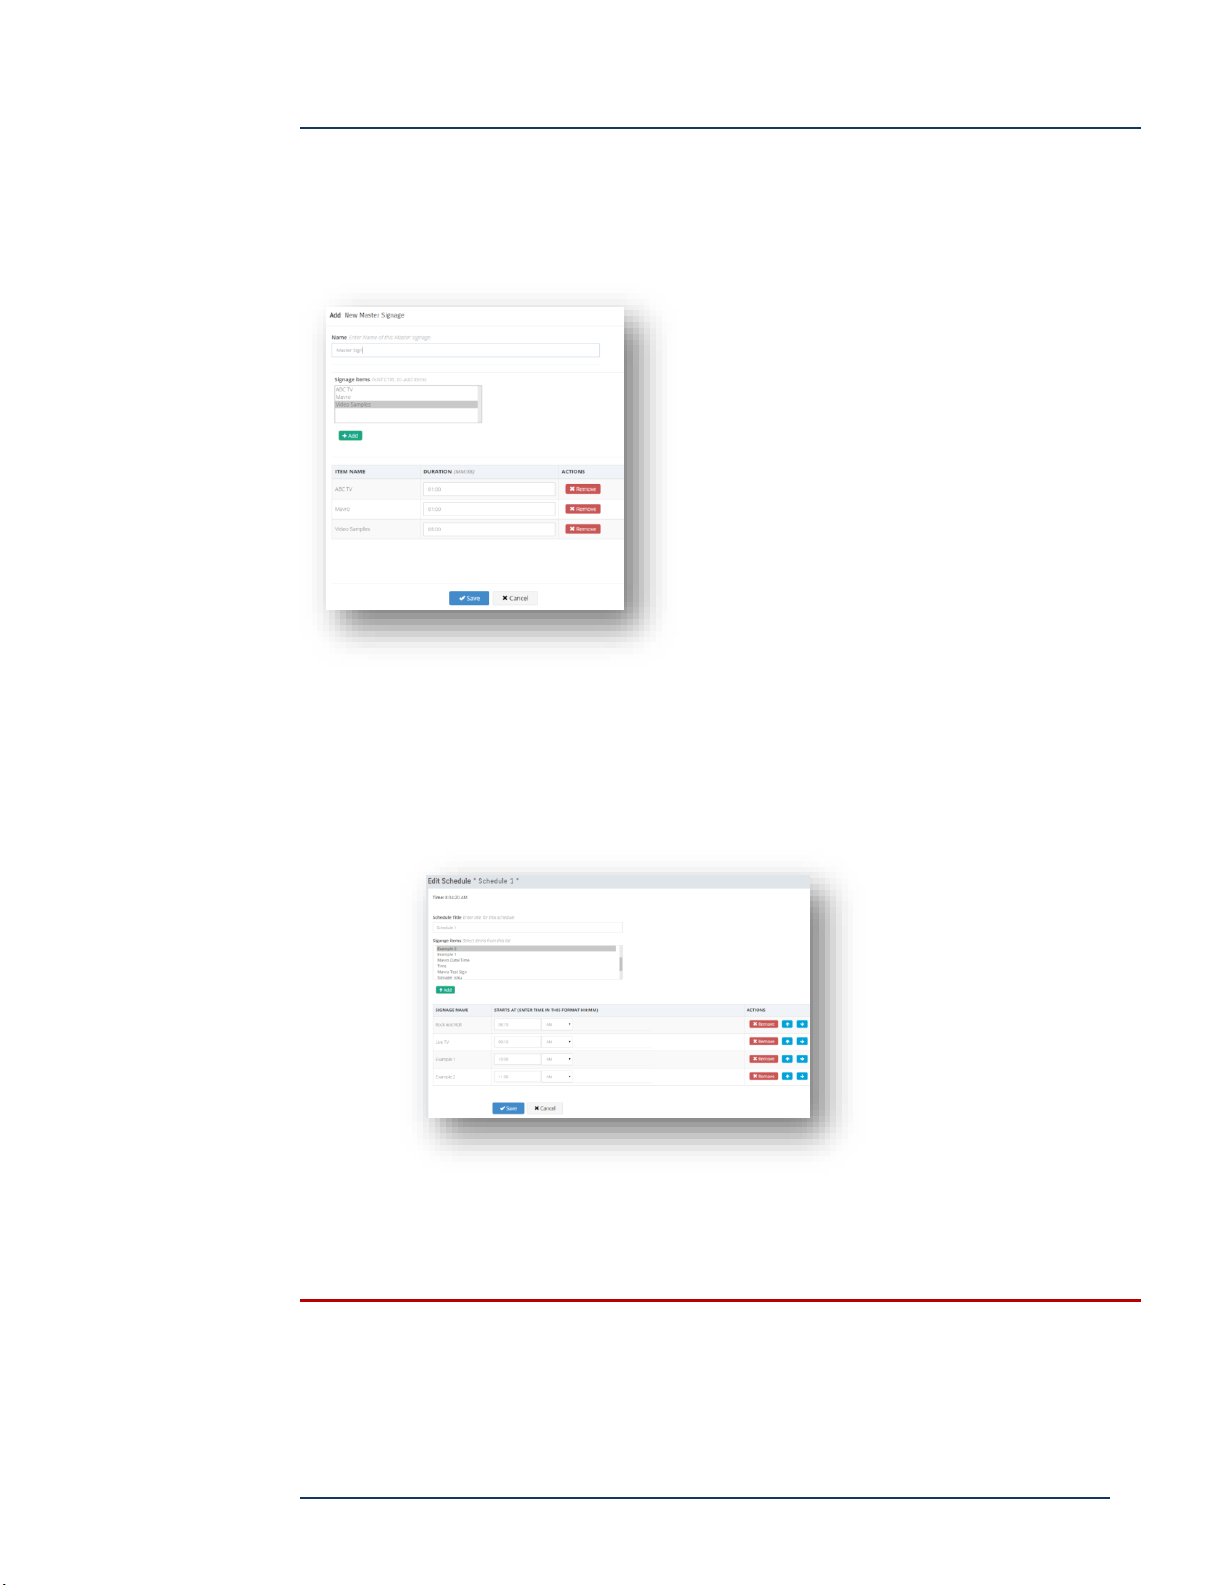
DEVOS -- Enterprise Video System
Master Signage
You can create a "Master Sign" which is a "sign of signs". The Master Signage will
display each of the selected signs for the specified duration.
Schedule Signage
You may create a schedule to display a sign at the same time every day. Select
"Schedule Signage" to create or edit a schedule. Give your schedule a name, select
the sign you want to use, and add it to the list. Enter the time for each sign and save.
After saving, click on the Schedule Signage Name to open it in your browser.
You may create as many schedules as desired. Note that you can include any sign in
your schedule (any template), so you can show image playlist in the morning, video
playlist in the afternoon, etc.
Schedule Signage display is supported in the web page, and in the Discover
Video Digital Signage Media Player, but not currently on 3rd party devices such
as Roku, Samsung, etc.
Page 90
DEVOS
Page 91
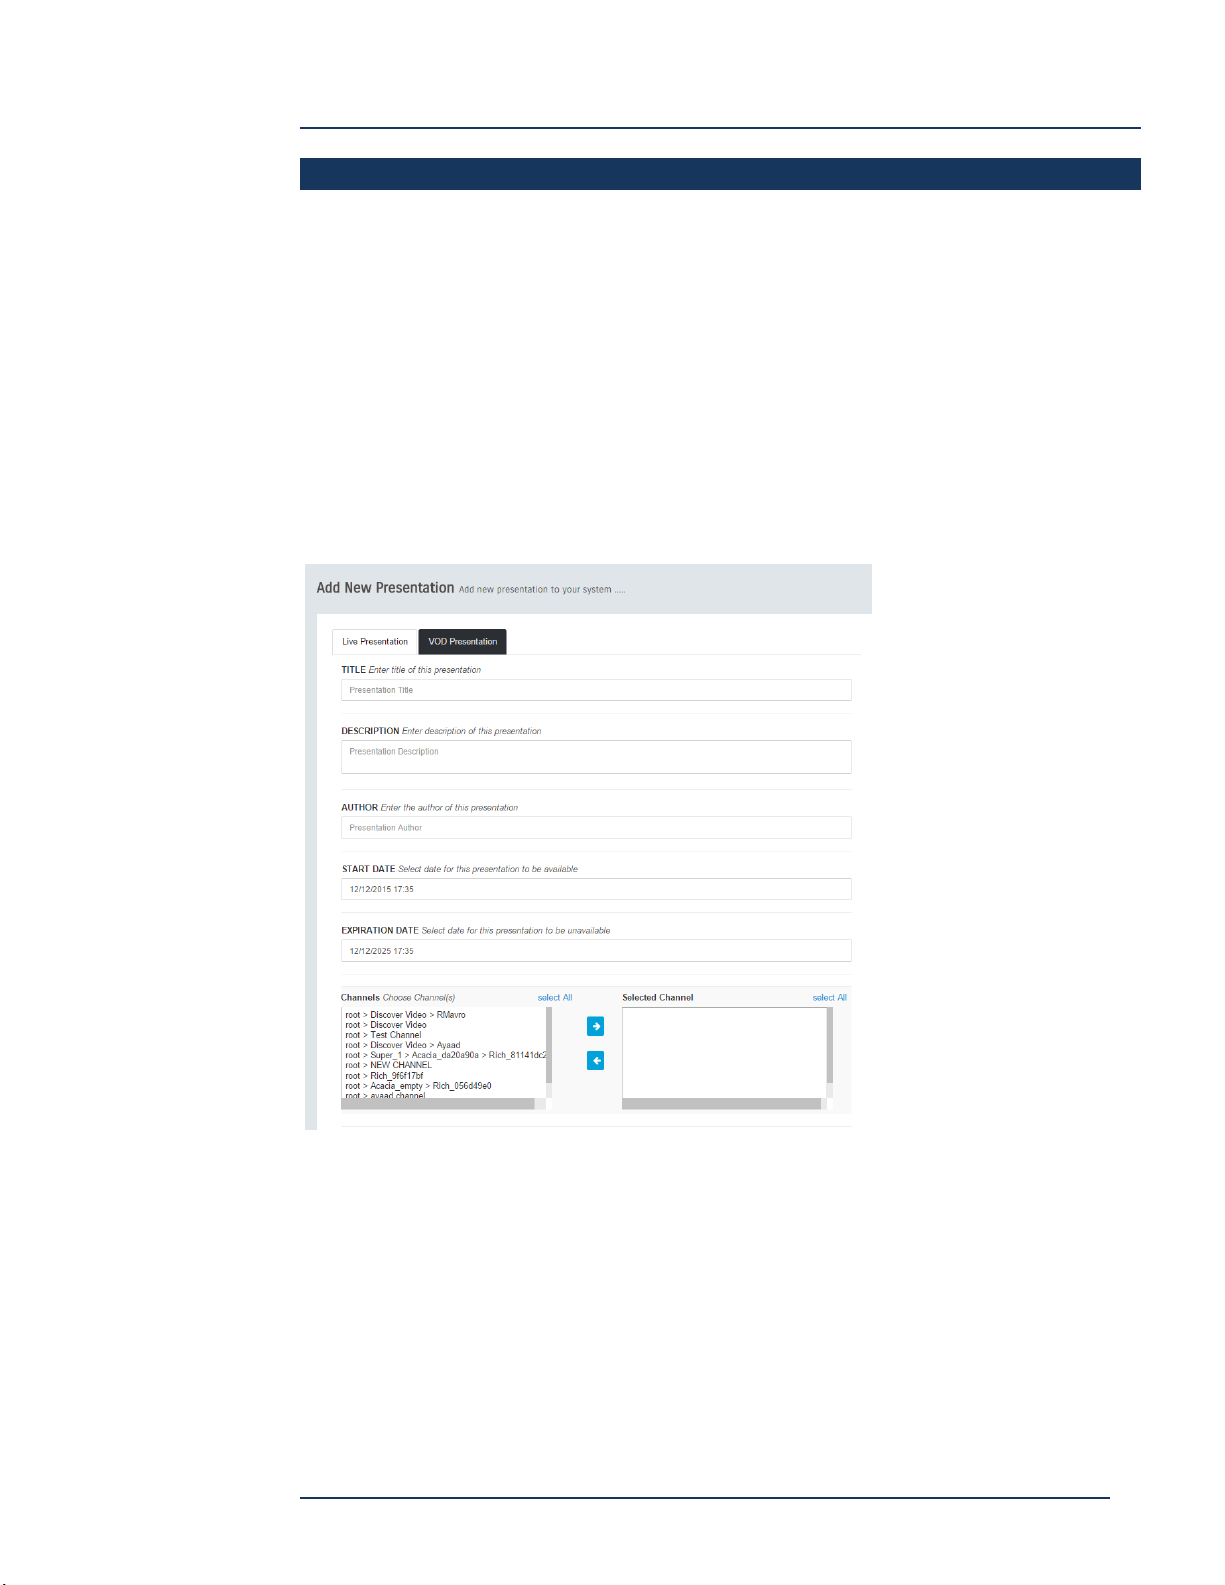
DEVOS -- Enterprise Video System
Title -- enter a title
Description -- enter a description
Author -- enter author
Start Date -- enter date/time when
the presentation will appear in a
channel (if channel selected)
Expiration Date -- enter date/time
when the presentation will be
hidden in a channel (if channel
selected)
Channel -- select channel(s) where
the live presentation will appear
Presentations
DEVOS empowers you to communicate with live video synchronized with live
PowerPoint slides. You can also synchronize PowerPoint slides with any video file to
create engaging multimedia that informs, instructs, or even entertains. And you can
give live slides-only presentations (where your audience engages via telephone).
Live Presentations
To set up a live presentation, be sure you have set up a live stream (e.g. have
Streamsie account ready), and you have a PowerPoint file ready. Log in to DEVOS and
select "Presentations", then select "Add New Presentation". Enter desired values as
described below:
Page 91
DEVOS
Page 92
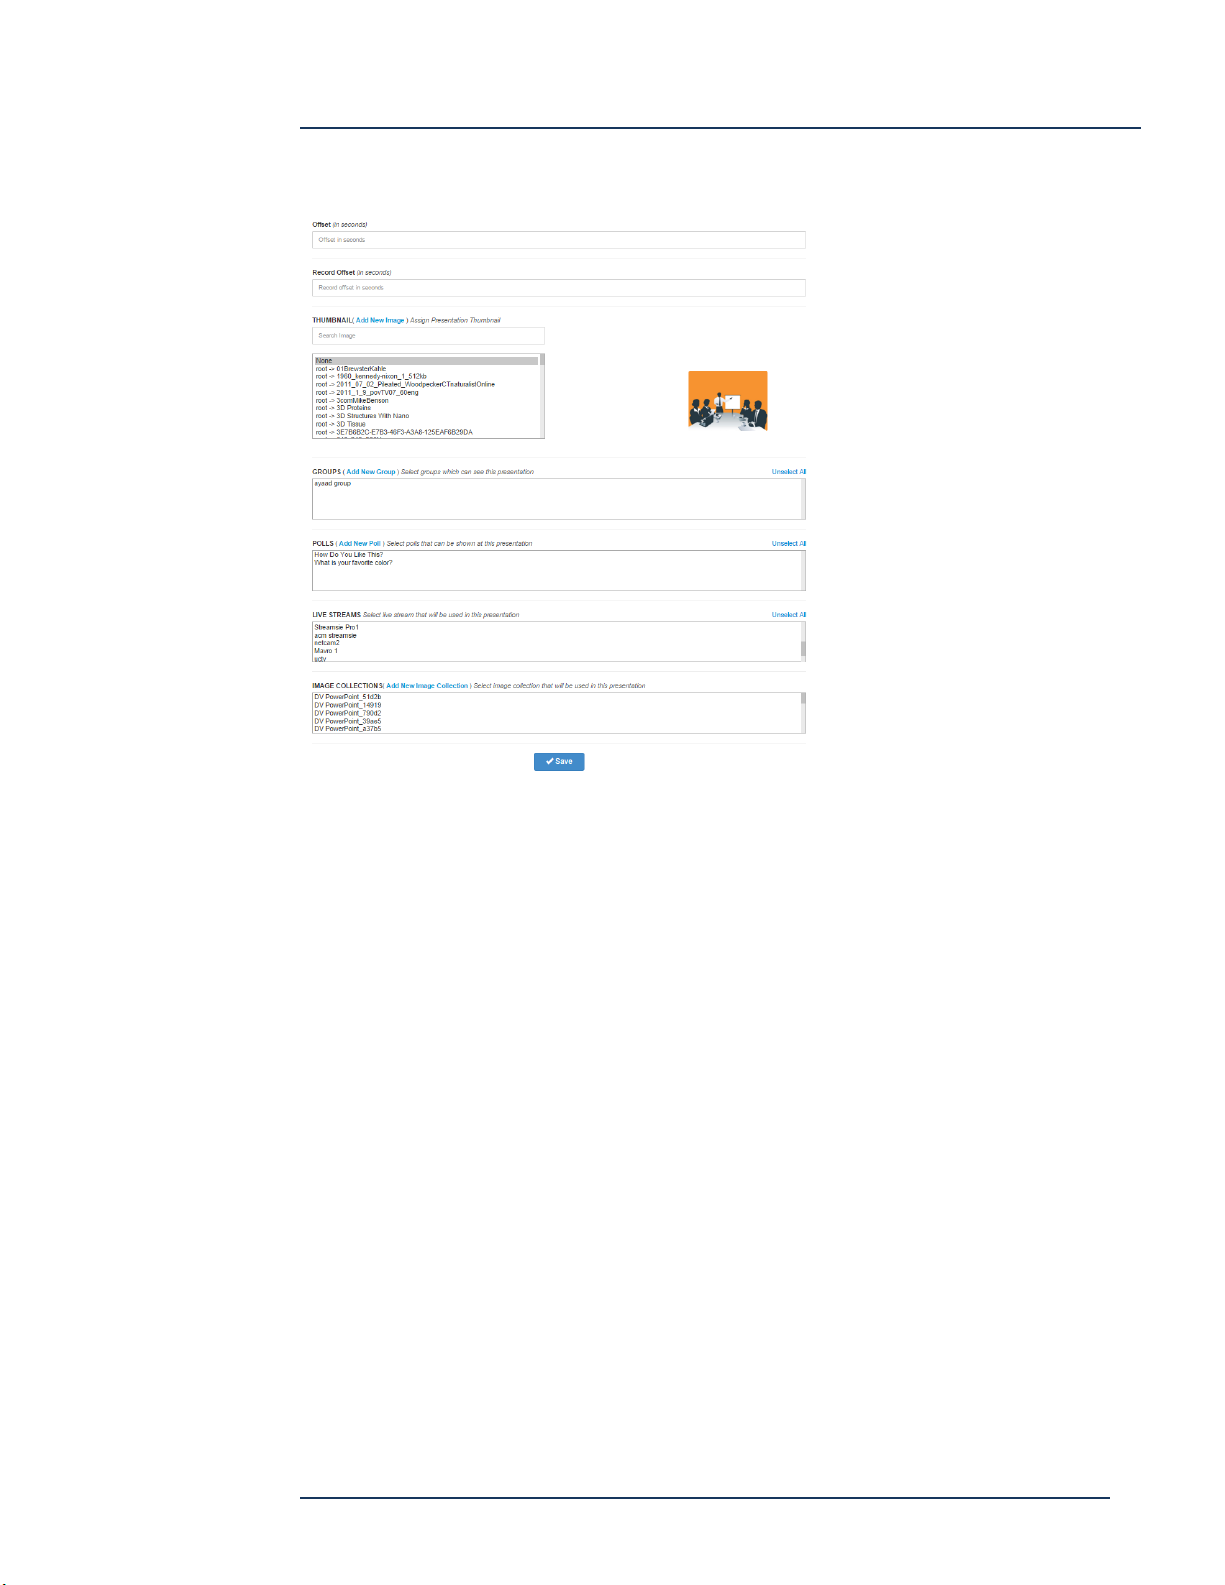
DEVOS -- Enterprise Video System
Offset -- how much to delay live slide
change for live viewers (default 0)
Record Offset -- how much to delay
live slide change for recording (default 0)
Thumbnail -- select image to display
for presentation thumbnail
Groups -- select security group that may
view (no selection means everyone
can view if published to a channel).
Polls -- add new poll to create poll
that will be used in the presentation
Live Stream -- select a live stream that
will be used. Leave blank for slides-only (assumes you will use
telephone conference, no recording).
Image Collection -- select PowerPoint
or other image collection to be used
for your presentation, or add new
If you have not already uploaded a PowerPoint, you may select "Add New Image
Collection" and upload your .ppt or .pptx file now and wait for it to process.
If you know that you will poll the audience to get live responses, you may select "Add
New Poll" now (you can also do it during the live presentation, but your audience will
have to wait while you create it so you should create your polls in advance whenever
possible). You can also create and manage your polls from the main Presentation
page.
When done, select "Save". A presentation image now appears in your Presentation
page with the title you have entered and with a "Give Presentation" image overlay
which indicates it is a live presentation.
Page 92
DEVOS
Page 93
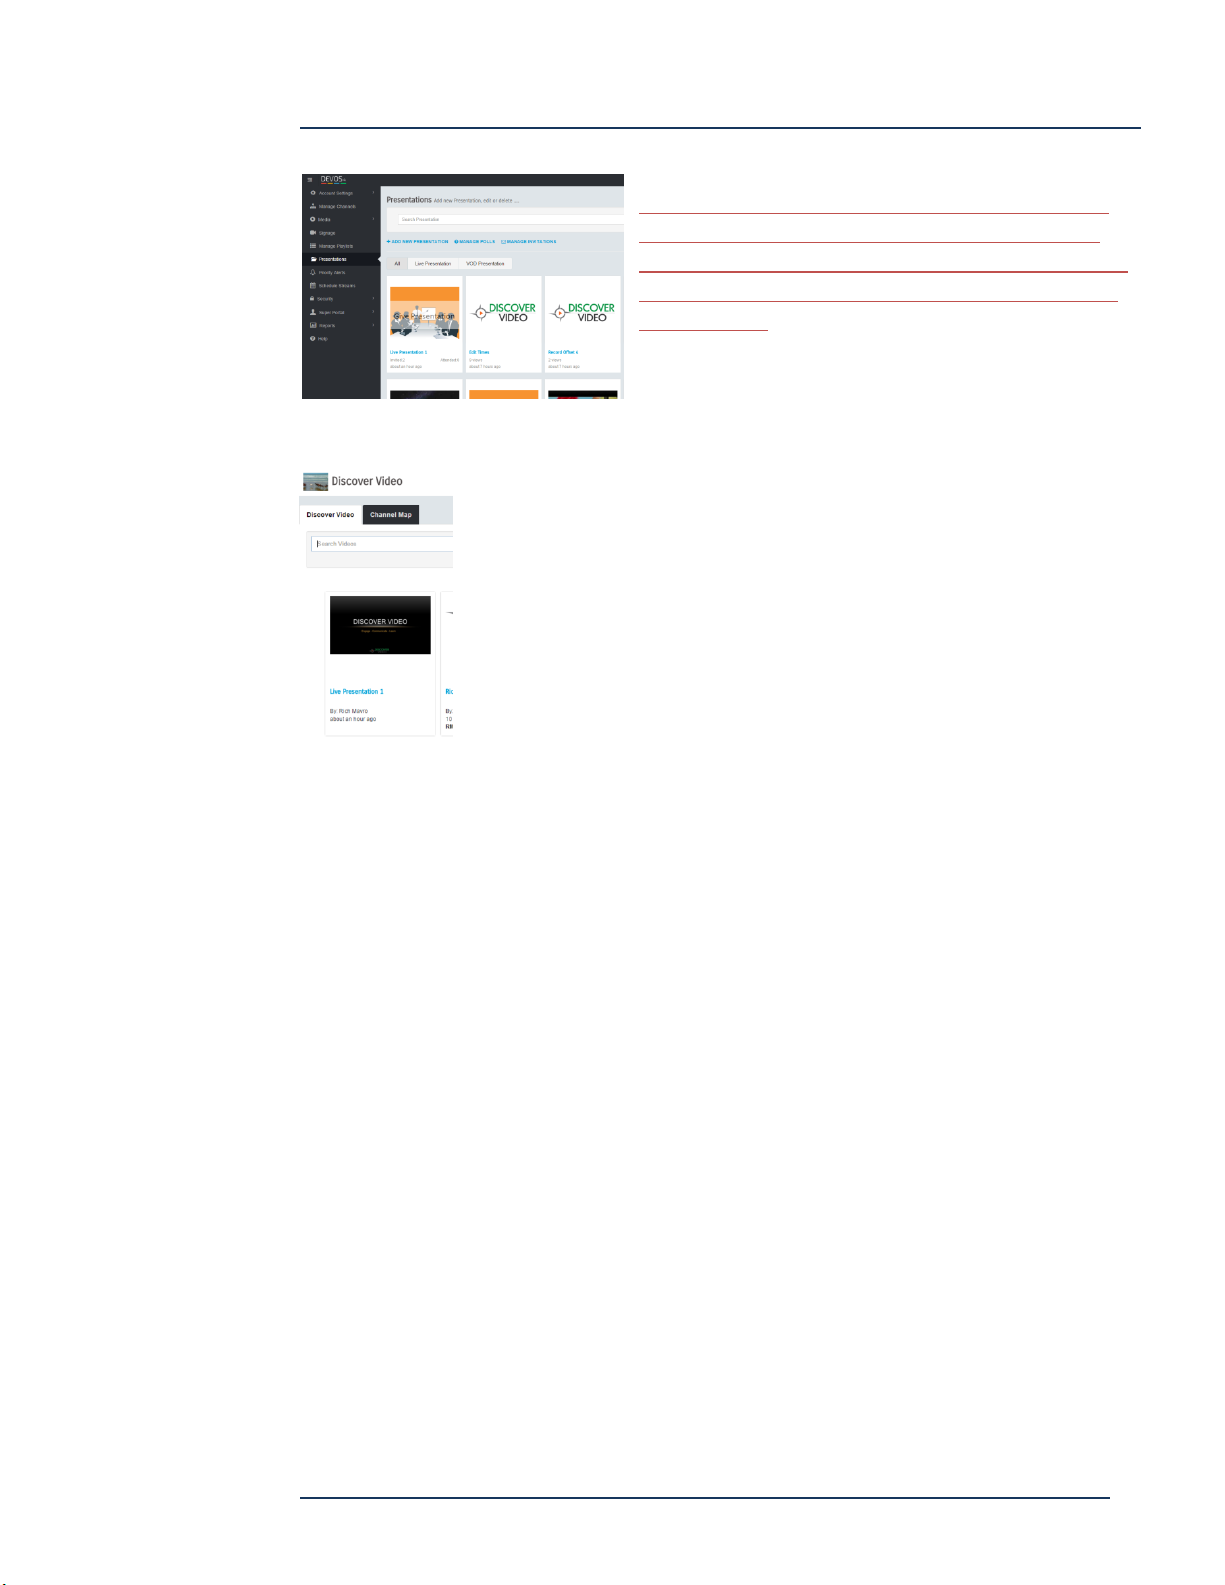
DEVOS -- Enterprise Video System
NOTE THAT YOU CAN USE THE SAME LIVE PRESENTATION
AGAIN OVER AND OVER AGAIN. ONCE IT IS SET UP, YOU
GIVE THE SAME LIVE PRESENTATION TO DIFFERENT VIEWERS
ANYTIME YOU WISH, PROVIDED THE EXPIRE TIME HAS NOT
BEEN REACHED.
If you selected a channel for your live presentation, then it appears in
the channels with the title you entered, and with the thumbnail you
selected.
If you did not select a channel, then your viewers can only access
your presentation from a link you must send to them, or via
invitation (see below).
To access the live presentation link, right-click on the presentation from the
Presentation page, and select "View" to open the viewing page in a new browser
window. Copy the URL and send it to the viewers.
Page 93
DEVOS
Page 94
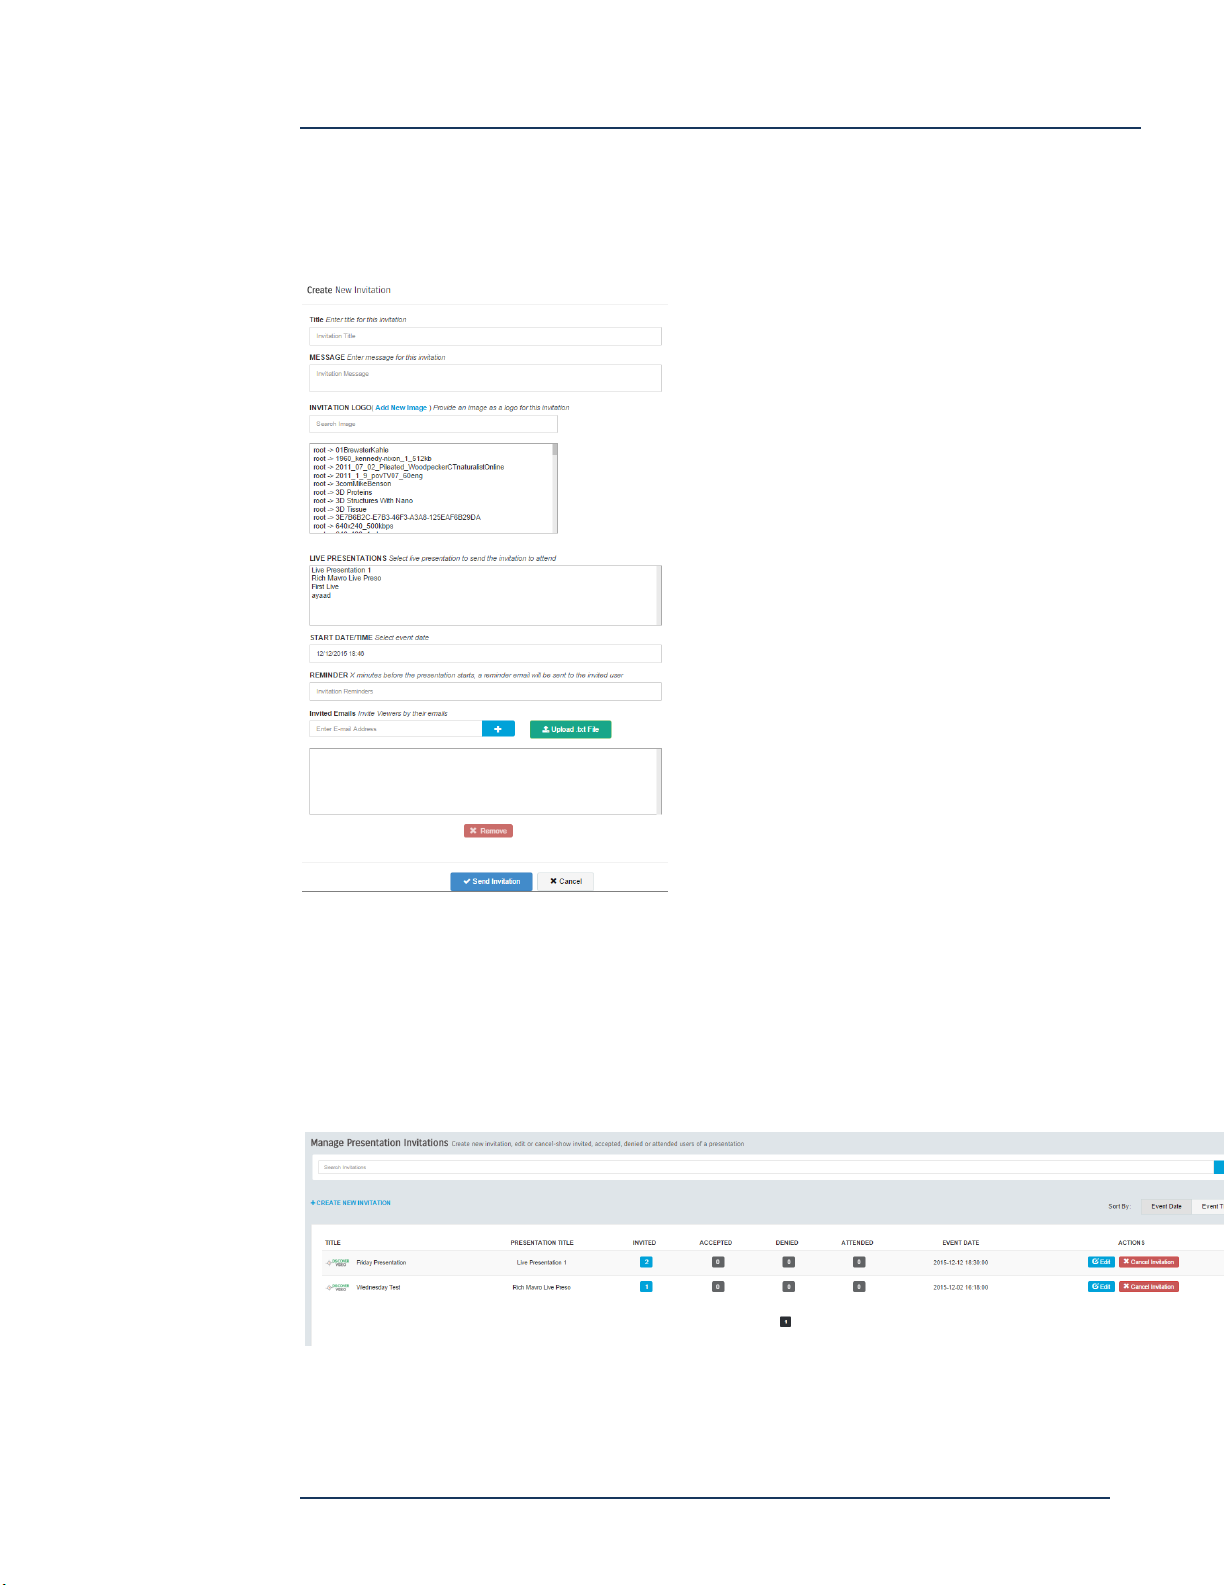
Title -- enter the title of the message that
viewers will receive
Message -- enter a message such as "View my
presentation from Discover Video"
Logo -- select an image to be shown in the
invitation
Live Presentation -- select the live presentation
that you will use
Start Date/Time -- select the date/time when
you will start your presentation.
Reminder -- enter the number of minutes
prior the to start date/time to send a
email reminder to your audience
Invited Emails -- enter email addresses
of people you wish to invite (press + after each).
You may also upload a text file with one
email address per line.
Send Invitation -- sends email to each
person on your invitation list.
Invitations
You can electronically invite people to watch your live presentation. Select "Manage
Invitations" from the Presentation page.
Note that emails will only be sent if your DEVOS system has SMTP account set up (via
Super System Settings).
Once your invitation has been sent, you can monitor responses for each invitation
from the Manage Invitation page:
DEVOS -- Enterprise Video System
Page 94
DEVOS
Page 95
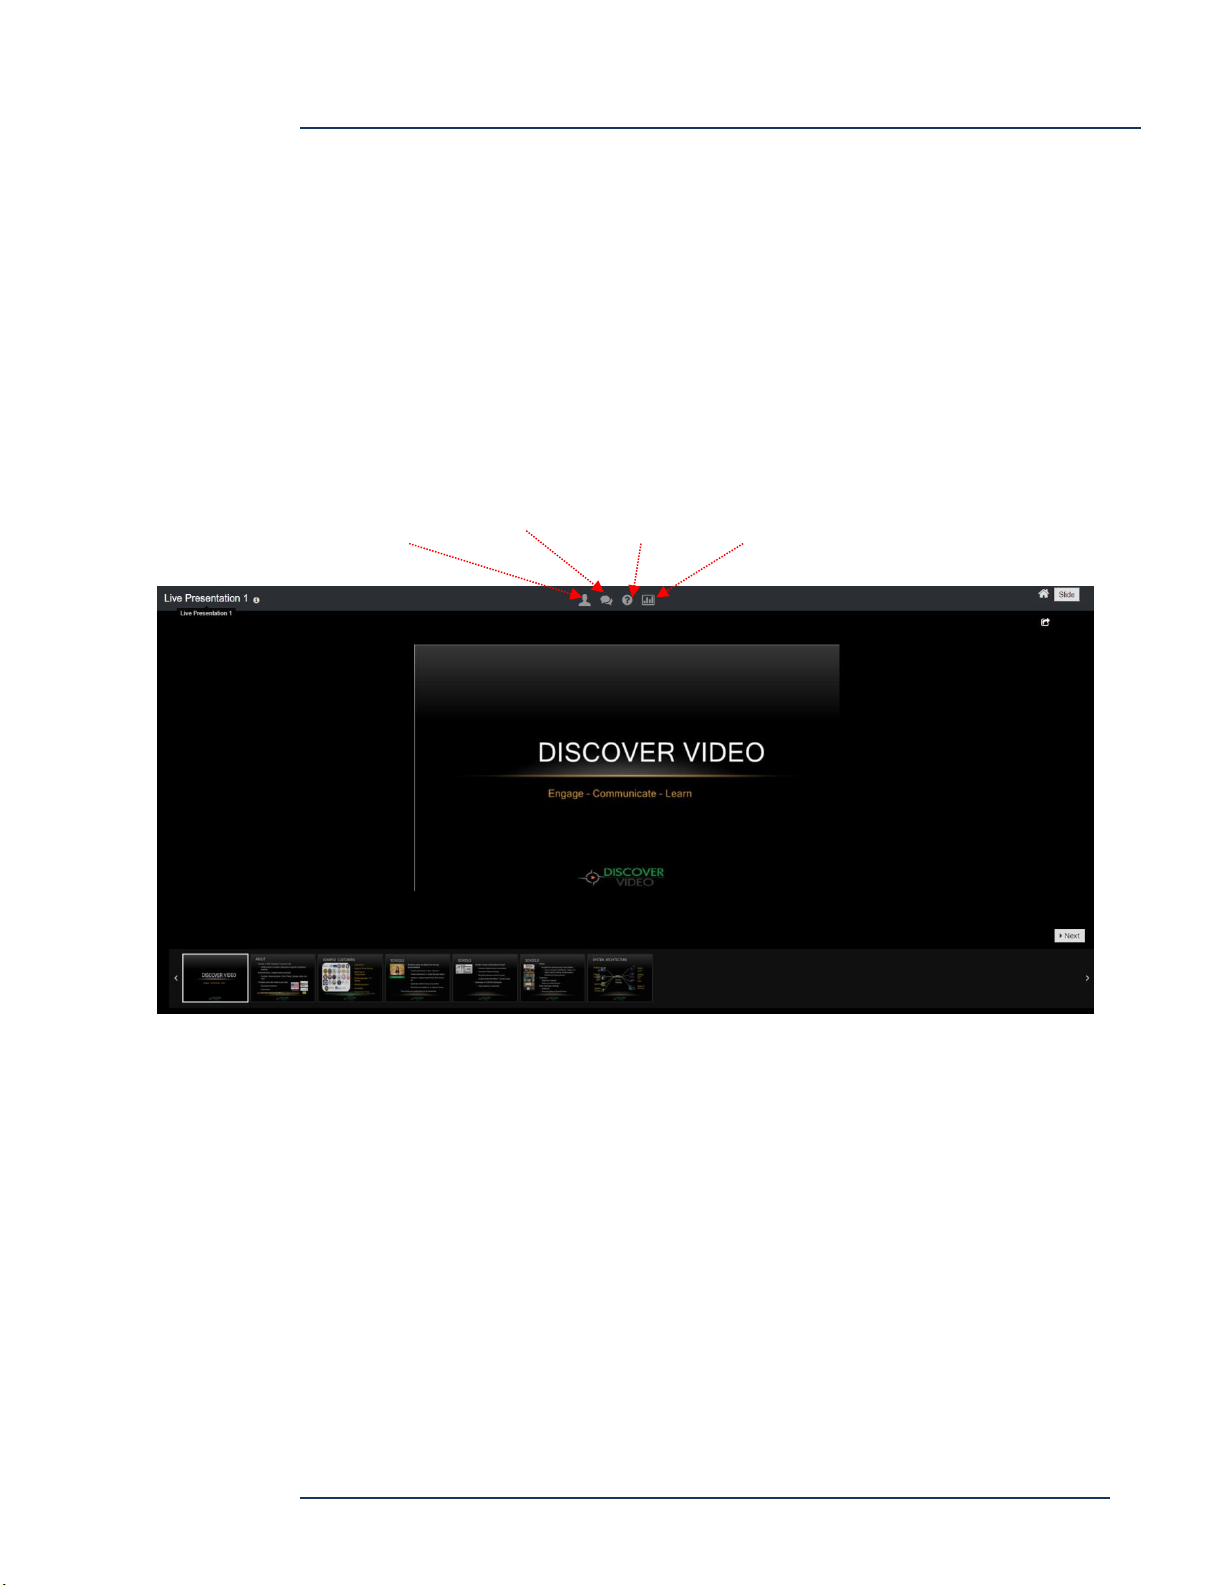
DEVOS -- Enterprise Video System
View Attendees
Chat
Questions
Polls
The invitations show how many people you have invited, how many have accepted,
how many you have later denied, and how many have actually attended your live
presentation.
You may cancel the live presentation and the system will send cancellation notices to
invited parties.
Giving A Live Presentation
Select the presentation. By default, you will see the first slide in your presentation. To
change slides, just click on the "Next" button, or click on the desired slide.
View Attendees -- shows list of who is watching your presentation
Chat -- opens/closes chat window for you and for your audience
Questions -- indicates when there is a question. Click to view questions.
Polls -- opens poll window
If you have included live video in your presentation, you may change your viewing
layout and start a recording.
Page 95
DEVOS
Page 96
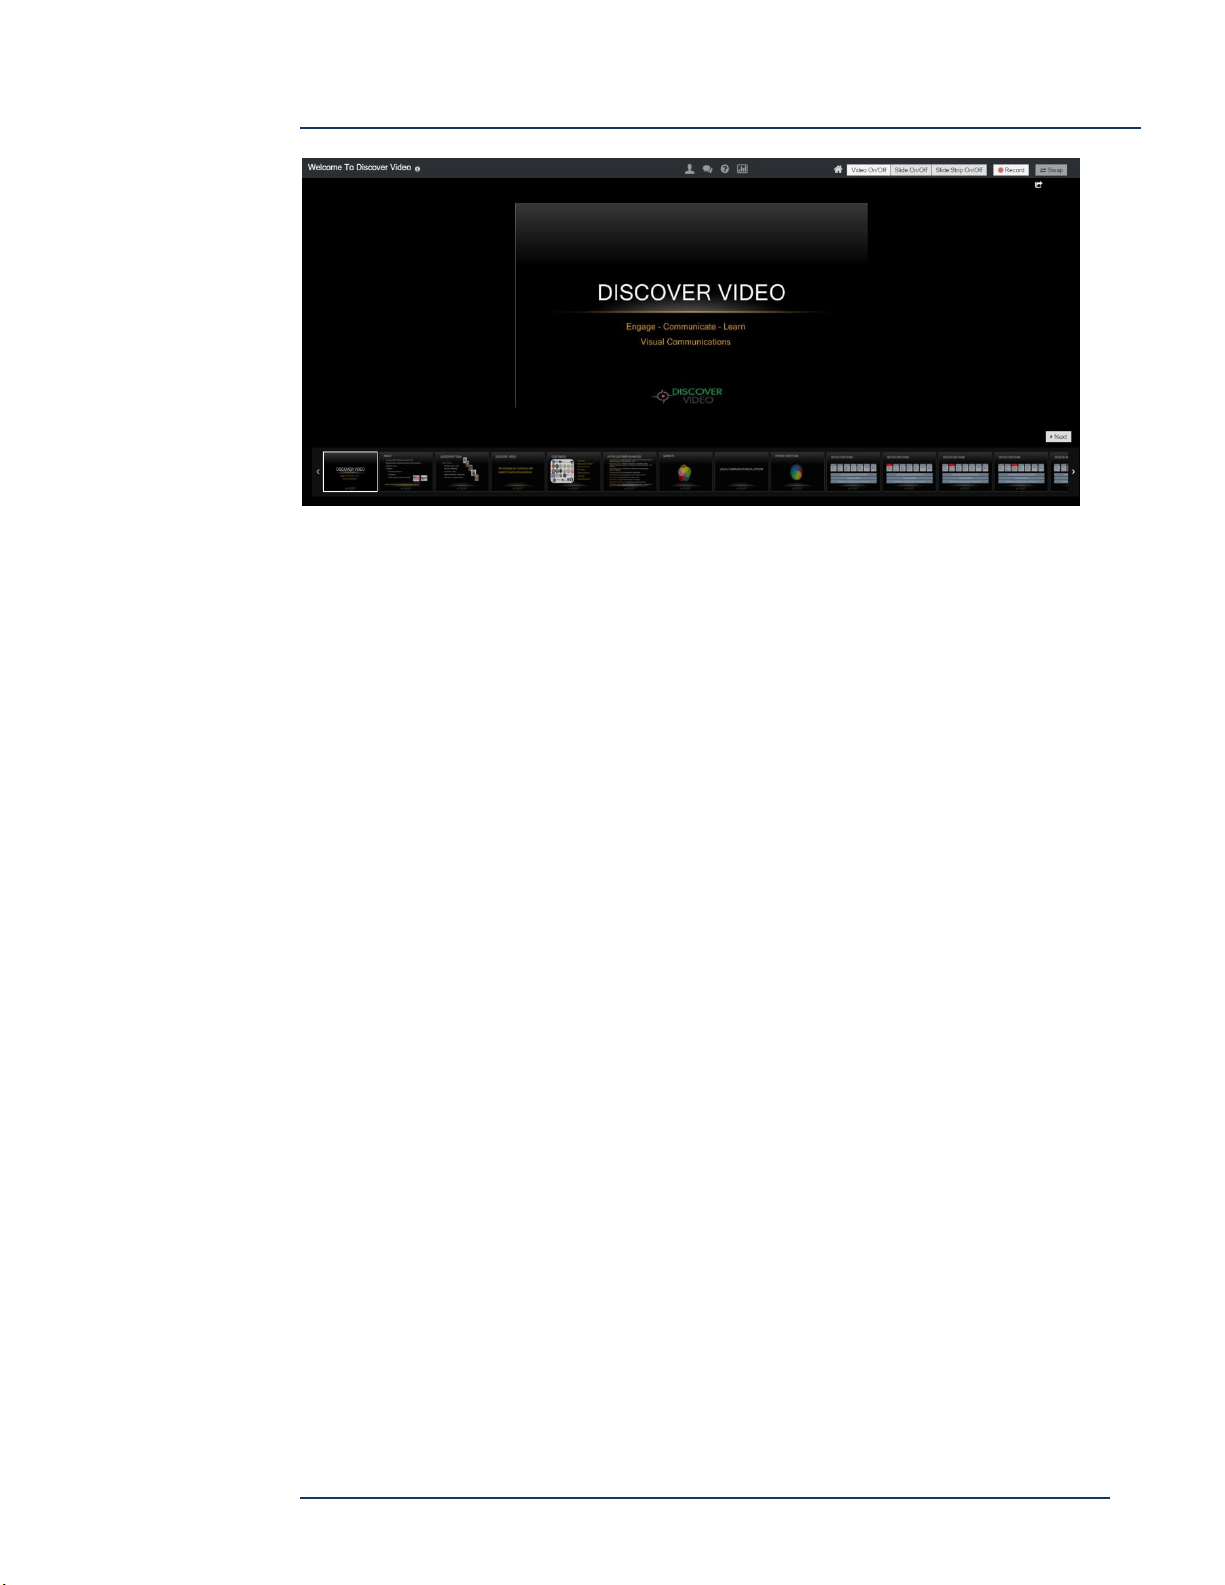
DEVOS -- Enterprise Video System
Video On/Off -- displays your live video. This is used for confidence monitor so you
can be sure your live stream is running. Because there may be audio feedback and
video delay, you should not have video displayed when giving a presentation.
Slide On/Off -- displays your slide, or if video is enabled displays video + slide.
Slide Strip On/Off -- displays the slide filmstrip to allow random access to your
slides.
Swap -- swaps position of video and slides (toggle).
Recording -- to record your live presentation, select Record and wait for the status to
change to "Stop Recording". To end recording, select "Stop Recording".
Note: after recording, your recorded presentation appears in the Presentations
manager page. Select Edit and you can add it to a channel, edit, adjust times, etc.
Page 96
DEVOS
Page 97
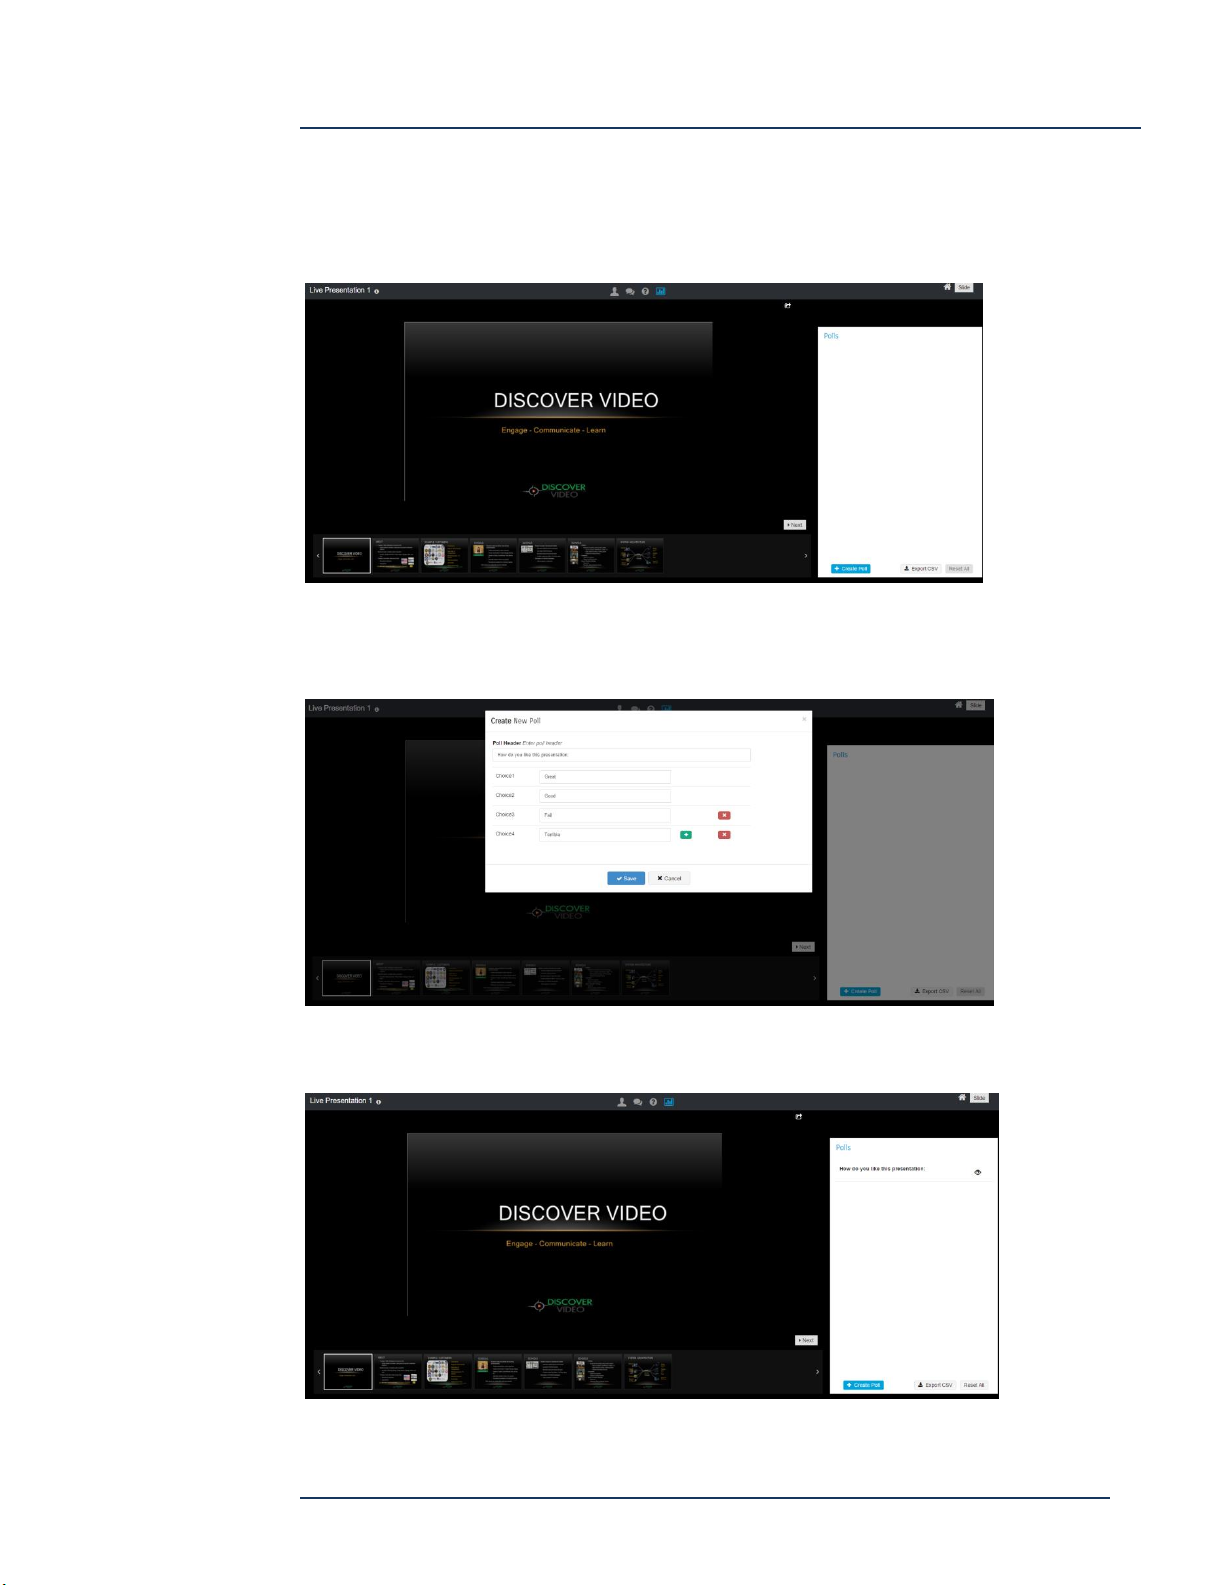
DEVOS -- Enterprise Video System
Polls
Polls are a powerful way to get real time audience feedback, to make your
presentation more interactive, and to gain insight into your audience's thoughts.
Select Poll to expose the poll panel. Select Create Poll and enter a question and
possible answers
Your poll is now ready to be sent to viewers. Select the "eye" icon next to the desired
poll to cause it to be shown to your audience
Page 97
DEVOS
Page 98
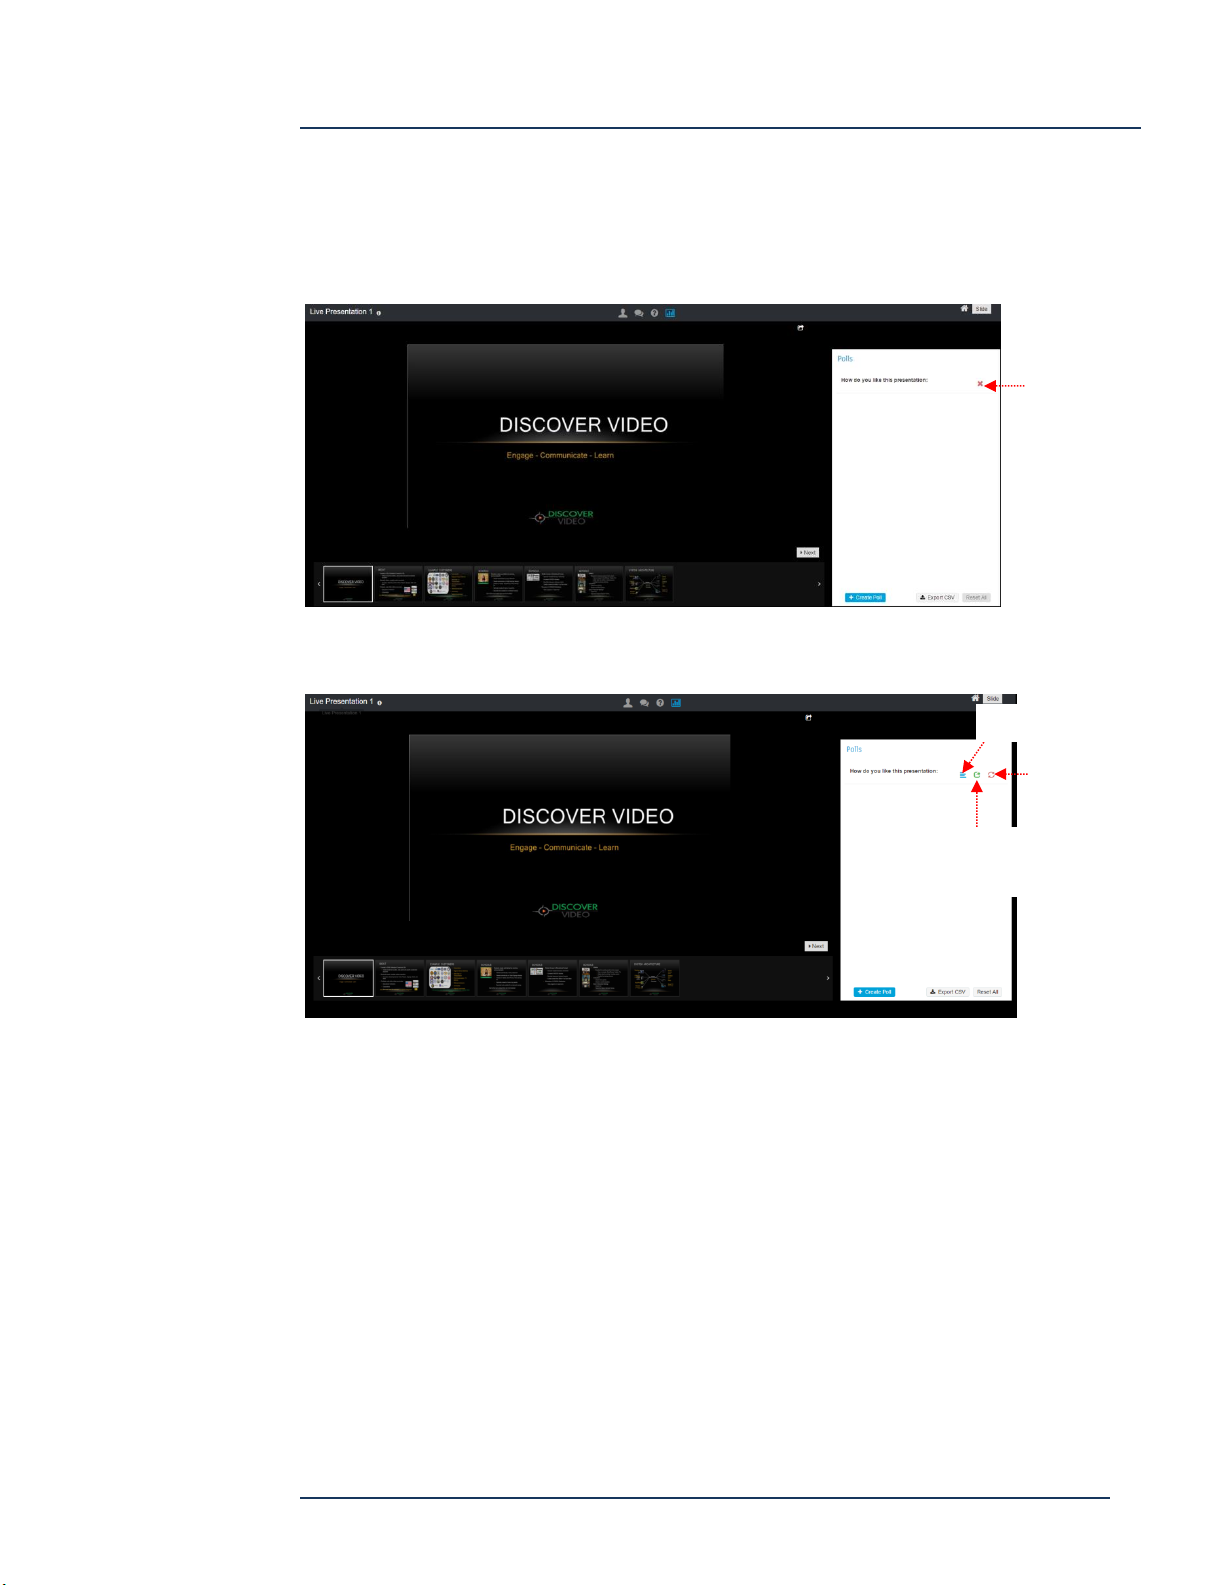
DEVOS -- Enterprise Video System
Close Poll
View the poll results
Show the poll results with
your audience
Reset the poll
When you start the poll, the audience has the poll open on their screen until you
close it. To close the poll and retrieve the result, select the close "X" icon next to the
open poll
After you close the poll, you may view the results
Note: Polls are for live presentations only. When you record a presentation with a
poll, the poll does not appear in the recording.
Page 98
DEVOS
Page 99
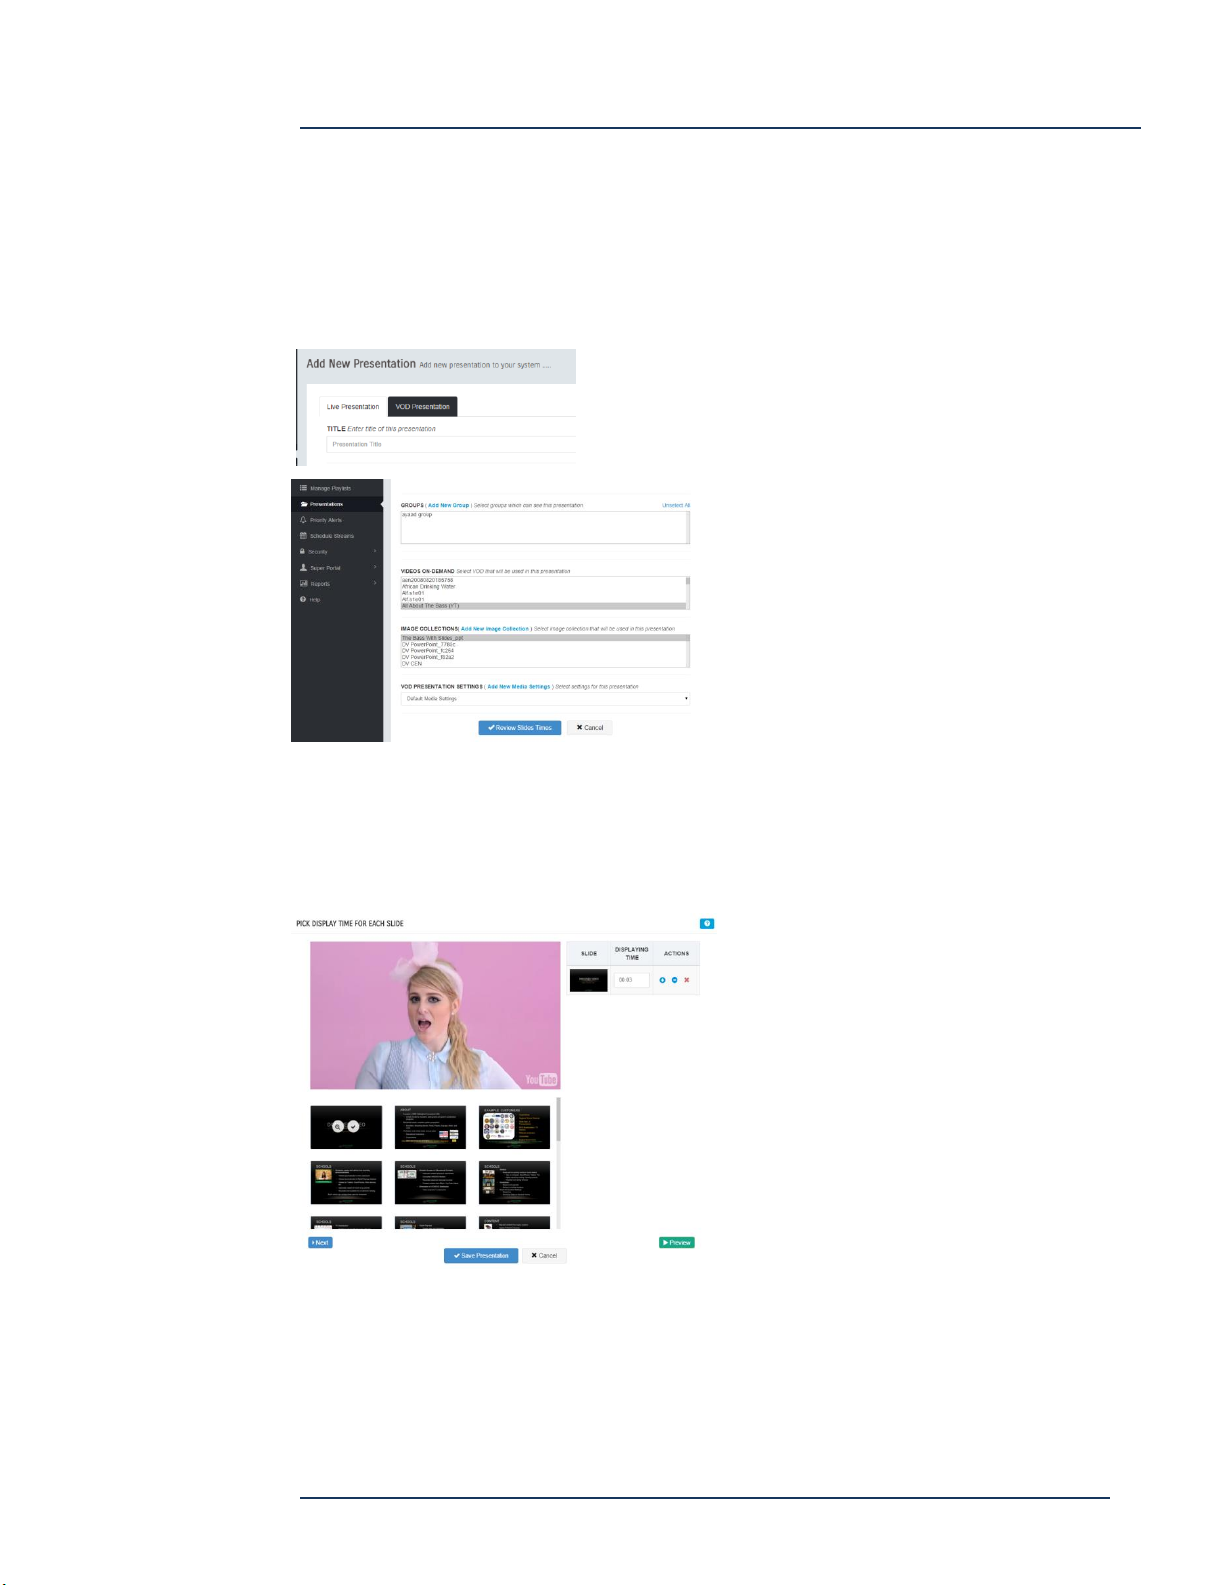
DEVOS -- Enterprise Video System
VoD Presentations
You can create a presentation using any existing video. This is a great way to
underscore and augment a message being delivered in a video that you created, was
created by someone else including a video downloaded from (not linked to) YouTube.
Select Presentations, Add New Presentation, then select the tab for VOD Presentation.
Enter the desired title, description, etc., similar to
creating a live presentation.
Select an existing Video on Demand and
Image collection (or upload a new
PowerPoint Image Collection).
When done, select Adjust Slide Times.
The timing editor opens and the video
starts to play. Select the desired slide at
the desired time to add it to the list, or
simply select "Next" to add slides in
presentation order.
Add as many slides as desired.
You can select the + and - button for
each inserted slide to adjust the time (use
Preview function to see result). You can
delete any slide in the timeline using the
"x" icon.
When you are done, select "Save Presentation" (be patient while it is published).
Page 99
DEVOS
Page 100
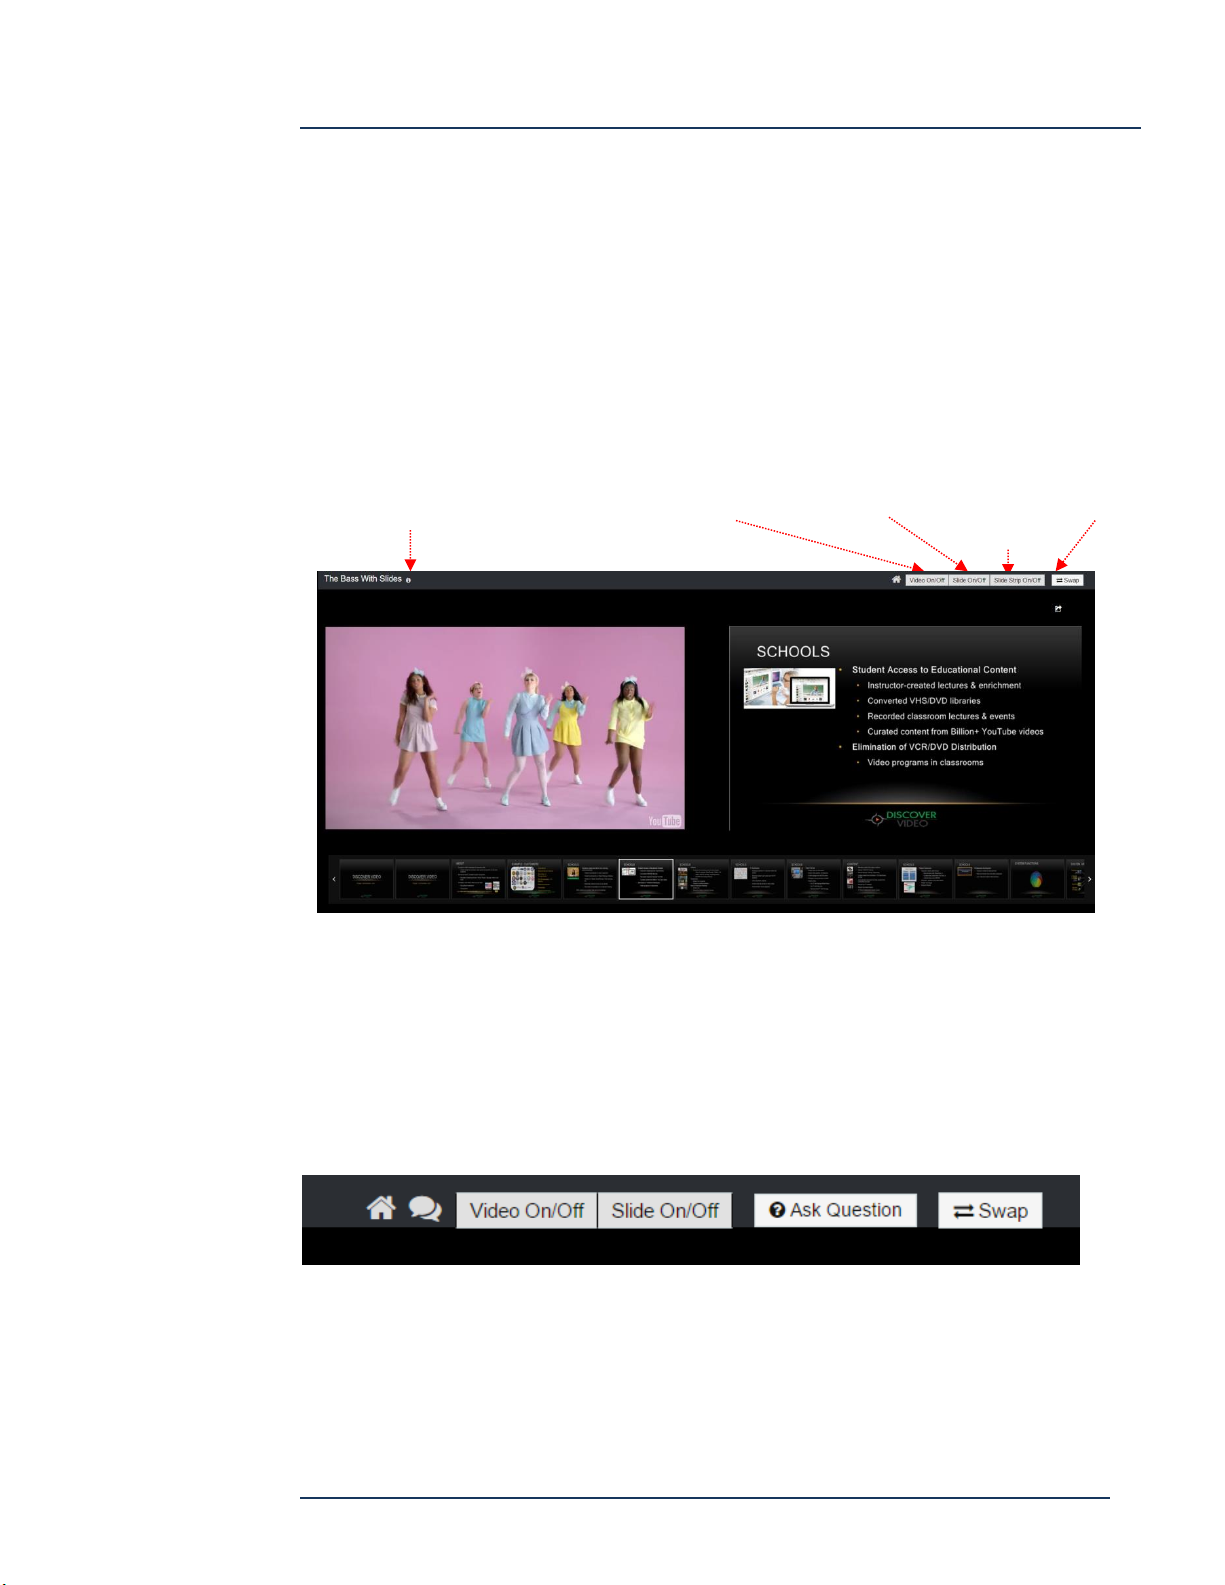
DEVOS -- Enterprise Video System
Show Video
Swap Video / Slide
Show Video
Show Video + Slide
Show Description
Chat
Viewing Presentations
Your audience can view a presentation by simply clicking on it if you have added it to
a channel. If you have added group security, then they must be a member of the
group(s) to view.
If you have sent out invitations for a live presentation, then invitations are sent, and a
reminder email is also automatically sent.
The viewer then can view your presentation.
Live Presentation Viewing
For live presentation viewing, the viewer has these buttons:
During a live presentation, the viewer’s page may automatically change to show polls,
chat, and questions under control of the presenter.
Page 100
DEVOS
 Loading...