

DSG-X10 User Manual
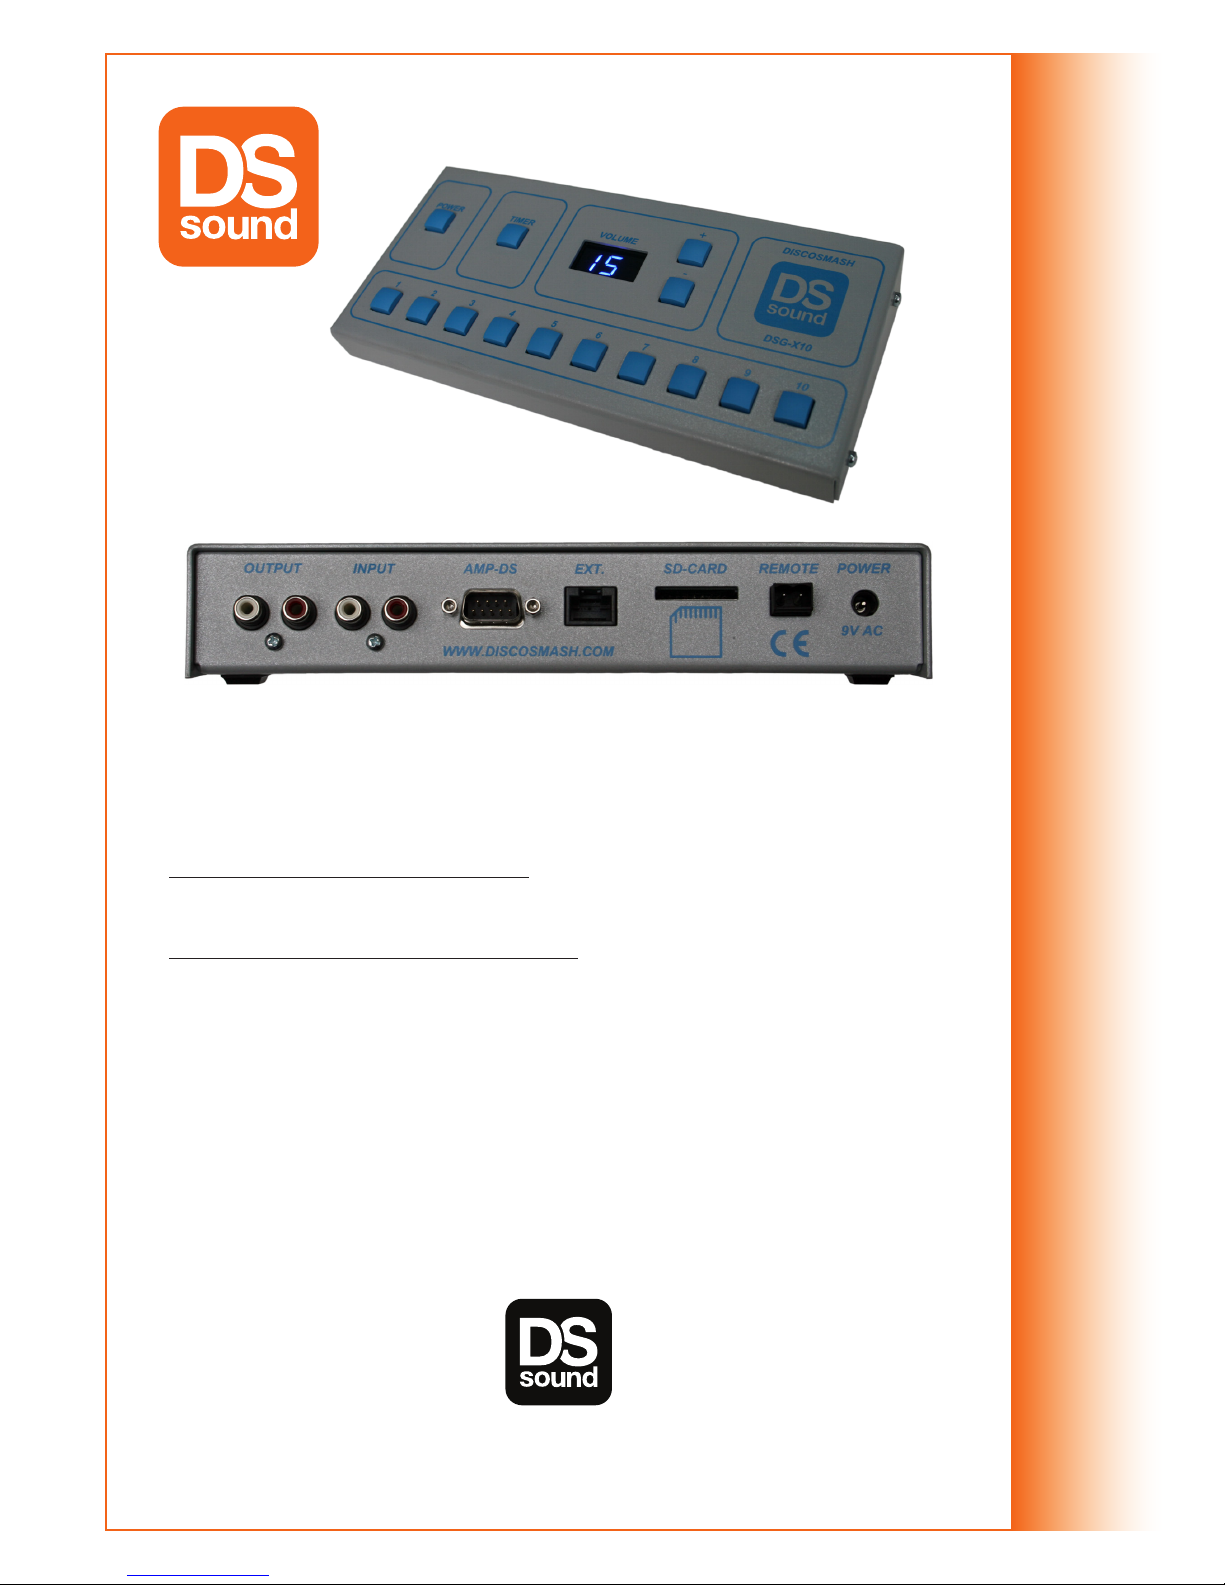
• Connections:
The soundbox can be connected in 2 ways:
1. If you have a Discosmash mixing panel:
Use the AMP-DS connector. This connects to the “EXT” connection of the mixing panel.
The Output, Input and Power connections are not used.
2. If you don’t have a Discosmash mixing panel:
You need to connect the output of the CD-player (or other music source) to the Input of the
soundbox. The Output of the soundbox connects to your mixing panel or amplier, where
the CD-player was previously connected. A 9V AC power adapter is connected to the
Power connection.
The Ext. connector is for external expansions and won’t be used in most cases.
The Remote connector can be used to activate a sound remotely by shorting the 2 pins.
(i.e. with an external switch or relays contact)
• General:
Make sure there is a SD memory card with the correct contents in the slot.
On start-up rst the software version will be displayed.
After this, if the card can be read correctly, the selected bank will be displayed (“b01”
means that bank 1 is now active).
Each of the 10 buttons will activate a sound. The volume + and - buttons will change the
volume (between 0 and 50) and save it.
DSG-X10
DSG-X10
Discosmash
Vroegeinde 14, 2243 Pulle, Belgium
Tel.: +32 (0)3 4640909 - Fax: +32 (0)3 4640139
info@discosmash.com - www.discosmash.com
MANUAL
MANUAL

• Stopping a sound
To stop a sound which is playing, push the Power button. When this is pushed while a sound is playing it will be
stopped. If this is pushed while no sound is playing, it will switch off.
• Switching banks:
When the box is switched on, bank 1 will be used. To change to another bank: push and hold the power button, push
on the number of the bank you want to use and then release the power button. The selected bank will now be loaded.
If you select a bank which doesn’t contain any sounds, the error message “Pre” will appear, which indicates that it
cannot load the settings le for this bank. When this happens, just select another bank. To set up extra banks or
change the sounds in banks, you need to use our conguration software on a PC.
• Timers:
With the timer, sounds can be played automatically with pre-programmed intervals.
The program the timer:
• Push and hold the Timer button until the display shows ‘Pro’.
• Choose the rst sound with one of the 10 buttons
• Choose the time which you want as pause after the rst sound.
You need to enter the time in seconds, using 3 buttons (use button 10 to
enter a 0). i.e. for a time of 30 seconds, you need to push 10, 3, 10. The display will show 030.
• Now you can choose the second sound, after this the time to wait after the second sound,
then the third sound, the third waiting time,.....
• After selecting the last sound which you want to use in the timer, enter the time you want to wait
before the timer starts again from the beginning. After this push the Timer button again.
Now the timer is programmed and saved on the memory card.
To start the timer: push on the Timer button. It will show ‘P--’ while playing a sound and then it will start counting down
for the next one. To stop it: push again on the Timer button.
The next time the soundbox is used, the timer doesn’t have to be programmed again, it just can be started.
• Volume offsets:
Each sound can have it’s own volume offset. This way you can make the volume of all sounds equal if they aren’t. To
change this, push and hold the button of the sound you want to change. While holding the number, use the volume
buttons to change the volume offset of this sound. It can be set from -50 to +50. When you reached the volume you
want, let go of the numbered button. Next time the sound is played, it will adjust it’s volume by the value that you
chose.
• Input sensitivity:
To change the sensitivity of the input:
Switch on the soundbox while pushing and holding the volume + or -.
Now the input sensitivity of the input will be shown and can be changed with + or -. The sensitivity can be set between
-23 and +8. Each step is 1.5dB. This gives a range of -34.5dB to +12dB.
This way the volume of the CD player can be adjusted to be in the same range as the volume that the soundbox can
produce.
• Changing the sounds:
To change the sounds or settings of the sounds, you can put the memory card into a DSR-X20 and make the changes
there. You also can put it in your PC and use our special software, which you can download from our website.
• Error messages:
The following error messages can appear on the display:
“crd”: There is no card inserted, or it cannot be read. If a card is in the slot,
remove and replace it a few times and try again.
“Pre”: The card can be read, but the settings les cannot be found. This
happens when a new card is inserted without rst loading the default data or a bank has been
selected which doesn’t contain any sounds.
“Clp”: The output is distorting. Lower the volume to keep the output from distorting.
• Software Updates:
To update the software, download the latest update le from our website. Place this le on the memory card (not
in any map but just straight on the card). Disconnect the power from the soundbox (with the AMP-DS or Power
connector). Push the volume + and - buttons at the same time and hold them while reconnecting the power. The
update will start with the following messages:
“ud0”: searching for a memory card with the update le
“ud1”: reading the update le and programming the memory
“ud2”: ready, restarting.
If something is wrong, these can be the error messages:
UE1, UE2, UE3 or UE4: indicates problems with reading the memory card.
There is no card or it’s not formatted correctly.
UE5: The update le cannot be found: make sure that the le is on the card and the name hasn’t been
changed. It has to be called “DSG-X10.FMW”.
UE6: The le is found but cannot be read. Try to copy it again, or format the memory card and copy it
again.
 Loading...