

Disc-O-Bed 2XL Outfitter Assembly Instructions Manual

assembly instructions
AI30007BOUS
www.discobed.com
IMPORTANT INFORMATION CONCERNING THIS PRODUCT TO
PREVENT SERIOUS OR FATAL INJURIES
Keep these instructions for future reference
1. Read carefully and fully understand the manufacturer’s assembly.
2. Care and special attention should be used where a warning is indicated.
3. Never allow a child under 6 years of age on the top bed. Only one person allowed on each level.
4. Use the bunk as it is intended – DO NOT triple stack.
5. Ensure that the 5 point check list is followed prior to each use of the bunk.
6. Openings in and between bunk parts can entrap head and neck of small children.
7. DO NOT allow horseplay on or under the bunk. NO jumping on the product. This product is not a toy.
8. DO NOT use substitute parts. Contact the manufacturer or dealer for replacement parts. The use of a guard rail is not required
with this product.
9. Metal parts could have sharp, pointed or jagged edges. Remove these with a le or an emery board. Children must not be
allowed to suck any metal part of this product.
10. Children should use this product under adult supervision.
11. Maximum weight tolerance is 600lbs per single cot and a total 1200lbs in a bunk conguration ie. 600lbs per level.
12. STRANGULATION HAZARD – Never attach or hang items to any part of the bunk that are not designed for use with the bunk;
example, but not limited to, hooks, belts and jump ropes.
Before building scan QR code
or visit http://www.discobed.com/v/c/ and watch assembly video
1
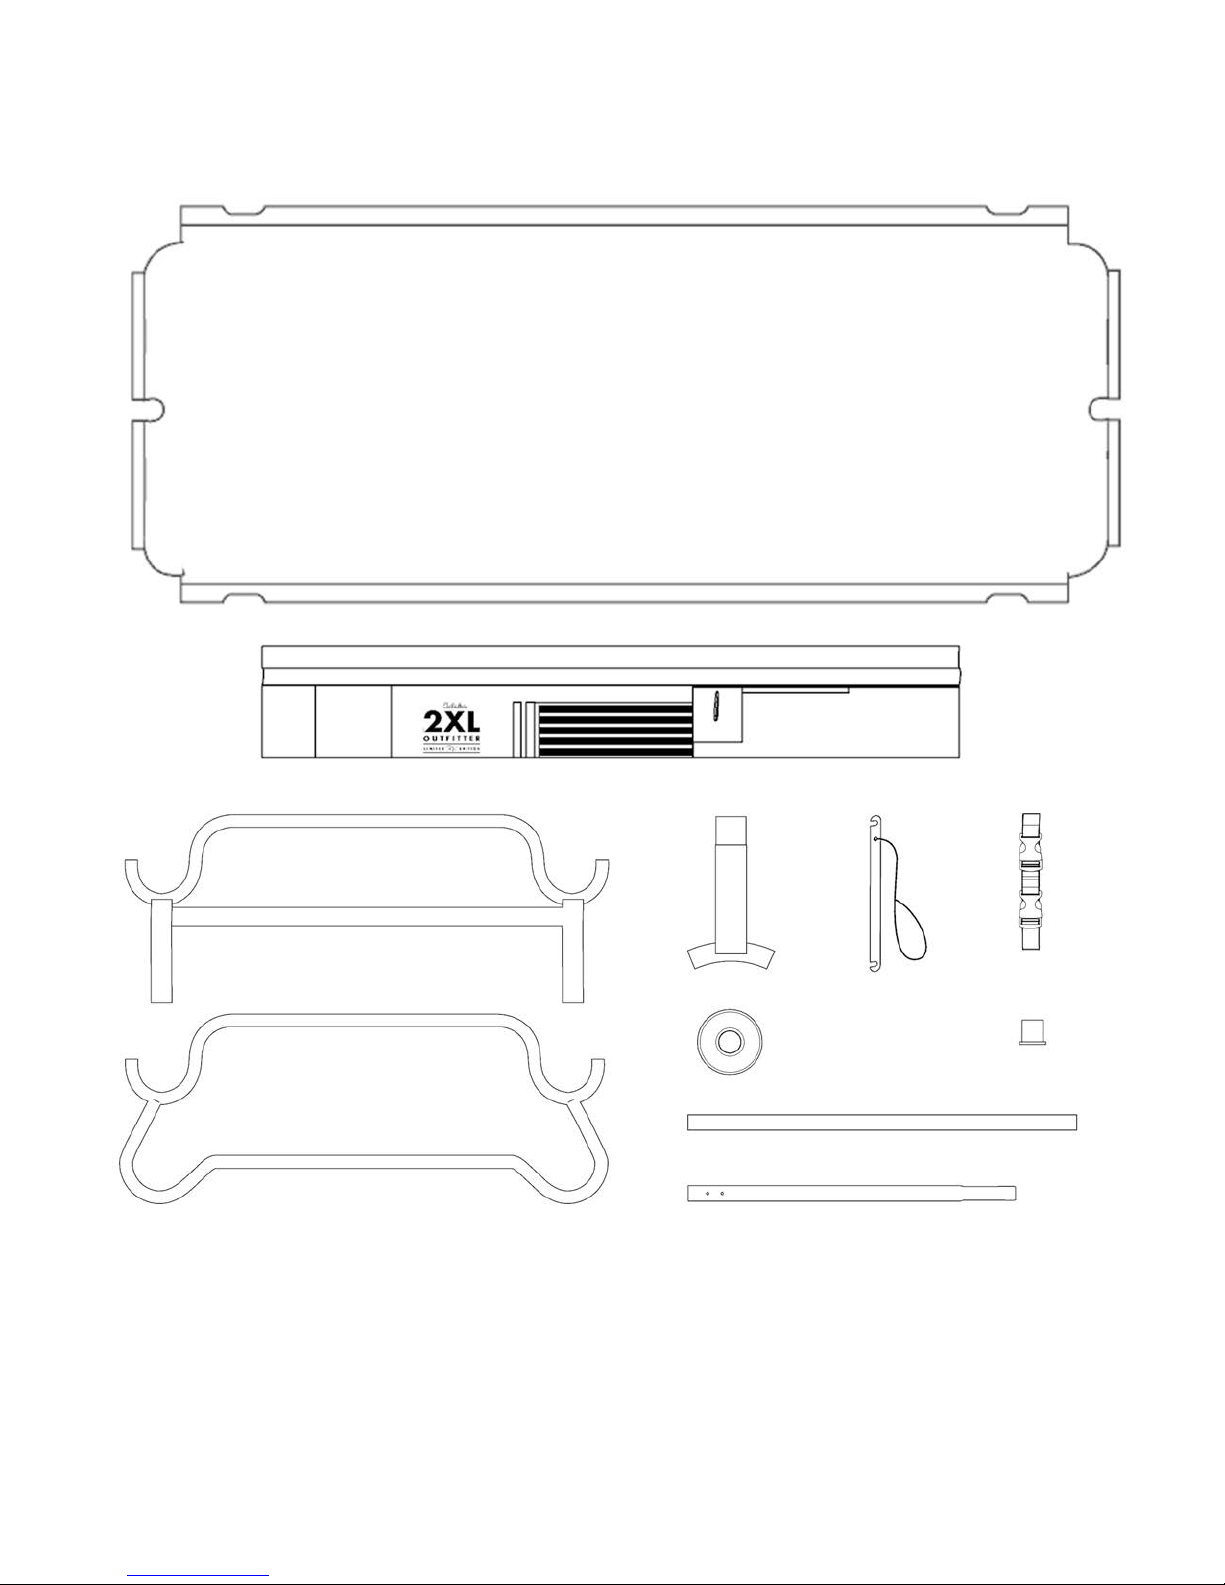
PARTS
2x Sleeping Mats
2x Side Organizers
2x Straight End Frames
2x Round End Frames
4x Stack Adapters
8x Discs
4x Straight Side Rails
8x Swaged Side Rails
8x Stabilizer Bars
2x Locking Straps
4x Foot Plugs
2

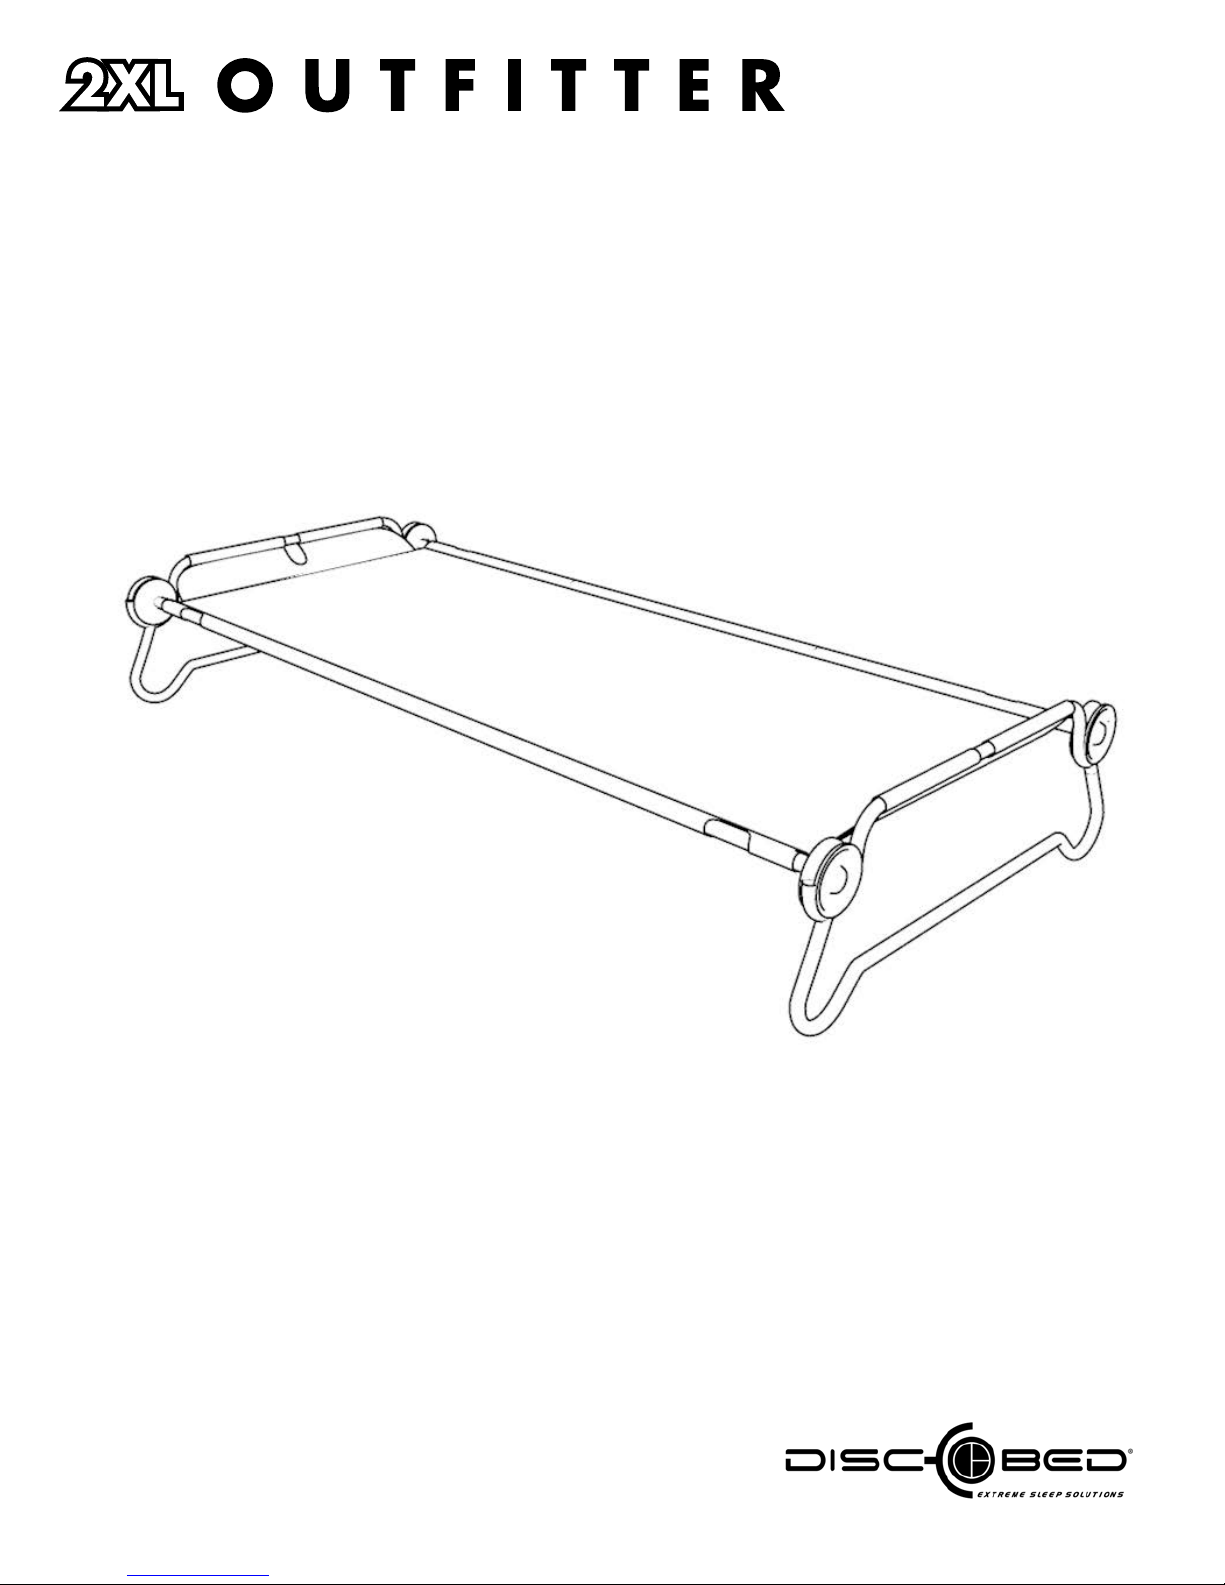
rounded frame assembly instructions
BUNK
www.discobed.com
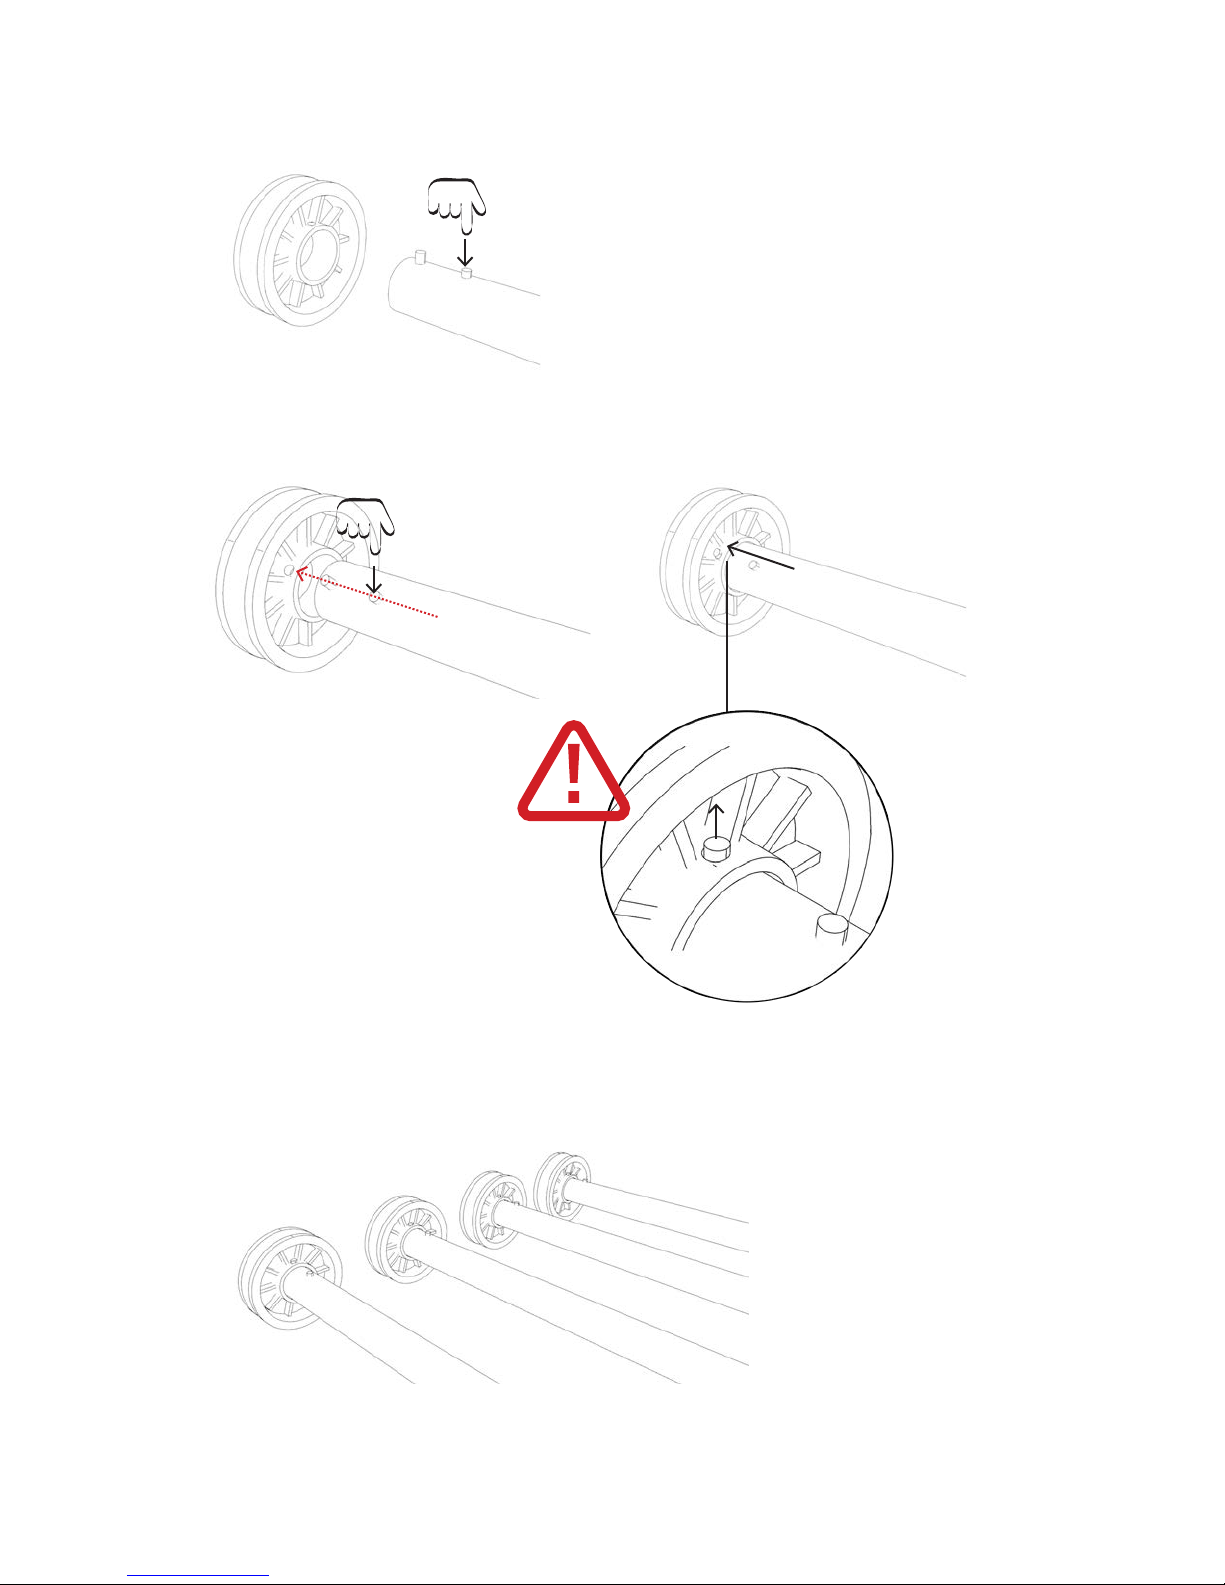
STEP 1. SECURING DISC TO SWAGED SIDE RAIL
1.1. Holding swaged rail, press pin (A) down and hold.
B
A
1.2. Line up pin (B) with hole in disc, insert rail into disc. Let pin (A) go.
B
B
A
Pin (B) is only securely locked in when you hear
a ‘click’ sound. Make sure pin (B) has popped up
before moving on.
1.3. Repeat steps 1.1 and 1.2 four times with each of the swaged side rails.
A
B
A
4x
5
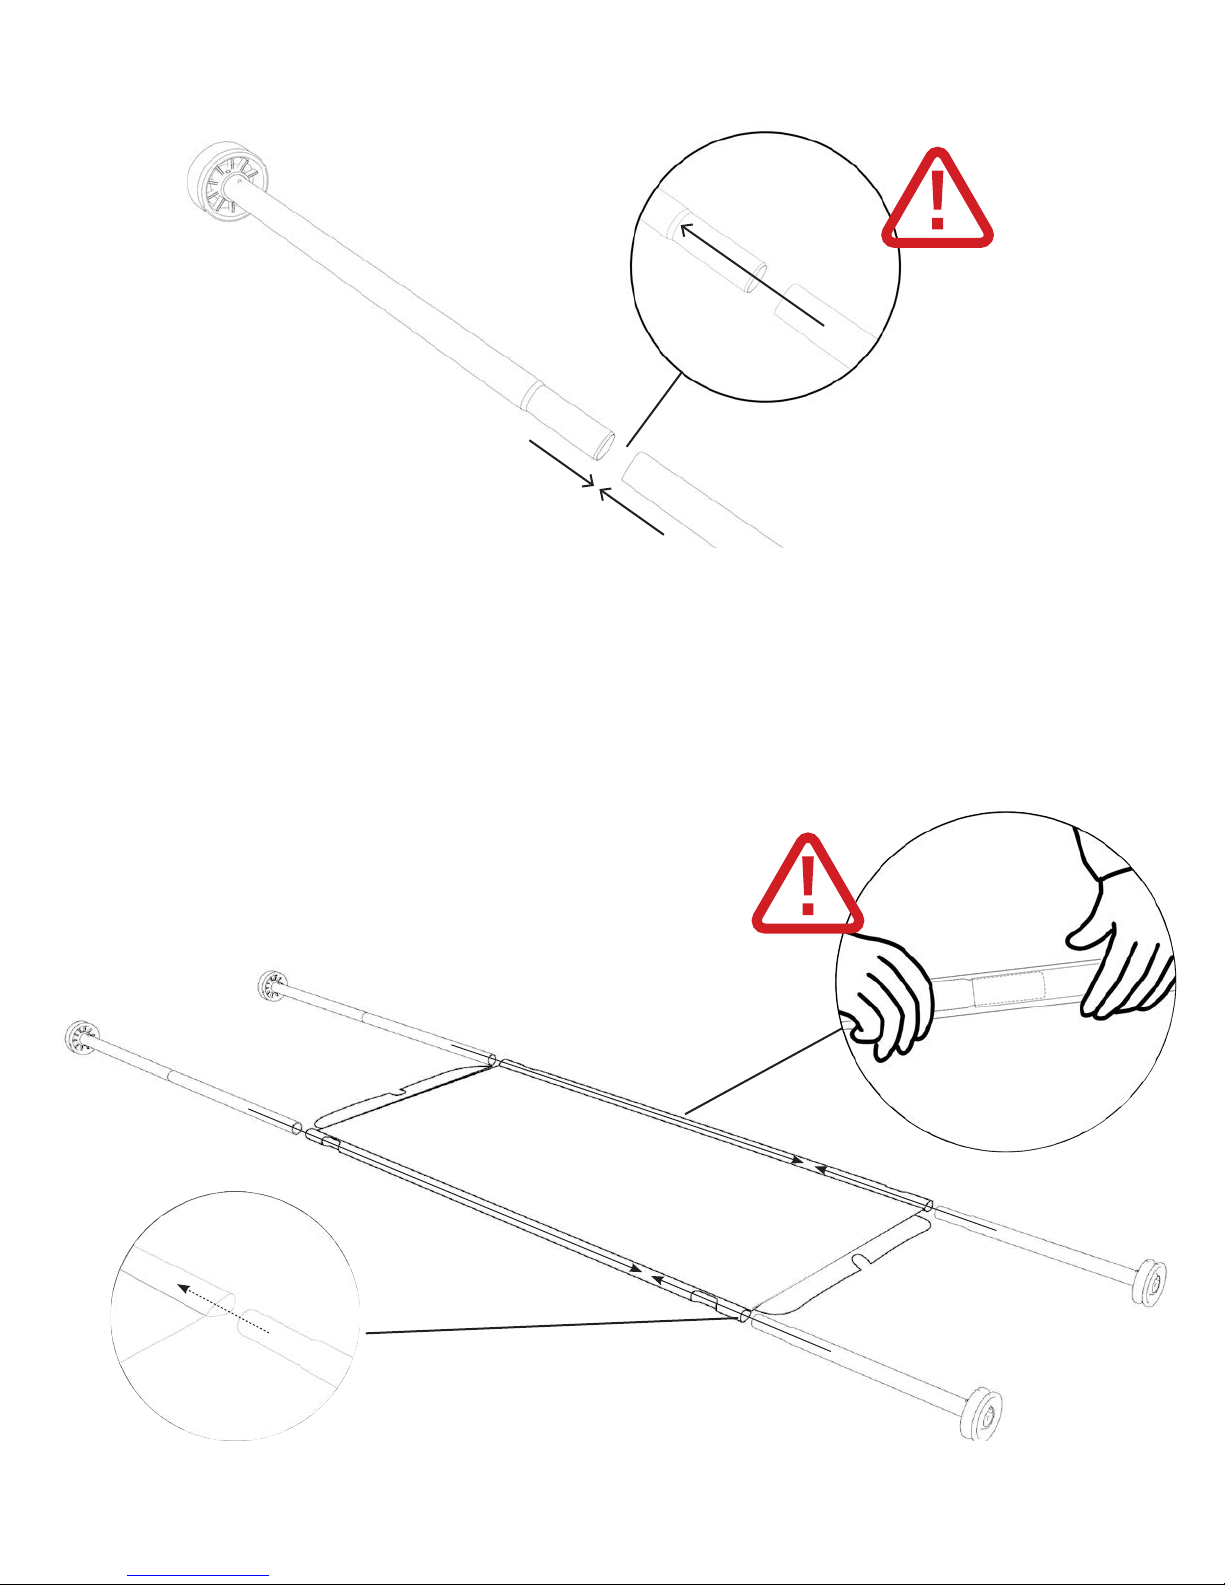
STEP 2. CONNECTING SWAGED SIDE RAIL TO STRAIGHT SIDE RAIL
2.1. Attach a swaged side rail (completed in step 1) to a straight rail.
Make sure they slide into one
another completely.
2x
2.2. Repeat step 2.1
STEP 3. ATTACHING SLEEPING MAT TO SIDE RAILS
3.1. Open out sleeping mat with the correct (logo) side up.
3.2. At one end, slide the 2 rails (completed in step 2) into the sleeves of the mat.
3.3. On the other end slide the remaining 2 rails (completed in step 1) into the sleeves of the mat.
Make sure that the rails slide into one another
completely. Do this by running your ngers
over the side rails where the connections are.
It should feel smooth to the touch.
3.2
3.2
3.3
3.3
6
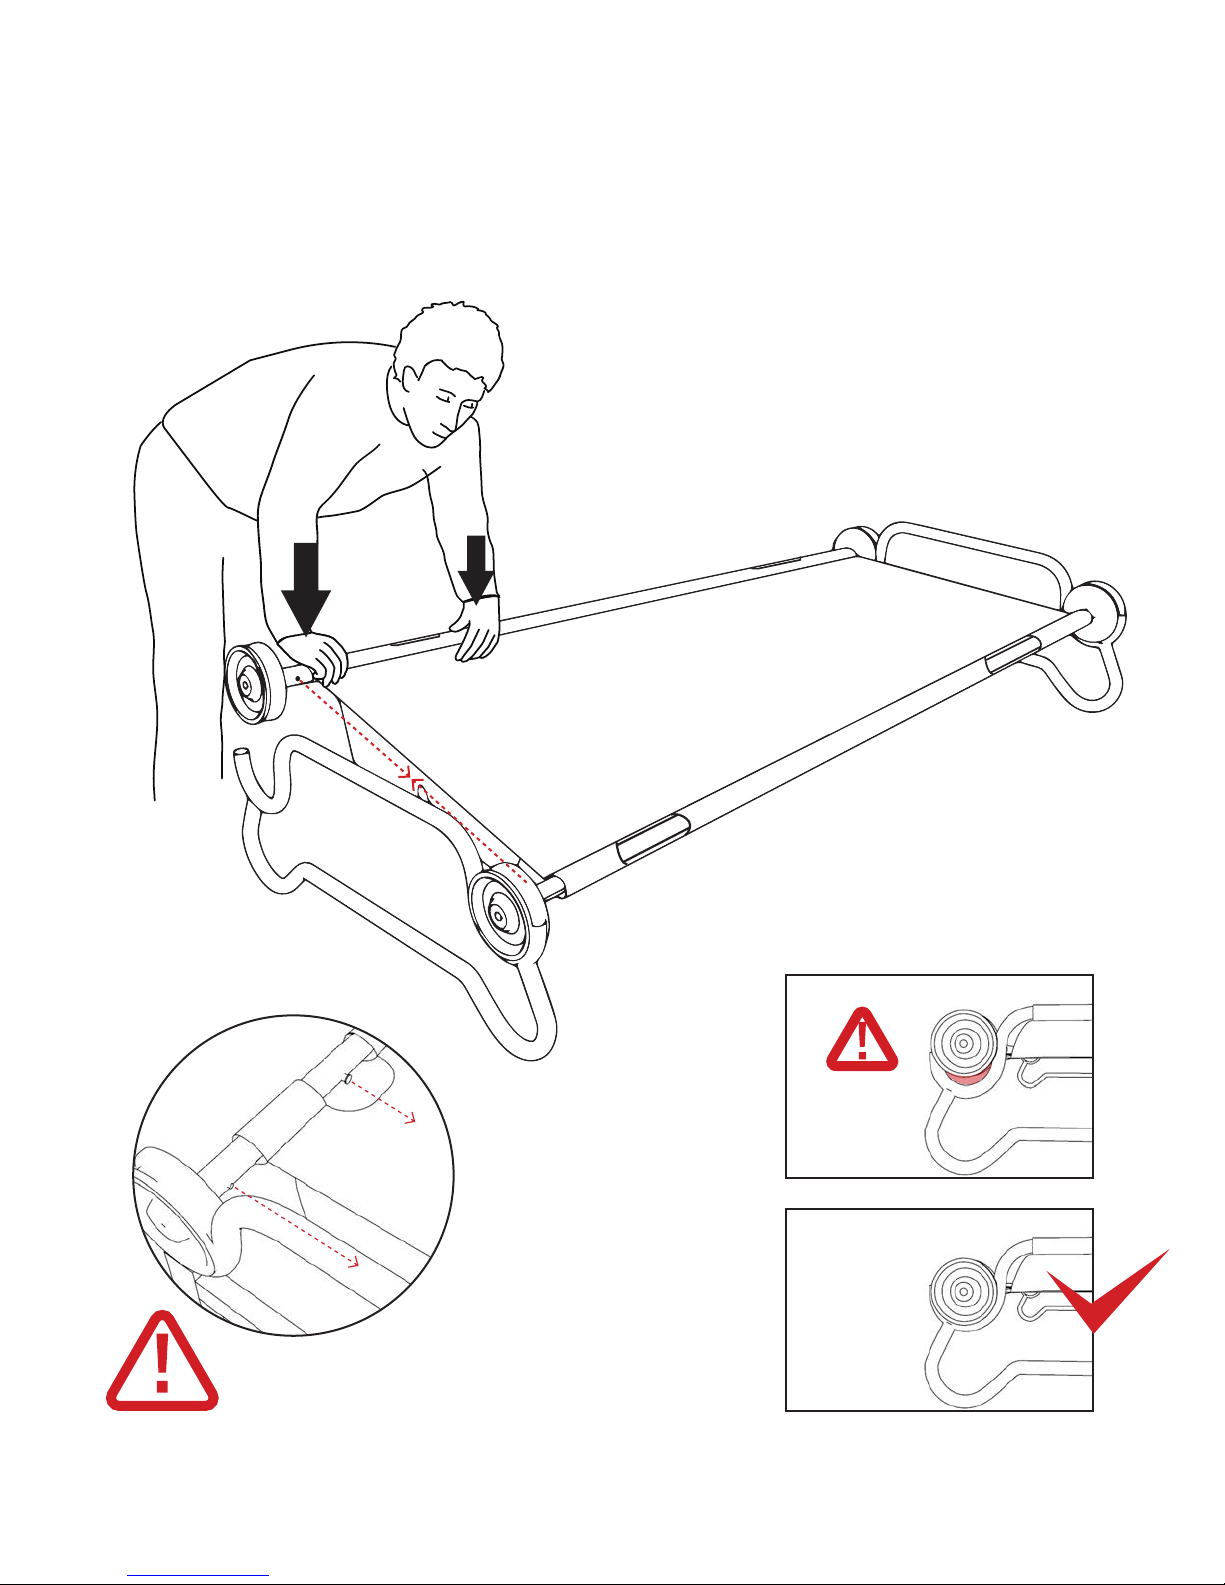
STEP 4. SECURING EACH DISC INTO THE END FRAME
4.1. Make sure pin (A) and (C) are visible, are not covered by the sleeping mat and are facing inwards. Check all four bed
posts (see diag. 4.1).
4.2. Loosely place each disc into the loop of the bed end frame, ensure your ngers are not in the way and
rmly push down on the side rail (see diag. 4.2).
4.3. Make sure the the disc ts completely into the bed end frame (see diag. 4.3).
4.4. Repeat steps 4.1, 4.2 and 4.3 on each bed post.
Diagram 4.2
1
4
2
Diagram 4.1
A
3
Diagram 4.3
C
Pinch hazard
X
A
Make sure pin (A) and (C) are facing
inwards and not covered by sleeping mat.
7
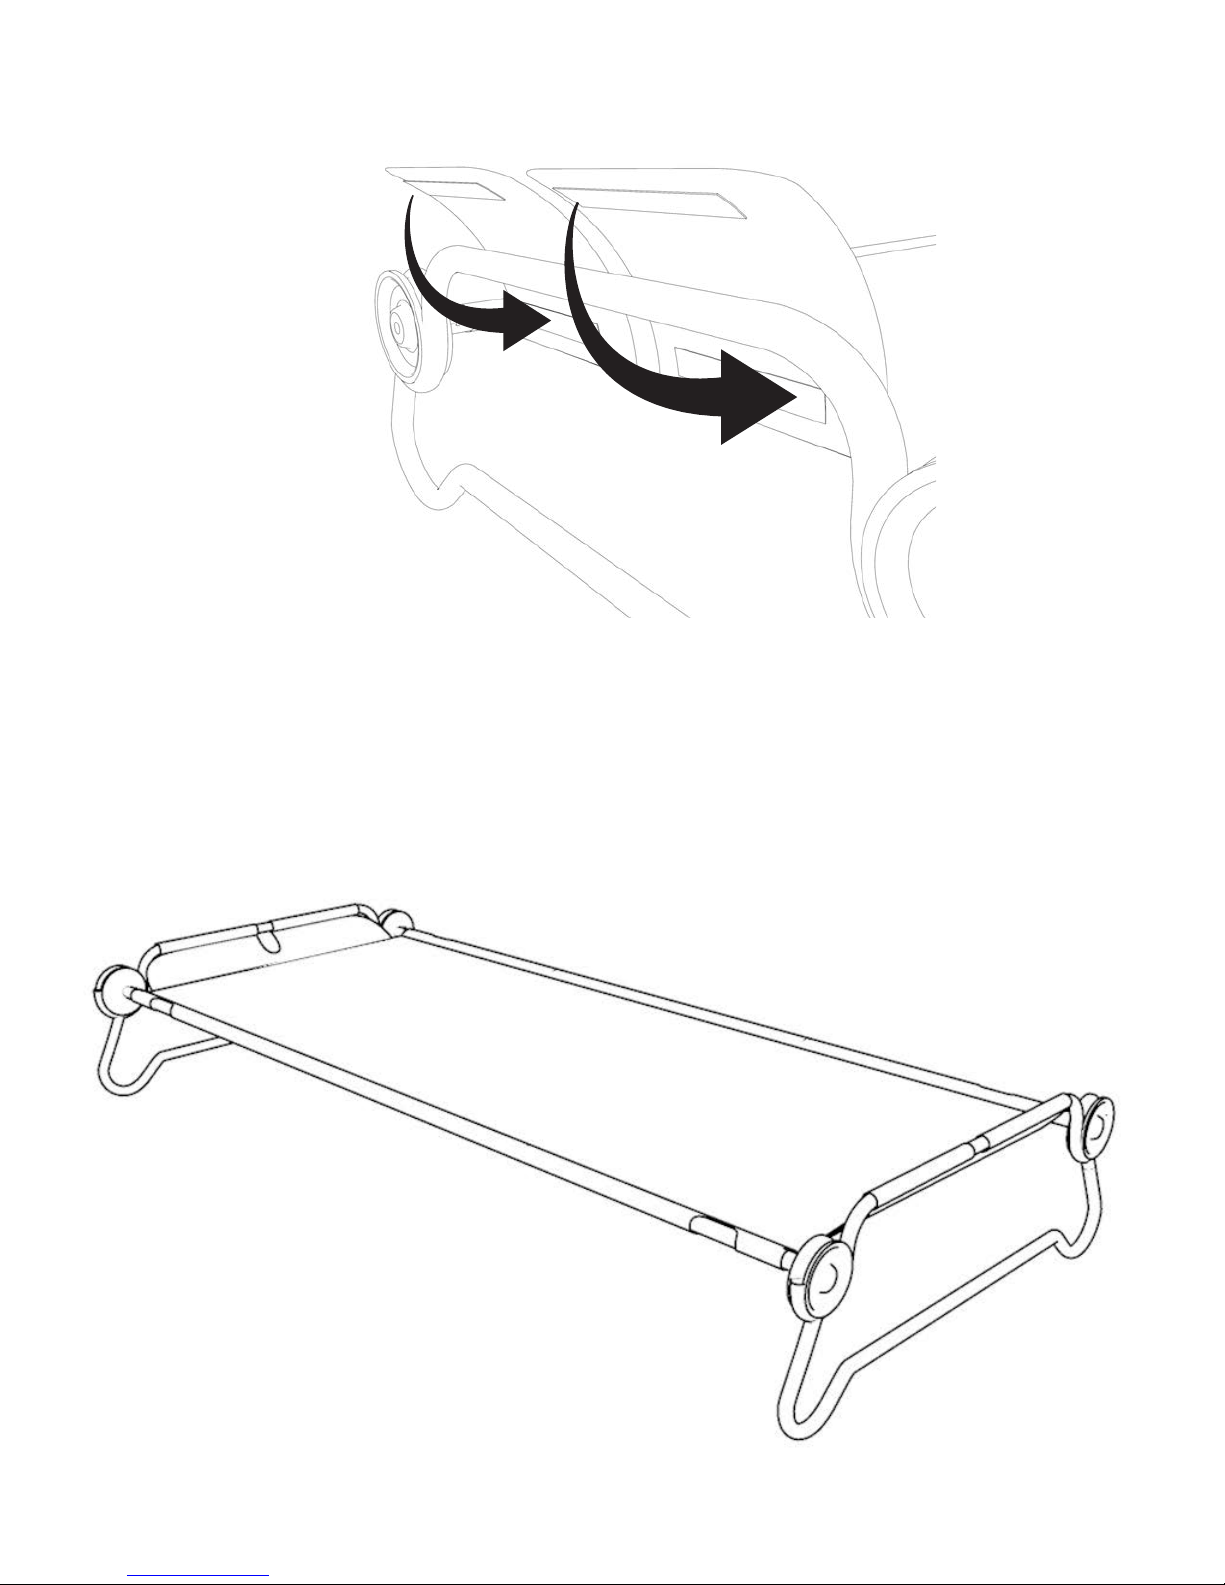
STEP 5. SECURING HEAD REST
5.1. Flap head rest over bed end frame and secure on underside hook and loop.
5.2. Repeat at other bed end.
THE ASSEMBLY OF YOUR 2XL OUTFITTER BUNK
ROUNDED FRAME SINGLE COT IS NOW COMPLETE.
8
 Loading...