

Page 1
Page 2
35
Page 3
36
Page 4
37
Page 5
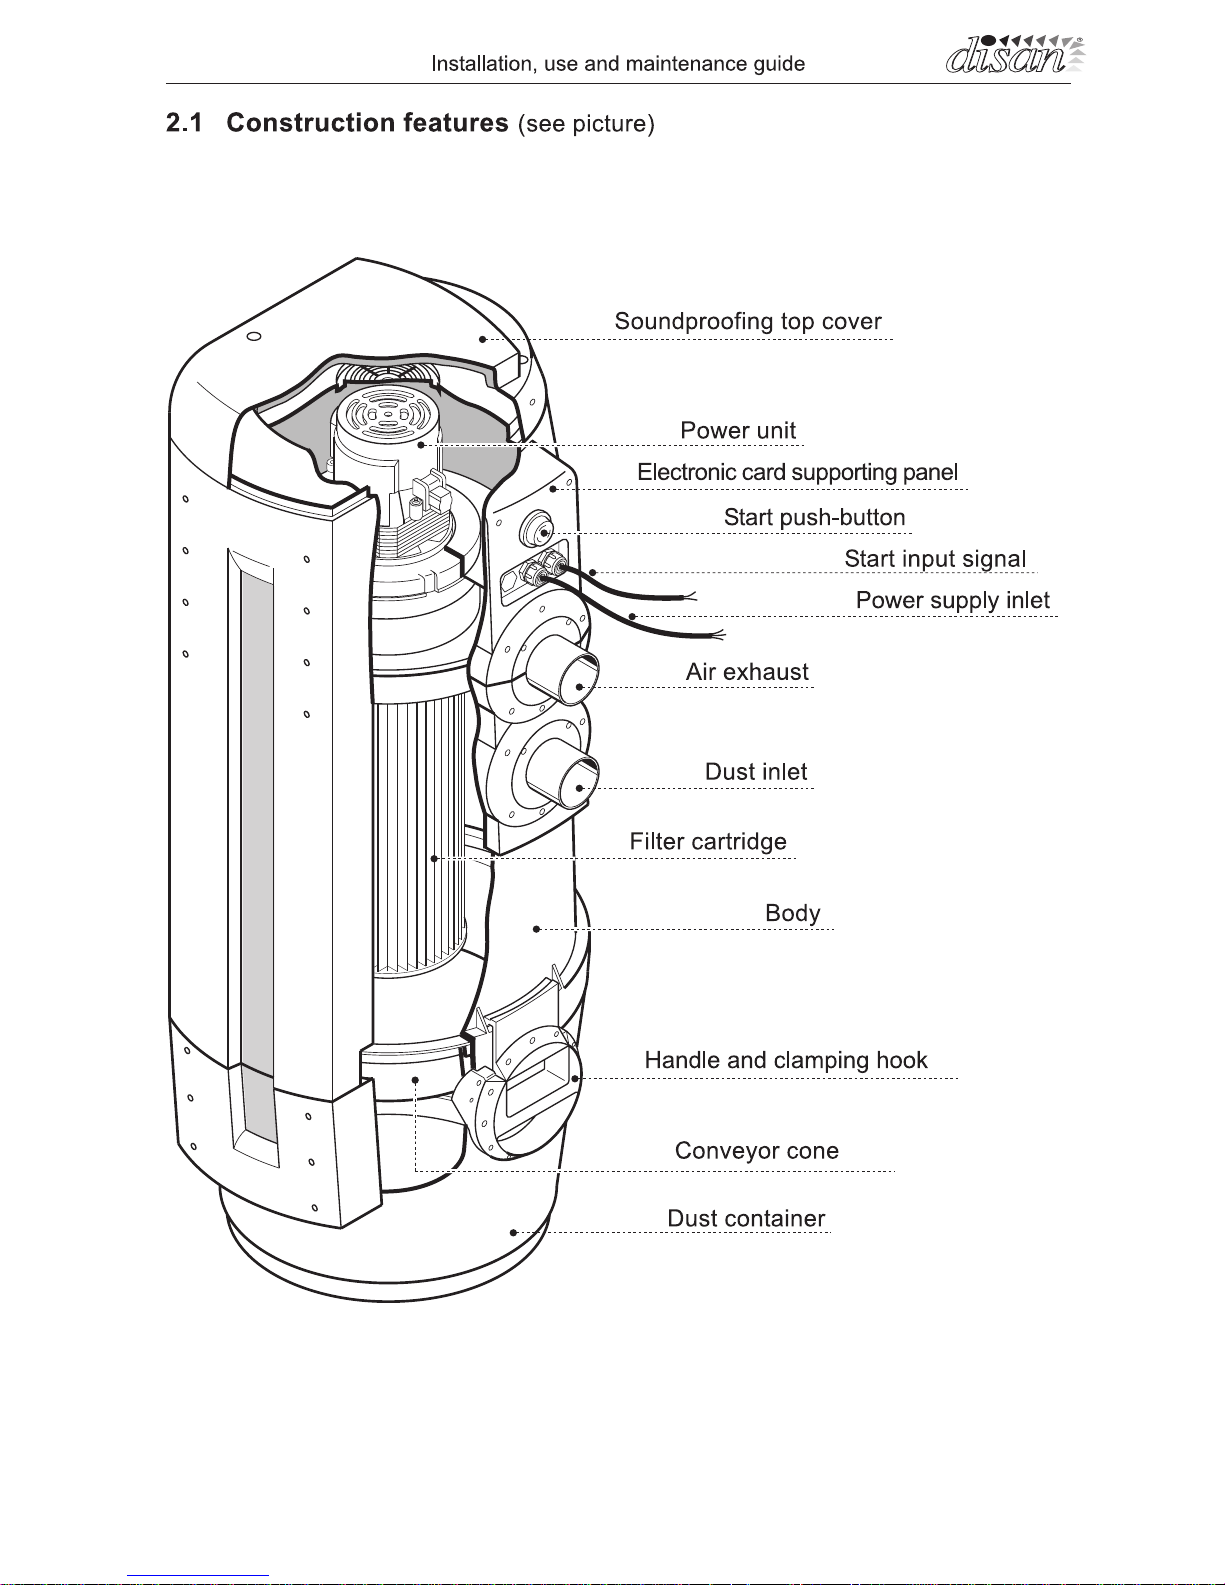
38
Page 6
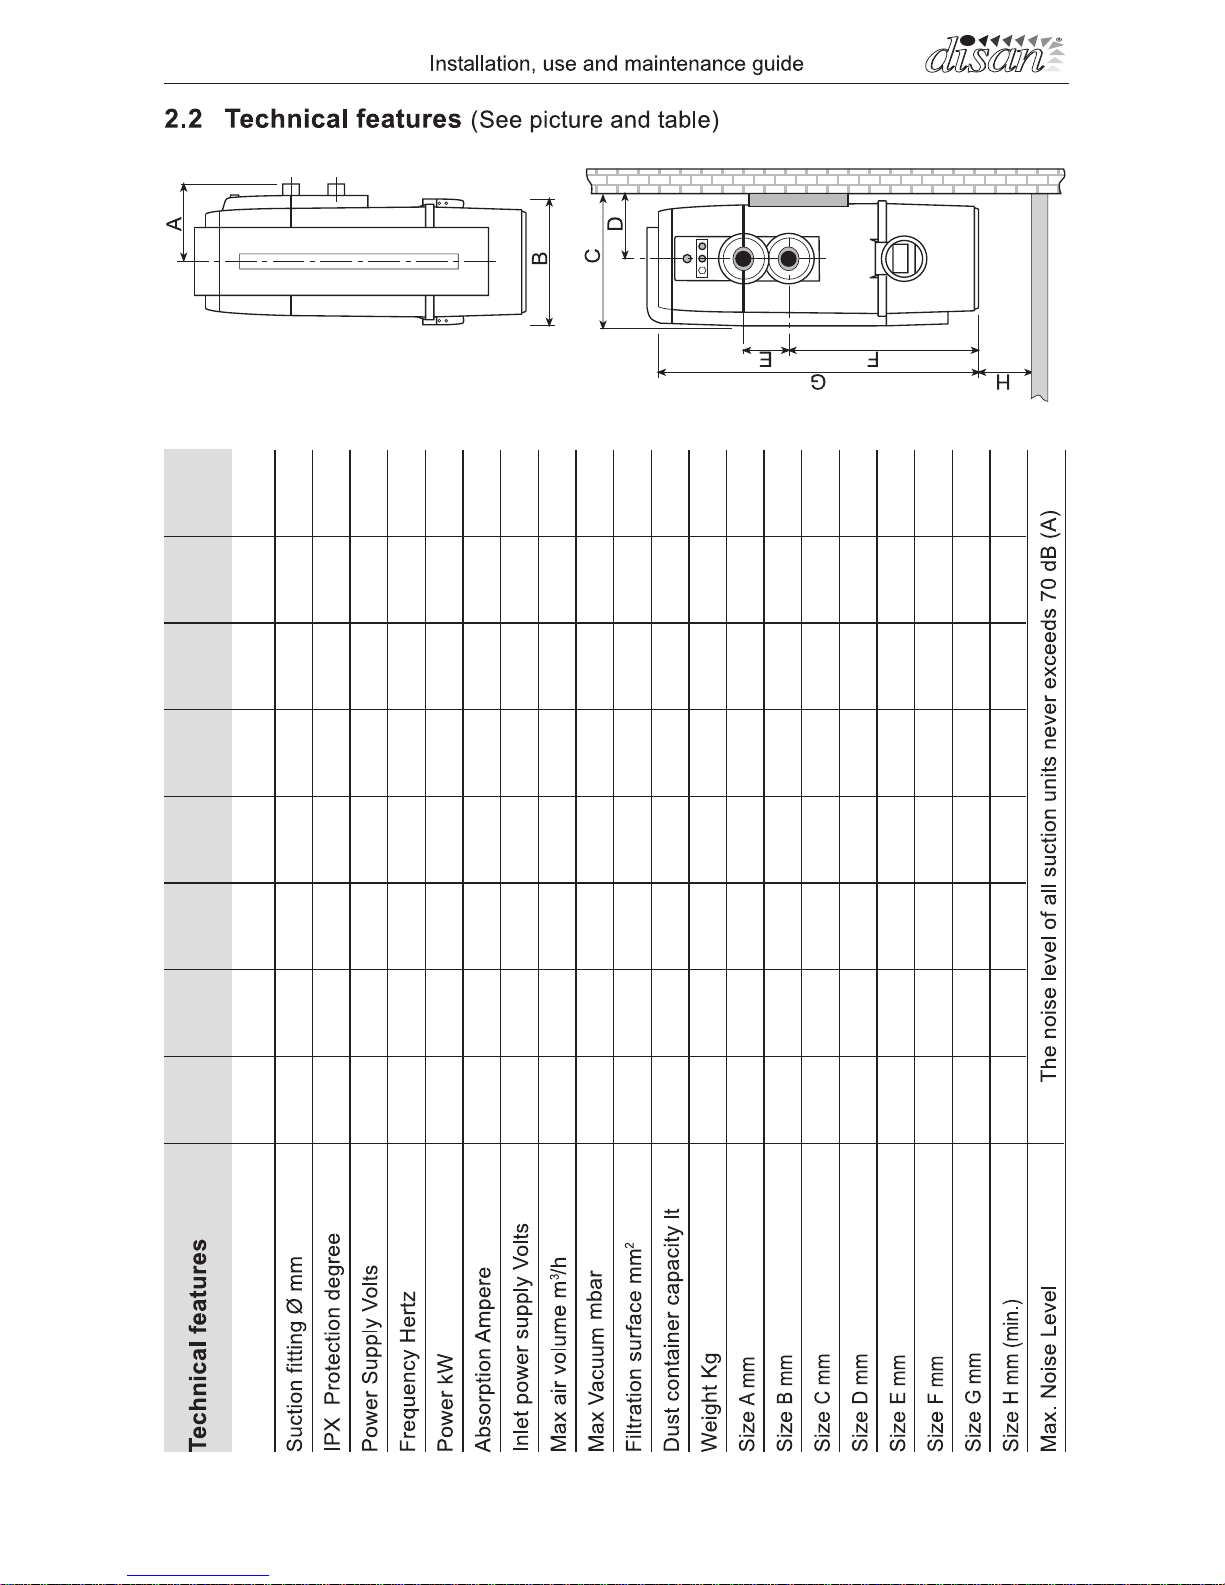
50 50
40 40
230 230
50/60 50/60
1,1 1,4
5 6,5
12 12
182 220
270 330
8.000 8.000
20 20
17,5 20
230 230
360 360
380 380
185 185
105 105
585 585
915 915
100 100
Version
EVO 200
Version
EVO 550
39
Page 7
40
Page 8
41
Page 9
42
Page 10
43
Page 11
44
Page 12
45
Page 13
5. Operation
The cleaner is manufactured in order to minimize the output of noise both in the body
as in the motor. During the use please pay attention to the following advices:
Do not allow children to operate the machine without surveillance
Do not allow the suction of the handle to come into contact the eyes or ears.
Do not insert fi ngers in the handle.
Pay attention to the ceasing of the cleaner.
Due to the depression in the tubing and in the motor, the system remains under
depression for a couple of seconds after switching it off.
Disan take no responsibility for any harm or damage done due to misuse of the
machine
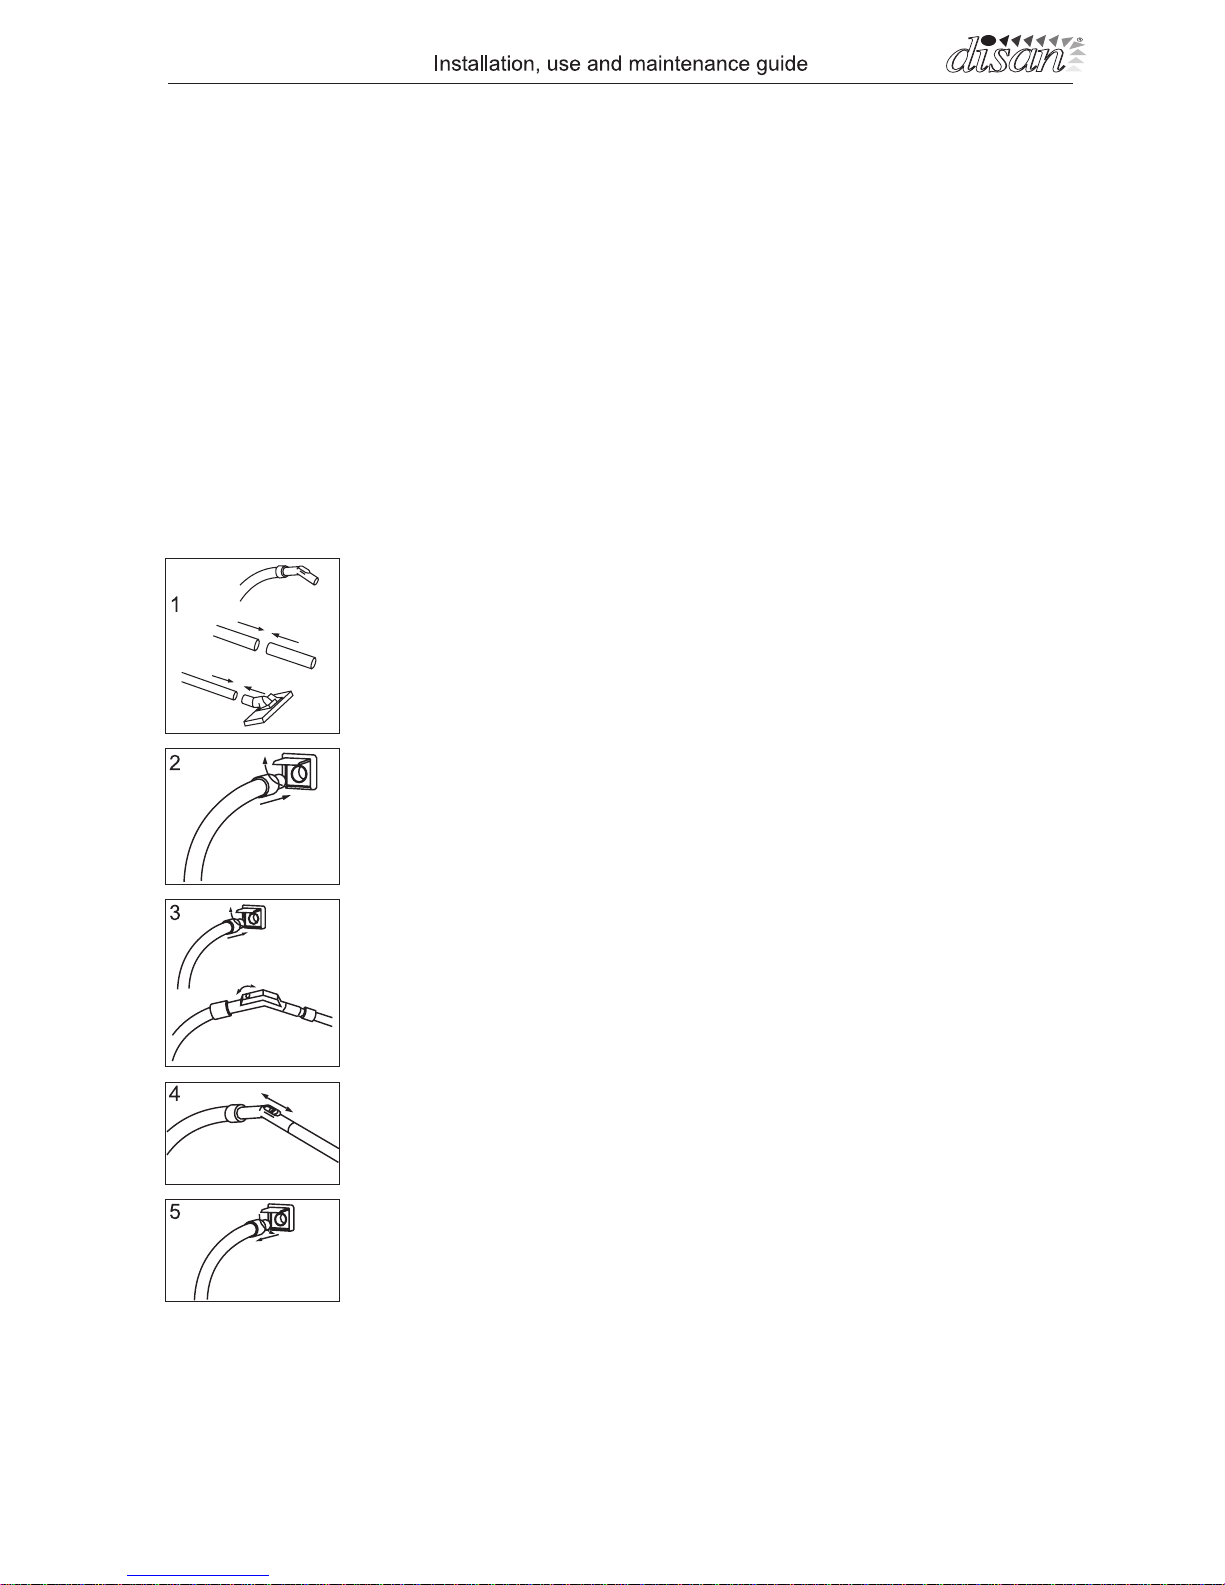
5.1 USE OF ACCESSORIES
1) Place the appropriate ends together: Into the handle; into the
2 chrome plated extension tubes or into the chrome plated telescopic pipe.
2) Lift the cover of the inlet valve and place the metal end of the
vacuum hose.
3a) If an automatic inlet valve is being used the system will start
when the vacuum hose is pressed into the valve.
3b) If using a semi automatic system, the machine starts when
the hose end with the metal collar is placed into the inlet valve or
when the switch is operated on the handle.
4) In the event of excessive suction make use of the pressure
regulation on the curved connection
5) When vacuuming is fi nished the machine can be switched off
by removing the hose from the inlet valve and carefully closing
the cover.
6. MAINTEINANCE
6.1 TECHNICAL ADVICE
- If during operation you experience an irregularity that is not dealt with in section
“maintenance of the vacuum machine” please switch off the machine and get it
inspected by a qualifi ed person.
•
•
•
•
•
•
•
46
Page 14
- No maintenance or repair work should be carried out on the machine unless it is
disconnected from the mains fi rst.
- We recommend every 4-5 years a general check of the electric motor, the bearings, cables including a replacement set of brushes if necessary and a new fi lter
should be installed.
6.2 Ordinary maintenance
All these operations are to be carried out on the machine disconnected from the mains
fi rst and when the cleaner is chilled from the surrounding temperature. This maintenance is made to keep the cleaner working properly and to extend the lifetime of the
cleaner. Disconnect the mains fi rst also to clean the cleaner outside and pay attention
that the dust canister is properly fi xed on the cleaner’s body.
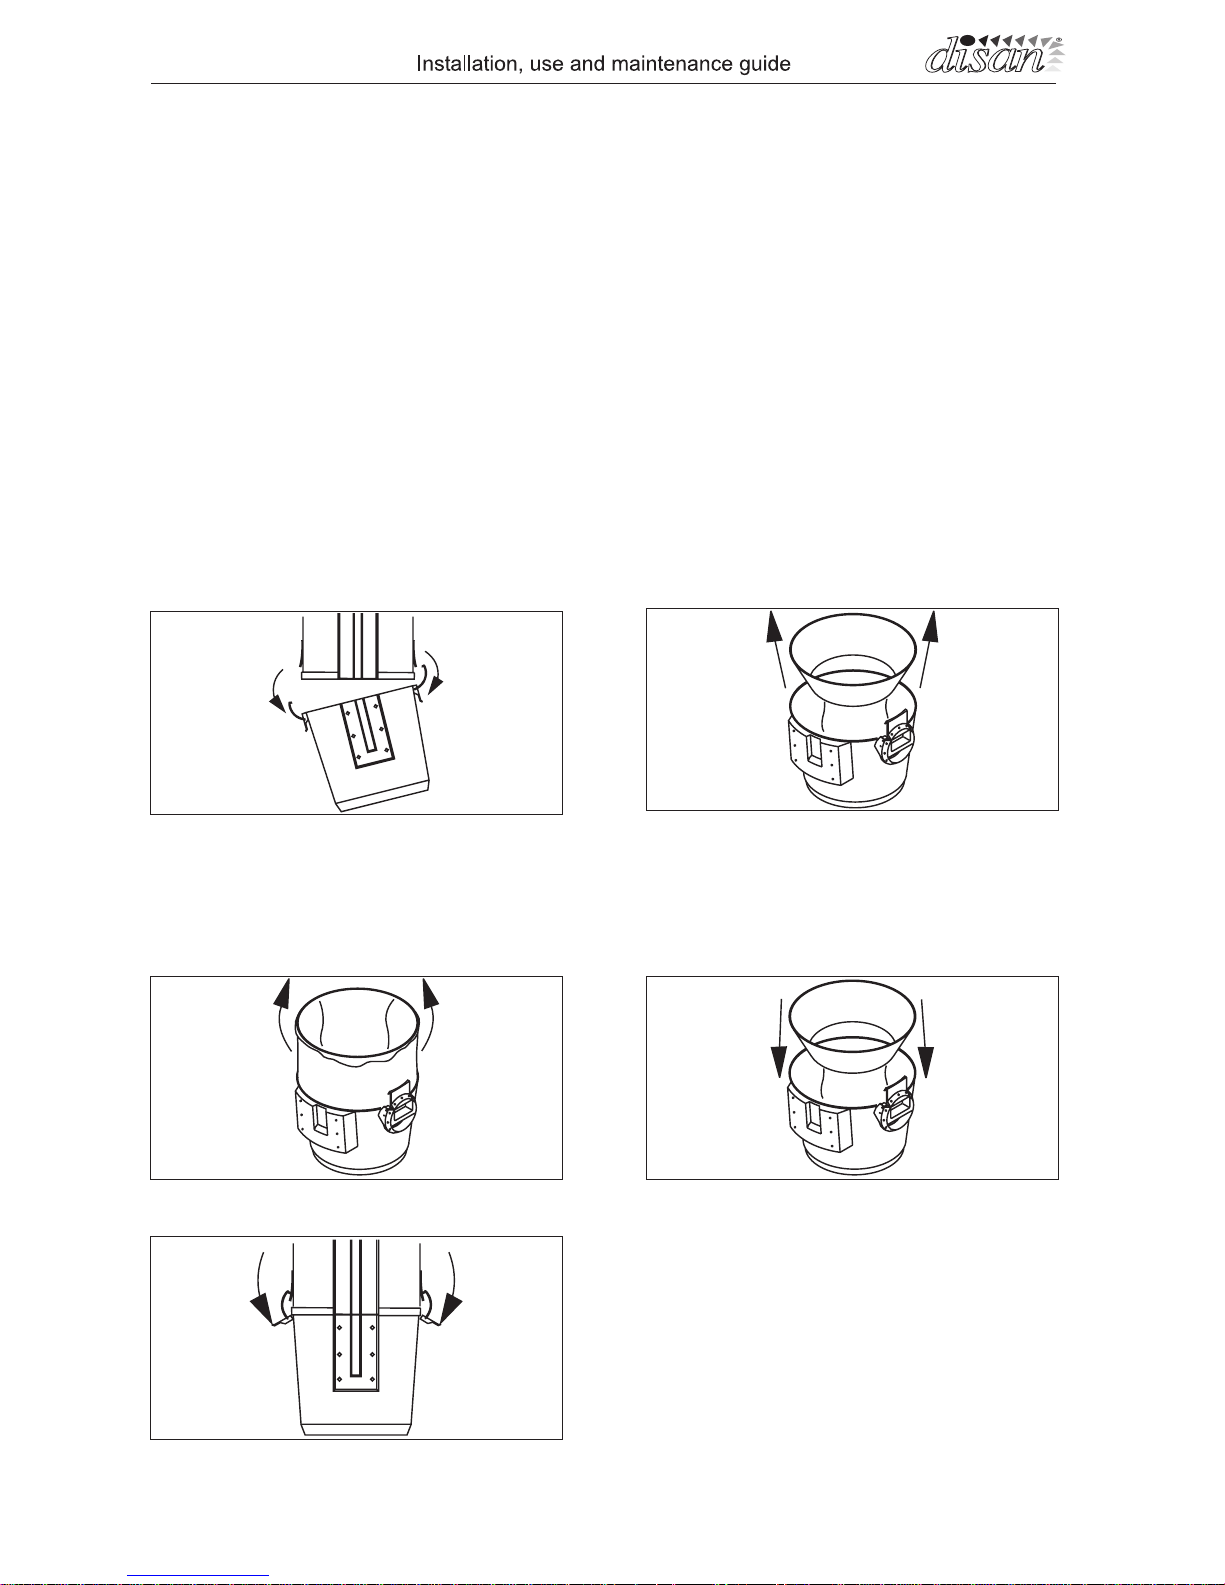
EMPTYING OF WAST CONTAINER
•
•
1.Unclip the waste unit from the machine
2.Remove the cyclonic separator and
bag support frame
3. Empty the waste container or replace
the plastic bag.
Cod. ER627 x Mod.EVO 200/550
4.Reassemble the cyclonic separator
and the bag support into the waste container ensuring all parts are clean and
not damaged.
5. Carefully place the waste container
up to the bottom of the machine in order to make a good seal. (Close both
clamps together)
47
Page 15
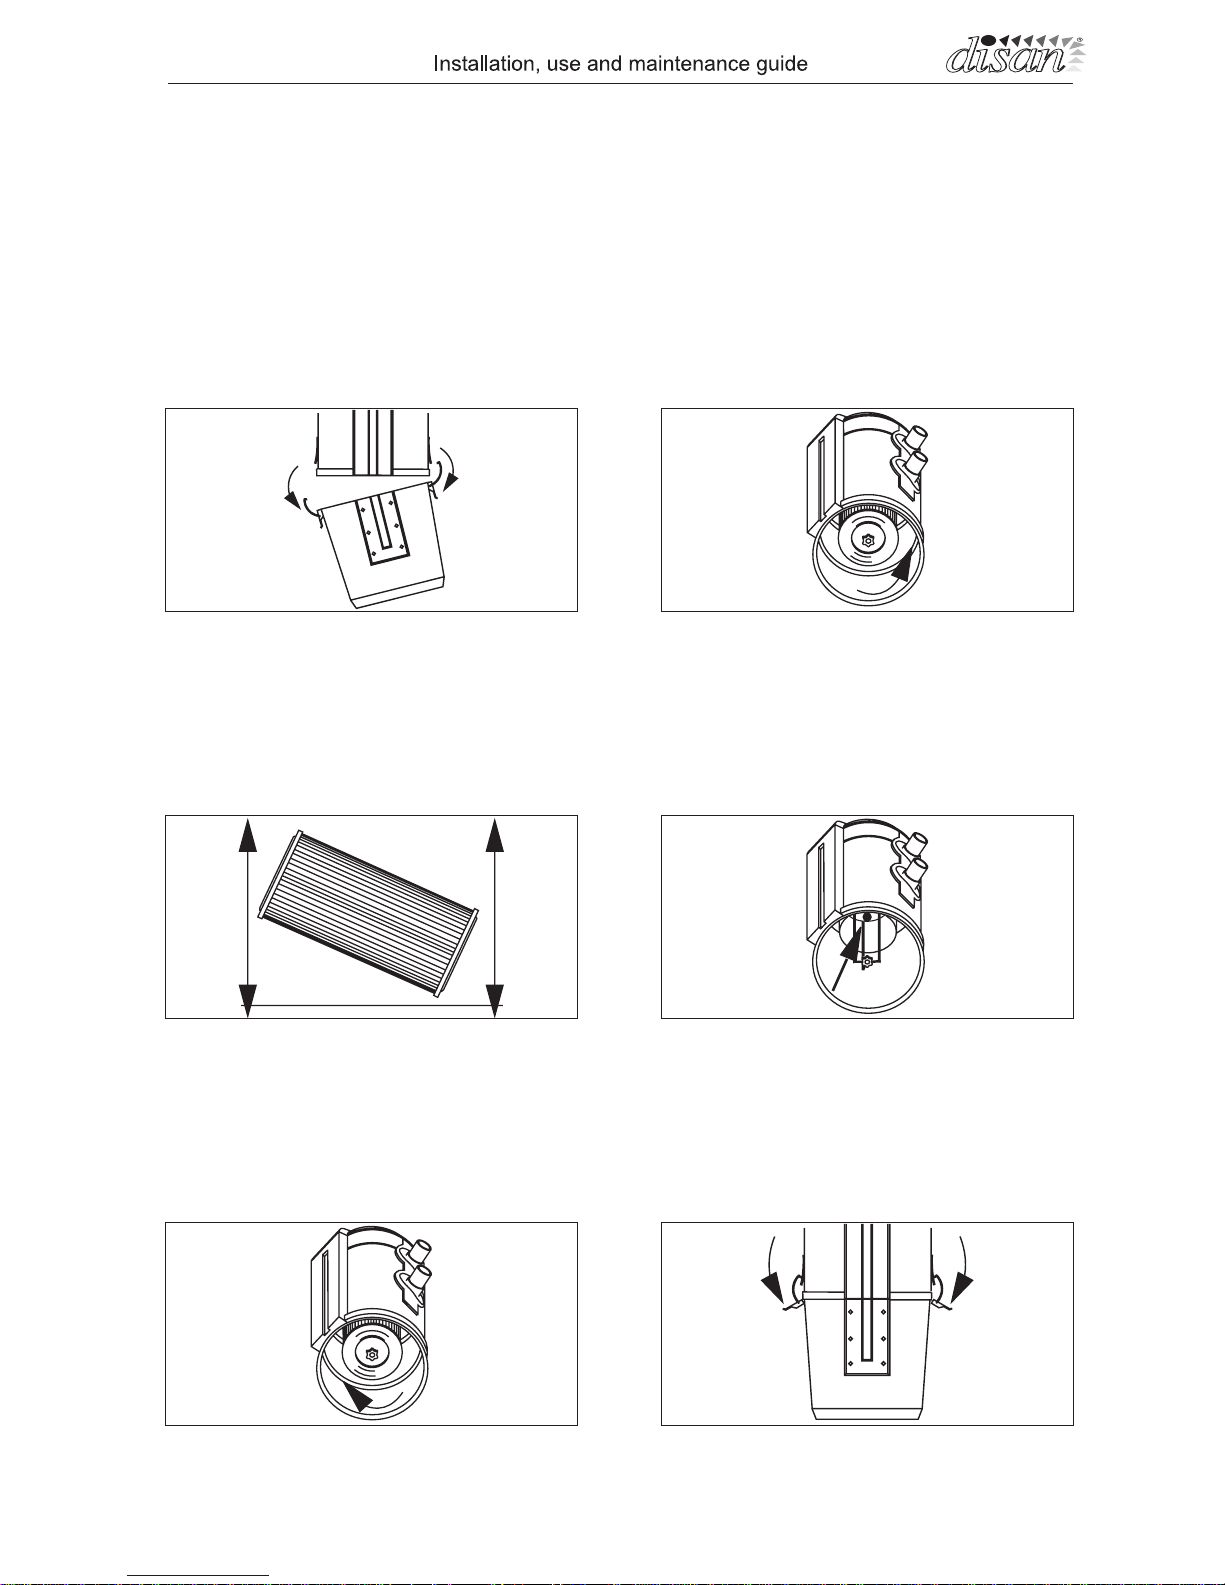
CLEANING OF THE FILTER:
Before touching the cleaner pay attention to its temperature, which due to the motor
can be high. Wait until the cleaner is cold from the surrounding temperature. For a perfect operation of the system, particular attention should be paid to the condition of the
fi lter inside the vacuum unit. It must be checked and cleaned if necessary every 2 or 3
months or if a loss of power is noticed.
1. Uncouple the waste unit from the
machine
2. Rotate the fi nger grip anticlockwise
until the fi lter can be removed.
3. Extract the polyester fi lter and pro-
ceed to clean it using a compressor,
traditional vacuum, by a simple shaking motion or with a clean water, being
careful not to damage it.
4. Check that the metal motor protection grill is not damaged or dirty.
5. Replace the fi lter into the machine
case an retighten the knurled nut.
6. Re-connect the container with the
machine being careful not to damage
the seal edges which would cause a
loss of suction (close both clamps together).
48
Page 16

7. TROUBLESHOOTING
1. Filter is blocked. If suction power at end of the hose is weak check to see if waste
paper bag is full or damaged
2. Flexible hose is blocked. If suction at the inlet valve is correct, the fl exible hose
could be stopped.
3. Damaged waste container not sealed onto machine correctly. Check the condition of the waste container and check that it is installed onto the machine correctly, in
order to prevent loss in suction. Then close both clamps together.
4. Several suction hoses being used at the same time. All single phase systems are
designed for use by a single person at a time.
5. Blockages in the pipes. You should contact an offi cial DISAN installer.
6. Safety protection. The 10 Amp fuse will quickly blow if - The vacuum motor is expo-
sed to an overload - The motor becomes detective - The carbon motor brushes become
defective or in need of replacement.
7. Micro Switch on inlet is dirty or faulty. If the machine continues to run with the
hose removed or will not run with the hose installed check the operation of the micro
switch on the inlet valve if the cause is not found call the installer.
8. Overheating. If the motor becomes overheated due to a blocked fi lter or a blockage
in the pipeline the thermostat will switch the motor off. It will restart when it has cooled
down (8-10 minutes) If after you have followed procedures 1 and 2 it continues to overheat please call the installer.
9. 12 volt supply is interrupted. On the rare occasion that the switching cable that
connects the inlet valve to the machine becomes faulty, please contact the installer.
10. short circuit If the motor will not run after checking the previous points the problem
is likely to be a short circuit in the system wiring and the installer should be called in.
11. Damage to motor or control module. If the previous procedures do not start the
system the cause is likely to be either the transformer relay or an internal problem with
the motor and an installer should be called.
12. Hose with on/off switch is defective. If you are using a system with a fl exible
pipe containing an on/off switch and you experience problems such as the machine
switching on and off intermittently or it will not start or switch off you should contact the
installer.
13. Low power in the house. If the system fails to start and trips the main switch in
the house it could be that there are too many appliances using the electricity. To rectify,
switch off any non essential appliances.
14. Voltage supply too high or low. Do not use the machine if the household voltage
varies by more than 5 % than that stated on the identifi cation plate.
49
Page 17
15. Waste container is full. To empty the waste container See page 38.
16. Inlet valve seal damaged or screws not secure. Replace the seal or tighten the
screws securely.
8. GUARANTEE
8.1 Terms of guarantee The guarantee conditions become valid from the date the
system was fi rst purchased. Always seek professional advice on installation and main-
tenance problems. Any attempt by the customer or other persons to modify o repair
the system with non original parts will automatically render the warranty void and the
manufacturer will not be held responsible for any damage caused either to persons or
their property.
The following relieves the manufacturer of any responsibility for warranty:
- Improper Installation
- Improper use of the system or accessories
- Operating against the regulations of the respective country
- Use of non original spare parts failing to observe the operating instructions
- Total or partial inobservance of the present manual
- Not sending of the guarantee coupon
•
•
•
•
•
•
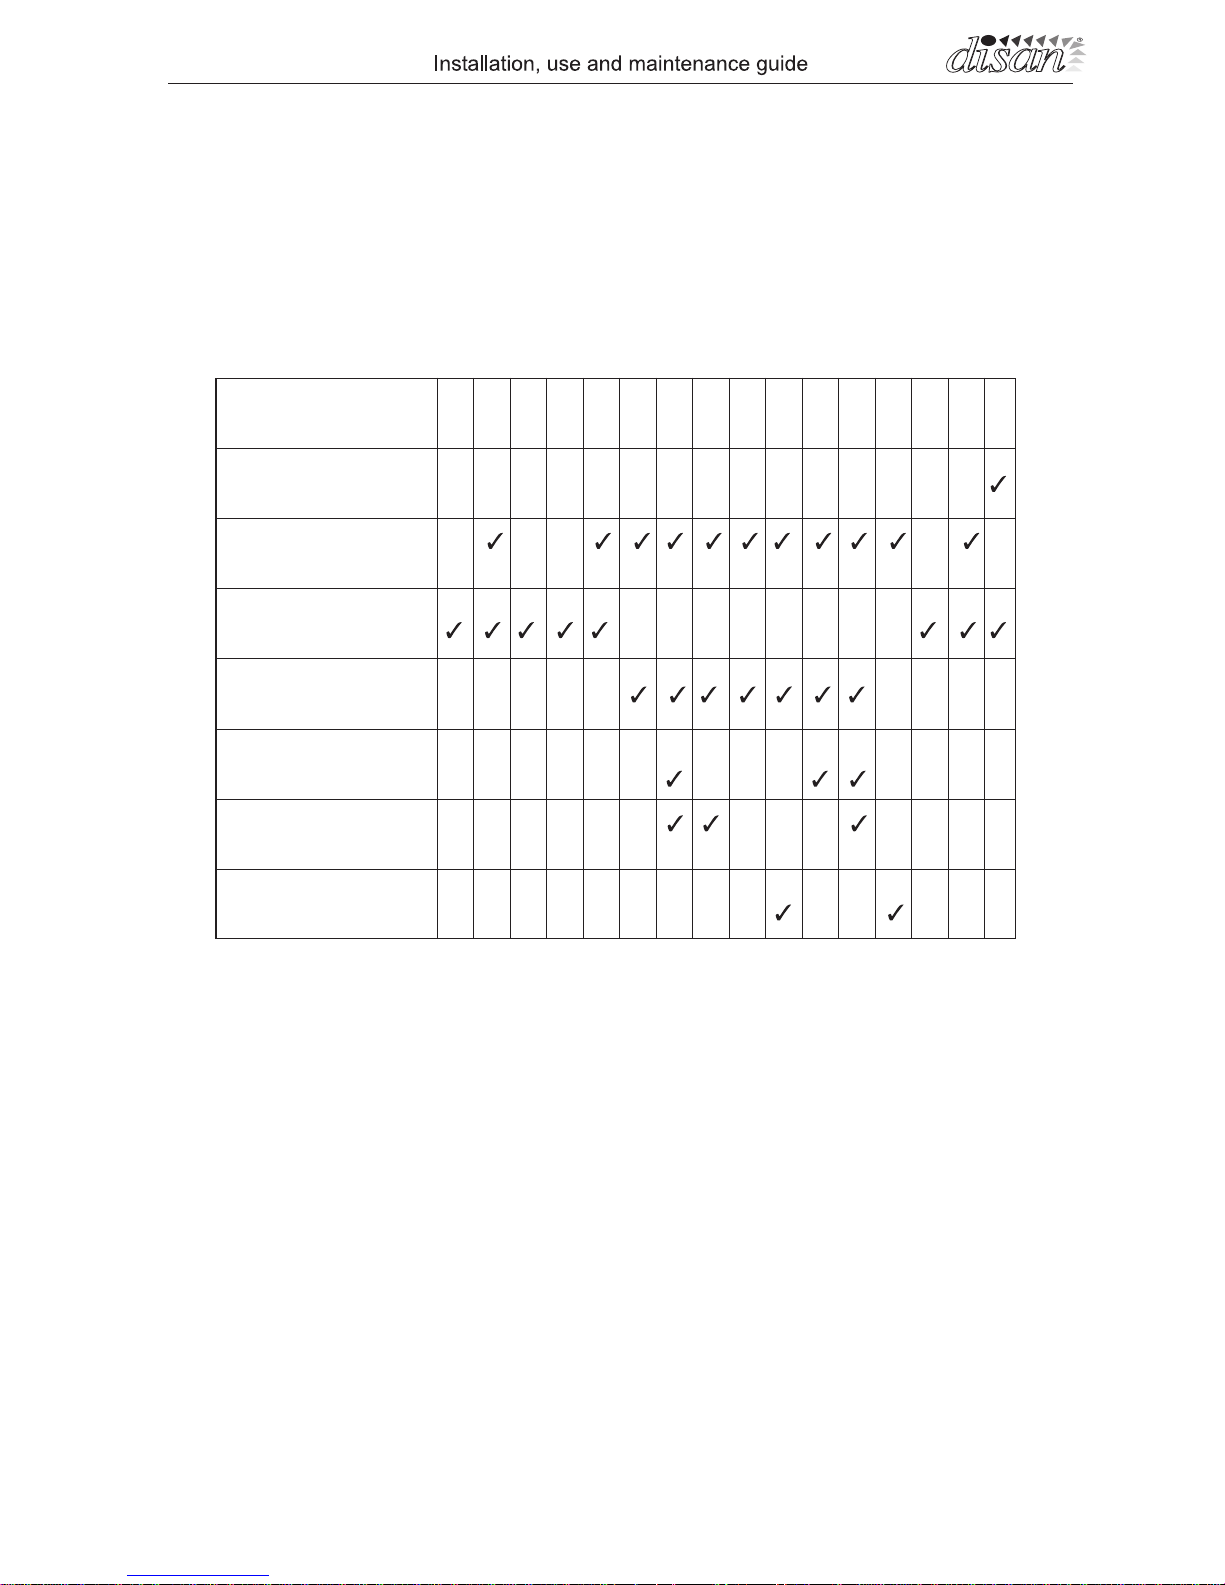
TABLE FOR TROUBLESHOOTING
1 2 3 4 5 6 7 8 9 10 11 12 13 14 15 16
Whistling inlets
Absence of
suction power
Weak suction
power
Motorbreak
The motor does not
switch off
Defective running
of the motor
Voltage supply
fells down
50
Page 18

The manufacturer will under the guarantee replace any parts that are found to be defective due to faulty construction. In order for the guarantee to be valid the machine
must be operated in accordance with this instruction book. All defective parts must
be returned to the headquarter for inspection in their technical laboratory, and under
the terms of their guarantee defective parts will be replaced. The cost of taking apart
and assembly and the transport cost for the faulty part are the responsibility of the
purchaser. The guarantee issued by DISAN will be valid if the portion which can be
separated (see last page) is received by the manufacturer no more than 30 days after
the purchase date. Replacement parts under guarantee will only be issued if the payment terms were kept by the purchaser. Any disputes will be resolved by the courts in
Bolzano (Italy).
8.2 Coupon of guarantee For the registration of your guarantee right fi ll in the coupon
on the cover of the present book and insert the data reported on the identifi cation label
of your cleaner. Send it within 30 days from purchase.
51
Page 19
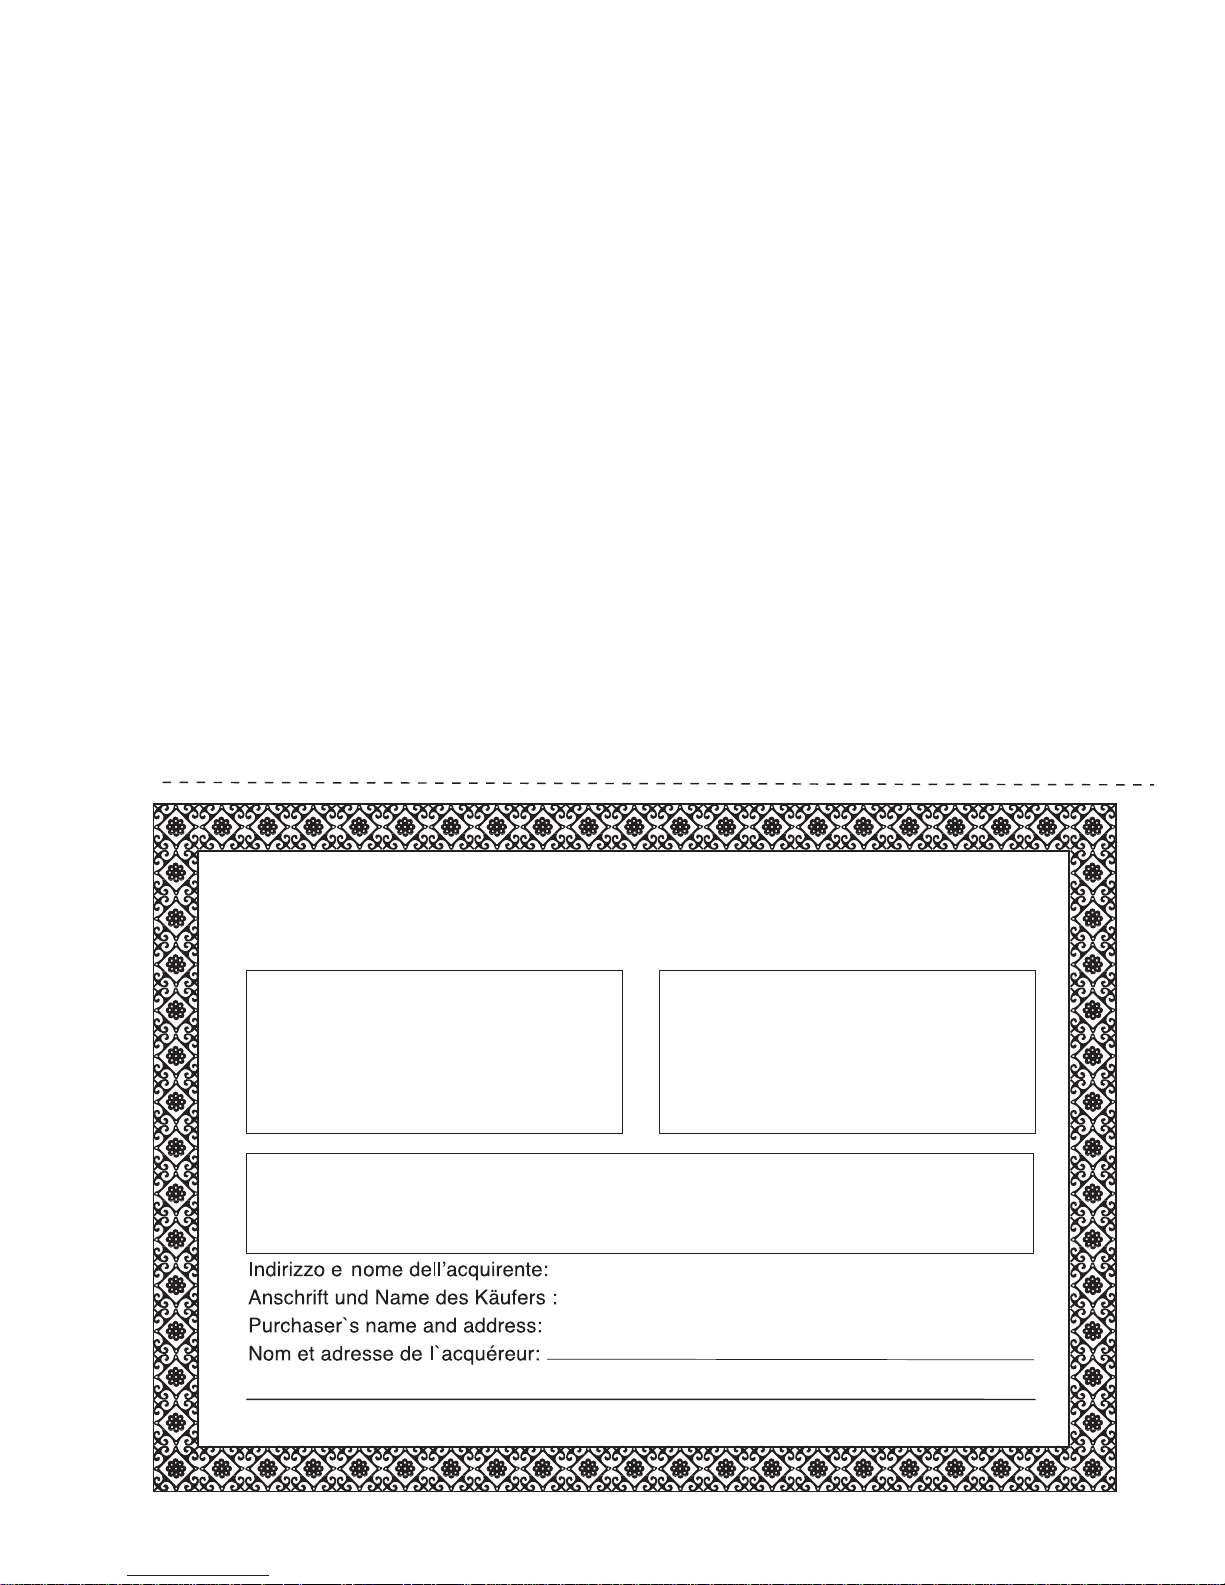
Certificato di garanzia - Garantieschein - Guarantee Coupon - Certificat de Garantie
Timbro e firma del venditore
Stempel und Unterschied des Verkufer
Stamp and sign of seller
Cachet et signature
Data di acquisto:
Kaufdatum :
Date of purchase:
Date d`achat:
GARANZIA 24 MESI - GARANTIE 24 MONATE - GARANTEE 24 MONTHS
Page 20

 Loading...