

Dirt Devil R084015 Owner's Manual
OWNER'S
MANUAL
1CI,
RoomMate
Please read these instructions
carefully before using your
RoomMate.
Let us help you put your
vacuum together or answer
any questions:
1 -800-321 -1 134
(USA).
1-800-661 -6200
(Canada).
CONSUMER INFORMATION
THIS VACUUM IS INTENDED FOR HOUSEHOLD USE ONLY.
IMPORTANT SAFETY INSTRUCTIONS
--
SAVE THESE INSTRUCTIONS
When using an electrical appliance, basic precautions should always be followed, including the following:
READ ALL INSTRUCTIONS BEFORE USING THIS APPLIANCE
ALWAYS FOLLOW THESE SAFETY INSTRUCTIONS
WARNING - FULLY ASSEMBLE CLEANER BEFORE OPERATING.
WARNING:
TO
REDUCE THE RISK
OF
FIRE, ELECTRIC SHOCK,
OR
INJURY
Do not leave appliance when plugged in. Unplug from outlet when not in use and before servicing.
Do not use outdoors or on wet surfaces.
Do not allow to be used as a toy. Close attention is necessary when used by or near children.
Use
~ly as described in this manual. Use only manufacturer's recommended attachments.
Do not use with damaged cord or plug. If appliance is not working as
it
should, has been dropped, damaged, left outdoors,
or dropped into water, return
it
to a service center.
Do not pull or carry by cord, use cord as a handle, close a door on cord, or pull cord around sharp edges or corners. Do not
run appliance over cord. Keep cord away from heated surfaces.
Do not unplug by pulling on cord. To unplug, grasp the plug, not the cord.
Do not handle plug or appliance with wet hands.
Do not put any object into openings. Do not use with any opening blocked; keep free of dust, lint, hair, and anything that
may reduce air flow.
Keep hair, loose clothing, fingers, and all parts of body away from openings and moving parts.
Do not pick up anything that is burning or smoking, such as cigarettes, matches, or hot ashes.
Turn
off
all controls before unplugging.
Use extra care when cleaning on stairs.
Do not use to pick up flammable or combustible liquids, such as gasoline, or use in areas where they may be present.
Look on your vacuum cleaner and follow all label and marking instructions.
Do not use an extension cord with this cleaner.
Keep your hands, feet, hair and clothing away from moving parts; especially the revolving brush.
Do not use the vacuum cleaner without
dustcup and filter in place.
Store the vacuum cleaner indoors. Put the vacuum cleaner away after use to prevent tripping accidents.
A~oroved bv the Vacuum Cleaner Manufacturer's Association Executive Committee. A~ril 29. 1987.
WARNING:
TO
reduce
the
risk of electric shock, this appliance has a polarized plug (one blade
is
wider than the other). This plug
will fit in a polarized outlet only one way. If the plug does not fit fully in the outlet, reverse the plug.
If
it still does not fit, contact a qualified
electrician to install the proper outlet. Do not change the plug in any way.
Your cleaner contains
a
Thermal Protector,#which will automatically shut off the motor
at
abnormally high motor
temperatures. If the Thermal Protector is activated -Turn switch off and unplug the cleaner. Contact an authorized service
representative or call Customer Service at 1-800-321
-1
134.
NOTE: RETURN WARRANTY CARD TO REGISTER YOUR CLEANER
MAINTENANCE:
Proper maintenance of your cleaner will assure continued effective cleaning performance.
1.
Always use genuine Royal replacement parts.
2. Clean-out dustcup frequently.
PART
NO.
1-40091 0-033
O
1996
All
rights resewed
Rev.
10197-0
LIMITED WARRANTY
To the consumer, Royal Appliance Mfg. Co. warrants this vacuum cleaner to be free of defects in material or workmanship commencing upon the date of the original
purchase. Refer to your vacuum cleaner carton for the length of warranty and save your original sales receipt to validate start of warranty period.
If the vacuum cleaner should become defective within the warranty period, we will repair or replace any defective parts free of charge. The complete machine must be
delivered
DreDaid
to any ROYAL Authorized Sales & Warranty Service Station. Please include complete description of the problem, day of purchase, copy of original
sales receipt and your name, address and telephone number. If you are not near a Warranty Station, call the factory for assistance at USA: 1-800-321-1134
1
CANADA:
1-800-661-6200. Use only genuine Royal replacement parts.
The warranty does not include unusual wear, damage resulting from accident or unreasonable use of the vacuum cleaner. This warranty does not cover belts, brushes,
bags, bulbs or fan damage. This warranty does not cover unauthorized repairs. This warranty gives you specific legal rights and you may also have other rights. (Other
rights may vary from state to state in the USA).
TABLE OF CONTENTS
.....................................................................
How to Assemble ;......................Page
3
How to Operate
..............................................................................................
Page
3
Belt & Brush Roll Removal/Replacement
........................................................
Page
4
Cleaning Dustcup & Filter
...............................................................................
Page
5
Quick Cord Release
.........................................................................................
Page 6
RoomMate Storage
.........................................................................................
Page 6
Troubleshooting
..............................................................................................
Page
7
GARANTIE
LIMITEE
Royal Appliance Mfg. Co. garantit au consommateur que cet aspirateur est exempt de tout vice de materiau ou de fabrication. Cette garantie entre en vigueur a la date
d'achat originale et sur reception de votre carte de garantie. La durke de la garantie est inscrite sur le carton d'emballage de I'aspirateur. Si I'aspirateur fait defaut durant
la periode couverte par la garantie, nous reparerons ou remplacerons toute piece dkfectueuse gratuitement.
L'aspirateur au complet doit &re livr6, port payb,
a
n'importe quel point de vente et de service ROYAL autorise. Vous devez inclure une description detaillke du prob-
Ieme, la date d'achat, et vos nom, addresse et numkro de tklkphone. S'il n'y a pas de point de vente dans votre region, tklbphonez
2
I'usine, au 1-800-661-6200.
N'utilisez que des pieces de rechange Royal.
La garantie ne couvre pas les utilisations non prevues, ni les detkriorations dues
a
un accident ou a un usage abusif de I'aspirateur. Elle ne couvre pas non plus les
courroies, les brasses, les sacs, les ampoules ou le ventiateur. Cette garantie ne couvre pas les reparations non autorisees. Cette garantie vous conf8re des droits
juridiques precis, conformbment aux lois applicables.
Assemblage
....................................................................................................
Page
3
Mode d'emploi
..............................................................................................
Page
3
Retrait et remplacement de la courroie ou du reuleau de brosse
...................
Page
4
Nettoyage du recipient a poussiere et du filtre
................................................
Page
5
Liberation rapide du cible
...............................................................................
Page 6
1.
Rangement de I asp~rateur
..............................................................................
Page 6
Guide de depannage
........................................................................................
Page
7
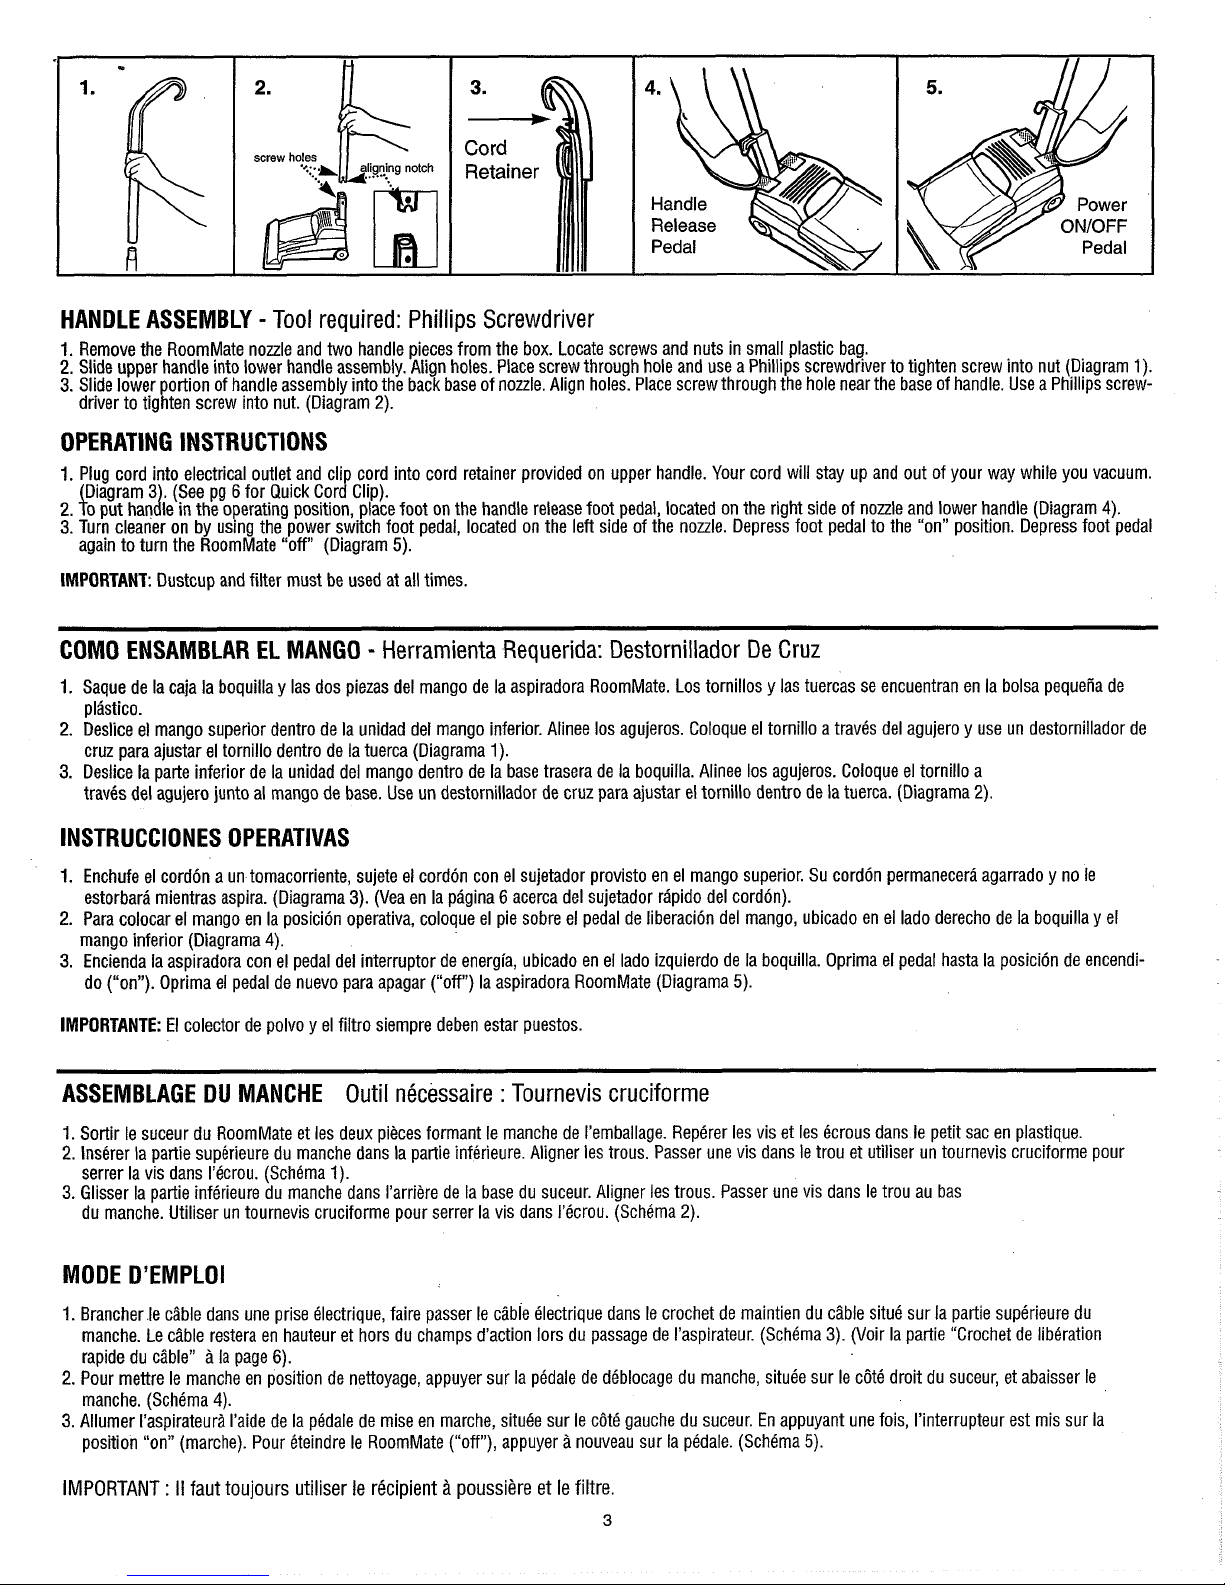
HANDLE ASSEMBLY
-
Tool
required:
Phillips
Screwdriver
1.
Remove the RoomMate nozzle and two handle pieces from the box. Locate screws and nuts in small plastic bag.
2.
Slide upper handle into lower handle assembly. Align holes. Place screw through hole and use a Phillips screwdriver to tighten screw into nut (Diagram
1).
3. Slide lower portion of handle assembly into the back base of nozzle. Align holes. Place screw through the hole near the base of handle. Use a Phillips screwdriver to tighten screw into nut. (Diagram 2).
OPERATING INSTRUCTIONS
1.
Plug cord into electrical outlet and clip cord into cord retainer provided on upper handle. Your cord will stay up and out of your way while you vacuum.
{Diagram
3J
(See pg 6 for Quick Cord Clip).
2.
o put han le in the operating position, place foot on the handle release foot pedal, located on the right side of nozzle and lower handle (Diagram
4).
3. Turn cleaner on by using the power switch foot pedal, located on the left side of the nozzle. Depress foot pedal to the "on" position. Depress foot pedal
again to turn the RoomMate "off (Diagram
5).
IMPORTANT:
Dustcup and filter must be used at all times.
COMO ENSAMBLAR EL MANGO - Herramienta
Requerida:
Destornillador
De
Cruz
1.
Saque de la caja la boquilla y las dos piezas del mango de la aspiradora RoomMate. Los tornillos y las tuercas se encuentran en la bolsa pequeiia de
plastico.
2.
Deslice el mango superior dentro de la unidad del mango inferior. Alinee 10s agujeros. Coloque el tornillo a traves del agujero y use un destornillador de
cruz para ajustar el tornillo dentro de la tuerca (Diagrama 1).
3. Deslice la parte inferior de la unidad del mango dentro de la base trasera de la boquilla. Alinee
10s agujeros. Coloque el tornillo a
travBs del agujero junto al mango de base. Use un destornillador de cruz para ajustar el tornillo dentro de la tuerca. (Diagrama
2).
INSTRUCCIONES OPERATIVAS
1.
Enchufe el corddn a un tomacorriente, sujete el cordon con el sujetador provisto en el mango superior. Su cordon permanecera agarrado y no le
estorbara mientras aspira. (Diagrama 3). (Vea en la pagina
6
acerca del sujetador rapido del cordon).
2. Para colocar el mango en la posicion operativa, coloque el pie sobre el pedal de
liberation
del mango, ubicado en el lado derecho de la boquilla y el
mango inferior (Diagrama
4).
3. Encienda la aspiradora con el pedal del interruptor de energia, ubicado en el lado izquierdo de la boquilla. Oprima el pedal hasta la posicion de encendi-
do ("on"). Oprima el pedal de nuevo para apagar ("off") la aspiradora RoomMate (Diagrama
5).
IMPORTANTE:
El colector de polvo y el filtro siempre deben estar puestos.
ASSEMBLAGE
DU
MANCHE
Outil
necessaire : Tournevis
cruciforme
1.
Sortir le suceur du RoomMate et les deux pieces formant le manche de I'emballage. Reperer les vis et les ecrous dans le petit sac en plastique.
2.
lnserer la partie superieure du manche dans la partie inferieure. Aligner les trous. Passer une vis dans le trou et utiliser un tournevis cruciforme pour
serrer la vis dans I'ecrou. (Schema 1).
3. Glisser la partie inferieure du manche dans I'arriere de la base du suceur. Aligner les trous. Passer une vis dans le trou au bas
du manche. Utiliser un tournevis cruciforme pour serrer la vis dans
I'ecrou. (Schema 2).
MODE D'EMPLOI
1.
Brancher le cible dans une prise electrique, faire passer le cable electrique dans le crochet de maintien du cable situe sur la partie superieure du
manche. Le c2ble restera en hauteur et hors du champs d'action lors du passage de I'aspirateur. (Schema 3). (Voir la partie "Crochet de liberation
rapide du cable" a la page 6).
2.
Pour mettre le manche en position de nettoyage, appuyer sur la pedale de deblocage du manche, situee sur le ~6th droit du suceur, et abaisser le
manche. (Schha
4).
3. Allumer I'aspirateura I'aide de la pedale de mise en marche, situee sur le cdte gauche du suceur. En appuyant une fois, I'interrupteur est mis sur la
position "on" (marche). Pour Bteindre le RoomMate ("off), appuyer
ii
nouveau sur la pedale. (Schema
5).
IMPORTANT
:
II
faut toujours utiliser le recipient a poussiere et le filtre.
 Loading...