

Page 1
USER GUIDE
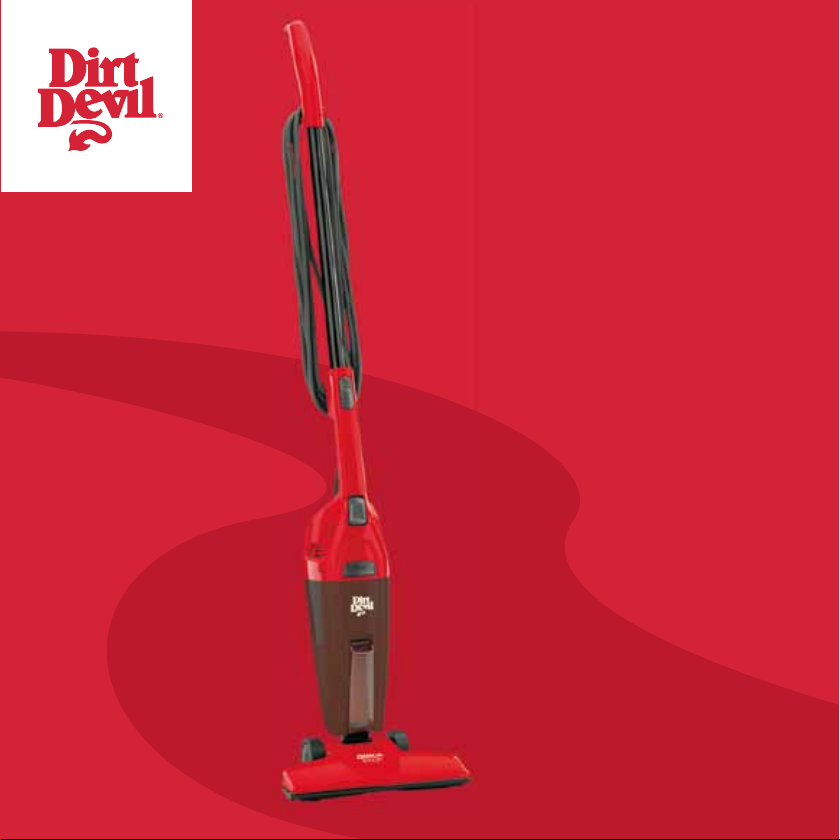
QUICKSTEP
Bagless Stick Vac
DSV-VC
Page 2

LET’S GO.
Page 3

IMPORTANT SAFETY INSTRUCTIONS
THIS VACUUM IS INTENDED FOR HOUSEHOLD USE ONLY.
When using an electrical appliance, basic precautions should always be followed, including the following:
▪ READ ALL INSTRUCTIONS BEFORE USING THIS APPLIANCE.
▪ ALWAYS FOLLOW THESE SAFETY INSTRUCTIONS.
▪ DO NOT LEAVE CLEANER UNATTENDED.
WARNING: TO REDUCE THE RISK OF FIRE, ELECTRIC SHOCK OR INJURY:
▪ Fully assemble before operating.
▪ Operate cleaner only at voltage specied on data plate on back of cleaner.
▪ Do not use outdoors or on wet surfaces.
▪ Do not allow to be used as a toy. Not intended for use by children age 12 and under. Close supervision is necessary when
used near children. To avoid injury or damage, keep children away from product, and do not allow children to place ngers
or other objects into any openings.
▪ Use only as described in this manual. Use only manufacturer’s recommended attachments.
▪ Do not use with damaged cord or plug.
▪ Do not pull or carry by cord, use cord as a handle, close a door on cord, or pull cord around sharp edges or corners. Do not
run vacuum cleaner over cord. Keep cord away from heated surfaces.
▪ Do not unplug by pulling on cord. To unplug, grasp the plug, not the cord.
▪ Do not handle plug or appliance with wet hands.
▪ Do not put any object into openings. Do not use with any opening blocked; keep free of dust, lint, hair and anything that may
reduce air ow.
▪ Keep hair, loose clothing, ngers, and all parts of body away from openings and moving parts.
▪ Turn off all controls before unplugging.
▪ Use extra care when cleaning on stairs. To avoid personal injury or damage, and to prevent the cleaner from falling, always
place cleaner at bottom of stairs or on oor. Do not place cleaner on stairs or furniture, as it may result in injury or damage.
▪ Do not use to pick up ammable or combustible liquids, such as gasoline, or ne wood sandings or use in areas where they
may be present.
▪ Do not pick up anything that is burning or smoking, such as cigarettes, matches or hot ashes.
▪ Store the product indoors. Put the product away after use to prevent tripping accidents.
▪ Do not use without lters and/or dirt cup in place.
▪ Any other servicing should be done by an authorized service representative.
▪ Do not leave appliance when plugged in. Unplug from outlet when not in use and before servicing.
CAUTION: TO REDUCE THE RISK OF DAMAGE:
▪ Avoid picking up hard, sharp objects with this product, as they may cause damage.
SAVE THESE INSTRUCTIONS
WARNING:
This plug will t in a polarized outlet only one way. If the plug does not t fully in the outlet, reverse the plug. If it still does not
t, contact a qualied electrician to install the proper outlet. Do not change the plug in any way.
Page 4
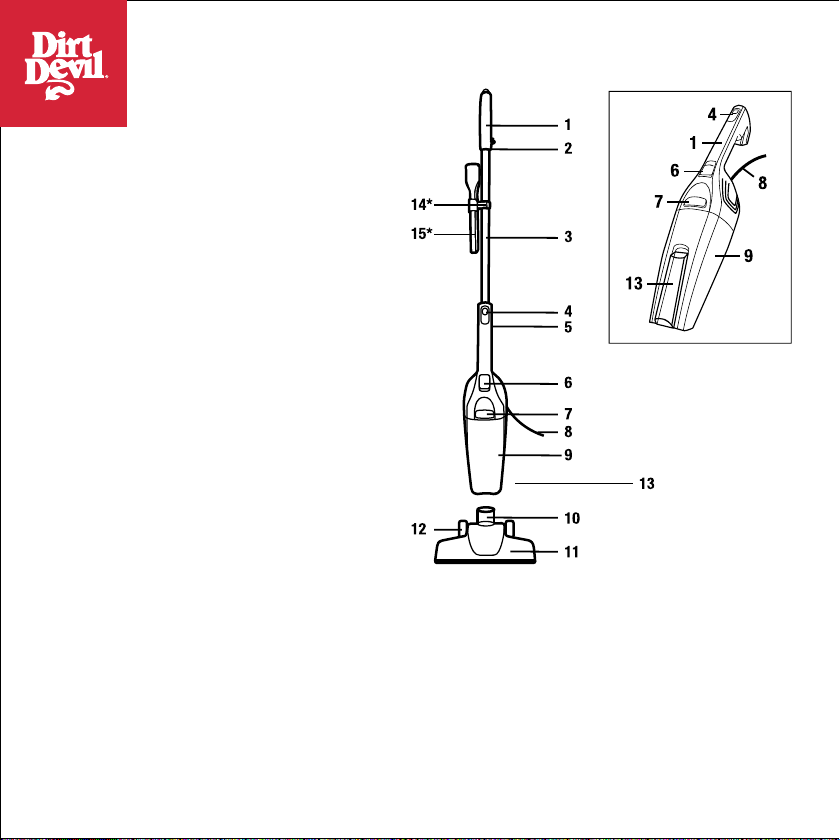
CLEANER DESCRIPTON
1. Handle Grip
2. Upper Cord Wrap (located on back of
handle grip)
3. Handle Tube
4. Handle Release Button
5. Lower Cord Wrap (located on back of
hand vac)
6. On/Off Switch
7. Dirt Cup Release Button
8. Power Cord
9. Dirt Cup
10. Dirt Inlet Tube
11. Floor Nozzle
12. Wheels
13. Quickstep Crevice Tool*
14. Tool Clip*
15. Crevice Tool*
*Depending on model Crevice Tool* can be
on Hand vac or on Tool clip* attached to
handle.
Page 5
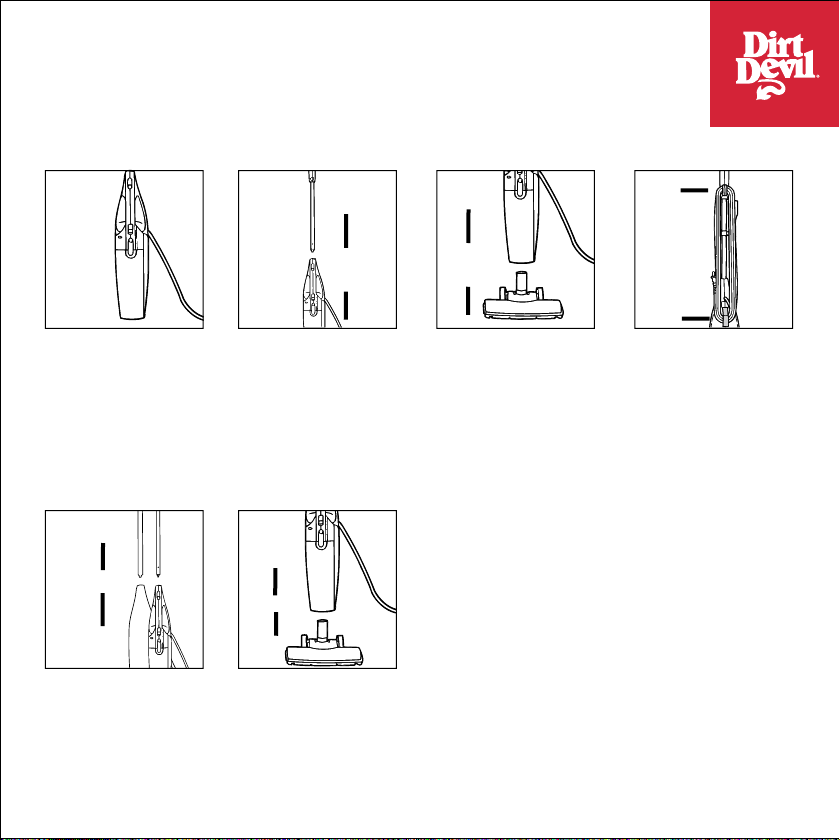
HOW TO USE AS A STICK VAC
TO USE: Slide the power switch to the ON position.
TO TURN UNIT OFF: Slide the power switch to the OFF position.
▪ Empty and clean the unit and lter after each use or after large pickups when the unit becomes full.
Hold body of unit in an
upright position.
Slide handle down until it
snaps in place.
HOW TO USE AS A HAND VAC
Place unit in an upright
position with the back of
the unit facing forward.
Push release button
forward, then pull handle
from unit.
Remove the oor tool from
the nozzle.
Insert oor tool into dirt
cup nozzle. Firmly press to
assure proper connection.
TO USE: Slide the power switch to the ON position.
TO TURN UNIT OFF: Slide the power switch to the OFF
position.
▪ Empty and clean the unit and lter after each use or
after large pickups when the unit becomes full.
For storage, wrap cord
around hooks located on
back of cleaner.
Page 6
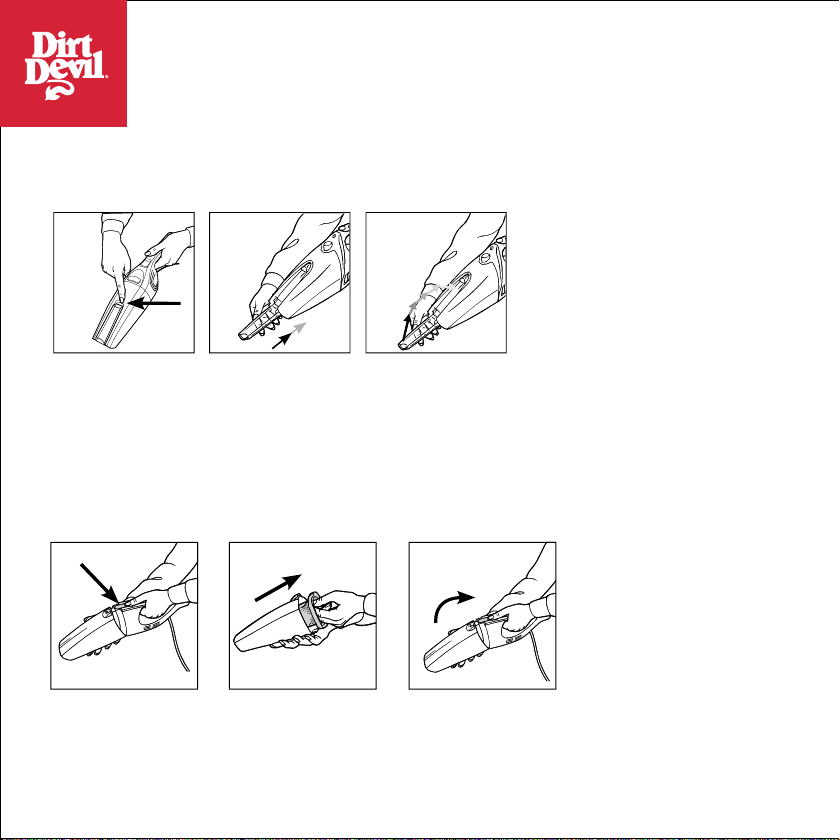
HAND VAC ATTACHMENTS
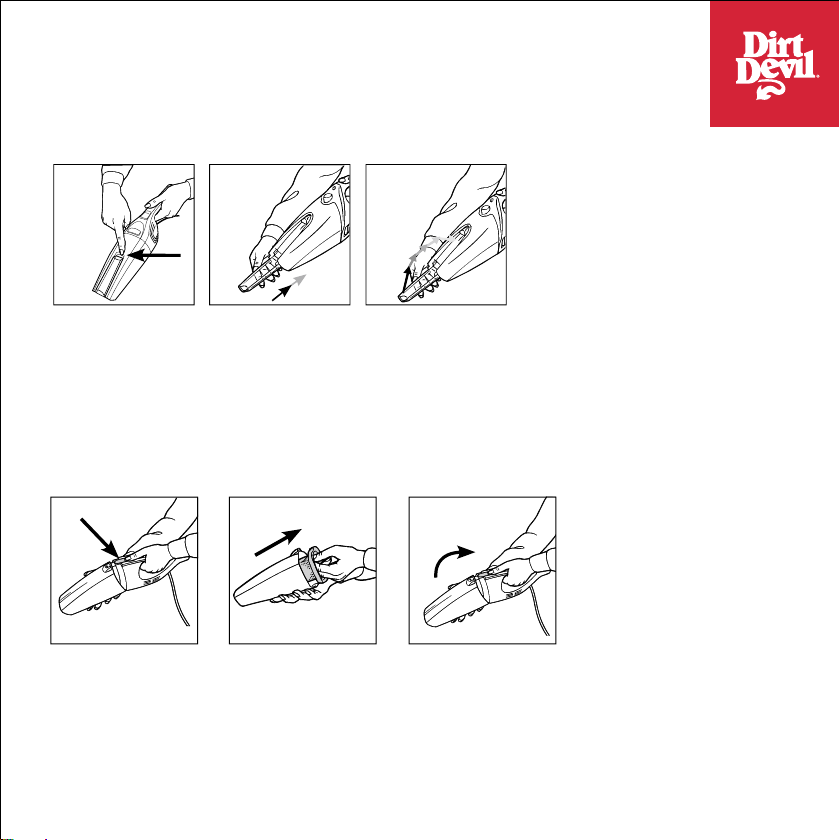
USING AND STORING THE CREVICE TOOL
The crevice tool is permanently stored on-board. It is located on the top of the dust cup for your convenience.
1. Unsnap the crevice tool.
2. Flip crevice tool down to line up with
nozzle then press up until secure in
place.
3. To store crevice tool: Pull down until
loose.
Flip crevice tool up towards unit and you feel
it lock into place.
DIRT CUP & FILTER: REMOVAL & REPLACEMENT
IMPORTANT: FOR BEST RESULTS, CLEAN THE FILTER AFTER EACH USE.
NOTE: For best performance, replace lter every 6 months.
EMPTY & CLEAN DIRT CUP
Depress the dirt cup
release button and pivot
nozzle away from unit.
Hold dirt cup over a
wastebasket. Grasp
lter and gently pull out.
Shake excess dirt and debris out of dirt cup.
Brush the dust and dirt off the lter, or shake
the lter inside of the wastebasket.
Page 7
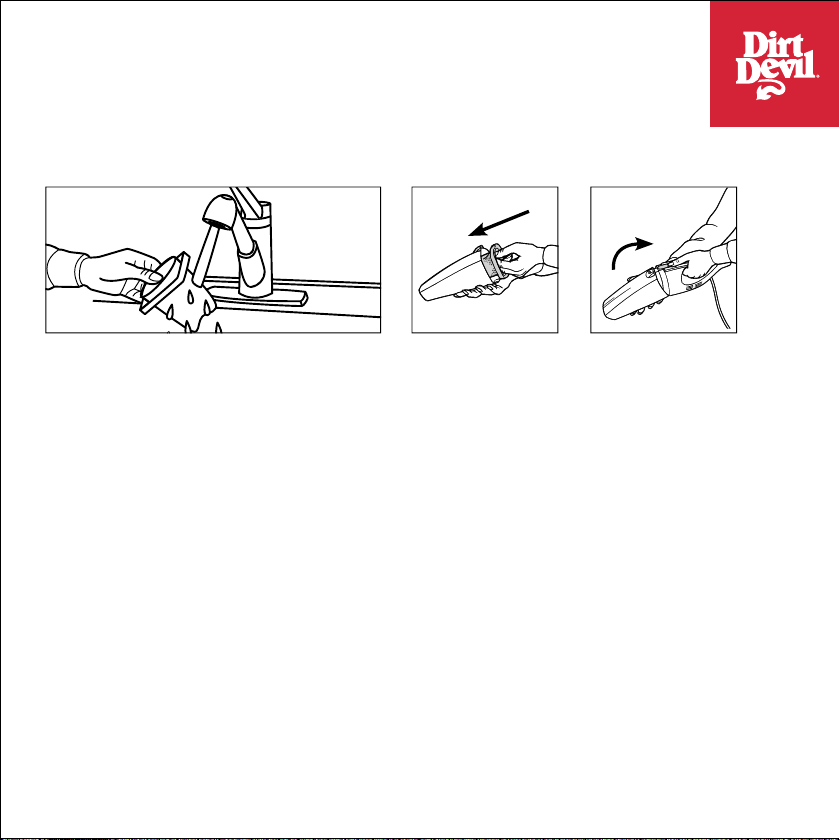
CLEAN & RINSE FILTER
Hold lter under running water to rinse. DO NOT use
soap/detergent. Tap excess water out of lter. Allow
lter to COMPLETELY DRY for at least 24 hours before
replacing in dirt cup.
TROUBLESHOOTING GUIDE
Cleaner tools won’t pick up
▪ Crevice tool clogged. Remove crevice tool; remove
obstruction.
▪ Dirt cup is full. Empty dirt cup.
▪ Filter clogged. Clean lter.
Cleaner won’t pick up or low suction
▪ Dirt Cup not installed correctly. Review Dirt Cup and
Filter Removal and Replacement
▪ Dirt cup is full. Empty dirt cup.
▪ Clogged lter. Remove lter and clean.
▪ Dirt inlet tube clogged. Remove nozzle; remove obstruction.
Gently push lter back
into dirt cup.
WARNING: TO REDUCE RISK OF PERSONAL INJURY
- UNPLUG CLEANER BEFORE SERVICING
Dust escaping from cleaner
▪ Dirt cup is full. Empty dirt cup.
▪ Dirt Cup not installed correctly. Review Dirt Cup & Filter
Removal & Replacement.
▪ Filter not installed correctly. Review Dirt Cup & Filter
Removal & Replacement.
▪ Filter is dirty. Clean lter or replace.
Cleaner won’t run
▪ Power cord not rmly plugged into outlet. Plug unit in
rmly.
To reattach dirt cup: Align
bottom rst and pivot dirt cup
until it snaps into place.
Page 8

使用手冊
QUICKSTEP
無塵袋直立式真空吸塵機
DSV-VC
Page 9

入門指南
Page 10

重要安全指引
本機僅為家居使用。
使用電器時,務必遵守基本注意事項,包括下列幾點:
使用本產品前,請先詳讀所有的指示。
▪
遵循以下安全指示。
▪
請看管好你的吸塵機。
▪
警告:為降低引起火災、電擊或受傷的風險:
組裝完成後才可操作。
▪
請按背面指定的電壓下操作本機。
▪
不要在室外或潮濕的表面上使用。
▪
不可將本產品當做 玩具使用。
▪
品損壞,請讓兒童遠離本產品,勿讓兒童將手指及其他異物放入吸塵機的吸頭中。
請務必遵照本手冊說明使用及使用製造商的附件。
▪
不得使用損壞的電線或插頭。
▪
請勿拉扯電線或用電線提起吸麈機、將電線當做把手使用、令電線受門 縫擠壓,或沿著尖銳邊緣或角落拉扯電線。 使用本
▪
產品時請勿壓住電線。電線不可接觸發熱的表面。
拔出插頭時請勿拉扯電線。拔出插頭時請抓住插頭,請勿拉扯電線。
▪
手部沾濕時,請勿接觸插
▪
請勿將任何異物放入拖洗吸塵機的吸頭中。當吸頭有任何堵塞時請勿使用;請 保持產 品不受 灰麈、棉屑、毛 髮以及 任何物
▪
品所堵塞。
請注意避免毛髮、寬鬆的衣服、手指和身體的任何一部份接近吸頭。
▪
請先關閉所有電源,再拔出插頭。
▪
清潔樓梯時需特別小心。為避免造成受傷或產品損壞,並避免吸麈機掉 落,請將吸麈機放置在地板上。請不 要將吸 麈機放
▪
在樓梯級或傢俱上,因為可能會造成受傷或損壞。
請勿用產品吸易燃或可燃液體例如汽油,或在可能有這些液體的地方使用本產品。
▪
請勿用本產品吸起任何正在燃燒或冒煙的物體,如香煙、火柴或滾燙的灰燼。
▪
本產品須存儲於室內。使用本產品後請收好產品,以防絆倒。
▪
請勿在未安裝過濾網和
▪
任何其他保養應由授權服務中心人員進行。
▪
在無人看管的情況下,不要將吸塵機接通電源。不使用時緊記要從插座拔出電源。
▪
歲或以下的兒童不 宜使用。使用時若 附近有兒童,請務 必嚴密監 控使用。為避免受 傷或產
12
頭或使用本產品。
或集塵筒時使用。
/
小心:為降低損壤的風險:
請避免使用本產品吸
▪
請保留此手冊以供日後參考
警告:
此插頭只有一個 方向可配對插座。如果插頭不能完全插 進插座,請把插 頭倒轉再試。如 果仍然不能完全配對,請聯絡合資格
電器技工,以安裝適當的插座。在任何情況下都不可替換插頭。
堅硬、尖銳的物體,以免損壞。
Page 11

吸塵機產品說明
手把握柄
1.
上方電線捆拴位(位於手把握柄後面)
2.
手柄長管
3.
手柄分離掣
4.
下方電線捆拴位(位於手提式吸麈機後面)
5.
關按鈕
6. 開/
集塵筒分離掣
7.
電源線
8.
集塵筒
9.
地板吸頭接駁口
10.
地板吸頭
11.
輪子
12.
13. Quickstep
縫隙吸頭緊定夾
14.
縫隙吸頭
15.
取決於不同的型號,縫隙吸頭*可以安裝在手
*
提式吸塵機上, 也可 安裝 在手 柄上 安裝 的縫 隙
吸頭緊定夾
縫隙吸頭
*
上。
*
*
*
Page 12

如何進行直立式操作
開機:將電源開關撥到ON位置。
關機:將電源開關置於
每次使用或吸入大量塵垢後,請清空并清洗本機及過濾網。
▪
OFF
位置。
將吸塵機置於直立狀態。 向下滑動手柄直至扣緊。
如何以手提方式操作
將吸塵機置於直立狀態,吸
麈機後端向上。
向前推分離掣,將手柄從吸
麈機拉出。
將地板工具從吸麈機吸頭
上移除。
將地 板 工具插 入 集麈筒 吸
頭。用力 按 下 以確保 連 接
正確。
開機:將電源開關撥到ON位置。
關機:將電源開關置於
每次使 用或吸入大 量塵垢後,請 清空并清洗 本機及
▪
過濾網。
OFF
存放時, 將 電 線 纏 繞 在 吸
麈機背面的掛鉤上。
位置。
Page 13
手提吸塵機附件
縫隙吸頭的操作及存放
縫隙吸頭永久地存於板上。它位於集塵筒之上,以便使用。
集塵筒與過濾網:拆卸和更換
重要事項:每次使用後,清潔過濾網以獲得最佳效果。
注意:為確保最佳性能,請每隔
個月更換過濾網。
6
清倒及清洗集塵筒
鬆開縫隙吸頭。
1.
將縫隙吸頭向下翻開直至與吸麈機吸
2.
頭同一直線後往上推至牢固位置。
存放縫隙吸頭:往下拉至鬆開位置。
3.
將縫隙吸頭向上翻直至鎖定到位。
往下按集麈筒分離掣並
從吸塵機拿開噴嘴。
將集麈筒放在廢紙簍上
方。抓緊過濾網及輕輕
拉出。
搖抖集塵筒抖 出灰 麈及 垃圾。將麈
埃及灰塵從過 濾網 刷掃 出來,或在
廢紙簍內搖抖過濾網。
Page 14

清理及清洗過濾網
用自來水沖洗過濾網。切勿使用肥皂/洗滌劑。輕 拍過
濾網以除去多餘水漬。過濾網須乾透最少
新放入集麈筒內。
故障檢修指南
吸塵工具無法吸塵
縫隙吸頭堵塞。請移除縫隙工具;清除異物。
▪
集塵筒已滿。請清空集塵筒。
▪
過濾網堵塞。請清洗過濾網。
▪
吸塵機沒有吸力或吸力不佳
集塵筒安裝不正確。請查閱「集麈筒與過濾綱的拆卸
▪
和更換」。
集塵筒已滿。請清空集麈筒。
▪
過濾網堵塞。請拆下並清洗過濾網。
▪
吸塵入口管堵塞。請卸下吸頭;清除障礙物。
▪
警告:降低受 傷的風除——拔 掉吸塵機電源方可維修
小時方可重
24
將過濾 網 輕 輕 推 入集麈
筒內。
塵屑從吸塵機溢出
集塵筒已滿。請清空集塵筒。
▪
集塵筒 安裝不正確。請查 閱「集 麈筒與過濾 綱的拆卸
▪
和更換」。
過濾網 安裝不正確。請查 閱「集 麈筒與過濾 綱的拆卸
▪
和更換」。
過遽網充滿污垢。請清洗或更換過濾網。
▪
吸塵機無法運作
電源 線可 能未
▪
插座。
牢固 地插 入插 座。請將 插頭 牢固 插入
重新裝入集 麈 筒:將集
塵筒底 部 對 準 後 放入直
至緊扣位置。
Page 15

用户指南
QUICK
无袋直立式真空吸尘器
STEP
DSV-VC
Page 16

LET’S GO.
Page 17

安全操作说明
本吸尘器仅限于家庭使用。
电器设备使用时,应遵循基本的防范措施,包括:
▪
设备使用之前,请仔细阅读操作说明。
▪
始终遵循以下安装操作说明。
▪
请勿将机器置于无人看管状态。
警告:为降低火灾、触电或意外伤害之风险:
▪使用前,请确保各部件正确组装。
▪仅可在产品背面的数据标签上规定的电压条件下使用本产品。
▪请勿在户外或潮湿的表面使用本产品。
▪请勿给儿童当作玩具。本产品不适合 12 岁及以下儿童使用。使用时如有儿童在近旁,必须密切注意防护。为了避免意外伤害
或设备损坏,请勿让儿童碰触本产品,严禁儿童将手指或任何其他物品放进设备风口端。
▪务必按照本手册中的描述使用本产品。务必使用制造商推荐的附件。
▪请勿使用破损的电线或插头。
▪请勿提拉电线,或将电线用作把手,不可夹着电线关门或在尖锐角落拉扯电线。请勿使真空吸尘器压到电线。电线应远离热源。
▪拔出电源插座时请勿扯拉电线。拔出电源线时,应握住插头而非电线。
▪请勿用湿手触碰插头或设备。
▪禁止将任何物品塞入风口。如风口堵塞请停止使用该设备;请勿让灰尘、绒毛、头发等任何物体阻碍设备空气流通。
▪请防止头发、宽松衣
▪在拔下电源插头之前,请先关闭所有控制按钮。
▪清扫楼梯时需格外小心。为避免造成人身伤害、机器损坏及吸尘器意外坠落,操作人离开时请勿将吸尘器放置于楼梯底部或地
板上。切勿将设备搁放在楼梯或家具上,以免造成人身伤害或吸尘器损坏。
▪请勿使用本品吸除易燃或可燃液体(如汽油)或碎木屑等,不得在任何有可能存在此类物品的场所中使用本品。
▪请勿用于吸除任何燃烧或冒烟的物体,如烟蒂,火柴或滚烫的灰烬。
▪请将本产品存放在室内。在使用完设备后请将其收起,以避免发生绊倒事故。
▪请勿在没有安装滤器和 / 或集尘杯时使用本品。
▪所有维护均需由授权维修商进行。
▪请勿在接通电源后离开设备。在不使用时或维修之前应将电源插头从插座中拔出。
小心:为了降低损坏风险,请注意以下事项:
▪请勿用本设备吸除可能导致产品损坏的坚硬尖锐物体。
物、手指以及身体任何部位靠近风口或移动部件。
请妥善保存此类说明
警告:
此插头只能以一种方式
深电工安装合适的插座。请勿以任何方式改装此插头。
插入极性插座中。使用时如无法顺利插入插座,请将插头反向再试一次。如果仍然无法插入,请联系资
Page 18

吸尘器说明
1. 手柄把手
2. 上部电线挂钩(位于手柄把手后面)
3. 手柄杆
4. 手柄释放按钮
5. 下部电线挂钩(位于手提式吸尘器后面)
6. 启动 / 关闭开关
7. 集尘杯释放按钮
8. 电源线
9. 集尘杯
10. 地板吸头入口管
11. 地板吸头
12. 轮子
13. Quickstep 缝隙吸头 *
14. 缝隙吸头固定架 *
15. 缝隙吸头 *
* 取决于型号 的不 同,缝 隙吸 头 * 可能 在手 提
式吸尘器上也可能在与手柄相连的缝隙吸头固
定架 * 上。
Page 19

如何进行直立式操作
开机:将电源开关拨到 ON 位置。
关机:将电源开关拨到 OFF 位置。
▪每次使用后或者吸满污垢后,应清空并清洗吸尘器和过滤器。
将吸尘器置于直立状态。 向下滑动手柄直至扣紧。
如何以手提方式操作
将吸尘器置于直立状态,使
吸尘器背面朝前。向前推动
释放按钮,然后将手柄从吸
尘器中拔出。
将地板工具从吸头上取下。
将地 板 工具插 入 集尘杯 吸
头。用 力 按 下 以确保 连 接
正确。
开机:将电源开关拨到 ON 位置。
关机:将电源开关拨到 OFF 位置。
▪每次使用后或者吸满污垢后,应清空并清洗吸尘器和过
滤器。
存放前,应将电线缠绕在吸
尘器背面的挂钩上。
Page 20

手提式吸尘器附件
缝隙吸头的使用及存放
缝隙吸头永久安装在吸尘器上。它位于集尘杯顶部,以便使用。
集尘杯和过滤器:拆卸与更换
重要说明:请在每次使用后清洗过滤器 , 以获得最佳使用效果。
注:为确保最佳性能,请每隔 6 个月更换过滤器。
清空和清洗集尘杯
1. 松开缝隙吸头
2. 将缝隙吸头向下翻,直至与吸尘器吸头处
于同一直线,然后向上推至牢固位置。
3. 存 放 缝 隙 吸 头: 向 下 拉 至 松 开 位 置
将缝隙吸头向上翻,直至感觉锁紧入位。
按住集尘 杯释放按钮,转
动吸头并将其从吸尘器上
取下。
手持 集 尘 杯并置 于 垃 圾
桶上方。 抓 住 过 滤 器 轻
轻拉出。
抖动集 尘杯将剩余 尘土和
碎屑倒 出。扫 掉过滤器上
的灰尘 和尘 土,或在垃圾
桶内抖动过滤器。
Page 21

清理和冲洗过滤器
手持过滤器在流动水下冲洗。请勿使用肥皂和清洁剂。轻
拍过滤器,去掉多余水渍。使过滤器至少经过 24 小时完
全干燥后方可放回集尘杯。
故障检修指南
吸尘工具无法吸尘
▪缝隙吸头堵塞取下缝隙吸头,清除堵塞物。
▪集尘杯已满。清空集尘杯。
▪过滤器堵塞。清理过滤器。
吸尘器没有吸力或吸力小。
▪集尘杯未正确安装。请查阅“集尘杯和过滤器的拆卸与更
换”部分。
▪集尘杯已满。清空集尘杯。
▪过滤器堵塞。拆下并清洗过滤器。
▪污物入口管堵塞取下吸头,清除堵塞物。
警告:为降低受伤风险,维修前应拔掉吸尘器电源
将过滤器轻轻推入集尘杯。
尘土从吸尘器中漏出。
▪集尘杯已满。清空集尘杯。
▪集尘杯未正确安装。请查阅“集尘杯和过滤器的拆卸与更
换”部分。
▪过滤器安装不正确。请查阅“集尘杯和过滤器的拆卸与更
换”部分。
▪过滤器太脏。清洗或更换过滤器。
吸尘器无法运转
源线未能牢牢插入插座。将设备插头紧紧插入。
▪电
重新安 装 集 尘 杯: 先 将
底部对 齐, 然 后 转 动 集
尘杯直至扣紧入位。
Page 22

 Loading...