

Page 1
OWNER’S MANUAL
Operating and Servicing Instructions
Español - página E1
Carpet Cleaner
TM
www.DirtDevil.com
IMPORTANT: READ CAREFULLY BEFORE ASSEMBLY AND USE.
Questions or concerns? For assistance, please call Customer Service at
1-800-321-1134 Mon-Fri 8a m-7pm EST before retur n i n g t h is produ ct to the sto r e.
THIS PRODUCT IS INTENDED FOR HOUSEHOLD USE ONLY.
IF USED COMMERCIALLY WARRANTY IS VOID.
©2013 Techtronic Floor Care Technology Limited. All rights reserved. #921131250 ID1 0 7 2 43-R0
Page 2
Thank you for choosing a DIRT DEVIL® product.
Please enter the complete model and Manufacturing
Code in the spaces provided.
MODEL
MFG. CODE
Hint: Attach your sales receipt to this owner’s manual.
Verification of date of purchase may be required for
warranty service of your DIRT DEVIL® product.
Be sure to register your product online at DirtDevil.com or
call 1-800-321-1134 to register by phone.
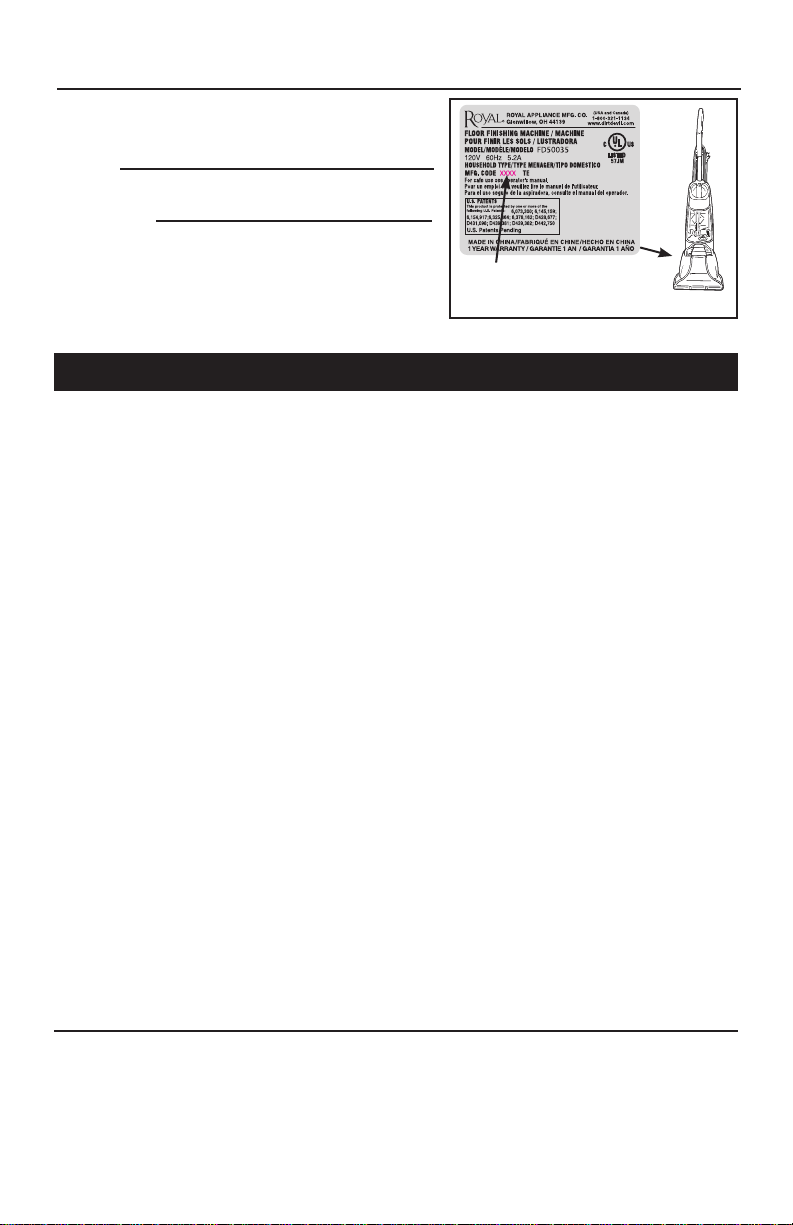
MANUFACTURING CODE
(Label located under cleaner)
CONTENTS
Important Safety Instructions ................................................................................. 3-4
Assembling Cleaner ................................................................................................. 5
Carton contents ...................................................................................................5
Body and Handle Assembly ................................................................................5
Tool Caddy Assembly .........................................................................................6
How To Use ...............................................................................................................7
Cleaner Description ............................................................................................. 7
Preparing the Carpet ...........................................................................................8
Remove and Replace Clean Water Solution Tank ..............................................8
Carpet Cleaning ..................................................................................................9
Above Floor Cleaning/Attachments .....................................................................9-10
Dirty Water Tank .................................................................................................10-11
Maintenance .............................................................................................................. 11-12
Belt or Brushroll...................................................................................................12
Troubleshooting .......................................................................................................13
Service.......................................................................................................................14
Cleaning Products .................................................................................................... 15
Warranty ....................................................................................................................16
If you need assistance:
Visit our website at DirtDevil.com. Follow the authorized dealer locator link to find the Dirt Devil® authorized dealer nearest you or call 1-800-321-1134 for an automated referral of Dirt Devil® authorized
dealer locations (U.S. only) or to speak with a customer service representative; Mon- Fri 8am- 7pm EST.
PLEASE DO NOT RETURN THIS PRODUCT TO THE STORE.
2
Page 3

IMPORTANT SAFETY INSTRUCTIONS
SAVE THESE INSTRUCTIONS
When using an electrical appliance, basic precautions should always be
followed, including the following:
READ ALL INSTRUCTIONS BEFORE USING THIS APPLIANCE.
WARNING: TO REDUCE THE RISK OF FIRE,
ELECTRIC SHOCK OR INJURY:
• Fully assemble before operating.
• Operate cleaner only at voltage specified on data plate on bottom of cleaner.
• Do not leave appliance when plugged in. Unplug from outlet when not in use
and before cleaning or servicing.
• Use indoors only.
• Do not immerse. Use only on carpet moistened by cleaning process.
• Use only DIRT DEVIL® cleaning products intended for use with this machine.
(See the “Cleaning Products” section of this manual.)
• Do not use a flammable or combustible liquid to clean a floor.
• Do not allow to be used as a toy. Not intended for use by children age 12
and under. Close supervision is necessary when used near children. To avoid
injury or damage, keep children away from product, and do not allow children
to place fingers or other objects into any openings.
• Use only as described in this manual. Use only manufacturer’s recommended
attachments and products.
• Do not use with damaged cord or plug. If appliance is not working as it should,
has been dropped, damaged, left outdoors, or dropped into water, take it to a
service center prior to continuing use.
• Do not pull or carry by cord, use cord as a handle, close a door on cord, or pull
cord around sharp edges or corners. Do not place product on cord. Do not run
appliance over cord. Keep cord away from heated surfaces.
• Do not unplug by pulling on cord. To unplug, grasp the plug, not the cord.
• Do not handle plug or appliance with wet hands.
• Do not put any object into openings. Do not use with any opening blocked;
keep free of dust, lint, hair, and anything that may reduce air flow.
• Keep hair, loose clothing, fingers, and all parts of body away from openings
and moving parts.
• Turn off all controls before unplugging.
• Use extra care when cleaning on stairs. To avoid personal injury or damage,
and to prevent the cleaner from falling, always place cleaner at bottom of stairs
or on floor. Do not place cleaner on stairs or furniture, as it may result in injury
or damage.
• Do not use to pick up flammable or combustible materials, such as gasoline,
or fine wood sandings, or use in areas where they may be present.
• Connect to a properly grounded outlet only. See Grounding Instructions.
• Do not pick up anything that is burning or smoking, such as cigarettes,
matches, or hot ashes.
• Do not use without tanks or filters in place.
3
Page 4
• Do not clean over floor electrical outlets.
GROUNDING
OUTLET BOX
• WARNING: This product contains chemicals known to the State of California to
cause cancer, birth defects or reproductive harm.
CAUTION - TO REDUCE THE RISK OF DAMAGE:
• Avoid picking up hard, sharp objects with this product, as they may cause
damage.
• Store in a dry place. Do not expose machine to freezing temperatures.
• Brushroll continues to turn while product is turned on and handle is in upright
position.To avoid damage to carpet, rugs, and flooring, avoid tipping cleaner
or setting it on furniture, fringed area rugs, or carpeted stairs during tool use.
• Do not use sharp objects to clean out hose as they can cause damage.
• To assist in reducing drying time, be certain the area is well ventilated when
using detergents and other cleaners with this machine.
• To help prevent matting and resoiling, avoid contact with carpets until they are
dry. Keep children and pets away from carpets until they are completely dry.
• Do not store extractor with solution in tanks.
• With brushs on, do not allow cleaner to sit in one location with brushes on for
extended periods of time, as damage to floor can result.
• DO NOT USE THIS EXTRACTOR ON HARD FLOORS. USING THIS MACHINE
ON HARD FLOORS MAY SCRATCH OR DAMAGE YOUR FLOOR.
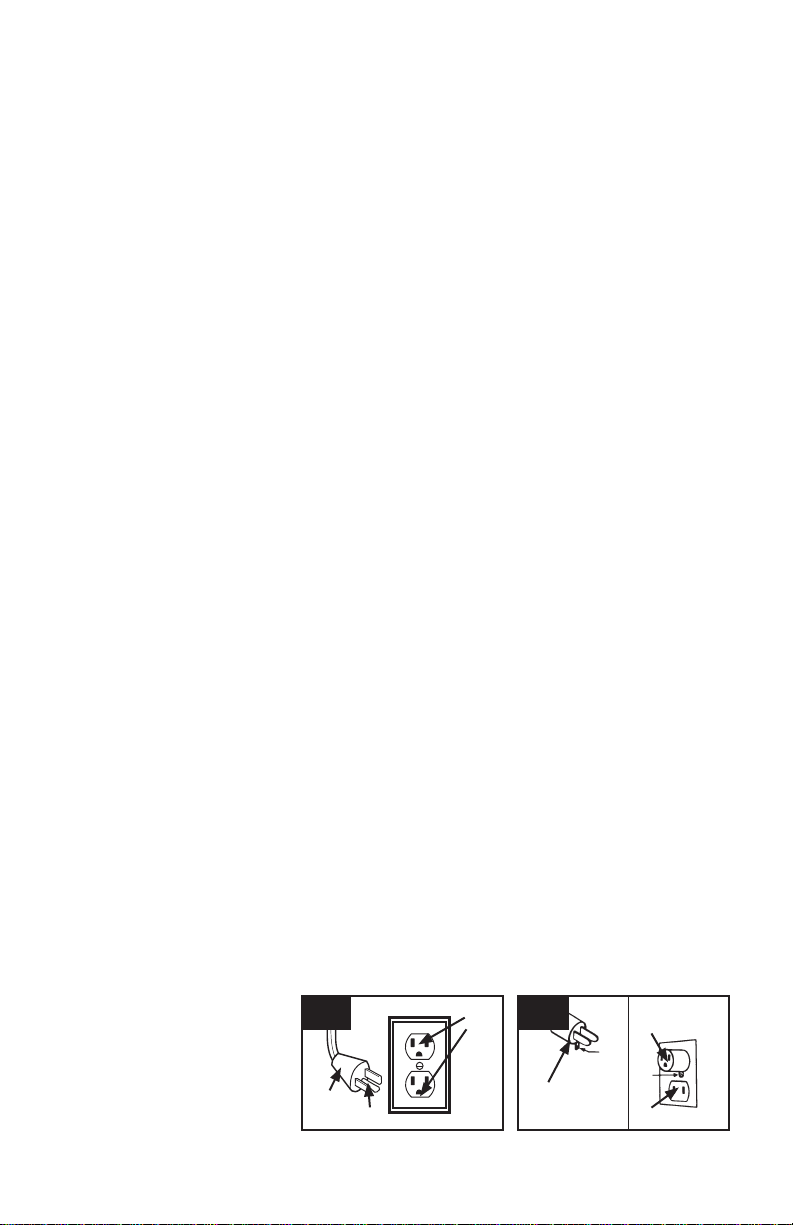
GROUNDING INSTRUCTIONS
This appliance must be grounded. If it should malfunction or breakdown,
grounding provides a path of least resistance for electric current to reduce
the risk of electric shock. This appliance is equipped with a cord having an
equipment-grounding conductor (C) and grounding plug (A). The plug must be
inserted into an appropriate outlet (B) that is properly installed and grounded in
accordance with all local codes and ordinances.
WARNING: Improper connection of the equipment-grounding conductor
can result in the risk of electric shock. Check with a qualified electrician or service
person if you are in doubt as to whether the outlet is properly grounded. Do not
modify the plug provided with the appliance - if it will not fit the outlet, have a
proper outlet installed by a qualified electrician. This appliance is for use on a
nominal 120-volt circuit and has a grounding plug that looks like the plug (A)
illustrated in Fig. 1. A temporary adapter (D) may be used to connect this plug to
a 2-pole receptacle (E) if a properly grounded outlet is not available (Fig. 2). The
temporary adapter should be used only until a properly grounded outlet (B) can
be installed by a qualified electrician (Fig. 1). The green colored rigid ear, lug, or
the like (F) extending from the adapter must be connected to a permanent ground
(G) such as a properly grounded outlet box cover (Fig. 2). Whenever the adapter
is used, it must be held in place by a metal screw. NOTE: In Canada, the use of a
temporary adapter is not permitted by the Canadian Electrical Code.
1
A
C
4
B
2
D
D
F
G
E
Page 5
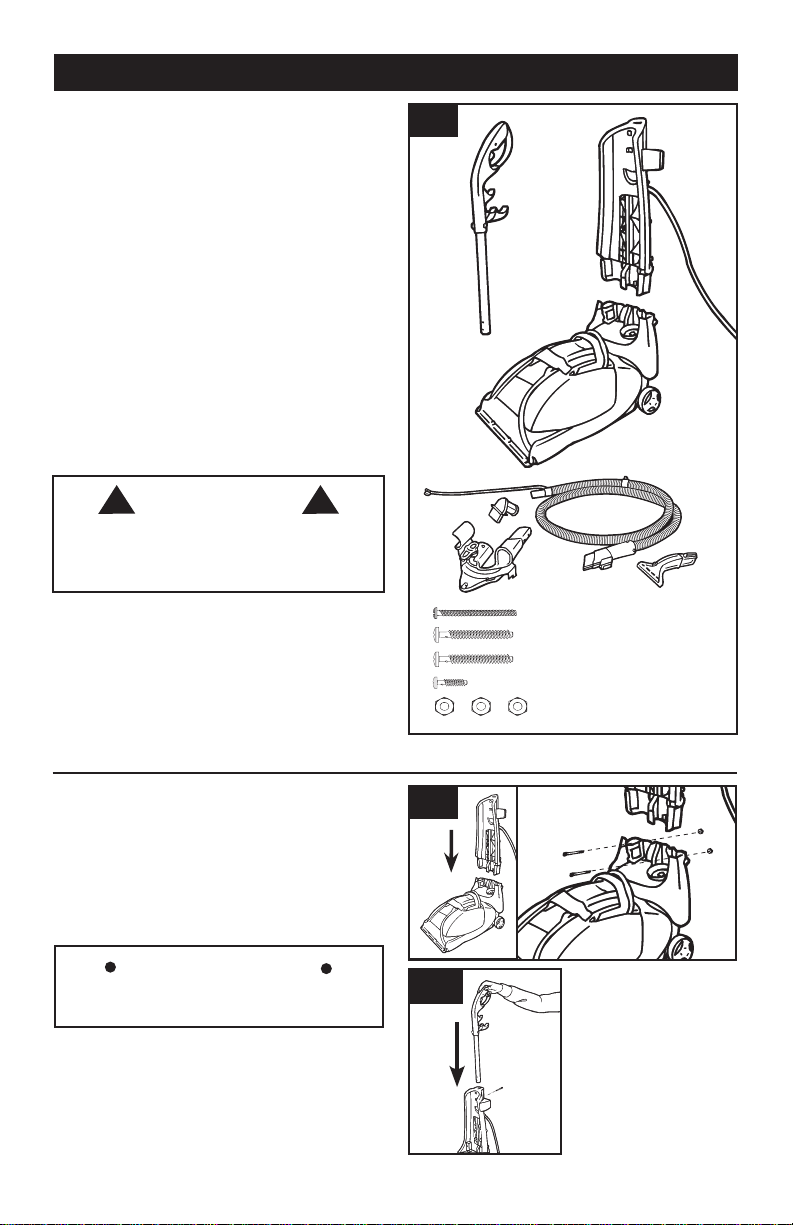
1. CLEANER ASSEMBLY
CARTON CONTENTS
A. Upper Handle
B. Midsection
C. Base
D. Upholstery/Stair Hose Adapter
E. Tool Caddy
F. Upholstery/Stair Hose
G. Upholstery/Stair Attachment
H. (1) Upper Handle screw
I. (2) Right and Left Base Screws
J. (1) Middle Base Screw
K. (3) Nuts
Remove all parts from carton and identify each
item shown.
Make sure all parts are located before disposing of
packing materials.
NOTE: Phillips screwdriver needed for assembly
! !
DO NOT USE THIS EXTRACTOR ON HARD
FLOORS. USING THIS MACHINE ON HARD
FLOORS MAY SCRATCH OR DAMAGE YOUR
FLOOR.
CAUTION
1.1
E
A
D
J
B
C
F
G
H
I
I
K
BODY AND HANDLE ASSEMBLY
1.2 Stand base in upright position. Push
midsection onto base by aligning tabs on the
backside of midsection and the pockets on the
backside of base. Assemble the two lower handle
screws (I) in the following manner: while holding
nuts (K) in place, insert screw through front of
midsection and tighten.
IMPORTANT
Make sure the power cord is out of the way to
avoid pinching.
1.3 Slide upper handle down onto unit. Place Upper
Handle screw (H) into recess in back of upper
handle and tighten.
5
1.2
1.3
K
I
I
H
K
Page 6
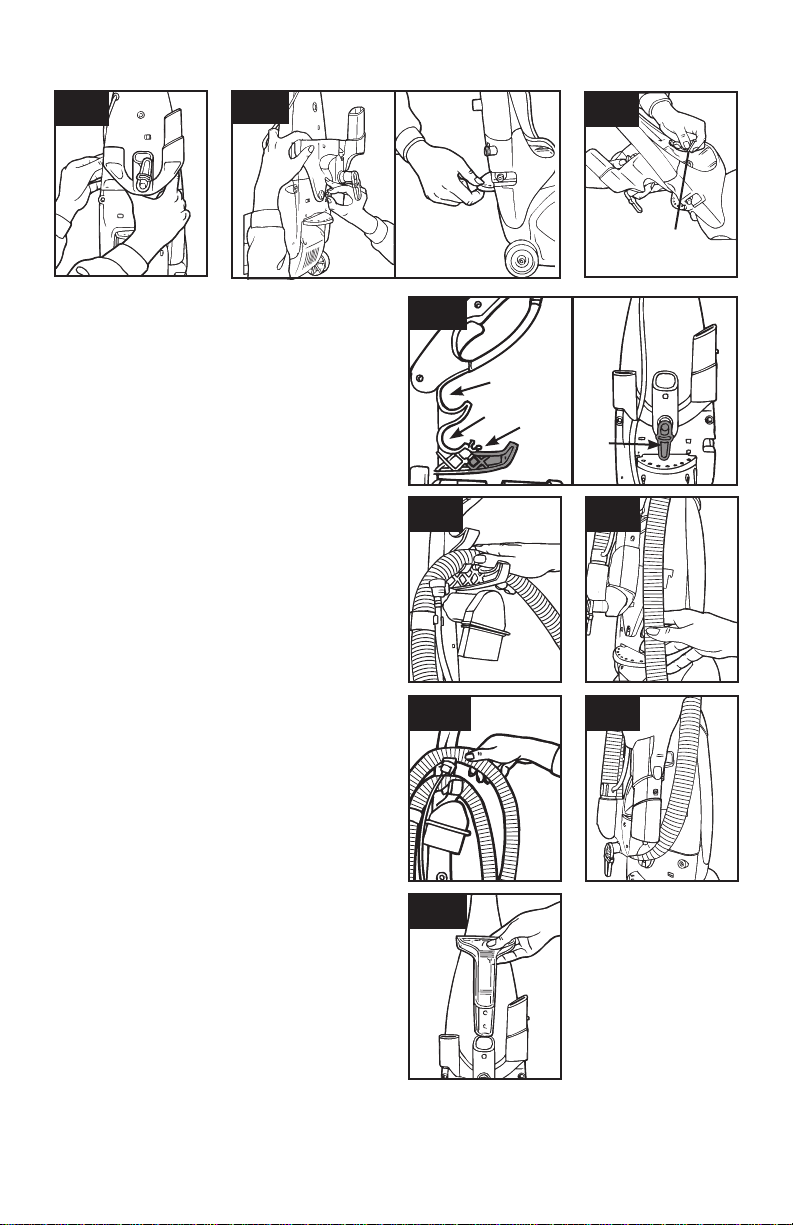
TOOL CADDY ASSEMBLY
1.4
1.4 Align tabs on tool caddy with slots on midsection
and snap into place.
1.5 Place nut (K) into recess on tool caddy and hold
into place (Diagram A). Press handle release with
your other hand to tilt the midsection backwards
(Diagram B).
1.6 Place middle base screw (J) through center of
lower midsection and tighten.
1.7 Wrap the cord around the upper and lower
cord clips.
1.8 Run the hose to the upper caddy and press into
hose clip #1 (See Fig. 1.7).
1.9 Continue wrapping the hose clockwise around
the tool caddies, pressing the hose into the groove
on the bottom of the lower tool caddy.
1.10 Run the hose back to the upper caddy and
press into hose clip #2 (See Fig. 1.7).
1.11 Lock the attachment end of the hose into place
by pressing down onto the post located on the right
side of the lower tool caddy, until secure in place.
1.12 Slide the Upholstery/Stair Attachment into the
middle slot of the lower tool caddy.
1.5
A
1.6
B
1.7
Hose Clip 2
Hose Clip 1
Upper
Lower
Cord
Cord
Clip
Clip
1.8 1.9
1.10 1.11
J
6
1.12
Page 7
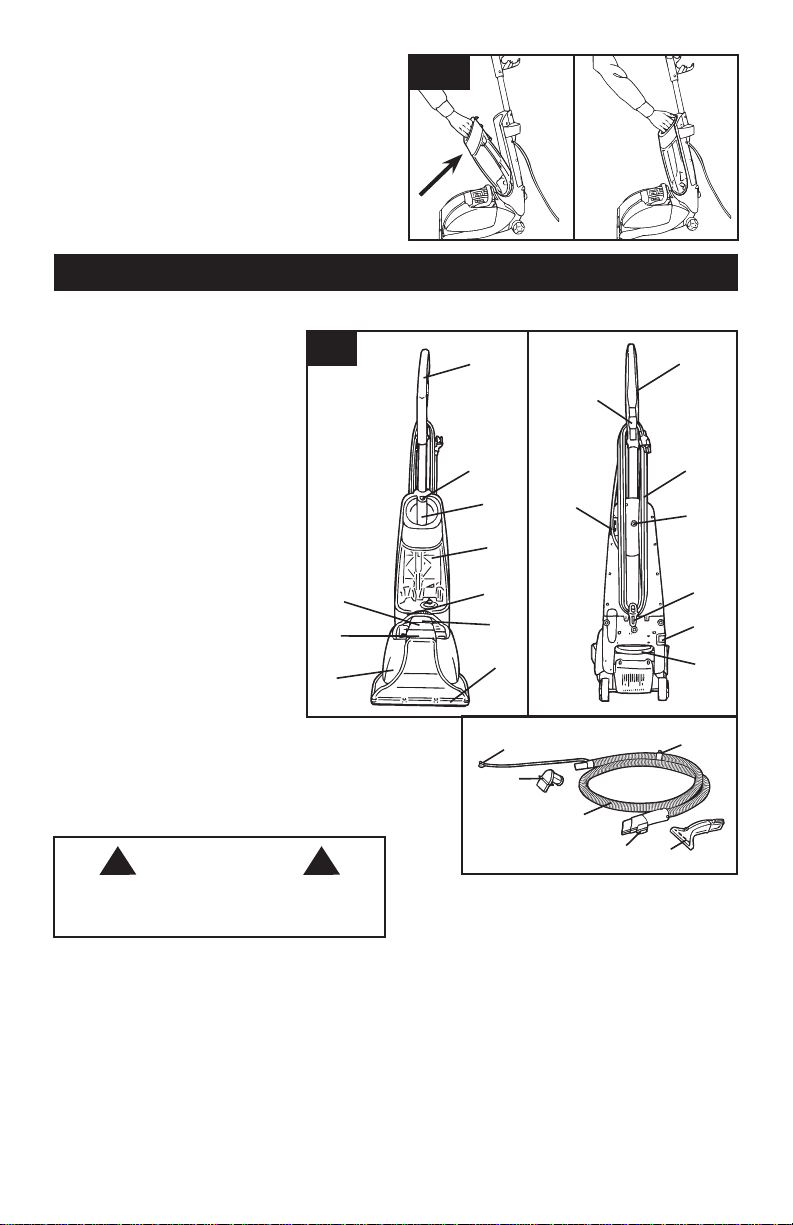
ATTACHING CLEAN WATER
SOLUTION TANK
1.13 Place Clean Water Solution Tank into cleaner
and tilt back until it snaps into place.
2. HOW TO USE
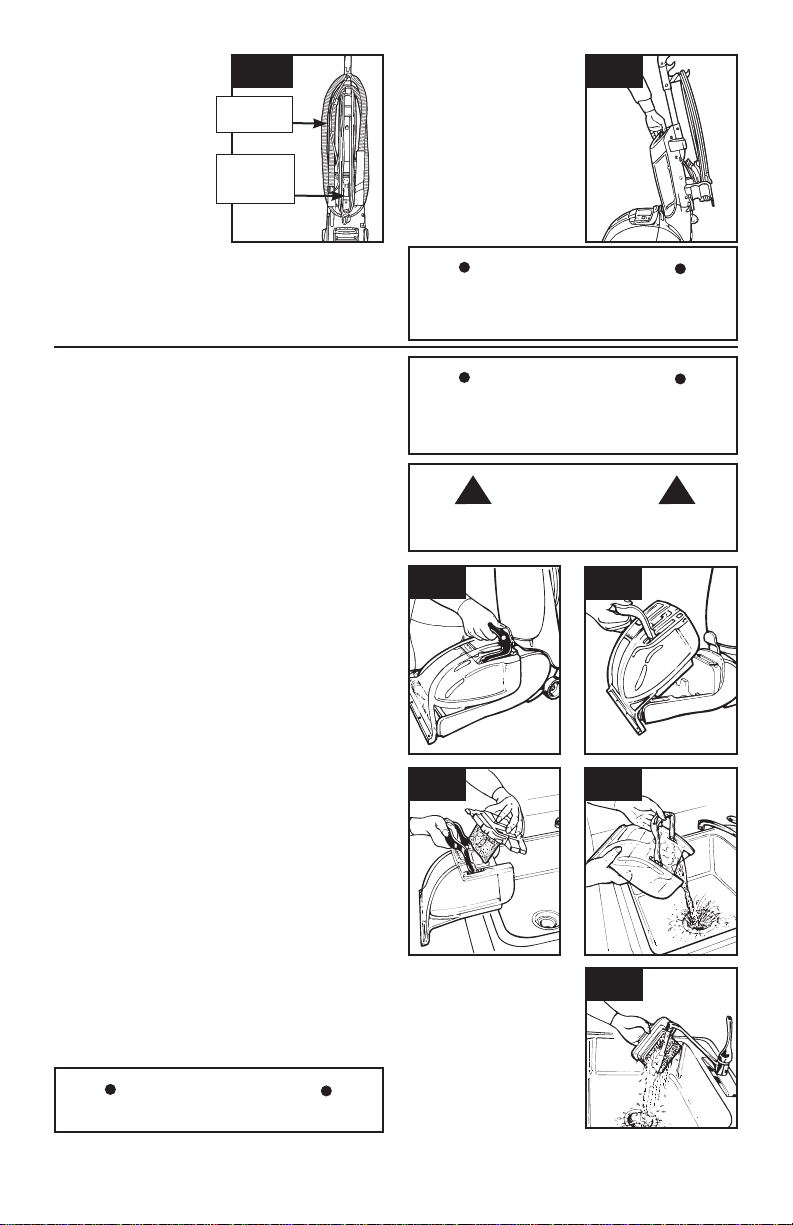
CLEANER DESCRIPTION
1. Non-Slip Grip™ Handle
2. Clean Clean Water Solution
Tank Latch
3. Carry Handle
4. Clean Water Solution Tank
5. Dirty Water Tank Latch
6. Dirty Water Tank Handle
7. Brushes
8. Dirty Water Tank
9. Dirty Water Tank Door
10. Dirty Water Tank Lid
11. Power Cord
12. Quick Cord Release
13. Attachment Water Supply Port
14. Handle Release Pedal
15. Power On/Off Switch
16. Upper Handle Screw
17. Upper Cord Clip
18. Solution Spray Trigger
19. Upholstery/Stair Base Water
Supply Connector
20. Upholstery/Stair Hose Adapter
21. Upholstery/Stair Hose
22. Upholstery/Stair Trigger
23. Upholstery/Stair Attachment
24. Solution Tube Clip
! !
DO NOT USE THIS EXTRACTOR ON HARD
FLOORS. USING THIS MACHINE ON HARD
FLOORS MAY SCRATCH YOUR FLOOR.
CAUTION
2.1
10
9
8
1.13
1
17
2
3
5
15
4
6
7
19
20
21
22
18
11
16
12
13
14
24
23
7
Page 8
PREPARING THE CARPET
IMPORTANT
Do not use the carpet cleaner as a dry vacuum.
1. Vacuum carpet thoroughly. Use a Dirt Devil®
vacuum cleaner with a revolving brushroll for best
results.
2. Remove as much furniture from the room as
possible. If unable to remove the furniture, place
plastic or foil under and around the legs until the
carpet has dried completely.
Check for Color Fastness
Before cleaning carpet/upholstery, test for color
fastness. Dampen a white cloth with solution. Test a
small area in a closet or under a cushion. Gently rub
the cloth over the area. Check each color for color
bleeding. If the cloth remains clean, it should be
safe to clean the carpet/upholstery.
Helpful Hints for Cleaning Carpet
1. Do not oversaturate carpet with cleaning solution
while using the carpet cleaner.
2. For heavily soiled areas, additional applications
may be necessary.
3. Allow plenty of time to dry carpet thoroughly.
4. Wipe cleaning solution from woodwork and wood
to prevent any damage.
5. Try not to walk on carpet until it is completely dry.
6. After carpet is thoroughly dry, vacuum the carpet
using a cleaner with a revolving brushroll.
7. Before cleaning, determine where you will start
and end, making sure not to walk over previously
cleaned areas.
After Cleaning
• Allowcarpettodrycompletely.Trynottowalkon
the carpet until it is dry.
• Ifyou need to walk on the carpet, place white
towels on the areas you want to walk.
• Ifthecarpetisnotdryandthefurnituremust be
placed back in the room, use plastic or foil under the
furniture to prevent staining the carpet.
• Thoroughlycleanthedirtywatertankwithhottap
water. See page 10.
! !
Do not store the carpet cleaner in garage or area
where unit could freeze.
WARNING
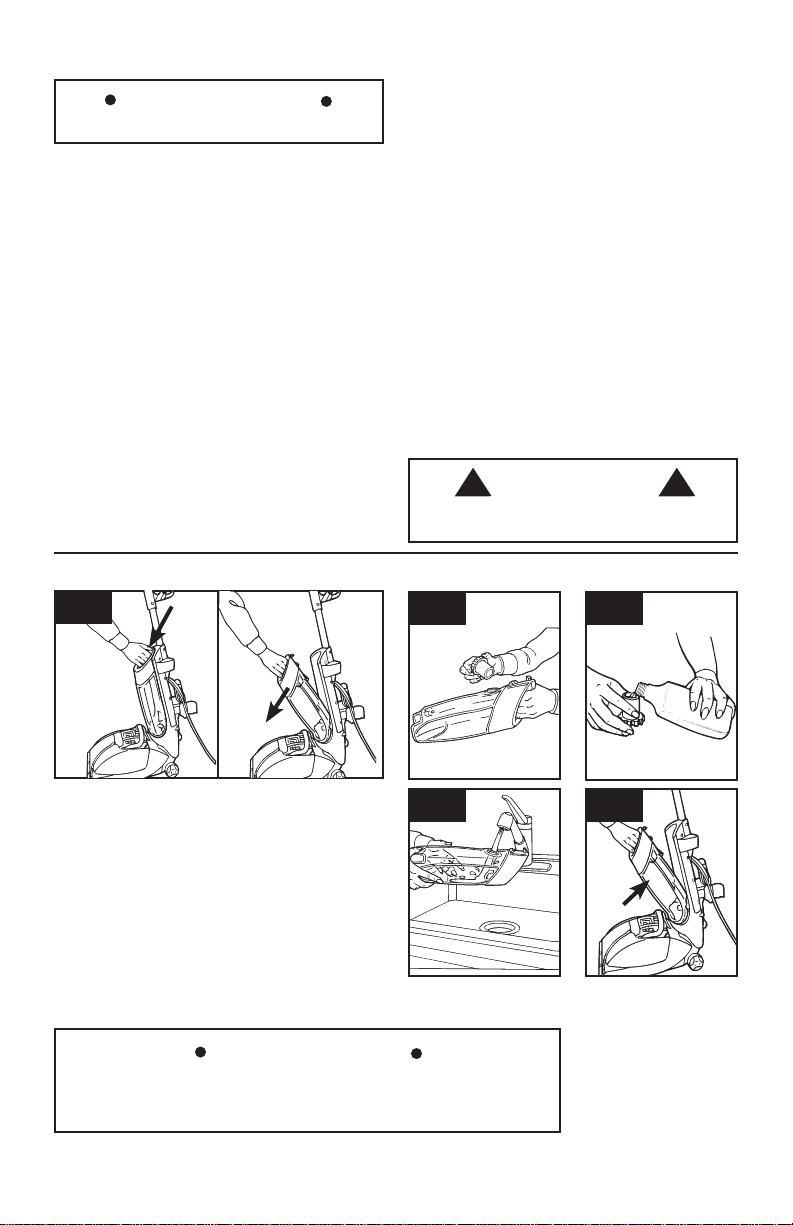
REMOVE AND REPLACE CLEAN WATER SOLUTION TANK
2.2
A
2.2 Press clean Clean Water Solution Tank latch
(Diagram A). Tilt Clean Water Solution Tank away
from cleaner and remove (Diagram B).
2.3 Unscrew measuring cap from back side of
Clean Water Solution Tank.
2.4 Fill measuring cap with solution 5 times,
(approximately 4 oz.).
2.5 Fill remaining Clean Water Solution Tank with
hot tap water. Replace measuring cap.
2.6 Place bottom of Clean Water Solution Tank into
cleaner and position until the lever snaps into place.
Use only Dirt Devil® brand detergent. Using other cleaning solutions may
cause excessive foaming. Excessive foam will cause the float to shut off
the cleaner prematurely. Using other detergents can void your warranty.
B
IMPORTANT
2.3
2.5 2.6
8
2.4
Page 9
CARPET CLEANING
2.7 Plug cord into electrical outlet. Step on handle
release pedal, to put unit in cleaning position.
2.8 Turn power switch to the “ON” position.
IMPORTANT
Never leave unit unattended with power on.
Turn OFF when emptying and filling tank. Do
NOT oversaturate the carpet.
2.7
2.8
Power
ON/OFF
Switch
2.9 While depressing solution spray trigger, slowly
push unit forward. Release trigger and pull unit
backward in the same path to remove dirty water
and solution from carpet. (For heavily soiled areas,
repeat if necessary).
IMPORTANT
If the sound of the motor changes to a high
pitch, this indicates the dirty water tank is full
and must be emptied.
NOTE: For best cleaning results use a steady,
forward and backward motion. Cleaning should be
done at half the speed of dry vacuuming. For
heavily soiled areas, repeat if necessary.
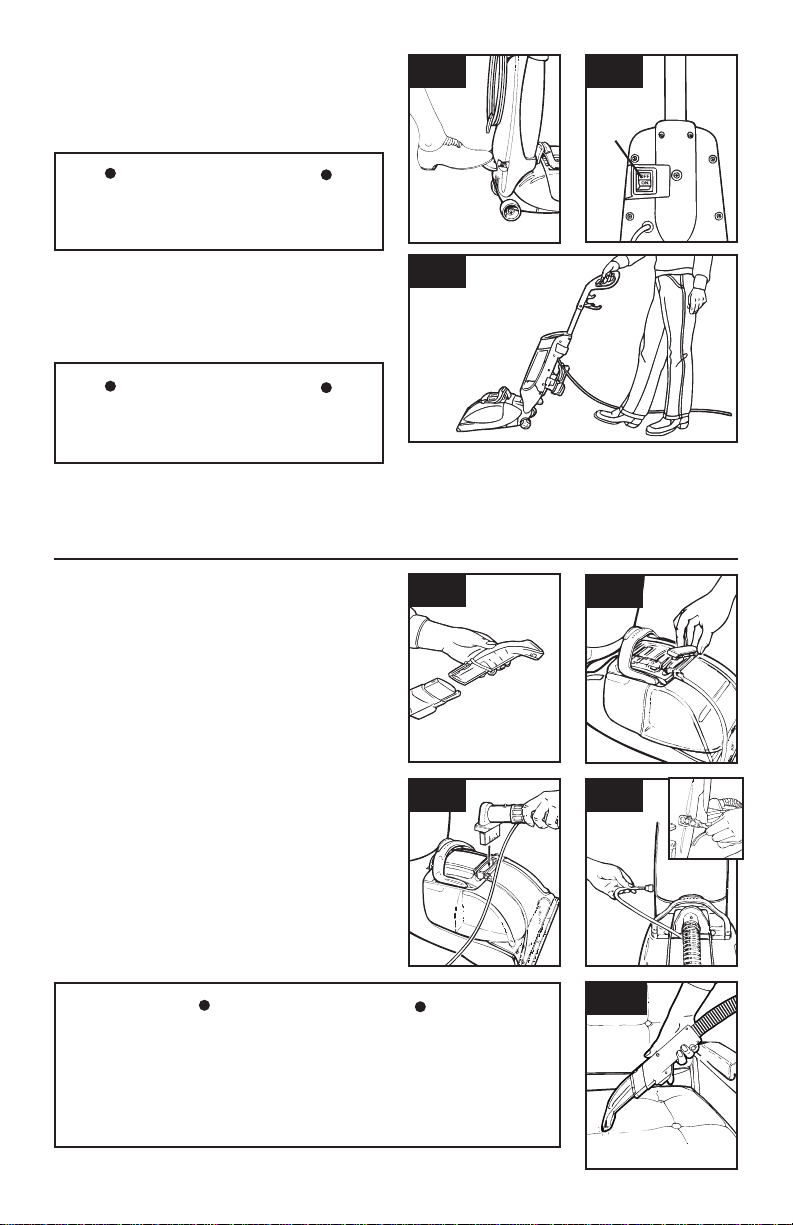
ABOVE FLOOR CLEANING/
ATTACHMENTS
2.10 Put cleaner in its upright position. Connect the
upholstery attachment to the trigger adaptor.
2.11 Remove the dirty water tank door.
2.12 Insert the hose adaptor into the dirty water
tank.
2.13 Connect the base water supply connector into
the fitting on the lower left side of handle facing
cleaner (A).
Attachment Usage
2.14 Turn power switch on. While depressing
solution spray trigger, push attachment forward.
Release trigger and pull attachment backward in
the same path to remove dirty water and solution
from upholstery. (For heavily soiled areas, repeat if
necessary.)
2.9
2.10
2.11
2.12 2.13
A
Do NOT oversaturate the upholstery.
IMPORTANT
FOR BEST CLEANING RESULTS USE STEADY, MODERATE,
FORWARD AND BACKWARD MOTION. Make sure upholstery is dry
before use.
If the hose attachment door is not replaced, there will be no suction through
the nozzle and the unit will not operate properly.
9
2.14
Page 10
STORING TOOLS
Place hose and
upholstery attachment
into their storage
locations. Store for next
use.
2.15
Upholstery/
Stair Hose
Upholstery/
Stair
Attachment
CARRY HANDLE
Grasp the carry handle
on the front of the unit
to move unit from room
to room.
2.16
IMPORTANT
Do not transport the carpet cleaner with either
the Clean Water Solution Tank or Dirty Water
Tank full.
DIRTY WATER TANK
Your carpet cleaner is equipped with a shut off valve
within your dirty water tank. When the dirty water
tank becomes full, the blue float (viewed from top of
tank) will rise, shutting off the air flow thru the nozzle.
NOTE: The float in your carpet cleaner, located in the
dirty water tank lid, will shut off the suction when the
dirty water tank is full. For best results, use smooth,
steady motion keeping the nozzle flat against the
carpeting. Tipping the cleaner and breaking the seal
of the nozzle and carpeting will cause the float to rise
and shut off the suction. Once the float is activated,
empty the dirty water tank. If the dirty water tank does
not appear full, turn the power switch off and wait for
the float to settle and reset. If the float repeatedly
shuts off the suction, empty the dirty water tank. For
best results, use only Dirt Devil
Other Solutions may generate excessive foam which
will cause the float to rise prematurely and shut off
the suction. Use five capfuls (4 ounces) of Dirt Devil
brand detergent per fill up of the Clean Water
Solution Tank. A higher concentration of shampoo
may cause excessive foaming.
How to Empty
2.17 Grasp top of dirty water tank handle and push
latch to release.
2.18 Grasp handle and pull tank out of base.
2.19 Remove dirty water tank lid.
2.20 To empty dirty water tank, grasp handle with
one hand and nozzle with the other and empty into
sink. Replace dirty water tank lid.
2.21 Rinse dirty water tank and filter with hot tap
water. Wipe and let dry thoroughly before storing to
prevent mildew from forming.
®
brand detergent.
®
IMPORTANT
You will hear a noticeable change in the pitch of
the cleaner. This indicates a need to empty the
dirty water tank.
! !
To reduce risk of personal injury - unplug cleaner
before servicing.
2.17
2.19 2.20
CAUTION
2.18
2.21
IMPORTANT
Do not use any chemicals when cleaning.
10
Page 11
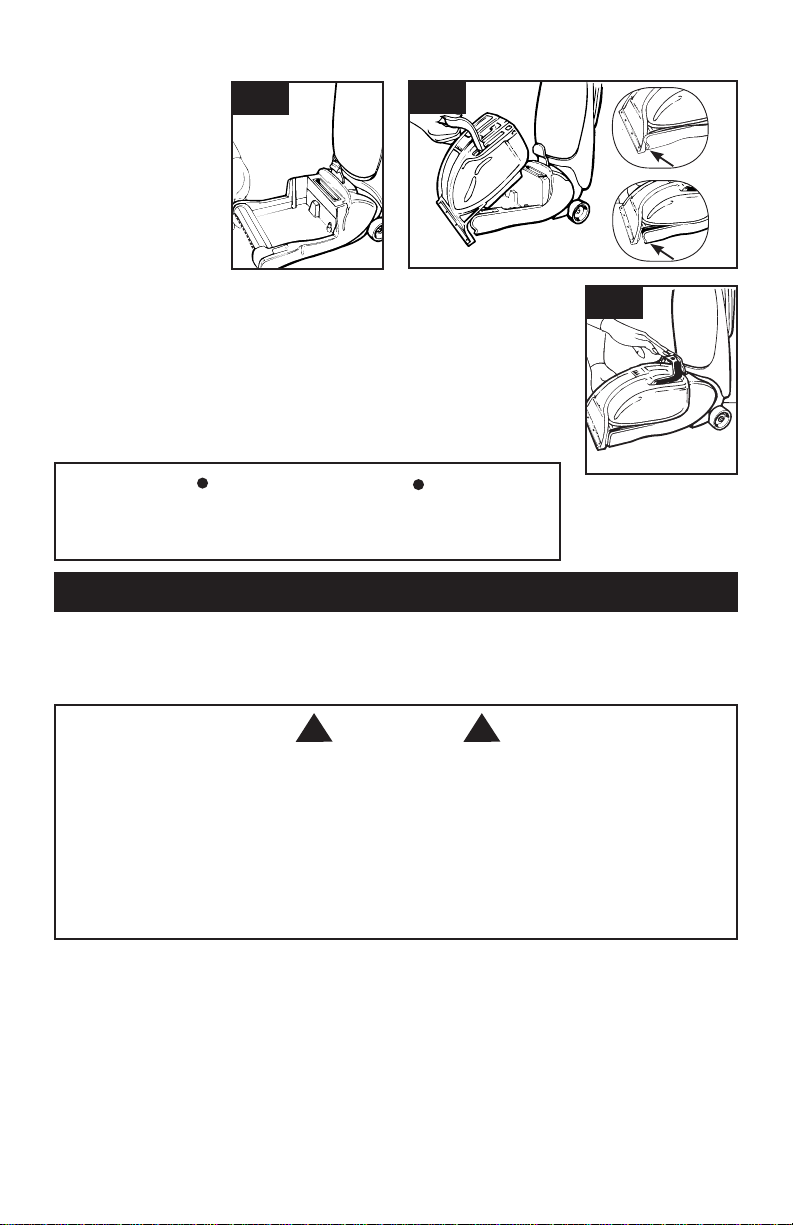
Placing Dirty Water Tank in Base of Cleaner
2.22 Lift front base of
cleaner off carpeting with
one hand.
2.23 Grasp handle and
hook front of dirty water
tank into base of cleaner,
making sure front of dirty
water tank is resting on
the base (Diagram A).
The Dirty Water Tank has
3 tabs on the underside
which MUST latch into the underside of the base of the cleaner. It is very
important to lift the base of the cleaner off of the carpeting and hook the nozzle to
the base so that the nozzle is flush with the base of the cleaner (Diagram B).
Failure to install the Dirty Water Tank correctly (Diagram C), will result in poor dirty
water pickup. The Dirty Water Tank will need to be emptied once or twice per fill
up of the Clean Water Solution Tank.
2.24 While making sure the front of the upper lower Dirty Water Tank is
resting on the base, place the rear of the tank into the base of the cleaner.
Push handle down until it latches.
2.22
2.23
A
B
C
2.24
Do not store cleaner with solution in Clean Water Solution Tank or dirty water
IMPORTANT
in Dirty Water Tank. Mineral deposits and mildew can form which will affect
the performance of your carpet cleaner.
3. MAINTENANCE
Familiarize yourself with these home maintenance tasks as proper use and care of your cleaner will ensure
continued cleaning effectiveness.
Any other servicing should be done by an authorized service representative.
! !
A Thermal Protector has been designed into your cleaner to protect it from overheating. When the
thermal protector activates the cleaner will stop running.
If this happens proceed as follows:
1. Turn cleaner OFF and unplug it from the electrical outlet.
2. Empty Dirty Water Tank and clean filters.
3. Inspect and remove blockage. This blockage may occur at the cleaner, inlet, hose, and filters.
4. When cleaner is unplugged and motor cools for 30 minutes, the thermal protector will deactivate
and cleaning may continue.
If the thermal protector continues to activate after following the above steps, your cleaner
needs servicing.
NOTICE
11
Page 12
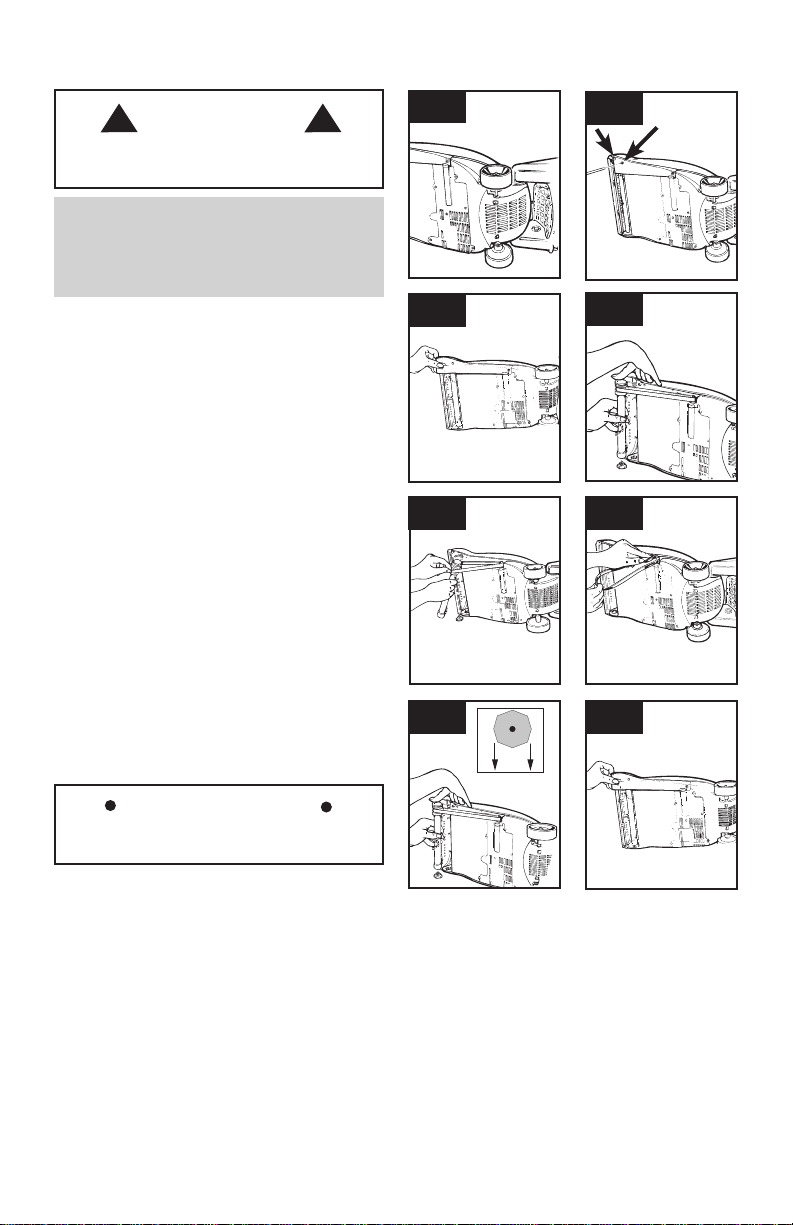
BELT OR BRUSHROLL: How to Remove and Replace
! !
WARNING
To reduce the risk of injury from moving parts -
unplug cleaner before changing belt.
Belt: What to Buy
For Belt Style 7 replacements, please call
1-800-321-1134 or visit our website at www.
DirtDevil.com to locate a dealer nearest you.
How to Remove
3.1 Flip cleaner on its side to expose nozzle base.
3.2 To remove belt cover, use Phillips screwdriver
to remove the two screws. Arrows show location of
screws.
3.3 Grasp belt cover near brushroll and lift out.
3.4 Grasp brushroll with one hand, using other
hand to keep tension on belt when removing. Lift up
when pulling out.
How to Replace
3.5 Remove belt. Dispose of old belt.
3.6 Place belt on motor shaft, then slip brushroll
through belt. Place belt in area of brushroll without
bristles.
3.7 With belt in place, pull and slide brushroll into
nozzle, making sure that the brushroll end caps are
in the correct orientation (Diagram A).
3.8 Replace belt cover by inserting end furthest
from brushroll first. Then place front of belt cover
into position. Secure by replacing the two screws.
3.1
3.3
3.5
3.7
3.2
3.4
3.6
A
3.8
IMPORTANT
Rotate brushroll manually to make sure belt is
not twisted or pinched.
12
Page 13
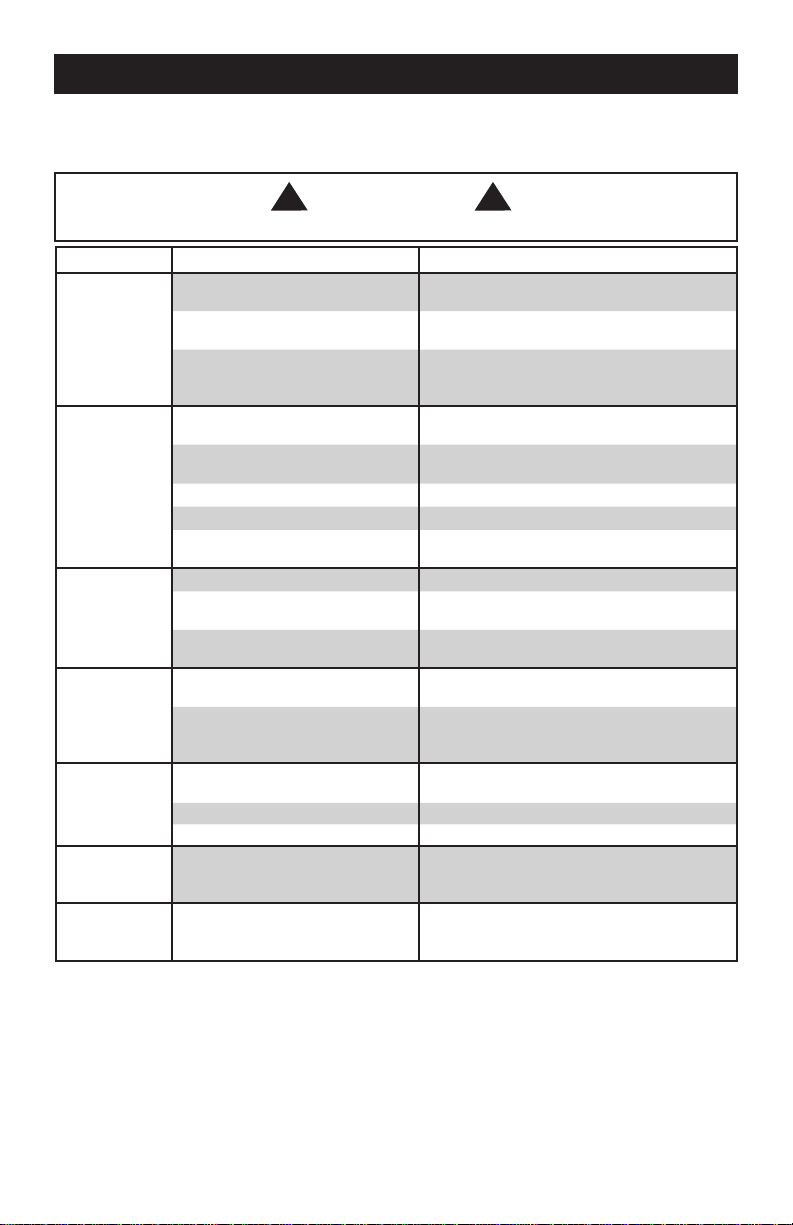
4. TROUBLESHOOTING
If a minor problem occurs, it usually can be solved quite easily when the cause is found by using the
checklist below.
Any other servicing should be done by an authorized service representative.
! !
To reduce risk of personal injury - unplug cleaner before servicing.
PROBLEM POSSIBLE CAUSE POSSIBLE SOLUTION
Cleaner won’t
run
Cleaner won’t
pick-up or low
suction
Water escaping from
Cleaner
Cleaner won’t
dispense
Cleaner
attachments
won’t pick up
Cleaner
attachments
won’t spray
Motor noise
becomes
high-pitched
1. Power cord not firml y plugge d
into outlet.
2. Blown f use or trip ped breake r. 2. Check f u s e o r breaker in h o m e. Re place
3. Needs service. 3. Take to service center. To find neares t
1. Dirty Water Tank Door not
installed.
2. Dirty Water Tank is not installed
correctly.
3. Dirty Water Tank is full. 3. Empty Dirty Water Tank - Pg. 10.
4. Dirty water passage clogged. 4. Clean Dirty Water Tank - Pg. 10.
5. Foam filter is dirty. 5. Clean filter. Review Emptying & Cleaning the
1. Dirty Water Tank is full. 1. Emptying Dirty Water Tank - Pg. 10.
2. Dirty Water tank is not installed
correctly.
3. Clean Water So l u t ion Tank not
installed properly.
1. Clean Water Soluti o n Tank not
installed properly.
2. Needs s e rvic e. 2. Take to servic e center. To find nearest
1. Hose is clogged. 1. Remove hose and tools; remove obs truction
2. Hose inlet clogged. 2. Remove hose a nd clean i n l e t - Pg. 9.
3. Dirty Water Tank is full. 3. Empty Dirty Water Tank - Pg. 10.
1. Water supp l y h o se not
connected properly.
1. The flo at i n t h e Dirty Water Tank
has been activated.
WARNING
1. Plug unit in firmly.
fuse/reset breaker in home.
location, visit our webs i te a t www.DirtDevil.
com or ca l l 1-800-321-1134.
1. Insert Dirty Water Tank Door - Pg. 9.
2. Review Placing Dirty Water Tank in base of
cleaner - Pg. 11.
Dirty Water Tank - Pg. 10.
2. Review Placing Dirty Water Tank in base of
cleane r - Pg. 11.
3. Review Cle a n Wate r S o l u t i o n Tank
Instal l ation - Pg. 8.
1. Review Clean Water Sol u tion Tank
Instal l ation - Pg. 8.
location, visit our webs i te a t www.DirtDevil.
com or ca l l 1-800-321-1134.
- Pg. 9.
1. Conne ct trigg e r wa te r s u pply co n n ector an d
base water s u p ply conn ector - Pg. 9.
1. Review Emptying & Cleaning the Dirty Water
Tank - Pg. 10.
13
Page 14

5. SERVICE
To obtain approved Dirt Devil
Devil® Warranty Service Dealer (Depot) by:
•CheckingtheYellowPagesunder“VacuumCleaners”or“Household”.
•VisitourwebsiteatDirtDevil.com(U.S.Customers)orDirtDevil.ca(Canadiancustomers).
Follow the service center link to find the service outlet nearest you.
•Foranautomatedreferralofauthorizedserviceoutletlocationscall1-800-321-1134.
Do not send your vacuum to Dirt Devil®, Inc., Company in Glenwillow for service. This will only result in delay.
If you need further assistance:
To speak with a customer service representative call 1-800-321-1134; Mon-Fri 8am-7pm EST.
Always identify your vacuum by the complete model number when requesting information or ordering parts.
(The model number appears on the bottom of the vacuum.)
PLEASE DO NOT RETURN THIS PRODUCT TO THE STORE.
®
service and genuine Dirt Devil® parts, locate the nearest Authorized Dirt
14
Page 15
6. CLEANING PRODUCTS
WARNING: To Reduce the risk of fire and electric shock due to internal
®
component damage, use only Dirt Devil
brand detergent products
intended for use with the appliance.
Dirt Devil® Cleaning Product Guide
Product Name
Dirt Devil
Quick & Light
®
Deep Clean
Advanced
64 oz.
Deep Clean
Pet
64 oz.
15
Page 16

7. WARRANTY
LIMITED ONE YEAR WARRANTY
(Domestic Use)
WHAT THIS WARRANTY COVERS
When used and maintained in normal household
use and in accordance with the Owner’s Manual,
your Dirt Devil® product is warranted against
original defects in material and workmanship.
During the Warranty Period, We will provide labor
and parts, at no cost to you, to correct any such
defect in products purchased in the United States,
U.S. Military Exchanges and Canada.
HOW TO MAKE A WARRANTY CLAIM
If this product is not as warranted, take or send
the product to a Dirt Devil® Authorized Warranty
Service Dealer along with proof of purchase. For
an automated referral to authorized service outlets in the U.S.A., phone: 1-800-321-1134 OR
visit Dirt Devil® online at www.DirtDevil.com. For
additional assistance or information concerning
this Warranty or the availability of warranty service outlets, phone the Dirt Devil® Consumer
Response Center, Phone 1-800-321-1134, MonFri 8am-7pm EST.
WHAT THIS WARRANTY DOES NOT COVER
This Warranty does not cover: use of the product
in a commercial operation (such as maid, janitorial and equipment rental services), brushroll, belt,
bags, filters, improper maintenance of the product, damage due to misuse, acts of God, nature,
vandalism or other acts beyond the control of
Royal Appliance Mfg. Co. (“Royal”, “we”), owner’s
acts or omissions, use outside the country in
which the product was initially purchased and
resales of the product by the original owner. This
warranty does not cover pick up, delivery, transportation or house calls. This warranty does not
apply to products purchased outside the United
States, including its territories and possessions,
outside a U.S. Military Exchange and outside of
Canada. This warranty does not cover products
purchased from a party that is not an authorized
retailer, dealer, or distributor of Royal products.
OTHER IMPORTANT TERMS
This Warranty is not transferable and may not be
assigned. This Warranty shall be governed and
construed under the laws of the state of Ohio. The
Warranty Period will not be extended by any
replacement or repair performed under this
Warranty.
THIS WARRANTY IS THE EXCLUSIVE
WARRANTY AND REMEDY PROVIDED BY
ROYAL. ALL OTHER WARRANTIES,
EXPRESSED OR IMPLIED, INCLUDING
WARRANTIES OF MERCHANTABILITY OR
FITNESS FOR PARTICULAR PURPOSE, ARE
DISCLAIMED. IN NO EVENT WILL ROYAL BE
LIABLE FOR ANY SPECIAL, INDIRECT,
INCIDENTAL OR CONSEQUENTIAL DAMAGES
OF ANY KIND OR NATURE TO OWNER OR
ANY PARTY CLAIMING THROUGH OWNER,
WHETHER BASED IN CONTRACT,
NEGLIGENCE, TORT OR STRICT PRODUCTS
LIABILITY OR ARISING FROM ANY CAUSE
WHATSOEVER. Some states do not allow the
exclusion of consequential damages, so the
above exclusion may not apply to you. This warranty gives you specific rights; you may also have
others that vary from state to state.
16
Page 17

MANUAL DEL PROPIETARIO
Instrucciones de Funcionamiento y Servicio
TM
Carpet Cleaner
www.DirtDevil.com
IMPORTANTE: LEA ATENTAMENTE ANTES DE ENSAMBLAR Y USAR.
¿Tiene al gun a pr eg un ta o i nq ui etu d? Para o bt en er a si st en c ia , ll am e al S ervic io d e ate nc i ón a l
cliente a l 180 03 211134, de lunes a vie rn es , de 8 a .m. a 7 p. m., ho ra d el ESTE , ant es d e devo l ver
este pro du ct o a la t ie n da .
ESTA ASPIRADORA PARA ALFOMBRAS ESTÁ DISEÑADA
PARA USO DOMÉSTICO.
EL USO COMERCIAL DE ESTE PRODUCTO ANULA LA GARANTÍA.
©2013 Techtronic Floor Care Technology Limited. Todos los der echos reservados. #921131250 ID107243-R0
E1
Page 18

Gracias por haber elegido un producto DIRT DEVIL®.
Anote los números completos de Código de fabricación
en los espacios provistos.
MODELO
CÓDIGO DE FABRICACIÓN
Consejo: Adjunte su recibo de compra a este Manual del
propietario. Para obtener el servicio de garantía de su
producto DIRT DEVIL
la fecha de compra.
Inscriba su producto en línea en DirtDevil.com, o llame al
1-800-321-1134 si prefiere hacerlo por teléfono.
®
puede requerirse la verificación de
ÍNDICE
Salvaguardias importantes ..............................................................................E3-4
Ensamblado de la aspiradora
Contenido de la caja ....................................................................................E5
Base y montaje maneta ...............................................................................E5
Ensamblaje del contenedor de accesorios ..................................................E6
Cómo usar
Descripción de la aspiradora .......................................................................E7
Preparación de la alfombra ..........................................................................E8
Remocion y reemplazo del deposito de solucion ........................................E8
Limpieza de alfombras .................................................................................E9
Limpieza por encima del nivel del piso ........................................................E9-10
Tanque de agua sucia .................................................................................E10-11
Mantenimiento
Banda y cepillo.............................................................................................E12
Solución de problemas
Servicio
Productos de limpieza
Garantía
.........................................................................................................E7
..................................................................................................E11-12
..............................................................................................................E14
.............................................................................................................E16
.........................................................................E5
....................................................................................E13
.....................................................................................E15
CÓDIGO DE FABRICACIÓN
(Etiqueta ubicada en la parte
posterior de la aspiradora)
Si necesita ayuda:
Visite nuestro sitio web en www.DirtDevil.com. Haga clic en el enlace que permite localizar los
vendedores autorizados Dirt Devil para encontrar el vendedor más cercano, o marque el 1-800-3211134 para escuchar un mensaje indicando la dirección de los vendedores autorizados Dirt Devil® (sólo
en ee. Uu.) O para hablar con un representante de atención al cliente (de 8 am a 7 pm, hora estándar
del este, de lunes a viernes).
POR FAVOR, NO DEVUELVA ESTE PRODUCTO A LA TIENDA.
E2
Page 19

¡SALVAGUARDIAS IMPORTANTES!
¡GUARDE ESTAS INSTRUCCIONES!
Al usar un aparato eléctrico, observe siempre las precauciones básicas,
incluyendo las siguientes:
LEA TODAS LAS INSTRUCCIONES ANTES DE USAR ESTE APARATO
ADVERTENCIA: PARA REDUCIR EL RIESGO
DE INCENDIOS, CHOQUES ELÉCTRICOS O
LESIONES:
• Ensamble completamente el producto antes de hacerlo funcionar.
• Cualquier otra tarea de mantenimiento debe ser realizada por un representante de mantenimiento autorizado.
• Haga funcionar la aspiradora solamente con el voltaje especificado en la placa de datos,
que se encuentra en la parte posterior de la aspiradora.
• Use el aparato únicamente en interiores.
• No lo sumerja. Úselo únicamente en alfombras humedecidas por el proceso de limpieza
o en derrames pequeños.
• Use only DIRT DEVIL® Use sólo los productos de limpieza DIRT DEVIL® para aparatos
diseñados para usar con esta máquina.
• No use líquidos inflamables ni combustibles para limpiar suelos.
• No permita que el aparato se use como un juguete. No está diseñado para que lo usen
niños de 12 años o menos. Se requiere una supervisión estricta cuando este aparato
se usa cerca de los niños. Para evitar lesiones o daños, mantenga a los niños lejos del
producto y no permita que coloquen los dedos ni otros objetos dentro de las aberturas.
• Use el producto sólo como se describe en este manual. Use sólo los accesorios y productos recomendados por el fabricante.
• No use este aparato con un cordón o enchufe dañados. Si el aparato no está funcionando
adecuadamente, se dejó caer, se dañó, se dejó a la intemperie o se dejó caer dentro del
agua, llévelo a un Centro de servicio antes de continuar usándolo.
• No tire del cordón ni traslade el aparato jalando del cordón, ni tampoco lo use como
manija; no cierre la puerta cuando el cordón está atravesado ni tire de este alrededor de
bordes o esquinas filosos. No coloque el producto sobre el cordón. No haga funcionar el
aparato encima del cordón. Mantenga el cordón lejos de superficies calientes.
• No lo desenchufe tirando del cordón. Para desenchufarlo, sujete el enchufe, no el cordón.
• Nunca manipule el enchufe ni el aparato con las manos húmedas.
• No coloque ningún objeto en las aberturas. No use este aparato con ninguna abertura
obstruida; manténgalo libre de suciedad, pelusa, cabello y cualquier objeto que pueda
reducir el flujo de aire.
• Mantenga el cabello, la ropa holgada, los dedos y todas las partes del cuerpo fuera de las
aberturas y otras piezas en movimiento.
• Apague todos los controles antes de desenchufarlo.
• Tenga especial cuidado al limpiar escaleras. Para evitar lesiones personales o daños, y evitar que la aspiradora se caiga, siempre colóquela al pie de la escalera, en el suelo. No coloque la aspiradora sobre escaleras ni muebles, ya que puede ocasionar lesiones o daños.
• No use este aparato para aspirar líquidos inflamables o combustibles, como gasolina,
o restos de madera lijada, ni lo use en áreas donde dichos materiales pudieran estar
presentes.
• Conecte el aparato únicamente a una toma de corriente con una conexión a tierra adecuada. Vea “Instrucciones de conexión a tierra”.
• No limpie las partes del piso en las que haya tomacorrientes.
• No use sin filtros y tanques.
• No aspire ningún objeto que se esté quemando o que libere humo, como cigarrillos,
fósforos o cenizas calientes.
E3
Page 20

GROUNDING
OUTLET BOX
• ADVERTENCIA: Este producto contiene sustancias químicas reconocidas por el estado de
California como causantes de cáncer, defectos congénitos o daño reproductivo.
ADVERTENCIA: PARA REDUCIR EL RIESGO DE
DAÑOS:
• Evite aspirar objetos duros y filosos con este producto, ya que pueden causar daños.
• Guarde la máquina en un lugar seco. No la exponga a temperaturas de congelamiento.
• El rodillo de cepillos continúa girando mientras el producto está encendido y el mango
está en posición vertical. Para evitar que las moquetas, los tapetes y los suelos se dañen,
evite inclinar la aspiradora o apoyarla sobre muebles, alfombras de área con flecos o
escaleras enmoquetadas durante el uso del accesorio.
• No use objetos filosos para limpiar la manguera, ya que pueden causar daños.
• Para ayudar a reducir el tiempo de secado, asegúrese de que el área esté bien ventilada
al usar detergentes y otros limpiadores con esta máquina.
• Para ayudar a evitar que las superficies se opaquen o se vuelvan a ensuciar, evite el contacto con las moquetas hasta que estén secas. Mantenga a los niños y a las mascotas
lejos de las moquetas hasta que estén completamente secas.
• No guarde el extractor con solución en los tanques.
• Dejar el aparato apoyado en un lugar mientras está funcionando puede provocar daños.
• No permita que la limpiadora quede inactiva durante periodos largos con los cepillos puestos.
• NO UTILICE ESTA ASPIRADORA EXTRACTORA EN SUELOS DUROS. UTILIZADO EN
SUELOS DUROS, ESTE APARATO PUEDE RAYAR O DAÑAR SU SUPERFICIE.
INSTRUCCIONES DE CONEXIÓN A TIERRA
Este aparato debe estar conectado a tierra. En caso de desperfecto o falla, la conexión
a tierra ofrece un circuito de menor resistencia para la corriente eléctrica a fin de
reducir el riesgo de choque eléctrico. Este aparato tiene un cordón con un conductor
de conexión a tierra del equipo (C) y un enchufe de conexión a tierra (A). El enchufe
debe estar enchufado en una toma de corriente (B) adecuada correctamente instalada
y conectada a tierra de acuerdo con todos los códigos y ordenanzas locales.
PELIGRO: La conexión inadecuada del conductor de conexión a tierra del equipo
puede ocasionar un riesgo de choque eléctrico. Consulte a un electricista calificado o al
personal de mantenimiento si no está seguro de que la toma de corriente está conectada
a tierra en forma adecuada. No modifique el enchufe suministrado con el aparato; si
no calza en la toma de corriente, haga que un electricista calificado instale una toma de
corriente adecuada. Este aparato es apto para uso en un circuito nominal de 120 voltios
y tiene un enchufe de conexión a tierra similar al enchufe (A) que se ilustra en el diagrama.
Si no se dispone de una toma de corriente con una conexión a tierra adecuada, se
puede usar un adaptador temporal (D) para conectar este enchufe a un receptáculo de
2 polos (E). El adaptador temporal debe utilizarse únicamente hasta que un electricista
calificado pueda instalar una toma de corriente con una conexión a tierra adecuada (B).
La oreja, patilla o dispositivo similar rígido de color verde (F) que sale del adaptador
debe conectarse a una conexión a tierra permanente (G), como la tapa de la caja de
una toma de corriente con una conexión a tierra adecuada. Cuando se use el adaptador,
debe mantenerse en su lugar con un tornillo de metal. NOTA: En Canadá, el Código
Eléctrico Canadiense
(Canadian Electrical
Code) no permite el
uso de adaptadores
temporales.
1
A
C
B
E4
2
F
D
D
G
E
Page 21

1. ENSAMBLADO DE LA ASPIRADORA
CONTENIDO DE LA CAJA
A. Sección Media
B. Asa Superior
C. Base
D. Adaptador de Gatillo para Tapicería/Escalera
E. Contenedor de Accesorios
F. Manguera para Tapicería/Escalera
G. Accesorio para Tapicería/Escalera
H. (1) Tornillo para el Asa Superior
I. (2) Tornillos para el Asa Inferior
J. (1) Tornillo para el Contenedor
K. (3) Tuerca Hexagonal
Retire todas las piezas de la caja e identifique
cada artículo que se muestra.
Asegúrese de ubicar todas las piezas antes de
eliminar el embalaje.
1.1
A
B
C
BASE Y MONTAJE MANETA
1.2 Coloque la base en posición verticale. Empuje
la sección media en la base al alinear las lengüetas
de la parte posterior de la sección media con las
ranuras de la parte posterior de la base. Ensamble
los dos tornillos (I) para el asa inferior de la
siguiente manera: mientras sujeta la tuerca (K) en
su lugar, inserte el tornillo a través de la sección
media y ajústelo.
IMPORTANTE
Asegúrese que el cordon eléctrico no se
interponga y evite pellizcarlo.
1.3 Deslice la asa superior dentro de la unidad.
Coloque el tornillo (H) en la hendidura ubicada en la
parte posterior del asa superior y ajústelo.
E
1.2
1.3
D
H
I
I
J
K
I
I
H
F
G
K
K
E5
Page 22

ENSAMBLAJE DEL CONTENEDOR DE ACCESORIOS
1.4
1.4 Alinee las lengüetas del contenedor de
accesorios con las ranuras en la sección media y
encájelas en su sitio.
1.5 Coloque la tuerca en la hendidura del
contenedor de accesorios y ajústela (A). Con la
otra mano apriete la liberación del asa para inclinar
la sección media hacia atrás (B).
1.6 Coloque el tornillo a través (J) del centro de la
sección media inferior y ajústelo.
1.7 Enrolle el cordón alrededor de las abrazaderas
superior e inferior.
1.8 Lleve la manguera hasta el contenedor superior
y oprima dentro de la abrazadera de la manguera
No.1 (1.7).
1.9 Continúe enrollando la manguera en sentido de
las agujas del reloj alrededor de los contenedores
de accesorios, presionando la manguera contra la
hendidura del fondo del contenedor de accesorios
inferior.
1.10 Lleve la manguera de regreso al contenedor
superior y oprima dentro de la abrazadera de la
manguera No. 2 (1.7).
1.11 Asegure el extremo del accesorio de la
manguera en su sitio al presionar hacia abajo en el
poste localizado en el lado derecho del contenedor
de accesorios inferior, para asegurarlo en su sitio.
1.12 Deslice el Accesorio para Tapicería/Escalera
en la ranura de en medio del contenedor de
accesorios inferior.
1.5
A
1.6
B
1.7
Hose Clip 2
Hose Clip 1
Upper
Lower
Cord
Cord
Clip
Clip
1.8 1.9
1.10 1.11
1.12
J
E6
Page 23

PARA FIJAR EL TANQUE DE
SOLUCIÓN
Coloque el tanque de solución en la aspiradora e
inclínela hacia atrás hasta que quede trabado.
2. CÓMO USAR
DESCRIPCIÓN DE LA ASPIRADORA
1. Manche Non-Slip Grip™
2. Traba de Tanque de Solución
Limpia
3. Mango para Transportar
4. Tanque de Solución Limpia
5. Traba de Tanque de Agua
6. Mango de Tanque de Agua Sucia
7. Cepillos
8. Tanque de Agua Sucia
9. Tapa del Tanque de Agua Sucia*
10. Tapa del Tanque de Agua Sucia
11. Cordón Eléctrico
12. Liberador Rápido de Cordón
13. Puerto de suministro de agua
para accesorios
14. Pedal del Liberador de Mango
15. Interruptor de encendido/apagado
16. Perno del Mango superior
17. Abrazadera Superior del Cordón
18. Gatillo para el rociador de solución
19. Conector de suministro de agua
base para tapizados/escaleras
20. Adaptador de manguera para
escaleras/tapizados
21. Manguera para tapizados/
escaleras
22. Gatillo para tapizados/escaleras
23. Accesorio para tapizados/
escaleras
24. Sujetador del tubo de solución
2.1
10
9
8
1.13
1
17
2
3
5
15
4
6
7
19
20
21
22
18
11
16
12
13
14
24
23
! !
PRECAUCIÓN
NO UTILICE ESTA ASPIRADORA
EXTRACTORA EN SUELOS DUROS.
UTILIZADO EN SUELOS DUROS, ESTE
APARATO PUEDE RAYAR O DAÑAR SU
SUPERFICIE.
E7
Page 24

PREPARACIÓN DE LA ALFOMBRA
IMPORTANTE
No use la limpiadora de moqueta como
aspiradora en seco.
1. Aspire bien la alfombra. Para obtener mejores
resultados utilice una aspiradora Dirt Devil®. Para
tener mejores resultados, use la aspiradora Dirt
®
con cepillo rotatorio.
Devil
2. Retire tantos muebles de la habitación como sea
posible. Si no puede retirar los muebles, coloque o
papel aluminio debajo y alrededor de las patas de los
muebles y déjelo puesto hasta que se haya secado
la alfombra por completo.
Revise la solidez del color
Antes de limpiar la alfombra/tapicería, haga una
prueba de la solidez del color. Humedezca
un paño blanco con la solución. Haga una prueba en
un área pequeña en un closet o debajo
de un cojín. Frote suavemente el paño sobre el área.
Fíjese si los colores manchan el paño.
Si el paño permanece blanco, puede considerarse
segura la limpieza de la alfombra/tapicería.
Sugerencias utiles para limpiar la
alfombra
1. No sobresature la moqueta de solución de limpieza
al utilizar la limpiadora de moquetas.
2. En áreas percudidas, puede ser necesario dar
más aplicaciones.
3. Tomará bastante tiempo para que la alfombra se
seque bien.
4. Limpie con un paño la solución que haya caído en
los muebles de madera para evitar que se dañen.
5. No camine por la alfombra hasta que esté
completamente seca.
6. Una vez que la alfombra ha secado por completo,
aspire la alfombra con una aspiradora que tenga
cepillo rotatorio.
7. Antes de aspirar, determine los lugares del inicio y
final, evitando caminar por las áreas aspiradas
previamente.
Despues de la limpieza
• Deje que la alfombra seque por completo. No
camine por la alfombra hasta que esté seca.
• Si necesita caminar por la alfombra, coloque
toallas blancas en las áreas donde va a caminar.
• Sinoestásecalaalfombraysisedebenvolvera
colocar los muebles en la habitación, use plástico o
papel aluminio para evitar que se ensucie la alfombra.
• Limpie bien el tanque de agua sucia con agua
caliente del grifo. Vea la página 10.
! !
ADVERTENCIA
No almacene la limpiadora de moquetas en le
garaje ni en un lugar en el que pudiera helar.
REMOCION Y REEMPLAZO DEL
DEPOSITO DE SOLUCION
2.2
A
2.2 Presione el seguro del tanque de solución de
limpieza (Diagrama A). Incline el depósito de
solución apartándolo de la aspiradora y retírelo
(Diagrama B).
2.3 Desenrosque la taza de medida que está en la
parte posterior del depósito de solución.
2.4 Llene con 5 tazas de medida de solución,
(aproximadamente 4 oz). Llene el espacio restante
del depósito con agua caliente del grifo.
2.5 Llene el espacio restante del depósito con agua
caliente del grifo. Vuelva a colocar la taza de
medida.
2.6 Ponga la parte inferior del depósito de solución
en la aspiradora y gire la parte superior hasta que
la palanca se coloque en su lugar.
B
2.3
2.4
2.5 2.6
IMPORTANTE
Use sólo detergentes de marca Dirt Devil®. El
uso de otras soluciones limpiadoras puede
generar demasiada espuma. Demasiada
espuma hará que el flotador apague la
aspiradora antes de tiempo. El hecho de utilizar
otras soluciones de limpieza puede anular la
garantía del aparato.
E8
Page 25

LIMPIEZA DE ALFOMBRAS
2.7 Enchufe el cordón en un tomacorriente. Pise el
pedal liberador de mango para poner la unidad en
la posición de aspirar.
2.8 Gire el interruptor a la posición de ENCENDIDO.
IMPORTANTE
Nunca deje la unidad desatendida mientras
esté encendida. APAGUELA cuando vaya a
vaciar y llenar el depósito. NO impregne
demasiado la alfombra.
2.9 Mientras presiona el activador de pulverización
de solución, mueva lentamente la unidad hacia
delante. Suelte el activador y tire de la unidad hacia
atrás por la misma área para retirar el agua sucia y
la solución de la alfombra. (Para áreas percudidas,
repita de ser necesario).
2.7
2.9
2.8
Interruptor
de
encendido/
apagado
IMPORTANTE
Si el sonido de motor se vuelve muy agudo,
indica que el tanque de agua sucia está lleno y
debe vaciarse.
LIMPIEZA POR ENCIMA DEL
NIVEL DEL PISO
2.10 Pongo la aspiradora en posición vertical.
Retire los accesorios de la bolsa de plástico.
Ensamble de manera correspondiente. Connecte
el accesorio de tapiceria al adaptador del gatillo.
2.11 Retire la puerta del tanque de agua sucia.
2.12 Inserte el adaptador de manguera en el tanque
de agua sucia.
2.13 Conecte el conector de suministro de agua de
la base en el accesorio en la parte inferior del lado
izquierdo de mango que está de cara a la
aspiradora.
Uso de accesorios
2.14 Encienda el interruptor de encendido. Mientras
presiona el activador de pulverización de solución,
mueva lentamente el accesorio hacia delante.
Suelte el activador y tire del accesorio hacia atrás
por la misma área para retirar el agua sucia y la
solución de la tapicería. (Para áreas percudidas,
repita de ser necesario.)
IMPORTANTE: Para una limpieza con mejores
resultados use un movimiento firme hacia adelante y
hacia atrás. La limpieza debe hacerse a la mitad de
la velocidad del aspirado en seco. Para áreas muy
sucias, repita el procedimiento si es necesario.
2.10
2.12 2.13
2.11
A
2.14
No impregne demasiado la tapicería. Para lograr los mejores resultados de
IMPORTANTE
limpieza aspire con movimientos constantes, moderados hacia adelante y
hacia atrás. Asegúrese que la tapicería esté completamente seca antes de
usarla. Si la puerta de accesorio de manguera no se vuelve a colocar, no
habrá succión por la boquilla y la unidad no funcionará apropiadamente.
E9
Page 26

COMO GUARDAR
LOS ACCESORIOS
Coloque la manguera
y el accesorio para
tapicería en sus
lugares de almacenaje. Guárdelos
hasta que los vuelva
a usar.
2.15
Manguera
para tapi-
cería/
escalera
Accesorio
para
tapicería/
escalera
TANQUE DE AGUA SUCIA
Su lavadora de alfombras está equipada con una
válvula de cierre dentro del tanque de agua sucia.
Cuando el tanque de agua sucia se llena, el flotador
azul (visto desde arriba del tanque) subirá, cerrando
el flujo de aire a través de la boquilla.
NOTA: El flotador de su lavadora de alfombras que
es la pieza azul en la tapa del tanque de agua sucia,
cerrará la succión cuando se llene dicho tanque.
Para tener mejores resultados, aspire con
movimientos uniformes y constantes manteniendo la
boquilla plana contra la alfombra. Si se inclina la
aspiradora se abre el sellado entre la boquilla y la
alfombra que hará que el flotador se suba e
interrumpa la succión. Una vez que se activa el
flotador, vacíe el tanque de agua sucia. Si el tanque
de agua sucia no parece estar lleno, apague el
interruptor de encendido y espere que el flotador se
asiente y vuelva a encenderla. Si el flotador
interrumpe repetidamente la succión, vacíe el tanque
de agua sucia. Para obtener majores resultados, use
únicamente el Champú para Alfombras y Tapetes de
Dirt Devil®. El uso de otras soluciones puede
generar espuma excesiva que hará que el flotador
suba prematuramente e interrumpa la succión.
Ponga dos tapas llenas (118 ml [4oz]) del Champú
para Alfombras y Tapetes de Dirt Devil® cada vez
que llena el tanque de solución limpia. Un
concentración alta de champú puede generar
excesiva espuma.
Como vaciarlo
2.17 Tome la parte superior del mango del tanque de
agua sucia y empuje la traba para soltarlo.
2.18 Tome el mango y retire el tanque de la base.
2.19 Quite la tapa del tanque de agua sucia.
2.20 Para vaciar el tanque de agua sucia, tome el
mango con una mano y la boquilla con la otra y vacíe
el agua en un lavabo.
2.21 Aclare el tanque de agua sucio y filtre con agua
de golpecito caliente. Limpie y deje seco a fondo
antes de almacenar para evitar que el moho forme.
No utilice ninguna productos química
IMPORTANTE
al limpiar.
COMO
2.16
TRANSPORTAR
LA UNIDAD
Para llevar la aspiradora de una habitación a
otra, use el asa para
transporte ubicada en
la parte frontal de la
aspiradora.
IMPORTANTE
No transporte la limpiadora de moquetas si el
tanque de solución o el tanque de agua sucia
están llenos.
IMPORTANTE
Escuchará un cambio apreciable en el sonido de
la aspiradora. Esto le indicará que necesita vaciar
el tanque de agua sucia.
! !
ADVERTENCIA
Para reducir el riesgo de lesiones ocasionadas
por piezas en movimiento, desenchufe la
aspiradora antes de realizar el mantenimiento.
2.17
2.18
2.19 2.20
2.21
E10
Page 27

Como colocar el tanque de agua sucia en la base de la aspiradora
2.22 Levante la base frontal de la aspiradora de la
alfombra con una mano.
2.23 Tome el mango y
enganche la parte frontal
del tanque de agua sucia
en la base de la aspiradora, asegurándose que
la parte frontal del tanque
de agua sucia descanse
en la base (Diagrama A).
Tanque de Agua Sucia. El Tanque de Agua Sucia tiene tres (3) pestañas en el
lado de abajo que DEBEN fijarse en el lado de abajo de la base de la aspiradora.
Es muy importante levantar la base de la aspiradora de la alfombra y fijar la
boquilla a la base de manera que la boquilla quede al mismo nivel que la base
de la aspiradora (Diagrama B). Si no se instala correctamente el Tanque de Agua
Sucia se tendrá una recolección deficiente del agua sucia (Diagrama C). El
Tanque de Agua Sucia debe vaciarse una o dos veces cada vez que se llene el
Tanque de Solución Limpia.
2.24 Una vez que la parte frontal del tanque de agua sucia descansa en la base,
coloque la parte posterior del tanque en la base de la aspiradora. Empuje el
mango hacia abajo hasta que abroche.
2.22
2.23
A
B
C
2.24
Pueden formarse depósitos minerales o moho, impidiendo el funcionamiento
IMPORTANTE
óptimo de su limpiadora de moquetas.
3. MANTENIMIENTO
Familiarícese con estas tareas de mantenimiento en el hogar, ya que el uso y cuidado apropiados de
su aspiradora asegurarán una limpieza continuamente eficaz.
Cualquier otra tarea de mantenimiento debe ser realizada por un representante de mantenimiento autorizado.
! !
Su aspiradora tiene incorporado un protector térmico para impedir el sobrecalentamiento. Cuando se
activa el protector térmico, la aspiradora deja de funcionar.
Si esto sucede, proceda de la siguiente manera:
1. Apague la aspiradora y desenchúfela de la toma de corriente eléctrica.
2. Vacíe el contenedor para polvo.
3. Inspeccione y elimine la obstrucción en todo el trayecto de suciedad. Esta obstrucción puede
producirse en: la entrada de la boquilla, el conector de la manguera, la manguera, la entrada del
contenedor para polvo, el filtro ciclónico, el filtro lavable y el filtro HEPA.
4. Cuando la aspiradora está desenchufada y se deja enfriar el motor durante 30 minutos, el protec
tor térmico se desactiva, y se puede continuar pasando la aspiradora.
Si el protector térmico sigue activándose después de efectuar los pasos anteriores, es posible que su
aspiradora necesite mantenimiento.
AVISO
E11
Page 28

BANDA Y CEPILLO: Cómo quitar y reemplazar
! !
PRECAUCIÓN
Para reducir el riesgo de lesiones ocasionadas
por piezas en movimiento, desenchufe la aspiradora antes de realizar el mantenimiento.
Banda: Qué comprar
Para el reemplazo de la banda Estilo 7 por
favor llame al 1-800-321-1134 o visite nuestro
sitio web www.DirtDevil.com para localizar al
distribuidor más cercano a usted.
Cómo quitar
3.1 Incline la aspiradora de lado para ver la base
de la boquilla
3.2 Para quitar la cubierta de la banda, utilice un
destornillador Phillips para retirar los dos (2) tornillos. Las flechas muestran la ubicación de los tornillos.
3.3 Tome la tapa de la banda cerca del cepillo
rotatorio y levántela.
3.4 Tome el cepillo rotatorio con una mano, con la
otra mano mantenga la tensión de la banda cuando
la quite. Levante cuando la retire.
Cómo reemplazar
3.5 Retire la banda. Deseche la banda usada.
3.6 Coloque la banda en el eje del motor, después
deslice el cepillo rotatorio por la banda. Coloque la
banda en el área del cepillo rotatorio que no tiene
cerdas.
3.7 Con la banda en su lugar, jale y deslice el cepillo
rotatorio en la boquilla, asegurándose que las tapas
de los extremos del cepillo rotatorio estén en la
orientación correcta (Diagrama 3.7a).
3.8 Vuelva a colocar la tapa de la banda insertando
el extremo más lejano del cepillo rotatorio primero.
Luego coloque la parte frontal de la tapa de la
banda en su lugar. Fíjela volviendo a colocar los
dos (2) tornillos.
3.1
3.3
3.5
3.7
3.2
3.4
3.6
A
3.8
IMPORTANTE
Gire el cepillo rotatorio con la mano para
asegurarse que la banda no está torcida ni
pellizcada.
E12
Page 29

El cable no está conectado
Necesita servicio.
4. SOLUCIÓN DE PROBLEMAS
Si ocurre un problema menor, generalmente puede resolverse con bastante facilidad cuando se
halla la causa, usando esta lista de verificación.
Cualquier otra tarea de mantenimiento debe ser realizada por un representante de mantenimiento autorizado.
! !
ADVERTENCIA
Para reducir el riesgo de lesiones ocasionadas por piezas en movimiento, desenchufe la aspiradora
antes de realizar el mantenimiento.
PROBLEMA CAUSA POSIBLE SOLUCIÓN POSIBLE
La limpiadora
de moquetas
no funciona.
La limpiadora
de moquetas
no aspira, o
tiene poca
fuerza de
succión.
La limpiadora
de moquetas
pierde agua.
La limpiadora
de moquetas
no distribuye
la solución
de limpieza.
Los accesorios de la
aspiradora
no recogen
Los accesorios de la
aspiradora
no surten
espray*
El sonido
del motor se
vuelve agudo
firmemente al tomacorriente.
El fusible está fundido o falló el
interruptor.
La puerta del tanque de agua sucia
no está instalada.
El tanque de agua sucia no está
instalado correctamente.
El tanque de agua sucia está lleno. Vacíe el Tanque de Agua Sucia - Pág. E10.
Pasaje de agua sucia bloqueado. Limpie el Tanque de Agua Sucia - Pág. E10.
Está sucio el filtro de espuma. Limpie el filtro. Consulte Cómo Vaciar y Limpiar el
El tanque de agua sucia está lleno. Cómo Vaciar el Tanque de Agua Sucia - Pág.
El tanque d e a g ua sucia no e s tá
instalado correctamente.
El tanque d e a g ua l i mpia no es t á
correctamente.
El tanque d e a g ua l i mpia no es t á
instalado correctamente.
Necesita servicio. Llévela a un c e nt ro de servici o. Par a e n contrar
La manguera está taponada. Retire la manguera y los accesorios; despeje la
La entrada de la manguera está
taponada.
El tanque d e a g ua sucia es t á l leno. Vacíe el tanque d e a g u a s u cia - Pág. E10.
La mangu e r a d e s u m i n i stro de
agua no está conectada apropiadamente.
Se ha acti va d o e l f lotador e n e l
tanque d e a g ua sucia.
Conecte el enchufe firmemente.
Revise el fusible o el interruptor. Reemplace el
fusible/vuelva a encender el enterruptor.
Llévela a un c e nt ro de servici o. Par a e n contrar
el lugar má s cercan o a su domicilio, visite
nuestro sitio Web en www.DirtDevil.co m o l l a m e
al 1-800-321-1134.
Coloque la puerta del tanque de agua sucia Pág. 9.
Revise Cómo Colocar el Tanque de Agua Sucia
en la Base de la Aspiradora - Pág. E11.
Tanque de Agua Sucia. Pág. E10.
E10.
Revise Có mo Colocar el Tanque de Agua Su cia
la Base de l a A spirad o r a - Pág. E11.
Revise la in f o r m a ción sobre la Instalaci ó n del
Tanque de Agua Limp i a - Pág . E8 .
Revise la in f o r m a ción sobre la Instalaci ó n del
Tanque de Agua Limp i a - Pág . 8 .
el lugar má s cercan o a su domicilio, visite
nuestro sitio Web en www.DirtDevil.co m o l l a m e
al 1-800-321-1134.
obstru cción - Pág. E 9.
Retire la manguera y despeje la entrada - Pág.
E9.
Conec te l e conec t o r d e l s u m i n i stro de agu a d e l
gatillo y e l conect o r d e suminis t ro de agua de l a
base - Pág. E9.
Consult e C ó mo Vaciar y Lim p i a r e l Tanque de
Agua Sucia. Pág. E10.
E13
Page 30

5. SERVICIO
Para obtener un servicio aprobado de Dirt Devil
Concesionario autorizado de servicio de garantía de Dirt Devil® (depositario) más cercano:
•ConsultandolasPáginasamarillasenlasección“Aspiradoras–uso”doméstico.
•VisitenuestrositiowebenDirtDevil.com(clientes
estadounidenses) o DirtDevil.ca (clientes canadienses). Siga el enlace del centro de servicio para
encontrar el centro de servicio más cercano.
•Paraqueleinformendemaneraautomáticalaubicacióndeloscentrosautorizadosdeservicio,llame
al 1-800-321-1134.No envíe su aspiradora a Dirt Devil®, Inc., Company en Glenwillow para realizar el
servicio. Esto sólo provocará demoras.
Si necesita recibir más ayuda:
Para hablar con un representante de atención al cliente, llame al 1-800-321-1134; de lunes a viernes, de 8
a.m. a 7 p.m., hora del Este. Siempre identifique su aspiradora por el número de modelo completo al
solicitar información o realizar pedidos de piezas.
(El número de modelo se encuentra en la parte inferior del mango de la limpiadora).
NO DEVUELVA ESTE PRODUCTO A LA TIENDA.
®
y piezas genuinas de Dirt Devil®, encuentre el
E14
Page 31

6. PRODUCTOS DE LIMPIEZA
ADVERTENCIA: Para reducir el riesgo de incendio y descarga eléctrica
debido a daños de los componentes internos, use únicamente productos
de limpieza de Dirt Devil
uso con este aparato (véase abajo).
®
y accesorios para suelos duros diseñados para
Guía de limpieza de productos Dirt Devil
Nombre del
producto
Quick & Light
de Dirt Devil
®
Avanzada
y profunda
limpieza
64 oz.
®
Limpieza
profunda
producidas por
mascotas
64 oz.
E15
Page 32

7. GARANTÍA
GARANTÍA LIMITADA DE UN AÑO
(Para uso doméstico)
LO QUE ESTÁ CUBIERTO POR ESTA
GARANTÍA
Siempre que el uso y el mantenimiento de su
producto Dirt Devil® se realicen en condiciones
de uso doméstico normales y según el Manual
del usuario, el producto estará garantizado contra
defectos originales en el material y la fabricación.
Durante el período de garantía, le proporcionaremos gratuitamente mano de obra y piezas para
corregir cualquier defecto de este tipo en productos comprados en los Estados Unidos, tiendas
situadas en una base militar de los EE. UU., y
Canadá.
CÓMO HACER UN RECLAMO BAJO LA
GARANTÍA
Si este producto no se ajusta a las condiciones
garantizadas, llévelo o envíelo a un Concesionario
autorizado de servicio de garantía de Dirt Devil®
junto con el comprobante de compra. Llame al
1-800-321-1134 para que le indiquen de manera
automática la ubicación de los centros autorizados de servicio en los EE. UU. O BIEN, visite Dirt
Devil® en línea en www.DirtDevil.com. Para
obtener asistencia adicional o información referente a esta garantía o a la disponibilidad de centros de servicio para reparaciones bajo la
garantía, llame al centro de respuesta a consumidores de Dirt Devil® al 1-800-321-1134, de
lunes a viernes de 8 a.m. a 7 p.m., hora del Este.
LO QUE ESTA GARANTÍA NO CUBRE
Esta garantía no cubre el uso del producto en una
operación comercial (tal como servicios de
empleadas domésticas, mantenimiento de edificios y alquiler de equipos), rodillos de cepillos,
correas, bolsas, filtros, mantenimiento incorrecto
del producto, daños debidos a uso indebido,
causas de fuerza mayor, naturaleza, vandalismo
u otras situaciones fuera del control de Royal
Appliance Mfg. Co. (“Royal”, “nosotros”), acciones u omisiones del propietario, uso fuera del
país en el que se compró el producto inicialmente
y reventas del producto por parte del propietario
original. Esta garantía no cubre recogidas, entre-
gas, transporte ni visitas a domicilio.
Esta garantía no se aplica a los productos comprados fuera de los Estados Unidos, incluidos
sus territorios y posesiones, fuera de una tienda
situada en una base militar de los EE. UU. ni
fuera de Canadá. Esta garantía no cubre los
productos comprados a una parte que no sea un
minorista, concesionario o distribuidor autorizados de los productos de Royal.
OTROS TÉRMINOS IMPORTANTES
Esta garantía no es transferible y no puede ser
asignada. Esta garantía será regida e interpretada bajo las leyes del estado de Ohio. El período
de garantía no podrá ser extendido por cualquier
tipo de reemplazo o reparación realizados bajo
esta garantía.
ESTA GARANTÍA ES LA ÚNICA GARANTÍA Y
EL ÚNICO RECURSO PROVISTO POR ROYAL.
TODAS LAS DEMÁS GARANTÍAS, EXPRESAS
O IMPLÍCITAS, INCLUIDAS LAS GARANTÍAS
DE COMERCIABILIDAD O APTITUD PARA UN
FIN PARTICULAR, QUEDAN EXCLUIDAS.
ROYAL NO SERÁ RESPONSABLE EN NINGÚN
CASO POR NINGÚN DAÑO ESPECIAL,
INDIRECTO, INCIDENTAL O MEDIATO DE
NINGÚN TIPO O NATURALEZA CON
RESPECTO AL PROPIETARIO O A CUALQUIER
PARTE QUE REALICE UN RECLAMO A
TRAVÉS DEL PROPIETARIO, YA SEA QUE SE
BASE EN RESPONSABILIDAD CONTRACTUAL,
NEGLIGENCIA, RESPONSABILIDAD
EXTRACONTRACTUAL O RESPONSABILIDAD
CIVIL OBJETIVA POR LOS PRODUCTOS, O
EMERGENTE DE CUALQUIER OTRA CAUSA.
Algunos estados no permiten la exclusión de los
daños mediatos, por lo que es posible que la
exclusión anterior no se aplique a su caso en
particular. Esta garantía le otorga derechos legales específicos, y es posible que también tenga
otros derechos que varían de un estado a otro.
E16
Page 33

GUIDE D’UTILISATION
Instructions d’utilisation et d’entretien
TM
Carpet Cleaner
www.DirtDevil.com
IMPORTANT : LIRE CES INSTRUCTIONS ATTENTIVEMENT AVANT
D’UTILISER L’ASPIRATEUR.
Vous avez des quest ions ou des i nquiétudes? Pour obteni r d e l ’ai d e e t ava n t d e r et o u r n e r
ce prod uit au magas i n, ve u i l l ez a ppeler l e serv i ce à la clie n tè l e a u 1 800 3211134 du
lundi au ven d r edi, de 8 h à 19 h (HNE).
L’UTILISATION DE CE PRODUIT À DES FINS COMMERCIALES INVALIDE
LA PRÉSENTE GARANTIE.
©2013 Techtronic Floor Care Technology Limited. Tous droits réservés. #921131 250 ID107243-R0
Page 34

Merci d’avoir choisi un produit DIRT DEVILMD.
Veuillez inscrire les numéros de modèle et de série
COMPLETS dans les espaces fournis à cet effet
MODÈLE
CODE DE FABRICATION
Conseil: Il est recommandé de joindre votre reçu de
caisse au guide de l’utilisateur, car une vérification de la
date d’achat peut être effectuée avant toute réparation
couverte par la garantie de votre produit DIRT DEVILMD.
N’oubliez pas d’enregistrer votre produit en ligne, à
l’adresse DirtDevil.com, ou par téléphone, au
1-800-321-1134.
CODE DE FABRICATION
(Étiquette située au dos de l’aspirateur)
CONTENU
Consignes de sécurité importantes ....................................................................... 3-4
Assemblage de l’aspirateur ..................................................................................... 5
Contenu de l’emballage ......................................................................................5
Assemblage du corps de l’appareil et du manche ..............................................5
Assemblage du support à accessoires ...............................................................6
Utilisation ..................................................................................................................7
Description de l’aspirateur ...................................................................................7
Préparation de la Moquette .................................................................................8
Dépose et remise en place du réservoir de solution ..........................................8
Nettoyage de Moquette .......................................................................................9
Nettoyage au-dessus des planchers/accessoires ...............................................9-10
Pour vider et nettoyer le réservoir d’eau sale ....................................................10-11
Entretien ....................................................................................................................11-12
Courroie ou rouleau brosse .................................................................................12
Dépannage ................................................................................................................ 13
Service ............................................................................................................... 14
Produits nettoyants .................................................................................................. 15
Garantie .....................................................................................................................16
Pour obtenir de l’assistance :
Visitez notre site web à l’adresse www.DirtDevil.ca. Cliquez sur le lien du localisateur de marchands
autorisés Dirt DevilMD pour trouver le marchand le plus près de chez vous, ou composez le 1 800 321
1134 pour écouter un message indiquant les adresses des marchands autorisés Dirt Devil
Seulement) ou pour parler à un représentant du service à la clientèle (de 8 h à 19 h, hne, du lundi au
vendredi).
VEUILLEZ NE PAS RETOURNER CE PRODUIT AU MAGASIN.
MD
(é.-U.
2
Page 35

CONSIGNES DE SÉCURITÉ IMPORTANTES
RANGER ET CONSERVER CES INSTRUCTIONS
Durant l’utilisation d’un appareil électrique, toujours respecter les précautions
élémentaires, y compris les suivantes :
LIRE TOUTES LES INSTRUCTIONS AVANT D’UTILISER CET APPAREIL.
AVERTISSEMENT: AFIN DE RÉDUIRE AU
MINIMUM LES RISQUES D’INCENDIE, DE CHOC
ÉLECTRIQUE OU DE BLESSURES :
• Assembler complètement avant l’utilisation.
• N’utiliser l’aspirateur qu’à la tension spécifiée sur la plaque signalétique située au dos de
l’aspirateur.
• Ne pas laisser l’appareil sans surveillance lorsqu’il est branché. Le débrancher quand il
n’est pas utilisé et avant d’en faire l’entretien.
• Utiliser cet appareil à l’intérieur seulement.
• Ne pas immerger. N’utiliser que sur des surfaces rendues humides par le processus de
nettoyage ou pour ramasser de petits dégâts de liquides renversés.
• N’utiliser que les produits nettoyants de DIRT DEVIL conçus pour cet appareil.
• Ne pas utiliser de liquide inflammable ou combustible pour nettoyer les planchers.
• Ne pas permettre que l’appareil soit utilisé comme un jouet. Ce produit n’est pas
conçu pour être utilisé par des enfants de 12 ans et moins. Exercer une étroite
surveillance lorsque l’appareil est utilisé à proximité d’enfants. Pour éviter les ris
ques de blessures ou de dommages, tenir le produit hors de la portée des enfants,
et ne pas leur permettre de placer leurs doigts ou des objets dans les ouvertures.
• L’appareil doit être utilisé seulement comme indiqué dans ce manuel. Utiliser
uniquement les accessoires et les produits recommandés par le fabricant.
• Ne pas utiliser l’appareil si la fiche ou le cordon est endommagé. Si l’aspirateur ne
fonctionne pas adéquatement, s’il est tombé, a été endommagé, a été laissé à l’extérieur
ou est tombé dans l’eau, l’expédier à un centre de réparation pour qu’il soit vérifié.
• Ne pas tirer l’appareil par le cordon, ne pas se servir du cordon comme poignée,
ne pas fermer de portes sur le cordon et ne pas contourner des coins ou des rebords
tranchants avec le cordon. Éviter de faire rouler l’appareil sur le cordon. Tenir le
cordon éloigné des surfaces chaudes.
• Ne pas tirer sur le cordon pour débrancher l’appareil, mais plutôt sur la fiche.
• Ne pas manipuler la fiche ou l’aspirateur avec les mains mouillées.
• Ne pas insérer d’objets dans les ouvertures de l’appareil. Ne pas utiliser l’appareil
si les orifices sont obstrués; retirer la poussière, la mousse, les cheveux ou tout ce
qui pourrait réduire le débit d’air.
• Garder les cheveux, les vêtements amples, les doigts et toute autre partie du corps
à l’écart des ouvertures et des pièces en mouvement.
• Éteindre toutes les commandes avant de débrancher l’appareil.
• Être très prudent pendant l’utilisation dans les escaliers. Ne pas déposer l’aspirateur
sur les marches. Afin d’éviter les blessures ou les dommages et d’empêcher
l’appareil de tomber, toujours placer l’appareil au bas de l’escalier. Ne pas placer
l’appareil dans les escaliers ou sur un meuble, ce qui pourrait causer des blessures
ou des dommages.
• Ne pas aspirer les liquides inflammables ou combustibles comme l’essence, ni
utiliser l’appareil à proximité de ces matériaux.
• Ne brancher cet appareil qu’à une prise correctement mise à la terre. Voir la section «
Consignes de mise à la terre ».
• N’aspirer aucune matière brûlante ou dégageant de la fumée, comme des ciga
rettes, des allumettes ou des cendres chaudes.
• Ne pas utiliser sans réservoirs ou filtres en place.
3
Page 36

• Ne pas nettoyer au-dessus de prises électriques situées au sol.
GROUNDING
OUTLET BOX
• MISE EN GARDE : Cet appareil contient des produits chimiques reconnus par l’État
de la Californie comme pouvant causer le cancer ou, entraîner des malformations
congénitales ou d’autres troubles de la reproduction.
MISE EN GARDE : POUR RÉDUIRE LES RISQUES
DE DOMMAGES :
• Éviter de ramasser des objets durs ou aux arêtes tranchantes avec l’appareil.
Ils peuvent endommager l’appareil.
• Ranger dans un endroit sec. Ne pas exposer l’appareil à des températures de gel.
• Le rouleaubrosse continue à tourner si l’aspirateur est sous tension et le manche en
position verticale. Pour éviter d’endommager les moquettes, les carpettes et les
revêtements de sol, éviter de faire basculer l’aspirateur, de le placer sur un meuble ou
de le faire passer sur les franges de carpettes ou dans des escaliers recouverts de tapis
pendant l’utilisation des accessoires.
• Ne pas utiliser d’objets aux arêtes tranchantes pour nettoyer le tuyau car
cela risquerait de l’endommager.
• Pour réduire le temps de séchage, s’assurer de bien aérer l’espace nettoyé lorsque cet
appareil est utilisé avec des détergents ou d’autres produits nettoyants.
• Pour éviter d’aplatir les fibres de la moquette ou de la salir de nouveau, éviter tout
contact avec la moquette jusqu’à ce qu’elle soit sèche. Garder les enfants et les ani
maux de compagnie éloignés de la moquette jusqu’à ce qu’elle soit sèche.
• Ne pas ranger l’extracteur avec de la solution nettoyante encore présente dans le réservoir.
• Le fait de rester sur place alors que l’appareil est en marche peut causer des dommages.
• Ne pas laisser l’appareil au même endroit avec les brosses en position de marche
pendant de longues périodes de temps.
• NE PAS UTILISER CET ASPIRATEUR EXTRACTEUR SUR LES PLANCHERS
À SURFACE DURE. L’UTILISATION DE CET APPAREIL SUR DES PLANCHERS À
SURFACE DURE PEUT ÉGRATIGNER OU ENDOMMAGER LE PLANCHER.
CONSIGNES DE MISE À LA TERRE
Cet appareil doit être mis à la terre. En cas de défectuosité ou de bris, la mise à la terre
fournit un espace de moindre résistance au courant électrique afin de réduire le risque de
choc électrique. Cet appareil est doté d’un cordon muni d’un conducteur de mise à la terre
de l’équipement (C) et d’une fiche de mise à la terre (A). La fiche doit être branchée dans
une prise appropriée (B) adéquatement installée et mise à la terre conformément à tous les
codes et ordonnances locaux.
AVERTISSEMENT: Un branchement inadéquat du conducteur de mise à la terre
de l’appareil peut entraîner un risque de choc électrique. Si vous n’êtes pas certain si la prise est
correctement mise à la terre, consulter un électricien ou un technicien qualifié. Ne pas modifier la
fiche fournie avec l’appareil. Si la fiche ne convient pas à la prise, faites installer une prise adéquate
par un électricien qualifié. Cet appareil est conçu pour être utilisé sur un circuit d’un calibre
nominal de 120 volts et est doté d’une fiche de mise à la terre qui ressemble à la fiche (A) illustrée.
Un adaptateur temporaire (D) peut être utilisé pour brancher cette fiche à une prise bipolaire (E)
si une prise adéquatement mise à la terre n’est pas disponible. L’adaptateur temporaire ne doit
être utilisé que jusqu’à ce qu’une prise adéquatement mise à la terre (B) soit installée par un
électricien qualifié. La patte rigide ou le taquet de couleur verte ou autre élément semblable (F) lié à
l’adaptateur doit être branché à une masse permanente (G) comme un couvercle de boîte à prises
adéquatement mis à la terre. Chaque
fois qu’un adaptateur est utilisé, il
doit être maintenu en place par une
vis en métal. Remarque : Au Canada,
l’usage d’un adaptateur temporaire
n’est pas permis par le Code canadien
de l’électricité.
1
A
C
4
B
2
D
D
F
G
E
Page 37

1. ASSEMBLAGE DE L’ASPIRATEUR
CONTENU DE L’EMBALLAGE
A. Poignée supérieure
B. Partie centrale
C. Base
D. Adaptateur à gâchette pour mobilier/ escaliers
E. Support à accessoires
F. Tuyau pour mobilier/escaliers
G. Accessoire pour mobilier/escaliers
H. (1) Vis de la poignée supérieure
I. (2) Vis droite et gauche de la base
J. (1) Vis de la partie médiane de la base
K. (3) Écrou hexagonal
Retirer toutes les pièces de l’emballage.
Avant d’éliminer les matériaux d’emballage,
s’assurer qu’aucune des pièces illustrées ne
manque.
OUTIL NÉCESSAIRE : tournevis cruciforme
!
MISE EN GARDE
NE PAS UTILISER CET ASPIRATEUR
EXTRACTEUR SUR LES PLANCHERS À
SURFACE DURE. L’UTILISATION DE CET
APPAREIL SUR DES PLANCHERS À
SURFACE DURE PEUT ÉGRATIGNER OU
ENDOMMAGER LE PLANCHER.
!
1.1
E
A
D
J
B
C
F
G
H
I
I
K
ASSEMBLAGE DU CORPS DE
L’APPAREIL ET DU MANCHE
1.2 Placer l’aspirateur en position verticale. Pousser
la partie centrale de l’appareil sur la bas en alignant
les attaches au dos de l’appareil et les poches au
dos de la base. Placez les deux vis de la poignée
inférieure (I) de la manière suivante : tout en
maintenant l’écrou, insérez la vis dans la partie
avant de la section médiane et serrez-la (K).
IMPORTANT
S’assurer que le cordon d’alimentation est
éloigné pour éviter de se pincer.
1.3 Faire glisser la poignée supérieure vers le bas
sur l’appareil. Placez la vis dans le creux situé
derrière la poignée supérieure (H) et serrez.
1.2
K
I
I
K
1.3
H
4
Page 38

ASSEMBLAGE DU SUPPORT À ACCESSOIRES
1.4
1.4 Alignez les attaches du support à accessoires
sur les encoches de la section médiane et
enclenchez-les.
1.5 Placez l’écrou dans le creux situé sur le
support à accessoire et maintenez-le (illustration
A). Appuyez sur le déclencheur de la poignée avec
la main pour faire basculer la section médiane en
arrière (illustration B).
1.6 Insérez la vis (J) au centre de la section
médiane et serrez.
1.7 Enroulez le cordon autour des attaches
inférieure et supérieure.
1.8 Faites passer le tuyau sur le support
d’accessoires supérieur et insérez-le dans l’attache
pour tuyau n°1 (1.7).
1.9 Continuez à enrouler le tuyau autour des
supports d’accessoires dans le sens des aiguilles
d’une montre, en appuyant dessus jusqu’à ce
qu’il s’enclenche dans l’encoche située en bas du
support d’accessoires inférieur.
1.10 Faites passer à nouveau le tuyau sur le
support d’accessoires supérieur et insérez-le dans
l’attache pour tuyau n°2 (1.7).
1.11 Verrouillez l’extrémité de fixation du tuyau
en appuyant dessus jusqu’à ce qu’il s’emboîte
solidement dans le support situé sur la droite du
support d’accessoires inférieur.
1.12 Faites glisser l’accessoire de nettoyage des
escaliers et des meubles dans l’encoche du milieu
du support d’accessoires inférieur.
1.5
A
1.6
B
1.7
Hose Clip 2
Hose Clip 1
Upper
Lower
Cord
Cord
Clip
Clip
1.8 1.9
1.10 1.11
1.12
J
6
Page 39

POUR FIXER LE RÉSERVOIR
CONTENANT LA SOLUTION
1.13 Placez le réservoir de solution dans l’appareil
et inclinez-le pour l’enclencher.
2. UTILISATION
DESCRIPTION DE L’ASPIRATEUR
1. Manche Non-Slip Grip™
2. Loquet de réservoir de solution
propre
3. Poignée de transport
4. Réservoir de solution propre
5. Loquet de réservoir d’eau sale
6. Poignée de réservoir d’eau sale
7. Brosses
8. Réservoir d’eau sale
9. E du Port réservoir d’eau sale
10. Couvercle de réservoir d’eau sale
11. Cordon électrique
12. Pince de libération rapide
du cordon
13. Orifice d’alimentation d’eau pour
accessoires
14. Pédale de déblocage du manche
15. Commutateur d’alimentation
Marche/Arrêt (On/Off)
16. Vis de poignée supérieure
17. Attache supérieure du cordon
18. Gâchette de pulvérisation de solution nettoyante
19. Connecteur d’alimentation en eau
de base pour mobilier/escaliers
20. Adaptateur à gâchette pour
mobilier/ escaliers
21. Tuyau pour mobilier/escaliers
22. Adaptateur de tuyau pour
mobilier/ escaliers
23. Accessoire pour mobilier/escaliers
24. Attache du tube de solution
2.1
10
9
8
1.13
1
17
2
3
5
15
4
6
7
19
20
21
22
18
11
16
12
13
14
24
23
!
MISE EN GARDE
NE PAS UTILISER CET ASPIRATEUR
EXTRACTEUR SUR LES PLANCHERS À
SURFACE DURE. L’UTILISATION DE CET
APPAREIL SUR DES PLANCHERS À
SURFACE DURE PEUT ÉGRATIGNER OU
ENDOMMAGER LE PLANCHER.
!
7
Page 40

PRÉPARATION DE LA MOQUETTE
IMPORTANT
Ne pas utiliser la shampouineuse comme
aspirateur à sec.
1. Aspirer la moquette à fond. Pour obtenir de
meilleurs résultats, utiliser un aspirateur Dirt DevilMD
muni d’un.
2. Enlever le plus de meubles possible de la pièce.
Si cela n’est pas possible, mettre du plastique ou du
papier d’aluminium sous les pieds, et autour, jusqu’à
ce que la moquette soit complètement sèche.
Vérification de la solidité de la couleur
Avant de nettoyer la moquette, faire un essai de la
solidité de la couleur. Humecter un chiffon blanc de
solution. Faire un essai sur une petite surface dans
un placard. Frotter délicatement le tissu sur la
surface. Vérifier chaque couleur pour dégorgement.
Si le tissu reste propre, la moquette doit pouvoir se
nettoyer sans risques.
Conseils pratiques de nettoyage de
moquette
1. Ne pas sursaturer le tapis de solution nettoyante
pendant l’utilisation de la shampouineuse.
2. Pour les surfaces extrêmement sales, plusieurs
applications sont peut-être nécessaires.
3. Laisser suffisamment de temps pour que la
moquette soit bien sèche.
4. Essuyer la solution de nettoyage des boiseries et
du bois pour éviter de les endommager.
5. Si possible, ne pas marcher sur la moquette
avant que celle-ci ne soit complètement sèche.
6. Une fois la moquette bien sèche, l’aspirer avec
un rouleau-brosse pivotant.
7. Avant de nettoyer, décider de l’endroit où l’on
commence et où l’on finit, en veillant bien à ne pas
marcher sur les parties préalable ment nettoyées.
Après le nettoyage
• Laisser la moquette sécher complètement. Si
possible, ne pas marcher sur la moquette avant que
celle-ci ne soit complètement sèche.
• Si on a besoin de marcher sur la moquette,
placer des serviettes blanches sur les endroits sur
lesquels doit marcher.
• Silamoquetten’estpassèche,etquelemobilier
doit être remis en place, mettre du plastique ou du
papierd’aluminium sous les meubles pour éviter de
tacher la moquette.
• Bien nettoyer le réservoir d’eau sale avec de
l’eau chaude du robinet. Consulter la page 10.
!
AVERTISSEMENT
Ne pas ranger la shampouineuse dans un garage
ou à un endroit où l’appareil pourrait geler.
!
DÉPOSE ET REMISE EN PLACE
DU RÉSERVOIR DE SOLUTION
2.2
A
2.2 Appuyez sur le loquet du réservoir de solution
propre (illustration A). Écarter le réservoir de
solution de l’aspirateur en l’inclinant et le retirer
(illustration B).
2.3 Dévisser le capuchon doseur de l’arrière du
réservoir de solution.
2.4 Remplir le capuchon doseur de solution à 5
reprises (environ 4 oz).
2.5 Remplir le reste du réservoir de solution avec de
l’eau chaude du robinet. Remettre le capuchon
doseur en place.
2.6 Placer le bas du réservoir de solution dans
l’aspirateur et faire pivoter le dessus en place
jusqu’à ce que le levier s’enclenche.
B
2.3
2.4
2.5 2.6
IMPORTANT
Utiliser seulement un détergent de marque Dirt
MD
. Utiliser toute autre solution de
Devil
nettoyage risque de créer une mousse
excessive. Trop de mousse provoquerait la
coupure prématurée de l’aspirateur par le
flotteur. L’utilisation d’autres solutions
nettoyantes peut annuler la garantie.
8
Page 41

NETTOYAGE DE MOQUETTE
2.7 Brancher le cordon dans une prise électrique.
Appuyer sur la pédale de déblocage de manche
pour mettre l’appareil en position de nettoyage.
2.8 Mettre sous tension.
IMPORTANT
Ne jamais laisser l’unité sans surveillance
lorsque celle-ci est branchée. Couper l’aspirateur
pour vider et remplir le réservoir. NE PAS
saturer de trop la moquette.
2.9 Tirez sur la gâchette de pulvérisation de la
solution tout en poussant lentement l’appareil.
Relâchez la gâchette et tirez l’appareil vers l’arrière,
en suivant la même trajectoire, pour aspirer l’eau et
la solution sales de la moquette. (Pour les surfaces
extrêmement tachées, répéter si nécessaire).
2.7
2.9
2.8
Commutateur
d’alimentation
Marche/Arrêt
(On/Off)
IMPORTANT
Si le son du moteur passe à une tonalité aiguë
ou si le flotteur bleu est arrivé en haut du
réservoir d’eau sale.
NETTOYAGE AU-DESSUS DES
PLANCHERS/ACCESSOIRES
2.10 Mettre l’aspirateur en position verticale.
Connecter l’accessoire pour mobilier capitonné à
l’adaptateur à gâchette.
2.11 Enlevez la porte du réservoir d’eau sale.
2.12 Insérer l’adaptateur de tuyau dans le réservoir
d’eau sale.
2.13 Connecter le connecteur d’alimentation d’eau
de bas (dans le raccord sur le côté inférieur gauche
du manche en faisant face à l’aspirateur (4a).
Utilisation des Accessoires
2.14 Mettre l’appareil sous tension. Tout en tirant
sur la gâchette de pulvérisation de la solution,
poussez doucement l’accessoire vers l’avant.
Relâchez la gâchette et tirez l’accessoire vers
l’arrière en suivant la même trajectoire, afin d’aspirer
l’eau sale et la solution de la moquette. (Pour les
endroits extrêmement sales, répéter si nécessaire.)
IMPORTANT : Pour de meilleurs résultats, passez
l’appareil d’avant en arrière sans vous arrêter. allez
deux fois plus lentement que pour aspirer des
détritus secs. au besoin, répétez l’opération dans
les endroits très sales.
2.10
2.12 2.13
IMPORTANT
NE PAS saturer de trop le mobilier capitonné.
POUR OBTENIR DE MEILLEURS RÉSULTATS, SE DEPLACER EN
MOUVEMENTS RÉGULIERS D’UN PAS MODÉRÉ D’AVANT EN
ARRIÈRE. Veiller à ce que le mobilier capitonné soit bien sec avant toute
utilisation.
Si le volet d’accessoires de tuyau n’est pas remis en place, il n’y aura pas
d’aspiration par le suceur et l’appareil ne fonctionnera pas correctement.
9
2.11
A
2.14
Page 42

ENTRREPOSAGE
DES OUTILS
Placez le tuyau et
l’accessoire de nettoyage des meubles
dans leurs encoches
de stockage. Rangez
jusqu’à la prochaine
utilisation.
2.15
Upholstery/
Stair Hose
Upholstery/
Stair
Attachment
TRANSPORTER
2.16
PAR LE MANCHE
Saisissez la poignée de
transport située à
l’avant de l’appareil
pour transporter ce
dernier d’une pièce à
l’autre.
IMPORTANT
Ne pas transporter la shampouineuse si le
réservoir contenant la solution ou le réservoir
d’eau sale est plein.
POUR VIDER ET NETTOYER LE
RÉSERVOIR D’EAU SALE
Le réservoir d’eau sale de la shampouineuse est doté
d’une valve d’arrêt. Lorsque le réservoir d’eau sale est
plein, le flotteur vert (sur le dessus du réservoir) s’élève
pour bloquer l’écoulement d’air dans la buse.
REMARQUE : Le disque flottant de la shampouineuse,
situé dans le couvercle du réservoir d’eau sale,
interrompra la succion lorsque le réservoir d’eau sale
sera plein. Pour de meilleurs résultats, procéder d’un
mouvement uniforme et régulier en conservant le
suceur bien à plat contre la moquette. Le fait d’incliner
l’aspirateur et de désamorcer le suceur de la moquette
fera relever le flotteur et coupera l’aspiration. Une fois
le flotteur activé, vider le réservoir d’eau sale. Si le
réservoir d’eau sale ne semble pas plein, couper
l’alimentation et attendre que le flotteur se stabilise et
se remette dans sa position originale. Si le flotteur
coupe l’aspiration à plusieurs reprises, vider le réservoir
d’eau sale. Pour des résultats optimaux, n’utiliser que
le détergent de marque Dirt Devil
de nettoyage risque de créer une mousse excessive
qui fera relever le flotteur prématurément et coupera
l’aspiration. Employer cinq bouchons (4 onces ou 118
ml) de détergent de marque Dirt Devil
d’eau propre. Une concentration plus forte de
shampooing risque de provoquer une mousse
excessive.
Comment le nettoyer
2.17 Saisir le haut de la poignée du réservoir d’eau
sale et appuyer sur le loquet pour débloquer.
2.18 Saisir la poignée et retirer le réservoir de la base.
2.19 Retirer le couvercle de réservoir d’eau sale.
2.20 Pour vider le réservoir d’eau sale, saisir la
poignée d’une main et le suceur de l’autre et vider dans
l’évier.
2.21 Remettre le couvercle du réservoir d’eau sale et
le volet d’acessoires de tuyau en place.
MD
. D’autres solutions
MD
par réservoir
IMPORTANT
On entendra un changement considérable dans
le son de l’aspirateur. Ceci signifie qu’il faut vider
le réservoir d’eau sale.
!
AVERTISSEMENT
Pour réduire les risques de blessures causées
par des pièces en mouvement, débrancher
l’appareil avant d’en effectuer l’entretien.
2.17
2.19 2.20
2.18
2.21
!
Ne pas utiliser de produits chimiques pour le nettoyage.
IMPORTANT
10
Page 43

Remise en place du réservoir d’eau sale dans la base de l’aspirateur
2.22 Soulever la base
avant de l’aspirateur de la
moquette d’une seule
main.
2.23 Saisir la poignée et
accrocher le devant du
réservoir d’eau sale dans
la base de l’aspirateur, en
veillant à ce que le devant
du réservoir d’eau sale
repose sur la base
(illustration 2). Réservoir d’eau sale. Le réservoir d’eau sale est muni de trois (3)
pattes sur le dessous qui DOIVENT se verrouiller dans le dessous de la base de
l’aspirateur. Il est très important de soulever la base de l’aspirateur de la moquette
et d’accrocher le suceur à la base de façon à ce que le suceur se trouve à fleur
de la base de l’aspirateur (illustration 2a). Une mauvaise installation du réservoir
d’eau sale entraînerait une récupération inadéquate de l’eau sale (illustration 2b).
Le réservoir d’eau sale doit être vidé une ou deux fois fois par remplissage du
réservoir d’eau propre.
2.24 Tout en veillant à ce que le devant du réservoir d’eau sale repose sur la base,
placer l’arrière du réservoir dans la base de l’aspirateur. Appuyer sur la poignée
jusqu’à enclenchement.
2.22
2.23
A
2.24
B
C
Ne pas ranger l’aspirateur avec de la solution dans le réservoir ou de l’eau
IMPORTANT
sale dans le réservoir d’eau sale. Il se peut que des dépôts de minéraux et
de la moisissure se forment et nuisent au rendement de la shampouineuse.
3. ENTRETIEN
Il est recommandé de vous familiariser avec les tâches d’entretien; l’utilisation et l’entretien appropriés de
l’appareil assureront son bon fonctionnement.
Toute autre tâche d’entretien doit être confiée à un représentant de service autorisé.
! !
L’aspirateur est doté d’un protecteur thermique interne pour le protéger contre la surchauffe. Lorsque le
protecteur thermique est activé, l’aspirateur s’arrête.
Si cela se produit, procéder comme suit :
1. Éteindre l’aspirateur et le débrancher.
2. Vider le videpoussière.
3. Inspecter le conduit à poussière et éliminer tout blocage qui peut s’y trouver. Cette obstruction
peut survenir aux points suivants : l’entrée de la buse, le connecteur à l’extrémité du tuyau, le
tuyau, l’entrée du videpoussière, le filtre cyclonique, le filtre lavable et le filtre HEPA.
4. Lorsque l’aspirateur est débranché et que le moteur a refroidi pendant 30 minutes, le protecteur
thermique est automatiquement réinitialisé, et l’aspirateur peut de nouveau être utilisé.
Si le protecteur thermique est encore activé après avoir suivi les étapes ci-dessus, il se peut que
l’aspirateur ait besoin d’entretien.
AVIS
11
Page 44

COURROIE OU ROULEAU BROSSE : Comment le retrait et remplacement
!
MISE EN GARDE
Pour réduire les risques de blessures causées
par des pièces en mouvement, débrancher
l’appareil avant d’en effectuer l’entretien.
!
Courroie : Quoi acheter
Pour remplacer la courroie modèle 7, veuillez
appeler le 1-800-321-1134 ou visiter notre site
à www.DirtDevil.com pour connaître le revendeur le plus proche.
Comment le retrait
3.1 Retourner l’aspirateur de manière à exposer le
dessous du suceur.
3.2 Pour retirer le couvercle de la courroie, enlevez
les deux (2) vis à l’aide un tournevis cruciforme. Les
flèches indiquent l’emplacement des vis.
3.3 Saisir le couvercle de courroie près du rouleau
brosse et le sortir en le soulevant.
3.4 Saisir le rouleau brosse d’une main et se servir
de l’autre main pour maintenir la tension de la courroie lors de son retrait. Soulever pour enlever.
Comment le remplacement
3.5 Retirer la courroie. Jeter la courroie usagée.
3.6 Placer la courroie sur l’arbre moteur, puis enfiler
le rouleau-brosse dans la courroie. Placer la
courroie autour de la partie du rouleau-brosse sans
poils.
3.7 Une fois la courroie en place, tirer et faire glisser
dans le suceur (Schéma 3.7) en veillant bien à ce
que les embouts du rouleau-brosse soient orientés
correctement (Schéma 3.7a).
3.8 Remettre le couvercle de la courroie en place
en commençant par insérer l’extrémité qui est la
plus éloignée du rouleau-brosse. Mettre ensuite
l’avant du couvercle de courroie en place. Fixez à
en remettant les deux (2) vis.
3.1
3.3
3.5
3.7
3.2
3.4
3.6
A
3.8
IMPORTANT
Faire pivoter le rouleau-brosse à la main en
veillant bien à ne pas tordre ni pincer la
courroie.
12
Page 45

4. DÉPANNAGE
2. Un fusible est grillé ou le
Si un problème mineur survient, il est habituellement possible de le résoudre facilement si la cause est
déterminée à l’aide de la liste ci dessous.
Toute autre tâche d’entretien doit être confiée à un représentant de service autorisé.
!
Pour réduire les risques de blessures causées par des pièces en mouvement, débrancher l’appareil avant
d’en effectuer l’entretien.
AVERTISSEMENT
!
PROBLÈME CAUSE POSSIBLE SOLUTION POSSIBLE
La shampouineuse ne fonctionne
pas.
La shampouin-
euse n’aspire pas,
ou la puissance
de succion est
faible.
De l’eau
s’échappe de la
shampouineuse.
La shampouineuse ne distribue
pas de solution
nettoyante.
Les accessoires
de l’aspirateur ne
ramassent pas
Les accessoires
de l’aspirateur ne
vaporisent
Le son du moteur
devient très aigu
1. La fiche du cordon
d’alimentation n’est pas bien
insérée dans la prise de
courant.
disjoncteurest déclenché.
3. L’appareil doit être entretenu. 3. Rappor t ez l’appareil a u centre de r é p a r ation.
1. Le volet du réservoir d’eau
sale n’est pas bien installé.
2. Le réservoir d’eau sale n’est
pas bien installé.
3. Le réservoir d’eau sale est
plein.
4. Passage d’eau sale colmaté. 4. Nettoyer le réservoir d’eau sale - Page 10.
5. Le filtre mousse est sale. 5. Nettoyer le filtre. Consultez la section Vider et
1. Le réservoir d’eau sale est
plein.
2. Le réservoir d’eau sale n’est
pas bien installé.
3. Le réservoir d’eau sale n’est
pas intallé correctement.
1. Le réservoir d’eau sale n’est
pas installé correctement.
2. A besoi n d’en t r et ien. 2. Rappo rtez l’appa r e i l au centre d e réparati o n .
1. Le tuyau est bouc hé. 1. Enlever le tuyau et les outils; enlever
2. L’admission du tuyau est
bouchée.
3. Le réservoir d’eau sale est
plein.
1. Le tuyau d’alimentation
en eau n’est pas branché
correctement.
1. Le flotteur du r é s e rvoir d’eau
sale a été ac tivé.
1. Branchez fermement le cordon d’alimentation.
2. Vérifiez le fusible ou le disjoncteur.
Remplacez le fusible ou réenclenchez le
disjoncteur.
Pour trouve r l’ad r esse du ce n t r e l e p l u s p roche,
visitez n o t r e s i t e Web, www.DirtDevil.com ou
appele z l e 1-800-321-1134.
1. Insérer le volet du réservoir d’eau sale -Page 9.
2. Relisez la section Installation du réservoir
d’eau sale dans le socle de l’appareil - Page 11.
3. Vider le réservoir d’eau sale - Page 10.
nettoyer le réservoir d’eau sale - Pg. 10.
1. Videz le réservoir d’eau sale - Page 10.
2. Relisez la section Installation du réservoir
d’eau sale dan s l e socle d e l’appareil - Pag e 11.
3. Consul t ez l a s ectio n r el a t ive à insta l l ation du
réservoir d’eau propre - Pg. 8.
1. Consultez la se ction re l a t i ve à i n stallat ion du
réservoir d’eau propre - Pg. 8.
Pour trouve r l’ad r esse du ce n t r e l e p l u s p roche,
visitez n o t r e s i t e Web, www.DirtDevil.com ou
appele z l e 1-800-321-1134.
l’obstruction - Page 9.
2. Enlever le tuyau et nettoyer l’admission Page 9.
3. Vider le réservoir d’eau sale - Page 10.
1. Brancher le connecteur d’alimentation d’eau à
gâchette et le connecteur d’alimentation en eau
de base - Page 10.
1. Consultez la se ction V i d e r e t n ettoyer le ré servoir d ’eau s a le - Pg. 10.
13
Page 46

5. SERVICE
Pour obtenir du service autorisé Dirt DevilMD et des pièces Dirt DevilMD d’origine, trouver l’atelier de service
garanti autorisé (dépôt) le plus près de chez vous. Pour ce faire :
• ConsulterlesPagesjaunesàlarubrique«Aspirateursdomestiques».OU
• VisiternotresiteWebwww.DirtDevil.com(auxÉtats-Unis)ouwww.DirtDevil.ca(auCanada).Cliquer
surlelien«Serviceàlaclientèle»pourconnaîtrel’adresseduCentredeserviceleplusprèsdechezvous.
• Composer le 1-800-321-1134 pour écouter un message indiquant les adresses des Centres de
service autorisés. Prière de ne pas envoyer votre aspirateur à Dirt DevilMD, Inc. à Glenwillow, en Ohio,
pour qu’il soit réparé. Cela n’entraînera que des délais supplémentaires.
Si vous avez besoin d’autres renseignements :
Pour parler avec un représentant du service à la clientèle, composer le 1-800-321-1134 du lun. au ven. de
8 h à 17 h (HNE). Toujours identifier l’aspirateur par le numéro du modèle et le code de fabrication lorsque
vous demandez des informations ou que vous commandez des pièces de rechange. (Le numéro de modèle
figure au bas de l’appareil.)
VEUILLEZ NE PAS RETOURNER CE PRODUIT AU MAGASIN.
14
Page 47

6. PRODUITS NETTOYANTS
AVERTISSEMENT: Pour réduire les risques de choc électrique causés
par des composants internes endommagés, n’utiliser que les produits
nettoyants Dirt Devil
pour cet appareil, tel qu’il est indiqué cidessous.
MD
et les accessoires pour les surfaces dures conçus
Guide de produits nettoyants Dirt Devil
Nom du produit
HooverAspirateur
Quick & Light
de Hoover
MC
MD
MD
Nettoyage en
profondeur
avancé
64 oz.
Nettoyage en
profondeur pour
taches et odeurs
d’animaux
64 oz.
15
Page 48

7. GARANTIE
GARANTIE LIMITÉE DE UN AN
(Usage domestique)
ÉLÉMENTS COUVERTS PAR LA PRÉSENTE
GARANTIE
Votre produit Dirt DevilMD est garanti pour des
conditions normales d’utilisation et d’entretien
domestiques, tel qu’il est stipulé dans le Guide de
l’utilisateur, contre les défauts de matériaux et de
fabrication. Pendant la Période de garantie et tel
qu’il est décrit dans la présente garantie, nous
fournirons les pièces et la main-d’œuvre nécessaires à la remise en bon état de fonctionnement
de tout produit acheté aux États-Unis, au Canada
ou par l’intermédiaire du Programme d’échanges
militaires américain.
COMMENT PRÉSENTER UNE DEMANDE DE
RÉPARATION SOUS GARANTIE
Si ce produit ne fonctionne pas comme annoncé,
l’apporter ou le poster à un atelier de service
garanti Dirt DevilMD autorisé, accompagné de la
preuve d’achat. Pour accéder à un service d’aide
automatique donnant la liste des centres de service autorisés aux États-Unis, téléphoner au
1 800 944-9200 OU visiter Dirt DevilMD sur
Internet à www.dirtdevil.com. Pour obtenir de plus
amples renseignements ou pour toute question
sur la présente garantie ou sur l’emplacement
des différents centres de service garanti, communiquer avec le Centre de service à la clientèle
de Dirt DevilMD en composant le 1 800 3211134, du lun. au ven. de 8 h à 19 h (HNE).
ÉLÉMENTS NON COUVERTS PAR LA
PRÉSENTE GARANTIE
La présente garantie ne couvre pas : toute utilisation commerciale du produit (ex. : dans le cadre
de services ménagers, de conciergerie ou de
location de matériel); le rouleau-brosse, la courroie, les sacs, les filtres; l’entretien inadéquat du
produit; les dommages liés à une utilisation inadéquate, à des cas fortuits ou catastrophes
naturelles, au vandalisme, à tout autre acte hors
du contrôle de Royal Appliance Mfg. (aussi
appelée«Royal»et«nous),ouàtoutacteou
négligence de la part du propriétaire de l’appareil;
toute utilisation dans un pays autre que celui où
le produit a été acheté initialement, et tout produit
revendu par son propriétaire original. La présente
garantie ne couvre pas le ramassage, la livraison,
le transport ou la réparation à domicile du produit.
La présente garantie ne s’applique pas aux
produits achetés hors des États-Unis (ce qui
comprend ses territoires et possessions), hors du
Programme d’échanges militaires américain, ou
hors du Canada. La présente garantie ne couvre
pas les produits achetés chez un tiers autre qu’un
détaillant, marchand ou distributeur autorisé de
produits Royal.
AUTRES MODALITÉS IMPORTANTES
La présente garantie n’est pas transférable et ne
peut pas être cédée. La présente garantie sera
régie et interprétée selon les lois de l’État de
l’Ohio. La Période de garantie ne peut pas être
prolongée par quelque réparation ou remplacement que ce soit exécuté en vertu de la présente
garantie.
CETTE GARANTIE EST L’UNIQUE GARANTIE
ET RECOURS OFFERTS PAR ROYAL.
L’ENTREPRISE DÉCLINE TOUTE
RESPONSABILITÉ QUANT À TOUTES LES
AUTRES GARANTIES EXPRESSES OU
TACITES, Y COMPRIS LES GARANTIES LIÉES
À LA QUALITÉ MARCHANDE OU À LA
COMPATIBILITÉ DU PRODUIT POUR UN
USAGE PARTICULIER. ROYAL NE POURRA
EN AUCUN CAS ÊTRE TENUE RESPONSABLE
DE TOUS DOMMAGES-INTÉRÊTS SPÉCIAUX
OU DOMMAGES INDIRECTS, ACCESSOIRES
OU CONSÉCUTIFS DE QUELQUE NATURE
QUE CE SOIT, SUBIS PAR LE PROPRIÉTAIRE
DU PRODUIT OU PAR TOUTE PARTIE
RÉCLAMANT PAR L’INTERMÉDIAIRE DU
PROPRIÉTAIRE, QU’ILS RELÈVENT DU DROIT
DES CONTRATS, DE LA NÉGLIGENCE, DE LA
RESPONSABILITÉ CIVILE DÉLICTUELLE OU
DE LA RESPONSABILITÉ STRICTE DU FAIT
DES PRODUITS, OU QU’ILS DÉCOULENT DE
QUELQUE CAUSE QUE CE SOIT. Certains
États ne permettent pas l’exclusion des dommages consécutifs. Par conséquent, l’exclusion
précédente pourrait ne pas être applicable dans
votre cas. La présente garantie vous donne des
droits spécifiques. Vous pouvez également avoir
d’autres droits, lesquels varient d’un État à l’autre.
16
 Loading...