

Page 1
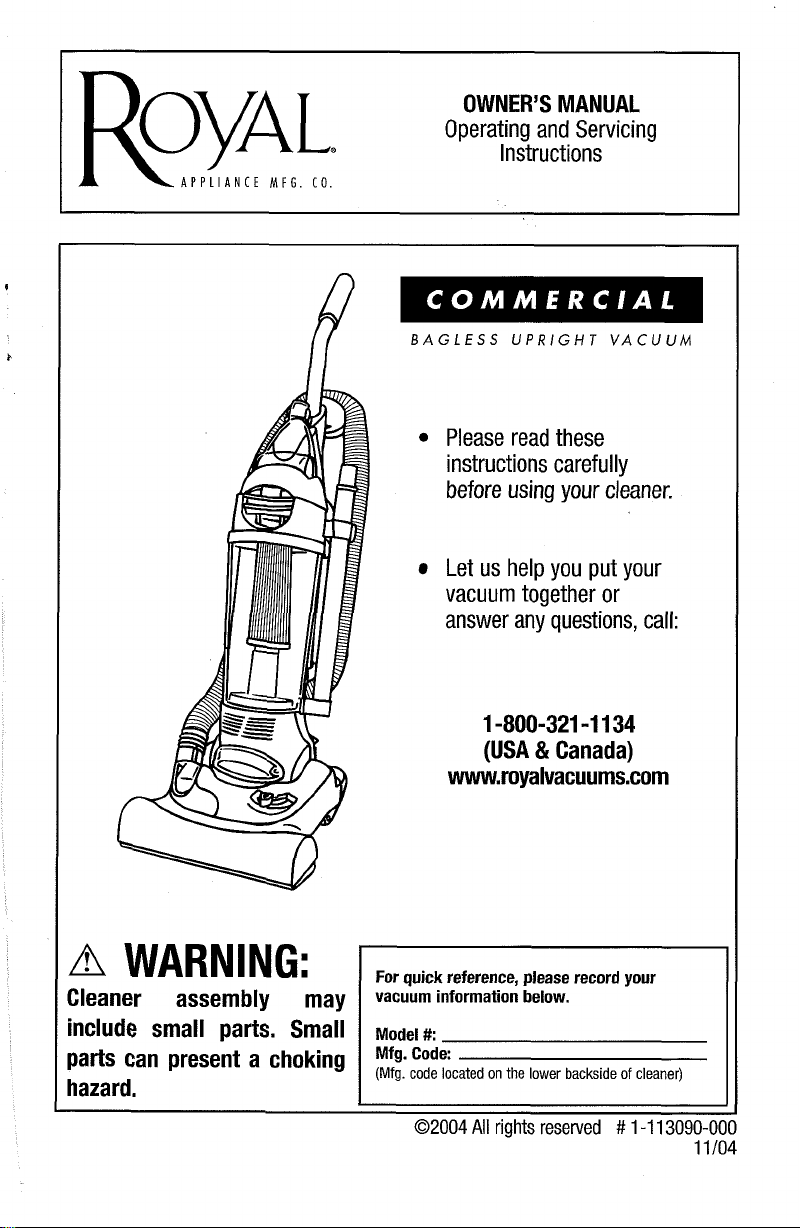
OWNER'S MANUAL
ROYAL@
APPLIANCE
MFG.
CO.
Operating and Servicing
Instructions
BAGLESS UPRIGHT VACUUM
Please read these
instructions carefully
before using your cleaner.
Let us help you put your
vacuum together or
answer any questions, call:
A
WARNING:
Cleaner assembly may
include small parts. Small
parts can present a choking
hazard.
1-800-321
(USA
www.royalvacuums.com
For quick reference, please record your
vacuum information below.
Model
#:
Mfg. Code:
(Mfg.
code located on the lower backside of cleaner)
I
02004
All
rights reserved # 1-1 130904
-1
&
Canada)
134
Page 2

THlS VACUUM CLEANER IS INTENDED FOR COMMERCIAL USE ONLY.
IMPORTANT SAFETY INSTRUCTIONS
When vou use an amliance, basic
including
READ ALL INSTRUCTIONS BEFORE USING THlS APPLIANCE.
ALWAYS FOLLOW THESE SAFETY INSTRUCTIONS.
DO NOT LEAVE CLEANER UNATTENDED WHEN PLUGGED IN.
REGULARLY CHECK THE FILTERS TO CLEAN OR REPLACE.
WARNING: DO NOT USE ANY SHARP OBJECTS TO CLEAN OUT HOSE
SINCE THEY COULD CAUSE DAMAGE TO THE HOSE.
WARNING: FULLY ASSEMBLE CLEANER BEFORE OPERATING
OCCASIONALLY REMOVE BRUSHROLL AND CLEAN DEBRIS FROM END
CAPS TO KEEP BRUSH ROTATING SMOOTHLY.
WARNING: THE CORDS, WIRES AND/OR CABLES SUPPLIED WITH THlS
PRODUCT CONTAINS CHEMICALS, INCLUDING LEAD OR LEAD COMPOUNDS,
KNOWN TO THE STATE OF CALIFORNIA TO CAUSE CANCER AND BIRTH
DEFECTS OR OTHER REPRODUCTIVE HARM. WASH HANDS AFTER USING.
the
follov\;ing:
rec cautions
should always
be
followed,
WARNING: TO REDUCE THE RISK
OF
FIRE,
ELECTRIC SHOCK OR INJURY:
Do not leave appliance when plugged in. Unplug from outlet when not in use
and before servicing.
Do not use outdoors or on wet surfaces.
Do not allow to be used as a toy. Close attention is necessary when used by or
near children.
Use only as described in this manual. Use only manufacturer's recommended
attachments.
Do not use with damaged cord or plug. If appliance is not working as
has been dropped, damaged, left outdoors, or dropped into water, return
service center for inspection. Call 1-800-321
Do not pull or carry by cord, use cord as a handle, close a door on cord, or pull
cord around sharp edges or corners. Do not run appliance over cord. Keep cord
away from heated surfaces.
Do not unplug by pulling on cord. To unplug, grasp the plug, not the cord.
Do not handle plug or appliance with wet hands.
Do not put any object into openings. Do not use with any opening blocked; keep
free of dust, lint, hair and anything that may reduce air flow.
Keep hair, loose clothing, fingers, and all parts of body away from openings and
moving parts.
Turn off all controls before unplugging.
Use extra care when cleaning on stairs.
Do not use to pick up flammable or combustible liquids, such as gasoline, or
use in areas where they may be present.
Look on your vacuum cleaner and follow all label and marking instructions.
Do not use an extension cord with this cleaner.
-1
134 for the nearest service center.
it
should,
it
to
-
a
Page 3
Keep end of hose, wands and other openings away from your face and body.
Keep your hands, feet, hair and clothing away from moving parts; especially the
revolving brush.
Do not use the vacuum cleaner without dust bag and/or filters in place.
Do not pick up anything that is burning or smoking, such as cigarettes, matches, or
hot ashes.
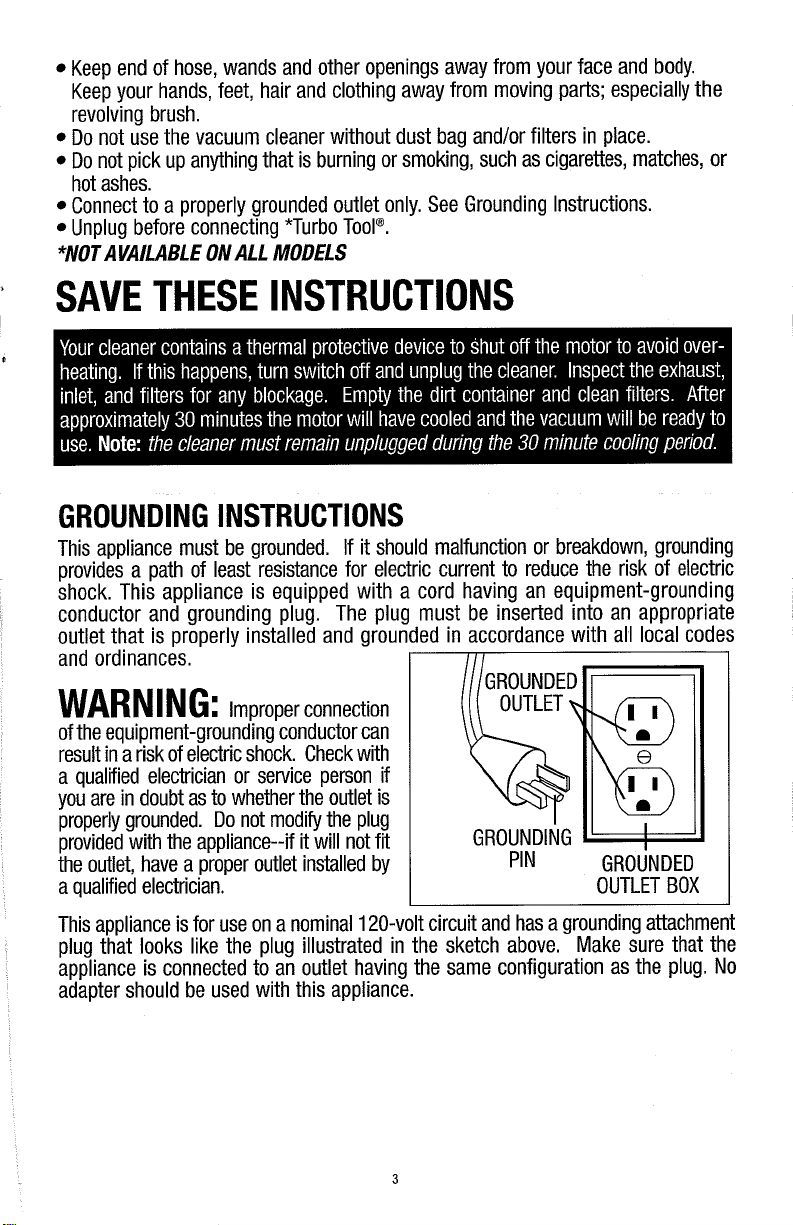
Connect to a properly grounded outlet only. See Grounding Instructions.
Unplug before connecting *Turbo ToolB.
*NOT AVAILABLE ON ALL MODELS
SAVE THESE INSTRUCTIONS
GROUNDING INSTRUCTIONS
This appliance must be grounded. If it should malfunction or breakdown, grounding
provides a path of least resistance for electric current to reduce the risk of electric
shock. This appliance is equipped with a cord having an equipment-grounding
conductor and grounding plug. The plug must be inserted into an appropriate
outlet that is properly installed and grounded in accordance with all local codes
and ordinances.
WARN
of the equipment-grounding conductor can
result in a risk of electric shock. Check with
a qualified electrician or service person if
you are in doubt as to whether the outlet is
properly grounded. Do not modify the plug
provided with the appliance--if
the outlet, have a proper outlet installed by
a qualified electrician.
..
IN
G
-
:
Improper connection
it
will not fit
GROUNDED
OUTLET
GROUNDING
p
PIN
GROUNDED
OUTLET BOX
This appliance is for use on a nominal 120-volt circuit and has a grounding attachment
plug that looks like the plug illustrated in the sketch above. Make sure that the
appliance is connected to an outlet having the same configuration as the plug. No
adapter should be used with this appliance.
Page 4
CONGRATULATIONS
You are now the proud owner of a Royal" Upright. We trust your new purchase
will bring you many years of satisfaction.
Our company designed and developed this product with you in mind.
We are very proud of our products and hope that you are equally satisfied
with their quality and performance.
Thank you for your support of Royal" products.
Visit our website at www.royalvacuums.com
TABLE OF CONTENTS
Safety Instructions. Page
Features. Page
........................................
How to Assemble. Page 6,7
Body to Nozzle Page
Tool Caddy Page 6
Handle to Body Page
How To Operate. Page
FloorlCarpet Cleaning Page
Above Floor Cleaning. Page
Dirt
Container & Filter: Removal & Replacement
Belt or Brush: Removal & Replacement
Lightbulb: Removal & Replacement
General Maintenance Page
Troubleshooting Guide Page
................................
.................................
................................
...................................
................................
..................................
...........................
...........................
..........
.................
....................
Page
Page
Page
...............................
..............................
2,3
5
6
6
7,8
8
8
9
10,ll
11
11
12
WARRANTY
To the consumer, Royal Appliance Mfg. Co, warrants this vacuum cleaner to be free of defects in material or
workmanship for 1 year from the date of the original purchase. Save your original sales receipt to validate
start of warranty period.
I
If the vacuum cleaner should become defect~ve within the warranty period, we will repair or replace any defective
parts free of charge. The complete machine must be delivered
Warranty Service Station. Please include complete description of the problem, day of purchase, copy of original
sales receipt and your name, address and telephone number. If you are not near a Warranty Station, call the
factory for assistance in the USA
The warranty does not include unusual wear, damage resulting from accident or unreasonable use of the vacuum
cleaner. This warranty does not cover brushes, bags, flat belts, filters, bulbs or fan damage. This warranty does
not cover unauthorized repairs. This warranty gives you specific legal rights and you may also have other rights.
(Other rights may vary from state to state in the USA).
Lll
IMPORTANT: USE ONLY GENUINE ROYAL" REPLACEMENT PARTS.
NOTE: RETURN WARRANTY CARD TO REGISTER YOUR CLEANER
&
CANADA: 1-800-321 -1 134. Use only genuine RoyaP replacement parts.
pcgakl
to any ROYALe Authorized Sales
&
Page 5
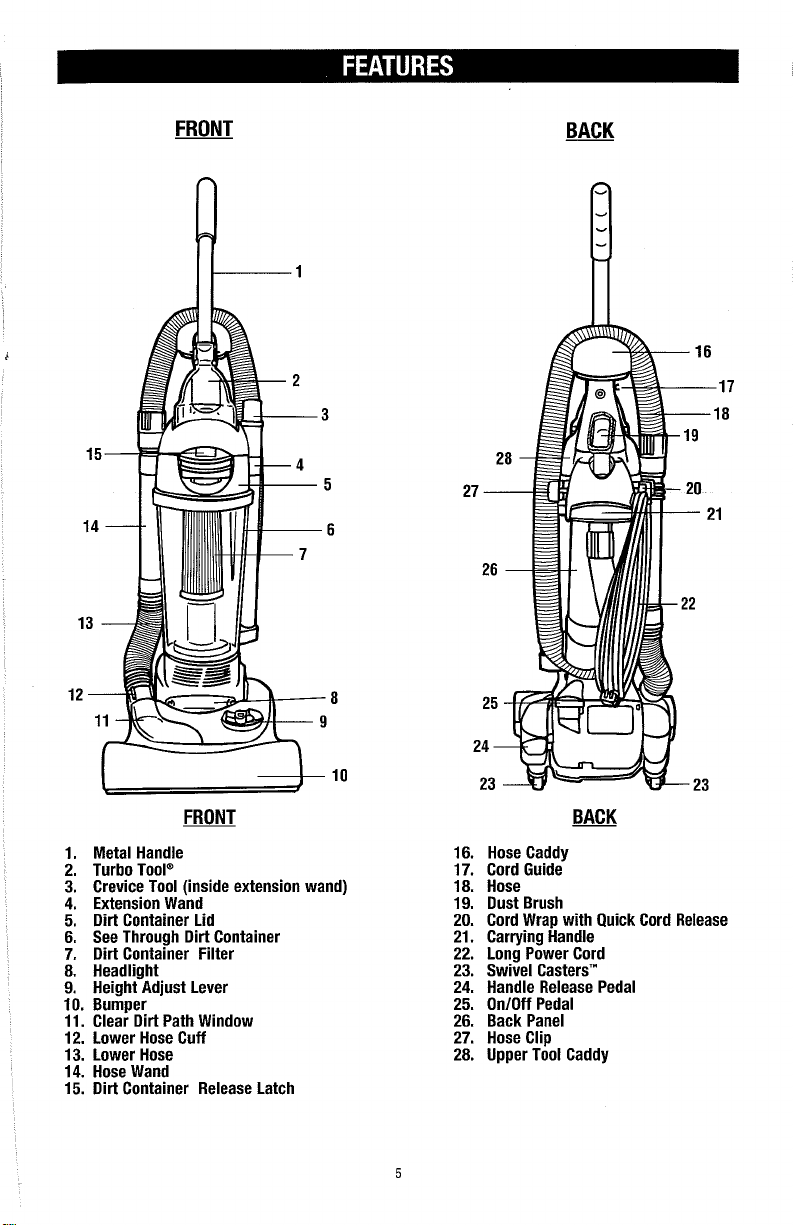
FRONT
BACK
A
I
FRONT
1.
Metal Handle
2.
Turbo Tool"
3.
Crevice Tool (inside extension wand)
4.
Extension Wand
5.
Dirt Container Lid
6.
See Through Dirt Container
7.
Dirt Container Filter
8.
Headlight
9.
Height Adjust Lever
10.
Bumper
11.
Clear Dirt Path Window
12.
Lower Hose Cuff
13.
Lower Hose
14.
Hose Wand
15.
Dirt Container Release Latch
lo
16.
Hose Caddy
17.
Cord Guide
18.
Hose
19.
Dust Brush
20.
Cord Wrap with Quick Cord Release
21.
Carrying Handle
22.
Long Power Cord
23.
Swivel Casters'"
24.
Handle Release Pedal
25.
OnIOff Pedal
26.
Back Panel
27.
Hose Clip
28.
Upper Tool Caddy
Page 6
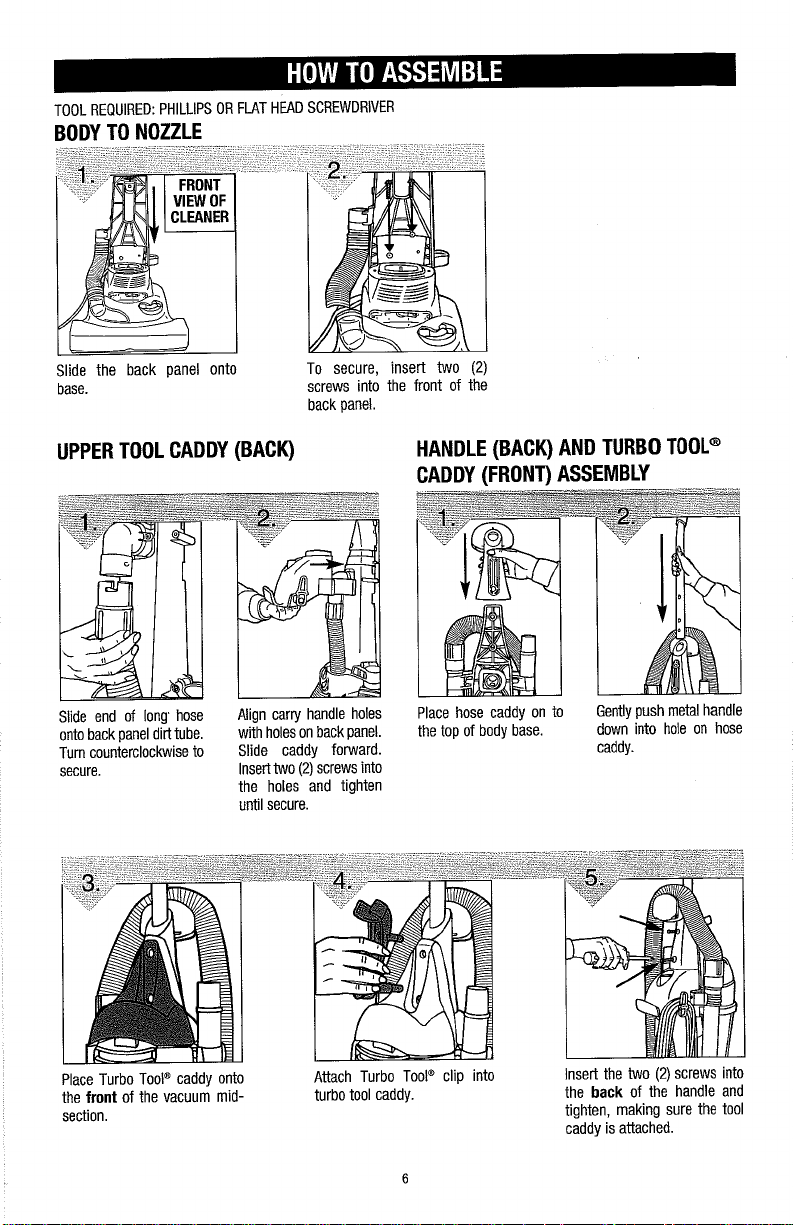
TOOL REQUIRED: PHILLIPS OR FLAT HEAD SCREWDRIVER
BODY TO NOZZLE
Slide the back panel onto To secure, insert two
base.
UPPER TOOL CADDY (BACK)
screws into the front of the
back panel.
HANDLE (BACK) AND TURBO TOOLB
CADDY (FRONT) ASSEMBLY
Slide end of long hose
onto back panel dirt tube.
Turn counterclockwise to Slide caddy forward.
secure. Insert two
Align carry handle holes
with holes on back panel.
(2)
the holes and tighten
until secure.
screws into
Place hose caddy on to
the top of body base.
(2)
Gently push metal handle
down into hole on hose
caddy.
Place Turbo TooP caddy onto
the
front
of the vacuum mid-
section.
Attach Turbo Too$ clip into
turbo tool caddy.
Insert the two
back
the
tighten, making sure the tool
caddy is attached.
(2)
screws into
of the handle and
Page 7

INSTALL TURBO TOOLB SECURE BACK HOSE SECURE SIDE HOSE
Clip Turbo Toolm onto the Wrap hose around back of Align tabs on clear dirt passage window
front of the turbo tool caddy. hose caddy (Diagram 1). Push
hose wand down into the right
side of cleaner (Diagram la).
with the slots on the lower hose cuff. Push
and turn hose clockwise until secure.
.
TOOL STORAGE INSTALL DIRT CONTAINER
Attach tools: (a) Slide the
dust brush onto post on the (Diagram
upper tool caddy with bristles
facing out. (b) Slide the
extension wandlcrevice tool
into round slot on the front
right side of tool caddy.
CORD RELEASE
Align slots on lid with tabs on container Set aligning tab on bottom of
4).
Push the lid down and dirt container into rectangular
NOTE:
twist clockwise.
guide arrow on back of lid. Align
arrow with right edge of dirt container
handle and turn clockwise until
secure (Diagram 4a).
There is a
slot on cleaner (Diagram 5),
and push to snap into place
(Diagram 5a).
HEIGHT ADJUST LEVER
Turn Quick Cord
Release for easy cord
removal. Store cord in
cord guide (see
Features
keep out of the way
while vacuuming.
-
pg. 5) to
lever to match the surface
being cleaned.
TANT:
ADJUSTMENT, PLACE
CLEANER IN FULL
UPRIGHT POSITION.
IMPOR-
FOR EASIEST
rn
Page 8
--
CAUTION:
is on. Keep hair, loose clothing, fingers, and all parts of body away from brush area while cleaner
Cleaner must be in the upright position to lift the rotation brush off the carpet when cleaning above
Brush agitator continues to rotate while hose is removed or in use and at all times while
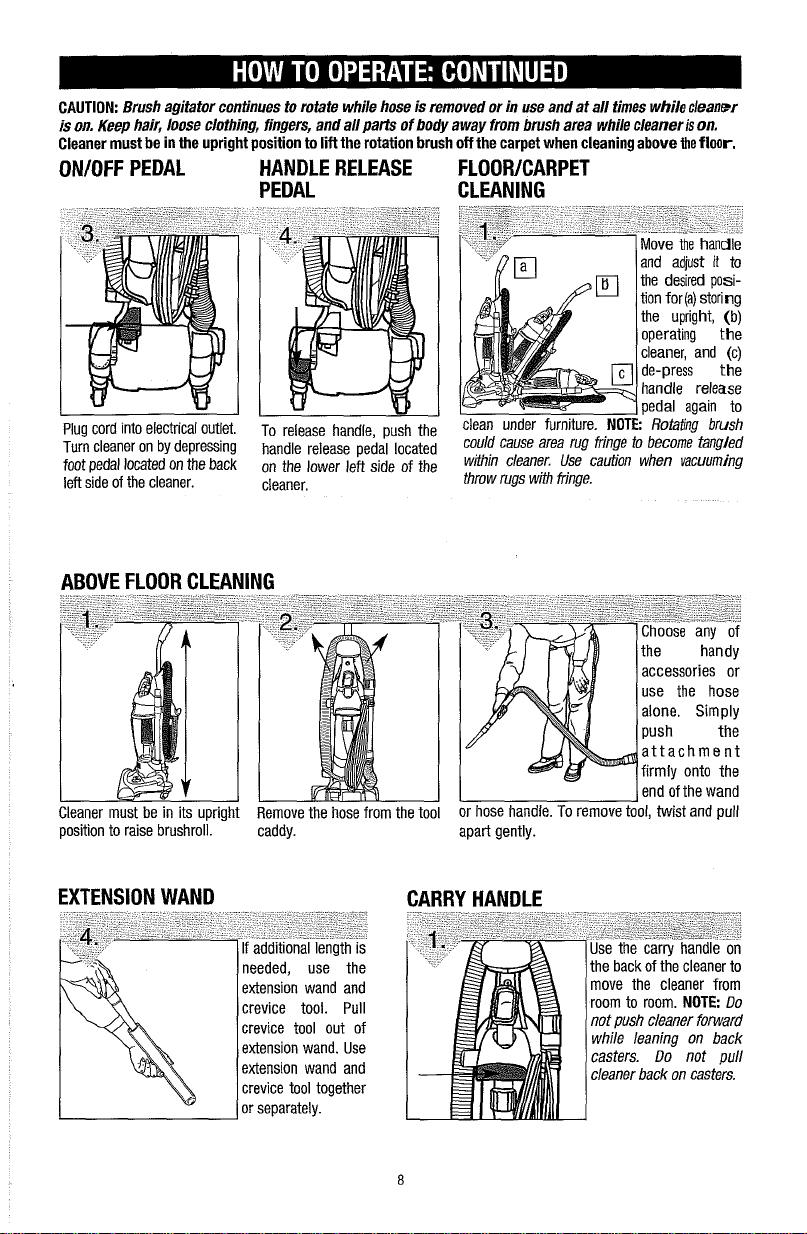
ONIOFF PEDAL HANDLE RELEASE FLOORICARPET
PEDAL CLEANING
handle release
cleaner
is
on.
the
floor.
Plug cord into fAectrica1 outlet.
Turn cleaner on by depressing
foot pedal located on the back
left side of the cleaner.
position to raise brushroll. caddy.
To release handle, push the
handle release pedal located
on the lower left side of the
cleaner.
.
-
EXTENSION WAND
needed, use the
extension wand and
crevice tool. Pull
crevice tool out of
extension wand. Use
extension wand and
crevice tool together
or separately.
clean under
could cause area rug frlnge to become tangled
w~thm cleaner Use caubon when vacuuming
throw rugs with fnnge
furnrture
NOTE:
-
apart gently.
CARRY HANDLE
the back of the cleaner to
move the cleaner from
room to room.
not push cleaner forward
while leaning on back
casters. Do not pull
cleaner back on casters.
Rotat~ng brush
use the hose
attachment
I
end of the wand
NOTE:
Do
Page 9
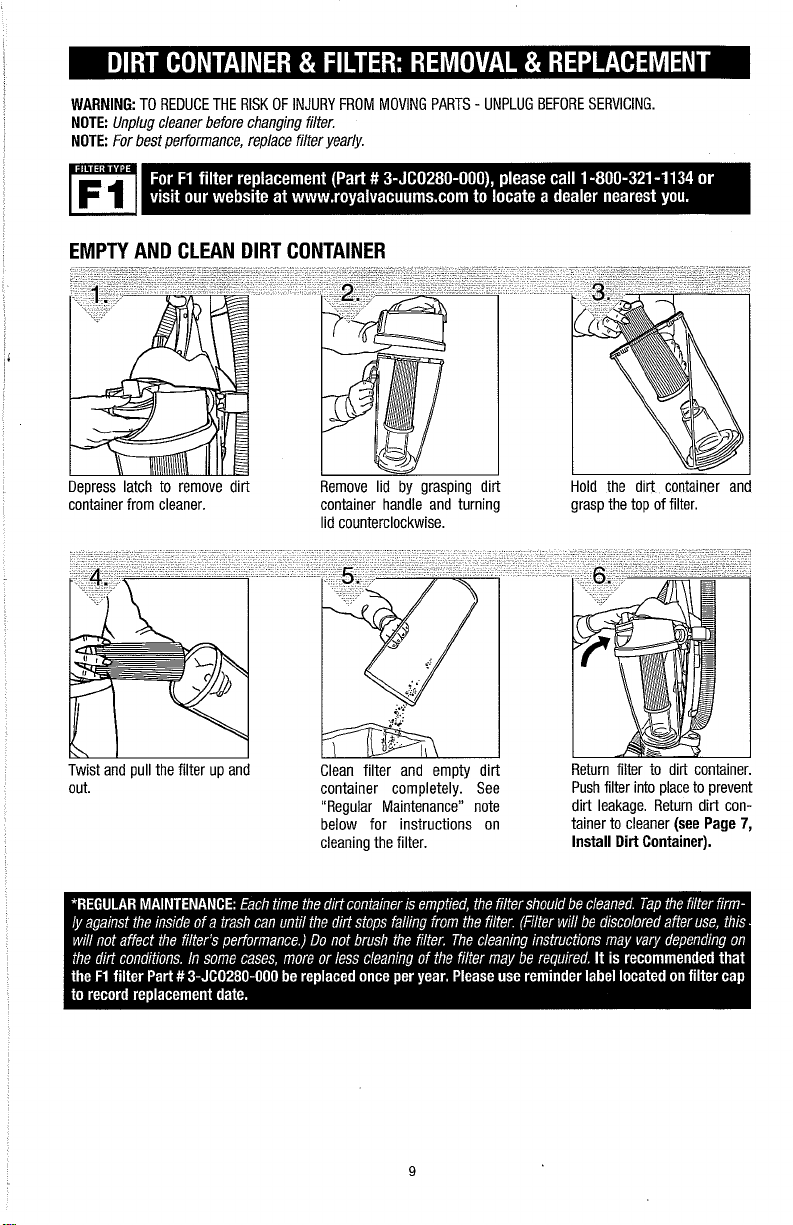
WARNING:
NOTE:
NOTE:
TO REDUCE THE RISK OF INJURY FROM MOVING PARTS - UNPLUG BEFORE SERVICING.
Unplug cleaner before changing filter.
For best performance, replace filter yearly.
EMPTY AND CLEAN DIRT CONTAINER
Depress latch to remove dirt Remove lid by grasping dirt
Hold the dirt container and
container from cleaner. container handle and turning grasp the top of filter
lid counterclockwise.
Twist and pull the filter up and
L
Clean filter and empty dirt
Return filter to dirt container.
out. container completely. See Push filter into place to prevent
"Regular Maintenance" note dirt leakage. Return dirt conbelow for instructions on tainer to cleaner
cleaning the filter.
Install
Dirt
Container).
(see Page
7,
Page 10
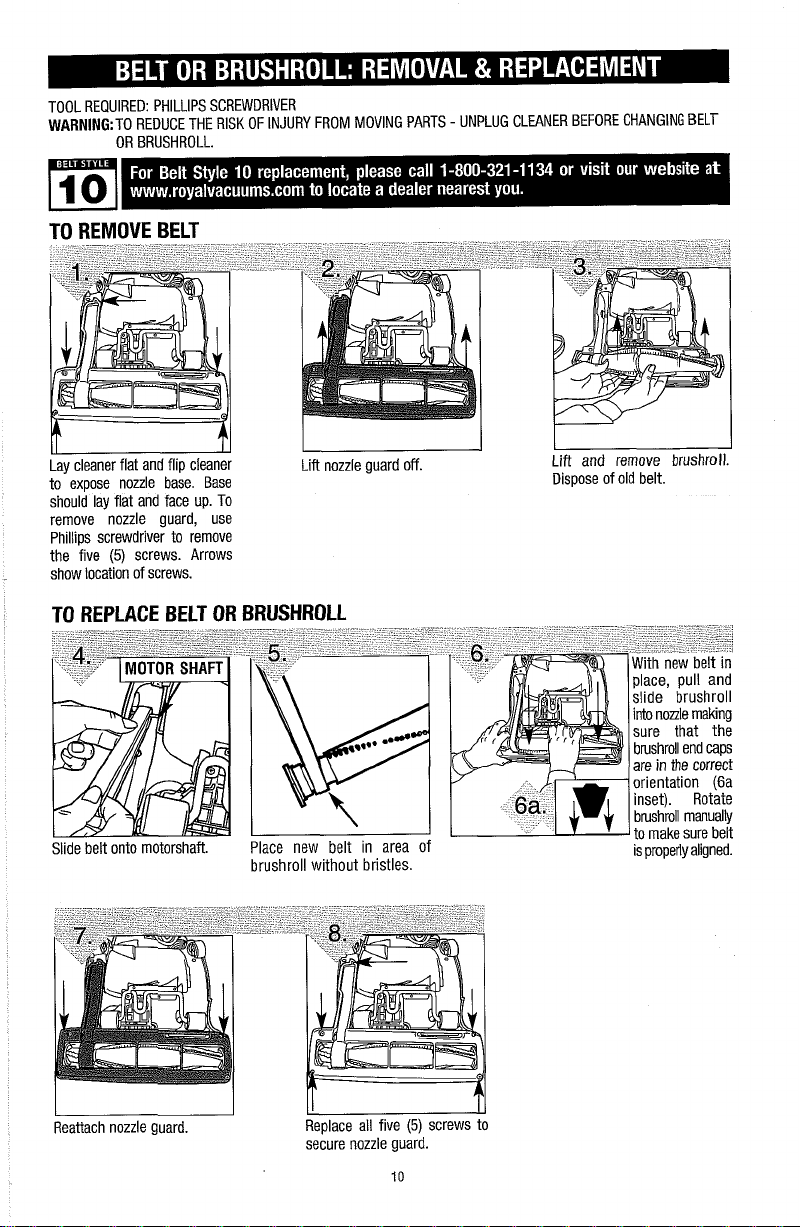
TOOL REQUIRED: PHILLIPS SCREWDRIVER
WARNING:TO REDUCE THE RISK OF INJURY FROM MOVING PARTS
OR BRUSHROLL.
-
UNPLUG CLEANER BEFORE CHANGING
BELT
Lay cleaner flat and flip cleaner
I
Lift nozzle guard off.
to expose nozzle base. Base
should lay flat and face up. To
remove nozzle guard, use
Phillips screwdriver to remove
the five
(5)
screws. Arrows
show location of screws.
TO REPLACE BELT OR BRUSHROLL
Slide belt onto motorshaft. Place new belt
brushroll without bristles.
in
area of
1
I
Lift and remove brushroll.
I
Dispose of old belt.
place, pull and
slide brushroll
into node making
sure that the
brushroll end caps
are in the correct
orientation (6a
inset). Rotate
brushroll manually
to make sure belt
is properly aligned.
Reattach nozzle guard.
Replace all five
(5)
secure nozzle guard.
I
screws to
I
Page 11

TOOL REQUIRED: FLATHEAD SCREWDRIVER
WARNING:TO REDUCE THE RISK OF ELECTRIC SHOCK
REPLACING LIGHTBULB.
This cleaner uses a common automotive lamp
#906,13.0
or your local auto parts store.
-
UNPLUG CLEANER BEFORE REMOVING OR
volts. For bulb replacement call
1-800-321-1134
Lean cleaner handle back.
Remove the two (2) screws
Pull bulb out of socket to
remove. Do NOT twist. Gently
located on either side of the push bulb into socket to
headlight lens. replace.
WARNING: TO REDUCE THE
RISK OF INJURY FROM MOVING PARTS
-
UNPLUG BEFORE SERVICING.
DEBRIS REMOVAUHOSE
1. Check to see if dirt cup is full; empty if needed.
2. Plug cleaner in and check to see if there is any suction
at end of hose (Diagram 1). If there is
hose, move on to Diagram 4. If there is
the end of hose, clear dirt path window and lower
hose. Follow these steps: 1. Remove hose from upper
hose inlet (Diagram 2) by twisting clockwise. 2. Unwrap
hose from caddy. Remove obstruction.
hose from clear dirt path window (Diagram
reversing Step 2, Page
Hose". Remove obstruction.
DEBRIS REMOVAU DEBRIS REMOVAUTURBO TOOLm
NOZZLE GUARD
Secure the headlight lens by
replacing the two (2) screws.
suction
at end of
no suction
3.
Remove
7,
under heading "Secure Side
3)
at
by
Remove nozzle auard (see Rotate lockina rina 180"
'ivot lower housina and To reassemble, be sure
Diagram 4) by-removing and turn ~urbo -~ool@ remove clog.
the five
(5)
screws. Look
over.
for any obstructions and
remove.
I
I
tabs are engaged and
pivot the lower housing
closed.
I
Page 12

WARNING:
Cleaner won't
pick-up or low
suction
TO REDUCE RISK OF PERSONAL INJURY - UNPLUG CLEANER BEFORE SERVICING
3.
Needs service.
f&
.
~ozr[eldirf pa~%geh*$bggecJ.
7.
Carpet he~ght settmg
I
I
IS
incorrect
3.
Take to service center or call
^^
@~pi^m'ove~ower
I
7.
Set carpet he~ght adjust lever to appropr~ate
1
setting for carpet being cleaned - Pg.
h@j~miv$-&hi":<~~:7~!1~?
1-800-321 -1 134.
7.
I
1
-
3.
Review hose insta!lat~on
4
Rev~ew f~lter removal & replacement
I
1.
Remove hose and- tools; remove obstruction
Pg.7,11.__
2
Em~tv
dirt
3.
Clean filter - Pg.
I
1.
Replace bulb
2..
Call
RoyalD Dealer.
1. Set carpet height adjust lever to appropriate
setting for carpet being cleaned
contamer - Pa
-
1-800-321-i134
-
Pg.
7.
-
9.
9.
PQ.
1
1.
for nearest authorized
-
..
Pg.
-
Pg.
-
7.
9.
;
I
Cleaner tools won't
pick-up
1
Headlight not
working
Cleaner is difficult
to push
3.
Hose not connected correctly.
4
F~lter not ~nstalled completely
1.
Hose clogged.
2
D~rt contamer ?ull.
3.
Filter clogged.
I
1.
~ulb burnt out.
2
Loose electr~cal wires.
1.
Carpet height setting is incorrect.
ANY OTHER SERVICING SHOULD BE DONE BY AN AUTHORIZED SERVICE REPRESENTATIVE
CUSTOMER SERVICE
In the event that further assistance is required, see your Yellow Pages for an authorized Royalm Dealer. Costs of any
transportation to and from any place of repair are to be paid by the owner. The service parts used in this unit are
easily replaced and readily available from an authorized Royalm Dealer or retailer. Always identify your cleaner by
the model number and manufacturing code when requesting information or ordering replacement parts. (The model
number appears on the bottom of the cleaner.)
(1 -800-321 -1 134)
Page 13

MANUAL DEL PROPIETARIO
lnstrucciones de
ROYAL*
APPLIANCE
MFG.
CO.
Funcionamiento
ASPIRADORA VERTICAL
SIN BOLSA
Por favor lea estas
instrucciones con cuidado
antes de usar su aspiradora.
y
Servicio
--
-1 1
a
34
Permitanos ayudarle
ensam blar su aspiradora o a
contestar sus preguntas,
lame al:
1
-800-321
(EE.UU. y Canada)
www.royalvacuums.com
I
02004 Todos 10s derechos reselvados # 1-1 13090-001
Page 14

ESTE APARATO ESTA
DISENADO
PARA US0 COMERCIAL
CUANDO USE UN
BASICAS
Cuando use
basicas, incluyendo las siguientes:
LEA TODAS LAS INSTRUCCIONES ANTES DE USAR ESTE APARATO.
SIEMPRE SlGA ESTAS INSTRUCCIONES DE SEGURIDAD.
NO DEJE
REVISE
ADVERTENCIA: NO UTlLlCE
LA
ADVERTENCIA: ENSAMBLE TMALMENTE LA ASPIRADORA
DE VEZ EN CUANDO RETIRE EL CEPILLO GlRATORlO Y LIMPIE LOS
RESIDUOS DE LAS TAPAS FINALES PARA PERMlTlR LA
UNIFORME DEL CEPILLO.
ADVERTENCIA: LOS CORDONES, ALAMBRES YIO CABLES SUMlNlSTRADOS
CON ESTE PRODUCT0 CONTIENEN PRODUCTOS QUlMlCOS QUE INCLUYEN
PLOMO
SABIDO EN EL ESTADO DE CALJFORNIA, PRODUCEN
DE NAClMlENTO U OTROS DANOS REPRODUCTIVOS. LAVESE LAS
MANOS
LA
CON FRECUENCIA
MANGUERA DEBIDO A QUE PUEDEN CAUSARLE
0
DESPUES
INCLUYENDO LAS SIGUIENTESa
un
e~ectrodom6stico se deben seguir siempre las precaucione~
ASPIRADORA SIN VIGILANCIA CUANDO ESTE CONECTADA.
COMPUESTOS DE PLOMO ACERCA DE LOS CUALES SE HA
DE SU USO.
ELECTRODOMESTICO
LOS
FILTROS PARA UMPIARLOS 0 REEMPLAZARLOS.
NING~~N
OBJETO CON FlLO PARA LlMPlAR
DANO.
ANTES
CANCER,
DE
USARLA
ROTACION
DEFECTOS
SE
ADVERTENCIA: PARA MDUClR EL RIESGO DE
INCENDIO, CHOQUE ELECTRIC0
No deje solo el aparato cuando este conectado. Desconectelo de la toma de
y
corriente cuando no lo use
No lo utilice en exteriores o en superficies mojadas.
No permita que se use como juguete. Ponga mucha atencion cuando lo use un
niiio o cerca de niiios.
Uselo solamente como se indica en este manual. Use solamente 10s accesorios
recomendados por el fabricante.
No lo utilice con el cordon electrico o la clavija daiiados. Si el aparato no trabaja
como debiera, se ha caido, daiiado, dejado en exteriores o caido en agua,
regreselo a un centro de servicio para su inspeccion. Llame al 1-800-321
para encontrar el centro de servicio mas cercano a su domicilio.
No tire ni lo transporte tomandole del cordon electrico, no utilice el cordon electrico
como asa, no cierre la puerta sobre el cordon electrico, o tire del cordon electrico
alrededor de rebordes o esquinas agudos. No pase el aparato
electrico. Mantenga el cordon electrico lejos de superficies calientes.
No lo desconecte tirando del cordon electrico. Para desconectarlo, tome la clavija,
no el cordon electrico.
No tome la clavija o el aparato con las manos mojadas.
No coloque objetos en las aperturas. No lo use con una apertura bloqueada; rnantengalo
libre de polvo, pelusa, pelo
Mantenga lejos de las aperturas y partes moviles, el pelo, ropa suelta, dedos
todas las partes del cuerpo.
Apague todos 10s controles antes de desconectar.
antes de darle servicio.
y
cualquier cosa que pueda reducir el flujo de aire.
E2
0
LESIONES:
-1
134
sobre el cordon
y
Page 15

Tenga mas cuidado cuando aspire escaleras.
No lo use para aspirar liquidos inflamables o combustibles, tales como gasolina,
ni lo use en areas donde estos pudieran estar presentes.
Siga las instrucciones de la etiqueta y las marcas que se encuentran en su aspiradora.
No use una extension electrica al usar esta aspiradora.
Mantenga lejos de su cara y cuerpo la manguera, lanzas y otras aperturas.
Mantenga sus manos, pies, pelo
del cepillo giratorio.
No use la aspiradora sin tener en su sitio la bolsa y 10s filtros.
No aspire objetos que esten quemandose o emitiendo humo, tales como cigarrillos,
cerillos o cenizas calientes.
Conectela solamente a una toma de coriente conectada a tierra. Vea las
instrucciones para conectar a tierra.
Desconecte la aspiradora antes de conectar el *Turbo Tool@.
*IVO
DlSPONlBLE EN LOS TODOS LOS MODELOS
y
ropa lejos de las partes moviles; especialmente
GUARDE ESTAS INSTRUCCIONES
INSTRUCCIONES DE
Este aparato debe tener conexion a tierra. En caso de averia o ma1 funcionamiento, la
conexion a tierra proporciona una ruta de menor resistencia para corriente electrica a
fin de reducir el riesgo de choque electrico. Este aparato esta equipado con un cable
que tiene un conductor de conexion a tierra del equipo
La clavija debe enchufarse en una toma de corriente apropiada correctamente instalada
y
con conexion a tierra, segun todos 10s codigos y dkposiciones locales.
ADVERTENCIA:
incorrecta del conductor de conexion a
tierra del equipo puede resultar en un riesgo
de choque electrico. Comuniquese con un
electric~sta cualificado o con el tecnico de
servicio si no esta seguro si la toma de
corriente tiene una buena conexion a tierra.
No modifique la clavija proporcionada con el
aparato
corriente, solicite a un electricista cualificado
la instalacion de una toma de corriente
apropiada.
Este aparato esta
una clavija con conexion a tierra parecida a la clavija ilustrada en el diagrama.
Asegljrese de que el aparato este conectado a una toma de corriente que tenga la
misma
-
si esta no encaja en la toma de
diseiiado para uso en un circuit0 nominal de
configuracion que la clavija. No se debe usar un adaptador con este aparato.
CONEXION
Una conexion
CONEXION A TIERRA
E3
A TIERRA
y
una clavija de conexion a tierra.
CAJA
DE CORRIENTE CON
CONEXI~N A TIERRA
120
voltios y tiene
DE
TOMA
Page 16

FELlClTAClONES
Usted es ahora el orgulloso propietario de una aspiradora vertical Royal".
Confiamos en que su nueva adquisicion ie ofrecera muchos aiios de
Nuestra compafiia diseiio y desarrollo este product0 teniendolo a usted en
mente.
satisfaction.
Estamos muy orgullosos de nuestros productos
igualmente satisfecho con su calidad
y
rendimiento.
y
esperamos que usted este
Gracias por su apoyo a 10s productos Royal".
Visite nuestro sitio Web en www.royalvacuums.com
lnstrucciones de seguridad
Caracteristicas Pagina E5
Como ensambla. Pagina
....................................
..................................
Ensamblaje del cuerpo a la boquilla
Ensamblaje del contenedor de accesorios
Ensamblaje del asa a1 cuerpo
Como funciona. Pagina
-
-
...................................
Limpieza de alfombras I piso
Limpieza por encima del nivel del piso
Recipiente de polvo
y
Retiroy reemplazo. Pagina E9
Banda o cepillo: retiro y reemplazo
Foco: retiro v reem~lazo.
~antenimiento general Pagina El 1
Guia de solucion de problemas
..........................
................
.............
.....................
.....................
..............
filtro:
.............................
......................
............................
.............................
.......................
Pagina
Pagina
Pagina
Pagina E6
Pagina E8
Pagina E8
Pagina El
Pagina El 1
Pagina El2
E2,
E3
E6,
E7
E6
E6
E7,
0,
E8
El 1
-
GARANT~A
Al consumidor, Royal Appliance Mfg. Co. le garantiza que esta aspiradora no tiene defectos ni de material ni de mano de obra por
1 aho a partir de la fecha de compra original. Guarde su recibo original de compra para hacer valido el periodo de garantia.
En
caso que la aspiradora muestre algun defect0 dentro del periodo de garantia, repararemos o reemplazaremos de manera
gratuita cualquier parte defectuosa. La maquina completa debe ser enviada con porte pagado a cualquier Estacion Autorizada
ROYALB de Ventas y Se~icio de Garantia. Por favor incluya una descripcidn completa del
del recibo de compra original y su nombre, domicilio y numero de telefono. Si no se encuentra cerca de una Estacion de
Garantia,
llame a la fabrica para pedir asistencia en 10s EE.UU. y CANADA: 1-800-321-1134. Use solamente partes de
repuesto genuinas RoyalB.
La garantia no incluye el desgaste anormal,
Esta garantia no
no autorizadas. Esta garantia le confiere derechos legales especificos y podria haber otros derechos tambien. (LOS otros
derechos varian de Estado a Estado en 10s EE.UU.)
cubre 10s cepillos,bandas planas, bolsas, filtros o daho al ventilador. Esta garantia no cubre reparaciones
daiio como resultado de un accidente o del uso no adecuado de la aspiradora.
problems,
fecha de compra, Copia
IMPORTANTE: USE SOLAMENTE PARTES DE REPUESTO GENUINAS ROYAL".
NOTA: REGRESE
LA
TARJETA DE
GARANT~A
PARA REGISTRAR SU ASPIRADORA
E4
Page 17

PARTE FRONTAL
PARTE POSTERIOR
PARTE FRONTAL
1.
Asa de metal
2.
Turbo Tool"
3.
Accesorio para Hendiduras (en la
lanza de extension)
4.
Lanza de Extension
5.
Tapa del Recipiente de Polvo
6.
Recipiente de Polvo Transparente
7.
Filtro del Recipiente de Polvo
8.
Luz Frontal
9.
Palanca de Ajuste de Altura
10.
Tope
11.
Ventana de Paso del Polvo
Transparente
12.
Yugo de la Manguera Inferior
13.
Manguera lnferior
14.
Lanza de la Manguera
15.
Seguro de Liberacion del Recipiente
de Polvo
PARTE POSTERIOR
16.
Contenedor de la manguera
17.
Guia del Cordon Electrico
18.
Manguera
19.
Cepillo para Polvo
20.
Gancho con Liberacion Rapida del
Cordon Electrico
21.
Asa de Transporte
22.
Cordon Electrico Largo
23.
Swivel Casters"
24.
Pedal de Liberacion del Asa
25.
Pedal de Encendido / Apagado
26.
Cubierta Posterior
27.
Abrazadera de la Manguera
28.
Contenedor de Accesorios Superior
Page 18

HERRAMIENTA NECESARIA: DESTORNILLADOR PHILLIPS 0 PLAN0
Deslice la cubierta ~osterior en
-
-~
la base.
Para asegurar inserte dos
tornillos en la seccion frontal
de la cubierta posterior.
CONTENEDORDEACCESORIOS
SUPERIOR (FRENTE)
manguera larga en el
tubo de polvo de la orificios de la cubierta
cubierta posterior. posterior. Deslice el asa
asa de transporte con 10s
hacia delante. lnserte
(2)
tornillos en 10s
dos
orificios
hasta asegurarlos.
y
aprietelos
(2)
ENSAMBLAJE DEL CONTENEDOR
LA
TURBO TOOL" (FRENTE)
DE
Coloque el contenedor Empuje suavemente
de la manguera en la hacia abajo el asa de
parte superior
del cuerpo. contenedor de la
de la base metal en el orificio del
manguera.
Y
Coloque el contenedor de la
Torbo Tool" en la parte frontal
de la seccion media de la misma.
aspiradora.
Fije la abrazadera de la Turbo
Tool" en el contenedor de la
€6
(2)
10s dos
lnserte
la parte trasera del asa
aprietelos, asegurandose que
el contenedor de accesorios
esta asegurad0.
tornillos en
y
Page 19

INSTALACION DE LA
TURBO TOOLm
FIJAC~ON
DE
LA
F~JAC~ON
MANGUERA POSTERIOR MANGUERA
DE
LA
LATERAL
Gjete la Turbo Tool" en la
parte frontal de su contenedor.
ALMACENAMIENTO
DE ACCESORIOS
Para fijar 10s accesorios: (a)
Deslice el cepillo para polvo en
el contenedor de accesorios
superior con las cerdas
afuera. (b) Deslice el accesorio
hendidurasl la lanza de
para
extension en la ranura redonda
del lado derecho frontal del
contenedor de accesorios.
LIBERACION DEL
hacia
CORDON ELECTRICO
6ro11e la manguera alrededor de Alinee las lengiietas de la tapa
la parte posterior del contenedor
(Diagrama
~NSTALACION
Alinee las lenguetas del recipiente con
las ranuras en la tapa (Diagrama
Empuje la tapa hacia abajo y girela en
sentido de las manecillas del reloj.
NOTA: Hay una flecha de guia en la parte
posterior de la tapa. Alinee la flecha con
el borde derecho del asa del recipiente
de polvo y gire en el sentido de las
manecillas del reloj hasta asegurarlo
(Diagrama 4a).
1).
la manguera
lado derecho de la aspiradora
(Diagrama la).
Empuje la lanza de
hacia abajo en el girela en sentido de las
DEL REClPlENTE DE POLVO
.
4).
con
las ranuras en el recipiente.
Empuje la tapa hacia abajo y
manecillas del reloj.
Fijelo alineando la lengiieta en la
parte inferior del recipiente de
polvo en la ranura rectangular
de
la
aspiradora
empfijelo
SitiO
(Diagrams
para
(inserci6n)
que
entre
5a).
AJUSTE DE ALTURA PALANCA
en
retirarlo mas ticilmente.
Guardelo en la guia
del cordon el6ctrico.
superficie que se va a
limpiar.
IMPORTANTE:
1-1
Para un ajuste mas facil,
coloque la aspiradora en
position
completamente
vertical position.
Page 20

PRECAUCION:
La aspiradora debe estar en posicion vertical para levantar de la alfombra el cepillo giratorio cuando limpie
por encima del nivel del piso.
El agitador del cepillo continua girando cuando usted usa o retira la manguera o si la aspirdora esta
funcionando. Mantenga lejos del area del cepillo el pelo, la ropa suelta, 10s dedos
cuerpo cuando la aspiradora este funcionando.
y
otras partes del
PEDAL DE ENCENDIDO PEDAL DE PISOIALFOMBRAS
Conecte el cordon electric0 en Para liberar el- asa, ~ise el
la toma de corriente. Encienda
la aspiradora pisando el pedal localizado en la parte inferior
localizado en la parte posterior izquierda de la aspiradora.
izquierda de la aspiradora.
pedal de
liberation
del
ass
para limpiar debajo de 10s muebles.
cepillo en rotacionpodrlB hacer que 10s flecos de
la alfombra se enredaran dentrode la aspiradora.
Sea precavido cuando aspire alfombras con flecos.
NOTA:
El
LlMPlEZA
La aspiradora debe estar en su Retire la manguera del
posicion vertical para levantar contenedor de accesorios.
el cepillo giratorio.
LANZA DE
POR
EXTENSION
longitud, use la lanza de
extension
para hendiduras. Saque
la herramienta para
hendiduras de la lanza
de extension. Use la
lanza de extension
la herramienta para
hendiduras juntas o
por separado.
y
el accesorio
ASA DE TRANSPORTE
y
_I
e
la manguera. Para quitar el accesorio, gire
re suavemente.
este solamente sobre /as
ruedas traseras.
di 10s utiles
accesorios o use
la manguera
Simplemente
empuje el
accesorio con
firmeza en el
extremo de la
I
lanza o del asa
sola.
y
Page 21

ADVERTENCIA:
NOTA:
NOTA:
VAC~E
PARA
REDUCIR
EL
DESCONECTE ANTES DE DAR SERVICIO.
Desconecte la aspiradora antes de cambiar el filtro.
Para on mejor desempeiio, reemplace el filtro cada
Y
LlMPlE
EL
RIESGO
REClPlENTE DE POLVO
DE
LESIONES
CAUSADAS
POR
ah
LAS
PARTES
MOVILES,
Oprima el seguro para quitar
el recipiente de polvo de la
aspiradora.
Gire
y
tire del filtro hacia
y
afuera.
arriba
Retire la tapa al tomar el asa Sostenga el recipiente de
del recipiente de polvo
girando la tapa en
contrario a las manecillas del
reloj.
Limpie el filtro
de polvo completamente. Vea
la nota a
"Mantenimiento Regular" fugas de polvo. Coloque de
para las instrucciones de nuevo el recipiente de polvo en
limpieza
y
continuation
del filtro.
el recipiente
y
sentido
polvo y sujete el tope del filtro.
Coloque de nuevo el filtro en el
recipiente de polvo. Empuje el
filtro en su sitio para evitar
la aspiradora
E7, lnstalacion del
Recipiente de Polvo.)
(vea la Pagina
Page 22

HERRAMIENTA NECESARIA: DESTORNILLADOR PHILLIPS
ADVERTENCIA:
PARA REDUCIR EL RIESGO DE LESIONES CAUSADAS POR
DESCONECTE
LA
ASPIRADORA ANTES DE CAMBIAR
LAS
PARTES
LA
BANDA 0 EL CEPILLO GIRATORIO.
MOVILES,
Acueste la aspiradora
para ver la base de la boquilla.
base debe quedar plana
hacia arriba. Utilice un
destornillador Phillips para retirar
10s cinco
(5)
proteccion de la boquilla. Las
flechas indican la
10s tornillos.
tornillos y asi quitar la
y
volteela
La
y
mirando
posicion de
Levante la
protection
de la Levante y retire el cepillo
boquilla. giratorio. Deseche la banda
usada.
REEMPLAZO DE LA BANDA 0 DEL CEPILLO GlRATORlO
banda nueva esta
~uesta en su
lugar, tire del
ceplllo qtratorio
deslicei dentro
de la boqu~lla
I
v"
Deslice la banda en el eje del Coloque la banda nueva en el correcta (insercion 6a). Gire el cepillo giratorio de
motor.
area sin cerdas del cepillo
giratorio. alineada apropiadarnente.
forma manual para asegurarse que la banda este
asegurandose
que las tapas
frnales esten en
la onentacldn
~ ~
-
.~-
y
Vuelva a colocar la proteccion Reemplace 10s cinco
(5)
tornillos
de la boquilla. para asegurar la proteccion de
la boquilla.
I
I
Page 23

HERRAMIENTA NECESARIA: DESTORNILLADOR PLAN0
ADVERTENCIA:
Esta aspiradora utiliza un foco automotor comun No.906,13.0 voltios. Para focos de reemplazo, llame al
1-800-321
PARA REDUCIR EL RIESGO DE CHOQUE
ANTES DE RETIRAR 0 REEMPLAZAR EL FOCO.
-1
134 o a su tienda de partes automotrices.
ELECTRICO,
DESCONECTE LA ASPIRADORA
Incline hacia atras el asa de la
aspiradora. Retire 10s dos (2)
tornillos ubicados en Para reemplazarlo, empljjelo tornillos.
cualquiera
lente de la luz frontal.
ADVERTENCIA:
de 10s lados de la
PARA REDUCIR EL RIESGO DE LESIONES CAUSADAS POR LAS PARTES M~VILES,
DESCONECTE ANTES DE DAR SERVICIO.
Para retirar el foco, saquelo
del receptaculo. NO lo gire.
suavemente en el receptaculo.
Fije la lente de la luz frontal
volviendo a colocar
RETIRO DE LOS DESECHOS 1 MANGUERA
1.
Vea si el recipiente esta Ileno; vacielo si es necesario.
2. Conecte la aspiradora y verifique que haya succion en
el extremo de la manguera (Diagrama
en el extremo de la manguera, vaya al Diagrama 4. Si
no hay succion en el extrerno de la manguera, limpie la
ventana
del paso del polvo y baje la manguera. Siga
DESECHOS,
I
PROTECCION DE
LA
RETIRO DE LOS DESECHOS
estos pasos:
de la manguera (Diagrama 2) girandola en sentido horario.
2. Saque la manguera de la caja. Retire la obstruccion.
Saque la manguera de la ventanatransparente del paso del
polv~ (Diagrarna
encabezado "Fijacion de la Manguera Lateral." Retire la
obstruccion.
1.
Saque la manguera de la entrada superior
3)
al invertir el Paso
I
10s dos (2)
1
.)
Si hay succion
2,
Pagina E7, bajo el
3.
Retire la proteccion de la Gire el anillo del seguro Gire el alojamiento Para reensamblar,
boquilla (vea el Diagrama 180" y dele vuelta a la inferior y retire el atasco. asegljrese que
4) al quitar 10s cinco
tornillos. Busque las y gire para cerrar el
obstrucciones y retirelas. alojamiento inferior.
(5)
Turbo ~oop.
El
1
lengiietas esten metidas
1%
Page 24

ADVERTENCIA: PARA REDUCIR EL RIESGO DE LESIONES PERSONALES - DESCONECTE
DE DARLE SERVICO.
LA
ASPIRAOORA ANTES
La as~iradora no
aspira o la succibn I lnstalado correctamente
es muy debil
Polvo escapando
de la as~iradora
La luz frontal no
funciona
Es dificil empujar
a aspiradora
I
1. El recipiente de polvo no esta
2.
El reclpiente de polvo esta Ileno. 2. Vacie el recipiente de polvo - Pag. E9.
3. Cepillo g~rator~o desgastado.
4. Banda rota o desgastada. 4 Reemplace la banda
I
5
!go tapado
6.
--
--
-Esg tapatla la bo$illa fmangU@
=i
depas~ de
7
-&te mcorrecto de la altura de 7
alfombra
I.
El reciprente de polvo esta Ileno.
2.
El recl~iente de ~olvo no esta
I
lnstalado correciamente.
3.
La
manguera no esth instalada 3. Revise la instal&ion de la manguera
correctamente.
I
4. El filtro no esta instalado
completamente. filtro
I
1 Foco fUndld0
2.
Cables electricos sueltos
1. Ajuste incorrect0 de la altura de
alfombra.
-----
@I@.
$-I?-
%-:r
.
-=
-
I
1. Revise la forma de retiro v reemolazo del
recrp~ente de polvo - ~ag'~9
I
3. Reemplace el ceplllo grratorlo - Pag. E10.
I
5-
"--
Retire_y l~mp~e el f~ltro__ag E9
g
62
Retire lacmangu% in~rf@~%%?~~~~~-~~$~
_
-
_dl,3trucc16n
Mueva la palanca de ajuste de altura de
alfombra a un nwel aprop~ado para la
alfombra que se este l~rnp~ando
I
.
1
.-
Vacie el recip~ente de polvo - Pag. E9.
2
Rev~se la forma de retlro v reemolazo del
I
reciorente de oolvo
.
.
-1
Pag. E7.
4. Revise la forma de retiro y reemplazo del
-
I
1. Reemplace el foco
2.
1. Mueva la palanca de ajuste de altura de
Pag. E9.
Llame al 1-800-323-1 134 para encontrar al
Distnbuidor Royale mas cercano a su domic~lio~
alfombra a un nivel apropiado para la
alfombra que se este limpiando
-
%g,%7,
-
-
Pag. E10.
xf&
-
PBO.'E~.
-
Pag. El 1
,_?-_
-
'
-
Pag. E7
.
--
-
Pag.
-
-_:
___
--
- -
-
-
E7.
I
I
I
I
I
I
I
CUALQUIER OTRO SERVICIO
REPRESENTANTE DE SERVlClO AUTORIZADO
SERVlClOS AL CLIENTE
En caso de necesitar mas ayuda, vea en las Paginas Amarillas para encontrar a un Distribuidor Autorizado Royal"
Los costos de transporte hacia y desde el sitio de reparacion seran pagados por el propietario. Las partes de
repuesto
utilizadas en esta unidad son de reemplazo facil y estan disponibles a traves de un Distribuidor Autorizado
Royal" o en otras tiendas. Siempre identifique su aspiradora por medio del numero de modelo y el codigo de
fabricacion cuando pida informacion
de la aspiradora.)
u
ordene partes de repuesto. (El numero de rnodelo aparece en el fondo
DEBERA
SER EFECTUADO POR UN
(1 -800-321 -1 134)
Page 25

AVERTISSEMENT : POUR
REDUIRE
LE
RISQUE DE SE BLESSER,
DEBRANCHER
L'ASPIRATEUR AVANT
LE
SERVICE
L'appareil n'aspire
pas ou n'a qu'une
faible succion
De la poussiere
Les
accessOires
n'aspirent pas la
poussiere
La lumiere avant
ne fonctionne pas
L'aspirateur est
difficile
a
pousser
2. Un fusible est grille ou le disjoncteur
I
est dclenche.
3 L'appare~l dolt dtre entretenu.
I
1. Le godet
I
I
1.
1. ~etuyau
2 Godet a oouss~ere oleln
3.
I
1. L'amooule est arillee.
2. Les fils ~lectriqies sont desserres.
1. Mauvais reglage de la hauteur de
6.
poussiere n'est pas
Godet a poussiere plein.
est
obs&~
F~ltrei~bSirueY-
I'appareil.
_
-
2. Verifiez le fusible ou le disjoncteur. Remplacez
I
le fusible ou r6enclenchez Ie disioncteur.
3. ApporIez I'appare~l au centre de reparailon
ou telephone2 au 1-800-321 -1 134.
I
1. Revoir 17en18vement et la reinstallation dul
I
-1
1.
Vider le-godet a poysiere - Pg.
1.
~nlever.letuyau et les accessolres, degiger-
-
fes obstructions - Pg.
2. Vlder le oodet a oouss~ere
--
3. Nettoyer le f~ltre - Pg.7.
I
1. Chanaer I'amooule - Po. 11.
elk
2.
1.
le 1-800-321
le deposltalre Royala le plus proche.
Regler la hauteur de I'appareil pour
I'epaisseur du tapis
a
9.
7.
-
-
Po 9
.,
-
..
.
-
- -
-i
134-~our connaftrc
nettoyer - Pg.
8.
-
I
I
I
TOUT AUTRE ENTRETIEN DOlT
SERVICE
Pour obtenir de I'aide supplementaire, consultez les Pages jaunes afin de connaitre les depositaires RoyaPautorises.
Les coirts de transport aller-retour
le proprietaire de I'appareil. Les pieces reparables utilisees dans cet appareil peuvent facilement &tre remplacees
et sont disponibles aupres des depositaires ou revendeurs Royal" autorises. identifiez toujours I'aspirateur par le
numero du modele et le code de fabrication lorsque vous demandez des informations ou que vous commandez des
pieces de rechange. (Le numero de mod& figure au bas de I'appareil).
ETRE
~FFECTUE
A
LA
CLIENTELE
a
partir de I'endroit ou sont effectuees les reparations doivent dtre defrayes par
PAR UN
:
(1
-800-321
REPRESENTANT
-1
134)
AUTORISE
Page 26

AVERTISSEMENT
:
POUR REDUIRE LE RISQUE DE CHOC ELECTRIQUE : DEBRANCHEZ L'ASPIRATEUR
AVANT D'ENLEVER ET DE REMPLACER L'AMPOULE.
Cet aspirateur utilise une ampoule automobile courante : no 906,13,0 volts. Pour acheter une ampoule
composez le 1-800-321-1134 ou contactez votre magasin de ~ieces automobiles.
Basculez la poignee de
I'aspirateur. Enlevez les deux
vis qui se trouvent de chaque
c6te des verres de la lampe.
AVERTISSEMENT
POUR ENLEVER
(2)
:
POUR
REDUIRE
L'APPAREIL AVANT DE FAIRE SON ENTRETIEN.
LA
Tirez sur I'arnpoule pour la sortir
de la douille. Ne la tournez
was. lnserez soianeusement
I'arnpoule dans la douille.
LE RISQUE DE LESION A CAUSE
.
Verifiez si le godet a poussikre est plein, videz-le si
necessaire.
.
Branchez I'aspirateur et verifiez s'il se produit une aspiration
a
I'extrernite du tuyau, passez a I'illustration
aspiration ne se produit; degagez I'obstruction de I'orifice
de passage de la poussiere et abaissez ie tuyau inferieur.
Suivre les
du tuyau superieur (illustration
horaire.
support. Degagez I'obstruction. 3. Enlevez le tuyau de la
fen6tre de passage de la poussiere (Schema 3) en suivant
I'etape
fixer le tuyau lateral
SALET@DISPOSITIF POUR ENLEVER LES
DE PROTECTION DU TURBO TOOL@
Fixez-la lampe
deux
*
-~
~
.-
-
DE
PIECES
I'extremite du tuyau. (Schema
etapes suivantes
2.
Deroulez soigneusernent le tuyau du
2
en ordre inverse, page
enlevees.
EN MOUVEMENT,
:
1.
..
Degagez I'obstruction.
SALETESI
a
(2)
I'aide des
vis que vous aviez
DEBRANCHEZ
1).
Si I'aspiration se produit
Enlevez le tuyau de I'orifice
2)
en tournant dans le sens
7,
4.
Si aucune
sous la rubrique u Pour
a
protection du suceur de verrouillage a 180"
(Schema
degager toute obstruction.
les cinq
4)
en enlevant mettez le Turbo Toolm a I'obstruction. engager les attaches et
(5)
vis. Veillez
a
I'envers.
et inferieur et degager nouveau, veillez
faites pivoter le boitier
11
inferieur pour le ferrner.
a
Page 27

OUTlL
NECESSAIRE
AVERTISSEMENT
:
:
TOURNEVIS A POINTE CRUCIFORME
POUR
~ITER
DE VOUS BLESSER AVEC LES
PIECES
EN MOUVEMENT,
DEBRANCHEZ
L'APPAREIL AVANT DE REMPLACER LA COURROIE OU LE ROULEAU-BROSSE.
I
I I
I
Posez I'aspirateur a plat Soulevez le dispositif de pro- Les fleches indiquent I'emretournez-le pour exposer la
base
du suceur. La base doit
etre
a
plat et tournee vers le
haut. Pour enlever le dispositif
du suceur. placement des vis. Soulevez
tection
et enlevez le rouleau-brosse.
Jetez la courroie usagee.
de protection du suceur, utilisez
un tournevis
pour devisser les quatre
a
pointe cruciforme
(5)
vis.
POUR REMPLACER LA COURROIE OU LE ROULEAU-BROSSE
nouvelle courroie
rouleau-brosse
dans le suceur
extremites du
rouleau-brosse
Glissez la courroie
de moteur.
sur I'arbre
placez la nouvelle courroie
dans la partie du rouleaubrosse
,,layant
pas
de crins,
correctement (illustration 6a). Faites pivoter le
rouleau-brosse
a
la main pour vous assurer que
la courroie est alignee correctement.
soient orientees
I
I I
Remettez en place le dispositif
de protection du suceur.
I
Remettez les cinq
(5)
I
vis pour
fixer le dispositif de protection
du suceur.
10
Page 28

AVERTISSEMENT
REMARQUE
REMARQUE
:
POUR
L'APPAREIL
:
Debranchez I'aspirateur avant de changer le filtre.
:
Pour un meilleur rendement, remplacez le filtre chaque annee.
EVITER
DE VOUS BLESSER AVEC LES
AVANT
DE
PROCEDER
A
SON
PIECES
EN MOUVEMENT,
ENTRETIEN.
DEBRANCHEZ
POUR VlDER ET NETTOYER
Appuyez sur le loquet pour
retirer le godet
I'aspirateur.
Tournez le filtre vers le haut et
retirez-le. cornpletement le godet
a
poussiere de
LE
GODET
Retirez le couvercle en saisissant
la poignee do godet a poussiere
et en toumant le couvercle dans
le sens horaire.
Nettoyez
poussiere. Reportez-vous
note sur
ci-dessous en ce qui concerne le godet
les instructions sur le nettoyage I'aspirateur
du filtre.
A
POUSSIERE
le filtre et videz
I'
((
Entretien regulier
a
Tenez le godet
saisissez le filtre par le haut.
a
a
la le filtre pour prevenir toute
))
Remettez
godet a-poussiere. Enfoncez
fuite de poussiere. Rernettez
Installation du godet
poussiere).
poussiere et
le filtre dans le
a
poussiere dans
(voir page
7,
a
Page 29

AllENllON
I'aspirateur fonctionne.
bmsse
L'aspirateur
PEDALE
MARCHEIARRET
:
Cagitateur
lotsque I'aspimteur
doi
&e
de
Gardez
en
posiiion
la
bmsse
continues a pivoter lorsque le hryau
les
chevm,
16
est
en
matche.
verticale pour pouvoir lever la
PEDALE
vm
DE NETTOYAGE DU SOUDES TAPlS
DEGAGEMENT
amples,
DE
bmsse
LA
est
enleve ou en marche
et
twde
pa&
mtaiive
et
a
I'hrt
tout
du
corps
nettoyer au-dessus du
letemps lorsque
de
la zone
de
la
sol.
POIGNEE
Branchez le cordon dans une Pour degager la poignee, de la poignee
prise de courant. Mettez appuyez sur la pedale de pour nettoyer sous les meubles.
I'aspirateur en marche en degagement de la poignee
appuyant sur la pedale de situee sur la partie inferieure
marche situee a I'arriere de de l'aspirateur.
I'aspirateur du cBte gauche.
Les franges de tapispeuvents'emmiler dans le
rouleau~e brosse de I'aspirateurlorsque celui-ci
toume. Eire prudent 101s du passage de I'aspirateur
sur des &pis pouwus de franges.
REMARPUE
:
NETTOYAGE AU-DESSUS DU SOL
Mettez I'asoirateur en oosition
vertical pour lever la biosse.
RALLONGE
Retirez le tuvau du su~oort
accessoires.'
d'une longueur
supplementaire,
utilisez la rallonge
le suceur. Retirez
et
le suceur plat de la
rallonge. Utilisez la
rallonge et
plat ensemble ou
separement.
le suceur
, ,
8
ooignee du tuvau et aoouvez fermement Pour
a
retier un acckoire, timez-le et retirez-le avec
precaution.
POIGNEE
I
DE TRANSPORT
Utilisez la poignee de
transport situee a I'arriere
de I'asp~rateur pour
transporter I'aspirateur
d'une piece
REMARQUE
pousser I 'aspirateur vers
I'avant sur les roulettes
arriere. Ne pas firer
I'aspirateur sur Ies
roulettes arriere.
a
l'autre.
:
Ne pas
Page 30

POUR INSTALLER
L'ACCESSOIRE TURBO
Attachez I'accessoire turbo
I'avant du support a accessoires.
a
RANGEMENT DES
ACCESSOIRES
Enroulez le tuyau a I'arriere du
support de tuyau (Schema
lnserez la rallonge de tuyau
sur le c6te droit de I'aspirateur
(Schema
1
a).
INSTALLATION DU GODET
1).
A
Alignez les languettes situees
sur la fenetre du passage de la
poussiere sur les encoches du
tuyau inferieur. Poussez
tuyau et tournez-le dans le sens
anti-horaire pour le bloquer.
POUSSIERE
le
maniere a correspondre
la surface a nettoyer.
IMPORTANT
FAClLlTER LE
METTEZ L'ASPIRATEUR
EN POSITION VERTICALE.
a
:
POUR
REGWGE,
Page 31

OUTlL
NECESSAIRE
:
TOURNEVIS A POINTE CRUCIFORME
OU
A
TETE PLATE
ASSEMBLAGE DU SUCEUR SUR LE CORPS DE L'APPAREIL
Glissez le panneau arriere sur la
base.
Pour fixer I'ensernble, inserez
(2)
vis sur la partie avant
deux
du panneau arriere.
SUPPORT DES ACCESSOIRES
Glissez I'extremite du Alignez les trous de la
long tuyau dans le tube a poignee de transport
poussiere du panneau avec les trous situes
arriere. Tournez dans le sur le panneau arriere.
sens anti-horaire pour le Glissez le support vers
fixer. I'avant. lnserez deux
vis dans les trous et
serrez-les jusqu'a ce
qu'ils soient bloques.
(2)
_I
ENSEMBLE
POIGNEE
(ARRIERE) ET
SUPPORT TURBO TOOL (AVANT)
Placez le support de Poussez doucement la
tuyau en haut de la poignee metallique dans
base.
le trou du support de
tuyau.
Mettez le support du Turbo
Tool" a I'avant de la section
mediane de I'aspirateur. Toola.
Fixez
dans le support du Turbo
I'attache du Turbo Tool"
lnserez les deux
I'arriere de la poignee et serrez.
Veillez
a
ce que le support
accessoire soit bien attache.
(2)
vis
a
a
Page 32

AVANT
AVANT
1.
Poignee metallique
2. Turbo Tool"
3. Suceur plat (dans la rallonge)
4. Rallonge
5.
Couvercle du godet a poussiere
6. Godet
7.
8. Phare avant
9.
10. Pare-choc
11.
12. Encoche
13. Tuyau inferieur
14. Tuyau de rallonge
15. Loquet
a
poussiere transparent
Filtre du godet a poussiere
Levier de reglage de la hauteur
Fenltre de passage de la poussiere
du tuyau inferieur
du godet
a
poussiere
ARRIERE
16. Support du tuyau
17. Guide du cordon
18. Tuyau
19. Brosse
20. Dispositif d'enroulement du cordon
21. Poignee de transport
22. Cordon d'alimentation long
23. Swivel Casters'"
24.
25. Pedale
26. Panneau arrite
27. Attaches pour tuyau
28. Support
a
epousseter
a
declenchement rapide
Pedale de degagement de la
poignee
marche/arr&
des accessoires
superieurs
Page 33

FELICITATIONS
Vous etes desormais I'heureux proprietaire d'un aspirateur vertical
Royal". Nous sommes persuades que cet appareil vous satisfera
pendant plusieurs annees.
!
Nous avons cony ce produit pour vous faciliter la vie.
Noua sommes tres fiers de nos produits et nous esperons que vous serez
aussi satisfait que nous de leur qualite et de leur performance.
Merci d'utiliser les produits Royal".
a
Visitez notre site Web
Consignes de securite
Caracteristiques. Page
Assemblage de l'appareil.
Assemblage du suceur sur le corps de I'appareil
Assemblage du support
Assemblage de la poignee sur le corps
de I'appareil Page 6
Utilisation de I'appareil.
Nettoyage du solltapis
Nettoyage au-dessus du sol
Godet a poussiere et filtre
Enlevement et remplacement.
Courroie ou brosse Depose et remplacement
Ampoule
Entretien General. Page 11
Guide de depannage Page 12
:
Depose et remplacement
www.royalvacuums.com.
TABLE DES
..............................
..................................
...........................
a
MATIERES
accessoires
Page
Page 6,
......
..............
Page 6
Page 6
2'3
5
..................................
.............................
..........................
......................
:
........................
............
...................
Page
7,
Page
8
Page
8
Page
9
Page 10,ll
Page 11
.................................
...............................
7
8
I
I
I
I
Royal Appliance Mfg. Co. garantit au consommateur que cet aspirateur est exempt de vices de materiau ou de
fabrication pendant 1 annee
pour justifier la date d'entree en vigueur de la periode de garantie.
Si I'aspirateur
toute piece defectueuse. L'appareil entier doit 6tre retoume port paye
en vertu des garanties autorise ROYALa. Veuillez inclure une description detaillee du probleme, la date d'achat, une
copie du requ d'achat d'origine ainsi que vos nom, adresse et numero de telephone. Si aucun centre de service ne se
trouve dans votre region, communiquez avec I'usine au numero 1-800-321 -1 134, au CANADA et aux ETATS-UNIS.
N'utilisez que les pieces de rechange Royala authentiques.
Cette garantie ne couvre pas I'usure inhabituelle, les dommages causes par les accidents ou un usage abusif
de l'aspirateur. Elle ne couvre pas non plus les brosses, les courroies plates, les sacs, les ampoules ou les
dommages au ventilateur. Cette garantie ne couvre pas les reparations non autorisees. Cette garantie vous
~onfere des droits,reconnus par la loi et peut-btre aussi d'autres droits. (Les autres droits peuvent varier d'un
Etat
IMPORTANT : N'UTILISEZ QUE LES
REMARQUE
fait defaut pendant la periode couverte par la garantie, nous reparerons ou remplacerons gratuitement
a
I'autre aux Etats-Unis.)
:
RENVOYEZ
VOTRE ASPIRATEUR
a
compter de sa date d'achat d'origine. Conservez votre rey d'achat d'origine
a
n'importe quel point de vente ou de service
LA
PIECES
FICHE DE GARANTIE POUR ENREGISTRER
DE RECHANGE ROYAL" AUTHENTIQUES.
4
Page 34

Fermez toutes les commandes avant de debrancher I'appareil.
Faites bien attention quand vous nettoyez les marches d'escalier.
N'aspirez aucun liquide inflammable ou combustible tel que de I'essence ; n'utilisez
pas I'appareil en presence de ce type de materiaux.
Examinez votre aspirateur et suivez toutes les instructions inscrites sur les etiquettes.
N'utilisez pas de rallonge electrique avec cet aspirateur.
Gardez le bout du tuyau, les tubes et autres ouvertures a I'ecart de votre visage
et
de votre corps. Gardez vos mains, vos pieds, vos cheveux et vos vBtements
a
distance des pieces mobiles, tout specialement de la brosse rotative.
N'utilisez pas cet appareil sans son sac a poussiere ni ses filtres.
Evitez d'aspirer tout ce qui brQle ou fume, comme les cigarettes, les allumettes
et les cendres chaudes.
Brancher a une prise de courant avec contact de mise a la terre seulement. voir
a
instuctions de mise
Debranchez avant de connecter le "Turbo Toola.
*ION DISPONIBLE SUR TOUS LES
la terre.
MODELES
VEUILLEZ CONSERVER CES INSTRUCTIONS
INSTRUCTIONS DE MlSE
Cet appareil doit Btre mis a la terre. En cas de mauvais fonctionnement ou de panne,
a
la mise
reduit les risques d'electrocution. Cet appareil est equipe d'un cordon d'alimentation
muni d'un conducteur et d'une prise de terre. La fiche doit Btre branchee sur une
prise appropriee, installee correctement et mise
kt
la terre offre un conduit de moindre resistance au courant electrique ce qui
legislations locales.
AVERTISSEMENT
a
conducteur de mise
connecte, vous pouvez vous electrocuter.
Consultez un electricien qualifie ou un
technicien specialise si n'ktes pas sQr que
la prise est correctement mise
Ne modifiez jamais la fiche fournie avec
-
I'appareil
avec votre prise murale, demandez
electricien qualifie d'installer une prise
compatible.
Cet appareil doit Gtre utilise sur un circuit nominal de
prise de mise
que I'appareil n'est pas branche sur une prise dont la configuration est identique
celle de la fiche. Cet appareil ne peut Btre utilise avec un adaptateur.
Si elle n'est pas compatible
a
la terre n'est pas bien
la terre ressemblant a celle de I'illustration ci-dessus. Assurez-vous
si
a
la terre.
a
A
un
LA
le
3
TERRE
a
la terre en vertu des reglements
PRlSE DE
TERRE
BROCHE MlSE
LA
TERRE
120
9
A
SORTIE DE
TERRE
volts et il est equipe d'une
a
Page 35

APPAREIL
RESERVE
A
L'USAGE CQMMERCIAL,
INSTRUCTIONS DE SECURITE IMPORTANTES
Lorsque vous utilisez un appareil menager, vous devez toujours suivre certaines
precautions de securite, dont les suivantes
LlSEZ TOUTES LES INSTRUCTIONS AVANT D'UTILISER CET APPAREIL.
RESPECTEZ TOUJOURS A LA LETTRE CES INSTRUCTIONS DE
NE LAlSSEZ PAS L'APPAREIL SANS SURVEILLANCE QUAND IL EST
VERIFIEZ
AVERTISSEMENT : NE NETTOYEZ JAMAIS LE TUYAU AVEC DES
OBJETS POINTUS, CAR ILS POURRAIENT L'ENDOMMAGER.
AVERTISSEMENT : MlSE EN GARDE - ASSEMBLEZ
L'ASPIRATEUR AVANT DE LE METTRE EN MARCHE.
DE TEMPS EN TEMPS, RETIREZ LE ROULEAU-BROSSE ET NETTOYEZ
LES DEBRIS ENGRANGES DANS SES EXTREMITES AFlN QUE LA
BROSSE CONTINUE
AVERTISSEMENT : LES CORDONS, FILS
FOURNIS AVEC CE PRODUIT CONTIENNENT DES PRODUITS CHlMlQUES
Y COMPRIS DU PLOMB OU DES
L'ETATDE
ENTRAINER DES MALFORMATIONS CONGENITALES ET ENDOMMAGER
LES ORGANES DE REPRODUCTION. LAVEZ-VOUS LES MAINS
TOUTE UTILISATION.
AVERTISSEMENT
REGULIEREMENT
A
LA CALlFORNlE POUR SON EFFET
LES FILTRES A NETTOYER OU A REMPLACER.
PIVOTER SANS
COMPOSES
:
POUR
:
SECURITE.
BRANCHE.
ENTIEREMENT
PROBLEME.
ELECTRIQUES
DU PLOMB CONNU PAR
CANCERIGENE,
EMP~HER
ETIOU
CABLE
POUVANT
APRES
LES
CHOCS ELECTRIQUES OU LES BLESSURES
Ne laissez jamais I'appareil sans surveillance quand
le quand il n'est pas utilise ainsi qu'avant de proceder
N'utilisez pas I'appareil a I'exterieur ou sur des surfaces mouillees.
Ne laissez pas les enfants jouer avec I'appareil. Exercez une surveillance etroite
quand I'appareil est utilise par les enfants ou
Utilisez I'appareil en respectant a la lettre les consignes de ce manuel. Utilisez
seulement les accessoires recommandes par le fabricant.
N'utilisez pas I'appareil si la fiche ou le cordon est endommage. Si I'aspirateur
ne fonctionne pas comme prevu, s'il est tombe, s'il a ete endommage, laisse
I'exterieur ou s'il est tombe dans I'eau, expediez-le a un centre de reparation
pour qu'il soit verifie. Telephonez au 1-800-321 -1 134 pour savoir quel est le
centre de reparation le plus proche.
Ne tirez pas I'appareil par son cordon, ne vous servez pas du cordon comme
poignee, ne fermez pas de portes sur le cordon et ne tirez pas le cordon sur des
coins ou bords tranchants. Evitez de passer I'appareil sur le cordon d'alimentation.
a
Gardez le cordon
Ne debranchez pas I'appareil en tirant sur le cordon. Pour le debrancher, tirez sur
la fiche et non sur le cordon.
Ne manipulez pas la fiche ou I'aspirateur avec les mains mouillees.
N'inserez pas d'objets dans les orifices. N'utilisez pas I'appareil si ses orifices
sont obstrues; enlevez de ces dernieres la poussiere, les peluches, les cheveux
et tout ce qui pourrait reduire le debit d'air.
Gardez vos cheveux, tout vitement ample, vos doigts et toute partie du corps
loin des ouvertures et des pieces en mouvement.
I'ecart des surfaces chauffees.
2
il
est branche. Debranchez-
a
son entretien.
a
proximite de ceux-ci.
:
a
Page 36

APPLIANCE
MFG
CO
Notice d'utilisation et d'entretien
ASPIRATEUR-BALAI SANS SAC
Veuillez lire attentivement ces
instructions avant d'utiliser
votre aspirateur.
AAVERTISSEMENE
L1assemblage de I1appareil
:omprend des petites pieces.
Ges dernieres presentent un
danger dletouff ement.
Consignez les renseignements ci-dessous pour
pouvoir les consulter rapidement.
No de modele
Code de fabrication
(Le code de fabrication se trouve sur la partie inferieure
arriere de I'aspirateur)
Nous pouvons vous aider
assembler votre aspirateur et
a
repondre a vos questions.
Pour cela composez le
1-800-321
(E.u.
:
:
2004 Tous droits reserves
-1
et
Canada
134
#
1-1
13090-0(
a
:
 Loading...