

Page 1

Kruz
Akku-Sauger
DE
Bedienungsanleitung
Rechargeable vacuum cleaner
GB
Operating Manual
Aspirateur sans fil
FR
Mode d‘emploi
Accu-zuiger
NL
Bedieningshandleiding
Aspiradora de batería
ES
Manual de instrucciones
Aspirapolvere ad accumulatore
IT
Instrucioni d’uso
Ⱥɤɤɭɦɭɥɹɬɨɪɧɵɣ ɩɵɥɟɫɨɫ
RUS
ɂɧɫɬɪɭɤɰɢɹ ɩɨ ɷɤɫɩɥɭɚɬɚɰɢɢ
Akumulátorový vysávaþ
SK
Návod na obsluhu
Sesalnik na baterije
SI
Navodila za uporabo
Akkumulátoros porszívó
HU
Kezelési útmutató
Akumulátorový vysavaþ
CZ
Návod k obsluze
Odkurzacz akumulatorowy
PL
Instrukcja obslugi
Baterijski usisavaþ
HR
Uputa za upotrebu
Roya-6625 24.10.2007
Page 2
Bedienungsanleitung
DE
Sicherheit
Zur Bedienungsanleitung
Lesen Sie diese Bedienungsanleitung
vollständig durch, bevor Sie mit dem
Gerät arbeiten. Bewahren Sie die Anleitung gut auf. Falls Sie das Gerät an Dritte
weitergeben, geben Sie auch die Bedienungsanleitung mit.
Die Nichtbeachtung dieser Anleitung
kann zu schweren Verletzungen oder
Schäden am Gerät führen.
Für Schäden, die aufgrund der Nichtbeachtung dieser Bedienungsanleitung entstehen, übernehmen wir keine Haftung.
Das Gerät darf nur im Haushalt eingesetzt werden. Es ist für eine gewerbliche
Nutzung nicht geeignet.
Hinweise
Wichtige Hinweise für Ihre Sicherheit
sind wie folgt gekennzeichnet:
WARNUNG:
Warnt vor Gefahren für Ihre Gesundheit und zeigt mögliche Verletzungsrisiken auf.
ACHTUNG:
Weist auf mögliche Gefährdungen für
das Gerät oder andere Gegenstände
hin.
HINWEIS:
Hebt Tipps und Informationen für Sie
hervor.
Stromversorgung
Das Gerät wird mit elektrischem Strom
aufgeladen und betrieben, dabei besteht
grundsätzlich die Gefahr eines elektrischen Schlags. Achten Sie daher besonders auf Folgendes:
Fassen Sie das Netzteil niemals mit
nassen Händen an.
Wenn Sie das Netzteil aus der
Steckdose herausziehen wollen,
ziehen Sie immer direkt am Stecker
und niemals am Kabel, es könnte
reißen.
Achten Sie darauf, dass das Strom-
kabel nicht geknickt, eingeklemmt,
überfahren wird oder mit Hitzequellen in Berührung kommt.
Tauchen Sie das Gerät/Netzteil
niemals in Wasser oder andere
Flüssigkeiten und halten Sie es von
Regen und Nässe fern.
Kruz
Laden Sie das Gerät nur, wenn die
auf dem Netzteil angegebene elektrische Spannung mit der Spannung
Ihrer Steckdose übereinstimmt. Eine
falsche Spannung kann das Netzteil
zerstören.
Akkus
Das Gerät enthält wiederaufl adbare Nickel-Cadmium-Akkus.
Verwenden Sie nur das mitgelieferte
Netzteil zum Laden der Akkus. Bei
Verwendung eines anderen als im
Lieferumfang befi ndlichen Netzteils
erlischt der Garantieanspruch.
Die Akkus nicht ins Feuer werfen
oder hohen Temperaturen aussetzen. Es besteht Explosionsgefahr.
Bei falscher Anwendung kann
Flüssigkeit aus den Akkus austreten.
Diese kann zu Hautreizungen
führen. Vermeiden Sie den Kontakt
mit der Flüssigkeit. Bei Kontakt die
Flüssigkeit mit viel Wasser abspülen.
Wenn die Flüssigkeit in die Augen
gelangt, sofort 10 min. mit Wasser
ausspülen und unverzüglich einen
Arzt aufsuchen.
Sollte es erforderlich sein, die Akkus auszutauschen, wenden Sie sich an einen
Fachhändler oder den Royal®Appliance
Kundendienst. Für Schäden durch unsachgemäß ausgetauschte Akkus übernehmen wir keine Haftung.
Kinder
Lassen Sie das Gerät nicht unbeaufsichtigt und verwenden Sie es mit
größter Vorsicht, wenn Kinder oder
Personen, die die Gefahren nicht
einschätzen können, in der Nähe
sind.
Kinder oder Personen, die die
Gefahren nicht einschätzen können,
dürfen das Gerät nicht benutzen.
Bewahren Sie es unzugänglich auf.
Verpackungsmaterialien dürfen nicht
zum Spielen verwendet werden. Es
besteht Erstickungsgefahr.
Bestimmungsgemäße Verwendung
Der Akku-Sauger dient ausschließlich
zum Aufsaugen kleiner Mengen Staub
von Hartböden. Jede weitere Verwendung gilt als nicht bestimmungsgemäß
und ist untersagt. Insbesondere die im
Folgenden aufgeführten Tätigkeiten dürfen auf keinen Fall mit dem Akku-Sauger
ausgeführt werden:
Das Saugen von:
glühender Asche, brennenden Zi-
–
garetten oder Streichhölzern. Es
kann zum Brand kommen.
spitzen Gegenständen, wie Glas-
–
splittern, Nägeln etc. Diese Gegenstände zerstören den Filter.
Wasser und anderen Flüssigkeiten,
–
insbesondere feuchten TeppichReinigungsmitteln. Feuch tigkeit
im Inneren des Gerätes kann zum
Kurzschluss führen.
Toner (für Laserdrucker, Kopierer
–
etc.). Es besteht Brand- und Explosionsgefahr.
Gips, Zement etc. Der Filter kann
–
verstopfen.
Das Absaugen von Menschen und
Tieren (z. B. Haare, Finger und
andere Körperteile) sowie das
Hineinstecken von Körperteilen in die
Öffnungen des Gerätes. Es besteht
Verletzungsgefahr.
Die Verwendung in der Nähe von
explosiven oder leicht entzündlichen
Stoffen. Es besteht Brand oder
Explosionsgefahr.
Die Verwendung im Freien. Es
besteht die Gefahr, dass Regen und
Schmutz das Gerät zerstören.
Das Hineinstecken von Gegenstän-
den in die Öffnungen des Gerätes.
Es könnte überhitzen.
Falls das Gerät defekt ist
Betreiben Sie niemals ein defektes Gerät
oder ein Gerät mit einem defekten Kabel.
Es besteht erhebliches Verletzungsrisiko.
Geben Sie ein defektes Gerät zur Reparatur an einen Fachhändler oder den
Royal® Appliance Kundendienst.
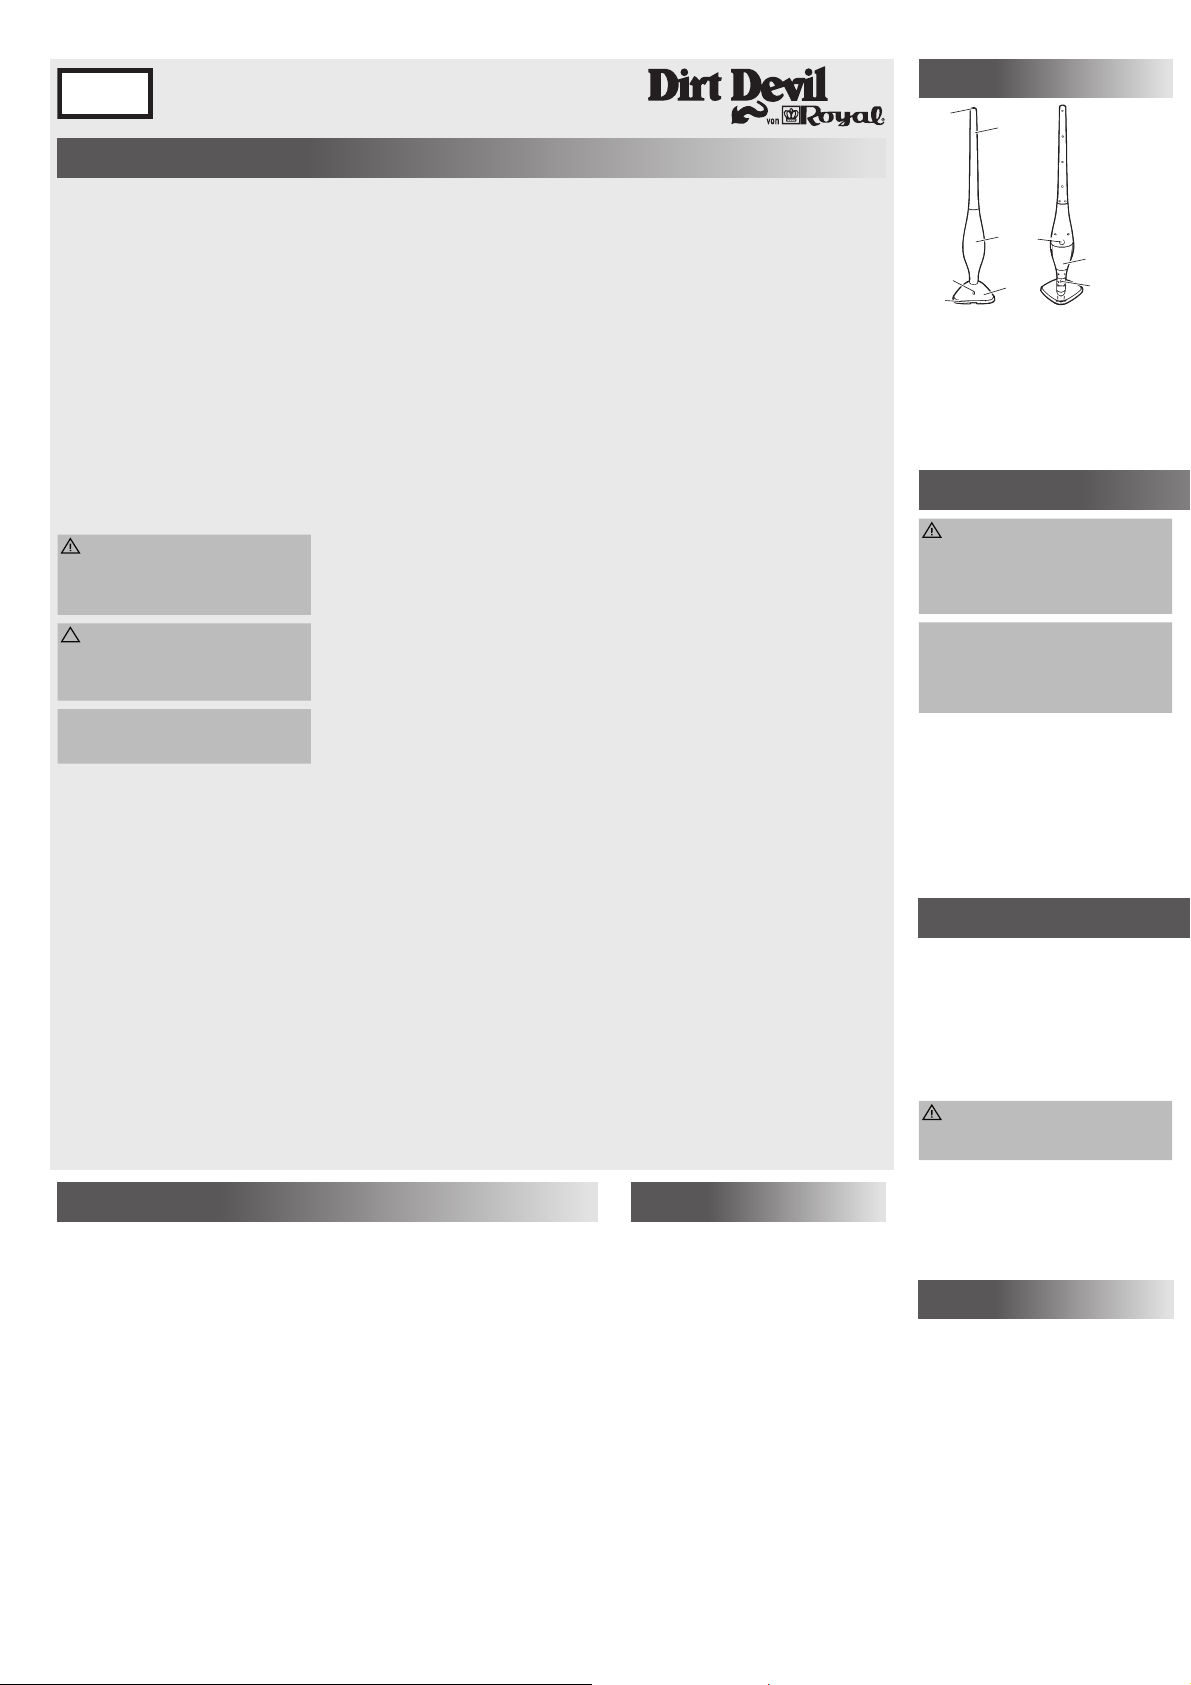
Überblick
1
2
3
7
4
6
Ein-/Aus-Schalter
1
Handgriff
2
Motorteil
3
Ladeleuchte
4
Bodendüse
5
Große Saugöffnung
6
Staubbehälter-Entriegelung
7
Staubbehälter
8
Bodendüse-Entriegelung
9
5
8
9
4. Saugen
WARNUNG:
Prüfen Sie den Akku-Sauger vor jeder Benutzung. Ein beschädigtes
Gerät darf nicht verwendet werden.
Es besteht Verletzungsrisiko.
HINWEIS:
Stellen Sie den Akku-Sauger nach
jeder Benutzung auf die Ladestation.
So stellen Sie sicher, dass der AkkuSauger jederzeit einsatzbereit ist.
Nehmen Sie den Akku-Sauger
1.
(10) nach oben von der Ladestation (11). Die Ladeleuchte (4)
erlischt.
Schalten Sie den Akku-Sauger am
2.
Ein-/Aus-Schalter (1) ein.
Drücken Sie zum Ausschalten
3.
erneut den Ein-/Aus-Schalter (1).
6. Dauerfi lter reinigen/
austauschen
Der Akku-Sauger besitzt einen Dauerfi lter, der die eingesaugte Luft fi ltert. Der
Dauerfi lter kann nach einiger Zeit verstopfen und dadurch die Saugleistung reduzieren. Deshalb ist es wichtig, dass der
Dauerfi lter regelmäßig gereinigt wird.
Falls Sie feststellen, dass der Dauerfi lter
beschädigt ist, ersetzen Sie diesen umgehend.
WARNUNG:
Schalten Sie das Gerät aus, bevor
Sie den Dauerfi lter entnehmen.
Garantie
Innerhalb der Garantiezeit beseitigen wir
nach unserer Wahl durch Reparatur oder
Austausch des Gerätes oder des Zubehörs (Schäden an Zubehörteilen führen
nicht automatisch zum Umtausch des
kompletten Gerätes) unentgeltlich alle
Mängel, die auf Material- oder Herstellungsfehlern beruhen. Von der Garantie
sind Schäden ausgenommen, die auf
unsachgemäßen Gebrauch (Betrieb mit
falscher Stromart/-spannung, Anschluss
an ungeeignete Stromquellen, Bruch
etc.) zurückzuführen sind sowie normaler Verschleiß und Mängel, die den Wert
oder die Gebrauchstauglichkeit des Gerätes nur unerheblich beeinfl ussen.
Bei Eingriffen durch eine nicht von uns
autorisierte Stelle oder bei Verwendung
anderer als original Royal® Appliance
Ersatzteile erlischt die Garantie. Verschleißteile fallen nicht unter die Garantie
und sind deshalb kostenpfl ichtig!
Die Garantie tritt nur in Kraft, wenn das
Kaufdatum durch Stempel und Unter-
schrift des Händlers auf der Garantiekarte bestätigt ist oder eine Rechnungskopie dem eingeschickten Gerät beiliegt.
Garantieleistungen bewirken weder eine
Verlängerung der Garantiezeit, noch
beginnt dadurch ein Anspruch auf eine
neue Garantie!
Versenden Sie das Gerät mit entleertem
Staubbehälter und einer kurzen Fehlerbeschreibung in Blockschrift. Versehen Sie
das Anschreiben mit dem Vermerk „Zur
Garantie“. Senden Sie es zusammen mit
der Garantiekarte oder einer Rechnungskopie an unseren Service (Adresse siehe
Umschlag).
Ersatzteile
Zubehörteile sowie Ersatzteile können
nachbestellt werden. Diese erhalten Sie:
im Dirt Devil Onlineshop unter
www.dirtdevil.de
oder bei den Firmen
Zubehör-Ersatzteile-Service-Versand
Ina Riedmüller
Frankenstraße 34
D-89233 Neu-Ulm
Tel.: 0 73 07 / 51 75
Fax: 0 73 07 / 41 56
Riedmueller.service@t-online.de
Zubehör-Ersatzteile-Service-Versand
Staubsauger-Center Feuerbach KG
Corneliusstraße 75
D-40215 Düsseldorf
Tel.: 02 11 / 38 10 07
Fax: 02 11 / 37 04 97
Staubsaugercenter@t-online.de
Technische Daten
Geräteart: Akku-Sauger für
Modell: Kruz
Netzteil: 230V ~ 50Hz
Batterie: Ni-Cd 12V DC
max.
Betriebsdauer:
Leistung: 72 W nom.
Staubbehälter: ca. 300 ml,
Gewicht: ca.
Hartböden
beutellos
15V DC 200 mA
1600 mAh
t 16-20 h
Ladezei
ca. 8-10 min.
85 W max.
auswaschbar
2,2 kg
Page 3

Lieferumfang 1. Auspacken 2. Montieren
11
10
Akku-Sauger
10
Ladestation
11
Netzteil
12
Dauerfi lter
13
Dauerfi lter-Adapter
14
Drei Schrauben
15
13
15
14
12
Packen Sie das Gerät und alle Zubehörteile aus und überprüfen Sie den Inhalt
auf Vollständigkeit.
ACHTUNG:
Transportieren/versenden Sie das
Gerät grundsätzlich immer in der
Originalverpackung, damit es keinen
Schaden nimmt. Heben Sie dazu die
Verpackung auf.
Entsorgen Sie nicht mehr benötigtes
Verpackungsmaterial entsprechend
den in Ihrem Land geltenden Vorschriften.
HINWEIS:
Sollten Sie einen Transportschaden bemerken, wenden Sie sich umgehend an
Ihren Händler.
3
16
17
9
Stecken Sie das Motorteil (3) auf
1.
die Halterung der Bodendüse (16),
bis es hörbar eintrastet. Um das
Motorteil im Bedarfsfall wieder zu
lösen, drücken Sie die Bodendüse-Entriegelung (9) und ziehen Sie
das Motorteil nach oben von der
Bodendüse ab.
Stecken Sie den Handgriff (2)
2.
passgenau auf die Halterung am
Motorteil (17).
Ziehen Sie die drei Schrauben
3.
(15) am Handgriff fest.
5. Staubbehälter ausleeren
Klopfen Sie den Dauerfi lter zur
4.
Grobreinigung über einem Mülleimer aus.
13
Setzen Sie den Dauerfi lter (13)
5.
mit Dauerfi lter-Adapter (14) wieder
passgenau in den Staubbehälter
ein.
Setzen Sie den Staubbehälter (8)
6.
wieder in die Rückseite des Motorteils (3) ein und drücken Sie den
Staubbehälter an, bis er hörbar
einrastet.
HINWEIS:
Saugen Sie den Untergrund jetzt wie
gewohnt. Der Akku-Sauger gleitet
dank der 360°Gleitrollen nicht nur
vor und zurück, sondern auch seitlich
über den Untergrund. So erreichen
Sie auch beispielsweise Ecken und
Kanten an den Fußleisten.
WARNUNG:
Schalten Sie das Gerät aus, bevor
Sie den Staubbehälter leeren.
7
13
14
8
Drücken Sie die Staubbehälter-
1.
Entriegelung (7) und entnehmen
Sie den Staubbehälter (8).
Nehmen Sie den Dauerfi lter (13)
2.
mit Dauerfi lter-Adapter (14) aus
dem Staubbehälter heraus.
Schütten Sie den aufgesaugten
3.
Staub aus dem Staubbehälter in
einen Mülleimer.
14
3. Akku laden
Bevor Sie mit dem Gerät arbeiten kön-
2
15
3
8
nen, muss der Akku geladen werden.
Stellen Sie die Ladestation (11)
1.
auf einen ebenen Untergrund.
Stecken Sie das Netzteil (12) der
2.
Ladestation (11) in die Steckdose.
HINWEIS:
Stellen Sie sicher, dass das Gerät
ausgeschaltet ist, bevor Sie es auf
die Ladestation stellen (siehe Kapitel
„4. Saugen“).
4
5
11
Stellen Sie den Akku-Sauger mit
3.
der Bodendüse (5) passgenau in
die Ladestation (11). Die Ladeleuchte (4) beginnt zu leuchten.
Lassen Sie den Akku vor der ersten
Benutzung des Akku-Saugers
16-20 h laden (zum späteren Wie-
deraufl aden 14 h).
HINWEIS:
Die Ladeleuchte leuchtet solange
der Akku-Sauger auf der Ladestation
steht. Sie wechselt nicht die Farbe
oder erlischt, wenn der Akku vollständig aufgeladen ist.
HINWEIS:
Stellen Sie den Akku-Sauger nach
jeder Benutzung auf die Ladestation
zurück. So stellen Sie sicher, dass
der Akku-Sauger jederzeit einsatzbereit ist.
Leeren Sie den Staubbehälter und
1.
entnehmen Sie den Dauerfi lter
(13) mit Dauerfi lter-Adapter (14).
13
14
A
Drücken Sie den Dauerfi lter (13)
2.
14
B
13
an den Seiten leicht zusammen
und klappen Sie ihn dann nach
vorne von dem Dauerfi lter-Adapter
(14) ab (Ansicht A).
Reinigung
WARNUNG:
Schalten Sie das Gerät aus, bevor
Sie es reinigen.
Reinigen Sie das Gehäuse ausschließlich mit einem trockenen oder mit einem
leicht angefeuchteten Tuch. Verwenden
Sie keine Reinigungsmittel, Scheuermittel oder Alkohol, da diese das Gehäuse
beschädigen können.
Ersatzteile
Artikel Nr. Beschreibung Menge
0777001 Dauerfi lter 1
3.
Klopfen Sie den Dauerfi lter zur
Grobreinigung über einem Mülleimer aus.
4.
Bürsten Sie Gewebe und Kunststoffteile bei Bedarf ab.
HINWEIS:
Der Dauerfi lter ist nicht auswaschbar. Ersetzen Sie einen stark verschmutzten oder beschädigten Dauerfi lter stets durch einen Neuen.
Drücken Sie den Dauerfi lter (13)
5.
an den Seiten leicht zusammen und
setzen Sie ihn mit der Führungsschiene an die rechten Seite des
Dauerfi lter-Adapter an.
Klappen Sie den
den
Dauerfi lter-Adapter (14), bis er
einrastet (Ansicht B).
Dauerfi lter dann an
Entsorgung
Der Dauerfi lter kann im Hausmüll entsorgt werden.
Wenn das Gebrauchsende erreicht ist, machen Sie das aus-
gediente Gerät unbrauchbar, indem Sie
das Netzteil aus der Steckdose ziehen
und das Stromkabel durchtrennen.
Elektrische Abfälle dürfen nicht zusammen mit Haushaltsabfällen entsorgt
werden. Das Gerät enthält Nickel-Cadmium-Akkus, die nicht in den Hausmüll
gelangen dürfen.
Wenden Sie sich für Ratschläge bezüglich des Recyclings an Ihre Kommunalbehörde oder Ihren Händler.
3
13
14
8
Setzen Sie den Dauerfi lter (13)
6.
mit Dauerfi lter-Adapter (14) wieder
passgenau in den Staubbehälter
ein.
Setzen Sie den Staubbehälter (8)
7.
wieder in die Rückseite des Motorteils (3) ein und drücken Sie den
Staubbehälter an, bis er hörbar
einrastet.
ERVICE-HOTLINE
n Deutschland stehen wir Ihnen für Fragen,
Anregungen oder bei Problemen unt er fol-
gender Nummer gern zur Verfügung:
0180 501 50 50*
Mo-Fr, 8-20 Uhr
*14 Ct pro Minute aus dem
deutschen Festnetz
Störungen
Bevor Sie das Gerät an den Royal
Appliance Kundendienst einschicken,
überprüfen Sie anhand der folgenden Tabelle, ob Sie den Fehler selbst beseitigen
können.
WARNUNG:
Bevor Sie sich auf Fehlersuche begeben, schalten Sie das Gerät aus. Verwenden Sie niemals ein defektes Gerät.
Fehler Ursache, Lösung
Ladeleuchte
leuchtet nicht
Gerät läuft
nicht
Gerät nimmt
keinen
Schmutz auf
oder gibt Staub
ab
Netzteil ist nicht eingesteckt.
Netzteil einstecken.
Steckdose führt keinen
Strom.
Testen Sie das Netzteil an
einer anderen Steckdose,
bei der Sie sich sicher sind,
dass diese Strom führt.
Ein-/Aus-Schalter eingeschaltet.
Akku defekt. Royal
Appliance Kundendienst
kontaktieren.
Akku leer.
Akku laden.
Staubbehälter ist voll oder
verstopft.
Staubbehälter leeren/
reinigen.
Akku fast leer.
Akku laden.
Dauerfi lter verstopft oder
beschädigt.
Dauerfi lter reinigen oder
ersetzen.
®
®
Page 4

GB
Safety
Operating Manual
Kruz
Overview
1
2
Regarding the operating
manual
Read this operating manual through
completely before working with the appliance. Keep the operating manual safe. If
you pass the appliance on to a third party,
give them the operating manual as well.
Non-compliance with these instructions
can lead to serious injuries or damage to
the appliance.
We assume no liability for damage that
occurs as a result of non-compliance with
this operating manual.
The appliance may only be operated in
households. It is not suitable for industrial
or commercial use.
Instructions
Important instructions for your safety are
marked as follows:
WARNING:
Warns against hazards for your
health and indicates possible risks
of injury.
ATTENTION:
Indicates possible hazards for the appliance or other objects.
INSTRUCTION:
Highlights tips and information for
you.
Power supply
The appliance is charged and operated
with electrical power which means there
is in principle a risk of electric shock.
Therefore pay particular attention to the
following:
Never touch the power unit with wet
hands.
If you want to pull the power unit out
of the socket then always pull directly
on the plug and never on the cable
as it could break.
Make sure that the power cable is
not bent, caught or run over, and that
it does not come into contact with
heat sources.
Never immerse the device/plug
socket in water or other liquids and
keep it away from rain and moisture.
Only charge the device if the electrical voltage matches the voltage of
your plug socket. The wrong voltage
can destroy the power unit.
Warranty
Within the warranty period, we will remove all defects free of charge that are
due to material or manufacturing faults,
either by repair work or replacing the appliance or accessories, at our discretion
(damage to accessory parts does not
automatically lead to the entire appliance
being replaced). The warranty does not
cover damage due to improper use (operating with the wrong power type/voltage,
connecting to unsuitable power sources,
breakage, etc.), normal wear and defects
that only insignifi cantly affect the value or
the ability of the appliance to be used.
The warranty is made null and void if any
work is carried out by a site not authorized by us or if spare parts other than
Royal® Appliance spare parts are used.
Wear parts are not included in the warranty and are therefore at the customer's
expense!
The warranty only comes into force if the
purchase date is confi rmed by a stamp
and signature of the dealer on the war-
Batteries
The appliance contains rechargeable
nickel-cadmium batteries.
Only use the power unit supplied
with the appliance for charging
the batteries. Any warranty claims
become null and void if you use
a power unit other than the one
included in the scope of delivery.
Do not throw the batteries into fi re or
subject to high temperatures. There
is a risk of explosion.
If used wrongly, fl uid can leak from
the batteries. This can cause skin
irritations. Avoid any contact with
the fl uid. If you experience contact
with the fl uid, rinse with lots of water.
If the fl uid comes into contact with
your eyes, rinse immediately for 10
min. with water and fi nd a doctor
straightaway.
If you have to replace the batteries, contact a specialist dealer or Royal® Appliance Customer Services. We assume
no liability for any damage resulting from
improperly replaced batteries.
Children
Never leave the appliance unattended, and use it with the greatest
of care if children or persons who
cannot assess the risks are nearby.
Children or persons who cannot
assess the risks may not use the appliance. Store it so it is inaccessible.
Packaging material must not be used to
play with. There is a danger of suffocation.
ranty card or if a copy of the invoice is
included with the appliance when it is
sent in. Warranty work does not extend
the warranty time nor does it constitute a
claim for a new warranty!
Send the appliance with an emptied dust
container and a short description of the
fault in block capitals. Write the comment
"Regarding warranty" on the address
label. Send it together with the warranty
card or a copy of the invoice to our Service department (see cover for the address).
Intended use
The rechargeable vacuum cleaner is
only used for vacuuming small amounts
of dust from hard fl oors. Any other use is
considered non-intended use and is prohibited. In particular, the activities listed
in the following may under no circumstances be carried out with the battery
powered vacuum cleaner:
Do not vacuum:
hot ash, burning cigarettes or
–
matches. These can cause fi re.
pointed objects such as glass frag-
–
ments, nails, etc. These objects
destroy the fi lter.
water and other fl uids, especial-
–
ly damp carpet cleaning agents.
Dampness inside the appliance
can lead to a short-circuit.
toner (for laser printers, copy ma-
–
chines, etc.). There is a risk of fi re
and explosion.
plaster, cement, etc. The fi lter can
–
become blocked.
Do not vacuum people or animals
(e. g. hair, fi ngers or other body
parts) or push body parts into the
openings of the appliance. There is a
danger of injury.
Do not use near explosive or easily
fl ammable substances. There is a
risk of fi re or explosion.
Do not use in the open-air. There is a
risk of the appliance being destroyed
by rain and dirt.
Do not push objects into the
openings of the appliance. It could
overheat.
If the appliance is defective
Never operate a defective appliance or an
appliance with a defective cable. There is
a considerable risk of injury. Send defective appliances for repair to a specialist
dealer or to Royal® Appliance Customer
Service.
Spare parts
Accessory parts and spare parts can be
reordered. The addresses can be found
on the last page:
„Royal® Appliance Int. GmbH International Service“.
3
7
4
6
On/off switch
1
Handle
2
Motor section
3
Charging light
4
Floor nozzle
5
Large suction end
6
Dust container release
7
Dust container
8
Floor nozzle release
9
5
8
9
4. Vacuuming
WARNING:
Check the battery powered vacuum
cleaner before each use. A damaged
appliance must never be used. There
is a risk of injury.
INSTRUCTION:
Place the rechargeable vacuum
cleaner on the charging station after
each use. Thus you ensure that the
rechargeable vacuum is always ready
for use.
Take the rechargeable vacuum
1.
cleaner (10) out of the charging
station (11). The charging light (4)
goes out.
Switch on the rechargeable
2.
vacuum cleaner using the on/off
switch (1).
To switch it off, press the on/off
3.
button (1) again.
6. Cleaning/exchanging
permanent fi lter
The rechargeable vacuum cleanerr
has a permanent fi lter, which fi lters
sucked-in air. The permanent fi lters
can become blocked after some time
and can reduce the suction power as
a result. It is therefore important that
the permanent fi lters are cleaned regularly.
If you determine that a permanent fi lter
is damaged, replace it immediately.
WARNING:
Switch off the appliance before removing the permanent fi lter.
Technical data
Type of appliance:
Model: Kruz
Power unit: 230V ~ 50Hz
Battery: Ni-Cd 12V DC
max. operating
time:
Output: 72 W nom.
Dust container: approx. 300 ml,
Weight: approx.
Bagless rechargeable
vacuum cleaner for
hard fl oors
15V DC 200 mA
1600 mAh
time 16-20 h
Charging
approx. 8-10 min
85 W max.
washable
2.2 kg
Page 5

Scope of delivery 1. Unpacking 2. Assembly
11
13
10
14
15
Rechargeable vacuum cleaner
10
Charging station
11
Power unit
12
Permanent fi lter
13
Permanent fi lter adapter
14
Three screws
15
12
Unpack the appliance and all accessory
parts and check that the contents are
complete.
ATTENTION:
Always transport/send the appliance
in its original packaging so that it
does not become damaged. Keep the
packing material for this purpose.
Dispose of any packing material that
is no longer required in accordance
with the provisions applicable in your
country.
INSTRUCTION:
If you should notice damage due to
transport, then contact your dealer immediately.
3
16
17
9
Push the motor section (3) onto
1.
the holder of the fl oor nozzle (16),
until it audibly clicks into place. In
order to release the motor section
again, in case of need, press the
fl oor nozzle release (9) and pull
the motor section upward, away
from the fl oor nozzle.
Push the handle (2) onto the mo-
2.
tor section (17) so it fi ts exactly.
Firmly tighten the three screws
3.
(15) on the handle.
5. Emptying the dust container
Knock the permanent fi lter over a
4.
dustbin for a rough clean.
13
Re-insert the permanent fi lter (13)
5.
with permanent fi lter adapter (14)
into the dust container.
Re-insert the dust container (8) in
6.
the back side of the motor section
(3) and push the dust container in
until it audibly clicks into place.
INSTRUCTION:
Now vacuum the surface as normal.
Thanks to the 360° guide rollers, the
rechargeable vacuum cleaner glides
not only forward and backward, but
also laterally across the surface. So
you can also reach corners and edges on the baseboards, for example.
WARNING:
Switch off the appliance before emptying the dust container.
7
13
14
8
Press the dust container release
1.
(7) and remove the dust container
(8).
Remove the permanent fi lter (13)
2.
with permanent fi lter adapter (14)
from the dust container.
Tip the collected dust out of the
3.
dust container into a dustbin.
14
3. Charging the battery
The battery must be charged before
2
15
3
8
working with the appliance.
Place the charging station (11) on
1.
an even surface.
Then plug the power unit (12) of
2.
the charging station (11) into the
socket.
INSTRUCTION:
Make sure that the appliance is
switched off before you place it on
the charging station (see chapter "4.
Vacuuming").
4
5
11
Place the rechargeable vacuum
3.
cleaner with the fl oor nozzle (5) so
that it fi ts exactly into the charging
station (11). The charging light
(4) begins to light up.
fi rst use of the rechargeable vacuum
cleaner leave the battery to charge
16-20 h (for recharging later 14 h).
INSTRUCTION:
The charging light lights up as long
as the rechargeable vacuum is on the
charging station. It does not change
colour or go out if the battery is fully
charged.
INSTRUCTION:
Place the rechargeable vacuum
cleaner back on the charging station
after each use. Thus you ensure that
the rechargeable vacuum is always
ready for use.
Prior to the
Empty the dust container and
1.
remove the permanent fi lter (13)
with permanent fi lter adapter (14).
13
14
A
Gently press the permanent fi lter
2.
14
B
13
(13) on the sides and then clap it
forward, away from the permanent
fi lter adapter (14) (Image A).
Knock the permanent fi lter over a
3.
dustbin for a rough clean.
Cleaning
WARNING:
Switch off the appliance before cleaning it.
Only clean the housing with a dry or
slightly damp cloth. Do not use any cleaning agent, scouring agent or alcohol as
these can damage the housing.
Spare parts
Item No. Description Quan-
0777001 Permanent fi lter 1
tity
4.
Brush off the fabric and plastic
parts, as necessary.
INSTRUCTION:
The permanent fi lter is not washable.
Always replace a heavily-soiled or
damaged permanent fi lter with a new
one.
Gently press the permanent fi lter
5.
(13) on the sides and arrange it with
the guide rail on the right side of
the
permanent fi lter adapter. Then
clap the
permanent fi lter onto the
permanent fi lter adapter (14), until
it clicks into place (Image B).
Waste disposal
The permanent fi lter can be
disposed of with the domestic waste. When the appliance
comes to the end of its service
life, render the fi nished appli-
ance unusable by removing the mains
plug from the socket and disconnecting
the power cable. Electrical waste must
not be disposed of with domestic waste.
The appliance contains nickel-cadmium
batteries that must not end up in the
domestic waste. Contact your municipal
authority or your dealer for any advice
regarding recycling.
3
13
14
8
Re-insert the permanent fi lter (13)
6.
with permanent fi lter adapter (14)
into the dust container.
Re-insert the dust container (8) in
7.
the back side of the motor section
(3) and push the dust container in
until it audibly clicks into place.
Faults
Before sending the appliance to Royal
Appliance Customer Services, use the
following table to check whether you can
correct the malfunctions yourself.
WARNING:
Switch off the appliance before troubleshooting. Never use a defective appliance.
Malfunc-
Cause, Solution
tion
Charging
light does not
light up
Appliance does
not work
Appliance does
not pick up dirt
or emits dust
Power unit has not been
plugged in.
Insert power unit.
Socket does not carry any
current.
Test the power unit at
another socket which you
are sure carries current.
On/off switch switched on.
Battery defect. Contact
Royal®Appliance customer service.
Battery dead.
Charge the battery.
Dust container is full or
blocked.
Empty/clean dust container.
Battery almost dead.
Charge the battery.
Permanent fi lter blocked or
damaged.
Clean or replace permanent fi lter.
®
Page 6

Royal® Appliance Int. GmbH International Service
DE
Royal Appliance International GmbH
Abt. Kundenservice
Itterpark 7-9
40724 HILDEN
DEUTSCHLAND
Tel.: +49 - 2103 - 20 07 10
Fax: +49 - 2103 - 20 07 77
AT
Zmugg Elektronik Service
und Vertriebges. M.b.H.
Fabriksgasse 27
8020 GRAZ
ÖSTERREICH
Tel: +43 - 316 - 77 21 20
Fax: +43 - 316 - 77 21 20 10
PYC
ɈɈɈ ɊɌɐ „ɋɨɜɢɧɫɟɪɜɢɫ“
127081 ɝ. ɆɈɋɄBȺ
əɫɧɵɣ ɩɪɨɟɡɞ, ɞ. 10
ɊɈɋɋɂɃɋɄȺə ɎȿȾȿɊȺɐɂə
Ɍɟɥ.: +7 - 495 - 47 39 003
FR
Pièce de rechange service
OPM NANTÉS Enterprises
33 Rue du Bois Briand
BP 61635
44316 NANTES Cedex 3
FRANCE
Tel. +33 - 2 - 40 49 64 25
Fax +33 - 2 - 40 93 96 22
www.opm-france.com
CZ SK
Le Cygne electronic service
spol. s r.o.
Jablonecká 722/8
190 00 PRAHA 9
ýESKÁ REPUBLIKA
Tel: +420 - 28 68 83 940
Fax: +420 - 28 68 85 064
DK
Scandia Serviceteknik A/S
Hedeager 5
2605 BRØNDBY
DANMARK
Tel: +45 - 43 20 27 10
Fax: +45 - 43 20 27 19
ES
Royal Appliance Espana, SL
Royal, Dirt Devil, Stellar
C/ Jazmin, 66 - 3°
28033 MADRID
ESPAÑA
Tel: +34 - 902 - 43 06 63
PL
SERV-SERWIS Sp. z o.o.
ul. Poniatowskiego 4/1
45-049 OPOLE
POLSKA
Tel: +48 - 77 - 45 36 139
Fax: +48 - 77 - 45 36 138
Mail: adabrowski@serv-serwis.pl
SI
Strojinc Ciril s.p.
Koseskega ul. 1a
1000 LJUBLJANA
SLOVENIJA
Tel: +386 -1- 42 28 489
NL
Z.E.S. Goes B.V.
T.a.v. afd. Service
Pearyweg 1
4462 GT GOES
NEDERLAND
Tel: +31 - 113 - 24 07 00
Fax: +31 - 113 - 24 07 50
Mail: dirtdevil@zesgoes.nl
RUS
OOO RTC “Sovinservice“
127081 MOSCOW
Jasny proezd, 10
ROSSIJSKAJA FEDERAZIJA
Tel.: +7 - 495 - 47 39 003
HU
FLAG Kft.
Práter u. 51
1083 BUDAPEST
MAGYARORSZÁG
Tel.: +36 - 1 - 21 00 344;
Fax: +36 - 1 - 21 02 775
Mail: fl agservice@axelero.hu ;
diszpecserkozpont@ fl agservice.hu
Garantiekarte
Warranty Card
Carte de garantie
Garantiekaart
Tarjeta de garantía
Scheda di garanzia
Ƚɚɪɚɧɬɢɣɧɚɹ ɤɚɪɬɨɱɤɚ
Záruþný list
Garancijski list
Garancialevél
Záruþní list
Karta gwarancyjna
Jamstveni list
Garantibevis
Kruz
Stempel und Unterschrift des Händlers / Stamp and signature of the dealer / Tampon et signature du revendeur / Stempel en handtekening van de handelaar /
Sello y fi rma del vendedor / Timbro e fi rma del rivenditore / ɉɟɱɚɬɶ ɢ ɩɨɞɩɢɫɶ ɩɪɨɞɚɜɰɚ / Peþiatka a podpis predajcu / Žig in podpis trgovca / A kereskedés
bélyegzĘje és aláírása / Razítko a podpis prodejce / Pieczątka i podpis sprzedawcy / Peþat i potpis trgovca / Forhandlerens stempel og underskrift
Fehlerbeschreibung / Fault description / Description du défaut / Beschrijving van de fout / Descripción del fallo /
Descrizione dell‘anomalia / Ɉɩɢɫɚɧɢɟ ɧɟɢɫɩɪɚɜɧɨɫɬɢ / Popis poruchy / Opis napake / Hiba leírása /
Popis poruchy / Opis usterki / Opis greške / Fejlbeskrivelse
Kaufdatum / Date of purchase / Date d’achat / Koopdatum / Fecha de compra / Data di acquisto / Ⱦɚɬɚ ɩɨɤɭɩɤɢ /
Dátum zakúpenia / Datum nakupa / Vásárlás napja / Datum zakoupení / Data zakupu / Datum kupnje / Købsdato
HR
TD ‘’MEÐIMURKA’’ D.D.
Trg Republike 6
40000 ýAKOVEC
HR VATSK A
Tel.: +385 - 40 - 31 27 60
Fax: +385 - 40 - 32 86 61
www.dirtdevil.dewww.dirtdevil.de
 Loading...