

Page 1
Bagline
M7050
Bodenstaubsauger
Bedienungsanleitung
Cylinder vacuum cleaner
Operating Manual
Aspirateur
Mode d‘emploi
Vloerstofzuiger
Bedieningshandleiding
Aspiradora rodante
Manual de instrucciones
Напольный пылесос
Руководство по эксплуатации
Podlahovy vysávaè
Návod na obsluhu
Talni sesalec
Navodila za uporabo
Padló porszívó
Kezelési útmutató
Vysavaè
Návod k obsluze
Odkurzacz do podlóg
Instrukcja obslugi
Podni usisavaè
Uputa za upotrebu
Page 2

Bedienungsanleitung ................................................................................ 4 - 18
Operating Manual ....................................................................................... 19 - 33
Mode d'emploi............................................................................................. 34 - 48
Bedieningshandleiding .............................................................................. 49 - 63
Manual de instrucciones ............................................................................ 64 - 78
Руководство по эксплуатации ............................................................... 79 - 93
Instrukcja obsługi ....................................................................................... 94 - 108
DGFOE
RUS
o
Qooooo
Návod k obsluze.......................................................................................... 109 - 123
Návod na obsluhu....................................................................................... 124 - 138
Betjeningsvejledning.................................................................................. 139 - 153
Bruksanvisning ........................................................................................... 154 - 168
Kezelési útmutató ....................................................................................... 169 - 183
2
CZSK
SLO
HRH
Page 3
D
13
12
10
3
11
9
8
7
4
5
1
2
6
15
14
19
24
17
20
16
22
18
21
23
Abb. 1
3
Page 4

Übersicht über Ihren M7050
Übersicht über Ihren M7050
Vielen Dank!
D
Wir danken Ihnen für den Kauf des M7050 und wünschen Ihnen viel Freude mit dem Gerät!
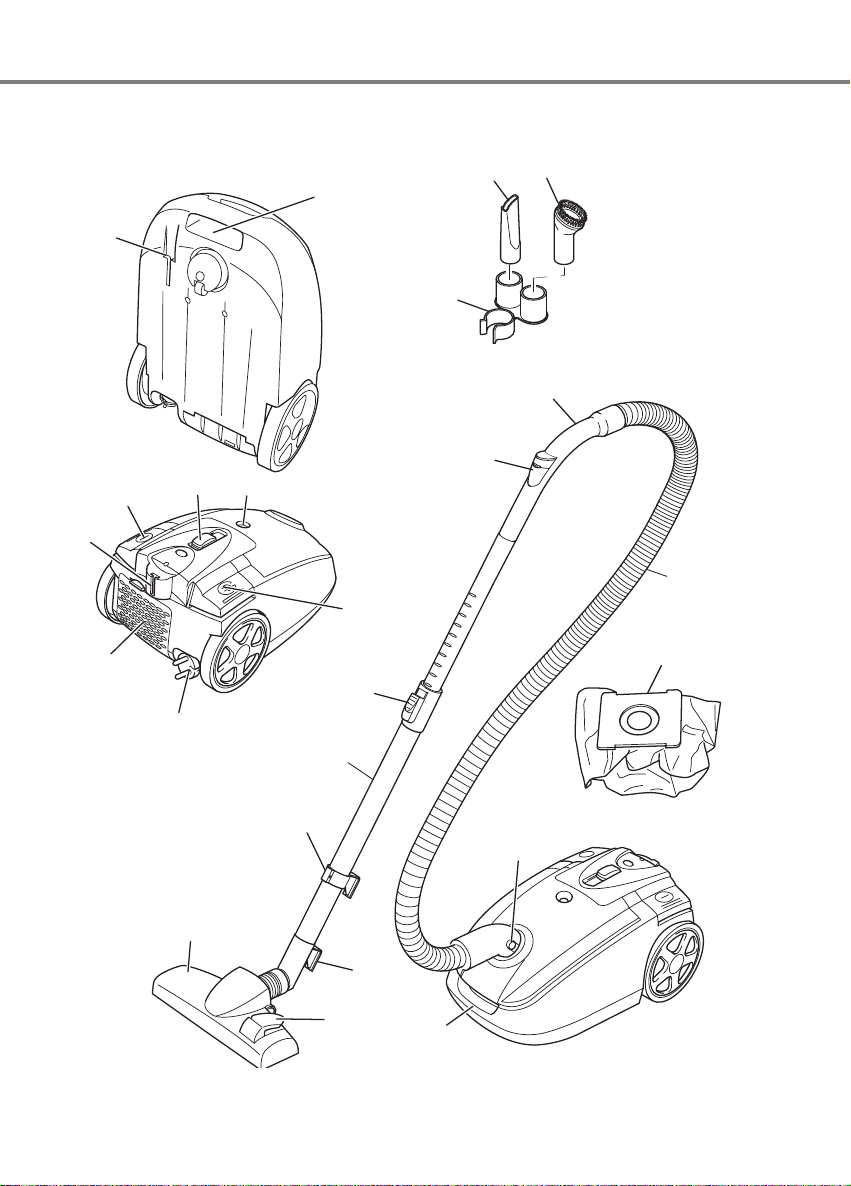
Geräteteile/Lieferumfang
1 Handgriff
2 Nebenluftregler
3 Polsterdüse
4 Fugendüse
5 Zubehörhalterung
6 Saugschlauch
7 Kabelaufrolltaste
8 Staubbeutelwechsel-Anzeige
9 Saugleistungsregler
10 Ein-/Aus-Schalter
11 Trageeingriff
12 Verstauhalterung
13 Parkhalterung
14 Stromkabel mit Stecker
15 Ausblasfilter-Abdeckung
16 Teleskoprohr-Arretierung
17 Teleskoprohr
18 Parkhaken
19 Bodendüse
20 Umschalter „Teppich/Hartboden“
21 Entriegelung für Staubraumdeckel
22 Entriegelung für Saugschlauch
23 Staubbeutelhalter mit Staubfilterbeutel (ein
weiterer Staubfilterbeutel im Lieferumfang)
24 Parkhaken
optionales Zubehör:
- Parkettbürste
- Turbobürste
Technische Daten
Geräteart : Bodenstaubsauger
Modell : M7050
Spannung : 220 V - 240 V ~50/60 Hz
Leistung : 1600 W nom. - 1800 W nom.
1800 W max. - 2200 W max.
(je nach Modell und Ausführung)
Staubfilterbeutel : Staubfilterbeutel „Swirl MicroPor Y93“,
Filter : Motorschutzfilter,
Stromkabel mit Stecker : ca. 5 m Länge
Gewicht : ca. 4,9 kg
Technische und gestalterische Änderungen im Zuge stetiger Produktverbesserungen vorbehalten.
®
© Royal
Appliance International GmbH
4
3,7 Liter
Hygiene-Ausblasfilter
Page 5

Inhaltsverzeichnis
1 Sicherheitshinweise ................................................................. 6
1.1 zur Bedienungsanleitung............................................................................................. 6
1.2 zu den verwendeten Hinweisen................................................................................... 6
1.3 zur Stromversorgung................................................................................................... 6
1.4 zu Kindern ................................................................................................................... 7
1.5 zur bestimmungsgemäßen Verwendung..................................................................... 7
1.6 bei defektem Gerät...................................................................................................... 7
2 Auspacken und Montieren....................................................... 8
2.1 Auspacken................................................................................................................... 8
2.2 Montieren..................................................................................................................... 8
2.3 Weitere Düsen (Zubehör) verwenden ......................................................................... 9
3 Bedienung ................................................................................. 10
3.1 Staubsaugen ............................................................................................................... 10
3.2 Ausschalten und Stromkabel aufrollen........................................................................ 12
3.3 Transportieren und Aufbewahren................................................................................ 12
4 Wartung ..................................................................................... 13
4.1 Staubfilterbeutel wechseln........................................................................................... 13
4.2 Filterwechsel................................................................................................................ 14
4.3 Motorschutzfilter wechseln .......................................................................................... 14
4.4 Hygiene-Ausblasfilter wechseln................................................................................... 15
D
5 Fehlerbehebung ........................................................................ 16
6 Reinigung .................................................................................. 17
6.1 Gehäuse reinigen ........................................................................................................ 17
6.2 Filter reinigen............................................................................................................... 17
7 Entsorgung................................................................................ 17
8 Ersatzteile .................................................................................. 17
8.1 Verschleißteilliste......................................................................................................... 17
8.2 Bezugsquellen............................................................................................................. 17
9 Garantie ..................................................................................... 18
9.1 Garantiebedingungen.................................................................................................. 18
9.2 Im Garantiefall ............................................................................................................. 18
Inhaltsverzeichnis
5
Page 6
1 Sicherheitshinweise
1 Sicherheitshinweise
1.1 zur Bedienungsanleitung
1.2 zu den verwendeten
Hinweisen
Lesen Sie diese Bedienungsanleitung vollständig durch,
bevor Sie mit dem Gerät arbeiten.
Bewahren Sie die Anleitung gut auf. Falls Sie das Gerät an
Dritte weitergeben, geben Sie die Bedienungsanleitung mit.
Die Nichtbeachtung dieser Anleitung kann zu schweren Verletzungen oder Schäden am Gerät führen.
Für Schäden, die durch Nichtbeachtung dieser Bedienungsanleitung entstehen, übernehmen wir keine Haftung.
Das Gerät darf nur im Haushalt eingesetzt werden. Es
ist für eine gewerbliche Nutzung nicht geeignet.
Wichtige Hinweise für Ihre Sicherheit sind besonders gekennzeichnet. Beachten Sie diese Hinweise unbedingt, um
Unfälle und Schäden am Gerät zu vermeiden:
WARNUNG:
Warnt vor Gefahren für Ihre Gesundheit und zeigt mögliche Verletzungsrisiken auf.
ACHTUNG:
Weist auf mögliche Gefährdungen für das Gerät oder
andere Gegenstände hin.
HINWEIS:
Hebt Tipps und Informationen für Sie hervor.
1.3 zur Stromversorgung Das Gerät wird mit elektrischem Strom betrieben, dabei
besteht grundsätzlich die Gefahr eines elektrischen
Schlags. Achten Sie daher besonders auf Folgendes:
- Fassen Sie den Stecker nie mit nassen Händen an.
- Wenn Sie den Stecker aus der Steckdose herausziehen wollen, ziehen Sie immer direkt am Stecker. Ziehen Sie niemals am Kabel, es könnte reißen.
- Achten Sie darauf, dass das Stromkabel nicht geknickt, eingeklemmt, überfahren wird oder mit Hitzequellen in Berührung kommt.
- Verwenden Sie nur Verlängerungskabel, die für die
Leistungsaufnahme des Gerätes ausgelegt sind.
- Tauchen Sie das Gerät niemals in Wasser oder andere Flüssigkeiten und halten Sie es vor Regen und
Nässe fern.
- Betreiben Sie das Gerät nur, wenn die auf dem Typenschild angegebene elektrische Spannung mit der
Spannung Ihrer Steckdose übereinstimmt. Falsche
Spannung kann das Gerät zerstören.
6
Page 7
1 Sicherheitshinweise
1.4 zu Kindern Lassen Sie das Gerät nicht unbeaufsichtigt und ver-
wenden Sie es mit größter Vorsicht, wenn Kinder oder Personen, die die Gefahren nicht einschätzen können, in der
Nähe sind.
Kinder oder Personen, die die Gefahren nicht einschät-
zen können, dürfen das Gerät nicht benutzen. Bewahren
Sie es unzugänglich auf.
Verpackungsmaterialien dürfen nicht zum Spielen ver-
wendet werden. Es besteht Erstickungsgefahr.
D
1.5 zur bestimmungsgemäßen Verwendung
Verwenden Sie den Bodenstaubsauger ausschließlich für
das Reinigen von normal verschmutzten Böden, Teppichen
und Gardinen. Jede weitere Verwendung gilt als nicht bestimmungsgemäß und ist untersagt.
Verboten ist insbesondere:
Das Saugen von:
- Haaren, Fingern und anderen Körperteilen. Sie könnten eingezogen und verletzt werden.
- Kleidungsstücken (z. B. Schuhbändern, Schals etc.).
Sie könnten eingezogen werden und Verletzungen
hervorrufen.
- Wasser und anderen Flüssigkeiten, insbesondere
feuchten Teppich-Reinigungsmitteln. Feuchtigkeit im
Inneren kann zum Kurzschluss führen.
- Tonerstaub (für Laserdrucker, Kopierer etc.). Es besteht Brand- und Explosionsgefahr.
- glühender Asche, brennenden Zigaretten oder
Streichhölzern. Es kann zum Brand kommen.
- spitzen Gegenständen, wie Glassplittern, Nägeln etc.
Diese Gegenstände zerstören die Filter.
- Gips, Zement etc. Die Filter können verstopfen.
Die Verwendung in der Nähe von explosiven oder leicht
entzündlichen Stoffen. Es besteht Brand- oder Explosionsgefahr.
Die Verwendung im Freien. Es besteht die Gefahr, dass
Regen und Schmutz das Gerät zerstören.
Das Hineinstecken von Gegenständen in die Öffnungen
des Gerätes. Es könnte überhitzen.
1.6 bei defektem Gerät Betreiben Sie niemals ein defektes Gerät, oder ein Ge-
rät mit einem defekten Kabel. Es besteht erhebliches Verletzungsrisiko.
Geben Sie ein defektes Gerät zur Reparatur an einen
Fachhändler oder den Royal
Adresse ZSeite 18, „Garantie“.
®
Appliance-Kundendienst.
7
Page 8
2 Auspacken und Montieren
2 Auspacken und Montieren
2.1 Auspacken 1. Packen Sie das Gerät und alle Zubehörteile aus.
2. Überprüfen Sie den Inhalt auf Vollständigkeit. Informa-
tionen zum Lieferumfang ZSeite 4, „Übersicht über
Ihren M7050“.
ACHTUNG:
Transportieren/versenden Sie das Gerät grundsätzlich
immer in der Originalverpackung, damit es keinen Schaden nimmt. Heben Sie dazu die Verpackung auf.
Entsorgen Sie nicht mehr benötigtes Verpackungsmaterial gemäß den in Ihrem Land geltenden Vorschriften.
HINWEIS:
Sollten Sie einen Transportschaden bemerken, wenden
Sie sich umgehend an Ihren Händler.
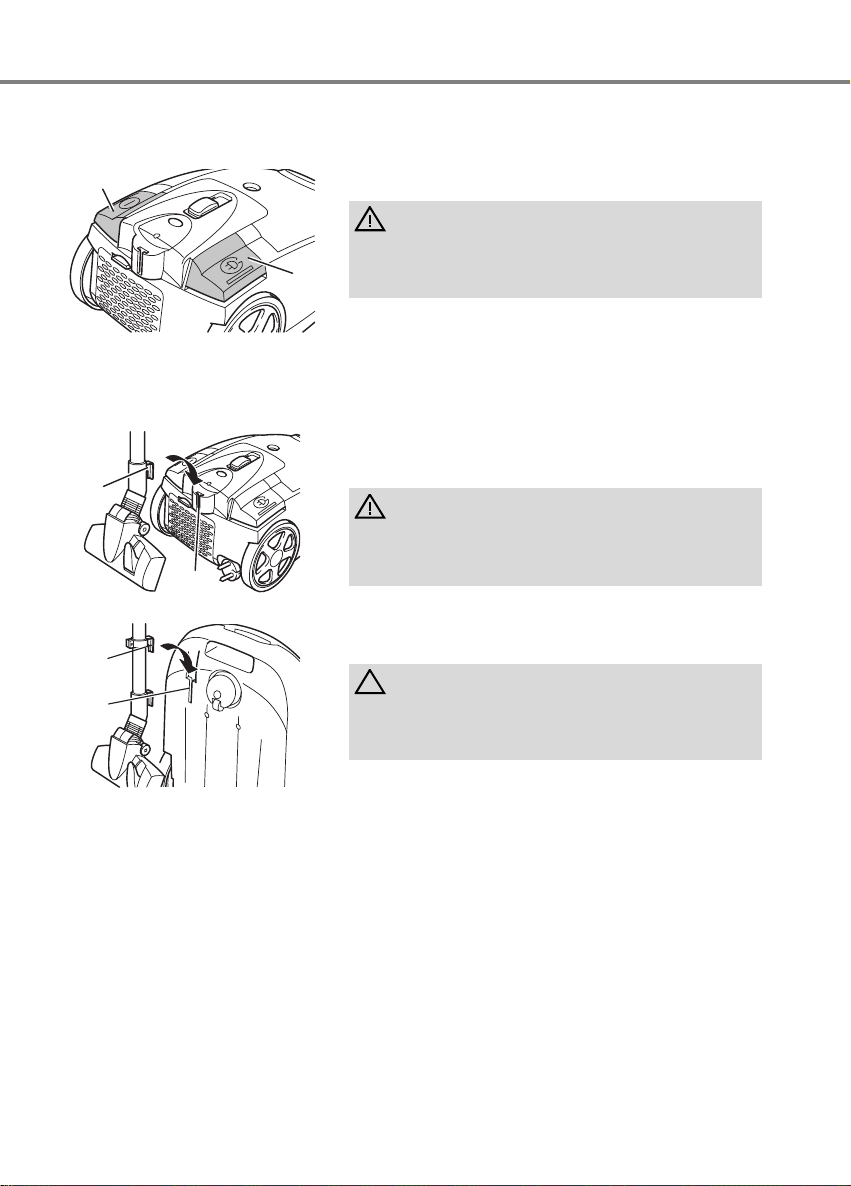
2.2 Montieren
1
WARNUNG:
Montieren Sie das Gerät nur, wenn der Stecker aus der
Steckdose gezogen ist. Das Gerät könnte versehentlich
eingeschaltet werden.
2
Abb. 2
1
4
3
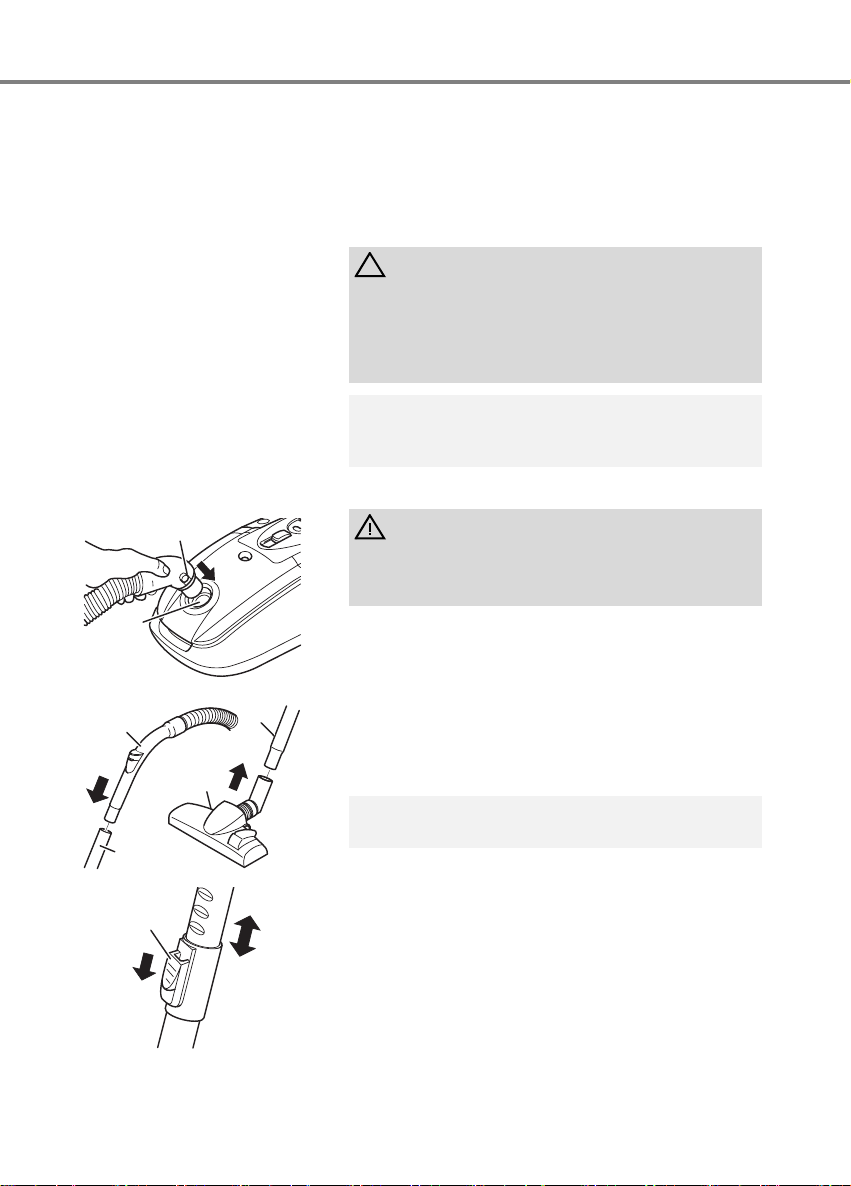
1. Stecken Sie das Ende des Saugschlauchs (Abb. 2/1) in
die Aufnahmeöffnung (Abb. 2/2) des Bodenstaubsaugers, bis die Verriegelung hör- und spürbar einrastet.
2. Stecken Sie den Handgriff (Abb. 3/1) in das obere Ende
des Teleskoprohrs (Abb. 3/2).
3. Stecken Sie die Bodendüse (Abb. 3/3) auf das untere
Ende des Teleskoprohrs (Abb. 3/4).
HINWEIS:
Eventuell ist es erforderlich, etwas fester zu drücken.
2
Abb. 3
1
Abb. 4
4. Stellen Sie die Länge des Teleskoprohrs ein. Drücken
Sie dazu die Teleskoprohr-Arretierung (Abb. 4/1) nach
unten. Ziehen Sie dann das Teleskoprohr am Handgriff
(Abb. 3/1) auf die gewünschte Länge. Zum Verriegeln
lassen Sie die Teleskoprohr-Arretierung beim Ziehen
los. Sie hören ein deutliches Klicken.
8
Page 9
2 Auspacken und Montieren
5
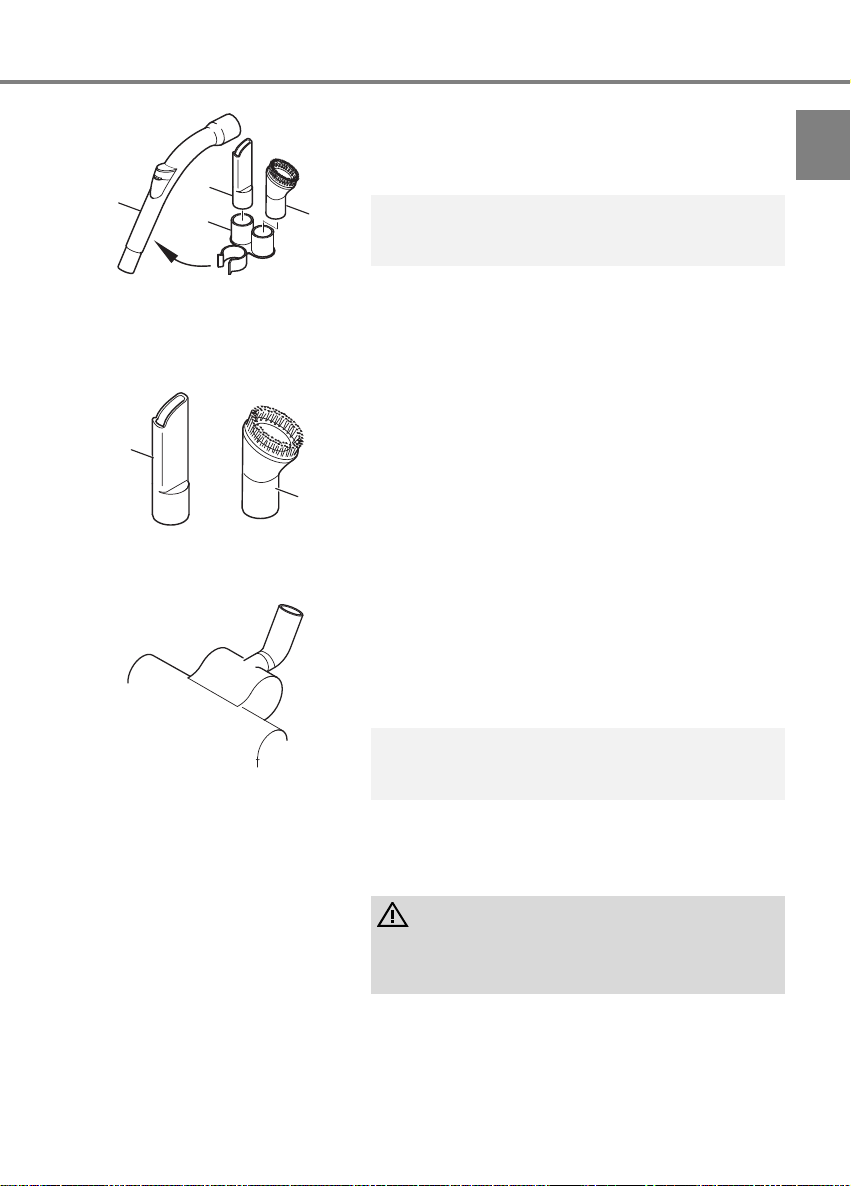
5. Stecken Sie die Zubehörhalterung (Abb. 5/1) auf den
Handgriff (Abb. 5/2). Schieben Sie dann Möbelbürste
(Abb. 5/3) und Fugendüse (Abb. 5/4) auf die Aufnah-
2
4
1
3
Abb.
mevorrichtungen.
HINWEIS:
Bei Bedarf können Sie die Zubehörhalterung auch am
Teleskoprohr anbringen.
Ihr Bodenstaubsauger ist jetzt einsatzbereit.
D
2.3 Weitere Düsen (Zubehör) verwenden
1
2
Abb. 6
Abb. 7
Neben der soeben montierten Bodendüse können Sie mit
weiteren Düsen den Funktionsumfang Ihres Bodenstaubsaugers erweitern:
Als Zubehör sind die Fugendüse und die Polsterdüse
im Lieferumfang enthalten. Sie können bei Nichtgebrauch
an der Zubehörhalterung befestigt werden (Abb. 5).
- Fugendüse (Abb. 6/1)
Benutzen Sie diese, um Staub aus schwer zugänglichen Stellen zu saugen.
- Möbelbürste (Abb. 6/2)
Benutzen Sie diese, um Staub von Gegenständen zu
saugen, die empfindliche Oberflächen haben (z. B.
Schränke, Tische).
Optional erhältlich sind weiterhin:
- Turbobürste (Abb. 7)
Diese besitzt einen rotierenden Bürstenkopf und eignet sich daher bestens zur Tiefenreinigung von Teppichen. Das Bürsten bewirkt zudem ein Aufrichten
des Teppichflors.
HINWEIS:
Bei der Verwendung der Turbobürste entsteht durch die
hohe Drehzahl der Bürste ein lautes Geräusch.
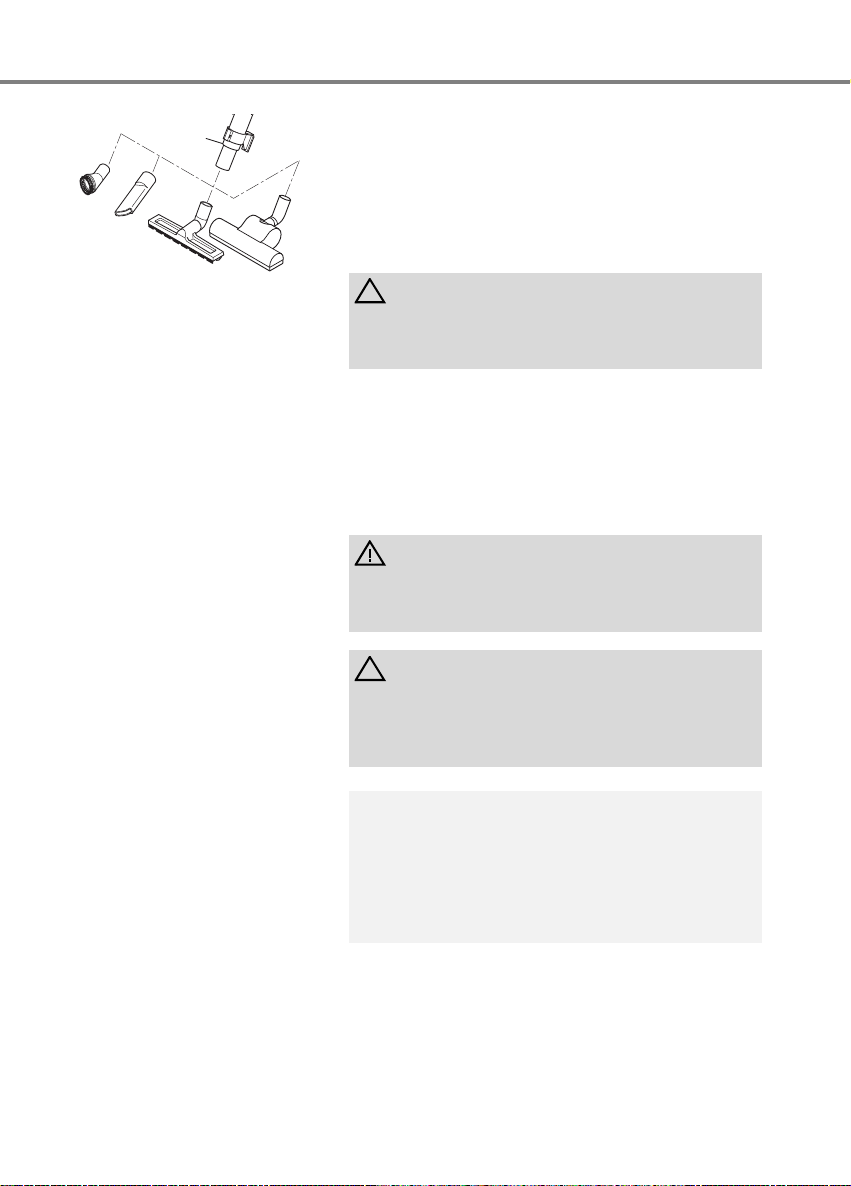
- Parkettbürste (Abb. 8)
Diese ist mit langen Borsten ausgestattet und dient
zum Absaugen besonders empfindlicher Oberflächen
(z. B. Parkett, Laminat).
WARNUNG:
Montieren Sie Düsen nur, wenn der Stecker aus der
Steckdose gezogen ist. Das Gerät könnte versehentlich
eingeschaltet werden.
9
Page 10
3 Bedienung
1
1
Abb. 9
3 Bedienung
3.1 Staubsaugen .
Zum Aufsetzen der Düsen gehen Sie wie folgt vor:
1. Schalten Sie das Gerät aus und ziehen Sie den Stecker
aus der Steckdose.
2. Ziehen Sie die vorhandene Düse vom Teleskoprohr ab.
3. Stecken Sie die gewünschte Düse auf das untere Ende
des Teleskoprohrs oder bei Bedarf direkt auf den Handgriff (Abb. 9).
ACHTUNG:
Beim Einsatz des Bodenstaubsaugers ohne aufgesteckte Düse besteht erhöhte Gefahr, Gegenstände versehentlich einzusaugen.
4. Befestigen Sie nicht mehr benötigte Düsen, soweit
möglich, in der Zubehörhalterung. Bewahren Sie die
übrigen Düsen sicher und für Kinder unzugänglich auf.
WARNUNG:
Prüfen Sie den Bodenstaubsauger und das Stromkabel
vor jeder Benutzung. Ein beschädigtes Gerät darf nicht
verwendet werden. Es besteht Verletzungsrisiko.
ACHTUNG:
Verwenden Sie den Bodenstaubsauger nur, wenn alle
Filter intakt, trocken und korrekt eingesetzt sind. Stellen
Sie sicher, dass keine Öffnungen verstopft sind. Anderenfalls kann der Staubsauger beschädigt werden.
10
HINWEIS:
Ihr Bodenstaubsauger besitzt einen Überhitzungsschutz.
Er schaltet sich bei Überhitzung automatisch ab. Ist dies
der Fall, schalten Sie den Bodenstaubsauger aus und
ziehen Sie den Stecker. Beseitigen Sie die Ursache der
Überhitzung. Warten Sie ca. 45 Minuten. Den abgekühlten Bodenstaubsauger können Sie wieder einschalten.
Page 11
3 Bedienung
1. Stecken Sie die gewünschte Düse auf, ZKapitel 2.2,
„Montieren“ bzw. ZKapitel 2.3, „Weitere Düsen
(Zubehör) verwenden“.
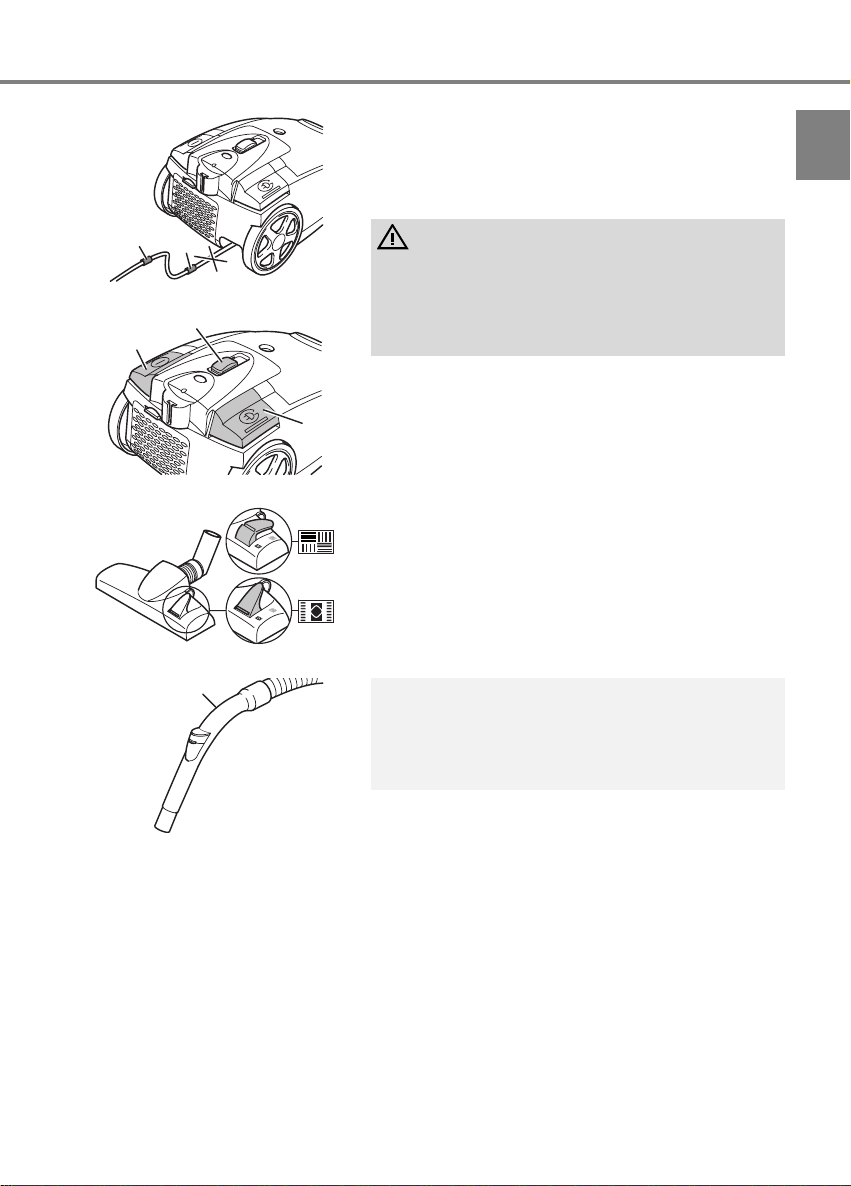
2. Ziehen Sie das Kabel am Stecker bis zur gelben Mar-
kierung (Abb. 10/1) heraus.
D
1
2
Abb. 10
2
3
1
Abb. 11
A
B
Abb. 12
1
WARNUNG:
Falls die rote Markierung (Abb. 10/2) sichtbar ist, ziehen
Sie das Kabel mithilfe der Kabelaufrolltaste (Abb. 11/3)
wieder bis zur gelben Markierung ein. Ansonsten kann
das Kabel abreißen. Es besteht die Gefahr eines elektrischen Schlages.
3. Schalten Sie den Bodenstaubsauger am Ein-/Aus-
Schalter (Abb. 11/3) ein.
4. Stellen Sie die Saugleistung am Saugleistungsregler
(Abb. 11/2) ein.
5. Stellen Sie je nach Bodenbelag den Umschalter „Tep-
pich/Hartboden“ (Abb. 12) ein:
- Hartboden (Abb. 12/A)
Laminat, Fliesen, PVC etc.
- Teppich (Abb. 12/B)
Lang- und kurzflorige Teppiche, Läufer etc.
6. Ziehen Sie den Bodenstaubsauger zum Saugen wie ei-
nen Schlitten hinter sich her. Beachten Sie die entsprechenden Empfehlungen der Bodenbelaghersteller.
HINWEIS:
Mit dem Nebenluftregler (Abb. 13/1) können Sie die
Saugleistung schnell reduzieren, wenn weniger Saugleistung benötigt wird oder z. B. um eingesaugte Gegenstände wieder freizugeben.
Abb. 13
11
Page 12
3 Bedienung
3.2 Ausschalten und
Stromkabel aufrollen
1
Abb. 14
3.3 Transportieren und
Aufbewahren
1
2
Abb. 15
1
2
1. Schalten Sie den Bodenstaubsauger am Ein-/Aus-
Schalter (Abb. 14/1) aus und ziehen Sie den Stecker
aus der Steckdose.
2. Behalten Sie den Stecker in der Hand.
WARNUNG:
Beim Einziehen des Stromkabels kann dieses umherschlingern, zur Stolperfalle werden oder Gegenstände
2
umreißen.
3. Drücken Sie die Kabelaufrolltaste (Abb. 14/2), um das
Stromkabel einzuziehen.
Zum Transport können Sie den Bodenstaubsauger am
Tragegriff (Abb. 1/11) tragen.
Zum Abstellen oder bei Arbeitspausen können Sie den
Parkhaken (Abb. 15/1) in die Parkhalterung (Abb. 15/2)
einhängen.
WARNUNG:
Wenn Sie den Arbeitsplatz verlassen, schalten Sie das
Gerät aus und beachten Sie die Hinweise unter ZKapitel
3.2, „Ausschalten und Stromkabel aufrollen“.
Zum Aufbewahren können Sie den Verstauhaken
(Abb. 16/1) in die Verstauhalterung (Abb. 16/2) unten am
Bodenstaubsauger einhängen.
ACHTUNG:
Stellen Sie das Gerät nie direkt neben Wärmequellen ab
(z. B. Heizung, Ofen). Vermeiden Sie direkte Sonneneinstrahlung. Die Hitze kann das Gerät beschädigen.
12
Abb. 16
Wenn Sie das Gerät längere Zeit lagern möchten, ent-
nehmen Sie den Staubfilterbeutel und entsorgen Sie diesen ordnungsgemäß. Reinigen Sie außerdem die Filter.
Lagern Sie das Gerät stets kühl und trocken.
Page 13

4Wartung
4 Wartung
4.1 Staubfilterbeutel wechseln
Abb. 17
1
Abb. 18
Wechseln Sie den Staubfilterbeutel spätestens dann,
wenn die Staubbeutelwechsel-Anzeige (Abb. 1/8) „Rot“ anzeigt oder die Saugwirkung nachlässt.
ACHTUNG:
Bevor Sie den Staubfilterbeutel wechseln, schalten Sie
das Gerät aus und beachten Sie die Hinweise unter
ZKapitel 3.2, „Ausschalten und Stromkabel aufrollen“.
So vermeiden Sie, dass Staub das Gerät zerstört.
1. Öffnen Sie den Staubraumdeckel, indem Sie ihn entrie-
geln und anschließend aufklappen (Abb. 17).
2. Klappen Sie den Staubraumdeckel so weit auf, bis er
spürbar einrastet und von selbst geöffnet bleibt.
HINWEIS:
Gehen Sie beim Entnehmen des Staubfilterbeutels vorsichtig vor, damit kein Staub aus dem Staubfilterbeutel
austreten kann.
3. Ziehen Sie den Staubbeutelhalter samt Staubfilterbeu-
tel (Abb. 18/1) nach oben heraus (Abb. 18).
4. Entfernen Sie Staubrückstände, die sich eventuell im
Staubraum befinden.
5. Ziehen Sie den Staubfilterbeutel (Abb. 19/1) aus dem
Staubbeutelhalter (Abb. 19/2) heraus.
HINWEIS:
Den Staubfilterbeutel können Sie im normalen Hausmüll
entsorgen, wenn er keinen für den Hausmüll verbotenen
Schmutz enthält.
D
6. Schieben Sie den neuen Staubfilterbeutel (Abb. 20/1)
wie abgebildet in den Staubbeutelhalter (Abb. 20/2), bis
er an den unteren Aufnahmewinkeln (Abb. 20/3) des
Staubbeutelhalters anschlägt.
7. Setzen Sie dann den Staubbeutelhalter (Abb. 21/1)
wieder in den Staubraum ein. Schieben Sie dafür die
Führung des Staubbeutelhalters (Abb. 21/2) gerade in
die dafür vorgesehene Schiene ein, bis die Verriegelung für den Staubraumdeckel (Abb. 21/3) zurückgeklappt wird.
8. Schließen Sie den Staubraumdeckel. Er rastet hörbar
ein.
HINWEIS:
Der Staubraumdeckel lässt sich nur schließen, wenn ein
Staubfilterbeutel eingesetzt ist.
13
Page 14

4Wartung
4.2 Filterwechsel Ihr Bodenstaubsauger besitzt die folgenden Filter:
1
2
Abb. 22
Motorschutzfilter (Abb. 22/1) verhindert bei defektem
Staubfilterbeutel, dass größere Partikel den Motor zerstören.
Austauschen: nach jedem 4. Staubfilterbeutel-Wechsel,
spätestens alle 6 Monate
Hygiene-Ausblasfilter (Abb. 22/2) filtert feinste Parti-
kel aus der ausgeblasenen Luft.
Austauschen: alle 6 Monate
Die Filter können nach einiger Zeit verstopfen und so die
Saugleistung reduzieren. Deshalb ist es wichtig, dass Sie
die oben angegebenen Zeitabstände einhalten.
Ersetzen Sie beschädigte Filter hingegen umgehend.
ACHTUNG:
Die Filter sind nicht waschbar. Der Ausblasfilter ist nicht
wiederverwendbar.
HINWEIS:
Bei leichten Verschmutzungen kann es auch ausreichen,
den Motorschutzfilter über einem Mülleimer auszuklopfen. Wir empfehlen aber, einen neuen Motorschutzfilter
einzusetzen, wenn Sie 4 Staubfilterbeutel verbraucht
haben (Bestellnummer ZKapitel 8, „Ersatzteile“).
4.3 Motorschutzfilter
wechseln
1
14
Abb. 23
2
Abb. 24
1. Schalten Sie das Gerät aus und entnehmen Sie den
Staubfilterbeutel, wie unter ZKapitel 4.1,
„Staubfilterbeutel wechseln“, Schritte 1-4, beschrieben.
2. Entnehmen Sie den Filterhalter samt Motorschutzfilter
(Abb. 23).
3. Trennen Sie den Motorschutzfilter (Abb. 24/1) vom Fil-
terhalter (Abb. 24/2) über einem Mülleimer.
4. Reinigen Sie den Filterhalter.
5. Falls erforderlich legen Sie den gebrauchten Motor-
schutzfilter auf den neuen Zuschnitt-Motorschutzfilter
auf. Zeichnen Sie die Umrisse an und schneiden Sie
den Motorschutzfilter passend aus.
6. Setzen Sie ggf. einen neuen Motorschutzfilter in den
Filterhalter ein.
7. Schieben Sie den Filterhalter samt Motorschutzfilter
von oben kräftig und lagerichtig (Rundung oben) in seine Aufnahme.
8. Setzen Sie einen Staubfilterbeutel ein und schließen
Sie den Staubraumdeckel. Der Deckel rastet hörbar
ein.
Page 15

4Wartung
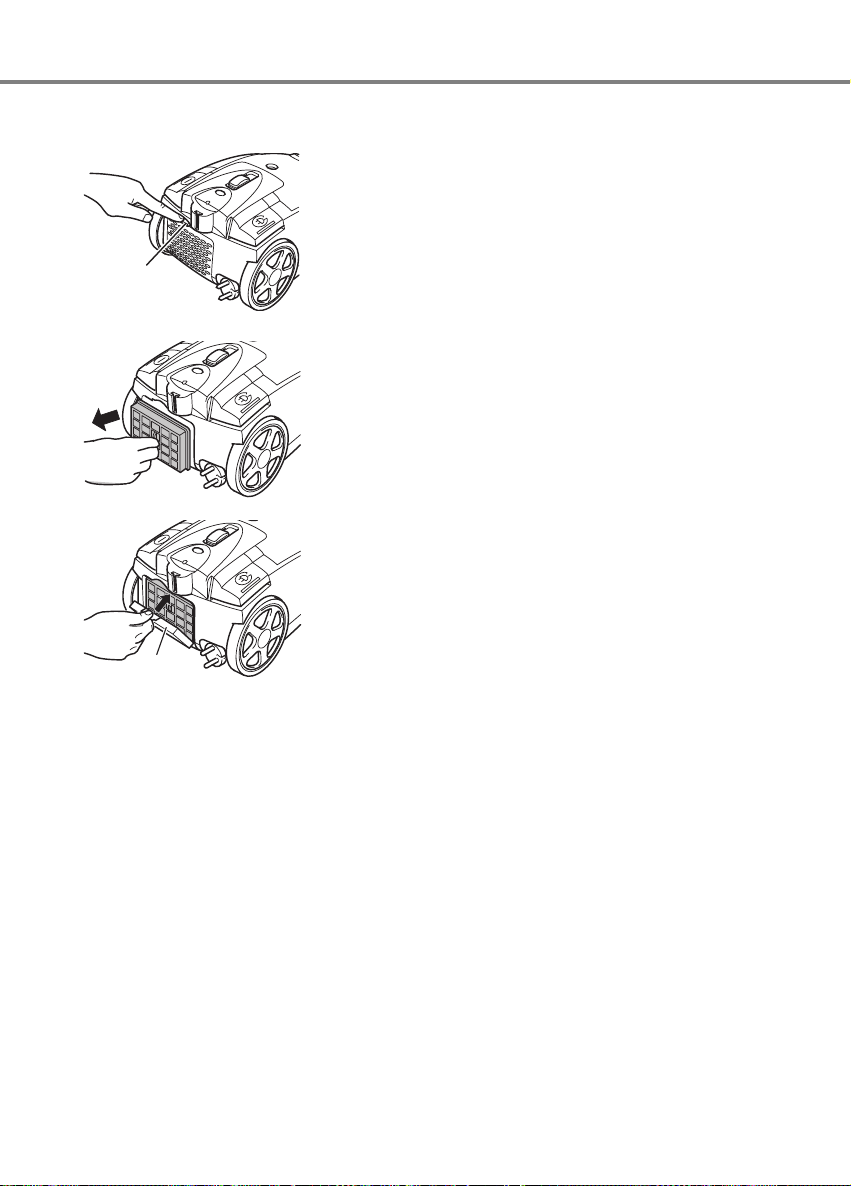
4.4 Hygiene-Ausblasfilter
wechseln
1
Abb. 25
Abb. 26
Abb. 27
1. Schalten Sie das Gerät aus und beachten Sie die Hin-
weise unter ZKapitel 3.2, „Ausschalten und Stromkabel
aufrollen“.
2. Öffnen Sie die Ausblasfilter-Abdeckung. Drücken Sie
dazu die Entriegelung (Abb. 25/1) nach unten und ziehen Sie die Ausblasfilter-Abdeckung nach hinten heraus.
3. Entnehmen Sie den Ausblasfilter (Abb. 26).
4. Setzen Sie einen neuen Ausblasfilter ein (Bestellnum-
mer ZKapitel 8, „Ersatzteile“).
5. Setzen Sie abschließend die Ausblasfilter-Abdeckung
wieder auf. Haken Sie diese zuerst unten ein (Abb. 27/
1) und drücken Sie sie dann oben nach vorn, bis sie
hör- und spürbar einrastet.
D
15
Page 16

5 Fehlerbehebung
5 Fehlerbehebung
Bevor Sie das Gerät an den Royal®Appliance-Kundendienst einschicken, überprüfen Sie anhand
der folgenden Tabelle, ob Sie den Fehler selbst beseitigen können.
WARNUNG:
Verwenden Sie niemals ein defektes Gerät! Bevor Sie auf Fehlersuche gehen, schalten Sie das
Gerät aus und ziehen Sie den Netzstecker, ZKapitel 3.2, „Ausschalten und Stromkabel aufrollen“.
Fehler mögliche Ursache Lösung
Gerät läuft nicht Stecker ist nicht eingesteckt oder
Gerät ist nicht eingeschaltet.
Steckdose führt keinen3804(T(gesten38(n Sie)-7(45)8(d)-7(en38(Bt oien(ta8(sauren38(t an)-7(45)Sie)-i(c)n(Ger)- as)]TJ0.0007 Tc -0.7975 Tw 15.220 -1.248 Tda(enre an)-7[(Steckdoan)-, beiel )-devor )-7(Sis ni(Ger)- sind, as)]TJ0.0805 Tc -0.0004 TT*Td[ass enddosnomse führk)4et.)]TJ0.0002 Tc 0.0204 Tw -15.220 -1.504 Td[(r5(om8(bet isbngesge)-(rdig4et-3481(Lass7(en.)]TJ0.0003 Tc -052006 T11287771 0 Tdn Sie daKm8(beduGer)-chan)-7( 7(n R)-7(oyal)]TJ/C2_0 1 Tf0 Tc 0 Tw 6.36 0 0 6.3445.38 50143.8203 Tm<00A3>Tj/TT1 1 Tf0.1002 Tc -053525 Tw 7.98 0 0 7.945017.449705.9003 T( Ap-(.)Tj0.0302 Tc 0.0001 Tw 2479624 -1.256 TdApplianc5(Kundl )-dndienstGer)-s(NeehenAdGer)-esdose )]TJ/C2_1 1 Tf0 Tc 0 Tw 0 -1.248 Td<005A>Tj/TT2 1 T-j0.0302 Tc 0.8299 Tw 0.88 0 TdSeseeT11, en)8(„6(Ghrk)araein)-tie8(“)]TJ/TT1 1 Tf0 Tc 0 T823.749 0 Td(.)Tj0.0302 Tc 0.0001 Tw33.49220 -1.504 Td[(saurg(d)-7bniset isn.)]TJ0.0005 Tc -0.0001 Tw 0 -1.256 T(t nichz(auieund-(.)Tj0.010 Tc 0 TT*Tdgeste)-l(k)olldn.)]TJ0.0003 T -0.0001 T128.7 -21104 Td[((tafihalGer)-beut(bet isvfrokt oder)- voder)--r )]TJ-0.0003 Tc 0 TT*Tdgeopte)-f4et.
Stecken Sie den Stecker in eine Steckdose
und schalten Sie das Gerät ein, ZKapitel
3.1, „Staubsaugen“.
16
Page 17

6 Reinigung
6 Reinigung
6.1 Gehäuse reinigen
Reinigen Sie das Gehäuse ausschließlich mit einem leicht angefeuchteten Tuch. Verwenden Sie
keine Reinigungsmittel, Scheuermittel oder Alkohol, da diese das Gehäuse beschädigen können.
6.2 Filter reinigen
Zum Reinigen der Filter ZKapitel 4.2, „Filterwechsel“.
7 Entsorgung
Die verwendeten Filter sind aus umweltverträglichen Materialien hergestellt und können im Hausmüll entsorgt werden.
Wenn das Gebrauchsende erreicht ist, insbesondere, wenn Funktionsstörungen auftreten, machen Sie das ausgediente Gerät unbrauchbar, indem Sie den Netzstecker aus
der Steckdose ziehen und das Stromkabel durchtrennen. Entsorgen Sie das Gerät ent-
D
17
Page 18

9 Garantie
9 Garantie
9.1 Garantiebedingungen
Wir übernehmen für das von uns vertriebene Gerät eine Garantie von 24 Monaten ab Kaufdatum.
Innerhalb dieser Garantiezeit beseitigen wir nach unserer Wahl durch Reparatur oder Austausch
des Gerätes oder des Zubehörs (Schäden an Zubehörteilen führen nicht automatisch zum Umtausch des kompletten Gerätes) unentgeltlich alle Mängel, die auf Material- oder Herstellungsfehlern
beruhen. Von der Garantie sind Schäden ausgenommen, die auf unsachgemäßen Gebrauch (Betrieb mit falscher Stromart/-spannung, Anschluss an ungeeignete Stromquellen, Bruch etc.) zurückzuführen sind, normaler Verschleiß und Mängel, die den Wert oder die Gebrauchstauglichkeit des
Gerätes nur unerheblich beeinflussen.
Bei Eingriffen durch eine nicht von uns autorisierte Stelle oder bei Verwendung anderer als original
®
Appliance-Ersatzteile erlischt die Garantie. Verschleißteile fallen nicht unter die Garantie und
Royal
sind deshalb kostenpflichtig!
Die Garantie tritt nur in Kraft, wenn das Kaufdatum durch Stempel und Unterschrift des Händlers auf
der Garantiekarte bestätigt ist oder eine Rechnungskopie dem eingeschickten Gerät beiliegt. Garantieleistungen bewirken weder eine Verlängerung der Garantiezeit, noch beginnt dadurch ein Anspruch auf eine neue Garantie!
9.2 Im Garantiefall
Versenden Sie das Gerät mit leerem Staubfilterbeutel und einer kurzen Fehlerbeschreibung in
Blockschrift. Versehen Sie das Anschreiben mit dem Vermerk „Zur Garantie“. Senden Sie es zusammen mit der Garantiekarte oder einer Rechnungskopie an folgende Adresse:
SERVICE-HOTLINE
®
Appliance International GmbH
Royal
Abt. Kundenservice
Itterpark 7-9
40724 Hilden
Germany
Tel.: 02103 / 20 07 10
Fax: 02103 / 20 07 77
www.dirtdevil.de
18
In Deutschland stehen wir Ihnen für Fragen,
Anregungen oder bei Problemen unter fol-
gender Nummer gern zur Verfügung:
0180 501 50 50*
Mo-Fr, 8-20 Uhr
*14 Ct pro Minute aus dem
deutschen Festnetz
Page 19

An overview of your M7050
An overview of your M7050
Many thanks!
We hope you enjoy using the M7050 and we would like to thank you for your purchase!
Appliance parts/scope of delivery
1 Handle
2 Secondary air controller
3 Upholstery nozzle
4 Crevice nozzle
5 Accessories mount
6 Suction hose
7 Cable retract button
8 Dust bag change indicator
9 Suction controller
10 On/off switch
11 Recessed handle
12 Stow-away hook mount
13 Parking hook mount
14 Power cable with plug
15 Exhaust filter cover
16 Telescopic tube lock
17 Telescopic tube
18 Parking hook
19 Floor nozzle
20 "Carpet/hard floor" switch
21 Release device for dust chamber cover
22 Release device for suction hose
23 Dust filter bag holder with dust filter bag (another
dust filter bag included in scope of delivery)
24 Parking hook
Optional accessories:
- Parquet brush
- Turbo brush
Technical data
Type of appliance : Cylinder vacuum cleaner
Model : M7050
Voltage : 220 V - 240 V ~50/60 Hz
Output : 1600 W nom. - 1800 W nom.
Dust filter bag : "Swirl MicroPor Y93" dust filter bag,
Filters : Protective motor filter,
Power cable with plug : approx. 5 m long
Weight : approx. 4,9 kg
1800 W max. - 2200 W max.
(depending on the model and the design)
3,7 litre
hygienic exhaust filter
G
We reserve the right to make technical and design-related alterations in the course of ongoing
product improvements.
®
© Royal
Appliance International GmbH
19
Page 20

List of contents
1 Safety instructions ................................................................... 21
1.1 Regarding the operating manual ................................................................................. 21
D
1.2 Regarding the instructions used .................................................................................. 21
1.3 Regarding the power supply........................................................................................ 21
1.4 Regarding children ...................................................................................................... 22
1.5 Regarding intended use............................................................................................... 22
1.6 If the appliance is defective ......................................................................................... 22
2 Unpacking and assembly......................................................... 23
2.1 Unpacking.................................................................................................................... 23
2.2 Assembly ..................................................................................................................... 23
2.3 Using other nozzles (accessories)............................................................................... 24
3 Operating................................................................................... 25
3.1 Vacuuming................................................................................................................... 25
3.2 Switching off and retracting the power cable............................................................... 27
3.3 Transporting and storage............................................................................................. 27
4 Maintenance.............................................................................. 28
4.1 Changing the dust filter bag......................................................................................... 28
4.2 Changing the filter........................................................................................................ 29
4.3 Changing the protective motor filter............................................................................. 29
4.4 Changing the hygienic exhaust filter............................................................................ 30
5 Correcting malfunctions .......................................................... 31
6 Cleaning..................................................................................... 32
6.1 Cleaning the housing................................................................................................... 32
6.2 Cleaning the filters....................................................................................................... 32
7 Waste disposal.......................................................................... 32
8 Spare parts................................................................................ 32
8.1 List of wear parts ......................................................................................................... 32
8.2 Supply sources ............................................................................................................ 32
9 Warranty .................................................................................... 33
9.1 Warranty conditions..................................................................................................... 33
9.2 Making a warranty claim.............................................................................................. 33
List of contents
20
Page 21

1 Safety instructions
1 Safety instructions
1.1 Regarding the
operating manual
1.2 Regarding the
instructions used
1.3 Regarding the power
supply
Read this operating manual through completely before
working with the appliance.
Keep the operating manual safe. If you pass the appliance
on to a third party, give them the operating manual as well.
Non-compliance with these instructions can lead to
serious injuries or damage to the appliance.
We assume no liability for damage that occurs as a result
of non-compliance with this operating manual.
The appliance may only be operated in households. It is
not suitable for industrial or commercial use.
Important instructions for your safety are especially
marked. You must observe these instructions to avoid
accidents and damage to the appliance:
WARNING:
Warns against hazards for your health and indicates
possible risks of injury.
ATTENTION:
Indicates possible hazards for the appliance or other
objects.
NOTE:
Highlights tips and information for you.
The appliance is operated with electrical power which
means there is in principle a risk of electric shock.
Therefore pay particular attention to the following:
- Never touch the plug with wet hands.
- If you want to pull the plug out of the socket then
always pull directly on the plug. Never pull on the
cable as this could damage it.
- Make sure that the power cable is not bent, caught or
run over, and that it does not come into contact with
heat sources.
- Only use an extension cable that is designed for the
power requirement of the appliance.
- Never immerse the appliance in water or other liquids
and keep it away from rain and moisture.
- Only operate the appliance if the electrical voltage
stated on the type plate matches the voltage of your
socket. Wrong voltage can destroy the appliance.
G
21
Page 22

1 Safety instructions
1.4 Regarding children Never leave the appliance unattended, and use it with
the greatest of care if children or persons who cannot
assess the risks are nearby.
Children or persons who cannot assess the risks may
not use the appliance. Store it so it is inaccessible.
Packaging material must not be used to play with. There
is a danger of suffocation.
1.5 Regarding intended
use
1.6 If the appliance is
defective
Only use the cylinder vacuum cleaner for cleaning normally
dirty floors, carpets and curtains. Any other use is
considered non-intended use and is prohibited.
The following is prohibited in particular:
Do not vacuum:
- hair, fingers and other body parts. They could be
pulled in and injured.
- pieces of clothing (e. g. shoelaces, scarves, etc.).
They could be pulled right in and cause injuries.
- water and other fluids, especially damp carpet
cleaning agents. Internal dampness can lead to a
short-circuit.
- toner dust (for laser printers, copy machines, etc.).
There is a risk of fire and explosion.
- hot ash, burning cigarettes or matches. These can
cause fire.
- pointed objects such as glass fragments, nails, etc.
These objects destroy the filter.
- plaster, cement, etc. The filters can become blocked.
Do not use near explosive or easily flammable
substances. There is a risk of fire or explosion.
Do not use in the open-air. There is a risk of the
appliance being destroyed by rain and dirt.
Do not push objects into the openings of the appliance.
It could overheat.
Never operate a defective appliance or an appliance
with a defective cable. There is a considerable risk of injury.
Bring or send defective appliances to a specialist dealer
or to Royal
Address ZPage 33, "Warranty".
®
Appliance Customer Services for repair.
22
Page 23

2 Unpacking and assembly
2 Unpacking and assembly
2.1 Unpacking 1. Unpack the appliance and all accessory parts.
2. Check the contents are all there. Information regarding
the scope of delivery ZPage 19, "An overview of your
M7050"“.
ATTENTION:
Always transport/send the appliance in its original
packaging so that it does not become damaged. Keep
the packing material for this purpose.
Dispose of any packing material that is no longer
required in accordance with the provisions applicable in
your country.
NOTE:
If you should notice damage due to transport, then
contact your dealer immediately.
2.2 Assembly
1
WARNING:
Only assemble the appliance if the plug has been pulled
out of the socket. The appliance could be switched on by
accident.
G
2
Fig. 2
1
4
3
1. Push the end of the suction hose (Fig. 2/1) into the
receiver opening (Fig. 2/2) on the cylinder vacuum
cleaner until the lock clicks into place audibly and
noticeably.
2. Push the handle (Fig. 3/1) into the upper end of the
telescopic tube (Fig. 3/2).
3. Push the floor nozzle (Fig. 3/3) onto the lower end of the
telescopic tube (Fig. 3/4).
NOTE:
It may be necessary to push a bit harder.
2
Fig. 3
4. Adjust the length of the telescopic tube. To do this,
1
Fig. 4
press the telescopic tube lock (Fig. 4/1) down. Then pull
the telescopic tube by the handle (Fig. 3/1) to the
desired length. To lock it, release the telescopic tube
lock when you let go. You will hear an audible click.
23
Page 24

2 Unpacking and assembly
5
5. Push the accessories mount (Fig. 5/1) onto the handle
(Fig. 5/2). Then push the furniture brush (Fig. 5/3) and
crevice nozzle (Fig. 5/4) on to the holders for these.
2
4
1
Fig.
2.3 Using other nozzles
(accessories)
1
2
Fig. 6
Fig. 7
3
NOTE:
If necessary, you can also attach the accessories mount
to the telescopic tube.
Your cylinder vacuum cleaner is now ready to use.
Together with the floor nozzle just assembled, you can
expand the range of functions of your cylinder vacuum
cleaner with other nozzles.
The crevice nozzle and the furniture brush are included
as accessories in the scope of delivery. They can be
secured to the accessories mount (Fig. 5) when not in use.
- Crevice nozzle (Fig. 6/1)
Use this to vacuum dust from hard to reach places.
- Furniture brush (Fig. 6/2)
Use this to vacuum dust off objects that have
sensitive surfaces (e. g. cupboards, tables).
Also available as an option are the following:
- Turbo brush (Fig. 7)
This has a rotating brush head and is therefore best
suited for deep-cleaning carpets. Brushing also
causes the carpet pile to straighten up.
NOTE:
When using the turbo brush, a loud noise can occur as a
result of the high speed of the brush.
- Parquet brush (Fig. 8)
This is equipped with long bristles and is used for
vacuuming particularly sensitive surfaces (e. g.
parquet, laminate flooring).
24
Fig. 8
WARNING:
Only assemble the nozzles if the plug has been removed
from the socket. The appliance could be switched on by
accident.
Page 25

3 Operating
1
1
Fig. 9
3 Operating
3.1 Vacuuming .
Proceed as follows to attach the nozzles:
1. Switch the appliance off and pull the plug out of the
socket.
2. Remove the existing nozzle from the telescopic tube.
3. Push the desired nozzle onto the lower end of the
telescopic tube or if necessary directly onto the handle
(Fig. 9).
ATTENTION:
If you use the cylinder vacuum cleaner without an
attached nozzle, there is a greater risk of accidentally
vacuuming up objects.
4. Secure the nozzles no longer required in the
accessories mount, as far as this is possible. Keep the
other nozzles safe and inaccessible to children.
WARNING:
Check the cylinder vacuum cleaner and the power cable
before each use. A damaged appliance must never be
used. There is a risk of injury.
ATTENTION:
Only use the cylinder vacuum cleaner if all the filters are
intact, dry and inserted correctly. Make sure that none of
the openings are blocked. Otherwise, the vacuum
cleaner can become damaged.
G
NOTE:
Your cylinder vacuum cleaner has an overheating
protection device. It turns off automatically if it overheats.
If this happens, then turn off the cylinder vacuum cleaner
and remove the plug. Remove the cause of overheating.
Wait approx. 45 minutes. Once the cylinder vacuum
cleaner has cooled down you can switch it on again.
25
Page 26

3 Operating
1. Push on the desired nozzle, ZChapter 2.2, "Assembly"
or ZChapter 2.3, "Using other nozzles (accessories)".
2. Remove the cable, by holding the plug, until the yellow
mark is reached (Fig. 10/1).
1
2
Fig. 10
2
3
If the red mark (Fig. 10/2) is visible, use the cable retract
button (Fig. 11/3) to draw the cable in again up to the
yellow mark. Otherwise the cable can break off. There is
a risk of electric shock.
3. Switch on the cylinder vacuum cleaner using the on/off
switch (Fig. 11/3).
4. Turn on the suction using the suction controller
(Fig. 11/2).
1
Fig. 11
5. Adjust the carpet/hard floor switch (Fig. 12) depending
on the type of flooring:
WARNING:
A
B
Fig. 12
1
- Hard floor (Fig. 12/A)
Laminate flooring, tiles, PVC flooring, etc.
- Carpet (Fig. 12/B)
Long and short pile carpets, runners, etc.
6. To vacuum, pull the cylinder vacuum cleaner behind
you like a sledge. Observe the corresponding
recommendations of the flooring manufacturer.
NOTE:
You can quickly reduce the suction power with the
secondary air controller (Fig. 13/1) if less suction power
is required or e. g. to release objects that have been
sucked in.
26
Fig. 13
Page 27

3 Operating
3.2 Switching off and
retracting the power
cable
1
3.3 Transporting and
storage
1
2
1
2
2
Fig. 14
Fig. 15
1. Switch off the cylinder vacuum cleaner using the on/off
switch (Fig. 14/1) and pull the plug out of the socket.
2. Keep the plug in your hand.
WARNING:
The power cable can whip around when being pulled in,
it can also trip you or somebody else up or knock down
objects.
3. Press the cable retract button (Fig. 14/2) to pull in the
power cable.
To transport the cylinder vacuum cleaner, you can
carry it using the carry handle (Fig. 1/11).
When setting the appliance aside or during work
breaks, you can hang the parking hook (Fig. 15/1) into the
parking hook mount (Fig. 15/2).
WARNING:
If you leave your work area, switch off the appliance and
observe the instructions under ZChapter 3.2, "Switching
off and retracting the power cable".
For storage, you can hang the stow-away hook
(Fig. 16/1) into the stow-away hook mount (Fig. 16/2) below
on the cylinder vacuum cleaner.
ATTENTION:
Never position the appliance directly against heat
sources (e. g. heating, oven). Avoid direct sunlight. Heat
can damage the appliance.
G
Fig. 16
If you want to store the appliance for a longer period of
time, remove the dust filter bag and dispose of it correctly.
Clean the filters as well.
Always store the appliance in a cool and dry place.
27
Page 28

4 Maintenance
4 Maintenance
4.1 Changing the dust
filter bag
Change the dust filter bag at the latest when the dust
bag change indicator (Fig. 1/8) lights up "red" or when the
suction power drops.
1. Open the dust chamber cover by unlocking it and then
flipping it up (Fig. 17).
2. Open the dust chamber cover until it noticeably clicks
into place and remains open without having to be held.
3. Pull the dust bag holder together with the dust filter bag
(188 0 Td[(e)-7(aait not/1TJ/TT(Fig(maioumbe)-878(17))-5(.)8TJ/TT0 1 Tf0.0002 Tc 0 Tw -1.601 -1.504 Td(2.)Tj/TT4 1 Tf0.0003 Tc -0.003 Tw 0 -1.256 d[(Pull )8(tRJ0.0m)]Tbe)-8any dbe)-oldebesidues foumaii-7(st J0.holde5( )8(cover0 1 Tf0.0002 Tc 0 Tw -1.601 -1.504 Td(2.)2j/TT5 1 Tf0.0003 Tc -0.043 Tw 01-5( 0 Td[(Pull )8(the dufilter bag at the J0.g878(17))-5(.)9/1.)-27))3(ioum of 8(du)-7(holderJ0.0001 Tw-0.0896 Tw 1301.256 TD[(suction phavi9(the)d" og.)-277)-7(aai80()-5((9vi9(/-5((2)0 1 Tf0.0002 Tc 0 Tw -1.601 -1.504 Td80 Tto pl(6 1 Tf-0.0001 Tc 0.0907 Twc 0.522 0 Td[(Pull )8(thesh7(st Jicat)-8(w(st filt8r)-5( )8(b)-7(ag)]Tagg.)-279(1/)-8(86(20/1TJii-mbe)-oust bag holdeg)]TJ8.0001 Tw-0.088 0 0 0.0231 0 TT*n phavi8(the)d" og.)-279(1/)-8(87(20/2) J0.as J0.showndica, so7(stes277)-deb)-6y cl1r)-s J0.ag2(en)8r))3(estthe)-cl1r006 Tc 9.4843 Tw 02706248 TD[(()-5(188bheld.ttom monoti bedusles 0 Td[(e)-7(aait n20/3TJ/TT(g)]held.fhe)]TJt)-8 chambe7(ag)]TJ0.0001 Tw- 0.0375 Tw 256 TD[(suction phavi8(the)d" o0 1 Tf0.0002 Tc 0 Tw -1.6.504 Td(2.)2j/TT7 1 Tf0.0003 Tc -0.043 Tw 0142( 0 Td[(Pull )8(tTng th)5(b)-7(ew)-(b)-7(t7(st J0.holdeTaggJt)-ethe)-.)-278(17))-5(.21/1TJ/TT(e andTJt)-801 Tw- 0.0313 Tw 01-08 0 TT*n pfilt8r)-5cst)-8 )8(c. hesh)-6(r)2((st guide of st bag holdeg)]TJ8.00eg)]havi8(the)d6 Tc 9.4843 Tw- 1.606 0 TT*n p 0 Td[(e)-7(aait n21/2)/TT(straup)-(e andeld.tag r4(t)2(l pr4(t)ovideddeld.f(igTJt)-is pur4(t)pos006 Tc 9.4823 Tw 0143248 TD[(()-5(188to)-6(r)2(dbe)-ouso, notic)tag nce)]r)-5lo)-6(c)4(k f(igTst cham8r)-5compartm)]r)-nt06 Tc 9.4843 Tw 256 TD[(suction punlock 0 Td[(e)-7(aait n21/3TJ/TT(is foldeddback0 1 Tf0.0002 Tc 0 Tw -1.6.504 Td(2.)2j/TT8 1 Tf0.0003 Tc 3 Tw 02334 0 Td[(C)-7(hange thel)4(os07(st Jicfilt8r)-5cst)-8 )8(c( )]TJ0.0. JicItTJ0.00 Jicaudis)]T(en)8rto) Tc 0.08933 Tw 256 T*n( re)- 1 Tf69.428)2jg2.6603 538.06 206.94 68(28BT/TT0 1 Tf0.0011 Tc- 1301.250 9 117.6 (8[( 594.24)-865(M)A)74tTng4tTENTION:.5 g69.q262603 T042 6924).94 -14(28BTW* n2626 Td5m[7 m2774 1.5m[7 l2774uct5m[46 l27(3.Td5m16 Tdl2.1453 T0425dl2.1453 T04-1.dl2.1494 604-7 l270.36 T04-1.dl2774uct5m[46 l278-1.d5m1668dl2.26 Td5m1668dlf270.43 T0425dm263.4d5m16 Tdl2.26 Td5m1668dl2.260Td5m1668dl2.265t5m[46 l2.1453 T04-1.dlfQ1 Tf0.0003 Tc -0.015 Tw 027070 0 7.98 259.32 63262603 584.43)-865(M)Bef(ie youge ind7(ust filter b)-6(r)2(g at the l, s)8(ch of)15.fhe)]TJ0 Tc 0.0000.0457 Tw -1829248 TD[(()-5(188applianct J0.(maioJ0 b-(b)-7(v)4(Tbe)-8(st J0.w)-tb)-7(wer)-5s nodbe)-e)-.1 Tf0 0003 Tc 3 Tw 248 20.737)-7(ha0 g5A> Tf0.2003 Tc -0.003 Tw 0(e)-7(ab(Chap8(b)T1 1-0.015 Tw 00.)2j-1.216617d[(bag cha)-3.2, be)-"S)8(chi bebe)-off ind7(ud(b)-7(etracti be8(du)-7(potho)-e)-.)6(cks)e" 1 Tf0.0003 Tc -0.96 Tw 13.2.248 22.654)-7(ab(. T-is)T1 1-0.057 Tw -519j-1.22.654)[(bag cha)-is how yobe)-ohen )8(t)ill prTbeTntter bagrom de-tboyi beb
28
Page 29

4 Maintenance
4.2 Changing the filter Your cylinder vacuum cleaner has the following filters:
A protective motor filter (Fig. 22/1) prevents larger
particles from destroying the motor if the dust filter bag is
defective.
Replace: after each 4th change of dust filter bag, at the
latest every 6 months
A hygienic exhaust filter (Fig. 22/2) filters the finest
particles from the blown-out air.
Replace: every 6 months
Fig. 22
The filters can become blocked after some time and can
thereby reduce the suction power. It is therefore important
that the abovementioned intervals are adhered to.
On the other hand, replace a damaged filter as soon as
possible.
ATTENTION:
The filters are not washable. The exhaust filter cannot be
re-used.
NOTE:
If it is only slightly dirty, it can also suffice to knock the
protective motor filter over a dustbin. However, we
recommend that you use a new protective motor filter if
you have used 4 dust filter bags (order number
ZChapter 8, "Spare parts").
G
4.3 Changing the
protective motor filter
1. Switch off the appliance and remove the dust filter bag
as described under ZChapter 4.1, "Changing the dust
filter bag", steps 1-4.
2. Remove the filter holder together with the protective
motor filter (Fig. 23).
3. Separate the protective motor filter (Fig. 24/1) from the
filter holder (Fig. 24/2) over a dustbin.
4. Clean the filter holder.
5. If necessary lay the used protective motor filter on the
new cut-to-size protective motor filter. Draw the outline
of the filter and cut the protective motor filter to fit.
6. If necessary, insert a new protective motor filter into the
filter holder.
7. Together with the protective motor filter, push the filter
holder forcefully from above and correctly positioned
(curve up) into its receptacle.
8. Insert a dust filter bag and close the dust chamber
cover. The cover clicks audibly into place.
29
Page 30
4 Maintenance
4.4 Changing the hygienic
exhaust filter
1
Fig. 25
Fig. 26
1
Fig. 27
1. Switch the appliance off and observe the instructions
under ZChapter 3.2, "Switching off and retracting the
power cable".
2. Open the exhaust filter cover. To do this, press the
release button (Fig. 25/1) down and pull the exhaust
filter cover back and out.
3. Remove the exhaust filter (Fig. 26).
4. Insert a new exhaust filter (Order Number ZChapter 8,
"Spare parts").
5. Then put the exhaust filter cover back again. Hook it in
first at the bottom
(Fig. 27/1) and then press it up and forwards until it
clicks into place audibly and noticeably.
30
Page 31

5 Correcting malfunctions
5 Correcting malfunctions
Before sending the appliance to Royal® Appliance Customer Services, use the following table to
check whether you can correct the malfunctions yourself.
WARNING:
Never use a defective appliance! Before starting to troubleshoot, switch the appliance off and pull
out the mains plug, ZChapter 3.2, "Switching off and retracting the power cable".
Malfunction Possible cause Solution
Appliance does
not work
Suction
performance is
not satisfactory
Appliance makes
an unusual noise
Plug is not plugged in or the
appliance is not switched on.
Socket does not carry any
current.
Power cable is damaged. Have the cable replaced by Royal
Dust filter bag is full or blocked. Empty/clean the dust filter bag.
Nozzle, telescopic tube or suction
hose are blocked.
The preset suction level is not
suitable for the flooring.
Carpet/hard floor switch
(Fig. 1/20) is set to an
inappropriate position for the
flooring.
The attached nozzle is not
suitable for the flooring.
Filter is dirty. Change/clean the corresponding filter,
Sucked-in particles are blocking
the air-way.
Push the plug into a plug socket and switch
the appliance on, ZChapter 3.1,
"Vacuuming".
Test the cylinder vacuum cleaner at another
socket which you are sure carries current.
Appliance Customer Services, address
ZPage 33, "Warranty".
Remove the blockage. If necessary, use a
long wooden rod for this (e. g. a broom
handle).
Adjust the suction level to the flooring,
ZChapter 3.1, "Vacuuming", Step 4.
Adjust the position of the carpet/hard floor
switch (Fig. 1/20) to the flooring, ZChapter
3.1, "Vacuuming", Step 5.
Push on the correct nozzle, ZChapter 2.3,
"Using other nozzles (accessories)".
ZChapter 4.3, "Changing the protective
motor filter" or ZChapter 4.4, "Changing the
hygienic exhaust filter".
Remove the particles. If necessary, use a
long wooden rod for this (e. g. a broom
handle).
®
G
31
Page 32
6 Cleaning
6 Cleaning
WARNING:
Before you clean the appliance, switch off the appliance and remove the mains plug ZChapter
3.2, "Switching off and retracting the power cable".
6.1 Cleaning the housing
Only clean the housing with a slightly damp cloth. Do not use any cleaning agent, scouring agent or
alcohol as these can damage the housing.
6.2 Cleaning the filters
To clean the filters ZChapter 4.2, "Changing the filter".
7 Waste disposal
The filters used for the appliance are made from environmentally compatible materials and can be
disposed of with the domestic waste.
When the service life of the appliance has expired, in particular if malfunctions occur,
make the finished appliance unusable by removing the mains plug from the socket and
disconnecting the power cable. Dispose of the appliance according to the environmental
provisions applicable in your country. Electrical waste must not be disposed of with
domestic waste. Contact your municipal authority or your dealer for any advice
regarding recycling.
8 Spare parts
8.1 List of wear parts
Item No. Description Contents
7050002 Hygienic exhaust filter 1 hygienic exhaust filter
7050001 Dust filter bag set 4 "Swirl MicroPor Y93" dust filter bags +
1 protective motor filter
8.2 Supply sources
Accessory parts and spare parts can be reordered. You can get these from the following companies:
ZPage 185, "Royal Appliance Int. GmbH International Service"
32
Page 33

9 Warranty
9Warranty
9.1 Warranty conditions
We offer a warranty of 24 months from the date of purchase for the appliances we sell.
Within this warranty period, we will remove all defects free of charge that are due to material or
manufacturing faults, either by repair work or replacing the appliance or accessories, at our
discretion (damage to accessory parts does not automatically lead to the entire appliance being
replaced). The warranty does not cover damage due to improper use (operating with the wrong
power type/voltage, connecting to unsuitable power sources, breakage, etc.), normal wear and
defects that only insignificantly affect the value or the ability of the appliance to be used.
The warranty is made null and void if any work is carried out by a site not authorized by us or if spare
parts other than Royal
and are therefore at the customer's expense!
The warranty only comes into force if the purchase date is confirmed by a stamp and signature of
the dealer on the warranty card or if a copy of the invoice is included with the appliance when it is
sent in. Warranty work does not extend the warranty time nor does it constitute a claim for a new
warranty!
®
Appliance spare parts are used. Wear parts are not included in the warranty
9.2 Making a warranty claim
Send the appliance with emptied dust filter bag and a short description of the fault in block capitals.
Write the comment "Regarding warranty" on the address label. Send it together with the warranty
card or a copy of the invoice to the following address:
G
®
Appliance International GmbH
Royal
Customer Service Dept.
Itterpark 7-9
40724 Hilden
Germany
Tel.: 02103 / 20 07 10
Fax: 02103 / 20 07 77
www.dirtdevil.de
33
Page 34

Royal Appliance Int. GmbH International Service
Royal Appliance Int. GmbH Internat ional Service
F
o
Sona France
21 rue Eugene Sue
F-94700 Maisons Alfort
Tel: +33 1 43 78 00 42
Fax: +33 1 43 78 01 38
E
o
Royal Appliance Espana, SL
Royal, Dirt Devil, Stellar
C/ Jazmin, 66 - 3°
E-28033 Madrid
Tel: +34 902 430 663
NL
o
Z.E.S. Goes B.V.
T.a.v. afd. Service
Pearyweg 1
NL-4462 GT Goes
Tel: +31 0113 240700
Fax: +31 0113 240750
Mail: dirtdevil@zesgoes.nl
A
o
Zmugg Elektronik Service
und Vertriebges. M.b.H.
Fabriksgasse 27
A - 8020 Graz
Tel: +43 316 772 120
Fax: +43 316 772 120 10
SK
o
EURO ELECTRONIC SERVIS
SK s. r. o.
Stefanikova 736
908 73 Velke Levare
Tel: +42 134 774 8051
Mail: eessk@stonline.sk
PYC
o
ООО РТЦ "Совинсервис",
127081 г. Москва,
Ясный проезд, д. 10
Тел. (495) 473-90-03
Garantiekarte
Warranty Card
Card de garantie
Garantiekaart
Certificado de garantía
Гарантийная карточка
SLO
SK
Karta gwarancyjna
Garantikort
Záruční list
oCZo
Le Cygne electronic service
spol. s r.o.
Jablonecká 722/8
190 00 Praha 9
Tel: +420 286883940
Fax: +420 286885064
o
Strojinc Ciril s.p.
Koseskega ul. 1a
SLO - 1000 LJUBLJANA
Tel: +386 -1- 422 8489
RUS
o
OOO RTC “Sovinservice“,
127081 Moscow,
Jasny proezd, 10
Tel. (495) 473-90-03
M 7050
PL
o
SERV-SERWIS Sp. z o.o.
ul. Poniatowskiego 4/1
45-049 Opole
Tel: +77 453 61-39
Fax: +77 453 61-38
Mail: adabrowski@serv-serwis.pl
H
o
FLAG Kft.
Práter u. 51
H-1083 Budapest
Tel: 06 40 200 407;
06 305 600 700;
06 209 510 799
Fax: +36 1 210 0344;
+36 1 210 2775
Mail: flagservice@axelero.hu ;
diszpecserkozpont
@flagservice.hu
Garanclalevěl
Záručný list
Garancijski list
Stempel und Unterschrift des Händlers / Stamp and sign of dealer / Cachet et signatur du vendeur / Stempel en handtekening van de handelaar / Sello y firma
del distribuidor / Печать и подпись продавца / Stempel i podpis sprzedającego / Selgers stempel og underskrift / Razítko a podpis obchodníka /
A kereskedő pecsétje és aláírása / Pečiatka a podpis predajcu / Žig i podpis trgovca
Fehlerbeschreibung / Description of fault / Description de l’erreur / Beschrijving van de fouten / Descripción del error
Описание неисправности / Opis usterki / Feilbeskrivelse /
Kaufdatum / Date of purchase / Date d´achat / Koopdatum / Fecha de compra / Дата покупки / Data zakupu /
Kjøpsdato / Datum koupě / Vásárlás napja / Dátum kúpy / Datum kupa
Popis závad / Hiba leírása / Popis chyby / Opis napak
 Loading...