

Page 1
Operating and Servicing Instructions
Some states require that the batteries contained in this
product be recycled at the end of their useful life.
Espafiol - pagina
El
01999
All
rights resewed #I-015720-033
7/99
Page 2
THIS VACUUM IS INTENDED FOR HOUSEHOLD USE ONLY.
IMPORTANT SAFETY INSTRUCTIONS
SAVE THESE INSTRUCTIONS
When using an electrical appliance, basic precautions should always be fol-
lowed, including the following:
READ ALL INSTRUCTIONS BEFORE USING THE APPLIANCE.
ALWAYS FOLLOW THESE SAFETY INSTRUCTIONS.
WARNING: TO REDUCE THE RISK OF
FIRE, ELECTRIC SHOCK OR INJURY:
Warning: Do not use outdoors or
on wet surfaces.
Do not charge the unit outdoors.
Do not allow to be used as a toy.
Close attention is necessary when
used by or near children.
Use only as described in this manual. Use only manufacturer's recommended attachments.
Do not use charger with damaged
cord or plug. If vacuum or charger is not working as it should, has
been dropped, damaged, left outdoors, or dropped into water,
return it to a service center for
inspection. Call 1-800-321
for the nearest Service Center.
Do not abuse the cord. Never
carry the charger or base by the
cord or yank to disconnect from
an outlet; instead grasp the charger and pull to disconnect. Keep
cord away from heated surfaces.
Do not pull cord qround sharp
edges or corners.
door on the charger c&d.
Do not handle plug or appliance
with wet hands.
This product includes rechargeable nickel cadmium batteries.
Do not incinerate batteries or
expose to high temperatures, as
they may explode.
Unplug the charger from the outlet
before any routine cleaning or
0'0
-1
134
not close
maintenance.
Do not put any object into openings. Do not use with any opening
blocked; keep free of dust, lint,
hair, and anything that may reduce
air flow.
Keep hair, loose clothing, fingers,
and all parts of body away from
openings and moving parts.
Do not pick up anything that is
burning or smoking, such as cigarettes, matches, or hot ashes.
Do not use without dust bag1 or filters in place.
Turn off all controls before unplugging.
Use extra care when cleaning on
stairs.
Do not use to pick up flammable or
combustible liquids such as gasoline or use in areas where they may
be present.
Leaks from battery cells can occur
under extreme conditions. If the
liquid, which is 20-35% solution of
potassium hydroxide, gets on the
skin (1) wash quickly with soap and
water or (2) neutralize with a mild
acid such as lemon juice or vinegar. If the liquid gets into the eyes,
flush them immediately with clean
water for a minimum of 10 minutes.
Seek medical attention.
Use only the charger supplied by
the manufacturer to recharge.
Page 3
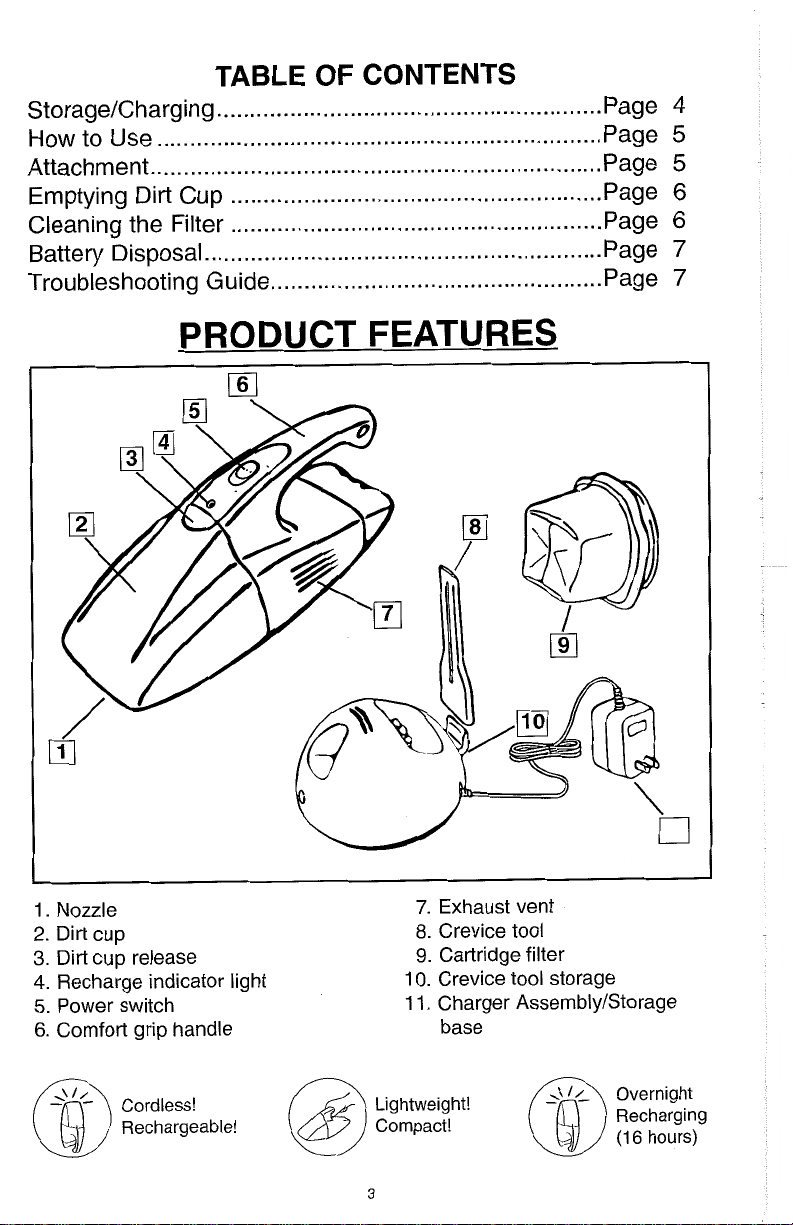
TABLE OF CONTENTS
StorageICharging
How to Use
Attachment age
....................................................................
Emptying Dirt Cup
Cleaning the Filter .................Page
Battery Disposal Page
Troubleshooting Guide
...................................
.......................................
........................
..............................
..........................................................
.......................................
............................................................
..................................................
ge
ge
ge
Page
PRODUCT FEATURES
(61
4
5
5
6
6
7
7
1.
Nozzle
2.
Dirt cup
3.
Dirt cup release
4.
Recharge indicator light
5.
Power switch
6.
Comfort grip handle
Cordless!
Rechargeable!
7.
Exhaust vent
8.
Crevice tool
9.
Cartridge filter
10.
Crevice tool storage
11.
Charger AssemblyIStorage
base
Recharging
(1
6
hours)
Page 4
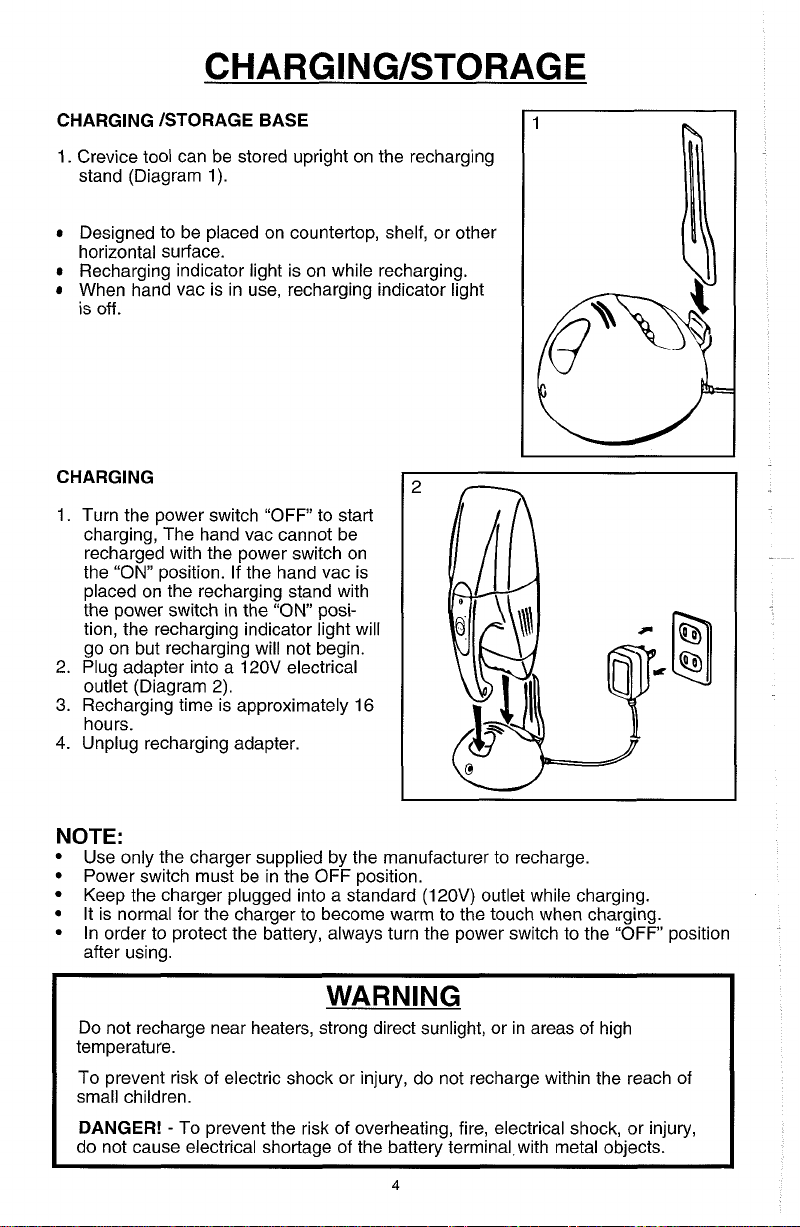
CHARGING ISTORAGE BASE
1.
Crevice tool can be stored upright on the recharging
stand (Diagram 1).
Designed to be placed on countertop, shelf, or other
horizontal surface.
Recharging indicator light is on while recharging.
When hand vac is in use, recharging indicator light
is off.
CHARGING
1. Turn the power switch "OFF to start
charging, The hand vac cannot be
recharged with the power switch on
the "ON" position. If the hand vac is
placed on the recharging stand with
the power switch in the "ON position, the recharging indicator light will
go on but recharging will not begin.
2. Plug adapter into a 120V electrical
outlet (Diagram 2).
3.
Recharging time is approximately 16
hours.
4.
Unplug recharging adapter.
NOTE:
Use only the charger supplied by the manufacturer to recharge.
Power switch must be in the OFF position.
Keep the charger plugged into a standard (120V) outlet while charging.
It is normal for the charger to become warm to the touch when charging.
In order to protect the battery, always turn the power switch to the "OFF position
after using.
WARNING
Do not recharge near heaters, strong direct sunlight, or in areas of high
temperature.
To prevent risk of electric shock or injury, do not recharge within the reach of
small children.
DANGER!
do not cause electrical shortage of the battery terminal.with metal objects.
-
To prevent the risk of overheating, fire, electrical shock, or injury,
Page 5
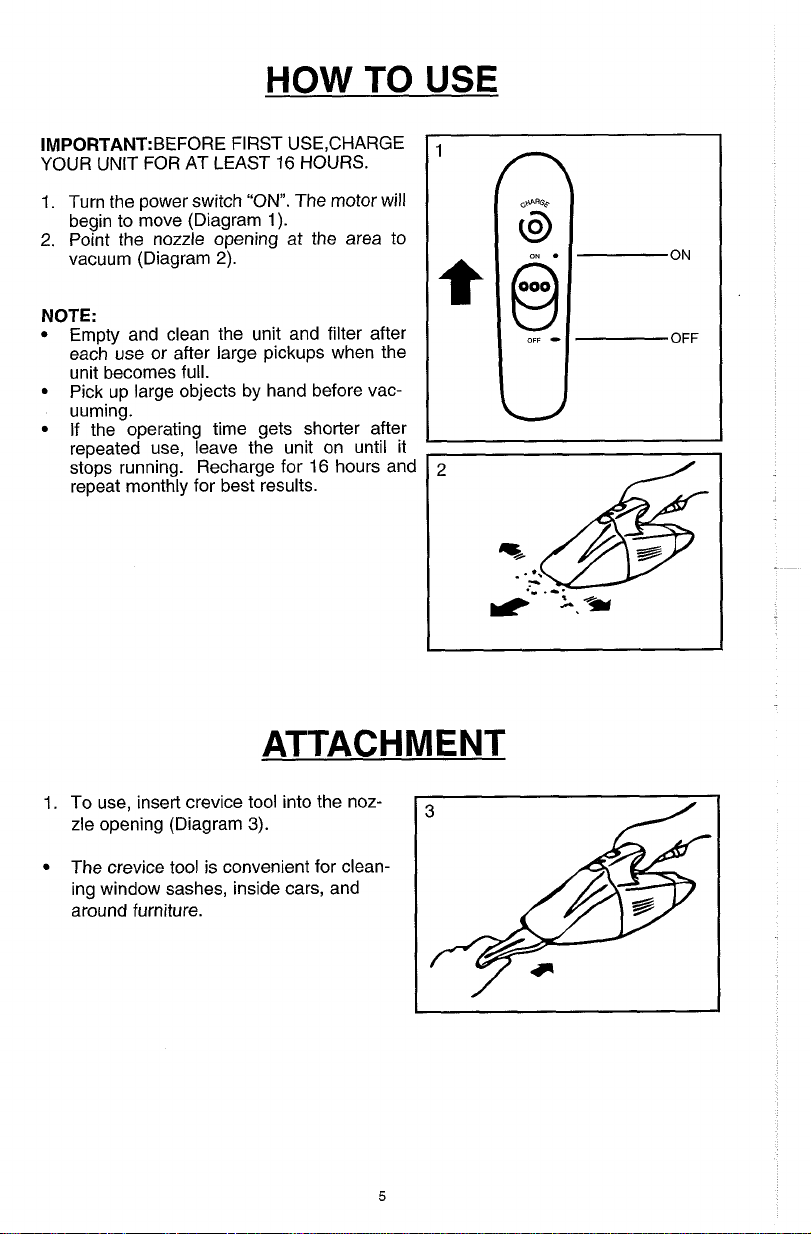
HOW
IMP0RTANT:BEFORE FIRST USE,CHARGE
YOUR UNIT FOR AT LEAST
1.
Turn the power switch "ON". The motor will
begin to move (Diagram
2.
Point the nozzle opening at the area to
vacuum (Diagram
NOTE:
Empty and clean the unit and filter after
each use or after large pickups when the
unit becomes full.
Pick up large objects by hand before vacuuming.
If the operating time gets shorter after
repeated use, leave the unit on until it
stops running. Recharge for
repeat monthly for best results.
2).
16
1).
HOURS.
16
hours and
TO
USE
ON
OFF
ATTACHMENT
1.
To use, insert crevice tool into the noz-
zle opening (Diagram
The crevice tool is convenient for clean-
ing window sashes, inside cars, and
around furniture.
3).
Page 6
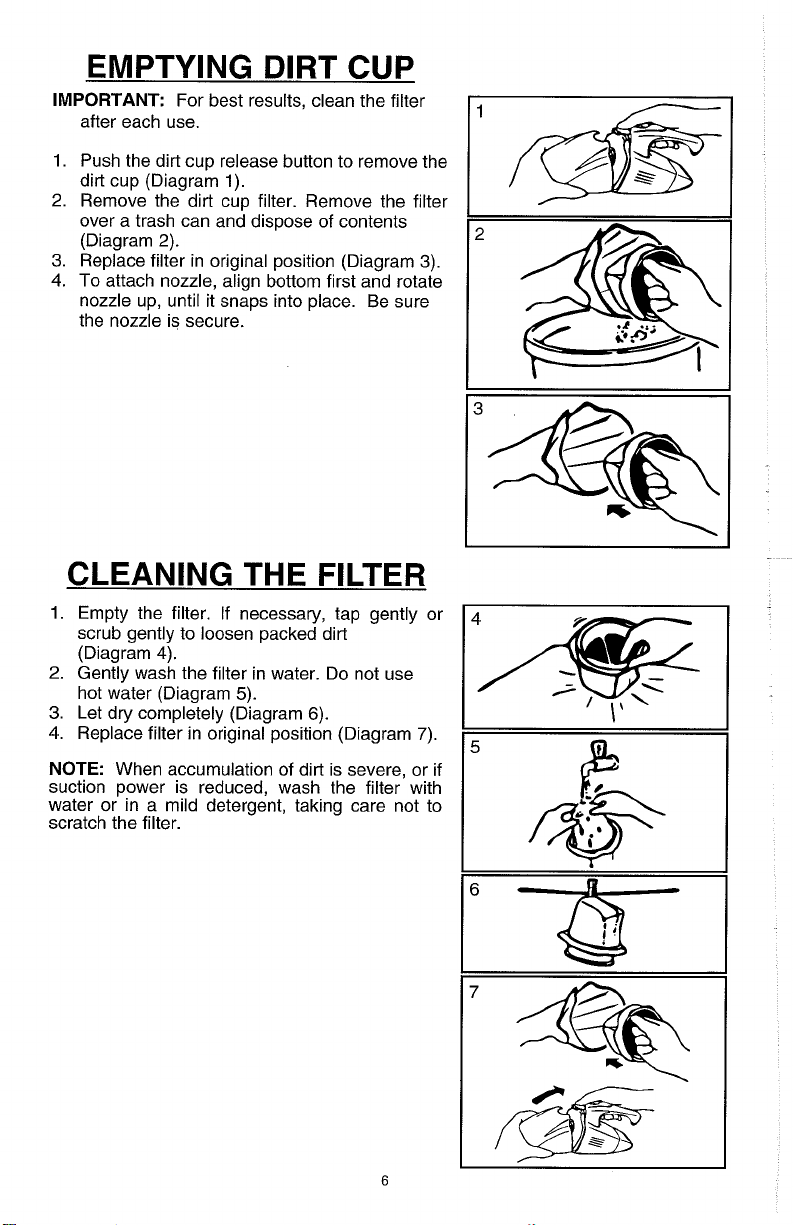
EMPTYING DIRT CUP
IMPORTANT:
after each use.
1. Push the dirt cup release button to remove the
dirt cup (Diagram 1).
2. Remove the dirt cup filter. Remove the filter
over a trash can and dispose of contents
(Diagram 2).
Replace filter in original position (Diagram 3).
3.
4.
To attach nozzle, align bottom first and rotate
nozzle up, until it snaps into place. Be sure
the nozzle is secure.
For best results, clean the filter
CLEANING THE FILTER
1.
Empty the filter. If necessary, tap gently or
scrub gently to loosen packed dirt
(Diagram
2. Gently wash the filter in water. Do not use
hot water (Diagram
Let dry completely (Diagram
3.
4.
Replace filter in original position (Diagram
4).
5).
6).
7).
NOTE:
suction power is reduced, wash the filter with
water or in a mild detergent, taking care not to
scratch the filter.
When accumulation of dirt is severe, or if
Page 7
BATTERY DISPOSAL
To preserve natural resources, please recycle or dispose of expired
battery pack properly.
THIS PRODUCT CONTAINS NICKEL-CADMIUM BATTERY. MUST BE DISPOSED
OF PROPERLY. LOCAL, STATE, OR FEDERAL LAWS MAY PROHIBIT DISPOSAL
OF NICKEL-CADMIUM BATTERIES IN ORDINARY TRASH, CONSULT YOUR
LOCAL WASTE AUTHORITY FOR INFORMATION REGARDING AVAILABLE
RECYCLING AND/OR DISPOSAL OPTIONS. FOR DISPOSAL INFORMATION,
CALL THE RECHARGEABLE BATTERY RECYCLING CORPORATION AT
I-~oo-~-BATTERY.
A
WARNING:
Nickel-cadmium batteries must be recycled or disposed of properly. Also, never touch
both terminals with metal objects and/or body parts as short circuit may result. Keep
away from children. Failure to comply with these warnings could result in fire and/or
serious injury.
TROUBLESHOOTING GUIDE
PROBLEM
Cleaner won't
run
Cleaner won't
pick up or low
suction
Dust escaping
from cleaner
POSSIBLE REASON
1. Battery not charged.
2.
Contacts between battery and charger dirty.
3. Needs service. 3. Take to Service Center or call
weak.
2.
Dirt compartment is full.
3. Filter cartridge is dirty.
1. Dirt compartment is full.
2.
Filter cartridge is dirty.
I
I
POSSIBLE SOLUTION
1. Charge battery. For first use,
charge for at least
Power switch must be in the
"OFF position when charging.
2.
Wipe dirt from contacts.
1 -800-321
2. Empty dirt compartment.
3. Clean cartridge or replace.
1.
Empty dirt compartment.
2.
Clean cartridge or replace.
-1
1 34.
16
hours.
Page 8
I
To the consumer, Royal Appliance Mfg. Co. warrants this vacuum cleaner to be free of defects in
material or workmanship commencing upon the date of the original purchase. Refer to your vac-
uum cleaner carton for the length of warranty and save your original sales receipt to validate start
of warranty period.
LIMITED
WARRANTY
If the vacuum cleaner should become defective within the warranty period, we will repair or replace
any defective parts free of charge. The complete machine must be delivered
Authorized Sales
day of purchase, copy of original sales receipt and your name, address and telephone number. If
you are not near a Warranty Station, call the factory for assistance at USA: 1-800-321-1134
CANADA: 1-800-661-6200. Use only genuine Royal replacement parts.
The warranty does not include unusual wear, damage resulting from accident or unreasonable use
of the vacuum cleaner. This warranty does not cover belts, brushes, bags, bulbs or fan damage.
This warranty does not cover unauthorized repairs. This warranty gives you specific legal rights
and you may also have other rights. (Other rights may vary from state to state in the USA).
&
Warranty Service Station. Please include complete description of the problem,
DreDaid
to any ROYAL
/
Page 9

MANUAL
DEL
USUARIO
lnstrucciones para el funcionamiento y el servicio
Por favor lea cuidadosamente estas
instrucciones antes
de usar su aspiradora
Touch Up.
Dejenos que ie
armemos su
aspiradora o que
respondamos
cualquier pregunta,
llame al
1-800-321 -1 134
(EE.UU.).
1-800-661 -6200
(Canada).
le
Algunos estados exigen que /as baterias utilizadas por
este product0 se reciclen a1 final de su vida util.
Page 10

ESTA ASPIRADORA ES SOLO PARA US0 EN EL HOGAR.
IMPORTANTES INSTRUCCIONES
SOBRE SEGURIDAD. GUARDE ESTAS
Al usar un artefacto electric0 se deben seauir ~recauciones basicas de
seguridad, incluyendo las siguientes:
LEA TODAS LAS INSTRUCCIONES ANTES DE USAR EL ARTEFACTO.
SIEMPRE SlGA ESTAS INSTRUCCIONES DE SEGURIDAD.
-.
ADVERTENCIA: PARA REDUCIR EL
INSTRUCCIONES
RlEGO
DE
ELECTRIC0
Advertencia: No lo utilice afuera ni
en superficies mojadas.
No cargue la unidad afuera.
No permita que lo usen como un
juguete. Se necesita supervision
cuando lo usa un nit70 o cerca del
mismo.
Uselo solo de la manera descrita en
este manual. Utilice solo 10s accesorios recomendados por el fabricante.
No use el cargador si la clavija o el
cordon estan dahados. Si la aspiradora no funciona como debiera o
se ha caido, daiiado o se dejo a la
intemperie, o se cay6 al agua,
llevela a un centro de servicio para
que la revisen. Llame al 1-800321 -1 134 para localizar el centro
de servicio mas cercano.
Nunca transporte la aspiradora del
cable, ni tire del mismo para
chufarla; en su lugar, para desconectarla tire del enchufe. Mantenga el
cable alejado de superficies calientes.
No tire el cable alrededor de bordes o
esquinas filosas. No cierre la puerta
sobre el cable del cargador.
No toque el enchufe ni el artefacto
con las manos mojadas.
Este product0 incluye baterias recargables de niquel cadmio. No las
incinere ni exponga a temperaturas
elevadas pues pueden explotar.
Desenchufe el cargador antes de
comenzar la limpieza o el mantenimiento de rutina.
No coloque ningh objeto en las
aberturas. No lo utilice si alguna
INCENDIO, CHOQUE
0
LESIONES:.
abertura se encuentra obstruida;
desen-
mantengalo sin polvo,
cabellos y cualquier cosa que pueda
reducir la
Mantenga el cabello, la ropa suelta,
10s dedos y todas las partes del cuerpo alejados de las aberturas y de las
piezas que se mueven.
No aspire ningun objeto que se
encuentre encendido o con humo,
como cigarrillos, cerillos o cenizas
calientes.
No lo utilice sin la bolsa para el polvo
o 10s filtros en su lugar.
Apague todos 10s controles antes de
desenchufarlo.
Tenga precaucion extrema cuando
aspire escaleras.
No lo utilice para aspirar liquidos
inflamables o combustibles como por
ejemplo gasolina ni lo use en areas
donde estos puedan encontrarse
presentes.
En condiciones extremas la bateria
puede perder liquido. El liquido es
una
a 35% de hidroxido de potasio, en
caso de contact0 con la piel (1) lave
inmediatamente con agua
(2) neutralice con un acido suave
como por ejemplo
vinagre. Si el liquido penetra en 10s
ojos, enjuaguelos inmediatamente
con agua limpia por lo menos
durante 10 minutos. Busque atencion medica.
Para recargarla, utilice solo el cargador provisto por el fabricante.
circulation
solucion con un contenido del20
jug0 de limon o
pelusas,
del aire.
y
jabon o
Page 11

INDICE
AlmacenamientoICarga
Como usarla
Accesorio
Vaciando el recipiente para polvo.
Limpieza del filtro
Desecho de la bateria
Guia para la deteccion y solucion de problemas
....................................
.......................................
............................
.....................
.................................
.............................
..........
.Pagina
.Pagina
.Pagina
Pagina E6
.Pagina E6
.Pagina
.Pagina
CARACTERETICAS DEL PRODUCT0
E4
E5
E5
E7
E7
1. Boquilla
2.
Recipiente para polvo
3.
Boton liberador del recipiente
para polvo 10.Almacenamiento del accesorio
4.
Luz indicadora de recarga
5.
lnterruptor de encendido
6. Mango comodo de almacenamiento
@
Sin i Recargable! cordones!
@
7.
Ventila del escape
8.
Accesorio para espacios estrechos
9.
Cartucho del filtro
para espacios estrechos
1
1.
Ensamblado delcargadorIBase
'
'
Ligero!
iCompacto! la noche
@
E3
Recarga durante
(1
6
horas)
Page 12

1
CARGA I BASE DE ALMACENAMIENTO
1. El accesorio para espacios estrechos puede ser
almacenado en forma vertical en la base de recarga
(Diagrama 1).
Disetiada para ser colocada sobre un mostrador,
estante u otra superficie horizontal.
La luz indicadora de recarga esta encendida
mientras esta recargando.
Cuando se esta utilizando la aspiradora manual,
la luz indicadora de recarga esta apagada.
CARGA
1.
Coloque el interruptor de encendido
en apagado
a cargar. La aspiradora manual no
puede ser recargada con el interruptor de encendido en la posicion "ON"
(encendido). Si la aspiradora manual
se coloca
con el interruptor de encendido en la
posicion "ON", la luz indicadora de
recarga se encendera per0 no
comenzara la recarga.
2.
Conecte el adaptador a un tomacorriente de
3.
El tiempo de recarga es de aproximadamente
4.
Desconecte el adaptador de recarga
("OFF)
sobre la base de recarga
120V
16
para comenzar
(Diagrama
horas.
2).
2
NOTA:
Para recargar utilice solamente el cargador proporcionado por el fabricante.
El interruptor de encendido debe estar en la posicion "OFF (apagado).
Mantenga el cargador conectado a un tomacorriente estandar
este recargando.
Es normal que el cargador este tibio al tacto cuando esta recargando.
Para proteger la bateria, coloque siempre el interruptor de encendido en la posi.
cion de apagado ("OFF) despues de usar la aspiradora.
No la recargue cerca de calentadores, luz solar directa o en areas con temperatura
aka.
I
Para prevenir el riesgo de descargas electricas o lesiones, no la recargue donde
este al alcance de niiios pequehos.
iPELIGRO!
trica o lesiones, no provoque el cortocircuito de la terminal de la bateria con obj
-
Para evitar el riesgo de sobrecalentamiento, incendio, descarga ele
(120V)
mientras
Page 13

COMO USARLA
IMPORTANTE:
RECARGUE SU UNIDAD POR LO MENOS
DURANTE
1.
Coloque el interruptor de encendido en
"ON". El motor comenzara a funcionar
(Diagrama
2. Dirija la abertura de la boquilla hacia el
area que desea aspirar (Diagrama 2).
NOTA:
Vacie y limpie la unidad y el filtro
despues de cada uso o despues de
haber aspirado areas muy sucias
unidad este Ilena.
Recoja 10s objetos grandes con la mano
antes de aspirar.
Si el tiempo de funcionamiento se acorta
despues del uso repetido, deje la unidad
encendida hasta que deje de funcionar.
Recargue durante
operacion cada mes para obtener mejores
resultados.
ANTES DE USARLA,
16
HORAS.
1).
16
horas y repita esta
y
la
n
d
8
OFF
-
cl
ON
OFF
ACCESORIO
1.
Para usarlo, inserte el accesorio para
espacios estrechos dentro de la abertura de la boquilla (Diagrama
El accesorio para espacios estrechos es
conveniente para limpiar marcos de
ventanas, el interior del automovil
alrededor de 10s muebles.
3).
y
Page 14

VACIANDO EL REClPlENTE PARA
POLVO
IMPORTANTE:
RESULTADOS, LlMPlE EL FILTRO DESPUES
DE CADA USO.
1.
Presione el boton liberador del recipiente
para polvo para quitar el recipiente (Diagrama
2.
Quite el filtro del recipiente para polvo. Quite
el filtro sobre un bote de basura y elimine el
contenido (Diagrama
3. Vuelva a colocar el filtro en su posicion
original (Diagrama 3).
4. Para colocar la boquilla, alinee primer0 la
parte inferior y haga girar la boquilla hacia
arriba, hasta que haga clic en su lugar.
Asegurese de que la boquilla este firme.
PARA OBTENER MEJORES
2).
LlMPlEZA DEL FILTRO
1.
Vacie el filtro. Si fuera necesario, golpee o
restriegue suavemente para aflojar el polvo
compact0 (Diagrama 4).
2.
Lave cuidadosamente el filtro con agua. No
use agua caliente (Diagrama 5).
3. Deje secar completamente (Diagrama
4. Vuelva a colocar el filtro en la posicion original (Diagrama
7).
6).
NOTA:
si la eficacia de aspirado ha disminuido, lave el
filtro con agua o con detergente suave, teniendo
cuidado de no raspar el filtro.
Cuando hay mucho polvo acumulado, o
Page 15

ELlMlNAClON DE BATERIAS
Para preservar 10s recursos naturales sirvase reciclar o desechar las
baterias gastadas de forma apropiada.
ESTE PRODUCT0 CONTIENE BATERIA DE NIQUEL-CADMIO.
DAMENTE. LAS LEYES LOCALES, ESTATALES
BATERIAS DE NIQUEL-CADMIO CON LOS DESPERDICIOS COMUNES. CONSULTE A LA AUTORIDAD LOCAL CORRESPONDIENTE SOBRE LAS OPCIONES DE ELlMlNAClON YIO RECICLAJE
DISPONIBLES. COMUNIQUESE CON LA CORPORACION DE RECICLAJE DE BATERIAS RECAR-
GABLES AL 1-800-8-BATTERY PARA OBTENER INFORMACION SOBRE ELIMINACION.
0
FEDERALES PUEDEN PROHlBlR DESECHAR
DEBE DESECHARSE APROPIA-
A
Las baterias de niquel-cadmio deben reciclarse o desecharse de forma apropiada. Ademas, nunca
toque las terminales con objetos metalicos ylo partes del cuerpo para evitar cortocircuitos.
Mantengalas
incendios ylo lesiones graves.
PROBLEMA
La aspiradora
I
La aspiradora
no aspira o
aspira poco
alejadas de 10s niiios. No cumplir con estas advertencias puede traer como resultado
GUlA PARA LA DETECCION
Y
SOLUCION DE PROBLEMAS
POSIBLE CAUSA
1.
La bateria no esta cargada.
3. Necesita servicio.
I
1.
El cargador de la bateria
se esta debilitando.
2.
El compartimiento para
polvo esta Ileno.
3.
El cartucho del filtro se
encuentra sucio.
1. Recargue la bateria. Para el primer
2.
3. Llevela al Centro de Servicio o llame
1.
2.
3. Limpie el cartucho o reemplacelo.
POSIBLE SOLUCION
uso, cargue por lo menos durante 16
horas. El interruptor de encendido
debe estar en la
DO
("OFF")
Limpie la suciedad de 10s contactos.
al 1-800-321
Cargue la bateria.
Vacie el compartimiento para polvo.
posicion de "APAGA-
cuando este cargando.
-1
134.
El polvo esta
saliendo de la
aspiradora
1. El compartimiento para
polvo esta Ileno.
2.
El cartucho del filtro esta
sucio.
1. Vacie el compartimiento para polvo.
2.
Limpie el cartucho o reemplacelo.
Page 16

GARANTIA LlMlTADA
Para el consumidor, Royal Appliance Mfg. Co. garantiza esta aspiradora contra
defectos de materia prima o de mano de obra, a partir de la fecha de la compra original. Vea en la caja del empaque la
cornpra original para validar el inicio del periodo de garantia.
Si la aspiradora se descompone dentro del periodo de la garantia, repararemos o
reemplazaremos las partes defectuosas sin cargo alguno. Se debe enviar todo el
aparato con porte pagado con
Ventas
y
problema, el dia de compra, copia del recibo original de compra y su nombre, direccion y numero telefonico. Si no se encuentra cerca de una Estacion de Garantia,
llame a la fabrica para que le asistan, en EE.UU.: 1-800-321-1134
661-6200. Use unicamente piezas de repuesto genuinas de Royal.
Garantia autorizada por Royal. Por favor incluya la descripcion completa del
duracion de la garantia y guarde su recibo de
anticipation
a cualquier Estacion de Servicio de
I
CANADA: 1-800-
La garantia no
del uso no razonable de la aspiradora. Esta garantia no cubre el daiio a las bandas,
cepillos, bolsas, focos, ni al ventilador. Esta garantia le otorga derechos legales
especificos y puede tener tambien otros derechos. (Otros derechos pueden variar de
estado a estado en 10s EE.UU.)
incluye el desgaste inusual, 10s daiios que resulten de accidentes o
Page 17

GARANTIE
Royal Appliance Mfg. Go. garantit au consornrnateur que cet aspirateur est exempt de tout vice de
rnateriau ou de fabrication. Gene garantie entre en vigueur
tion de votre carte de garantie. La duree de la garantie est inscrite sur le carton d'ernballage de
I'aspirateur. Si I'aspirateur fait defaut durant la periode couverte par la garantie, nous reparerons
ou rernplacerons toute piece defectueuse gratuiternent.
L'aspirateur
ROYAL autorise. Vous devez inclure une description detaillee du problerne, la date d'achat, et vos
norn, addresse et nurnero de telephone. S'il n'y a pas de point de vente dans votre region, teI&
phonez
La garantie ne couvre pas les utilisations non prevues, ni les deteriorations dues a un accident ou
a
un usage abusif de I'aspirateur. Elle ne couvre pas non plus les courroies, les brosses, les sacs,
les ampoules ou le ventilateur. Cette garantie ne couvre pas les reparations non autorisees. Cette
garantie vous confere des droits juridiques precis, conforrnernent aux lois applicables.
au cornplet doit &re livre, port paye,
a
I'usine, au 1-800-661-6200. N'utilisez que des pieces de rechange Royal.
LIMITEE
a
la date d'achat originale et sur recep-
a
n'irnporte quel point de vente et de service
I
Page 18

MlSE AU REBUT
Pour preserver les ressources naturelles, veuillez recycler et mettre au rebut toute
pile usee de rnaniere appropriee.
CE PRODUIT CONTIENT UNE PILE AU NICKEL CADMIUM, QUI DOlT
MANIERE
VENT INTERDIRE LA MlSE AU REBUT DES PILES AU NICKEL CADMIUM AVEC LES DECHETS
ORDINAIRES. CONSULTER LE SERVICE LOCAL DE
AMPLES RENSEIGNEMENTS AU SUJET DU RECYCLAGE ET DE LA MlSE AU REBUT DES
POUR OBTENIR DES INFORMATIONS SUR
BAlTERY RECYCLING CORPORATION AU 1-800-&BATTERY.
Les piles au nickel cadmium doivent faire I'objet d'un recyclage et d'une rnise au rebut appropries. De rnbme, ne jamais toucher le deux bornes
partie de son corps, dans la rnesure ou un court circuit peut en resulter. Garder hors de portee
des enfants. Le non-respect de ces rnesures de precaution peut entrainer incendies et blessures graves.
APPROPRI~. DES DISPOSITIONS LOCALES, PROVlNClALES OU
LA
A
AVERTISSEMENT:
DE
TRAITEMENT DES
MlSE AU REBUT, APPELER LA "RECHARGEABLE
a
LA BATTERIE
ETRE
MlSE AU REBUT DE
FEDERALES
DECHETS
la fois, avec un objet rnetallique ou une
POUR DE PLUS
PEU-
PILES.
-
PROBLEME
-
I
-'aspirateur ne
r
narche pas
-
L'aspirateur ne
ramasse pas
ou I'aspiration
est faible
La poussiere
s'echappe de
I'aspirateur
GUIDE DE
RAISON POSSIBLE
1. La pile n'est pas
chargee.
2.
Les contacts entre la
pile et le chargeur sont
sales.
3.
A besoin de service.
1. La charge des piles s'affaiblit.
2.
Le compartiment
salete est rempli.
3.
La cartouche a filtre est
sale.
1.
Le compartiment
salete est rempli.
2. La cartouche
sale.
DEPANNAGE
-
a
filtre est
SOLUTION POSSIBLE
1.
Chargement de la batterie. Pou~
un premier emploi, charger pen.
dant au moins 16 heures
L'interrupteur d'alimentation
trique doit &re en position
(ARRET) lors du chargement.
2. Enlever la salete presente sur les
contacts.
3.
Apporter au Centre de Service ou
appeler le 1-800-661 -6200
1.
Charger les piles.
a
2.
Vider le compartiment a salete.
3.
Nettoyer la cartouche ou la remplacer.
a
1. Vider
2. Nettoyer la cartouche ou la rem.
le compartiment
placer.
a
salete.
elec.
"OFF'
Page 19

VIDANGE DU VIDE-
IMPORTANT:
TATS, NETTOYER LE FILTRE APRES
CHAQUE UTILISATION.
1
Appuyer sur le declencheur de vide-poussiere
poussiere (Schema
2.
Enlever le filtre du vide-poussiere. Enlever le
filtre par dessus une poubelle et jeter le
contenu (Schema
3. Remettre le filtre dans sa position initiale
(Schema 3).
4.
Pour attacher le suceur, aligner d'abord la
partie inferieure et tourner le suceur vers le
haut, jusqu'a ce qu'il se bloque en place avec
un bruit sec. S'assurer que le sucer est bien
fixe.
POUR DE MEILLEURS
1).
2).
RESUL-
NETTOYAGE DU FIL-
TRE
1.
Vider le filtre. Si necessaire, taper doucement
ou gratter doucement pour enlever les
saletes tassees (Schema
2.
Laver doucement le filtre avec de I'eau. Ne
pas utiliser d'eau chaude (Schema
3. Le laisser secher completement (Schema
4.
Remettre le filtre dans sa position initiale
(Schema 3).
4).
5.)
6).
NOTE:
En cas d'accumulation massive de
saletes, ou de reduction du pouvoir
d'aspiration, laver le filtre avec de I'eau et un
detergent doux, en
pas le rayer.
faisant attention de ne
Page 20

MODE D'EMPLOI
IMPORTANT: AVANT L'UTILISATION INI-
TIALE, CHARGER L'APPAREIL PENDANT
AU
MOlNS 16 HEURES.
1.
Mettre le commutateur d'alimentation sur
la position ON (MARCHE). Le moteur
demarre (Schema
2.
Diriger I'ouverture du suceur vers I'endroit
a
aspirer (Schema
NOTE:
Vidanger et nettoyer I'appareil et le filtre
apres chaque utilisation ou apres avoir
ramasse beaucoup de saletes, lorsque
I'appareil en est rempli.
Ramasser les arands obiets a la main
avant d'aspire;
Si
la duree de fonctionnement diminue
apres des utilisations repetees, laisser I'appareil en marche jusqu'a ce qu'il s'arrgte.
Le recharger pendant 16 heures et repeter
I'operation une fois par mois, pour obtenir
les meilleurs resultats.
1).
2).
ACCESSOIRE
1.
Pour I'utiliser, inserer le suceur plat
dans I'ouverture de suceur (Schema
Le suceur plat est pratique pour nettoyer les cadres de fenetres, I'interieur des
voitures et autour des meubles.
3).
Page 21

CHARGEMENTIRANGEMENT
BASEDECHARGEMENTIRANGEMENT
1. Le suceur plat peut 6tre range en position verticale
sur le support de rechargement. (Schema 1
Con~u pour &re range sur comptoir, sur etagere ou
sur une autre surface horizontale.
Pendant le rechargement, le voyant lumineux de
rechargement est allume.
Pendant I'utilisation de I'aspirateur portatif, le voyant
lumineux de rechargement est eteint.
CHARGEMENT
1. Pour demarrer le chargement, mettre le commutateur d'alimentation sur:
la position OFF (ARRET).
L'aspirateur portatif ne peut pas 6tre
recharae si le commutateur d'alimen-
tation ;st sur la ~osition ON
(MARCHE). Si llkpirateur est mis
dans le support de rechargement
avec le commutateur d'alimentation
sur la position ON (MARCHE),
voyant lumineux de rechargement
sera allume, mais le rechargement
ne comrnencera pas.
2. Brancher I'adaptateur dans une prise
de courant de 120 V (Schema
3.
La duree de rechargement est d'environ 16 heures.
4.
Debrancher I'adaptateur de
rechargement.
le
2).
.)
I
L
NOTE:
Pour charger, n'utiliser que le chargeur fourni par le fabriquant.
Le commutateur d'alimentation doit &re sur la position OFF (ARRET).
Pendant le chargement, laisser le chargeur branche dans une prise de courant
standard (1 20 V).
Pendant le chargement, il est normal que le chargeur devienne chaud au toucher.
Afin de proteger la pile, mettre toujours le commutateur d'alimentation sur la
position OFF (ARRET) apres I'utilisation.
I
~viter de recharger pres de dispositifs chauffants, sous la lumiere solaire directe ou
dans des endroits
I
Afin d'eviter les risques de choc electrique ou de blessure, ne par
recharger pres de petits enfants.
I
DANGER
ou de blessure, ne pas court-circuiter les bornes de la pile avec des objets metalliques.
I
a
!
-
Afin d'eviter les risques de surchauffe, d'incendie, de choc electrique
AVERTISSEMENT
temperature elevee.
I
I
Page 22

TABLE DES
Rangementlchargement
Mode d'emploi
Accessoire
............................
...............................
Vidange du vide-poussiere
Nettoyage du filtre
..........................
~vacuation de la pile
Guidededepannage Page7
.....................
........................
.........................
MATIERES
...................
.Page
.Page
.Page
.Page
.Page
4
5
5
6
6
.Page 7
1.
Suceur
2.
Vide-poussiere
3.
Declencheur de vide-poussiere
4.
Voyant lumineux de rechargement
5.
Commutateur d'alimentation
6.
Poignee confortable rangement
Sans fil!
Rechargeable!
@
7.
vent
8.
Suceur plat
9.
Cartouche a filtre
10.Rangement du suceur plat
1 1
.Ensemble chargeur1Base de
Compact! Gger!
3
4
@
Rechargement
pendant la nuit
(1
6
heures)
Page 23

THIS VACUUM IS INTENDED FOR HOUSEHOLD USE ONLY.
IMPORTANT SAFETY INSTRUCTIONS
SAVE THESE INSTRUCTIONS
When using an electrical appliance, basic precautions should always be fol-
lowed, including the following:
READ ALL INSTRUCTIONS BEFORE USING THE APPLIANCE.
ALWAYS FOLLOW THESE SAFETY INSTRUCTIONS.
WARNING: TO REDUCE THE RISK OF
FIRE, ELECTRIC SHOCK OR INJURY:
Warning: Do not use outdoors or
on wet surfaces.
Do not charge the unit outdoors.
Do not allow to be used as a toy.
Close attention is necessary when
used by or near children.
Use only as described in this manual. Use only manufacturer's recommended attachments.
Do not use charger with damaged
cord or plug. If vacuum or charger is not working as it should, has
been dropped, damaged, left out-
doors, or dropped into water,
return it to a service center for
inspection. Call
for the nearest Service Center.
Do not abuse the cord. Never
carry the charger or base by the
cord or yank to disconnect from
an outlet; instead grasp the charger and pull to disconnect. Keep
cord away from heated surfaces.
Do not pull cord around sharp
edges or corners. Do not close
door on the charger cord.
Do not handle plug or appliance
with wet hands.
This product includes rechargeable nickel cadmium batteries.
Do not incinerate batteries or
expose to high temperatures, as
they may explode.
Unplug the charger from the outlet
before any routine cleaning or
1-800-321 -1 134
maintenance.
Do not put any object into openings. Do not use with any opening
blocked; keep free of dust, lint,
hair, and anything that may reduce
air flow.
Keep hair, loose clothing, fingers,
and all parts of body away from
openings and moving parts.
Do not pick up anything that is
burning or smoking, such as ciga-
rettes, matches, or hot ashes.
Do not use without dust bag/ or fil-
ters in place.
Turn off all controls before unplugging.
Use extra care when cleaning on
stairs.
Do not use to pick up flammable or
combustible liquids such as gasoline or use in areas where they may
be present.
Leaks from battery cells can occur
under extreme conditions. If the
liquid, which is 20-35% solution of
potassium hydroxide, gets on the
skin (1) wash quickly with soap and
water or (2) neutralize with a mild
acid such as lemon juice or vine-
gar. If the liquid gets into the eyes,
flush them immediately with clean
water for a minimum of 10 minutes.
Seek medical attention.
Use only the charger supplied by
the manufacturer to recharge.
Page 24

OWNER'S MANUAL
Operating and Servicing Instructions
0
Please read these
instructions carefully before using
your Touch Up
vacuum.
0
Let us help you
put your vacuum
together or answer
any questions, call
1-800-321
(USA).
1-800-661 -6200
(Canada).
-1
134
Some states require that the batteries contained in this
product be recycled at the end of their useful life.
Espafiol - pagina
El
01999
All
rights rese~ed #1-015720-033
7/99
 Loading...