

Page 1

ELECTRIC POWERHEAD
OWNER’S
MANUAL
Review this manual before operating
your EDGE Electric Powerhead
Page 2

©Copyright 2009 H-P Products, Inc.
TABLE OF CONTENTS
Subject Page
Safety Instructions ..................................................................................3
Assembling your Edge Powerhead ............................................................4
General Operation ...................................................................................5
Edge Attachments
Handle Attachments ................................................................................5
Wand Assembly Attachments ...................................................................5
Performance Features
Edge Cleaner ..........................................................................................6
Overload Protector ...................................................................................6
Suction Control ........................................................................................6
Maintenance and Care
Brush Cleaning ........................................................................................7
Belt Removal and Replacement ................................................................7
Brush Replacement .................................................................................8
Replacement Parts ...............................................................................10
Limited Warranty ...................................................................................11
Service Information ................................................................................11
2
Page 3

IMPORTANT SAFETY
INSTRUCTIONS
Read all instructions before using this vacuum system.
When using an electrical appliance, basic precautions should always be followed, including
the following:
WARNING
To reduce the risk of fire, electrical shock or injury:
• Unplug and disconnect power
before servicing.
• Do not use on wet surfaces.
• Do not allow to be used as a toy.
Close attention is necessary when
used by or near children.
• Use only as directed in this
manual. Use only manufacturer’s
recommended attachments.
• Do not use with damaged cord or
plug. If appliance is not working
as it should, has been dropped,
damaged or exposed to water,
return it to a service center.
• Do not pull or carry by cord, use
cord as a handle, close a door on
cord, or pull cord around sharp
objects or corners. Do not run
appliance over cord. Keep cord
away from heated surfaces.
• Do not unplug by pulling on cord.
To unplug, grasp the plug, not
the cord.
• Do not handle system or appliance
with wet hands.
• Do not put any object into
openings.
• Do not use with any opening
blocked; keep free of dust, lint,
hair, and anything that may
reduce airflow.
• Keep hair, loose clothing, fingers,
and all parts of body away from
openings and moving parts.
• Do not pick up anything that is
burning or smoking, such as
cigarettes, matches, or hot ashes.
• Turn off all controls before
unplugging.
• Use extra care when cleaning on
stairs.
• Do not pick up flammable or
combustible liquids such as
gasoline or use it in any areas
where they may be present.
• The hose contains electrical wires.
Do not use if damaged, cut or
punctured. Avoid picking up
sharp objects.
• Always turn off this appliance
before connecting or discon necting either hose or motorized
nozzle.
SAVE THESE INSTRUCTIONS
Intended for Household Use Only
3
Page 4
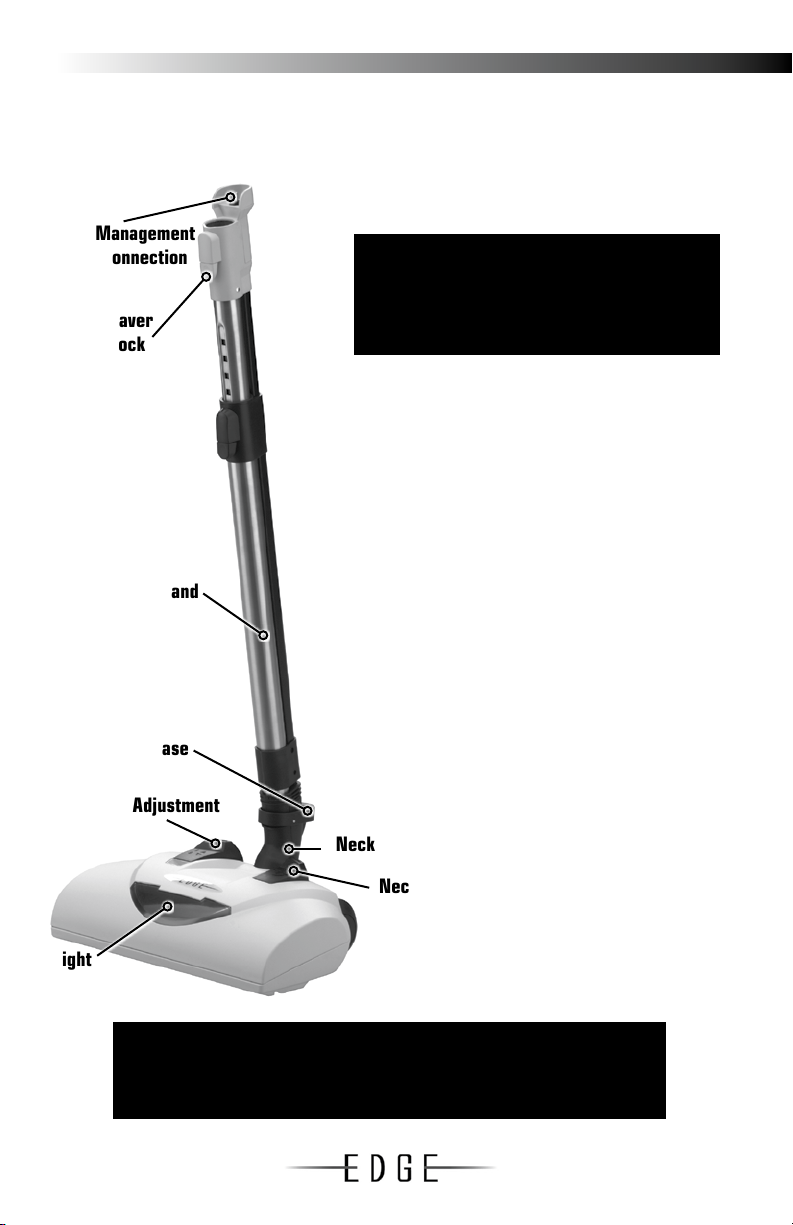
ASSEMBLING YOUR EDGE POWERHEAD
Before assembling your Edge Electric Powerhead for the first use,
be sure you have all parts.
Cord Management
Wand Connection
Thumb Saver
Button Lock
Adjustable Wand
Wand Release
Do not plug into electrical supply until
assembly is complete. Failure to do so could
result in electrical shock or injury.
1. Insert the wand into the opening located
on the neck of the electric powerhead.
The lower wand button lock will prevent
the wand assembly from detaching from
the Edge while in use.
2. Insert the hose handle into the wand
assembly. Insert the hose wall adapter
into the vacuum inlet valve. If your hose
has a “pigtail”, plug the 120V power
cord into the nearest electrical outlet.
To remove the wand, disconnect the power cord
and step on the wand release pedal, then pull up on
the wand.
WARNING:
Height Adjustment
Light
may suddenly restart. Failure to do so can result in personal injury.
4
Neck
Neck Release
WARNING
Always unplug the Edge before cleaning the brush area as brush
Page 5

GENERAL OPERATION
The Edge is controlled by pressing the three
position on/off power control switch located on
the hose handle. When the switch is pushed to
the left (I) it turns on the vacuum only. When the
switch is pushed to the right (II) it operates both
the vacuum and the brush roller. The headlight
will operate when the Edge is turned on.
The powerhead has a height adjustment pedal for
various carpet heights. Use the low setting (#1)
for short napped carpets and the highest setting
(#5) for plush carpets. To change the height of
the Edge, simply, apply pressure to the height
adjustment pedal with your toe.
EDGE ATTACHMENTS
Hose Handle Attachments - using the hose with other attachments
If the Edge is attached to the wand, turn cleaner OFF before removing hose
handle from the wand.
To disconnect the hose from the wand:
1. Press the gray “thumb-saver” lock button, then pull on the handle to
disconnect from the wand.
2. Slide attachments firmly on handle as needed.
Wand Assembly Attachments
To remove the powerhead from the wand:
1. Lock wand in the straight up position.
2. Press easy release pedal with foot, located on
the left side, and pull the wand straight up out
of the Edge.
3. Put desired attachments on wand as needed.
CAUTION
Do not attach or remove handle or wands while cleaner is ON.
This could cause sparking and damage the electrical contacts.
5
Page 6

PERFORMANCE FEATURES
Edge Cleaner
The Edge has built-in channels on both sides that
allow dirt and debris to flow in from the edges freely.
Vacuuming close to baseboards and furniture will
capture dirt trapped at carpet edges.
Channels
Overload Protector
The Edge has built-in protection against motor and belt damage should an
obstruction cause the roller brush to suddenly stop. The overload protector
will activate when the powerhead consumes more power than planned or an
obstruction makes the brush hard to turn. If this occurs:
• Turn off the vacuum and remove hose handle from the wand.
• Remove the object that is preventing the brush from rotating.
• 30 - 60 seconds of cool-down time may be required for the circuit breaker to
automatically reset.
• Reconnect the hose handle to the powerhead and proceed to clean.
Suction Control
The suction control allows you to easily change the vacuum suction for different
fabric and carpet weights. Opening the control decreases suction for drapes and
lightweight rugs, while closing the control increases suction for upholsteries and
carpets.
Handle Release Pedal
The handle release pedal allows you to lower the
wand and handle for extended and easier reach
under furniture.
6
Handle Release
Page 7

MAINTENANCE AND CARE
WARNING:
Always unplug electrical cord and vacuum hose before servicing and maintaining
the Edge Electric Powerhead. Failure to do so could result in electrical shock or
personal injury from cleaner suddenly starting. Always follow all safety precautions
specified when caring for your Edge.
Brush Cleaning
Check the brush roll and brush support areas frequently in order to maintain optimum
efficiency. If hair, string, thread, carpet fiber or lint becomes wound around the brush roll,
remove by unwinding them by hand or carefully cutting with scissors. If buildup becomes
excessive, disconnect the EDGE Powerhead from the wand assembly and follow the Brush
Replacement steps on page 8. Instructions can also be found under the light cover.
Belt Removal and Replacement
The belt should also be checked periodically
to be sure it is in good condition. It should
be replaced if it is stretched, cracked or
broken. If the belt needs replaced, use only
Edge Belt #9204-01.
To remove belt:
1. Remove cover
• Depress Neck Release Pedal and remove
(8) #10 Torx screws, set aside for
reassembly. Note: 3 longer screws are in
front of the brush roller.
• Turn Edge right side up and lift cover
making sure pedals stay secure in
cover housing.
Remove 8 Torx Screws
2. Remove secondary cover
• Remove clear plastic neck release lever
and return spring-set aside.
• Remove 3 #10 Torx screws and set
aside
• Lift secondary cover and slide by wiring
harness.
Remove 3 Torx Screws
7
Page 8

MAINTENANCE AND CARE
3. Remove Brush Roller Assembly
• Lift Roller Assembly while guiding end cap past belt.
4. Remove Belt
• Guide belt past drive gear on motor.
5. Replace Belt
• Only use Edge Belt # 9204-01.
• Guide new belt over gear on motor.
• Guide new belt over end cap of brush roll.
6. Replace Brush Roller
• Place brush roller assembly with belt over gear into base assembly. Note:
Narrow side of end cap faces down.
7. Reverse steps above to reassemble the powerhead
• Make certain all wires are in their original positions.
• Take care when placing the neck assembly into its original position. The 2
yellow wires from the neck must move freely through the ‘gate’ under the
neck axis pivot. Be certain wires do not become “pinched.”
Changing the Brush Roller
Depending on usage and flooring type the brush will become worn and will need
to be replaced.
**Only replace the complete brush
assembly (brush, axles, bearings, end
caps, part #9193).
To remove roller brush
1. Remove Cover
• Depress Neck Release Pedal and
remove (8) #10 Torx screws, set aside
for reassembly. Note: 3 longer screws
are in front of the brush roller.
8
Remove 8 Torx Screws
Page 9

MAINTENANCE AND CARE
• Turn Edge right side up and lift cover
making sure pedals stay secure in
cover housing.
2. Remove secondary cover
• Remove clear plastic neck release
lever and return spring-set aside.
• Remove 3 #10 Torx screws and set
aside.
• Lift secondary cover slide by wiring
harness-set aside.
3. Remove Brush Roller Assembly
• Lift Roller Assembly while guiding end cap past belt.
4. Replace Brush Roller
• Only use part #9193.
• Place brush roller assembly with belt over gear into base assembly.
Note: Narrow side of end cap faces down.
Remove 3 Torx Screws
5. Reverse Steps above to reassemble the powerhead
• Make certain all wires are in their original positions.
• Take care when placing the neck assembly into its original position. The 2
yellow wires from the neck must move freely through the ‘gate’ under the
neck axis pivot. Be certain wires do not become “pinched.”
9
Page 10

EDGE REPLACEMENT PARTS
Neck - 9192
Cover - 9191
Motor
Cover-9209
Height Adjustment
Assembly - 9194
Long Screw-9211
Short
Screw - 9210
Front Wheels
w/ Stirrup - 9197
Wire Coupler - 9198
Noise Reducer - 9199
Circuit Protector - 9200
LED Light Bar - 9201
Brush
Roll - 9193
Motor
9196
Rear Wheel
9203
Rear Wheel Axle - 9202
Belt - 9204-01
10
Page 11

LIMITED WARRANTY
H-P Products, Inc. warrants that the Edge Electric Powerhead, when used for household
purposes, pursuant to Seller’s instructions, will be free from defects in materials and
workmanship for a period of one (1) year from the date of the initial consumer purchase.
H-P Products, Inc. warrants that the Edge Electric Powerhead, when used in a commercial
application, pursuant to Seller’s instructions will be free from defects in materials and
workmanship for a period of ninety (90) days from the date of initial sale by H-P Products, Inc.
This warranty does not cover consumable parts such as light bulbs and replacement belts.
This warranty is limited to the replacement of defective parts and any costs of shipping shall
be incurred by the purchaser.
THIS WARRANTY IS EXCLUSIVE AND IS IN LIEU OF ALL OTHER WARRANTIES, EXPRESS,
IMPLIED OR STATUTORY AND H-P PRODUCTS, INC. SPECIFICALLY DISCLAIMS
RESPONSIBILITY FOR CONSEQUENTIAL AND INCIDENTAL DAMAGES AND LIMITS THE IMPLIED
WARRANTY OF MERCHANTABILITY TO THE PERIOD OF EFFECTIVENESS OF THIS EXPRESS
WARRANTY.
SERVICE INFORMATION
The instructions in this booklet serve as a guide to routine maintenance. If additional
service or repairs are required, please call 1-800-822-8356 for your nearest authorized
servicing dealer.
WARNING:
ELECTRIC SHOCK COULD OCCUR IF USED ON WET SURFACES
11
Page 12

512 W. Gorgas Street
Louisville, Ohio 44641-0912
www.CentralVacService.com
PN 9207 06/11
 Loading...