

Page 1
Bedienungsanleitung
DE
beutelloser Bodenstaubsauger
Operating Manual
GB FR
Bagless cylinder
vacuum cleaner
Mode d'emploi
Aspirateur-traîneau
sans sac
Bedieningshandleiding
NL ES IT
Stofzuiger zonder
stofzak
Kullanim Klavuzu
TR
Manual de instrucciones
Aspiradora rodante
sin bolsa
Torbasz elektrik
süpürgesi
Roya-22400-21 • A4 • 26.09.2012
Istruzioni per l'uso
Aspirapolvere senza
sacchetto
Page 2

Bedienungsanleitung .................................................................................................. 3- 7
Operating Manual ........................................................................................................ 8 - 12
Mode d'emploi ............................................................................................................. 13 - 17
Bedieningshandleiding ............................................................................................... 18 - 22
DEGBFRNLESITTR
Manual de instrucciones ............................................................................................ 23 - 27
Istruzioni per l'uso ...................................................................................................... 28 - 32
Kullanim Klavuzu ........................................................................................................ 33 - 37
2
Page 3

1 Sicherheitshinweise
WARNUNG:
ACHTUNG:
HINWEIS:
1 Sicherheitshinweise
1.1 zur Bedienungsanleitung
Lesen Sie diese Bedienungsanleitung vollständig durch, bevor Sie mit dem
Gerät arbeiten. Bewahren Sie die Anleitung gut auf. Falls Sie das Gerät an
Dritte weitergeben, geben Sie die Bedienungsanleitung mit.
Die Nichtbeachtung dieser Anleitung kann zu schweren Verletzungen
oder Schäden am Gerät führen.
Für Schäden, die durch Nichtbeachtung dieser Bedienungsanleitung entstehen, übernehmen wir keine Haftung.
Beachten Sie Hinweise, die wie folgt gekennzeichnet sind, unbedingt, um
Unfälle und Schäden am Gerät zu vermeiden.
1.2 zu bestimmten Personengruppen
Diese Geräte können von Kindern ab 8 Jahren und darüber und von
Personen mit verringerten physischen, sensorischen oder mentalen Fähigkeiten oder Mangel an Erfahrung und/oder Wissen benutzt werden, wenn
sie beaufsichtigt werden oder bezüglich des sicheren Gebrauchs des Gerätes unterwiesen wurden und die daraus resultierenden Gefahren verstanden haben.
Kinder dürfen nicht mit dem Gerät spielen.
1.3 zur Stromversorgung
Das Gerät wird mit elektrischem Strom betrieben, dabei besteht grundsätzlich die Gefahr eines elektrischen Schlags. Beachten Sie daher Folgendes:
Tauchen Sie das Gerät niemals in Wasser oder andere Flüssigkeiten
und halten Sie es von Regen und Nässe fern.
Fassen Sie den Stecker nie mit nassen Händen an. Betreiben Sie das
Gerät nicht im Freien oder in Räumen mit hoher Luftfeuchtigkeit.
Achten Sie darauf, dass das Stromkabel nicht geknickt, eingeklemmt,
überfahren wird oder mit Hitzequellen in Berührung kommt. Es darf außerdem nicht zur Stolperfalle werden.
Stellen Sie vor dem Anschließen an die Stromversorgung sicher, dass
die auf dem Typenschild angegebene elektrische Spannung mit der Spannung Ihrer Steckdose übereinstimmt. Benutzen Sie nur Steckdosen mit
Schutzkontakt.
Warnt vor Gefahren für Ihre Gesundheit und zeigt mögliche Verletzungsrisiken auf.
DE
Weist auf mögliche Gefährdungen für das Gerät oder andere Gegenstände hin.
Hebt Tipps und Informationen für Sie hervor.
Reinigung und Benutzer-Wartung dürfen nicht durch Kinder ohne Be-
aufsichtigung durchgeführt werden.
Kinder jünger als 8 Jahre sollten vom Gerät und der Anschlussleitung
ferngehalten werden, wenn es eingeschaltet ist oder abkühlt.
Verpackungsmaterialien dürfen nicht zum Spielen verwendet werden.
Es besteht Erstickungsgefahr.
Kontrollieren Sie das Stromkabel vor dem Benutzen auf eventuelle Be-
schädigungen.
Transportieren Sie das Gerät niemals am Stromkabel. Es könnte be-
schädigt werden.
Bevor Sie das Gerät reinigen oder warten, schalten Sie das Gerät aus
und ziehen Sie den Stecker aus der Steckdose.
Wenn Sie den Stecker aus der Steckdose herausziehen wollen, ziehen
Sie immer direkt am Stecker. Ziehen Sie niemals am Stromkabel, es könnte beschädigt werden.
Benutzen Sie nach Möglichkeit keine Verlängerungskabel. Falls dies
unumgänglich ist, benutzen Sie nur GS-geprüfte, spritzwassergeschützte,
einfache Verlängerungskabel (keine Mehrfachsteckdosen), die für die
Leistungsaufnahme des Gerätes ausgelegt sind.
1.4 zur bestimmungsgemäßen Verwendung
Der Bodenstaubsauger darf nur im Haushalt eingesetzt werden.
Er ist für eine gewerbliche Nutzung nicht geeignet.
Verwenden Sie den Bodenstaubsauger ausschließlich für das Reinigen
von trockenen, normal verschmutzten Böden. Wenn Sie die Möbelbürste
montiert haben, können Sie das Gerät ebenso zum Saugen von Polstern
und Möbeln einsetzen.
Jede weitere Verwendung gilt als nicht bestimmungsgemäß und ist untersagt. Verboten ist insbesondere:
Die Verwendung in der Nähe von explosiven oder leicht entzündlichen
Stoffen. Es besteht Brand- oder Explosionsgefahr.
Die Verwendung im Freien. Es besteht die Gefahr, dass Regen und
Schmutz das Gerät zerstören.
Das Hineinstecken von Gegenständen in die Öffnungen des Gerätes.
Es könnte überhitzen.
Das selbstständige Umbauen oder Reparieren des Gerätes.
1.5 bei defektem Gerät
Betreiben Sie niemals ein defektes Gerät oder ein Gerät mit einem defekten Stromkabel. Wenn die Anschlussleitung dieses Gerätes beschädigt ist,
muss sie durch den Hersteller oder seinen Kundendienst oder eine ähnlich
qualifizierte Person ersetzt werden, um Gefährdungen zu vermeiden.
Verboten ist zudem:
Das Saugen von:
- Menschen, Tieren, Pflanzen, insbesondere Haaren, Fingern und anderen Körperteilen sowie am Körper befindlichen Kleidungsstücken.
Diese können eingezogen werden. Verletzungen können die Folge
sein.
- Wasser und anderen Flüssigkeiten, insbesondere feuchten Teppichreinigern. Feuchtigkeit im Inneren kann zum Kurzschluss führen.
- Toner (für Laserdrucker, Kopierer usw.). Es besteht Brand- und Explosionsgefahr.
- glühender Asche, brennenden Zigaretten oder Streichhölzern. Es
kann zum Brand kommen.
- spitzen Gegenständen, wie Glassplittern, Nägeln etc. Dadurch kann
das Gerät beschädigt werden.
- Bauschutt, Gips, Zement, feinstem Bohrstaub, Schminke, Puder
usw. Dadurch kann das Gerät beschädigt werden.
Geben Sie ein defektes Gerät zur Reparatur an einen Fachhändler oder
den Royal
2Gebrauch
Appliance-Kundendienst (ZSeite 38, „International Service“).
3
Page 4
2Gebrauch
click!
WARNUNG:
ACHTUNG:
HINWEIS:
!
WARNUNG:
ACHTUNG:
WARNUNG:
HINWEIS:
WARNUNG:
HINWEIS:
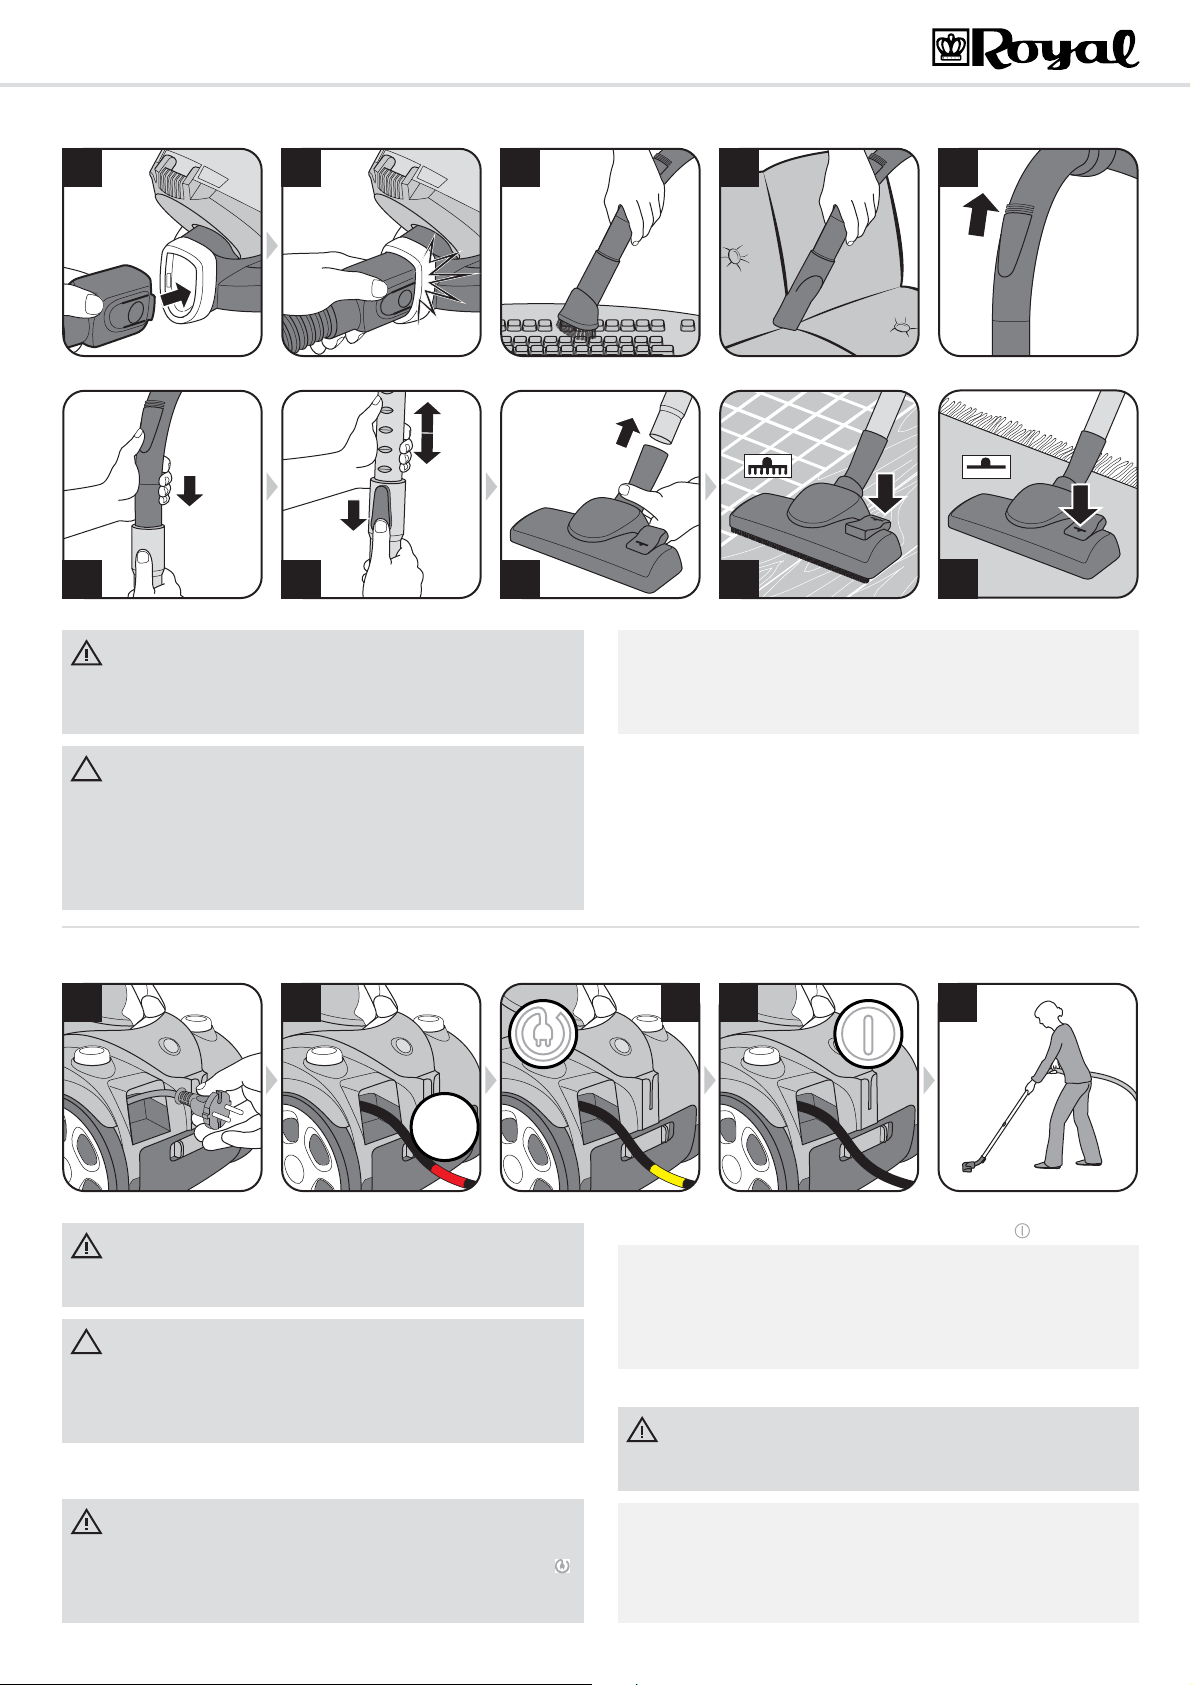
2.1 Gerät montieren und Düsen an Untergrund anpassen
1
6
Verletzungsgefahr! Montieren Sie die Geräteteile nur, wenn der Stecker
aus der Steckdose gezogen ist. Anderenfalls kann das Gerät anlaufen
und Körperteile, Haare oder Kleidungsstücke einziehen.
2
click!
7
3 4
8
5
9
Eventuell ist es erforderlich, beide Teile beim Zusammenstecken etwas
gegeneinander zu drehen, damit sie fest sitzen. Prüfen Sie montierte
Teile auf festen Halt, indem Sie versuchen, diese auseinanderzuziehen.
10
Stellen Sie vor dem Montieren sicher, dass die aufgesetzte Düse unbeschädigt und für den zu saugenden Untergrund geeignet ist. Reinigen
Sie z. B. niemals Böden oder Gegenstände mithilfe einer Bürste mit
rotierenden Borsten, die Sie nicht bedenkenlos mit einer konventionellen Bürste reinigen würden. Beachten Sie die Empfehlungen des Belagherstellers.
2.2 Staubsaugen
11
Verletzungsgefahr! Prüfen Sie Gerät und Stromkabel vor jeder Benutzung. Ein beschädigtes Gerät darf nicht verwendet werden.
Verwenden Sie das Gerät nur, wenn alle Filter unbeschädigt, trocken
und korrekt eingesetzt sind. Stellen Sie sicher, dass keinerlei Gegenstände das Teleskoprohr, den Saugschlauch oder andere Öffnungen
verstopfen.
1. Ziehen Sie das Kabel aus dem Gerät (Abb. 11) und stecken Sie den
Stecker in eine Steckdose.
12
1. Montieren Sie die Geräte- und Zubehörteile, je nachdem welchen Un-
tergrund Sie saugen möchten (Abb. 1 – 8).
2. Achten Sie darauf, dass der Nebenluftregler geschlossen ist (Abb. 5).
3. Falls Sie das Teleskoprohr verwenden (Abb. 6), stellen Sie dessen
Länge ein (Abb. 7).
4. Falls Sie die Bodendüse verwenden (Abb. 8), stellen Sie diese auf den
zu saugenden Untergrund ein (Abb. 9 Hartboden, Abb. 10 Teppich).
14
13
2. Schalten Sie das Gerät über den Ein-/Aus-Schalter ( ) ein (Abb. 14).
Der Nebenluftregler (Abb. 5) muss beim Saugen vollständig geschlossen sein. Mit seiner Hilfe können Sie bei Bedarf die Saugleistung
schnell reduzieren, um eingesaugte Gegenstände (z. B. Gardinen) wieder freizugeben.
3. Saugen Sie Staub (Abb. 15).
Verletzungsgefahr! Achten Sie insbesondere beim Saugen von Treppen
darauf, dass Sie sich stets oberhalb des Gerätes befinden.
15
4
Gefahr eines elektrischen Schlags! Falls die rote Markierung sichtbar ist
(Abb. 12), ziehen Sie das Stromkabel mithilfe der Kabelaufrolltaste ( )
wieder bis zur gelben Markierung (Abb. 13) ein. Anderenfalls kann das
Stromkabel beschädigt werden.
Ihr Staubsauger besitzt eine integrierte Schutzfunktion, die das Gerät
ausschaltet, bevor das Gerät überhitzen kann (z. B. aufgrund verstopfter
Saugwege oder eines überfüllten Staubbehälters), ZKapitel 4.1, „Bevor
Sie das Gerät einsenden“.
Page 5
3 Wartung und Pflege
ACHTUNG:
ACHTUNG:
24 h
click!
HINWEIS:
ACHTUNG:
ACHTUNG:
3 Wartung und Pflege
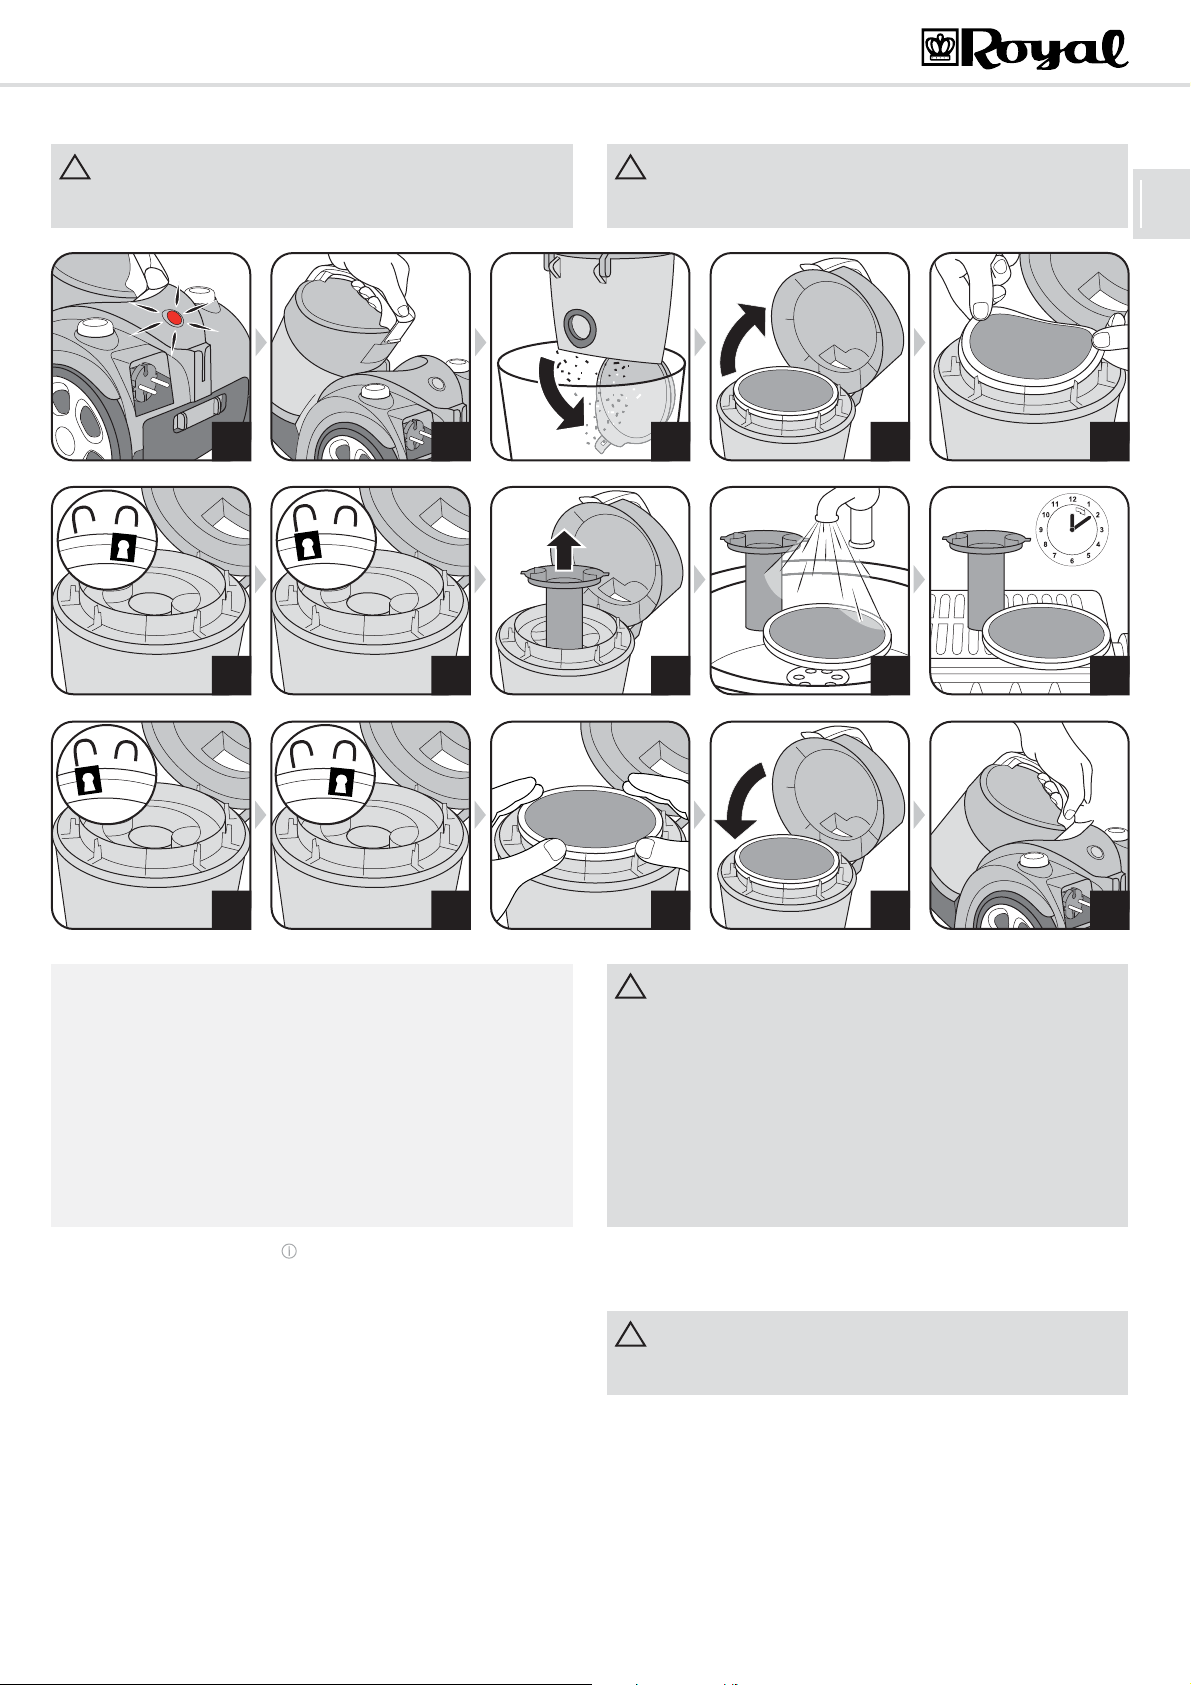
3.1 Staubbehälter leeren und reinigen
Bevor Sie den Staubbehälter entnehmen, schalten Sie das Gerät aus.
So vermeiden Sie, dass Staub das Gerät beschädigt.
16
21
17
22
Den Inhalt des Staubbehälters können Sie im Hausmüll entsorgen,
solange er keinen für den Hausmüll verbotenen Schmutz enthält.
18
23
19
24
20
25
DE
26
Der Staubbehälter muss regelmäßig geleert und gereinigt werden. Anderenfalls wird das Entleeren von Mal zu Mal schwieriger oder es können
sich sogar Gerüche oder Keime bilden, je nachdem, was Sie zuvor aufgesaugt haben.
Leeren Sie den Staubbehälter also am besten nach jedem Saugvor-
gang.
Leeren und reinigen Sie den Staubbehälter spätestens, sobald die
Reinigungs-/Entleerungsanzeige leuchtet (Abb. 16).
Leeren und reinigen Sie den Staubbehälter zudem spätestens alle
3 Monate, vor längerer Lagerung oder bevor Sie das Gerät versenden.
1. Schalten Sie das Gerät aus ( ).
2. Ziehen Sie den Stecker aus der Steckdose.
3. Entnehmen Sie den Staubbehälter (Abb. 17).
4. Leeren Sie den Staubbehälter (Abb. 18).
5. Kontrollieren Sie bei dieser Gelegenheit auch gleich die Filterelemente
im Staubbehälter (Abb. 19 – 23).
6. Sollten die Filterelemente verschmutzt sein, reinigen Sie diese unter
fließendem, kaltem oder handwarmem Wasser, bis sämtliche Verschmutzungen beseitigt sind (Abb. 24).
27
click!
28
Die Filterelemente sind waschbar, jedoch weder spülmaschinen- noch
waschmaschinentauglich.
Verwenden Sie außerdem zur Reinigung der Filterelemente keine
Reinigungsmittel oder Bürsten mit harten Borsten.
Lassen Sie die Filterelemente nach der Nassreinigung trocknen
(ca. 24 Stunden bei Raumtemperatur).
Setzen Sie die Filterelemente erst wieder ein, wenn sie vollkommen
trocken sind.
Ersetzen Sie beschädigte oder verformte Filter umgehend (Bestellin-
formationen siehe ZKapitel 3.4, „Ersatzteile und Zubehör“).
7. Lassen Sie die Filterelemente nach der Nassreinigung trocknen
(ca. 24 Stunden bei Raumtemperatur, Abb 25).
8. Setzen Sie die Filterelemente wieder ein (Abb. 26 – 29).
Betreiben Sie das Gerät niemals ohne korrekt eingesetzte Filter.
Betreiben Sie das Gerät niemals mit beschädigten Filtern.
9. Setzen Sie den Staubbehälter wieder ein (Abb. 30).
Er muss hör- und spürbar einrasten.
29
30
5
Page 6
3 Wartung und Pflege
click!click!
click!
ACHTUNG:
ACHTUNG:
WARNUNG:
WARNUNG:
ACHTUNG:
ACHTUNG:
ACHTUNG:
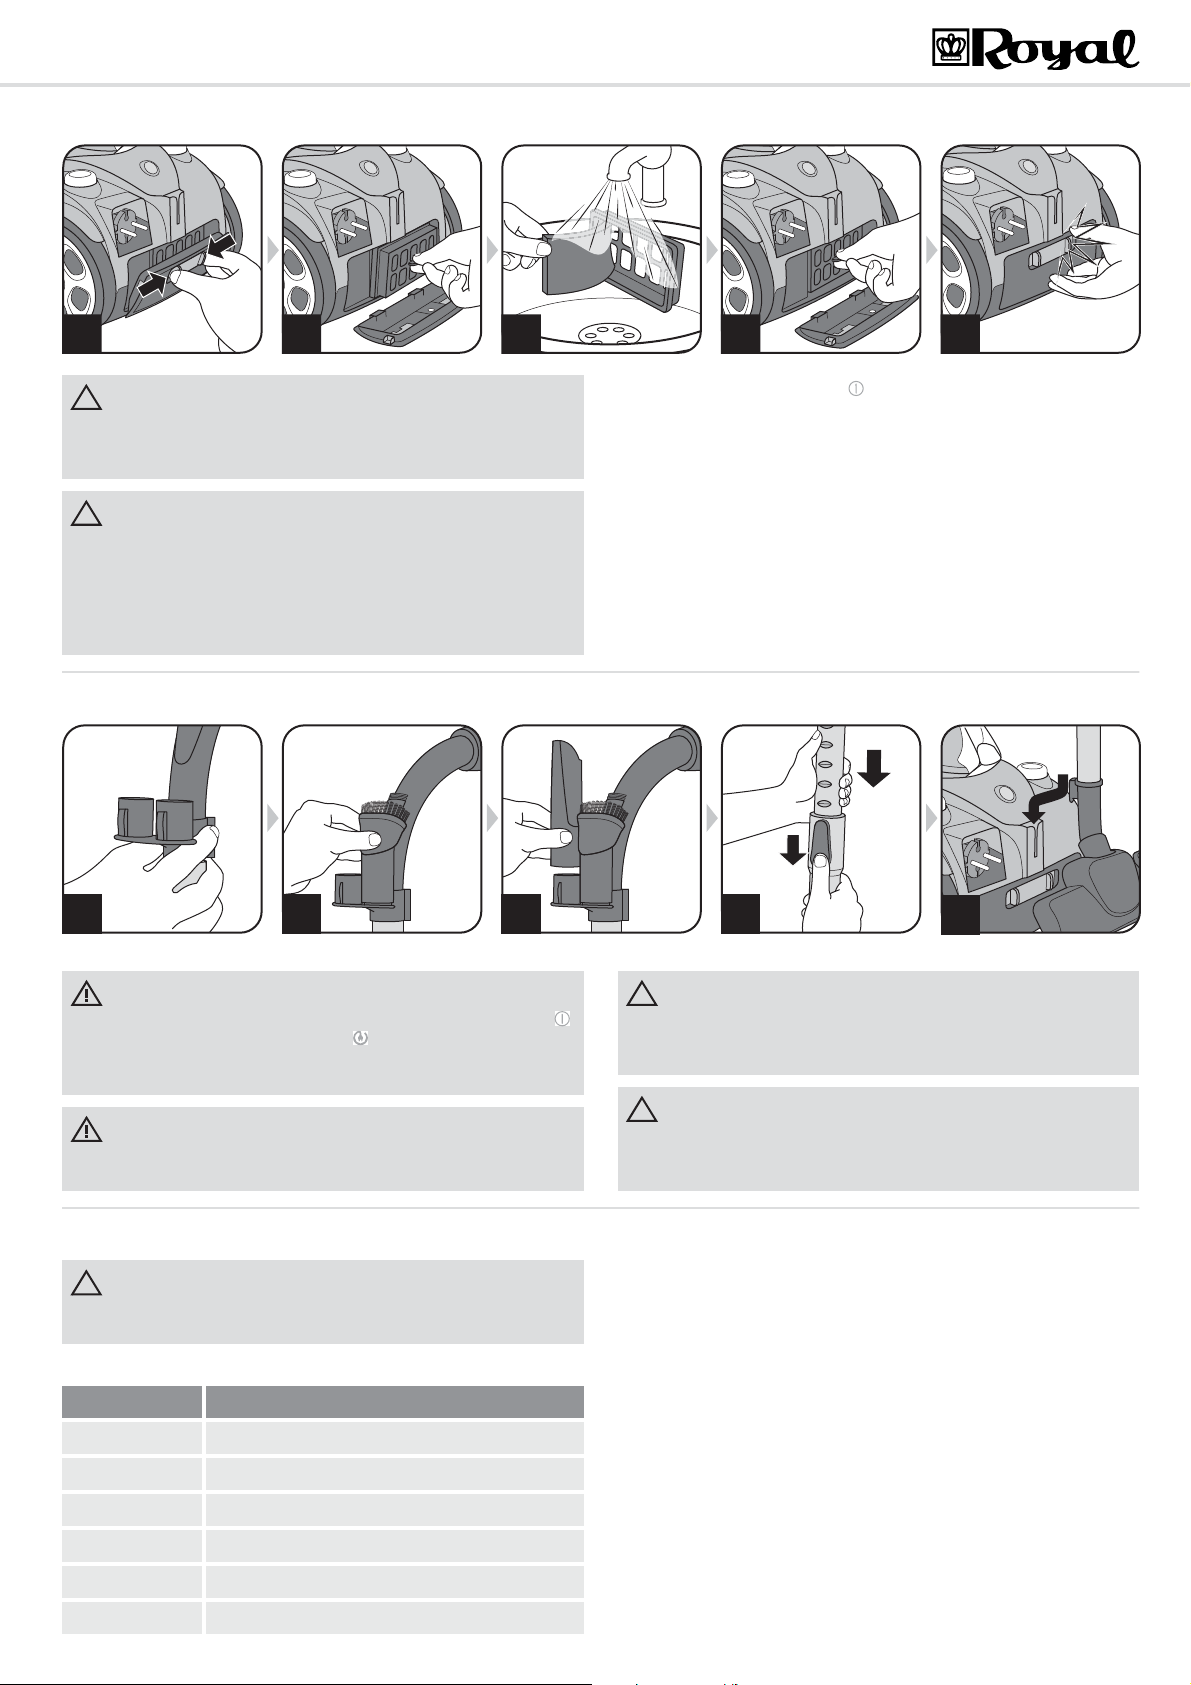
3.2 Ausblasfilter reinigen/wechseln
31 32
Reinigen Sie den Filter jedes Mal, wenn Sie den Staubbehälter reinigen. Wechseln Sie den Filter, wenn dieser beschädigt oder verformt ist
(Bestellinformationen siehe ZKapitel 3.4, „Ersatzteile und Zubehör“).
Die Filterelemente sind waschbar, jedoch weder spülmaschinen- noch
waschmaschinentauglich. Verwenden Sie außerdem zur Reinigung der
Filterelemente keine Reinigungsmittel oder Bürsten mit harten Borsten.
Lassen Sie die Filterelemente nach der Nassreinigung trocknen
(ca. 24 Stunden bei Raumtemperatur). Setzen Sie die Filterelemente
erst wieder ein, wenn sie vollkommen trocken sind.
33 34
3.3 Aufbewahren
37 3836
35
1. Schalten Sie das Gerät aus ( ).
2. Ziehen Sie den Stecker aus der Steckdose.
3. Entriegeln Sie die Ausblasfilterabdeckung wie abgebildet (Abb. 31).
4. Entnehmen Sie den Ausblasfilter (Abb. 32).
5. Spülen Sie beide Filterelemente unter fließendem Wasser
gründlich aus (Abb. 33).
6. Lassen Sie die Filterelemente trocknen (ca. 24 Stunden bei
Raumtemperatur) und setzen Sie diese wieder zusammen.
7. Setzen Sie den Ausblasfilter zurück in seine Konsole (Abb. 34).
8. Setzen Sie die Ausblasfilterabdeckung zuerst unten an und drücken
Sie die Abdeckung dann oben fest an, bis sie einrastet (Abb. 35).
39
40
Verletzungsgefahr! Schalten Sie das Gerät nach dem Saugen aus ( )
und wickeln Sie das Stromkabel auf ( ). Behalten Sie den Stecker
beim Aufrollen in der Hand, damit das Kabel nicht umherschlingert und
Sie sich womöglich verletzen.
Verletzungsgefahr! Bewahren Sie das Gerät stets für Kinder unzugänglich auf.
3.4 Ersatzteile und Zubehör
Verwenden Sie nur Originalersatzteile aus dem Lieferumfang oder solche, die Sie durch Nachbestellung erworben haben.
Folgende Zubehör- und Ersatzteile können Sie nachbestellen:
Artikel-Nr. Beschreibung
2991001 1 Dual-Motorschutzfilter
2991003 1 Ausblasfilter
2991005 1 Filtersieb
M203 1 Parkettbürste
M209 1 Turbobürste
M219 1 Mini-Turbobürste „Fellino“
6
Stellen Sie das Gerät nie direkt neben Wärmequellen ab (z. B. Heizung,
Ofen). Vermeiden Sie direkte Sonneneinstrahlung. Bewahren Sie Gerät
und Zubehör kühl, trocken und platzsparend auf (Abb. 36 – 40).
Wenn Sie beabsichtigen, das Gerät längere Zeit zu lagern, leeren und
reinigen Sie den Staubbehälter sowie seine Filterelemente ZKapitel
3.1, „Staubbehälter leeren und reinigen“.
Zubehör- und Ersatzteile können Sie auf verschiedenen Wegen bestellen:
Bestellung per Telefon: 01805 15 85 08*
*0,14 €/Minute aus dem deutschen Festnetz (deutscher Mobilfunkhöchstpreis 0,42 €/Minute)
Bestellung per E-Mail: Ersatzteilshop@dirtdevil.de
Bestellung in unserem Onlineshop: Z www.dirtdevil.de
Bestellung bei unserem Servicepartner:
Service Center Feuerbach KG
Corneliusstr. 75
40215 Düsseldorf
DEUTSCHLAND
Tel.: +49 (0) 1805 - 15 85 08*
Fax: +49 (0) 211 - 37 04 97
dirtdevil-service@t-online.de
www.dirtdevil-service.de
*0,14 €/Minute aus dem deutschen Festnetz (deutscher Mobilfunkhöchstpreis 0,42 €/Minute)
Page 7

4 Problembehebung und Technische Daten
WARNUNG:
HINWEIS:
www.dirt-devil.de/service
*0,14 €/Min. aus dem
deutschen Festnetz
(deutscher Mobilfunkhöchstpreis 0,42 €/Min.)
SERVICE-HOTLINE
0180 501 50 50
*
Mo.– Fr., 8 – 20 Uhr
4 Problembehebung und Technische Daten
4.1 Bevor Sie das Gerät einsenden
Verletzungsgefahr! Verwenden Sie niemals ein defektes Gerät! Bevor
Sie auf Problemsuche gehen, schalten Sie das Gerät aus und ziehen
Sie den Stecker aus der Steckdose.
Bevor Sie uns kontaktieren oder das Gerät gar einsenden, überprüfen Sie
anhand der Tabelle, ob Sie das Problem selbst beseitigen können.
Problem mögliche Ursache / Lösung
Saugergebnis ist trotz
einwandfreier Funktion
nicht zufriedenstellend.
Nebenluftregler (Abb. 5) ist geöffnet.
Schließen Sie den Nebenluftregler (Abb. 5).
Aufgesteckte Düse ist nicht angemessen.
Wechseln Sie die Düse, ZKapitel 2.1, „Gerät montieren
und Düsen an Untergrund anpassen“.
Bürstkranz der Bodendüse steht in einer dem Belag
nicht angemessenen Stellung (Abb. 9 – 10).
Passen Sie die Stellung des Bürstkranzes über den Umschalter der Bodendüse an den Belag an (Abb. 9 – 10).
Staubbehälter ist voll.
Leeren und reinigen Sie den Staubbehälter ZKapitel
3.1, „Staubbehälter leeren und reinigen“.
Filter sind verschmutzt.
Reinigen Sie die Filter, ZKapitel 3.1, „Staubbehälter
leeren und reinigen“ bzw. ZKapitel 3.2, „Ausblasfilter
reinigen/wechseln“.
Düse, Teleskoprohr oder Saugschlauch sind verstopft.
Entfernen Sie die Verstopfung. Benutzen Sie dazu falls
erforderlich einen langen Stab (z. B. einen Besenstiel).
Problem mögliche Ursache / Lösung
Reinigungs/Entleerungsanzeige leuchtet
(Abb. 16).
Gerät hört
plötzlich auf
zu saugen.
Wenn Sie das Problem mit Hilfe dieser Tabelle nicht beheben konnten,
kontaktieren Sie die Service-Hotline (Z siehe unten) oder den Royal
Appliance-Kundenservice (Z siehe unten).
Staubbehälter ist voll.
Leeren und reinigen Sie den Staubbehälter ZKapitel
3.1, „Staubbehälter leeren und reinigen“.
Filter sind verschmutzt.
Reinigen Sie die Filter, ZKapitel 3.1, „Staubbehälter
leeren und reinigen“ bzw. ZKapitel 3.2, „Ausblasfilter
reinigen/wechseln“.
Düse, Teleskoprohr oder Saugschlauch sind verstopft.
Entfernen Sie die Verstopfung. Benutzen Sie dazu falls
erforderlich einen langen Stab (z. B. einen Besenstiel).
Überhitzungsschutz hat angesprochen (möglicherweise
aufgrund verstopfter Saugwege o. Ä.).
1. Schalten Sie das Gerät aus und ziehen Sie den Ste-
cker aus der Steckdose.
2. Beseitigen Sie die Ursache der Überhitzung (z. B.
Teleskoprohr und Saugschlauch demontieren und
Verstopfung entfernen).
3. Warten Sie ca. 45 Minuten, bis das Gerät abgekühlt
ist.
4. Das abgekühlte Gerät können Sie wieder einschal-
ten.
DE
4.2 Gewährleistung
Es gelten die gesetzlichen Gewährleistungsregeln nach EU-Richtlinie
1999/44/EG. In Nicht-EU-Ländern gelten die im jeweiligen Land gültigen
Mindestansprüche der Gewährleistung.
4.3 Entsorgung
Entsorgen Sie das Gerät entsprechend den in Ihrem Land geltenden Umweltschutzvorschriften. Elektrische Abfälle dürfen nicht zusammen mit Haushaltsabfällen entsorgt werden. Nutzen Sie stattdessen die örtlichen Sammelstellen zur Rückgabe von Altgeräten.
Die Filter sind aus umweltverträglichen Materialien hergestellt. Sie können
diese – anders als das Gerät – im Hausmüll entsorgen, solange Sie keine
für den Hausmüll verbotenen Stoffe aufgesaugt haben.
4.4 Technische Daten
Geräteart : beutelloser Bodenstaubsauger
Modellname : Centrino
Modellnummer : M2991-2
Spannung : 220–240 V ~, 50/60 Hz
Leistung : 1.200 W nom. – 1.800 W max.
max. nutzbares Volumen des
Staubbehälters
Stromkabellänge : ca. 5 m
: ca. 1,6 Liter
+
Gewicht : ca. 3,5 kg
Technische und gestalterische Änderungen im Zuge stetiger Produktverbesserungen vorbehalten.
© Royal Appliance International GmbH
Beheben Sie
Störungen
ganz leicht selbst.
Royal Appliance International GmbH
Abt. Kundenservice
Jagenbergstraße 19
41468 Neuss
DEUTSCHLAND
Tel.: +49 (0) 180 - 501 50 50*
Fax: +49 (0) 2131 - 60 90 60 95
*0,14 €/Minute aus dem deutschen Festnetz;
(deutscher Mobilfunkhöchstpreis 0,42 €/Minute)
servicecenter@dirtdevil.de
www.dirtdevil.de
7
Page 8

1 Safety instructions
WARNING:
CAUTION:
NOTE:
1 Safety instructions
1.1 About the operating manual
Read this operating manual completely before working with the appliance.
Keep the operating manual in a safe place. Include the operating manual if
you pass the appliance on to someone else.
Failure to comply with these instructions can lead to serious injuries
or damage to the appliance.
We take no responsibility for damage due to failure to comply with these
operating instructions.
Always comply with the notices marked as follows to avoid accidents and
damage to the appliance.
1.2 Concerning certain groups of persons
These appliances can be used by children of 8 years and upwards and
persons with impaired physical, sensory or mental abilities, or insufficient
experience or knowledge, providing they are supervised or have been instructed in the proper use of the appliance and understand the risks involved.
Children are not permitted to play with the appliance.
1.3 Concerning the power supply
The appliance is operated with electrical power which means there is always a risk of electric shock. Therefore, please comply with the following:
Never immerse the appliance in water or other liquids; keep it away
from rain and moisture.
Never touch the plug with wet hands. Do not operate the appliance out-
side or in rooms with a high level of humidity.
Take care that the power cord is not kinked, pinched, or rolled over and
ensure it does not come into contact with heat sources. Also take care that
it does not become a stumbling hazard.
Before connecting to the power supply, make sure that the voltage stat-
ed on the type plate matches the voltage of your plug socket. Only use
sockets with a ground/safety contact.
Warns of health hazards and indicates possible risks of injury.
Warns of possible dangers to the appliance or other objects.
Highlights tips and information for you.
Children must not carry out cleaning tasks or maintenance unless they
are supervised.
Children under the age of eight should be kept away from the appliance
and the connection cable whilst it is switched on or cooling down.
Packing material must not be used to play with. There is danger of suf-
focation.
Always check the power cord for possible damage before using the ap-
pliance.
Never carry the appliance by its power cord. It could be damaged.
Before you clean or maintain the appliance, switch off the appliance
and pull the mains plug from the socket.
Always pull directly on the plug if you want to disconnect the appliance
from the mains. Never pull on the power cord as this could damage it.
If possible, do not use extension cords. If you must use an extension
cord, use only safety-certified, water-protected single extension cords (no
multi-socket distributors) designed for the power consumption of the appliance.
1.4 Concerning intended use
The cylinder vacuum cleaner is intended for home use only.
It is not suitable for commercial use.
Use the cylinder vacuum cleaner only for cleaning dry, normally soiled
floors. With the furniture brush attached, you may also use the appliance
for vacuuming upholstery and furniture surfaces.
Any other use is considered non-intended use and is prohibited. Particu-
larly prohibited:
Use in the vicinity of explosive or highly-flammable substances. There
is a risk of fire or explosion.
To use the appliance outdoors. There is danger of rain or dirt destroying
the appliance.
Sticking objects into the appliance's openings. It could overheat.
To modify or repair the appliance yourself.
1.5 If the appliance is defective
Never use a defective appliance or operate an appliance with a defective
power cord. If the power cord of this appliance is damaged, it must be replaced by the manufacturers, their authorised service representative or a
similarly qualified person to avoid danger.
Also prohibited:
Vacuuming of:
- Persons, animals, plants, especially hair, fingers and other parts of
the body as well as articles of clothing on the body. These might be
drawn in. This could result in injuries.
- Water and other fluids, especially damp carpet cleaners. Moisture inside the appliance can cause a short-circuit.
- Toner (for laser printers, copying machines, etc.). There is danger of
fire or explosion.
- Hot ash, burning cigarettes or matches. This could cause a fire.
- Pointed objects, such as glass shards, nails, etc. They can damage
the appliance.
- Rubble, plaster, cement, fine drilling-dust, make-up, etc. These might
damage the appliance.
Refer a defective appliance to an authorised dealer or the Royal
Service (ZPage 38, ‘International Service’) for repair.
2Use
Appliance
8
Page 9

2Use
click!
WARNING:
CAUTION:
NOTE:
!
WARNING:
CAUTION:
WARNING:
NOTE:
WARNING:
NOTE:
2.1 Assemble appliance and adjust nozzles to surface
1
6
Danger of injury! Only attach the appliance parts when the appliance is
not connected to the power supply. Otherwise the machine might start
up and parts of your body, hair or pieces of clothing might be sucked in.
2
click!
click!
7
3 4
8
5
9
You might have to twist the parts when connecting them so they are
securely in place. Ensure that installed parts are secure by trying to pull
them apart.
10
GB
Before assembling, make sure that the fitted nozzle suits the surface to
be cleaned. Do not clean e.g. any floors or objects with a brush with
rotating bristles that you would not clean without a second thought with
a conventional brush. Also observe the flooring manufacturer's recommendations.
2.2 Vacuum cleaning
11
Danger of injury! Check appliance and power cord before each use. A
damaged appliance must never be used.
Only use the appliance with all filters undamaged, dry and correctly fitted. Make sure that no objects obstruct the telescopic tube, the suction
hose or other openings.
1. Pull the cord out of the appliance (Fig. 11) and push the plug into the
socket.
12
1. Assemble the appliance and accessory parts depending on the surface
you want to vacuum clean (Figures 1 – 8).
2. Ensure that the bypass vent is shut (Fig. 5).
3. If you use the telescopic tube (Fig. 6), adjust its length (Fig. 7).
4. If you use the floor nozzle (Fig. 8), set it to the floor to be cleaned
(Fig. 9 hard floor, Fig. 10 carpet).
14
13
2. Switch on the appliance using the on/off switch ( ) (Fig. 14).
When vacuuming the bypass vent (Fig. 5) must be completely closed.
With the auxiliary air regulator you can quickly reduce the suction
power, to release objects (such as curtains) that have been sucked in.
3. Vacuum dust (Fig. 15).
Danger of injury! Especially when vacuum-cleaning stairs make sure
that you always stand on a higher level than the appliance.
15
Danger of electric shock! If the red marking shows (Fig. 12) retract the
cord by pressing the retraction button ( ) to pull in the cord up to the
yellow mark (Fig. 13) . Otherwise, the power cord may be damaged.
Your vacuum cleaner has an integrated protective function that switches
the appliance off before it can overheat (e.g. due to blocked channels or
an overfilled dirt tank) ZChapter 4.1, ‘Before you send in the appliance’.
9
Page 10

3 Maintenance and care
CAUTION:
CAUTION:
24 h
click!
NOTE:
CAUTION:
CAUTION:
3 Maintenance and care
3.1 Emptying and cleaning the dust container
Before removing the dust container switch the appliance off. This will
prevent dust from damaging the appliance.
16
21
17
22
You can dispose of the dust filter bag with your regular domestic trash
as long as it contains no waste materials prohibited in domestic trash.
18
23
19
24
20
25
26
The dust container has to be emptied and cleaned regularly. Otherwise
emptying will get harder and harder or smells and bacteria might develop,
depending on what you have vacuumed up.
So empty the dust container after each vacuuming session.
Empty and clean the dust container at the latest when the cleaning/
emptying display lights up (Fig. 16).
Also, empty and clean the dust container at the latest every 3 months
before storing it for a long time or before dispatching it.
1. Switch off the appliance ( ).
2. Pull the plug out of the plug socket.
3. Remove the dust container (Fig. 17).
4. Empty the dust container (Fig. 18).
5. Also take this opportunity to check the filter elements in the vacuum
cleaner (Figures 19 – 23).
6. If the filter elements are dirty, clean them under cold or lukewarm run-
ning water until all the dirt is gone (fig 24).
27
click!
28
The filter elements are washable, but may not be cleaned in dishwashers or washing machines.
Also, do not use detergents or brushes with hard bristles to clean the
filter elements.
Let the filter elements dry (for approx 24 hours at room temperature)
after wet cleaning.
Only put them back into the appliance when they are completely dry.
Replace damaged or deformed filters immediately (see ZChapter
3.4, ‘Spare parts and accessories’ for ordering information).
7. Let the filter elements dry (for approx 24 hours at room temperature,
Fig. 25) after wet cleaning.
8. Put the filter elements (Figures 26 – 29) back in.
Never operate the appliance without the filters correctly in place.
Never operate the appliance with damaged filters.
9. Put the dust container back in (Fig. 30).
You should feel and hear it clicking into place.
29
30
10
Page 11

3 Maintenance and care
click!click!
click!
CAUTION:
CAUTION:
WARNING:
WARNING:
CAUTION:
CAUTION:
CAUTION:
3.2 Cleaning / changing the exhaust filter
31 32
Clean the filter each time you clean the dust filter. Replace the filter if it
is damaged or deformed (see ZChapter 3.4, ‘Spare parts and accesso-
ries’ for ordering information).
The filter elements are washable, but may not be cleaned in dishwashers
or washing machines. Also, do not use detergents or brushes with hard
bristles to clean the filter elements. Let the filter elements dry (for
approx 24 hours at room temperature) after wet cleaning. Only put them
back into the appliance when they are completely dry.
33 34
3.3 Storage
37 3836
35
1. Switch off the appliance ( ).
2. Pull the plug out of the plug socket.
3. Unlock the exhaust filter cover as shown (Fig. 31).
4. Remove the exhaust filter (Fig. 32)
5. Rinse both filter elements thoroughly under running water (Fig. 33).
6. Allow the filter elements to dry (approx. 24 hours at room temperature)
and put them back together.
7. Put the exhaust filter back into its holder (Fig. 34).
8. Set the exhaust filter cover into the bottom end first and then push it up
firmly until it clicks into place (Fig. 35).
39
40
GB
Danger of injury! After vacuuming switch the appliance off ( ) and wind
up the power cord ( ). Hold the plug in your hand while winding up so
that the cable does not thrash about and injure you.
Danger of injury! Keep the appliance out of the reach of children.
Never store the appliance next to heat sources (e.g. stoves or radiators).
Avoid direct sunlight. Store the appliance and accessories in a cool, dry
place where it does not take up too much space (Figures 36 – 40).
If you intend to store the appliance for a long time, empty and clean the
dust container and its filter elements ZChapter 3.1, ‘Emptying and
cleaning the dust container’.
3.4 Spare parts and accessories
The following accessories and spare parts can be reordered: Accessory parts and spare parts can be reordered through
Item number Description
2991001 1 dual motor protection filter
2991003 1 exhaust filter
2991005 1 filter screen
M203 1 parquet brush
M209 1 turbo brush
M219 1 mini-turbo brush “Fellino”
ZPage 38, ‘International Service’
Only use original spare parts from the scope of delivery or those that
you have purchased by reordering.
11
Page 12

4 Troubleshooting and technical data
WARNING:
NOTE:
4 Troubleshooting and technical data
4.1 Before you send in the appliance
Danger of injury! Never use a defective appliance! Always switch off the
appliance and disconnect it from the mains before starting troubleshooting.
Before contacting us or even sending the appliance to us, use the table to
check whether you can correct the problem yourself.
Problem Possible cause / solution
The cleaning results are unsatisfactory in spite of
the appliance
working correctly.
The bypass vent (Fig. 5) is open.
Close the bypass vent (Fig. 5).
The attached nozzle is unsuitable.
Change the nozzle, ZChapter 2.1, ‘Assemble appli-
ance and adjust nozzles to surface’.
The collar brush of the floor nozzle is not in a position appropriate to the type of floor (Figures 9 – 10).
Adjust the position of the collar brush to the type of
floor using the floor nozzle switch (Figures 9 – 10).
The dust container is full.
Empty and clean the dust container ZChapter 3.1,
‘Emptying and cleaning the dust container’.
The filters are dirty.
Clean the filters, ZChapter 3.1, ‘Emptying and
cleaning the dust container’ that is ZChapter 3.2,
‘Cleaning / changing the exhaust filter’.
Nozzle, telescopic tube or suction hose is blocked.
Remove the obstruction. If necessary, use a long
wooden stick (e.g. a broomstick) to do this.
Problem Possible cause / solution
Cleaning / emptying display
lights up (Fig.
16).
The vacuum
cleaner stops
suddenly.
If you cannot solve the problem following these instructions, contact our
customer services (ZPage 38, ‘International Service’).
The dust container is full.
Empty and clean the dust container ZChapter 3.1,
‘Emptying and cleaning the dust container’.
The filters are dirty.
Clean the filters, ZChapter 3.1, ‘Emptying and
cleaning the dust container’ or ZChapter 3.2,
‘Cleaning / changing the exhaust filter’.
Nozzle, telescopic tube or suction hose is blocked.
Remove the obstruction. If necessary, use a long
wooden stick (e.g. a broomstick) to do this.
The overheating protection has tripped (possibly
due to blocked suction channels, filters, or similar).
1. Switch the appliance off and pull the plug out of
the socket.
2. Remove the cause of overheating (e.g. by dis-
assembling telescopic tube and suction hose
and removing the obstacle and/or cleaning filters).
3. Wait approx. 45 minutes until the appliance has
cooled off.
4. After the appliance has cooled off, you may
switch it on again.
4.2 Warranty
The statutory warranty regulations in accordance with the EU Directive
1999/44/EC apply.
4.3 Disposal
Dispose of the appliance in compliance with the environmental
protection laws of your country. Electrical waste may not be disposed of together with domestic waste. Use local old-appliance
collection points instead.
4.4 Technical data
Type of appliance : bagless cylinder vacuum cleaner
Model name : Centrino
Model number : M2991-2
Voltage : 220-240 V ~, 50/60 Hz
Power : 1,200 W nom. – 1,800 W max.
Max. available dust container
capacity
Power cord length : approx. 5 m
: approx. 1.6 litres
+
In non-EU countries the minimum requirements of the warranty in the respective country apply.
The filters are made from environment-friendly materials. You can dispose
of these — as opposed to the appliance — in your domestic waste unless
you have cleaned up substances that are prohibited from disposal in this
way.
Weight : approx. 3.5 kg
Technical and design specifications
may be changed in the course of continuous product improvement.
© Royal Appliance International GmbH
12
Page 13

1 Consignes de sécurité
AVERTISSEMENT:
ATTENTION:
REMARQUE:
1 Consignes de sécurité
1.1 Mode d'emploi
Veuillez lire attentivement et intégralement ce mode d'emploi, avant de
vous servir de l'appareil. Conservez précieusement ce mode d'emploi. Remettez toujours le mode d'emploi à toute personne se servant de l'appareil.
Le non-respect de ce mode d'emploi peut entraîner des blessures
graves ou des dommages irréparables à l'appareil.
Nous déclinons toute responsabilité pour des dommages résultant du nonrespect de ce mode d'emploi.
Respectez impérativement les consignes mentionnées ci-dessous afin
d'éviter tout accident ou d'endommager l'appareil.
1.2 Groupes particuliers de personnes
Ces appareils peuvent être utilisés par des enfants d'au moins 8 ans et
par des personnes aux capacités physiques, sensorielles ou mentales réduites ou disposant de peu d'expérience et/ou de connaissances. Toutes
ces personnes doivent cependant avoir été rendues attentives à l'emploi
de cet appareil en toute sécurité et des dangers qu'implique son utilisation.
Les enfants ne doivent pas jouer avec cet appareil.
Nous vous avertissons des dangers pouvant mettre en péril votre santé
et vous informons sur les éventuels risques de blessures.
Nous attirons votre attention sur les risques éventuels pour l'appareil ou
pour tout autre objet.
Nous vous fournissons des conseils et des informations.
Le nettoyage et l'entretien de l'appareil ne doivent pas être exécutés
par des enfants si ceux-ci ne sont pas sous surveillance.
Les enfants de moins de 8 ans ne doivent pas s'approcher de l'appareil
ni de son cordon de branchement tant qu'il est allumé ou en phase de refroidissement.
Le matériel d'emballage ne doit pas être employé comme jouet. Il existe
un risque d'asphyxie.
FR
1.3 Alimentation électrique
L'appareil est alimenté par du courant électrique, ce qui implique par principe un risque d'électrocution. C'est la raison pour laquelle vous devez observer les points suivants :
Ne plongez jamais l'appareil dans de l'eau ou tout autre liquide, conser-
vez-le à l'abri de la pluie et de l'eau.
Ne touchez jamais la prise avec des mains mouillées. N'utilisez jamais
l'appareil à l'extérieur ou dans des locaux très humides.
Assurez-vous que le cordon d'alimentation n'est pas plié, coincé, écra-
sé ou encore en contact direct avec une source de chaleur. Il ne doit pas
non plus risquer de faire trébucher les gens.
Assurez-vous, avant le branchement au réseau d'alimentation, que la
tension électrique indiquée sur la plaque signalétique correspond à celle
de la prise. N'utilisez que des prises avec un contact de protection.
1.4 Utilisation conforme à la destination
Cet aspirateur-traîneau doit seulement être utilisé dans un cadre domestique. Toute utilisation à titre professionnel est strictement interdite.
Cet aspirateur-traîneau doit uniquement servir à nettoyer des sols secs
normalement sales. Lorsque vous avez monté la brosse à meubles, vous
pouvez également utiliser l'appareil pour nettoyer les meubles, y compris
les meubles capitonnés.
Toute autre utilisation est considérée comme non conforme et est interdite.
Cette interdiction concerne en particulier :
L'emploi à proximité de matières explosives ou facilement inflam-
mables. Il y a un risque d'incendie et d'explosion.
L'utilisation à l'extérieur. La pluie et la saleté peuvent causer des dom-
mages irréparables sur l'appareil.
L'introduction d'objets dans les ouvertures de l'appareil, car ce dernier
pourrait surchauffer.
Toute ouverture, modification ou réparation de l'appareil.
Vérifiez si le cordon d'alimentation est endommagé avant de vous ser-
vir de l'appareil.
Ne saisissez jamais l'appareil par le cordon d'alimentation. Vous ris-
queriez de l'endommager.
Avant de nettoyer ou d'entretenir l'appareil, éteignez-le et débranchez-
le.
Pour débrancher l'appareil, tirez toujours sur la fiche. Ne tirez jamais
sur le cordon, car vous risqueriez de l'endommager.
Évitez autant que possible d'utiliser une rallonge électrique. Si une ral-
longe est vraiment indispensable, utilisez seulement une rallonge simple
certifiée GS (pas de prises multiples) à l'épreuve des projections d'eau et
qui soit conçue pour la puissance absorbée par l'appareil.
Cette interdiction s'applique en outre à :
L'aspiration :
- directe sur des êtres humains, des animaux, des plantes, des cheveux, des doigts, d'autres parties du corps ou des habits portés par
des personnes. Ces derniers risqueraient d'être happés, et causer
des blessures.
- de l'eau ou d'autres liquides, en particulier les produits de nettoyage
humide pour tapis. Toute humidité à l'intérieur de l'appareil peut provoquer un court-circuit.
- de cartouches d'encre (pour imprimantes laser, copieurs, etc.). Il y a
un risque d'incendie et d'explosion.
- des cendres incandescentes, des cigarettes ou allumettes non
éteintes. Risque d'incendie.
- d'objets pointus tels des éclats de verre, des clous, etc. L'appareil
pourrait être endommagé.
- de plâtre, ciment, décombres de chantiers, fine poussière de perçage, produits de maquillage, poudre, etc. L'appareil pourrait subir
des dommages.
1.5 En cas de défectuosité de l'appareil
N'utilisez jamais un appareil défectueux ou ayant un cordon d'alimentation
abîmé. Si le cordon de raccordement au secteur de cet appareil est endommagé, faites-le remplacer par le fabricant, son service après-vente ou
toute personne ayant des compétences similaires, ceci afin d'éviter tout
danger.
Amenez l'appareil à réparer dans un magasin spécialisé ou au service
après-vente Royal
2 Utilisation de l'appareil
Appliance, (ZPage 38, « International Service »).
13
Page 14

2 Utilisation de l'appareil
click!
AVERTISSEMENT:
ATTENTION:
REMARQUE:
!
AVERTISSEMENT:
ATTENTION:
AVERTISSEMENT:
REMARQUE:
AVERTISSEMENT:
REMARQUE:
2.1 Assemblage de l'appareil et choix des suceurs adaptés au type de sol
1
6
Risque de blessures ! Ne montez les parties de l'appareil qu'après avoir
retiré la fiche de la prise. L'appareil pourrait sinon se mettre en marche
et aspirer des cheveux, des parties du corps ou des pièces de vêtements.
2
click!
7
3 4
8
5
9
Quand vous assemblez les deux pièces, il peut s'avérer nécessaire de
les faire pivoter en sens inverse l'une contre l'autre pour obtenir un
assemblage ferme. Contrôlez la fermeté de l'assemblage en essayant
de le défaire en tirant.
10
Avant de commencer à aspirer, assurez-vous que le suceur ou la
brosse mis en place correspond bien au type de sol. Ne nettoyez jamais
avec la (mini)-turbobrosse des revêtements de sols ou des objets que
vous hésiteriez à nettoyer avec une brosse conventionnelle. Respectez
les recommandations des fabricants des revêtements de sols.
2.2 Utilisation de l'aspirateur
11
Risque de blessures ! Vérifiez l'appareil et le cordon d'alimentation
avant chaque utilisation. N'utilisez jamais un appareil qui est endommagé.
N'utilisez l'appareil que si tous les filtres sont en parfait état, secs et parfaitement insérés. Assurez-vous qu'aucun objet n'obstrue le tube télescopique, le tuyau d'aspiration ou d'autres ouvertures.
12
1. Montez les parties de l'appareil et les accessoires en fonction du type
de sol qu vous voulez aspirer (Fig. 1 – 8).
2. Vérifiez que le variateur mécanique de puissance est bien fermé (Fig. 5).
3. Si vous utilisez le tube télescopique, il faut en régler la longueur (Fig. 6 – 7).
4. Si vous utilisez la buse universelle (Fig. 8), vous devez la régler au type
de sol que vous voulez aspirer (Fig. 9 sol dur, Fig. 10 tapis).
14
13
marche (Fig. 14).
Le variateur mécanique de puissance (Fig. 5) doit être complètement
fermé pour aspirer des surfaces sèches. En vous servant du variateur
mécanique de puissance, vous pouvez si nécessaire réduire rapidement la puissance d'aspiration, par exemple pour relâcher des objets ou
des rideaux que vous auriez malencontreusement aspirés.
3. Aspirer de la poussière (Fig. 15).
15
1. Tirez le cordon de l'enrouleur (Fig. 11) et branchez la fiche dans une prise.
Risque d'électrocution ! Si la marque rouge (Fig.12) devient visible, rentrez à nouveau le cordon à l'aide de l'enrouleur ( ) jusqu'à ce que la
marque jaune soit à nouveau visible (Fig. 13). Vous risquez sinon
d'endommager le cordon d'alimentation.
2. Appuyez sur l'interrupteur marche-arrêt ( ) pour mettre l'appareil en
14
Risque de blessures ! Quand vous passez l'aspirateur dans des escaliers, veillez à toujours vous trouver au-dessus de l'appareil.
Votre aspirateur est doté d'une fonction de protection intégrée qui
stoppe l'appareil avant qu'il ne puisse surchauffer (en raison, par
exemple, de canaux d'aspiration bouchés ou d'un bac de poussière trop
plein.), ZChapitre 4.1, « Avant de procéder à l'envoi de l'appareil ».
Page 15

3 Maintenance et entretien
ATTENTION:
ATTENTION:
24 h
click!
REMARQUE:
ATTENTION:
ATTENTION:
3.1 Videz le bac à poussières et nettoyez-le
Avant de changer le sac-filtre à poussière, éteignez l'appareil.
Vous évitez ainsi que la poussière n'endommage l'appareil.
16
17
3 Maintenance et entreti en
Le contenu du bac à poussière peut être mis à la poubelle s'il ne
contient pas de composants dont la présence est interdite dans les
ordures ménagères.
18
19
20
FR
21
26
Le bac à poussières doit être vidé et nettoyé à intervalles réguliers, sous
peine de devenir plus lourd de fois en fois, et de développement d'odeurs
nauséabondes ou même de germes selon ce que vous avez aspiré précédemment.
Videz le bac à poussières si possible après chaque utilisation.
Videz et nettoyez le bac à poussières au plus tard quand l'indicateur
de nettoyage / de vidange (Fig. 16) s'allume.
Videz et nettoyez le bac à poussières au moins tous les 3 mois, avant
toute période prolongée d'entreposage ou encore avant de retourner
l'appareil pour réparation.
1. Arrêtez l'appareil ( ).
2. Débranchez la fiche de la prise de courant.
3. Retirez le bac à poussière, (Fig. 17).
4. Videz le bac à poussière (Fig. 18).
5. Inspectez à cette occasion également les éléments filtrants dans le bac
à poussières (Fig. 19 – 23).
6. Si certains éléments filtrants sont encrassés, ils devront d'abord être la-
vés à l'eau courante froide ou tiède jusqu'à ce que tous les salissures
soient supprimées (Fig. 24).
22
27
23
24
click!
28
Les éléments du filtre sont lavables, mais ne peuvent cependant pas
être lavés dans un lave-vaisselle ni une machine à laver.
N'utilisez pas non plus de produit de nettoyage ni de brosse à poils
durs pour nettoyer les éléments filtrants.
Faites sécher les filtres après leur nettoyage à l'eau (durant
environ 24 heures à température ambiante).
Remettez-les en place uniquement lorsqu'ils sont parfaitement secs.
Remplacez immédiatement les filtres endommagés ou déformés.
(Informations de commande, voir ZChapitre 3.4, « Pièces de rechange
et accessoires »).
7. Faites sécher les filtres après leur nettoyage à l'eau (durant
environ 24 heures à température ambiante, Fig. 25).
8. Reposez les filtres en place (Fig. 26 – 29).
Ne vous servez jamais de l'appareil sans filtres correctement posés.
N'utilisez jamais l'appareil avec des filtres endommagés.
9. Remettez le bac à poussière (Fig. 30).
Vous entendez et constatez qu'il s'emboîte correctement.
29
25
30
15
Page 16

3 Maintenance et entretien
click!click!
click!
ATTENTION:
ATTENTION:
AVERTISSEMENT:
AVERTISSEMENT:
ATTENTION:
ATTENTION:
ATTENTION:
3.2 Remplacement / nettoyage du filtre de sortie d'air
31 32
Contrôlez le filtre chaque fois que vous nettoyez le bac à poussière.
Remplacez le filtre dès qu'il est nettoyé ou déformé (informations de commande, voir ZChapitre 3.4, « Pièces de rechange et accessoires »).
Les éléments du filtre sont lavables, mais ne peuvent cependant pas
être lavés dans un lave-vaisselle ni une machine à laver. N'utilisez pas
non plus de produit de nettoyage ni de brosse à poils durs pour nettoyer
les éléments filtrants. Faites sécher les filtres après leur nettoyage à
l'eau (durant environ 24 heures à température ambiante). Remettez les
éléments filtrants en place uniquement lorsqu'ils sont parfaitement secs.
33 34
3.3 Rangement
35
1. Arrêtez l'appareil ( ).
2. Débranchez la fiche de la prise de courant.
3. Déverrouillez le couvercle du filtre de sortie comme le montre l'illustra-
tion (Fig. 31).
4. Retirez le filtre de sortie (Fig. 32).
5. Rincez soigneusement les deux éléments filtrants à l'eau courante
(Fig. 33).
6. Laissez sécher les éléments filtrants à température ambiante (durant
environ 24 heures) avant de les remettre en place.
7. Remettez le filtre de sortie d'air dans sa console (Fig. 34).
8. Posez le couvercle du filtre de sortie d'air d'abord en bas, puis poussez-
le en haut jusqu'à ce qu'il s'engage (Fig. 35).
37 3836
Risque de blessures ! Après avoir passé l'aspirateur, éteignez l'appareil
( ) puis commandez l'enroulement du cordon ( ). Durant l'enroulement, gardez la fiche en main pour empêcher le cordon de risquer de
blesser des personnes par des mouvements incontrôlés.
Risque de blessures ! Rangez toujours l'appareil hors de portée des
enfants.
3.4 Pièces de rechange et accessoires
Vous pouvez commander ultérieurement les pièces de rechange et accessoires suivants :
N° d'art. Description
2991001 1 Filtre Dual de protection du moteur
2991003 1 Filtre de sortie d'air
2991005 1 Tamis de filtre
M203 1 Brosse pour parquets
39
Ne rangez ou ne posez jamais l'appareil à proximité directe d'une
source de chaleur (tel un radiateur ou un poêle) Évitez de l'exposer
directement aux rayons du soleil. Rangez l'appareil et ses accessoires
dans un endroit frais, sec et sans encombrement (Fig. 36 – 40).
Si vous rangez l'appareil pour une période prolongée, videz et nettoyez
le bac à poussière et les éléments du filtre ZChapitre 3.1, « Videz le
bac à poussières et nettoyez-le ».
Vous pouvez commander ultérieurement les pièces de rechange et les
accessoires :
ZPage 38, « International Service »
Utilisez seulement les pièces de rechange d'origine fournies à la livraison ou que vous avez commandées.
40
M209 1 Turbobrosse
M219 1 Mini-turbobrosse « Fellino »
16
Page 17

4 Dépannage et caractéristiques techniques
AVERTISSEMENT:
REMARQUE:
4 Dépannage et caractéristiques techniques
4.1 Avant de procéder à l'envoi de l'appareil
Risque de blessures ! N'utilisez jamais un appareil défectueux ! Avant
de chercher la cause de l'anomalie, éteignez l'appareil et débranchez la
fiche de la prise électrique.
Avant de nous contacter ou d'expédier l'appareil à notre service aprèsvente, veuillez vérifier, en vous aidant du tableau ci-dessous, si vous ne
pouvez pas remédier vous-même à l'anomalie.
Problème Cause possible / solutions
Le résultat de l'aspiration
n'est pas
satisfaisant malgré un
fonctionnement
correct.
Le variateur mécanique de puissance (Fig. 5) est ouvert.
Refermez le variateur mécanique de puissance (Fig. 5).
Le suceur ou la brosse mis en place n'est pas adéquat.
Changez le suceur ou la brosse, ZChapitre 2.1,
« Assemblage de l'appareil et choix des suceurs adaptés
au type de sol ».
La couronne de brosse du suceur universel se trouve
dans une position qui ne convient pas pour le type de sol
(Fig. 9 – 10).
Corrigez la position de la couronne de brosse en appuyant
sur le commutateur du suceur universel (Fig. 9 – 10).
Le bac à poussière est plein.
Videz et nettoyez le bac à poussière, ZChapitre 3.1,
« Videz le bac à poussières et nettoyez-le ».
Les filtres sont encrassés.
Nettoyez les filtres, ZChapitre 3.1, « Videz le bac à pous-
sières et nettoyez-le » respectivement ZChapitre 3.2,
« Remplacement / nettoyage du filtre de sortie d'air ».
Le suceur, le manche télescopique ou le tuyau flexible
d'aspiration sont bouchés.
Débouchez-les. Si nécessaire, utilisez à cet effet un long
morceau de bois (par ex. un manche à balai).
Problème Cause possible / solutions
L'indicateur de
nettoyage et
de vidage s'allume (Fig. 16).
L'appareil
cesse soudain d'aspirer.
Prenez contact avec le service après-vente (ZPage 38, « International
Service ») si vous ne pouvez pas remédier vous-même à l'anomalie au
moyen de ce tableau.
Le bac à poussière est plein.
Videz et nettoyez le bac à poussière, ZChapitre 3.1,
« Videz le bac à poussières et nettoyez-le ».
Les filtres sont encrassés.
Nettoyez les filtres, ZChapitre 3.1, « Videz le bac à
poussières et nettoyez-le » et ZChapitre 3.2,
« Remplacement / nettoyage du filtre de sortie d'air ».
Le suceur, le manche télescopique ou le tuyau flexible
d'aspiration sont bouchés.
Débouchez-les. Si nécessaire, utilisez à cet effet un
long morceau de bois (par ex. un manche à balai).
La protection contre les surchauffes s'est déclenchée
(certainement à cause d'une obturation des canaux
d'aspiration ou pour une raison semblable).
1. Arrêtez l'appareil et débranchez-le.
2. Éliminez la cause de la surchauffe (par exemple
en démontant le tube télescopique et le tuyau
d'aspiration pour en retirer ce qui cause l'obturation).
3. Attendez quelques 45 minutes que l'appareil ait re-
froidi.
4. Une fois l'appareil refroidi, vous pouvez le remettre
en marche.
FR
4.2 Garantie légale
Les règles de garantie légale suivant la directive européenne 1999/44/CE
sont applicables.
4.3 Mise au rebut
Éliminez l'appareil en tenant compte des réglementations nationales en vigueur en matière de protection de l'environnement. Les
déchets électriques ne doivent pas être jetés avec les déchets domestiques. Utilisez donc les emplacements locaux servant à la
restitution d'appareils usagés.
4.4 Caractéristiques techniques
Type d'appareil : Aspirateur-traîneau sans sac
Nom du modèle : Centrino
Numéro de modèle : M2991-2
Tension : 220-240 V ~, 50/60 Hz
Puissance : 1.200 W nom. – 1.800 W max.
Volume utile maximal du bac à
poussière
Longueur du cordon : 5 m environ
: environ 1,6 litres
+
Pour les pays hors de la CE, les exigences minimum de garantie légale en
vigueur dans le pays respectif sont applicables.
Les filtres utilisés sont composés de matériaux ne nuisant pas à l'environnement. Contrairement à l'appareil, ils peuvent être jetés avec les ordures
ménagères sous réserve de ne contenir aucune substance interdite dans
les ordures ménagères.
Poids : 3,5 kg environ
Toutes les modifications d'ordre technique ou conceptuel liées à l'évolution
du produit sont réservées.
© Royal Appliance International GmbH
17
Page 18

International Service
DE
DE
International Service
Kundenservice:
Royal Appliance International GmbH
Abt. Kundenservice
Jagenbergstraße 19
41468 Neuss
DEUTSCHLAND
Tel.: +49 (0) 180 - 501 50 50*
Fax: +49 (0) 2131 - 60 90 60 95
Hotline Ersatzteile: 01805 15 85 08*
E-Mail: Ersatzteilshop@dirtdevil.de
www.dirtdevil.de
servicecenter@dirtdevil.de
*0,14 €/Minute aus dem deutschen Festnetz
(deutscher Mobilfunkhöchstpreis 0,42 €/Minute)
Zubehör und Ersatzteile:
Service Center Feuerbach KG
Corneliusstr. 75
40215 Düsseldorf
DEUTSCHLAND
Tel.: +49 (0) 1805 - 15 85 08*
Fax: +49 (0) 211 - 37 04 97
dirtdevil-service@t-online.de
www.dirtdevil-service.de
*0,14 €/Minute aus dem deutschen Festnetz
(deutscher Mobilfunkhöchstpreis 0,42 €/Minute)
AT
Zmugg Elektronik Service
und Vertriebges. M.b.H.
Fabriksgasse 27
8020 Graz
ÖSTERREICH
Tel. +43 - 316 - 77 21 20
Fax +43 - 316 - 77 21 20 10
Tel. Ersatzteile: +43 - 316 - 77 21 20 14
Fax Ersatzteile: +43 - 316 - 77 21 20 15
zmuggelektronik@utanet.at
www.zmuggelektronik.at
BE
Z.E.S. Goes B.V.
T.a.v. afd. Service
Pearyweg 1
4462 GT Goes
NEDERLAND
Tel: +31 - 113 - 24 07 00
Fax: +31 - 113 - 24 07 50
dirtdevil@zesgoes.nl
www.zesinternational.com
BG
Pirita Ltd.
6, Tzar Ivan Assen II Str. entr. 2, ap.6
1124 Sofia
Tel: +35 (0) 9 2 973 11 31
Fax:+35 (0) 9 2 944 96 49
office@pirita.bg
www.pirita.bg
ES ES ES ES
Recambios y accesorios online:
Tel.: +34 665 931 296
www.recambiosyaccesoriosonline.es
pedidos@recambiosyaccesoriosonline.es
ES ES FI
Reparaciones y recambios:
M.J. Toribio
Calle Tahona 4
28223 -Pozuelo de Alarcon- Madrid
ESPANA
Tel.: +34 917 156 052
Fax: +34 917 156 052
mjtoribio@telepolis.com
CH
Bluepoint-Service SAGL
Via Cantonale 14
6917 Barbengo
SWITZERLAND
Tel.: +41 (0)91 980 49 73
Fax.: +41 (0)91 605 37 55
info@bluepoint-service.ch
www.bluepoint-service.ch
Call Center / Helpline:
Call Center Madrid, S.L.
Tel.: +34 902 070 425
Fax: +34 931 878 922
atencion.cliente@dirtdevil.es
Reparaciones y recambios:
Servicios Tecnicos B E A
Germana de Foix 1
50015 Zaragoza
ESPANA
Tel.: +34 976 520 077
Fax: +34 976 528 200
satbea@satbea.es
www.satbea.es
CZ
K+P service s.r.o.
Vanurova 83
33901 Klatovy
eská Republika
Tel: +420 - 602 366 221
k.p.servis@seznam.cz
www.tvservis.eu
Reparaciones y recambios:
SAT Eixample
Calabria 277-279
08029 Barcelona
ESPANA
Tel: +34 934 306 950
Fax: +34 934 306 950
sateixample@hotmail.com
Simson Huoltopalvelu Oy
Karvaamokuja 1
00380 Helsinki
SUOMI
Tel.:+358 (0) 20 755 87 90
Fax:+358 (0) 20 755 87 99
huolto@simson.fi
www.simson.fi
WhiteBrown A/S Service
c/o BSL Baltship Seatainers Logistics
Egeskowej 6
8700 Horsens
DANMARK
Tel.: +45 73326150
info@whitebrown.eu
Electronica Latina, S.L.
Paseo Virgen del Puerto 13
28005 Madrid
ESPANA
Tel.: +34 913 665 202
Tel.: +34 913 665 203
Fax: +34 913 641 233
eleclatina@hotmail.es
Service Consommateur France
Tel.: +33 (0)810 810 307**
**Coût d’un appel local depuis un
téléphone fixe français. Coût depuis
un mobile suivant opérateurs.
Horaires : lundi - vendredi de 9h à 18h
savdirtdevil@tti-fc.com
www.dirtdevilsav.fr
DK
Reparaciones y recambios:
FR
FR
OPM FRANCE
Service pièce de rechange
33 rue du Bois Briand
BP 61635
44316 NANTES CEDEX 3
FRANCE
Tel.: +33 2 40 49 64 25
Fax: +33 2 40 93 96 22
opm@opm-france.com
www.opm-france.com
LU
Z.E.S. Goes B.V.
T.a.v. afd. Service
Pearyweg 1
4462 GT Goes
NEDERLAND
Tel: +31 - 113 - 24 07 00
Fax: +31 - 113 - 24 07 50
dirtdevil@zesgoes.nl
www.zesinternational.com
PT
Famatécnica
Rua António Enes, n° 20 C
1050-025 Lisboa
PORTUGAL
Tel.: +35 121 314 35 10
Tel.: +35 121 353 55 65
Fax: +35 121 35 35 565
famatecnica@netcabo.pt
38
HU
SEKON BT.
Budafoki út 60
1117 Bp.
MAGYARORSZÁG
Tel: +36 (0)1-205-3180
Fax: +36 (0)1-205-3181
Mobil: +36 (0)70-297-6985
service@invitone.hu
www.invitone.hu
NL
Z.E.S. Goes B.V.
T.a.v. afd. Service
Pearyweg 1
4462 GT Goes
NEDERLAND
Tel: +31 - 113 - 24 07 00
Fax: +31 - 113 - 24 07 50
dirtdevil@zesgoes.nl
www.zesinternational.com
SI
Strojinc Ciril s.p.
Koseskega ul. 1a
1000 Ljubljana
SLOVENIJA
Tel: +386 -1- 42 28 489
IT
Ricambi Elettrodomestici
Corso L. Zanussi 11
33080 Porcia
ITALIA
Tel.: +39 434 55 08 33
Fax: +39 434 18 51 001
info@elettrodomesticiricambi.com
www.elettrodomesticiricambi.com
NO
Easy Robot AS K.G.
Meldahlsvei 9
1671 Kråkerøy
NORGE
Tel.: +47 4034657
post@easyrobot.no
www.easyrobot.no
SK
PREMT s.r.o.
Skladová 1
91701 Trnava
SLOVAKIA
Tel: +42 (0) 1 33 55 45 007
Fax: +42 (0) 1 33 55 45 007
premt@premt.sk
www.premt.sk
KO
D.Z."VALENTINI"
Jakov Xoxa p.n.
10000 Prishtine
KOSOVO
Tel.: +386 49 800 400
Tel.: +377 44 238 440
Tel.: +377 44 168 441
Fax: :+381 38 225 000
valentini.service@gmail.com
PL
Obsuga Gwarancyjna i Serwisowa
QUADRA-NET Sp. z o.o.
61-888 Pozna, ul. Skadowa 5
POLSKA
Tel.: +48 (0)66 444 88 00
Fax.: +48 (0)61 642 90 62
infolinia@quadra-net.com
www.quadra-net.pl
Page 19

Servicekarte • Service card
DE
GB
FR
NL
ES
IT
TR
Carte de service • Servicekaart
Tarjeta de servicio • Tagliando di servizio
D
Garanti kapsam
NUR GÜLTIG MIT RECHNUNGSKOPIE! • VALID ONLY INCLUDING A COPY OF THE PURCHASE SLIP!
VALABLE UNIQUEMENT AVEC UNE COPIE DE LA FACTURE! • ALLEEN GELDIG MET KOPIE VAN DE REKENING!
¡VÁLIDO SÓLO CON COPIA DE FACTURA! • VALIDO SOLO SE CORREDATO DA UNA COPIA DELLA FATTURA!
SADECE FATURA SURET LE GEÇERLDR!
Absender: Bitte Blockschrift in Großbuchstaben • From: Please print in capitals • Expéditeur : Veuillez écrire en caractères d'imprimerie et en majuscules •
Afzender: a.u.b. blokletters in grote letters • Remitente: Por favor, escriba en letra de imprenta y en mayúsculas • Mittente: Per cortesia in stampatello a lettere
maiuscole • Gönderen: Lütfen büyük harfler ve düz yazyla
Name • Name • Nom • Naam • Nombres y apellidos • Nome • sim
Straße und Hausnummer • Street and house number • Rue et numéro de maison • Straat en huisnummer • Calle y número • Via e numero civico • Sokak ve ev no
PLZ und Ort • Zip code and town • Numéro postal et lieu • Postcode en plaats • C.P. y ciudad • CAP e località • Posta kodu ve yer
Telefon mit Vorwahl • Phone number (with area code) • Téléphone avec indicatif • Telefoon met kengetal • Teléfono con prefijo •
Telefono con prefisso • ehirleraras kodla telefon
M2991-2
E-Mail • email • Courriel • E-mail • Correo electrónico • e-mail • E-Posta
Kaufdatum • Date of purchase • Date d'achat • Datum van aankoop • Fecha de compra • Data d'acquisto • Satn alma tarihi
Datum, Unterschrift des Käufers • Date and owner's signature • Date, signature de l'acheteur • Datum, handtekening van de koper •
Fecha, firma del comprador • Data, firma dell'acquirente • Tarih, satn alann imzas
_________________________________________________________________________________________________________________
Fehlerbeschreibung • Description of the malfunction • Description du problème • Omschrijving van de fout •
Descripción del fallo • Descrizione del difetto • Hata tanm:
_________________________________________________________________________________________________________________
Bitte diesen Abschnitt ausschneiden und dem Gerät beilegen. • Please detach this part and send it in with the appliance. • Veuillez détacher cette partie et la joindre à l'appareil.
Dit deel a.u.b. uitknippen en bij het apparaat leggen. • Por favor, recorte este resguardo y añádelo al aparato. • Per cortesia ritagliare questa sezione e allegarla all'apparecchio.
Lütfen bu bölümü kesin ve cihazn yanna ekleyin.
Page 20

DE
GB
FR
NL
ES
IT
TR
Royal Appliance International GmbH
Jagenbergstraße 19
41468 Neuss
Germany
servicecenter@dirtdevil.de
www.dirtdevil.de
+49 (0) 1805 - 10 90 19*
+49 (0) 2131 - 60 90 60 95
* 0,14 €/Minute aus dem deutschen Festnetz, deutscher Mobilfunkhöchstpreis 0,42 €/Minute;
Die Gebühren für Telefonate aus dem Ausland (also außerhalb von Deutschland) richten sich nach den Preisen
der jeweiligen ausländischen Anbieter und der jeweils aktuellen Tarife.
* € 0.14 per minute from German landlines, maximum German mobile phone tariff € 0.42 per minute.
The cost of calls from abroad—outside Germany—depend upon the current prices of the respective foreign
telephone company.
*0,14 € par minute depuis le réseau fixe allemand, 0,42 € par minute au maximum depuis le réseau mobile allemand;
Les coûts des appels depuis l'étranger (donc hors de l'Allemagne) dépendent des prix fixés par les opérateurs
étrangers et des tarifs actuellement en vigueur.
* 0,14 €/minuut vanuit het Duitse vaste telefoonnet, vanuit het Duitse mobiele netwerk max. 0,42 €/minuut;
De kosten voor telefoongesprekken vanuit het buitenland (dus buiten Duitsland) richten zich naar de prijzen van
de betreffende buitenlandse aanbieders en de betreffende actuele tarieven.
* 0,14 €/minuto desde la red fija alemana, precio máximo alemán para telefonía móvil 0,42 €/minuto;
Las tasas para las llamadas telefónicas desde el extranjero (fuera de Alemania) se orientan a los precios de cada
servidor extranjero y a las correspondientes tarifas actuales.
* 0,14 €/minuto da rete fissa tedesca, prezzo massimo per la telefonia mobile tedesca 0,42 €/minuto;
Le tariffe delle chiamate dall'estero (ovvero da fuori Germania) dipendono dai prezzi degli operatori telefonici
stranieri e dalle tariffe di volta in volta in vigore.
* Almanya'da sabit hatlardan 0,14 €/dakika; Alman mobil telefon azami fiyat 0,42 €/dakika;
Yurtdndan (yani Almanya dndan) yaplan aramalarn ücretleri ilgili yurtd operatörün fiyatlarna ve her
defasnda güncel tarifelerine göre belirlenir.
 Loading...