

Page 1
NON-DVR RECEIVERS
USER GUIDE
NON-DVR RECEIVERS
USER GUIDE
DIRECTV® HD RECEIVER
DIRECTV® STANDARD RECEIVER
DIRECTV® HD RECEIVER
DIRECTV® STANDARD RECEIVER
Page 2

Your receiver is ENERGY STAR qualified, giving you the benefit of saving energy
and helping our environment (This may not apply to older models).
When used in conjunction with a DIRECTV Subscription, this receiver meets
ENERGY STAR criteria without requiring the consumer to take any additional
steps.
Page 3
3
Welcome! Now that you’re plugged in, it’s time to start enjoying access to over 265 channels of TV programming, including Sirius XM
and Sonic Tap satellite music channels, plus an extensive Pay Per View selection. We’ll take you step by step through everything from
pushing the POWER button to searching and finding your favorite programs. If you want a quick overview of your receiver, read Chapter 1,
Quick Start. Detailed information starts in Chapter 2.
Getting Connected
If a professional installed your DIRECTV® Receiver, you are ready to start watching TV. If your receiver was not professionally installed or
you just added a surround sound system or other equipment, please see Chapter 3: Connections for TV and Auxiliary Equipment.
You must add/maintain HD Access on your account in order to be able to view the HD channels
included in your programming package.
DIRECTV hardware, programming, and HD Access fee available separately. For information and pricing
regarding programming, and HD Access, please visit directv.com.
IM PO RTA NT:
This user guide describes DIRECT V Standard-Definition (SD), as well as High-Definition (HD) receivers. Because this user guide was
designed to accommodate several models of DIRECTV Receivers, your receiver and its user interface may vary slightly from what is
shown here.
Welcome to the DIRECTV Family!
Page 4
4
TA B LE O F C O N T E N T S
Viewing Live Television..............................................14
Program Guide .......................................................................14
Local Channels ........................................................................15
HD & SD Channels .................................................................15
Unsubscribed Channels ........................................................16
Guide Banners .........................................................................16
Mini Guide ................................................................................17
Channel Banner ......................................................................17
Interactive Channels ...............................................................18
Program Guide Features and Options .........................24
Filtering the Guide ...................................................................24
Guide Options ..........................................................................25
Special Feature: Channel Program List .................................27
Live TV Features and Options ..................................28
QuickTune
™
.............................................................................28
GameSearch™ .........................................................................28
Live TV Options .......................................................................29
Main Menu - Search for Shows .................................33
Search by Title .........................................................................33
Search by Person ................................................................... 34
Search by Channel ................................................................. 34
Search by Keyword ................................................................ 35
Recent Searches ................................................................. 36
CHAPTER 2: DETAILED INFORMATION
TABLE OF CONTENTS
Main Menu - Overview ...............................................31
Using Your Remote Control.........................................12
Turning Equipment On and Off ................................................12
Navigation and Destination Buttons ........................................13
Short Cut Buttons ...................................................................13
Safety & Care ..............................................................8
Product Information ...................................................7
Welcome to the DIRECTV Family ..................................3
DIRECTV Cinema and Pay Per View Events ..........................20
Main Menu ...............................................................................21
CHAPTER 1: QUICK START
Page 5

5
Main Menu - Manage Autotunes ................................37
To Do List .................................................................................37
History ................................................................................... 38
Purchases ............................................................................... 38
Manual Autotunes ..................................................................38
Main Menu - TVmail ..................................................40
Main Menu - Caller ID ...........................................39
Main Menu - Parental, Fav’s & Setup .........................41
Parental Controls ...................................................................41
Favorite Channels ..................................................................47
System Setup ..........................................................................48
Help Topics and FAQs (High-Definition Receivers Only) .........57
CHAPTER 3: CONNECTIONS FOR TV AND AUXILIARY EQUIPMENT
Connections ..............................................................60
Your Phone Connection ...........................................................60
Connections for TV and Auxiliary Equipment .........................60
Setup and Activation .................................................64
Guided Setup ...........................................................................64
Activate Your DIRECTV® Service ..............................................64
Programming Your Remote Control ..........................65
CHAPTER 4: TROUBLESHOOTING
Troubleshooting Tips ..................................................68
Resetting/Reauthorizing Your Receiver .................................68
On-Screen Error Messages ....................................................69
System Software Updates .......................................................69
DIRECTV® Receiver or TV Problems ..........................70
Remote Control Problems .......................................78
Running the System Test ..........................................79
Page 6
6
CHAPTER 5: WARRANTY & OTHER INFORMATION
Appendix 1: Receivers Front and Back Panel ...........94
Standard-Definition Receiver .................................................94
High -Definition Receiver .......................................................98
Appendix 2: About High-Definition ..........................102
Appendix 3: How to Network Your HD Receiver ......108
INDEX ......................................................................116
Limited 90-Day Warranty ......................................82
DIRECTV Protection Plan ..........................................85
FCC Customer Information ....................................86
Terms & Conditions for Use of Software .................90
APPENDICES
TA B L E O F C O N T E N T S
TABLE OF CONTENTS
Page 7
7
Product Information
Keep your receipt to obtain warranty parts and service and for proof of acquisition. Attach it here and record the serial and model
numbers in case you need them. *These numbers are typically located behind the card door on the front panel of your receiver.
Model No. *
Serial No.
Acquisition Date
Dealer/Address/Phone
Access Card *
Receiver ID *
Page 8

DIRECTV USER GUIDE - HD & SD STANDARD RECEIVERS
8
Important Safety Instructions
1) Read these instructions.
2) Keep these instructions.
3) Heed all warnings.
4) Follow all instructions.
5) Do not use this apparatus near water.
6) Clean only with dry cloth.
7) Do not block any ventilation openings. Install in accordance with the manufacturer’s instructions.
8) Do not install near any heat sources such as radiators, heat registers, stoves, or other apparatus (including amplifiers) that produce heat.
9) Do not defeat the safety purpose of the polarized or grounding-type plug. A polarized plug has two blades with one wider than the other. A grounding type plug has two blades and
a third grounding prong. The wide blade or the third prong are provided for your safety. If the provided plug does not fit into your outlet, consult an electrician for replacement of the
obsolete outlet.
10) Protect the power cord from being walked on or pinched particularly at plugs, convenience receptacles, and the point where they exit from the apparatus.
11) Only use attachments/accessories specified by the manufacturer.
12) Use only with the cart, stand, tripod, bracket, or table specified by the manufacturer, or sold with the apparatus. When a cart is used, use caution
when moving the cart/apparatus combination to avoid injury from tip-over.
13) Unplug this apparatus during lightning storms or when unused for long periods of time.
14) Refer all servicing to qualified service personnel. Servicing is required when the apparatus has been damaged in any way, such as power-supply
cord or plug is damaged, liquid has been spilled or objects have fallen into the apparatus, the apparatus has been exposed to rain or moisture, does
not operate normally, or has been dropped.
Your DIRECTV® Receiver has been designed and manufactured to stringent quality and safety standards. You should, however, be aware of the following important precautions for
safe and optimal use of the equipment.
Meaning of symbols printed on the rear panel of the product:
This symbol indicates that there are important operating and maintenance instructions in the literature accompanying this unit.
This symbol indicates that dangerous voltage consisting a risk of electric shock is present within this unit.
Safety & Care
Page 9

9
CAUTION: Avoid moisture to reduce the
risk of fire or electric shock. The DIRECTV®
Receiver should not be used near water (for
example, kitchen sink, bathtub, pool, damp
basement). Also, never spill liquid on the
receiver, and do not place vases or other
vessels containing liquid on top of it.
WARNING: To reduce the risk of fire or
electric shock, do not expose this product
to rain or moisture. The apparatus shall not
be exposed to dripping or splashing and no
objects filled with liquids, such as vases,
shall be placed on the apparatus.
IMPORTANT: Be sure not to place your
DIRECTV® Receiver near anything WET or
HOT!
If this product is used at 240VAC, a suitable
attachment plug should be used.
TIP: We highly recommend plugging the
DIRECTV® Receiver into a surge protector
to prevent damage from fluctuations in
your power supply.
CAUTION: To reduce the risk of electric
shock, do not remove cover (or back).
No user-serviceable parts inside.
Refer servicing to qualified service
personnel.
RISK OF ELECTRIC
SHOCK DO NOT OPEN!
CAUTION
• Ensure proper ventilation — the vent slots on the DIRECTV® Receiver must be left uncovered to allow proper airflow to the unit.
Blocking the airflow to the unit could impair performance or damage your receiver and other components.
• Do not stack electronic components or other objects on top of the DIRECTV® Receiver. Also, do not stack the receiver on top of a
“hot component” such as an audio power amplifier.
• Protect your components from power surges by connecting all the components before plugging any power cords into the wall
outlet. Use of a surge protector is also recommended.
• Don’t overload power outlets or extension cords, which can result in the risk of re or shock. It’s also important to use only the
type of power source indicated on the marking label or in this manual.
• Avoid audio hum or interference by inserting all cable plugs rmly into their jacks. Also, place Audio/Video (A/V) cables to the
sides of the TV back panel rather than down the middle once connected. Try not to coil any twin-lead cables and keep them away
from A/V cables as much as possible.
• Never insert objects of any kind into any openings in the DIRECTV® Receiver (other than the DIRECTV® Access Card as detailed in
this manual).
• Place it on a at, hard surface — do not operate the DIRECTV® Receiver on a carpet or other padded surface.
• Always unplug your DIRECTV® Receiver before moving it.
• Always unplug the DIRECTV® Receiver, TV and other equipment before you connect or disconnect any cables.
• The only way to disconnect the DIRECTV® Receiver from the power supply is to remove the power cord. The DIRECTV® Receiver
unit must therefore be installed next to the power point which must be easily accessible.
• CAUTION: Electric Shock — never attempt to disassemble the DIRECTV® Receiver yourself; always take it to a qualified
service person when repair is required. Opening or removing covers may expose dangerous voltage or other risks, and incorrect
reassembly can cause shock when receiver is subsequently used. Attempted self-repair may also void your warranty. Changes or
modifications not expressly approved by the party responsible for compliance (by the warranty or by the manufacturer) could void
the user’s authority to operate the equipment.
• Do not drop your DIRECTV® Receiver and always move it with care.
• Have your DIRECTV® Receiver professionally serviced (do not attempt to service it yourself).
• Any changes or modications in construction of this device which are not expressly approved by the party responsible for
compliance could void the user’s authority to operate the equipment.
• If you move your DIRECTV® Receiver between locations at different temperatures, allow it to reach room temperature before you
apply power to it.
• Do not pick up or otherwise move your DIRECTV® Receiver while it is connected to the AC power supply. If you want to move your
set-top box, first disconnect it, then wait at least 30 seconds before continuing
• CAUTION: To reduce the risk of fire, use only No. 26 AWG or better telecommunications line cord.
• CAUTION: Replace remote control batteries with same or equivalent type. There is danger of explosion if batteries are incorrectly
replaced.
• For your information: The identification sticker can be located underneath or on the back of your receiver.
• The telecommunication network voltage used is the category number 3.
Note to Satellite Dish Installer: This reminder is provided to call your attention to articles 810 and 820 of the 2005 National
Electrical Code. Refer to article 810, in particular 810-1 and 810-15, for required grounding of the metal structure of the dish
antenna. Refer also to the 810-2 which, by reference to article 820, requires that the satellite dish coaxial cable shield be connected
to the grounding system of the building as close to the point of cable entry as practical.
Safety & Care
Page 10

DIRECTV USER GUIDE - HD & SD STANDARD RECEIVERS
10
Page 11
11
USING YOUR REMOTE CONTROL ..................................12
VIEWING LIVE TELEVISION ...........................................14
CHAPTER 1 - QUICK START
Page 12
DIRECTV USER GUIDE - HD & SD STANDARD RECEIVERS
12
Mode Switch
Note:
Each time you press a button, a green light at the top of the remote flashes.
If the light flashes several times for just one press, it means the batteries
(size AA) are getting low and need to be replaced.
These two buttons turn your TV and DIRECTV® Receiver on or off
together. If your DIRECTV® System was installed professionally, your
remote has already been programmed to operate your TV. If you need to
reprogram the remote for a new TV or for any other reason, press MENU,
select “Parental, Fav’s & Setup,” then “System Setup,” then “Remote,”
and follow the step by step instructions.
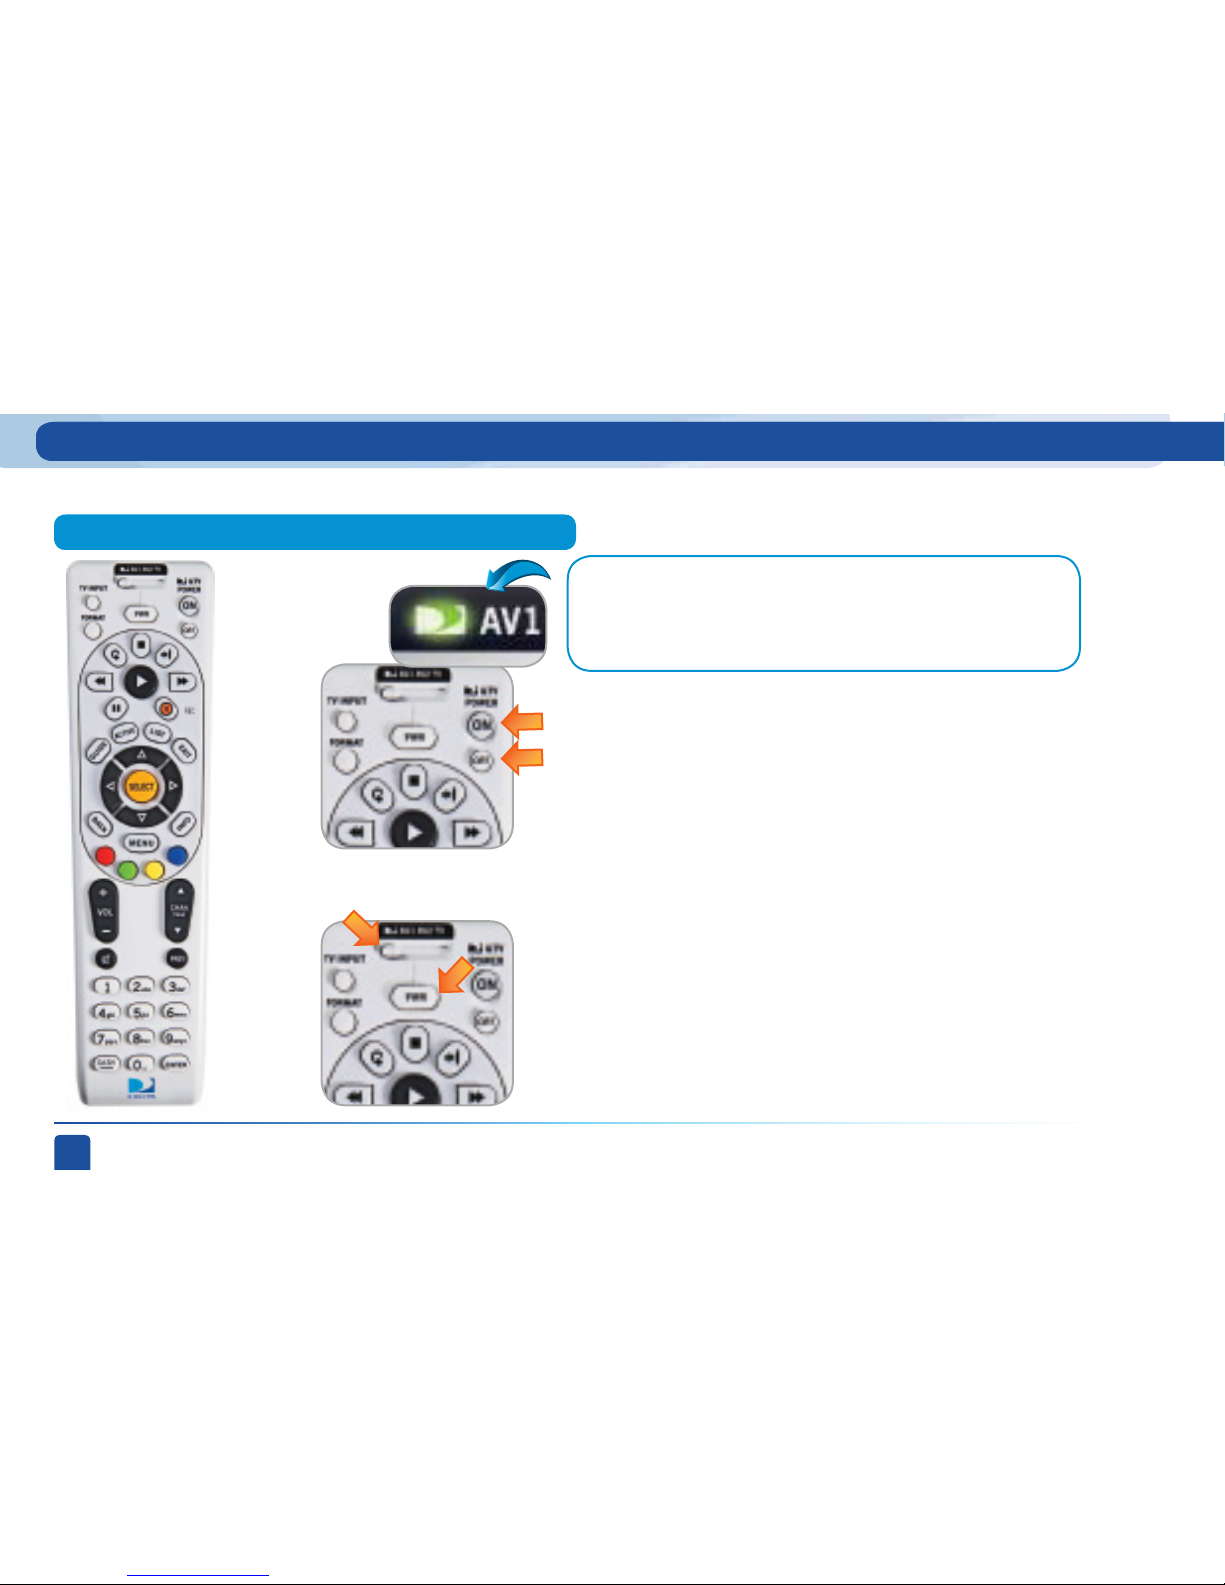
Use the POWER (PWR) button and Mode Switch to turn a single
component on or off (for example a DVD player or surround sound
system). Simply slide the mode switch to the position that matches the
component you want to control and then use the POWER button to turn
it off or on. The mode switch must always be in the left-most position to
control your DIRECTV® Receiver. If the mode switch is in a position that
has not been programmed, or if you press a button that is not supported
by that particular piece of equipment, an on-screen message will pop up
to alert you.
This universal remote control is your touch point to the system, so we’ll start here.
Turning Equipment On and Off
Using Your Remote Control
Page 13

Chapter 1
Chapter 2 Chapter 3 Chapter 4 Chapter 5
Chapter 1 - Quick Start
13
Shortcut hints
Using Your Remote Control
The buttons in the middle of the remote are navigation and destination keys.
Press the GUIDE button to go to the program guide screen. Press the ACTIVE button to go to the
DIRECTV Interactive Services home page. The LIST button takes you to the To Do List. See Chapter
2, “Manage Autotunes” for details. Press EXIT to get out of any menu screen and return to live TV.
Use the ARROW buttons and SELECT button to navigate though the guide or any menu screen.
Press BACK to move back to the previous screen. (You can also use the LEFT ARROW button to step
backward one column at a time.) The MENU key takes you to the main menu where you go to access
all of the features available in your system. Press INFO on any show to see information about that
show.
You can move through all of the DIRECTV user screens using
only the direction ARROW buttons and the SELECT button as
appropriate. However, the RED, GREEN, YELLOW, and BLUE
buttons on the remote are special short cuts that change
function depending on which menu screen you are looking at.
As you use the system look in the bottom right of particular
screens for hints that tell you which color button to use for a
particular short cut. You’ll see several examples in this chapter.
Navigation and Destination Buttons
Short Cut Buttons
Page 14
DIRECTV USER GUIDE - HD & SD STANDARD RECEIVERS
14
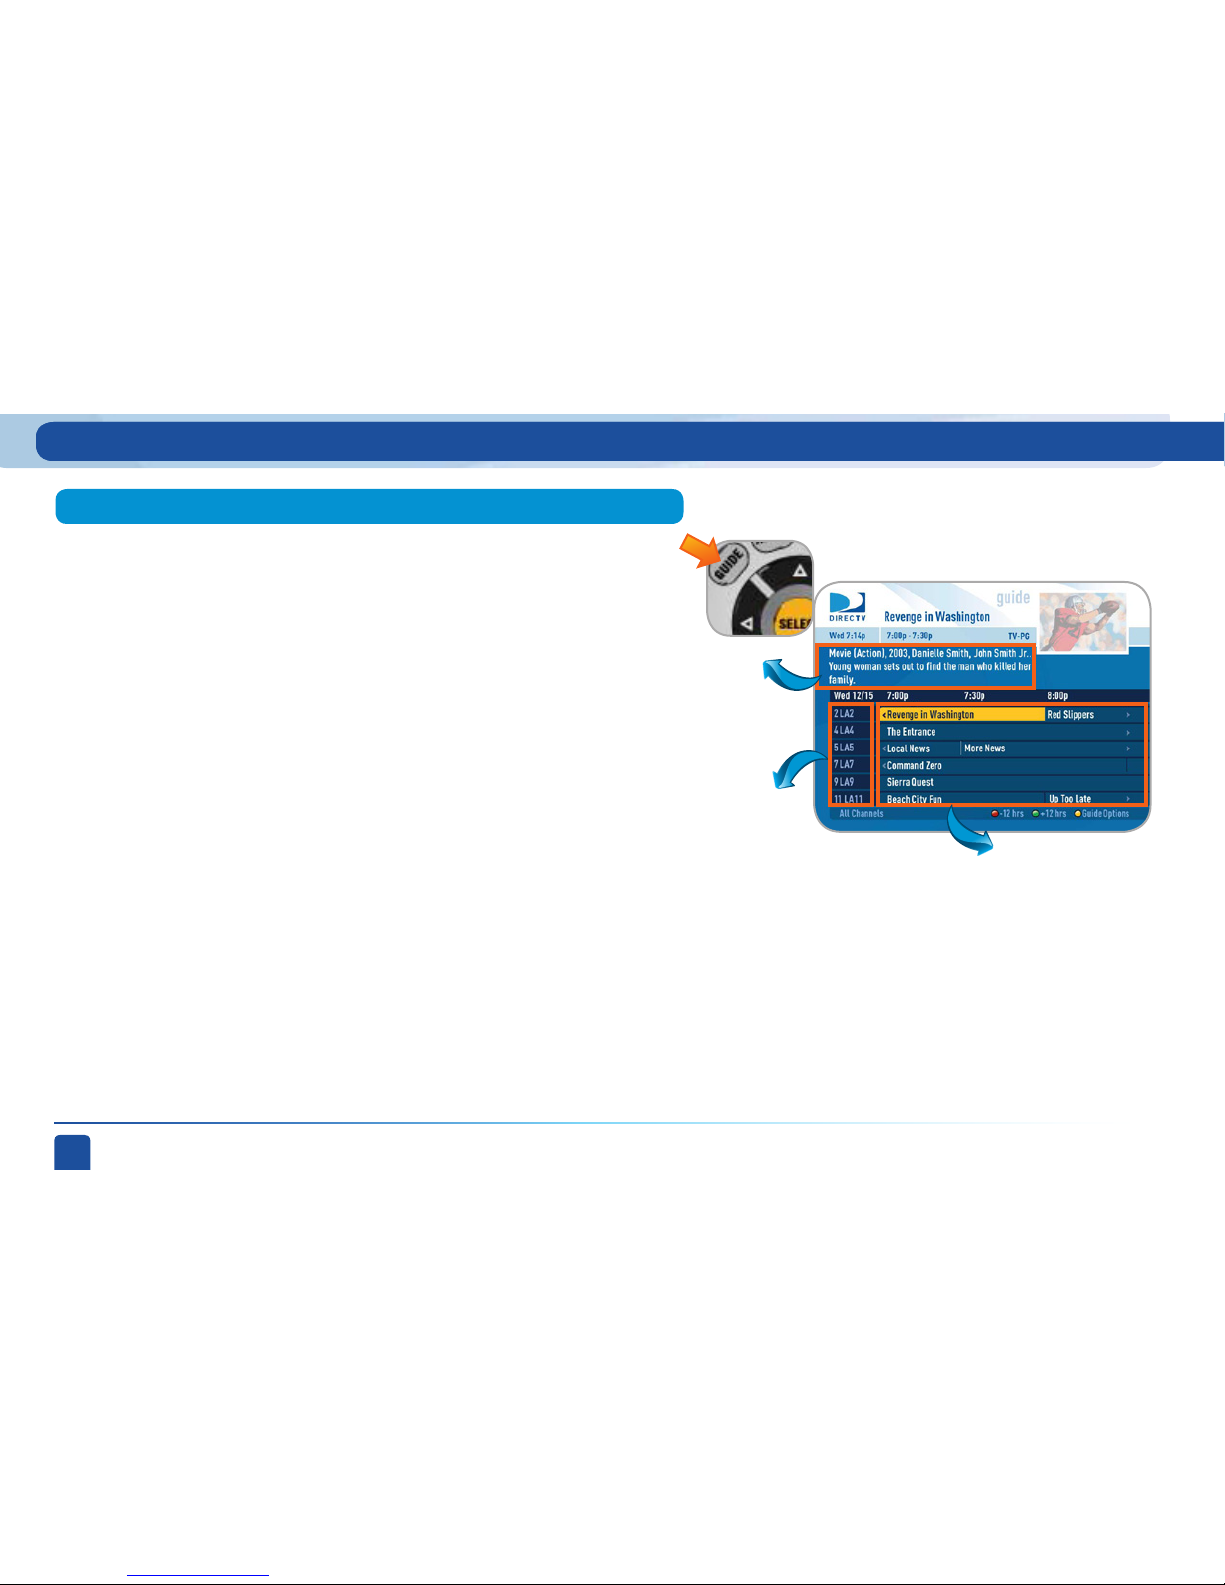
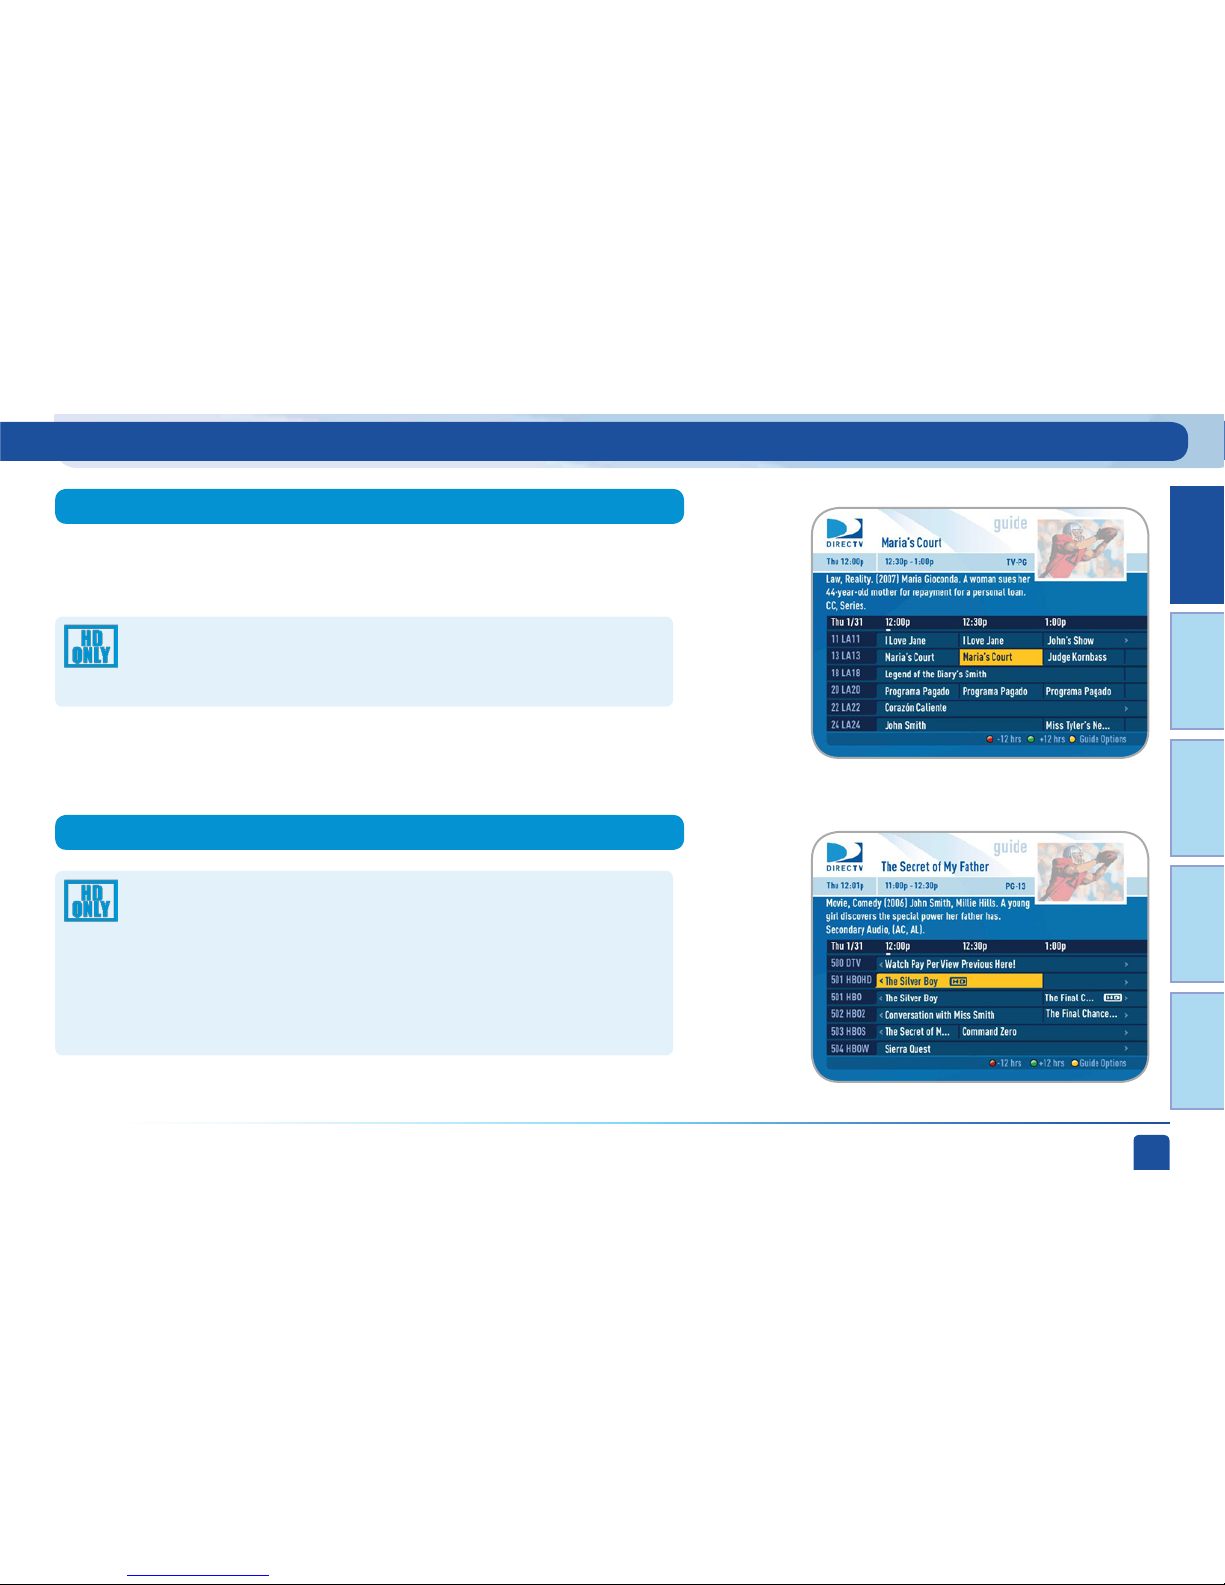
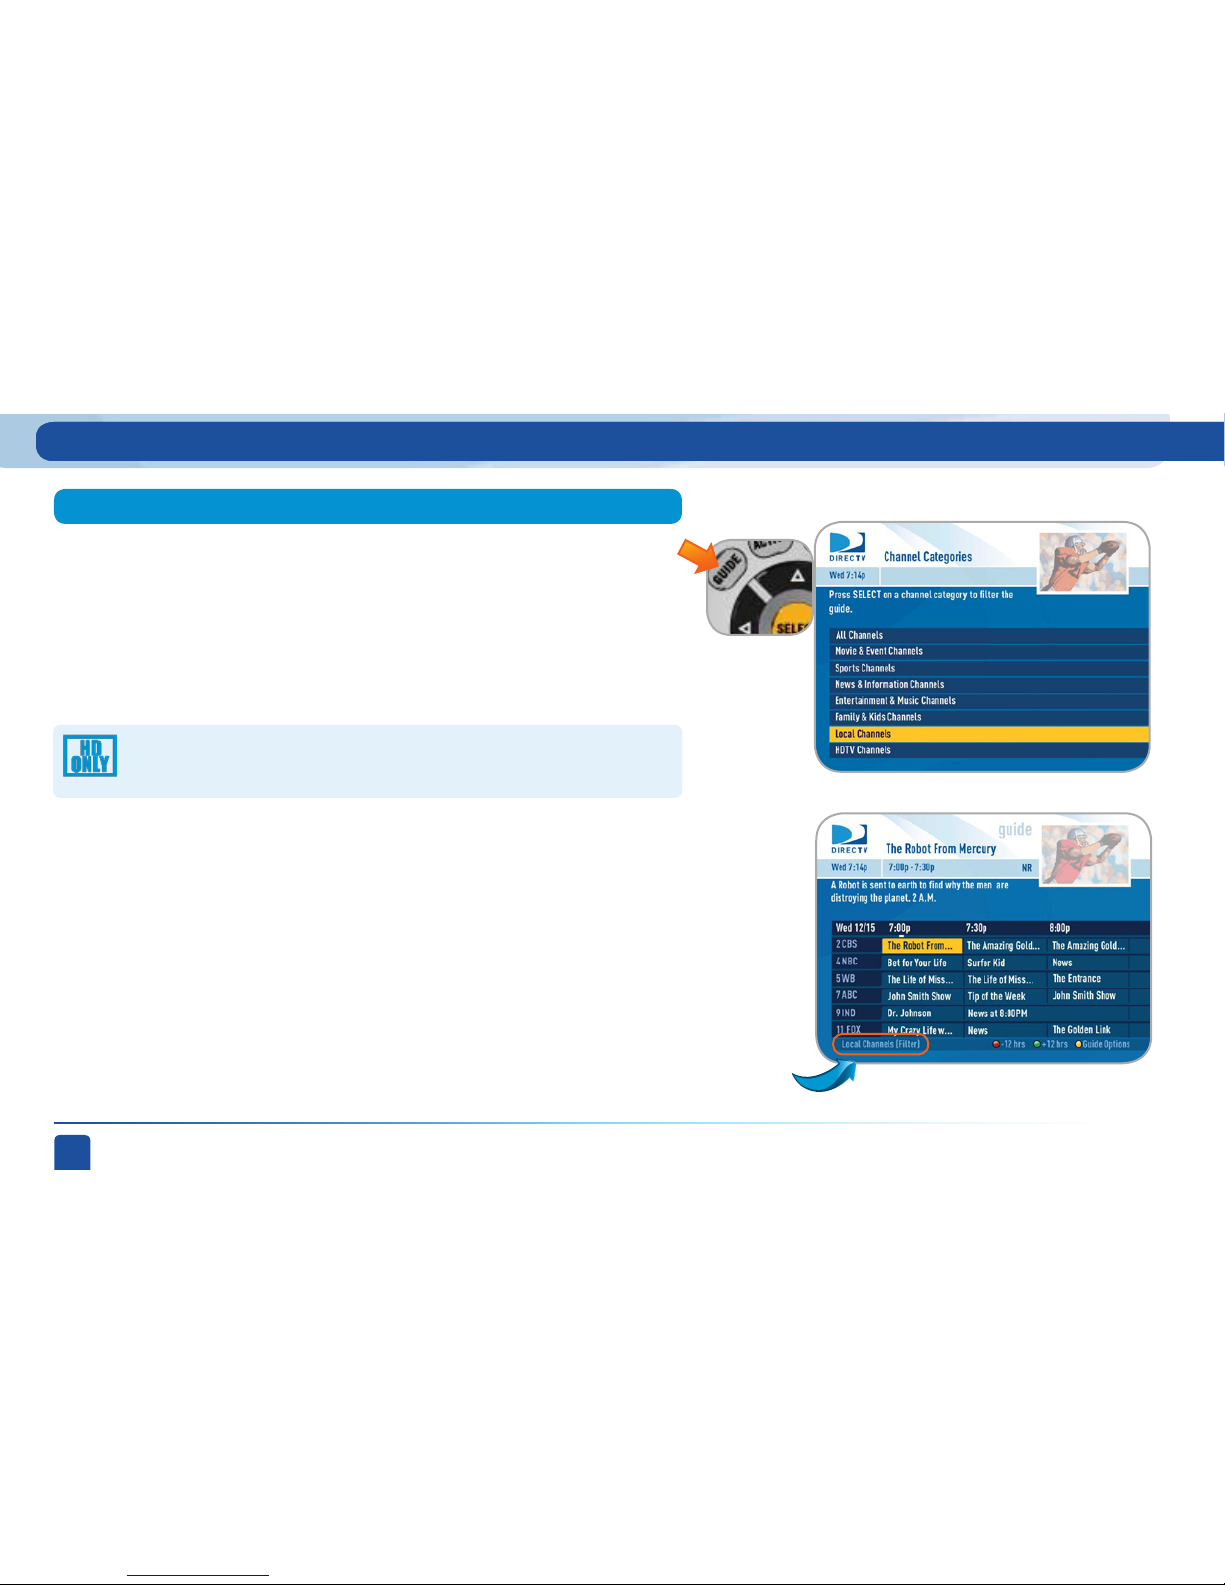
To see what’s showing, press the GUIDE button to display the on-screen
program guide. The guide holds up to 7 days of programs for high-definition
receivers and 3 ½ days of programs for standard-definition receivers.
The current programs are listed on the left side of the guide. The future
programs are off to the right. Move the yellow highlight onto the current
program you want to watch and press SELECT to tune to it. If the program is
in the future, press SELECT, then “Autotune” and then “Set Autotune.” This
schedules your receiver to automatically tune to the program when it airs.
This way, you can be sure never to miss a favorite program, or you can use
autotune to record a program using a connected video recorder.
You can navigate in the guide three ways: use the ARROW buttons to move
one cell at a time up/down/left/right; use the CHAN/PAGE button to scroll a
whole page up or down; or type in the channel number to go directly there.
Look for the color-button hints at the bottom of the screen for short cuts
(use the GREEN button to move ahead in time 12 hours, once there use the
red key to come back 12 hours).
If you press GUIDE twice, you’ll see a screen that lets you filter the guide.
See Chapter 2 “Program Guide Features and Options, Filtering the Guide” for
details.
Program Guide
Channels
Programs
Program
Info
Viewing Live Television
Page 15
Chapter 1
Chapter 2 Chapter 3 Chapter 4 Chapter 5
Chapter 1 - Quick Start
15
Your DIRECTV-provided local channels can be found in the guide from
channel numbers 2 through 69.
DIRECTV has a tremendous offering of HD channels and they are
spread throughout the guide. To find them, look for HD after the
channel call sign (i.e. STZHD or CNNHD) in the channel column of
the guide and also look for HD after the program title in the guide. If you
want to see only the HD version of a channel in the guide go to chapter 2,
section “Parental, Fav’s & Setup/Settings/Display” for instructions on how
to make that setting.
If you have HD, depending on your local market, you may see an
HD and/or SD version of a local channel.
Local Channels
HD and SD Channels
Viewing Live Television
Page 16
DIRECTV USER GUIDE - HD & SD STANDARD RECEIVERS
16
Guide Banners
Channels in the guide that are not part of your subscription package are
shown grayed out. You can customize your guide to hide those channels. See
Chapter 2 “Program Guide Features and Options / Guide Options / Change
Favorites List” for details.
Unsubscribed Channels
Unsubscribed
Channels
Viewing Live Television
In the guide you will also notice from time to time a special row sandwiched
between channels.
We use these “banners” to post important messages, or helpful hints, or to
alert you to new products or services. To learn more, simply press SELECT on
the banner and it will take you to that destination.
Page 17
Chapter 1
Chapter 2 Chapter 3 Chapter 4 Chapter 5
Chapter 1 - Quick Start
17
When you find a current show in the guide that you want to watch, press
SELECT and the receiver will tune to that channel. A channel banner will
briefly display at the top of the screen showing you the program name,
channel number, date, time and other information. The channel banner
also appears any time you change channels, whether by entering a channel
number, or simply using the CHAN UP/DOWN button on your remote. The
icons near the upper right give you more information about your show
or your system such as whether a second audio language is available or
if you have a system message waiting. Go to the inside of the back cover
of this manual to get an explanation of all the icons. If your program has
an alternate audio track, press the GREEN button to hear it. Press the
YELLOW button to display the Live TV Options menu. See Chapter 2 for
details.
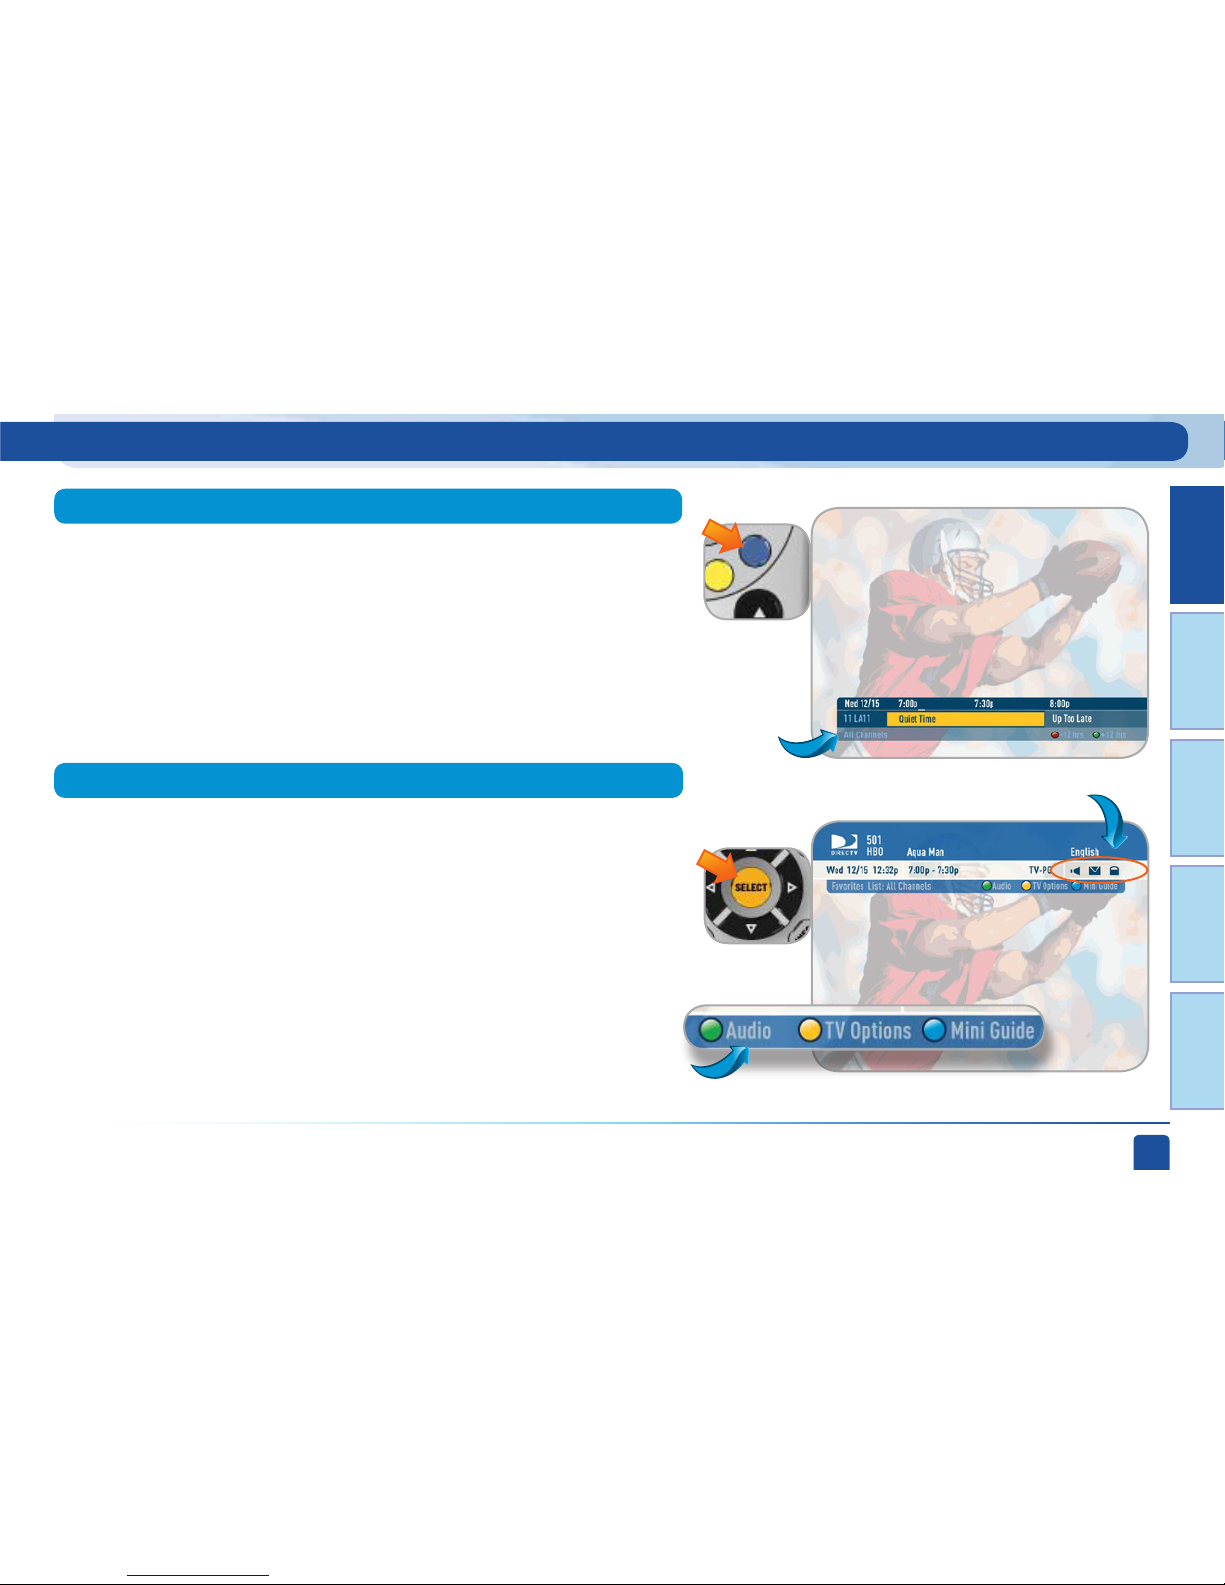
If you are watching a show and want a quick look at what’s on next, press the
BLUE button to display a one-line mini program guide. You can use it for
the current channel or you can type in a new channel number to see what’s
on there. Press SELECT on the new show if you want to go to that channel.
Mini-guide
One-line
mini-guide
Channel Banner
Icons
Shortcut hints
Viewing Live Television
Page 18

DIRECTV USER GUIDE - HD & SD STANDARD RECEIVERS
18
Interactive channels are unique because in addition to video and audio, they
also contain a software application that lets you interact with what you see on
the screen. When accessing these channels you will have to wait a few seconds
for the software to download.
Press the ACTIVE button on your remote to get the latest weather,
horoscopes, lottery results and more. The channel is ready to interact when
the yellow highlight box appears.
When you want to exit an interactive channel, simply press GUIDE and pick the
channel you want to move to or you can type in the new channel number while
in the interactive channel.
Other interactive channels can be found in the guide from channels 100 to
115. The News Mix and Sports Mix channels let you see up to eight of the
hottest channels on one screen. Move the yellow highlight box around using
the direction arrows on your remote to hear the audio associated with each
channel. If you want to see one of the channels full-screen, simply move the
yellow highlight box on top of it and press SELECT.
Interactive Channels
Viewing Live Television
Page 19

Chapter 1
Chapter 2 Chapter 3 Chapter 4 Chapter 5
Chapter 1 - Quick Start
19
The Game Lounge™ service contains memory and skill games that you
can play on-screen using only your remote. There are free as well as
subscription-only games to play. If you become a top scoring player,
you will see your name on the leader board.
Interactive content, like scores, statistics and other information, is
also provided along with some of our special sports and entertainment
channels. Look for an on-screen popup that lets you know when
interactive content is available and follow the on-screen instructions
to use the interactive features.
Viewing Live Television
Page 20

DIRECTV USER GUIDE - HD & SD STANDARD RECEIVERS
20
Viewing Live Television
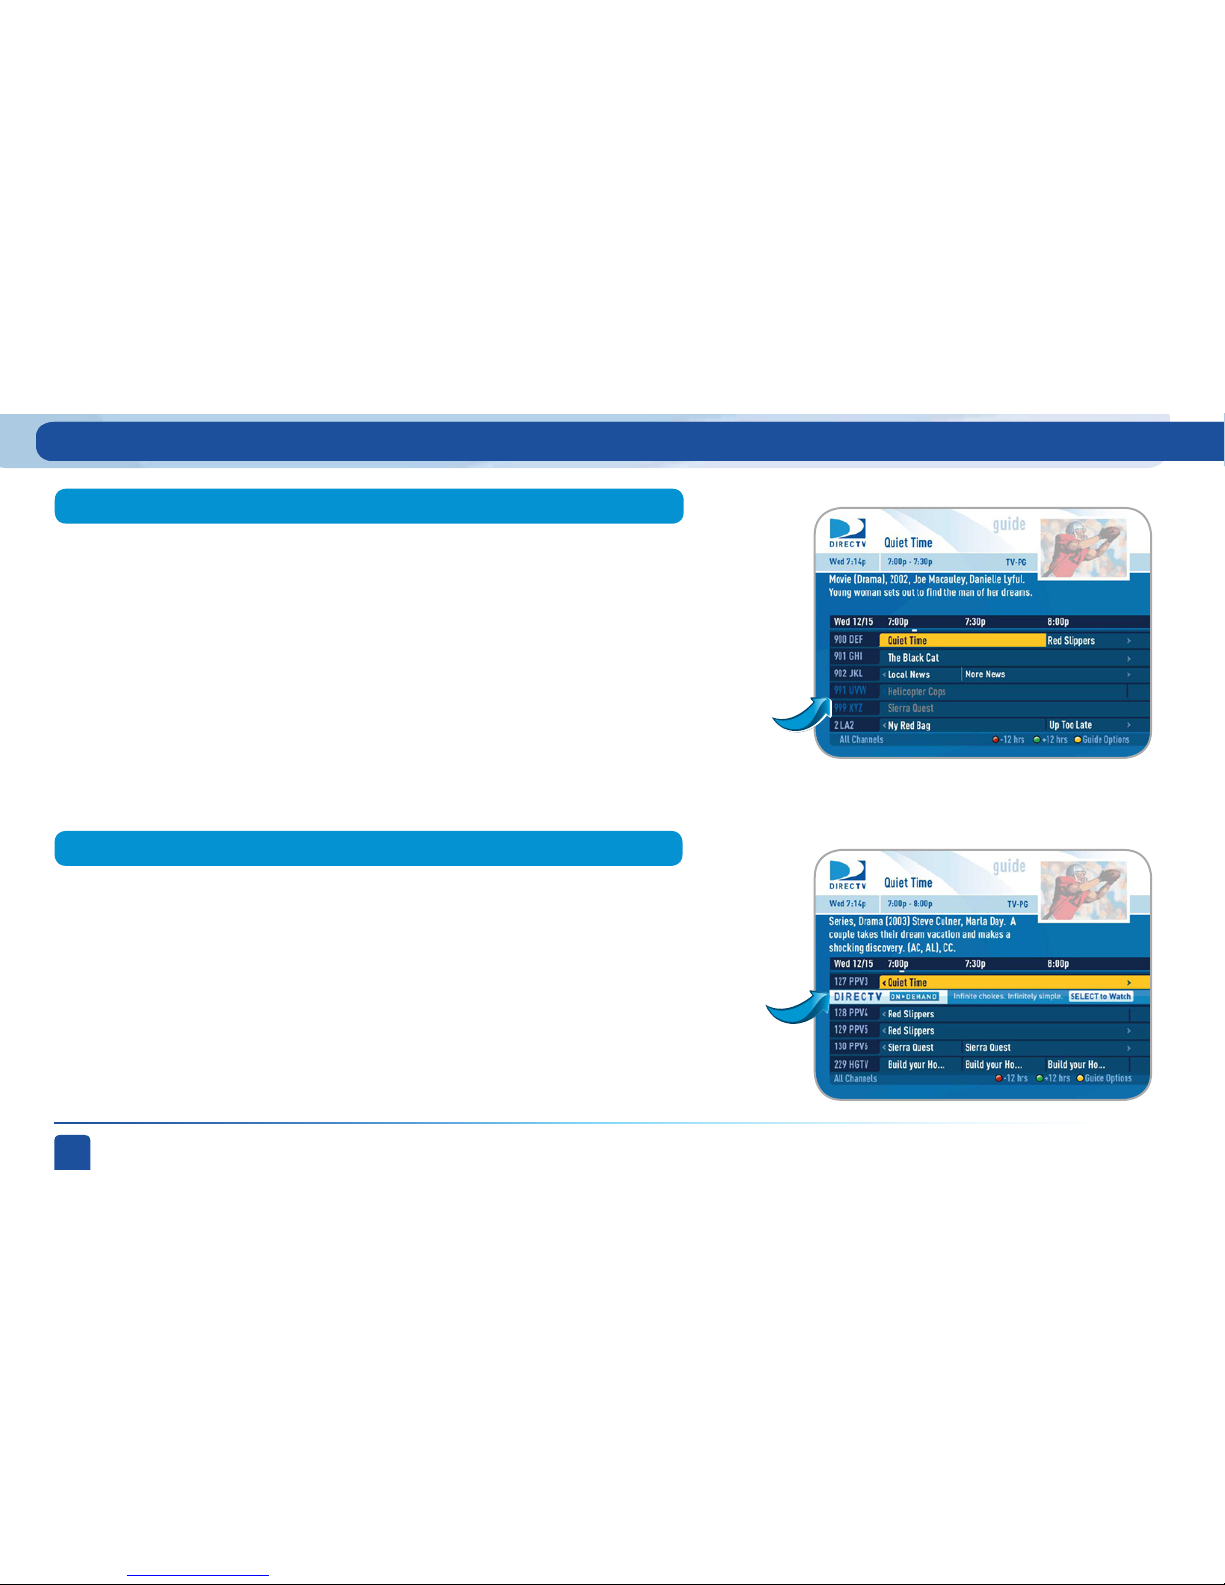
You don’t have to go out for the best and biggest movies and special events!
Recent hits and events like sports, comedy and more are available 24 hours
a day. You’ll find them listed in the program guide starting around channel
120.
To buy a program, tune to it directly or press INFO on the highlighted
program in the Guide. Select the Buy option and follow the on-screen
instructions. As long as your receiver is connected to a land-based phone
line, you can use your remote to order.
If you order a program in advance, you can cancel it for any reason before
the program starts airing. To cancel a purchase, press MENU, then select
“Manage Autotunes,” then “Purchases.” Select the program, then select
“Cancel PPV” to delete it.
DIRECTV Cinema and Pay Per View Events
Note:
You can also order your DIRECTV Cinema movies and Pay Per View events
on the Internet at directv.com or over the phone at 1-800-DIRECTV. Keep in
mind, though, there is an additional ordering fee for purchases placed over
the phone.
Page 21
Chapter 1
Chapter 2 Chapter 3 Chapter 4 Chapter 5
Chapter 1 - Quick Start
21
Viewing Live Television
Use the main menu to access key system features, such as search, parental
controls, system settings, manage your autotunes and more.
Press MENU once to see the main menu. Press MENU again (or EXIT) to
make it go away.
Main Menu
HD Receivers
Menu
SD Receivers
Menu
Note:
The menu items may vary slightly for certain receiver models.
Page 22

DIRECTV USER GUIDE - HD & SD STANDARD RECEIVERS
22
Viewing Live Television
Page 23

23
PROGRAM GUIDE FEATURES AND OPTIONS ........................ 24
LIVE TV FEATURES AND OPTIONS ......................................... 28
MAIN MENU
OVERVIEW .......................................................................29
SEARCH FOR SHOWS ......................................................33
MANAGE AUTOTUNES ....................................................37
CALLER ID ......................................................................39
TVMAIL ............................................................................40
PARENTAL, FAV’S & SETUP ............................................41
CHAPTER 2 - DETAILED INFORMATION
Page 24
DIRECTV USER GUIDE - HD & SD STANDARD RECEIVERS
24
Pressing GUIDE once on the remote displays the program guide which
allows you to browse the huge selection of DIRECTV Channels. However,
there may be times when you want to temporarily trim down the channels
that are shown in the guide, filtering them according to the type of
program you are looking for. For example, you may want to see what’s on
for Sports, Movies or News. In that case, press GUIDE twice to display the
guide filter.
You can choose “HDTV Channels” to filter the guide to show only HD
channels.
Simply use the arrow keys to get to the filter you want, press SELECT, and the
guide will then show only that type of channel. Look for the label in the bottom
left of the guide to see how it is being filtered. Since the filtering is temporary,
it only lasts as long as you keep the program guide up on the screen. The next
time you come into the guide, it will not be filtered and will again show all
channels.
Filtering the Guide
Look here to
see how the
guide is being
filtered.
Program Guide Features and Options
Page 25
Chapter 1
Chapter 2 Chapter 3 Chapter 4 Chapter 5
Chapter 2 - Detailed Information
25
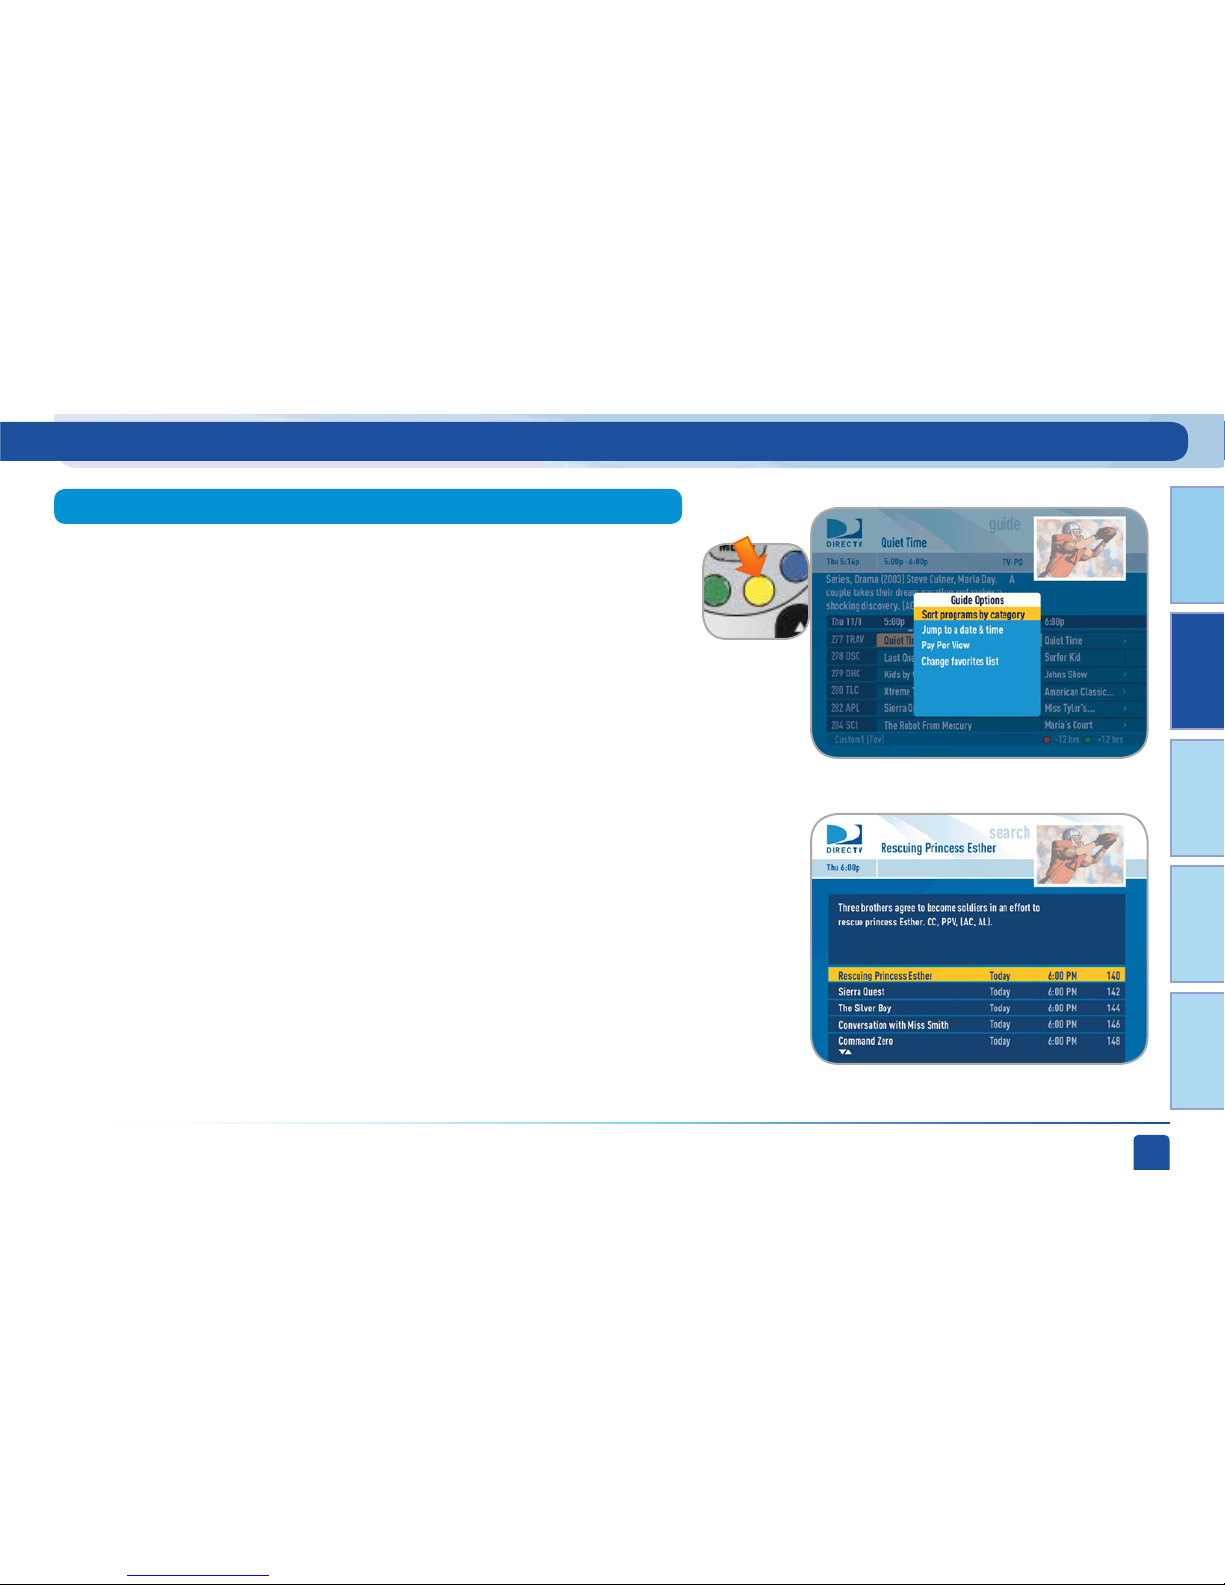
From the program guide screen, press the YELLOW button to display “Guide
Options.”
Select “Sort Programs by Category,” then select a category to see a list of
shows in chronological order that match your sort criterion.
Select “Jump to a Date & Time” to quickly go to a future date and time in the
Guide.
Select “Pay Per View” and then the type of show you want, to see a
complete listing of what is available in the guide in chronological order.
Guide Options
Sort Programs by Category
Jump to a Date & Time
Pay Per View
Program Guide Features and Options
Page 26

DIRECTV USER GUIDE - HD & SD STANDARD RECEIVERS
26
Change Favorites List (Customizing the Guide)
If you have an HD receiver, you may also choose “Channels I Get”
to see only the channels that are in your DIRECTV Programming
package.
Select “Change Favorites List” to select or create a completely custom list
of channels that you want to see in your program guide or when channel
surfing in live TV. You can choose “All Channels” (some channels may not
be in your programming package, so although you may see them in the
guide you will not be able to tune to them), or any of your self-created lists.
To create your own Favorite List choose “Edit Settings”. See the “Parental,
Fav’s & Setup” section near the end of this chapter for details.
Program Guide Features and Options
Page 27
Chapter 1
Chapter 2 Chapter 3 Chapter 4 Chapter 5
Chapter 2 - Detailed Information
27
Channel Program List lets you see all programs coming up for a specific
channel. Press GUIDE, then move the highlight to the channel of interest and
press INFO.
The receiver will sort through the guide and give you up to 7 days of programs
for high-definition receivers and 3 ½ days of programs for standard-definition
receivers in chronological order for that channel. Use the ARROW buttons to
navigate up or down the list or use the CHAN UP/DOWN button to page through
the list. Highlight a show in the list and press INFO to get more information
about it. Select “Done” to return to the guide.
Special feature: Channel Program List
Highlight the
channel
Program Guide Features and Options
Page 28
DIRECTV USER GUIDE - HD & SD STANDARD RECEIVERS
28
Live TV Features and Options
QuickTune
™
GameSearch
™
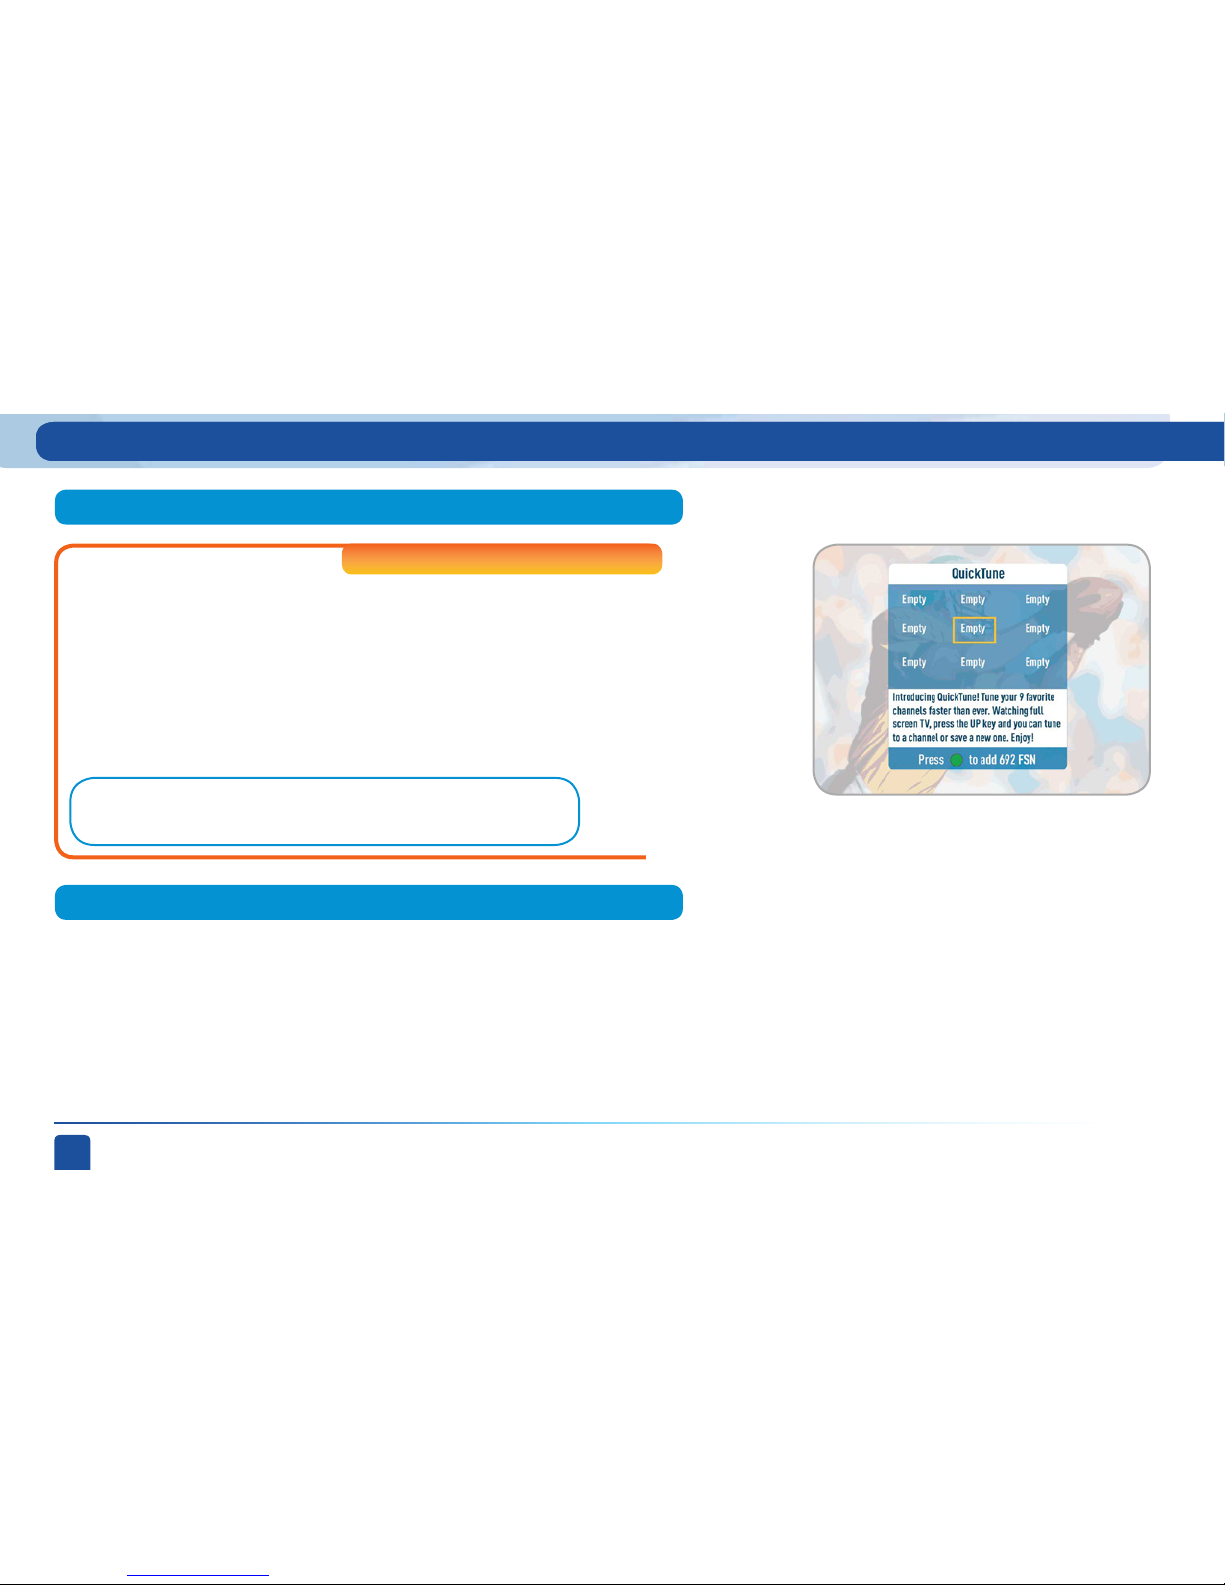
Use QuickTune to get to your 9 “must see” channels fast! While
watching live TV, press the UP arrow on your remote control. A
display with spots for 9 channels will appear on screen. To fill
the spots, press the GREEN button on your remote control. The
channel you are currently viewing will be added to the QuickTune
display. After you’ve made all your picks, press the UP arrow
whenever you want to bring up the application. Use the arrow keys
to highlight the channel you want to watch and then press SELECT.
High-Definition Receivers
Sports blackouts, a long time source of frustration and confusion for
sports fans, occur when a sporting event is not televised in a certain area.
But thanks to DIRECTV’s cutting-edge technology, whenever you tune
in to a channel with a blacked-out game, GameSearch™ recognizes the
blackout and immediately looks to see if the game is on another channel.
If a broadcast of the game is found, GameSearch displays an on-screen
message that gives you the option to tune in to that channel. If it can’t find
one, an on-screen message will let you know the game is not available.
Note:
This feature is not available on model H20.
Page 29

Chapter 1
Chapter 2 Chapter 3 Chapter 4 Chapter 5
Chapter 2 - Detailed Information
29
Live TV Features and Options
While watching Live TV you can press the YELLOW button to display a
list of options: “View Previous Channels,” “DIRECTV Subtitling,” “Closed
Captioning,” “Change Favorites List,” “Audio Options.”
Select “View previous channels” to see a shor t list of the channels you have
watched previously. If you select a channel from this list the receiver will
tune to that channel. This is an easy way to toggle between the channels you
watch most often.
Live TV Options
DIRECTV Subtitling / Closed Captioning
View Previous Channels
High-Definition Receivers
Displays an on screen transcription of a program’s soundtrack.
Select “DIRECT V Subtitling” or “Closed Captioning” to toggle it ON or
OFF. Both options display the same text so only one or the other can
be “ON” at a time. The display format is the only difference so check
out both to determine your preference.
Page 30

DIRECTV USER GUIDE - HD & SD STANDARD RECEIVERS
30
Audio Options
Speaker Icon
Change Favorites List
If the program you are watching is being broadcast with additional language
audio tracks (such as Spanish), a speaker icon is displayed at the top-right of
the channel banner. Select “Audio Options” and select the language you want
(not all shows have an alternate language) or press the GREEN button to
cycle through the available languages.
Select “Change Favorites List” to select or create a completely custom list of
channels that you want to see in your program guide or when channel surfing
in live TV. You can choose “All Channels” (some channels may not be in your
programming package, so although you may see them in the guide you will
not be able to tune to them), or any of your self-created lists.
You can also choose Edit Settings if you want to create a new list. See the
“Parental, Fav’s & Setup” section near the end of this chapter for details.
Live TV Features and Options
If you have an HD receiver, you may also choose “Channels I Get”
to see only the channels that are in your DIRECTV Programming
package.
High-Definition Receivers
Page 31

Chapter 1
Chapter 2 Chapter 3 Chapter 4 Chapter 5
Chapter 2 - Detailed Information
31
Search for Shows
Finds shows by title, actor, or keyword that appear within the 7-day
(3½-day for standard-definition receivers) program guide. You can also
search for channels here instead of browsing the entire Guide.
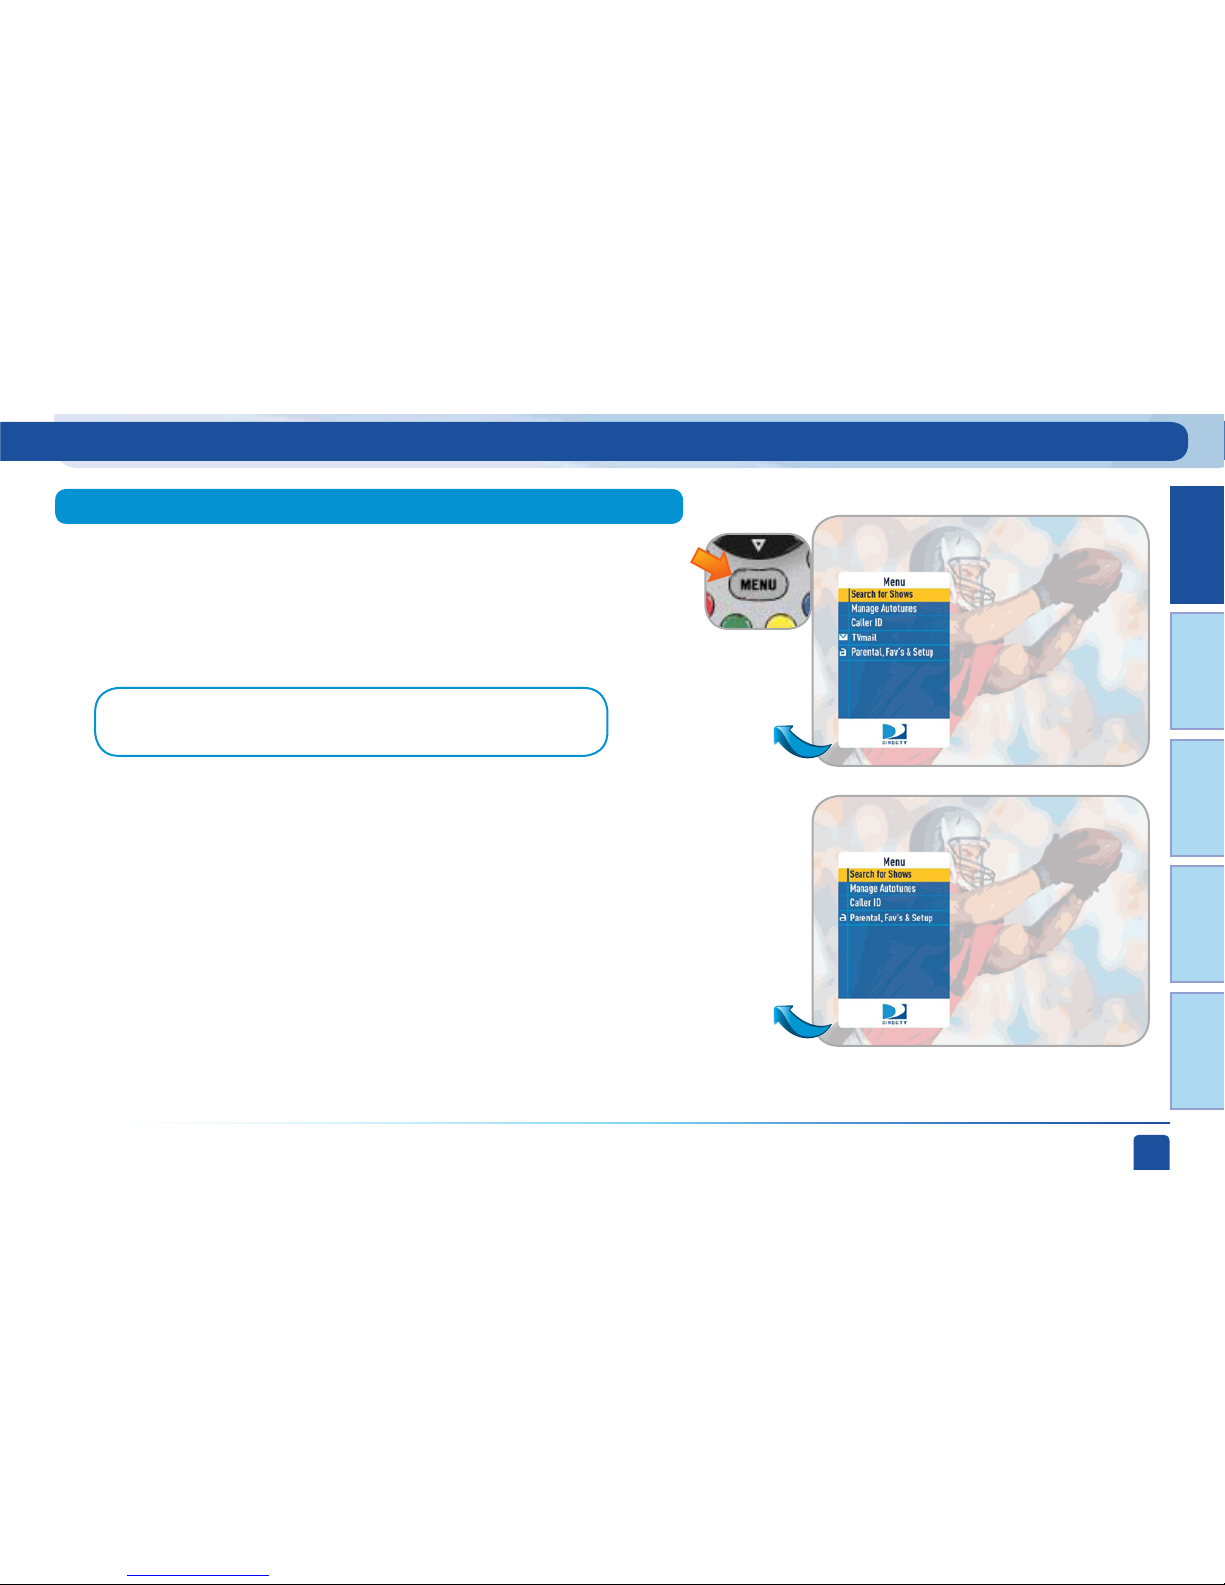
Press MENU on the remote to display the main menu. The Menu lists
important destinations in your DIRECTV® System. They are summarized
below and explained in more detail in the remainder of this chapter.
Contains a log of the phone calls into your home (assuming you have connected
a land line and purchased Caller ID phone service from your telephone
provider).
Lets you see the status of shows (past and future) that the receiver is set
to tune to automatically (Autotunes). You can also see past Pay Per View
purchases listed and set an Autotune by channel and time.
Caller ID
Manage Autotunes
Overview
Main Menu - Overview
Page 32

DIRECTV USER GUIDE - HD & SD STANDARD RECEIVERS
32
Lets you set parental control limits, choose favorite channels for a
customized program guide, and choose settings for your TV, remote, and your
entire DIRECTV® System.
“Help Topics” can be found under “Parental, Fav’s & Setup.” This is
a list of topics and frequently asked questions that explain how to
use your DIRECTV Receiver.
Messages from DIRECT V about new features and services, free previews as
well as, tips & tricks.
Parental, Fav’s & Setup
TVmail
Main Menu - Overview
High-Definition Receivers
Page 33

Chapter 1
Chapter 2 Chapter 3 Chapter 4 Chapter 5
Chapter 2 - Detailed Information
33
Main Menu - Search for Shows
Search by Title
Use the “Search for Shows” option to find programs based on Title, Person,
Channel or Keyword. This powerful tool finds all programs that match your
criterion within the 7-day (3 ½-day for standard-definition receivers) program
guide.
Here’s how it works:
Always start search by pressing MENU on the remote. Select “Search for
Shows” and then select one of the following categories:
When you know the title you are searching for, enter it one letter at a time in
the on-screen keypad by highlighting the letter you want and pressing SELECT.
You can choose Delete (DEL) to get rid of the last letter or Clear (CLR) to start
over if you make a mistake. You do not have to enter the initial article like “The”
or “An.” Each time you enter a letter, the search becomes more precise,
however you don’t always have to enter the complete title. Just the first few
letters will usually get you close enough. Then you can move the highlight to
the list on the right and scroll or page down until you see your title.
Because your title can appear on several channels, it may have a folder icon
next to it.
Press SELECT on the show to bring up the information screen.
Search for Shows
Page 34

DIRECTV USER GUIDE - HD & SD STANDARD RECEIVERS
34
Main Menu - Search for Shows
Search by Person
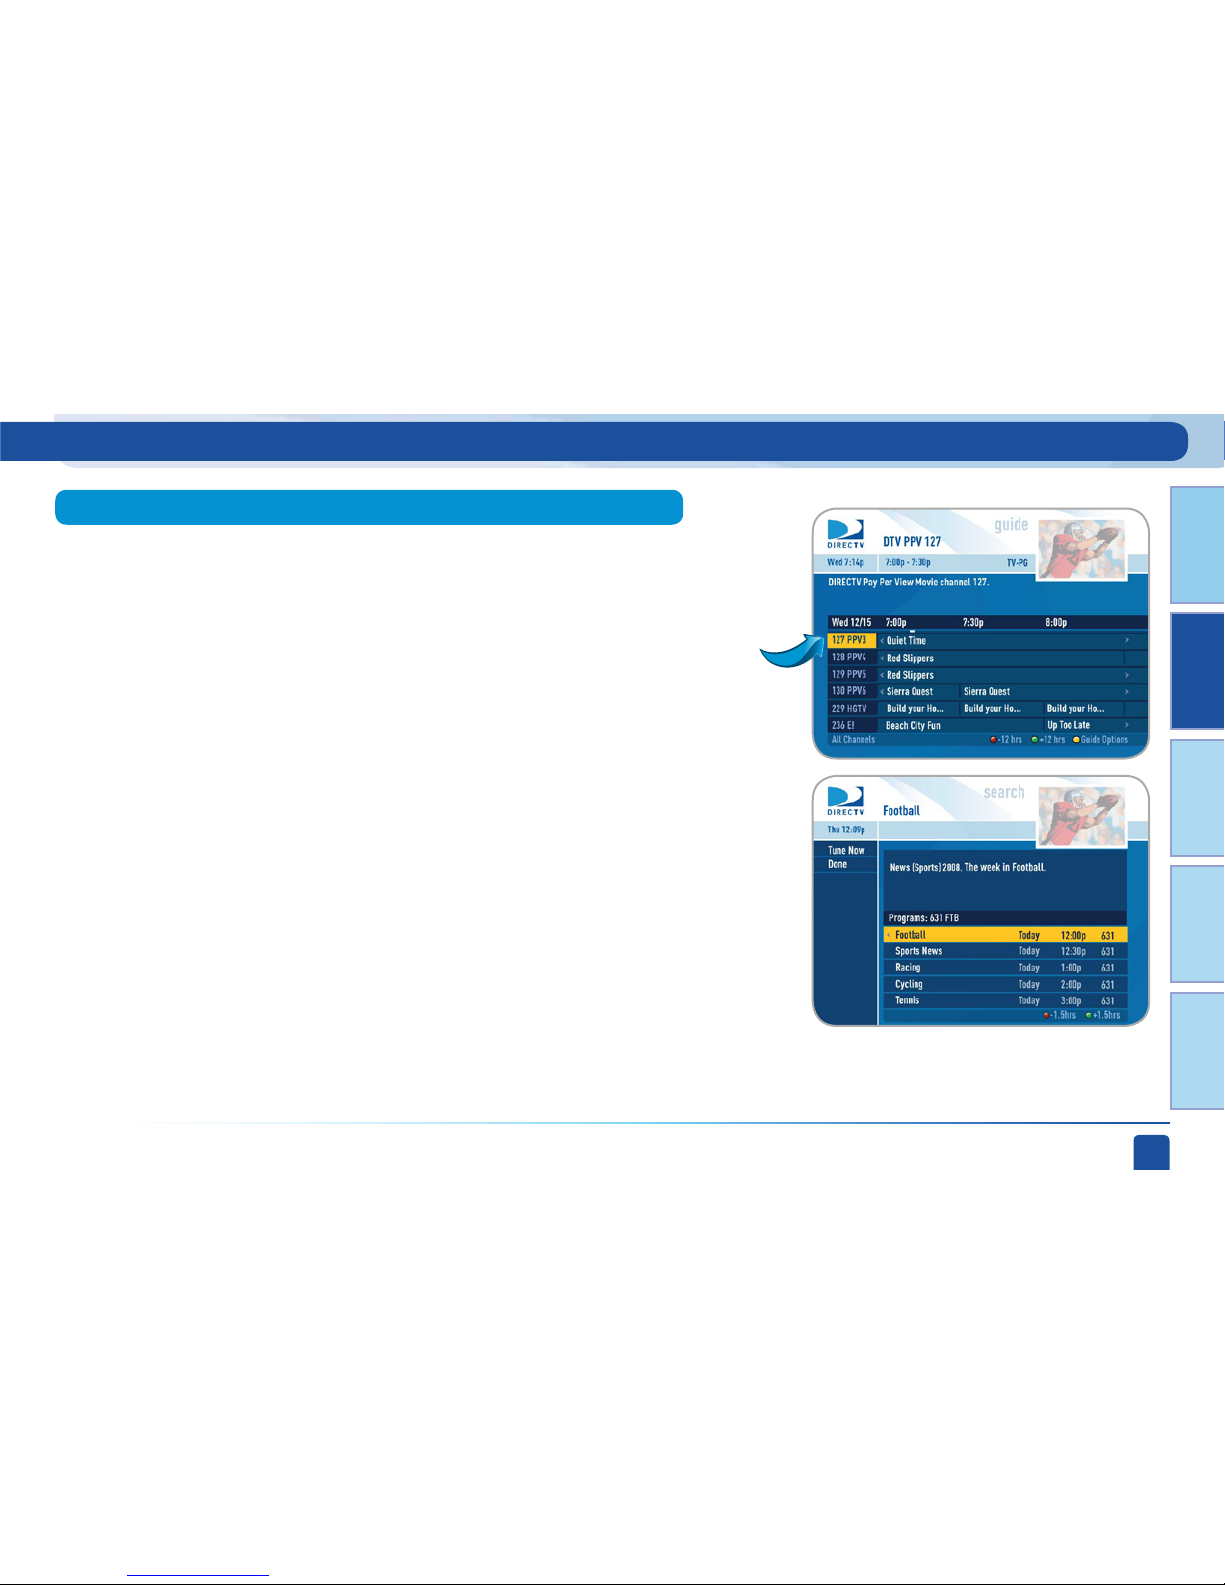
The Search by Channel feature lets you type in a channel name to find it instead
of surfing through the large DIRECTV Program Guide.
Enter the first few letters of the channel name.
In this case we typed in “BL” to find Bloomberg.
Select your desired channel from the list on the right you will get a list of the
shows scheduled on that channel.
Enter the first few letters of the person’s last name. You will see a list on the
right side of the screen showing you actors, actresses, and directors.
Select a name to see a list of program associated with that person.
Search by Channel
Page 35

Chapter 1
Chapter 2 Chapter 3 Chapter 4 Chapter 5
Chapter 2 - Detailed Information
35
Main Menu - Search for Shows
Search by Keyword
You can use the keyword search to find programs that don’t fit into the Title
or Person search criteria. For example, if you are looking for a show about
cats, use the keypad to spell out “cats.”
In some cases, simple words can give you a lot of errant results, so try to
pick specific keywords to get the best results. You can enter a phrase (for
example “Wild Cats”), but it must be an exact match to the program guide
information to appear in the search results. Usually, it is better to use
single words.
The search feature looks through show titles and descriptions for the
keyword. The more specific you can be with your keyword, the better your
search results will be. If you enter a word that is also part of a larger
word, you may get unintended results. For example, if you enter “cats”
you may get results that include “Catskills Mountains” as well as “Cats in
Washington.”
Page 36

DIRECTV USER GUIDE - HD & SD STANDARD RECEIVERS
36
Main Menu - Search for Shows
This handy feature lets you go back to a list of your 25 most recent searches
in case you want to update or reuse a search you used previously.
Recent Searches
Page 37

Chapter 1
Chapter 2 Chapter 3 Chapter 4 Chapter 5
Chapter 2 - Detailed Information
37
Main Menu - Manage Autotunes
Manage Autotunes
You can select future programs in the Guide to set up an “autotune,” which
causes your receiver to automatically tune to the program when it airs. This way,
you can be sure never to miss a favorite program, or, you can use autotune to
record a program using a connected video recorder.
Once you have set up autotunes, you can find the status and history of those
autotunes by pressing MENU and selecting “Manage Autotunes” to see the
following sections:
“To Do List” contains all of the autotunes your receiver is set to make in the
future. The icons next to the titles indicate whether the autotune is a single
event, or part of a series, or an autotune based on a person or keyword search.
The list is ordered by time with the next autotune at the top and the furthest in
the future at the bottom. You can use this screen to make sure your autotunes
are properly scheduled or to delete future scheduled autotunes.
Deleting single shows is easy: Simply highlight the show you want to delete
and press the RED button on the remote. A confirmation message will
appear before you can delete the show.
To Do List
Page 38

DIRECTV USER GUIDE - HD & SD STANDARD RECEIVERS
38
Main Menu - Manage Autotunes
Provides status information for every autotune scheduled, whether they
were tuned, canceled or deleted. If you think something should have been
autotuned, but wasn’t, check here to look for an explanation.
Provides status information for all Pay Per View programs that were bought
and, if viewed, the date and time.
There may be times when you want to set up a manual autotune based on
channel, time and date. In this case, select “Manual” and enter all of the
options as you wish, including whether you want this to be a one-time or
recurring autotune (i.e. every Tuesday), channel, day and date, start time and
duration. You can schedule a manual autotune up to 12 days in advance.
History
Purchases
Manual Autotunes
Page 39

Chapter 1
Chapter 2 Chapter 3 Chapter 4 Chapter 5
Chapter 2 - Detailed Information
39
Main Menu - Caller ID
This feature allows you to configure and review your Caller ID (if you have that
phone service and your receiver is connected to the phone line). To set up your
receiver to display Caller ID, press MENU, “select Caller ID” then select “Turn
On Notices.”
When the Notification option is on, you’ll see a notice on your TV screen
whenever a call comes in. You can review your 25 most recent calls in the call
log at any time. To see your call log, press MENU, select “Caller ID” and then
select “Call Log.”
Caller ID
Page 40

DIRECTV USER GUIDE - HD & SD STANDARD RECEIVERS
40
Main Menu - TVmail
DIRECTV sends messages to you via satellite for important news items or
special promotions. We also summarize important software changes or new
features that we download to your receiver. When you have new mail, the
“envelope” message icon will appear in the channel banner of any program
you are watching.
Simply press MENU and select “TVmail,” to see your DIRECTV Messages.
TVmail
Standard-Definition Receivers
On Standard-Definition Receivers, press MENU, select “TVmail & Caller
ID,” then “TVmail” to see your messages.
Page 41

Chapter 1
Chapter 2 Chapter 3 Chapter 4 Chapter 5
Chapter 2 - Detailed Information
41
Parental Fav’s & Setup
Parental Controls
Selecting “Parental, Fav’s & Setup” in the “main menu” displays a submenu of
items that lets you customize and adjust your DIRECTV viewing experience.
• You can choose “Parental Controls” to limit what ratings your children are
allowed to watch, how much they can spend for Pay Per View shows or
even what hours they can watch DIRECTV Programming.
• Choose “Favorite Channels” to set up your own personal list of favorite
channels and then use it in the program guide for a more customized
experience.
• Select “System Setup” to adjust and configure how you want your TV and
DIRECTV® System to work together.
“Parental Controls” enables parents to place certain restrictions on just who’s
watching what, and requires a passcode to view restricted programming.
Whether it’s for mature content, spending amounts, or even the number of
hours of TV watching allowed, you’re always able to keep limitations where you
want them for the whole family.
Press MENU, select “Parental, Fav’s & Setup,” select “Parental Controls,” then
“Edit Settings,” and you’ll see the current status, showing any restrictions. The
system default is “unlocked” for all categories.
Main Menu - Parental, Fav’s & Setup
Page 42

DIRECTV USER GUIDE - HD & SD STANDARD RECEIVERS
42
Main Menu - Parental, Fav’s & Setup
Note:
You can also use the RED or GREEN buttons to move between the tabs (movies, TV,
other)
The Ratings feature lets you set ratings limits for Movies, TV and
unrated shows. From the left menu, select “Ratings,” then highlight
the desired tab using the ARROW keys and press SELECT.
Ratings
Highlight and select the Movies tab, then select the button next to the
overall rating limit you wish to impose. Brief descriptions of the ratings
appear for your guidance.
- Movies
Adult Channels
Select “Adult Ch’s” then press SELECT again to completely hide adult channels
in the program guide, Manage Recordings screens, and when channel surfing.
Pressing SELECT on “Show Adult” toggles between Show Adult and Hide Adult.
Page 43

Chapter 1
Chapter 2 Chapter 3 Chapter 4 Chapter 5
Chapter 2 - Detailed Information
43
Main Menu - Parental, Fav’s & Setup
The Channel Blocks feature lets you prevent children from viewing channels that
you have selected. From the left menu select “Chan Blocks,” then scroll down
the channel list to select those you wish to block, or key in channel numbers for
quicker access. Use “Block All” or “Allow All” to save time if you wish to affect a
large number of channels.
Select the “TV” tab, then highlight and select the TV rating limit you desire. You
can also set rating limits for particular content (for example, Fantasy Violence
(FV), Dialogue (D), Language (L), Sexual Content (S) and Violence (V)), each of
which is described when highlighted.
To block programming that has no rating — such as news and sports — select
the “Other” tab.
Channel Blocks
- TV Programs
- Other Shows
Page 44

DIRECTV USER GUIDE - HD & SD STANDARD RECEIVERS
44
Main Menu - Parental, Fav’s & Setup
The Spending Limit feature lets you enter a dollar limit on the amount that can
be spent on each Pay Per View purchase. From the left menu, select Spending,
then enter your preferred spending limit. Simply key in the amount using the
numbers on your remote.
The Hours feature lets you select times during which TV watching is allowed
in your household. From the left menu, select Hours, then select the start
times and durations for viewing. You can set hours based on “school nights”
(Monday-Thursday) and/or weekend nights (Friday-Saturday) and Sunday.
Limit Spending
Limit TV Viewing Hours
Page 45

Chapter 1
Chapter 2 Chapter 3 Chapter 4 Chapter 5
Chapter 2 - Detailed Information
45
Main Menu - Parental, Fav’s & Setup
Temporarily or permanently unlocking a restriction is easy. To temporarily
unlock a particular program:
When any controls are currently activated, “Unlock Now” will appear if
you try to tune to a restricted program.
Select “Unlock Now” and enter the passcode.
Unlock Your Receiver
Once you’ve set the restrictions you want, choose “Lock Now” from the left
menu. You’ll be directed to create a passcode (which you’ll want to make easy
enough to remember, but hard enough that the little ones won’t guess it!). This
passcode will be your entry to unlocking and adjusting limitations in the future.
An on-screen message will appear whenever anyone tries to tune to a channel
or program that has been restricted, or attempts to spend or watch beyond
limitations set. He or she will not be allowed to proceed without the passcode.
Using your passcode, you can easily override the limits.
1.
2.
Lock Your Receiver
Page 46

DIRECTV USER GUIDE - HD & SD STANDARD RECEIVERS
46
Main Menu - Parental, Fav’s & Setup
Making multiple entries aimed at guessing the passcode is discouraged by a
time delay; each invalid passcode entered lengthens the delay for subsequent
entry by one second.
To change your passcode at any time:
Scroll down to “Passcode” and press SELECT.
Enter your old passcode, then enter a new one twice to
confirm.
Press MENU, then select “Parental Fav’s & Setup,” then
select “Parental Controls.”
Various options for removing restrictions temporarily
or permanently will appear. Select one and enter your
passcode.
For more unlock options:
1.
2.
3.
2.
Press MENU, select “Parental Controls, Fav’s & Setup,” then
“Parental Controls,” then “Edit Settings.”
1.
Note:
If you forget your passcode, call 1-800-531-5000 to reset it. You must be the
registered account holder and have your account number.
Note:
If you have Parental Controls set and temporarily unlocked, turning the receiver
off will turn the parental controls back on.
Page 47

Chapter 1
Chapter 2 Chapter 3 Chapter 4 Chapter 5
Chapter 2 - Detailed Information
47
Main Menu - Parental, Fav’s & Setup
You can reach the favorite channels feature from the main menu or live TV.
From the main menu select “Parental, Fav’s & Setup,” then “Favorite
Channels.” From live TV, press the YELLOW button, then select “Change
Favorites List.”
If you have not already created a Favorites list, the options “Setup Custom 1”
and “Setup Custom 2” will be displayed. Select the one you want, and follow the
on-screen instructions to create and name your list. Once your list is created,
if you press the YELLOW button while in the guide, the guide options menu will
appear. Select “Change Favorites List” to pick the list you want to use in the
guide.
Selecting a Favorites list makes it active and hides the display of all other
channels in the guide. See the label in the bottom left of the program guide
screen that reminds you which channel list you are currently using. To return
to displaying all channels, press the YELLOW button while in the guide, select
“Change Favorites List” and select the “All Channels” option.
Favorite Channels
Page 48

DIRECTV USER GUIDE - HD & SD STANDARD RECEIVERS
48
Main Menu - Parental, Fav’s & Setup
Press MENU select “Parental, Fav’s & Setup” and then select “System
Setup.” The system setup screen provides your basic system information:
receiver model, receiver ID, access card number and software version.
Also from this screen you can access the “Info & Test,” “Satellite,”
“Network,” “Remote Setup,” “Audio Setup,” “Display Setup,” “HDT V” (if
applicable) and “Reset” screens.
From System Setup, select “Info & Test.” The option “Run System Test,”
initiates a test of the tuners, access card, receiver ID and phone line and
reports the results on screen. The option “More System Info,” displays all
current receiver settings which may be helpful during troubleshooting.
Note:
Running the System Test may interfere with live TV and scheduled autotunes.
System Setup
Info & Test
Page 49

Chapter 1
Chapter 2 Chapter 3 Chapter 4 Chapter 5
Chapter 2 - Detailed Information
49
Main Menu - Parental, Fav’s & Setup
This option is typically only used by installers when your system is initially
set up. However, you can come here to see the satellite signal strength your
receiver is getting or to repeat the satellite setup procedure.
Satellite
Network
You can set up and test the connection of your receiver to the Internet
here. See Appendix 3 for details.
High-Definition Receivers
Page 50

DIRECTV USER GUIDE - HD & SD STANDARD RECEIVERS
50
Main Menu - Parental, Fav’s & Setup
You can also program your remote control to run other equipment as
described above. In addition, if you have an optional RF remote, select
IR/RF Setup to change your remote method of transmission from
Infrared (IR) signals to Radio Frequency (RF). While IR transmission
requires a clear line of sight to the front of the receiver, RF
transmission lets your put your receiver inside a cabinet or behind solid
doors and still be able to command it from up to 200 feet away. Select
“Receiver Mode” if you want to use one remote to command more than
one DIRECT V® Receiver.
From System Setup, select “Remote” and then “Program Remote.” Use
this option to set up your remote for your TV or auxiliary A/V equipment.
Select AV1, AV2 or TV and follow the step by step instructions to set your
remote to control your TV or other equipment A/V equipment like a DVD
player or surround sound system.
It is best to know the model number as well as the brand of the
equipment. It will produce the best results when programming the
remote.
Select “Receiver Mode” to program your remote to control more than one
DIRECTV® Receiver.
Remote
Standard-Definition Receivers
High-Definition Receivers
Page 51

Chapter 1
Chapter 2 Chapter 3 Chapter 4 Chapter 5
Chapter 2 - Detailed Information
51
HD Receivers
SD Receivers
Main Menu - Parental, Fav’s & Setup
If you have an HD receiver you have three choices to make:
- Preferred audio language
- Volume of sound effects
- Dolby Digital output (for a surround sound system, for example).
Not all TV programs deliver Dolby® Digital 5.1 channel signals. Look for
the Dolby® Digital icon in the program description and Channel Banner.
HD Channels include 5.1 surround sound when available from the
programmer. Additional equipment is required and sold separately.
“Dolby” and the double-D symbol are trademarks of Dolby Laboratories.
Audio
The Audio option in Setup lets you make lasting adjustments to
settings such as your preferred audio language.
To make temporary adjustments to your preferred audio language,
press the GREEN button on your remote from Live TV to cycle
through the available audio tracks.
Standard-Definition Receivers
High-Definition Receivers
Page 52

DIRECTV USER GUIDE - HD & SD STANDARD RECEIVERS
52
Main Menu - Parental, Fav’s & Setup
Display
This important section allows you to customize how important DIRECTV and
system information are displayed on your TV.
Choose the “Preferences” tab to:
Move to the “TV Ratio” tab by using the arrow keys (or pressing the GREEN
button). This allows you to set the aspect ratio of your TV to either Standard
(4:3) or Widescreen (16:9).
Go to the “Time Zone” tab to set your time zone and whether you want the
receiver to show Daylight Savings time or not.
• Set the channel banner display time to determine how quickly the
banner disappears after moving to a new channel.
• Choose your preferred text language for screen text.
• Choose whether you want the first press of the GUIDE button to take
you directly to the program guide or to go to the category filter first. (No
matter which one you choose, pressing GUIDE a second time shows you
the other option.)
Standard-Definition Receivers
Page 53

Chapter 1
Chapter 2 Chapter 3 Chapter 4 Chapter 5
Chapter 2 - Detailed Information
53
High-Definition Receivers
Main Menu - Parental, Fav’s & Setup
This important section allows you to customize how important DIRECTV
Programming and system information are displayed on your TV.
Choose the “Preferences” tab:
• Set whether you want lists in the program guide to display in smooth
scrolling or in blocks as you page up and down.
• Set the channel banner time to determine how quickly the banner
disappears after moving to a new channel.
• Choose your preferred language for screen text.
• Choose whether you want the guide to show your HD channels and
their duplicate SD channels or to hide the SD duplicates.
• Choose whether you want the first press of the GUIDE button to take
you directly to the program guide or to go to the category filter first.
(No matter which one you choose, pressing GUIDE a second time
shows you the other option.)
Move to the “Captioning” tab by using the arrow keys (or pressing the
GREEN button) and select your preferred options. You can customize how
closed captioning appears, or whether it appears at all.
Go to the “Clock” tab to set your time zone and whether you want the
receiver to show Daylight Savings time or not.
Display
Page 54

DIRECTV USER GUIDE - HD & SD STANDARD RECEIVERS
54
Main Menu - Parental, Fav’s & Setup
You can optimize your HD Receiver output to match the settings on your
HDTV.
- Video Tab:
The Video tab lets you set Native mode ON or OFF. Native Mode looks at the
digital aspect ratio and resolution of the program coming into the receiver and
sets your TV to the same format on-the-fly. For example, if your particular
program is being broadcast in 4:3 aspect ratio and 720p resolution, your HD
Receiver tells the TV to show it in that same format. If the next program changes
to 16:9 and 1080i, the receiver tells the TV to change to that format. You do not
need to choose Native mode because your HD Receiver will adjust and change
the picture to fit your TV as described in the following paragraphs. In fact, Native
Mode slows down the response of your system to channel changes because the
receiver and TV must communicate at every channel change before the video
comes up on the screen. Therefore, the default position is OFF, but your can
override it if you wish.
Choose the color of the bars you prefer when viewing an image in letterbox (or
pillar) mode.
Choose the screen format you prefer for the instances when the broadcast
does not exactly fit your TV screen and the HD Receiver will automatically
size it. For example, when viewing very wide format movies you can choose
to have letterbox bars on the top and bottom of the screen. This preserves
the proportions of the images on the screen. Or you can choose to stretch the
images vertically to fill up the screen. If your HDTV is 4:3 aspect ratio, you may
want to choose “crop” to cut off the content at the left and right side of the
screen while preserving the proportion of the images that remain.
HDTV
Note:
You may want to refer to Appendix 2 which
describes HD formats and resolution.
Page 55

Chapter 1
Chapter 2 Chapter 3 Chapter 4 Chapter 5
Chapter 2 - Detailed Information
55
Main Menu - Parental, Fav’s & Setup
The “TV Ratio tab” lets you define the aspect ratio of the TV you are using with
your receiver. Most HDTVs are 16:9.
- TV Ratio Tab:
- TV Resolutions Tab:
The “T V Resolutions” tab lets you define what resolutions your T V can
support, so that your HD Receiver can pass the proper signal.
Note:
You can move between the tab screens by pressing the GREEN button.
HDTV (Cont’d)
Page 56

DIRECTV USER GUIDE - HD & SD STANDARD RECEIVERS
56
Main Menu - Parental, Fav’s & Setup
From here you can restart the receiver, reset to factory defaults, or reset
everything. Restarting the receiver is the same function as pressing the RED
button behind the access card door on the front of the receiver. Restoring
factory defaults erases all of your personal preference items and restores
the receiver configuration to how it was set at the factory. “Reset Everything”
completely erases everything from system memory and starts over like a new
receiver.
Reset
Page 57

Chapter 1
Chapter 2 Chapter 3 Chapter 4 Chapter 5
Chapter 2 - Detailed Information
57
Help Topics and FAQs
High-Definition Receivers
Main Menu - Help Topics and FAQs
If you have an HD receiver you can access to a list of Help topics
and Frequently Asked Questions (FAQ) that explain how to use your
DIRECTV Receiver. Press MENU, then select “Parental, Fav’s &
Setup,” then select “Help Topics.”
Select a folder to open it, then press SELECT on the topic of your
choice. If you want to go to the FAQ tab, press the GREEN button.
Page 58

DIRECTV USER GUIDE - HD & SD STANDARD RECEIVERS
58
Page 59

59
CHAPTER 3 - CONNECTIONS FOR TV AND AUXILIARY EQUIPMENT
CONNECTIONS ....................................................................60
SETUP AND ACTIVATION ...................................................64
PROGRAMMING YOUR REMOTE CONTROL .....................65
Page 60

DIRECTV USER GUIDE - HD & SD STANDARD RECEIVERS
60
Your Phone Connection
Connections for TV and Auxiliary Equipment
Tip:
To obtain the best picture quality, make sure the
receiver is connected directly to the TV.
Note:
Never connect an IN to an IN or an OUT to an OUT. All A/V jacks and inputs are
color coded. Always match the color of the plug to the same color of the jack.
For the best user experience and system performance we highly recommend that your system be professionally installed.
Call 1-800-DIRECTV to schedule an installation.
Connecting your receiver to a land-based telephone line saves you money because it allows you to purchase Pay Per View movies and
special events without calling DIRECTV to order. It is required for sports package subscriptions and is also used to enhance the interactive
features available on our interactive channels. The receiver uses a toll-free number once a month for a few minutes duration and is
designed not to interfere with your regular phone service. You will need an RJ11-type modulator jack (the most common type of phone jack).
If you disconnect the phone line, the receiver will not allow you to purchase PPV programs and some features of our interactive channels
will be limited.
Do not connect your receiver to a digital PBX phone system — doing so may permanently damage your equipment and void your
warranty.
The following instructions apply if you are upgrading to a new TV or adding a surround sound system, DVD player/burner or VCR some time
after your professional installation.
Due to restrictions imposed by copyright holders, certain programming may include content protection measures that may restrict
viewing or recording with certain consumer electronics equipment attached to the receiver. Please contact the manufacturer of such
equipment for additional information.
Not all cables come with your digital satellite receiver; you may need to purchase additional cables depending on your setup.
Connections
Page 61

Chapter 1
Chapter 2 Chapter 3 Chapter 4 Chapter 5
Chapter 3 - Connections for TV and Auxiliary Equipment
61
All of the video and audio outputs on your receiver offer good quality. Pick one of each
from the list below, based on the connectors your receiver and TV support; they are listed
in order, with the highest quality options at the top of each list. Not all connectors are
available on all receivers and TV models.
WARNING:
Do not connect your receiver (or any other
equipment such as a TV or VCR) to the AC power
supply until you have properly connected all the
other cables.
- S-Video (one connector per receiver) provides good video, but does not provide audio. You will need to connect audio separately using
the digital audio or RCA audio connectors.
- RCA jacks (two sets per receiver) provide good video and usually come bundled with three cables for one video and two audio channels.
Video Connections
- RCA jacks provide good audio quality and are found on older auxiliary equipment.
There are so many makes and models of T Vs and auxiliary equipment, it is impossible to fully describe all of the possible connections
between them and your receiver. Refer to the manuals for that equipment to see the connection options specific to each make and
model. The following images show examples of how your receiver may be connected, using the supported video and audio connections
for the TV, the surround sound, and the DVD player/burner or VCR.
Audio Connections
- HDMI [High-Definition Multimedia Interface, one connector per receiver] provides the best digital video and digital audio in
one connector.
- Component Video Output (YPbPr, one set per receiver) provides high-quality video, but does not provide audio. You will need to
connect audio separately using the digital audio or RCA audio connectors.
- HDMI [High-Definition Multimedia Interface] provides the best digital video and audio in one connector.
- Digital Audio Optical (one connector per receiver) provides excellent quality digital audio and is often used on newer
surround sound and DVD equipment.
- Digital Audio Coax (one connector per receiver) provides high quality digital audio and is also found on newer surround sound and
DVD equipment.
Connections
Page 62

DIRECTV USER GUIDE - HD & SD STANDARD RECEIVERS
62
Here is an example using a TV that has an HDMI connector as the
best video/audio input and a surround sound system that has a
digital audio optical connector as the best audio input:
This example also shows using a VCR or DVD burner with RCA audio
and component video connectors.
Here is an example using a TV that has component video
connectors as the best video input with RCA audio connectors as
the best audio input and a surround sound system that has a digital
audio coax connector as the best audio input:
This example also shows using a VCR or DVD burner with RCA
audio and video connectors.
Example: TV with HDMI Connector
Example: TV with Component Video Connectors
DIRECT V® HD Receiver
DIRECT V® HD Receiver
Television
Television
Surround System
Surround System
VCR/DVD Burner
VCR/DVD Burner
Connections
Page 63

Chapter 1
Chapter 2 Chapter 3 Chapter 4 Chapter 5
Chapter 3 - Connections for TV and Auxiliary Equipment
63
DIRECT V® HD Receiver
DIRECT V® SD Receiver
Television
Television
Surround System
VCR/DVD Burner
VCR/DVD Burner
Here is an example of a TV that has an S-Video connector
as the best video input and RCA audio connectors as the best audio
input and a surround sound system with a digital audio optical
connector as the best audio input:
This example also shows using a VCR or DVD burner with RCA
audio and component video connectors.
Example: TV with S-Video Connector
Here is an example of a TV that has an S-Video connector as the
best video input and with RCA connectors as the best audio input:
This example also shows using a VCR or DVD burner with RCA
audio and video connectors.
Example: TV with S-Video Connector
Connections
Page 64

DIRECTV USER GUIDE - HD & SD STANDARD RECEIVERS
64
Guided Setup
Activate Your DIRECTV® Service
If your receiver was not professionally installed, or you have had to reset your receiver for any reason, you will need to follow the guided
setup screens before starting DIRECTV Service.
Once all the setup processes are complete, all that’s left to do is activate your DIRECTV Service. Before you make the call, be sure to:
Have on hand your service address, social security number and a valid major credit card.
Write down your receiver ID and access card numbers on the Receiver Information page located before Chapter 1. The receiver ID is on
a sticker behind the access card door on the front of the receiver, while the card number is on the access card itself.
When you’re ready, just call 1-800-DIRECTV (1-800-347-3288) to pick the programming package that’s right for you and subscribe to
DIRECTV Service.
Simply follow the on-screen directions to complete your setup functions. If you’ve installed your satellite dish and system yourself, you’ll
be guided though various functions for optimizing your signal and setup — including positioning your dish and a system test. After these
setup procedures are complete, you’ll see a message on-screen that says, “Acquiring Satellite Info,” as the receiver gathers information
from the satellite for the on-screen program guide.
Next, you’ll be given the opportunity to program your remote to control other equipment such as your TV and/or DVD player. Just follow
the screen instructions and you’ll be ready to watch in no time!
2.
3.
4.
1.
Make sure the MODE switch at the top of the remote control is set to DIRECTV, which is the far-left position.
Press PWR. The DIRECTV® Receiver will turn on. (Make sure your TV is also turned on!)
The first screen will allow you to select a language. Using the arrow keys on the remote control, move to the language
you prefer and press SELECT.
You will see a Welcome screen.
Setup and Activation
Page 65

Chapter 1
Chapter 2 Chapter 3 Chapter 4 Chapter 5
Chapter 3 - Connections for TV and Auxiliary Equipment
65
You can program the DIRECTV Remote Control to operate your TV power, volume and mute, additional equipment such as a DVD, VCR,
stereo, or a second TV or DIRECTV® Receiver.
To reset the remote control and clear all but DIRECTV Mode, follow these steps:
Once your remote is programmed to work with your TV, the VOL and MUTE key control the TV regardless of the MODE slide switch
position. If you would like to change the VOL and MUTE to work with other audio equipment, such as a stereo, you can. When you
program the remote for the audio equipment, on-screen instructions will direct you on how to do this.
Factory Defaults
2.
2.
3.
4.
5.
1.
1.
Press MENU to display the on-screen Menu.
Highlight “Parental, Fav’s & Setup” and press SELECT.
Highlight “System Setup” and press SELECT.
Press SELECT on “Remote” in the left menu.
Follow the on-screen instructions to program your remote for your TV or additional equipment (AV1 and AV2).
Point the remote away from your DIRECTV® Receiver and components. Press and hold MUTE and SELECT until the light
above the slide switch on the remote flashes twice (about 5 seconds).
Enter 9-8-1. The light on the remote will flash four times, indicating you have cleared AV1, AV2 and TV modes.
Programming Your Remote Control
Programming Your Remote Control
Page 66

DIRECTV USER GUIDE - HD & SD STANDARD RECEIVERS
66
Page 67

67
TROUBLESHOOTING TIPS ..................................................68
DIRECTV® RECEIVER OR TV PROBLEMS ...........................70
REMOTE CONTROL PROBLEMS ........................................78
RUNNING THE SYSTEM TEST ...........................................79
CHAPTER 4 - TROUBLESHOOTING
Page 68

DIRECTV USER GUIDE - HD & SD STANDARD RECEIVERS
68
Many problems can be corrected by performing a simple reset of the DIRECTV® Receiver. If you experience frozen audio or video, a blank
screen, or the system won’t respond to front panel button or remote button presses try one of these:
- Press the red RESET button behind the access card panel door on the front of the
DIRECTV® Receiver, then wait for program guide information to be acquired.
- If the problems persist, try unplugging the power cord of the DIRECTV® Receiver
for 15 seconds, then plug it in again.
- If the above two items don’t work, try reauthorizing your receiver. On a computer,
go to directv.com/ reauthorize and follow the onscreen instructions. You will need
to be logged into your account on directv.com to complete this process.
- Running the System Test (later in this section) can also help you diagnose and
solve many common problems.
Resetting / Reauthorizing Your Receiver
Reset Button
Reset Button
SD Receiver
HD Receiver
Troubleshooting Tips
Page 69

Chapter 1
Chapter 2 Chapter 3 Chapter 4 Chapter 5
Chapter 4 - Troubleshooting
69
DIRECTV periodically sends system software updates to your receiver to improve performance and upgrade features and functions.
These updates will occur automatically, usually at times when the receiver would likely be turned off. If your receiver is on when an
update is sent, you will see an on-screen message and you may experience a disruption in reception for a few minutes. Your reception
should return to normal after the update is complete. Your receiver must be plugged in to AC power to receive any updates.
System Software Updates
On-Screen Messages
Troubleshooting Tips
There may be times when you see an on-screen message similar to the one on
the right. The top line of the message gives a brief description of what causes the
on-screen message to display, while the second line displays instructions to follow.
Most on-screen messages supply a code in parentheses. That code is used by
DIRECTV Customer Service to help troubleshoot your call.
The message at right shows an example of trying to view a channel that you have not
purchased or that is not in your programming package. To resolve the situation, call
Customer Service at 1-800-DIRECTV and mention the code when prompted.
Page 70

DIRECTV USER GUIDE - HD & SD STANDARD RECEIVERS
70
Problem: Progress bar freezes while Acquiring Guide Data / Data From Satellite
Solution:
Possible Causes:
Possible Causes:
Solution:
Problem: Wrong picture, blue screen, snow or black/blank picture
- This may be normal. After five minutes, the screen saver will display. Press any key on the remote to see the progress bar again.
- May happen if your satellite dish isn’t adjusted properly.
While the “Acquiring Guide Data” or “Acquiring Data From Satellite” message is on the screen, progress freezes during download.
- If satellite data acquisition still does not move forward, press the RESET button behind the access panel door on the front of the
DIRECTV® Receiver and wait for program guide information to be acquired.
Your TV displays incorrect picture, or you have a blue, black, snowy or blank screen.
- If you don’t see the signal you think you should be seeing, try using these buttons to toggle between the signals:
• Press the TV/VCR button on the VCR remote or on the VCR’s front panel.
• Press the INPUT button on the TV remote control to change video source.
- If problems persist, turn off all equipment that is connected to your TV, wait a few minutes, then turn the DIRECTV® Receiver back
on.
- Check your connections and cables.
- The DIRECTV® Receiver and most TVs and VCRs let you toggle between different video sources.
- Your TV may be on a different input source than what you are trying to view.
DIRECTV® Receiver or TV Problems
Page 71

Chapter 1
Chapter 2 Chapter 3 Chapter 4 Chapter 5
Chapter 4 - Troubleshooting
71
Possible Causes:
Problem: DIRECTV® Receiver will not turn on
Your receiver won’t turn on with either the remote or from the front panel.
- Remote batteries are dead.
- Receiver or power strip is not plugged in to a power source, or power cord is not plugged in to receiver.
- Wall outlet is dead.
Solution:
- Make sure the remote control MODE switch is in the left-most position (DIRECTV Mode), and press PWR (power key) or press
POWER button on the front panel of the receiver.
- Verify that the power cord is plugged into the DIRECTV® Receiver and the wall outlet.
- Check the outlet or power strip to make sure it is “live” by plugging in something else.
- Replace batteries in remote control.
- Be sure remote is pointed at remote sensor on receiver, and sensor is not blocked.
- Try plugging receiver into a different wall outlet.
- Unplug receiver for five minutes, and then plug it in again.
- Press TV POWER ON. Press it again, if needed.
- If your receiver is plugged into a power strip, check the power strip and reset its circuit breaker, if needed.
DIRECTV® Receiver or TV Problems
Page 72

DIRECTV USER GUIDE - HD & SD STANDARD RECEIVERS
72
Possible Causes:
Solution:
Problem: DIRECTV® Receiver Turns off while playing
Your receiver turns off unexpectedly.
- Excessive heat may have caused the receiver to go into a standby state.
- Electronic protection circuit may have been activated due to a power surge.
- You may have blown a circuit breaker or be experiencing a power outage.
- Parental viewing limits may have been activated on your DIRECTV® Receiver.
- Ensure that your receiver has plenty of ventilation and that nothing is on top of the receiver.
- Wait 30 seconds for internal circuits to reset, then turn receiver back on.
- Check the circuit breakers in your home.
- Consider using a line conditioner or surge protector.
- Consult an electrician if the problem is frequent or severe, especially if other household appliances or electronics are affected.
- If parental limits are active, turn your DIRECTV® Receiver back on and enter your parental lock code at the prompt.
Possible Causes:
Problem: DIRECTV® Receiver turns on or changes channels unexpectedly
Your receiver changes to a different channel without a remote control command.
- A scheduled autotune may be about to begin, so the receiver is changing channels to tune the show as requested.
- Your TV’s timer may have been activated.
DIRECTV® Receiver or TV Problems
Page 73

Chapter 1
Chapter 2 Chapter 3 Chapter 4 Chapter 5
Chapter 4 - Troubleshooting
73
Solution:
- Check your To Do List to see if there are other scheduled autotunes. Press MENU, select “Manage Autotunes,” then “To Do list.”
- Check your TV owner’s manual to turn off the TV’s timer.
Solution:
Problem: Blank screen
There is nothing on your TV screen.
Possible Causes:
- Your TV and/or your receiver are not powered on.
- Your receiver may be hooked up to the TV incorrectly.
- You may be on the wrong video source for your DIRECTV® Receiver.
- You may be tuned to a channel that is not currently broadcasting, or that you don’t subscribe to.
- Check that DIRECTV® Receiver and TV are both powered on.
- Check the Installation and Connections (Chapter 3) section of this manual for instructions about connecting your receiver.
- Press the INPUT button on the TV remote control to change video source.
- Try another channel and see if you have live video.
- Press the POWER button on the front panel of the DIRECTV® Receiver.
- Press the red RESET button behind the door on the front panel of the receiver.
DIRECTV® Receiver or TV Problems
Page 74

DIRECTV USER GUIDE - HD & SD STANDARD RECEIVERS
74
Solution:
Problem: Temporary loss of the satellite signal (“Searching for Satellite Signal” message is displayed),
“frozen” picture, or picture breaks into blocks / pixels.
The image on your screen is frozen, blocky, or you see a message that says “Searching for Satellite Signal (x 771).
Possible Causes:
- Weather issues are usually temporary. Wait for the weather to clear and your signal should return to normal.
- If there are no weather problems in your area, reset your DIRECTV® Receiver using the red RESET button behind the door on the
front of the receiver or by unplugging the receiver for 15 seconds and then plugging it back in.
- You can also check all the cable connections between your DIRECTV® Receiver and the satellite dish for loose or broken
connections.
- If the problem is coming from the program source (for example, you see the problem on one channel, but not on any others),
wait for the broadcasting channel to resolve the issue.
- If there are obstructions blocking the dish’s clear view of the satellite, you should contact a professional to remove them or a
DIRECTV Installer at 1-800-DIRECTV to relocate your dish.
- If your signal strength is lower than 70 (60 or lower on HD receivers) on most transponders in good weather, contact a
professional installer to realign your dish or call us at 1-800-DIRECTV.
- Severe weather (rain, snow, hail etc.) may cause this issue.
- There may be an obstruction to your dish (debris, snow, ice, etc.) or a building or tree that blocks your line of sight to the
satellite.
- There may be a problem with the cables running from your satellite dish to your DIRECTV® Receiver.
- If the picture is frozen, blocky, or pixels, there may be a problem with the transmission from the source.
DIRECTV® Receiver or TV Problems
Page 75

Chapter 1
Chapter 2 Chapter 3 Chapter 4 Chapter 5
Chapter 4 - Troubleshooting
75
Solution:
Problem: Partial programming loss. Channels missing from the Guide. Channel is in the Guide but I can’t tune
to it.
Your Program Guide is missing channels, or you are unable to use the guide to tune to a channel.
Possible Causes:
- The channels might be excluded from the Favorites list currently in use.
- Your satellite dish may be incorrectly configured.
- Your receiver information may need to be refreshed.
- To change your Favorites List, press GUIDE on the remote, then press the YELLOW button and select “Change Favorites List,”
then “All Channels.”
- Enter the channel number using the number pad on the remote control.
- Check the dish type set in your receiver’s preferences: Press the MENU key on the remote control, then select “Parental, Fav’s
& Setup,” then “System Setup.” Check Satellite Dish Type shown on the System Setup screen to see if it is correct. If not, select
“Satellite” from the left menu, then select “Repeat Satellite Setup.” Follow the steps. From the Satellite Dish Type screen, make
sure the proper dish type is selected.
- To refresh your receiver information, go to directv.com, click on Customer Service, Troubleshooting, On-Screen Messages,
Please Call Customer Service, ext. 721. You will need to be logged into your account on directv.com to complete this process.
DIRECTV® Receiver or TV Problems
Page 76

DIRECTV USER GUIDE - HD & SD STANDARD RECEIVERS
76
Problem: No Audio with Picture
You can see a picture from your DIRECTV® Receiver, but there is no sound.
Possible Causes:
Solution:
- Change the channel on your DIRECTV® Receiver. This may re-sync the audio.
- Try replacing the cables between your surround sound system and your DIRECTV Receiver. Refer to your surround sound
system’s manual for assistance.
- If the issue continues, reset your DIRECTV® Receiver. Press the RESET button behind the access panel door on the front of the
DIRECTV® Receiver. You can also press MENU, press SELECT on “Parental, Fav’s & Setup,” then select “System Setup.” Select
the “Reset” item from the left menu and follow the on-screen instructions.
- A setting (such as mute or volume) may have changed on the receiver or your TV.
- The cables between your TV and the receiver may not be connected properly, or there may be a problem with an external stereo
or surround sound system.
DIRECTV® Receiver or TV Problems
Problem: My video and audio are out of sync.
The audio track does not match the lip movements on the screen.
Possible Causes:
- Problem with how the program was produced or how it was sent to DIRECTV for broadcast.
- Your surround sound system may be out of sync, or may be set up incorrectly.
Page 77

Chapter 1
Chapter 2 Chapter 3 Chapter 4 Chapter 5
Chapter 4 - Troubleshooting
77
Solution:
- Verify “MUTE” button is not activated.
- Raise or lower the volume. Did volume meter display on TV?
- Test sound on TV by changing the input to another source, such as a DVD player, game box, or antenna.
- If connected to stereo, make sure stereo is on and set to the correct mode.
- Verify audio cables are secure and connected correctly.
- Verify that your surround sound system is working, if applicable.
- If the issue continues, reset your DIRECTV® Receiver. Press the RESET button behind the access panel door on the front of the
DIRECTV® Receiver. You can also press MENU, select “Parental, Fav’s & Setup,” then select “System Setup.” Select the “Reset” item
from the left menu and follow the on-screen instructions.
Possible Causes:
Solution:
Problem: Caller ID not working
Caller ID information isn’t showing on your TV screen when phone calls come in.
- You don’t subscribe to Caller ID service through your local phone company.
- The Caller ID feature in your DIRECTV® Receiver is turned off. See “Caller ID” in Chapter 2.
- You are using a wireless phone jack, which usually will not transmit Caller ID information.
- Contact your local phone company to subscribe to Caller ID service.
- Select “Caller ID” from the main menu to turn on your Caller ID notifications.
- Verify that your wireless phone jack transmits Caller ID information. If not, connect a standard phone cable to your receiver or
replace your wireless phone jack.
DIRECTV® Receiver or TV Problems
Page 78

DIRECTV USER GUIDE - HD & SD STANDARD RECEIVERS
78
- Check that nothing is between the remote control and the remote sensor.
- Make sure the remote control MODE switch is in the left-most position (DIRECTV Mode). Slide the MODE switch on the remote to the
DIRECTV position so the remote will control the DIRECTV® Receiver.
- Check the batteries in the remote control. They may be weak, dead or installed incorrectly. Try replacing batteries.
- If you’re entering a channel number that is less than four digits long, the receiver might wait two seconds before tuning to the
channel. Press ENTER after entering a channel number to tune immediately.
- If you are trying to operate a device other than the DIRECTV® Receiver that you have programmed the remote to control, make sure
you first slide the MODE switch to the mode that is programmed for that device (AV1 or AV2). The indicator light for the component
you’re trying to control should light up when you press a valid key for that component. If it doesn’t, make sure the MODE switch is in
the correct position.
- Make sure the device you are trying to control has been programmed to your DIRECTV Remote Control. See Chapter 3 of this
manual for instructions on how to program your remote to control other devices.
- If the indicator lights on the remote control start flashing, the batteries in the remote control are running low and should be replaced
soon. You may also see an on-screen message that the batteries are low. Note that when you replace the batteries, you should not
have to reprogram your remote to control other devices unless the batteries have been completely dead for a month or more.
Remote Control Solutions
Remote Control Problems
Page 79

Chapter 1
Chapter 2 Chapter 3 Chapter 4 Chapter 5
Chapter 4 - Troubleshooting
79
The System Test allows you to run a basic diagnostics check on your DIRECTV Receiver. If you are experiencing any trouble with your
receiver, run the system test. It will also allow you to get your access card and receiver ID numbers or to initiate diagnostic procedures on
your digital satellite receiver.
First make sure that:
• All connections — jacks, cables, etc. — are in place correctly (see Chapter 3, Connections for TV and Auxiliary Equipment, for more
information).
• There are batteries in the remote control, and they are working correctly.
• The access card is inserted in the DIRECTV® Receiver.
Follow these steps to run the diagnostics system test on your DIRECTV® Receiver.
1. Turn on your TV and the DIRECTV® Receiver.
2. Slide the mode switch to the DIRECTV position to put the remote control in satellite receiver-controlling mode, then press MENU to
display the Quick Menu.
3. Select “Parental, Fav’s & Setup.”
4. Select “System Setup,” then “Info & Test.”
5. Highlight the System Test tab and press SELECT, then press SELECT on “Run Test.”
6. If your system does not pass the System Test, check any of these potential trouble areas: cabling, pointing the satellite dish, phone
connection and access card.
7. If you continue to have problems, call DIRECTV Customer Service at 1-800-531-5000.
8. You should run a system test several times before concluding that there is a problem. Occasional fluctuations in the phone line or
satellite signal can give temporary false readings.
Running the System Test
Page 80

DIRECTV USER GUIDE - HD & SD STANDARD RECEIVERS
80
Page 81

81
LIMITED 90-DAY WARRANTY ...............................................82
DIRECTV PROTECTION PLAN ...............................................85
FCC CUSTOMER INFORMATION ............................................86
TERMS & CONDITIONS FOR USE OF SOFTWARE .................90
CHAPTER 5 - WARRANTY AND OTHER INFORMATION
Page 82

DIRECTV USER GUIDE - HD & SD STANDARD RECEIVERS
82
DIRECTV warrants your DIRECTV® Receiver (Models D and H) and any included accessories against defects in material or workmanship for
a period of ninety (90) days after the date of acquisition.
Who is Covered?
What is Excluded?
What is Covered?
You must have proof of acquisition to receive warranty service. A receipt or other document showing that you acquired the product is
considered proof of acquisition. THIS LIMITED WARRANTY EXTENDS ONLY TO THE ORIGINAL CONSUMER ACQUIRER OR ANY PERSON
RECEIVING THE DIRECTV® RECEIVER AS A GIFT FROM THE ORIGINAL CONSUMER ACQUIRER AND TO NO OTHER ACQUIRER OR
TRANSFEREE. THIS WARRANTY DOES NOT EXTEND TO COMMERCIAL USERS. THIS PRODUCT IS NOT AUTHORIZED FOR USE OUTSIDE THE
UNITED STATES AND ANY SUCH USE VOIDS THIS WARRANTY.
Your warranty does NOT cover:
Labor charges for installation or setup of the product.
Installation, performance of, or repair of: audio/video cabling, telephone line, or accessory attachments used with the product.
Warranty coverage begins the day you acquire the product. For ninety (90) days from the acquisition date, at the option of DIRECTV, the
DIRECTV® Receiver will be repaired or replaced with a new, repaired, refurbished or comparable product (whichever is deemed necessary)
if it becomes defective or inoperative. This exchange is done without charge to you for parts and labor. You will be responsible for the cost of
shipping to and from the location designated by DIRECTV. If DIRECTV cannot reasonably repair or replace the Receiver then DIRECTV may, at
its sole discretion, refund the price you paid for the product or the current retail price of the product.
All products, including replacement products, are covered only for the original warranty period. When the warranty on the original
product expires, the warranty on the replacement product also expires. After ninety (90) days from the date of acquisition, you pay for the
replacement of all parts, and for all labor charges.
SOME STATES DO NOT ALLOW LIMITATIONS ON HOW LONG AN IMPLIED WARRANTY LASTS, SO THE ABOVE LIMITATION MAY NOT APPLY
TO YOU.
Limited 90-Day Warranty
Page 83

Chapter 1
Chapter 2 Chapter 3 Chapter 4 Chapter 5
Chapter 5 - Warranty and Other Information
83
Product replacement because of misuse, accident, lightning damage, unauthorized repair, or other cause not within the control of
DIRECTV.
Incidental or consequential damages resulting from the product. SOME STATES DO NOT ALLOW THE EXCLUSION OF INCIDENTAL OR
CONSEQUENTIAL DAMAGES, SO THE ABOVE EXCLUSION MAY NOT APPLY TO YOU.
Any modifications or other changes to the product, including but not limited to software or hardware modification in any way other than
as expressly authorized by DIRECTV will void this limited warranty. Except in the case of hardware or software provided by DIRECTV,
installing software modifications, “hacks” or utilizing service access or “back doors” will void this limited warranty.
Reception transmission problems caused by signal conditions, telephone line, or cable or antenna systems outside the unit.
A product that has been modified or adapted to enable it to operate in any country other than the country for which it was designed,
manufactured, approved and/or authorized, or repair of products damaged by these modifications.
A product used for commercial or institutional purposes.
DIRECTV makes no warranty that the access connection will be a local (not long distance) phone call.
The continued provisioning of any of the programming and other services delivered through the Receiver including but not limited to
television programming, show information, program guide data, and scheduling information.
Make Sure You Keep...
Before Requesting Repair Service...
To Get Warranty Service...
Please keep your receipt or other document showing proof of acquisition. Attach it to this User Guide and keep both nearby. Also keep the
original box and packing material in case you need to return your product.
Please check the troubleshooting section of this guide. This may save you a call to DIRECTV Customer Care.
Warranty service will be provided by DIRECTV. If you believe you need service for your Receiver, contact DIRECTV at 1-800-DIRECTV. A
representative will go through a diagnostic checklist with you. If it is determined that the product needs to be returned for service or
exchanged, you will receive a return authorization number. The representative will give you complete shipping details.
Limited 90-Day Warranty
Page 84

DIRECTV USER GUIDE - HD & SD STANDARD RECEIVERS
84
To Get Out-of-Warranty Service...
To obtain out-of-warranty service contact DIRECTV at 1-800-DIRECTV for information on the possibility of and any costs for repair or
replacement of out-of-warranty products.
ALL WARRANTIES IMPLIED BY LAW, INCLUDING ANY IMPLIED WARRANTIES OF MERCHANTABILITY AND FITNESS FOR A PARTICULAR
PURPOSE ARE EXPRESSLY LIMITED TO THE DURATION OF THIS EXPRESS LIMITED WARRANTY.
WITH THE EXCEPTION OF ANY WARRANTIES IMPLIED BY THE LAW OF ANY STATE OF THE U.S.A., THIS EXPRESS LIMITED WARRANTY IS
EXCLUSIVE AND IN LIEU OF ALL OTHER WARRANTIES, GUARANTEES, AGREEMENTS AND SIMILAR OBLIGATIONS OF DIRECTV. REPAIR OR
REPLACEMENT AS PROVIDED IN THIS LIMITED WARRANTY IS THE EXCLUSIVE REMEDY UNDER THIS LIMITED WARRANTY. IN NO EVENT
WILL DIRECTV BE LIABLE FOR ANY AMOUNT GREATER THAN THE RETAIL PRICE OF THE DIRECTV® Receiver. DIRECTV SHALL NOT BE
LIABLE FOR ANY INCIDENTAL OR CONSEQUENTIAL DAMAGES FOR BREACH OF ANY EXPRESS OR IMPLIED WARRANTY ON THE DIRECTV
®
RECEIVER.
SOME STATES DO NOT ALLOW LIMITATIONS ON WARRANTIES, SO THE ABOVE LIMITATIONS MAY NOT APPLY TO YOU. THIS WARRANTY
GIVES YOU SPECIFIC LEGAL RIGHTS. YOU MAY HAVE OTHER RIGHTS WHICH VARY FROM STATE TO STATE.
DIRECTV, Inc.
2230 E. Imperial Hwy
El Segundo, CA 90245
1-800-DIRECTV
Limited 90-Day Warranty
Page 85

Chapter 1
Chapter 2 Chapter 3 Chapter 4 Chapter 5
Chapter 5 - Warranty and Other Information
85
Professional In-home service calls when needed Dedicated Technical Support 24-hour a day
Power surge related repairs including those caused
by lightning
Unlimited dish antenna alignments
Cables, switches, and associated wiring throughout
your home
Replacement of defective receiver equipment
(if problem can not be resolved over the phone)
Defective remote control replacements All parts and labor for repair
Safeguard your DIRECTV® System with the ultimate in professional technical service. For a low monthly fee, the DIRECTV PROTECTION
PLAN covers the components of your entire DIRECTV® System, giving you affordable peace of mind and comprehensive support to ensure
that you and your family enjoy nonstop DIRECTV® entertainment.
Your DIRECTV Limited Warranty provides certain remedies for this receiver during the stated coverage term. The DIRECTV PROTECTION
PLAN provides comprehensive coverage for your DIRECTV® System, including:
DIRECTV PROTECTION PLAN Benefits
DIRECTV PROTECTION PLAN
The DIRECTV PROTECTION PLAN is offered by AIG Warranty Guard and underwritten by New Hampshire Insurance Company on behalf
of DIRECTV where authorized by law. Certain limitations may apply. Pricing, terms and conditions of the DIRECTV PROTECTION PLAN
are subject to change. Full terms and conditions will be mailed to you prior to service billing and are available at directv.com/protection.
Sign up today for the DIRECTV PROTECTION PLAN by calling 1-800-DIRECTV
Page 86

DIRECTV USER GUIDE - HD & SD STANDARD RECEIVERS
86
This device complies with Part 15 of the FCC Rules. Operation is subject to the following two conditions: (1) this device may not cause
harmful interference, and (2) this device must accept any interference received, including interference that may cause undesired
operation.
Responsible Party:
DIRECTV, Inc.
2230 E. Imperial Hwy
El Segundo, CA 90245
1-800-DIRECTV
• Trade Name: DIRECTV
• Type of Equipment: DIRECTV Satellite Receiver
• Model Numbers: D or H
Federal Communications Commission (FCC): This equipment complies with both Part 15 and Part 68 of the FCC rules.
This equipment has been tested and found to comply with the limits of a Class B digital device, pursuant to part 15 of the FCC Rules.
These limits are designed to provide reasonable protection against harmful interference in a residential installation.
FCC Customer Information
Page 87

Chapter 1
Chapter 2 Chapter 3 Chapter 4 Chapter 5
Chapter 5 - Warranty and Other Information
87
FCC Customer Information
This equipment generates, uses, and can radiate radio frequency energy and, if not installed and used in accordance with the
instructions, may cause harmful interference to radio communications. However there is no guarantee that interference will not occur
in a particular installation. If this equipment does cause harmful interference to radio or television reception, which can be determined
by removing and applying power to the equipment, the user is encouraged to try to correct the interference by one or more of the
following measures:
• Reorient or relocate the receiving satellite dish antenna.
• Increase the separation between the equipment and the DIRECTV® Receiver.
• Connect the equipment into an outlet on a circuit different from that to which the DIRECTV® Receiver is connected.
• Consult the dealer or an experienced radio/TV technician for help.
• CAUTION: Changes or modifications not expressly approved by the manufacturer responsible for compliance could void the user’s
authority to operate the equipment.
The user may find the following booklet, prepared by the Federal communications Commission, helpful: “How to Identify and Resolve
Radio and TV Interference Problems.” This booklet is available from the U.S. Government Printing Office, Washington, DC. To meet FCC
requirements, only peripherals (computer input/output devices, terminals, printers, etc.) certified to comply with Class B limits may be
attached to this device. Operation with non-certified peripherals is likely to result in interference to radio and TV reception. To meet FCC
requirements, shielded cables are required to connect the device to a personal computer, peripheral, or other Class B certified device.
This equipment complies with Part 68 of the FCC Rules and the requirements adopted by ACTA. On the back of this equipment is a label
that contains a product identifier in the format US:AAAEQ##TXXXX.
Page 88

DIRECTV USER GUIDE - HD & SD STANDARD RECEIVERS
88
If requested, this information must be provided to your telephone company. This equipment uses the following USOC Jack: RJ11C. A
plug and jack used to connect this equipment to the premises wiring and telephone network must comply with the applicable FCC Part
68 rules and requirements adopted by ACTA. A compliant telephone cord and modular plug is provided with this product. It is designed to
be connected to a compatible modular jack that is also compliant.
See installation instructions for details.
The REN is used to determine the number of devices that may connect to a telephone line. Excessive RENs on a telephone line may
result in the devices not ringing in response to an incoming call. In most but not all areas, the sum of the RENs should not exceed five
(5.0).
To be certain of the number of devices that may be connected to a line, as determined by the total RENs, contact your local telephone
company. The REN for this product is part of the product identifier that has the format US: AAAEQ##TXXXX. The digits represented by
## are the REN without the decimal point (e.g., 03 is a REN of 0.3).
If this DIRECTV® Receiver causes harm to the telephone network, the telephone company will notify you in advance that temporary
discontinuance of service may be required. But if advance notice isn’t practical, the telephone company will notify the customer as soon
as possible. Also, you will be advised of your right to file a complaint with the FCC if you believe it is necessary.
The telephone company may make changes in its facilities, equipment, operations or procedures that could affect the proper functioning
of your equipment. If they do, you will be notified in advance in order for you to make necessary modifications to maintain uninterrupted
service. Connection to party line service is subject to state tariffs. Contact the state public utility commission, public service commission
or corporation commission for information.
FCC Customer Information
Page 89

Chapter 1
Chapter 2 Chapter 3 Chapter 4 Chapter 5
Chapter 5 - Warranty and Other Information
89
FCC Customer Information
If your home has specially wired alarm equipment connected to the telephone line, ensure the installation of this DIRECTV Satellite
Receiver does not disable your alarm equipment. If you have questions about what will disable alarm equipment, consult your alarm
company, telephone company or a qualified installer.
DO NOT DISASSEMBLE THIS EQUIPMENT. It does not contain any user-serviceable components.
We recommend the installation of an AC surge arrester in the AC outlet to which this equipment is connected. Telephone companies
report that electrical surges, typically lightning transients, are very destructive to customer terminal equipment connected to AC power
sources.
If trouble is experienced with this unit, for repair or warranty information, please contact DIRECTV Customer Care at the address and
phone number listed below. If the equipment is causing harm to the network, the telephone company may request that you disconnect
the equipment until the problem is resolved.
DIRECTV, Inc.
2230 E. Imperial Hwy
El Segundo, CA 90245
1-800-DIRECTV
Page 90

DIRECTV USER GUIDE - HD & SD STANDARD RECEIVERS
90
THE DIRECTV® Receiver INCORPORATES SOFTWARE WHICH IS OWNED BY DIRECTV, INC. (“DIRECTV”) OR ITS THIRD PARTY
LICENSORS (the “Software”). BEFORE USING THE RECEIVER PLEASE READ THESE TERMS. IF YOU DO NOT AGREE TO THESE TERMS
YOU MAY NOT USE THE RECEIVER AND SHOULD IMMEDIATELY RETURN THE RECEIVER TO DIRECTV OR YOUR SUPPLIER. THESE
TERMS ALSO APPLY TO ANY MODIFICATIONS, UPDATES OR SUPPLEMENTS TO THE SOFTWARE PROVIDED TO YOU.
DIRECTV grants you a non-exclusive, non-transferable, limited license to use the Software solely in executable code form and solely
as integrated with, incorporated into, and in conjunction with the Receiver. You must ensure that the copyright, trademark and other
protective notices contained in the Software are maintained and not altered or removed. The Software is protected by copyright
and other laws and international copyright and other treaties. All title and intellectual property rights in and to the Software and all
modifications, updates, enhancements and derivative works of the Software are owned exclusively by DIRECTV or its licensors and you
agree to execute any document reasonably requested by DIRECTV to evidence such ownership rights. Certain third party software used
in connection with the Receiver may be made directly available to you by the providers thereof. Use of such Software is also subject to
the terms of any applicable agreement between you and each such provider. DIRECTV reserves the right to modify, supplement, update
and otherwise alter the Software via software download or other modification procedures, and these terms will apply to such Software
as modified, supplemented, updated, and otherwise altered.
You may not copy, modify or transfer the Software, or any copy thereof, in whole or in part. You may not reverse engineer, disassemble,
decompile or translate the Software, or otherwise attempt to derive the source code of the Software, except to the extent allowed under
any applicable law. Any attempt to transfer any of the rights, duties or obligations of this license agreement is void. You may not rent,
lease, load, resell for profit or distribute the Software, or any part thereof. You may not export, transfer or re-export the Software in
violation of any applicable law. The Software may include some components that are covered by “free software” licenses, open source
licenses and other similar license use rights, which require such components to be used, modified and/or distributed only under the
terms of such licenses.
Any such components are subject only to the terms of such licenses, and not these Terms.
A. License Grant and Conditions
B. License Restrictions
TERMS AND CONDITIONS FOR USE OF SOFTWARE (“TERMS”)
Page 91

Chapter 1
Chapter 2 Chapter 3 Chapter 4 Chapter 5
Chapter 5 - Warranty and Other Information
91
TERMS AND CONDITIONS FOR USE OF SOFTWARE (“TERMS”)
The Software is licensed, not sold, to you for use only under the terms of this license agreement, DIRECTV is NOT transferring title or
any ownership rights in the Software to you and DIRECTV and its suppliers reserve all rights not expressly granted to you. Except as
stated above, this license agreement does not grant to you any intellectual property rights in the Software.
These Terms are effective until terminated. You may terminate these Terms by returning the Receiver to DIRECTV or your supplier.
These Terms will terminate automatically without notice if you fail to comply with these Terms or any other agreement between you and
DIRECTV. Upon termination you must return the Receiver to DIRECTV or your supplier.
THE SOFTWARE IS (TO THE EXTENT PERMITTED BY LAW) SUPPLIED “AS IS.” NEITHER DIRECTV NOR ANY OF ITS LICENSORS
EXPRESSLY MAKES OR PASSES ON TO YOU ANY WARRANTY OR REPRESENTATION ON BEHALF OF DIRECTV OR ITS LICENSORS WITH
RESPECT TO THE SOFTWARE, INCLUDING BUT NOT LIMITED TO ANY WARRANTIES, EXPRESS OR IMPLIED, INCLUDING (BUT NOT
LIMITED TO) ANY IMPLIED WARRANTIES OF MERCHANTABILITY, SATISFACTORY QUALITY, FITNESS FOR A PARTICULAR PURPOSE,
TITLE OR NON-INFRINGEMENT OF THIRD PARTY RIGHTS.
IN NO EVENT WILL DIRECTV OR ITS LICENSORS BE LIABLE TO YOU WITH RESPECT TO THE SOFTWARE FOR ANY DIRECT, INDIRECT,
CONSEQUENTIAL, SPECIAL, PUNITIVE OR INCIDENTAL DAMAGE (INCLUDING LOSS OF PROFITS, LOST SAVINGS, LOSS OF DATA OR
THE COST OF PROCUREMENT OF SUBSTITUTE GOODS, TECHNOLOGY OR SERVICES) ARISING OUT OF THE USE OR THE INABILITY TO
USE THE SOFTWARE, EVEN IF DIRECTV OR ITS LICENSORS HAVE BEEN ADVISED OF THE POSSIBILITY OF SUCH DAMAGES, OR FOR
ANY CLAIM BY A THIRD PARTY. Some states or jurisdictions do not allow the exclusion or limitation of incidental, consequential or
special damages, so the above limitations may not apply to you.
C. Ownership of Software and Reservation of Rights
D. Termination
E. Disclaimer
Page 92

DIRECTV USER GUIDE - HD & SD STANDARD RECEIVERS
92
DIRECTV’S LICENSORS AND SUPPLIERS SHALL BE THIRD PARTY BENEFICIARIES OF THESE LICENSE TERMS, AS APPLICABLE.
YOUR USE OF THE RECEIVER CONSTITUTES YOUR ACKNOWLEDGEMENT THAT YOU HAVE READ THESE TERMS AND AGREE TO BE
BOUND HEREBY.
Certain additional terms and information for the Software and certain third party software (including the text of licenses applicable
to any free, open source and other similar software that may be included in the Software) may be found in the DIRECTV Customer
Agreement, the DIRECTV website located at www.directv.com, and the GNU website located at www.gnu.org.
F. Third Party Beneficiaries
G. Additional Information
TERMS AND CONDITIONS FOR USE OF SOFTWARE (“TERMS”)
Page 93

93
APPENDIX 1: RECEIVERS FRONT AND BACK PANELS ..........94
STANDARD-DEFINITION RECEIVER...............................94
HIGH-DEFINITION RECEIVER .......................................98
APPENDIX 2: ABOUT HIGH-DEFINITION .............................102
APPENDIX 3: HOW TO NETWORK YOUR HD RECEIVER ........108
APPENDICES
Page 94

DIRECTV USER GUIDE - HD & SD STANDARD RECEIVERS
94
The layout of your DIRECTV® Receiver’s front and back panels may vary slightly depending on model and manufacturer.
FRONT PANEL:
1
7
2
3
4 5
6
8 9
The buttons on the front panel perform the same functions as similarly named buttons on the remote control. You can use the front panel
buttons at any time, but they are especially useful if you misplace your remote control or the batteries die.
Standard-Definition Receiver
Your equipment may not look exactly like the model illustrated.
Appendix 1: Receivers Front and Back Panels
Page 95

95
Appendix 1: Receivers Front and Back Panels
1. POWER – Turns your DIRECTV
®
Receiver on or off. Your DIRECTV® Receiver still tunes and receives messages when powered off.
The power light flashes when you press a key on the remote to let you know it has received the command.
2. REMOTE SENSOR - The infrared sensor picks up commands from the remote control.
3. GUIDE - Displays the on-screen program guide.
4. MENU - Brings up the main menu to access settings and services.
5. ARROWS – Move the on-screen highlight up, down, left or right.
6. SELECT – Selects the item highlighted.
7. DIRECTV ACTIVE™ CHANNEL – Displays the DIRECTV Active
™
Channel - local weather and more.
8. INFO – Displays channel banner or info for a highlighted program or channel cell.
9. DOOR PANEL – The access card slot, RESET button, receiver ID and model number are located behind the door panel.
Page 96

DIRECTV USER GUIDE - HD & SD STANDARD RECEIVERS
96
STANDARD-DEFINITION BACK PANEL:
1 72
3
4 5
6
8 9
10
Your equipment may not look exactly like the model illustrated.
Appendix 1: Receivers Front and Back Panels
Page 97

97
Appendix 1: Receivers Front and Back Panels
1. SATELLITE IN – Use to connect the DIRECTV Receiver to the satellite dish antenna.
2. OUT TO TV – Connects the DIRECTV Receiver to your TV or VCR using RF coaxial cable. This jack provides the most basic
connection, carrying good sound and video quality.
3. OFF-AIR IN – Connect a standard TV antenna or cable feed to the DIRECTV Receiver using this jack.
4. 3/4 CHANNEL SWITCH – Allows users to choose the channel that is not used in your area (3 or 4) when the receiver is
connected to TV using RF coaxial cable from the DIRECTV Receiver’s OUT TO TV.
5. S-VIDEO – Provides the best picture quality, better than VIDEO RCA-type or RF coaxial cable jacks. If your TV has an S-Video jack,
use an S-Video jack, use it along with the audio jacks (S-Video only carries picture information, not sound) to connect to your TV.
6. VIDEO (YELLOW) – Provides better picture quality than the OUT TO TV jack. Connect the second RCA-type composite VIDEO
jack to another device, such as a VCR. Your must also connect the AUDIO cables when using the VIDEO connection.
7. AUDIO (R-Red and L-White) – Audio cables offer better sound quality than RF coaxial cables. You can connect a second set of
audio cables to another component, such as a VCR or stereo.
8. USB PORT – For future use.
9. PHONE – Connects the DIRECTV Receiver to a telephone wall jack to enable Pay Per View purchasing and Caller ID (if your phone
service package includes it).
10. POWER – Connects the DIRECTV Receiver to an electrical outlet. We recommend you use a surge protector to safeguard your
DIRECTV Receiver from power spikes.
Page 98

DIRECTV USER GUIDE - HD & SD STANDARD RECEIVERS
98
1 72
3
4 5
6
8 9
10
11
FRONT PANEL:
The buttons on the front panel perform the same functions as similarly named buttons on the remote control. You can use the front panel
buttons at any time, but they are especially useful if you misplace your remote control or the batteries die.
High-Definition Receiver
Your equipment may not look exactly like the model illustrated.
Appendix 1: Receivers Front and Back Panels
Page 99

99
1. POWER – Turns your DIRECT V
®
Receiver on or off. Your Receiver still tunes and receives messages when powered off. The power
light flashes when you press a key on the remote to let you know it has received the command.
2. REMOTE SENSOR – The infrared sensor picks up commands from the remote control.
3. GUIDE – Displays the on-screen program guide.
4. MENU - Brings up the main menu to access settings and services.
5. ARROWS – Move the on-screen highlight up, down, left or right.
6. SELECT – Selects the item highlighted.
7. ACTIVE – Displays the DIRECTV Active
™
Channel - local weather and more.
8. INFO – Displays channel banner or info to a highlighted program or channel cell.
9. RES – The RES button switches the output resolution of the HD receiver. Each time you press the key, it cycles to the next
available resolution: 1080i, 720p, 480p and 480i (Some models may support 1080p).
10. RESOLUTION INDICATOR – The adjacent lights indicate the current resolution setting.
11. DOOR PANEL – The access card slot, RESET button, receiver ID and model number are located behind the door panel.
Appendix 1: Receivers Front and Back Panels
Page 100

DIRECTV USER GUIDE - HD & SD STANDARD RECEIVERS
100
HD BACK PANEL:
1 10
7
3
4 115 6 829
Your equipment may not look exactly like the model illustrated.
Appendix 1: Receivers Front and Back Panels
 Loading...