

Page 1
Owner’s Manual
Page 2
Notices
WARNING:
To reduce the risk of fi re or
electric shock, do not expose
this product to rain or moisture.
The apparatus shall not be
exposed to dripping or splashing
and that no objects fi lled with
liquids, such as vases, shall be
placed on the apparatus.
CAUTION
RISK OF ELECTRIC SHOCK
DO NOT OPEN
CAUTION:
TO REDUCE THE RISK OF
ELECTRIC SHOCK, DO NOT
REMOVE COVER (OR BACK).
NO USER-SERVICEABLE
PARTS INSIDE. REFER
SERVICING TO QUALIFIED
SERVICE PERSONNEL.
IMPORTANT:
Be sure not to place your
DIRECTV Sat-Go system near
anything WET or HOT!
CAUTION:
There is a danger of explosion
if batteries are incorrectly
replaced. Replace only with
same or equivalent type.
TIP:
We highly recommend plugging
the DIRECTV Sat-Go system
into a surge protector to prevent
damage from fl uctuations in your
power supply.
!
Safety and Care
Your DIRECTV® Sat-Go system has been designed and manufactured to stringent
quality and safety standards. You should, however, be aware of the following important
precautions for safe and optimal use of the equipment.
Meaning of symbols printed on the rear panel of the product:
The “ bolt of lightning” indicates un-insulated material within your unit may cause an
electrical shock. For the safety of everyone in your household, please do not remove
product covering.
The “exclamation point” calls attention to features for which you should read the
enclosed literature closely to prevent operating and maintenance problems.
Important Safety Instructions
1) Read these instructions.
2) Keep these instructions.
3) Heed all warnings.
4) Follow all instructions.
5) Do not use this apparatus near water.
6) Clean only with dry cloth.
7) Do not block any ventilation openings. Install in accordance with the manufacturer’s
instructions.
8) Do not install near any heat sources such as radiators, heat registers, stoves, or other
apparatus (including amplifi ers) that produce heat.
9) Do not defeat the safety purpose of the polarized or grounding-type plug. A polarized
plug has two blades with one wider than the other. A grounding type plug has two
blades and a third grounding prong. The wide blade or the third prong are provided for
your safety. If the provided plug does not fi t into your outlet, consult an electrician for
replacement of the obsolete outlet.
10) Protect the power cords from being walked on or pinched, particularly at plugs,
convenience receptacles, and the point where they exit from the apparatus.
11) Only use attachments/accessories specifi ed by the manufacturer.
12) Use only with the cart, stand, tripod, bracket, or table specifi ed by the manufacturer,
or sold with the apparatus. When a cart is used, use caution when moving the cart/
apparatus combination to avoid injury from tip-over.
13) Unplug this apparatus during lightning storms or when unused for long periods of
time.
14) Refer all servicing to qualifi ed service personnel. Servicing is required when the
apparatus has been damaged in any way, such as power-supply cord or plug is
damaged, liquid has been spilled or objects have fallen into the apparatus, the
apparatus has been exposed to rain or moisture, does not operate normally, or has
been dropped.
15) Do not place anything heavy, wet or magnetic on the TV or the power cord. Never cover the
ventilation openings with any material and never touch them with metallic or infl ammable
objects.
1
Page 3

Notices
16) Avoid operating the TV in extreme heat, humidity or areas affected by dust. The operating
temperature range is 0~50°C (32~122°F). The operating humidity range is 20~90%.
17) Do not use sharp tools such as a pin or a pencil near the TV, as they may scratch the LCD.
18) Do not use a solvent, such as benzene, to clean the TV, as it will damage the LCD surface.
19) The acrylic exterior surface of the TV can become rough or even sharp as it is exposed to wear.
Exercise caution when handling the unit to avoid scratches or minor cuts.
®
• CAUTION: Avoid moisture to reduce the risk of fi re or electric shock. The DIRECTV
Go system should not be used near water (for example, kitchen sink, bathtub, pool, damp
basement). Also, never spill liquid on the receiver, and do not place vases or other vessels
containing liquid on top of it.
• Ensure proper ventilation — the vent slots on the DIRECTV Sat-Go system must be left
uncovered to allow proper airfl ow to the unit. Blocking the airfl ow to the unit could impair
performance or damage your receiver and other components.
• Do not stack electronic components or other objects on top of the DIRECTV Sat-Go system.
Also, do not stack the receiver on top of a “hot component” such as an audio power amplifi er.
• Protect your components from power surges by connecting all the components before plugging
any power cords into the wall outlet. Use of a surge protector is also recommended.
• Don’t overload power outlets or extension cords, which can result in the risk of fi re or shock.
It’s also important to use only the type of power source indicated on the marking label or in this
manual.
• Avoid audio hum or interference by inserting all cable plugs fi rmly into their jacks. Also, place
Audio/Video (A/V) cables to the sides of the TV back panel rather than down the middle once
connected. Try not to coil any twin-lead cables and keep them away from A/V cables as much as
possible.
• Never insert objects of any kind into any openings in the DIRECTV Sat-Go system (other than
the DIRECTV access card as detailed in this manual).
• Place it on a fl at, hard surface — do not operate the DIRECTV Sat-Go system on a carpet or
other padded surface.
• Always unplug your DIRECTV Sat-Go system before moving it.
• Always unplug the DIRECTV Sat-Go system, TV and other equipment before you connect or
disconnect any cables.
• CAUTION: Electric Shock — never attempt to disassemble the DIRECTV Sat-Go system
yourself; always take it to a qualifi ed service person when repair is required. Opening or removing
covers may expose dangerous voltage or other risks, and incorrect reassembly can cause shock
when receiver is subsequently used. Attempted self-repair may also void your warranty. Changes
or modifi cations not expressly approved by the party responsible for compliance (by the warranty
or by the manufacturer) could void the user’s authority to operate the equipment.
• Do not drop your DIRECTV Sat-Go system, or expose to sudden or jarring movements, and
always move it with care. Protect the LCD screen from impact.
• Have your DIRECTV Sat-Go system professionally serviced (do not attempt to service it
yourself).
• Any changes or modifi cations in construction of this device which are not expressly approved by
the party responsible for compliance could void the user’s authority to operate the equipment.
• The DIRECTV Sat-Go system should be stored between -20°C and 60°C (-4°F to 140°F).
Sat-
For your information:
The identifi cation sticker can be located underneath your DIRECTV Sat-Go system.
The telecommunication network voltage used is the category number 3.
2
Page 4

Notices
Recommendation to Avoid or Minimize Phosphor Burn-in:
Like all phosphor-based display devices and all TFT LCD Displays, LCDs can be susceptible
to phosphor burn under certain circumstances. Certain operating conditions, such as the
continuous display of a static image over a prolonged period of time, can result in phosphor
burn if proper precautions are not taken. To protect your investment in this LCD, please adhere
to the following guidelines and recommendations for minimizing the occurrence of image burn.
1. Display a moving image whenever possible.
2. Always power down the LCD when you are fi nished using it.
3. Lower the brightness and contrast levels as much as possible without impairing image
readability.
Burn-in is not covered by the warranty.
The LCD Panel consists of 3 million cells. It is therefore possible that a few cells might be
fl awed. We allow a maximum of 6 defective cells for the device to be in proper running order.
Please recognize that a device with 6 or fewer defective cells cannot be exchanged or refunded.
IMPORTANT:
This device incorporates an anticopy process technology that is protected by U.S.
patents and other intellectual property rights. The anticopy process is licensed for
non-commercial, home use only. Reverse engineering or disassembly is prohibited.
Unauthorized changes or modifi cations to this equipment may void the user’s
authority to operate it.
3
Page 5

Contents
Notices. . . . . . . . . . . . . . . . . . . . . . . . . . . . . . . . . . . . . . . . . . . . . . 2
Safety and Care. . . . . . . . . . . . . . . . . . . . . . . . . . . . . . . . . . . . . . . 2
Important Safety Instructions . . . . . . . . . . . . . . . . . . . . . . . . . . . . . . . . 2
Recommendation to Avoid or Minimize Phosphor Burn-in: . . . . . . . . . . . . . . . . . 4
®
Before Using Your DIRECTV
Package Contents . . . . . . . . . . . . . . . . . . . . . . . . . . . . . . . . . . . . . 8
Inside the DIRECTV Sat-Go Case . . . . . . . . . . . . . . . . . . . . . . . . . . . . . 9
TV Display Panel . . . . . . . . . . . . . . . . . . . . . . . . . . . . . . . . . . . . . .11
TV Receiver Panel . . . . . . . . . . . . . . . . . . . . . . . . . . . . . . . . . . . . .12
TV Rear Connector Panel. . . . . . . . . . . . . . . . . . . . . . . . . . . . . . . . . .13
Before Using Your DIRECTV
Remote Control . . . . . . . . . . . . . . . . . . . . . . . . . . . . . . . . . . . . . . .14
Inserting Battery into the TV . . . . . . . . . . . . . . . . . . . . . . . . . . . . . . . .17
Setting Up Your DIRECTV
Sat-Go . . . . . . . . . . . . . . . . . . . . . . . . . . . . . 8
®
Sat-Go . . . . . . . . . . . . . . . . . . . . . . . . . . .14
®
Sat-Go. . . . . . . . . . . . . . . . . . . . . . . . . . . . . . .18
Finding a Suitable Antenna Site. . . . . . . . . . . . . . . . . . . . . . . . . . . . . . .18
Setting Up the DIRECTV Sat-Go TV and Antenna . . . . . . . . . . . . . . . . . . . . .19
Connecting the DIRECTV Sat-Go TV to the Antenna. . . . . . . . . . . . . . . . . . . .20
Connecting the DIRECTV Sat-Go to Power . . . . . . . . . . . . . . . . . . . . . . . .21
Guided Setup and Activation . . . . . . . . . . . . . . . . . . . . . . . . . . . . . . . .22
After Guided Setup: Getting a Satellite Signal . . . . . . . . . . . . . . . . . . . . . . .23
Connecting DIRECTV Sat-Go to a VCR, DVD player or PMP (personal media player) . .27
®
Setting Up Your DIRECTV
Sat-Go. . . . . . . . . . . . . . . . . . . . . . . . . . . . . . .29
Connecting your DIRECTV Sat-Go to a Telephone Line (when used in the home). . . . .29
Connecting your DIRECTV Sat-Go system to a second TV or Monitor. . . . . . . . . . .30
Completing the Connections . . . . . . . . . . . . . . . . . . . . . . . . . . . . . . . .31
Installing the DIRECTV Access Card . . . . . . . . . . . . . . . . . . . . . . . . . . . .32
®
Guided Setup for DIRECTV
Activating Y our DIRECTV
Service . . . . . . . . . . . . . . . . . . . . . . . . . . . .33
®
Service . . . . . . . . . . . . . . . . . . . . . . . . . . . . .34
Basic Operation. . . . . . . . . . . . . . . . . . . . . . . . . . . . . . . . . . . . . . . . .35
Watching TV . . . . . . . . . . . . . . . . . . . . . . . . . . . . . . . . . . . . . . . .35
The Guide. . . . . . . . . . . . . . . . . . . . . . . . . . . . . . . . . . . . . . . . . .36
Autotune . . . . . . . . . . . . . . . . . . . . . . . . . . . . . . . . . . . . . . . . . .37
Pay Per View . . . . . . . . . . . . . . . . . . . . . . . . . . . . . . . . . . . . . . . .38
4
Page 6

Contents
Using the TV Menu . . . . . . . . . . . . . . . . . . . . . . . . . . . . . . . . . . . . . . .39
Picture. . . . . . . . . . . . . . . . . . . . . . . . . . . . . . . . . . . . . . . . . . . .39
Sound . . . . . . . . . . . . . . . . . . . . . . . . . . . . . . . . . . . . . . . . . . . .40
Settings . . . . . . . . . . . . . . . . . . . . . . . . . . . . . . . . . . . . . . . . . . .41
Parental Controls . . . . . . . . . . . . . . . . . . . . . . . . . . . . . . . . . . . . . .42
Using the Menu . . . . . . . . . . . . . . . . . . . . . . . . . . . . . . . . . . . . . . . . .44
Settings . . . . . . . . . . . . . . . . . . . . . . . . . . . . . . . . . . . . . . . . . . .44
Audio Options. . . . . . . . . . . . . . . . . . . . . . . . . . . . . . . . . . . . . . . .45
Category Sort . . . . . . . . . . . . . . . . . . . . . . . . . . . . . . . . . . . . . . . .45
Pay Per View . . . . . . . . . . . . . . . . . . . . . . . . . . . . . . . . . . . . . . . .46
Search . . . . . . . . . . . . . . . . . . . . . . . . . . . . . . . . . . . . . . . . . . .46
Date & Time. . . . . . . . . . . . . . . . . . . . . . . . . . . . . . . . . . . . . . . . .47
Favorites . . . . . . . . . . . . . . . . . . . . . . . . . . . . . . . . . . . . . . . . . .47
Caller ID & Messages. . . . . . . . . . . . . . . . . . . . . . . . . . . . . . . . . . . .48
Parental Controls . . . . . . . . . . . . . . . . . . . . . . . . . . . . . . . . . . . . . .49
Menu Map . . . . . . . . . . . . . . . . . . . . . . . . . . . . . . . . . . . . . . . . . . . .51
Troubleshooting . . . . . . . . . . . . . . . . . . . . . . . . . . . . . . . . . . . . . . . .53
TV Problems . . . . . . . . . . . . . . . . . . . . . . . . . . . . . . . . . . . . . . . .53
Remote Control Problems . . . . . . . . . . . . . . . . . . . . . . . . . . . . . . . . .55
Signal Problems. . . . . . . . . . . . . . . . . . . . . . . . . . . . . . . . . . . . . . .55
Running the System Test . . . . . . . . . . . . . . . . . . . . . . . . . . . . . . . . . .56
System Errors. . . . . . . . . . . . . . . . . . . . . . . . . . . . . . . . . . . . . . . .57
Warranty. . . . . . . . . . . . . . . . . . . . . . . . . . . . . . . . . . . . . . . . . . . . .58
Who is Covered? . . . . . . . . . . . . . . . . . . . . . . . . . . . . . . . . . . . . . .58
What is Covered?. . . . . . . . . . . . . . . . . . . . . . . . . . . . . . . . . . . . . .58
What is Excluded? . . . . . . . . . . . . . . . . . . . . . . . . . . . . . . . . . . . . .59
To Get Warranty Service... . . . . . . . . . . . . . . . . . . . . . . . . . . . . . . . . .60
DIRECTV Protection Plan. . . . . . . . . . . . . . . . . . . . . . . . . . . . . . . . . .61
DIRECTV PROTECTION PLAN Benefi ts . . . . . . . . . . . . . . . . . . . . . . . .61
Sign up for the DIRECTV PROTECTION PLAN Today. . . . . . . . . . . . . . . . . . .62
FCC Customer Information. . . . . . . . . . . . . . . . . . . . . . . . . . . . . . . . . . .63
Other Information . . . . . . . . . . . . . . . . . . . . . . . . . . . . . . . . . . . . . .63
Specifi cations. . . . . . . . . . . . . . . . . . . . . . . . . . . . . . . . . . . . . . . . . .65
Dish-Pointing Coordinates. . . . . . . . . . . . . . . . . . . . . . . . . . . . . . . . . . .67
5
Page 7
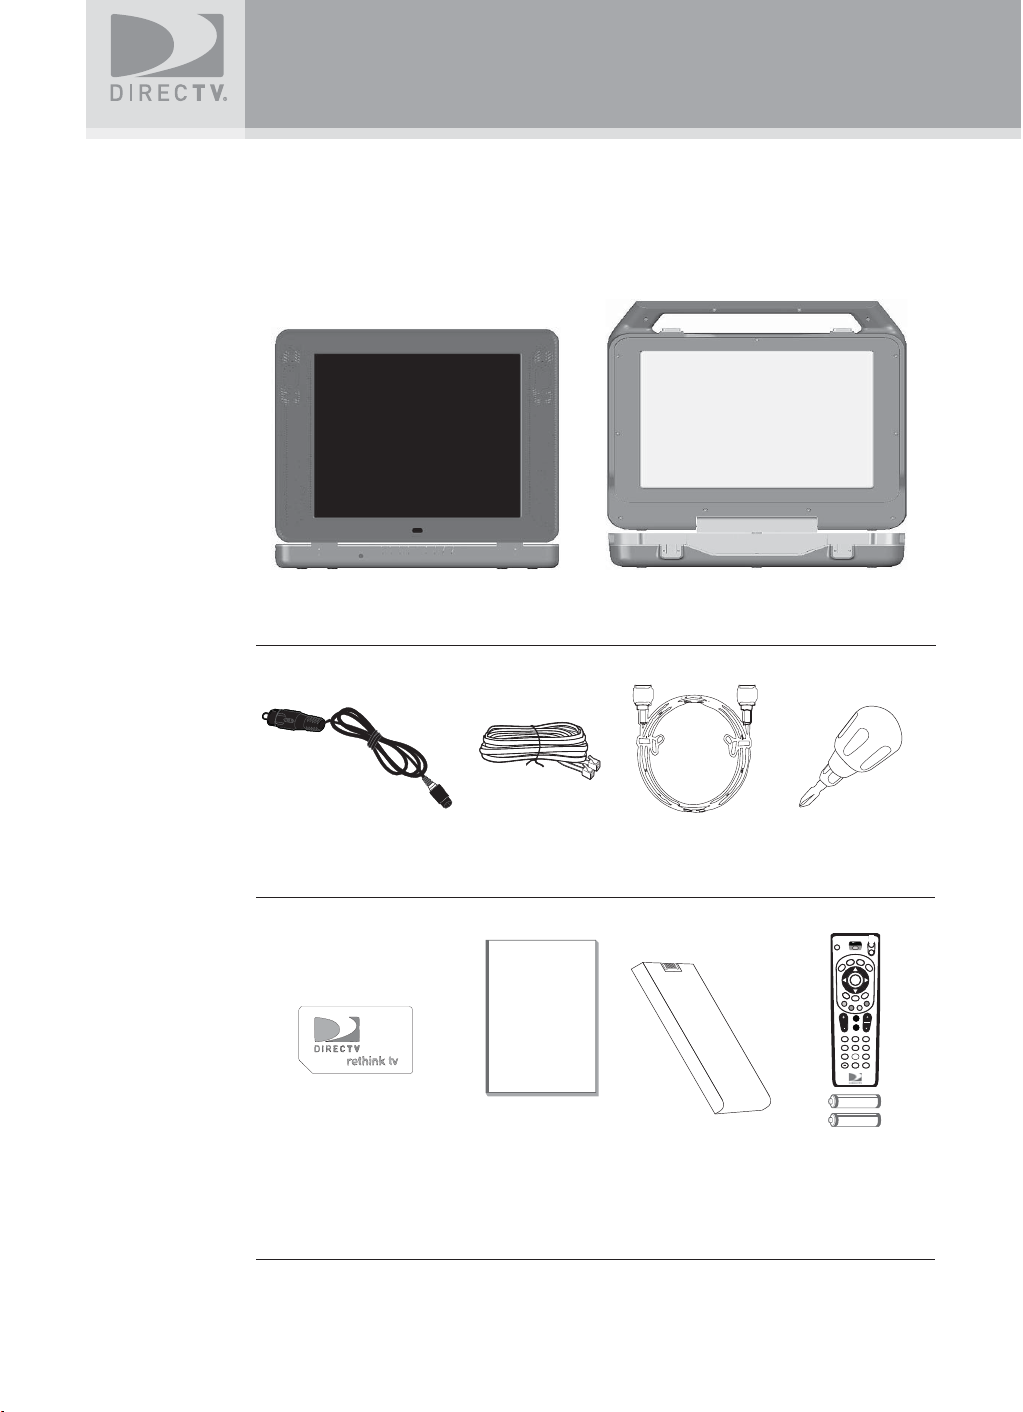
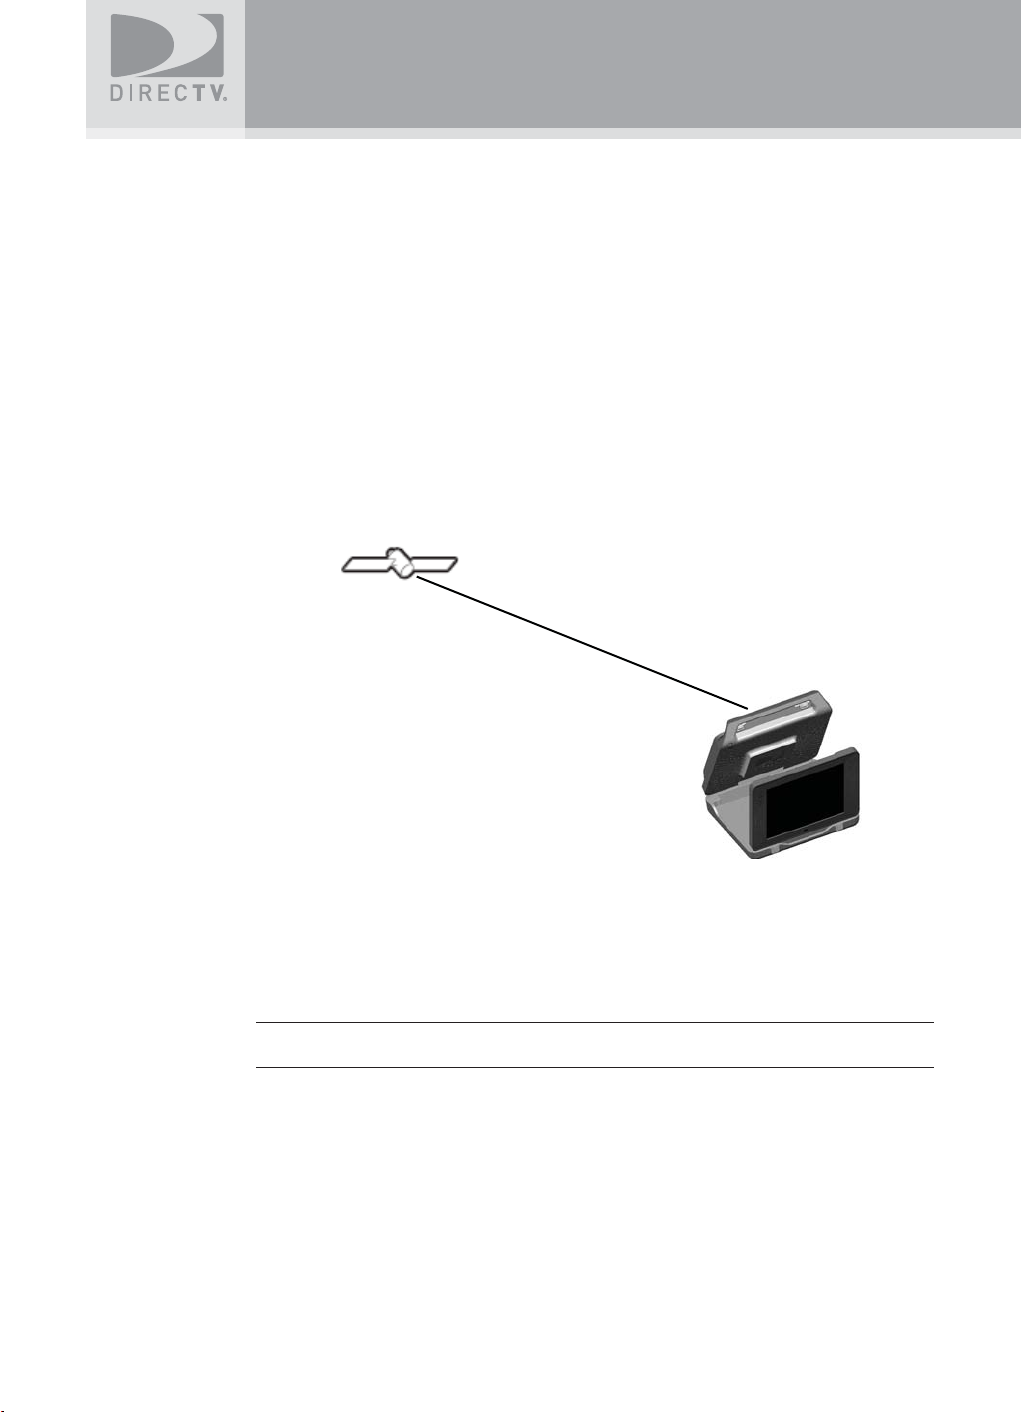
Before Using Your DIRECTV® Sat-Go
Package Contents
The following items are included with your Sat-Go portable TV and antenna:
TV and Receiver Antenna / DIRECTV Sat-Go Case
DC Cable Phone Cable
Satellite/Antenna
Screwdriver
Cable
RG-179 (15’)
POWER
TV INPUT
TV
ON
OFF
LIST
ACTIVE
EXIT
GUIDE
SELECT
BACK
INFO
MENU
CHAN
VOL
MUTE
PAGE
PREV
PREV
defabc
123
jkl
ghi
mno
4 5 6
tuv wxyzpqrs
789
ENTER
0
DIRECTV Access Card
(Pre-installed in Access
Card Compartment)
Documentation:
Quick Start
Guide, User Guide
and Compass labels
Rechargeable
Battery Pack*
Remote Control and
AAA Batteries (x2)
*A full charge of the rechargeable battery pack can take as much as 8 hours. It is recommended
that you charge the batteries overnight before the fi rst use.
6
Page 8
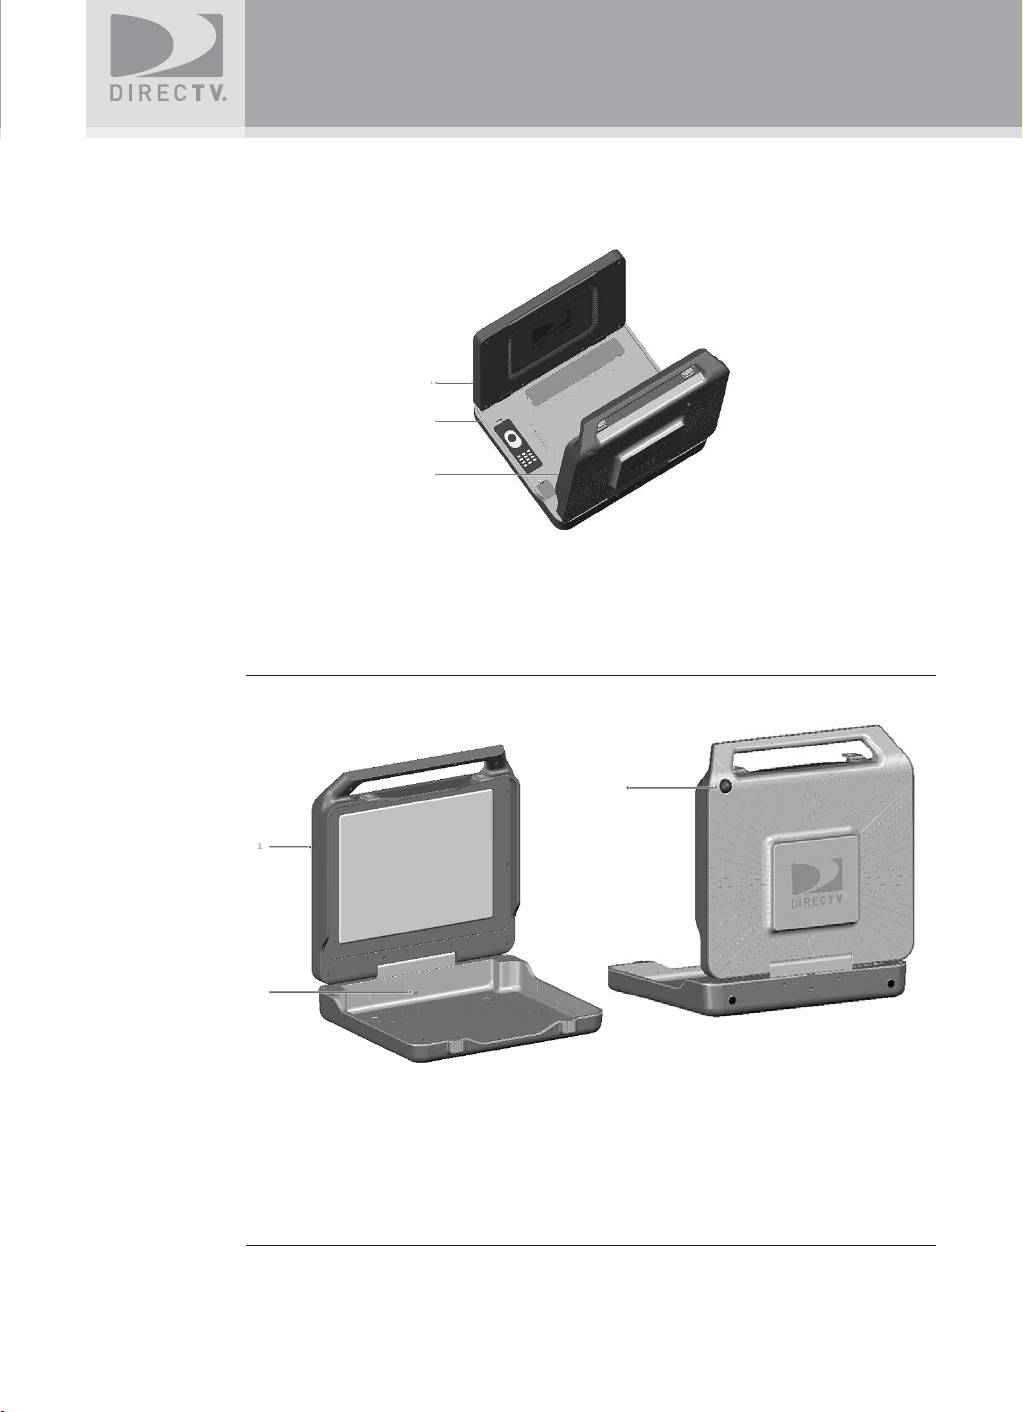
Before Using Your DIRECTV® Sat-Go
112
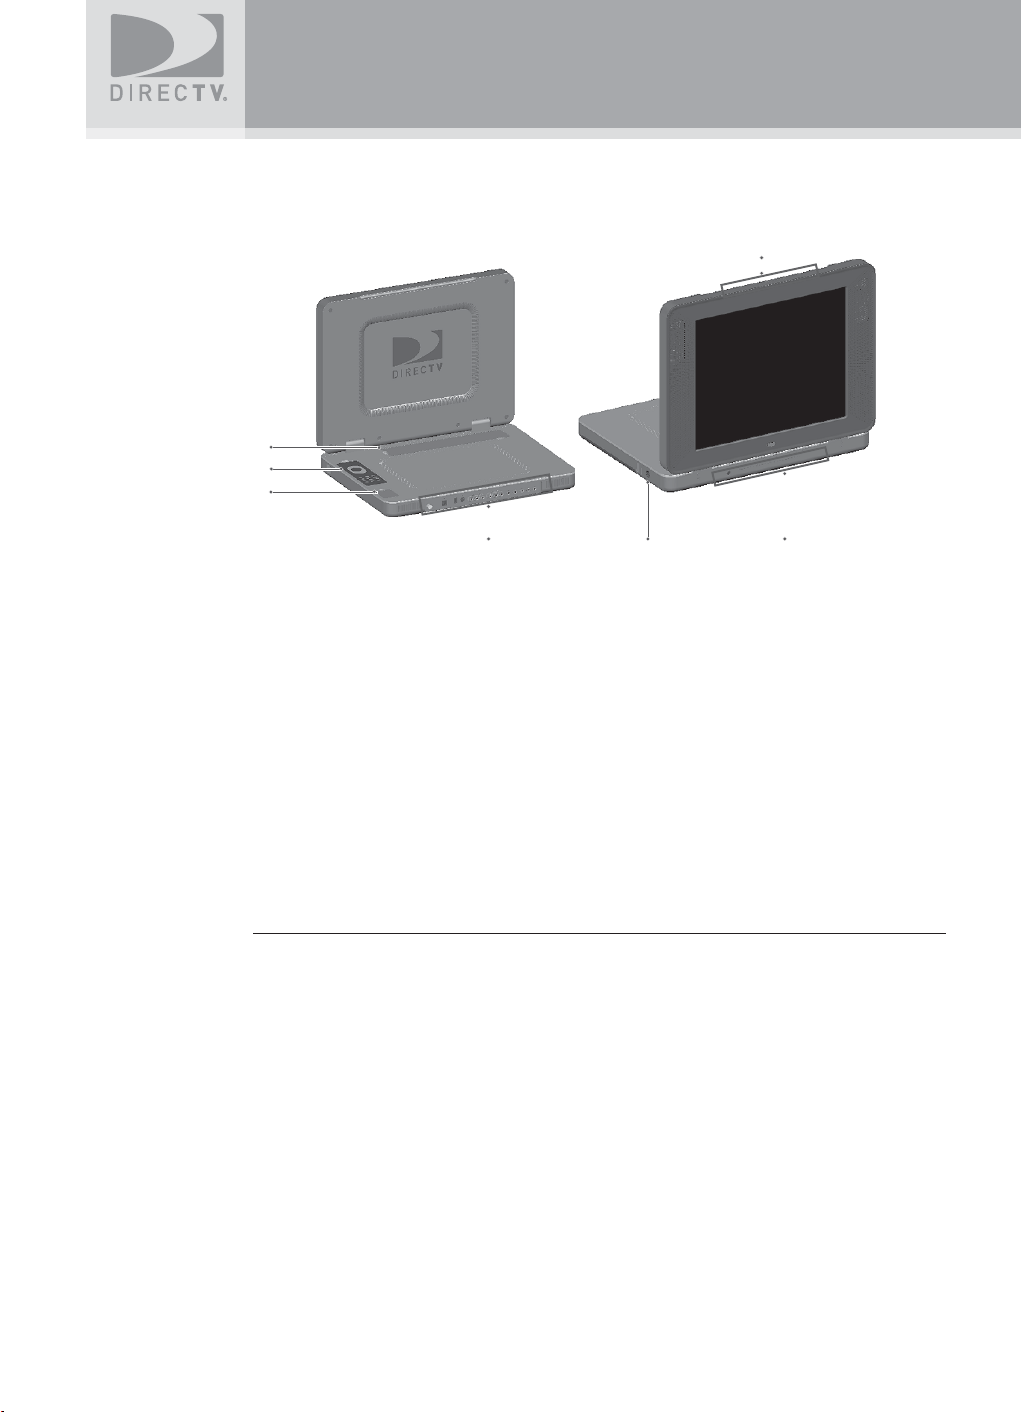
Inside the DIRECTV Sat-Go Case
When you open the case, you’ll notice the DIRECTV Sat-Go case is the antenna and contains the
easily removable TV.
1
2
3
DIRECTV Sat-Go Case Opened
1 DIRECTV Sat-Go TV Display
2 DIRECTV Sat-Go! TV Receiver
3. DIRECTV Sat-Go Case Cover / Antenna
Sat-Go Case / Antenna
2
Antenna Rear View
(TV removed)
1. DIRECTV Sat-Go Case Cover / Antenna
2. Antenna Connector
3. Compass, which also shows elevations
3
Antenna Front View
Front View
7
Page 9
Before Using Your DIRECTV® Sat-Go
Sat-Go TV
An integrated TV receiver is stored inside the DIRECTV Sat-Go case.
7
1
2
3
4
TV Rear View TV Front View
1. Cable Compartment
The Cable compartment stores the AC power cable (permanently attached).
2. Remote Control
3. Access Card Slot
The DIRECTV access card is pre-installed. The access card allows you to view DIRECTV
programming. The slot also contains a RESET button.
4. TV Connector Panel
5. DC Power Connector
6. DIRECTV Receiver Panel
7. TV Display Panel
5
6
®
8
Page 10
Before Using Your DIRECTV® Sat-Go
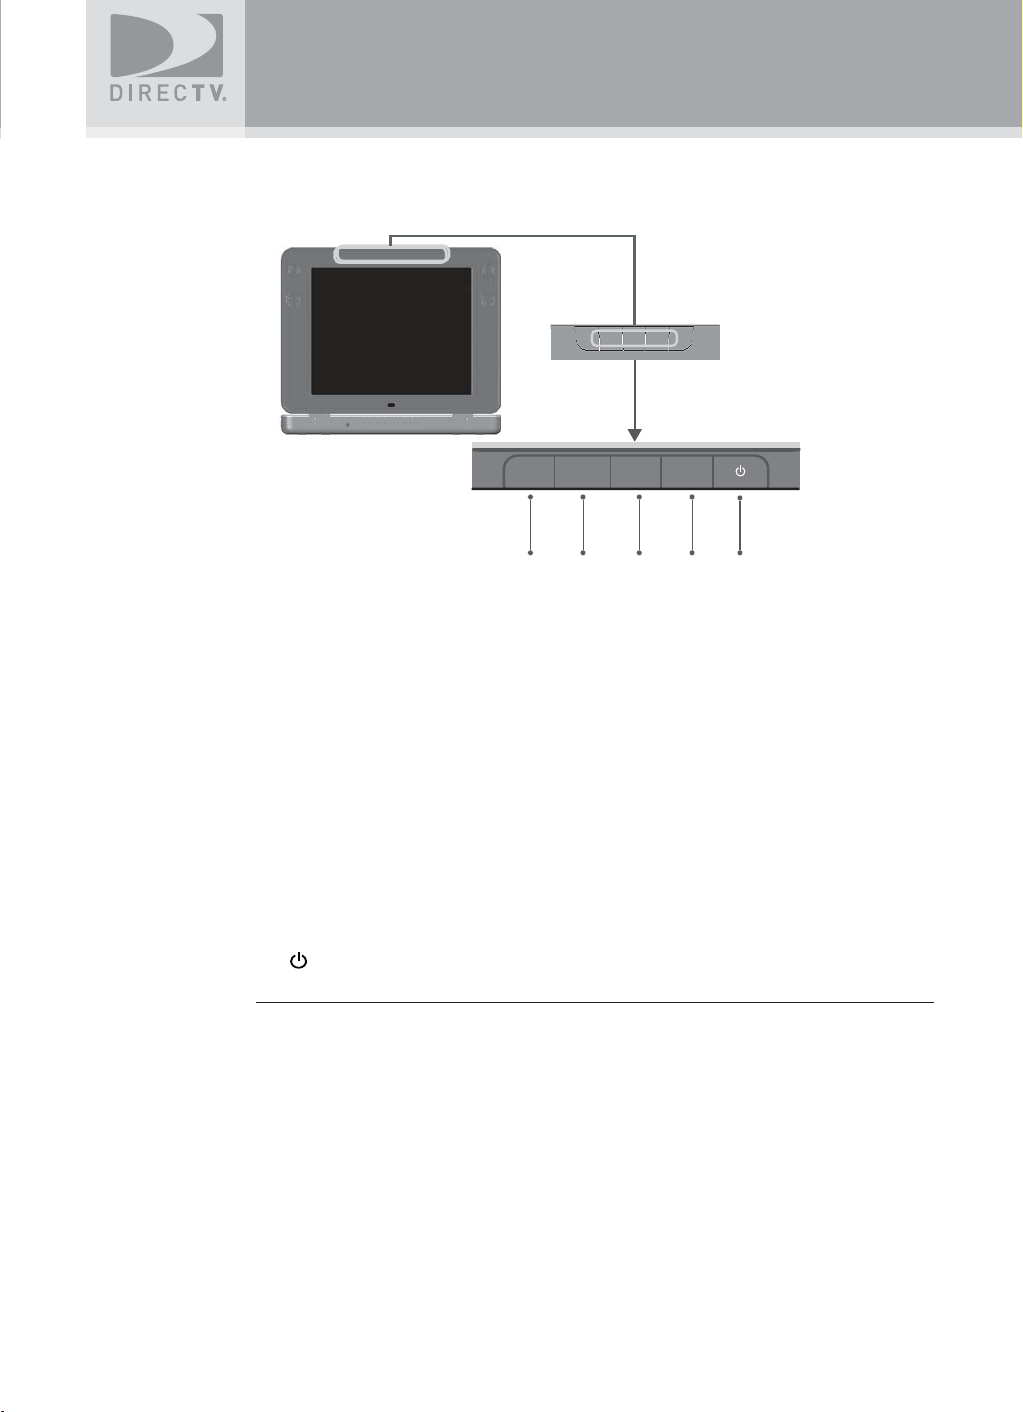
TV Display Panel
TV INPUT/
TV MENU
SELECT
1 2
1. TV MENU
Displays the TV Menu to adjust TV settings. This menu automatically times out after a few
seconds.
2. TV INPUT / SELECT
Changes the input source, or selects the highlighted TV MENU item when the TV MENU is
on.
3. VOL -
- Decreases volume.
- Moves the highlight bar up or down to move through menu items when the TV MENU is
on.
4. VOL +
- Increases volume.
- Moves the highlight bar up or down to move through menu items when the TV MENU is
on.
5.
(POWER)
Turns the TV on or off.
VOL -
VOL +
345
9
Page 11
Before Using Your DIRECTV® Sat-Go
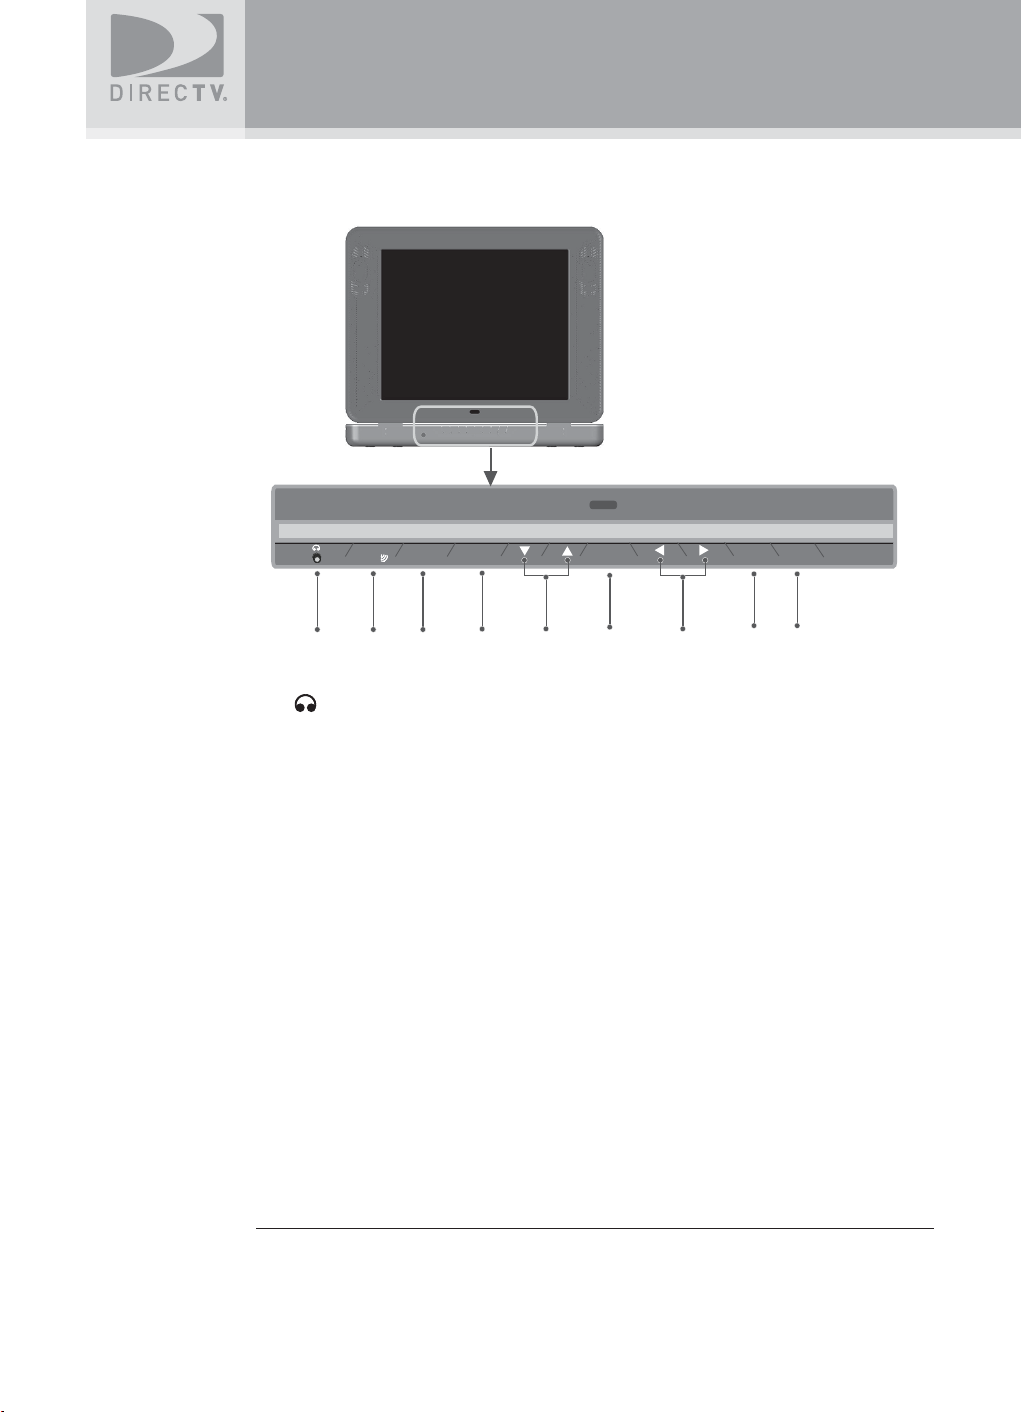
TV Receiver Panel
SIGNAL
GUIDE MENU
2
1
34
5
SELECT
6
ACTIVE INFO
7
8 9
1. (Earphones)
Connects personal earphones to the TV for personal listening.
2. SIGNAL
Displays the Signal Strength Meter. This is used for pointing the antenna for the strongest
possible signal. Press and hold this key for 1 second to exit the Signal Strength Meter
display.
3. GUIDE
Displays the onscreen program guide.
4. MENU
Displays the DIRECTV Menu, a compact menu of settings and services.
5. ▼ ARROW ▲ / - CH +
Moves the highlight bar up or down to move through the onscreen menus.
In live TV, changes the channel up or down; in the Menu or Guide, scrolls up or down.
6. SELECT
Selects the item highlighted.
7. ◀ ARROW ▶
Moves the highlight bar left or right to move through the onscreen menus.
8. ACTIVE
Displays the DIRECTV Interactive Home Page—local weather and more!
9. INFO
Displays the channel banner or info to a highlighted program or channel cell.
10
Page 12
Before Using Your DIRECTV® Sat-Go
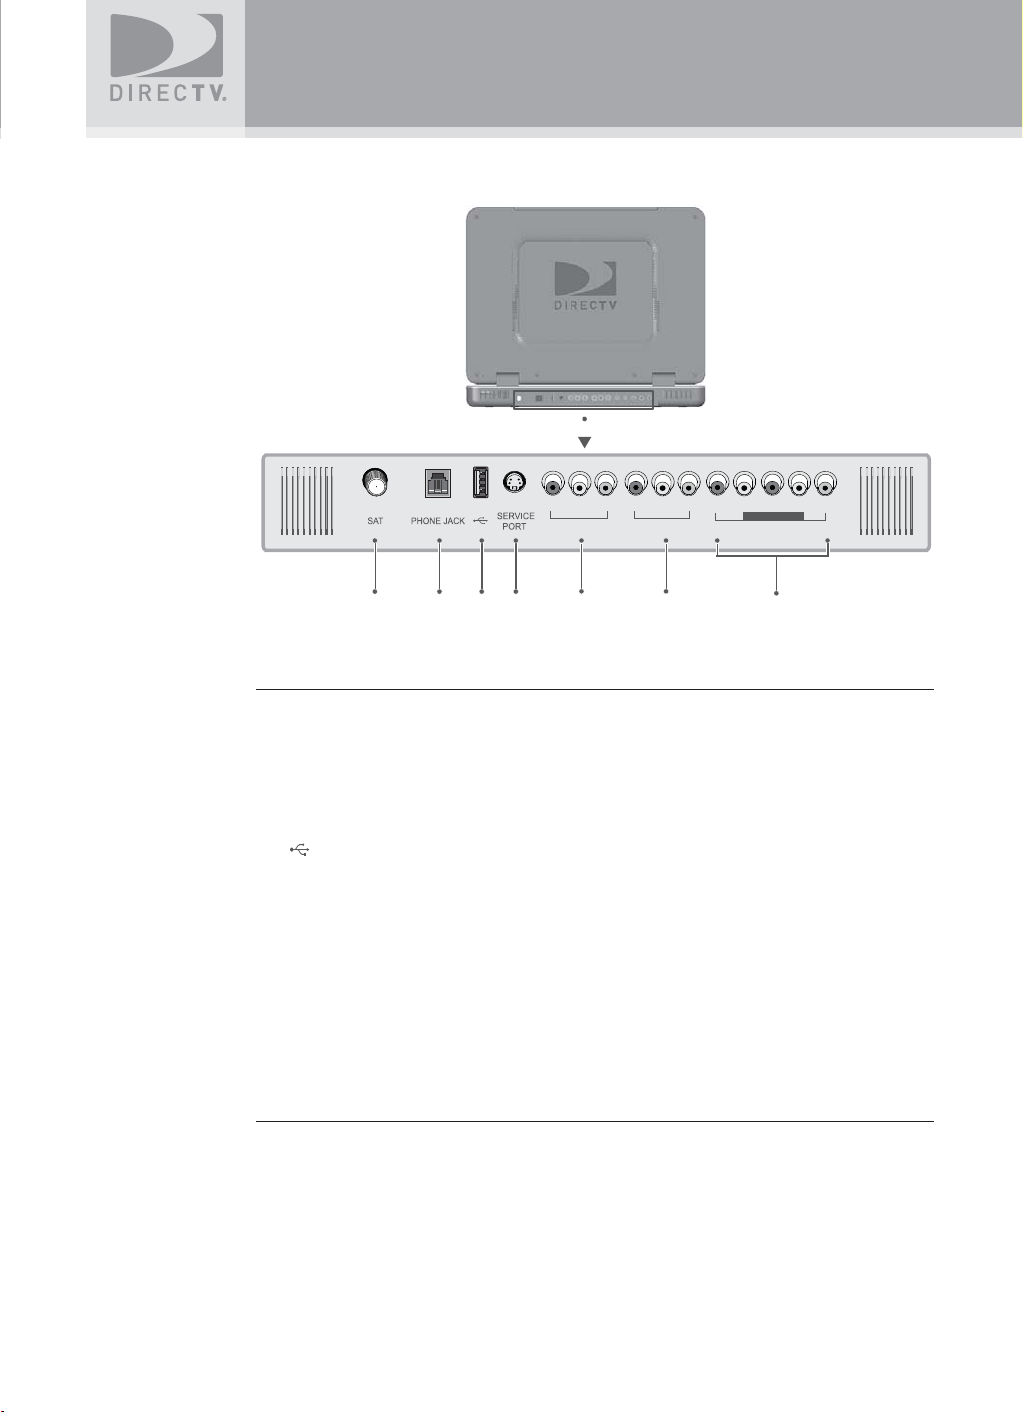
TV Rear Connector Panel
AV OUT
1
234 5 6
AV IN 1
COMPONENT
AV IN 2
7
1. SAT
Connects the DIRECTV Sat-Go TV to the DIRECTV Sat-Go antenna or a residential
DIRECTV antenna.
2. PHONE JACK
Connects the TV to a telephone wall jack. We require a land-based telephone connection
to communicate periodically with your TV.
3.
(USB Port)
For future use.
4. SERVICE PORT (RS232)
Used as a service port for upgrading the DIRECTV Sat-Go software.
5 AV OUT (Composite video and audio output)
Connects the TV to equipment with a composite AV input, such as a VCR or DVD player.
6. AV IN 1 (Composite video and audio input)
Connects the TV to equipment with a composite AV output, such as a VCR or DVD player.
7. COMPONENT AV IN 2 (Component video and audio input)
Connects the TV to equipment with a component AV output, such as a DVD player.
11
Page 13
Before Using Your DIRECTV® Sat-Go
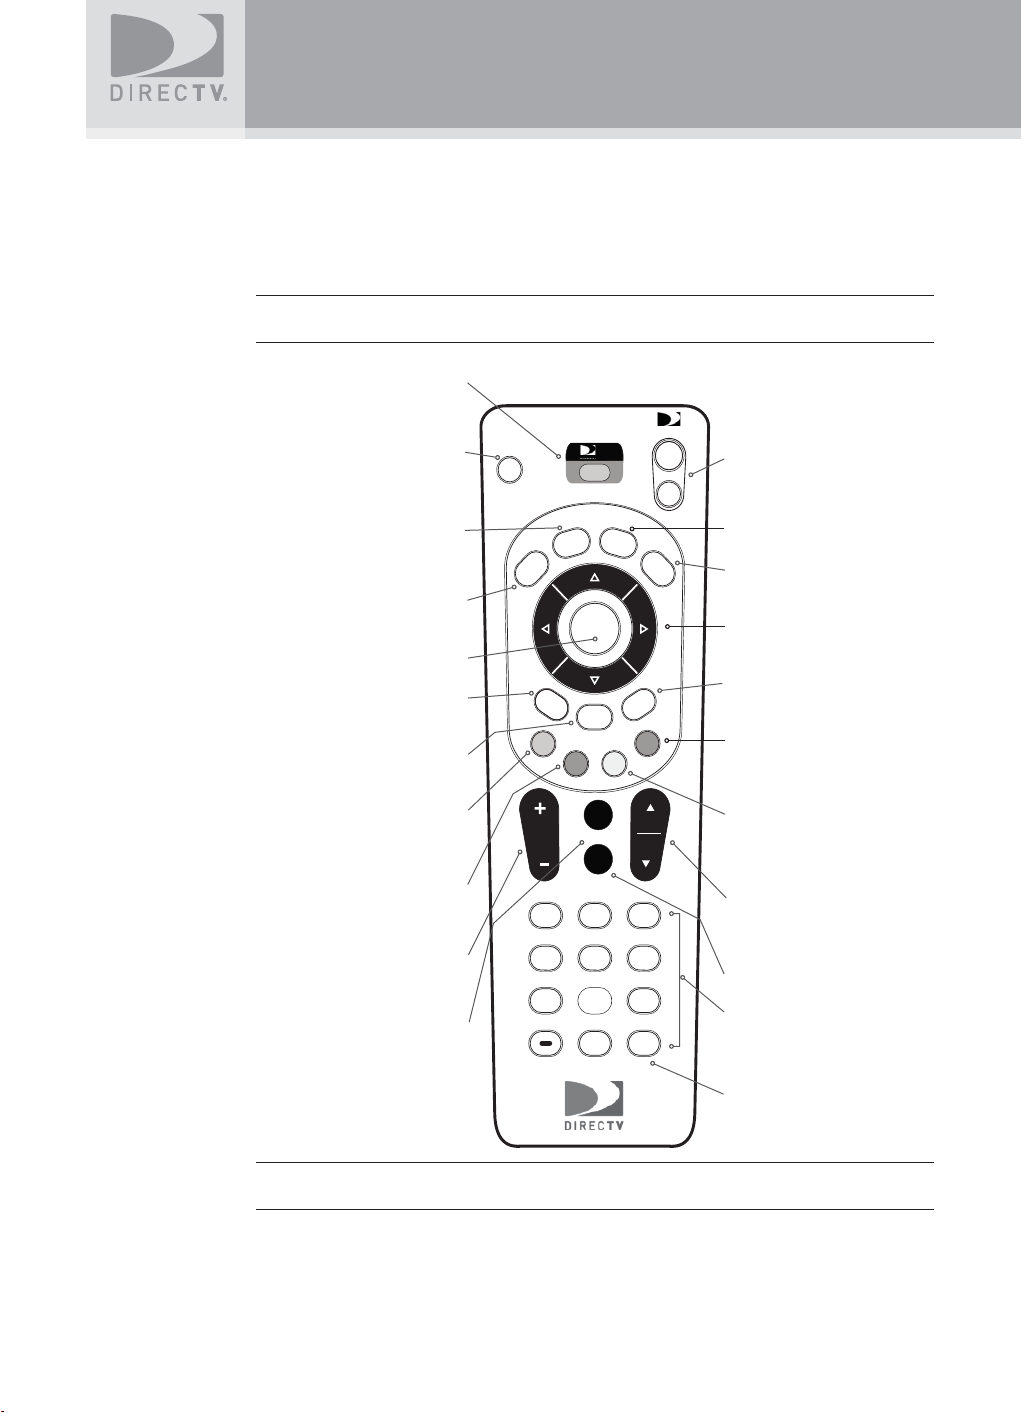
Remote Control
1) Remote Control in DIRECTV Mode
All the functions for DIRECTV® service can be controlled with the Remote control. Some
function can also be adjusted with the buttons on the TV display panel.
NOTE: To use your remote control in DIRECTV mode, the MODE switch on the
remote control should be set to the DIRECTV logo.
Changes remote to adjust the
DIRECTV menu or the TV menu,
or to control other equipment
Changes the “source” — the
piece of equipment whose signal
Interactive Home Page—local
Displays the onscreen program
Selects any highlighted item
Takes you to the screen you
Displays a compact menu of
In Guide, jumps 12 hours back;
other functions vary — look for
forward; other functions vary —
Toggles sound volume on/off
MODE SWITCH
TV INPUT
is displayed on your TV
ACTIVE
Displays the DIRECTV
weather and more!
GUIDE
guide
SELECT
BACK
visited previously
MENU
settings and services
RED
onscreen hints
GREEN
In Guide, jumps 12 hours
look for onscreen hints
VOLUME
Raises or lowers volume
MUTE
TV INPUT
GUIDE
BACK
VOL
1
ghi
4 5 6
789
ACTIVE
SELECT
MENU
MUTE
PREV
PREV
2
jkl
tuv wxyzpqrs
0
POWER
TV
ON
POWER ON/OFF
Turns equipment on and off, as
selected by MODE switch
OFF
LIST
EXIT
LIST
Displays your To Do List
EXIT
Exits any menu and returns to
last channel viewed
ARROWS
Move highlight to items in any
direction needed
INFO
INFO
Displays info for a highlighted or
fullscreen program
BLUE
In live TV, displays the Mini
Guide; other functions vary —
look for onscreen hints
CHAN
PAGE
YELLOW
In fullscreen TV, cycles through
alternate audio tracks; other
functions vary — look for
onscreen hints
defabc
3
CHAN/PAGE
In live TV, changes channel up
or down; in a menu, such as the
mno
Guide, scrolls page up or down
PREV
Tunes to last channel viewed
NUMBER KEYS & DASH
ENTER
Tune to a channel directly; also
input numbers and letters when
needed in onscreen menus
ENTER
Activates number entries quickly
12
NOTE: Don’t worry about getting stuck in a menu. You can always press EXIT to
return to video.
Page 14
Before Using Your DIRECTV® Sat-Go
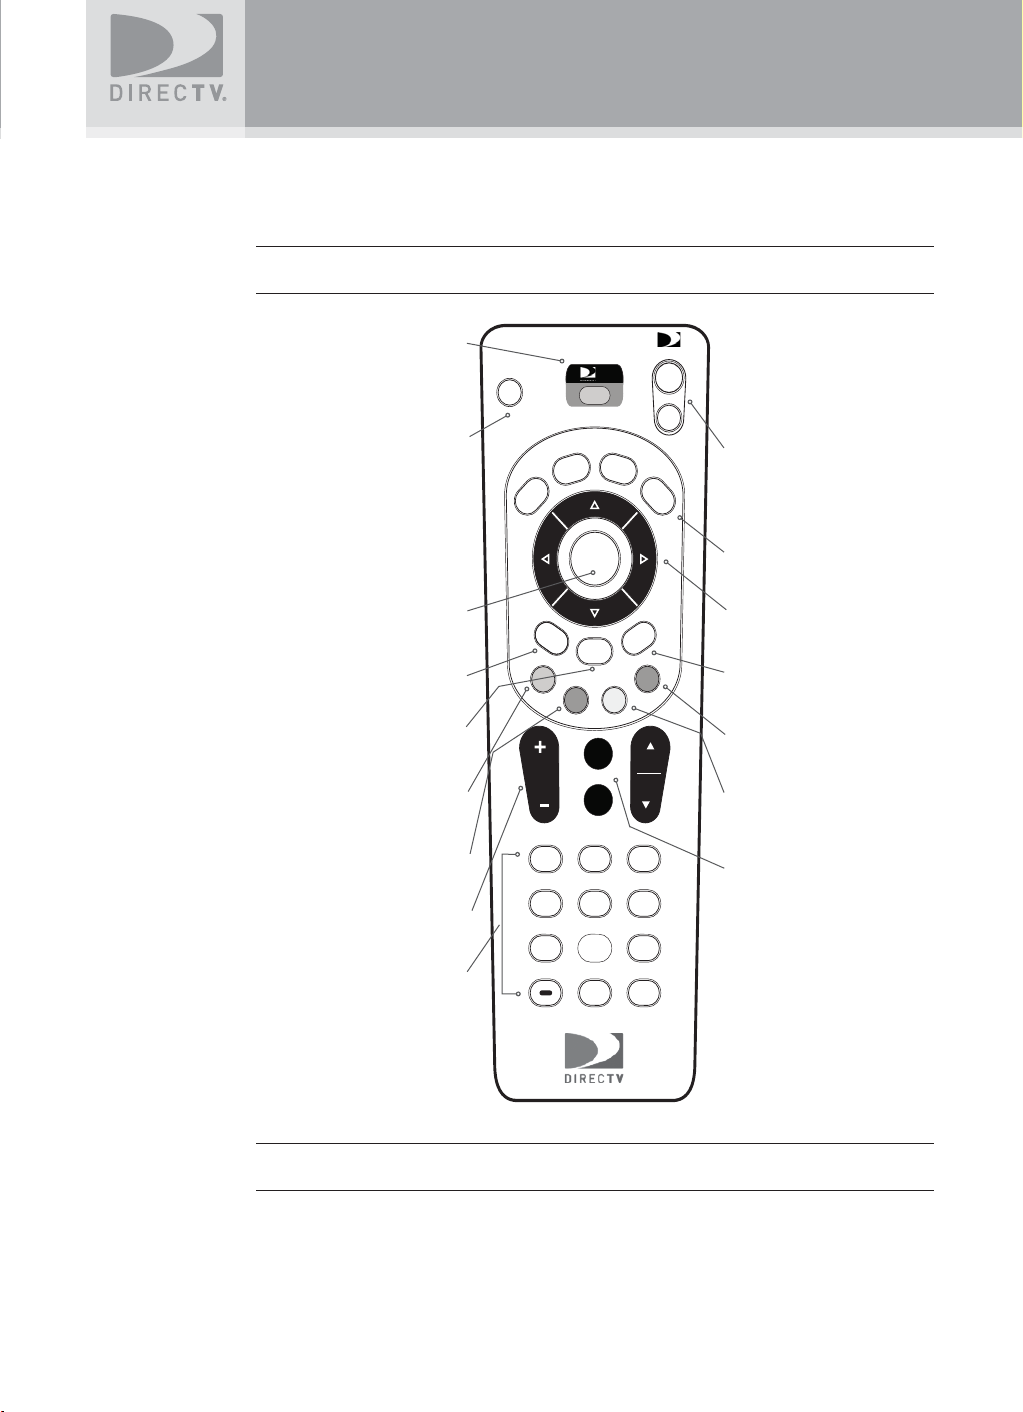
2) Remote Control in TV Mode
All the functions for TV mode can be controlled with the Remote control. Some function can also
be adjusted with the buttons on the front panel of the LCD.
NOTE: To use your remote control in TV mode, the MODE switch on the remote
control should be set to TV.
Changes remote to adjust the
MODE SWITCH
DIRECTV menu or the TV menu,
or to control other equipment
TV INPUT
Changes the input source
SELECT
Selects any highlighted item
BACK
Takes you to the screen you
visited previously
MENU
Displays the TV menu or returns
to the previous menu
RED
Changes the closed caption
TV INPUT
GUIDE
VOL
ACTIVE
SELECT
BACK
MENU
MUTE
PREV
PREV
POWER
TV
ON
OFF
TV POWER ON/OFF
LIST
EXIT
Turns equipment on or off, as
selected by MODE switch
EXIT
Exits any menu and returns to
last channel viewed
ARROWS
INFO
Move highlight to items in any
direction needed
INFO
Displays the current input source
BLUE
CHAN
PAGE
Changes the screen resolution
YELLOW
For future use
GREEN
For future use MUTE
VOLUME
Raises or lowers volume
1
ghi
4 5 6
789
defabc
2
3
jkl
mno
tuv wxyzpqrs
Toggles sound volume on/off
NUMBER KEYS
Use to input password
ENTER
0
NOTE: Don’t worry about getting stuck in a menu. You can always press EXIT to
return to video.
13
Page 15
Before Using Your DIRECTV® Sat-Go
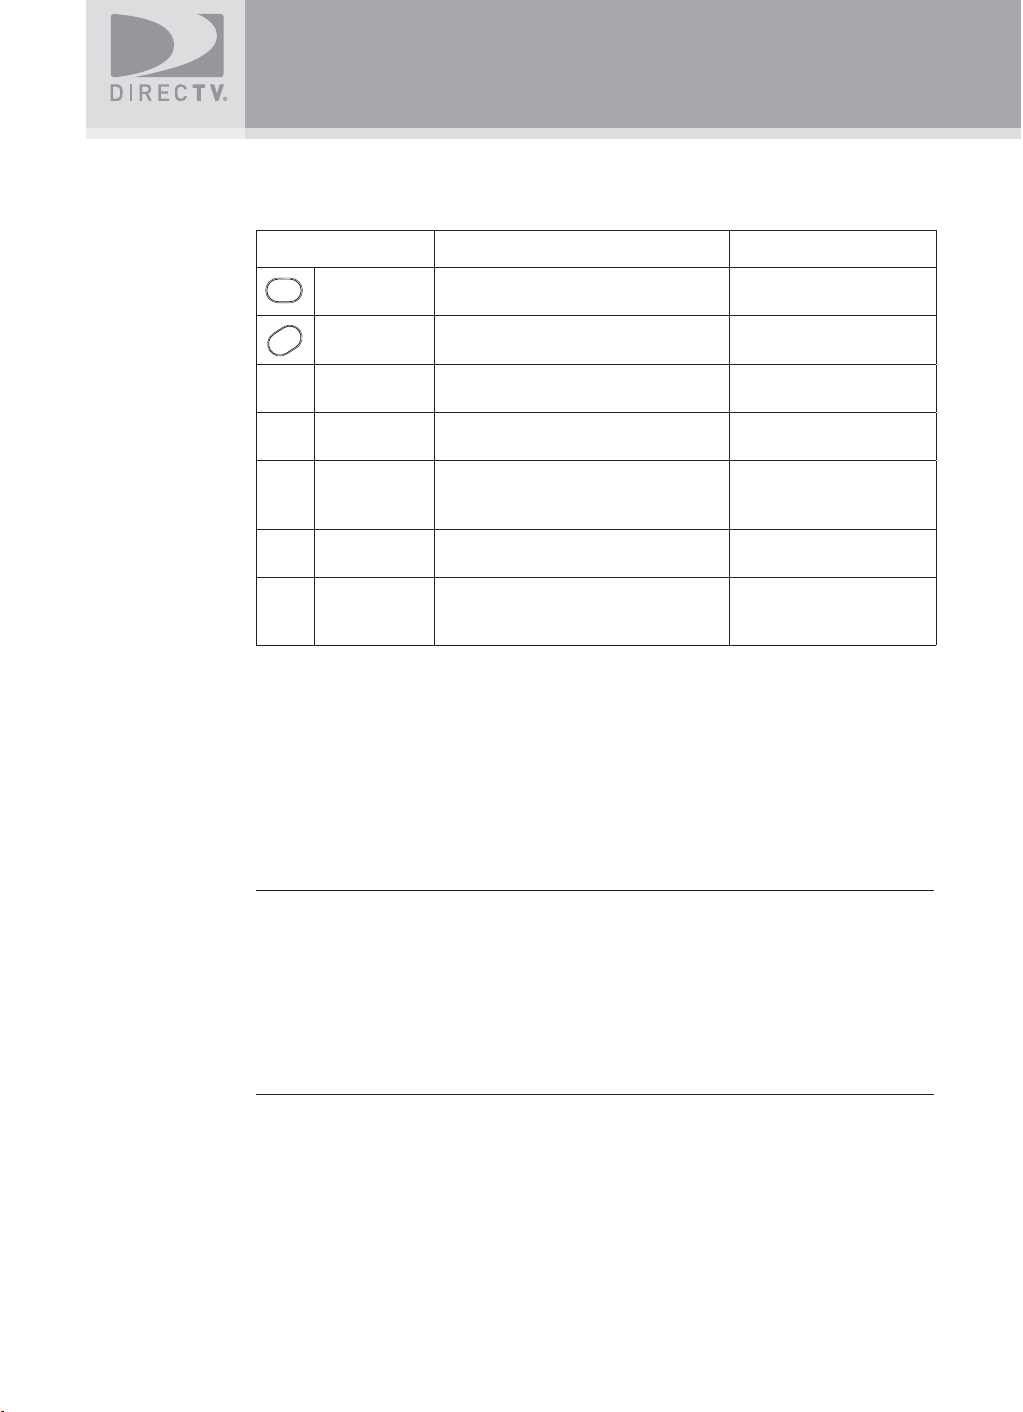
Difference of key operation in TV mode and DIRECTV mode
- The following buttons are operated differently in TV mode and DIRECTV mode.
Key In DIRECTV Mode In TV Mode
MENU
INFO
MENU
INFO
RED
GREEN
YELLOW
BLUE
NUMBER KEYS
Displays the DIRECTV menu of settings
and services
Displays info for a highlighted or
fullscreen program
In Guide, jumps 12 hours back; other
functions vary — look for onscreen hints
In Guide, jumps 12 hours forward; other
functions vary — look for onscreen hints
In fullscreen TV, cycles through alternate
audio tracks; other functions vary — look
for onscreen hints
In live TV, displays the Mini Guide; other
functions vary — look for onscreen hints
Tune to a channel directly; also input
numbers and letters when needed in
onscreen menus
Displays the TV menu or
returns to the previous menu
Displays the current input
source
Changes the closed caption
(For future use)
(For future use)
Changes the screen
resolution
Use to input password
Inserting the Batteries
You must insert or replace the batteries in the remote control when you:
+ Purchase the DIRECTV Sat-Go.
+ Find that the remote control is no longer operating correctly.
1. Remove cover from the battery compartment by sliding it downward.
2. Insert 2 AAA batteries (supplied), matching the positive (+) and negative (–) at each end.
3. Slide the cover back on to complete installation.
CAUTIONS:
- Insert two 1.5V AAA-type batteries. Don’t mix used batteries with new batteries.
- Remove batteries when you don’t use the remote control for long periods. Liquid
leakage from old batteries may cause operation failure.
- Make sure there are no objects between the remote control and its sensor.
- Don’t place the remote control near a heater or damp place. Strong impact on
remote controller may cause operation failure.
- The signal from the remote control may be subjected to interference from sunlight
or other strong light.
14
Page 16

Before Using Your DIRECTV® Sat-Go
Inserting Battery into the TV
You must insert or replace the batteries in the DIRECTV Sat-Go system when you:
+ Purchase the DIRECTV Sat-Go system.
+ Find that the DIRECTV Sat-Go TV is no longer operating correctly.
TIP:
The Low Portable Battery symbol displays onscreen when the portable battery is
low. The power light will also blink every second for 10 minutes before switching the
DIRECTV Sat-Go to standby mode automatically. (Battery usage time is about 1 hour;
battery charging time is about 8 hours.)
1
SCREWS
2
1. Open the DIRECTV Sat-Go case and remove the TV by lifting the TV from the DIRECTV
Sat-Go case.
2. On the back of the TV, unscrew the two screws holding the battery cover in place.
3. Remove the cover from the battery compartment by sliding it outward.
4. Insert lithium battery pack (supplied).
5. Slide the cover over the battery compartment to replace the battery cover.
6. Replace the two screws to hold the battery cover in place and complete the installation.
A full charge can take as much as 8 hours. It is recommended that you charge the batteries
overnight before the fi rst use.
CAUTIONS:
- Remove batteries when you don’t use the DIRECTV Sat-Go system for long
periods. Liquid leakage from old batteries may cause operation failure.
- Don’t place the TV near a heater or damp place. Strong impact on the TV may
cause operation failure.
3
15
Page 17
Setting Up Your DIRECTV® Sat-Go
This section describes how to set up the DIRECTV Sat-Go TV and antenna. Select the most
appropriate procedure depending on your requirements.
Finding a Suitable Antenna Site
When selecting a site to obtain a satellite signal, choose a location with an unobstructed view of
the southern sky--no trees, leaves, or buildings can be in the line of sight between the antenna
and the satellite. A suitable site requires the antenna have an unobstructed view of the southern
sky and a fl at, stable surface.
The satellite is always located south of Texas. This means if you live in Miami, you must have a
clear line of sight to the southwest; if you live in San Francisco, you must have a clear line to the
southeast.
Depending on where you live, the antenna should be at an elevation angle between 30 and 60
degrees. Southern states point more toward 60 degrees; northern states point more toward 30
degrees.
Sat A, 101
TIP: The antenna case has an integrated compass to help you obtain the correct
o
direction and angle based on your location.
16
Page 18
Setting Up Your DIRECTV® Sat-Go
Setting Up the DIRECTV Sat-Go TV and Antenna
1
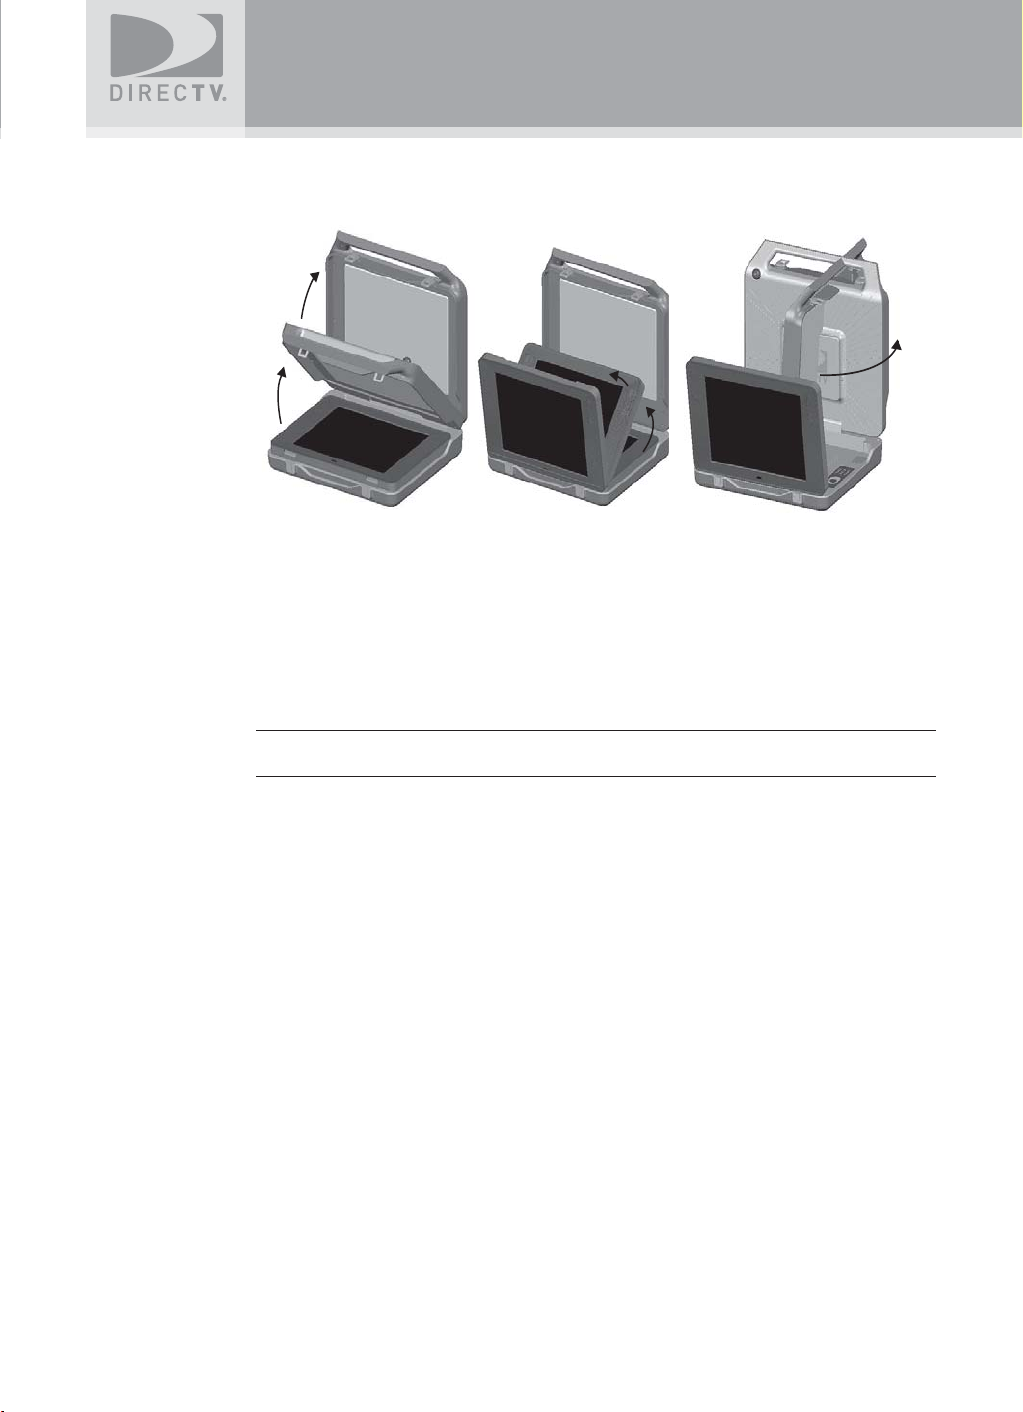
1. Open the DIRECTV Sat-Go case and antenna by opening the latches and lifting the
handle.
2. Lift the TV display to an upright position allowing space to rotate the antenna. After rotating
the antenna, you may remove the integrated TV/Receiver. (The antenna may fall over if not
rotated prior to removing the TV/Receiver.) You may leave the TV in the case, or lift and
remove it from the case, then move it a suitable viewing position.
3. Rotate the antenna counter-clockwise toward satellites in the southern sky.
TIP: Use the compass on the outer antenna case to fi nd the approximate antenna
direction and to point the antenna towards the satellites in the southerly skies.
2
3
17
Page 19
Setting Up Your DIRECTV® Sat-Go
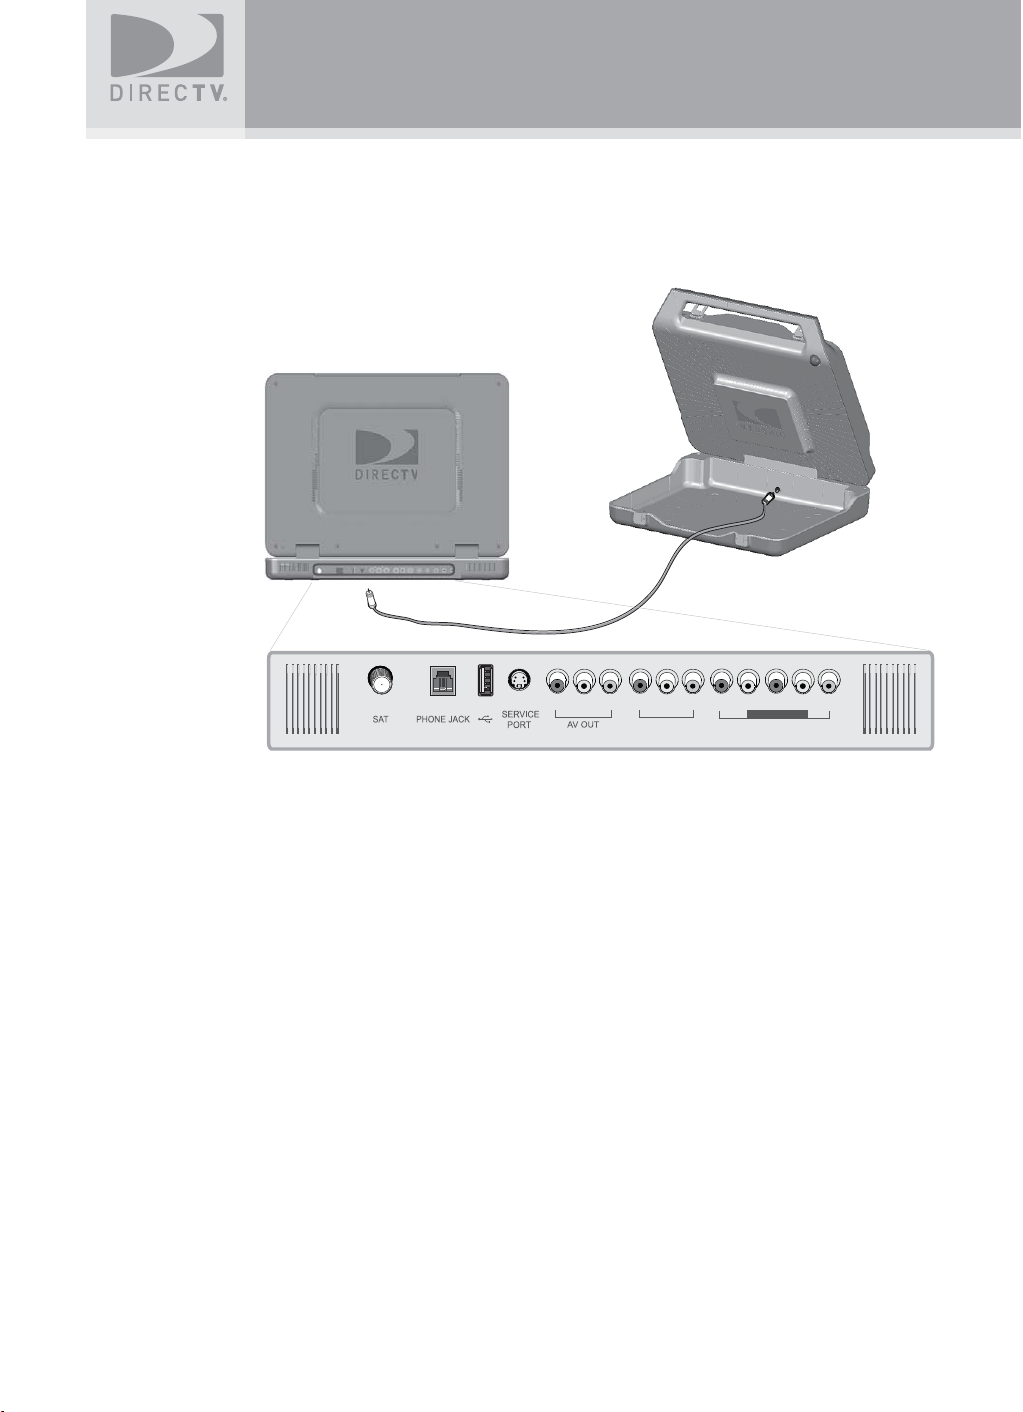
Connecting the DIRECTV Sat-Go TV to the Antenna
The DIRECTV Sat-Go comes pre-assembled with the Antenna cable connected to the SAT
connector on the TV rear connector panel and to the SAT connector on the rear antenna
base.
AV IN 1
COMPONENT
AV IN 2
Note: You can place the antenna up to 15’ from the DIRECTV Sat-Go TV for remote
viewing, and up to a maximum of 100’ with an optional RG-6 cable. A residential
DIRECTV dish can also be connected via an optional RG-6 cable for in-home
viewing.
18
Page 20
Setting Up Your DIRECTV® Sat-Go
Connecting the DIRECTV Sat-Go to Power
12
3
For AC power
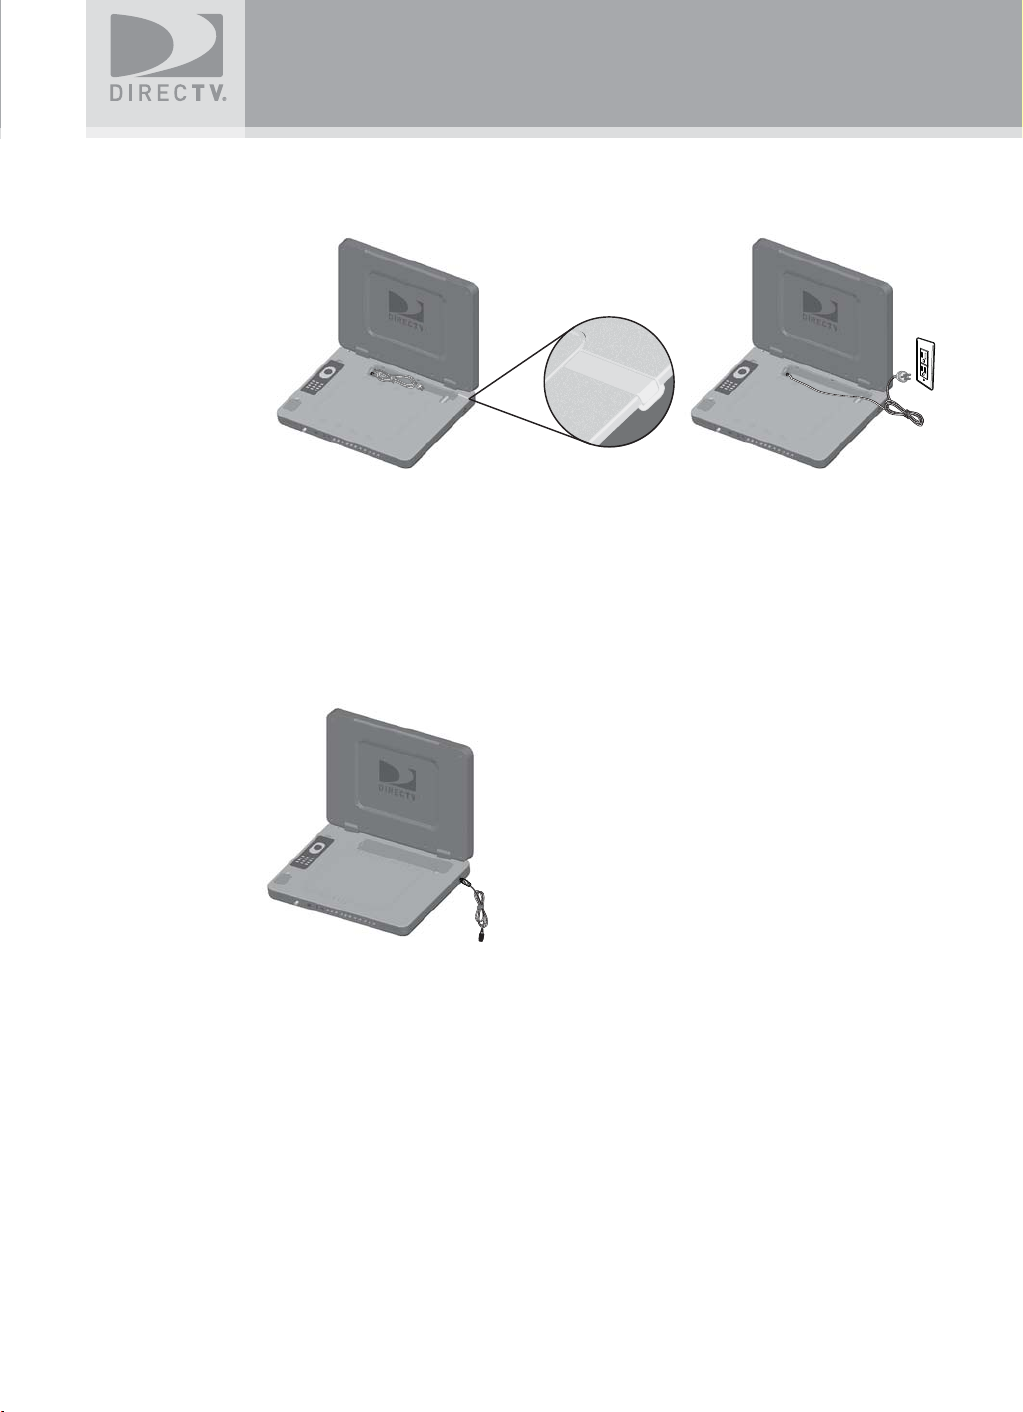
1. Remove the cable cover from the cable compartment located in the TV receiver. The AC
power cable is permanently connected to the receiver.
2. Remove the soft plastic cover plug from the top of the case and lay the AC power cable into
the provided groove.
3. Plug the AC power cable into a grounded 3-prong outlet.
4. Replace the cable cover.
For DC power
1. Remove the DC cable from the DIRECTV Sat-Go case.
2. Remove the TV from the DIRECTV Sat-Go case.
3. Connect the DC cable to the DC connector on the side of the receiver and to a DC power
source such as a cigarette lighter in a car or boat. The DC power cable is not permanently
connected to the TV.
Note:
The AC and DC cables should never be plugged into a power source at the same
time.
Hibernation Mode
If you fold down the Liquid Crystal Display (LCD) when TV power is on, the LCD and speakers
are turned off automatically. (The power to the TV is not turned off.)
19
Page 21

Setting Up Your DIRECTV® Sat-Go
Guided Setup and Activation
Now that your DIRECTV Sat-Go is hooked up and plugged in, you’re ready to fi nish all the
details to begin receiving your DIRECTV® service.
1 Make sure the MODE SWITCH on the remote control is set to DIRECTV.
2 Press TV POWER ON. The DIRECTV Sat-Go TV will turn on.
3 Simply follow the onscreen directions to complete your setup functions. You’ll be guided
though various selections and functions for setting up and optimizing your antenna signal
and setup — including positioning your antenna and a system test.
Throughout the remainder of the Guided Setup, use the arrow keys on the remote control
to move to an option or desired selection and then press SELECT.
a Select the desired language and press SELECT.
b Select antenna type Round Dish and press SELECT.
c Enter the ZIP Code for your location and press SELECT.
d Align the antenna, see “Aligning the Antenna” on page 25.
e Select Continue and proceed through the remainder of the Guided Setup.
4 Once completed, you will see a Welcome screen and now you’re ready to watch TV.
Important:
In order to protect your TV screen from burn-in (a side-effect caused when
a stationary image is displayed for too long), the DIRECTV Sat-Go system
interface automatically goes into screen saver mode, and displays a black
screen with a moving logo when no key is pressed for 5 minutes or more while
a stationary image is displayed on the TV. To dismiss the screen saver and
return to what you were doing, press any key on the remote. Burn-in may cause
permanent damage to your TV and DIRECTV is not liable for any damages that
may be caused to your TV.
20
Page 22

Setting Up Your DIRECTV® Sat-Go
After Guided Setup: Getting a Satellite Signal
If the antenna is already aligned to the satellite, the TV automatically comes on when you press
(POWER). If the antenna is not aligned to the satellite, a message displays on the screen,
“Searching for Satellite.” You can easily realign the antenna using the Signal Strength Meter. If
you need additional support, you can use antenna coordinates to help you point your antenna
towards the satellites.
TIP:
If you have already aligned the antenna using the coordinates for your region, you do
not need to re-enter your ZIP code to get the coordinates for your location. Only if you
leave the region would you have to re-enter your ZIP code to get the coordinates for
the new location.
Determining Antenna Coordinates
Antenna coordinates (Direction and Angle numbers) are based on the ZIP code of your location.
You can use these coordinates when aligning your antenna to the satellites.
1. Turn on the DIRECTV Sat-Go, press the
2. Select Repeat Satellite Setup in the Satellite menu.
The ANTENNA INSTALLATION screen menu appears.
3. Select the antenna type Round (1 or 2 LNB).
4. Enter the ZIP code of your location. Select Continue and then select Signal Meter. The
appropriate direction (azimuth) and angle (elevation) display on the screen.
5. Write down the antenna coordinates that display (Direction and Angle) on the line below
each illustration.
(POWER) button on the TV display.
Direction/Azimuth
(horizontal, side-to-side)
Note: Antenna coordinates will vary based on your location
6. Now align the antenna using these coordinates; go to view the signal meter (see “Aligning
the Antenna with the Satellite” on page 25.
Angle/Elevation
(vertical up/down)
21
Page 23

Setting Up Your DIRECTV® Sat-Go
Aligning the Antenna with the Satellite
• The Signal Strength Meter will help you to fi ne-tune the antenna signal. It is
important to obtain the strongest (peak) signal possible.
• The higher the signal, the less likely you are to experience signal outages
during adverse weather.
Good Signal Strength = 60%
Minimum Signal Strength = 50%
1. Turn the DIRECTV Sat-Go on. Press
display panel.
2. Press the Signal button on the receiver to display the Signal Strength
Meter on the Test Signal Strength screen.
a. Point the antenna to the general southerly direction using the compass
and/or use the Direction and Angle coordinates that display on the
Signal Strength Meter screen to guide you as you rotate the antenna.
Set the antenna to the angle/elevation for your ZIP code as noted on
the previous page.
b. Very slowly move the antenna from side-to-side horizontally to get the
highest number, then slightly tilt the antenna angle up and down to
obtain the optimum signal strength.
c. Pause for 3-5 seconds during antenna rotation to allow the Signal
Strength Meter to update, which will show your current Direction and
Angle coordinates and signal strength. An audible beep sounds and the
beeps become faster as your signal strength becomes stronger.
d. Once you scan and obtain the optimal signal strength (60-70%), stop.
Write down the actual angle and duration from the compass on the
compass label included with the DIRECTV Sat-Go.
TIP:
You may want to rotate the antenna past the peak signal a couple of
times to make sure you stop on the strongest signal.
e. Press and hold the Signal button on the receiver to exit and watch live
TV.
You have now successfully set up the DIRECTV Sat-Go and are receiving
the DIRECTV satellite signal.
3. On the Signal Strength screen, Highlight Done and press SELECT.
Note:
If this is a new setup, the Receiver will gather satellite
information for a few minutes.
(POWER) button on the TV
22
Moving the antenna after attaining signal lock may cause
the antenna to lose signal lock and require you to realign the
antenna.
Page 24

Setting Up Your DIRECTV® Sat-Go
Set Up Checklist
If the signal is not found, check the following to be sure the TV and antenna set-up have been
properly followed:
• Verify all cable connections are correct and each connection is seated properly.
• Inspect the inside of each cable connector for dirt or damage to connector case/shield
causing a possible short.
• Verify the antenna Direction and Angle coordinates for your location by ZIP code.
• Make sure there are no obstructions (trees, buildings, windows, corner or roof overhang,
including your body or hands) – the signal does not pass through leaves, branches, glass,
etc.
• Make sure the access card from your receiver is fully inserted into the access card slot and
oriented correctly.
• Verify the antenna cable:
- Using the 15’ cable (provided), connect the antenna and receiver
- To place the TV and Receiver more than 15’ from the antenna RG-6 cable is
highly recommended. Use of an RG-59 cable is not recommended and may cause
performance problems.
• Some after-market, off-the shelf add-on components may not be as advertised. They might
not work or could cause additional DC drops and signal amplitude attenuation. Remove
such components, go back to the basic connections described in this manual and re-verify.
• If you’ve verifi ed the above checklist items and the signal is still not found, change the
Angle adjustment of the antenna slightly (+/-2 degrees, then +/- 4 degrees from the calledfor coordinate setting) and repeat the antenna alignment procedure.
23
Page 25

Setting Up Your DIRECTV® Sat-Go
Connecting Your DIRECTV Sat-Go to other Equipment
There are several ways to connect your DIRECTV Sat-Go to match your particular equipment
setup and to gain optimum signal quality. The basic steps are as follows:
• Connect your DIRECTV Sat-Go to your VCR or DVD player
• Connect your DIRECTV Sat-Go to a telephone line
• Connect your DIRECTV Sat-Go to your second TV or monitor
• Plug in all power cords.
The following pages give detailed instructions on the types of connections you can make,
depending on the equipment you have, in order to get the best picture and sound quality. Note
that the back panels of your equipment may not exactly match those illustrated.
NOTE: Not all cables come with your DIRECTV Sat-Go you may need to purchase
TIP: When working with cables, be sure to connect corresponding outputs and inputs
additional cables depending on your setup.
(Video OUT to Video IN, Right Audio OUT to Right Audio IN, etc.). Never connect an IN
to an IN or an OUT to an OUT. All A/V jacks and inputs are color coded. Always match
the color of the plug to the same color of the jack.
24
Page 26

Setting Up Your DIRECTV® Sat-Go
R -
Connecting DIRECTV Sat-Go to a VCR, DVD player or PMP
(personal media player)
Depending on the connections on the back of your VCR or DVD player, you have the following
options:
• Component Connection (Best Quality)
• A/V Connection (Better Quality)
These connections are described on the following.
Component Connection (Best Quality)
1. Connect the Component video cable to the component video output jacks (Y/Pb/Pr) on the
VCR or DVD Player and to the component video input jacks (COMPONENT AV IN 2) on
the DIRECTV Sat-Go TV rear connector panel.
2. Connect the audio cable to the audio output jacks (L/R) on the VCR or DVD Player and to
the COMPONENT AV IN 2 jacks (L/R) on the DIRECTV Sat-Go TV rear connector panel.
UNIT IMAGE
LINE OUT
LINE OUT
S-VIDEO OUT
AV IN 1
COMPONENT OUT
R - AUDIO - L
COMPONENT
AV IN 2
NOTE: Depending on the manufacturer, the Y/Pb/Pr jacks may be identifi ed as Y/PB/PR,
Y/B-Y/R-Y, or Y/CB/CR.
25
Page 27

Setting Up Your DIRECTV® Sat-Go
O
A/V Connection (Better Quality)
1. Connect the video cable to the video output jack on the VCR or DVD Player and to the
video input jack (AV IN 1) on the DIRECTV Sat-Go TV rear connector panel.
2. Connect the audio cable to the audio output jacks (L/R) on the VCR or DVD Player and to
the audio input jacks (AV IN 1) on the DIRECTV Sat-Go TV rear connector panel.
AUDIO -
LINE OUT
AV IN 1
VIDE
S-VIDEO OUT
COMPONENT OUT
COMPONENT
AV IN 2
26
Page 28

Setting Up Your DIRECTV® Sat-Go
Connecting your DIRECTV Sat-Go to a Telephone Line
(when used in the home)
Plug one end of the telephone cord into a phone jack on your wall (or into a phone splitter that
is plugged into a phone jack) and the other end into the PHONE JACK on the DIRECTV Sat-Go
TV rear connector panel. A phone connection is not required for outdoor use, but you will need
to connect to a phone line occasionally if you want to purchase pay per view movies.
13/18V 450mA Max.
AV IN 1
COMPONENT
AV IN 2
27
Page 29

Setting Up Your DIRECTV® Sat-Go
Connecting your DIRECTV Sat-Go system to a second TV
or Monitor
The DIRECTV Sat-Go system has a special signal output capability that allows you to connect a
second TV or monitor to your DIRECTV Sat-Go TV.
1. Connect the video cable to the video input jack on the second TV or monitor and to the
video output jack (AV OUT) on the DIRECTV Sat-Go TV rear connector panel.
2. Connect the audio cable to the audio input jacks (L/R) on the second TV or monitor and to
the audio output jacks (AV OUT) on the DIRECTV Sat-Go TV rear connector panel.
13/18V 450mA Max.
R - AUDIO - L
AV IN
VIDEO
S-VIDEO
AV IN 1
COMPONENT
COMPONENT
AV IN 2
NOTES:
- Neither AV IN 1 nor AV IN 2 can be used for the second TV or monitor out.
- See the Operating Manual of the second TV or monitor for further details regarding
that device’s input settings.
28
Page 30

Setting Up Your DIRECTV® Sat-Go
Completing the Connections
Plug all power cords into electrical sockets.
AC
DC
29
Page 31

Setting Up Your DIRECTV® Sat-Go
Installing the DIRECTV Access Card
The DIRECTV access card is pre-installed in your DIRECTV Sat-Go TV. The DIRECTV access
card provides the ability to view DIRECTV® programming. This card should not be removed
unless Customer Service instructs you to do so and must be properly inserted to obtain
DIRECTV programming. In the event you are directed to replace the access card, please follow
the steps below:
1. Locate the access card case below the remote control compartment in the receiver
2. Remove the access card door and remove the pre-installed access card.
3. Replace the access card with the new one provided by DIRECTV.
Make sure the side with the metal contact is facing toward the receiver when installed.
You may get an onscreen message that says, “Please insert access card” if the card is not
correctly inserted.
Note:
The access card should only be removed when replacing the card with a new
one provided by DIRECTV or your program provider.
30
Page 32

TV INPUT
ACTIVE
Setting Up Your DIRECTV® Sat-Go
Guided Setup for DIRECTV® Service
Now that your DIRECTV Sat-Go equipment is all hooked up and plugged in,
you’re ready to fi nish all the details to begin receiving your DIRECTV service.
POWER
TV
ON
OFF
LIST
1) Make sure the MODE switch on the remote control is set to DIRECTV.
2) Press TV POWER ON. The TV will turn on.
3) The fi rst screen will allow you to select a language. Using the arrow
keys on the remote control, move to the language you prefer and press
SELECT.
4) You will see a Welcome screen.
Now, let us lead the way…
Simply follow the onscreen directions to complete your setup functions. If you’ve
set up your antenna, you’ll be guided though various functions for optimizing
your signal and setup — including positioning your antenna and a system test.
After these setup procedures are complete, you’ll see the Satellite Data
Acquisition screen, as the receiver gathers information from the satellite for the
onscreen program guide.
Next, you’ll be given the opportunity to set up your phone connection, as well as
program your remote to control other equipment, such as your DVD player. Just
follow the screen instructions and you’ll be ready to watch in no time!
TIP: You may decide to set
up, change or adjust
some of the settings later.
When you’re ready, press
MENU on your remote
control, press SELECT on
Settings and then select
Setup.
IMPORTANT:
In order to protect your TV screen from burn-in (a side-effect
caused when a stationary image is displayed for too long),
the TV interface automatically goes into screen saver mode,
and displays a black screen with a moving logo when no key
is pressed for 5 minutes or more while a stationary image is
displayed on the TV. To dismiss the screen saver and return to
what you were doing, press any key on the remote. Burn-in may
cause permanent damage to your TV.
31
Page 33

Setting Up Your DIRECTV® Sat-Go
Activating Your DIRECTV® Service
Once all the setup processes are complete, all that’s left to do is activate your
DIRECTV service.
Before you make the call, be sure to:
• Tune to Channel 100 and be sure you’re picking up a satellite signal
(DIRECTV channel).
• Have on hand your service address, social security number and a valid
major credit card.
• Note your access card and receiver ID numbers (fi nd these by pressing
MENU, then go to Settings and press SELECT. Then go to Setup and
press SELECT. Highlight Info & Test and press SELECT.
When you’re ready, just call 1-800-DIRECTV (1-800-494-4388) and pick the
programming package that’s right for you.
32
Page 34

Basic Operation
ON
TV
POWER
ON
TV
POWER
TV INPUT
TUV WXYZPQRS
DASH ENTER
TIP: Use the Channel Lineup
(included in your
Welcome package) to get
familiar with our channel
numbers.
The channel banner gives you
info on the channel and show you
are currently watching.
POWER
TV
ON
OFF
Watching TV
With the MODE switch to the left (under the DIRECTV logo), press TV POWER
ON. To access the channel of your choice, simply key in its numbers on your
remote control (the channel will appear in a few seconds, or press ENTER after
the numbers and it will appear right away). You can also navigate to different
channels through the Guide. Keep in mind, either way, you’ll only be able to
access those channels in your chosen DIRECTV® programming package.
Use the black keys on the left side of your remote control to adjust volume up
or down (VOL) or mute the sound (MUTE). The black keys on the right side can
take you to the next channel numerically up or down (CHAN), or jump to the
previous channel you watched (PREV).
The Channel Banner
Any time you tune to a channel, you’ll see the channel banner appear across
the top of the screen. This banner displays the following useful information:
1) Current date & time
To see program details at any
time press INFO on your remote
control (press a second time to
clear). Select More Info button to
see additional options.
2) DIRECTV Channel – Channel logo, number and call letters of the station
you’re currently viewing.
3) Program – Program title, stop and start time and rating of the current
program.
4) Current Favorites – Favorite Channels list currently in use.
5) Audio options – Two states: bright and dim. If displayed brightly, alternate
audio options are available.
6) Messages – Two states: bright and dim. If displayed brightly, there are new
DIRECTV messages in Caller ID & Messages.
7) Parental Controls – Parental Controls lock status. Three states: Locked,
unlocked and temporarily unlocked.
Music Channels
Your DIRECTV service includes dozens of enjoyable, continuous, commercialfree music channels with something for every taste. Tune to these just as you
would to any channel. You’ll see a special Channel Banner that initially displays
the channel description (for example, “Alternative,” “Today’s Country”). As each
song is played, its info will appear in the banner, including song title, artist and
record company.
33
Page 35

Basic Operation
MENU
INFO
BACK
EXIT
LIST
GUIDE
ACTIVE
SELECT
ON
TV
POWER
The Guide
TIP: Press the GUIDE key
twice to skip the Category
Sort screen.
Highlight an item by using the
arrow keys to move
UP or DOWN. Press SELECT
to access the information or
channel.
LEFT, RIGHT ,
Overview of the DIRECTV Advanced Program Guide
®
The Guide displays listings of current and upcoming programs for up to 3.5
days in advance. Find out what’s on (now or later), change the channel, fi nd
and purchase a pay per view movie or event, or search for a program you’re
interested in.
Icons you may see in the Guide:
•
•
- Broadcast in letterbox (16:9 or widescreen) format
- All Day Ticket Pay Per View showings (pay once, watch all day)
Getting Around in the Guide
Press the GUIDE key on your remote control, then choose how you want to
fi lter the Guide. Select All Channels, or channels in a specifi c category.
Moving through the Guide is simple:
• The UP, DOWN, LEFT and RIGHT arrow keys move you through listings
and time slots. Highlight a program or channel cell to view its description.
• Use the CHAN key up or down to scroll a full page.
• Press the RED or GREEN keys to move forward or back in time.
• To tune to a program that is on now, highlight the program and press
SELECT. Selecting a future program displays program information.
• Press INFO when you’ve highlighted a show in the Guide to view a more
in-depth description and options. Pressing INFO when you’ve highlighted
the channel name displays the channel’s listing for up to 3.5 days.
• Press SELECT when you’ve highlighted a channel cell (far left) to view that
channel in the TV window.
• Press MENU to see Guide options, change your Favorites list, or jump to a
desired date and time.
34
Page 36

IN
FO
BACK
IN
FO
LIST
Basic Operation
Autotune
An even better way to catch all your favorites
Autotune is a great way to see your favorite programs on your schedule. You
won’t miss your favorite series because it moved to a different day or time,
or miss your team’s playoff game because you had to work late. Just set a
program to autotune and your TV will tune to it automatically when it starts.
To schedule a program for autotuning with specifi c options:
1) Highlight a program that interests you and press INFO.
MENU
INFO
2) Highlight and select Autotune. A screen is displayed where you can set
Autotune options for that program. Follow the onscreen instructions to set
the program to autotune as you wish.
3) Select the Set Autotune button, then OK on the confi rmation screen.
If a program you select to autotune confl icts with another program, you will
be notifi ed of the confl ict at the time and given a choice of which autotune to
cancel.
Changing Autotune Options/Canceling an Autotune
Once you have scheduled a program to autotune, you can change the autotune
options or cancel the autotune by selecting the program in the Guide or the
To Do List (press LIST); then, select the Autotune item in the left menu, and
follow the onscreen instructions to change the program’s options or cancel the
Autotune completely.
You can change the following Autotune options:
• For all programs, you can extend Autotune start and stop times (for
example, start 1 minute before the program; stop 5 minutes after the
scheduled end of the program).
• For programs with multiple episodes, you can select whether to Autotune
fi rst run programs and repeats or just fi rst runs.
Recording to VCR
To record a program on your VCR, make sure you’ve connected your VCR
properly to your TV, then set up your VCR to record at the same time as
a scheduled autotune and you’re set. See your VCR User’s Maunal for
information on how to set it up for scheduled or manual recording.
35
Page 37

INFO
LIST
LIS
T
ACTIVE
GUIDE
SELECT
BACK
MENU
INFO
TIP: Y ou can also order
DIRECTV Pay Per View
movies and events on
the Internet at DIRECTV .
com or over the phone
at 1-800-531-5000. Keep
in mind, though, there is
an ordering fee for those
purchases placed over
the phone.
Basic Operation
Pay Per View
The Latest Movies, 24 Hours a Day
You don’t have to go out for the best and biggest movies and special events!
Recent hits and events like sports, comedy and more are available 24 hours a
day on DIRECTV® Pay Per View. You’ll fi nd them listed in the Guide in the 100s,
with previews on channel 100.
Tune to a pay per view program or press INFO on a highlighted pay per view
program. Select a Buy option and follow the onscreen instructions. As long as
EXIT
your TV has been connected to a land-based phone line, you can use your
remote control to order. You’ll get a reminder a few minutes before the pay per
view’s start time.
You can cancel your pay per view order for any reason as long as none of
the program has been viewed. Press LIST to display the To Do List. Press
SELECT on the Purchases item in the left menu.
Select the desired program and follow the onscreen instructions.
36
Page 38

Using the TV Menu
TV INPUT
TIP: Make sure the MODE
switch on the remote
control is set to TV .
POWER
TV
OFF
Set the MODE switch to TV and then press MENU on your remote control or
ON
you can press TV Menu on the TV Display Panel to easily access the TV Menu.
Once the TV Menu is displayed, use the UP and DOWN arrows on the remote
control to highlight a desired menu item, then press SELECT to access that
item. Some menu items will display a submenu. To exit the TV Menu at any
time, press EXIT.
You can also navigate using the buttons on the TV Display Panel. Use the Vol-
and Vol+ buttons to scroll up and down, and press TV Input/Select to highlight
a desired menu or submenu item. The TV Menu mode will automatically time
out, returning you to your program after several seconds.
Picture
Picture Mode
You can select the picture mode that best corresponds to your viewing
requirements.
1) Press MENU to display the TV Menu.
2) Highlight Picture and press SELECT.
3) Highlight Picture Mode and press SELECT.
4) Press SELECT on a desired picture mode as followings.
Custom – Dynamic – Standard – Mild – Movie
Custom Picture
There are several setting options that allow you to control the picture quality.
1) Press MENU to display the TV Menu.
2) Highlight Picture and press SELECT.
3) Highlight Custom Picture and press SELECT.
4) Press SELECT on a desired option of the followings.
Contrast – Brightness – Sharpness – Color – Tint
5) The horizontal bar is displayed. Use the UP or DOWN arrow keys on your
remote control to reach the optimal setting.
6) Press BACK or MENU to return to the previous menu.
Color Tone
You can change the color tone of the entire screen to suit your requirements.
1) Press MENU to display the TV Menu.
2) Highlight Picture and press SELECT.
3) Highlight Color Tone and press SELECT.
4) Press SELECT on a desired color tone of the followings.
Cool1 – Cool2 – Normal – Warm1 – Warm2
37
Page 39

Using the TV Menu
Size
You can change the size of the screen to that which best corresponds to your
viewing requirements.
NOTE: This is typically used for content that is natively displayed in
1) Press MENU to display the TV Menu.
2) Highlight Picture and press SELECT.
3) Highlight Size and press SELECT.
4) Press SELECT on a desired size of the followings.
Widescreen format.
Normal – Zoom – Wide
Sound
Sound Mode
You can select the sound mode to be used when watching a given broadcast.
1) Press MENU to display the TV Menu.
2) Highlight Sound and press SELECT.
3) Highlight Sound Mode and press SELECT.
4) Press SELECT on a desired picture mode of the followings.
Standard – Music – Movie – Speech
38
Page 40

Using the TV Menu
Settings
Language
To choose a language from the TV Menu, follow these steps:
1) Press MENU to display the TV Menu.
2) Highlight Settings and press SELECT.
3) Highlight Language and press SELECT.
4) Press SELECT on a desired language of the followings.
English – Español
Closed Caption
Your TV decodes and displays the closed captions information that is broadcast
along with some television shows. These captions are usually subtitles for the
hearing impaired or translations into other languages. Check for the closed
caption symbol
1) Press MENU to display the TV Menu.
2) Highlight Settings and press SELECT.
3) Highlight Closed Caption and press SELECT.
4) Press SELECT on a desired option of the followings.
Off – CC1 – CC2 – CC3 – CC4 – Text1 – Text2 – Text3 – Text4
on your TV program-schedule.
CC
NOTE: The options may change depending on the broadcasting service.
Backlight Brightness
You can easily adjust the brightness of the Liquid Crystal Display (LCD).
1) Press Menu to display the TV Menu.
2) Highlight Settings and press SELECT.
3) Highlight Backlight Brightness and press SELECT.
4) Press SELECT on a desired option:
- Low
- High
Internal Battery
You can check Internal Battery level.
1) Press Menu to display the TV Menu.
2) Highlight Settings and press SELECT.
3) Highlight Internal Battery and press SELECT.
39
Page 41

Using the TV Menu
Parental Controls
This feature allows you to block certain channels or programs so children
cannot view programs that are not age appropriate.
NOTE: This Parental Controls menu is adapted to external input (AV
NOTE: To enter the Parental Controls menu, you need a password. The
IN 1). When the input is DIRECTV, this menu is deactivated. To
adjust the Parental Controls of DIRECTV input, see the Menu-
Parental Controls in page 50.
fi rst time you enter, use password 0000.
Change Password
After you enter the Parental Controls menu for the fi rst time, you can set your
own four-digit password.
1) Press MENU to display the TV Menu.
2) Highlight Parental Controls and press SELECT.
3) Enter your 4-digit password to access.
4) Highlight Change Password and press SELECT.
5) Enter your new password using the NUMBER and LEFT/RIGHT keys.
Block
Turns on or off all your parental control settings.
1) In the Parental Controls menu, select Block and press SELECT.
2) Press SELECT on a desired option of the followings.
On – Off
40
MPAA Rating
Blocks movies based on their rating.
1) In the Parental Controls menu, select MPAA Rating and press SELECT.
2) Press SELECT on a desired rating of the following ratings.
- G: All children and General audience.
- PG: Parental guidance suggested.
- PG-13: Parental guidance for children under 13.
- R: Restricted viewing, parental guidance is suggested for children under
17.
- NC-17: No children under age 17.
- X: Adults only .
- View: Not rated.
Page 42

Using the TV Menu
TV Rating - Children
Blocks TV shows based on children’s age rating.
1) In the Parental Controls menu, select TV Rating-Children and press
SELECT.
2) Highlight Age or Fantasy Violence and press SELECT.
3) Press SELECT on a desired rating of the followings.
- TV-Y: Young children.
- TV-Y7: Child 7 and over.
- View: Not rated
TV Rating - General
Blocks TV shows based on general’s age rating.
1) In the Parental Controls menu, select TV Rating-General and press
SELECT.
2) Press SELECT on a desired sub-rating of the followings.
Age – Dialogue – Language – Sex - Violence
3) Select a desired restriction rating of the followings in the each sub-rating
and press SELECT.
- TV-G: General audience.
- TV-PG: Parental guidance suggested.
- TV-14: Parents strongly cautioned.
- TV-MA: Mature audience.
- View: Not rated.
No Rating Program
Blocks the TV signal or movies displayed without restriction ratings.
1) In the Parental Controls menu, select No Rating Program and press
SELECT.
2) Press SELECT on a desired option of the followings.
- View: When TV signal or movies display without restriction ratings, All
signals will be unblocked, and you can view any other program
- Block: When TV signal or movies display without restriction ratings, TV
or Movies signal will be blocked, and a blank screen will be displayed.
41
Page 43

Using the Menu
TIP: Make sure the MODE
switch on the remote
control is set to DIRECTV
logo.
If the MODE switch is to the left (under the DIRECTV logo), press MENU on
your remote control or MENU on the TV receiver panel to easily access the
DIRECTV features (Menu).
Once the Menu is displayed, use the UP and DOWN arrows to highlight a
desired menu item, then press SELECT to access that item. Some menu items
will display a submenu, others will take you directly to a new screen. To remove
the Menu at any time, press EXIT.
Settings
Selecting Settings in the Menu displays a submenu of items that lets you
customize, adjust and keep track of your DIRECTV viewing experience.
Setup
The Setup item in the Menu displays the Setup screen, where you can access
the Info & Test, Satellite Setup, Remote Setup, Audio Setup, Display Setup, TV
Type, Access Card and System Reset screens.
• Info & Test - The System Info option lets you view the current system
information. The System Test option lets you run a test on the tuner, access
card, receiver ID and phone line.
• Sat & Ant. - This option is useful if your TV has lost signal strength, or you
need to realign your satellite dish or antenna.
• Remote - This option is useful for programming your remote control.
• Audio - This option lets you to change the language for programs with
multiple audio tracks.
• Display - This option lets you specify how long the Channel Banner
displays.
• Access Card - Follow the onscreen directions to replace your access card.
You will need your old and new access cards to complete this process.
(Note: DIRECTV will provide new access cards and instructions when
necessary.)
• Reset - From here you can restart the TV, reset to factory defaults, or reset
everything.
• Done - Select to return to live TV.
42
Scheduler
This feature gives you an overview of and access to all the programs you’ve set
to Autotune or purchase.
Favorites Channels
Check the current status of your Favorites list(s) by clicking here, and make
changes if you like. See page 48 for more details.
Parental Controls
Check the current restrictions of your Parental Controls by clicking here, and
make any adjustments. See page 50 for more details.
Page 44

Using the Menu
Audio Options
Some programs have alternate audio available (such as other language tracks
or Dolby Digital). You can set the default so that whenever a program has
alternate audio available, it automatically plays this audio, or you can change
the alternate audio temporarily for the program you are watching. In either case,
press MENU while in Live TV, then:
NOTE: This option only appears in the Menu over Live TV when the
To change the default audio, from the Menu, select Settings, select Setup,
then select Audio in the left menu and follow the onscreen instructions.
To temporarily change the audio, from the Menu, select Audio Options, then
select the audio track you prefer. Once the program is over or you change the
channel, the audio will change back to the default setting.
current program has alternate audio.
Category Sort
This feature lets you temporarily arrange the Guide to list only programs in a
particular category such as Movies, Sports or News.
While in the Guide, from the Menu, select Category Sort. To further narrow
your search, select the category you want, then select a subcategory if you
wish. To quickly move through the Category Search results, use the RED
or GREEN key on your remote control to advance or reverse in 90-minute
increments.
Press GUIDE to return to the regular Guide, or EXIT to return to live TV.
43
Page 45

Using the Menu
Pay Per View
This option enables you to check out DIRECTV® Pay Per View listings by
category.
While in the Guide, press MENU, then select Pay Per View. You will see three
choices for sorting the listings. Choose All to display all current pay per view
programs. Movies will give you listings of all current movies available. Pick
Special Events to see specifi c events such as sports, comedy specials and
more. The Guide will update with matching programs.
Search
Would you like to locate a particular program, movie or sports event you want to
see — even shows starring a favorite actor, or games with your favorite team?
Search offers some easy ways to spot just what you want to watch.
Press MENU, then select Search. Y ou can fi nd a program by Title, Person,
Keyword, Channel or News. Your search will be quicker if you narrow your
search by selecting subcategories; just follow the onscreen instructions. Once
you’ve found a program you’re after, all you have to do is highlight and select
the title to display when the program is on.
44
Recent Searches
If you’d like to repeat a previous search, select Recent Searches, then select
your search to view matching programs.
NOTE: Keep in mind, when you do a Search, only those programs
slated to air within the Guide’s number of days of programming
supported by your TV will appear on your list.
Page 46

Using the Menu
Date & Time
This option gives you a convenient way to look up to 3.5 days ahead in the
Guide, without having to scroll through pages of programs.
Favorites
Favorites allows you to set up special, customized Guide that shows only those
channels you choose. So you can have easy access to the channels you like
best, or perhaps a grouping of family channels just for the kids.
When you’re using a Favorites list, the Guide will only display those channels
you’ve chosen — and you’ll also only see those channels when you change
channels using Chans / Get on your remote control.
Keep in mind, no matter what Favorites list you’re currently using, you can still
always access any channel you receive by keying in its channel number on your
remote control. You can also edit or delete a list at any time.
45
Page 47

Using the Menu
Caller ID & Messages
This feature lets you get messages from DIRECTV. If you have Caller ID
service, you can also view phone calls you’ve received or turn call notifi cation
on or off.* Press MENU to display the Menu, select Caller ID & Msgs, then
select Edit Settings. Select either Caller ID or Messages from the left menu,
as desired.
Caller ID
The Call Log tab displays up to 25 recent incoming calls. Highlight and select a
name to delete that listing from your log.
The Notices tab lets you turn the notifi cation feature on or off. When the
Notices option is on, you’ll see a notice on your TV screen whenever a call
comes in.
NOTE: * You must subscribe to Caller ID service through your local
telephone company, and your TV must be connected to a phone
line.
DIRECTV Messages
This feature lets you view a listing of current DIRECTV messages waiting for
you. Simply highlight and select a message in the list to read, then you’ll have
the choice to keep or delete it.
The messages icon will appear brightly on your channel banner whenever
there’s any new or unread message in your Inbox.
46
Page 48

Using the Menu
Parental Controls
TIP: For ratings limits and
channel blocks, as well as
most other checkbox-type
items, pressing SELECT
toggles the item on and
off when setting them up.
NOTE: This Parental Controls menu in the Menu is adapted only to
Parental Controls enables parents to place certain restrictions on just who’s
watching what, and require a passcode to view restricted programming.
Whether it’s for mature content or spending amounts, you’re always able to
keep limitations where you want them for the whole family.
Press MENU to display the Menu, Select Parental Controls, then Edit
Settings, and you’ll see the current status showing any restrictions. The system
default is “unlocked” for all categories.
DIRECTV input. To adjust the Parental Controls of external input,
see the
TV Menu – Parental Controls on page 43.
Ratings
Here you can set rating limits for Movies and TV:
1) Select Ratings.
2) Move to the right to select the another tab. (Note: You can use RED or
GREEN to cycle tabs.)
• Movies - Highlight and select the Movies tab, then set the overall rating
limit you wish to impose Brief descriptions of the ratings appear for your
guidance.
• TV (Programs) - Select the TV tab, then highlight and select the TV rating
you desire. You can also set ratings for particular content (for example,
Fantasy Violence, Dialogue), each of which is described when highlighted.
• Other (Shows) - Select the Other tab o block programming that has no
rating — such as news and sports and shows with a rating of “None”
— select the Other tab.
Channel Blocks
You can block viewing of a certain channel or channels from this menu.
Select Chan Blocks in the left menu, then scroll down the channel list to select
those you wish to block, or key in channel numbers for quicker access. Use
Block All or Allow All to save time if you wish to affect a large number of
channels.
Spending
From the left menu, select Spending, then set your preferred spending limit for
any single pay per view purchase. Simply key in the amount using the numbers
on your remote control.
Hours
From the left menu, select Hours, then set your preferred hours during which
TV can be viewed. You can set hours based on “school nights” and weekend
nights—Monday-Thursday, Friday-Saturday, and Sunday.
47
Page 49

Using the Menu
Now, lock it
Once you’ve set the restrictions you want, choose Lock Now from the left
menu. You’ll be directed to create a passcode (which you’ll want to make easy
enough to remember, but hard enough that the little ones won’t guess it!). This
passcode will be your entry to unlocking and adjusting limitations in the future.
An onscreen message will appear whenever anyone tries to tune to a channel
or program that has been restricted, or attempts to spend or watch beyond
limitations set. He or she will not be allowed to proceed without the passcode.
Using your passcode, you can easily override the limits.
TIP: The Parental Control icon
in the Channel Banner
will tell you if the receiver
is locked, temporarily
unlocked, or unlocked.
Locked
Unlocked
Temporarily Unlocked
Let me in…!
Temporarily or permanently unlocking a restriction is easy. To temporarily unlock
a particular program:
1) When any controls are currently activated, Unlock Now will appear if you
try to tune to a restricted program.
2) Select Unlock Now and enter the password.
For more unlock options:
1) Press MENU, then select Parental Controls.
2) Various options for removing restrictions temporarily or permanently will
appear. Select one and enter your password.
Also note: If you have Parental Controls set and temporarily unlocked, turning
the TV power off will relock the box. If anyone tries to unlock restrictions using
an invalid passcode, there’s a time delay that’s added with each additional
attempt to discourage them.
To change your passcode at any time:
1) Press MENU, select Parental Controls, then Edit Settings.
2) Scroll down to Passcode and press SELECT.
3) Enter your old password, then enter a new one twice to confi rm.
48
Page 50

Menu Map
TV Menu
Picture Mode Custom, Dynamic, Standard, Mild, Movie
Custom Picture Contrast, Brightness, Sharpness, Color, Tint
Picture
Color Tone Cool1, Cool2, Normal, Warm1, Warm2
Size Normal, Zoom, Wide
Sound Sound Mode Standard, Music, Movie, Speech
Language English, Español
Closed Caption Off, CC1, CC2, CC3, CC4, Text1, Text2, Text3, Text4
Settings
Backlight Brightness High, Low
Internal Battery 0 ~ 100%
Change Password New Password, Confi rm
Parental
Controls
Block On, Off
MPAA Ratings G, PG, PG-13, R, NC-17, X, View
Age TV-Y, TV-Y7, View
TV Rating – Children
TV Rating - General
No rating programs View, Block
Fantasy
Violence
Age TV-G, TV -PG, TV-14, TV -MA, View
Dialogue TV-PG, TV-14, View
Language TV -PG, TV-14, TV-MA, View
Sex TV-PG, TV-14, TV -MA, View
Violence TV-PG, TV-14, TV-MA, View
TV-Y7, View
49
Page 51

Menu Map
Menu (for DIRECTV® Service)
Setup
Settings
Category Sort All, Movies, Sports, News, etc. ----------- ( Appears while in the Guide)
Pay Per View All, Movies, Special Events, etc. ----------- ( Appears while in the Guide)
Search
Date & Time ------------------------------------------------------ ( Appears while in the Guide)
Scheduler To Do List, History, Purchase, Manual
Favorite Channels --- (Moves to the Favorites - Editing Settings menu.)
Parental Controls --- (Moves to the Parental Controls menu.)
Recent Finds
Title
Person
Keyword
Channel
Editing Settings Set Current, Custom 1, Custom 2
Info & Test, Sat. & Ant., Remote, Audio, Display, TV
Type, Access Card, Reset, Done
50
All Channels
Favorites
Setup Custom 1
Setup Custom 2
Previous Ch’s Displays the last 4 channel searches
Calls
& Msgs
Parental
Controls
Edit Settings Messages, Caller ID
Turn Off Notices Turn On Notices
Unlock Now
Ratings
Chan Blocks
Spending
Hours
Page 52

Troubleshooting
Many problems can be corrected by performing a simple reset of the system.
If you experience image freezes, audio freezes or blank screen, or the system won’t respond to
the panel button or remote control, try one of these:
• Press the RESET button behind the access card door on the TV receiver base, then wait
for the program guide information to be acquired.
• If the problems persist, try unplugging the TV power cord and wait for 15 seconds, then
plug it in again.
• Running the System Test (later in this section) can also help you diagnose and solve many
common problems.
TV Problems
Progress bar freezes during Satellite Data Acquisition
This is normal. The progress bar times out after two minutes. If your screen is still blank for a
few minutes after the progress bar times out, press the RESET button on the TV and wait for
program guide information to be acquired.
Wrong picture, blue screen, snow or black/blank picture
The TV lets you toggle between video sources. If you don’t see the signal you think you should
be seeing, try using these buttons to toggle between the signals:
• Press the TV INPUT/SELECT button on the TV display panel or the SELECT button on the
remote control.
• If problems persist, turn off all equipment that is connected to your DIRECTV Sat-Go
system, wait a few minutes.
Problems with Caller ID
• You must subscribe to Caller ID service through your local phone company.
Also, check to be sure your Caller ID feature is turned on (see page 49).
• If you are plugging your TV to a wireless phone jack, note that it typically does not transmit
Caller ID information and you may need a special wireless phone jack to use with Caller ID
service. See the user’s manual that came with the wireless phone jack to see if it transmits
Caller ID information. If it doesn’t, either connect the phone line directly to a standard wallmount phone jack or install a wireless phone jack that transmits Caller ID information.
TV will not turn on
• Check to make sure the DIRECTV Sat-Go system is connected to power (either AC or DC
power).
• Check the wall receptacle (or extension cord) to make sure it is “live” by plugging in
something else.
• Check batteries in the DIRECTV Sat-Go system and in the remote control.
• Be sure remote control is pointed at remote sensor, and that the front of the TV display is
not blocked.
• Unplug the DIRECTV Sat-Go system. Wait fi ve minutes. Plug it in again.
51
Page 53

Troubleshooting
Turns off while playing
• Electronic protection circuit may have been activated because of a power surge. Wait 30
seconds, then turn on again.
• Unplug the DIRECTV Sat-Go system for a few minutes, then plug back in. If this happens
frequently, the voltage in your house may be abnormally high or low.
• Consider using a surge protector or line conditioner.
• If your TV turns off while playing, and other lights/appliances in your house do too, you may
have blown a circuit breaker or be experiencing a power outage.
• Consult an electrician if the problem is frequent or severe, especially if other household
appliances or electronics are affected.
DIRECTV Sat-Go system turns on or changes channels unexpectedly
• An Autotune may have been activated. See page 38.
Blank screen
• Check that all components connected to the input jacks are turned on.
• Try another channel.
• Press the TV INPUT key on the remote control to make sure that the TV input is set to
DIRECTV.
• Press the POWER button on the front of the TV.
• Press the RESET button behind the access card door on the TV receiver base.
Temporary loss of the satellite signal or Searching for Satellite Signal message
• Your satellite system may be experiencing a temporary loss of the satellite signal due to
unusually heavy rain clouds or rainfall. This is usually brief, lasting only as long as the
heavy rain cloud condition persists.
• Your antenna may be blocked. Check that something is not blocking the antenna.
Partial programming loss/channels missing from the Guide/channel is in the
Guide but can’t tune to
• Your antenna may be incorrectly confi gured. Check the dish type set in your preferences
and change if necessary. While in the DIRECTV input and the MODE switch is set to
DIRECTV logo, press the MENU key on the remote control to display the Menu, then
select Settings, then Setup. In the next menu, select Satellite, then Repeat Satellite Dish
Setup. Follow the steps. From the Antenna Type screen, make sure the proper dish type
(Round) is selected.
• The channels might be excluded from the Favorites list currently in use. Enter the Menu,
select Favorites, then All Channels, or enter the channel number manually.
My video and audio are out of sync
• Try changing channels.
• Press LIST, then EXIT.
• If neither of those work, restart your TV. On the remote control, press MENU, press
SELECT on Settings, then select Setup. Select the Reset item from the left menu and
follow the onscreen instructions.
52
Page 54

Troubleshooting
My video and audio are out of sync
• Try changing channels.
• Press LIST, then EXIT.
• If neither of those work, restart your TV. On the remote control, press MENU, press
SELECT on Settings, then select Setup. Select the Reset item from the left menu and
follow the onscreen instructions.
My TV is “frozen” on a single frame of a TV picture.
• If you are on a Pay Per View channel, watching the preview portion of a program, the
preview portion may be completed. You must buy the program to continue watching.
• If that doesn’t work, restart your TV. Enter the Menu, press SELECT on Settings,
then select Setup. Select the Reset item from the left menu and follow the onscreen
instructions.
Remote Control Problems
Problems with the remote control
• Check that nothing is between the remote control and the remote sensor.
• Make sure the mode switch on the remote control is set correctly to each mode. Slide the
mode switch to the desired position so the remote control will control the TV.
• Check the batteries in the remote control. They may be weak, dead or installed incorrectly.
Try replacing batteries.
• If you’re entering a channel number that is less than four digits long, the TV might wait two
seconds before tuning to the channel. Press ENTER after entering a channel number to
tune immediately.
• If you are trying to operate a device other than the DIRECTV Sat-Go TV that you have
programmed the remote to control, make sure you fi rst slide the mode switch to the
corresponding device (DVD player, VCR, etc.). The indicator light for the component you’re
trying to control should light up when you press a valid key for that component. If it doesn’t,
make sure the mode switch is clicked into the correct position.
A remote control indicator light starts fl ashing
The batteries in the remote control are running low and should be replaced soon. (Note that
when you replace the batteries, you may have to reprogram your remote to control other
devices.)
Signal Problems
If you already set up the antenna for the optimal signal strength, fi ne-tune the signal and run a
system test. If you need to run the Guided Setup again, select Settings from the Menu, then
select Guided Setup. Next, press SELECT on Satellite, then select Repeat Satellite Setup.
53
Page 55

Troubleshooting
Running the System Test
The System Test allows you to run a basic diagnostics check on your DIRECTV Sat-Go system.
If you are experiencing any trouble with your TV or antenna, run the system test. It will also
allow you to get your access card and receiver ID numbers or to initiate diagnostic procedures
on your TV.
First make sure that:
• All connections — jacks, cables, etc. — are in place correctly.
• There are batteries in the remote control and that they are working correctly.
• There is a battery in the DIRECTV Sat-Go System and that it is working correctly.
• The access card is installed properly in the DIRECTV Sat-Go System.
Follow these steps to run the diagnostics system test on your DIRECTV Sat-Go
System
1) Turn on your TV.
2) Slide the mode switch to the DIRECTV position to put the remote control in satellite -
controlling mode, then press MENU.
3) Select Settings.
4) Select Setup, then Info & Test.
5) Use arrow keys to highlight the System Test tab, then press SELECT on Run Test.
6) If your system does not pass the system test, check any of these potential trouble areas:
cabling, pointing the satellite, phone connection and access card.
You should run a system test several times before concluding that there is a problem.
Occasional fl uctuations in the phone line or satellite signal can give temporary false readings.
54
Page 56

Troubleshooting
System Errors
Temperature Error
When the TV temperature reaches a high level, the Temperature Error icon ( ) appears on
the screen and the power light on the front of the TV display blinks 3 times per second to alert
you that the system is in danger of overheating. After 1 minute, the TV will automatically switch
into standby mode.
Low Portable Battery Level Alert
When the portable battery in the TV reaches a low level, the Low Portable Battery icon
(
) appears on the screen. The power light on the front of the TV display blinks every
second for 10 minutes and will then automatically switch the TV into standby mode. (Battery
usage time: about 1 hour, Battery charging time: about 10 hours.)
Low Vehicle Battery Level Alert
When using an external DC power source such as an automobile battery, the Low Vehicle
Battery icon (
blinks every second, when it has been determined that the automobile battery voltage has
been drained close to a point where the automobile could no longer be started. As this low
automobile battery threshold may be different across the many types and brands of automobile
batteries the “low battery warning” on the DIRECTV Sat-Go may be triggered some time
before it is in fact near a critical point for any given automobile battery. DIRECTV has designed
the DIRECTV Sat-Go system to adhere to industry standards for voltage tolerances and as a
result each user should carefully monitor the automobile battery drain in this situation.
Note:
Connecting to a vehicle battery can sometimes cause the electric discharge of
your vehicle battery. Make sure your vehicle battery is fully charged.
) appears on the screen and the power light on the front of the TV display
55
Page 57

Warranty
Limited 90-Day Warranty
DIRECTV warrants your DIRECTV® Sat-Go system (Model Number: Z11-500) and any included
accessories against defects in material or workmanship for a period of 90 days after the date of
purchase.
Who is Covered?
You must have proof of purchase to receive warranty service. A sales receipt or other document
showing that you purchased the product is considered proof of purchase. THIS LIMITED
WARRANTY EXTENDS ONLY TO THE ORIGINAL CONSUMER PURCHASER OR ANY
PERSON RECEIVING THE DIRECTV SAT-GO SYSTEM AS A GIFT FROM THE ORIGINAL
CONSUMER PURCHASER AND TO NO OTHER PURCHASER OR TRANSFEREE. THIS
WARRANTY DOES NOT EXTEND TO COMMERCIAL USERS. THIS PRODUCT IS NOT
AUTHORIZED FOR USE OUTSIDE THE UNITED STATES AND ANY SUCH USE VOIDS THIS
WARRANTY.
What is Covered?
Warranty coverage begins the day you purchase the product. For ninety (90) days from the
purchase date, at the option of DIRECTV, the DIRECTV Sat-Go system will be repaired or
replaced with a new, repaired, refurbished or comparable product (whichever is deemed
necessary) if it becomes defective or inoperative. This exchange is done without charge to
you for parts and labor. You will be responsible for the cost of shipping to and from the location
designated by DIRECTV. If DIRECTV cannot reasonably repair or replace the system then
DIRECTV may, at its sole discretion, refund the price you paid for the product or the current
retail price of the product.
All products, including replacement products, are covered only for the original warranty period.
When the warranty on the original product expires, the warranty on the replacement product
also expires. After ninety (90) days from the date of purchase, you pay for the replacement of
all parts, and for all labor charges. SOME STATES DO NOT ALLOW LIMITATIONS ON HOW
LONG AN IMPLIED WARRANTY LASTS, SO THE ABOVE LIMITATION MAY NOT APPLY TO
YOU.
56
Page 58

Warranty
What is Excluded?
Your warranty does NOT cover:
- Labor charges for installation or setup of the product.
- Installation, performance of, or repair of: audio/video cabling, telephone line, or accessory
attachments used with the product.
- Product replacement because of misuse, accident, lightning damage, unauthorized repair,
or other cause not within the control of DIRECTV.
- Incidental or consequential damages resulting from the product. SOME STATES DO NOT
ALLOW THE EXCLUSION OF INCIDENTAL OR CONSEQUENTIAL DAMAGES, SO THE
ABOVE EXCLUSION MAY NOT APPLY TO YOU.
Any modifi cations or other changes to the product, including but not limited to software or
hardware modifi cation in any way other than as expressly authorized by DIRECTV, will void this
limited warranty.
Except in the case of hardware or software provided by DIRECTV, installing software
modifi cations, “hacks” or utilizing service access or “back doors” will void this limited warranty.
Reception transmission problems caused by signal conditions, telephone line, or cable or
antenna systems outside the unit.
- A product that has been modifi ed or adapted to enable it to operate in any country other
than the country for which it was designed, manufactured, approved and/or authorized, or
repair of products damaged by these modifi cations.
- A product used for commercial or institutional purposes. DIRECTV makes no warranty that
the access connection will be a local (not long distance) phone call.
- The continued provisioning of any of the programming and other services delivered through
the system including but not limited to television programming, show information, program
guide data, and scheduling information.
Make Sure You Keep...
Please keep your sales receipt or other document showing proof of purchase. Attach it to this
User Guide and keep both nearby. Also keep the original box and packing material in case you
need to return your product.
Before Requesting Repair Service...
Please check the troubleshooting section of this guide. This may save you a call to DIRECTV
Customer Care.
57
Page 59

Warranty
To Get Warranty Service...
Warranty service will be provided by DIRECTV. If you believe you need service for your system,
contact DIRECTV at 1-800-DIRECTV. A representative will go through a diagnostic checklist
with you. If it is determined that the product needs to be returned for service or exchanged, you
will receive a return authorization number. The representative will give you complete shipping
details.
To Get Out-of-Warranty Service...
To obtain out-of- warranty service contact DIRECTV at 1-800-DIRECTV for information
on the possibility of and any costs for repair or replacement of out-of- warranty products.
ALL WARRANTIES IMPLIED BY LAW, INCLUDING ANY IMPLIED WARRANTIES OF
MERCHANTABILITY AND FITNESS FOR A PARTICULAR PURPOSE ARE EXPRESSLY
LIMITED TO THE DURATION OF THIS EXPRESS LIMITED WARRANTY. WITH THE
EXCEPTION OF ANY WARRANTIES IMPLIED BY THE LAW OF ANY STATE OF THE
U.S.A., THIS EXPRESS LIMITED WARRANTY IS EXCLUSIVE AND IN LIEU OF ALL OTHER
WARRANTIES, GUARANTEES, AGREEMENTS AND SIMILAR OBLIGATIONS OF DIRECTV.
REPAIR OR REPLACEMENT AS PROVIDED IN THIS LIMITED WARRANTY IS THE
EXCLUSIVE REMEDY UNDER THIS LIMITED WARRANTY. IN NO EVENT WILL DIRECTV BE
LIABLE FOR ANY AMOUNT GREATER THAN THE RETAIL PRICE OF THE DIRECTV SAT-GO
SYSTEM. DIRECTV SHALL NOT BE LIABLE FOR ANY INCIDENTAL OR CONSEQUENTIAL
DAMAGES FOR BREACH OF ANY EXPRESS OR IMPLIED WARRANTY ON THE DIRECTV
SYSTEM. SOME STATES DO NOT ALLOW LIMITATIONS ON WARRANTIES, SO THE ABOVE
LIMITATIONS MAY NOT APPLY TO YOU. THIS WARRANTY GIVES YOU SPECIFIC LEGAL
RIGHTS. YOU MAY HAVE OTHER RIGHTS WHICH VARY FROM STATE TO STATE.
DIRECTV, Inc.
2230 E. Imperial Hwy
El Segundo, CA 90245
1-800-DIRECTV
Product Information
Product Information
Keep your sales receipt to obtain warranty parts and service and for proof of purchase. Attach
it here and record the serial and model numbers in case you need them. These numbers are
located on the product.
Model No. _______________________________________________________________
Serial No. _______________________________________________________________
Purchase Date: ___________________________________________________________
Dealer/Address/Phone: _____________________________________________________
Access Card: _____________________________________________________________
Receiver ID: ______________________________________________________________
DIRECTV Protection Plan
The DIRECTV® Sat-Go system is not eligible for the Protection Plan.
58
Page 60

FCC Customer Information
This device complies with Part 15 of the FCC Rules. Operation is subject to the following two
conditions: (1) this device may not cause harmful interference, and (2) this device must accept
any interference received, including interference that may cause undesired operation.
Responsible Party:
DIRECTV, Inc.
2230 E. Imperial Hwy
El Segundo, CA 90245
1-800-DIRECTV
- Trade Name: DIRECTV
- Type of Equipment: DIRECTV Satellite Receiver with LCD and built-in antenna
- Model Number: Z11-500
Federal Communications Commission (FCC): This equipment complies with both Part 15 and
Part 68 of the FCC rules.
This equipment has been tested and found to comply with the limits of a Class B digital
device, pursuant to part 15 of the FCC Rules. These limits are designed to provide reasonable
protection against harmful interference in a residential installation.
Other Information
This equipment generates, uses, and can radiate radio frequency energy and, if not installed
and used in accordance with the instructions, may cause harmful interference to radio
communications. However there is no guarantee that interference will not occur in a particular
installation. If this equipment does cause harmful interference to radio or television reception,
which can be determined by removing and applying power to the equipment, the user is
encouraged to try to correct the interference by one or more of the following measures:
• Reorient or relocate the receiving satellite antenna.
• Increase the separation between the equipment and the DIRECTV Sat-Go system.
• Connect the equipment into an outlet on a circuit different from that to which the DIRECTV
Sat-Go system is connected.
• Consult the dealer or an experienced radio/TV technician for help.
• CAUTION: Changes or modifi cations not expressly approved by the manufacturer
responsible for compliance could void the user’s authority to operate the equipment.
The user may fi nd the following booklet, prepared by the Federal Communications Commission,
helpful: “How to Identify and Resolve Radio and TV Interference Problems.” This booklet
is available from the U.S. Government Printing Offi ce, Washington, DC. To meet FCC
requirements, only peripherals (computer input/output devices, terminals, printers, etc.)
certifi ed to comply with Class B limits may be attached to this device. Operation with non-
certifi ed peripherals is likely to result in interference to radio and TV reception. To meet FCC
requirements, shielded cables are required to connect the device to a personal computer,
peripheral, or other Class B certifi ed device.
59
Page 61

FCC Customer Information
This equipment complies with Part 68 of the FCC Rules and the requirements adopted by
ACTA. On the back of this equipment is a label that contains a product identifi er in the format
US:AAAEQ##TXXXX. If requested, this information must be provided to your telephone
company. This equipment uses the following USOC Jack: RJ11C. A plug and jack used to
connect this equipment to the premises wiring and telephone network must comply with the
applicable FCC Part 68 rules and requirements adopted by ACTA. A compliant telephone cord
and modular plug is provided with this product. It is designed to be connected to a compatible
modular jack that is also compliant. See installation instructions for details.
The REN is used to determine the number of devices that may connect to a telephone line.
Excessive RENs on a telephone line may result in the devices not ringing in response to an
incoming call. In most but not all areas, the sum of the RENs should not exceed fi ve (5.0).
To be certain of the number of devices that may be connected to a line, as determined by the
total RENs, contact your local telephone company. The REN for this product is part of the
product identifi er that has the format US: AAAEQ##TXXXX. The digits represented by ## are
the REN without the decimal point (e.g., 03 is a REN of 0.3).
If this DIRECTV Sat-Go system causes harm to the telephone network, the telephone company
will notify you in advance that temporary discontinuance of service may be required. But if
advance notice isn’t practical, the telephone company will notify the customer as soon as
possible. Also, you will be advised of your right to fi le a complaint with the FCC if you believe it
is necessary.
The telephone company may make changes in its facilities, equipment, operations or
procedures that could affect the proper functioning of your equipment. If they do, you will be
notifi ed in advance in order for you to make necessary modifi cations to maintain uninterrupted
service. Connection to party line service is subject to state tariffs. Contact the state public utility
commission, public service commission or corporation commission for information.
If trouble is experienced with this unit, for repair or warranty information, please contact
DIRECTV Customer Care at the address and phone number listed below. If the equipment
is causing harm to the network, the telephone company may request that you disconnect the
equipment until the problem is resolved.
DIRECTV, Inc.
2230 E. Imperial Hwy
El Segundo, CA 90245
1-800-DIRECTV
If your home has specially wired alarm equipment connected to the telephone line, ensure
the installation of this DIRECTV
you have questions about what will disable alarm equipment, consult your alarm company,
telephone company or a qualifi ed installer.
DO NOT DISASSEMBLE THIS EQUIPMENT. It does not contain any user-serviceable
components.
We recommend the installation of an AC surge arrester in the AC outlet to which this equipment
is connected. Telephone companies report that electrical surges, typically lightning transients,
are very destructive to customer terminal equipment connected to AC power sources.
®
Sat-Go system does not disable your alarm equipment. If
60
Page 62

Specifi cations
Item Specifi cation
DIRECTV Sat-Go unit Dimensions 18.8” x 19.2” x 4.8”
Type A-Si Active Matrix TFT -LCD
Display Area 13.3“ x 10.6”
LCD Panel
Max. Resolution SXGA 1280 x 1024 pixels
Input / Output
Other
Viewing Angle
Satellite In F-type RF Connector
Phone Jack RJ-11 (2-wire) female modem connector
USB USB 2.0 - Type A
Service Port
AV Out Composite Audio/Video Output (RCA type)
AV In 1 Composite Audio/Video Input (RCA type)
AV In 2
AC Power Input 120V AC, 60 Hz
DC Power Input Vehicle harness: 12V, 5A
Optional LiPB battery 12.6V, 5.5A
Power Consumption 70W(Max.)
H (Left, Right): 80° x 80°
V (Up, down): 80° x 80°
RS-232 Serial Port for TV software
upgrade
Component Audio/Video Input (RCA type):
- Video: Y Pb Pr (480i/p, 720p, 1080i)
- Audio: L/R
Speaker Output 3W x 2EA
Weight NET: 26 lb
61
Page 63

DIRECTV programming sold separately. Activate your DIRECTV programming today
at 1-800-DIRECTV (1-800-347-3288). ACTIVATION OF PROGRAMMING MAY BE
SUBJECT TO CREDIT APPROVAL. DEPOSIT OR PREPAYMENT MAY BE REQUIRED.
Programming is subject to change at any time. ©2007 DIRECTV, Inc. DIRECTV, the
Cyclone Design logo and ADVANCED PROGRAM GUIDE are registered trademarks of
DIRECTV, Inc. This product incorporates copyright protection technology that is protected
by U.S. patents and other intellectual property rights. Use of this copyright protection
technology must be authorized by Macrovision Corporation, and is intended for home
and other limited viewing uses only unless otherwise authorized by Macrovision. Reverse
engineering or disassembly is prohibited.
Due to restrictions imposed by copyright holders, certain programming may include content
protection measures that may restrict viewing and/or recording with certain consumer
electronics equipment attached to the receiver. Please contact the manufacturer of such
equipment for additional information. Rev. 1.0i — Z11-500.070302.
62
Page 64

Dish-Pointing Coordinates
State City Direction Angle
AL Birmingham 21 48
AL Mobile 21 52
AR Little Rock 19 49
AZ Flaqstaff 15 48
AZ Phoenix 15 49
AZ Tucson 15 51
CA Fresno 14 43
CA Los Angeles 14 46
CA San Diego 14 48
CA San Francisco 13 41
CO Denver 16 44
CO Grand Junction 16 44
CT Hartford 23 34
DC Washington 23 39
FL Jacksonville 22 49
FL Miami 23 52
FL Orlando 22 50
FL Tampa 22 52
GA Atlanta 21 47
GA Savannah 22 47
IA Davenport 20 41
IA Des Moines 19 41
ID Boise 14 37
IL Chicago 20 40
IN Indianapolis 21 42
KS Wichita 18 46
KY Louisville 21 43
LA Baton Rouge 20 53
LA New Orleans 20 53
LA Shreveport 19 51
MA Boston 24 33
MD Baltimore 23 38
MD Hagerstown 23 38
ME Bangor 24 29
ME Portland 24 31
MI Detroit 21 38
MI Grand Rapids 21 38
MI Marquette 20 35
MN Duluth 19 36
MN Int’l Falls 19 34
MN Minneapolis 19 38
State City Direction Angle
MO Kansas City 19 44
MO Saint Louis 20 44
MO Springfi eld 19 46
MS Jackson 20 51
MT Billings 16 37
MT Great Falls 15 35
NC Charlotte 22 44
NC Raleigh 22 42
ND Bismarck 17 36
ND Fargo 18 36
NE North Platt 17 43
NE Omaha 18 42
NJ Atlantic City 23 37
NM Albuquerque 16 49
NV Las Vegas 14 45
NV Reno 14 40
NY Albany 23 34
NY Buffalo 22 36
NY New York 23 36
NY Syracuse 23 34
OH Cincinnati 21 42
OH Cleveland 22 38
OK Oklahoma City 18 49
OK Tulsa 18 48
OR Medford 13 36
OR Portland 13 33
PA Philadelphia 23 37
PA Pittsburgh 22 39
RI Providence 24 33
SC Charleston 22 46
SD Rapid City 17 39
SD Sioux Falls 18 40
TN Knoxville 21 45
TN Memphis 20 48
TX Amarillo 17 49
TX Dallas 18 52
TX El Paso 16 53
TX Houston 19 55
TX San Antonio 18 56
UT Salt Lake City 15 42
VA Richmond 23 40
63
Page 65

Dish-Pointing Coordinates
State City Direction Angle
VA Roanoke 22 42
VT Burlington 23 32
WA Seattle 13 32
WA Spokane 14 33
WI Madison 20 39
WI Milwaukee 20 39
WV Charleston 22 41
WY Cheyenne 16 42
64
 Loading...