

Page 1
DVR RECEIVERS
DVR RECEIVERS
USER GUIDE
USER GUIDE
DIRECTV® PLUS DVR
DIRECTV® PLUS DVR
Page 2

When you see the ENERGY STAR label on your set-top box, it means that your set-top box is ENERGY STAR
qualified, giving you the benefit of saving energy and helping our environment.
However, ENERGY STAR labeled HD DVR set-top boxes qualify for ENERGY STAR only when configured with the
DIRECTV Whole-Home DVR service. All other ENERGY STAR labeled set-top boxes, when used in conjunction
with a DIRECTV subscription, meet ENERGY STAR criteria without requiring the consumer to take any additional
steps.
Page 3

3
Page 4

4
DIRECTV® PLUS DVR USER GUIDE
Page 5
Welcome to the DIRECTV Family!
Welcome! Now that you’re plugged in, enjoy over 285 channels of programming inclusive of satellite music plus an extensive selection of
the biggest box office movies from DIRECTV CINEMA™. We’ll take you step by step through everything from pushing the POWER button to
recording your favorite programs. This user guide applies to the DIRECTV Plus® DVR (Digital Video Recorder). Because this user guide was
designed to accommodate several models of DIRECTV® Receivers, your receiver and its user interface may vary slightly from what is shown
here.
Getting Connected
If a professional installed your DIRECTV® Receiver, you’re ready to start watching TV. If your receiver was not professionally installed or you
just added a surround sound system or other equipment, please see Chapter 6: Settings.
IMPO RT ANT:
You must subscribe to DIRECTV DVR service in order to use the recording features.
For information and pricing please visit directv.com.
5
Page 6
TABLE OF CONTENTS
TABLE OF CONTENTS
Welcome to the DIRECTV Family! �����������������������������������5
Safety & Care ���������������������������������������������������������������10
Product Information ��������������������������������������������������12
CHAPTER 1 - YOUR REMOTE CONTROL
Your Remote Control �����������������������������������������������14
Turning Your Equipment On and Off ��������������������������������������� 14
Navigation and Destination Buttons �������������������������������������� 15
Shortcut Buttons ��������������������������������������������������������������������� 15
DVR Control Buttons ��������������������������������������������������������������� 16
The Progress Bar �����������������������������������������������������17
Live Buffer �����������������������������������������������������������������18
CHAPTER 2 - CHANNELS & PROGRAM INFO
Program Guide ���������������������������������������������������������� 20
Local Channels ����������������������������������������������������������������������� 20
Unsubscribed Channels ��������������������������������������������������������� 20
Interactive Channels ��������������������������������������������������������������� 21
Mini-guide ��������������������������������������������������������������������������������� 22
Filtering the Guide �������������������������������������������������������������������� 22
Guide Options ����������������������������������������������������������������������������23
Channel Banner ��������������������������������������������������������� 24
TV Options ������������������������������������������������������������������ 25
View Previous Channels ����������������������������������������������������������� 25
Change Favorites List ���������������������������������������������������������������25
Audio Options ���������������������������������������������������������������������������� 25
Menu �������������������������������������������������������������������������� 26
Search for Shows ������������������������������������������������������� 28
Search by “Title” ����������������������������������������������������������������������� 28
Search by “Person” �������������������������������������������������������������������29
Search by “Channel” ����������������������������������������������������������������� 29
Search by “Keyword” ���������������������������������������������������������������� 30
“Recent Searches” �������������������������������������������������������������������� 30
Parental Controls ������������������������������������������������������� 31
Lock Now ���������������������������������������������������������������������������������� 32
Unlock Now ������������������������������������������������������������������������������� 33
Adult Channels ������������������������������������������������������������������������� 33
6
Page 7
Ratings ������������������������������������������������������������������������������������� 34
Channel Blocks ������������������������������������������������������������������������ 35
Spending Limits ����������������������������������������������������������������������� 36
Viewing Hours �������������������������������������������������������������������������� 36
Favorite Channels ����������������������������������������������������� 37
CHAPTER 3 - DIRECTV CINEMA™ & PAY PER VIEW
DIRECTV CINEMA ™ ���������������������������������������������������� 40
Showroom �������������������������������������������������������������������������������� 40
Pay Per View Events ��������������������������������������������������� 41
CHAPTER 4 - RECORDINGS
Recording a Single Show ������������������������������������������� 44
Recording a Series ���������������������������������������������������� 46
Watching and Deleting Your Recorded Shows ����������� 47
My Playlist ����������������������������������������������������������������� 48
Playlist Options ����������������������������������������������������������������������� 49
Managing My Playlist �������������������������������������������������������������� 50
Manage Recordings ����������������������������������������������������� 52
To Do List ����������������������������������������������������������������������������������� 52
Prioritizer ����������������������������������������������������������������������������������� 53
History ���������������������������������������������������������������������������������������� 54
Purchases ���������������������������������������������������������������������������������� 54
Manual Recordings �������������������������������������������������������������������� 54
Recording Defaults �������������������������������������������������������������������� 55
Recording from Your Computer or Phone ������������������� 56
CHAPTER 5 - EXTRAS
Messages & Caller ID ������������������������������������������������ 60
DIRECTV™ iPad® App ������������������������������������������������ 61
GameSearch™ ������������������������������������������������������������ 62
GSN Game Lounge ���������������������������������������������������� 62
ScoreGuide™ �������������������������������������������������������������� 63
7
Page 8

TABLE OF CONTENTS
TABLE OF CONTENTS
CHAPTER 6 - SETTINGS
Setup and Activation ������������������������������������������������ 66
Guided Setup ��������������������������������������������������������������������������� 66
Activate Your DIRECTV® Service ���������������������������������������������66
Connections �������������������������������������������������������������� 67
Your Phone Connection ����������������������������������������������������������� 67
Connections for Auxiliary Equipment ������������������������������������� 67
System Setup ������������������������������������������������������������ 70
Info & Test ������������������������������������������������������������������������������� 70
Satellite ����������������������������������������������������������������������������������� 71
Remote Control ����������������������������������������������������������������������� 71
Audio ���������������������������������������������������������������������������������������� 72
Display ������������������������������������������������������������������������������������� 73
Access Card ���������������������������������������������������������������������������� 74
Reset ��������������������������������������������������������������������������������������� 75
CHAPTER 7 - HELP & TROUBLESHOOTING
Help �������������������������������������������������������������������������� 78
Troubleshooting Tips ������������������������������������������������ 79
Reset / Reauthorize Your Receiver ����������������������������������������� 79
System Software Updates ������������������������������������������������������ 80
Onscreen Error Messages ������������������������������������������������������ 80
Run the System Test ��������������������������������������������������������������� 81
Frequently Asked Questions ������������������������������������� 82
CHAPTER 8 - WARRANTY AND OTHER INFORMATION
Limited 90-Day Warranty ������������������������������������������ 96
DIRECTV PROTECTION PLAN ������������������������������������ 99
FCC Customer Information �������������������������������������� 101
TERMS AND CONDITIONS FOR USE OF SOFTWARE
(“TERMS”) ��������������������������������������������������������������� 105
8
Page 9
APPENDICES
Appendix 1: Receivers Front and Back Panels ��������118
Index ������������������������������������������������������������������������ 122
9
Page 10
Safety & Care
Your DIRECTV® Receiver has been designed and manufactured to stringent quality and safety standards. You should, however, be aware of the following important precautions for
safe and optimal use of the equipment.
Meaning of symbols printed on the rear panel of the product:
This symbol indicates that dangerous voltage consisting a risk of electric shock is present within this unit.
This symbol indicates that there are important operating and maintenance instructions in the literature accompanying this unit.
Important Safety Instructions
1) Read these instructions.
2) Keep these instructions.
3) Heed all warnings.
4) Follow all instructions.
5) Do not use this apparatus near water.
6) Clean only with dry cloth.
7) Do not block any ventilation openings. Install in accordance with the manufacturer’s instructions.
8) Do not install near any heat sources such as radiators, heat registers, stoves, or other apparatus (including amplifiers) that produce heat.
9) Do not defeat the safety purpose of the polarized or grounding-type plug. A polarized plug has two blades with one wider than the other. A grounding type plug has two blades and
a third grounding prong. The wide blade or the third prong are provided for your safety. If the provided plug does not fit into your outlet, consult an electrician for replacement of the
obsolete outlet.
10) Protect the power cord from being walked on or pinched particularly at plugs, convenience receptacles, and the point where they exit from the apparatus.
11) Only use attachments/accessories specified by the manufacturer.
12) Use only with the cart, stand, tripod, bracket, or table specified by the manufacturer, or sold with the apparatus. When a cart is used, use caution
when moving the cart/apparatus combination to avoid injury from tip-over.
13) Unplug this apparatus during lightning storms or when unused for long periods of time.
14) Refer all servicing to qualified service personnel. Servicing is required when the apparatus has been damaged in any way, such as power-supply
cord or plug is damaged, liquid has been spilled or objects have fallen into the apparatus, the apparatus has been exposed to rain or moisture, does
not operate normally, or has been dropped.
10
DIRECTV® PLUS DVR USER GUIDE
Page 11
WARNING: To reduce the risk of fire or
electric shock, do not expose this product
to rain or moisture. The apparatus shall not
be exposed to dripping or splashing and no
objects filled with liquids, such as vases,
shall be placed on the apparatus.
CAUTION
RISK OF ELECTRIC
SHOCK DO NOT OPEN!
CAUTION: To reduce the risk of electric
shock, do not remove cover (or back).
No user-serviceable parts inside.
Refer servicing to qualified service
personnel.
IMPORTANT: Be sure not to place your
DIRECTV® Receiver near anything WET or
HOT!
If this product is rated at 240VAC, a suitable
attachment plug should be used.
CAUTION: Avoid moisture to reduce the
risk of fire or electric shock. The DIRECTV®
Receiver should not be used near water (for
example, kitchen sink, bathtub, pool, damp
basement). Also, never spill liquid on the
receiver, and do not place vases or other
vessels containing liquid on top of it.
TIP: We highly recommend plugging the
DIRECTV® Receiver into a surge protector
to prevent damage from fluctuations in
your power supply.
Safety & Care
• Ensure proper ventilation — the vent slots on the DIRECTV® Receiver must be left uncovered to allow proper airflow to the unit.
Blocking the airflow to the unit could impair performance or damage your receiver and other components.
• Do not stack electronic components or other objects on top of the DIRECTV® Receiver. Also, do not stack the receiver on top of a
“hot component” such as an audio power amplifier.
• Protect your components from power surges by connecting all the components before plugging any power cords into the wall
outlet. Use of a surge protector is also recommended.
• Don’t overload power outlets or extension cords, which can result in the risk of re or shock. It’s also important to use only the type
of power source indicated on the marking label or in this manual.
• Avoid audio hum or interference by inserting all cable plugs rmly into their jacks. Also, place Audio/Video (A/V) cables to the sides
of the TV back panel rather than down the middle once connected. Try not to coil any twin-lead cables and keep them away from A/V
cables as much as possible.
• Never insert objects of any kind into any openings in the DIRECTV® Receiver (other than the DIRECTV® Access Card as detailed in
this manual).
• Place it on a at, hard surface — do not operate the DIRECTV® Receiver on a carpet or other padded surface.
• Always unplug your DIRECTV® Receiver before moving it.
• Always unplug the DIRECTV® Receiver, TV and other equipment before you connect or disconnect any cables.
• The only way to disconnect the DIRECTV® Receiver from the power supply is to remove the power cord. The DIRECTV® Receiver unit
must therefore be installed next to the power point which must be easily accessible.
• CAUTION: Electric Shock — never attempt to disassemble the DIRECTV® Receiver yourself; always take it to a qualified service
person when repair is required. Opening or removing covers may expose dangerous voltage or other risks, and incorrect reassembly
can cause shock when receiver is subsequently used. Attempted self-repair may also void your warranty. Changes or modifications
not expressly approved by the party responsible for compliance (by the warranty or by the manufacturer) could void the user’s
authority to operate the equipment.
• Do not drop your DIRECTV® Receiver and always move it with care.
• Have your DIRECTV® Receiver professionally serviced (do not attempt to service it yourself).
• Any changes or modications in construction of this device which are not expressly approved by the party responsible for
compliance could void the user’s authority to operate the equipment.
• If you move your DIRECTV® Receiver between locations at different temperatures, allow it to reach room temperature before you
apply power to it.
• Do not pick up or otherwise move your DIRECTV® Receiver while it is connected to the AC power supply. If you want to move your
set-top box, first disconnect it, then wait at least 30 seconds before continuing
• CAUTION: To reduce the risk of fire, use only No. 26 AWG or better telecommunications line cord.
• CAUTION: Replace remote control batteries with same or equivalent type. There is danger of explosion if batteries are incorrectly
replaced.
•For your information: The identication sticker can be located behind the small door on the front panel of your receiver.
The telecommunication network voltage used is the category number 3.
Note to Satellite Dish Installer: This reminder is provided to call your attention to articles 810 and 820 of the 2005 National
Electrical Code. Refer to article 810, in particular 810-1 and 810-15, for required grounding of the metal structure of the dish
antenna. Refer also to the 810-2 which, by reference to article 820, requires that the satellite dish coaxial cable shield be connected
to the grounding system of the building as close to the point of cable entry as practical.
11
Page 12
Product Information
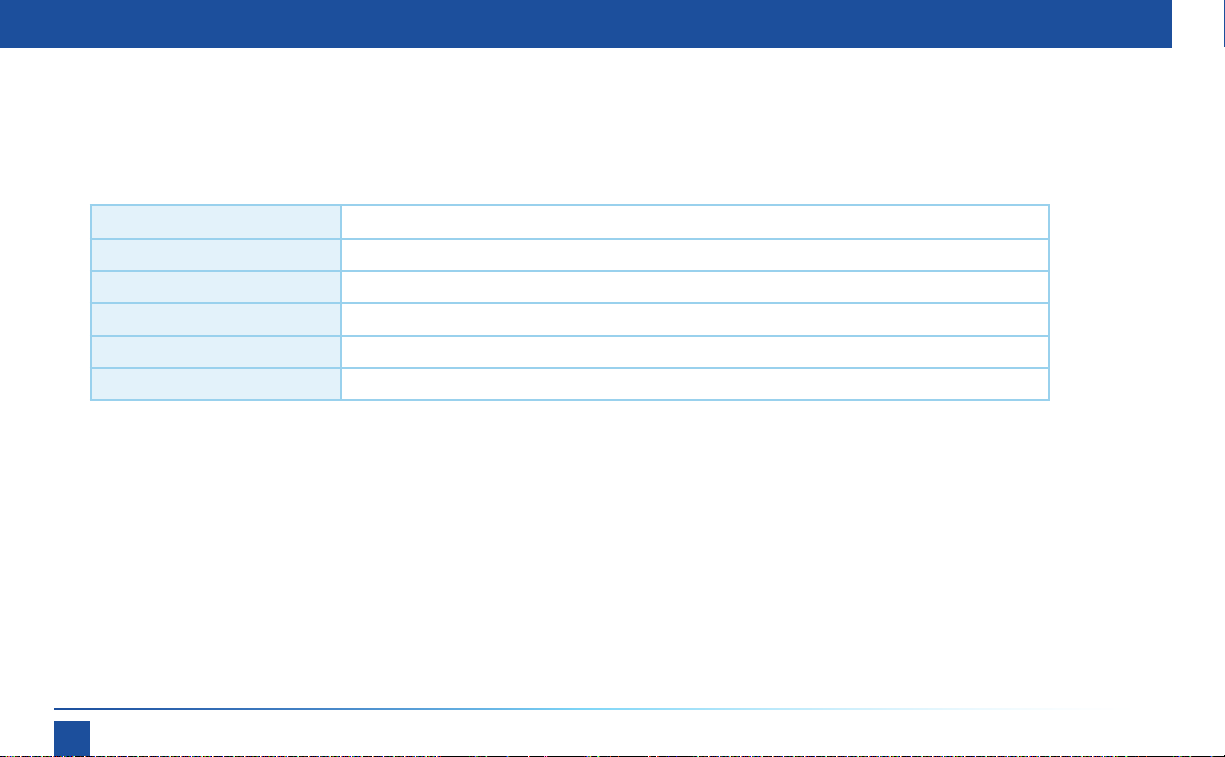
Keep your receipt to obtain warranty parts and service and for proof of acquisition. Attach it here and record the serial and
model numbers in case you need them. *These numbers are typically behind the card door on the front panel of your receiver.
Model No. *
Serial No.
Acquisition Date
Dealer/Address/Phone
Access Card *
Receiver ID *
12
DIRECTV® PLUS DVR USER GUIDE
Page 13
CHAPTER 1 - YOUR REMOTE CONTROL
YOUR REMOTE CONTROL ���������������������������������������� 14
Turning Your Equipment On and Off ..................... 14
Navigation and Destination Buttons ..................... 15
Shortcut Buttons ................................................... 15
DVR Control Buttons ............................................. 16
THE PROGRESS BAR ������������������������������������������������ 17
LIVE BUFFER ����������������������������������������������������������� 18
13
Page 14
Your Remote Control
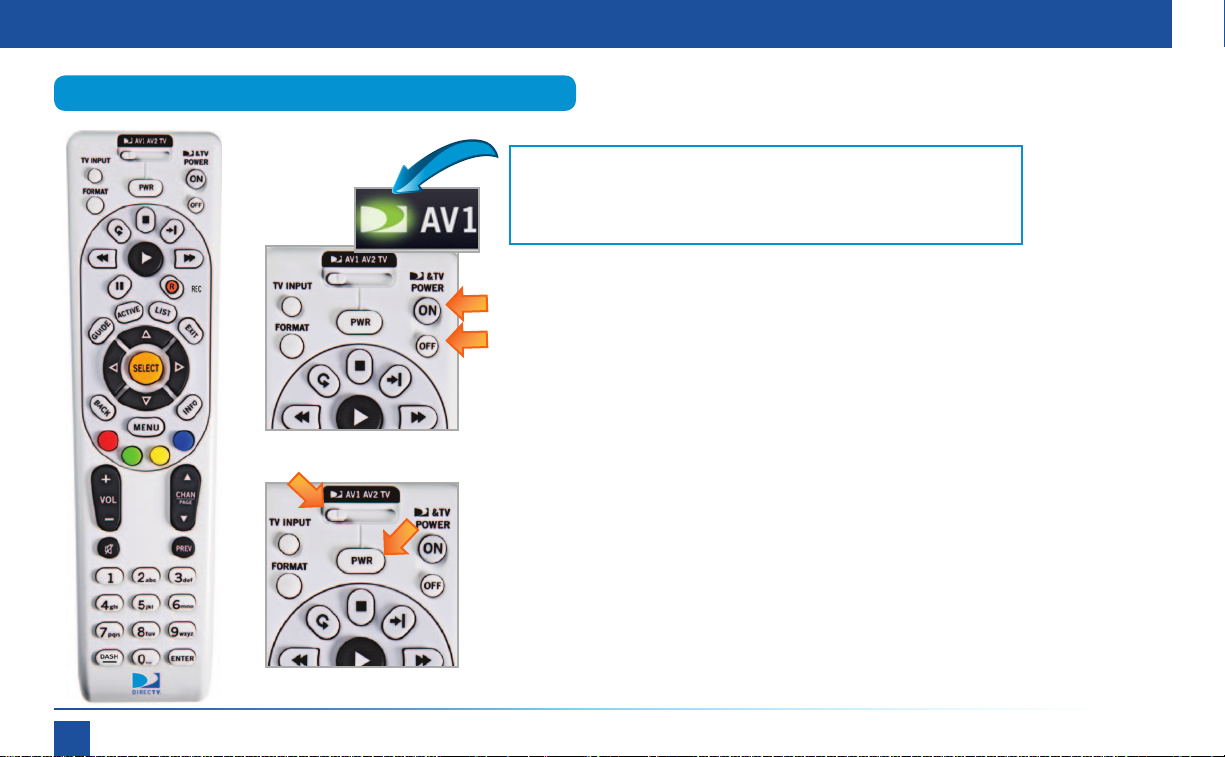
Turning Your Equipment On and Off
Mode Switch
Note: Each time you press a button, a green light at the top of the remote
flashes. If the light flashes several times for just one press, it means the
batteries (size AA) are getting low and need to be replaced.
These two buttons turn your T V and DIRECTV® Receiver on or off together. If
your DIRECTV® System was installed professionally, your remote has already
been programmed to operate your T V. If you need to reprogram the remote
for a new TV or other audio-visual equipment, press MENU, select Parental,
Fav’s & Setup, then System Setup, then Remote, and follow the step by step
instructions.
Use the POWER (PWR) button and Mode Switch to turn a single component
on or off (for example a DVD player or surround sound system). Simply slide
the mode switch to the position that matches the component you want to
control and then use the POWER button to turn it off or on. The mode switch
must always be in the left-most position to control your DIRECTV® Re c e i ver.
If the mode switch is in a position that has not been programmed, or if you
press a button that is not supported by that particular piece of equipment, an
onscreen message will pop up to alert you.
14
DIRECTV® PLUS DVR USER GUIDE
Page 15
Navigation and Destination Buttons
Your Remote Control
Chapter
1
Shortcut Buttons
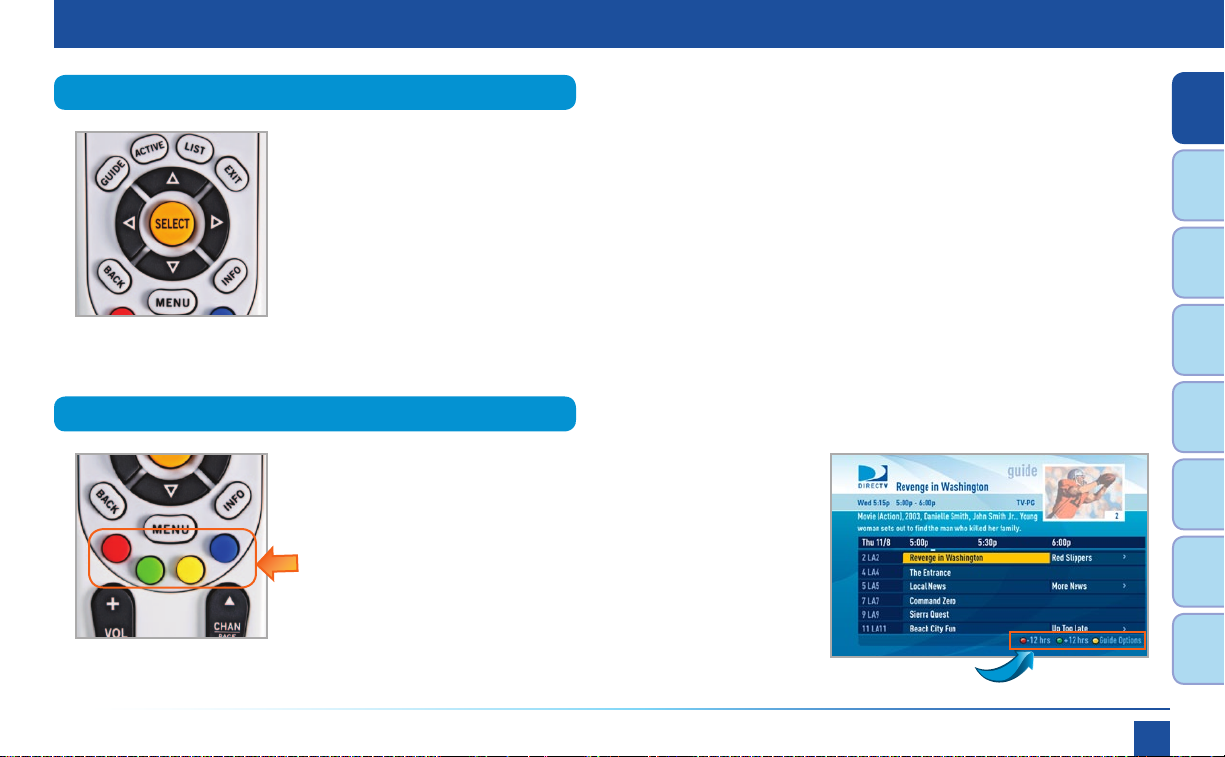
The buttons in the middle of the remote are navigation and destination keys. Press the GUIDE
button to go to the program guide screen. Press the ACTIVE button to go to the DIRECTV Interactive
services home page. The LIST button takes you to the Playlist. Press EXIT to get out of any menu
screen and return to live T V. Use the ARROW buttons and SELECT button to navigate though the
guide or any menu screen. Press BACK to move back to the previous screen. The MENU button
takes you to the main menu where you go to access all of the features available in your system.
Press INFO on any show to see information about that show.
You can move through all of the DIRECTV user screens using
only the direction ARROW buttons and the SELECT button as
appropriate. However, the RED, GREEN, YELLOW, and BLUE
buttons on the remote are special shortcuts that change
function depending on which menu screen you are looking at.
As you use the system look in the bottom right of particular
screens for hints that tell you which color button to use for
a particular shortcut. You’ll see several examples in this
chapter.
Shortcut hints
Chapter
2
Chapter
3
Chapter
4
Chapter
5
Chapter
6
Chapter
7
Chapter
8
CHAPTER 1 - Using Your Remote Control
15
Page 16
Your Remote Control
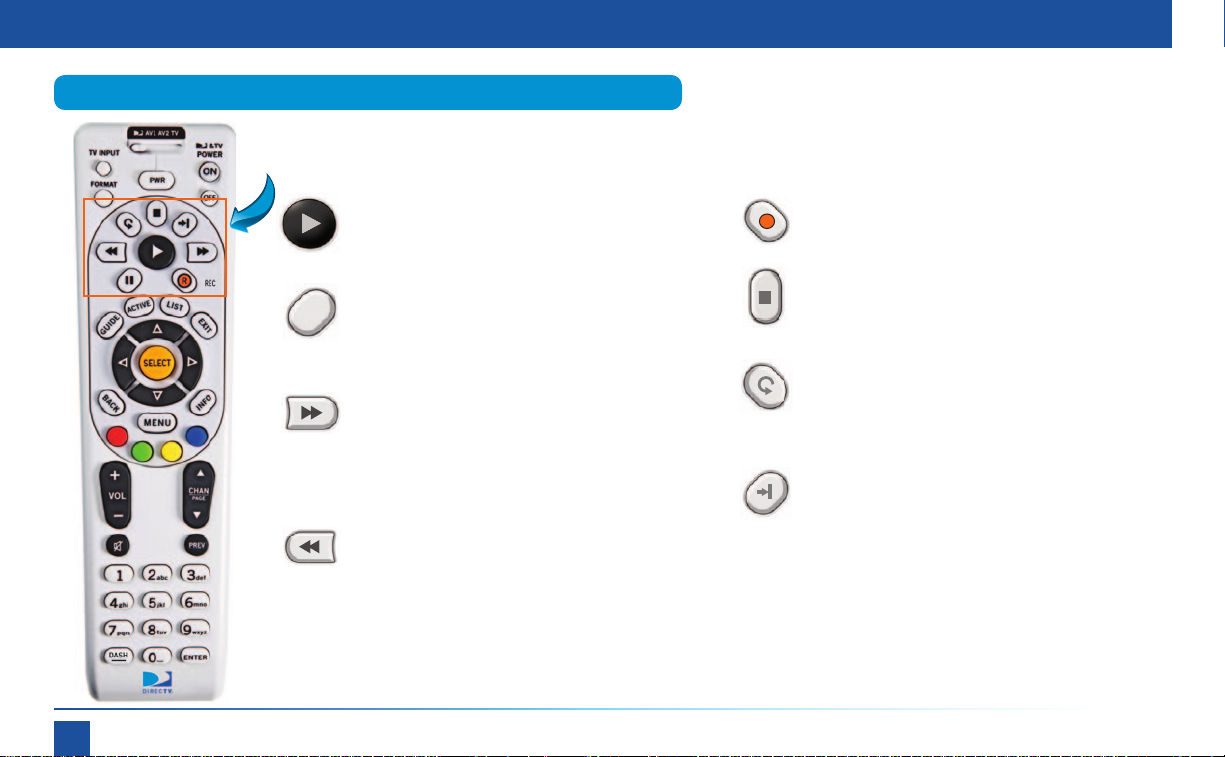
DVR Control Buttons
These are the DVR control buttons (Rewind, Fast Forward, etc.). They can also be used along with the
mode switch to control a DVD player or other auxiliary equipment.
PLAY / SLOW MOTION
Starts the recorded video or paused live TV
currently on screen. Hold this button down for
slow motion.
PAUSE / FRAME BY FRAME
II
Freezes the action of any live or prerecorded
television program. While paused, press FFWD
or REW to move forward or backward frame by
frame.
FFWD / JUMP TO TICKMARK
Fast-forwards recorded or live-stored video.
Press up to four times to fast-forward at
increasing speeds. Press and hold FF to jump
to the next tickmark. Pressing PLAY returns to
normal play.
REW / JUMP TO TICKMARK
Rewinds recorded or live-stored video. Press
up to four times to rewind at increasing speeds.
Press and hold REW to jump to the previous
tickmark. Pressing PLAY returns to normal play.
16
DIRECTV® PLUS DVR USER GUIDE
RECORD
R
One press allows you to record programs in the
Guide and live TV. Press twice to record a series.
STOP
While watching recorded TV, pressing this stops
playback, displays the recorded program info
screen and inserts live TV in the top right.
REPLAY / JUMP TO BEGINNING OF PROGRAM
Jumps the program you’re watching backwards
6 seconds and starts playing from that point.
Holding down REPLAY jumps to the beginning of
the program.
ADVANCE / JUMP TO END OF PROGRAM
Jumps ahead in recorded or live-stored video
by 30 seconds. Press multiple times to skip
multiples of 30 seconds. Hold down to continue
to the end of the program.
Page 17
R
Football
12:30p
12:00p
12:09p
The Progress Bar
The Progress Bar
Chapter
1
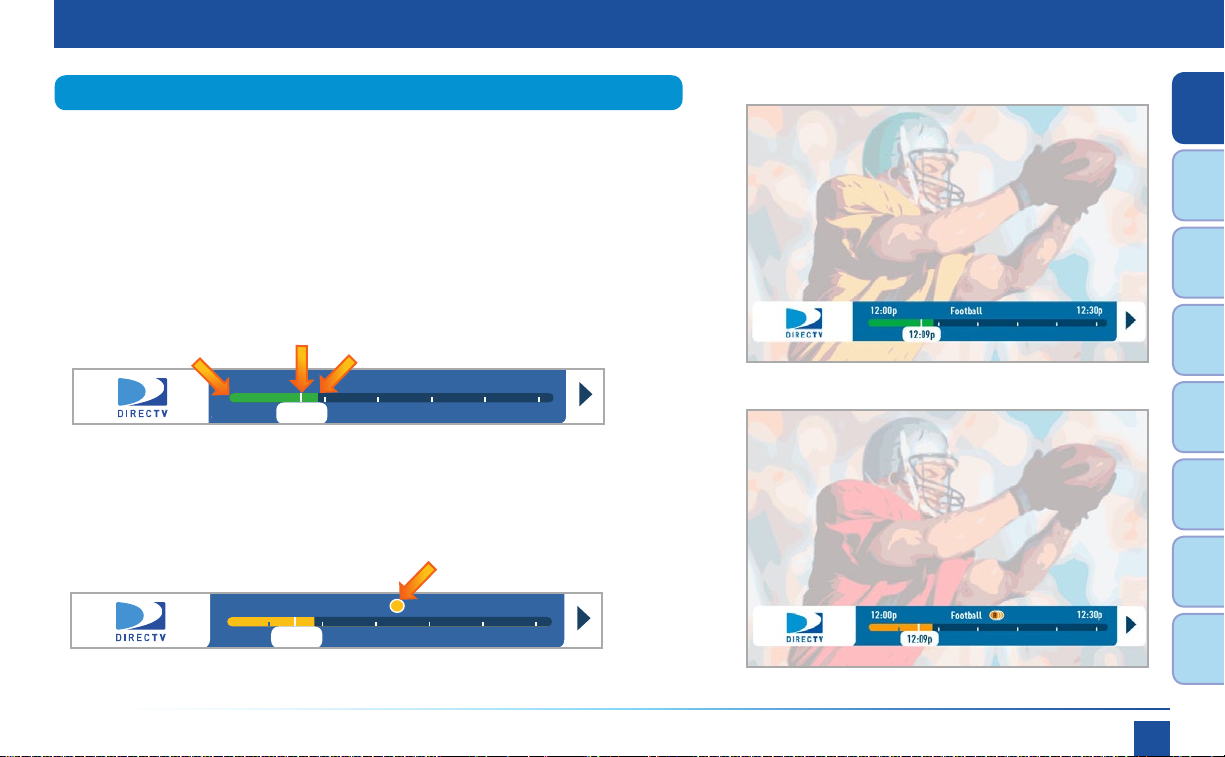
When you use the DVR control buttons, this indicator bar appears at the
bottom of the screen to show where you are in the program and how far you
can go for ward or back. For live programs, the progress bar is green and the
time shown is the time of day.
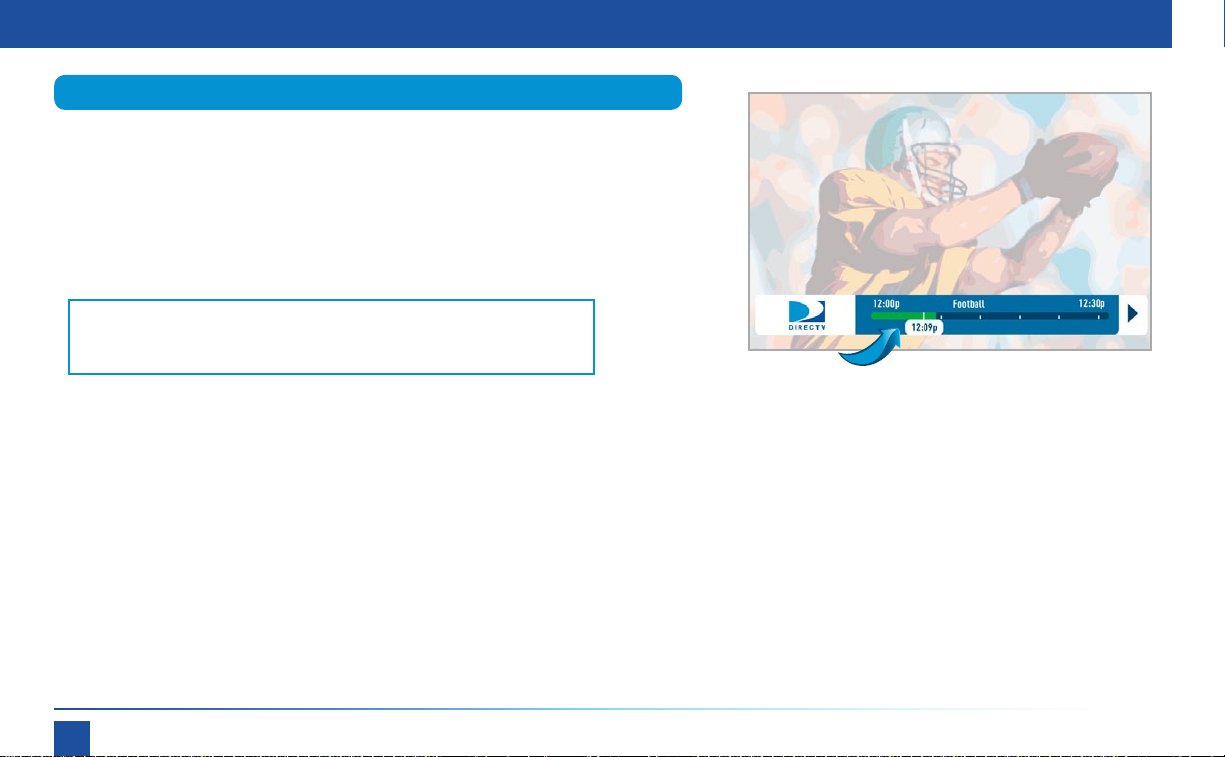
The white line
The left end of the
green bar shows
how far back in
time you can go.
shows where
you are in the
program you are
viewing.
12:00p
12:09p
The right end of the
green bar shows how far
ahead you can go.
Football
12:30p
If you press the RECORD button during a live show, the progress bar turns
orange and the orange record icon appears next to the title of the show.
CHAPTER 1 - Using Your Remote Control
Chapter
2
Chapter
3
Chapter
4
Chapter
5
Chapter
6
Chapter
7
Chapter
8
17
Page 18
Live Buffer
Live Buffer
Your DVR saves programs to the hard drive instantly and continuously, while
you watch. This “live buffer” lets you pause, rewind, fast forward or instant
replay (jump back 6 seconds). If you start watching a program late, even if
it is not set to record, you can back up to the beginning (up to 90 minutes)
using REWIND, as long as you haven’t changed channels since the program
started. Simply press PLAY during a show to display the progress bar and
see how far back in time you can go.
Note: You cannot fast forward during live TV until you pause or rewind
a program.
If you change channels, you lose what is in the live buffer. If you want to
flip between two shows at the same time and not lose the ability to go
back in time on either channel you can record them both and then use the
PREV(ious) button on the remote to toggle between them.
Progress Bar
18
DIRECTV® PLUS DVR USER GUIDE
Page 19
CHAPTER 2 - CHANNELS & PROGRAM INFO
PROGRAM GUIDE ���������������������������������������������������������� 20
CHANNEL BANNER ������������������������������������������������������ 24
TV OPTIONS ������������������������������������������������������������������ 25
MENU ����������������������������������������������������������������������������26
SEARCH FOR SHOWS ����������������������������������������������������28
PARENTAL CONTROLS ��������������������������������������������������31
FAVORITE CHANNELS ���������������������������������������������������37
19
Page 20
Program Guide
Program Guide
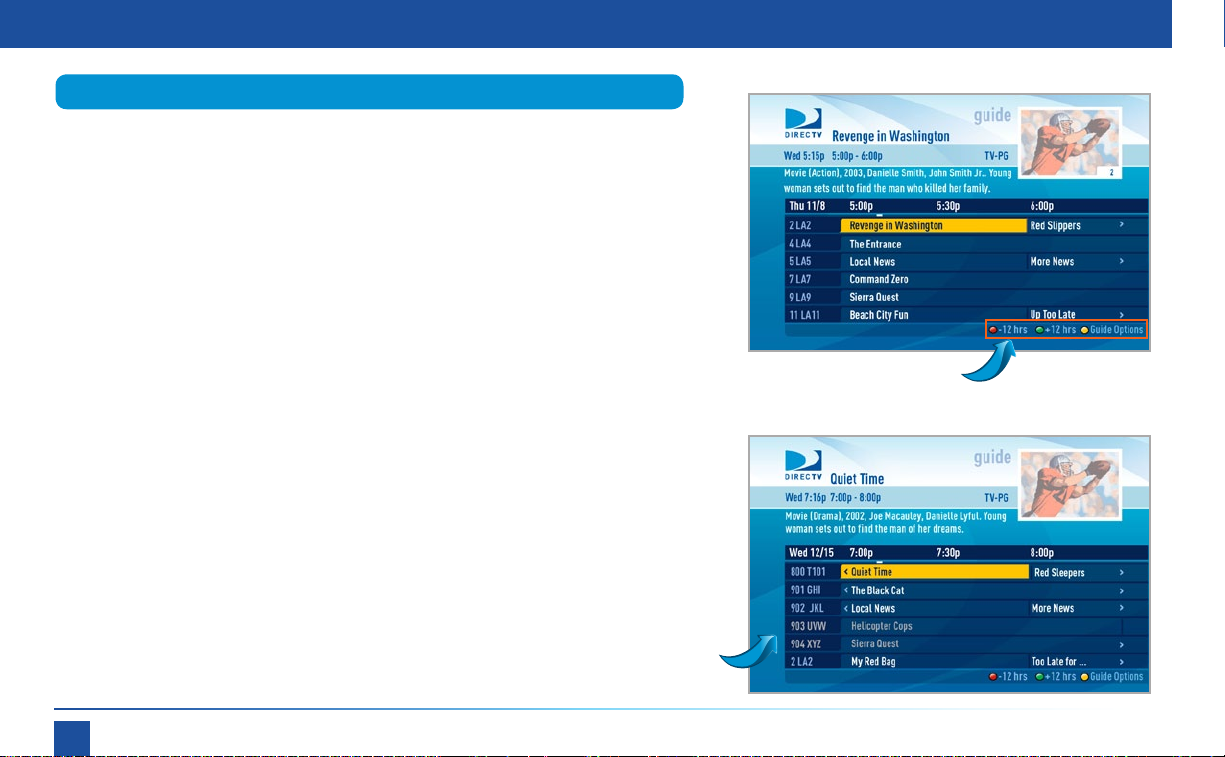
To see what’s showing, press the GUIDE button to display the onscreen
program guide. The guide holds up to 14 days of programming information
for you. You can navigate in the guide as follows: use the ARROW buttons
to move one cell at a time up/down/left/right; use the CHAN/PAGE button
to scroll a whole page up or down; type in the channel number to go
directly there. Look for the color-button hints at the bottom of the screen
for shortcuts (use the GREEN button to move ahead in time 12 hours, once
there use the RED button to come back 12 hours). If you press GUIDE twice,
you’ll see a screen that lets you filter the guide. See “Filtering the Guide”
later in this chapter for details.
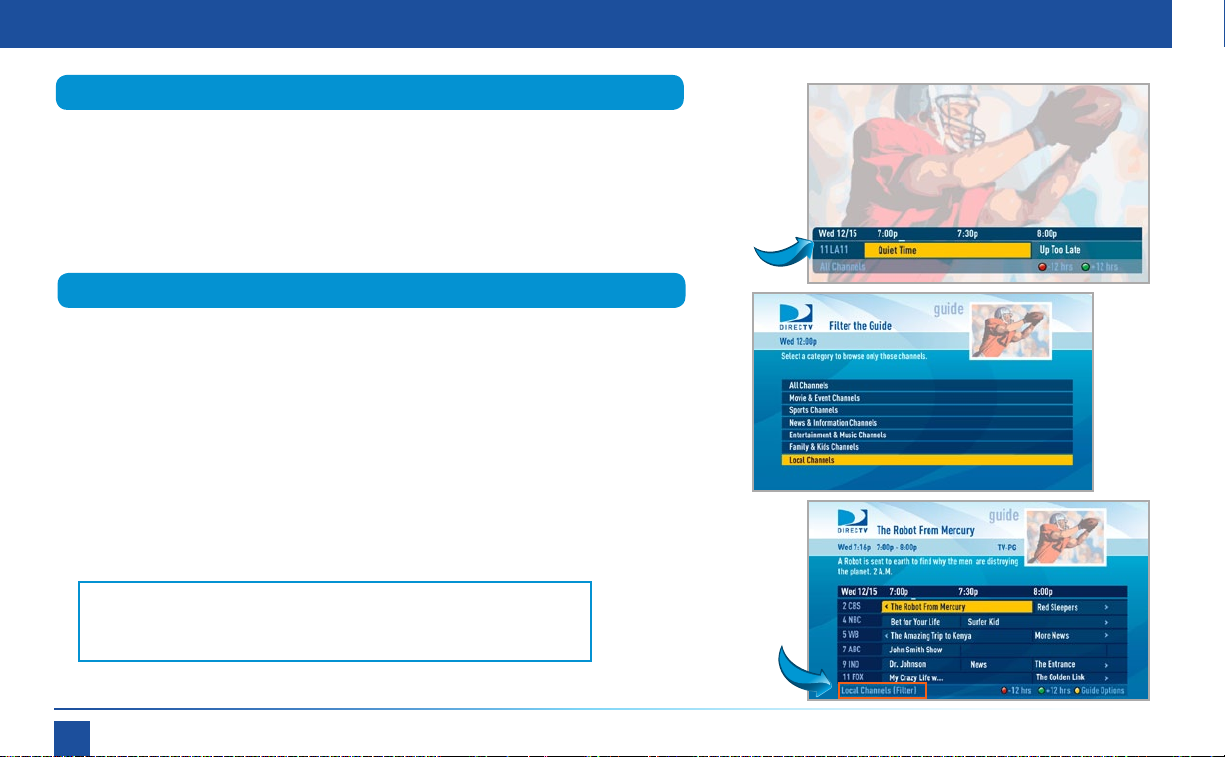
Local Channels
Your DIRECTV-provided local channels can be found in the guide from
channel numbers 2 through 69.
Unsubscribed Channels
Channels in the guide that are not part of your subscription package are
shown grayed out. You can customize your guide to hide these channels.
See “Guide Options, Change Favorites List” later in this chapter for details.
Look for shortcut
hints here.
20
DIRECTV® PLUS DVR USER GUIDE
Unsubscribed
Channels
Page 21

Program Guide
Interactive Channels
Interactive channels are unique. In addition to video and audio, they also
contain a software application that lets you interact with what you see on
screen. When accessing these channels you will have to wait a few seconds for
the software to download.
Press the ACTIVE button on your remote to get the latest weather,
horoscopes, lottery results, games and more. The channel is ready to
interact when the yellow highlight box appears.
To exit an interactive channel, press GUIDE and pick the channel you
want to move to or you can type in the new channel number while in the
interactive channel.
Other interactive channels such as, News Mix and Sports Mix, let
customers with a qualifying programming package see up to eight of the
hottest channels on one screen. Move the yellow highlight box around
using the direction arrows on your remote to hear the audio associated
with each channel. If you want to see one of the channels full-screen,
move the yellow highlight box over it and press SELECT.
Chapter
1
Chapter
2
Chapter
3
Chapter
4
Chapter
5
Chapter
6
Chapter
7
Chapter
8
CHAPTER 2 - Channels & Program Info
21
Page 22
Program Guide
Mini-guide
If you are watching a show and want a quick look at what’s on next, press
the BLUE button to display a one-line mini program guide� You can use it
for the current channel or you can type in a new channel number to see
what’s on there. Press SELECT on the new show if you want to go to that
channel.
Filtering the Guide
There may be times when you want to temporarily trim down the
channels that are shown in the guide, filtering them according to the type
of program you are looking for. For example, you may want to see just
sports or movies or news. In that case, press GUIDE twice to display the
guide filter.
Simply use the arrow keys to highlight the category you want and press
SELECT. The guide will now show only the channels that match that
categor y. Look for the label in the bottom left of the guide to see how it is
being filtered.
One-line
mini-guide
Note: Since the filtering is temporary, it only lasts as long as you keep the
program guide up on the screen.
22
DIRECTV® PLUS DVR USER GUIDE
Look here to
see how the
guide is being
filtered.
Page 23
Guide Options
Program Guide
Chapter
1
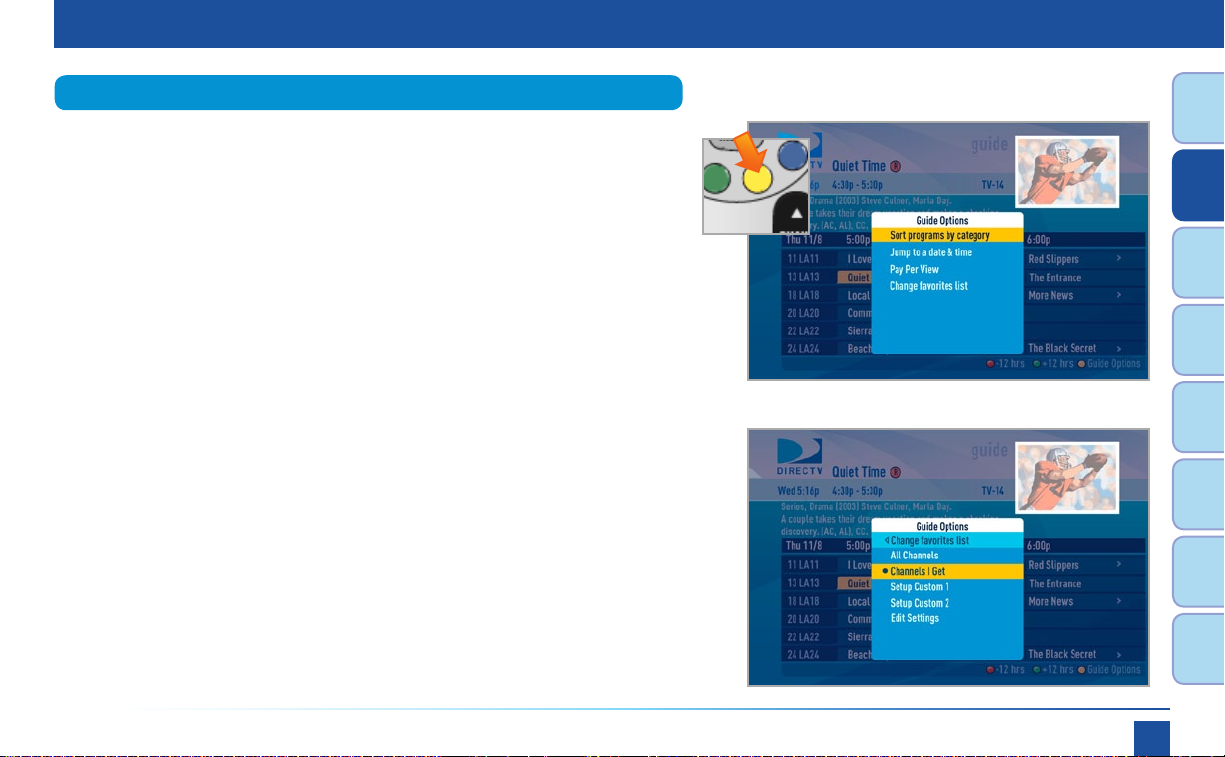
From the program guide, press the YELLOW button to display “Guide Options”.
Sort Programs by Category
Select “Sort programs by category”, then select a category to see a list of
shows in chronological order that match your sort criterion.
Jump to a Date & Time
Select “Jump to a date & time” to quickly go to a future date and time in the guide.
Pay Per View
Select “Pay Per View” and then the type of show you want, to see a
complete listing of what is available in the guide in chronological order.
Change Favorites List
By default, your program guide displays all channels offered by DIRECTV, some of
which may not be in your programming package. “Change favorites list” allows
you to toggle the channels displayed in your guide between any of the following:
“All Channels”, “Channels I Get” (channels you subscribe to) or a custom list
of channels you have defined. The “Edit Settings” option allows you to modify
the channels in your custom list. See “Favorite Channels” section later in this
chapter for details.
Chapter
2
Chapter
3
Chapter
4
Chapter
5
Chapter
6
Chapter
7
Chapter
8
CHAPTER 2 - Channels & Program Info
23
Page 24
Channel Banner
Channel Banner
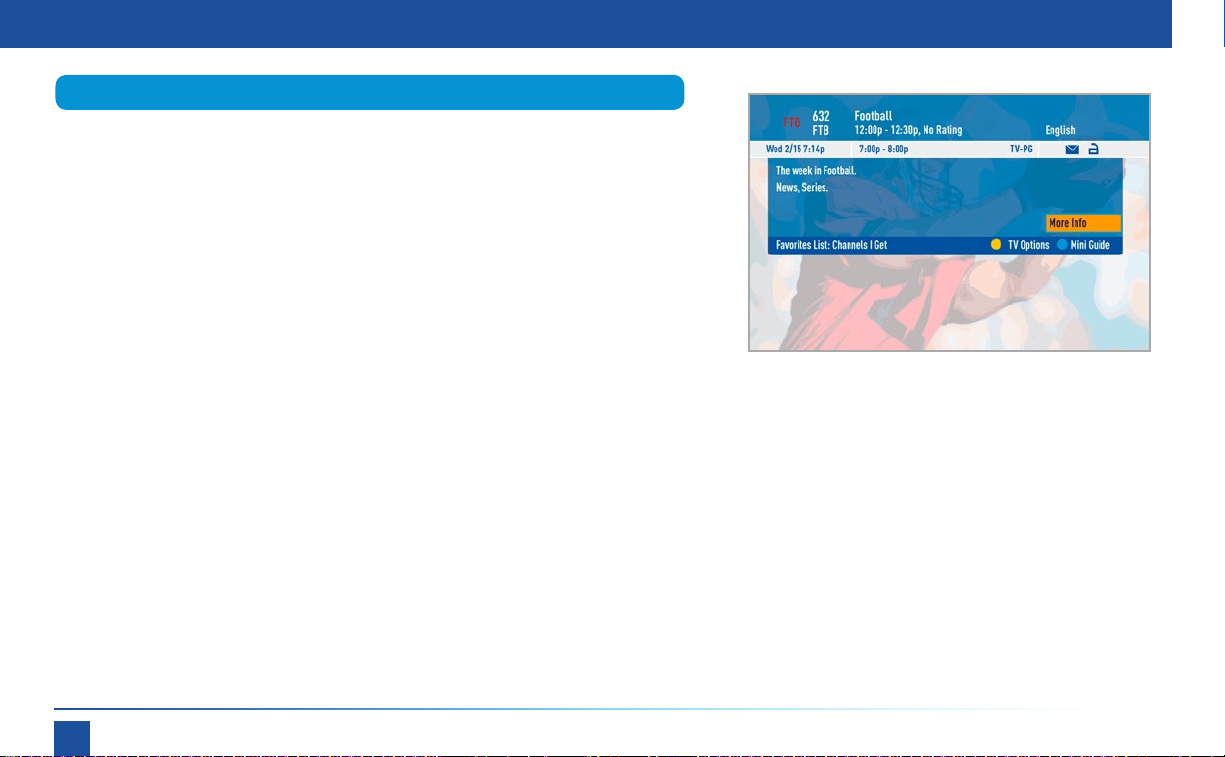
When you find a current show in the guide you want to watch, press
SELECT and the receiver changes to that channel. The channel banner
briefly displays at the top of the screen, with program title, channel
number, date, time and other information. You can also press INFO to
display the channel banner while watching a program� Select “More Info”
for detailed program information and other options.
24
DIRECTV® PLUS DVR USER GUIDE
Page 25
TV Options
TV Options
Chapter
1
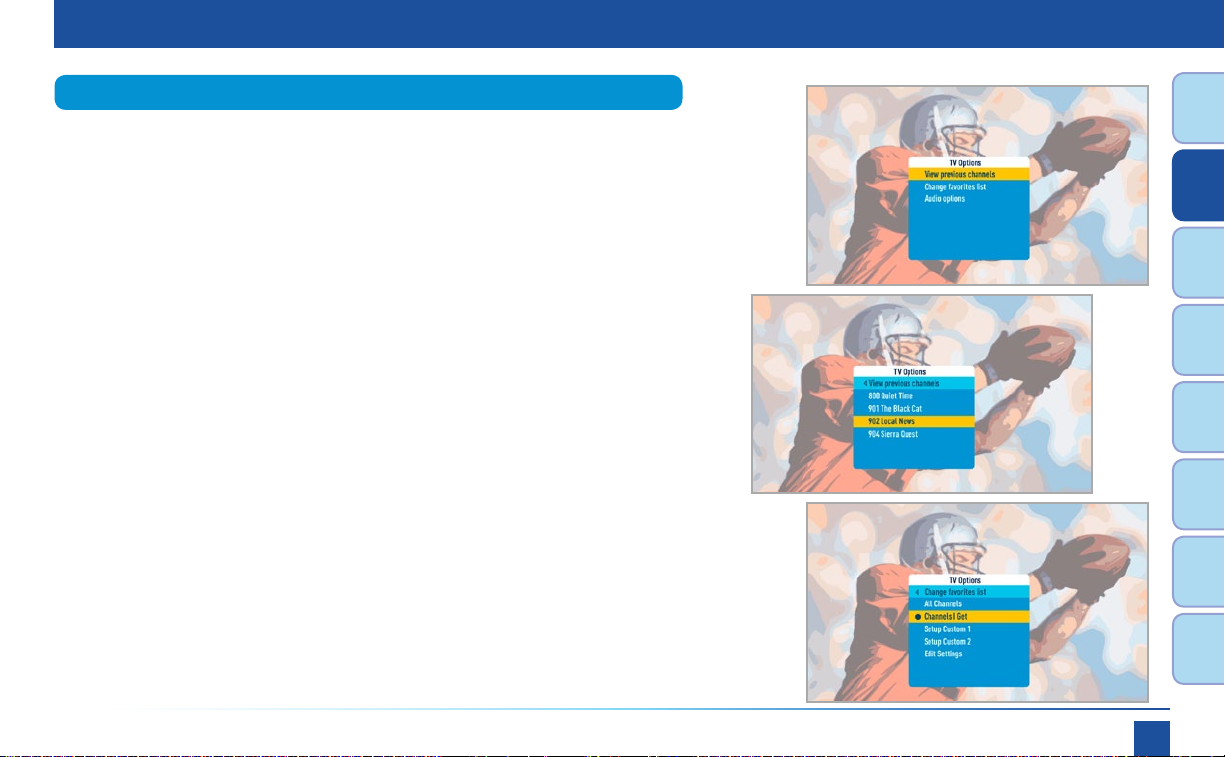
While watching TV you can press theYELLOW button for quick access to
options such the viewing previous channels channels you watched and
Favorite Channels.
View Previous Channels
Select “View Previous Channels” to see a list of previous channels you’ve
watched (up to 4). When you select a channel from this list, the receiver will
tune to that channel. This is an easy way to toggle among the channels you
watch most often. The list is reset if you turn off your DIRECT V Receiver.
Change Favorites List
Select “Change Favorites List” to update the program guide to show only
the channels you want to see. You have 4 options to choose from: “All
Channels”, “Channels I Get”, “Custom 1” and “Custom 2”. Channels I Get
displays only the channels you subscribe to. Custom 1 and 2 are selfcreated lists of your favorite channels. If one of your self-created lists is
active, select the “Add...” or “Remove...” option to add or remove the current
channel from that list.
Audio Options
When Audio Options is displayed, you may select it to change the audio
language of the program you are watching. If Audio Options is not displayed,
the current channel does not have a second audio track.
Chapter
2
Chapter
3
Chapter
4
Chapter
5
Chapter
6
Chapter
7
Chapter
8
CHAPTER 2 - Channels & Program Info
25
Page 26
Menu
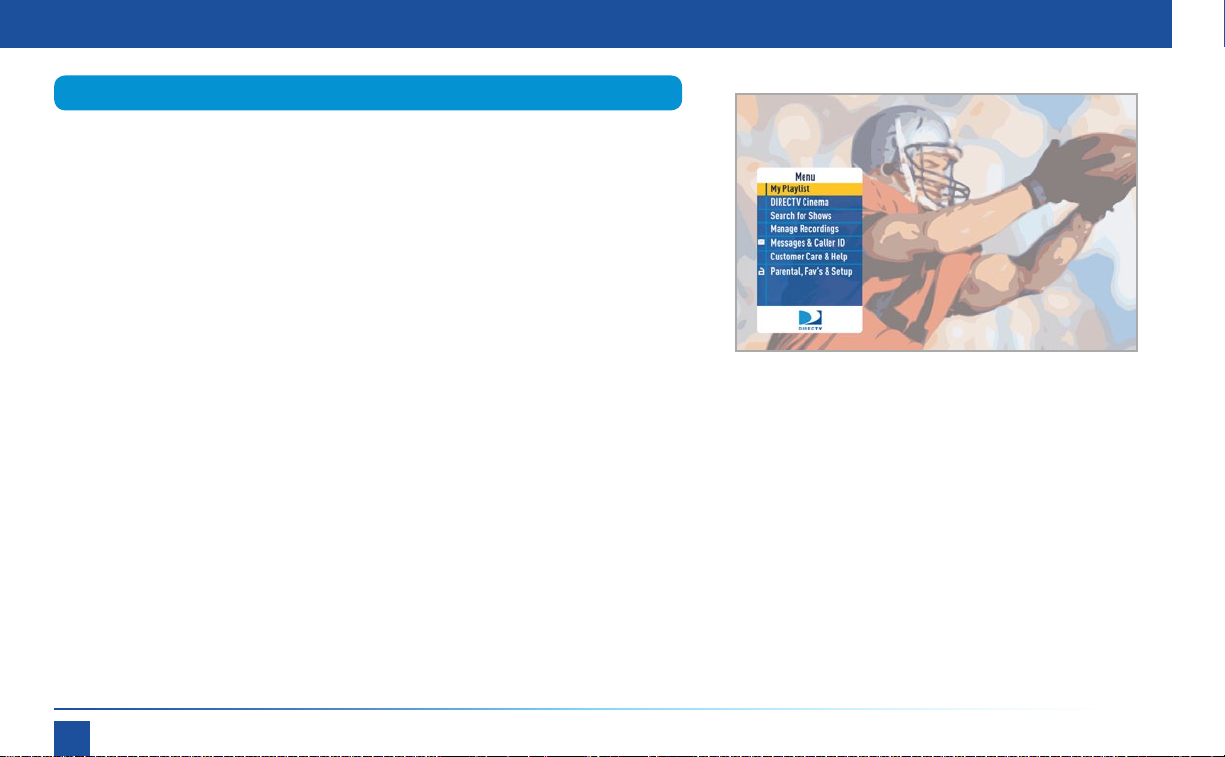
Menu
Use the main menu to access key system features. Press MENU on your
remote to display the menu and press MENU again (or EXIT) to make it go
away.
My Playlist
Displays the shows you’ve recorded that are ready for viewing.
DIRECTV Cinema
Displays the DIRECTV CINEMA home page.
Search for Shows
Use this feature to instantly find movies, shows, people, sports, etc... for you to
watch or record.
Manage Recordings
Prioritize upcoming recordings, view recording history and change recording
defaults.
26
DIRECTV® PLUS DVR USER GUIDE
Page 27
Menu
Messages & Caller ID
Press MENU, select “Messages & Caller ID”, then “Edit Settings”, then
“Messages” to see your messages. DIRECTV sends messages to you for
important news items or special promotions. We also notify you of software
changes and new features that we download to your receiver.
Caller ID diplays a log of the phone calls into your home (assuming you have a
connected land line and subscribe to Caller ID service from your telephone
provider).
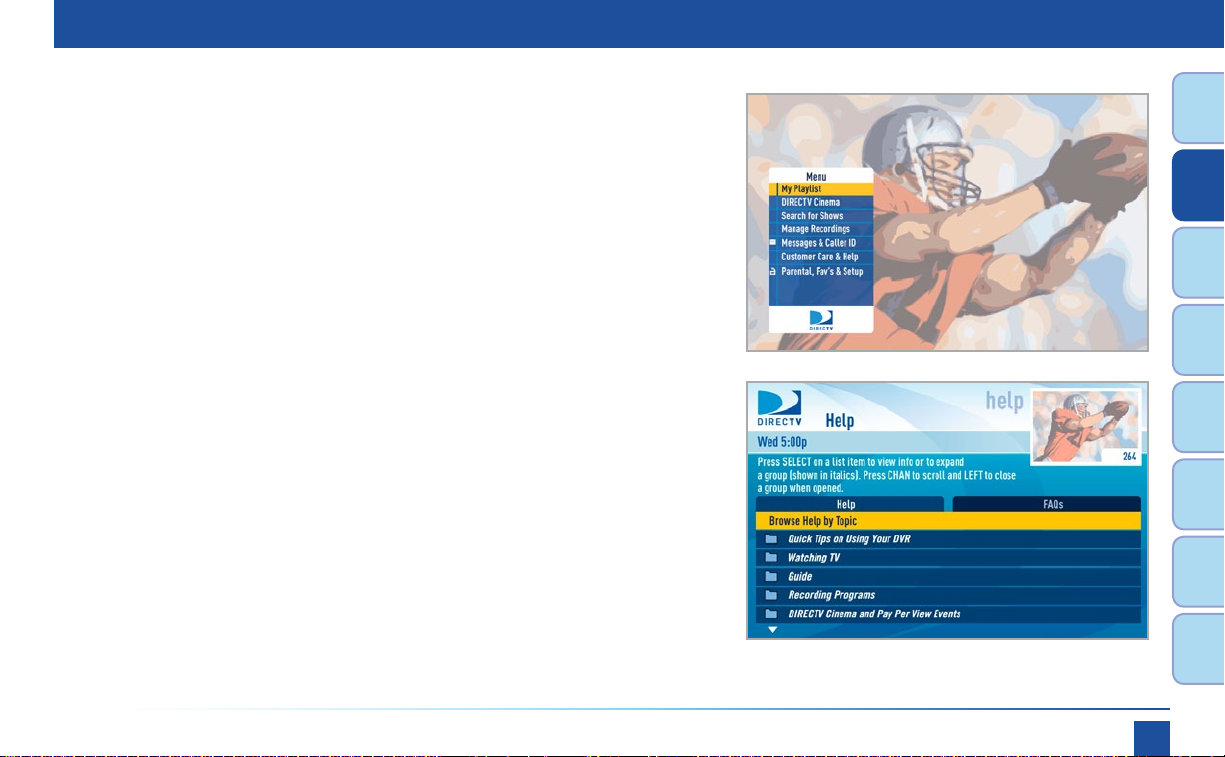
Customer Care & Help
Access onscreen help for features, FAQs, and troubleshooting tips.
Parental, Fav’s & Setup
Set parental control limits, choose favorite channels for a customized program
guide, and choose settings for your TV, remote, and DIRECTV® System.
Chapter
1
Chapter
2
Chapter
3
Chapter
4
Chapter
5
Chapter
6
Chapter
7
Chapter
8
CHAPTER 2 - Channels & Program Info
27
Page 28
Search for Shows
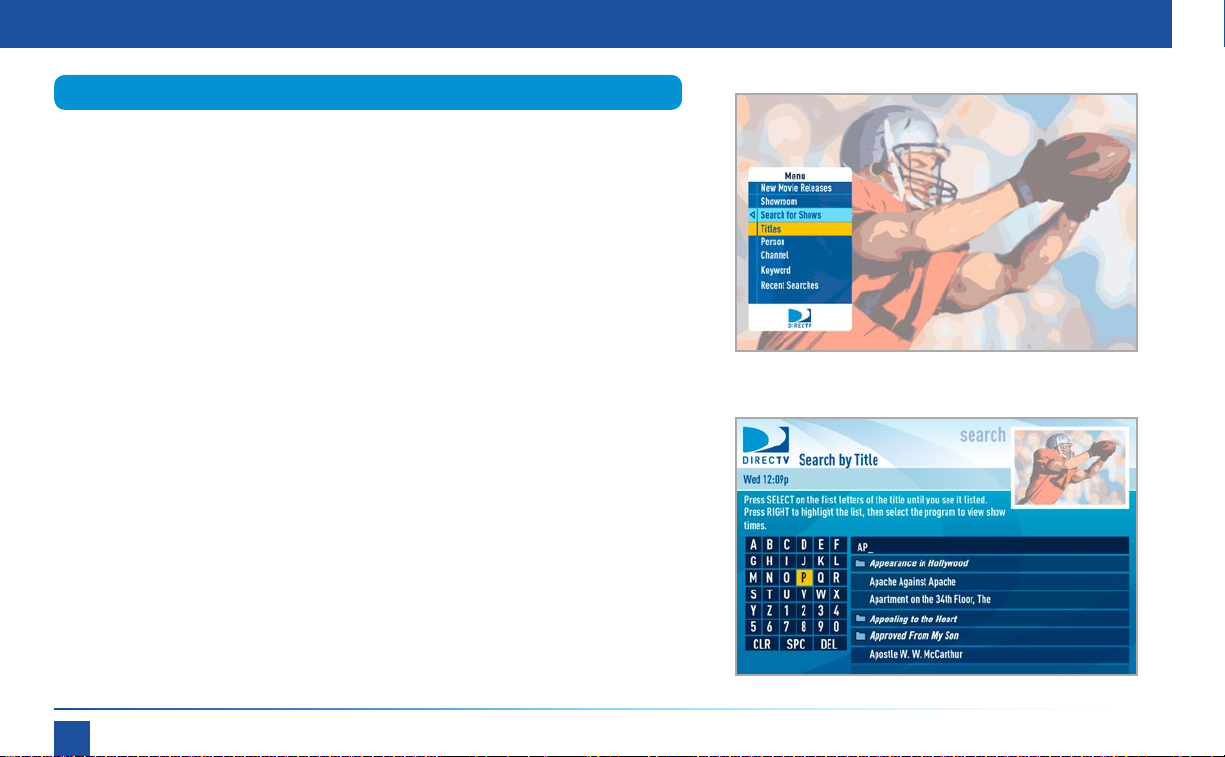
Search for Shows
Use the “Search for Shows” option to find programs based on Title,
Person, Channel or Keyword. This powerful tool finds all programs that
match your criterion within the 14-day program guide as well as the
DIRECTV CINEMA library.
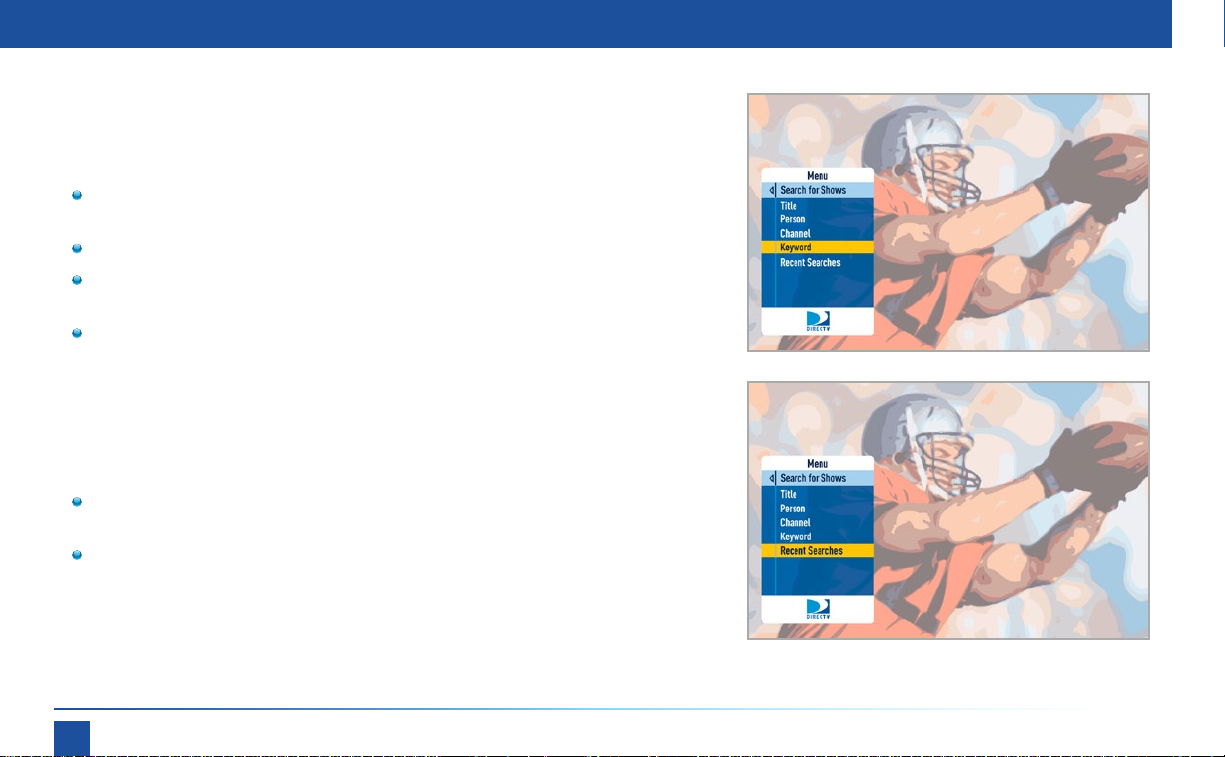
To start your search, press MENU on your remote, select “Search for
Shows”, and then select the search type: “Title”, “Person”,“Channel”,
“Keyword” or “Recent Searches”.
Using the onscreen keypad, enter one letter at a time by highlighting the
letter you want and pressing SELECT. Select DEL (Delete) to get rid of the
last letter or CLR (Clear) to start over if you make a mistake. You do not
have to enter the initial article like “The” or “An”. Each time you enter a
letter, the search becomes more precise. You don’t always have to enter
the complete word. Just the first few letters will usually get you close
enough.
Search by “Title”
Use the onscreen keypad to type in the first 3-4 characters of your title.
A list of all movie and show titles matching your search term will display.
If a program is being broadcast on more than one channel, a folder icon
will display next to the title. DIRECTV CINEMA titles have a VOD icon
next to them. Highlight a title and press SELECT for program info and
recording and other options.
28
DIRECTV® PLUS DVR USER GUIDE
Page 29
Search for Shows
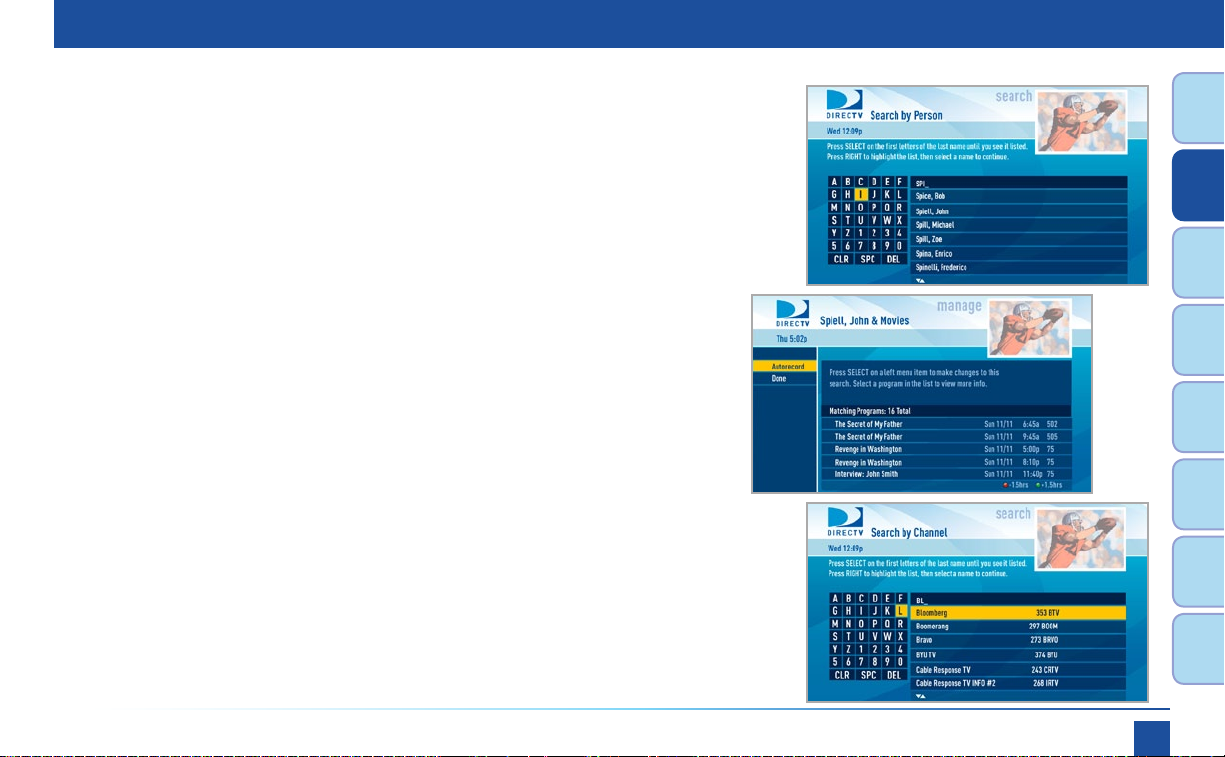
Search by “Person”
Use the onscreen keypad to type in the first 3-4 characters of person’s last
name. You’ll see a list of names which include actors, actresses and directors.
After you select a name, you’ll be given the option select a category to narrow
your search results. If you don’t want to narrow, select “All”.
A list of program titles will display. Highlight and select an individual program
to record or select “Autorecord” to record all programs for the person selected.
Autorecords are persistent. Therefore, any time a program becomes available in
the Guide that matches your Person, it will automatically be recorded.
Search by “Channel”
Use the onscreen keypad to enter the first few letters of the channel name.
For example, type in “BL” to find Bloomberg. Highlight and select the desired
channel from the list. A list of programs scheduled on that channel will display.
Highlight a title and press SELECT for program info and recording and other
options.
Chapter
1
Chapter
2
Chapter
3
Chapter
4
Chapter
5
Chapter
6
Chapter
7
Chapter
8
CHAPTER 2 - Channels & Program Info
29
Page 30
Search for Shows
Search by “Keyword”
A keyword search is an in-depth search that looks for programs by matching a
keyword (of your choice), to a program’s title or description. The more specific you
can be with your keyword, the better your search results will be.
Press MENU on your remote and select “Search for Shows”, then select
“Keyword”.
Type in your keyword and select “Continue”.
Select a category to narrow your results or if you don’t want to narrow,
select “All”.
A list of programs matching your keyword displays.
“Recent Searches”
This handy feature displays a list of your 25 most recent searches in case you
want to update or reuse a search you used previously.
Press MENU on your remote, select “Search for Shows” then select
“Recent Searches”.
Highlight a previous search from the list and press “SELECT”.
30
DIRECTV® PLUS DVR USER GUIDE
Page 31

Parental Controls
Parental Controls
Chapter
1
Parental Controls enable parents to place certain restrictions on just who’s
watching what, and requires a passcode to view restricted programming.
Whether it’s for mature content, spending amounts, or even the number of
hours of TV watching allowed, you’re always able to keep limitations where you
want them for the whole family.
Press MENU, select “Parental, Fav’s & Setup”, select “Parental Controls”, and
then “Edit Settings”. You’ll see the current status, showing any restrictions.
The system default is “unlocked” for all categories.
Chapter
2
Chapter
3
Chapter
4
Chapter
5
Chapter
6
Chapter
7
Chapter
8
CHAPTER 2 - Channels & Program Info
31
Page 32

Parental Controls
Lock Now
After setting the restrictions you want (see below for options), choose “Lock
Now” from the left menu. You’ll be asked to create a passcode. You’ll want
to make it easy enough to remember, but hard enough so someone can’t
guess what it is! This passcode will be your entry to unlocking and adjusting
limitations in the future.
An onscreen message will appear whenever anyone tries to tune to a channel
or program that has been restricted, or attempts to spend or watch beyond
limitations set. He or she will not be allowed to proceed without the passcode.
Using your passcode, you can easily override the limits.
Making multiple entries aimed at guessing the passcode is discouraged by a
time delay; each invalid passcode entered lengthens the delay for subsequent
entry by one second.
Note: If you have Parental Controls set and temporarily unlocked, turning the
receiver off will turn the parental controls back on.
32
DIRECTV® PLUS DVR USER GUIDE
Page 33

Parental Controls
Unlock Now
When parental controls are locked, a message appears if you try to tune to
a restricted program explaining why the program is blocked. To temporarily
unlock a particular program select “Unlock Now” and enter your passcode.
For more unlock options, press MENU, select “Parental Fav’s & Setup”,
then select “Parental Controls”. Various options for removing restrictions
temporarily or permanently will appear. Select one and enter your passcode.
Note: If you forget your passcode, call 1-800-531-5000 to reset it. You must be the
registered account holder and have your account number.
Adult Channels
Hide adult channels in the program guide, Manage Recordings screens, and
when channel surfing. Select “Adult Ch’s” then highlight and select the box to
toggle between “Hide Adult” and “Show Adult”.
Chapter
1
Chapter
2
Chapter
3
Chapter
4
Chapter
5
Chapter
6
Chapter
7
Chapter
8
CHAPTER 2 - Channels & Program Info
33
Page 34

Parental Controls
Ratings
Set rating limits for Movies, T V and Other (unrated) shows. From the left
menu, “Ratings” and then highlight the desired tab using the GREEN and RED
buttons on your remote to switch between tabs. There is a separate tab for
Movies, TV and Other.
Movies
Select the button next to the overall ratings limit you wish to impose.
Brief descriptions of the ratings appear for your guidance.
TV Programs
Highlight and select the TV ratings limit you desire. In addition to allowing
or blocking shows by TV rating (i.e. TV_MA) you can also set ratings limits
for particular types of content such as, Fantasy Violence (FV), Dialogue (D),
Language (L), Sexual Content (S) and Violence (V). A description of each
content type displays when highlighted.
34
DIRECTV® PLUS DVR USER GUIDE
Page 35

Parental Controls
Other Shows
Highlight and select the box to toggle the setting between “Allow No Rating” and
“Block No Rating”. If you choose “Block No Rating”, programming that has no
rating such as, news and sports will not display.
Channel Blocks
Prevent children from viewing pre-selected channels. Select “Chan Blocks”.
Scroll down the channel list and select those you wish to block. You can also key
in channel numbers or use “Block All” or “Allow All” to save time.
Chapter
1
Chapter
2
Chapter
3
Chapter
4
Chapter
5
Chapter
6
Chapter
7
Chapter
8
CHAPTER 2 - Channels & Program Info
35
Page 36

Parental Controls
Spending Limits
Limit the amount that can be spent on each Pay Per View purchase. Select
“Spending”. Then enter your preferred spending dollar limit using the
numbers on your remote.
Viewing Hours
Specify days and times when TV watching is allowed in your household.
Select “Hours”, then select the start times and durations for viewing. You can
set hours based on “school nights” — Monday-Thursday – and/or weekend
nights—Friday-Saturday, and Sunday.
36
DIRECTV® PLUS DVR USER GUIDE
Page 37

Favorite Channels
Favorite Channels
Chapter
1
Create lists of your favorite channels. Use your list to see only those specific
channels listed in the guide as well as, when you’re channel surfing in live
TV. You can create up to two custom lists on this receiver. You can also
choose “Channels I Get” to see only the channels that are in your DIRECTV
programming package.
Press MENU on your remote, select “Parental, Fav’s & Setup”, then “Favorite
Channels”. If you haven’t created a Favorites list, the “Setup Custom 1” and
“Setup Custom 2” options will be displayed. Select the one you want, and follow
the onscreen instructions to create and name your list.
Selecting a Favorites list makes it active and hides the display of all other
channels in the guide. From the program guide, press the YELLOW button
on your remote, select “Favorites” and then select the list you want to make
active. The name of the currently selected Favorites list is displayed in the
bottom left of the program guide screen to remind you which list you are
currently using. To return to displaying all channels, press the YELLOW button
while in the guide, select “Change favorites list”, and select “All Channels”.
Chapter
2
Chapter
3
Chapter
4
Chapter
5
Chapter
6
Chapter
7
Chapter
8
CHAPTER 2 - Channels & Program Info
37
Page 38

38
DIRECTV® PLUS DVR USER GUIDE
Page 39

CHAPTER 3 - DIRECTV CINEMA™ & PAY PER VIEW
DIRECTV CINEMA
™
�������������������������������������������������� 40
PAY PER VIEW EVENTS �������������������������������������������� 41
39
Page 40

DIRECTV CINEMA
DIRECTV CINEMA
You don’t have to go out for the biggest box office movies! The latest hits
are available 24 hours a day. Find them in the program guide starting at
channel 125 or go to DIRECTV CINEMA, channel 1100 to browse the newest
movie releases.
To order a movie from the program guide, highlight the title and press
INFO on your remote. Select the Record option and follow the onscreen
instructions. As long as your receiver is connected to a land-based phone
line or the Internet, you can use your remote to order. Otherwise, order on
directv.com. Your receiver lets you record movies before you buy them;
you’re charged when you watch. If the movie has been recorded and you
want to delete it, press LIST, highlight the title and press the RED button. If
the movie is set to record in the future, press MENU, then select “Manage
Recordings” then “To Do List”. Highlight the program and press the RED
button to cancel it.
Showroom
Showroom offers you DIRECTV content such as instructional videos, behindthe-scenes clips and video extras, information about DIRECTV sports
subscriptions, special offers, trailers and more. Press MENU, select “DIRECTV
CINEMA”, then “Showroom”.
40
DIRECTV® PLUS DVR USER GUIDE
Page 41

Pay Per View Events
Pay Per View Events
Chapter
1
Special events like UFC, Boxing, WWE and more are listed in the program
guide starting on channel 117.
Ordering PPV events works the same way as ordering DIRECTV CINEMA
movies from the program guide. See previous section for details.
Chapter
2
Chapter
3
Chapter
4
Chapter
5
Chapter
6
Chapter
7
Chapter
8
CHAPTER 3 - DIRECTV Cinema
™
& Pay Per View
41
Page 42

42
DIRECTV® PLUS DVR USER GUIDE
Page 43

CHAPTER 4 - RECORDINGS
RECORDING A SINGLE SHOW ������������������������������������������� 44
RECORDING A SERIES ������������������������������������������������������ 46
WATCHING AND DELETING YOUR RECORDED SHOWS ���� 47
MY PLAYLIST �������������������������������������������������������������������� 48
Playlist Options .............................................................. 49
Managing My Playlist ..................................................... 50
MANAGE RECORDINGS ���������������������������������������������������� 52
RECORDING FROM YOUR COMPUTER OR PHONE ������������ 56
43
Page 44

Recording a Single Show
Recording a Single Show
From Live TV
To record a show you are currently watching, simply press RECORD once�
The progress bar will appear and turn orange and the circle R icon will
appear next to the title to let you know your show is now being recorded.
From the Guide
You don’t have to be watching a show to record it� Simply find it in the
program guide and use the RECORD button as described above. The
orange record icon appears to let you know that your show is being
recorded or is scheduled to record.
Note: You can record two shows at the same time with your DIRECTV DVR if
you have made the proper connections to your satellite dish.
44
DIRECTV® PLUS DVR USER GUIDE
Page 45

Recording a Single Show
Changing a Record Option
Some live events and even a few TV shows run past their allotted time
slot. Your DVR is very smart, but it sets up all recordings based on the
start and stop times the broadcasters give us for the program guide.
If you are watching while recording and you think your show might go
into the next time slot, press INFO on the remote, then select “More Info”
and “Recording” from the onscreen choices to see the recording options
for that show. Once there you can change the stop time or any other
option. To save your changes select “Update”.
If your show is set to record in the future, you can find it in the guide
or To Do list, then press INFO to display the Info screen. To change
a recording option for that one show, select “Rec. Once” and choose
whichever option or options you want to change. If you want to change
a recording option for every show in the series, select “Rec. Series” and
then choose the options you want to change.
Stopping an In-progress Recording
If you press the RECORD button a second time on a single show (like a
movie), an onscreen message will appear giving you the choice to “Cancel
This” or “Don’t Cancel”. This is an easy way to cancel a recording.
Chapter
1
Chapter
2
Chapter
3
Chapter
4
Chapter
5
Chapter
6
Chapter
7
Chapter
8
CHAPTER 4 - Recordings
45
Page 46

Recording a Series
Recording a Series
From Live TV
If the show you are currently watching is a series and not a single event (like
a movie), simply press the RECORD button twice to automatically record
every episode of the series. The RECORD icon is now a repeated circle R to
let you know that this is a series and not a single recording.
From the Guide
As mentioned previously, you don’t have to be watching a series to record it.
Simply find it in the program guide and press the RECORD button twice to
record all episodes of it.
Changing a Record Option
If you are currently watching a series show and need to extend the recording
time or change any other recording option, press INFO on the remote, select
“More Info” and then “Rec. Series” from the onscreen choices. If you see a
series set to record in the future in the program guide or the To Do List, to
change a record option press INFO and select “Rec. Series”.
Stopping an In-Progress Recording
If you press the RECORD button a third time on a series, an onscreen
message will appear giving you the choice “Cancel This”, “Cancel All” or
“Don’t Cancel”.
46
DIRECTV® PLUS DVR USER GUIDE
Page 47

Watching and Deleting Your Recorded Shows
Watching and Deleting Your Recorded Shows
Chapter
1
To see your list of recorded shows, press LIST on the remote. Alternatively,
you can also press MENU and select “My Playlist”. Use the arrow keys to
highlight the desired show, press SELECT, then select “Play” (or “Resume”
if you’ve already watched part of the show) to start the show. You can use
any of the DVR control buttons (like PAUSE, FFWD, ADVANCE, etc�) while
watching your recorded show� If you press STOP, the show will stop and
an information screen with various options will appear. The last channel
viewed in live T V will appear in the upper-right corner of the screen. To
return to full-screen live TV, press EXIT or select “Done”.
If you want to delete a show from your playlist, use the arrow keys to
highlight the desired show and press the RED button. You will then be asked
to confirm the deletion.
Look for shortcut
hints here.
Chapter
2
Chapter
3
Chapter
4
Chapter
5
Chapter
6
Chapter
7
Chapter
8
CHAPTER 4 - Recordings
47
Page 48

My Playlist
My Playlist
The Playlist screen displays all your recorded programs. To get to the
Playlist screen directly, press LIST on the remote, or press MENU and
select “My Playlist”. Titles that you have not viewed yet are shown in
bright, white letters, while titles that you have already viewed (partially or
completely), are light blue.
The time, date and channel of each recorded program is displayed to the
right of the program title. Any icon identifying program status is displayed
to the left of the program title (for example, a circle K for “Keep Until I
Delete”). See the inside back cover for a list of all the icons.
Highlighting a program title displays the program description, just as in
the Guide. If you press SELECT or INFO on a program, an Info screen is
displayed for the program that offers several actions including Play, Keep,
Delete and others.
Series programs are identified in the list with a folder icon� For example, if
you record a weekly comedy series, the title for that series is shown with a
folder icon. Press SELECT on the series title to see the recorded episodes
for that series. The number of new (not viewed) programs and total
programs for each series is displayed to the right of the series name; for
example, “2 New/5 Total”. Press PL AY on a series to play all the episodes
in the folder, in order from oldest to newest.
48
DIRECTV® PLUS DVR USER GUIDE
Page 49

Playlist Options
My Playlist
Chapter
1
From the Playlist screen, press the YELLOW button to display Playlist
Options.
Mark Programs to Delete
Select “Mark programs to delete” if you want to delete two or more programs
at once.
Sort Programs by Category
Select “Sort programs by category” and then select Movies, Sports, News,
Kids, etc., to filter the playlist as desired. This option will help you find what you
want faster, once you start to record a lot of programs.
This is just a temporary filter for your list, so just press the left arrow or BACK
to see your full Playlist again.
Change Order of Playlist
Select “Change order of Playlist” to pick how you want to arrange the
order of your recorded shows. You can sort by date with the newest at the
top (that’s the factory default setting), the oldest at the top; alphabetically
with A at the top, or Z at the top; by expiration date with first to expire at
the top or last to expire at the top.
Chapter
2
Chapter
3
Chapter
4
Chapter
5
Chapter
6
Chapter
7
Chapter
8
CHAPTER 4 - Recordings
49
Page 50

My Playlist
Open/Close All
Series programs are grouped in folders in your Playlist. Select “Open/Close
All” to open all of your folders so you can see each episode without having to
select each series individually. You can also use this option to close them all.
Managing My Playlist
Your DVR has lots of recording space but it is possible to fill up the hard drive if
you record regularly. A quick way to check how much space you have available is
the Disk Space Bar.
Disk Space Bar
The Disk Space bar is at the bottom of your Playlist. It shows the approximate
amount of space available on your disk at any given time.
The Disk Space bar shows programs you have designated “Keep Until I Delete”
in dark blue, programs subject to expiration or automatic deletion in light blue,
and the remaining unused disk space that is available for recording in black.
When your disk is full, the oldest shows (viewed or not) are automatically pushed
out to make room for the new ones. If you have a show that you don’t want
pushed out, press the BLUE button to “Keep” it in your Playlist until you delete it.
50
DIRECTV® PLUS DVR USER GUIDE
37% Free
Page 51

My Playlist
Keep
Highlight the show you want to keep and press the BLUE button on your
remote. A blue,circle K icon will appear next to the program title indicating
it will be kept until you delete it. You may be tempted to make all of your
recordings “Keep Until I Delete”, but if your hard drive ever fills up, new
recordings can’t take place.
Another way to manage your Playlist is to delete recordings you no longer
want.
Delete
Highlight a single show or a series (indicated by a folder icon) and press the
RED button to delete it. If you delete a folder, all episodes of that series will
be deleted. Don’t worr y about pressing the RED button accidentally. You will
always see a confirmation message before you delete anything.
DIRECTV CINEMA
Press the GREEN button to go to the DIRECT V CINEMA home page.
Chapter
1
Chapter
2
Chapter
3
Chapter
4
Chapter
5
Chapter
6
Chapter
7
Chapter
8
CHAPTER 4 - Recordings
51
Page 52

Manage Recordings
Manage Recordings
Once you have scheduled recordings, you can find the status and history of
those recordings by pressing MENU and selecting “Manage Recordings” to see
the following options: To Do List, Queue, History, Purchases, Prioritizer, Manual
and Record Defaults. These features are described on the next few pages.
To Do List
The To Do List displays recordings your DVR is scheduled to make in the
future� Icons next to the titles indicate whether the recording is a single
event, part of a series, or an autorecord based on a person or keyword
search. The list is ordered by time with the next recordings at the top and
the furthest in the future at the bottom. You can use this screen to make
sure your recordings are properly scheduled or to delete future scheduled
recordings you no longer want to record. The To Do list does not display
DIRECTV CINEMA programs scheduled for download over the Internet; these
are shown in the Queue screen.
Deleting single shows is easy: Simply highlight the show you want to delete
and press the RED button on the remote. A confirmation message will appear
before you can delete the show.
If you want to delete an entire series from the To Do List, select the show,
select “Rec. Series...”, then select “Cancel All”.
52
DIRECTV® PLUS DVR USER GUIDE
Page 53

Manage Recordings
Prioritizer
The Prioritizer screen displays a prioritized list of all the series you’ve
scheduled to record. If there is a series recording conflict and the receiver must
choose which show to record, it uses this list to determine the priority. As you
set up series recordings, the most recent series goes to the bottom of the list
in last priority. You can change the order of the priority at any time by selecting
“Prioritizer”, selecting the show you want to move, moving the highlight to the
right, and then using the arrow keys to promote or demote the series.
There are a couple of color key short cuts on this screen as well. Use the RED
button to delete an entire series. Use the GREEN button to move a highlighted
show to the top of the list in one press.
You can also adjust the recording options used for a particular series from this
screen. Select the series you want, then select “Rec. Series” and change the
recording options as desired.
Chapter
1
Chapter
2
Chapter
3
Chapter
4
Chapter
5
Chapter
6
Chapter
7
Chapter
8
CHAPTER 4 - Recordings
53
Page 54

Manage Recordings
History
Provides status information for every recording scheduled, whether they
were completed, canceled or deleted. If you think something should have
been recorded, but wasn’t, check here to look for an explanation.
Purchases
Provides status information for all Pay Per View programs that were bought
and, if viewed, the date and time.
Manual Recordings
There may be times when you want to set up a manual recording based
on channel, time and date. In this case, select Manual and enter all of the
options as you wish, including whether you want this to be a one-time or
recurring recording (i.e. every Tuesday), channel, day and date, start time
and duration. You can schedule a manual recording up to 14 days in advance.
54
DIRECTV® PLUS DVR USER GUIDE
Page 55

Manage Recordings
Recording Defaults
The Recording Defaults screen lets you set the recording options you want the
receiver to use every time it does a recording. The receiver’s default settings
work best in the vast majority of cases, but you may want to change them to your
personal preferences.
When recording a series, the Episode Type gives you the option to record
first run only, repeats only, or both.
The Keep at Most option lets you decide how many episodes you want to
keep: 1, 2, 3, 4, 5, 10 or All. If you select “All Episodes” for a show that
appears many times in the guide, you may find it uses disk space rapidly.
The Keep Until option lets you keep a recording until you delete it or until
the disk is full, in which case the DVR can delete it automatically if the
disk fills up. A recording that is labeled “Keep Until I Delete” will never be
deleted until you do it manually; if all of your recordings are labeled that
way and the disk fills up, no new recordings will occur until you manually
delete some of your “Keep Until I Delete” recordings.
Finally, the Start and Stop options let you adjust the times of your
recordings to ensure you don’t miss a thing. Keep in mind that starting
early and ending late on all of your recordings may create more recording
conflicts than if you started and stopped on-time (according to the
program guide schedule). If you find a particular series runs habitually late
or early, it is better to adjust that series using the program’s Info screen
rather than set the recording defaults, which would affect all of your
DVR recordings. Press MENU, select “Manage Recordings”, then select
“Prioritizer”. Select the program you want to adjust, then select “Rec.
Series”.
Chapter
1
Chapter
2
Chapter
3
Chapter
4
Chapter
5
Chapter
6
Chapter
7
Chapter
8
CHAPTER 4 - Recordings
55
Page 56

Recording from Your Computer or Phone
Recording from a Computer or Phone
Have you ever forgotten to set a recording and wish you could do it remotely
from work or while on the go?
Note: You must have an account on directv.com to use remote scheduling.
From a Computer
To schedule a recording from your computer, go to directv�com/
tvlistings to see an on-line version of the program guide� Select a show
and click “Record”. If you have more than one DVR in your home, choose
the DVR you want to record to and then click “Record to Receiver”.
Note: If you have a mix of HD and SD DVRs in your home, make sure not to
pick an HD movie for your SD DVR. It will not record.
56
DIRECTV® PLUS DVR USER GUIDE
Page 57

Recording from Your Computer or Phone
DVR Scheduler Mobile App
Our FREE, award-winning DVR Scheduler Mobile App is available for the
iPhone, Android™, Palm® Pre™, Palm® Pixi™, BlackBerry®, and Windows®
Phone 7. Turn your smartphone into the easiest, fastest, most convenient way
to find any program and set your home DVR.
Features:
Search for any television show up to 14 days in advance
Browse programs by channel or date & time
Get program information instantly, including description, length and
rating
Record a single episode or an entire series
Order DIRECTV CINEMA™ right on your phone (available for iPhone,
Android, Palm, BlackBerr y and Windows Phone 7), no need to have your
receiver connected to a phone line Record to any DIRECTV DVR in your
home
Go to directv.com/mobileapps for more information.
Chapter
1
Chapter
2
Chapter
3
Chapter
4
Chapter
5
Chapter
6
Chapter
7
Chapter
8
CHAPTER 4 - Recordings
57
Page 58

58
DIRECTV® PLUS DVR USER GUIDE
Page 59

CHAPTER 5 - EXTRAS
MESSAGES & CALLER ID ������������������������������������������������60
DIRECTV™ IPAD® APP ���������������������������������������������������61
GAMESEARCH™ ������������������������������������������������������������62
GSN GAME LOUNGE ��������������������������������������������������������62
SCOREGUIDE™ ���������������������������������������������������������������63
59
Page 60

Messages & Caller ID
Messages
Press MENU, then select “Messages & Caller ID”, “Edit Settings”, then
“Messages”, to see your messages. DIRECTV sends messages to you for
important news items or special promotions. We also notify you of software
changes and new features that we download to your receiver. When you have
new mail, an “envelope” icon appears in the channel banner.
Caller ID
To set up your receiver to display an onscreen notices whenever you receive
a call, press MENU and select “Messages & Caller ID”, then “Turn Caller ID
On”. This will toggle the option to now read “Turn Caller ID Off”.
Note: You must subscribe to caller ID service through your phone company
and your receiver must be connected to the phone line.
You can review your 25 most recent calls in the call log at any time. To see
your call log, press MENU, select “Messages & Caller ID”, select “Edit
Settings”, then select “Caller ID”.
60
DIRECTV® PLUS DVR USER GUIDE
Page 61

DIRECTV™ iPad® App
DIRECTV™ iPad® App
Chapter
1
The DIRECTV ™ iPad® App is a FREE app that turns your iPad into a remote
control, giving you more control of your TV experience. Get instant access
to your favorite channels, shows and sports scores. Customize your home
screen with the programming you watch most. Plus, program your DVR from
wherever you are.
Features:
Use your iPad as a remote control: Play, pause, rewind, fast-forward,
scroll through channels, and more, all with a tap.
Create your own Home screen: Get instant access to your favorite
channels and sports. You control what’s on your screen by choosing
the channels you want to see, the teams and sports you want to follow,
even the modules you want to include.
Create your own sports roster: Browse games and get scores instantly
across all sports. You choose the teams and sports you want to follow.
Search for any television show up to 14 days in advance
Browse programs by channel or date & time
Watch trailers and get detailed show info: See descriptions, upcoming
showings, cast & crew, parental info, similar shows, and photos.
Go to directv.com/ipad for more information.
Chapter
2
Chapter
3
Chapter
4
Chapter
5
Chapter
6
Chapter
7
Chapter
8
CHAPTER 5 - Extras
61
Page 62

GameSearch™, GSN Game Lounge
GameSearch
Sports blackouts, a long-time source of frustration and confusion for sports
fans, occur when a sporting event is not televised in a certain area. But
thanks to DIRECTV’s cutting-edge technology, whenever you tune in to a
channel with a blacked-out game, GameSearch recognizes the blackout and
immediately looks to see if the game is on another channel. If a broadcast of
the game is found, GameSearch displays an onscreen message that gives you
the option to tune in to that channel. If it can’t find one, an onscreen message
will let you know the game is not available.
™
GSN Game Lounge
The GSN Game Lounge service (Channel 110) contains memory and skill
games that you can play onscreen using only your remote. There are free as
well as subscription-only games. If you become a top scoring player you will
see your name on the leader board.
62
DIRECTV® PLUS DVR USER GUIDE
Page 63

ScoreGuide
™
ScoreGuide
™
Interactive content, like scores, statistics and other information, is
also provided along with some of our special sports and entertainment
channels. Look for an onscreen popup that lets you know when interactive
content is available and follow the onscreen instructions to use the
interactive features.
Chapter
1
Chapter
2
Chapter
3
Chapter
4
Chapter
5
Chapter
6
Chapter
7
Chapter
8
CHAPTER 5 - Extras
63
Page 64

64
DIRECTV® PLUS DVR USER GUIDE
Page 65

CHAPTER 6 - SETTINGS
SETUP AND ACTIVATION ���������������������������������������������������66
CONNECTIONS ������������������������������������������������������������������ 67
SYSTEM SETUP �����������������������������������������������������������������70
Info & Test .......................................................................70
Satellite ...........................................................................71
Remote Control ..............................................................71
Audio ...............................................................................72
Display ............................................................................73
Access Card ....................................................................74
Reset ...............................................................................75
65
Page 66

Setup and Activation
Guided Setup
If your receiver was not professionally installed, or you have had to reset your receiver for any reason, you will need to follow the guided
setup screens before starting DIRECTV Service.
1� Make sure the MODE switch at the top of the remote control is set to DIRECTV, which is the far-left position.
2� Press PWR. The DIRECTV DVR will turn on. (Make sure your TV is also turned on!)
3� The first screen will allow you to select a language. Using the arrow keys on the remote control, move to the language you prefer
and press SELECT.
4� Follow the onscreen instructions.
After these setup procedures are complete, you’ll see a message onscreen that says, “Acquiring Satellite Info”, as the receiver gathers
information from the satellite for the onscreen program guide. Next, you’ll be given the opportunity to program your remote to control
other equipment such as your TV and/or DVD player. Just follow the screen instructions and you’ll be ready to watch in no time!
Activate Your DIRECTV® Service
Once all the setup processes are complete, all that’s left to do is activate your DIRECTV Service. Before you make the call, be sure to:
1� Have on hand your service address, social security number and a valid major credit card.
2� Note your receiver ID and access card numbers. The receiver ID is on a sticker behind the access card door on the front of the
receiver, while the card number is on the access card itself. Use the Product Information page to note this information.
3� When you’re ready, just call 1-800-531-5000; pick the programming package that’s right for you and subscribe to DIRECTV
service.
66
DIRECTV® PLUS DVR USER GUIDE
Page 67

Your Phone Connection
Connections
Chapter
1
Connecting your receiver to a land-based telephone line saves you money because it allows you to purchase DIRECTV CINEMA movies
and Pay-Per-View events without calling DIRECTV to order. It is required for sports package subscriptions and is also used to enhance
the interactive features available on our interactive channels. The receiver uses a toll-free number once a month for a few minutes and
is designed not to interfere with your regular phone service. You will need an RJ11-type modulator jack (the most common type of phone
jack). If you disconnect the phone line, the receiver will not allow you to purchase PPV programs and some features of our interactive
channels will be limited. Do not connect your receiver to a digital PBX phone system — doing so may permanently damage your
equipment and void your warranty�
Connections for Auxiliary Equipment
The following instructions apply if you are upgrading to a new TV or adding a surround sound system, DVD player/burner or VCR some
time after your professional installation. Due to restrictions imposed by copyright holders, certain programming may include content
protection measures that may restrict viewing or recording with certain consumer electronics equipment attached to the receiver.
Please contact the manufacturer of such equipment for additional information.
Not all cables come with your digital satellite receiver; you may need to purchase additional cables depending on your setup�
Note: Never connect an IN to an IN or an OUT to an OUT. All A/V jacks and inputs
are color coded. Always match the color of the plug to the same color of the jack.
Tip: To obtain the best picture quality, make
sure the receiver is connected directly to the TV.
Chapter
2
Chapter
3
Chapter
4
Chapter
5
Chapter
6
Chapter
7
Chapter
8
CHAPTER 6 - Settings
67
Page 68

Connections
All of the video and audio outputs on your receiver offer good quality. Pick one of each from
the list below, based on the connectors your TV supports; they are listed in order, with the
highest quality options at the top of each list.
WARNING:
Do not connect your receiver (or any other
equipment such as a TV or VCR) to the AC power
supply until you have properly connected all the
other cables�
Video Connections
- S-video (one connector per receiver) provides good video, but does not provide audio. You will need to connect audio separately using
the digital audio or RCA audio connectors.
- RCA jacks (two sets per receiver) provide good video and usually come bundled with three cables for one video and two audio
channels.
Audio Connections
- Digital Audio Optical (one connector per receiver) provides excellent quality digital audio and is often used on newer surround sound
and DVD equipment.
- Digital Audio Coax (one connector per receiver) provides high quality digital audio and is also found on newer surround sound and
DVD equipment.
- RCA jacks provide good audio quality and are found on older auxiliary equipment.
- There are so many makes and models of TVs and auxiliary equipment, it is impossible to fully describe all of the possible connections
between them and your receiver. Refer to the manuals for that equipment to see the connection options specific to each make and
model. The following images show examples of how your receiver may be connected, using the supported video and audio connections
for the TV, the surround sound, and the DVD player/burner or VCR.
68
DIRECTV® PLUS DVR USER GUIDE
Page 69

Connections
Example: TV with S-Video Connector
Here is an example of a TV that has an S-video connector as the
best video input and RCA audio connectors as the best audio input
and a surround sound system with a digital audio optical connector
as the best audio input:
This example also shows using a VCR or DVD burner with RCA audio
and video connectors.
Example: TV with RCA Connectors
Here is an example of a TV that has RCA connectors as the best
audio/video inputs and a surround sound system with a digital audio
coax connector as the best audio input:
This example also shows using a VCR or DVD burner with RCA audio
and video connectors.
Television
DIRECT V DVR
VCR/DVD Burner
Television
Surround System
Surround System
DIRECT V DVR
Chapter
1
Chapter
2
Chapter
3
Chapter
4
Chapter
5
Chapter
6
Chapter
7
Chapter
8
VCR/DVD Burner
CHAPTER 6 - Settings
69
Page 70

System Setup
System Setup
Press MENU, select “Parental, Fav’s & Setup”, then “System Setup”. Go
to System Setup to review or change your system settings which include:
audio options, video format, TV resolution, network setup, remote control
setup and more.
Info & Test
Select “Info & Test” to display the System Info & Test screen. Press the GREEN
and RED buttons on your remote to move between the System Info and System
Test screens. From the System Test screen, select “Run System Test” to initiate
a test of the tuners, access card, receiver ID and phone line.
Note: Running the System Test will interfere with live TV and any current
recordings.
The System Info screen lets you review your basic system information such
as receiver model, receiver ID, access card number and software version,
as well as current receiver settings. This information can be useful during
troubleshooting.
70
DIRECTV® PLUS DVR USER GUIDE
Page 71

System Setup
Satellite
This option is used by installers when your system is initially set up; you
should not have to use it. However, you can use this screen to view the
satellite signal strength your receiver is getting or to repeat the satellite
setup procedure.
Remote Control
When the MODE switch on your remote is in the left-most position, it controls
your DIRECTV Receiver. However, you can also program the AV1, AV2 and TV
positions to control other equipment such as your TV, DVD, VCR or Stereo.
Select “Remote” and then select either “Program Remote”, “IR/RF Setup”, or
“Receiver Mode”.
Program Remote
Follow the step-by-step instructions to set your remote to control your TV
or other A/V equipment such as, a DVD player or surround sound system.
For best results, it is helpful to know the model number and brand of your
equipment.
This is also where you’ll have the option to “Reset Remote” which clears
the AV1, AV2 and TV modes.
Chapter
1
Chapter
2
Chapter
3
Chapter
4
Chapter
5
Chapter
6
Chapter
7
Chapter
8
CHAPTER 6 - Settings
71
Page 72

System Setup
IR/RF Setup
Certain remote control models feature RF (radio frequency) capability. Refer
to the model number printed on the top left corner of your DIRECTV Remote
Control. A letter R at the end of the model number (which may be followed by
other letters) indicates that the remote supports radio frequency. If no letters
follows the number, the remote works in IR mode only.
If you have a remote with RF capability you can change the remote’s signal from
Infrared (IR) to RF. While the IR signal requires a clear line of sight to the front
of the receiver, RF signals let you put your receiver inside a cabinet or behind
solid doors and still be able to command it from up to 200 feet away.
Note: Not all DIRECTV Receivers are RF-capable.
Receiver Mode
Select “Receiver Mode” if you want to use one remote to command a second
DIRECTV® Re c e i ver.
Audio
Select “Audio” to make a persistent change to your audio settings.
Audio options include:
Language: Select your preferred audio language, i.e. English,
Spanish, Chinese, etc…
Sound Effects: Select the volume of sound effects
72
DIRECTV® PLUS DVR USER GUIDE
Page 73

System Setup
Dolby® Digital: Select whether you want Dolby Digital audio output
on or off, i.e. for a surround sound system.
Not all TV programs deliver Dolby Digital 5.1 audio. Look for the Dolby Digital icon
in the program description and Channel Banner.
“Audio” and then press the GREEN and RED buttons on your remote to move
between the Language, Sound Effects and Dolby® Digital screens.
Display
Press MENU, select “Parental, Fav’s & Setup”, then “Display” and then
press the GREEN and RED buttons on your remote to move between the
“Preferences”, “TV Ratio ” and “ Time Zone ” screens.
Preferences
These are user interface display settings which include:
Guide shows: Select whether you want the first press of the GUIDE
button to take you directly to the program guide or to go to the
category filter first. No matter which one you choose, pressing
GUIDE a second time shows you the other option.
Language: Select your preferred onscreen text language.
Scrolling Effects: Turn scrolling effects on or off. This affects the
appearance of large text areas when they scroll.
Chapter
1
Chapter
2
Chapter
3
Chapter
4
Chapter
5
Chapter
6
Chapter
7
Chapter
8
CHAPTER 6 - Settings
73
Page 74

System Setup
Banner Time: Set the channel banner time to determine how
quickly the banner disappears after moving to a new channel.
Recording Tips: Choose whether to display onscreen tips when
you press the RECORD button during live TV.
TV Ratio
Select the “TV Ratio” tab to set the “aspect ratio” of your TV. Most
Standard-Definition TVs are 4:3. Most high-definition (HD) TVs are 16:9.
Time Zone
Select “Time Zone” to set your time zone and whether you want the
receiver to show Daylight Savings time or not.
Access Card
Do not select Access Card unless you have a new access card provided by
DIRECTV. DIRECTV will provide new access cards and instructions when
necessary. Follow the onscreen directions to replace your access card. You will
need your old and new access cards to complete this process.
74
DIRECTV® PLUS DVR USER GUIDE
Page 75

System Setup
Reset
The Reset screen lets you restart the receiver, reset to factory defaults, or reset
everything.
“Restart Receiver” is the same function as pressing the red reset button
behind the access card door on the front of the receiver. This option does
not affect your settings and scheduled recordings.
“Reset Defaults” erases all of your personal preference items, such as
parental controls, favorites, language and scheduled recordings, and
restores the receiver configuration to how it was set at the factory.
“Reset Everything”: Completely erases everything from system memory
and starts over like a new receiver. WARNING: All your recordings will be
erased from the hard drive!
Note: If Parental Controls are locked, you must enter your password to reset the receiver.
Chapter
1
Chapter
2
Chapter
3
Chapter
4
Chapter
5
Chapter
6
Chapter
7
Chapter
8
CHAPTER 6 - Settings
75
Page 76

76
DIRECTV® PLUS DVR USER GUIDE
Page 77

CHAPTER 7 - HELP & TROUBLESHOOTING
HELP �������������������������������������������������������������������������78
TROUBLESHOOTING TIPS ����������������������������������������79
FREQUENTLY ASKED QUESTIONS ���������������������������82
77
Page 78

Help
Help
For helpful information about your receiver as well as, frequently asked
questions (FAQs), press MENU, select “Customer Care & Help” and then
select “Help Topics”.
You can also tune to Channel 1 to access the interactive DIRECTV
Customer Information Channel. Watch videos on a variety of topics, such
as your remote control, receiver features, and troubleshooting. To exit
the Customer Information channel, press CHAN UP/DOWN, press GUIDE,
or enter a channel number to tune to.
You can also find answers to all your questions on DIRECTV’s Answer
Center at support.directv.com.
78
DIRECTV® PLUS DVR USER GUIDE
Page 79

Troubleshooting Tips
Troubleshooting Tips
Chapter
1
Reset / Reauthorize Your Receiver
Many problems can be corrected by performing a simple reset of the DIRECTV® Plus
DVR. If you experience frozen audio or video, blank screen, or the system won’t respond
to front panel button or remote control, try one of these:
- Press the red RESET button behind the access card panel door on the front of the
- DIRECTV® Receiver, then wait for program guide information to be acquired.
- If the problems persist, try unplugging the power cord of the DIRECTV DVR for 15
seconds, then plug it in again.
- If the above two items don’t work, try reauthorizing your receiver. On a computer,
go to directv.com/reauthorize and follow the onscreen instructions. You will need to
be logged into your account on directv.com to complete this process.
- Running the System Test (at the end of this section) can also help you diagnose and
solve many common problems. Note that resetting your receiver twice in a row will
clear all your program guide data. It could take as much as 48 hours to reacquire
all of it.
Chapter
2
Chapter
3
Chapter
4
Chapter
5
Reset Button
Chapter
6
Chapter
7
Chapter
8
CHAPTER 7 - Help & Troubleshooting
79
Page 80

Troubleshooting Tips
System Software Updates
DIRECTV periodically sends system software updates to your receiver to improve performance and upgrade features and functions.
These updates will occur automatically, usually at times when the receiver would likely be turned off. If your receiver is on when an
update is sent, you will see an onscreen message and you may experience a disruption in reception for a few minutes. Your reception
should return to normal after the update is complete. Your receiver must be plugged in to AC power to receive any updates.
Onscreen Error Messages
There may be times when you see an onscreen message similar to the one on
the right. The top line of the message gives a brief description of what causes
the onscreen message to display, while the second line displays instructions
to follow. Most onscreen messages supply an error code in parentheses. Go
to directv.com/troubleshooting and select the onscreen error message for
solutions.
The message at right shows an example of trying to view a channel that you
have not purchased or that is not in your programming package. To resolve
this error, call Customer Service at 1-800-531-5000 and mention the error
code number when prompted.
80
DIRECTV® PLUS DVR USER GUIDE
Page 81

Troubleshooting Tips
Run the System Test
The System Test allows you to run a basic diagnostics check on your DVR. If you are experiencing any trouble with your receiver, run the
system test. It will also allow you to get your access card and receiver ID numbers or to initiate diagnostic procedures on your digital
satellite receiver.
First make sure that:
1� All connections -- jacks, cables, etc. -- are in place correctly. See Chapter 6, “Connections for Auxiliary Equipment” for more
information.
2� There are batteries in the remote control, and they are working correctly.
3� The access card is inserted in the DIRECTV Receiver.
Follow these steps to run the diagnostics system test on your DVR:
1� Turn on your TV and the DVR.
2� Slide the mode switch to the DIRECTV position to put the remote control in satellite receiver-controlling mode, then press MENU to
display the Quick Menu.
3� Select “Parental, Fav’s & Setup”.
4� Select “System Setup”, then “Info & Test”.
5� Press the GREEN button to access the System Test tab and then select “Run Test”.
6� If your system does not pass the System Test, check any of these potential trouble areas: cabling, pointing the satellite dish, phone
connection and access card.
7� If you continue to have problems, call DIRECTV Customer Service at 1-800-531-5000.
8� You should run a system test several times before concluding that there is a problem. Occasional fluctuations in the phone line or
satellite signal can give temporary false readings.
Chapter
1
Chapter
2
Chapter
3
Chapter
4
Chapter
5
Chapter
6
Chapter
7
Chapter
8
CHAPTER 7 - Help & Troubleshooting
81
Page 82

Frequently Asked Questions
Progress bar freezes while Acquiring Guide Data / Data From Satellite
While the “Acquiring Guide Data” or “Acquiring Data From Satellite” message is on the screen, progress freezes during download.
Possible Causes:
- This may be normal. After five minutes, the screen saver will display. Press any key on the remote to see the progress bar again.
- May happen if your satellite dish isn’t adjusted properly.
Solution:
- If satellite data acquisition still does not move forward, press the RESET button behind the access panel door on the front of the
DIRECTV DVR and wait for program guide information to be acquired.
Blue, black, gray or snowy screen
Your TV displays a blue, black, gray or snowy screen.
Possible Causes:
- Your TV and/or your receiver are not powered on.
- The DIRECTV® Receiver and most T Vs and VCRs let you toggle between different video sources. Your TV may be on a different
input source than what you are trying to view.
Solution:
- Check that DIRECTV® Receiver and TV are both powered on.
- If snowy screen, make sure your TV is on channel 3 or 4.
- Press TV INPUT on your DIRECTV remote to cycle through the “sources” or pieces of equipment whose signal is displayed on your TV.
TV INPUT must be programmed to work; see Chapter 6, “System Setup, Remote Control” for instructions.
82
DIRECTV® PLUS DVR USER GUIDE
Page 83

Frequently Asked Questions
- Press the INPUT button on the TV remote control to change the video source.
- Press the TV/VCR button on the VCR remote or on the VCR’s front panel.
- If problems persist, turn off all equipment connected to your TV, wait a few minutes, then turn the DIRECTV® Receiver back on.
- Check your connections and cables.
DIRECTV DVR will not turn on
Your receiver won’t turn on with either the remote or from the front panel.
Possible Causes:
- Remote batteries are dead.
- Receiver or power strip is not plugged in to a power source, or power cord is not plugged in to receiver.
- Wall outlet does not have power.
Solution:
- If remote is not turning on the receiver:
• Make sure mode switch is all the way to left, then press PWR button on remote.
• If still not responding, check batteries – green light should blink when any key is pressed.
• If steady blinking, replace batteries.
• If solid green light, make sure nothing is blocking the IR sensor.
- If receiver does not respond to pressing the buttons on the front panel of the receiver:
• Verify power cord is plugged in at both the wall outlet and rear panel of the receiver.
• If receiver is plugged into a wall outlet, make sure it is not controlled by a wall switch.
• If receiver is plugged into a power strip, make sure power strip is working. If the power strip is not working, press the reset
button on the power strip OR unplug and plug back in (not all power strips have a reset button).
Chapter
1
Chapter
2
Chapter
3
Chapter
4
Chapter
5
Chapter
6
Chapter
7
Chapter
8
CHAPTER 7 - Help & Troubleshooting
83
Page 84

Frequently Asked Questions
DIRECTV DVR turns off while playing
Your receiver turns off unexpectedly.
Possible Causes:
- Excessive heat may have caused the receiver to go into a standby state.
- Electronic protection circuit may have been activated due to a power surge.
- You may have blown a circuit breaker or be experiencing a power outage.
- Parental viewing limits may have been activated on your DIRECTV® Receiver.
Solution:
- Ensure that your receiver has plenty of ventilation and that nothing is on top of the receiver.
- Wait 30 seconds for internal circuits to reset, then turn receiver back on.
- Check the circuit breakers in your home.
- Consider using a line conditioner or surge protector.
- Consult an electrician if the problem is frequent or severe, especially if other household appliances or electronics are affected.
- If parental limits are active, turn your DIRECTV® Receiver back on and enter your parental lock code at the prompt.
DIRECTV DVR turns on or changes channels unexpectedly
Your receiver changes to a different channel without a remote control command.
Possible Causes:
- A scheduled recording may be about to begin, so the receiver is changing channels to record the show as requested.
- Your TV’s timer may have been activated.
84
DIRECTV® PLUS DVR USER GUIDE
Page 85

Frequently Asked Questions
Solution:
- Check your To Do List to see if there are other scheduled recordings. Press MENU, select “Manage Recordings”, then “To Do list”.
- Check your TV owner’s manual to turn off the TV’s timer.
Blank screen
There is nothing on your TV screen.
Possible Causes:
- Your TV and/or your receiver are not powered on.
- Your receiver may be hooked up to the TV incorrectly.
- You may be on the wrong video source for your DIRECTV® Receiver.
- You may be tuned to a channel that is not currently broadcasting, or that you don’t subscribe to.
Solution:
- Check that DIRECTV DVR and TV are both powered on.
- Read Chapter 6, “Connections for Auxiliary Equipment” for instructions about connecting your receiver.
- Press the INPUT button on the TV remote control to change video source.
- Try another channel and see if you have live video.
- Press the POWER button on the front panel of the DIRECTV® Receiver.
- Press the red RESET button behind the door on the front panel of the receiver.
Chapter
1
Chapter
2
Chapter
3
Chapter
4
Chapter
5
Chapter
6
Chapter
7
Chapter
8
CHAPTER 7 - Help & Troubleshooting
85
Page 86

Frequently Asked Questions
Temporary loss of the satellite signal, “frozen” picture, or picture breaks into blocks / pixels
The image on your screen is frozen, blocky, or you see a message that says, “Searching for Satellite Signal (x 771).
Possible Causes:
- Severe weather (rain, snow, hail etc.) may cause this issue.
- There may be an obstruction to your dish (debris, snow, ice, etc.) or a building or tree that blocks your line of sight to the
satellite.
- There may be a problem with the cables running from your satellite dish to your DIRECTV® Receiver.
- If the picture is frozen, blocky, or pixels, there may be a problem with the transmission from the source.
Solution:
- Weather issues are usually temporary. Wait for the weather to clear and your signal should return to normal.
- If there are no weather problems in your area, reset your DIRECTV DVR using the red RESET button behind the door on the front of
the receiver or by unplugging the receiver for 15 seconds and then plugging it back in.
- You can also check all the cable connections between your DIRECTV DVR and the satellite dish for loose or broken connections.
- If the problem is coming from the program source (for example, you see the problem on one channel, but not on any others), wait for
the broadcasting channel to resolve the issue.
- If there are obstructions blocking the dish’s clear view of the satellite, you should contact a professional to remove them or a
DIRECTV installer at 1-800-531-5000 to relocate your dish.
- If your signal strength is lower than 70 (60 or lower on HD receivers) on most transponders in good weather, contact a professional
installer to realign your dish or call us at 1-800-531-5000.
86
DIRECTV® PLUS DVR USER GUIDE
Page 87

Frequently Asked Questions
Partial programming loss; Channels missing from the Guide; Channel is in the Guide but I can’t tune to it
Your Program Guide is missing channels, or you are unable to use the guide to tune to a channel.
Possible Causes:
- The channels might be excluded from the Favorites list currently in use.
- Your satellite dish may be incorrectly configured.
- Your receiver information may need to be refreshed.
Solution:
- To change your Favorites List, press GUIDE on the remote, then press the YELLOW button and select “Change Favorites List”, then
“All Channels”.
- Enter the channel number using the number pad on the remote control.
- Check the dish type set in your receiver’s preferences: Press MENU, then select “Parental, Fav’s & Setup” and then “System Setup”.)
Check the Satellite Dish Type shown on the System Setup screen to see if it is correct. If not, select “Satellite” from the left menu,
then select “Repeat Satellite Setup”. Follow the steps. From the Satellite Dish Type screen, make sure the proper dish type is
selected.
- To refresh your receiver information, go to directv.com/reauthorize. You will need to be logged into your account on directv.com to
complete this process.
Chapter
1
Chapter
2
Chapter
3
Chapter
4
Chapter
5
Chapter
6
Chapter
7
Chapter
8
CHAPTER 7 - Help & Troubleshooting
87
Page 88

Frequently Asked Questions
My video and audio are out of sync
The audio track does not match the lip movements on the screen.
Possible Causes:
- Problem with how the program was produced or how it was sent to DIRECTV for broadcast.
- Your surround sound system may be out of sync, or may be set up incorrectly.
Solution:
- Change the channel on your DIRECTV® Receiver. This may re-sync the audio.
- Rewind the program for about 5 seconds, then fast forward to live programming.
- Try replacing the cables between your surround sound system and your DIRECTV Receiver. Refer to your surround sound system’s
manual for assistance.
- If the issue continues, reset your DIRECTV Receiver. Press the RESET button behind the access panel door on the front of the
DIRECTV Receiver. You can also press MENU, press SELECT “Parental, Fav’s & Setup”, then select “System Setup”. Select the
“Reset” item from the left menu and follow the onscreen instructions.
No Audio with Picture
You can see a picture from your DIRECTV® Receiver, but there is no sound.
Possible Causes:
- A setting (such as mute or volume) may have changed on the receiver or your TV.
- The cables between your TV and the receiver may not be connected properly, or there may be a problem with an external stereo or
surround sound system.
- Verify that your surround sound system is working, if applicable.
88
DIRECTV® PLUS DVR USER GUIDE
Page 89

Frequently Asked Questions
Solution:
- Verify “MUTE” button not activated.
- Raise or lower the volume. Did volume meter display on TV?
- Test sound on TV by changing the input to another source, such as a DVD player, game box, or antenna.
- If connected to stereo or surround sound system, verify components are on and set to the correct mode, and that audio cables are
secure and connected correctly.
- If the issue continues, reset your DIRECTV® Receiver. Press the RESET button behind the access panel door on the front of the
DIRECTV® Receiver. You can also press MENU, select “Parental, Fav’s & Setup”, then select “System Setup”. Select the “Reset” item
from the left menu and follow the onscreen instructions.
Caller ID not working
Caller ID information isn’t showing on your TV screen when phone calls come in.
Possible Causes:
- You don’t subscribe to Caller ID service through your local phone company.
- The Caller ID feature in your DIRECTV® Receiver is turned off. See “Caller ID” in Chapter 5.
- You are using a wireless phone jack, which usually will not transmit Caller ID information.
Solution:
- Contact your local phone company to subscribe to Caller ID service.
- Turn on Caller ID notification. Press MENU select “Caller ID” and then select “Turn On Notices”.
- Verify that your wireless phone jack transmits Caller ID information. If not, connect a standard phone cable to your receiver or
replace your wireless phone jack.
Chapter
1
Chapter
2
Chapter
3
Chapter
4
Chapter
5
Chapter
6
Chapter
7
Chapter
8
CHAPTER 7 - Help & Troubleshooting
89
Page 90

Frequently Asked Questions
A program I tried to record does not show up in the My Playlist screen
You wanted to record a program to watch later, but it is not listed in your Playlist.
Possible Causes:
- Someone else may have prevented the recording or erased the program after it recorded.
- The recording may have been cancelled due to a conflict with another program with higher priority in the Prioritizer.
- The program may have been blocked by Parental Locks.
- You may have deleted a Series recording. If you delete a Series by pressing RECORD on an episode in the Guide, you cancel the entire
series, not just the highlighted episode.
Solution:
- To see if the program was recorded then deleted, press MENU, select “Manage Recordings”, then in the left menu, select “History”.
- If the recording was cancelled due to a Prioritizer conflict, you will need to record the program again and if necessary you will need to
adjust the programming priority. See “Manage Recordings, Prioritizer” section in chapter 4 for details.
- Check the Parental Locks on your receiver and TV. Adjust the content ratings, if necessary.
I wanted to record a program, but I got an error message saying it conflicted with another scheduled record�
What do I do?
Your DIRECTV DVR can record up to two programs at once, or it can record one program while you watch another live program.
Possible Causes:
- You tried to record three programs at the same time or tried to watch a live program while recording two others at the same time.
- There was an overlap in the programs you tried to record.
90
DIRECTV® PLUS DVR USER GUIDE
Page 91

Frequently Asked Questions
Solution:
- If you tried to record three programs at once, or watch a live TV program with two others recording, you will need to decide which
recording to cancel.
- If the overlap is a couple of minutes (for example, some networks occasionally start programs at 8:59 instead of 9:00 p.m.), adjust
your recording start and end times in the Recording Options. See Chapter 4, “Changing a Record Option”.
I recorded a program, and the recording got cut off just before the end so I missed the last bit of the program
Your recording stopped before the program or event ended.
Possible Causes:
- The program you were trying to record may have started or ended early.
- If you were trying to record a sporting event, the event may have run over its allotted time.
- You may have had a recording conflict with a higher priority program.
- Someone may have manually ended the recording.
Solution:
- Try setting the end time of the recording in the Record Options so the recording ends one or two minutes later (or more, if necessary).
You may be able to record the same program again later in the week. Check the Program Guide for additional showings.
- For sporting events, you may want to extend the recording stop time 15 minutes or more to protect against overtime games.
- If you had a priority conflict, try adjusting your start and end times. You may need to choose a different time slot to record a program
if the conflict continues.
Chapter
1
Chapter
2
Chapter
3
Chapter
4
Chapter
5
Chapter
6
Chapter
7
Chapter
8
CHAPTER 7 - Help & Troubleshooting
91
Page 92

Frequently Asked Questions
A program I recorded was displayed in the My Playlist screen, but got deleted before I could watch it
Your recording(s) were deleted before you had a chance to view them.
Possible Causes:
- Someone else manually deleted the program.
- The hard drive on your DVR is full. The program may not have recorded.
- The receiver may have deleted older recordings to make room for newer ones.
- You exceeded the allotted purchase or viewing time on a Pay Per View movie or event.
- Bad weather may have caused a loss in signal. Your receiver will automatically delete these incomplete programs.
Solution:
- Delete some of the content on your DVR to make room for new recordings.
- Change your recording options to keep programs until you delete them manually. See “Recording a Single Show” or “Recording
a Series” in Chapter 4 for details.
- You can also change a recording you’ve already made to “Keep Until I Delete”. See “Managing My Playlist” in Chapter 4.
- To avoid this in the future, you can change settings for recordings that you’ve set to occur in the future, but haven’t recorded
yet. Press MENU, select “Manage Recordings”, then “To Do List”, choose the show you want to change and select it, select
RECORD, press SELECT on “Keep…”, press SELECT on the “Keep Until” box to change it to “I Delete”, use the ARROW button to
move over to Update and press SELECT.
- If you recorded a DIRECTV CINEMA movie or Pay Per View event, but did not watch it, the time which you are allowed to
purchase or watch it may have expired. To avoid this in the future, check your Pay Per View recordings in the My Playlist screen
for expiration dates.
92
DIRECTV® PLUS DVR USER GUIDE
Page 93

Frequently Asked Questions
I’ve set up a series recording, but now I get a bunch of reruns and multiple copies of the same program
Your DVR is getting full of duplicate recordings of the same program, or old episodes of the chosen show.
Possible Causes:
- Your series is set to record both First Run and Repeat episodes.
- The programmer may not provide enough details in the program description for your receiver to determine whether the
program is a repeat.
Solution:
- When you set up a series, make sure you select only the First Run option. This is the default for one-touch recording unless
you have changed your default recording settings.
Chapter
1
Chapter
2
Chapter
3
Chapter
4
Chapter
5
Chapter
6
Chapter
7
Chapter
8
CHAPTER 7 - Help & Troubleshooting
93
Page 94

Frequently Asked Questions
My remote control doesn’t work
Possible Causes:
- Weak batteries are almost always the problem.
- Trying to operate equipment other than your DIRECTV Receiver?
- Remote sensor on the receiver could be blocked.
Solution:
- Check that nothing is between the remote control and the remote sensor.
- Make sure the remote control is in DIRECTV mode. Slide the MODE switch on the remote to the DIRECTV position so the remote will
control the DIRECTV® Receiver.
- Check the batteries in the remote control. They may be weak, dead or installed incorrectly. Try replacing batteries.
- If you’re entering a channel number that is less than four digits long, the receiver might wait two seconds before tuning to the channel.
Press ENTER after entering a channel number to tune immediately.
- If you are trying to operate a device other than the DIRECTV DVR that you have programmed the remote to control, make sure you first
slide the MODE switch to the mode that is programmed for that device (AV1 or AV2). The indicator light for the component you’re trying
to control should light up when you press a valid key for that component. If it doesn’t, make sure the MODE switch is in the correct
position.
- Make sure the device you are trying to control has been programmed to your DIRECTV Remote Control. See Chapter 6, “System Setup,
Remote Control” for instructions on how to program your remote to control other devices.
- If the indicator lights on the remote control start flashing, the batteries in the remote control are running low and should be replaced
soon. You may also see an onscreen message that the batteries are low. Note that when you replace the batteries, you should not have
to reprogram your remote to control other devices unless the batteries have been completely dead for a month or more.
94
DIRECTV® PLUS DVR USER GUIDE
Page 95

CHAPTER 8 - WARRANTY AND OTHER INFORMATION
LIMITED 90-DAY WARRANTY �����������������������������������������96
DIRECTV PROTECTION PLAN �����������������������������������������99
FCC CUSTOMER INFORMATION ������������������������������������101
TERMS AND CONDITIONS FOR USE OF SOFTWARE
(“TERMS”) ���������������������������������������������������������������������105
95
Page 96

Limited 90-Day Warranty
DIRECTV warrants your DIRECTV Plus® DVR (Model Number: R16, R22) and any included accessories against defects in material or
workmanship for a period of ninety (90) days after the date of acquisition.
Who is Covered?
You must have proof of acquisition to receive warranty service. A receipt or other document showing that you acquired the product is
considered proof of acquisition. THIS LIMITED WARRANTY EXTENDS ONLY TO THE ORIGINAL CONSUMER ACQUIRER OR ANY PERSON
RECEIVING THE DIRECTV PLUS® DVR AS A GIFT FROM THE ORIGINAL CONSUMER ACQUIRER AND TO NO OTHER ACQUIRER OR
TRANSFEREE. THIS WARRANTY DOES NOT EXTEND TO COMMERCIAL USERS. THIS PRODUCT IS NOT AUTHORIZED FOR USE OUTSIDE
THE UNITED STATES AND ANY SUCH USE VOIDS THIS WARRANTY.
What is Covered?
Warranty coverage begins the day you acquire the product. For ninety (90) days from the acquisition date, at the option of DIRECTV,
the DIRECTV Plus® DVR will be repaired or replaced with a new, repaired, refurbished or comparable product (whichever is deemed
necessary) if it becomes defective or inoperative. This exchange is done without charge to you for parts and labor. You will be responsible
for the cost of shipping to and from the location designated by DIRECTV. If DIRECTV cannot reasonably repair or replace the Receiver then
DIRECTV may, at its sole discretion, refund the price you paid for the product or the current retail price of the product.
All products, including replacement products, are covered only for the original warranty period. When the warranty on the original
product expires, the warranty on the replacement product also expires. After ninety (90) days from the date of acquisition, you pay for the
replacement of all parts, and for all labor charges.
SOME STATES DO NOT ALLOW LIMITATIONS ON HOW LONG AN IMPLIED WARRANTY LASTS, SO THE ABOVE LIMITATION MAY NOT APPLY
TO YOU.
96
DIRECTV® PLUS DVR USER GUIDE
Page 97

Limited 90-Day Warranty
What is Excluded?
Your warranty does NOT cover:
Labor charges for installation or setup of the product.
Installation, performance of, or repair of: audio/video cabling, telephone line, or accessory attachments used with the product.
Product replacement because of misuse, accident, lightning damage, unauthorized repair, or other cause not within the control of
DIRECTV.
Incidental or consequential damages resulting from the product. SOME STATES DO NOT ALLOW THE EXCLUSION OF INCIDENTAL OR
CONSEQUENTIAL DAMAGES, SO THE ABOVE EXCLUSION MAY NOT APPLY TO YOU.
Any modifications or other changes to the product, including but not limited to software or hardware modification in any way other than as
expressly authorized by DIRECTV will void this limited warranty. Except in the case of hardware or software provided by DIRECTV, installing
software modifications, “hacks” or utilizing service access or “back doors” will void this limited warranty.
Reception transmission problems caused by signal conditions, telephone line, or cable or antenna systems outside the unit.
A product that has been modified or adapted to enable it to operate in any country other than the country for which it was designed,
manufactured, approved and/or authorized, or repair of products damaged by these modifications.
A product used for commercial or institutional purposes.
DIRECTV makes no warranty that the access connection will be a local (not long distance) phone call.
The continued provisioning of any of the programming and other services delivered through the Receiver including but not limited to
television programming, show information, program guide data, and scheduling information.
Make Sure You Keep���
Please keep your receipt or other document showing proof of acquisition. Attach it to this User Guide (see page 12) and keep both nearby.
Also keep the original box and packing material in case you need to return your product.
Before Requesting Repair Service���
Please check the troubleshooting section of this guide. This may save you a call to DIRECTV Customer Care.
Chapter
1
Chapter
2
Chapter
3
Chapter
4
Chapter
5
Chapter
6
Chapter
7
Chapter
8
CHAPTER 8 - Warranty & Other Information
97
Page 98

Limited 90-Day Warranty
To Get Warranty Service���
Warranty service will be provided by DIRECTV. If you believe you need service for your Receiver, contact DIRECTV at 1-800-531-5000.
A representative will go through a diagnostic checklist with you. If it is determined that the product needs to be returned for service or
exchanged, you will receive a return authorization number. The representative will give you complete shipping details.
To Get Out-of-Warranty Service���
To obtain out-of-warranty service contact DIRECTV at 1-800-531-5000 for information on the possibility of and any costs for repair or
replacement of out-of-warranty products.
ALL WARRANTIES IMPLIED BY LAW, INCLUDING ANY IMPLIED WARRANTIES OF MERCHANTABILITY AND FITNESS FOR A PARTICULAR
PURPOSE ARE EXPRESSLY LIMITED TO THE DURATION OF THIS EXPRESS LIMITED WARRANTY.
WITH THE EXCEPTION OF ANY WARRANTIES IMPLIED BY THE LAW OF ANY STATE OF THE U.S.A., THIS EXPRESS LIMITED WARRANTY IS
EXCLUSIVE AND IN LIEU OF ALL OTHER WARRANTIES, GUARANTEES, AGREEMENTS AND SIMILAR OBLIGATIONS OF DIRECTV. REPAIR OR
REPLACEMENT AS PROVIDED IN THIS LIMITED WARRANTY IS THE EXCLUSIVE REMEDY UNDER THIS LIMITED WARRANTY. IN NO EVENT
WILL DIRECTV BE LIABLE FOR ANY AMOUNT GREATER THAN THE RETAIL PRICE OF THE DIRECTV® Receiver. DIRECTV SHALL NOT BE
LIABLE FOR ANY INCIDENTAL OR CONSEQUENTIAL DAMAGES FOR BREACH OF ANY EXPRESS OR IMPLIED WARRANTY ON THE DIRECTV
Receiver.
SOME STATES DO NOT ALLOW LIMITATIONS ON WARRANTIES, SO THE ABOVE LIMITATIONS MAY NOT APPLY TO YOU. THIS WARRANTY
GIVES YOU SPECIFIC LEGAL RIGHTS. YOU MAY HAVE OTHER RIGHTS WHICH VARY FROM STATE TO STATE.
DIRECTV
2230 E� Imperial Hwy
El Segundo, CA 90245
1-800-531-5000
®
98
DIRECTV® PLUS DVR USER GUIDE
Page 99

DIRECTV PROTECTION PLAN
Safeguard your DIRECTV® System with the ultimate in professional technical service. For a low monthly fee, the DIRECTV PROTECTION
PLAN covers the components of your entire DIRECTV® System, giving you affordable peace of mind and comprehensive support to ensure
that you and your family enjoy nonstop DIRECTV® entertainment.
DIRECTV PROTECTION PLAN Benefits
Your DIRECTV Limited Warranty provides certain remedies for this receiver during the stated coverage term. The DIRECTV PROTECTION
PLAN provides comprehensive coverage for your DIRECTV® System, including:
Professional In-home service calls when needed Dedicated Technical Support 24-hour a day
Power surge related repairs including those caused
by lightning
Cables, switches, and associated wiring throughout
your home
Defective remote control replacements All parts and labor for repair
All this — for one low monthly fee — covers every DIRECTV component and receiver on your account�
Unlimited dish antenna alignments
Replacement of defective receiver equipment
(if problem can not be resolved over the phone)*
Chapter
1
Chapter
2
Chapter
3
Chapter
4
Chapter
5
Chapter
6
Chapter
7
Chapter
8
CHAPTER 8 - Warranty & Other Information
99
Page 100

DIRECTV PROTECTION PLAN
Sign up today for the DIRECTV PROTECTION PLAN
Call 1-800-531-5000, or log in at directv.com/protection to sign up for the DIRECTV PROTECTION PLAN.
The DIRECTV PROTECTION PLAN is offered by AIG Warranty Guard and underwritten by New Hampshire Insurance Company on behalf
of DIRECTV where authorized by law. Certain limitations may apply. Pricing, terms and conditions of the DIRECTV PROTECTION PLAN
are subject to change. Full terms and conditions will be mailed to you prior to service billing and are available at directv.com/protection.
100
DIRECTV® PLUS DVR USER GUIDE
 Loading...