

Page 1

DIRECTV
®
HD DVR User's Guide
DIRECTV HD DVR
User's Guide
The On-Screen Menus and the Remote Control
Arrow Buttons
To navigate the DIRECTV® HD DVR’s on-screen menus, use
S
e
c
l
e
Select
the remote control
onto the option you want, then press SELECT.
t
The LEFT arrow button often takes you to a previous screen.
’s arrow buttons to move the highlight bar
Highlight Bar
Two Types of On-Screen Arrows
The arrows that appear beside or near
the highlight bar show possible
directions. For example, on this screen,
you could press the RIGHT arrow to
highlight Options or the DOWN arrow to
highlight
“Edit Keyword WishList.”
Page Up
Arrow
Arrows Near
Highlight Bar
When you see page up or page
down arrows at the top or
bottom of the screen (or a list),
press the CHAN UP/DOWN
button to jump to more items
an entire page at a time.
Page Down
Arrow
CHAN UP/DOWN
Chan
Button
P
e
a
g
Page 2

Remote Control Tips
Press the DIRECTV button once to go to DIRECTV Central, or twice to
go to the Now Playing List.
LIST brings you directly to the Now Playing List.
Press (FORWARD) and (BACK) up to 3 times for 3 speeds.
Press a fourth time, or press PLAY, to resume normal play.
INSTANT REPLAY replays the last 8 seconds of a program.
Press CLEAR to delete a title in a list (like the Now Playing list) or to
clear things that aren’t part of the program you’re watching (like
the channel banner and status bar).
INFO brings up the channel banner. Press the RIGHT arrow
to switch among three versions of the banner, each with a
different amount of information.
CHAN UP/DOWN does more than change the channel—it also pages
up or down through lists of programs or menu items.
With dual tuner enabled, press LIVE TV or DOWN arrow while
watching live TV to switch between the two tuners.
Inserting Batteries in the Remote Control
Hold the remote with the battery door facing you. Place your thumb
in the depression of the door and slide the door towards you.
Insert two AA batteries (supplied). Be sure to match the + and -
marks on the batteries to the + and - marks in the compartment.
Replace the battery door by sliding it back into the case with the
tabs towards the rear of the compartment. You’ll hear a click
when it’s securely back in place.
Press GUIDE to see the DIRECTV Advanced Program Guide™, then
press INFO (while the guide is visible) to see Guide Options and
change the day or time, or show only a category of programs.
RATIO lets you change how the HD DVR displays a picture when the
broadcast aspect ratio (screen width and height) does not match
your TV’s screen size.
EXIT clears all menus and goes to the last channel or recorded
program you were watching. If you press it while you are
watching a program, it clears things that aren't part of the
program (like the channel banner and status bar).
ADVANCE moves you quickly through saved programming. Press it
while you are fast forwarding or rewinding to jump to the next
tick mark on the status bar.
When you’re watching “behind” live TV (for example, if you
paused live TV and later resumed watching from the paused
spot), ADVANCE catches you up to the live broadcast. In a
recorded program, press it once to jump to the end of the
program, then again to jump to the beginning.
Use ADVANCE to enter a dash (-) for channel numbers that
include a dash (for example, off-air high-definition channels).
If you program your remote control (as explained in chapter seven),
the TV POWER, VOLUME, MUTE, and TV INPUT buttons can
control your TV and A/V equipment.
The SAT/TV Switch sets the remote control to send channel
changing signals to either the HD DVR (SAT) or the television
(TV). Many of the remote control’s buttons are disabled when
this switch is set to TV (for example, SLOW, FAST FORWARD and
PAUSE), so if your remote control doesn’t seem to be working,
check to make sure this switch is set to SAT.
DIRECTV Button
Arrow Buttons
Ratio
Exit
List
Select
Thumbs Down
Mute
Volume
Play
Pause
Back (rewind)
Slow
Instant Replay
TV Power TV Input
Number Buttons
Clear
Remote Active Light
Live TV
Info
Guide
Thumbs Up
Chan Up/Down
Record
Fast Forward
Advance
SAT/TV Switch
Enter/Last
Page 3

Welcome to DIRECTV
Page 4

1034748-0001
DIRECTV, the Cyclone Design logo, and
Advanced Program Guide are trademarks of DIRECTV, Inc.,
a unit of Hughes Electronics Corp., and are used with permission.
All rights reserved. DIRECTV,
2230 East Imperial Hwy., El Segundo, CA 90245.
TiVo, the TiVo logo, TiVolution, the Instant Replay logo,
the Advance logo, and the TiVo and Smile design are registered trademarks of TiVo Inc.
Season Pass, WishList, Overtime Scheduler,
the Thumbs Down logo and text, and the Thumbs Up logo and text
are trademarks of TiVo Inc. 1999, 2003. All rights reserved.
TiVo Inc., 2160 Gold Street, P.O. Box 2160, Alviso, CA 95002-2160.
Manufactured under license from Dolby Laboratories.
“Dolby” and the double-D symbol are trademarks of Dolby Laboratories.
HDMI, the HDMI logo and High-Definition Multimedia Interface are trademarks
or registered trademarks of HDMI Licensing LLC.
All other trademarks are the properties of their respective owners.
© 1999, 2004 by TiVo Inc. Reproduction in whole or in part without
written permission is prohibited.
ii
Page 5

Thank you for choosing the DIRECTV® HD DVR!
Whether you've been enjoying DIRECTV® service for years or this is your first experience
with us, we are excited to introduce to you the DIRECTV HD DVR. Now you can enjoy the
best and widest variety in high-definition and digital entertainment with the added
convenience of digital video recording, all in one receiver.
DIRECTV Delivers HD content. DIRECTV offers access to major HD networks such as HBO
HDTV, Showtime HD, ESPN HD, Discovery HD Theater, HDNet, HDNet Movies and
more. With your HD DVR and an off-air antenna, you can even enjoy your favorite prime
time shows in high definition.* For more information on HD programming available through
DIRECTV, visit DIRECTV.com.
All digital, all the time. DIRECTV offers access to over 225 channels of Hollywood hits,
classic movies, family programming, news, and exciting sports action. Plus access to up to
36 commercial-free music channels—all in digital-quality picture and sound.
DIRECTV
your home! You’ll have access to great movies, exclusive special live sports, concerts, and
special events. DIRECTV offers up to 55 different pay per view choices each day including
select titles in HD on channel 85. Just use your remote control to order front-row seats for
your friends and family! (Phone connection required.)
DIRECTV knows sports. DIRECTV offers access to more sports than you ever thought
possible. So you can follow your favorite team across the country with our pro and college
sports subscriptions. DIRECTV will take you to the arena for the best sports has to offer.
With DIRECTV
latest in television technology, including the DIRECTV Advanced Program Guide
to 14 days of program listings, and the ability to pause and replay live TV. Plus, with Pick
Programs to Record and the other easy to use features of your DIRECTV
service, you'll never miss your favorite shows again.
®
Pay Per View movies and events. With DIRECTV service, the main event is in
®
DVR with TiVo®, you're in control. The DIRECTV HD DVR brings you the
®
DVR with TiVo®
™
, with up
*In cities where local off-air, high-
definition programs are available;
reception may vary based on geographic
location.
iii
Page 6

Table of Contents
Using this Guide . . . . . . . . . . . . . . . . . . . . . . . . . . . . . . . . . . . . . . . . . . . . . . . . . . . . . . . . . . . . . . . . . . . . . vii
Chapter 1: Connecting . . . . . . . . . . . . . . . . . . . . . . . . . . . . . . . . . . . . . . . . . . . . . . . . . . . . . . . . . . . . . . . . . . . .1
Introduction to Digital Television . . . . . . . . . . . . . . . . . . . . . . . . . . . . . . . . . . . . . . . . . . . . . . . . . . . . . . . . 2
Before You Begin . . . . . . . . . . . . . . . . . . . . . . . . . . . . . . . . . . . . . . . . . . . . . . . . . . . . . . . . . . . . . . . . . . . . . 3
Useful Terms . . . . . . . . . . . . . . . . . . . . . . . . . . . . . . . . . . . . . . . . . . . . . . . . . . . . . . . . . . . . . . . . . . . . . . . . 6
Cables and Accessories . . . . . . . . . . . . . . . . . . . . . . . . . . . . . . . . . . . . . . . . . . . . . . . . . . . . . . . . . . . . . . . . 9
Setup Options . . . . . . . . . . . . . . . . . . . . . . . . . . . . . . . . . . . . . . . . . . . . . . . . . . . . . . . . . . . . . . . . . . . . . . . 12
Chapter 2: Guided Setup . . . . . . . . . . . . . . . . . . . . . . . . . . . . . . . . . . . . . . . . . . . . . . . . . . . . . . . . . . . . . . . . .21
Welcome! . . . . . . . . . . . . . . . . . . . . . . . . . . . . . . . . . . . . . . . . . . . . . . . . . . . . . . . . . . . . . . . . . . . . . . . . . . 22
Satellite Dish Guided Setup . . . . . . . . . . . . . . . . . . . . . . . . . . . . . . . . . . . . . . . . . . . . . . . . . . . . . . . . . . . . 23
Activate Services . . . . . . . . . . . . . . . . . . . . . . . . . . . . . . . . . . . . . . . . . . . . . . . . . . . . . . . . . . . . . . . . . . . . 27
Off-Air Channels and Video Setup . . . . . . . . . . . . . . . . . . . . . . . . . . . . . . . . . . . . . . . . . . . . . . . . . . . . . . 28
Phone Setup . . . . . . . . . . . . . . . . . . . . . . . . . . . . . . . . . . . . . . . . . . . . . . . . . . . . . . . . . . . . . . . . . . . . . . . . 33
DIRECTV Central . . . . . . . . . . . . . . . . . . . . . . . . . . . . . . . . . . . . . . . . . . . . . . . . . . . . . . . . . . . . . . . . . . . 35
Chapter 3: The Basics in 5 Short Tours . . . . . . . . . . . . . . . . . . . . . . . . . . . . . . . . . . . . . . . . . . . . . . . . . . . . .37
Tour 1: Play with Live TV . . . . . . . . . . . . . . . . . . . . . . . . . . . . . . . . . . . . . . . . . . . . . . . . . . . . . . . . . . . . . 38
Tour 2: DIRECTV Advanced Program Guide™ . . . . . . . . . . . . . . . . . . . . . . . . . . . . . . . . . . . . . . . . . . . . 40
Tour 3: Find and Record Your Favorite Programs . . . . . . . . . . . . . . . . . . . . . . . . . . . . . . . . . . . . . . . . . . 42
Tour 4: Find New Programs . . . . . . . . . . . . . . . . . . . . . . . . . . . . . . . . . . . . . . . . . . . . . . . . . . . . . . . . . . . . 44
Tour 5: Now Playing List . . . . . . . . . . . . . . . . . . . . . . . . . . . . . . . . . . . . . . . . . . . . . . . . . . . . . . . . . . . . . . 46
Cool Things You Can Do . . . . . . . . . . . . . . . . . . . . . . . . . . . . . . . . . . . . . . . . . . . . . . . . . . . . . . . . . . . . . . 47
iv
Page 7

Chapter 4: Pick Programs to Record . . . . . . . . . . . . . . . . . . . . . . . . . . . . . . . . . . . . . . . . . . . . . . . . . . . . . . . .49
Season Pass, Recording Options, To Do List . . . . . . . . . . . . . . . . . . . . . . . . . . . . . . . . . . . . . . . . . . . . . . . 50
Using the Guide to Find Programs . . . . . . . . . . . . . . . . . . . . . . . . . . . . . . . . . . . . . . . . . . . . . . . . . . . . . . . 56
Find Your Favorite Programs . . . . . . . . . . . . . . . . . . . . . . . . . . . . . . . . . . . . . . . . . . . . . . . . . . . . . . . . . . . 58
Find Programs That Match Your Interests . . . . . . . . . . . . . . . . . . . . . . . . . . . . . . . . . . . . . . . . . . . . . . . . 62
Chapter 5: Watching Live TV and Recorded Programs . . . . . . . . . . . . . . . . . . . . . . . . . . . . . . . . . . . . . . . . .69
Using the Control Buttons . . . . . . . . . . . . . . . . . . . . . . . . . . . . . . . . . . . . . . . . . . . . . . . . . . . . . . . . . . . . . 70
Status Bar . . . . . . . . . . . . . . . . . . . . . . . . . . . . . . . . . . . . . . . . . . . . . . . . . . . . . . . . . . . . . . . . . . . . . . . . . . 71
Channel Banner . . . . . . . . . . . . . . . . . . . . . . . . . . . . . . . . . . . . . . . . . . . . . . . . . . . . . . . . . . . . . . . . . . . . . 72
Watching Live TV . . . . . . . . . . . . . . . . . . . . . . . . . . . . . . . . . . . . . . . . . . . . . . . . . . . . . . . . . . . . . . . . . . . 73
Watching Programs from Now Playing . . . . . . . . . . . . . . . . . . . . . . . . . . . . . . . . . . . . . . . . . . . . . . . . . . . 76
Watching High-Definition Programs . . . . . . . . . . . . . . . . . . . . . . . . . . . . . . . . . . . . . . . . . . . . . . . . . . . . . 78
Save to VCR . . . . . . . . . . . . . . . . . . . . . . . . . . . . . . . . . . . . . . . . . . . . . . . . . . . . . . . . . . . . . . . . . . . . . . . . 81
Music Channels . . . . . . . . . . . . . . . . . . . . . . . . . . . . . . . . . . . . . . . . . . . . . . . . . . . . . . . . . . . . . . . . . . . . . 82
Chapter 6: Messages and Setup . . . . . . . . . . . . . . . . . . . . . . . . . . . . . . . . . . . . . . . . . . . . . . . . . . . . . . . . . . .83
Messages from DIRECTV . . . . . . . . . . . . . . . . . . . . . . . . . . . . . . . . . . . . . . . . . . . . . . . . . . . . . . . . . . . . . 84
Purchases . . . . . . . . . . . . . . . . . . . . . . . . . . . . . . . . . . . . . . . . . . . . . . . . . . . . . . . . . . . . . . . . . . . . . . . . . . 85
Settings . . . . . . . . . . . . . . . . . . . . . . . . . . . . . . . . . . . . . . . . . . . . . . . . . . . . . . . . . . . . . . . . . . . . . . . . . . . . 89
System Information . . . . . . . . . . . . . . . . . . . . . . . . . . . . . . . . . . . . . . . . . . . . . . . . . . . . . . . . . . . . . . . . . 104
System Test . . . . . . . . . . . . . . . . . . . . . . . . . . . . . . . . . . . . . . . . . . . . . . . . . . . . . . . . . . . . . . . . . . . . . . . 105
Troubleshooting . . . . . . . . . . . . . . . . . . . . . . . . . . . . . . . . . . . . . . . . . . . . . . . . . . . . . . . . . . . . . . . . . . . . 106
Restart or Reset System . . . . . . . . . . . . . . . . . . . . . . . . . . . . . . . . . . . . . . . . . . . . . . . . . . . . . . . . . . . . . . 107
Standby . . . . . . . . . . . . . . . . . . . . . . . . . . . . . . . . . . . . . . . . . . . . . . . . . . . . . . . . . . . . . . . . . . . . . . . . . . . 108
v
Page 8

Chapter 7: Programming the Remote Control . . . . . . . . . . . . . . . . . . . . . . . . . . . . . . . . . . . . . . . . . . . . . . 109
Introduction . . . . . . . . . . . . . . . . . . . . . . . . . . . . . . . . . . . . . . . . . . . . . . . . . . . . . . . . . . . . . . . . . . . . . . . 110
Instructions: TV Power, Volume, and TV Input . . . . . . . . . . . . . . . . . . . . . . . . . . . . . . . . . . . . . . . . . . . 111
Resetting the Programmable Buttons . . . . . . . . . . . . . . . . . . . . . . . . . . . . . . . . . . . . . . . . . . . . . . . . . . . . 114
Setting a Remote Address . . . . . . . . . . . . . . . . . . . . . . . . . . . . . . . . . . . . . . . . . . . . . . . . . . . . . . . . . . . . 115
Chapter 8: Troubleshooting . . . . . . . . . . . . . . . . . . . . . . . . . . . . . . . . . . . . . . . . . . . . . . . . . . . . . . . . . . . . 117
Chapter 9: Warranty and Specifications . . . . . . . . . . . . . . . . . . . . . . . . . . . . . . . . . . . . . . . . . . . . . . . . . . 147
Appendix A: Front and Back Panel Reference . . . . . . . . . . . . . . . . . . . . . . . . . . . . . . . . . . . . . . . . . . . . . . 159
Appendix B: GNU General Public License . . . . . . . . . . . . . . . . . . . . . . . . . . . . . . . . . . . . . . . . . . . . . . . . . . 165
Index . . . . . . . . . . . . . . . . . . . . . . . . . . . . . . . . . . . . . . . . . . . . . . . . . . . . . . . . . . . . . . . . . . . . . . . . . . . . . . . 171
Glossary of Icons. . . . . . . . . . . . . . . . . . . . . . . . . . . . . . . . . . . . . . . . . . . . . . . . . . . . . . . . . . .Inside Back Cover
vi
Page 9

Using this Guide
This User’s Guide describes how to connect your new DIRECTV® HD DVR to your
television and other audio/video equipment. It also provides valuable information about
the features and use of the HD DVR.
Remote Control Tips & Glossary of Icons. The inside front cover of this guide provides
an introduction to the remote control. The inside back cover has a Glossary of Icons that
explains many of the graphic symbols you will see when using your HD DVR.
Useful Terms. Many technical terms in this guide are explained in the Useful Terms
section beginning on page 6.
Menu Paths. Notes at the bottom of some pages show you how to find the screen being
discussed on that page. For example, page 59 describes the “Record by Time or Channel”
feature. At the bottom of the page is the note DIRECTV Central Pick Programs to
Record Record by Time/Channel. This note means you can find Record by Time/
Channel, the screen being discussed, by going to DIRECTV Central (press the DIRECTV
button on your remote control) and selecting Pick Programs to Record, then Record by
Time/Channel.
DIRECTV
provided through the DIRECTV HD DVR.
DIRECTV HD DVR. Refers collectively to the high-definition satellite and off-air receiver
and the digital video recorder (DVR) hardware. Your HD DVR combines a DIRECTV
HD Receiver, an off-air digital receiver, and a DVR.
®
DVR with TiVo® Service. This is the program searching and recording service
Throughout this guide, you will
see important and helpful notes
and tips in this format.
vii
Page 10
Before you install the HD DVR,
mount the satellite dish antenna.
Professional installation is highly
recommended. Your dish must be
mounted—with cables running to the
room where your HD DVR will be
installed—before you can begin the HD
DVR installation as described in this
guide.
The TiVo Logo. As you use your DIRECTV HD DVR, you’ll see the TiVo
logo in places like the Now Playing List and TiVo Suggestions. Your new HD
DVR incorporates the latest high-definition DVR (Digital Video Recorder)
technology from TiVo. This means you have access to exclusive TiVo
features such as WishList
and Thumbs Down
™
, TiVo Suggestions, and TiVolution® Magazine, all in one seamlessly
™
searches, Season Pass™ recordings, Thumbs Up™
integrated product that will change the way you watch television.
Getting Started
After a satellite dish antenna has been installed, you’re ready to start using this guide:
1. Connect the HD DVR according to the proper setup for your Audio/Video equipment.
(See chapter 1, “Connecting.”)
2. Complete Guided Setup to point your satellite dish antenna and activate your
DIRECTV
DVR service following the instructions in chapter 2, “Guided Setup.”
For access to high-definition
programming, a triple LNB multi-
satellite dish antenna, along with a high-
definition capable DIRECTV
high-definition television is required.
Satellite dish antenna sold separately.
Due to copyright restrictions, you may not
be able to view some high-definition
programs in high-definition format using
the HD DVR.
viii
®
Receiver and
Start using your DIRECTV HD DVR. It’s easy! Learn the basics by browsing the Start
Here guide. Take the five tours in chapter 3 of this User’s Guide for an interactive way to
learn about the HD DVR’s powerful features. Chapters 4, 5, 6, and 7 describe the
DIRECTV
®
DVR with TiVo® service in detail. Read through them to become familiar
with the service. Chapter 8 provides a comprehensive troubleshooting guide in case you
have questions.
Page 11

CHAPTER
1
Connecting
Introduction to Digital Television 2
Before You Begin 3
Useful Terms 6
Cables and Accessories 9
Setup Options 12
Page 12

Chapter 1
Connecting
Introduction to Digital Television
TV used to be simple: a handful of channels, no color, no stereo sound, no choices. All
you needed was an antenna and a TV. The antenna captured pictures and sounds and sent
them to your TV over a wire.
As televisions have acquired more features, and new devices have been created to work
with them, it may seem that everything has become more complex. Fortunately, one thing
has remained the same: what you need to do is get the pictures and sounds from their
source (satellite, DVD, game console, etc.) to your TV.
For the past 50 years, the television broadcast system used in the United States has been
analog. Many things can interfere with an analog broadcast signal, even other home
appliances, and the signal can degrade as it travels to your home, causing snow, ghosts,
and other artifacts to appear on the screen.
High-definition television (HDTV) combines high-resolution digital television with
digital surround sound. It is bigger, sharper, and better than anything you have previously
experienced in home entertainment. Your DIRECTV
including HDTV, from DIRECTV satellites and from off-air antenna broadcasts, and
passes the pictures and sound to your TV set.
With the DIRECTV
best of both worlds: state of the art digital television that’s simple and easy to enjoy.
HD DVR and the DIRECTV
®
HD DVR receives digital signals,
®
DVR with TiVo® service, you have the
2
Page 13

Before You Begin
Before You Begin
Make sure that all of your equipment is turned off and the HD DVR is unplugged.
Connecting Your HD DVR to a Phone Line
Your DIRECTV HD DVR needs to be connected to a standard analog phone jack for
DVR service and pay per view functionality. The HD DVR periodically makes a brief
phone call to update your service information. You do not need to install a new telephone
jack or phone number for the HD DVR to work; it can detect when your phone line is in
use and will only make brief calls (about once every other day) when the phone line is
free. If you don’t have a phone jack nearby, use the 25 foot phone cord that ships with the
HD DVR. If your phone jack is being used for a phone, use the provided splitter to
connect both the phone and the HD DVR to the same phone jack.
Connecting Your DVR to a Satellite Dish Antenna
Your DIRECTV HD DVR will work with any type of DIRECTV satellite dish antenna,
but for full functionality—including receiving DIRECTV
programming—a triple LNB multi-satellite dish is required.
Your HD DVR comes equipped with two jacks for satellite input. The HD DVR will work
if connected to only one satellite input, but connecting both allows you to record from two
channels at the same time (see Dual Tuner on page 6). The setup options in this chapter
show the HD DVR with connections to both satellite input jacks. To do this, you must
have two Coaxial RF cables coming from your satellite dish antenna to the room where
the HD DVR will be installed.
Round Dual LNB dish antennas and Oval two-satellite dish antennas connect to at least
two Coaxial RF cables. However, these types of dishes are not recommended, since they
cannot receive all high-definition programming from DIRECTV.
®
High-Definition
Do not connect your HD DVR to a
digital PBX phone system. Doing
so may permanently damage your HD
DVR’s modem and will void your warranty.
Digital PBX phone systems allow many
phones to share a single telephone
number and are usually used in hotels and
office buildings. If you are installing the
HD DVR in your home, it is very unlikely
that you are using a digital PBX phone
system.
For access to high-definition
programming, a triple LNB multi-
satellite dish antenna, along with a high-
definition capable DIRECTV
high-definition television is required.
Satellite dish antenna sold separately.
Due to copyright restrictions, you may not
be able to view some high-definition
programs in high-definition format using
the HD DVR.
®
Receiver and
1
3
Page 14
Chapter 1
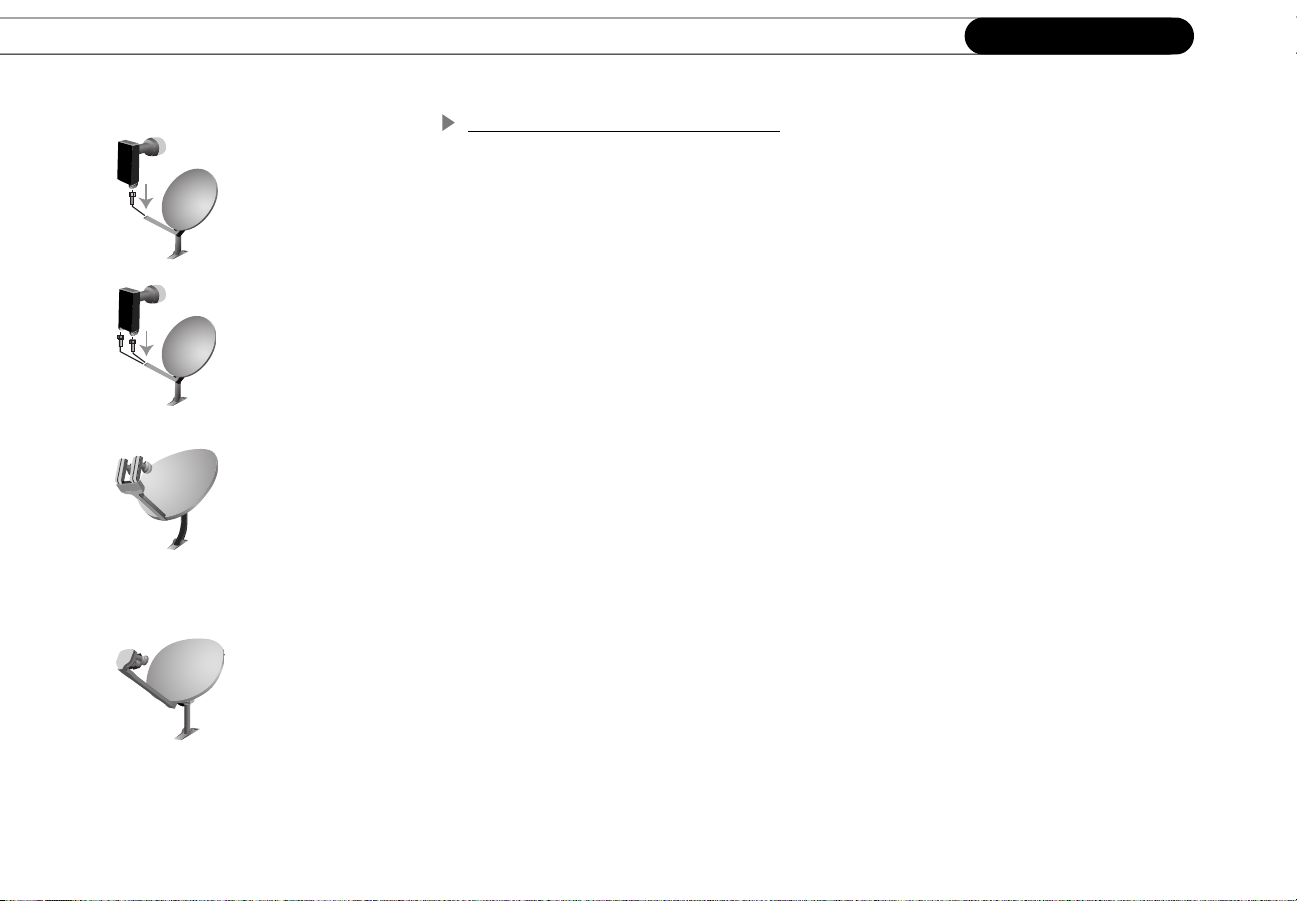
Round
Single LNB
Single satellite
Round
Dual LNB
Single satellite
Oval
Dual LNB
Two satellite
Connecting
Satellite Dish Antennas and LNBs
Satellite dish antennas come in two shapes, Round and Oval. A Round dish receives
signals from one satellite (Sat A), while an Oval dish can receive signals from two or three
satellites (Sat A, Sat B, and Sat C). Every satellite dish antenna includes at least one Low
Noise Blocker (LNB). The LNB is the device at the focal point of the satellite dish that
gathers the signal reflected by the dish and sends it to your HD DVR. (It’s the mushroom
shaped “finger” pointed back at the dish from the extended “arm.”)
There are three types of LNBs, single, dual, and triple. A single LNB sends one signal and
has one jack, or connector, inside the arm extending from the dish. A dual LNB sends two
signals and has two jacks. A triple LNB dish adds an extra LNB for the third satellite (Sat
C). The LNBs determine the number of independent signals your dish can send to your
HD DVR.
If you have a two satellite dish, or a multi-satellite dish, your HD DVR will not work
properly unless you have connected a multiswitch as well. Some satellite dish antennas
have a multiswitch built-in. For more information about multiswitches, see page 6.
Required for all HD programming:
Oval
Triple LNB
Multi-satellite
high-definition programming from DIRECTV, and to take advantage of the HD DVR’s
dual tuner functionality (described on page 6). If you can’t tell by looking at it, the easiest
way to determine what type of dish you have is to consult the documentation that came
with the dish. Disassembling the dish to determine its type is not recommended. If you
currently own a different type of satellite dish, contact the installer or retailer for
information about upgrading your dish.
4
Remember, you need a triple LNB multi-satellite dish for full functionality: to receive all
Page 15

Before You Begin
Caring for your DIRECTV HD DVR
Moving your HD DVR. To prevent damage to sensitive components such as the hard disk
drive, ALWAYS unplug your HD DVR, then WAIT a moment for the hard disk to stop
spinning before moving it.
If you take your HD DVR with you to a location without satellite access—for example, on
a weekend get-away to a mountain cabin—you will still be able to connect it to a
television and watch programs saved in the Now Playing List. You can also connect an
off-air antenna and watch live TV from off-air digital channels.
After completing Guided Setup one time, whenever you unplug the HD DVR and plug it
back in, it will search for a satellite signal. When you see the message “Acquiring Satellite
Information,” you can press the DIRECTV button on the remote control to go directly to
DIRECTV Central, then to your Now Playing List.
Do not drop. Your new HD DVR contains a hard disk drive that is constantly in motion
when plugged in; it may be damaged if the HD DVR falls or is dropped. Place the HD
DVR in a stable location.
Do not stack. Your HD DVR is NOT designed to carry the weight of other consumer
components such as VCRs, DVD players, A/V receivers, or TVs.
Flat, hard surface. The HD DVR should rest on a flat, hard surface only. Do not operate it
on a carpet or other padded surface, as this can inhibit proper ventilation and cause the
HD DVR to overheat.
The HD DVR does not have an
on/off switch. To turn the HD DVR
on, plug it in. The HD DVR, like a clock or a
refrigerator, is designed for constant use
and does not need to be turned off. If you
must turn it off—for example, to move it—
simply unplug it. (The HD DVR does have
an optional standby mode, explained on
page 108.)
Be sure to read the safety
instructions on page 155.
1
Use a surge protector. Like all electronics equipment, your HD DVR can be damaged by
fluctuations in your power supply. Purchasing a surge protector is highly recommended. A
surge protector that allows you to plug in both power and phone cords may help prevent
damage to the parts of your HD DVR that are connected to the phone line as well!
5
Page 16
Chapter 1
Connecting
Useful Terms
If you’re not an audio/video wizard, you may find yourself stumbling over some of the
names, features, and functions of various pieces of equipment. Here’s a quick reference to
help you understand some of the terms you may encounter during installation.
Satellite TV Terms
Satellite Receiver. A satellite receiver does what its name suggests and more. It “receives”
the signal from your satellite dish antenna, translates it into a signal your TV can
understand, then sends it to the TV. Your HD DVR has a built-in satellite receiver.
Dual Tuner. A tuner picks one channel out of all of your available channels to display on
your TV. Dual tuner means your HD DVR can pick two channels at once, so it can record
two channels at the same time, provided you connect two cables from your satellite dish to
the “Satellite In” jacks, and activate the DVR service. If you set up the HD DVR for “Off-
Air antenna only,” you can watch, but not record, two antenna channels. See page 48.
Multiswitch. A multiswitch lets you send the signal from one satellite dish antenna to two
or more satellite receivers. Adding a multiswitch allows you to send a satellite signal to
each of your HD DVR’s two tuners, as well as to another satellite receiver for your second
television. If you own a two satellite or multi-satellite dish antenna, you must use a
multiswitch to send signals to your HD DVR or other satellite receiver(s).
DIRECTV
ACCE SS CARD
Access Card. Your access card contains information about your DIRECTV programming
subscription. It must be properly inserted and activated for your HD DVR to work.
Transponder. A transponder is a piece of equipment on a satellite. The transponders
receive information from DIRECTV and rebroadcast it to your satellite dish antenna. Each
transponder rebroadcasts a different set of channels. If the HD DVR does not receive a
signal for an individual transponder, it will not be able to show that transponder’s channels.
6
Each satellite may have a different number of transponders on it.
Page 17

Useful Terms
Video, Audio, and Electronics Equipment Terms
HDTV Receiver. A high-definition television receiver decodes high-definition, enhanced-
definition, and standard-definition video signals for display on your TV. Your HD DVR
combines an HDTV receiver with a satellite receiver and a digital video recorder.
Off-Air Antenna. Any antenna used to receive standard or digital TV signals broadcast
locally is referred to in this guide as an off-air antenna.
SDTV, EDTV, and HDTV. These acronyms define three types of digital television formats:
Standard Definition, Enhanced Definition, and High Definition. SDTV is the basic digital
TV format and provides better quality than traditional, analog television. EDTV uses the
same number of lines of resolution as SDTV, but the scanning format is progressive rather
than interlaced, providing a sharper image. HDTV is the highest quality digital TV format,
offering the greatest number of scanning lines for each frame of video, which results in the
most detailed picture possible today. HDTV video can be progressive or interlaced. See
page 31 for more information about video output formats.
Digital Visual Interface (DVI). DVI describes a type of 15-pin connection found on many
high-definition TVs. DVI allows a true digital connection for video signals and other
digital information. You can connect your HD DVR to your TV’s DVI jack using the
HDMI-to-DVI cable supplied with your HD DVR. Since a DVI jack accepts only video,
you will need to connect a separate cable for audio if you use this connection.
High Definition Multimedia Interface (HDMI). HDMI is an uncompressed, all-digital
audio/video interface for electronic devices such as DVD players, A/V receivers, and
high-definition TVs. HDMI improves on DVI in that it sends both high-definition video
and digital audio signals through a single cable. Like DVI, it also sends and receives
digital content protection information. (See page 79 for details.) HDMI is backwardcompatible with DVI using the supplied HDMI-to-DVI adapter cable.
1
7
Page 18

Chapter 1
Connecting
A/V Receiver. An A/V receiver is the hub of a home theater system. It allows you to
connect multiple audio and video devices and manage the signal from each device. With it
you can switch easily between watching TV, viewing video from your DVD player, or
running your game system, by changing the input source. An A/V receiver may also be
used to drive two or more loud speakers for a theater-like audio experience. It may offer
features such as remote control or Dolby
®
Dolby
soundtrack is recorded on six separate channels, each of which can be heard on one of six
Digital Audio. Some programs are broadcast with Dolby Digital audio: the
separate speakers. To hear Dolby Digital audio, you must use an optical digital audio
cable (not supplied) to connect your HD DVR to an A/V receiver capable of supporting
Dolby Digital audio. Not all A/V receivers with optical audio inputs are capable of
receiving Dolby Digital audio. You must also set your HD DVR to record using Dolby
Digital audio. For more information, see page 89.
®
Dolby
Surround Sound. Dolby Surround Sound audio is a technique for encoding
surround sound audio on two channels. When decoded by a compatible A/V receiver,
audio on these two channels is separated into as many as five signals which play through
your home theater speakers. To hear Dolby Surround Sound audio, you must connect your
HD DVR to an A/V receiver that supports Dolby Pro Logic or Dolby Pro Logic II. You
can use either L/R audio cables or an optical digital audio cable.
®
Digital audio.
Surge Protector. Surge protectors are devices that protect electronic equipment from
power fluctuations. Like all electronic equipment, your HD DVR can be damaged by
fluctuations in power line voltage. Purchasing a surge protector is highly recommended. If
you purchase a surge protector that allows you to plug in both your HD DVR’s power and
your telephone cord, you may prevent damage to the parts of your HD DVR that are
connected to your phone line as well. Surge protectors can be found at hardware,
electronics, or general merchandise stores.
8
Page 19
Cables and Accessories
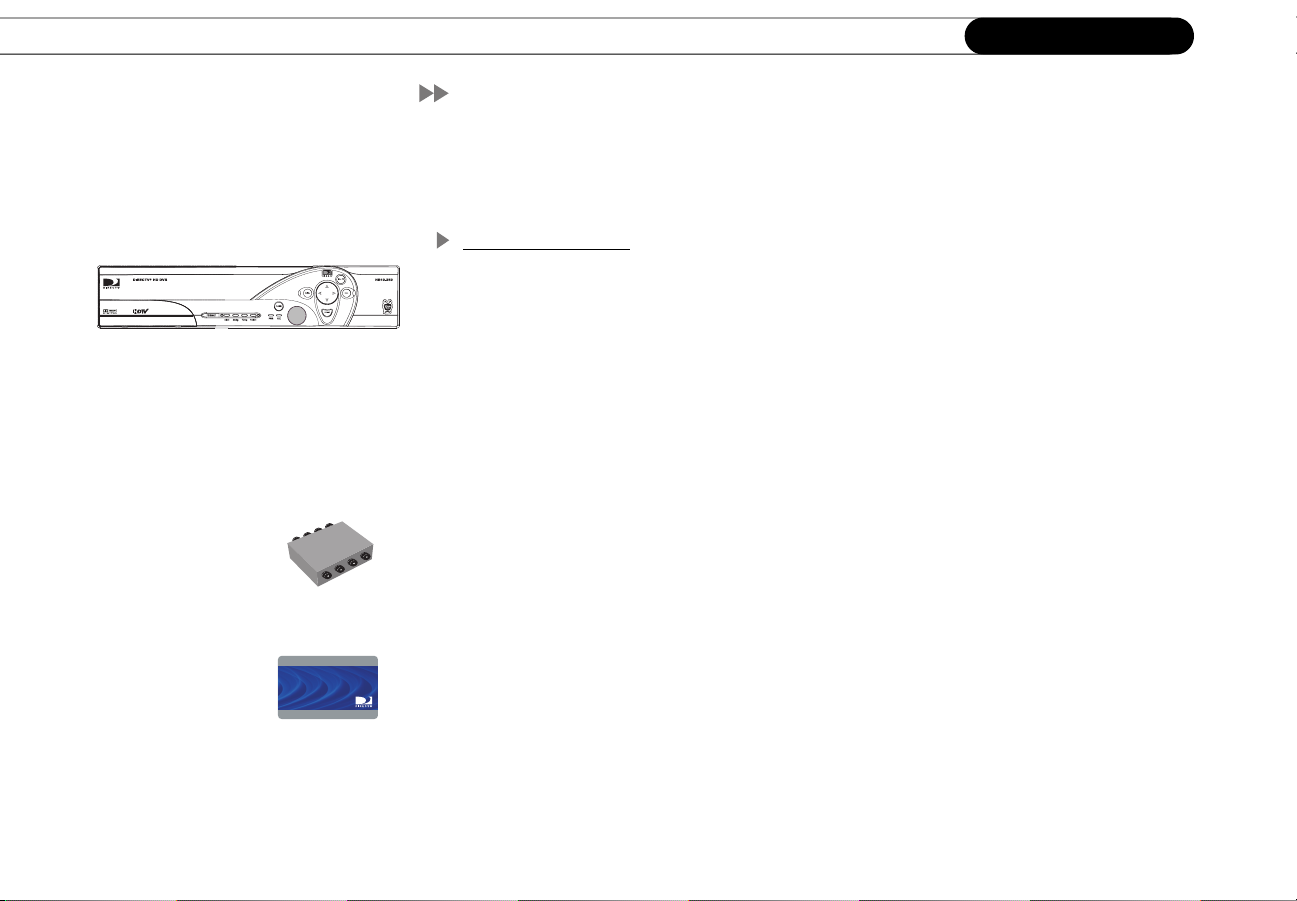
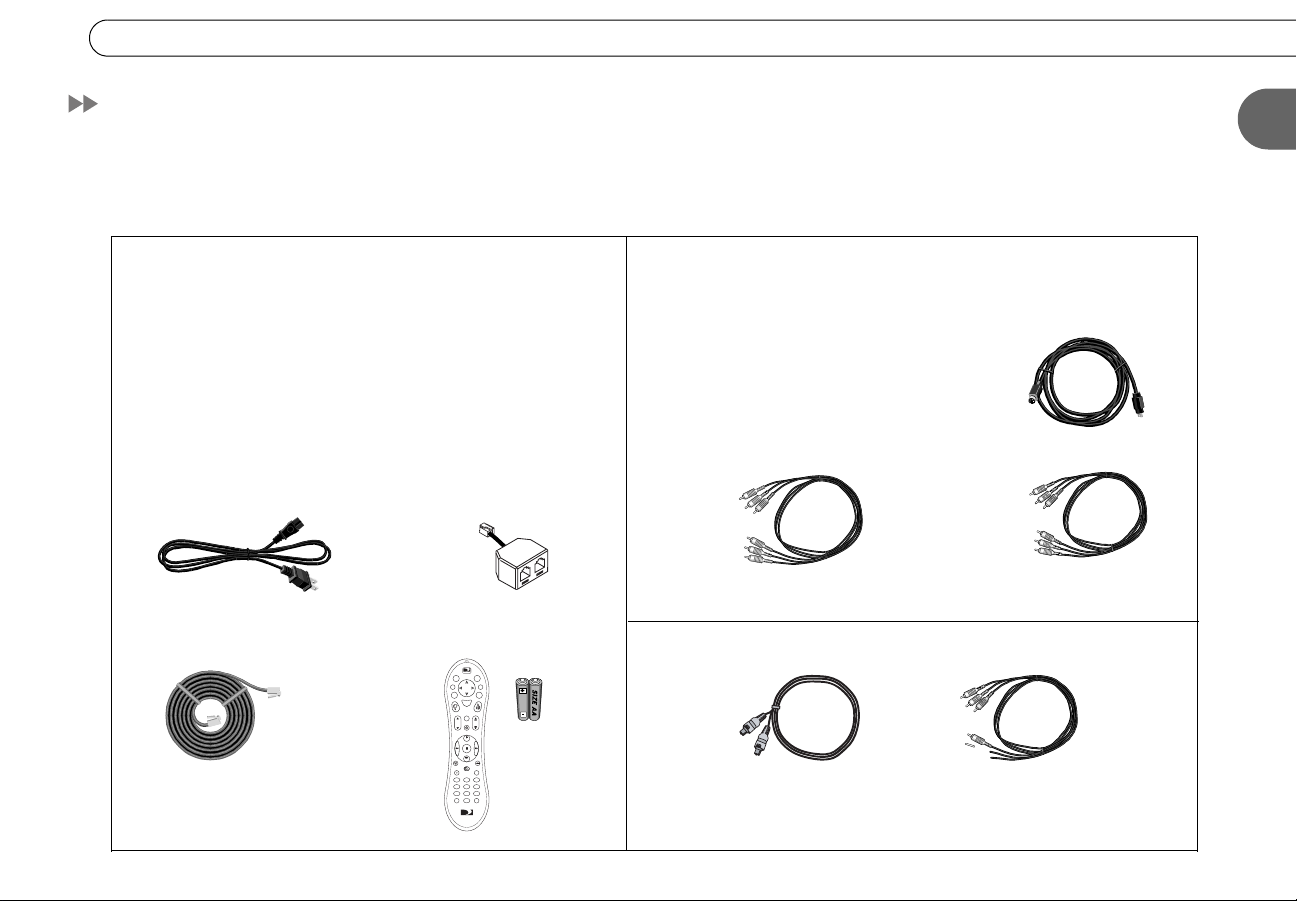
Cables and Accessories
In addition to your TV and the equipment that shipped with your DIRECTV HD DVR (shown below), you’ll need a satellite dish
antenna, an off-air antenna—both of which should be properly mounted before you connect the HD DVR—and a standard phone line
(see page 3 for details) for full functionality.
1. These are the basics: 2. The carton contains one of each of the following:
HD DVR
Power Cord
25' Phone Cord
DIRECTV Access Card
Phone Line Splitter
TV
DIREC
t
i
e
a
o
T
v
V
i
R
L
f
o
i
n
t
x
I
E
G
e
L
t
u
d
i
s
i
S
t
e
c
l
e
t
u
e
M
Chan
Vol
o
c
r
d
e
R
P
e
a
g
P
y
l
a
Remote Control
( )
-
S
w
l
o
TVSAT
o
w
n
p
P
I
u
e
t
V
r
V
T
T
3
102
and 2 AA
465
798
a
/
e
r
L
r
l
e
a
C
t
s
n
t
E
Batteries
TV
DIREC
Component Video Cable
(red, blue, green)
3. You may need to purchase additional cables for some setups:
Optical Digital Audio Cable
(Setup B on page 16.)
Extra Composite A/V Cable
(Adding a VCR or DVD recorder
on page 18.)
S-Video Cable
Composite A/V Cable
(red, white, yellow)
1
9
Page 20
Chapter 1
Due to copyright restrictions, you
may not be able to view some
high-definition programs in high-
definition format using the HD DVR.
Wherever possible, you should connect
both high-definition and standard video
cables to permit standard viewing of
programs if HD viewing is restricted. For
more information, see page 79.
(green)
(blue)
(red)
Connecting
Choosing Audio and Video Cables
Your DIRECTV HD DVR can output either standard, enhanced, or high-definition video
signals, and either analog or digital audio signals. If you have a TV, A/V receiver, or home
theatre system that accepts high-definition video and digital audio signals, using these
connections will provide the best possible audio and video quality.
The HD DVR offers several video output formats for standard and high-definition TV
signals. In order to see a high-definition picture, you must connect a high-definition video
cable from your HD DVR to your TV, and choose the appropriate video output setting. See
“Video Setup” on page 29 for more information about video output format settings.
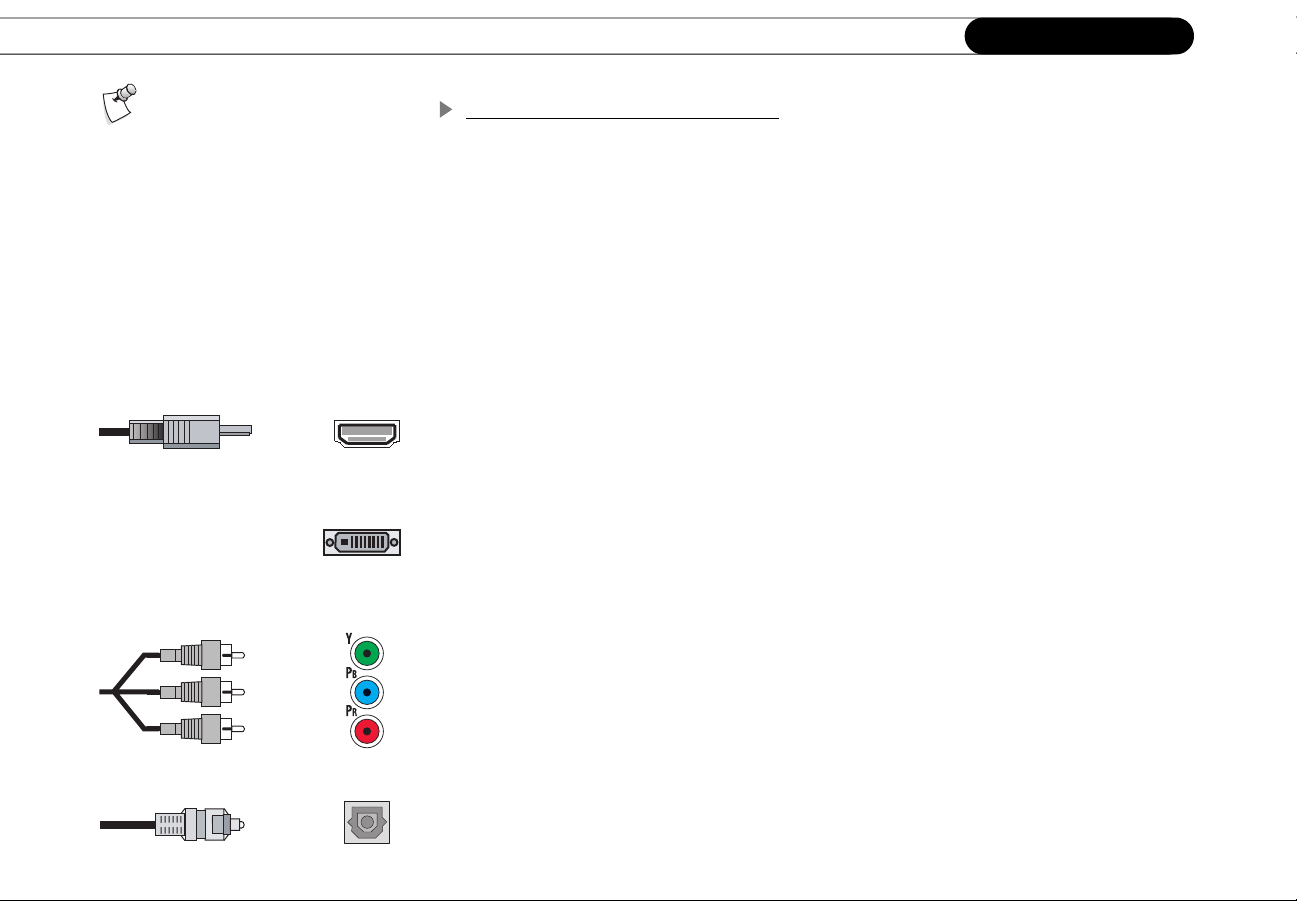
High-Definition Video and Digital Audio
The HD DVR provides two output jacks for sending HD video: HDMI and Component
Video. While a cable is connected to the HDMI Output jack, the Component Video Output
is disabled. You can’t view video from both the HDMI Output and the Component Video
Output at the same time. See page 31.
If your TV has an HDMI (High-Definition Multimedia Interface) input jack, you can use
the HDMI cable (, supplied) to send both HD video and digital audio signals from your
HD DVR in a single cable. Although HDMI sends both audio and video, make a separate
audio connection to your A/V receiver if you want to use a multi-speaker sound system.
If your TV has a DVI input jack, you can use the HDMI-to-DVI cable (, supplied) to
connect your HD DVR (see Option A on page 14). Since a DVI jack accepts only video,
you will need to connect a separate cable for audio if you use this cable for video.
10
The HDMI and HDMI-to-DVI cables also allow other information to pass between your HD
DVR and your TV, such as High-definition Digital Content Protection (HDCP) used with
some HD broadcasts. We recommend you connect your HD DVR to a TV that is
compatible with HDCP. For more about copyright restrictions, see page 78.
Page 21

Cables and Accessories
The Component Video cable (, supplied) provides excellent video quality by separating
the video signal into three components, luminance (Y) and two color difference signals
(Pb, Pr). You will need to connect a separate cable for audio. (See Option B on page 16.)
The HD DVR also has a Digital Audio Out jack to connect an Optical Digital Audio cable
(, not supplied). If you want Dolby Digital audio, purchase an Optical Digital Audio
cable and use this connection. Ordinarily, your HD DVR produces tones to indicate when
certain buttons on the remote are pressed. If you use Digital Audio Out or HDMI for
audio, you will not hear these tones when watching programs with Dolby Digital audio.
Standard Audio and Video
To take full advantage of the HD DVR’s high-definition audio and video capabilities, you
should connect it to your system using high-definition video and digital audio cables.
However, the HD DVR also has standard audio and video connections that are useful
depending on the equipment you have.
An S-Video cable (, supplied) provides excellent video quality. You can use this cable
to connect your HD DVR to standard video devices, such as a VCR, or a standard
definition TV. If you use this cable for video, connect a separate cable for audio.
The HD DVR also comes with a Composite A/V cable (, supplied). Composite A/V
cables have three ends, two (white and red) for stereo audio, and one (yellow) for video.
These three ends can be used together or separately. For example, you can use only the red
and white ends for analog stereo audio, along with an S-Video cable instead of the yellow
end for video. You can use this cable to connect your HD DVR to devices such as a DVD
recorder, a standard definition TV, or an A/V receiver.
1
A Coaxial RF cable (, not supplied) carries both audio and video signals (analog or
digital) TD0.0c0 Tw.
11
Page 22
Chapter 1
Connecting
Setup Options
Always connect cables from the
OUT jack of one device to the IN
jack of the next. Never connect an IN to
an IN or an OUT to an OUT.
OUT IN
If you have trouble, or if your
configuration isn’t covered by
one of these examples, see “Adding
Other Components” on page 13, or the
“Back Panel Reference” on page 162.
On the back of your equipment you will find several jacks. Some are labeled IN and some
are labeled OUT. The pictures and sound enter a piece of equipment through cables
connected to IN jacks and leave through cables connected to OUT jacks.
When you connect your DIRECTV
®
HD DVR to your television and/or A/V receiver, you
are simply creating a path that starts at the satellite dish and goes in (through IN jacks) and
out (through OUT jacks) of your equipment until it reaches your TV.
This section provides detailed examples showing how to connect the HD DVR to your
existing audio/video system. These setup options show a complete high-definition system,
including a triple LNB multi-satellite dish, a standard antenna for off-air digital
broadcasts, and a high-definition TV. If you have a different type of satellite dish or TV,
you may not be able to view high-definition programs in high-definition format.
From the table below, choose the option that most closely matches the equipment you
have and follow the steps in that section.
You have a high-definition TV
and a home theater system or
Option A: Connect audio to your A/V
receiver, video to your HDTV
page 14
A/V receiver.
You have a high-definition TV,
but no home theater system or
Option B: Connect audio and video to
your HDTV (no A/V receiver)
page 16
A/V receiver.
12
Page 23

Setup Options
Adding Other Components
You probably have other audio/video components in addition to your HD DVR and TV.
These might include a VCR, DVD recorder, DVD player, game console, and/or a cable
box. Some of these devices connect to your HD DVR, while others work independently,
with no connection to the HD DVR.
For example, you can connect a VCR or a DVD recorder to your HD DVR to archive your
favorite recordings. For information on connecting an archiving device, see “Adding a
VCR or DVD Recorder” on page 18.
Components that don’t connect to your HD DVR (such as a DVD player, cable box, or
game console) should be connected to additional inputs on your TV. If your TV doesn’t
have additional inputs, you can use an A/V receiver or a switch box. Refer to the
documentation that came with these devices for help connecting them.
1
13
Page 24
Chapter 1
Connecting
The audio and video cables
shown are examples only. Use
the best connections available on your
equipment. This setup includes a
high-definition digital video
connection to a DVI-compatible TV, an d
a digital audio connection to an A/V
receiver. The Optical Digital Audio
cable shown must be purchased
separately. For more information, see
“Choosing Audio and Video Cables” on
page 10.
Option A: Connect audio to your A/V receiver, video to your HDTV
14
Page 25
Setup Options
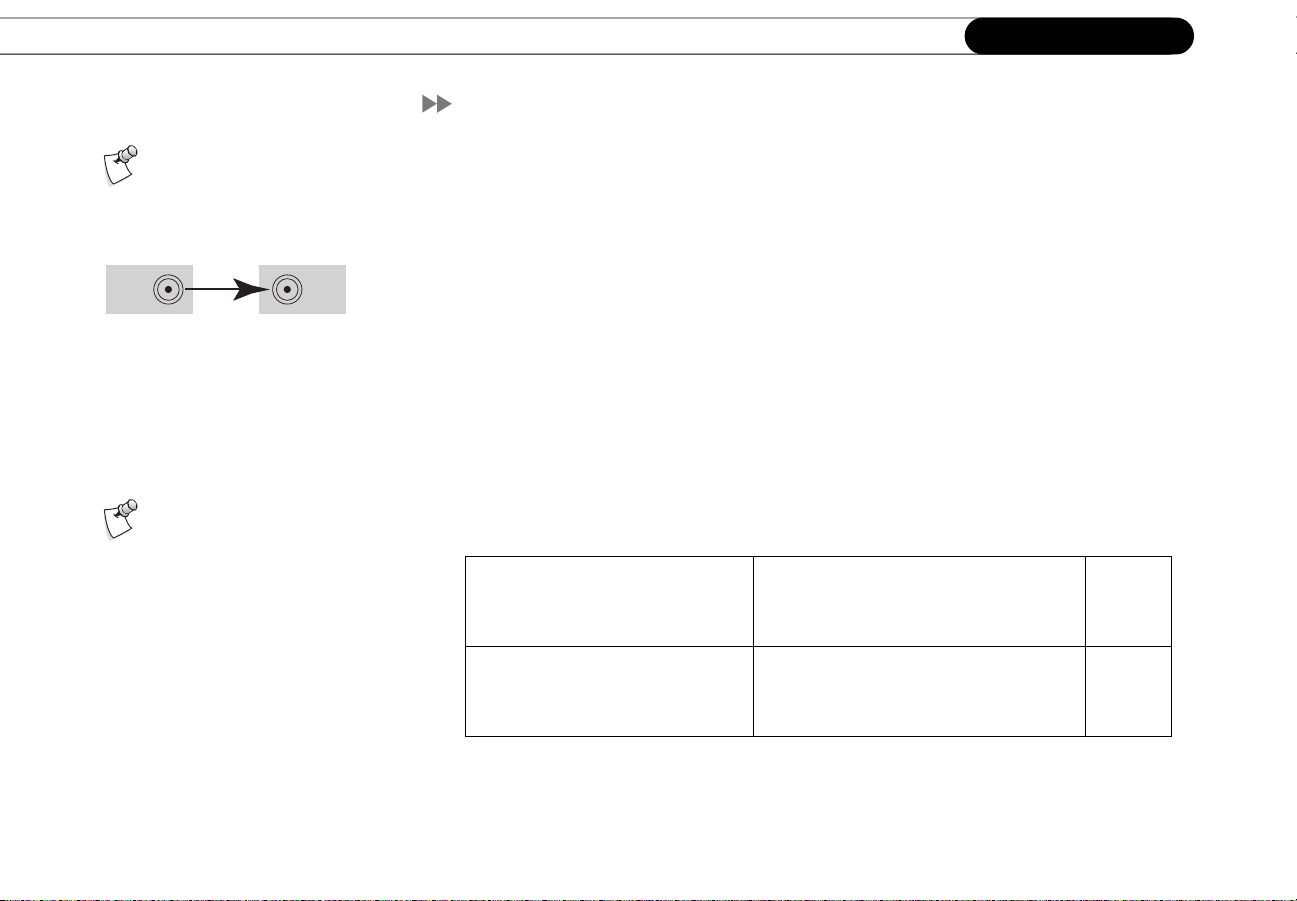
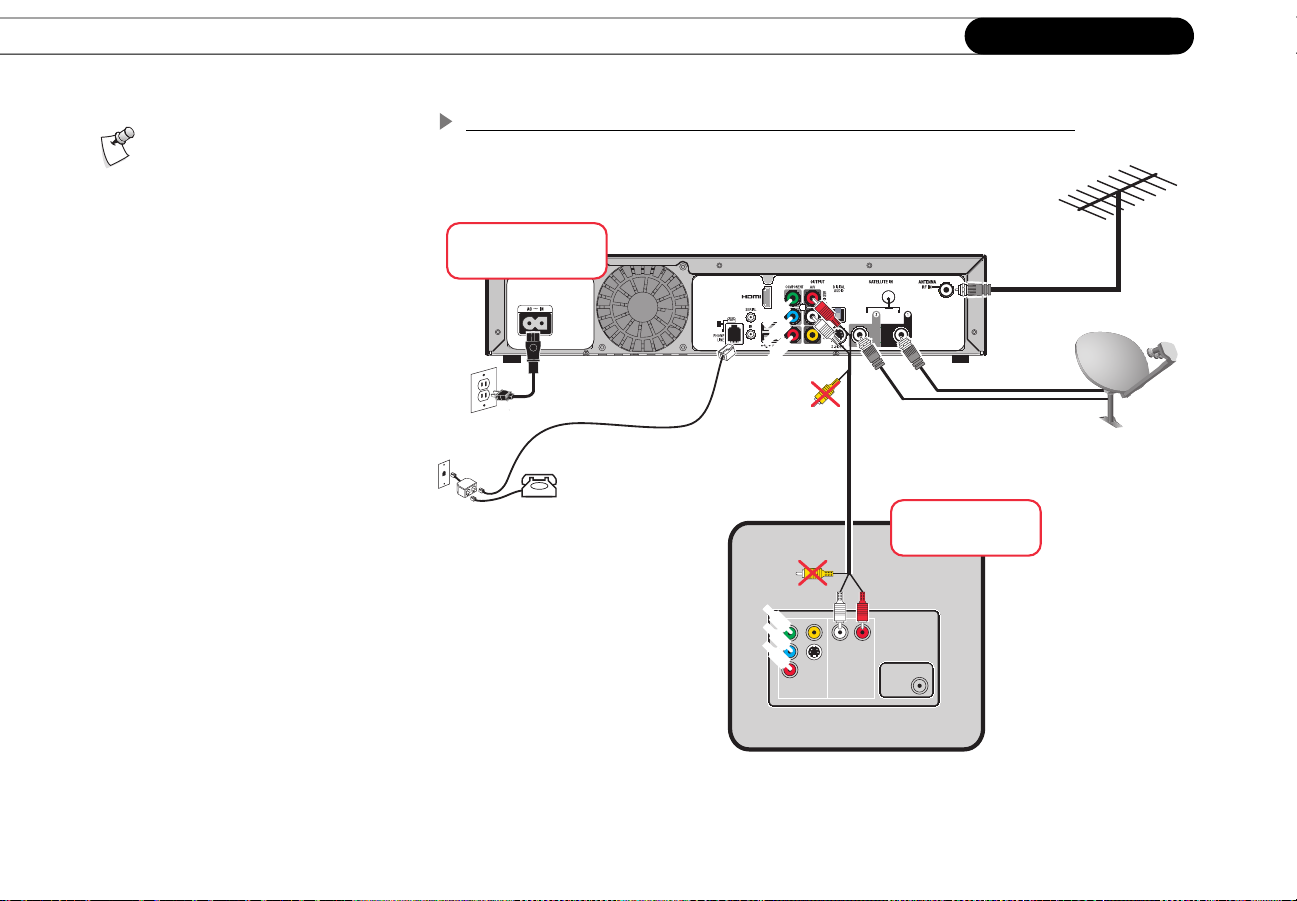
(Optional) Connect the Coaxial RF cable from your off-air antenna to the HD DVR’s
Antenna RF In jack. (If you don’t have an off-air antenna, you can skip this step.)
Connect the Coaxial RF cables from your satellite dish antenna to the jacks labeled
Satellite In 1 and Satellite In 2 on the back of the HD DVR. You can connect either cable
to either jack.
Connect the HDMI-to-DVI cable from the HD DVR’s HDMI Output jack to the DVI
Input jack on your HDTV. If your HDTV has an HDMI Input jack, you can use the HDMI
cable instead. If your HDTV does not have either of these jacks, use the Component Video
cable to connect the HD DVR as shown in step of Option B, on page 16.
Connect an Optical Digital Audio cable (not supplied) from the HD DVR’s Digital
Audio Out jack to your A/V receiver’s Digital Audio In jack. Alternately, you can use just
the red and white ends of a Composite A/V cable for analog stereo audio.
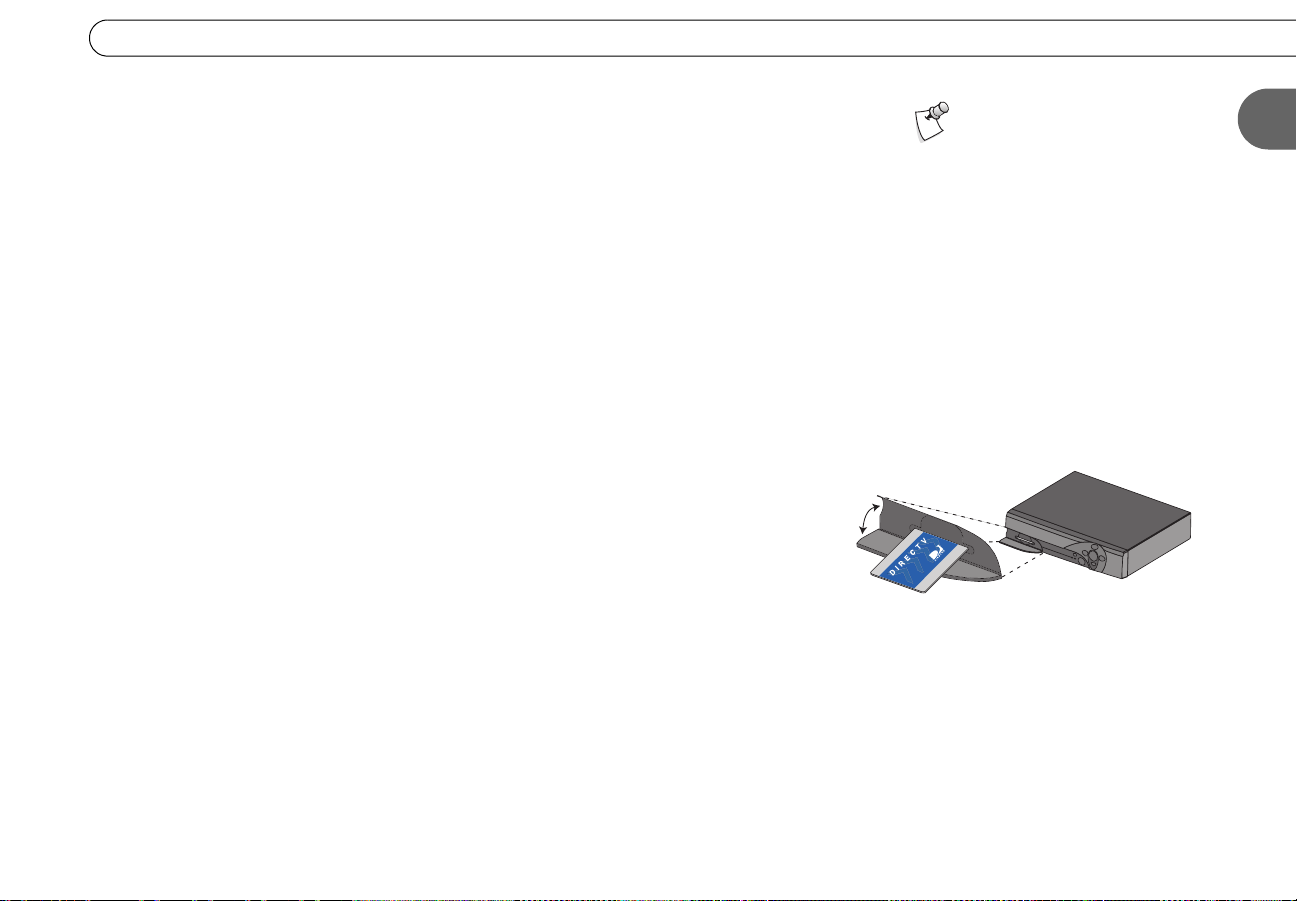
Insert the access card that came with your HD DVR into the Access Card slot on the
front panel as shown in the diagram to the right (with the gold chip down). Stop when the
card makes contact with the back of the slot. To receive DIRECTV service, you must
insert the card correctly and activate it. Activation is covered in the next chapter.
Connect the phone cord. (For more about the phone connection, see page 3.)
Plug in the power cord. After you see the Welcome screen, you can begin Guided
Setup, starting on page 22. If you do not see the Welcome screen, make sure the correct
input is selected on your HDTV, corresponding to the video input jack you used in step
above. Refer to your HDTV’s owner’s manual for help selecting inputs. You can find
additional tips in the “Troubleshooting” chapter of this guide.
Your HD DVR will work if you
connect only one cable to the
“Satellite In 1” jack, but it will not have
dual tuner functionality. See page 6 for
more information about dual tuner.
The Access Card slot is behind a small door.
1
15
Page 26
Chapter 1
Connecting
The audio and video cables
shown are examples only. Use
the best connections available on your
equipment. This setup includes an
analog high-definition video
connection and an analog stereo audio
connection to a high-definition TV. For
more information, see “Choosing Audio
and Video Cables” on page 10.
Option B: Connect audio and video to your HDTV (no A/V receiver)
DIRECTV® HD DVR
Television
Audio
Antenna
Video
In
16
Page 27
Setup Options
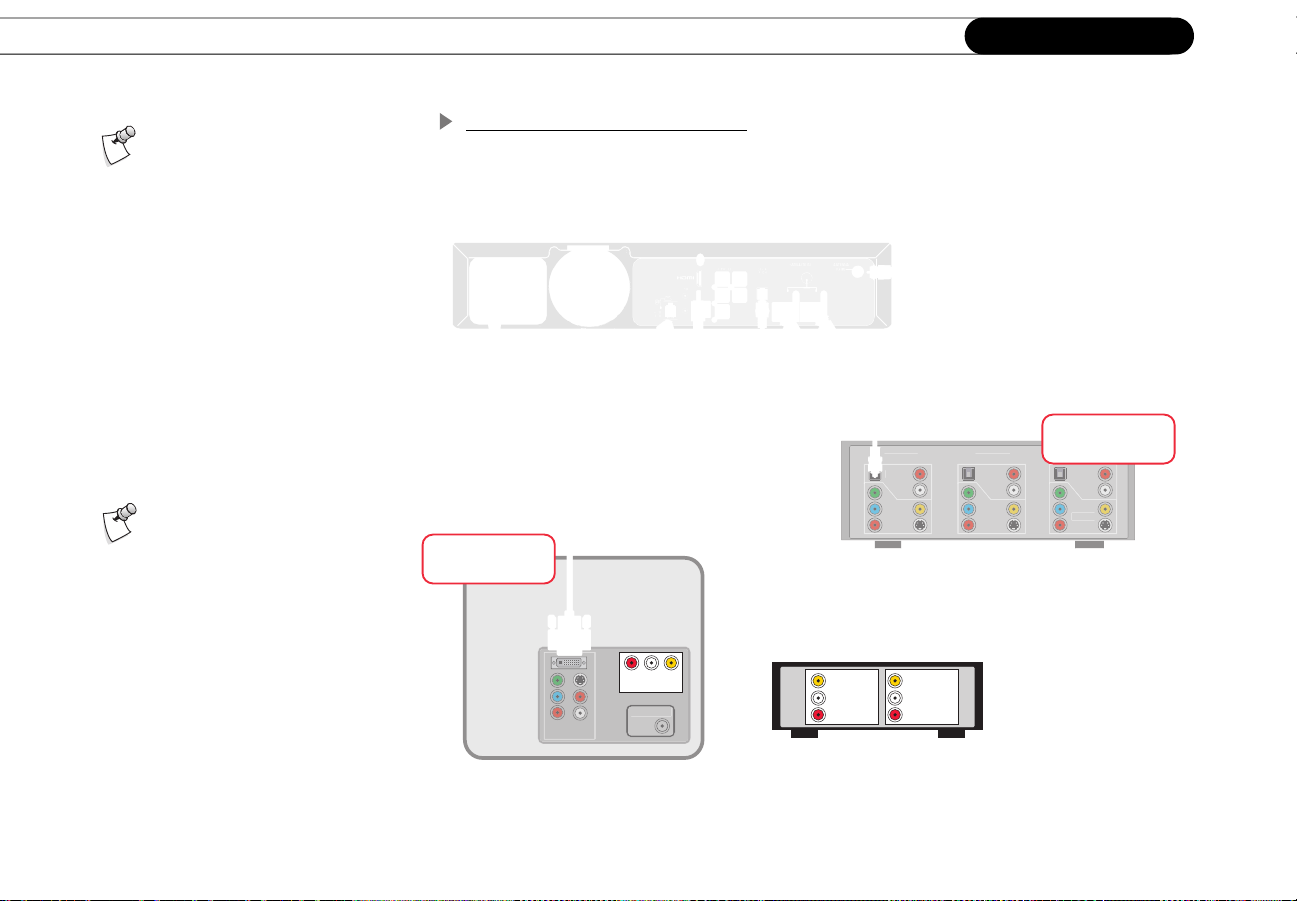
(Optional) Connect the Coaxial RF cable from your off-air antenna to the HD DVR’s
Antenna RF In jack. (If you don’t have an off-air antenna, you can skip this step.)
Connect the Coaxial RF cables from your satellite dish antenna to the jacks labeled
Satellite In 1 and Satellite In 2 on the back of the HD DVR. You can connect either cable
to either jack.
Connect the Component Video cable from the HD DVR’s Component Output jacks to
the Component Input jacks on your HDTV. Make note of the input you use for video on
your HDTV, and use the same input for audio. Alternately, if your HDTV has a DVI Input
jack, you can use the HDMI-to-DVI cable for video. Or, if your HDTV has an HDMI Input
jack, you can use just the HDMI cable for video and audio, and you don’t need to connect
a separate audio cable (i.e., skip step ).
Connect just the red and white ends of the Composite A/V cable from the HD DVR’s
L/R Audio Out jacks to your HDTV’s L/R Audio In jacks for stereo audio. Do not connect
the yellow end of the Composite A/V cable. Use the same input on your HDTV for audio
that you used for video in step .
Insert the access card that came with your HD DVR into the Access Card slot on the
front panel as shown in the diagram to the right (with the gold chip down). Stop when the
card makes contact with the back of the slot. To receive DIRECTV service, you must
insert the card correctly and activate it. Activation is covered in the next chapter.
Your HD DVR will work if you
connect only one cable to the
“Satellite In 1” jack, but it will not have
dual tuner functionality. See page 6 for
more information about dual tuner.
1
Connect the phone cord. (For more about the phone connection, see page 3.)
Plug in the power cord. After you see the Welcome screen, you can begin Guided
Setup, starting on page 22. If you do not see the Welcome screen, make sure the correct
input is selected on your HDTV
your HDTV’s owner’s manual for help selecting inputs. You can find additional tips in the
“Troubleshooting” chapter of this guide.
—the input you used in steps and above. Refer to
The Access Card slot is behind a small door.
17
Page 28
Chapter 1
A
a
INPU
INPUT 2
I
3
Video
o
Video
o
Video
Audio
INPUT 1
Connecting
Before You Begin:
Before adding other devices to
your setup, you must first make
connections from your satellite dish
antenna, to your HD DVR, and to your
HDTV using the setup option shown on
page 14. This diagram only shows how
to connect a VCR or DVD recorder to
your HD DVR.
The audio and video cables
shown are examples only. Use
the best connections available on your
equipment.
Adding a VCR or DVD Recorder
Television
INPUT 2
ntenn
In
T 1
Audi
OUTPUT INPUT
Audi
A/V Receiver
NPUT
18
Page 29

If your VCR or DVD recorder is already connected to your TV or A/V receiver for
watching video tapes or DVDs, do not disconnect it. All you need to do to save recordings
from your HD DVR is to connect standard audio and video from the HD DVR’s outputs to
the inputs on your VCR or DVD recorder.
In the diagram to the left, Composite A/V cables send audio and video from the HD DVR
to the VCR/DVD recorder, then from the VCR/DVD recorder to the TV. Your setup may
look different, but the basic idea should be the same: high-definition video to your TV,
digital audio to your A/V receiver, and standard audio/video to your VCR/DVD recorder.
You may need to purchase additional cables for these connections, or you may be able to
use cables that were included with your VCR or DVD recorder. This setup uses
Composite A/V cables. One Composite A/V cable is included with your HD DVR.
First make connections from your satellite dish antenna, to your HD DVR, and to your
HDTV and A/V receiver using the setup option shown on page 14.
Connect a Composite A/V cable from the HD DVR’s Composite A/V Output jacks to
the Composite A/V Input jacks on your VCR or DVD recorder. The HD DVR’s video
output format must be set to “480i” to send a signal from the Composite A/V jacks.
Your VCR or DVD recorder may already be connected to your TV (or A/V receiver). If
so, you’re done. If not, connect a Composite A/V cable from the VCR or DVD recorder’s
Composite A/V Output jacks to the Composite A/V Input jacks on your TV.
Setup Options
This setup shows you how to
connect a device such as a VCR
or DVD recorder to your HD DVR.
1
To watch a video tape or DVD, change the input source on your TV to the input
corresponding to the jacks you used in step . Refer to your TV’s documentation for help
selecting the correct input.
For information about saving programs to a VCR or DVD recorder, see page 81.
19
Page 30

Chapter 1
Connecting
20
Page 31

CHAPTER
2
Guided Setup
Welcome! 22
Satellite Dish Guided Setup 23
Activate Services 27
Off-Air Channels and Video Setup 28
Phone Setup 33
DIRECTV Central 35
Page 32

Chapter 2
For information about the remote
control, see “Introducing the
Remote Control” on the inside front cover
of this guide.
Guided Setup
Welcome!
Now that you have finished connecting your DIRECTV® HD DVR, you are ready to begin
Guided Setup. When you first plug in the HD DVR, you will see gray screens which
display its progress as it starts up. After a few minutes, you will see the Welcome screen,
which marks the start of Guided Setup. If you do not see the Welcome screen, refer to the
troubleshooting tips on page 119.
Remember, while a cable is connected to the HDMI Output jack, the standard video
output jacks (S-Video and Composite A/V) will only display video at “480i,” and the
Component Video output is disabled. (You can’t view video from both the HDMI Output
and the Component Video Output at the same time.) If you used the HDMI or HDMI-toDVI cable to connect your HD DVR to your TV, make sure your TV is set to display
video from the input jack you used.
During Guided Setup, follow the on-screen instructions to point your satellite dish antenna
(if you haven’t already), activate your DIRECTV
with TiVo
®
service, select your default video output format, and set up your HD DVR’s
phone connection. Use the remote control to select menu items and move through setup
screens. If you need additional assistance, this chapter contains detailed instructions.
Guided Setup includes four basic steps, described in this chapter:
®
programming and DIRECTV® DVR
22
Your HD DVR must be connect to a
standard phone line to complete
Guided Setup.
• Satellite Dish Guided Setup
• Activate Services
• Off-Air Channels and Video Setup
•Phone Setup
When you see the Welcome screen, press SELECT to start Guided Setup.
Page 33

Satellite Dish Guided Setup
Satellite Dish Guided Setup
Satellite Dish Guided Setup tells the HD DVR what type of satellite dish antenna you are
using, so you must go through it at least once, even if you are replacing a DIRECTV DVR
that was already working. Satellite Dish Guided Setup usually takes about five minutes,
plus any time you may need to position your dish.
Connect Cables. After you press SELECT on the Welcome screen, you’ll see a reminder
to make sure all cables (satellite, phone line, and antenna, if applicable) are properly
connected to the HD DVR. (The Guided Setup screens refer to your HD DVR with the
generic term “Recorder.”) Press SELECT when you are ready to continue.
Program Source. Choose how you will receive programming on your HD DVR: from
your satellite dish antenna, from a standard off-air antenna, or both. If you do not intend to
activate DIRECTV services, but you do have a satellite dish antenna connected, choose
“Satellite and off-air antenna.” This will ensure that you receive program information for
your off-air antenna channels.
If you do not have a satellite dish connected, choose “Off-Air antenna only” and read the
“Next Steps” screen that appears. Then skip to “Off-Air Channels and Video Setup” on
page 28.
Satellite Dish Type. Choose the type of satellite dish antenna you have installed. For full
functionality, a triple LNB multi-satellite dish antenna is required. See page 4 for details.
Satellite Connections. If you connected a Coaxial RF cable to each of the HD DVR’s
“Satellite In” jacks, select “Two cables.” If you connected only one cable (to the “Satellite
In 1” jack), select “One cable.” To be able to record two satellite channels at the same time
(dual tuner), you must connect two cables from your satellite dish antenna (or
multiswitch) to both of the “Satellite In” jacks and then choose “Two cables” on this
screen. See page 6 for more information about the dual tuner feature.
Notice the progress bar at the
bottom of the screen. It can help
you keep track of how far along you are in
Guided Setup.
Your HD DVR has very limited
functionality without the
®
DIRECTV
Air antenna only” as your program source,
the HD DVR won’t have any recording
capability. You will only be able to watch
off-air channels and control live TV.
DVR service. If you choose “Off-
2
23
Page 34

Chapter 2
Guided Setup
ZIP Code. Use the number keys on your remote control to enter your ZIP code. The HD
DVR uses your ZIP code to determine the direction your satellite dish antenna should
point. It also sets your primary network area for off-air channel reception. If you make a
mistake, press LEFT arrow to correct it.
Satellite Dish Direction. Based on your ZIP code and dish type, this screen shows
roughly how to pos(sh sed 33-6(control)-4.4(0)-4.2-5.8( )e)-1.6(ll(sh see dish an.8( )e)-1.6(nna. You3-6(control)w)-6.4(ill fine tu3-6(cone the po)-5.7(s(sh sed 3-6(con later on )]TJT*0.0001 Tc-0.0031 Tw[(during)-5.9( Satel)-5.2(lite )-6(Di)-5.2(sh)-5.9( G)-6.6(u)0.1(id)-5.9(ed)-5.9( Setu3-6(9(p )-6(at t)-5.2(h)0.1(e )-6(Test)]TJ18.4819 0 TD0.0005 Tc0.0025 Tw[( )6(Sig33-6(5(al St)-4.8(reng)-5. seh screen. Before )6(p)-5. so)0.5(s(ti)-4.8(oni)-4.8(ng )]TJ-18.4819 -1.4096 TD0.0003 Tc-0.0154 Tw[(the d3-6(coi)1(sh, be sure th3-6(coe mast )-6.1((th3-6(coe)-1.6( pol)-5(e on )-6.1(which3-6(co the )-6.1(dish (sh ss)-2.1( mo)-5.7(un.8( )ed3-6(co) (sh ss)-2.1( s.8( )ra(sh sght )-6.1(up a33-6(cod do)-5.7(wn. )]TJ0 -1.4036 TD0.0027 Tw[(Fo)-5.7(r two)-5.7(-)2( or )6(th3-6(coree--5.8( )e)-1.6(ll(sh see dish an.e33-6(con)0.3(as, th3-6(coe )]TJ17.9458 0 TD0.0005 Tc0.0025 Tw[(screen)-5. s )6(p)-5. sr)2.2(ov)-5. sides a )6(requi)-4.8(red ti)-4.8(lt in add)-5. siti)-4.8(on to )]TJ-17.9458 -1.4096 TD0.0002 Tc0.0028 Tw[(side-to-s(sh .1(de (azim)-5.1(u)0.2(t)-5.1(h)0.2() and)-5.8( )6(up)-5.8(-d)-5.8(own (el)-5.1(e)-1(covati)]TJ17.6145 0 TD0.0006 Tc0.0024 Tw[(on) )6(i)-4.con)0.6(fo)-5.4(rm)-4.7(atio)-5.4(n availab)-5.4(l)1.3(e for )6(roun)-5.4(d dishes. )]TJ-17.6145 -1.4036 TD0.0015 Tc-0.0045 Tw[(Profes)5.1(sd 3al )-6(s)5.1(a)-0.4seellite installers are )-6(available in)]TJ18.5783 0 TD0.001 Tc-0.004 Tw[( most areas to )-6(ensure )-6(correct installation. )-6(If )]TJ-18.5783 -1.4036 TD0.0008 Tc0.0022 Tw[(you3-6(2(r satelli)-4. see sy)-5.2(stem was instal)-4. sled by a professd 33-6(2(al, )6(t)-4.5(h)0.8(e )6(-5.8(4. )e)-1.1(ll(.8(4. )e )6(d)-5.2(i)1.5(sh an.e33-6(2on)0.8(a )6(d)-5.2(i)1.5(rect8(4. )d 33-6(2( )]TJ0 -1.4096 TD0.0016 Tc0.0014 Tw[(should be correct. )6(To see )6(the next screen, pres)5.2(s SELECT.)]TJ/F2 1 Tf0 -1.9036 TD0.0012 Tc0.0027 Tw[(Sat)16.9(e)1.2(l)11.1(l)-0.9(it)22.9(e Chec)22.5(k)12.2(l)5.1(i)10.1(s)0.3(t.)]TJ/TT2 1 Tf8.0361 0 TD0.0016 Tc0.0014 Tw[( The items )6(on )6(this list )6(help ensure )]TJ13.7711 0 TD0.0014 Tc0.0016 Tw[(you receive )6(a clear satelliee sig3al. )]TJ-21.8072 -1.4096 TD0.0019 Tc0.0011 Tw[(To )6(-ee the next s)5.5(c)0(reen, )6(press )6(SELECT when )6(y)]TJ18.5904 0 TD0.0011 Tc0.0019 Tw[(ou are satisfied that )6(each3]TJ9.9157 0 TD0.0015 Tc0.0015 Tw( item is complete.)Tj/F2 1 Tf-28.506 -1.9036 TD0.0064 Tc-0.0085 Tw[(T)87.8(e)6.4(s)11.5(t)4( Sa)6.4(t)28.1(e)0.4(l)16.3(l)4.3(i)9.3(t)22.1(e)6.4( Si)9.3(g)6(2on)14.3(a)12.4(l)-1.8(.)]TJ/TT2 1 Tf8.7952 0 TD0.0013 Tc0.0017 Tw[( )6(You use this screen to )6(check )6(the )]TJ13.4337 0 TD0.0001 Tc0.0029 Tw[(st)-5.2(reng)-5.9seh of )6(t)-5.2(h)0.1(e si)-5.2(g3al recei)-5.2(v)0.1(ed by)-5.9( )]TJ-22.2289 -1.4096 TD0.0006 Tc0.0024 Tw[(you3-6(4(r satelli)-4.7see dish an.8(4(coe)4.con)-5.4(n)0.6(a. )6(If you3-6(4( )6(h3-6(4(a)-1.3(ve cable)]TJ17.9458 0 TD0.0014 Tc0.0016 Tw[(s c)5. so)(4(6(nnected )6(to boeh “Satelliee )6(In” jacks, )6(this )]TJ-17.9458 -1.4036 TD0.001 Tc0.002 Tw[(screen shows th3-6(e )6(-ig)-5on)1(al stre33-6(g)1seh for each )]TJ16.6928 0 TD0.0013 Tc0.0017 Tw[(conn8(4(coectio)-4.con. It a)5.4(l)-4(so lets you see )6(the sig3al )]TJ-16.6928 -1.4036 TD0.0016 Tw(stre3geh from individual transponders one at)Tj17.8072 0 TD0.0017 Tw[( a )6(time. To be s)4.9(u)-4.core you )6(receive all your )]TJ-17.8072 -1.4096 TD0.0004 Tc-0.0155 Tw[(chann)-5.6)e)-1. sls, )-6.1(you )-6.1(sh)-5.6(oul)-4.9(d check)-5.6( sig3)-5.6(al stre3gt)-4.9(h o3)-5.6( all)-4.9( transpon)-5.6(ders. Ad)-5.6(just )-6.1(your di)-4.9(sh un)-5.6(til)-4.9( you3-6(6( )]TJ0 -1.4036 TD0.0014 Tc0.0016 Tw[(see)5. s strong )6(-ig3al—at l)]TJ8.9458 0 TD0.0009 Tc0.0021 Tw(east 60 on each transponder.)Tj-8.9458 -1.9096 TD0.0011 Tc0.0019 Tw[(The )6(-i)-4.2(g3al stre3geh)-4.9( )6(m)-4.2(e)-0.8(ter )6(o)-4.9(n)1.1( thi)-4.2(s)4.co screen provi)-4.2(des )6(au)-4.9(dio)-4.9( )6(feedback—)-4.9(a)-0.8( tone th3-4.9(at becom)-4.2(e)-0.8(s )]TJ0 -1.4036 TD0.0004 Tc-0.0215 Tw[(hig)-5.6(h)0.4(er p)-5.6(itch)-5.6)e)-1. sd as the sig)-5.6)n)0.4(al get)-4.9(s)-2( s.8(4.9(ron)-5.6(g)0.4(er. Yo)-5.6(u m)-4.9(a)-1. sy be abl)-4.9(e)-1. s to .8(4.9(u)0.4(r3)-5.6( the vo)-5.6(lum)-4.9(e)-1. s o3)-5.6( your TV )]TJT*0.0005 Tc0.0025 Tw[(up so you3-6( s )6(can hear )6(t)-4.8(h)0.6(e ton)-5. se)4.6( wh)-5. sile yo)-5. su )6(ad)-5. sjust yo)-5. sur satell)-4.8(iee di)-4.8(sh3-6( s )6(an)-5. s.e3na. Alt)-4.8(e)4.6(rnat)-4.8(el)-4.8(y, )6(y)-5. sou )]TJ0 -1.4096 TD[(mi)-4.8(ght)-4.8( )6(hav)-5. se)-1.4( )6(som)-4.8se)-1.4(on)-5. se wat)-4.8(c)-1.4(h the sig3al)-4.8( )6(stre3gt)-4.8(h met)-4.8(e)4.6(r and then)-5. s )6(report throug)-5. sh )6(a cell)-4.8( )6(p)-5. shone )]TJ0 -1.4036 TD0.0009 Tc0.0021 Tw[(or )6(wal)-4.4(k)0.9(ie-talk)-5.1(i)1.6(e to the person who)-5.1( )6(i)-4.4(s)4. s adj)-4.4(u)0.9(stin)-5.1(g )6(t)-4.4(h)0.9(e -5.8(4.4se)-1(lli)-4.4see dish an.en)-5.1(n)0.9(a. )]TJ/F2 1 Tf7.98 0 0 7.98 75.42 344.34 Tm-0.0005 Tc0.0011 Tw[(A3-6( tr)-6.9(ansp)-4.9(on)-5.4(der is a p)-4.9(i)2.8se)-5.8(c)3.4se)-5.8( of )]TJ0 -2.0075 TD0.0042 Tc-0.0036 Tw[(eq)6.3(ui)7. spm)7.coen)6.8(t o3)6.8( a s)4(a)4.9(t)6.9(e)-1.1(l)7(l)-0. si)7. st)-0.7(e)6.4(.)2( T)6.5(h)-2.2(e)6.4( )]TJ-3.1805 -2.0075 TD-0.0005 Tc-0.0741 Tw[(DIRECT)-5.7(V t3-6(4(r)0.6(an)-5.4(spon)-5.4(de)-5.8(rs r)-6.9(e)1.7(cei)-4.cov)4.9(e)-5.8( i)-4.con)2.1(f)-4.8(o)-1.3(rm8(4. )ati)-4.coo)-1.3(n )]TJ0 -2 TD-0.0009 Tc0.0015 Tw[(fr)-7.3(om D)-7(I)-0.6(REC)-8.3(T)1.4(V a)-7.con)1.7(d re)-6.2(br)-7.3(oadcast)-5.8( it t)-5.8(o)-1.7( you3-6.3(r)0.2( )]TJ0 -2.0075 TD-0.0003 Tc0.0009 Tw[(satelliee dish a)-7.1on)2.3(te)-5.6)nn)]TJ8.8496 0 TD[(a. Each tr3-6.7(ans)-8(p)2.8son)-5.2(der )]TJ-8.8496 -2.0075 TD0.0055 Tc-0.05 Tw[(r)6.6)e)7.cobrdcasts differt e chnnels. f
the H DVR does not receive a -igal for
an indvidualsp dr, it will not be
able ow th3-7.2(at )-7.5otransponder’s channel.
24
Page 35

Satellite Dish Guided Setup
• To change the currently selected transponder, use the UP arrow to highlight the
transponder number. Press the RIGHT or LEFT arrow to change the transponder. It is
best if each transponder has a signal strength above 60.
• If you have connected both “Satellite In” jacks, the signal strength for each connection
is shown. You should have a good signal on all transponders for both connections.
If you have a multi-satellite dish antenna, you should check the signal strength from
transponders on each satellite.
• To change the selected satellite, press the UP arrow until the satellite number is
highlighted. Press the RIGHT or LEFT arrow to change the satellite.
When you have finished, select “Done Testing Signal Strength.” If you cannot acquire a
good satellite signal, see Satellite Signal Troubleshooting on the next page.
Confirming Satellite Setup. At each of the next two screens there is a short wait while the
HD DVR confirms your setup then gathers a list of channels from the satellite.
Program Guide Data. Over the first day or two after setup, the DIRECTV HD DVR will
gather and process up to two weeks of program information from the DIRECTV satellites,
including program titles and descriptions, broadcast times, channels, and more.
Many of the HD DVR’s features use this program information. Although you may be able
to use such features immediately, you may not be able to find all the programs you are
looking for right away. If programs you are looking for do not appear in the program
information, check again later.
Steps to Activate. This screen explains the next step of Guided Setup, activation of
DIRECTV services. When you call DIRECTV Customer Support to activate, you will be
instructed to tune to channel 100. From this screen, press the LIVE TV button on your
2
If the HD DVR is low on program
information, this message at the bottom
of the screen alerts you.
25
Page 36

Chapter 2
Guided Setup
remote control to go to live TV. This screen also reminds you that you still have some
setup steps to complete. Continue with “Activate Services” on page 27.
Satellite Signal Troubleshooting. If you encounter problems during Satellite Dish
Guided Setup, you will see an error screen with some suggestions. For example, you may
have made a mistake entering your ZIP code or your type of satellite dish antenna.
If you are trying to set up the HD DVR, choose one of the options that return to part of
Satellite Dish Guided Setup. For example, if you received the “Satellite Info Error,”
choose “Try Again to Acquire Information.” You can also repeat Satellite Dish Guided
Setup. This allows you to check that your ZIP code and satellite dish antenna type are
correct. If you repeat Guided Setup and still receive error notifications, it is possible that
your satellite dish antenna is not pointed correctly or the dish or multiswitch is miswired.
Check the cabling, or consult a professional satellite system installer.
If you are trying to bypass Satellite Dish Guided Setup—for example, if you are setting up
the HD DVR in a place without a satellite signal—the bottom choice on the error screens
allows you to continue without resolving potential problems. While you may receive
fewer or no TV channels, you can still watch previously recorded programs.
26
Page 37

Activate Services
Now it’s time to activate services fo
Activate Services
2
27
Page 38

Chapter 2
Guided Setup
Off-Air Channels and Video Setup
If you did not connect an off-air
antenna to your HD DVR, you can
skip “Off-Air Channels Setup” and go to
“Video Setup” on page 29.
An off-air channel’s frequency may
not correspond to its channel
number in the guide. For example, a scan
for off-air channels may detect a signal
on frequency 25, but the corresponding
channel may be 9-1.
28
To begin Off-Air Channels and Video Setup, press the DIRECTV button on your remote
control to go to DIRECTV Central. Select Messages & Setup, then Settings.
Off-Air Channels Settings
If you connected an off-air antenna to your HD DVR, select Channels from the Settings
screen, then select Off-Air Channels to confirm or modify these settings.
• If you selected “Satellite and off-air antenna” as your program source during Guided
Setup, your HD DVR is already set up to receive digital broadcasts from an off-air
antenna. You can use these settings to scan for additional digital off-air channels your
antenna may receive, and specify a secondary network area to gather program
information for digital off-air channels from a nearby city. You can complete these
steps at any time.
• If you selected “Off-Air antenna only” as your program source during Guided Setup,
you must complete these settings to see digital off-air antenna channels in your
channel lists. Keep in mind that if you do not have a satellite dish antenna connected as
well, your HD DVR will not receive any program guide information.
Scan For Off-Air Channels. On the Off-Air Channel Settings screen, highlight Scan For
Off-Air Channels and press SELECT. To proceed with the off-air channel scan, press
THUMBS DOWN three times, then ENTER. The HD DVR begins its scan for digital
channels in your area. This can take several minutes. If additional digital channels are
found, a list is displayed and those channels are added to the Channels You Receive list.
Program information for channels found with this scan may not be available. Additionally,
the HD DVR may detect frequencies for which no channel number information is
available. In this case, the channel will appear in the guide with its frequency number, not
its actual channel number.
Page 39

29
Page 40

Chapter 2
4:3
Standard Screen Wide Screen
16:9
Guided Setup
or use the UP arrow button on the remote to cycle through formats you select on the
“Output Format - UP Arrow Setup” screen (see below). For more about watching highdefinition programs, see page 78.
Output Format - UP Arrow Setup. Use this screen to select all of the video formats that
your TV can display. (Check your TV’s owner’s manual to be sure.) Press SELECT to
check each format your TV supports. Press the LEFT arrow to leave the screen when
you’re done. You can then use the UP arrow to cycle through the formats you selected
while watching live TV or recorded programs. Press UP arrow once to display the current
output format, and again to change it. This allows you to easily change the output format
to suit the program you’re watching.
TV Aspect Ratio. Aspect ratio is the relationship between screen height and width. Choose
your TV screen size: Standard (4:3) or Wide Screen (16:9). Traditional TV programs are
broadcast in Standard format (4:3). High-definition programs are broadcast in Wide
Screen format (16:9). The setting you choose here should match your TV.
TV Aspect Correction. Programs may be broadcast in Standard (4:3) or Wide Screen
(16:9) format. If the broadcast format does not match your TV’s size, the HD DVR can
display panels at the sides, or at the top and bottom of the picture, to fill the screen. Use
this screen to choose whether or not you want your HD DVR to add letterbox and sidebar
panels to the picture.
30
While watching live or recorded programs, you can use the RATIO button on your remote
to switch between TV Aspect Correction settings. Press RATIO once to display the
current setting, and again to change it.
If your TV supports a “zoom” mode, which automatically stretches a picture to fill the
entire screen, you can choose “Full,” and no panels will be added to the picture. Or choose
“Panel” to add sidebars and letterboxing when appropriate.
Page 41

Off-Air Channels and Video Setup
What's the difference between 1080i, 720p, 480p, and 480i?
These are names for different video resolution formats. Each name includes a number and
a letter. The number indicates how many horizontal lines of information make up a single
video image. Generally, bigger numbers mean sharper, more detailed images. The letter
indicates whether the output uses “interlaced” or “progressive” scanning.
With interlaced scanning, the horizontal lines in a video frame are divided into two
groups. If you were to number the lines from the top to the bottom of the screen, one group
would be the odd numbered lines, and the other would be the even numbered lines.
Interlaced video refreshes half of the video frame 60 times per second—alternating
between the odd and even lines. This means the whole video frame refreshes 30 times per
second. This is fine for smaller screens but can result in flickering on larger screens.
Progressive scanning refreshes the whole video frame (all even and odd horizontal lines),
60 times per second. This eliminates flicker but requires the TV to process more
information since twice as many frames are displayed each second.
For any given resolution (number of scan lines), progressive scanning looks better than
interlaced. Standard TV has 480 lines, uses interlaced scanning, and is referred to as 480i.
Many HDTVs offer a display format called 720p (720 lines with progressive scanning).
2
Video formats 720p and 1080i have similar picture quality, each having the edge over the
other under particular circumstances. For example, 1080i shows detail better in still
images or when there is little motion, whereas 720p excels when there is lots of action.
The size and capabilities of your high-definition TV will also inform your choice of video
output formats, so be sure to check its owner’s manual.
High-resolution video signals require special types of cables and connections. It’s
important to remember that Composite A/V and S-Video cables do not support enhanced-
31
Page 42

Chapter 2
Guided Setup
or high-definition video signals. You must connect your HD DVR to your HDTV using
the HDMI cable, the HDMI-to-DVI cable, or the Component Video cable to use the
enhanced- or high-definition video output formats.
The table below shows which video output formats can be viewed with each of the HD
DVR’s video output jacks.
While a cable is connected to the
HDMI Output jack, the Component
Video Output is disabled. You can’t view
video from both the HDMI Output and the
Component Video Output at the same
time.
Video Output Format Composite A/V S-Video Component HDMI
480i standard-definition
OK OK OK OK
interlaced
480p enhanced-definition
no picture no picture OK OK
progressive
720p high-definition
no picture no picture OK OK
progressive
1080i high-definition
no picture no picture OK OK
interlaced
Next Steps. Once you have chosen your default video settings, you are ready to begin the
last part of Guided Setup. Go to “Phone Setup” on page 33.
32
Page 43

Phone Setup
To begin Phone Setup, press the DIRECTV button on your remote. Select Messages &
Setup, then Settings, then Phone. The Final Setup Steps screen appears.
Final Setup Steps. Make sure the DIRECTV HD DVR is connected to a standard phone
line. The HD DVR occasionally makes a brief phone call to get updates to the DVR
service and for pay per view functionality. By default, the HD DVR will not pick up the
phone if the line is busy. If you pick up the phone while the HD DVR is using the line, the
HD DVR’s modem will disconnect. To use the phone line you should hang up, wait at
least 45 seconds, then pick up the phone again to get a dial tone.
Review Service Terms. This screen advises you to read the DIRECTV Customer
Agreement, available online at DIRECTV.com or printed on your first monthly statement
from DIRECTV. If you agree to the terms, press SELECT to continue.
Area Code. The DVR service uses your area code to determine which local dial-in
numbers are available. If you make a mistake, press LEFT arrow to correct it.
Phone Dialing Options. Most people will not need to change the settings the HD DVR
uses to dial out. However, if your phone system uses special dialing options, select “Yes.”
See “Phone Dialing Options” on page 96 for help with the various settings.
Phone Setup
2
Update Numbers. The HD DVR makes a toll-free call to get a list of local dial-in
numbers in the selected area code. The call usually takes less than five minutes, and its
status displays on the screen. If the call fails, check the Troubleshooting chapter of this
guide, on page 133.
33
Page 44

34
Page 45

DIRECTV Central
Almost everything you do with the DVR service starts from DIRECTV Central. You can
set up recordings, watch live TV or recorded programs, read messages from DIRECTV,
and access Showcases featuring entertaining and informative video clips. To get to
DIRECTV Central, press the DIRECTV button on your remote control.
Occasionally, you will notice icons beside some of the options in DIRECTV Central.
These icons will let you know that you have received something new from DIRECTV:
When you see this icon, you know you have Messages to read. See page 84 for
more about DIRECTV Messages.
This icon appears next to selections that contains special video content. Highlight
the selection and press PLAY (or SELECT) on your remote to play the video.
Choose the selection next to this icon to watch a special preview or visit a
Showcase. See page 45 for more about Showcases.
You can find a complete glossary of icons in the inside back cover of this guide.
Take a Tour! Now that you’re all set up, we suggest you start with the tours provided in
“The Basics in 5 Short Tours” on page 37. These will guide you through the basics and
show you some fun features of the DIRECTV
®
HD DVR.
DIRECTV Central
2
35
Page 46

Chapter 2
Guided Setup
36
Page 47

CHAPTER
3
The Basics in 5 Short Tours
Tour 1: Play with Live TV 38
Tour 2: DIRECTV Advanced Program Guide™ 40
Tour 3: Find and Record Your Favorite Programs 42
Tour 4: Find New Programs 44
Tour 5: Now Playing List 46
Cool Things You Can Do 47
Page 48

Chapter 3
G
u
i
d
e
L
i
s
t
The Basics in 5 Short Tours
Tour 1: Play with Live TV
Vol
Chan
o
c
r
d
e
R
P
e
a
g
P
y
l
a
In this tour, you’ll take a look at how you can control live TV. So grab your remote and
press the LIVE TV button to go to live TV!
First, press the PAUSE button—the program you’re watching pauses. Now you can
stand up and stretch, or go to the kitchen and get a snack. You can pause live TV for up to
30 minutes! With dual tuner, you can switch between two channels in live TV without
( )
-
S
w
l
o
TVSAT
o
w
P
e
r
V
T
n
p
I
u
t
V
T
losing the saved portion of either one by pressing the DOWN ARROW.
But for now, press PLAY and the program resumes.
P
y
l
a
Next, press BACK and the program rewinds. Press BACK a second time—it goes
faster! A third time—faster still! Both the FORWARD and BACK buttons have three
speeds. Press BACK a fourth time to return to normal speed.
Press PAUSE once more. Then press FORWARD to move the program a small step
forward. Press BACK to move the picture a small step back. When your show is paused,
pressing FORWARD and BACK moves the picture forward or back in small steps. Press
PLAY to resume watching at normal speed.
Try out the INSTANT REPLAY button. INSTANT REPLAY jumps you back 8
seconds—useful for when you miss a great sports play or a bit of dialog, or for when you
fast forward too far.
S
w
l
Press INSTANT REPLAY again, then immediately press SLOW — you get your
o
own slow-motion replay!
38
Finally, try the ADVANCE button. Presto! You’re caught up to the current time in
live TV.
Page 49

Tour 1: Play with Live TV
Status Bar
Press PAUSE or PLAY to see the status bar. It shows a one-hour period. The green
segment is the portion of the current hour that has been saved by your DIRECTV
DVR. The right edge of the green part is always the current time.
®
HD
The white line marks the part of the program you are currently watching. If it is anywhere
back in the green segment you are “behind” real time.
Press CHAN UP. When you change channels, the HD DVR starts to save what is showing
on the new channel. With dual tuner, 30 minutes of live TV is saved on both tuners. That
means you can use the instant replay, slow motion and pause features on either channel. If
you leave one of these two channels, however, the saved information on the original
channel is cleared, and the HD DVR starts saving live TV on the new channel.
Channel Banner
The channel banner describes the program you’re currently watching. Press INFO or the
RIGHT arrow to see the channel banner. The channel banner is only there for a few
seconds, but you can bring it back by pressing INFO or the RIGHT arrow again. While the
banner is visible, press the RIGHT arrow to switch from a small, to medium, to large
banner. Each version has a different amount of information.
Keep pressing the RIGHT arrow until you see the largest version of the channel banner.
Notice the small icons on the right side. Each symbol represents a useful feature, like
swapping tuners or setting Parental Controls. Press the UP and DOWN arrows to highlight
different icons. Pressing SELECT while an icon is highlighted will take you to that
feature. Finally, press the EXIT button—the channel banner disappears. (EXIT gets rid of
graphics that aren’t part of the program you’re watching.)
Now go have fun playing with live TV, then come back for the next tour!
Status Bar
channel banner
3
This white line
tells you where
you are.
selectable
icons
39
Page 50

Chapter 3
The Basics in 5 Short Tours
If you find that the Program Guide
or the CHAN UP/DOWN buttons are
not showing channels you want to see,
filtering or a custom channel list is
probably turned on. Check the Guide
Options (from the Program Guide, press
INFO).
Tour 2: DIRECTV Advanced Program Guide
™
In live TV, the Advanced Program Guide lets you see what’s on, change channels,
schedule recordings, and more. Press the GUIDE button to see it.
Changing Channels
The guide shows a list of channels on the left and times across the top. One program is
highlighted—it’s a different color than the others. Its description appears at the top of the
grid. Press the UP or DOWN arrows to move to a new channel, then press SELECT.
Selecting a program that is currently showing changes the channel and hides the guide.
If you selected “Satellite and off-air antenna” during Guided Setup, local digital broadcast
stations appear in the guide on local channels with a dash (-) in the channel number. For
example, 7-1 might be the digital broadcast of your local channel 7.
Scheduling a Recording
It’s easy to record a program using the guide. Simply highlight the program you want and
press the RECORD button. On the transparent screen that appears, select “Record this
Showing.” If the program is playing, the HD DVR changes channels and begins
recording; otherwise, the recording is scheduled for the future. When a program is
recording, the red light on the front of the HD DVR comes on.
Guide Options
40
When you want to change the way the guide appears and what it displays, use Guide
Options. While the guide is visible, press the INFO button to see Guide Options.
Channels. This option lets you select which channel list the guide uses to display
programs. You can choose to display “All” channels (including channels you may not
subscribe to), just the channels “You Receive,” or only your “Favorite” channels. Setting
up your customized channel lists is easy. See page 90 for details.
Page 51

41
Page 52

Chapter 3
The Basics in 5 Short Tours
Tour 3: Find and Record Your Favorite Programs
If you do not find the program
you’re looking for, it may be
because the HD DVR is still gathering
program information. A message at the
bottom of the screen will alert you. The HD
DVR should be done collecting program
information within 24-48 hours of finishing
Guided Setup.
42
You can always record the program you’re watching by pressing the RECORD button on
the remote. If you have not changed the channel for a while, your DIRECTV
®
HD DVR
will add to your recording whatever part of the program it has already saved, up to 30
minutes. Your HD DVR also provides many ways to quickly search for programs and
schedule recordings in advance. Even buying and recording pay per view events is quick
and easy—and you don’t have to call to order! What’s more, if a program is part of a
series, you can get a Season Pass
™
to the series. A Season Pass records every episode of a
selected program that airs on a given channel.
Search by Title
In this tour, we’ll show you how to find a series program and get a Season Pass. As an
example, we’ll be searching for a fictitious show called The Downtown Lawyers, but you
can use the same steps to search for your favorite TV series.
To get started, press the DIRECTV button to see DIRECTV Central. Press the DOWN
arrow to highlight Pick Programs to Record. Press SELECT. The Pick Programs to
Record screen appears. As you can see, there are many ways to search for a program.
Since you know the program’s title, highlight Search by Title and press SELECT. The
next screen lets you limit your search to any of several categories (such as Audio & Video
and HDTV), but for now, choose “All Programs” and press SELECT.
The next screen has a picture of an alphanumeric keypad. Notice the white box around the
“A”. Use the RIGHT, LEFT, UP, and DOWN arrows to move the box. To find The
Downtown Lawyers, you would move the box to “D” and press SELECT. A list of
programs appears on the right side of the screen. (Notice, the list alphabetizes without “A”
or “The.”) Move the white box to “O” and press SELECT again. The list changes. Your
HD DVR searches through all available programs (usually, data for the next two weeks) to
Page 53

43
Page 54

Chapter 3
Your personal TV preferences are
just that: personal. DIRECTV
privacy policies are included in your first
monthly statement, and are available
online at DIRECTV.com.
The Basics in 5 Short Tours
Tour 4: Find New Programs
Your DIRECTV® HD DVR makes it easy for you to find what you want to watch—by
responding to your interests and collecting the best the networks have to offer.
TiVo Suggestions
TiVo Suggestions is a personalized list of shows selected to match your preferences. How
is this magic possible? Any time you watch programs, live or pre-recorded, or browse
programs with the Program Guide, you can rate them. If you like a program, press the
green THUMBS UP
THUMBS DOWN
Over time, the more shows you rate with your Thumb buttons, the better TiVo
Suggestions will be at finding programs you like. The suggestions are listed under TiVo
Suggestions in order of how closely they match your preferences.
Try it! Press GUIDE to bring up the DIRECTV Advanced Program Guide
few programs and rate them by pressing the THUMBS UP or THUMBS DOWN
button. Then go to DIRECTV Central, then Pick Programs to Record, then TiVo
Suggestions. Suggested programs based on your Thumb ratings appear in TiVo
Suggestions. (If you don’t see programs yet, come back later—it may take a few hours the
first time.) You can press SELECT on a suggestion, then set up a recording.
™ ™
button on your remote control. If you dislike it, press the red
™ ™
. You can give a program up to three Thumbs, up or down.
™
. Highlight a
Only programs airing on channels
in the Channels You Receive list
can be recorded as TiVo Suggestions.
44
Auto-Recording TiVo Suggestions. As an added bonus, when the HD DVR has available
space, it may automatically record TiVo Suggestions. (You can turn this feature off if you
prefer; see page 101 for details.) You will find recorded TiVo Suggestions at the bottom of
the Now Playing List, below programs you requested, marked with a TiVo icon ( ).
Page 55

Tour 4: Find New Programs
It’s important to remember these characteristics of TiVo Suggestions recordings:
• TiVo Suggestions never replace shows you explicitly request, and they do not prevent
your requested shows from being recorded.
• TiVo Suggestions are always the first programs deleted to make room for recordings
you request.
Auto-recording TiVo Suggestions is an easy way to find programs that you never knew
about, or old favorites you may have forgotten.
Showcases
Showcases is an interactive content area which often includes opportunities to schedule
recordings of featured programs, or allows you to watch previews of upcoming movies or
TV shows. The selections in Showcases are grouped in theme packages, giving you “onestop shopping” convenience when browsing for programs to record. Packages may
include exclusive content, the inside scoop on hit movies, exciting miniseries, hot
specials, popular series, and shows featuring the biggest stars of the screen and stage.
Showcases is updated during your HD DVR’s regular connections to the DVR service, so
you won’t see this selection on DIRECTV Central until after its first regular connection.
3
45
Page 56

Chapter 3
The Basics in 5 Short Tours
Tour 5: Now Playing List
Your DIRECTV® HD DVR can record many hours of programming—enough to fill a
slew of video tapes! Fortunately, it also labels and organizes all those saved programs.
Unlike a VCR, your HD DVR’s Now Playing List gives you instant access to all recorded
programs—no need to spend time scanning for an episode somewhere on a tape.
To go to the Now Playing List, press the LIST button. Programs you recorded are at the
top of the list, in the order they were recorded. An icon (like this one: ) to the left of a
program’s title tells you the recording’s current status. (For a summary of what these icons
mean, see the inside back cover of this guide.)
Programs you request will appear in the Now Playing List the moment recording begins.
You can watch any title in the list—even one that is still being recorded—by highlighting
it, then pressing the PLAY button.
Try it! Highlight a program in the Now Playing List and press PLAY. OK, now for the
cool part: Watch the program for at least five minutes, then press the LEFT arrow to go
back to Now Playing List. Select the same program again—the Program Information
screen says “Resume Playing” instead of “Play.” Select “Resume Playing” and return to
the program at the point you left it!
46
Save until. . . Programs you choose to record are saved at least two days by default. To
see options for saving a program longer, highlight the program in the Now Playing List,
then press SELECT.
The Program Information screen appears. Select “Save until....” On the next screen, use
the UP/DOWN arrows to highlight the date, then use the RIGHT/LEFT arrows to change
it. When you are done, press SELECT.
Page 57

Cool Things You Can Do
Cool Things You Can Do
Never be late for your favorite programs. Working late? Stuck in traffic? Don’t worry. If
you set up a recording or a Season Pass, the program will be waiting for you in the Now
Playing List. You can even start watching from the beginning while it finishes recording.
Make your television wishes come true with a WishList
actor? A favorite hobby or interest? How about a favorite sports team? If they’re on TV,
chances are a WishList
Looking for good movies? Kids’ shows? Science fiction? With Search by Title, you can
browse all the upcoming programs in a particular category and find shows you didn’t
know were on (see page 42).
See a good preview, record the show. If you’re watching live TV and a promotion
comes on for an upcoming program, you may see an Ipreview
one: Press THUMBS UP while you see the icon to automatically set up a
recording for the program. You don’t have to remember when it’s on—it will be recorded!
(If you didn’t schedule a recording when you saw the icon, rewind until it’s visible again.)
Make a list of your favorite channels. You can create a list of your favorite channels and
then set the guide to show only channels that are on the list. This is a quick way to see
programs coming up on the channels that are most important to you. See page 90.
Use the Overtime Scheduler
before they’re supposed to and often end later than scheduled. With Recording Options,
you can adjust your recordings to account for variations using the Overtime Scheduler.
This is especially useful for sporting events. See page 52.
™
search will find them. See page 62.
™
(and don’t miss overtime!). Programs sometimes start
™
search. Have a favorite
®
icon like this
3
47
Page 58

Chapter 3
The Basics in 5 Short Tours
Use the EXIT button. The EXIT button hides the status bar, guide, channel banner, and
anything else that is not part of the program.
Record two programs at the same time with Dual Tuner! Dual tuner means your HD
DVR can record programs on two channels at the same time—two satellite channels, two
off-air channels, or one of each (depending on how you connected your HD DVR).
Dual tuner will not work if you only
connect one cable from your
satellite dish, even if you also connect an
off-air antenna.
To enable dual tuner, both Satellite In jacks on the back of the HD DVR must be
connected to cables from your satellite dish antenna (or a multiswitch), and you must
choose the “Two cables” option in Guided Setup (described on page 23).
If you set up the HD DVR to receive off-air antenna broadcasts only (that is, you
connected an off-air antenna and you selected “Off-Air antenna only” during Guided
Setup), you will be able to watch programs from two antenna channels at the same time.
However, no recording is possible unless you activate the DVR service and connect a
satellite dish antenna.
The Star and the Clapboard. You will occasionally see a yellow star ( ) on
DIRECTV Central. The star signals a new selection that may change the next time you
visit. Depending on the selection, it may allow you to record a program, watch a preview,
or go to a special Showcase. Don’t worry if you pass up a particular new selection; keep
going back to DIRECTV Central until it appears again—or just go to Showcases and look
for the item you’re interested in.
The clapboard icon—on DIRECTV Central, or in Showcases—indicates that a selection
includes a video preview. If the clapboard has a green triangle in it ( ), you can press
PLAY to play the video. If there is no green triangle, the current selection takes you to
another screen where you’ll find the actual video clip.
48
Page 59

CHAPTER
4
Pick Programs to Record
Season Pass, Recording Options, To Do List 50
Using the Guide to Find Programs 56
Find Your Favorite Programs 58
Find Programs That Match Your Interests 62
Page 60

Chapter 4
If some Season Pass programs are
not recording, you may need to
change their priority with the Season
Pass Manager. See page 53.
Pick Programs to Record
Season Pass, Recording Options, To Do List
Your DIRECTV® HD DVR makes finding and recording programs easy—so easy that you
may find more programs you enjoy than you ever expected! Your HD DVR can help with
this too, by giving you simple ways to manage your recordings and make sure you watch
what you want, when you want to watch it.
Season Pass and Other Repeating Recordings
There are three types of recordings that repeat automatically:
• Season Pass. Records every episode of a series that airs on a certain channel—even if
the day or time slot changes! It is totally automatic and easy to set up. Just select a
program (from the DIRECTV Advanced Program Guide
choose “Get a Season Pass.” You can even set a Season Pass to record first-run
programs only (no repeats!), and to keep as many, or as few, episodes as you want.
• Manual Repeating Recording. Records on a specific channel at a specific time, just as
you would with a VCR. See page 61 for more information.
• Auto-recording WishList
These three types of recordings also have the following in common:
TM
TM
, or from search results) and
TM
. Records all programs a WishList search finds. See page 67.
50
• No duplicates within 28 days. If you watch or delete a particular episode or showing, it
will not be recorded automatically again for 28 days. This prevents the Now Playing List
from filling up with shows you probably don’t want. If you want to record duplicates, go
to Recording Options, Show Type, and select “All (with duplicates).” You can also
schedule a single duplicate recording for a particular program.
There is one common exception to this “28 day rule:” if a program is deleted before you
watch it, that program may be recorded again within 28 days.
Page 61

Season Pass, Recording Options, To Do List
• Parental Controls. If Parental Controls are on when you schedule a repeating
recording, the HD DVR checks its current program information to see if any upcoming
program violates a Parental Control. If it does, the HD DVR requires the current
password to continue. See page 91 for more information.
• Keep at Most=5. By default, five episodes of a program are kept in the Now Playing
List. You can change this setting. See page 52.
• Resolving conflicts. The DVR service resolves scheduling conflicts between
repeating recordings by comparing recording priorities. You can change recording
priorities using the Season Pass Manager. See page 53.
Recording Options
You can set Recording Options when you set up a recording. You can change them later
by selecting the program in the To Do List or Season Pass Manager.
Setting Recording Options. The Program Information screen that appears when you
select a program includes choices to “Record this episode” and “Get a Season Pass.”
When one of these actions is highlighted, “Options” appears to its right. To see the current
Recording Options, use the arrow buttons to highlight “Options,” then press SELECT.
To set your Recording Options:
4
1. Use the UP/DOWN arrows to highlight an option on the Recording Options screen.
2. Use the RIGHT and LEFT arrows to change the setting.
3. When you are done, press SELECT or highlight “Record with these options.”
4. Press SELECT again to schedule the recording with the new options.
To cancel your changes, press the LEFT arrow, or highlight “Don’t change recording
options” and press SELECT.
51
Page 62

Chapter 4
Pick Programs to Record
Recording Options include:
• Keep At Most. This option sets the maximum number of episodes to be saved—useful
for keeping only the most recent nightly news or only a few of your kids’ daily
programs. The default setting is 5. (Only appears for a repeating recording.)
• Show Type. You can select “Repeats & first run,” “First run only,” which records only
new episodes, and “All (with duplicates).” (Only appears for a repeating recording.)
• Keep Until. You can change this setting from “Space needed” (the default setting) to
“Until I delete.” (Only appears for a repeating recording.)
• Keep At Least. You can set the minimum amount of time the HD DVR keeps a
recording. The default setting is “Until space needed” (about two days), except for pay
per view events, which default to “Save until I delete.” (Only appears for an individual
recording.)
The Overtime Scheduler
• Start Recording. You can choose to start recording up to ten minutes before a
program begins. The default setting is “On-time.” (This option is not available once
recording starts.)
TM
consists of these two options:
52
• Stop Recording. You can set a recording to continue—for a few minutes or up to three
hours—after it’s scheduled to end. For example, you can extend the recording of a
sports event and be sure to catch the whole game—even if it goes into overtime. The
default setting is “On-time.”
Page 63

Season Pass, Recording Options, To Do List
Season Pass Manager
With dual tuner, you can record two programs at the same time. Conflicts will occur only if
you try to schedule a third recording that overlaps the other two. By default, the oldest
Season Pass has the greatest priority. If some Season Pass programs are not recording, you
may need to change their priority with the Season Pass Manager. To do this, go to
DIRECTV Central, then select Pick Programs to Record, then Season Pass Manager.
Changing the priority order. If you don’t change priorities in the Season Pass Manager,
repeating recordings are prioritized be the order they were set up: the first has highest
priority, and so on. To change the priority order:
1. Use the UP/DOWN arrows to highlight one of your repeating recordings.
2. Press the RIGHT arrow to highlight the arrows to the right of the title.
3. Use the UP/DOWN arrows to move the selected title up or down in the list.
Priorities and resolving conflicts. If a conflict occurs when you’re setting up a new
repeating recording, you’ll be shown which programs are involved. You’ll also be given
options to resolve the conflict:
• Record only those programs that do not conflict with others previously scheduled to
record. This gives the new repeating recording the lowest priority.
4
• Record all programs requested. This gives the repeating recording the highest priority.
Canceling a Season Pass. To cancel a Season Pass, just highlight the program’s title in
the Season Pass Manager and press CLEAR. Or, from a Program Information screen,
select “Cancel/edit the Season Pass,” then “Cancel this Season Pass.”
DIRECTV Central Pick Programs to Record Season Pass Manager
53
Page 64

Chapter 4
Pick Programs to Record
To Do L ist
The To Do List shows all your scheduled recordings and lets you cancel or edit them. To
view it, go to DIRECTV Central, then Pick Programs to Record, then To Do List.
Individual recordings are marked with a single checkmark ( ) to the left of the
program title. Season Pass and manual repeating recordings have a double checkmark
( ), and WishList recordings (see page 62) have a star ( ). Season Pass
recordings with no upcoming episodes scheduled to record appear at the bottom of the list.
Canceling the recording of a pay
per view event does not
automatically cancel the purchase. You
must cancel the purchase on the
Purchases screen, described on page 85.
54
Select a recording from the To Do List. Then you can:
• Change recording options. Highlight “Record as planned,” then press the RIGHT
arrow and select “Options” to change the recording options for a single episode.
• View upcoming episodes/showings. This displays a list of upcoming episodes/
showings of the selected program. Programs scheduled to record have a checkmark,
double checkmark, or a star. Select a program to see the Program Information screen.
• Cancel this recording or Cancel only this episode/showing. Cancel a single
recording or a single episode from a Season Pass. You can also cancel a recording
from the To Do List by pressing CLEAR on your remote.
• Cancel/edit the Season Pass. From this screen you can cancel the Season Pass, view
upcoming programs, or change recording options for the whole Season Pass.
• Cancel/edit manual repeat recording. Lets you cancel or change recording options
for a manual repeat recording.
DIRECTV Central Pick Programs to Record To Do List
Page 65

Season Pass, Recording Options, To Do List
View Recording History
This is an advanced feature in the To Do List for those who really want all the details.
Selecting this option takes you to a list of three types of programs:
Deleted. To find programs that were deleted, press the UP arrow or CHAN UP. (You will
find these programs listed above the point where the highlight bar starts off.) Selecting a
title will take you to a screen that tells you how and when the program was deleted.
Were not recorded. To find programs that were not recorded, press the UP arrow or
CHAN UP. (You will find these programs listed above the point where the highlight bar
starts off.) Selecting a title will take you to a screen that tells why it was not recorded.
Will not be recorded. To find programs that will not be recorded, press DOWN arrow or
CHAN DOWN. (You will find these programs listed below the point where the highlight
bar starts off.) Selecting a title will take you to a screen that tells you why the program will
not be recorded. You can then select “More recording options” on this screen, which will
display the Program Information screen. You could choose “View upcoming episodes” to
find an episode that doesn’t conflict with anything else, or change Recording Options,
which may allow the program to be recorded.
4
DIRECTV Central Pick Programs to Record To Do List View Recording History
55
Page 66

Chapter 4
Pick Programs to Record
Using the Guide to Find Programs
The DIRECTV Advanced Program Guide™ displays up to two weeks of TV programming
at the touch of a button. You can use the guide to quickly find programs and set up
recordings by customizing the channels and filtering the types of programs shown in the
guide. To view the guide, press the GUIDE button on your remote.
Customizing the Guide
The guide has options that let you quickly change what programs and channels it shows.
To see Guide Options, press INFO while the guide is displayed. Available options are:
Channels. Choosing a list here selects the channels displayed in the guide. The three
channel lists are:
• All. This is the default list. It displays all DIRECTV
• [Channels] You Receive. This list displays only channels you have selected in
Channels You Receive. See page 90 for details.
®
channels.
56
By customizing the guide, you can
use it to display only program
information you want to see. For example,
you can use the movie filter to quickly
check what movies are on, or use the
“Favorite Channels” list to see
information for your previously selected
channels.
• Favorites. This list shows only the favorite channels you have selected. See page 90.
Day and Time. Sets the guide to show what’s on at a particular day and time.
Style. Change the style of the guide to Grid Guide or List Guide. See page 74 for details.
Filtering. Turn guide filtering on or off. When you want to see all programs in a selected
channel list, turn filtering off.
Choose filter. Choose a category with which to filter the guide. When filtering is on,
programs that do not fit the selected category appear grayed on the guide until you
Page 67

Using the Guide to Find Programs
highlight them. In addition, if a channel has no programs in the selected category within
six hours of the time on the guide, the guide will not show that channel.
Recording a Program from the Guide
If the program is in progress, highlight it in the guide and press RECORD. If the program
is on later, highlight it and press RECORD or SELECT. If the program you have chosen is
not a pay per view event, a transparent screen displays. Select “Record this showing.” If
you have chosen a pay per view program, the pay per view screen appears.
Recording the Program You Are Watching
You can always record the program you are watching: just press RECORD. From the
options that display, choose “Record this showing.” Or you can choose “Season Pass and
other options” to see the Upcoming Program screen and other actions you can take:
• Record this program/episode. Schedules a recording of the current program. You
can also use the RIGHT arrow to highlight “Options,” then press SELECT to change
Recording Options.
• Get a Season Pass
get a Season Pass for the program.
• View upcoming episodes/showings. Displays a list of upcoming episodes/showings
of the program on all channels.
Stopping a recording. The recording will stop automatically when the program ends.
You can stop it before that by pressing the RECORD button while in live TV. A
transparent screen will appear with a selection to “Stop the current recording.” You can
also select the program in the Now Playing List, and then choose “Stop recording.”
TM
. (Only available if the program is part of a series.) Select this to
Up to 30 minutes of the current
channel’s broadcast is always
being saved, even when you are not
recording a program. With dual tuner
enabled, the HD DVR saves up to 30
minutes on each tuner. If the HD DVR has
saved a portion of a program, the saved
portion is added to the beginning if you
choose to record that program.
4
57
Page 68

Chapter 4
If you only know one word in the
title, use a Title WishList
the program. See page 65 for details.
Replace hyphens ( - ), slashes ( / )
and periods ( . ) with spaces. For
example, use CATS DOGS to search for the
title “Cats/Dogs.” Any other marks, such
as apostrophes ( ’ ), asterisks ( * ),
ampersands ( & ) and dollar signs ( $ ) are
ignored. For example, you would use
6 OCLOCK NEWS to search for the title
“6 O’Clock News.”
TM
to find
Pick Programs to Record
Find Your Favorite Programs
Search by Title
If you know the name of the program you’re looking for, or even the first part of the name,
choose Search by Title from Pick Programs to Record. Then follow these steps:
1. If you wish, you can first narrow the search with a category and sub-category.
2. The next screen has a grid with numbers and
letters. Spell out the title by using the arrow
buttons to move, then pressing SELECT on
each letter you want. As you select letters, an
alphabetical list of programs appears on the
right. Keep selecting letters until you see your
program in the list.
You can use other buttons on your remote
control to help: CLEAR erases all the letters
you’ve selected; BACK erases one letter at a time; FWD inserts a blank space.
3. When you see your program, press RIGHT arrow to move the highlight to the program
list. Use UP and DOWN arrows to move the highlight within the list. You can also
press CHAN UP/DOWN to move quickly up or down the list one screen at a time.
4. When you find a program you want to record, highlight it and press SELECT to bring
up the Program Information screen.
Browsing a category. You can browse through all of the programs in any category and
sub-category. Numbers come before letters, so to start from the top of the list, enter a zero.
58
DIRECTV Central Pick Programs to Record Search by Title
Page 69

Find Your Favorite Programs
Record by Time or Channel
Record by Time or Channel offers you three options: Browse by Time, Browse by
Channel, and Manually Record Time/Channel.
Browse by Time. Browse by Time lets you browse all programs on a particular day and
time. For example, you can browse all the movies on Saturday night. With Browse by
Time, you can filter the list to see only programs on your Favorite Channels or only
programs in a particular category. To learn how to set up your list of Favorite Channels,
see page 90. To find a program:
1. Use the arrow buttons to highlight a category (for example, “Movies”) to narrow the
list of programs. Then press SELECT.
2. Select a subcategory (for example, “Comedy”), then press SELECT.
3. Use the UP and DOWN arrows to select the day of programming that you want to see.
Press the RIGHT arrow to move the highlight to the time column.
4. Use the UP and DOWN arrows to select a time. The time will advance in half-hour
increments.
5. Press SELECT to bring up the list of programs without leaving the time selector (or
press the RIGHT arrow to bring up the list of programs and move to the list at the same
time). When you find a program you want to record, highlight it and press SELECT to
bring up the Program Information screen.
4
DIRECTV Central Pick Programs to Record Record by Time or Channel
59
Page 70

Chapter 4
Pick Programs to Record
Browse by Channel. Browse by Channel lets you browse through programs on a
particular channel. You can start with all channels or just your favorites. To browse by
channel:
1. Highlight and select either “All Channels,” which includes all the channels you
receive, or “Favorite Channels,” which includes just the channels you have selected as
your favorites.
2. Use the UP and DOWN arrows to select the date you want to browse. Press the
RIGHT arrow to move the highlight to the channel column.
3. Use the UP and DOWN arrows to select a channel. (You can also use the numbers on
the remote to type in a channel, then press ENTER/LAST.)
4. Press SELECT to show the list of programs without leaving the channel selector. Press
the RIGHT arrow to show the list of programs and move to the list at the same time).
5. When you find a program you want to record, highlight it and press SELECT to bring
up the Program Information screen. Then you can view upcoming episodes, set up a
Season Pass, or record an individual showing.
60
DIRECTV Central Pick Programs to Record Record by Time or Channel
Page 71

Find Your Favorite Programs
Manually Record Time/Channel. Manually Record Time/Channel lets you schedule a
recording on a specific channel at a specific time, just as you would with a VCR. You can
also create a manual repeating recording for every week, every day, or every weekday. To
create a manual recording:
1. To choose the Recording Type, use the UP and DOWN arrows to select “One Time,”
or “Repeating.” Then press the RIGHT arrow.
2. To choose the day(s) for the recording, use the UP and DOWN arrows to change the
current selection. If you chose “Repeating,” you can also choose to repeat the
recording on a specified day of the week, on every weekday (select “Every M-F”) or
every day (select “Every Day”).
3. To choose a channel, use the UP and DOWN
arrows or enter a number from the number
keypad. Press the RIGHT arrow.
4. To set the hour, minute, and am/pm for the
start and stop time, use UP/DOWN arrows to
change the current selection. Press the
RIGHT arrow to move to the next step, LEFT
arrow to move back.
4
Record by Time or Channel is
useful for times when you want to
record only a portion of a program, for
example, the opening monologue of a talk
show.
5. To schedule the recording, press SELECT. A
confirmation screen appears. The recording will be named with a “best guess” based
on program guide listings for that time and channel. This will help you find your
program later in the To Do List or Now Playing List.
DIRECTV Central Pick Programs to Record Record by Time or Channel Manually Record Time/Channel
61
Page 72

Chapter 4
Pick Programs to Record
Find Programs That Match Your Interests
Try a WishList Search!
If you know what you like, WishList searches are great! A WishList search automatically
finds programs that match your interests, tastes, passions, and whims on any channel you
receive. And it keeps on searching for as long as you keep the WishList.
For example, you could create a Category Only WishList for the category “Movies” and
subcategory “Action/Adventure.” You could then use it occasionally to look at a list of all
action/adventure movies airing in the next two weeks. The list would be constantly
updated by program guide data.
You could search for something more specific by creating an Actor WishList for Elizabeth
Myer, and then include the category “Movies,” and subcategory “Romance.” This
WishList would only find romance movies with Elizabeth Myer.
With a Keyword WishList, you can look for something very specific. For example, the
Keyword WishList “LIGHTNING” with category “Football” would find Lightning
football (but not baseball) games for you.
Here’s another example: You could create a Keyword WishList to find a 1986 remake of a
movie called The Fright, starring Chris Fields. The keyword entry would look like this:
“CHRIS FIELDS” FRIGHT. Not only does this WishList search find a specific
program—it finds the specific version! (You could also find this movie by making a
Keyword WishList for the movie’s title and year. In that case, the keyword entry might
look like this: “THE FRIGHT” 1986.)
TM
62
DIRECTV Central Pick Programs to Record Search Using a WishList
Page 73

Find Programs That Match Your Interests
After you create a WishList search, you can periodically view what it finds by selecting
“View all upcoming WishList programs,” or selecting an individual WishList, then
selecting “View upcoming programs.” Then you can schedule recordings for the programs
or episodes you want. (See page 67 for more details.)
Can a WishList Do More Than Search?
Yes it can! You can set a WishList to auto-record, and it will record every program the
WishList finds, on any channel you receive. For example, if you set the Elizabeth Myer
Actor WishList (discussed earlier) to auto-record, you would automatically collect
Elizabeth Myer romance movies in the Now Playing List.
Some WishList searches are better suited to browsing than to auto-recording. For
example, you could create a Category Only WishList for the category “Documentary.”
This WishList would find every upcoming documentary. You might not want to record
every documentary, but you could occasionally browse the WishList and choose the ones
you do want to record.
The more specific a WishList search is, the better suited it is to auto-recording. For
example, an auto-recording Keyword WishList with the keywords SNICKS and RABBITS,
and category “Sports/Basketball” would only record basketball games with both of these
teams—a great way to ensure that you enjoy this season’s rivalry. (For more on autorecording a WishList, see page 67.)
If you set up an auto-recording
WishList search for sports
broadcasts, consider using the Overtime
Scheduler
make sure you don’t miss the most
exciting part of the game!
(described on see page 52) to
4
DIRECTV Central Pick Programs to Record Search Using a WishList
63
Page 74

Page 75

Find Programs That Match Your Interests
Keyword or Title WishList. You can create a Keyword WishList with one keyword or
with several. If you enter more than one keyword, the WishList only finds programs that
match all of your keywords. With Keyword WishList searches, the DVR service checks
for your keywords in the program or episode title, description, actor, director, year, and
category information. Title WishList searches work very similarly, but the DVR service
searches only program and episode titles.
Spell your keyword(s) by using the arrow buttons to move around, then pressing SELECT
to enter highlighted letters on the keypad. You can enter as many characters as will fit on
the screen. When you have finished, use the RIGHT arrow to highlight “Done creating
keywords,” then press SELECT.
Using * in WishList Searches. To search for similar words in Keyword and Title
WishList searches, use the asterisk (*) as a special symbol that replaces the endings of
words. For example, the keyword HELI* would find shows containing “helicopter,”
“heliport,” “helium,” as well as the movie “Helicopter Cops.” To enter an asterisk, press
the SLOW ( ) button as you are spelling out your keyword or title.
The asterisk can be helpful when you’re looking for a range of similar words, or if you’re
just not sure how something is spelled. Pop quiz: is it “irresistible” or “irresistable?” Use
the keyword IRRESIST* and don’t worry about it! Remember, when using the asterisk:
4
• It can only be used at a word’s end; it cannot be used to omit letters at the beginning or
in the middle of a word. (For example, HELI*ER or *COPTER would not work.)
• Be as specific as possible. For example, do not use keywords like TH*. There will not
be enough room to show all the results of a keyword that is too general.
DIRECTV Central Pick Programs to Record Search Using a WishList
65
Page 76

Chapter 4
Pick Programs to Record
Title WishList searches are an
excellent way to search for a
program that is not on in the next couple
of weeks, but that you would want to
record if it ever came on. For example, if
you want to record “The Shadow Country”
the next time it airs, create a Title
WishList for the phrase “Shadow
Country.” Set the WishList to auto-record.
If you want to make sure the program will
record, give the WishList a high priority
with the Season Pass Manager. (See page
50.) The next time “The Shadow Country”
comes on, your WishList will record it.
If you see too many programs
when you select “View upcoming
programs,” the WishList you are using is
probably better suited for searching and
browsing than for auto-recording.
Tips for entering keywords:
• To specify an exact phrase in a Keyword or Title WishList, surround a set of words
with quotation marks (to enter quotation marks, press PAUSE ( ). For example, the
keyword BILL SIMON might also turn up a documentary about Simon Branden with a
director whose name is Bill. Use “BILL SIMON” to be certain you find programs that
only feature Bill Simon.
• If you enter more than one keyword in Keyword or Title WishList searches, only
programs that match all of your keywords (for example, “CHRIS FIELDS” FRIGHT)
are found.
• If you want to include an exact phrase and additional keywords, there should be a
space between the final quotation mark and the beginning of the next word. You can
place a space character by selecting SP on the grid of letters or by pressing
FORWARD ( ).
• Replace hyphens ( - ), slashes ( / ) and periods ( . ) with spaces. For example, you
would use the keyword phrase 10 10 to search for the title “10/10.” For an Actor
WishList for Sarah Mills-Jones, use MILLS JONES, SARAH. You can place a space
character by selecting SP on the grid of letters or by pressing FORWARD ( ).
• Any other marks, such as apostrophes ( ’ ) and ampersands ( & ), are ignored. For
example, you would use the keyword phrase 6 OCLOCK NEWS to search for the title
“6 O’Clock News.” (Note that commas ( , ) are also ignored, except in actor and
director WishList searches, where they are essential.)
• For dollar signs ( $ ) substitute the letter S. For example, to find “$50,000 Chance,”
use S50000. (In Search by Title, skip the dollar signs to find these titles.)
66
DIRECTV Central Pick Programs to Record Search Using a WishList
Page 77

Find Programs That Match Your Interests
Browsing, Recording, and Editing a WishList Search
Browsing all WishList searches. Select “View all upcoming WishList programs.” This
displays a list of up to 10 upcoming programs from each of your WishList searches—and
up to 200 programs total (so it may take a long time to display). To record a program,
select its title, then choose “Record this episode” on the Program Information screen.
Browsing an individual WishList: Highlight the WishList and press SELECT. Select
“View upcoming programs,” which searches through current program information and
creates a list of up to 200 unique upcoming programs that match this WishList. This list
displays the first airing of an episode or program.
To see all the showings of upcoming episodes (up to two weeks into the future), select the
title of the program in the “Upcoming programs” list generated by your WishList. Then
select “View upcoming episodes.” A comprehensive list appears, including several
episodes with showings on different channels and different time slots. The Program
Information screen also includes an option for recording a particular program.
Auto-recording WishList searches. When you create a WishList or select it, you can
choose to “Auto-record WishList programs.” This means every program the WishList
finds will be automatically recorded.
Each auto-recording WishList search and its upcoming recordings are marked with a star
( ). To be sure that all the matches your WishList finds are recorded, give the
WishList a high priority in the Season Pass Manager. See page 50 for details.
Editing a WishList. You can change a WishList—for example, to correct a misspelling or
to add a category or subcategory. Just select the WishList, then select “Edit WishList.”
4
If you create an auto-recording
WishList search with the category
“Sports,” previews of pay per view
programs may be recorded and appear on
your Now Playing List. These will be
marked as partial recordings on the
Program Information screen. You will not
be charged for such recordings.
DIRECTV Central Pick Programs to Record Search Using a WishList
67
Page 78

Chapter 4
Pick Programs to Record
68
Page 79

CHAPTER
5
Watching Live TV and Recorded Programs
Using the Control Buttons 70
Status Bar 71
Channel Banner 72
Watching Live TV 73
Watching Programs from Now Playing 76
Watching High-Definition Programs 78
Save to VCR 81
Music Channels 82
Page 80

Chapter 5
When you fast forward too far,
press INSTANT REPLAY to rewind
eight seconds. Press it again if you really
missed the mark.
WARNING TO REAR PROJECTION
AND PLASMA TV OWNERS! Be
careful about using the pause feature for
long periods of time if you have a
projection or plasma TV. Most projection
and plasma TVs are sensitive and “burn
in” still images very quickly. If you pause
your program for too long, you may
permanently damage your screen. See
your TV’s owner’s manual for more
information.
70
Watching Live TV and Recorded Programs
Using the Control Buttons
Part of the fun of watching programs with your DIRECTV® HD DVR is using the pause,
instant replay, and slow motion features. Here’s an overview of the control buttons:
RECORD. Records a program. You can press RECORD when you are watching a
program in live TV, or when a program title is highlighted on the guide.
PLAY. Shows programs at normal speed. The status bar appears for five seconds.
P
y
l
a
PAUSE. Freezes the picture. To resume, press PLAY, or press PAUSE again. You
can pause live TV for 30 minutes. You can pause a recorded program indefinitely.
To move small steps forward or backward: first press the PAUSE button. Then
press either the FORWARD or BACK button. For very slow motion back or
forward, hold down the BACK or FORWARD button while paused.
BACK. Plays the program in reverse. Press BACK once, twice, or three times to go
backward fast, faster, or fastest.
FORWARD. Plays the program in fast forward. As with reverse, pressing the
FORWARD button repeatedly cycles through three speeds of fast forward.
SLOW. Plays the program in slow motion.
S
w
l
o
INSTANT REPLAY. Instantly plays the last eight seconds of the program again.
ADVANCE. (a) If you are watching live TV, catches up to the current time. (b) When
you are fast forwarding in a recorded program, instantly jumps ahead to the next
tick mark (short white line on the status bar). When you are rewinding, jumps back
to the previous tick mark. (c) If you are watching a recorded program, jumps to the
end of the recording. Press again to jump to the beginning of the recording. (d) Use
ADVANCE to enter a dash (-) for channel numbers that include a dash.
Page 81

Status Bar
When you press PLAY, PAUSE, FORWARD or BACK, the status bar appears on the
lower part of your screen. In live TV, the status bar represents one hour (notice the white
tick marks every 15 minutes). In recorded programs, the bar shows the program’s length.
The green portion of the bar represents the part of the program saved by the HD DVR. The
HD DVR automatically saves up to 30 minutes of live TV. You can rewind and fast
forward through the saved portions of a program.
In live TV, the right edge of the green segment represents the current time. A white
vertical line shows where you are in the saved portion of the program. If the white line is
anywhere back in the green segment, you are behind live TV. When you’re behind live
TV, you can press the ADVANCE button ( ) to catch up.
Status Bar
5
Status bar for live TV.
Status bar for a twohour recorded
program.
This is where you are
now.
The BACK button has
been pressed twice.
This shows which
special feature you are
using. (This is the
symbol for pause.)
tick marks (15 min. apart)
This is where you
catch up with live TV
and the current time.
This recorded program
is two hours long.
The EXIT button hides the status
bar, guide, channel banner, and
anything else that is not part of the
program.
71
Page 82

Chapter 5
h
Watching Live TV and Recorded Programs
Channel Banner
Pressing the RIGHT arrow cycles throug
channel banner styles, from
small . . .
to medium . . .
to large . . .
The channel banner appears at the top of the screen when you change channels or press
INFO, THUMBS UP or THUMBS DOWN, or the RIGHT arrow during a program. It
disappears after a few seconds. You can set how long the banner stays on the screen when
you change channels. (See page 90.) Press EXIT (or INFO) to hide the channel banner.
Use the RIGHT arrow to cycle through three versions of the channel banner: small (with
only the current time and channel), medium (adds the title, running time, and ratings), and
large (with a program description and icons for useful shortcuts). The size of the banner
you last viewed becomes the default size when you change channels.
Channel Banner Shortcuts. The large channel banner has a number of selectable icons.
To select an icon, use the UP and DOWN arrows to highlight it, then press SELECT.
Select to start a recording. This icon is bright when the HD DVR is recording a
program, dim when it is not recording.
Highlight to display what’s on the other tuner (for dual tuner). Select to switch to
that tuner. This icon is bright if the program on the other tuner is being recorded. It
is dim if the program on the other tuner is not being recorded.
Select to view audio options, including alternate audio tracks or closed caption
options. If alternate audio is available, this icon will be bright, otherwise it will be
dim. Highlight the icon and press SELECT to choose an alternate audio track.
If Dolby
Select to display Parental Controls (see page 91). If Parental Controls are off, the
padlock appears unlocked and dim. If they are on, it appears locked and bright. If
they are temporarily turned off, it appears unlocked and bright.
If this icon is bright, you have new messages. Select to display Messages & Setup.
®
Digital audio is available, the Dolby Digital icon will appear bright.
72
Page 83

Watching Live TV
When you’re watching a program as it’s broadcast, you’re watching live TV. To go to live
TV at any time, press the LIVE TV button on your remote. You can also select Watch
Live TV from DIRECTV Central. If you’ve used the pause, rewind, slow, or instant replay
features and are “behind” live TV, press ADVANCE to catch up.
Changing Channels
There are several ways to change channels:
• Use the Guide. Tired of channel surfing? Press GUIDE to bring up the Advanced
Program Guide
press SELECT. The channel changes to that program.
• Use the Number Pad.
™
. Use the arrow buttons to highlight a program that’s on now and
Watching Live TV
5
73
Page 84

Chapter 5
Watching Live TV and Recorded Programs
channel is cleared, and the HD DVR starts saving live TV on the new channel (in addition
to the other most recent channel you were watching). You can use the pause, fast forward,
instant replay, and slow motion features on either of the two current channels. For more on
dual tuner, see page 48.
The DIRECTV Advanced Program Guide
While you are watching live TV, the Advanced Program GuideTM shows you current and
upcoming programs. You can use it to see what’s on, change the channel, schedule a
recording, purchase and/or record pay per view events when pricing information is
available, set Thumb ratings, or select a channel filter. The guide has program information
for up to the next two weeks.
To display the guide, press the GUIDE button. To hide it, press GUIDE again (or EXIT).
Choosing a Guide Style. You can choose between two styles of the Advanced Program
™
Guide
different formats. To change the guide style, press the GUIDE button to display the guide,
then press INFO to see the Guide Options. Highlight “Style” and select either the
DIRECTV Grid or the List Guide. The DIRECTV Grid is the default style.
Moving Through the Guide. Use the UP, DOWN, RIGHT and LEFT arrows to move
around in the guide. Use CHAN UP/DOWN to page up or down. In the Grid Guide, use
the FORWARD and BACK buttons to jump through programming information 90
minutes at a time. In the List Guide, the FORWARD and BACK buttons jump through 30
minutes of programming information at a time.
: the DIRECTV Grid and the List Guide. They provide similar information, but in
TM
74
Upcoming Programs. Press SELECT on a program that is not currently airing. This
displays some information about the program. You can choose to “Record this showing,”
or select “Season Pass & other options” to see the Upcoming Program screen and other
actions you can take. See “Recording a Program from the Guide” on page 57.
Page 85

Watching Live TV
DIRECTV Grid
T
Program listings
5
75
Page 86

Chapter 5
Watching Live TV and Recorded Programs
Watching Programs from Now Playing
All programs recorded on your DIRECTV® HD DVR are listed in the Now Playing List
(no more searching through unlabeled videotapes!). To go to the Now Playing List, press
the DIRECTV button on your remote control twice, or press the LIST button. As soon as a
recording begins, it appears at the top of the list.
You can watch any title in the Now Playing List, even one that is still recording. Just
highlight it and press PLAY. If you have watched part of the program already, it resumes
from the point you stopped watching. When a program ends, you have the option to delete
it. If you don’t delete it, the program is available to watch again from the beginning. To
delete a program from the list, highlight it and press CLEAR.
Program Information Screen
Selecting a program in the Now Playing List displays the Program Information screen.
Recorded programs offer these actions on the Program Information screen:
• Play (or Resume playing). Plays the program from the beginning, or from the last
paused point.
• Save until.... To change the date when the program may be deleted, press the DOWN
arrow until the date is highlighted, then press the RIGHT or LEFT arrows until the
date you want appears. Press SELECT to return to the Program Information screen.
76
• Delete Now or Stop Recording (if recording is in progress).
• Save to VCR. See page 81 for information on this feature.
The Program Information screen includes a brief description of the selected program. It
also shows the program’s start time, channel, duration, ratings, advisories, and other
attributes. For more details on a given program, press INFO at a Program Information
screen. The Program Details screen appears.
Page 87

Watching Programs from Now Playing
If you have given a program a Thumb rating, Thumbs Up/Thumbs Down icons appear at
the top of the Program Information screen. You can change the rating here by pressing
THUMBS UP or THUMBS DOWN.
Ratings and Advisories. The Program Information screen shows ratings and advisories
for the selected program. For a description of movie and television ratings, and of
television advisories, see “Parental Controls” on page 91. A movie may also have
advisories, regardless of whether it has a rating. The following movie advisory codes may
appear in parentheses after the description:
AC: Adult Content SC: Sexual Content N: Nudity
AL: Adult Language MV: Mild Violence BN: Brief Nudity
GL: Graphic Language GV: Graphic Violence RP: Rape
Other attributes. Other attributes may appear in parentheses after the description of a
program. These may include genre information or technical notes such as CC (closed
captioning is available), letterbox (which means the program is broadcast in letterbox, a
wide-screen format), HDTV, and Dolby Digital.
5
77
Page 88

Chapter 5
While a cable is connected to the
HDMI Output jack, the Component
Video Output is disabled. You can’t view
video from both the HDMI Output and the
Component Video Output at the same
time.
Watching Live TV and Recorded Programs
Watching High-Definition Programs
High-definition television is different, and not just because it delivers the highest quality
all-digital pictures and sound available today. High-definition pictures can come to your
home in several different video resolution formats (see page 31 for a full description).
HDTV signals are broadcast in wide-screen (16:9) aspect ratio (the relationship between
screen width and height). They can also carry advanced closed-captioning options,
multiple audio tracks, and digital content protection information. Since the producers and
broadcasters of HDTV content have many options available to them, your HD DVR gives
you choices for viewing HDTV programming.
Set your HD DVR to match your HDTV
Your HD television also has options for how to display a picture on the screen. In most
cases, you should set your HD DVR to match your TV’s capabilities. For example, if you
have a wide screen TV, set the HD DVR’s TV Aspect Ratio to “Wide Screen - 16:9.” If
your TV can display a number of different video resolution formats, use the “Output
Format - UP Arrow Setup” screen to select the formats available on your TV.
You probably made these settings when you first set up your HD DVR. See page 29 for
Video Setup information.
78
Feel free to change your video settings. You will probably want to change your video
settings depending on the program you are watching. Feel free to experiment with
different settings and choose what looks best to you. Keep in mind that the Video Settings
you make only affect what you see on the screen; they will not affect your recordings.
You can use the remote to quickly change video settings while watching live TV or
recorded programs.
Page 89

Watching High-Definition Programs
• Use the RATIO button to change your “TV Aspect Correction” setting. Press RATIO
once to display the current setting, and again to change it. This setting either stretches
the picture, or adds panels to the picture, to fill the entire screen. This is useful if the
broadcast aspect ratio does not match your TV’s screen size. See page 30 for more
about “TV Aspect Correction.”
• Use the UP arrow button to cycle through the video output formats you selected on the
“Output Format - UP Arrow Setup” screen. Press UP arrow once to display the current
output format, and again to change it. This allows you to easily change the output
format if you go from watching a standard-definition program to watching a highdefinition program. See page 30 for more about setting the UP arrow.
RATIO
button
UP arrow
button
TV
DIREC
t
i
a
o
R
i
t
x
E
L
t
i
s
e
T
v
V
i
L
f
o
n
I
G
e
u
d
i
High-definition Digital Content Protection (HDCP)
High-definition programs are broadcast in a pure digital signal, received by your satellite
dish or off-air antenna. This allows for other information to be sent along with the video
signal, such as digital content protections sometimes used with HD broadcasts. One type
of protection is High-definition Digital Content Protection (HDCP). If you connected your
HD DVR to your TV using a digital video cable (HDMI or HDMI-to-DVI), all of the
digital information for a program, including the video signal and any content protections,
is passed to the TV.
Programs broadcast with HDCP can be viewed in HD format only on a compatible TV.
Check your TV’s owner’s manual to see if it supports HDCP. If it doesn’t, you may not be
able to view some high-definition programs in high-definition format.
The Component Video cable carries a high-definition video signal, but without other
digital information. If your TV does not support HDCP, consider using the Component
Video cable instead of the HDMI or HDMI-to-DVI cable to connect your HD DVR to
your TV.
5
Due to copyright restrictions, you
may not be able to view some
high-definition programs in high-
definition format using the HD DVR. If you
see a message that says “Viewing is not
permitted using the HDMI output” while
watching a program, refer to the
troubleshooting on page 137.
79
Page 90

Chapter 5
Watching Live TV and Recorded Programs
Finding High-Definition Programs
There are many ways to find high-definition programs to watch and record.
• Filter the program guide. See page 41 for more about filtering the guide.
• Check out HD programming from DIRECTV. The DIRECTV
several HD channels. When you subscribe to the DIRECTV
receive a list of the HD channels currently available.
• The “HD” icon in the DIRECTV Advanced Program Guide
are in HD format. If you see this icon in the program grid, you know it’s broadcast in
high-definition format.
• Limit the results of any program search (such as Search by Title) using the category
Audio & Video, and the sub-category HDTV.
If you connected an off-air antenna, digital off-air broadcast stations are generally on local
channels with a dash (-) in the channel number. For example, 7-1 might be the local digital
broadcast of your local channel 7. Use ADVANCE to enter a dash (-) for channel numbers
that include a dash.
®
HD Package includes
®
HD Package, you will
TM
shows which programs
80
Page 91

Save to VCR
Save to VCR
If you have a VCR, you can save a program from the Now Playing List to a videotape.
Save to VCR happens in real time, so if a program is two hours long, it will take two hours
to save it. You will not be able to watch live TV or recordings while saving. Programs
recorded in high-definition format will be saved to a videotape in standard format.
Preparing for Save to VCR
1. Use the FORMAT button on the HD DVR’s front panel to set the video output mode
to 480i. This enables the HD DVR’s standard video jacks (S-Video, Composite A/V).
2. Make sure your VCR is connected to your HD DVR. See page 18 for details.
3. Set your VCR’s input to record from your HD DVR. See your VCR’s instructions.
Using Save to VCR
1. Insert a videotape into your VCR.
2. Go to Now Playing, highlight the show you want to save, then press SELECT.
3. Highlight “Save to VCR,” then press SELECT.
4. Select “Start saving from the beginning.”
5. A title screen appears for ten seconds. When you see it, press your VCR’s record
button. When the program is over, press stop on your VCR.
You can cancel saving to VCR by pressing the LIVE TV or DIRECTV button
on your remote. A videotape icon appears as a warning. Press the same button
again and a confirmation screen appears giving you the option to resume
saving at a later time, or cancel saving to VCR. If you choose to cancel saving, be sure to
press stop on your VCR as well.
You can use the “Save to VCR”
feature with a DVD recorder; just
connect a DVD recorder to your HD DVR
instead of a VCR. The steps to follow are
the same. (See your DVD recorder’s
instructions for details on how to record a
DVD.)
5
Most of the buttons on your
remote that control playback work
as usual during Save to VCR—you can fast
forward through the boring parts! The VCR
81
Page 92

Chapter 5
Watching Live TV and Recorded Programs
Music Channels
Some DIRECTV® channels feature continuous music. You can tune to a music channel
just as you would any other channel. You cannot record music channels or use special
features—such as pause or rewind—on a music channel.
Music Channels have a special music banner that displays for five minutes when you first
tune to them. You can bring the music banner back to the screen by pressing the RIGHT
arrow, or INFO. The music banner is updated continuously as information comes in from
the satellite. It may not always have complete information.
82
Page 93

CHAPTER
6
Messages and Setup
Messages from DIRECTV 84
Purchases 85
Settings 89
System Information 104
System Test 105
Troubleshooting 106
Restart or Reset System 107
Standby 108
Page 94

Chapter 6
Messages and Setup
Messages from DIRECTV
From time to time DIRECTV may send you messages about updates to your service and
other important notices. These messages are important, useful and easy to find—we made
them that way because we really want you to read them. When your DIRECTV
receives a new message, a message icon ( ) appears on the channel banner and in
DIRECTV Central. To read a message:
1. From DIRECTV Central, select Messages & Setup.
2. Select “Messages.”
3. Select the message you want to read.
Use the CHAN DOWN button to see text that does not fit on the screen. When you are
finished reading a message, select “Done” or “Delete Message.”
Selecting the message icon in the channel banner will also take you to your list of
messages. The message list will display “No Messages” if there are no messages to read.
®
HD DVR
84
DIRECTV Central Messages & Setup Messages
Page 95

Purchases
The Purchases screen displays a list of all pay per view programs you have purchased,
along with their date and time. To see the Purchases screen, press the DIRECTV button to
go to DIRECTV Central. Select Messages & Setup, then Purchases. Each program in the
list is marked either “Upcoming,” “Purchased,” “Canceled,” or “Unviewed.”
• Upcoming. These programs are scheduled to be purchased but have not aired yet. You
have not yet been charged for them. You can cancel upcoming purchases by selecting
them. The Purchase Info screen, described below, will appear.
• Purchased. These programs have been viewed. You were charged for them.
• Canceled. Purchase of these programs was canceled before the programs aired. You
were not charged for them.
Purchases
• Unviewed. These programs were scheduled to be purchased but were not viewed and
not recorded. You were not charged for them.
Purchase Info. The Purchase Info screen shows a selected pay per view event’s date,
time, channel and purchase price. You can cancel upcoming purchases on this screen.
Canceling a scheduled pay per view recording in another place—for example, the To Do
List—does not cancel the purchase. You must cancel the purchase from the Purchases
screen. To see Purchase Info, highlight a program and press SELECT.
Canceling a Purchase. To cancel an upcoming purchase, highlight an upcoming purchase
and press SELECT. The Purchase Info screen appears. Select “Cancel this purchase.”
Press SELECT on the confirmation screen that appears, and the purchase is canceled. If
you cancel a purchase that is scheduled to record, the recording is also canceled.
DIRECTV Central Messages & Setup Purchases
6
85
Page 96

Chapter 6
Messages and Setup
Pay Per View
If a pay per view program exceeds
spending or rating limits you have
set with Parental Controls, a password
will be required to purchase it.
Your DIRECTV® HD DVR makes buying and recording pay per view events a snap. You
can order them when they are promoted on live TV, or during a search for programs. You
can order them to watch, or to be recorded. And the whole transaction can be handled
using your remote control.
Ordering from Live TV. If you tune to a pay per view channel that has an upcoming pay
per view event, you will see a message bar at the bottom of the screen which says “Press
SELECT for ordering information.” If you press SELECT, you will see the pay per view
Program Information screen.
While watching promotions for other pay per view events on a pay per view channel (for
example, between showings of a pay per view event), you may see a small message that
alternately says “Press Select” and “Next Showing.” If you press SELECT, you will see
the pay per view Program Information screen for the next showing of the pay per view
event airing on the current channel.
Pay Per View Program Information. When you order a pay per view event from live TV,
or select a pay per view event in Pick Programs to Record or the Program Guide, you see
the pay per view Program Information screen. Options on this screen vary, depending on
whether the selected event is currently showing, is already scheduled to record, or is
currently available for purchase. Though some events have dedicated channels that allow
ordering more than 24 hours in advance, you usually cannot use the HD DVR to purchase
a pay per view event more than 24 hours before the event airs.
86
Page 97

The pay per view Program Information screen gives you the following options:
• Purchase & record info. If the HD DVR does not have purchase information (such as
the price of the pay per view event) immediately available, it can do a quick check to
retrieve it. When the HD DVR gets purchase information, the event becomes available
to purchase and record. To check for purchase information the HD DVR must briefly
tune to a special channel. If you are recording a program, checking for pricing
information this way may create a short skip in the recording. The skip is usually less
than two seconds but may be up to ten seconds long. The HD DVR provides a
confirmation screen so you can avoid such a skip by choosing not to check for
purchase information.
If the HD DVR finds purchase information by tuning away, the pay per view screen
will be refreshed with the new information and you will have the option to purchase
and record the program. If the HD DVR cannot find purchase information, you will be
informed that purchase information is not available.
• Buy and record. When you select this option, the pay per view event is purchased and
a recording of it is scheduled on the To Do List. A verification screen appears
describing any scheduling conflicts. If you verify that you want to buy and record the
event, a second screen confirms the purchase. You can select “Options,” to the right of
“Buy and record,” to change Recording Options for the pay per view event.
Purchases
6
Recorded pay per view programs are marked “Save Until I Delete” (the green circle
icon) by default. That way your recorded movies are saved until you manually delete
them from the Now Playing screen
• Buy; don’t record. When you select this option, you purchase the pay per view event.
A verification screen appears with a description of any scheduling conflicts.
87
Page 98

Chapter 6
Messages and Setup
• View upcoming showings. Press SELECT to display a list of upcoming showings for
the program. Highlighting one of these showings and pressing SELECT displays the
Program Information screen for that showing. LEFT arrow from the list returns to the
previous screen.
• Watch Now. Available if the program has been purchased and is currently playing.
• Review/cancel purchases. The pay per view screen includes this option if you have
already purchased a program. Selecting “Review/cancel purchases” displays the
Purchases screen, where you can cancel any purchases you have not yet watched or
recorded.
• Record as planned. Available if you already scheduled the program to record.
Selecting this leaves the pay per view screen without making any changes.
• Cancel this recording. Available if the program has been purchased and is being
recorded. Selecting this option cancels the recording. (Because the HD DVR began
recording the program, you will still be charged for the purchase.)
• Continue recording. Available if the program is already recording. Selecting this
option leaves the pay per view screen without making any changes.
88
Page 99

Settings
With the selections in Settings, you can customize the HD DVR to work more to your
liking. To view the available options, go to DIRECTV Central and select Messages &
Setup, then Settings.
Audio
Alternate Audio. Some programs have alternate audio tracks available, including other
language tracks. Use this setting to choose your default language track. Some of the
languages listed will not be available for some programs. If the default language you
choose here is not available, the program’s original language is used. When programs
include multiple language tracks, you can select the Alternate Audio icon ( ) in the
channel banner to view available options.
®
Dolby
Digital audio. If you connected your HD DVR to an A/V receiver that supports Dolby
Digital audio (using an Optical Digital Audio cable), you can set your HD DVR to record
and output Dolby Digital audio by default when it is available. You can also switch to
Dolby Digital audio for individual programs that include it by selecting the Dolby Digital
icon ( ) in the channel banner. If you are watching a program with Dolby Digital
audio, you will not hear the HD DVR’s sound effects.
Digital. Some programs, including high-definition programs, include Dolby
Settings
6
Sound Effects Volume. Allows you to change the volume or turn off your HD DVR’s
sound effects (the tones played when you press buttons on the remote control). The default
setting is Medium. If you are watching a program with Dolby Digital audio, you will not
hear the HD DVR’s sound effects.
DIRECTV Central Messages & Setup Settings Audio
89
Page 100

Chapter 6
Messages and Setup
Channels
Channel Banner. When you change channels or press the RIGHT arrow while watching
live TV, the channel banner displays, then disappears after a few seconds. If you want the
channel banner to disappear quickly, select “Clear banner quickly.”
Channel Lists. With DIRECTV
channels available through DIRECTV. You may not subscribe to all of these channels, so
to make it easier for you to find and record programs on channels you do receive, you can
set up custom channel lists.
• Channels You Receive. Use the Channels You Receive list to select channels you
actually subscribe to, and that reflect your viewing preferences. For example, if you
never watch a channel and don’t want to record from it, uncheck it on Channels You
Receive. Features such as Search by Title and Search Using a WishList look for
programs only on channels you have selected in the Channels You Receive list.
• Favorite Channels. Use the Favorite Channels list for channels you watch frequently.
Include only a few channels in this list, so that you can quickly look at what’s coming
up on them using the program guide. See page 56 for information on customizing the
guide to show your Favorite Channels.
®
service, your HD DVR receives information for all
90
Use SELECT to check and uncheck channels in your lists. You can scroll through the list
using CHAN UP/DOWN. To go directly to a specific channel, press the number buttons,
then press ENTER/LAST. Your changes are saved automatically.
Channels marked with an asterisk (*) are off-air channels for which no guide information
is available. If these channels are added to the DIRECTV Advanced Program Guide
TM
(creating duplicates in your lists), you can identify channels to uncheck by the asterisk.
DIRECTV Central Messages & Setup Settings Channels
 Loading...