

Page 1

HDTV
User’ s Manual
Page 2
Important Information
WARNING
To reduce the risk of fire or
shock hazard, do not expose
this TV to rain or moisture.
WARNING
RISK OF ELECTRIC
SHOCK DO NOT OPEN
This symbol indicates
"dangerous voltage" inside
the product that presents a
risk of electric shock or
personal injury.
Refer to the identification/rating label located on the back panel of your product
for its proper operating voltage.
This device complies with part 15 of the FCC rules. Operation is subject to the
condition that this device does not cause harmful interference. FCC Regulations
state that unauthorized changes or modifications to this equipment may void the
user’s authority to operate it. Use of this device without the supplied power cord
may cause this set to be no-compliant with FCC part 15 regulations.
If fixed (non-moving) images are left on the screen for long periods, they may be
permanently imprinted on the screen. Such images include network logos,
phone numbers, and video games. This damage is not covered by your warranty.
Extended viewing of channels displaying these images should be avoided.
To reduce the risk of electric shock, do not remove
cover (or back). No user serviceable parts inside.
Refer servicing to qualified service personnel.
This symbol indicates
important instructions
accompanying the product.
Cable TV Installer: This reminder is provided to call your attention to Article 82040 of the National Electrical Code (Section 54 of the Canadian Electrical Code,
Part 1) which provides guidelines for proper grounding and, in particular, specifies
that the cable ground shall be connected to the grounding system of the building
as close to the point of cable entry as practical.
Product Registration
Please fill out the product registration card and return it immediately. Returning the card allows us to contact you if
needed.
Keep your sales receipt to obtain warranty parts and service and for proof of purchase. Attach it here and record the serial
and model numbers in case you need them. The numbers are located on the back of the television.
Model No. _______________________________________________________
Serial No. ________________________________________________________
Purchase Date: ____________________________________________________
Dealer/Address/Phone: _____________________________________________
Page 3

Page 4

Table Of Contents
WELCOME TO HDTV ................................................................................ 4
Getting Started ........................................................................................... 4
SETUP AND CONNECTIONS .................................................................... 5
Step 1: Unpack the System ......................................................................... 6
Step 2: Connect Your TV to Other Components .......................................... 6
Things to Know Before Connecting Components .............................................6
Jacks and Cables.............................................................................................. 7
Front of the TV .................................................................................................8
Back of the TV ............................................................................................... 10
The Basic Connection.................................................................................... 12
The Advanced Connection .............................................................................13
Connecting Speakers to the TV ...................................................................... 14
Step 3: Place Batteries in the Remote Control ........................................... 16
Step 4: Plug in and Turn on the System..................................................... 16
Step 5: Complete the Interactive Setup ..................................................... 16
Step 6: Order Programming...................................................................... 16
USING THE REMOTE............................................................................... 17
Remote Control Buttons ........................................................................... 18
Programming the Remote Control ............................................................ 20
Using the Remote to Control a Component .............................................. 21
Remote Control Codes ............................................................................. 22
BASIC TV OPERATION............................................................................ 23
About the Channel Banner .......................................................................24
Changing Between DIRECTV and TV Mode ............................................. 26
Changing Channels .................................................................................. 27
PIP (Picture-in-Picture) Operation ............................................................ 28
Using the INPUT Button........................................................................... 30
USING THE PROGRAM GUIDES............................................................. 31
Bringing Up the Program Guides.............................................................. 32
Anatomy of the TV Program Guide ........................................................... 33
Anatomy of the DIRECTV Program Guide ................................................ 34
Tuning to a Program ................................................................................. 35
1
Page 5

Table Of Contents
Getting Around in the Guides .................................................................. 35
The Other Guides Icon............................................................................. 36
Using the GUIDE Button .......................................................................... 36
Exiting A Program Guide .......................................................................... 37
®
Sorting the DIRECTV
The Other Icons ....................................................................................... 40
ADJUSTING TV CONTROLS ................................................................... 41
Picture Quality Controls ........................................................................... 42
Picture Settings ..............................................................................................42
Auto Color..................................................................................................... 43
Color Warmth................................................................................................ 43
Noise Filter .................................................................................................... 43
Auto Converge............................................................................................... 43
Theatre ..........................................................................................................43
Reset Controls ............................................................................................... 43
Programming Guide .............................................. 38
Audio Controls ......................................................................................... 44
Mute.............................................................................................................. 44
Equalizer ....................................................................................................... 44
Speakers ........................................................................................................44
Special Audio ................................................................................................ 47
Loudness ....................................................................................................... 48
SAP ............................................................................................................... 48
Audio Language............................................................................................. 48
USING THE PROFILES ............................................................................. 49
About Profiles .......................................................................................... 50
The DIRECTV Setup ................................................................................. 50
Editing Channels in a DIRECTV List ...............................................................50
Selecting or Deleting All DIRECTV Channels ................................................. 51
Setting the DIRECTV Spending Limit.............................................................. 51
Setting the DIRECTV Rating Limit .................................................................. 52
The TV Setup ............................................................................................ 53
Editing Channels in a TV List.......................................................................... 53
Selecting or Deleting All TV Channels ...........................................................53
Setting the TV Rating ................................................................................ 54
The Rating Limit Screen ................................................................................. 55
Blocking Age-Based Ratings ...........................................................................56
Setting the Movie Rating ................................................................................ 58
2
Page 6

Table Of Contents
Blocking Unrated TV Shows ..........................................................................59
Choosing Your Profile ............................................................................... 60
Locking and Unlocking a User Profile ...................................................... 61
Locking the System .................................................................................. 62
Unlocking the System .................................................................................... 62
SYSTEM OPTIONS AND PREFERENCES .................................................. 63
Changing the Signal Source...................................................................... 64
Changing the Signal Type ......................................................................... 64
Auto Tuning .............................................................................................. 65
Channel Search ........................................................................................ 66
Mailbox ................................................................................................... 66
Purchases: Pay Per View Programs ............................................................ 67
Tuning to a Pay Per View Program ..................................................................67
Using the Program Guide for Pay Per View Programs .....................................68
Reviewing and Canceling an
Upcoming Purchase ...................................................................................... 70
Setting the Time and Date ........................................................................ 71
Using the Preferences Menu..................................................................... 71
Using Fetch .............................................................................................. 74
GETTING ASSISTANCE............................................................................ 75
Running the Interactive Setup................................................................... 76
Getting Antenna Information .................................................................... 76
The Select Dish Menu Screen................................................................... 77
Using the On-Screen Signal Meter ................................................................ 78
Your New Access Card ............................................................................. 78
Running the System Test ........................................................................... 78
REFERENCE.............................................................................................. 79
Troubleshooting ....................................................................................... 80
Care and Cleaning ................................................................................... 81
PROSCAN High Definition Television (HDTV) Limited Warranty.............. 82
FCC Registration Information ................................................................... 83
Accessory Information.............................................................................. 84
Index........................................................................................................ 92
3
Page 7
Welcome to HDTV
High Definition refers to a new way of sending programming information over the airwaves and into your TV. There
are two types of TV display formats available. One is ATSC format, which originated from the Advanced Television
Systems Committee. The other is NTSC format, which is named for the National Television Systems Committee. What
makes your High Definition Television (HDTV) special is that it has tuners capable of receiving ATSC and NTSC
formats as well as digital satellite signals. You can receive: analog (in NTSC format), digital terrestrial (in ATSC
format), cable (in NTSC and ATSC formats), and digital satellite. This TV makes receiving all types of signals seamless.
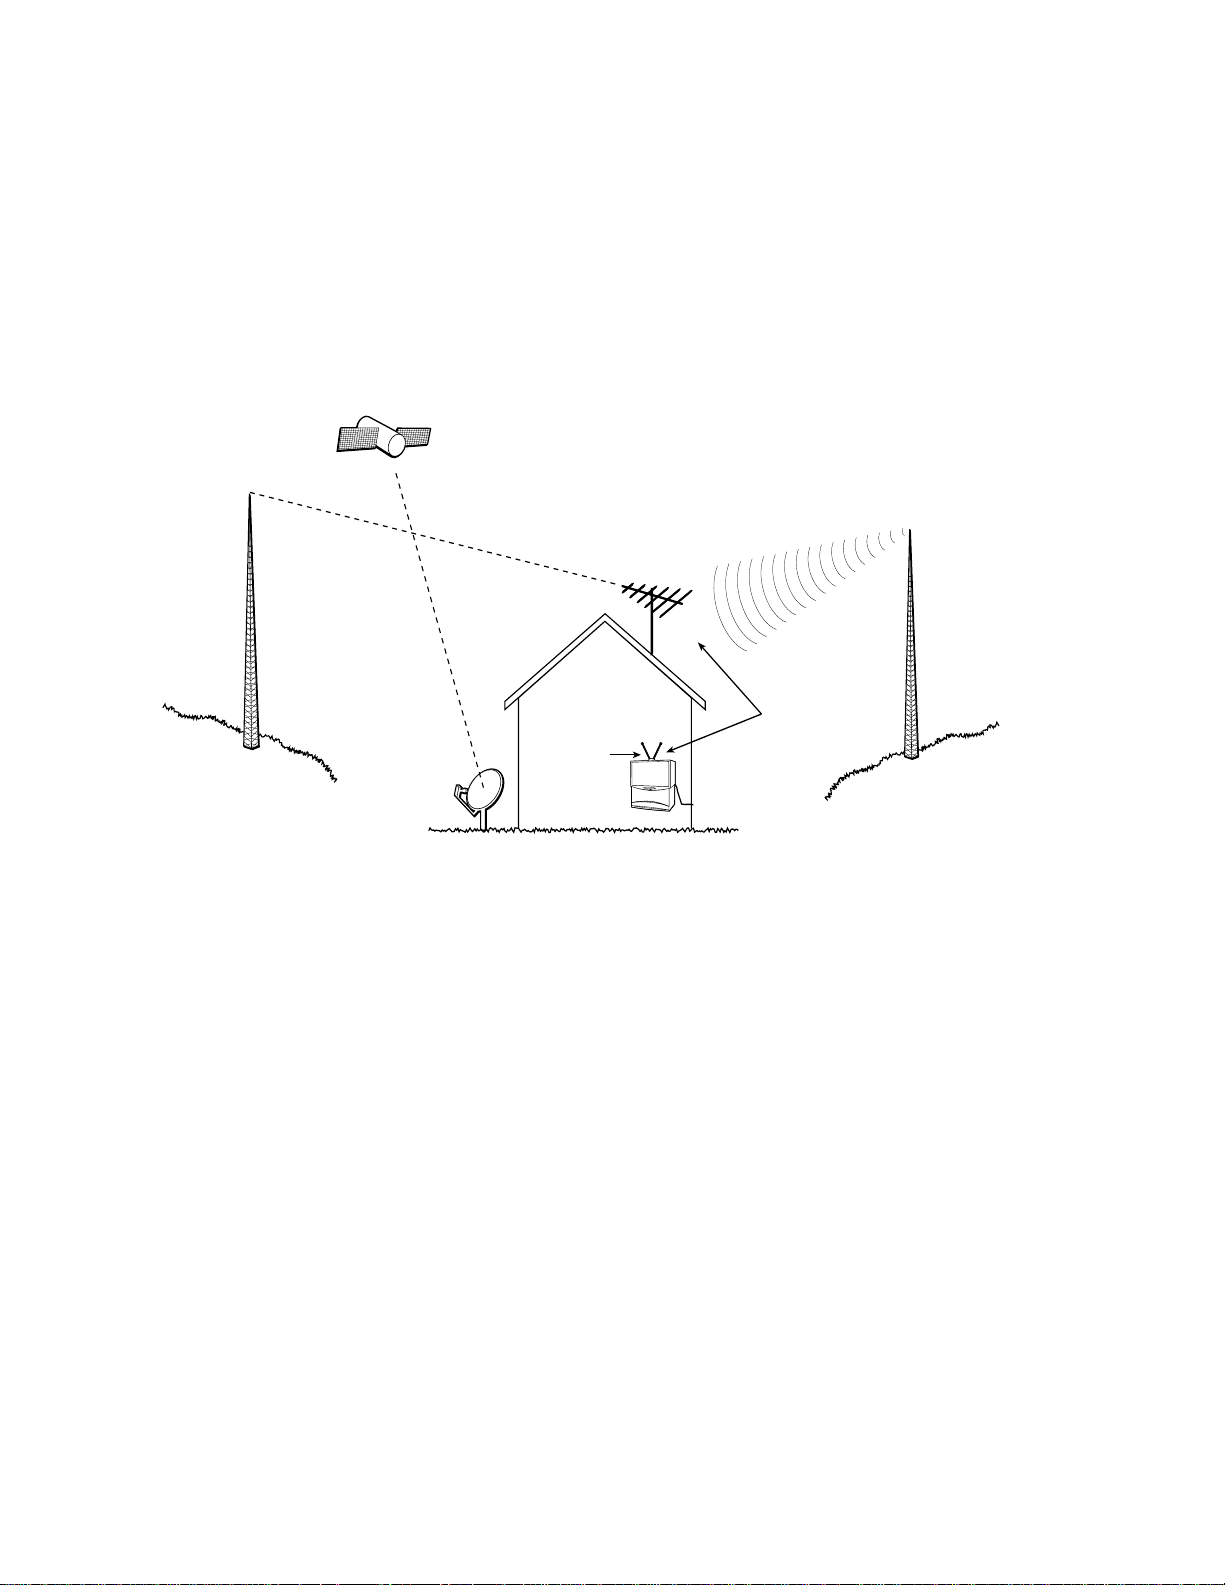
Below is an example of how your HDTV can receive the different types of signals.
SATELLITE
TERRESTRIAL
ANTENNA
(DIGITAL AND ANALOG)
OR
TERRESTRIAL
TOWER SENDING
DIGITAL SIGNALS
SATELLITE
DISH ANTENNA*
ANTENNA
HDTV
CABLE TV
TOWER SENDING
ANALOG SIGNALS
So why is it called High Definition? Definition—commonly called resolution—refers to the sharpness of the image
and is determined by the number of dots, or pixels, your screen uses to create the image. The more pixels the sharper
the image. An HDTV normally has either 1080 or 720 rows and over 1,000 columns of pixels. This results in a
display of over one million pixels. Your HDTV also has a wide screen, or “wide aspect ratio” of 16:9 as opposed to
the common 4:3 ratio. It is normally capable of displaying both interlaced images (like today’s analog TVs) and
progressive images (like a computer monitor).
What this all means is that while digital broadcasting will bring many new possibilities, only people with HDTVs like
yours will actually be capable of realizing many of them. A wide aspect ratio, one million pixel resolution, CDquality audio with Dolby Digital surround sound, and improved interactivity are features of many digital broadcasts,
and your HDTV will help bring it all into your home.
GETTING STARTED
Now that you have an understanding of what your HDTV can do, read on to find necessary information about how to use
the TV.
The first section of this manual shows you how to connect components and speakers to your TV. The “Basic TV
Operation” section describes how you receive the three signals and the important modes of operation: TV mode and
DIRECTV mode. The rest of this manual describes how to use your television’s many features, such as program guides,
picture and audio controls, and system options.
* The appearance of your satellite dish antenna may differ from that shown here.
4
Page 8

Setup and Connections
This section tells you how to get your
HDTV set up and connected. It describes
the cables you will need, explains the front
and back panels, and walks you through
the steps needed to start using your TV.
SETUP AND
1
CONNECTIONS
➣
USING THE REMOTE
2
BASIC TV OPERATION
3
USING THE
➣➣
4
PROGRAM GUIDES
➣
ADJUSTING TV
5
CONTROLS
➣
USING THE PROFILES
6
SYSTEM OPTIONS AND
7
PREFERENCES
➣
➣
GETTING ASSISTANCE
8
REFERENCE
9
➣
Page 9

Setup and Connections
STEP 1: UNPACK THE SYSTEM
Make sure to locate the remote control and power cord.
STEP 2: CONNECT YOUR TV TO OTHER
ON•OFF
DVD
VCR2
MUTE SKIP
CH
VOL
CH
GUIDE INFO
MENU CLEAR
123
456
789
INPUT
0
REVERSE PLAY FORWARD
RECORD
STOP PAUSE
PIP SWAP CH CTRL WHO
TVVCR1
AUX
DIRECTV
+
VOL
GO BACKFETCH
OK
ANTENNA
COMPONENTS
During the satellite dish antenna installation, the TV may have been connected
with just a coaxial cable for the system test. Depending on what components you
have, another connection may provide better picture and audio quality. The
following sections provide cable and connection information to help you decide
what connection is best for you.
THINGS TO KNOW BEFORE CONNECTING COMPONENTS
Protect Your Components from Power Surges
• Connect all components before plugging any power cords into the wall outlet.
• Always turn off the TV and other components before you connect or
disconnect any cables.
Position Cables Correctly to Avoid Audio Hum or
Interference
• Insert all cable plugs firmly into their jacks.
Remote Control
Power Cord
• Place the audio/video cables to the sides of the TV’s back panel instead of
straight down the middle after you connect your components.
• Try not to coil any twin-lead cables; keep them away from the audio/video
cables as much as possible.
• Make sure all antennas and cables are properly grounded. Refer to the safety
sheet packed with your unit.
Protect Your Components from Overheating
• Do not block ventilation holes in any of the components. Arrange the
components so that air can circulate freely.
• Do not stack components.
• Allow adequate ventilation when placing your components in a stand.
• Place an amplifier on the top shelf of the stand so that heated air rising from it
will not flow around other components.
6
Page 10

Setup and Connections
JACKS AND CABLES
Below is a description of the jacks and cables you can use to make
connections. Note that not all cables come with your television unit.
S-Video Jack and Cable
The S-Video jack provides the best picture quality for your system.
This jack is available on this TV and is used in conjunction with audio
cables. Remember also to connect the left and right audio cables because
the S-Video jack carries only the picture signal, not the sound.
Audio/Video Jacks and Cables (RCA-type)
The audio/video jacks provide very good picture and stereo sound quality.
Theses jacks are used for most audio/video connections between
components. The audio/video jacks are often color coded (yellow for
video, red for right audio, and white for left audio). If your component has
only one input for audio (mono), connect it to the left (white L/Mono)
audio jack on the TV.
S-Video Jack
Audio/Video Jacks
RF Jacks and Coaxial Cables (F-type)
The RF jacks are necessary for reception of off-air broadcasts, cable, and
DIRECTV signals.
These jacks are required for antenna or cable connections. The RF and
coaxial jacks on the TV are labeled SATELLITE IN, ANTENNA A IN, and
ANTENNA B IN. An RG-6 coaxial cable is required for all satellite signal
distribution.
Optical Jack and Cables
The optical cable is used for connecting a Dolby Digital receiver. If you
own a Dolby Digital receiver that uses an optical cable-type input, you
can use an optical cable to connect the TV to that receiver for the best
sound quality.
Telephone Jack and Cord
The telephone line cord is required to connect your TV to a phone line if
you choose to subscribe to DIRECTV® programming. The phone line
connection is used to periodically call out to DIRECTV. You will need an
RJ11 type modular jack, which is the most common type of phone jack
and might look like the one pictured here. If you don’t have a modular
jack, call your local telephone company to find out how to get one
installed.
RF Jack
Digital Audio
Out Jacks
Phone Jacks
7
Page 11
Setup and Connections
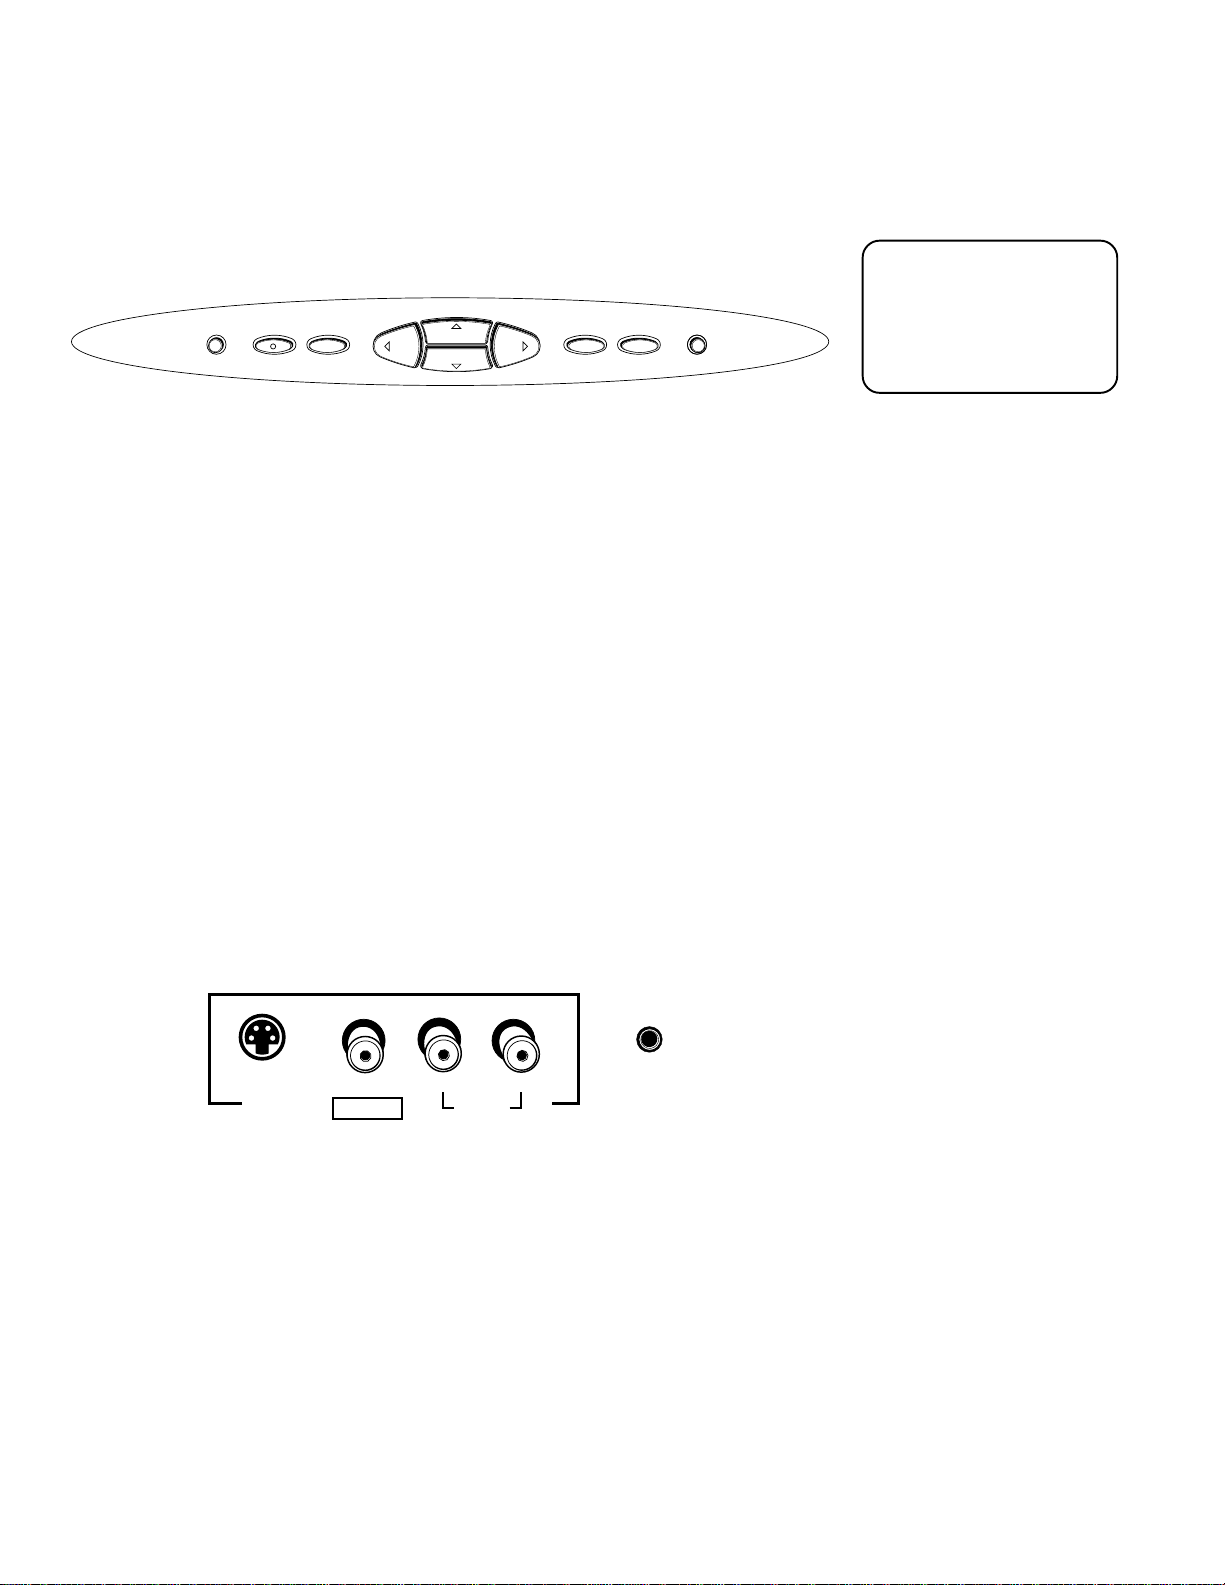
FRONT OF THE TV
The diagrams below describe the front panel and front input jacks on the TV.
POWER MENU/OK TV/DIRECTV INFO
CH
VOL
VOL
CH
POWER Turns the TV on and off.
MENU/OK Brings up the main menu. When in the menu system, it selects
highlighted items.
VOL < Decreases the volume. When in the menu system, VOL < moves the
highlight left and adjusts menu controls.
VOL > Increases the volume. When in the menu system, VOL > moves the
highlight right and adjusts menu controls.
CH v Scrolls down through the current channel list. If you are in TV mode and
press CHv, you scroll down through TV channels. If you subscribe to DIRECTV
®
programming and are in DIRECTV mode, you scroll down through DIRECTV
channels. In the menu system, CHv moves the highlight down and adjusts menu
controls.
CH ^ Scrolls up through the channel list. If you are in TV mode and press CH^,
you scroll up through TV channels. If you subscribe to DIRECTV® programming and
are in DIRECTV mode, you scroll up through DIRECTV channels. In the menu
system, CH^ moves the highlight up and adjusts menu controls.
If you cannot find your
remote control, you can
use the front panel of the
TV to operate many of
the TV’s features.
TV/DIRECTV Toggles between TV mode and DIRECTV mode.
INFO Brings up the on-screen channel banner. Press when in the program guide to
get more information on the highlighted program or channel.
S-VIDEO VIDEO L/MONO R
INPUT 4
AUDIO
HEADPHONE
INPUT 4 Lets you connect a baseband NTSC (analog) component such as a VCR,
Internet access device, game, or camcorder.
S-VIDEO Lets you connect an S-Video cable for better video quality picture to a
component with S-Video capability, such as a VCR. When using S-Video, make
sure to connect the two audio cables as well as the S-Video connector.
VIDEO Provides video connection. The video connector is usually yellow.
AUDIO L/MONO Provides left audio connection. The left audio
connector is usually white.
R AUDIO Provides right audio connection. The right audio
connector is usually red.
HEADPHONE Provides a connection for headphones.
8
Page 12
Setup and Connections
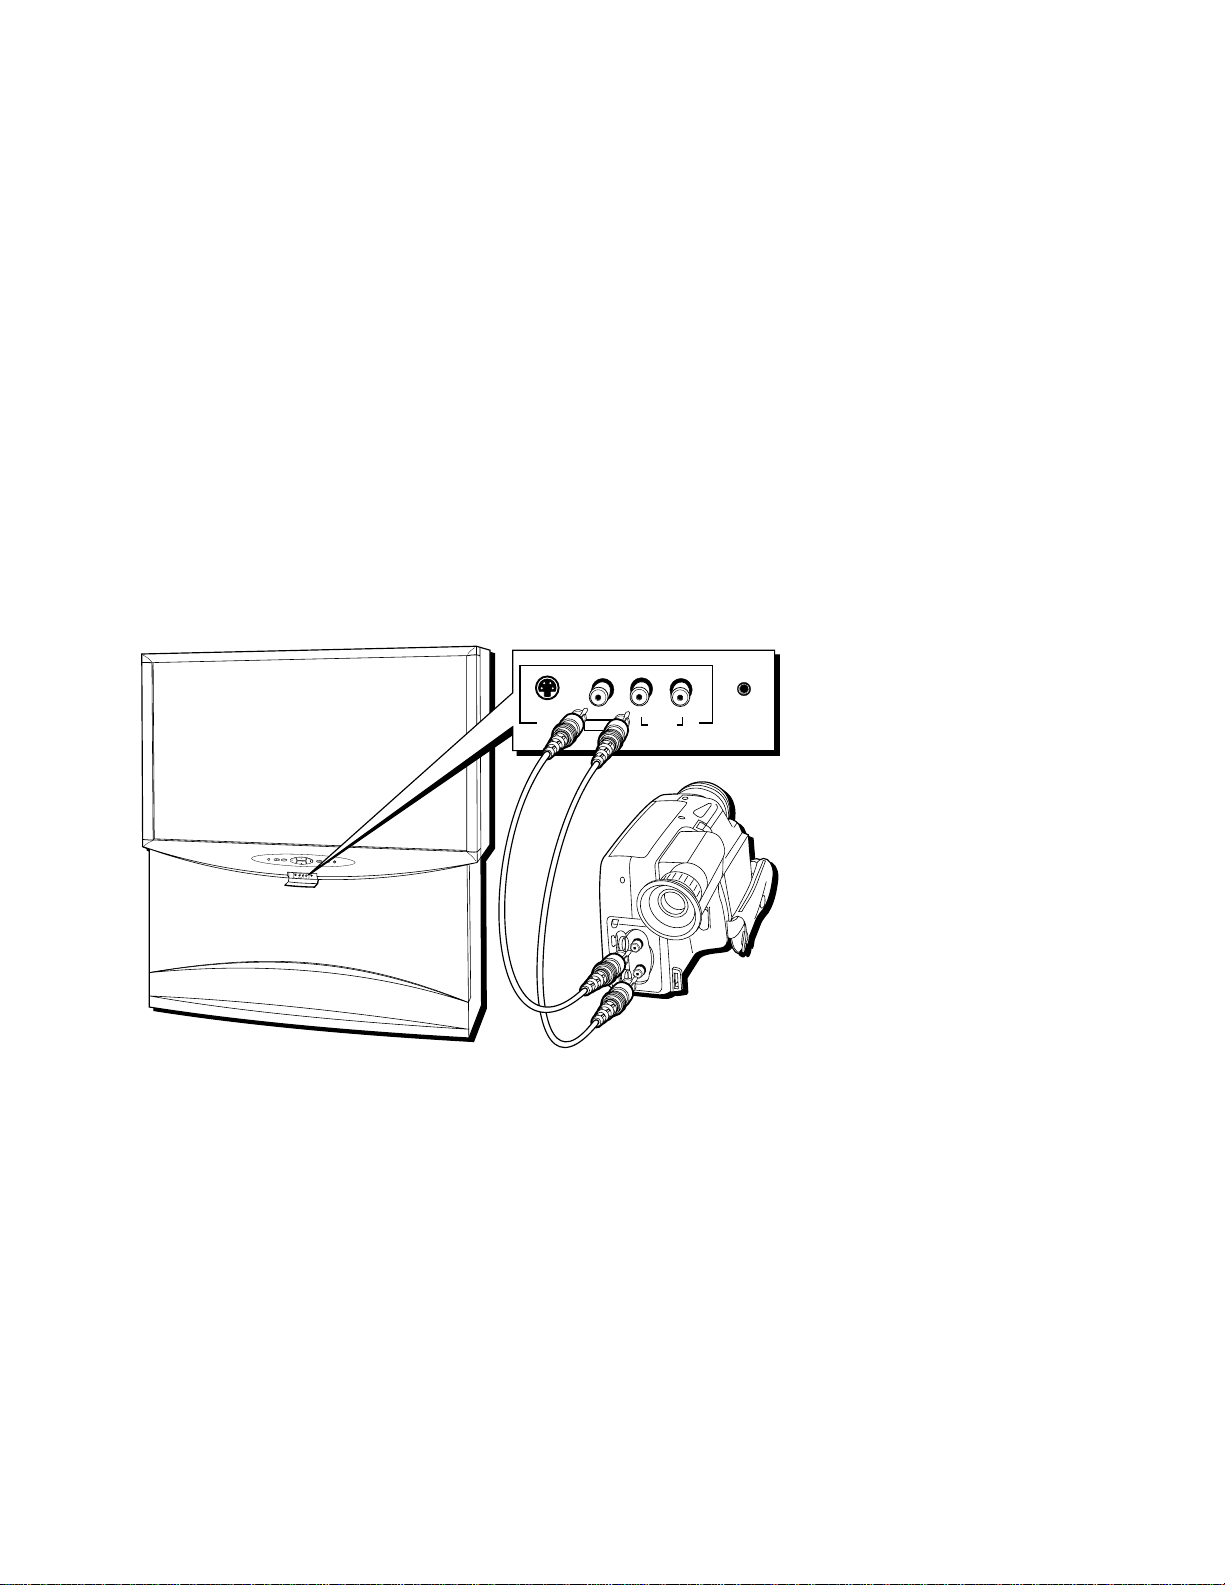
Making Connections to the Front Panel
You can connect one of many types of devices to the TV’s front panel, such as a video
game or camcorder for playback.
To connect a device to the front panel:
1. Open the small front panel door protecting the INPUT 4 jacks.
2. Connect the device’s audio/video outputs to the INPUT 4 audio and video jacks on
the TV.
3. If the device has S-Video capability, connect an S-Video cable (instead of the video
cable) from the device to the S-VIDEO jack on the TV. If not, skip this step.
4. Press the INPUT button on the remote control until FRNT (or SFRNT if you have
connected an S-Video cable) appears in the channel banner.
Below is an example of how you might connect a camcorder for playback.
S-VIDEO VIDEO L/MONO R
INPUT 4
P
O
W
E
R
M
E
N
U
/
O
K
T
V
/
C
D
H
I
R
E
C
T
V
I
N
F
O
V
O
L
V
O
L
C
H
S
V
I
D
E
O
V
I
D
E
O
L
/
M
O
N
O
R
H
E
A
D
P
H
O
N
E
I
N
P
U
T
4
A
U
D
I
O
AUDIO
V
I
D
E
O
A
U
D
I
O
HEADPHONE
9
Page 13
Setup and Connections
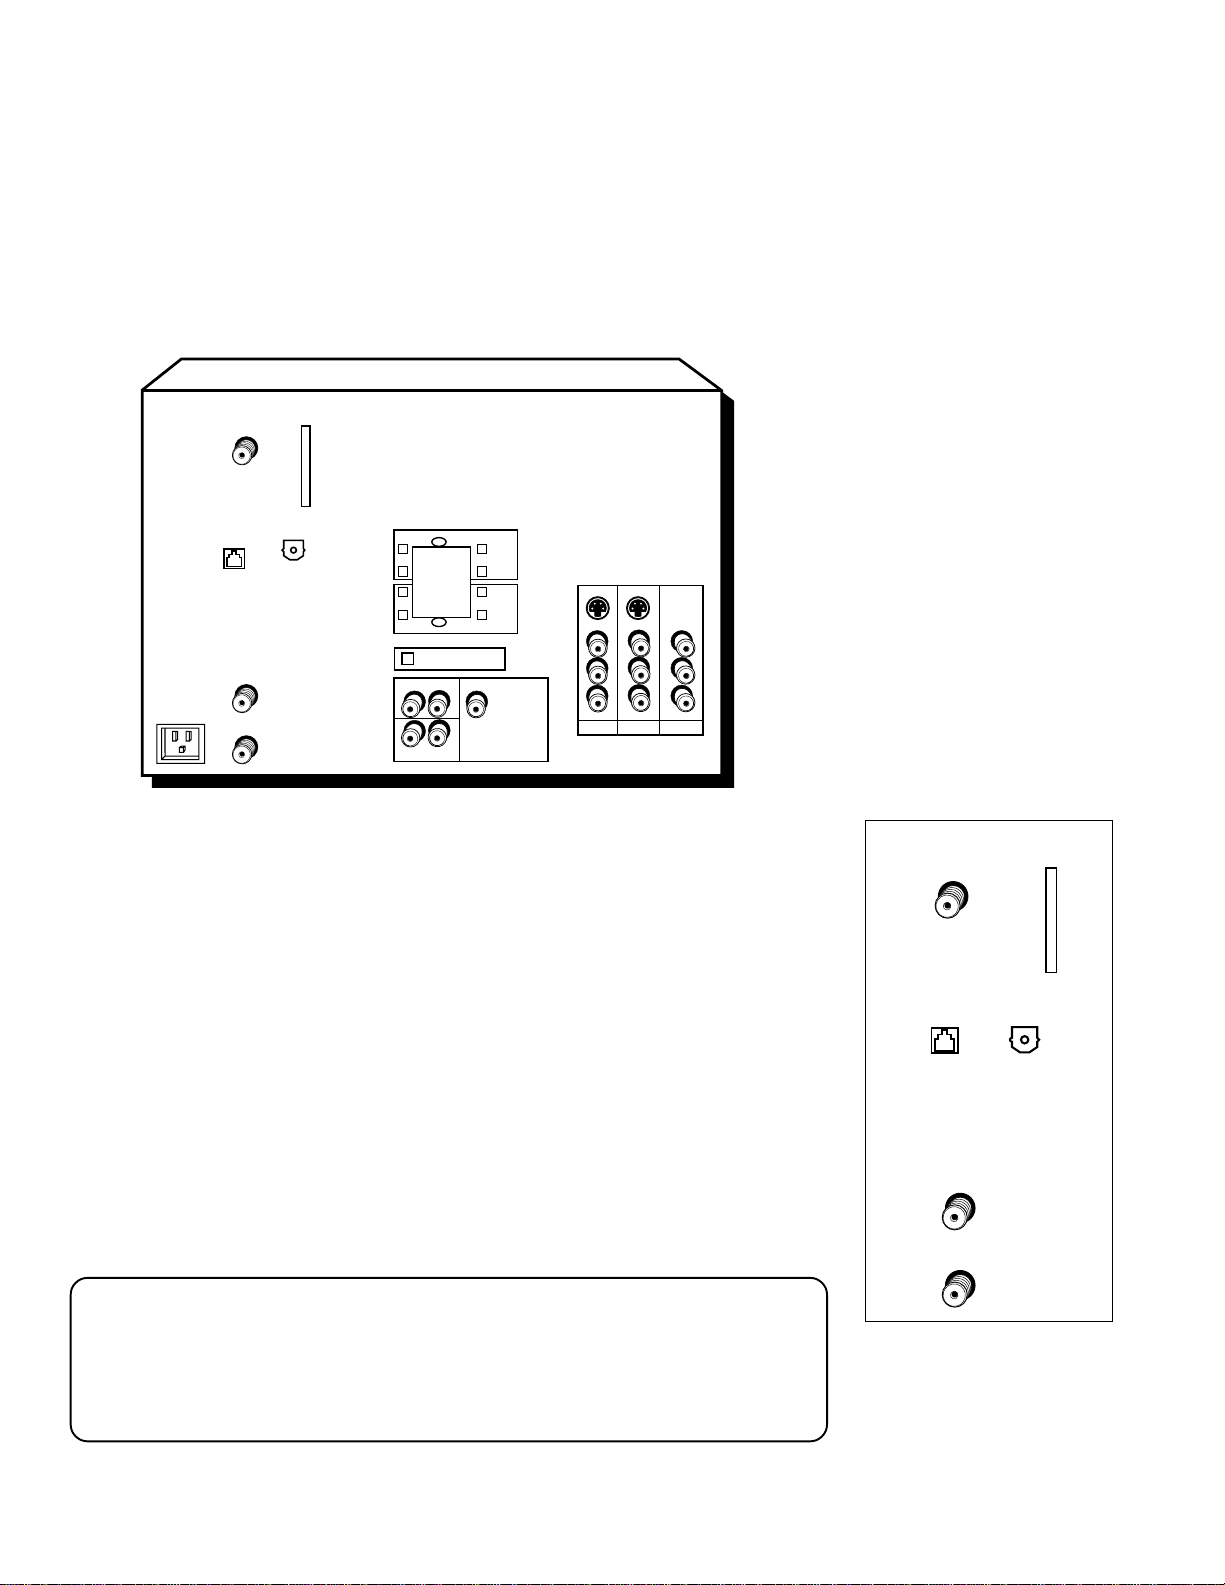
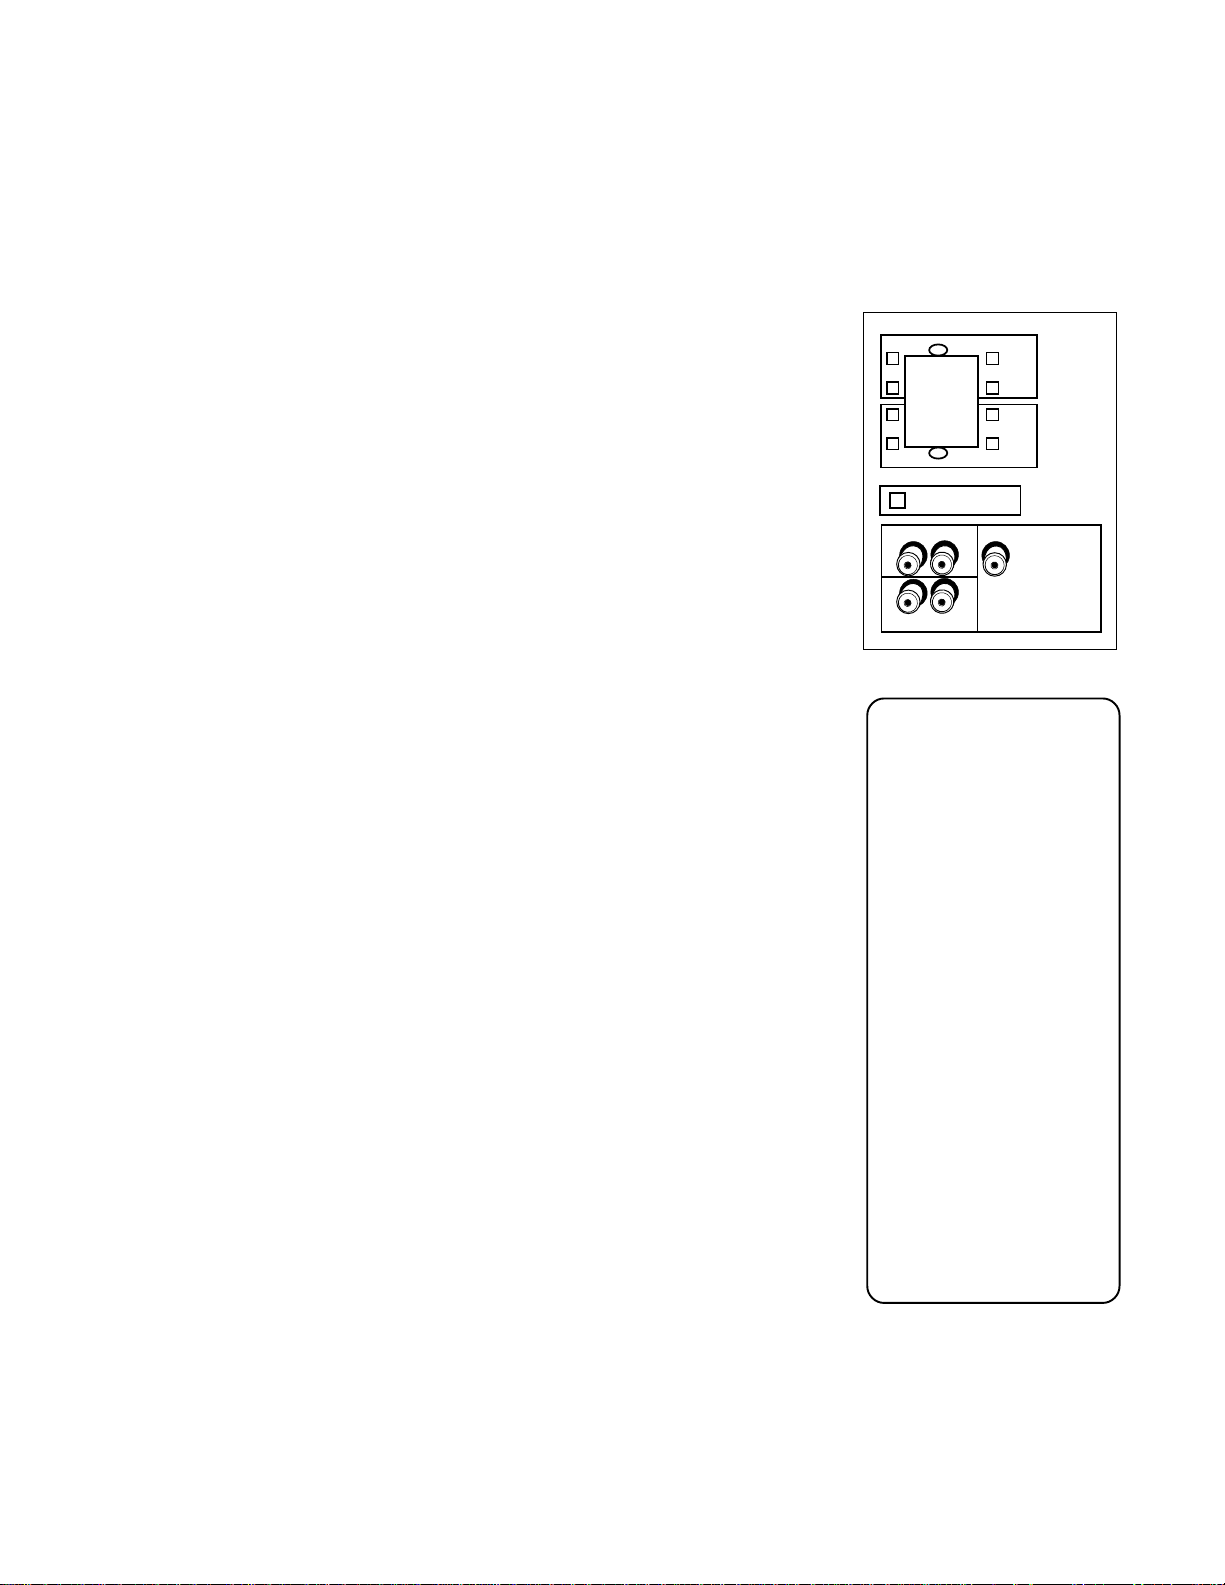
BACK OF THE TV
The diagram below describes each of the back panel jacks found on the TV. When
connecting A/V cables, be sure to connect corresponding outputs and inputs (video
to video, right audio to right audio, etc.).
SATELLITE
IN
ACCESS
CARD
INTERFACE
DIGITAL
PHONE
JACK
ANTENNA B
IN
ANTENNA A
IN
AUDIO OUT
FRONT SPEAKER
+ +
R
_
+
R
_
REAR SPEAKER
INT.
FRONT SPEAKER
EXT.
TRANSMITTER OUT
LR
LR
FIX/VARIABLE OUT
L
_
+
L
_
LFE/SUB WOOFER
S-VIDEO S-VIDEO
VIDEO
VIDEO
VIDEO
OUT
AUDIO
AUDIO
INPUT 1 INPUT 2 INPUT 3
AUDIO
SATELLITE IN Use to connect the satellite dish antenna to the TV.
ACCESS CARD INTERFACE Insert the access card into the slot so your
programming provider can identify you. Make sure the contacts on the access card
are on the left of the card while inserting. (Refer to “New Access Card” in this
manual’s “Assistance” section for details.) The DIRECTV System requires a valid card.
PHONE JACK Use to connect a phone line to the TV. The DIRECTV System
requires a phone line connection to periodically call out to program providers.
DIGITAL A UDIO OUT Use a digital optical cable (or SPDIF cable) to connect your
TV to a compatible Dolby Digital receiver or decoder. Dolby Digital offers theatrequality sound (six audio channels). You will not be able to use this jack and the LFE/
SUBWOOFER OUT simultaneously.
ANTENNA B IN Use to connect an off-air or terrestrial antenna or cable TV signal
to the TV.
ANTENNA A IN Use to connect a second off-air or terrestrial antenna or cable TV
signal to the TV.
You can also use the ANT B IN (or ANT A IN) for video games and switch between
the two inputs using the ANTENNA button on the remote control. When using TV
games, computers, and similar products with your TV, keep the contrast at a low
setting. If a fixed (non-moving) pattern is left on the screen for long periods of time
at a high contrast setting, the image can be permanently imprinted onto the picture
tubes. These types of imprints are not covered by your warranty because they are
the result of misuse.
SATELLITE
IN
ACCESS
CARD
INTERFACE
PHONE
JACK
ANTENNA B
IN
ANTENNA A
IN
DIGITAL
AUDIO OUT
10
Page 14
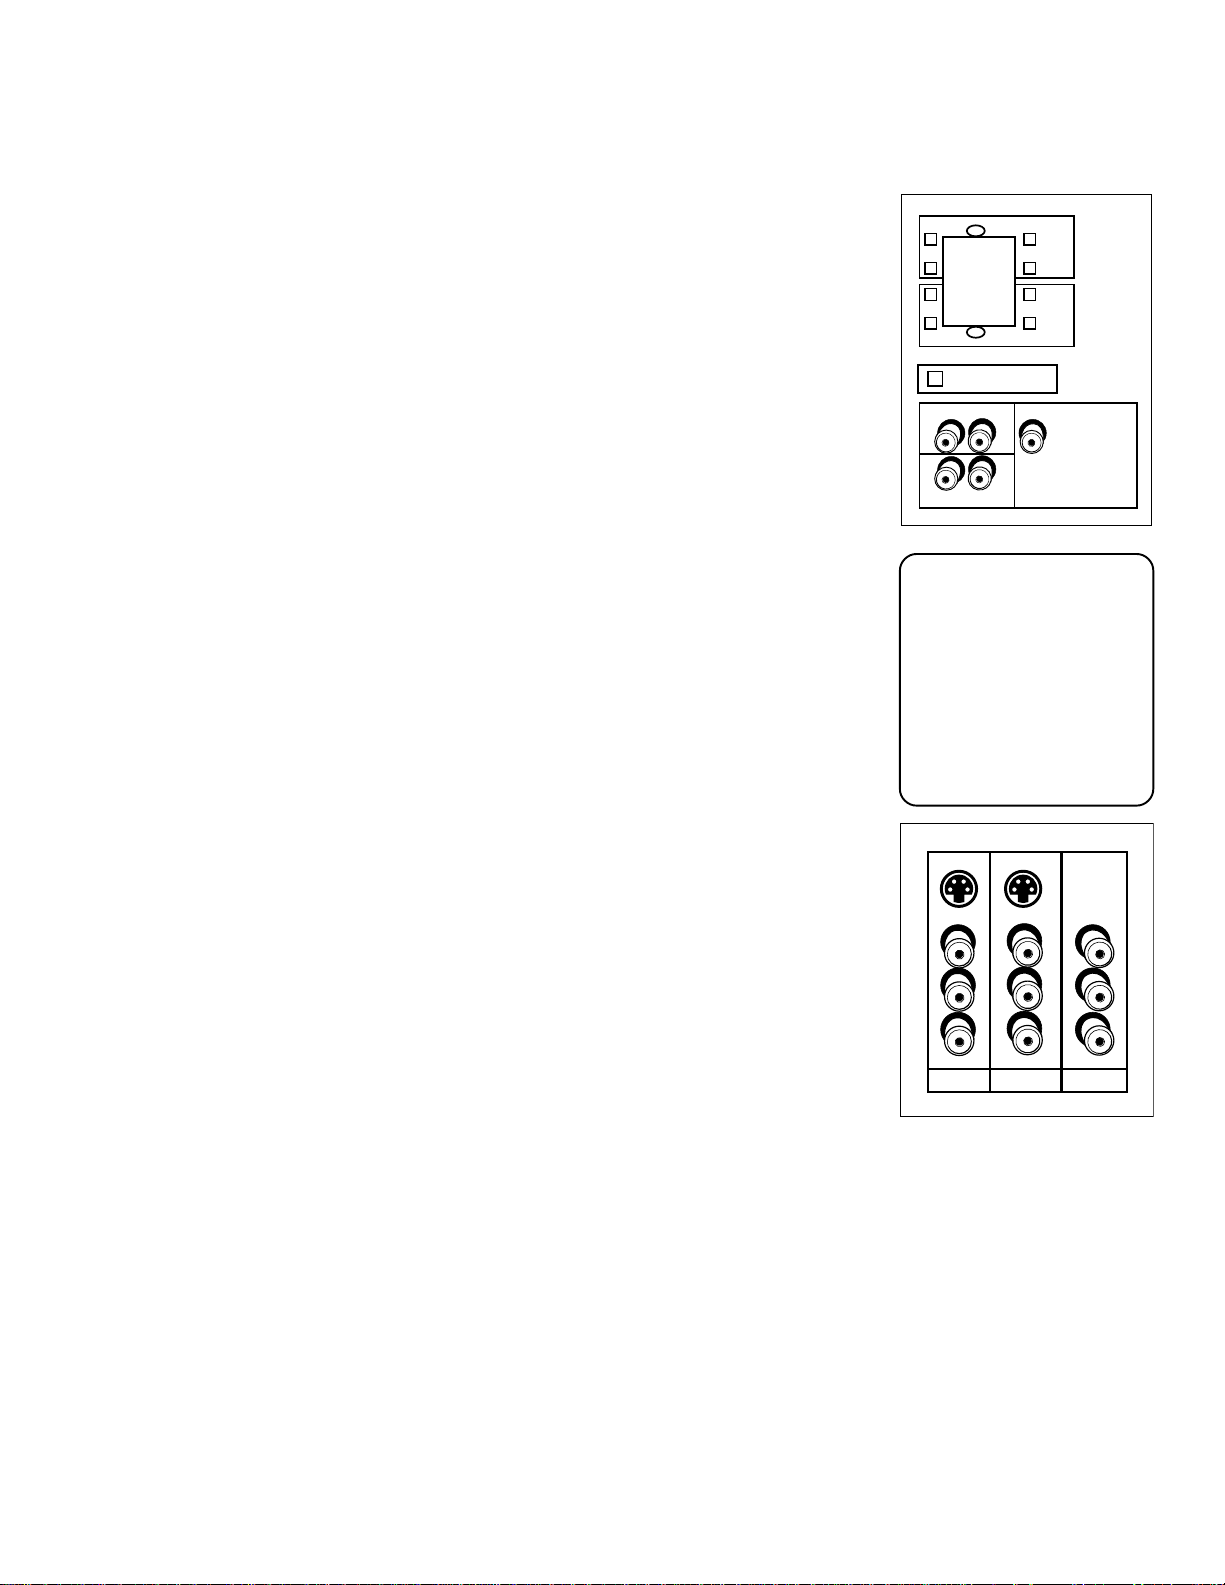
Setup and Connections
FRONT and REAR SPEAKER Terminals Use to connect external speakers for
front sound and rear surround sound.
FRONT SPEAKER INT. / EXT. (switch) Set to INT. if you want to use the
internal TV speakers only or the interal TV speakers plus separate rear speakers.
Set to EXT. if you want to use any combination of front external speakers. This
switch does not turn off the TV center speaker.
TRANSMITTER OUT Use to connect an optional component such as a
wireless audio transmitter.
FIX/VARIABLE OUT Use to connect an audio receiver or amplifier (an
auxiliary baseband component) for variably-controlled or fixed level stereo
output. When set to fixed (via the Audio Output choice in the Speakers menu),
a fixed-level audio signal is provided, making these jacks ideal for audio
recording or for use with an audio amplifier that has its own remote control.
LFE/SUBWOOFER OUT Use to connect a LFE (Low Frequency Effects)
powered subwoofer. This jack is tailored for carrying low frequency
information. You will not be able to use this jack and the DIGITAL AUDIO
OUT (an optical output) simultaneously.
EXT.
INT.
FRONT SPEAKER
L
_
+
L
_
REAR SPEAKER
FRONT SPEAKER
LR
LR
LFE/SUB WOOFER
OUT
+ +
R
_
+
R
_
TRANSMITTER OUT
FIX/VARIABLE OUT
To specify how you have
set up your speakers,
press MENU on the
remote control and
choose Audio. Then
choose Speakers… from
the menu. For details,
see the section
“Adjusting TV Controls”
in this book.
INPUT 1 Lets you connect a baseband NTSC (analog) component such as a
VCR, laserdisc player, Internet access device, or DVD player.
• R AUDIO provides right audio connection. The right audio connector is
usually red.
• L AUDIO provides left audio connection. The left audio connector is usually
white.
• VIDEO provides composite video connection. The video connector is
usually yellow.
• S-VIDEO lets you connect an S-Video cable for better video quality
picture to a component with S-Video capability, such as a VCR or DVD
player. When using S-Video, make sure to connect the two audio
cables, as well as the S-Video connector.
INPUT 2 Provides connection to a second NTSC (analog) video component
such as a VCR or laserdisc player. Its jacks are the same as described for INPUT
1, above.
INPUT 3 Provides connection to a third NTSC (analog) video component,
such as a VCR or laserdisc. Its jacks are the same as described for INPUTS 1
and 2, except with no S-Video jack.
S-VIDEO S-VIDEO
VIDEO
AUDIO
INPUT 1 INPUT 2 INPUT 3
VIDEO
LLL
RRR
AUDIO
VIDEO
AUDIO
11
Page 15
Setup and Connections
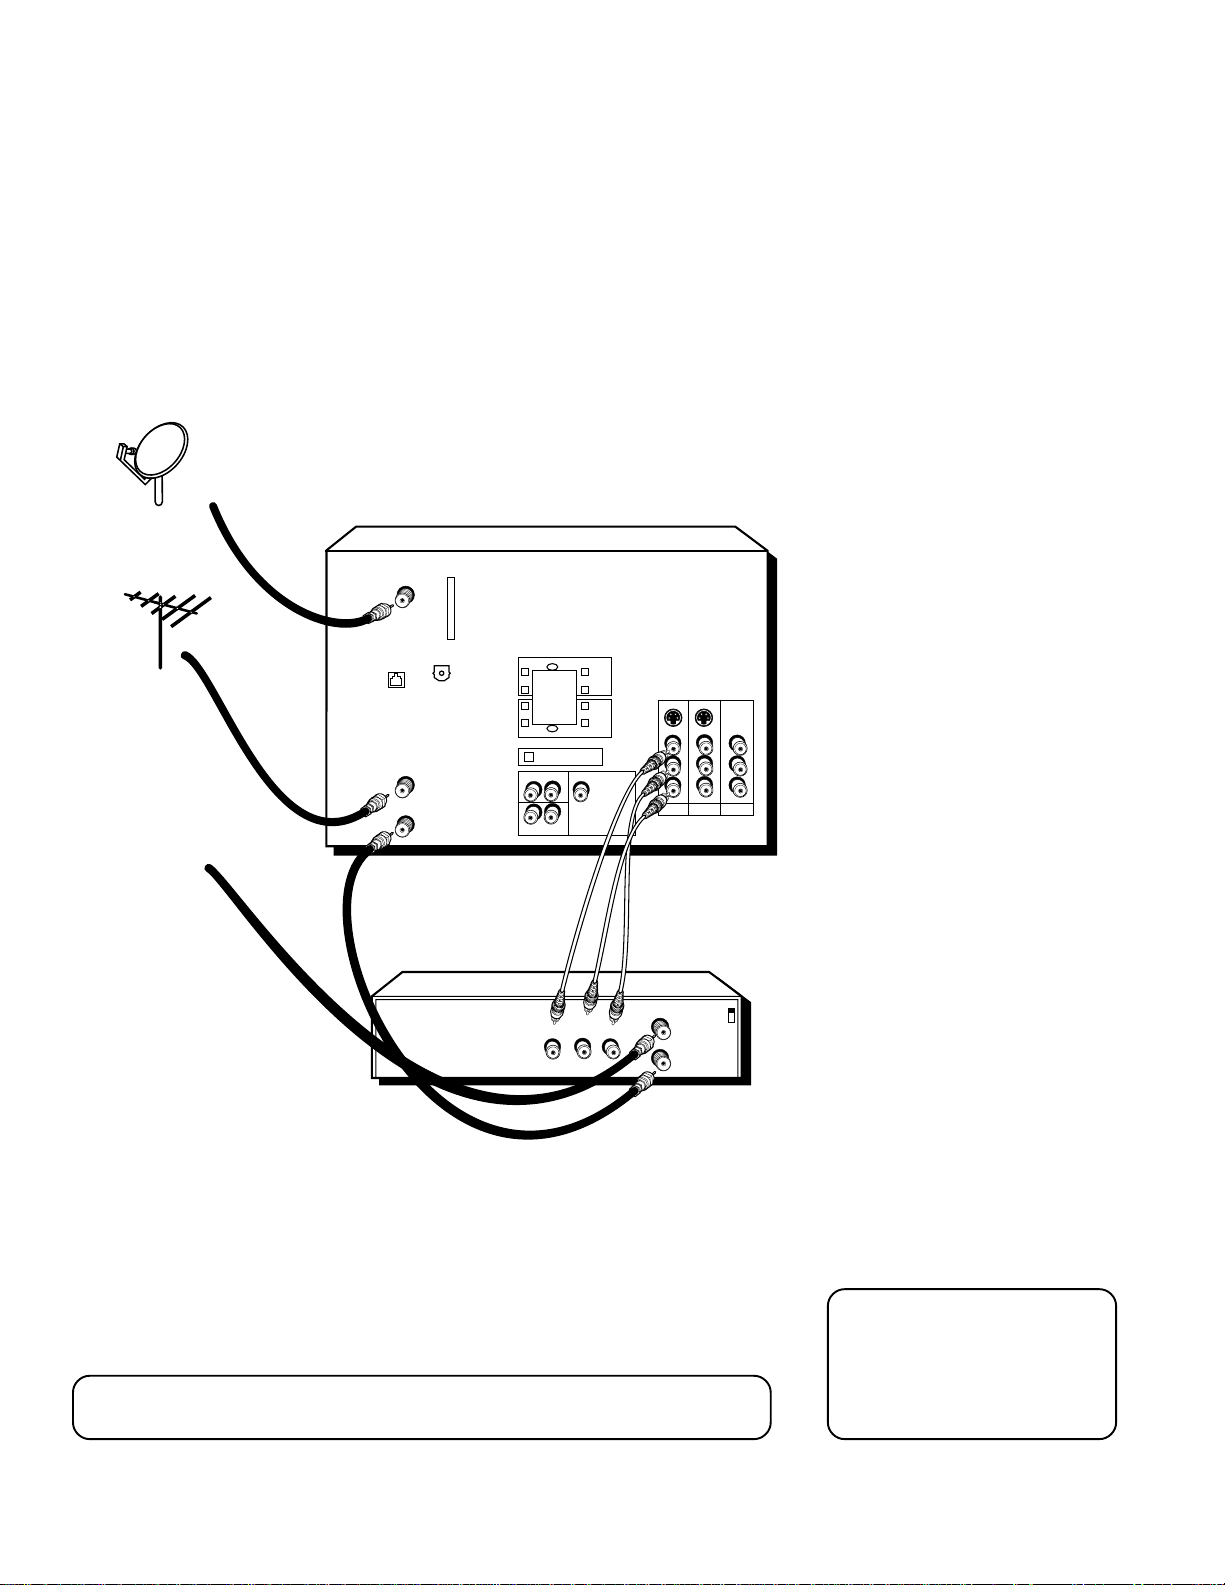
THE BASIC CONNECTION
TV and VCR
SATELLITE
DISH ANTENNA
CABLE OR
ANY ALTERNA TE
RF SIGNAL, SUCH AS
A DIGITAL OR ANALOG
TERRESTRIAL ANTENNA
CABLE OR
OFF-AIR ANTENNA
TV
SATELLITE
IN
ACCESS
CARD
INTERFACE
PHONE
JACK
ANTENNA B
IN
ANTENNA A
IN
VCR
DIGITAL
AUDIO OUT
+ +
R
_
+
R
_
INT.
FRONT SPEAKER
EXT.
TRANSMITTER OUT
FIX/VARIABLE OUT
VIDEO
FRONT SPEAKER
L
_
+
L
_
REAR SPEAKER
LR
LFE/SUB WOOFER
LR
OUT
R
OUT
L
S-VIDEO S-VIDEO
VIDEO
AUDIO
INPUT 1 INPUT 2 INPUT 3
IN FROM ANT
OUT TO TV
VIDEO
AUDIO
How to view
programming:
• To watch cable TV or off-air
TV programs from an
antenna in this connection,
press ANTENNA on the
remote control until
ANTENNA A is displayed in
the channel banner.
• To watch cable or any other
alternate RF signal, such as
digital or analog terrestrial,
press ANTENNA on the
remote control until
ANTENNA B is displayed in
the channel banner.
• To watch satellite
programming, press
DIRECTV on the remote
VIDEO
control and channel up or
down to the desired
program.
AUDIO
How to view your
VCR:
• Press INPUT on the remote
control and select the video
input (in this example,
VID1) in the channel
CH
CH
banner. Because the digital
decoder is in the TV, not the
VCR, digital channels
cannot be recorded. If an
off-air antenna is used, the
VCR output should be
viewed using one of the
video inputs.
Some cable systems may require a “conversion box.” If so, consult your cable
company’s box tuning instructions for details.
12
• NOTE: Viewing a VCR in
AIR mode may result in
poor picture performance.
The ANT B and ANT A jacks
can receive digital or analog
RF signals. The illustrations
here are recommended
connections in a cable
environment.
Page 16
Setup and Connections
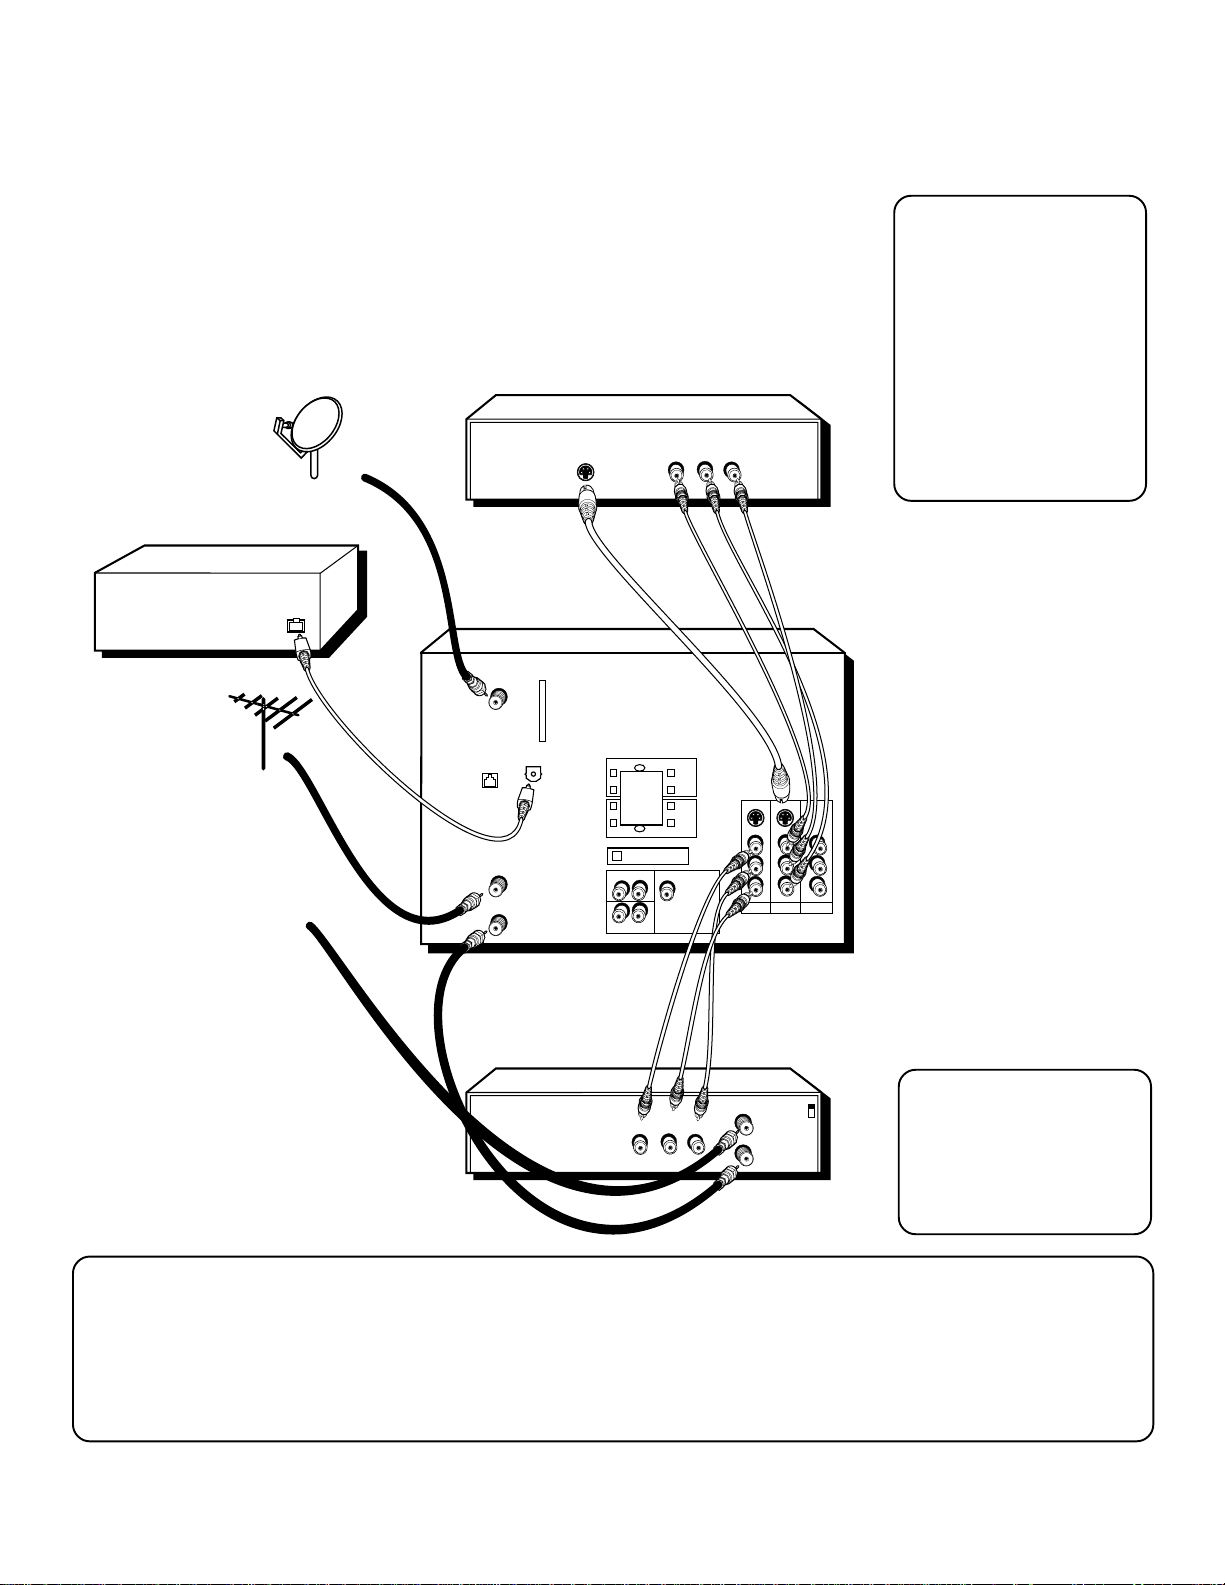
THE ADVANCED CONNECTION
TV, VCR, and DVD Player With Amplifier
DVD
AMPLIFIER WITH
OPTICAL INPUT
CABLE OR
ANY ALTERNA TE
RF SIGNAL, SUCH AS
A DIGITAL OR ANALOG
TERRESTRIAL ANTENNA
CABLE OR
OFF-AIR ANTENNA
DIGITAL
AUDIO IN
SATELLITE
DISH ANTENNA
TV
SATELLITE
IN
ACCESS
CARD
INTERFACE
PHONE
JACK
ANTENNA B
IN
ANTENNA A
IN
DIGITAL
AUDIO OUT
S-VIDEO
+ +
R
_
+
R
_
INT.
FRONT SPEAKER
EXT.
TRANSMITTER OUT
FIX/VARIABLE OUT
VIDEO
FRONT SPEAKER
L
_
+
L
_
REAR SPEAKER
LR
LFE/SUB WOOFER
LR
OUT
OUT
R
L
S-VIDEO S-VIDEO
VIDEO
VIDEO
AUDIO
AUDIO
INPUT 1 INPUT 2 INPUT 3
VIDEO
AUDIO
After you have made your
connections, program the
TV to tune to the correct
video input channel to
see and hear audio and
video from the attached
component (VCR, DVD
player, etc.). Program your
TV as described in the
“System Options and
Preferences” section of
this book.
How to view your DVD
and VCR:
• To watch the VCR in this
connection, press INPUT
on the remote control
until the correct video
input appears (in this
example, VID1). Note
that because the digital
decoder is in the TV, not
the VCR, you cannot
record digital channels.
• To watch the DVD player
in this connection, press
INPUT on the remote
control until the correct
video input appears (in
this example, S-VID2).
VCR 1
Some cable systems may
require a “conversion
box.” If so, consult your
VIDEO
OUT
IN FROM ANT
L
R
OUT TO TV
CH
CH
cable company’s box
tuning instructions for
details.
Please Read Before Using the Digital Audio Out Jack
This TV’s optical digital output jack fully complies with the international standard governing this type of jack (IEC958), and
is designed for connection to a Dolby Digital (AC-3 or PCM) receiver or Dolby Digital (AC-3 or PCM) decoder. Older
equipment, some of which is not fully compliant with IEC958, may not be compatible with the Dolby Digital bitstream.
Such a connection using anything other than Dolby Digital AC-3 or PCM receiver or decoder could create a high noise
level, causing damage to headphones or speakers.
13
Page 17
Setup and Connections
CONNECTING SPEAKERS TO THE TV
You can connect up to four additional speakers to the TV: two to the FRONT
SPEAKER terminal, and two to the REAR SPEAKER terminal.
1. If necessary, remove the vinyl covering from the ends of the speaker wire and
twist the wire core.
2. Press down and hold the lever on the speaker terminal.
3. Insert the wire core into the hole. Be sure to connect the (+) to (+) and (-) to (-).
4. Release the lever. Pull gently on the wire to see that it’s connected securely.
To specify how you have set up your speakers, press MENU on the remote control
and choose Audio. Then choose Speakers… from the menu. For details, see the
section “Adjusting TV Controls” in this book.
Connecting Front (Main) Speakers
To connect external front speakers:
1. Connect speakers to the FRONT SPEAKER terminal.
2. Set the speaker switch (labeled FRONT SPEAKER) to EXT. to indicate you would
like to use the connected external speakers.
Connecting Rear Speakers
To connect rear speakers for surround sound effects:
1. Connect speakers to the REAR SPEAKER terminal.
2. Position the speakers behind you in your TV room. To improve the surround
sound effect, you may prefer to set or mount the speakers several feet off the
ground.
INT.
FRONT SPEAKER
EXT.
FRONT SPEAKER
L
_
+
L
_
REAR SPEAKER
LR
LFE/SUB WOOFER
LR
OUT
+ +
R
_
+
R
_
TRANSMITTER OUT
FIX/VARIABLE OUT
When connecting the
speaker wire, make sure
you connect the positive
(+) terminal on the TV to
the positive (+) terminal
on the speaker. One side
of the speaker wire is
usually marked with a
white stripe to help you
match the terminals
correctly. If the (+) and
(-) terminals are not
matched properly, the
speakers will not be “in
phase,” causing
reduction in bass
frequencies.
14
Do not allow the wire
core to touch other
wires or terminals.
Damage to components
could result if the cores
of two wires touch.
Page 18
Setup and Connections
Connecting a Subwoofer
To connect a subwoofer to the TV:
1. Connect the subwoofer’s audio input to the LFE/SUBWOOFER OUT jack.
Connecting a Wireless Transmitter
To connect a wireless transmitter (for wireless speakers, wireless headphones, etc.):
1. Connect the transmitter’s audio input to the TRANSMITTER OUT jack. Make sure
to connect the right audio cable to the right audio jack and the left audio cable to
the left audio jack. The right audio connector is usually red and the left audio
connector is usually white.
2. Specify that you have connected a wireless transmitter by pressing MENU on the
remote control, selecting Audio, then Special Audio, then Wireless Audio. Select
the appropriate variable audio output. For more information, see the section in this
book, “Adjusting TV Controls.”
Connecting a Stereo Amplifier
1. Connect the amplifier’s TV audio inputs to the left and right FIX/VARIABLE OUT
jacks.
2. You may prefer to turn off the TV’s internal speakers by selecting a speaker
configuration with external speakers. Select Audio from the main menu and then
select Speakers.
Important: Do not use the amplifier’s PHONO inputs. Consult the amplifier’s
owner’s manual for the manufacturer’s recommended hookup.
TRANSMITTER OUT
LR
LFE/SUB WOOFER
OUT
LR
FIX/VARIABLE OUT
The FIX/VARIABLE OUT
jacks on the back panel
provide a fixed or
variable audio signal.
When set to “variable”
via the Audio menu, they
are ideal for use with an
audio amplifier that does
not have its own remote
volume control. When set
to “fixed,” the output
volume stays the same no
matter how the volume
changes on the TV.
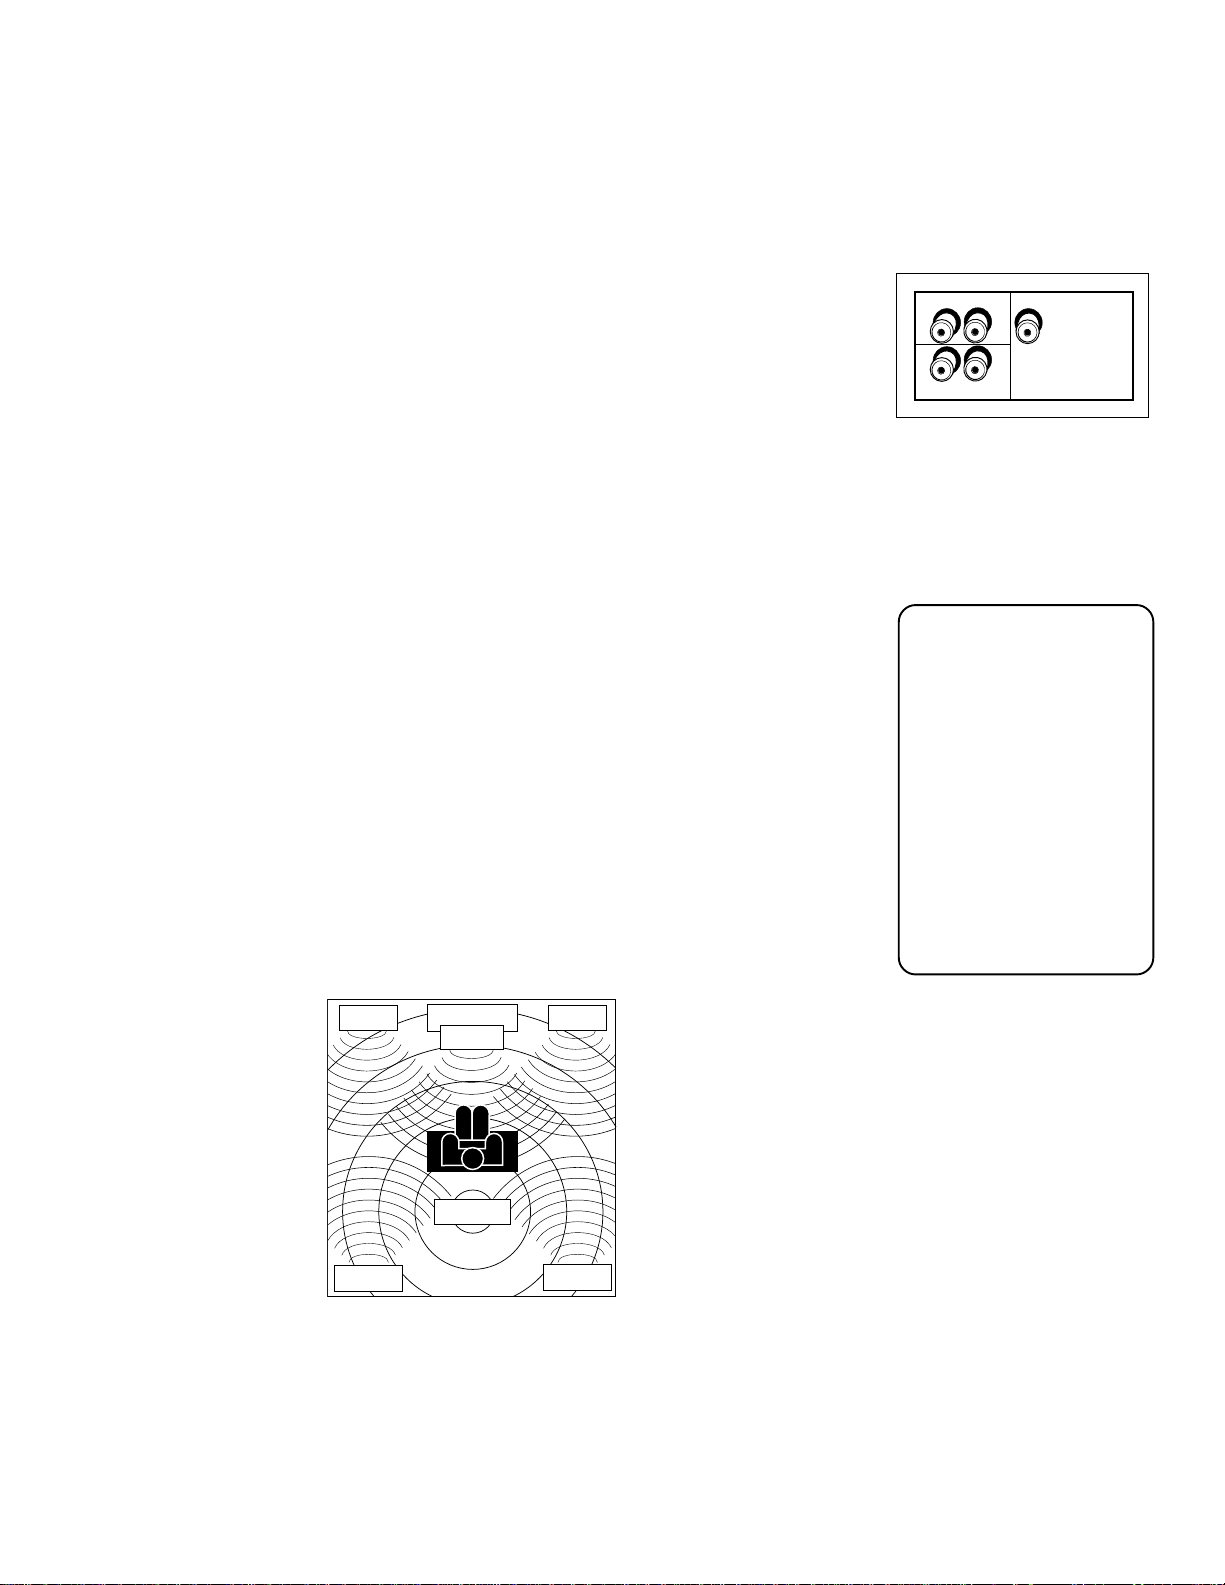
LEFT RIGHT
LEFT
SURROUND
Arrange the speakers in your TV room to achieve maximum
sound quality.
TELEVISION
CENTER
SUBWOOFER
RIGHT
SURROUND
15
Page 19
Setup and Connections
TV
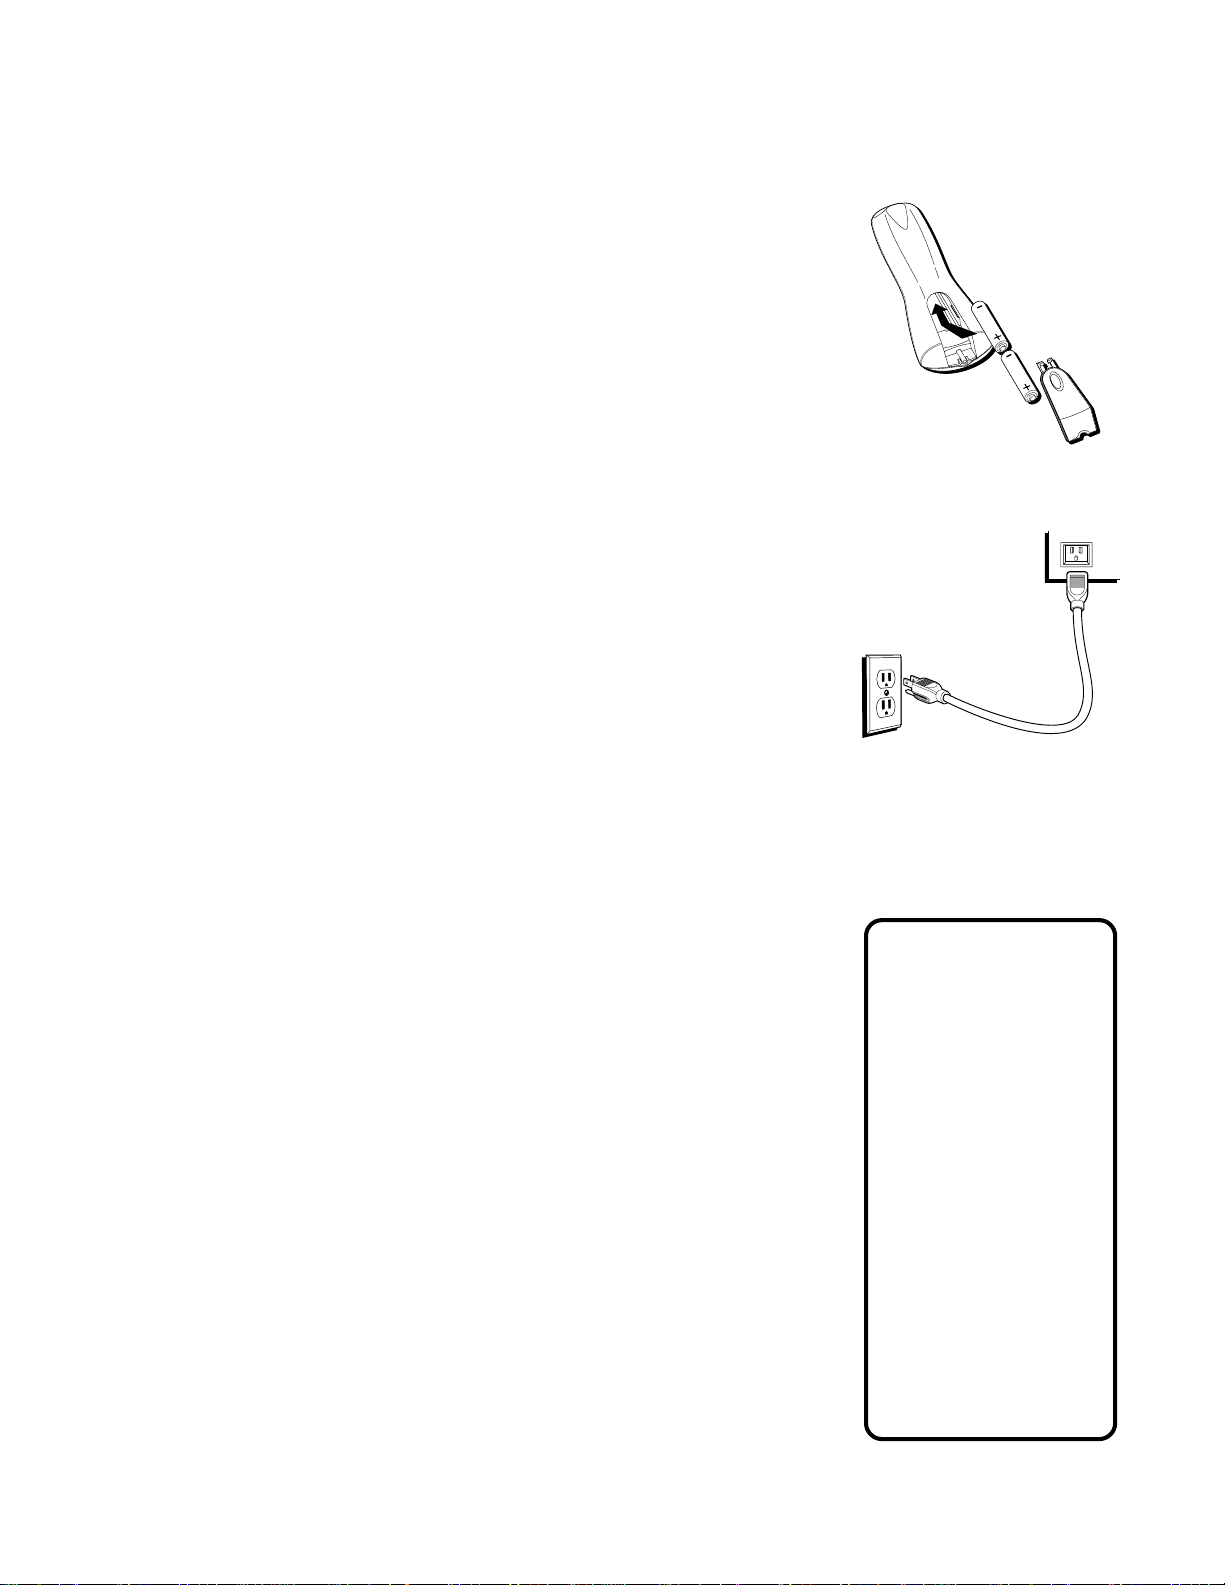
STEP 3: PLACE BATTERIES IN THE REMOTE CONTROL
Follow these steps whenever you need to install or change the batteries in your TV’s
remote control.
1. Remove the cover from the battery compartment.
2. Insert batteries into the battery compartment, matching
the + and – end of each battery.
3. Replace the cover.
STEP 4: PLUG IN AND TURN ON THE SYSTEM
Plug one end of the power cord into the back of the television as shown on right.
Plug the other end into a wall outlet. Be sure to insert the plugs completely.
To turn on the TV, press the TV or ON•OFF button on the remote control or the
POWER button on the front panel. It may take several seconds for the TV to turn on.
STEP 5: COMPLETE THE INTERACTIVE SETUP
Interactive setup appears when you turn on your TV for the first time. Follow the
steps to configure the basics of your system, such as setting up the time and day,
searching for available channels, and setting up speakers. To run it again, select
Assistance from the main menu, then select Interactive Setup. For more details, see
the section “Getting Assistance” in this book.
STEP 6: ORDER PROGRAMMING
You should decide if you would like to receive DIRECTV® programming*. To receive
DIRECTV programming, your satellite dish antenna must be installed and pointed
correctly. You must also contact your service provider, DIRECTV.
Programming with DIRECTV: Call 1-800-347-3288
* DIRECTV® programming is provided in accordance with the terms and conditions
of the DIRECTV Customer Agreement, a copy of which is provided with your first
DIRECTV billing statement. DIRECTV is a trademark of DIRECTV, Inc., a unit of
Hughes Electronics Corp., and is used with permission.
When you order
programming, you need
to know your access
card number. To get the
number, select
Assistance from the
main menu and then
select System Test.
Wait for the system to
run all of its tests. The
access card number is
displayed at the end of
the system test.
Write the access card
number in the space
below for easy
reference:
______________________________
16
Page 20

Using the Remote
In this section y ou will find out ho w to use
your uni versal remote control. This section:
• defines the buttons on the remote
control.
• describes ho w you toggle between TV
“mode” and DIRECTV “mode. ”
• shows you how to change between
analog terrestrial, digital terrestrial, and
DIRECTV channels.
• walks y ou through using the PIP
(picture-in-picture) feature.
• describes ho w to program the remote
to control other devices suc h as a VCR.
Important: Because this uni versal remote
can control sev eral different components
(TV , VCR, etc.), it uses oper ational modes
triggered b y the component buttons. F or
example, if y ou want the remote to control
the VCR, y ou would press the VCR button
to put the remote into VCR mode so y ou
could control the VCR.
SETUP AND CONNECTIONS
1
➣
USING THE REMOTE
2
BASIC TV OPERATION
3
USING THE
4
PROGRAM GUIDES
➣➣
➣
ADJUSTING TV CONTROLS
5
➣
USING THE PROFILES
6
➣
SYSTEM OPTIONS AND
7
PREFERENCES
➣
GETTING ASSISTANCE
8
➣
REFERENCE
9
Page 21
Using the Remote
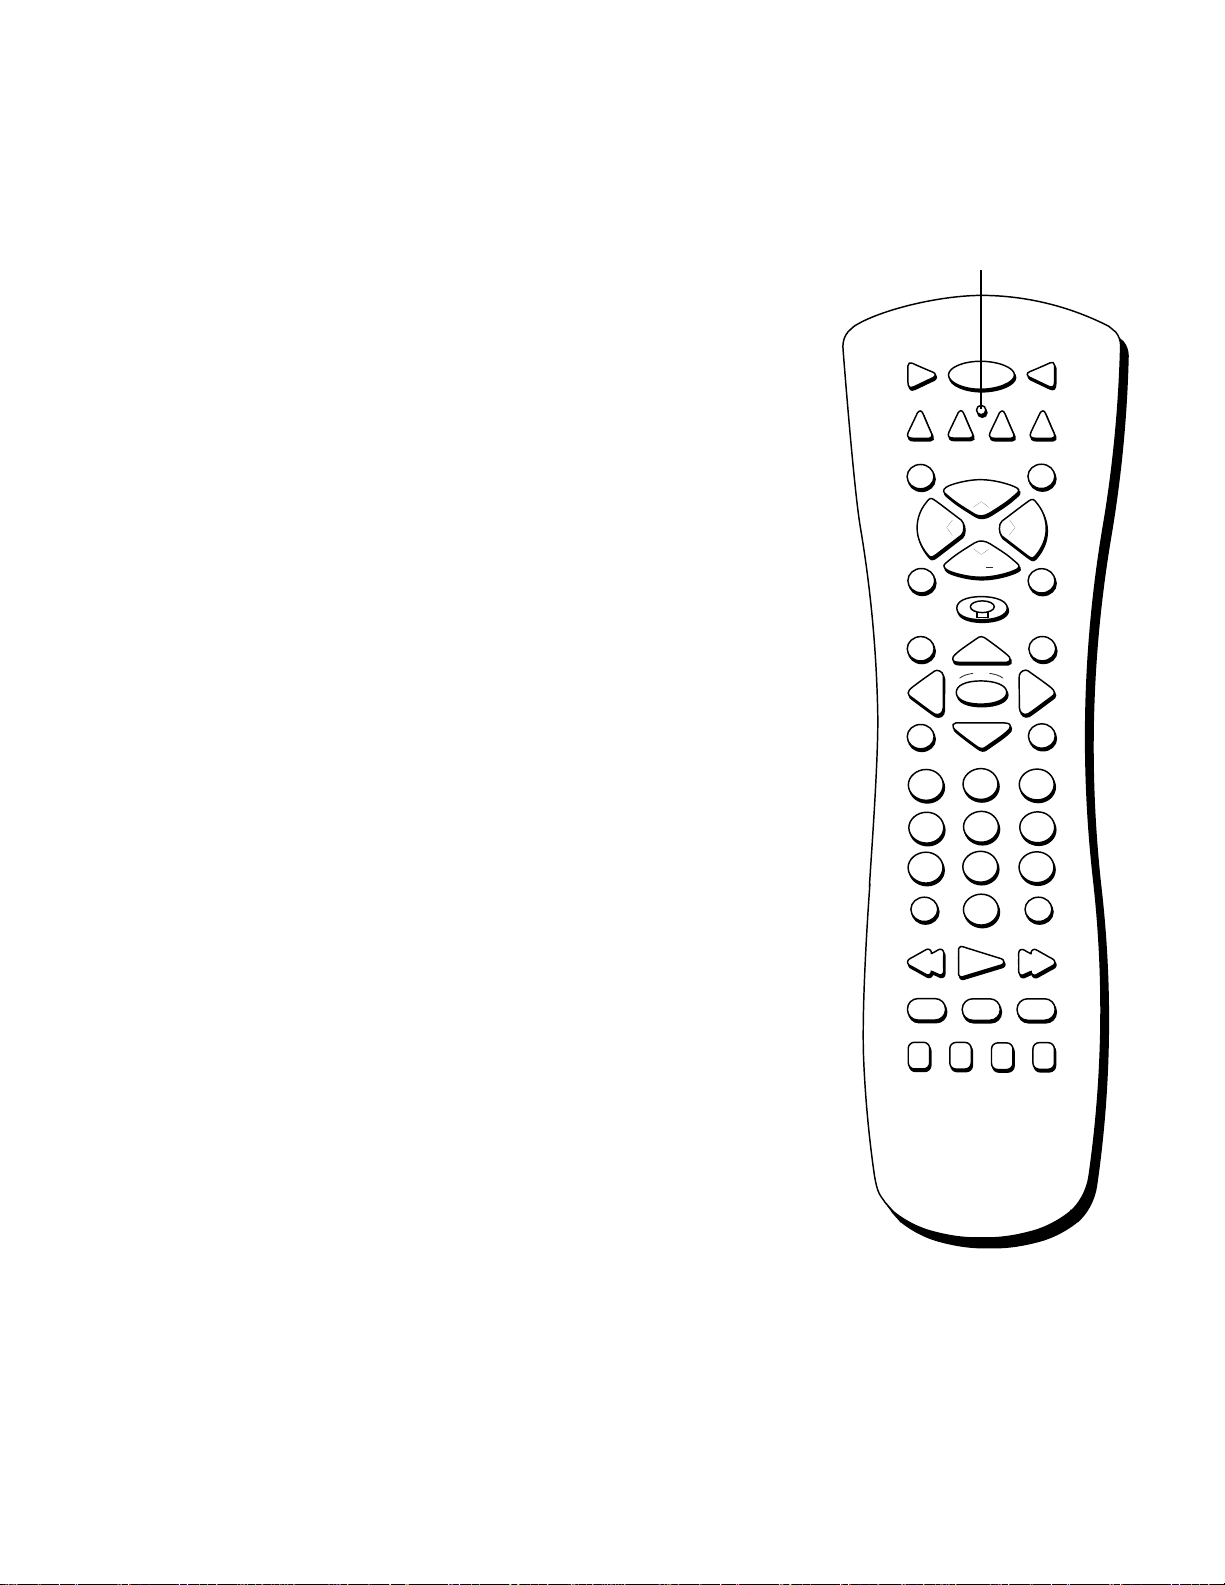
REMOTE CONTROL BUTTONS
ON•OFF When the remote control is in TV or DIRECTV mode, turns the TV on or
off. If in another component mode, (VCR, DVD, etc.) and programmed, will turn
the component on and off. When pressed twice within two seconds, all
components that are on will be turned off (this feature only works with most RCA,
PROSCAN, and GE products).
VCR1 Places the remote control in VCR mode and if auto tuning is enabled, it will
turn on the TV and tune to the correct channel for viewing VCR1.
TV Turns on the TV and tunes to the last-viewed TV channel. Also places the
remote control in TV mode. Placing the remote in TV mode enables you to access
the menu system as well as tune to analog, digital, or cable TV channels.
DVD Places the remote control in DVD mode and if auto tuning is enabled, it will
turn on the TV and tune to the correct channel for viewing your DVD player.
VCR2 Places the remote control in VCR2 mode and if auto tuning is enabled, it
will turn on the TV and tune to the correct channel for viewing VCR2.
LED Light that indicates you’re in programming mode when programming the
remote control. Also displays when a valid remote control button is pressed.
AUX Places the remote in auxiliary mode in order to control the component (such
as a laserdisc player) that you have programmed it to control. Acts as a “wildcard”
button, as it can be programmed to control a second VCR, cable box, or an RCA,
GE, or PROSCAN audio component.
DIRECTV Places the remote control in DIRECTV mode, turns on the TV, and tunes
to the last-viewed DIRECTV channel. If you subscribe to DIRECTV® programming,
you must be in DIRECTV mode to view DIRECTV channels. Placing the remote in
TV mode enables you to access the menu system as well as tune to DIRECTV
channels.
LED
ON•OFF
DVD
VCR2
MUTE SKIP
CH
VOL
CH
GUIDE INFO
OK
MENU CLEAR
123
456
789
INPUT
0
REVERSE PLAY FORWARD
TVVCR1
AUX
DIRECTV
+
VOL
GO BACKFETCH
ANTENNA
MUTE Reduces the TV’s volume to its minimum level. Press again to restore
volume.
SKIP Press once before changing channels and the TV will wait 30 seconds and
then return to the original channel. Press repeatedly to add more time. If no other
displays are present, pressing CLEAR will cancel the skip timer.
CHAN +/- Scrolls up or down through the current channel list. Press once to
change the channel up or down; press and hold to continue changing channels. If
you are in TV mode and press CH+/-, you scroll through TV channels. If you
subscribe to DIRECTV and are in DIRECTV mode, you scroll through DIRECTV
channels.
VOL UP/DOWN Adjusts the TV’s audio volume.
FETCH Brings up the Fetch menu, which is a list of most commonly accessed
menu items.
18
RECORD
STOP PAUSE
PIP SWAP CH CTRL WHO
Page 22

Using the Remote
GO BACK Moves you back and forth between the last two channels selected in either
DIRECTV mode or TV mode. For example, if you have been viewing both DIRECTV and
TV channels (and thus using both the DIRECTV and TV “modes”), pressing GO BACK
while watching a DIRECTV channel moves you back to the last DIRECTV channel you
viewed. Pressing it while watching a TV channel moves you to the last TV channel you
viewed. In the menu system, pressing GO BACK returns you to the previous menu
screen.
LIGHT ICON Press to illuminate the remote control’s buttons.
GUIDE When in TV mode, brings up the TV program guide. In DIRECTV mode,
brings up the DIRECTV
scroll through the different types of guides.
INFO Brings up channel and viewing information via the channel banner. Press again
to bring up an extended channel banner. Press when in the program guides to get more
information on the highlighted program or channel.
ARROWS Used to point to different items in the menu system and adjust the menu
controls. Also move the PIP window when no menus are on the screen.
OK When in the menu system, selects highlighted items.
MENU Brings up the main menu and selects highlighted items. When in using an
RCA, GE, or PROSCAN VCR and in VCR mode, it functions as a PROGRAM button.
CLEAR Removes on screen displays and returns to normal viewing. If no displays are
present and the skip timer is set, CLEAR will cancel the timer.
®
programming guide. Subsequent presses of the GUIDE button
Don’t worry about getting
stuck inside a menu.
Pressing the CLEAR
button on the remote
control takes you out of
the menu system.
DIGIT BUTTONS (0 - 9) Enters channel numbers and time settings directly though the
remote control. For more information on entering digits to change channels, see the
section “Basic TV Operation.” When in the menus, the digit buttons can be used to
directly select items without using the arrows. 0 can be used to return to the previous
menu screen.
INPUT Toggles through the available external input sources.
ANTENNA Switches the source of the off-air signal between ANTENNA A and B.
REVERSE, PLAY, FORWARD, RECORD, STOP, PAUSE If programmed, provides
transport control for some remote-controllable VCRs, DVD players, laserdisc players,
tape decks, and CD players.
PIP Brings up the small picture-in-picture window. Press again to hide PIP.
SWAP Exchanges the main picture with the PIP window.
CH CTRL (Channel Control) Selects the picture window (either the main or PIP
window) that will change when you press the CH +, CH -, INPUT, or digit buttons on
the remote control.
WHO Toggles through user profiles.
19
Page 23
Using the Remote
PROGRAMMING THE REMOTE CONTROL
The universal remote can be programmed to control most brands of remote
controllable components, such as VCRs. The remote is already programmed to
control most RCA, GE and PROSCAN TVs, VCRs, DVD players, and laserdisc
players.
TESTING THE REMOTE CONTROL
To determine whether the universal remote control requires programming, turn on
a component, such as a VCR, point the remote control at the VCR, and press the
VCR1 button. Then press ON•OFF or CH + (channel up) or CH - (channel down)
to see if the VCR responds to the remote control commands. If not, it requires
programming.
VCR1
LED
ON OFF
TV
PROGRAMMING THE REMOTE CONTROL
Using Automatic Code Search
The following instructions can be used to program the remote to control each of
the components connected to your TV. If you want to exit the automatic code
search without programming any of your components, press and hold CLEAR until
the LED light on the remote control turns off.
1. Turn on the component you want to control (VCR, DVD, etc.).
2. Press and hold the button you want to program (VCR1, VCR2, etc.). Note that
the AUX button can only be programmed using direct entry (see the next
section for details). While holding the component button, press and hold
ON•OFF until the LED light on the remote control turns on, then release both
buttons.
3. Press and release PLAY, then wait five seconds or until the LED light stops
flashing.
At this point the remote control is searching for the correct code to program. If,
after five seconds, the component you want to control does not turn off, press
PLAY again to tell the remote control to search the next set of codes.
Continue pressing PLAY until the component turns off or you have searched
through all of the codes. There are 20 total sets of codes. If the component
does not turn off after pressing PLAY 20 times, then the remote cannot control
that particular component.
DIRECTV
AUX
VCR2
DVD
+
H
C
C
PLAYREVERSE
STOP
V
O
L
H
-
L
O
V
You’ll use these buttons when you
program the remote to control any
component.
The remote may not operate all
models of all brands.
If the component you want to control does turn off:
1. Press and release REVERSE, then wait two seconds. Repeat this step until the
component turns back on.
2. To finish, press and hold STOP until the LED light on the remote control turns
off.
20
Page 24

Using the Remote
Using Direct Entry
1. Turn on the component to be programmed.
2. Look up the brand and code number(s) for the component on the code list in the
section “Remote Control Codes” on the following page.
3. Press and hold the remote control button you want to program.
4. Enter the code from the code list.
5. Release the button, and then press ON•OFF to see if the component responds to
the remote control commands. If it doesn’t, try pressing the component button and
then ON•OFF again.
6. If you get no response, repeat these steps using the next code listed for your brand
until the component responds to the remote control commands.
USING THE REMOTE TO CONTROL A COMPONENT
Once the remote has been programmed successfully, you are ready to use it to
control your components, such as a VCR, DVD player, or laserdisc player.
To operate the component:
This remote control may
not operate all models
of the brands that are
shown. Use the codes
shown in this manual,
or on the sheet packed
with your remote
control.
1. Press the component button (VCR1, VCR2, DVD, or AUX) to set the remote to
control the component.
2. Press ON•OFF to turn the component on or off.
3. Use the remote control buttons that apply to that component.
21
Page 25

Using the Remote
REMOTE CONTROL CODES
VCR
Admiral ........................................ 2131
Adventura.................................... 2026
Aiko .............................................. 2027
Aiwa................................... 2002, 2026
Akai... 2003, 2004, 2005, 2007, 2008,
American High ........................... 2021
Asha.............................................. 2013
Audio Dynamics.............. 2009, 2010
Audiovox ..................................... 2014
Bell & Howell.............................. 2011
Beaumark .................................... 2013
Broksonic ......................... 2012, 2025
Calix ............................................. 2014
Candle .........2013, 2014, 2015, 2016,
Canon..................... 2021, 2022, 2114
Capehart........................... 2020, 2110
Carver .......................................... 2062
CCE ................................... 2027, 2061
Citizen....... 2013, 2014, 2015, 2016,
Colortyme................................... 2009
Colt............................................... 2061
Craig ............ 2013, 2014, 2023, 2061
Curtis-Mathes...... 2000, 2002, 2009,
2016, 2018, 2021, 2022, 2024, 2115
Cybernex..................................... 2013
Daewoo ...... 2015, 2017, 2019,2025,
Daytron........................................2110
Dbx .................................... 2009, 2010
Dimensia...................................... 2000
Dynatech .......................... 2002, 2026
Electrohome .................... 2014, 2029
Electrophonic .............................2014
Emerson................. 2002, 2012,2014,
. 2015, 2021, 2024, 2025,2026,2029,
2030, 2032, 2033, 2034, 2035, 2036,
2037, 2038, 2039, 2040, 2041, 2042,
2044, 2045, 2047, 2065, 2105, 2113,
Fisher 2011, 2023, 2048, 2049, 2050,
Fuji...................................... 2021, 2119
Funai .................................. 2002, 2026
Garrard ........................................ 2026
GE .....2000, 2001, 2013, 2021, 2022,
Goldstar......2009, 2014, 2018, 2054,
Gradiente .................................... 2026
Harley Davidson ........................ 2026
Harman Kardon ......................... 2009
Harwood .....................................2061
Headquarter ............................... 2011
Hitachi .........2002, 2055, 2056, 2057,
HI-Q .............................................2023
Instant Replay ............................. 2021
JCL ................................................ 2021
JC Penney ................................... 2009,
2010,2011,2013,2014,2021,
2022, 2055, 2056, 2058, 2059, 2060,
Jensen ..................... 2055, 2056, 2111
JVC....2009, 2010, 2011, 2018, 2058,
Kenwood ....2009, 2010, 2011, 2016,
2111,2112, 2113
2017, 2018, 2019
2017, 2018,2019,2027
2013,
2026, 2027, 2028, 2110
2116, 2117, 2130
2051, 2052,2118
2053, 2115, 2120
2121
2107, 2111, 2120, 2122
2107, 2118
2111, 2123
2018, 2058, 2111,2123
KLH ..............................................2061
Kodak ................................2014, 2021
Lloyd.................................. 2002, 2026
Logik .............................................2061
LXI ................................................2014
Magnavox... 2021, 2022, 2062, 2063,
Magnin ......................................... 2013
Marantz .................2009, 2010, 2011,
.2016, 2018, 2021, 2058, 2062,2064
Marta ............................................2014
Masushita .................................... 2021
MEI ................................................2021
Memorex .........................2002, 2011,
2013, 2014, 2021, 2023, 2026, 2104,
MGA .......................2029, 2065, 2113
MGN T echnology.......................2013
Midland ....................................... 2053
Minolta ...................2055, 2056, 2107
Mitsubishi .. 2029, 2055, 2056, 2065,
2070, 2071, 2072, 2073, 2074, 2106,
Montgomery Ward.........2075, 2131
Motorola.......................... 2021,2131
MTC .......................2002, 2013, 2026
Multitech.... 2002, 2013, 2016, 2026,
NEC.2009, 2010, 2011, 2016, 2018,
2058, 2064, 2076, 2078, 2079, 2111,
Nikko............................................2014
Noblex ........................................ 2013
Olympus ..................................... 2021
Optimus............................ 2014, 2131
Optonica..................................... 2096
Orion............................................2035
Panasonic ... 2021, 2022, 2109, 2125,
Pentax2016, 2055, 2056, 2107, 2120
Pentex Research ........................2018
Philco........... 2021, 2022, 2062, 2063
Philips ..........2021, 2062, 2096, 2124
Pilot...............................................2014
Pioneer....... 2010, 2055, 2080, 2081,
Portland ...... 2016, 2017, 2019, 2110
PROSCAN .......................2000, 2001
Protec.......................................... 2061
Pulsar............................................2104
Quarter....................................... 2011
Quartz......................................... 2011
Quasar ...................2021, 2022, 2125
RCA .2000, 2001, 2003, 2013, 2021,
2055, 2056, 2082, 2083, 2084,2085,
2088, 2089, 2090, 2091, 2107, 2115,
Radioshack/Realistic...... 2002, 2011,
2021, 2022, 2023, 2026, 2029, 2049,
Radix.............................................2014
Randex ........................................ 2014
Ricoh ............................................2128
Runco .......................................... 2104
Samsung ..... 2005, 2013, 2015, 2033,
Sanky .................................2131, 2104
Sansui...........2010, 2092, 2111, 2123
Sanyo ......................2011, 2013, 2023
Scott 2012, 2015, 2025, 2032, 2035,
2104, 2108, 2124
2131
2066, 2067, 2069,
2113, 2123
2053, 2061
2123
2126, 2127
2123
2086,2087,
2120, 2125
2013, 2014
2050, 2096, 2131
2053, 2112
2038, 2065, 2093, 2116
Sears 2011, 2014, 2021, 2023, 2048,
2049, 2050, 2051, 2055, 2056, 2107,
Sharp 2002, 2017, 2029, 2094, 2095,
Shintom....... 2004, 2056, 2061, 2098
Shogun..........................................2013
Signature......................... 2002, 2131
Singer......................2021, 2061, 2128
Sony . 2002, 2004, 2098, 2099, 2119,
STS .....................................2021, 2107
Sylvania....... 2002, 2021, 2022, 2026,
Symphonic ........................2002, 2026
T andy .................................2002, 2011
Tashiko .........................................2014
T atung................................2058, 2111
TEAC 2002, 2026, 2058, 2085, 2111
T echnics ............................2021, 2109
T eknika....... 2002, 2014, 2021, 2026,
TMK........................ 2013, 2024, 2047
T oshiba....... 2015, 2049, 2051, 2055,
T oteVision ........................2013, 2014
Unitech ........................................2013
Vector Research.. 2009, 2010, 2015,
Victor ...........................................2010
Video Concepts .. 2009, 2010, 2015,
Videosonic...................................2013
Wards....... , 2002, 2013, 2014, 2015,
2029, 2055, 2056, 2061, 2096, 2101,
XR-1000 ................2021, 2026, 2061
Y amaha ....... 2009, 2010, 2011, 2018,
Zenith2004, 2098, 2104, 2119, 2128
ABC . 5002, 5003, 5004, 5005, 5006,
Antronix ........................... 5008, 5009
Archer.........5008, 5009, 5010, 5011
Cabletenna ..................................5008
Cableview.................................... 5008
Century ....................................... 5011
Citizen..........................................5011
Colour V oice ....................5012, 5013
Comtronics...................... 5014, 5015
Contec ......................................... 5016
Eastern .........................................5017
Garrard ........................................5011
GC Electronics...........................5009
Gemini....................5018, 5019, 5049
General Instrument...................5003
Hamlin ........ 5020, 5021, 5022, 5035,
Hitachi..........................................5003
Hytex............................................5002
Jasco..............................................5011
Jerrold5003, 5005, 5007,5018, 5023,
Magnavox.....................................5025
Memorex..................................... 5026
Movie Time............ 5002, 5027, 5028
NSC ........................ 5002, 5027, 5028
Oak ..........................5002,5016, 5029
Panasonic..........................5048, 5052
2062, 2063, 2065, 2124
2065, 2093, 2116
2021, 2023, 2026,
2102, 2103, 2107, 2116, 2131
Cable Boxes
5024, 5046, 5053
2118
2096, 2131
2128
2100, 2129
2016
2016, 2113
2058, 2111
5007,5053
5045
Paragon ....................................... 5026
Philips ........ 5011, 5012, 5013, 5019,
Pioneer............................. 5033, 5034
Pulsar........................................... 5026
RCA .......................5047, 5049, 5052
Realistic............................ 5009, 5049
Regal ................................. 5022, 5035
Regency.......................................5017
Rembrandt .................................5003
Runco .......................................... 5026
Samsung ........................... 5014, 5034
Scientific Atlanta. 5006, 5036, 5037,
Signal................................. 5014, 5018
Signature.....................................5003
SL Marx....................................... 5014
Sprucer .......................................5052
Starcom.................5007, 5018, 5053
Stargate ............................5014, 5018
Starquest.....................................5018
Tandy ...........................................5040
Teleview ...................................... 5014
T ocom ...................5004, 5023, 5041
Toshiba ........................................5026
Tusa ..............................................5018
TV86............................................5027
Unika .....................5008, 5009, 5011
United Artists ............................ 5002
United Cable .............................5053
Universal.... 5008, 5009, 5010, 5011
Videoway ....................................5044
Viewstar..... 5015, 5025, 5027, 5040
Zenith.................... 5026, 5050, 5051
Chapparal ........................ 5056, 5057
Drake................................5058, 5059
GE .....................................5000, 5001
General Instuments...... 5060, 5061,
Panasonic ....................................5075
Primestar ....................................5076
PROSCAN ...................... 5000, 5001
RCA..................................5000, 5001
Realistic....................................... 5063
Sony .............................................5072
STS1............................................. 5064
STS2............................................. 5065
STS3............................................. 5066
STS4............................................. 5067
Toshiba ........................................5068
Toshiba ........................................5073
Uniden.........................................5069
(For RCA and Dimensia
brands only)
AM/FM ........................................4003
Aux ..............................................4004
Phono ..........................................4005
CD ...............................................4007
Tape ............................................. 4006
GE, RCA, PROSCAN ............. 2001
5025, 5030, 5031, 5032
5038
Satellite Receivers
5062
Audio
DVD Pla y ers
22
Page 26

Basic TV Operation
T his section tells y ou about the c hannel
banner, whic h appears w hen y ou change
channels or press INFO on the remote.
It also describes ho w to change c hannels
and modes and ho w to use PIP (picture-inpicture).
T his section gi ves you a broad, clear view
of how to operate the basics of y our TV .
SETUP AND CONNECTIONS
1
➣
USING THE REMOTE
2
BASIC TV OPERATION
3
USING THE
➣➣
4
PROGRAM GUIDES
➣
ADJUSTING TV CONTROLS
5
➣
USING THE PROFILES
6
SYSTEM OPTIONS AND
7
PREFERENCES
➣
➣
8
9
GETTING ASSISTANCE
➣
REFERENCE
Page 27
BASIC TV OPERATION
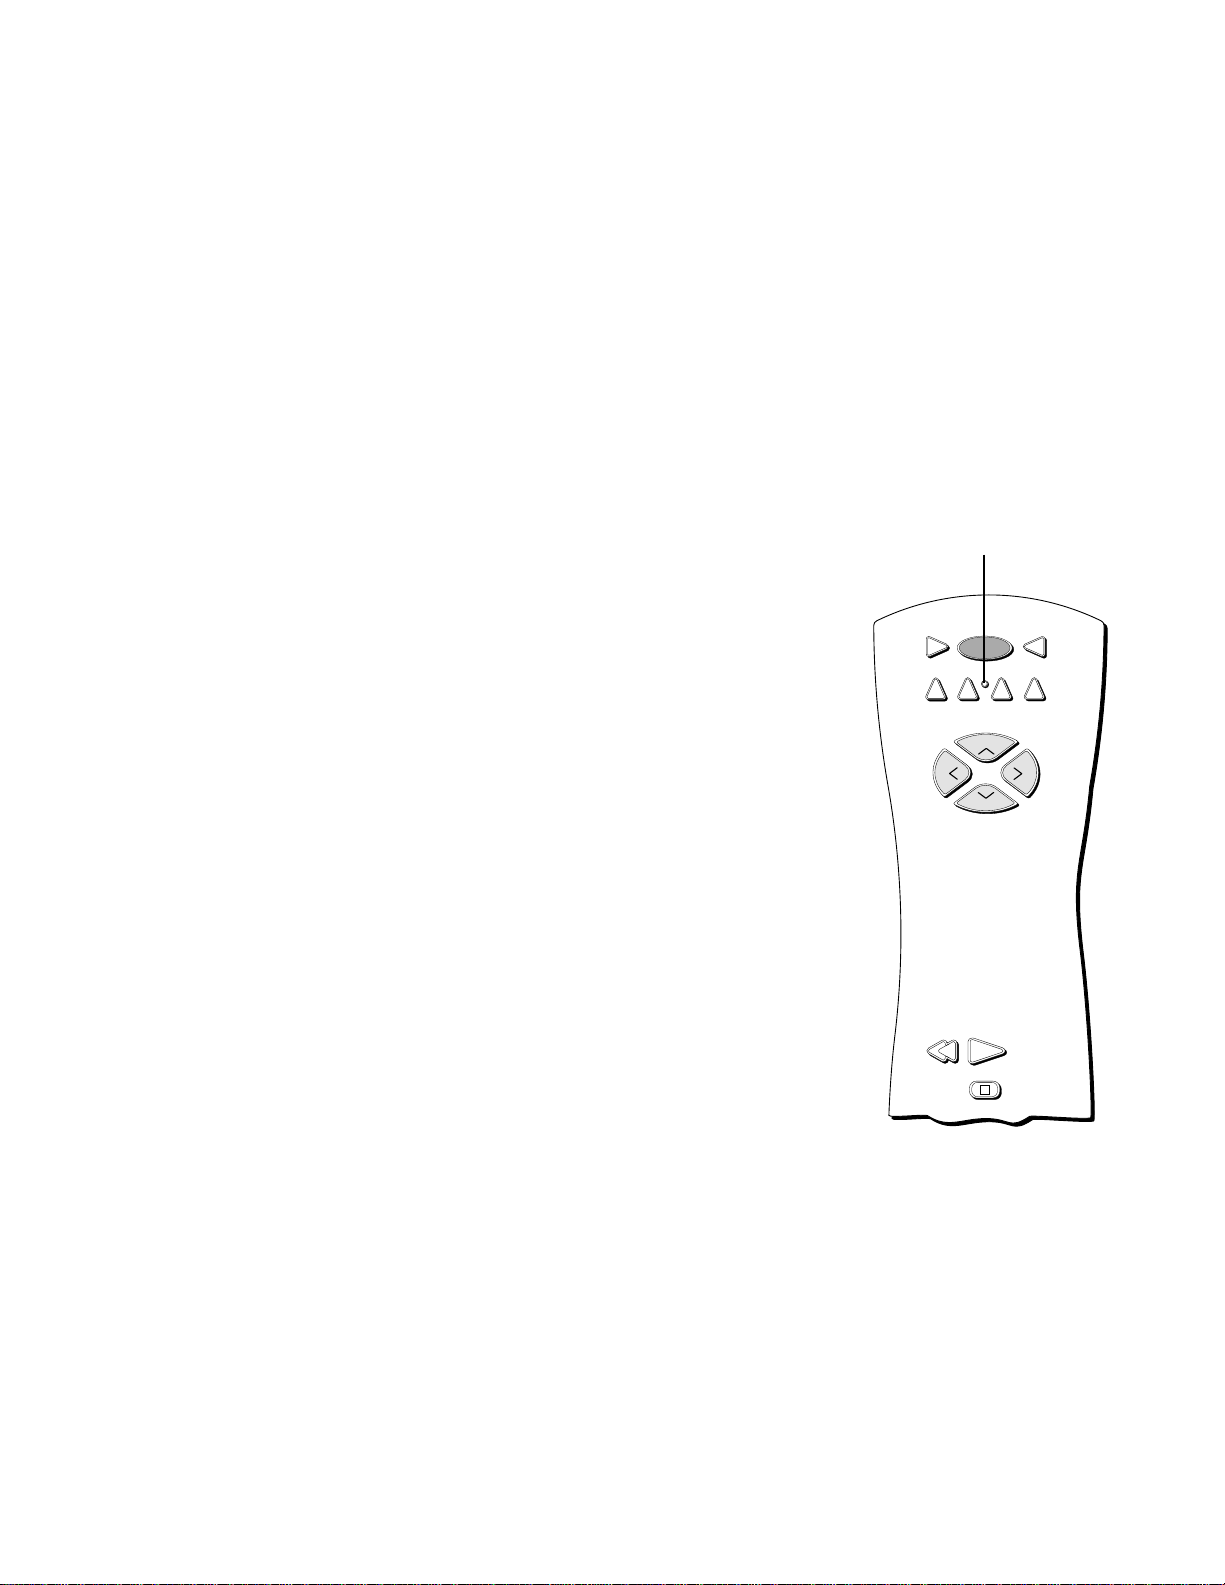
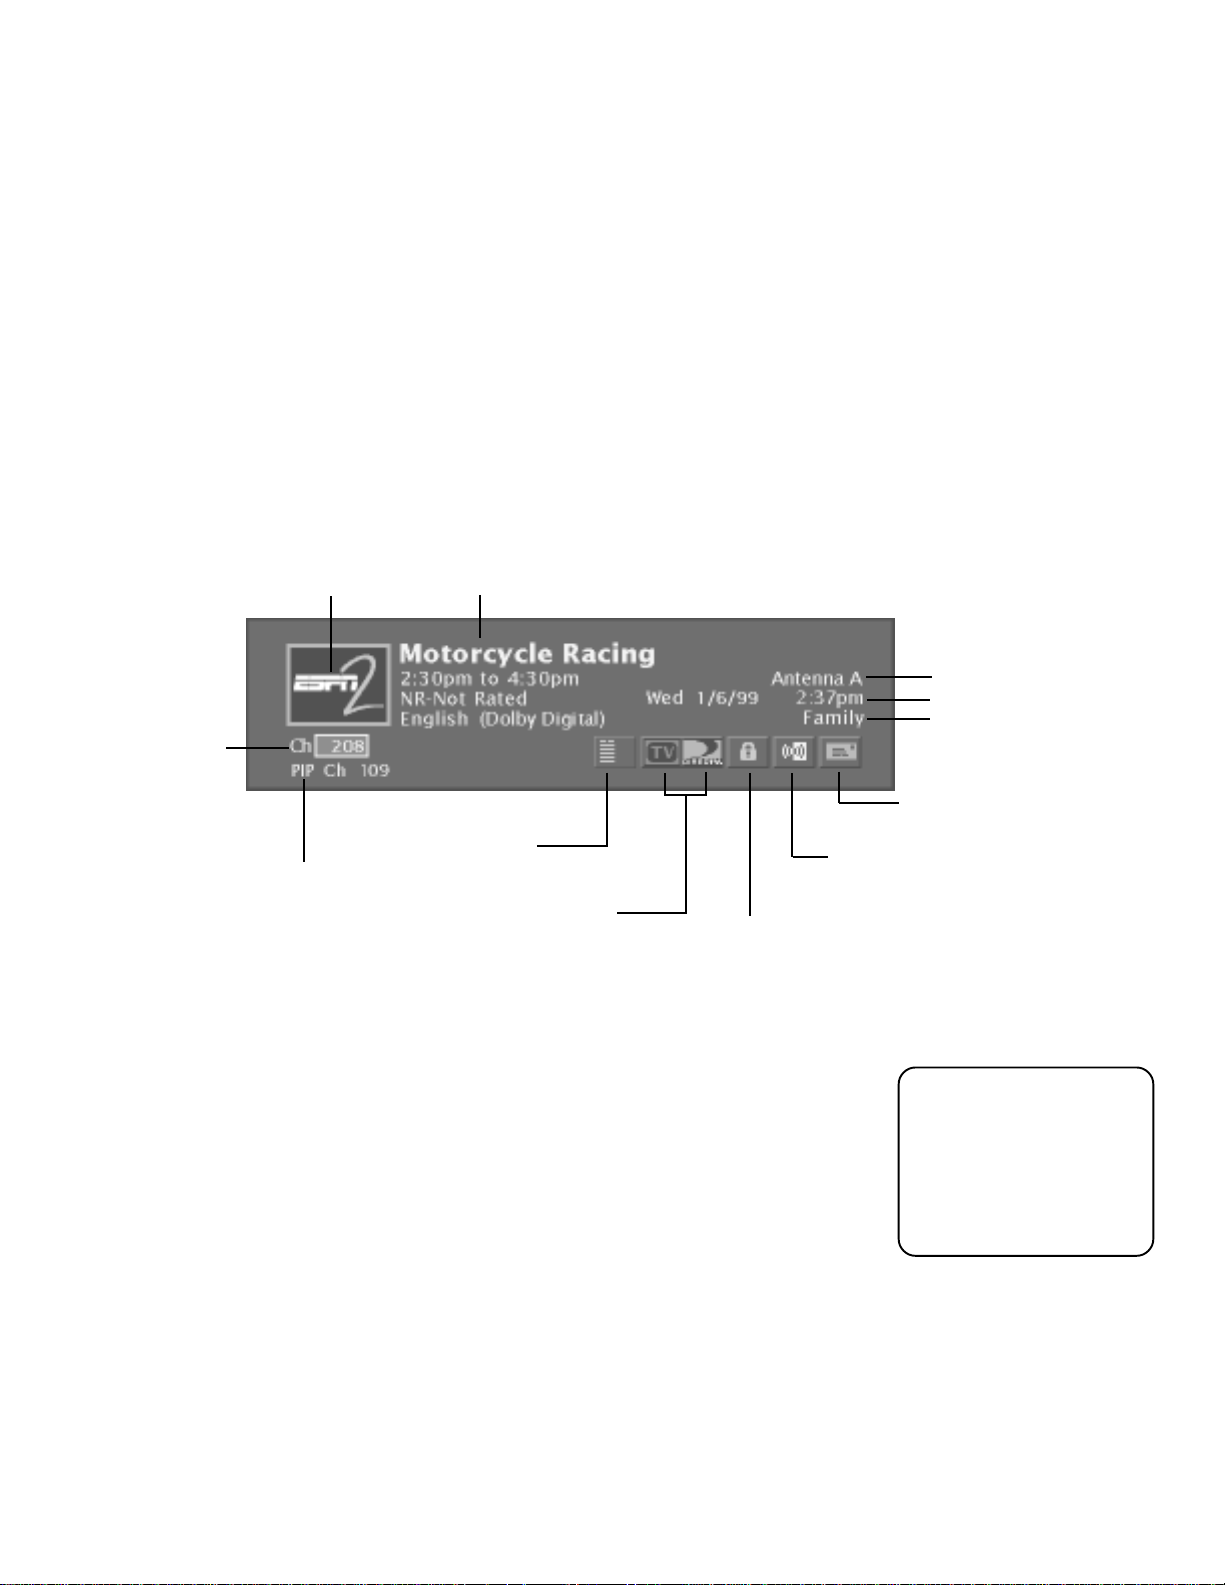
ABOUT THE CHANNEL BANNER
The channel banner appears whenever you tune to a channel or press INFO on the
remote control. Use the arrow buttons and OK to choose an item in the channel
banner.
On-screen icons represent frequently-used features. Some icons also change
appearance to show the item’s status.
Below is a description of the icons you’ll find on the channel banner.
Channel number
Channel logo, when available
Takes you to the Main menu
PIP channel number
Toggles between TV mode and DIRECTV mode
Program title, start and end time, rating, language, and audio mode
Current antenna
Current date and time
“Family” is one of five
selectable profiles
Displays mail from program providers
Cycles through the audio language choices
Locks the system or unlocks the video
Please note that when
you’re in TV mode, the
channel banner will
look differently than
when you’re in
DIRECTV mode (if you
subscribe to DIRECTV).
24
Page 28

BASIC TV OPERATION
Main menu icon When selected, takes you to the main menu.
TV/DIRECTV logo Toggles between TV and DIRECTV mode. The highlighted
icon indicates the current mode.
Green unlock icon Indicates that the system is unlocked. Spending, viewing and
other limits can be accessed and changed.
Yellow unlock icon Indicates that a password has been entered to override
profile limits. No limits can be accessed or changed.
Red lock icon Indicates that no limits can be accessed or changed. A password is
required to override limits or access the system.
Audio language icon If the icon is highlighted when watching a digital terrestrial
or a DIRECTV channel, more than one audio language is available. If you select
the icon, you will hear the language, and the language name will appear in the
channel banner. You will activate the language for the current channel (all other
channels remain unaffected).
Highlighted mail icon Indicates that you have a message in your mailbox from
your DIRECTV programming provider. Select this icon to access the mailbox and
read your mail. If you do not subscribe to DIRECTV® programming, this icon will
be absent.
Press INFO on the remote
control twice to view an
expanded channel banner
that shows a program
description (when
available).
25
Page 29
BASIC TV OPERATION
CHANGING BETWEEN DIRECTV AND TV MODE
When you change channels by entering numbers with the remote control, you tune
to programming that can come from one of three different sources: the DIRECTV
satellite (if you have DIRECTV service), a terrestrial off-air antenna, or cable TV. You
tune to one of these sources by pressing either TV or DIRECTV on the remote
control; then you can enter the channel numbers. The diagrams below show how
your remote control communicates with the three sources.
ON•OFF
In DIRECTV mode, you tune to channels
that come from the DIRECTV satellite
signal (if you subscribe to DIRECTV
®
programming). Enter channel numbers
that are three or four digits long. Then
press OK to tune.
DVD
MUTE SKIP
VOL
GUIDE INFO
TVVCR1
DIRECTV
AUX
VCR2
CH
+
VOL
CH
GO BACKFETCH
OK
In TV mode, you tune to channels that
carry the terrestrial off-air or cable TV
signal.
• To tune to a digital channel, enter
channel numbers that are one, two, or
three digits long. If necessary, press the
right arrow and enter a subchannel
number. These numbers appear in the
box to the right of the primary channel
number. Press OK to tune.
• To tune to an analog channel, enter
channel numbers that are up to three
digits long. Press OK to tune.
MENU CLEAR
ON•OFF
DVD
MUTE SKIP
GUIDE INFO
DIRECTV
AUX
VCR2
CH
+
VOL
CH
GO BACKFETCH
OK
TVVCR1
VOL
Primary
Channel
Subchannel (if
necessary)
Right arrow button
26
MENU CLEAR
Page 30
BASIC TV OPERATION
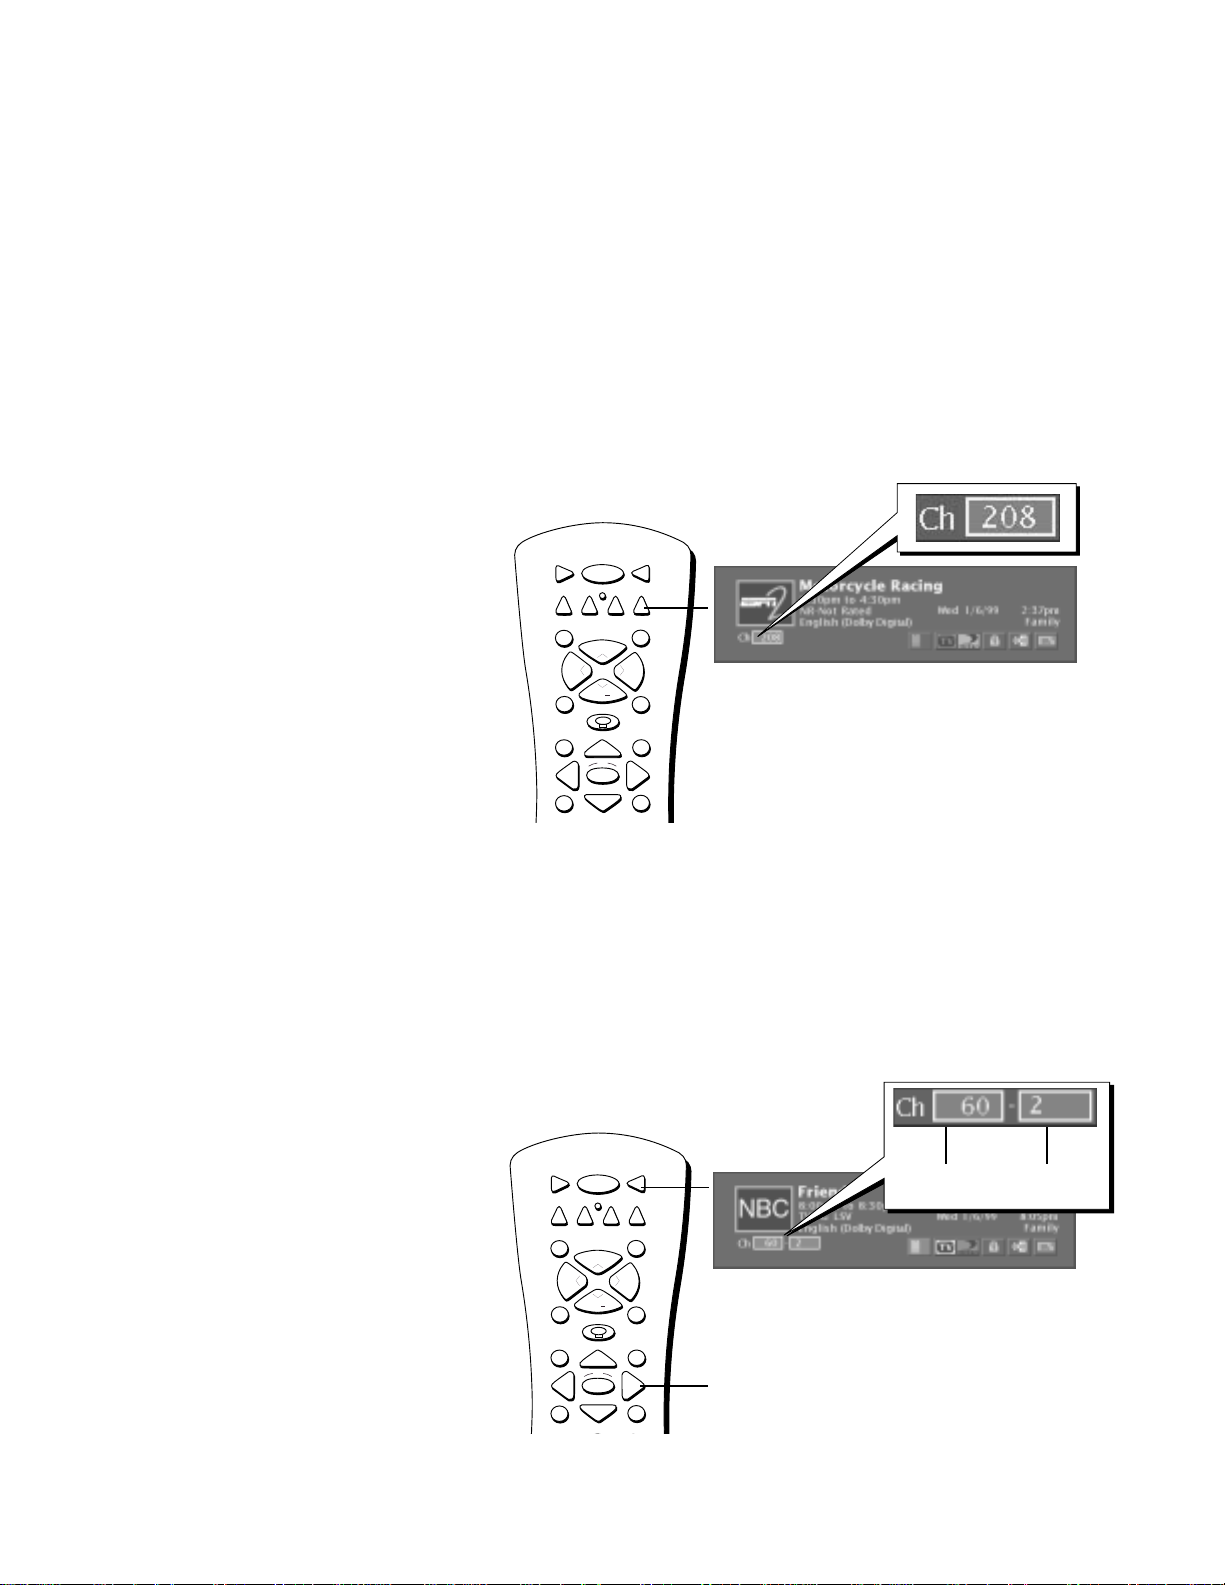
CHANGING CHANNELS
To change channels by entering numbers with the remote control, the remote needs to be in the correct “mode”: either
DIRECTV mode (if you subscribe to DIRECTV) or TV mode.
ON•OFF
TVVCR1
When you want to watch DIRECTV
®
programming, put the remote in DIRECTV
mode
1. Make sure you are in DIRECTV mode by pressing DIRECTV
on the remote control.
2. Enter the channel number and press OK. The channel
numbers are three or four digits long. If you do not enter at
least three digits, “???” will appear in the channel entry box,
and the system will wait for a valid entry.
Channel entry box
DVD
AUX
DIRECTV
VCR2
MUTE SKIP
CH
+
VOL
VOL
Highlighted to indicate
DIRECTV mode
DIRECTV
button
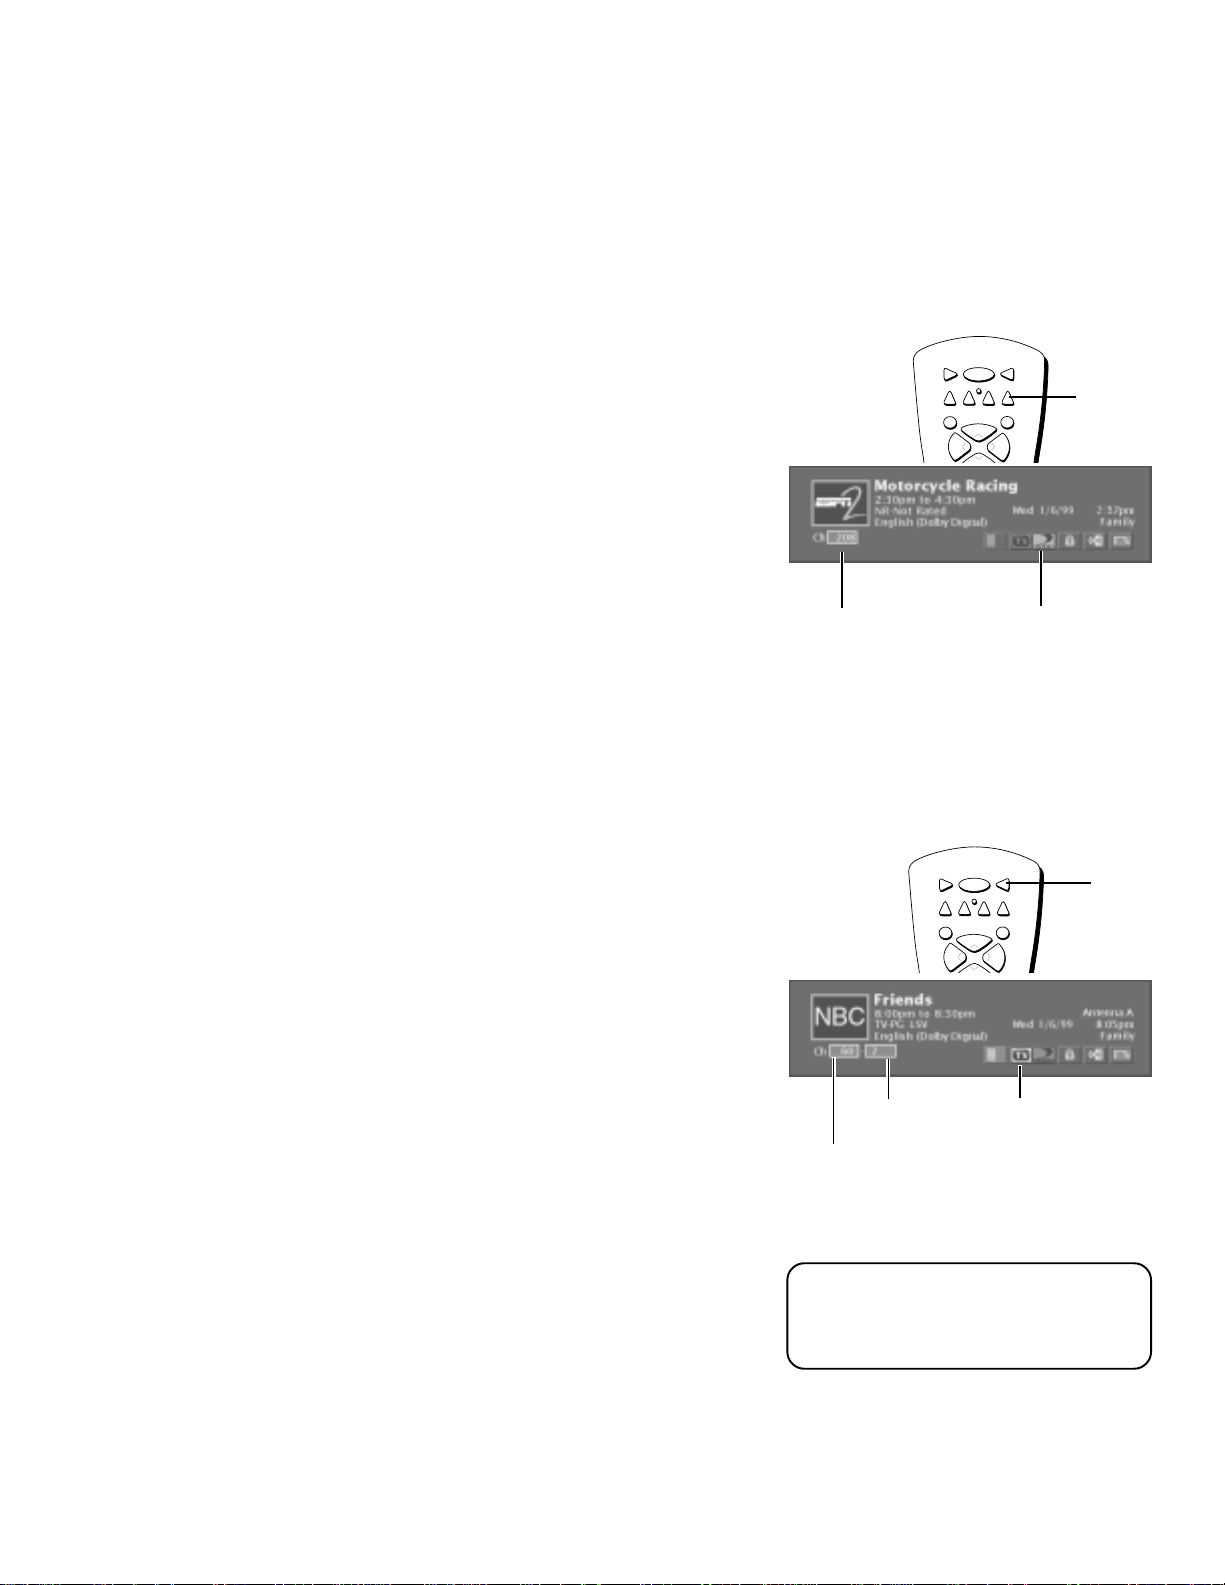
When you want to watch a digital or analog
TV channel, put the remote in TV mode
If you want to watch a digital channel:
1. Make sure you are in TV mode by pressing TV on the remote
control.
2. Enter the primary channel number. This number will appear
in the primary channel entry box. If there is no subchannel,
press OK.
3. If the primary channel number has fewer than three digits
and you want to enter subchannel numbers, press the right
arrow to advance to the subchannel entry box.
4. Enter the number of the subchannel. This number will appear
in the subchannel entry box.
5. Press OK on the remote control to tune to the channel.
If you want to watch an analog channel:
1. Make sure you are in TV mode by pressing TV on the remote
control.
2. Enter the channel number. This number will appear in the
primary channel entry box. (Analog channels don’t have
subchannels.)
3. Press OK on the remote control to tune to the channel.
ON•OFF
TVVCR1
DIRECTV
DVD
AUX
VCR2
MUTE SKIP
CH
+
VOL
VOL
Subchannel entry box
Highlighted to
indicate TV mode
Primary channel entry box
Note that you can always use the
channel up and down buttons on the
remote control to change channels
within the DIRECTV and TV modes.
TV
button
27
Page 31

BASIC TV OPERATION
PIP (PICTURE-IN-PICTURE) OPERATION
The PIP (picture-in-picture) feature lets you display a second, smaller analog (NTSC
format) picture on top of the main analog picture.
Your TV is equipped with a dual NTSC tuner that tunes to cable or off-air television
signals. You will only be able to use the PIP window and main picture with analog
channels.
PIP BUTTONS
There are certain remote buttons that control the way the PIP window works:
PIP Brings up the PIP window. Press PIP again to remove the window.
Arrows Let you move the PIP window to different areas of the screen.
SWAP Switches, or “swaps,” the video from the PIP window with the main
picture.
CH CTRL (Channel Control) Lets you switch channel control between the PIP
window and the main picture. To determine whether you are controlling the PIP or
the main picture, look at the channel banner as you change channels. The
triangular indicator is beside the channel number for the picture you’re controlling.
Main picture
channel number
Channel
control
indicator
PIP channel
number
Note that you will only
be able to use PIP with
analog channels.
ON•OFF
DVD
VCR2
MUTE SKIP
CH
VOL
CH
GUIDE INFO
Arrows
PIP
buttons
OK
MENU CLEAR
123
456
789
INPUT
0
REVERSE PLAY FORWARD
RECORD
STOP PAUSE
PIP SWAP CH CTRL WHO
TVVCR1
DIRECTV
AUX
+
VOL
GO BACKFETCH
ANTENNA
USING THE PIP FEATURE
While you may use PIP in different ways, this basic PIP scenario should get you
started. When watching an analog channel, follow these steps.
1. Press the PIP button on the remote control. The PIP window appears on the
screen.
2. Use the channel up and down or digit buttons to change the PIP channel.
3. To change the program in the main picture window, press CH CTRL. Then use
the channel up and down or digit buttons.
To go back and forth between controlling the PIP window and the main picture,
press the CH CTRL button.
28
Page 32

BASIC TV OPERATION
PIP PROBLEMS?
• If you are channel surfing and the PIP disappears, you may have tuned to a
digital channel. To view PIP and the main picture, make sure that both the
main and PIP channels are analog inputs, or signals. Continue changing the
channel until you find an analog (NTSC format) channel. The PIP window
will reappear.
The message “PIP Not Viewable” in the channel banner lets you know that PIP is
not available on this channel and you should tune to another channel.
• If you press PIP and the PIP box is grayed, you may have movie or TV
rating limits set. These limits may block your access to the PIP channel. For
information on removing limits, see the section “Using the Profiles.”
• If the PIP window disappears when closed captioning is displayed or you
press the MUTE button on the remote control, you have a conflict in your
settings. You cannot view PIP when parental controls have blocked the
current program or closed captioning is displayed. In order to view PIP,
either unlock parental controls or change the closed captioning setting.
• You cannot view closed captioning in the PIP window.
29
Page 33

BASIC TV OPERATION
USING THE INPUT BUTTON
1. Repeatedly press the INPUT button to scroll through the available input sources
until you find the input associated with the component (such as VCR or DVD
player) you want to view.
Input
source
Watch the channel banner to see the input sources change with
each press of the INPUT button.
2. Once you have found the input source you want, stop pressing INPUT.
• If you tune to VID1 and your VCR is connected to that input, you will be
able to view your VCR. To play, stop, or rewind the VCR1 tape using the
remote that came with your TV, you must first press the VCR1 button to put
the remote control in VCR mode.
There are other ways of selecting an input channel:
• Program the component (VCR, DVD, etc.) buttons on the remote control to
automatically tune to the correct input channel when pressed. See the section
in this book, “System Options and Preferences“ for information on auto tuning.
INPUT
button
ON•OFF
DVD
AUX
DIRECTV
VCR2
MUTE SKIP
+
CH
VOL
CH
GUIDE INFO
MENU CLEAR
123
456
789
REVERSE PLAY FORWARD
RECORD
GO BACKFETCH
OK
INPUT
ANTENNA
0
STOP PAUSE
PIP SWAP CH CTRL WHO
TVVCR1
VOL
• After pressing INPUT on the remote, enter the digits 1, 2, 3, or 4 to tune to
(S)VID1, 2, 3, or FRONT, respectively.
Press INPUT then
GUIDE on the remote
control to view a guidelike list of your line
inputs and
corresponding channels.
30
Page 34

Using the Program Guides
What is a program guide?
A program guide is an on-screen
programming schedule. It is a list of the
current and future programs. There are
separate guides for television programs and
DIRECTV programs (available if you
subscribe to DIRECTV® programming).
Both of these guides can be viewed in
different formats.
Using the program guides is easy as long as
you remember to highlight items on the
screen by pressing the arrow buttons on
the remote control. Then, press OK to tune
to that channel.
SETUP AND CONNECTIONS
1
➣
USING THE REMOTE
2
BASIC TV OPERATION
3
➣
➣
USING THE PROGRAM
4
GUIDES
➣
ADJUSTING TV CONTROLS
5
➣
USING THE PROFILES
6
➣
SYSTEM OPTIONS AND
7
PREFERENCES
➣
GETTING ASSISTANCE
8
➣
REFERENCE
9
Page 35

Using the Program Guides
BRINGING UP THE PROGRAM GUIDES
If you subscribe to DIRECTV® programming, you have access to two
program guides: a DIRECTV program guide and a TV program guide.
If you do not subscribe to DIRECTV programming, you will have one
guide: the TV program guide.
You can access the program guides by:
• Pressing MENU on the remote control and selecting Program
Guide.
• Pressing the GUIDE button on the remote control.
Note that when you access a program guide, you view the guide
corresponding to the “mode” you are in. For example, if you are in
DIRECTV mode and press the GUIDE button, you will view the
DIRECTV program guide. Similarly, if you are in TV mode and press
the GUIDE button, you will view the TV program guide.
If you are viewing the TV program guide and would like to view the
DIRECTV guide, press DIRECTV on the remote control to change
“modes” and view the other guide.
GUIDE
button
ON•OFF
AUX
DIRECTV
DVD
VCR2
MUTE SKIP
+
CH
VOL
VOL
CH
GO BACKFETCH
GUIDE INFO
OK
MENU CLEAR
123
456
789
ANTENNA
INPUT
0
REVERSE PLAY FORWARD
RECORD
STOP PAUSE
PIP SWAP CH CTRL WHO
TVVCR1
32
Page 36

Using the Program Guides
ANATOMY OF THE TV PROGRAM GUIDE
To access the TV program guide, press the TV button on the remote control, then
press GUIDE on the remote control. The following diagram shows you the kind of
information you will see in the TV program guide. Note that the availability of TV
program titles and information is dependent upon information provided by local
broadcasters.
“Family” is one of five selectable profiles
Primary channel number
Subchannel number
Abbreviated channel name,
when available
Returns you to previous screen
Program titles and information, when available
Scrolls down through the guide
Help gives you more information
about the program guide
Indicates current time and day
Takes you to the main menu
The “Other Guides” icon displays guide sorting options
33
Page 37

Using the Program Guides
ANATOMY OF THE DIRECTV PROGRAM GUIDE
To access the DIRECTV guide, you must subscribe to DIRECTV service. Press the
DIRECTV button, then press GUIDE on the remote control. The following diagram
shows you the kind of information you will see in the DIRECTV program guide.
“Family” is one of five selectable profiles
Program titles and information
Indicates current time and day
Returns you to previous screen
Help gives you more information
about the program guide
34
Sort the guide by movies or sports
Scrolls down through the guide
Takes you to the main menu
The “Other Guides” icon displays guide
sorting options
Sort the guide by topics
Shows all available programs
Page 38

Using the Program Guides
GETTING AROUND IN THE GUIDES
There are several ways to change channels and move around the TV and DIRECTV
program guides.
• Point to channels with the number buttons (0-9)
You can quickly highlight any channel in the program guides by entering the
channel number with the number buttons (0-9). For example, to highlight channel
228, press the numbers 2-2-8 and press OK on the remote control. To highlight
channel 73, press 7-3 and OK.
• Scroll channel by channel
The programs that you see on the TV screen make up one section—or page—of the
total program guide. You can scroll to other sections using the arrows: highlight
other times with the left and right arrows; highlight other channels with the up and
down arrows.
• Scroll page by page
If you want to scroll up or down through the program guides faster, press the
channel up and down buttons on the remote control. The highlight scrolls a page at
a time.
TUNING TO A PROGRAM
• To tune directly to a current program listed in a guide, highlight the program name
and press OK.
• To see information about a program or channel in the guide, highlight the program
or channel name and press INFO.
After you highlight a program name and press INFO, the Program Details screen
appears and gives you several options.
Then, if the program is not a pay-per-view (PPV) program, you can select:
• View Channel to tune to that channel
• Channel Guide to see a program lineup for that channel
• Other Times to see what other times the program is available
The options available to you may vary according to the type of program you select. If
the program is PPV, you will have the option to buy the program.
35
Page 39

Using the Program Guides
USING THE GUIDE BUTTON
Each press of the GUIDE button on the remote control takes you to an alternate type
of TV or DIRECTV
or Grid Guide.
By default, the Detail Guide appears when you press GUIDE on the remote control.
You can change the default guide from the Detail Guide to the Grid Guide or
SurfGuide (DIRECTV only) using the following steps:
1. Select Preferences from the main menu.
2. Select Default Guide.
3. Use the arrows and OK to choose the guide you want to appear first when you
press GUIDE. If SurfGuide is selected as the default guide, the Grid Guide will
appear when you access the TV program guide, since SurfGuide isn’t available
as a TV program guide.
®
programming guide: Detail Guide, SurfGuide (DIRECTV only),
The Detail Guide
The Detail Guide shows five channels in a time-and-channel format, with program
information for the highlighted program at the top of the guide.
The SurfGuide (DIRECTV only)
The SurfGuide displays seven DIRECTV channels in a half-hour time-and-channel
format, if you subscribe to DIRECTV® programming. The full name of the program
and its rating are listed at the bottom of the screen. Press the right arrow button to
extend the SurfGuide to show the next two hours.
The TV Detail Guide
The DIRECTV SurfGuide
The Grid Guide
The Grid Guide shows seven channels in a time-and-channel format, with the full
title of the highlighted program at the top of the guide.
THE OTHER GUIDES ICON
The Other Guides icon at the bottom of the TV guide and DIRECTV
lets you sort the guides by different variables, such as by channels, data, channel lists,
and channel groups. You can access these guides by highlighting then selecting the
Other Guides icon at the bottom of the Detail Guide and Grid Guide.
• Channel Guide Displays a channel’s DIRECTV® or TV programming schedule in
a channel-by-channel format.
®
program guides
The TV Grid Guide
Other Guides icon
36
Channel Guide lets you see what programs are on a specific channel.
Page 40

Using the Program Guides
• Guide Data Shows you the future guides that are available and lets you select one
to view in either the TV or DIRECTV® programming guide.
Guide Data shows you future guides.
• Channel Lists Displays a list of profiles. You can choose a profile from this list and
the guide will display only the DIRECTV or TV channels which have been included
in that profile’s channel list.
• Channel Groups Lets you sort only the DIRECTV
only channels that fall into the selected category. For example, you could sort the
DIRECTV guide by Pay Per View movies that are available at a future time.
• Attractions… Displays a list of DIRECTV channels that show coming attractions
and special events information.
®
programming guide to include
You can highlight any
program then tune to
that channel or get more
information by pressing
the OK or INFO buttons.
The Attractions Guide shows coming DIRECTV events and programs.
EXITING A PROGRAM GUIDE
There are three ways to exit a guide:
• Highlight a channel and press OK.
• Highlight Exit and press OK.
• Press CLEAR or GO BACK on the remote control.
37
Page 41

Using the Program Guides
SORTING THE DIRECTV® PROGRAMMING GUIDE
Sorting the guide is a way of organizing the DIRECTV programming guide to show
only the types of programs that interest you. There are several on-screen buttons
that sort the DIRECTV guide in different ways.
The Sorting icons appear at the bottom of the Grid Guide and Detail Guide.
SORTING THE DIRECTV® PROGRAMMING
GUIDE BY TOPICS
The topics icon sorts the DIRECTV programming guide according to the current
user’s preferences. Select the topics icon to sort the guide.
After you select the topics icon, it changes to the topics themes icon. Select the
topics themes icon to edit the current user’s themes preferences. These preferences
are saved in each user’s profile.
Checkmark the themes that interest you.
Select the topic categories, and checkmark the themes you would like to appear
when you select the topics icon in the guides. Programming that fits the description
of checkmarked themes will appear in the DIRECTV programming guide when you
sort by the topics icon.
Topics button
Topics themes button
38
Page 42

Using the Program Guides
SORTING THE DIRECTV® PROGRAMMING
GUIDE BY MOVIES
Select the movies icon to tell the DIRECTV programming guide to list
only DIRECTV movies. After you select the movies icon, it changes to a
movies themes icon.
Select the movies themes icon to sort the guide to list movies by type,
such as comedies or musicals.
Movies icon
Movies themes icon
Select a Movies Theme that interests you.
SORTING THE DIRECTV® PROGRAMMING
GUIDE BY SPORTS
Select the sports icon tell the DIRECTV programming guide to list only DIRECTV
sporting events. After you select the sports icon, it changes to the sports themes
icon.
Select the sports themes icon to sort the guide to list sports by type, such as
basketball or soccer.
Select a sports theme that interests you.
Sports icon
Sports themes icon
LISTING ALL DIRECTV® PROGRAMMING
The all icon resets the DIRECTV programming guide to show all available topics,
channels and listings for the current profile.
All icon
39
Page 43

Using the Program Guides
THE OTHER ICONS
These icons are located on both the DIRECTV and TV program guides.
Exit
Exits the guide and returns you to normal viewing on the current channel. Press OK to
continue.
Help
Brings up additional information about the guide. Press OK to continue.
Exit icon
Down Arrow
The arrow icon allows you to scroll down through other channels in the guide. Point to
the down arrow, and then press either OK or the down arrow on the remote to scroll
down through the program guide.
The Main Menu
Brings up the main menu. Press OK to continue.
Help icon
Arrow icon
Main menu icon
40
Page 44

Adjusting TV Controls
The following section tells you how to
adjust the picture quality and audio quality
of your TV.
• The Picture Quality menu contains the
controls that let you adjust the picture.
• The Audio menu contains the controls
that let you adjust the way the audio
sounds.
SETUP AND CONNECTIONS
1
➣
USING THE REMOTE
2
BASIC TV OPERATION
3
USING THE PROGRAM
4
GUIDES
➣➣
➣
ADJUSTING TV CONTROLS
5
➣
USING THE PROFILES
6
➣
SYSTEM OPTIONS AND
7
PREFERENCES
➣
8
GETTING ASSISTANCE
➣
REFERENCE
9
41
Page 45

Adjusting TV Controls
PICTURE QUALITY CONTROLS
The Picture Quality menu contains all of the TV’s video configuration controls. To
access the Picture Quality menu, press MENU on the remote control to go to the
main menu, then select Picture Quality.
PICTURE SETTINGS
The Picture Settings menu displays the controls for adjusting the way the picture
looks. The picture settings you specify apply to your current mode. Use the left and
right arrow buttons on the remote control to move the slider to the desired position.
Then select Exit when you are finished.
Your options under the Picture Settings menu are:
• Contrast Adjusts differences between the light and dark areas of the picture.
• Color Adjusts the richness of the color.
• Tint Adjusts the balance between the red and green levels.
• Black Level Adjusts the brightness of the picture.
• Sharpness Adjusts the crispness of edges in the picture.
You can have six different picture settings: one for analog channels, one for digital
channels (including DIRECTV channels), and one for components attached to
INPUT 1, 2, 3, and 4 (FRONT).
To make settings for analog and digital channels:
1. Enter the “mode” for which you would like to apply the setting (for example,
press DIRECTV or TV).
2. Then press MENU.
3. Select Picture Quality, and then select Picture Settings to set picture settings for
digital and DIRECTV channels.
To make settings for the components connected to INPUT 1, 2, 3, or 4 (FRONT),
take the following steps:
1. Press INPUT on the remote control until the input that corresponds with the
component you want to make settings for appears in the channel banner. (For
example, if your DVD player is connected to VID1, stop pressing INPUT when
VID1 appears.)
42
Page 46

Adjusting TV Controls
2. Point the remote away from the TV so the TV will not receive any signals from the
remote. Press the TV button.
3. Point the remote at the TV once again, press MENU, and select your picture
settings. When complete, press the component button again to control it.
AUTO COLOR
Auto Color displays a choice list that lets you turn on the feature that automatically
corrects the color of the picture when you are viewing analog channels. This is
especially useful for tracking realistic flesh tone colors as you switch from channel to
channel. Choose On or Off, depending on your preference.
COLOR WARMTH
Color Warmth displays a choice list that lets you set one of two automatic color
adjustments: Cool for a more blue palette of picture colors, and Warm for a more red
palette of picture colors. The warm setting corresponds to the NTSC standard of 7500ºK
and the cool setting corresponds to 9300ºK.
NOISE FILTER
You can turn Noise Filter on or off. When turned on, the television produces a cleaner,
smoother picture by reducing picture “static” or any type of interference. This is
especially useful for providing a cleaner picture in weak signal conditions. When Noise
Filter is on, picture detail is somewhat decreased.
AUTO CONVERGE
Selecting Auto Converge begins a process which aligns the blue, green, and red picture
tubes to produce the best picture quality. These tubes may have shifted since it was
manufactured. If your picture seems fuzzy or has a yellow tint, running Auto Converge
could fix this problem.
THEATRE
Theatre allows you to set picture quality controls to a predetermined setting suitable for
a theatre-type environment, such as a dark room. You may want to turn the Theatre
option on when viewing movies because the color temperature of movie film has a red
tint, lower contrast, and reduced sharpness that live video does not. Selecting the
Theatre option causes the picture to approach the “look” of an actual film.
While running Auto
Converge, you may
notice that flashing
letters change to dashes
to indicate progress. The
Auto Converge process
takes several minutes.
When Theatre is
selected:
• picture controls are
dimmed for a low light
setting
• auto color is turned on
• color warmth is set to
warm
• noise filter is turned on
RESET CONTROLS
Allows you to reset all picture quality controls to their original defaults.
43
Page 47

Adjusting TV Controls
AUDIO CONTROLS
The Audio menu lets you adjust the controls that involve the TV’s audio outputs. To
access the Audio menu, press MENU on the remote, then select Audio from the
main menu.
MUTE
Turn Mute on (select Sound Off) to set the TV’s volume to its minimum level. The
same can be accomplished by pressing MUTE on the remote control.
EQUALIZER
Equalizer allows you to separately adjust the front and center audio frequencies.
Select which speakers you would like to adjust—front or center. Then use the right
and left arrows to select a band of frequency, and use the up and down arrows to
adjust the band of frequency to the level you desire. To return to the previous menu,
select Exit when you are finished.
SPEAKERS
The Speakers menu lets you specify the type of speakers and volume levels you
would like to use. From this menu, you have the following options:
Speaker Setup Displays a list of speaker options describing the various ways you
can use internal and/or external speakers. From this list, choose the one that
matches the way you have set up your speakers. This menu allows you to control
the speaker outputs without using external switches. Choose from the following
options:
Your selection in the
Speakers menu
determines what options
will be available under
the Audio Processor
menu. The Audio
Processor menu allows
you to choose whether
you want to receive
mono, stereo, Dolby 3,
or other sound qualities.
For information on
connecting external
speakers to your HDTV,
see the section “Setup and
Connections.”
44
Page 48

Adjusting TV Controls
Internal TV Only Choose this option if you do not want to use any external
speakers and want all the sound to come from the TV’s internal speakers. Make sure
to turn the back panel’s INT./EXT. Front Speaker switch to INT.
C
L
Internal TV Only
Internal TV and Rear Choose this option if you want the sound to come from the
TV’s internal speakers and the external rear speakers you have connected to the TV.
Make sure to turn the back panel’s INT./EXT. Front Speaker switch to INT.
R
C
R
RIGHT
L
LEFT
Internal TV & Rear
External Speakers w/TV Center Choose this option if you want to use only the
TV’s internal center speaker and external front and rear speakers you have
connected to the TV. Make sure to turn the back panel’s INT./EXT. Front Speaker
switch to EXT.
LEFT
C
off
off
RIGHT
off
off
LEFT
RIGHT
External Speakers w/ TV Center
45
Page 49

Adjusting TV Controls
External Front w/ Amp w/TV Center Choose this option if you would like to use
external front speakers and a separate amplifier you have connected to the TV
and would also like to use the internal center speaker in the TV.
AMP
LEFT
C
off
off
RIGHT
Ext. Front w/ Amp & TV Center
Ext. Front w/Amp & Rear w/TV Center Use this option if you would rather use
external front speakers with a separate amplifier you have connected to the TV,
rear speakers, and the internal center speaker in the TV.
AMP
When you select Sound
Check, you will hear a
burst of noise emitted
from each speaker you
have set up. The onscreen display will show
which speaker should
be emitting the burst of
noise.
LEFT
LEFT
C
off
RIGHT
RIGHT
off
External Front w/Amp & Rear w/ TV Center
Ext. Front & Rear w/ Amp w/TV Center Choose this option if you would like to
use the external front speakers with a separate amplifier, external rear speakers
with a separate amplifier as well as the internal center speaker in the TV.
AMP
LEFT
C
off
RIGHT
off
46
LEFT
RIGHT
AMP
Ext Front and Rear w/ Amp & TV Center
Page 50

Adjusting TV Controls
Audio Output Displays a choice list of available audio output modes, which
determine how volume will be controlled through the output jacks.
• Fixed Output Fixed audio mode provides a fixed output control level from
the TV’s audio output jacks to an external device such an external sound
amplifier. With the fixed audio mode, the TV’s volume control, tone controls,
and mute are disabled. You must use the amplifier’s remote control to change
volume.
• Variable Output Variable audio mode allows a variable output control level
from the TV’s audio output jacks. If the volume changes on the TV via the
volume buttons on the remote control or front panel, the output volume
changes as well.
Sound Check Tests the front, rear, and center speakers to make sure all channels are
working and are properly connected to the correct speakers.
Front Balance Allows you to adjust the sound balance between the left front and right
front channels.
Rear Balance Allows you to adjust the sound balance between the left front and right
rear channels.
Rear V olume Lets you adjust the rear output volume level.
For more information on
the variable and fixed
audio jacks, see the
section “Setup and
Connections” under
“Back of the TV” and
“Connecting a Stereo
Amplifier.”
Center V olume Lets you adjust the center output volume level.
Subwoofer V ol Lets you adjust the volume coming from the subwoofer jack.
SPECIAL AUDIO
Audio Processor Displays a choice list of available audio modes, which control the
way the sound comes through your speakers. Depending on your speaker setup, any
combination of the following options will appear:
• Mono Plays the sound in mono only, and outputs sound from the front left and
right speakers only. This is a good choice when receiving broadcasts where
distance from the broadcasters makes the stereo signal weak. The channel banner
displays the word Mono when you tune to a program that is broadcast in mono.
• Stereo Splits the incoming stereo audio signal into left and right front channels.
Most TV programs and recorded materials have stereo audio. The channel banner
displays the word Stereo when you tune to a program that is broadcast in stereo.
• Dolby 3 Splits the incoming audio signal into front left, right, and center
channels. The channel banner displays the words Dolby Digital when you tune to a
program that is broadcast in Dolby Digital.
• Pro Logic Splits the incoming audio into left, right, center, and rear channels. You
must connect rear speakers to hear the rear (surround) channel sound. This is a
good choice for movies and TV programs broadcast in Dolby Surround.
• Hall Surround Splits the incoming audio signal into left, right, and rear channels.
Extra delay is added to the rear channels to simulate a concert hall sound effect.
• Matrix Surround Splits the incoming audio signal into left, right, and simulated
rear channels. You must connect rear speakers to hear the rear (surround) channel
sound. This is a good choice when you’re listening to monophonic audio, such as
speeches, sporting events, or plain dialog and wish to have sound coming from all
channels.
47
Page 51

Adjusting TV Controls
Optical Output Select Auto Select if your TV is connected to a Dolby Digital and
PCM decoder. Select Dolby Digital if the TV is connected to a Dolby Digital only
decoder; it will provide six independent soundtrack channels through the optical
output jack (labeled DIGITAL AUDIO OUT). Select PCM if it is connected to a
PCM only decoder; it will then provide two independent soundtrack channels.
Select Off if you want no audio output provided.
Sound Logic Monitors a program’s audio track and limits volume excursions to a
minimum and maximum volume range from the current volume setting. Acting like
a dynamic range limiter, it compresses the dynamic range to limit sudden volume
increases, like when a commercial begins.
Dynamic Bass Brings the bass level up to its maximum point. The maximum
point is determined by the current volume level.
Wireless Audio Allows you to choose between three possible variable audio
outputs for a separate set of wireless speakers, stereo amplifier, wireless
headphones, or whatever component you have connected to the TRANSMITTER
OUT jack on the back panel. You can choose from the following output selections:
• Front Speakers Tells the TV that you’ve set up your wireless speakers in the
front of the room. Your system will then play the “front speaker” audio stream
through the wireless speakers.
• Rear Speakers Tells the TV that you’ve set up your wireless speakers in the
rear of the room. Your system will then play the “rear speaker” audio stream
through the wireless speakers.
• PIP Audio If you choose PIP (picture-in-picture) Audio, your wireless
transmitter (e.g. speakers or headphones) will play the PIP audio program. If no
PIP is displayed, the wireless transmitter will play the main channel audio
program.
LOUDNESS
When turned on, loudness allows the setting of the volume control to also control
the output frequency response. High and low frequencies are boosted at lower
volume levels.
SAP
When turned on, Second Audio Program (SAP) plays the program’s audio in a
second language, if one is available. SAP is also used to broadcast a program’s
audio with descriptions of the video for the visually impaired. SAP is broadcast in
mono and is not available for digital programs.
AUDIO LANGUAGE
The Audio Language menu lets you choose the default audio language you want to
hear when it is available. The system will automatically set the audio program to
the selected audio language when the channel you are viewing is either a
DIRECTV or a digital channel and the specified language is available. Highlight the
audio language you want using the up and down arrows, then press OK to select.
When the TV is
connected to an
optional, compatible sixchannel amplifier/
receiver and speakers
via the DIGITAL AUDIO
OUT jack on the back
panel, you receive
Dolby Digital Surround
Sound, if transmitted.
Use the Optical Output
menu to specify Auto
Select, PCM, Dolby
Digital, or Off.
You will find an audio
language icon in the
channel banner. When
this icon is highlighted,
it indicates that a
Second Audio Program
(SAP) is available for
analog programs. If you
select it when
highlighted, you will
activate the SAP for the
current channel (all
other channels remain
unaffected). If the icon is
highlighted when
watching a digital
channel or a DIRECTV
channel, more than one
audio language is
available. If you select
the icon, you will hear
the language and the
name will appear in the
channel banner.
48
Page 52

Using The Profiles
T his section describes the user profiles
feature. It includes information about:
• creating a profile’ s TV and DIRECTV
viewing lists.
• setting spending limits.
• setting DIRECTV , TV , and mo vie r ating
limits.
• blocking unr ated TV programs.
• locking and unloc king a profile.
SETUP AND CONNECTIONS
1
BASIC TV OPERATION
2
USING THE REMOTE
3
USING THE
4
PROGRAM GUIDES
➣
➣➣
➣
ADJUSTING TV CONTROLS
5
➣
USING THE PROFILES
6
SYSTEM OPTIONS AND
7
PREFERENCES
➣
➣
GETTING ASSISTANCE
8
➣
REFERENCE
9
Page 53

Using the Profiles
ABOUT PROFILES
When you select Profiles from the main menu, you can create four different profiles
in addition to the default “Family” profile. You can set up specific channels, rating
limits, and spending limits for each profile. After you’ve set up these profiles, press
the WHO button on the remote control to scroll through your profiles and access a
certain one.
But first, personalize a profile by entering a name.
1. Select Profiles from the main menu.
2. Select a profile to edit: User 1, User 2, User 3, or User 4.
3. Select Edit User Name from the next menu.
4. Use the up, down, and right arrows on the remote control to find and select a
letter.
Use the MENU button
on the remote control to
bring up the main menu,
use the arrows to
highlight an option, and
press OK to select it.
If the main menu does
not appear, the remote
control might not be in
TV or DIRECTV mode.
Try pressing the TV or
DIRECTV button and
then MENU.
You can personalize each profile.
To continue editing the profile, select DIRECTV Setup (if you have ordered
DIRECTV
up these features.
®
programming) or TV Setup. The following sections describe how to set
THE DIRECTV SETUP
The DIRECTV Setup menu item only exists if you subscribe to DIRECTV
programming. Through this menu you can establish DIRECTV channel lists, set
spending limits, and set rating limits for DIRECTV® programs using the DIRECTV
Setup menu.
EDITING CHANNELS IN A DIRECTV LIST
You should create a DIRECTV channel list to establish which DIRECTV channels
the selected profile can access. To create the DIRECTV channel list:
1. Highlight and select a user name, then select DIRECTV Setup.
2. Highlight Edit Channels and press OK.
®
You can also set up
profiles as categories
instead of as users. For
example, name a profile
“Sports” and include
only sports channels in
the profile. Or, name it
“Movies,” include only
movie channels, and set
a rating and spending
limit for yourself or your
family.
50
Page 54

Using the Profiles
Check the channels you want to include in the list (programming subject to change).
3. Use the arrow buttons to point to a DIRECTV channel, and press OK to remove (or
replace) the check mark.
Checkmarked items appear in the DIRECTV channel list. In other words, when you
select that profile and begin surfing through DIRECTV channels with the channel up
and down buttons, only the checkmarked channels will appear as you surf.
SELECTING OR DELETING ALL DIRECTV CHANNELS
You might be able to save time when creating a DIRECTV channel list by using the
Select All Chans option or the Delete All Chans option to either add or delete all
channels before removing or adding individual channels.
Also, DIRECTV program providers may make additional channels available. To prevent
new channels from appearing in a profile channel list, choose Delete All Chans and
checkmark only the channels you want to appear in the list.
SETTING THE DIRECTV SPENDING LIMIT
Use the Spending Limit option to indicate a profile’s per-event spending limit for Pay Per
View (PPV) programs. To set the spending limit, choose the user profile name, select
DIRECTV Setup, then follow these steps:
1. Highlight Spending Limit, and press OK.
You can set a per-event spending limit for each profile.
2. Use the digits or the arrow buttons on the remote control to enter a single-program
spending limit.
Tip
You can also access
spending limits by
selecting System
Options from the main
menu and then selecting
Purchases. You can then
select Spending Limit
and set limits for each
user.
3. Lock the system. See “Locking the System” near the end of this section for details.
51
Page 55

Using the Profiles
After a spending limit is set and the system is locked, you must enter a password to
purchase a Pay Per View program that costs more than your spending limit allows.
The system will then temporarily unlock the limits you have set until the power is
turned off. When the system is turned back on, the system will be locked again.
SETTING THE DIRECTV RATING LIMIT
The Set Rating Limit menu enables you to set a maximum viewing limit for rated
DIRECTV movies (based on the MPAA ratings system), as long as the DIRECTV
program provider has transmitted the proper code.
• Note that the ratings limit cannot be enforced if a DIRECTV program has not
been rated, if rating information for that program is not transmitted by the
program provider, or if the system has not been locked.
1. Select a user.
2. Select DIRECTV Setup.
3. Highlight Set Rating Limit and press OK.
Important!
You need to lock the
system in order for rating
limits, channel limits,
and spending limits to
go into effect.
To edit the limits after
you lock the system, you
need to enter the system
password. See “Locking
the System” for details.
Use the arrow buttons on the remote control to move the selector up and down.
4. Use the up and down arrows to move the rating selector to the highest rating
you want to be able to view. In the preceding illustration, movies that are rated
up to and including a PG-13 rating can be viewed.
After the rating limit is set and the system is locked, you must enter the system
password to watch programs with a rating higher than the limit. The system will
then temporarily unlock the limits you have set until the power is turned off. When
the system is turned back on, the system will be locked again.
THE TV SETUP
You can establish TV channel lists, set spending limits, and set rating limits for TV
programs using the TV Setup menu.
52
Please note that the rating
limit you set while in the
DIRECTV Setup menu
apply only to DIRECTV
programs—they do not
apply to TV programs.
To set limits for TV
programming, select a
profile, select TV Setup
and then select Set TV
Rating or Set Movie
Rating.
Page 56

Using the Profiles
EDITING CHANNELS IN A TV LIST
You should create a TV channel list to establish which TV channels (including both
analog and digital) the selected profile can access. To create the TV channel list:
1. Select a user.
2. Select Edit Channels.
To start, you can add or delete all channels.
3. Use the arrow buttons to highlight a TV channel, and press OK to remove (or
replace) the check mark.
Checkmarked items appear in the channel list. In other words, when you select that
profile and begin surfing through TV channels, only the checkmarked channels will
appear as you surf. Note that the only channels you can add to a list are ones that were
found during the channel search (see the “Getting Assistance” section in this book for
details on searching for channels).
SELECTING OR DELETING ALL TV CHANNELS
You might be able to save time when creating a TV channel list by using the Select All
Chans option or the Delete All Chans option to either add or delete all channels before
removing or adding individual channels.
Also, terrestrial program providers may make additional channels or subchannels
available. To include new channels in your TV channel list:
1. Select System Options from the main menu, then select Channel Search. The
system will run a channel search, making it aware of the new channel(s).
2. Select Profiles from the main menu.
3. Select the user profile name, then TV Setup.
4. Choose Edit Channels and checkmark the new channel.
Don’t forget about
the CLEAR button.
Press the CLEAR button
on the remote control to
remove the on-screen
menus and return to
normal viewing.
53
Page 57

Using the Profiles
SETTING THE TV RATING
The Set TV Rating menu enables you to program your TV so children cannot see certain programs or channels.
The last three choices in the TV Setup menu involve software inside your TV (often called V-Chip) which allows
you to “block” TV programs and movies based on violence, sex, or other content you may believe children
should not view. In other words, it lets you program your TV so it will not display certain programs. Once you
block programs, you or other adults are not limited to only parent-approved programs; you can “unblock”
programs by entering the system password.
The V-Chip software inside your TV is initially turned “off,” so if you choose not to implement it, you can just
ignore it.
When turned “on,” the V-chip software reads a code that most broadcasters send with programs. That code tells
the V-Chip software the program’s age-based rating (TV-MA, TV-14, etc.) and content themes (Violence (V),
Adult Language (L), etc.). If you have blocked the rating or content themes that the program contains, you will
receive the message, “Program exceeds the TV rating limit you set,” when you turn to that particular channel.
Broadcasters are not required to provide ratings. However, you can block out programs that have been given a
rating of “Not Rated,” and programs that are considered “unrated” because no code has been sent by the
broadcaster.
The TV age-based ratings and content themes you can block are listed in the table below.
Age-Based
Rating
TV-MA
TV-14
TV-PG
TV-G
TV-Y7
Mature Audience Only. Specifically designed to be viewed by adults and may be unsuitable for
children under 17. It contains one or more of the following content themes: crude indecent
language (L), explicit sexual activity (S), or graphic violence (V).
Parents Strongly Cautioned. Contains some material that many parents would find unsuitable for
children under 14. Parents are strongly urged to exercise greater care in monitoring this program
and are cautioned against letting children under the age of 14 watch unattended. This program
contains one or more of the following content themes: intensely suggestive dialogue (D), strong
coarse language (L), intense sexual situations (S), or intense violence (V).
Parental Guidance Suggested. Contains material that parents may find unsuitable for younger
children. Many parents may want to watch it with their younger children. The program contains
one or more of the following content themes: some suggestive dialogue (D), infrequent coarse
language (L), some sexual situations (S), or moderate violence (V).
General Audience. Most parents would find this program suitable for all ages. It contains little or no
sexual dialogue (D), no strong language (L) or situations (S), and little or no violence (V).
Directed to Children 7 years and older. Designed for children ages 7 and above. It may be more
appropriate for children who have acquired the developmental skills needed to distinguish between
make-believe and reality. Themes and elements in this program may include mild fantasy violence
(FV) or comedic violence, or may frighten children under the age of 7.
Description and Content Themes for Age-Based Ratings
54
TV-Y
All Children. Themes and elements in this program are designed for a young audience, including
children from ages 2-6. It is not expected to frighten younger children.
Page 58

Using the Profiles
To set TV programming limits:
1. From the main menu, select Profiles.
2. Select the user name you would like to set limits for through the Profiles menu.
3. Select TV Setup from the next menu.
4. Select Set TV Rating.
Selecting TV Rating allows you to set a limit for TV programs based on rating
and content.
Once you get to the Set TV Rating screen, use the arrows and OK buttons on your
remote control to change the status of a TV program rating from View to Block. The
following sections give you more details about how to change the status of TV
program limits.
Remember you are only
blocking TV programs
and movies for the one
Profile you select in the
Profiles menu. If you
would like to block
different programs for
different users, be sure
to complete the process
for each of them.
THE RATING LIMIT SCREEN
Below is an example of where items are located within the Rating Limit screen.
Age-Based Rating Limit
Lists the available ratings you
can block or view with the
rating status buttons.
Rating Status Buttons
Lets you know whether the status of the age-based
rating limit to the left is View or Block.
Content Themes
Lists the content themes you can block or view
with the content status buttons.
Content Status Buttons
Lets you know which content themes are
available for that rating, and whether the status of
the content theme is View (V) or Block (B).
You must remember to
lock the system for rating
limits to take effect.
55
Page 59

Using the Profiles
BLOCKING AGE-BASED RATINGS
You can automatically block all program ratings above a specified age-based rating
level. For example, if you only want your child to watch programs that have a
TV-G rating and lower (in other words, you want the child to watch only TV-G,
TV-Y7, and TV-Y programs), then you need to block other programming with higher
ratings.
To block programs with higher ratings:
1. First, determine the lowest level rating you do not want the child to watch.
2. Highlight the rating status button that corresponds with the lowest rating you
do not want the child to watch. (In the example above, you would point to the
rating status button corresponding to TV-PG, since the highest rating you want
her to watch is TV-G.)
3. Press OK to change the button from View to Block. The status for this and all
higher ratings automatically change to Block (and B).
When you change the
status of a rating to Block,
the system will
automatically block
higher ratings and all
corresponding content
themes.
Hierarchy of
Age-Based Ratings
TV-MA
TV-14
TV-PG
Mature
Audience Only
Parents Strongly
Cautioned
Parental
Guidance
Suggested
Changing the TV-PG rating status button from View to Block causes the buttons
for the higher ratings and content to change to Block and B.
4. Press the left arrow button on the remote control to return to the menu.
Viewing Age-Based Ratings
After you block age-based ratings, you have the option of going back and changing
some of the ratings to View.
1. Determine the rating you want to view that is currently blocked.
2. Use the arrows on the remote control to highlight the rating status button, such
as TV-14, whose status is Block.
3. Press OK to change the status to View. Your child would then be able to watch
all programs with a TV-14, TV-G, TV-Y7, and TV-Y rating.
Note that the content theme buttons corresponding to TV-14 change to View as
well. They and the age-based rating status buttons are the only buttons that
automatically change back to View when you complete this process.
TV-G
TV-Y7
TV-Y
General
Audience
Directed to
Children 7
Years and Older
All Children
56
Page 60

Using the Profiles
Blocking Specific Content Themes
You can block programs based on their content. (Content is represented by the D, L,
S, V, and FV on your screen. See “Setting the TV Rating” for details.) When you block
a content theme for a particular rating, you automatically block that content theme
for higher rated programs as well.
For example, if you do not want your child to watch programs that have adult
language (L) rated TV-PG or higher, you need to block adult language in all
programming rated TV-PG and above.
To block program content:
1. Determine the lowest level of content you do not want the child to watch.
2. Highlight the content button that corresponds with the lowest content you do
not want the child to watch. (In the example above, you would highlight the V
button located under the L and to the right of TV-PG.)
Content Themes
D Sexually Explicit
Dialogue
L Adult Language
3. Press OK to change the button from V to B. All higher ratings’ language content
theme button will automatically change to B.
Selecting the content theme button corresponding with adult language (L) and TVPG blocks all programs with adult language (L) rated TV-PG and higher.
4. Press the left arrow to return to the menu or exit the screen.
Viewing Specific Content Themes
After you block specific content themes, you have the option of going back and
changing some of the content themes back to View (V):
1. Determine the content themes you want to change to View (V).
2. Use the arrows to highlight a particular content button, such as the B under
language (L) corresponding with TV-14.
S Sexual Situations
V Violence
FV Fantasy Violence
You must remember to
lock the system for
rating limits to take
effect.
3. Press OK to change its status back to V. Your child would then be able to watch
programs with TV-14 adult language content, but not programs with TV-PG or
TV-MA language content.
Note that only the content theme status button corresponding to TV-14 language
(L) changes to View (V). Higher rated content theme buttons, such as that for TVMA language, do not change.
57
Page 61

Using the Profiles
SETTING THE MOVIE RATING
You set movie rating limits by blocking movies rated above a specified level. To
access the Set Movie Rating menu:
1. From the main menu, select Profiles.
2. Select the user you for whom you would like to set limits.
3. Select TV Setup from the next menu.
4. Select Set Movie Rating.
Selecting Set Movie Rating allows you to set a limit for movies based on rating.
Blocking Movie Ratings
If you only want your child to watch movies that have a PG rating and lower (in
other words, movies rated PG and G), then you can automatically block out all other
movies with higher ratings.
To block movies:
Please note that the rating
limits you set while in the
TV Setup menu apply
only to TV programs—
they do not apply to
DIRECTV programs.
To set limits for
DIRECTV® programming,
select a profile, select
DIRECTV Setup and then
select Set Rating Limit.
You must remember to
lock the system for
rating limits to take
effect.
1. Determine the lowest level rating you do not want the child to watch.
2. Highlight the rating status button corresponding to the lowest rating you do not
want the child to watch. (In the example above, you would highlight the rating
status button corresponding to PG-13, since the highest rating you want the
child to watch is PG.)
3. Press OK to change the button from View to Block. All higher ratings’ View
buttons will automatically change to Block.
Change the button from View to Block and all higher rated movies will also be
blocked.
4. Press the left arrow to return to the menu or exit the screen.
58
Page 62

Using the Profiles
Viewing Moving Ratings
After you block movie ratings, you have the option of going back and changing some
of the rating status buttons back to View:
1. Determine the movie ratings you want to change to View (V).
2. Use the arrows to highlight the status button you want to change.
3. Press OK to change its status back to View.
For example, if movies with a rating of PG-13 and higher are blocked, you can
change the rating status button corresponding with NC-17. Your child would then
be able to watch all movies with a G, PG, and NC-17 rating.
BLOCKING UNRATED TV SHOWS
Some movies may be
given a “Not Rated”
rating. After blocking
movie ratings, you must
separately set “Not Rated
Movies” to View to see
these movies.
Some TV programming is not rated and may contain material you do not want your
children to see. These shows must be blocked separately.
To block unrated shows:
1. Select the user you would like to set limits for through the Profiles menu.
2. Select TV Viewing.
3. Select Set TV Rating.
4. Now select Unrated Shows.
5. Highlight the radio button beside your choice of View Unrated Shows or Block
Unrated Shows and press OK to select it.
Selecting Unrated Shows allows the user to view or block all unrated programs.
Note that “unrated” TV
shows may include news,
sports, political, religious,
local and weather
programs, emergency
bulletins, public
announcements, and
programs sent without
ratings. It could also
include programs whose
ratings are either “None”
or “N/A.”
59
Page 63

Using the Profiles
CHOOSING YOUR PROFILE
Each time you turn on the TV, the Family profile is selected by default. To select a
different profile:
1. Press the WHO button to scroll through the profiles in the channel banner.
The WHO button toggles through the profiles.
2. When your profile appears, enter your four-digit personal password to access your
profile. If the profile is not password protected, you can just press OK to activate it.
The channel, spending, ratings and viewing limits associated with the chosen profile
will be active only when the system is locked.
60
Page 64

Using the Profiles
LOCKING AND UNLOCKING A USER PROFILE
When you lock a profile, you prevent anyone who does not know the user
password from accessing the locked profile. This applies only when they press
WHO on the remote control. It does not prevent them from accessing and
editing the profile via the main menu if they first enter the system password.
When you lock a profile (excluding “Family”), you lock its channel limits, rating
limits, and spending limits. After locking the profile, you need to enter the
system password to edit these settings.
1. Choose the profile you want to lock or unlock from the Profiles menu,
highlight Lock User or Unlock User, and press OK.
Locking the user profile protects the limits you set up.
Don’t Forget Your
Password
If you forget a USER
password and the
system is locked, you
need to unlock the
system and then assign
a new user password. If
the system is not
locked, select Profiles
from the main menu,
choose Unlock User,
and enter a new
password.
2. When locking a user, use the arrows or the digits on the remote control to
enter a four-digit user password.
Some other things to remember about locking and unlocking profiles are:
• For a lock to be effective, you must exit out of the menu system.
• When you attempt to access a profile’s channel that is blocked by one or
more limits and the system is locked, you will be asked to unlock the video
by entering the SYSTEM password.
• If you enter the system password to override a limit, the lock on the
channel banner will turn yellow, and all limits are temporarily unlocked
until you turn off the television. When you turn on the television again, the
system will be locked, and the Family profile channel list will be active. If
you want to re-lock without turning off the television, you can select the
lock icon in the channel banner.
• If a profile is locked and you want to access its channels, press WHO on
the remote control and then enter the user password.
• If a profile is locked and you want to access its settings, you can access it
through the menu system by choosing Profiles, then choosing the profile
name. Then enter the system password.
61
Page 65

Using the Profiles
LOCKING THE SYSTEM
When you lock the system, all limits set up for all profiles are put into effect,
regardless of whether the profile is locked or unlocked. Unlocked profiles
require no user password to access their channel list if the system is locked.
When the system is locked, you can still access a profile and watch a channel
in its channel list (if the profile is locked, however, you must have the user
password). Locking the system activates all rating, spending, viewing, and
channel limits for all profiles. When you lock the system, no one can modify
any of these settings without first entering the four-digit system password.
1. Select Profiles from the main menu. Then select Lock System and press OK.
Or, press INFO on the remote control and select the green unlock icon
from the channel banner.
You can lock the system via the channel banner by entering a password.
2. Use the arrows or the digits to enter a four-digit system password.
The Lock/Unlock icons in
the channel banner are an
easy way to lock or unlock
the system. Press INFO
and select the icon to
change the lock status.
• Green Unlock icon
The system is unlocked.
Spending, viewing and
other limits can be
accessed and changed.
• Yellow Unlock icon
A password has been
entered to override
family or profile limits.
No limits can be
accessed or changed
without a password.
• Red Lock icon Limits
cannot be accessed or
changed without the
password and all limits
are in effect.
3. Enter the password a second time to confirm it.
For the changes to be effective, you must exit out of the menu system.
UNLOCKING THE SYSTEM
When the system is unlocked, the channel, spending, viewing, and ratings
limits that you set are no longer in effect. To unlock:
1. Highlight Unlock System in the Profiles menu and press OK.
2. Highlight Yes and press OK to confirm that you want to unlock the system.
When you attempt to access a channel that is blocked by one or more limits
and the system is locked, you will be asked to temporarily unlock the system by
entering the four-digit system password.
If you enter the system password to override a limit, all limits are unlocked until
you turn off the TV. When you turn on the TV again, the system will be locked,
and the Family profile channel list will be selected. If you want to re-lock the
system without turning off the TV, you can select the lock icon in the channel
banner.
If you subscribe to
DIRECTV
and forget the SYSTEM
password, contact your
satellite program
provider’s authorization
center.
If you forget the system
password and do not
have DIRECTV, remove
the access card from the
TV’s back panel (store it
in a safe place, or
reinsert it upside down
to store it in the TV).
Press and hold the INFO
button on the front
panel; simultaneously
press and hold the WHO
button on the remote
control. Continue to
hold for three seconds.
All passwords will be
cleared.
®
programming
62
Page 66

System Options and Preferences
This chapter describes the other options
available to y ou such as:
• selecting a signal source and type
• auto tuning your remote control to
tune to the VCR1, VCR2, or DVD
channel
• searching for all available channels
• checking your mailbox
• purchasing programs
• setting up system preferences
• using the FETCH button on the remote
control
SETUP AND CONNECTIONS
1
➣
USING THE REMOTE
2
BASIC TV OPERATION
3
USING THE
4
PROGRAM GUIDES
➣➣
➣
ADJUSTING TV CONTROLS
5
➣
USING THE PROFILES
6
SYSTEM OPTIONS AND
7
PREFERENCES
➣
➣
GETTING ASSISTANCE
8
➣
REFERENCE
9
Page 67

System Options and Preferences
CHANGING THE SIGNAL SOURCE
The Signal Source menu allows you to choose the source from which you would
like the signal to come: Antenna A, Antenna B, or DIRECTV or Video Inputs. The
same can be accomplished using the ANTENNA, DIRECTV, and INPUT buttons on
your remote control. If you misplace your remote control, use the front panel
buttons to access this menu and change the signal source.
To access the Signal Source menu:
1. Press MENU on the remote control to access the main menu.
2. Select System Options from the main menu.
3. Select Signal Source from the next menu.
Select the appropriate signal source.
4. Use the arrows and OK to select which source from which you would like to
receive a signal.
CHANGING THE SIGNAL TYPE
The Signal Type menu lets you choose whether you are receiving a signal from
cable TV or an off-air antenna. When you run Channel Search (see “Channel
Search” in this section for details), the TV automatically detects your signal and you
don’t have to specify it here. However, if you decide to change the source, you will
need to use the Signal Type menu. Note that if your signal source is coming from
DIRECTV, this menu will not be available.
64
Select whether you are receiving signals from an off-air antenna or cable.
Page 68

System Options and Preferences
AUTO TUNING
This menu displays the various components you have connected to your TV. It lets you
set up the TV to automatically tune to the correct input channel when you press a
component button (VCR1, VCR2, or DVD) on the remote control.
1. Use the arrow keys on the remote control to highlight the field corresponding with
a component.
Selecting any of the fields on this screen enables you to specify which input or
channel the component will use.
2. Press the OK button on the remote control to choose which input channel you want
to tune to when you press that component button. The choices for each component
are:
Not Connected Select this if you don’t have that component connected to the
antenna or video input jack on the back of the TV or if you don’t want the TV to
tune to a channel when the particular component button is pressed.
Ch 2 (or 3 or 4) - Ant A Select this if your component is connected to Antenna A
on the back of the TV and you want the TV to tune to channel 2 (or 3 or 4) when
you press the component button.
Ch 2 (or 3 or 4) - Ant B Select this if your component uses Antenna B on the
back of the TV and you want the TV to tune to channel 2 (or 3 or 4) when you press
the component button.
Video INPUT 1 (or 2 or 3) Select this if your component is connected to the
Video INPUT 1 (or 2 or 3) jack on the back of the TV and you want the TV to tune
to the input channel VID1 (or VID2 or VID3) when you press the button. If you have
an S-Video cable connected, the input channel will read S-VID1 (or S-VID2).
3. Now you can use the component buttons (VCR1, VCR2, or DVD) on the remote
control to tune to the correct input channel when you press the button.
If you have programmed your remote control and completed the above steps to auto
tune, you can—for example—press the VCR button and both tune to the VCR’s input
channel and enter into “VCR mode.” You can then begin using the REVERSE, PLAY,
FORWARD, REC, STOP, and PAUSE buttons to control your VCR.
Reminder: Make sure
the Ch 2/3/4 switch on
the back of the
component is set to the
channel you specify in
the Auto Tuning screen.
65
Page 69

System Options and Preferences
CHANNEL SEARCH
Engaging in a channel search tells the TV to search automatically for all the
terrestrial TV channels available through the Antenna A and B inputs. When the TV
finds an active channel, it places it in the channel list. Inactive channels (weak
stations or channels with no signal at all) will not be placed the channel list.
Running channel search collects all available channels in a channel list.
MAILBOX
If you have ordered DIRECTV® programming, the mailbox shows you messages that
are sent—or “mailed”—from your program providers. For example, you may
receive a message calling your attention to a new service or special program
offering. If you have new or unread mail, the mail icon in the channel banner is
highlighted.
You can edit the channel
list and remove
unwanted channels by
using the Profiles menu.
Please note that because
channel search will
search for both digital
and analog TV channels
on all antenna inputs,
the process may take
many minutes.
CHECKING YOUR MAIL
1. Select Mailbox from the System Options menu or the mail icon from the
channel banner to view your mail.
2. Highlight a message and press OK. The message opens for you to read.
2. Press OK again to close the message.
3. If you want to erase a message, highlight Erase Message and press OK. When
you exit the display screen, messages not erased are saved in memory.
Mail provides the latest information from program providers.
66
Page 70

System Options and Preferences
PURCHASES: PAY PER VIEW PROGRAMS
Pay Per View (PPV) programs are DIRECTV programs that you
purchase—like a movie ticket—on an event-by-event basis if you
subscribe to DIRECTV
labelled “PPV” in the DIRECTV program guide. A channel labeled PPV
could run nothing but previews for movies. After previewing the
movie, you can purchase it or find out more details about it.
PURCHASING AND PREVIEWING
There are several ways to purchase and preview DIRECTV Pay Per View
movies and events if you subscribe to DIRECTV programming:
• Tune to a Pay Per View program’s channel. Program providers may
offer on-screen purchase instructions, usually as the Pay Per View
program begins.
• Highlight a Pay Per View program from the program guide and
press INFO.
®
programming. Pay Per View programs are
• Preview a coming attraction by selecting a channel from the
Attractions Guide.
TUNING TO A PAY PER VIEW PROGRAM
When you use the channel up and down buttons or digits on the
remote control to tune to a Pay Per View channel, you need to press
the INFO button to bring up the Program Details screen in order to
purchase a program.
Use the program guide to get to the Program Details screen.
You may need to enter
your four-digit system
password to order a PPV
program if it costs more
than the spending limit
you set up in the Profiles
menu.
67
Page 71

System Options and Preferences
USING THE PROGRAM GUIDE FOR PAY PER VIEW PROGRAMS
Another way to get to the Program Details screen is by using the
DIRECTV program guide (if you subscribe to DIRECTV® programming).
Press DIRECTV on the remote control, then press GUIDE. Highlight a
program name in the DIRECTV program guide and press INFO.
The Program Details screen gives you several options.
You need to connect
your phone line to your
television to be able to
order PPV programs
using the on-screen
menus.
You can select:
• View Channel to tune to that channel
• Channel Guide to see a program lineup for that channel
• Buy Program to purchase the program
• Other Times to see what other times the program is available
The options available to you may vary according to the type of
program you select.
68
Page 72

System Options and Preferences
USING THE ATTRACTIONS GUIDE
Your program providers may offer future programming events not
currently listed in your DIRECTV program guide. These events are
called “coming attractions” and can be previewed in the Attractions
Guide. To access the Attractions Guide:
1. Press the DIRECTV button on the remote control. Then press
GUIDE.
2. Use the down arrow icon to move the highlight to the bottom of
the screen.
3. Select the Other Guides icon.
4. Select Attractions Guide.
5. Select a channel.
The Other Guides icon
The Attractions Guide is accessed through the Other Guides
menu.
69
Page 73

System Options and Preferences
USING THE PURCHASES MENU
The Purchases menu allows you to review upcoming and past
DIRECTV Pay Per View purchases.
The Purchases menu shows you upcoming or past DIRECTV
purchases and spending limits.
The list of purchases may be longer than one screen; use the down
arrow button on the remote control to see more items. The display also
shows the title, channel, date, time, and cost of each program.
• Note that the past purchases list might not be updated until the
end of the billing cycle and therefore may show purchases for
which you have already paid.
REVIEWING AND CANCELING AN UPCOMING PURCHASE
You can review the program description, as well as cancel an
upcoming purchase. Highlight an upcoming purchase from the
DIRECTV Future Purchases screen and press OK.
The Future Purchases screen lets you cancel an upcoming
purchase.
70
Page 74

System Options and Preferences
SETTING THE TIME AND DATE
You can set the current time and day, the current date, the time zone,
and whether or not you observe daylight saving time.
Indicate the settings for your area.
Use the arrow buttons to move around the menu screen, OK to select
an item, and the digit buttons on your remote control to enter numbers.
If you have already acquired a digital signal, the time was
automatically set and you cannot reset it.
USING THE PREFERENCES MENU
The Preferences menu allows you to change some aspects of your TV to
fit your personal preference. The following sections outline what you
can do in this menu.
COLOR SCHEME
You can change the color that appears in the menu and guides. To
change the color, select Preferences from the main menu and select
Color Scheme.
Use the up and down arrows and OK button to select the menu
color scheme you prefer.
71
Page 75

System Options and Preferences
TRANSLUCENCY
You can adjust the level of translucency that the menu screens and program guides
possess. Adjust the slider up for more translucency (the video behind the menu and
guides will be more visible) or down for less translucency (less video will be shown
behind the menu or guides).
DEFAULT GUIDE
By default, the Detail Guide appears when you press GUIDE on the remote control, no
matter if you access the DIRECTV® programming guide or the TV guide. You can change
the default guide from the Detail Guide to the Grid Guide or SurfGuide (DIRECTV
only).
1. Select Preferences from the main menu, then select Default Guide.
2. Use the arrows and OK to choose which guide you want to appear first when you
press the GUIDE button on the remote control.
SCREEN FORMAT
If you receive an image with a 4:3 aspect ratio, the image will be displayed at that ratio
on your HDTV unless you specify otherwise. The Screen Format menu allows you to
adjust the image through the following options:
Normal Choose this when receiving a 4:3 image and you want the on-screen
appearance of the video to be a centered picture with side panels (blank areas) on the
right and left sides.
Smooth Wide Choose this when receiving a 4:3 image and you do not want side
panels on the right and left sides of the screen. The television will proportionally adjust
the image horizontally so it fills your 16:9 screen with no apparent distortion or side
panels added.
For more information
about the three types of
guides, see the section,
“Using the Program
Guides.”
4:3 ratio
16:9 ratio
Full Choose this when you want the television to adjust the 4:3 image horizontally so
it fills your 16:9 screen. No side panels will be added, and the image is vertically
unaltered. This setting is especially useful for viewing 16:9 formatted DVDs.
Fill Choose this when receiving a 4:3 image and you do not want side panels on the
right and left sides of the screen. The television will adjust the image both horizontally
and vertically so it fills the height and width of your 16:9 screen with no side panels
added. It will also maintain the correct image proportion. Use with material such as
“letterboxed” laserdiscs or VCR tapes.
72
Some digital (ATSC
format) stations may
transmit 4:3 images in a
way that will not allow
expansion. You will be
unable to adjust the
screen format.
Page 76

System Options and Preferences
CAPTION DISPLAY
The Caption Display menu displays a choice list that lets you choose when closed
captioning information is shown on the screen.
On Always Captioning information is shown always, when available.
On When Muted Captioning information is only shown when the TV’s sound is
muted, when available. (To mute the sound, press the MUTE button on the remote
control.)
Off No captioning information is displayed.
CAPTION MODE
You can also select a closed caption mode, which is the mode, or source, used for
displaying captioning information. The content of CC and Text are different; you
can select which one you want to see on the screen.
• CC displays information at any position on the screen. It overlays the text on
top of the picture as it is received.
• Text displays information at one particular position (such as the bottom third)
of the screen. You cannot see the picture underneath the text.
You can choose between eight closed caption modes, or sources:
• CC1 and Text 1 are the primary caption and text services. The captioning or
text is displayed in the same language as the program’s dialog.
• CC3 and Text 3 serve as the preferred data channels. The captioning or text is
often a secondary language translation, simplified English, or displayed at a
slower rate.
• CC2 and CC4 and Text 2 and Text 4 are rarely available and broadcasters use
them only in special conditions, such as when CC1 and CC3 are not available,
or Text1 and Text3 are not available.
73
Page 77

System Options and Preferences
USING FETCH
The Fetch menu is a list of eight most-used menu items. It serves as a shortcut to access
these menu items. To view the Fetch menu, press FETCH on the remote control.
Using FETCH is a convenient way to call up frequently used menu items.
74
Page 78

Getting Assistance
If you run across any problems or need to
rely on the system to give you feedback,
you should use the Assistance menu to get
information. This section explains the
different types of assistance your system is
capable of giving you. It walks you through
the Assistance menu, which is accessed by
pressing MENU then selecting Assistance.
This section:
• tells you about the interactive setup
process
• helps you get antenna and signal meter
information
• explains the on-screen signal meter
• tells you how to validate a new access
card
• describes how to use the system test
SETUP AND CONNECTIONS
1
➣
USING THE REMOTE
2
BASIC TV OPERATION
3
USING THE
➣➣
4
PROGRAM GUIDES
➣
ADJUSTING TV CONTROLS
5
➣
USING THE PROFILES
6
➣
Most of the screens contain information to
help you decide what to do next. If you get
stuck, look for the help text at the bottom
of the screen.
SYSTEM OPTIONS AND
7
PREFERENCES
➣
GETTING ASSISTANCE
8
➣
REFERENCE
9
Page 79

Getting Assistance
RUNNING THE INTERACTIVE SETUP
You should have completed the interactive setup the first time you plugged in your
TV. However, if you need to access the interactive setup again, you can access it
through the Assistance menu.
1. Press MENU on the remote control to access the main menu.
2. Select Assistance from the main menu.
3. Select Interactive Setup and follow the on-screen directions.
The interactive setup process allows you to complete all steps or selectively skip
steps.
The steps involved in the interactive setup include:
• Setting the time and date
• Searching for channels
• Setting up speakers
• Selecting an audio processor
• Specifying your satellite dish antenna type
• Running the system test
Note that if you do not subscribe to DIRECTV® programming, you can select “Skip
this step” for specifying satellite dish antenna type and running the system test.
GETTING ANTENNA INFORMATION
The Antenna Info menu helps you measure the strength of all available TV
channels. It will help you adjust any terrestrial TV antennas. (The actual adding of
channels is done by using the Channel Search menu.)
To access the Antenna Info menu:
1. Press MENU to bring up the main menu.
2. Select Assistance.
3. Then select Antenna Info.
A dialog box reports the status of the signal search and lists channels that are being
received or have been received from all terrestrial antennas. To switch between
antennas, highlight and channel and then press ANTENNA on the remote control.
76
Page 80

Getting Assistance
When getting antenna information, the screen lists:
• the channel number,
• the station name, if available,
• whether the channel is digital or analog,
• which antenna is receiving the signal, and
• if a digital channel, the current signal strength.
The channel list consists of all channels being received or that have been
received from terrestrial antennas.
THE SELECT DISH MENU SCREEN
Note that if you highlight
a channel in the Antenna
Info menu, you tune to
the channel and, if
digital, get a real-time
update of the signal
strength.
To specify the type of dish you are using:
1. Press MENU on the remote to bring up the main menu.
2. Select Assistance, then Dish Pointing, then Select Dish.
3. Specify the type of dish you are using.
77
Page 81

Getting Assistance
USING THE ON-SCREEN SIGNAL METER
The signal strength meter is used to determine whether you are receiving the
DIRECTV signal; it also indicates the strength of the DIRECTV signal once the signal
is acquired. Follow these steps to bring up the on-screen signal meter:
1. Press MENU on the remote to bring up the main menu.
2. Select Assistance then Dish Pointing.
3. Select Signal Meter.
If the dish is pointed correctly, the signal meter will show you the current signal
strength (and you should hear a continuous tone).
4. Use the arrows and OK button on the remote control to toggle between the
satellites. Try to achieve the peak signal for each.
YOUR NEW ACCESS CARD
Peak Signal
The “Peak Signal”
indicates the highest
signal strength you have
obtained, which is not
necessarily the highest
possible signal.
While the maximum
signal strength is 100, the
signal strength you
achieve will probably be
less. Although there is no
difference in picture
quality between signal
strengths of 60 and 85,
the higher the signal, the
less likely you are to
experience negative
effects in degraded
conditions such as rain
or snow (called “rain
fade”).
Periodically, your program provider may issue you a replacement access card if you
subscribe to DIRECTV® programming. The New Access Card Setup screen allows
you to transfer the information from the old card onto the new one. The access card
fits into the TV through the back panel.
To replace the card:
1. Select Assistance from the main menu.
2. Select New Access Card.
3. Follow the on-screen directions to validate the new card.
RUNNING THE SYSTEM TEST
The System Test display screen is accessed through the Assistance menu and allows
you to initiate diagnostic procedures on the DIRECTV System, if you subscribe to
DIRECTV® programming. You should use this feature to get your access card
number or when your television doesn’t seem to be receiving satellite signals
correctly.
A message screen appears when you select System Test from the Assistance menu.
This screen tells you whether the system passed each test. If your system fails the
test, run the system test several times before concluding that there is a problem.
Occasional fluctuations in the phone line or satellite signal can give temporary false
readings. Note that if you do not subscribe to DIRECTV® programming or do not
have your satellite dish antenna installed, the test will fail.
See the section “Setup
and Connections” for
details about where to
insert your access card.
78
Page 82

Reference
This section contains troubleshooting
information, y our PR OSCAN limited warranty,
and accessory ordering information.
SETUP AND CONNECTIONS
1
USING THE REMOTE
2
BASIC OPERATION
3
USING THE
4
PROGRAM GUIDES
➣
➣➣
➣
ADJUSTING TV CONTROLS
5
➣
USING THE PROFILES
6
➣
SYSTEM OPTIONS AND
7
PREFERENCES
➣
GETTING ASSISTANCE
8
➣
REFERENCE
9
Page 83

Reference
TROUBLESHOOTING
Can’t select certain channel
• Channel may be blocked or not approved in the Profiles menu.
• If using a VCR, check to make sure the TV/VCR button on the VCR is in the correct “mode.”
Noisy stereo reception
• May be a weak station. Change to mono mode instead of stereo in the Audio menu under Special Audio.
No picture, no sound but TV is on
• Maybe a vacant channel or input is tuned.
• If watching VCR (connected only through antenna input), make sure TV is tuned to channel 3 or 4 – same as
CH3/4 switch on VCR. Also check to make sure the TV/VCR button on the VCR is in the correct “mode.”
Sound okay, picture poor
• Check antenna connections and pointing and also check for interfering sources.
• Try adjusting the picture quality, especially sharpness, to improve weak signals.
Black box appears on the screen
• Captioning may be turned on. Check the Caption Display in the Options menu.
Wrong picture
The TV and most VCRs let you toggle between pictures: one can be the picture from DIRECTV signal or a terrestrial
antenna (or cable) and one can be from the VCR. If you don’t see the picture you think you should be seeing, try
using these buttons to toggle between the pictures:
• Press the TV/VCR button on the VCR remote or on the VCR’s front panel.
• Press the ANTENNA button on the remote control.
Taking either of these actions lets you switch the source of the video signal from DIRECTV to the off-air antenna or
cable, and vice versa.
Problems with the remote control
• Maybe something is between the remote control and the remote sensor on the front of the TV.
• Maybe the remote control is not in the correct mode. Press the DIRECTV button so the remote will be in
DIRECTV mode or press the TV button so the remote will be in TV mode.
• Maybe the batteries in the remote control are weak, dead or installed incorrectly. Try replacing batteries. (Note, if
you remove the batteries, you may have reprogram the remote to control other components.)
• Remove the batteries and hold the number 1 button for at least 60 seconds to drain the microprocessor inside the
remote control. Release the button, replace the batteries, and (if necessary) reprogram the remote control.
• Remove all batteries for approximately 12 hours. Then replace batteries and (if necessary) reprogram the remote.
80
Page 84

Reference
Blank screen
• Maybe the component (VCR, DVD, etc.) connected to the input jacks is not on.
• Try another channel, because there may just not be any programming on at that time.
• Cables in back may be disconnected.
TV will not turn on
• Check to make sure it is plugged in, and try the front panel POWER button.
• Check the wall receptacle (and extension cord, if applicable) to make sure it is “live” by plugging in something
else.
• Maybe batteries in remote control are “dead.” To test, see if the LED lights up when you press a button.
• Maybe remote control is not aimed at remote sensor.
TV turns off while playing
• Electronic protection circuit may have been activated because of a power surge. Wait 30 seconds and then turn
on again. If this happens frequently, the voltage in your house may be abnormally high or low.
Problems with your system password
• If you forget your system password and subscribe to DIRECTV® programming, you should call DIRECTV to obtain
a new one.
CARE AND CLEANING
CAUTION: Turn OFF your TV before cleaning.
You can clean the TV as required, using a soft lint-free cloth. Be sure to occasionally dust the ventilation slots in the
cabinet to help assure adequate ventilation.
The TV’s screen may be cleaned with a soft, lint-free cloth as well. Take care not to scratch or mar the screen. If
necessary, you may use a cloth dampened with warm water.
Never use strong cleaning agents, such as ammonia-based cleaners, or abrasive powder. These types of cleaners will
damage the TV.
While cleaning do not spray liquid directly on the screen, or allow liquid to run down the screen and inside the TV.
Also, avoid placing drinks, vases, or potted plants with water on top of the TV. This could increase the risk of fire or
shock hazard or damage to the TV.
Caution: If fixed (non-moving) images are left on the screen for long periods, they may be permanently imprinted on
the screen. Such images include network logos, phone numbers, and video games. This damage is not covered by
your warranty. Extended viewing of channels displaying these images should be avoided.
81
Page 85

Reference
PROSCAN HIGH DEFINITION TELEVISION (HDTV) LIMITED WARRANTY
What your warranty covers:
• Any defect in materials or workmanship.
For how long after your purchase:
• One year for labor charges.
• One year for parts.
• Two years for the picture tube.
The warranty period for rental units begins with the first rental or 45 days from date of
shipment to the rental firm, whichever comes first.
What we will do:
• Pay any Authorized PROSCAN Digital Television Service Center the labor charges
to repair your HDTV.
• Pay any Authorized PROSCAN Digital Television Service Center for the new or, at
our option, refurbished replacement parts and picture tube required to repair your
HDTV.
How you get service:
• Call 1-888-903-HDTV and have your unit’s date of purchase and model number
ready.
• A representative will troubleshoot your problem over the phone.
• If the representative determines that you should receive service they will provide
you with name(s) of the closest Proscan Digital Television Authorized Service
Center(s).
• Contact the Service Center and arrange for home service.
• Show the Authorized Service Center Representative your sales receipt or other
evidence of purchase date or first rental.
What your warranty does not cover:
• Customer instruction. (Your Owner’s Manual clearly describes how to install,
adjust, and operate your HDTV. Any additional information should be obtained
from your dealer.)
• Installation and related adjustments.
• Signal reception problems not caused by your HDTV.
• Damage from misuse or neglect.
• Batteries.
• Images burned onto the screen.
• A HDTV that has been modified or incorporated into other products or used for
institutional or other commercial purposes.
• Acts of God, such as but not limited to lightning damage.
82
Page 86

Reference
Product Registration:
• Please complete and mail the Product Registration card packed with your HDTV. It
will make it easier to contact you should it ever be necessary. The return of the
card is not required for warranty coverage.
How state law relates to this warranty:
• This warranty gives you specific legal rights, and you also may have other rights
that vary from state to state.
If you purchased your HDTV outside the United States:
This warranty does not apply. Contact your dealer for warranty information.
FCC REGISTRATION INFORMATION
Your HDTV is registered with the Federal Communications Commission and is in
compliance with parts 15B and 68, FCC Rules and Regulations.
1. Notification to the Local Telephone Company.
On the back of this equipment is a label indicating among other information, the FCC
Registration number and Ringer Equivalence Number (REN) for the equipment. You
must, upon request, provide this information to your telephone company.
The REN is useful to determine the number of devices you may connect to your
telephone line and still have all these devices ring when your telephone number is
called. In most (but not all) areas, the sum of the RENs of all devices connected to one
line should not exceed 5. To be certain of the number of devices you may connect to
your line as determined by the REN, you should contact your local telephone company.
Note: This equipment may not be used on coin service provided by the telephone
company. Party lines are subject to state tariffs, and therefore you may not be able to
use your own telephone equipment if you are on a party line. Check with your local
telephone company. Notice must be given to the telephone company upon permanent
disconnection of your equipment from your line.
2. Rights of the Telephone Company.
Should your equipment cause trouble on your line which may harm the telephone
network, the telephone company shall, where practicable, notify you that temporary
discontinuance of service may be required. Where prior notice is not practicable and
the circumstances warrant such action, the telephone company may temporarily
discontinue service immediately. In case of such temporary discontinuance, the
telephone company must: (1) promptly notify you of such temporary discontinuance
(2) afford you the opportunity to correct the situation and (3) inform you of your right
to bring a complaint to the Commission pursuant to procedures set forth in Subpart E of
Part 68, FCC Rules and Regulations.
The telephone company may make changes in its communications facilities,
equipment, operations of procedures where such action is required in the operation of
its business and not inconsistent with FCC Rules and Regulations. If these changes are
expected to affect the use or performance of your telephone equipment, the telephone
company must give you adequate notice, in writing, to allow you to maintain
uninterrupted service.
83
Page 87

Reference
ACCESSORY INFORMATION
The following accessories are available from most dealers
and electronics supply stores in case you want to position
your components farther apart or need additional cables.
Flat 300-ohm twin-lead cable.
Standard Audio/V ideo cable with
RCA-type phono plugs. VH83
Monaural VCR Dubbing Audio/
Video Cable is a double cable that
lets you connect the video and audio
jacks of two VHS VCRs to duplicate
tapes. It can also be used to connect
a VCR to your TV. The cable is colorcoded and shielded. It has RCA-type
phono plugs on each end. GoldTipped cable, VH83 (6-ft)
Stereo VCR Dubbing Audio/Video
Cable is a triple cable that lets you
connect the VIDEO and AUDIO jacks of
stereo components. Gold-Tipped
cable, VH84 (6-ft)
S-Video Cable has multi-pin
connectors on each end for
connecting S-Video components to
your TV. VH976 (6-ft), VH913 (12-ft)
RG-6 Coaxial Burial Cable with
weatherproof “F” connectors. D905
Monaural VCR Dubbing Cable, 6 ft.,
VH83
Stereo VCR Dubbing Cable, 6
ft.VH84
84
Push-on Cable* attaches to the
round antenna connectors (called
75-ohm F-type) on the back of your
VCR or TV. The ends push on for a
quick connection. VH89 (6-ft)
Screw-on Cable* attaches to the
round antenna connectors (called
75-ohm F-type) on the back of your
VCR or TV. The ends screw onto the
connectors for a secure connection.
VH82 (6-ft), VH81 (3-ft)
Optical/SPDIF cables help you
connect to a component with an
Optical Audio In jack, such as a
Dolby Digital decoder or receiver.
DV3 (3-ft), DV6 (6-ft)
61” Super Shield protects your
television screen from fingerprints,
scratches, and other unwanted wear
and tear. SSH535
Page 88

Reference
123
456
789
0
O
N
•
O
F
F
T
V
V
C
R
1
D
V
D
M
U
T
E
S
K
I
P
G
O
B
A
C
K
F
E
T
C
H
G
U
I
D
E
I
N
F
O
M
E
N
U
C
L
E
A
R
I
N
P
U
T
R
E
V
E
R
S
E
P
L
A
Y
F
O
R
W
A
R
D
R
E
C
O
R
D
P
I
P
S
W
A
P
C
H
C
T
R
L
W
H
O
S
T
O
P
P
A
U
S
E
A
N
T
E
N
N
A
A
U
X
D
I
R
E
C
T
V
O
K
C
H
+
C
H
VOL
VOL
V
C
R
2
CRK76TCL2
2-way Splitter (VH47)
4-way Splitter (VH49)
Remote Control This is the
remote control that came
packed with your TV.
Replacements or spares can
be ordered as needed.
2-way Signal Splitter, 4-way
Signal Splitter* helps you
connect to other
components.
Accessory Order Form
Description
Part No.
Screw-on antenna cable* (3-ft) VH81 $4.95
Screw-on antenna cable* (6-ft) VH82 $6.95
Push-on antenna cable* (6-ft) VH89 $5.95
Weatherproof “F” Connector (2) D905 $5.95
Monaural VCR Dubbing Cable (6-ft) VH83 $5.95
Stereo VCR Dubbing Cable (6-ft) VH84 $9.95
S-Video Cable (6-ft) VH976 $7.95
S-Video Cable (12-ft) VH913 $8.95
2-way Signal Splitter* VH47 $3.95
4-way Signal Splitter* VH49 $6.95
Amplified Antenna ANT200 $49.95
Antenna Mixer 193984 $11.15
Remote Control (CRK76TCL2) 240895 $29.20
Optical/SPDIF Cable (3-ft) DV3 $15.95
Optical/SPDIF Cable (6-ft) DV6 $19.95
Price
Qty
Amplified VHF/UHF/FM
Antenna allows you to
easily switch from the
antenna signal to cable or
satellite easily without
ANT200
disconnecting antenna.
* This accessory is intended for use with an off-air or
cable TV signal distribution and is not suitable for
distribution of the satellite signal originating from
your satellite dish antenna.
Super Shield (61”)** SSH535 $219.95
Audio•Video Adapter 228449 $4.45
Diplexer D920 $19.95
Total Merchandise...............................................................
Sales Tax ...............................................................................
We are required by law to collect the appropriate sales
tax for each individual state, country, and locality to
which the merchandise is being sent.
Shipping and Handling* ....................................................
Total Amount Enclosed......................................................
Use VISA, MasterCard, or Discover Card preferably.
Money order or check must be in U.S. currency only.
No COD or CASH.
**Shipping and handling for a SuperShield is $12.00.
✂
Prices are subject to change without notice.
All accessories are subject to availability.
Where applicable, we will ship a superseding model.
Detach Here
Please complete other side also
$
$
$ 5.00 or
$ 12.00**
$
85
Page 89

Reference
Charge your order on your VISA,
MasterCard, or Discover Card by
USE YOUR CREDIT CARD
IMPORTANT: Copy complete account number
IMPORTANT: Copy complete account number
Copy Number
above your
name on
MasterCard
IMPORTANT: Copy complete account number
filling in below
from your VISA card
My card expires:
from your MasterCard
My card
expires:
from your Discover Card
Placing an Order
To place your order by phone, have your Visa, MasterCard
®
s
rr
TM
or Discover Card ready and call the toll-free number listed
below between 8AM and 8PM (EST) Monday through
Friday or between 9AM and 5PM (EST) Saturday.
Use this number only to place an order for accessory items
listed on this order form.
1-800-338-0376
To place your order by mail, detach and mail the
completed order form with credit card information, money
order or check in US currency (made payable to Thomson
Consumer Electronics, Inc.) to the following address:
Video Accessories
PO Box 8419
Ronks, PA 17573
My card expires:
AUTHORIZED SIGNATURE
(Credit card order will not be processed without signature)
Print or type your name and
address clearly.
Name:
Street:
City:
State:
Daytime Phone Number:
A complete and correct
order will save you days
of waiting.
Apt:
Zip:
Please make sure that both sides of this form
have been filled out completely.
• Allow 4 weeks for delivery.
• All accessories are subject to availability.
• Prices are subject to change
86
Page 90

Reference
This page left blank intentionally.
87
Page 91

Reference
This page left blank intentionally.
88
Page 92

Reference
This page left blank intentionally.
89
Page 93

Reference
This page left blank intentionally.
90
Page 94

Reference
This page left blank intentionally.
91
Page 95

Reference
INDEX
A
Access card 10, 78
Number 16
Accessories 84
Age-based ratings 54
Blocking 56
Viewing 56
All icon 39
Amplifier
Connecting 15
Analog terrestrial 26
Anatomy of the TV pr ogram
guide 33
Antenna
A 64, 65
ANTENNA IN jacks 10
B 64, 65
Information 76
Receiving signals 77
Arrows on r emote 19
Assistance menu 75
Attractions guide 69
Audio
AUDIO jacks 8
Audio/Video jacks, cable 7
Language 48
Output 47
Processor 47
Quality controls 44
Audio Language 25
Auto
Color 43
Converge 43
Tuning 65
AUX button 18
Available channels 66
B
Back of the TV 10
Balance, front 47
Bass 48
Batteries 16, 80
Black level 42
Blocking
Age-based ratings 56
Content themes 57
Buy pr ograms 68
C
Cables 10
Jacks 7
Camcorder 9
Canceling pur chases 70
Caption
Display 73
Mode 73
Care and cleaning 81
Center volume 47
Changing
Channels 26, 27
From the TV guide to the DIRECTV
guide 32
Channel
Banner
Icons 24
Groups 37
Lists 37
Delete channels 51, 53
Retrieving channel number 77
Search 66, 76
Strength 76
Up and down 8, 18
Check, sound 47
CLEAR button 19
Closed captioning 73, 80
Color 42
Scheme 71
Warmth 43
Colors
Of Icons 25
Of icons 62
Coming attractions 67
Connections
To the back panel 6
To the front panel 9
Content themes 54
Blocking 57
Viewing 57
Contrast 42
D
Date and time 71
Default guide 36, 72
Detail guide 36
DIGITAL AUDIO OUT jack 10, 48
Digital terrestrial 26
DIRECTV
Button 16, 18, 80
Channel list 50
Rating limit 52
Setup 50
Signal 78
Spending limit 51
Dish pointing 77, 78
Dolby
3 sound 47
Digital 48
Receiver 7
DVD button 18
Dynamic bass 48
E
Editing
Channels 50
Profiles 50
Equalizer 44
Exit icon 40
Exiting
Program guides 37
F
FCC information 83
Fetch
Button 19
Using 74
Fixed
Images 81
Output 47
Variable out jack 11, 15
Front
And rear speaker jacks 11
Balance 47
Input jacks 8
Of the TV 8
Panel 8
Panel connections 9
Speaker INT./ EXT. switch 11
FRONT SPEAKER
Switch 14
FRONT SPEAKER terminal 14
92
Page 96

Reference
G
Getting around in the guides 35
GO BACK button 19
Grid guide 36
Guide
Button on the remote
19, 33, 34, 36
Data 36, 37
H
Hall Surround Sound 47
Headphone jack 8
Help 40
I
Icons 25, 62
In channel banner 24
Lock, Unlock 62
INFO
Button on front panel 8
Button on the remote 19, 35
INPUT
1 jacks 11
2 jacks 11
3 jacks 11
4 jacks 8
Button on the remote 19
Interactive setup 16, 76
J
Jacks 10
And cables 7
L
Language 48
LED light 18
LFE/SUBWOOFER OUT jack
11, 15
Listing all DIRECTV pr ograms 39
Lock icon 62
Locking
The system 25, 52, 58, 62
Loudness 48
M
Mail icon 66
Mailbox
Checking your mail 66
Deleting mail 66
Icon 25
Main menu 40
Matrix Surround Sound 47
Maximum signal strength 78
MENU button 8, 19
Menus
Dish pointing 77
Icons 62
Profiles 50
Modes 8
Of operation 26
SAT and TV 26
Mono sound 47
Movie
Icon in the program guide 39
Ratings 58
Blocking 58
Viewing 59
Themes icon 39
Mute 18, 44
N
Naming profiles 50
New access card 78
Noise filter 43
Not rated
Movies 59
Programs 54
Number buttons on the remote 35
O
OK button 19
ON•OFF button 18
On-screen signal meter 78
Optical
Jacks and cables 7
Output menu 48
Other guides
Attractions guide 69
Icon 36
Output
Audio 47
Fixed
Variable 47
Overheated components 6
P
Passwor d
System 61
User 61
Pay Per V iew pr ogram 52
Tuning to 67
PCM
Decoder 48
Phone
Jack 7, 10
Line 7
Picture 42
Controls 42
Quality 42, 78
Settings 42
PIP (Picture in Picture)
Audio 48
Buttons 28
Problems 29
Using 28
Positioning cables 6
Preferences menu 71
Pro Logic sound 47
Profiles
Choosing 60
Locking
Unlocking 61
Menu 50
Unlocking 60
Program guides
Anatomy 34
Default guide 72
Detail guide 36
DIRECTV 32
Down arrow 40
Exiting 37
Grid guide 36
Help 40
Pay Per View programs 68
Scrolling 35
SurfGuide 36
Tuning to a program 35
TV 32
Programming the r emote to contr ol
components 20
Purchases
Cancelling 70
Menu 70
Pay Per View programs 67
Previewing 67
Reviewing 70
Q
Quality controls 42
R
Rain fade 78
Rating limit 52
RCA-type cables 7
Rear
Speakers 14
Rear volume 47
Remote control 80
93
Page 97

Reference
Buttons 18
Programming 20
Reset picture controls 43
Reviewing pur chases 70
RF jacks
Cables 7
S
S-VIDEO jack 7, 8
SAP 48
Satellite 26
In jack 10
Screen format 72
Scrolling 35
Sear ch for channels 66
Second Audio Pr ogram (SAP) 48
Set
Movie ratings 58
Rating limit 52
Time and date 71
Sharpness 42
Signal
Meter 78
Peak Signal 78
Source
Changing 64
Strength 78
Of a digital signal 77
Type
Changing 64
SKIP button 18
Sorting
The DIRECTV guide
By movies 39
By sports 39
By topics 38
Using movies icon 39
Using sports icon 39
Using topics icon 38
Sound
Check 47
Logic 48
Speaker 44
Connecting 14
Setup 14, 44
Using internal and rear external 45
Using internal only 45
Special audio 47
Spending limit 51
Sports
Icon 39
Themes icon 39
Station name
Retrieving 77
Stereo sound 47
Subchannel number 33
Subwoofer
Connecting 15
Volume 47
SurfGuide 36
System
Lock 58, 62
Password 62
Test 78
Unlock 62
T
Telephone jack and cor d 7
Ter restrial antennas 76
Testing speakers 47
Text
Closed caption 73
Theatr e 43
Time and date 71
Tint 42
Translucency 72
TRANSMITTER OUT
Jack 11, 15
Tr oubleshooting 80
Tuning to a pr ogram 35
TV
And DIRECTV button on remote 8
Button 18
Channel list 53
Mode 27
Rating limit 54
Setup 53
U
Unlocking
Profiles 60
The system 25, 62
Unrated
Movies 59
Programs and shows 54
Shows 59
V
V-Chip
Age-based ratings 54
Content themes 54
Variable output 47
VCR
VCR1 button 18
VCR2 button 18
Video
Configuration 42
Games 9, 10
Jack 8
Viewing
Age-based ratings 56
Content themes 57
Volume 47
Button 8, 18
W
Warranty 82
Weak r eception 80
WHO button on the remote 60
Wireless
Audio 48
Transmitter, connecting 15
94
Page 98

Please do not send any products to the Indianapolis address listed in this manual or on the carton. This will only add delays in
service for your product.
10330 North Meridian Street
Indianapolis, IN 46290
©1999 Thomson Consumer Electronics, Inc.
Trademark(s)® Registered
Marca(s) Registrada(s)
DIRECTV is a trademark of DIRECTV, Inc., a unit of
Hughes Electronics Corp., and is used with permission.
Printed in USA
TOCOM 15351820
Part # QR27281
The following materials were
used in printing this publication:
20%
RECYCLED PAPER
MINIMUM 20% POST CONSUMER
 Loading...