

Page 1
OWNER'S MANUAL
HD Projection TV
TM
DW65X91
TOSHIBA CORPORATION, 1999
Owner's Record
The model number and serial number are on the back
of your TV. Record these numbers in the spaces below.
Refer to these numbers whenever you communicate
with your Toshiba dealer about this TV.
Model number: DW65X91
Serial number:
Page 2
IMPORTANT INFORMATION
WARNING
TO REDUCE THE RISK OF FIRE OR ELECTRIC SHOCK, DO NOT EXPOSE THIS APPLIANCE TO RAIN OR
MOISTURE.
The lightning symbol in the triangle tells you that the
voltage inside this product may be strong enough to
cause an electric shock. DO NOT TRY TO SERVICE
THIS PRODUCT YOURSELF.
The exclamation mark in the triangle tells you that
important operating and maintenance instructions
follow this symbol.
CAUTION
TO PREVENT ELECTRIC SHOCK, DO NOT USE THIS POLARIZED PLUG WITH AN
EXTENSION CORD RECEPTACLE OR OTHER OUTLET UNLESS THE PRONGS CAN
BE FULLY INSERTED INTO THE OUTLET TO PREVENT ANY EXPOSURE OF THE
PRONGS ON THE POLARIZED PLUG.
THIS DEVICE COMPLIES WITH PART 15 OF THE FCC RULES. OPERATION IS
SUBJECT TO THE FOLLOWING TWO CONDITIONS: (1) THIS DEVICE MAY NOT
CAUSE HARMFUL INTERFERENCE, AND (2) THIS DEVICE MUST ACCEPT ANY
INTERFERENCE RECEIVED, INCLUDING INTERFERENCE THAT MAY CAUSE
UNDERSIRED OPERATION.
CAUTION
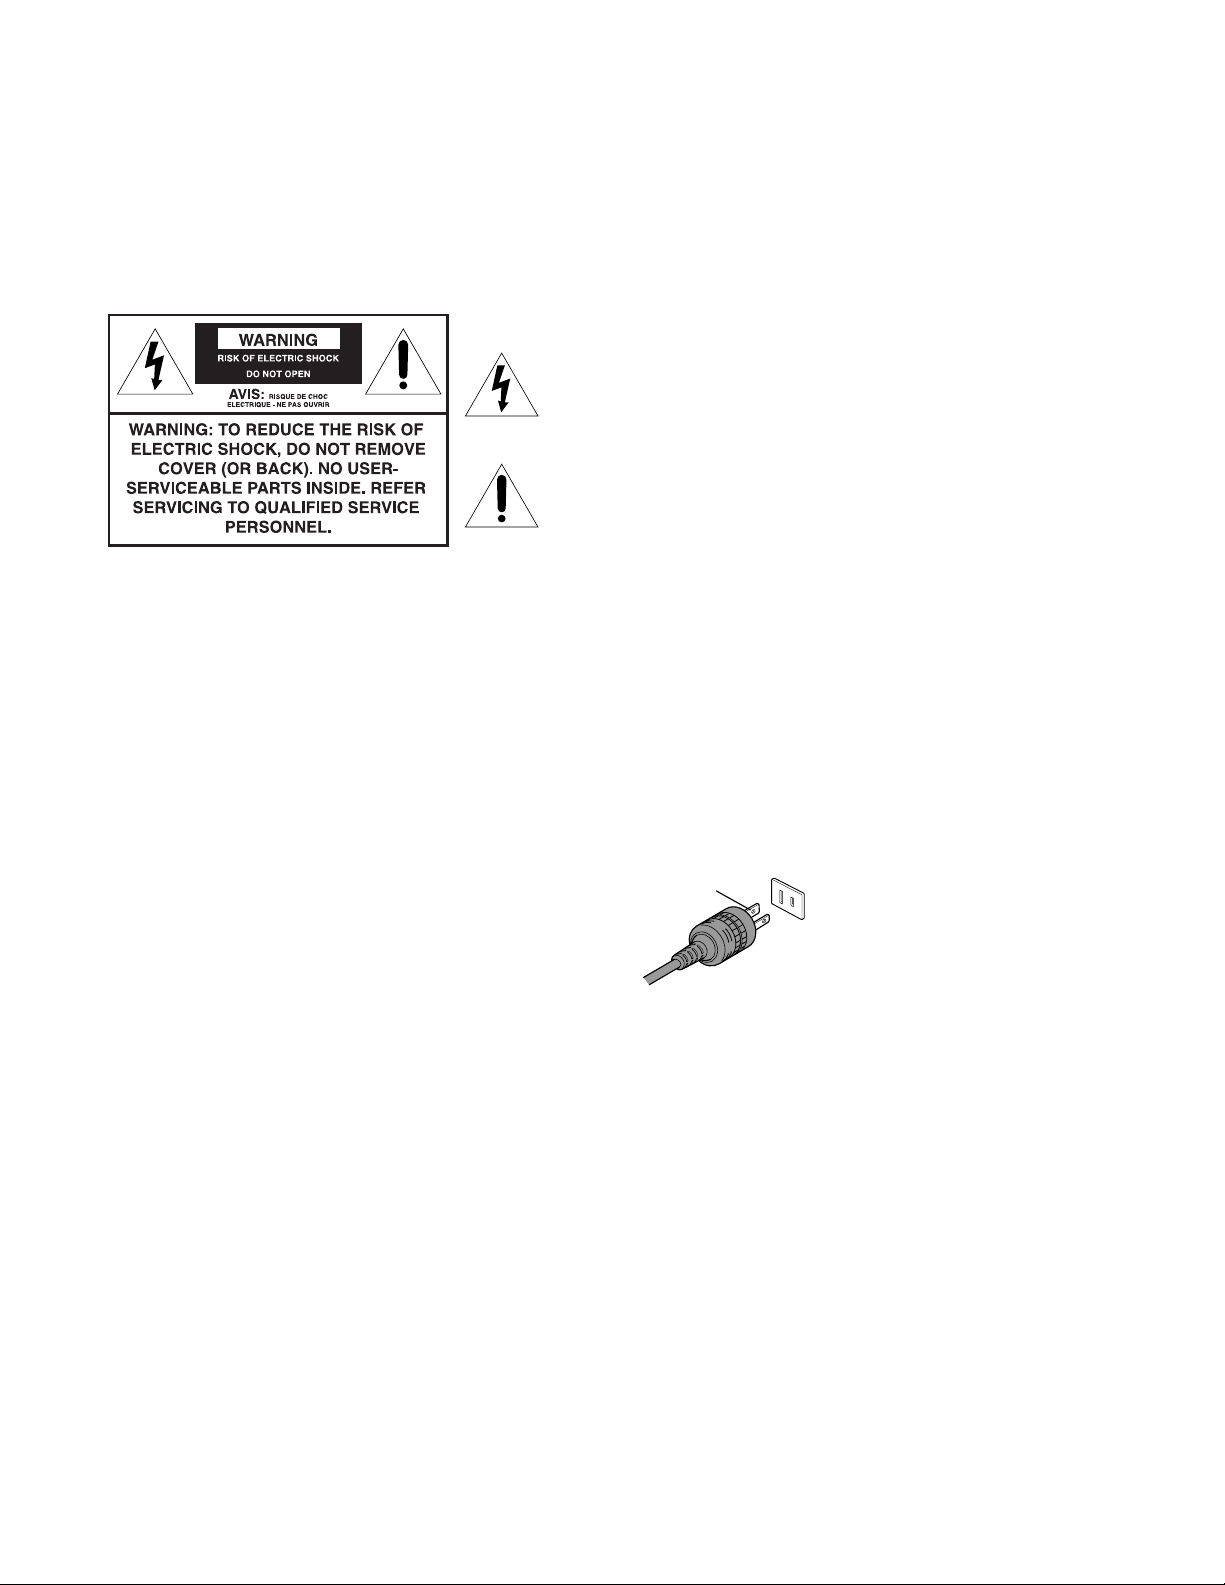
The plug has one prong wider than the other and will fit only one way
into a standard electrical outlet (120 volt AC, 60 Hz). If the plug does not
fit into the outlet, try turning it around. If the plug still does not fit, the
outlet is probably non-standard and must be replaced by a qualified
electrician. Do not tamper with the plug or try to force it into a
non-standard outlet.
wide prong
Note to CATV system installers in the USA
This reminder is provided to call the CATV system installer’s attention to Article 820-40 of the
NEC, which provides guidelines for proper grounding, and, in particular, specifies that the cable
ground shall be connected to the grounding system of the building, as close to the point of cable
entry as practical.
DIRECTV and DIRECTV PLUS are trademarks of DIRECTV, Inc., a unit of Hughes Electronics
Corp., and are used with permission.
Manufactured under license from Dolby Laboratories. “Dolby” and the double-D Symbol are
trademarks of Dolby Laboratories. Confidential Unpublished Works.
© 1992-1997 Dolby Laboratories. All rights reserved.
2
Page 3

IMPORTANT INFORMATION
Precautions
Installing your TV
•Place the TV on the floor or on a sturdy platform. The mounting surface should be flat and
steady. If you install the TV on a soft floor, make sure that the floor is not damaged by the weight
of the TV.
•Place the TV far enough away from the walls to allow proper ventilation. This will prevent the
TV from overheating and avoid possible damage to the TV. Avoid dusty places.
•Damage may occur if you leave the TV in direct sunlight or near a heater. Avoid places subject to
extremely high temperatures or humidity, and temperatures of 41˚F(5˚C) or lower.
•If you decide to subscribe to DIRECTV, we strongly recommend that you have the satellite
system professionally installed. Installation can be arranged through the dealer where the TV was
purchased.
Using your TV
•Do not stand or climb on the TV.
•Do not put any heavy object on top of the TV.
•Do not place containers with liquids such as drinks or cosmetics on the TV. If any foreign
material or water leaks into the TV, unplug the AC cord and contact your dealer.
•If the room temperature suddenly rises, condensation may occur on the lenses resulting in picture
distortion or color fading. In such a case, simply wait a while (with the power on) and the
condensation will evaporate.
• Avoid displaying stationary images on your TV screen for extended periods of
time. Stationary patterns generated by a picture-out-picture (POP) display,
computer displays, video games, stock market reports, etc., can become
permanently engrained on the picture tube. This damage is not protected by your
warranty because it is the result of misuse. If you wish to use your TV to display
still images, reduce brightness and contrast settings. Never leave a POP,
computer, or video game display unattended.
•Sit approximately 10-25 feet away from the TV. Sitting too far to the left or right of the screen
will cause the picture to appear dull as will direct sunlight and room lights. Turn the TV off to
check for reflections on the screen. Then remove the source of any reflections while viewing.
Software Upgrade
•Your digital satellite receiver is able to receive upgrades or modifications to some of its features
and functions. These modifications will occur automatically (usually at times when most viewers
are not watching programming). When an upgrade or modification is sent, you may experience a
disruption in reception for a few minutes. Your reception should return to normal after the
modification is complete. Your receiver must be plugged in to receive upgrades. Do not unplug
your receiver while an upgrade is in progress. Please consult the Upgrade menu to find a schedule
of upgrades or modifications planned by DIRECTV.
Cleaning your TV
• Clean the TV with a soft dry cloth. Never use strong solvents such as thinner or benzene which
might damage the finish of the cabinet. If the cabinet is very dirty, use a damp cloth to wipe the
cabinet clean, then finish with a dry cloth.
3
Page 4

TAB LE OF CONTENTS
GETTING STARTED ....................................................................................................8
SETUP AND CONNECTIONS ...................................................................................9
STEP 1: CONNECT YOUR TV TO OTHER COMPONENTS .............................. 10
THINGS TO KNOW BEFORE CONNECTING COMPONENTS ................. 10
Protect Your Components from Power Surges ................................................. 10
Position Cables Correctly to Avoid Audio Hum or Interference ...................... 10
Protect Your Components from Overheating .................................................. 10
JACKS AND CABLES .......................................................................................... 11
ColorStream™ Jacks and Cables (RCA-type) .................................................. 11
S-Video Jack and Cable ................................................................................... 11
Audio/Video Jacks and Cables (RCA-type) ...................................................... 11
RF Jacks and Coaxial Cables (F-type) .............................................................. 11
Optical Jack and Cables .................................................................................. 11
Telephone Jack and Cord ................................................................................ 11
FRONT OF THE TV ........................................................................................... 12
Making Connections to the Front Panel .......................................................... 13
BACK OF THE TV .............................................................................................. 14
THE BASIC CONNECTION ............................................................................. 16
TV and VCR .................................................................................................. 16
How to view programming: ............................................................................ 16
How to view your VCR:.................................................................................. 16
THE ADVANCED CONNECTION ................................................................... 17
TV, VCR, and DVD Player and Audio Amp. .................................................. 17
How to view your DVD and VCR: ................................................................. 17
Connecting two VCRs .................................................................................... 18
Connecting a stereo amplifier .......................................................................... 18
STEP 2: PLACE BATTERIES IN THE REMOTE CONTROL ................................. 19
STEP 3: COMPLETE THE INTERACTIVE SETUP ................................................ 19
STEP 4: ORDER PROGRAMMING.......................................................................... 19
USING THE REMOTE .............................................................................................. 21
REMOTE CONTROL BUTTONS ............................................................................ 22
PROGRAMMING THE REMOTE CONTROL ....................................................... 24
Testing the Remote Control ................................................................................... 24
Programming the Remote Control ......................................................................... 24
Using the Remote to Control a Component .......................................................... 25
DVD code table ..................................................................................................... 26
VCR code table ...................................................................................................... 26
Cable TV converter code table ............................................................................... 27
LEARNING OPERATING CODE OF ANOTHER REMOTE CONTROL ............ 28
Cancelling the learned operating codes................................................................... 29
BASIC TV OPERATION ........................................................................................... 31
ABOUT THE CHANNEL BANNER ......................................................................... 32
CHANGING BETWEEN DIRECTV AND TV MODE ........................................... 34
CHANGING CHANNELS ......................................................................................... 35
When you want to watch DIRECTV® programming,
put the remote in SAT mode .................................................................................. 35
When you want to watch a digital or analog TV channel,
put the remote in TV mode ................................................................................... 35
POP (PICTURE-OUT-PICTURE) OPERATION...................................................... 36
POP Buttons.......................................................................................................... 36
Basic POP Operation ............................................................................................. 37
POP Problems? ...................................................................................................... 37
4
Page 5

TAB LE OF CONTENTS
SELECTING THE PICTURE SIZE ........................................................................... 38
4:3 Standard........................................................................................................... 38
4:3 Full .................................................................................................................. 38
4:3 Wide 1 ............................................................................................................. 38
4:3 Wide 2 ............................................................................................................. 38
USING THE TV/VIDEO BUTTON.......................................................................... 39
USING THE PROGRAM GUIDES ......................................................................... 41
BRINGING UP THE PROGRAM GUIDES .............................................................. 42
ANATOMY OF THE TV PROGRAM GUIDE.......................................................... 43
ANATOMY OF THE DIRECTV® PROGRAMMING GUIDE ................................ 44
GETTING AROUND IN THE GUIDES .................................................................. 45
TUNING TO A PROGRAM ...................................................................................... 45
USING THE GUIDE BUTTON ................................................................................ 46
The Detail Guide ................................................................................................... 46
The SurfGuide (DIRECTV only) .......................................................................... 46
The Grid Guide ..................................................................................................... 46
The Other Guides Icon .......................................................................................... 46
EXITING A PROGRAM GUIDE ............................................................................... 47
SORTING THE DIRECTV® PROGRAMMING GUIDE......................................... 48
Sorting the DIRECTV® Programming Guide by Topics ........................................ 48
Sorting the DIRECTV® Programming Guide by Movies ....................................... 49
Sorting the DIRECTV® Programming Guide by Sports ........................................ 49
Listing All DIRECTV® Programming.................................................................... 49
Searching programs by using the Alphasort menu .................................................. 50
Searching programs by using the Hunt menu......................................................... 50
THE OTHER ICONS................................................................................................. 50
Return ................................................................................................................... 50
Help....................................................................................................................... 50
Down Arrow .......................................................................................................... 50
The Main Menu .................................................................................................... 50
ADJUSTING TV CONTROLS ................................................................................. 51
PICTURE QUALITY CONTROLS ............................................................................ 52
Picture Settings ...................................................................................................... 52
Color Temp ............................................................................................................ 53
Convergence .......................................................................................................... 53
Picture Pref ............................................................................................................ 54
Reset Controls ....................................................................................................... 54
AUDIO CONTROLS.................................................................................................. 54
Mute ...................................................................................................................... 54
Tone Settings ......................................................................................................... 54
Audio Processor ..................................................................................................... 55
Audio Output ........................................................................................................ 55
SAP ........................................................................................................................ 55
SBS ........................................................................................................................ 55
SBS Level ............................................................................................................... 55
Optical Output ...................................................................................................... 56
USING THE PROFILES ........................................................................................... 57
ABOUT PROFILES..................................................................................................... 58
THE SAT (DIRECTV) SETUP ................................................................................... 58
Editing Channels in a DIRECTV List ................................................................... 58
Selecting or Deleting All DIRECTV Channels ...................................................... 59
5
Page 6

TAB LE OF CONTENTS
Setting the DIRECTV Spending Limit .................................................................. 59
Setting the DIRECTV Rating Limit ...................................................................... 60
THE TV SETUP .......................................................................................................... 61
Editing Channels in a TV List................................................................................ 61
Selecting or Deleting All TV Channels................................................................... 61
SETTING THE TV RATING ..................................................................................... 62
The Rating Limit Screen ........................................................................................ 63
BLOCKING AGE-BASED RATINGS ..................................................................... 64
Viewing Age-Based Ratings .................................................................................... 64
Blocking Specific Content Themes ......................................................................... 65
Viewing Specific Content Themes ......................................................................... 65
SETTING THE MOVIE RATING .......................................................................... 66
Blocking Movie Ratings ......................................................................................... 66
Viewing Movie Ratings .......................................................................................... 67
BLOCKING UNRATED TV SHOWS .................................................................... 67
CHOOSING YOUR PROFILE................................................................................ 68
LOCKING AND UNLOCKING A USER PROFILE ............................................. 69
LOCKING THE SYSTEM ....................................................................................... 70
Unlocking the System ............................................................................................ 70
SYSTEM OPTIONS AND PREFERENCES ........................................................... 71
CHANGING THE SIGNAL SOURCE ...................................................................... 72
CHANGING THE SIGNAL TYPE ............................................................................. 72
CHANNEL SEARCH.................................................................................................. 73
MAILBOX ................................................................................................................... 73
Checking Your Mail ............................................................................................... 73
PURCHASES: PAY PER VIEW PROGRAMS ............................................................ 74
Purchasing and Previewing ..................................................................................... 74
Tuning to a Pay Per View Program ......................................................................... 74
Using the Program Guide for Pay Per View Programs ............................................ 75
Using the Attractions Guide................................................................................... 76
Using the Purchases Menu ..................................................................................... 77
Reviewing and Canceling an Upcoming Purchase .................................................. 77
SETTING THE TIME AND DATE ........................................................................... 78
USING THE PREFERENCES MENU ....................................................................... 78
Color Scheme ........................................................................................................ 78
Default Guide ........................................................................................................ 79
Caption Display ..................................................................................................... 79
Caption Mode ....................................................................................................... 80
USING FETCH........................................................................................................... 80
GETTING ASSISTANCE .......................................................................................... 81
RUNNING THE INTERACTIVE SETUP ................................................................ 82
GETTING ANTENNA INFORMATION ................................................................. 82
THE SELECT DISH MENU SCREEN ...................................................................... 83
Using the On-Screen Signal Meter ......................................................................... 84
YOUR NEW ACCESS CARD..................................................................................... 84
RUNNING THE SYSTEM TEST ............................................................................... 85
ACQUIRING OFF-AIR GUIDES .............................................................................. 85
UPGRADES ................................................................................................................ 85
REFERENCE ............................................................................................................. 87
TROUBLESHOOTING ............................................................................................. 88
Can’t select certain channel .................................................................................... 88
Noisy stereo reception ............................................................................................ 88
6
Page 7

TAB LE OF CONTENTS
No picture, no sound but TV is on ........................................................................ 88
Sound okay, picture poor ....................................................................................... 88
Wrong picture ........................................................................................................ 88
Problems with the remote control .......................................................................... 88
Temporary loss of reception ................................................................................... 88
Blank screen ........................................................................................................... 89
TV will not turn on ............................................................................................... 89
TV turns off while playing ..................................................................................... 89
Problems with your system password...................................................................... 89
Audio recording problems ...................................................................................... 89
System Lock-up ..................................................................................................... 89
CARE AND CLEANING ............................................................................................ 89
SPECIFICATION ........................................................................................................ 90
LIMITED UNITED STATES WARRANTY............................................................... 91
FCC REGISTRATION INFORMATION .................................................................. 92
INDEX......................................................................................................................... 93
7
Page 8
WELCOME TO HDTV
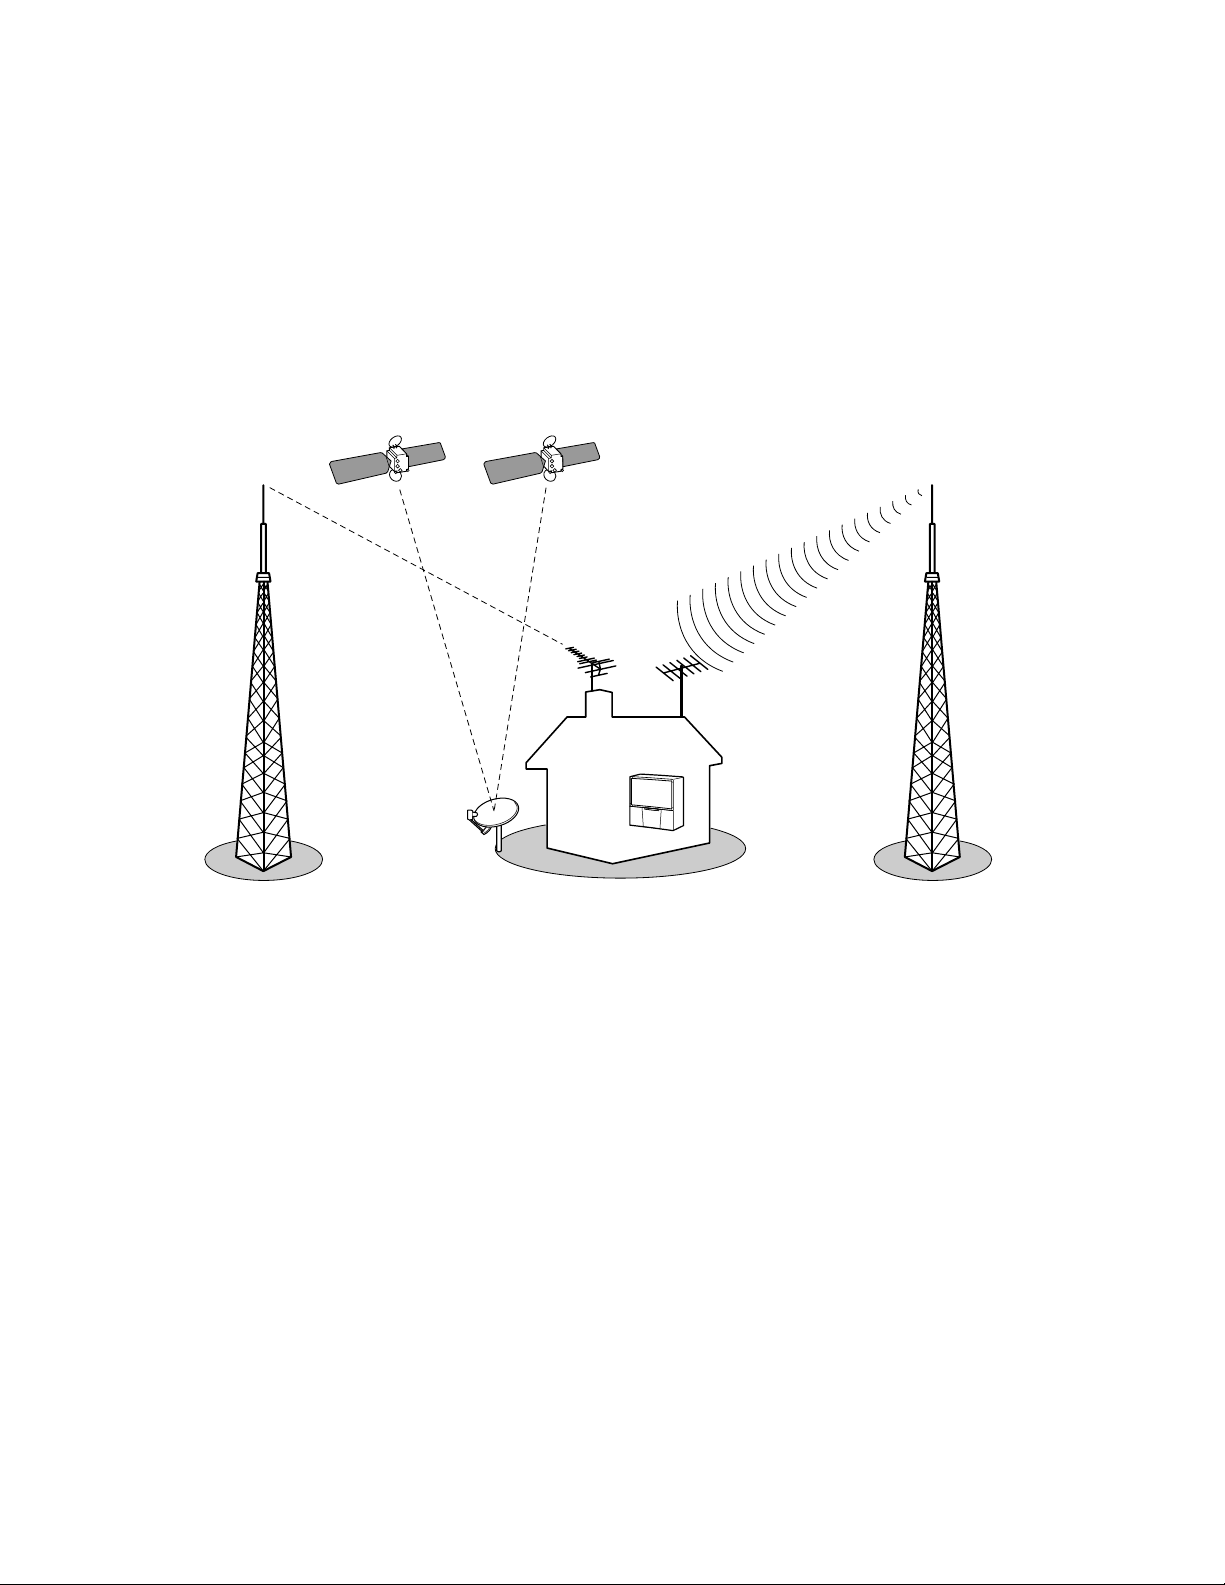
High Definition refers to a new way of sending programming information over the airwaves and into your TV. There are two
types of TV display formats available. One is ATSC format, which originated from the Advanced Television Systems
Committee. The other is NTSC format, which is named for the National Television Systems Committee. What makes your
High Definition Television (HDTV) special is that it has tuners capable of receiving ATSC and NTSC formats as well as
digital satellite signals. You can receive: analog (in NTSC format), digital terrestrial (in ATSC format), cable (in NTSC and
ATSC formats), and digital satellite. This TV makes receiving all types of signals seamless. Below is an example of how your
HDTV can receive the different types of signals.
DIRECTV
SATELLITE
SATELLITE
DISH ANTENNA*
TOWER SENDING
DIGITAL SIGNALS
DIRECTV HD
SATELLITE
DIGITAL
OFF-AIR
ANTENNA
ANALOG
OFF-AIR
ANTENNA
HDTV
TOWER SENDING
ANALOG SIGNALS
So why is it called High Definition? Definition—commonly called resolution—refers to the sharpness of the image and is
determined by the number of dots, or pixels, your screen uses to create the image. The more pixels the sharper the image. An
HDTV normally has either 1080 or 720 rows and over 1,000 columns of pixels. This results in a display of over one million
pixels. Your HDTV also has a wide screen, or “wide aspect ratio” of 16:9 as opposed to the common 4:3 ratio. It is normally
capable of displaying both interlaced images (like today’s analog TVs) and progressive images (like a computer monitor).
What this all means is that while digital broadcasting will bring many new possibilities, only people with HDTVs like yours
will actually be capable of realizing many of them. A wide aspect ratio, one million pixel resolution, CD-quality audio with
Dolby Digital surround sound, and improved interactivity are features of many digital broadcasts, and your HDTV will help
bring it all into your home.
GETTING STARTED
Now that you have an understanding of what your HDTV can do, read on to find necessary information about how to use the
TV.
The first section of this manual shows you how to connect components and speakers to your TV. The “Basic TV Operation”
section describes how you receive the three signals and the important modes of operation: TV mode and DIRECTV mode.
The rest of this manual describes how to use your television’s many features, such as program guides, picture and audio
controls, and system options.
* The appearance of your satellite dish antenna may differ from that shown here.
If your satellite dish antenna is round instead of oval, you can receive programming from only the DIRECTV satellite.
8
Page 9

SETUP AND CONNECTIONS
This section tells you how to get your
HDTV set up and connected. It
describes the cables you will need,
explains the front and back panels, and
walks you through the steps needed to
start using yourTV.
SETUP AND
1
CONNECTIONS
➛➛➛ ➛ ➛➛ ➛➛
USING THE REMOTE
2
BASIC TV OPERATION
3
USING THE PROGRAM
4
GUIDES
ADJUSTING TV
5
CONTROLS
USING THE PROFILES
6
SYSTEM OPTIONS AND
7
PREFERENCES
GETTING ASSISTANCE
8
REFERENCE
9
9
Page 10

SETUP AND CONNECTIONS
STEP 1: CONNECT YOUR TV TO OTHER
COMPONENTS
During the satellite dish antenna installation, the TV may have been connected with just a
coaxial cable for the system test. Depending on what components you have, another
connection may provide better picture and audio quality. The following sections provide
cable and connection information to help you decide what connection is best for you.
THINGS TO KNOW BEFORE CONNECTING
COMPONENTS
Protect Your Components from Power Surges
• Connect all components before plugging any power cords into the wall outlet.
• Always turn off the TV and other components before you connect or disconnect any
cables.
Position Cables Correctly to Avoid Audio Hum or
Interference
•Insert all cable plugs firmly into their jacks.
•Place the audio/video cables to the sides of the TV’s back panel instead of straight
down the middle after you connect your components.
•Try not to coil any twin-lead cables; keep them away from the audio/video cables as
much as possible.
•Make sure all antennas and cables are properly grounded. Refer to the safety sheet
packed with your unit.
Protect Your Components from Overheating
•Do not block ventilation holes in any of the components. Arrange the components so
that air can circulate freely.
•Do not stack components.
• Allow adequate ventilation when placing your components in a stand.
•Place an amplifier on the top shelf of the stand so that heated air rising from it will
not flow around other components.
10
Page 11
SETUP AND CONNECTIONS
JACKS AND CABLES
Below is a description of the jacks and cables you can use to make connections. Note that
not all cables come with your television unit.
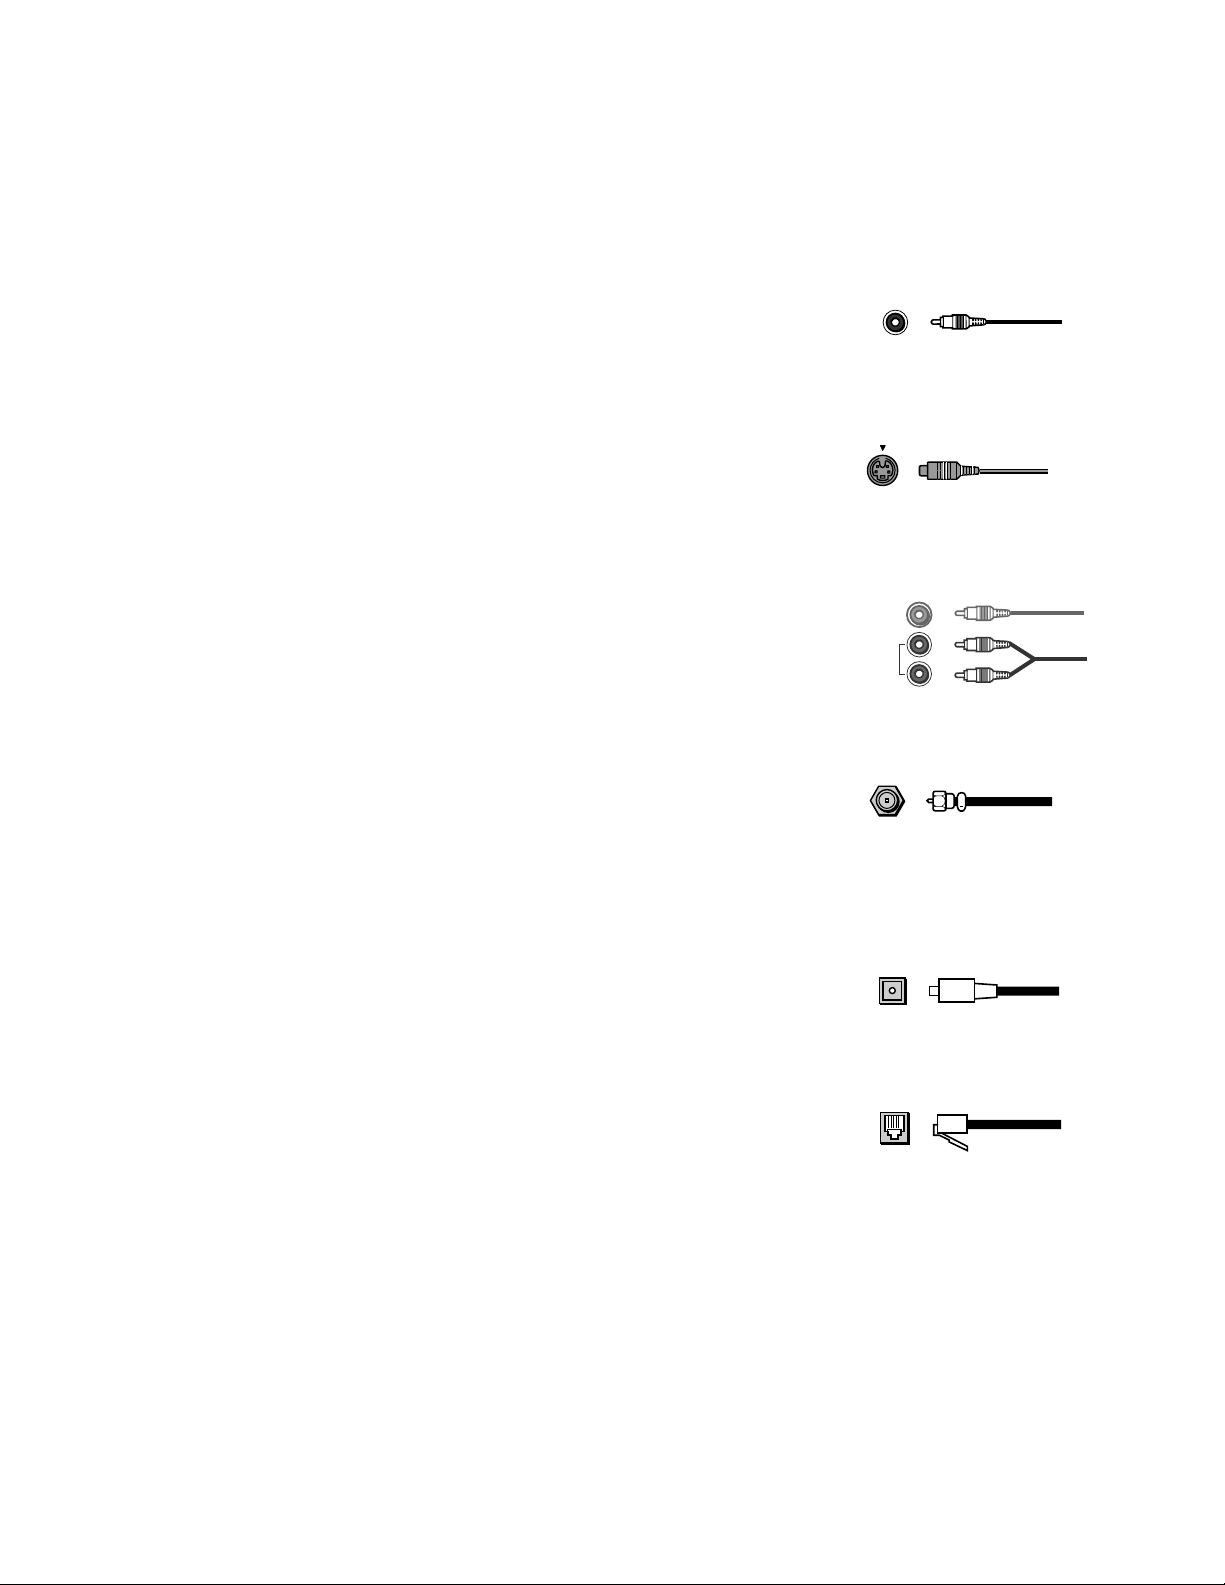
ColorStream™ Jacks and Cables (RCA-type)
ColorStream cables come in sets of three and provide the best picture performance.
ColorStream cables can only be used with ColorStream (component video) compatible
components.
S-Video Jack and Cable
The S-Video jack provides better picture quality for your system. This jack is available on
this TV and is used in conjunction with audio cables. Remember to connect the left and
right audio cables because the S-Video jack carries only the picture signal, not the sound.
Audio/Video Jacks and Cables (RCA-type)
The audio/video jacks provide very good picture and stereo sound quality.
Theses jacks are used for most audio/video connections between components. The audio/
video jacks are often color coded (yellow for video, red for right audio, and white for left
audio). If your component has only one input for audio (mono), connect it to the left
(white L/Mono) audio jack on the TV.
RF Jacks and Coaxial Cables (F-type)
The RF jacks are necessary for reception of off-air broadcasts, cable, and DIRECTV
signals.
These jacks are required for antenna or cable connections. The RF and coaxial jacks on
the TV are labeled SATELLITE IN, ANTENNA A IN, and ANTENNA B IN. An RG-6
coaxial cable is required for all satellite signal distribution.
ColorStream
Jacks
S-Video
Jacks
VIDEO
AUDIO
AUDIO/VIDEO
Jacks
RF Jacks
Optical Jack and Cables
The optical cable is used for connecting a Dolby Digital receiver. If you own a Dolby
Digital receiver that uses an optical cable-type input, you can use an optical cable to
connect the TV to that receiver for the best sound quality.
Telephone Jack and Cord
A telephone line cord is required to connect your TV to a phone line if you choose to
subscribe to DIRECTV® programming. The phone line connection is used to periodically
call out to DIRECTV. You will need an RJ11 type modular jack, which is the most
common type of phone jack and might look like the one pictured here. If you don’t have a
modular jack, call your local telephone company to find out how to get one installed.
Digital Audio
Out Jacks
Phone Jacks
11
Page 12

SETUP AND CONNECTIONS
FRONT OF THE TV
The diagrams below describe the front panel and front input jacks on the TV.
RESET
IN–VIDEO 3
S-VIDEO VIDEO
AUDIO
L/MONO R
INFO
MENU/
OK
ENTER
TV/SAT
VOLUME CHANNEL
POWER
Remote Sensor
POWER Turns the TV on and off.
MENU/OK Brings up the main menu.
When in the menu system, it selects highlighted items.
VOLUME z (
) Decreases the volume. When in the menu system, moves the
highlight left and adjusts menu controls.
VOLUME y ( ) Increases the volume. When in the menu system, moves the
highlight right and adjusts menu controls.
CHANNEL z ( ) Scrolls down through the current channel list. If you are in TV mode
and press CHANNEL z, you scroll down through TV channels. If you subscribe to
DIRECTV® programming and are in SAT mode, you scroll down through DIRECTV
channels. In the menu system, moves the highlight down and adjusts menu controls.
CHANNEL y ( ) Scrolls up through the channel list. If you are in TV mode and press
CHANNEL y, you scroll up through TV channels. If you subscribe to DIRECTV
®
programming and are in SAT mode, you scroll up through DIRECTV channels. In the
menu system, moves the highlight up and adjusts menu controls.
If you cannot find your remote
control, you can use the front panel
of the TV to operate many of the
TV’s features.
TV/SAT Toggles between TV mode and SATellite (DIRECTV) mode.
INFO Brings up the on-screen channel banner. Press when in the program guide to get
more information on the highlighted program or channel.
S-VIDEO VIDEO
IN–VIDEO 3
L/MONO R
AUDIO
VIDEO 3 Lets you connect a baseband NTSC (analog) component such as a VCR,
Internet access device, game, or camcorder.
S-VIDEO Lets you connect an S-Video cable for better video quality picture to a
component with S-Video capability, such as a VCR. When using S-Video, make sure
to connect the two audio cables as well as the S-Video connector.
VIDEO Provides video connection. The video connector is usually yellow.
AUDIO L/MONO Provides left audio (stereo left channel or mono)
connection. The left audio connector is usually white.
R AUDIO Provides right audio connection. The right audio (stereo
right channel) connector is usually red.
12
Page 13
SETUP AND CONNECTIONS
RESET Restarts the TV when the system is locked.
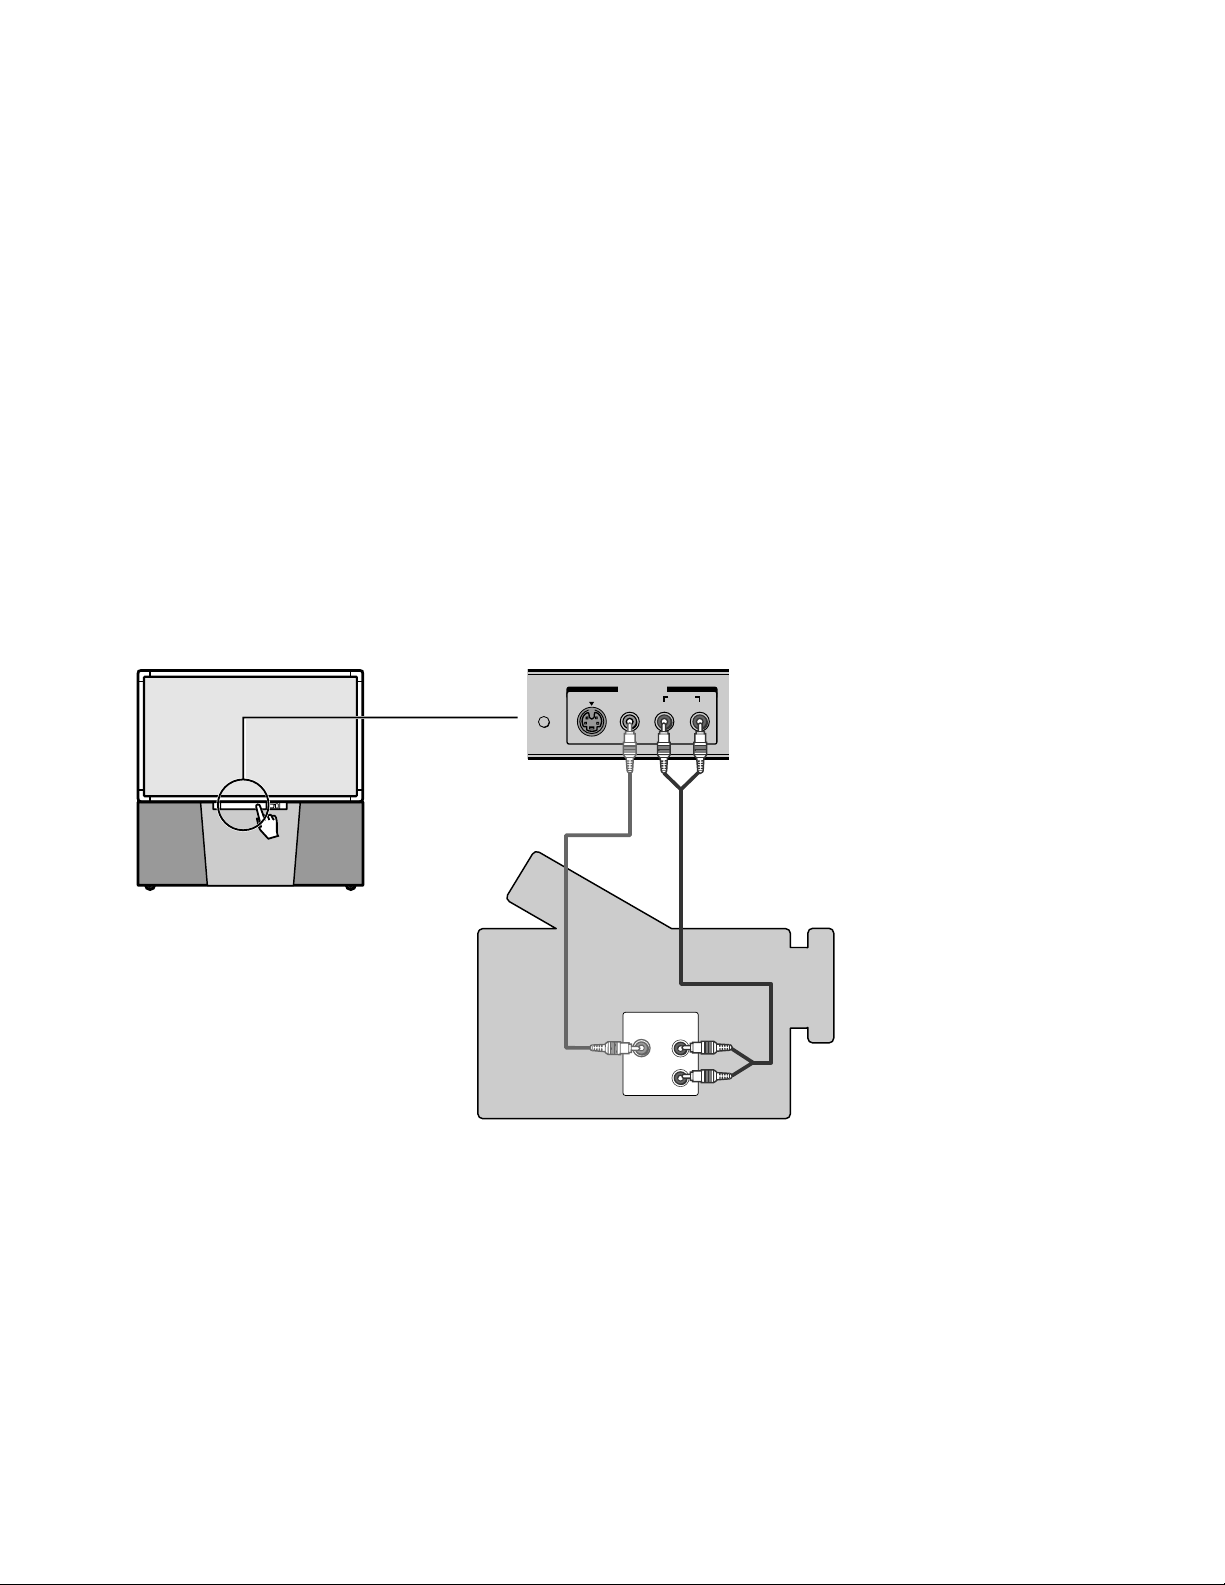
Making Connections to the Front Panel
You can connect one of many types of devices to the TV’s front panel, such as a video
game or camcorder for playback.
To connect a device to the front panel:
1. Open the small front panel door protecting the VIDEO 3 jacks.
2. Connect the device’s audio/video outputs to the VIDEO 3 audio and video jacks on
the TV.
3. If the device has S-Video capability, connect an S-Video cable (instead of the video
cable) from the device to the S-VIDEO jack on the TV. If not, skip this step.
4. Press the TV/VIDEO button on the remote control until V-3 appears in the channel
banner.
Below is an example of how you might connect a camcorder for playback.
TV front
IN–VIDEO 3
RESET
S-VIDEO VIDEO
AUDIO
L/MONO R
VIDEO
AUDIO
OUT
L
R
Camcorder
13
Page 14
SETUP AND CONNECTIONS
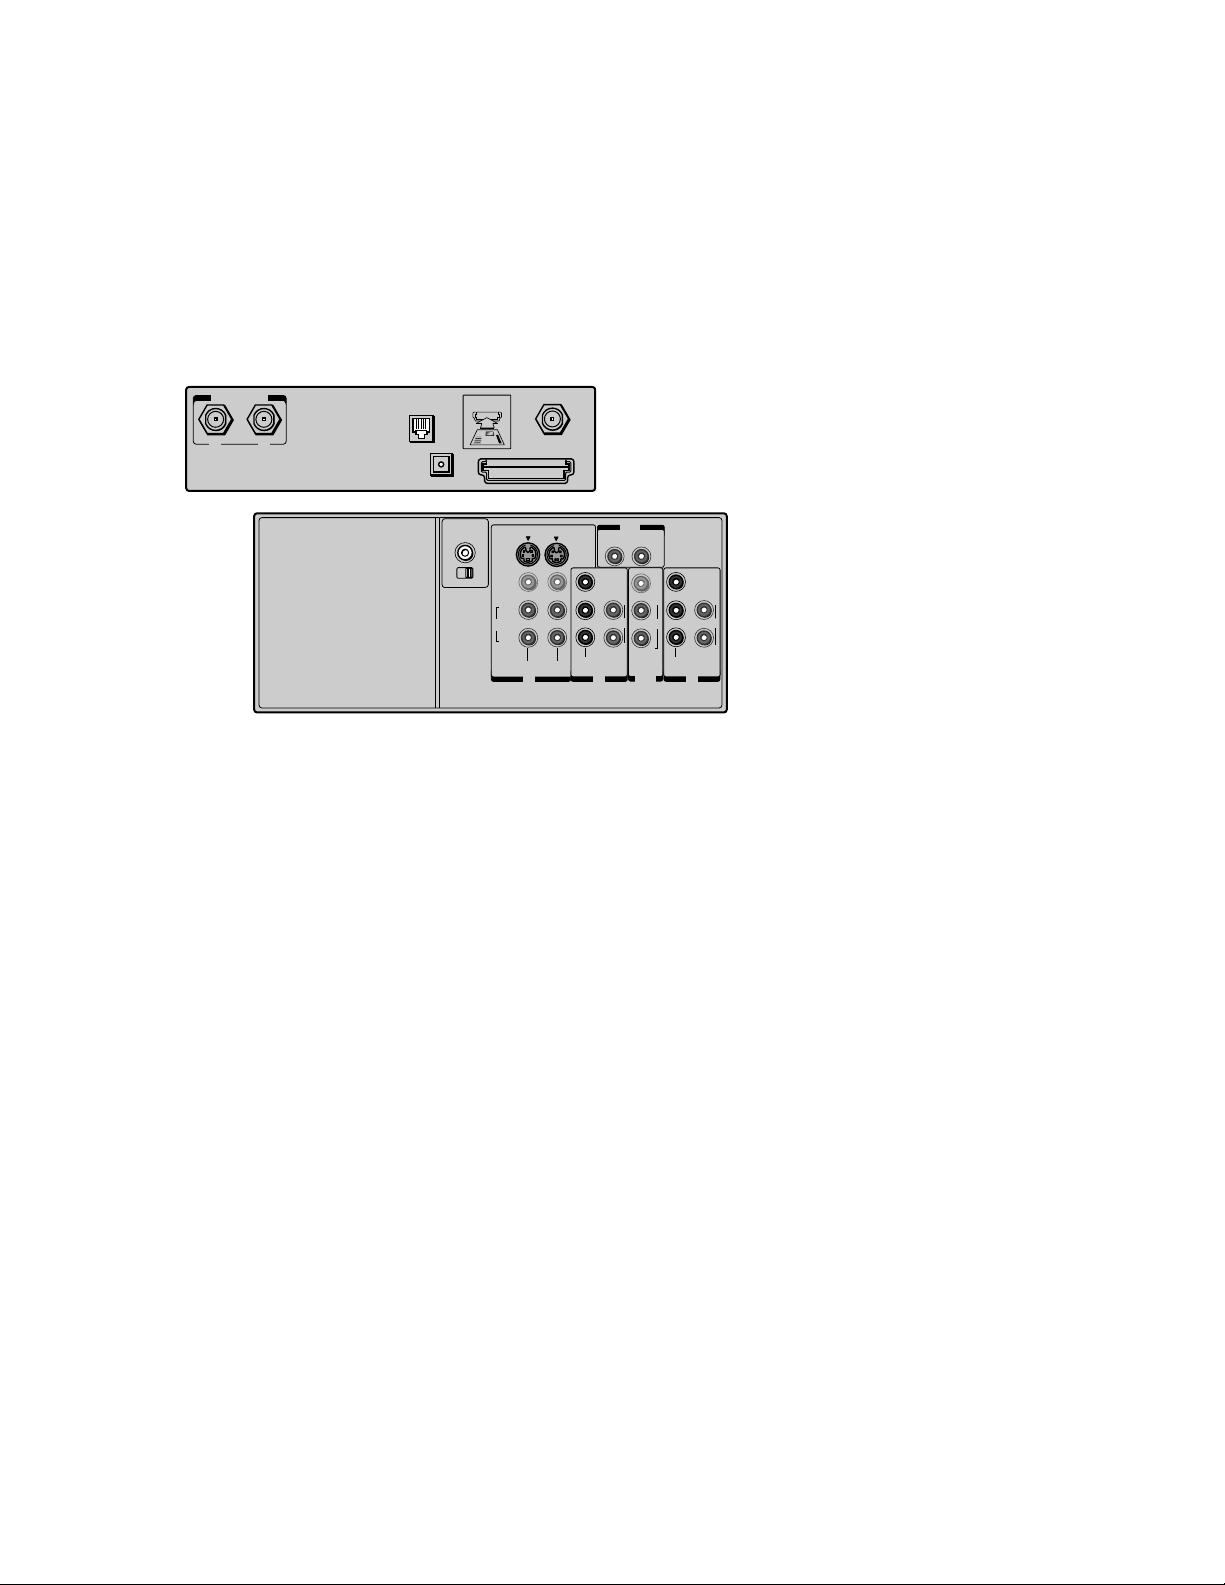
BACK OF THE TV
The diagram below describes each of the back panel jacks found on the TV. When
connecting A/V cables, be sure to connect corresponding outputs and inputs (video to
video, right audio to right audio, etc.).
ANTENNA
A B
-IN
ANT( 75
ANT-1 OUT ANT- 2
TOP OF CARD
PHONE
JACK
OPTICAL
DIGITAL
AUDIO-OUT
)
FACE DOWN
AUDIO CENTER
CHANNEL IN
ON OFF
ACCESS CARD
S-VIDEO
VIDEO
L/
MONO
AUDIO
R
-IN
SATELLITE
OUT
VAR
R
L
AUDIO
VIDEO
Y
L/
P
B
L
MONO
AUDIO AUDIO
P
R
R
VIDEO-1 VIDEO-2
COLOR
STREAM
HD 1 HD 2
IN IN
R
OUT
IN
COLOR
STREAM
Y
P
B
L
AUDIO
P
R
R
SATELLITE IN Use to connect the satellite dish antenna to the TV.
ACCESS CARD INTERFACE Insert the access card into the slot so your program
provider can identify you. Make sure the contacts on the access card are on the top of the
card while inserting. (Refer to “New Access Card” in this manual’s “Assistance” section on
page 84 for details.) The DIRECTV PLUS™ System requires a valid card.
PHONE JACK Use to connect a phone line to the TV. The DIRECTV PLUS™ system
requires a phone line connection to periodically call out to program providers.
DIGITAL AUDIO OUT Use a digital optical cable (or SPDIF cable) to connect your TV
to a compatible Dolby Digital receiver or decoder. Dolby Digital offers theatre-quality
sound (six audio channels).
ANTENNA A IN Use to connect an off-air antenna or cable TV signal to the TV.
ANTENNA B IN Use to connect a second off-air antenna or cable TV signal to the TV.
You can also use the ANT A IN (or ANT B IN) for video games and switch between the two inputs
using the ANTENNA button on the remote control. When using TV games, computers, and similar
products with your TV, keep the contrast at a low setting. If a fixed (non-moving) pattern is left on the
screen for long periods of time at a high contrast setting, the image can be permanently imprinted
onto the picture tubes. These types of imprints are not covered by your warranty because they are
the result of misuse.
14
Page 15
SETUP AND CONNECTIONS
VIDEO 1 Lets you connect a baseband NTSC (analog) component such as a VCR,
laserdisc player or Internet access device.
•R AUDIO provides right audio (stereo right channel) connection. The right audio
connector is usually red.
• L/MONO AUDIO provides left audio (stereo left channel or mono) connection. The
left audio connector is usually white.
• VIDEO provides composite video connection. The video connector is usually yellow.
• S-VIDEO lets you connect an S-Video cable, for better video quality, to a component
with S-Video capability, such as a VCR or DVD player. When using S-Video, make
sure to connect the two audio cables, as well as the S-Video connector.
VIDEO 2 Provides connection to a second NTSC (analog) video component such as a
VCR or laserdisc player. Its jacks are the same as described for VIDEO 1, above.
COLORSTREAM HD1 Lets you connect three ColorStream (component video) cables,
for the best video quality, to a component with ColorStream capability, such as a Toshiba
DVD player. When using ColorStream HD1, make sure to connect the two audio cables.
COLORSTREAM HD2 Lets you connect three ColorStream (component video) cables
to a second component with ColorStream capability. Its jacks are the same as described for
COLORSTREAM HD1, above.
VIDEO/AUDIO OUT Use to connect a VCR with video/audio inputs. These jacks are
ideal for recording TV or video programs being displayed on the screen.
VAR IABLE AUDIO OUT Use to connect an audio receiver or amplifier for variably
controlled stereo output. The TV’s remote control can be used to control audio.
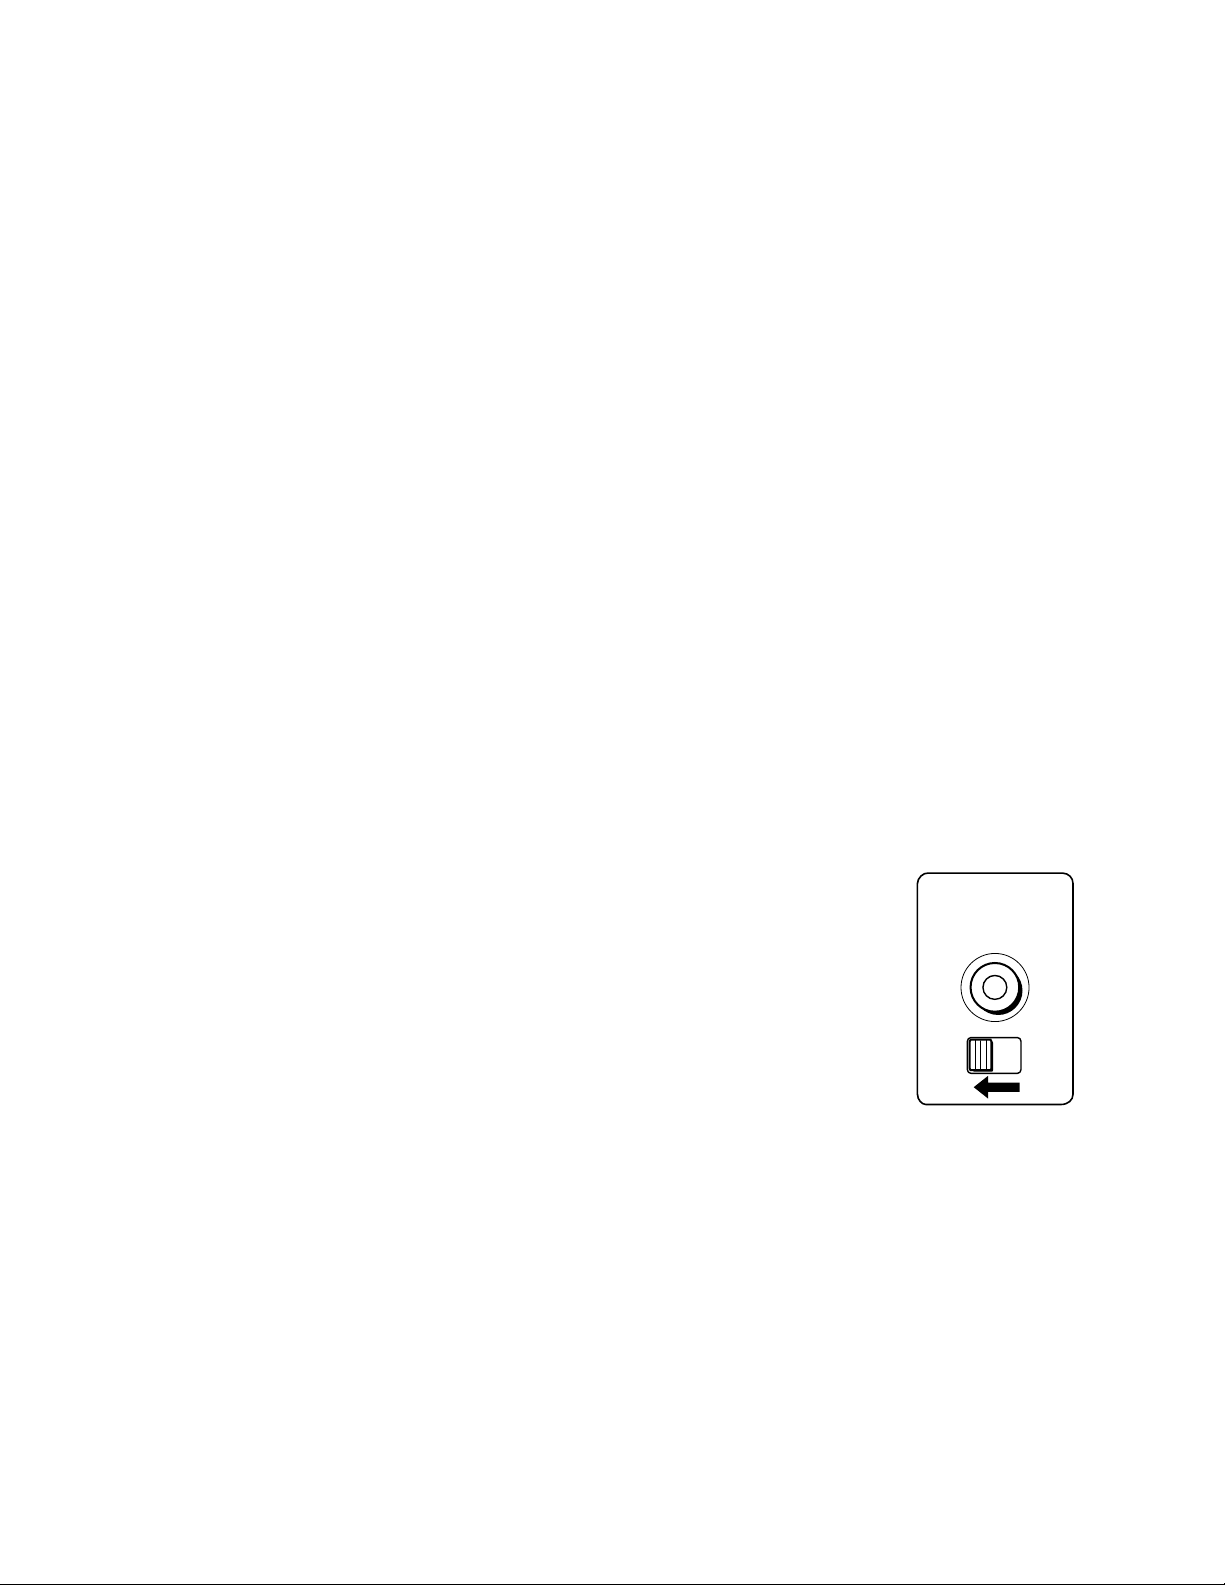
AUDIO CENTER CHANNEL IN Use to connect an audio amplifier with a Dolby
Digital (AC3) or Dolby Pro Logic surround sound capability. The TV’s speakers can be
used as center speakers.
ON/OFF Switch Set to OFF if you want to use the internal TV speakers only. Set to
ON if you want to use a Dolby Digital (AC3) or Dolby Pro Logic surround sound system.
The TV’s speakers can be used as center speakers.
AUDIO CENTER
CHANNEL IN
ON OFF
15
Page 16
SETUP AND CONNECTIONS
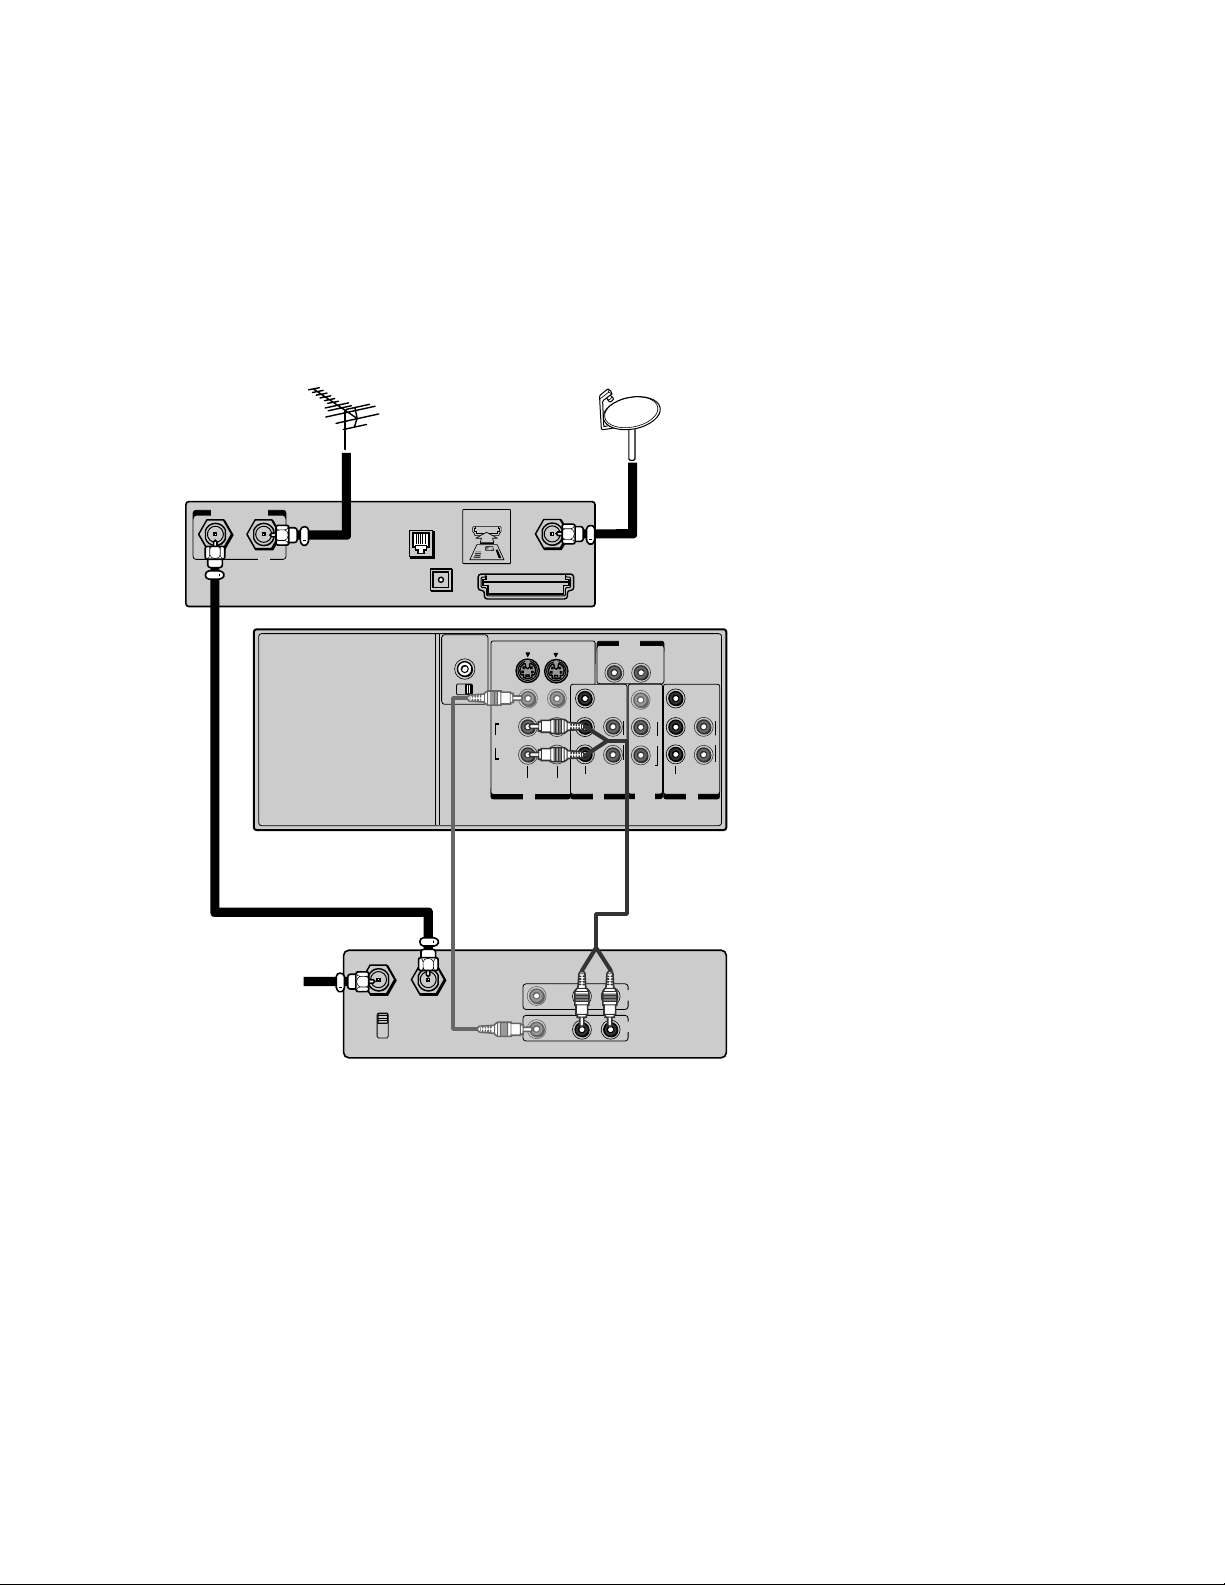
THE BASIC CONNECTION
TV and VCR
Cable or any alternate RF
signal, such as a digital or
analog off-air antenna
-IN
ANTENNA
A B
TV
ANT-1 OUT ANT- 2
Cable or off-air antenna
)
ANT( 75
IN from ANT OUT to TV
CH 3
CH 4
Satellite dish antenna
TOP OF CARD
PHONE
JACK
OPTICAL
DIGITAL
AUDIO-OUT
FACE DOWN
AUDIO CENTER
CHANNEL IN
ON OFF
-IN
SATELLITE
ACCESS CARD
S-VIDEO
VIDEO
L/
MONO
AUDIO
R
VIDEO-1 VIDEO-2
IN IN
VIDEO AUDIO
R
Y
P
B
AUDIO AUDIO
P
R
COLOR
STREAM
HD 1 HD 2
IN
LR
OUT
VAR
L
AUDIO
VIDEO
L/
L
MONO
R
R
COLOR
STREAM
OUT
Stereo VCR
IN
OUT
How to view
programming:
•To watch cable TV or off-air
TV programs from an
antenna in this connection,
press ANTENNA on the
remote control until
ANTENNA A is displayed
in the channel banner.
•To watch cable or any other
alternate RF signal, such as
digital or analog off-air,
press ANTENNA on the
remote control until
ANTENNA B is displayed
in the channel banner.
•To watch DIRECTV
®
programming, press TV/
Y
P
B
L
AUDIO
P
R
R
SAT on the remote control
and channel up or down to
the desired program.
How to view your
VCR:
•Press TV/VIDEO on the
remote control and select
the video input (in this
example, V-1) in the
channel banner. Because the
digital decoder is in the TV,
not the VCR, digital
channels cannot be recorded
with this hook-up. If an offair antenna is used, the
VCR output should be
viewed using one of the
video inputs.
The ANT A and ANT B jacks can
receive digital or analog RF signals.
The illustrations here are
recommended connections in a
cable environment.
Some cable systems may require a “conversion box.” If so, consult your cable company’s box tuning
instructions for details.
16
Page 17

SETUP AND CONNECTIONS
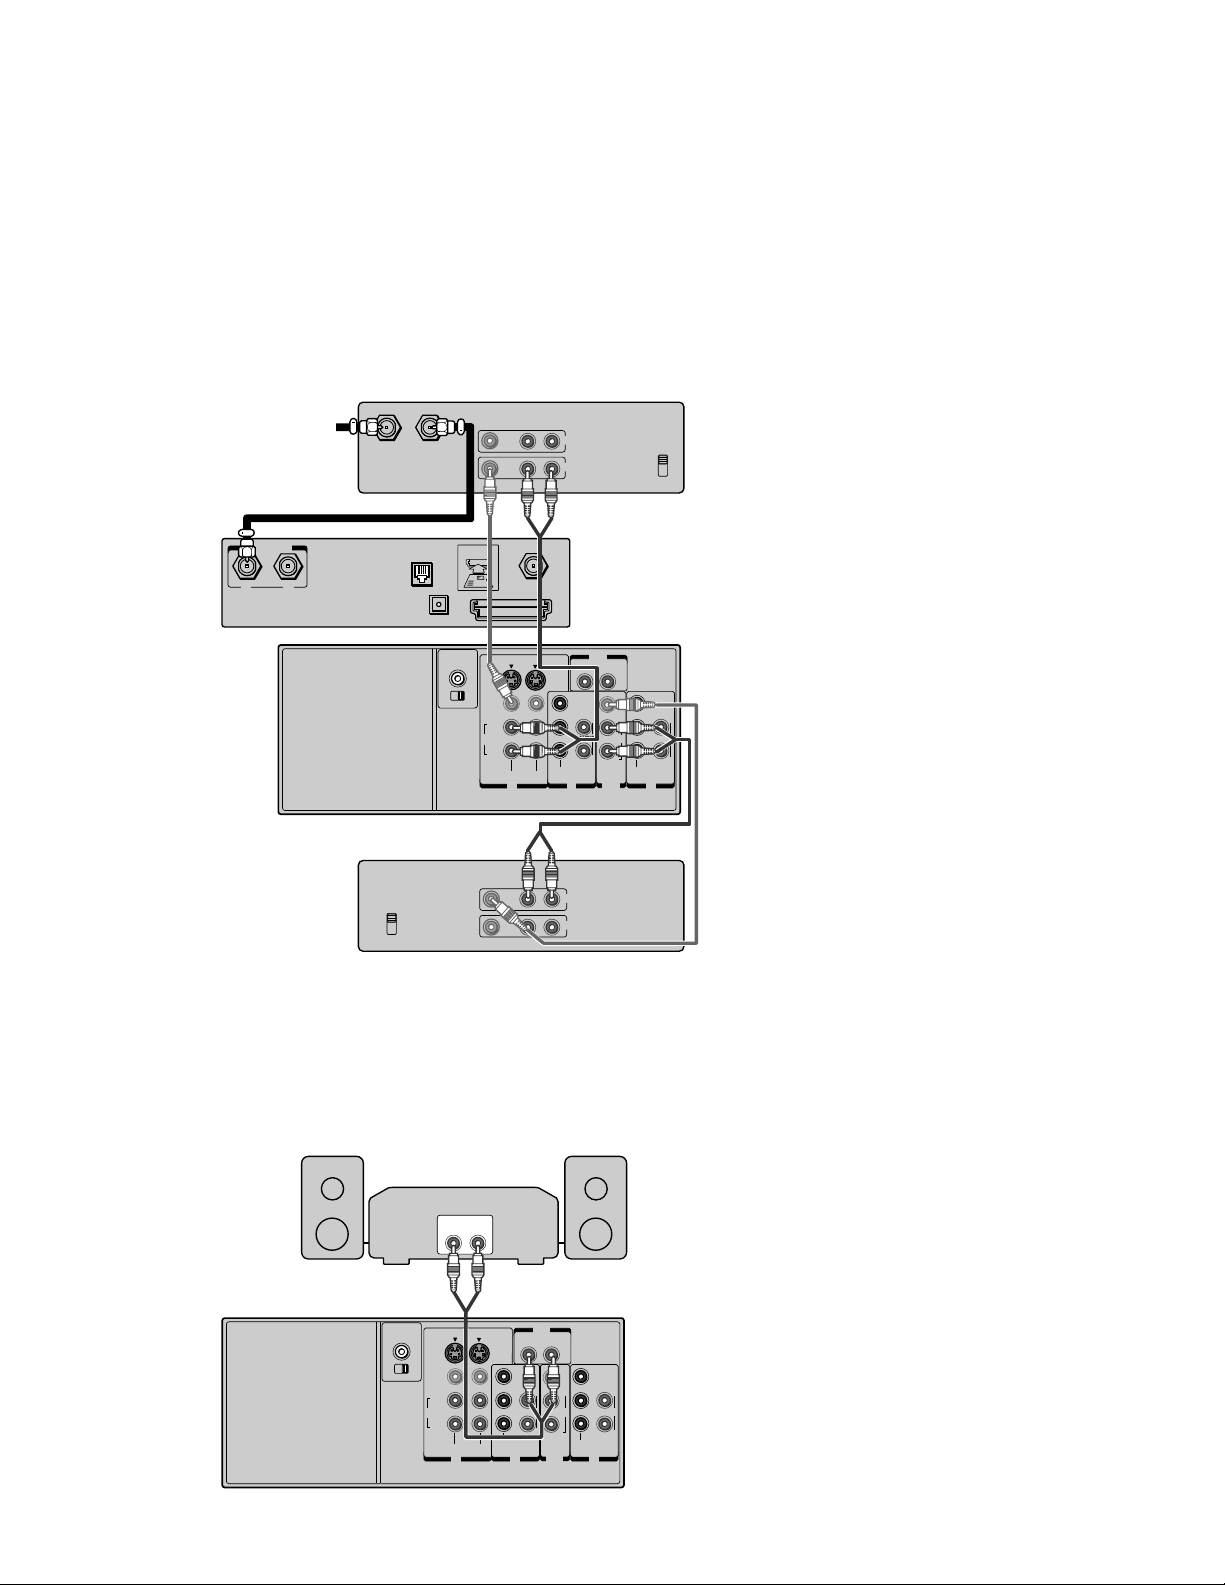
THE ADVANCED CONNECTION
TV, VCR, and DVD Player and Audio Amp.
Cable or any alternate
RF signal, such as a
digital or analog off-air
antenna
-IN
ANTENNA
A B
TV
ANT-1 OUT ANT- 2
ANT( 75
)
DVD
Satelite IN
PHONE
JACK
OPTICAL
DIGITAL
AUDIO-OUT
TV
S-VIDEO
TOP OF CARD
FACE DOWN
AUDIO CENTER
CHANNEL IN
ON OFF
COMPONENT VIDEO
Satellite dish
antenna
-IN
SATELLITE
ACCESS CARD
S-VIDEO
VIDEO
L/
MONO
AUDIO
R
VIDEO-1 VIDEO-2
IN IN
CbY
Cr
R
Y
P
B
AUDIO AUDIO
P
R
COLOR
STREAM
HD 1 HD 2
IN
VIDEO
OUT
OUT
L
R
OUT
L
VAR
AUDIO
VIDEO
L/
MONO
R
L
R
COLOR
STREAM
AUDIO
OUT
After you have made your
connections, program the TV to tune
to the correct video input channel to
see and hear audio and video from
the attached component (VCR,
DVD player, etc.). Program your TV
as described in the “System Options
and Preferences” section of this
Manual.
How to view your
DVD and VCR:
•To watch the VCR in this
connection, press TV/
VIDEO on the remote
control until the correct
video input appears (in this
example, V-1). Note that
because the digital decoder
is in the TV, not the VCR,
Y
P
B
L
AUDIO
P
R
R
L
R
you cannot record digital
channels with this hook-up.
•To watch the DVD player
in this connection, press
TV/VIDEO on the remote
control until the correct
video input appears (in this
example, CS-1).
Some cable systems may require a
“conversion box.” If so, consult your
cable company’s box tuning
instructions for details.
Audio amplifier with optical INPUT
TO
CENTER
SPEAKER
DIGITAL
AUDIO-IN
Cable or
off-air antenna
IN from ANT OUT to TV
CH 3
CH 4
S-VIDEO
VIDEO AUDIO
LR
Stereo VCR
IN
OUT
Please Read Before Using the Digital Audio Out Jack
This TV’s optical digital output jack fully complies with the international standard governing this type
of jack (IEC958), and is designed for connection to a Dolby Digital (AC-3 or PCM) receiver or
Dolby Digital (AC-3 or PCM) decoder. Older equipment, some of which is not fully compliant with
IEC958, may not be compatible with the Dolby Digital bitstream. Such a connection using anything
17
Page 18
SETUP AND CONNECTIONS
other than Dolby Digital AC-3 or PCM receiver or decoder could create a high noise level, causing
damage to headphones or speakers.
Connecting two VCRs
This connection allows you to record (dub/edit) from one VCR to another VCR while
watching a video program. You will also be able to record from one TV channel while
watching another channel.
VCR 1
VIDEO AUDIO
From Antenna
TV
-IN
ANTENNA
A B
ANT-1 OUT ANT- 2
ANT( 75
)
IN from ANT OUT to TV
PHONE
JACK
OPTICAL
DIGITAL
AUDIO-OUT
TOP OF CARD
FACE DOWN
AUDIO CENTER
CHANNEL IN
ON OFF
LR
IN
OUT
-IN
SATELLITE
ACCESS CARD
S-VIDEO
VIDEO
L/
MONO
AUDIO
R
VIDEO-1 VIDEO-2
IN IN
R
Y
P
B
AUDIO AUDIO
P
R
COLOR
STREAM
HD 1 HD 2
IN
CH 3
CH 4
TV
OUT
VAR
L
AUDIO
VIDEO
Y
L/
P
B
L
R
OUT
MONO
L
AUDIO
P
R
R
R
COLOR
STREAM
Caution:
Do not connect one VCR to the
output and input jacks on the TV at
the same time. If you are using a SVHS VCR, use the S-video
connections and remove the video
cable. Do not connect the video
cable and the S-video cable to
VIDEO 1 simultaneouly.
The unauthorized recording of
television programs, video tapes and
other materials may infringe upon
the provision of copyright laws.
Note:
To dub or edit, the VCR 2 must
select Line IN, and the TV must
select V-1.
VCR 2
VIDEO AUDIO
LR
IN
CH 3
CH 4
OUT
Connecting a stereo amplifier
This connection allows you to use an audio amplifier to adjust the audio level. This also
allows you to use external speakers.
To control the audio, turn on the TV and the stereo amplifier, then turn off the built-in
speakers. (See “AUDIO CONTROLS” on pages 54-55.)
Amplifier
LINE IN
LR
)
ANT( 75
ANT-1 OUT ANT- 2
AUDIO CENTER
CHANNEL IN
ON OFF
S-VIDEO
VIDEO
L/
MONO
AUDIO
R
VIDEO-1 VIDEO-2
IN IN
R
Y
P
B
AUDIO AUDIO
P
R
COLOR
STREAM
HD 1 HD 2
IN
OUT
VAR
L
AUDIO
VIDEO
Y
L/
P
B
L
R
OUT
MONO
L
AUDIO
P
R
R
R
COLOR
STREAM
18
Page 19
SETUP AND CONNECTIONS
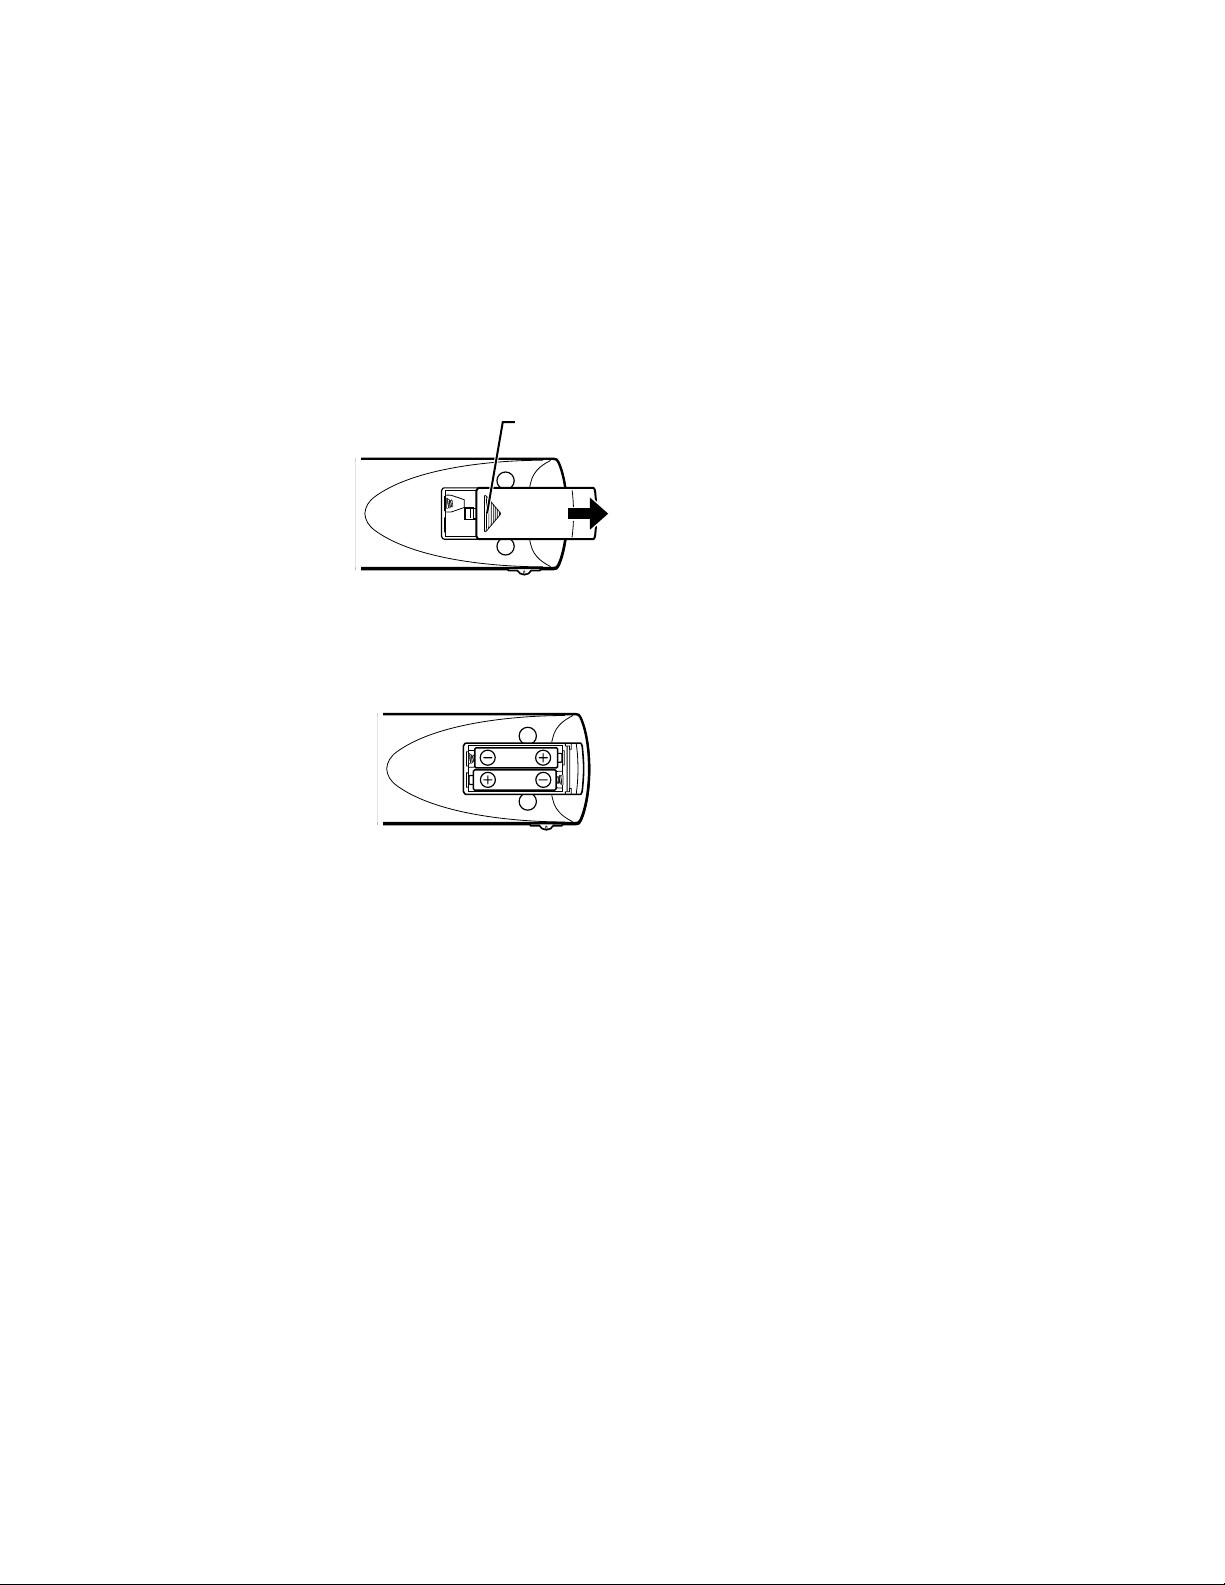
STEP 2: PLACE BATTERIES IN THE REMOTE
CONTROL
Follow these steps whenever you need to install or change the batteries in your TV’s
remote control.
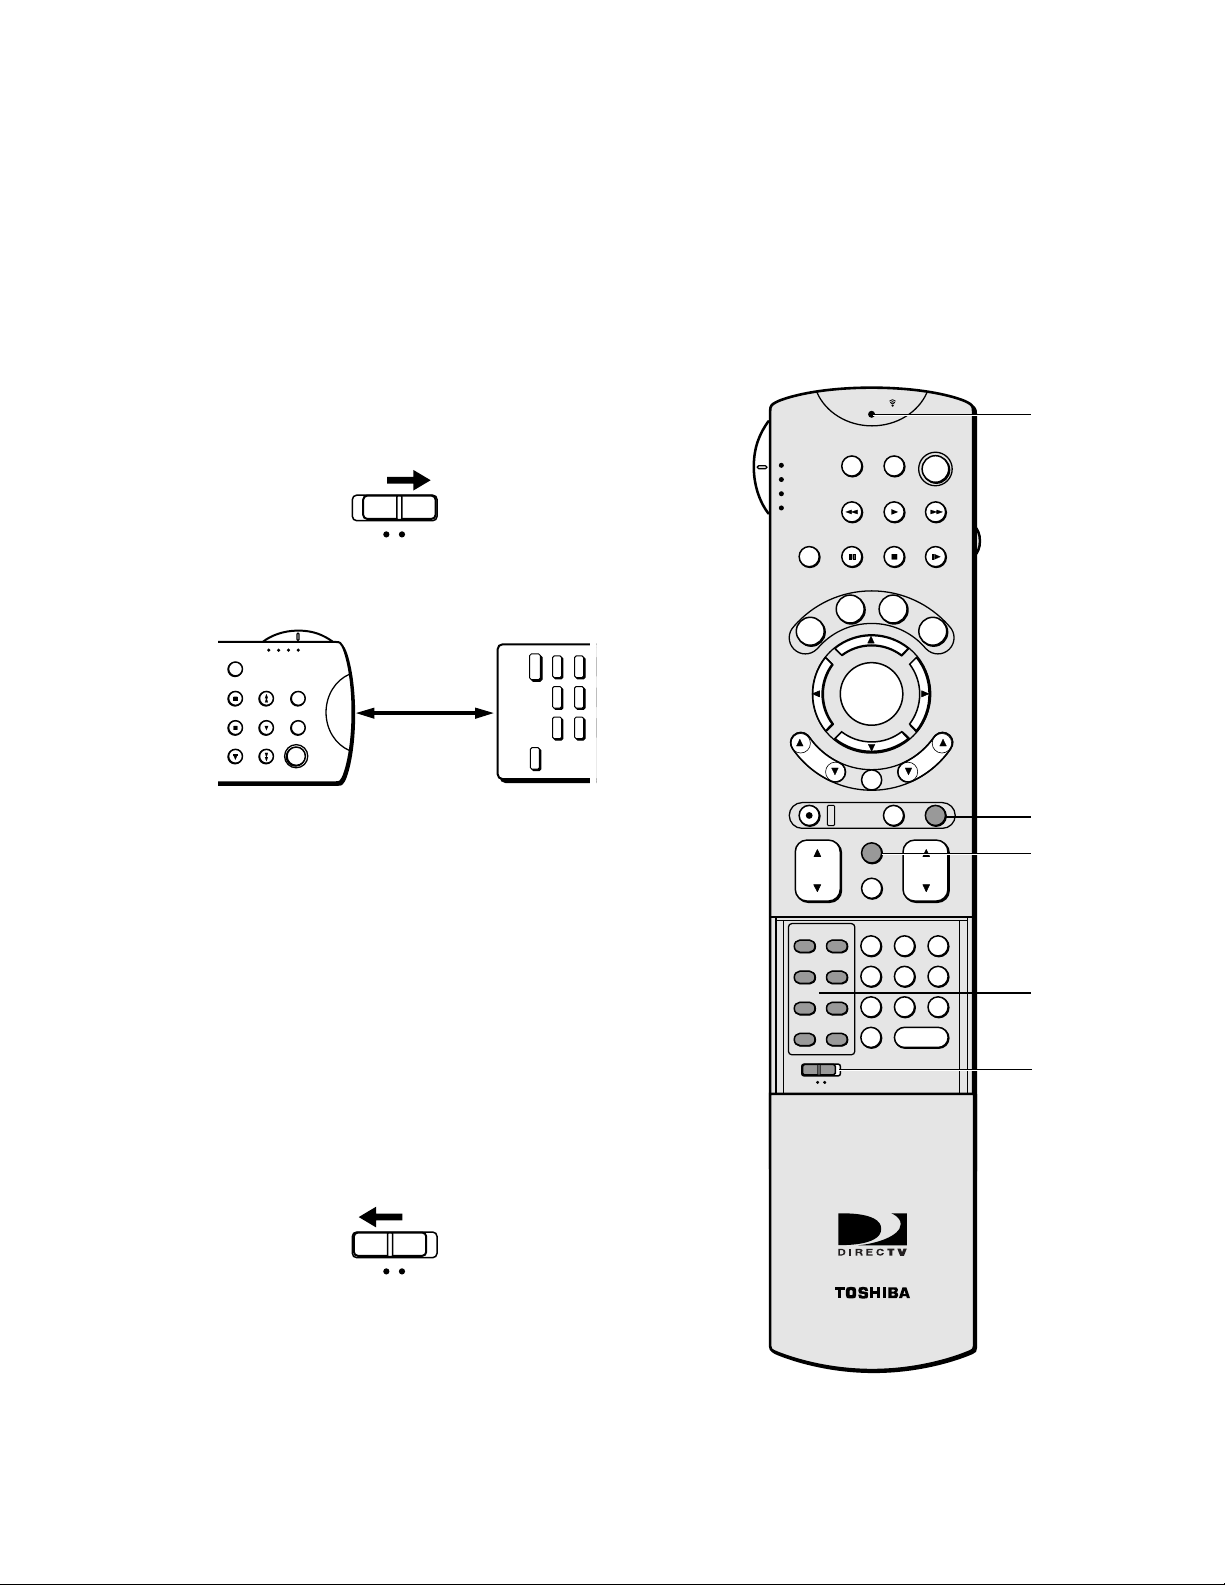
1. Remove the cover from the battery compartment.
Press and slide to remove.
2. Insert batteries into the battery compartment, matching the + and – end of each
battery.
3. Replace the cover.
STEP 3: COMPLETE THE INTERACTIVE SETUP
Interactive setup appears when you turn on your TV for the first time . Follow the steps to
configure the basics of your system, such as setting up the time and day, searching for
available channels, and setting up speakers. To run it again, select Assistance from the
Main menu, then select Interactive Setup. For more details, see the section “Getting
Assistance” on page 81.
STEP 4: ORDER PROGRAMMING
You should decide if you would like to receive DIRECTV® programming*. To receive
DIRECTV® programming, your satellite dish antenna must be installed and pointed
correctly. You must also contact your service provider, DIRECTV.
Programming with DIRECTV: Call 1-800-347-3288
When you order programming, you need to know your access card number. To get the
number, select Assistance from the Main menu and then select System Test. Wait for the
system to run all of its tests. The access card number is displayed at the end of the system
test. Write the access card number in the space below for easy reference:
______________________________
*DIRECTV programming is
provided in accordance with the
terms and conditions of the
DIRECTV Customer Agreement,
a copy of which is provided with
your first DIRECTV billing
statement. DIRECTV is a
trademark of DIRECTV, Inc., a
unit of Hughes Electronics Corp.,
and is used with permission.
______________________________
19
Page 20

20
Page 21

USING THE REMOTE
In this section you will find out how to
use your universal remote control. This
section:
• defines the buttons on the remote
control.
• describes how you toggle between TV
“mode” and Satellite “mode.”
• shows you how to change between
analog off-air, digital off-air, and
DIRECTV channels.
• walks you through using the POP
(picture-out-picture) feature.
• describes how to program the remote
to control other devices such as a
VCR.
• describes how to learn operating
codes from most infrared remote
control transmitters.
Important: Because this universal
remote can control several different
components (TV, VCR, etc.), it uses
operational modes triggered by the
component switch. For example, if you
want the remote to control the VCR,
you would select “VCR” position to
put the remote into VCR mode.
SETUP AND
1
CONNECTIONS
➛➛
USING THE REMOTE
2
BASIC TV OPERATION
3
➛
USING THE PROGRAM
4
GUIDES
➛➛➛ ➛➛
ADJUSTING TV
5
CONTROLS
USING THE PROFILES
6
SYSTEM OPTIONS AND
7
PREFERENCES
GETTING ASSISTANCE
8
REFERENCE
9
21
Page 22
USING THE REMOTE
LEARN/
TV/VIDEO TV/SAT
REW RLAY FWD
PAUSE STOP SLOW
TV/VCR
POWER
SWAP
SOURCE
POP
ANTENNA
STILL
S
E
T
U
P
T
I
T
L
E
S
U
B
T
I
T
L
E
A
U
D
I
O
F
E
T
C
H
W
H
O
G
U
I
D
E
I
N
F
O
REC RETURN EXIT
MUTE
PIC SIZE
A B
C D
E F
G H
1 2 3
4 5 6
7 8 9
OK
0
USE LEARN
CH
VOL
P
O
P
C
H
S
K
I
P
-
S
K
I
P+
MENU
+100 / ENTER
TV
CABLE
VCR
DVD
ENTER
O K
( )
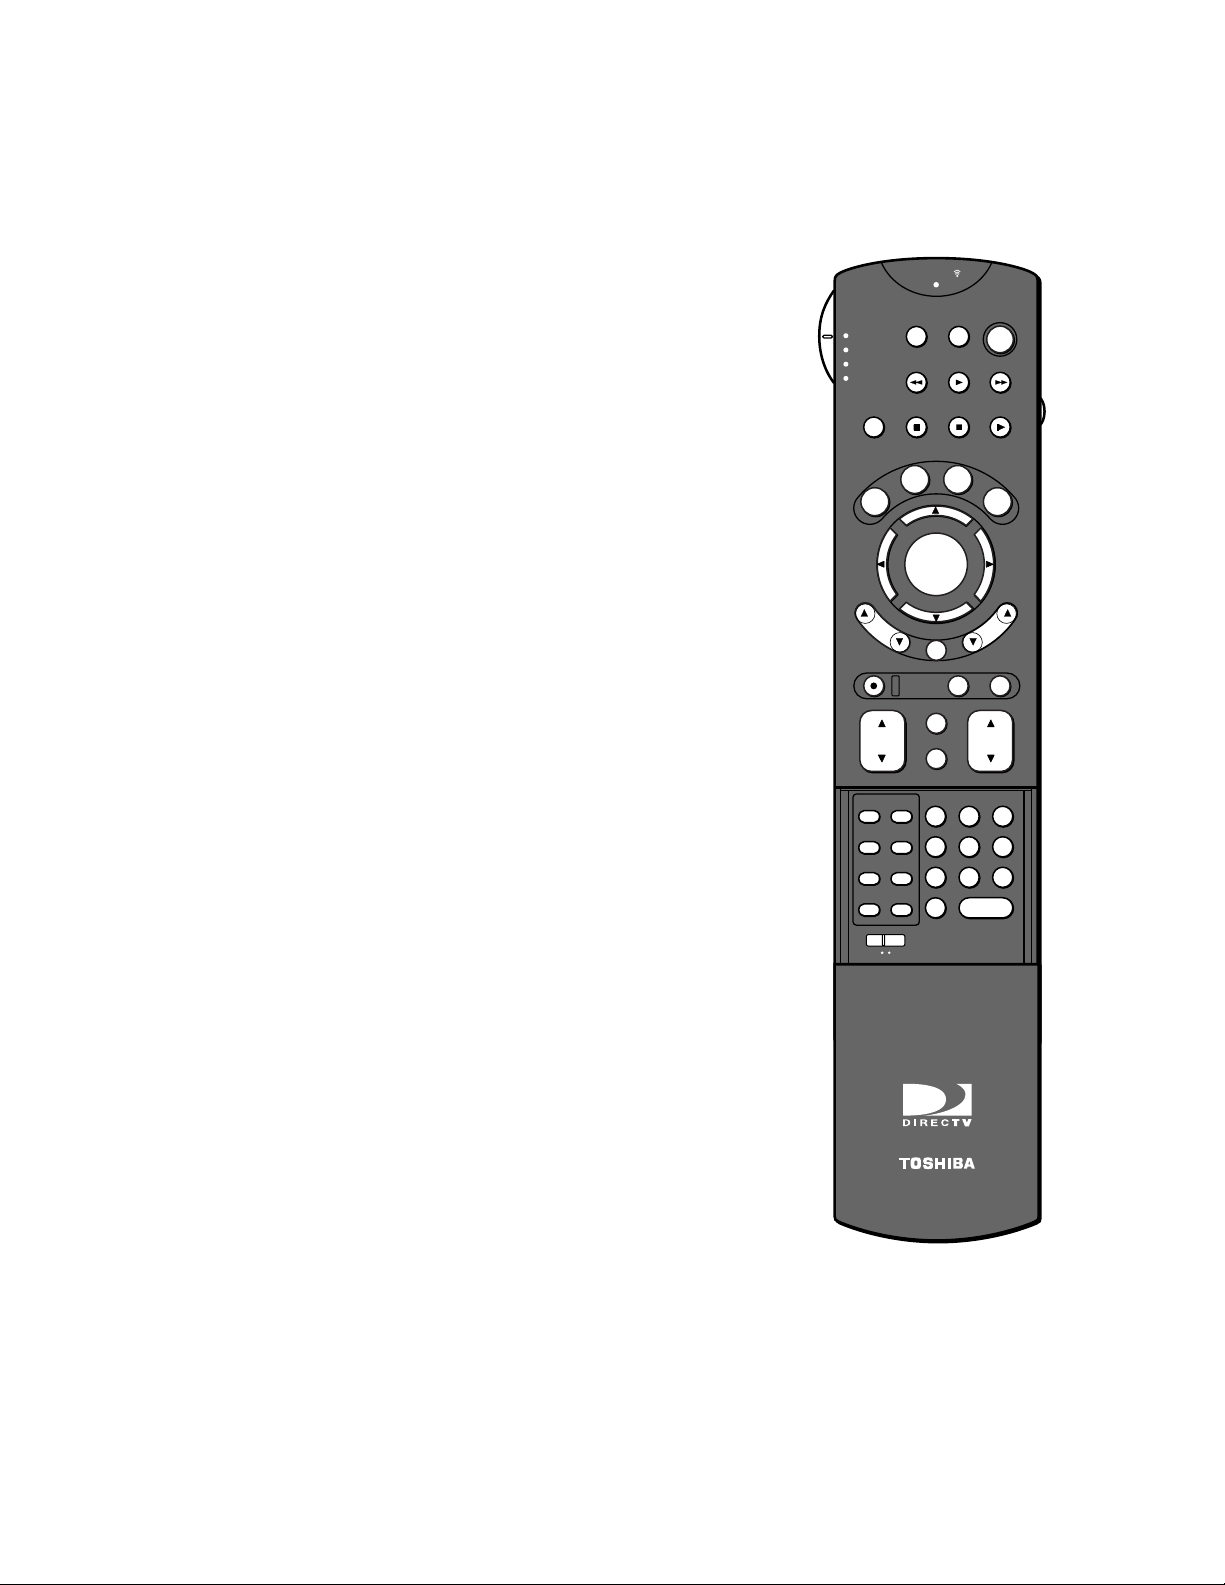
REMOTE CONTROL BUTTONS
POWER When the remote control is in TV or SAT mode, turns the TV on or off. If in
another component mode, (VCR, DVD, etc.) and programmed, will turn that
component on and off.
TV/DVD/VCR/CABLE Switches among TV,DVD,VCR and CABLE modes.
Light button Press to illuminate the remote control’s buttons(white keys only).
TV/SAT Switches between TV (off-air) and Satellite (DIRECTV) modes.
TV/VIDEO Toggles through the external input sources and TV mode.
CH yz Scrolls up or down through the current channel list. Press once to change the
channel up or down; press and hold to continue changing channels. If you are in TV
mode and press CH yz, you scan through TV channels. If you subscribe to DIRECTV
programming and are in Satellite mode, you scan through DIRECTV channels.
VOL yz Adjusts the TV’s audio volume.
MUTE Reduces the TV’s volume to its minimum level. Press again to restore volume.
RETURN Moves you back and forth between the last two channels selected in either
DIRECTV mode or TV mode. For example, if you have been viewing both DIRECTV
and TV channels (and thus using both the DIRECTV and TV “modes”), pressing
RETURN while watching a DIRECTV channel moves you back to the last DIRECTV
channel you viewed. Pressing it while watching a TV channel moves you to the last TV
channel you viewed.
yz x • Used to point to different items in the menu system and adjust the menu
controls.
OK (ENTER) When in the menu system, selects highlighted items.
MENU Brings up the main menu and selects highlighted items.
Light
button
®
22
EXIT Removes on screen displays and returns to normal viewing.
NUMBER BUTTONS (0 - 9) Enters channel numbers and time settings directly
though the remote control. For more information on entering digits to change channels,
see the section “Basic TV Operation.” When in the menus, the digit buttons can be used
to directly select items without using the arrows. 0 can be used to return to the previous
menu screen.
ANTENNA Switches the source of the off-air signal between ANTENNA A and B.
Don’t worry about getting stuck
inside a menu. Pressing the EXIT
button on the remote control takes
you out of the menu system.
Page 23

USING THE REMOTE
FETCH Brings up the Fetch menu, which is a list of most commonly accessed menu
items.
GUIDE When in TV mode, brings up the TV program guide. In Satellite mode, brings
up the Satellite guide. Subsequent presses of the GUIDE button scroll through the
different types of guides.
INFO Brings up channel and viewing information via the Channel Banner. Press again to
bring up an extended channel banner. Press when in the program guides to get more
information on the highlighted program or channel.
REW, PLAY, FWD, SLOW, STOP, PAUSE, TV/VCR, REC, +100/ENTER If
programmed, provides control for some remote-controllable VCRs.
POP Brings up the picture-out-picture window. Press again to hide POP.
SWAP Exchanges the main picture with the POP window.
SOURCE Toggles through the external input sources for POP.
STILL Freezes the POP picture.
WHO Toggles through user profiles.
POP CH yz Scrolls up or down through the current POP channel list.
REW, PLAY, FWD, SLOW, STOP, PAUSE, SETUP, TITLE, SUBTITLE, AUDIO,
SKIP yz, (ENTER), (+100) If programmed, provides control for some remote-
controllable DVD players.
PIC SIZE Toggles through 4 picture sizes “4:3 Standard”, “4:3 Full”, “4:3 Wide 1” and
“4:3 Wide 2”.
USE/LEARN Switches between USE and LEARN positions. The USE position places
the remote control in normal mode to control the TV or other components selected by
the TV/DVD/VCR/CABLE switch. The LEARN position places the remote control in
learning mode. You can program A to H buttons to control the component (such as a
laserdisc player).
A-H If programmed, you can control the component (such as a laserdisc player).
23
Page 24
USING THE REMOTE
PROGRAMMING THE REMOTE
CONTROL
The universal remote can be programmed to control most brands of remote
controllable components such as VCRs. The remote is already programmed
to control most TOSHIBA TVs, VCRs, and DVD players.
Testing the Remote Control
To determine whether the universal remote control requires programming,
turn on a component, such as a VCR, point the remote control at the VCR,
and set the component (TV/DVD/VCR/CABLE) switch to “VCR”. Then
press POWER or CH yz to see if the VCR responds to the remote control
commands. If not, it requires programming.
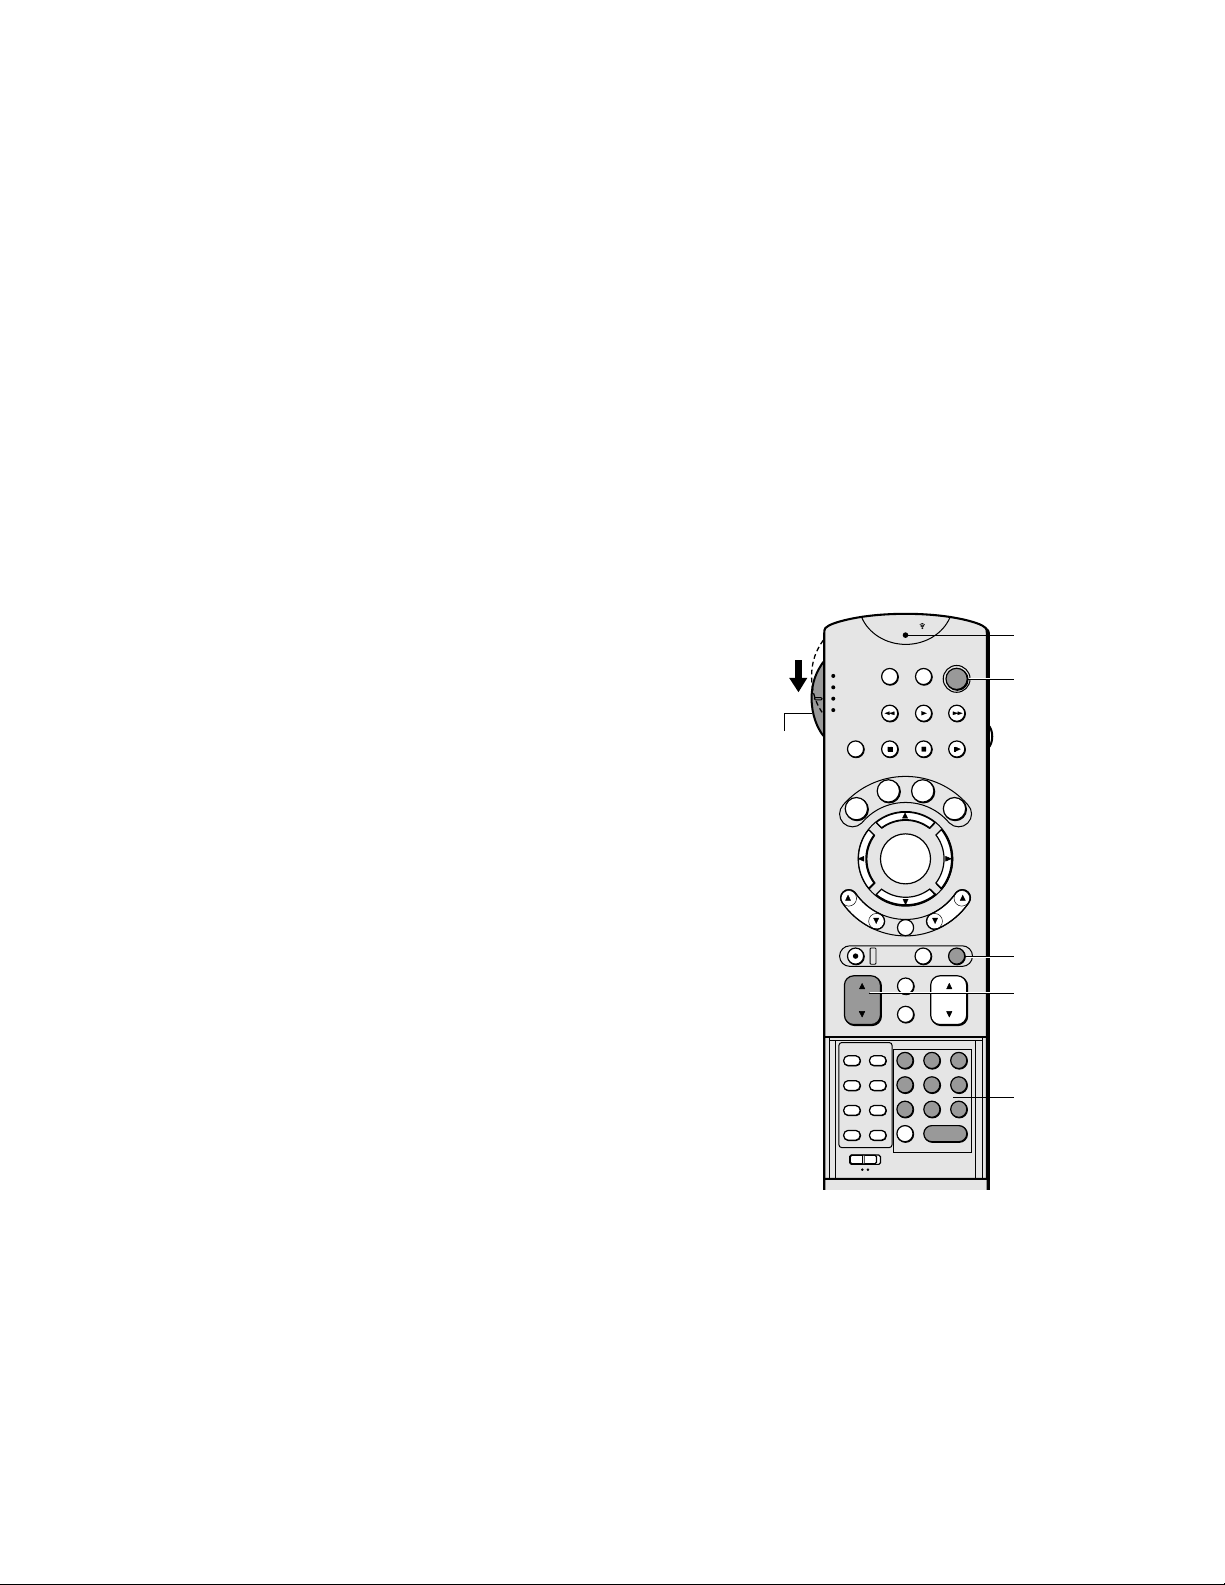
Programming the Remote Control
1. Refer to the “VCR code table”, ‘DVD code table” or “Cable TV
converter code table” on pages 26 and 27 to find the code number that
corresponds to the brand name of your component.
If more than one number is listed, try each one separately until you find
the one that works.
2. Set the component switch to “VCR”, “DVD” or “CABLE” position.
3. While holding down EXIT, press the Number buttons to enter the three
digit code number for your brand of component. The transmit indicator
lights up for 1 second when the programming is completed.
When an operation error has occurred, the indicator blinks.
Press EXIT again to reset.
4. Point the Remote Control at the component and press POWER to test
the code number.
–If the number is correct, the component should turn on.
–If the component does not respond to the remote control, repeat steps
1 through 4 with another code number.
•You have to reprogram the remote control when you change its batteries.
•Some newer VCRs are capable of working on either of two remote
codes. These VCRs have a switch labeled “VCR 1/VCR 2.”
If your VCR has this kind of switch, and does not respond to any of the
code numbers for your VCR brand name, set the switch to the other
position (“VCR 1” or “VCR 2”) and reprogram the remote control.
•In some rare cases, you may not be able to operate your non-TOSHIBA
equipment with the supplied remote control. This is because your
equipment may use a code that is not provided with this remote control.
In this case, please use the equipment’s own remote control.
Component
switch
LEARN/
TV/VIDEO TV/SAT
TV
DVD
VCR
REW RLAY FWD
CABLE
SWAP
SOURCE
PAUSE STOP SLOW
TV/VCR
STILL
ANTENNA
H
C
T
E
F
P
REC RETURN EXIT
CH
A B
C D
E F
G H
USE LEARN
O
E
S
P
W
P
U
T
C
H
O
H
S
E
L
T
I
T
O K
( )
ENTER
MENU
MUTE
PIC SIZE
1 2 3
4 5 6
7 8 9
OK
+100 / ENTER
G
U
I
D
U
B
T
I
T
L
E
P
I
K
S
POWER
E
A
U
D
-
VOL
0
POP
I
N
F
O
I
O
P+
I
K
S
Transmit
indicator
POWER
EXIT
CHyz
Number
buttons
For future reference, write the code number
you set.
DVD CODE: _______________________
VCR CODE: ________________________
CABLE CODE: _____________________
24
Page 25

USING THE REMOTE
Using the Remote to Control A Component
Once the remote has been programmed successfully, you are ready to use it to control
your components, such as a VCR, DVD player, or cable TV converter.
To operate the component:
1. Set the component switch to the appropriate position (VCR, DVD, or CABLE) to
set the remote to control the component.
2. Press POWER to turn the component on or off.
3. Use the remote control buttons that apply to that component.
25
Page 26

USING THE REMOTE
DVD code table
Brand name Code number
Harman/Kardon 601
JVC 577, 642
Kenwood 553
Magnavox 522
Mitsubishi 540
Onkyo 522, 646
Panasonic 509
Philips 522, 558
Pioneer 544, 590
Proscan 541
RCA 541
Samsung 592
Sharp 649
Sony 552
Technics 509
Theta Digital 590
Toshiba 522
Yamaha 509, 564
Zenith 522, 610
VCR code table
Brand name Code number
Admiral 067, 228
Adventura 019
Aiko 297
Aiwa 019, 056, 326
Akai 060
America Action 297
American High 054
Asha 259
Audiovox 056
Beaumark 259
Bell & Hawell 123
Brocksonic 228
Broksonic 021, 140, 203, 228,
498
Calix 056
Canon 054
Carver 100
CCE 091, 297
Cineral 297
Citizen 056, 297
Colt 091
Craig 056, 066, 091, 259,
290
Curtis Mathes 054, 060, 079, 181
Cybernex 259
Daewoo 064, 297
Denon 061
Dynatech 019
Elcatech 091
Electrohome 056
Electronic 056
Emerex 051
Emerson 019, 021, 056, 062,
140, 203, 227, 228,
297, 498
Fisher 066, 123
Fuji 052, 054
Funai 019
Garrard 019
GE 054, 067, 079, 259
Go Video 451, 545
GoldStar 056, 057
Gradiente 019, 027
Harley Davidson 019
Harman/Kardon 057, 100
Harwood 091
Headquarter 065
HI-Q 066
Hitachi 019, 060, 061
Hughes Network
Systems 061
Jensen 060
JVC 027, 060, 086
KEC 056, 297
Kenwood 057, 060, 086
KLH 091
Kodak 054, 056
Lloyd’s 019, 227
logik 091
LXI 056
Magnasonic 297
Magnavox 019, 054, 058, 100,
168
Magnin 259
Marantz 054, 100
Marta 056
Matsushita 054, 181, 473
MEI 054
Memorex 019, 054, 056, 058,
065, 066, 067, 123,
228, 259, 326
MGA 062, 259
MGN Technology 259
Minolta 061
Mitsubishi 062, 067, 086
Motorola 054, 067
MTC 019, 259
Multitech 019, 091
NEC 057, 060, 086, 123
Nikko 056
Noblex 259
Olympus 054
Optimus 056, 067, 123, 181,
451, 473
Orion 021, 203, 228, 498
Panasonic 054, 181, 244, 473
Penney 054, 056, 057, 061,
259
Pentax 061
Philco 054, 228, 498
Philips 054, 100
Pilot 056
Pioneer 086
Profitronic 259
Proscan 079
Protec 091
Pulsar 058
Quarter 065
Quartz 065
Quasar 054, 181, 473
Radio Shack 019
Radix 056
Randex 056
RCA 054, 061, 067, 079,
168, 259
Realistic 019, 054, 056, 065,
066, 067, 123
Runco 058
Samsung 064, 259
Sanky 058, 067
Sansui 019, 060, 086, 228,
290, 498
26
Page 27

USING THE REMOTE
Sanyo 065, 066, 123, 259
Scott 062, 064, 140, 203
Sears 019, 054, 056, 061,
065, 066, 123
Semp 064
Sharp 067
Shintom 091
Shogun 259
Singer 091
Sony 019, 051, 052, 054
STS 061
Sylvania 019, 054, 062, 100
Symphonic 019
Tatung 060
Teac 019, 060
Technics 054, 181
Teknika 019, 054, 056
Thomas 019
TMK 227, 259
Toshiba 062, 064
Totevision 056, 259
Unitech 259
Vector 064
Vector Research 057
Video Concepts 064
Videosonic 259
Wa rds 019, 054, 061, 066,
067, 079, 091, 100,
168, 259
White Westinghouse
XR-1000 019, 054, 091
Yamaha 057, 060
Zenith 019, 052, 058, 228,
228, 297
498
Cable TV converter
code table
Brand name Code number
ABC 022, 027, 030, 032,
033
Allegro 172
Archer 172
Bell & Howell 033
Century 172
Citizen 172
Comtronics 059
Contec 038
Eastern 021
Everquest 034, 059
Garrard 172
Gemini 034
General Instrument
Gold Star 059, 163
Hamlin 028, 039, 278
Hitachi 030
Jasco 034, 172
Jerrold 022, 030, 031, 033,
Memorex 019
Movie Time 082
NSC 082
Oak 038
Optimus 040
Panasonic 019, 040, 126
Paragon 019
Philips 172
Pioneer 163, 552
Pulsar 019
Quasar 019
Radio Shack 034
RCA 040
Regal 039, 278
Regency 021
Rembrandt 030
Runco 019
Samsung 059, 163
Scientific Atlanta 027, 496, 896
Signal 034, 059
Signature 030
SL Marx 059
Sprucer 040
Starcom 022, 034
Stargate 034, 059
Starquest 034
Teleview 059
Tocom 031, 032
Toshiba 019
Tusa 034
TV86 082
Unika 041, 172
Universal 172
Viewstar 082
Zenith 019, 544
030, 295, 495, 829
034, 295, 495, 829
27
Page 28
USING THE REMOTE
G
LEARNING OPERATING CODE OF
ANOTHER REMOTE CONTROL
This remote control is capable of learning operating codes from most infared
remote control transmitters. You can control the functions of your TV and a
variety of video/audio equipment with the supplied remote control only.
The A to H buttons can be used as the Learning buttons.
1. Set the USE/LEARN switch to the “LEARN” position.
USE LEARN
2. Place the supplied remote control and the remote control transmitter to
be learned, head to head approximately 1 to 3 inches (3 to 8 cm) apart.
TV
DVD
CABLE
VCR
ANTENNA
TV/VCR
SWAP
SOURCE
POP
TV/VIDEO TV/SAT
REW RLAY FWD
POWER
Head to Head
1-3 inches apart
PAUSE STOP SLOW
STILL
Supplied Remote
Control
3. Hold down the button to learn (A to H) on the supplied remote control
for about 1 second until the LEARN indicator lights up.
When you press a button other than a Learning button, the indicator
will blink.
4. Hold down the button of the function to be learned on the other remote
control transmitter for about 3 seconds until the LEARN indicator goes
off.
Note:
If the LEARN indicator blinks, the supplied Remote Control cannot learn the
operating code or an error has occurred.
5. Repeat steps 4 and 5 for storing other functions into other buttons.
321
654
POWER
TV/VCR
987
Remote Control to be
learned
LEARN/
TV/VIDEO TV/SAT
TV
DVD
VCR
REW RLAY FWD
CABLE
SWAP
SOURCE
PAUSE STOP SLOW
TV/VCR
STILL
ANTENNA
H
C
T
E
F
T
E
S
P
O
P
REC RETURN EXIT
CH
A B
C D
E F
G H
USE LEARN
H
W
T
P
U
C
H
G
O
S
U
B
E
L
T
I
O K
( )
ENTER
MENU
MUTE
PIC SIZE
1 2 3
4 5 6
7 8 9
OK
+100 / ENTER
U
I
D
E
T
I
T
L
E
A
-
P
I
K
S
VOL
POWER
POP
U
D
I
O
K
S
0
LEARN
indicator
I
N
F
O
P+
I
EXIT
MUTE
Learning
buttons
USE/
LEARN
switch
6. Set the USE/LEARN switch to the “USE” position.
USE LEARN
7. To check your programming, operate the appropriate equipment with
the supplied remote control. If the equipment does not operate as
expected, repeat steps 1 to 7.
If needed, try changing the distance between the two remote controls.
28
Page 29
USING THE REMOTE
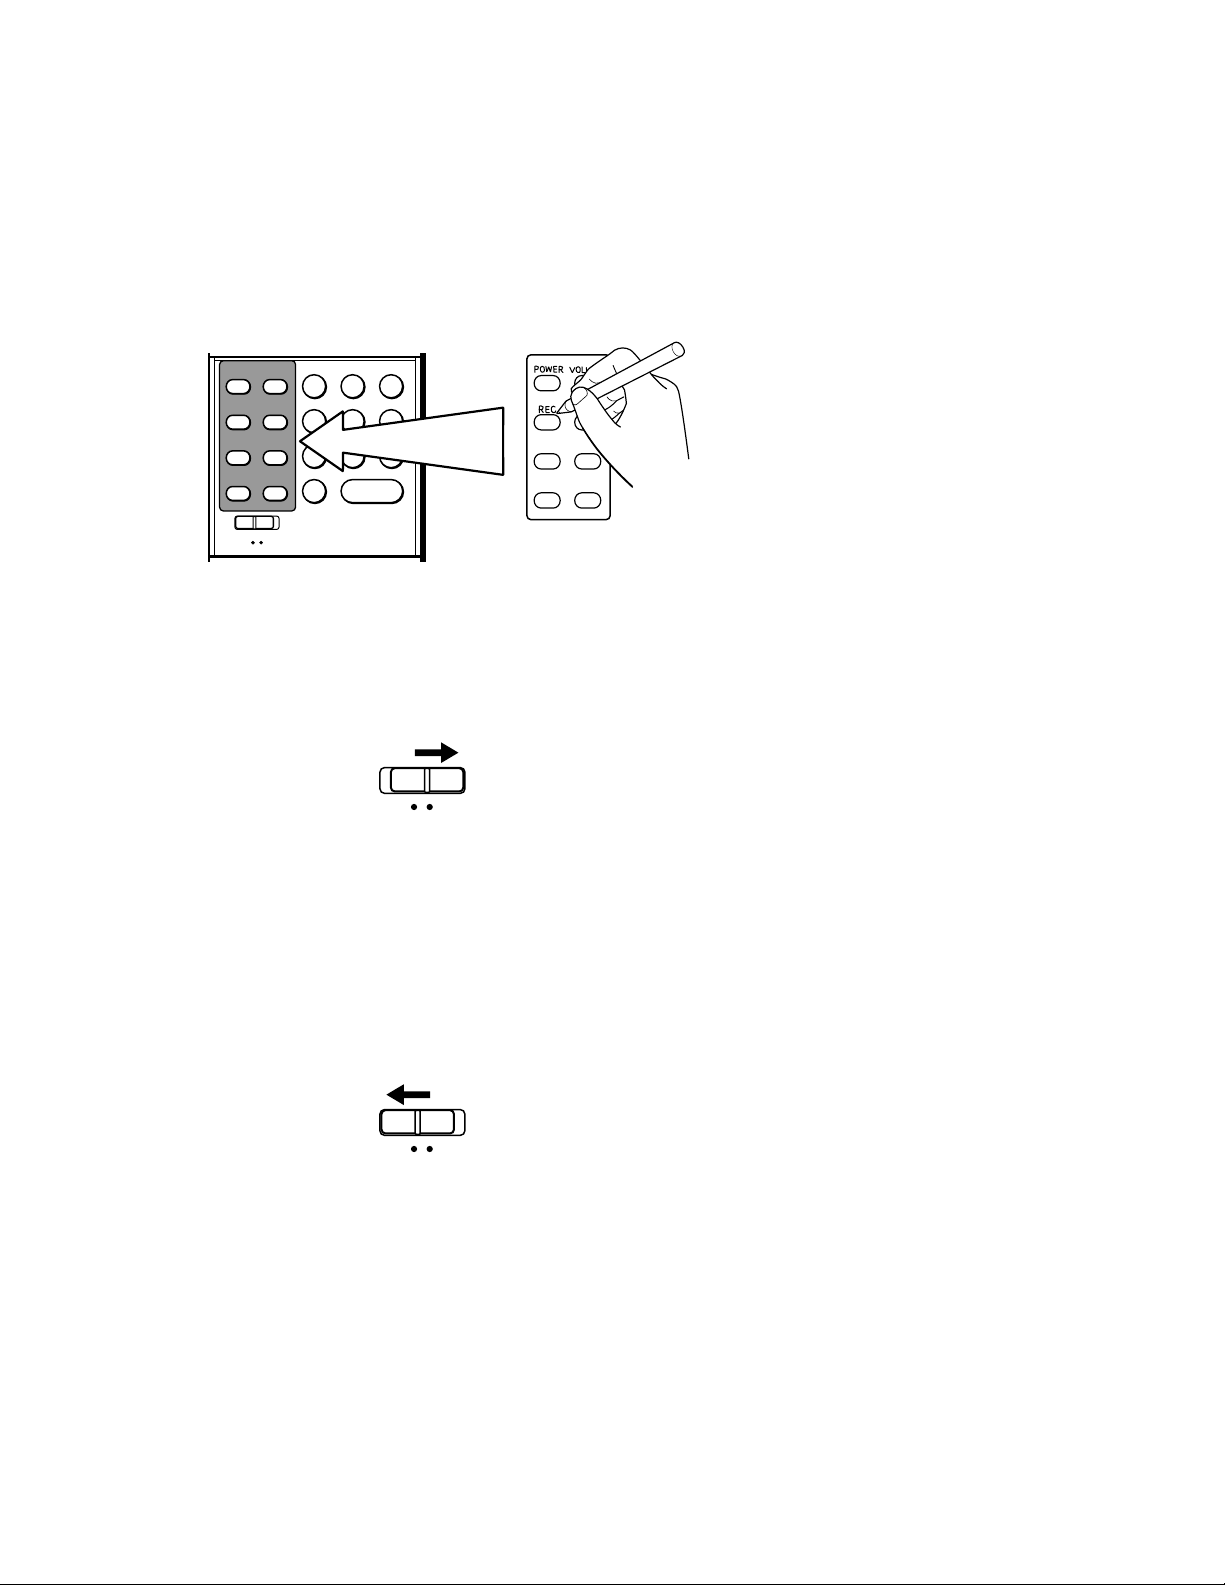
8. Attach the supplied Template to the remote control to enter the function
names of the learning buttons (A to H) you have programmed. Use a
ballpoint pen, etc. to write the function names.
A B
C D
E F
G H
USE LEARN
1 2 3
4 5 6
7 8 9
OK
+100 / ENTER
0
Cancelling the learned operating codes
1. Set the USE/LEARN switch to the “LEARN” position.
USE LEARN
2. Hold down the button of the function to cancel on the remote control
for about 1 second until the LEARN indicator lights up.
3. Hold down EXIT and MUTE at the same time for about 6 seconds
until the LEARN indicator goes off after blinking.
Note:
You cannot cancel the programming if you release the button while the indicator
is blinking.
4. Set the USE/LEARN switch to the “USE” position.
USE LEARN
29
Page 30

30
Page 31

BASIC TV OPERATION
This section tells you about the channel
banner ,which appears when you
change channels or press INFO on the
remote.
It also describes how to change
channels and modes and how to use
POP (picture-out-picture).
This section gives you a broad, clear
view of basic TV operation.
SETUP AND
1
CONNECTIONS
➛➛
USING THE REMOTE
2
BASIC TV OPERATION
3
➛
USING THE PROGRAM
4
GUIDES
➛➛➛ ➛➛
ADJUSTING TV
5
CONTROLS
USING THE PROFILES
6
SYSTEM OPTIONS AND
7
PREFERENCES
GETTING ASSISTANCE
8
REFERENCE
9
31
Page 32

BASIC TV OPERATION
ABOUT THE CHANNEL BANNER
The channel banner appears whenever you tune to a channel or press INFO on the
remote control. Use the arrow buttons and OK to choose an item in the channel banner.
On-screen icons represent frequently-used features. Some icons also change appearance to
show the item’s status.
Below is a description of the icons you’ll find on the channel banner.
Channel logo, when available
13
Channel
number
POP channel number
Ch 13
POP Ch6
Takes you to the Main menu
Program title, start and end time, rating, language, and audio mode
Information Not Available
Not Rated
(Mono)
Menu
4:3 Standard Antena A
Sat 01/01/00 8:00PM
TV
SAT
Toggles between TV mode and SAT (DIRECTV) mode
Family
Locks the system or unlocks the video
Picture size
Current antenna
Current date and time
“Family” is one of
five selectable
profiles
Read mail from program
providers
Cycles through the audio
language choices
Please note that when you’re in TV
mode, the channel banner will look
differently than when you’re in
Satellite mode (if you subscribe to
DIRECTV® programming).
32
Page 33

BASIC TV OPERATION
Main menu icon When selected, takes you to the main menu.
TV/SAT logo Toggles between TV and Satellite mode. The highlighted icon indicates
the current mode.
Green unlock icon Indicates that the system is unlocked. Spending, viewing and other
limits can be accessed and changed.
Yellow unlock icon Indicates that a password has been entered to override profile
limits. No limits can be accessed or changed.
Red lock icon Indicates that no limits can be accessed or changed. A password is
required to override limits or access the system.
Audio language icon If the icon is highlighted when watching a digital off-air or a
DIRECTV channel, more than one audio language is available. If you select the icon, you
will hear the language, and the language name will appear in the channel banner. You will
activate the language for the current channel (all other channels remain unaffected).
Highlighted mail icon Indicates that you have a message in your mailbox from your
DIRECTV® programming providers. Select this icon to access the mailbox and read your
mail. If you do not subscribe to DIRECTV® programming, this icon will be absent.
Press INFO on the remote control
twice to view an expanded channel
banner that shows a program
description (when available).
33
Page 34

BASIC TV OPERATION
CHANGING BETWEEN DIRECTV AND TV
MODE
When you change channels by entering numbers with the remote control, you tune to
programming that can come from one of three different sources: the DIRECTV satellite
(if you have DIRECTV service), an off-air antenna, or cable TV. You tune to one of these
sources by pressing TV/SAT on the remote control; then you can enter the channel
numbers. The diagrams below show how your remote control communicates with the
three sources.
In SAT mode, you tune to channels
that come from the DIRECTV
satellite signal (if you subscribe to
DIRECTV® programming). Enter
channel numbers that are three or four
digits long. Then press OK to tune.
In TV mode, you tune to channels
that carry the off-air or cable TV
signal.
•To tune to a digital channel, enter
channel numbers that are one,
two, or three digits long. If
necessary, press the right arrow
and enter a subchannel number.
These numbers appear in the box
to the right of the primary
channel number. Press OK to
tune.
•To tune to an analog channel,
enter channel numbers that are up
to three digits long. Press OK to
tune.
TV
DVD
VCR
CABLE
TV/VCR
ANTENNA
H
C
T
E
F
TV
DVD
VCR
CABLE
TV/VCR
ANTENNA
H
C
T
E
F
TV/VIDEO TV/SAT
U
T
E
S
P
O
P
C
TV/VIDEO TV/SAT
P
U
T
E
S
P
O
P
C
LEARN/
POWER
REW RLAY FWD
SWAP
SOURCE
S
U
B
SOURCE
S
U
B
POP
G
U
I
D
E
T
I
T
L
E
A
U
D
I
O
S
-
P
I
K
S
POWER
POP
G
U
I
D
E
T
I
T
L
E
A
U
D
I
O
S
-
P
I
K
S
PAUSE STOP SLOW
STILL
O
H
W
E
L
T
I
T
P
O K
( )
ENTER
H
MENU
LEARN/
REW RLAY FWD
SWAP
PAUSE STOP SLOW
STILL
O
H
W
E
L
T
I
T
O K
( )
ENTER
H
MENU
Direct Ticket Previews
Ch 208
8:00 PM to 8:00 PM
NR-Not Rated
English(Stereo)
TV
Menu
SAT
4:3 Full
Sat 01/01/00 8:10PM
Family
Ch 208
I
N
F
O
P+
I
K
56 -2
Ch
Information Not Available
Not Rated
(Mono)
-
2
56
4:3 Standard Antena A
Sat 01/01/00 8:00PM
TV
SAT
Menu
Family
Ch 56 - 2
I
N
F
O
Primary
channel
P+
I
K
Subchannel
(if necessary)
34
Page 35

BASIC TV OPERATION
CHANGING CHANNELS
To change channels by entering numbers with the remote control, the remote needs to be
in the correct “mode”: either SAT mode (if you subscribe to DIRECTV® programming)
or TV mode.
When you want to watch DIRECTV
®
programming, put the remote in SAT
mode
1. Make sure you are in SAT mode by pressing TV/SAT on the
remote control.
2. Enter the channel number and press OK. The channel numbers
are three or four digits long. If you do not enter at least three
digits, “???” will appear in the channel entry box, and the
system will wait for a valid entry.
When you want to watch a digital or
analog TV channel, put the remote in TV
mode
If you want to watch a digital channel:
1. Make sure you are in TV mode by pressing TV/SAT on the
remote control.
2. Enter the primary channel number. This number will appear in
the primary channel entry box. If there is no subchannel, press
OK.
3. If the primary channel number has fewer than three digits and
you want to enter subchannel numbers, press the right arrow to
advance to the subchannel entry box.
Direct Ticket Previews
8:00 PM to 8:00 PM
NR-Not Rated
Ch 208
English(Stereo)
Channel entry box
TV
DVD
VCR
CABLE
TV/VCR
ANTENNA
TV
SAT
Menu
Highlighted to indicate
DIRECTV mode
LEARN/
TV/VIDEO TV/SAT
REW RLAY FWD
SWAP
PAUSE STOP SLOW
STILL
POWER
SOURCE
4:3 Full
Sat 01/01/00 8:10PM
Family
TV/SAT
button
POP
4. Enter the number of the subchannel. This number will appear
in the subchannel entry box.
5. Press OK on the remote control to tune to the channel.
If you want to watch an analog channel:
1. Make sure you are in TV mode by pressing TV/SAT on the
remote control.
2. Enter the channel number. This number will appear in the
primary channel entry box. (Analog channels don’t have
subchannels.)
3. Press OK on the remote control to tune to the channel.
56-2
56
Ch
Primary
Information Not Available
Not Rated
(Mono)
-
2
Subchannel
entry box
4:3 Standard Antena A
Sat 01/01/00 8:00PM
TV
SAT
Menu
Highlighted to
indicate TV mode
Family
channel
entry box
Note that you can always use the channel up and down
buttons on the remote control to change channels within
the SAT and TV modes.
35
Page 36

BASIC TV OPERATION
POP (PICTURE-OUT-PICTURE)
OPERATION
Your TV is capable of displaying two pictures simultaneously. This is called
the Double-Window or POP (Picture-out-Picture) feature.
This TV is equipped with a dual NTSC tuner that tunes to cable or off-air
television signals. You will only be able to use the POP window and main
picture with analog channels.
Window picture
POP Buttons
There are six remote buttons that control the way the POP window works:
POP Brings up the POP window. Press POP again to remove the window.
POP CH yz Changes the POP channel.
SWAP Switches, or “swaps,” the video from the POP window with the
main picture.
STILL Freezes the POP picture. Press STILL again to return to a moving
picture.
SOURCE Toggles through the external input source (Video 1, Video 2, and
Video 3) for the POP. ColorStream HD1 and ColorStream HD2 can not be
selected.
Main
picture
channel
number
13
Ch 13
POP Ch6
Information Not Available
Not Rated
(Mono)
4:3 Standard Antena A
Sat 01/01/00 8:00PM
TV
Menu
SAT
Family
Note that you will only be able to use POP with
analog channels.
While the Caption Display is in On mode, the POP
can not be displayed.
LEARN/
TV/VIDEO
TV/SAT
S
E
L
O K
( )
ENTER
MENU
MUTE
PIC SIZE
SOURCE
STOP SLOW
G
U
I
D
E
U
B
T
I
T
L
E
A
U
-
P
I
K
S
RETURN
VOL
POWER
FWD
POP
I
D
I
O
P+
I
K
S
EXIT
POP
functions
N
F
O
POP
CH yz
TV
DVD
VCR
CABLE
TV/VCR
ANTENNA
C
T
E
F
REC
CH
H
T
E
S
P
O
P
REW RLAY
SWAP
PAUSE
STILL
O
H
W
T
I
T
P
U
C
H
36
Channel
control
indicator
POP channel
number
A B
C D
E F
G H
USE LEARN
1 2 3
4 5 6
7 8 9
OK
+100 / ENTER
0
CT-90012
Page 37

BASIC TV OPERATION
Basic POP Operation
1. Press the POP button on the remote control. The POP window appears on the screen.
2. Press the POP CH yz buttons to select the desired program for the window picture.
3. To remove the POP window, press the POP button again.
POP Problems?
•If you are channel surfing and the POP disappears, you may have tuned to a digital
channel. To view POP and the main picture, make sure that both the main and POP
channels are analog inputs, or signals. Continue changing the channel until you find
an analog (NTSC format) channel. The POP window will reappear.
Direct Ticket Previews
8:00 PM to 8:00 PM
NR-Not Rated
Ch 100 DTV
POP Not Viewable
The message “POP Not Viewable” in the channel banner lets you know
that POP is not available on this channel and you should tune to
another channel.
English(Stereo)
Menu
TV
SAT
•If you press POP and the POP box is grayed, you may have movie or TV rating limits
set. These limits may block your access to the POP channel. For information on
removing limits, see the section “Using the Profiles.”
4:3 Full
Sat 01/01/00 8:10PM
Family
The channel banner and the
message “POP Not Viewable” will
disappear after a few seconds, you
can refer to the POP message by
pressing the INFO button on the
remote control
•If the POP window disappears when closed captioning is displayed or you press the
MUTE button on the remote control, you have a conflict in your settings. You
cannot view POP when parental controls have blocked the current program or closed
captioning is displayed. In order to view POP, either unlock parental controls or
change the closed captioning setting.
37
Page 38

BASIC TV OPERATION
SELECTING THE PICTURE SIZE
Press PIC SIZE repeatedly. The 4:3 Standard, 4:3 Full, 4:3 Wide 1, 4:3
Wide 2 mode shown below will be selected in order.
4:3 Standard
This mode shows pictures in conventional ratio of 4:3.
Receiving a 4:3 program
4:3 Full
This mode shows the pictures stretched to fill the screen.
Receiving a 4:3 program
13
Ch 13
POP Ch6
Information Not Available
Not Rated
(Mono)
Menu
LEARN/
TV
DVD
VCR
CABLE
TV/VCR
ANTENNA
H
C
T
E
F
P
TV/VIDEO TV/SAT
W
P
U
T
E
S
O
P
C
REW RLAY FWD
SWAP
PAUSE STOP SLOW
STILL
O
H
L
T
I
T
( )
H
S
E
O K
ENTER
MENU
SOURCE
G
U
B
T
I
S
POWER
POP
U
I
D
E
I
N
F
O
T
L
E
A
U
D
I
O
P+
I
K
S
-
P
I
K
Picture size
4:3 Standard Antena A
Sat 01/01/00 8:00PM
TV
Family
SAT
4:3 Wide 1
The central images will be close to their normal proportions.
The left and right edges will be stretched.
Receiving a 4:3 program
4:3 Wide 2
The whole images will be retain to its true aspect, but some of the images on
the top and bottom will be lost.
Receiving a 4:3 program
REC RETURN EXIT
MUTE
CH
PIC SIZE
VOL
PIC SIZE
A B
C D
E F
G H
USE LEARN
1 2 3
4 5 6
7 8 9
OK
+100 / ENTER
0
CT-90012
•When the POP is displayed, the PIC SIZE button
is not available.
•When a 16:9 program is received, the PIC SIZE
button is ignored.
38
Page 39

BASIC TV OPERATION
USING THE TV/VIDEO BUTTON
1. Repeatedly press the TV/VIDEO button to scroll through the available
input sources until you find the input associated with the component
(such as VCR or DVD player) you want to view.
Information Not Available
V-1
Not Rated
Input
Input V-1
source
Watch the channel banner to see the input sources change
with each press of the TV/VIDEO button.
2. Once you have found the input source you want, the TV will display
information from that component.
•If you tune to VIDEO1 and your VCR is connected to that input, you
will be able to view your VCR. To play, stop, or rewind the VCR tape
using the remote that came with your TV, you must first set the
component switch to “VCR” to put the remote control in VCR mode.
4:3 Standard
Sat 01/01/00 8:10PM
TV
Menu
SAT
Family
Component
switch
TV/VIDEO
LEARN/
TV/VIDEO TV/SAT
TV
DVD
VCR
REW RLAY FWD
CABLE
SWAP
SOURCE
PAUSE STOP SLOW
TV/VCR
STILL
ANTENNA
H
C
T
E
F
T
E
S
P
O
P
REC RETURN EXIT
CH
U
C
W
P
H
O
H
L
T
I
T
( )
ENTER
MENU
PIC SIZE
E
O K
MUTE
G
U
I
D
E
S
U
B
T
I
T
L
E
A
P
I
K
S
POWER
POP
U
D
I
O
K
S
-
VOL
I
N
F
O
P+
I
A B
C D
E F
G H
USE LEARN
1 2 3
4 5 6
7 8 9
OK
+100 / ENTER
0
CT-90012
Press TV/VIDEO then GU IDE on the remote
control to view a guide-like list of your line inputs
and corresponding channels.
39
Page 40

40
Page 41

USING THE PROGRAM GUIDES
What is a program guide?
A program guide is an on-screen
programming schedule. It is a list of the
current and future programs. There are
separate guides for television programs
and DIRECTV
(available if you subscribe to
DIRECTV® programming).
Both of these guides can be viewed in
different formats.
Using the program guides is easy as
long as you remember to highlight
items on the screen by pressing the
arrow buttons on the remote control.
Then, press OK to tune to that
channel.
®
programming
SETUP AND
1
CONNECTIONS
➛➛
USING THE REMOTE
2
BASIC TV OPERATION
3
➛
USING THE PROGRAM
4
GUIDES
➛➛➛ ➛➛
ADJUSTING TV
5
CONTROLS
USING THE PROFILES
6
SYSTEM OPTIONS AND
7
PREFERENCES
GETTING ASSISTANCE
8
REFERENCE
9
41
Page 42

USING THE PROGRAM GUIDES
BRINGING UP THE PROGRAM GUIDES
If you subscribe to DIRECTV® programming, you have access to two
program guides: a DIRECTV® programming guide and a TV program
guide. If you do not subscribe to DIRECTV® programming, you will have
one guide: the TV program guide.
You can access the program guides by:
•Pressing MENU on the remote control and selecting Program Guide.
RTN Help
1 Program Guide...
2 Picture Quality...
3 Audio...
4 Profiles...
5 System Options...
6 Preferences...
7 Assistance...
•Pressing the GUIDE button on the remote control.
Note that when you access a program guide, you view the guide
corresponding to the “mode” you are in. For example, if you are in
DIRECTV mode and press the GUIDE button, you will view the
DIRECTV® programming guide. Similarly, if you are in TV mode and press
the GUIDE button, you will view the TV program guide.
If you are viewing the TV program guide and would like to view the
DIRECTV® programming guide, press TV/SAT on the remote control to
change “modes” and view the other guide.
GUIDE button
LEARN/
TV/VIDEO TV/SAT
TV
DVD
VCR
REW RLAY FWD
CABLE
SWAP
SOURCE
PAUSE STOP SLOW
TV/VCR
STILL
ANTENNA
H
C
T
E
F
T
E
S
P
O
P
REC RETURN EXIT
CH
A B
C D
E F
G H
USE LEARN
H
W
T
P
U
C
H
G
O
S
U
B
E
L
T
I
O K
( )
ENTER
MENU
MUTE
PIC SIZE
1 2 3
4 5 6
7 8 9
OK
+100 / ENTER
U
I
D
E
T
I
T
L
E
A
P
I
K
S
POWER
POP
U
D
I
O
S
-
VOL
0
I
N
F
O
P+
I
K
42
Page 43

USING THE PROGRAM GUIDES
ANATOMY OF THE TV PROGRAM GUIDE
To access the TV program guide, press the TV/SAT button on the remote control in the
TV mode, then press GUIDE on the remote control. The following diagram shows you the
kind of information you will see in the TV program guide. Note that the availability of TV
program titles and information is dependent upon information provided by local
broadcasters.
“Family” is one of five selectable profiles
Program titles and information, when available
Indicates current time and day
Primary channel number
Subchannel number
Abbreviated channel name
Returns you to previous screen
Thursday Afternoon
"apollo 13".Tom Hanks, Kevin Bacon.(1995) Based on the
true story of the ill-fated 13th Apollo mission bound for the
moon. It's 1970, and there's little interest in this "routine"
flight.. until that is, things go very wrong, and prospects of
a safe return fade. Directed by Ron Howard.
5:00 PM 5:30 PM 6:00 PM 6:30 PM
2
7
9
10-1
CBS HD1
10-2
CBS HD2
R
TN
Help gives you more information
about the program guide
Regular Schedule
Regular Schedule
Regular Schedule
Apollo 13
Techo Talk HD Today USA Talk Tim Smith
T
opics
Scrolls down through the guide
Family 5:18PM
Thu 01/04/00
The View
A LL
The “Other Guides” icon displays
guide sorting options
M
Takes you to
the main menu
enu
43
Page 44

USING THE PROGRAM GUIDES
ANATOMY OF THE DIRECTV® PROGRAMMING
GUIDE
To access the DIRECTV® programming guide, you must subscribe to DIRECTV service.
Press the TV/SAT button in the Satellite mode, then press GUIDE on the remote control.
The following diagram shows you the kind of information you will see in the DIRECTV
programming guide.
“Family” is one of five selectable profiles
Program titles and information
Indicates current time and day
®
R
TN
Returns you to previous
screen
Help gives you more information
about the program guide
Sort the guide by topics
Sort the guide by movies or sports
Thursday Evening
"Direct Ticket Previews". [NR-Not Rated] No description
available.
1/4 8:00 PM 8:30 PM 9:00 PM 9:30 PM
100
DTV
100
DTV
200
DTV
201
DTV
212
DTV
Scrolls down through the guide
Direct Ticket Previews
Welcome to DIRECTV's 119-degree Network
DIRECTV Big Events
DIRECTV Customer Service update
TMOS - NHL Special
T
opics
Shows all available programs
Family 8:10PM
Thu 01/04/00
A LL
Allows you to search available programs
by specific alphanumeric text.
Shows programs available
alphabetically beginning with the
alphanumeric code entered.
M
enu
Takes you to the
main menu
The “Other Guides” icon
displays guide sorting
options
44
Page 45

USING THE PROGRAM GUIDES
GETTING AROUND IN THE GUIDES
There are several ways to change channels and move around the TV and DIRECTV
®
programming guides.
•Point to channels with the number buttons (0-9)
You can quickly highlight any channel in the program guides by entering the channel
number with the number buttons (0-9). For example, to highlight channel 228, press
the numbers 2-2-8 and press OK on the remote control. To highlight channel 73, press
7-3 and OK.
• Scroll channel by channel
The programs that you see on the TV screen make up one section—or page—of the
total program guide. You can scroll to other sections using the arrows: highlight other
times with the left and right arrows; highlight other channels with the up and down
arrows.
• Scroll page by page
If you want to scroll up or down through the program guides faster, press the channel
up and down buttons on the remote control. The highlight scrolls a page at a time.
TUNING TO A PROGRAM
•To tune directly to a current program listed in a guide, highlight the program name
and press OK.
•To see information about a program or channel in the guide, highlight the program or
channel name and press INFO.
RTN Help
1 View Channel
2 Channel Guide...
3 Other Times
No description available.
After you highlight a program name and press
INFO, the Program Details screen appears and
gives you several options.
Direct Ticket Previews
Topics: Specials
Theme: Gen. Interest
Rating: NR-Not Rated
Stara: 8:00 pm
Length: 24hrs
DTV
Ch 100
01/01/00
Then, if the program is non-PPV*, you can select:
•View Channel to tune to that channel
• Channel Guide to see a program lineup for that channel
•Other Times to see what other times the program is available
The options available to you may vary according to the type of program you select. If the
program is PPV, you will have the option to buy the program.
* Pay per view programs (PPV) are
DIRECTV programs that you
purchase — like a movie ticket —
on an event-by-event basis if you
subscribe to DIRECTV
®
programming.
45
Page 46

USING THE PROGRAM GUIDES
USING THE GUIDE BUTTON
Each press of the GUIDE button on the remote control takes you to an alternate type of
TV or DIRECTV® programming guide: Detail Guide, SurfGuide (DIRECTV only), or
Grid Guide.
By default, the Detail Guide appears when you press GUIDE on the remote control. You
can change the default guide from the Detail Guide to the Grid Guide or SurfGuide
(DIRECTV only). Select Preferences from the Main menu. Select Default Guide. Use the
arrows and OK to choose the guide you want to appear first when you press GUIDE. If
SurfGuide is selected as the default guide, the Grid Guide will appear when you access the
TV program guide, since SurfGuide isn’t available as a TV program guide.
The Detail Guide
The Detail Guide shows five channels in a time-and-channel format, with program
information for the highlighted program at the top of the guide.
The SurfGuide (DIRECTV only)
The SurfGuide displays seven DIRECTV channels in a half-hour time-and-channel
format, if you subscribe to DIRECTV® programming. The full name of the program and
its rating are listed at the bottom of the screen. Press the right arrow button to extend the
SurfGuide to show the next two hours.
The Grid Guide
The Grid Guide shows seven channels in a time-and-channel format, with the full title of
the highlighted program at the top of the guide.
The Other Guides Icon
Besides the Detail Guide, Grid Guide, and SurfGuide, there are a few more DIRECTV
programming guide formats you can access. The Other Guides icon at the bottom of the
TV and DIRECTV® programming guides lets you sort the guides by different variables,
such as by channels, data, channel lists, and channel groups.
®
Thursday Evening
"Direct Ticket Previews". [NR-Not Rated] No description
available.
1/4 8:00 PM 8:30 PM 9:00 PM 9:30 PM
100
Direct Ticket Previews
DTV
100
Welcome to DIRECTV's 119-degree Network
DTV
200
DIRECTV Big Events
DTV
201
DIRECTV Customer Service update
DTV
212
TMOS - NHL Special
DTV
R
TN
T
opics
Family 8:10PM
A LL
The Detail Guide
Current Ch: 100
"Direct Ticket
Previews"
1/4 8:00 PM
100
Direct ...
DTV
100
Welcome...
DTV
200
DIRECTV...
DTV
201
DIRECT...
DTV
212
TMOS -...
DTV
220
DIRECT...
DTV
357
Tune he...
TIVO
The DIRECTV SurfGuide
Thursday Evening
"Tune here to learn about TIVO". [NR-Not Rated]
1/4 8:00 PM 8:30 PM 9:00 PM 9:30 PM
100
Direct Ticket Previews
DTV
100
Welcome to DIRECTV's 119-degree Network
DTV
200
DIRECTV Big Events
DTV
201
DIRECTV Customer Service update
DTV
212
TMOS - NHL Special
DTV
220
DIRECTV Sports Schedule
DTV
357
Tune here to learn about TIVO
TIVO
R
TN
T
opics
Family 8:10PM
A LL
The Grid Guide
Thu 01/04/00
Thu 01/04/00
M
enu
M
enu
You can access these guides by selecting the Other Guides icon at the bottom of the Detail
Guide and Grid Guide.
• Channel Guide Displays a channel’s DIRECTV® programming or TV
programming schedule in a channel-by-channel format.
RTN Help
1 Channel Up
2 Channel Down
Channel Guide lets you see what programs
are on a specific channel.
DTV 998
Platinum Presents: January
DTV 1/4 8:00 PM
46
Other Guides icon
Page 47

USING THE PROGRAM GUIDES
• Guide Data Shows you the guides that are available and lets you select one to view in
either the DIRECTV® or TV programming guide.
RTN Help
1 Grid Guide...
2 Surf Guide...
3 Channel Guide...
4 Guide Data
5 Channel Lists
6 Channel Groups
7 Attractions...
Guide Data shows you future guides.
Guide Data
Thursday 8:00 PM
Thursday 11:00 PM
Friday 4:00 AM
Friday 12:00 N
Friday 8:00 PM
Saturday 4:00 AM
Saturday 12:00 N
• Channel Lists Displays a list of profiles. You can choose a profile from this list and
the guide will display only the DIRECTV or TV channels which have been included in
that profile’s channel list.
• Channel Groups Lets you sort only the DIRECTV® programming guide to include
only channels that fall into the selected category. For example, you could sort the
DIRECTV guide by pay-per-view movies that are available at a future time.
• Attractions… Displays a list of DIRECTV channels that show coming attractions
and special events information.
You can point to any program then
tune to that channel or get more
information by pressing the OK or
INFO buttons.
RTN Help
Coming Attractions
DIRECTV PART TODOS
Information
Channel 400
The Attractions Guide shows coming DIRECTV
events and programs.
EXITING A PROGRAM GUIDE
There are three ways to exit a guide:
•Highlight a channel and press OK.
•Highlight RTN and press OK.
•Press EXIT on the remote control.
47
Page 48

USING THE PROGRAM GUIDES
SORTING THE DIRECTV® PROGRAMMING
GUIDE
Sorting the guide is a way of organizing the DIRECTV® programming guide to show
only the types of programs that interest you. There are several on-screen buttons that sort
the DIRECTV® programming guide in different ways.
Thursday Evening
"Tune here to learn about TIVO". [NR-Not Rated]
1/4 8:00 PM 8:30 PM 9:00 PM 9:30 PM
100
Direct Ticket Previews
DTV
100
Welcome to DIRECTV's 119-degree Network
DTV
200
DIRECTV Big Events
DTV
201
DIRECTV Customer Service update
DTV
212
TMOS - NHL Special
DTV
220
DIRECTV Sports Schedule
DTV
357
Tune here to learn about TIVO
TIVO
R
TN
T
opics
Family 8:10PM
A LL
Thu 01/04/00
M
enu
The Sorting icons appear at the bottom of the
Grid Guide and Detail Guide.
Sorting the DIRECTV® Programming Guide by Topics
The topics icon sorts the DIRECTV® programming guide according to the current user’s
preferences. Select the topics icon to sort the guide.
After you select the topics icon, it changes to the topics themes icon. Select the topics
themes icon to edit the current user’s themes preferences. These preferences are saved in
each user’s profile.
RTN Help
1 Movies
2 Sports
3 Specials
4 Series
5 News
6 Shopping
Family's Movies Themes
Action/Adv.
Children
Comedy
Drama
Fantasy
Horror
Musical
Romance
Show All Hide All
Sci.Fi
Western
Other
Checkmark the themes that interest you.
Select the topic categories, and checkmark the themes you would like to appear when you
select the topics icon in the guides. Programming that fits the description of checkmarked
themes will appear in the DIRECTV® programming guide when you sort by the topics
icon.
48
Topics
Topics button
T
hemes
Topics themes button
Page 49

USING THE PROGRAM GUIDES
Sorting the DIRECTV® Programming Guide by Movies
Select the movies icon to tell the DIRECTV® programming guide to list only DIRECTV
movies. After you select the movies icon, it changes to a movies themes icon.
Select the movies themes icon to sort the guide to list movies by type, such as comedies or
musicals.
RTN Help
All Movies
Action / Adv.
Children
Comedy
Drama
Fantasy
Horror
Musical
Select a Movies Theme that interests you.
Movies icon
THEMES
Movies themes icon
Sorting the DIRECTV® Programming Guide by Sports
Select the sports icon to tell the DIRECTV® programming guide to list only DIRECTV
sporting events. After you select the sports icon, it changes to the sports themes icon.
Select the sports themes icon to sort the guide to list sports by type, such as basketball or
soccer.
RTN Help
All Sports
Baseball
Basketball
Boxing
Football
Golf
Hockey
Racing
Select a sports theme that interests you.
Listing All DIRECTV® Programming
The all icon resets the DIRECTV® programming guide to show all available topics,
channels and listings for the current profile.
Sports icon
THEMES
Sports themes icon
A LL
All icon
49
Page 50

USING THE PROGRAM GUIDES
Searching programs by using the Alphasort menu
Select the alphasort icon to display the on-screen keyboard. Enter the keyword to show
programs available alphabetically beginning with the alphanumeric code.
RTN Help
A B C D E F G
H I J K L M N
O P Q R S T U
V W X Y Z
' & 1 2 3 4 5
6 7 8 9 0
space
backspace
Clear All
ABC
ABC News
386 (ABCE) 11/29 5:30 PM
ABC News
387 (ABCW) 11/29 6:30 PM
.
,
Enter the keyword (e.g., “ABC”).
Searching programs by using the Hunt menu
Select the Hunt icon to display the Hunt menu. You can enter 8 keywords (Hunt 1 to 8).
Select the Hunt number then press OK to display the on-screen keyboard.
Enter the text you want Hunt to search for. The Hunt operation will continue until you
clear the keyword.
RTN Help
1 Hunt 1
2 Hunt 2
3 Hunt 3
4 Hunt 4
5 Hunt 5
6 Hunt 6
7 Hunt 7
8 Hunt 8
Hunt 3
Hunt 3 is currently not in use.
RTN Help
1 Enter Text
2 Hunt Results
Hunt 3
Search the program guide for
TENN E S S E E
A B C D E F G H I J K L
M N O P Q R S T U V W X
,
'
Y Z
& 1 2 3 4 5 6 7
8 9 0
Run Hunt Clear Hunt
space
backspace
Alphasort icon
Hunt icon
Select a vacant Hunt number. Enter the text.
THE OTHER ICONS
These icons are located on both the DIRECTV® and TV programming guides.
Return
Exits the guide and returns you to normal viewing on the current channel. Press OK to
continue.
Help
Brings up additional information about the guide. Press OK to continue.
Down Arrow
The arrow icon allows you to scroll down through other channels in the guide. Point to
the down arrow, and then press either OK or the down arrow on the remote to scroll
down through the program guide.
The Main Menu
Brings up the main menu. Press OK to continue.
50
R
TN
RTN icon
Help icon
Arrow icon
Menu
Main menu icon
Page 51

ADJUSTING TV CONTROLS
The following section tells you how to
adjust the picture quality and audio
quality of yourTV.
• The Picture Quality menu contains
the controls that let you adjust the
picture.
• The Audio menu contains the
controls that let you adjust the way
the audio sounds.
SETUP AND
1
CONNECTIONS
➛➛
USING THE REMOTE
2
BASIC TV OPERATION
3
➛
USING THE PROGRAM
4
GUIDES
➛➛➛ ➛➛
ADJUSTING TV
5
CONTROLS
USING THE PROFILES
6
SYSTEM OPTIONS AND
7
PREFERENCES
GETTING ASSISTANCE
8
REFERENCE
9
51
Page 52

ADJUSTING TV CONTROLS
PICTURE QUALITY CONTROLS
The Picture Quality menu contains all of the TV’s video configuration controls. To access
the Picture Quality menu, press MENU on the remote control to go to the main menu,
then select Picture Quality.
RTN Help
1 Program Guide...
2 Picture Quality...
3 Audio...
4 Profiles...
5 System Options...
6 Preferences...
7 Assistance...
RTN Help
1 Picture Settings...
2 Color Temp
3 Convergence
4 Picture Pref
5 Reset Controls
Picture Settings
The Picture Settings menu displays the controls for adjusting the way the picture looks.
The picture settings you specify apply to your current mode. Use the left and right arrow
(x •) buttons on the remote control to move the slider to the desired position. Then
select RTN when you are finished.
Your options under the Picture Settings menu are:
• Contrast Adjusts differences between the light and dark areas of the picture.
• Color Adjusts the richness of the color.
• Tint Adjusts the balance between the red and green levels.
• Brightness Adjusts the brightness of the picture.
• Sharpness Adjusts the crispness of edges in the picture.
You can have seven different picture settings: one for analog channels, one for digital
channels (including DIRECTV channels), and one for components attached to VIDEO
1, VIDEO 2, VIDEO 3, ColorStream HD1 and ColorStream HD2.
To make settings for analog and digital channels:
1. Enter the “mode” for which you would like to apply the setting by pressing TV/SAT.
2. Then press MENU.
3. Select Picture Quality, and then select Picture Settings to set picture settings.
To make settings for the components connected to VIDEO 1, VIDEO 2, VIDEO 3,
ColorStream HD1 and ColorStream HD2, take the following steps:
1. Press TV/VIDEO on the remote control until the input that corresponds with the
component you want to make settings for appears in the channel banner. (For
example, if your VCR is connected to V-1, stop pressing TV/VIDEO when V-1
appears.)
2. Point the remote at the TV once again, press MENU, and select your picture settings.
52
Page 53

ADJUSTING TV CONTROLS
Color Temp
Color Temperature displays a list that lets you set one of three automatic color
adjustments: Cool for a more blue palette of picture colors, Medium for neutral picture
colors, and Warm for a more red palette of picture colors.
Convergence
The projection TV uses three separate TV tubes: a red one, a green one, and a blue one.
The red, green, and blue images are projected onto the screen where they converge to
form a full color picture. You can see a clear picture only when they converge correctly.
Convergence may drift over time or if you move the TV. If you can see clear images on the
screen, skip this procedure. This adjustment should be made after the TV has been on for
at least 30 minutes.
To check and adjust the color convergence:
1. Press MENU.
2. Select Picture Quality, and then select Convergence.
3. Press x or • to display the center convergence menu.
If you see separate colored lines, you have to adjust the convergence.
RED BLUE
PUSH ENTER
TO SEL ECT COLOR
PUSH 0
TO SEL ECT POS ONIIT
KEY
RED BLUE
PUSH ENTER
TO SEL ECT COLOR
PUSH 0
TO SELECT POS
KEY
ITION
(Correct convergence) (Adjustments are needed)
4. Press OK (ENTER) to select RED or BLUE.
5. Press y (up), z (down), x (left), • (right) to converge the red or blue line into the
green line. When color convergence is correctly adjusted, you will see two single
white lines.
6. Press “0” to display the circumference convergence menu.
7. Press the corresponding Number button (1-9) to select the place you want to adjust.
1 2 3
4 6
PUSH 1–9
7 8 9
RED BLUE
PUSH ENTER
TO SEL ECT COLOR
PUSH 0
TO SELECT POS
KEY
ITION
8. Press OK (ENTER) to highlight RED or BLUE.
9. Press y z x • to converge the red or blue line into the green line.
Repeat steps 8 and 9 until you see two single white lines.
10. Press 1-9 to select any other place you want to adjust, then repeat steps 7 through 9.
11. Press EXIT to close the convergence menu.
53
Page 54

ADJUSTING TV CONTROLS
Picture Pref
Picture Preference displays a choice list that lets you set one of three preset picture types:
Normal for a default picture setting, Theater for a movie-like picture setting, and Memory
for you personal preference including Contrast, Color, Tint, Brightness, and Sharpness.
Reset Controls
Allows you to reset all picture quality controls to their original defaults.
AUDIO CONTROLS
The Audio menu lets you adjust the controls that involve the TV’s audio outputs.
To access the Audio menu, press MENU on the remote, then select Audio from the main
menu.
RTN Help
1 Program Guide...
2 Picture Quality...
3 Audio...
4 Profiles...
5 System Options...
6 Preferences...
7 Assistance...
RTN Help
1 Mute
2 Tone Settings...
3 Audio Processor
4 Audio Output
5 SAP
6 SBS
7 SBS Level
8 Optical Output
Mute
Sound On
Sound Off
Mute
Turn Mute on (select Sound Off) to set the TV’s volume to its minimum level. The same
can be accomplished by pressing MUTE on the remote control.
Tone Settings
The Tone Settings menu displays the controls for adjusting the sound quality of your TV.
The tone settings you specify apply to your current mode. Use the left and right arrow (x
•) buttons on the remote control to move the slider to the disired position. Then select
RTN when you are finished.
When changes are made to the
Audio profile settings, the AUDIO
output is temporarily muted.
Do not change Audio profile settings
while recording.
Your options under the Tone Settings menu are:
• Bass Adjusts the bass performance of your TV.
• Treble Adjusts the treble performance of your TV.
• Balance Adjusts the volume balance between left or right speakers.
• Reset Controls reset all sound quality controls to their original defaults.
54
Page 55

ADJUSTING TV CONTROLS
Audio Processor
Audio Processor displays a choice list of available audio modes, which control the way the
sound comes through your speakers. Depending on your speaker setup, any combination
of the following options will appear:
• Mono Plays the sound in mono only. This is a good choice when receiving
broadcasts where distance from the broadcasters makes the stereo signal weak. The
channel banner displays the word Mono when you tune to a program that is
broadcast in mono.
• Stereo Splits the incoming stereo audio signal into left and right channels. Most TV
programs and recorded materials have stereo audio. The channel banner displays the
word Stereo when you tune to a program that is broadcast in stereo.
• Surround Expands the audio listening field wider and deeper to create exceptional
sound quality from the TV’s speakers. This feature uses stereo signals from a TV
broadcast or video input.
Audio Output
Audio Output controls whether the built-in speakers are on or off. Select Speakers Off if
the TV is connected to an audio amplifier and external speakers.
SAP
When turned on, Second Audio Program (SAP) plays the program’s audio in a second
language, if one is available. SAP is also used to broadcast a program’s audio with
descriptions of the video for the visually impaired. SAP is broadcast in mono and is not
available for digital programs.
SBS
When turned on, Sub-Bass System allows you to improve bass performance even when the
sound volume is low.
SBS Level
You can use the slider to control the level of the Sub-Bass System. Sliding the slider left
using the left arrow (x ) button decreases the SBS level, sliding the slider right using the
right arrow (•) button increases the SBS level. The SBS level can be changed even if SBS
is Off.
For more information on the variable
audio jacks, see the section “Setup
and Connect ions” under “Back of
the TV ” and “Connecting a Stereo
Amplifier.”
You will find an audio language icon
in the channel banner. When this
icon is highlighted, it indicates that a
Second Audio Program (SAP) is
available for analog programs. If you
select it when highlighted, you will
activate the SAP for the current
channel (all other channels remain
unaffected). If the icon is highlighted
when watching a digital channel or a
DIRECTV channel, more than one
audio language is available. If you
select the icon, you will hear the
language and the name will appear
in the channel banner.
55
Page 56

ADJUSTING TV CONTROLS
Optical Output
Select Auto Select if your TV is connected to a Dolby Digital and PCM decoder. Select
Dolby Digital if the TV is connected to a Dolby Digital only decoder; it will provide six
independent soundtrack channels through the optical output jack (labeled DIGITAL
AUDIO OUT). Select PCM if it is connected to a PCM only decoder; it will then
provide two independent soundtrack channels. Select Off if you want no optical audio
output.
When the TV is connected to an
optional, compatible six-channel
amplifier/ receiver and speakers via
the DIGITAL AUDIO OUT jack on
the back panel, you receive Dolby
Digital Surround Sound, if
transmitted. Use the Optical Output
menu to specify Auto Select, PCM,
Dolby Digital, or Off.
56
Page 57

USING THE PROFILES
This section describes the user profiles
feature. It includes information about:
•creating a profile’s TV and
DIRECTV viewing lists.
• setting spending limits.
• setting DIRECTV
TV, and movie rating limits.
• blocking unrated TV programs.
• locking and unlocking a profile.
®
programming,
SETUP AND
1
CONNECTIONS
➛➛
USING THE REMOTE
2
BASIC TV OPERATION
3
➛
USING THE PROGRAM
4
GUIDES
➛➛➛ ➛➛
ADJUSTING TV
5
CONTROLS
USING THE PROFILES
6
SYSTEM OPTIONS AND
7
PREFERENCES
GETTING ASSISTANCE
8
REFERENCE
9
57
Page 58

USING THE PROFILES
ABOUT PROFILES
When you select Profiles from the main menu, you can create four different profiles in
addition to the pre-set “Family” profile. You can set up specific channels, rating limits, and
spending limits for each profile. After you’ve set up these profiles, press the WHO button
on the remote control to scroll through your profiles and access a certain one.
But first, personalize a profile by entering a name.
1. Select Profiles from the main menu.
2. Select a profile to edit: User 1, User 2, User 3, or User 4.
3. Select Edit User Name from the next menu.
4. Use the up, down, and right arrows on the remote control to find and select a letter.
RTN Help
1 Edit User Name
2 SAT Setup...
3 TV Setup...
4 Lock User
You can personalize each profile.
To continue editing the profile, select DIRECTV Setup (if you have ordered DIRECTV
Edit User Name
U ser 1
®
programming) or TV Setup. The following sections describe how to set up these features.
Use the MENU button on the
remote control to bring up the main
menu, use the arrows to highlight an
option, and press OK to select it.
If the main menu does not appear,
the remote control might not be in
TV or DIRECTV mode. Try pressing
the TV/SAT button and then MENU.
THE SAT (DIRECTV) SETUP
The SAT Setup menu item only exists if you subscribe to DIRECTV® programming.
Through this menu you can establish DIRECTV channel lists, set spending limits, and set
rating limits for DIRECTV programs using the SAT Setup menu.
Editing Channels in a DIRECTV List
You should create a DIRECTV channel list to establish which DIRECTV channels the
selected profile can access. To create the DIRECTV channel list:
1. Highlight and select a user name, then select SAT Setup.
2. Highlight Edit Channels and press OK.
You can also set up profiles as
categories instead of as users. For
example, name a profile “Sports”
and include only sports channels in
the profile. Or, name it “Movies,”
include only movie channels, and set
a rating and spending limit for
yourself or your family.
58
Page 59

USING THE PROFILES
RTN Help
1 Edit Channels
2 Select All Chans
3 Delete All Chans
4 Set Rating Limit
5 Spending Limit
100
DTV
106
DTV
101
DTV
107
DTV
105
DTV
108
DTV
109
DTV
110
DTV
111
DTV
Check the channels you want to include in the
list (programming subject to change).
3. Use the arrow buttons to point to a DIRECTV channel, and press OK to remove (or
replace) the check mark.
Checkmarked items appear in the DIRECTV channel list. In other words, when you
select that profile and begin surfing through DIRECTV channels with the channel up and
down buttons, only the checkmarked channels will appear as you surf.
Selecting or Deleting All DIRECTV Channels
You might be able to save time when creating a DIRECTV channel list by using the Select
All Chans option or the Delete All Chans option to either add or delete all channels
before removing or adding individual channels.
Also, DIRECTV program providers may make additional channels available. To prevent
new channels from appearing in a profile channel list, choose Delete All Chans and
checkmark only the channels you want to appear in the list.
Setting the DIRECTV Spending Limit
Use the Spending Limit option to indicate a profile’s per-event spending limit for pay per
view (PPV) programs. To set the spending limit, choose the user profile name, select SAT
Setup, then follow these steps:
1. Highlight Spending Limit, and press OK.
RTN Help
1 Edit Channels
2 Select All Chans
3 Delete All Chans
4 Set Rating Limit
5 Spending Limit
You can set a per-event spending limit for
each profile.
User 1 Spending Limit
0$ 00
00 per event
2. Use the digits or the arrow keys on the remote control to enter a single-program
spending limit.
3. Lock the system. See “Locking the System” near the end of this section for details.
Tip
You can also access spending limits
by selecting System Options from
the main menu and then selecting
Purchases. You can then select
Spending Limit and set limits for
each user.
59
Page 60

USING THE PROFILES
After a spending limit is set and the system is locked, you must enter a password to
purchase a pay per view program that costs more than your spending limit allows. The
system will then temporarily unlock the limits you have set until the power is turned off.
When the system is turned back on, the system will be locked again.
Setting the DIRECTV Rating Limit
The Set TV Ratings Limit menu enables you to set a maximum viewing limit for rated
DIRECTV movies (based on the MPAA ratings system), as long as the DIRECTV
program provider has transmitted the proper code.
•Note that the ratings limit cannot be enforced if a DIRECTV program has not been
rated, if rating information for that program is not transmitted by the program
provider, or if the system has not been locked.
1. Select a user.
2. Select SAT Setup.
3. Highlight Set Rating Limit and press OK.
RTN Help
1 Edit Channels
2 Select All Chans
3 Delete All Chans
4 Set Rating Limit
5 Spending Limit
NC-17
NR-Mature
R
NR-Content
PG-13
PG
G
NR-Not Rated
Lock All
User 1
Rating Limit
Not Viewable
Viewable
Important!
You need to lock the system in order
for rating limits, channel limits, and
spending limits to go into effect.
To edit the limits after you lock the
system, you need to enter the
system password. See “Locking the
System” for details.
Use the arrow buttons on the remote control
to move the selector up and down.
4. Use the up and down arrows to move the rating selector to the highest rating you
want to be able to view. In the preceding illustration, movies that are rated up to and
including a PG-13 rating can be viewed.
After the rating limit is set and the system is locked, you must enter the system password
to watch programs with a rating higher than the limit. The system will then temporarily
unlock the limits you have set until the power is turned off. When the system is turned
back on, the system will be locked again.
Please note that the rating limit you
set while in the SAT Setup menu
applies only to DIRECTV programs—
they do not apply to TV programs.
To set limits for TV programming,
select a profile, select TV Setup and
then select Set TV Rating or Set
Movie Rating.
60
Page 61

USING THE PROFILES
THE TV SETUP
You can establish TV channel lists, set spending limits, and set rating limits for TV
programs using the TV Setup menu.
Editing Channels in a TV List
You should create a TV channel list to establish which TV channels (including both
analog and digital) the selected profile can access. To create the TV channel list:
1. Select a user.
2. Select Edit Channels.
RTN Help
1 Edit Channels
2 Select All Chans
3 Delete All Chans
4 Set TV Rating
5 Set Movie Rating
6 Unrated Shows
NBC
6
NBC
FOX CBS UPN
14
FOX
23 35
ABC 11
8
ABC
17
CBS
23 PBS 44
PBS
11
20
UPN
44
To start, you can add or delete all channels.
3. Use the arrow buttons to highlight a TV channel, and press OK to remove (or
replace) the check mark.
Checkmarked items appear in the channel list. In other words, when you select that
profile and begin surfing through TV channels, only the checkmarked channels will
appear as you surf. Note that the only channels you can add to a list are ones that were
found during the channel search (see the “Getting Assistance” section in this book for
details on searching for channels).
Selecting or Deleting All TV Channels
You might be able to save time when creating a TV channel list by using the Select All
Chans option or the Delete All Chans option to either add or delete all channels before
removing or adding individual channels.
Also, off-air program providers may make additional channels or subchannels available. To
include new channels in your TV channel list:
1. Select System Options from the main menu, then select Channel Search. The system
will run a channel search, making it aware of the new channel(s).
2. Select Profiles from the main menu.
3. Select the user profile name, then TV Setup.
4 . Choose Edit Channels and checkmark the new channel.
Don’t forget about the EXIT
button.
Press the EXIT button on the remote
control to remove the on-screen
menus and return to normal viewing.
61
Page 62

USING THE PROFILES
SETTING THE TV RATING
The Set TV Rating menu enables you to program your TV so children cannot see certain programs or channels.
The last three choices in the TV Setup menu involve software inside your TV (often called V-Chip) which allows you to
“block” TV programs and movies based on violence, sex, or other content you may believe children should not view. In other
words, it lets you program your TV so it will not display certain programs. Once you block programs, you or other adults are
not limited to only parent-approved programs; you can “unblock” programs by entering the system password.
The V-Chip software inside your TV is initially turned “off,” so if you choose not to implement it, you can just ignore it.
When turned “on,” the V-chip software reads a code that most broadcasters send with programs. That code tells the V-Chip
software the program’s age-based rating (TV-MA, TV-14, etc.) and content themes (Violence (V), Adult Language (L), etc.). If
you have blocked the rating or content themes that the program contains, you will receive the message, “Program exceeds the
TV rating limit you set,” when you turn to that particular channel. Broadcasters are not required to provide ratings. However,
you can block out programs that have been given a rating of “Not Rated,” and programs that are considered “unrated” because
no code has been sent by the broadcaster.
The TV age-based ratings and content themes you can block are listed in the table below.
Age-Based
Rating
TV-MA Mature Audience Only. Specifically designed to be viewed by adults and may be unsuitable for children under
17. It contains one or more of the following content themes: crude indecent language (L), explicit sexual
activity (S), or graphic violence (V).
TV-14 Parents Strongly Cautioned. Contains some material that many parents would find unsuitable for children
under 14. Parents are strongly urged to exercise greater care in monitoring this program and are cautioned
against letting children under the age of 14 watch unattended. This program contains one or more of the
following content themes: intensely suggestive dialogue (D), strong coarse language (L), intense sexual
situations (S), or intense violence (V).
TV-PG Parental Guidance Suggested. Contains material that parents may find unsuitable for younger children. Many
parents may want to watch it with their younger children. The program contains one or more of the following
content themes: some suggestive dialogue (D), infrequent coarse language (L), some sexual situations (S), or
moderate violence (V).
TV-G General Audience. Most parents would find this program suitable for all ages. It contains little or no sexual
dialogue (D), no strong language (L) or sexual situations (S), and little or no violence (V).
TV-Y7 Directed to Children 7 years and older. Designed for children ages 7 and above. It may be more appropriate
for children who have acquired the developmental skills needed to distinguish between make-believe and
reality. Themes and elements in this program may include mild fantasy violence (FV) or comedic violence,
or may frighten children under the age of 7.
Description and Content Themes for Age-Based Ratings
62
TV-Y All Children. Themes and elements in this program are designed for a young audience, including children
from ages 2-6. It is not expected to frighten younger children.
Page 63

USING THE PROFILES
To set TV programming limits:
1. From the main menu, select Profiles.
2. Select the user name you would like to set limits for through the Profiles menu.
3. Select TV Setup from the next menu.
4. Select Set TV Rating.
RTN Help
1 Edit Channels
2 Select All Chans
3 Delete All Chans
4 Set TV Rating
5 Set Movie Rating
6 Unrated Shows
Set V-Chip TV Rating Limit
Status
View
View
View
View
View
View
Rating Content
D
V
V
Rating
TV-MA
TV-14
TV-PG
TV-G
TV-Y7
TV-Y
L
S
V
FV
V
V
V
V
V
V
V
V
V
V
Selecting TV Rating allows you to set a limit
for TV programs based on rating and content.
Once you get to the Set TV Rating screen, use the arrows and OK buttons on your
remote control to change the status of a TV program rating from View to Block. The
following sections give you more details about how to change the status of TV program
limits.
The Rating Limit Screen
Below is an example of where items are located within the Rating Limit screen.
Age-Based Rating Limit
Lists the available ratings you
can block or view with the
rating status buttons.
Rating Status Buttons
Lets you know whether the status of the age-based
rating limit to the left is View or Block.
Remember you are only blocking TV
programs and movies for the one
Profile you select in the Profiles
menu. If you would like to block
different programs for different
users, be sure to complete the
process for each of them.
You must remember to lock the
system for rating limits to take effect.
RTN Help
Set V-Chip TV Rating Limit
1 Edit Channels
2 Select All Chans
3 Delete All Chans
4 Set TV Rating
5 Set Movie Rating
6 Unrated Shows
Rating
TV-MA
TV-14
TV-PG
TV-G
TV-Y7
TV-Y
Status
View
View
View
View
View
View
Rating Content
D
L
S
V
V
V
V
V
V
V
V
V
V
V
V
FV
Content Themes
Lists the content themes you can block or view
with the content status buttons.
Content Status Buttons
V
Lets you know which content themes are
available for that rating, and whether the status
of the content theme is View (V) or Block (B).
63
Page 64

USING THE PROFILES
BLOCKING AGE-BASED RATINGS
You can automatically block all program ratings above a specified age-based rating level.
For example, if you only want your child to watch programs that have a TV-G rating and
lower (in other words, you want the child to watch only TV-G, TV-Y7, and TV-Y
programs), then you need to block other programming with higher ratings.
To block programs with higher ratings:
1. First, determine the lowest level rating you do not want the child to watch.
2. Highlight the rating status button that corresponds with the lowest rating you do not
want the child to watch. (In the example above, you would point to the rating status
button corresponding to TV-PG, since the highest rating you want her to watch is
TV-G.)
3. Press OK to change the button from View to Block. The status for this and all higher
ratings automatically change to Block (and B).
RTN Help
1 Edit Channels
2 Select All Chans
3 Delete All Chans
4 Set TV Rating
5 Set Movie Rating
6 Unrated Shows
Set V-Chip TV Rating Limit
Status
Block
Block
Block
View
View
View
Rating Content
D
B
B
Rating
TV-MA
TV-14
TV-PG
TV-G
TV-Y7
TV-Y
L
S
V
FV
B
B
B
B
B
B
B
B
B
V
When you change the status of a
rating to Block, the system will
automatically block higher ratings
and all corresponding content
themes.
Hierarchy of
Age-Based Ratings
TV-MA Mature Audience
Only
TV-14 Parents Strongly
Cautioned
TV-PG Parental Guidance
Suggested
TV-G General Audience
TV-Y7 Directed to Children
7 Years and Older
TV-Y All Children
Changing the TV-PG rating status button from
View to Block causes the buttons for the
higher ratings and content to change to Block
and B.
4. Press the left arrow button on the remote control to return to the menu.
Viewing Age-Based Ratings
After you block age-based ratings, you have the option of going back and changing some
of the ratings to View.
1. Determine the rating you want to view that is currently blocked.
2. Use the arrows on the remote control to highlight the rating status button, such as
TV-14, whose status is Block.
3. Press OK to change the status to View. Your child would then be able to watch all
programs with a TV-14, TV-G, TV-Y7, and TV-Y rating.
Note that the content theme buttons corresponding to TV-14 change to View as well.
They and the age-based rating status buttons are the only buttons that automatically
change back to View when you complete this process.
64
Page 65

USING THE PROFILES
Blocking Specific Content Themes
You can block programs based on their content. (Content is represented by the D, L, S, V,
and FV on your screen. See “Setting the TV Rating” for details.) When you block a
content theme for a particular rating, you automatically block that content theme for
higher rated programs as well.
For example, if you do not want your child to watch programs that have adult language
(L) rated TV-PG or higher, you need to block adult language in all programming rated
TV-PG and above.
To block program content:
1. Determine the lowest level of content you do not want the child to watch.
2. Highlight the content button that corresponds with the lowest content you do not
want the child to watch. (In the example above, you would highlight the V button
located under the L and to the right of TV-PG.)
3. Press OK to change the button from V to B. All higher ratings’ language content
theme button will automatically change to B.
RTN Help
1 Edit Channels
2 Select All Chans
3 Delete All Chans
4 Set TV Rating
5 Set Movie Rating
6 Unrated Shows
Set V-Chip TV Rating Limit
Rating Content
Status
View
View
View
View
View
View
D
V
V
Rating
TV-MA
TV-14
TV-PG
TV-G
TV-Y7
TV-Y
L
S
V
FV
B
V
V
B
V
V
B
V
V
V
You must remember to lock the
system for rating limits to take effect.
Content Themes
DSexually Explicit Dialogue
LAdult Language
SSexual Situations
VViolence
FV Fantasy Violence
Selecting the content theme button
corresponding with adult language (L) and
TV-PG blocks all programs with adult
language (L) rated TV-PG and higher.
4. Press the left arrow to return to the menu or exit the screen.
Viewing Specific Content Themes
After you block specific content themes, you have the option of going back and changing
some of the content themes back to View (V):
1. Determine the content themes you want to change to View (V).
2. Use the arrows to highlight a particular content button, such as the B under language
(L) corresponding with TV-14.
3. Press OK to change its status back to V. Your child would then be able to watch
programs with TV-14 adult language content, but not programs with TV-PG or TVMA language content.
Note that only the content theme status button corresponding to TV-14 language (L)
changes to View (V). Higher rated content theme buttons, such as that for TV-MA
language, do not change.
You must remember to lock the
system for rating limits to take effect.
65
Page 66

USING THE PROFILES
SETTING THE MOVIE RATING
You set movie rating limits by blocking movies rated above a specified level. To access the
Set Movie Rating menu:
1. From the main menu, select Profiles.
2. Select the user for whom you would like to set limits.
3. Select TV Setup from the next menu.
4. Select Set Movie Rating.
RTN Help
1 Edit Channels
2 Select All Chans
3 Delete All Chans
4 Set TV Rating
5 Set Movie Rating
6 Unrated Shows
Selecting Set Movie Rating allows you to set a
limit for movies based on rating.
Set V-Chip TV Movie Rating Limit
Rating
NC-17
PG-13
Status
X
View
View
View
View
View
View
Not Rated
Movies
View
R
PG
G
Please note that the rating limits you
set while in the TV Setup menu
apply only to TV programs—they do
not apply to DIRECTV programs.
To set limits for DIRECTV
®
programming, select a profile, select
SAT Setup and then select Set
Rating Limit.
Blocking Movie Ratings
If you only want your child to watch movies that have a PG rating and lower (in other
words, movies rated PG and G), then you can automatically block out all other movies
with higher ratings.
To block movies:
1. Determine the lowest level rating you do not want the child to watch.
2. Highlight the rating status button corresponding to the lowest rating you do not want
the child to watch. (In the example above, you would highlight the rating status
button corresponding to PG-13, since the highest rating you want the child to watch
is PG.)
3. Press OK to change the button from View to Block. All higher ratings’ View buttons
will automatically change to Block.
RTN Help
1 Edit Channels
2 Select All Chans
3 Delete All Chans
4 Set TV Rating
5 Set Movie Rating
6 Unrated Shows
Set V-Chip TV Movie Rating Limit
Rating
NC-17
PG-13
PG
Status
X
Block
Block
Block
Block
View
View
Not Rated
Movies
View
R
G
You must remember to lock the
system for rating limits to take effect.
Change the button from View to Block and all
higher rated movies will also be blocked.
4. Press the left arrow to return to the menu or exit the screen.
66
Page 67

USING THE PROFILES
Viewing Movie Ratings
After you block movie ratings, you have the option of going back and changing some of
the rating status buttons back to View:
1. Determine the movie ratings you want to change to View ( V).
2. Use the arrows to highlight the status button you want to change.
3. Press OK to change its status back to View.
For example, if movies with a rating of PG-13 and higher are blocked, you can change the
rating status button corresponding with NC-17. Your child would then be able to watch
all movies with a G, PG, and NC-17 rating.
BLOCKING UNRATED TV SHOWS
Some movies may be given a “Not
Rated” rating. After blocking movie
ratings, you must separately set “Not
Rated Movies” to View to see these
movies.
Some TV programming is not rated and may contain material you do not want your
children to see. These shows must be blocked separately.
To block unrated shows:
1. Select the user you would like to set limits for through the Profiles menu.
2. Select TV Viewing.
3. Select Set TV Rating.
4. Now select Unrated Shows.
5. Highlight the radio button beside your choice of View Unrated Shows or Block
Unrated Shows and press OK to select it.
RTN Help
1 Edit Channels
2 Select All Chans
3 Delete All Chans
4 Set TV Rating
5 Set Movie Rating
6 Unrated Shows
Selecting Unrated Shows allows the user to
view or block all unrated programs.
Unrated Shows
Block Unrated Shows
View Unrated Shows
Note that “unrated” TV shows may
include news, sports, political,
religious, local and weather
programs, emergency bulletins,
public announcements, and
programs sent without ratings. It
could also include programs whose
ratings are either “None” or “N/A.”
67
Page 68

USING THE PROFILES
CHOOSING YOUR PROFILE
Each time you turn on the TV, the Family profile is selected by default. To select a
different profile:
1. Press the WHO button to scroll through the profiles in the channel banner.
Family
Press OK
to Select
The WHO button toggles through the profiles.
2. When your profile appears, enter your four-digit personal password to access your
profile. If the profile is not password protected, you can just press OK to activate it.
The channel, spending, ratings and viewing limits associated with the chosen profile will
be active only when the system is locked.
68
Page 69

USING THE PROFILES
LOCKING AND UNLOCKING A USER PROFILE
When you lock a profile, you prevent anyone who does not know the user password from
accessing the locked profile. This applies only when they press WHO on the remote
control. It does not prevent them from accessing and editing the profile via the main
menu if they first enter the system password.
When you lock a profile (excluding “Family”), you lock its channel limits, rating limits,
and spending limits. After locking the profile, you need to enter the system password to
edit these settings.
1. Choose the profile you want to lock or unlock from the Profiles menu, highlight
Lock User or Unlock User, and press OK.
RTN Help
1 Edit User Name
2 SAT Setup...
3 TV Setup...
4 Lock User
Lock User 1
. ...
Each user profile can be locked
and assigned a personal password.
When the profile is locked, the
password must be entered to use
that profile.
In order to lock this user, enter
the four-digit password to use
as this user's personal password.
Don’t Forget Your Password
If you forget a USER password and
the system is locked, you need to
unlock the system and then assign a
new user password. If the system is
not locked, select Profiles from the
main menu, choose Unlock User,
and enter a new password.
Locking the user profile protects the limits you
set up.
2. When locking a user, use the arrows or the digits on the remote control to enter a
four-digit user password.
Some other things to remember about locking and unlocking profiles are:
•For a lock to be effective, you must exit out of the menu system.
• When you attempt to access a profile’s channel that is blocked by one or more limits
and the system is locked, you will be asked to unlock the video by entering the
SYSTEM password.
•If you enter the system password to override a limit, the lock on the channel banner
will turn yellow, and all limits are temporarily unlocked until you turn off the
television. When you turn on the television again, the system will be locked, and the
Family profile channel list will be active. If you want to re-lock without turning off
the television, you can select the lock icon in the channel banner.
•If a profile is locked and you want to access its channels, press WHO on the remote
control and then enter the user password.
•If a profile is locked and you want to access its settings, you can access it through the
menu system by choosing Profiles, then choosing the profile name. Then enter the
system password.
69
Page 70

USING THE PROFILES
LOCKING THE SYSTEM
When you lock the system, all limits set up for all profiles are put into effect, regardless of
whether the profile is locked or unlocked. Unlocked profiles require no user password to
access their channel list if the system is locked.
When the system is locked, you can still access a profile and watch a channel in its
channel list (if the profile is locked, however, you must have the user password). Locking
the system activates all rating, spending, viewing, and channel limits for all profiles. When
you lock the system, no one can modify any of these settings without first entering the
four-digit system password.
1. Select Profiles from the main menu. Then select Lock System and press OK. Or, press
INFO on the remote control and select the green unlock icon from the channel
banner.
RTN Help
1 Lock System
You can lock the system via the channel banner by
entering a password.
2. Use the arrows or the digits to enter a four-digit system password.
3. Enter the password a second time to confirm it.
For the changes to be effective, you must exit out of the menu system.
Unlocking the System
When the system is unlocked, the channel, spending, viewing, and ratings limits that you
set are no longer in effect. To unlock:
1. Highlight Unlock System in the Profiles menu and press OK.
Lock System
.
***
Locking the system puts into effect
all of the lists and limits that you
have set up.
In order to lock the system, enter
the four-digit password you would
like to use as the system password.
The Lock/Unlock icons in the
channel banner are an easy way to
lock or unlock the system. Press
INFO and select the icon to change
the lock status.
• Green Unlock icon The system is
unlocked. Spending, viewing and
other limits can be accessed and
changed.
•Yellow Unlock icon A password
has been entered to override
family or profile limits. No limits
can be accessed or changed
without a password.
• Red Lock icon Limits cannot be
accessed or changed without the
password and all limits are in
effect.
If you subscribe to DIRECTV
programming and forget the
SYSTEM password, contact your
satellite program provider’s
authorization center.
If you forget the system password
and do not have DIRECTV, remove
the access card from the TV’s back
panel (store it in a safe place, or
reinsert it upside down to store it in
the TV). Press and hold the INFO
button on the front panel;
simultaneously press and hold the
WHO button on the remote control.
Continue to hold for three seconds.
All passwords will be cleared.
®
2. Highlight Yes and press OK to confirm that you want to unlock the system.
When you attempt to access a channel that is blocked by one or more limits and the
system is locked, you will be asked to temporarily unlock the system by entering the fourdigit system password.
If you enter the system password to override a limit, all limits are unlocked until you turn
off the TV. When you turn on the TV again, the system will be locked, and the Family
profile channel list will be selected. If you want to re-lock the system without turning off
the TV, you can select the lock icon in the channel banner.
70
Page 71

SYSTEM OPTIONS AND PREFERENCES
This chapter describes the other
options available to you such as:
• selecting a signal source and type
• searching for all available channels
• checking your mailbox
• purchasing programs
• setting up system preferences
• using the FETCH button on the
remote control
SETUP AND
1
CONNECTIONS
➛➛
USING THE REMOTE
2
BASIC TV OPERATION
3
➛
USING THE PROGRAM
4
GUIDES
➛➛➛ ➛➛
ADJUSTING TV
5
CONTROLS
USING THE PROFILES
6
SYSTEM OPTIONS AND
7
PREFERENCES
GETTING ASSISTANCE
8
REFERENCE
9
71
Page 72

SYSTEM OPTIONS AND PREFERENCES
CHANGING THE SIGNAL SOURCE
The Signal Source menu allows you to choose the source from which you would like the
signal to come: Antenna A, Antenna B, or DIRECTV (SAT) or Video Inputs. The same
can be accomplished using the ANTENNA, TV/SAT, and TV/VIDEO buttons on your
remote control. If you misplace your remote control, use the front panel buttons to access
this menu and change the signal source.
To access the Signal Source menu:
1. Press MENU on the remote control to access the main menu.
2. Select System Options from the main menu.
3. Select Signal Source from the next menu.
RTN Help
1 Signal Source
2 Signal Type
3 Channel Search
4 Mailbox...
5 Purchases...
6 Time and Date
Signal Source
Antenna A
Antenna B
SAT
Video inputs
Select the appropriate signal source.
4. Use the arrows and OK to select which source from which you would like to receive a
signal.
CHANGING THE SIGNAL TYPE
The Signal Type menu lets you choose whether you are receiving a signal from cable TV
or an off-air antenna. When you run Channel Search (see “Channel Search” in this section
for details), the TV automatically detects your signal and you don’t have to specify it here.
However, if you decide to change the source, you will need to use the Signal Type menu.
Note that if your signal source is coming from DIRECTV, this menu will not be available.
The Video Inputs selection is only for
“Video 1” source.
To select other signal sources, use
the TV/VIDEO button on the remote
control.
72
RTN Help
1 Signal Source
2 Signal Type
3 Channel Search
4 Mailbox...
5 Purchases...
6 Time and Date
Signal Type
Cable
Air
Select whether you are receiving signals from
an off-air antenna or cable.
Page 73

SYSTEM OPTIONS AND PREFERENCES
CHANNEL SEARCH
Engaging in a channel search tells the TV to search automatically for all the TV channels
available through the Antenna A and B inputs. When the TV finds an active channel, it
places it in the channel list. Inactive channels (weak stations or channels with no signal at
all) will not be placed into the channel list.
• Full Search searching through all the TV channels (off-air and Cable) for both
antenna inputs (ANTENNA A and B).
• Quick Search searching through the off-air or Cable channels of the current
ANTENNA (A or B).
RTN Help
1 Signal Source
2 Signal Type
3 Channel Search
4 Mailbox...
5 Purchases...
6 Time and Date
Running channel search collects all available
channels in a channel list.
Channel Search
Use Full Search the first time that
your system is setup. A Channel
Search will be performed for both
Antenna A and B and they will
automatically be set to Cable or Air.
Thereafter, use Quick Search. It
only searches the current antenna.
Quick Search is useful for adjusting
an over-the-air antenna to receive
the most channels for your area.
Full Search Quick Search
You can edit the channel list and
remove unwanted channels by using
the Profiles menu.
Please note that because channel
search will search for both digital
and analog TV channels on all
antenna inputs, the process may
take a few minutes.
MAILBOX
If you have ordered DIRECTV® programming, the mailbox shows you messages that are
sent—or “mailed”—from your program providers. For example, you may receive a
message calling your attention to a new service or special program offering. If you have
new or unread mail, the mail icon in the channel banner is highlighted.
Checking Your Mail
1. Select Mailbox from the System Options menu or the mail icon from the channel
banner to view your mail.
2. Highlight a message and press OK. The message opens for you to read.
2. Press OK again to close the letter.
3. If you want to erase a message, highlight Erase Message and press OK. When you exit
the display screen, messages not erased are saved in memory.
RTN Help
RTN Help
1 Read Message
2 Erase Message
3 Channel Search
4 Mailbox...
5 Purchases...
6 Time and Date
Mailbox
Call for you free month of ...
Call the service center if you ...
Watch channel 999 for ...
NFL Football season is ...
Wreslemania MCVII is here ...
Mail provides the latest information from
program providers.
73
Page 74

SYSTEM OPTIONS AND PREFERENCES
PURCHASES: PAY PER VIEW PROGRAMS
Pay per view programs (PPV) are DIRECTV® programming that you purchase—like a
movie ticket—on an event-by-event basis if you subscribe to DIRECTV® programming.
Pay per view programs are labeled “PPV” in the DIRECTV® programming guide. A
channel labeled PPV could run nothing but previews for movies. After previewing the
movie, you can purchase it or find out more details about it.
Purchasing and Previewing
There are several ways to purchase and preview DIRECTV pay per view movies and
events if you subscribe to DIRECTV® programming:
•Tune to a pay per view program’s channel. Program providers may offer on-screen
purchase instructions, usually as the pay per view program begins.
•Highlight a pay per view program from the program guide and press INFO.
•Preview a coming attraction by selecting a channel from the Attractions Guide.
Tuning to a Pay Per View Program
When you use the channel up and down buttons or digits on the remote control to tune
to a pay per view channel, you need to press the INFO button to bring up the Program
Details screen in order to purchase a program.
RTN Help
Buy Program
Buy and Record
Other Times
Hugh Grant, Andie McDowell. A confirmed bachelor
meets the woman of his dreams at a friend's wedding
and, for the first time contemplates the idea of marriage.
This is five lines of text, with a total of 255 characters
as required for the system.(255...)
Four Weddings and a Funeral
Topics: Movies
Theme: Comedy
Rating: PG-13
Stara: 10:00 pm
Length: 1hr 22min
DTV
Cost: $2.99
Ch 107
01/01/00
Use the program guide to get to the Program
Details screen.
You may need to enter your fourdigit system password to order a
PPV program if it costs more than
the spending limit you set up in the
Profiles menu.
74
Page 75

SYSTEM OPTIONS AND PREFERENCES
Using the Program Guide for Pay Per View Programs
Another way to get to the Program Details screen is by using the DIRECTV
programming guide (if you subscribe to DIRECTV® programming). Press TV/SAT on
the remote control, then press GUIDE. Highlight a program name in the DIRECTV
programming guide and press INFO.
®
®
RTN Help
Buy Program
Buy and Record
Other Times
Hugh Grant, Andie McDowell. A confirmed bachelor
meets the woman of his dreams at a friend's wedding
and, for the first time contemplates the idea of marriage.
This is five lines of text, with a total of 255 characters
as required for the system.(255...)
Four Weddings and a Funeral
Topics: Movies
Theme: Comedy
Rating: PG-13
Stara: 10:00 pm
Length: 1hr 22min
DTV
Cost: $2.99
Ch 107
01/01/00
The Program Details screen gives you several
options.
You can select:
•View Channel to tune to that channel
• Channel Guide to see a program lineup for that channel
•Buy Program to purchase the program
•Other Times to see what other times the program is available
The options available to you may vary according to the type of program you select.
You need to connect your phone line
to your television to be able to order
PPV programs using the on-screen
menus.
75
Page 76

SYSTEM OPTIONS AND PREFERENCES
Using the Attractions Guide
Your program providers may offer future programming events not currently listed in your
DIRECTV® programming guide. These events are called “coming attractions” and can be
previewed in the Attractions Guide. To access the Attractions Guide:
1. Press the TV/SAT button on the remote control. Then press GUIDE.
2. Use the down arrow icon to move the highlight to the bottom of the screen.
3. Select the Other Guides icon.
4. Select Attractions.
5. Select a channel.
The Other Guides icon
RTN Help
DTV Movies
DTV Events
DTV Previews
USSB
Coming Attractions
DirecTICKET
Movies
Channel 100
The Attractions Guide is accessed through the
Other Guides menu.
76
Page 77

SYSTEM OPTIONS AND PREFERENCES
Using the Purchases Menu
The Purchases menu allows you to review upcoming and past DIRECTV pay per view
purchases.
RTN Help
1 Future Purchases
2 Past Purchases
3 Spending Limit...
Future Purchases
TEll Mom the Babystitter's Dead
HBOW 12/24/00 12:00am
Ten Little lndians
HBOW 12/24/00 12:00am
Ten Seconds Over Tokyo
HBOW 12/24/00 12:00am
Terminator
HBOW 12/24/00 12:00am
Term of Endearment
HBOW 12/24/00 12:00am
The Purchases menu shows you upcoming or
past DIRECTV purchases, and spending limits.
The list of purchases may be longer than one screen; use the down arrow buttons on the
remote control to see more items. The display also shows the title, channel, date, time,
and cost of each program.
•Note that the past purchases list might not be updated until the end of the billing
cycle, and therefore may show purchases for which you have already paid.
Reviewing and Canceling an Upcoming Purchase
Highlight an upcoming purchase from the DIRECTV Future Purchases screen. You can
review the program description, as well as cancel an upcoming purchase.
RTN Help
1 Future Purchases
2 Past Purchases
3 Spending Limit...
Do you want to cancel this purchase?
Future Purchases
Armaggedon
150 5/22 12:30PM $2.99
NoYes
The Future Purchases screen lets you cancel
an upcoming purchase.
77
Page 78

SYSTEM OPTIONS AND PREFERENCES
SETTING THE TIME AND DATE
You can set the current time and day, the current date, the time zone, and whether or not
you observe daylight saving time.
RTN Help
1 Signal Source
2 Signal Type
3 Channel Search
4 Mailbox...
5 Purchases...
6 Time and Date
Time and Date
+
9:18 pm Thursday
–
January the 1st 1970
My current time zone is
Eastern
Do you observe daylight saving time?
Yes
No
Save Changes
+–+
Use Defaults
–
Indicate the settings for your area.
Use the arrow buttons to move around the menu screen, OK to select an item and the
digit buttons on your remote control to enter numbers. If you have already acquired a
digital signal, the time was automatically set and you cannot reset it.
USING THE PREFERENCES MENU
The Preferences menu allows you to change some aspects of your TV to fit your personal
preference. The following sections outline what you can do in this menu.
Color Scheme
You can change the color that appears in the menu and guides. To change the color, select
Preferences from the main menu and select Color Scheme.
78
RTN Help
1 Color Scheme
2 Default Guide
3 Caption Display
4 Caption Mode
Color Scheme
Fern Green
Ancient Blue
Raspberry
Maroon
Use the up and down arrows and OK button
to select the menu color scheme you prefer.
Page 79

SYSTEM OPTIONS AND PREFERENCES
Default Guide
By default, the Detail Guide appears when you press GUIDE on the remote control, no
matter if you access the DIRECTV® programming guide or the TV guide. You can
change the default guide from the Detail Guide to the Grid Guide or SurfGuide
(DIRECTV only).
1. Select Preferences from the Main menu, then select Default Guide.
2. Use the arrows and OK to choose which guide you want to appear first when you
press the GUIDE button on the remote control.
Caption Display
The Caption Display menu displays a choice list that lets you choose when closed
captioning information is shown on the screen.
For more information about the
three types of guides, see the
section, “Using the Program Guides.”
RTN Help
1 Color Scheme
2 Default Guide
3 Caption Display
4 Caption Mode
Caption Display
Off
On
On When Muted
On Captioning information is shown always, when available.
On When Muted Captioning information is only shown when the TV’s sound is
muted, when available. (To mute the sound, press the MUTE button on the remote
control.)
Off No captioning information is displayed.
When the captioning is turned on
while the POP is on the screen, the
POP will disappear.
79
Page 80

SYSTEM OPTIONS AND PREFERENCES
Caption Mode
You can also select a closed caption mode, which is the mode, or source, used for
displaying captioning information. The content of CC and Text are different; you can
select which one you want to see on the screen.
• CC displays information at any position on the screen. It overlays the text on top of
the picture as it is received.
•Text displays information at one particular position (such as the bottom third) of the
screen. You cannot see the picture underneath the text.
You can choose between eight closed caption modes, or sources:
• CC1 and Text 1 are the primary caption and text services. The captioning or text is
displayed in the same language as the program’s dialog.
• CC3 and Text 3 serve as the preferred data channels. The captioning or text is often
a secondary language translation, simplified English, or displayed at a slower rate.
• CC2 and CC4 and Text 2 and Text 4 are rarely available and broadcasters use them
only in special conditions, such as when CC1 and CC3 are not available, or Text1
and Text3 are not available.
USING FETCH
The Fetch menu is a list of eight most-used menu items. It serves as a shortcut to access
these menu items. To view the Fetch menu, press FETCH on the remote control.
RTN Help
1 Picture Settings...
2 Picture Pref
3 Audio Processor
4 Tone Settings...
5 Convergence
6 Caption Display
7 Signal Meter
8 Antenna info
Using FETCH is a convenient way to call up
frequently used menu items.
80
Page 81

GETTING ASSISTANCE
If you run across any problems or need
to rely on the system to give you
feedback, you should use the Assistance
menu to get information. This section
explains the different types of assistance
your system is capable of giving you. It
walks you through the Assistance
menu, which is accessed by pressing
MENU then selecting Assistance.
This section:
• tells you about the interactive setup
process
• helps you get antenna and signal
meter information
• explains the on-screen signal meter
• tells you how to validate a new access
card
• describes how to use the system test
Most of the screens contain
information to help you decide what to
do next. If you get stuck, look for the
help text at the bottom of the screen.
SETUP AND
1
CONNECTIONS
➛➛
USING THE REMOTE
2
BASIC TV OPERATION
3
➛
USING THE PROGRAM
4
GUIDES
➛➛➛ ➛➛
ADJUSTING TV
5
CONTROLS
USING THE PROFILES
6
SYSTEM OPTIONS AND
7
PREFERENCES
GETTING ASSISTANCE
8
REFERENCE
9
81
Page 82

GETTING ASSISTANCE
RUNNING THE INTERACTIVE SETUP
You should have completed the interactive setup the first time you plugged in your TV.
However, if you need to access the interactive setup again, you can access it through the
Assistance menu.
1. Press MENU on the remote control to access the main menu.
2. Select Assistance from the main menu.
3. Select Interactive Setup and follow the on-screen directions.
RTN Help
1 Interactive Setup
2 Antenna info
3 Dish Pointing...
4 New Access Card
5 System Test
6 Off-Air Guides
7 Upgrades...
The interactive setup process allows you to
complete all steps or selectively skip steps.
The steps involved in the interactive setup include:
•Setting the time and date • Specifying your satellite dish antenna type
•Searching for channels • Entering Zip Code
•Setting up speakers • Running the Signal Meter
•Selecting an audio processor • Running the system test
Note that if you do not subscribe to DIRECTV® programming, you can select “Skip this
step” for running the system test.
GETTING ANTENNA INFORMATION
The Antenna Info menu helps you measure the strength of all available TV channels. It
will help you adjust any off-air TV antennas. (The actual adding of channels is done by
using the Channel Search menu.)
To access the Antenna Info menu:
1. Press MENU to bring up the main menu.
2. Select Assistance.
3. Then select Antenna Info.
If you decide to subscribe to
DIRECTV, we strongly recommend
that you have the satellite system
professionally installed.
Installation can be arranged through
the dealer where the TV was
purchased.
A dialog box reports the status of the signal search and lists channels that are being
received or have been received from all off-air antennas. To switch between antennas,
highlight a channel and then press ANTENNA on the remote control.
82
Page 83

GETTING ASSISTANCE
When getting antenna information, the screen lists:
• the channel number,
• the station name, if available,
• whether the channel is digital or analog,
• which antenna is receiving the signal, and
• if a digital channel, the current signal strength.
RTN Help
1 Interactive Setup
2 Antenna info
3 Dish Pointing...
4 New Access Card
5 System Test
6 Off-Air Guides
7 Upgrades...
The channel list consists of all channels being
received or that have been received from
terrestrial antennas.
Antenna Info
Ch 2 Ant B Strength:N/A
Analog
Ch 4 Ant B Strength:N/A
Analog
Ch 6 Ant B Strength:N/A
Analog
Ch 13 Ant B Strength:N/A
Analog
THE SELECT DISH MENU SCREEN
Note that if you highlight a channel
in the Antenna Info menu, you tune
to the channel and, if digital, get a
real-time update of the signal
strength.
To specify the type of dish you are using:
1. Press MENU on the remote to bring up the main menu.
2. Select Assistance, then Dish Pointing, then Select Dish.
3. Specify the type of dish you are using.
RTN Help
1 Select Dish
2 Enter Zip Code
3 Enter Lat/Long
4 Signal Meter
Select Satellite Dish Antenna
Oval Satellite Dish
Round Satellite Dish
Next
83
Page 84

GETTING ASSISTANCE
Using the On-Screen Signal Meter
The signal strength meter is used to determine whether you are receiving the DIRECTV
signal; it also indicates the strength of the DIRECTV signal once the signal is acquired.
Follow these steps to bring up the on-screen signal meter:
1. Press MENU on the remote to bring up the main menu.
2. Select Assistance then Dish Pointing.
3. Enter ZIP Code.
4. Enter Lat/Long.
5. Select Signal Meter.
RTN Help
1 Select Dish
2 Enter ZIP Code
3 Enter Lat/Long
4 Signal Meter
If the dish is pointed correctly, the signal meter will show you the
current signal strength (and you should hear a continuous tone).
Signal Meter
101W Satellites
Transponder 2
Current Strength: Peak:0
No signal. See user's manual.
110W/119W
Transponder 23
Current Strength: Peak:
No measurement yet taken.
Alternate for fine tuning
+
–
+
–
Peak Signal
The “Peak Signal” indicates the
highest signal strength you have
obtained, which is not necessarily
the highest possible signal.
While the maximum signal strength
is 100, the signal strength you
achieve will probably be less.
Although there is no difference in
picture quality between signal
strengths of 60 and 85, the higher
the signal, the less likely you are to
experience negative effects in
degraded conditions such as rain or
snow (called “rain fade”).
4. Use the arrows and OK button on the remote control to toggle between the satellites.
Tr y to achieve the peak signal for each.
YOUR NEW ACCESS CARD
Periodically, your program provider may issue you a replacement access card if you
subscribe to DIRECTV® programming. The New Access Card Setup screen allows you to
transfer the information from the old card onto the new one. The access card fits into the
TV through the back panel.
To replace the card:
1. Select Assistance from the main menu.
2. Select New Access Card.
3. Follow the on-screen directions to validate the new card.
See the section “Setup and
Connections” for details about
where to insert your access card.
84
Page 85

GETTING ASSISTANCE
RUNNING THE SYSTEM TEST
The System Test display screen is accessed through the Assistance menu and allows you
to initiate diagnostic procedures on the DIRECTV System, if you subscribe to
DIRECTV. You should use this feature to get your access card number or when your
television doesn’t seem to be receiving satellite signals correctly.
A message screen appears when you select System Test from the Assistance menu. This
message tells you whether the system passed each test. If your system fails the test, run
the system test several times before concluding that there is a problem. Occasional
fluctuations in the phone line or satellite signal can give temporary false readings. Note
that if you do not subscribe to DIRECTV
dish antenna installed, the test will fail.
ACQUIRING OFF-AIR GUIDES
If you have trouble tuning to known off-air TV channels, try to select “Do Not Acquire
Off-Air Guides” mode.
®
programming or do not have your satellite
UPGRADES
Your digital satellite receiver is able to receive upgrades or modifications to some of its
features and functions. These modifications will occur automatically (usually at times
when most viewers are not watching programming). When an upgrade or modification
is sent, you may experience a disruption in reception for a few minutes. Your reception
should return to normal after the modification is complete. Your receiver must be
plugged in to receive upgrades. Do not unplug your receiver while an upgrade is in
progress. Please consult the Upgrade menu to find a schedule of upgrades or
modifications planned by DIRECTV.
85
Page 86

86
Page 87

REFERENCE
This section contains troubleshooting information,
your Toshiba limited warranty, and accessory
ordering information.
SETUP AND
1
CONNECTIONS
➛➛
USING THE REMOTE
2
BASIC TV OPERATION
3
➛
USING THE PROGRAM
4
GUIDES
➛➛➛ ➛➛
ADJUSTING TV
5
CONTROLS
USING THE PROFILES
6
SYSTEM OPTIONS AND
7
PREFERENCES
GETTING ASSISTANCE
8
REFERENCE
9
87
Page 88

REFERENCE
TROUBLESHOOTING
Can’t select certain channel
• Channel may be blocked or not approved in the Profiles menu.
•If using a VCR, check to make sure the TV/VCR button on the VCR is in the correct “mode.”
• The searching for available channels portion of the interactive setup (page 19, step 3) was not completed.
Noisy stereo reception
•May be a weak station. Change to mono mode instead of stereo in the Audio menu under Audio Precessor.
No picture, no sound but TV is on
•Maybe a vacant channel is tuned.
•If watching VCR (connected only through antenna input), make sure TV is tuned to channel 3 or 4 – same as CH3/4
switch on VCR. Also check to make sure the TV/VCR button on the VCR is in the correct “mode.”
Sound okay, picture poor
• Check antenna connections and antenna direction and also check for interfering sources.
•Try adjusting the picture quality, especially sharpness, to improve weak signals.
Black box appears on the screen
• Captioning may be turned on. Check the Caption Display in the Preferences menu.
Wrong picture
The TV and most VCRs let you toggle between pictures: one can be the picture from DIRECTV signal or an off-air antenna
(or cable) and one can be from the VCR. If you don’t see the picture you think you should be seeing, try using these buttons to
toggle between the pictures:
•Press the TV/VCR button on the VCR remote or on the VCR’s front panel.
•Press the ANTENNA button on the remote control.
Taking either of these actions lets you switch the source of the video signal from DIRECTV to the off-air antenna or cable,
and vice versa.
Problems with the remote control
•Maybe something is between the remote control and the remote sensor on the front of the TV.
•Maybe the remote control is not in the correct mode. Push the component switch on the remote to the appropriate
position (TV/DVD/VCR/CABLE).
•Maybe the batteries in the remote control are weak, dead or installed incorrectly. Try replacing batteries. (Note, if you
remove the batteries, you may have to reprogram the remote to control other components.)
•Some functions do not operate when menu is displayed. Wait for menu to time out.
Temporary loss of reception
Software Upgrades – Your digital satellite receiver is able to receive upgrades or modifications to some of its features and
functions. These modifications will occur automatically (usually at times when most viewers are not watching programming).
When an upgrade or modification is sent, you may experience a disruption in reception for a few minutes. Your reception
should return to normal after the modification is complete. Your receiver must be plugged in to receive upgrades. Do not
unplug your receiver while an upgrade is in progress. Please consult the Upgrade menu to find a schedule of upgrades or
modifications planned by DIRECTV.
88
Page 89

REFERENCE
Blank screen
•Maybe the component (VCR, DVD, etc.) connected to the input jacks is not turned on.
•Try another channel, because there may just not be any programming on at that time.
• Cables in back may be disconnected.
TV will not turn on
• Check to make sure it is plugged in, and try the front panel POWER button.
• Check the wall receptacle (and extension cord, if applicable) to make sure it is “live” by plugging in something else.
•Maybe batteries in remote control are “dead.” To test, see if the LED lights up when you press a button.
•Maybe remote control is not aimed at remote sensor.
TV turns off while playing
•Electronic protection circuit may have been activated because of a power surge. Wait 30 seconds and then turn on again. If
this happens frequently, the voltage in your house may be abnormally high or low.
Problems with your system password
•If you forget your system password and subscribe to DIRECTV® programming, you should call DIRECTV to obtain a
new one.
Audio recording problems
• When changes are made to the Audio profile settings, the AUDIO output is temporarily muted. Do not change Audio
profile settings while recording.
System Lock-up
•If the system locks up, press the RESET button on the front panel of the TV.
CARE AND CLEANING
CAUTION: Turn OFF your TV before cleaning.
You can clean the TV as required, using a soft lint-free cloth. Be sure to occasionally dust the ventilation slots in the cabinet to
help assure adequate ventilation.
The TV’s screen may be cleaned with a soft, lint-free cloth as well. Take care not to scratch or mar the
screen. If necessary, you may use a cloth dampened with warm water.
Never use strong cleaning agents, such as ammonia-based cleaners, or abrasive powder. These types of
cleaners will damage the TV.
While cleaning do not spray liquid directly on the screen, or allow liquid to run down the screen and inside the TV. Also, avoid
placing drinks, vases, or potted plants with water on top of the TV. This could increase the risk of fire or shock hazard or
damage to the TV.
89
Page 90

REFERENCE
SPECIFICATION
Television System NTSC standard
Channel Coverage VHF: 2 through 13
Power Source 120 V AC, 60 Hz
Power Consumption 270 W (average)
Audio Power 14 W + 14 W
Speaker Type Two 6-1/4 inches (16 cm) round
Video/Audio Terminals S-VIDEO IN (VIDEO 1/VIDEO 2/VIDEO 3)
Dimensions Width : 60 inches (1,522 mm)
Mass 438 lbs. (198.7 kg)
Supplied Accessories Remote Control with 2 size “AA” alkaline batteries
Design and specifications are subject to change without notice.
ATSC standard
DSS standard
UHF: 14 through 69
Mid band (A-8 through A-1, A through I)
Super band (J through W)
Hyper band (AA through ZZ, AAA, BBB)
Ultra band (65 through 94, 100 through 125)
Digital channel: 1 - 999
Y: 1 V(p-p), 75 ohm, negative sync.
C: 0.286 V(p-p) (burst signal), 75 ohm
VIDEO 1/VIDEO 2/VIDEO 3 IN
VIDEO: 1 V(p-p), 75 ohm, negative sync.
AUDIO: 150 mV(rms) (30% modulation equivalent, 47 kohm)
ColorStream™ (component video) IN
Y: 1V(p-p), 75 ohm
P
R: 0.7 V(p-p), 75 ohm
P
B: 0.7 V(p-p), 75 ohm
AUDIO: 150 mV(rms), 47 kohm
AUDIO CENTER CHANNEL IN
300 mV(rms) (30% modulation equivalent, 10k ohm)
VIDEO/AUDIO OUT
VIDEO: 1 V(p-p), 75 ohm, negative sync.
AUDIO: 150 mV(rms) (30% modulation equivalent, 4.7k ohm)
VARIABLE AUDIO OUT
0–300 mV(rms) (30% modulation equivalent, 4.7k ohm)
DIGITAL AUDIO OUT
Optional type
Height : 60-1/2 inches (1,540 mm)
Depth : 29 inches (736 mm)
Template for the learning buttons on the Remote Control
90
Page 91

REFERENCE
LIMITED UNITED STATES WARRANTY
Toshiba America Consumer Products, Inc. (“TACP”) and Toshiba Hawaii Inc. (“THI”) make the following limited warranties. These limited warranties extend to
the original consumer purchaser or any person receiving this set as a gift from the original consumer purchaser and to no other purchaser or transferee.
Limited One (1) Year Warranty
TACP and THI warrant this product and its parts against defects in
materials or workmanship for a period of one (1) year after the date of
original retail purchase. During this period, TACP and THI will repair or
replace a defective part, at their option, with a new or refurbished part,
without charge to you. TACP/THI Authorized Service Station personnel will
come to your home when warranty service is required. Depending on the
type of repair required, the service will either be performed in your home or
the set will be taken to the TACP/THI authorized service station for repair
and returned to your home at no cost to you.
Limited Two (2) Year Warranty of Picture Tube
TACP and THI further warrant the picture tube in this product against
defects in materials or workmanship for a period of two (2) years after the
date of original retail purchase. During this period, TACP and THI will
repair or replace a defective picture tube at their option, with a new or
refurbished picture tube, without charge to you, except that if a defective
picture tube is replaced after one (1) year from the date of the original retail
purchase, you pay labor charges involved in the replacement.
Rental Units
The warranty for rental units begins with the first rental or thirty (30) days
from the date of shipment to the rental firm, whichever comes first.
Commercial Units
Products sold and used for commercial use have a limited ninety (90) day
warranty for all parts, labor and picture tube.
How to Obtain Warranty Service
Owner’s Manual and Demographic Card
You should read this owner’s manual thoroughly before operating this
product. You should complete and mail the enclosed Demographic card
within ten days after you., or the person who has given you this product as a
gift, purchased this product. This is one way to enable TACP/THI to
provide you with better customer service and improved products. Failure to
return the Demographic card will not affect your rights under this warranty.
Your Responsibility
The above warranties are subject to the following conditions;
(1) You must retain your bill of sale or provide other proof of purchase.
(2) All warranty servicing of this product must be made by an
Authorized TACP/THI Service Station.
(3) These warranties are effective only if the product is purchased and
operated in the U.S.A. or Puerto Rico.
(4) Labor service charges for set installation, set up, adjustment of
customer controls and installation or repair of antenna systems are not
covered by this warranty. Reception problems caused by inadequate
antenna systems are your responsibility.
(5) Warranties extend only to defects in materials or workmanship as
limited above and do not extend to any product or parts which have
been lost or discarded by you or to damage to products or parts caused
by misuse, accident, damage caused by Acts of God, such as lightning
or fluctuations in electric power, improper installation, improper
maintenance or use in violation of instructions furnished by us; or to
units which have been modified or had the serial number removed,
altered, defaced or rendered illegible.
If after following all of the operating instructions in this manual and checking the section “BEFORE CALLING SERVICE PERSONNEL,” you find that
service is needed;.
(1) Call the TACP toll free number 1-800-631-3811 after you find a defective product or part
to find the nearest TOSHIBA Authorized Service Station.
(2) Please present your bill of sale or other proof to the Authorized Service Station. “Authorized
TACP/THI service station personnel will come to your home when warranty service is
required. Depending on the type of repair required, the service will either be performed in
your home or the set will be taken to the TACP/THI Authorized service station for repair
and returned to your home at no cost to you.”
All warranties implied by state law, including the implied warranties of merchantability and fitness for a particular purpose, are expressly limited to the
duration of the limited warranties set forth above. With the exception of any warranties implied by state law as hereby limited, the foregoing warranty is
exclusive and in lieu of all other warranties, guarantees, agreements and similar obligations of manufacturer or seller with respect to the repair or replacement
of any parts. In no event shall TACP or THI be liable for consequential or incidental damages.
No person, agent, distributor, dealer or company is authorized to change, modify or extend the terms of these warranties in any manner whatsoever. The time
within which action must be commenced to enforce any obligation of TACP or THI arising under this warranty or under any state, or law of the United
States or any state thereof, is hereby limited to 90 days from the date you discover or should have discovered, the defect. This limitation does not apply to
implied warranties arising under state law.
This warranty gives you specific legal rights and you may also have other rights which may vary from state to state. Some states do not allow limitation on
how long an implied warranty lasts, when an action may be brought, or the exclusion or limitation of incidental or consequential damages, so the above
provisions may not apply to you.
In the Continental United States call:
Toll Free
1-800-631-3811
In Hawaii contact:
Toshiba Hawaii, Inc. 327 Kamakee Street, Honolulu,
Hawaii 96814 (808) 591-8377
REV. 09-01
91
Page 92

REFERENCE
FCC REGISTRATION INFORMATION
Your HDTV is registered with the Federal Communications Commission and is in
compliance with parts 15B and 68, FCC Rules and Regulations.
1. Notification to the Local Telephone Company.
On the back of this equipment is a label indicating among other information, the FCC
Registration number and Ringer Equivalence Number (REN) for the equipment. You
must, upon request, provide this information to your telephone company.
The REN is useful to determine the number of devices you may connect to your
telephone line and still have all these devices ring when your telephone number is called.
In most (but not all) areas, the sum of the RENs of all devices connected to one line
should not exceed 5. To be certain of the number of devices you may connect to your line
as determined by the REN, you should contact your local telephone company.
Note: This equipment may not be used on coin service provided by the telephone
company. Party lines are subject to state tariffs, and therefore you may not be able to use
your own telephone equipment if you are on a party line. Check with your local telephone
company. Notice must be given to the telephone company upon permanent disconnection
of your equipment from your line.
2. Rights of the Telephone Company.
Should your equipment cause trouble on your line which may harm the telephone
network, the telephone company shall, where practicable, notify you that temporary
discontinuance of service may be required. Where prior notice is not practicable and the
circumstances warrant such action, the telephone company may temporarily discontinue
service immediately. In case of such temporary discontinuance, the telephone company
must: (1) promptly notify you of such temporary discontinuance, (2) afford you the
opportunity to correct the situation, and (3) inform you of your right to bring a
complaint to the Commission pursuant to procedures set forth in Subpart E of Part 68,
FCC Rules and Regulations.
The telephone company may make changes in its communications facilities, equipment or
operations of procedures where such action is required in the operation of its business and
not inconsistent with FCC Rules and Regulations. If these changes are expected to affect
the use or performance of your telephone equipment, the telephone company must give
you adequate notice, in writing, to allow you to maintain uninterrupted service.
92
Page 93

REFERENCE
INDEX
A
Access card 14, 84
Number 19
Age-based ratings 62
Blocking 64
Viewing 64
Alphasort icon 50
All icon 49
Amplifier
Connecting 18
Anatomy of the TV program guide 43
Antenna
A 72, 73
ANTENNA IN jacks 14
B 72, 73
Button 22
Information 82
Receiving signals 83
Arrows on remote 22
Assistance menu 81
Attractions guide 76
Audio
AUDIO jacks 12, 15
Audio/Video jacks, cable 11
Center Channel In jack 15
ON/OFF switch 15
Output 55
Processor 55
Quality controls 54
Audio Language 33
Available channels 73
B
Back of the TV 14
Batteries 19, 88
Blocking
Age-based ratings 62
Content themes 63
Brightness 52
Buy programs 75
C
Cable TV 14
Connecting 16, 17
Code table 27
Mode 22
Jacks 11
Camcorder 13
Canceling purchases 77
Caption
Display 79
Mode 80
Care and cleaning 87
Changing
Channels 34, 35
From the TV guide to the
DIRECTV® programming guide 42
Channel
Banner
Icons 32
Groups 47
Lists 47
Delete channels 59, 61
Number buttons 22
Retrieving channel number 83
Search 73, 82
Strength 82
Up and down 12, 22
Closed captioning 79, 88
Color 52
Scheme 78
Colors
Of Icons 33
Of icons 70
Coming attractions 74
Component switch (TV/DVD/VCR/
CABLE) 22, 24, 25
Connections
To the back panel 10
To the front panel 13
Content themes 62
Blocking 65
Viewing 65
Contrast 52
Convergence adjustment 53
D
Date and time 78
Default guide 46, 79
Detail guide 46
DIGITAL AUDIO OUT jack 14
DIRECTV
Channel list 58
Rating limit 60
Signal 84
Spending limit 59
Dish pointing 83, 84
DVD
Connecting 17
Code table 26
Control buttons 23
Mode 22
E
Editing
Channels 58
Profiles 58
EXIT button 22
Exiting
Program guides 47
F
FCC information 92
Fetch
Button 23
Using 80
Fixed
Images 3
Variable out jack 15, 18
Front
Input jacks 12
Of the TV 12
Panel 12
Panel connections 13
G
Getting around in the guides 45
Grid guide 46
Guide
Button on the remote
23, 43, 44, 46
Data 46, 47
H
Help 50
Hunt icon 50
I
Icons 33, 70
In channel banner 32
In program guides 44-50
Lock, Unlock 70
INFO
Button on front panel 12
Button on the remote 23, 45
Input
VIDEO 1 jacks 15, 16-18
VIDEO 2 jacks 15
VIDEO 3 jacks 12, 13
COLORSTREAM HD1 15, 17
COLORSTREAM HD2 15
Interactive setup 19, 82
93
Page 94

REFERENCE
J
Jacks and cables 7
L
Language 56
Latitude/Longitude Entering 84
LEARN indicator 28
Learning operating code of another
remote control 28
Learning buttons (A-H) 23, 28
Light button 22
Listing all DIRECTV programs 49
Lock icon 70
Locking
The system 33, 60, 66, 70
M
Mail icon 73
Mailbox
Checking your mail 73
Deleting mail 73
Icon 33
Main menu 50
Maximum signal strength 84
MENU button 12, 22
Menus
Dish pointing 83
Icons 70
Profiles 58
Modes 12
Of operation 34
SAT and TV 34
Mono sound 55
Movie
Icon in the program guide 49
Ratings 66
Blocking 66
Viewing 67
Themes icon 49
Mute 22, 54
N
Naming profiles 58
New access card 84
Not rated
Movies 67
Programs 62
Number buttons on the remote 22, 45
O
Off-air antennas 82
Off-air guides
Acquiring 85
OK button 22
On-screen signal meter 84
Optical
Jacks and cables 11
Output menu 56
Other guides
Attractions guide 76
Icon 46
Output
Video/Audio jacks 15, 18
Variable audio jacks 13, 15
Overheated components 10
P
Password
System 69
User 69
Pay per view program 60
Tuning to 74
Phone
Jack 11, 17
Line 11
Picture 52
Controls 52
Preference 54
Quality 52
Settings 52
Picture size
Selecting 38
POP (Picture out Picture)
Buttons 23, 36
Operation 36, 37
Problems 37
Positioning cables 10
POWER button 12, 22
Preferences menu 78
Profiles
Choosing 68
Locking
Unlocking 69
Menu 58
Unlocking 68
Program guides
Anatomy 44
Default guide 79
Detail guide 46
DIRECTV 42
Down arrow 50
Exiting 47
Grid guide 46
Help 50
Pay-per-view programs 75
Scrolling 45
SurfGuide 46
Tuning to a program 45
TV 42
Programming the remote to control
components 24
Purchases
Cancelling 77
Menu 77
Pay-per-view programs 74
Previewing 74
Reviewing 77
Q
Quality controls 52
R
Rain fade 84
Rating limit 60
RCA-type cables 11
Remote control 88
Buttons 22
Learning codes 28
Programming 24
RESET button 12
Reset picture controls 54
RETURN button 22
Reviewing purchases 77
RF jacks
Cables 11
RTN icon 50
S
S-VIDEO jack 11, 12, 17
SAP 55
Satellite 34
In jack 14
SAT Setup 58
SBS 55
SBS level 55
Sub-Bass System 55
Scrolling 45
Search for channels 73
Second Audio Program (SAP) 56
Set
Movie ratings 66
Rating limit 60
Time and date 78
Sharpness 52
Signal
Meter 84
Peak Signal 84
Source
Changing 72
Strength 84
Of a digital signal 83
94
Page 95

REFERENCE
Type
Changing 72
SKIP button 23
Sorting
The DIRECTV® programming guide
By movies 49
By sports 49
By topics 48
Using movies icon 49
Using sports icon 49
Using topics icon 48
Specifications 90
Spending limit 59
Sports
Icon 49
Themes icon 49
Station name
Retrieving 83
Stereo amplifier
connecting 18
Stereo sound 55
Subchannel number 43
SurfGuide 46
Surround sound 55
System
Lock 66, 70
Password 70
Test 84
Unlock 70
T
Shows 59
Upgrades 3, 85
USE/LEARN switch 23, 28
V
V-Chip
Age-based ratings 62
Content themes 62
VCR
Code table 26
Control buttons 23
Mode 22
Video
Configuration 52
Games 13
Jack 12, 15
Viewing
Age-based ratings 64
Content themes 65
Volume buttons 12, 22
W
Warranty 91
Weak reception 88
WHO button on the remote 23, 68
Z
Zip
Entering 84
Telephone jack and cord 11
Text
Closed caption 80
Time and date 78
Tint 52
Transmit indicator 24
Tr oubleshooting 86
Tuning to a program 45
TV
Channel list 61
Mode 22, 34
Rating limit 62
Setup 61
TV/SAT button 22
TV/VIDEO button 22
U
Unlocking
Profiles 66
The system 33, 70
Unrated
Movies 67
Programs and shows 62
95
Page 96

HEAD OFFICE/82 TOTOWA ROAD, WAYNE, NEW JERSEY 07470
FACTORY SERVICE CENTER:1420B TOSHIBA DRIVE, LEBANON, TN. 37087
HEAD OFFICE/327 KAMAKEE STREET, HONOLULU, HAWAII 96814, U.S.A.
MANUFACTURED BY
PRINTED IN USA
(00-01) 23563741
 Loading...