

Page 1
Page 2

Know these
CAUTION
RISK OF ELECTRIC SHOCK
DO NOT OPEN
CAUTION: TO REDUCE THE RISK OF ELECTRIC SHOCK, DO NOT
REMOVE COVER (OR BACK). NO USER-SERVICEABLE PARTS
INSIDE. REFER SERVICING TO QUALIFIED SERVICE PERSONNEL.
safety symbols
CAUTION: To prevent electric shock, this apparatus shall be
connected to a mains sock
y inserted.
and full
et outlet with a protective earthing
For Customer Use
This “bolt of lightning” indicates uninsulated material within
your unit may cause an electrical shock.For the safety of everyone
in your household, please do not remove product covering.
The “exclamation point” calls attention to features for which
you should read the enclosed literature closely to prevent
operating and maintenance problems.
WARNING: TO PREVENT FIRE OR SHOCK HAZARD, DO
NOT EXPOSE THIS EQUIPMENT TO RAIN OR MOISTURE.
TE:This owner's manual may be used with several different models. Not all features (or drawings) discussed in
NO
this manual will necessarily match those found with your system.This is normal and does not require you contacting your
dealer or requesting service.
DIRECTV programming sold separately. ACTIVATION OF PROGRAMMING MAY BE SUBJECT TO CREDIT APPROVAL AND REQUIRES VALID
SERVICE ADDRESS, SOCIAL SECURITY NUMBER AND/OR MAJOR CREDIT CARD. DEPOSIT OR PREPAYMENT MAY BE REQUIRED.
Programming subject to change. DIRECTV service not available outside the U.S. DIRECTV programming is sold separately and independently of
DIRECTV System hardware. A valid programming subscription is required to operate DIRECTV System hardware. Activate your DIRECTV
programming today at 1-800-DIRECTV (1-800-347-3288)
2004 DIRECTV, Inc. DIRECTV, the Cyclone Design logo and Advanced Program Guide are registered trademarks of DIRECTV, Inc. All other
©
trademarks and service marks are the property of their respective owners.
This product includes software developed by the University of California, Berkeley and its contributors. Copyright © 1982, 1986, 1988, 1990, 1993
The Regents of the University of California.All rights reserved.
Redistribution and use in source and binary forms, with or without modification, are permitted provided that the following conditions are met:
1. Redistribution of source code must retain the above copyright notice, this list of conditions and the following disclaimer.
2. Redistribution in binary form must reproduce the above copyright notice, this list of conditions and the following disclaimer in the
documentation and/or other materials provided with the distribution.
3. All advertising materials mentioning features or use of this software must display the following acknowledgment:This product includes software
developed by the University of California, Berkeley and its contributors.
Neither the name of the Univ
4.
without specific prior written permission.
ersity nor the names of its contributors ma
Enter below the Model, Serial and Access Card Number, and
er ID located behind front door of the DIRECTV
Receiv
Receiver. Retain this information for future reference.
Model No. ________________________________________
Serial No. ________________________________________
Access Card No. __________________________________
Receiver ID ______________________________________
om this softwar
y be used to endorse or pr
omote pr
oducts deriv
ed fr
®
e
THIS SOFTWARE IS PROVIDED BY THE REGENTS AND CONTRIBUTORS "AS IS" AND ANY EXPRESS OR IMPLIED WARRANTIES, INCLUDING,
THE IMPLIED WARRANTIES OF MERCHANTABILITY AND FITNESS FOR A PARTICULAR PURPOSE ARE DISCLAIMED.
,
O
BUT NO
IN NO EVENT SHALL THE REGENTS OR CONTRIBUTORS BE LIABLE FOR ANY DIRECT, INDIRECT, INCIDENTAL, SPECIAL, EXEMPLARY, OR
CONSEQUENTIAL DAMAGES (INCLUDING, BUT NOT LIMITED TO, PROCUREMENT OF SUBSTITUTE GOODS OR SERVICES;LOSS OF USE,
D
STRICT LIABILITY, OR TORT (INCLUDING NEGLIGENCE OR OTHERWISE) ARISING IN ANY WAY OUT OF THE USE OF THIS SOFTWARE,
EVEN IF
The software included in this product is based in part on the work of the Independent JPEG-Group and on the PNG Reference Library which is
copyright © 1998-2001 Glenn Randers-Pehrson, copyright © 1996, 1997 Andreas Dilger, and copyright © 1995, 1996 Guy Eric Schalnat, Group 42, Inc.
T LIMITED
ATA, OR PROFITS; OR BUSINESS INTERRUPTION) HOWEVER CAUSED AND ON ANY THEORY OF LIABILITY,WHETHER IN CONTRACT,
VISED OF THE POSSIBILITY OF SUCH DAMAGE.
AD
T
2
Page 3

Safety Instructions - Read Before Operating Equipment
Important Safety Instructions:
1 - Read these instructions.
2 - Keep these instructions.
3 - Heed all warnings.
4 - Follow all instructions.
5 - Do not use this apparatus near water.
6 - Clean onl
7 - Do not block an
newspapers, table clothes, curtains, etc.
8 - Do not install near any heat sources such as radiators, heat registers, stoves, or other apparatus (including amplifiers) that produce heat.
No naked flame sources, such as candles, should be placed on the apparatus.
9 - This apparatus shall not be exposed to dripping or splashing and no objects filled with liquids, such as vases, shall be placed on the apparatus.
10 - Do not defeat the safety purpose of the polarized or grounding-type plug. A polarized plug has two blades with one wider than the other.
A grounding type plug has two blades and a third grounding prong.The wide blade or the third prong are provided for your safety. If the provided
plug does not fit into your outlet, consult an electrician for replacement of the obsolete outlet.
11 - Protect the power cord from being walked on or pinched particularly at plugs, convenience receptacles, and the point where they exit from
the apparatus.
12 - Only use attachments/accessories specified by the manufacturer.
13 - Use only with the cart, stand, tripod, bracket, or table specified by the manufacturer, or sold with the apparatus.When a cart is used,
14 - Unplug this apparatus during lightning storms or when unused for long periods of time.
y with dry cloth.
y ventilation openings. Leave minimum distances around the apparatus. Do not cover ventilation openings with items, such as
use caution when moving the cart/apparatus combination to avoid injury from tipover.
15 - Refer all servicing to qualified service personnel. Servicing is required when the apparatus has been damaged in any way, such as power-supply
cord or plug is damaged, liquid has been spilled or objects have fallen into the apparatus, the apparatus has been exposed to rain or moisture, does
not operate normally, or has been dropped.
16 - Lea
e accessible the mains connector at the back of the unit in case of emergency shutdo
v
wn.
3
Page 4

Safety Instructions (cont’d), General Information
This device incorporates an anticopy process technology that is protected by U.S. patents and other intellectual property rights.The
anticopy process is licensed for non-commercial, home use only. Reverse engineering or disassembly is prohibited.
NOTE TO CATV SYSTEM INSTALLER
Article 820-40 of the NEC (National Electrical Code) provides guidelines for proper grounding and, in particular, specifies that the cable
ground shall be connected to the grounding system of the building, as close to the point cable entry as practical.
WARNING
This device complies with Part 15 of the FCC Rules.
Operation is subject to the following two conditions:
(1) This device may not cause harmful interference, and
(2) This device must accept any interference received, including interference that may cause undesired operation.
FCC Regulations and Information
This equipment has been tested and found to comply with the limits for a Class B digital device, pursuant to Part 15 of the FCC
Rules.These limits are designed to provide reasonable protection against harmful interference in a residential installation.This equipment
generates, uses and can radiate radio frequency energy and, if not installed and used in accordance with the instructions, may cause
harmful interference to radio communications.
However, there is no guarantee that interference will not occur in a particular installation. If this equipment does cause harmful interference to radio or television reception (which you can determine by turning the equipment off and on), you are encouraged to try
to correct the interference by one or more of the following measures:
Reorient or relocate the receiving satellite dish antenna.
Increase the separation between the equipment and receiver.
Connect the equipment into an outlet on a circuit different from that to which the receiver is connected.
Consult the dealer or an experienced radio/TV technician for help.
IMPORTANT
Any changes or modifications to the equipment by the user not expressly approved by the warranty or manufacturer could void the user’s
authority to operate the equipment.
Domestic use U. S.A – For units used at 120V, use only the power supply cord which is supplied with the product.
ANALOG DEVICE WARNINGS
Federal Communication Commission (FCC) Part 68 and Administrative Council for Terminal Attachments (ACTA)
This device complies with Part 68 of the FCC rules and the requirements adopted by the ACTA. A label on the bottom panel of this
equipment contains, among other information, a product identifier in the format US : AAAEQ##TXXXX. If requested, this number
must be provided to the telephone company. The REN is used to determine the number of devices that may be connected to a
telephone line. Excessive RENs on the telephone line may result in the devices not ringing in response to an incoming call. In most,
but not all areas, the sum of RENs should not exceed five (5.0).To be certain of the number of devices that may be connected to a line,
as determined by the total RENs, contact the local telephone company.
The REN f
are the REN without a decimal point. For the receiver, 0.1 means a REN of 0.1. Note : RENs are associated with loop-start and ground-start
ports. Do not use for E & M or digital ports.
This equipment uses the foll
A plug and jack used to connect the receiver to the premises wiring and telephone network must comply with the applicable FCC
Part 68 rules and requirements adopted by ACTA. A compliant telephone cord is provided with this product. It is designed to be
connected
If the receiver causes harm to the telephone network, the telephone company will notify you in advance that temporary discontinuance
of ser
Also, you will be advised of your right to file a complaint with the FCC if you believe it is necessary.The telephone company may make
changes in its facilities, equipment, operations or procedures that could affect the operation of the equipment. If this happens the telephone company will provide advance notice in order for you to make necessary modifications to maintain uninterrupted service. If the
equipment is causing harm to the telephone netw
the problem is resolved.
This equipment is of a type that is not intended to be r
This equipment cannot be used on public coin phone ser
is subject to state tariffs. Contact the state public utility commission, public service commission or corporation commission for information.
our home has speciall
If y
your alarm equipment. If you have questions about what will disable alarm equipment, consult your telephone company or a qualified
installer.
We recommend the installation of an AC surge arrester in the AC outlet to which this equipment is connected.Telephone companies
report that electrical surges, typically lightning transients, are very destructive to customer terminal equipment connected to AC
wer sources.
po
If tr
or this product is part of the product identifier that has the format US :AAAEQ##TXXXX.The digits represented by ##
wing USOC jack: RJ-11C.
o
to a compatible modular jack that is also compliant.
vice ma
oub
y be r
ed alarm equipment connected to the telephone line
y wir
le is experienced with the receiver, for repair or warranty information, please call: 1-800-347-3288.
But if advance notice isn’
ed.
equir
t practical,
ork, the telephone company may request that you disconnect the equipment until
ed b
epair
vice pr
No modular plug is pr
See installation instruction f
the telephone compan
y the user.
y the telephone company. Connection to party line service
vided b
o
ensur
,
vided with this equipment.
o
or details.
y will notify the customer as soon as possible.
e the installation of this r
eceiver does not disable
4
Page 5

Contents
Package Contents ......................................................6
Front and Rear Panels ..............................................7
Access Card ................................................................8
Connections
Antenna and Phone ................................................9
TV............................................................................10
Audio
VCR/DVD recorder................................................12
Remote Contr
Setup Wizard ................................................................17
Watching TV..................................................................18
Enhanced User Features
Favorite Channels ..................................................19
Program Guide
DIRECTV ADVANCED PROGRAM GUIDE
............................................................................20-21
Reminders ..............................................................21
PPV (Pay Per View)................................................21
Guide Menu ........................................................22-23
......................................................................11
ol Use........................................13-16
®
Main Menu
Using the Main Menu ............................................24
Preferences ............................................................25
Preferred Language ............................................25
Screen Format ....................................................25
Banner Duration..................................................26
arental Controls ..................................................27
P
Lock the System ..................................................27
Channel Locks
Set Spending Limit..............................................28
Set Rating Limit ..................................................28
Replace Access Card ..........................................28
Purchases ..............................................................29
Setup..................................................................30-31
System Upgrades ..................................................31
Messages ................................................................32
Caller ID ................................................................32
Troubleshooting........................................................33
Technical specifications............................................34
Limited Warranty ....................................................35
Protection Plan..........................................Back cover
......................................................27
5
Page 6
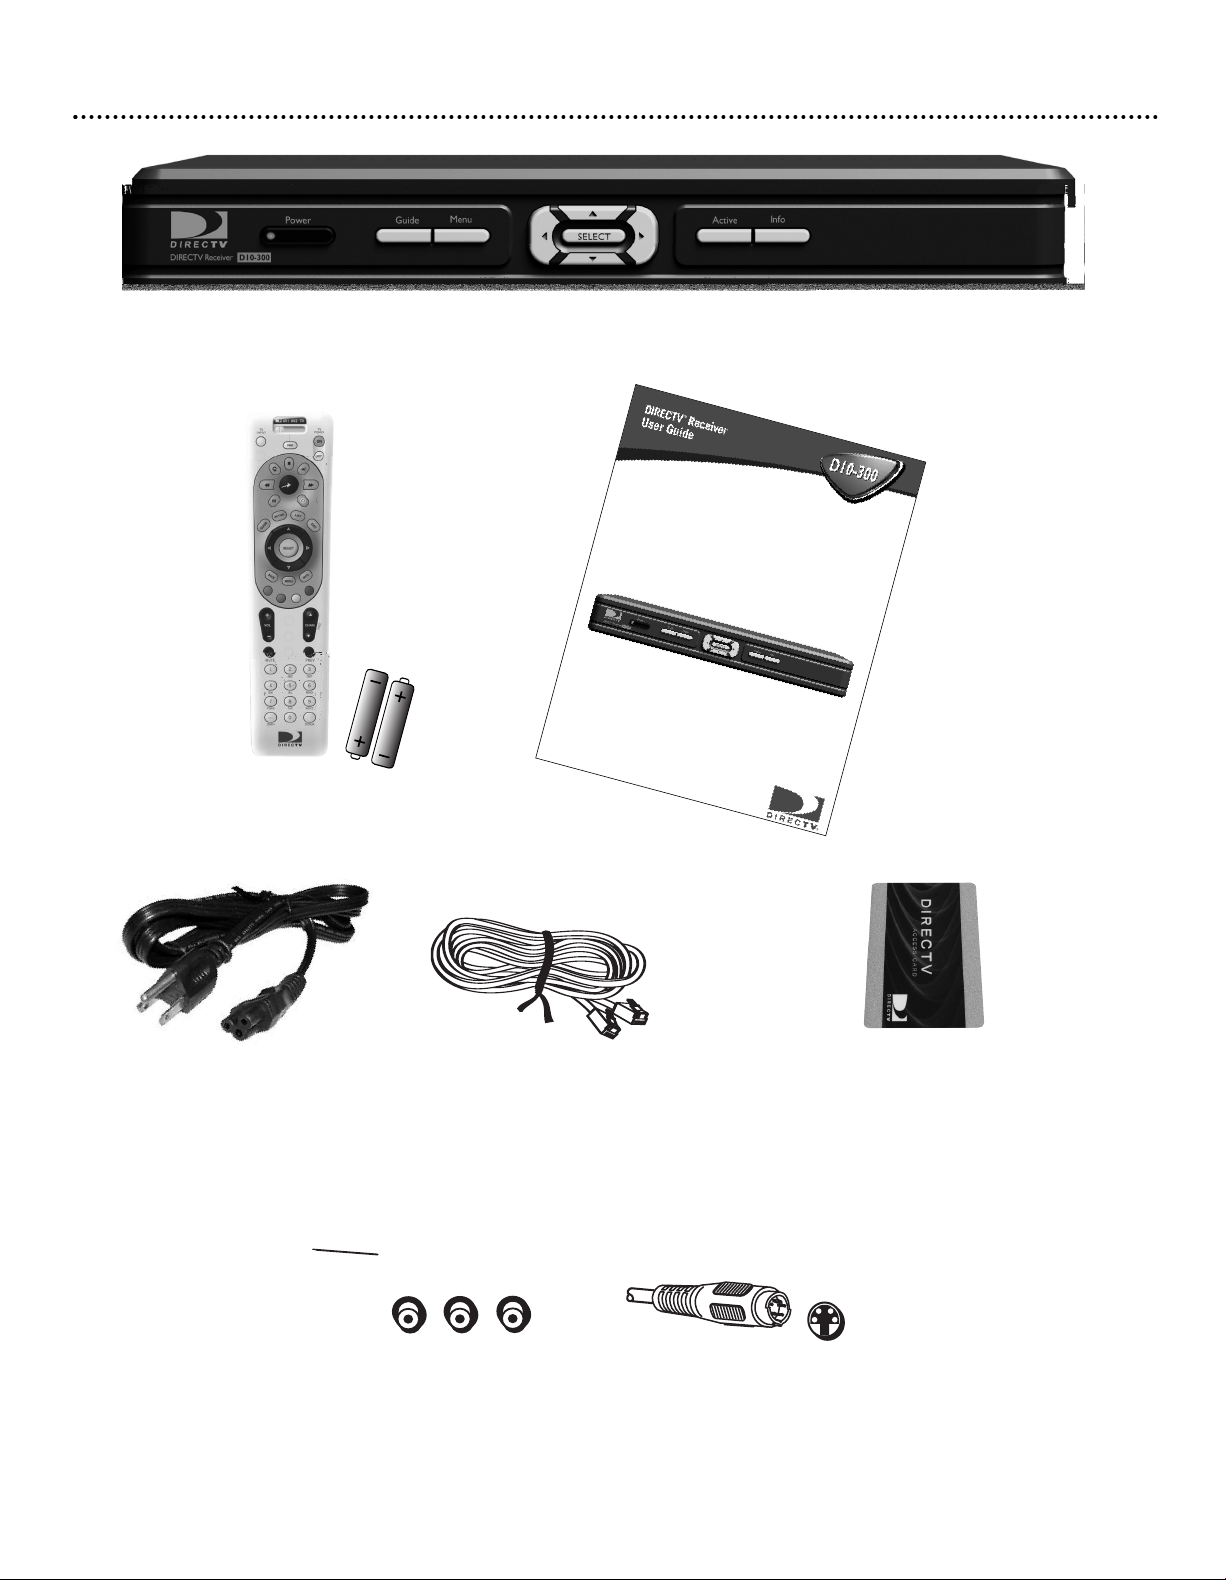
Package Contents
S-VIDEO
Infrared (IR) Universal
Remote Control with
two AA Batteries
DIRECTV®Receiv
er
User Guide
Power Supply Cord
RJ-11 Telephone Cord
RCA Type Audio/Video
Connecting Cable
Access Card
S-Video Connecting Cable
6
Page 7
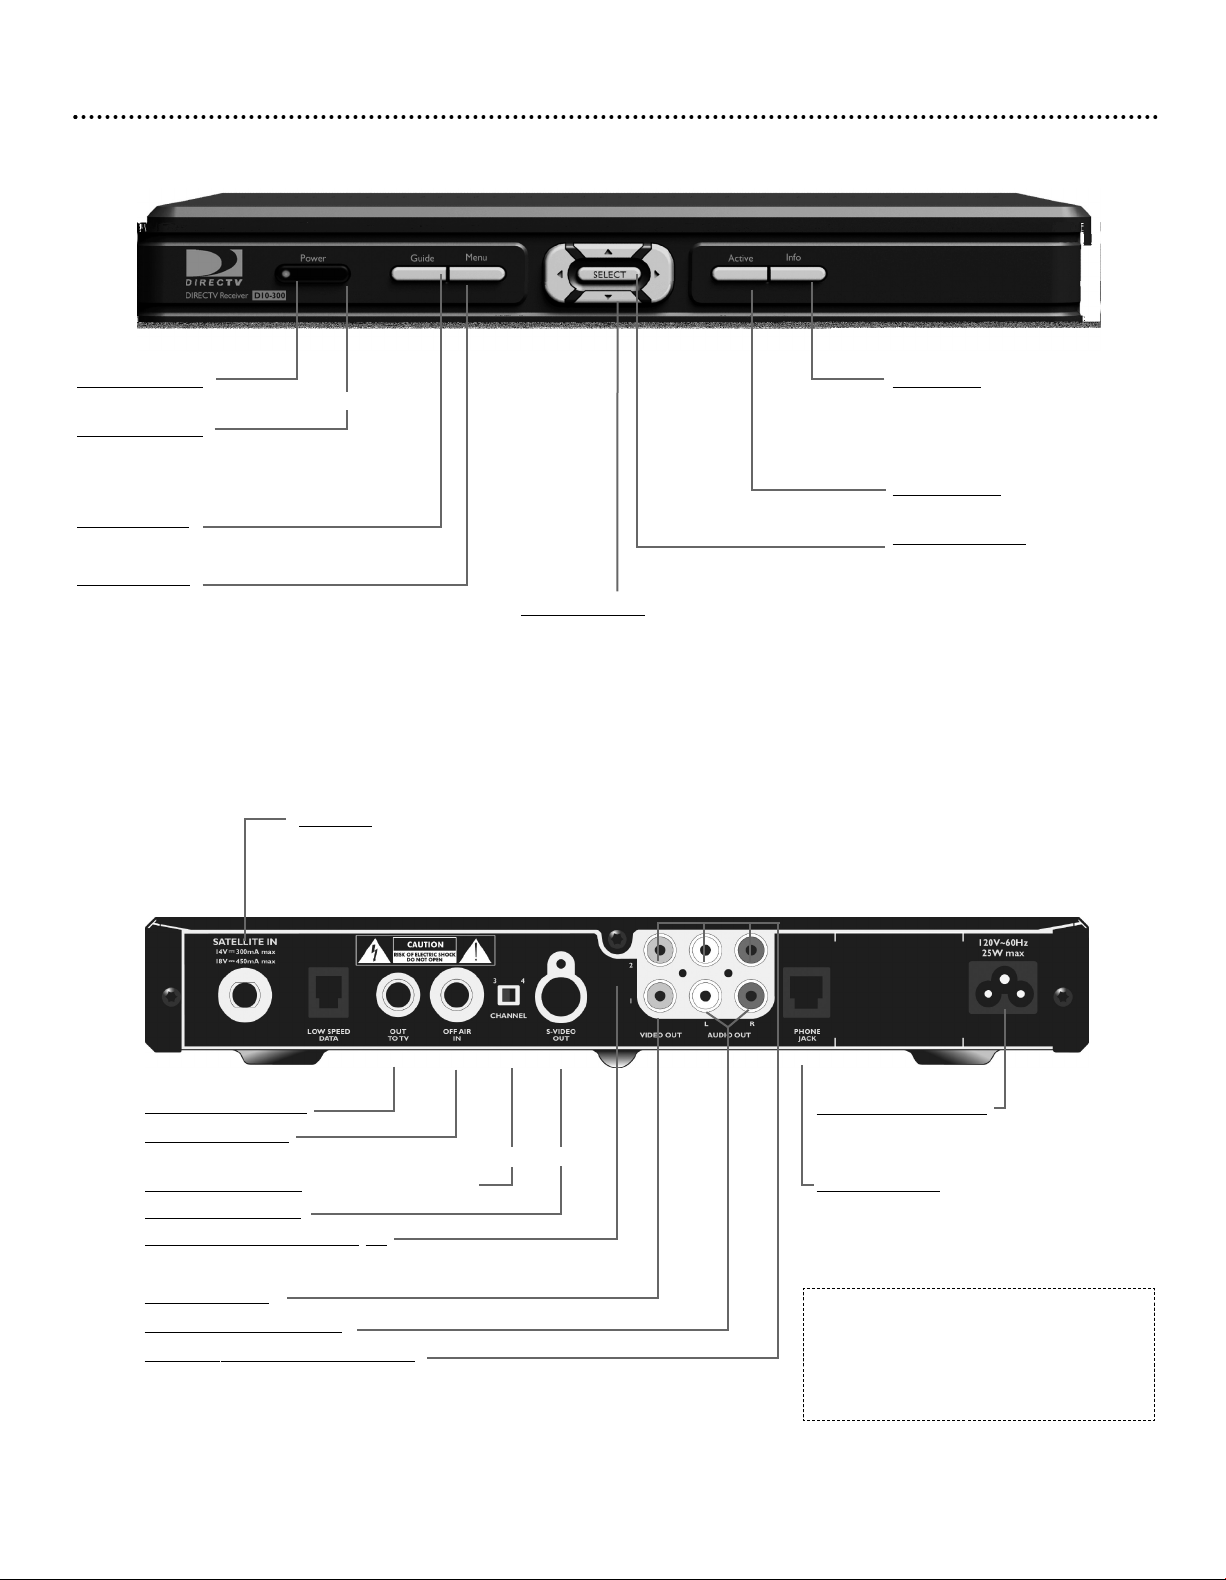
Front and Rear Panels
Front Panel
Power indicator
Lights when the DIRECTV Receiver is on.
WER button
PO
Turns the DIRECTV®Receiver on or
puts it in Standby.
Guide button
ys Program Guide.
Displa
MENU button
Displays the Main Menu.
Sat In (*)
Connect the coaxial cable
from the Satellite Dish antenna
. Details are on page 9.
e
her
Arrow buttons (;:,9)
vigates through the Guide and menus.
Na
While watching Satellite programming, use
the ,9arrows to channel up or down.
Rear Panel
Info button
Switches between program
information in the banner and
the program details screen.
Active button
For future use.
SELECT button
Confirms a selection.
TV/VCR Output (*)
Antenna Input (*)
Connect to an off-air antenna or analog cable system.
Details on page 10.
Channel 3/4 s
S-Video Output (*)
Component Video Output (*)
Video output 1
Left/right Audio output 1
Secondary Audio/Video Outputs
Note : The identification sticker can be located underneath your receiver.
witch :
7
AC power input (***)
Connect the supplied power
cord here.
Phone jack (**)
Connect the supplied phone
e and to a wall
d her
cor
phone jack in your home.
(*) SELV: Safety Extra Low Voltage
(**) TNV3: Telecommunication
Network Voltage
(***) HV: Hazardous Voltage
Page 8
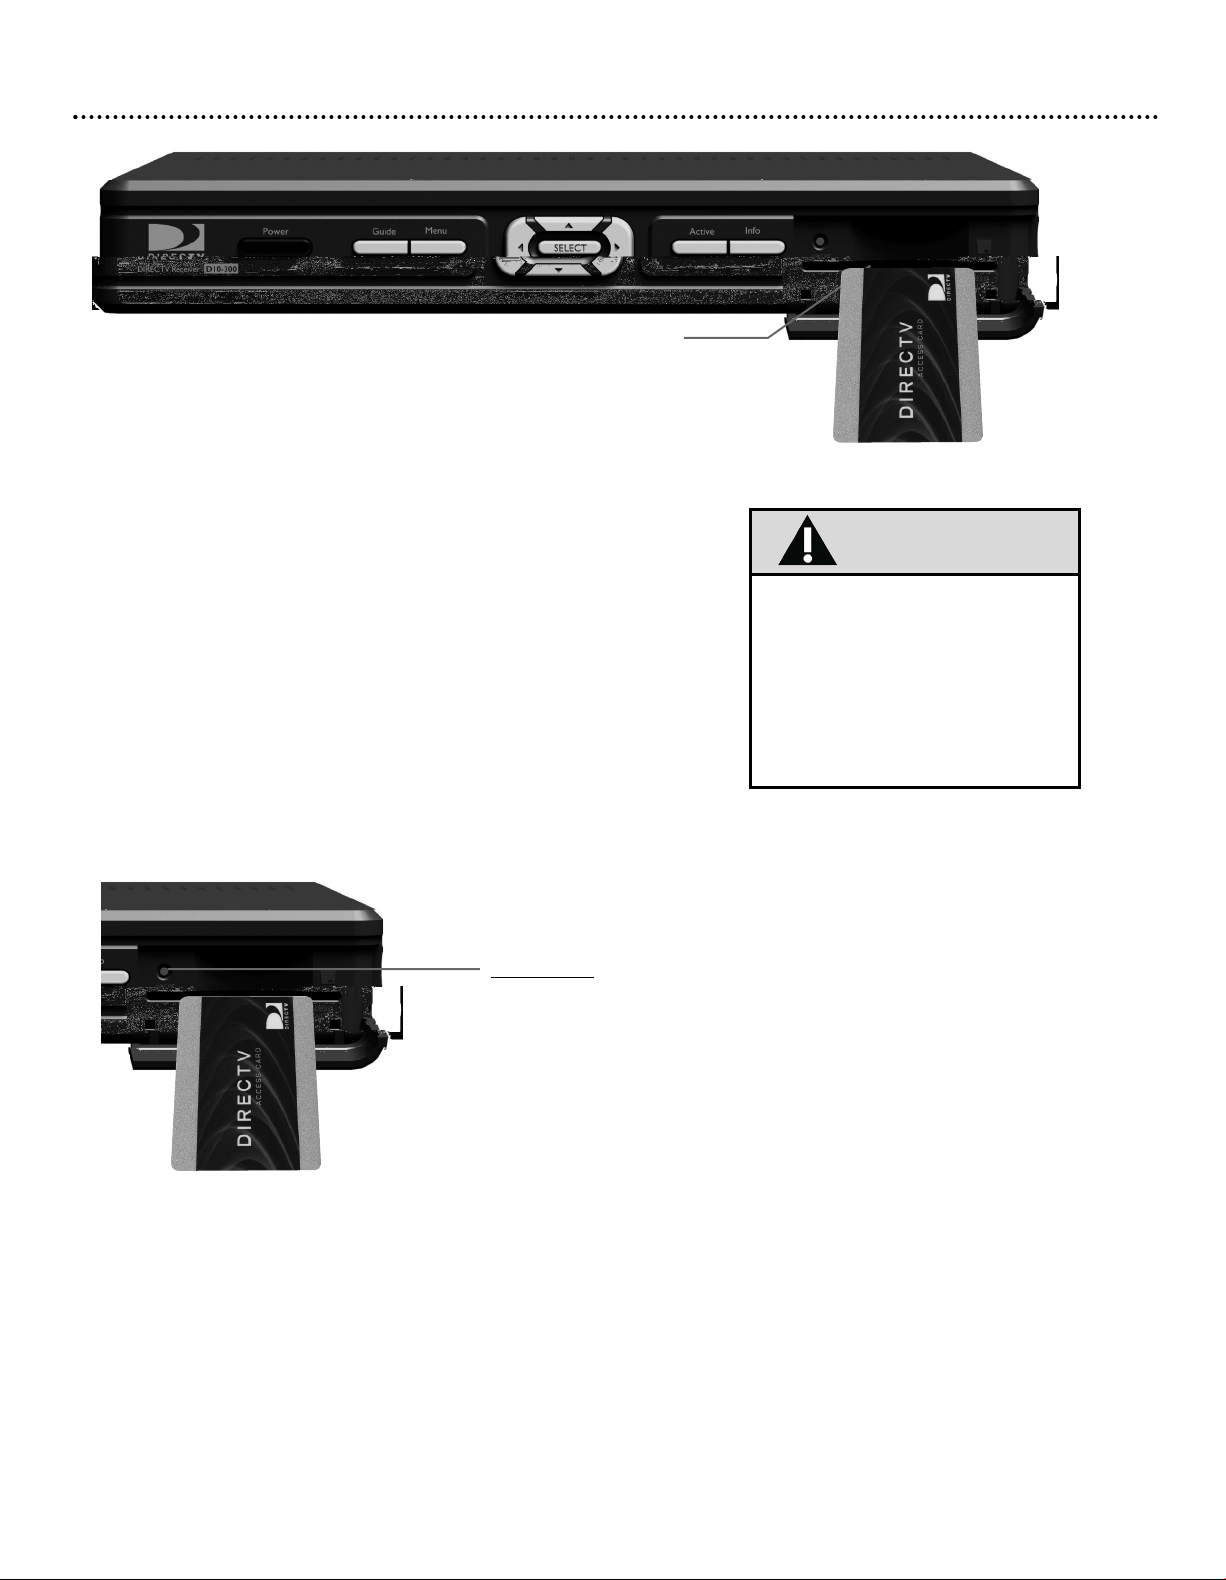
Access Card
Access Card
The access card provided with your system includes information about your
purchase authorization and other data.To watch channels, your viewing access card
needs to be inserted in the access card slot on the front of your DIRECTV
Receiver.
The access card needs to be inserted during system setup and generally does not
need to be removed. Each access card has a unique number. Be sure to record this
umber in the space provided on the second page of this manual in the “For
n
Customer Use” section for future reference.
1. Open the flip-down door on the front of the DIRECTV Receiver.
2. Gently insert the access card into the slot, following instructions on the card,
until it meets the stop. Do not use undue force.The end should be visible outside the slot.
3. Keep your access card permanently inserted in your DIRECTV Receiver.
If you have to reinsert the card, follow the instructions on the card, making sure
the gold chip is facing down.
®
Caution
aa
YOUR ACCESS CARD IS FRAGILE.
aa
ALWAYS INSERT CORRECTLY
AND CAREFULLY.
aa
DO NOT BEND.
aa
DO NOT REMOVE AND
RE-INSERT UNNECESSARILY.
aa
NEVER SUBMERGE IN LIQUID
OR APPLY CLEANING FLUIDS.
RESET button
Resets the receiver.
8
Page 9
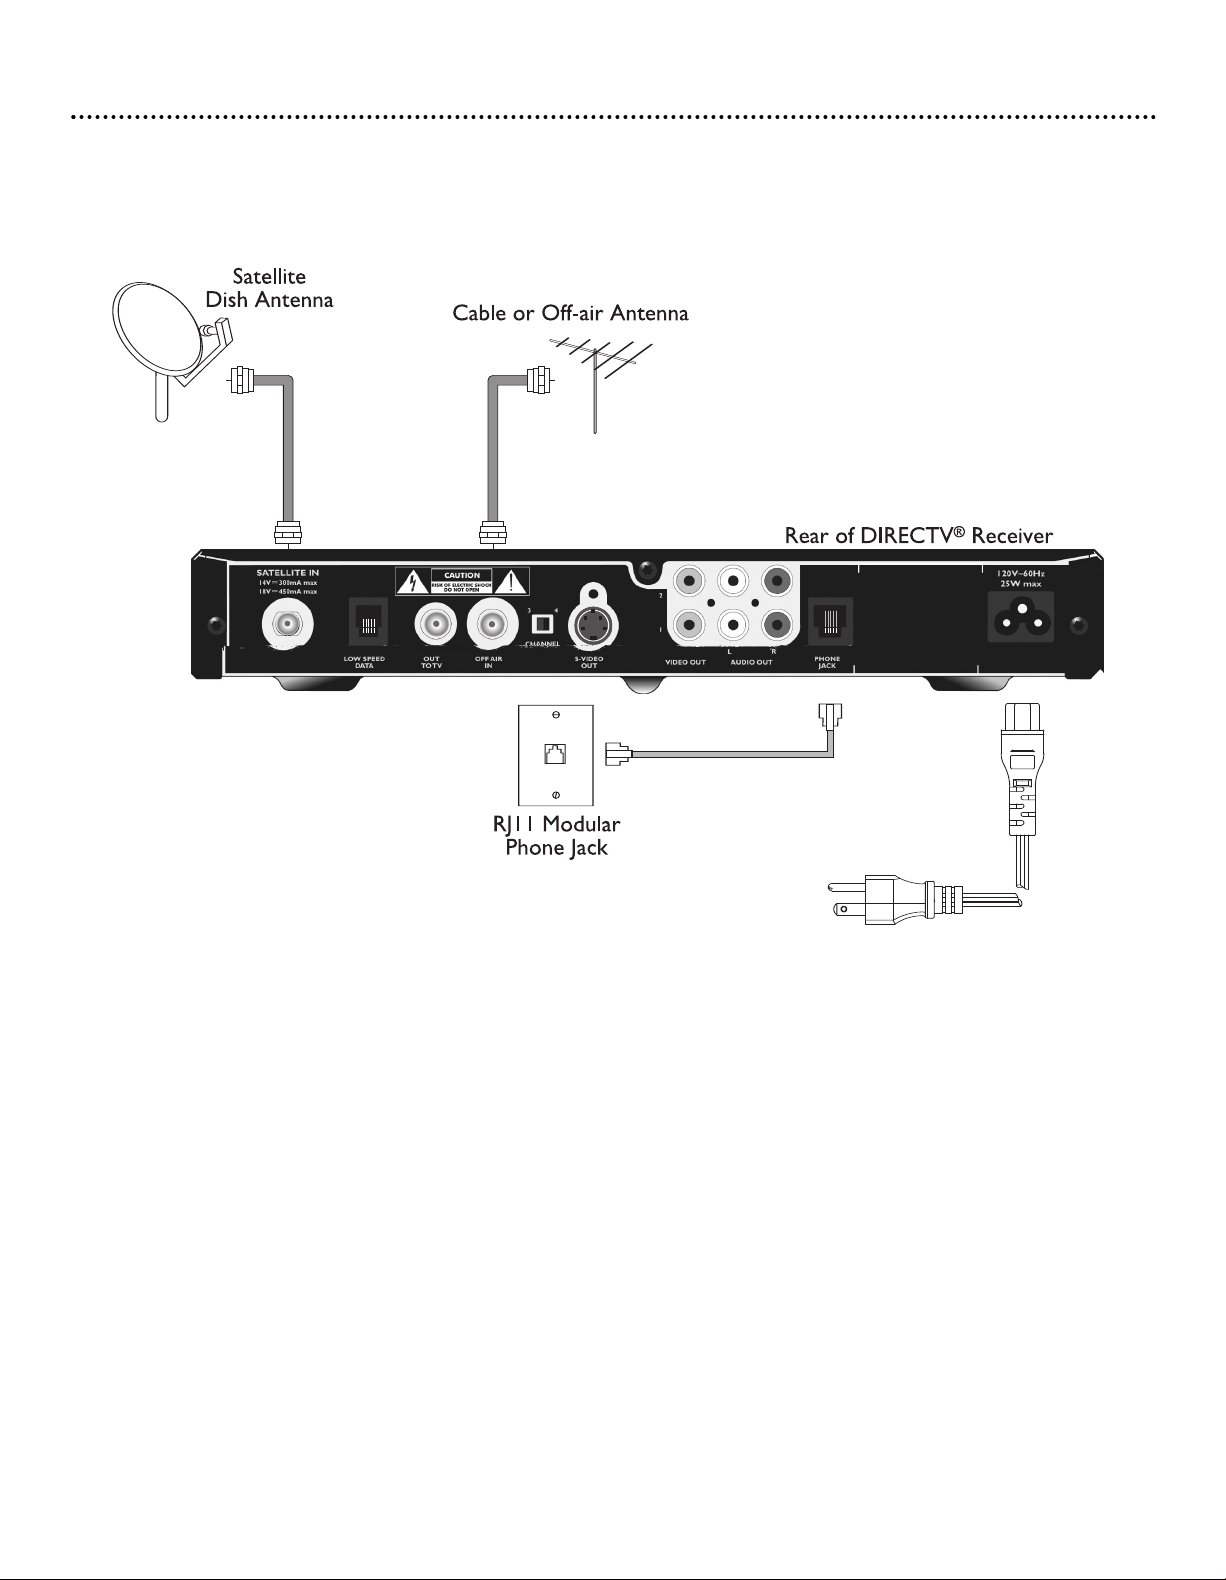
Antenna and Phone
Connections
e making connections.
C outlet bef
®
A
Receiv
er m
Unplug all equipment fr
1- Connect the RF coaxial cable from the satellite dish to the SAT IN connector.
2- If you have cable (CATV) or an off-air antenna, connect its RF coaxial cable to the OFF AIR IN connector
3- Using the telephone cord (supplied), connect one end of it to a phone jack in your home. Connect the other end to
the PHONE JA
ograms,
pr
4- Connect one end of the AC power cord (supplied) to the Receiver's AC IN plug.
5- Do not plug your DIRECTV Receiver to the mains power outlet until all connections are done.
the
om the
CK input on the rear of the Receiver.To enjoy uninterrupted programming and to order pay per view
DIRECTV
or
ust be contin
uously connected to a land-based phone line.
9
Page 10
Connections (cont’d)
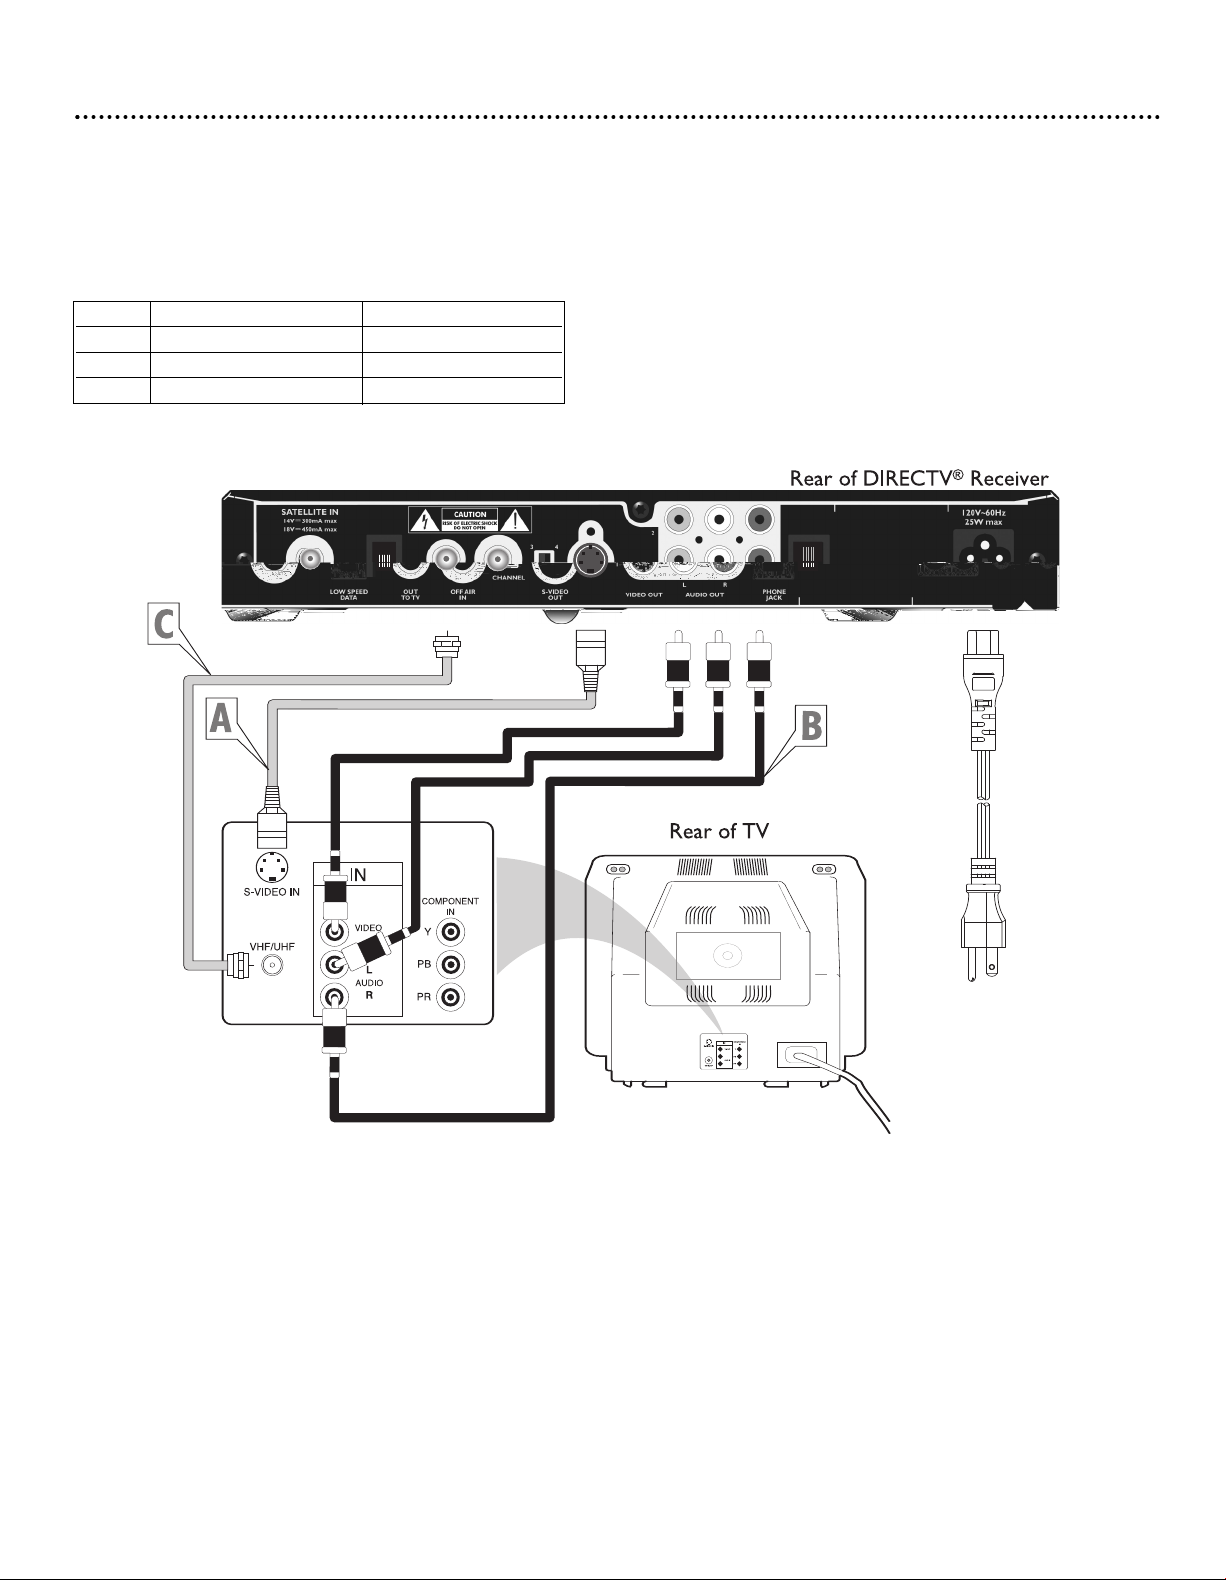
TV
Unplug all equipment from the AC outlet before making connections.
There are several options for connecting the video and audio outputs of your DIRECTV® Receiver, depending on the type
of equipment you want to connect and the quality of signal you want to achieve.The following chart summarizes your options
for video connections. Select either A, B, or C and refer to the illustration and steps below to connect.
Option Video Signal Quality Video Output
A Very Good S-VIDEO OUT
B Good VIDEO OUT 1
C Standard RF - OUT to TV
Note : The TV rear panel shown above has jacks for all possible connections.Your TV’s rear panel may differ.
A. Using a S-VIDEO cable (supplied),
Select the pr
.
TV
on the
B. Using the RCA type cable (supplied), connect one end to the OUT 1 VIDEO jack (yellow) on the Receiver to the VIDEO
. Select the proper input on your TV.
IN on the
C.Using the RF coaxial cable (not supplied),
jack on the TV.Turn the TV on and select channel 3 or 4, whichever is not used or least used in your area. Set the CHANNEL
witch on the back of the Receiv
s
Note : If only one plug is connected on either left or right mono audio output will be delivered by your DIRECTV ®receiver
TV
oper input on y
connect one end to the S-VIDEO connector on the Receiv
TV.
our
O TV connector on the Receiver to the RF IN
connect one end to the OUT
er to the same channel.
10
T
er to the S-VIDEO IN
Page 11
Connections (cont’d)
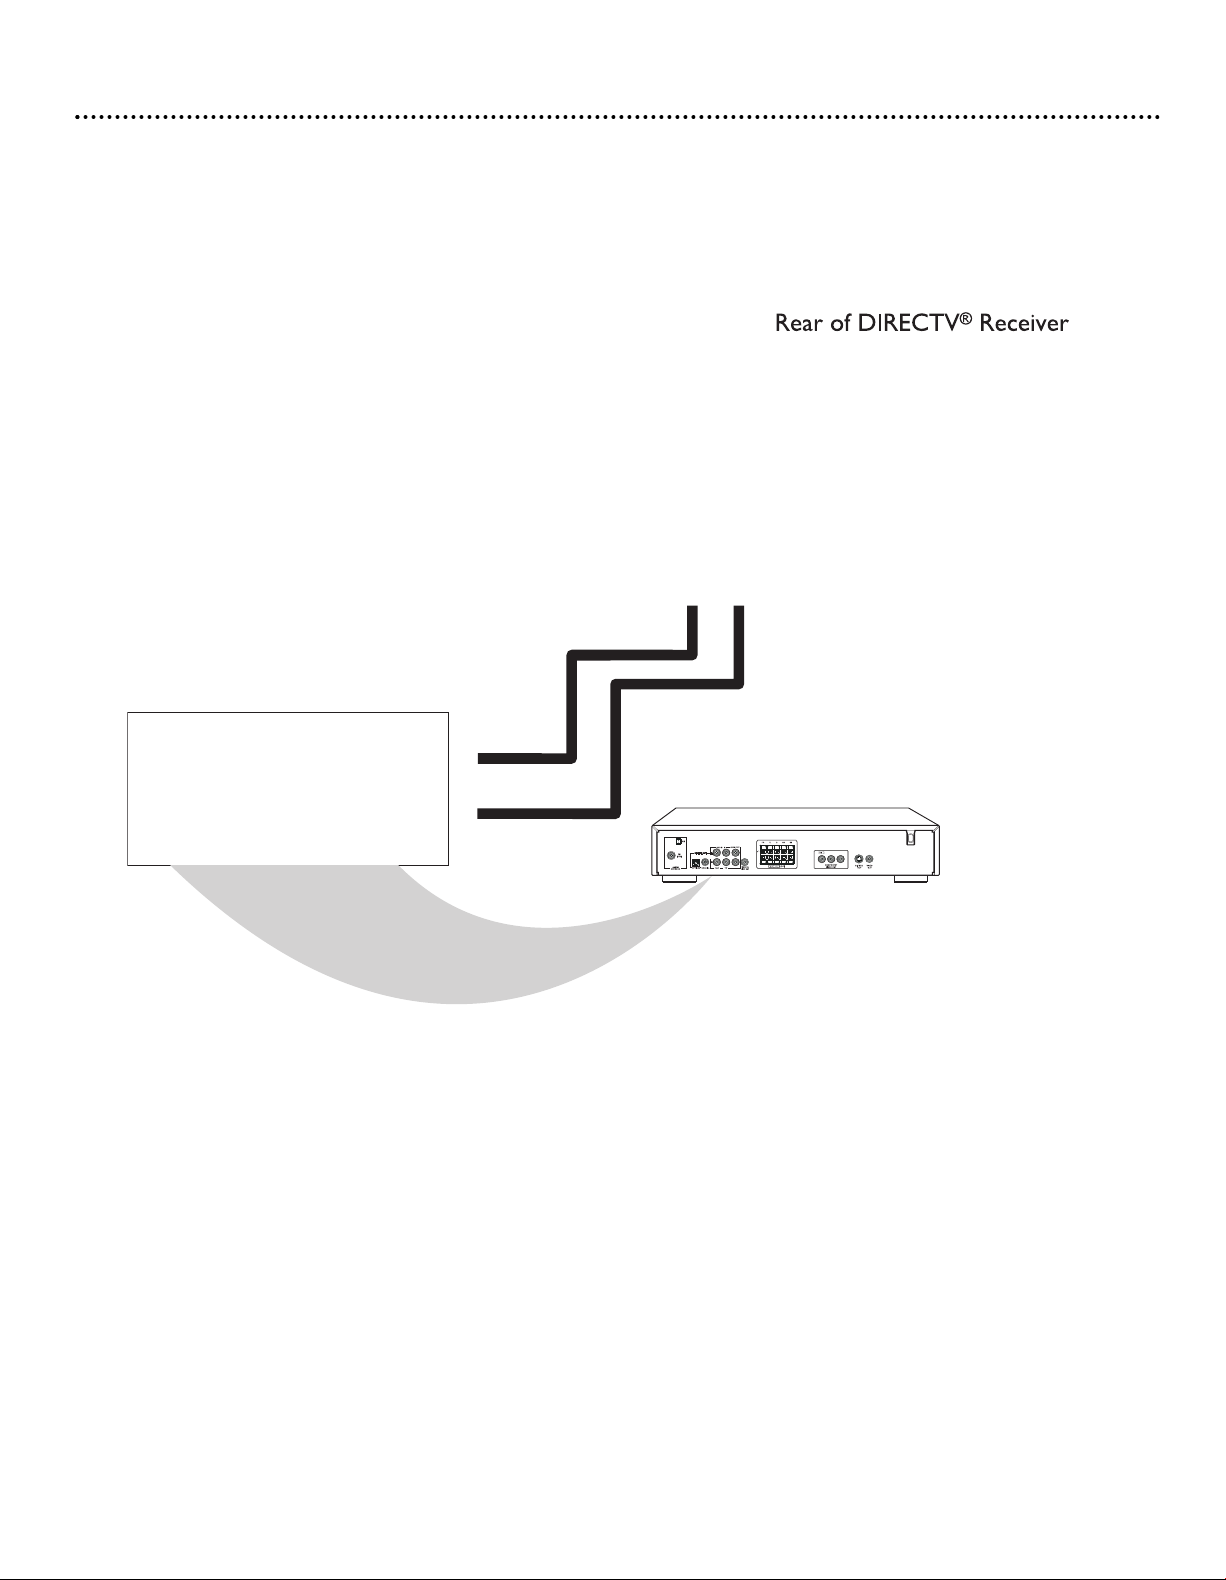
Audio
Unplug all equipment from the AC outlet before making connections.
There are several options for connecting the audio outputs of your DIRECTV® Receiver, depending on the type of equipment
you want to connect.The following chart summarizes your additional options for audio connections. Refer to the illustration and steps belo
w to connect.
Note : This illustration shows a home theater stereo receiver and TV rear panel for possible connections.Your home theater
system stereo receiver or TV rear jack panel may differ.
Using the RC
AUDIO OUT 1 LEFT and RIGHT connectors on the Receiver and the other ends to the left and right AUDIO IN on
the home theater ster
A type cable (supplied), connect the left (white) and right (red) jacks of one end of the cables to the
eo receiver or TV. Select the proper input on the home theater stereo receiver or TV.
11
Page 12

Connections (cont’d)
VCR/DVD recorder
Unplug all equipment from the AC outlet before making connections.
To record satellite programming, connect the VIDEO OUT 1 and AUDIO LEFT and RIGHT OUT 1 on the rear of the
DIRECTV Receiv
ogramming. Alternatively, you can connect OUT TO TV RF output to the RF input on the VCR.
pr
er to the corresponding video and audio inputs on the VCR. These outputs always output satellite
Note:
12
Page 13

Remote Control
Preparing Your Remote Control
Battery Installation
1. Remove the battery compartment
cover. Insert the two batteries
(type/AA) supplied.
osition them in the battery com-
2. P
tment, as shown in the diagram.
par
3. Replace the cover.
Satellite Functions
13
Page 14

Remote Control (cont’d)
Programming Your Remote Control
TV Setup (TV Power,VOL and MUTE)
ou can program the DIRECTV remote control to operate your TV
Y
power, volume and mute.
1) Move the slide switch near the top of the remote to TV.
oint the remote away from your DIRECTV Receiver. Press and
2) P
hold MUTE and SELECT until the light near the slide switch on the
remote flashes twice (about 5 seconds).
3) Enter the fiv
page).
4) Test the remote by pressing the PWR, VOL and MUTE. If the
emote does not control your television,repeat steps 2 and 3, using
r
a different five-digit code.
5) If you’ve tried all the codes for your TV, and you can’t control
your TV, then try Perform a Code Search
Once your remote is programmed to work with your TV, the VOL
and MUTE key will work regardless of the slide switch position. If
you would like to change the VOL and MUTE to work with another component, you can. Simply set up your remote to work with
the component, and then follow the Volume Lock instructions.
e-digit code for your TV (refer to the code list next
TV INPUT Select setup
Once you’ve set up your TV Power, VOL and MUTE, you can program the TV INPUT button if you’d like.
1) Move the slide switch near the top of the remote to TV.
2) Point the remote away from your DIRECTV Receiver. Press and
hold MUTE and SELECT until the light near the slide switch on the
remote flashes twice. (about 5 seconds)
3) Enter 9 – 6 – 0.The light will blink twice.
If you want to hide the TV INPUT button, then follow steps 1
through 3 again, and the light will blink 4 times, then pressing the TV
INPUT will do nothing.
Set up AV1 or AV2 to control DVD,VCR, other TV,
second DIRECTV Receiver, or Stereo
You can program the remote control to work with other electronic
components in your home.
1) Move the slide switch near the top of the remote control to AV1
or AV2
2) Point the remote away from your DIRECTV Receiver and com-
ponents. Press and hold MUTE and SELECT until the light near the
slide switch on the remote flashes twice. (about 5 seconds)
3) Enter the five-digit code for the component and brand (refer to
the code list located next page)
4) Test the remote by pressing the PWR button on the remote. If
the component turns off/on then you successfully programmed
your remote. If not then repeat step 1 with the next code for your
component.
5) If you’ve tried all the codes for component, and you can control
your equipment, then try Perform a Code Search
Volume Lock
If you programmed your remote to control your TV, then the VOL
y will automatically control the volume on your TV,
and MUTE k
egar
r
e
dless of the slide s
witch position.
ou want the
If y
VOL/MUTE
keys to control a different component, such as your stereo, you can.
1) First, program AV1 or AV2 to work with your stereo or A/V
equipment (see above instructions).
2) Move the slide switch near the top of the remote control to the
position you would like to lock the VOL & MUTE keys to.
3) Point to remote away from your DIRECTV Receiver and components. Press and hold MUTE and SELECT until the light near the
slide switch on the remote flashes twice (about 5 seconds).
4) Enter 9 – 9 – 3.The light will blink twice.
Now no matter which position your slide switch is in, the VOL and
MUTE will work this new component.
Global Volume Unlock
Depending on ho
control only your TV or other component, no matter which position the switch is in. If you don’t want it to work this way, the
remote can be programmed so that the VOL and MUTE work with
multiple components based on the switch position.
1) Point the remote away from your DIRECTV Receiver and components. Press and hold MUTE and SELECT until the light near the
slide switch on the remote flashes twice (about 5 seconds).
2) Enter 9 - 9 - 3 then VOL UP. The light will blink twice.
Now the VOL and MUTE will work for the component selected by
the slide switch position.
w you set up your remote,the VOL and MUTE will
Perform a Code Search
If you were unable to find a code for your brand of TV or component, you can try a code search.This process may take up to 30 minutes.
1) First turn on the TV or component.
2) Move the slide switch near the top of the remote control to the
appropriate position.
3) Point the remote away from your DIRECTV Receiver and components. Press and hold MUTE and SELECT until the light near the
slide switch on the remote flashes twice (about 5 seconds).
4) Enter one of the following 4 digits
TV: 9 9 1 1VCR or DVD: 9 9 1 2 Stereo: 9 9 1 3
5) Press the PWR key on the remote control.
6) Point the remote to the TV or component and press CHAN UP.
Repeatedly press the CHAN UP until the TV or component turns off.
7) When the TV or component turns off, the press SELECT.
Note: If the light flashes 3 times before the TV or component
responds, then you’ve cycled all codes and unfortunately the code
you need is not available.You must then use the remote that came
with your TV or component.
y Default
actor
F
eset all the functions of the r
o r
T
defaults, follow these steps:
y from your DIRECTV Receiver and com-
wa
oint the r
1) P
ponents.
slide switch on the remote flashes twice (about 5 seconds).
2) Enter 9-8-1.
w y
No
emote a
ess and hold MUTE and SELECT until the light near the
Pr
The light on the r
A
ed the
e clear
v
ou ha
emote contr
emote will flash twice
AV2 and TV modes.
V1,
ol to the factor
.
y
14
Page 15

TV Codes
Admiral ....................................10093,
Advent ........................10761, 10783, 10842
o .......................................................10092
Aik
Akai .............................10702,
on ...................................................10179
Alar
on ..................................10843, 10700
Albatr
Ambassador .........................................10177
Action ...................................10180
America
o ...................................................10751
Ampr
Anam .....................................................10180
OC ......................................................10030
A
Apex Digital ............................10748, 10765
vox ....................10451, 10180, 10092
Audio
Bell & Ho
Bradford ................................................10180
Br
Candle ......................................10030, 10056
Carnivale ..............................................
Car
Celebrity ...............................................10000
Celera ...................................................
Changhong ..........................................
Citizen ...........10060, 10030, 10056, 10092
Clarion ..................................................10180
Concerto ..............................................10056
Contec ..................................................10180
Craig ......................................................10180
Crosley ..................................................10054
Cr
Curtis Mathes ...........10047, 10054, 10154
............10451, 10093, 10060, 10702, 10030
............10145,
CXC ......................................................10180
Dae
Denon ...................................................10145
Dumont ................................................10017
Durabrand ..............................10180,
Dwin ........................................10774, 10720
Electr
Emerson ........10154, 10236, 10463, 10180
..........................10178,
well .........................10154, 10016
oksonic ................................10236, 10463
ver ...................................................10054
own ...................................................10180
10166, 10056, 10016, 10466
woo ........10451, 11661, 10672, 10092
oband ..........................................10000
10171, 10179, 10177
10463
10030, 10672
.10030
.10765
.10765
10178
VCR Codes
Admiral ....................................20048, 20209
Adventura ............................................20000
Aiko .......................................................20278
Aiwa ........................................20037, 20000
America Action ...................................20278
American High ....................................20035
Asha .......................................................20240
Audiovox .................................20037, 20278
Beaumark .............................................20240
Bell & Howell ......................................20104
Broksonic .....20184, 20121, 20209, 20002
....................................................21479, 20479
Calix ......................................................20037
Canon ...................................................20035
er ...................................................20081
v
Car
CCE ..........................................20072, 20278
Citizen..........................20037, 20278, 21278
Colt .......................................................20072
Craig .............20037,
Curtis Mathes ...........20060, 20035, 20162
.................................................................21035
Cybernex...............................................20240
Daewoo .....................20045, 20278, 21278
Denon ...................................................20042
Durabrand ..............................20039, 20038
Dynatech ..............................................20000
Electrohome ........................................20037
Electrophonic ......................................20037
Emerex .................................................20032
Emerson ........20037, 20184, 20000, 20121
............20043, 20209, 20002, 20278, 21278
....................................................20479,
Fisher .......................................20047,
Fuji ............................................20035, 20033
Funai ......................................................20000
Garrard .................................................20000
GE .....20060, 20035, 20240, 21060, 21035
20047,
20240, 20072
21479
20104
DVD Codes
o .......................................................20869
Allegr
Apex Digital ...................20672,
.................20794, 21061, 20755, 20830, 20796
Blaupunkt ..................................................20717
Blue Parade ...............................................20571
Broksonic ..................................................20695
CineVision .................................................20876
tis Mathes ..........................................21087
Cur
CyberHome .................................20816,
Daewoo .....................................................20784
Denon .......................................................20490
DVD2000 ..................................................20521
Emerson ..........................20591, 20675, 20821
Enterprise ..................................................20591
Fisher .........................................................20670
Funai ...........................................................20675
GE ....................................20522, 20815, 20717
20717,
21100
21023
Remote Control (cont’d)
vision .................................................10030
En
Fisher .....................................................10154
Fujitsu ............10179,
Funai ............................10180,
etech ............................................10180
Futur
way ...................................11756, 11755
Gate
GE .....10047, 10051, 10451, 10178, 10021
Gibralter ..................................10017,
GoldStar ..................................10030,
Grunpy .....................................10180, 10179
Hallmark ...............................................10178
Harley Davidson .................................10179
Harman/Kar
vard .................................................10180
Har
Havermy ................................................10093
Hello Kitty ............................................10451
Himitsu ..................................................10180
Hisense ..................................................10748
Hitachi ...........10145,
Infinity ....................................................10054
Inteq .......................................................10017
JBL ..........................................................10054
JCB .........................................................10000
ensen .....................................................10761
J
JVC .........................................................10053
KEC ........................................................10180
enwood ..............................................10030
K
KLH ........................................................10765
KTV ..........................................10180,
Logik ......................................................10016
Luxman ..................................................10056
LXI ....10047,
Magnavox ......10054, 10030, 10706, 10179
Majestic .................................................10016
Marantz ....................................10054, 10030
Matsushita ...............................10250, 10650
on .................................10178, 10145
Megatr
Memorex ......10154, 10250,
......................................10178,
MGA ...........................10150, 10030, 10178
Midland .......................10047,
.................................................................20807
Go Video ..............................................20432
GoldStar .....................20037, 20038, 21237
Gradiente ..............................................20000
Harley Davidson ..................................20000
Harman/Kardon .....................20081, 20038
Harwood ..............................................20072
HI-Q ......................................................20047
Hitachi ......................................20000, 20042
Hughes Network Systems ................20042
JVC .........................................................20067
KEC .........................................20037, 20278
Kenwood ................................20067, 20038
KLH .......................................................20072
odak .......................................20035,
K
Lloyd's ...................................................20000
Logik ......................................................20072
LXI .........................................................20037
Magnasonic ..........................................21278
Magnavox ......20035, 20039, 20081, 20000
..................................................................21781
Magnin ...................................................20240
Marantz ....................................20035, 20081
Marta .....................................................20037
Matsushita ...............................20035, 20162
MEI .........................................................20035
Memorex ......20035, 20162, 20037, 20048
............20039, 20047, 20240, 20000, 20104
.......................................20209, 20479, 21237
MGA .........................................20240, 20043
MGN Technology ................................20240
Minolta ...................................................20042
Mitsubishi ...................20067,
Motorola .................................20035, 20048
MTC .........................................20240, 20000
Multitech .................................20000, 20072
NEC ............................20104, 20067, 20038
Video ......................................20783,
Go
eenhill ...................................................20717
Gr
Hitachi ..........................................20573, 20664
er .......................................................20672
Hitek
Initial ...........................................................20717
JVC ...................................20558, 20623, 20867
Kenwood .....................................20490, 20534
KLH ..............................................20717,
oss ............................................................20651
K
Lasonic .......................................................20798
ox .....................................20503, 20675
v
Magna
Marantz ....................................................20539
Memorex ...................................................20695
Microsoft ...................................................20522
Mintek .........................................20839,
Mitsubishi .....................................21521,
Nesa ...........................................................20717
10809, 10683, 10853
10171, 10179
10030
10178
don ..................................10054
10016, 10151, 10056
10030
10054, 10154, 10156, 10178
10463, 10150
10179, 10016
10017, 10051
20037
20807
20043,
20715
21020
20717
20521
utz ....................................................10021
Min
Mitsubishi .....10093, 10150, 11250, 10178
Monivision ..............................10843,
ola ..............................................10093
Motor
MTC ...........................10060,
Multitech ..............................................10180
NAD ...........................10156, 10178, 10866
NEC ...............10030,
o ..........................10030, 10178, 10092
Nikk
Norcent ...................................10748, 10824
NTC ......................................................10092
Onwa ....................................................10180
us ........10154, 10250, 10166, 10650
Optim
Optonica ..............................................10093
Orion .........................10236, 10463, 10179
Panasonic ..................10250,
Penney ...........10047, 10156, 10051, 10060
.......................................10030,
Philco .......................................10054,
Philips .......................................10054, 10690
Pilot ........................................................10030
Pioneer .......................10166,
Portland ................................................10092
Prima ........................................10761,
Princeton ..............................................10700
Prism ......................................................10051
oscan .................................................10047
Pr
Proton.......................................10178, 10466
Pulsar ....................................................10017
Quasar .......................10250, 10051, 10650
RadioShack ...10047, 10154, 10180, 10030
....................................................10178,
RCA ............................10047, 10090, 10679
Realistic .........10154,
.................................................................10056
Runco .........................10017, 10030, 10603
Sampo ......................................10030,
Samsung ........10060, 10702, 10030,
.......................................10814,
Sansui .....................................................10463
yo .....................................................10154
San
Nikko ....................................................20037
Noblex ..................................................20240
Olympus ...............................................20035
Optimus ........21062, 20162, 20037, 20048
....................................................20104, 20432
Orion ............20184, 20209, 20002, 21479
.................................................................20479
Panasonic .....21062, 20035, 20162, 20616
...................................................20225, 21035
Penney ..........20035, 20037, 20240, 20042
......................................20038, 21237, 21035
Pentax ...................................................20042
Philco ....................................................20035
Philips .........................20035, 20081, 20618
Pilot .......................................................20037
Pioneer .................................................20067
Polk Audio ............................................20081
Profitronic ............................................20240
oscan ....................................20060,
Pr
Protec ...................................................20072
Pulsar ....................................................20039
Quasar .......................20035,
RadioShack .........................................20000
Radix .....................................................20037
Randex ..................................................20037
A .20060,
RC
....................................................21035, 20880
Realistic ........20035, 20037, 20048, 20047
...................................................20000, 20104
ReplayTV ..............................................20616
Runco ....................................................20039
Samsung .....................20240,
Sanky ........................................20048,
Sansui ............20000, 20067, 20209, 21479
.................................................................20479
Sanyo ..........................20047, 20240, 20104
Scott ..............20184, 20045, 20121, 20043
cent ....................................................21003
Nor
Onky
Oritron .......................................................20651
Panasonic .....................................20490,
Philips .................20503, 20539, 20646, 20854
Pioneer ..........................................20525, 20571
Polk Audio .................................................20539
oscan ......................................................20522
Pr
estar .....................................................20651
Qw
RCA........20522, 20571, 20717, 21022, 20822
Rio ...............................................................20869
Rotel ...........................................................20623
Samsung .......................................20573, 20820
Sansui ........................................................20695
o ............................................20670,
y
San
Sharp .........................................................20630
Shinsonic ......................................20533, 20839
20240,
o .......................................................20503
15
10700
10030, 10056
11704, 10056, 10704
10051, 10650
10178, 10021
10030
10866, 10679
10783
10056
10180, 10030, 10178
11755
10178
10766, 10056
21060
20162, 21035
20042, 20807, 21060
21014
20045,
20039
21362
20695
Scotch ...................................................10178
Scott ..............10236, 10180, 10178, 10179
Sears..10047,
.......................................10171,
Sharp
Sheng Chia.............................................10093
Signature ...............................................10016
y ..........................................10000, 10834
Son
Soundesign .................10180,
Squareview ............................................10171
SSS ..........................................................10180
Starlite ...................................................10180
Supr
A ........................................................10748
SV
Sylvania ........................10054, 10030, 10171
Symphonic ...............................10180,
Tandy .....................................................10093
echnics ...................................10250, 10051
T
echnol Ace .........................................10179
T
Techwood ...............................10051, 10056
eknika ..........10054, 10180, 10150, 10060
T
.........................10092,
Telefunken ...............................10702, 10056
TMK ............................10178,
TNCi .....................................................10017
oshiba ..........10154, 10156, 10060, 10650
T
....................................................11704,
TVS ........................................................10463
ector Research..................................10030
V
Victor ....................................................10053
Vidikron ................................................10054
Vidtech ..................................................10178
Viewsonic .............................................11755
ards ............10054, 10030, 10178, 10866
W
.........................10016, 10179, 10021, 10056
Waycon .................................................10156
White
Yamaha ..................................................10030
Zenith ...........10017,
.................................................................10016
Sears ..............20035, 20037, 20047, 20000
......................................20042, 20104, 21237
Sharp ........................................20048, 20807
Shintom ................................................20072
Shogun ..................................................20240
Singer ....................................................20072
Sonic Blue .............................................20616
Sony .20035, 20032, 20033, 20000, 21232
.................................................................20636
STS .........................................................20042
Sylvania ..........20035, 20081, 20000, 20043
..................................................................21781
Symphonic ............................................20000
Teac ........................................................20000
echnics ...................................20035,
T
Teknika .......................20035, 20037, 20000
Thomas .................................................20000
Tivo ..........................................20636, 20618
TMK ......................................................20240
Toshiba .......................20045, 20043, 21145
Totevision ...............................20037, 20240
Unitech .................................................20240
Vector ...................................................20045
Vector Research .................................20038
Video Concepts ................................20045
Videomagic ..........................................20037
Videosonic ...........................................20240
Villain .....................................................20000
Wards ...........20060, 20035, 20048, 20047
............20081, 20240, 20000, 20042, 20072
White Westinghouse ............20209, 20072
XR-1000 ....................20035,
amaha ..................................................20038
Y
Zenith ............20039, 20033, 20000, 20209
....................................................20479, 21479
Sonic Blue .................................................20869
y .................................20533,
Son
Sylvania .........................................20821, 20675
Symphonic .................................................20675
Technics ......................................................20490
Theta Digital ..............................................20571
Toshiba .............................20503, 21045, 20695
Urban Concepts........................................20503
Xbo
Yamaha .............................20490, 20539, 20545
Zenith ...............................20503,
10054, 10154, 10156, 10178
..10093, 10818, 10689, 10688, 10851
eme ................................................10000
Westinghouse ........................10463
x ...........................................................20522
10056, 10179
10178, 10179
10171
10016, 10179, 10056
10056, 10177
10845
10463, 10178, 10092
20162
20072
20000,
21033
20864,
20869
20591,
Page 16

Remote Control (cont’d)
TV Functions
Once programmed (refer to page 14), your DIRECTV®Remote Control should control certain functions of your TV. Be
sure to press the TV button before operating your TV.
TV
Move to position TV to put the remote
ol in TV mode. LED will blink when
contr
other buttons are pressed while in TV
mode.
TV INPUT
Switch through TV inputs (if applicable).
VOL +/-
Increases and decreases volume.
TV POWER ON
Press to turn TV on.
TV POWER OFF
Press to turn TV off.
CH+/CH-
Change channel up or down
MUTE
Switches audio on and off
0-9
Allows direct number entry for tuning to
a channel.
y not be suppor
TV ma
our
es on y
Note: All f
eatur
ted by this remote.
16
Page 17

Setup Wizard
If your equipment has been professionally installed,skip this first time
setup section and go to page 18.
After the DIRECTV®Receiver has been connected to your components, it is time to turn the DIRECTV Receiver on.
1. Press the PWR button on the remote control.
2. Use the 89 buttons to select your preferred language of the on
een menus and guide and press SELECT.
scr
3. When the Welcome screen displays, press the SELECT button on
the remote control to start the Setup Wizard.The Setup Wizard
is a first time setup that automatically steps you through the installation process.This screen will
your DIRECTV Receiver is turned on.
a. Enter the ZIP code.
Note: The ZIP code is critical to point your dish accurately
efer to page 30).
(r
b. Configure the dish (refer to page 30).
c. Point the dish (refer to page 30).
d. Test the System (refer to page 31).
4. After you have installed your DIRECTV System, you should
contact DIRECTV to order DIRECTV®programming at
1-800 DIRECTV (1-800-347-3288).
ONLY appear the very first time
17
Page 18

Watching TV
Young Father
Movies, Horror (2001) Seth Hill stars in this tale of a young father
facing otherworldly intruders in a secluded mansion during the
waning days of World War II.
106 PPV
5:30PM-7:15PM Jun 14, PG-13
5:22PM Jun 14
Spanish
News List 1
Press OK to purchase
The Info Banner shows information on the currently tuned program such as the rating, title, start and end time, program
description, and channel number. It also displays the current time and date and indicates if any special features are currently
enabled, such as Favorite Channels (page 19).
All Day Ticket (Pay Per View)
Alternate Audio Track
Closed Captioning
New Incoming Messages
Channel Number
& Name
Start/End Time
& Date
Channel Icon
Program Name
& Description
On screen Display
(OSD)
message space
indicates error
messages or
status or song ID
information
(when you select
a channel that
contains audio
only).
Letterbox format
System Locked
System Temporarily Unlocked
Pay Per View
Rating
Current Time
& Date
Current Alternate
Audio Track
- The alternate
audio icon indicates
an alternate audio
track is available.
To change audio
tracks, press the
; or : button on
the remote.
vorites (page 19)
Fa
status
Watching TV
To do this…. Do this….
y the banner
Displa
View program details 1. Press INFO to display the banner
w other channels with
Vie
the Browse Banner currently viewed program with the Browse Banner.
ess INFO button on the r
Pr
Press INFO again to display program details
2.
ou can see or “browse” what is on other channels without tuning away from the
Y
While watching a pr
1.
2. While the banner is displayed. press the ,9 buttons to see what is showing on
other channels.
3. Press SELECT to switch to the new channel displayed in the Banner or exit to
emo
r
Note: When Favorite Channels (page 19) is in use, the Browse Banner will only show
programs from those lists.
e the banner
v
.
emote
ogram, press the INFO button on the remote to display the banner.
18
Page 19

Enhanced User Features (cont’d)
Favorite Channels
vorite Channels is an easy way to customize the listing of
Fa
channels. Once Favorites is configured, the Favorites icon
displays in the banner and programs displayed in the Program
Guide are only those in the selected list. When using the CH+
and CH- buttons, you are limited to channels in the
Favorites list; however, you can access any channel by entering its
number directly on the remote control. You can save up to four
erent favorite channel lists. This way, members of a household
diff
can each set their own favorite channel list.
To access Favorite Channels:
1.
Press MENU.
2. Use the 9 button to select “Preferences” and press SELECT.
3. Use the 9 button to select “Set Favorite Channels” and press
SELECT.
Then, to select or edit a Favorite channel list:
Press the ,9 buttons to highlight the desired list, and press
1.
SELECT. To turn off any previously selected Favorites list, highlight “All Channels”, and press SELECT
2. Then, use the ,9 buttons to highlight “Select” to activate your
Favorite list and press SELECT.To edit the name or customize a
Favorite channel list, select “Select and Edit” and press SELECT.
Select & Edit: Change List Name:
1. Select “Change List Name” and press SELECT.
2. Use the ;:,9 buttons to scroll through the alphabet.When
the letter you want is selected, press SELECT. Repeat until you
have spelled the list name.
3. When finished, select “Done” on the on-screen keyboard and
press SELECT.
Select & Edit: Customize Favorites:
1. Select
2. You can manually select/deselect channels by highlighting a chan-
3. When customization is complete
“Customize Favorites” and press SELECT.
Use the
nel and pr
through the list, or use the PAGE +/- buttons to scroll the list
up or down by a complete page.
“Select All” selects all channels in the list.You can then manually
deselect any channel.
“Deselect All” deselects all the channels in the list. You can then
man
SELECT. Press BACK to return to the previous menu without
ving y
sa
essing SELECT
y select an
uall
our changes.
y channel.
.
,9 buttons to na
ve Changes” and press
“Sa
Select
,
vigate
To access Favorites from the Main Menu, press MENU
and select “Preferences”
Select “Set Favorite Channels” in the “Preferences” menu
Change List Name
19
Customize Favorites
Page 20

DIRECTV ADVANCED PROGRAM GUIDE
106 PPV 5:22PM Jun 14
5:30PM-7:15PM Jun 14
Fri Jun 14 5:00P 5:30P
Press Guide View Search Help
Young Father
Movies, Horror (2001) Seth Hill stars in this
tale of a young father facing otherworldly
intruders in a secluded mansion during the
waning days of World War II.
Rating: PG-13All Channels
106 PPV G The... Young Father
107 PPV
G
Young Father
108 PPV
G
Young Father
109 PPV
G
All
110 PPV
G
All
111 PPV All
ALLDAY
ALLDAY
ALLDAY
ALLDAY
ALLDAY
®
DIRECTV ADVANCED PROGRAM GUIDE
The DIRECTV ADVANCED PROGRAM GUIDE offers complete TV listings for up to 3 1/2 days plus access to much more.The
Guide lists programs according to their time slot and channel.With it, you can tune to a program,be notified when a program is
about to star
or future viewing.
f
The
Channel Scroll Bar shows the position of the channel relative to the total number of channels.
The
Channel List shows the channels available.
Arrows indicate that the program extends beyond the time slot shown.
The Clock indicates that a Reminder for the program has been set for future viewing. If a Reminder is set, it will always display
in the Guide cell.You will get notification before the program starts so that you can tune to it.
The Program List shows all the programs airing in a given time slot. If program names are too long to fit into a guide cell,they
may be shortened.When a program is selected, its full name appears in the banner.
The
Banner in the guide shows information on the highlighted program such as the rating, title, start and end time, pro-
gram description,
rently enabled, such as Favorite Channels (page 19).
t, order pay per view programs, search through listings by the type of program you’re looking for, and set reminders
and channel number. It also displays the current time and date and indicates if any special features are cur-
Channel Number
& Name
Currently Tuned
Channel
Picture in Guide
Time Slot
Selected Date
Channel Scroll
Bar
Channel List
Program List
Current
Time and
Date
Icons
Refer to page 18.
Star
t/End Time
& Date
Banner
Rating
Highlighted
Program
ows
Arr
Guide Menu
Buttons
Using the Guide
To do this…. Do this….
y the Guide
Displa
Scroll through the Press the ,9 buttons. You can use the PAGE+/- buttons to scroll a full page at
Program List a time.
oll to another time slot
Scr
Choose a pr
View program details You can toggle between the guide and program details by pressing the INFO button on
gram to vie
o
w
ess the GUIDE button on the r
Pr
ess the
Pr
ess the ar
Pr
Guide. If the program is in the current time slot, pressing SELECT tunes to the
;: buttons.
w buttons until the program you want to view is highlighted in the
o
r
Pr
selected channel and displays the information for the program in the banner.
If the program is in a future time slot, you are given the option to set a Reminder (refer
to page 21).
to pur
the r
If the selected future program is pay per view,you are also given the option
chase the pr
ogram.
emote.
emote contr
ogram inf
20
ormation displa
ol or select
“Guide” fr
ys in the banner
om the Main Men
.
u.
Page 21

DIRECTV ADVANCED PROGRAM GUIDE®(cont’d)
Using the Guide (cont’d)
To do this…. Do this….
Set a Reminder for future You can set up your viewing schedule ahead of time, so that you will be automatically
wing
vie
To set a Reminder for a 1. Highlight a future program in the guide and press SELECT. In the Reminder screen,
non-pay per view program
To set a Reminder for a 1. When a future pay per view is purchased, you are given the option to set a
pay per view program
To cancel a Reminder for a 1. Highlight the program in the guide and press SELECT.
program
notified of the shows you want to see. In the Guide, Reminders display as a clock to the
right of the program title.
If you wish to record a program using your VCR, set the VCR’s timer recording also.
Refer to your VCR’s owner’s manual for timer recording instructions.The DIRECTV®
Receiver will turn on at the correct time and tune to the channel if a Reminder is set.
choose whether you want to select this program once, daily, weekly, or MondayFriday. Remember, you are actually setting the Reminder by the time slot, so if the
program moves to a different time slot, you will need to reset the Reminder.
2. Press SELECT.
If the program is in the same time slot as another Reminder, the system will prompt
you that a conflict exists.
Reminder in the purchase details screen. If you set the Reminder for a purchased
pay per view, you will be charged when the event airs.
2. Choose “Once” if you want to cancel a Reminder program for one time slot only,
or “Always” if a program has been set as a Reminder more than once, for example, a
program that airs every day.Then, press SELECT.
PPV (Pay Per View)
Pay per view programs include special programming, movies, and sporting programs and are indicated by a "$" in the banner. In
the Guide, you can preview currently airing PPV programs, purchase current and future PPV programs, and cancel a purchase. From
the Main Menu, you can view the purchase history, cancel purchases, and restrict this feature by setting rating and spending
limits.
To purchase a PPV program:
1. Highlight the pr
2. Select "Buy" and press SELECT. The price will display on the button. If you have locked your DIRECTV Receiver and the
rating or spending limit is exceeded, you must enter your access code to temporarily unlock the receiver (refer to page 27)
before you can purchase it.
3. Select
4. Press SELECT to confirm your purchase.
Note: T
“Sho
(if available), then press the SELECT button to select it.
o or
ogram in the Guide and pr
wings” to see a list of alternate sho
the DIRECTV Receiver must be continuously connected to a land-based phone line.
der PPV
,
ess SELECT
.
w times.
ess the
Pr
,9 buttons to mo
e to the next selectable sho
v
wing
21
Page 22

Guide Menu
106 PPV 5:22PM Jun 14
5:30PM-7:15PM Jun 14
Fri Jun 14 5:00P 5:30P
Press Guide
View Search Help
You
ng Father
Movies, Horror (2001) Seth Hill stars in this
tale of a young father facing otherworldly
intruders in a secluded mansion during the
waning days of World War II.
Rating: PG-13
All Channels
106 PPV G The... Young Father
107 PPV
G
You ng Father
108 PPV
G
You ng Father
109 PPV
G
All
110 PPV
G
All
111 PPV All
ALLDA
Y
ALLDA
Y
ALLDA
Y
ALLDAY
ALLDA
Y
Guide Menu
The bottom of the Guide screen (refer to page 20) contains three
buttons that can be accessed by pressing the GUIDE button on the
remote control when the Guide is already displayed.
aa
Use the ;: buttons to highlight a button and press SELECT
to view its list of options.
aa
To close the list of options and select another Guide Menu
button, press BACK.
aa
To return to the Guide press BACK again or GUIDE.
aa
To exit to watch TV, press Exit.
Guide Menu:View
Selecting “View” displays “Go To Time, Pay Per View, Reminder List
and Time Reminder.” Use the ,9 buttons to select from the
View options. Press SELECT or
: to select an option.
Jump to specific time slot in guide
EZ Search Pay P
er View (see page 21)
List of Reminders set (see page 22)
Set a Reminder by specific date, time
and duration
22
Page 23

Guide Menu (cont’d)
S
earc
h for a
C
ategor
y
A
rrow up/down t
o scro
ll
.
P
ress
SELECT
t
o c
hoose
.
BACK
t
o previous menu
.
M
ain
-
indicate
s
s
ubcategorie
s
.
V
iew
the
m b
y pressi
ng the
righ
t arro
w
.
P
ress
SELECT
t
o c
hoose on
e category
o
r subcategory
.
M
ovies
S
port
s
I
nterest
s
L
ifestyles
N
ews
T
hemes
S
ho
w
T
ype
s
A
g
e
A
ppropriat
e
Guide Menu: Search: Category
A categ
categ
has subcateg
1. Use the ,9 buttons to highlight a category or the : arrow
2. Pr
Guide Menu: Search:Title/Actor/Director
To search for a specific title, actor or director:
1. Use the ;:,9 buttons to scroll through the alphabet.
2. When finished,highlight “Done” on the on-screen keyboard and
Note: Ignore punctuation and accents. For example, enter
JOHN’S as JOHNS and DAY-TO-DAY as DAYTODAY.When entering a full name, enter FIRST <space> LAST.
ory search allows you to choose from a predefined list of
ories and subcategories. The
row indicates the category
: ar
ories.
to view a list of subcategories.
ess SELECT to select one category or subcategory to search.
Highlight the letter you want, and press SELECT. Repeat until
you have spelled part or all of the title, actor or director’s name.
press SELECT.
Choose a category to search
Guide Menu: Search Results
Once your search is completed you will see a list of results on the
screen. Use the ,9 buttons to highlight a program and press
INFO to view the program details or SELECT to view a list of program sho
In addition to the icons on page 18, the list of program showing
times includes additional icons to reflect the available alternate
audio tracks.
wing times.
English
Spanish
French
German
Italian
penese
Ja
Korean
Chinese
Enter the name of the title, actor or director with the
on-screen keyboard
“Search Results” screen
“Showings” screen
23
Page 24

Main Menu
Using the Main Menu
The Main Men
er.
Receiv
To access the Main Menu from the Guide or TV:
ess the MENU button on the remote control.
Pr
To exit the menu:
Press the MENU button or EXIT.
To navigate through the menus:
Use the ,9 buttons to highlight an option.Then press SELECT
or : to confirm the selection and display a sub-menu. Selecting
items in a sub-menu displays options in which you can change or
review settings.
u lets you customize the features of your DIRECTV
®
Press MENU button to view Main Menu
24
Page 25

Main Menu (cont’d)
Main Menu: Preferences
The Preferences option in the Main Menu lets you change the “Preferred Language”, screen format, or banner duration, set
or edit the favorite channels list, and set the remote control ID.To change your preferences, select “Preferences” in the Main
Menu and press SELECT. In the sub-menus that display, use the ,9 buttons to highlight your selection. Press BACK to
eturn to the Main Menu.
r
Preferences: Preferred Language
Many programs are broadcast with program information and audio
tracks in different languages. You can choose the preferred language for the text in the Menu and Guide and for the audio tracks
of programs.
Note: Not all programs offer multiple languages. If the selected
program is not available in the language you prefer, it defaults to English.
To choose a language:
1. Press MENU. The Guide option will be highlighted. Press 9 to
select
“Preferences” and press SELECT.
2. Select “Preferred Language” and press SELECT.
3. Use the ,9 buttons to choose either “Menu & Guide” or “Audio
Track” and press SELECT. The currently selected language has a
checkmark to its right.
4. Use the ,9 buttons to choose a language from the list.
Press SELECT.
If desired, repeat steps 3-4 to change the other option.
Note: Once the language of the “Menu & Guide” menu is changed,
the Receiver will reset and the new language will be used.
Select preferred language of text in the Menus and
Guide in the “Menu & Guide” menu
Preferences: Screen Format
ormat:
o select a scr
T
1. Press MENU.
2. Press 9 to select “Preferences” and press SELECT.
ess
3. Pr
4. Use the ,9 buttons to choose fr
5. Once you have made your selection, press SELECT.
Note: Most standard TVs are 4:3 and that is the recommended
setting. If you have a widescreen TV, select 16:9.
9 to select the
een f
“Screen Format” and press SELECT.
om the options.
Select preferred language of every program in the
“Audio Track” menu
“Screen Format” menu
25
Page 26

Main Menu (cont’d)
Preferences: Banner Duration
Banner durations define how long the banner remains on the
een after you press INFO. Options are 5 or 10 seconds.
scr
The default value is 10 seconds.
To select the banner duration:
ess MENU.
1. Pr
2. Press 9 to select “Preferences” and press SELECT.
3. Press 9 to select “Banner Duration” and press SELECT.
4. Use the ,9 buttons to choose from the options.
5. Once you have made your selection, press SELECT.
Preferences: Set Favorite Channels
Refer to Enhanced User Features section, page 19.
“Banner Duration” menu options
26
Page 27

Main Menu (cont’d)
Main Menu: Parental Controls
If you want to control what channels and programs are being watched or how much is being spent on each pay per view
chase, Parental Controls allows you to do this with channel locks, spending limits, and rating limits. Parental Controls are
pur
protected by a 4-digit numeric password that you set.
To access this feature:
1. Press MENU.
2. Press 9 to select “Parental Controls” and press SELECT.
3. Use the ,9 buttons to choose from the options and press SELECT.
Parental Controls: Lock The System
®
(Lock/Unlock The DIRECTV
Once any Parental Control setting has been configured, the DIRECTV
Receiver must be locked in order for those changes to take effect.Your
DIRECTV Receiver can be locked or unlocked. When it is locked, the
system will prompt you to enter the password whenever you want to
change settings in the following menus: “Channel Locks”, ”Set Rating
Limits”, or “Set Spending Limits”.The lock icon in the banner indicates a
locked system.
To lock or unlock the system:
1. Choose “Lock The System” or “Unlock The System” from the
“Parental Controls” menu.
2. When the system prompts you for a password, enter it using the
numeric buttons on the remote control. If locking the system, you
will need to confirm it before it takes effect. If you have forgotten
or lost your password, contact your service provider.
Receiver)
Parental Controls: Channel Locks
Locking channels prevents a viewer from accessing the channels by
requiring a password.You must lock the DIRECTV Receiver
to enforce these settings (see above).
To set Channel Locks:
1. Choose “Channel Locks” from the “Parental Controls” menu and
press SELECT.
o lock /unlock all channels, use the
2. T
“Unlock
or
All”,
3. To manually lock/unlock individual channels, press :. Then, use
the ,9 buttons to select a channel and press SELECT to toggle
between lock and unlock.
4. Use the PAGE +/- buttons to scroll the channel list by a full page.
5. To store your new settings, select “Save Changes” and press SELECT.
All” and press SELECT.
,9 buttons to select
“Lock
“Parental Controls” menu
“Channel Locks” menu
27
Page 28

Main Menu (cont’d)
Parental Controls: Set Spending Limit
ou can set a per purchase spending limit on pay per view pro-
Y
grams. It is not a cumulative limit.You must lock the DIRECTV
Receiver to enforce this setting (refer to page 27).
To set the Spending Limit:
1. Choose “Set Spending Limit” from the “Parental Controls” menu
and press SELECT. The current purchase limit displays.
2. Enter the spending limit using the numeric buttons on the
remote. Or, use the ;: buttons to move from one digit to
another, then use the ,9 buttons to set the value for each digit.
®
Parental Controls: Set Rating Limit
You can restrict viewing by setting the rating limits to certain levels.
Ratings help you determine programming content, similar to the
way films are rated. For example, a rating of "G" is a program suitable for general audiences, while a rating of "R" might be suitable
for adults only.You must lock the system to enforce these settings.
To view a locked program, you must first enter a password.
To set the Rating Limits:
1. Choose “Set Rating Limits” from “Parental Controls” menu and
press SELECT.
2. There are three rating systems to set: Children-TV, Entire
Audience-TV, and MPAA-Movies.You can lock or unlock all ratings in each system.When you lock a particular rating, all ratings
exceeding the locked rating are automatically locked as well. For
example, if you lock "R", "NC-17” and “X”" will be automatically locked. Press
SELECT to lock or unlock it. The Children-TV and Entire
Audience-TV options contain sublevel ratings that can further
identify the programming content.
,9 to select the desired limit and press
Parental Controls: Replace Access Card
Use this menu to replace your current card with a new one, sent
y your service provider. Be sure to follow the on-screen instruc-
b
tions. For information on inserting access cards, see page 8.
To replace your access card:
1. Press MENU.
2. Use the ,9 buttons on the r
“Parental Controls”. Press SELECT.
3. Choose
current access card is inserted in the DIRECTV Receiver.
"Copying OLD access card information" will appear on the
scr
4 When pr
then press SELECT.
5. When this process is completed, press SELECT to return to
the previous menu.
6. Discard the old card since it no longer works.
“Replace
een.
ompted,
Access Car
ve the old card, insert the new card,
emo
r
emote control to highlight
d”,
then pr
ess SELECT
.
Be sur
e the
“Set Spending Limit” menu
“Children-TV” rating system
“Entire Audience” rating system
28
“MP
vies” rating system
AA-Mo
Page 29

Main Menu (cont’d)
Main Menu: Purchases
Purchases: Past Purchases
The Past Purchases menu displays a summary of your past pay per view
chases. It includes the program name and channel number, program
pur
date, start and end time, price, and whether the program was viewed
or cancelled. Information for all past purchases is stored on the access
card and displayed with the most recent purchase first.
To view past purchases:
1. Press MENU.
2. Choose “Purchases” from the main menu and press SELECT.
3. Use the ,9 buttons to choose “Past Purchases” and press
SELECT.
4. A list of past purchases displays indicating whether they were
viewed or cancelled. You can scroll through the list using the
,9 buttons or using the PAGE+/- buttons to scroll by a full page.
Purchases: Upcoming Purchases
The Upcoming Purchases menu displays all future pay per view
programs that you have purchased but not cancelled.You may cancel any pay per view program you have not yet watched that was
purchased through the DIRECTV Receiver.
Note: You cannot cancel a PPV purchase if you have already tuned to
the program.
To cancel purchases:
1. Press MENU.
2. Choose “Purchases” from the main menu and press SELECT.
3. Choose “Upcoming Purchases” and press SELECT.
4. A list displays of upcoming purchases that were ordered but not
viewed.You can scroll through the list using the ,9 buttons
y a full page
GE+/- buttons to scr
or using the P
o delete a pending pur
5. T
checkmark will appear.
6. Select “Save Changes” and press SELECT to cancel all checked
programs from the upcoming purchases list.
ou can verify the purchase was cancelled by checking in the
7. Y
“Past Purchases” menu.
A
chase
oll b
highlight it and pr
,
.
ess SELECT
.
“Past Purchases” menu
“Upcoming Purchases” menu
A
29
Page 30

Main Menu (cont’d)
Main Menu: Setup
Use this menu to run through the setup process (professional installation is highly recommended). Configure each setting
“Enter ZIP Code” and “Dish Configuration.” Use “Point Dish” and “System Test” to confirm your setup.
within
To view Setup options:
1. Press MENU.
2. Select “Setup” and press SELECT.
3. Use the ,9 buttons to select one of the “Setup” menu options.
Setup: Enter ZIP Code
Use this function to correctly position the satellite antenna.
To enter your ZIP code:
1. At the “Setup” menu, select “Enter ZIP Code” and press
SELECT.
2. Enter the ZIP code using the numeric buttons on the remote, or
use the
Press the : button to move to the next field.
• Your ZIP code is critical to the
installation process.
,9 buttons to select each digit in the ZIP code field.
Helpful Hint
“Enter ZIP Code” menu
Setup: Dish Type
Use this function to identify your type of satellite antenna dish.
To select your dish type:
1. At the “Setup” menu, select “Dish Type” and press SELECT.
2. Use the ,9 buttons to select “Manual Selection” if you know
the type of dish you have. Otherwise, contact your installer or
select “Auto Selection” and press SELECT.
3. Use the ,9 buttons to manually select your dish type and
ess SELECT
pr
.
Setup: Point Dish
Use this function to manually point the dish and correctly align it
with the satellite(s). You may want to have a helper to read the
e. Signal strength
een displa
onscr
readings change approximately 2 seconds after each adjustment is
made.
Note: Single dish installations often sho
than installations that receive signals from two or three satellites.
The onscreen display will tell you how to align your dish based on
our ZIP code
y
To point your dish:
1. At the Setup men
2. A signal str
strength meter stabilizes at a maximum reading.The range is 0 to
100. It is recommended to obtain a signal strength of at least 60.An
audible tone will help with this procedure. The tones or beeps get
faster as the signal strength increases until it becomes a continuous
sound. If you have problems getting a signal, refer to the
oubleshooting section of the user man
tr
ys f
.
select “Point Dish” and press SELECT.
u,
ength meter displa
ys.
ou during this pr
or y
ocedur
w higher signal strength
Adjust the dish until the signal
ual (page 33).
ual Selection” menu options
“Man
Note: Use the 8 or 9 buttons to switch between
satellites.
transponders f
Use the
; or : buttons to s
or the selected satellite
witch between
.
30
Page 31

Main Menu (cont’d)
Setup: System Test
This option performs a test of the system.This information is useful
in troubleshooting if you need to contact customer service.
o run a system test:
T
1. At the Setup men
A message
few seconds, the test results will display.
“Test in progress, Please Wait . . .” may appear. After a
Setup: System Information
This option shows information about your hardware and software
that will be useful in troubleshooting if you need to contact customer
service.
To view system information:
1. At the Setup menu, select “System Information” and press
SELECT.
2. Use the PAGE +/- buttons to scroll the information.
u, select “System Test” and press SELECT.
“System Test” menu
“System Inf
ormation” menu
Main Menu: System Upgrades
Your DIRECTV®Receiver is able to receive upgrades or modifications to some of its features and functions.These modifications will occur automatically, usually at times when the DIRECTV Receiver is not likely to be in use. If your DIRECTV
Receiver is on when an upgrade or modification is sent, reception may be interrupted for a minute or two. Reception should
return to normal after the modification is complete.Your DIRECTV Receiver must be plugged in to receive an upgrade. Do
not unplug your DIRECTV Receiver while an upgrade is in progress. Consult the System Upgrades Menu to find a schedule
of upgrades or modifications planned by DIRECTV.
To view past or future upgrades:
ess MENU
1. Pr
2. Select
3. Use the ,9 buttons to select “Past Upgrades” or “Future Upgrades” and press SELECT.
.
“System Upgrades” in the Main Men
u and pr
ess SELECT
.
31
Page 32

Main Menu (cont’d)
Main Menu: Messages
When you receive a new message, the New Incoming
Messages icon appears in the banner. You can view and
delete messages.
it was sent.
message is automaticall
sages (30) is exceeded.The banner on the Message screen indicates
how many messages you have.
To view messages:
1. Press MENU.
2. Use the ,9 buttons to choose “Messages” and press SELECT.
3. Use the ,9 buttons to select and view a message.
4. When a message is displayed, press SELECT to delete a
message (the torn en
5. When you press BACK or EXIT, all deleted messages are
removed permanently and will not display the next time you view
messages.
Main Menu: Caller ID
Note:You must have phone line connected to your Receiver and be
subscribed to Caller ID service from your phone service provider.
When a phone call comes in, a display will appear containing call
information.
To enable or disable Caller ID:
1. Press the MENU button. Use the ,9 buttons to select “Caller
ID”and press SELECT.
2. Use the ,9 buttons to select “Enable/Disable” and press
SELECT.
3. Use the ,9 buttons to select either “Enable” or “Disable” and
press SELECT.
To view Caller ID history:
At the Caller ID screen, use the ,9 buttons to select “Call
History” and press SELECT. The history information will be
displayed.
Each message includes the date and time
When new messages are received, the oldest
y deleted if the maximum amount of mes-
velope icon indicates a deleted message).
“Messages” menu
“Caller ID” options
32
Page 33

Troubleshooting
Where To Find Help
General help is available by highlighting the "HELP" button in the Guide menu and pressing SELECT.
No pictur
picture
No sound
Remote does not
work
Ordering or cancelling pay per view
e / poor
Press the POWER button on the front panel of the DIRECTV® Receiver if the power indica-
1.
tor LED is not on.
2. Make sure TV power is on.
3. Check TV connection from the DIRECTV Receiver.
a. If using RF output, tune TV to channel 3 or 4 to match the channel switch on the rear panel
of the DIRECTV Receiver.
b. If using composite, S-Video, or component outputs, select the proper input on your TV.
4. Make sure the SAT IN coaxial cable is properly connected to the antenna's LNB or multiswitch.
Check the cable for kinks.
5. Check the satellite antenna's signal strength (see page 30).To ensure a quality picture, make sure the
output signal is coming directly from the DIRECTV Receiver and not through your VCR.
6. Turn DIRECTV Receiver off, unplug, wait 10 to 15 seconds, and plug back in.
Note: Adverse weather conditions may affect picture quality.
1. Make sure that the TV volume is not set to mute.
2. Check audio connections from the DIRECTV Receiver to the TV. Select the proper inputs on
your TV.
Check if the problem exists on other channels. If so, turn DIRECTV Receiver off, unplug, wait
3.
10 to 15 seconds, and plug back in.
1. Make sure the batteries are inserted correctly (see page 13) and are not dead.
2. Be sure you are within operating range of the DIRECTV Receiver.
3. Make sure no objects obstruct the line of sight between the remote and the DIRECTV
Receiver.
1. Cannot order a. It may be too late to purchase the program. Check for other show times.
b. Check phone cord connection on rear panel of the DIRECTV Receiver and at the wall jack.
Keep phone cord connected.
2. Cannot cancel - you cannot cancel pay per view orders that you've watched or tuned to, or
ones not ordered through your DIRECTV Receiver.
Parental Controls
Favorites
Cannot access
channel(s)
Caller ID not w
orking
• The system must be locked before your Parental Controls settings will take effect
(see page 27).
• The system must be unlocked before you can make changes to the Parental Controls
settings.
Cannot disable - press the POWER button to go into standby and press the POWER again to
bring DIRECTV Receiver out of standby.
Check that y
1.
2. Be sure the system is not locked as indicated by a lock icon in the banner.
3. Make sure Favorites is not turned on. See “Favorites” above for instructions to cancel either
feature.
Phone line m
1.
2. Make sure there are no other devices in the phone connection, such as caller ID boxes.
ou are subscribing to the station to which you want to tune to.
y connected to the phone wall jack.
ust be dir
ectl
33
Page 34

Technical specifications
Video Decoding
• MPEG-2 DSS compliant (up to Main Profile/Main Level)
• Video bit rate: up to 15 Mbit/sec
• Video format : 4 :3 and 16:9
• Resolution : up to 720 x 480 pixels
Audio Decoding
• MPEG-1 layer II
Sampling frequency : 48 kHz - 32 kHz - 44.1 kHz
•
• MPEG-1 system packets
• Audio mode : Single channel, dual channel, stereo, joint
eo.
ster
Satellite Antenna Interface
• RF input: F-type connector, 75 ohm
• LNB supply : 0V / 14V / 18V
• LNB current: max. 300 mA on 14V max. 450 mA on 18V
• Tone switching (on/off): 22 kHz
• DiSeqC 2.0 compatible.
Reception Demodulation
Integrated telephone modem (Return Path)
• Built-in RJ-11 connector
• Modem type : v.22bis, 2400 baud
• Dialing mode : DTMF & pulse
• Error correction V42
• Caller ID
Electrical
Mains power supply: 120V (10%, 60Hz)
•
Environmental
• Temperature
- Operating temperature is : 32°F to 104ºF
- Storage temperature is : -40°F to 150ºF
Physical Dimensions
• Size : 11.33” (W) x 1.81” (H) x 7.71” (D)
• Weight D10 -300 : 1.15 kg = 2.54 lbs
• Weight D10 -300 packaged with accessories :
2.25 kg = 4.96 lbs
• QPSK Type
• Input frequency range : 960 to 2030 MHz
• Input level range: -69 to -15 dBm
30 Msymbol/sec
Symbol rate
•
• Satellite band coverage: KU band.
:
Input/Output Interfaces
• 1 Multi -Satellite input
TV input
•
• Video output: CVBS 2 video outputs
Audio output:Audio L/R 2 audio outputs
•
• S-video output (Y/C)
• Channel 3/4 (TV/VCR) output with selection switch
RJ-11 f
•
or modem
Package Contents
• Digital Satellite Receiver
• 1 x Universal IR remote control
• Battery type :Two AA
DIRECTV
•
• Mains power supply cord
• A/V RCA cable
• S-Video cable
Phone cor
•
• User Guide
Subject to change without prior notification
Access car
d
d
34
Page 35

Limited Warranty
LIMITED 90 DAY WARRANTY DIRECTV
warrants your DIRECTV Receiver (Model Number: D10-300) and any
included accessories against def
period of ninety (90) days after the date of purchase.
WHO IS CO
ou must have proof of purchase to receive warranty service. A sales
Y
receipt or other document showing that you purchased the product is
considered proof of purchase. THIS LIMITED WARRANTY EXTENDS
ONLY TO THE ORIGINAL CONSUMER PURCHASER OR ANY PERSON RECEIVING THE DIRECTV RECEIVER AS A GIFT FROM THE
ORIGINAL CONSUMER PURCHASER
CHASER OR TRANSFEREE. THIS WARRANTY DOES NOT EXTEND
TO COMMERCIAL USERS. THIS PRODUCT IS NOT AUTHORIZED
FOR USE OUTSIDE THE UNITED STATES AND ANY SUCH USE
VOIDS THIS WARRANTY.
VERED ?
ects in material or workmanship for a
AND TO NO OTHER PUR-
WHAT IS COVERED ?
Warranty coverage begins the day you purchase the product. For ninety
(90) days from the purchase date, at the option of DIRECTV, the
DIRECTV Receiver will be repaired or replaced with a new, repaired,
refurbished or comparable product (whichever is deemed necessary) if
it becomes defective or inoperative. This exchange is done without
charge to you for parts and labor.You will be responsible for the cost of
shipping to and from the location designated by DIRECTV. If DIRECTV
cannot reasonably repair or replace the Receiver then DIRECTV may, at
its sole discretion, refund the price you paid for the product or the current retail price of the product.All products,including replacement products, are covered only for the original warranty period.When the warranty on the original product expires, the warranty on the replacement
product also expires.After ninety (90) days from the date of purchase,
you pay for the replacement of all parts, and for all labor charges. SOME
STATES DO NOT ALLOW LIMITATIONS ON HOW LONG AN
IMPLIED WARRANTY LASTS, SO THE ABOVE LIMITATION MAY NOT
APPLY TO YOU.
WHAT IS EXCLUDED ?
Your warranty does NOT cover:
• Labor charges for installation or setup of the product.
• Installation, performance of,or repair of: audio/video cabling, telephone
line, or accessory attachments used with the product.
• Product replacement because of misuse, accident, lightning damage,
unauthorized repair, or other cause not within the control of DIRECTV.
• Incidental or consequential damages resulting from the product.SOME
STATES DO NOT ALLOW THE EXCLUSION OF INCIDENTAL OR
CONSEQUENTIAL DAMAGES, SO THE ABOVE EXCLUSION MAY
NOT APPLY TO YOU.
• Any modifications or other changes to the product, including but not
limited to software or hardware modification in any way other than as
expressly authorized by DIRECTV will void this limited warranty. Except
in the case of hardware or software provided by DIRECTV, installing
software modifications, “hacks” or utilizing service access or “back
doors” will void this limited warranty.
• Reception transmission pr
phone line, or cable or antenna systems outside the unit.
• A product that has been modified or adapted to enable it to operate in
oblems caused by signal conditions, tele-
any country other than the country for which it was designed, manufactured, approved and/or authorized, or repair of products damaged by
these modifications.
• A product used for commercial or institutional purposes.
• DIRECTV makes no warranty that the access connection will be a local
(not long distance) phone call.
• The continued provisioning of any of the programming and other services delivered through the Receiver including but not limited to television programming, show information, program guide data, and scheduling
information.
MAKE SURE YOU KEEP...
eep your sales receipt or other document showing proof of pur-
Please k
chase. Attach it to this User Guide and keep both nearby. Also keep the
original box and packing material in case you need to return your product.
BEFORE REQUESTING REPAIR SERVICE...
Please check the troubleshooting section of this guide.This may save you
a call to DIRECTV Customer Care.
TO GET WARRANTY SERVICE...
Warranty service will be provided by DIRECTV. If you believe you need
service for your Receiver, contact DIRECTV at 1-800-DIRECTV
(1-800-347-3288).A representative will go through a diagnostic checklist
with you. If it is determined that the product needs to be returned for
service or exchanged, you will receive a return authorization number.
The representative will give you complete shipping details.
TO GET OUT-OF-WARRANTY SERVICE...
To obtain out-of-warranty service contact DIRECTV at 1-800-DIRECTV
(1-800-347-3288) for information on the possibility of and any costs for
repair or replacement of out-of-warranty products.
REMEMBER...
Record the model and serial n
MODEL # _________________________________________________
SERIAL # __________________________________________________
ARRANTIES IMPLIED BY LA
W
ALL
WARRANTIES OF MERCHANTABILITY AND FITNESS FOR A PARTICULAR PURPOSE
THIS EXPRESS LIMITED
OF
ANY WARRANTIES IMPLIED BY THE LAW OF ANY STATE OF THE
THIS EXPRESS LIMITED WARRANTY IS EXCLUSIVE AND IN
.S.A.,
U
LIEU OF
AND SIMILAR OBLIGATIONS OF DIRECTV. REPAIR OR REPLACEMENT
SIVE REMED
WILL DIRECTV BE LIABLE FOR ANY AMOUNT GREATER THAN THE
RET
LIABLE FOR
FOR BREACH OF ANY EXPRESS OR IMPLIED WARRANTY ON THE
DIRECTV RECEIVER.
ON
TO YOU. THIS WARRANTY GIVES YOU SPECIFIC LEGAL RIGHTS.
OU MAY HAVE OTHER RIGHTS WHICH VARY FROM STATE
Y
O ST
T
1-800-DIRECTV
ALL O
OVIDED IN THIS LIMITED WARRANTY IS THE EXCLU-
AS PR
Y UNDER
AIL PRICE OF
ARRANTIES,
W
DIRECTV
TE.
A
ARE EXPRESSL
THER
THE DIRECTV RECEIVER. DIRECTV SHALL NOT BE
ANY INCIDENT
SO
, Inc. 2230 E. Imperial Hwy El Segundo, CA 90245
umbers found on the product below.
INCLUDING
,
W
Y LIMITED
WITH
ARRANTY
W
ARRANTIES,
W
THIS LIMITED
AL OR CONSEQUENTIAL D
SOME STATES DO NOT ALLOW LIMITATIONS
ABOVE LIMITATIONS MAY NOT APPLY
THE
.
ARANTEES, AGREEMENTS
GU
ARRANTY
W
ANY IMPLIED
TO THE DURATION
THE EXCEPTION OF
IN NO EVENT
.
GES
AMA
This w
anty gives you specif
arr
ic legal r
ou may have other r
Y
.
ights
ights which vary from state/province to state/province.
Page 36

DIRECTV PROTECTION PLAN
DIRECTV PROTECTION PLAN
Protect your DIRECTV®System with the DIRECTV PROTECTION PLAN. For a low monthly fee, the DIRECTV PROTECTION PLAN covers the
components of your DIRECTV System, giving you peace of mind and comprehensive support to ensure that you and your family enjoy nonstop
DIRECTV
DIRECTV PROTECTION PLAN BENEFITS
our DIRECTV Limited Warranty provides certain remedies for this receiver during the stated coverage term. The DIRECTV PROTECTION PLAN
Y
provides comprehensive coverage for your DIRECTV System, including:
®
enter
tainment.
- In home ser
vice calls when needed
 Loading...